Introduction
You know, there’s a tangible joy in rolling up your sleeves, clasping your tools, and crafting something incredible with your own hands. This piece sprung forth from such joy – my very own DIY outdoor kitchen plan. Every nook, corner, and counter designed with intent and purpose. Every detail finalized after careful deliberation. Sure, it’s there to inspire you, but first, it was about fueling my own passion for woodworking. What I’ve mustered together, the fruit of countless hours, is an unpretentious outdoor kitchen solution – a beguiling blend of rustic charm and modern convenience.
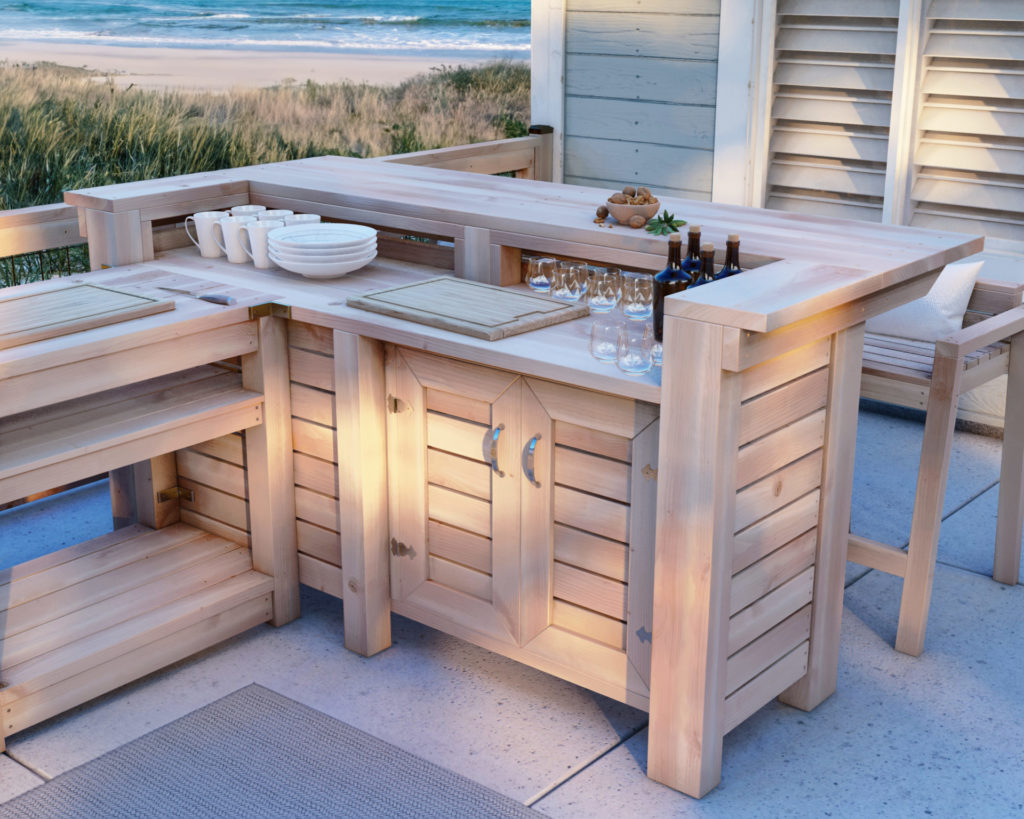

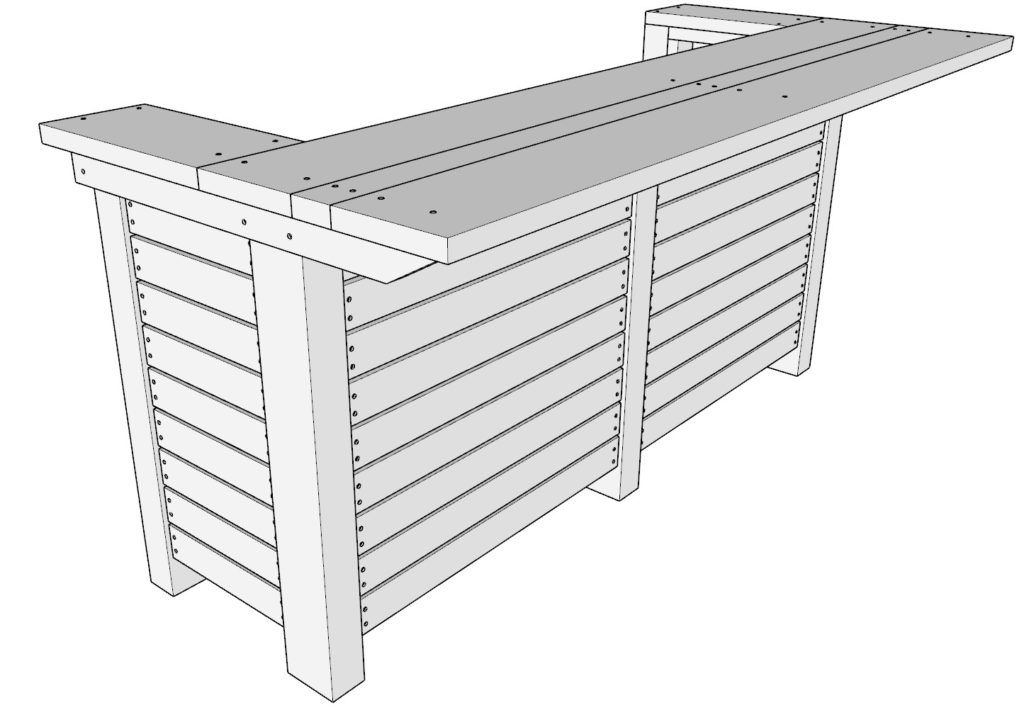
Setting the Stage – The Patio Bar
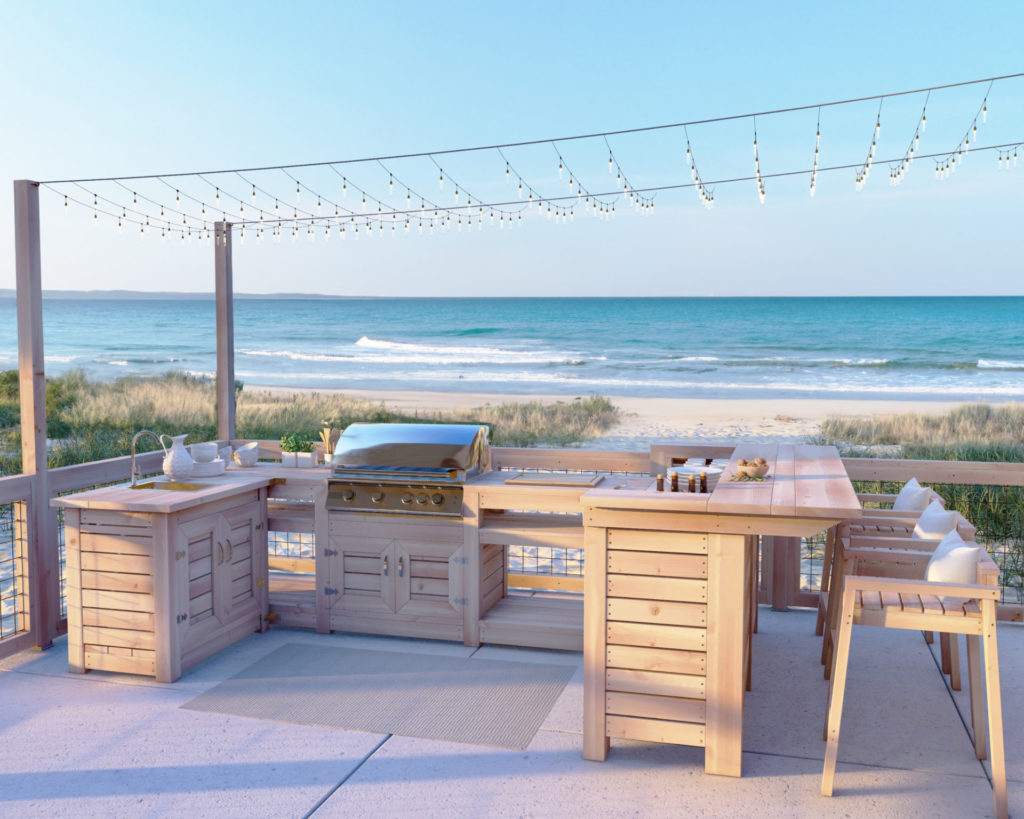
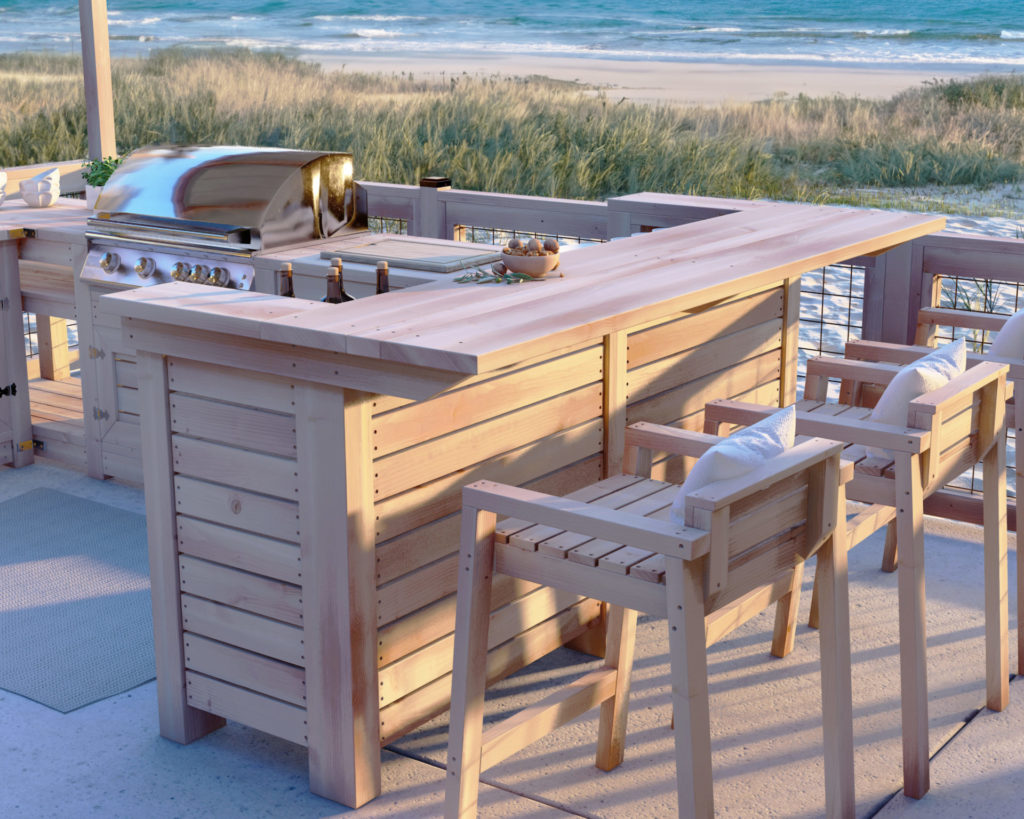
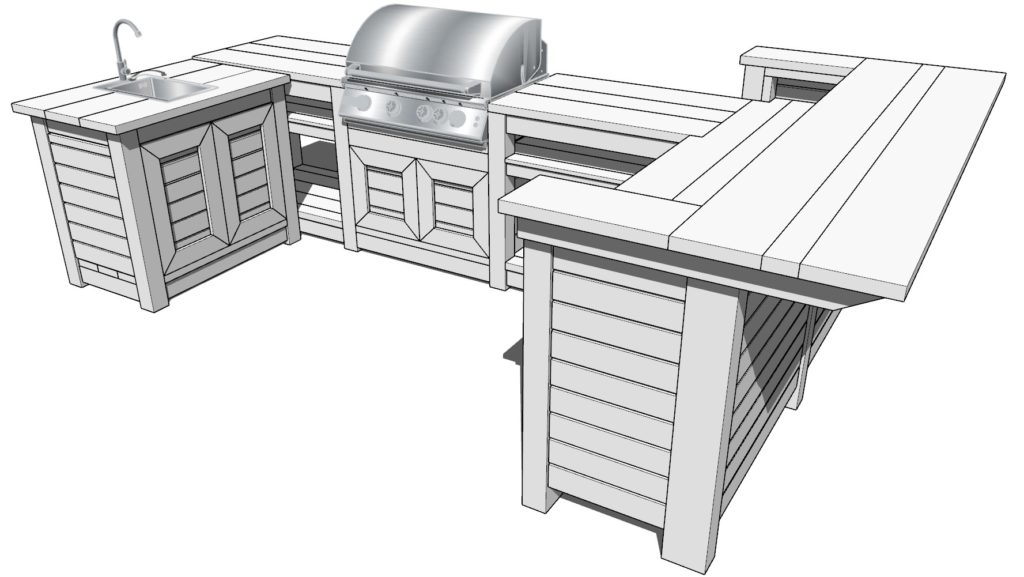
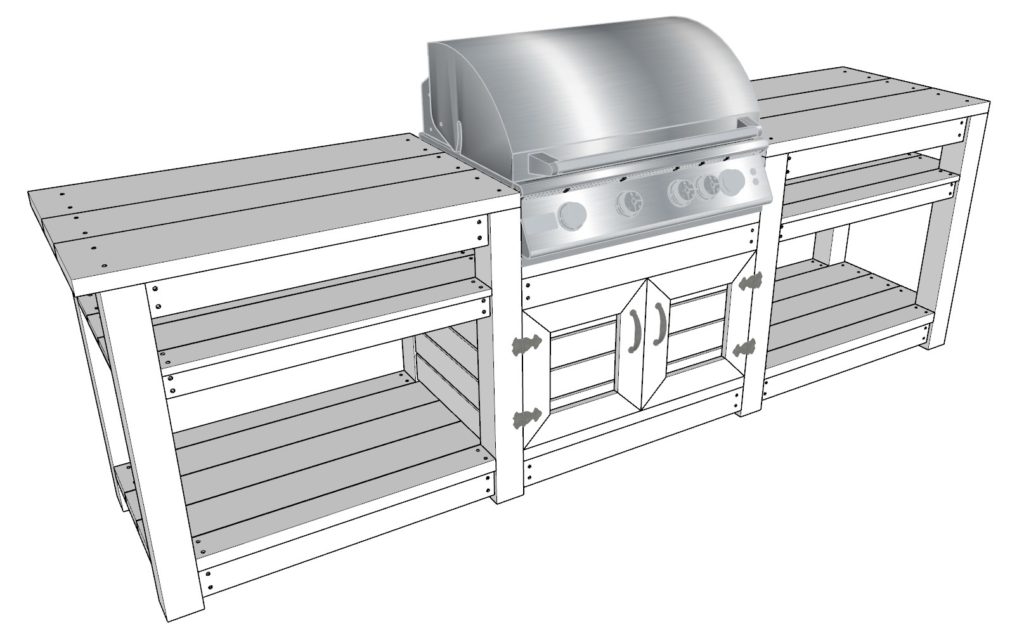
The nucleus of this DIY plan is hands-down, the patio bar. Imagine a bespoke board, not too ostentatious, setpiece to your intimate soirée, a housewarming hub of brunches and barbecues. This U-shaped design features sufficient room for an exclusive three to four, with additional plane for comestibles or condiments. An integral storage caters for the inevitable bits and bobs you’ll accumulate. In short, it’s just what you need, exactly when you need it.
Grilling and Thrilling – The Barbecue Block
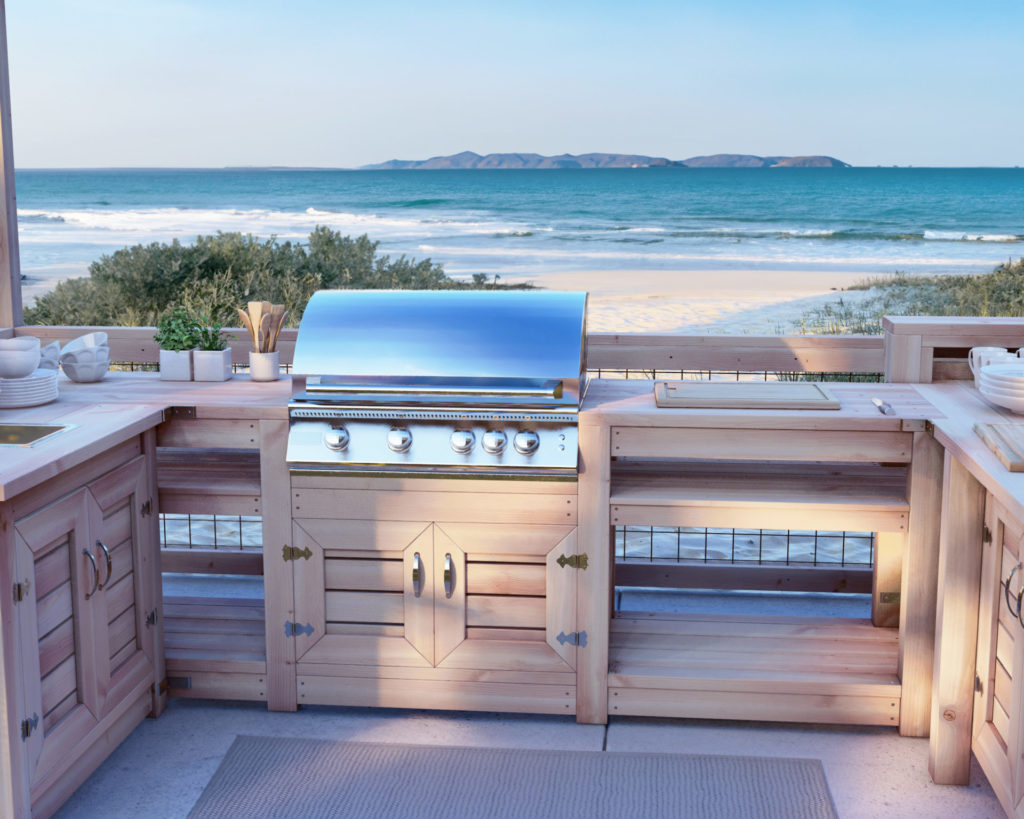
Fire up your grill because this DIY plan accommodates a medium-sized grill, snug and secure in its station. You like kamado-style cooking? We’ve factored that in too. Upgraded countertops double up as additional planes for chopping, marinating, plating, or simply showcasing. There’s a designated corner to house propane, thus maximizing the griller’s moving space. The counters or the grill – neither belittles the other. They share the center stage.
Where Function Meets Elegance – The Wash Counter
Serving up those gourmet entreés requires a bit of elbow grease. The wash counter facilitates just that while maintaining an understated elegance. It’s generous in size, practical in design, and keeps plumbing neatly tucked away. This portion of the plan maintains a tidy facade while catering to the vital needs of our epicurean exploits.
Woeful without Wooden Features
Let’s not gloss over the fact that wood is, in essence, endgame aesthetic material. If treated and maintained right, there’s no rivaling the stunning longevity of wood. Its warmth, its grounded presence, and its undeniable character turns the outdoor kitchen from a simple utility area into something truly marvelous.
The Power of U - Layout
The genius of this design lies in its thoughtful U-shaped layout. It’s not about the aesthetics alone, it’s about channeling functionality through purposeful design. The positioning, the allocation of each section – it’s all painstakingly planned to allow fluid movement and efficient operation within the kitchen with zero compromises on form.
Outdoor Integration Done Right
An outdoor kitchen that screams, ‘I belong!’ That’s the game. From the right lighting that exudes soft coziness to comfortable seating that welcomes hearty conversations, the design paves the way for open-air living that’s hard to resist. Landscaping, decor, and other personal touches weave their magic into this space, making it a cherished corner of your home.
Lighting – Illuminating Life
Harmonious lighting is paramount in satisfying both form and function. Imagine the mellifluous tune of string lights, skillfully strung across your kitchen, accentuating all the right spots. Icons of luminescent beauty – lanterns and sconces – illuminate striking features while task lighting takes center stage to aid in cooking.
Spaces for Intimation – Seating Area
An essential addition to your outdoor kitchen should be a welcoming seating space that champions comfort. It’s not just the proverbial ‘room to park’, but a thoughtful incorporation of furniture that renders your space holistic.
A Painted Landscape
Complement your DIY outdoor kitchen with your very own canvassed landscape. Embrace the beauty of potted plants, nurture verdant garden beds, and watch your space transform into your handcrafted Eden.
Maintenance – A Love Story
Protecting your realm requires attention. Regular maintenance of wood surfaces, routine grill and plumbing inspections – all are vital. This isn’t a story sung once, it’s an ongoing ballad of love and care that maintains the newly minted charm of your kitchen.
Conclusion
There you have it – an honest, thoughtful DIY outdoor kitchen plan that’s not just practical but rooted in sheer passion. There are no exaggerated promises here, it’s just a heartfelt offering from one DIY enthusiast to another. It’s a design that sings the song of functionality, comfort and style in perfect harmony, daring to redefine what outdoor living means to you. Are you ready to embark on this exciting voyage of converting your backyard into a kitchen retreat? I promise you, the thrill of raising this creation from a mere blueprint, one screw at a time, is an experience worth cherishing.
Time to build
2-3 days
Total cost of build
Costs can range from $1,300 to $4,300
Skill level required
Beginner-intermediate
Download the PDF plans
DIY Outdoor Kitchen PDF plans
What is included in the PDF download?
Easy to read step by step instructions
Material list
Tools needed
3D illustrations
Recommended tools/materials
Dear potential buyers,
With the purchase of our DIY outdoor kitchen plan, you’ll receive a comprehensive list of recommended tools, materials, and a project lumber shopping list to make your building experience hassle-free and efficient. Thank you for your interest and for making this website possible.
Happy building!
Click here for the plan.
Project lumber shopping list
Dear potential buyers,
With the purchase of our DIY outdoor kitchen plan, you’ll receive a comprehensive list of recommended tools, materials, and a project lumber shopping list to make your building experience hassle-free and efficient. Thank you for your interest and for making this website possible.
Happy building!
Click here for the plan.
DIY Bar Component
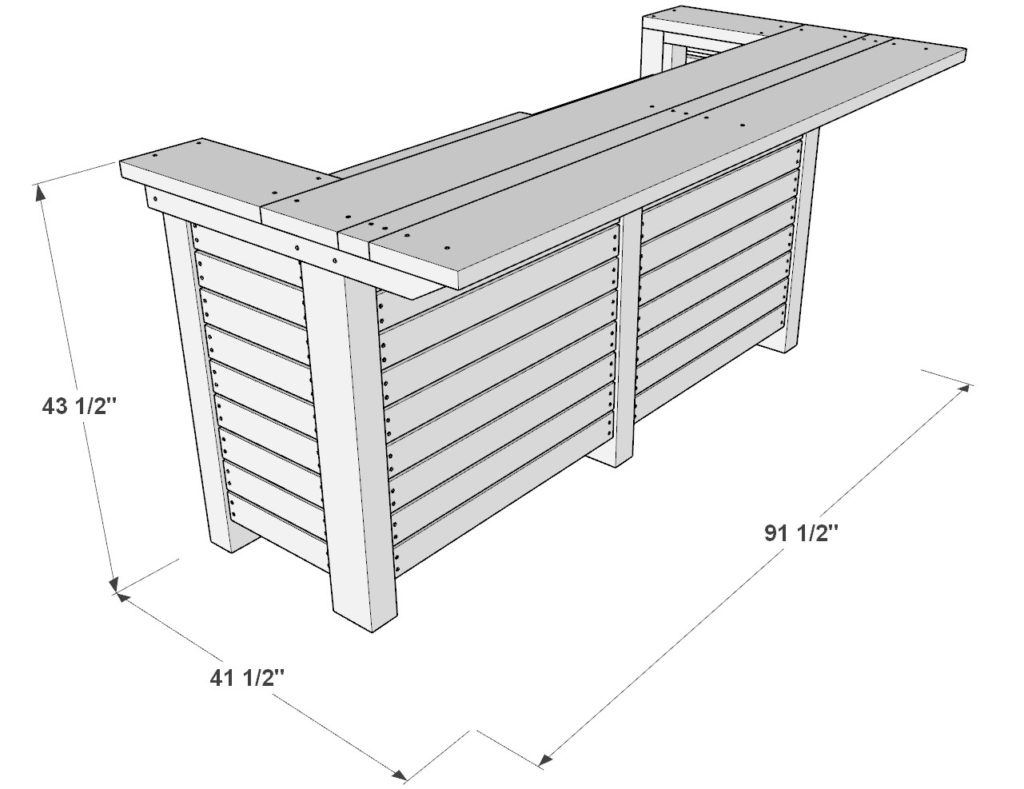
Bar lumber cut list
Dear potential buyers,
With the purchase of our DIY outdoor kitchen plan, you’ll receive a comprehensive list of recommended tools, materials, and a project lumber shopping list to make your building experience hassle-free and efficient. Thank you for your interest and for making this website possible.
Happy building!
Click here for the plan.
Step 1 (Building the Bar: Constructing the Wall Frame and Supports)
First, build the bar.
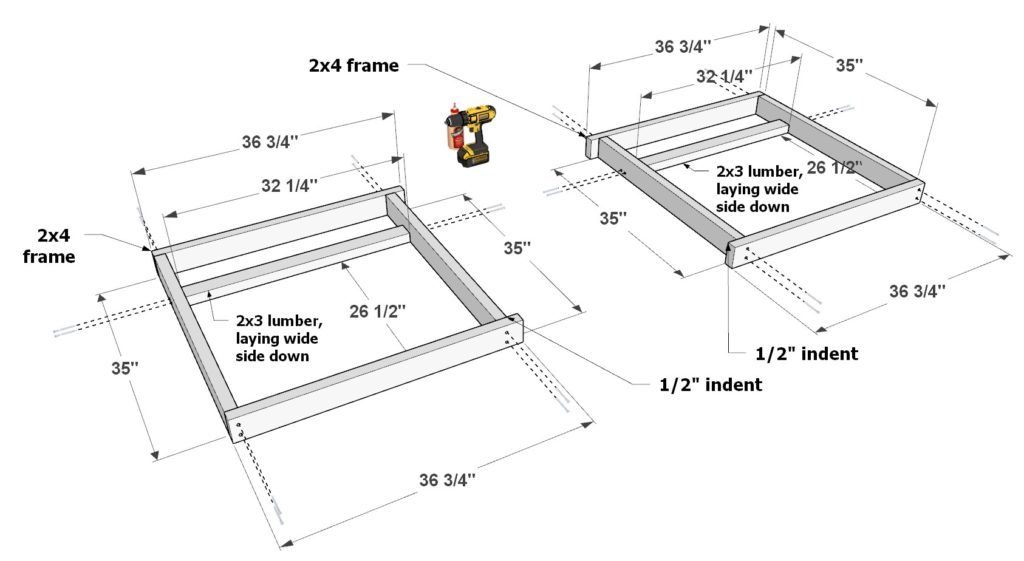
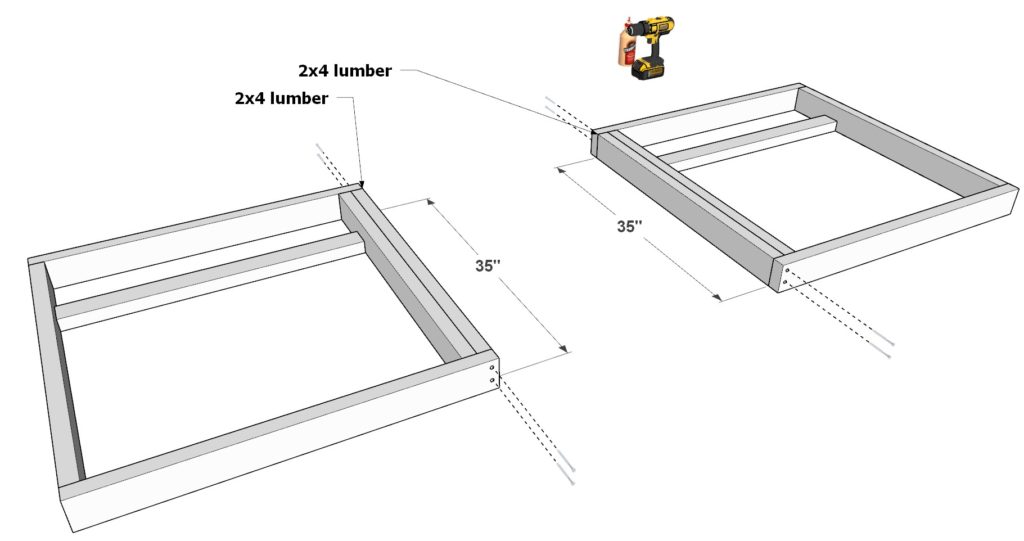
Begin by building bar wall frame.
Take four 35 inch 2×4 lumber pieces, four 36-3/4 inch 2×4 lumber pieces, and two 32-1/4 inch 2×3 lumber pieces. Arrange them as shown below. Add glue, predrill holes to prevent the wood from splitting, and add 3.5 inch screws to secure the frame together.
Next, add two more 35 inch 2×4 lumber pieces to the two frames.
At the end of this step you should have two bar wall frame pieces that are a mirror of each other.
Step 2 (Building the Bar: Crafting Additional Wall and Side Frames)
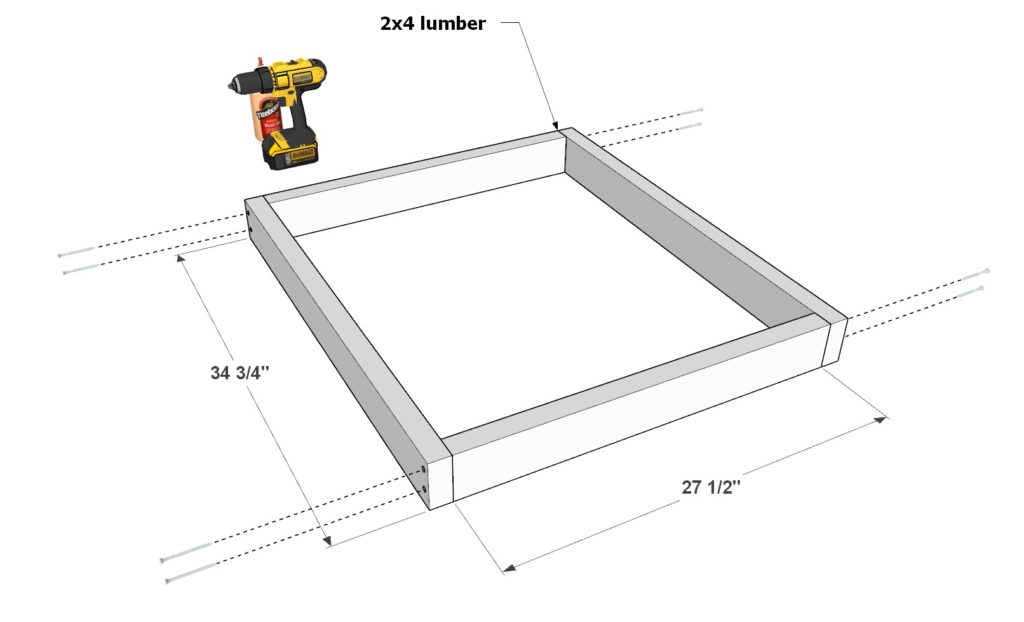
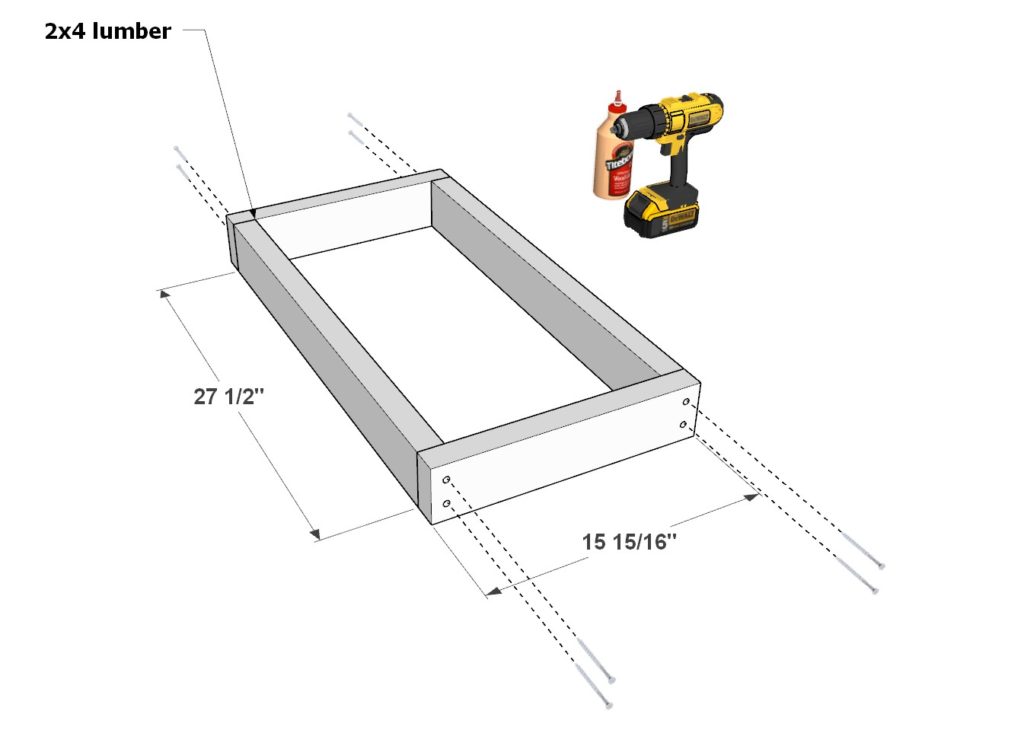
Next, continue to build additional bar frame pieces, including the bar wall side frames.
First, take two 27-1/2 inch 2×4 lumber pieces and two 34-3/4 inch 2×4 lumber pieces. Arrange them as shown in the diagram, add glue, predrill, and add 3.5 inch screws. Make two identical frames.
Next, take two 27-1/2 inch 2×4 lumber pieces, and two 15-15/16 inch 2×4 lumber pieces, and one 12-15/16 inch 2×3 lumber piece. Arrange them as shown in the diagram, add glue, predrill, and add 3.5 inch screws. Make two identical frames.


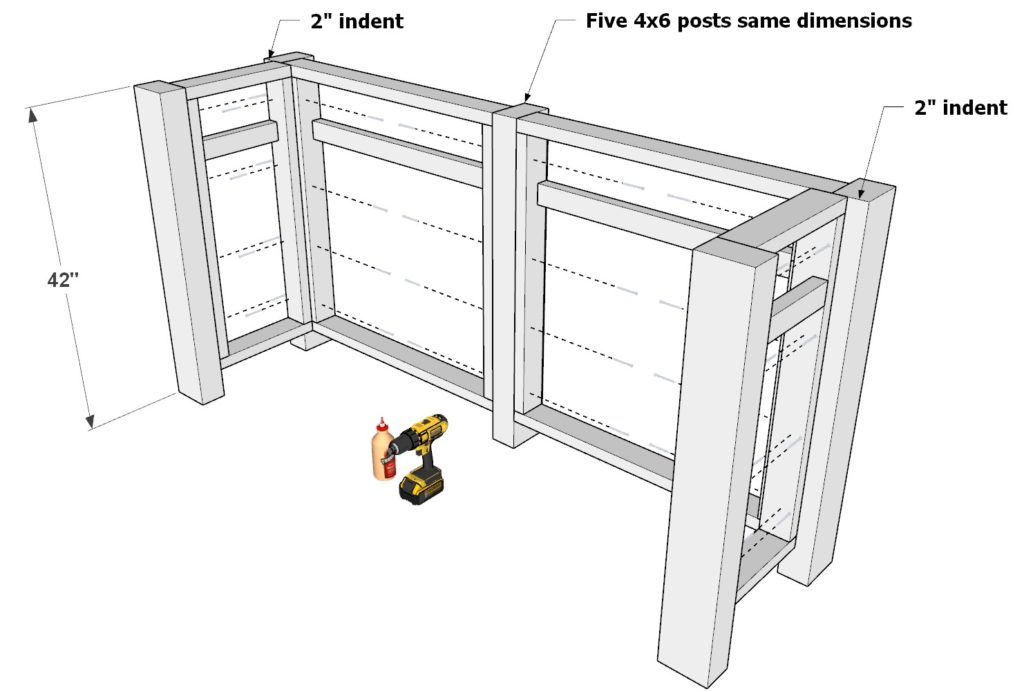
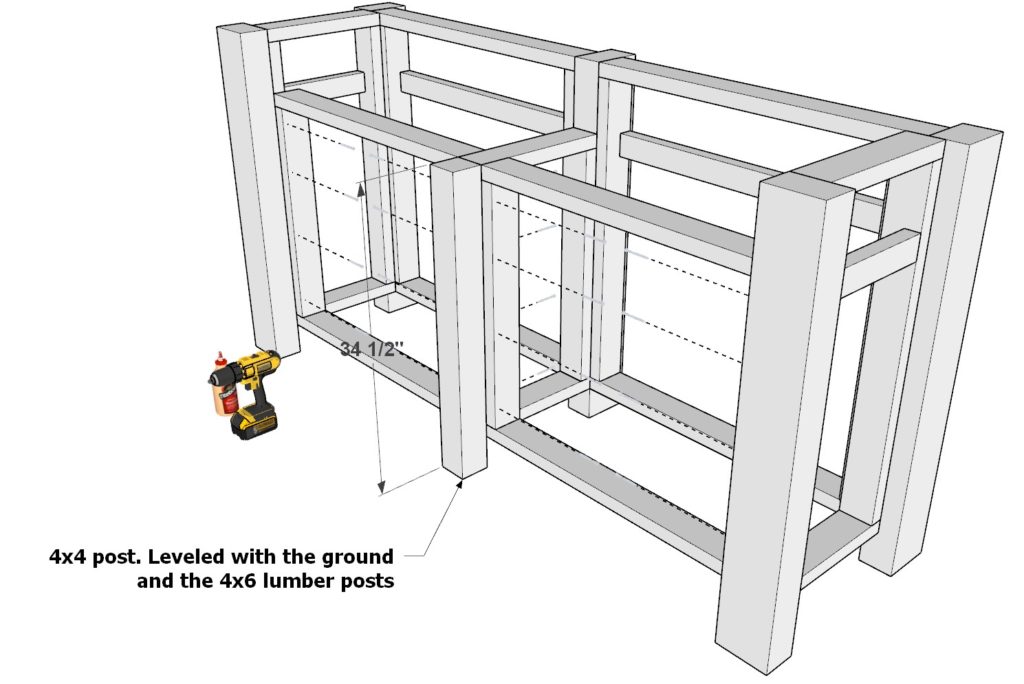
Step 3 (Assembling the Bar: Connecting Wall Frame Pieces to Leg Posts)
Next, attach the wall frame pieces to the bar leg posts.
The bar posts will include five 42 inch 4×6 lumber pieces and one 34-1/2 inch 4×4 lumber piece.
Take the frame pieces from the previous steps and arrange them as shown below. Add glue, predrill, and add 3.5 inch screws.
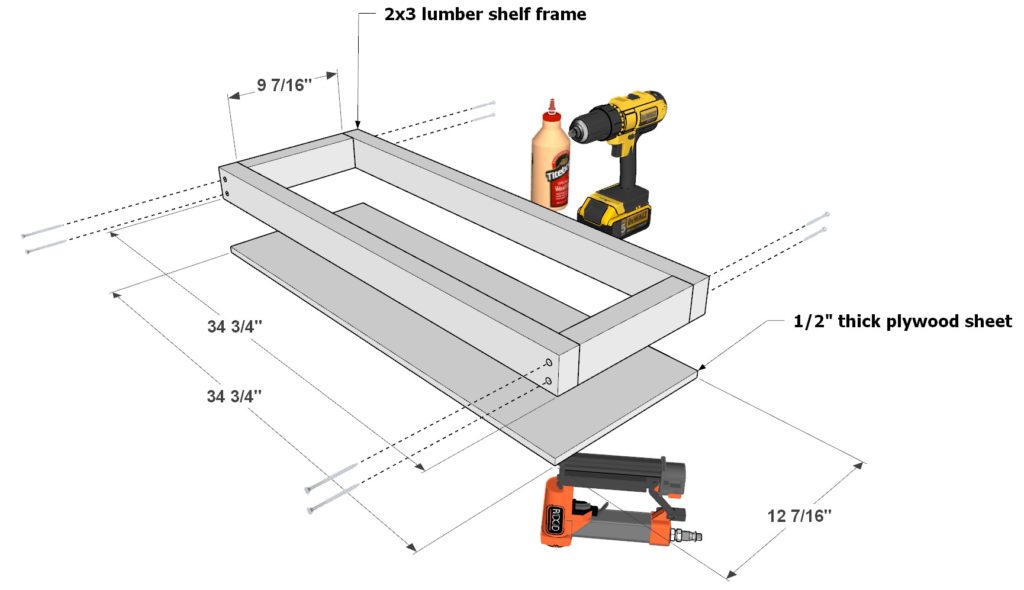
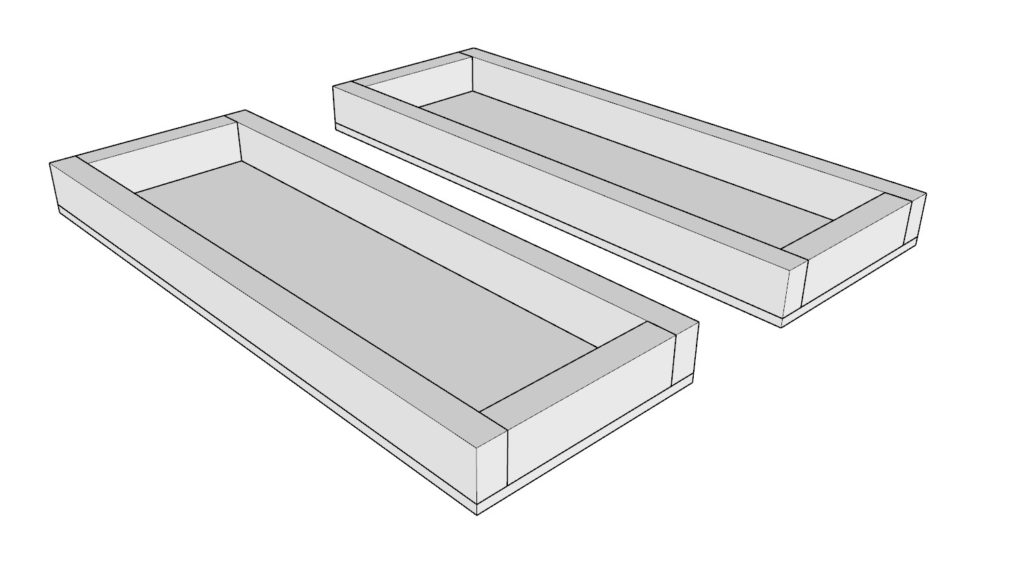
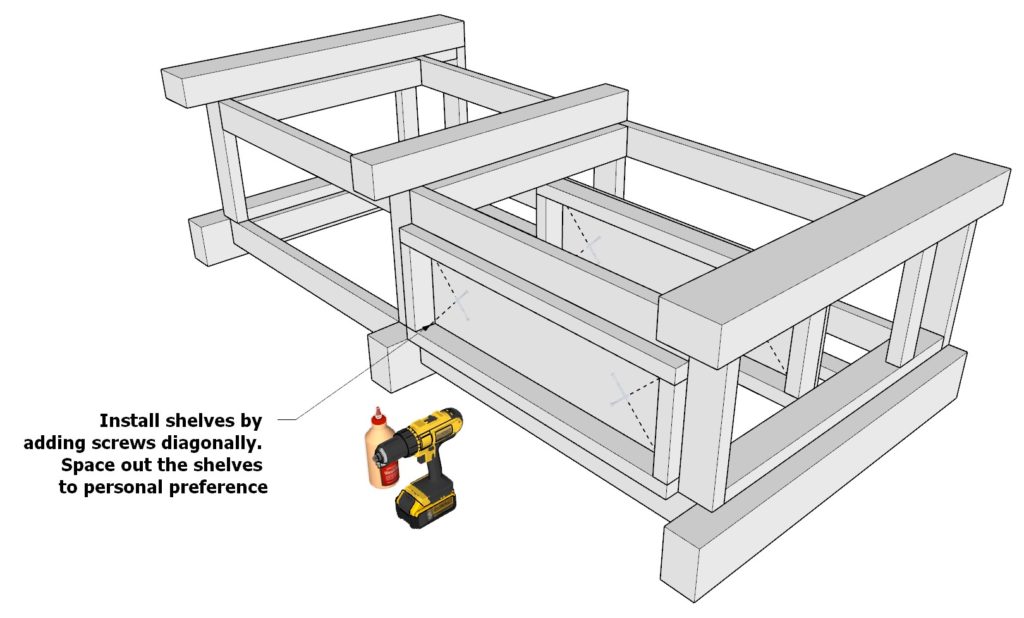
Step 4 (Constructing the Bar: Assembling and Installing Shelves)
Next, assemble and add the bar shelves.
Take two 34-3/4 inch 2×3 lumber pieces, two 9-7/16 inch 2×3 lumber pieces, and one 12-7/16 x 34-3/4 half inch thick plywood sheet and arrange them as shown below. Attach the lumber with glue, predrilling, and with 2.5 inch screws. Make an identical second shelf component.
Next, add the shelves to the bar frame as shown in the diagram. Add glue and screws diagonally to secure the shelves to the frame. Space out the shelves to personal preference.
Step 5 (Completing the Bar: Attaching Top Supports and Installing Siding)
Next, attach the bat top supports.
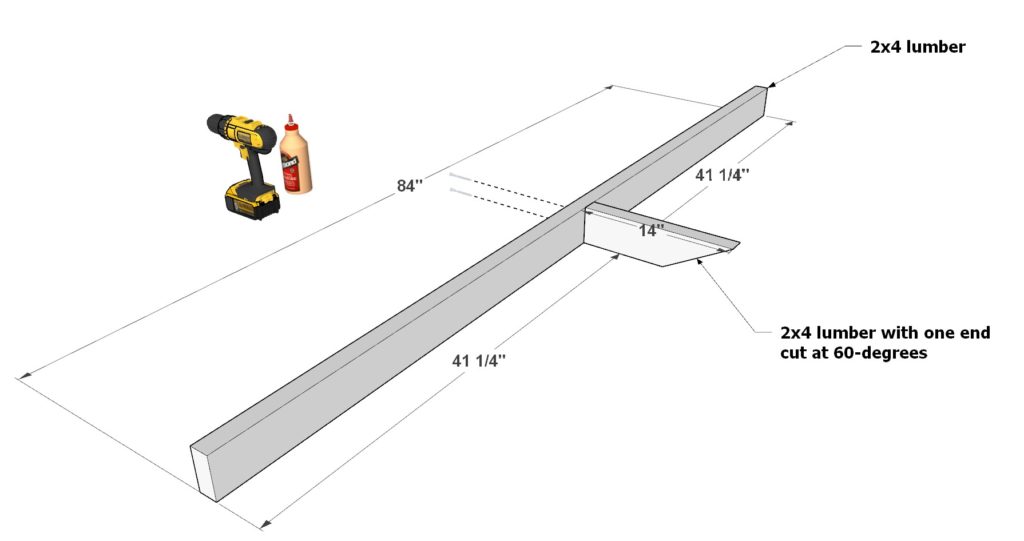
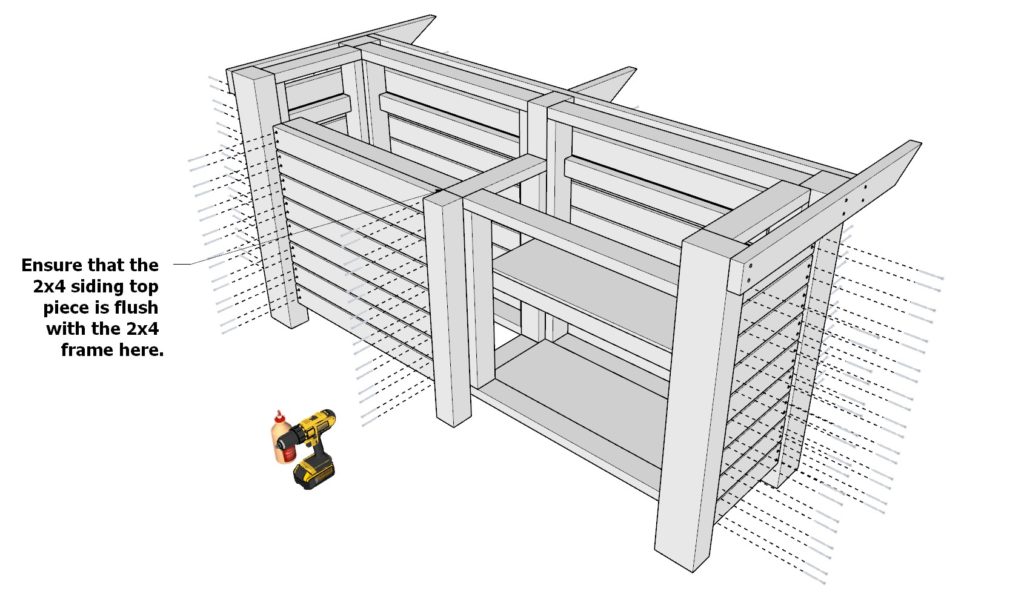
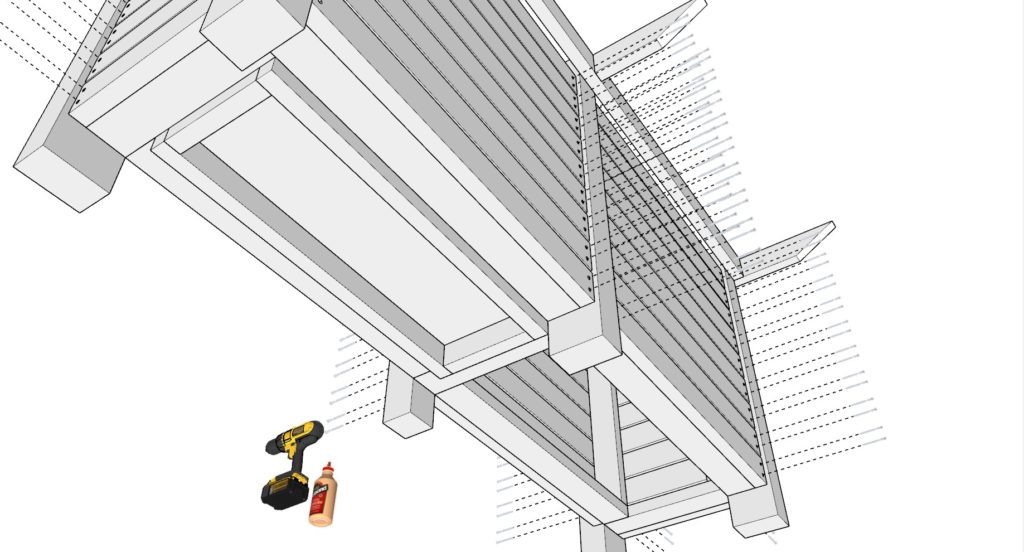
First, take one 84 inch 2×4 lumber pieces and one 14 inch 2×4 lumber piece that is cut at 60-degrees on one end and attach them together using glue, predrilling, and 3.5 screws. Attach the bar support along with two 40-7/16 inch 2×4 lumber pieces cut at 60-degrees on one end to the bar frame as shown in the diagram. Attach all components to the top of the bar frame by predrilling, adding glue, and adding 3.5 inch screws.
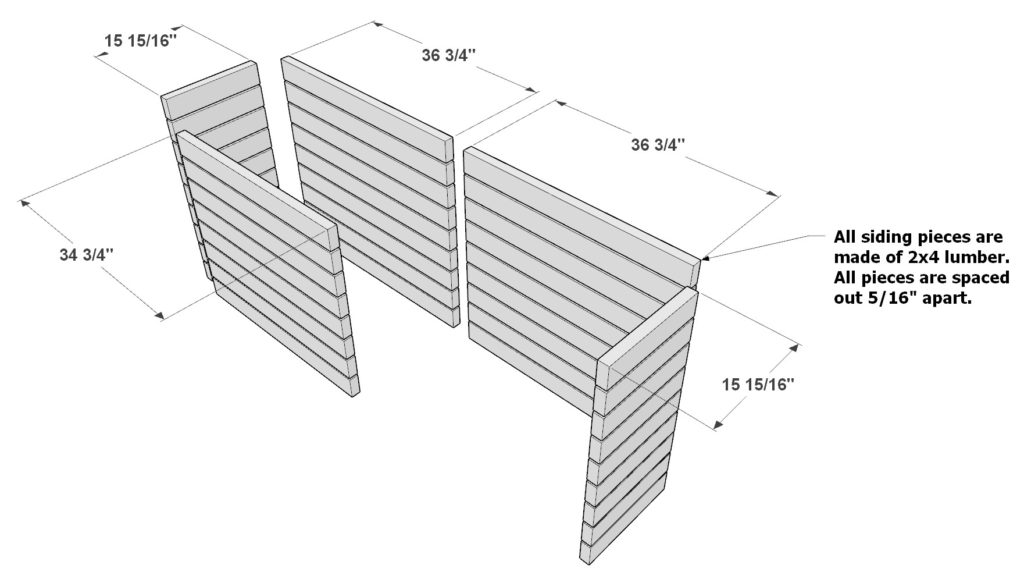
Next, add the bar siding. The siding pieces are all made of 2×4 lumber that are separated by a 5/16 inch gap between each piece. You will need a total of eight 34-3/4 inch 2×4 lumber pieces, eighteen 15-15/16 inch 2×4 lumber pieces, and eighteen 36-3/4 inch 2×4 lumber pieces. Attach the siding pieces as indicated by the diagram. Predrill, add glue, and add 2.5 inch screws.

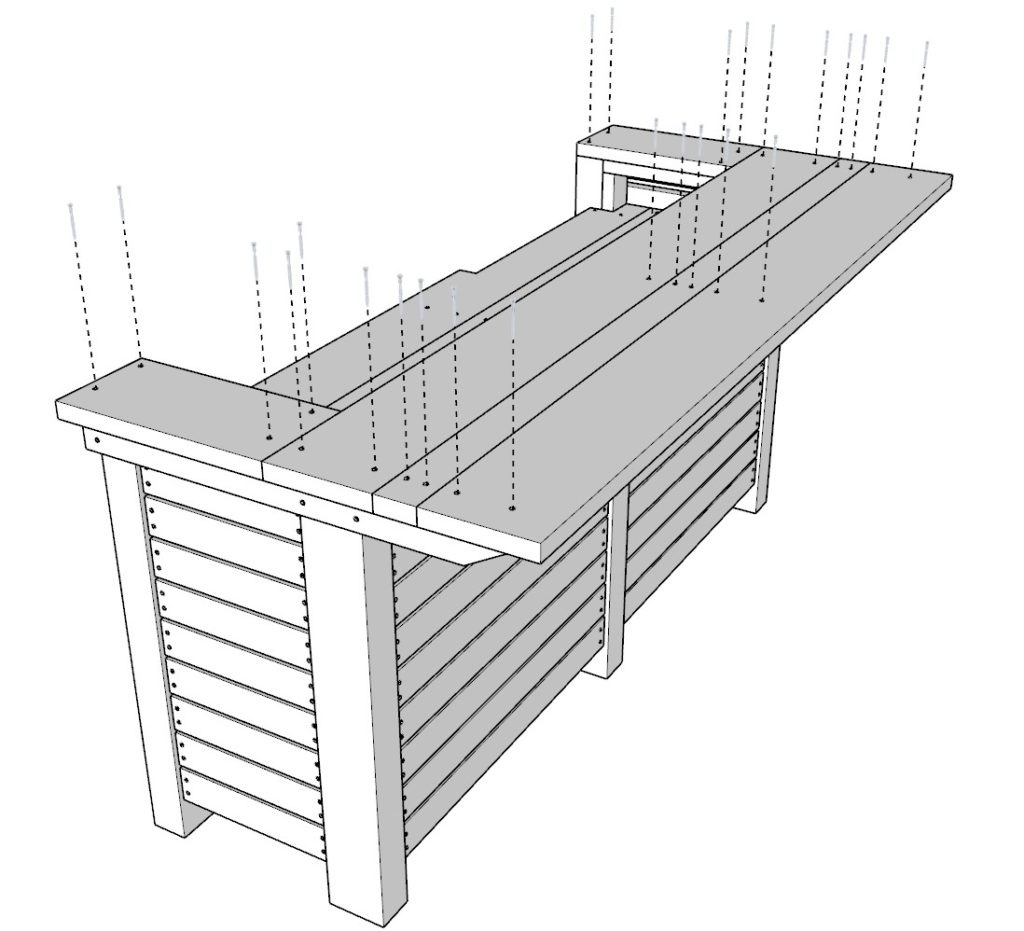
Step 6 (Building the Bar: Modifying and Installing Counter Work Area Top)
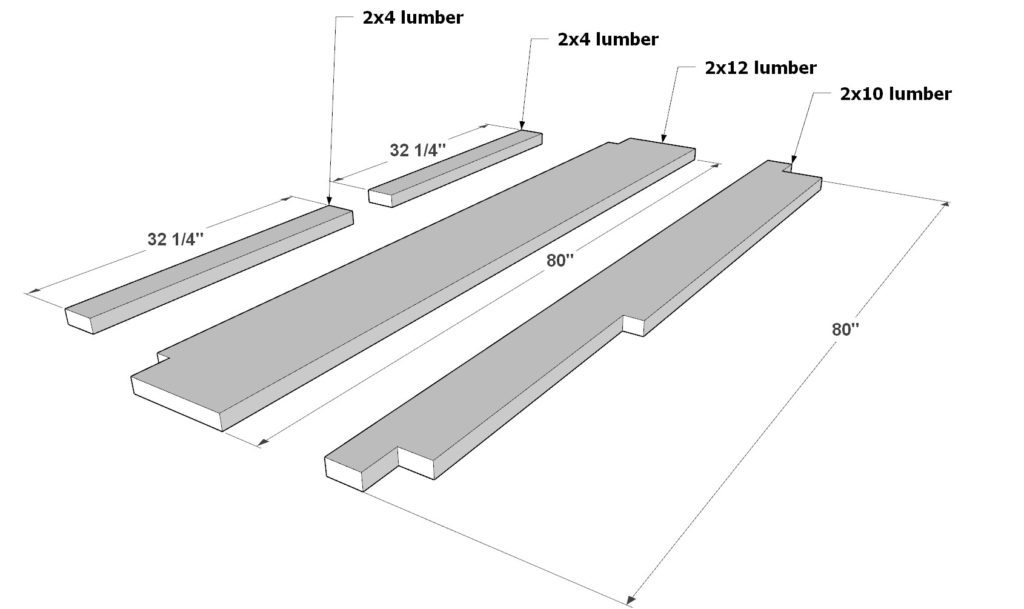
Next, add the bar top for the counter work area.
Take two 32-1/4 inch 2×4 lumber pieces, one 80 inch 2×12 lumber pieces, and one 80 inch 2×10 lumber pieces.
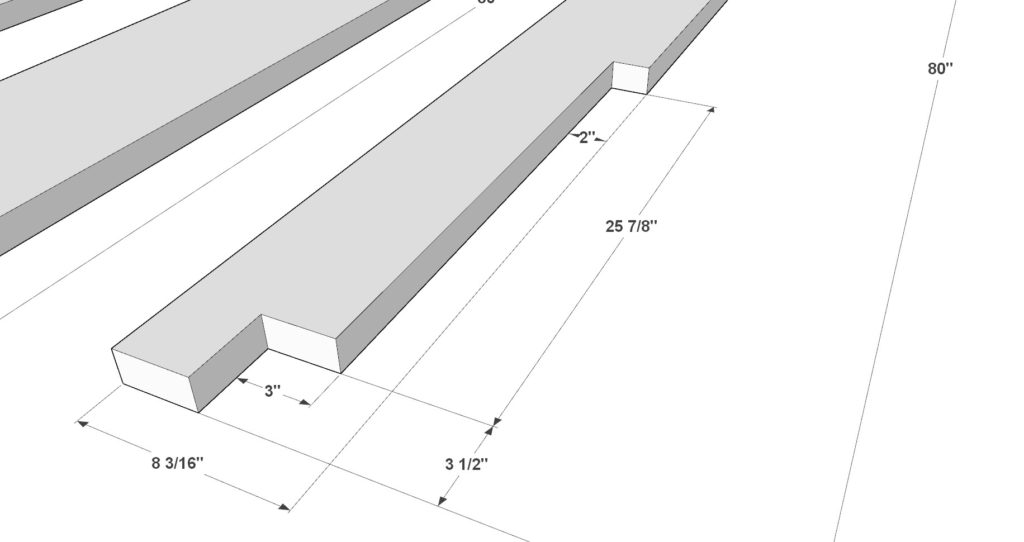
The 2×12 and 2×10 need to be modified in order to fit well into the counter work area.
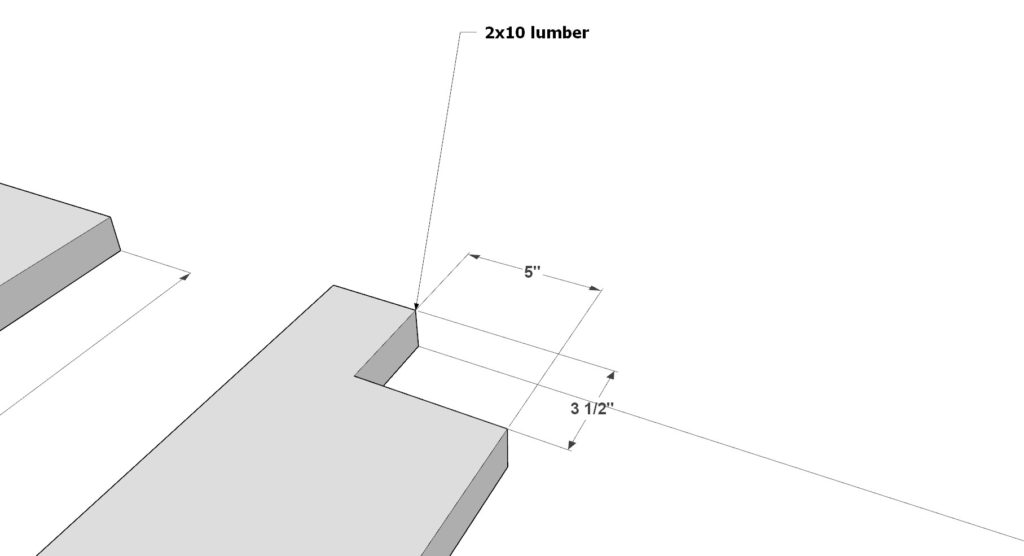
The 2×10 lumber needs to me cut down to size. This is the more complicated pieces as it requires multiple cuts. The diagram illustrates the dimensions of the lumber piece when its cut down to the correct size.
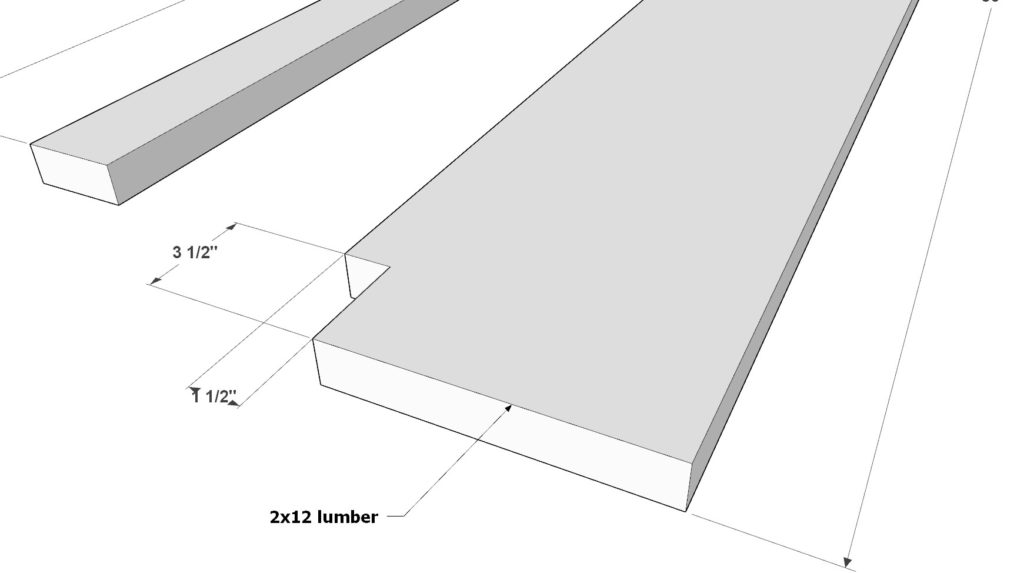
The 2×12 needs to have two notches cut into it on both sides of the lumber pieces as shown in the diagram. The notches are the same on both sides with the measurement of 3-1/2 inch x 1-1/2 inch.
Lastly install these work counter top pieces using glue, predrilling, and adding 2.5 inch screws.

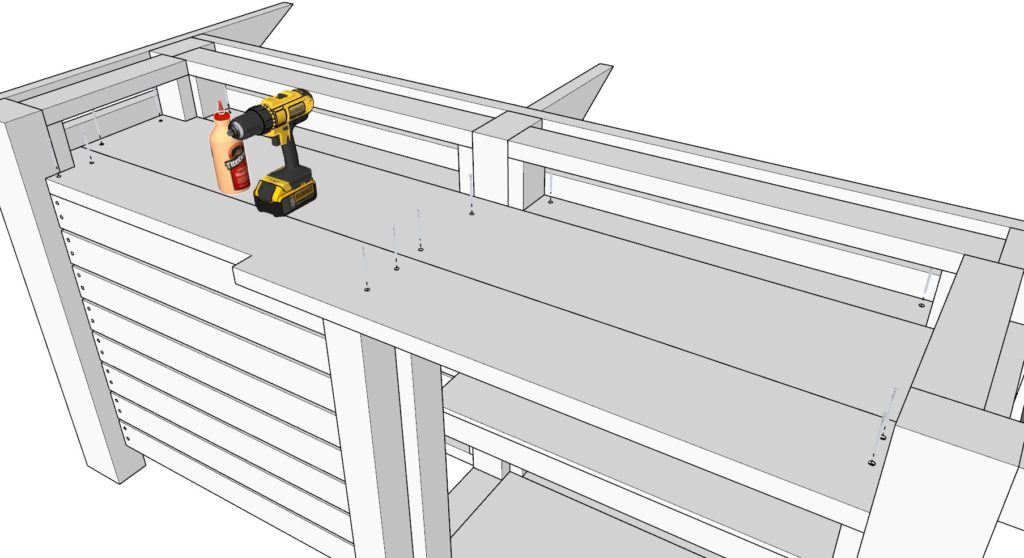
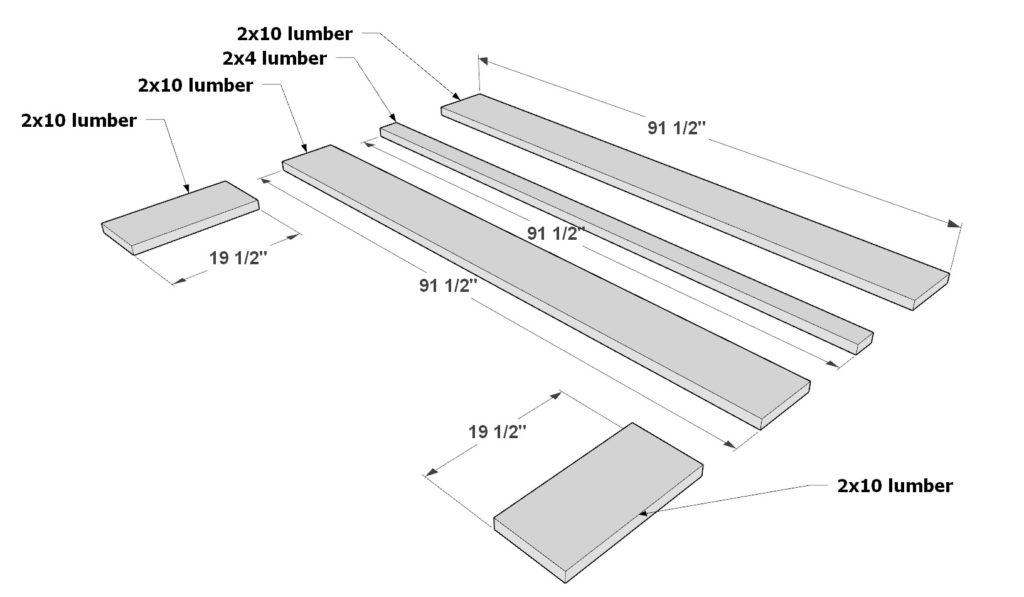
Step 7 (Constructing the Bar: Building and Installing Serving Area Top)
Next, build the bar top for the serving area.
Take two 91-1/2 inch 2×10 lumber pieces, one 91-1/2 inch 2×4 lumber pieces, and two 19-1/2 inch 2×10 lumbar pieces. Add these to the bar top frame using 2.5 inch screws, glue, and by predrilling holes.
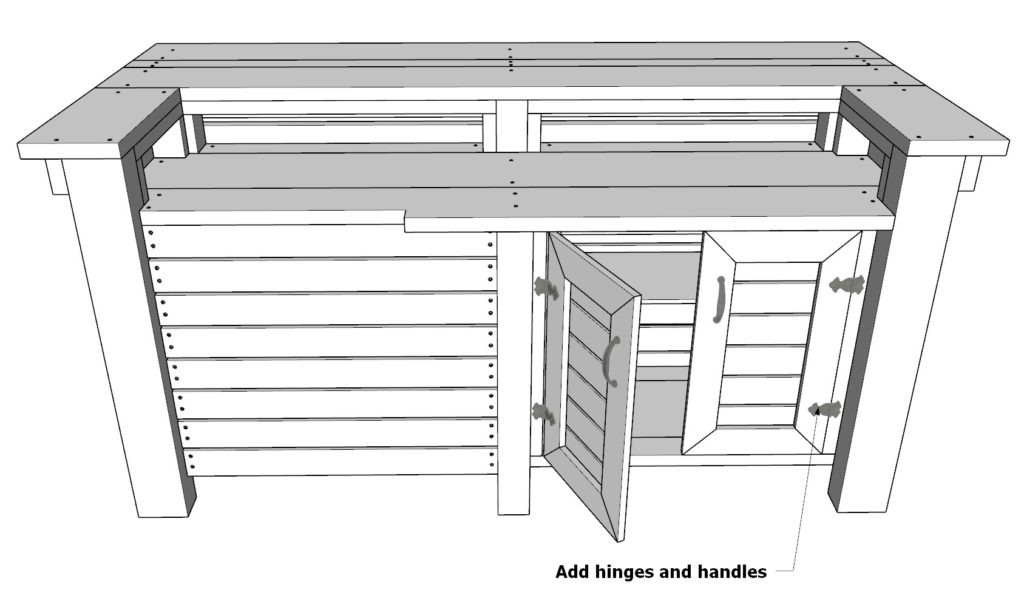
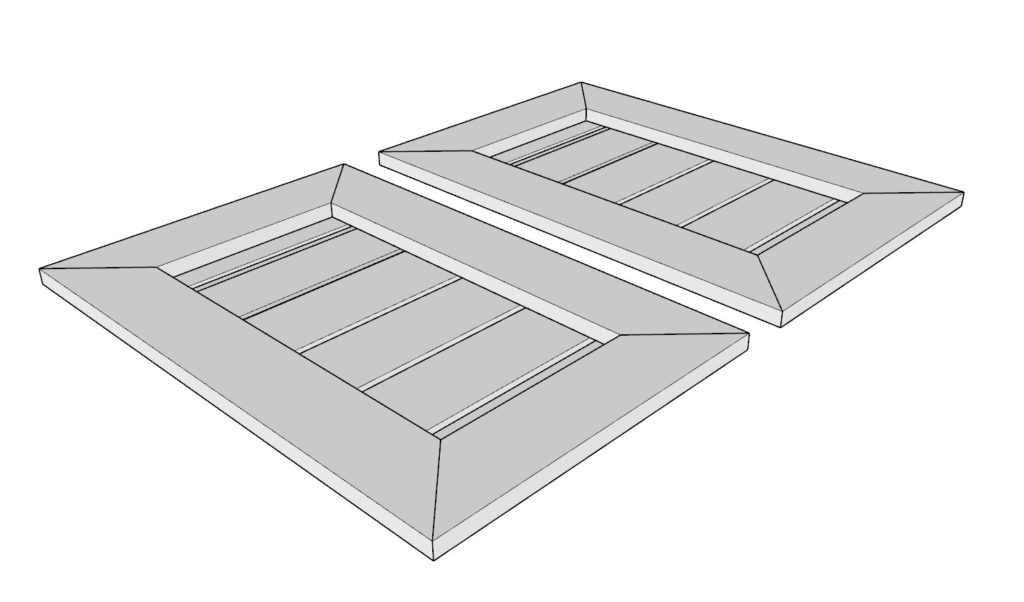
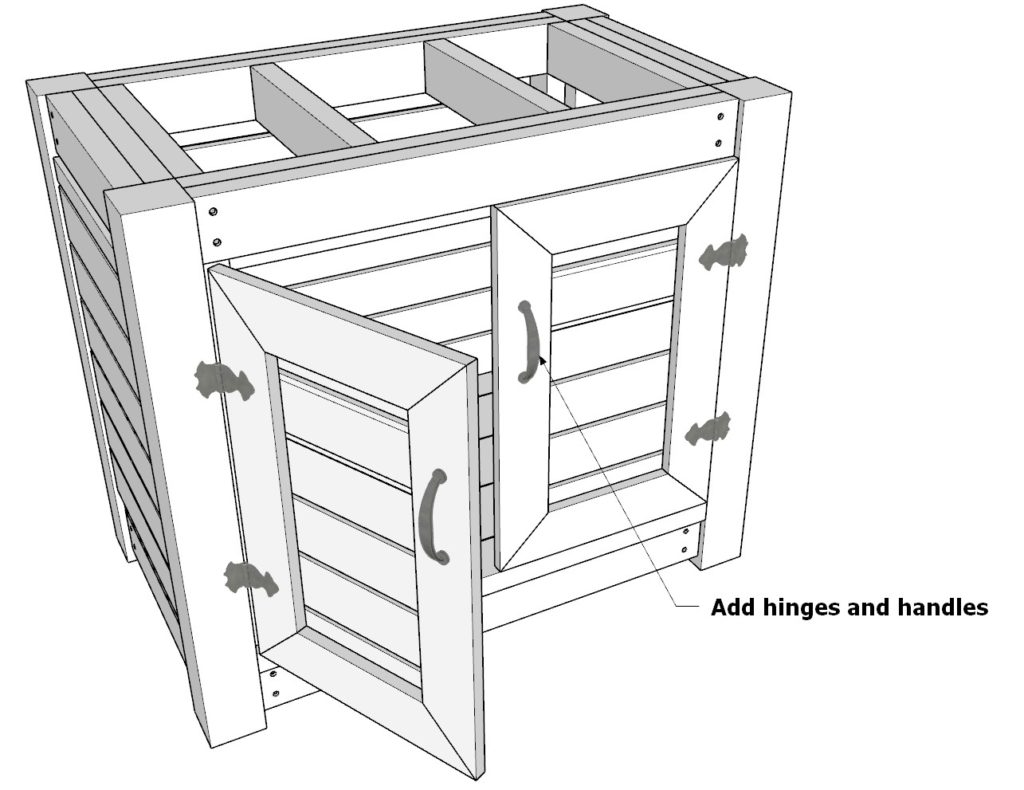
Step 8 (Constructing the Bar: Cabinet Doors and Frame Assembly)
Next, build and install the cabinet doors and frame.
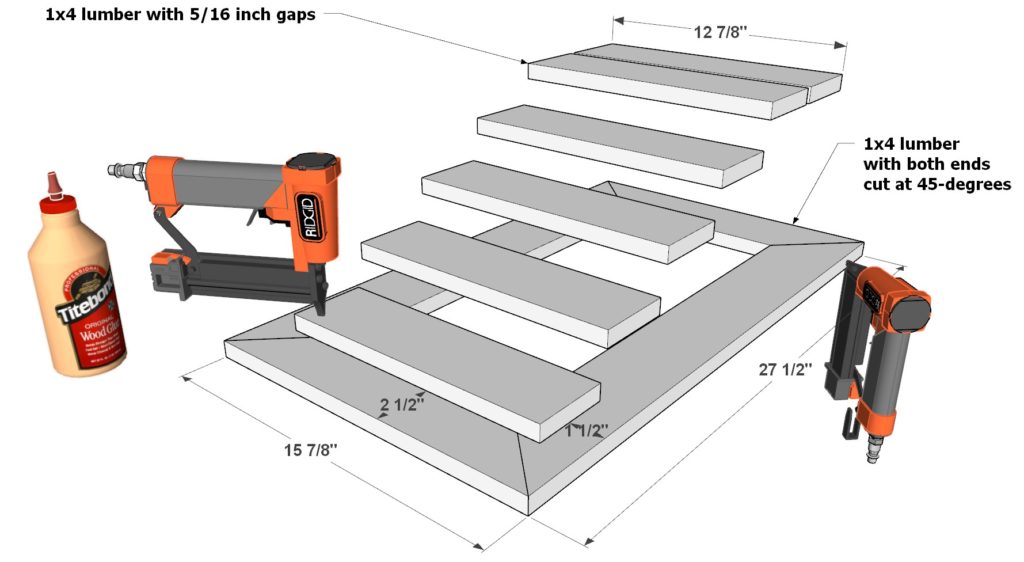
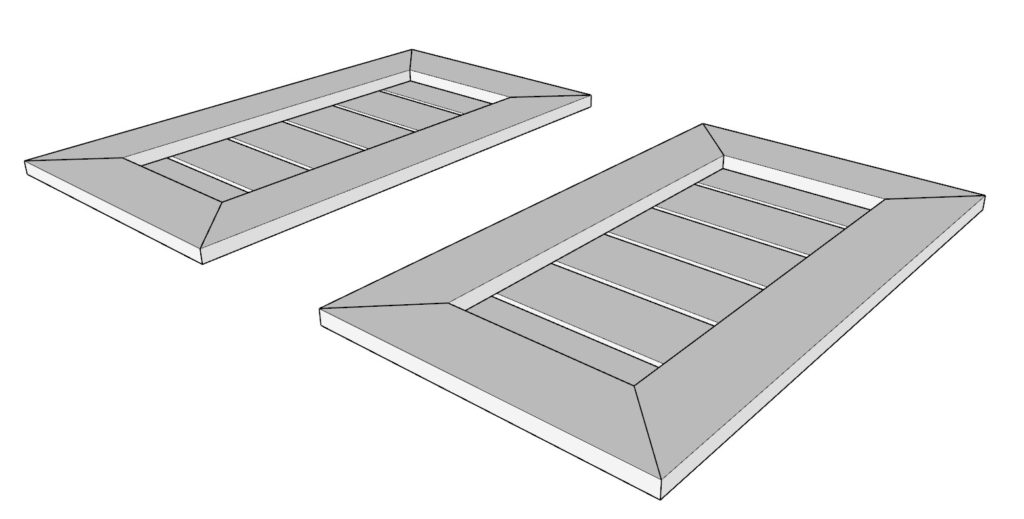
First build the cabinet doors. Take two 27-1/2 inch 1×4 lumber pieces cut at 45-degrees on both ends, two 15-7/8 inch 1×4 lumber pieces cut at 45-degrees on both ends, and six 12-7/8 inch 1×4 lumber pieces. Arrange them as shown in the diagram. Use glue and a nail gun and 1 inch nails to secure the components together. Make two identical cabinet doors.
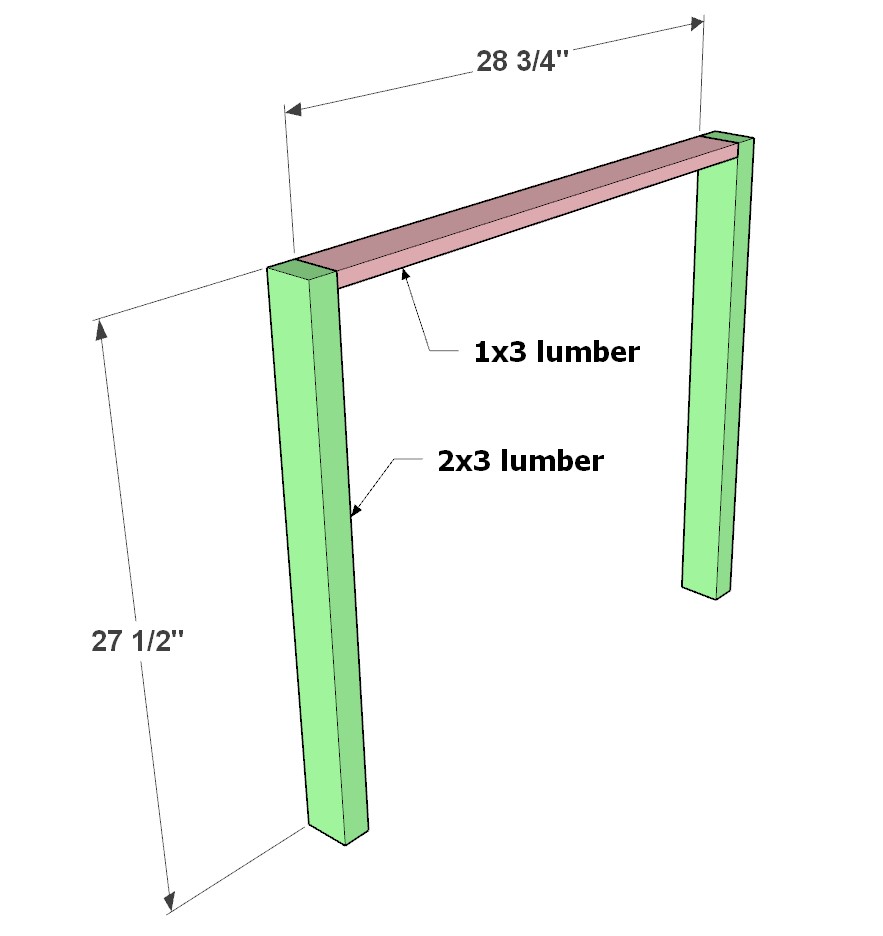
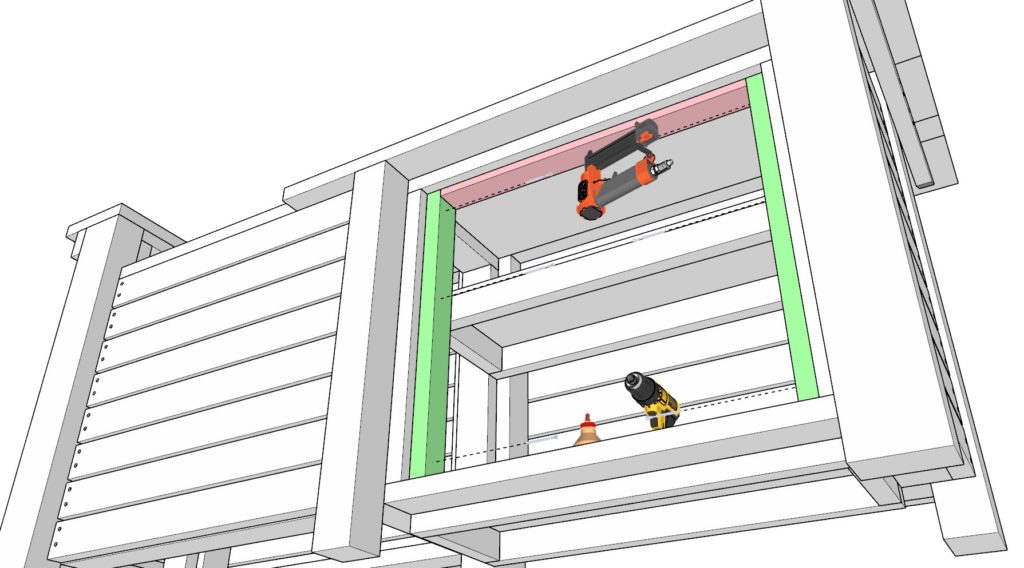
Next, install the cabinet door frame. Take two 27-1/2 inch 2×3 lumber pieces and one 28-3/4 inch 1×3 lumber pieces and secure these into place using a nail gun, glue, and 2.5 inch screws. The frame needs to be indented by 3/4 inch to allow for the cabinet doors to fit flush with the bar frame so that he cabinet hingers can be installed property.
Lastly add hinges and handles.
Step 9 (Final Touches: Sanding, Staining, and Painting the Bar Component)
In this step, you will prepare the bar component for staining or painting, ensuring a smooth finish and a polished look. Make sure the bar is ready to be attached to the other components of the outdoor kitchen.
First, sand the entire bar component using an orbital sander or a sanding block with medium-grit sandpaper (120-grit). Make sure to smooth out any rough edges or uneven surfaces on the wood. Pay special attention to the corners, edges, and any areas where the wood may have splintered or become rough during construction. Gradually move to finer grit sandpapers (180-grit and 220-grit) to achieve a smoother finish.
Once the entire bar component is sanded, wipe it down with a tack cloth or a damp rag to remove any dust or debris. Allow the wood to dry completely before moving on to staining or painting.
If you choose to stain the bar, select a high-quality wood stain in your desired color. Apply the stain with a brush or a clean cloth, following the grain of the wood. Allow the stain to penetrate the wood for the recommended time according to the manufacturer’s instructions. Wipe off any excess stain with a clean cloth and allow the stained wood to dry completely. You may need to apply additional coats to achieve your desired color. Always follow the manufacturer’s instructions for drying times between coats.
If you choose to paint the bar, first apply a coat of primer to the wood, which will help the paint adhere better and provide a more even finish. Allow the primer to dry completely, and then apply your chosen paint color with a brush or roller. Apply multiple thin coats, allowing each coat to dry according to the manufacturer’s instructions before applying the next coat.
After staining or painting the bar, consider applying a clear protective finish, such as a polyurethane, to protect the wood from moisture, UV rays, and wear. Follow the manufacturer’s instructions for application and drying times.
Finally, once the bar component is stained, painted, and fully dry, it is ready to be attached to the other components of the outdoor kitchen, completing your DIY outdoor wooden kitchen project.
DIY Grilling Counter Component

Disclaimer: This outdoor kitchen plan is designed for a medium-sized (32-inch wide) drop-in grill. Please note that if you plan to use a different sized grill, you may need to make adjustments to the plan to accommodate the size variations. Ensure that you measure your grill carefully and make the necessary modifications to the dimensions and materials used in the plan to ensure a proper fit and safe installation. It is recommended to consult the grill manufacturer’s guidelines and recommendations for proper clearances and installation requirements. Before starting the build, make sure to read through the entire plan to identify any adjustments that may be needed for your specific grill size and setup.
Built-in grills or drop-in grills come in various sizes to accommodate different outdoor kitchen designs and preferences. Some standard sizes include:
Small: 26-30 inches
Medium: 30-36 inches
Large: 36-42 inches
Extra-large: 42-54 inches
Grill station cut list
Dear potential buyers,
With the purchase of our DIY outdoor kitchen plan, you’ll receive a comprehensive list of recommended tools, materials, and a project lumber shopping list to make your building experience hassle-free and efficient. Thank you for your interest and for making this website possible.
Happy building!
Click here for the plan.
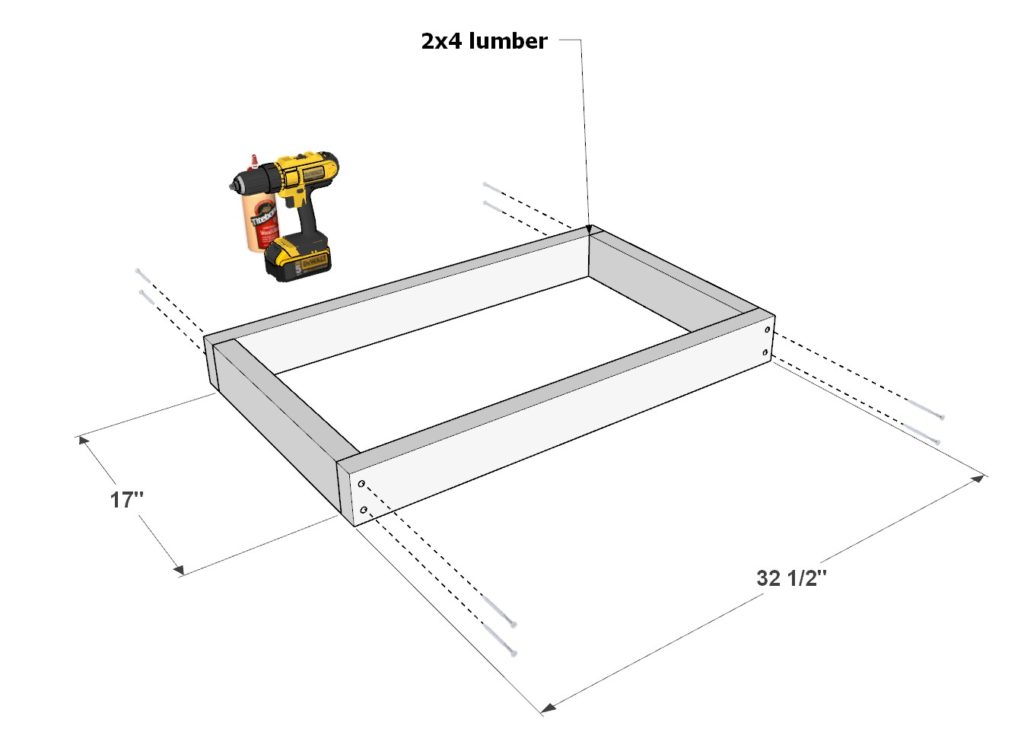
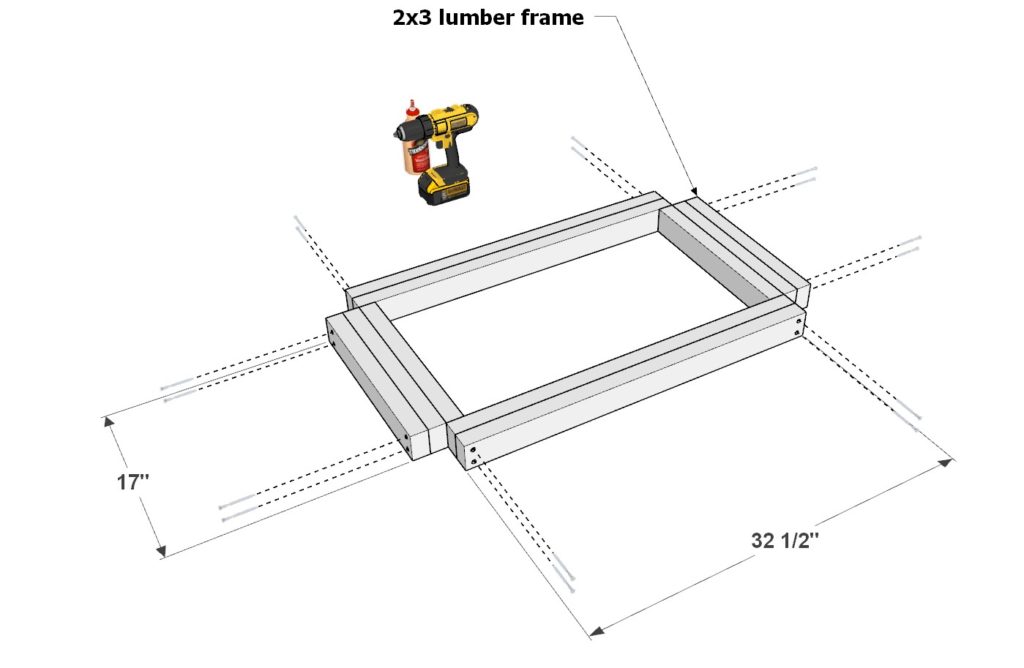
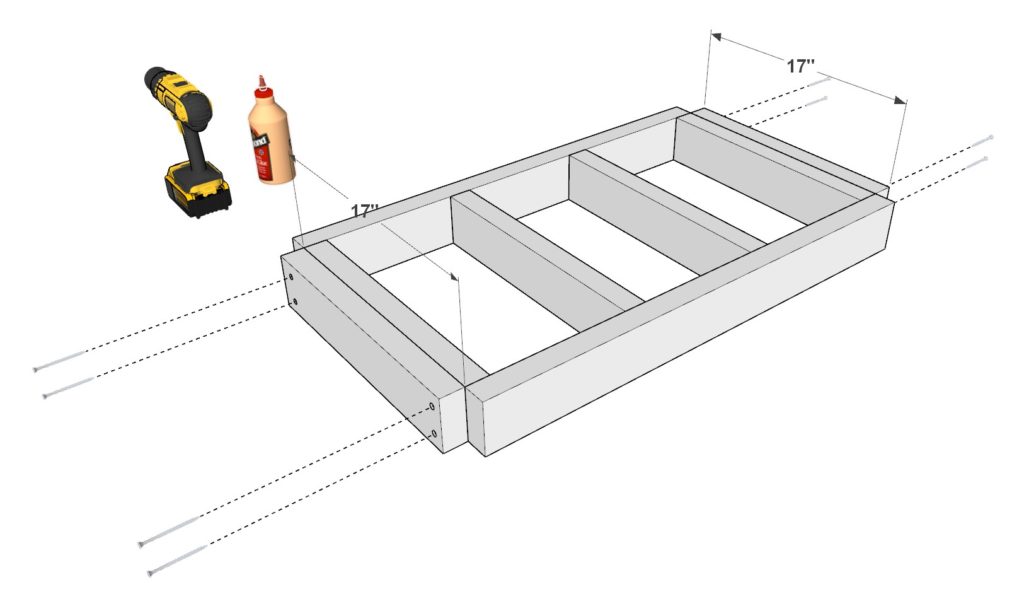
Step 1 (Building Grill Counter Frame Pieces): Assembling the 2x4 and 2x3 Lumber Frames
Begin by building the grill counter frame pieces.
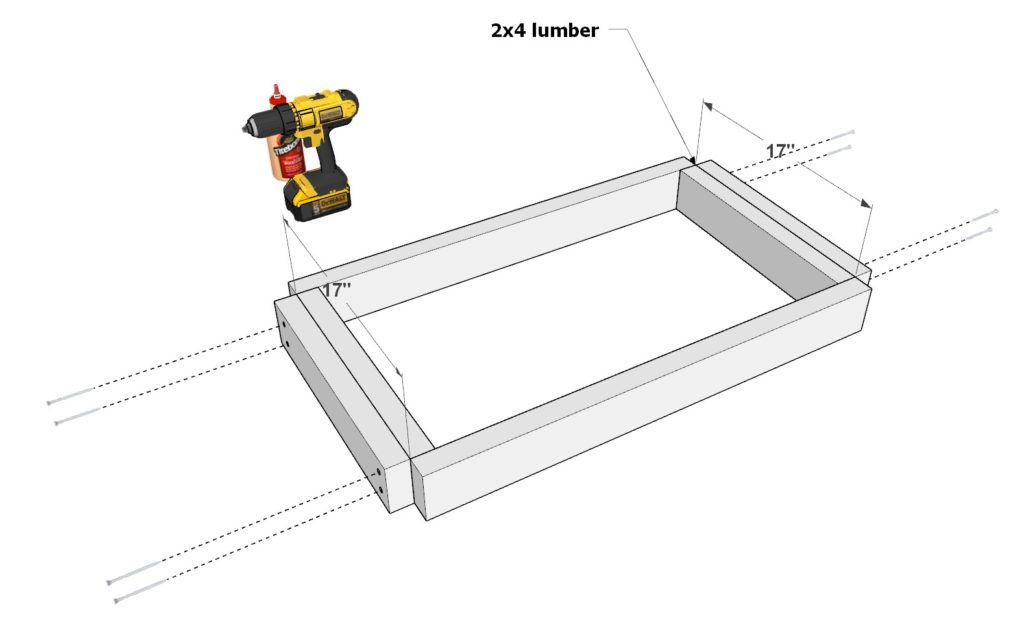
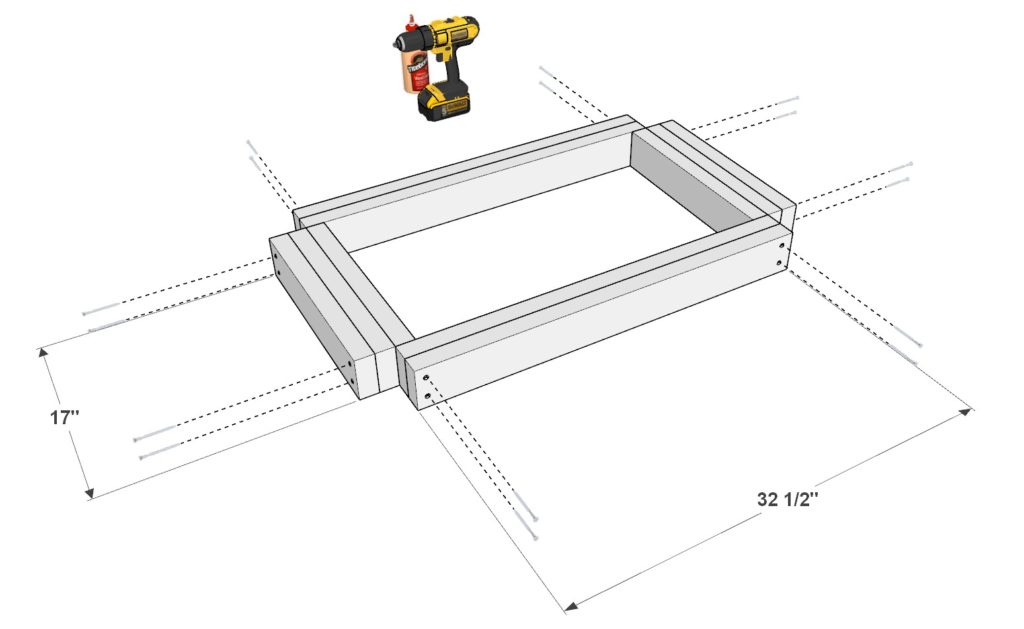
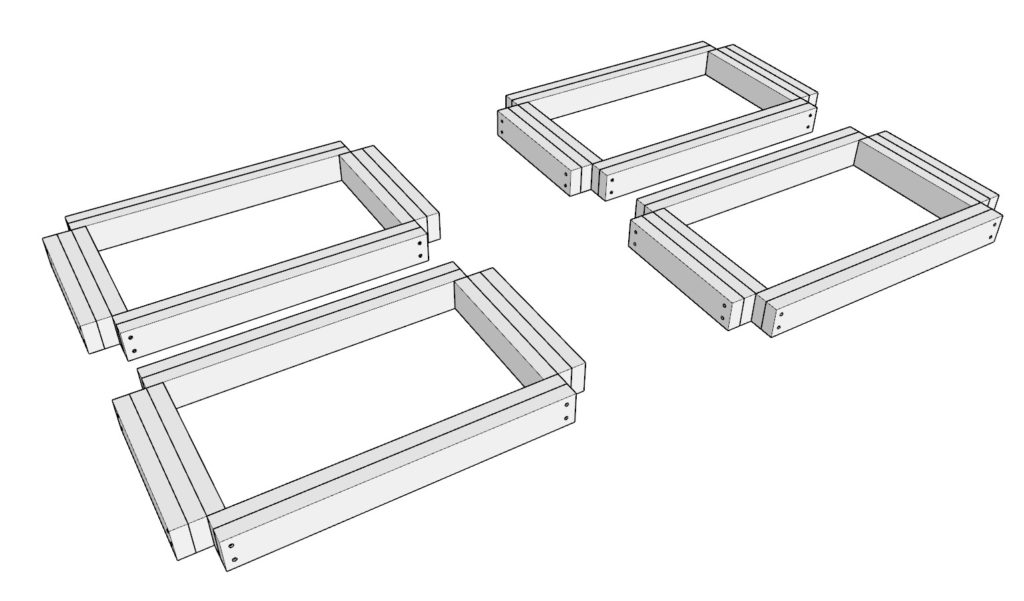
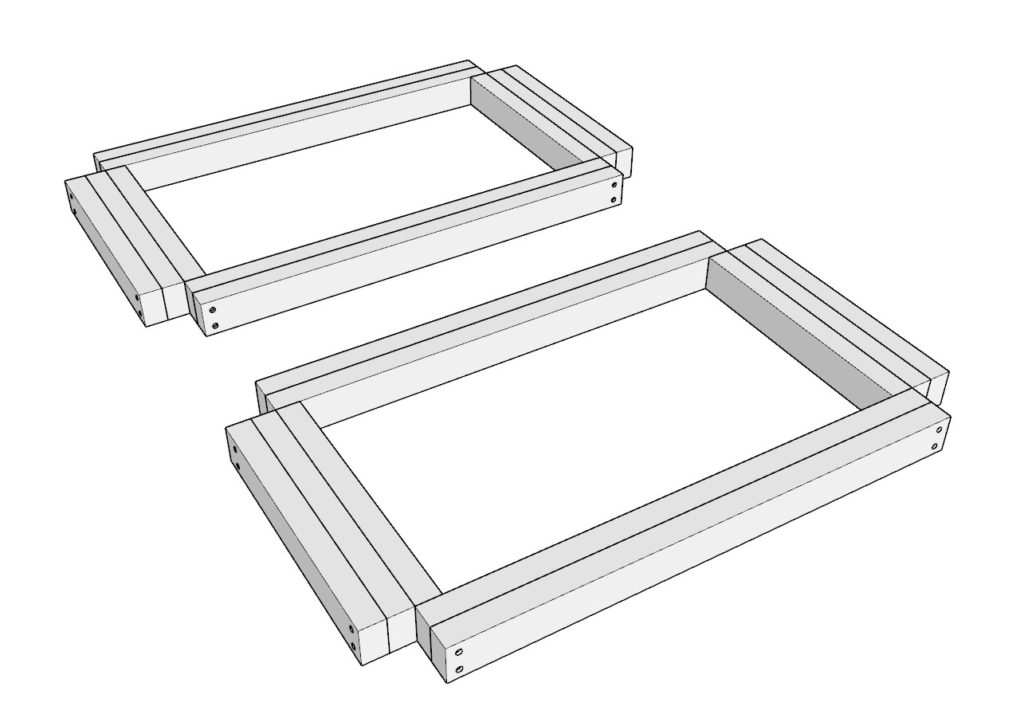
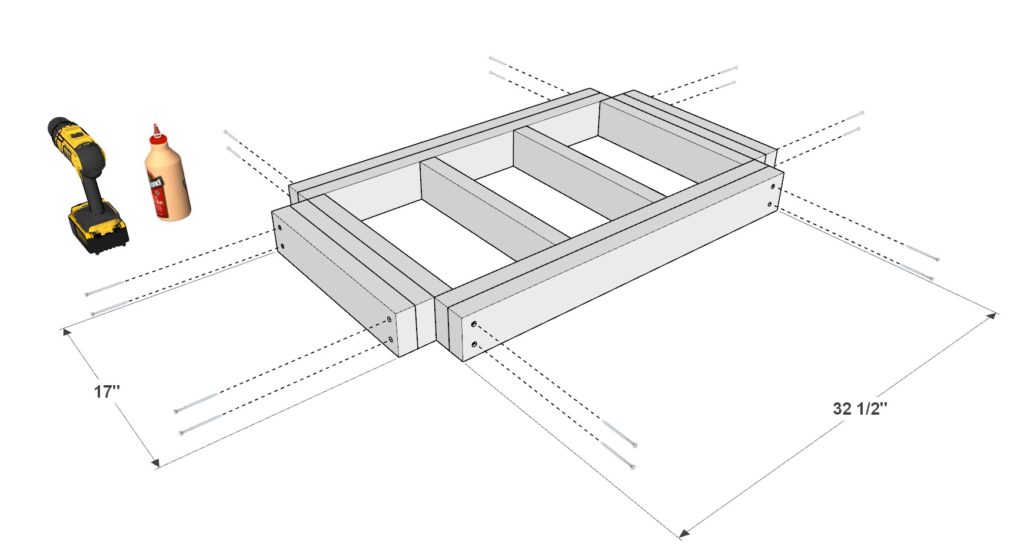
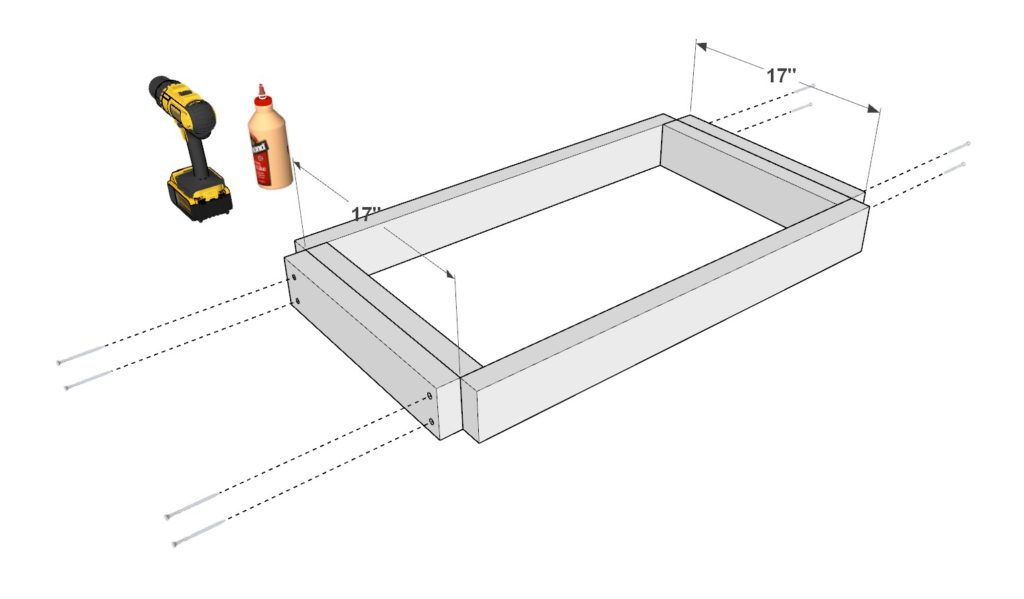
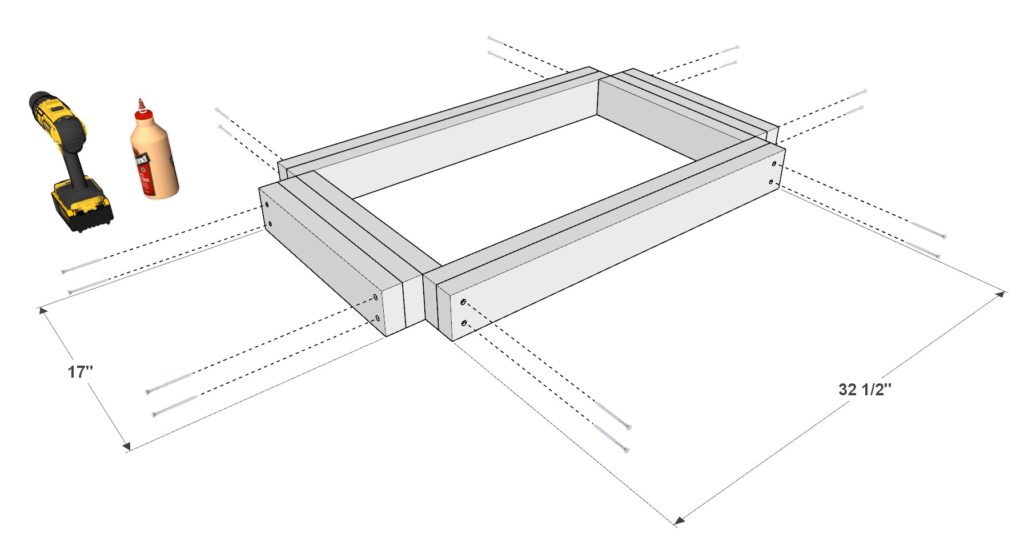
First, take two 32-1/2 inch 2×4 lumber pieces and two 17 inch 2×4 lumber pieces and arrange them as shown below. Predrill, add glue, and add 3.5 inch screws. Next, add two additional 17 inch 2×4 lumber pieces to frame as indicated below. Secure these with glue, predrilling, and 2.5 inch screws. Next, add an additional pair of 17 inch 2×4 lumber pieces and a pair of 32-1/2 inch 2×4 lumber pieces to the frame and secure them as before. You should have a total of four identical frame pieces.
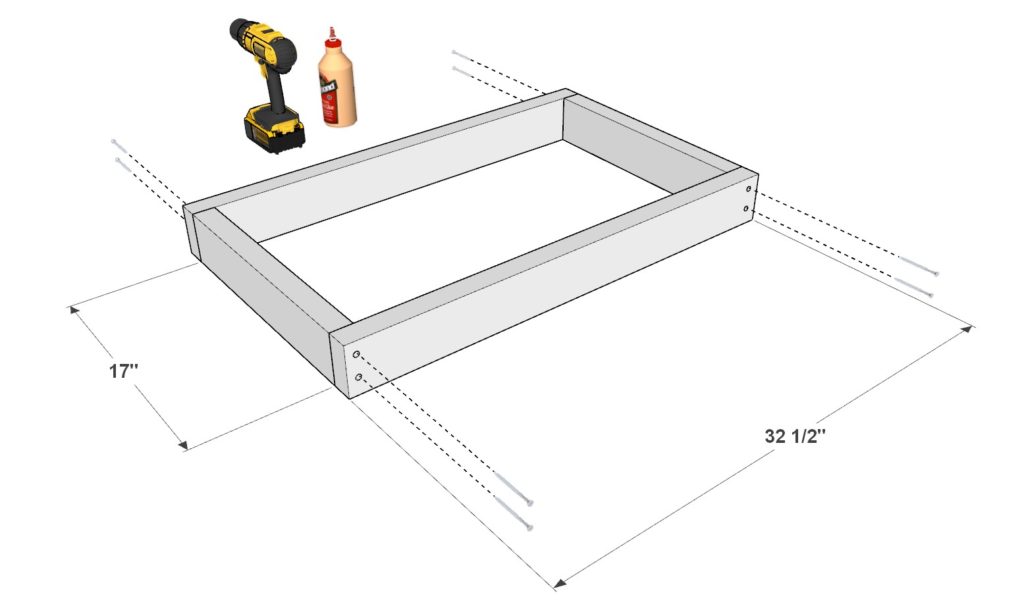
Next, repeat these steps but use 2×3 lumber instead. Create two frames total that are identical to each other but this time made of 2×3 lumber.
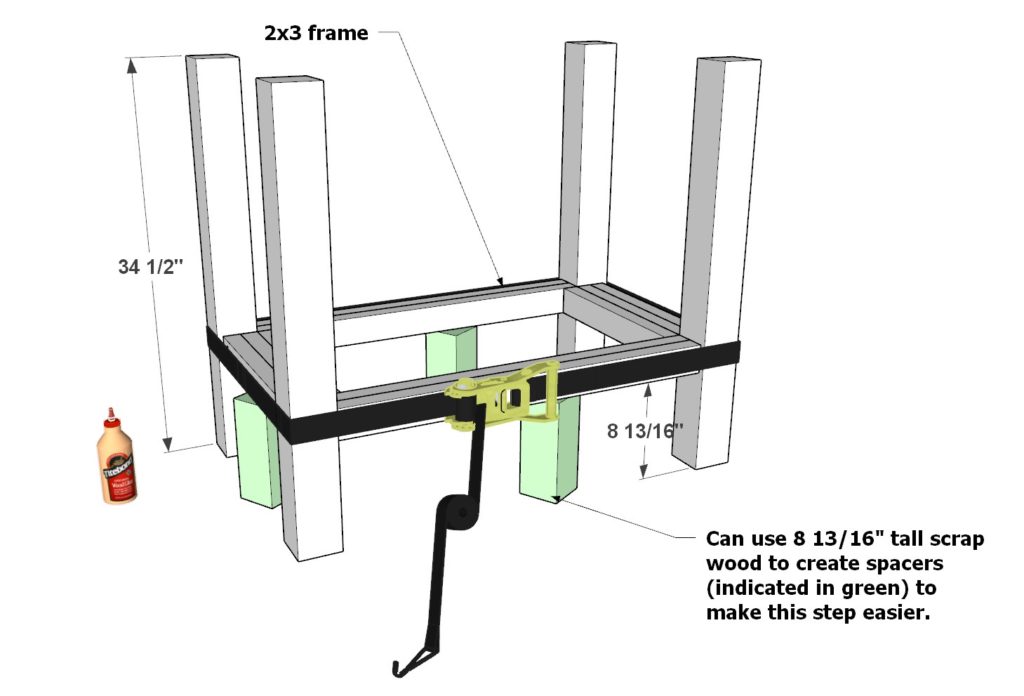
Step 2 (Attaching 2x4 and 2x3 Frame Pieces to Grill Counter Legs): Securing the Grill Counter Frame to the 4x4 Legs
Next, attach the 2×4 and 2×3 frame pieces to the grill counter legs.
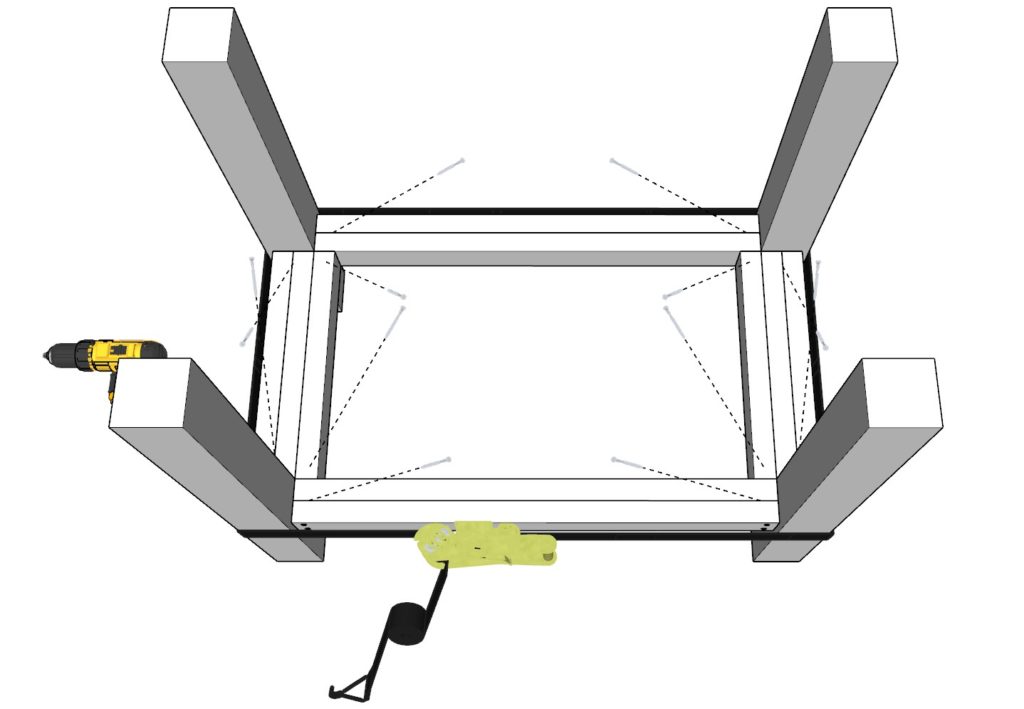
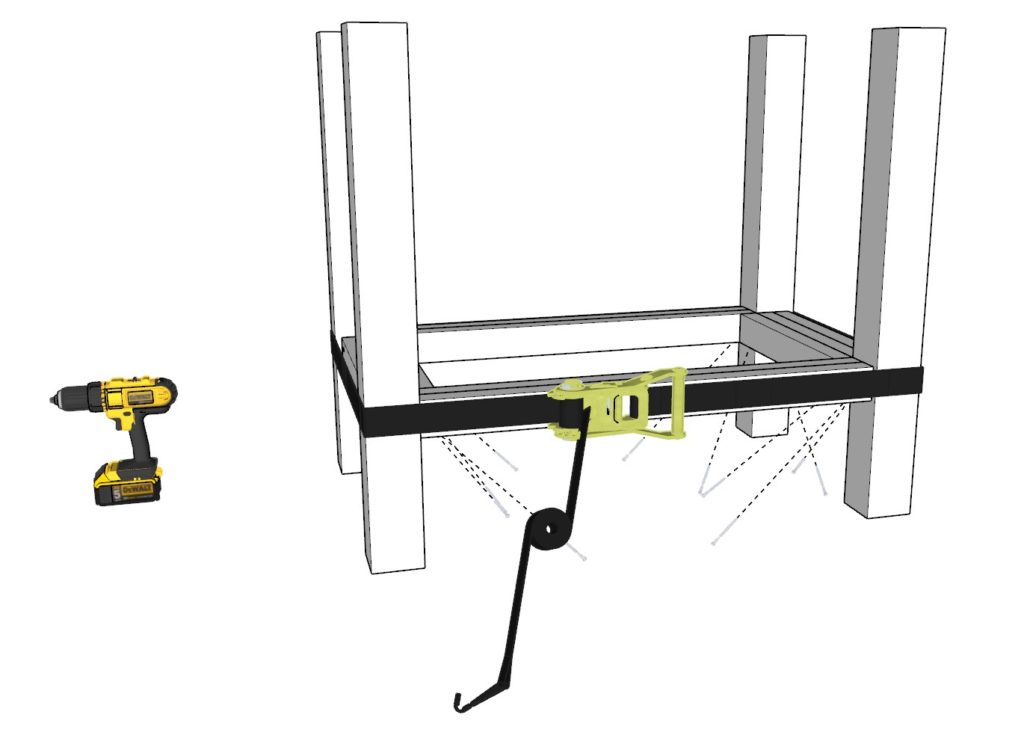
Take four 34-1/2 inch 4×4 lumber pieces and one of the 2×3 lumber frames built in the previous step. First, apply glue to the 2×3 frame parts that will be joined together. Place the 2×3 frame on top of 8-13/16 inch tall spacers (optional but helpful). Next, bring the 4×4 legs together using a ratchet strap as indicated below. Tighten the straps so that they would hold all pieces together. Next, use a hammer to knock into place any “stubborn” wood pieces that do not align. Once the alignment is prefect, tighten the straps so that no wood components are able to move. Next, take 3.5 inch screws, predrill, and add the screws to the frame. Repeat this from the bottom as well.
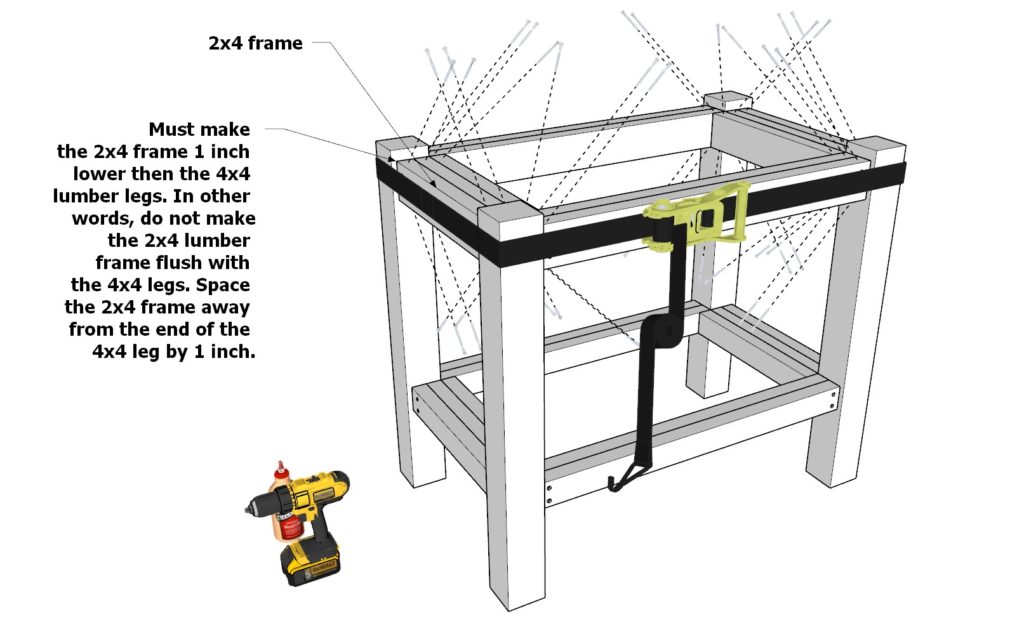
Next, take a 2×4 frame from the previous step and add it to the 4×4 legs as well. You must make the 4×4 frame 1 inch lower then the end of the 4×4 legs. See diagram. glue, add straps, predrill, and add 3.5 inch screws.
Make a total of two identical counter frame pieces.
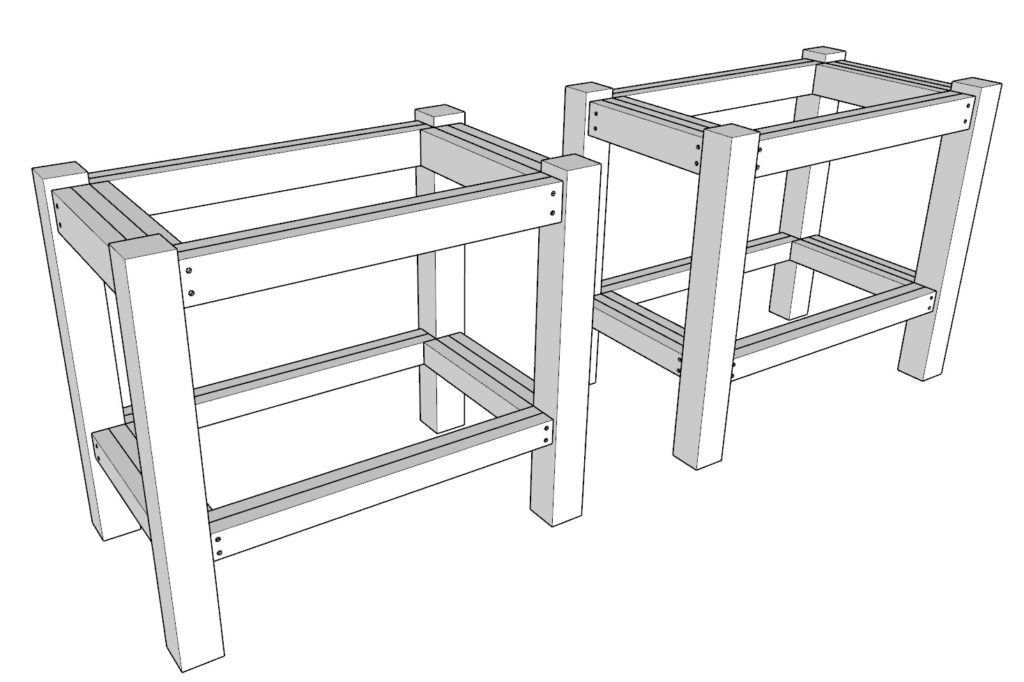
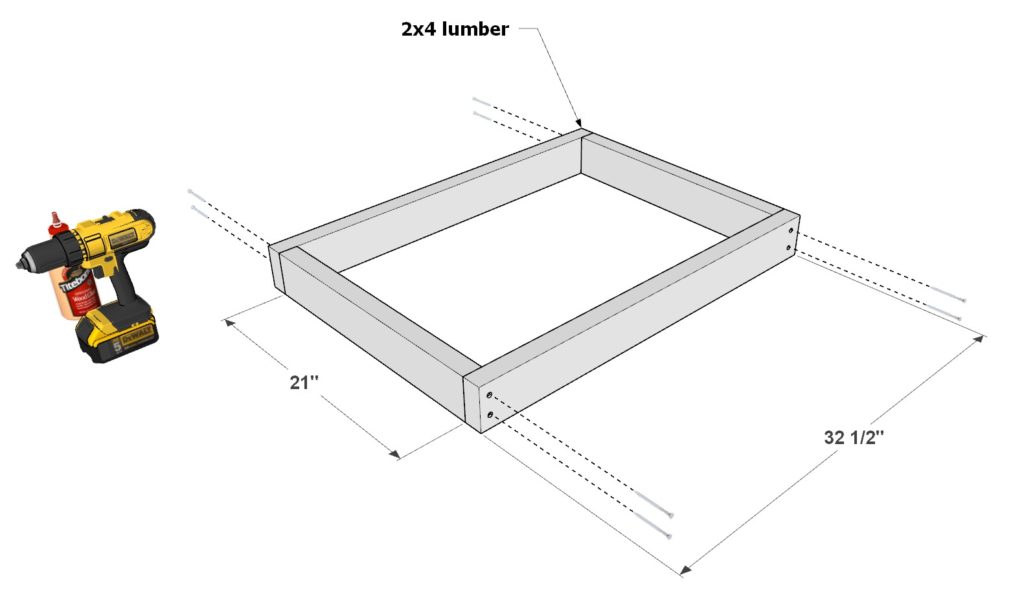
Step 3 (Adding Decking, Counter Shelf, and Counter Top Wood Planks): Assembling the Grill Counter Station Base, Shelves, and Counter Top
Next, add the decking and counter shelf and counter top wood planks.
Start buy creating a 2×4 wooden frame to extend the length of the wooden counter.
Take two 32-1/2 inch 2×4 lumber pieces and two 21 inch 2×4 lumber pieces and arrange them as shown below. Predrill, add glue, and add 3.5 inch screws.
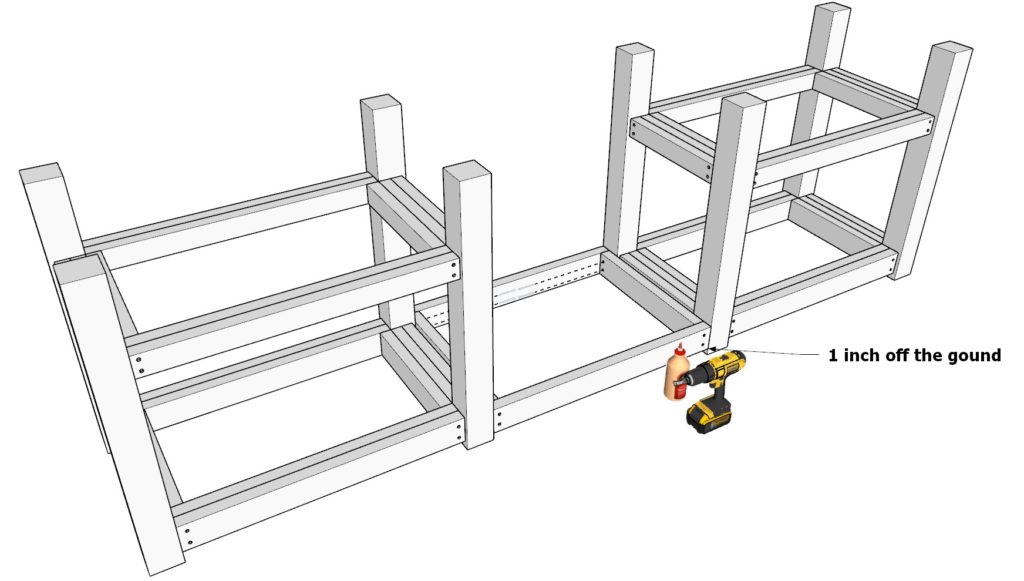
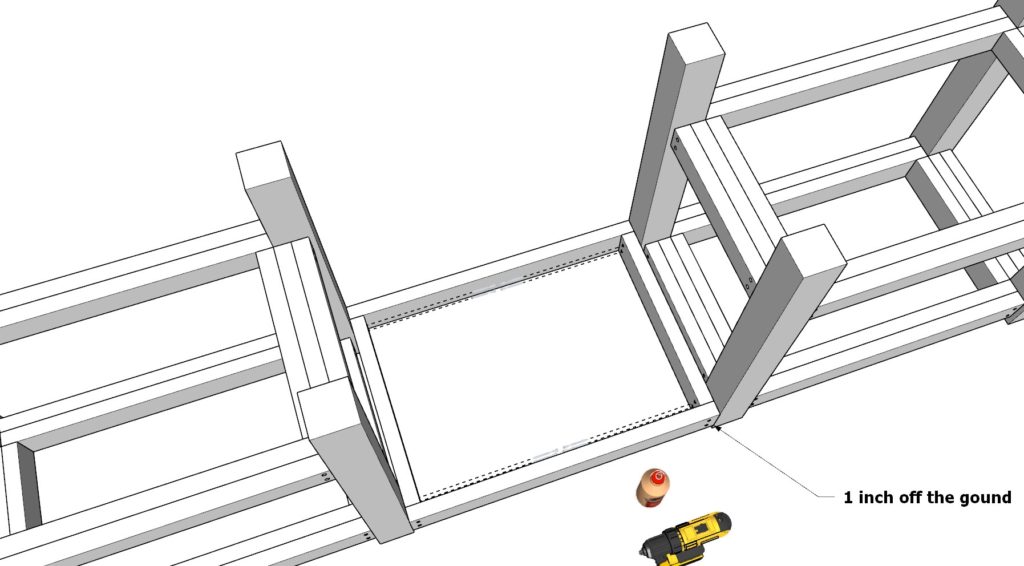
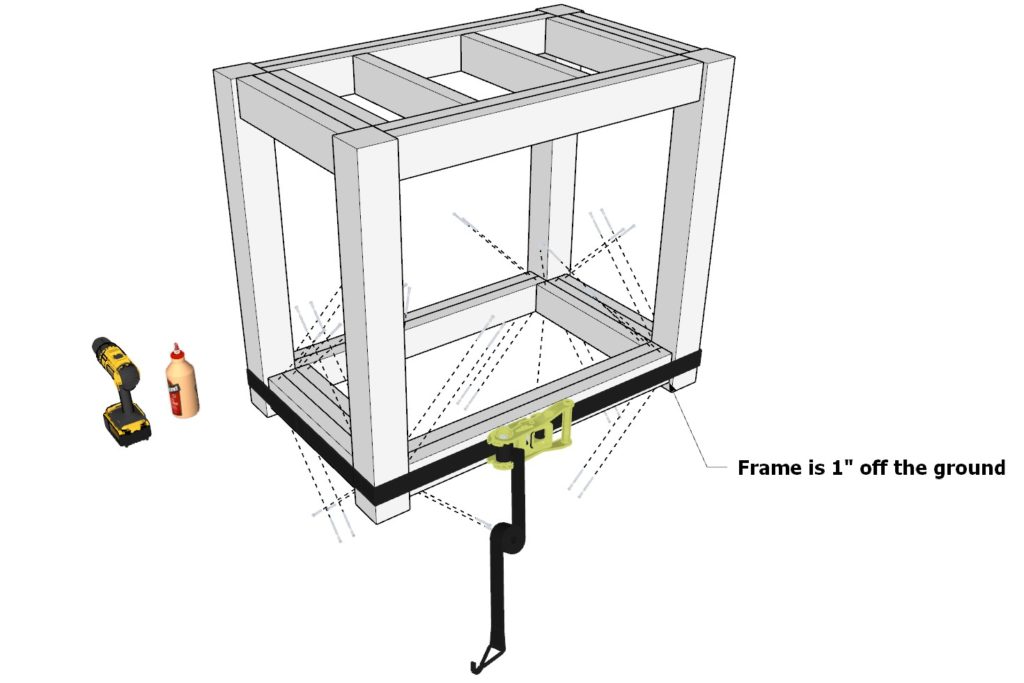
Take the 2×4 rectangular frame you just made and add it to the counter skeleton. Ensure that the frame is 1 inch off the ground as shown below. Secure the frame with predrilling, glue, and 3.5 inch screws.
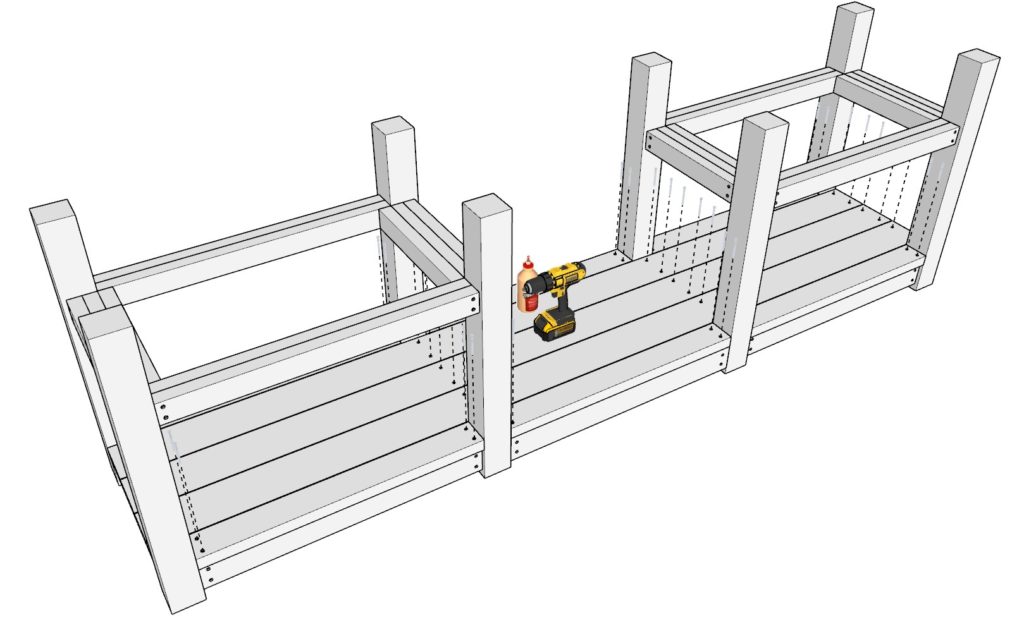
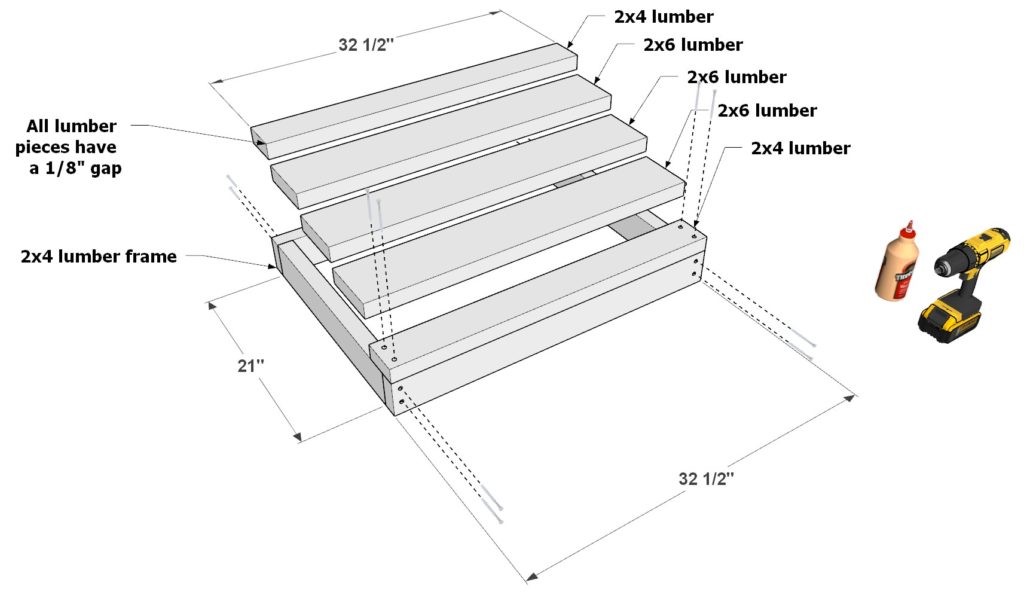
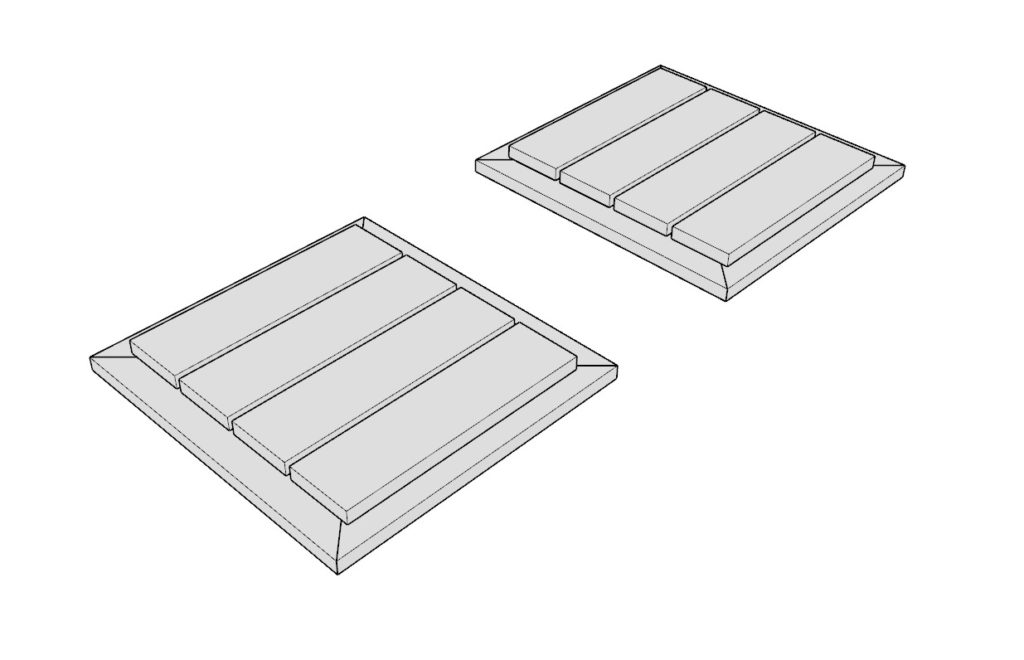
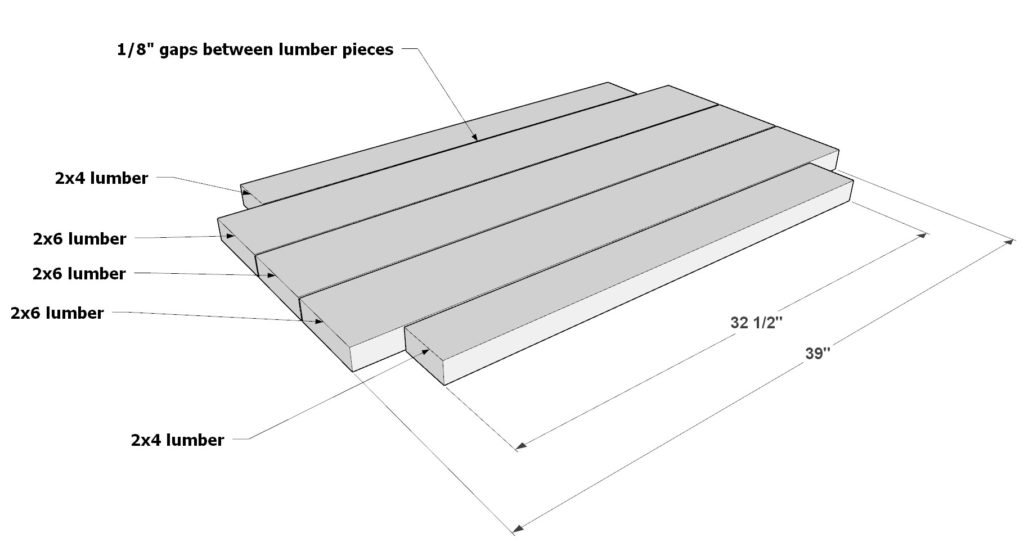
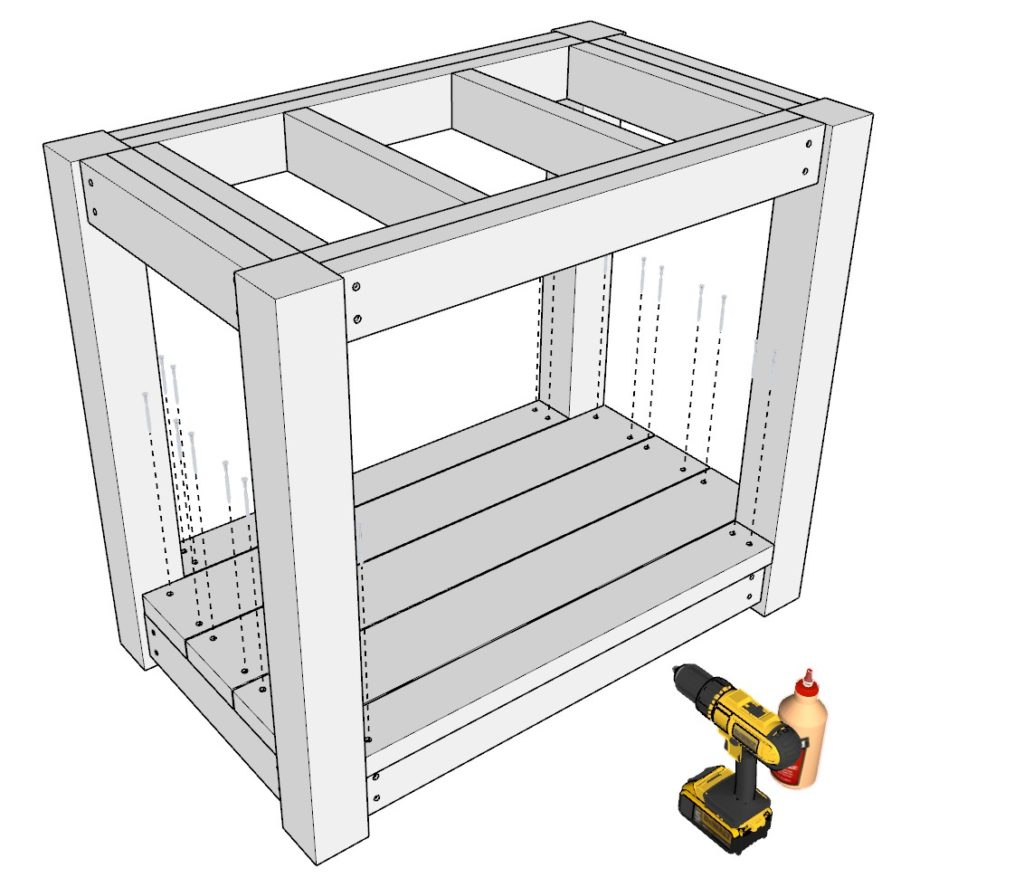
Next, add the decking that will run all the way across the grill counter station base. The decking pieces are made of six 32-1/2 inch 2×4 lumber pieces and three 111-1/2 inch 2×6 lumber pieces. These each will be spaced out 1/8 inches apart. To starts, align the 2×4 lumber pices to have their sides patch up with the 4×4 lumber frame legs. They need to be flush with the 4×4 lumber as shown in the diagram below. Secure these with glue, predrilling, and 3.5 inch screws.
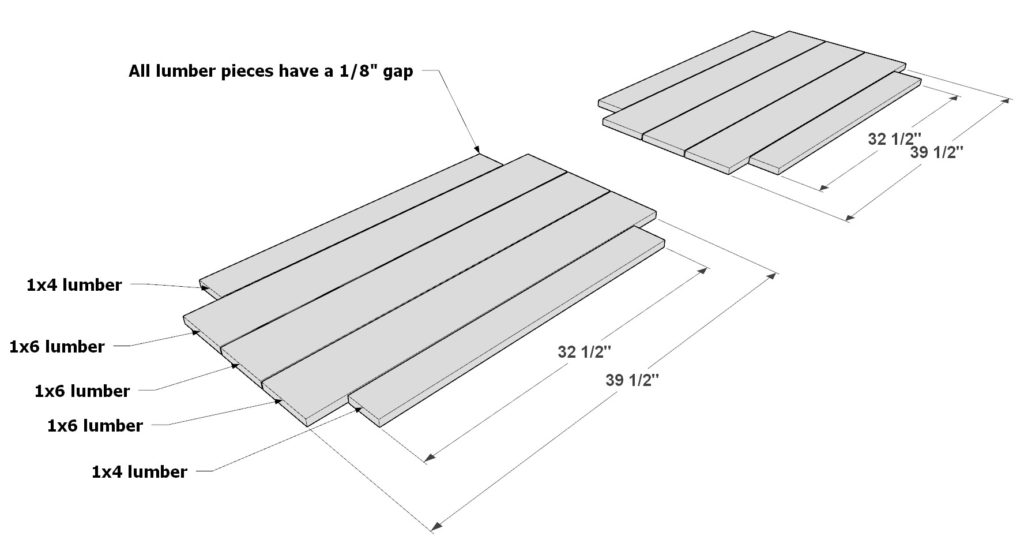
Next, add the shelve decking pieces. These are made of four 32-1/2 inch 1×4 lumber pieces and six 39-1/2 inch 1×6 lumber pieces. Secure these in the same way as the base decking pieces with the exception of using 2.5 inch screws instead of 3. inch screws.
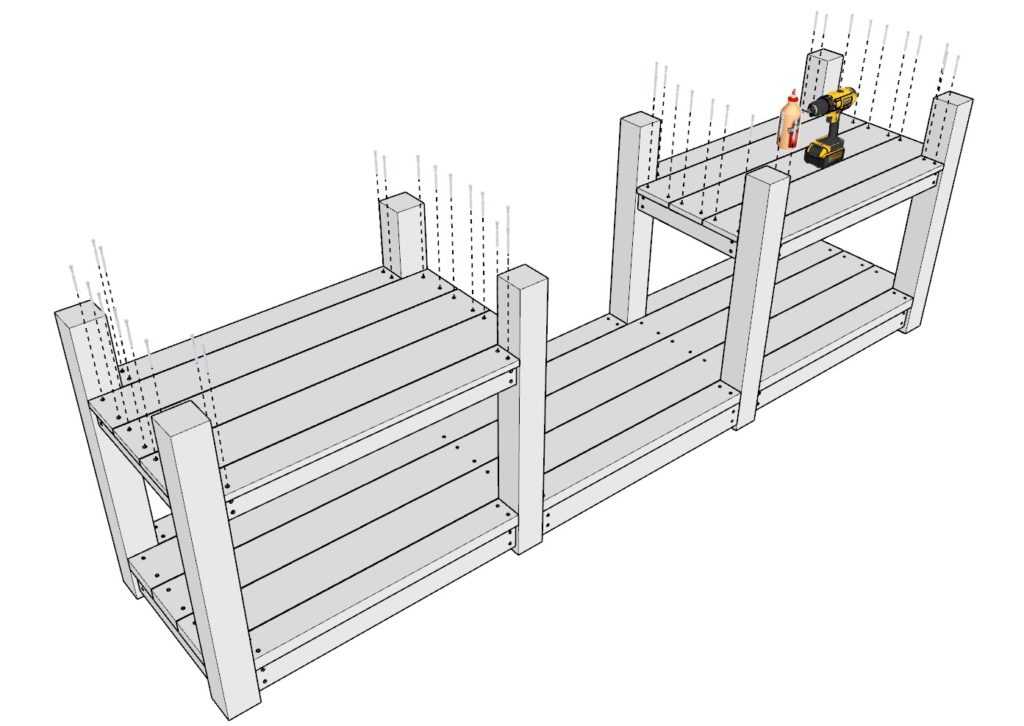
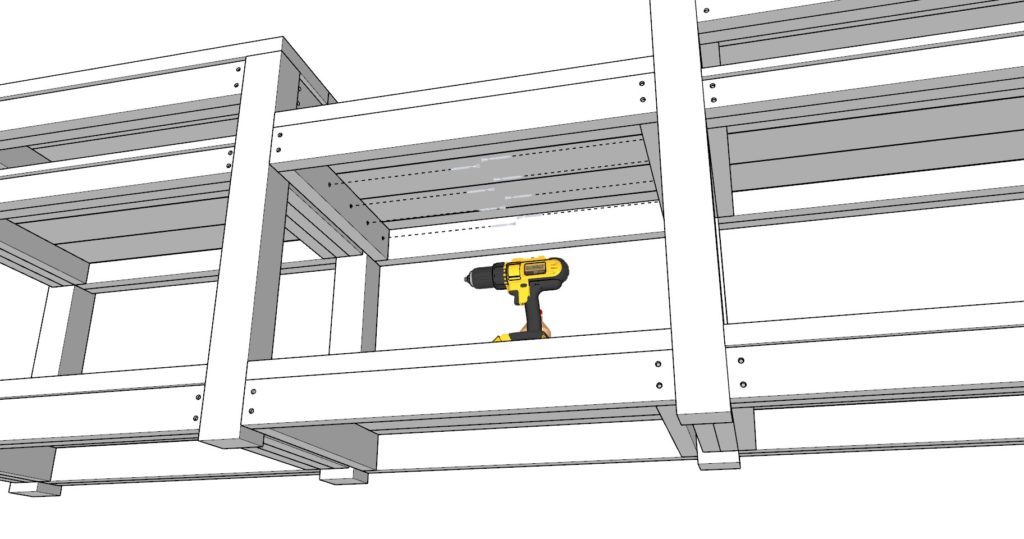
Next, add the remaining two 2×4 lumber rectangular frame pieces to complete the frame of the counters. Again use the straps, add glue, predrill, and add 3.5 inch screws just to the top.
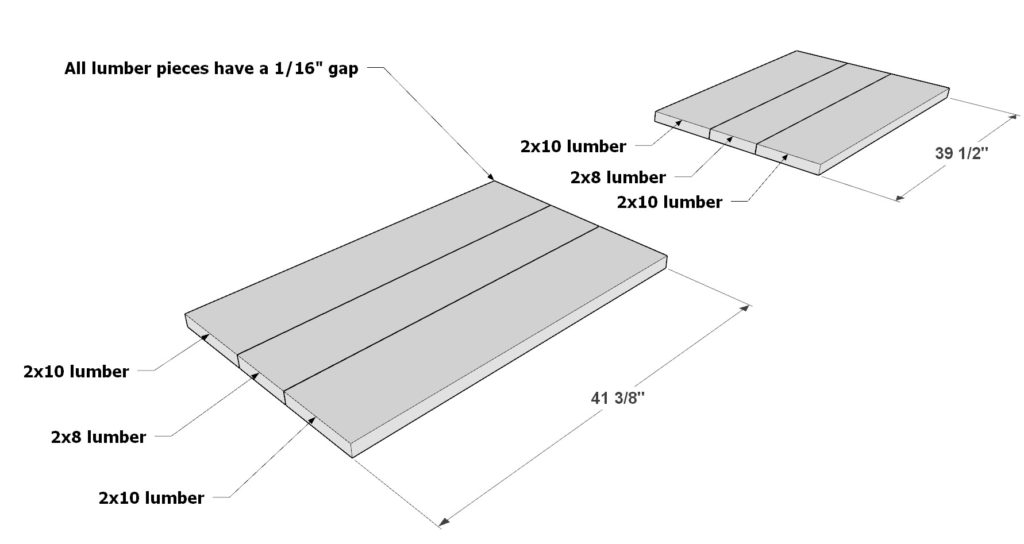
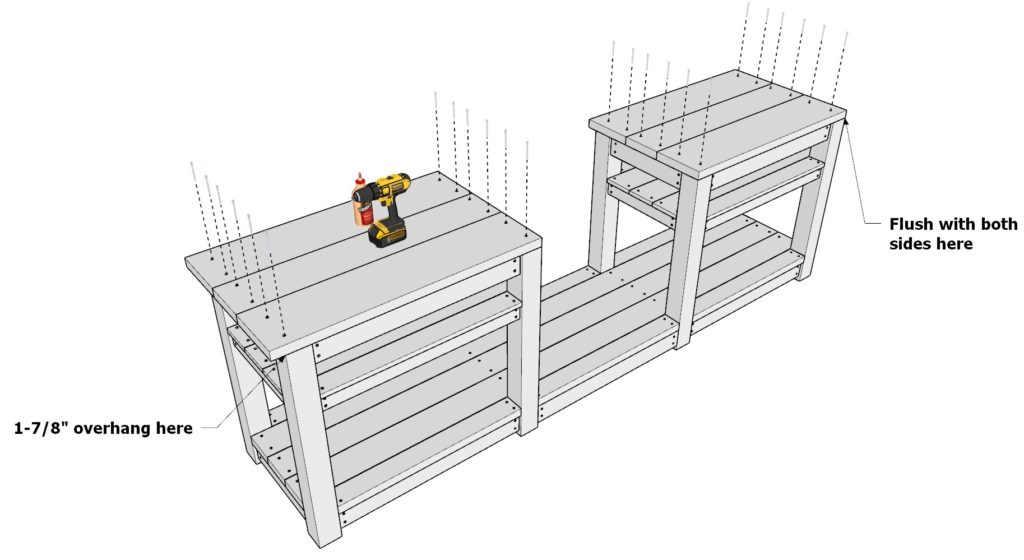
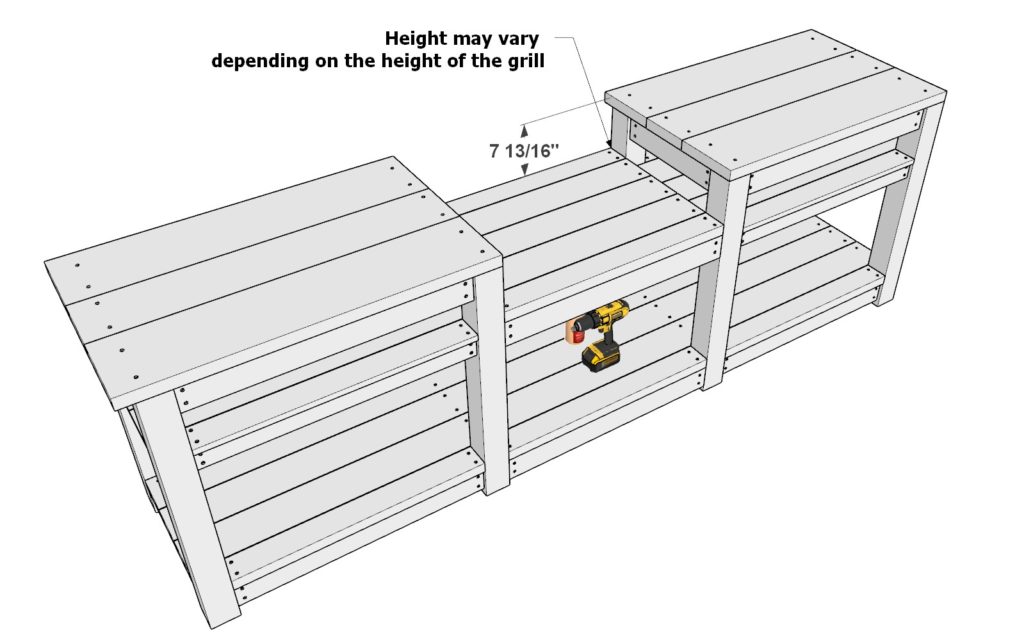
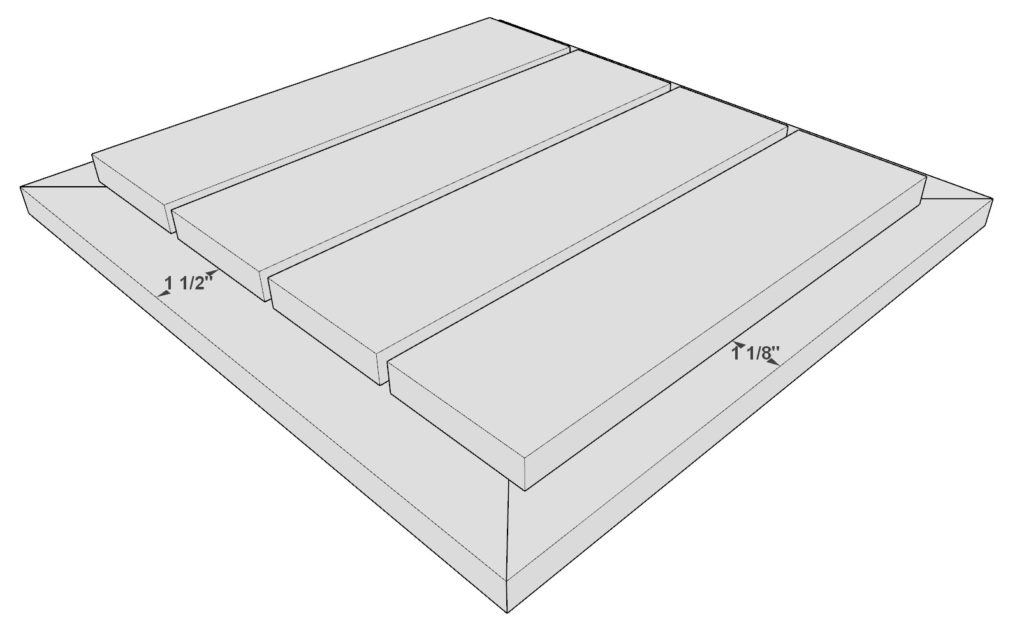
Lastly, add the counter top boards. Take two 41-3/8 inch 2×10 lumber boards, one 41-3/8 inch 2×8 lumber boards, two 39-1/2 inch 2×10 lumber boars, and one 39-1/2 inch 2×8 lumber boards and secure them to the top of the counter frames. Ensure that the shorter boards are flush with the 4×4 lumber legs as indicated by the diagram and that the longer boards have a 1-7/8 inch over hang on the other counter as indicated below.
Disclaimer: If your grill is a different size than a 32-inch grill, the dimensions in this step may need to be modified


Step 4 (Adding the Grill Support Platform): Building and Installing the Grill Support Platform for the Grill Counter
Next, add the grill support platform. The dimensions and the support platform height placement may vary if you are using a grill that is wider, taller, or shorter then the one described in this plan.
Take two 32-1/2 inch 2×4 lumber pieces, and two 21 inch 2×4 lumber pieces and arrange them as indicated below to create the rectangular frame. Predrill, add glue, and add 3.5 inch screws. Deck the frame using three 32-1/2 inch 2×6 lumber pieces and two 32-1/2 inch 2×4 lumber pieces. These need to be 1/8 inch apart from each other. Add glue, predrill, and secure these with 3.5 inch screws. Add the grill support platform to the grill counter using 3.5 inch screws.
Built-in grills or drop-in grills come in various sizes to accommodate different outdoor kitchen designs and preferences. Some standard sizes include:
Small: 26-30 inches
Medium: 30-36 inches
Large: 36-42 inches
Extra-large: 42-54 inches
These sizes typically refer to the width of the grill, which often correlates with the number of burners and overall cooking surface.
In my example I am using a medium size (32 inch wide drop-in grill).
Step 5 (Constructing Grill Station Cabinet Walls)
Next, build and add the grill station cabinet walls.
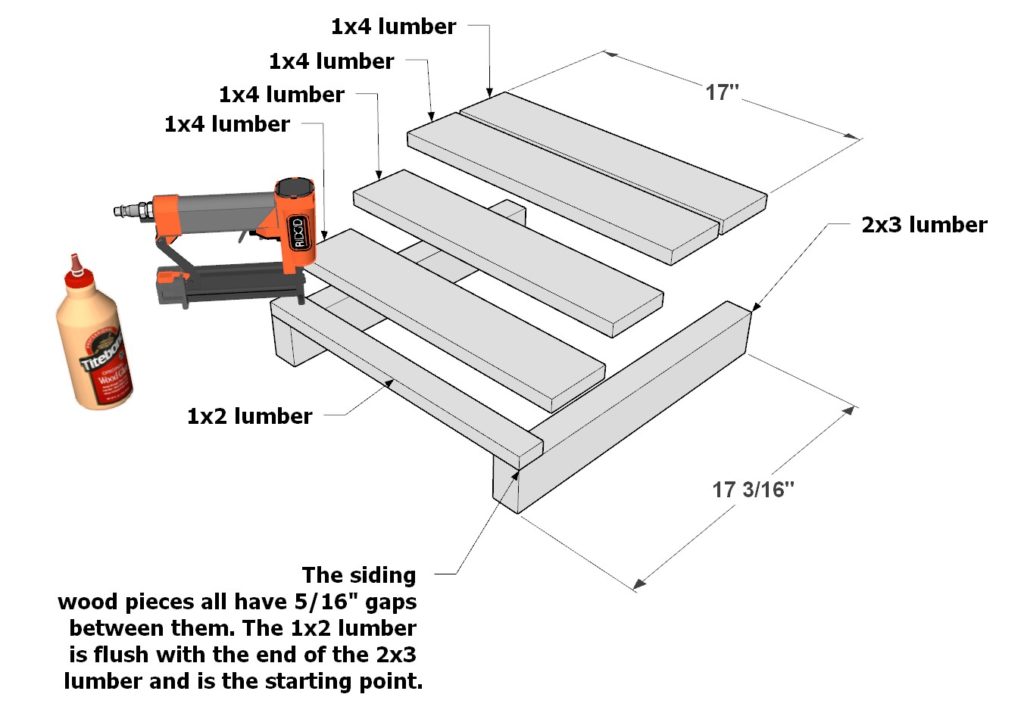
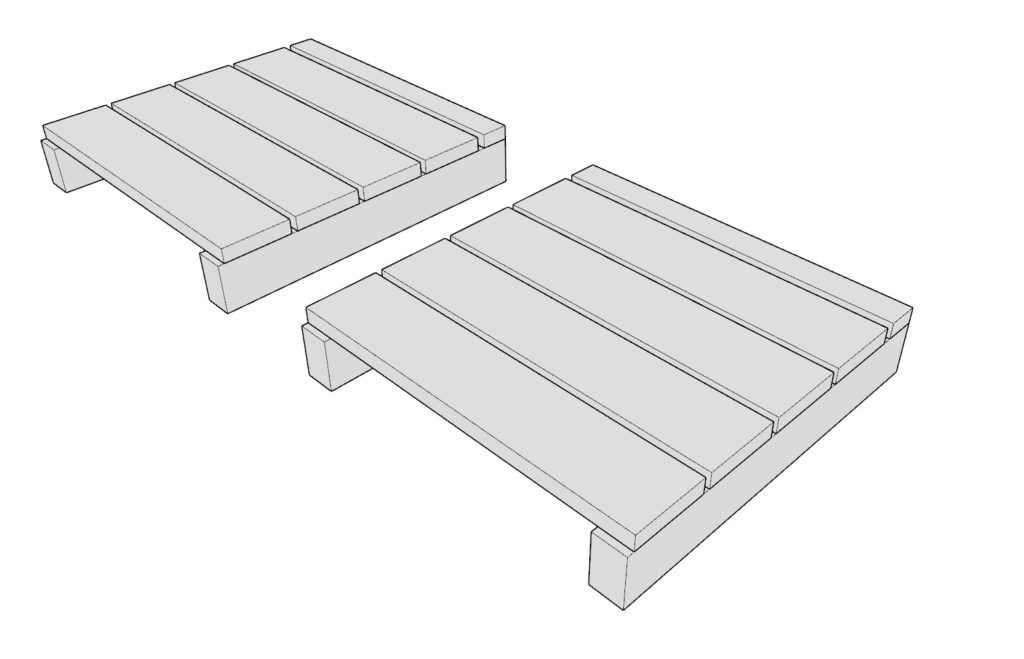
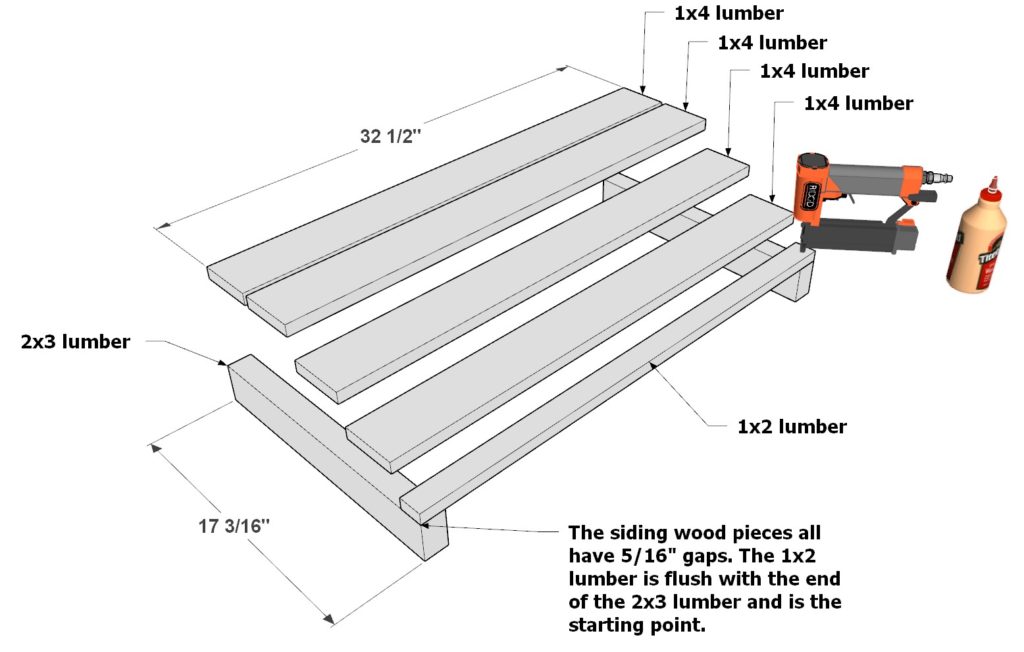
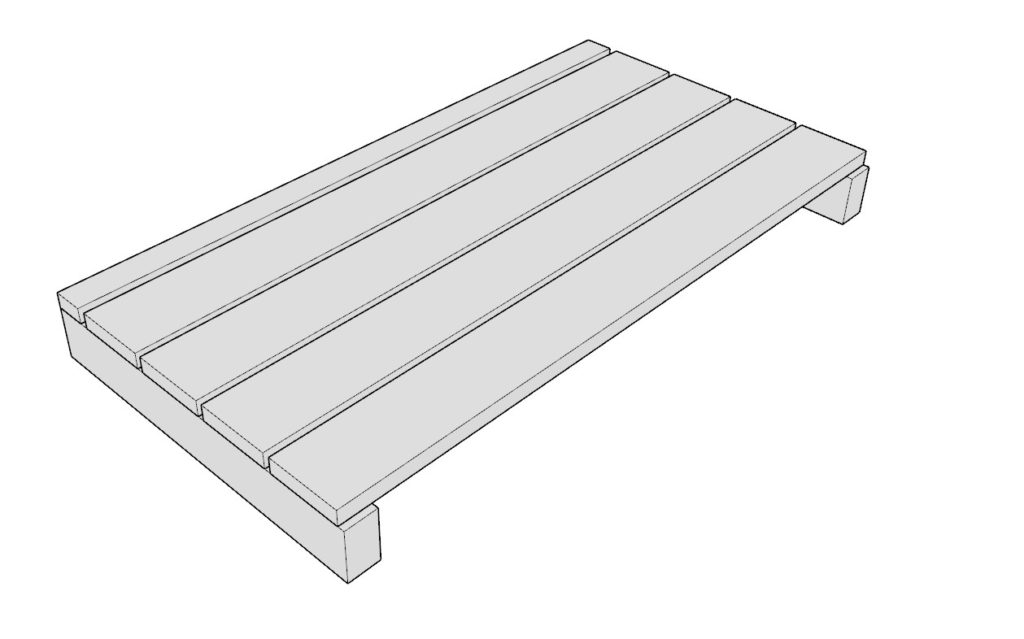
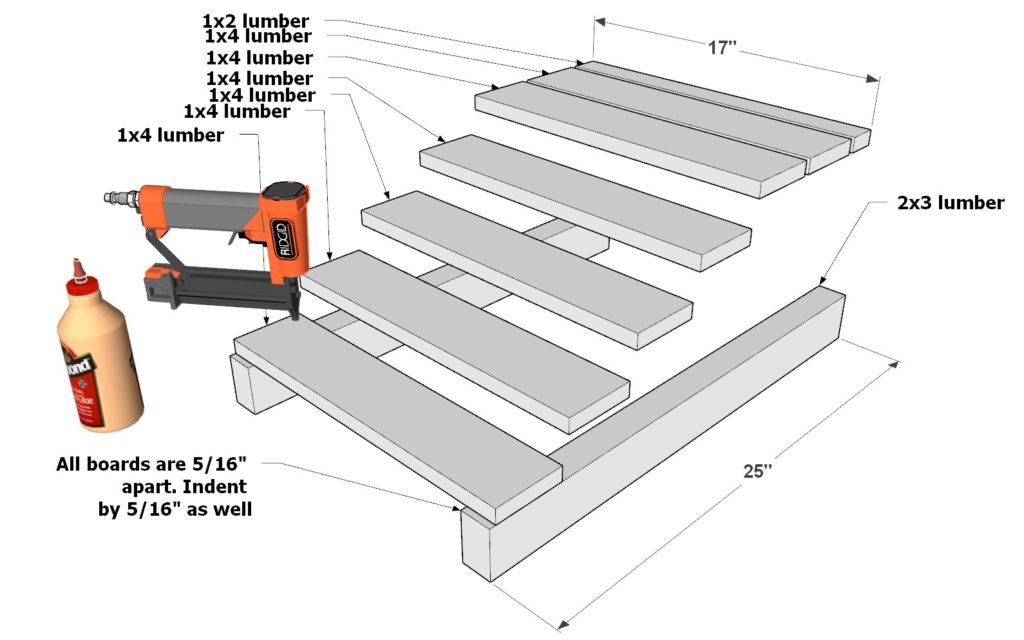
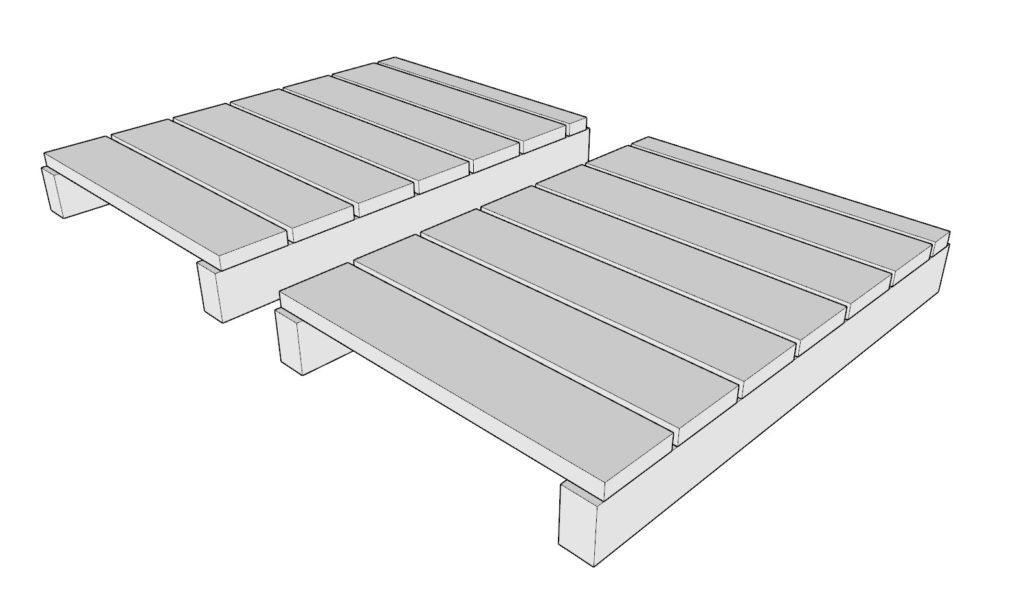
First, take two 17-3/16 inch 2×3 lumber pieces, one 17 inch 1×2 lumber piece, and four 17 inch 1×4 lumber pieces. Arrange them as indicated below with the appropriate spacing. Note that there will be a small gap between the end of the 2×3 lumber pieces and the ends of the 1×4 lumber pieces (as seen in the second image in this step). Add glue, and secure the pieces together using a nail gun and small 1 inch nails. Make two identical cabinet wall frames.
Next, build a similar back cabinet wall piece. Take two 17-3/16 inch 2×3 lumber pieces, one 32-1/2 inch 1×2 lumber piece, and four 32-1/2 inch 1×4 lumber pieces. Arrange them as shown below. Attach them as before.
Disclaimer: If your grill is a different size than a 32-inch grill, the dimensions in this step may need to be modified
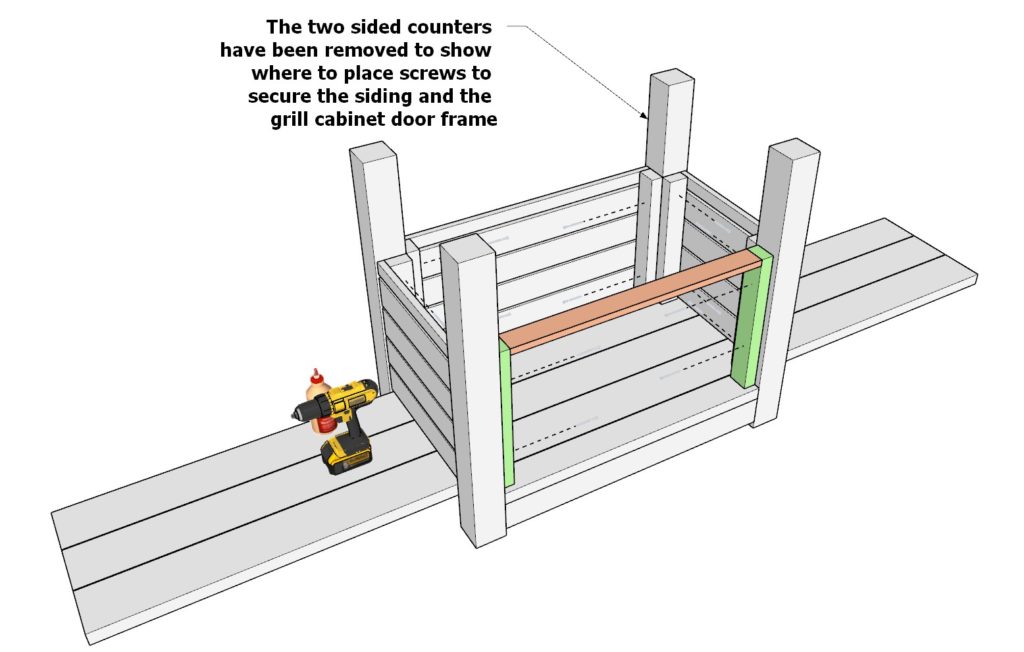
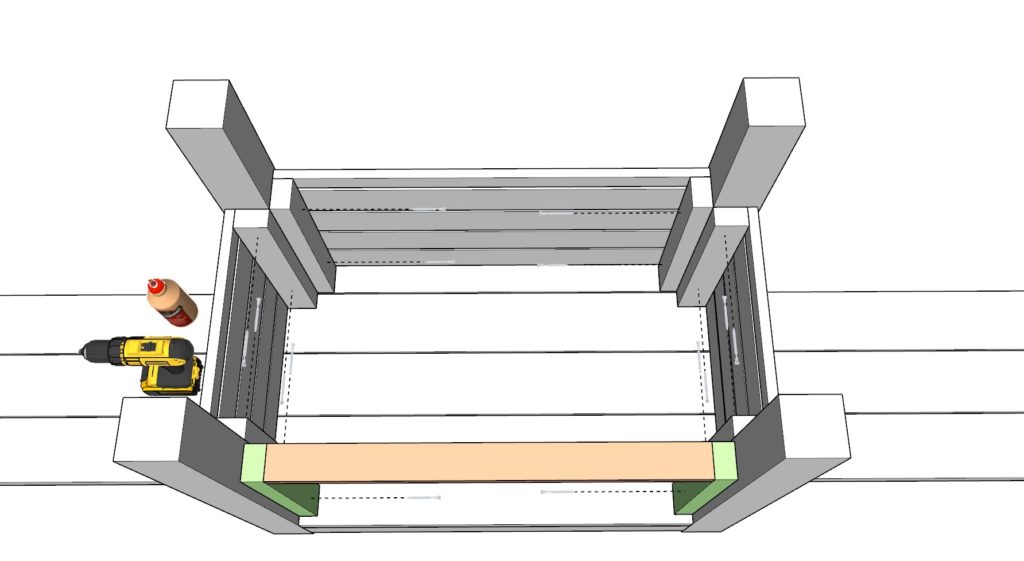
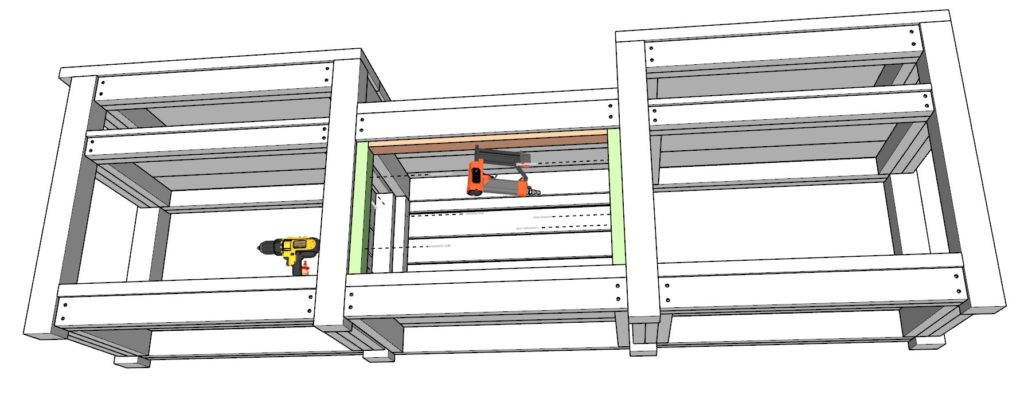
Step 6 (Building and Attaching the Cabinet Door Frame and Cabinet Wall to the Grill Station)
Next, build and attach the cabinet door frame and cabinet wall to the grill station.
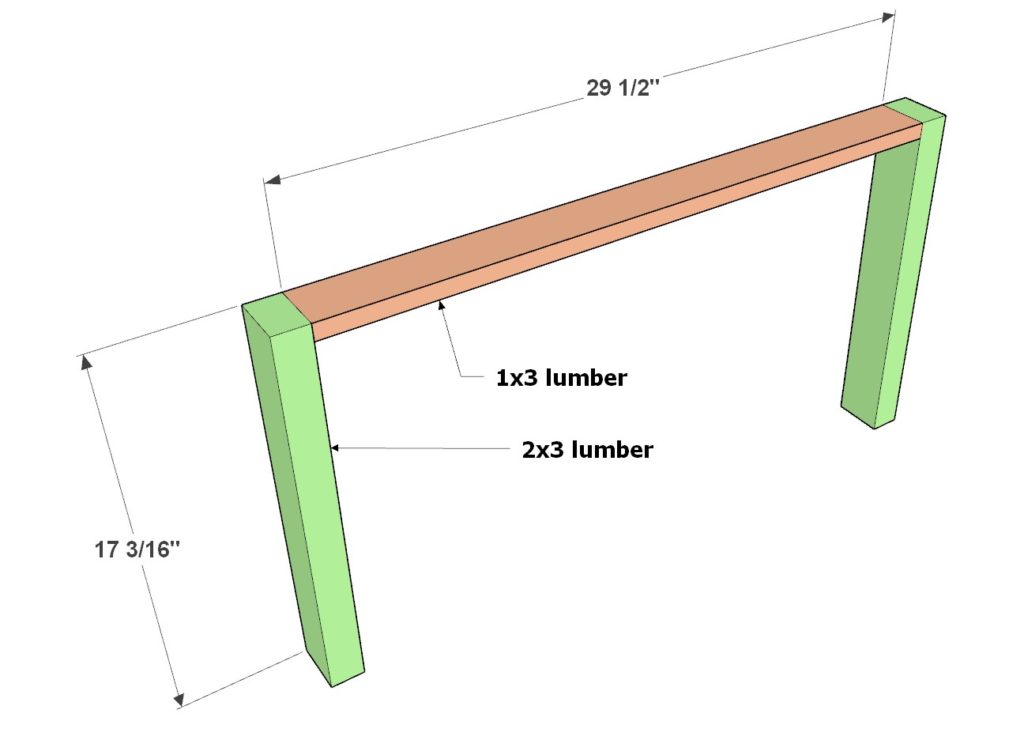
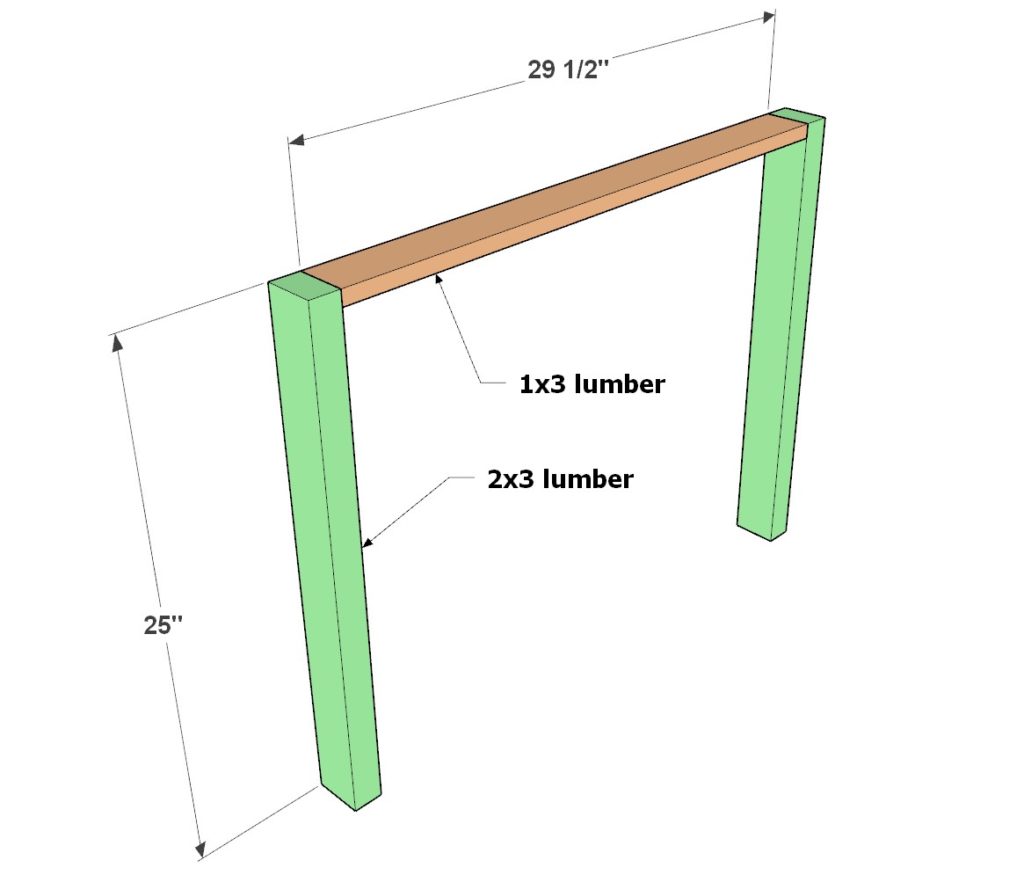
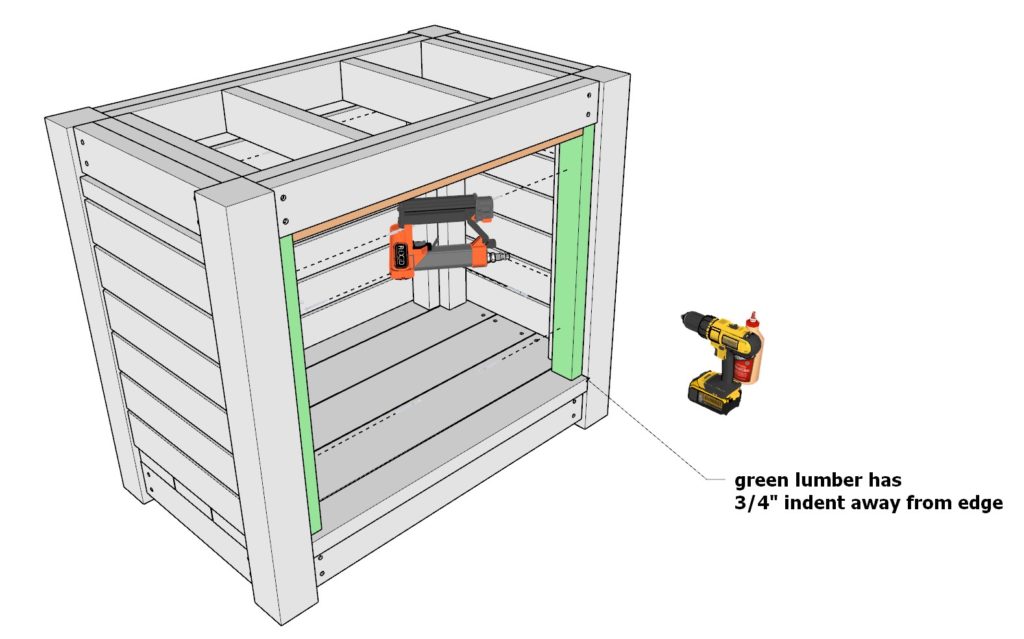
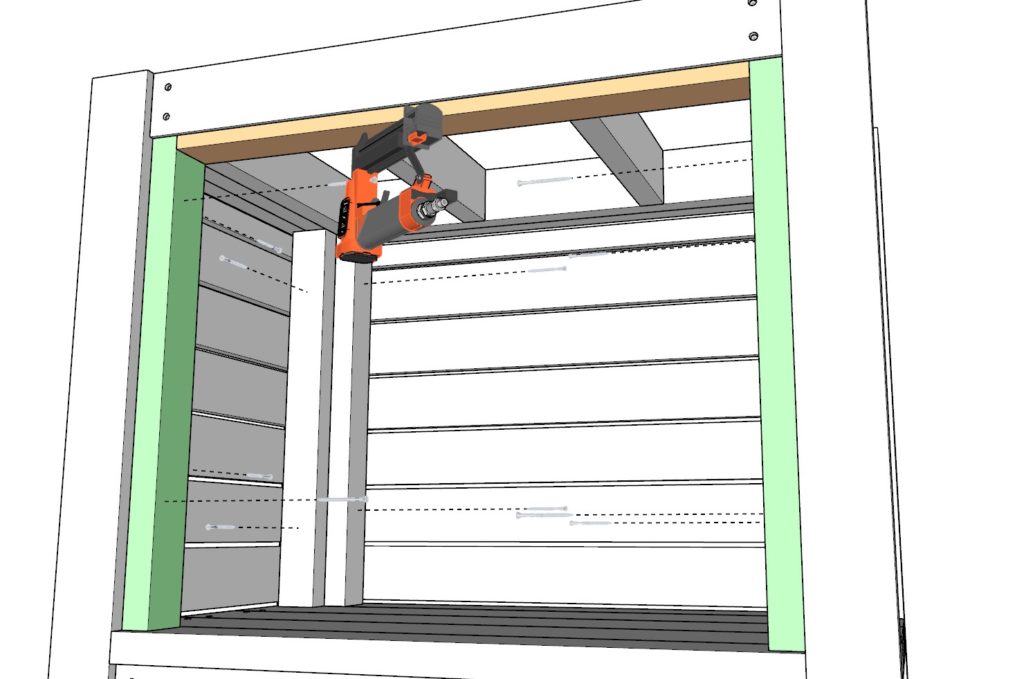
Take, two 17-3/16 2×3 lumber pieces and one 29-1/2 inch 1×3 lumber piece and attach it to the grill frame. The second image in this step illustrates how the components come together. The two side counters have been removed to better show how the components come together. Ensure that the 17-3/16 inch 2×3 lumber pieces (in green) and the 29-1/2 inch 1×3 lumber piece (in peach) need to be 3/4 inch away from the edge of the 4×4 lumber posts. This will ensure that the cabinet doors can lay flush with the 4×4 lumber posts and can have hinges attach appropriately.
Disclaimer: If your grill is a different size than a 32-inch grill, the dimensions in this step may need to be modified
Step 7 (Building and Attaching the Cabinet Doors)
Next, build and attach the cabinet doors.
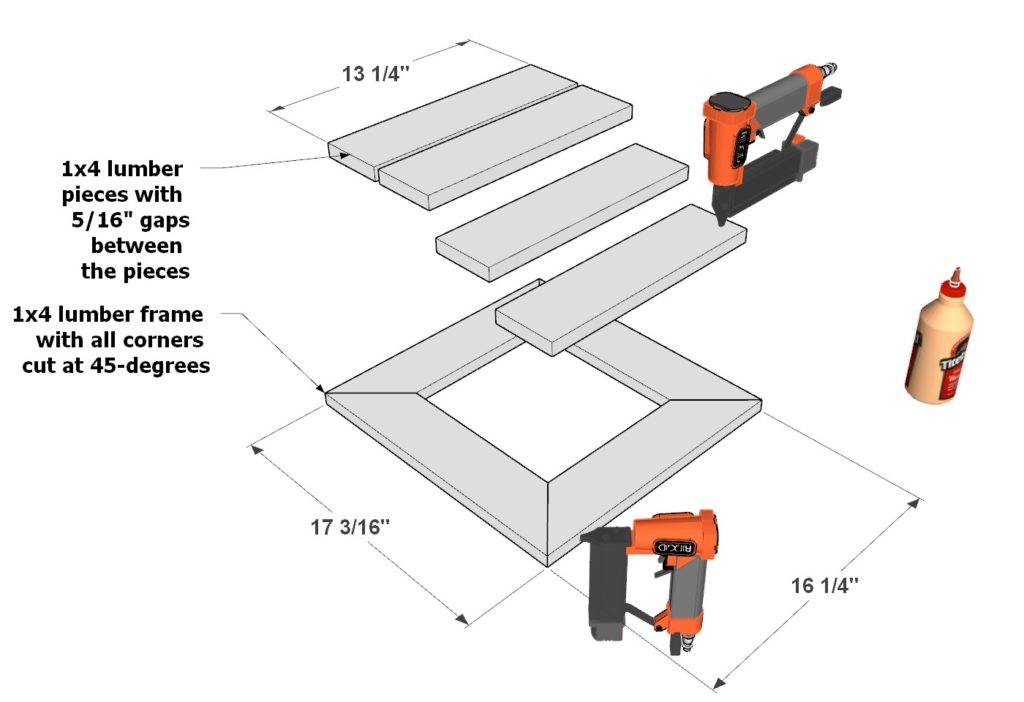
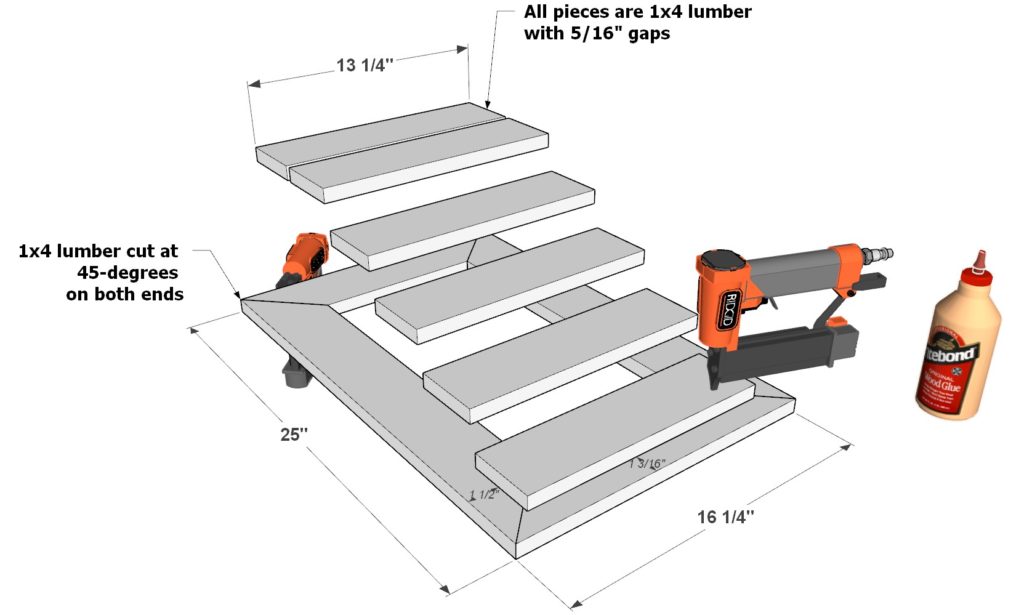
Take two 16-1/4 inch 1×4 lumber pieces that are cut at a 45-degree angle on both sides, two 17-3/16 inch 1×4 lumber pieces that are cut at a 45-degree angle, and four 13-1/4 inch 1×4 lumber pieces. Arrange them as shown below. Add glue and secure them with 1 inch nails from a nail gun. Make two identical doors.
Next, add handles and hinges to the doors.
Disclaimer: If your grill is a different size than a 32-inch grill, the dimensions in this step may need to be modified
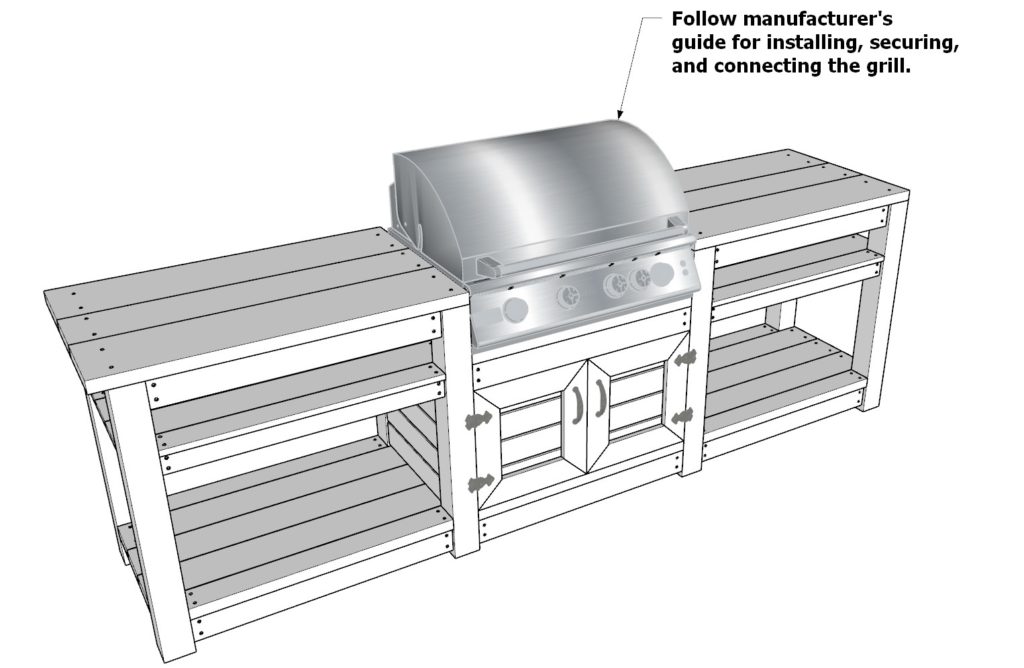
Step 8 (Installing the Drop-In Grill)
Follow your manufactures guide or installing, securing, and connecting you grill.
In general you will need to do the following:
• Install the grill support: Some drop-in grills may require additional support, such as support brackets or a ledge, to hold the weight of the grill. Follow the manufacturer’s guidelines for installing the support system.
• Position the grill: Carefully lower the grill into the opening, making sure it is properly aligned and sits securely on the support system.
• Secure the grill: Some drop-in grills may include clips or brackets to hold the grill in place. Attach these to the grill and the countertop according to the manufacturer’s instructions.
• Connect utilities: Connect any necessary utilities, such as a gas line or electrical supply, following local building codes and safety regulations. If you are unsure about this process, consider hiring a professional to complete this step.
• Test the grill: Before using the grill for the first time, turn it on to ensure it is functioning correctly and check for any leaks or issues.
• Install any additional accessories: Some drop-in grills may come with optional accessories, such as side burners, warming racks, or storage compartments. Install these according to the manufacturer’s guidelines.
Remember to consult your grill’s specific installation guide provided by the manufacturer for detailed instructions and safety information.
Step 9 (Final Touches: Sanding, Staining, and Painting the Grill Counter Component)
In this step, you will prepare the grill counter component for staining or painting, ensuring a smooth finish and a polished look. Make sure the grill counter is ready to be attached to the other components of the outdoor kitchen.
First, sand the entire grill counter component using an orbital sander or a sanding block with medium-grit sandpaper (120-grit). Make sure to smooth out any rough edges or uneven surfaces on the wood. Pay special attention to the corners, edges, and any areas where the wood may have splintered or become rough during construction. Gradually move to finer grit sandpapers (180-grit and 220-grit) to achieve a smoother finish.
Once the entire grill counter component is sanded, wipe it down with a tack cloth or a damp rag to remove any dust or debris. Allow the wood to dry completely before moving on to staining or painting.
If you choose to stain the grill counter, select a high-quality wood stain in your desired color. Apply the stain with a brush or a clean cloth, following the grain of the wood. Allow the stain to penetrate the wood for the recommended time according to the manufacturer’s instructions. Wipe off any excess stain with a clean cloth and allow the stained wood to dry completely. You may need to apply additional coats to achieve your desired color. Always follow the manufacturer’s instructions for drying times between coats.
If you choose to paint the grill counter, first apply a coat of primer to the wood, which will help the paint adhere better and provide a more even finish. Allow the primer to dry completely, and then apply your chosen paint color with a brush or roller. Apply multiple thin coats, allowing each coat to dry according to the manufacturer’s instructions before applying the next coat.
After staining or painting the grill counter, consider applying a clear protective finish, such as a polyurethane, to protect the wood from moisture, UV rays, and wear. Follow the manufacturer’s instructions for application and drying times.
Finally, once the grill counter component is stained, painted, and fully dry, it is ready to be attached to the other components of the outdoor kitchen, completing your DIY outdoor wooden kitchen project.
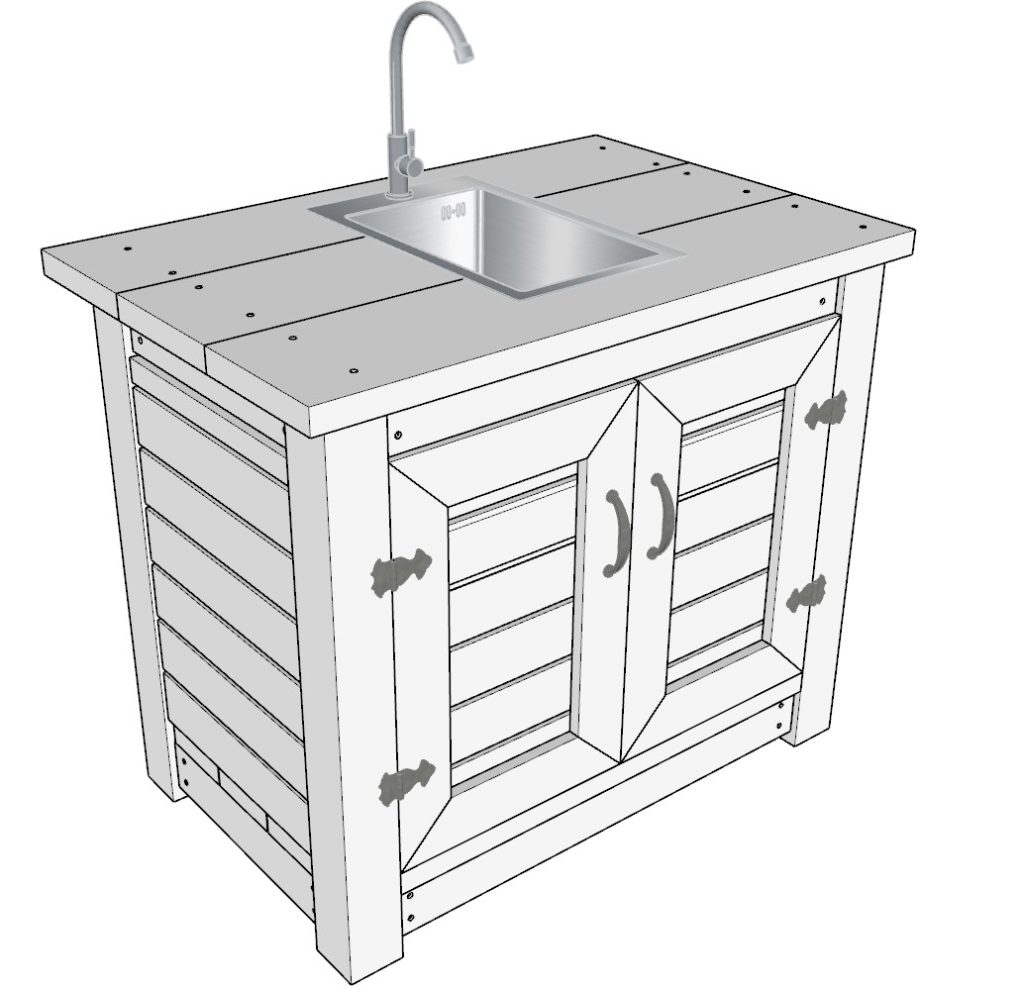
DIY Sink Component

Sink station cut list
Dear potential buyers,
With the purchase of our DIY outdoor kitchen plan, you’ll receive a comprehensive list of recommended tools, materials, and a project lumber shopping list to make your building experience hassle-free and efficient. Thank you for your interest and for making this website possible.
Happy building!
Click here for the plan.
Step 1 (Constructing the Sink Cabinet Frame)
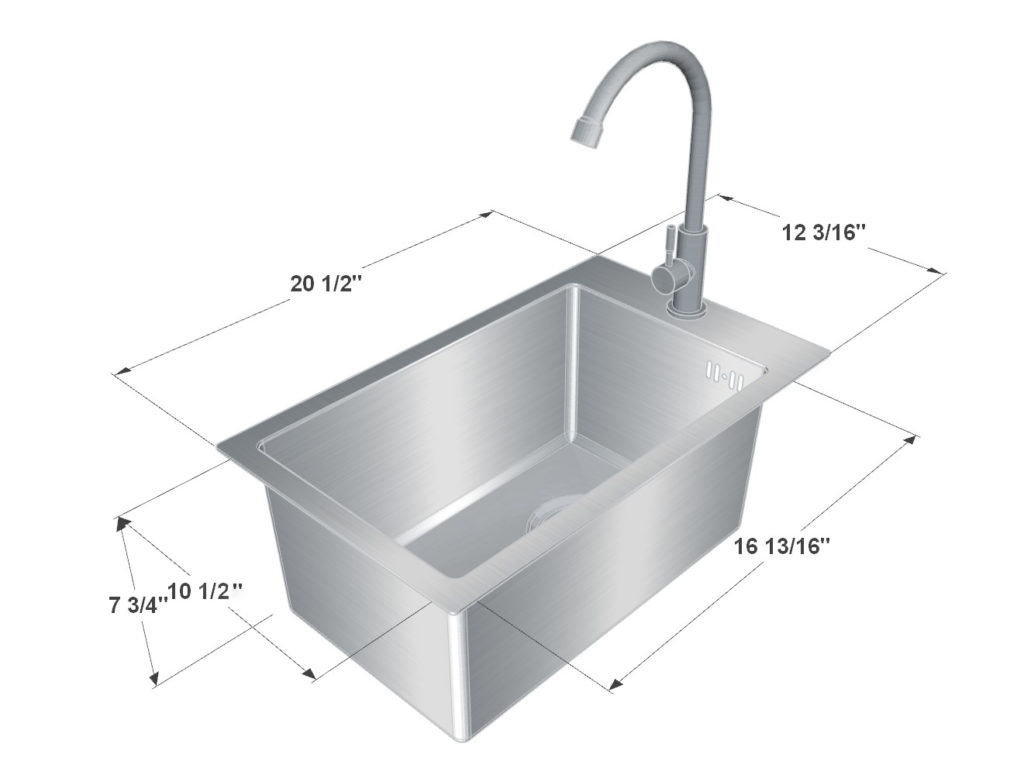
The kitchen sink cabinet design is based on the sink dimensions that are displayed below. Some modifications may need to be made in order to accommodate your sink. Read through the plan first before building to see if any modifications need to be made.
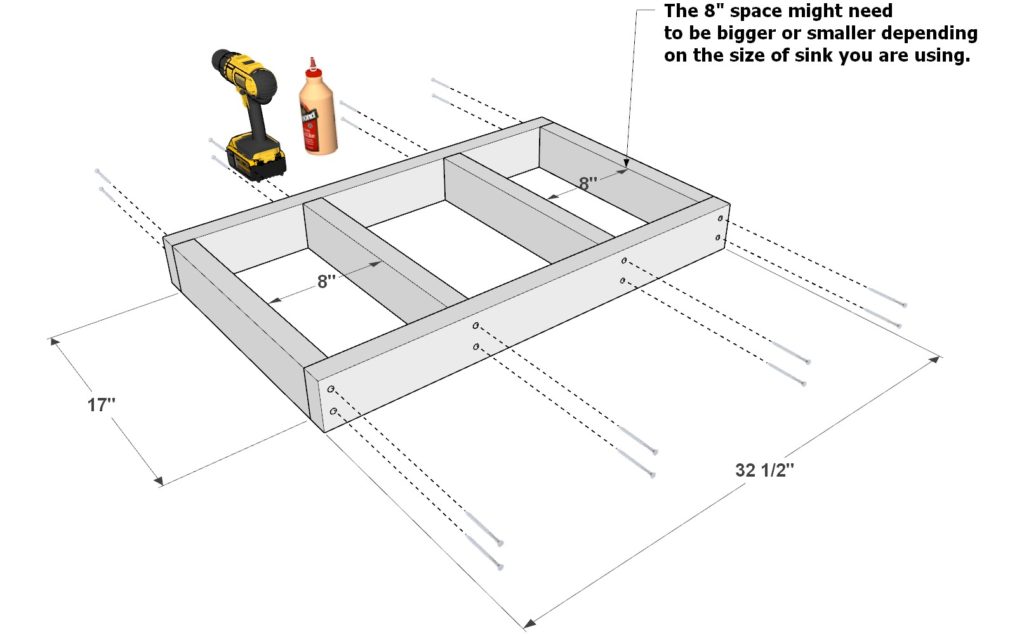
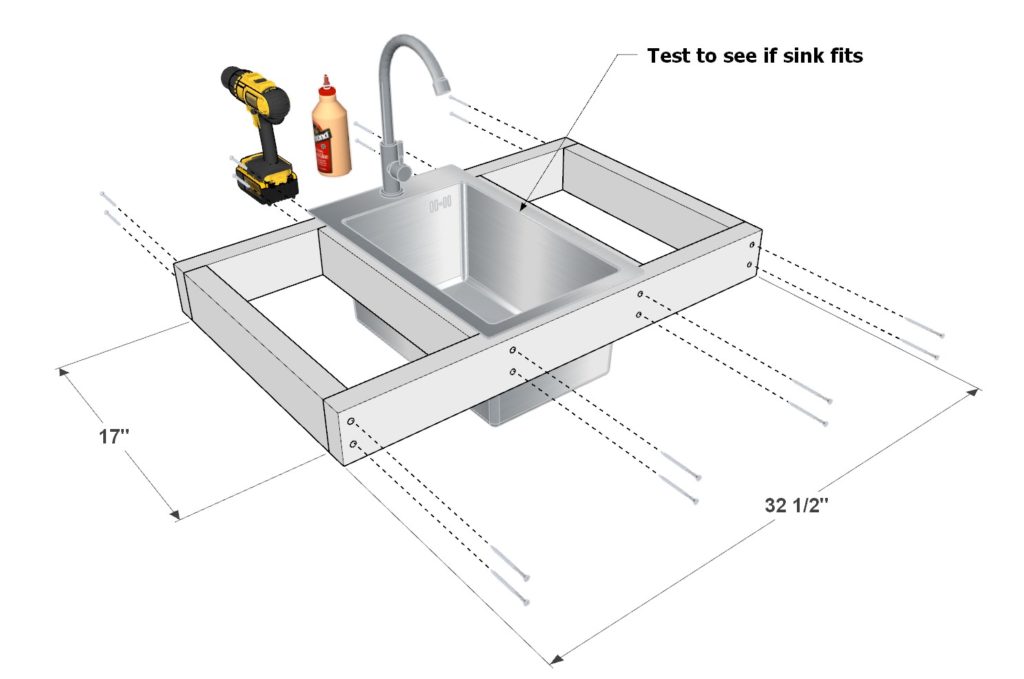
To build the outdoor kitchen sink, take two 32-1/2 inch 2×4 lumber pieces and four 17 inch 2×4 lumber pieces. Arrange them as shown in the diagram below. Add glue, predrill, and add 3.5 inch screws. Next, add two more 17 inch 2x4s on both ends of the frame and secure them in place with glue, predrilling, and 2.5 inch screws. Next, add an additional pair of 17 inch 2×4 lumber pieces and two 32-1/2 inch 2×4 lumber pieces as shown below and secure into place as before.
Next, build a similar frame piece but with out the additional 17 inch sink support 2x4s in the middle.
Step 2 (Attaching the Sink Frame to the Legs and Adding Decking)
Next, add the sink frame to the legs.
Take four 34-1/2 inch 4×4 lumber pieces and the 2×4 sink frame and using straps, glue, and 3.5 inch screws, secure the sink frame to the legs. To do this, first apply glue to the 2×4 frame parts that will be joined together. Next, bring the 4×4 legs together using a ratchet strap as indicated below. Tighten the straps so that they would hold all pieces together. Next, use a hammer to knock into place any “stubborn” wood pieces that do not align. Once the alignment is prefect, tighten the straps so that no wood components are able to move. Next, take 3.5 inch screws, predrill, and add the screws to the frame.
Repeat this for the bottom frame as well. Make sure the bottom 2×4 frame piece is elevated 1 inch off the ground.
Next, add the cabinet floor decking pieces. Take three 39 inch 2×6 lumber pieces and two 32-1/2 inch 2×4 lumber pieces. Arrange them as shown below. Space them 1/8 inch apart. Install the boards using glue, predrilling, and 3.5 inch screws.

Step 3 (Building the Cabinet Walls)
Next, build the cabinet walls.
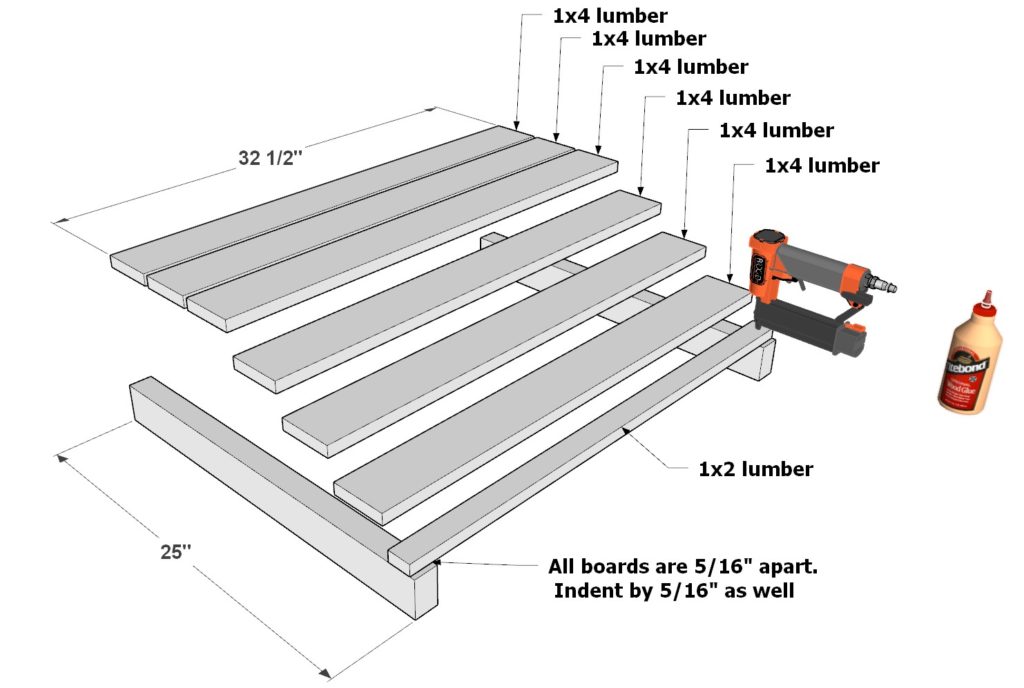
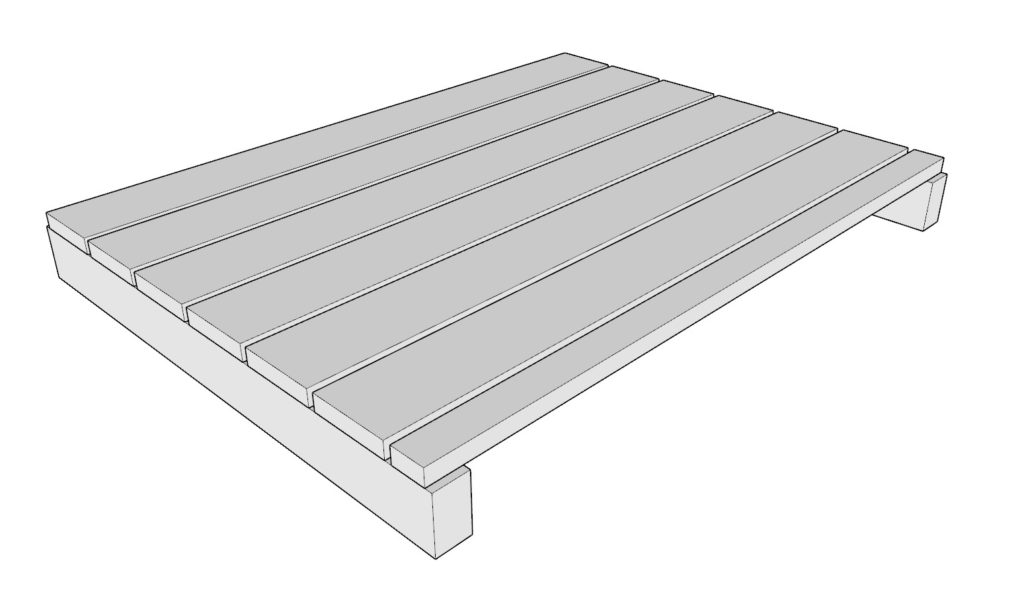
Take two 25 inch 2×3 lumber pieces, six 17 inch 1×4 lumber pieces, and one 17 inch 1×2 lumber piece. Space them out as indicated in the diagram. Use glue, a nail gun, and 1 inch nails to secure the wall component together. Make two identical pieces.
Next, build a similar wall piece for the back of the cabinet. Take two 25 inch 2×3 lumber pieces, six 32-1/2 inch 1×4 lumber pieces, and one 32-1/2 inch 1×2 lumber piece. Space them out as indicated in the diagram. Use glue, a nail gun, and 1 inch nails to secure the wall component together. Make two identical pieces.
Step 4 (Assembling and Installing Cabinet Door Frame and Walls)
Next assemble and install the cabinet door frame and cabinet walls.
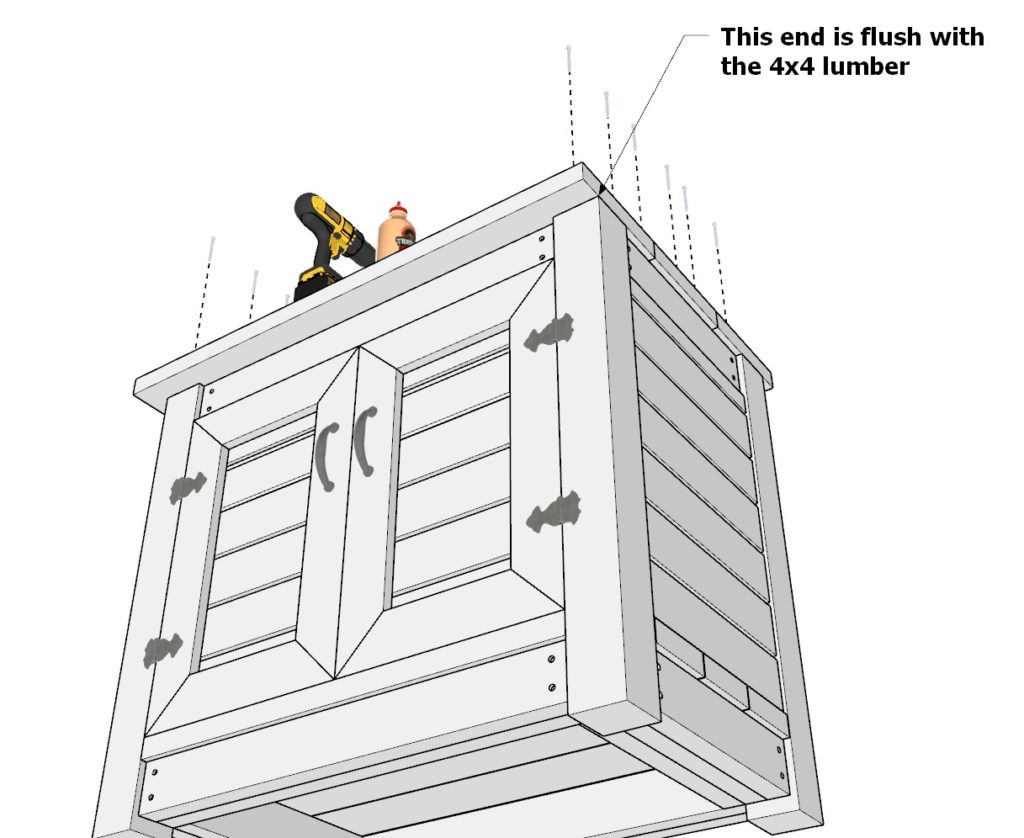
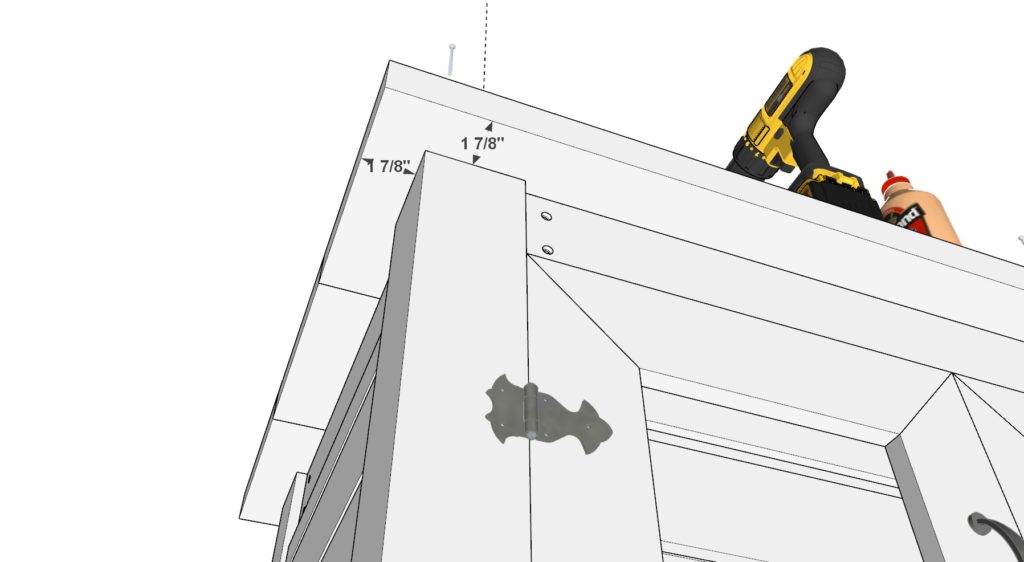
Take two 25 inch 2×3 lumber pieces and one 29-1/2 inch 1×3 lumber piece and add these to the cabinet frame along with the cabinet walls. Ensure that the cabinet door frame is indented by 3/4 inch away from the 4×4 posts. This will ensure that the cabinet doors can lay flush with the 4×4 posts. Use 2.5 inch screws, glue, and 1 inch nails to secure the components.
Step 5 (Assembling and Installing Cabinet Doors)
Next assemble and install the cabinet doors.
First, take two 25 inch 1×4 lumber pieces with both ends cut at 45-degrees, two 16-1/4 inch 1×4 lumber pieces with both ends cut at 45-degrees, and six 13-1/4 inch 1×4 lumber pieces and arrange them as shown below. Space out the components as indicated, add glue, and secure with 1 inch nails. Make two identical doors.
Next install the doors, add hinges, and add handles.
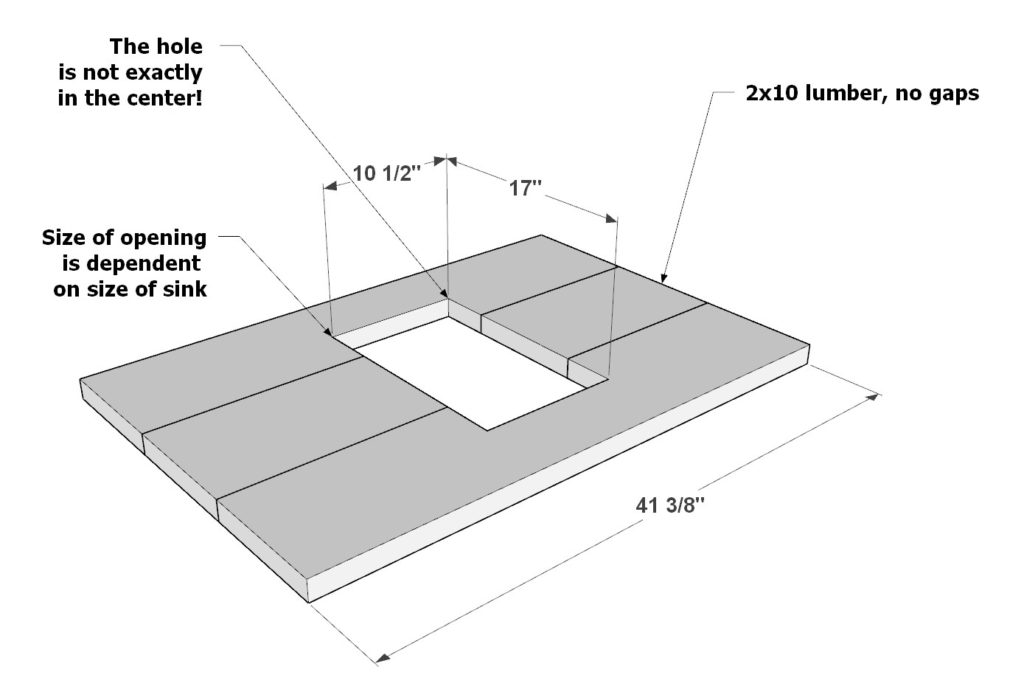
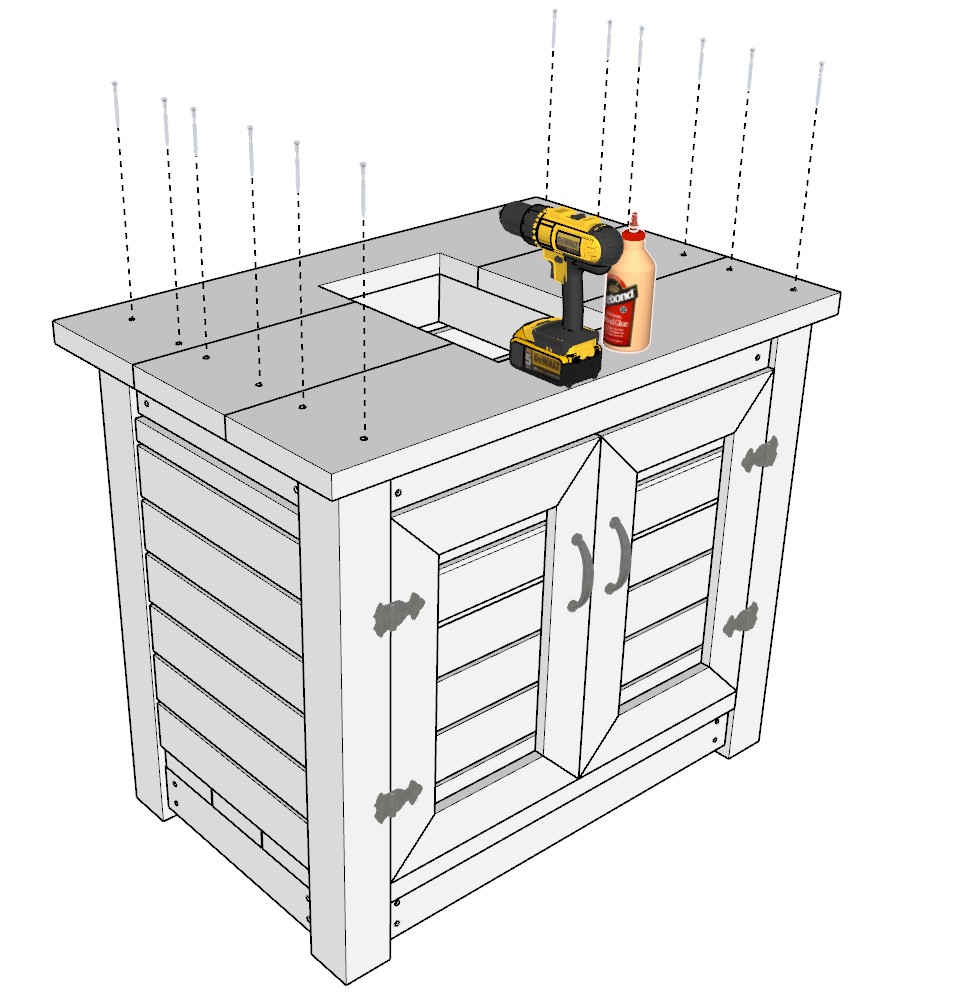
Step 6 (Adding Countertop Boards and Sink Opening)
Next, add the counter top boards. The size of the opening will need to be adjusted if you are using a different sized sink.
Take three 41-3/8 inch 2×10 lumber boards and cut an opening to accommodate your sink size. In my case its a 10-1/2 inch x 17 inch hole. The hole needs to be offset to match the sink support 2x4s. Ensure that the boards are also flush on one end with the 4×4 lumber pieces, and overhang by 1-7/8 on the other three sides. Secure the boards with glue, predrilling, and 3.5 inch screws.
Step 7: Outdoor Sink Installation and Connection
Follow your sink manufacturer’s instructions for installations. General steps for installing a sink are indicated below.
Choose the appropriate sink: Select a sink suitable for outdoor use, considering factors such as size, material, and style.
Gather required tools and materials: Obtain necessary tools like wrenches, plumber’s tape, and PVC pipes, as well as materials like a faucet, a drain assembly, and supply lines.
Position the sink: Place the sink into the designated cut-out area on the countertop, ensuring a proper fit and even overhang.
Secure the sink: Follow the manufacturer’s instructions to secure the sink to the countertop, typically using clips or mounting brackets.
Install the faucet: Assemble and attach the faucet to the sink, following the manufacturer’s guidelines.
Connect the water supply lines: Run the cold and hot water supply lines from the main water source to the sink, using appropriate connectors and pipes (e.g., PVC, PEX, or copper).
Attach supply lines to the faucet: Using wrenches and plumber’s tape, connect the water supply lines to the corresponding hot and cold inlets on the faucet.
Install the drain assembly: Insert the drain assembly into the sink’s drain hole, and secure it with a locknut or other fastening method provided by the manufacturer.
Connect the drainpipe: Attach the drainpipe to the drain assembly, and then connect it to the main sewer or septic system, ensuring proper slope and using appropriate pipe materials.
Install a P-trap: Fit a P-trap into the drainpipe to prevent sewer gases from entering the outdoor kitchen area.
Test the sink: Turn on the water supply and test both the hot and cold water faucets, checking for leaks at all connections.
Inspect the drain: Fill the sink and then drain it, checking for any leaks in the drain assembly and pipes.
Make adjustments if necessary: Tighten any connections or apply more plumber’s tape if leaks are detected.
Remember to always refer to the manufacturer’s instructions for specific guidance on installing and connecting your outdoor sink.
Step 8 (Finishing Touches on the Sink Component)
In this step, you will prepare the sink component for staining or painting, ensuring a smooth finish and a polished look. Make sure the sink is ready to be attached to the other components of the outdoor kitchen.
First, sand the entire sink component using an orbital sander or a sanding block with medium-grit sandpaper (120-grit). Make sure to smooth out any rough edges or uneven surfaces on the wood. Pay special attention to the corners, edges, and any areas where the wood may have splintered or become rough during construction. Gradually move to finer grit sandpapers (180-grit and 220-grit) to achieve a smoother finish.
Once the entire sink component is sanded, wipe it down with a tack cloth or a damp rag to remove any dust or debris. Allow the wood to dry completely before moving on to staining or painting.
If you choose to stain the sink, select a high-quality wood stain in your desired color. Apply the stain with a brush or a clean cloth, following the grain of the wood. Allow the stain to penetrate the wood for the recommended time according to the manufacturer’s instructions. Wipe off any excess stain with a clean cloth and allow the stained wood to dry completely. You may need to apply additional coats to achieve your desired color. Always follow the manufacturer’s instructions for drying times between coats.
If you choose to paint the sink, first apply a coat of primer to the wood, which will help the paint adhere better and provide a more even finish. Allow the primer to dry completely, and then apply your chosen paint color with a brush or roller. Apply multiple thin coats, allowing each coat to dry according to the manufacturer’s instructions before applying the next coat.
After staining or painting the sink, consider applying a clear protective finish, such as a polyurethane, to protect the wood from moisture, UV rays, and wear. Follow the manufacturer’s instructions for application and drying times.
Finally, once the sink component is stained, painted, and fully dry, it is ready to be attached to the other components of the outdoor kitchen, completing your DIY outdoor wooden kitchen project.
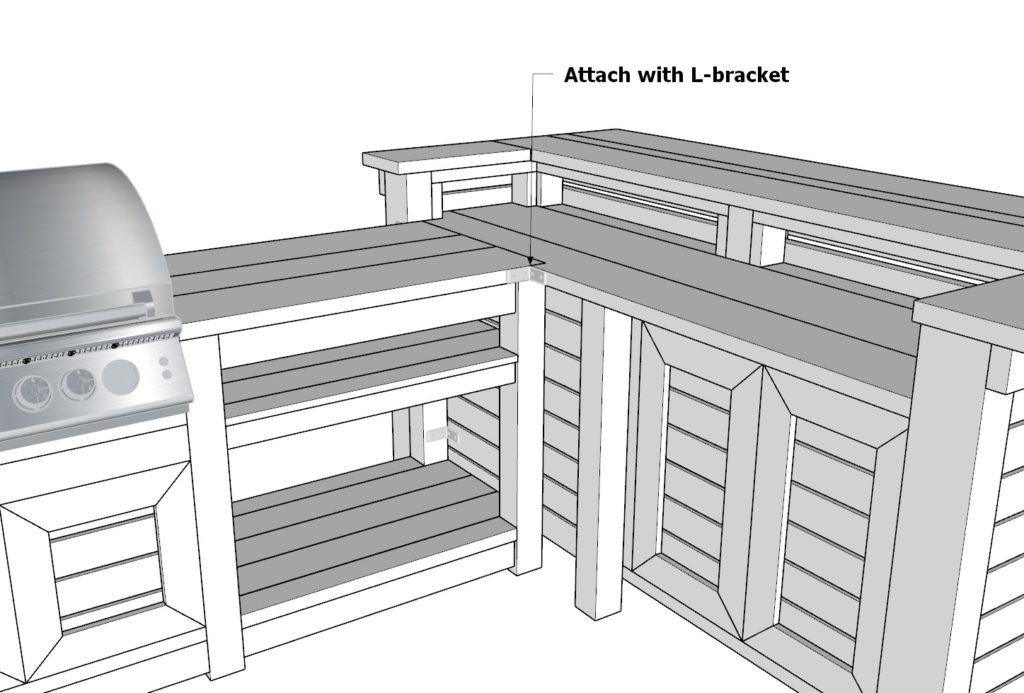
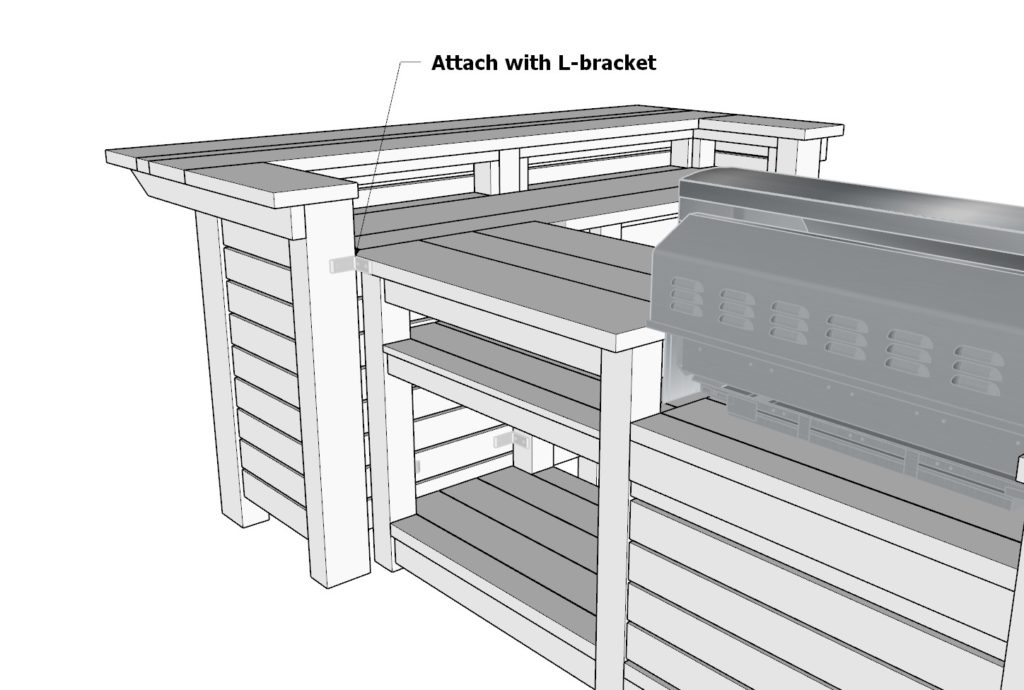
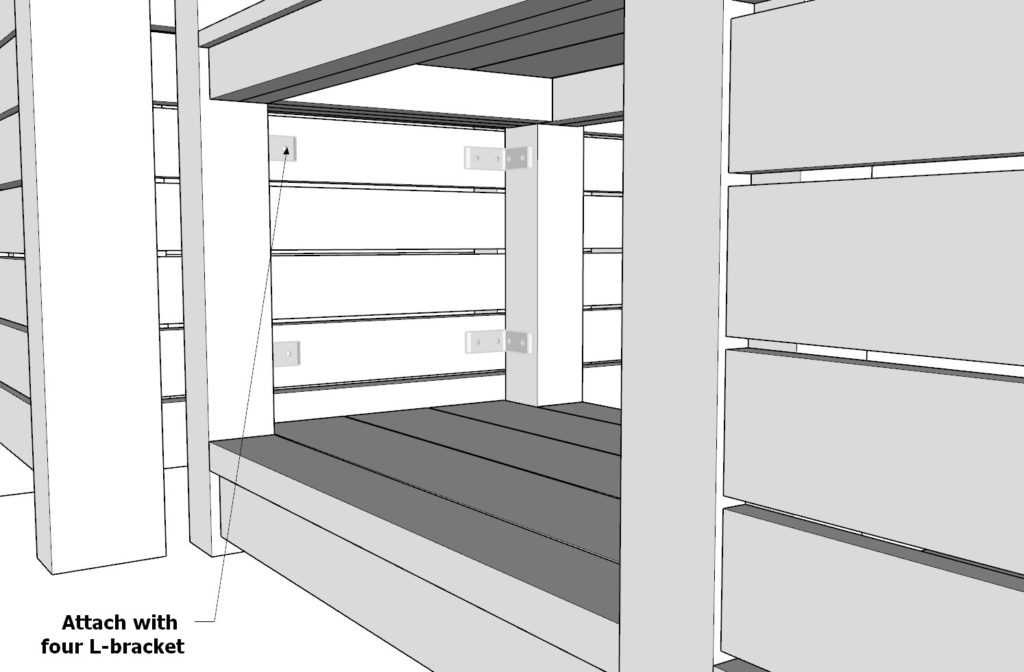
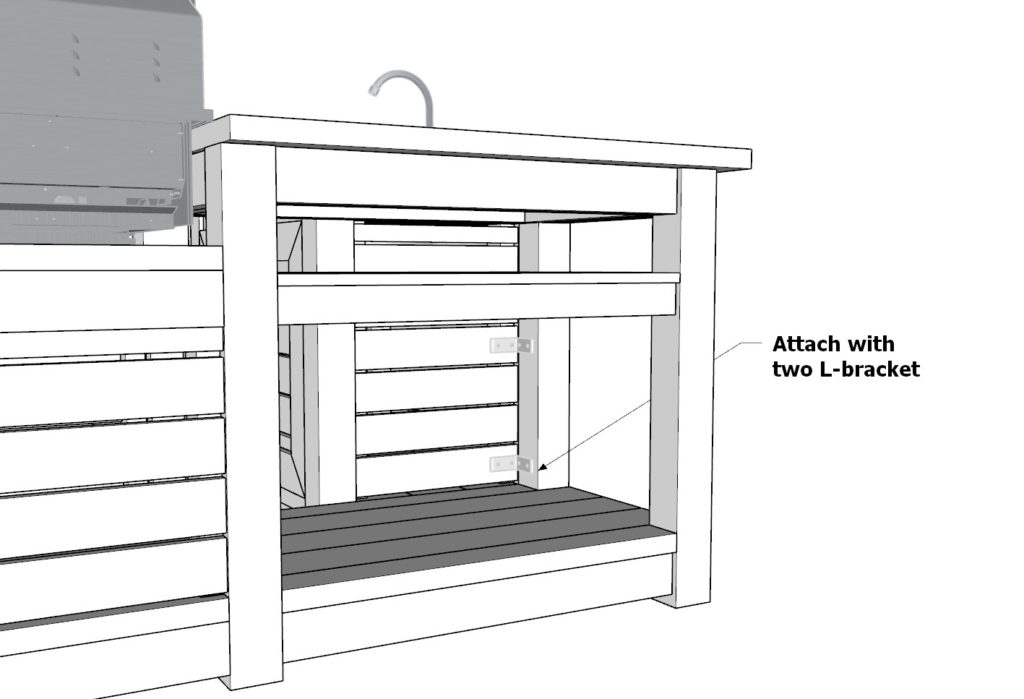
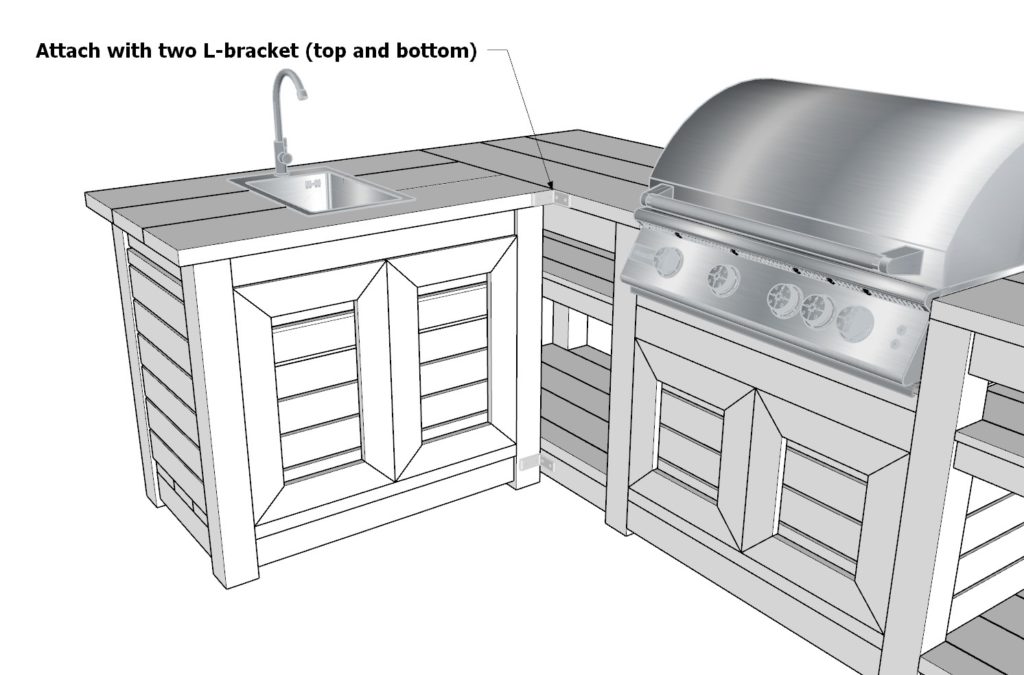
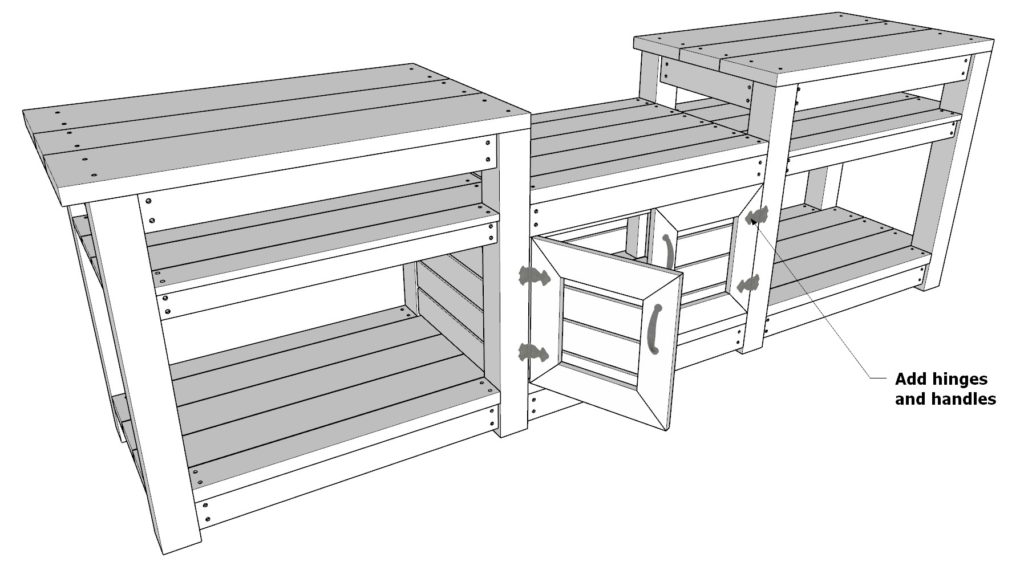
Attaching The Finished Outdoor Kitchen Components
To securely connect the various components of the outdoor kitchen, utilize L-shaped brackets at the designated points indicated in the diagrams. These brackets will provide a robust and stable connection between the individual pieces, ensuring a reliable and long-lasting outdoor kitchen.