Introduction
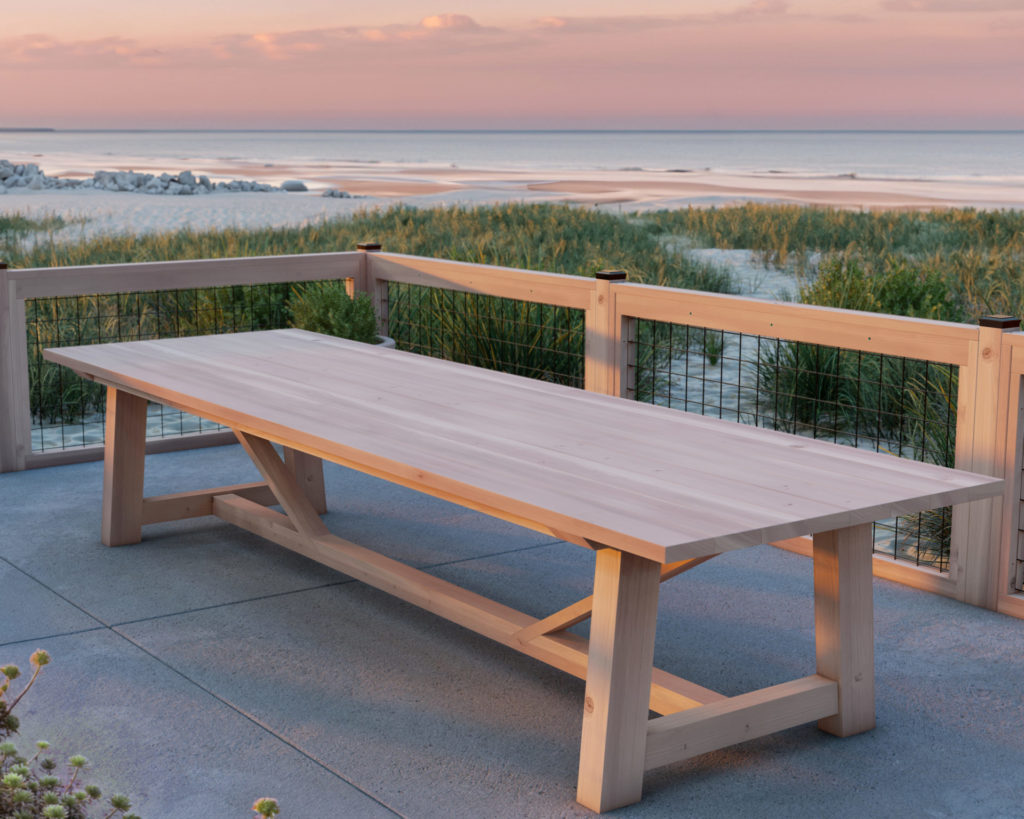
Imagine a space where the warm tones of a handcrafted table take center stage, a place where friends and family gather and stories unfold. This is not just a table; it’s a canvas for life’s moments, designed by you. It’s where the simplicity of wood meets the sophistication of design.
Specifications
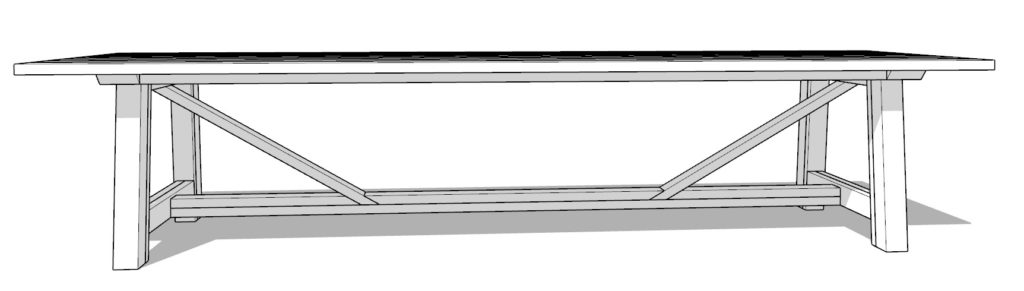
With dimensions that invite conversation and celebration, our table stretches 144 inches in length, stands 30 inches tall, and spans 44 inches in width. Its presence is a balance of grandeur and grace, offering a stage for everything from quiet morning coffees to lively evening dinners. Crafted for those who appreciate the finer details, it speaks the language of home.
This is a Beginner-Friendly Project
Starting a DIY project can sometimes feel daunting, but it doesn’t have to be. Our farmhouse table plan is tailored for anyone eager to create with their hands, no prior experience necessary. The process is straightforward — simple cuts, simple assembly, and detailed guidance to ensure your success. We celebrate the beginner’s spirit and provide all the necessary information to make the journey from lumber to a full-fledged table as smooth as possible.
Customization Options
Your space is a reflection of your style, and this table adapts to it effortlessly. Whether it’s the rustic charm of Cedar or the robust lines of Douglas Fir, select the wood that resonates with your vision. With the ability to tailor dimensions to your living space, this table becomes uniquely yours.
What Makes Our DIY Plan Stand Out
Our guide is crafted for clarity and ease, using imperial dimensions to match the tools you already have. Each step is laid out with precision, paired with visuals that guide you without overwhelming. We go beyond the build, offering insights into finishing techniques that add character to your creation, ensuring that what you create today will be cherished for years to come.
Conclusion
Embark on a journey of creation with our DIY farmhouse table plan, where every step you take is a move towards bringing a vision to life. This is more than just a table; it’s a celebration of what you can build with your own hands. Welcome to the art of DIY, where you are the creator of more than just furniture—you’re crafting the centerpiece of your home.
Join us, and let’s build not just a table, but a lifetime of memories. Get your plan today.
Time
10 hours (varies with experience)
Cost
$200 (Costs may vary based on location and supplier.)
Skill level required
Beginner

DIY Farmhouse Table PDF Plan
What is included in the PDF download?
- Easy to read step by step instructions
- Material list
- Tools needed
- Helpful links to materials and tools needed
DIY Farmhouse Table Dimensions

Tools Needed for This Project:
Available with the purchase of the DIY plan PDF.
Lumber Shopping & Cut List
Available with the purchase of the DIY plan PDF.
Step 1: Cutting and Assembling the Table Base Frame
Cutting the Pieces:
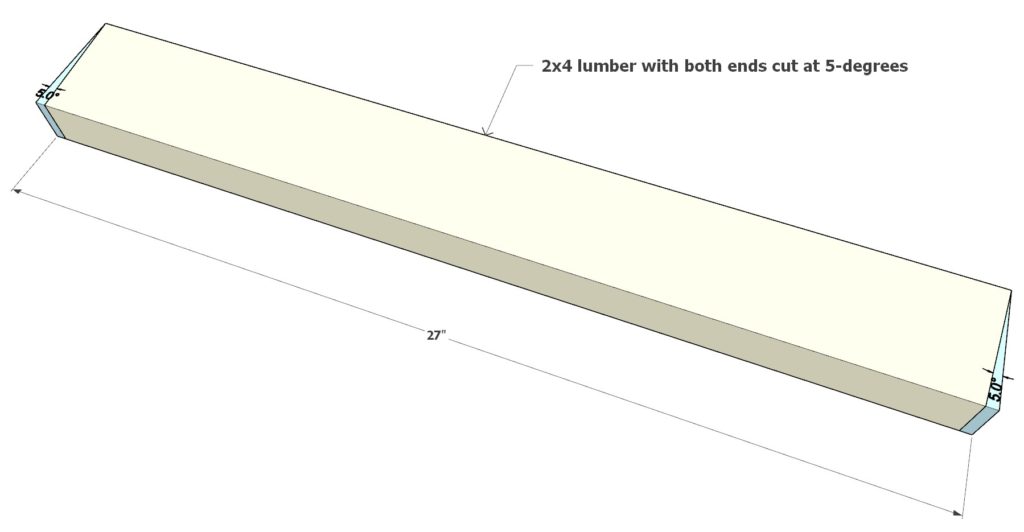
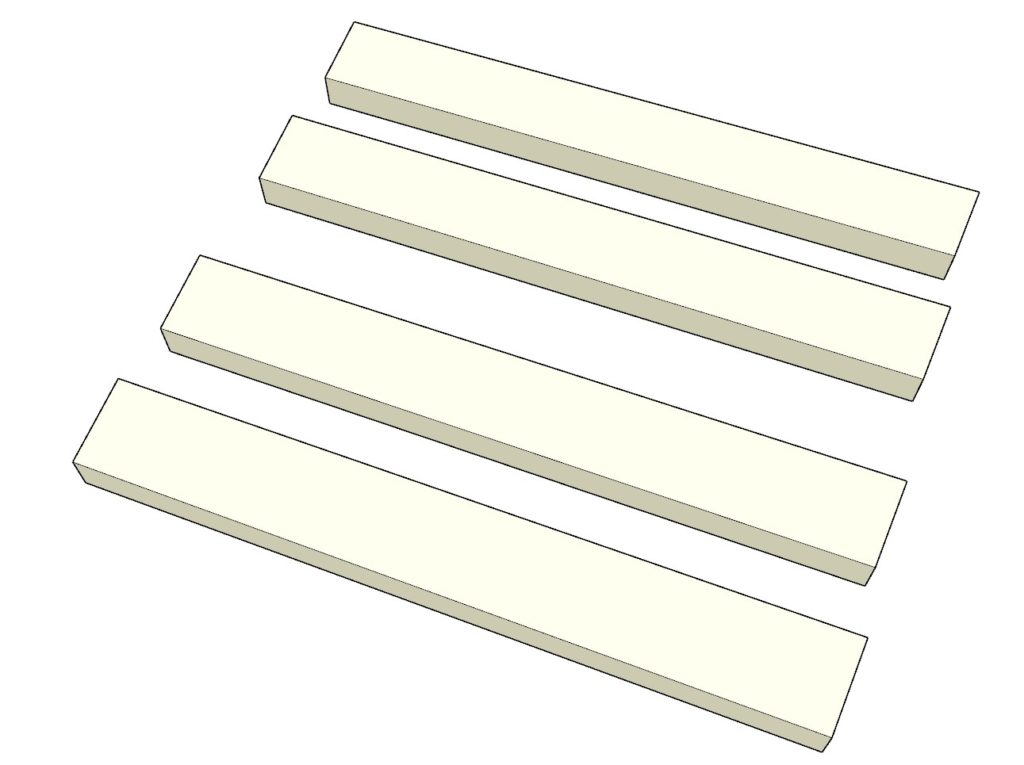
- 27-inch 2x4s: Cut both ends at a 5-degree angle. You’ll need four pieces in pastel yellow.
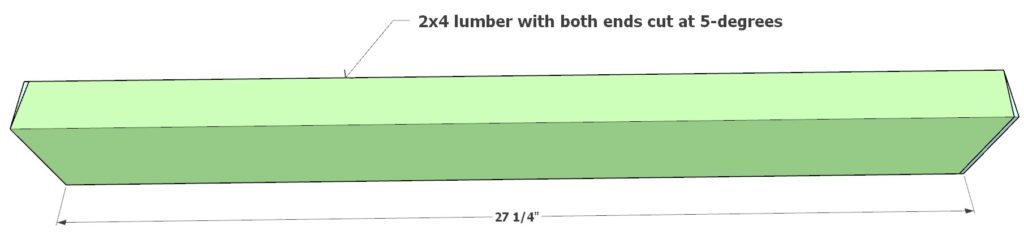
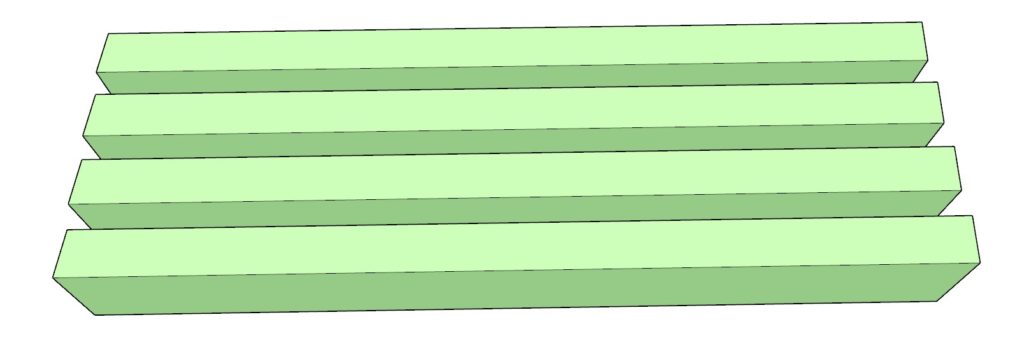
- 27-1/4 inch 2x4s: Cut both ends at a 5-degree angle. You’ll need four pieces in light green.
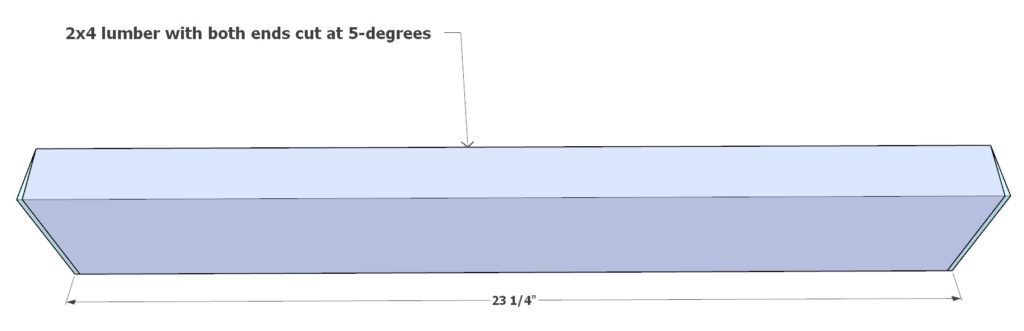
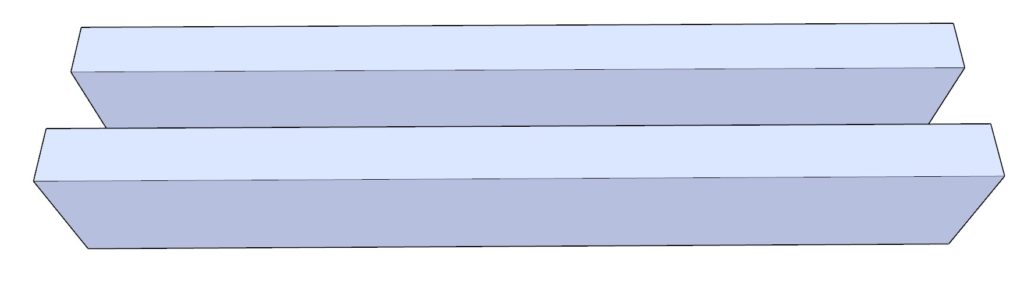
- 23-1/4 inch 2x4s: Cut both ends at a 5-degree angle. You’ll need two pieces in lavender.
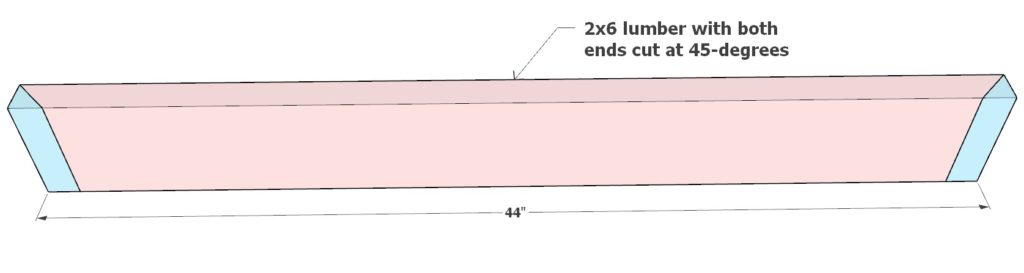
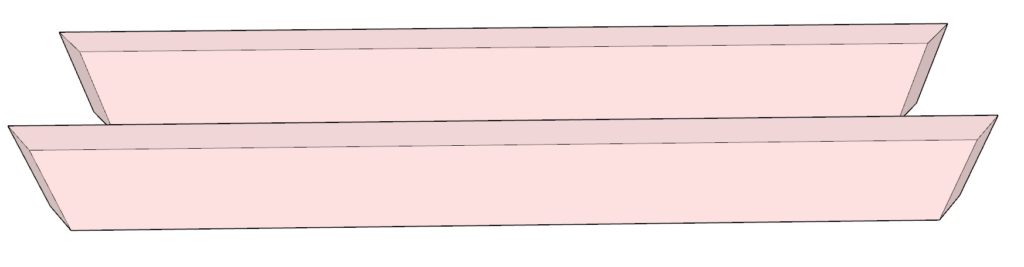
- 44-inch 2x6s: Cut both ends at a 45-degree angle. You’ll need two pieces in pink.
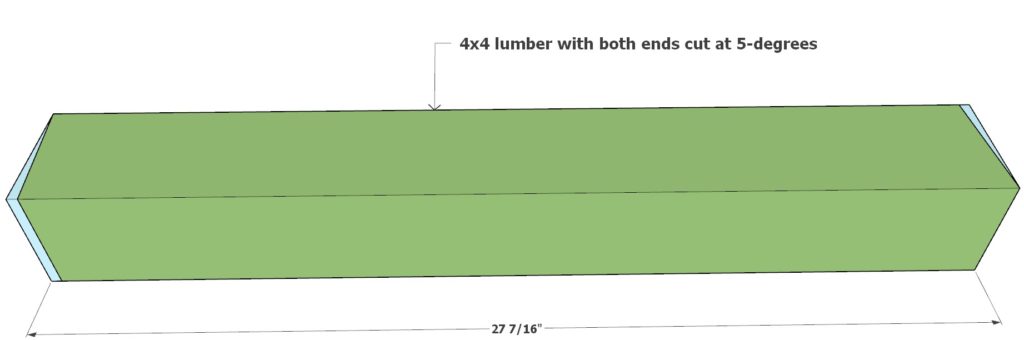
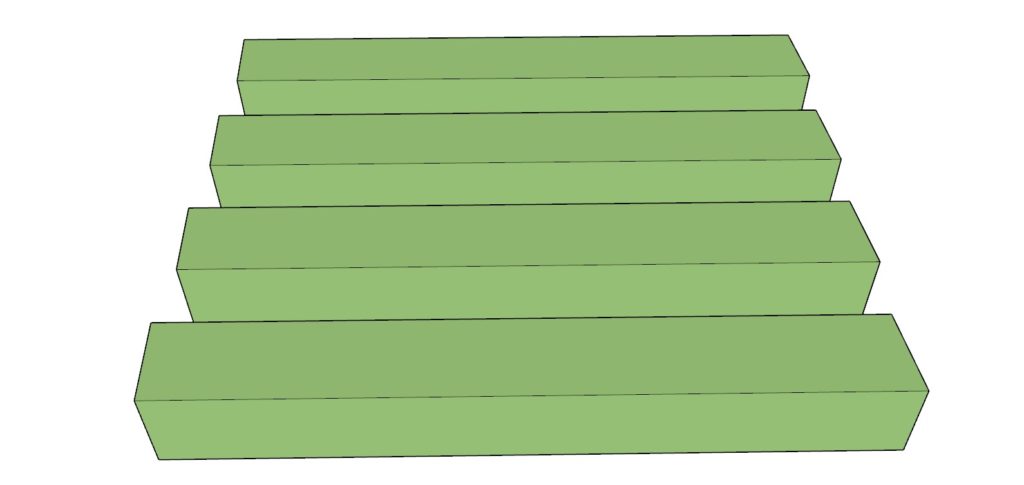
- 27-7/16 inch 4x4s: Cut both ends at a 5-degree angle. You’ll need four pieces in dark green.
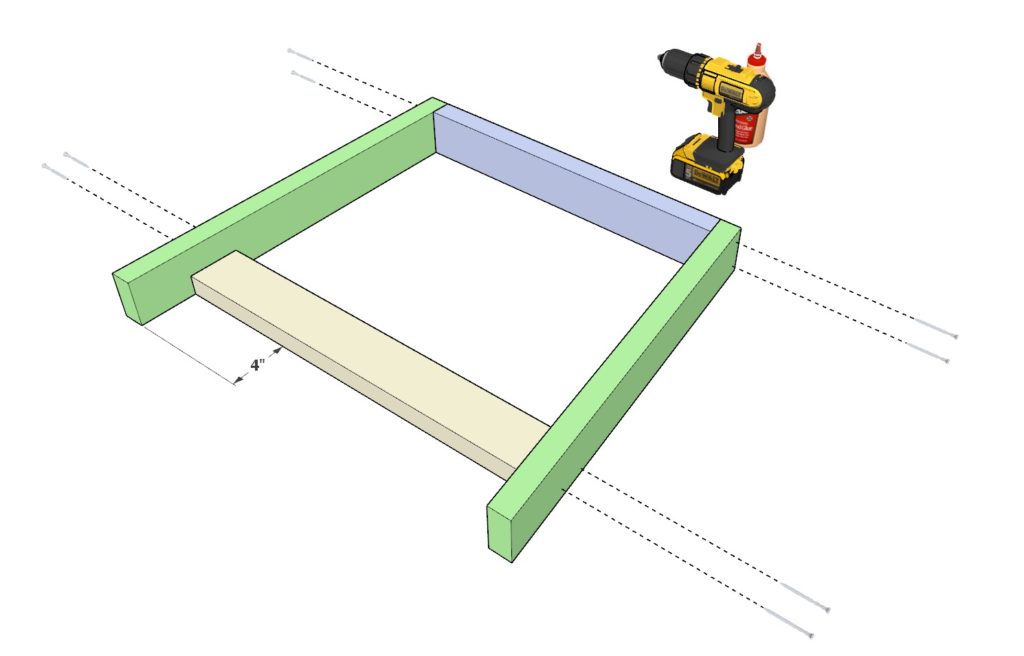
Assembling the A-Frame:
- Start Assembly: Take two light green pieces, one lavender piece, and one pastel yellow piece. Join them using wood glue and 3.5-inch screws.
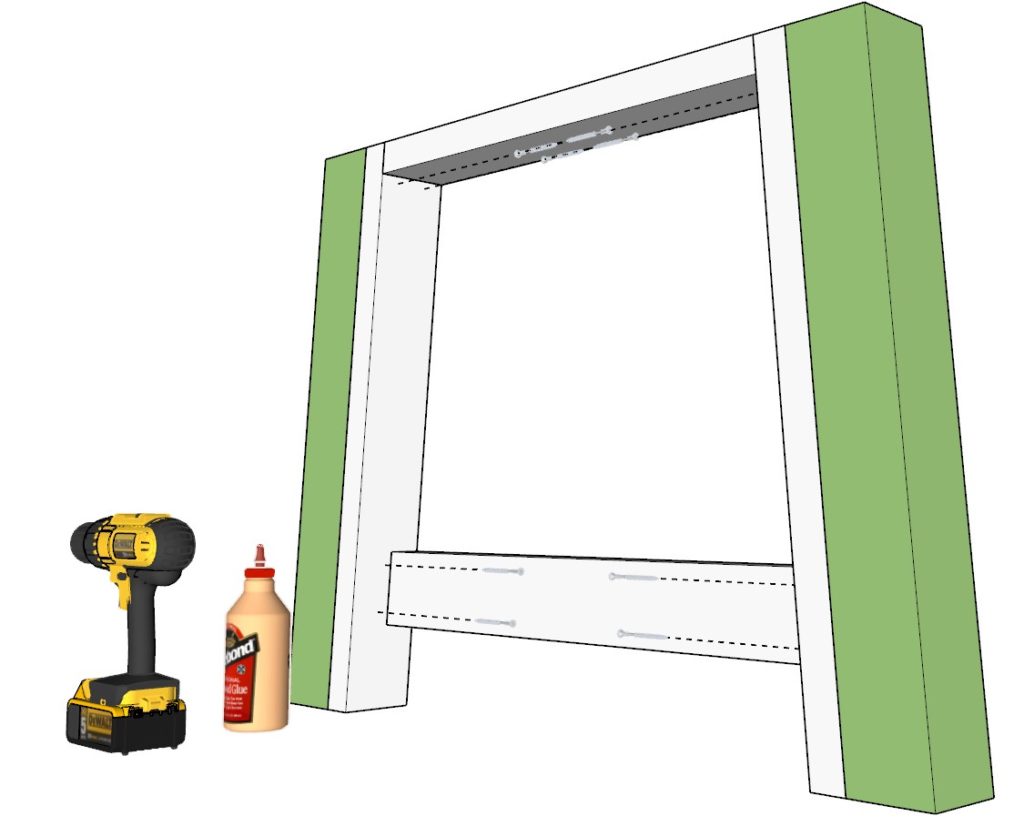
- Attach Vertical Supports: Secure two dark green pieces to the light green pieces using wood glue and 3.5-inch screws.
- Create Two A-Frames: Ensure you have two identical A-frame leg assemblies before proceeding.
Tips for a Professional Finish:
- Countersinking: Use a countersink drill bit for screw holes to achieve a neater finish.
- Hole Plugs: If using dowels to plug screw holes, predrill to match the dowel size. For wood putty, note that it may stain differently than wood.
- Pre-Staining: For a more professional look, consider staining or painting pieces before assembly.
- Glue Cleanup: Wipe off any excess glue immediately. Dried glue can affect stain absorption and appearance, especially if staining a dark color over light wood.
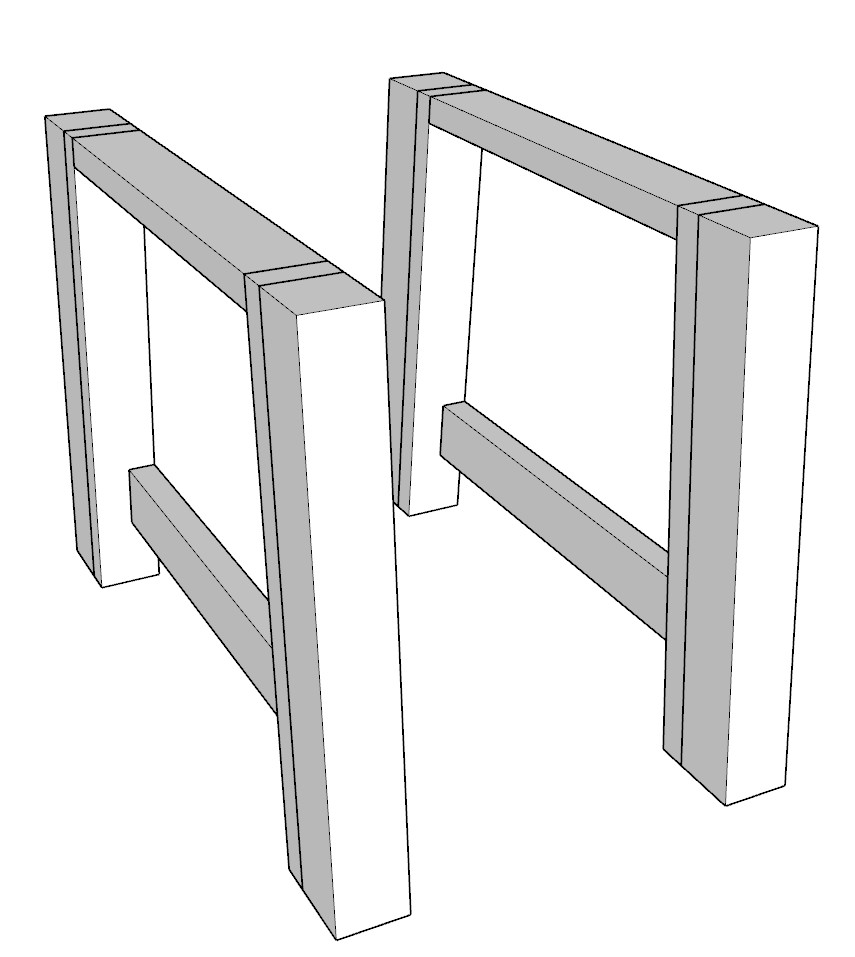
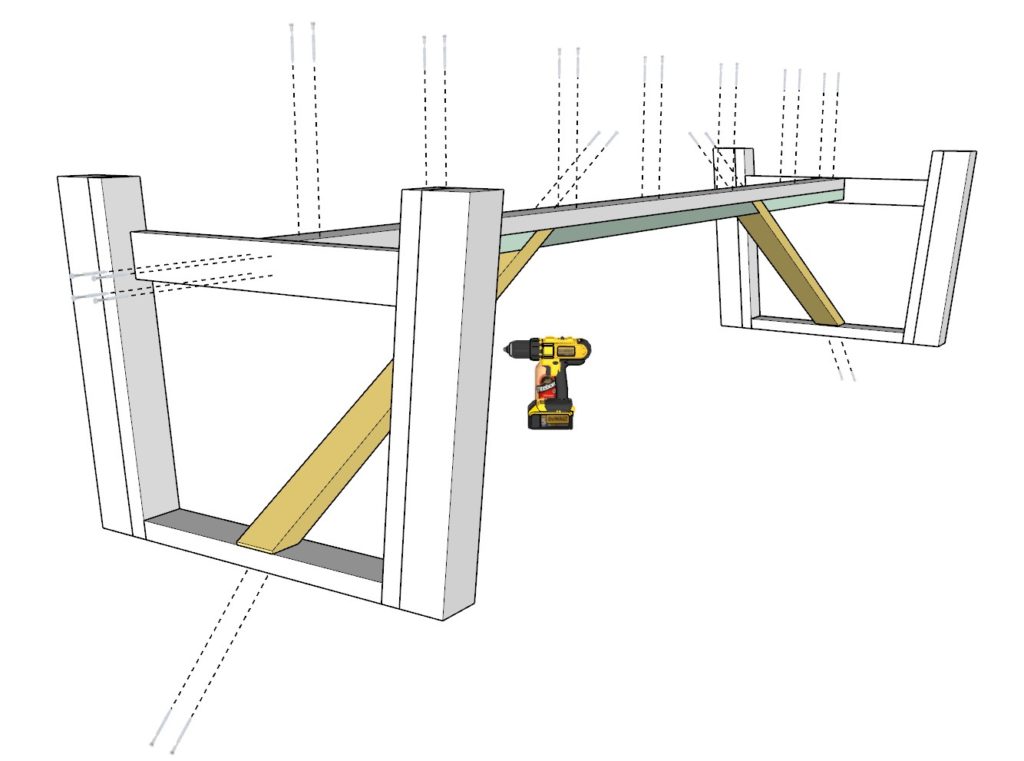
Step 2: Constructing the Table Frame Supports
Preparing the Supports:
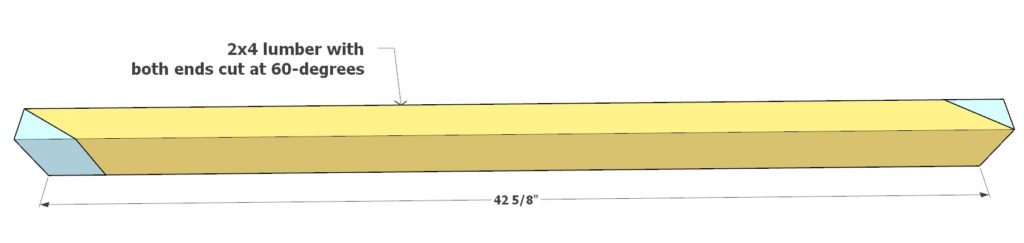
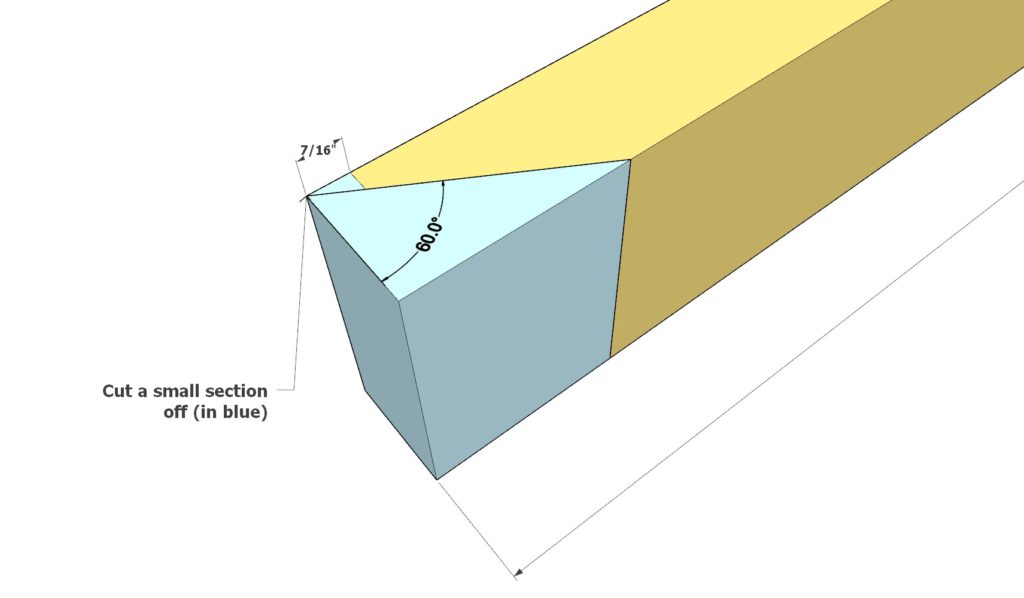
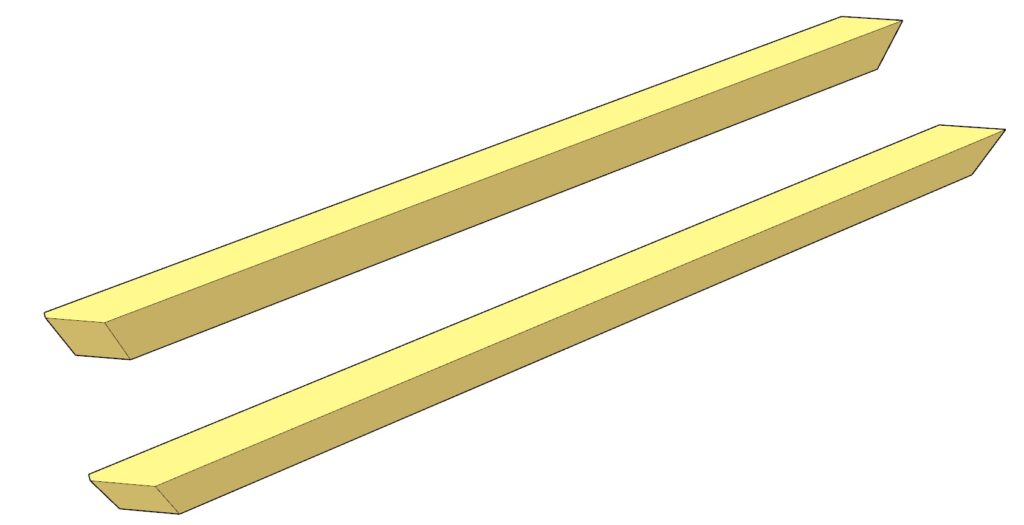
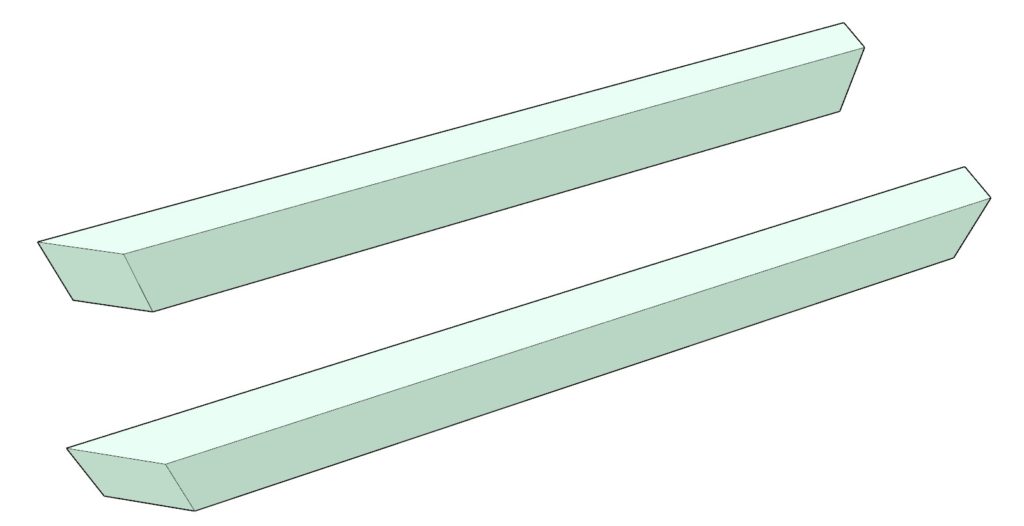
- Long Cross Beams (Bright Yellow): Cut two pieces of 2×4 lumber to 42-5/8 inches with both ends at 60-degrees. Then, as indicated, slightly trim one end of each piece.
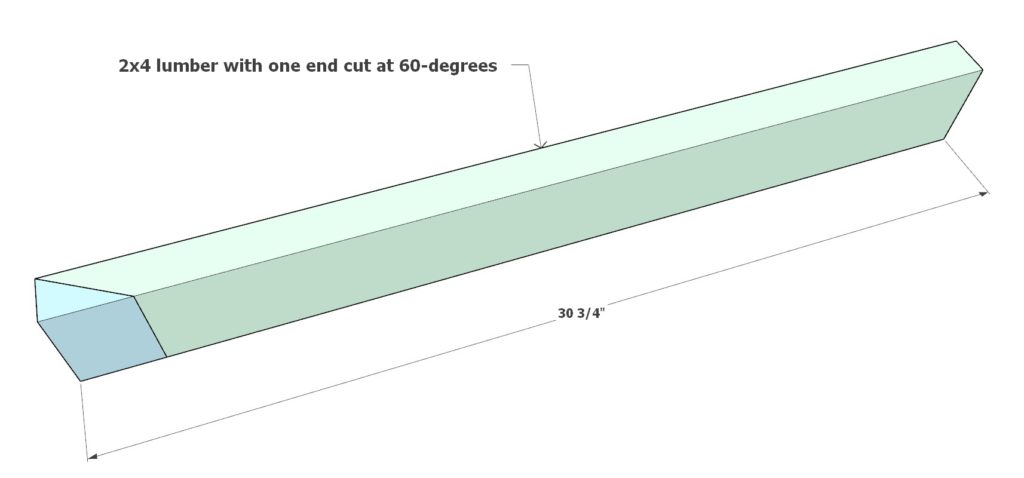
- Short Cross Beams (Teal): Cut two pieces of 2×4 lumber to 30-3/4 inches with one end at 60-degrees.
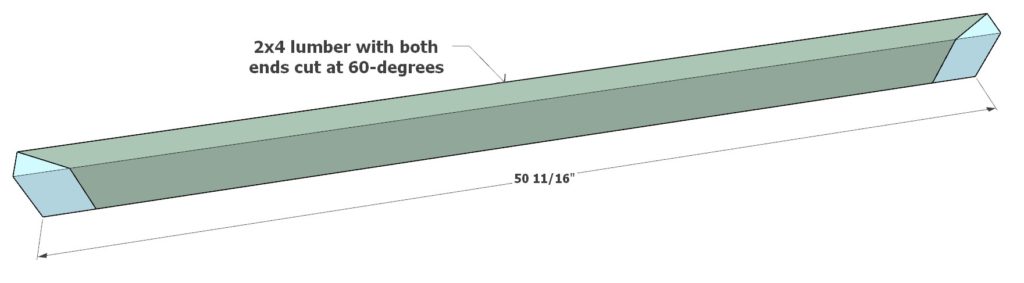
- Central Support Beam (Dark Teal): Cut one piece of 2×4 lumber to 50-11/16 inches with both ends at 60-degrees.
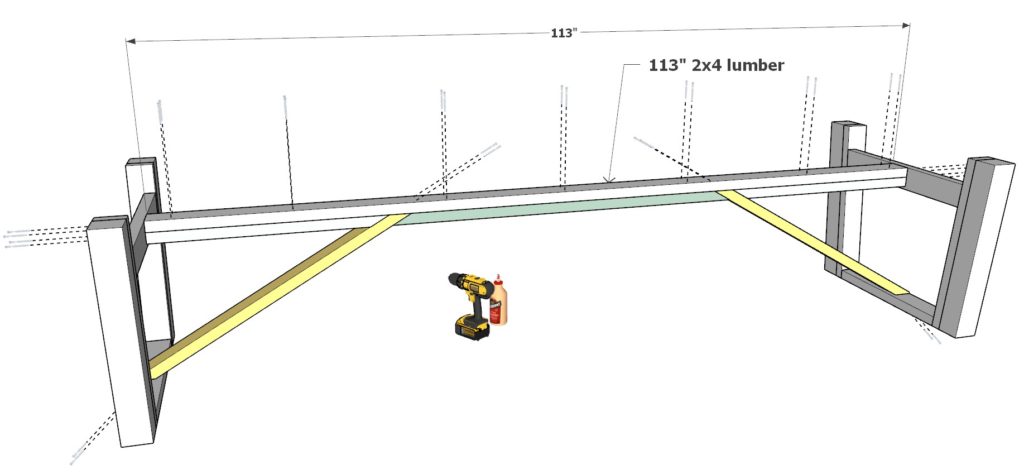
Assembling the Base Frame:
- Connect the A-Frames: Position the bright yellow long cross beams, teal short cross beams, and the dark teal central support beam to join the A-frame leg pieces together.
- Attach the Horizontal Beam: Incorporate the 113-inch 2×4 (uncut and in white) horizontally across the structure.
- Securing the Structure: Use 3.5-inch screws for most connections, switching to 2.5-inch screws in areas where longer screws might poke through.
Finalizing the Frame:
- Add Pink and Pastel Yellow Pieces: From Step 1, attach the pink 2x6s and the pastel yellow 2x4s to the assembly with wood glue and a combination of 2.5-inch and 3.5-inch screws, depending on placement and depth.
Tips for a Clean Assembly:
- Screw Placement: Follow the diagram closely for optimal screw placement, especially if you’re opting not to use dowels or wood putty, as this will help to conceal the screws for a more polished look.
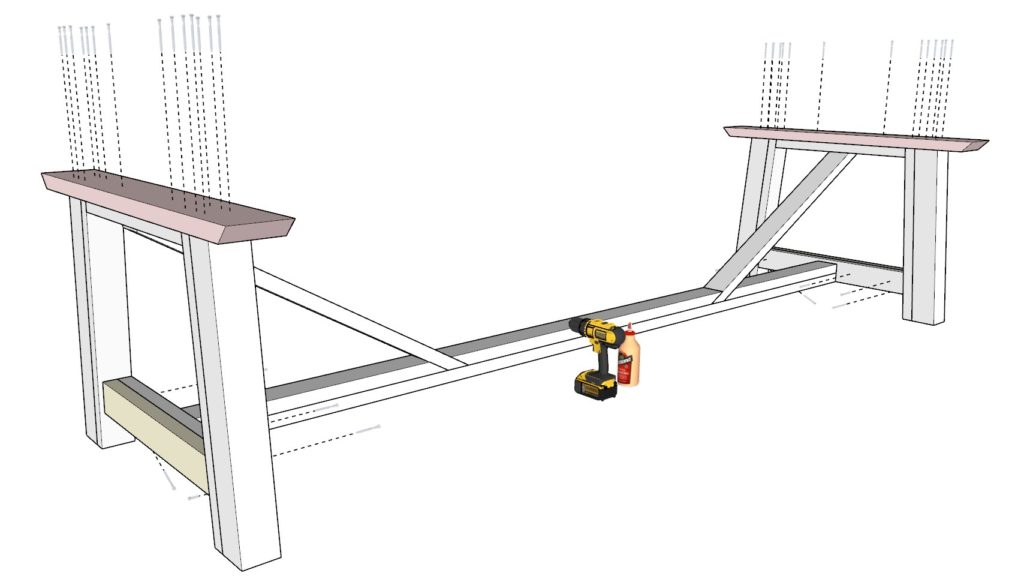
Step 3: Crafting the Tabletop
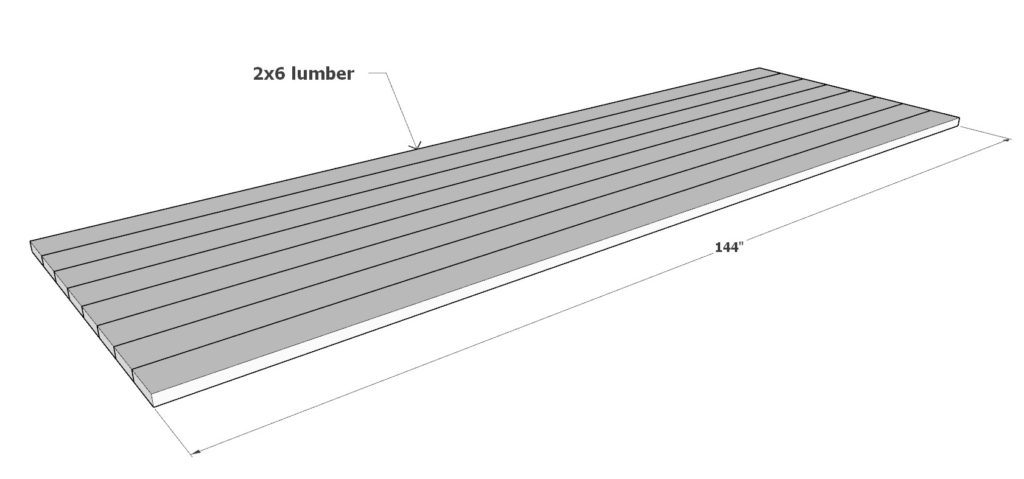
Assembling the Top:
- Main Planks: Gather eight 2×6 lumber pieces, each 144 inches long, for the tabletop surface.
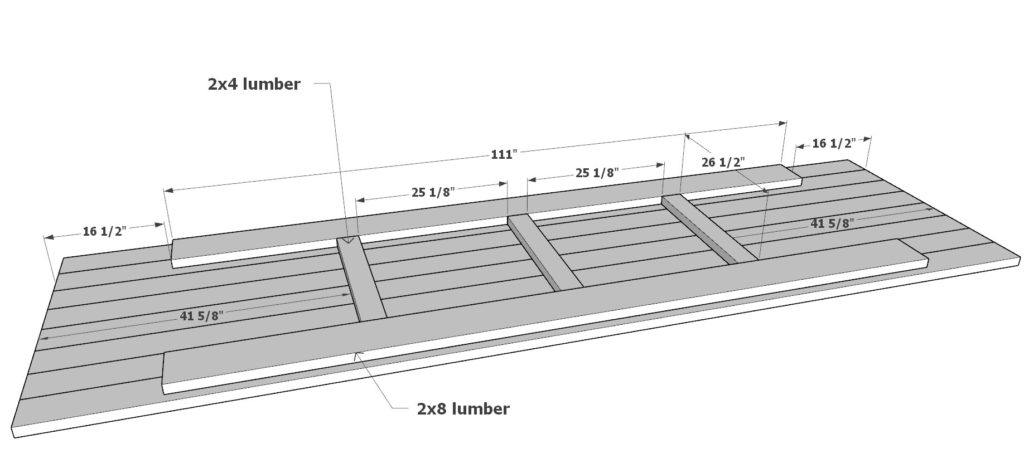
- Top Frame: For the frame beneath the planks, cut two 2×8 lumber pieces to 111 inches and three 2×4 lumber pieces to 26-1/2 inches.
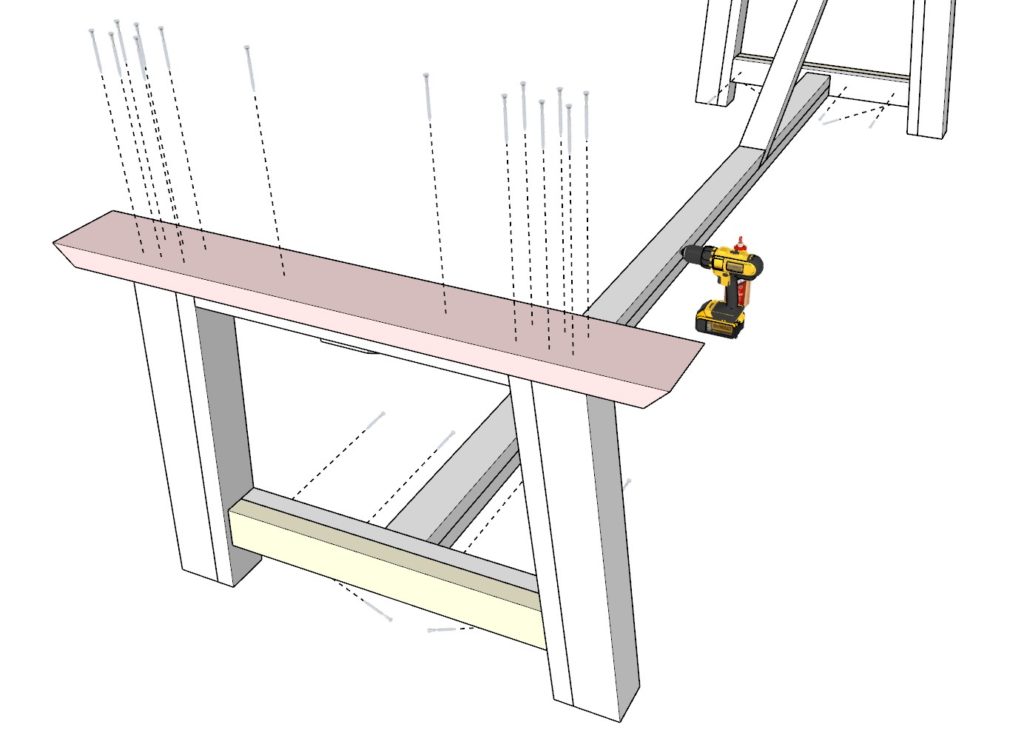
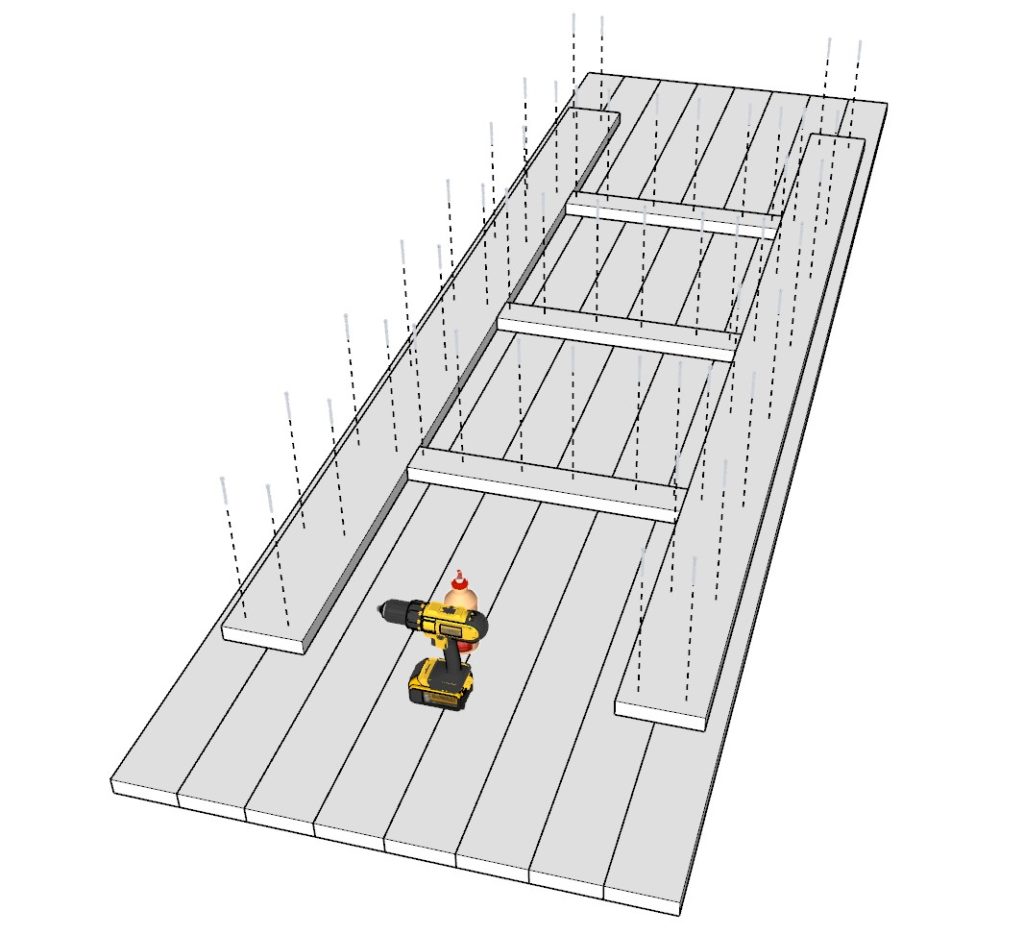
Constructing the Frame:
- Frame Layout: Arrange the 2×8 and 2×4 pieces underneath the planks as illustrated in the second diagram.
- Securing the Frame: Join the pieces using 2.5-inch screws and wood glue for a sturdy hold.
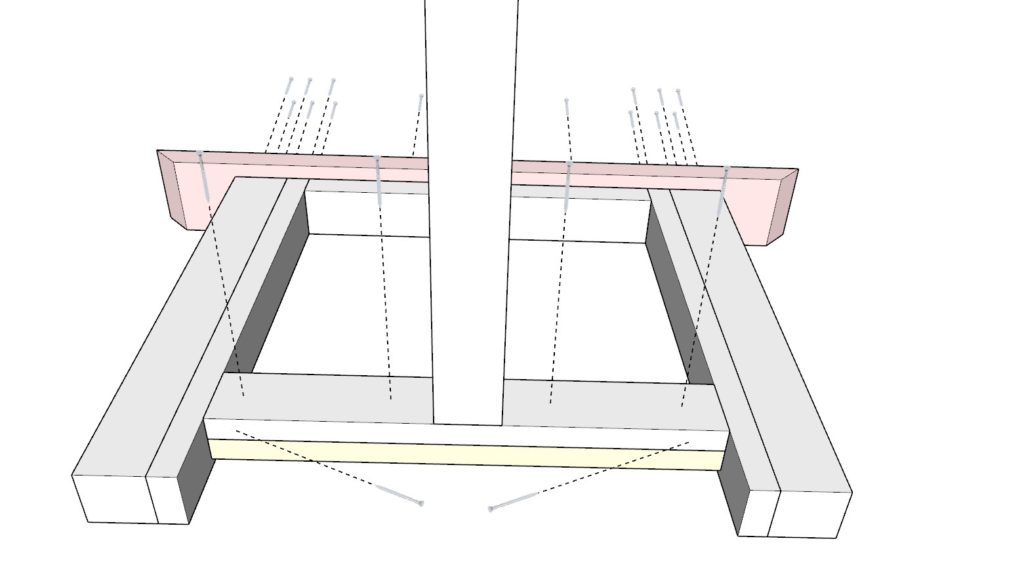
Attaching the Base to the Top:
- Combine Base and Top: Carefully align and then attach the table base to the table top using 2.5-inch screws and wood glue, as detailed in the last diagram.
Pro Tips for a Solid Tabletop:
- Clamping: Utilize pipe clamps to snugly fit the tabletop planks together as you secure them to the frame. Keep the clamps on until the glue sets completely.
- Screwing: Don’t hold back on using 2.5-inch screws; they’re key to the tabletop’s stability and won’t be seen once the table is complete.
- Considering Wood Characteristics: If your wood has many knots or tends to warp, and especially if the table will be outdoors, consider relying on screws rather than glue. This allows the wood to move naturally without the glue breaking and causing unsightly gaps.

Step 4: Preparing and Finishing the Wood
Preparing for Staining and Painting:
- Sand the wood thoroughly, starting with a coarse-grit sandpaper and progressing to a fine-grit paper for a smooth finish.
- Remove all dust with a tack cloth or a damp rag to ensure a clean surface.
Using Wood Conditioners and Pre-Stains:
- Pros: They can help achieve a more even stain application, especially on woods like pine that tend to absorb stains unevenly.
- Cons: Additional step and cost; may not be necessary for all wood types or desired finishes.
Distressing Wood Techniques:
- Physical Techniques: Use tools like hammers, chains, and screws to create dents and scratches for an aged look.
- Finish Techniques: Apply layers of paint, then sand in places to reveal the wood or underlying paint colors.
- Pros and Cons: Physical distressing offers authenticity; however, it can weaken the wood if overdone. Finish techniques can be less damaging but may look less natural.
Staining Wood:
- Apply stain with a brush or rag, working along the wood grain.
- Wipe off excess stain with a clean rag for an even finish.
- Apply multiple coats until the desired color is achieved, allowing adequate drying time between coats.
Painting Wood:
- Apply a primer coat and let it dry completely to ensure paint adhesion.
- Use a high-quality paintbrush or roller to apply paint in thin, even coats.
- Sand lightly between coats for a smooth, professional finish.
Maintaining Your Table:
- For indoor use, dust regularly and clean spills quickly with a dry cloth.
- Reapply a protective finish, such as polyurethane, every few years or as needed.
- For outdoor use, consider a UV-protective sealant, and cover or store the table during harsh weather.