Introduction
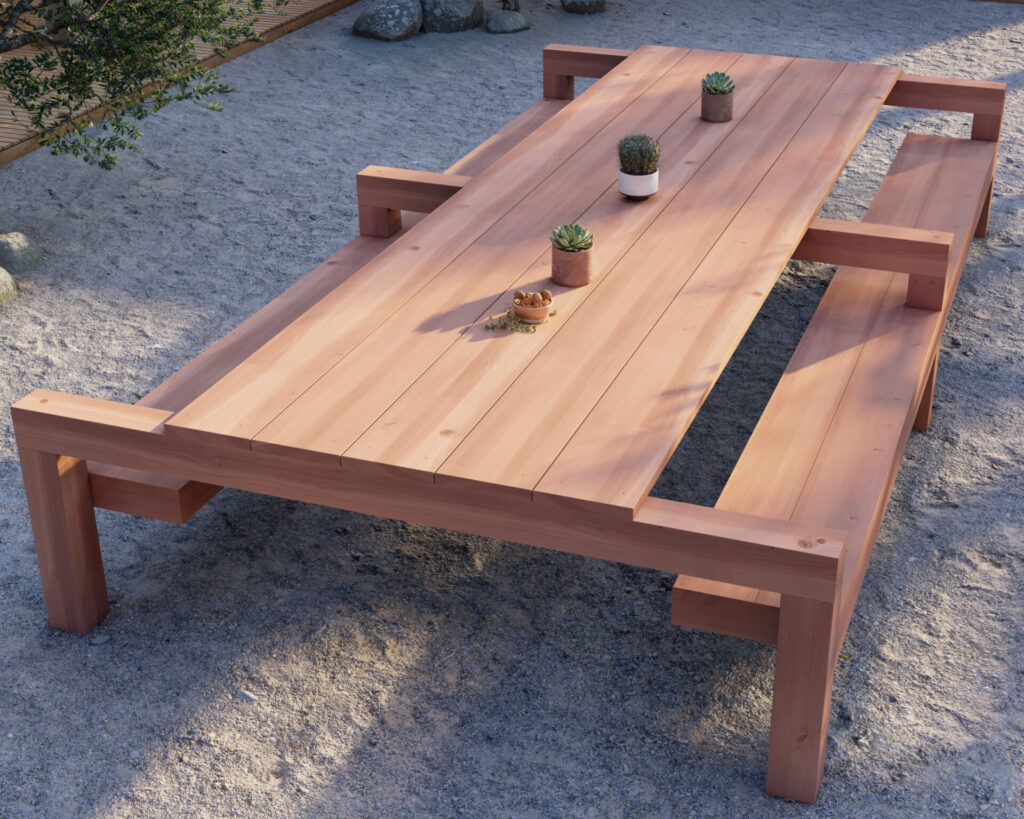
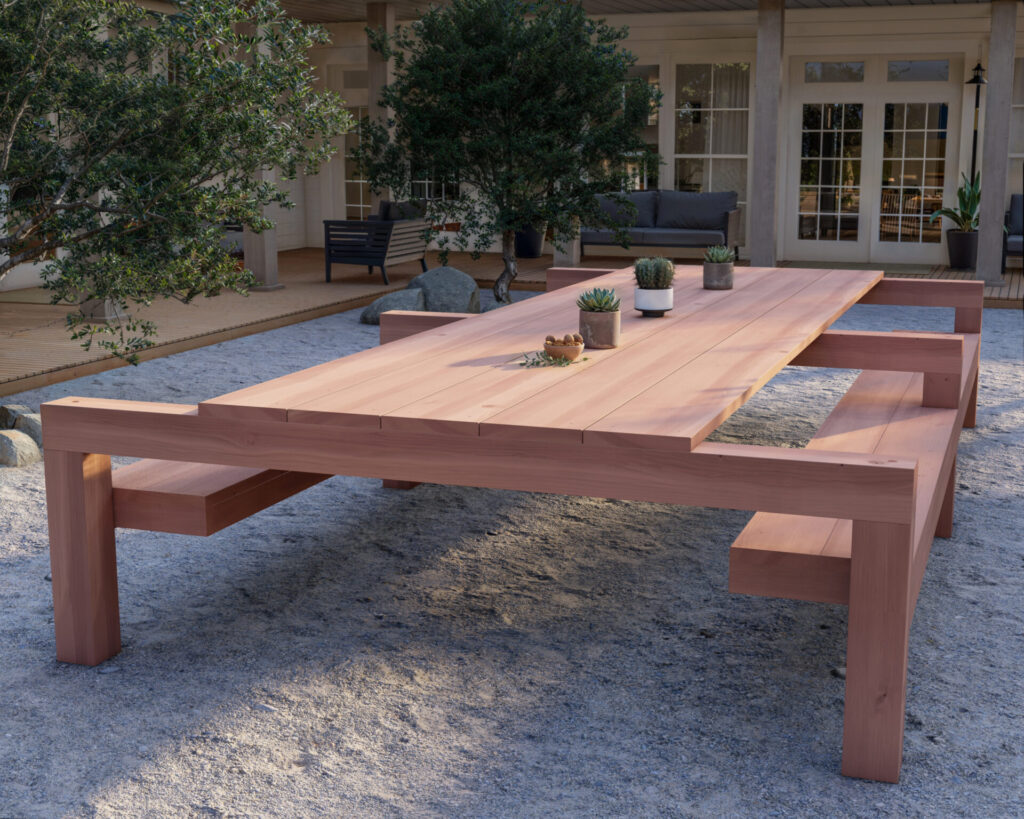
Embark on a journey of craftsmanship with our DIY redwood table and bench set plan, tailored for both seasoned woodworkers and aspiring creators. This design isn’t just a blueprint for furniture; it’s a framework for gathering, laughter, and memories under the open sky.
Specifications
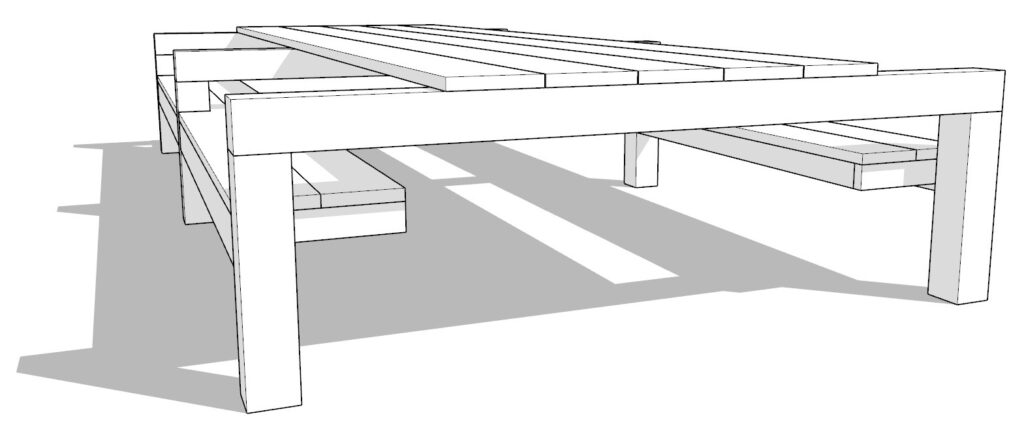
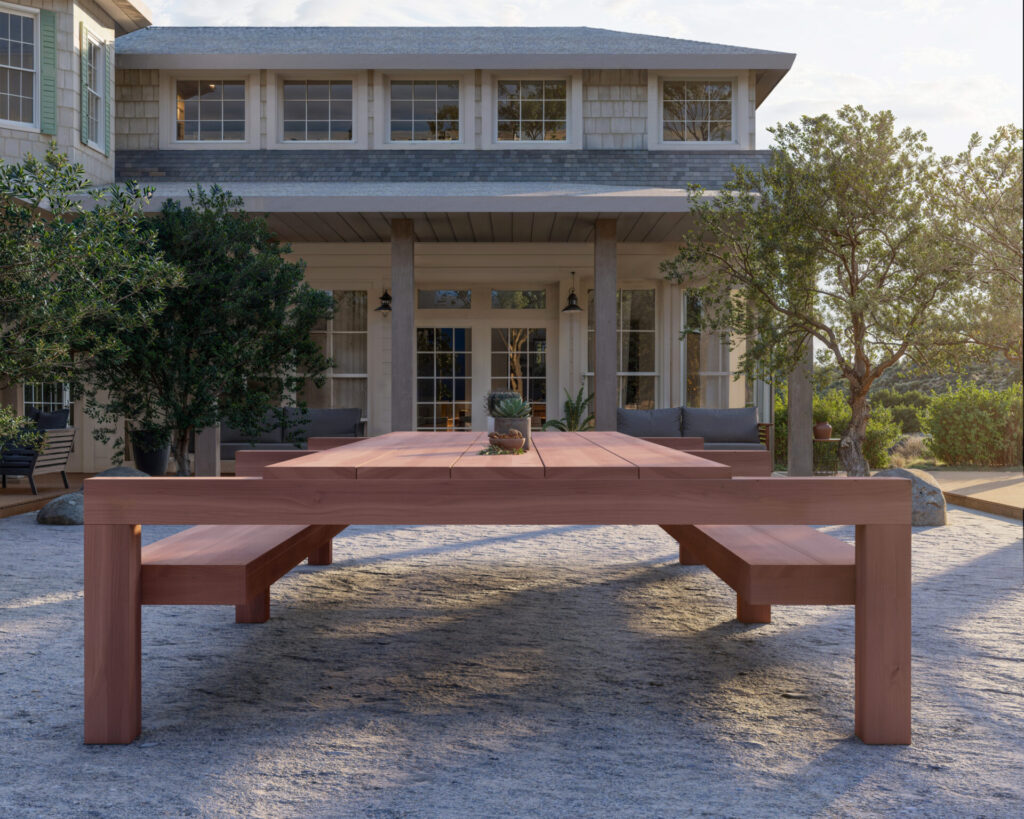
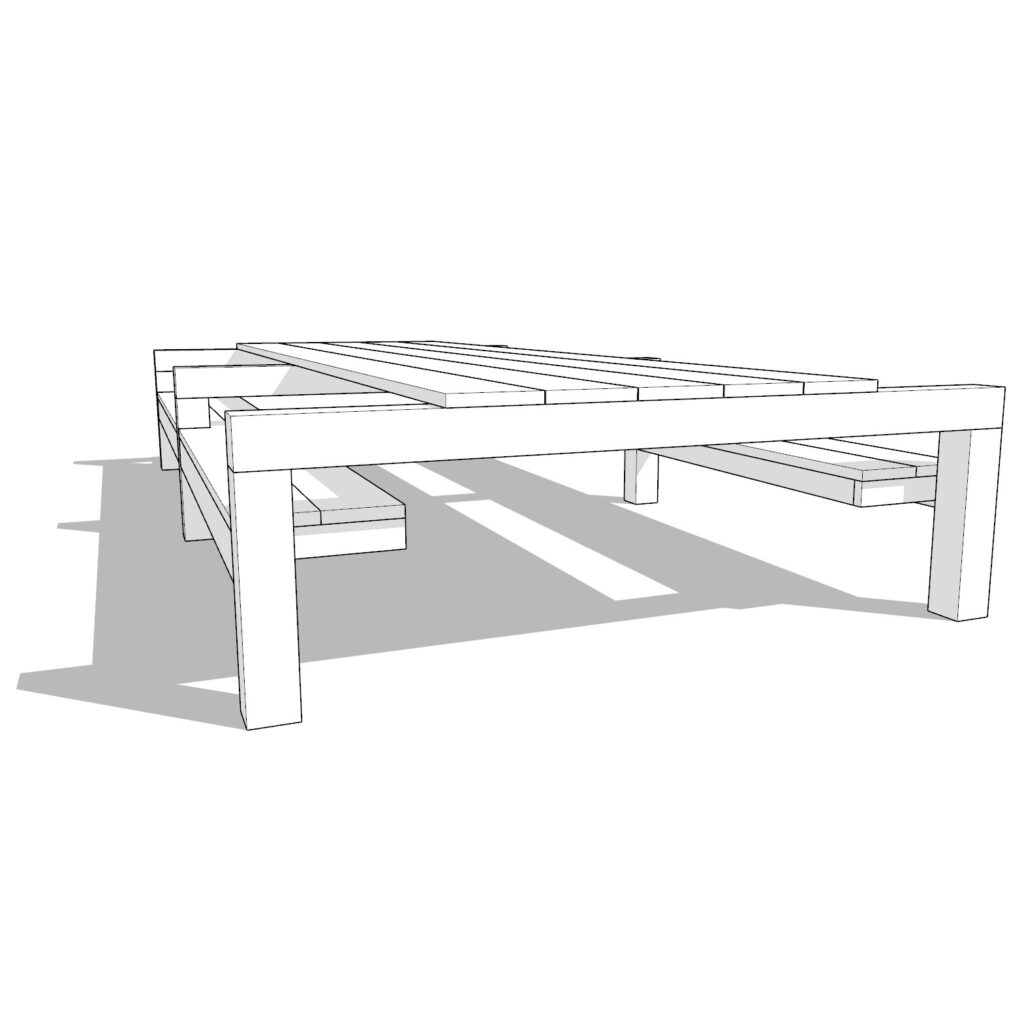
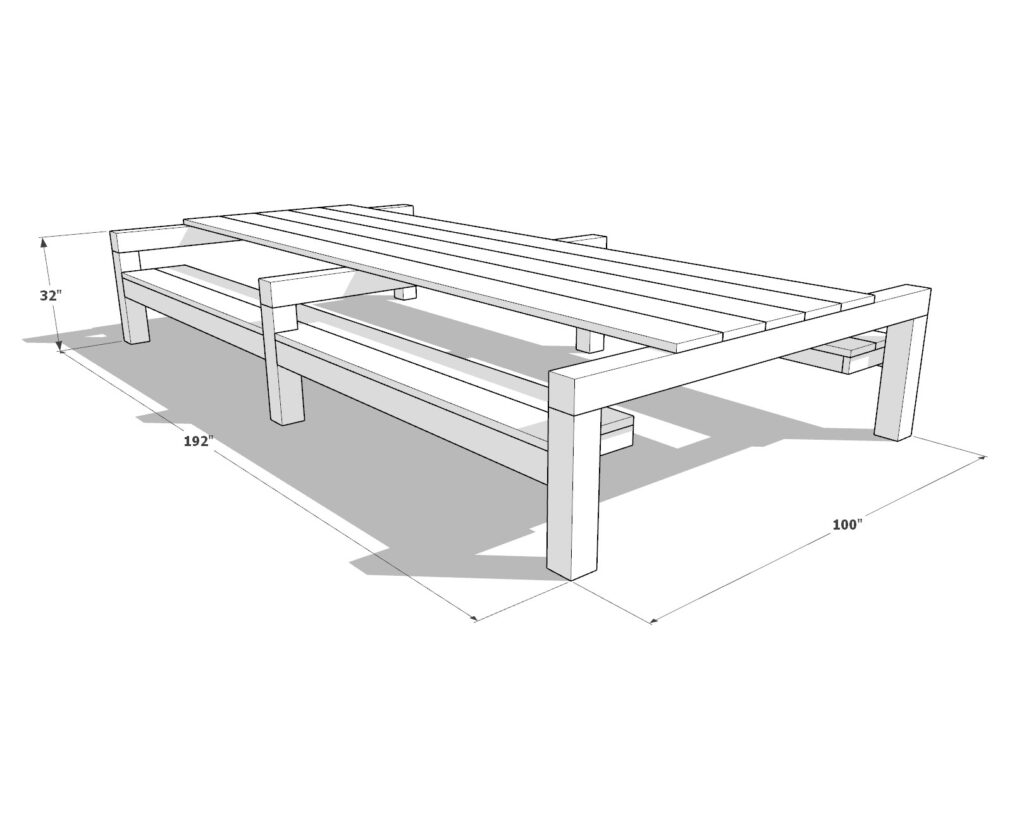
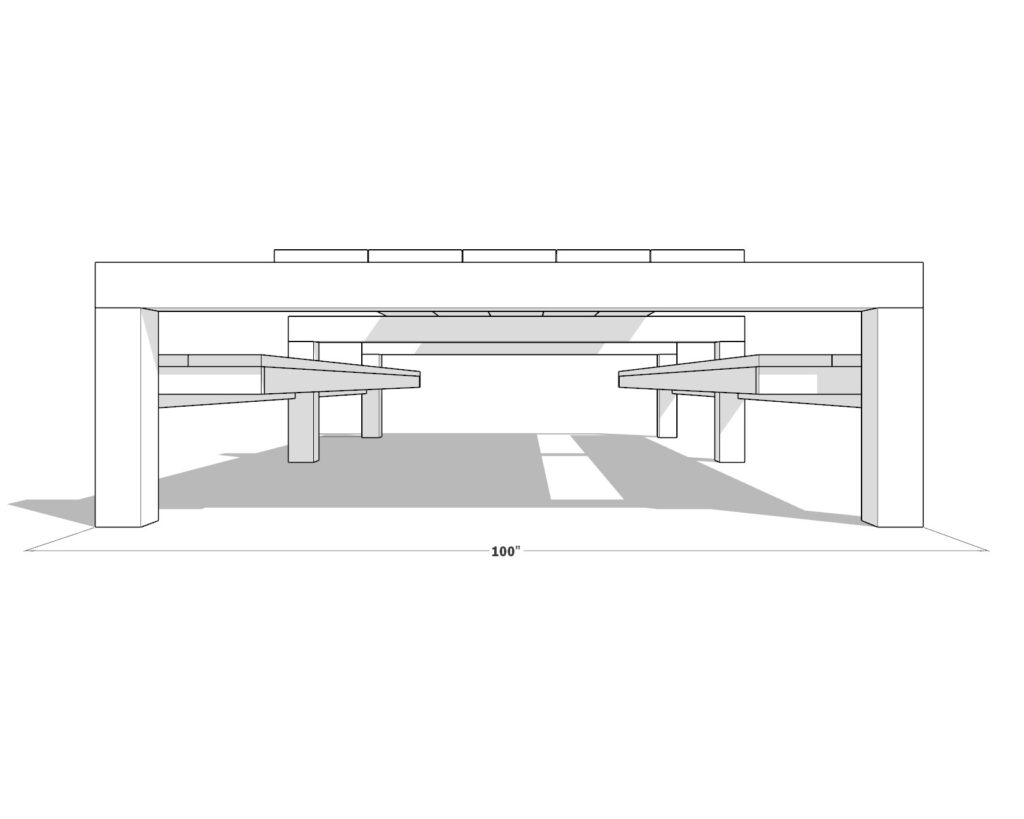
Our comprehensive DIY plan unveils the design for a substantial 192-inch long and 100-inch wide table, paired with proportionate benches, all standing at a welcoming height of 32 inches. Designed to comfortably seat between 12 to 16 guests, it’s an ideal fixture for grand events or intimate outdoor dinners. The redwood construction promises durability and a chic, modern aesthetic, with slats meticulously spaced to allow water drainage, enhancing longevity. Benches are crafted to support full thigh comfort, inviting guests to linger and relax.
Conclusion
With this DIY plan, you transform more than wood. You’re crafting an experience, a centerpiece where stories will be shared and meals enjoyed. The purchase provides not just step-by-step instructions, but the pathway to creating a functional piece of art. Embrace the challenge and satisfaction of DIY, and make the heart of your outdoor living space a testament to your skill and vision.
Important Notice Before Purchasing This DIY Plan
AVAILABILITY OF MATERIALS:
Before committing to purchase this DIY plan, it is CRUCIAL that you verify the availability of the required materials in your local area. Certain items listed, such as 6×6 lumber and 16-foot long boards, are NOT COMMON and may not be readily available everywhere. Specifically, for this project, I utilized:
- Mendocino Forest Products 6 in. x 6 in. x 10 ft. Construction Heart Rough Redwood Lumber, priced at $98.58 each,
- Along with other boards made from Construction Common Redwood.
Please CHECK WITH YOUR LOCAL LUMBER STORE to confirm they carry these items or suitable alternatives.
COST CONSIDERATION:
Be aware that the materials specified, particularly the redwood lumber, are EXPENSIVE. The financial investment for this project may be significant, so it’s advised to budget accordingly.
MODIFICATIONS MAY BE NECESSARY:
Due to the potential challenge of sourcing specific materials, you might find it necessary to ALTER THE ORIGINAL PLAN. This could involve adjusting dimensions to suit the sizes of lumber available to you or substituting different types of wood. Such modifications may require a degree of DIY experience and creativity.
RESEARCH IS KEY:
We urge you to undertake THOROUGH RESEARCH to source all materials needed for this project. The unique nature of this DIY plan means that finding and procuring the right materials is fundamental to your success in building it.
YOUR DIY JOURNEY:
This notice is not to deter you but to ensure you are well-informed before embarking on this DIY journey. The satisfaction of completing a project with your hands is immensely rewarding, and we want to make sure you are prepared for the adventure ahead.
Time to build
(varies with experience)
Cost
Estimated cost: $1,800 (material prices may fluctuate; verify current costs for accuracy)
Skill level required
Beginner
Download the PDF plans
DIY Outdoor table PDF plan
What is included in the PDF download?
- Easy to read step by step instructions
- Material list
- Tools needed
- Helpful links to materials and tools needed
DIY Outdoor Table Dimensions
Recommend Tools & Materials
Available with the purchase of the DIY plan PDF.
Lumber Shopping List
Available with the purchase of the DIY plan PDF.
Step 1: Preparing the Table Base Components
Cut and Prepare the Wood:
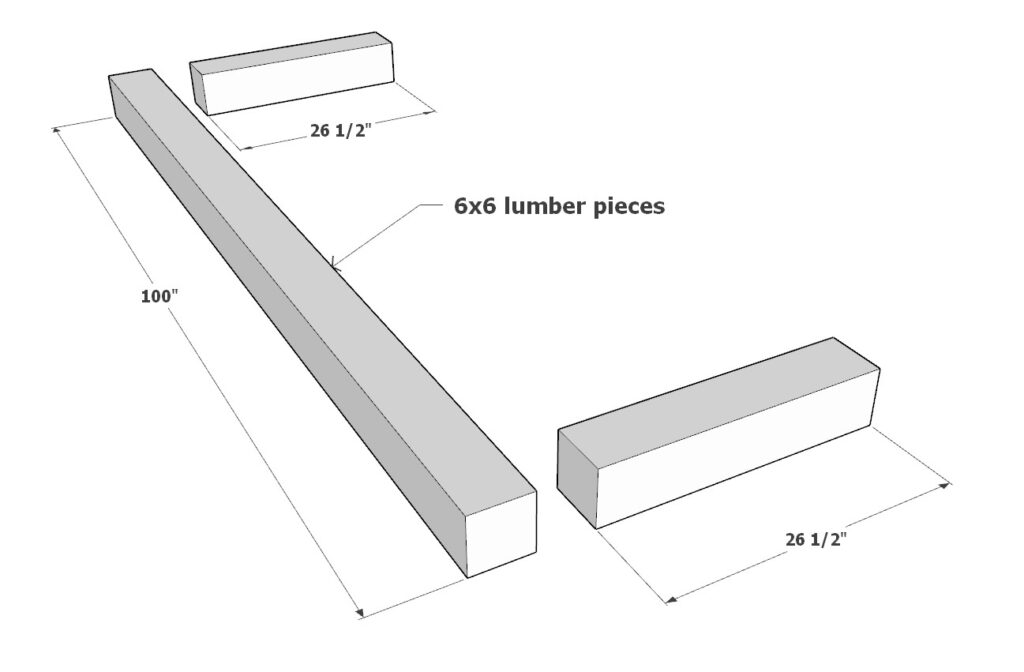
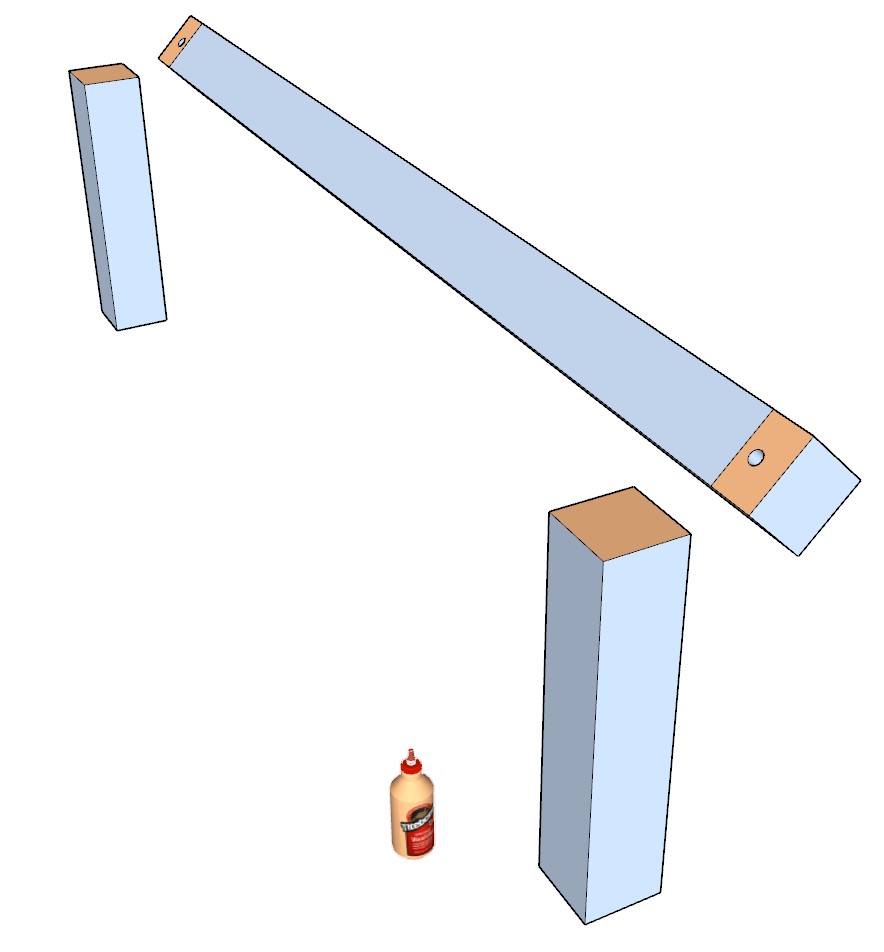
- Begin by cutting two pieces 6×6 wood to 26-1/2 inches for the legs and one piece to 100 inches for the stretcher.
- Plane and sand all pieces to ensure a smooth, uniform surface. This will aid in a stronger glue bond later.
- Match the legs to the stretcher, checking for the best fit.
- Mark each joint area lightly with a pencil for easy identification during assembly.
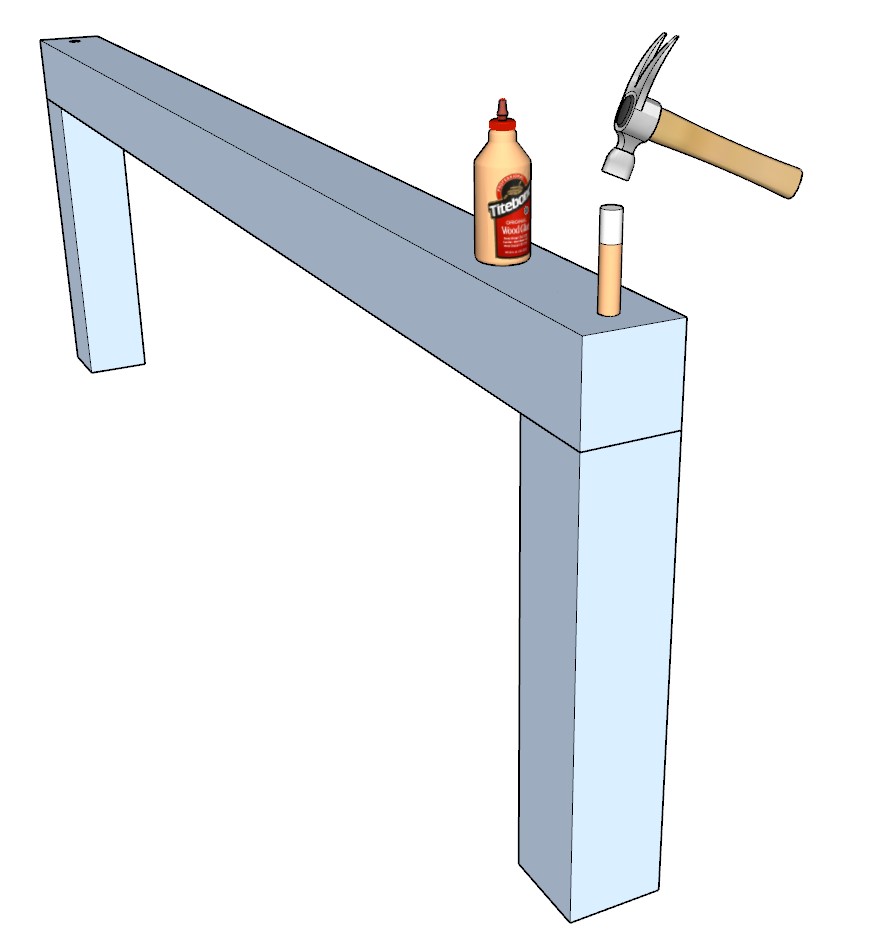
Drill Holes for Assembly:
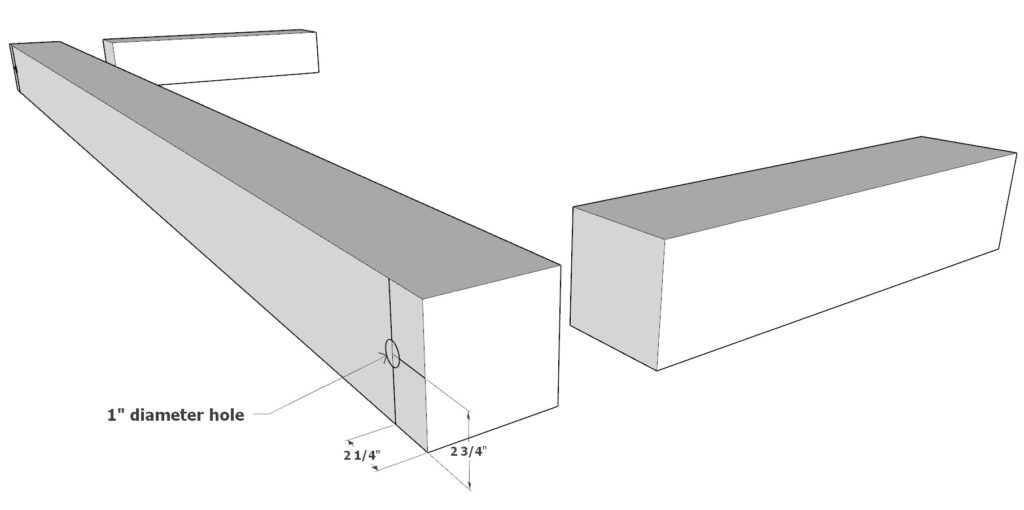
- Mark the drilling points on the legs and stretcher using the diagram as a guide. Precision here is key for proper alignment.
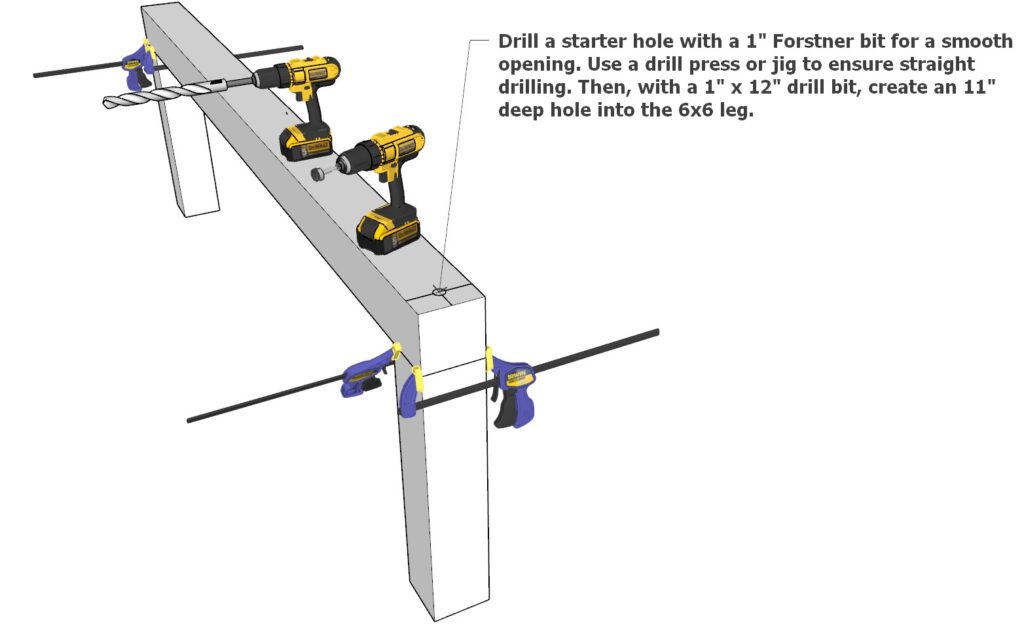
- Secure the wood with clamps to prevent movement while drilling. Follow the illustration for proper clamping technique.
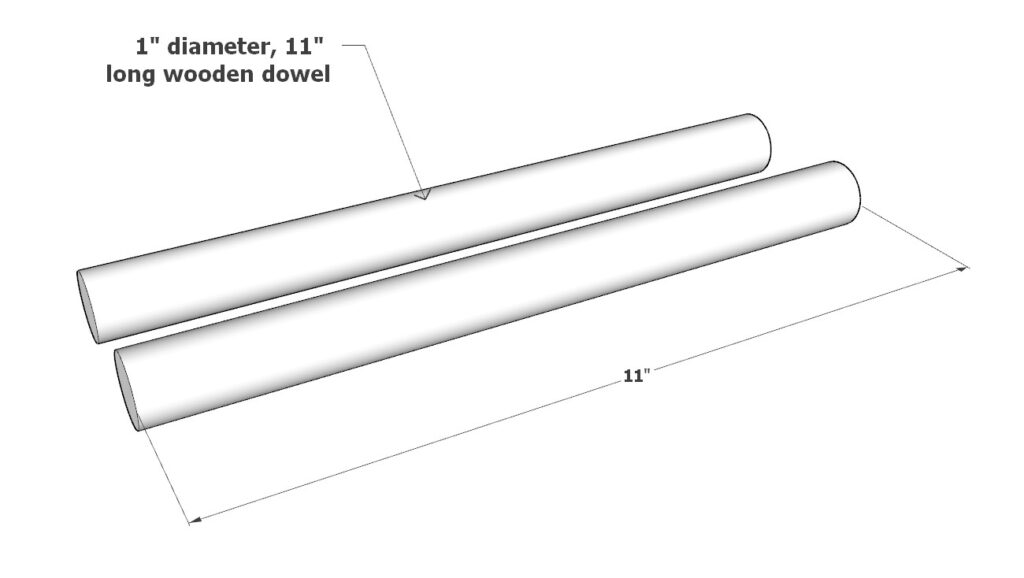
- Start the hole with a 1-inch Forstner bit to create a clean edge. Remember, Forstner bits are ideal for shallow, clean holes.
- Switch to a 1-inch diameter, 12-inch long drill bit to bore an 11-inch deep hole into each leg piece.
- Use a drill press if available for the straightest, cleanest holes.
Inserting Dowels and Gluing:
- Apply wood glue inside the holes and on the surfaces that will join. Ensure all sawdust is wiped away before applying glue for the best adhesion.
- Coat the 1-inch diameter, 11-inch long dowels with glue and insert them into the holes.
- Wipe away any excess glue with a damp rag to keep the work area clean.
Final Touches:
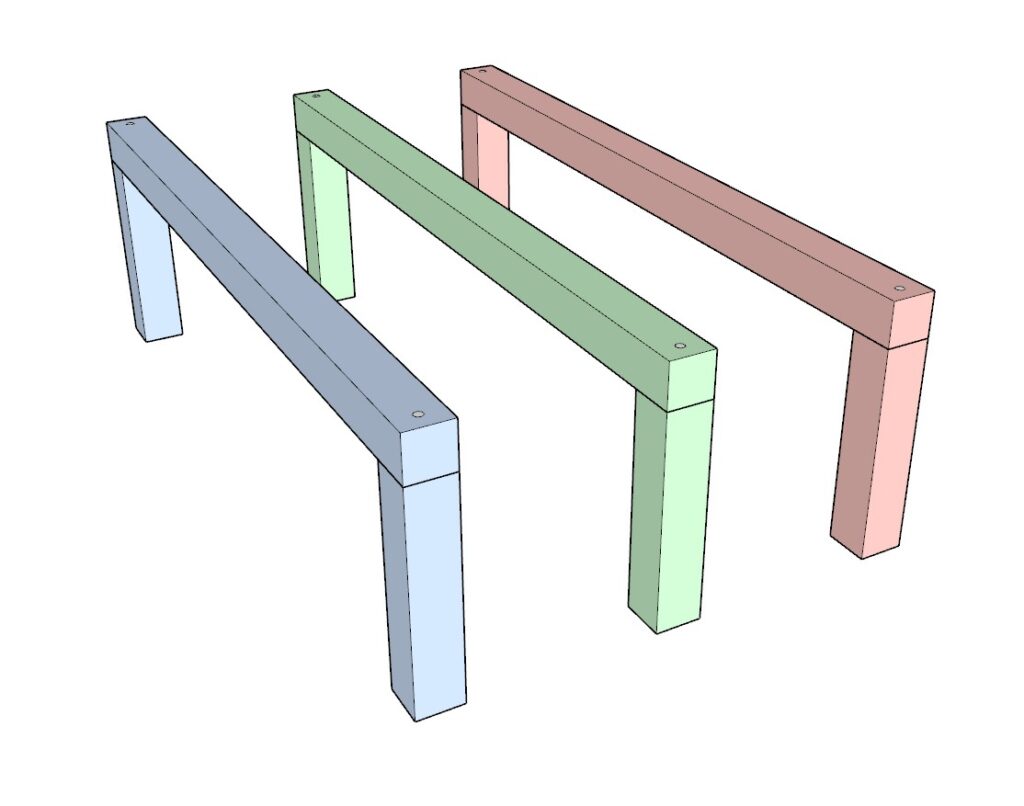
- Once the glue has fully dried, sand the pieces once more for a smooth finish.
- Assemble three sets of legs and stretcher units to complete the table base structure.
Step 2: Constructing and Attaching the Benches
Prepare Bench Components:
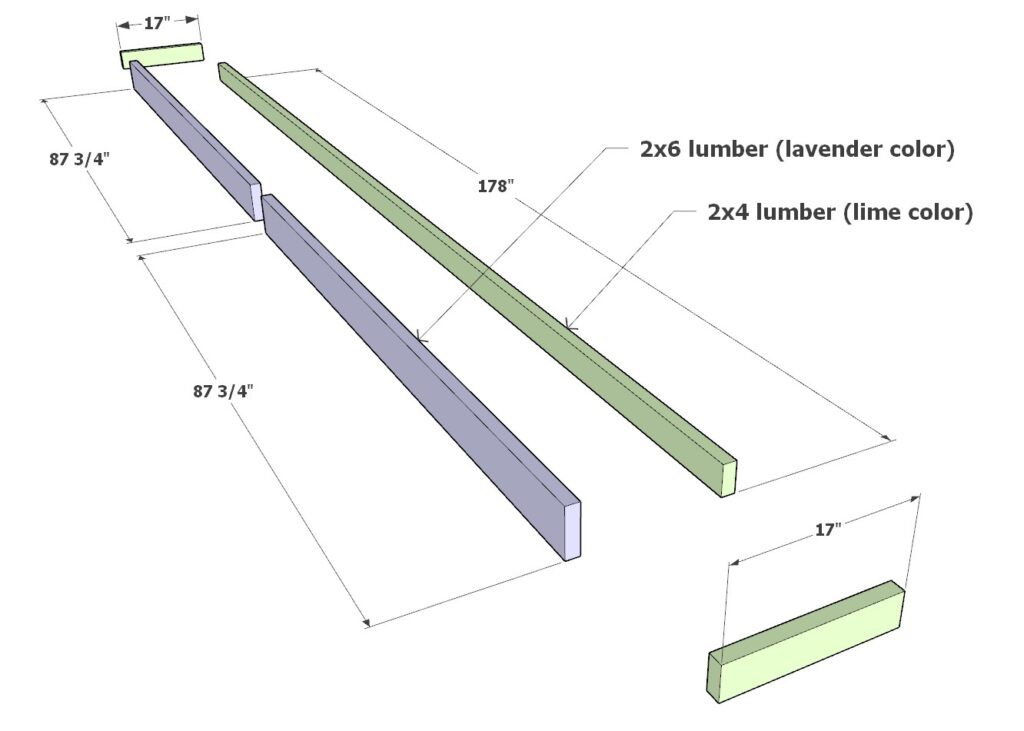
- Take one 178-inch long 2×4, two 17-inch 2x4s, and two 87-3/4 inch 2x6s as per the diagram, with lavender indicating 2x6s and lime green for 2x4s.
Test Fit and Assemble:
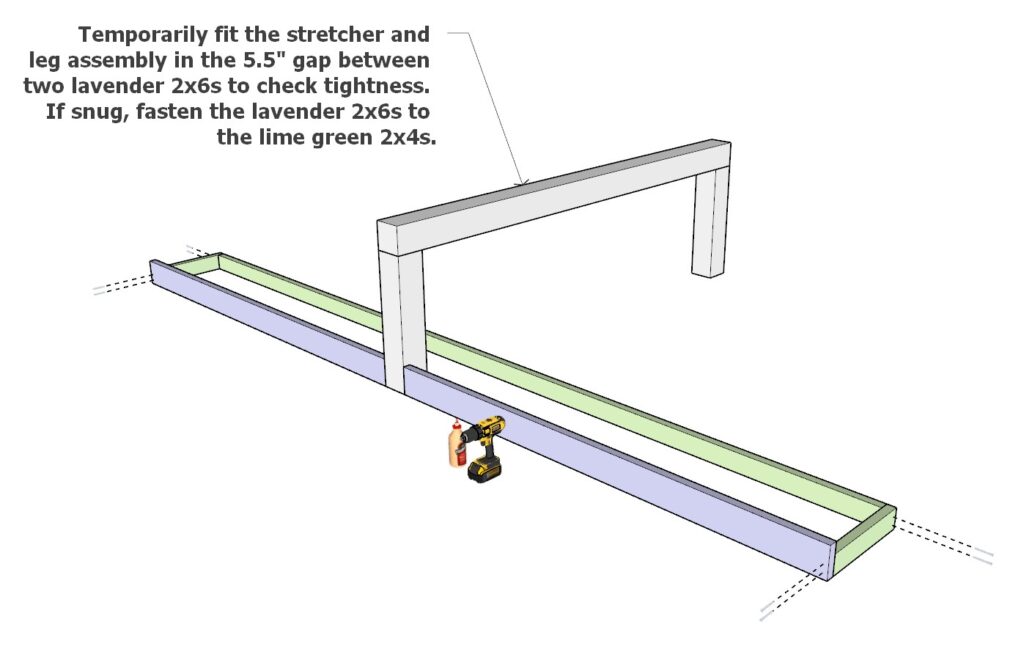
- Position the table top support and leg components from Step 1 in the 5.5-inch gap between the lavender 2×6 pieces to ensure a snug fit around the table legs.
- Once confirmed, glue and fasten the lavender 2x6s to the lime green 2x4s, pre-drilling holes to avoid splitting. Plan for hole concealment beforehand.
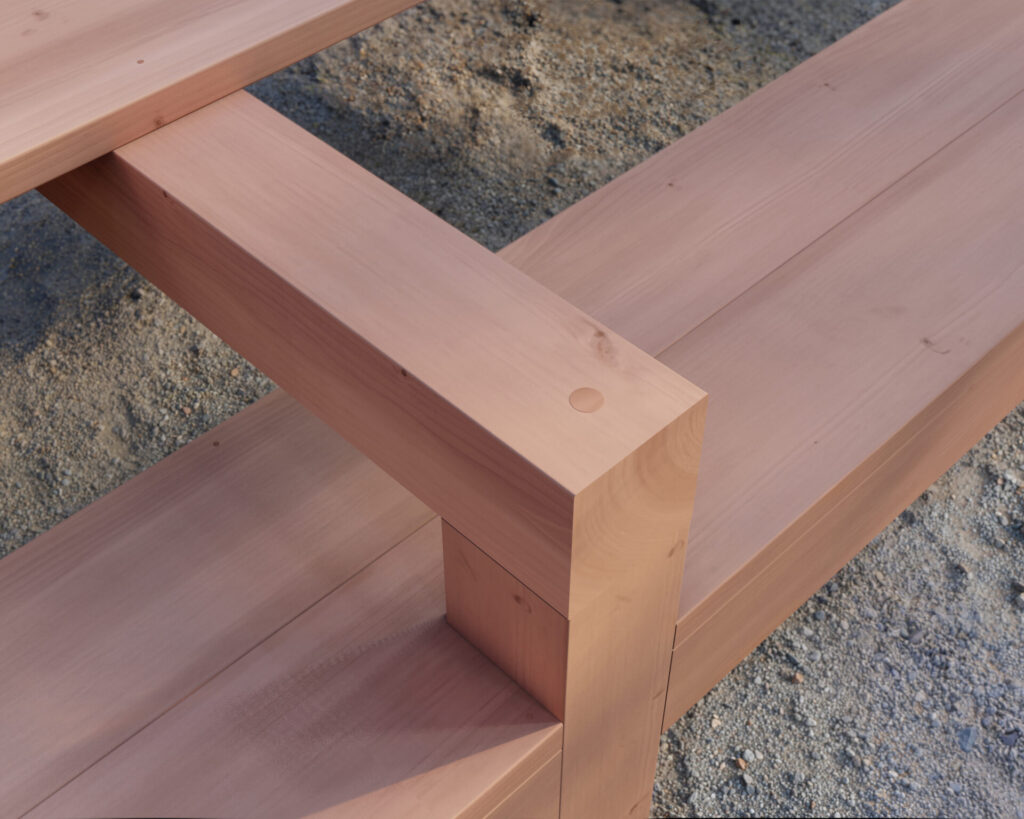
Concealing Screw Holes with a Plug Cutter:
- A plug cutter allows for consistent staining and grain matching, making screws nearly invisible.
- Use a plug cutter to create wood plugs from the same material for a seamless finish. (see bonus page for details)
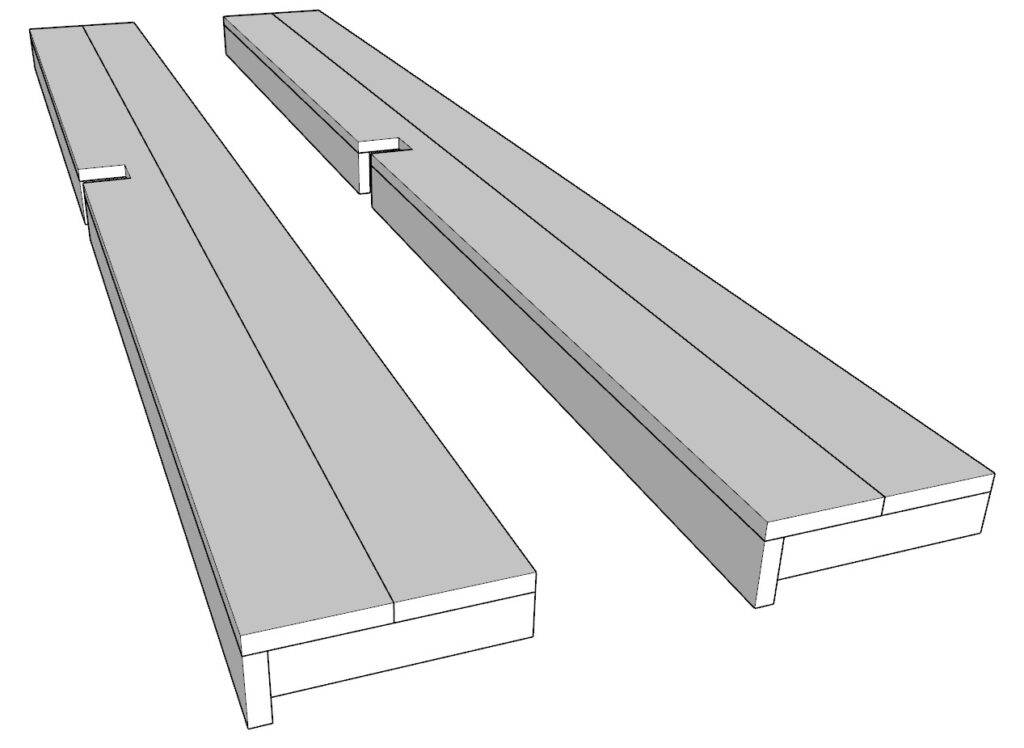
Create Bench Seats:
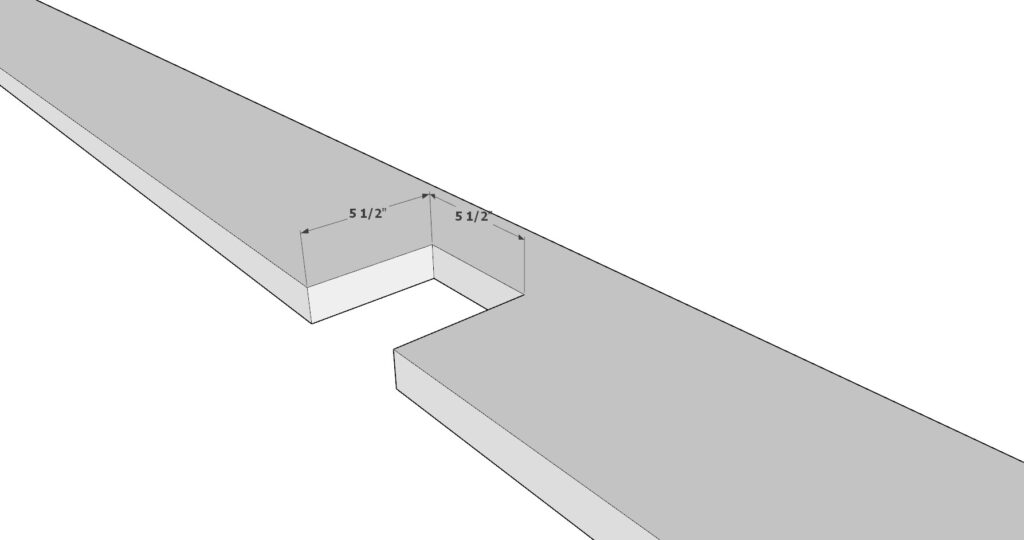
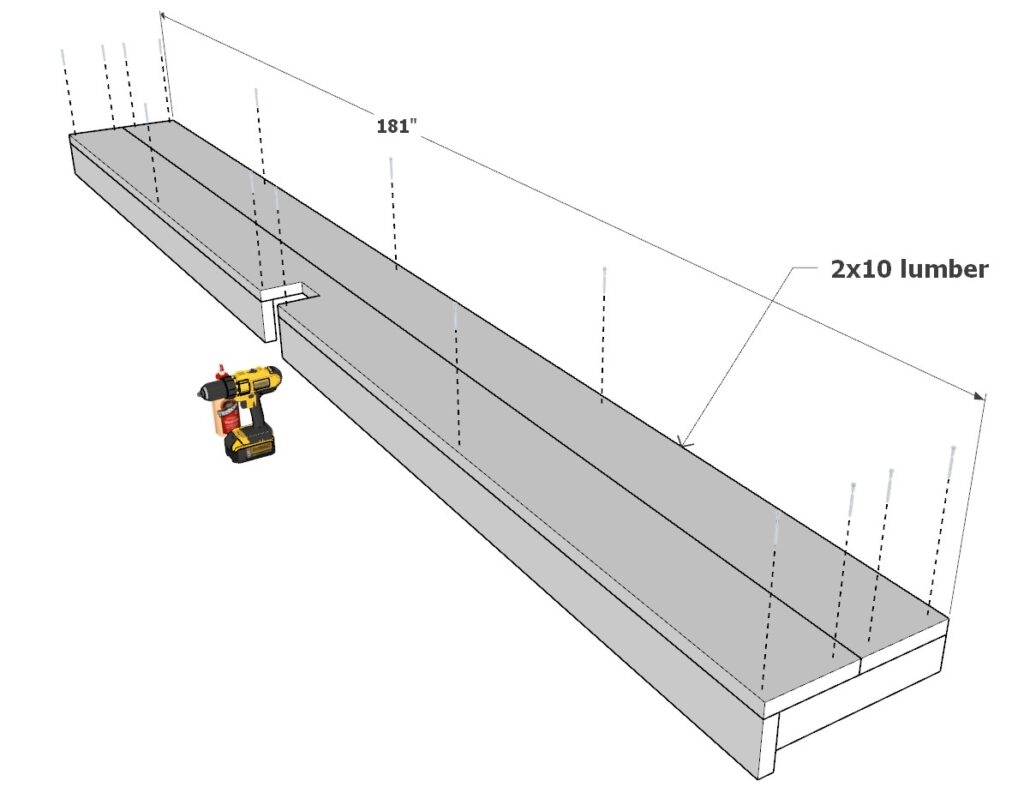
- Notch a 5.5-inch square into the center of a 181-inch long 2×10 to accommodate the stretcher and leg assembly.
- Ensure a tight fit of the table legs into the notch, using a hand saw and chisels for precision.

Assemble Bench Frame:
- Secure the notched 2×10 and an additional 181-inch long 2×10 to form the bench seating platform.
- Construct two identical bench assemblies to complete the seating for the table set.
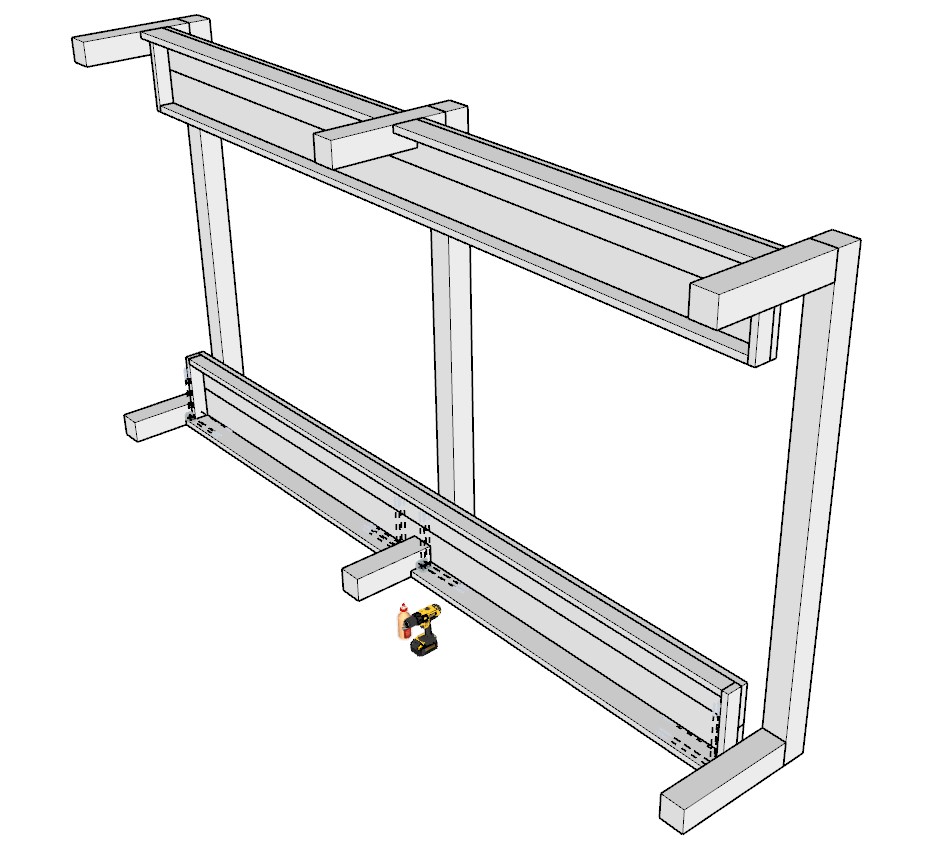
Step 3: Joining the Bench and Table Leg Assemblies
Align and Position Assemblies:
- Stand one bench assemblies and all three of the stretcher/leg assemblies on the sides with the help of an assistant or two, as it can be quite heavy.
- Position the three stretcher/leg assemblies using the diagram for accurate height alignment.
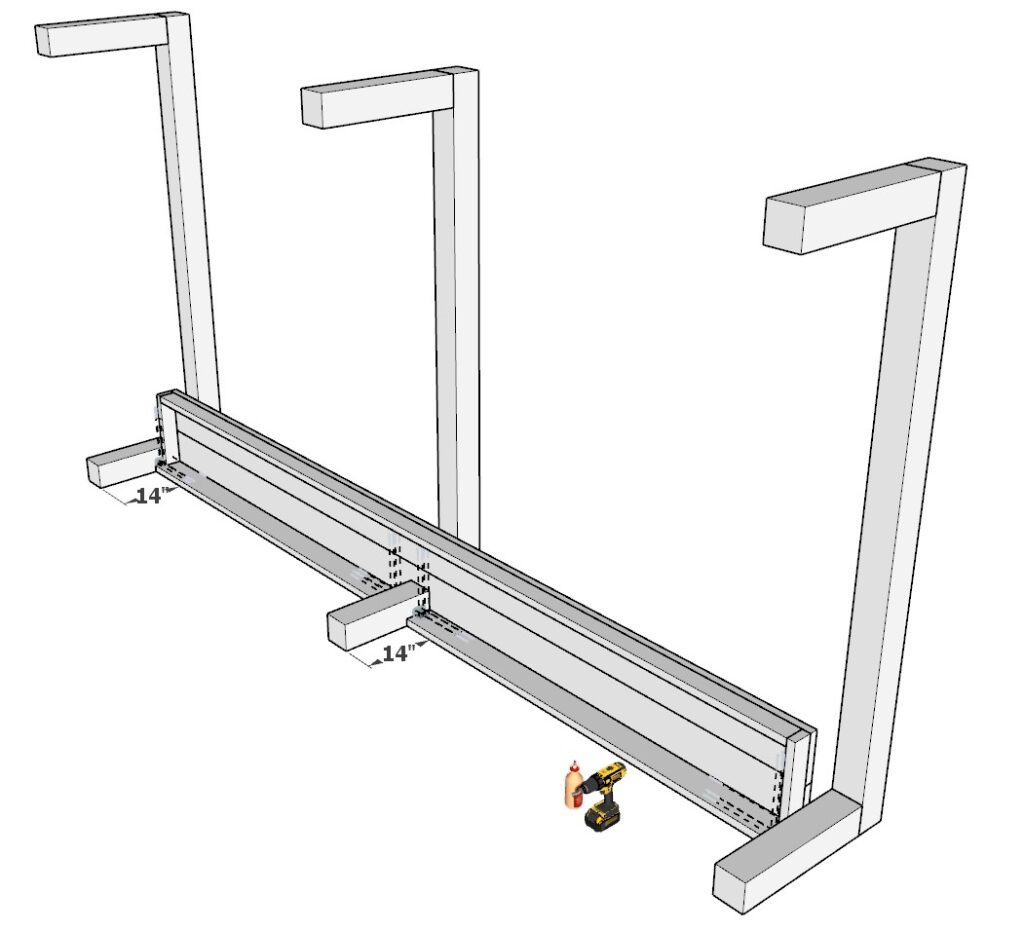
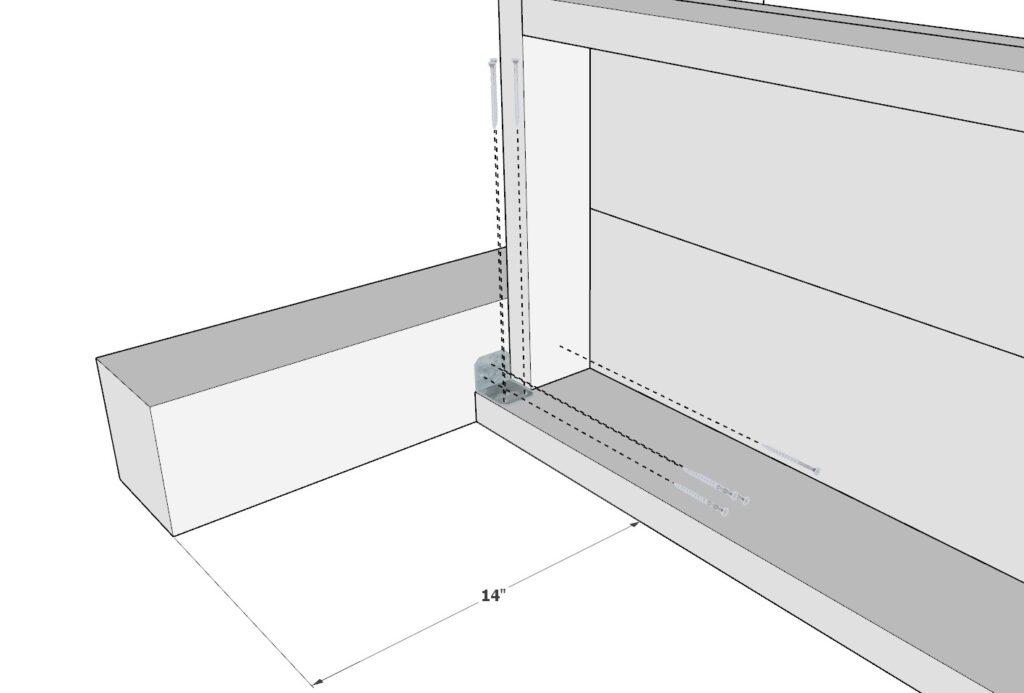
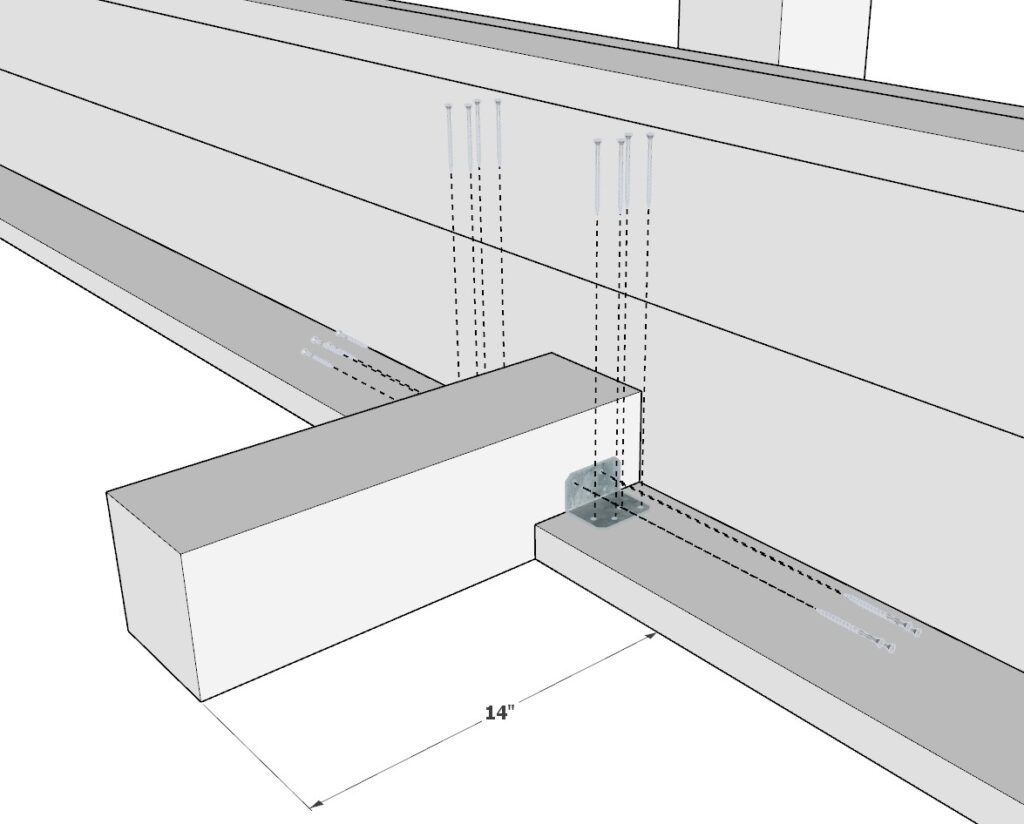
Secure the Structures:
- To join the bench assembly to the legs, you’ll need robust hardware:
- Two 2 in. x 1-1/2 in. x 2-3/4 in. Galvanized Angles, or similar-sized L-brackets.
- A 2 in. Zinc-Plated Double-Wide Corner Brace (2-Pack) for additional stability.
- Use 4-inch wood screws to attach the galvanized angles to the 6×6 leg, ensuring the connection is robust for frequent use.
- For the corner braces, select screws that match the depth of your material, typically 1-1.25 inches for 2x4s, to avoid protrusion.
Drilling and Screw Selection:
- Pre-drilling is essential to prevent wood splitting. Choose a drill bit slightly smaller than the screw’s core diameter.
- Opt for thicker screws for a stronger hold, especially since the bench will support multiple people.
- Ensure screws are evenly distributed and secured firmly, checking stability before proceeding.

Attach the Second Bench:
- Repeat the alignment and securing process with the second bench assembly, ensuring it is parallel and at the same height as the first.
- Confirm that both benches are equally stable and firmly attached to the stretcher/leg assemblies for a cohesive and sturdy final structure.
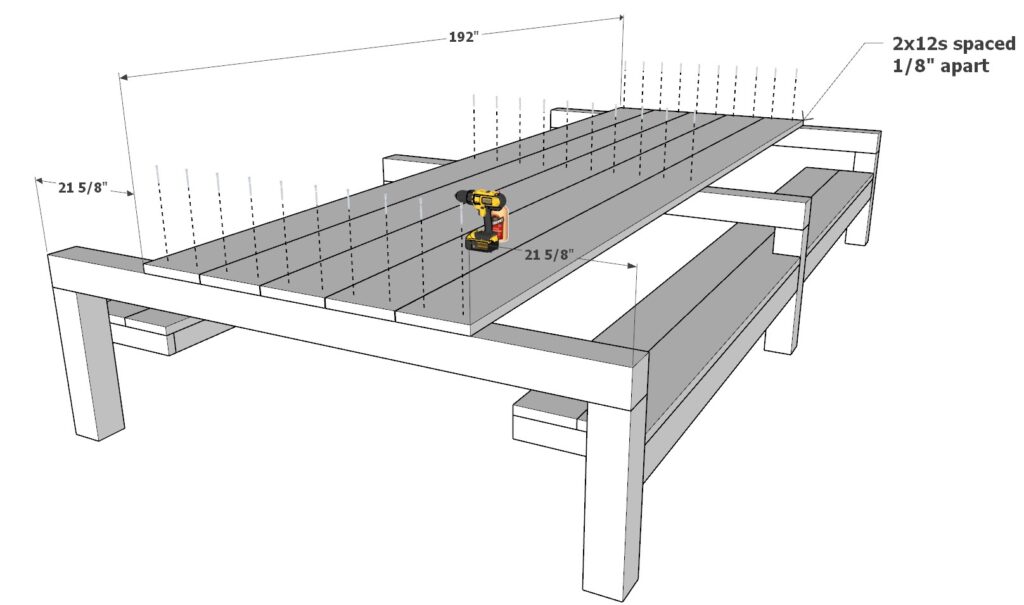
Step 4: Attaching the Tabletop
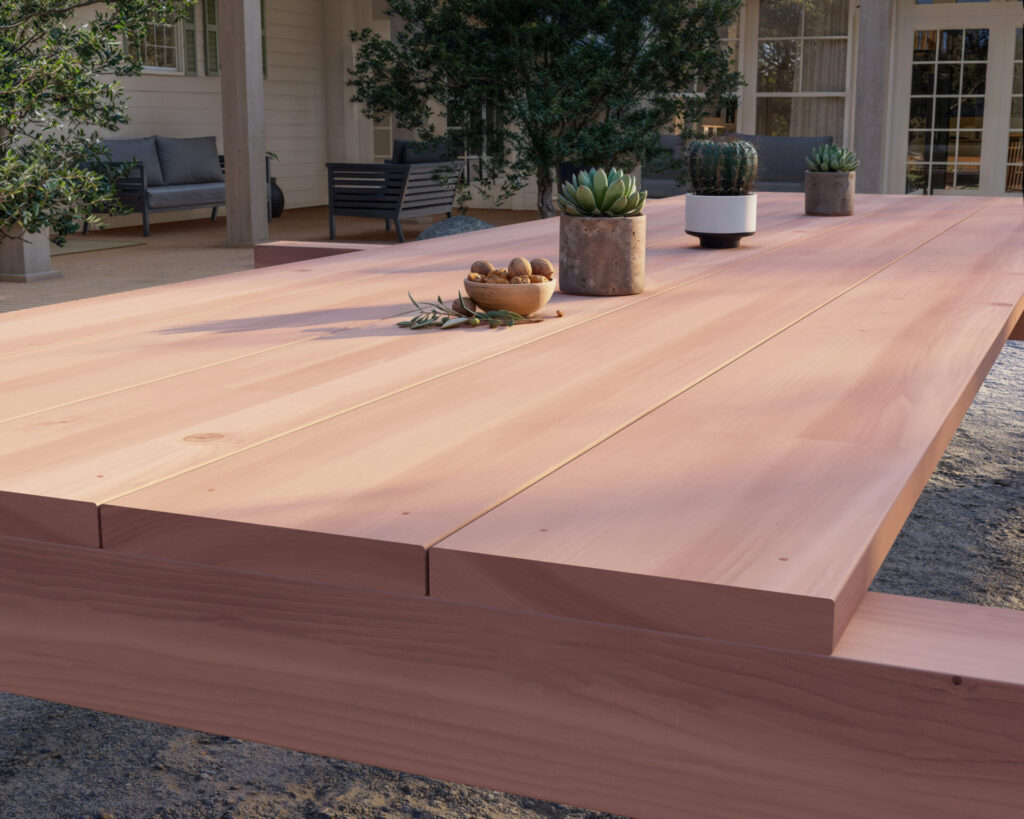
Place the Tabletop Boards:
- Position the five 192-inch long 2×12 lumber boards across the stretcher assemblies.
- Ensure an even 1/8-inch gap between each board to allow for water drainage.
Secure the Tabletop:
- Use 3.5-inch wood screws to fasten the tabletop boards to the stretchers, providing a strong anchor.
- Apply wood glue between the boards and stretchers for added durability.
Concealment and Finishing Touches:
- For a clean finish, refer to the bonus page on how to conceal screw holes effectively with wood plugs.
- Remember to wipe away excess glue immediately for a neat appearance.
By following these steps, your tabletop will not only be secure but also prepared for the outdoor elements with proper spacing for water drainage.
Step 5: Finishing Touches
Filling Screw Holes with Plugs:
- Use a plug cutter to craft wood plugs from the same lumber as your project for a consistent look. This is critical for uniform staining and discreet concealment of screw holes.
- Match the wood grain direction when inserting the plugs to help them blend seamlessly with the surrounding wood.
- Pair the plug cutter with a countersink drill bit for a flush finish. A drill press can enhance precision.
Sanding the Wood:
- Begin with a coarse grit sandpaper to remove any rough spots or unevenness.
- Progressively move to finer grits until the wood is smooth to the touch.
- Always sand in the direction of the grain to prevent scratches that are difficult to stain over.
Staining or Clear Coating:
- Clean the wood thoroughly to remove dust before applying stain or sealant.
- Use a brush or cloth for application, and work in sections, maintaining a wet edge to avoid lap marks.
- Apply multiple thin coats rather than one thick coat, sanding lightly between layers for the best finish.
Applying Paint:
- If painting, prime the wood first to ensure even paint coverage and to prevent the wood from absorbing too much paint.
- Use exterior-grade paint for durability, and apply with a brush, roller, or sprayer depending on the finish you desire.
Maintenance for Longevity:
- Place the table in a shaded area to minimize direct exposure to sunlight, which can cause the wood to warp or fade.
- Cover the table during extreme weather like rain or snow, or consider a waterproof sealant for additional protection.
- Regularly clean the table and reapply a top coat of sealant or paint as needed to maintain its resistance to the elements.