Introduction
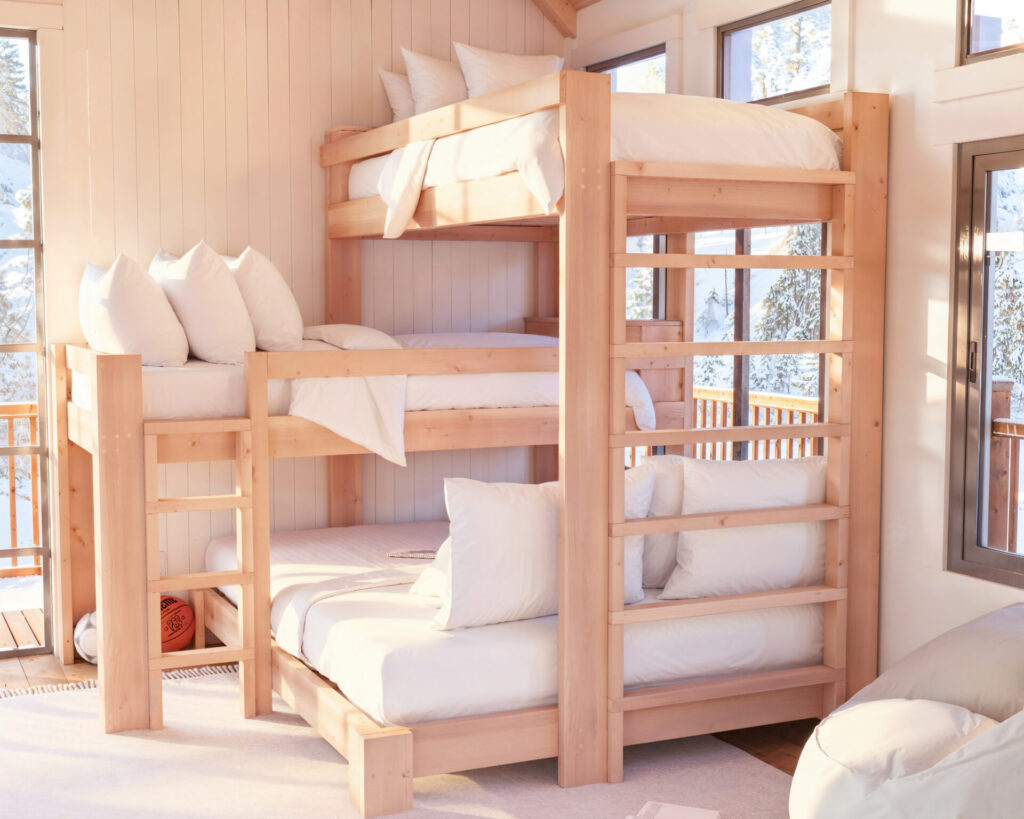
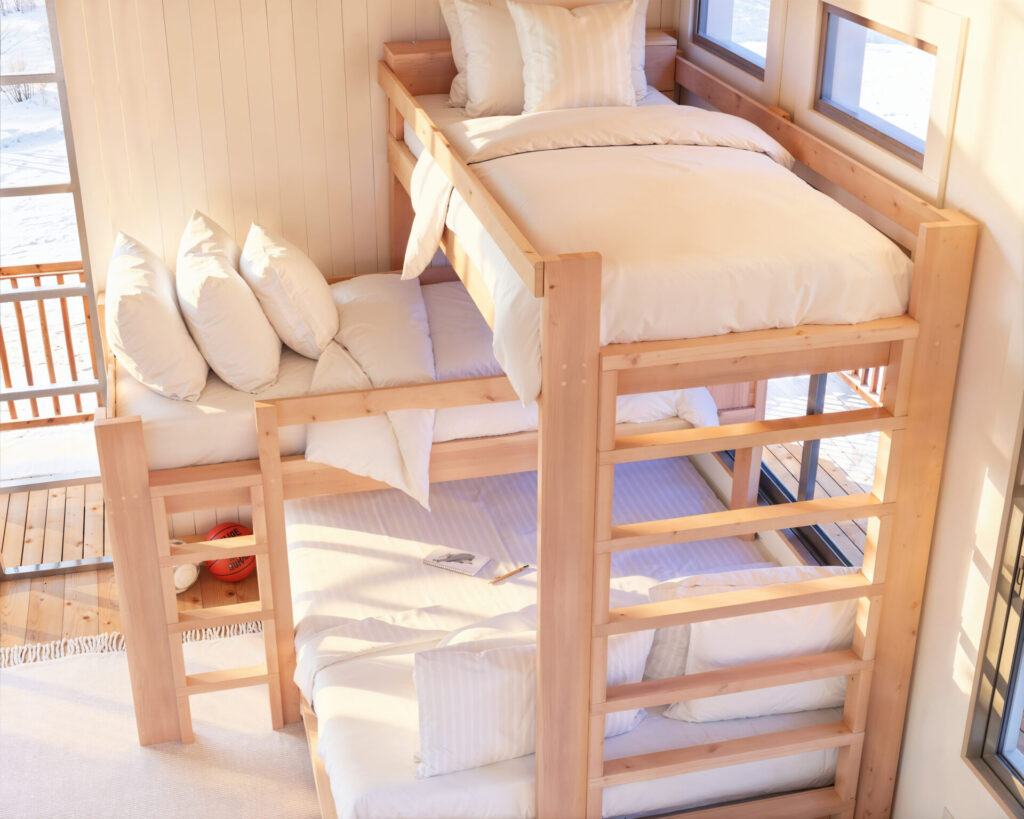
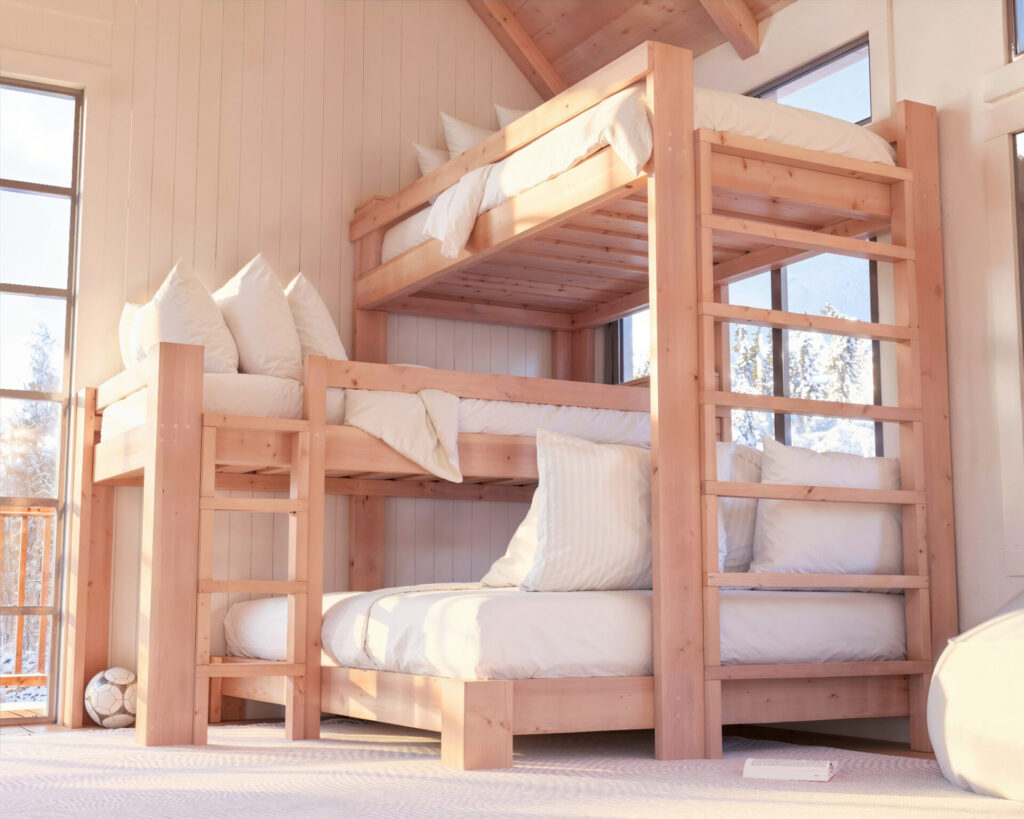
Step into a world where functionality meets elegance. Our triple bunk bed plan transforms your space into a multi-level sanctuary, perfect for sleep, storage, and play. Designed for modern living where every inch is precious, this bed elevates comfort, inviting siblings or guests to a personal retreat in the clouds. It’s an economical and stylish solution that celebrates the joy of DIY and the warmth of family life. With room for twin and queen mattresses and a nod to custom decor, our guide offers a path to a personalized, space-saving wonder that fits seamlessly into your home.


Plan Specifications
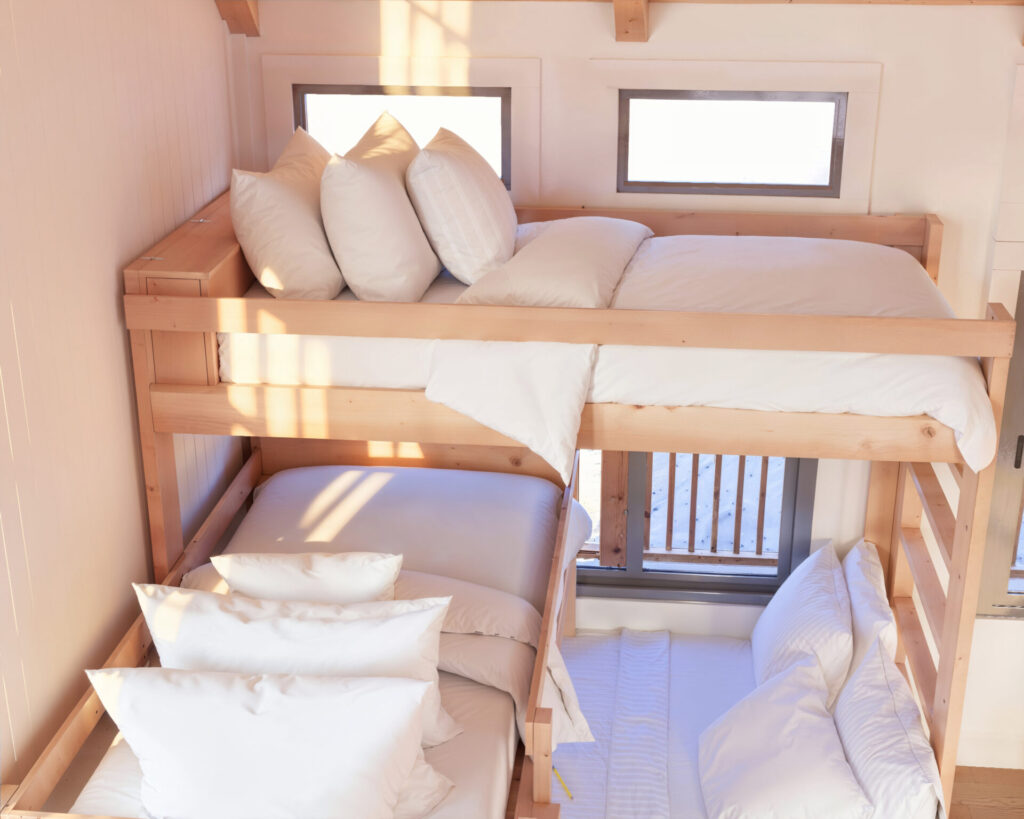
- Tailored for Spacious Interiors: Our design necessitates a minimum of 9-foot ceilings, ensuring each bunk has ample headroom for both comfort and safety.
- Safety Considerations: We prioritize well-being; our plans include a recommendation to remove ceiling fans in proximity to the upper bunks, mitigating any risk without compromising style.
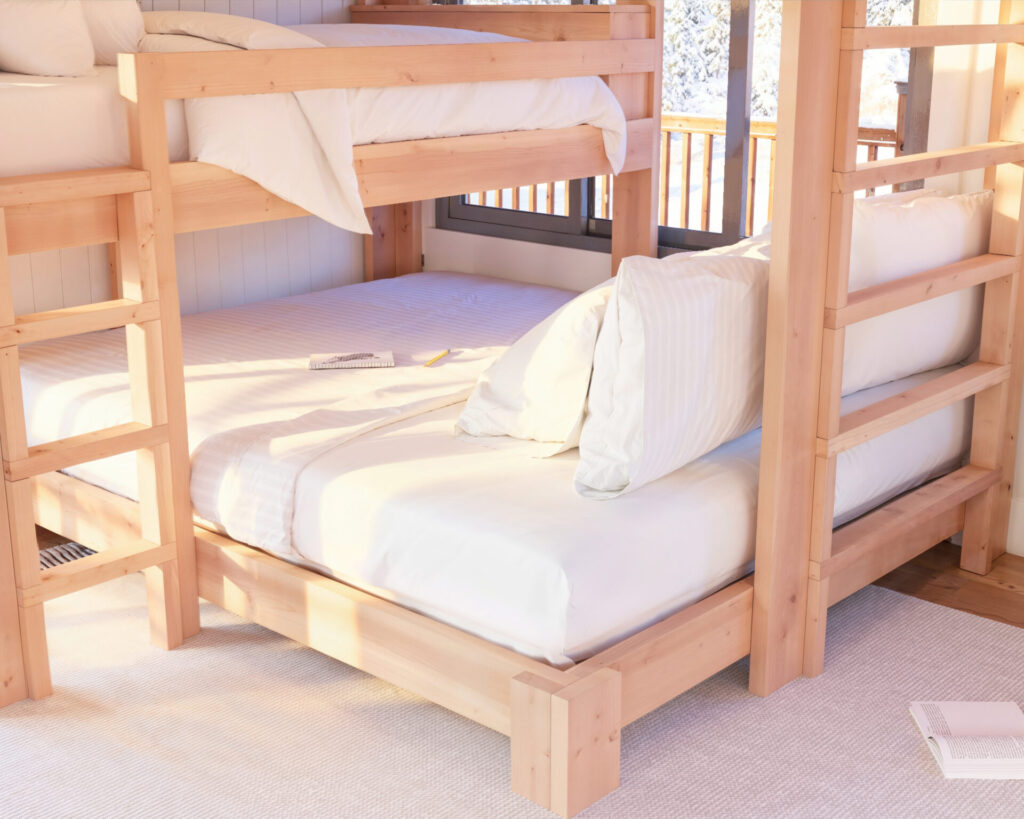
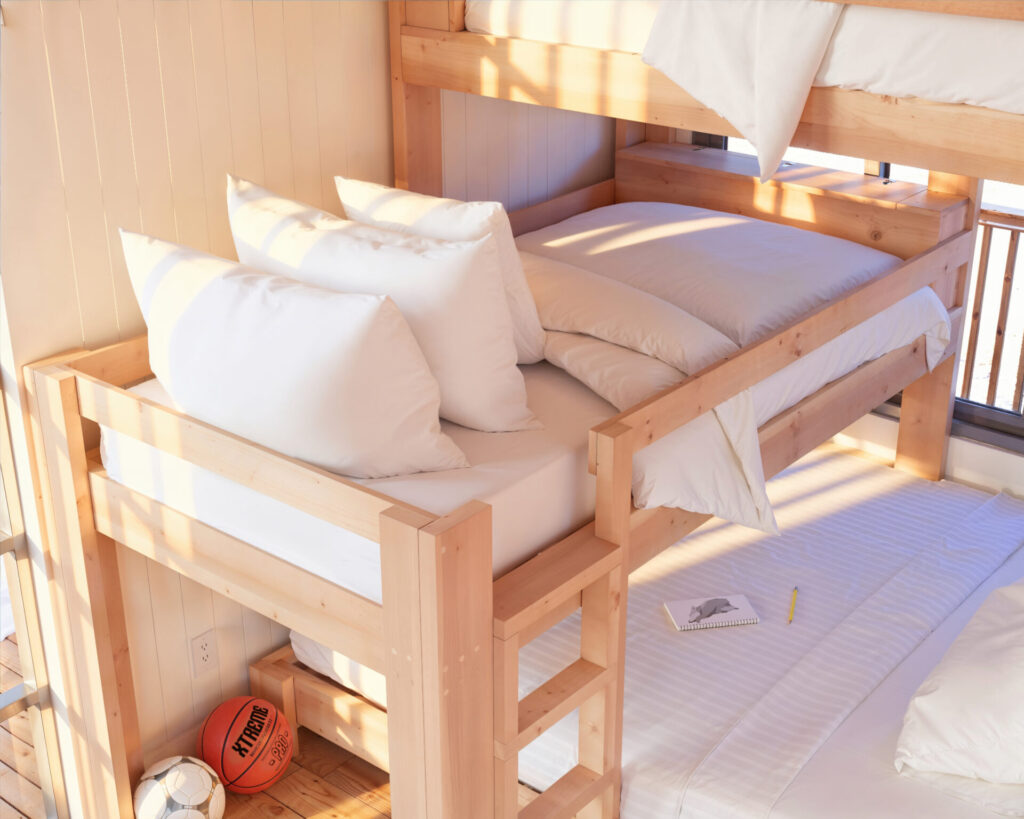
- Guarded Slumber: Rest easy knowing that the twin beds are encircled with sturdy railings, designed to safeguard your children throughout the night.
- Clever Storage: The integrated storage feature is both a space-saver and an organizer’s dream, seamlessly blending functionality with the sleek design of the bed.
Conclusion
In concluding, purchasing our DIY plan equips you with more than just the blueprint for a triple bunk bed—it hands you the compass for a smooth woodworking journey. Each set of plans is a comprehensive toolkit designed to transform lumber into a masterpiece with minimal stress. With our guide, you receive:
- Detailed Step-by-Step Instructions: Every step, from the first cut to the final screw, is laid out with clarity.
- Color-Coded Diagrams: Visualize each phase with diagrams that detail every component’s placement.
- Material and Tool Lists: Prepare with confidence using our curated shopping, cut, and tools lists, ensuring you have everything needed before you start.
- Maintenance Wisdom: Benefit from our maintenance tips that will help your creation stand the test of time.
- Finishing Expertise: Achieve a professional look with our painting and staining guidelines, enhancing your bed’s durability and aesthetic appeal.
Above all, you’re not just buying a plan; you’re gaining a support system. We’re on standby to respond to your messages and emails, ready to guide you to successful project completion. Embrace the satisfaction of DIY without the guesswork—our plan is your path to a hassle-free, rewarding build.
Time
(varies with experience)
Cost
Estimated Project Cost: $500 (Note: Costs can vary by location and supplier.)
Skill level required
Beginner
DIY Triple Bunk Bed PDF Plan
What is included in the PDF download?
- Easy to read step by step instructions
- Material list
- Tools needed
- Helpful links to materials and tools needed
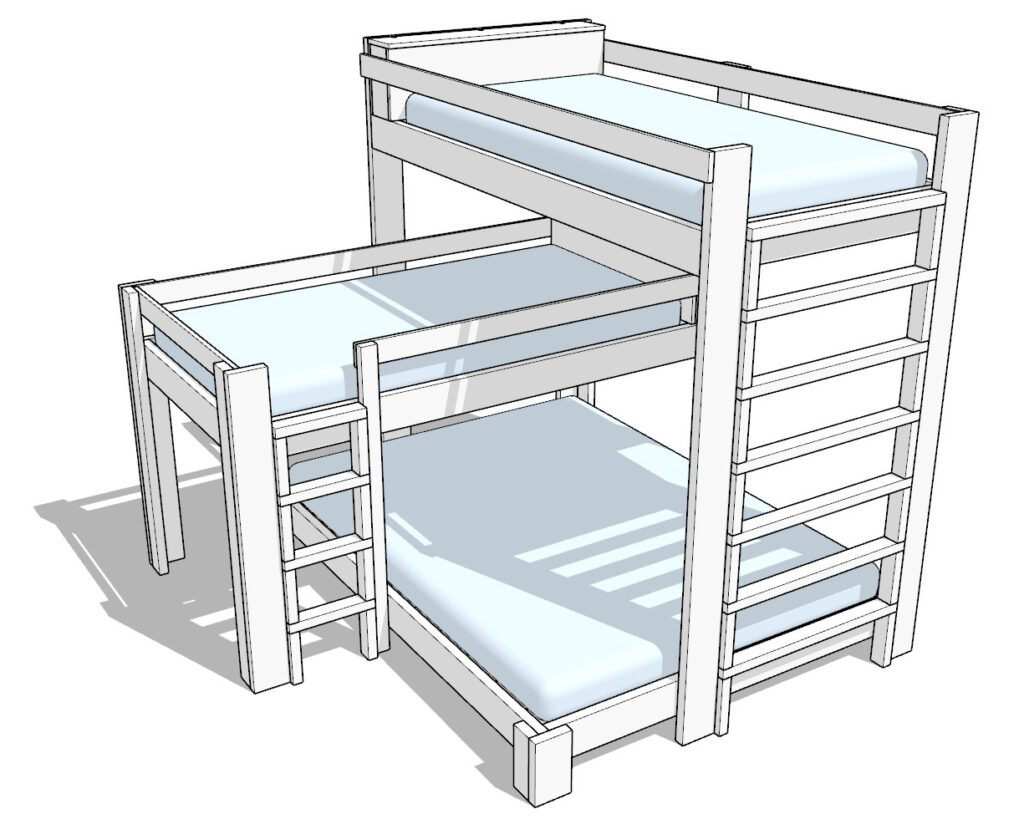
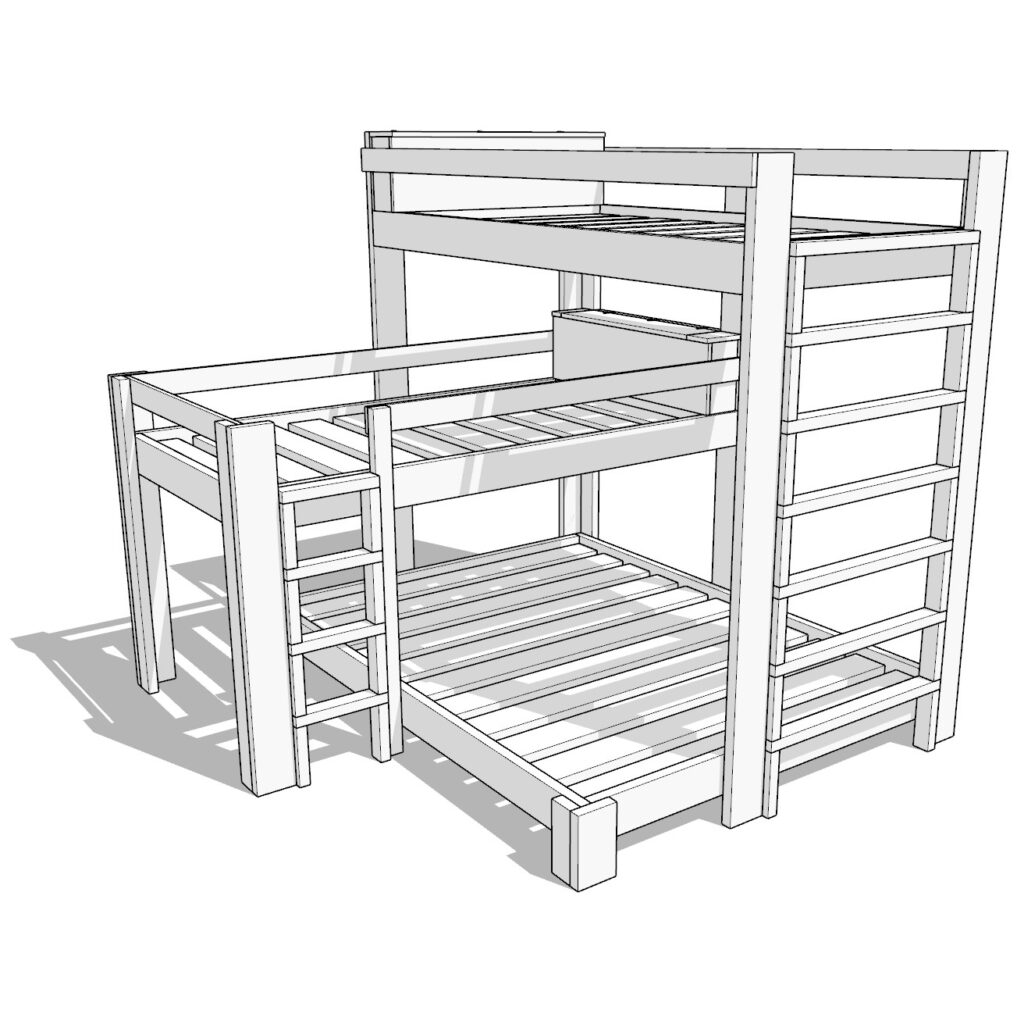
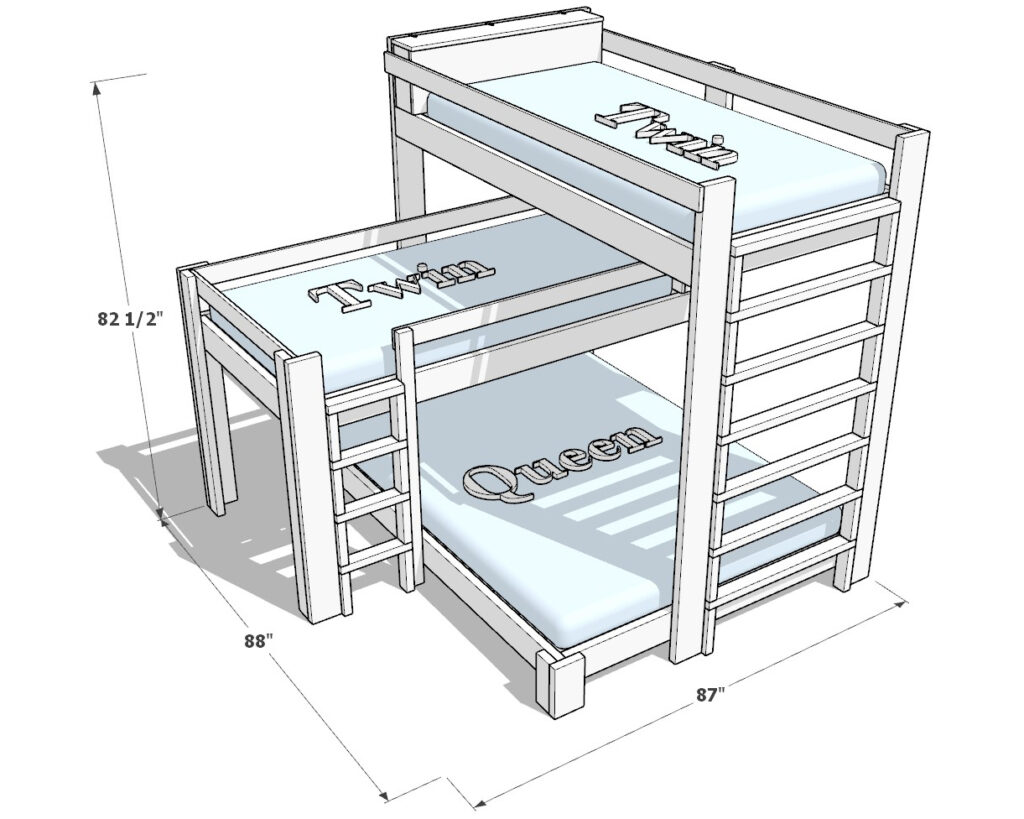
DIY Triple Bunk Bed Dimensions
Tools and Materials List:
Available with the purchase of the DIY plan PDF.
Lumber Cut List:
Available with the purchase of the DIY plan PDF.
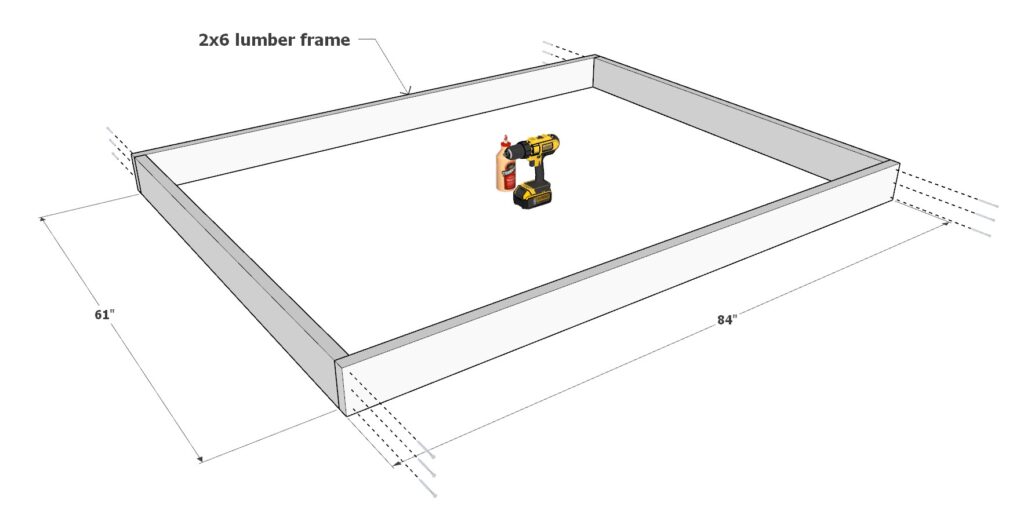
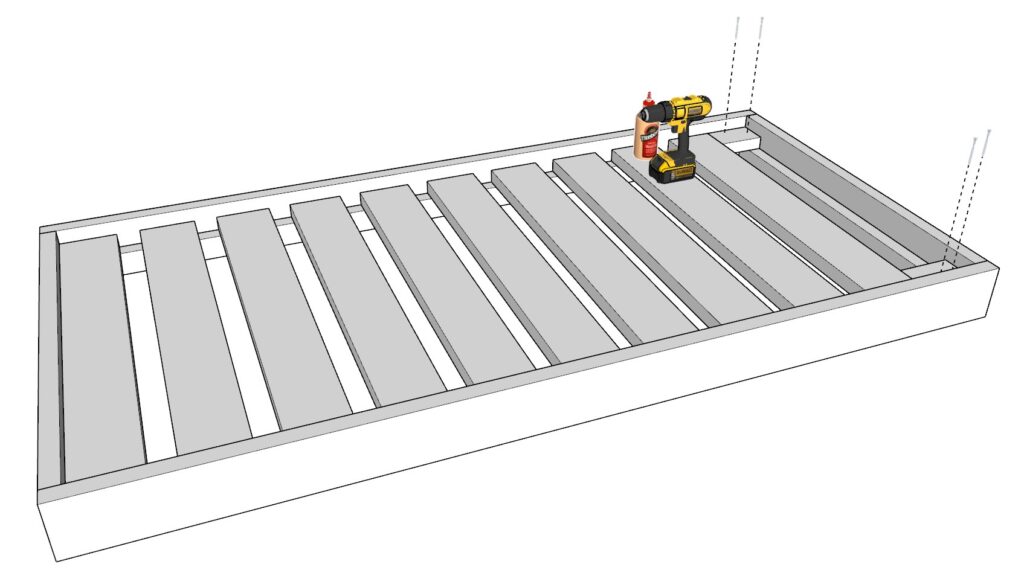
Step 1: Constructing the Queen Bed Frame
1.1 Assembling the Primary Frame
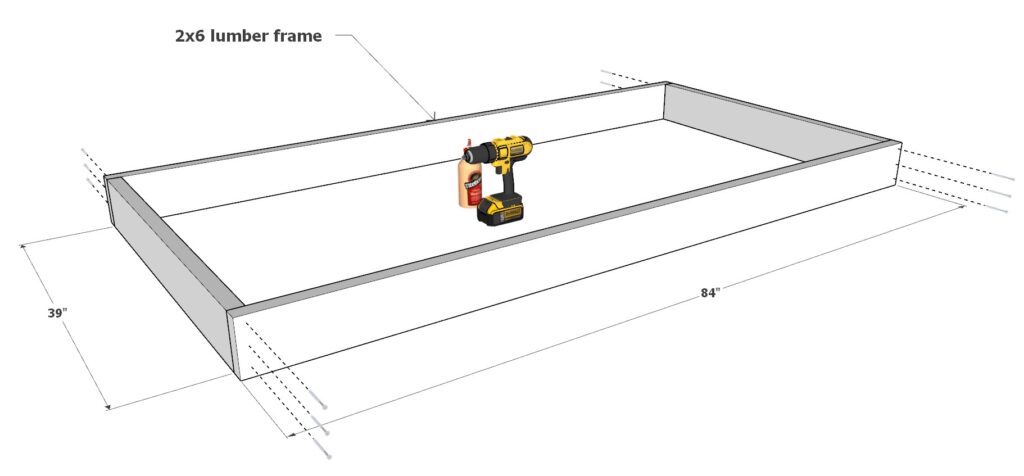
- Outline the Frame: Position the two 84″ 2×6 pieces parallel to each other, and place the two 61″ 2×6 pieces between them at the ends, forming a rectangle.
- Secure the Corners: Apply wood glue at each corner junction, then fasten with 3.5″ screws to create a solid rectangular frame.
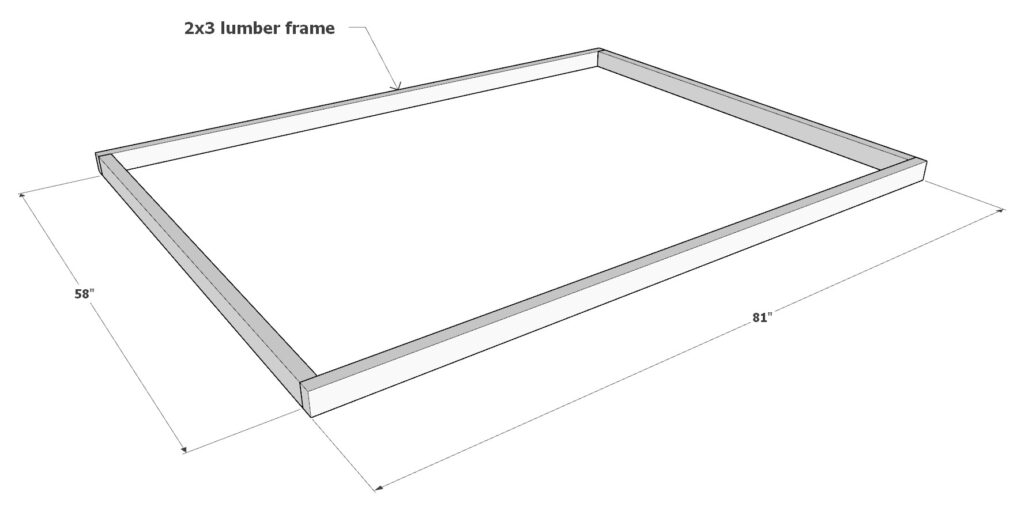
1.2 Adding the Inner Support Frame
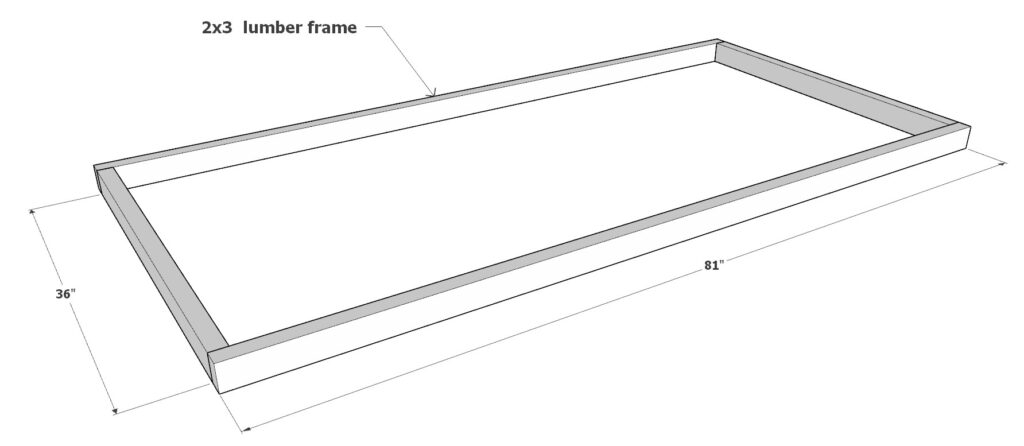
- Form the Inner Rectangle: Within the primary rectangle, lay the two 81″ 2×3 pieces parallel to the longer sides and the two 58″ 2×3 pieces at the ends, mirroring the outer frame but inside it.
- Secure the Inner Frame: Attach this frame to the primary one using 2.5″ screws and wood glue, ensuring the screws are short enough not to protrude through the exterior.
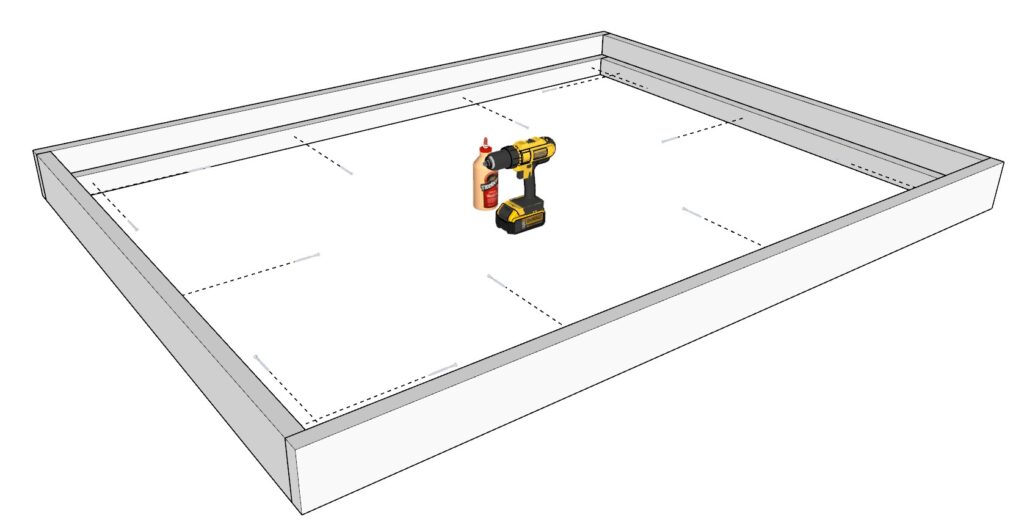
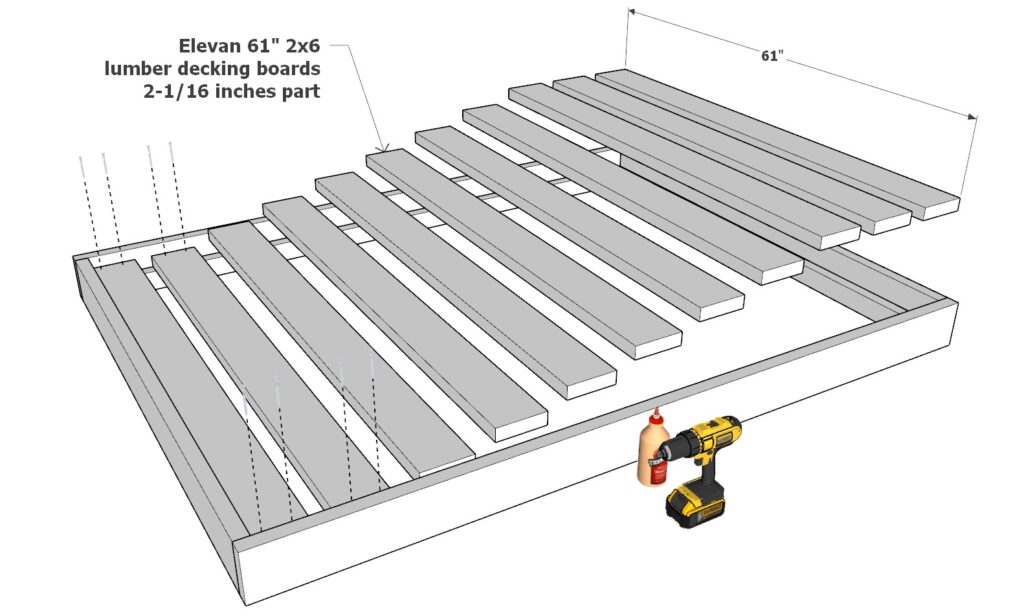
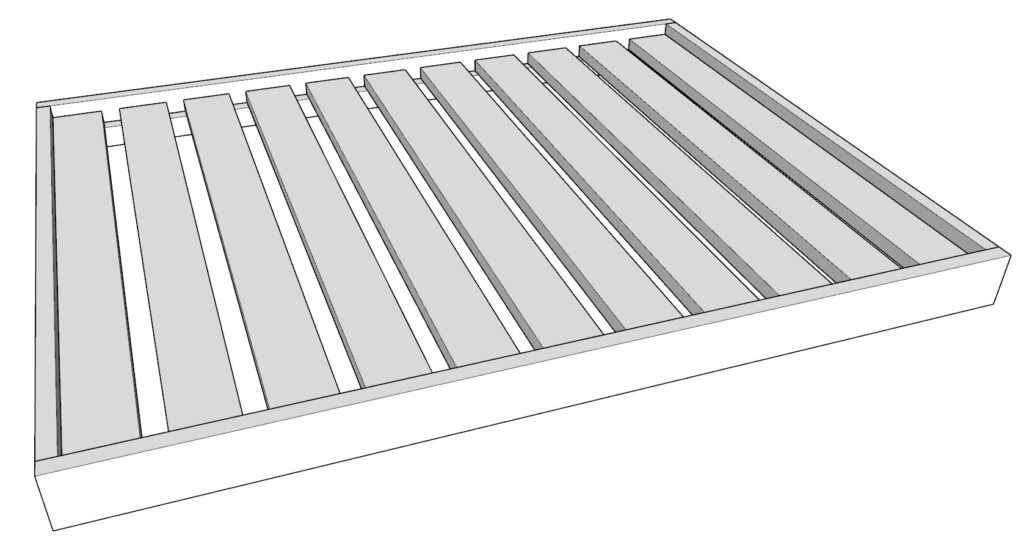
1.3 Decking the Bed
- Layout the Decking Boards: Distribute the eleven 61″ 2×6 boards across the frame’s top, maintaining a gap of 2-1/16″ between each for even spacing.
- Secure Each Board: Affix the boards to the frame with 2.5″ screws, ensuring a tight and flush fit against the frame.
Tips for Success:
- Pre-Drill Holes: To minimize wood splitting, pre-drill holes before inserting screws, especially near the ends of the boards.
- Sanding for Smoothness: For the best finish, sand all lumber pieces before assembly. This not only enhances the bed’s appearance but also makes it safer by removing splinters.
- Even Spacing Made Easy: For consistent spacing between decking boards, craft a 2-1/16″ thick spacer from scrap wood. Use it as a guide when placing boards to ensure uniform gaps.
- Consider Hole Treatment: Decide how you will treat screw holes—fill with wood putty, use dowels, or leave as is. If opting for wood putty, test on a scrap piece to check the stain match.
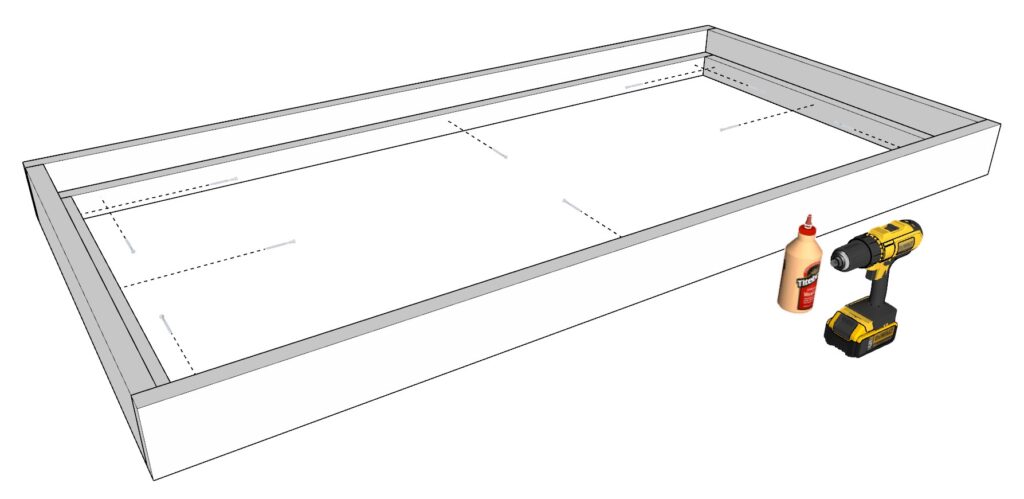
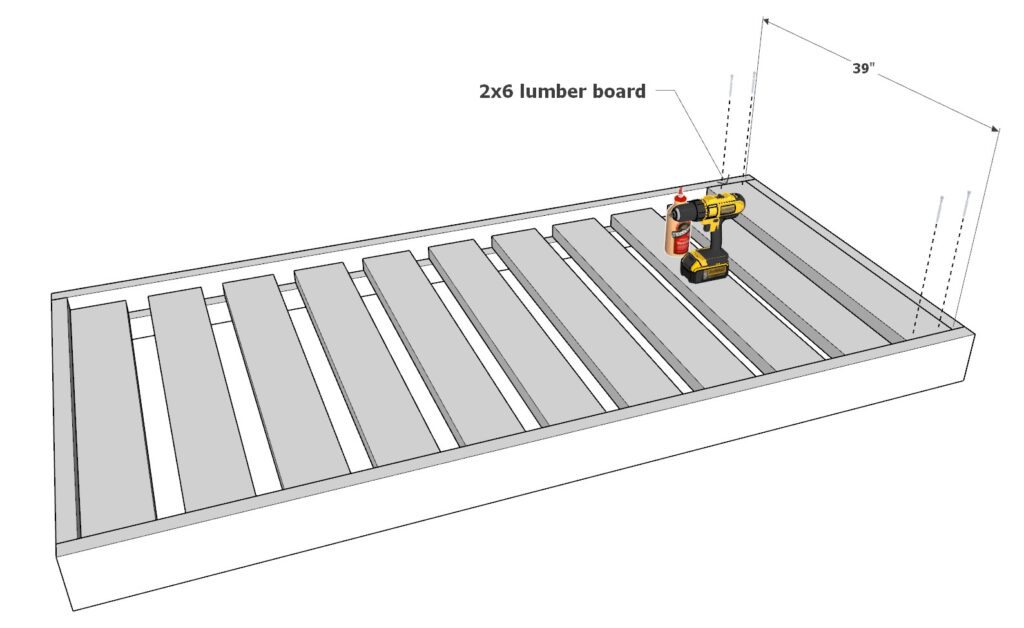
Step 2: Assembling the Twin Bed Frames
2.1 Constructing the Outer Frame
- Layout the Frame: Arrange the two 84″ 2×6 lumber pieces and the two 39″ 2×6 lumber pieces into a rectangle, similar to the queen frame construction.
- Join the Corners: Apply wood glue at the junctions and secure the corners with 3.5″ screws, ensuring the frame is square and stable.
2.2 Adding the Inner Support Frame
- Form the Inner Support: Inside the larger rectangle, position the two 81″ 2×3 lumber pieces and the two 36″ 2×3 lumber pieces to create a smaller rectangle.
- Secure the Support: Fasten this inner frame to the outer frame using 2.5″ screws and wood glue for added stability.
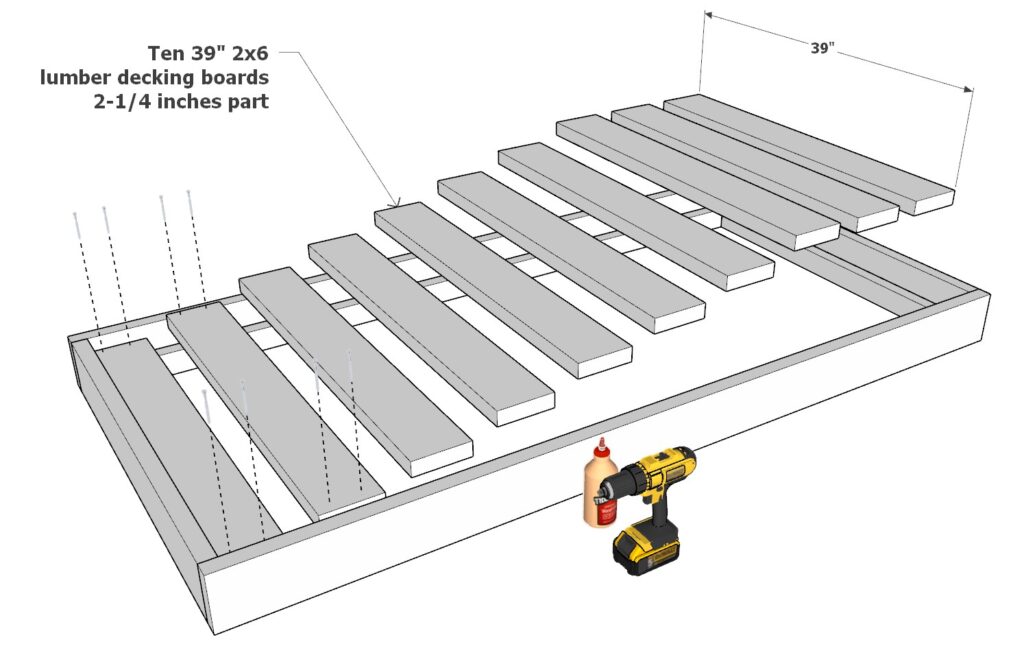
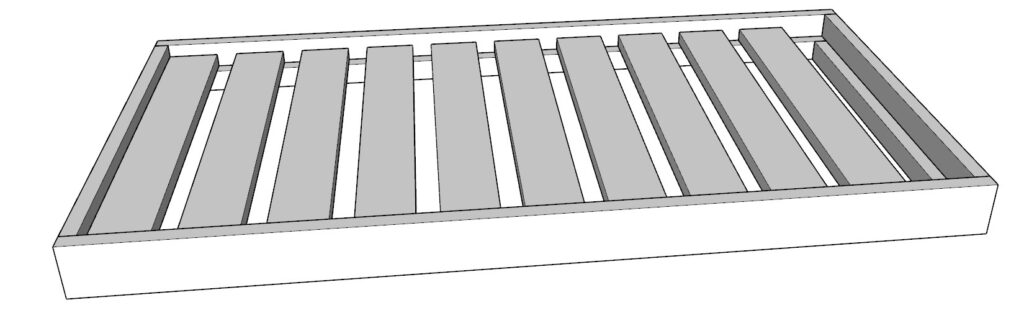
2.3 Decking the Twin Bed Frame
- Space the Decking Boards: Lay out ten 39″ 2×6 boards across the top of the frame, leaving a gap of 2-1/4″ between each for even support.
- Secure the Boards: Fix each board to the frame with 2.5″ screws and wood glue, ensuring they are firmly attached.
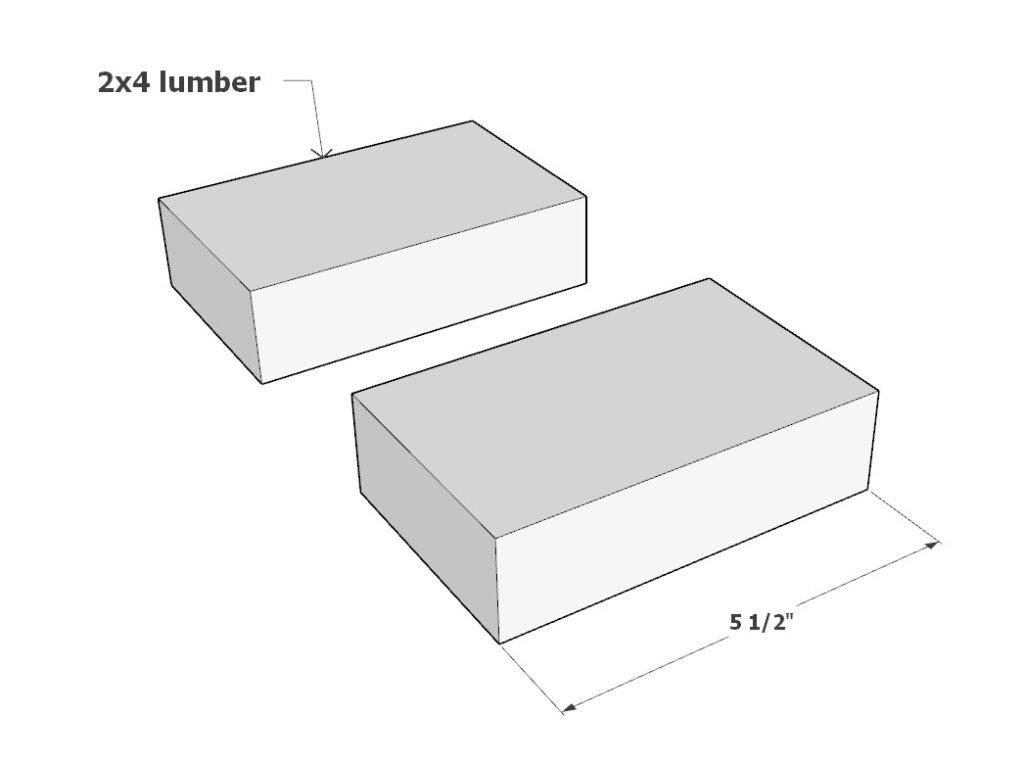
2.4 Filling the Gap
- Place the 2×4 Pieces: In the remaining 5-1/2″ gap at the end of the frame, position the two 5-1/2″ 2×4 lumber pieces.
- Secure the Pieces: Attach these 2x4s to the frame with 2.5″ screws and wood glue, making sure they are flush with the decking pieces surface.
2.5 Adding the Final Board
- Top Off the Frame: Place one more 39″ 2×6 lumber board on top of the 2×4 pieces you just secured.
- Final Attachment: Use wood glue and 2.5″ screws to attach this board.
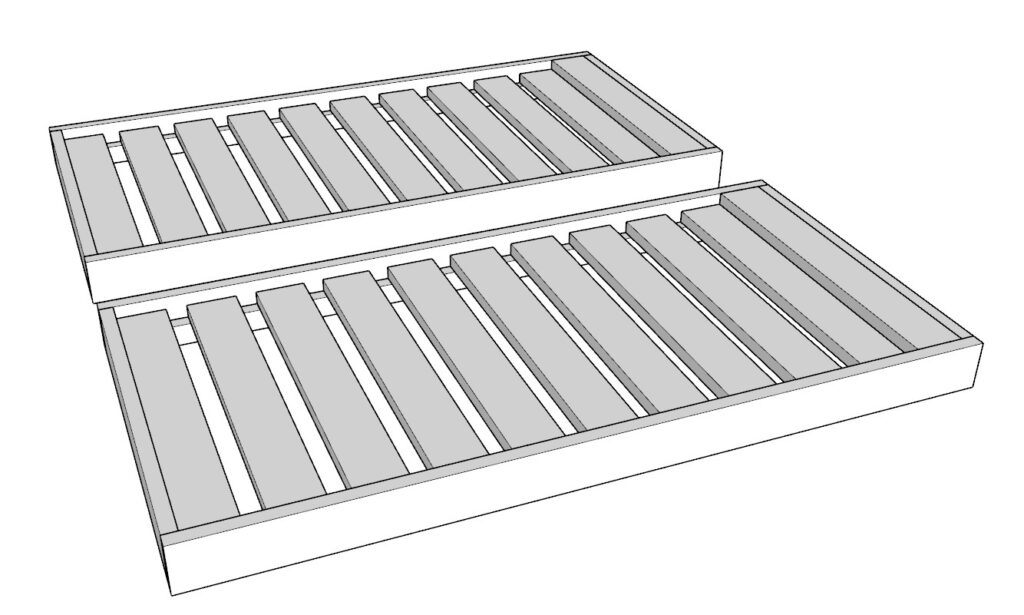
Repeat for Second Twin Bed Frame
- Build Another Frame: Following the same steps, construct a second identical twin bed frame to complete the setup.
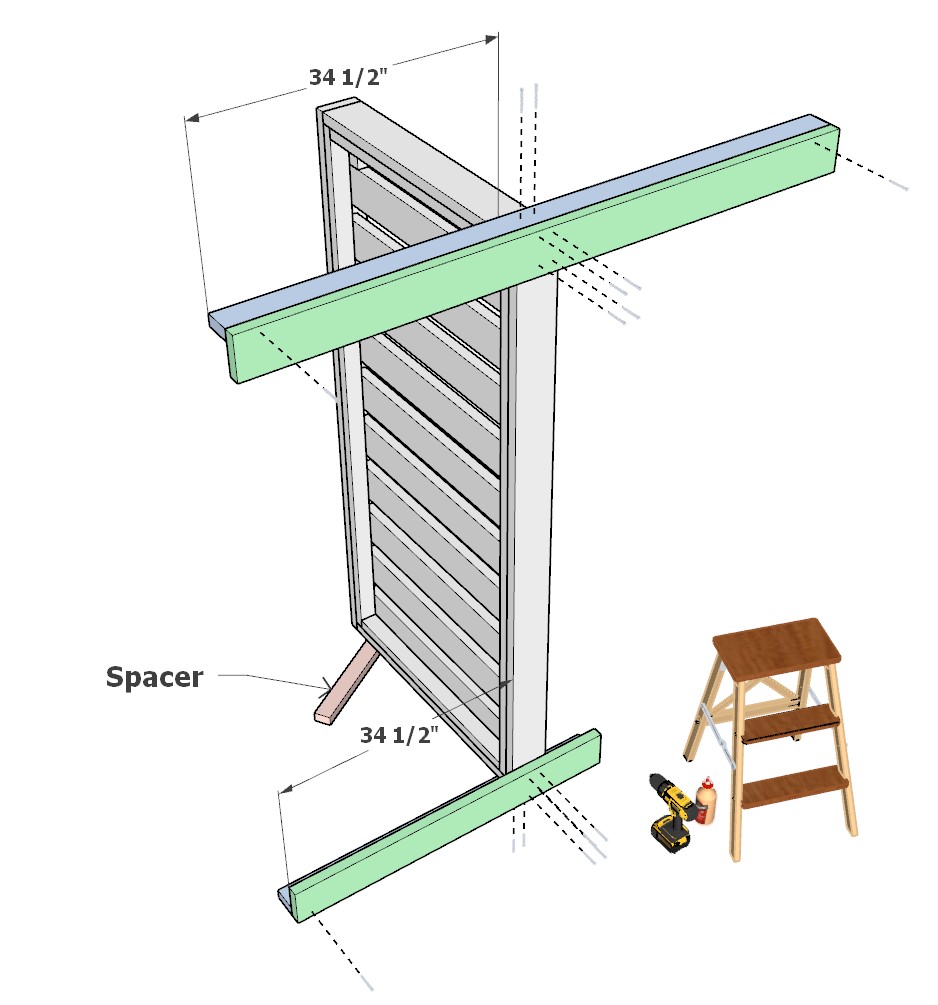
Step 3: Building the Vertical Support Frame
3.1 Attaching the Base Supports
- Prepare the Base: Begin by placing the twin bed frame upright. Use a 1.5-inch thick spacer beneath one end to keep it stable and level while you work. It’s essential to have a helper to hold the frame steady during this step.
- Attach Side Supports: Secure one 48-1/2″ 2×4 and one 48-1/2″ 2×6 lumber piece to the side of the twin bed frame as indicated in the diagram, using 3.5″ screws and wood glue for a solid bond.
3.2 Assembling the Vertical Supports
- Additional sides support Pieces: Fasten one 80″ 2×4 and one 80″ 2×6 lumber piece together with screws and glue, forming the initial vertical support structure. Attach using 3.5″ screws and glue.

3.3 Completing the Vertical Framework
- Install the Remaining Supports: Following the diagram, add two more 80″ 2×6 lumber piece to the structure as indicated, securing it in place with screws and glue.
- Final Supports: Attach the remaining 48-1/2″ 2×4 and 48-1/2″ 2×6 lumber pieces to the other side of the twin bed frame, using 3.5″ screws and glue.
Tips for Success:
- Stability is Key: Always ensure your working area is stable. Use spacers and have a partner assist you to maintain the frame’s balance as you work.
- Accuracy: Use a level when attaching vertical supports to ensure that they are perfectly upright. This will prevent any future wobbling or instability.
- Clamping: If available, use clamps to hold the pieces together tightly while the glue sets before you screw them in place.
- Safety First: Utilize a step ladder for reaching the higher points of the frame safely when attaching vertical supports.
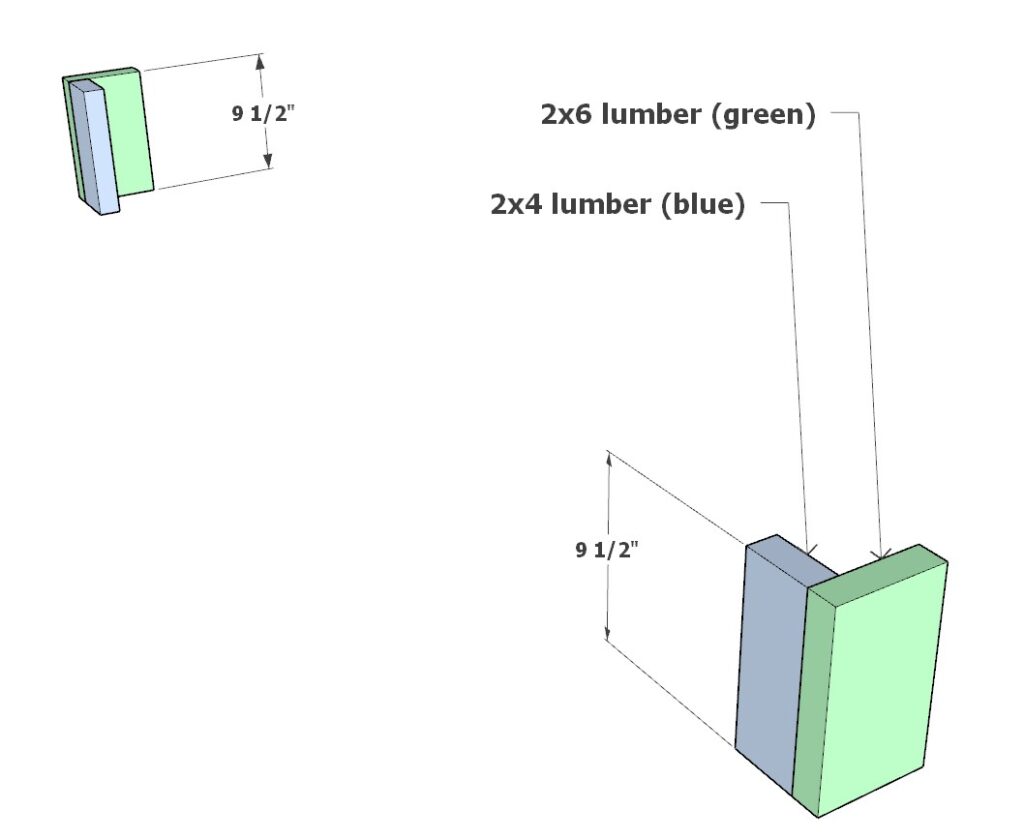
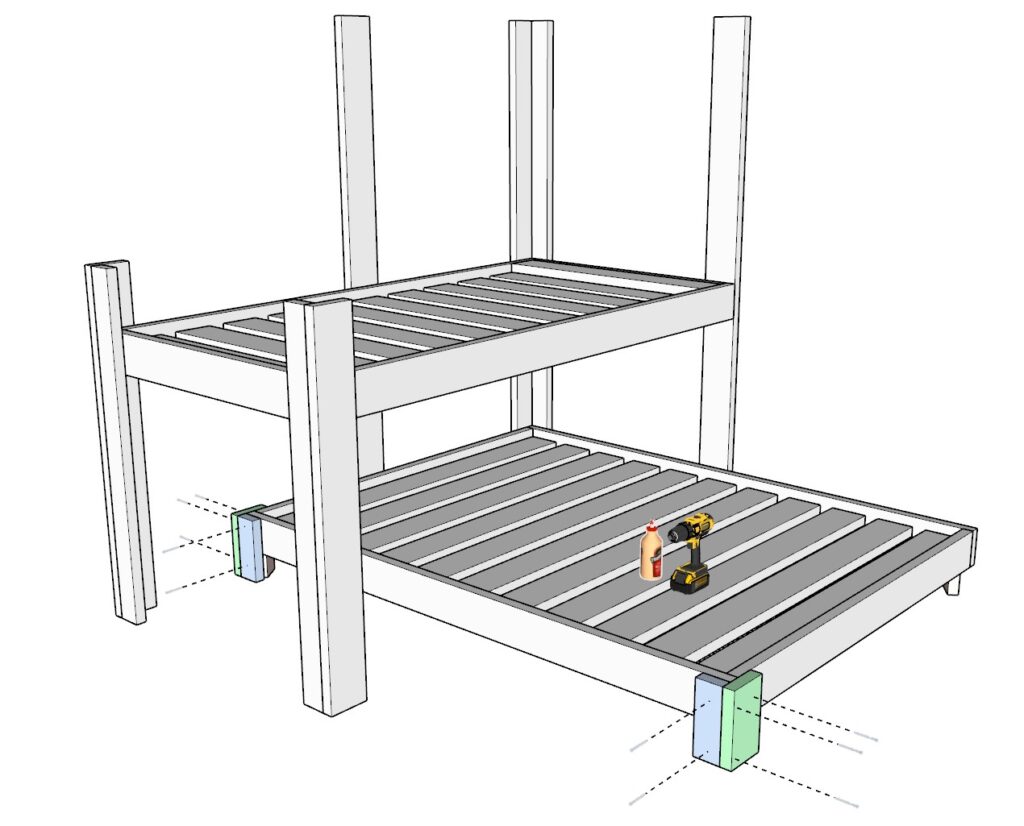
Step 4: Elevating and Attaching the Queen Bed Frame Legs
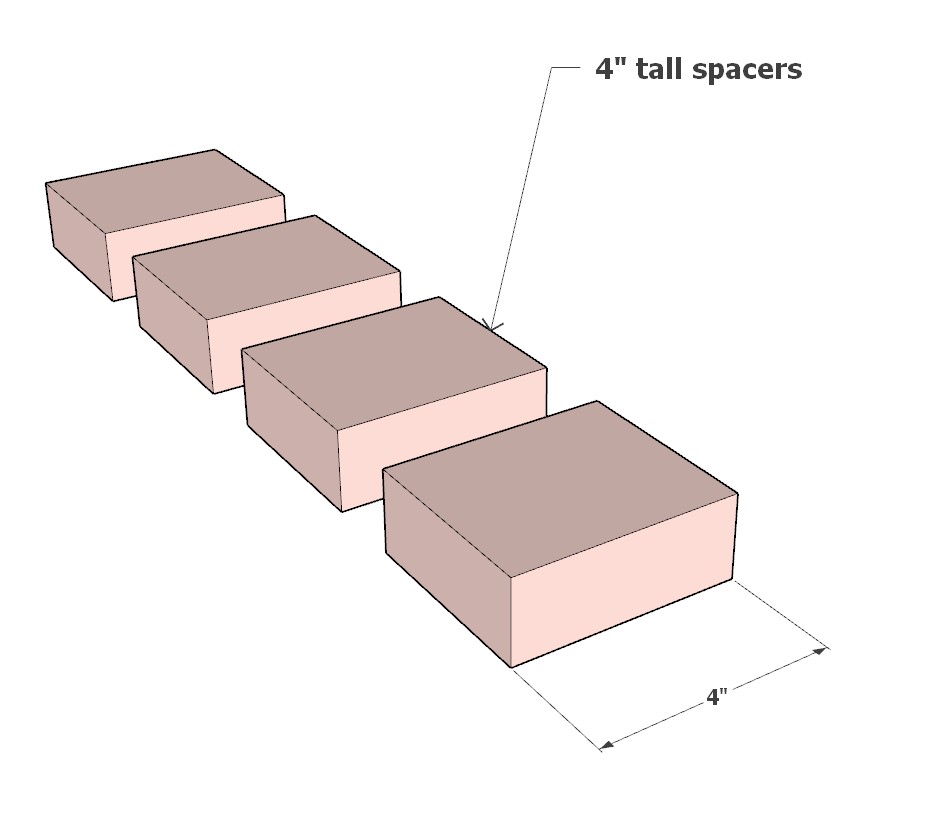
4.1 Creating and Placing the Spacers
- Cut the Spacers: Measure and cut four pieces of wood to 4 inches in length. These will be used as spacers to elevate the queen bed frame.
- Position the Spacers: Place the spacers underneath the corners of the queen bed frame, raising it exactly 4 inches above the ground. Ensure that they are evenly placed for stability.
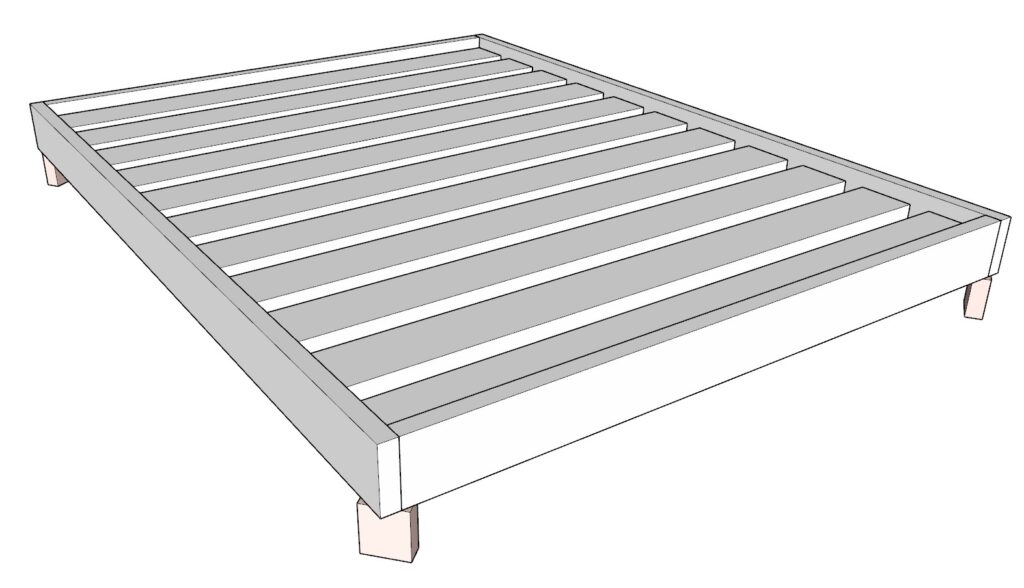
4.2 Installing the Legs
- Prepare the Legs: Take two 9-1/2″ 2x4s and two 9-1/2″ 2x6s; these will serve as the legs for the queen bed frame.
- Attach the Legs: Apply wood glue to the top of each leg, position them at the corners of the queen bed frame on top of the spacers, and secure them using 2.5″ screws. Make sure the legs are perpendicular to the frame for proper support.
4.3 Securing the Frame to Vertical Supports
- Align the Frame: With the legs attached, lift and align the queen bed frame with the vertical supports from the previous step.
- Secure the Frame: Attach the queen bed frame to the vertical supports as shown in the diagram using 2.5″ screws and wood glue, ensuring a strong connection for optimal stability.
Tips for Success:
- Consistency: Make sure all spacers are the same height to avoid any imbalance in the bed frame.
- Precision: Double-check that the legs are cut to the exact same length and attached squarely to maintain a level bed frame.
- Strength in Connections: Use an adequate amount of wood glue and screws at each joint to ensure a solid and lasting bond.
- Safety: When lifting and aligning the queen bed frame to the vertical supports, it’s advisable to have assistance to maintain control and ensure safety.
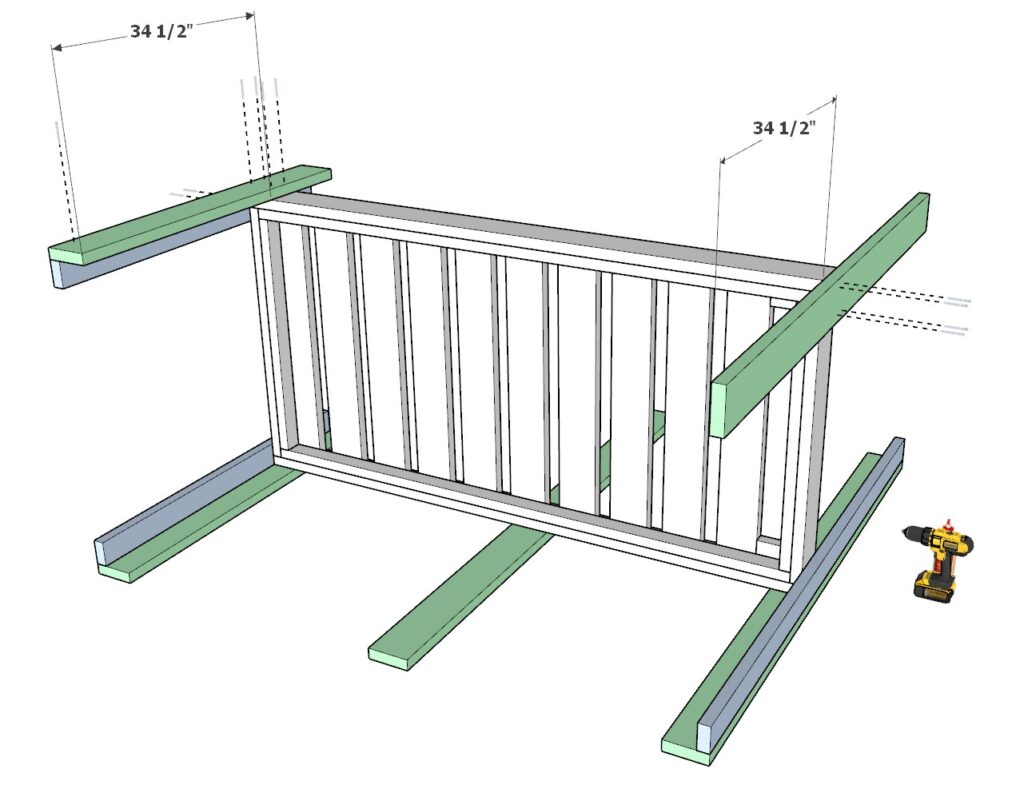
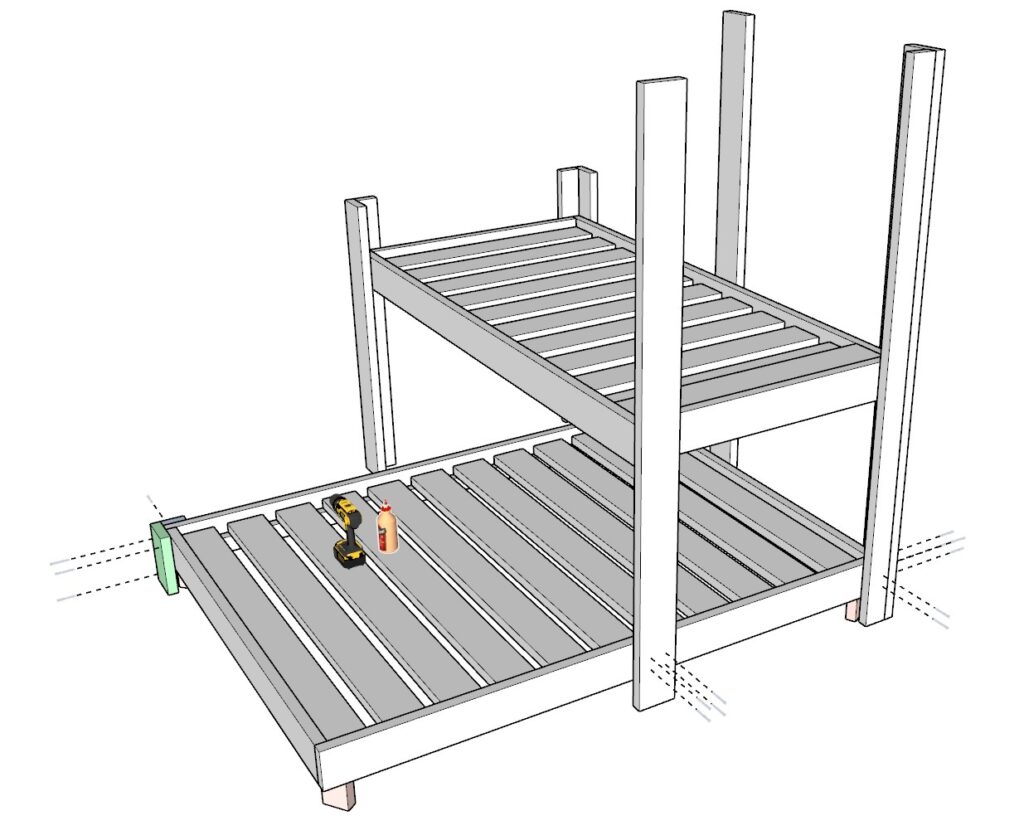
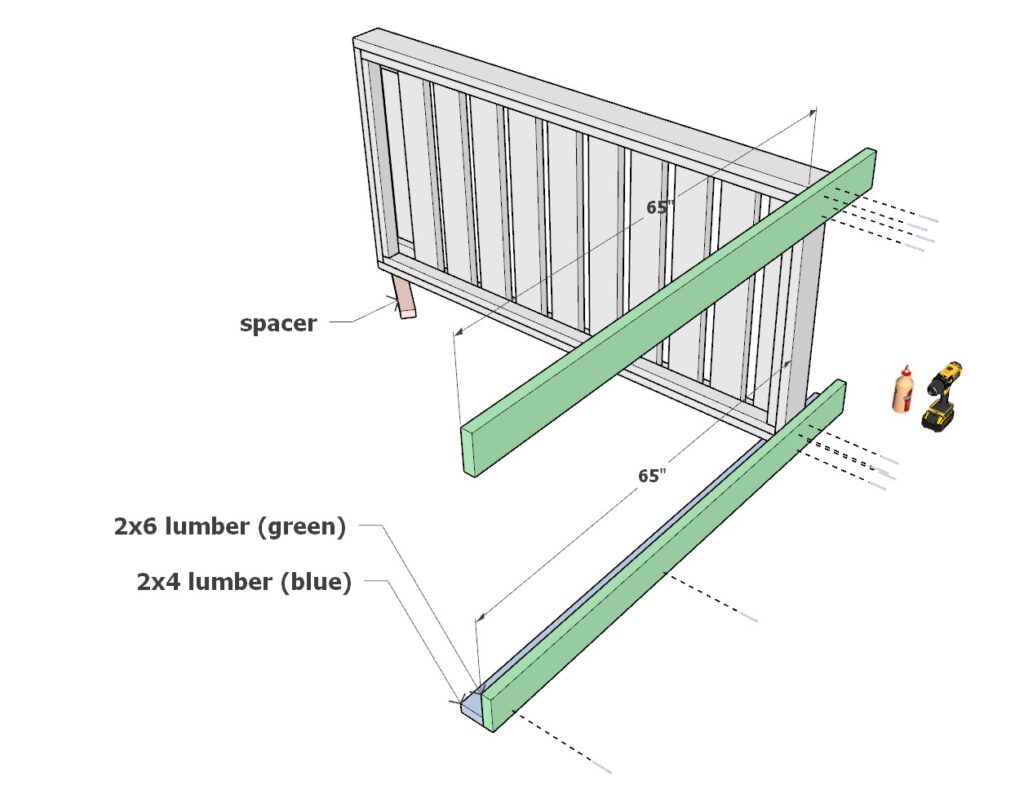
Step 5: Installing the Topmost Twin Bed Frame
5.1 Preparing the Twin Bed Frame
- Attach the Support Pieces: On the remaining twin bed frame, affix two 65″ 2×6 lumber pieces and one 65″ 2×4 lumber piece. Place them according to the diagram provided, ensuring they align correctly with the frame.
- Secure the Supports: Use wood glue on the contact surfaces and reinforce the structure with 2.5″ screws. Ensure that the screws are evenly spaced and driven in straight for a firm hold.
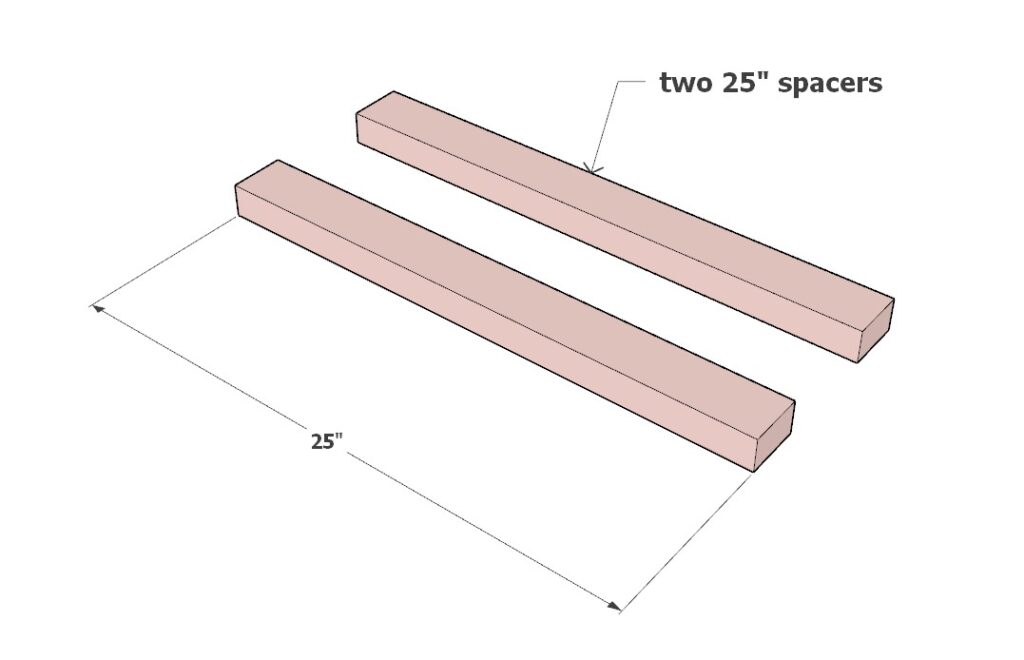
5.2 Positioning the Frame for Installation
- Create Temporary Supports: Cut two 25″ pieces of wood to use as spacers. These will temporarily support the twin bed frame while you attach it to the vertical structure.
- Clamp the Spacers: Position the spacers against the vertical supports at the height where the top bunk will be installed, as shown in the diagram. Use wood clamps to hold these spacers in place securely.
5.3 Attaching the Top Bunk
- Lift the Frame: Carefully raise the prepared twin bed frame to rest on the temporary spacers. It’s crucial to have assistance during this step to ensure safety and to keep the frame steady.
- Secure the Frame to Vertical Supports: Once the frame is resting evenly on the spacers, apply wood glue where it will connect with the vertical supports. Attach the frame to the supports using 2.5″ screws, following the diagram for proper placement.

Tips for Success:
- Use a Level: As you attach the support pieces and install the frame, use a level to ensure everything is perfectly horizontal. This will prevent any unevenness in the finished bunk bed.
- Steady as You Go: Take your time during this step to ensure the frame is correctly aligned before securing it. A steady hand will result in a more polished final product.
- Check and Re-check: Before finalizing the installation, double-check that all connections are tight and the frame is securely attached to the vertical supports.
- Remove Temporary Supports: Once the top bunk is firmly in place, carefully remove the clamps and spacers.
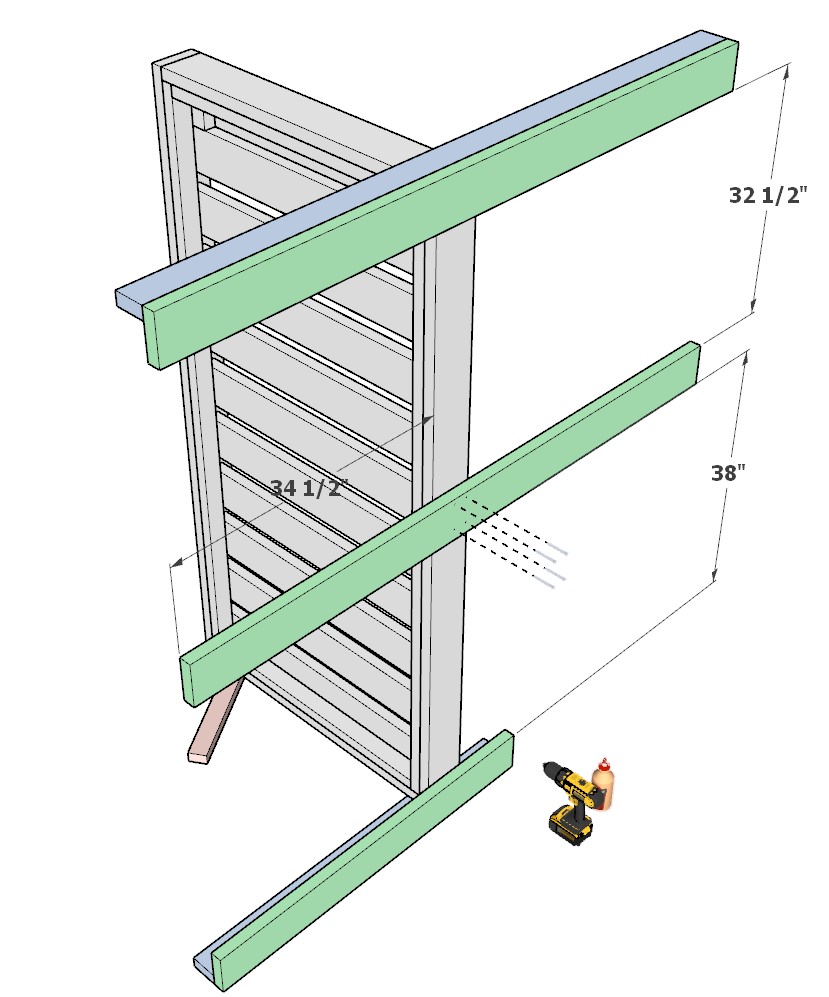
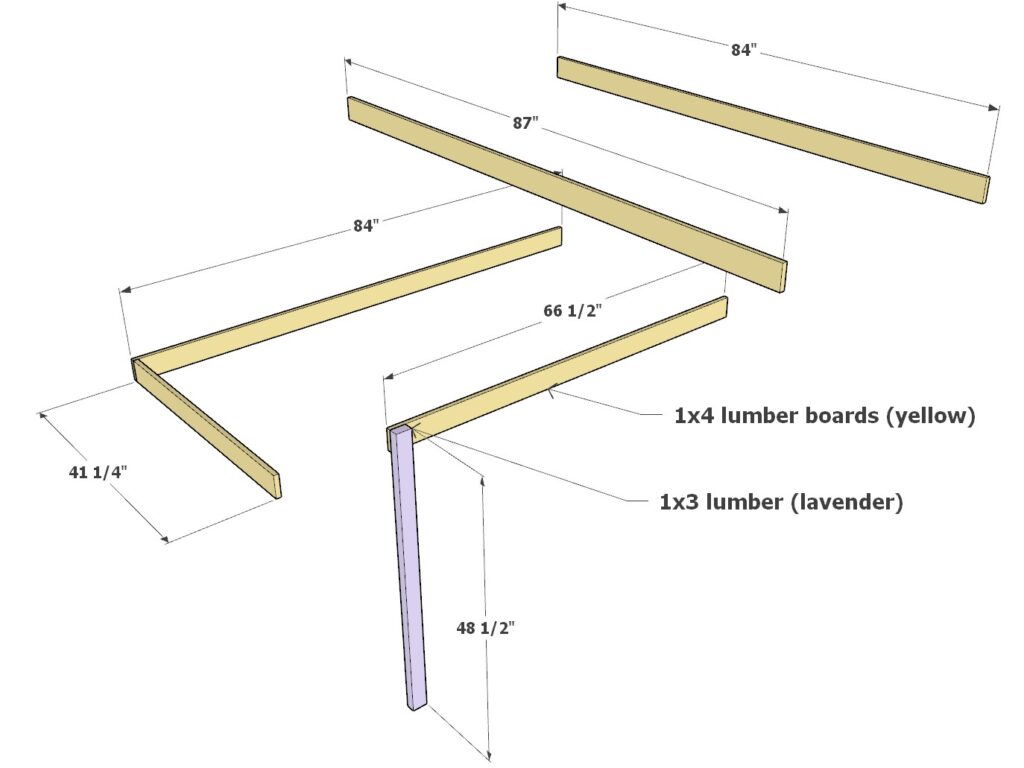
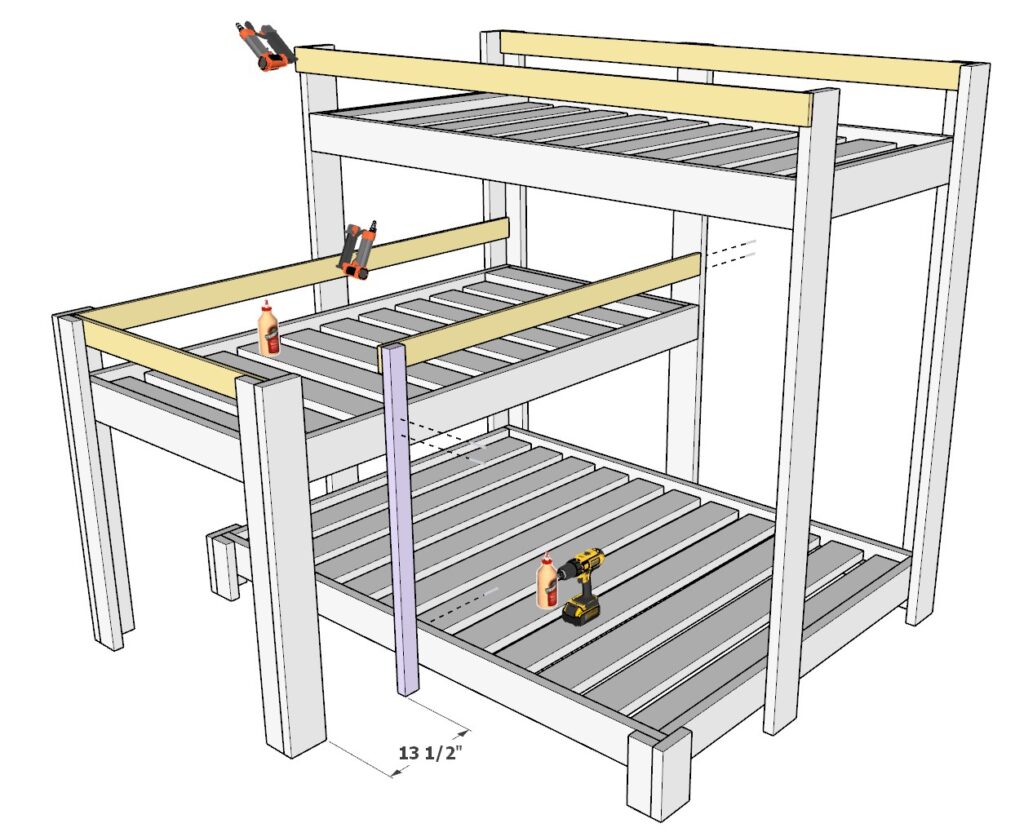
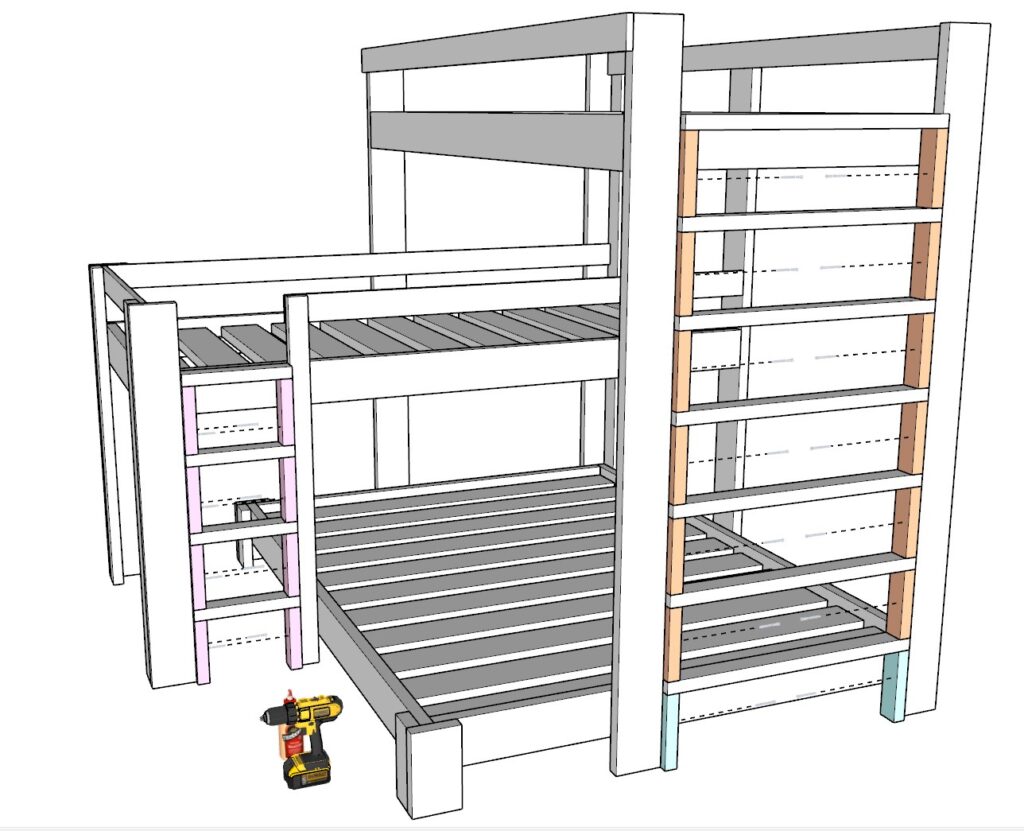
Step 6: Installing Railings and Ladder Support
6.1 Preparing the Railing Pieces
- Measure and Cut: Ensure you have the 1×4 lumber pieces cut to the following lengths for the railings: two at 84″, one at 87″, one at 66-1/2″, and one at 41-1/4″. Also, prepare one 48-1/2″ long 2×3 piece for the ladder support.
6.2 Attaching the Railings
- Position the Railings: Locate the appropriate positions for the railing pieces on the bunk bed frames as indicated in the diagram.
- Secure the Railings: Apply wood glue to the contact areas of the railings and attach them to the frame. Use a pin nailer with 1.25-1.5 inch nails for a secure hold. For places where the pin nailer isn’t suitable, switch to using 2.5″ screws.
6.3 Installing the Ladder Support
- Place the Ladder Support: Take the 48-1/2″ 2×3 lumber piece (labeled in lavender in the diagram) and align it with the bed frame where the ladder will be attached.
- Secure the Support: Glue the ladder support in place and use 2.5″ screws to attach it securely to the frame, as shown in the diagram.
Tips for Success:
- Alignment: Ensure the railing pieces are straight and even before securing them. Use a level to check for horizontal alignment.
- Glue and Pin Nail: The combination of wood glue and pin nailing will provide a strong but less visible join, keeping the railings looking neat and professional.
- Use Screws for Strength: In areas that will bear more weight or require extra strength, such as where the ladder will attach, use screws for a more robust construction.
- Check for Snags: After attaching the railings, run your hand along them to check for any snags or sharp edges that may need sanding.
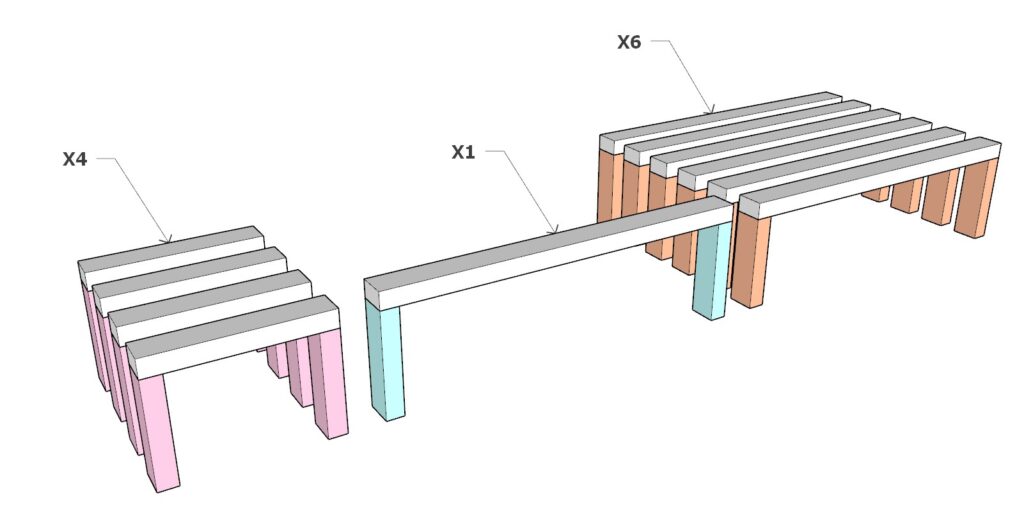
Step 7: Constructing and Installing the Bunk Bed Ladder
Assembling the Ladder Rungs and Supports
- Gather the Ladder Pieces: Collect the color-coded 2×3 lumber pieces for the ladder assembly.
- Pink: Eight pieces, each 8-1/2 inches long
- Teal: Two pieces, each 9 inches long
- Orange: Twelve pieces, each 8-1/2 inches long
- Four additional 13-1/2 inch long 2×3 lumber pieces
- Seven additional 32-1/2 inch long 2×3 lumber pieces
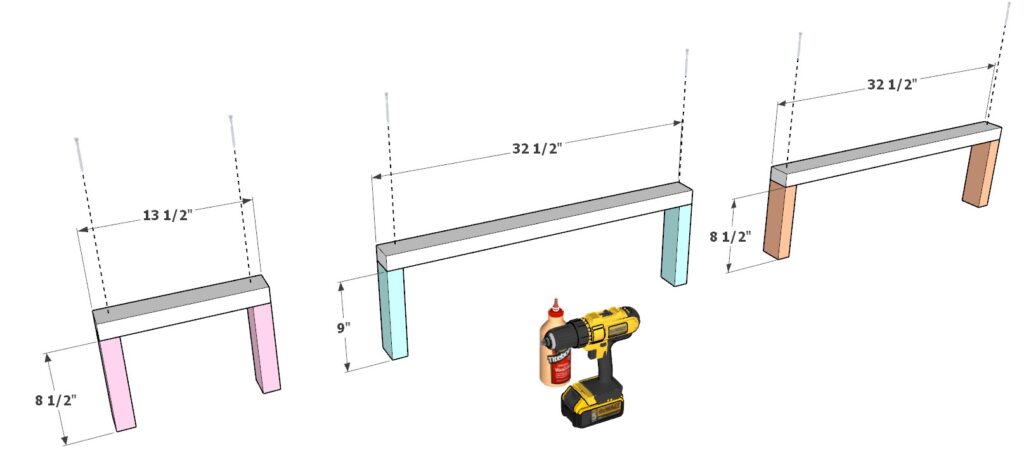
Building the Ladder Sections
- Construct the Ladder Components: Apply wood glue on the ends of each rung and pre-drill holes before securing with 2.5″ screws. Maintain even spacing between the rungs. Repeat the process until all the ladder components are assembled.
Installing the Ladder to the Bunk Bed
- Position the Ladder: Align the assembled ladder pieces with the bunk bed frame where it will be attached. It should be in the location as indicated in the provided diagram.
- Secure the Ladder: Affix the ladder pieces to the frame with wood glue and 2.5″ screws. Make sure to pre-drill the holes to secure the ladder without causing damage.
Tips for Success:
- Pre-Drilling: Always pre-drill holes to prevent wood from splitting. This is especially important for the ladder as it needs to be strong enough to handle weight safely.
- Strong Bonding: Ensure a strong bond by applying a generous amount of wood glue at each joint before screwing the pieces together.
- Test for Stability: After installation, test the ladder for stability and firmness to ensure it can support the intended weight without wobbling or giving way.
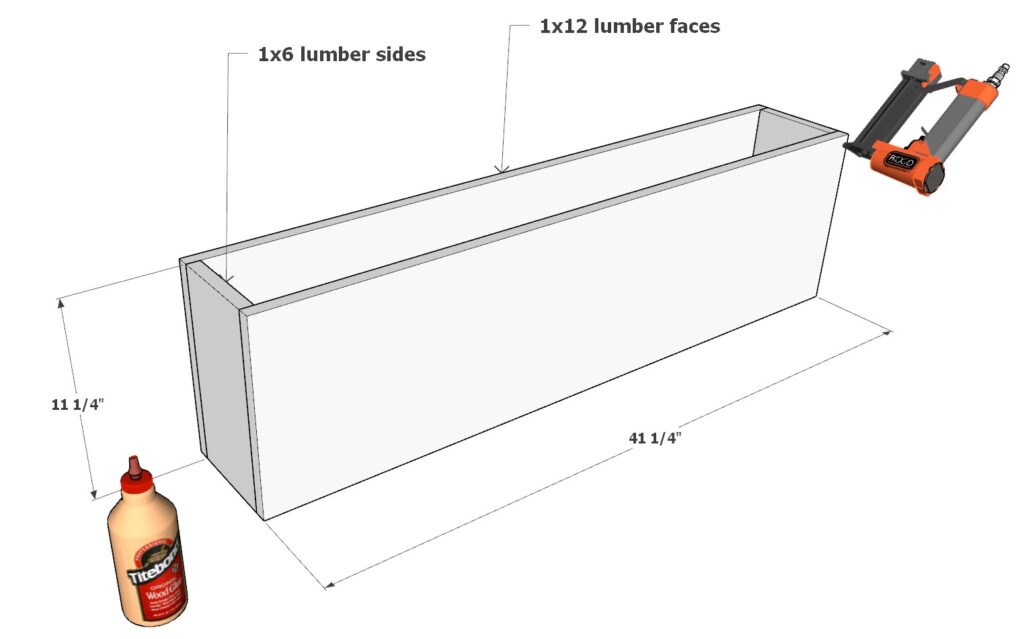
Step 8: Creating the Top Bunk Storage Bin
Constructing the Storage Box
- Gather Materials: Start with two 41-1/4 inch long 1×12 lumber boards for the front and back of the box, and two 11-1/4 inch long 1×6 lumber boards for the sides.
- Form the Box: Arrange these boards to form a rectangular box shape, with the 1×12 boards as the length and the 1×6 boards as the width.
- Assemble the Box: Apply wood glue on the edges where the boards meet, and use a pin nailer with pin nails to secure the boards together, forming the main body of the storage box.
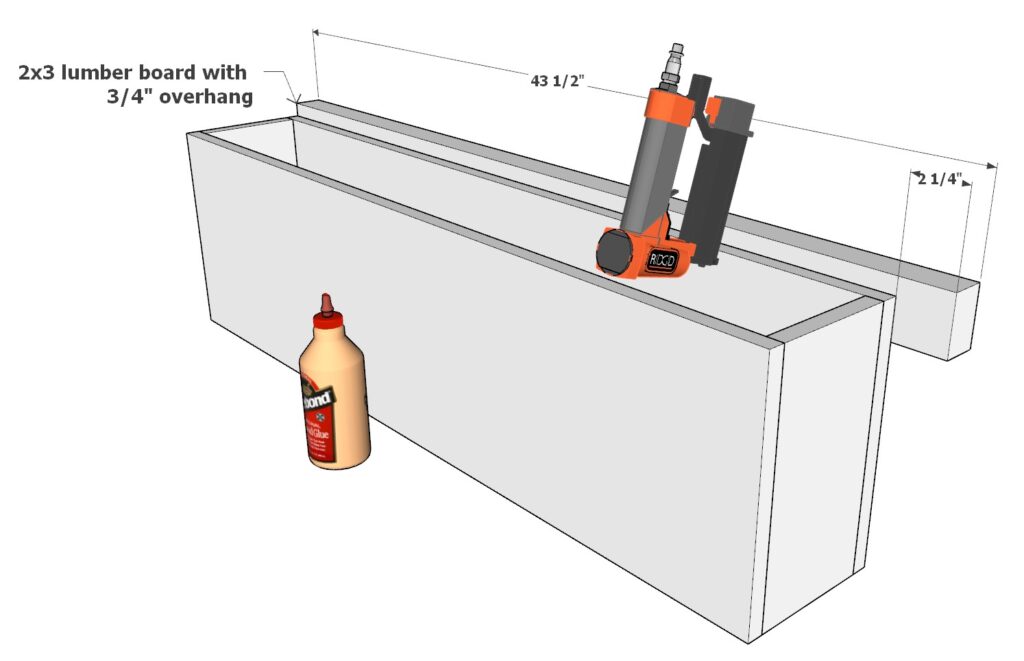
Adding the Support
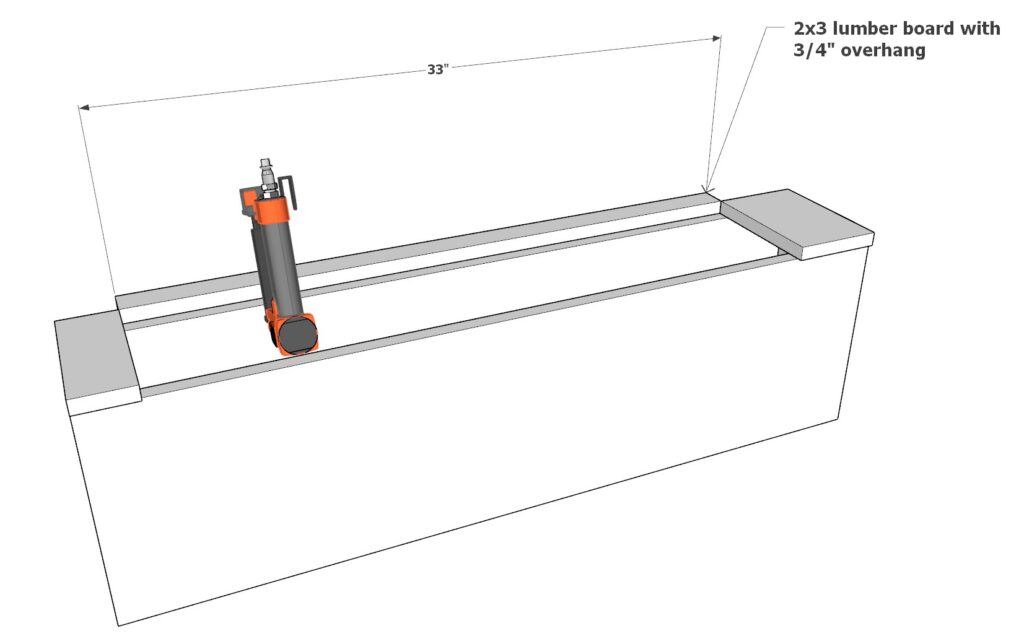
- Prepare the Support: Take a 43-1/2 inch long 2×3 lumber piece; this will act as a support rail for the lid.
- Attach the Rail: Position the 2×3 so that it overhangs by 3/4″ on the backside of the storage box, which is crucial for attaching the lid. Secure the rail to the box using a pin nailer and wood glue.
Attaching the Lid
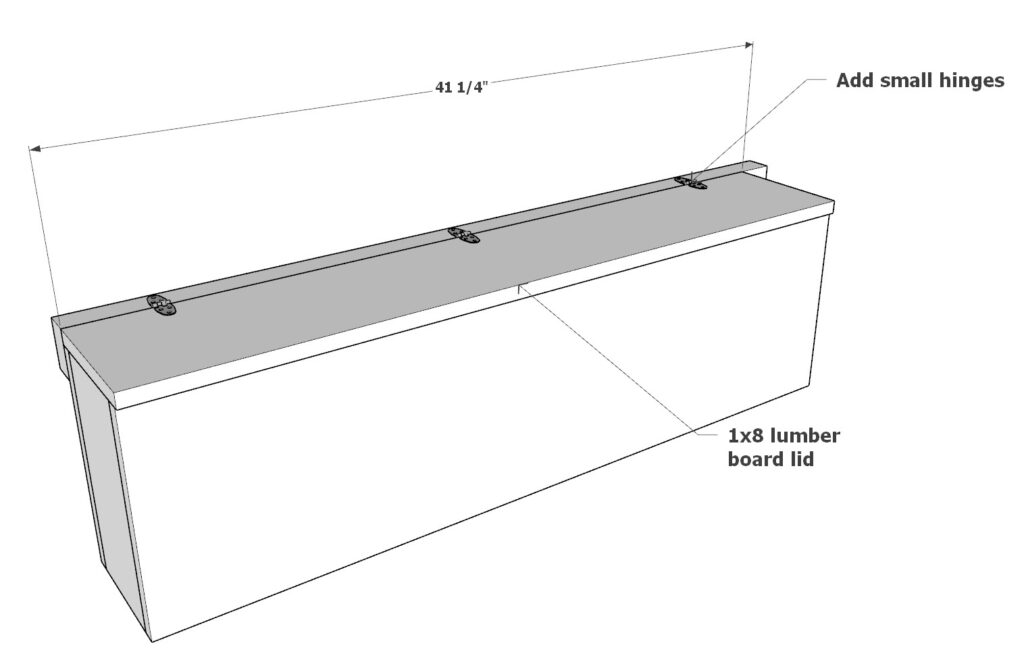
- Lid Placement: Place a 41-1/4 inch long 1×8 lumber piece on top of the box to serve as the lid.
- Install Hinges: Attach the lid to the overhanging 2×3 support rail using small hinges, ensuring that the lid can open and close easily.
Securing the Storage Box to the Bed
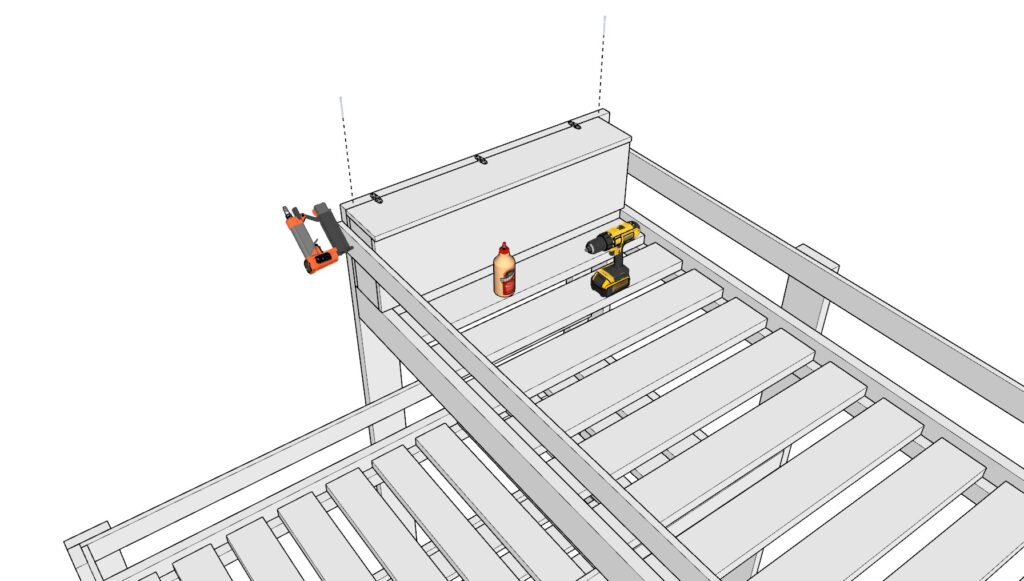
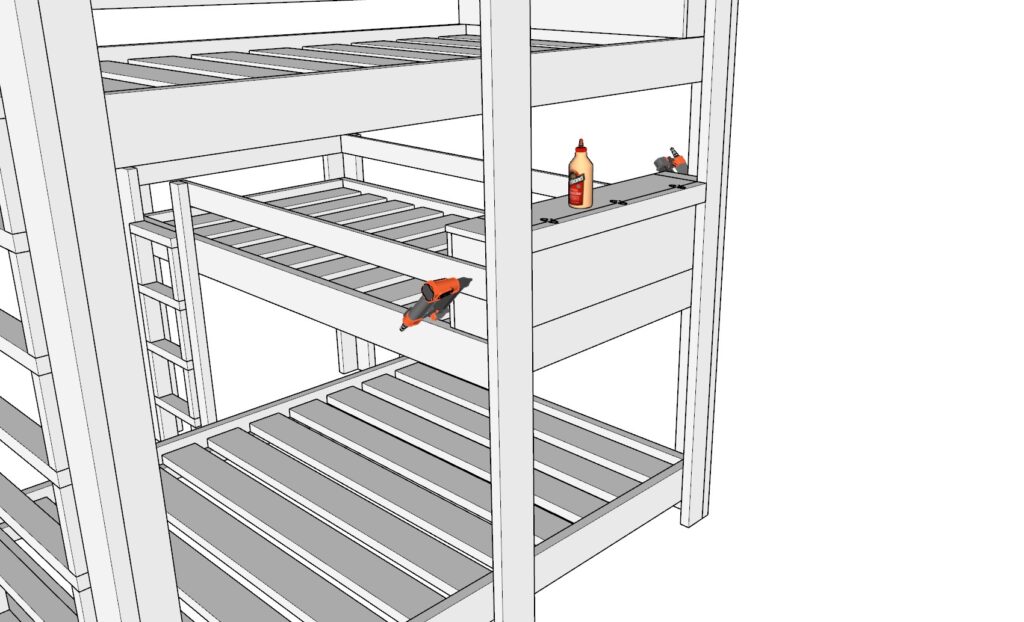
- Position the Box: Locate the appropriate position on the top bunk bed where the storage box will be mounted.
- Secure the Box: Fasten the box to the bed using a combination of pin nails, wood glue, and 3.5-inch long screws for a firm attachment, as shown in the diagram.
Step 9: Building the Middle Bunk Storage Trunk
Assembling the Storage Box
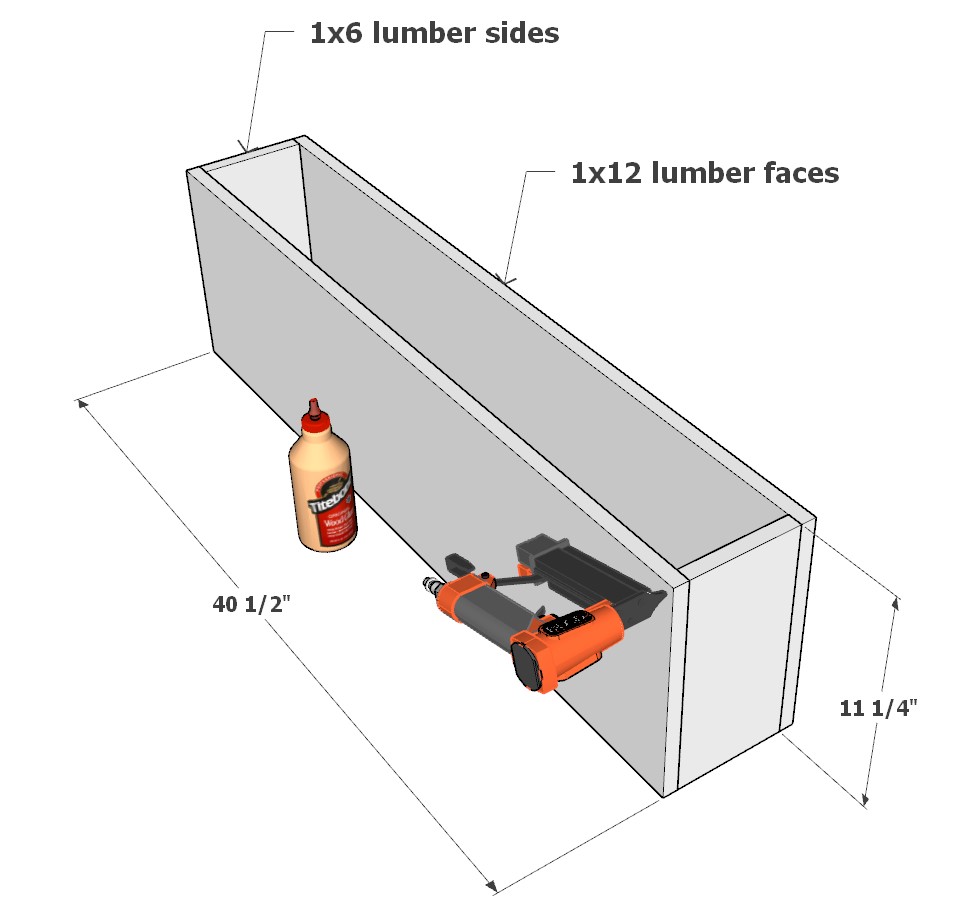
- Prepare the Box Pieces: Take the two 40-1/2 inch long 1×12 lumber boards for the length and the two 11-1/4 inch long 1×6 lumber boards for the width of the box.
- Construct the Box: Form a rectangular box by placing the 1×12 boards as the front and back and the 1×6 boards as the sides. Join the boards with wood glue at the edges and reinforce them with pin nails to form the box structure.
Adding End Supports for the Lid
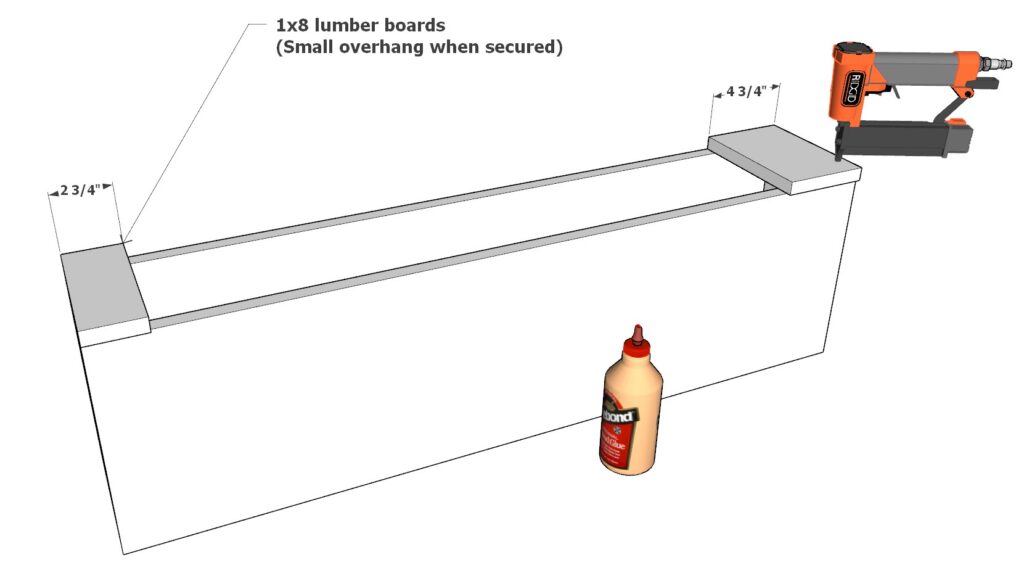
- Attach End Supports: On each end of the box, affix a 2-3/4 inch long 1×8 lumber board to one end and a 4-3/4 inch long 1×8 lumber board to the other end, ensuring they are perpendicular to the box. These supports are crucial for the lid attachment and should be secured with wood glue and pin nails.
Installing the Backbone for Hinges
- Prepare the Backbone Piece: Take a 33 inch long 2×3 lumber board, which will act as the backbone for the lid hinges.
- Attach the Backbone: Secure this 2×3 to the storage box with a 3/4 inch overhang along the backside of the box. The overhang is essential for mounting the hinges. Use wood glue and pin nails to attach the backbone securely.
Securing the Lid
- Position the Lid: Take a 33 inch long 1×8 lumber board, which will serve as the lid of the storage trunk.
- Install Hinges: Fasten the lid to the overhanging backbone using hinges, making sure that the lid can open and close smoothly.

Mounting the Storage Trunk to the Bed
- Secure the Trunk: Affix the completed storage trunk to the bed using wood glue and pin nails for a sturdy and lasting fit.
Tips for Success:
- Check the Fit: Before attaching the supports and the backbone, dry-fit all pieces to ensure they align correctly with the box and lid.
- Smooth Edges: Sand any rough edges on the supports and the lid to prevent snags and ensure a clean, finished look.
- Reinforce with Screws: If desired, add screws in addition to pin nails for added strength, especially if the trunk will hold heavier items.
- Test Lid Movement: After attaching the lid, test the movement to ensure it opens easily and closes securely without binding or gaps.
Step 10: Detailed Finishing and Maintenance for Bunk Beds
1. Filling Screw Holes
Using Dowels:
- Measure the diameter of the hole and choose a dowel of the same size.
- Cut the dowel slightly longer than the depth of the hole.
- Apply wood glue inside the hole and insert the dowel, tapping it gently with a hammer until it’s fully seated.
- Allow the glue to dry, then sand the dowel flush with the wood surface.
- Stain or paint over the dowel to match the surrounding wood.
Using Putty:
- Choose a wood filler or putty that matches the color of your wood or can be stained or painted over.
- Press the putty into the hole using a putty knife, ensuring it’s slightly overfilled.
- Allow the putty to dry according to the manufacturer’s instructions.
- Sand the area smoothly so that the putty is flush with the surrounding surface.
- Paint or stain as desired.
Leaving as Is:
- If you prefer a rustic look, or if the screw holes are in a non-visible area, you may choose to leave them unfilled.
- Ensure any sharp edges are sanded down to avoid injury or snagging.
2. Sanding and Preparing for Painting or Staining
Sanding:
- Start with a coarser grit sandpaper (around 80-100 grit) to remove any rough spots or glue residue.
- Progress to a finer grit (150-200 grit) to smooth the wood in preparation for finishing.
- Finish with a very fine grit (220-240 grit) for a smooth-to-the-touch finish.
- Always sand in the direction of the wood grain to avoid scratches.
Cleaning:
- After sanding, remove all dust with a vacuum and wipe down the wood with a tack cloth to ensure a clean surface for staining or painting.
3. How to Stain
Preparation:
- Use a pre-stain wood conditioner if working with a softwood or a wood with uneven porosity to ensure an even stain application.
Applying Stain:
- Apply stain using a brush, rag, or sponge. Work in manageable sections.
- Allow the stain to penetrate the wood for a few minutes, then wipe off any excess with a clean rag.
- Apply additional coats as needed to achieve the desired depth of color, allowing adequate drying time between coats.
Finishing Touches:
- Once the final coat of stain has dried, apply a clear finish such as polyurethane to protect the wood and the stain.
4. How to Paint
Priming:
- Apply a quality primer to all surfaces to be painted. This helps to seal the wood and allows the paint to adhere better.
Painting:
- Use a brush or roller to apply the first coat of paint. Be sure to cover all surfaces evenly.
- Allow the first coat to dry completely, then sand lightly with fine-grit sandpaper.
- Apply a second coat of paint for even coverage and a more durable finish.
5. How to Maintain
Regular Inspection:
- Check periodically for any loose screws or wear and retighten or replace as needed.
Cleaning:
- Wipe down the bunk beds regularly with a slightly damp cloth to keep them clean.
- Avoid harsh chemicals that can damage the wood finish.
Protection:
- Use furniture pads on the ladder steps and other high-wear areas to prevent paint or stain wear.
- Place the bunk bed away from direct sunlight to prevent fading of the stain or paint.
By following these detailed steps, you will ensure your bunk beds are beautifully finished and well-maintained for years of use.