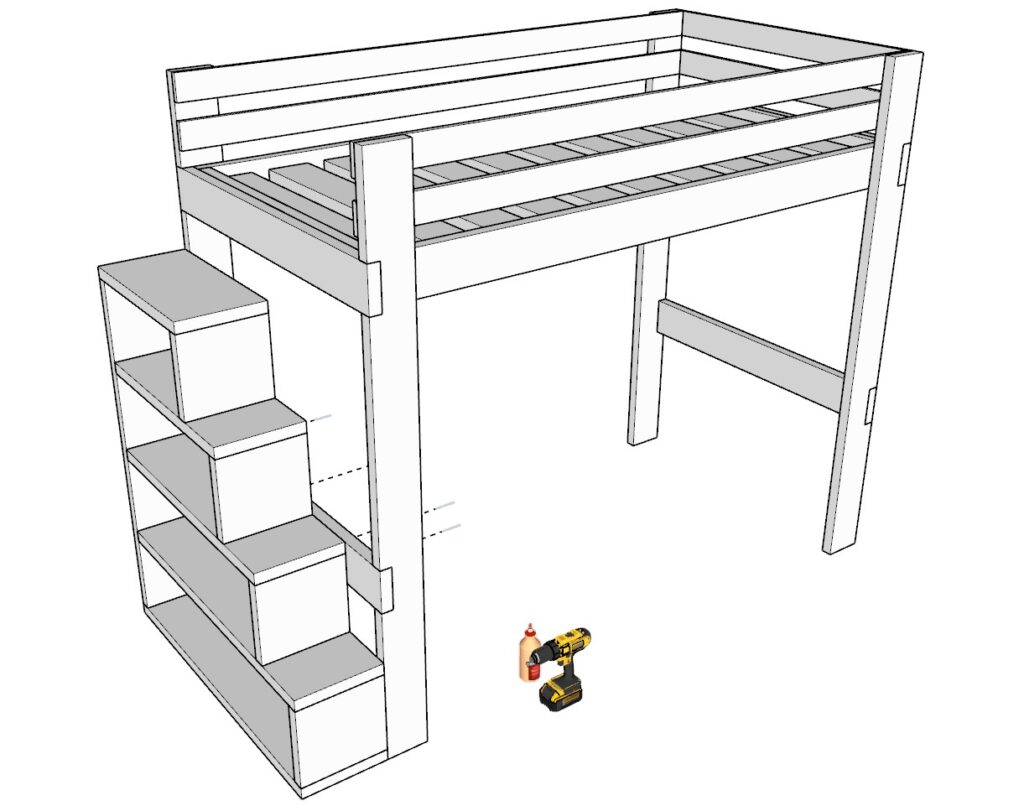
Introduction: Make the Most of Your Space
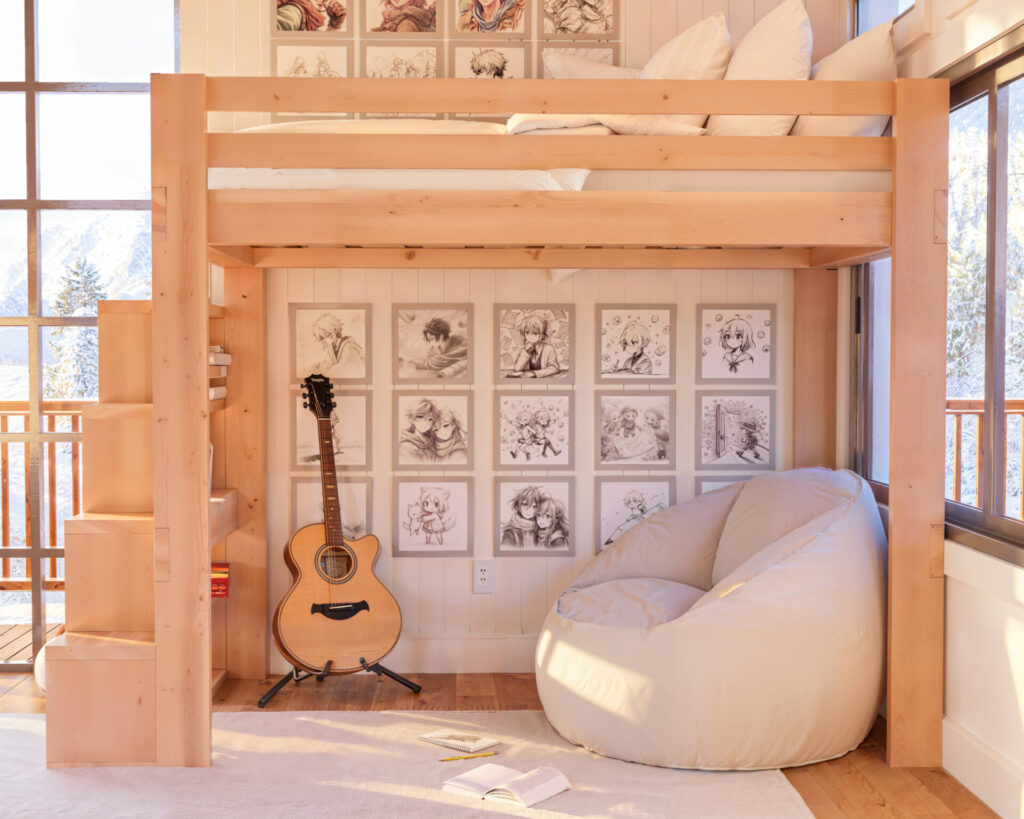
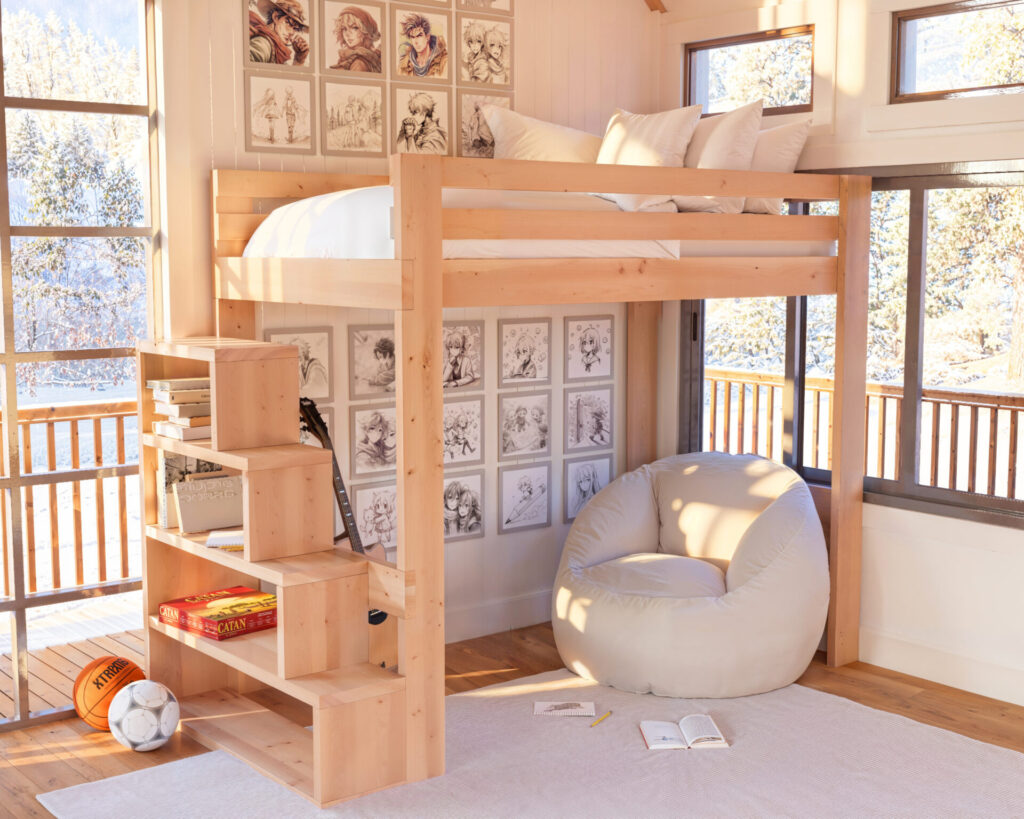
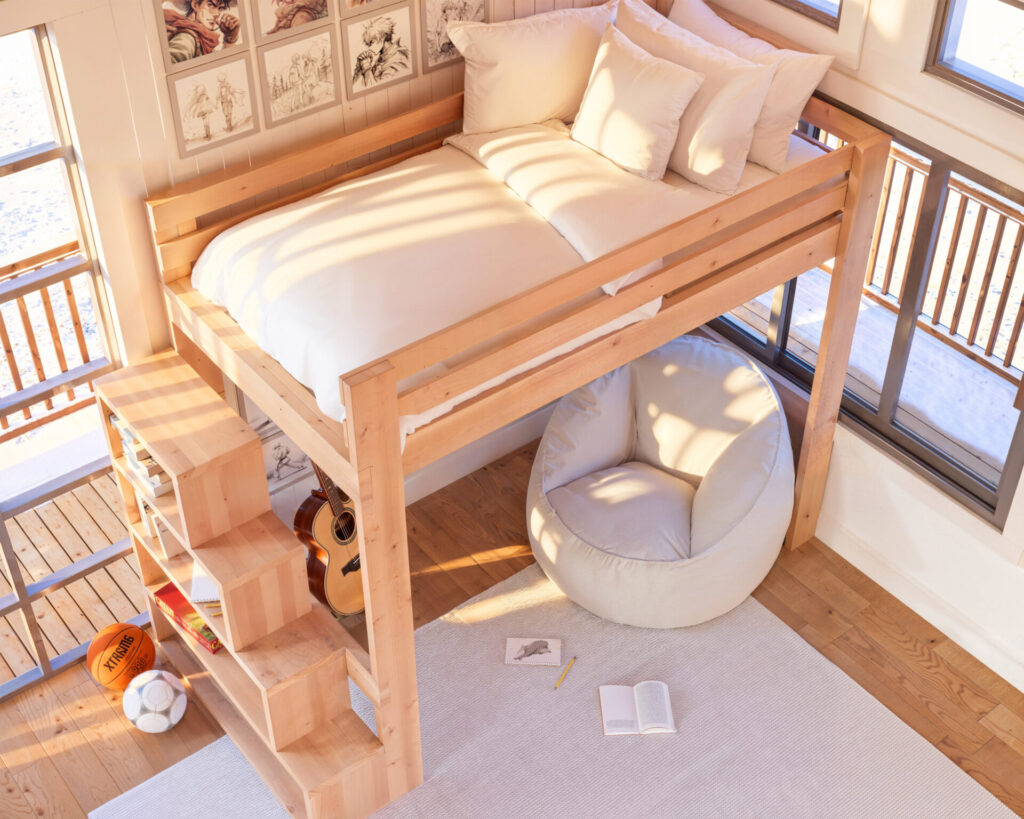
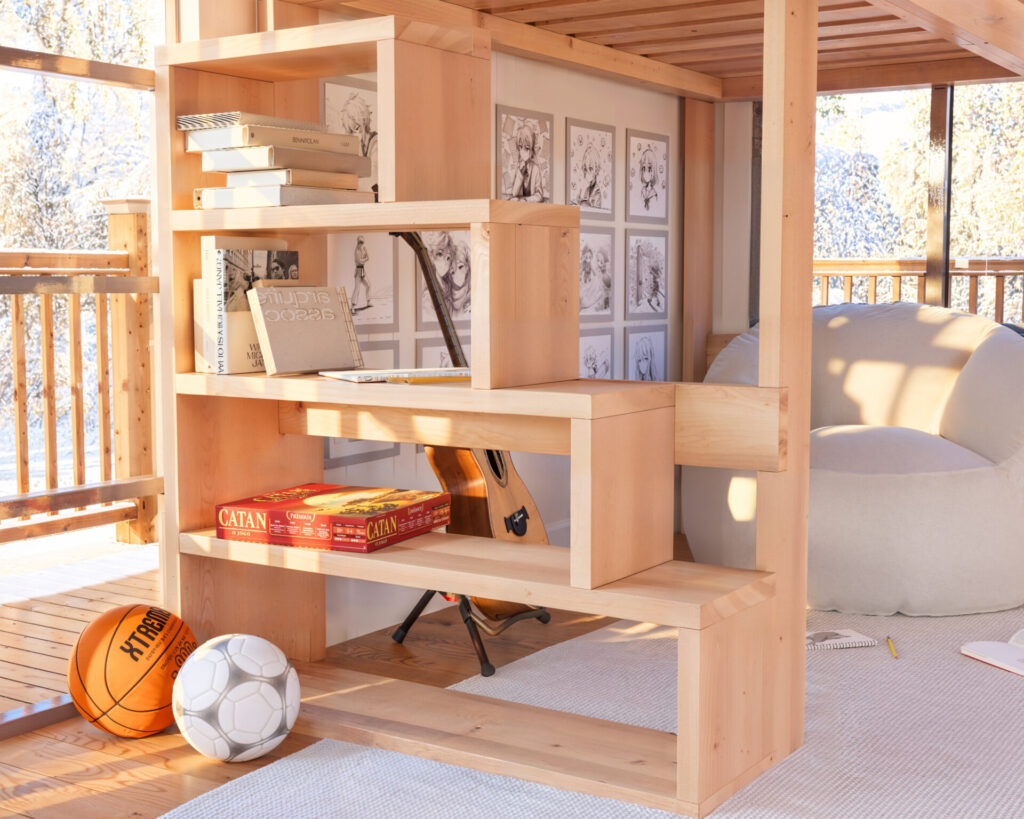
In many homes, space is at a premium. The biggest challenge? Fitting everything you need into rooms that can feel too small for comfort. Whether it’s a child’s bedroom that needs to double as a playroom, a studio apartment where every inch counts, or a guest room that’s also your home office, the need for more space is a common thread. Our DIY Twin Loft Bed addresses this challenge head-on. With its smart design, it gives you back your floor space, providing a versatile area below for work, play, or relaxation.


Specifications: A Bed That Does More
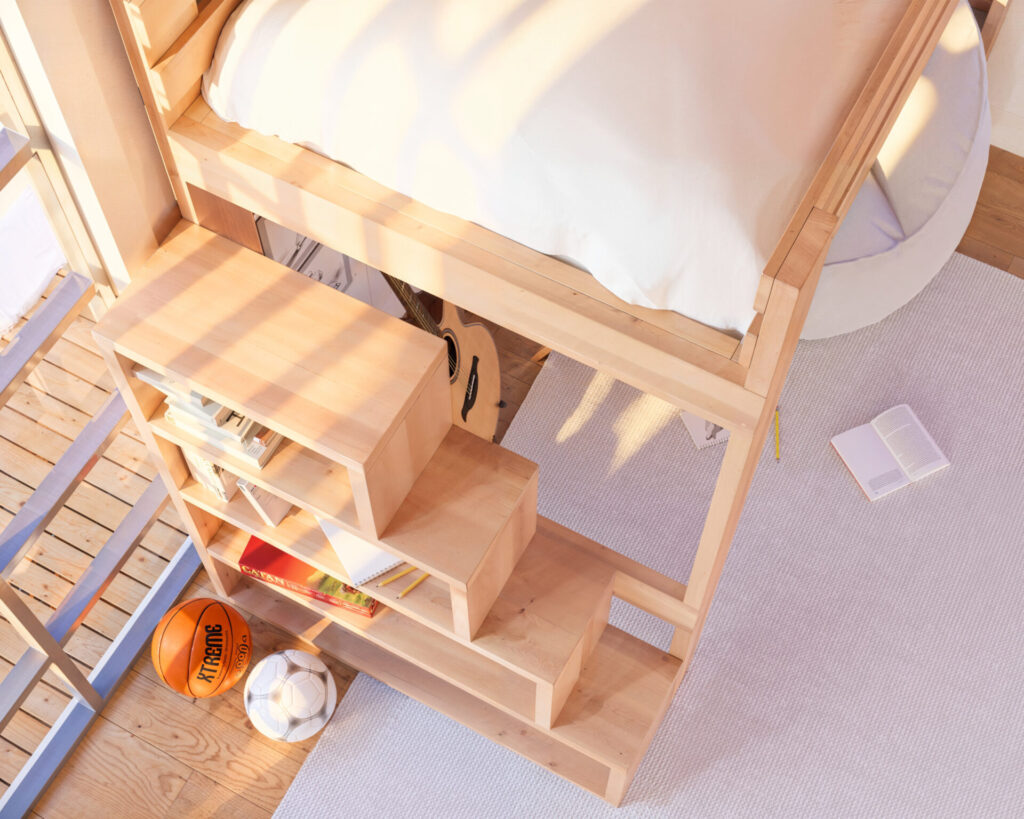
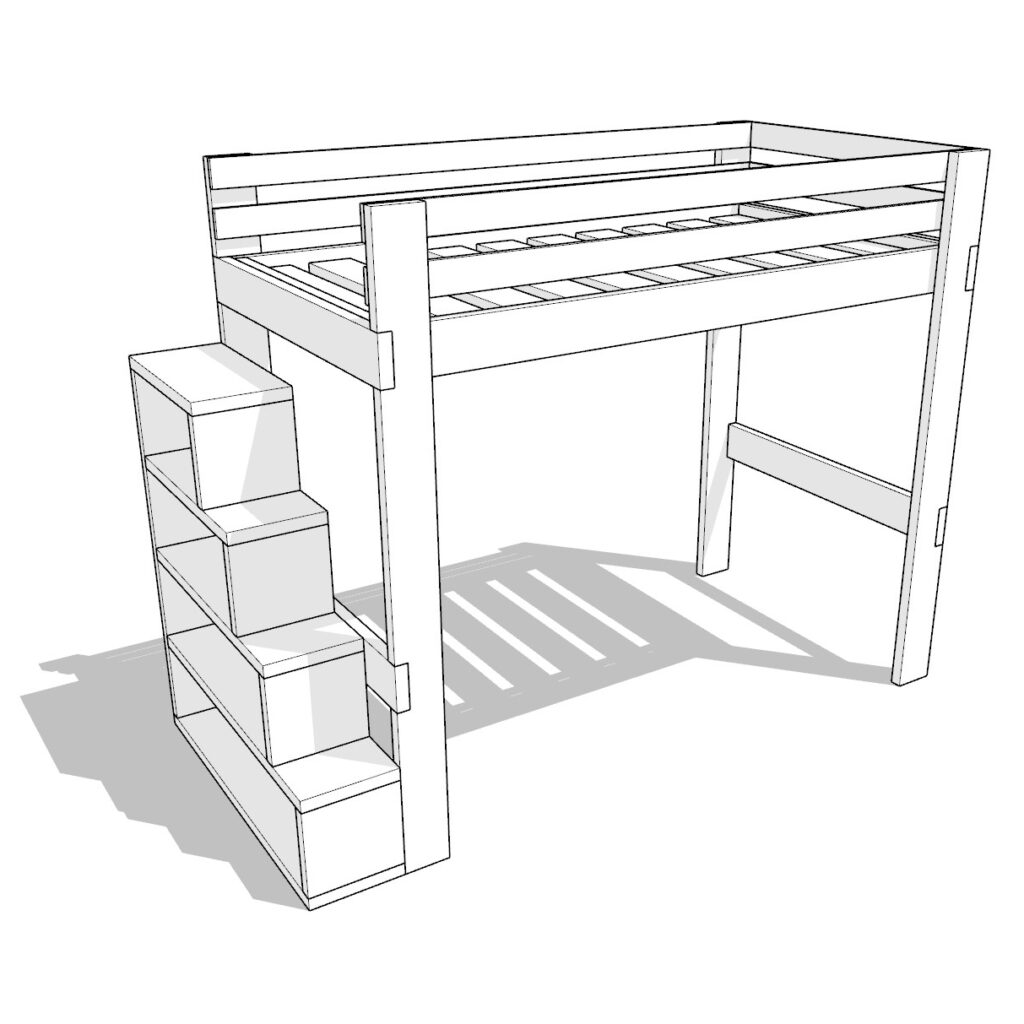
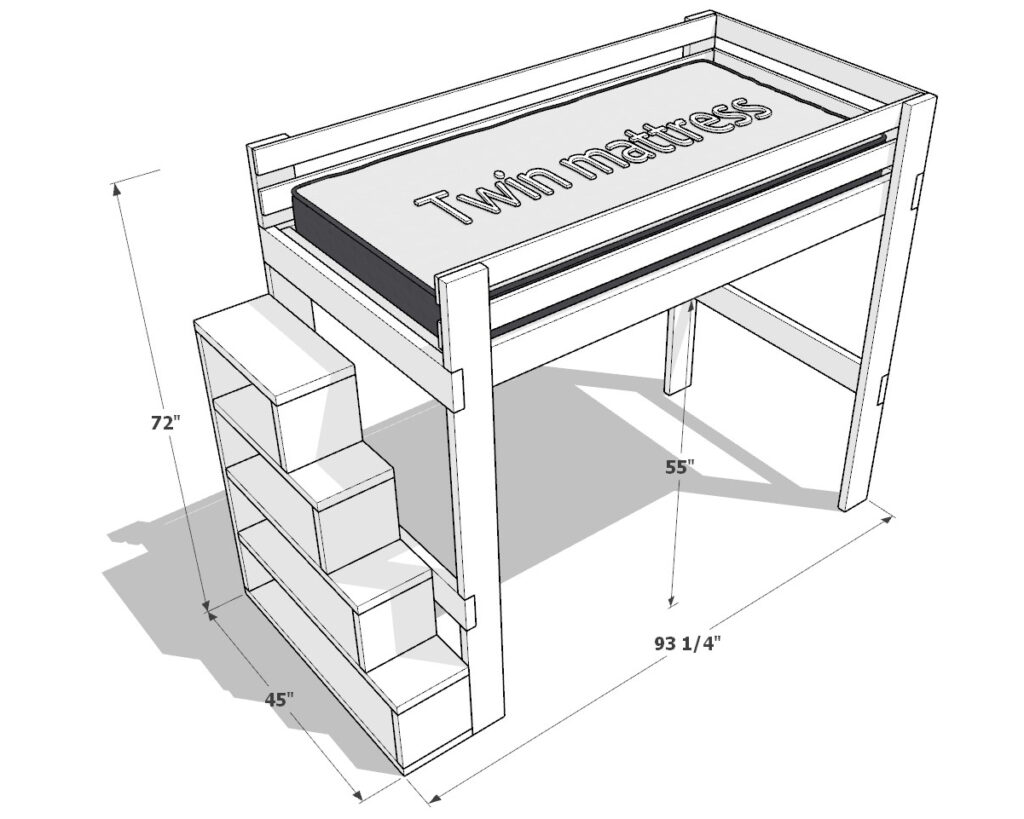
Let’s talk about what this bed offers. Standing at 72 inches tall, this twin loft bed fits neatly over a 45-inch wide and 55-inch tall nook, leaving ample space for a desk or a cozy bean bag. At 93-1/4 inches long, it’s just right for stretching out at night. The staircase isn’t just a way to the top—it’s built-in storage for your books or essentials. And for safety, there’s a sturdy railing to give you or your guests peace of mind while sleeping up high.
Conclusion: DIY Success for Everyone
Building your own bed might seem like a tough job, but our guide makes it doable, even if you’ve never picked up a hammer before. We’ve laid out everything you need in a clear, easy guide. You’ll get a shopping list, a cut list for your lumber, a list of tools, and some handy links. The instructions are simple, written out, and accompanied by clear diagrams. This guide is all about helping beginners succeed and making sure you end up with a bed you’re proud of.
Time
(varies with experience)
Cost
Estimated Project Cost: $180 (Note: Costs can vary by location and supplier.)
Skill level required
Beginner
Twin Loft Bed DIY PDF Plan
What is included in the PDF download?
- Easy to read step by step instructions
- Material list
- Tools needed
- Helpful links to materials and tools needed
Twin Loft Bed DIY PDF Dimensions
Tools & Materials List:
Available with the purchase of the DIY plan PDF.
Lumber Cut & Shopping List:
Available with the purchase of the DIY plan PDF.
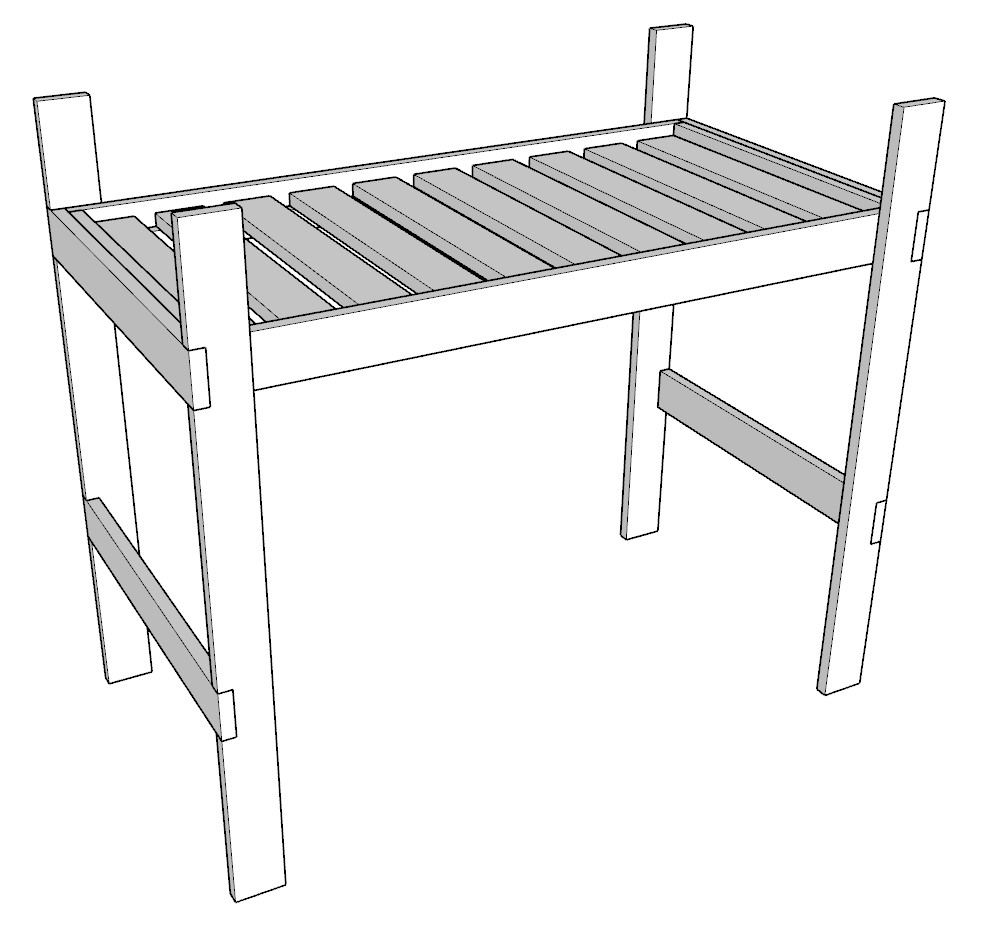
Step 1: Constructing the Bed Frame
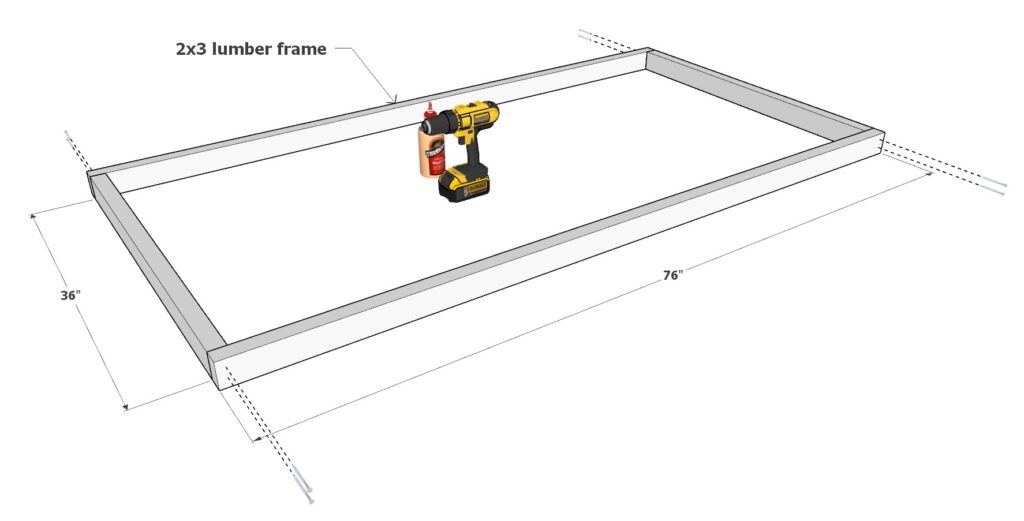
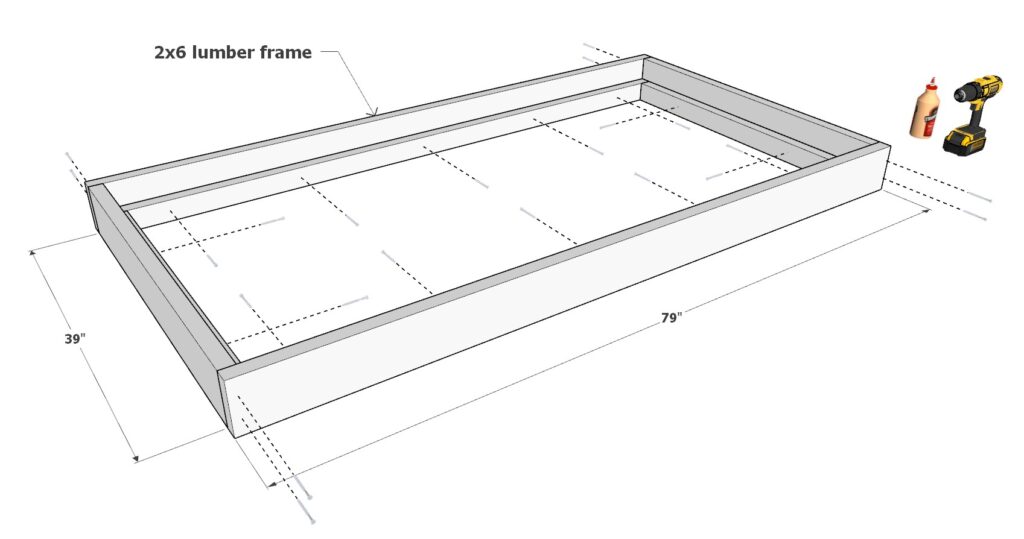
1.1 Frame Assembly: Begin by forming the base frame. Take two 76-inch 2×3 lumber pieces and two 36-inch 2×3 pieces. Arrange them to create a rectangle. To secure the joints, apply wood glue, predrill holes to avoid splitting the wood, and then fasten them with 3.5-inch screws.
1.2 Reinforcing with 2×6 Frame: Now, enhance the structure by adding a 2×6 lumber frame around the 2×3 frame you just made. Use two 79-inch 2×6 pieces and two 39-inch 2×6 pieces for this layer. This 2×6 frame should encapsulate the 2×3 frame. Again, use wood glue for stability, predrill, and then secure with 2.5-inch screws, making sure the screws don’t protrude.
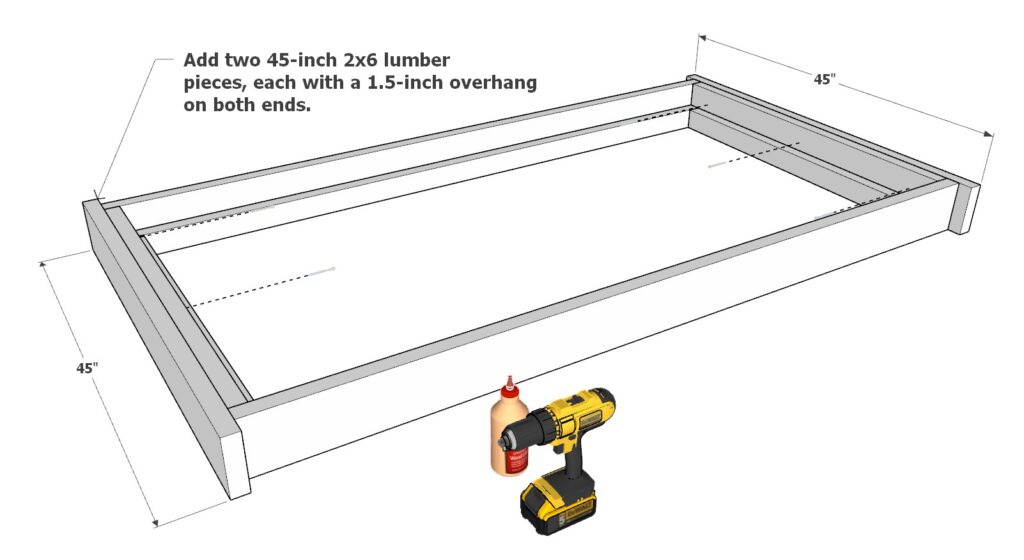
1.3 End Supports: Attach two 45-inch 2×6 lumber pieces at the bed frame’s ends, ensuring there is a 1.5-inch overhang on both sides. Secure these pieces with wood glue and 2.5-inch screws.
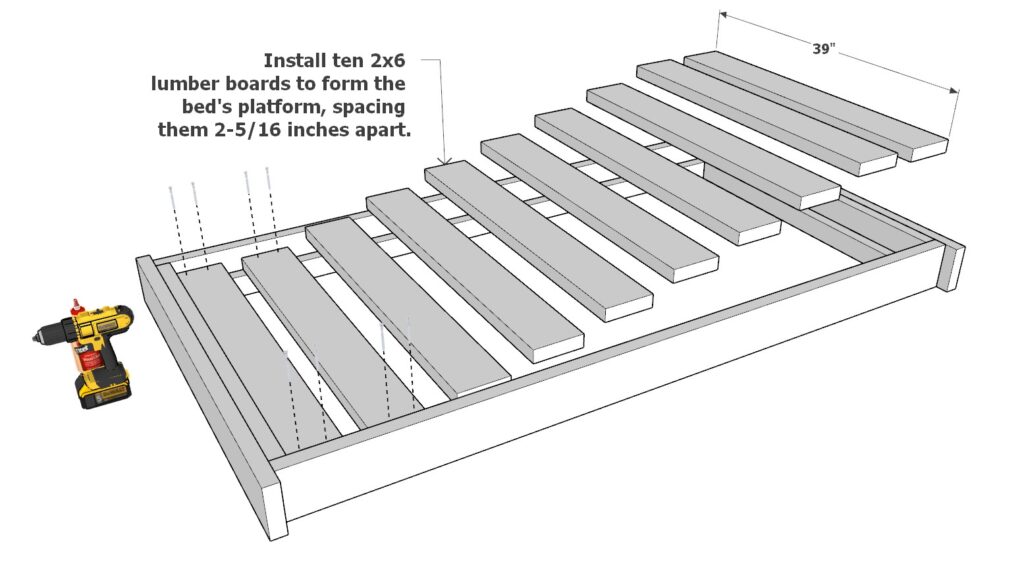
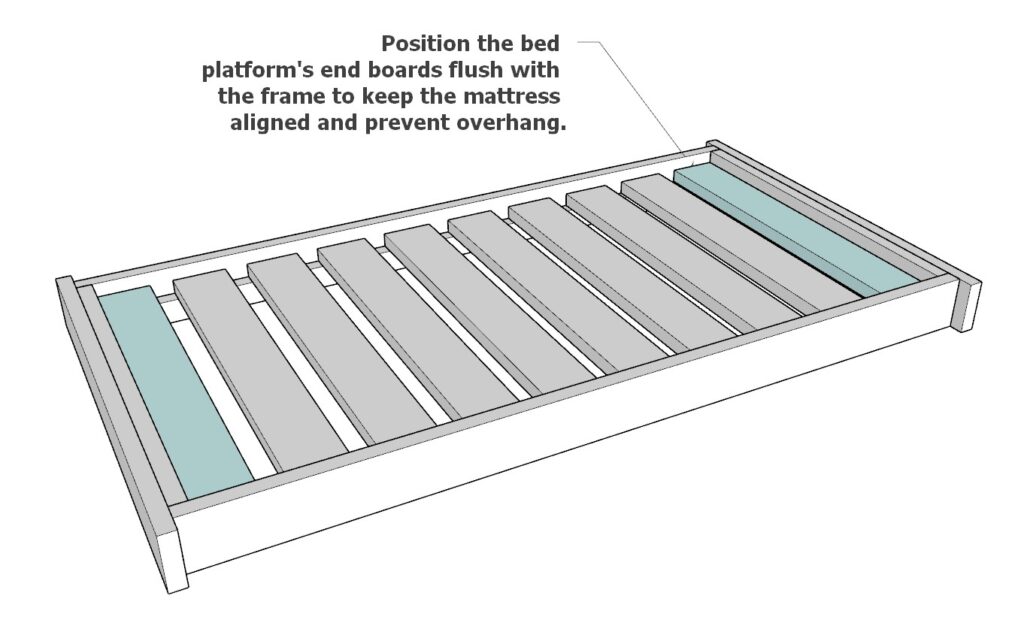
1.4 Platform Installation: For the bed’s platform, install ten 39-inch 2×6 boards, spacing them evenly at 2-5/16 inches apart. The outermost platform boards should be flush with the bed frame to keep the mattress neatly in place.
Helpful Tips:
- Always predrill to prevent the wood from splitting.
- Planing and sanding all pieces before assembly is recommended for ease of work and a professional-grade finish. It’s challenging to sand in tight corners once the bed is assembled.
Step 2: Crafting the Loft Bed Legs and Leg Assembly
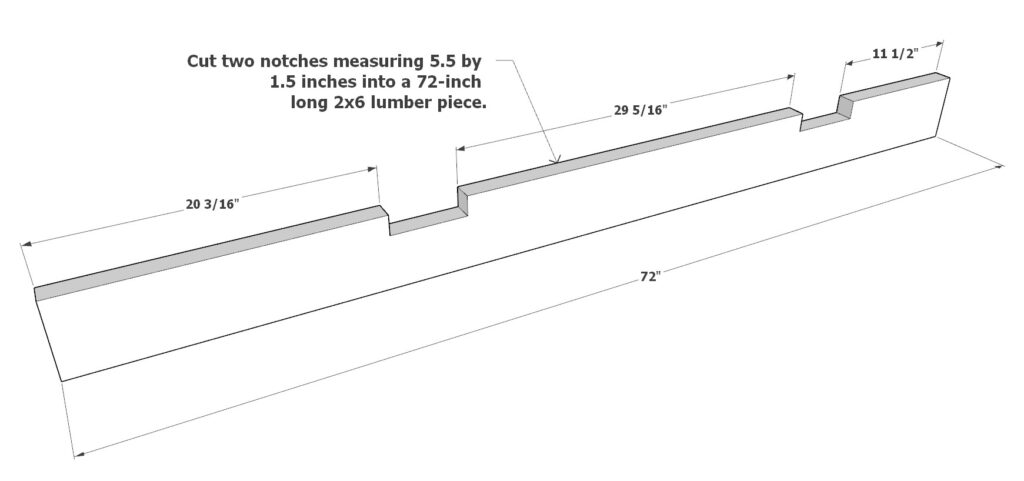
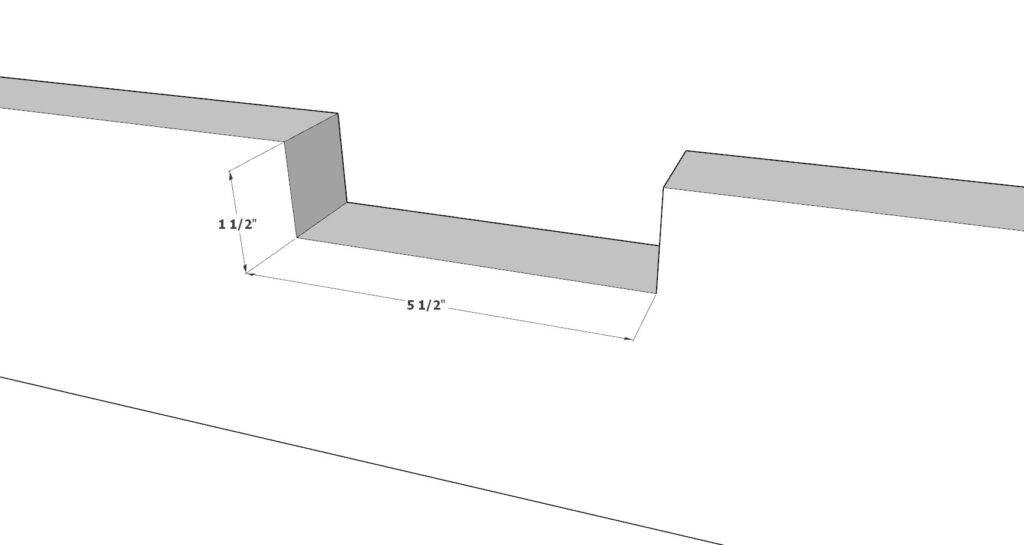
2.1 Notching the Legs: Select four 72-inch long 2×6 lumber boards for the legs. Each leg will have two notches measuring 5.5 inches in length and 1.5 inches in depth. Refer to the diagram for precise placement. There are various methods to notch the wood:
- Use a sliding miter saw with a depth stopper set to 1.5 inches. Mark the 5.5-inch length, then repeatedly slide the saw back and forth, slightly shifting the board with each pass to remove the wood within the marked area. Finish by chiseling and sanding to smoothness.
- A jigsaw, band saw, handsaw and chisel, or chisels alone are also viable tools for this task.
- Find creative methods that work with the tools you have at hand.
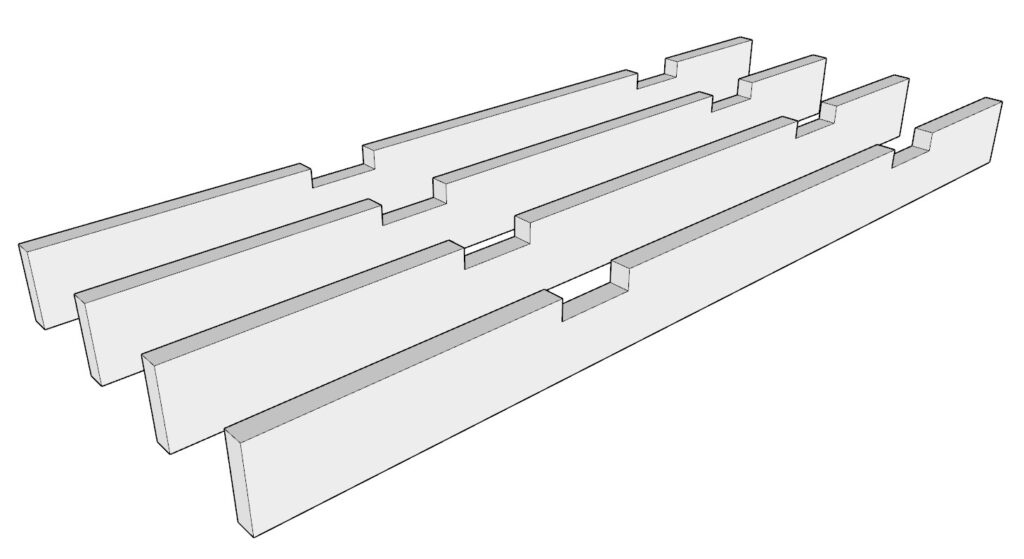
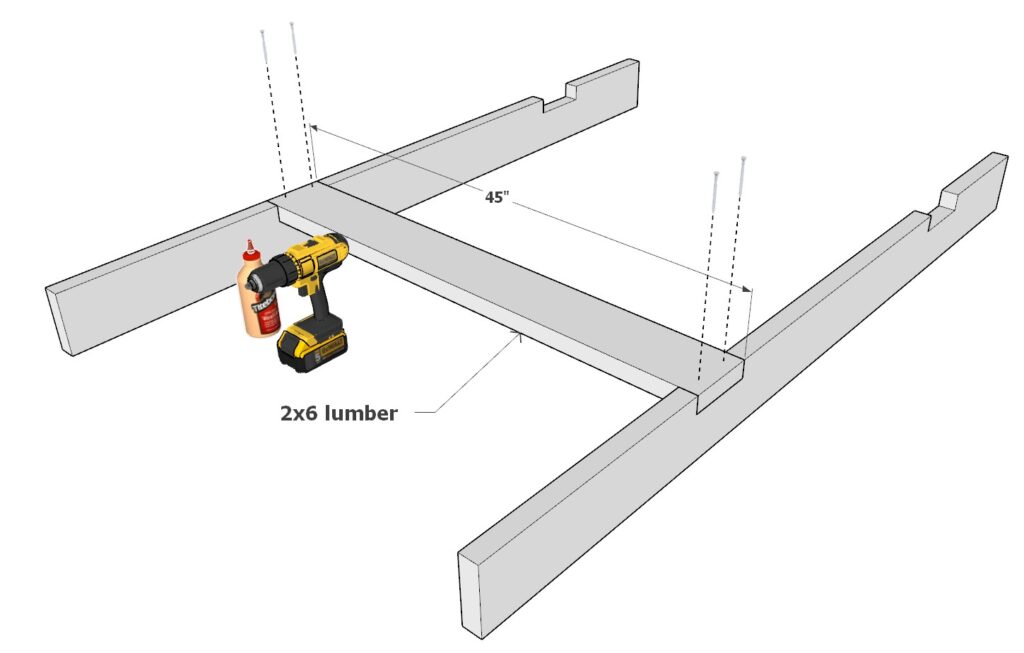
2.2 Fitting the Crosspieces: Once notched, take a 45-inch 2×6 lumber piece and fit it into the notches you’ve created on the 72-inch boards. Secure them using 3.5-inch screws and wood glue as shown in the diagram.
2.3 Assembling the Leg Pairs: Assemble two sets of leg pairs with the 45-inch crosspieces in place.

Pro Tips:
- If you plan to plane the 45-inch 2×6 boards, account for slight reductions in size due to planing. The goal is to ensure a snug fit within the notches.
- Precision is key in this step to ensure the stability of your loft bed. Take your time to measure, cut, and fit each piece accurately.
Step 3: Attaching the Leg Assemblies to the Bed Frame
3.1 Preparing for Assembly: Gather the leg assemblies from Step 2 and the bed frame constructed in Step 1. It’s best to approach this step in the final room destination for the bed due to the bulk and weight of the frame post-assembly.
3.2 Securing the Legs: Position the bed frame on its side to make attaching the legs easier. Fit the bed frame into the remaining notches on the leg assemblies—these should align with the 1.5-inch overhangs from the bed frame ends. Secure the fit using wood glue and 3.5-inch screws, making sure to predrill to prevent splitting the wood.
3.3 Repeating the Process: Carefully flip or lean the bed to access the other side and repeat the attachment process for the remaining leg assembly, again using glue and screws.
3.4 Erecting the Bed: Once both sides are securely attached, set the bed upright into its final position.
Pro Tip:
- Wood clamps are extremely helpful in this step. They can hold the frame steady and in the correct position while you secure it with screws, ensuring a solid build.
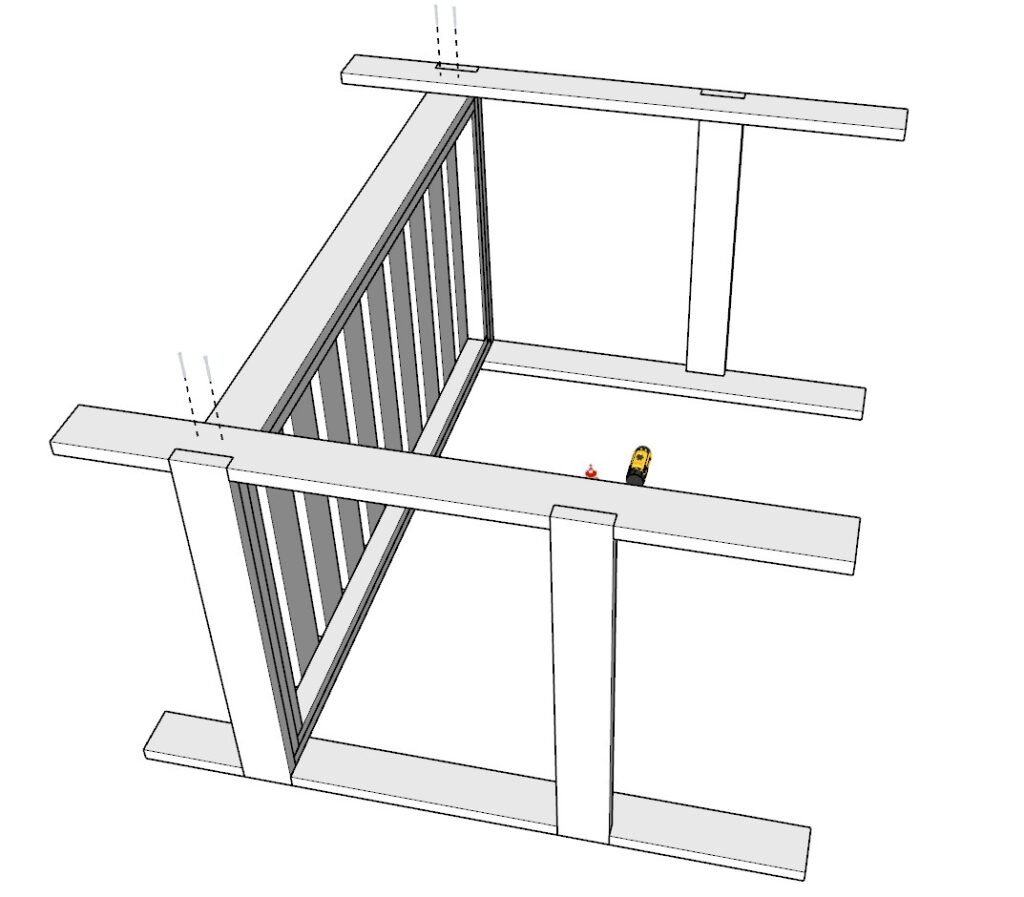
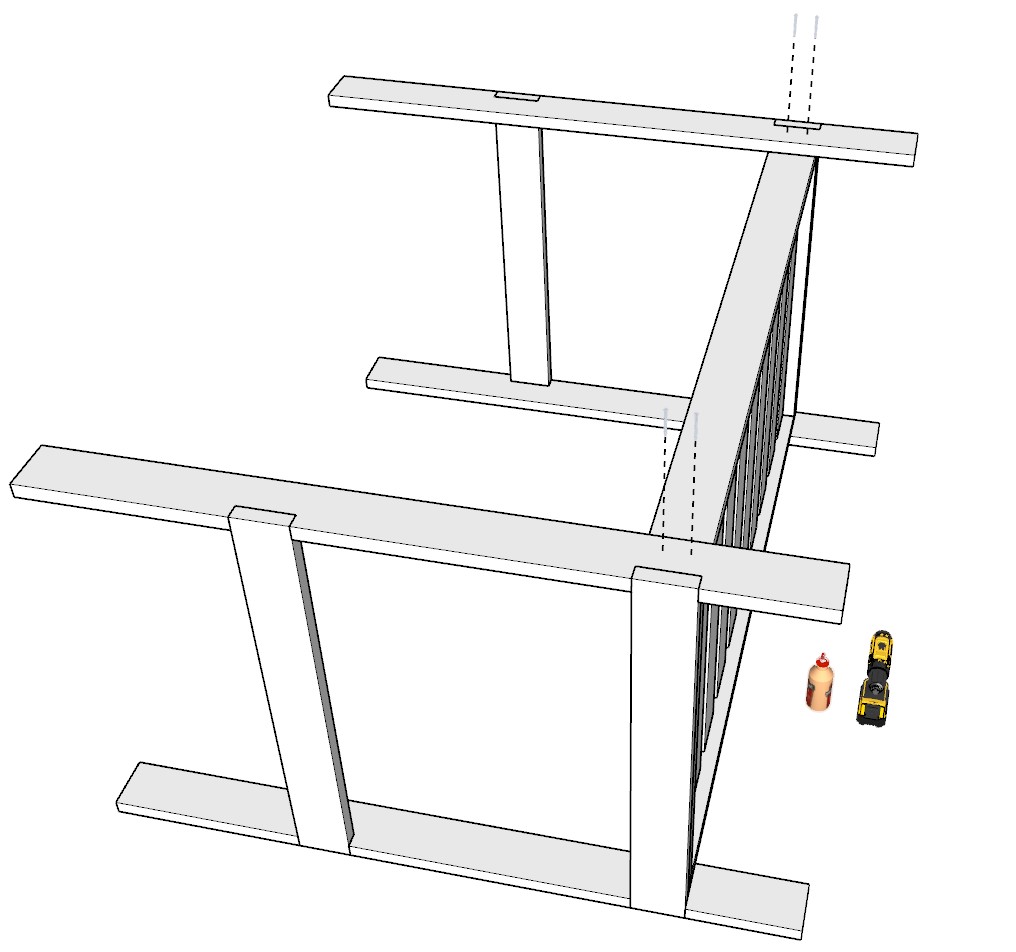
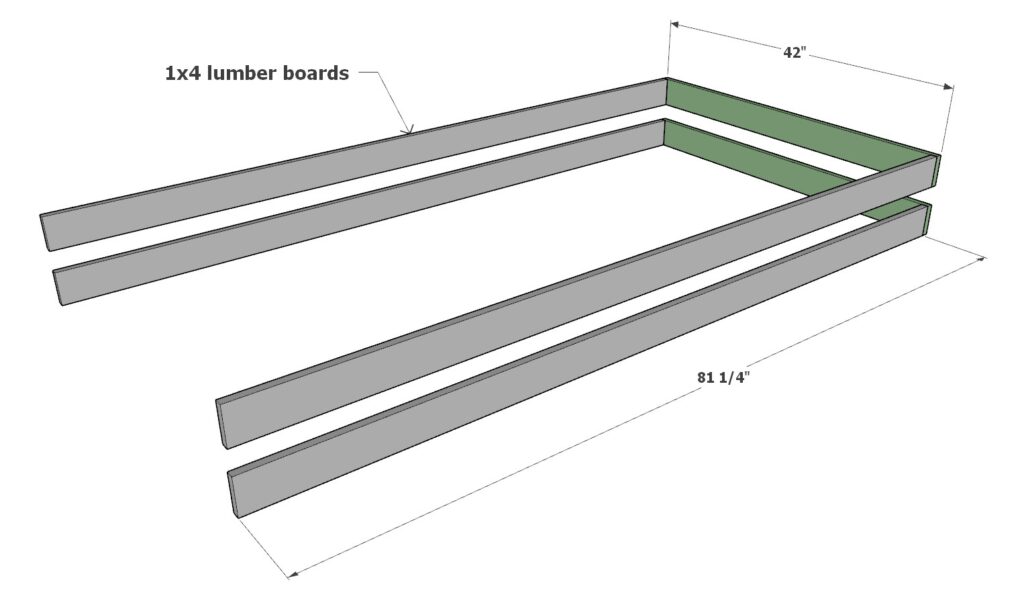
Step 4: Installing the Safety Bed Railing
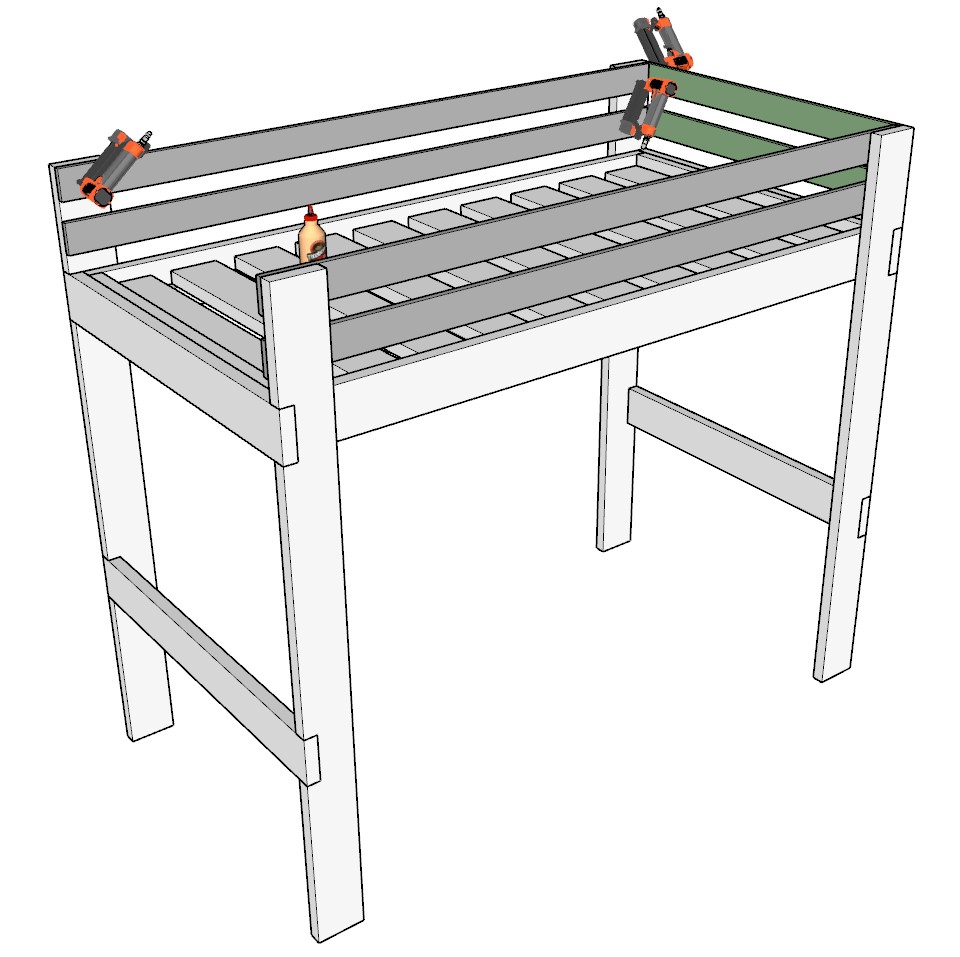
4.1 Gathering Materials: Collect your railing materials, which include four 81-1/4 inch 1×4 lumber pieces and two 42 inch 1×4 lumber pieces. These will be referenced as gray and forest green in your diagram for easy identification.
4.2 Positioning the Rails: Lay out the gray and forest green lumber pieces along the sides of the bed frame, spacing them 2-1/4 inches apart as per the diagram. This spacing ensures a secure and aesthetically pleasing barrier.
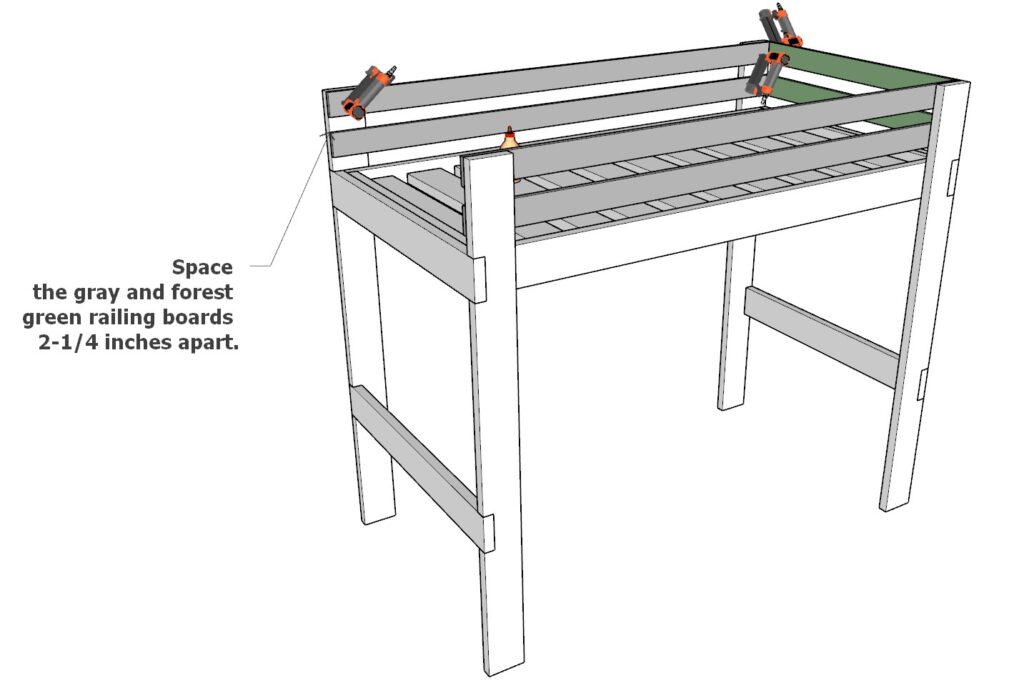
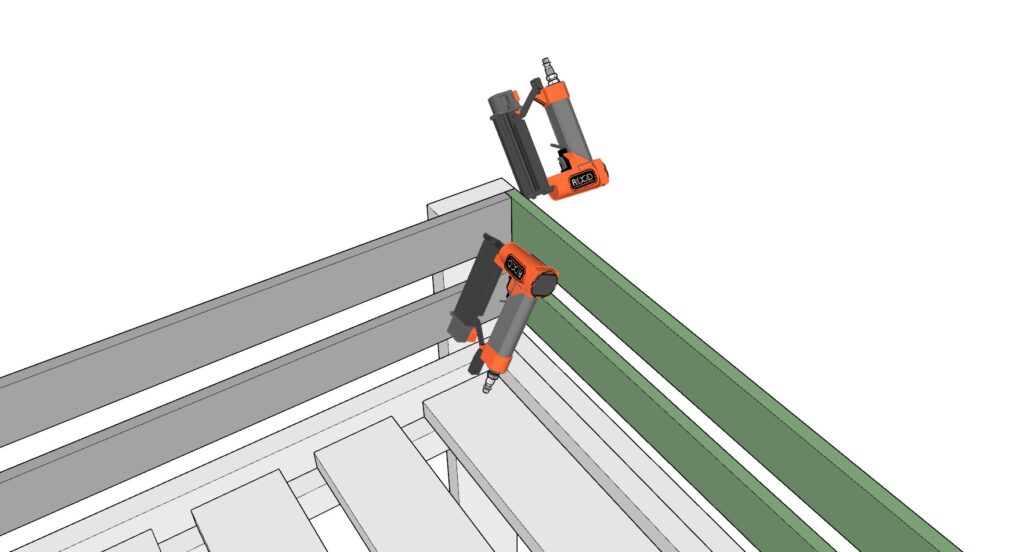
4.3 Attaching the Rails: Affix the railing pieces to the leg frame assembly to create a robust safety barrier. For a smooth finish, use a pin nailer with 1-inch to 1.25-inch long pin nails along with wood glue for a firm hold.
Pro Tip:
- If you’re working without a pin nailer, you can substitute with 1.5-inch screws. Make sure they are sunk just enough to be flush with the wood, ensuring they don’t protrude and the finish remains neat.
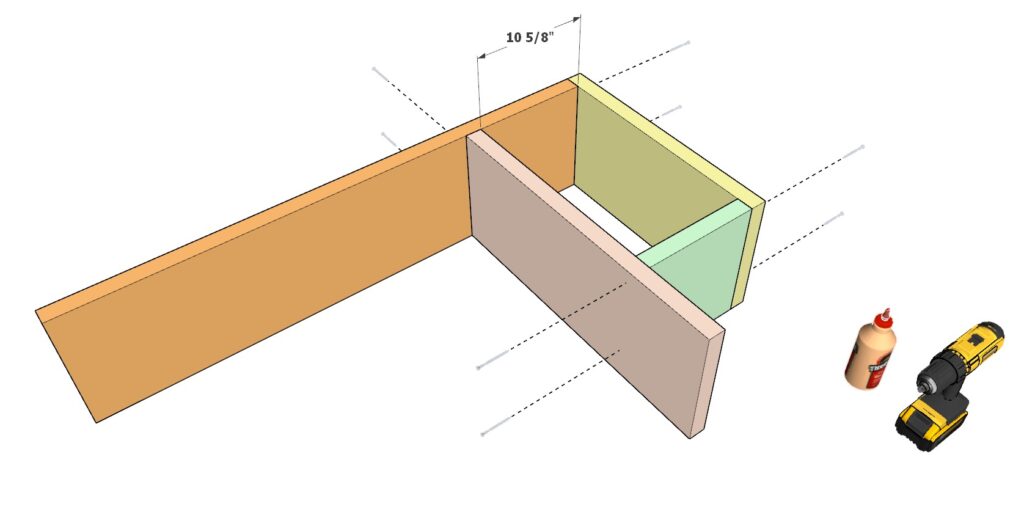
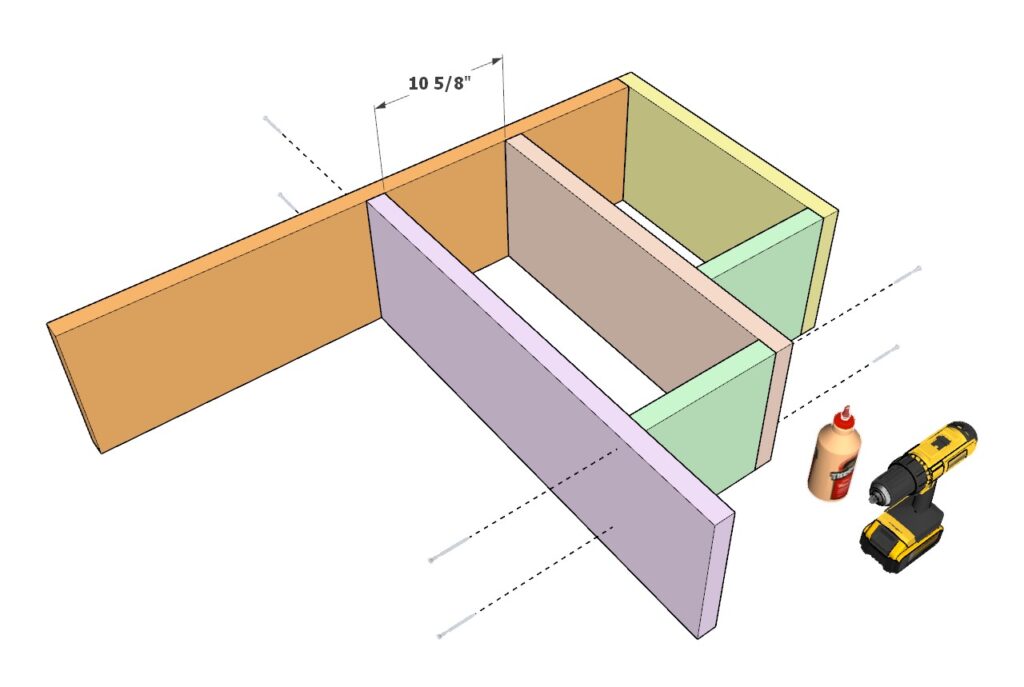
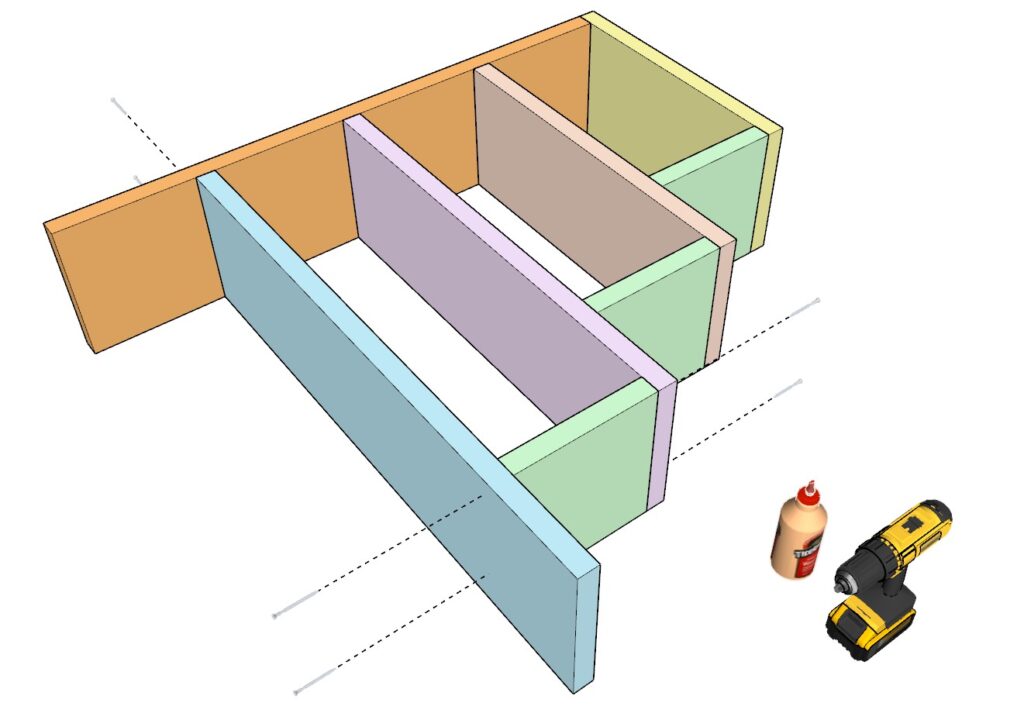
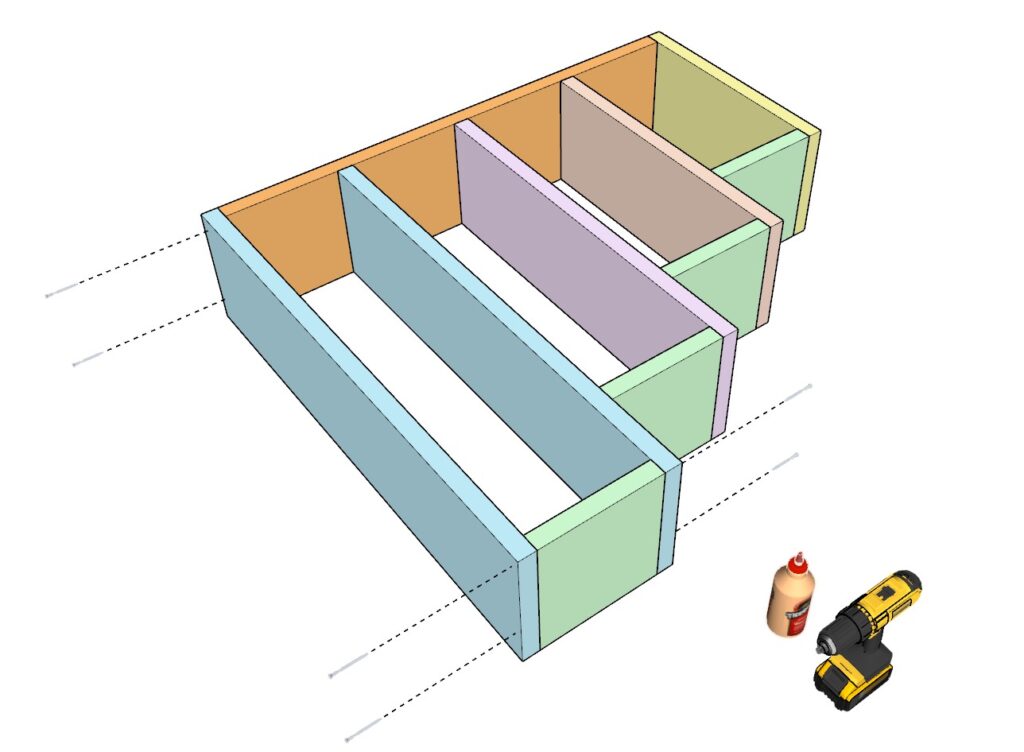
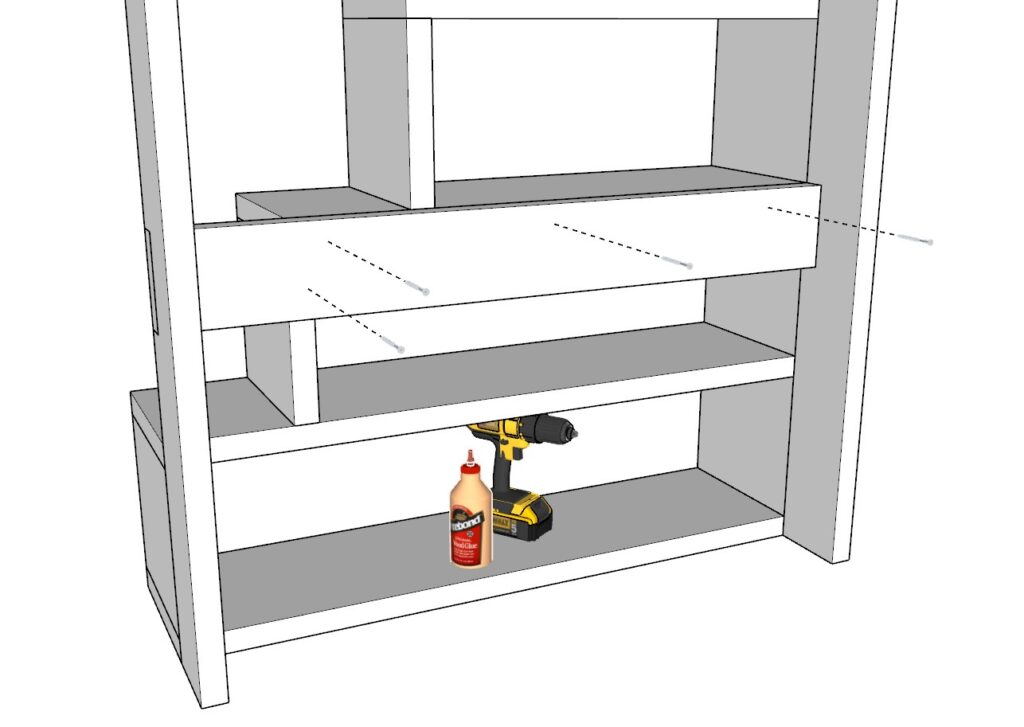
Step 5: Constructing the Staircase/Storage Shelves
5.1 Preparation and Color Coordination: To facilitate assembly, refer to the color-coded parts in the diagram provided. This visual aid is designed to simplify the process and ensure clarity throughout the build.
5.2 Gathering Components: Assemble the necessary pieces for the staircase, which include:
- Four 10-5/8 inch long 2×12 boards (light green)
- One 22-1/2 inch long 2×12 board (yellow)
- One 28-1/2 inch long 2×12 board (peach)
- One 36 inch long 2×12 board (lavender)
- One 43.5 inch long 2×12 board (navy blue)
- One 45 inch long 2×12 boards (baby blue)
- One 46-7/8 inch long 2×12 board (orange)
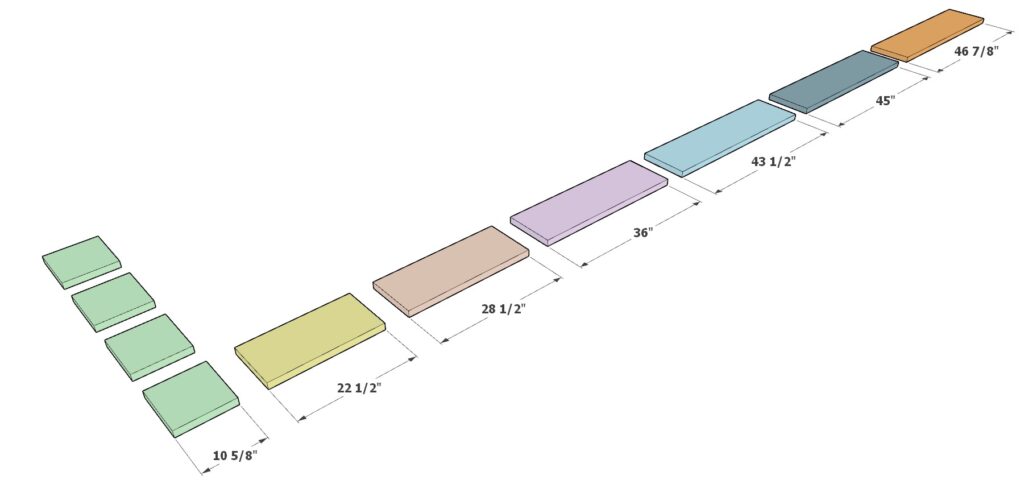
5.3 Assembly Process: Begin the assembly by attaching the boards as outlined in the diagram. For a secure fit:
- Apply wood glue at each joining point.
- Predrill the holes to prevent wood splitting.
- Use 3.5-inch long screws to fasten the boards together.
Start with the top step and progress downwards, assembling each piece in order to build the base of the staircase as depicted in the diagram.
Step 6: Attaching the Staircase/Storage Shelf to the Loft Bed
6.1 Positioning the Staircase: Determine the placement of the staircase based on your room’s layout and the setup you desire. The staircase will connect to the loft bed through one of the 45-inch long crosspieces installed in Step 2.
6.2 Securing the Staircase: Align the staircase with the chosen crosspiece on the loft bed’s leg frame assembly. To ensure a strong and stable connection:
- Use wood glue at the contact points for additional strength.
- Predrill holes to prevent the wood from splitting.
- Fasten the staircase to the frame using 3.5-inch screws.
Step 7: Finishing Touches - Sanding, Staining, Painting, and Maintenance
Sanding and Preparation:
Before staining or painting, ensure your loft bed is smooth and free from splinters:
Sanding:
- Start with a coarse-grit sandpaper (around 80 grit) for rough areas. Sand every surface of your loft bed, focusing on edges and corners.
- Progress to a medium-grit sandpaper (around 120-150 grit) to smooth out the surfaces further.
- Finish with a fine-grit sandpaper (220 grit or higher) for a polished surface.
- Always sand in the direction of the wood grain to avoid scratches.
Cleaning:
- Remove all dust with a vacuum cleaner. Use a tack cloth to pick up any remaining fine particles.
- Ensure the bed is completely clean and dry before moving on to staining or painting.
Staining Guide:
Choosing Your Stain:
- Select an appropriate wood stain. Consider the wood type and desired finish.
Application:
- Apply the stain with a brush or rag, working in sections and along the grain.
- Wipe off excess stain with a clean rag to avoid uneven tones.
- Allow the first coat to dry. Apply additional coats if a darker color is desired, allowing time to dry between coats.
Sealing:
- Once the stain is dry, apply a clear sealer to protect the wood and enhance the stain’s longevity.
Painting Guide:
Priming:
- Apply a wood primer to ensure even coverage and to help the paint adhere better.
Painting:
- Choose a paint suitable for wood. Apply the first coat with a brush or roller.
- Let the first coat dry completely, then apply a second coat if necessary.
Finishing:
- Once the paint is dry, consider applying a clear protective finish to safeguard your paint job.
Maintenance:
- Regularly check for loose screws or wear and repair as needed.
- Clean with a damp cloth. Avoid harsh chemicals that might damage the wood finish.
Safety:
- Ceiling Fans: If the loft bed is placed under or near a ceiling fan, consider removing the fan or replacing it with a flush mount light fixture to prevent accidents.
- Assembly and Testing: Always work with a partner when assembling to ensure everything is done correctly and safely. Before use, have an adult test the bed’s stability.
- Weight Limits: Respect the weight limits. Ensure adults test the bed for stability and strength.
- Glue Drying: Allow all glue to dry fully before proceeding to the next step or using the bed to ensure maximum bond strength.
By meticulously preparing, finishing, and maintaining your loft bed, and by adhering to safety guidelines, you ensure not only its aesthetic appeal but also its longevity and safety for all who enjoy it.