Introduction
Discover how to create the ideal Montessori house bed for your child with our comprehensive step-by-step guide. In this article, you’ll learn about the benefits of Montessori house beds, how to choose the perfect design and size, and the essential safety considerations to keep in mind. We’ll walk you through the entire process, from selecting the best materials and tools to adding those personalized touches that make the bed truly special for your child. With our easy-to-follow guide and beginner-friendly plan, even those new to woodworking can successfully build a beautiful wooden Montessori house bed.
Overview of Montessori House Bed
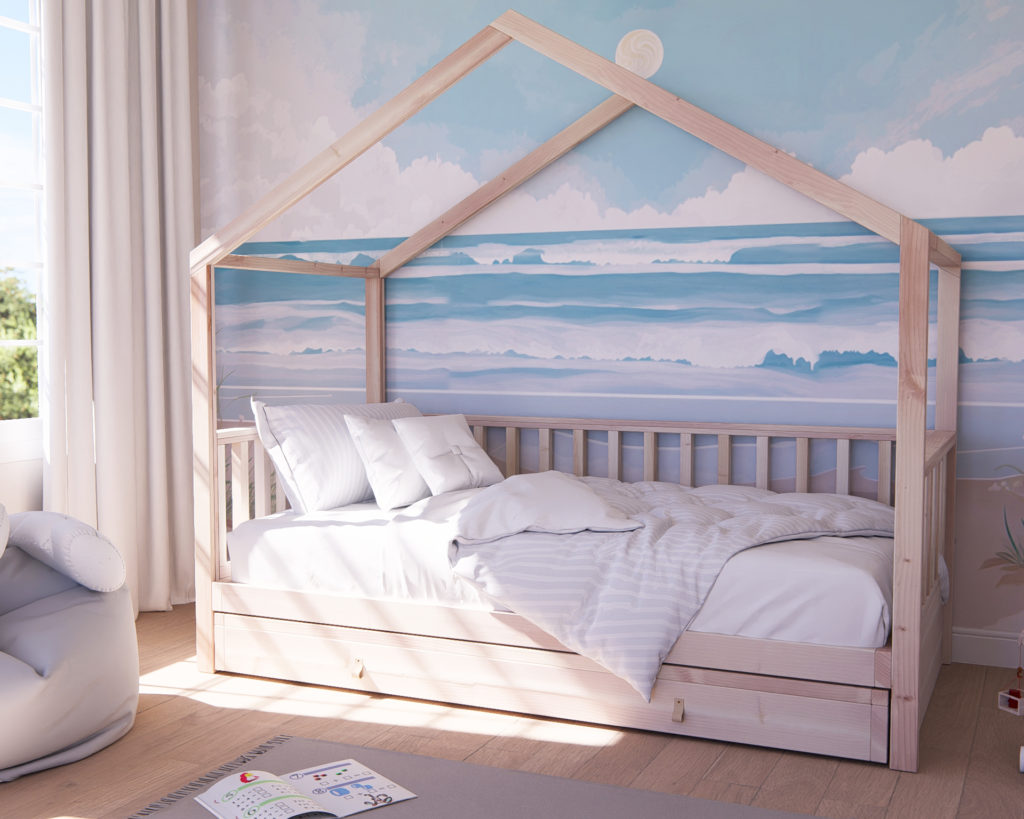
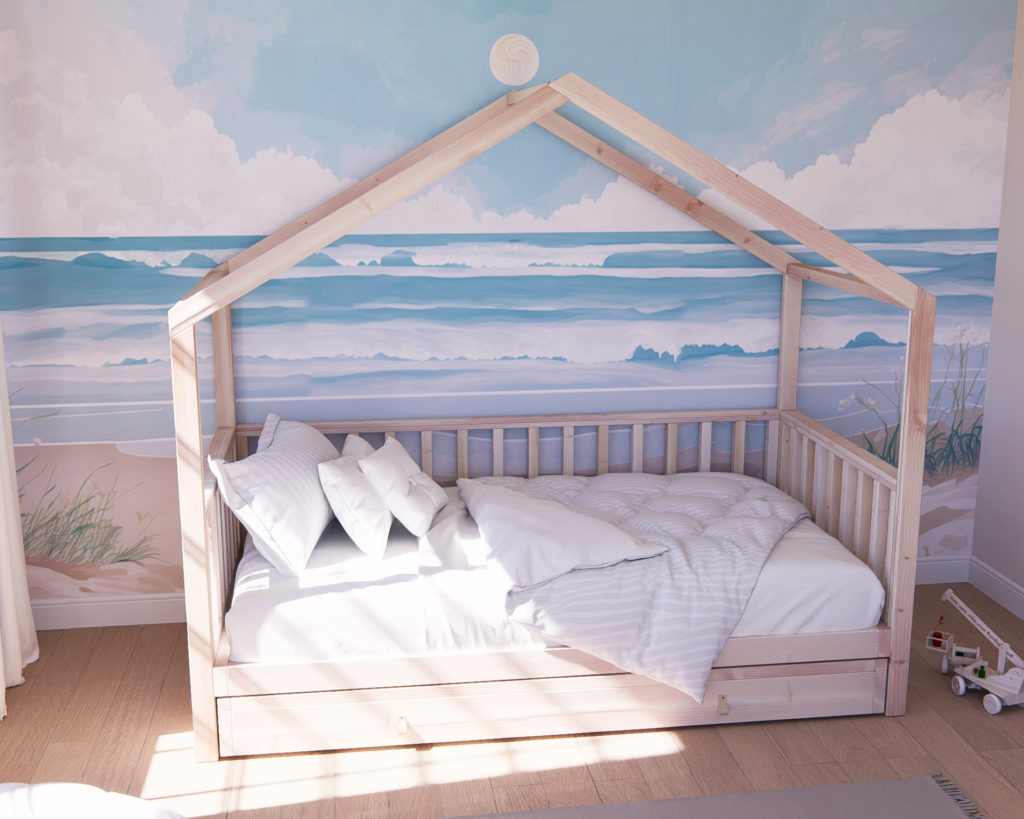
Montessori house beds offer a unique combination of style, function, and philosophy, fostering an environment that promotes independence, exploration, and learning. These beds are designed to be low to the ground, encouraging children to develop self-reliance and motor skills.
The Montessori educational philosophy emphasizes the importance of a child-centered environment, which is both nurturing and stimulating. By incorporating this philosophy into your child’s bedroom, you create a space where they feel secure and empowered to explore, learn, and grow at their own pace.
Montessori house beds come in various designs, shapes, and sizes, but they all share common features that promote the Montessori principles of independence, self-regulation, and active learning. Some of the key benefits of Montessori house beds include:
- Encouraging independence: The low height of the bed allows children to safely climb in and out on their own, fostering self-reliance and autonomy.
- Providing a sense of security: The house-like structure creates a cozy, comfortable space that helps children feel secure and nurtured.
- Stimulating imagination and creativity: The unique design of Montessori house beds can inspire imaginative play and creativity, as children can use the bed as a backdrop for various scenarios and stories.
- Adapting to individual needs: Montessori house beds can be customized to suit each child’s preferences, ensuring they have a space that truly reflects their personality and interests.
Benefits of a Wooden Montessori House Bed
Our featured Montessori house bed is made from wood, which offers numerous benefits, including:
- Durability: Wood is a strong and long-lasting material that can withstand the test of time. With proper care and maintenance, a wooden Montessori house bed can last for years, growing with your child.
- Sustainability: Wood is a renewable resource, making it an eco-friendly option for your child’s bedroom furniture. By choosing a wooden bed, you’re making a responsible choice for the environment.
- Aesthetics: Wood has a timeless, classic appeal that can complement any room decor. The natural grain patterns and warm tones of wood can create a cozy, inviting atmosphere in your child’s bedroom.
- Customization: Wooden beds can be easily customized with paint or stain, allowing you to create a one-of-a-kind piece that reflects your child’s unique style and preferences.
Choosing the Right Design and Size
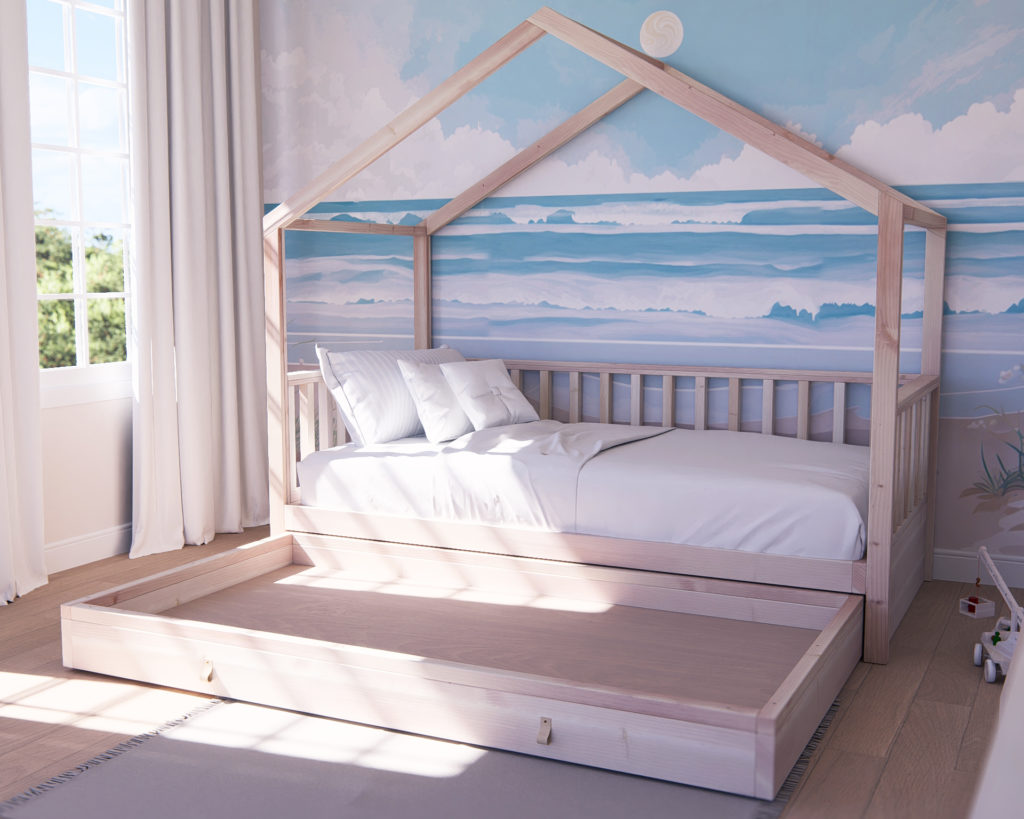
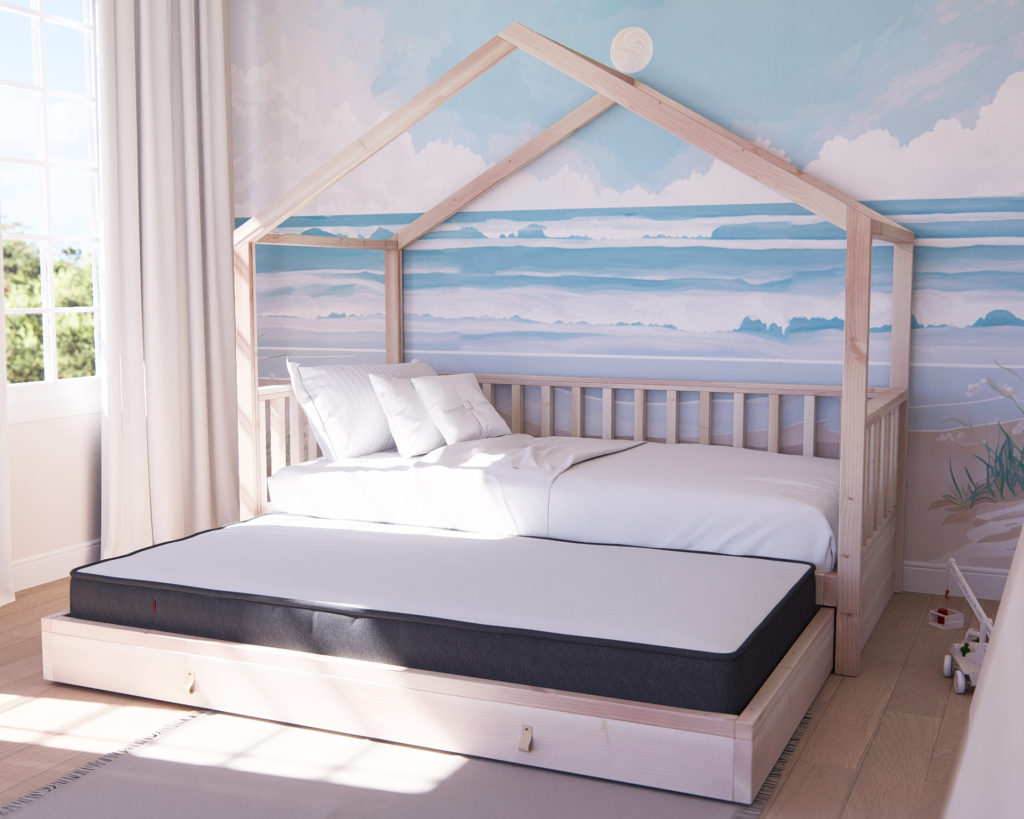
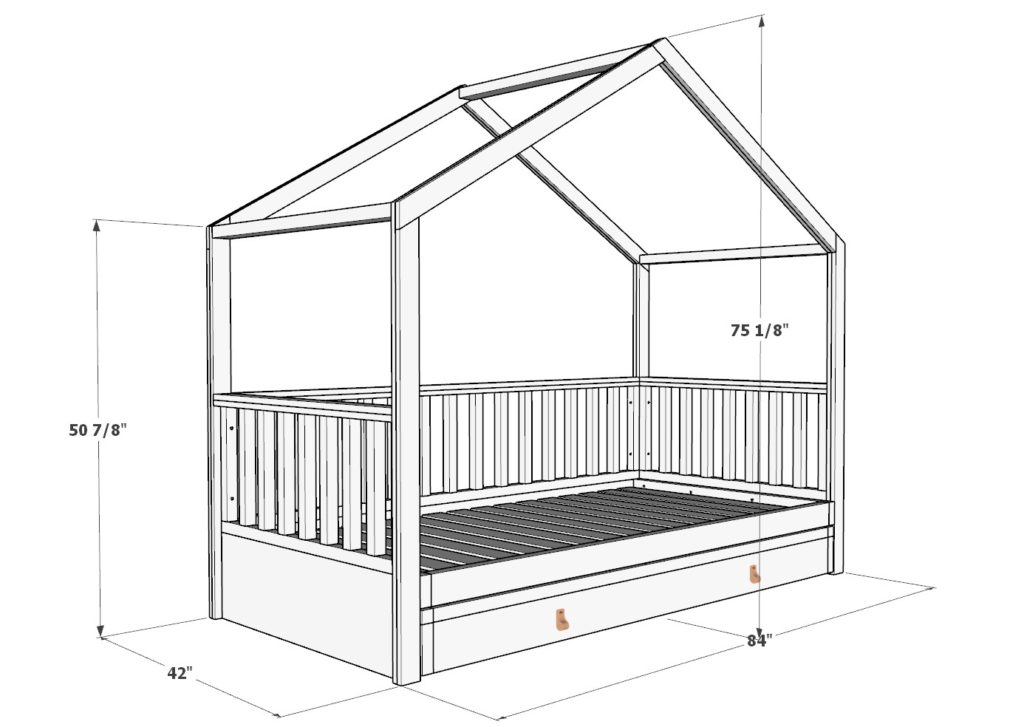
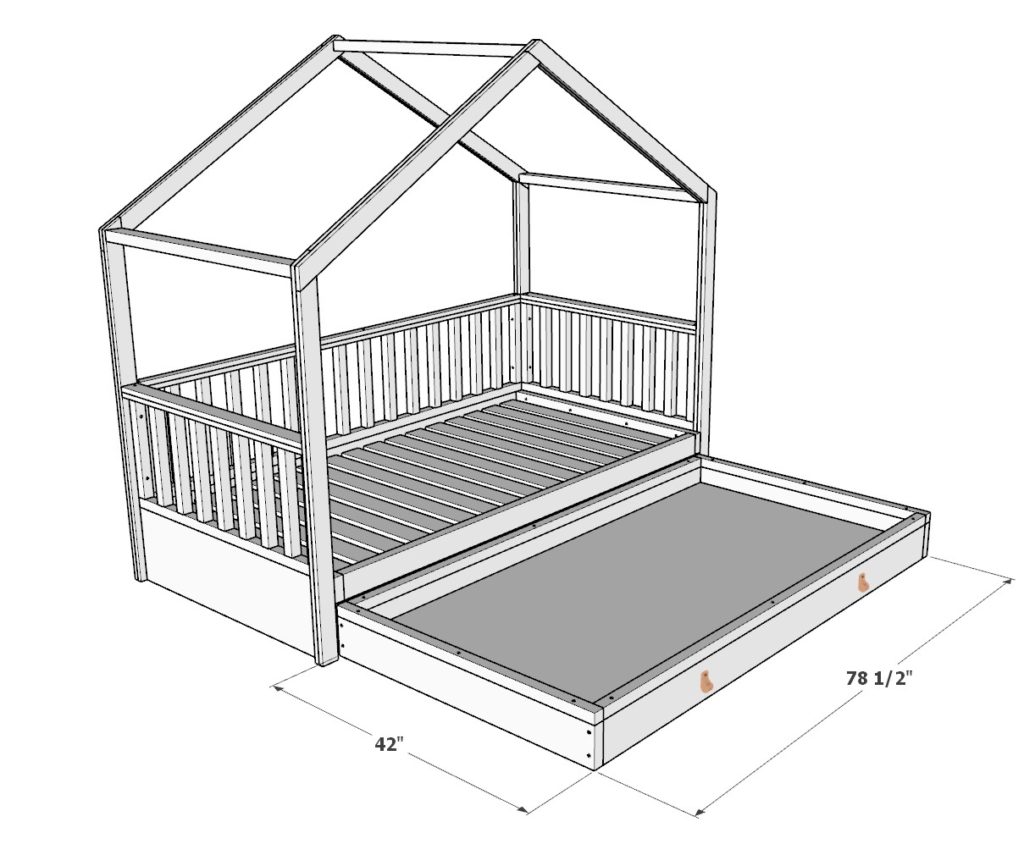
Our featured design stands out for its versatility and practicality, with a built-in shelf that can be used for spacious storage or converted to accommodate a second twin mattress for sleepovers. This social aspect adds an extra layer of fun and excitement for your child. The twin size of this bed frame is ideal for most children, offering ample space and the potential to accommodate two mattresses if needed.
When selecting the right design and size for your child’s Montessori house bed, consider the following factors:
- Room size: Measure the available space in the room to determine the best bed size and design that will fit comfortably while allowing enough space for other furniture and play areas.
- Age and developmental stage: Consider your child’s age and developmental stage when selecting the bed size and design. A toddler may need a smaller, simpler design, while an older child may appreciate a larger bed with more storage or customization options.
- Personal preferences: Take into account your child’s likes and dislikes when choosing the design and color scheme of the Montessori house bed. This will help create a space that truly reflects their personality and interests.
- Functionality: Think about the bed’s functionality, such as storage options and the potential for sleepovers. Our featured design offers a versatile solution that can adapt to your child’s needs over time.
Beginner-Friendly DIY Plan and Basic Tools
Our step-by-step DIY plan is specifically designed for those who are new to woodworking, with no fancy joints or cuts required. The building process is simplified, making it accessible to anyone with basic woodworking skills and tools.
Step-by-Step Construction Guide
In this article, you’ll find a detailed, easy-to-follow guide on building the Montessori house bed, complete with diagrams, pictures, and descriptions to ensure a smooth construction process. We’ll cover everything from preparing the materials and cutting the wood to assembling the bed frame and adding the finishing touches. By following our step-by-step instructions, even beginners will be able to successfully create a beautiful wooden Montessori house bed.
Safety Considerations
As you embark on this DIY project, it’s essential to prioritize safety. Here are some key safety considerations to keep in mind during the construction process:
- Sanding sharp edges: Make sure to sand down any rough or sharp edges on the wood pieces to prevent potential injuries.
- Securing the structure: Ensure that all screws and fasteners are tightened securely to maintain the bed’s structural integrity.
- Using non-toxic paint or finishes: When painting or staining the bed, opt for non-toxic, child-safe products to protect your child’s health and well-being.
Customization Ideas
Adding personal touches to the Montessori house bed can make it even more special for your child. Here are some ideas for customizing the bed:
- Paint colors: Choose a paint color that matches your child’s favorite hues or complements the room’s decor.
- Decorative elements: Add decals, stencils, or hand-painted designs to the bed frame to create a unique, personalized look.
- Bedding and cushions: Select bedding, pillows, and cushions that reflect your child’s interests and style.
Maintenance and Care
To ensure the Montessori house bed remains safe and sturdy over time, follow these maintenance and care tips:
- Cleaning: Regularly dust and clean the bed to keep it looking fresh and inviting.
- Checking for loose screws: Periodically inspect the bed for any loose screws or fasteners and tighten as needed.
- Structural integrity: Regularly examine the bed’s overall structure for any signs of wear or damage, addressing any issues promptly to maintain safety.
Room Setup and Accessories
To create a Montessori-inspired bedroom that focuses on the bed, consider the following tips for room setup and accessories:
- Positioning the bed: Place the Montessori house bed in a central, easily accessible location in the room, allowing for ample space around it for play and movement.
- Incorporating Montessori principles: Arrange the room to promote independence, self-regulation, and active learning by providing low shelves, child-sized furniture, and clearly defined activity areas.
- Selecting accessories: Choose accessories that complement the bed and support your child’s development, such as comfortable rugs for playtime, inspiring wall art, and easy-to-care-for plants that bring a touch of nature into the space.
Conclusion
Building a DIY Montessori house bed is a rewarding project that provides a comfortable, functional, and stylish sleeping solution for your child. By following our step-by-step guide and incorporating the tips and suggestions provided, even those new to woodworking can successfully create a beautiful, personalized bed that promotes independence, exploration, and learning. With the right design, materials, tools, and care, your child’s Montessori house bed will become the centerpiece of their dream bedroom, serving as a cherished space for years to come.
Time to build
12 hours
Total cost of build
About $500
Skill level required
Beginner
Download the PDF plans
DIY Montessori house PDF plans
What is included in the PDF download?
Easy to read step by step instructions
Material list
Tools needed
3D illustrations
Recommended tools/materials
- Miter saw
- Drill
- Impact driver with bit for screws
- Sander
- wood countersink drill bit
- Wood glue
- Sand paper
- Nail gun and small pack of 1 inch nails (optional)
- Table saw or circular saw
- 2 lb of 3.5 inch screws
- 2 lb of 2.5 inch screws
- 1 lb 1 inch screws
- Four swivel caster wheels that have a 2-1/2 inch mounting height (this means that they need to be a total of 2-1/2 inches tall with the wheel and metal components when attached)
- Pair of handles for pull out drawer
Shopping list and cut list
Lumber shopping list:
(1) 2in x 12in x 8ft
(3) 2in x 6in x 8ft
(3) 2in x 4in x 8ft
(2) 2in x 3in x 8ft
(15) 2in x 2in x 8ft
(8) 1in x 4in x 8ft
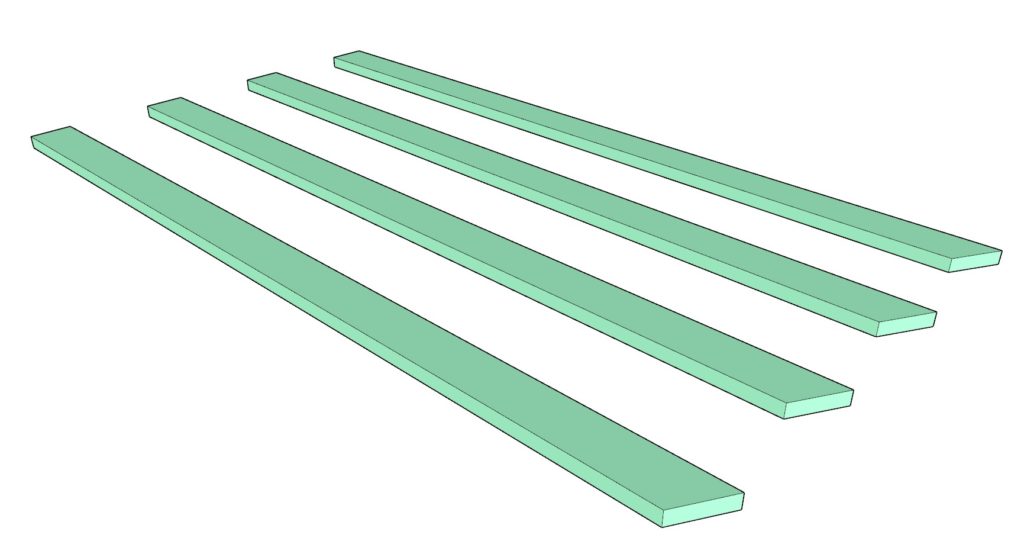
(4) 1in x 3in x 8ft (to cut the 52-5/16 and 39 inch pieces)
(6) 1in x 3in x 8ft (to cut the 48-1/2 and 49-7/16 inch pieces)
(2) 1in x 2in x 8ft
(1) 3/4″ thick 4ft x 8ft plywood sheet
2×12 lumber cut list:
(2)2in x 12in x 39in
2×6 lumber cut list:
(2)2in x 6in x 42in
(2)2in x 6in x 75-1/2in
2×4 lumber cut list:
(2)2in x 4in x 42in
(2)2in x 4in x 76in
2×3 lumber cut list:
(3)2in x 3in x 39in
2×2 lumber cut list:
(2)2in x 2in x 76in
(2)2in x 2in x 36in
(4)2in x 2in x 75-1/2in
(2)2in x 2in x 42in
(1)2in x 2in x 79in
(34)2in x 2in x 15in
(2)2in x 2in x 39in
1×4 lumber cut list:
(16)1in x 4in x 39in
1×3 lumber cut list:
(8)1in x 3in x 48-1/2in (both ends cut at 30-degrees. See diagram)
(4)1in x 3in x 49-7/16in (one end cut at 30-degrees. See diagram)
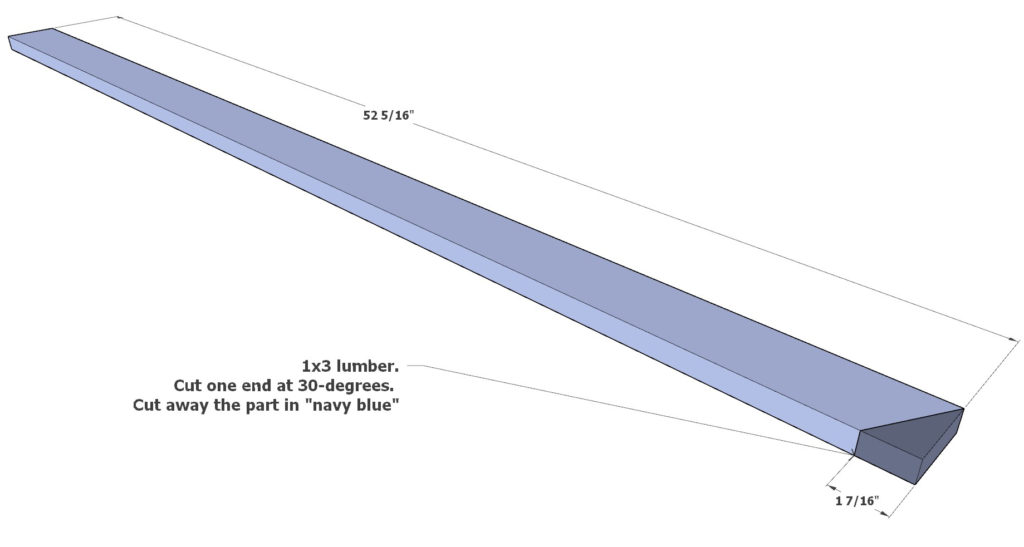
(4)1in x 3in x 52-5/16in (one end cut at 30-degrees. See diagram)
(4)1in x 3in x 39in
1×2 lumber cut list:
(2)1in x 2in x 79in
3/4″ thick plywood cut list:
(1) 75-1/2 in x 39 in plywood sheet
Please note that this shopping list assumes that the provided cut list has taken into account the saw kerf (the width of the material removed by the saw blade) and any additional length needed for safe cutting.
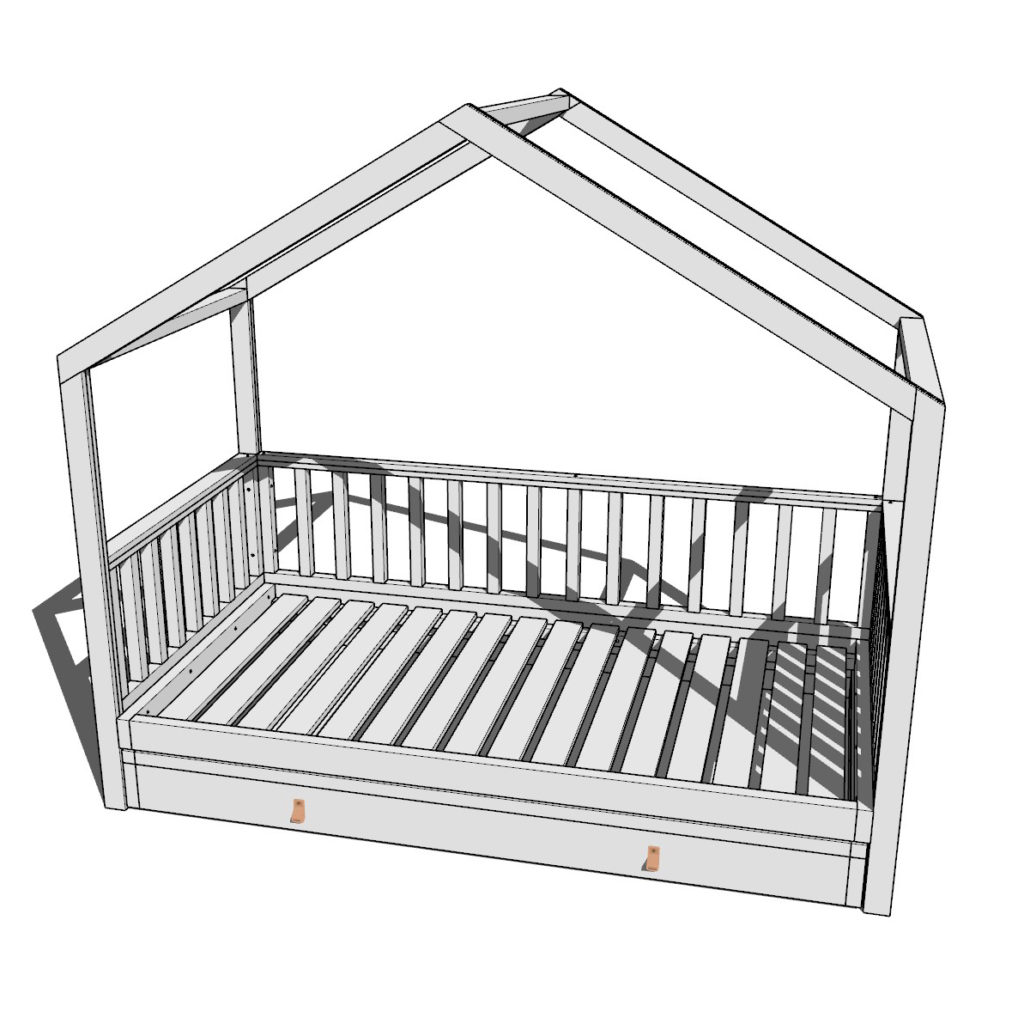
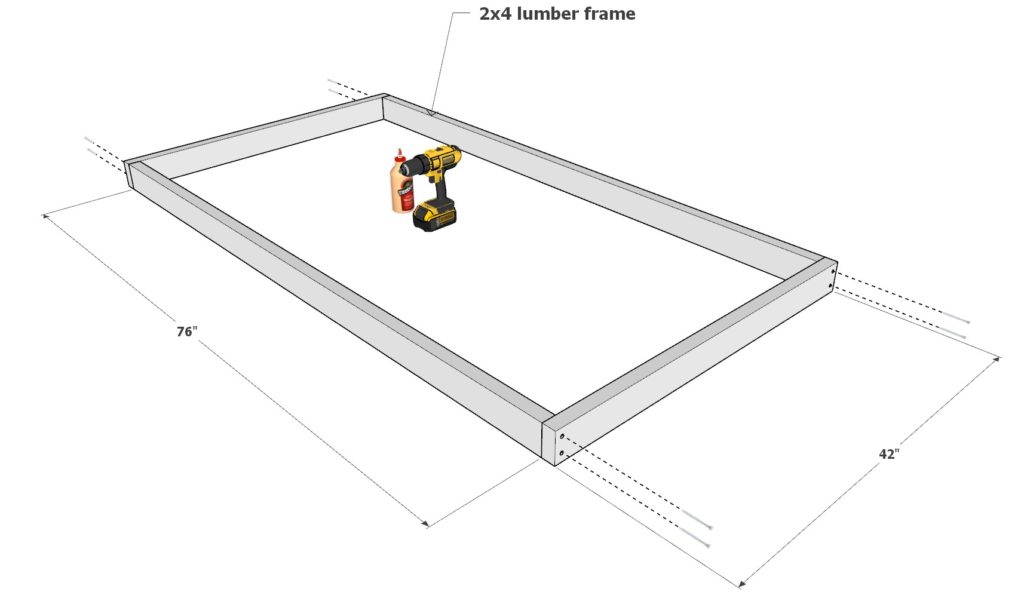
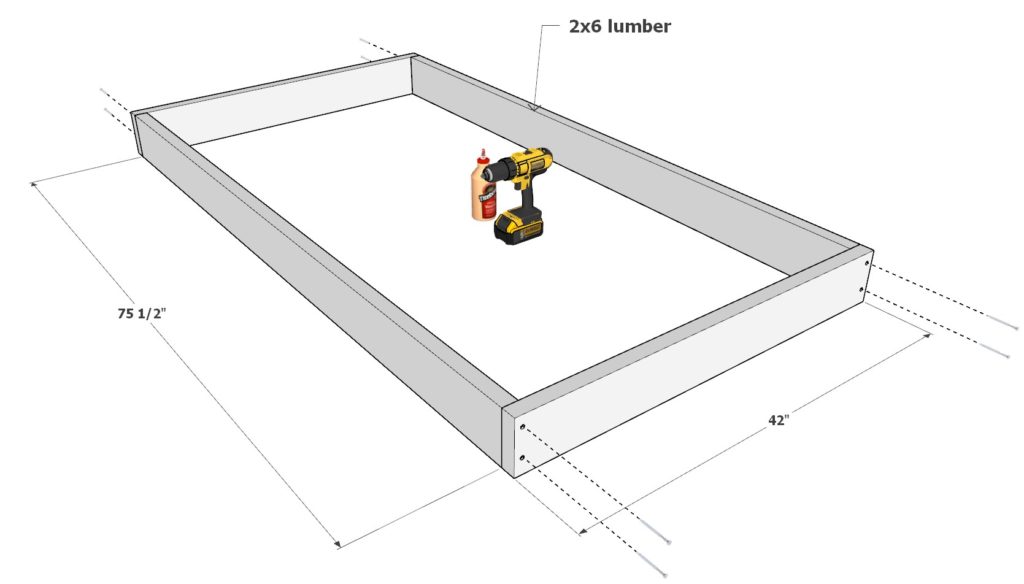
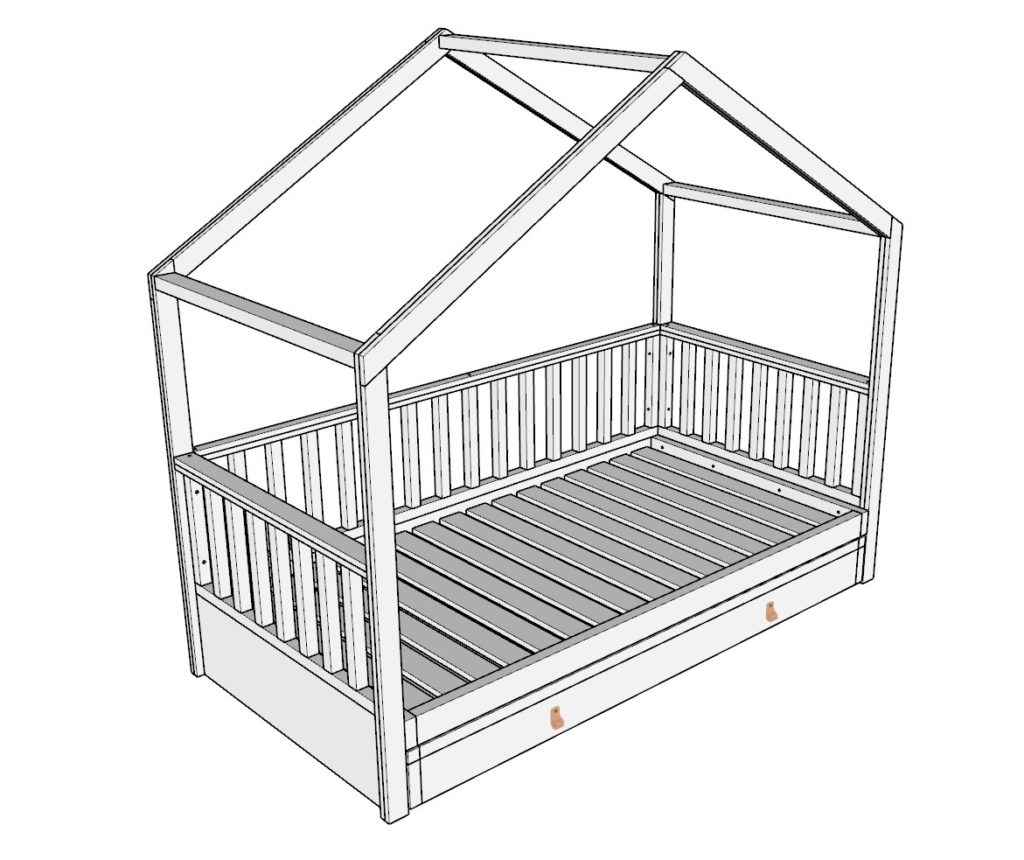
Step 1 (Assembling the Montessori House Bed Frame: Constructing the Base and Mattress Support Ledge)
Being by building the frame of the bed.
Take two 76 inch 2×4 lumber pieces and two 42 inch 2×4 lumber pieces and arranging them as shown below.
Predrill holes to prevent the wood from splitting, add glue, and add 3.5 inch screws to secure the frame together.
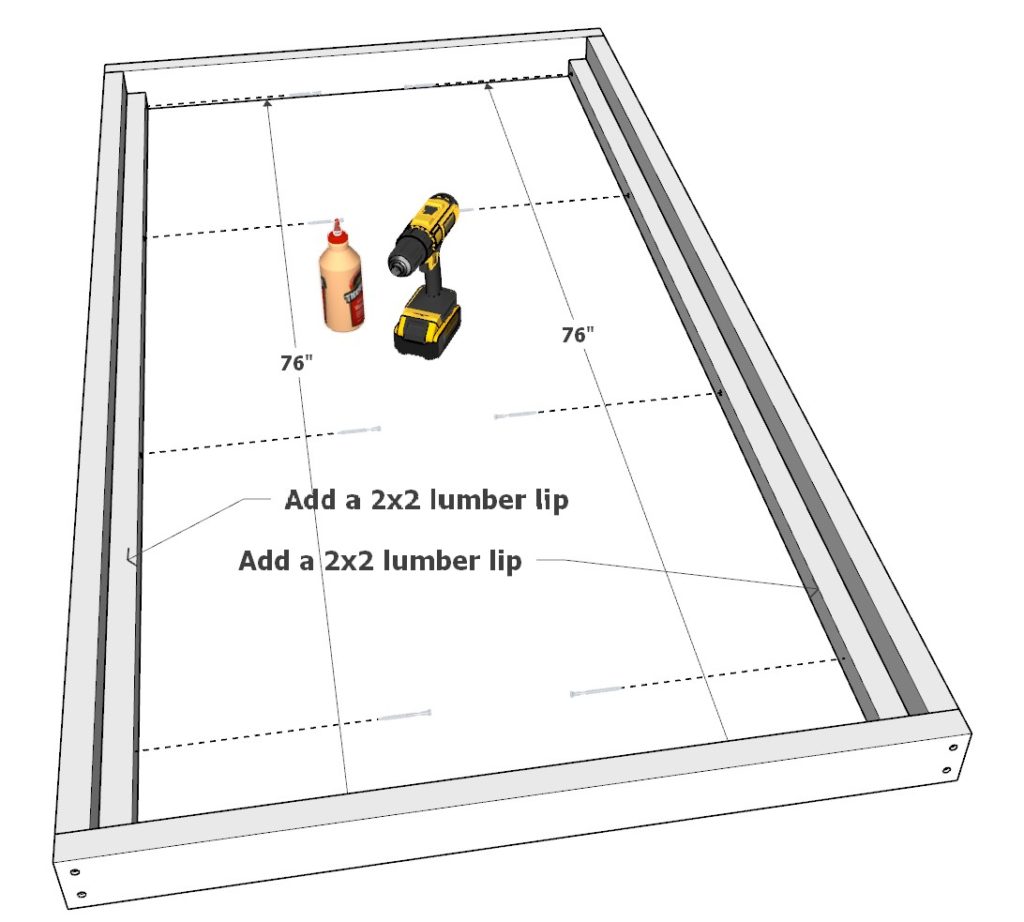
Next, add a 2×2 lumber lips to the inside of the bed frame. This will serve as a base upon which the mattress support boards will sit.
Take two 76 inch 2×2 lumber pieces and add them to be flush with the base of the bed frame.
Secure the 2×2 lumber with 2.5 inch screws and glue.
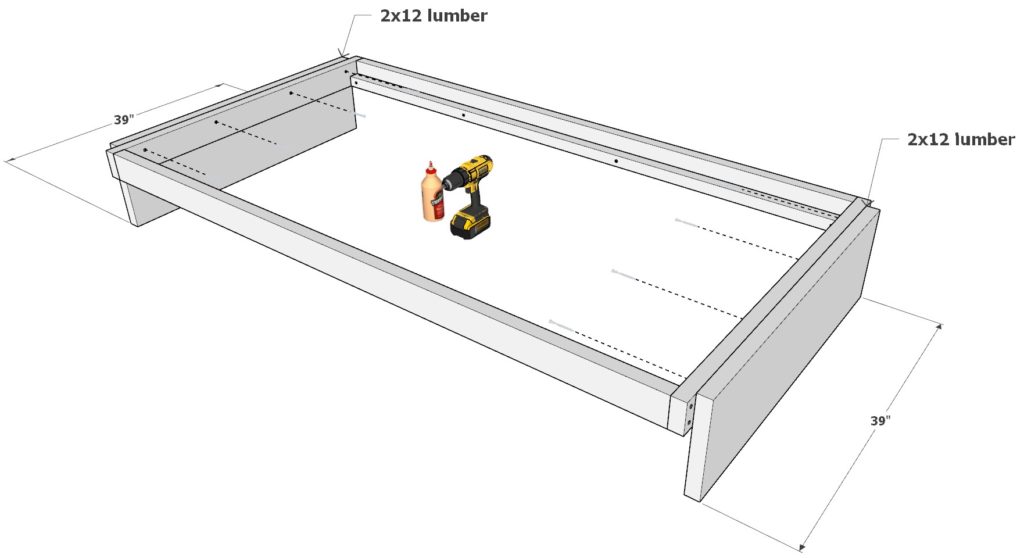
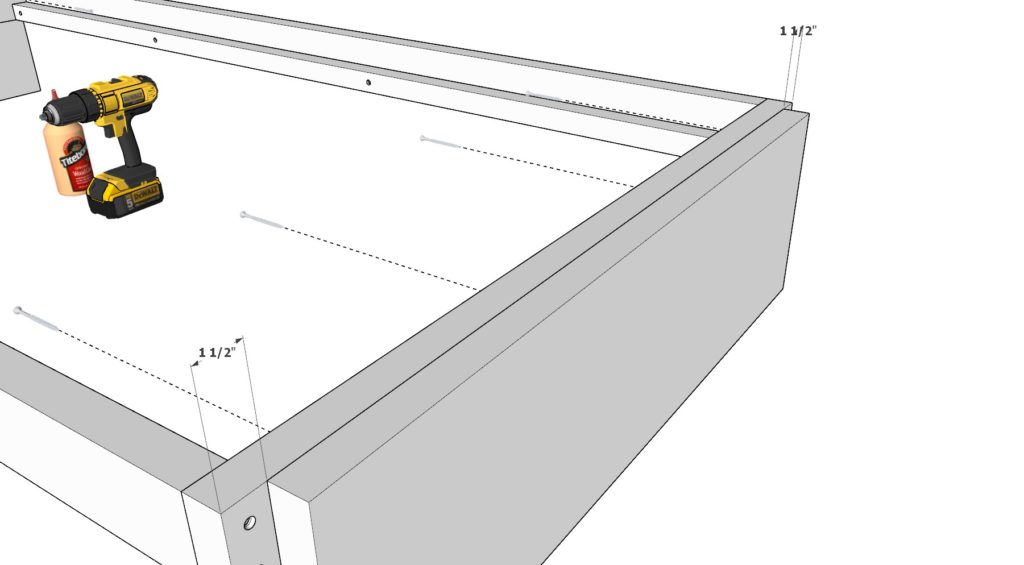
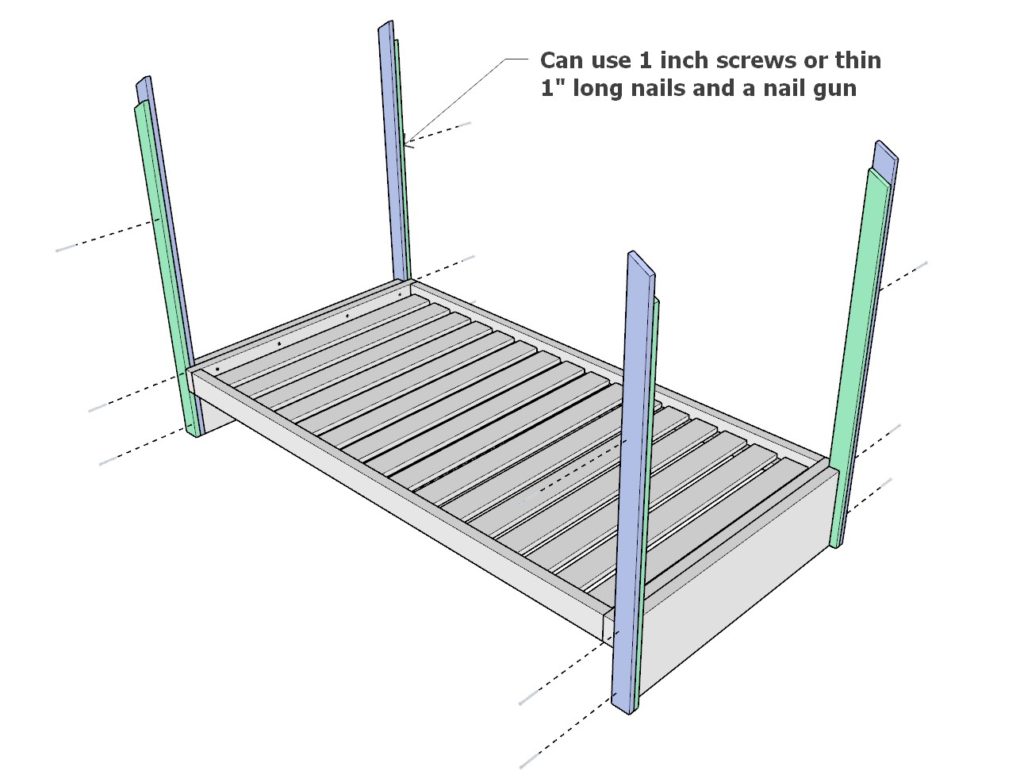
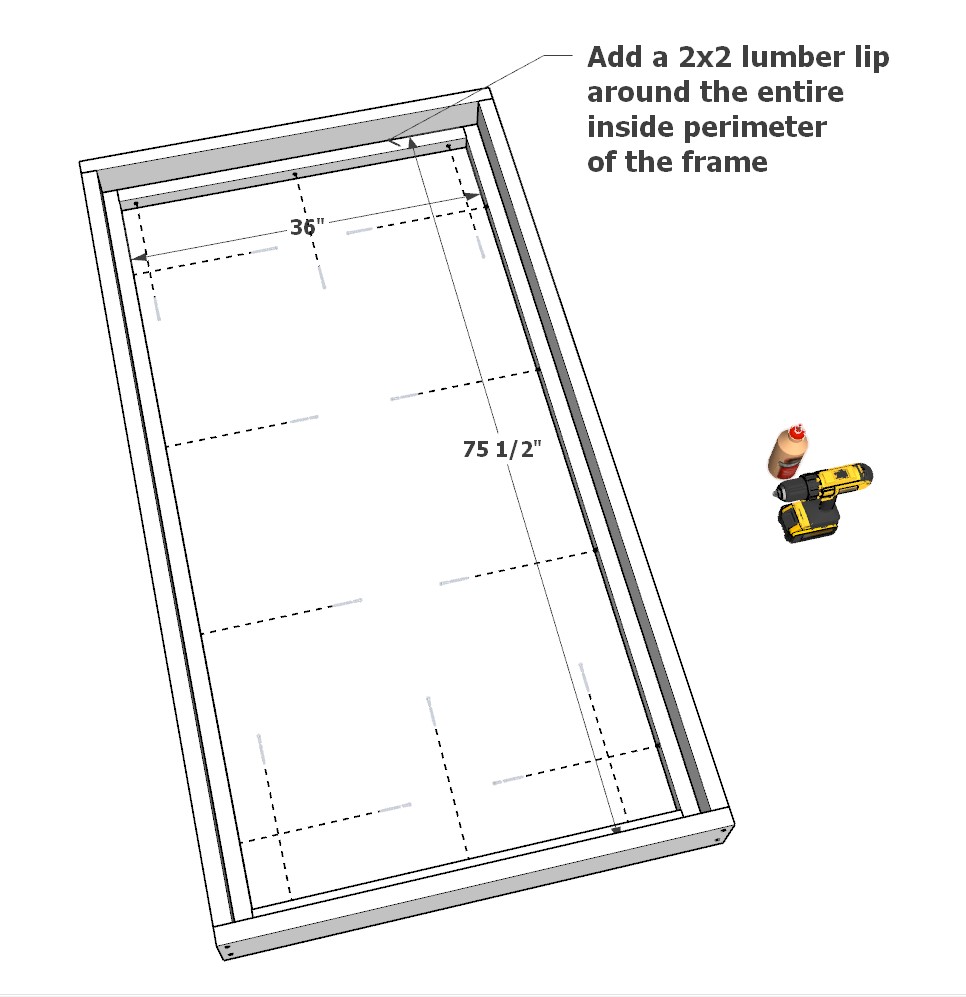
Step 2 (Attaching Bed Legs and Installing Mattress Support Boards: Securing Bed Frame Components and Ensuring Even Spacing)
Next, add the bed legs and the mattress support boards.
Take two 39 inch 2×12 lumber pieces and secure them to both ends of the bed frame. Center the 2×12 lumber pieces so that they have 1-1/2″ spaces on either ends as shown below. Secure these with 2.5 inch screws and glue.
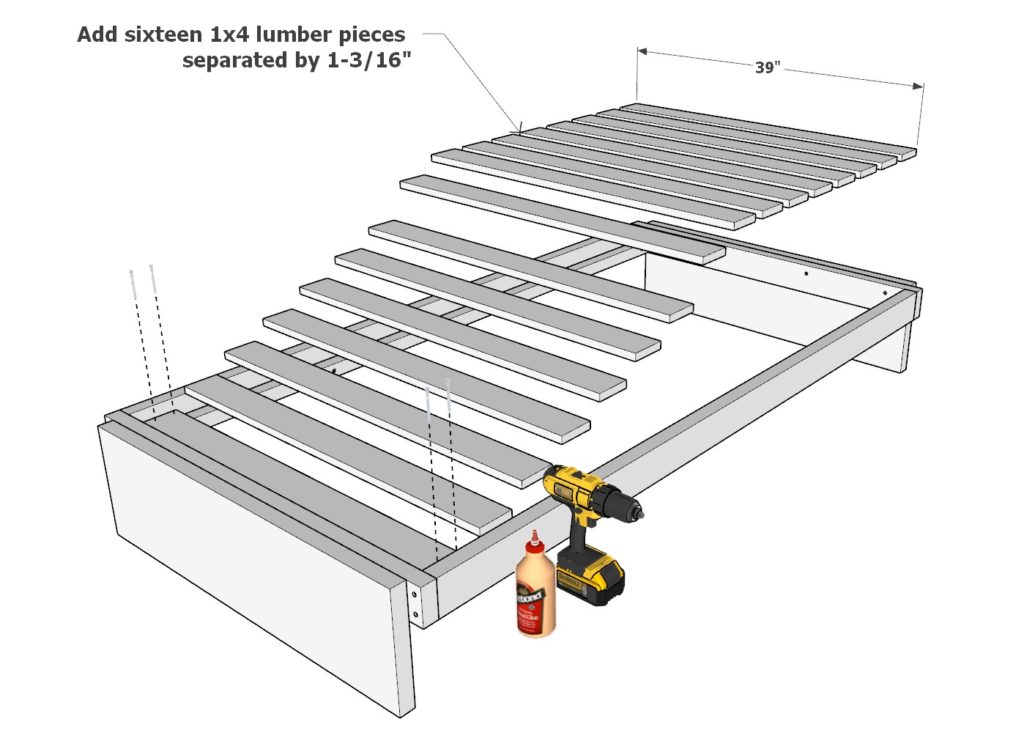
Next, add the sixteen 39 inch 1×4 lumber pieces to support the mattress. These need to be spaced out 1-3/16 inches apart. Secure these with 1.5 inch screws and glue.
Step 3 (Preparing Components for the Montessori House Bed Frame: Cutting and Shaping the 1x4 Lumber Pieces for House Structure)
Next, cut out all the components for the “house” portion of the bed.
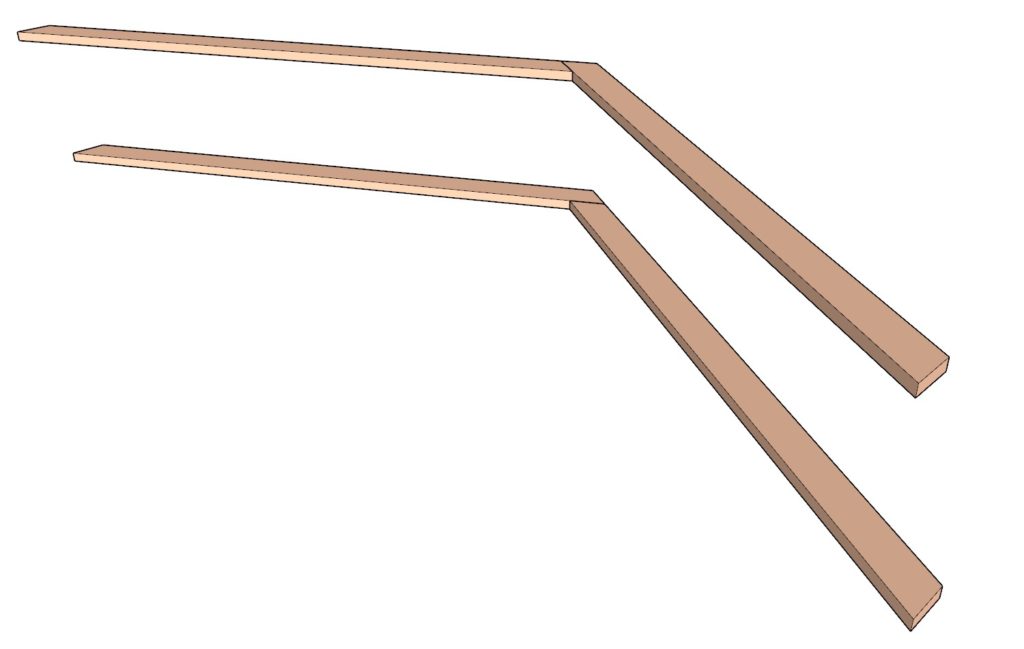
Take a 48-1/2 inch 1×3 lumber piece and cut off both ends at 30-degrees as shown below. make a total of eight of these. They are indicated in the peach color.
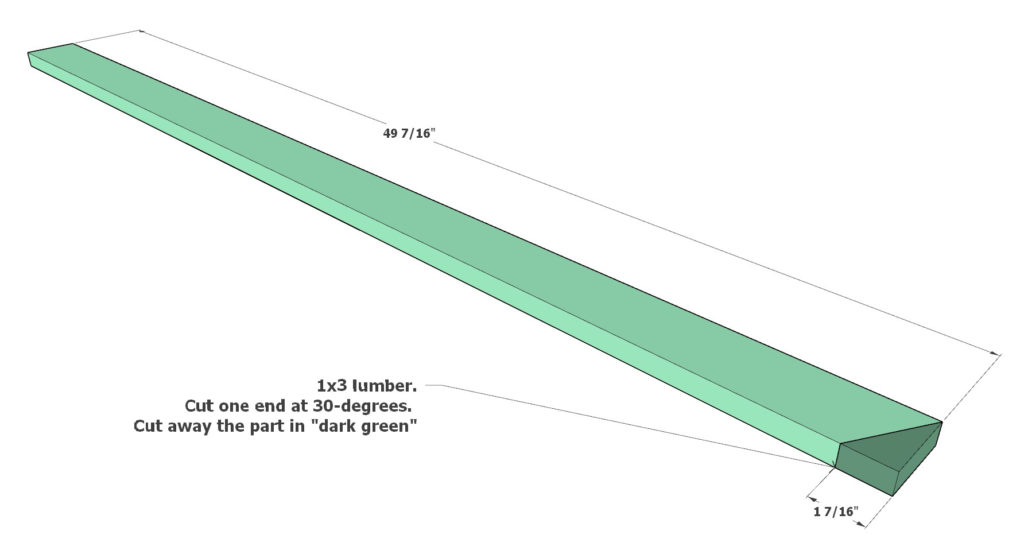
Take a 49-7/8 inch 1×3 lumber piece and cut off one end at 30-degrees as shown below. make a total of four of these. They are indicated in the green color.
Take a 52-5/16 inch 1×3 lumber piece and cut off one end at 30-degrees as shown below. make a total of four of these. They are indicated in the lavender color.


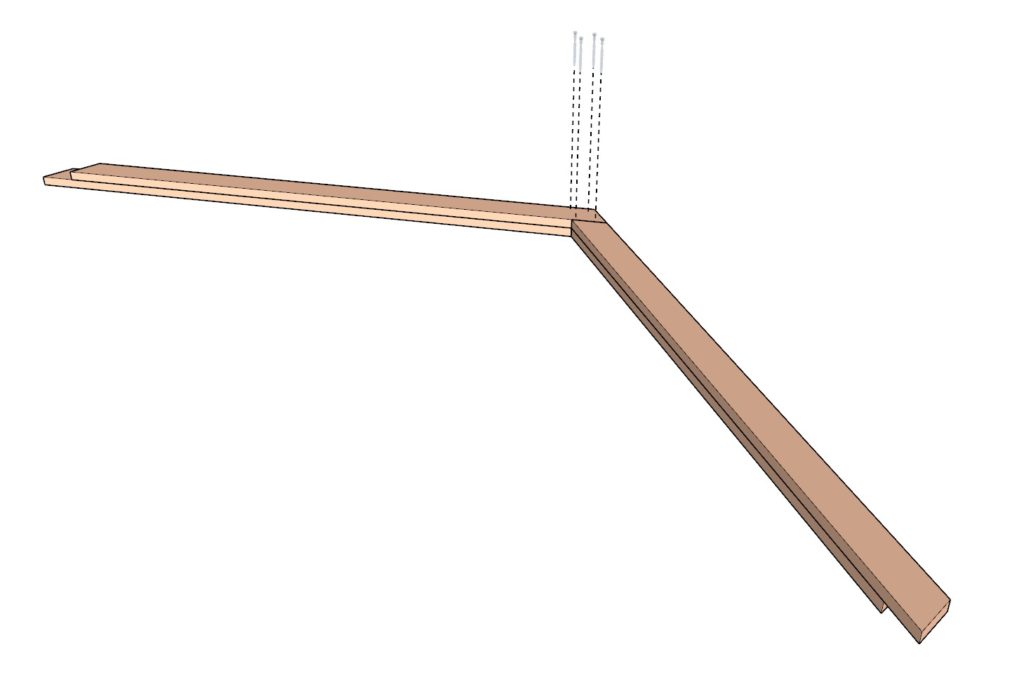
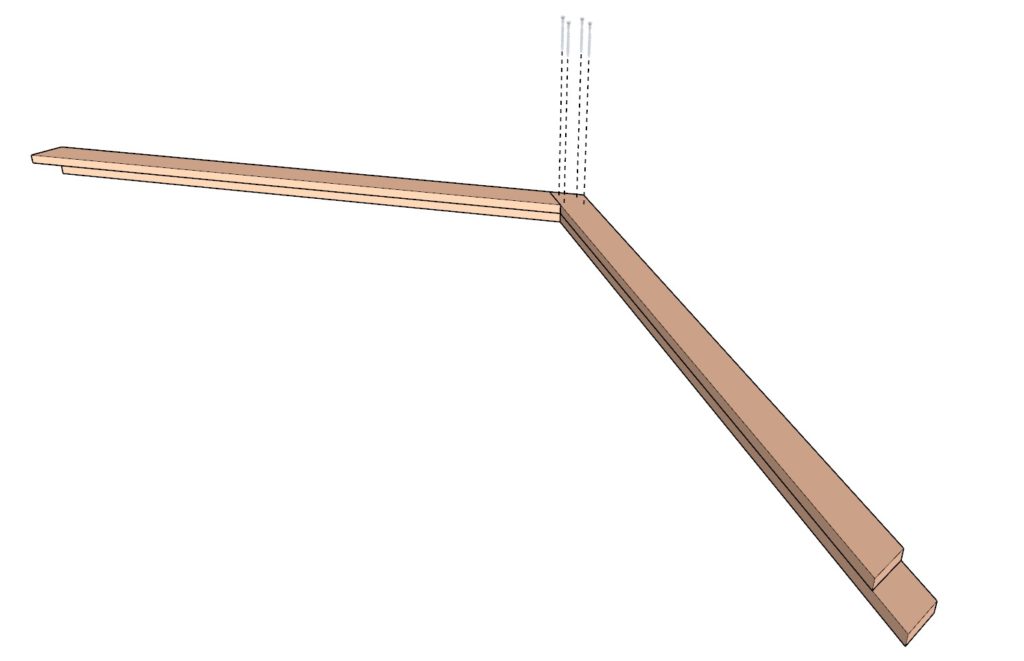
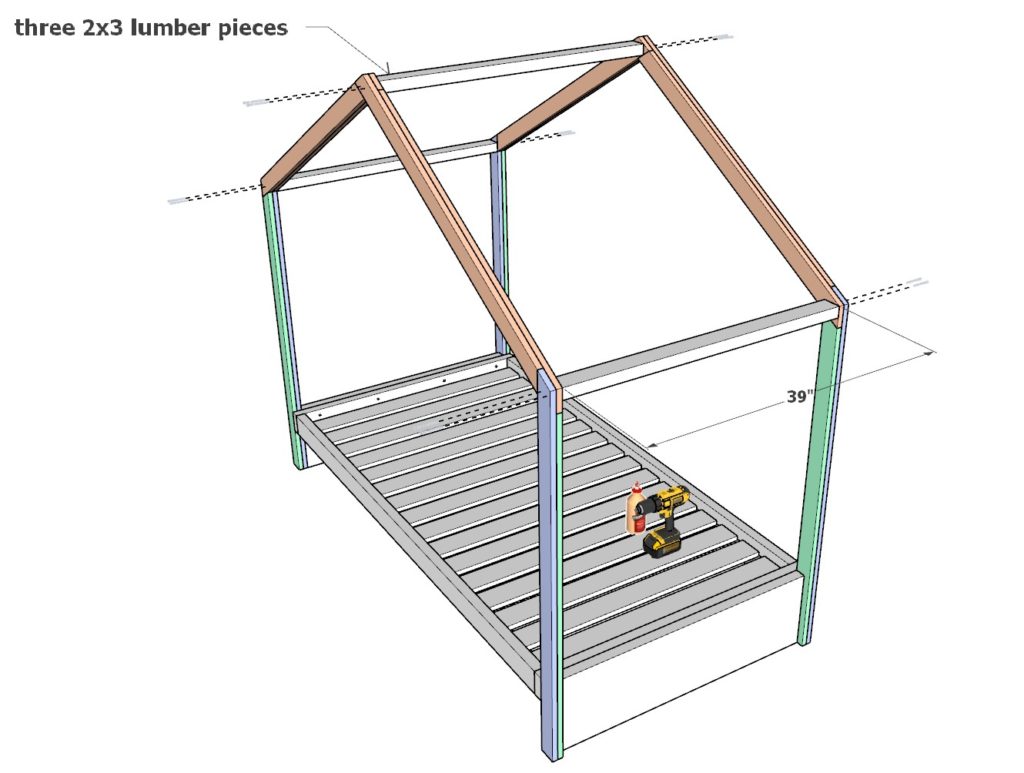
Step 4 (Assembling and Installing the Montessori House Bed Structure: Constructing the Arch, House Frame Components, and Adding Stability)
Next, install the “house” components of the bed.
Take the green and lavender components and arrange them as shown below. Use glue and 1 inch screws or 1 inch nails from a nail gun to secure the pieces together. Secure the pieces directly to the bed legs using 3.5 inch screws.
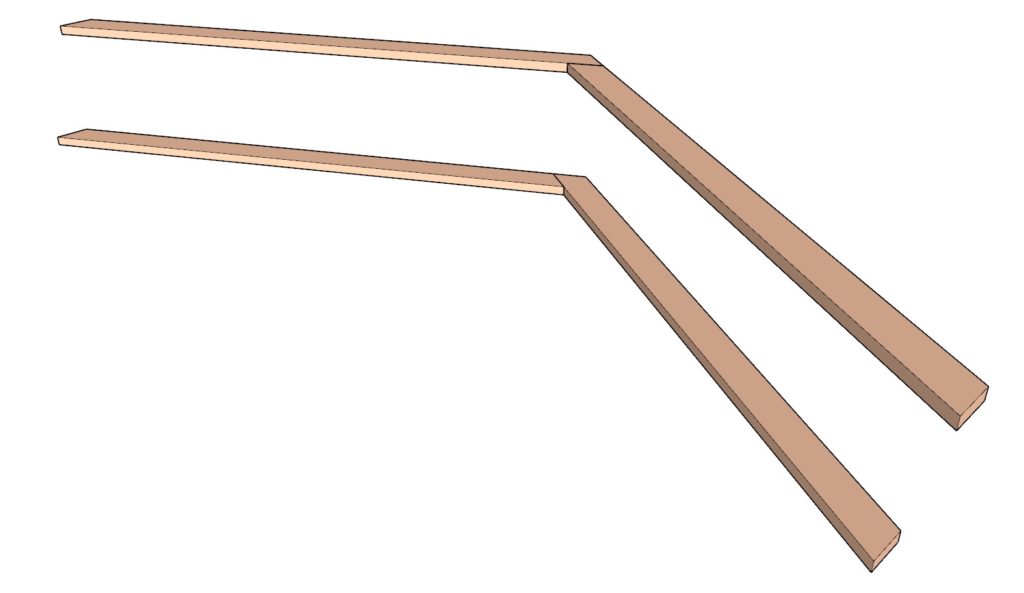
Next, build the “arch” component of the “house” frame. The arch is made of the peach colored boards. Superimpose and offset the boards as shown below. Use glue and 1 inch screws or 1 inch nails from a nail gun to secure the pieces together. The two “arch” components are not identical.
Next, secure the “arch” components together with the rest of the house frame. Use glue and 1 inch screws or 1 inch nails from a nail gun to secure the pieces together.
Lastly, add three 39 inch long 2×3 lumber pieces to the house frame to add stability. Secure them to the rest of the house frame with glue and 3.5 inch screws.

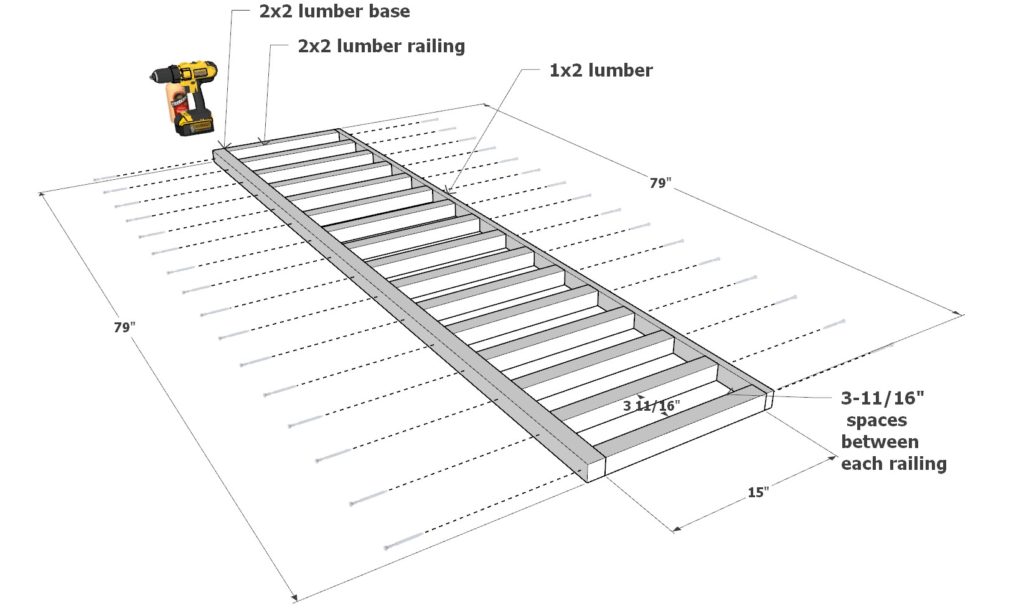
Step 5 (Constructing and Installing the Montessori House Bed Railings: Assembling the Longer Back Railing and Two Side Rail Pieces for Enhanced Safety)
Next, assemble the railing of the bed.
First, make the longer back railing. Take one 79 inch 2×2 lumber piece, one 79 inch 1×2 lumber piece, and sixteen 15 inch 2×2 lumber pieces and arrange them as shown below. Space out the railing pieces 3-11/16 inches apart. Secure them together with glue and 3.5 inch screws. Predrill to prevent the delicate 2×2 lumbar from splitting. Next, add a 79 inch 1×2 lumber piece on top of the other 79 inch 1×2 lumber piece. Secure it with either 1 inch screws or 1 inch nails and nail gun.
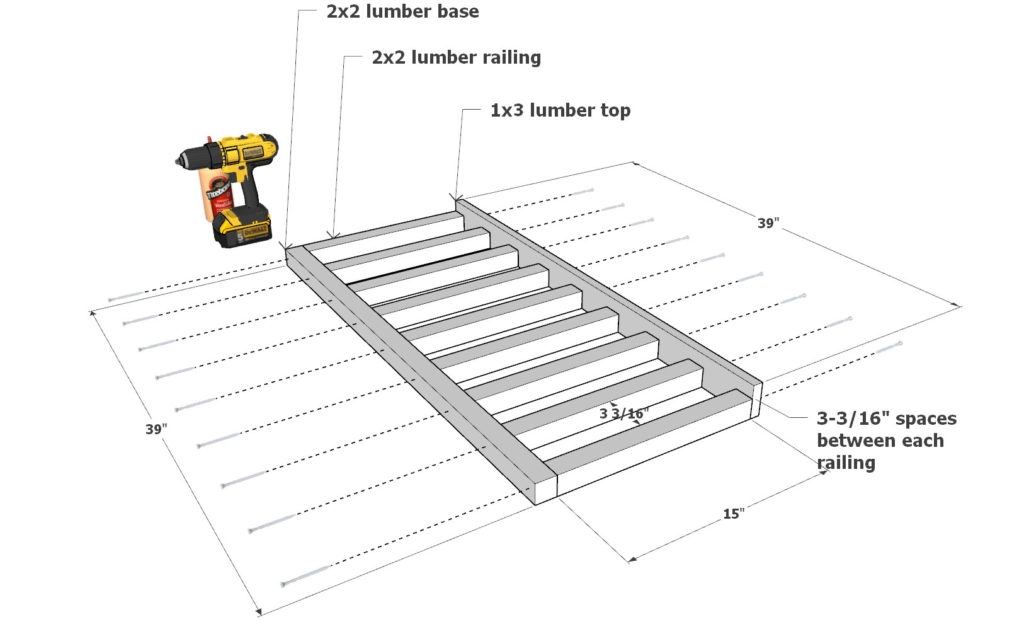
Next, build the other two side rail pieces.
Take one 39 inch 2×2 lumber piece, one 39 inch 1×3 lumber piece, and nine 15 inch 2×2 lumber pieces and arrange them as shown below. Space out the railing pieces 3-3/16 inches apart. Secure them together with glue and 3.5 inch screws. Again, predrill to prevent the delicate 2×2 lumber from splitting. Next, add a 39 inch 1×3 lumber piece on top of the other 39 inch 1×2 lumber piece. Secure it with either 1 inch screws or 1 inch nails nd nail gun.
Make two identical 39 inch long railing.
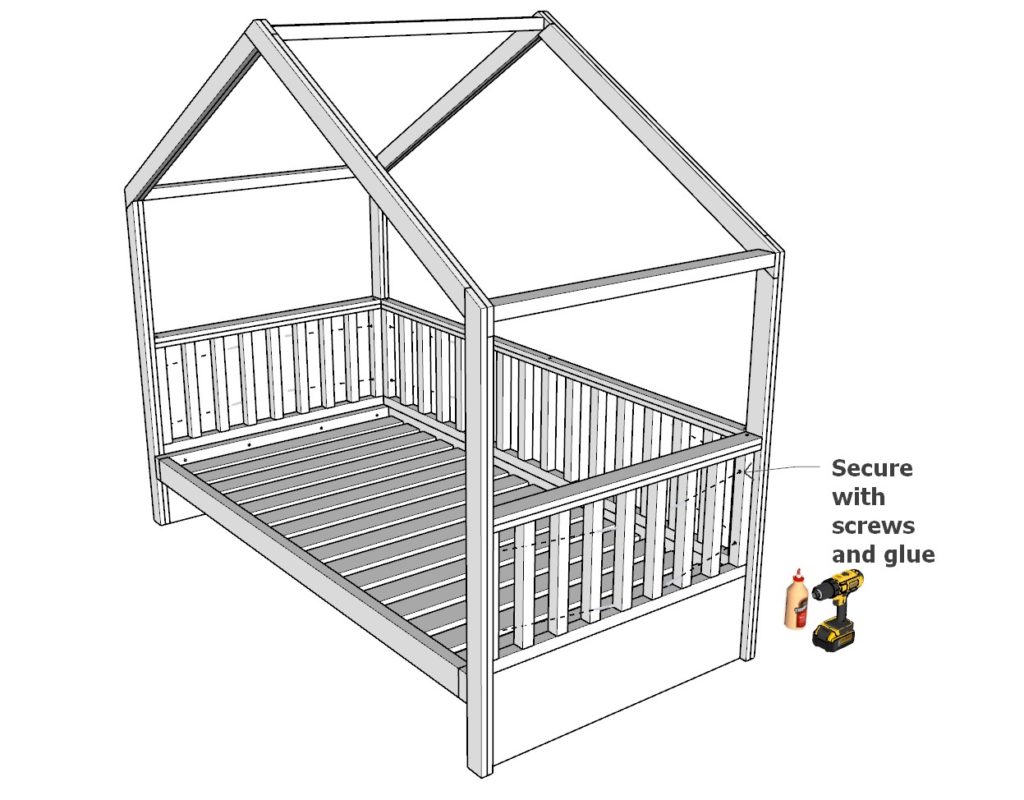
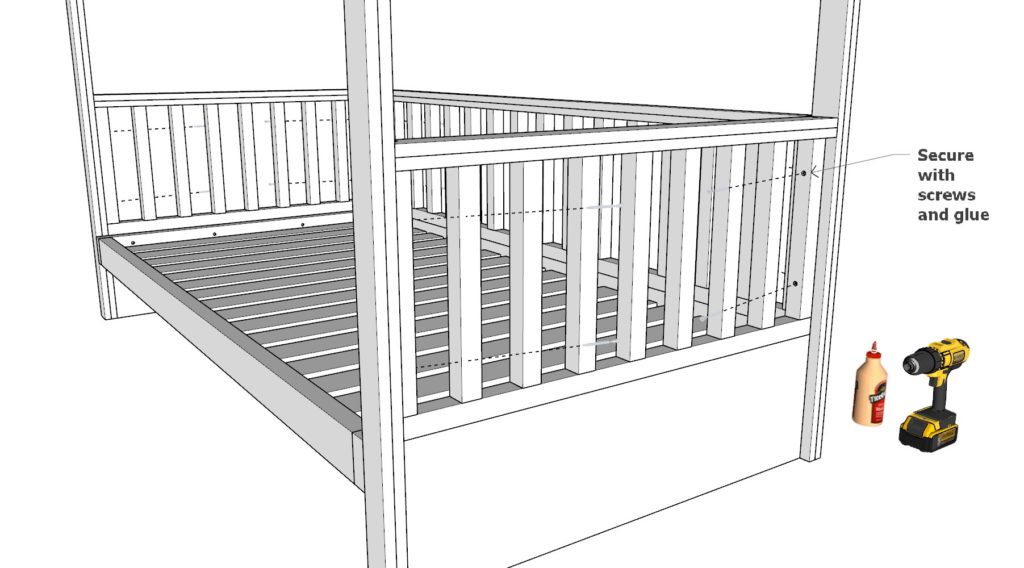
Next, install the railing. Secure them to the bed frame using 2.5 inch screws and glue.


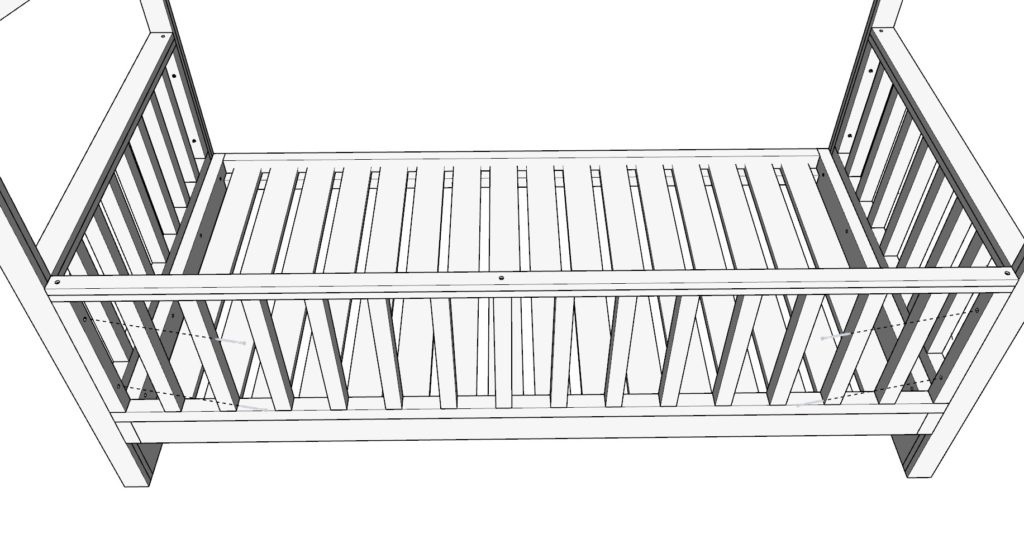
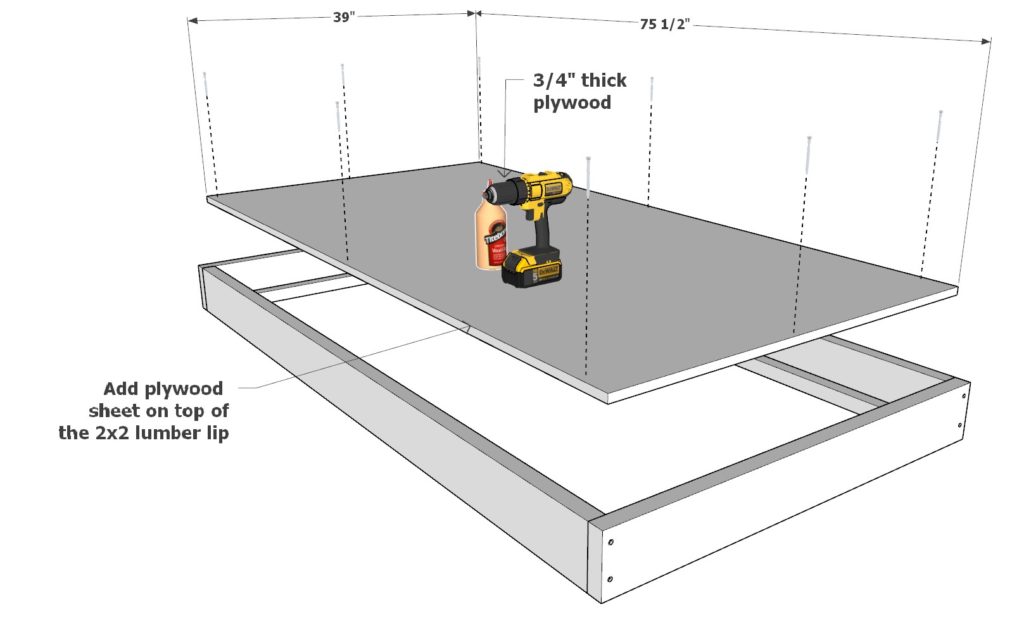
Step 6 (Constructing the Montessori House Bed's Slide-Out Drawer: Building the Frame, Adding Support and Caster Wheels for Smooth Functionality)
Next, build the slide out drawer for the bed.
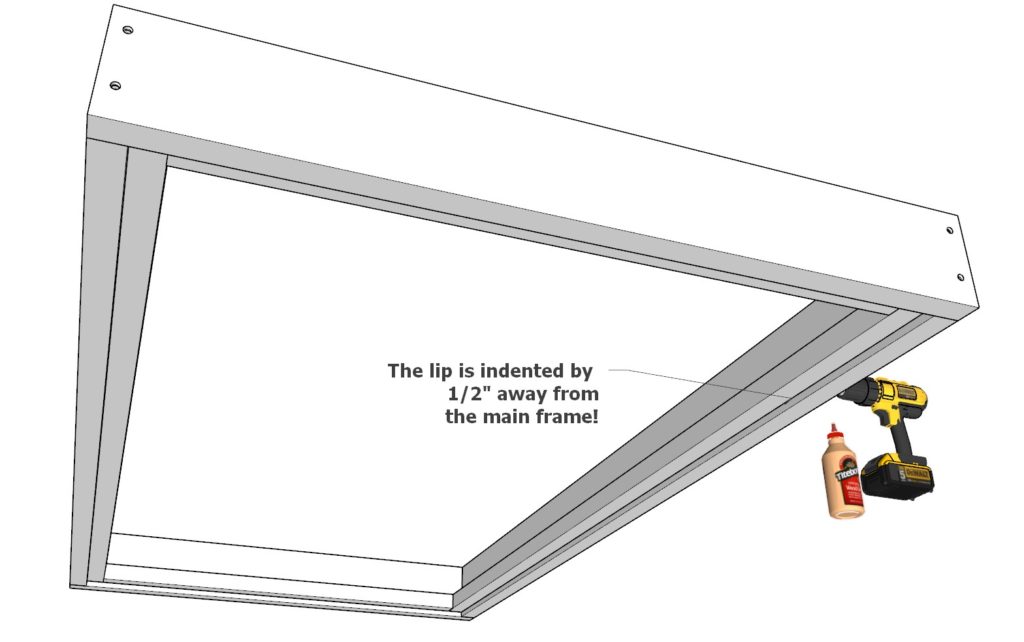
Take two 75-1/2 inch 2×6 lumber pieces and two 42 inch 2×6 lumber pieces and arrange them as shown below. Secure them together with 3.5 inch screws and wood glue.
Next, add a 2×2 lumber lip to go all the way around the internal perimeter of the slide out drawer frame. The lip is made of two 36 inch 2×2 lumber pieces and two 75-1/2 inch 2×2 lumber pieces. These are secured by 2.5 inch screws and glue. CAUTION! The lip MUST be indented by 1/2″ away from the main frame base!
Next, add a 75-1/2 inch x 39 inch (3/4″ thick) plywood sheet to the 2×2 lumber lip. Secure the plywood sheet with 1 inch screws and generous amounts of glue.
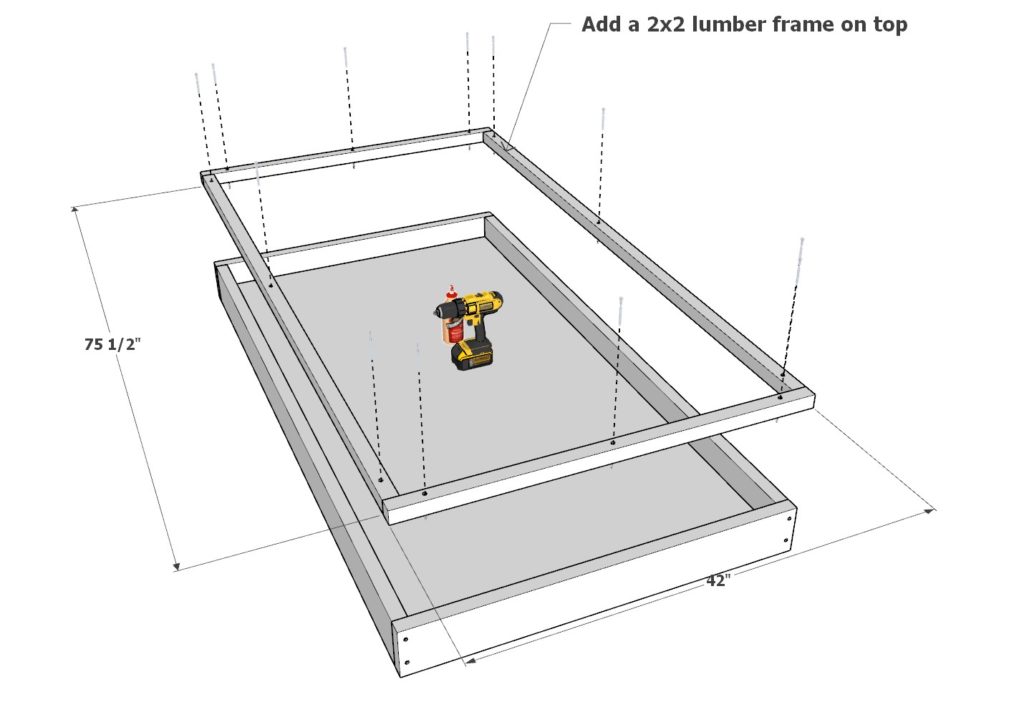
Next, add a 2×2 lumber frame directly on top of the 2×6 frame. This 2×2 lumber frame is made of two 42 inch and two 75-1/2 inch long 2×2 lumber pieces. Secure with 2.5 inch screws and glue.
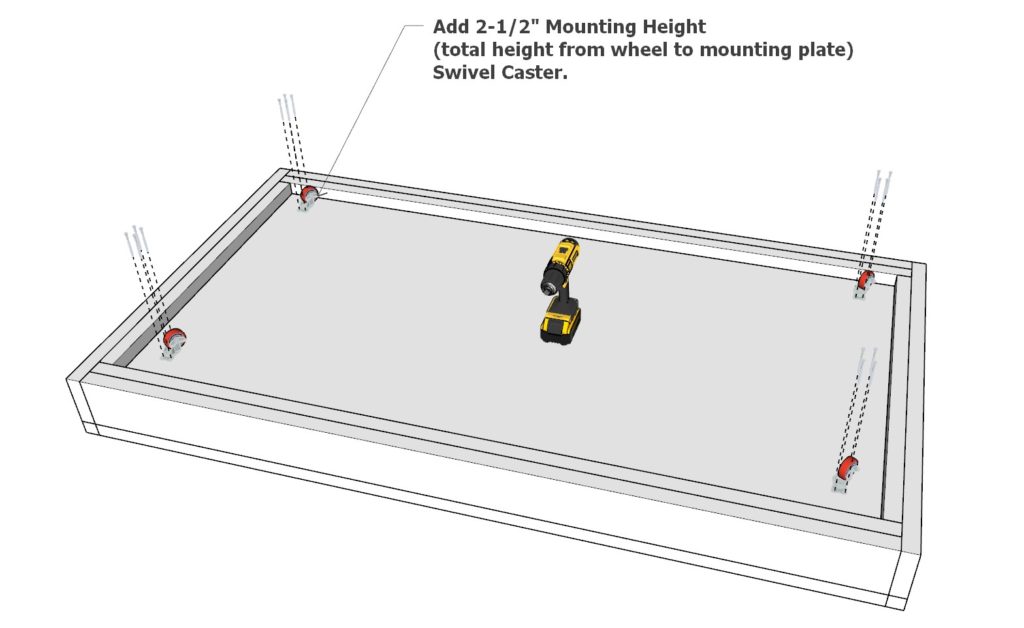
Next, add four swivel caster wheels to the bottom of the pull out drawer. These casters need to have a 2-1/2 inch mounting height. This means that they need to be a total of 2-1/2 inches tall with the wheel and metal components when attached.
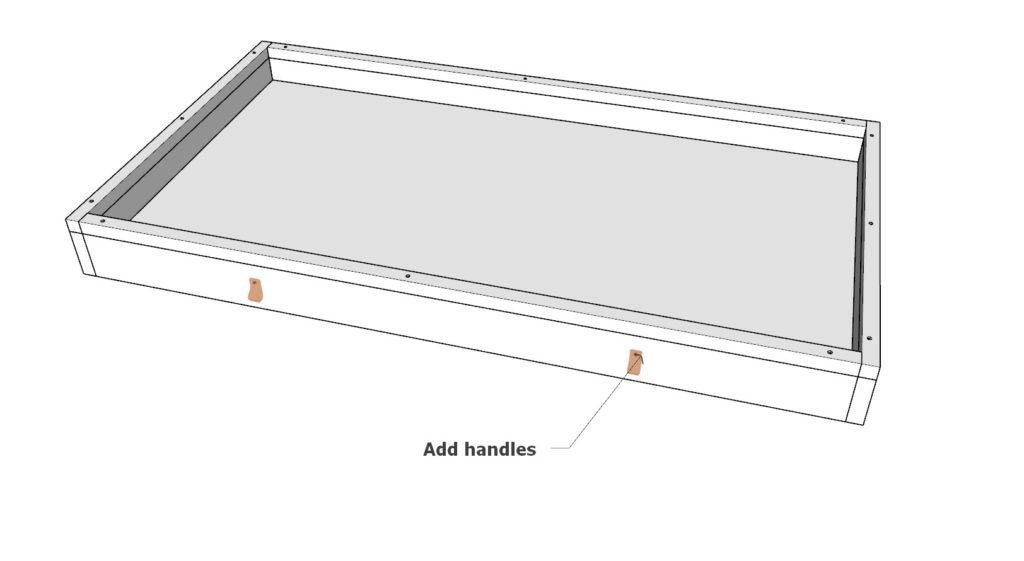
Lastly add two handles to be able to pull the drawer out when needed.
Adding Finishing Touches to the Montessori House Bed: Preparing the Surface for Staining or Painting
When you have completed building your Montessori house bed, it’s essential to apply finishing touches before staining or painting to ensure a polished and professional appearance. This step focuses on refining the surfaces and making them ready for the final finish.
Inspect the Bed: Begin by carefully inspecting the entire bed, looking for any rough spots, uneven surfaces, or inconsistencies. Pay special attention to areas where the wood joins together, corners, and edges.
Fill Gaps and Holes: If you find any gaps, holes, or imperfections, fill them with wood filler. Choose a filler that matches the color of the wood if you plan to stain or a paintable filler if you intend to paint. Apply the filler following the manufacturer’s instructions and allow it to dry completely.
Sanding: Start sanding the bed using medium-grit sandpaper (approximately 100-120 grit). Sand all surfaces, paying particular attention to any rough spots, sharp edges, or corners. Sand along the direction of the wood grain to avoid scratching the surface. Gradually move to finer grit sandpaper (180-220 grit) for a smoother finish.
Clean the Surface: After sanding, use a vacuum cleaner with a brush attachment or a tack cloth to remove any sawdust from the bed’s surfaces. This step is crucial, as any residual sawdust can affect the finish quality.
Test Stain or Paint: Before applying your chosen stain or paint to the entire bed, test a small, inconspicuous area to ensure the color and finish meet your expectations. This will also help you determine the proper application technique.
Apply Stain or Paint: Following the manufacturer’s instructions, apply the stain or paint to the bed using a brush, roller, or spray gun. Work in a well-ventilated area and wear protective gear, such as gloves and a mask, if necessary. Apply the finish in thin, even coats, allowing each coat to dry before applying the next. Generally, two to three coats are recommended for a durable and even finish.
Seal the Surface: If you used stain, protect the wood by applying a clear topcoat, such as polyurethane or a similar product. This will provide an additional layer of protection and enhance the wood’s natural beauty. If you painted the bed, consider a clear protective topcoat designed for painted surfaces.
Final Inspection: After the finish has dried, inspect the bed one last time to ensure a uniform appearance. Address any imperfections, if necessary, and allow the bed to dry completely before use.
By following these detailed steps, you can achieve a professional, polished finish on your DIY Montessori house bed that will withstand the test of time and look beautiful in your child’s room.
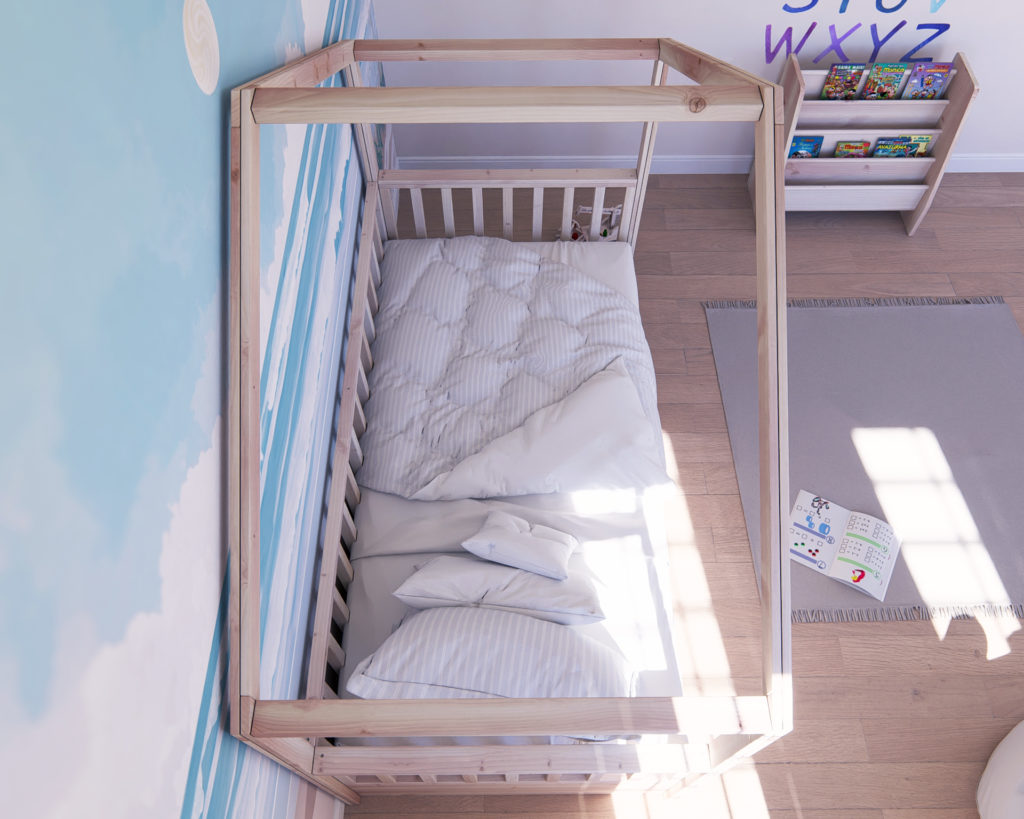
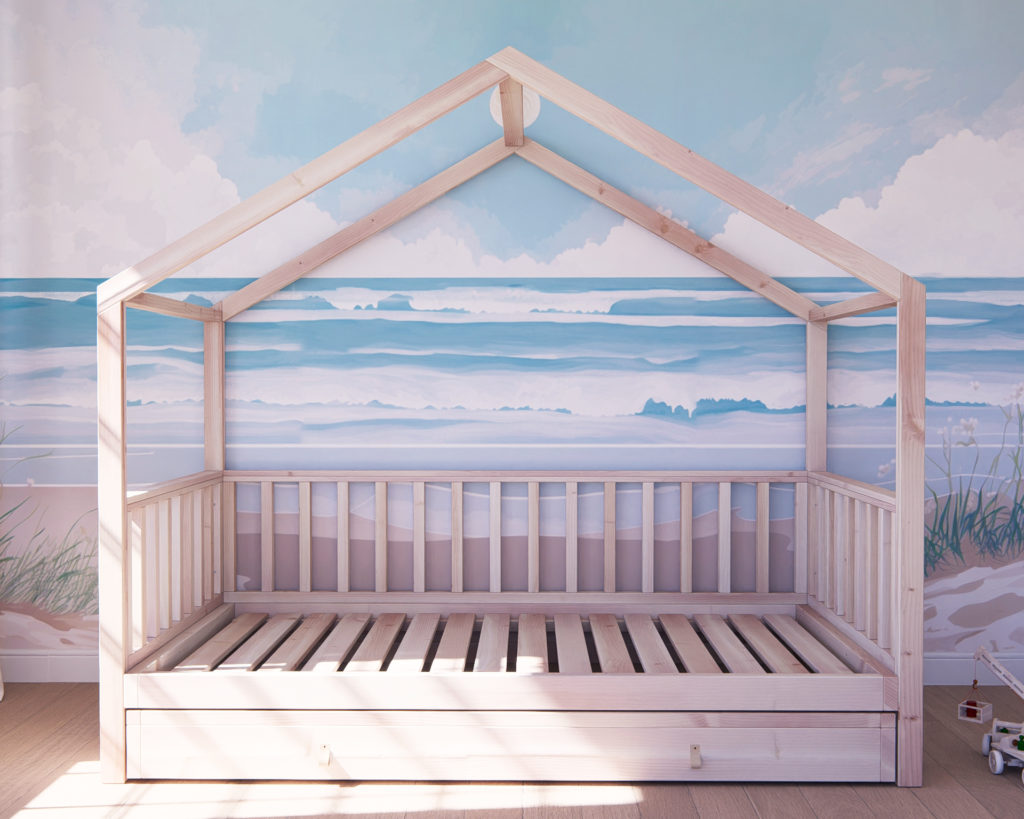
Beach-Themed Mural for Montessori Bedrooms: Complement Your DIY House Bed with Coastal-Inspired Art
As you embark on the journey to create the perfect Montessori house bed for your child, consider enhancing the room’s atmosphere with a beach-themed mural that complements the bed and captures the essence of seaside tranquility. Our beach-inspired mural idea will transform your child’s Montessori bedroom into a serene, calming space that promotes relaxation and encourages imaginative play.
The mural features a gentle shoreline with waves lapping against the sand, backed by a clear blue sky that fades into a soft gradient. A lighthouse stands tall on the horizon, surrounded by sailboats and seagulls playfully interacting in the ocean breeze. Various seashells and starfish are scattered across the sandy beach, adding interest and texture to the scene.
To make this mural idea even more special, we’re offering the image free for your use. Feel free to download it and use it as a reference or template for creating your own beach-themed mural in your child’s Montessori bedroom. The combination of this captivating mural with your DIY Montessori house bed will create an inviting, nurturing space that fosters your child’s growth and development.
Embrace the calming energy of the ocean and the principles of Montessori education by incorporating this beautiful beach-themed mural into your child’s bedroom. The result will be a harmonious, inspiring environment that perfectly complements your child’s DIY Montessori house bed and encourages exploration, learning, and relaxation.

Interested in a diy Montessori house twin bunkbeds plan with stairs. Do you have one? I can’t find one anywhere, thanks
Hello Karen. I do not have a design like that at this time.