Introduction
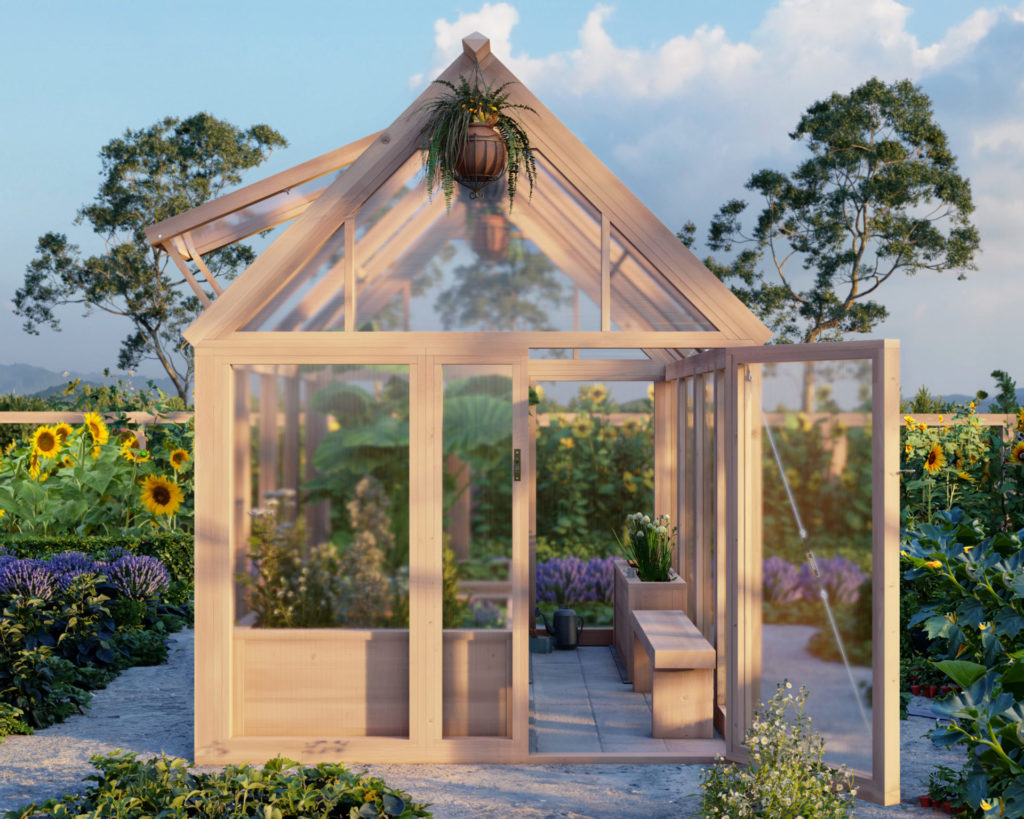
Imagine stepping into your oasis of greenery, where lush vegetables and vibrant flowers bloom, regardless of the season. Our DIY greenhouse plan is more than a building guide; it’s a doorway to self-sufficiency, providing fresh produce right at your doorstep. Experience the freedom and tranquility of tending to your garden, watching life unfold day by day. This greenhouse isn’t just a structure; it’s a lifestyle choice for those who yearn for connection with nature and a desire to nourish their families with home-grown goodness.
The Greenhouse Panels
Our design seamlessly integrates LEXAN Thermoclear polycarbonate panels, chosen meticulously for their superior qualities. These panels slot effortlessly into the structure, negating the need for cutting or screwing that could compromise their integrity. Let’s delve into why these panels are the epitome of greenhouse glazing:
- UV Protection: Shielding your plants from harmful UV rays while bathing them in the life-giving light they require.
- Temperature Regulation: The multi-wall structure of the panels ensures a consistent temperature, vital for plant growth and energy efficiency.
- Durability: Virtually unbreakable, these panels are designed to withstand nature’s elements, ensuring your greenhouse stands the test of time.
- Optimized Growth Environment: Plants flourish under the gentle diffusion of light, creating an ideal microclimate for a variety of flora.
Design Features
Our greenhouse plan is meticulously crafted, featuring:
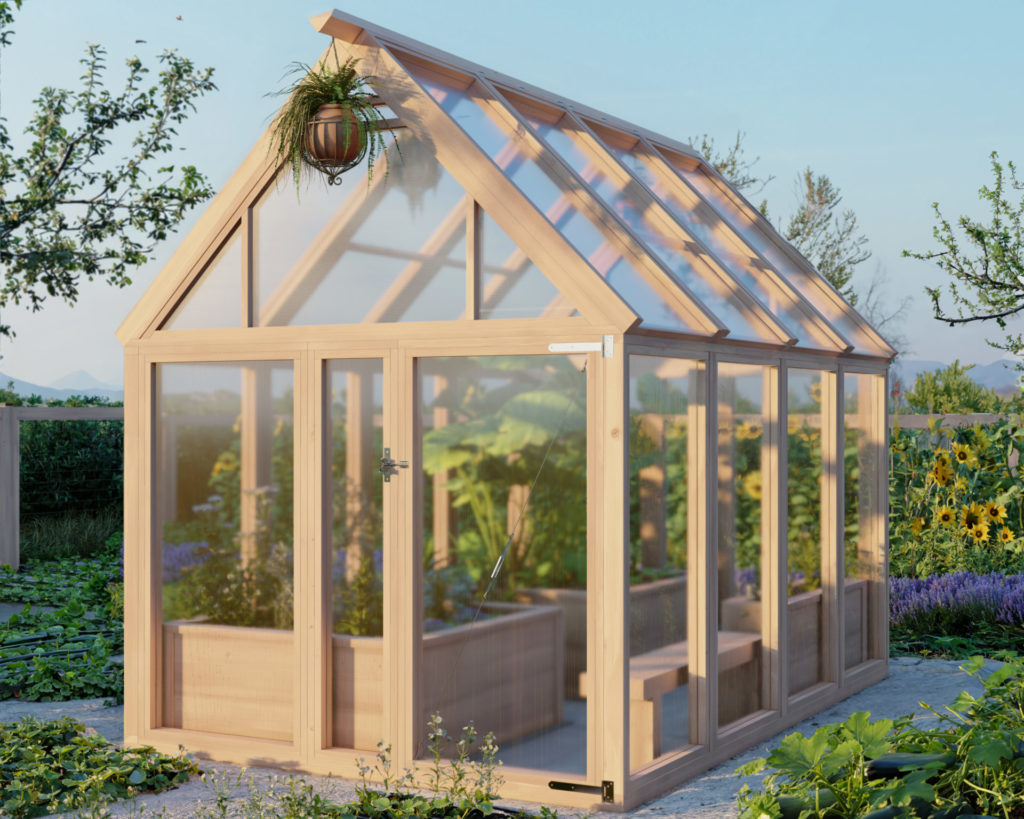
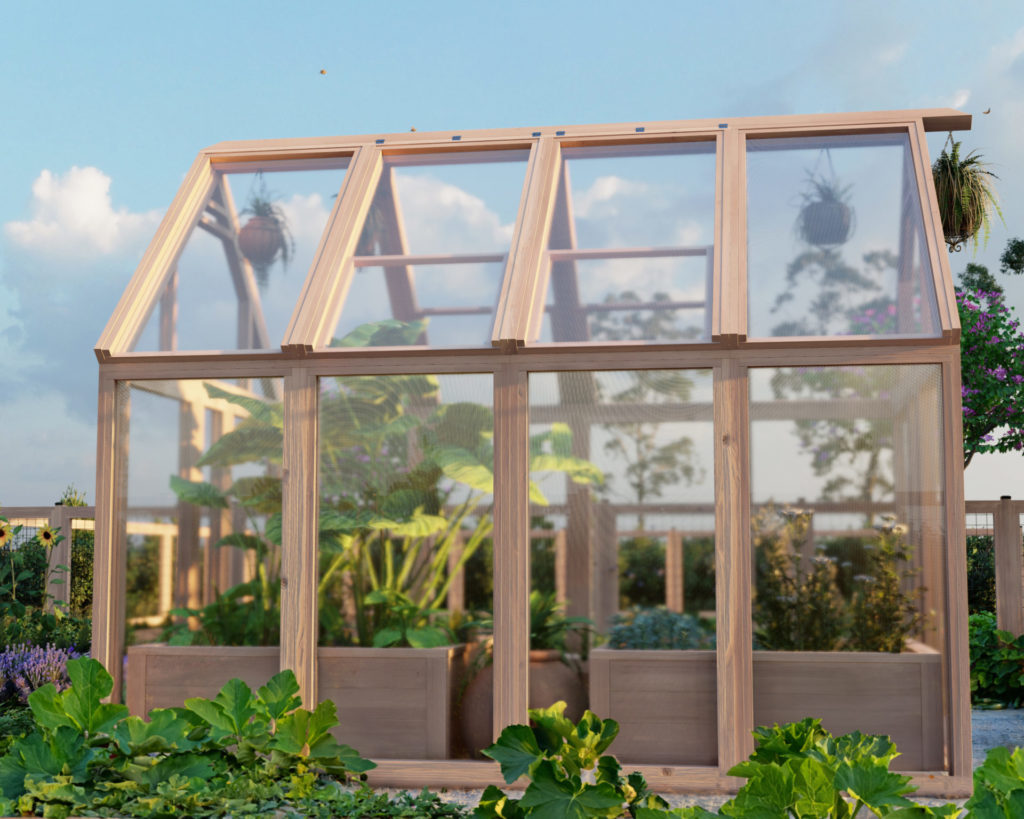
- Superior Ventilation: Four expansive vents swing doors for optimal airflow and temperature control.
- Flexible Foundation: Whether on soil, concrete, or a raised foundation, the design is adaptable to your preference.
- Robust Shelving: Equipped with sturdy 4×4 lumber, perfect for hanging plants or installing sprinkler systems.
- Easy Assembly: Beginner-friendly with a focus on common construction lumber and straightforward assembly – no advanced carpentry skills required.
Beginner's Guide
We’ve tailored our greenhouse plan to empower even the novice DIYer:
- Comprehensive Guidance: Step-by-step written instructions, diagrams, and images walk you through each stage.
- No Complicated Cuts: Simple construction techniques focused on screws and glue, not fancy carpentry.
- Detailed Resources: Complete with tool and material lists, shopping guides, and estimated costs, we provide everything you need to bring this project to fruition.
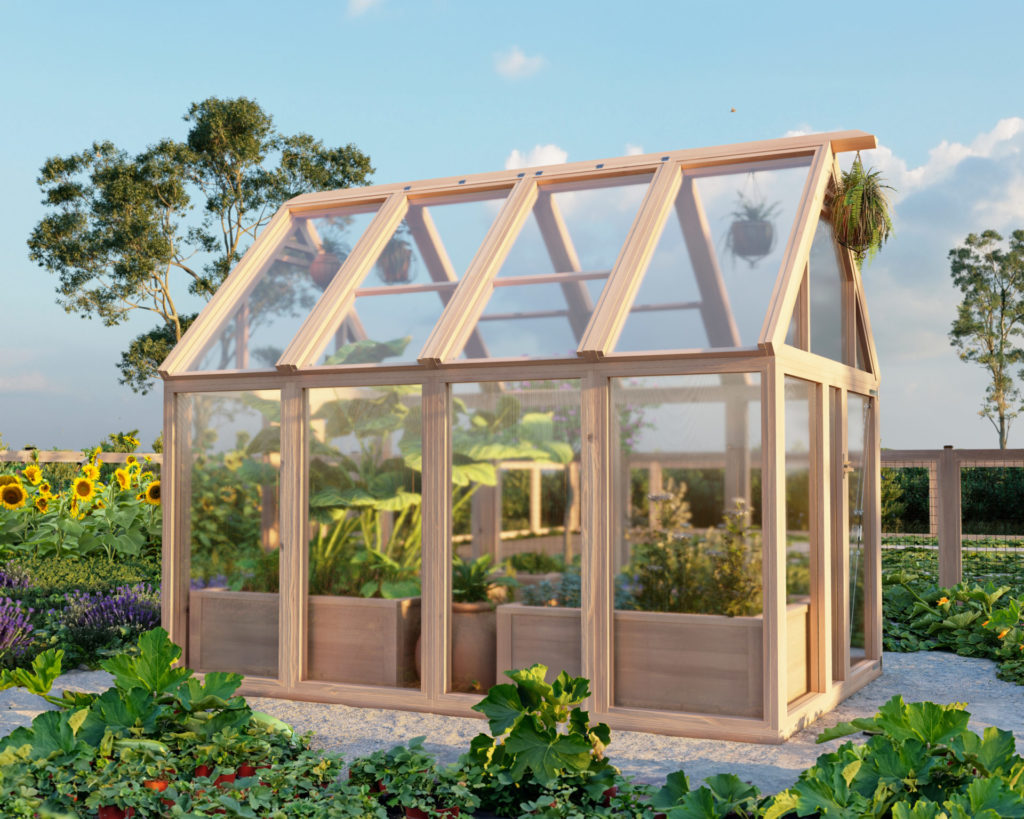
Seasonal Benefits
Each season brings a unique charm and set of requirements for greenhouse gardening:
- Spring: Nurture seedlings in a controlled environment, safe from late frosts.
- Summer: Provide a sun-drenched haven for heat-loving crops, with adequate ventilation to prevent overheating.
- Fall: Extend the growing season for your favorite vegetables as the temperatures drop.
- Winter: Shield delicate plants from the harsh cold and maintain a thriving garden year-round.
Conclusion
Building a greenhouse is an ambitious project, but with our comprehensive plan, it’s within your reach. It’s more than just constructing walls and a roof; it’s about creating a self-sustaining ecosystem that brings joy and harvest to your family. So why wait? Embark on this journey of growth and green living today – with our plan, your dream greenhouse is just a few steps away.
Time
(varies with experience)
Cost
$2,300 (Costs may vary based on location and supplier.)
Skill level required
Beginner
DIY Greenhouse PDF Plan
What is included in the PDF download?
- Easy to read step by step instructions
- Material list
- Tools needed
- Helpful links to materials and tools needed
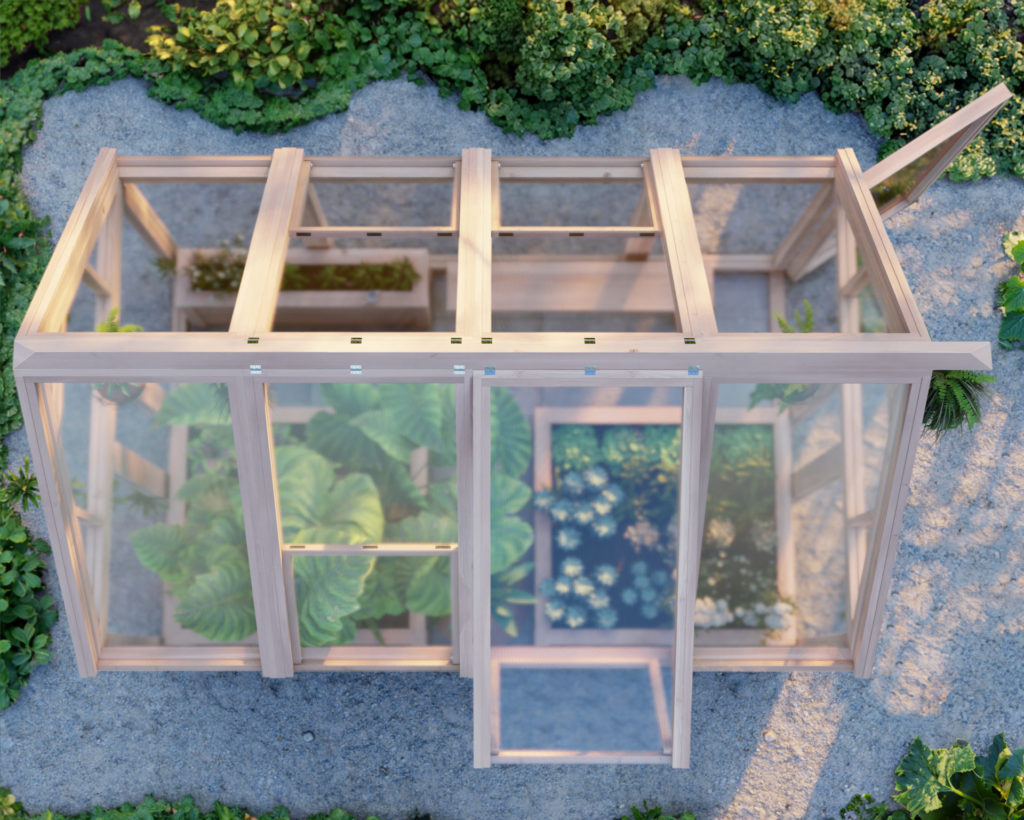
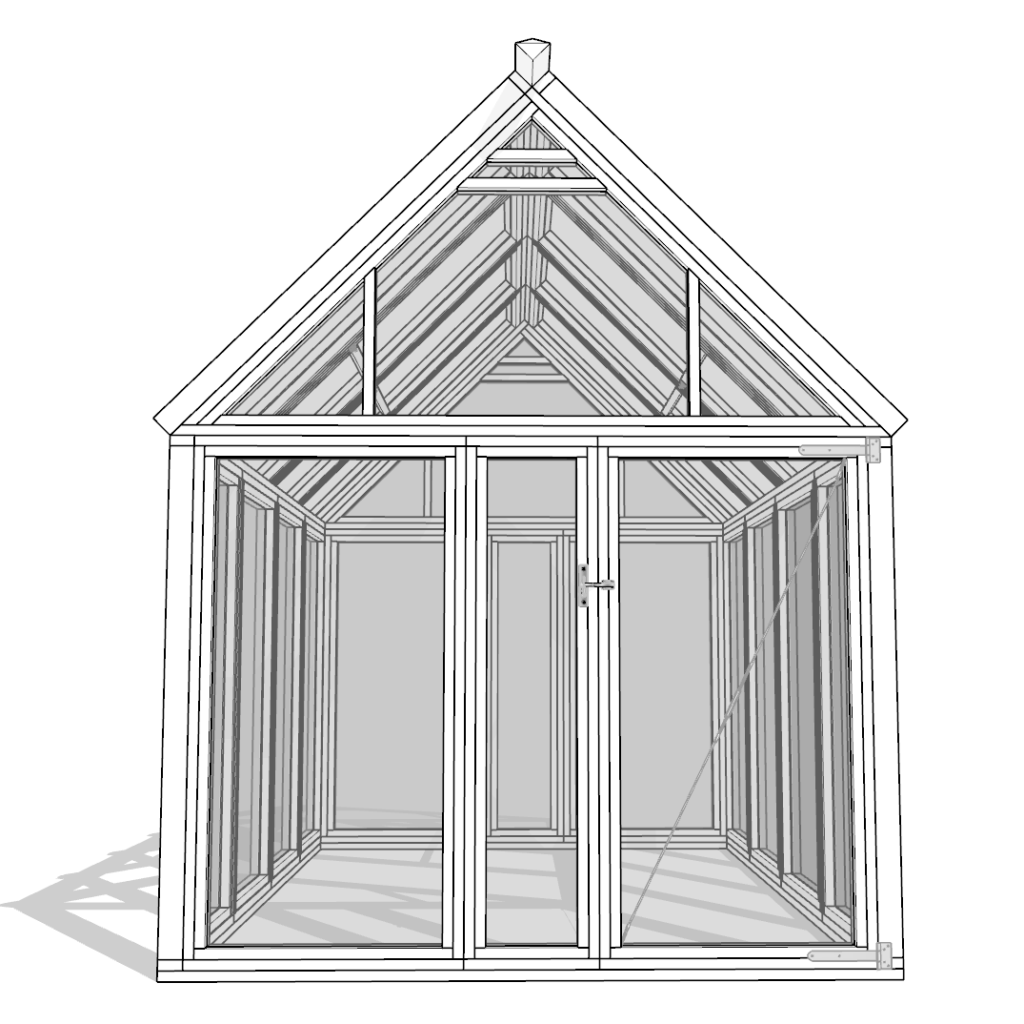
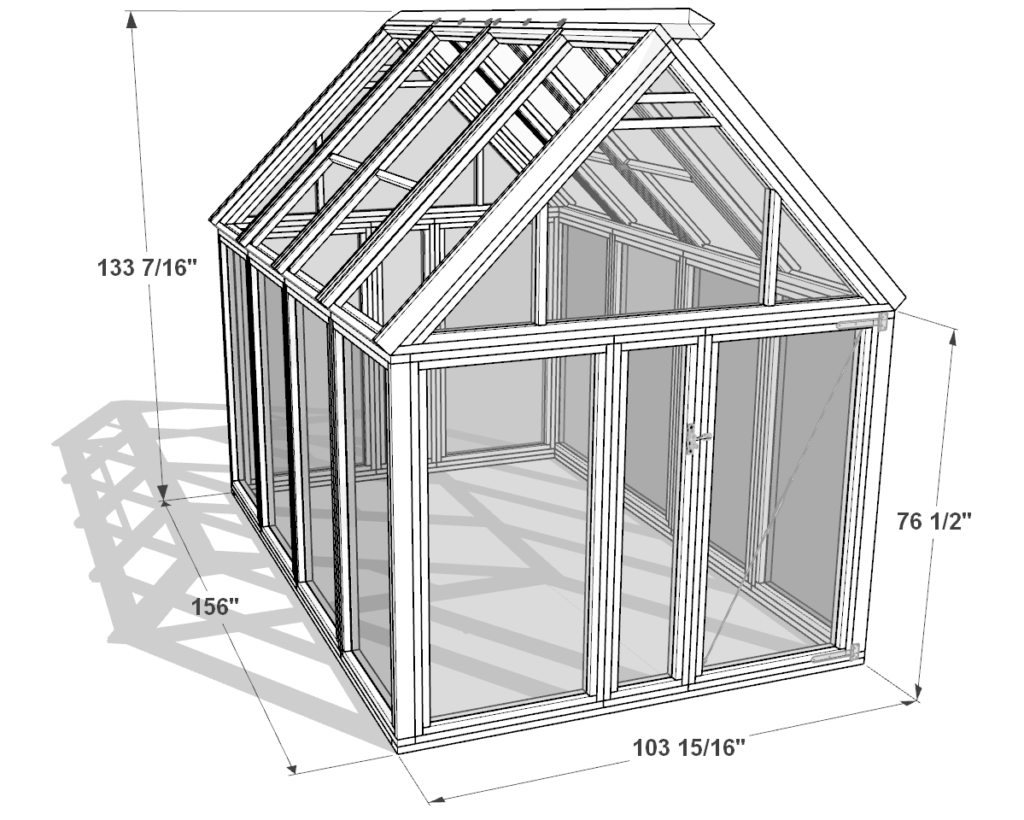
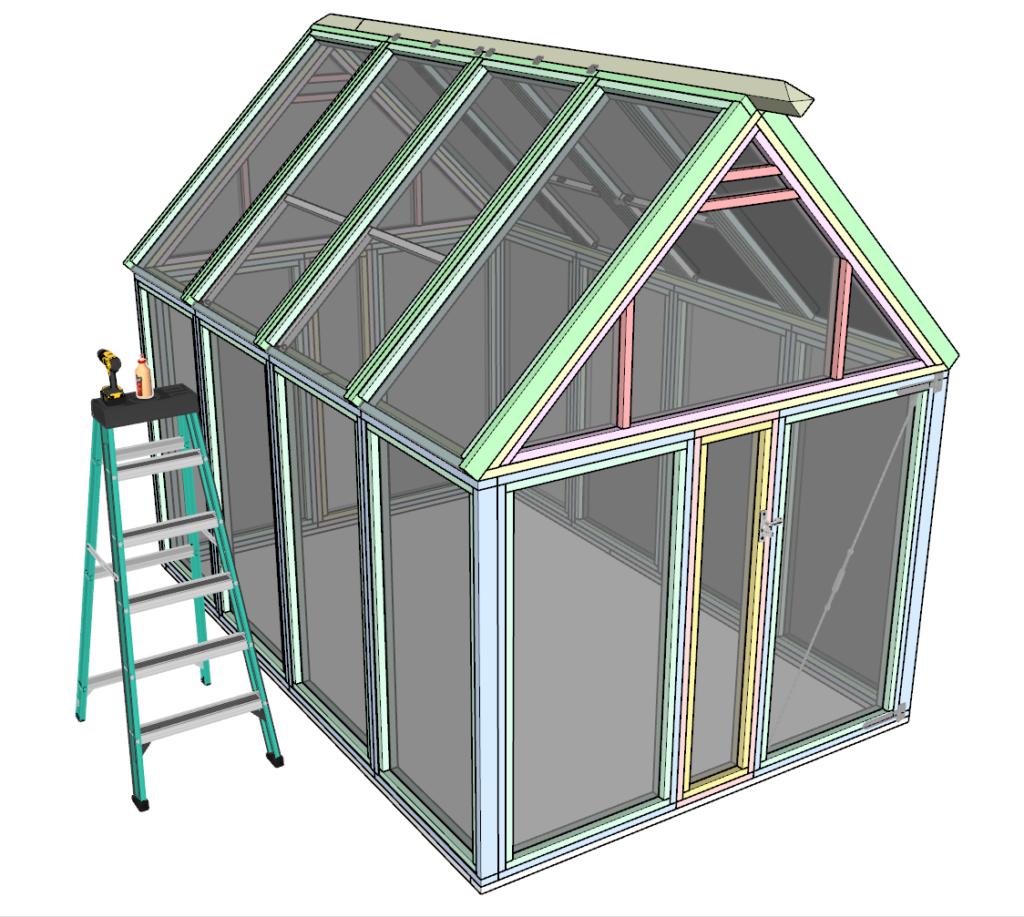
DIY Greenhouse Dimensions
Tools and Materials:
Available with the purchase of the DIY plan PDF.
Lumber Shopping & Cut List:
Available with the purchase of the DIY plan PDF.
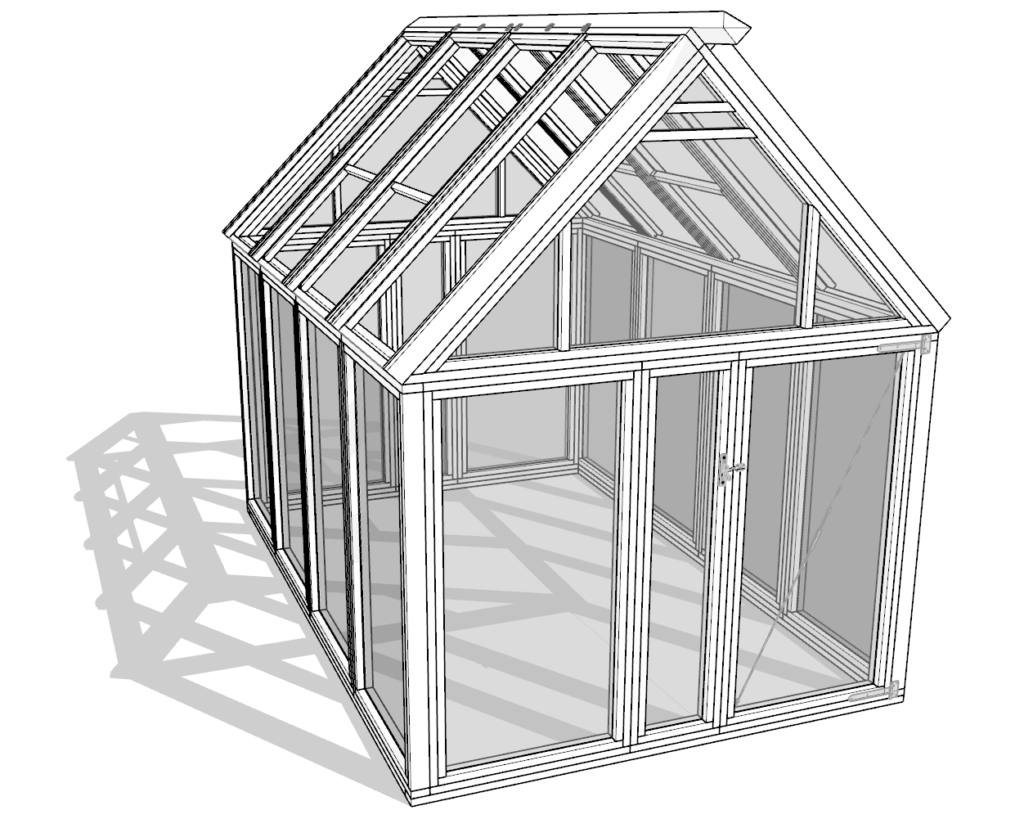
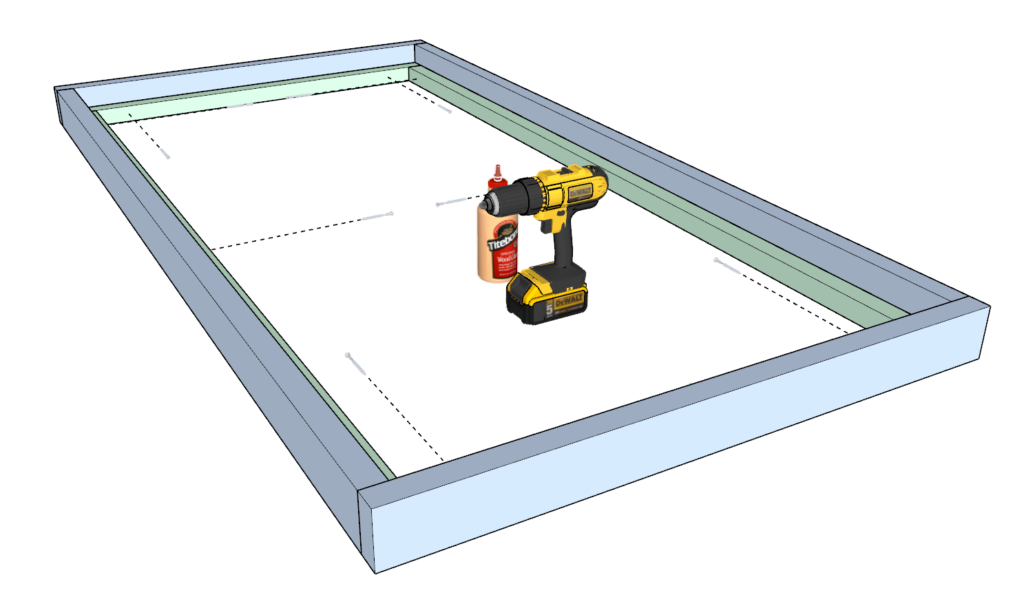
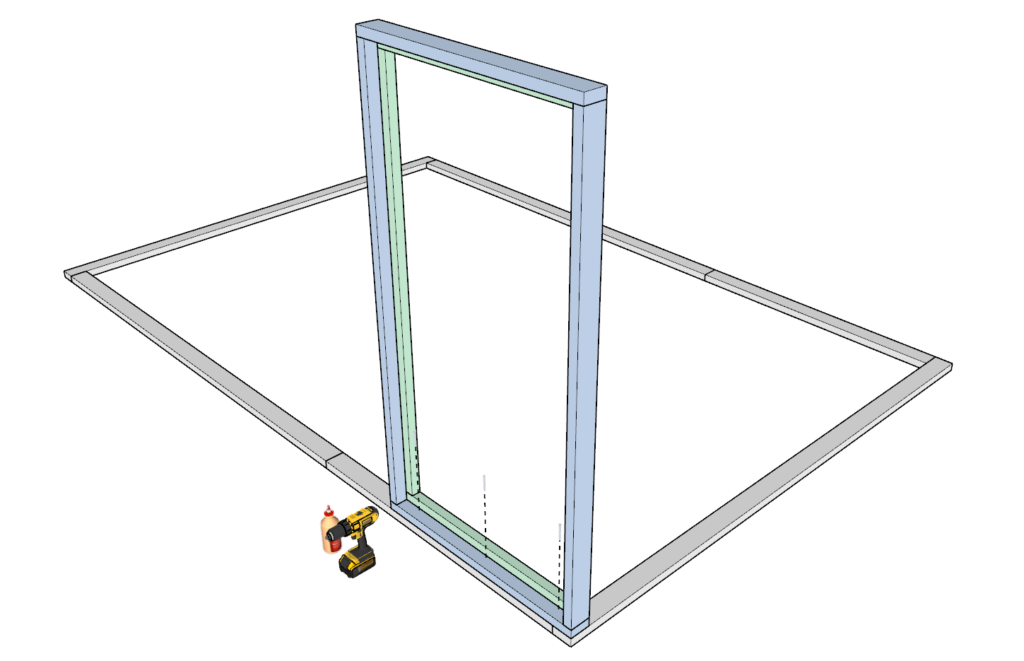
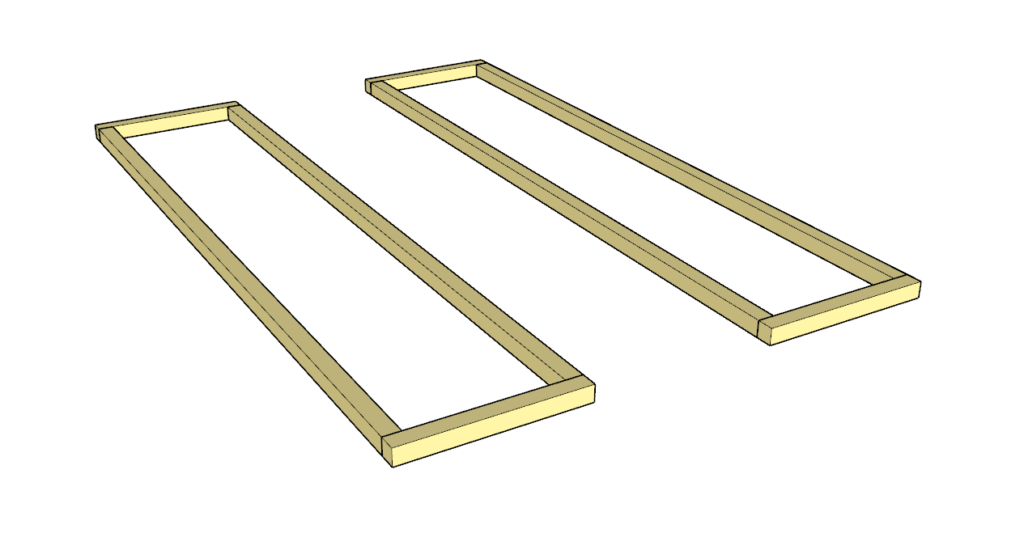
Step 1: Assemble the Greenhouse Frames
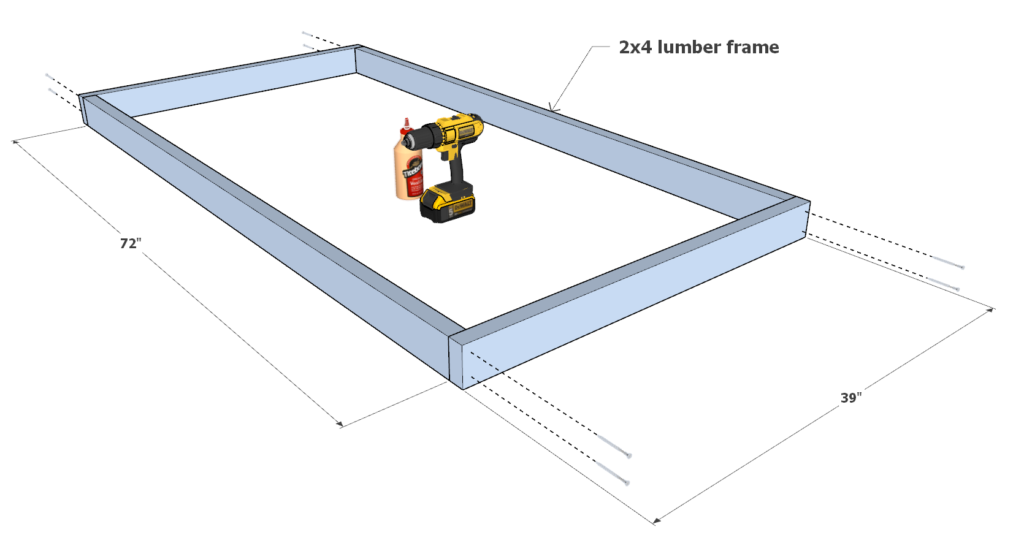
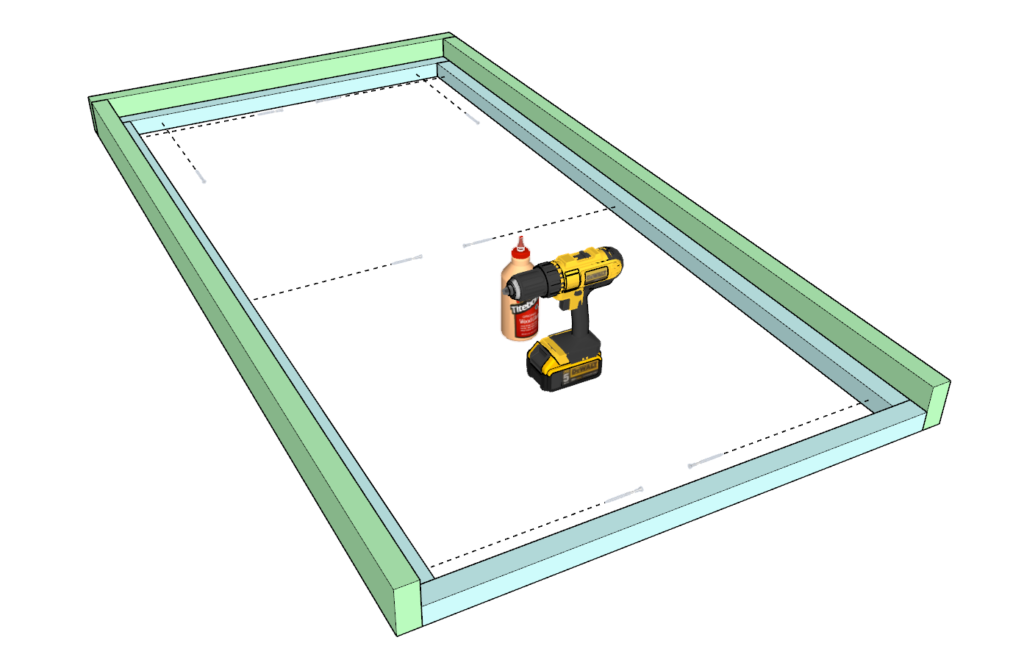
Side Panels Construction
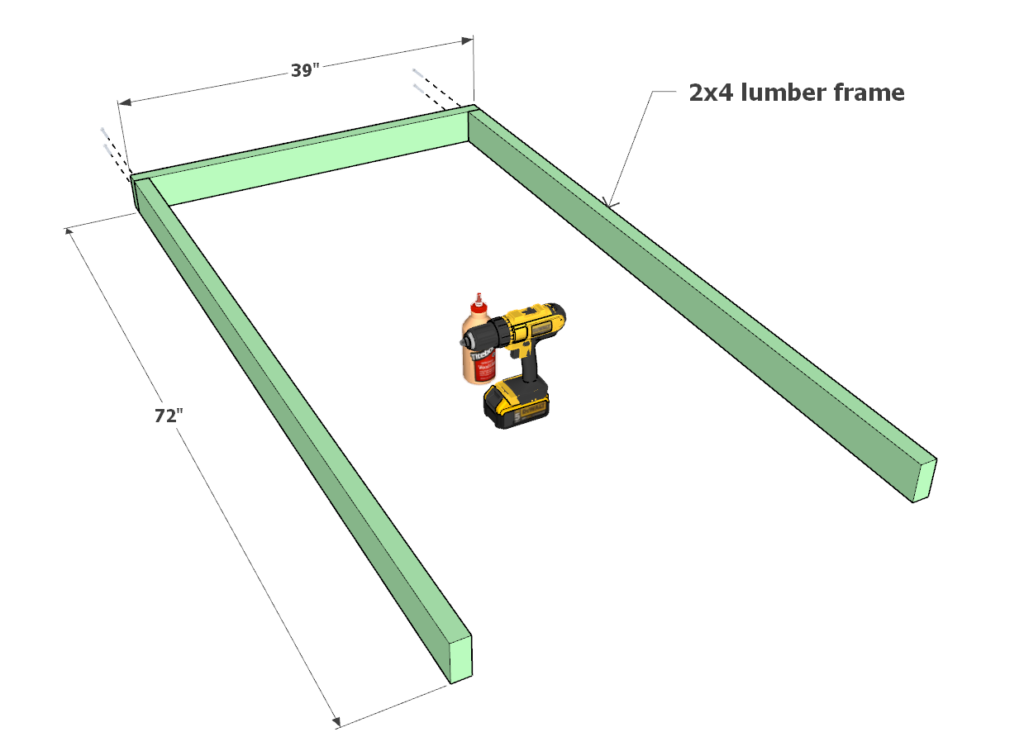
- Secure the Main Frame: Take two 39-inch and two 72-inch 2×4 lumber pieces. Apply wood glue on the ends and join them to form a rectangle. Secure with 3.5-inch screws (blue-coded in the diagram).
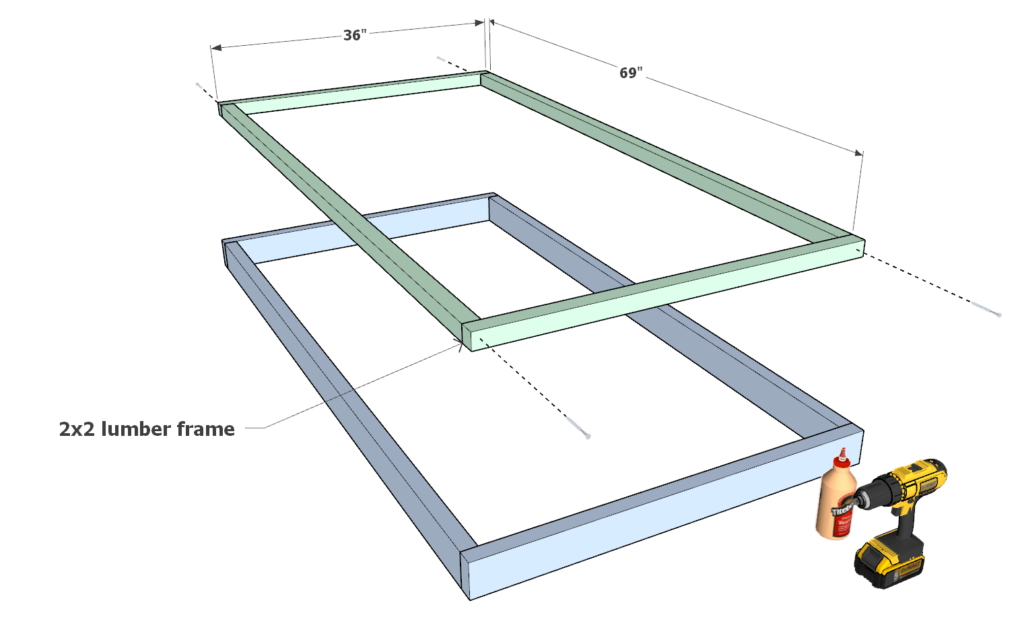
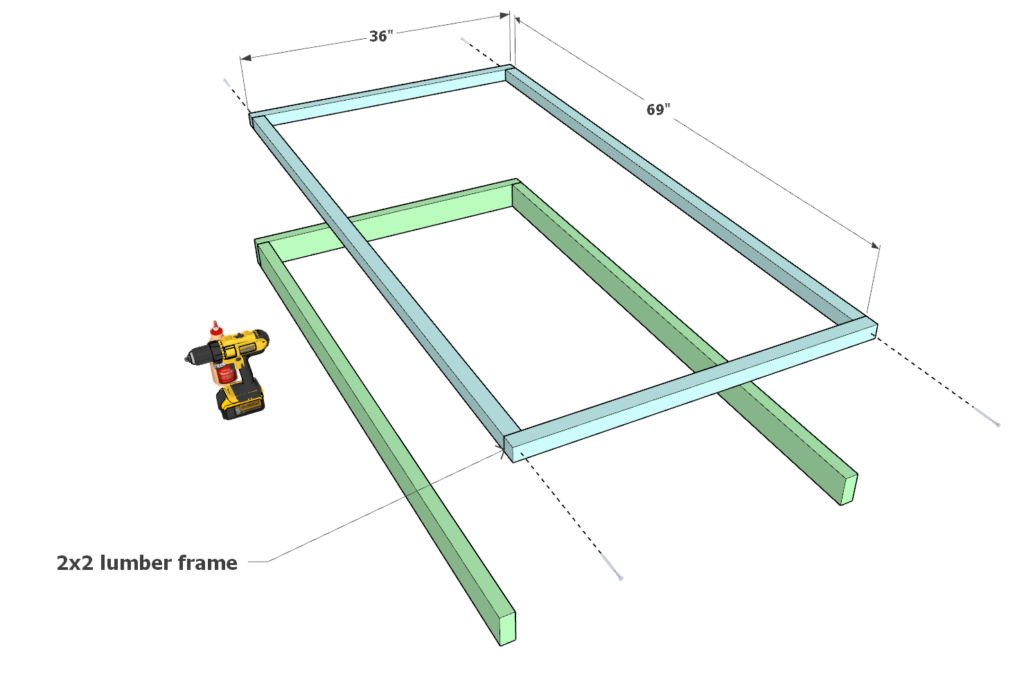
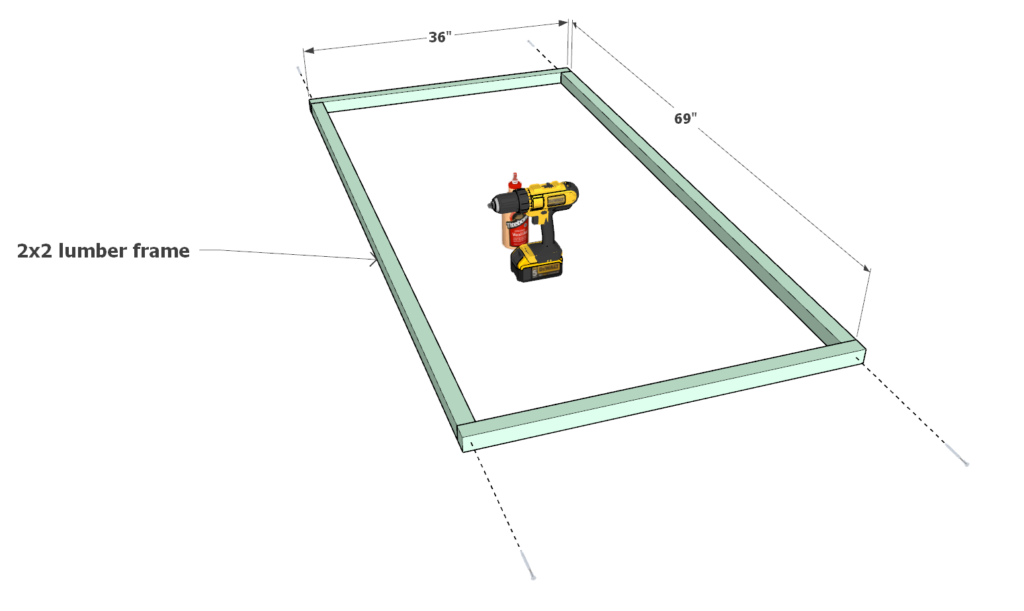
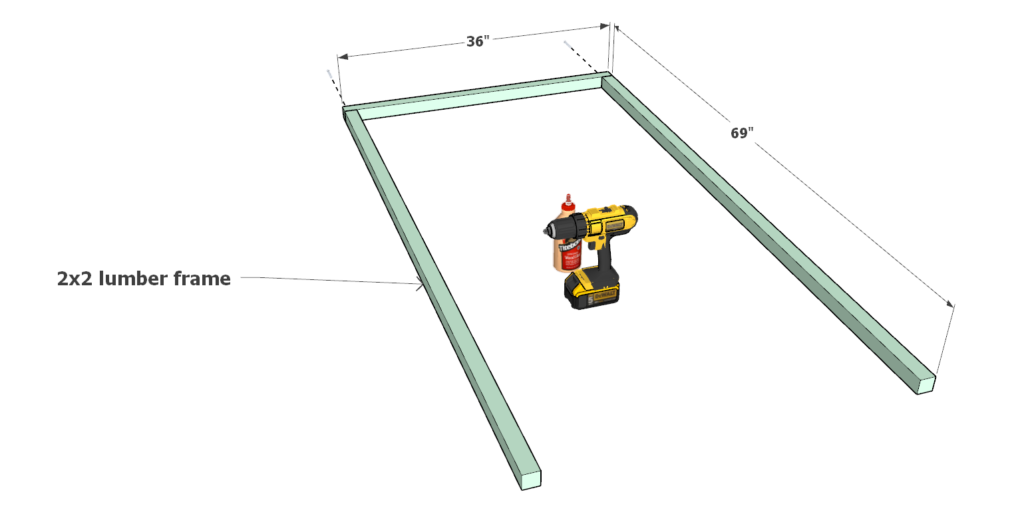
- Inner Frame Setup: Create an inner frame with two 69-inch and two 36-inch 2×2 lumber pieces, secured with 3.5-inch screws and wood glue (green-coded).
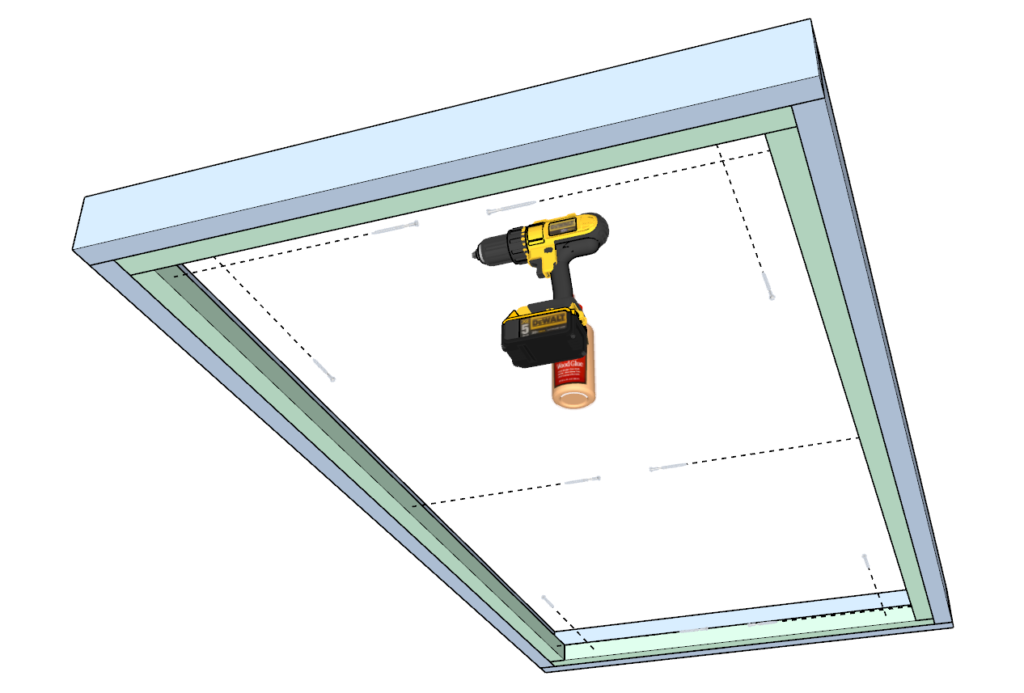
- Combine Frames: Insert the green-coded frame inside the blue-coded frame, securing them together with 2.5-inch screws and glue.
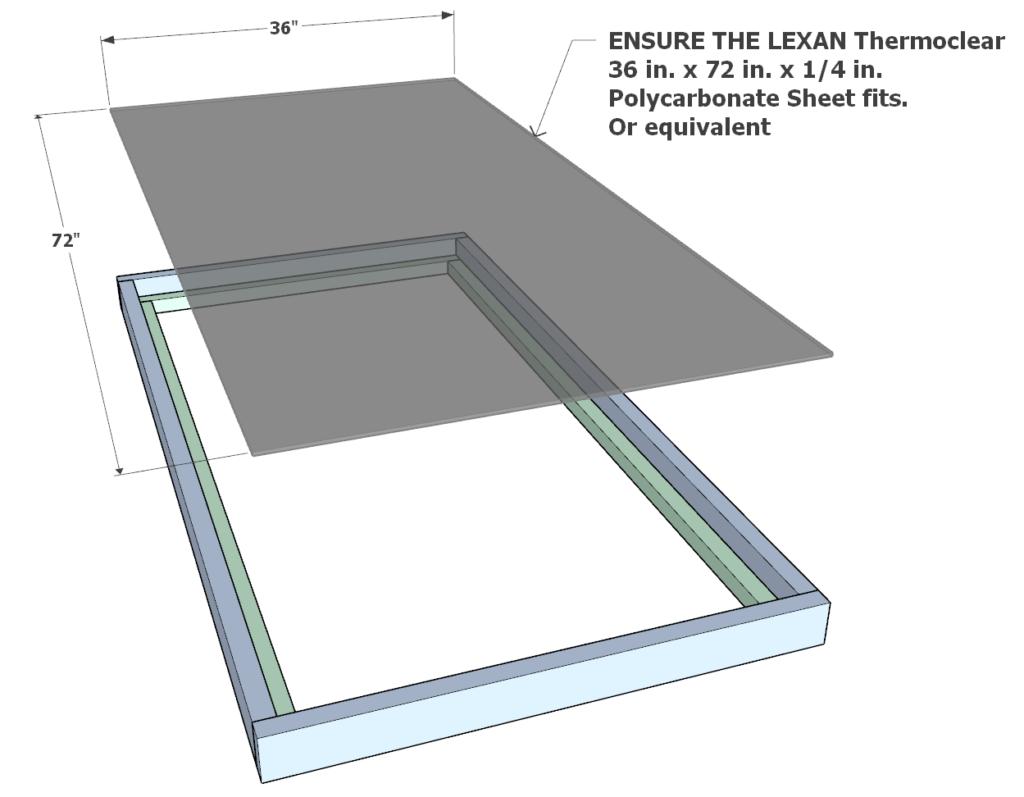
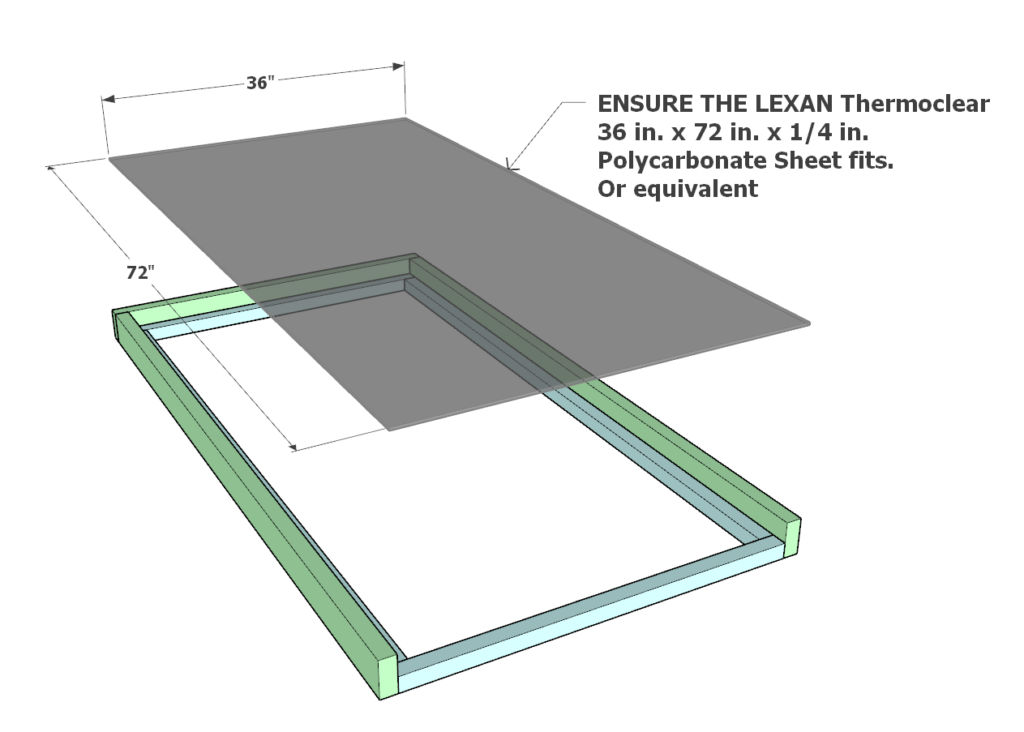
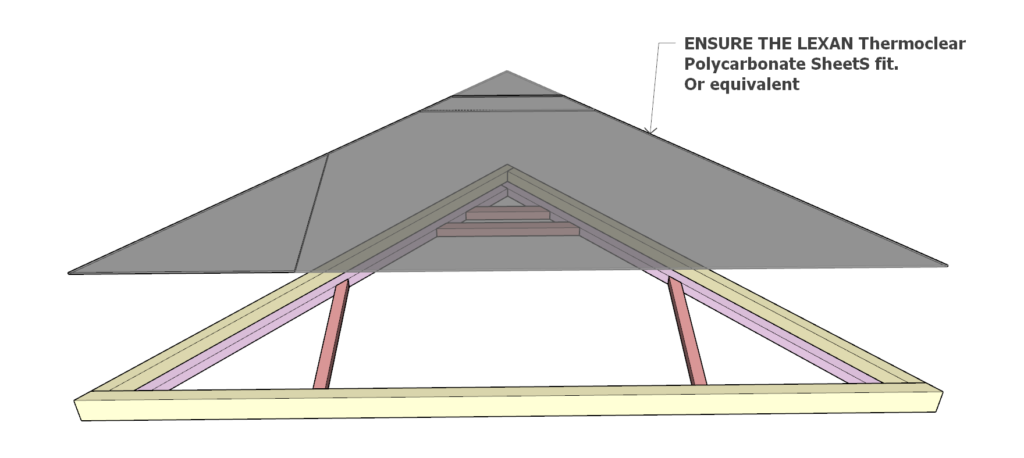
Fitting the Polycarbonate Sheets
- Test Fit: Ensure the 36-inch x 72-inch Lexan Thermoclear polycarbonate sheets fit inside the frame without the need for additional cuts.
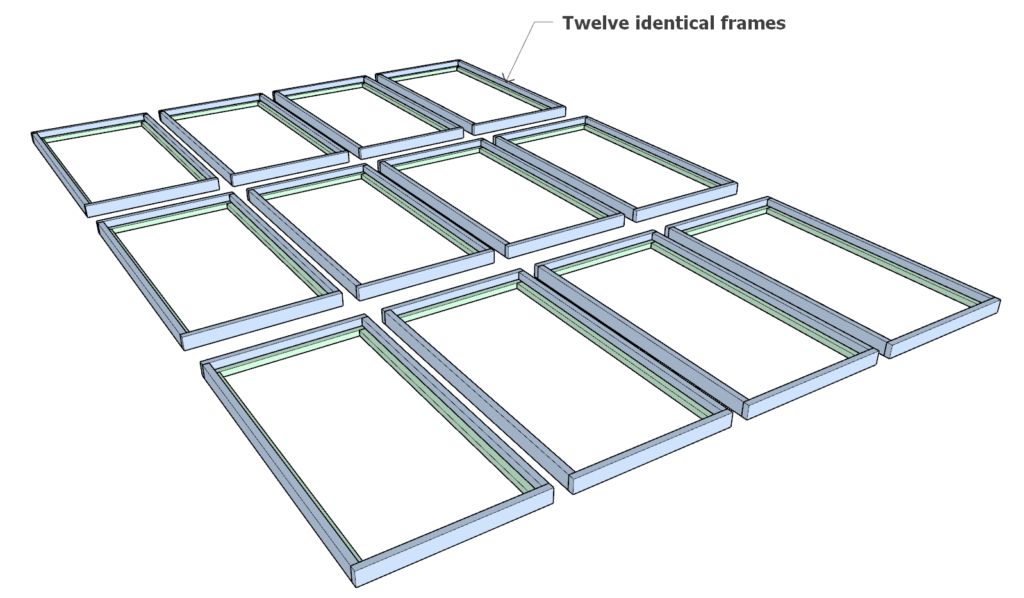
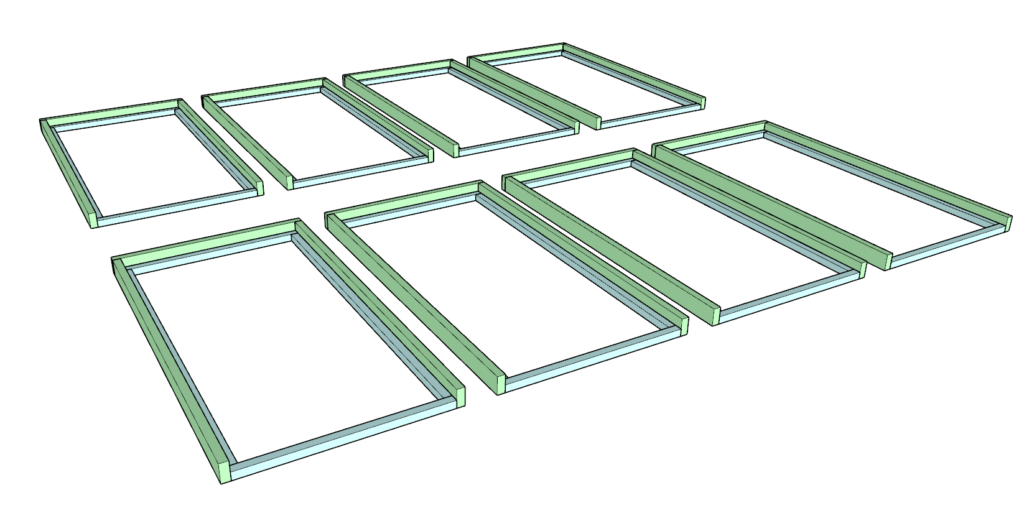
- Repeat for Quantity: Construct twelve identical side frames following these steps.
- Pre-drill Tip: Before inserting screws, for all wood joints, pre-drill holes to avoid splitting the wood. Use a countersink bit for a cleaner finish.
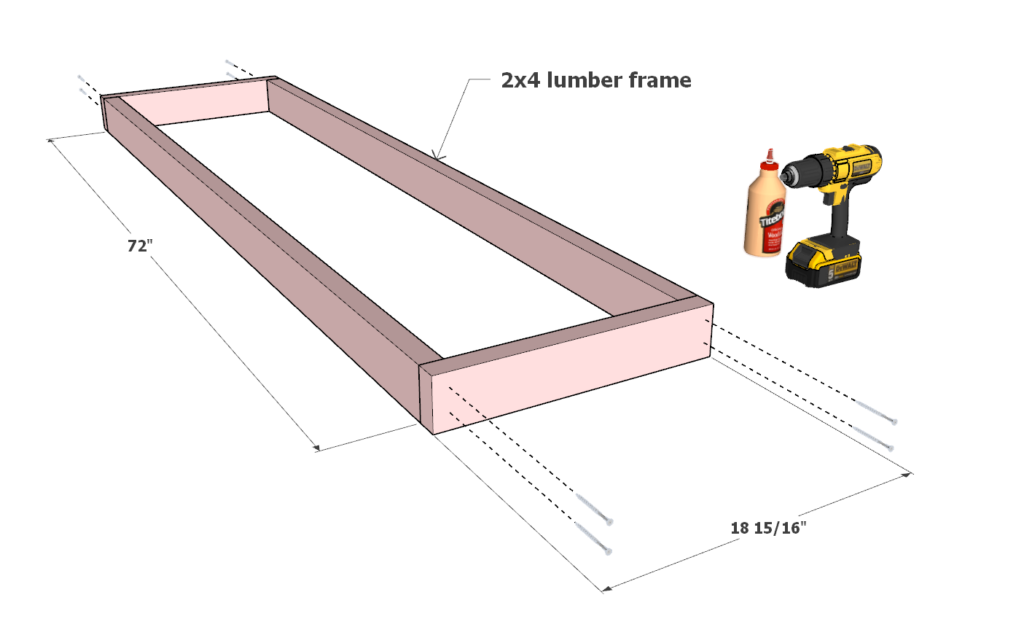
Different Sized Side Frame
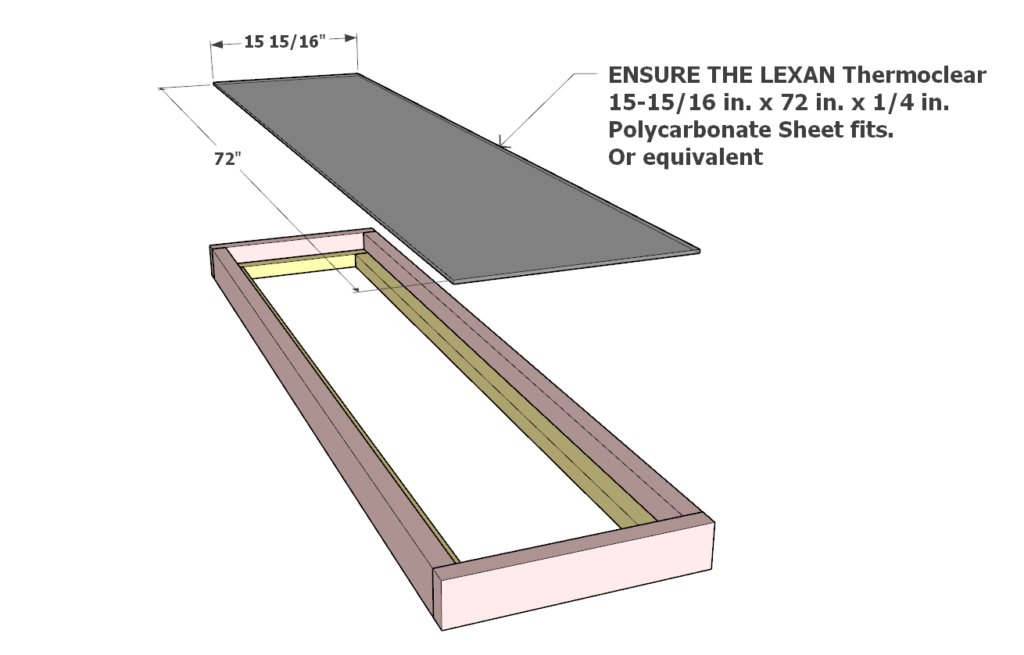
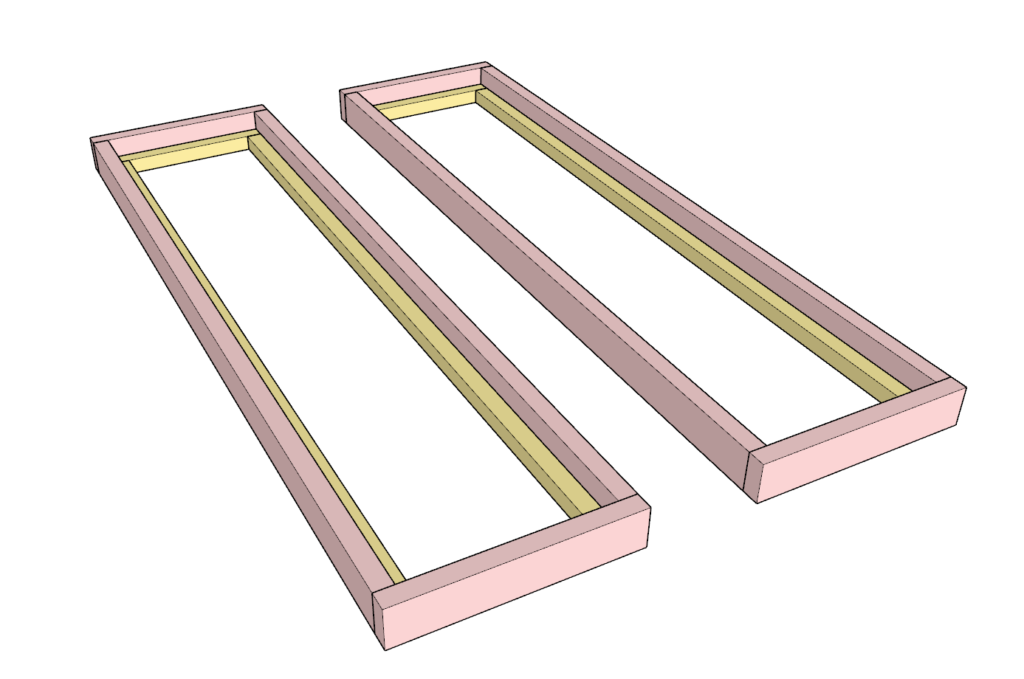
- Assemble the Frame: Use two 72-inch and two 18-15/16 inch 2×4 lumber pieces to make a rectangle (pink-coded), then secure with 3.5-inch screws and wood glue.
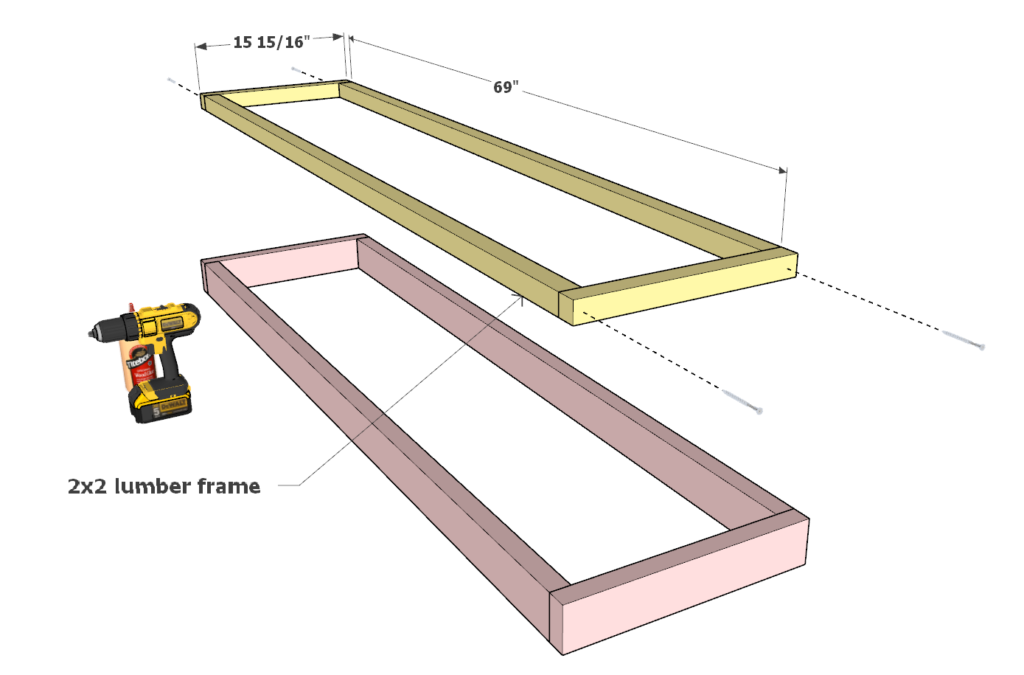
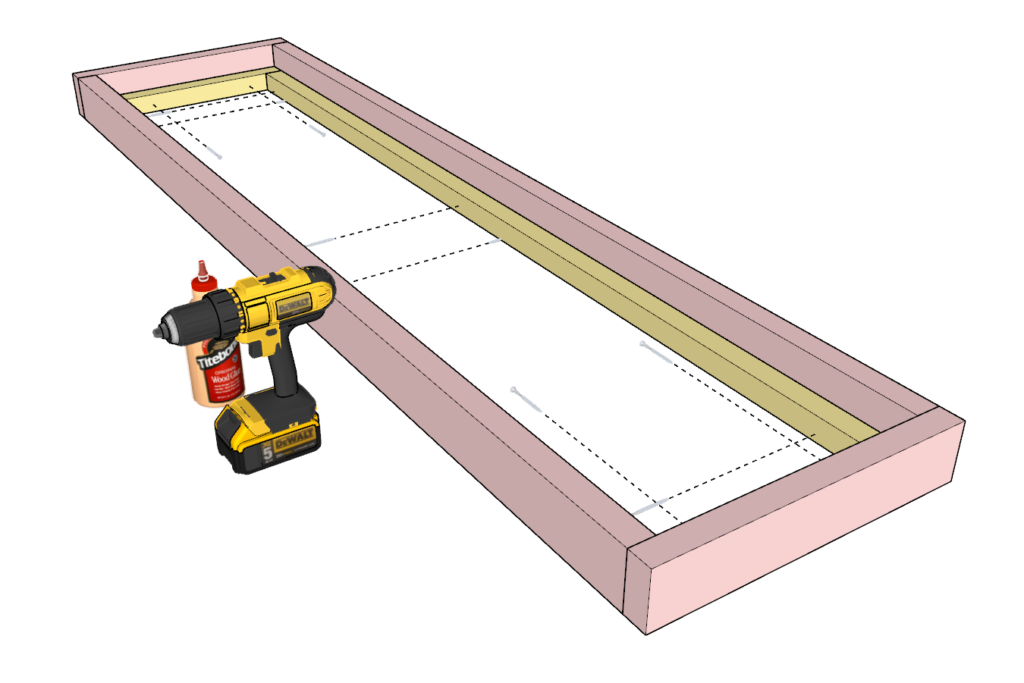
- Inner Frame Addition: For the inner frame (yellow-coded), connect two 69-inch and two 15-15/16 inch 2×2 lumber pieces. Insert and secure it within the pink frame with 2.5-inch screws and glue.
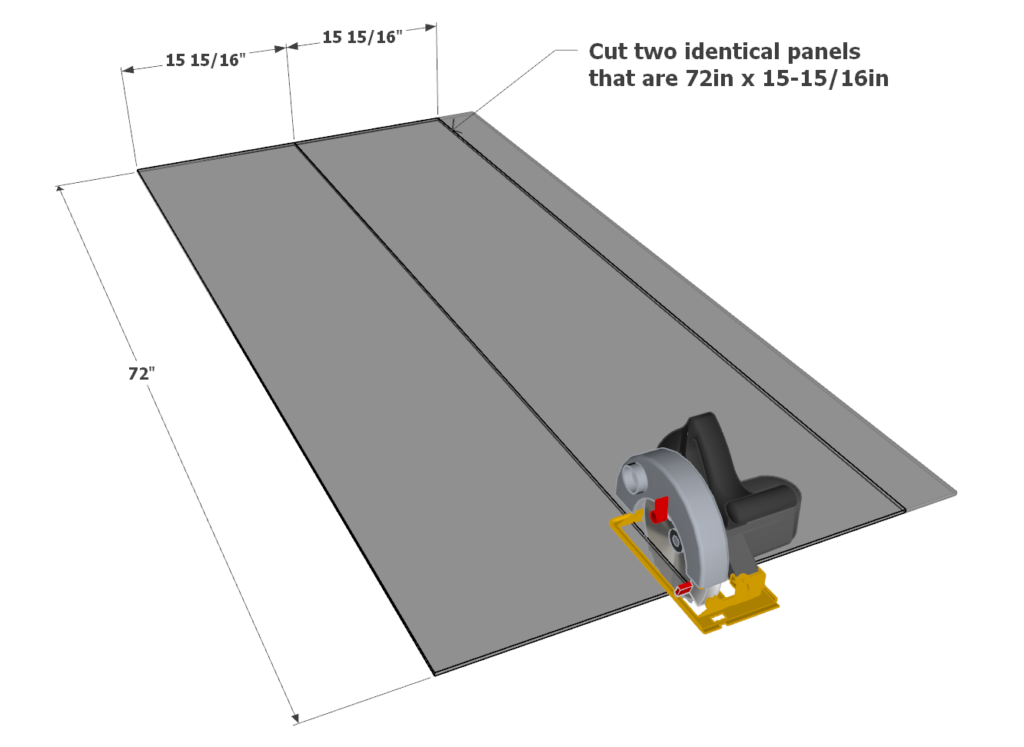
- Prepare the Polycarbonate: Cut a polycarbonate sheet to 15-15/16 inch x 72 inch using a circular saw and ensure a proper fit.
- Duplicate: Create a second identical frame with the same dimensions.
Roof Panels Assembly
- Create the U-Shape: Connect two 72-inch 2x4s and one 39-inch 2×4 to form a U-shaped frame (lime green-coded).
- Inner Teal Frame: Make an inner frame with two 69-inch and two 36-inch 2×2 lumber (teal-coded). Affix this frame inside the U-shaped frame using 2.5-inch screws and glue.
- Check the Fit: Place a 36-inch x 72-inch polycarbonate sheet into the frame to ensure fit and then replicate to make eight identical roof panels.
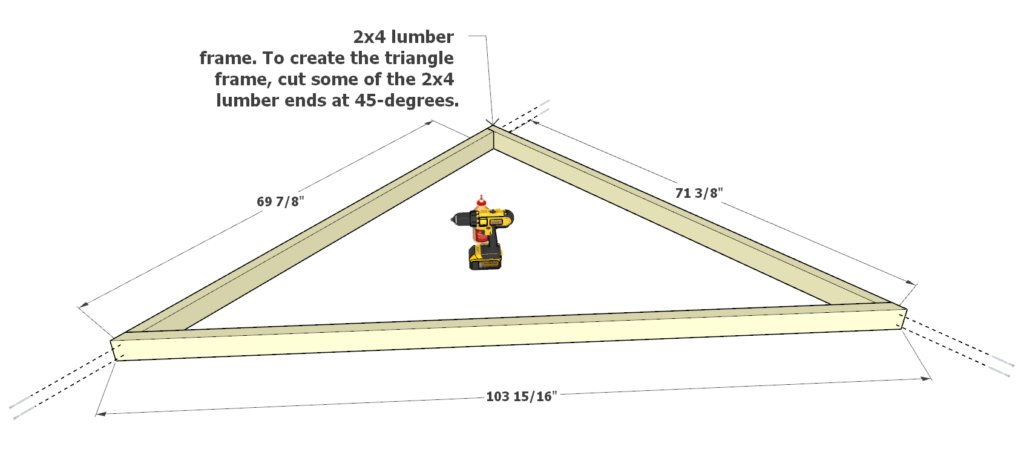
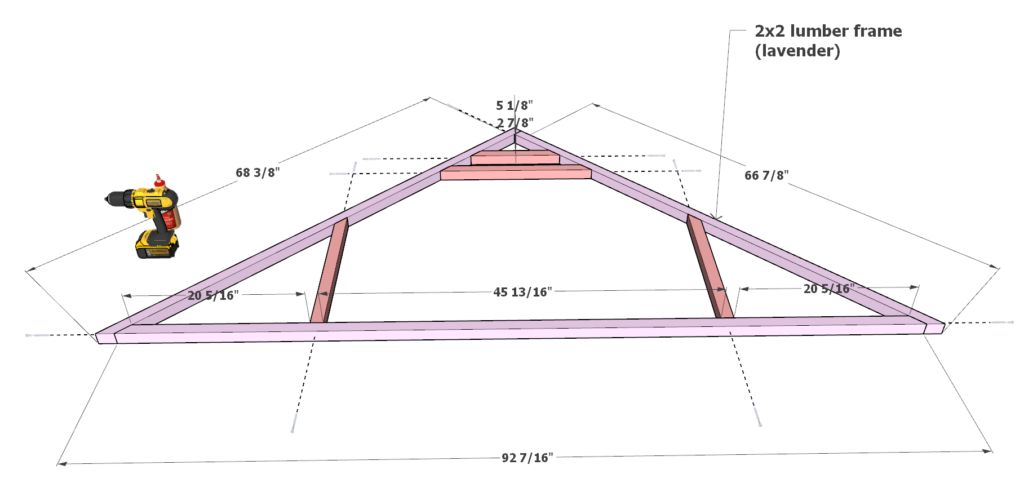
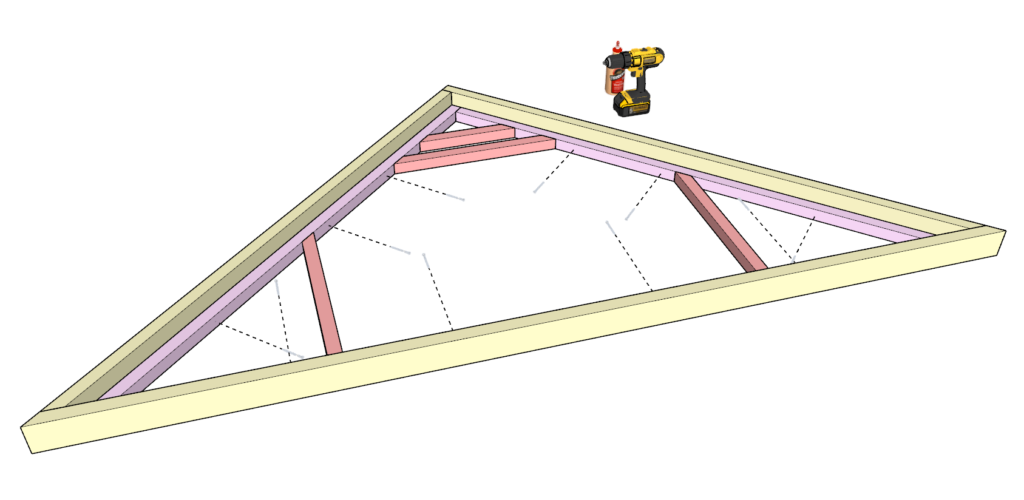
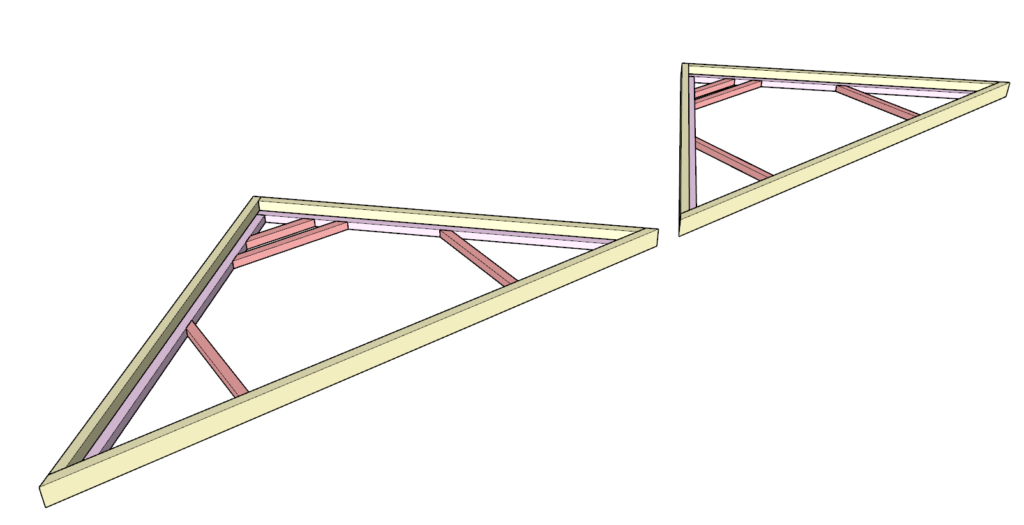
Assembling the Triangular Roof Side Frames
Frame Construction:
- Main Frame (Muted Yellow): Connect one 103-15/16″ 2×4 (45-degree cuts both ends), one 71-3/8″ 2×4 (45-degree cut one end), and one 69-7/8″ 2×4 (45-degree cut one end) using 3.5″ screws and glue.
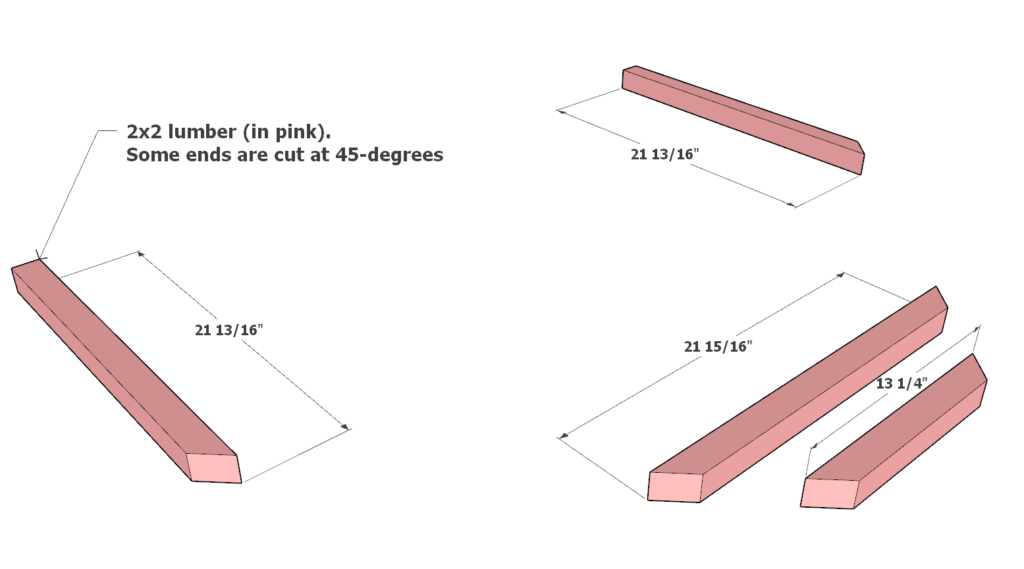
- Inner Frame (Pink): Lay out one 21-13/16″ 2×2 (45-degree cut one end), one 21-15/16″ 2×2 (45-degree cuts both ends), and one 13-1/4″ 2×2 (45-degree cuts both ends).
- Secondary Frame (Lavender): Create using one 92-7/16″ 2×2 (45-degree cuts both ends), one 66-7/8″ 2×2 (45-degree cut one end), and one 68-3/8″ 2×2 (45-degree cut one end).
Frame Assembly:
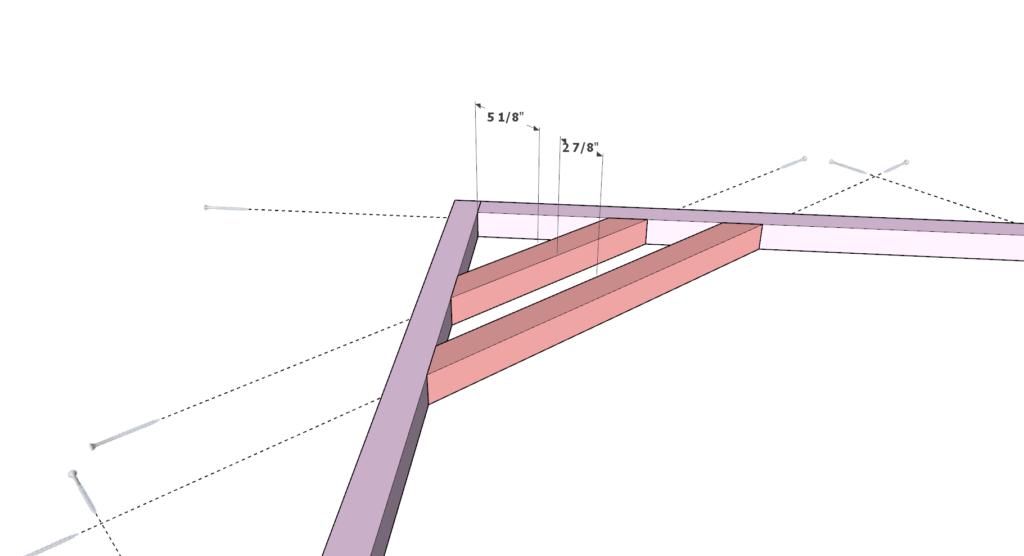
- Combine Pink and Lavender Frames: Align and attach the lavender frame around the pink frame, securing them with glue and 3.5″ screws.
- Attach to Main Frame: Affix the pink and lavender assembly to the muted yellow frame using glue and 2.5″ screws, following the detailed diagram for proper placement.
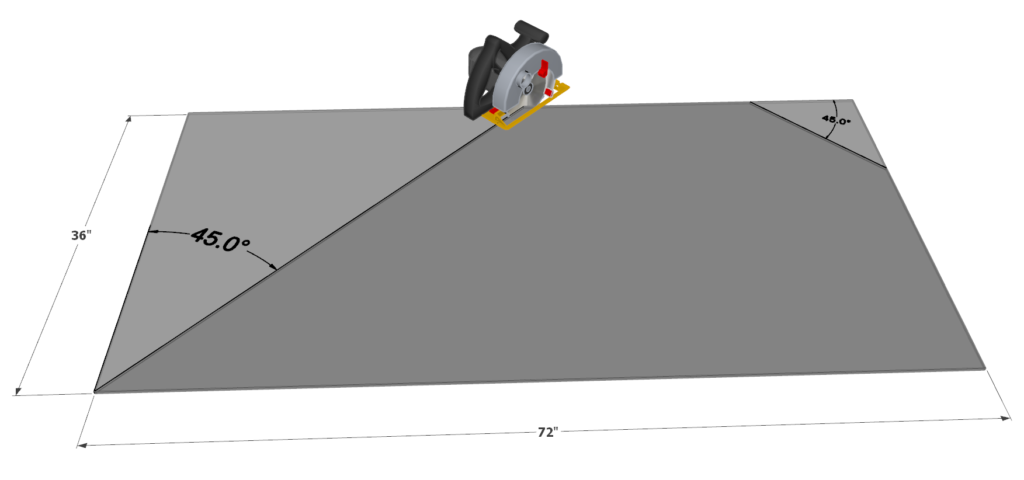
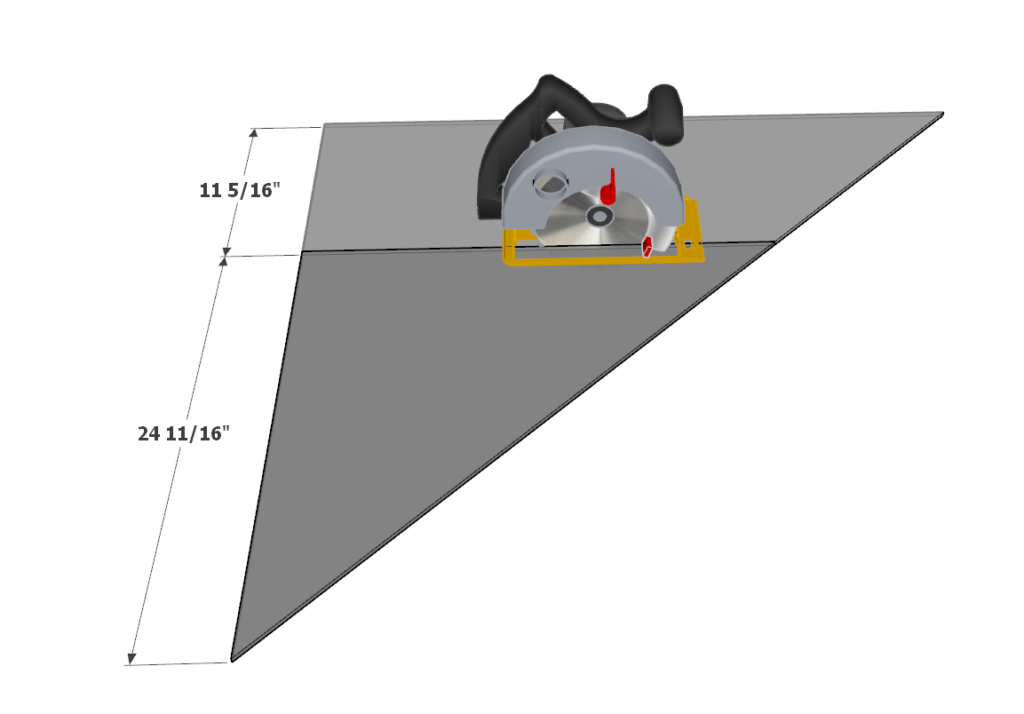
Polycarbonate Preparation:
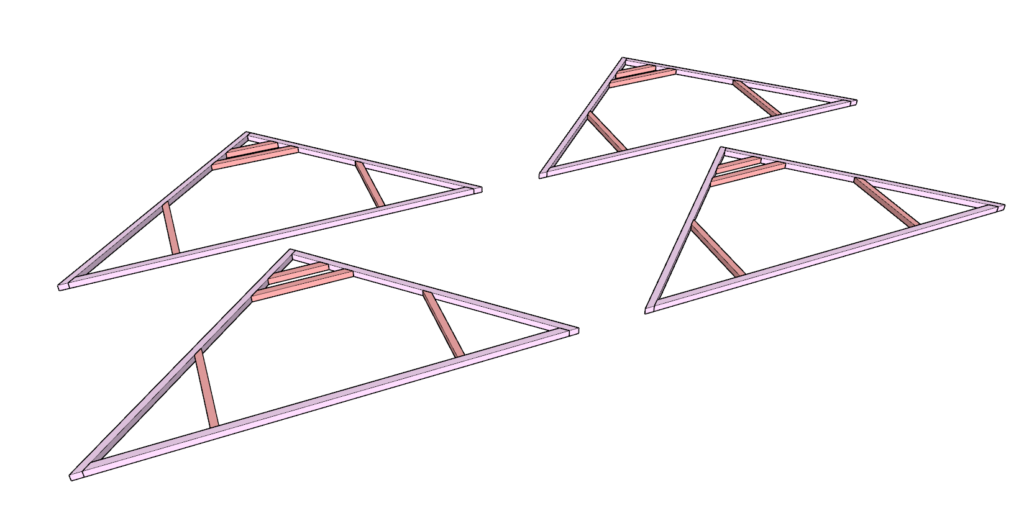
- Measure and Cut: Trim a full-sized polycarbonate sheet to create four geometric shapes that fit the triangular frame. Ensure a snug fit by test placing the cut shapes.
- Repeat for Second Set: Make a second identical set of triangular frames by following the same steps.


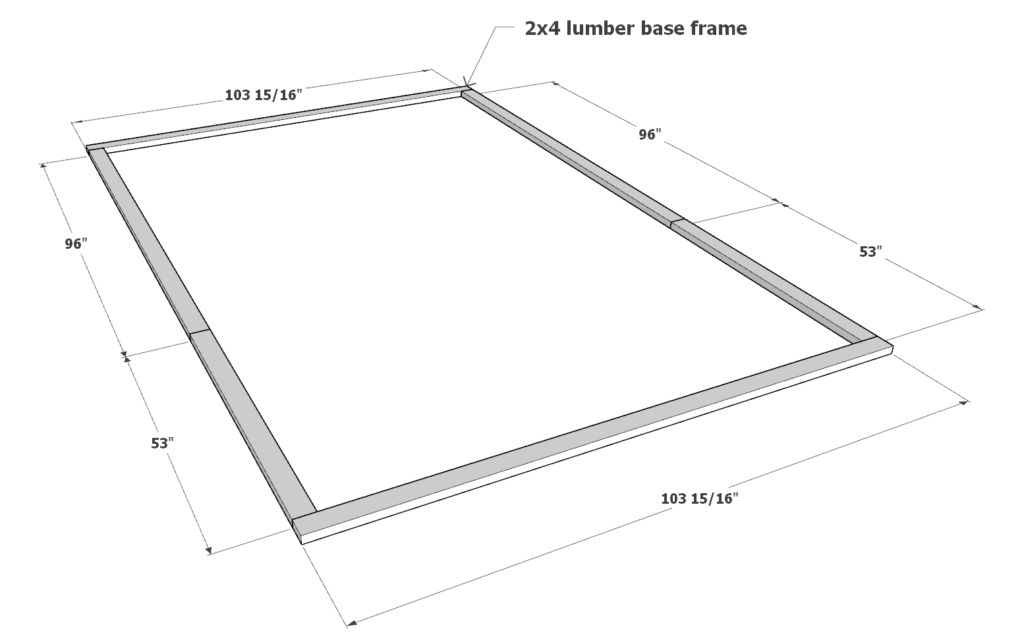
Step 2: Installing the Greenhouse Sides and Door
Setting the Perimeter Base:
- Lumber Requirements: Gather two 53-inch, two 96-inch, and two 103-15/16 inch 2×4 lumber pieces for the base frame.
- Pressure-Treated Wood Caution: If using pressure-treated lumber, ensure it’s not in direct contact with soil if you plan to grow plants directly in the ground.
- Foundation Considerations: The frame should be placed on a solid foundation, which can be dirt, cement, gravel, or rocks. It’s essential to anchor the base frame properly, with the anchoring method depending on the foundation type.
Attaching Side Panels:
- Initial Assembly: Start by attaching the side panels made in Step 1 to the base frame. These are the panels with the blue and green frames.
- Secure with Screws and Glue: Use 2.5-inch screws for securing the panels to ensure they don’t protrude. Apply wood glue for additional strength.
- Follow the Diagram: Carefully arrange and add the side panels as illustrated in the provided diagram.
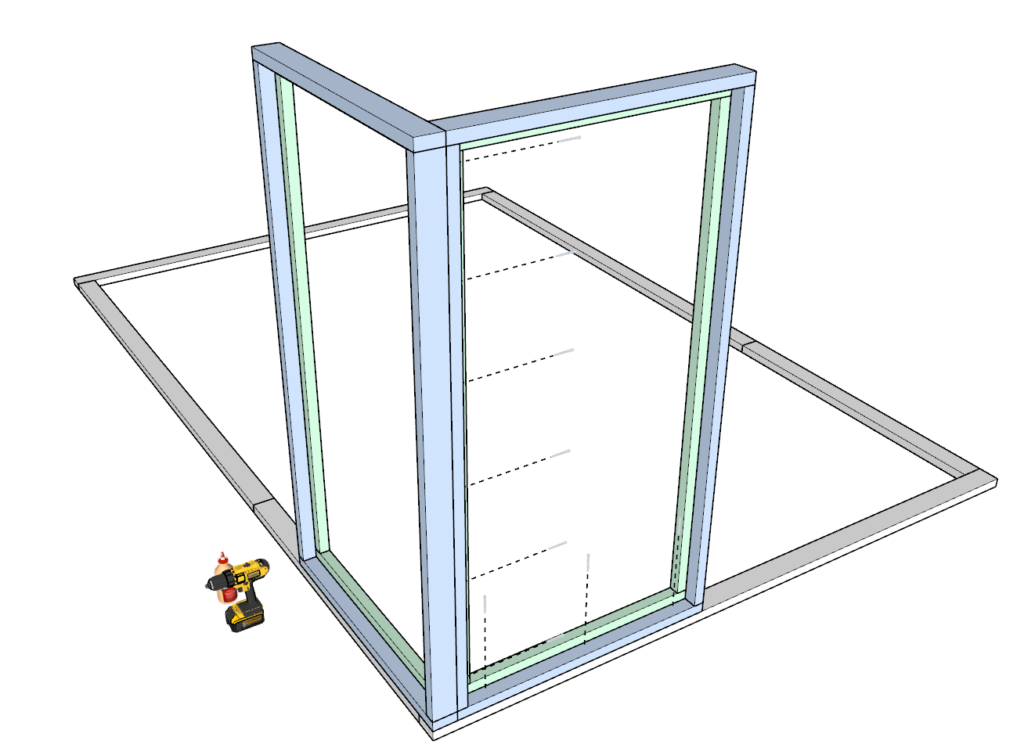
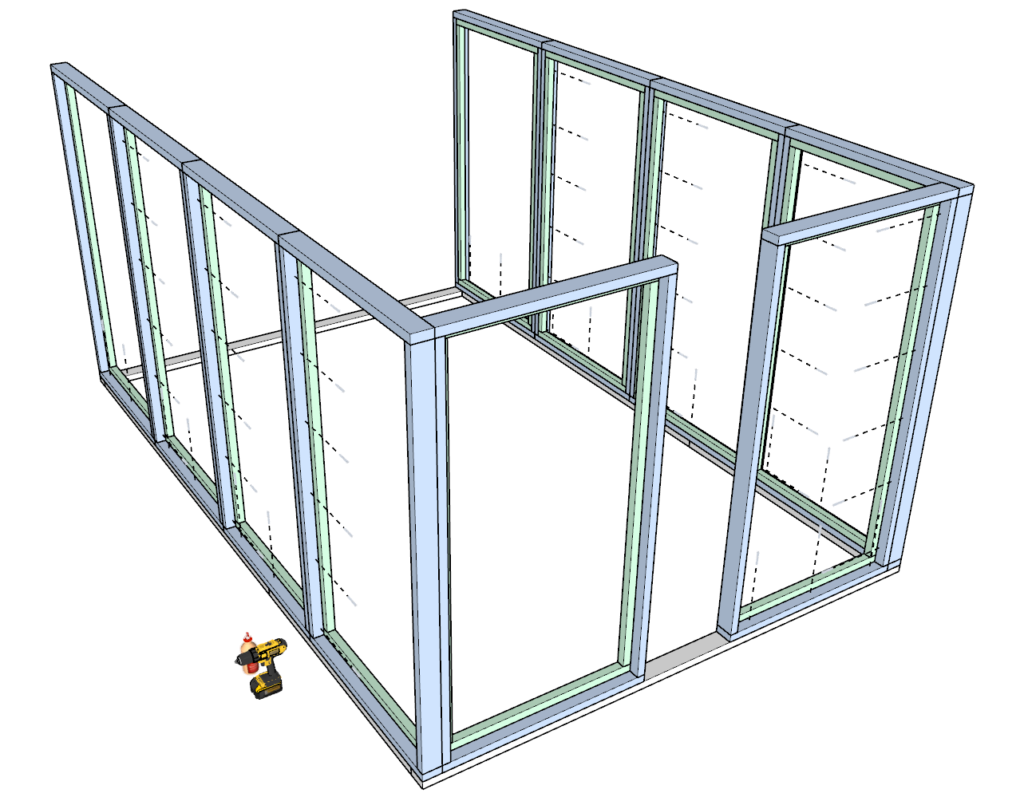
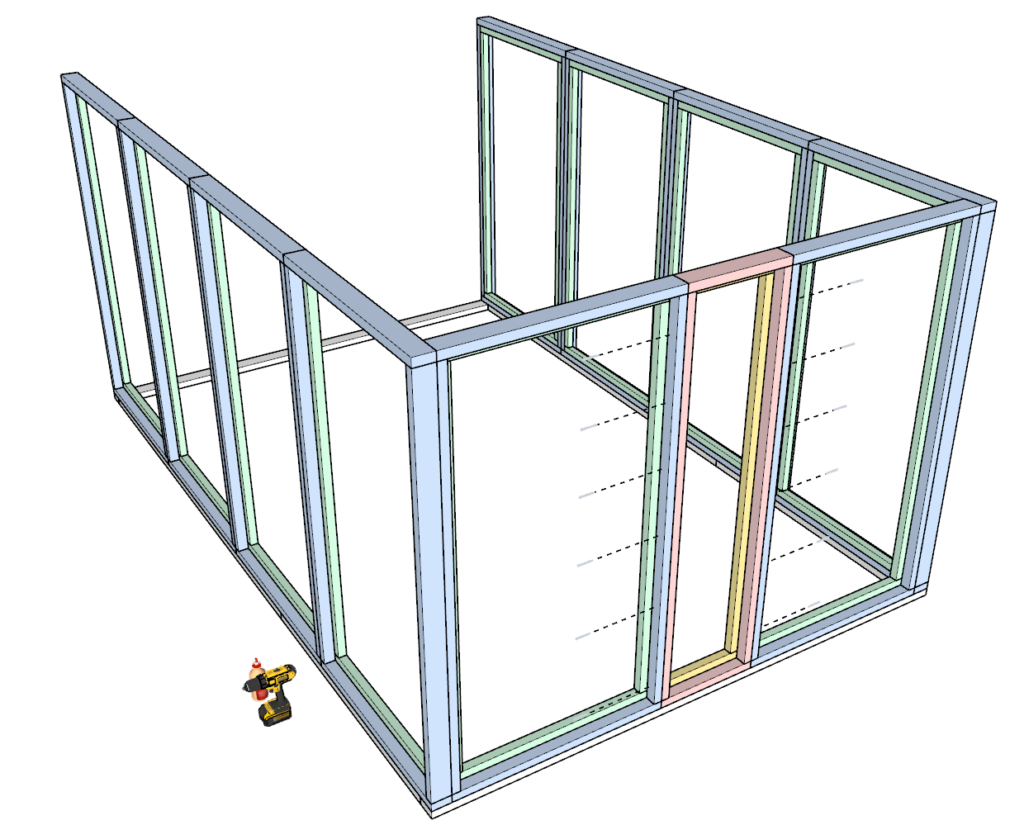
Filling the Gaps:
- Use Special Frames: In the gap on the side opposite the door, place the ‘Different Sized Side Frame’ (pink and yellow from Step 1). These are secured in the same way, using 2.5-inch screws and wood glue.
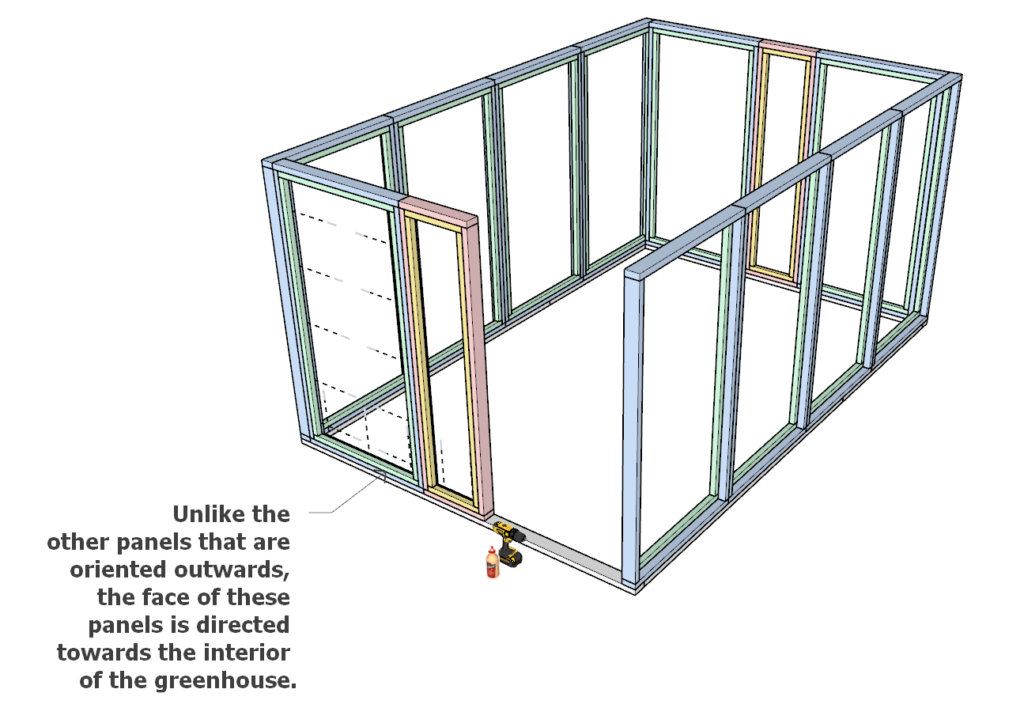
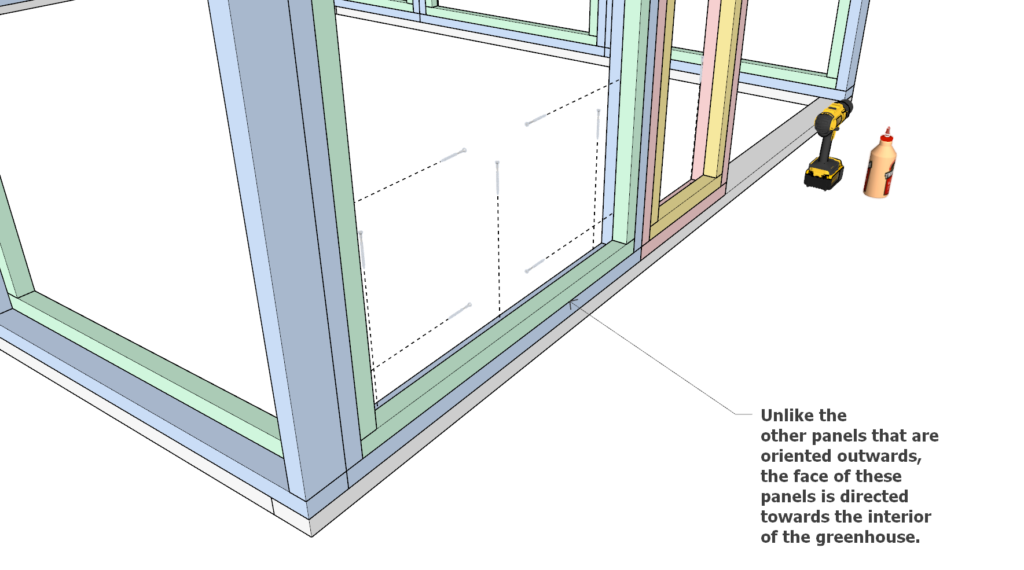
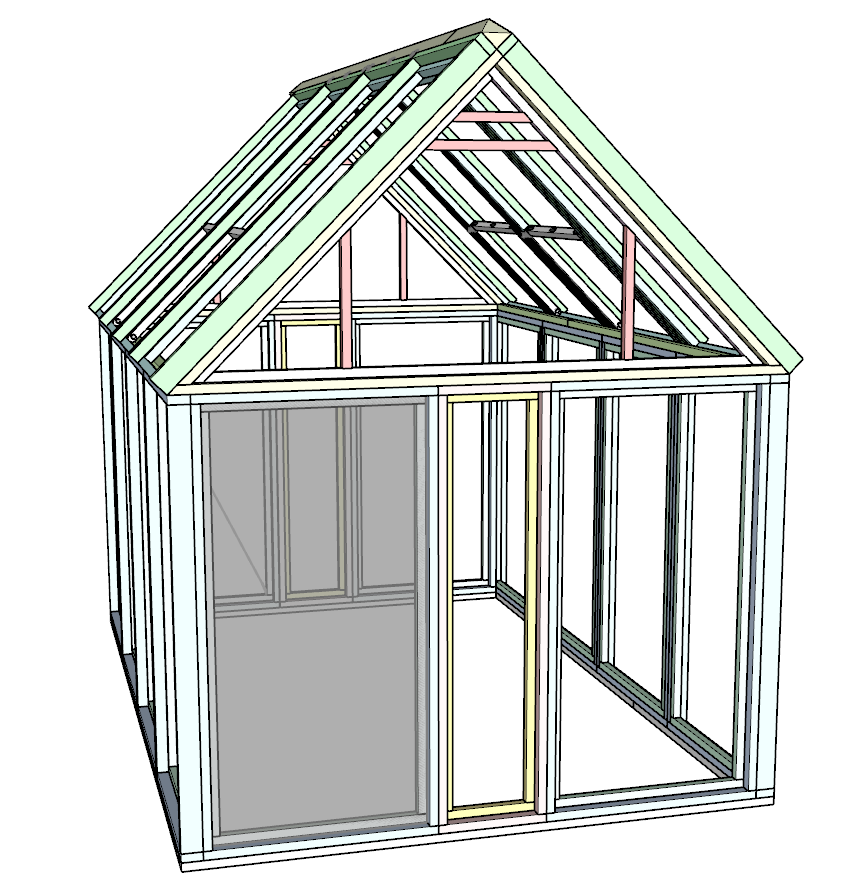
Front Side Panel Setup:
- Orientation for Door Side: For the front side, where the door will be, ensure that the panels face inward. This is different from the other sides where panels face outward.
- Install Panels at Front: Secure a regular-sized (blue + green) panel and one ‘Different Sized Side Frame’ (pink + yellow) to the front, using the same attachment method.
Door Preparation and Installation:
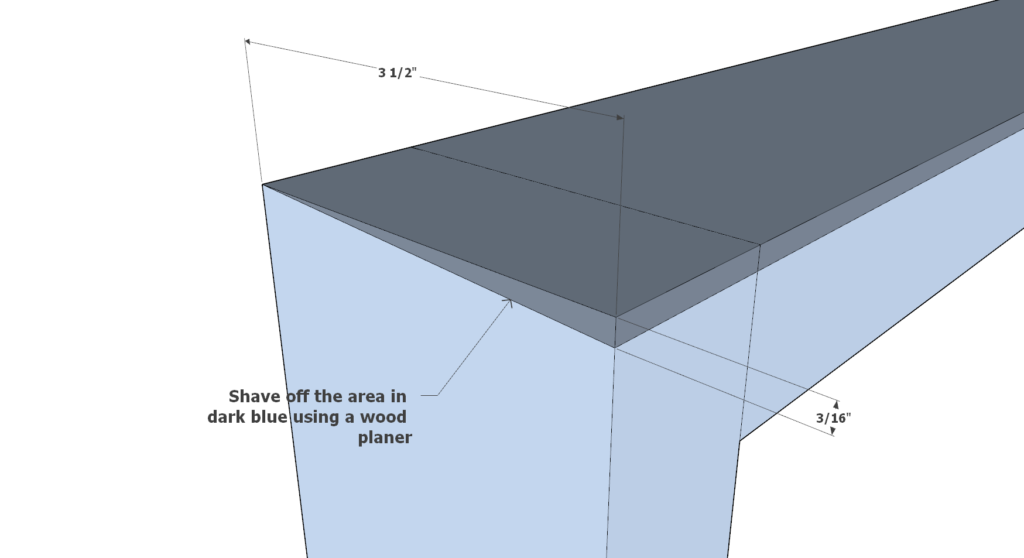
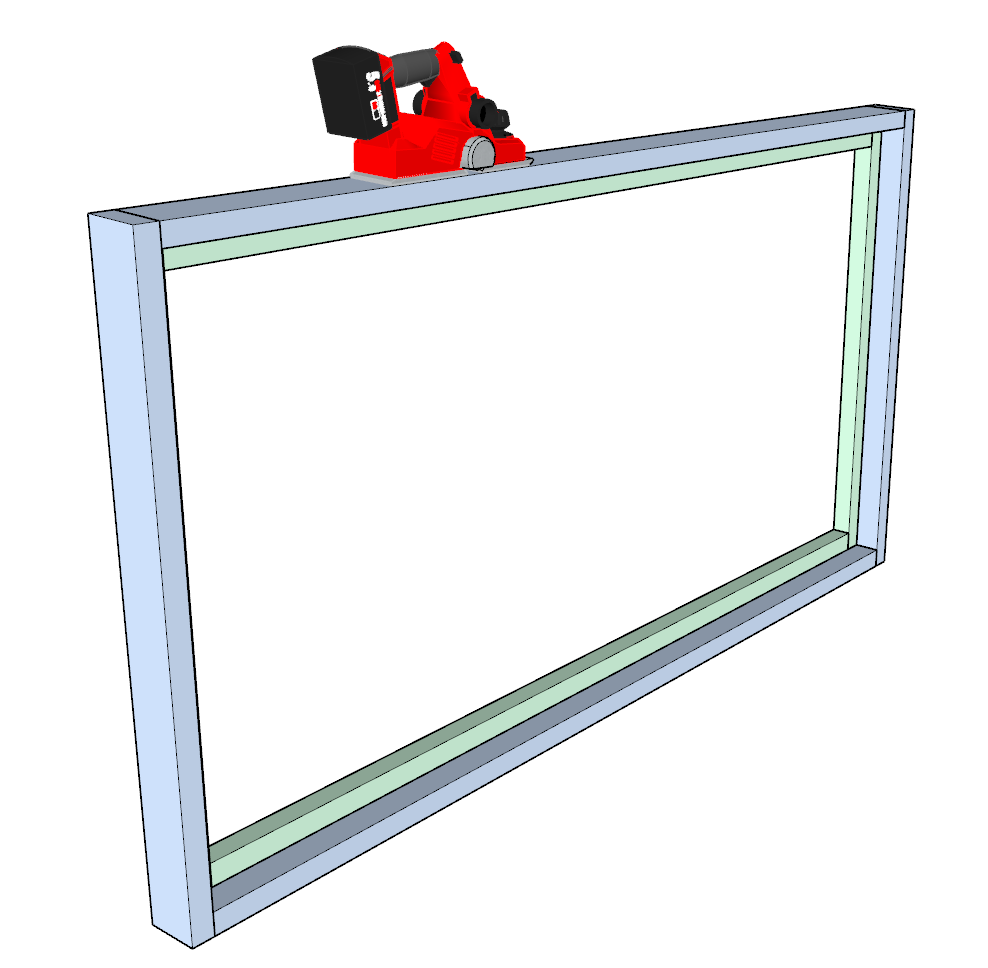
- Door Panel Modification: Select one regular side panel (blue and green) for the door. You’ll need to shave off about 3/16 inches using a wood planer. This shaving is done at an angle to allow the door to swing open freely.
- Handling Screws: Ensure there are no screws in the way when planing. You may need to remove screws temporarily, plane the area, and then reattach them.
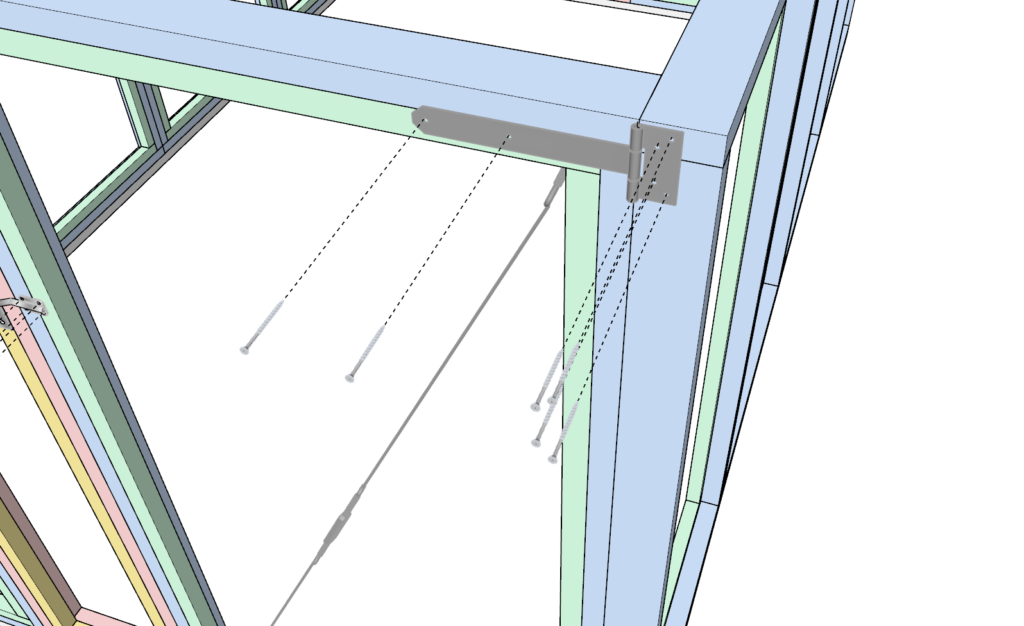
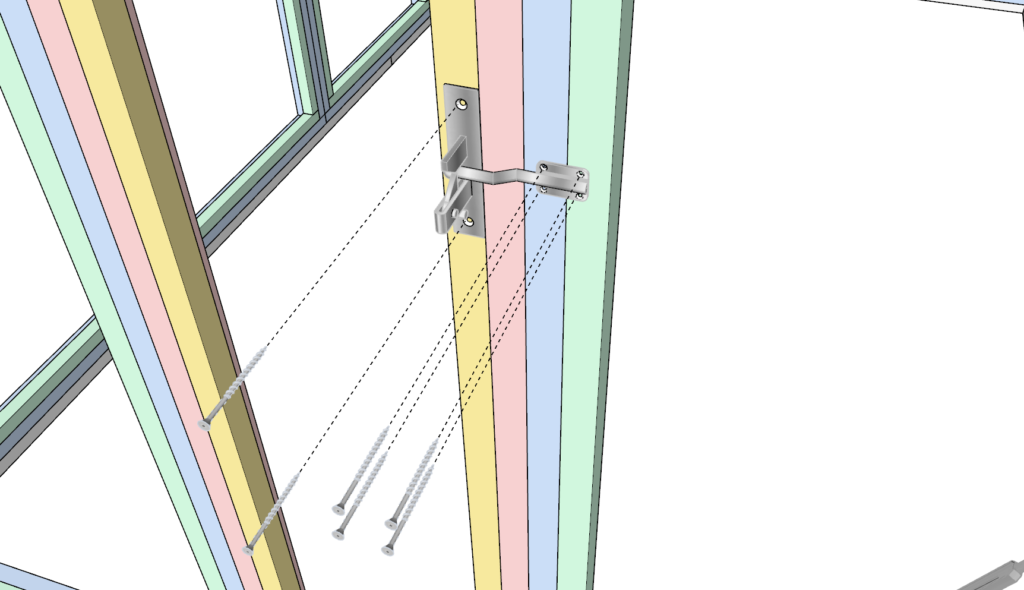
- Attach the Door: After modifying the door panel, attach it to the greenhouse structure. Add hinges for it to swing, a door handle, an anti-sag kit to maintain its shape, and a lock latch for security.


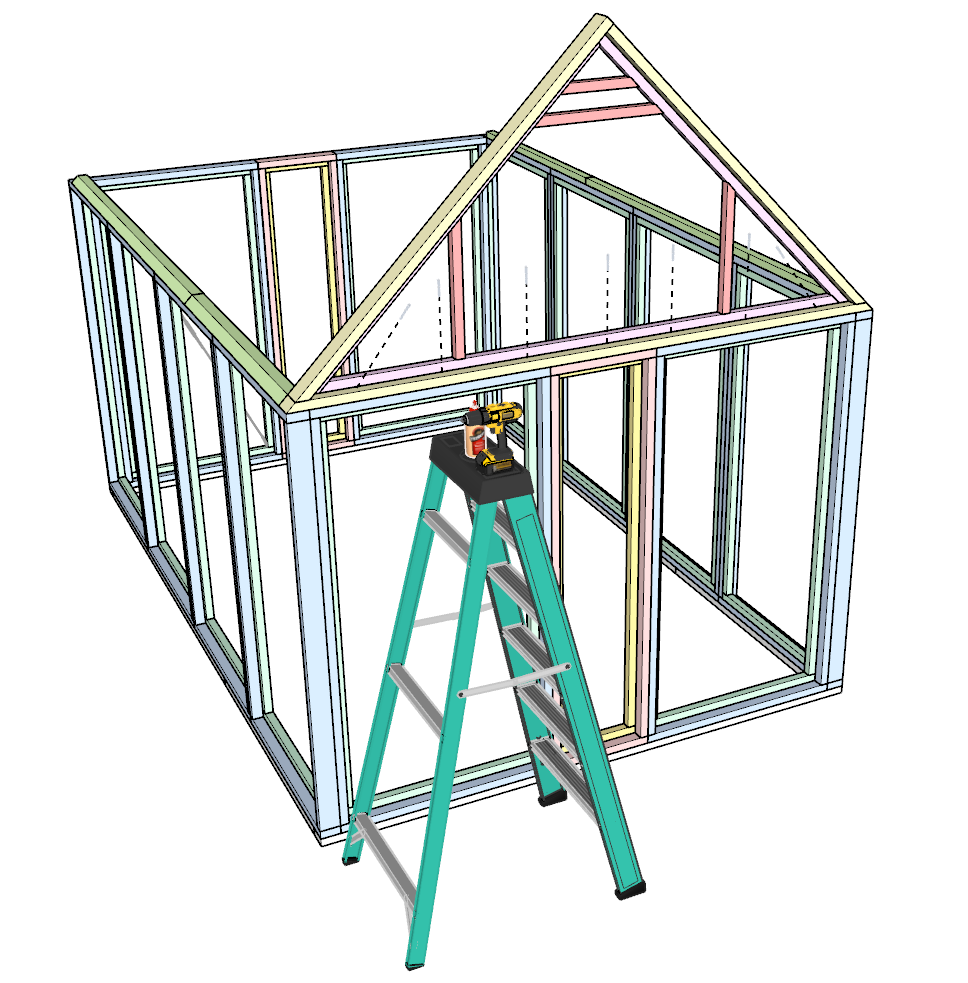
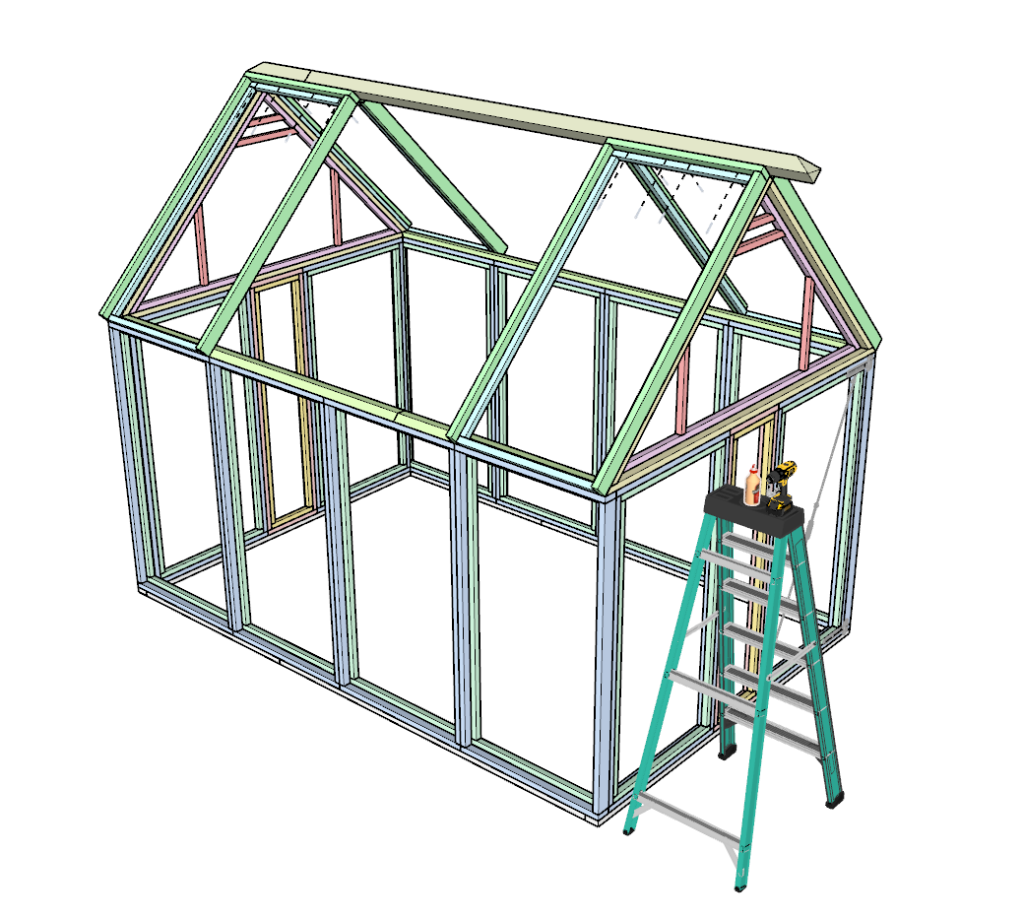
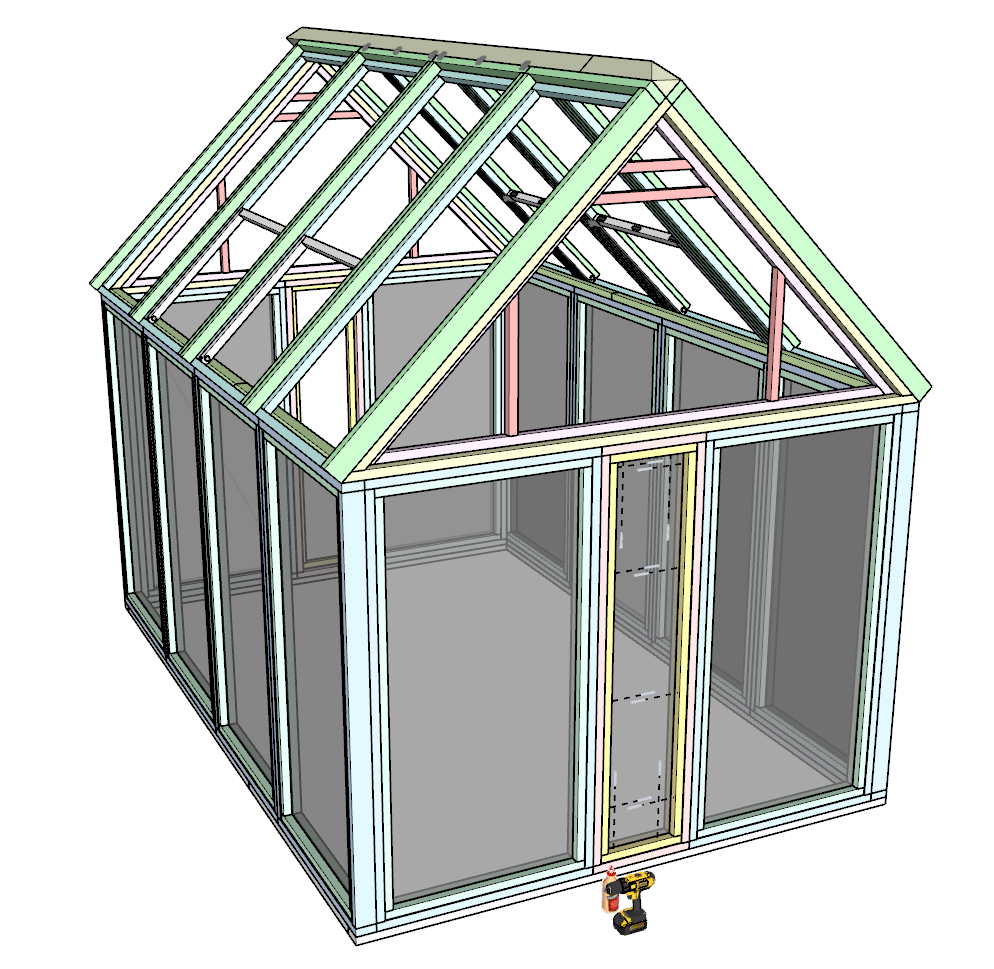
Step 3: Installing Roof Supports and Joists for Greenhouse Structure
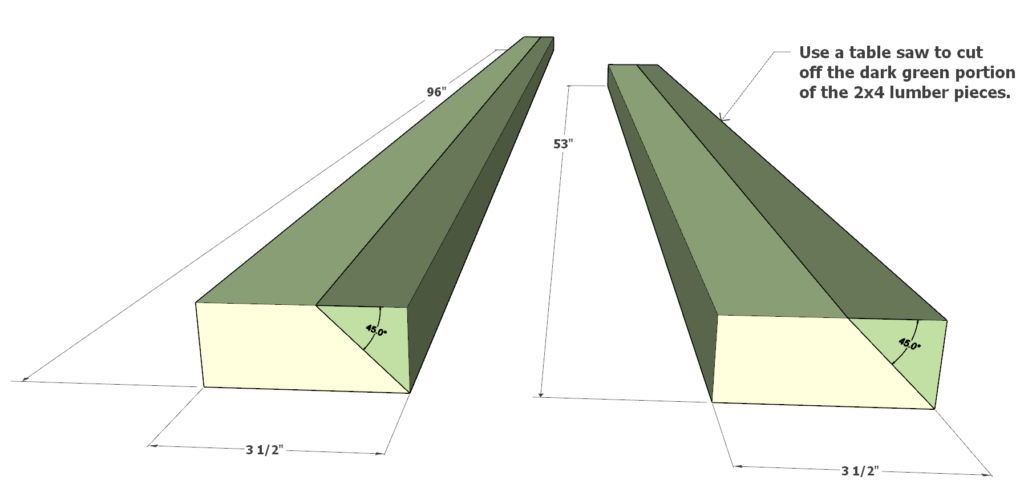
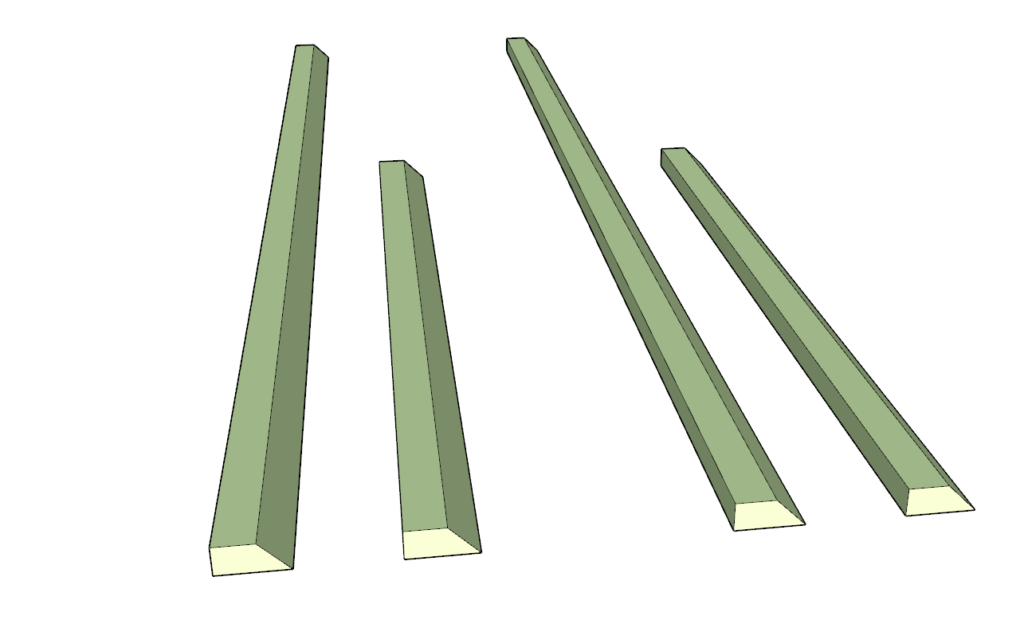
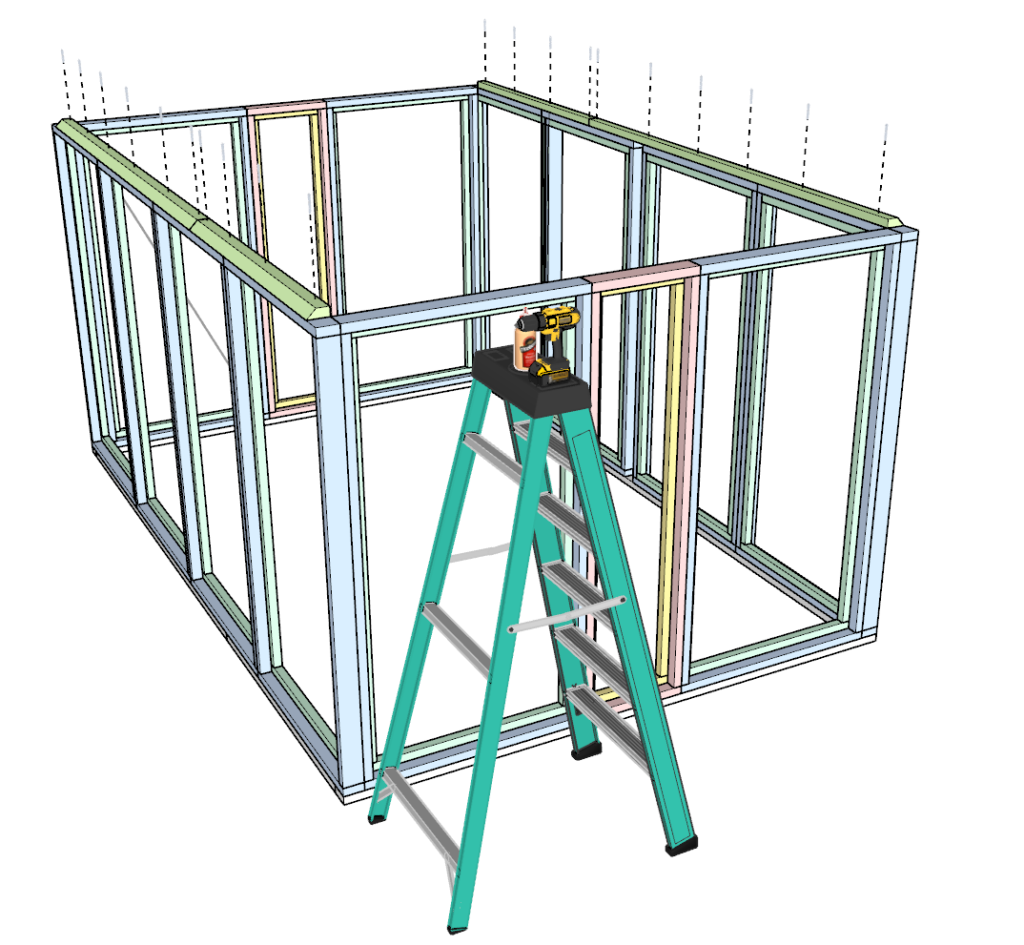
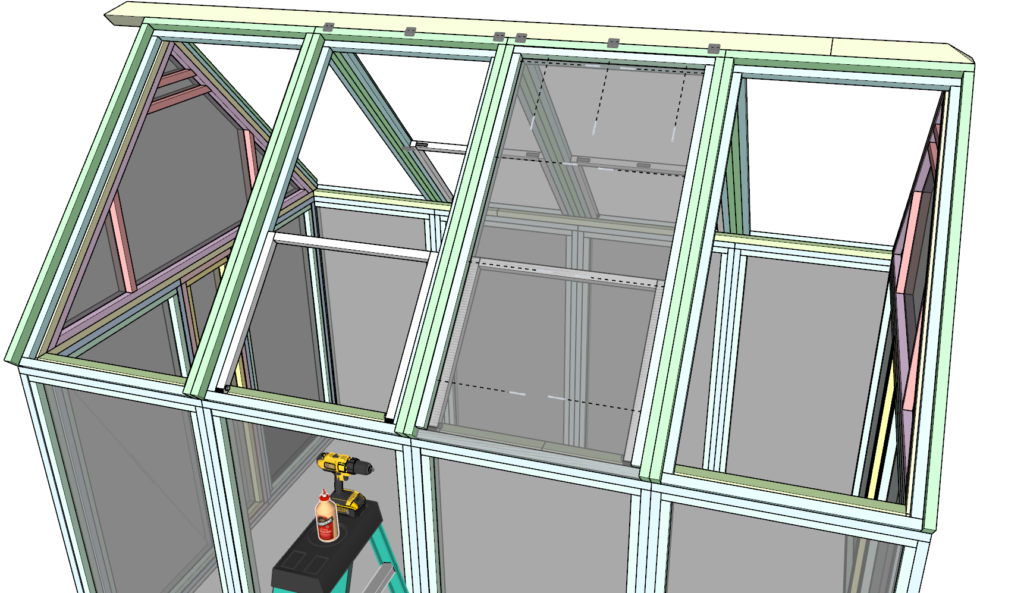
Installing Top Frame Supports:
- Prepare the Lumber: Select two 96-inch and two 53-inch 2×4 lumber pieces. These will be color-coded in forest green for easy identification.
- Cutting Angles: Measure and mark a 45-degree angle cut as shown in the diagram. Use a table saw to make precise angled cuts.
- Secure the Supports: Affix these forest green 2×4 supports to the tops of the side panels using wood glue and 2.5-inch screws for a secure bond.
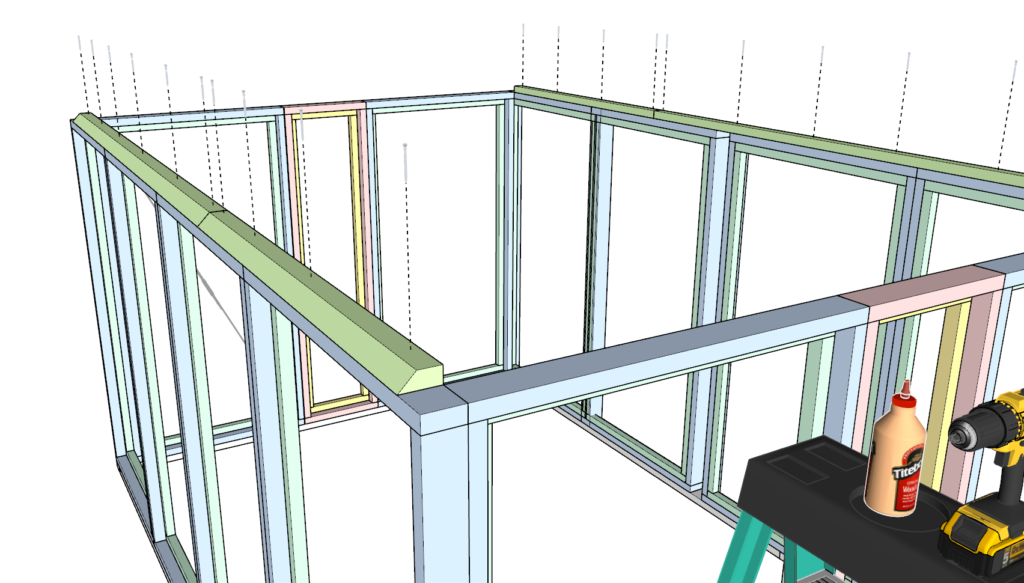
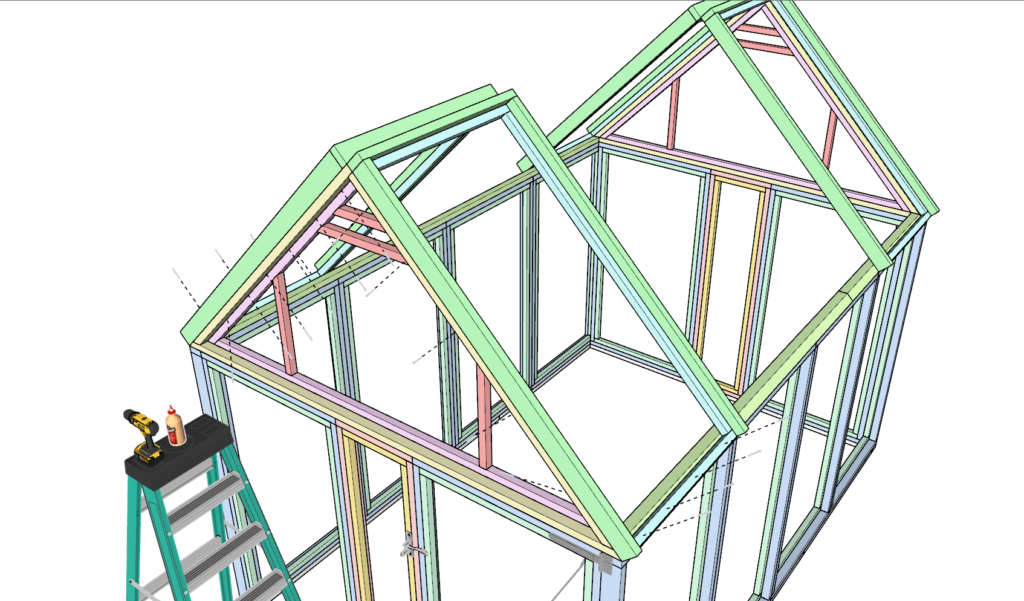
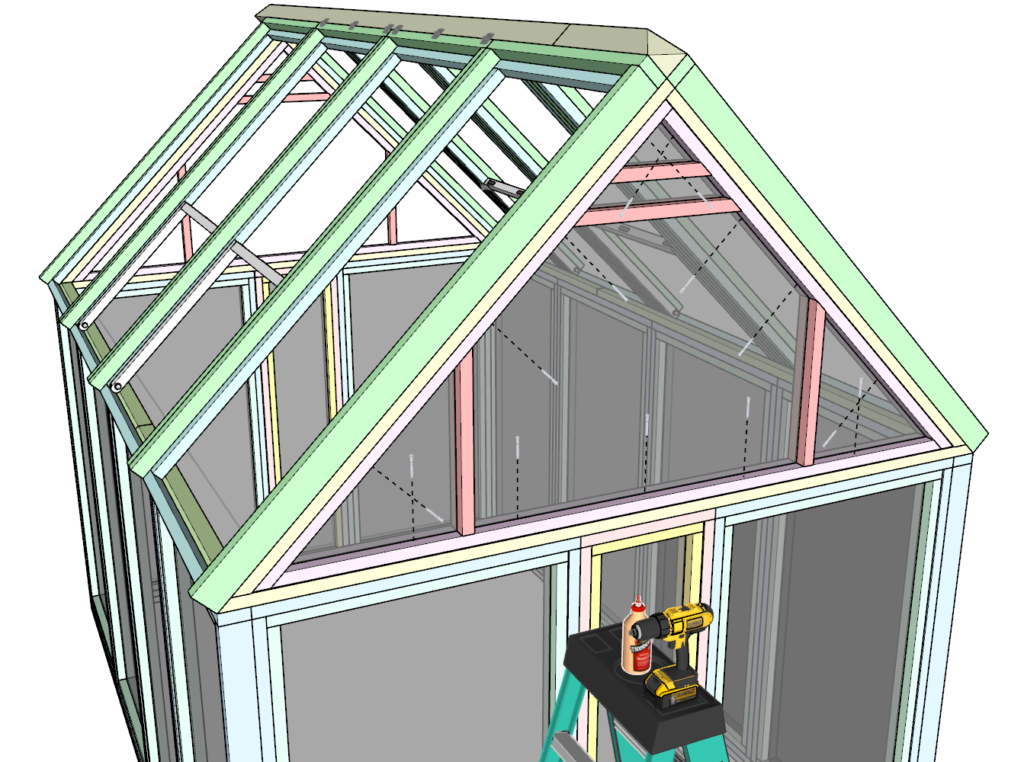
Attaching Triangular Roof Components:
- First Triangular Component: Position one of the triangular roof components (from Step 1) on the side opposite the door. Ensure it is aligned correctly, then glue and screw into place as indicated.
- Roof Panel Placement: Take two roof panels prepared earlier and secure them to the triangular component with glue and 2.5-inch screws, following the layout in the diagram.
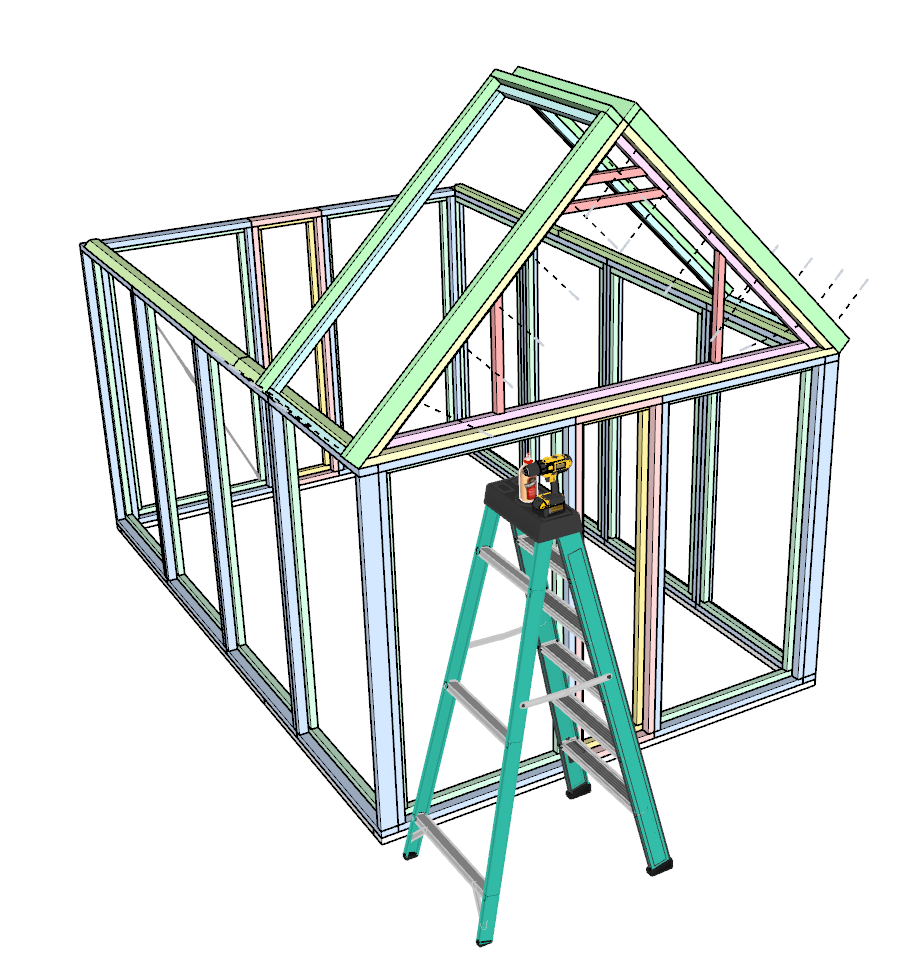
Installation on Door Side:
- Second Triangular Attachment: Attach the second triangular component to the door side, using the same method. Pay attention not to place screws where the door swings to avoid interference.
- Additional Roof Panels: Affix two more roof panels above the door side using the same fastening technique with 2.5-inch screws and wood glue.
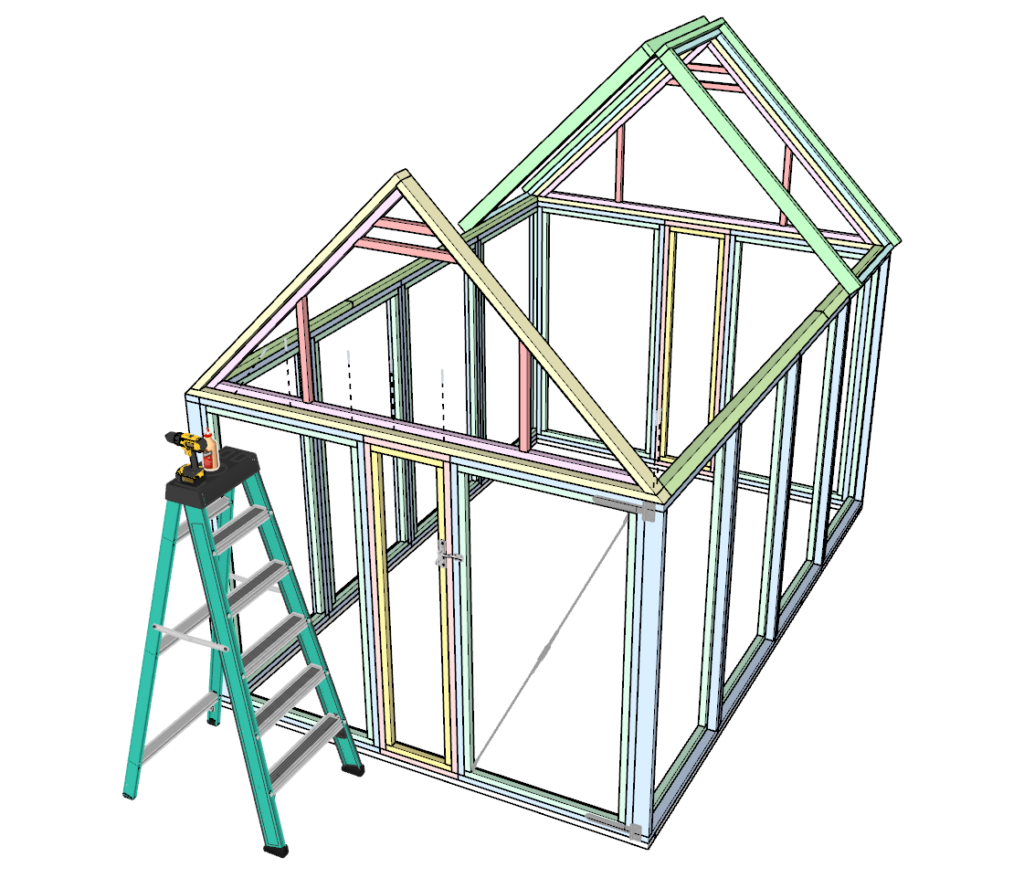
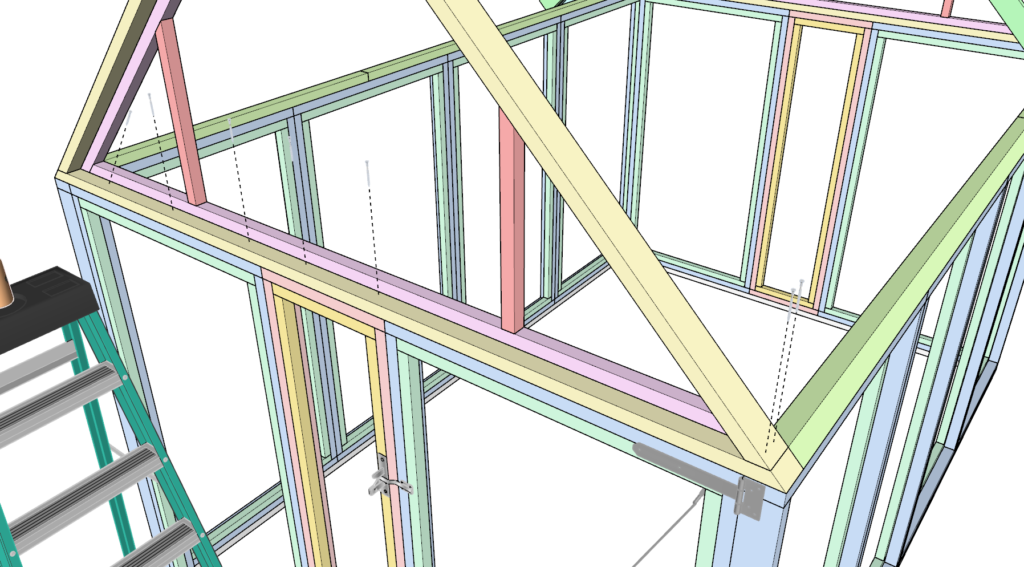
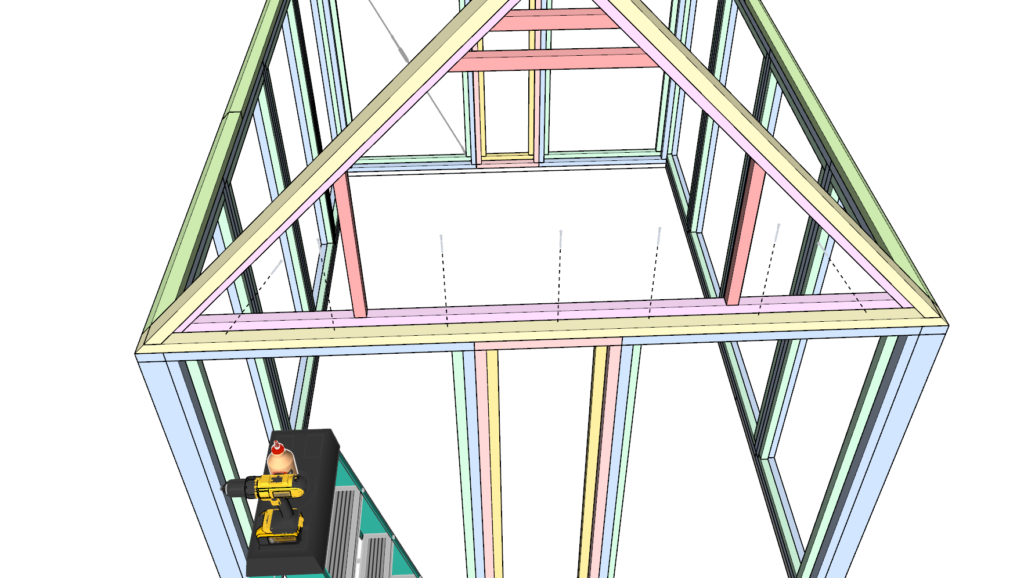
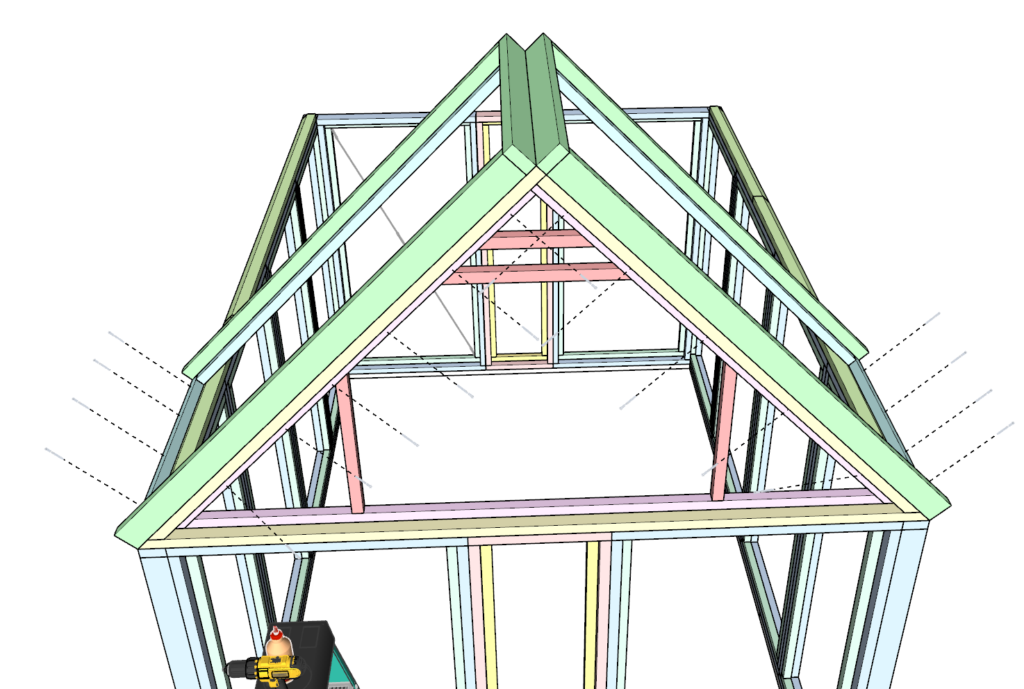
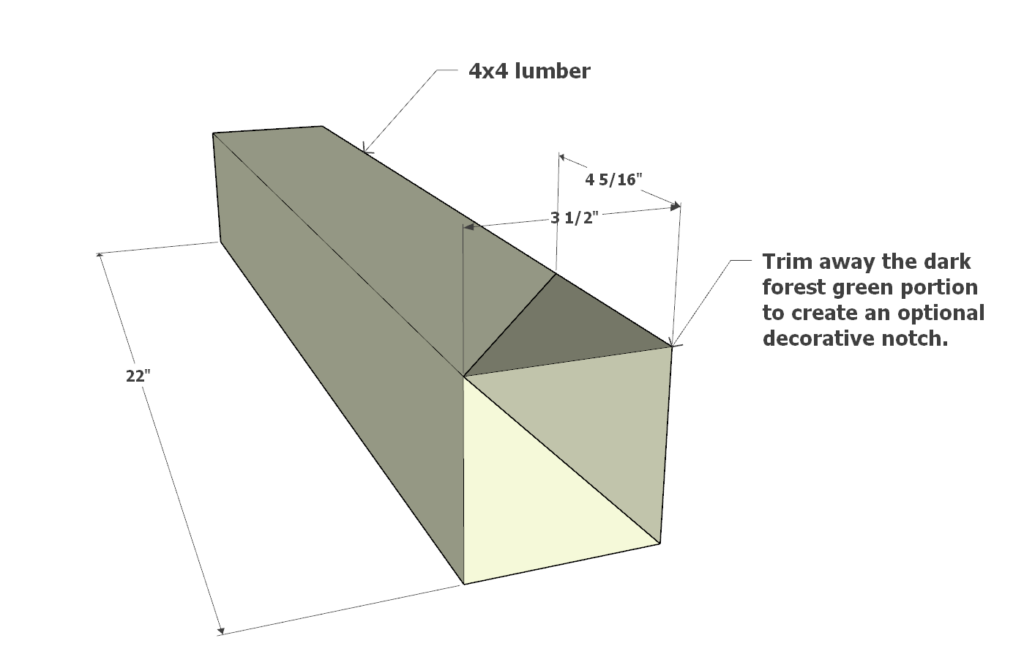
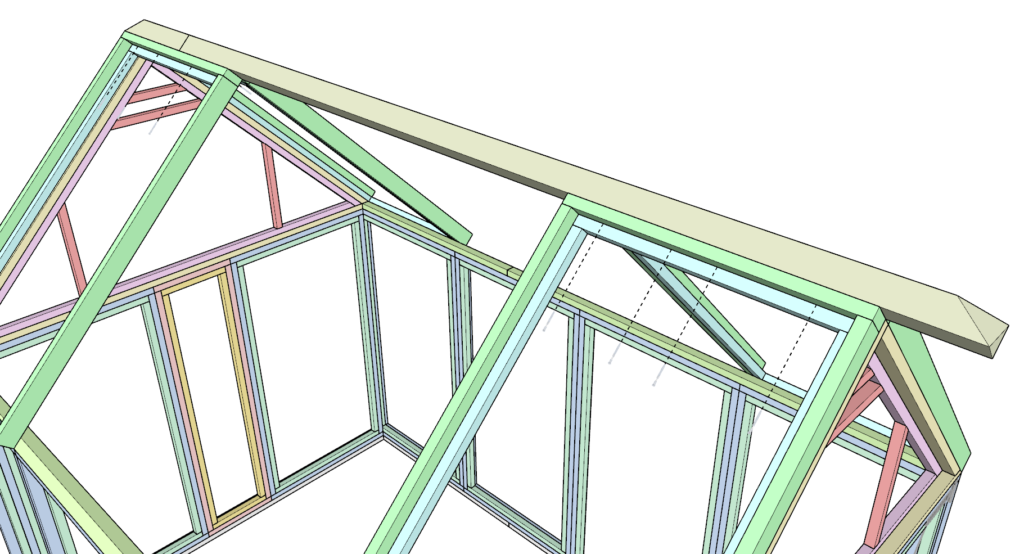
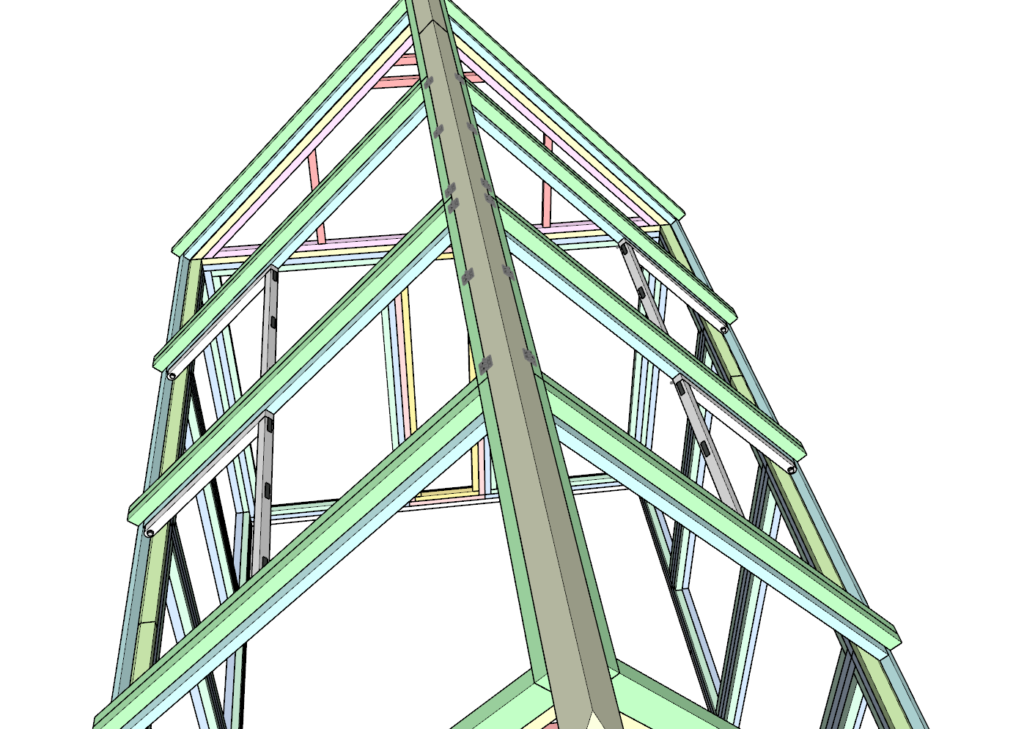
Adding Ceiling Joists (Rafters):
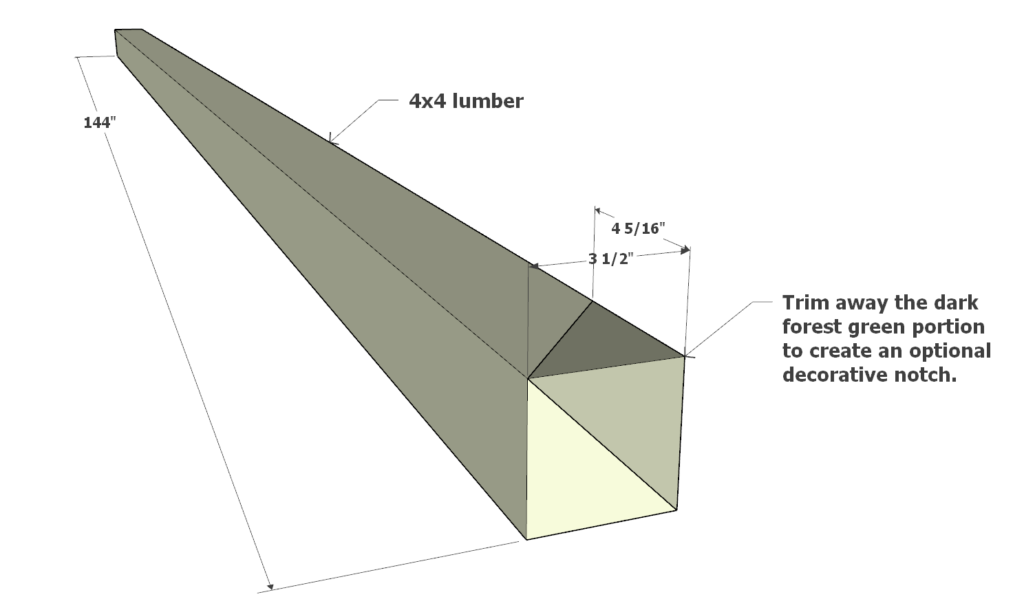
- Prepare Rafters: Obtain one 144-inch and one 22-inch 4×4 lumber pieces. Trim the designated dark forest green sections to add an optional decorative notch if desired.
- Install Rafters: Position these rafters along the roof’s peak and across the width of the greenhouse. Secure each rafter with 3.5-inch screws and wood glue for a solid structure.
Step 4: Constructing and Installing Greenhouse Vents
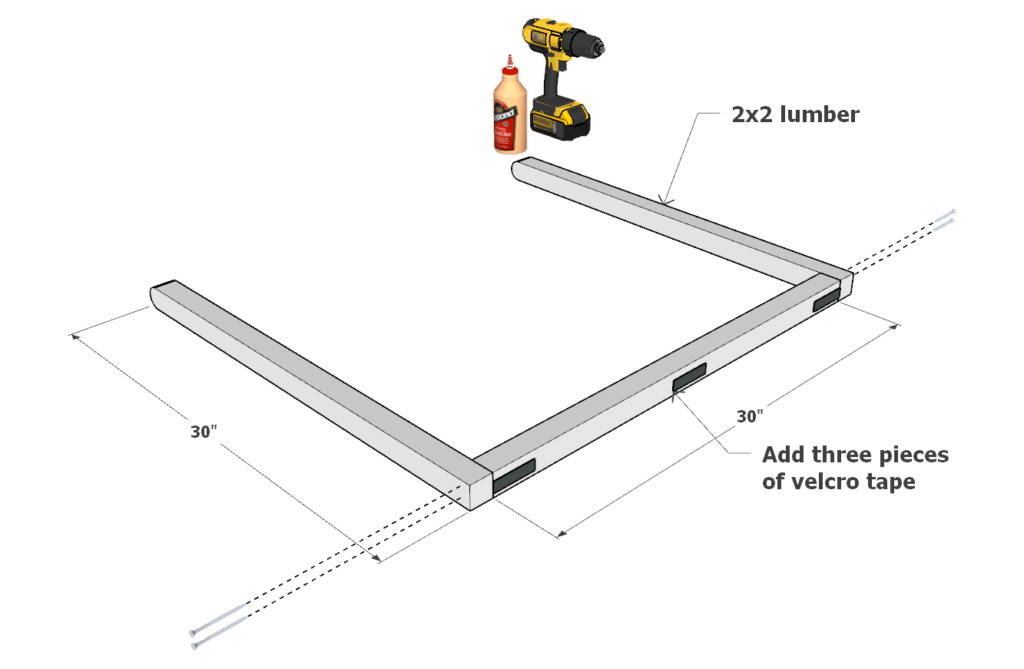
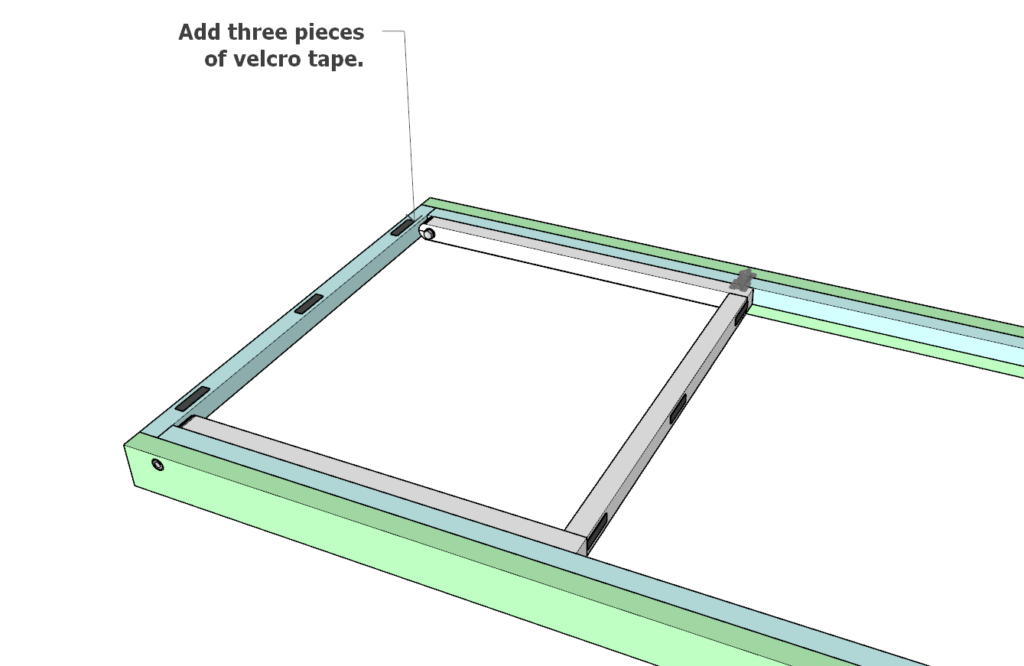
Crafting the Vent Openers:
- Select and Prepare Lumber: Gather three 30-inch 2×2 lumber pieces—two with one end rounded off for the opener mechanism.
- Assemble the Pieces: Join these pieces using wood glue and 3.5-inch screws to form the vent opener mechanism.
- Apply Velcro: Attach Velcro tape to the vent openers as marked in the diagram.
Attaching Vent Openers to Roof Panels:
- Create the Assembly: Integrate the vent opener with a roof panel by using a bolt, washers, and nut. Ensure the bolt is of adequate length to pass through all wooden layers.
- Drilling: Drill a hole through both the vent opener and the roof panel where indicated in the diagram. The hole size will depend on your chosen bolt’s thickness.
- Bolt Installation: Install the bolt so it sits flush with the 2×4 lumber of the roof panel, avoiding any protrusion.
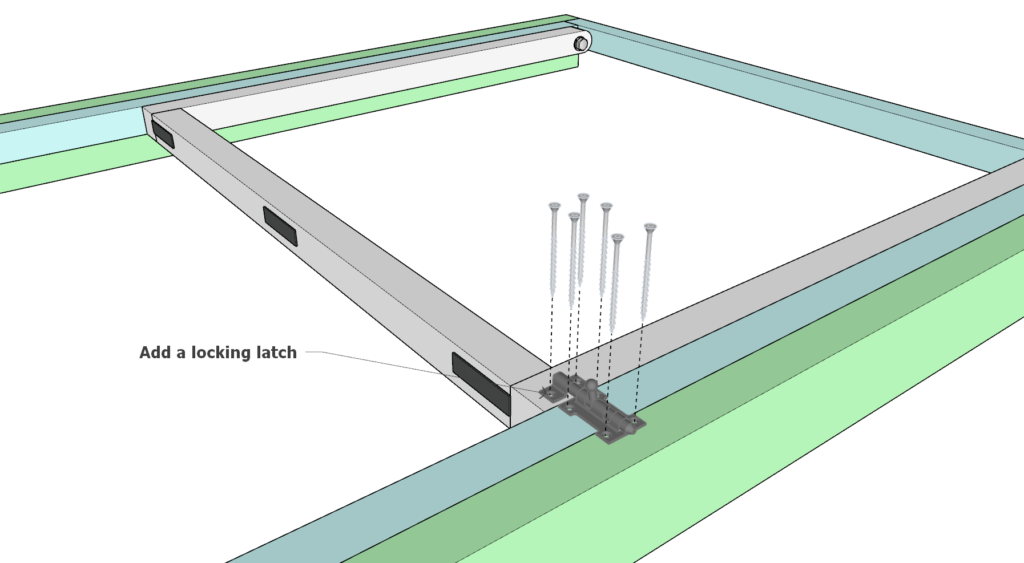
Securing Vent Components:
- Install Locking Mechanism: Fix a locking latch to the roof panel and vent opener.
- Attach Velcro: Adhere three pieces of Velcro to the roof panel in positions similar to those on the vent opener.
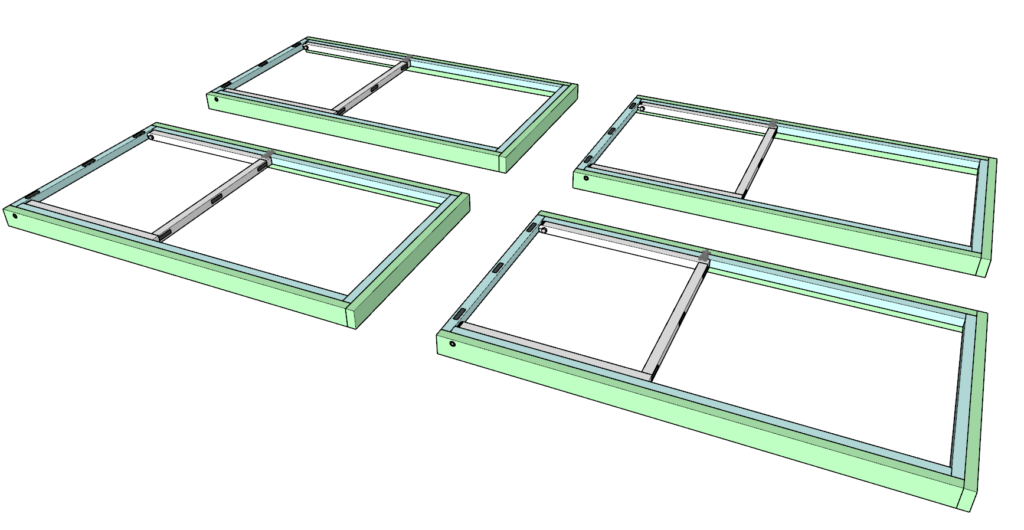
Replicate for All Vents:
- Create Identical Units: Construct four identical vent components following the above steps for a consistent and uniform look.
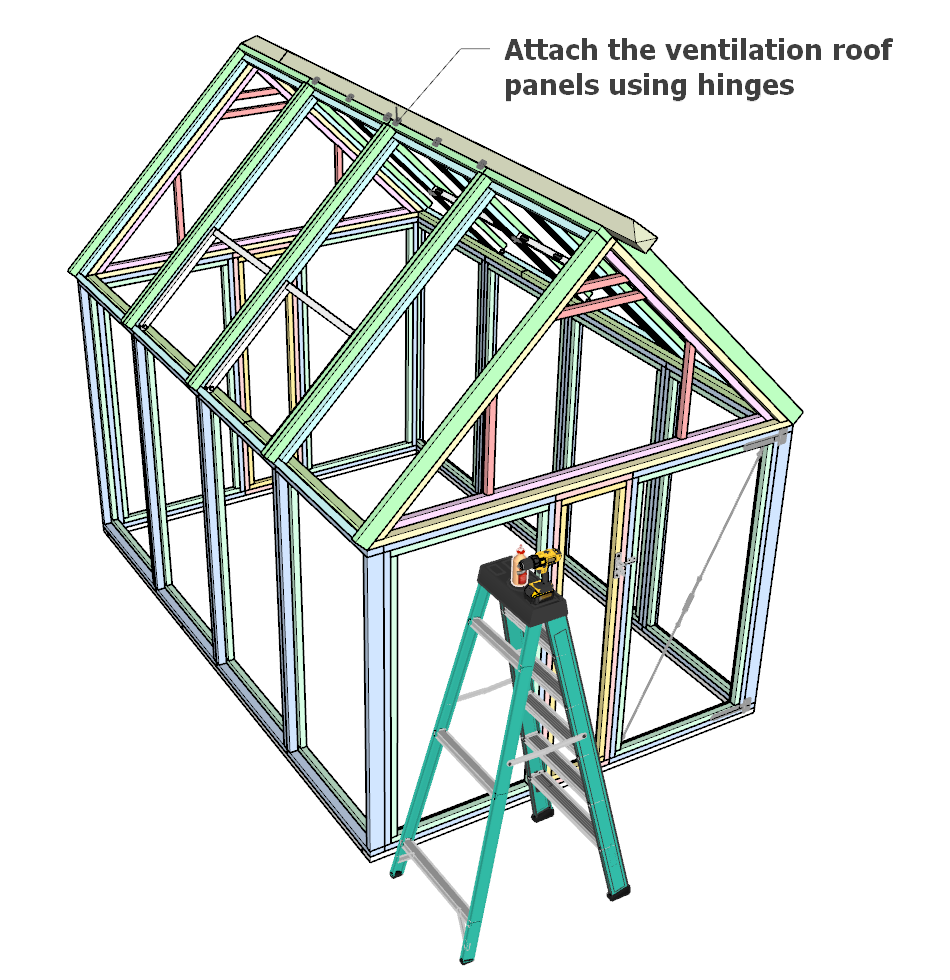
Hinging the Vents:
- Attach Hinges: Fix the ventilation roof panels to the greenhouse structure using hinges to allow them to open and close smoothly.
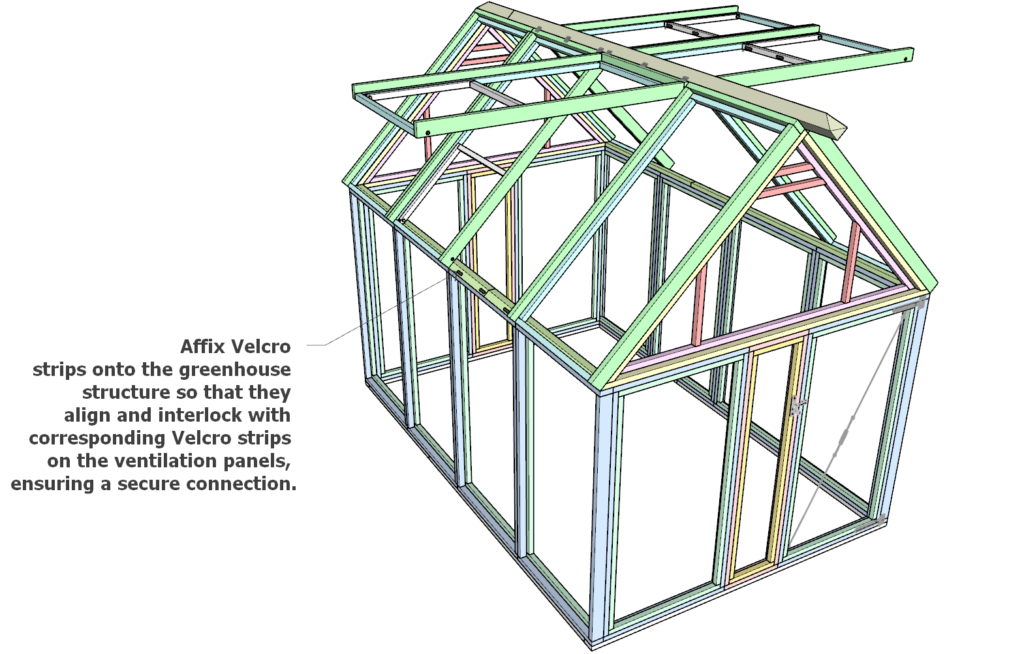
Finalizing Vent Installation:
- Place Velcro Strips: Affix Velcro strips onto the greenhouse frame to align with the Velcro on the vent openers. This ensures the vents remain closed against the elements and can be propped open securely when needed.
Step 5: Assembly of the Polycarbonate Sheet Frames
Constructing Side Panel Frames:
- Frame Dimensions: Start by creating twelve frames using 2×2 lumber. Each frame should consist of two 36-inch lengths and two 69-inch lengths. Secured with wood glue and 3.5-inch screws.

Building Roof Panel Frames:
- U-Shaped Frames: For the roof, make eight U-shaped frames. You’ll need one 36-inch and two 69-inch 2×2 lumber pieces for each frame.
- Construction: Attach these using 3.5-inch screws and wood glue, forming a U-shape.

Creating Narrow Side Panel Frames:
- Frame Measurements: For the narrower side panels, create two identical frames using two 69-inch and two 15-15/16 inch 2×2 lumber pieces.
- Securing Frames: Use 3.5-inch screws and wood glue to assemble these frames.

Preparing and Painting Your Greenhouse Frame
Before you add the Polycarbonate Sheets, taking the time to paint the greenhouse frame can significantly increase its longevity and aesthetic appeal. Here’s a step-by-step guide on how to achieve a professional-quality paint job:
Sanding the Surface:
- Begin by sanding down your greenhouse frame. Use a medium-grit sandpaper (around 120-grit) to remove any rough spots and to create a surface that primer and paint will adhere to well.
- Wipe down the frame with a damp cloth to remove all the dust and debris from sanding.
Applying Primer:
- Choose a high-quality primer that’s suitable for the frame material. Primer is crucial as it provides a good base for the paint to stick to and increases the durability of the paint job.
- Apply the primer evenly with a brush or a spray. Make sure to cover all nooks and crannies. A brush might be better to ensure you get into all the grain of the wood.
- Allow the primer to dry completely as per the manufacturer’s instructions.
Painting the Frame:
- Opt for a paint that’s specifically designed for outdoor use and is suitable for your greenhouse frame. High-quality exterior paint can resist weathering and UV damage, maintaining its color for longer.
- Apply the paint in thin, even coats to prevent drips or uneven coverage. A second or third coat might be necessary for the best coverage and color richness. Allow each coat to dry thoroughly before applying the next.
- Use a smaller brush for detailed areas to ensure even coverage throughout the frame.
Pros of Painting Your Greenhouse:
- Protection: Paint acts as a protective layer against moisture, pests, and UV rays, which can help prevent rot and rust.
- Insulation: A well-painted frame can improve the greenhouse’s insulation, keeping it warmer in winter and cooler in summer.
- Aesthetics: A fresh coat of paint can significantly enhance the visual appeal of your greenhouse, helping it blend into your garden or become a standout feature.
- Resale Value: A well-maintained and nicely painted greenhouse can add value to your property should you choose to sell in the future.
Tips for a Successful Paint Job:
- Weather Conditions: Paint on a dry day with moderate temperatures; extreme heat or cold can affect how the paint dries.
- Quality Brushes and Tools: Invest in good brushes, rollers, or sprayers for a smooth finish and to ensure that the paint adheres well.
- Preventative Measures: Use painter’s tape to protect any hardware or areas you do not wish to paint. Lay down drop cloths to protect the ground from spills.
- Regular Maintenance: After painting, regular inspections and touch-ups can help maintain the integrity of the paint job over time.
Painting your greenhouse is not just about aesthetics; it’s a practical step in ensuring the longevity and effectiveness of your greenhouse. Take the time to do it right, and your greenhouse will remain a vibrant and functional part of your garden for years to come.
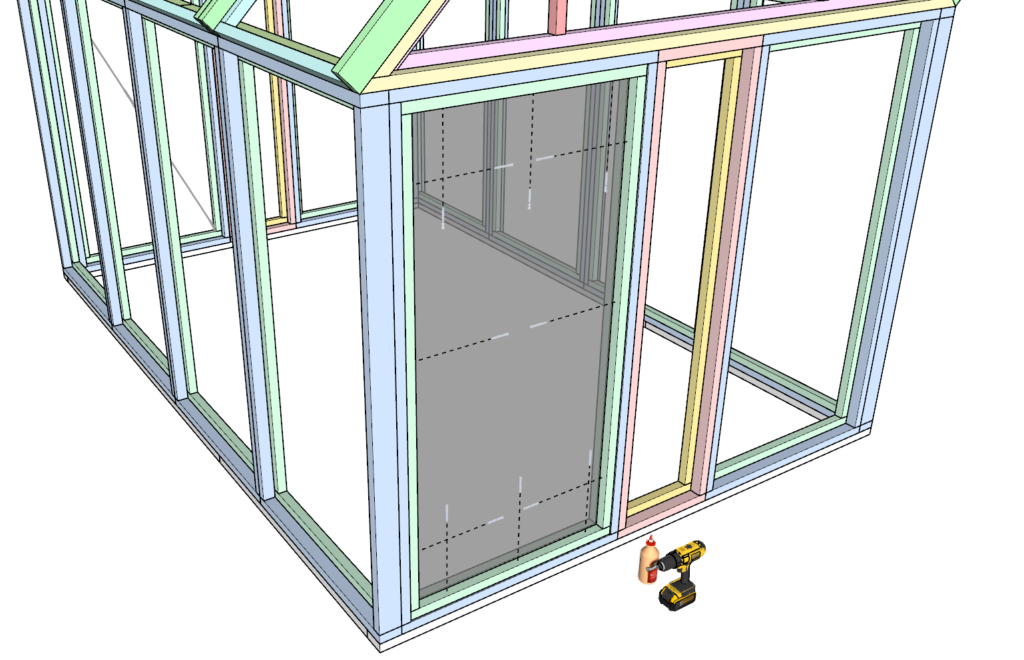
Step 6: Attaching Polycarbonate Sheets to the Greenhouse Structure
Install Polycarbonate on Side Panels:
- Starting with Full-Sized Sheets: Take a 72-inch x 36-inch Polycarbonate Sheet and place it onto one of the side panels created in Step 1 (blue and green frames).
- Securing the Frame: Position the corresponding 2×2 lumber frame (from Step 5) on top of the Polycarbonate Sheet. Fasten the frame to the panel using 2.5-inch screws, ensuring the sheet is snug and secure within the frame.
- Repeat the Process: Continue this method until all regular-sized side panels are fitted with their Polycarbonate Sheets and frames.
Fitting Polycarbonate on Narrower Panels:
- Similar Approach for Narrow Panels: Apply the same installation technique for the Polycarbonate Sheets on the narrower side panels. Ensure the sheets and frames align properly before securing them.
Adding Sheets to Triangular Roof Panels:
- Placing Geometric Sheets: Attach the custom-cut geometric Polycarbonate Sheets to the triangular roof side panels.
- Frame Overlay: Lay the triangular frame (pink + lavender from Step 1) over the geometric sheets. Secure the frame to the panel using 2.5-inch screws, making sure everything is tight and flush.
- Ensure Symmetry: Perform this step on both sides to maintain a symmetrical appearance.
Securing Roof Panels:
- Roof Assembly: Proceed to place the Polycarbonate Sheets onto the roof panels following the same procedure. Each sheet should fit within its designated U-shaped frame and be firmly secured in place with the corresponding frame.
Step 7: Maintaining and Repainting Your Greenhouse
Regular Maintenance for Longevity: Maintaining your greenhouse not only involves cleaning and caring for the plants but also preserving the structure itself. Here’s how to ensure your greenhouse withstands the test of time:
- Inspection: Regularly inspect the entire structure for any signs of wear, damage, or loose components. Check the Polycarbonate Sheets for cracks or discoloration and the frame for any rust, rot, or loose screws.
- Cleaning: Keep the Polycarbonate Sheets clean. Dirt and debris can block sunlight and promote algae growth. Use a mild soap solution and a soft cloth or sponge to clean the panels. Rin’t wash them down with a gentle stream from a hose.
- Ventilation: Ensure that the ventilation mechanisms are in good working order.
- Weather Protection: After storms or snowfall, check the greenhouse and clear any accumulated snow or debris from the roof to prevent damage.
Repainting the Greenhouse: To repaint the greenhouse and refresh its protection:
- Remove the Polycarbonate Sheets: Carefully dismantle the Polycarbonate Sheet frames and remove the sheets themselves. This process should be done gently to avoid cracking or damaging the sheets.
- Surface Preparation: Sand the frame of the entire greenhouse to remove any peeling paint or rust. Wipe down the frame to remove sanding dust.
- Primer and Paint: Apply a fresh coat of primer and then paint as described in the previous painting section. Choose a paint that’s rated for outdoor use and compatible with the material of your frame.
- Reassembly: Once the paint is dry, reattach the Polycarbonate Sheet frames and the sheets themselves. Check for any gaps and seal them to prevent moisture ingress.
Replacing a Polycarbonate Sheet: If a panel gets damaged:
- Remove the Frame: Unscrew the 2×2 lumber frame holding the damaged Polycarbonate Sheet.
- Extract the Damaged Sheet: Carefully take out the damaged sheet, taking care to wear gloves and safety glasses as broken polycarbonate can have sharp edges.
- Measure and Cut New Sheet: If you need to cut a new Polycarbonate Sheet to size, use a circular saw with a fine-tooth blade. Ensure the new piece matches the dimensions of the old one.
- Install New Sheet: Place the new Polycarbonate Sheet into the frame and secure it with screws as before. Be sure not to overtighten and crack the new sheet.
By following these detailed steps, you can extend the life of your greenhouse significantly. Periodic repainting and prompt replacement of damaged components will keep your greenhouse looking new and functional for many years. Remember, the key to longevity is regular maintenance and immediate attention to any repairs that may be needed.