
The Dream DIY Project: Envisioning Your Versatile Wooden Bar
Adding a personalized touch to your home is a valuable endeavor, both in terms of monetary worth and the quality of your lifestyle. One dynamic way to make such a transformation is by constructing a versatile wooden bar. Suitable for your basement, garage, or outdoor patio, this bar is not confined by location. It serves as a centerpiece for social gatherings and relaxed afternoons, irrespective of where you choose to place it. Begin by envisioning your dream space – a bar that fits perfectly into its surroundings. With the right plan, you can bring this vision to life.
Hello Daniel. I apologize for the delayed response. For the clear coat, Gennadiy used Minwax Helmsman Clear Satin Water-Based Varnish (1-Gallon). You can find it on the Lowe’s website using this link:
Minwax Helmsman Clear Satin Water-Based Varnish
He recommends that if you’re doing a touch-up, you could use the aerosol spray version. It’s called Minwax Helmsman Clear Satin Oil-Based Varnish Aerosol Spray (11.5-oz), and it costs $13.98. Here’s the link for it on Lowe’s:
Minwax Helmsman Clear Satin Oil-Based Varnish Aerosol Spray
Please feel free to ask if you have more questions.
Here are some tips to prolong the life of the clear coat on your furniture:
- Preparation: Before reapplying the clear coat, make sure the surface is clean, dry, and free of dust, oil, or other contaminants. Use a lightly damp cloth to clean the surface if necessary, and allow it to dry completely before moving on.
- Application: When reapplying, make sure to use even strokes and maintain a consistent pressure if you’re using the aerosol spray. You want to ensure a uniform application to avoid uneven wear.
- Layering: It’s better to apply multiple thin coats than one thick one. Thick coats can become tacky and take longer to dry, which might attract dust and other particles.
- Drying Time: Allow each coat to dry thoroughly before applying the next one. The drying time can vary depending on the humidity and temperature of your area, but generally, 24 hours is a safe bet.
- Avoid Sunlight and Moisture: Excessive sunlight and moisture can degrade the clear coat faster. If possible, position the furniture in a place where it’s protected from these elements.
- Regular Maintenance: Regularly dust the furniture and clean up any spills immediately. This reduces the amount of work the clear coat has to do to protect the wood underneath.
By following these steps, you can extend the life of the clear coat and maintain the look and durability of your furniture.
Choosing the Right DIY Plan: Why This Wooden Bar is Perfect for You
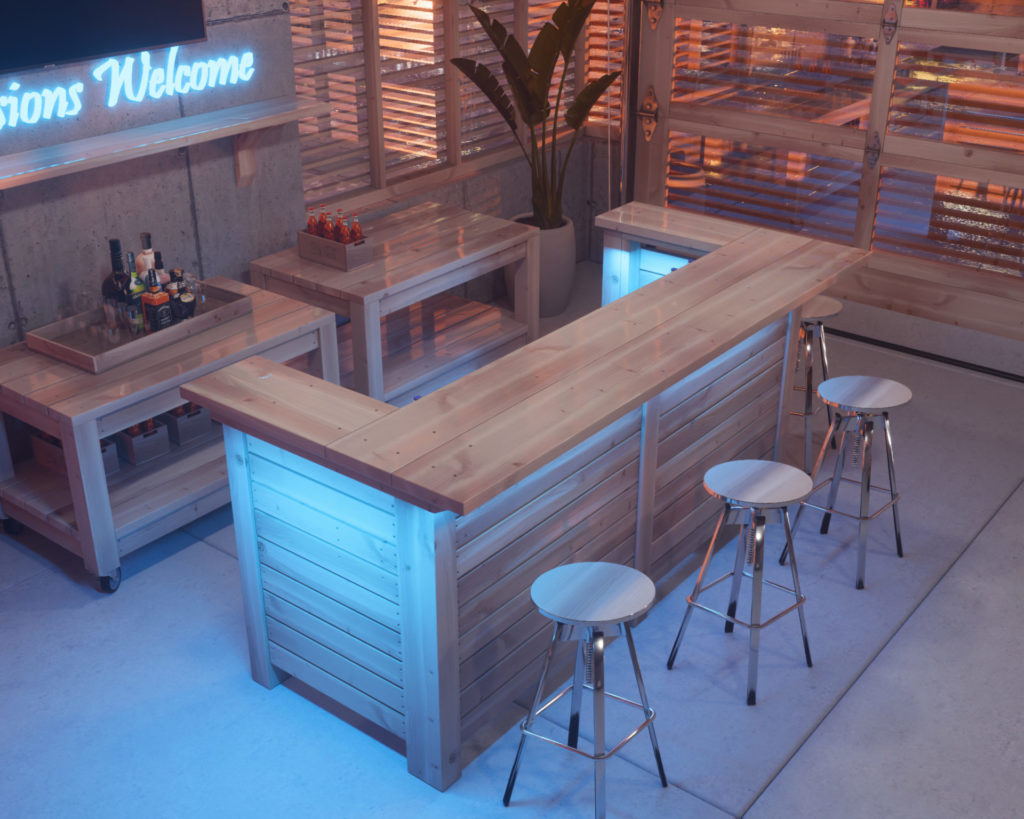
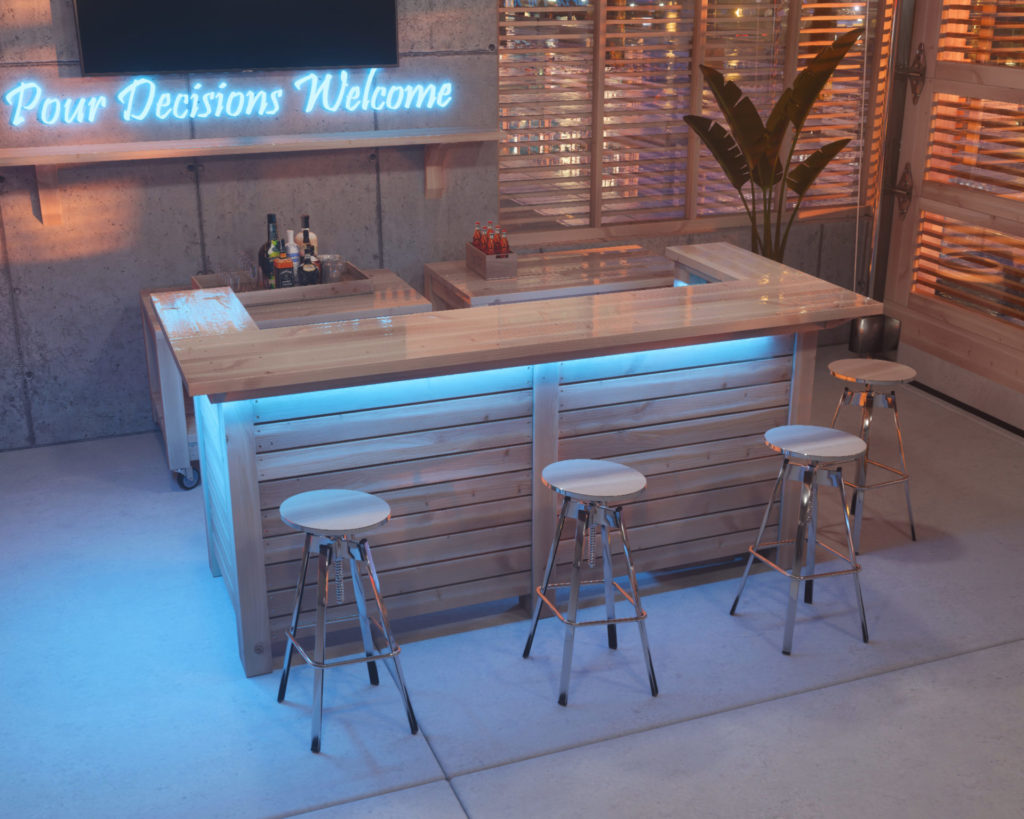
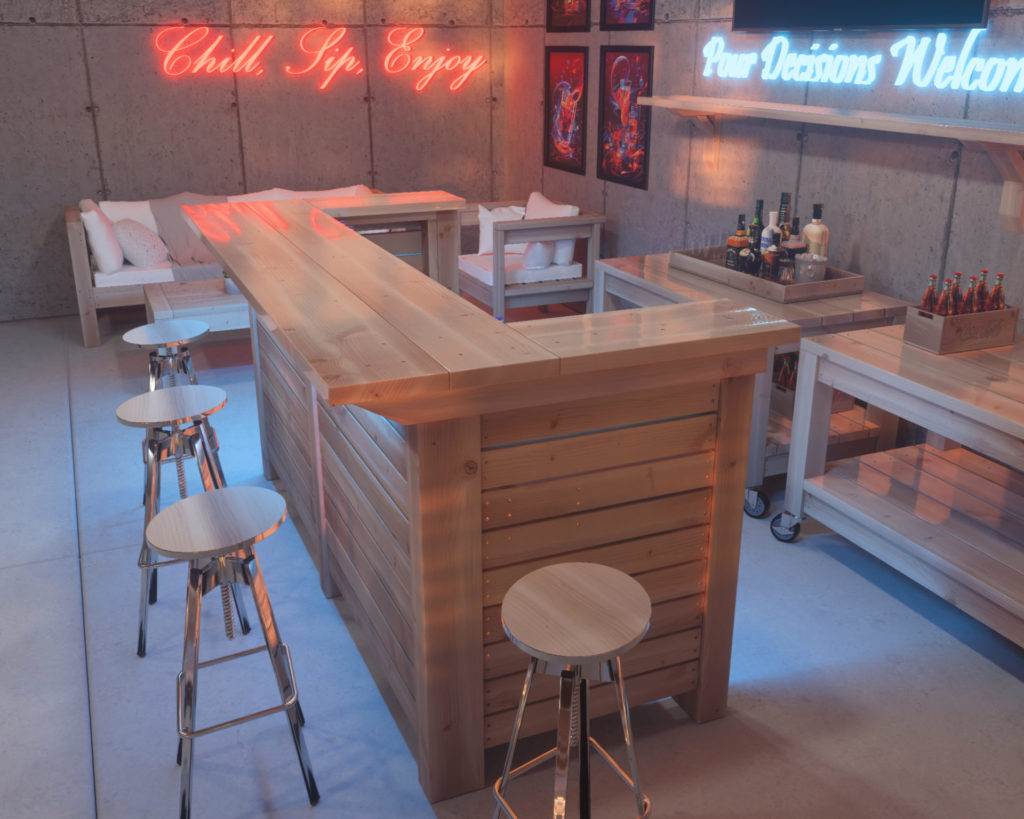
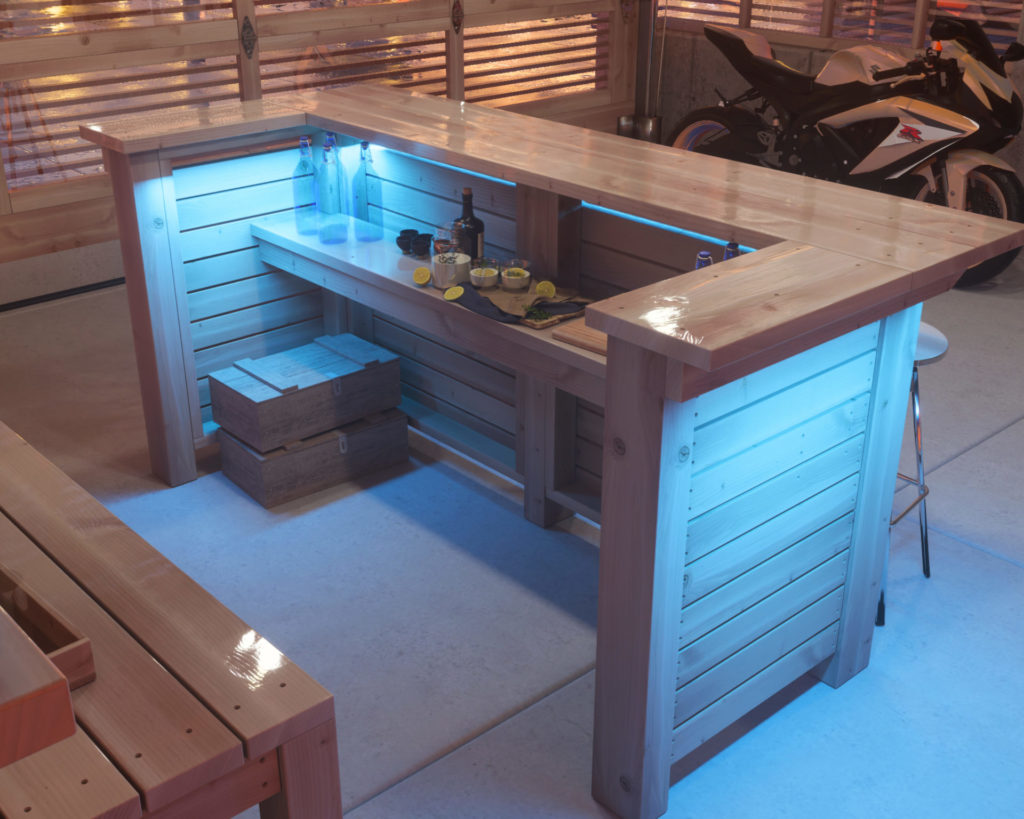
Selecting the appropriate plan is a crucial step in your DIY journey. Our bar plan stands out due to its versatility, simplicity, and attention to detail. Whether you are a novice or an experienced woodworker, our plan, with its clear instructions, demystifies the construction process, setting you up for success. Its adaptable design, featuring a work area and a U-shaped serving counter, enhances functionality and aesthetic appeal in any setting – basement, garage, or outdoors. This plan equips you to create a bar that fits your space perfectly.
The Beauty of Simplicity: Embracing Easy Cuts in Woodworking
Simplicity is often the gateway to successful woodworking. Our plan embraces this principle, focusing on simple cuts achievable with common construction material and readily available tools. This approach makes the process more accessible, without compromising on the quality or design of your bar. The beauty of simplicity is its facilitation of progress and results, fostering a sense of accomplishment as you see your bar taking shape.
Turning Dreams Into Reality: The Power of a Solid Plan
In the world of DIY, a well-structured plan is the key to transforming dreams into reality. Our step-by-step PDF plan, detailed yet easy-to-understand, empowers you to bring your dream wooden bar to life. It acts as a blueprint, ensuring that your initial vision aligns with the final product. Regardless of the location you choose – be it the basement, garage, or outdoors – this plan serves as a roadmap to your successful DIY project.
Unleashing Your Creativity: The Potential of DIY Woodworking
Diving into a DIY project such as constructing your own wooden bar is not just about adding a functional element to your living space, it’s also about exploring your creative potential. Through woodworking, you can express your personal style and preferences, allowing your bar to reflect your personality. Whether you prefer a sleek, modern aesthetic or a rustic, classic vibe, the power to bring your vision to life lies in your hands.
The Transformation: How Our PDF Plan Translates Into a Stunning Wooden Bar
You might be wondering, how does a PDF plan translate into a beautiful, functional wooden bar? The secret lies in the detail and clarity of our plan. It breaks down the entire construction process into manageable steps, guiding you on everything from selecting the right wood to assembling the pieces. Each stage of the project is clearly outlined, helping you understand not just the ‘how’, but also the ‘why’ of each step. This methodical approach ensures that you not only complete the project successfully, but also gain a deeper understanding of the woodworking process.
The Charm of a U-Shaped Serving Counter: Enhancing Your Hosting Capabilities
One of the standout features of our wooden bar plan is the U-shaped serving counter. This design element is more than just aesthetically pleasing; it’s a smart solution to enhance your hosting capabilities. The U-shape allows you to serve guests from all sides, making your gatherings more inclusive and interactive. Whether it’s a bustling party or a quiet get-together, this unique serving counter ensures that you’re always at the center of the action.
Your DIY Journey: The Satisfaction of Building Your Own Wooden Bar
There’s a certain satisfaction that comes with building something with your own hands. It’s the feeling of creating, of accomplishing, of adding something new and unique to the world – or at least, to your home. As you progress with your DIY bar project, you’ll find yourself experiencing this sense of satisfaction. Each piece of wood you cut, each part you assemble, brings you closer to your goal. It’s a journey filled with learning, growth, and a sense of achievement that’s hard to match.
Making it Personal: Customizing Your Wooden Bar
DIY projects offer a unique opportunity – the ability to customize. Our bar plan is designed with flexibility in mind, allowing you to make adjustments that suit your style and needs. Perhaps you want a vintage finish, or maybe you’d like to incorporate a built-in bottle rack. Whatever your preferences, this project provides the platform to explore and implement them. By customizing your wooden bar, you’ll be creating a piece that truly belongs to you and reflects your individuality.
Common Construction Material: The Key to Accessible DIY
What makes our bar plan even more appealing is its reliance on common construction materials. You won’t need to embark on a treasure hunt for obscure or expensive materials. Everything you need can be found at your local hardware and lumber store. This approach makes your DIY project more accessible and less daunting, ensuring that you can start – and finish – with confidence.
Standing the Test of Time: The Durability of Your DIY Wooden Bar
Our bar plan doesn’t compromise on durability. Despite the simplicity of construction, the final product is designed to be robust and long-lasting. By choosing high-quality, common construction materials and following the guidelines in our PDF plan, you’re investing in a wooden bar that will serve you for years to come. Whether you place it in your garage, basement, or outdoors, rest assured that it’s built to withstand the test of time.
Completing Your DIY Project: The Final Transformation
As you assemble the final pieces, take a step back to appreciate the transformation. From a dream to a plan, from a plan to reality, you have journeyed through the rewarding process of DIY. The final result – a stunning, custom-made wooden bar that enhances your living space and hosting capabilities. And the best part? Every time you glance at your bar, every time you serve a drink, you’ll be reminded of your successful DIY journey and the skills you gained along the way.
Creating a Cohesive Space: Complementary DIY Plans
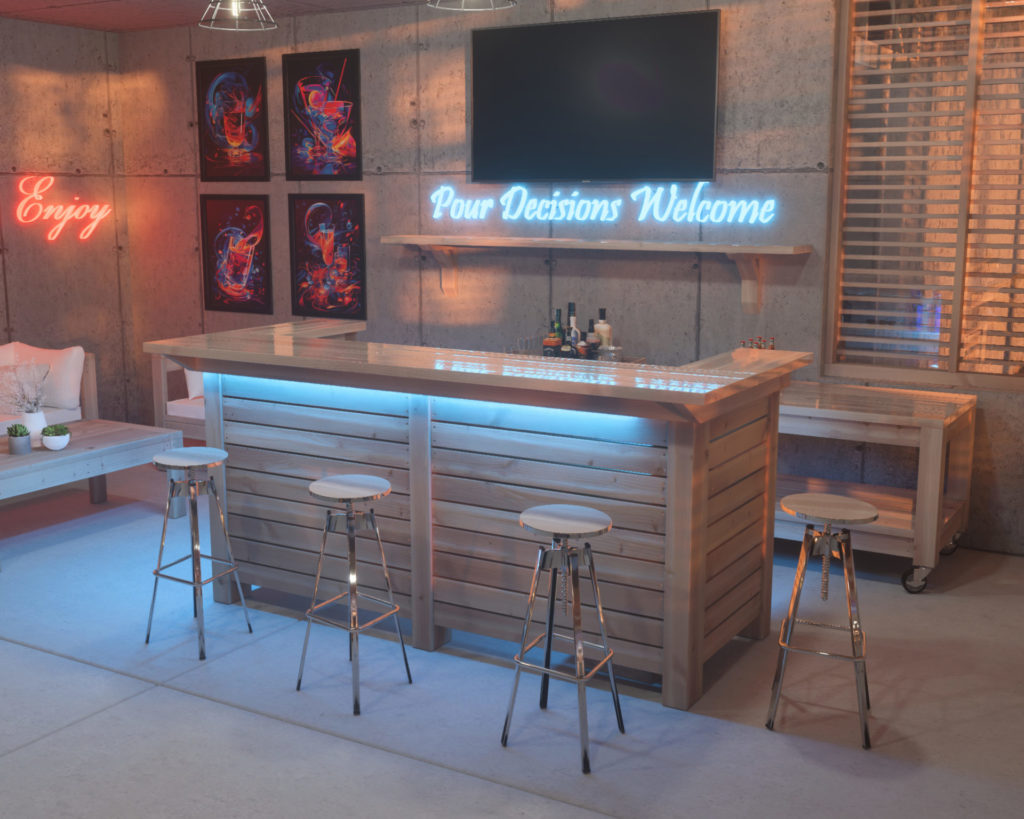
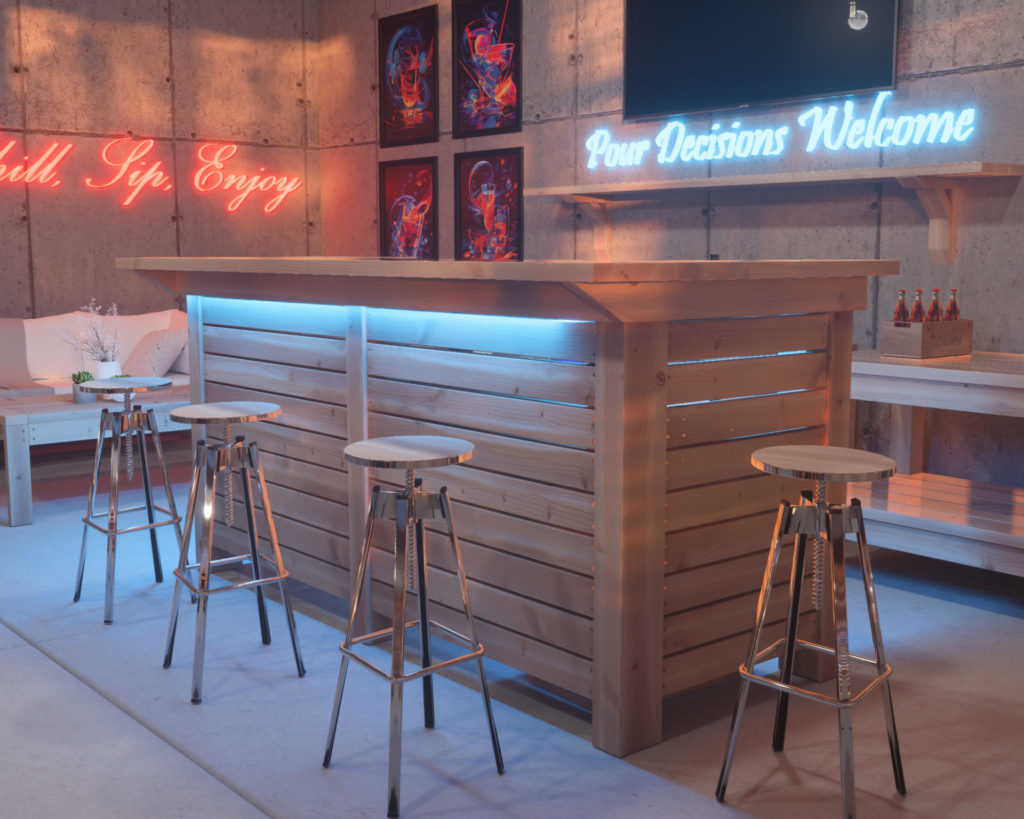
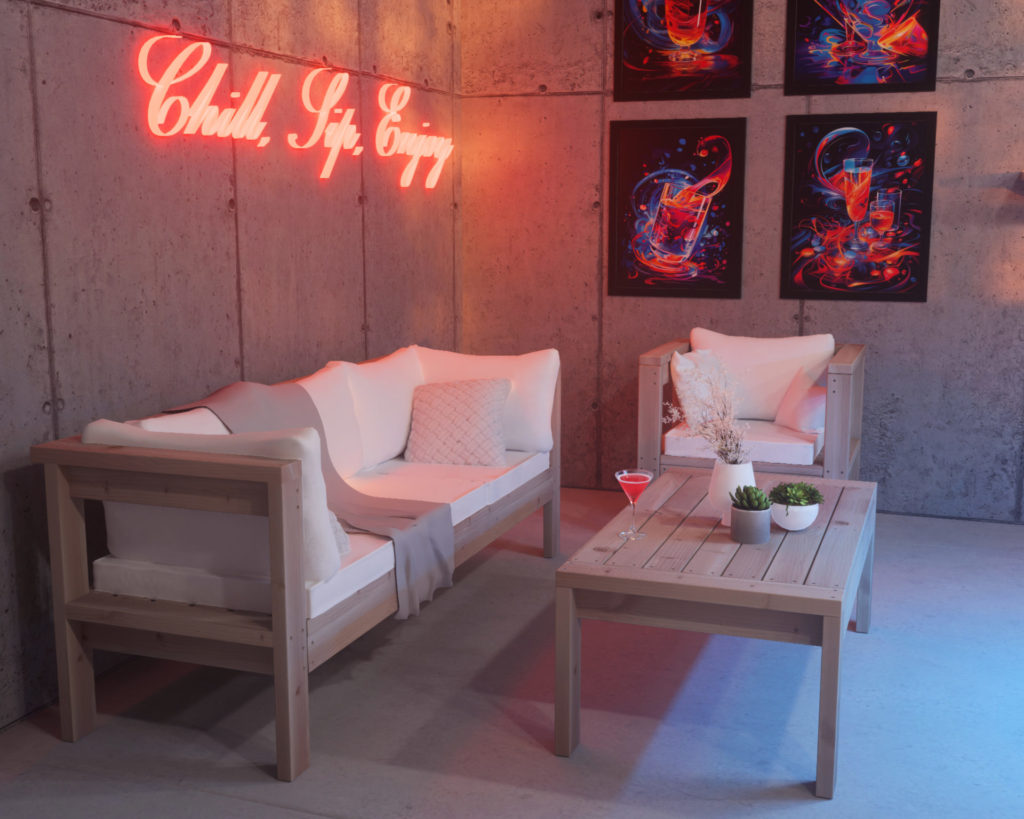
While the wooden bar is undoubtedly the star of the show, the supporting pieces in our photoshoot serve to enhance its appeal and functionality. Each piece of furniture, from the utility cart to the sofa, contributes to creating a cohesive, comfortable space. If you’re looking to recreate this setup, we have good news for you! DIY plans for these complementary pieces are readily available, allowing you to construct an entire lounge area that echoes the craftsmanship of your bar.
The Flat Shelf Utility Cart: This robust cart is more than meets the eye. With its oversized shelves, it can load and unload large items with ease. The top shelf also doubles as a work surface, increasing the cart’s versatility. Swivel casters allow for easy mobility, while the bottom shelf offers additional storage space. Positioned behind the bar in our photoshoot, it serves as a handy storage and prep station. For the utility cart plan, click here.
The 3-Seater Sofa: Crafting a lounge area involves more than just a bar; comfortable seating is key. Our DIY plan for a 3-seater sofa is a perfect place to start. With ample space and cozy cushions, it invites guests to sit back and relax. Its design complements the bar, contributing to the cohesive look of the space. For the 3-seater sofa plan, click here.
The Single Seater Chair: A good lounge area offers varied seating options. Our single seater chair, part of the lounge set, provides a perfect spot for guests who prefer more personal space. Its design mirrors that of the 3-seater sofa, maintaining the harmonious aesthetic of your lounge area. For the single seater chair plan, click here.
Building a cohesive, comfortable space involves meticulous planning and execution. With our range of DIY plans, you’re equipped to construct not just a bar, but an entire lounge area that’s sure to impress.

Time to build
About 6 hours
Total cost of build
About $300
Skill level required
Beginner
Download the PDF plans
Bar PDF plans
What is included in the PDF download?
- Easy to read step by step instructions
- Material list
- Tools needed
- Helpful links to materials and tools needed
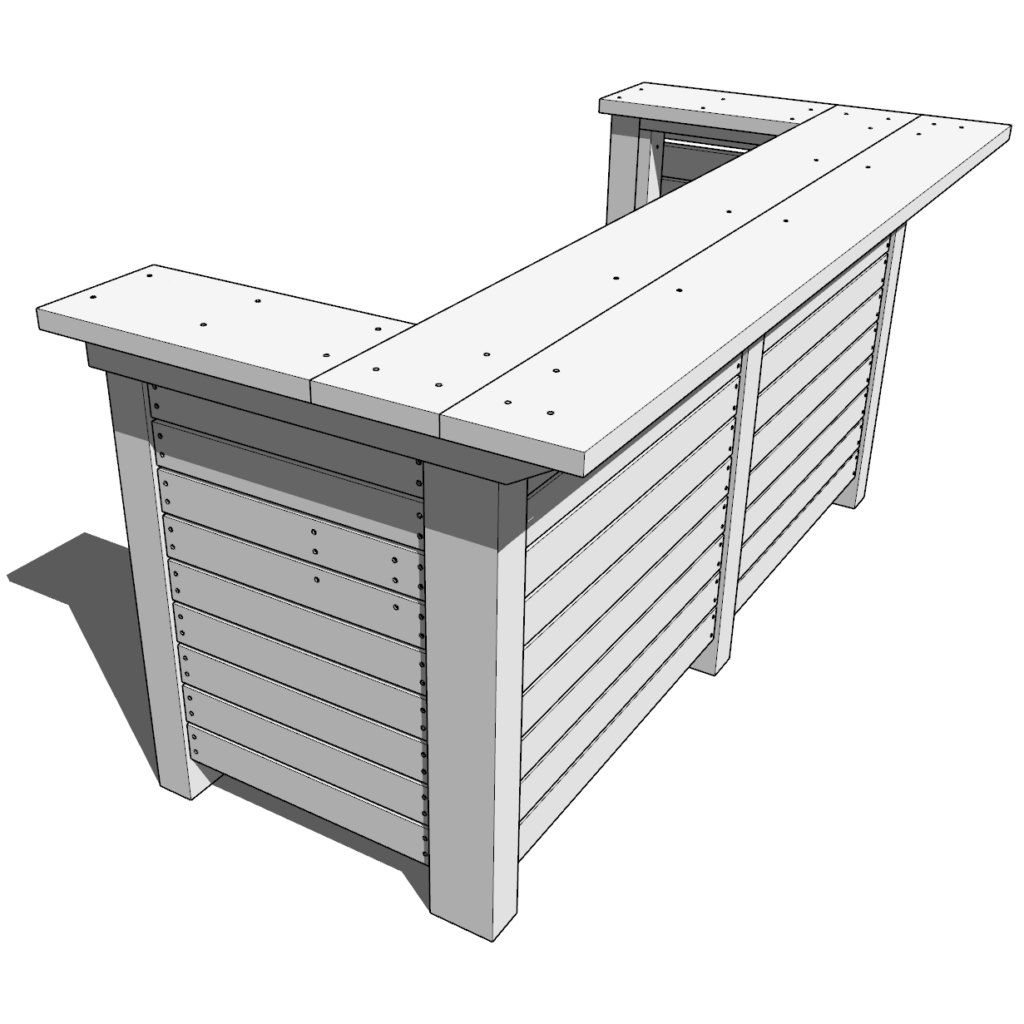
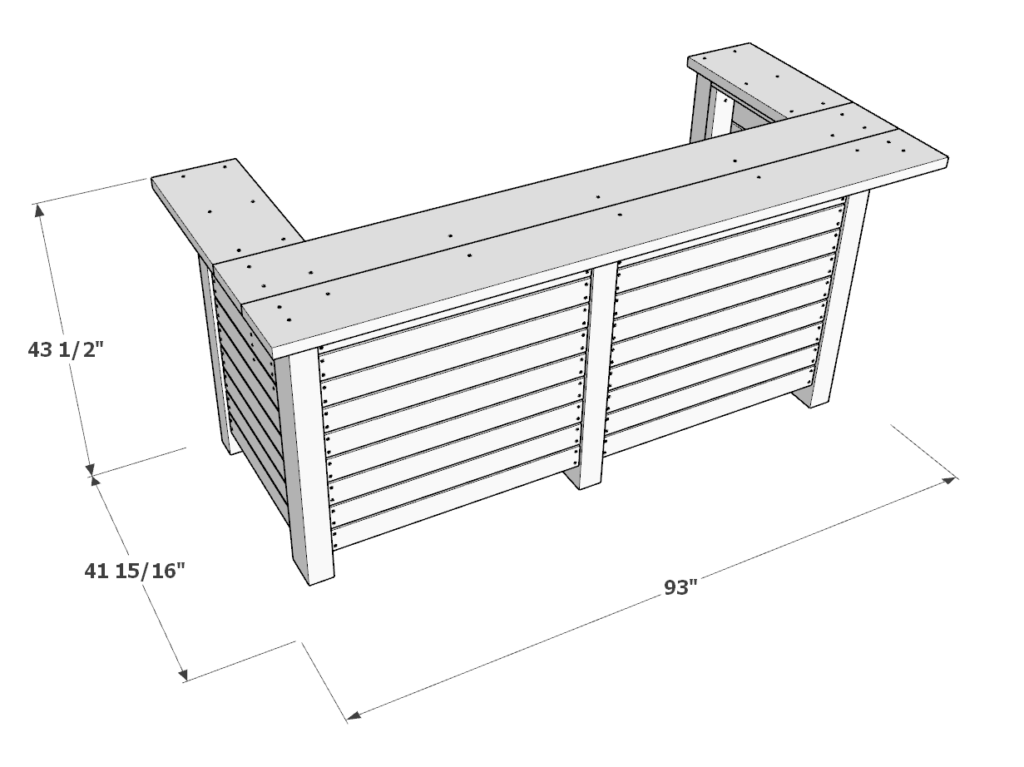
Step-by-step instruction on building the DIY outdoor bar
Recommend tools
- Saw (miter saw recommended for precision cuts)
- Drill
- Impact driver with bit for screws
- Sander
- wood countersink drill bit
- measuring tape
- pencil
Material list and cut list
Available with purchase of PDF plans.
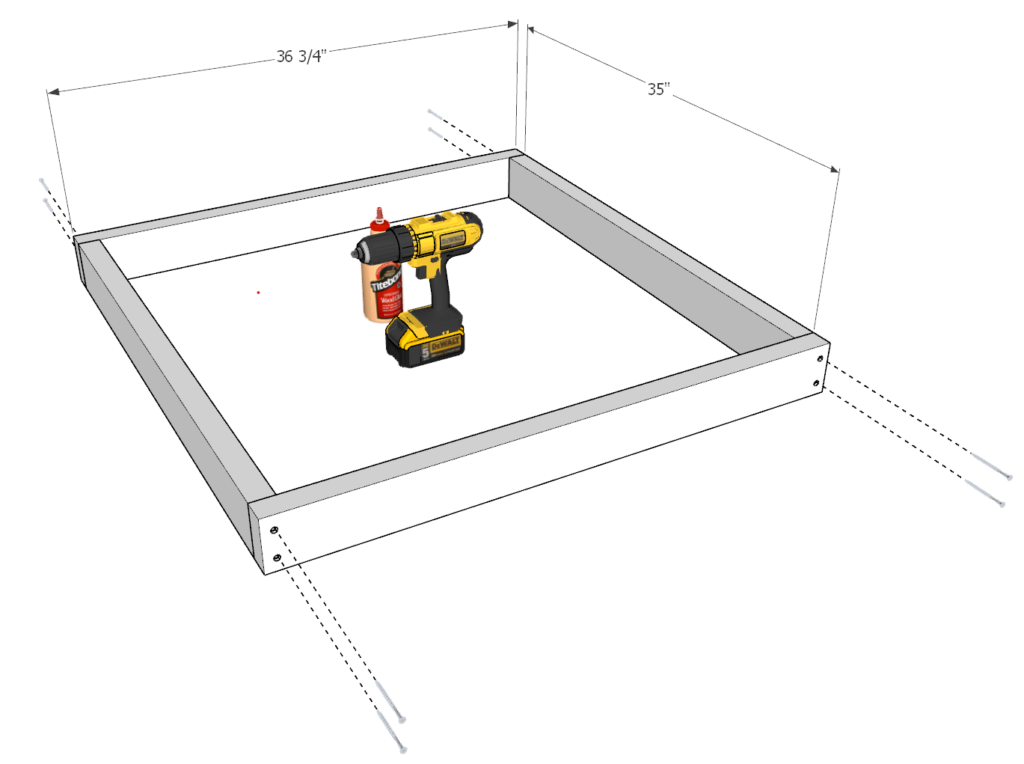
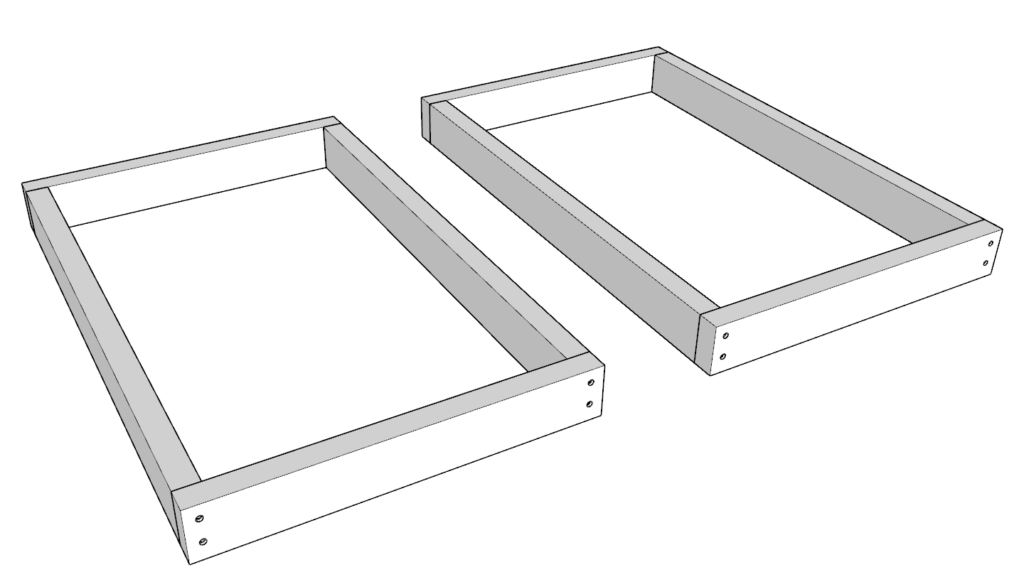
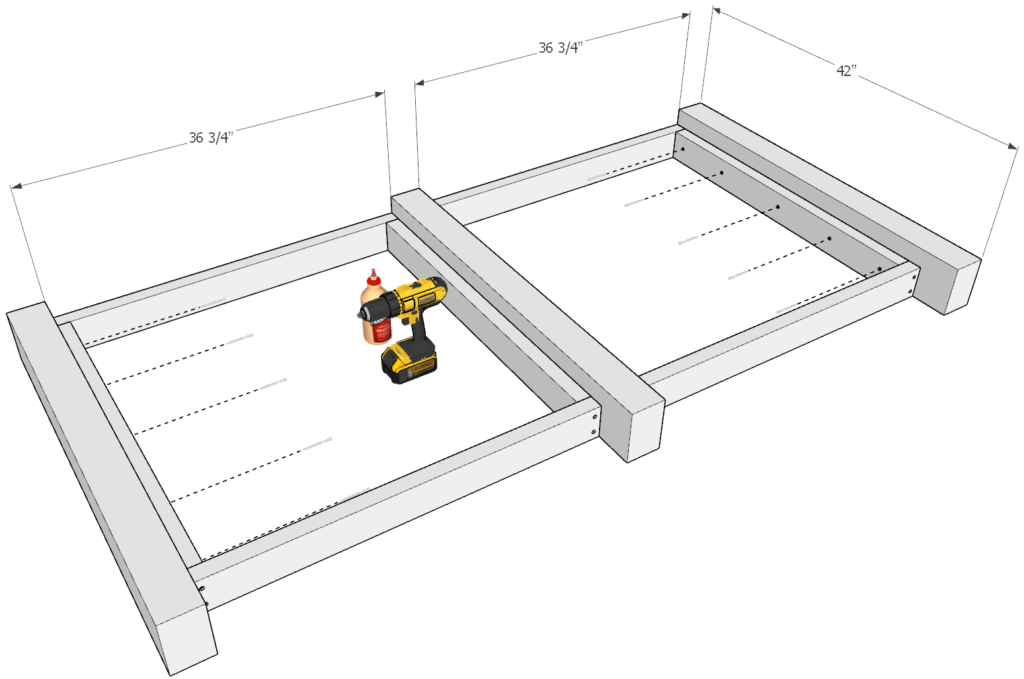
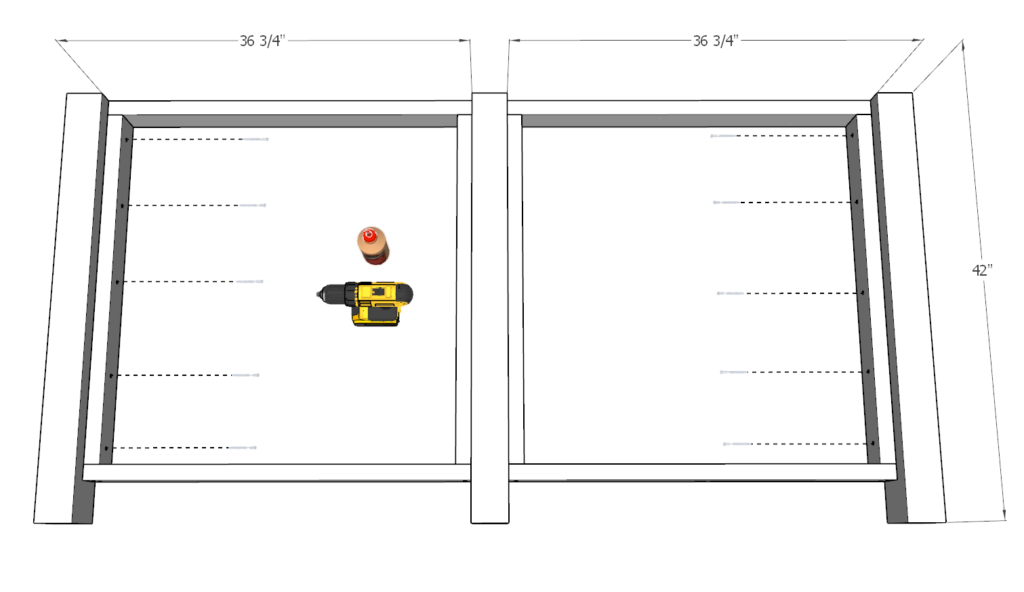
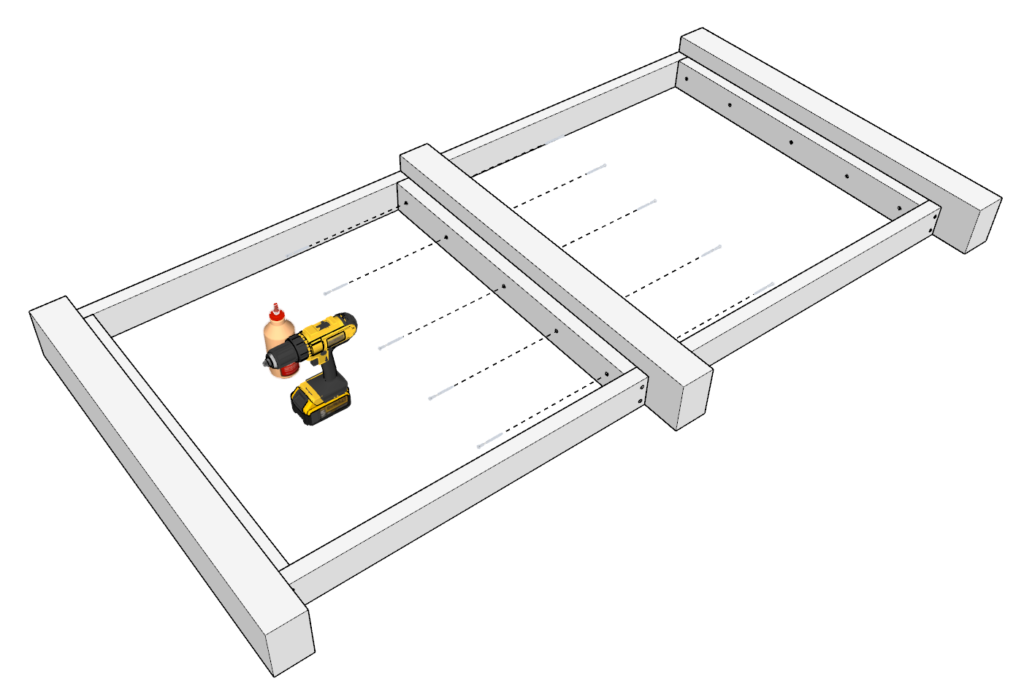
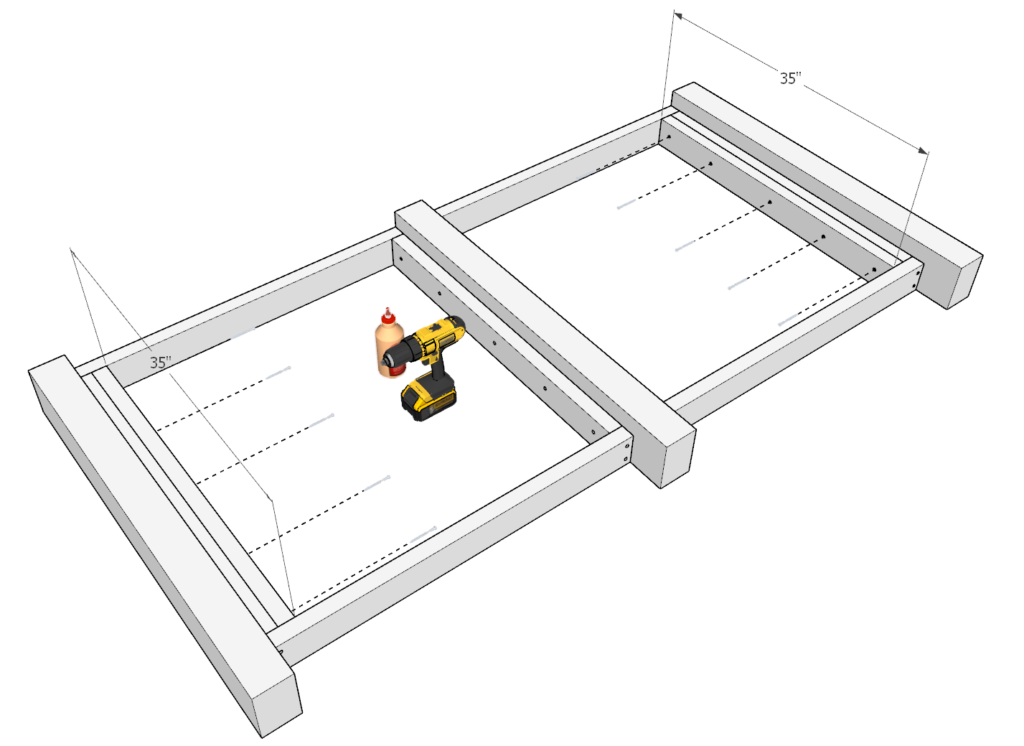
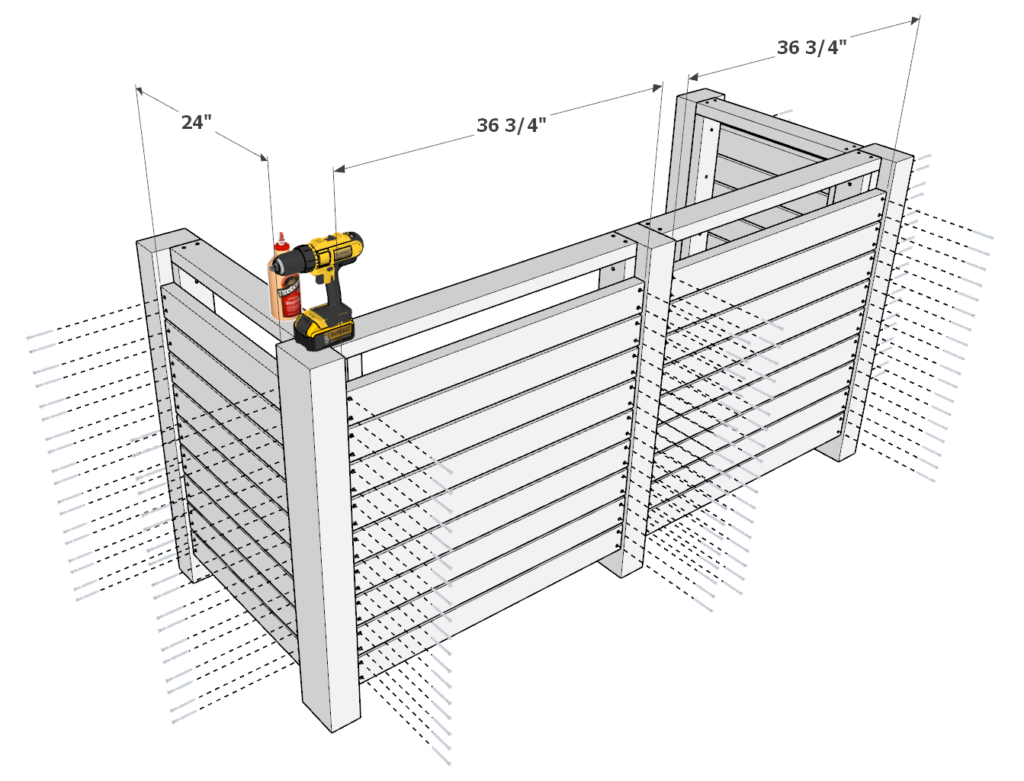
Step 1 (DIY outdoor bar)
First, take two 35 inch 2×4 lumber pieces and two 36-3/4 inch 2×4 lumber pieces and arrange them as shown below. Add glue to the areas of the 2x4s that will be joined together, predrill (to prevent wood splitting), and add 3.5 inch screws.
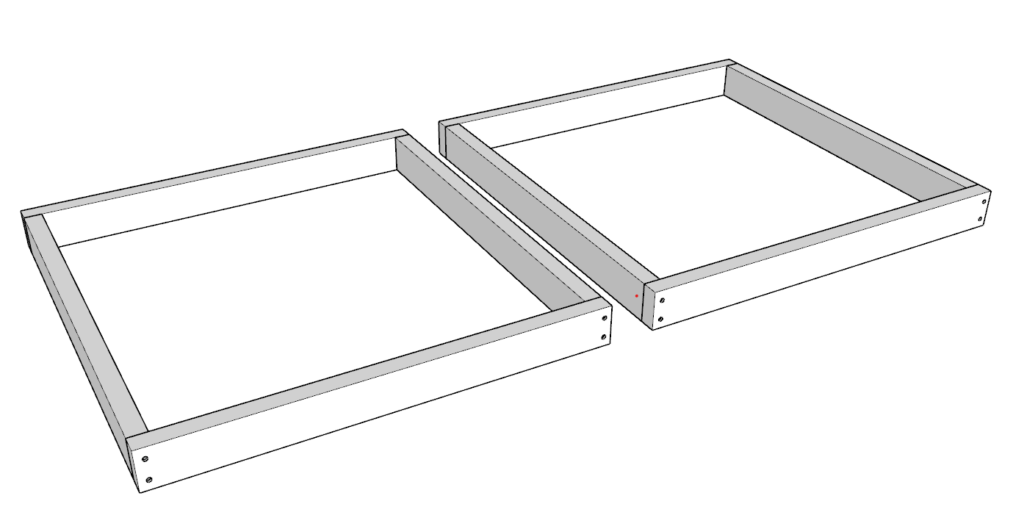
Repeat to make an identical second frame piece for a total of two pieces.
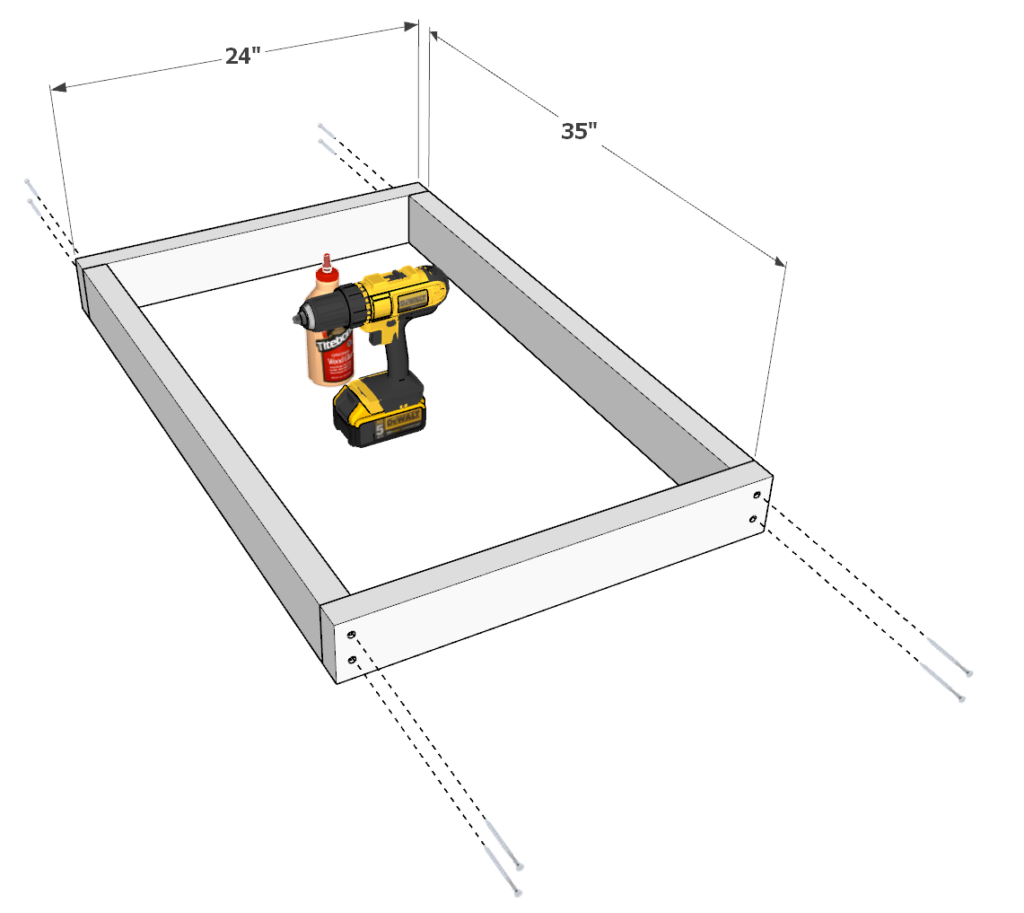
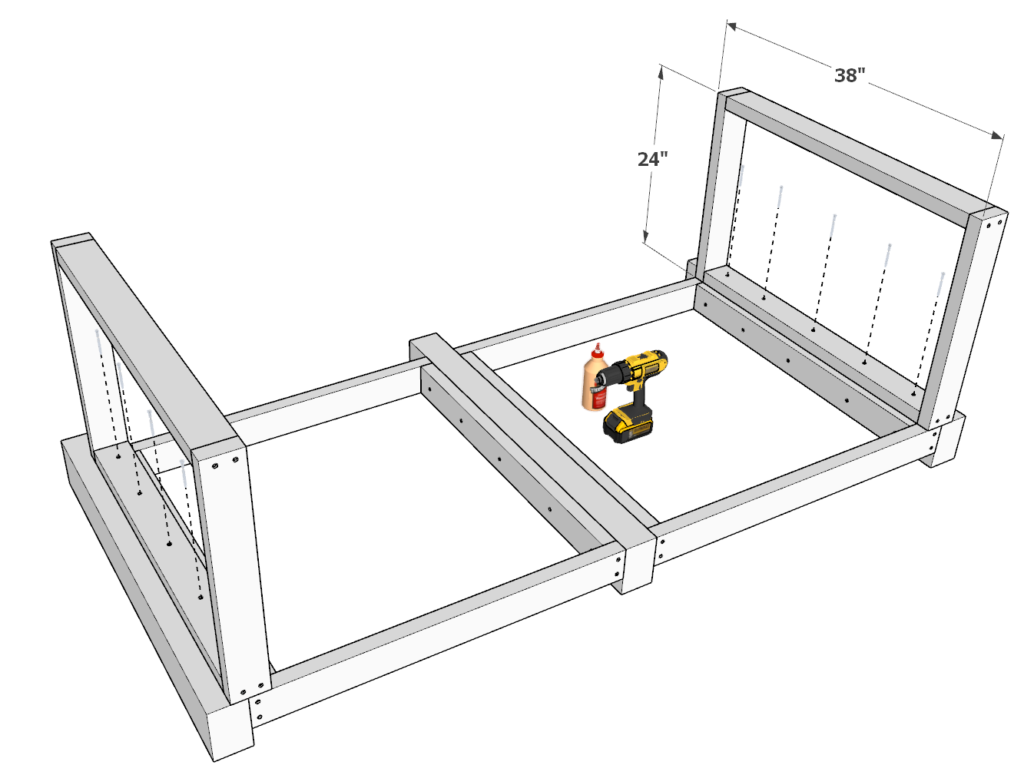
Step 2 (DIY outdoor bar)
Next, take two 35 inch 2×4 lumber pieces and two 24 inch 2×4 lumber pieces and arrange them as shown below. Add glue to the areas of the 2x4s that will be joined together, predrill, and add 3.5 inch screws.
Repeat to make an identical second frame piece for a total of two pieces.
Step 3 (DIY outdoor bar)
Next, take three 42 in 4×6 lumber pieces and the two larger frame pieces you just assembled and arranged them as shown below.
Add glue to all areas that will be joined together.
Predrill holes and add 3.5 inch screws to all areas that need to be joined.
Next, take two more 35 inch 2×4 lumber pieces and add them to the outdoor bar frame as shown in the last picture in this step. Again, add glue, predrill, and add 3.5 inch screws.
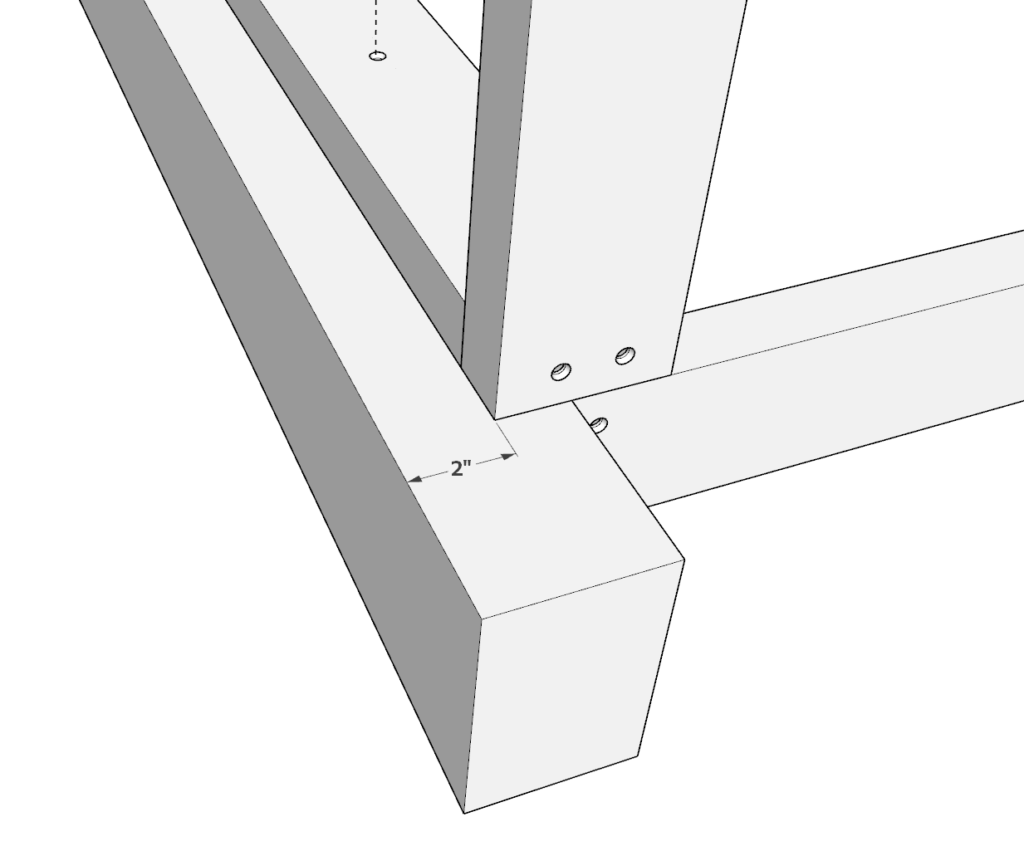
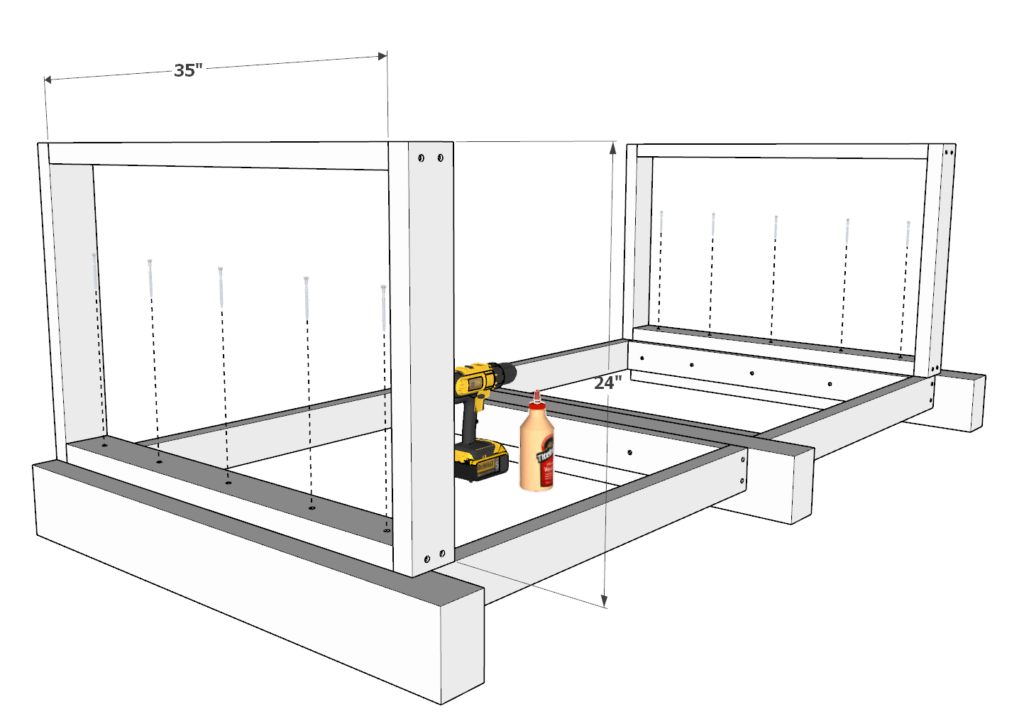
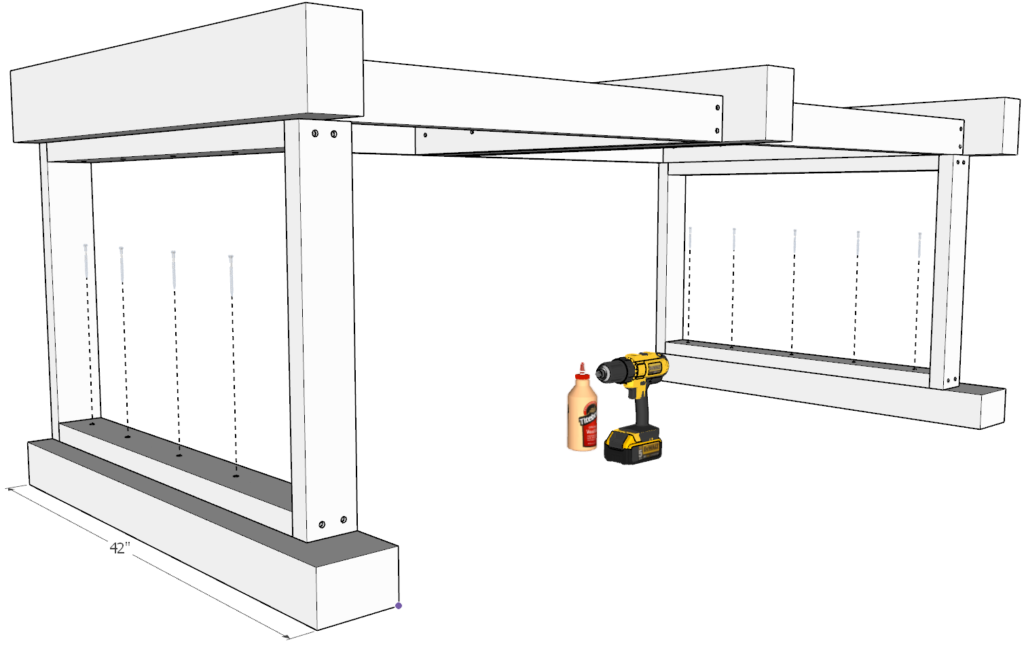
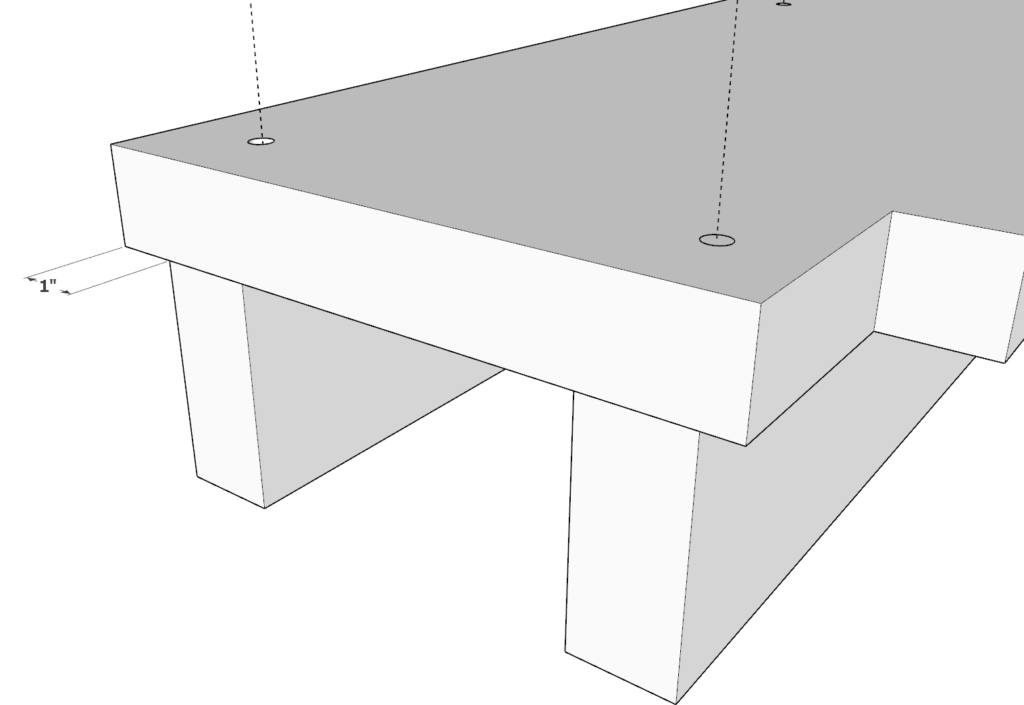
Step 4 (DIY outdoor bar)
Next, take the other smaller 38 in x 24 in frame pieces you assembled in the previous steps and add them to the main frame of the bar. When adding, indent by 2 inches as shown below.
Secure the frame pieces with glue, predrilling, and screws.
Next, take two more 42 inch 4×6 lumber pieces and add them to the main frame as shown in the last picture of this step. Make sure to add glue, predrill, and add screws.
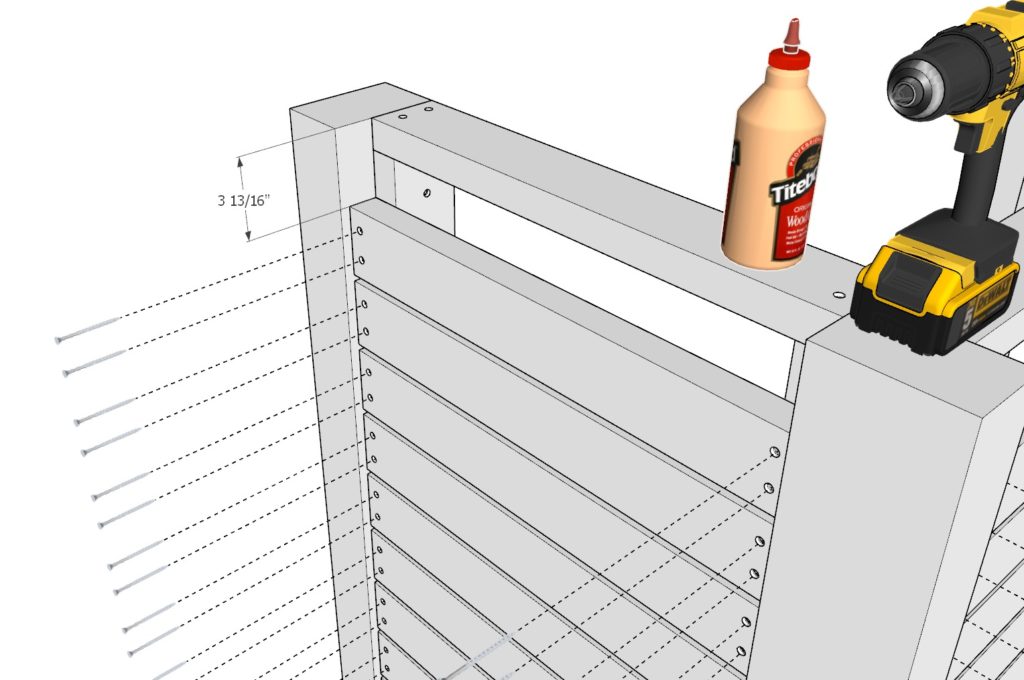
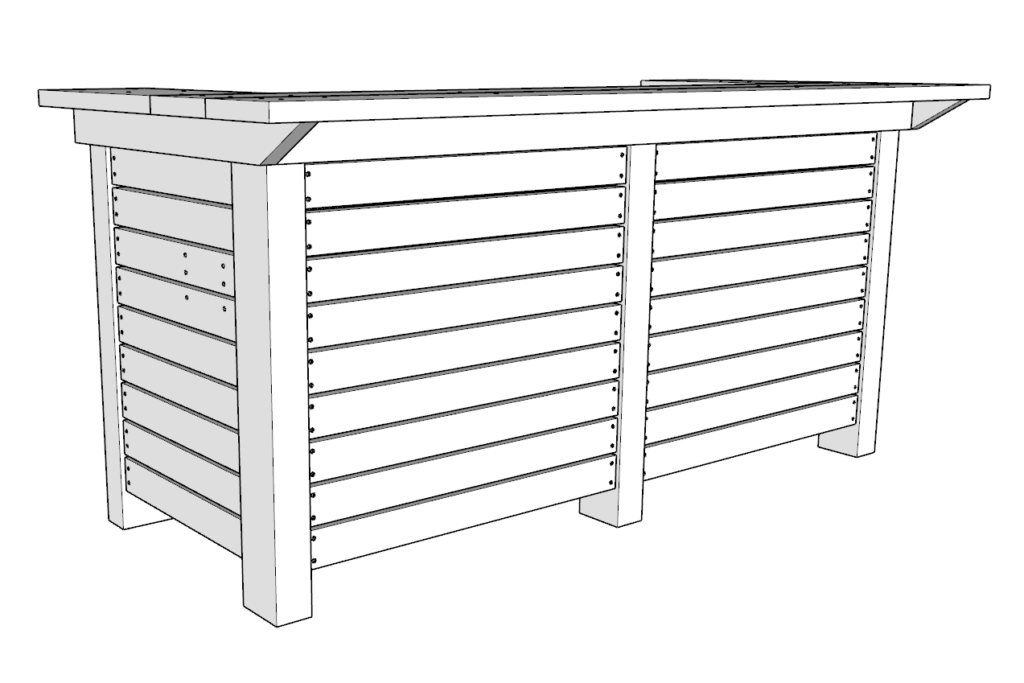
Step 5 (DIY outdoor bar)
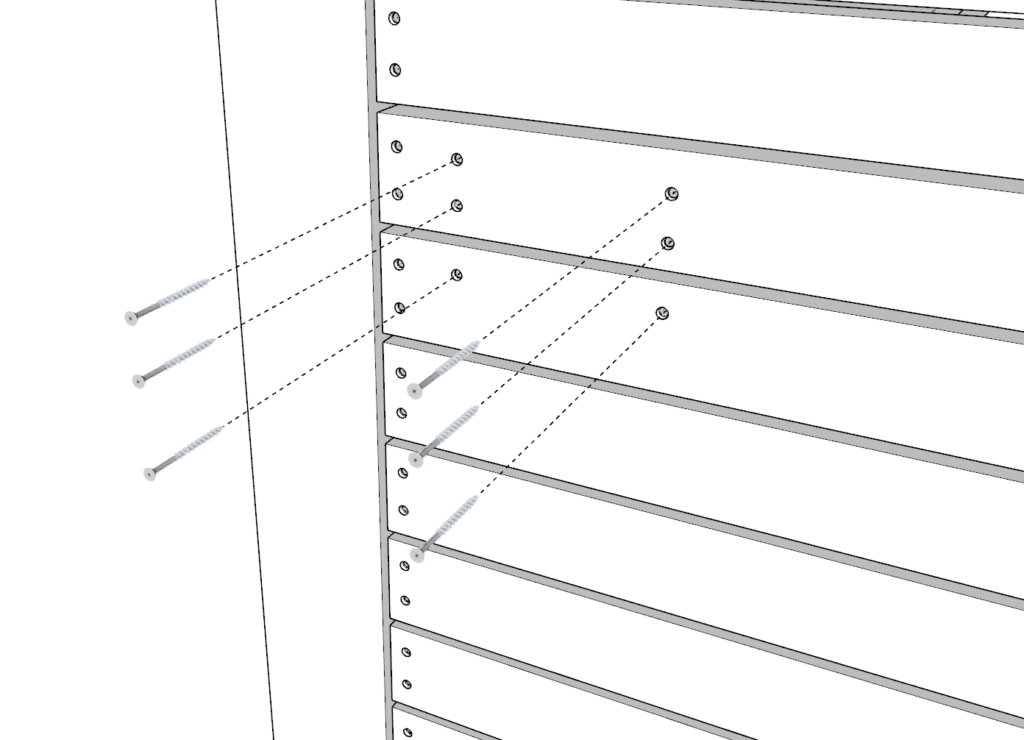
Next, add the siding pieces.
Take eighteen 36-3/4 2×4 lumber pieces and eighteen 24 2×4 lumber pieces and add them to the outdoor bar frame as shown below.
Begin by attaching the first 2x4s about 3-13/16 (or about 4 inches) away from the top of the bar frame as shown below.
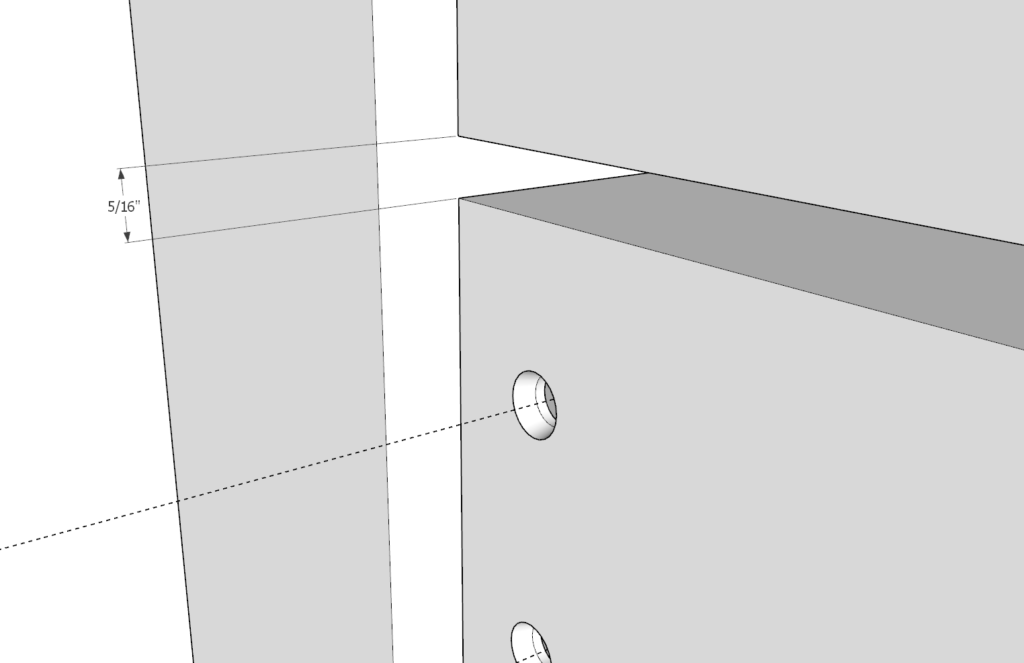
The remaining pieces need to be about 5/16 inches apart.
To space out the pieces evenly you can use a spacer. This spacer can be cut from a scrap piece of wood on hand.
As before, glue, predrill, and add screws.
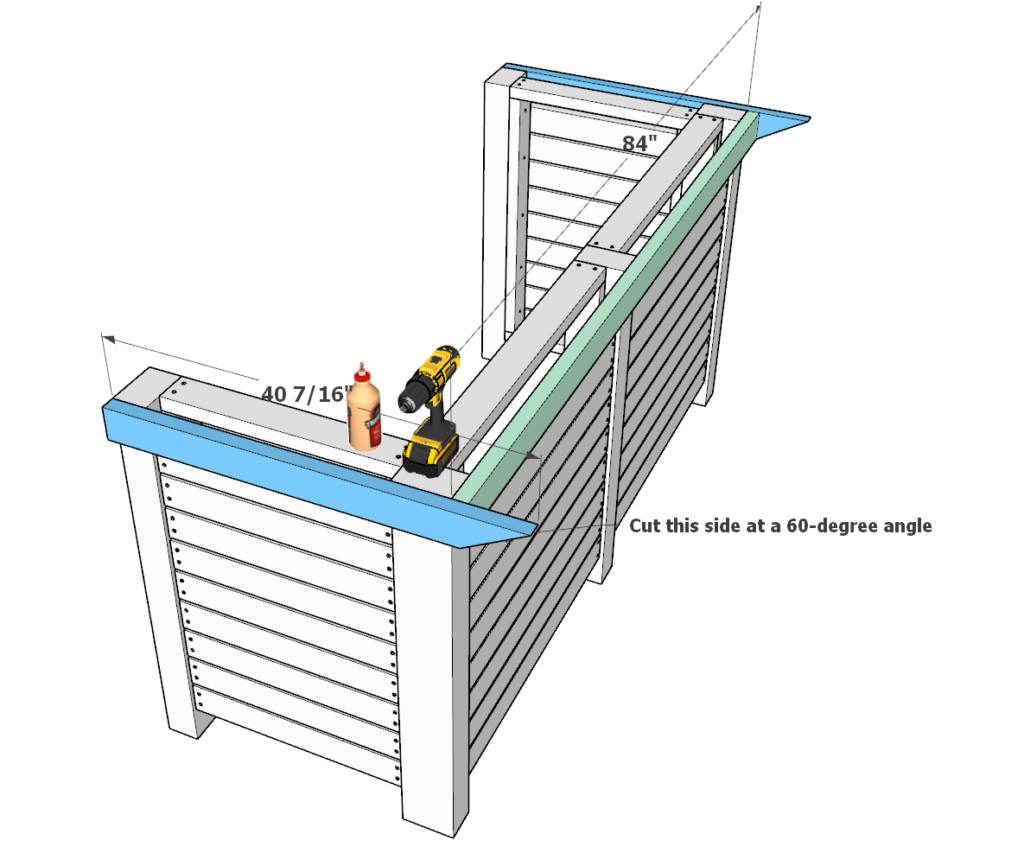
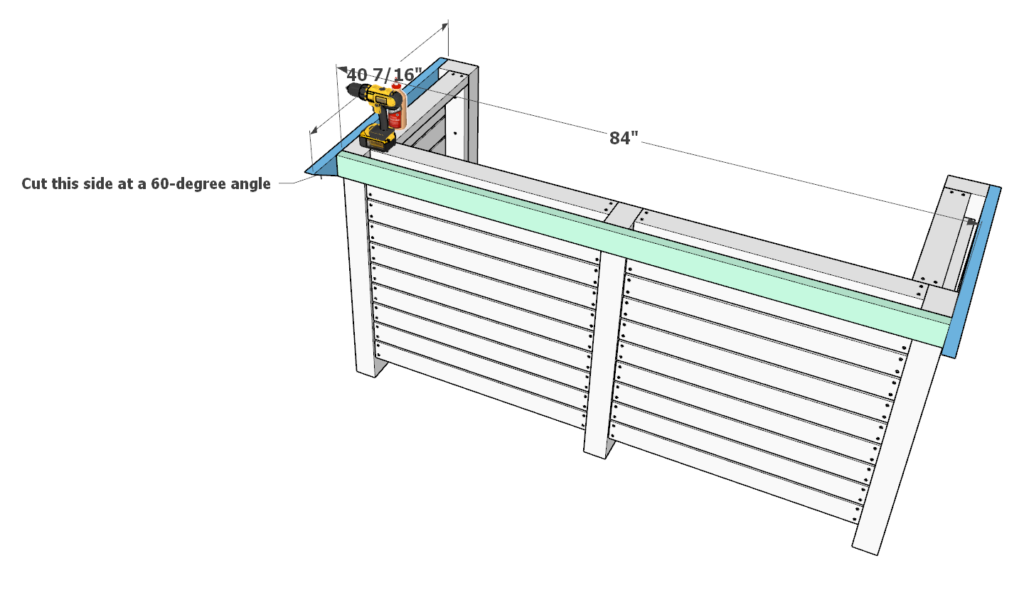
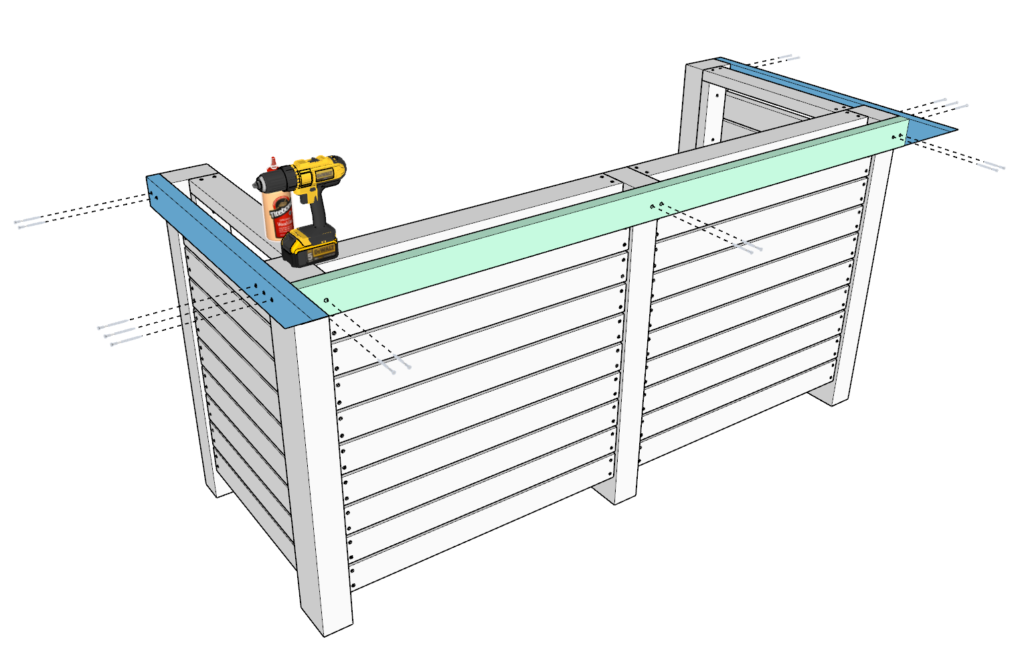
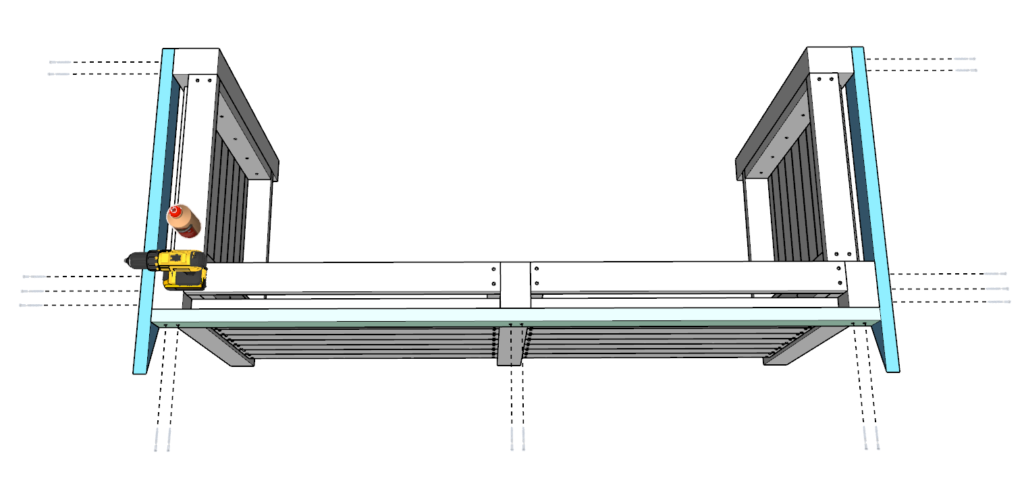
Step 6 (DIY outdoor bar)
Next, add two 40-7/16 in 2×4 pieces that are cut at 60-degrees on one end and one 84 inch 2×4 lumber piece to the frame of the bar as shown below.
As before, predrill, add glue, and add 3.5 inch screws.
Step 7 (DIY outdoor bar)
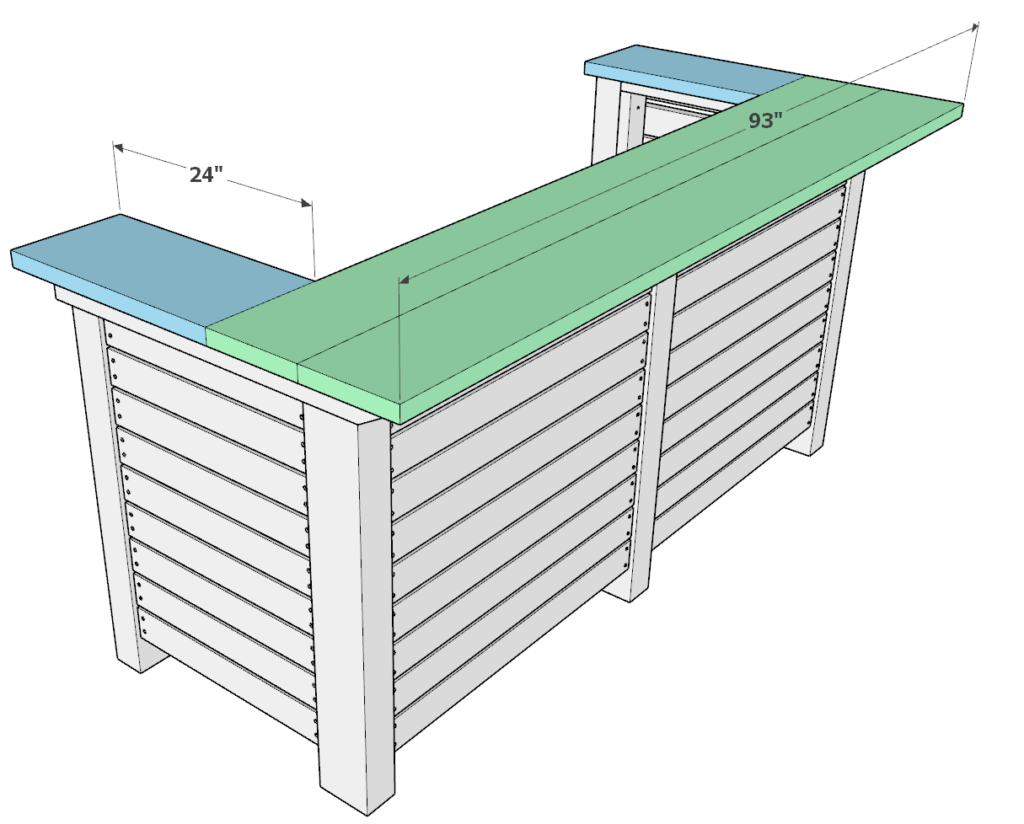
Next, add two 93 inch 2×10 lumber pieces and two 24 inch 2×12 lumber pieces to the bar frame as shown below.
Add glue to all areas that will hold up the bar top, including the parts of the top that will join to the other bar top planks.
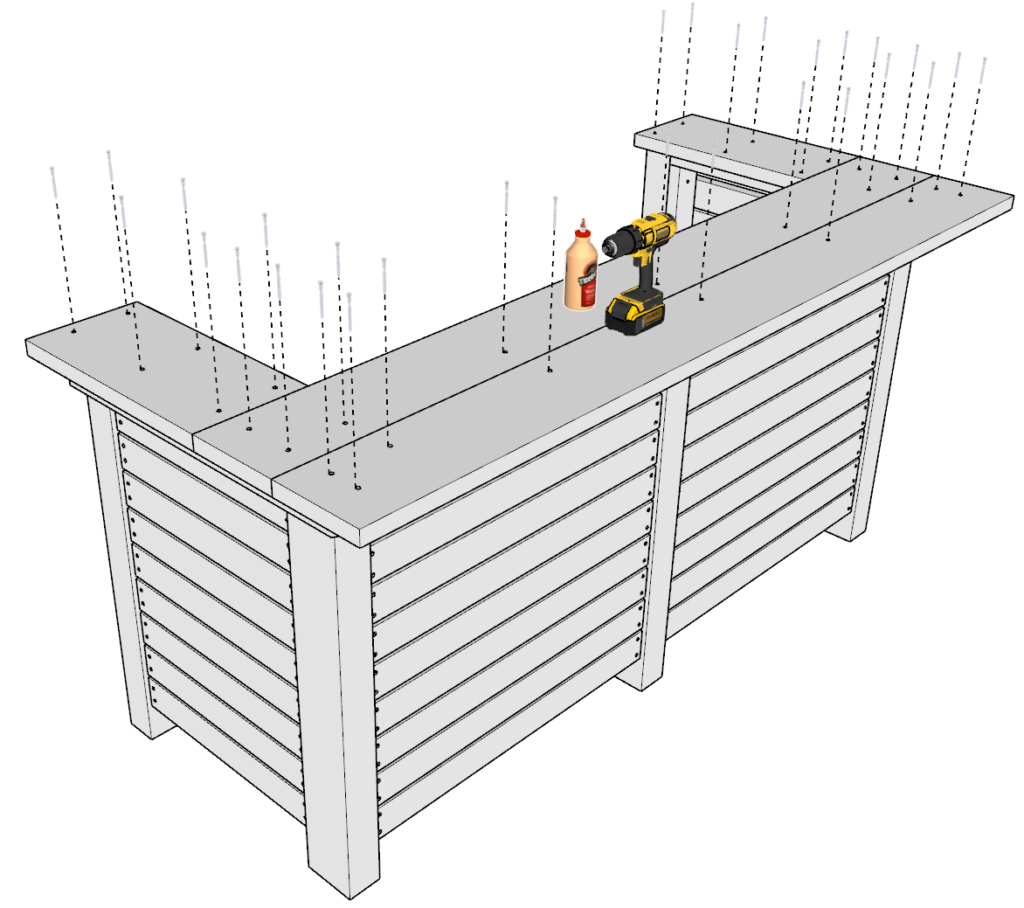
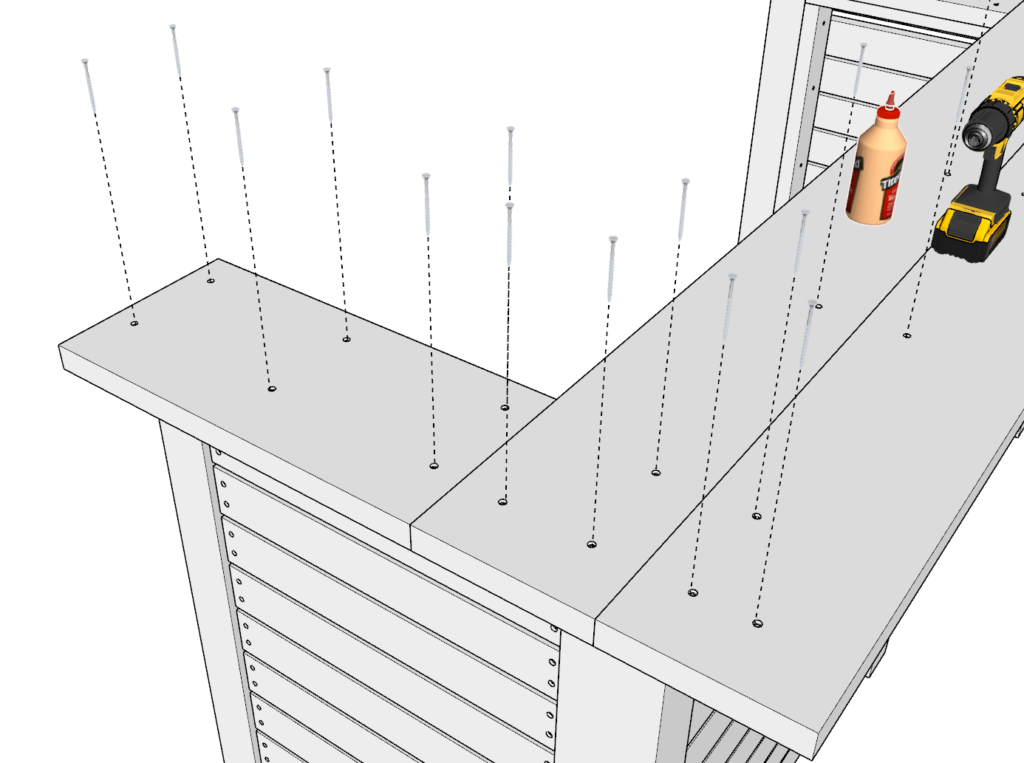
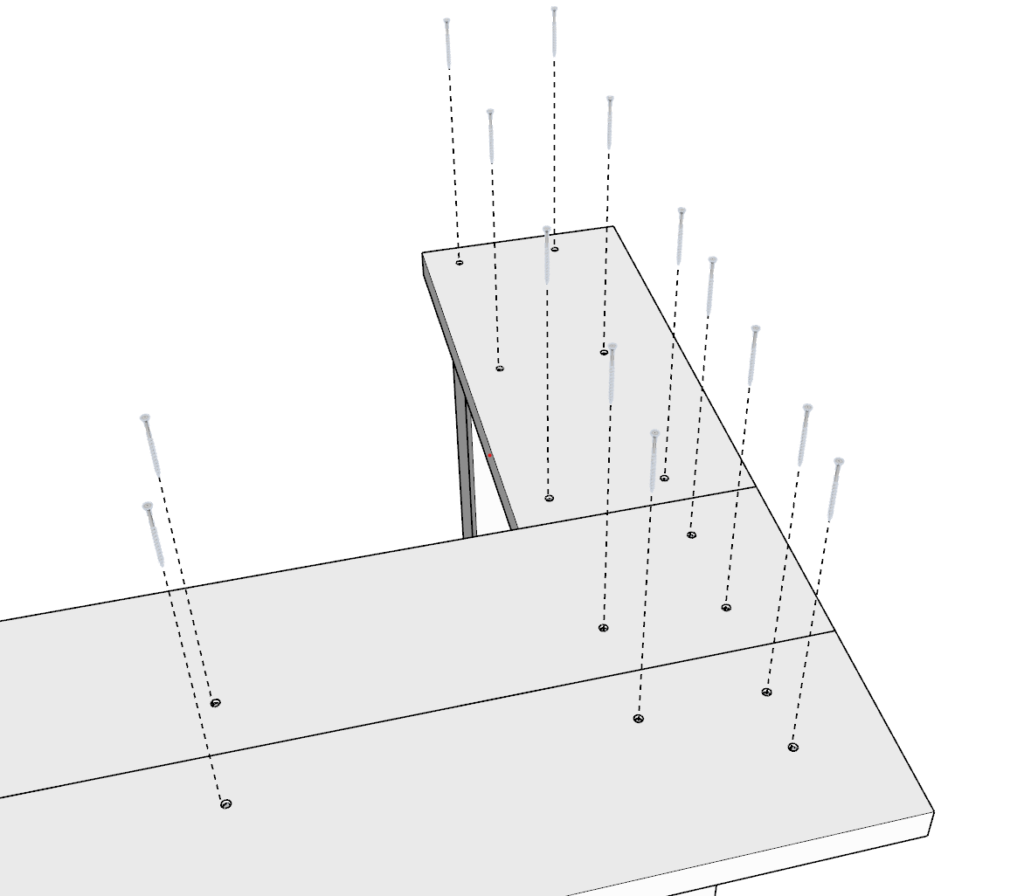
As before, predrill, add plenty of glue, and add screws.
The screw pattern I have in the photo is just one way to secure the top.
These screw holes can later be covered up to have a flush and clean looking surface.
I would also recommend using some sort of clamp or vice to bring all the bar top board together to minimize the gaps. This will make the bar top look more clean and nice.

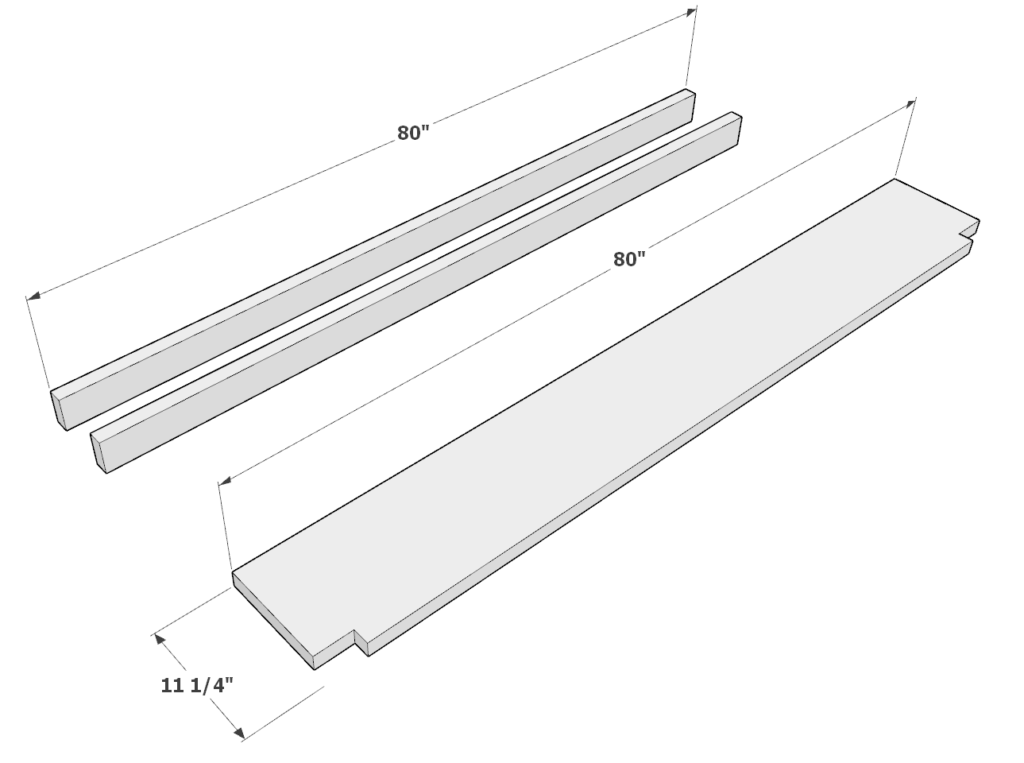
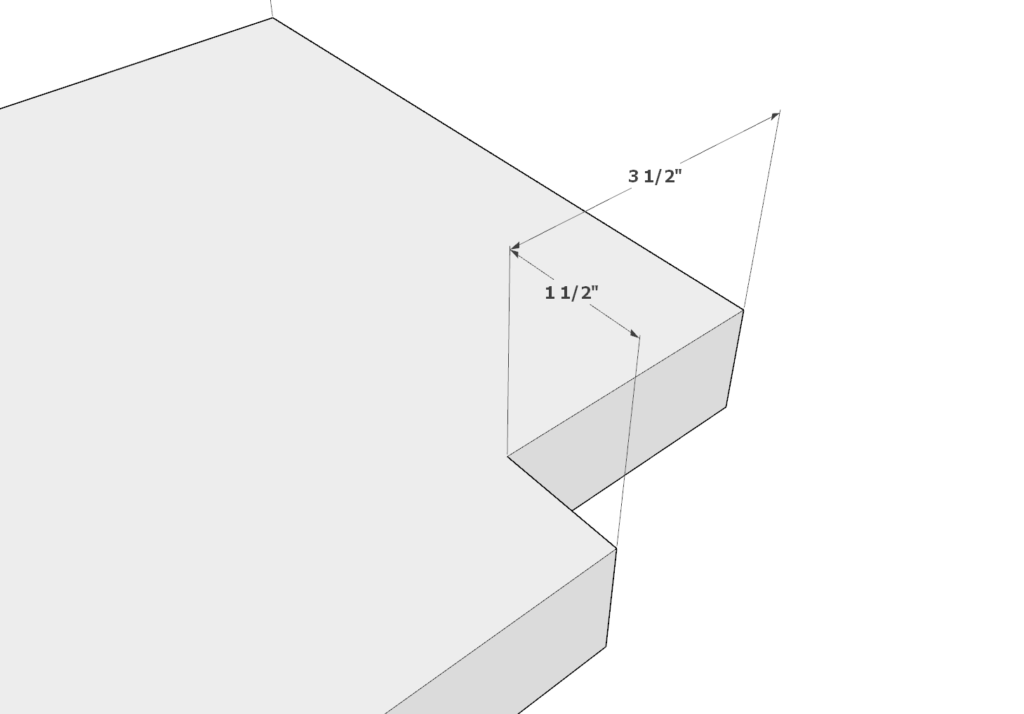
Step 8 (DIY outdoor bar)
Next, take two 80 inch 2×4 lumber pieces and one 80 inch long 2×12 lumber pieces to make the shelve.
Cut 3-1/2 inch x 1-1/2 inch indents on both ends of the 2×12 lumber piece as shown below.
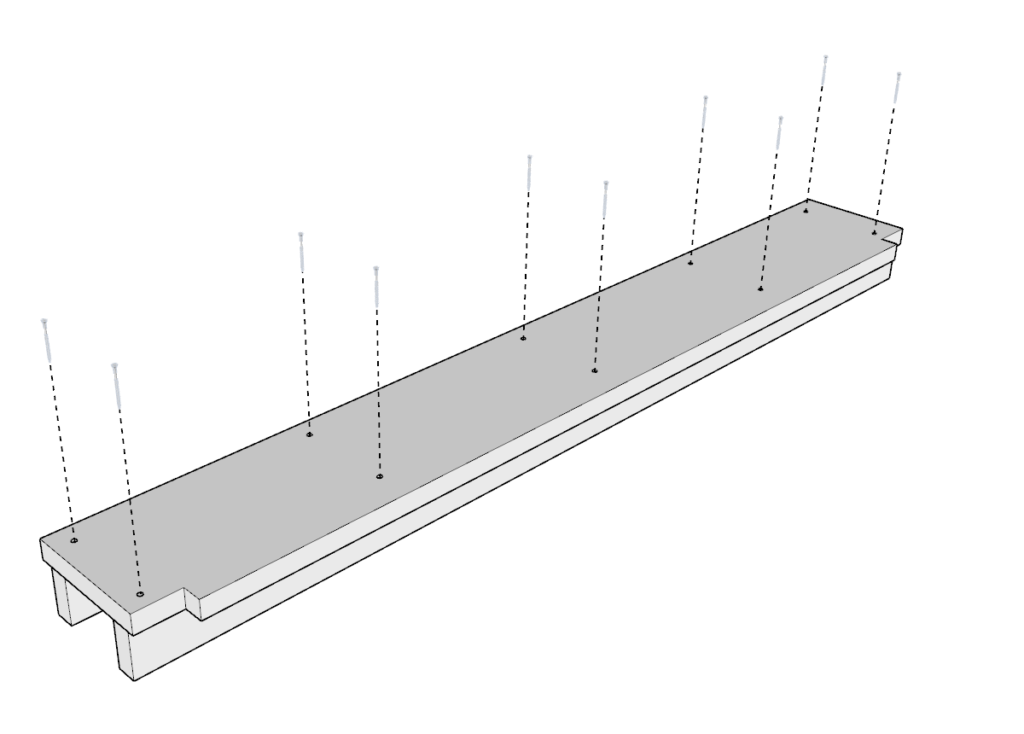
Next, attach the frame of the shelve to the shelve top.
I indent the shelve frame 2x4s by 1 inch on each side as shown in the last picture in this step. The indent is only for aesthetics and is inconsequential.
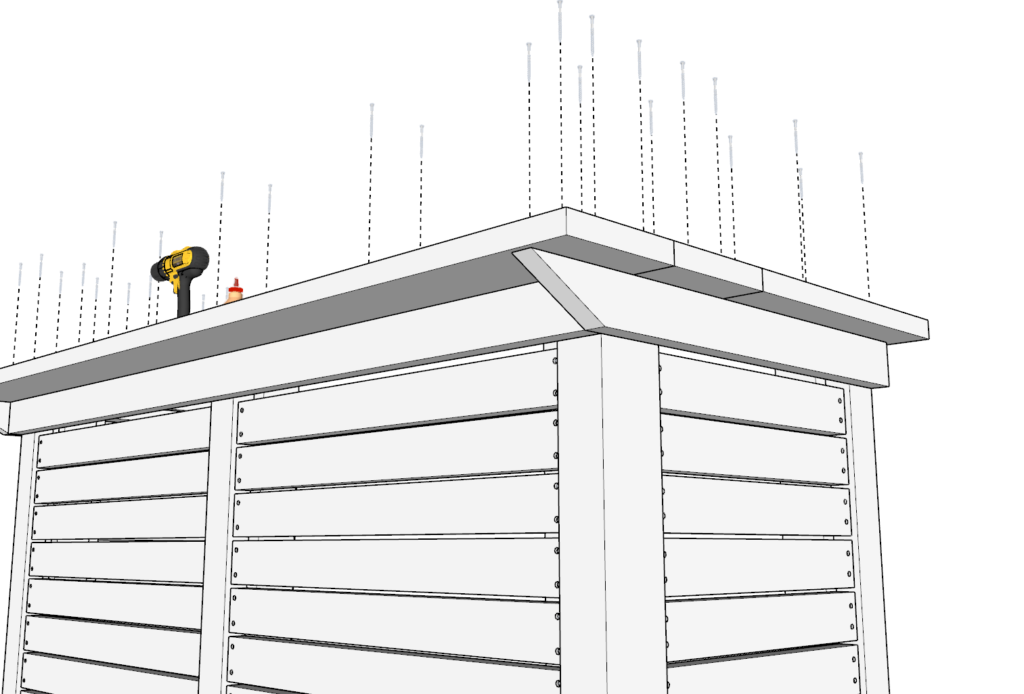
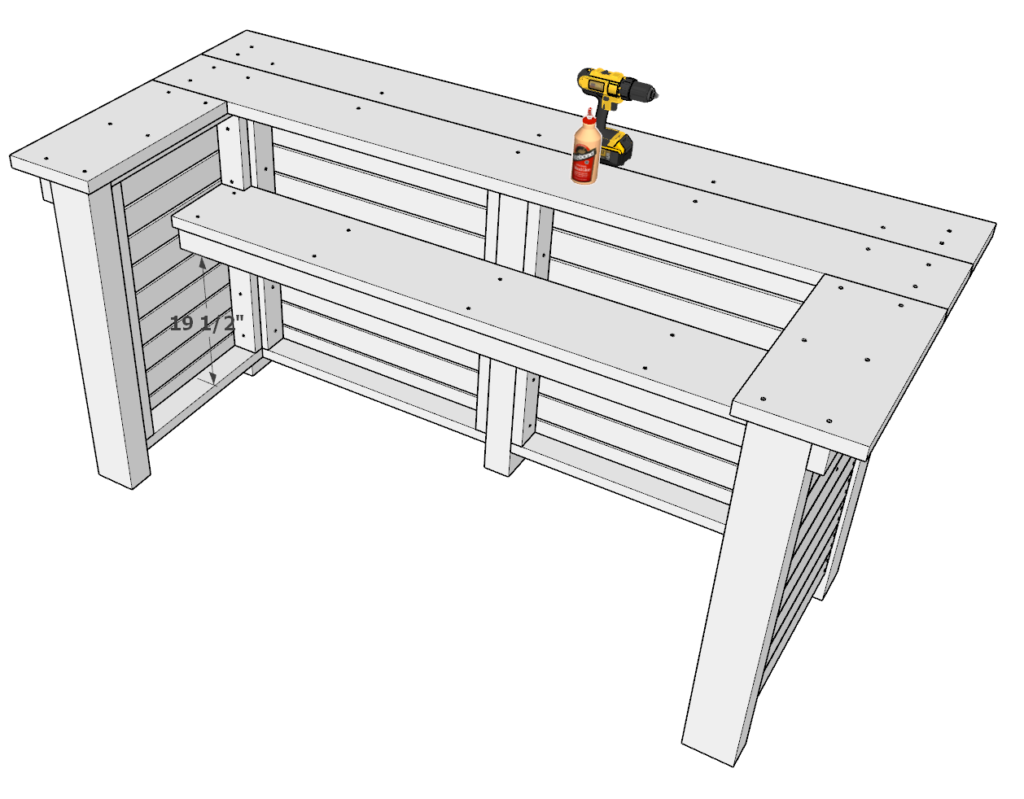
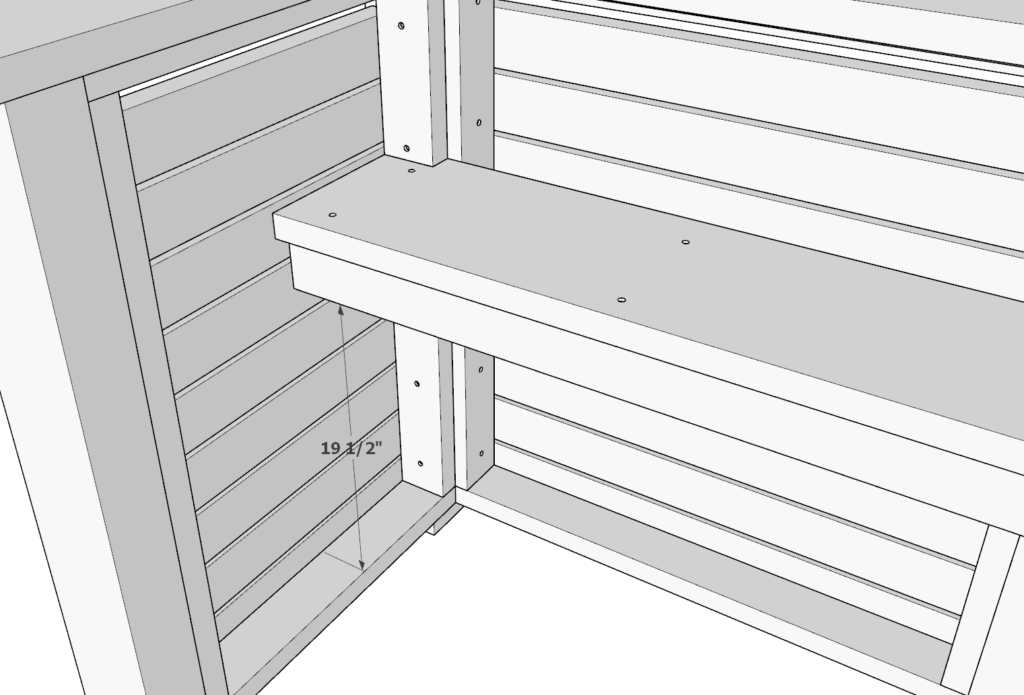
Step 9 (DIY outdoor bar)
Next, attach the shelve to the main bar frame.
The height that I attach the shelve is at 19-1/2 inches. This make the bar shelve working surface to be at 24.5 inches tall. This height can be modified depending on how tall you are.
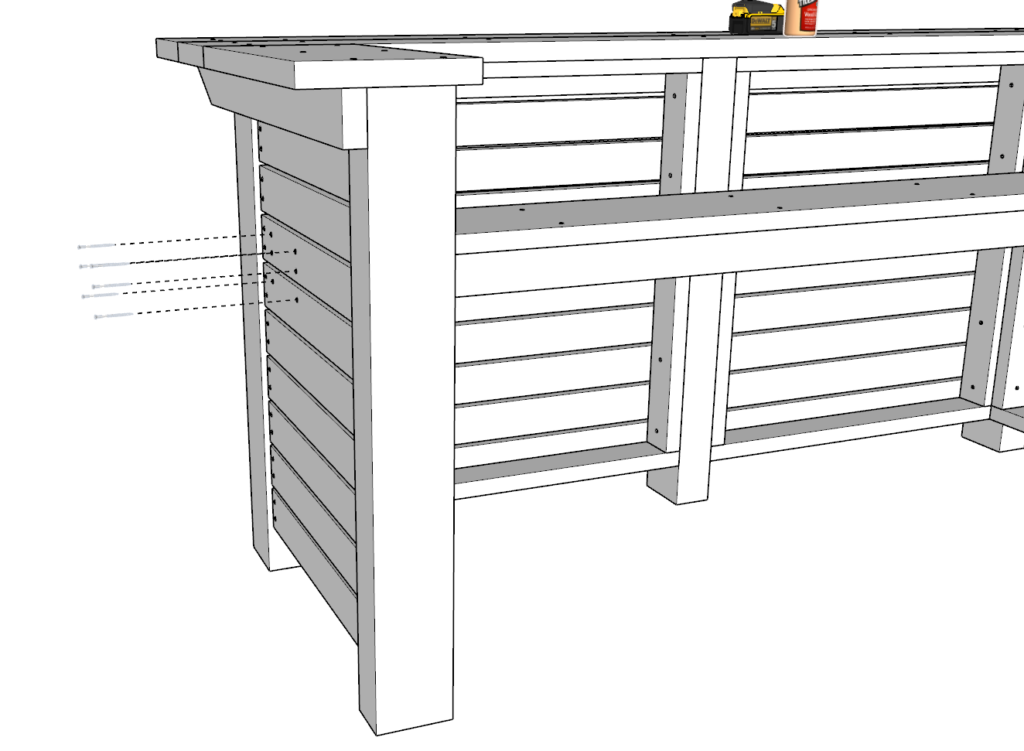
Next, add glue, predrill, and add screws directly through the bar siding to secure the shelve in place. I use at least six 3.5 inch screws to make sure the shelve can hold weight.
Lastly, sand down the whole bar. I use an orbital sander to speed up the process
I use a rough 80 grit paper first and then finish it with a 220 grit paper.
Filling in the holes is optional.
I also like to use a router on the perimeter edges of the bar top to round off my corners so that the top doesn’t press in on the forearms and elbows when its in use. This makes the table more comfortable. This can also be done with a sander if you don’t have a router on hand.
At this point it is ready to be stained or painted!

Where can I find plans for a indoor sectional sofa
Thank you for your inquiry about plans for an indoor sectional sofa. While I don’t have plans specifically tailored for an indoor sectional sofa, I do have some versatile furniture plans that have been used both indoors and outdoors by many customers.
The first plan is for a DIY outdoor wood patio bench:
https://gooddiyplans.com/how-to-build-a-diy-outdoor-wood-patio-bench-3/
The second one is for an outdoor DIY patio chair:
https://gooddiyplans.com/outdoor-diy-patio-chair-plans/
As you can see from the photoshoot, these pieces look great indoors too. They’re designed with flexibility in mind, so you can adapt them to your specific indoor or outdoor needs. With some creativity and minor adjustments, they can be combined to create a cozy and beautiful indoor sectional sofa.
Feel free to reach out if you have any more questions or need further assistance. I’m here to help!