
Ignite Your Creativity: The Charm of DIY Wooden Christmas Trees
Embrace the magic of the festive season with this unique DIY nested wooden Christmas tree project. Picture this: the sun gently setting outside, and the flicker of tealight candles casting mesmerizing shadows through the sleek wooden design of your homemade Christmas tree. The satisfaction of creating something so beautiful with your own hands, coupled with the admiration it garners from visitors, is unparalleled.
These nested wooden Christmas trees aren’t just about aesthetics. They represent time, effort, and personal touch. Every notch and layer you add is a testament to your creativity and dedication. The best part? It’s not just a decor piece. It’s a story, a memory, and a testament to your craftsmanship.


Details that Matter: Dive into the DIY Plan
This DIY project can be tailored to your preference. While the images provide a specific dimension, the beauty lies in its adaptability. You can decide the height, breadth, and number of tiers. These choices enable you to either go grand and attention-grabbing or opt for a subtle, understated piece that complements your existing decor.
The types of wood are also at your discretion. While hardwoods like oak or maple provide a polished and lasting finish, you could also venture into using scrap wood. It’s sustainable, economical, and perfect for those who love upcycling. If you’ve recently done some woodwork and have pieces lying around, this project can be incredibly cost-effective. Instead of letting the scrap wood gather dust, transform it into a beautiful holiday centerpiece!
Here's why our plan stands out:
- Clarity in Instruction: Each step is meticulously detailed for a smooth crafting process.
- Material Versatility: Open to various wood types, from premium choices to scraps.
- Cost-Conscious: Particularly budget-friendly if you’re using scrap wood.
- Contemporary Aesthetics: A refreshing addition to holiday decor.
- Eco-Friendly: An ideal way to breathe new life into leftover wood.
- Tailored Experience: From wood selection to final touches, make it truly yours.
- Inclusive Design: Catering to both DIY beginners and seasoned crafters.
- Dedicated Support: We’re here for any questions or guidance you might need.
As the holiday season beckons, consider stepping into the realm of DIY. It’s more than just a plan; it’s an invitation to weave a fresh chapter into your festive celebrations. Ready to start the journey?
Time
1 hour (varies with experience)
Cost
$5 (Costs may vary based on location and supplier.)
Skill level required
Beginner

Nested Christmas Tree PDF Plan
What is included in the PDF download?
- Easy to read step by step instructions
- Material list
- Tools needed
- Helpful links to materials and tools needed
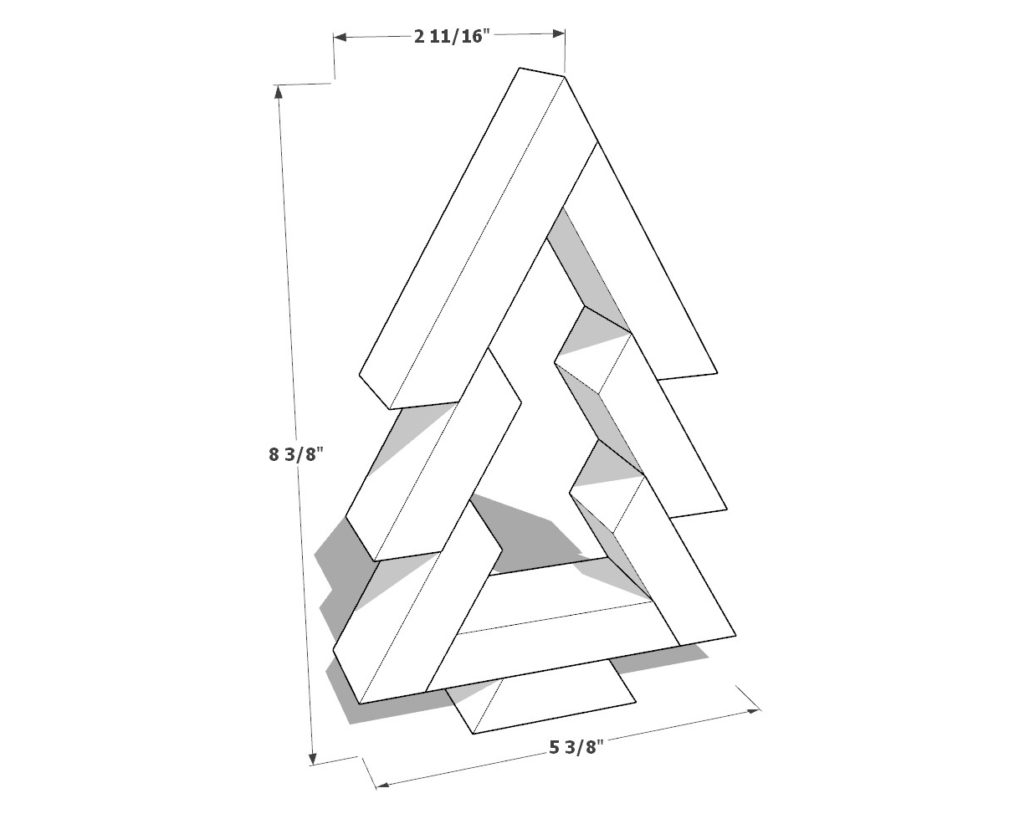
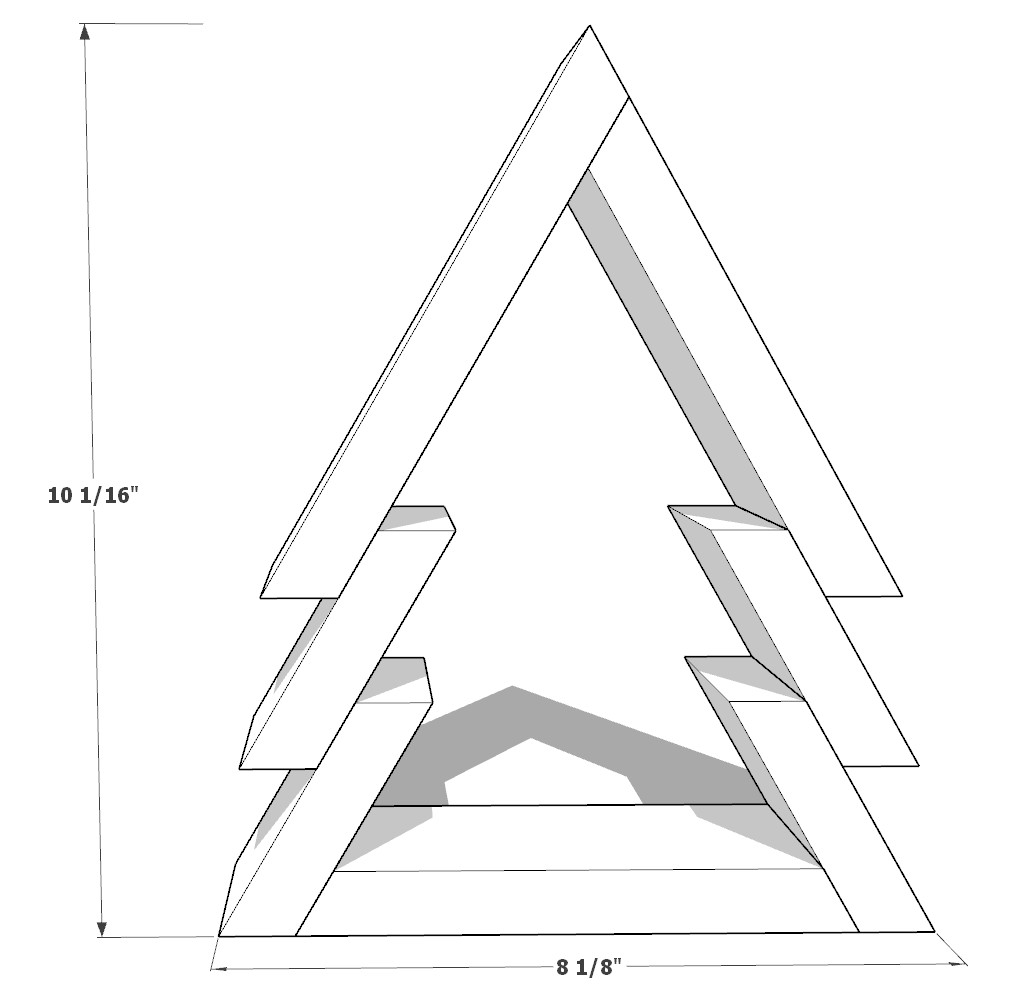
Nested Christmas Tree Decor Dimensions

Tools Needed for This Project:
Available with the purchase of the DIY plan PDF.
Lumber Shopping & Cut List
Available with the purchase of the DIY plan PDF.
Step 1: Preparing the Lumber For Smallest Tree
Start by gathering and cutting your lumber. For this tree, you’ll be using 1×2 lumber pieces. However, if you have different sizes at hand, they can be adapted to fit the design.
List of Lumber Cuts:
- Lavender Piece: One 4-3/8 inch long 1×2 lumber, both ends cut at 30-degrees.
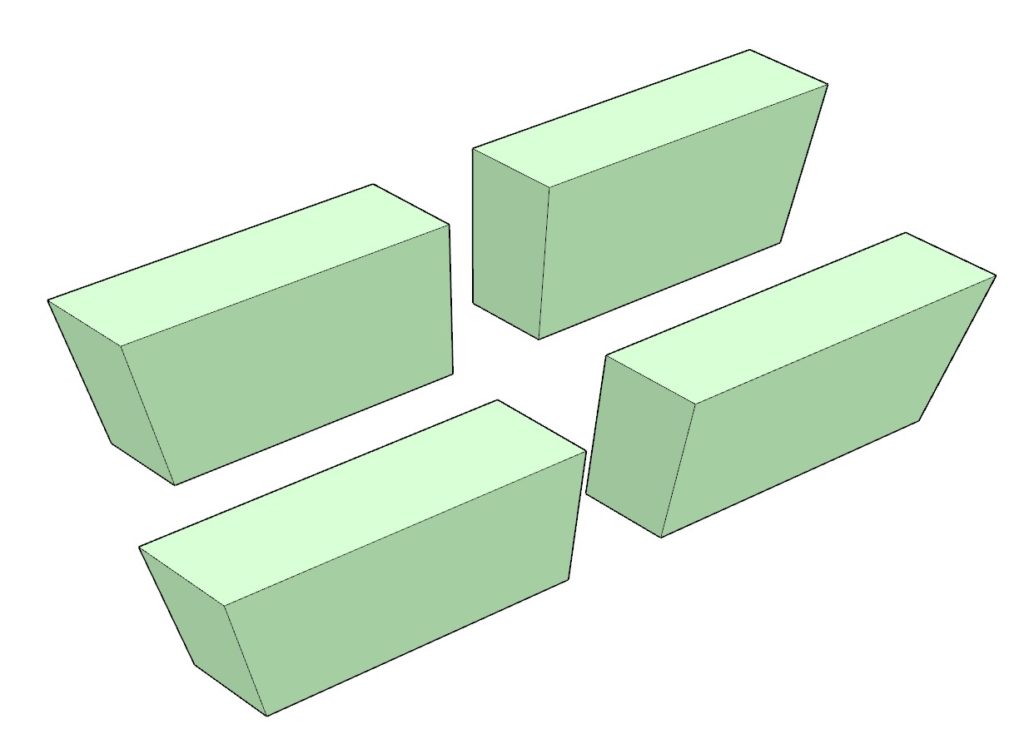
- Green Pieces: Four 3 inch long 1×2 lumbers, both ends of each piece cut at 30-degrees.
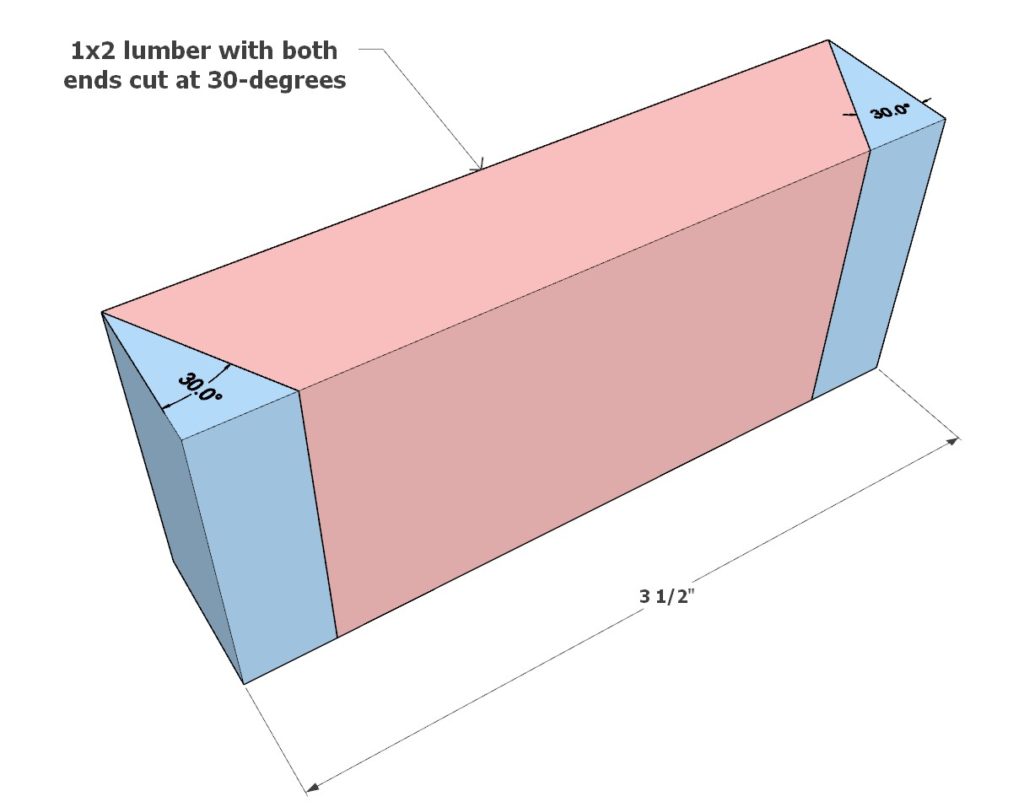
- Pink Piece: One 3-1/2 inch long 1×2 lumber, both ends cut at 30-degrees.
- Blue Piece: One 3-5/8 inch long 1×2 lumber, both ends cut at 30-degrees.
Each lumber piece has been color-coded to simplify the assembly instructions later on.
Pro Tips:
- Sand all the lumber pieces before assembly. This will give your tree a polished appearance, and it’s much easier than sanding post-assembly.
- If you intend to paint or stain your tree, it’s best to do so before assembly. This ensures a thorough coat and minimizes post-assembly touch-ups.


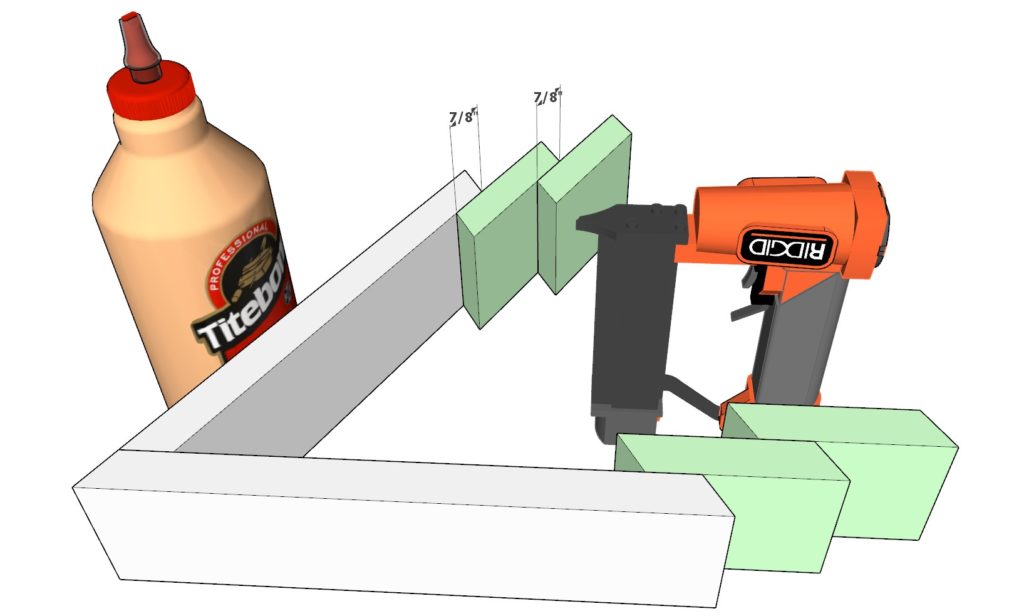
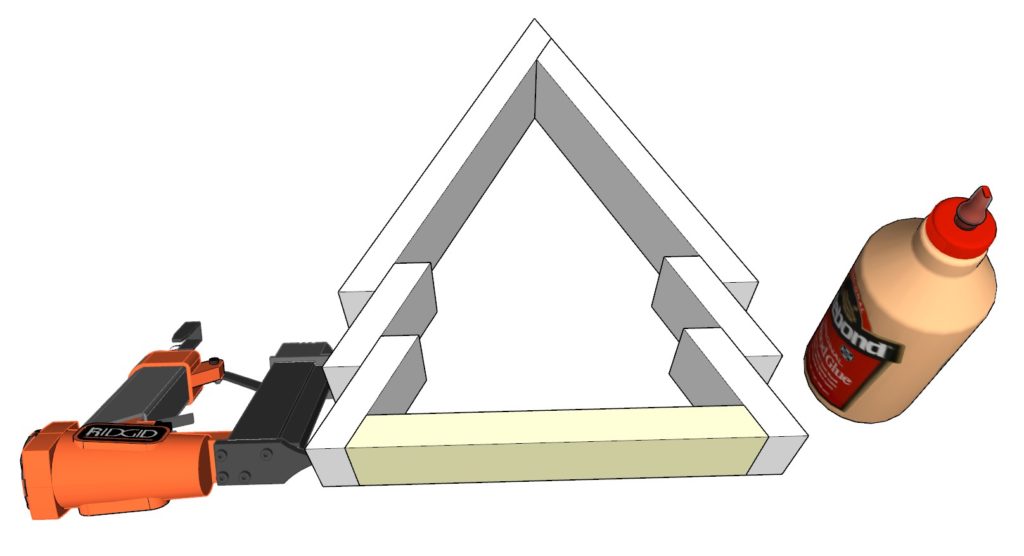
Step 2: Assembling the Smallest Christmas Tree
Begin your tree assembly by constructing the topmost part.
Top Assembly:
- Combine the lavender and pink pieces to form the tree top. Refer to the 1st diagram for guidance.
- Secure the pieces together using 1-inch pin nails and wood glue.
Middle Assembly:
- Attach the four green pieces next. Align and space them as illustrated in the 2nd diagram.
- Again, use wood glue and 1-inch pin nails to secure these parts.
Bottom Assembly:
- Position and affix the blue piece to create the base of your Christmas tree.
- As before, rely on pin nails and wood glue for a secure fit.
Pro Tips:
- Opt for thin pin nails. This ensures minimal damage to the wood, and they remain nearly invisible once in place.
- If you haven’t stained your pieces yet, always wipe off any excess glue with a damp cloth. Dried glue can prevent the stain from adhering properly, resulting in unsightly patches.


Step 1: Preparing the Lumber For The Medium Size Tree
Start by gathering and cutting your lumber. For this tree, you’ll be using 1×3 lumber pieces. However, if you have different sizes at hand, they can be adapted to fit the design.
List of Lumber Cuts:
- Lavender Piece: One 6-1/4 inch long 1×3 lumber, both ends cut at 30-degrees.
- Green Pieces: Four 3-1/2 inch long 1×3 lumbers, both ends of each piece cut at 30-degrees.
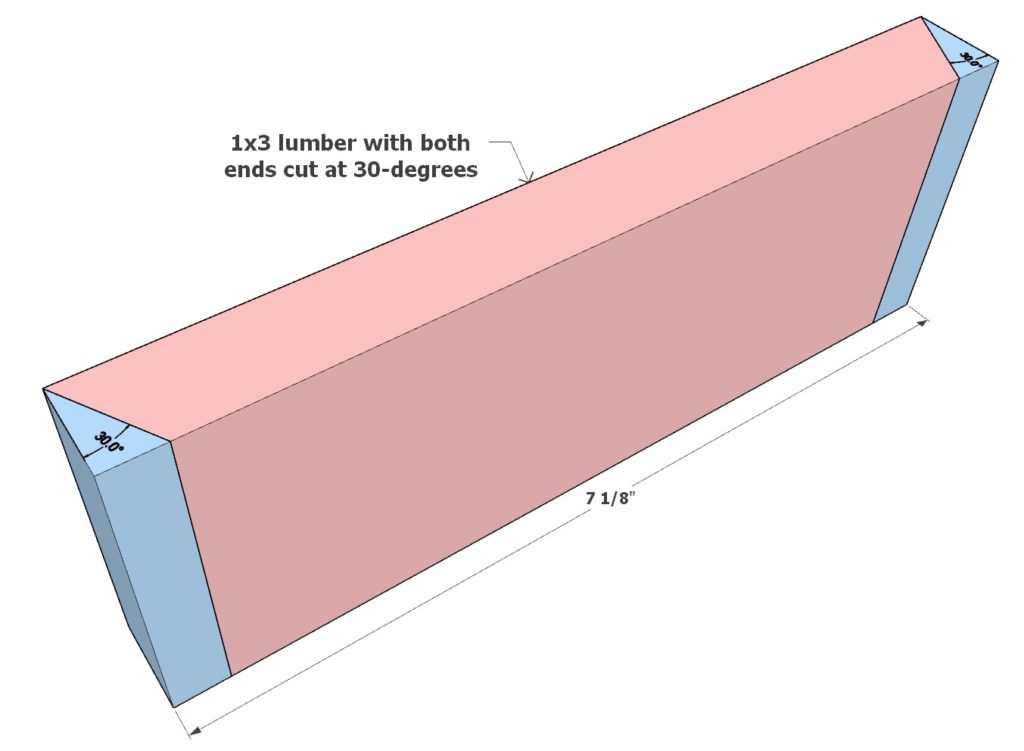
- Pink Piece: One 7-1/8 inch long 1×3 lumber, both ends cut at 30-degrees.
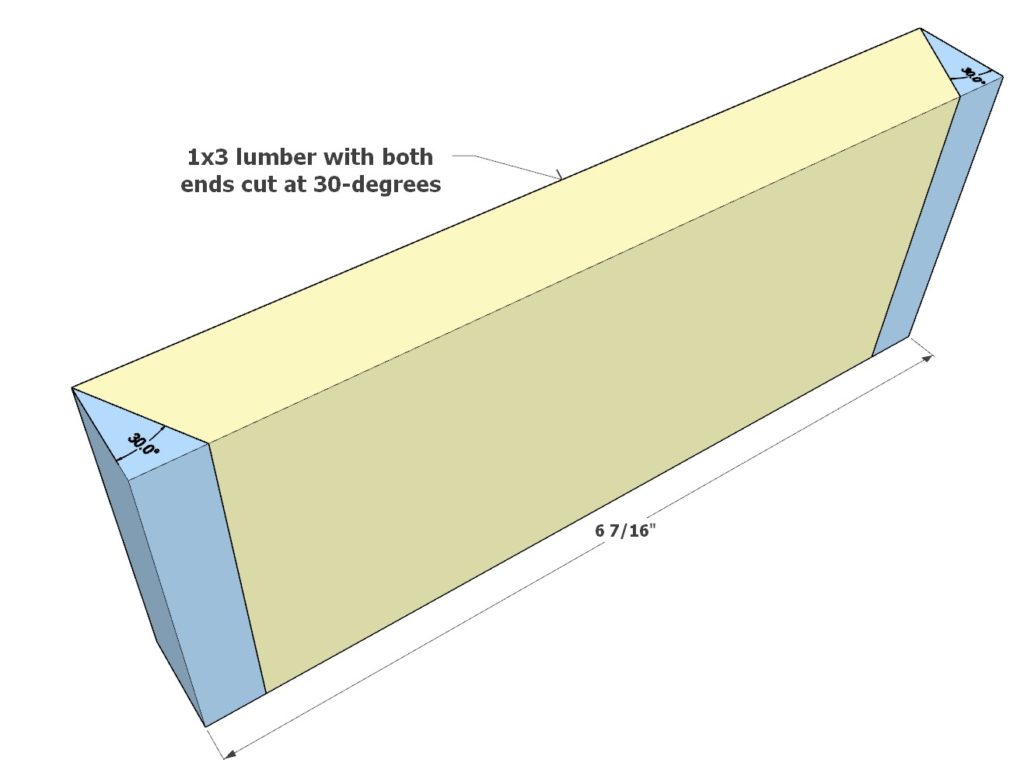
- Yellow Piece: One 6-7/16 inch long 1×3 lumber, both ends cut at 30-degrees.
Each lumber piece has been color-coded to simplify the assembly instructions later on.
Pro Tips:
- Sand all the lumber pieces before assembly. This will give your tree a polished appearance, and it’s much easier than sanding post-assembly.
- If you intend to paint or stain your tree, it’s best to do so before assembly. This ensures a thorough coat and minimizes post-assembly touch-ups.


Step 2: Assembling the Medium Christmas Tree
Begin your tree assembly by constructing the topmost part.
Top Assembly:
- Combine the lavender and pink pieces to form the tree top. Refer to the 1st diagram for guidance.
- Secure the pieces together using 1-inch pin nails and wood glue.
Middle Assembly:
- Attach the four green pieces next. Align and space them as illustrated in the 2nd diagram.
- Again, use wood glue and 1-inch pin nails to secure these parts.
Bottom Assembly:
- Position and affix the yellow piece to create the base of your Christmas tree.
- As before, rely on pin nails and wood glue for a secure fit.
Pro Tips:
- Opt for thin pin nails. This ensures minimal damage to the wood, and they remain nearly invisible once in place.
- If you haven’t stained your pieces yet, always wipe off any excess glue with a damp cloth. Dried glue can prevent the stain from adhering properly, resulting in unsightly patches.


Step 1: Preparing the Lumber For The Large Tree
Start by gathering and cutting your lumber. For this tree, you’ll be using 1×2 lumber pieces. However, if you have different sizes at hand, they can be adapted to fit the design.
List of Lumber Cuts:
- Lavender Piece: One 9-1/16 inch long 1×3 lumber, both ends cut at 30-degrees.
- Green Pieces: Four 3-1/2 inch long 1×3 lumbers, both ends of each piece cut at 30-degrees.
- Pink Piece: One 9-15/16 inch long 1×3 lumber, both ends cut at 30-degrees.
- Yellow Piece: One 9-3/16 inch long 1×3 lumber, both ends cut at 30-degrees.
Each lumber piece has been color-coded to simplify the assembly instructions later on.
Pro Tips:
- Sand all the lumber pieces before assembly. This will give your tree a polished appearance, and it’s much easier than sanding post-assembly.
- If you intend to paint or stain your tree, it’s best to do so before assembly. This ensures a thorough coat and minimizes post-assembly touch-ups.


Step 2: Assembling the Large Christmas Tree
Begin your tree assembly by constructing the topmost part.
Top Assembly:
- Combine the lavender and pink pieces to form the tree top. Refer to the 1st diagram for guidance.
- Secure the pieces together using 1-inch pin nails and wood glue.
Middle Assembly:
- Attach the four green pieces next. Align and space them as illustrated in the 2nd diagram.
- Again, use wood glue and 1-inch pin nails to secure these parts.
Bottom Assembly:
- Position and affix the yellow piece to create the base of your Christmas tree.
- As before, rely on pin nails and wood glue for a secure fit.
Pro Tips:
- Opt for thin pin nails. This ensures minimal damage to the wood, and they remain nearly invisible once in place.
- If you haven’t stained your pieces yet, always wipe off any excess glue with a damp cloth. Dried glue can prevent the stain from adhering properly, resulting in unsightly patches.

Step 3: Finishing Touches – Sanding, Staining, and Painting
Sanding the Christmas Tree:
- Before sanding, always wear safety goggles and a dust mask to protect your eyes and lungs.
- Choose a medium-grit sandpaper to start, and sand the entire structure in the direction of the wood grain.
- To access tight spots or intricate areas, consider using a sanding block or folded sandpaper.
- Once the initial sanding is done, repeat the process using a fine-grit sandpaper to achieve a smooth finish.
- Wipe away all the dust using a soft cloth before proceeding to staining or painting.
Staining the Christmas Tree:
- Always use gloves to protect your hands and work in a well-ventilated area.
- Prepare your wood by ensuring it’s free from dust and debris.
- Use a brush or rag to apply the stain, moving in the direction of the wood grain.
- Allow the stain to penetrate the wood; the longer you leave it on, the deeper the color will be.
- Wipe away any excess stain with a clean cloth.
- Allow the stain to dry according to the manufacturer’s recommendations.
Painting the Christmas Tree:
- Begin by priming the wood to ensure an even and lasting paint application.
- Once the primer is dry, apply your chosen paint color using a paintbrush or foam brush for a smoother finish.
- Remember to paint in the direction of the wood grain and to apply thin, even coats.
- Depending on the paint type and color choice, you may need multiple coats. Always allow sufficient drying time between coats.
- Once done, let the final coat dry thoroughly before displaying or using your Christmas tree.
Safety Tips:
- Always work in a well-lit and well-ventilated space, especially when using paints and stains which can emit fumes.
- Keep children and pets away from your workspace.
- Store paints, stains, and other chemicals out of reach and in a safe place.