Introduction:
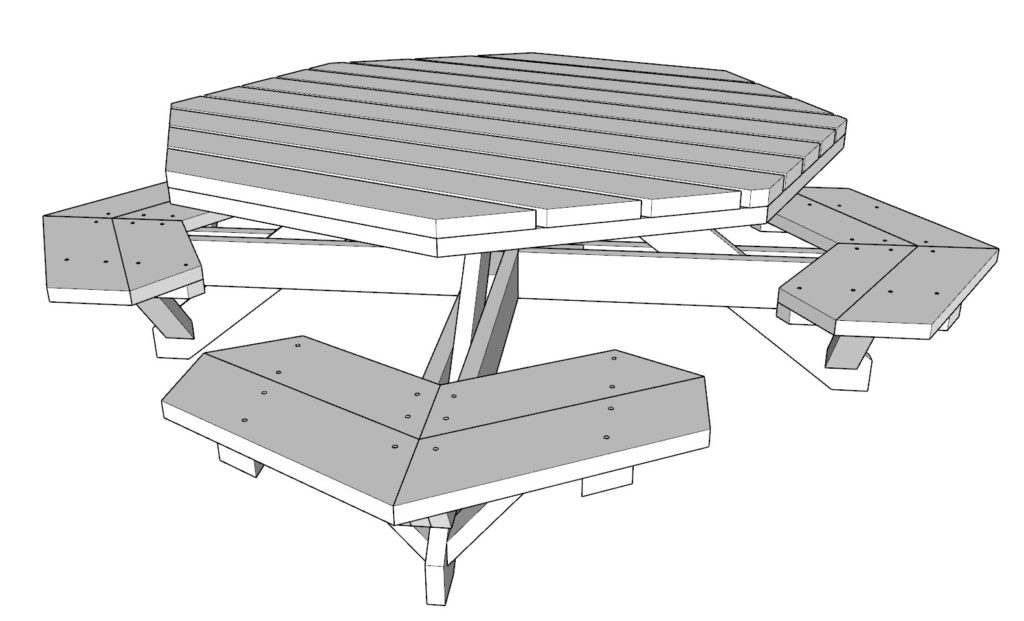
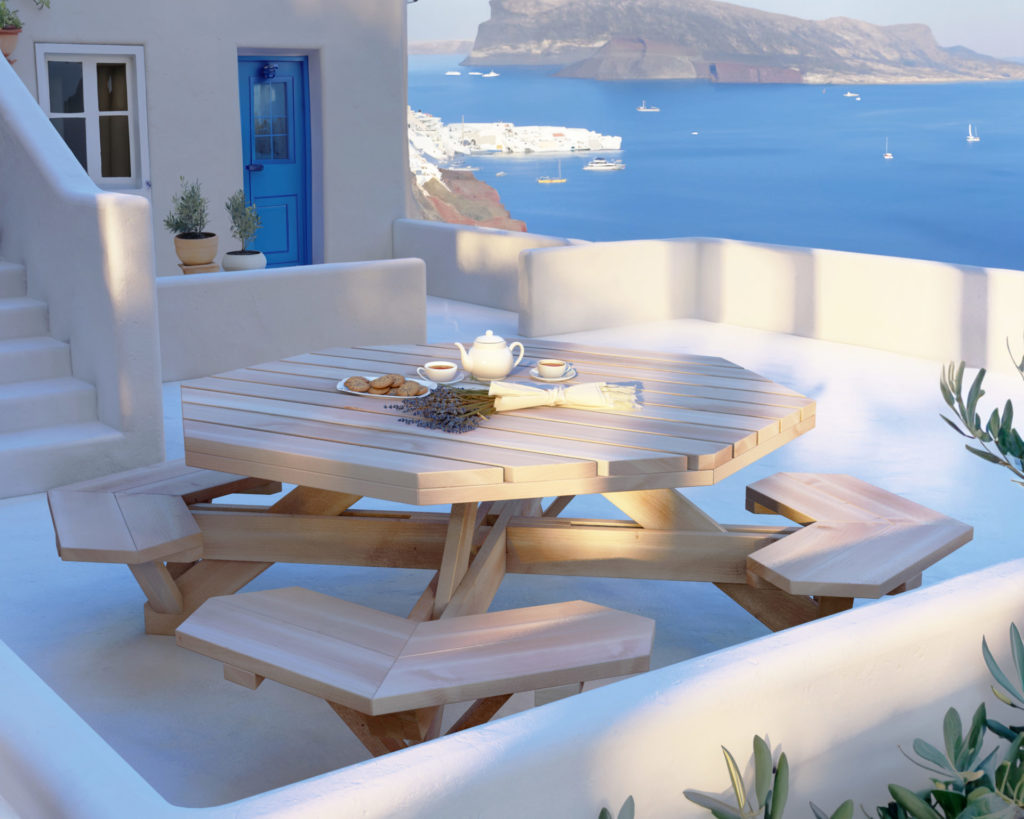
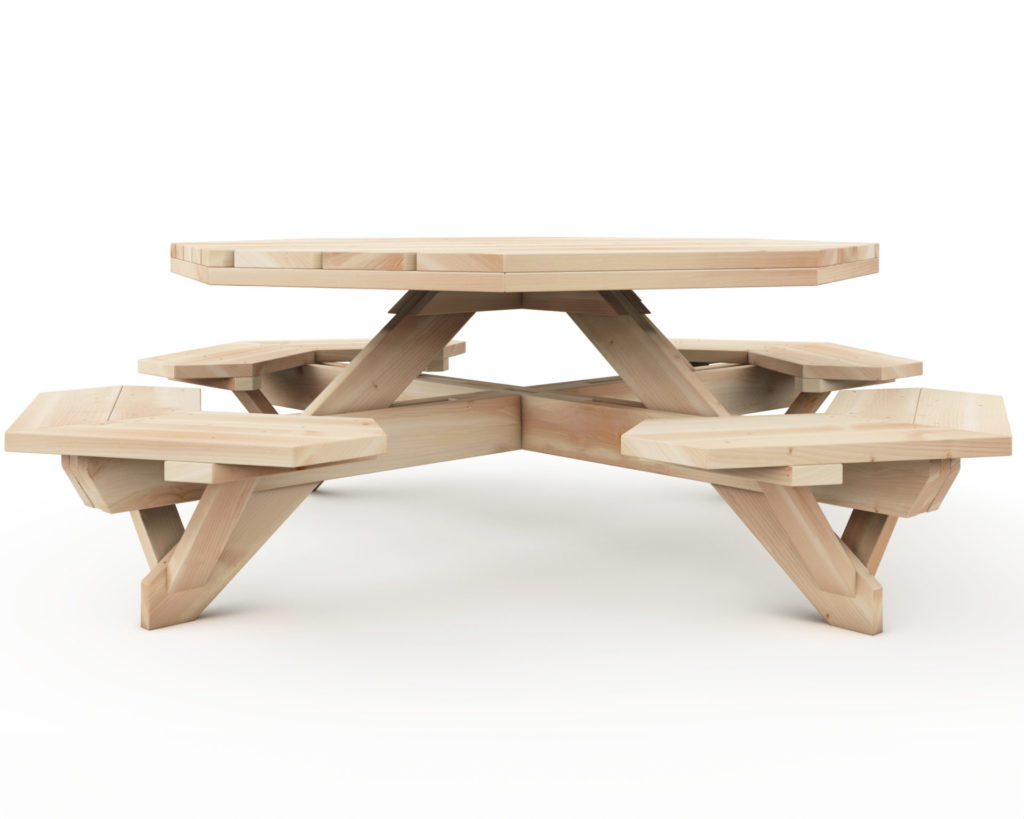
Picnics are all about friends, family, food, fresh air and relaxation. But, imagine hosting that on your own enchanting octagonal picnic table; the masterpiece of your garden. A picnic table that isn’t your run-of-the-mill, it’s stylish and a unique architectural piece. It’s not just a table; it’s an eight-sided wonder, with each side calling out to friends, family, even neighbors, bidding them to sit, relax, and enjoy!
Octagonal Elegance:
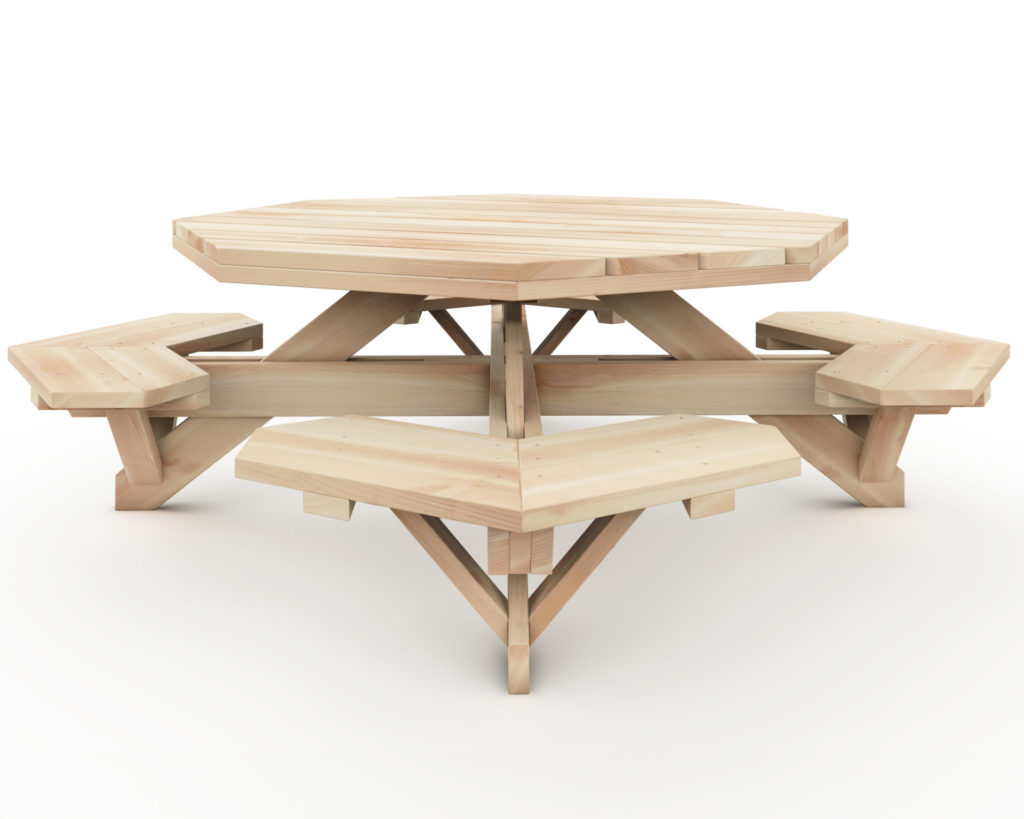
Our latest DIY plan bridges the gap between functionality and aesthetics – the Octagonal Picnic Table! A design that’s instantly captivating with its refreshing, non-conventional octagonal shape, and the added bonus of being able to seat up to eight people creating countless happy hours in the sunshine.
Sturdy and Spacious:
Crafted with love and attention to detail this table is not only sturdy, it’s spacious and secure. Thanks to the choice of solid 2×4, 2×6, and 2×8 lumber, this picnic table is guaranteed to last through the seasons, without compromising on safety. Yes, it’s more than OK to jump for joy when your favorite team scores, the table can handle it!
Innovative Design:
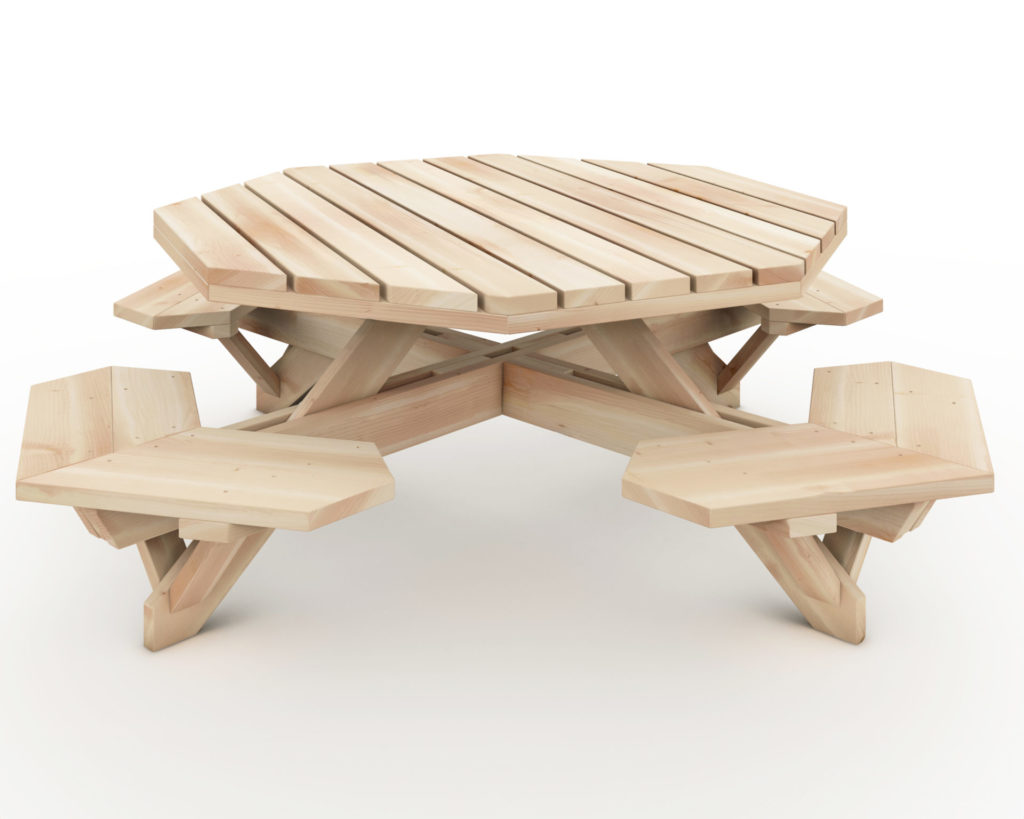
Forget common tripod frames and say hello to robust quadropod legs that offer unrivalled stability. The table top, formed from slats, is perfect for those dewy mornings or unexpected rain showers, allowing the water to drain off, leaving no water marks or damages. Your tablescape is ready, come sunshine, or rain!
The Perfect Picnic Table - Sunny or Shady:
We know that the sun can be a friend and a fiend, and so, our octagonal picnic table DIY design has you covered. Sun too hot? Raindrops crashing your party? No worries. The ample tabletop is mindfully designed to accommodate an optional umbrella hole.
The process of umbrella integration is as simple as it gets – your umbrella can be easily installed with a quick and convenient drill through the tabletop to provide that necessary shade or shelter. No complex tweaking required, the design had this feature in mind from the start. All you need is your favourite outdoor umbrella to add that final touch on your masterpiece.
This addition carries our design from delightful dining, to a stylish sanctuary from the weather’s whims. Now you can enjoy your quaint outdoor setup – come rain, or shine. Its all about creating the best moments, while experiencing the best of every season. An outdoor celebration or a steaming cup of coffee in solitude, your octagonal picnic table is perfect, just like the memories you’ll create along the way!
Enriching Aesthetics:
The beauty of the octagonal table lies not only in its endurance, but in its charm. The butterfly-shaped seating pairs sturdiness with sophistication, while the strikingly attractive, structurally sound ‘quadropod’ (yes, we’re coining a new term!) frame adds galore to your garden scene.
Conclusion:
Embrace the beauty of the octagon and infuse your outdoor space with an undeniable allure. Imagine those picture perfect moments with family and friends, the photograph just as charming as the reality. With our easy-to-follow, beginner-friendly, comprehensive DIY guide, you’re in safe hands. Remember, creating something memorable, something beautiful, isn’t about being perfect, it’s about expressing oneself. So, loosen up, get inspired and let’s start building your dream DIY Octagonal Picnic Table together.
Time to build
About 8 hours
Cost of build
$150
Skill level required
Beginner
Download the PDF Plans
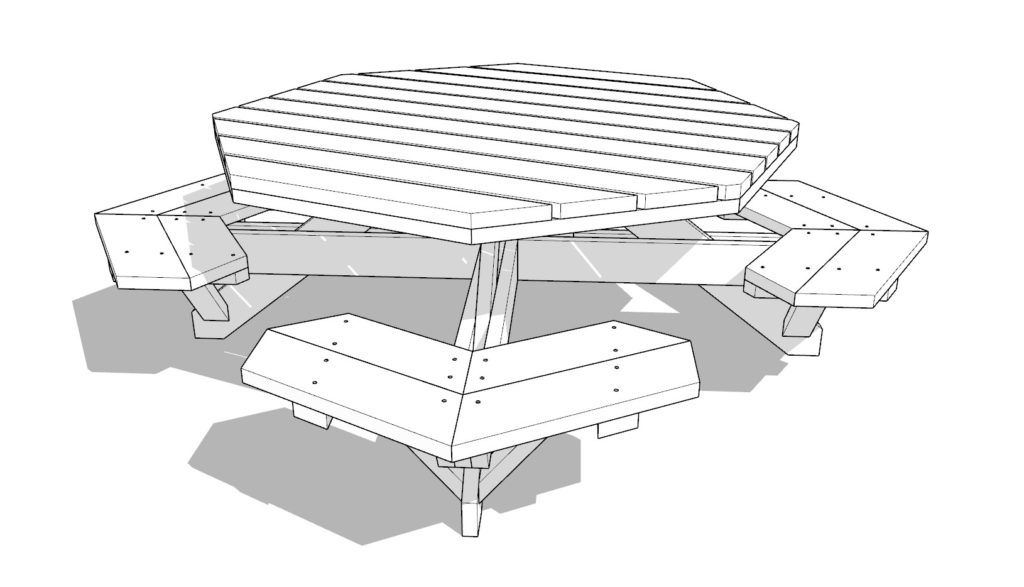
Octagonal Picnic Table PDF Plan
In the PDF download, you can find:
– Clearly written, step-by-step instructions
– A comprehensive list of materials required
– A detailed cut list for each piece
– A list of essential tools for the project
– Visual diagrams to guide you through the process
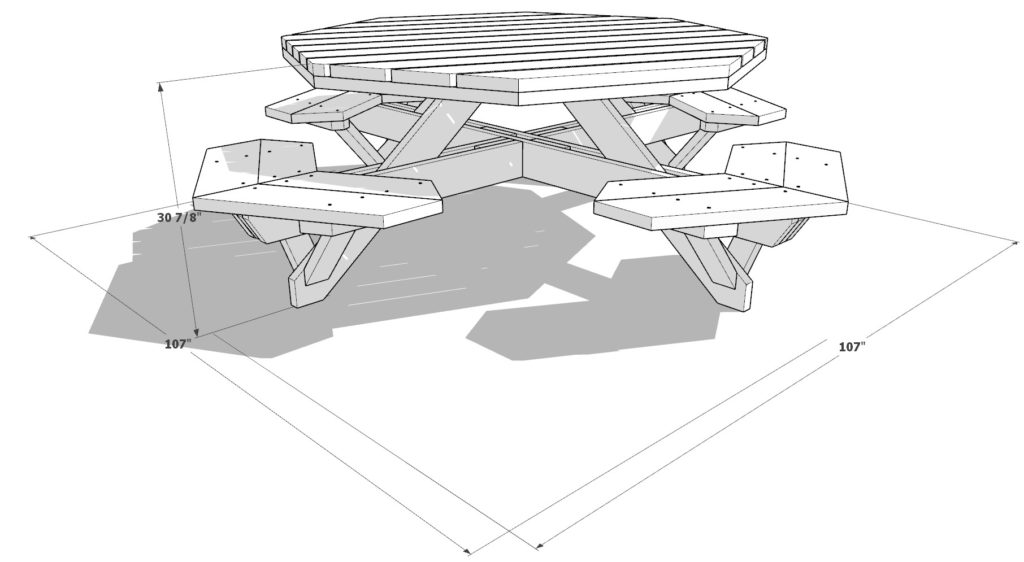
DIY Modern Farmhouse Table Dimensions
Step 1: Assembling the Table Legs
Begin with the foundation of our Octagonal Picnic Table by first constructing the legs. Here’s how to do it:
1.1 Cutting the Legs
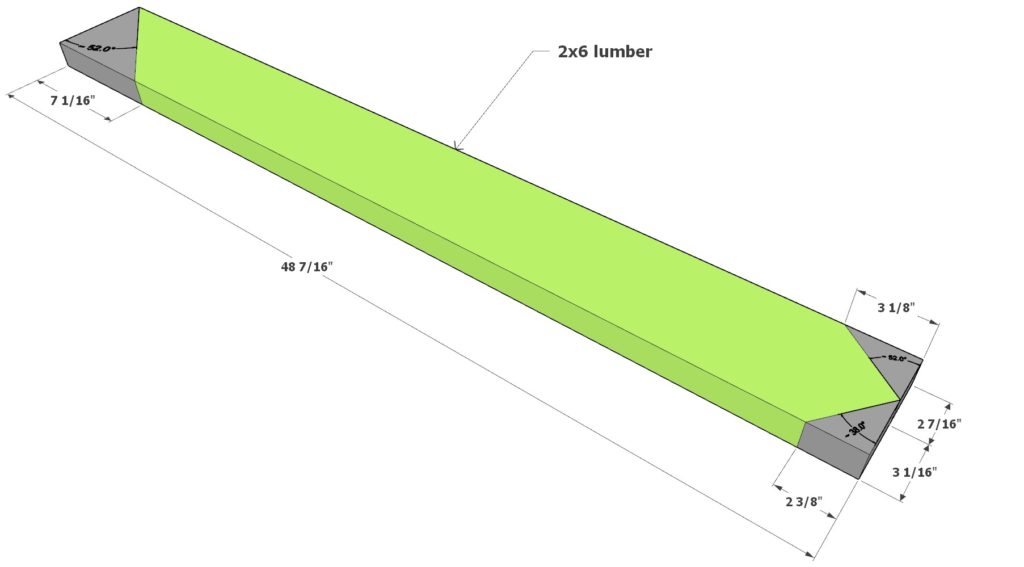
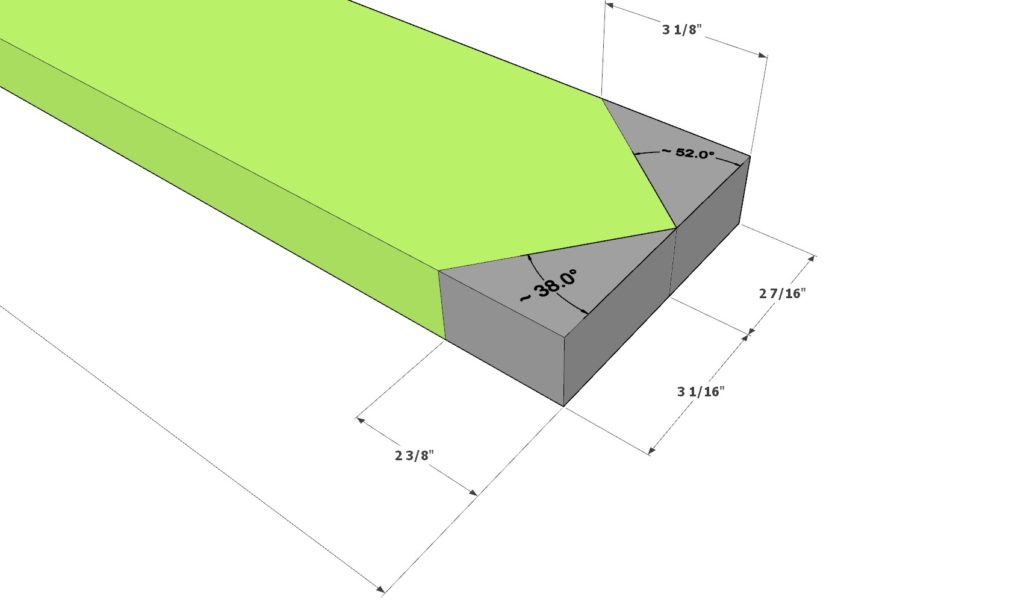
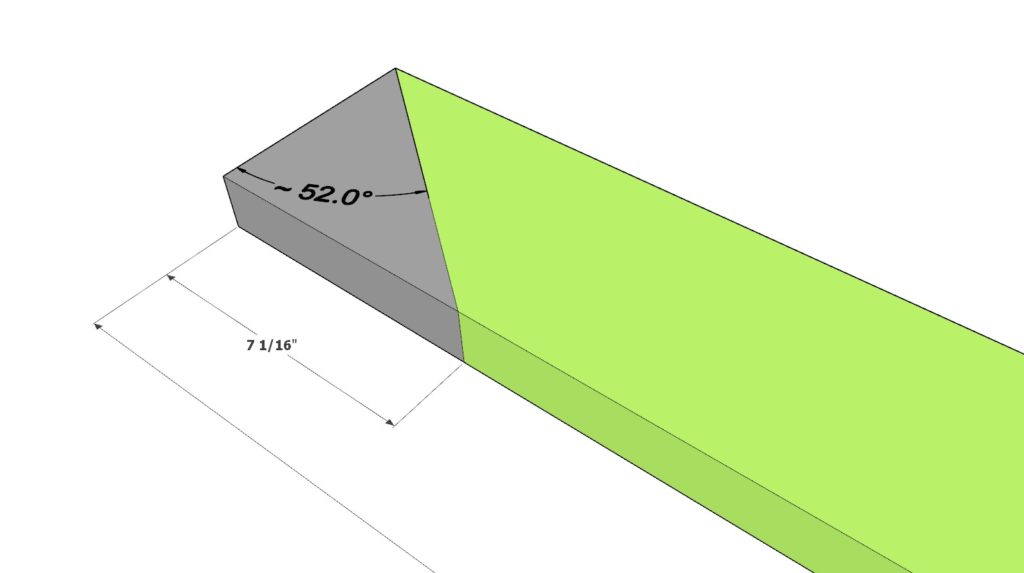
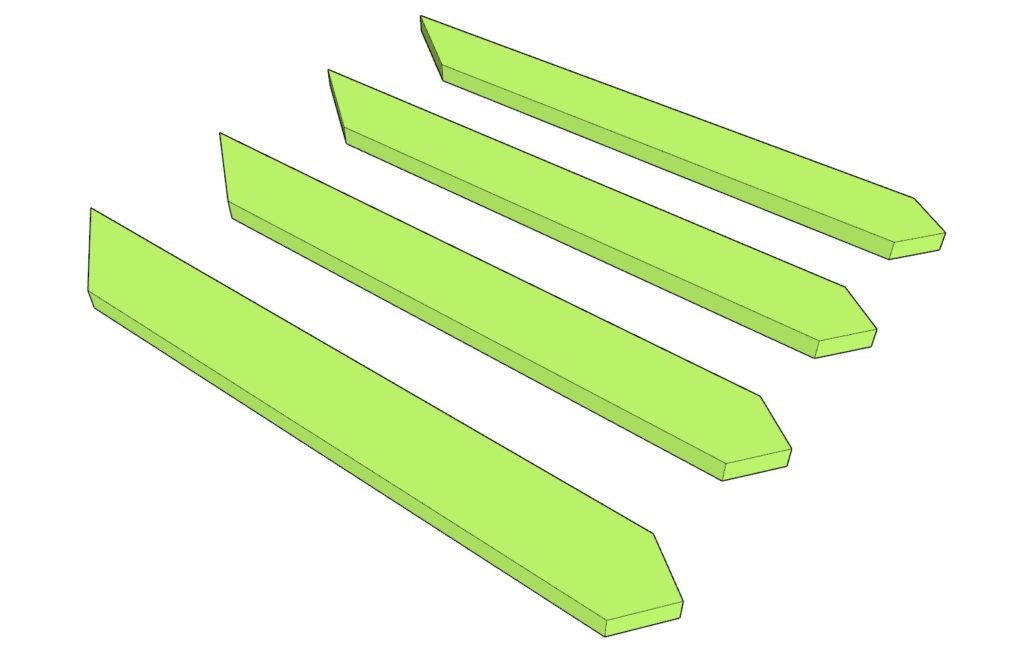
Start by taking a 2×6 lumber piece of 48-7/16 inches in length, which will make up the core of each table leg. Cut the ends to the specified angles as demonstrated in the illustrations. The dark gray potion represents the potion that is to be cut way and the key 2×6 component is represented in lime green. You’ll require four such pieces.
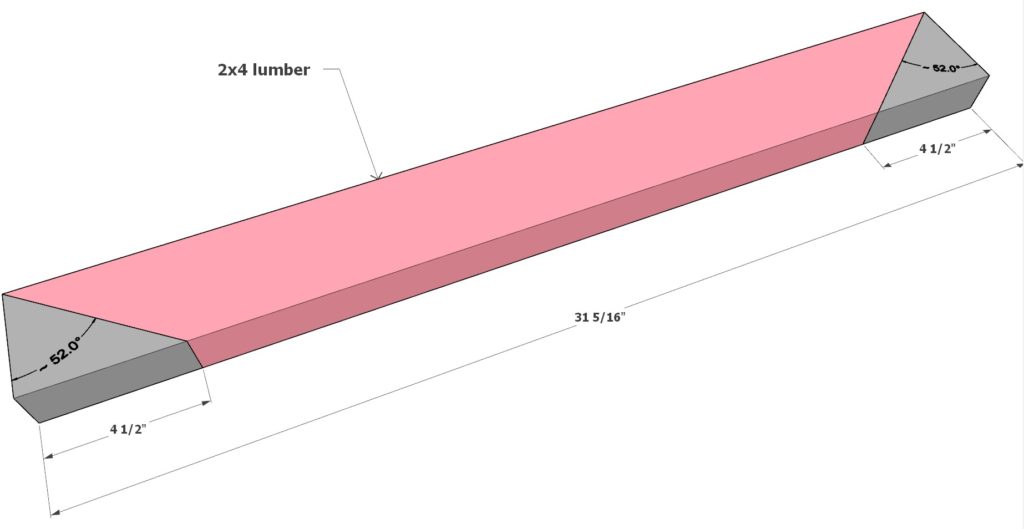
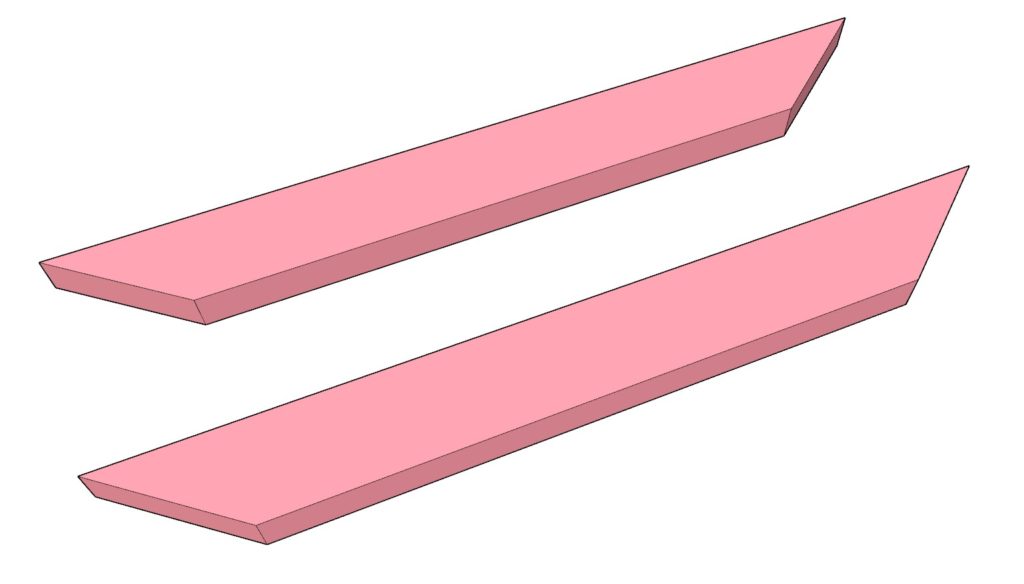
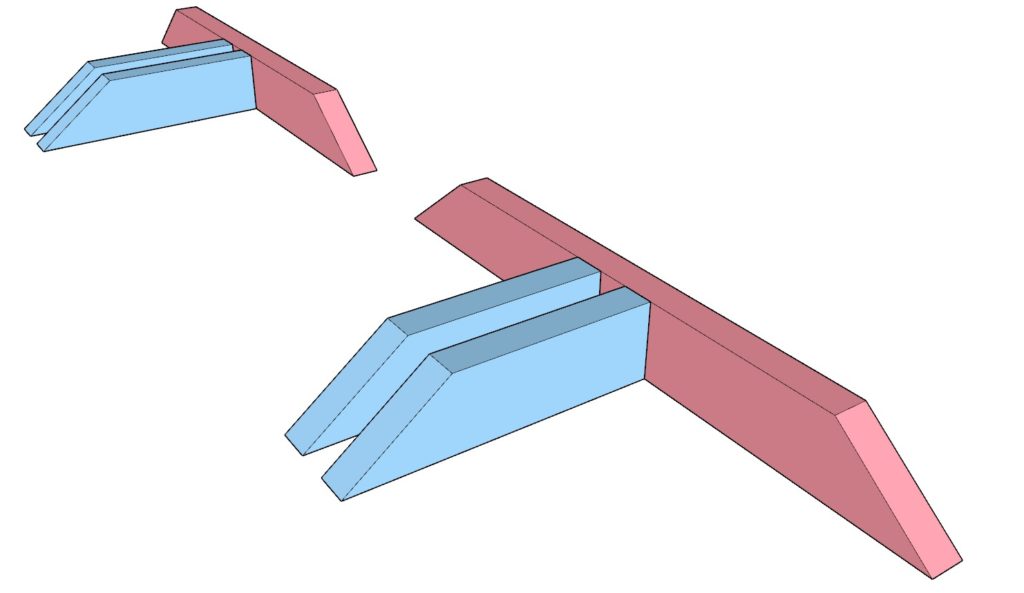
Next take a 2×4 lumber piece with a length of 31-5/16 inches and trim the ends at a 52-degree angle, guided by the illustrative diagram. You need to have two such pink-colored pieces.
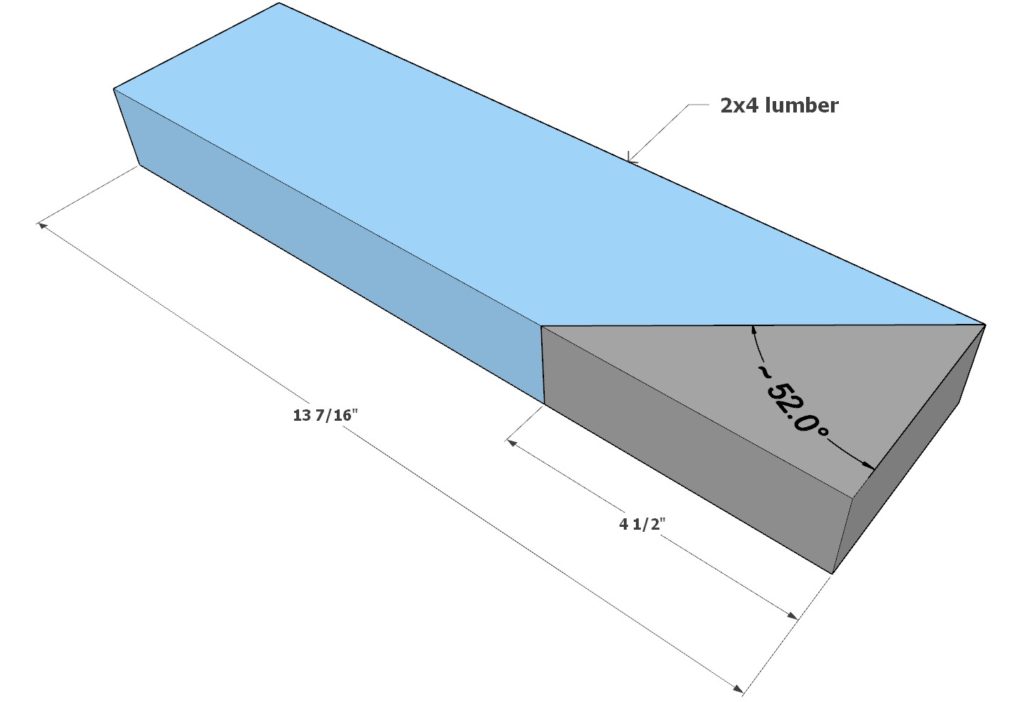
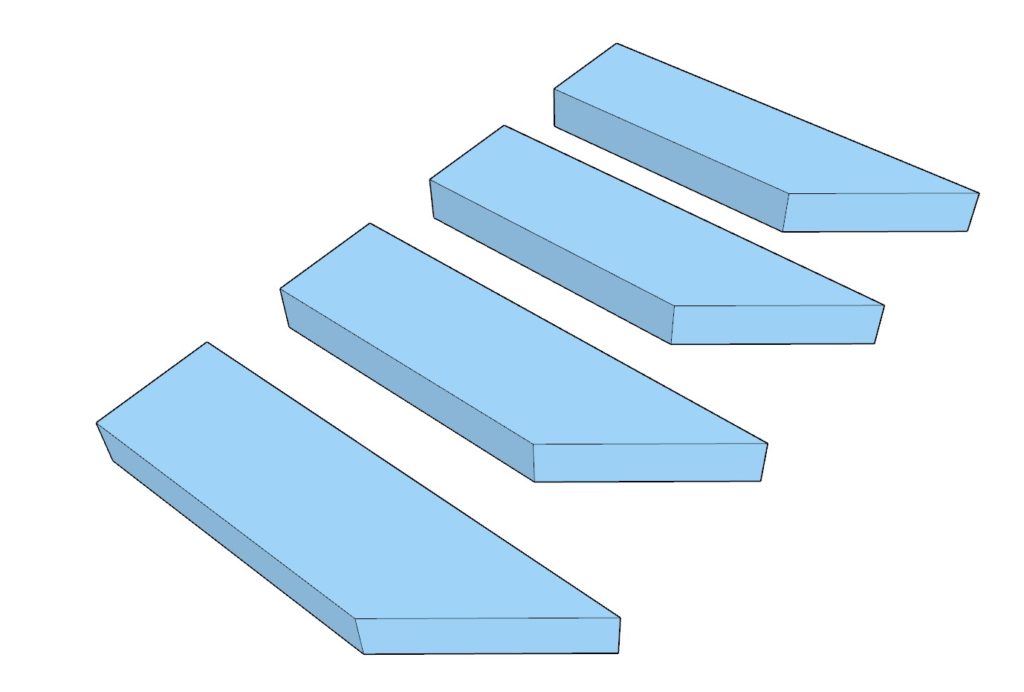
In addition, take a 2×4 lumber piece with a length of 13-7/16 inches and cut one end at a 52-degree angle. Prepare four such pieces known as the blue components.
1.2 Constructing the Support Assemblies
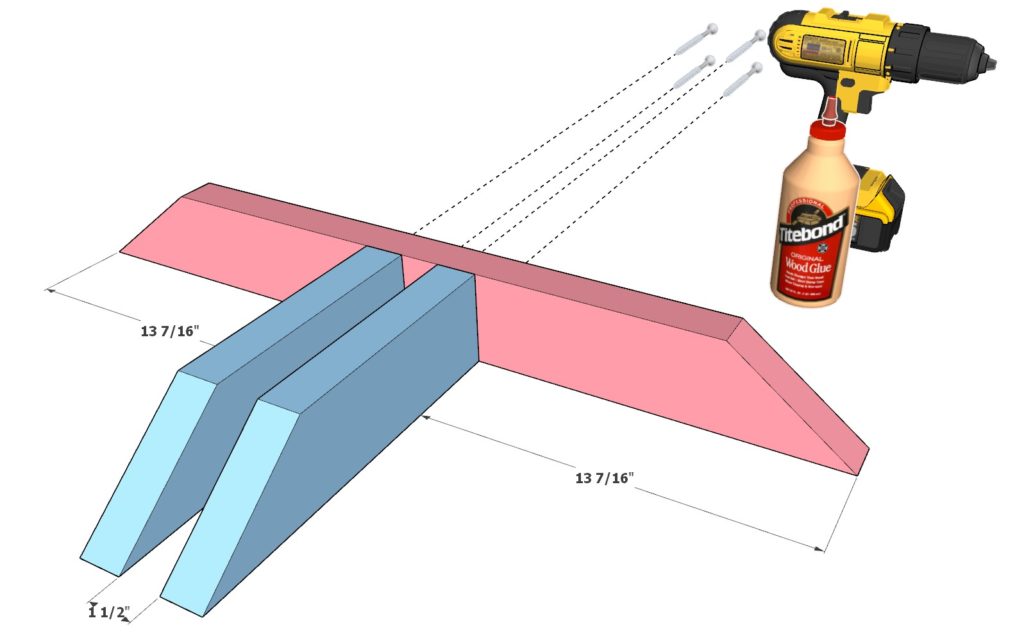
Begin combining these parts together forming the leg assemblies. Use a pink 2×4, accompanied by two blue 2×4 pieces, and position them correctly as indicated in the provided diagram.
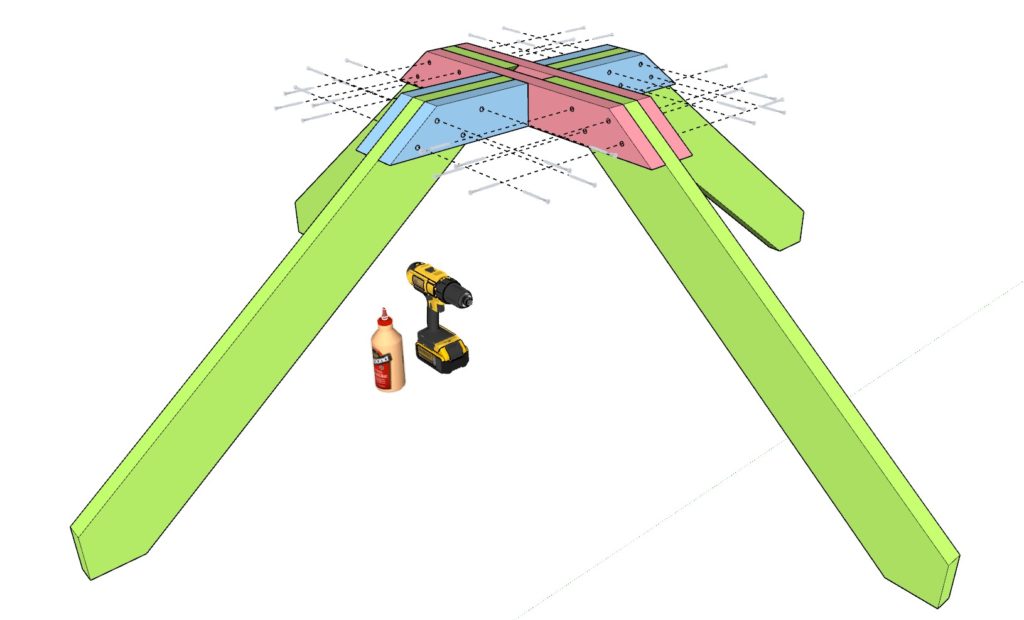
Tip: Always pre-drill holes before adding screws to help protect the wood from splitting. Give your assembly enduring strength
Add 3.5-inch long screws after applying wood glue to the seams. You’ll need two of these sub-assemblies for the table legs.
1.3 Putting the Legs together
Your final task for this initial step is to incorporate these green 2×6 components into the two sub-assemblies you’ve just crafted. Secure them with 3.5 inch screws, using predrilled holes and wood glue at junction points, as demonstrated in the delineation provided.
Step 2: Creating the Seating Cross Beam Supports
We shall now move on to the vital seating cross beam supports.
2.1 Designing the Primary Supports
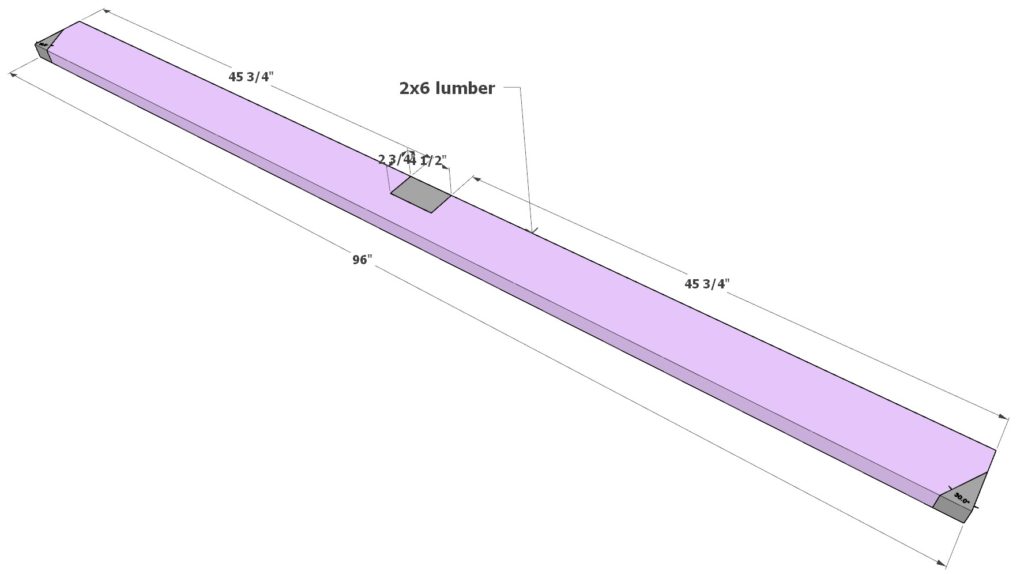
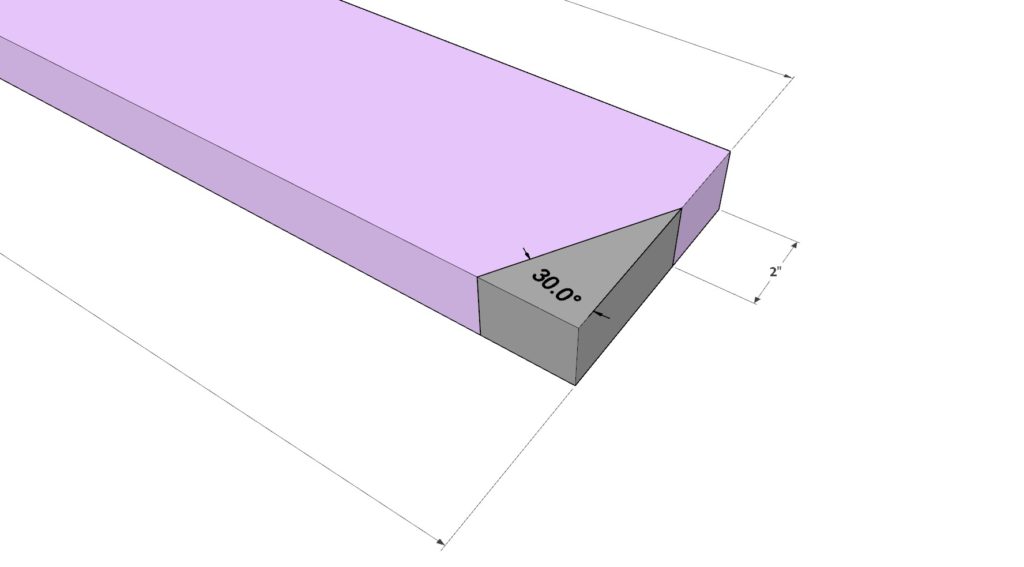
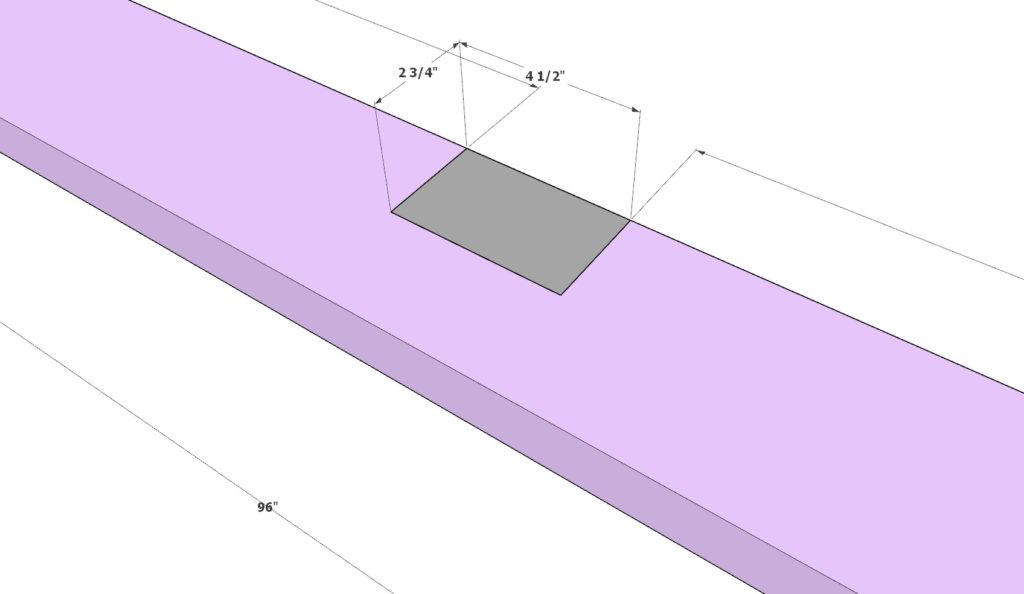
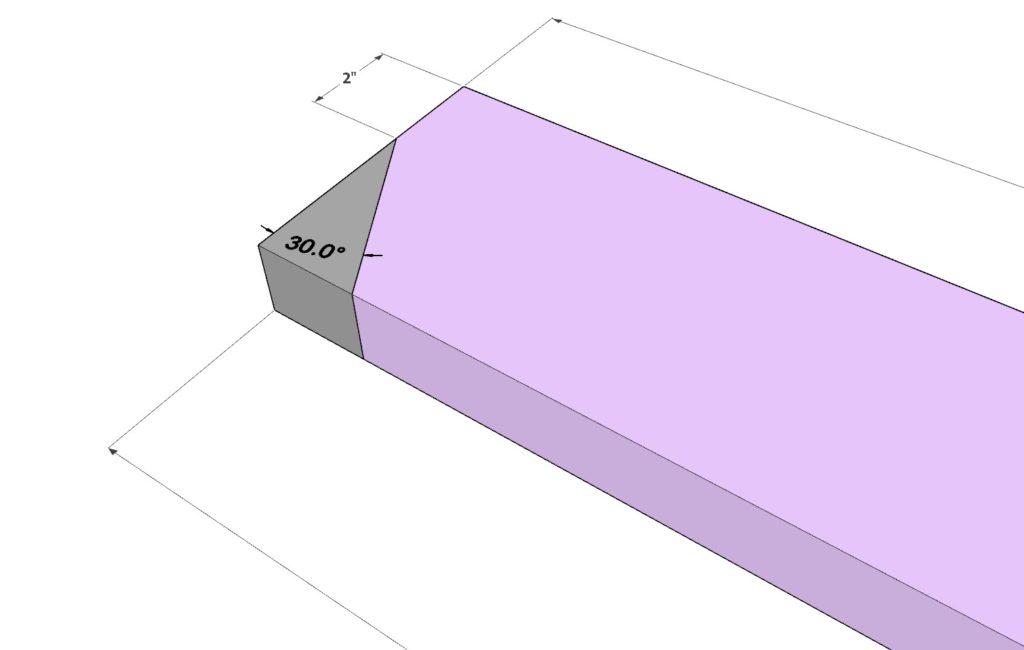
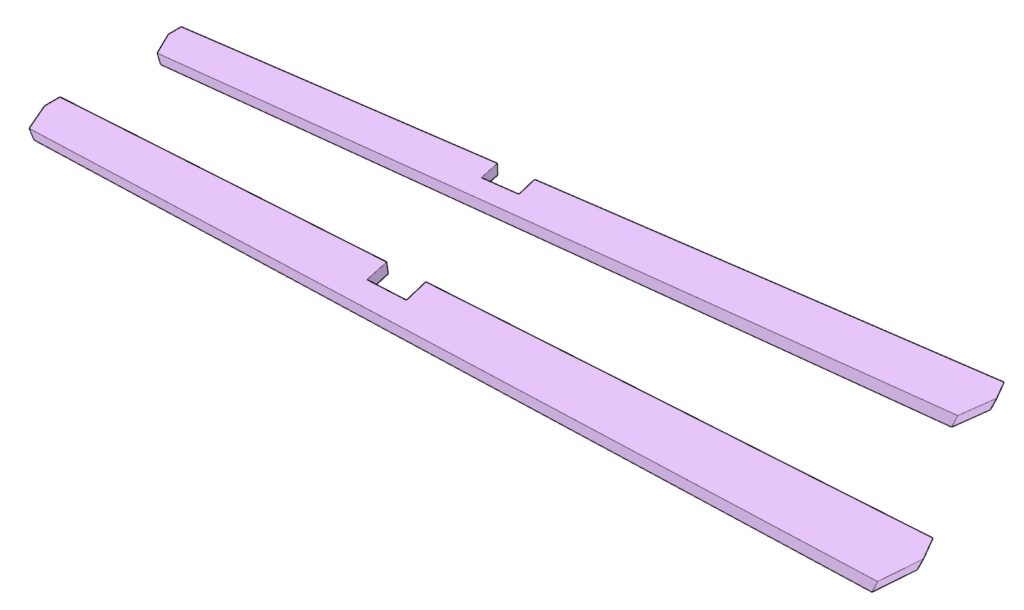
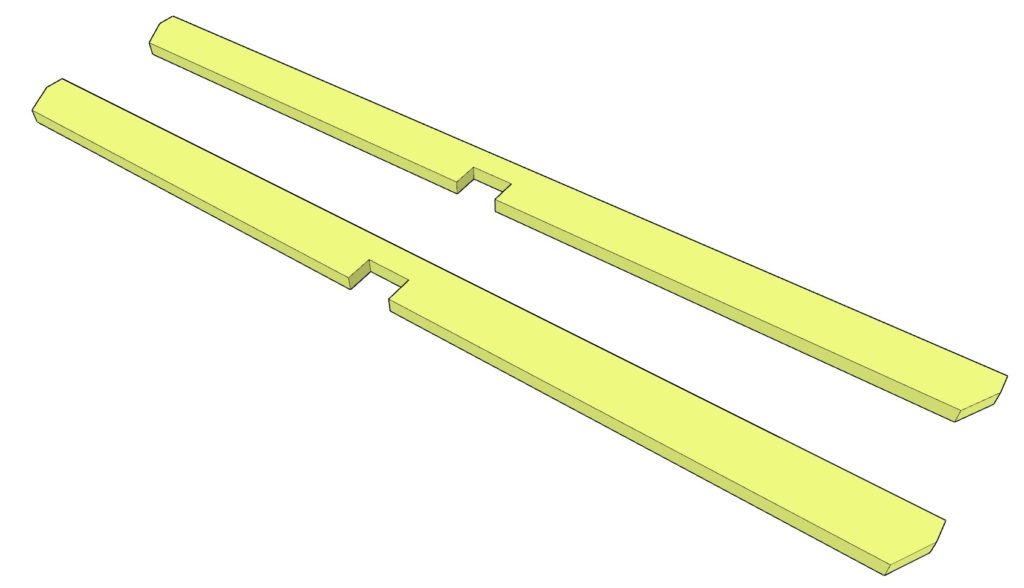
Grab a 2×6 lumber piece measuring 96 inches and precisely trim the ends at a 30-degree angle: this specific part is represented as the purple beam in our illustration. You’ll then need to carve a notch into the central section of this beam – this should measure 2-3/4 inches by 4-1/2 inches. This is where the intersection of two pairs of 2x6s will be perfectly situated to create a robust ‘plus’ shape for ensured support.
For this notch, you can either use a combination of a hand saw and chisel or utilize the time-efficient sliding feature on your miter saw. Remember to set your saw to the correct depth, then slide your saw back and forth while cautiously adjusting your 2×6 on each pass until your notch reaches the perfect size. You’ll need two of these purple beams.
2.2 Designing the Secondary Supports
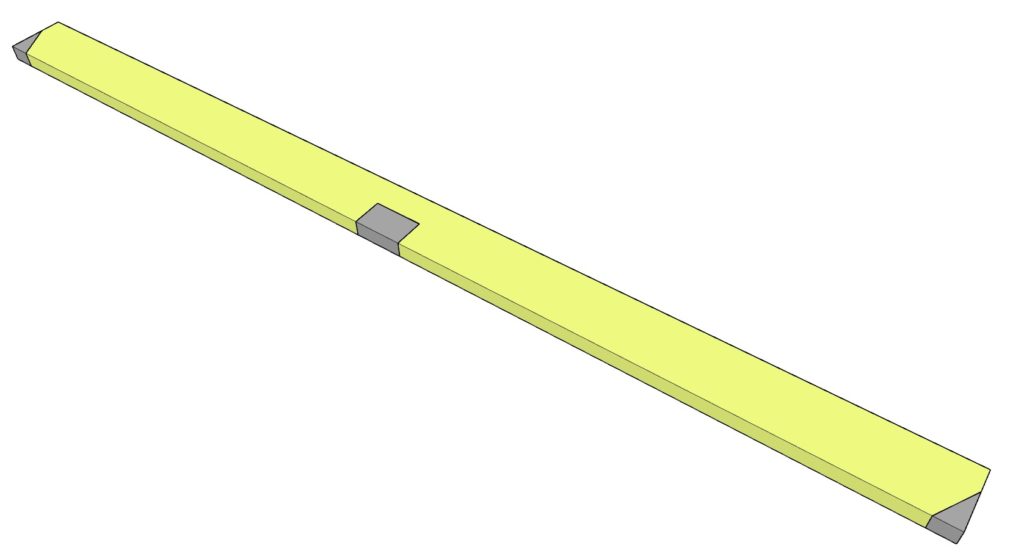
Next, you’ll be crafting a set of similar supports, but with a slight variation. Just like before, you’ll have 30-degree cuts on each end and a similar central notch. However, for these beams, make sure the 30-degree cuts are on the opposite side of the beam, shown in the illustration by the yellow beams.
2.3 Creating the Spacers
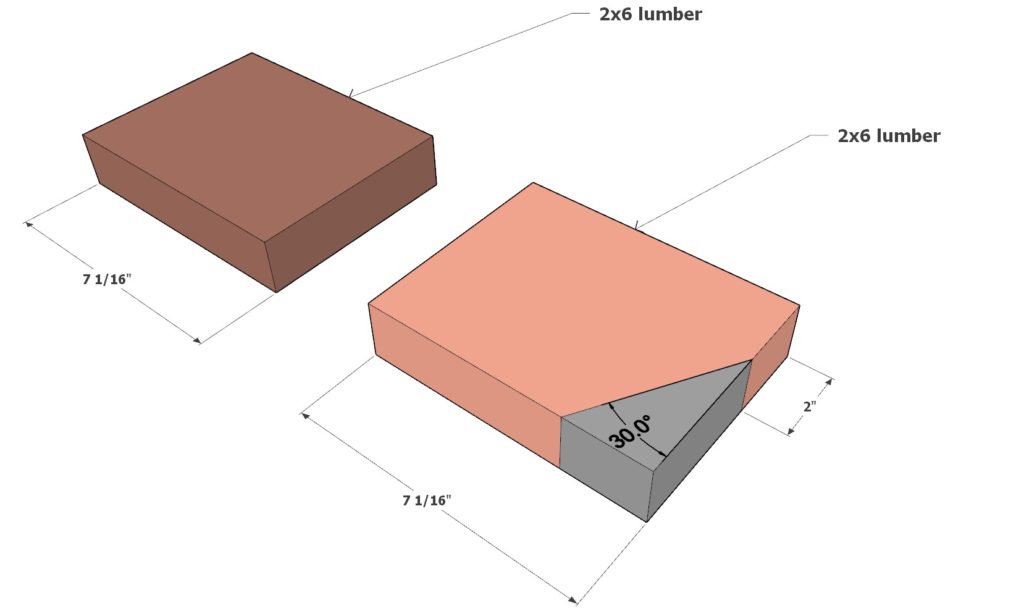
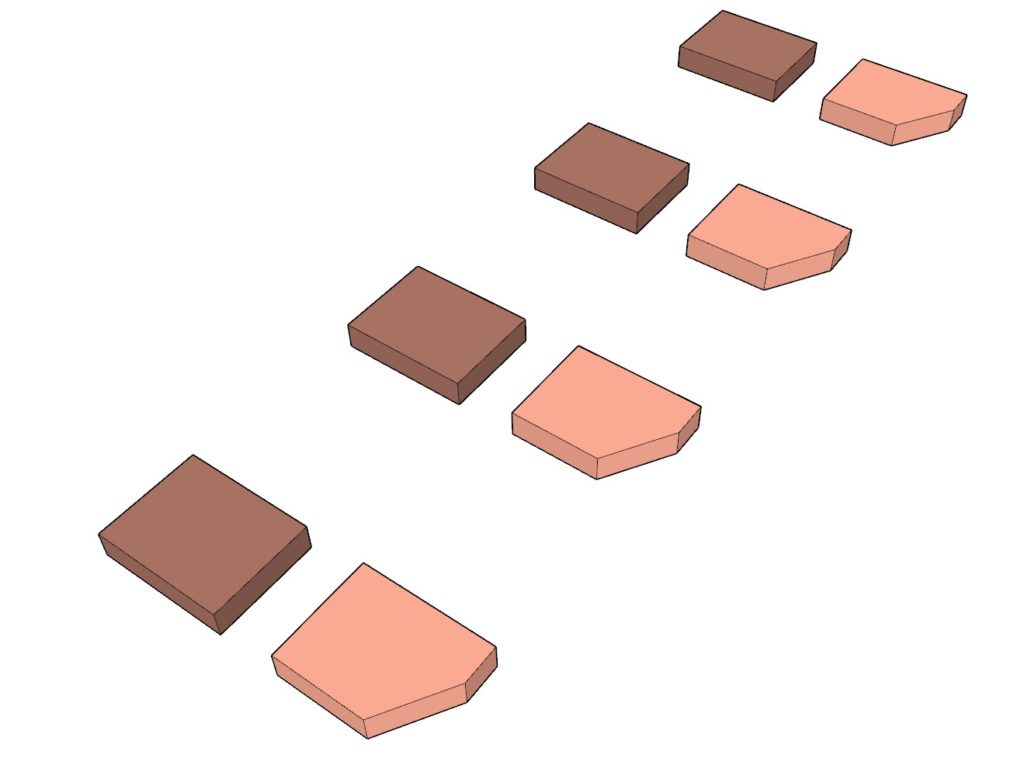
Now, let’s create both styles of spacers. These shorter parts are fashioned from 2×6 lumber and they are represented in the instructional diagrams in peach and brown color. These items are 7-1/16 inches in length, but, unlike the brown, make sure one end on each peach-colored spacer is cut at a 30-degree angle.
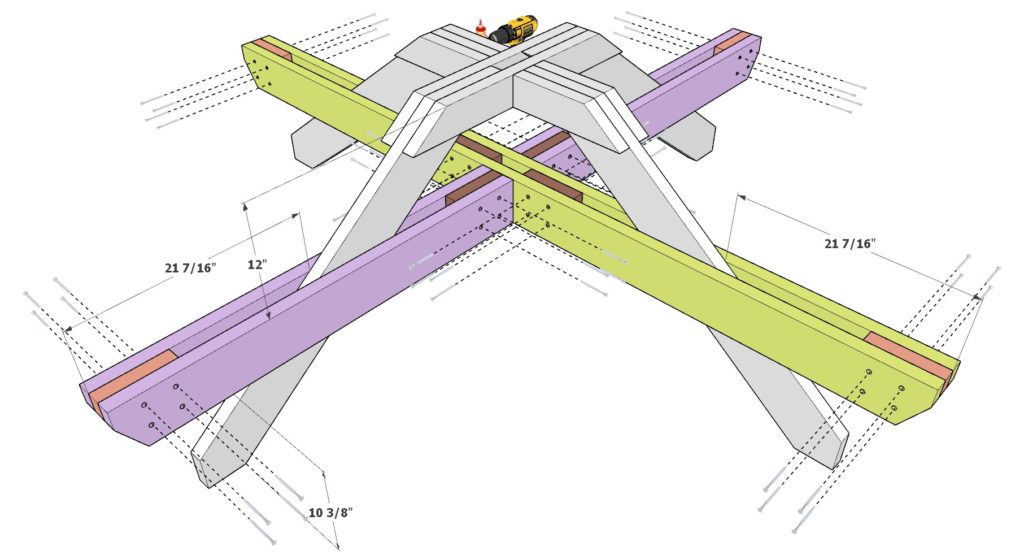
2.4 Assembling the Seating Cross Beam Supports
Finally, it’s time to piece it all together! Use the last diagram from this step for visual guidance. Apply wood glue, predrill holes, and secure everything together with 3.5-inch screws.
Step 3: Crafting the Seating Lumber
We’re transitioning now into creating the seating arrangements for your octagonal picnic table.
3.1 Cutting Seating Planks
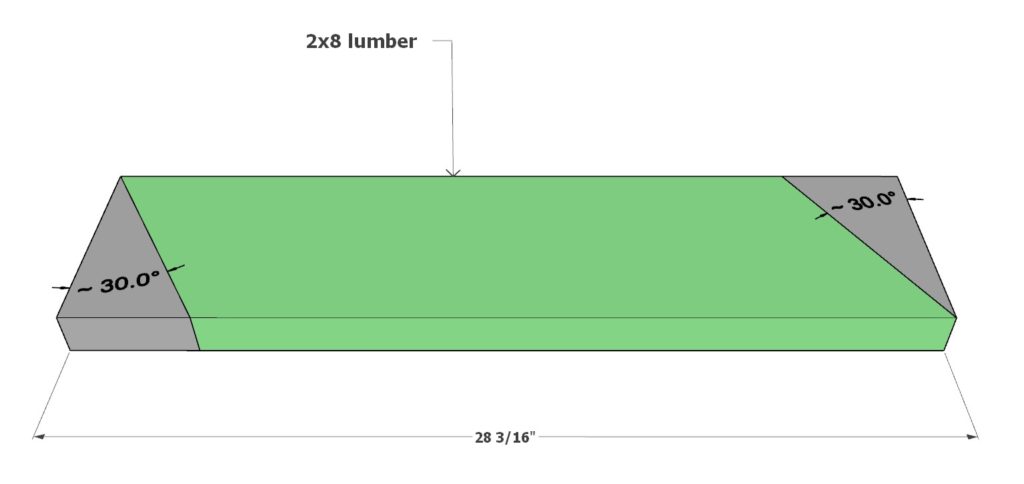
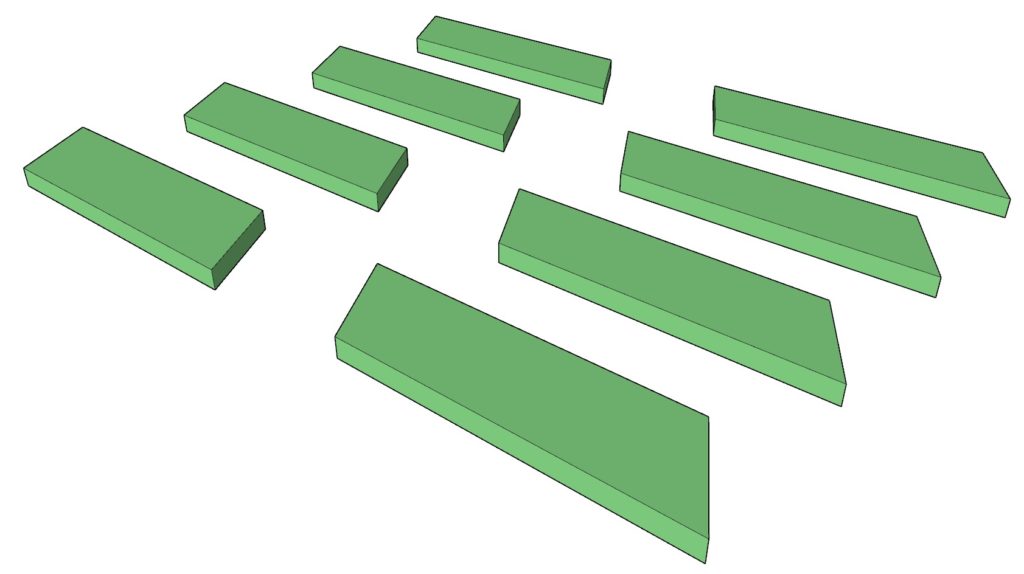
The first seating plank we will work on is sketched in green and is crafted from a 2×8 lumber piece, cut to a length of 28-3/16 inches. Trim both ends, specifically at a 30-degree angle as illustrated. Make eight of these components.
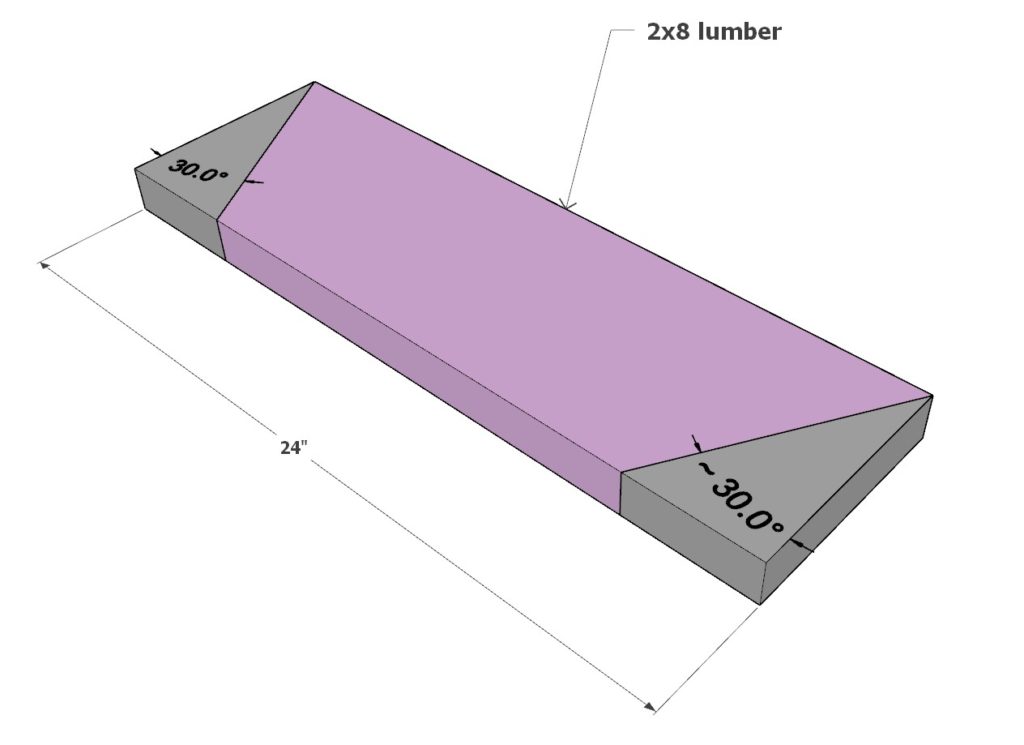
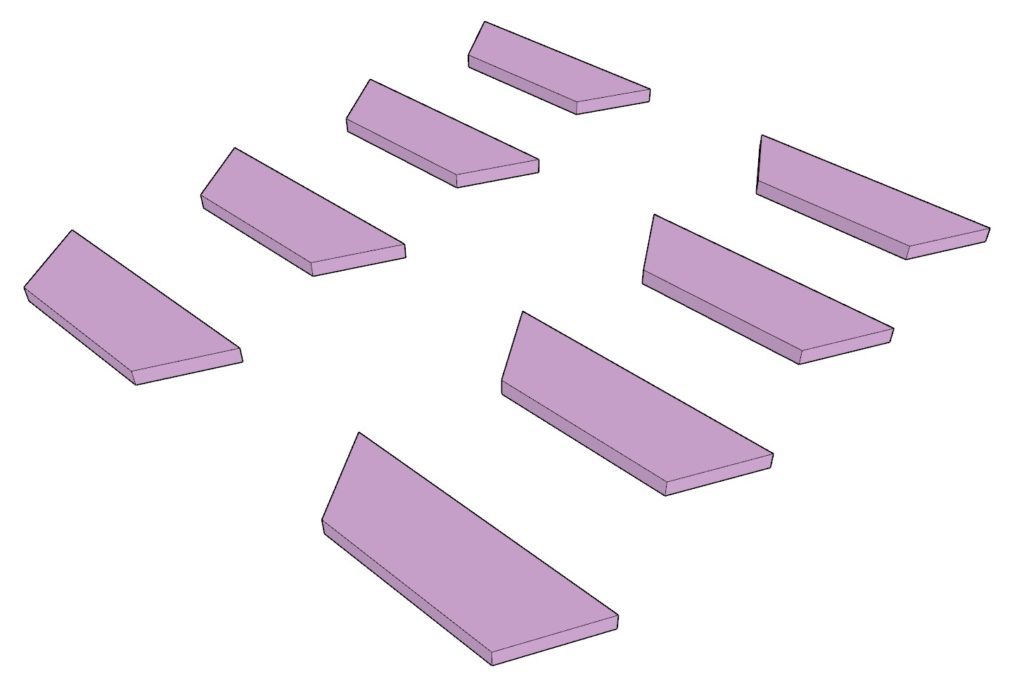
Next, move on to making a shorter 2×8 seating plank. Take a 24 inch 2×8 board, cut the ends at 30-degrees as indicated in the diagram depiction of the purple colored 2×8 lumber piece. Make eight of these.
3.2 Crafting the Connecting Pieces
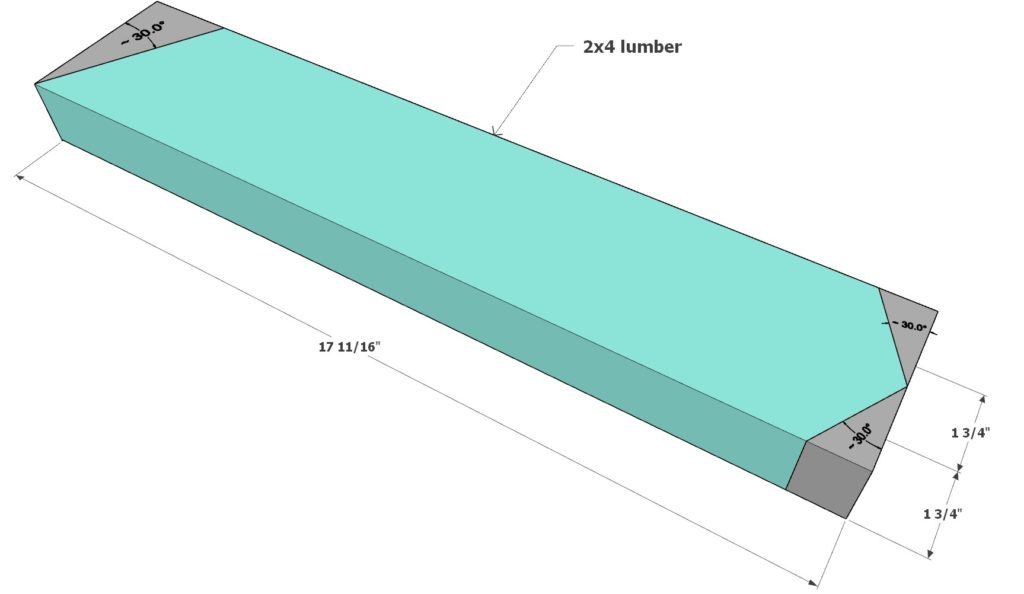
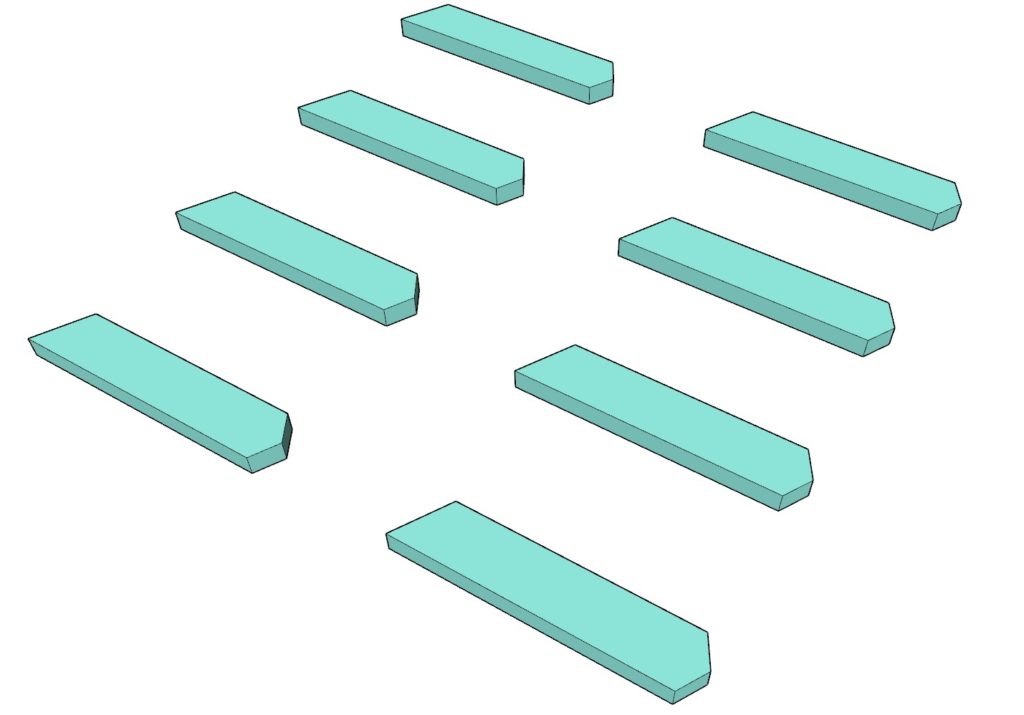
The connecting parts of the seating are displayed as teal-colored pieces and are made from 2×4 lumber. These have a length of 17-11/16 inches. Follow the pattern outlined and cut the ends at respective angles: 30 degrees at one end and two 30-degree cuts on the other to create a pointed edge. Make eight of these connectors.
3.3 Assembling the Seating
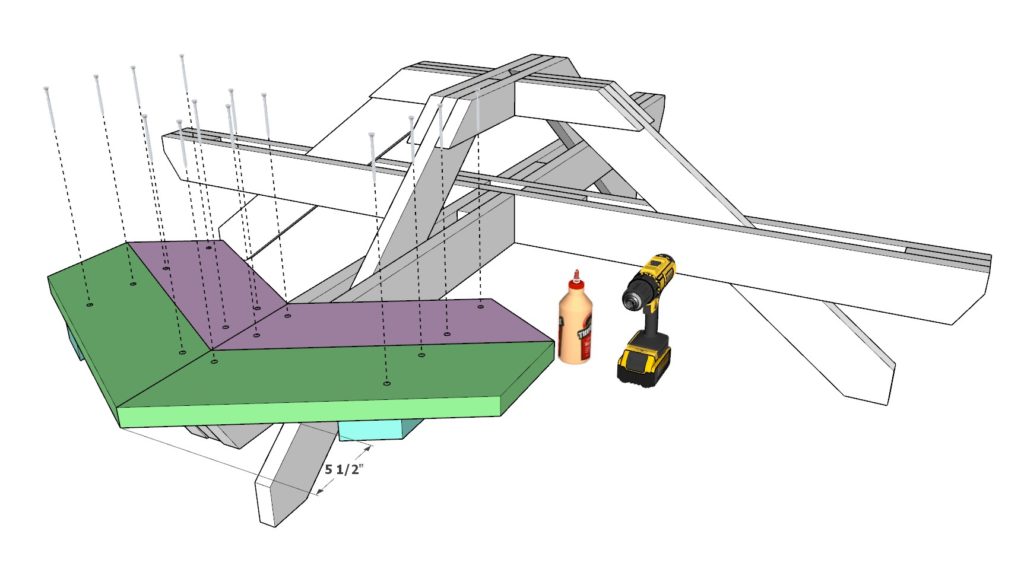
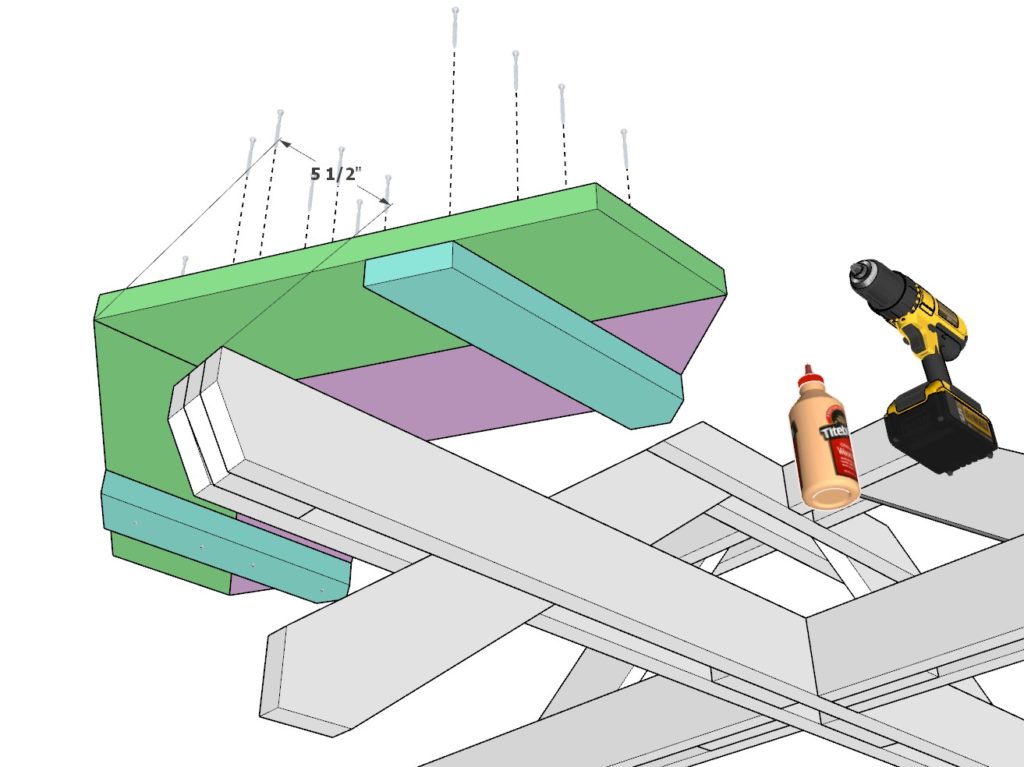
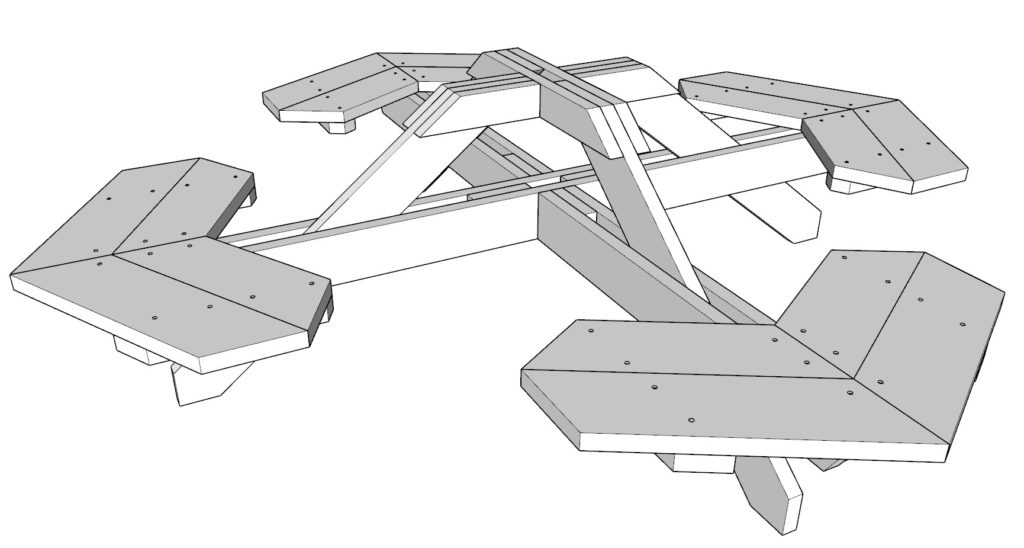
Upon obtaining all these units, arrange them in the shape of a butterfly as demonstrated below. Utilize 3.5-inch screws to secure the components where they attach to the main frame while using 2.5-inch screws to bind the smaller teal-colored pieces to the larger purple and green sections of the seating. The use of the 2.5-inch screws will guarantee that no screws extend beyond the wood, offering a smooth, prick-free seating experience.
Replicate this process for all four ‘butterfly’ seats.
Step 4: Crafting and Installing Cross Support Beams
These essential parts ensure your seating remains well supported and can comfortably bear heavy weight.
4.1 Cutting Support Beams
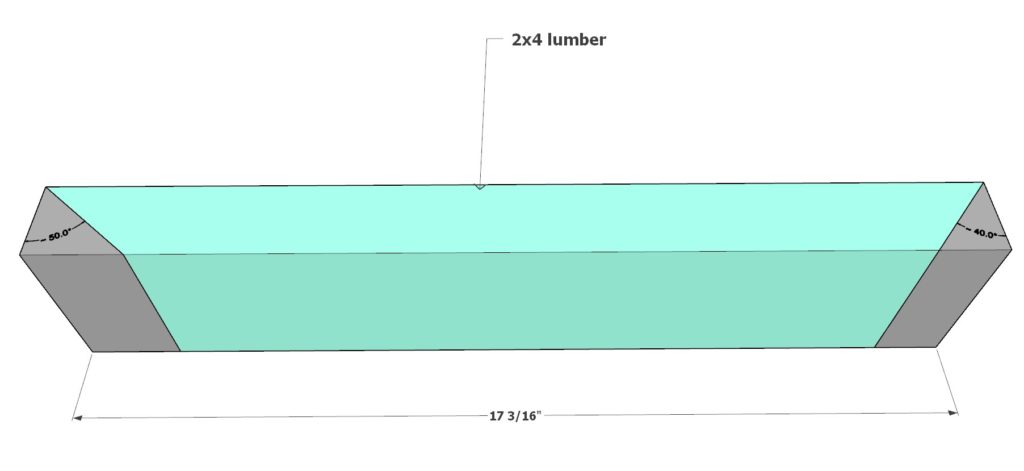
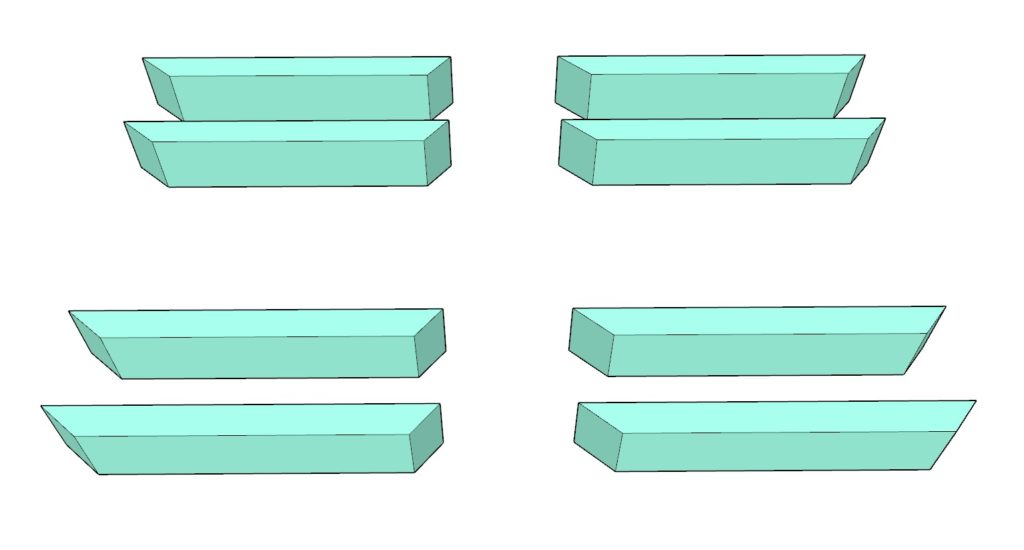
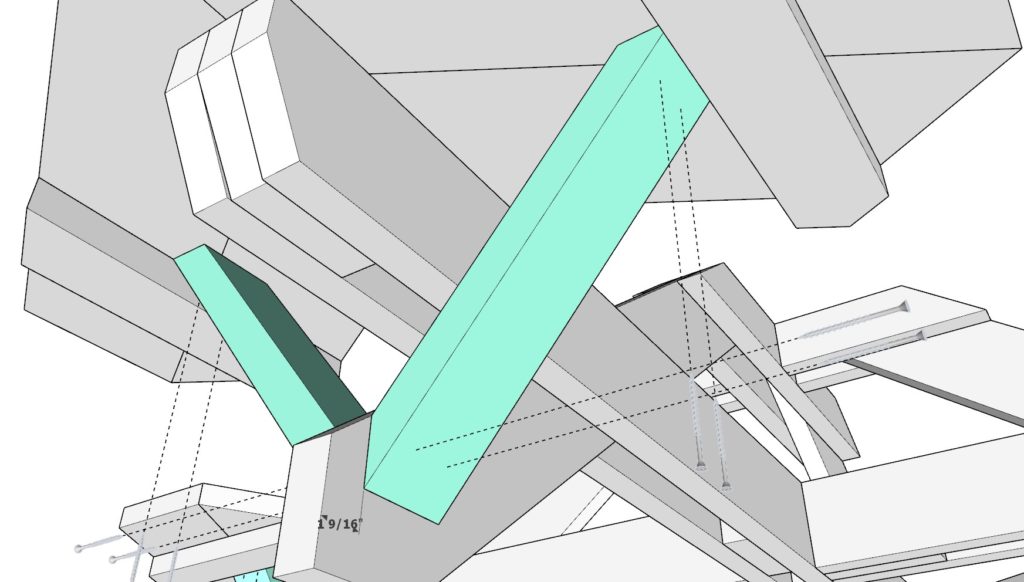
First, take 2×4 lumber and cut pieces to a length of 17-3/16 inches. Pay close attention to the diagram that guides the cutting of the beam ends: the first cut is at 50 degrees and the other at 40 degrees. Keep in mind that the cuts should extend through the thicker section of the 2×4. You’ll need eight of these beams.
4.2 Installing Support Beams
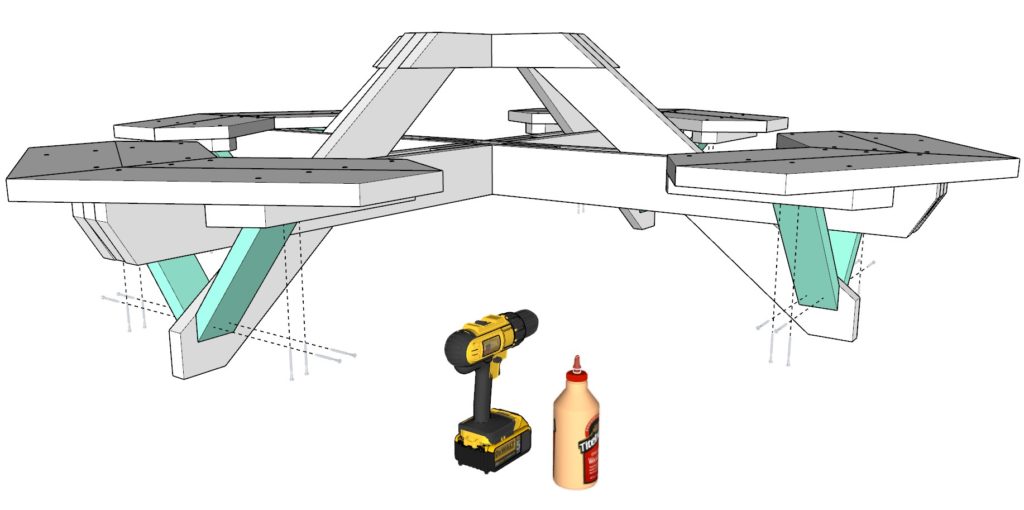
Now it’s time to integrate these into your structure. These supports need precise positioning against the two-pointed support pieces from the previous step. This ensures maximum weight support.
To secure these supports, pre-drill holes, apply a liberal quantity of glue and fasten them safely with 2.5-inch screws. This step enhances stability, ensuring that your Octagonal Picnic table is sturdy and safe.
Step 5: Constructing the Table Top
Now it’s time to create the crowning glory of your project, the tabletop.
5.1 Cutting Lumber for Top
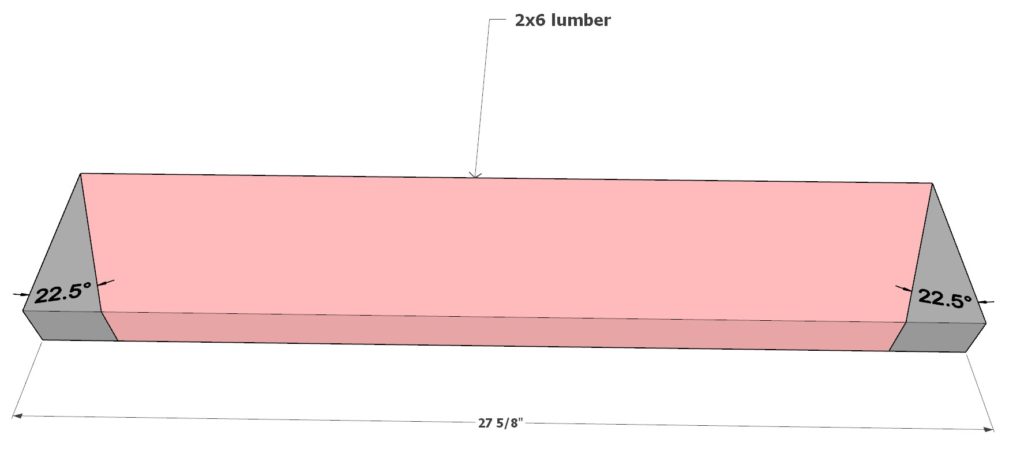
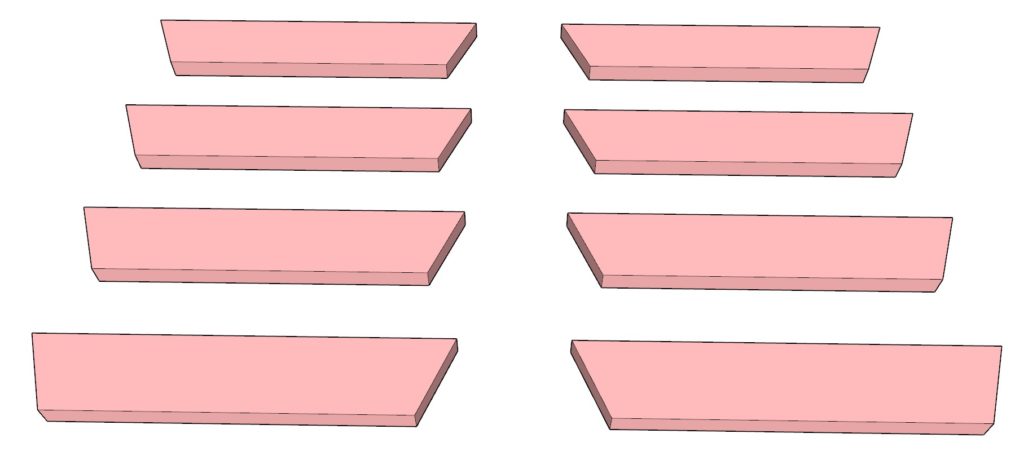
To kick off this step, take a 2×6 piece of lumber that’s 27-5/8 inches long. Make 2 cuts on both ends at an angle of 22.5 degrees respectively as shown in the pink diagram. You’ll need to prepare eight of these pieces.
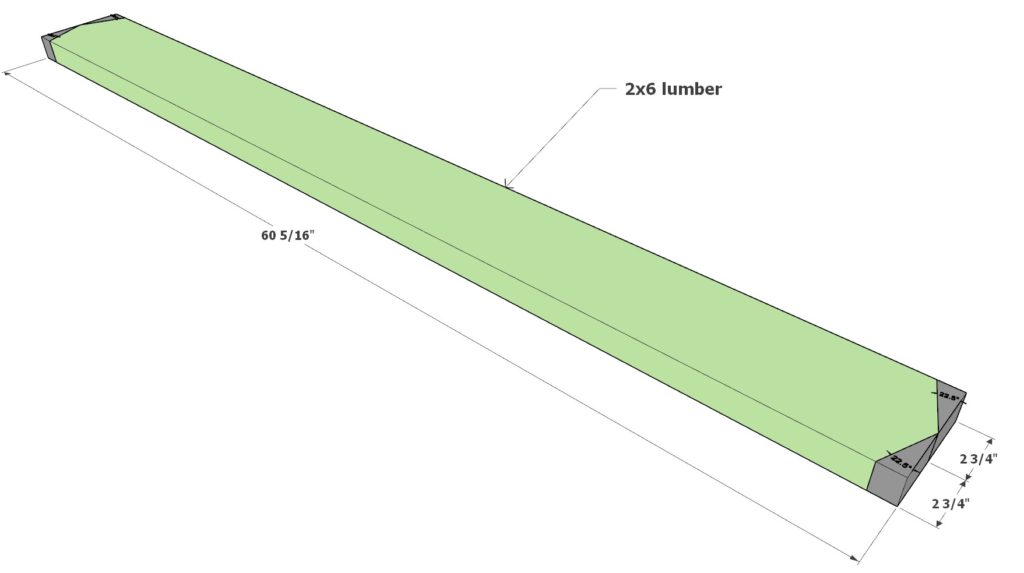
Next, find a longer 2×6 lumber piece that measures 60-5/16 inches. Proceed to cut both ends to a point by making two cuts at 22.5 degrees. You will only need to make one of these components, indicated by the color green in the diagram.
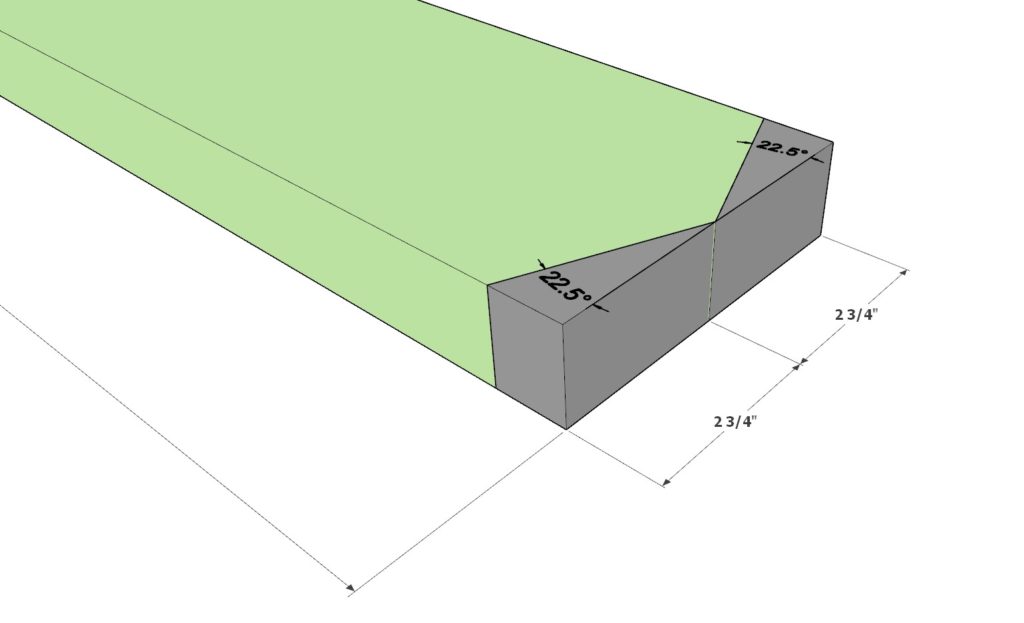
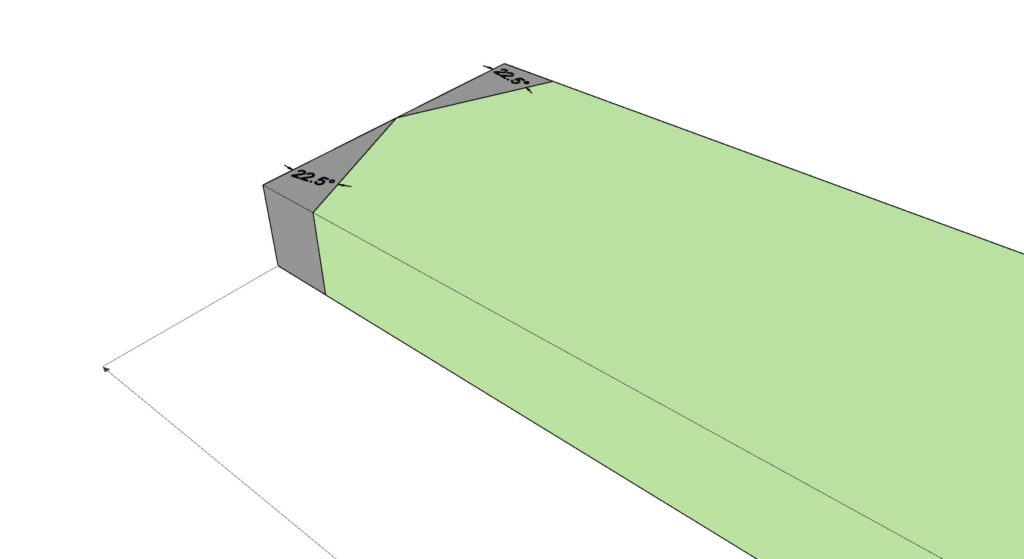
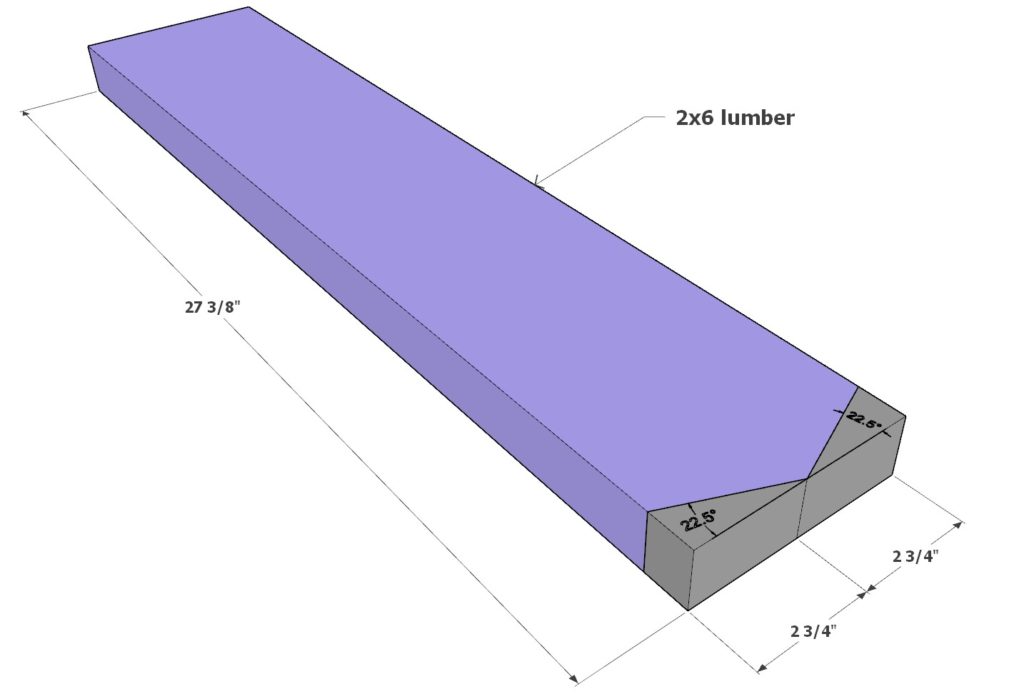
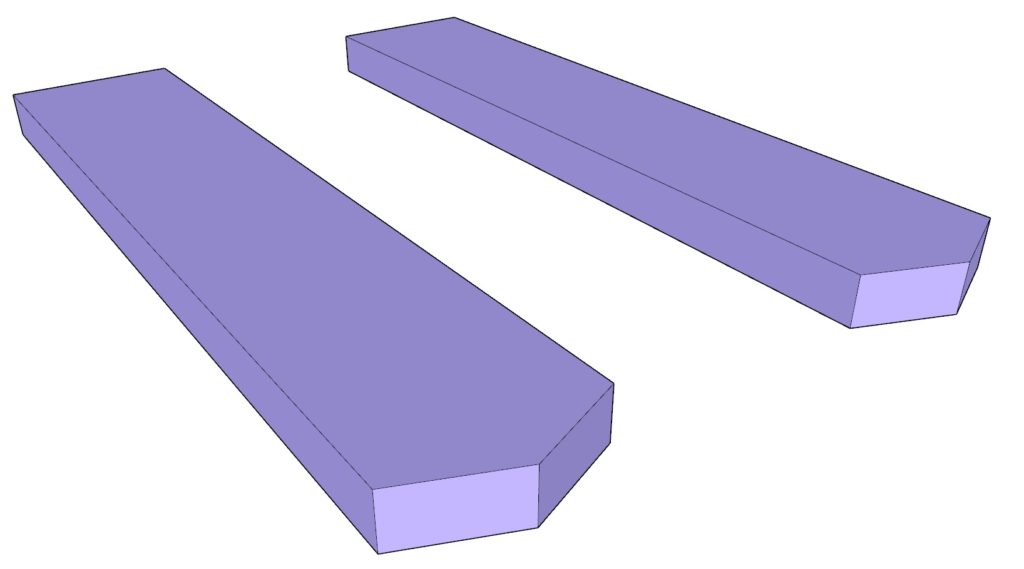
Following this, take another 2×6 lumber piece but this time 27-3/8 inches long. Cut one end to a point by cutting off two sections at 22.5 degrees. You’ll want two of these segments, represented by the color lavender in the diagram.
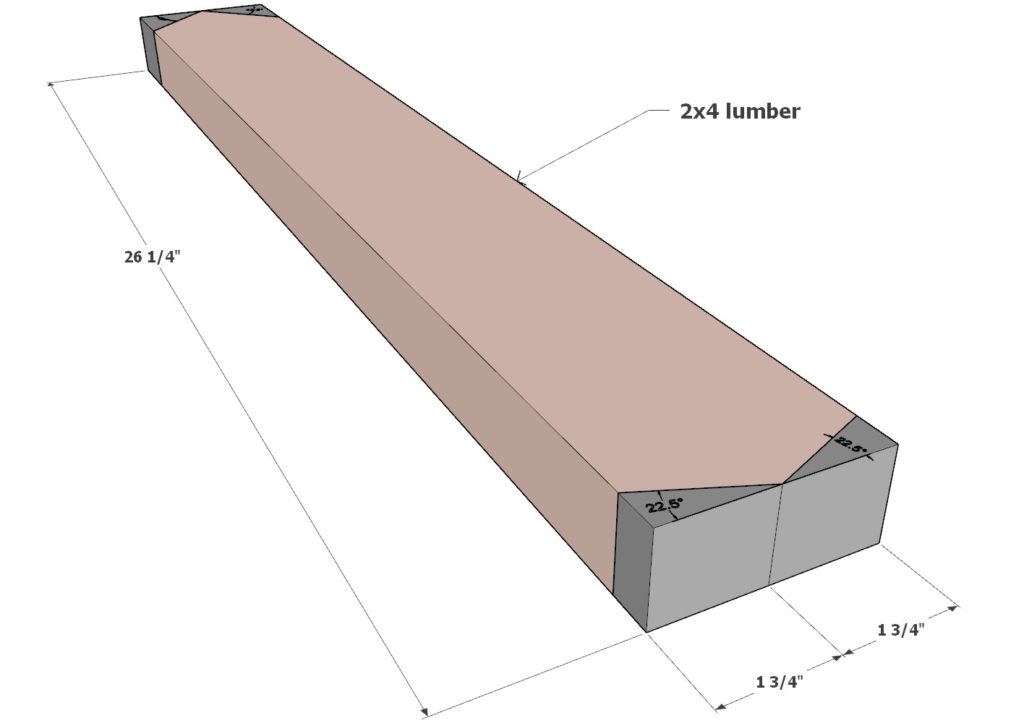
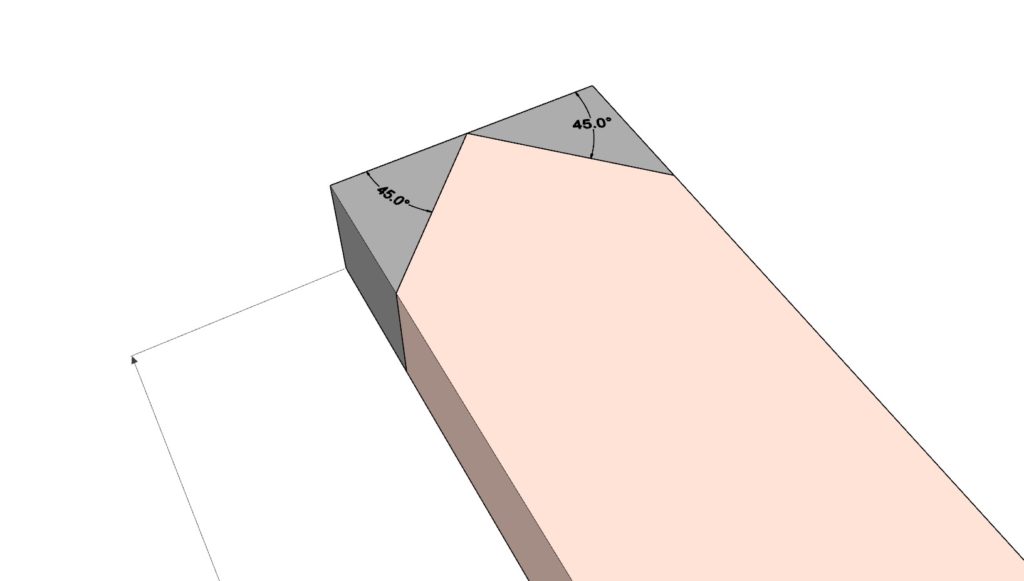
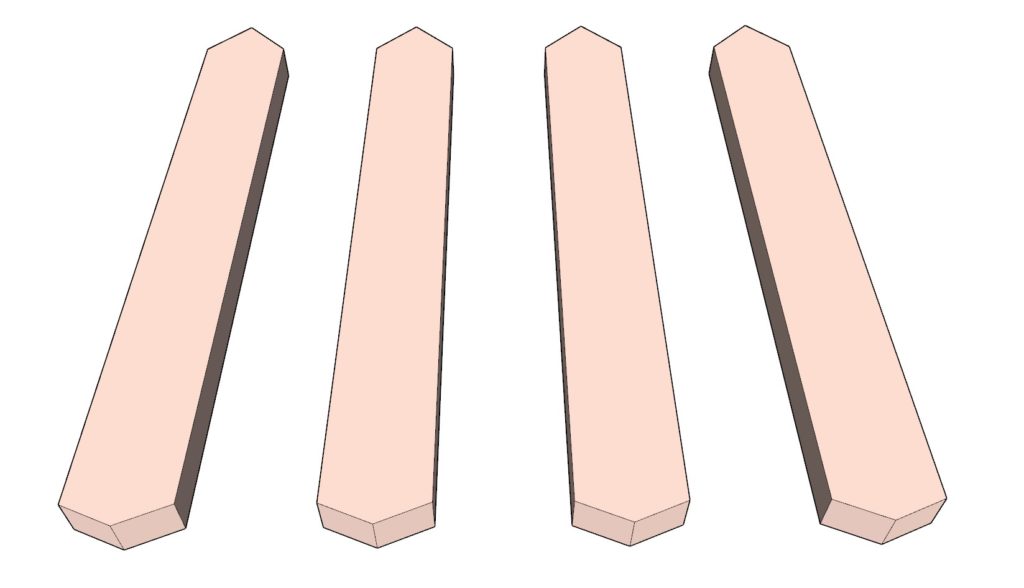
Lastly, get a 2×4 lumber piece of 26-1/4 inches in length. Trim both ends to a point – the first end should have two 22.5-degree cuts and the other two 45-degree cuts. Craft four of these pieces represented in light brown.
5.2 Assembling Table Top
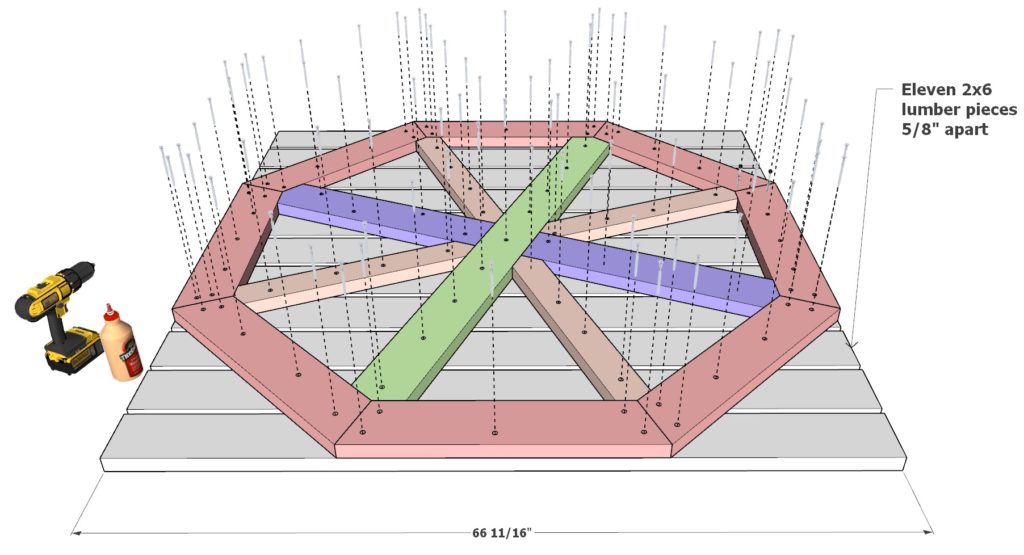
Once you have all these sections, align them over eleven 2×6 boards that are at least 66-11/16 inches long. These are placed 5/8 inches apart and serve as the top for your tabletop.
Join all these pieces together using a liberal amount of wood glue, then secure it all with 2.5-inch screws. The glued areas should bond fully.
5.3 Finalizing Table Top
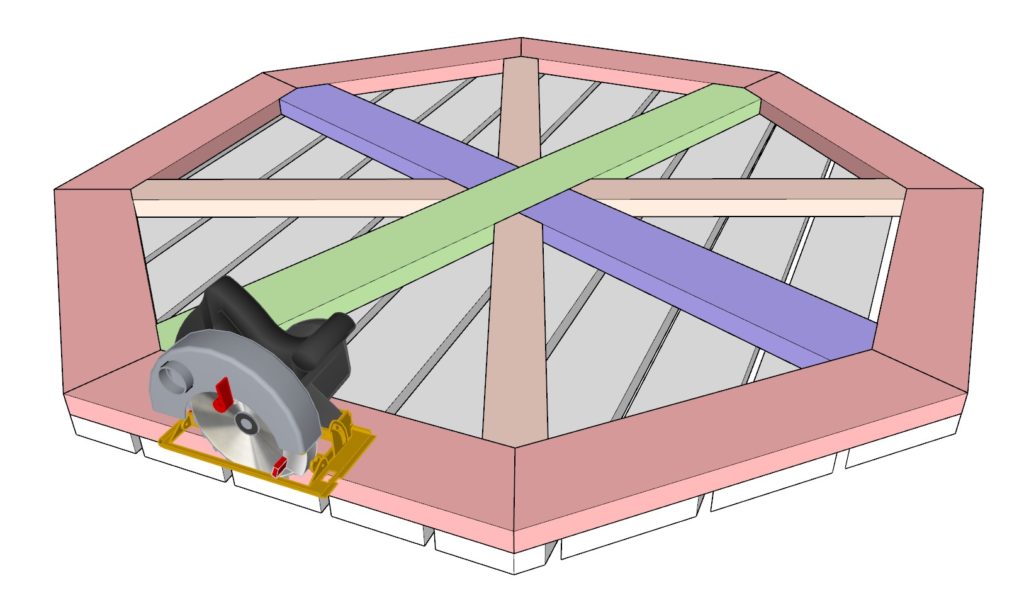
The final task in this step requires you to cut out the tabletop shape. By using a handheld or circular saw, trim off all parts of the 2×6 lumber pieces that do not conform to the octagonal outline of the table top.
Step 6: Attaching the Table Top to the Base
Let’s bring everything together now by securing the tabletop to the base.
6.1 Positioning the Base
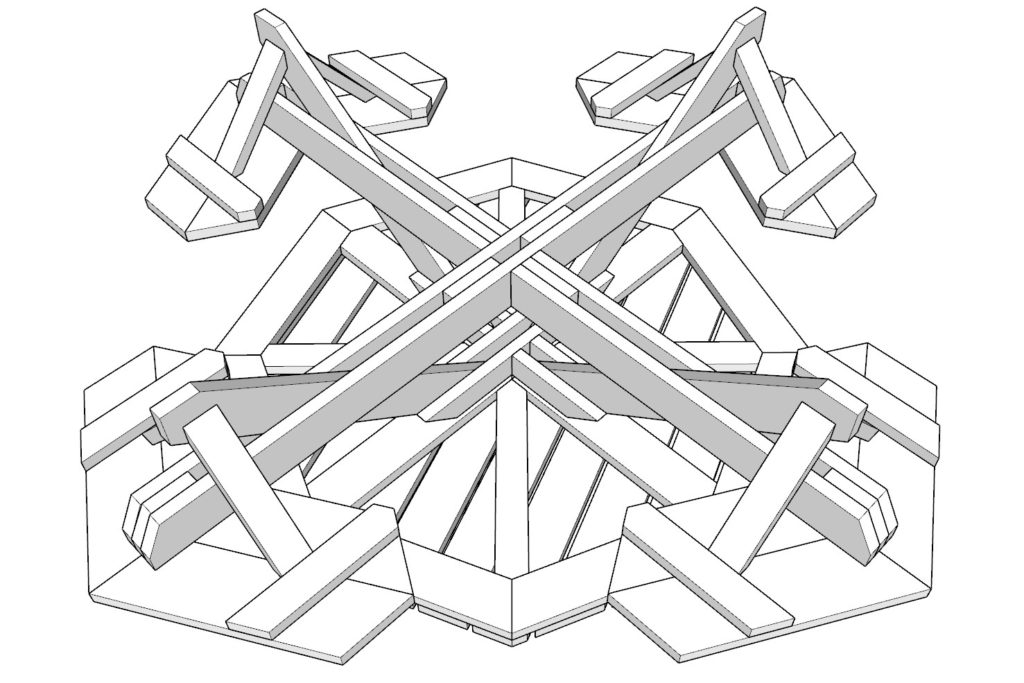
Start by flipping the tabletop upside down to easily access the base. Carefully position the table base in alignment as depicted in the first diagram.
6.2 Secure the Top to the Base
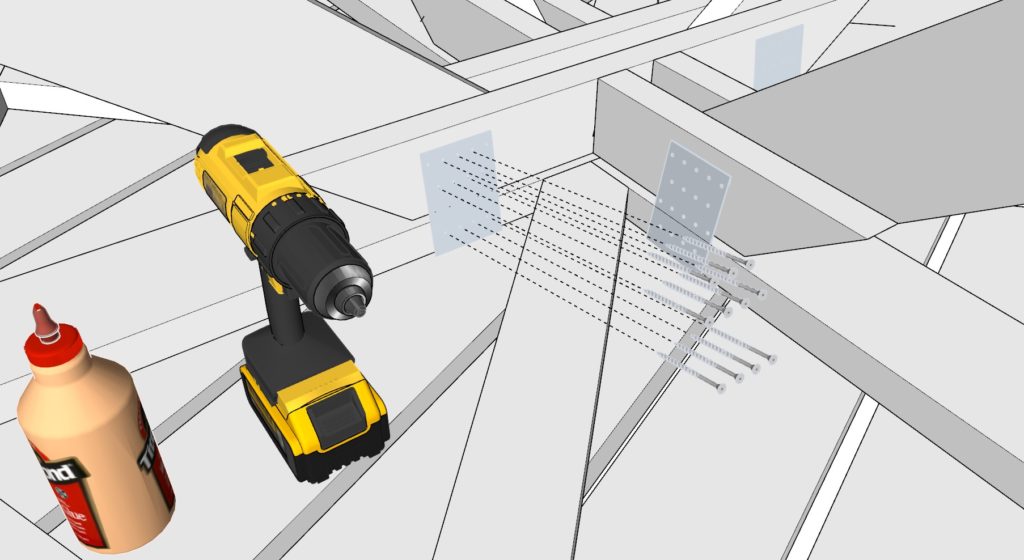
Next, secure the base to the table top using common metal plates. My diagram suggests rectangular plates, but they don’t have to be that shape specifically. Screw these plates into the proper positions thereby binding all the components tightly together.
While the plates hold the table top securely, you may opt for an extra layer of robustness by applying glue to all the joint areas. However, ensure the plates themselves are free from glue.
There may be alternative methods to affix the top to the base, but using metal plates not only provides strength but also remains a practical and simple process. They are vital in maintaining the integrity of your Octagonal Picnic Table.
Step 7: Adding the Finishing Touches
In this final step, we transform function into art by applying the finishing touches.
7.1 Preparing the Surface
Sanding is the first thing we’ll discuss. Begin with a coarse-grit sandpaper (60-80 grit) to level off uneven areas and remove any ‘fuzz’. After that, switch to a medium grit (100-150) to remove visible scratches and marks. And finally, use a fine-grit sandpaper (180-220) to create a smooth surface suitable for painting or staining.
TIP: Always sand in the direction of the wood grain to avoid scratching the surface. Clean the table with a slightly damp cloth to remove any sawdust off the surface.
7.2 Covering Screw Holes
To cover screw holes, you can use wood filler, available in a variety of shades to match your wood. Apply the wood filler into the holes using a putty knife and let it dry. Once it’s dry, sand over it for a smooth finish.
7.3 Round off the Legs
To prevent splintering of wooden legs over time or during movement, consider rounding off the legs. You can do this using a router with a round-over bit, which trims the sharp corners off the edges, leaving a neat, rounded finish.
7.4 Applying Paint/Stain
Choose an exterior-grade paint or stain specifically designed for outdoor wood surfaces. If you choose to stain your table, try to seal it with a transparent varnish to protect it from the elements. Applying it in thin, even coats will yield the best results.
When painting, it is advisable to use a primer first. This will create an ideal surface for the paint to adhere to and provide a longer-lasting finish. Always allow any paint or stain to dry fully as per product instructions.
TIP: Remember, outdoor paint or stain always works best for an outdoor table as they can withstand changing weather conditions.
7.5 Final Inspection
The last thing to do is to thoroughly inspect your table. Ensure all screws are tight, all components are secure, and the finish is flawless.
Remember, taking the time to add these finishing touches not only enhances the table’s appearance but it also ensures its longevity. A well-made and well-maintained DIY octagonal picnic table can be a point of pride for many years to come.
