The Ultimate DIY Playhouse Plan: Unveiling the Dream
Welcome, DIY enthusiasts, to the journey of a lifetime – a journey to make childhood dreams come true! Imagine the spark in your little one’s eyes as they behold their new kingdom – a place of boundless imagination, creativity, and joy. This isn’t just a DIY project; it’s a labor of love, an investment in precious memories, and a gift that keeps on giving. Let’s unveil the dream together – your dream of creating the ultimate DIY playhouse.
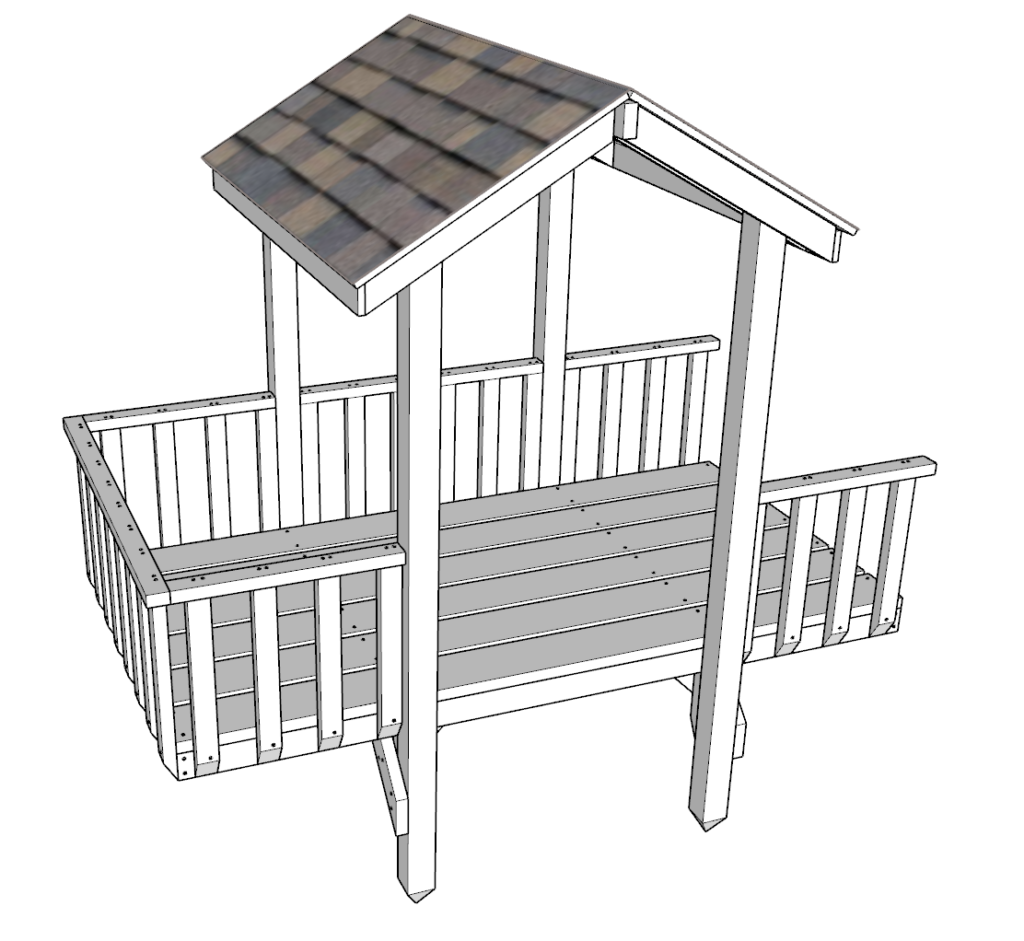
Navigating the Adventure: Understanding the Playhouse Layout
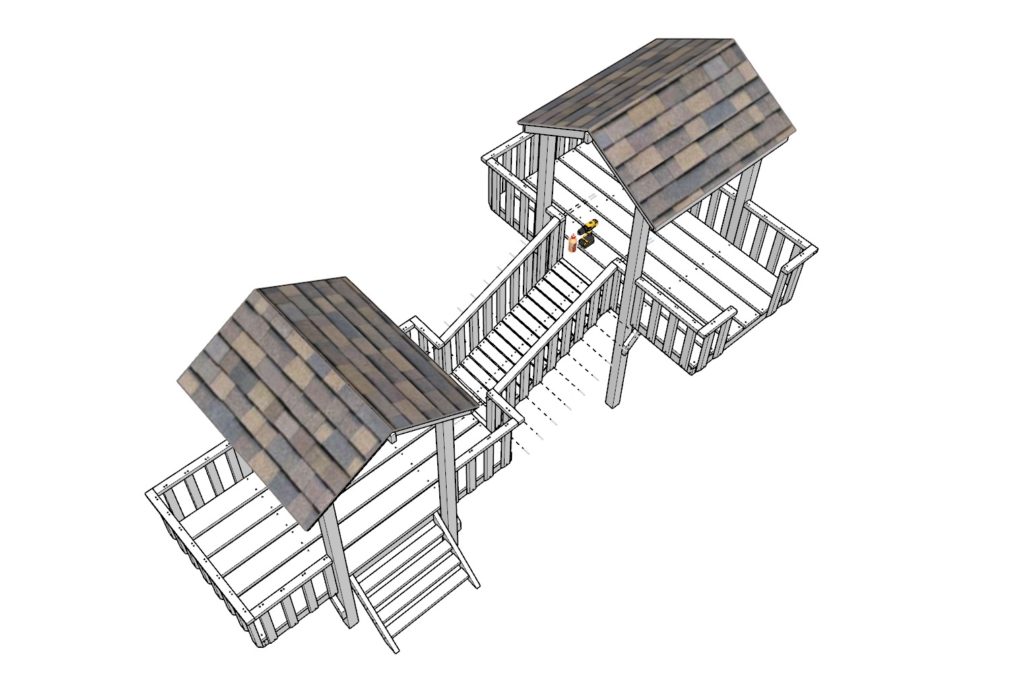
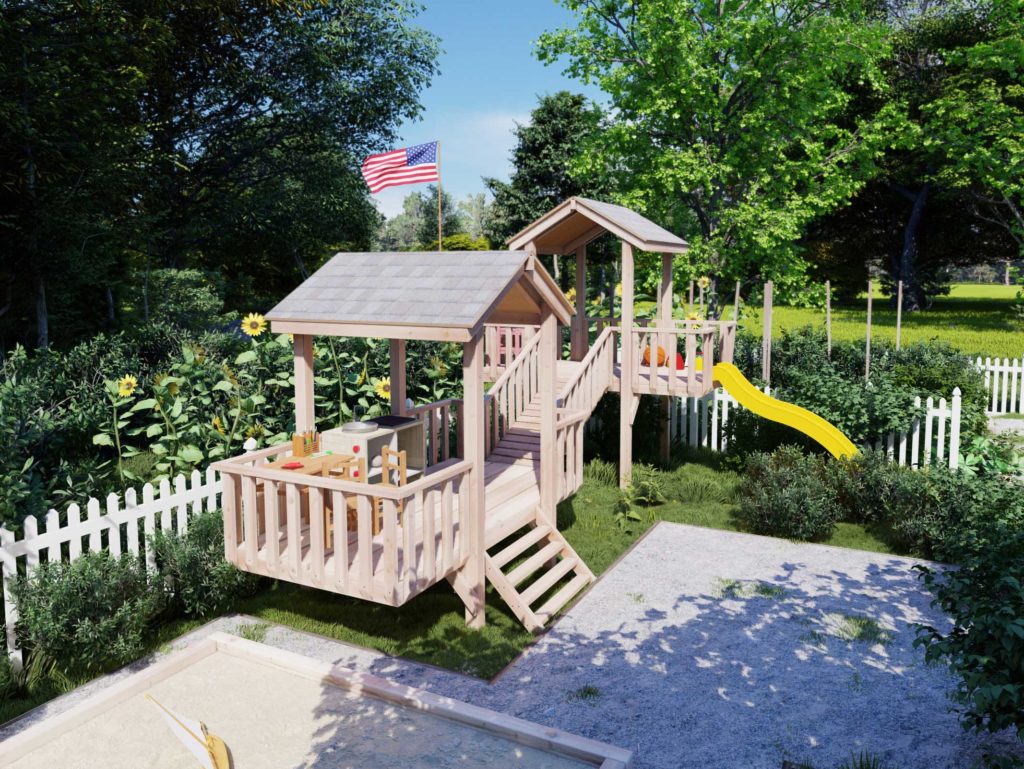
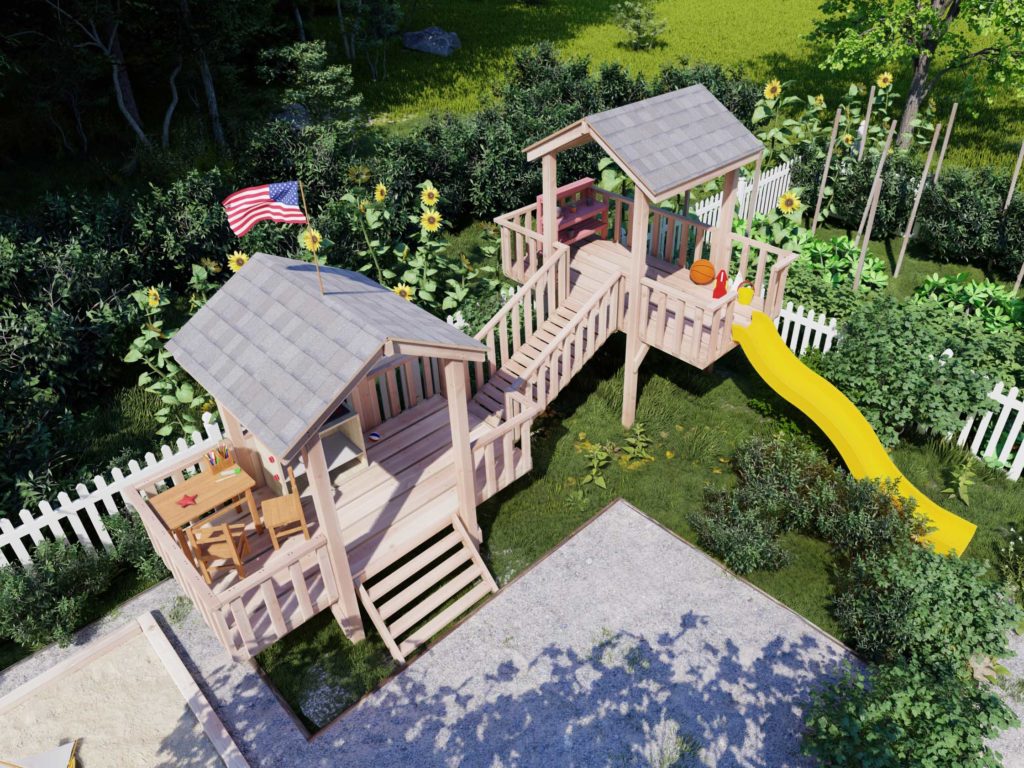
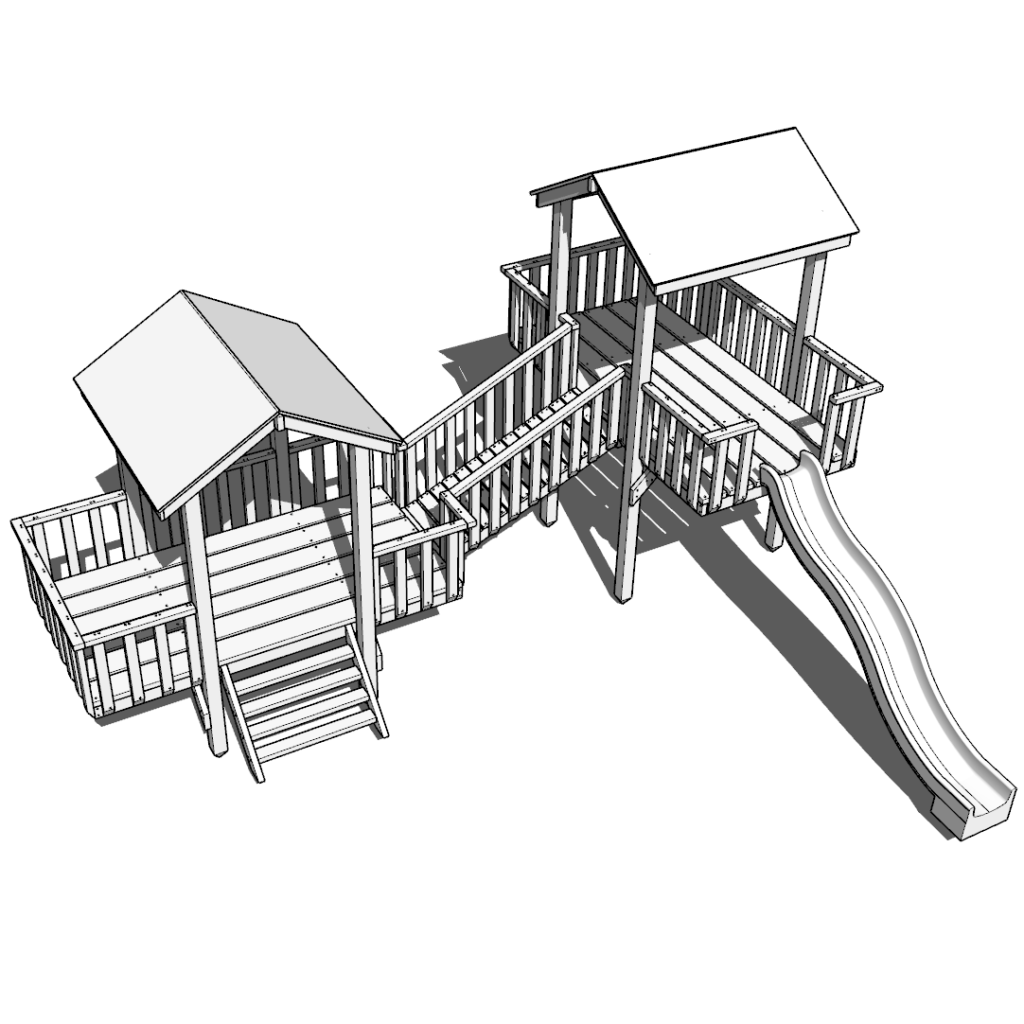
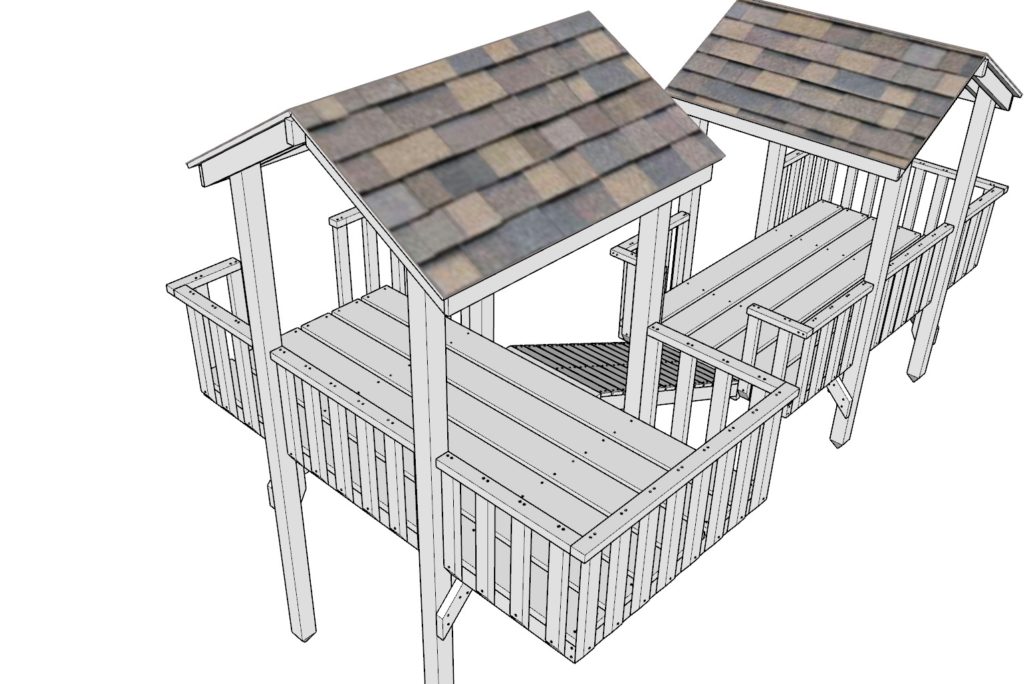
Our DIY playhouse plan unfolds an epic adventure. Built with two main structures, each providing a unique space for children to play, learn, and let their imagination run wild. The playhouses are connected by a charming wooden bridge, and a fun slide descends from the higher structure, creating an engaging and interactive play area that kids would love. But that’s not all – this design ensures to make the most out of every square foot of the playhouse, inside and out.
The Lower Playhouse: A Cozy Nook for Play and Learn
Picture a world within a world, where your child can escape into a realm of make-believe, engrossed in play and learning. The lower playhouse is a cozy nook designed to cater to this need. It’s an ideal setting for a pretend tea-party or a secret clubhouse meeting. A small wooden table and chairs provide space for activities, and the storage cubby keeps their favorite toys and crafts within reach.
Building Bridges: Linking Play and Imagination
No castle is complete without a bridge! Our playhouses are linked by a charming wooden bridge, adding a dash of adventure and imaginative play to the structure. It’s not just a bridge, but a portal into a world of make-believe, be it an escape from an imaginary dragon or a passage to a far-off land.
Sliding into Fun: Integrating Play Elements in the Design
At the heart of every great playhouse is fun, and what could be more fun than a slide? The upper playhouse is designed with a slide that not only offers a quick exit but a dose of exhilaration and giggles. It’s an integral part of the playhouse that enhances the fun factor and ensures kids will be entertained for hours.
Safe and Sound: Safety Features of the Playhouse
Just as every parent would want, safety is our utmost priority. Our playhouse design includes plenty of safety features to give parents peace of mind. Enclosed by sturdy safety railings, both the playhouses ensure your child’s playtime is carefree and safe. The slide attached to the higher house is designed with gentle slopes for safe landings, and the bridge that connects the houses is wide and secured to prevent slips or falls.
As Easy as 1, 2, 3: Effortless DIY with Common Construction Materials
We understand the thrill of making something with your own hands. That’s why we’ve ensured our playhouse design is as straightforward as possible. You won’t need any fancy equipment or specialized knowledge to bring this plan to life. All components are made from common construction materials like 2x4s, 4x4s, and plywood sheets, readily available at any local lumber or hardware store. Simple cuts, no complicated joins, and a step-by-step guide make this project feasible even for a beginner woodworker.
Harmonizing Your Playhouse with Nature: A Green Scene
The setting of this playhouse couldn’t be more serene and inviting. Surrounded by greenery, the playhouse is an addition that blends seamlessly with nature. It sits next to a garden of flowers and vegetables, a delightful spot for children to observe and learn about nature’s wonders. The vibrant sunflowers peeping over the white picket fence add a dash of color and cheer, enriching the scene.
Bring the Outdoors In: Garden-Themed Playhouse Décor
Keeping in tune with the outdoor setting, the playhouse can be decorated with a garden theme. Imagine miniature potted plants, flower-themed furnishings, or wall decals with garden critters – the possibilities are endless. This kind of décor not only enhances the beauty of the playhouse but also helps create a connection with the outdoors and nurtures an appreciation for nature in children.
Transform Your Backyard: The Power of a DIY Playhouse
The power of a DIY playhouse extends beyond just being a play area for your kids. It’s an addition that transforms your entire backyard, turning it into an inviting play and learning zone. With the white picket fence, lush greenery, and sunflowers creating an idyllic setting, your backyard could easily be the most loved spot in your home, where children can play, learn, and grow, and adults can find joy in watching them.
Inspiring Imagination: The Power of Playhouse Décor
The decoration and thematic elements of a playhouse can play a significant role in sparking a child’s imagination and creativity. A garden-themed playhouse, for instance, can foster an interest in nature, encouraging children to learn more about the plants and critters in their backyard. Other themes can similarly inspire a variety of play scenarios and learning opportunities.
Beyond Aesthetics: The Functional Design of Our Playhouse
Our playhouse design isn’t just about aesthetics – it’s about functionality and creating spaces that cater to a child’s needs and interests. The inclusion of a small table and chairs in the lower house and a potting bench in the upper house, for instance, serve specific purposes – to promote play and learning. These thoughtful additions make our playhouse more than just a structure – it’s a nurturing environment for your child.
Your Child's First Home: Step by Step to an Ideal Playhouse
Building your child’s first “home” is an exciting journey, and our step-by-step guide is here to ensure it’s a smooth one. With our comprehensive plan, you’ll find everything you need to craft this perfect playhouse – from a detailed list of materials and tools to 3D illustrations and precise measurements. Even if you’re new to woodworking, you’ll find our guide easy to follow.
The Joy of Building: Why DIY Playhouse Plans are Worth It
There’s a certain joy in creating something from scratch, and a DIY playhouse plan provides just that. Not only do you end up with a wonderful playhouse for your children, but you also get to experience the satisfaction of building it yourself. The process can be rewarding and educational – and who knows, it might even inspire you to take up more DIY projects in the future.
Time to Act: Purchasing Your DIY Playhouse Plan Today
Why wait when you can start creating your child’s dream playhouse today? Our DIY playhouse plan is readily available for purchase, offering a comprehensive guide to building this wonderful play structure. This plan is more than just a blueprint – it’s a gateway to countless hours of fun, learning, and growth for your child. So don’t delay – buy our DIY playhouse plan today and embark on an exciting DIY journey.

Time to build
25-35 hours
Total cost of build
About $700 (slide cost not included)
Skill level required
Beginner-Intermediate
Download the PDF plans
Outdoor wood double Kids playhouse PDF
What is included in the PDF download?
Easy to read step by step instructions
Material list
Tools needed
3D illustrations
Recommend tools for this project
- Saw (miter saw recommended for precision cuts)
- Drill
- Impact driver with bit for screws
- Sander
- wood countersink drill bit
- 7 Inch Speed Square tool
- Level
- Pencil
- Hammer
Cut list and material list
Ready to jump into your DIY project? Purchase our PDF plans here now to instantly receive a comprehensive cut list and material list. Let’s start crafting your dream playhouse today

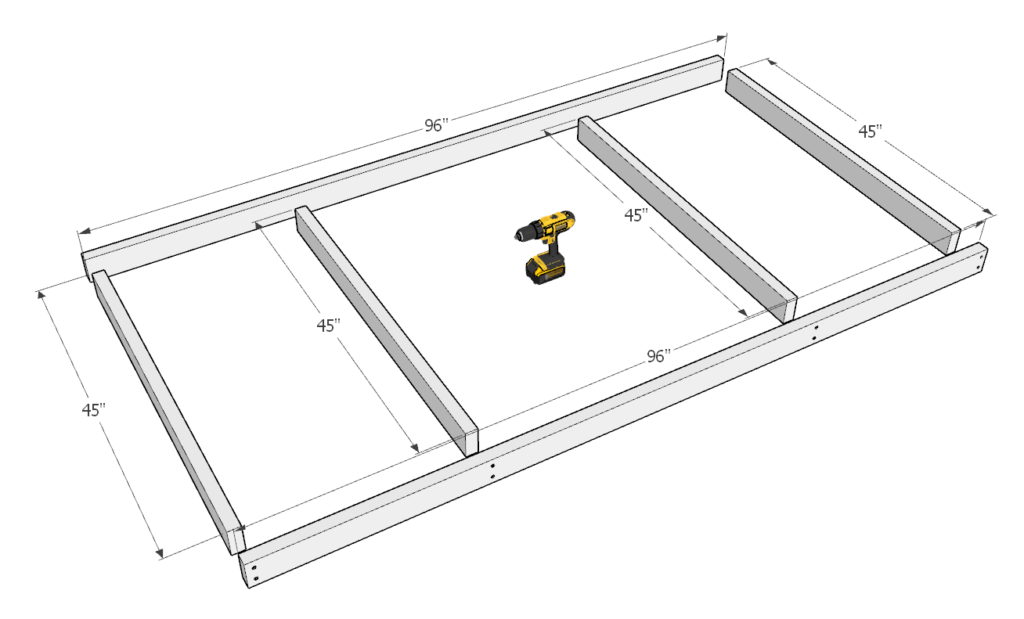
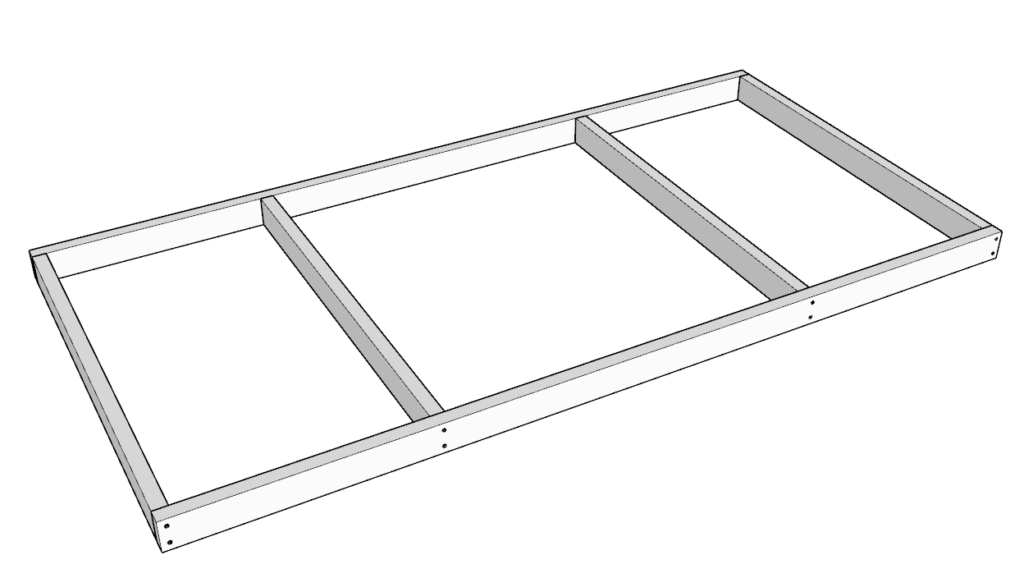
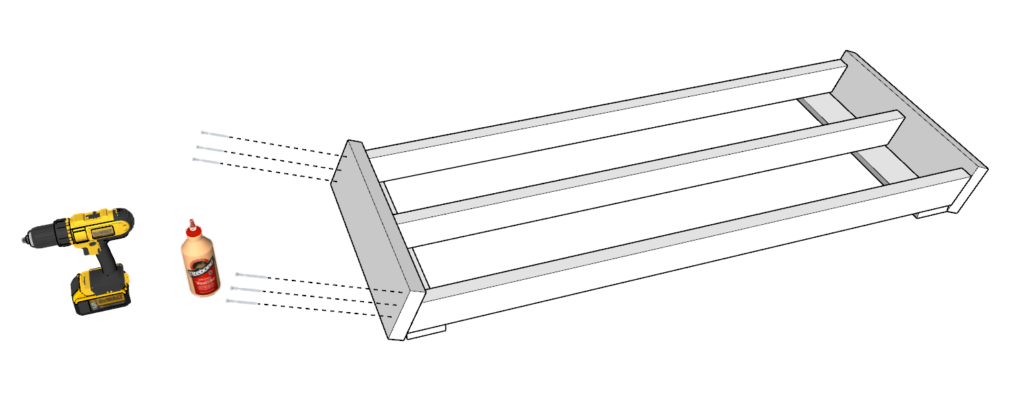
Step 1
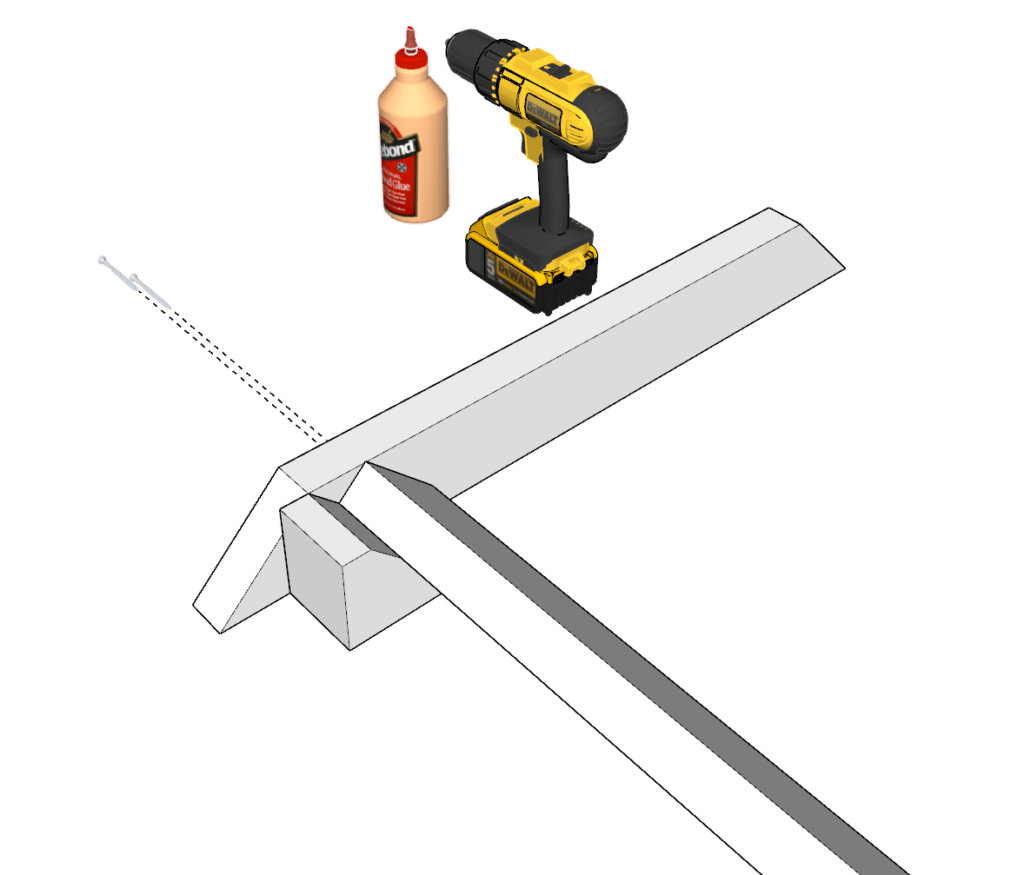
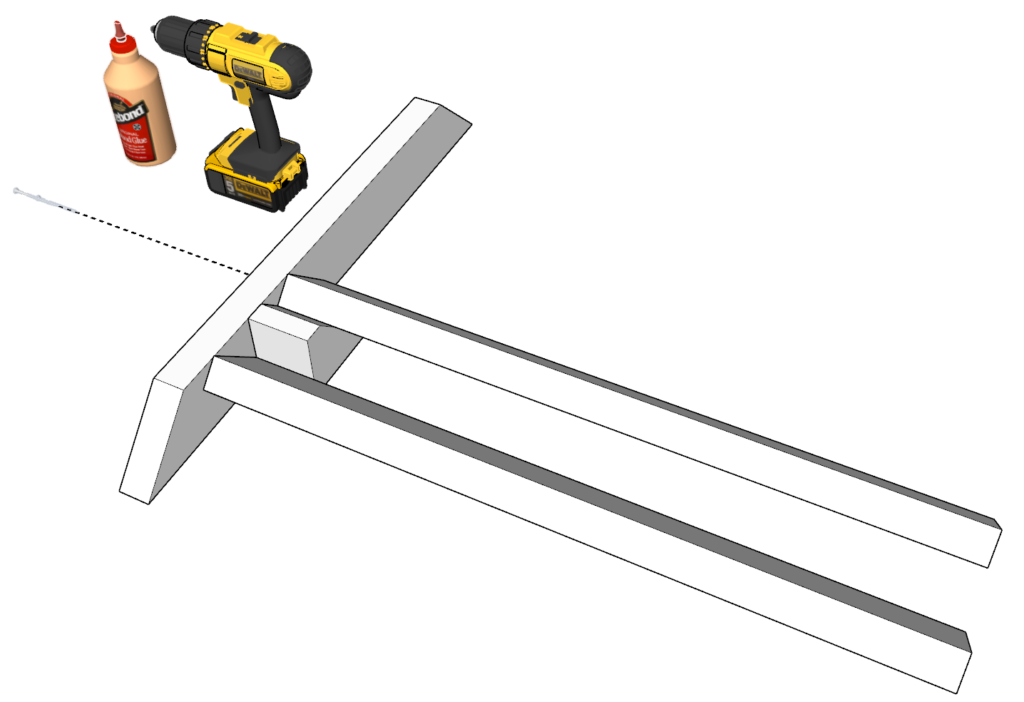
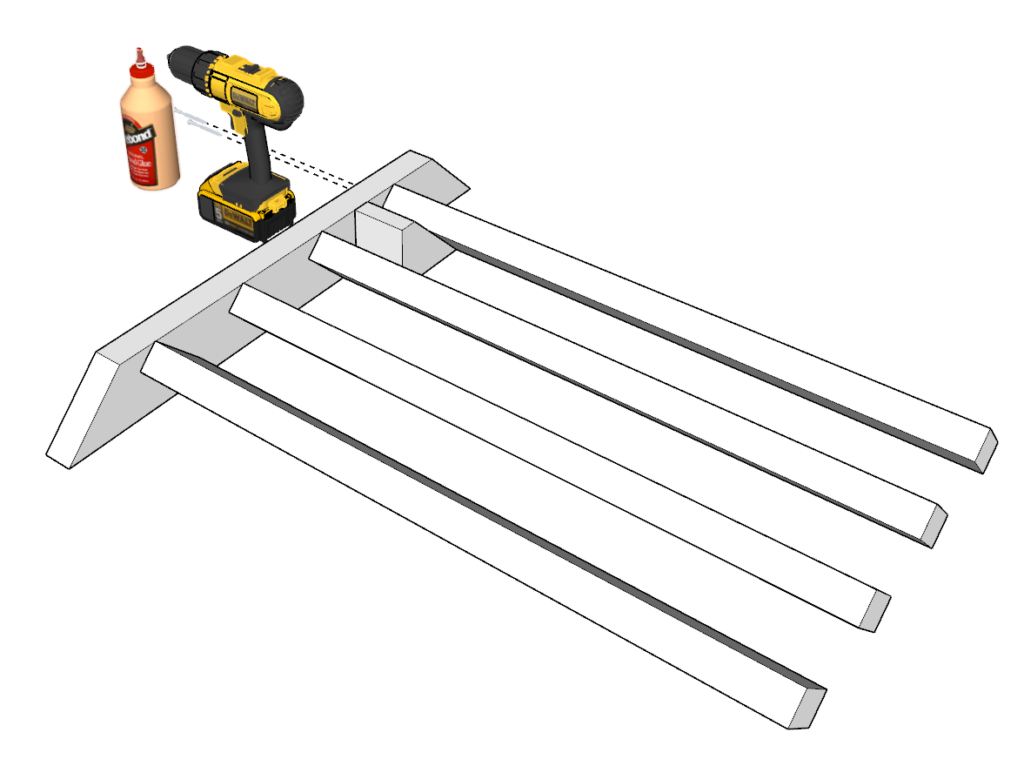
First precut four 45-in 2x4s and place them together with two 96-in pieces as shown in the diagram.
Space them out as shown in the diagram. The spacing is going to very important later on when attaching the wood pillars. Ensure the spacing is correct.
Predrill with a countersink drill bit

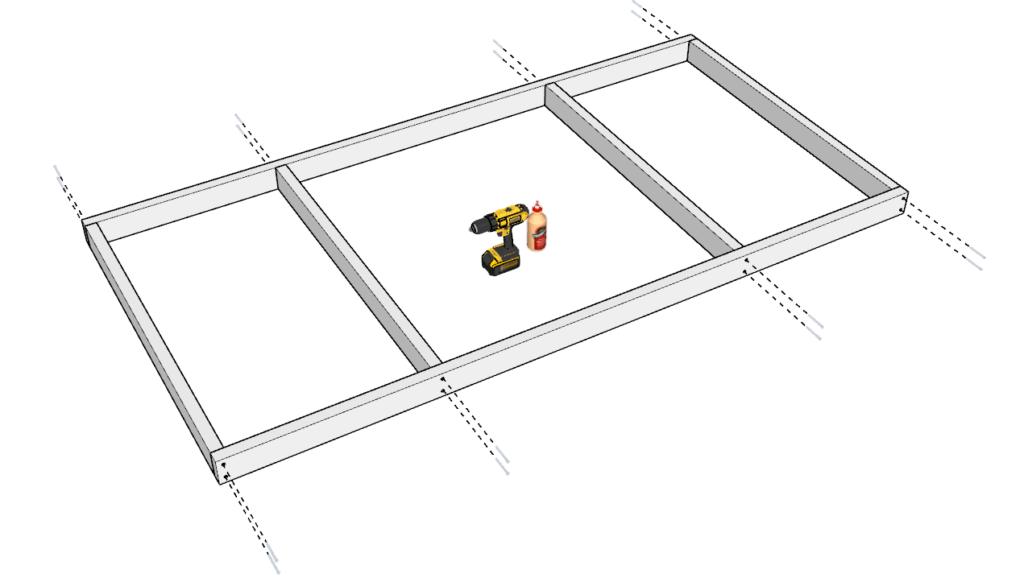
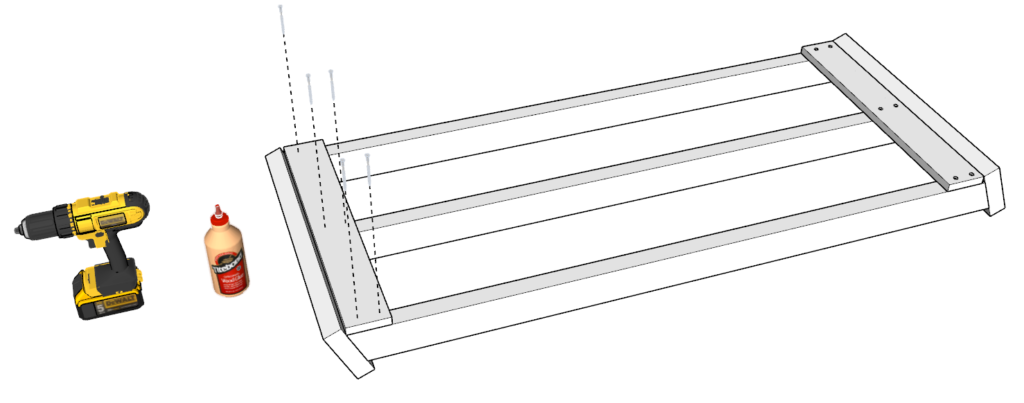
Step 2
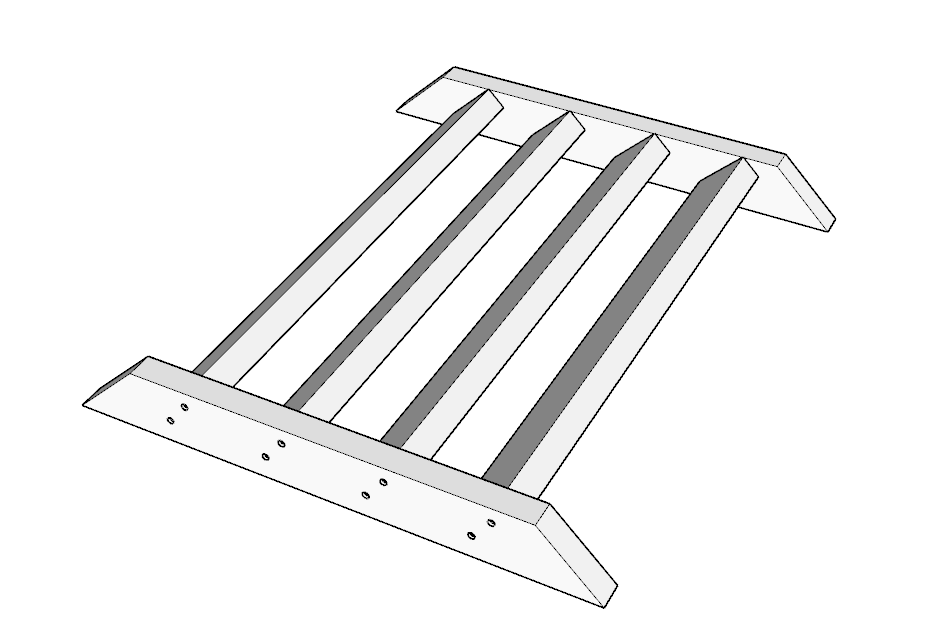
Apply glue to all areas that will be joined together and add crews.
This will make the frame of the playhouse.
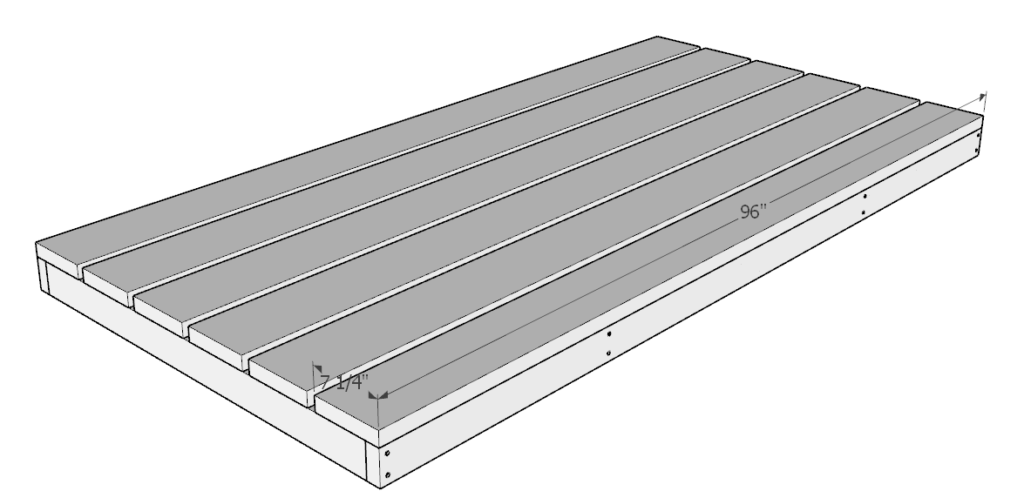
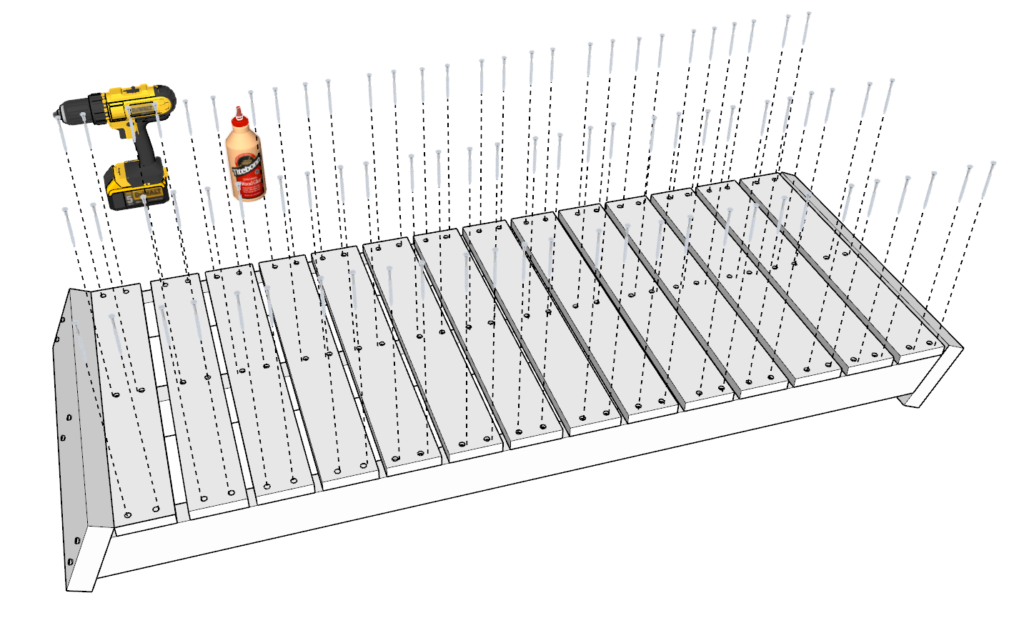
Step 3
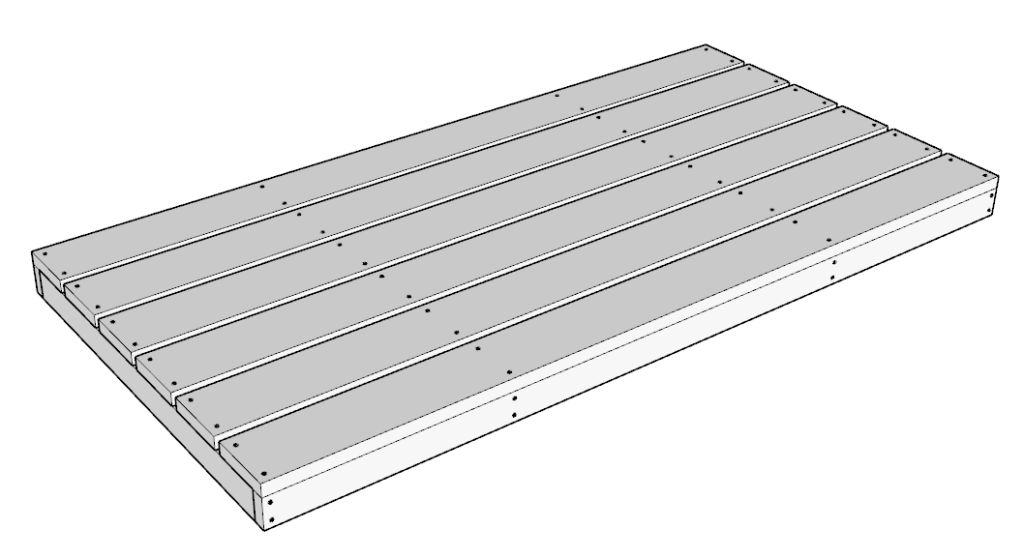
Next add 2x8x8s to the frame of the playhouse to give it a floor.
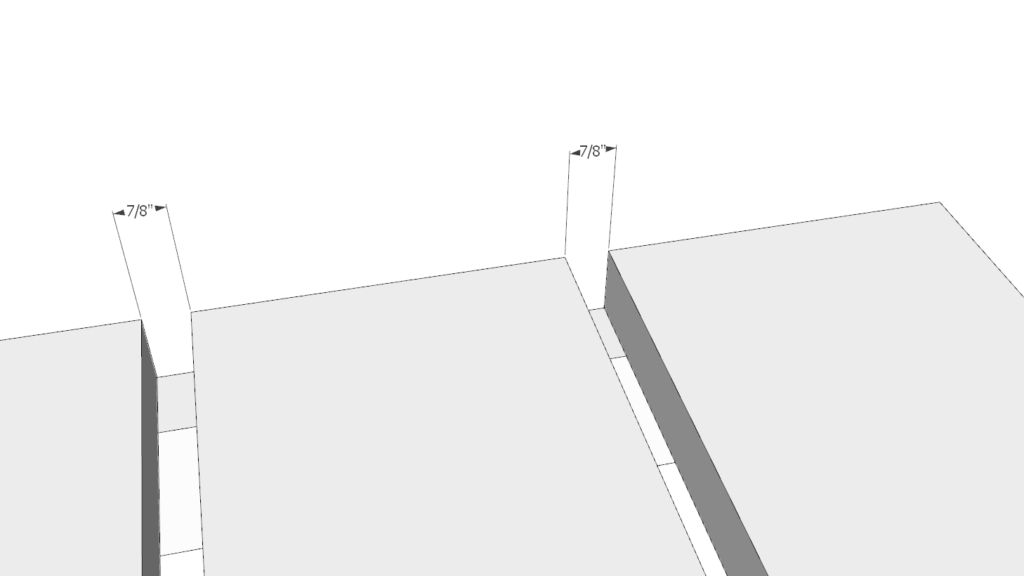
Align the 2x8x8s to the frame and space them out evenly. The spaces between them should be roughly 7.25-in.
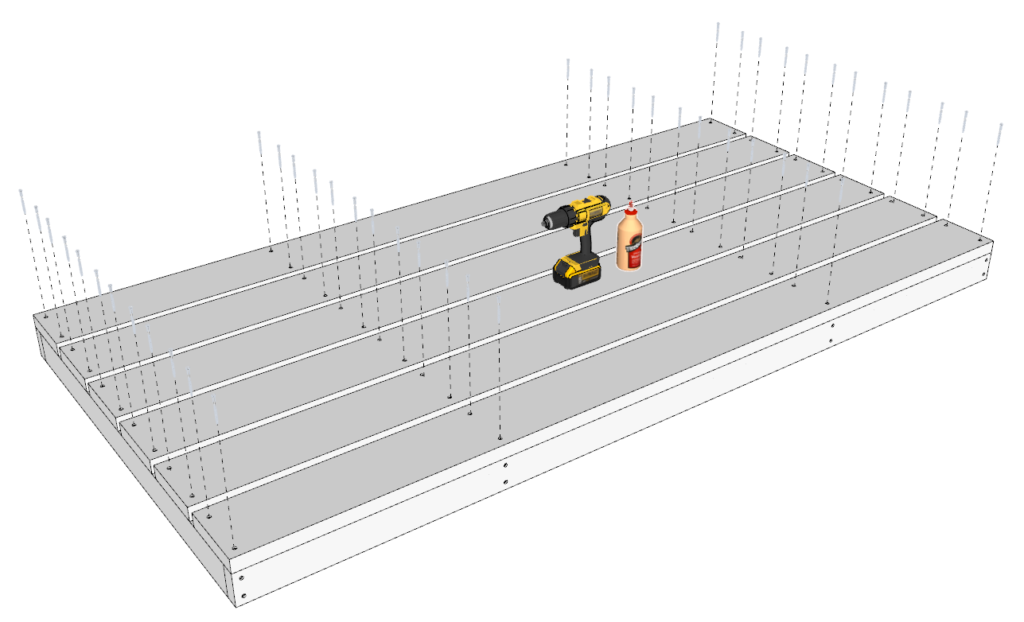
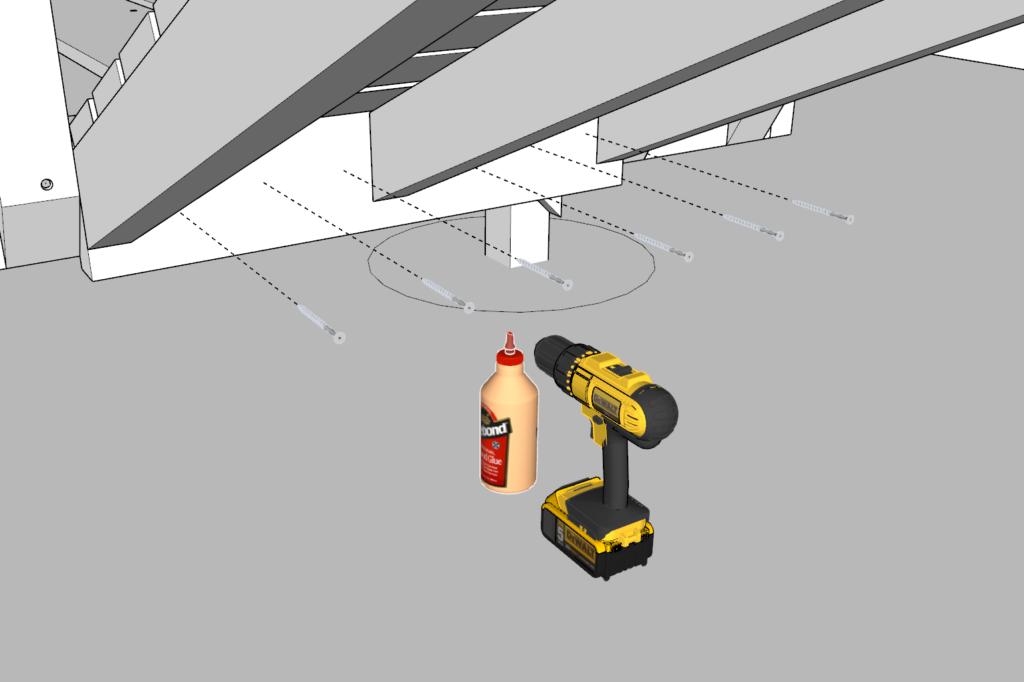
Step 4
Next remove each floorboard one by one and apply glue to the areas where the frame of the playhouse will meet the floorboards of the playhouse.
Predrill the holes and add crews to secure the platform together.
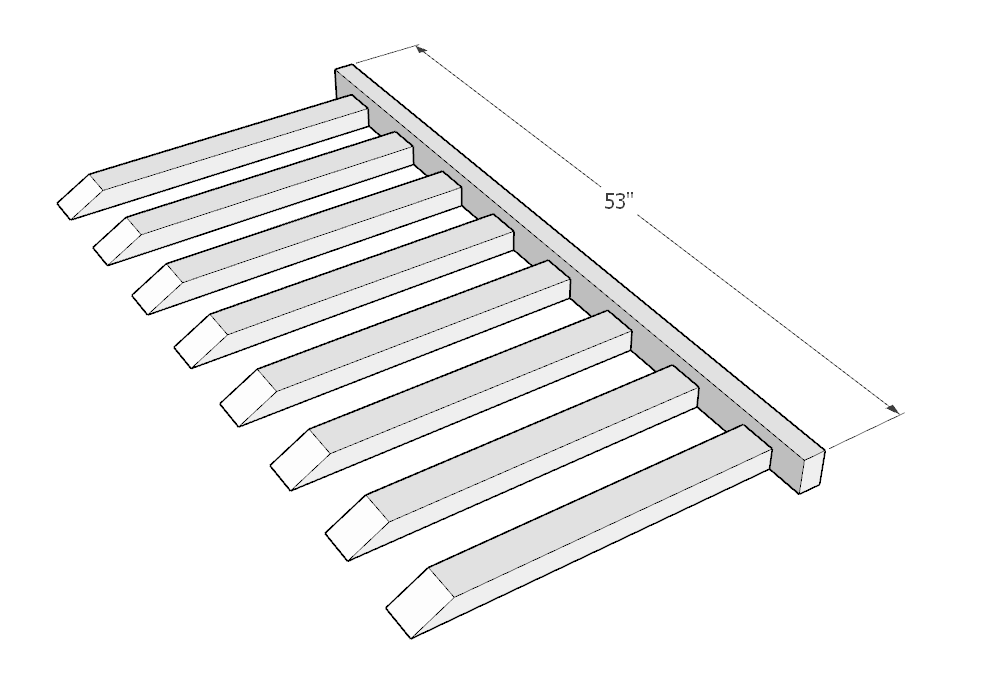
Step 5
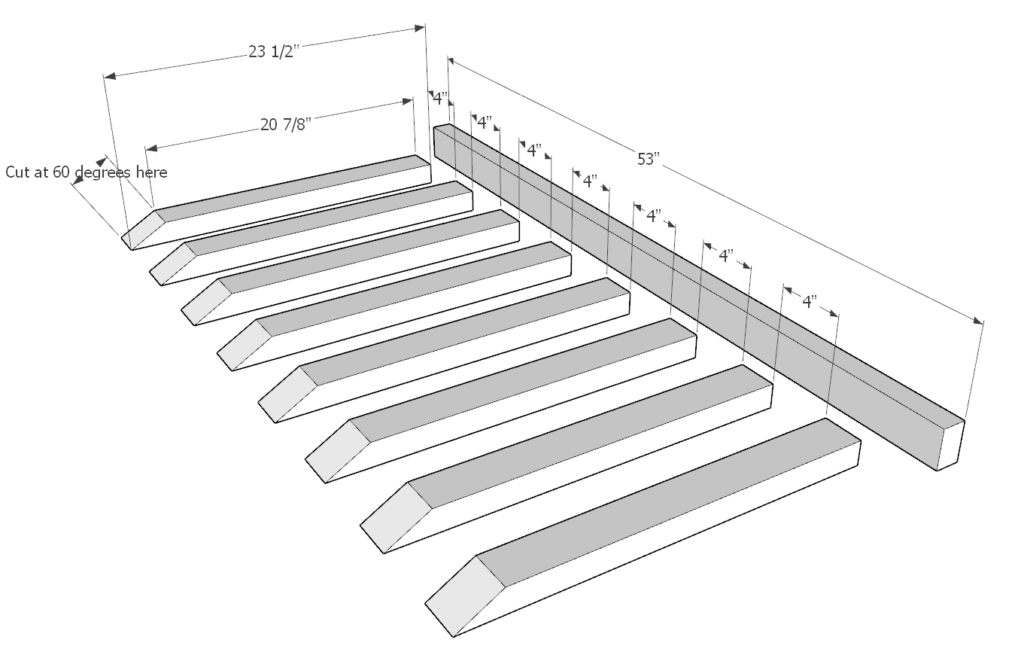
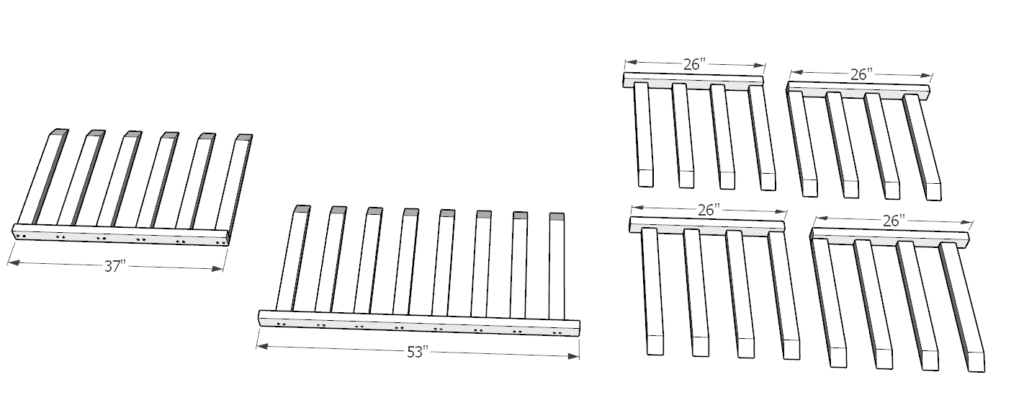
In this step we will begin making all the railing that will go around the play structure.
Cut the 2x3x8s into the sizes specified in the diagram.
You will need one 53-in piece and (8) 23.5-in pieces that are cut at 60 degrees on one end.
Make sure that when you are cutting at an angel that you cut along the correct side (see diagram).
The following steps will show how to put this railing together with the appropriate spacing.
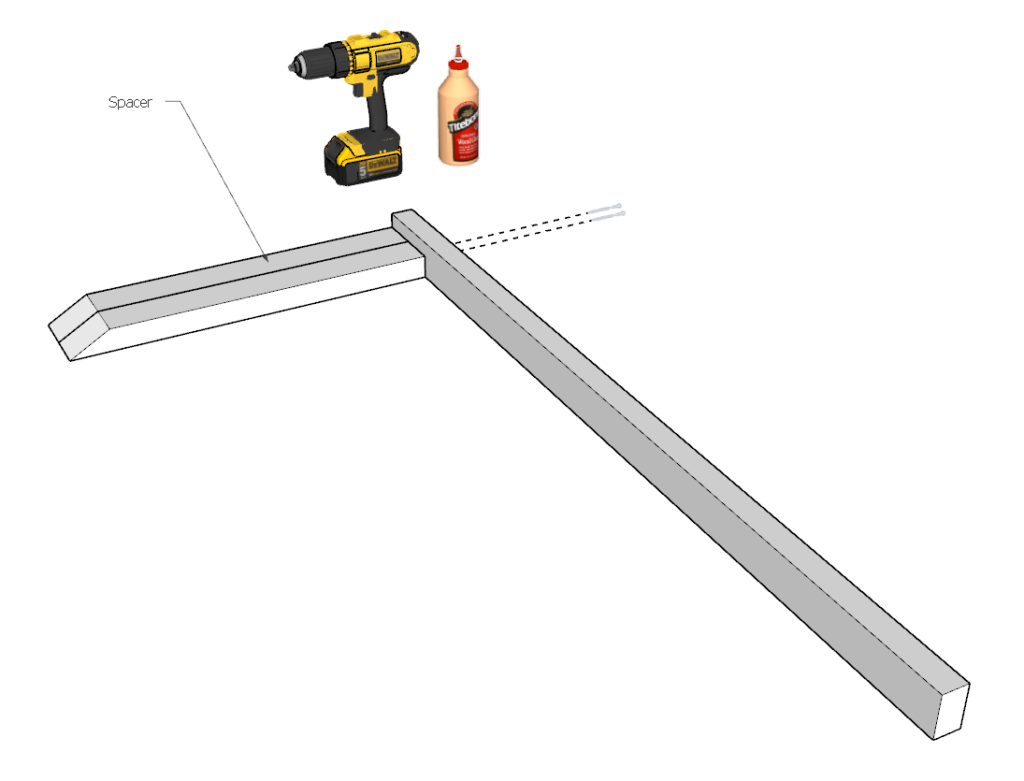
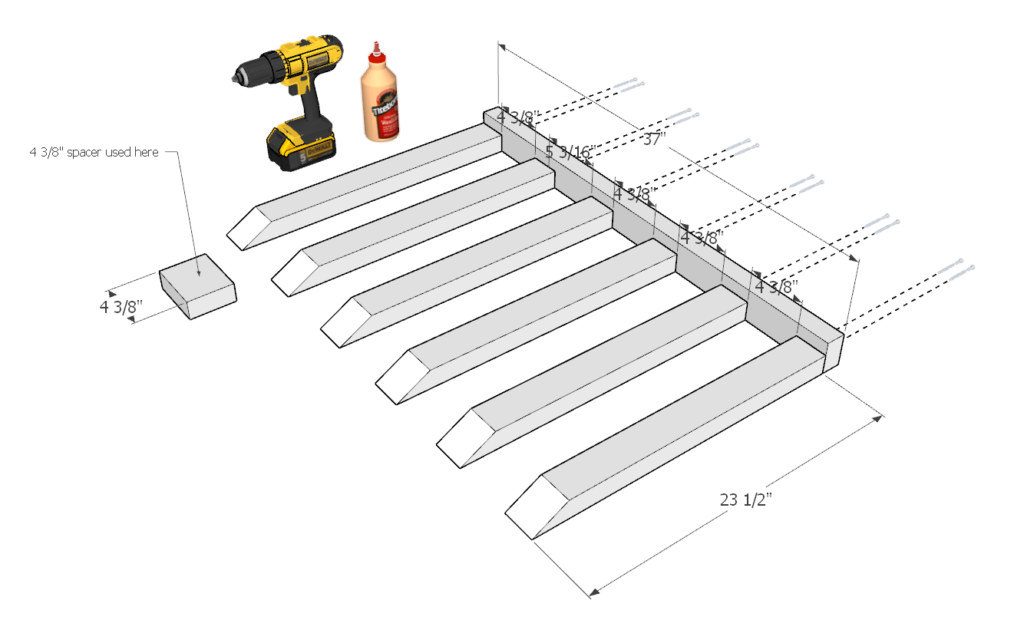
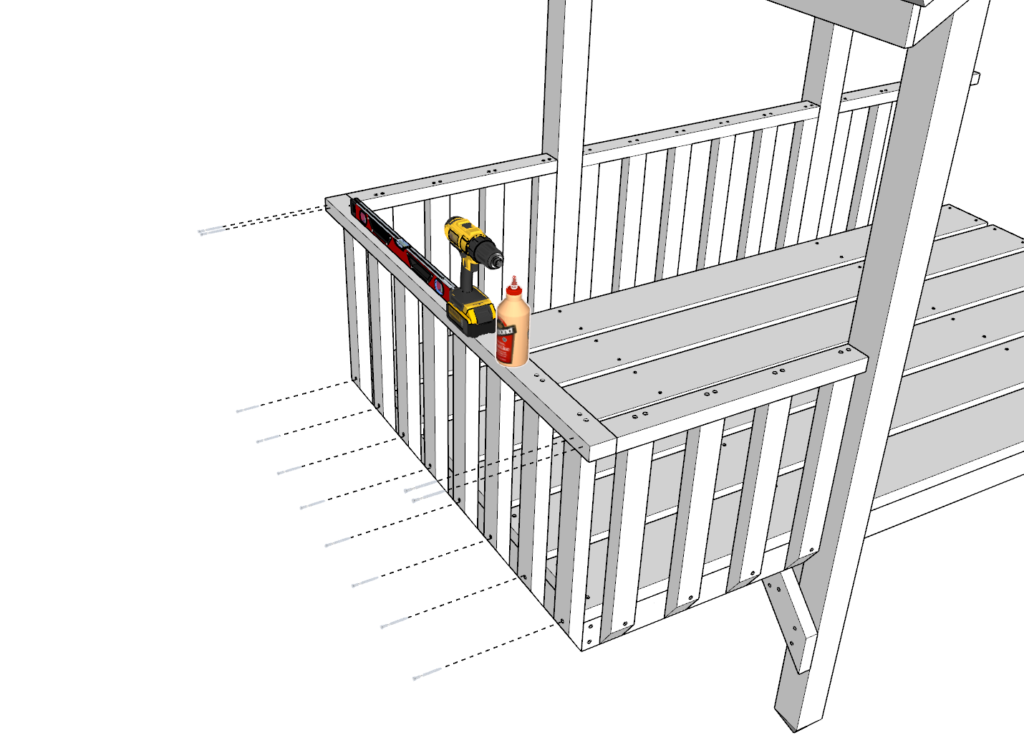
Step 6
Begin by using one of the railing pieces as a spacer. DO NOT attach it to the railing but only use it as a spacer. The idea is to have the first railing piece be attached with an indent.
Predrill 2 holes, add glue, and add screws. It is important to have 2 holes so that the railing does not turn of move.
Step 7
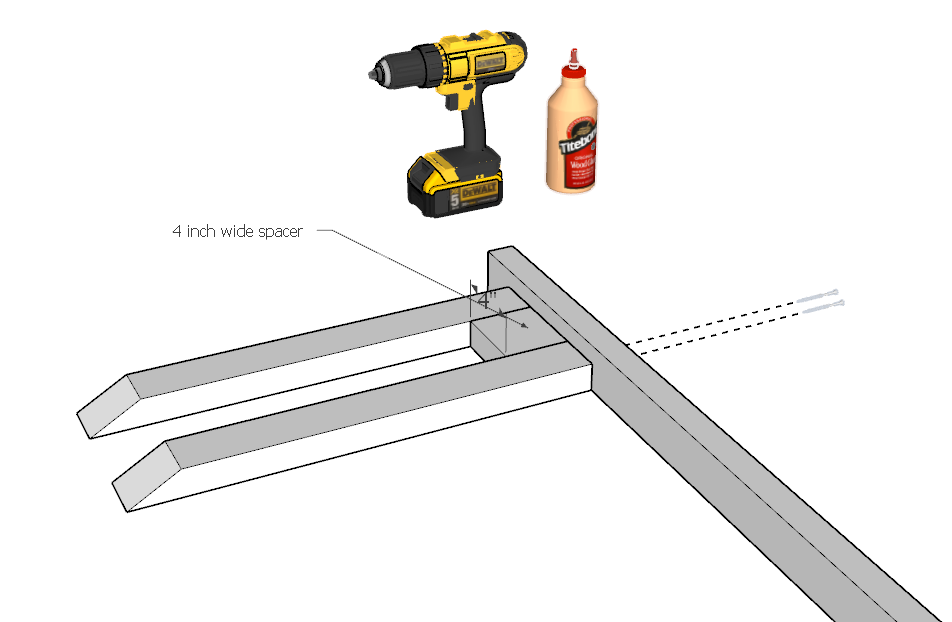
In the next step you will need to cut a 4-in spacer. This can be cut from just some scraps.
Using the 4-in spacer continue adding railing pieces until you have 8 railing pieces added.
Tip: to make sure the spacing is perfect, you can add 4 pieces from one side, starting with at one end, and then add 4 remaining pieces on the other side starting on the opposite end. This will make any imperfection seem less noticeable. This will make the railing symmetrical.
The final railing unit will have indentations on both sides (see next image).
Step 8
Next, make a similar railing unit. This time the total length is 37-in, with 6 railing pieces.
Use a 4 3/8-in spacer.
predrill, add glue, and screws.
You only need to make one of these.
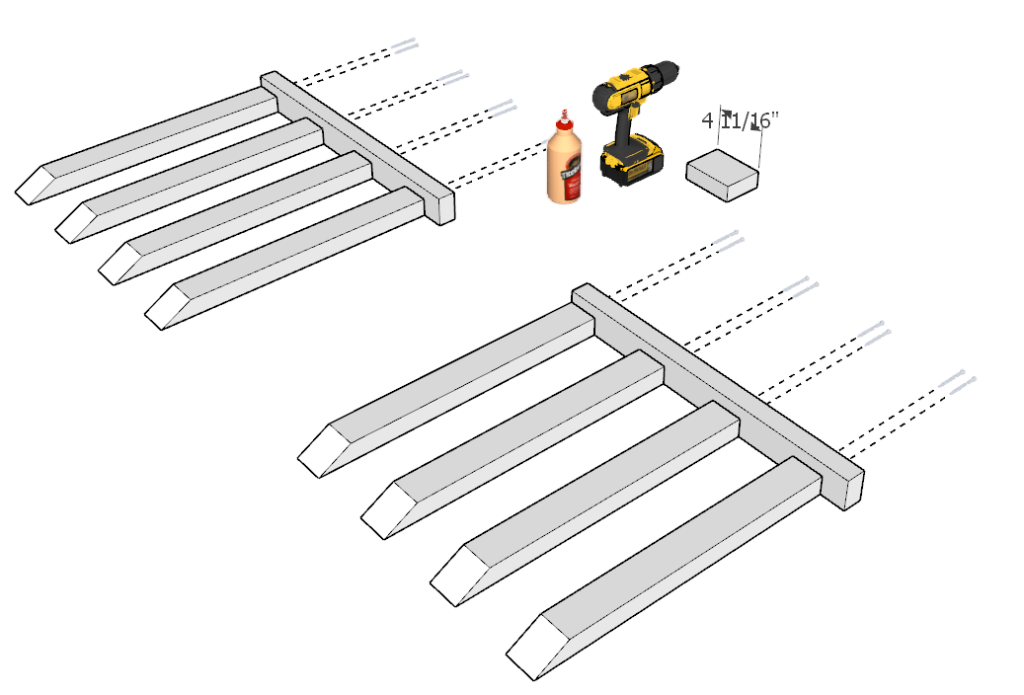
Step 9
Next, make two identical 26-in railing units. Each will have (4) 23.5-in pieces.
One side will be indented. Which indented side is very important (see diagram).
Use a 4 11/16-in spacer to achieve the correct space.
Predrill, add glue, and add 2 screws per railing piece as before.

Step 10
Next, make 2 more units similar to step 9 but with ONE MAJOY DIFFERENCE. Make sure the 26-in pieces are indented on the OPPOSITE side.
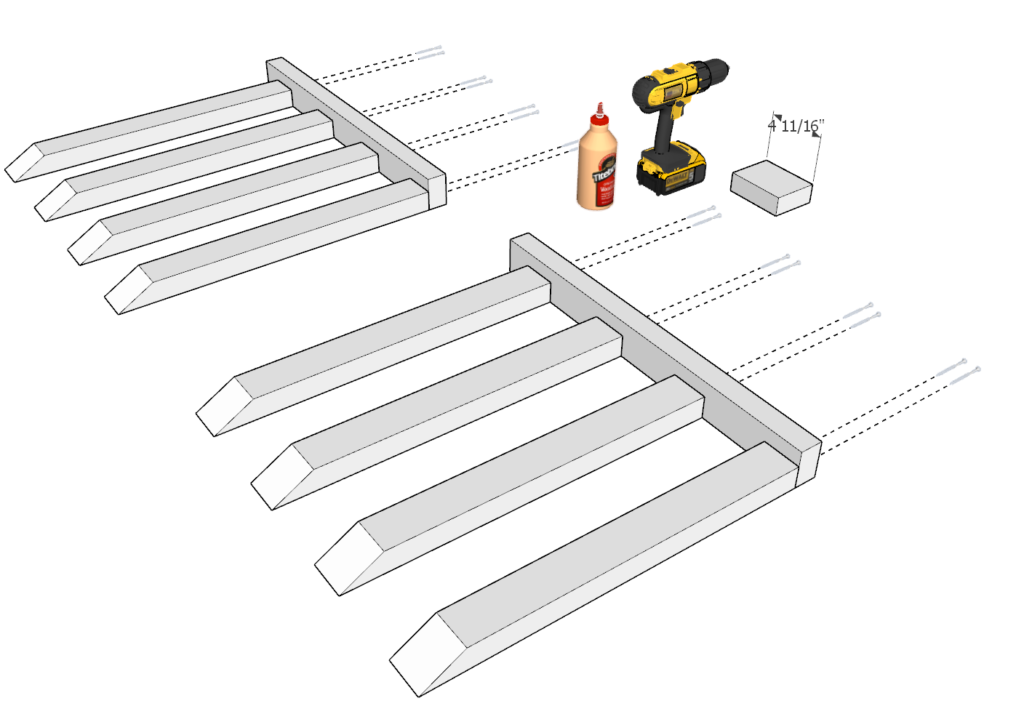
Step 11
After making all the railing units, you should have a total 6 units.
Step 12
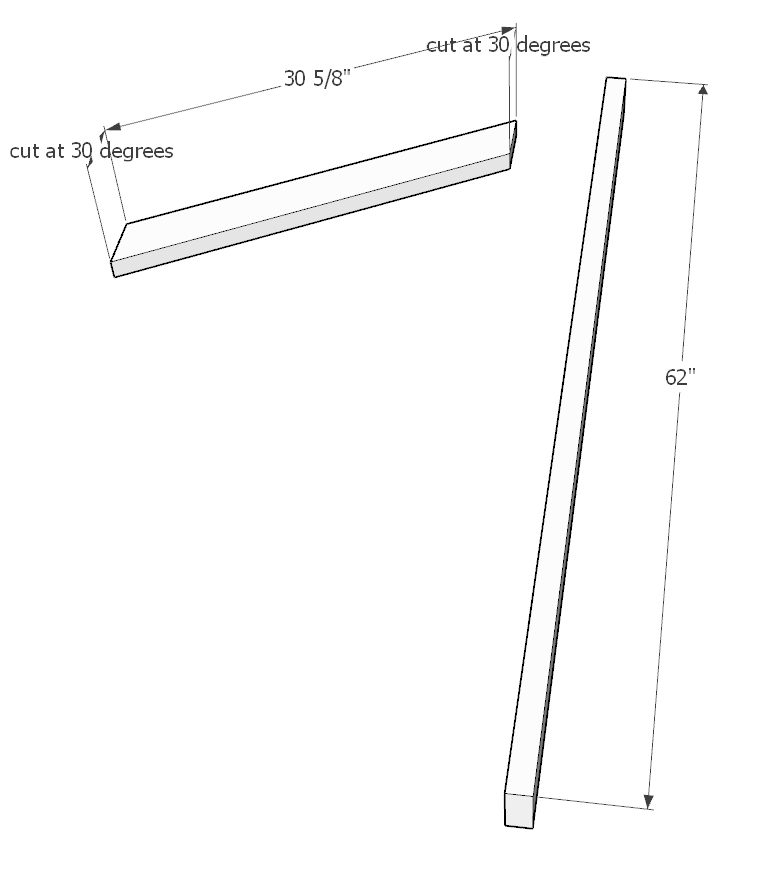
Next, you will need to make the roof frame.
Star by cutting a 62-in piece of 2×4 and also a total of (8) 30 5/8-in pieces at a 30-degree angle on either side from 2x4x8 lumber pieces (see diagram).
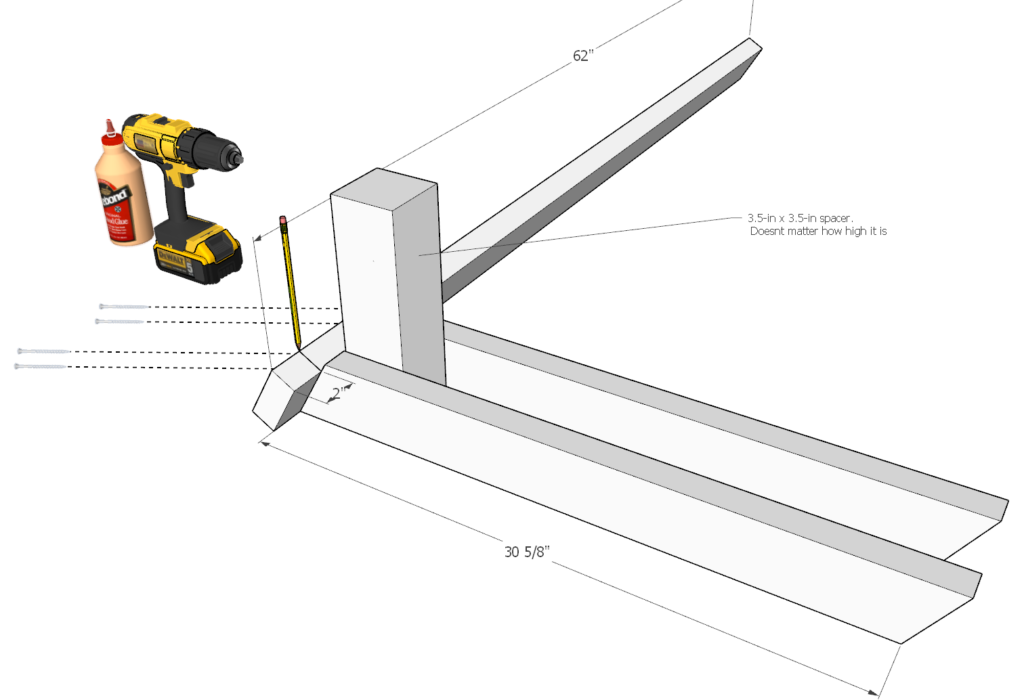
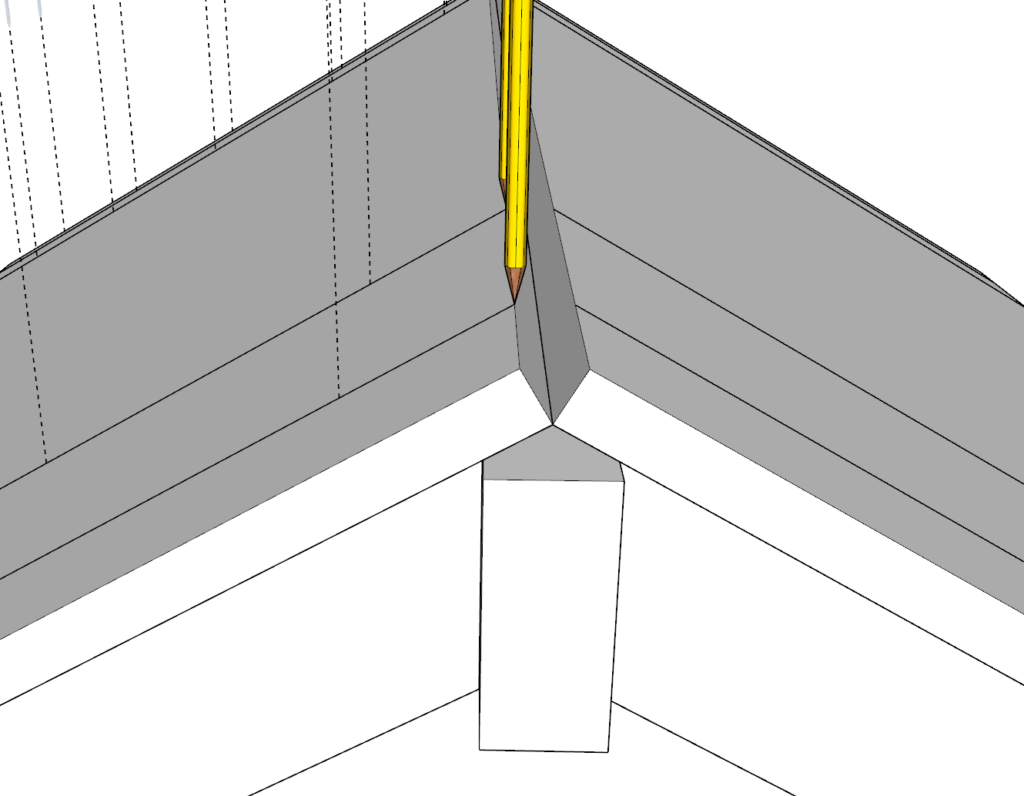
Once you have cut the appropriate pieces, arrange two of the 30 5/8-in pieces and one of the 62-in pieces as shown in the diagram below.
add a 3.5-in x 3.5-in spacer to separate the two 30 5/8-in pieces. The height of the spacer is not important.
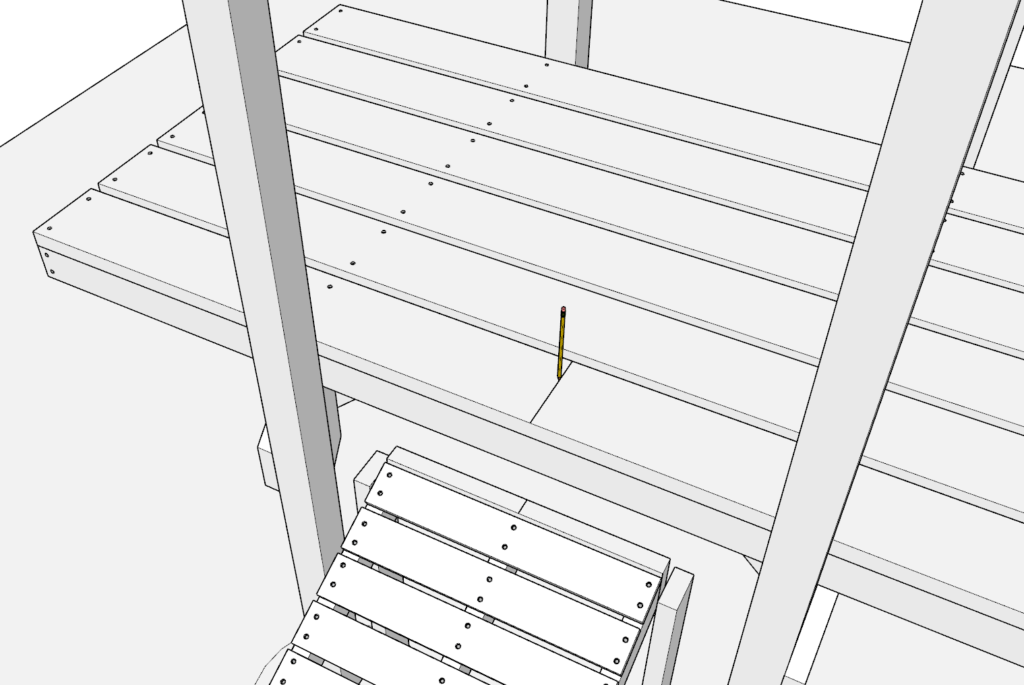
Draw a guideline that is 2 inches away from the edge of the 62-in piece (shown in diagram with a pencil).
The 2-in line will serve as a guide to know where to place the 30 5/8-in pieces.
As before, predrill, glue, and add screws.
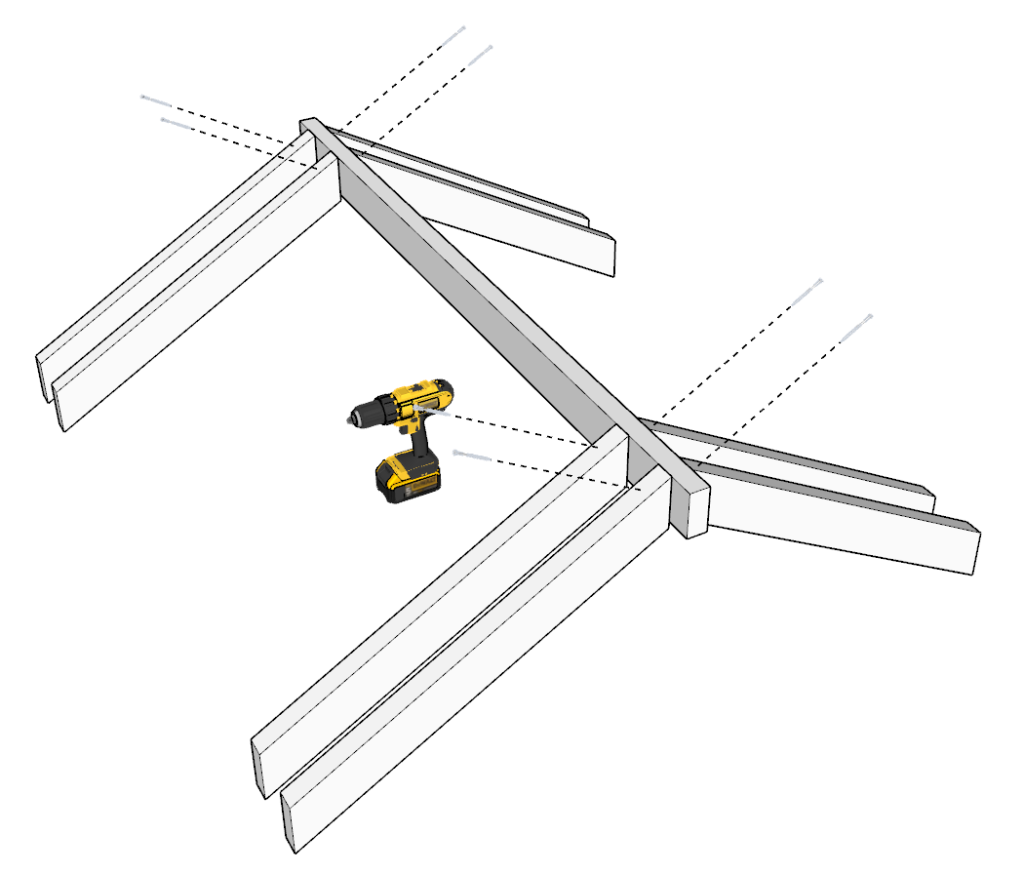
Step 13
Next, repeat the same steps as before to attach the next two 30 5/8-in pieces.

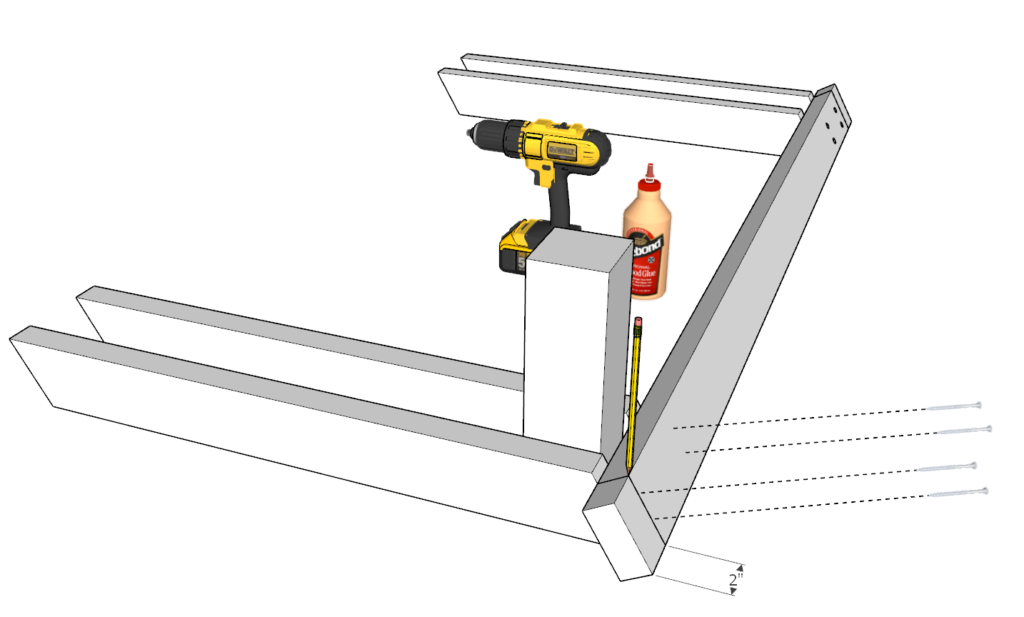
Step 14
Next attach the other four 30 5/8-in pieces using glue and screws.
If the pieces are moving around too much, then you can add two screws per each 30 5/8-in piece. They will be reinforced in the next few steps.
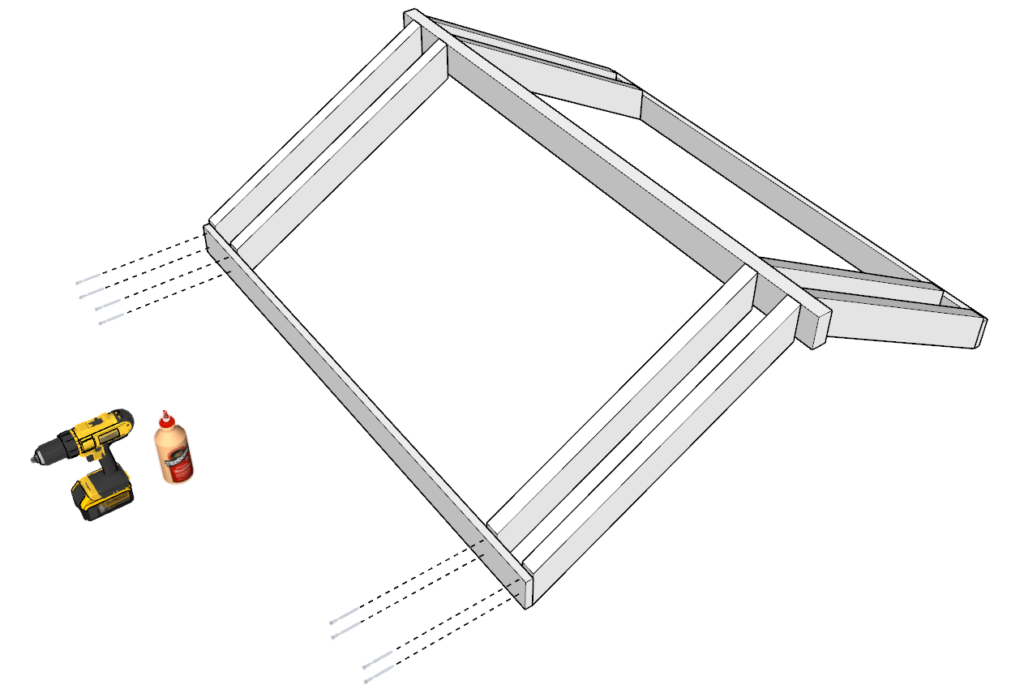
Step 15
Next flip the structure (best done with a friend so as to not take anything out of joint while it’s still fragile and unreinforced) and add screws to reinforce it.
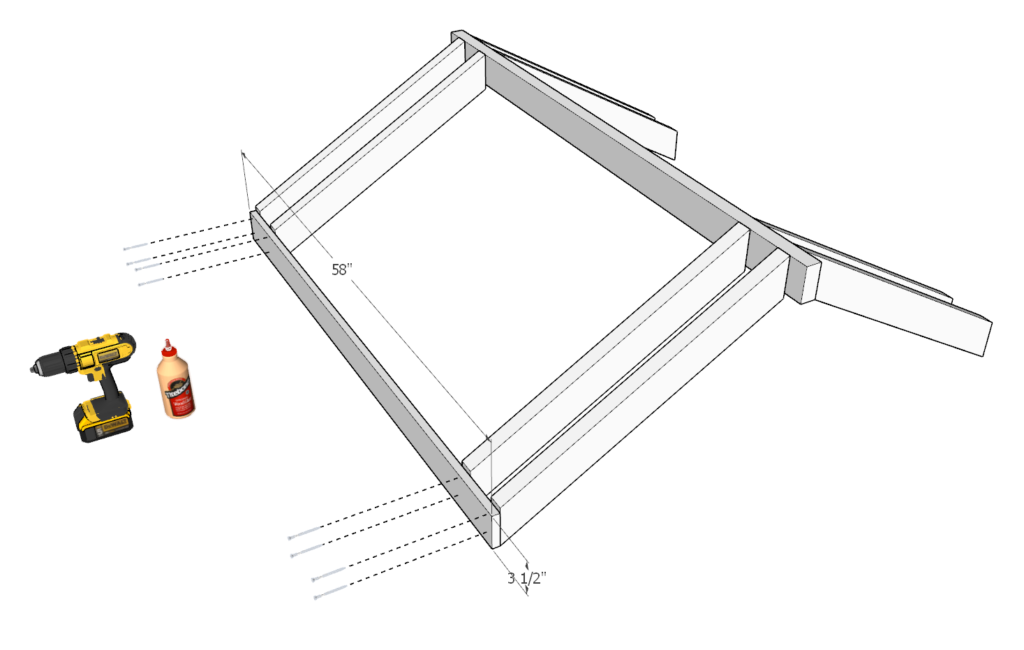
Step 16
In this step, add a 58-in 1×4 (actual size is 3.5-in x 0.75-in) to with end of the roof structure.
A little bit of space will exist between the roof 30 5/8-in pieces and the 58-in 1×4. This is ok.
As before, predrill, add glue, add screws.
Step 17
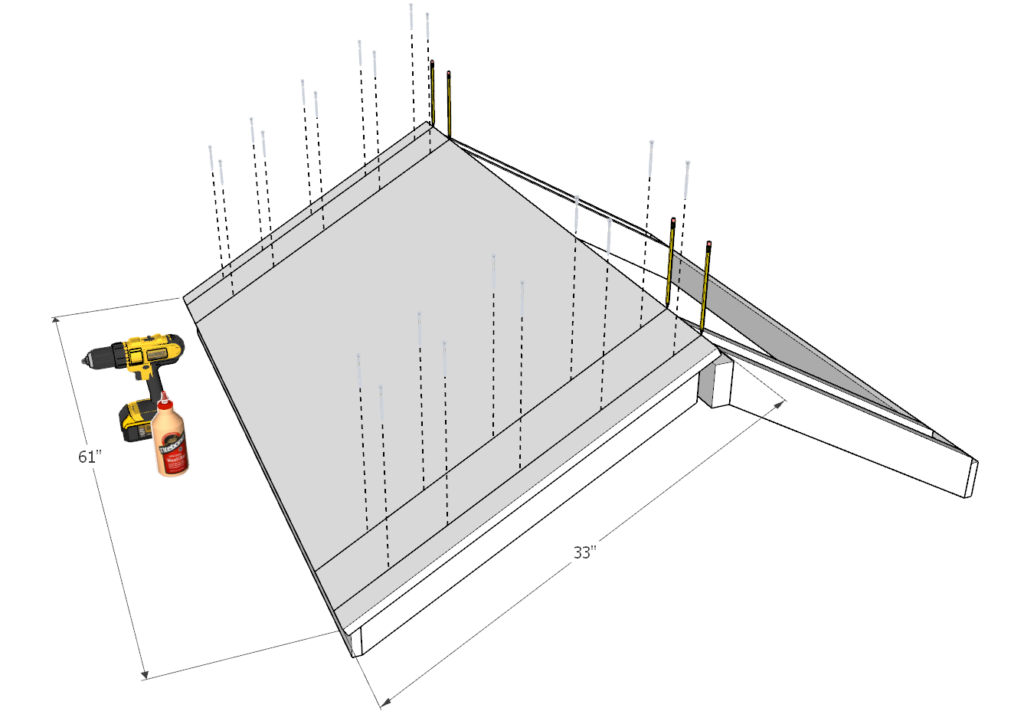
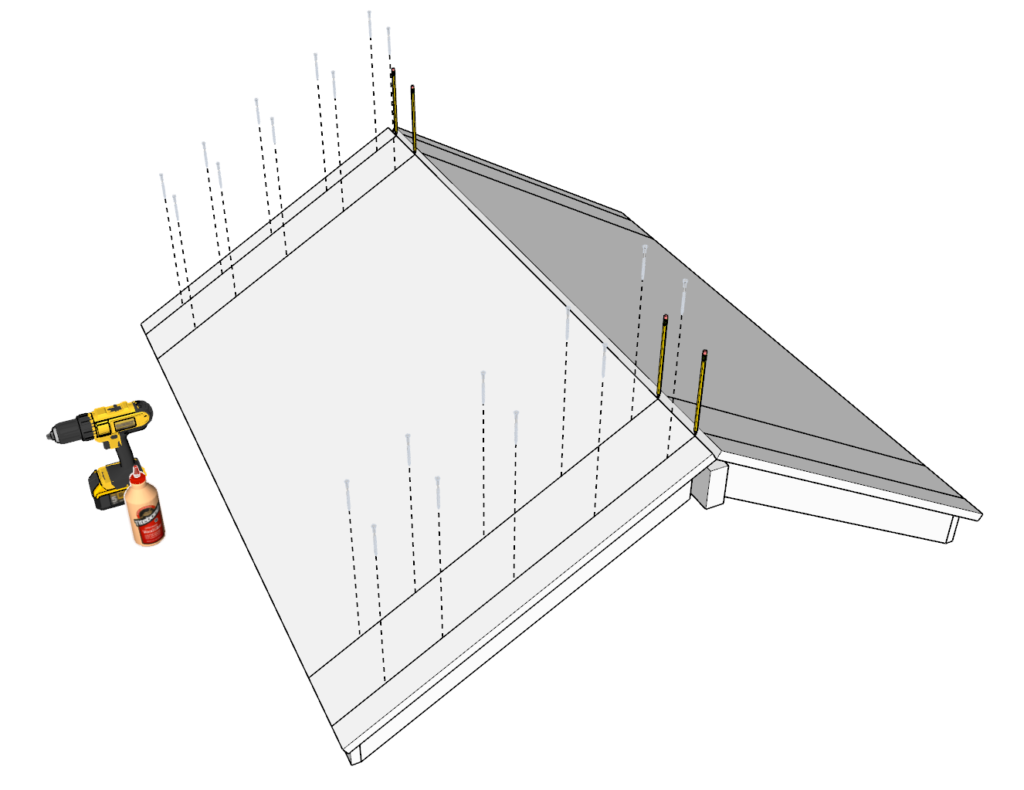
In this step you will need to add the plywood sheets to the wood frame.
Cut two 61-in x 33-in pieces.
Place them on top of the structure as shown in the diagram. A little bit of the 62-in 2×4 will be showing. This is ok and is part of the design.
add lines to indicate where to add screws so that you don’t miss and create unnecessary holes.
If a screw is not correctly places REMOVE IT. This can be a hazard as it can injury a child’s head when the stand. After placing all the screws, inspect from underneath to make sure that no screws are sticking out.
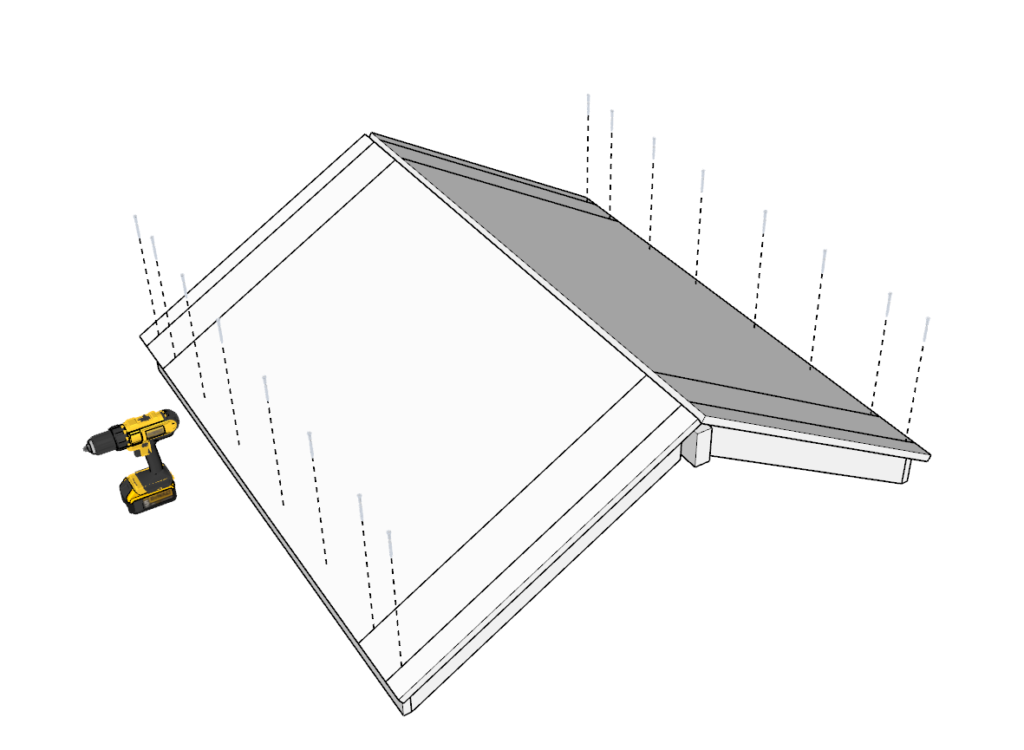
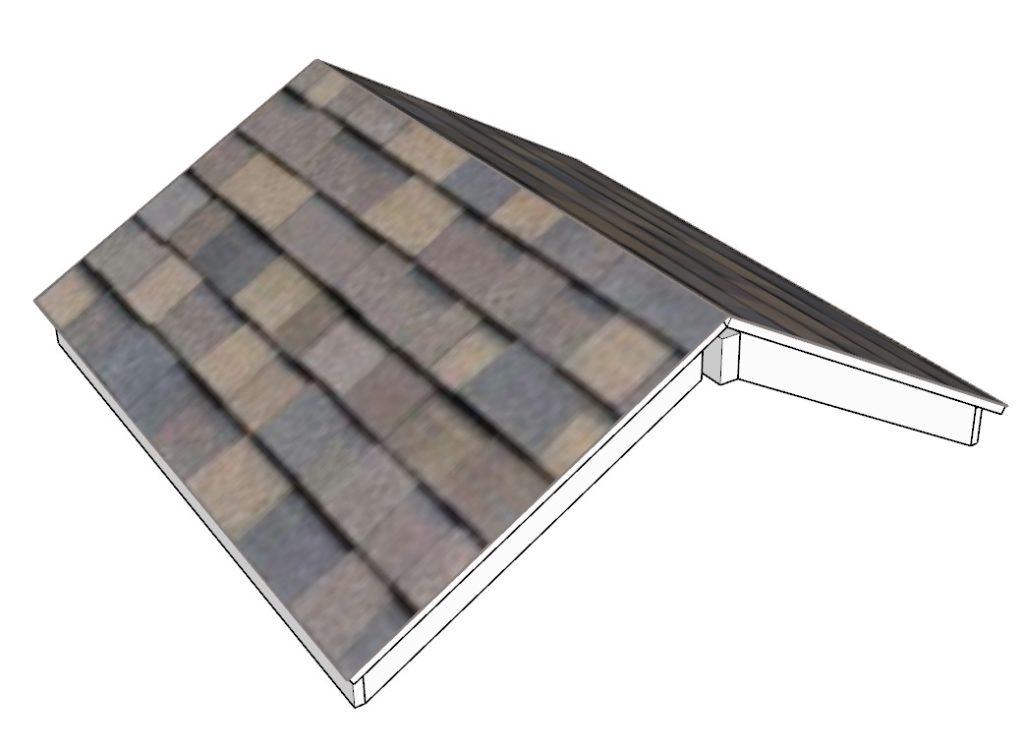
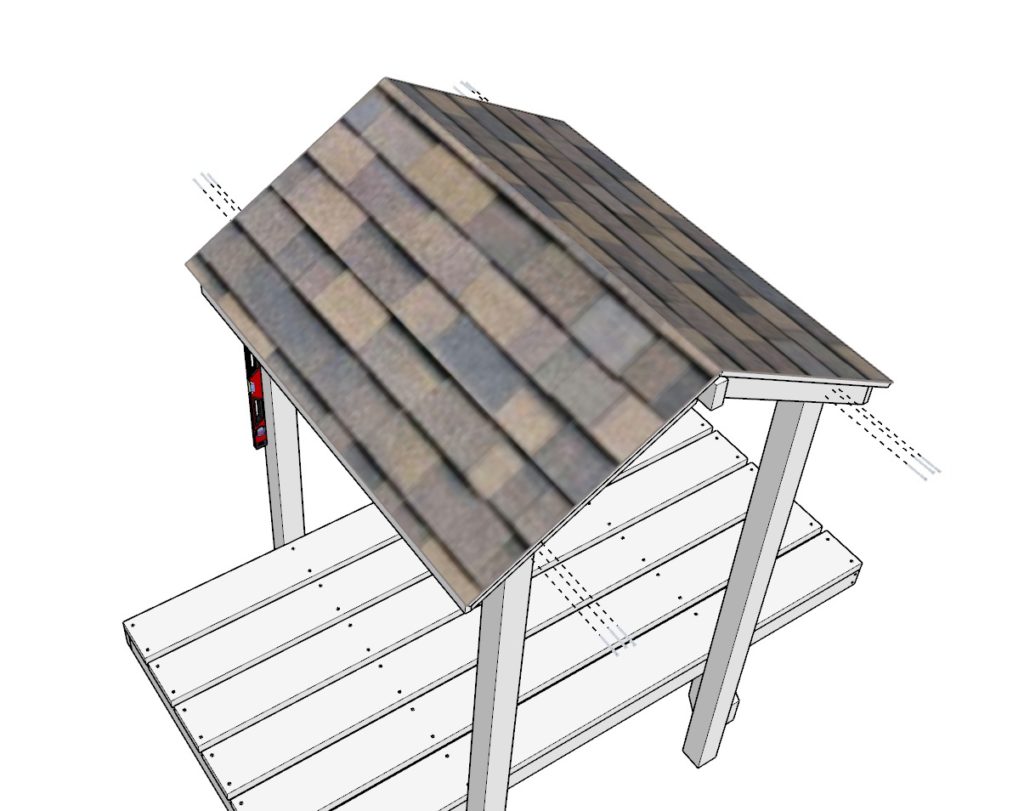
Step 18
Next, add shingles.
This step can be done after the roof is on the playhouse. The pro of this option is that the roof will be lighter and easier to work with. The con is that you will have to add shingles to a structure that is over 8 feet high.
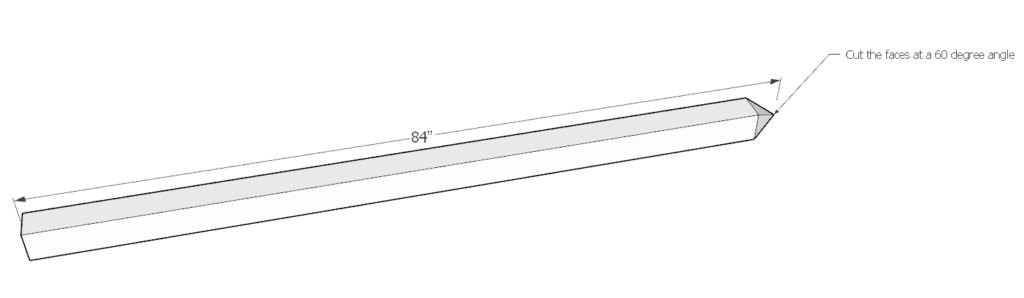
Step 19
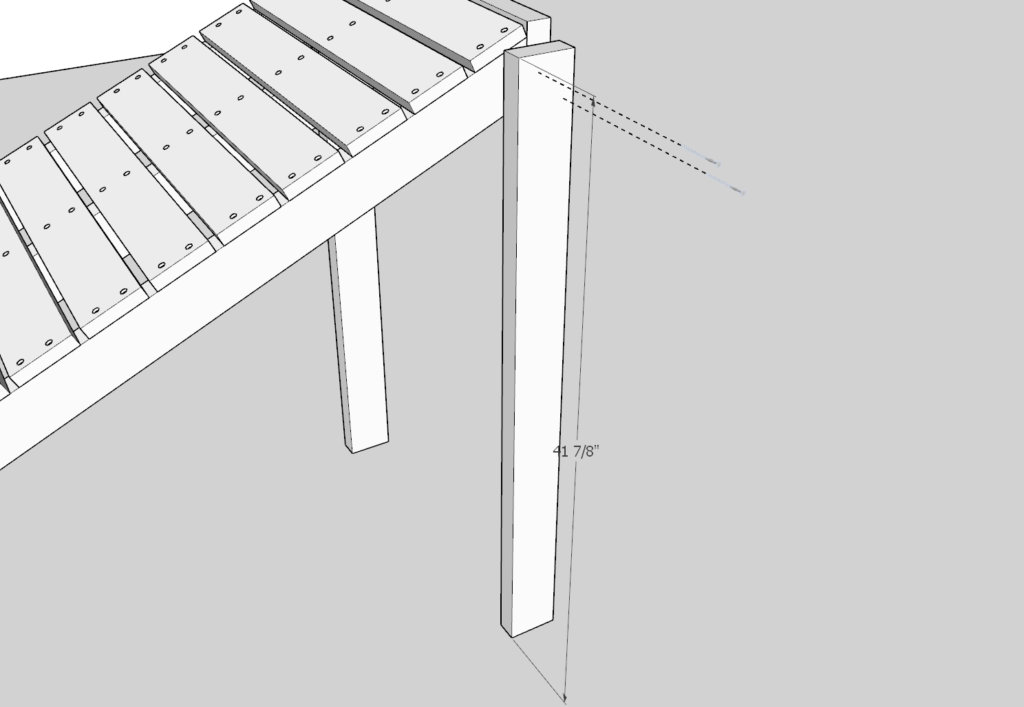
In this step, take the 4x4s and cut them down to 84 inches.
The ends of the 4x4s need to be cut at 60 degrees.
Draw a line with a pencil at 20.5-inches as shown in the diagram.
In this step, its a good idea to make sure the ends that are cut at a 60 degree angle all match. This will be important in the later steps.
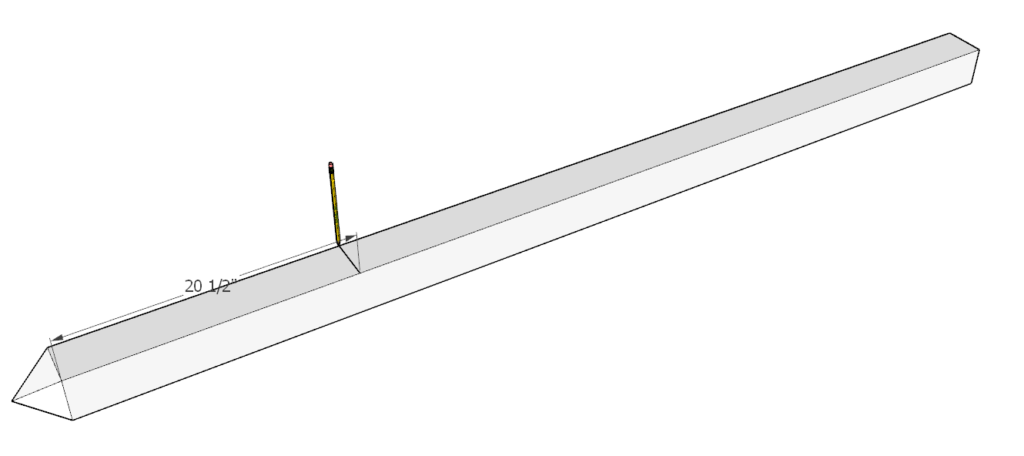
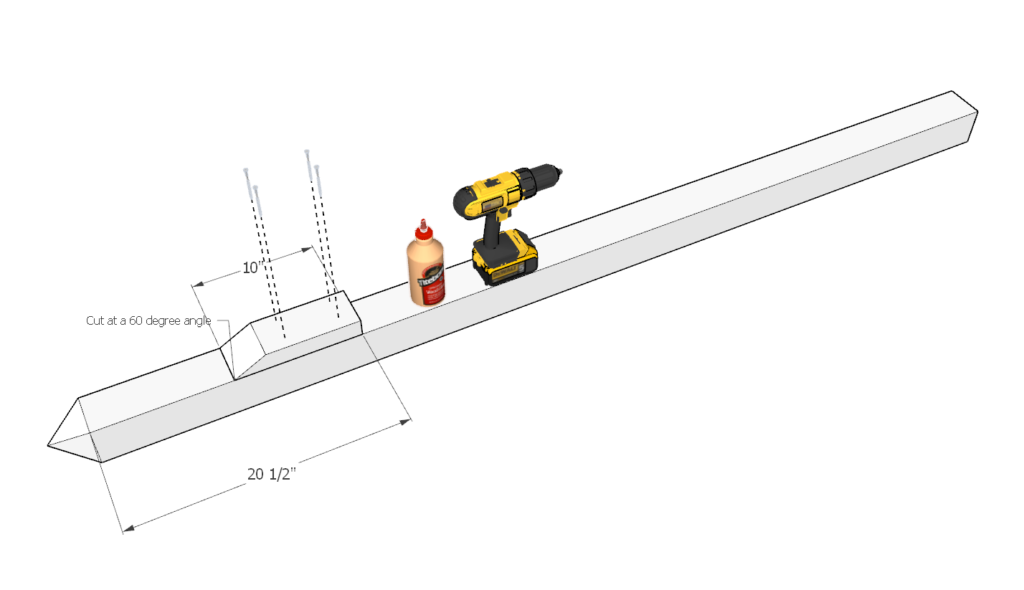
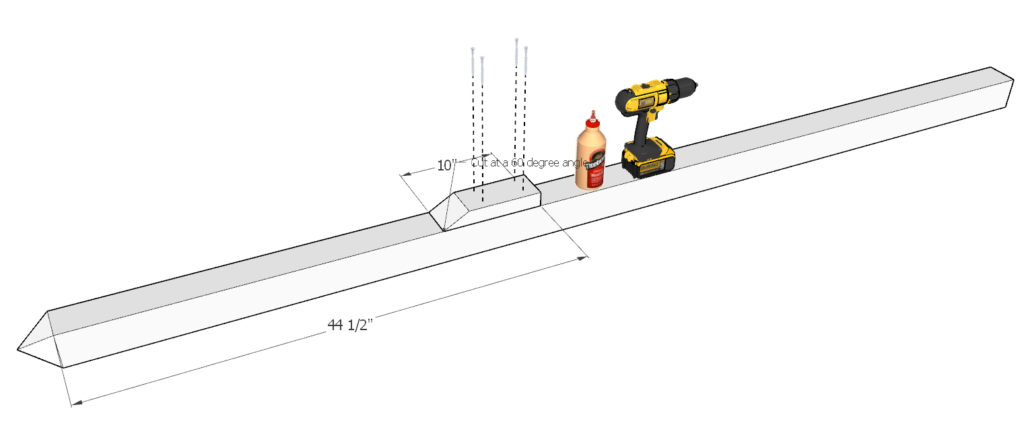
Step 20
Next, cut a 10-in 2×4 piece that has one end cut at a 60-degree angle.
Place it at the 20.5-in mark. Use the mark to note where the top of the 10-in piece should go.
predrill, glue, and add screws.
Make a total of 4 pillars just like this.
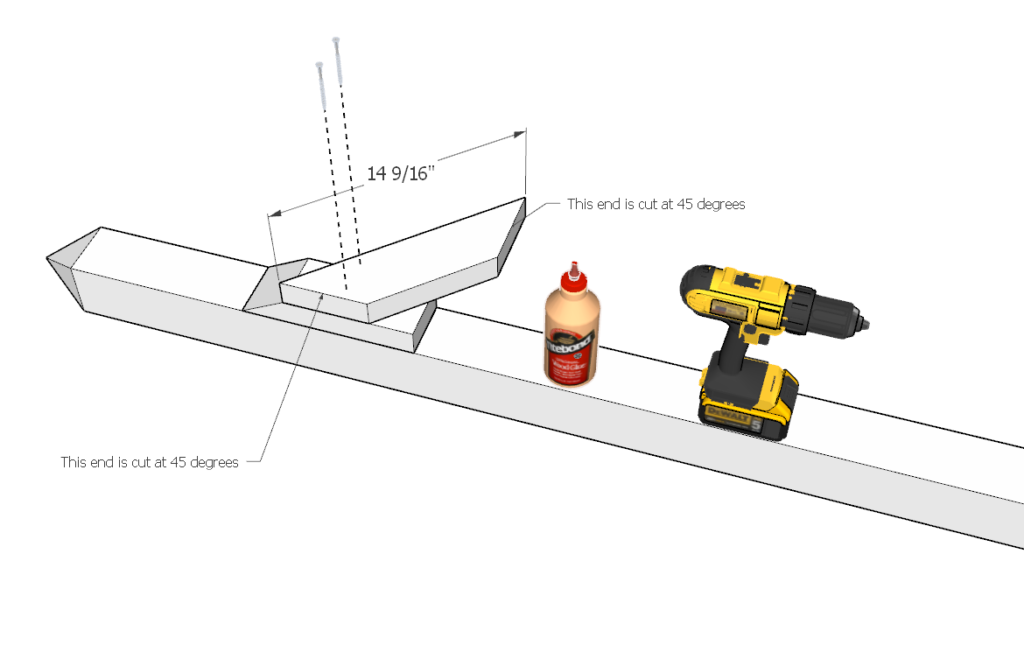
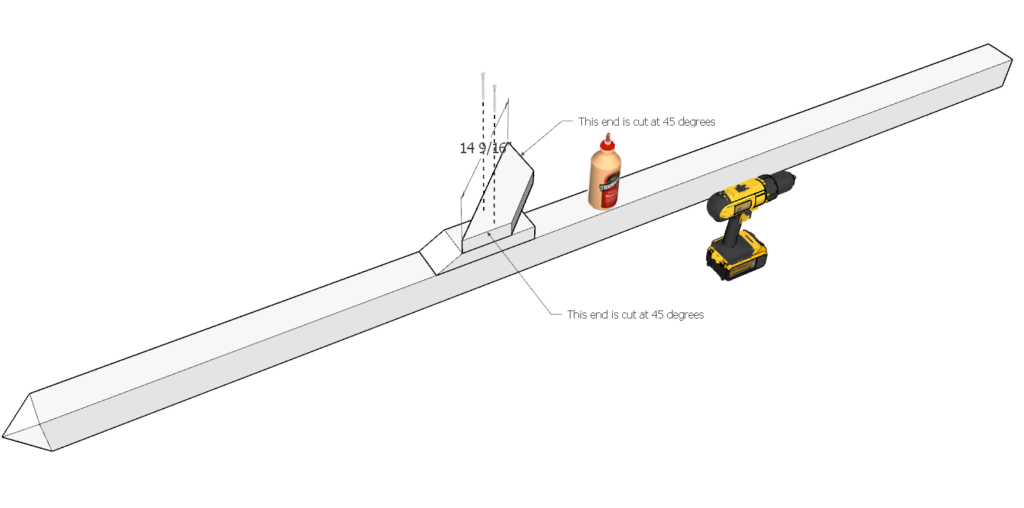
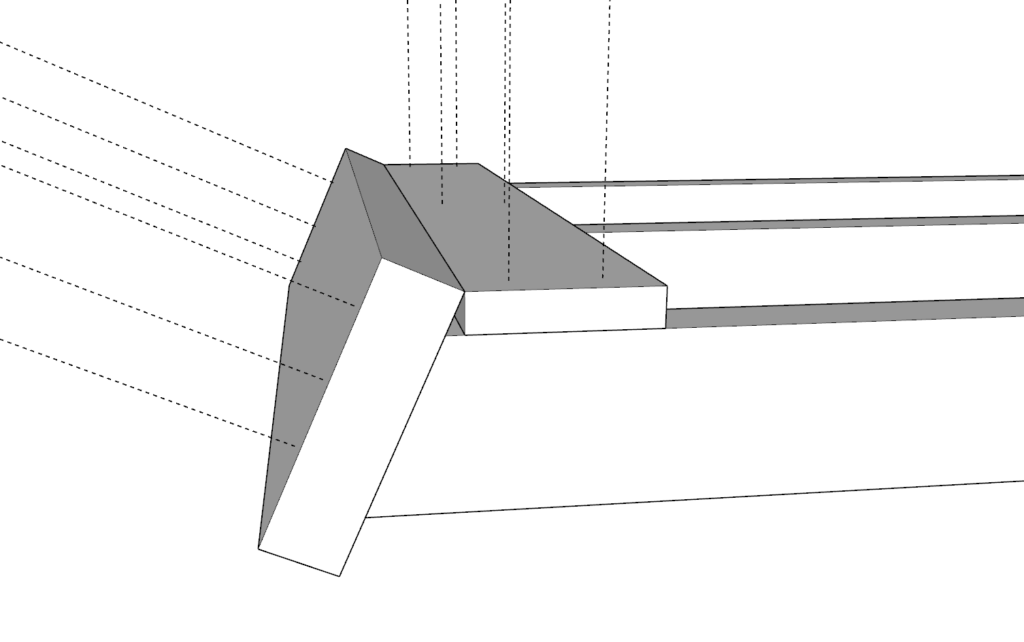
Step 21
Next, add a 14 9/16-in piece as shown in the diagram. The edges are cut at 45 degrees.
Predrill, glue, and add screws.
Repeat this 2x
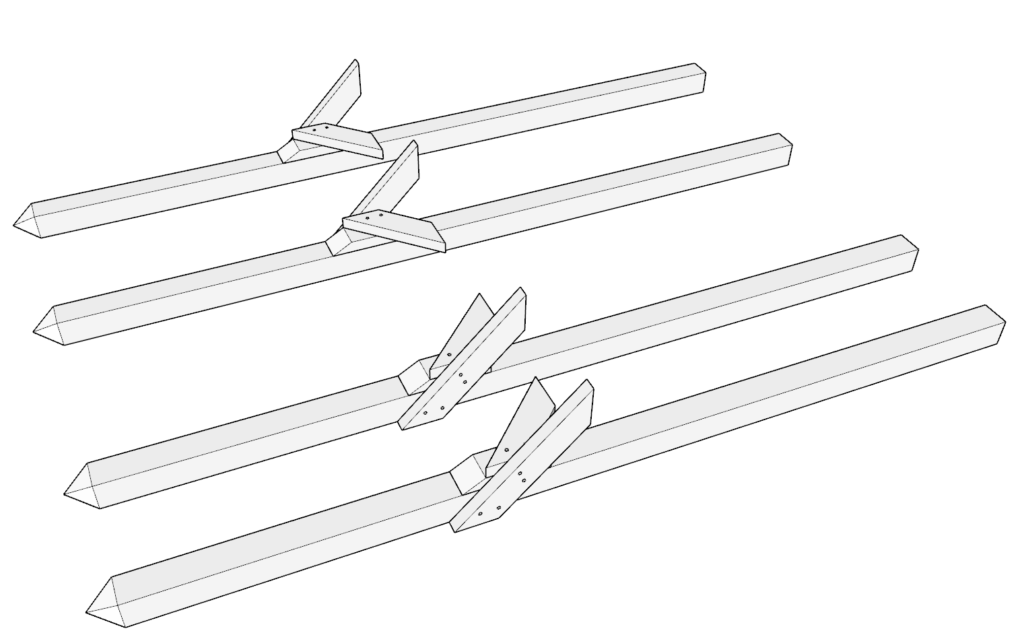
On the last 2 pillars at the 14 9/16-in piece but in a mirror fashion (See image below).
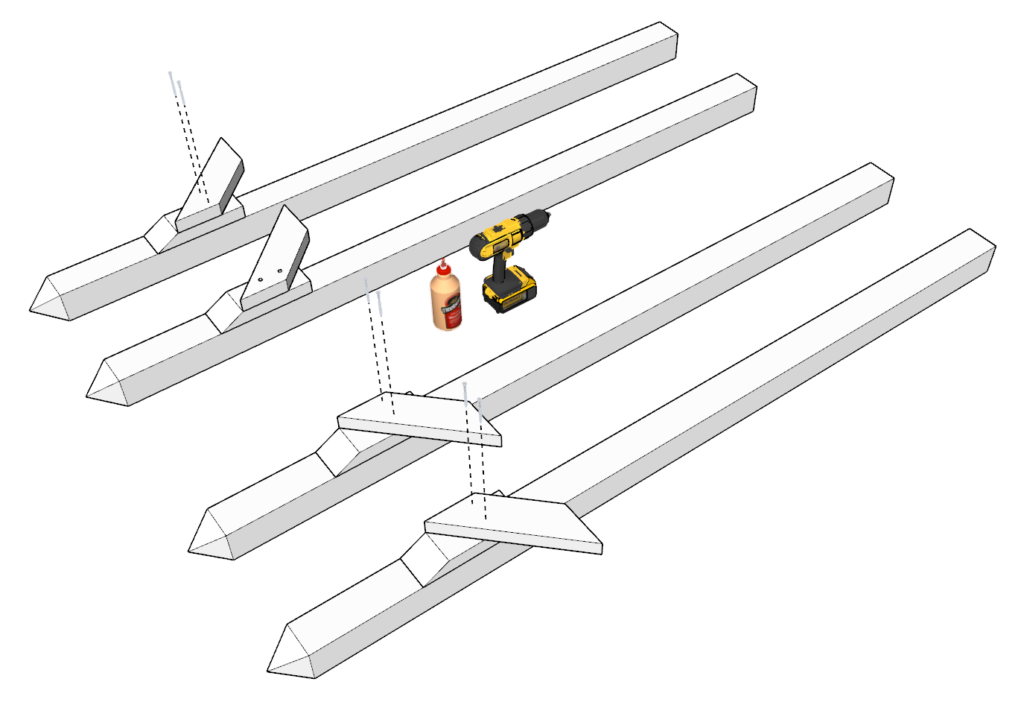
In the end you should have 4 pillars. two pairs that are identical.
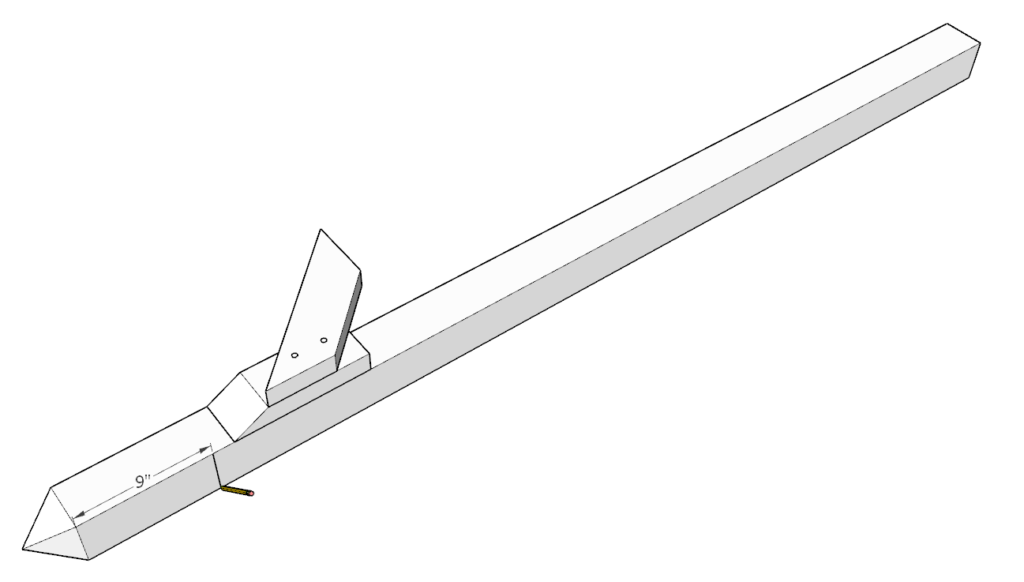
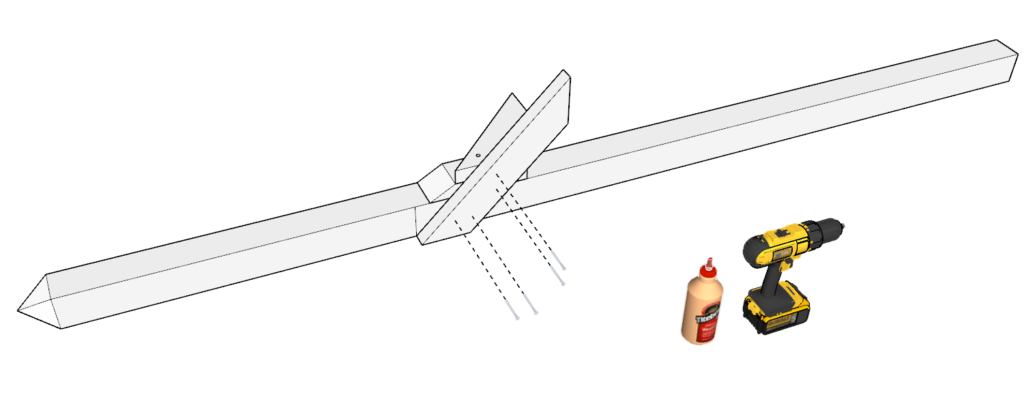
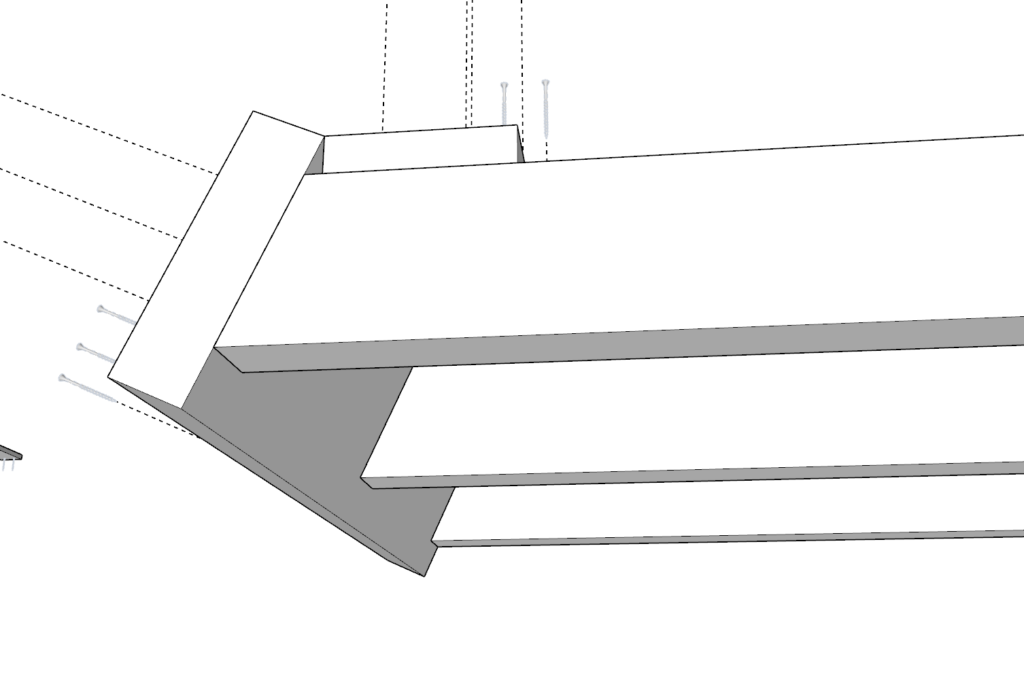
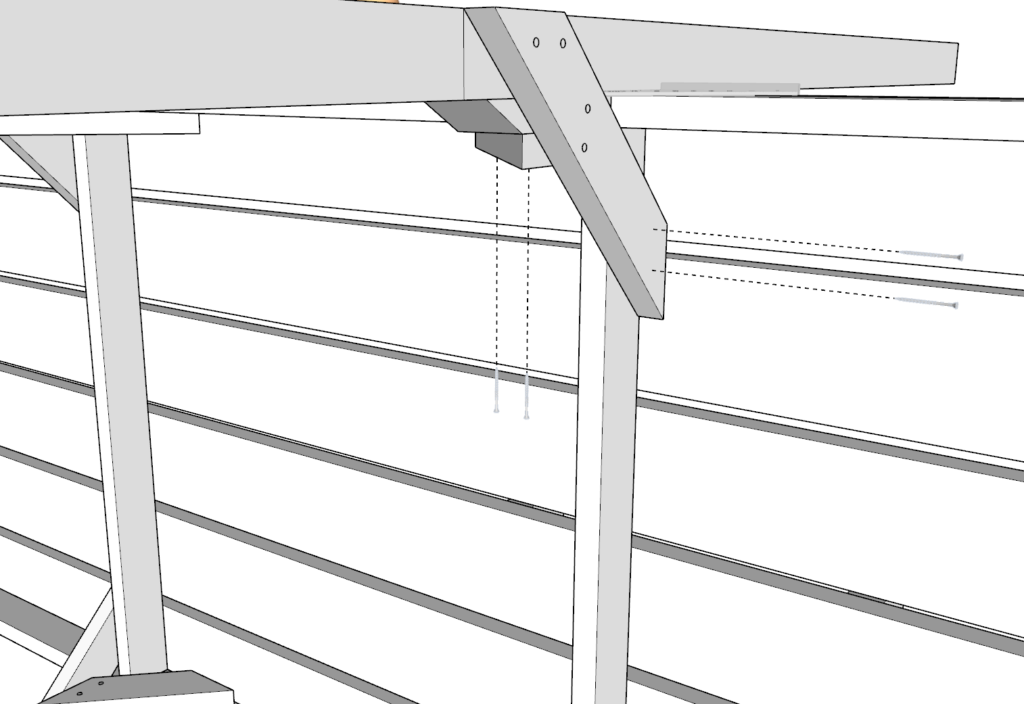
Step 22
In this step take one of the pillars and draw a line 9 inches from angled base (as shown in diagram).
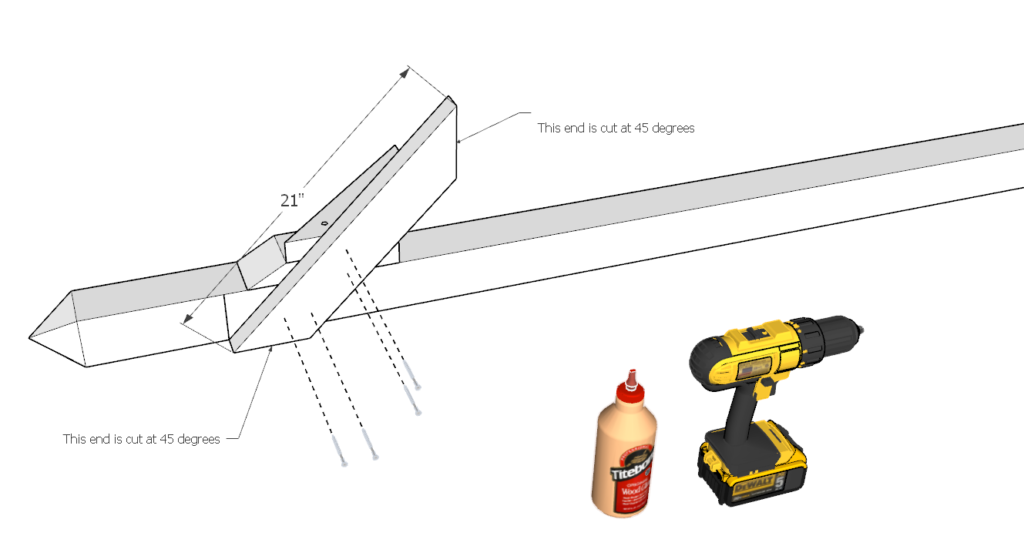
add a 21-in piece that is cut at 45 degrees on both sides (as shown in diagram).
Predrill, glue, and add screws.
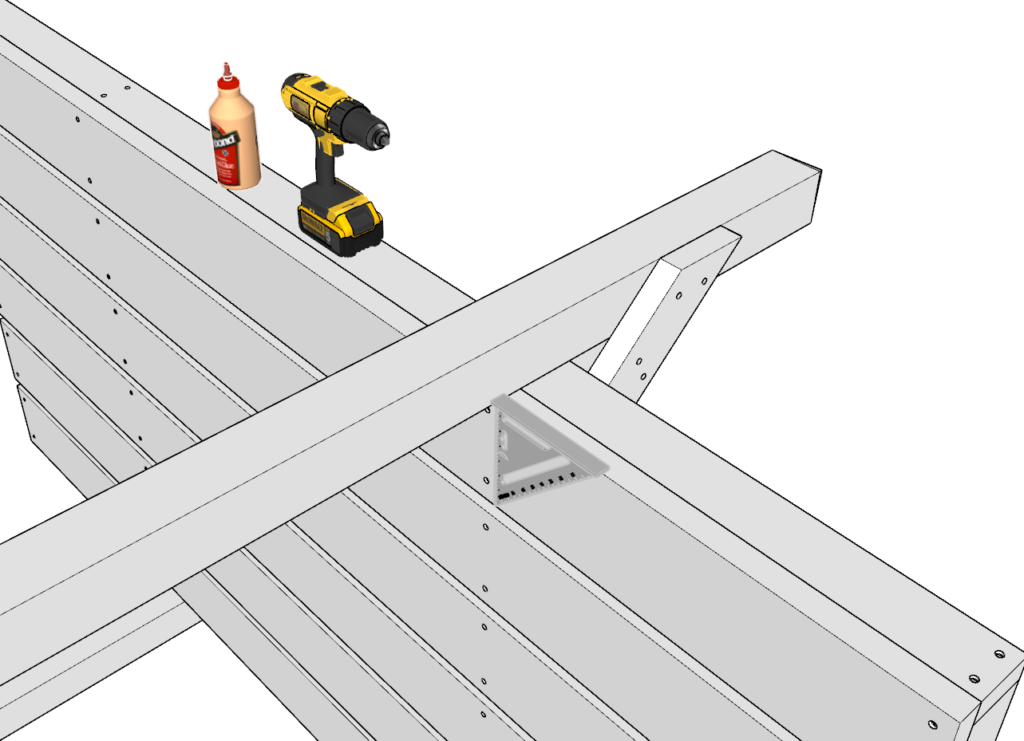
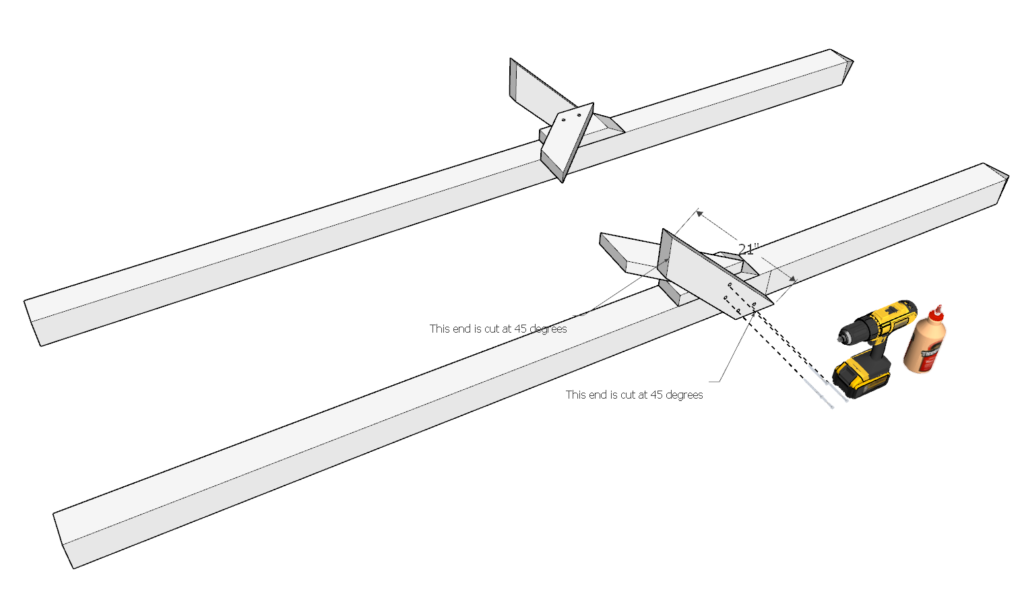
Step 23
Next, repeat step 22 on the remaining 3 pillars. IMPORTANT to note that the location of the 21-in piece needs to correspond to what is shown in the diagram.

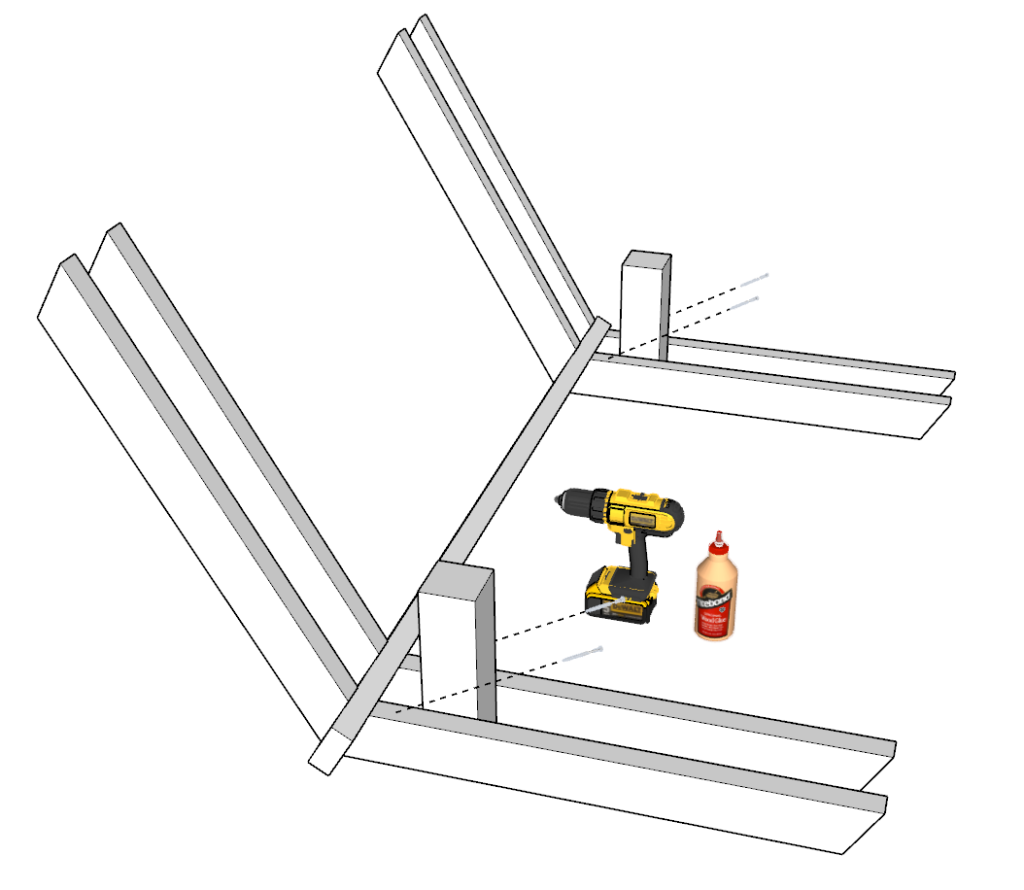
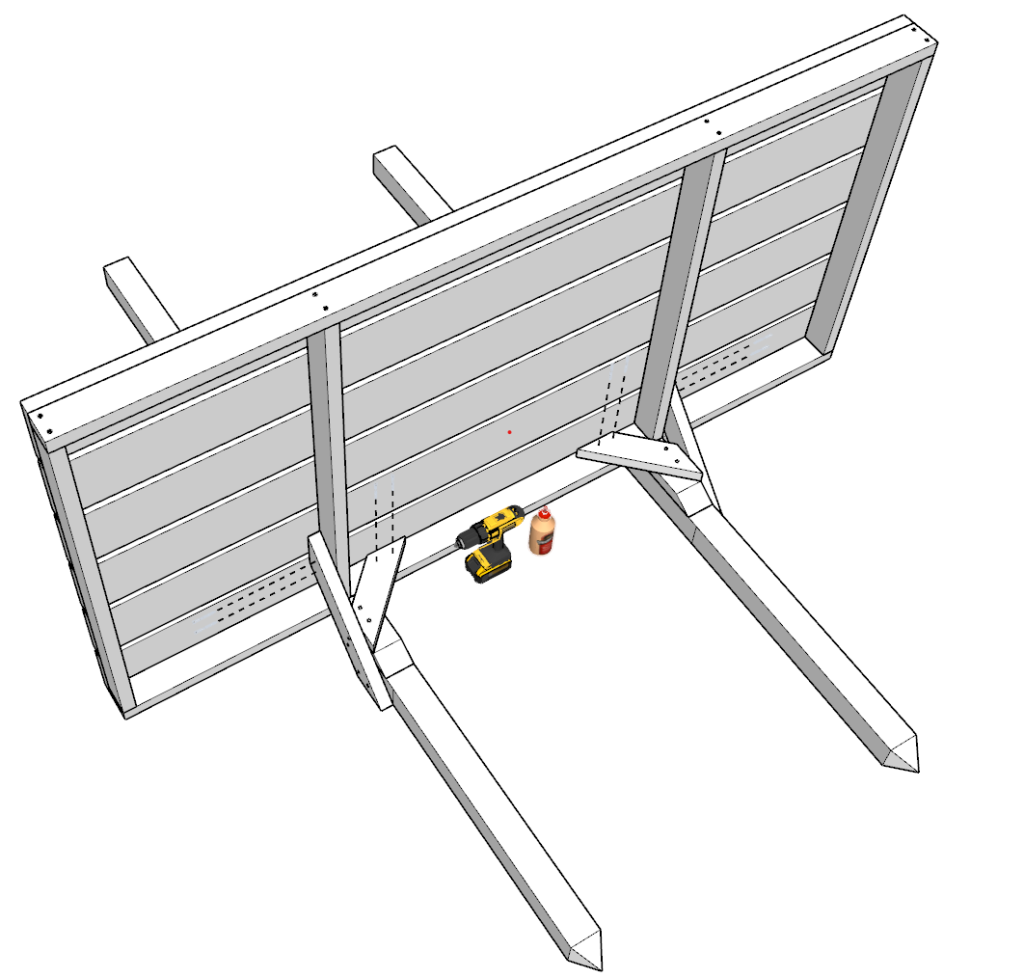
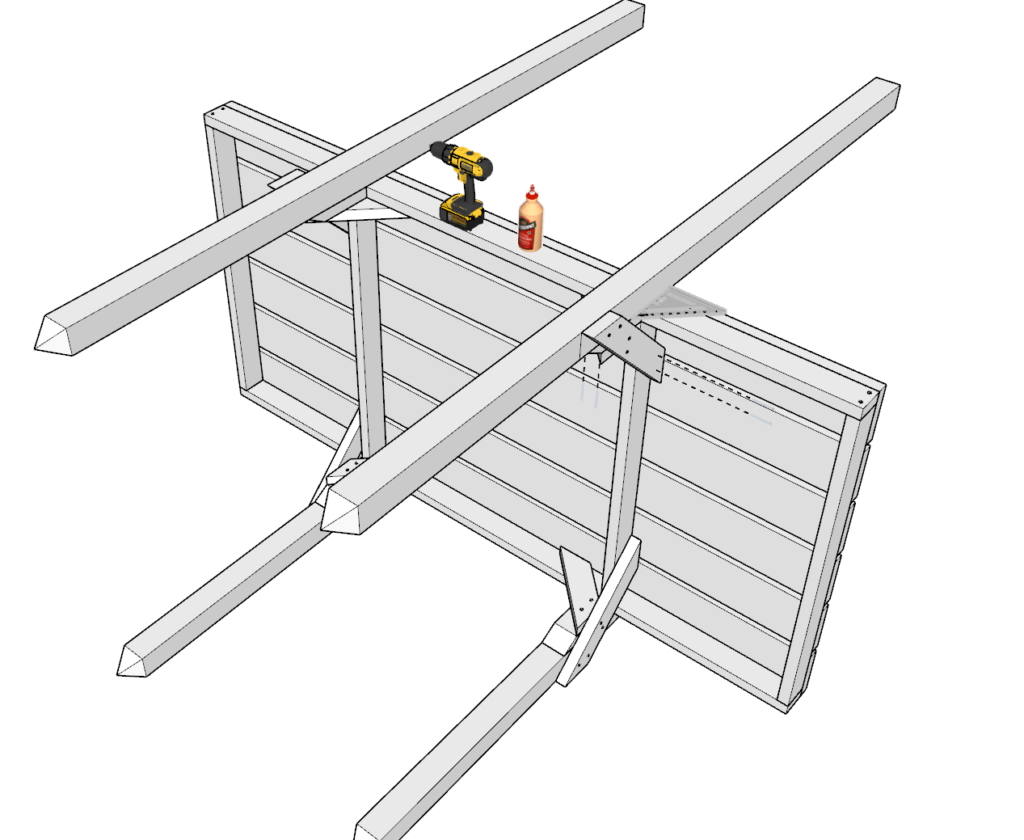
Step 24
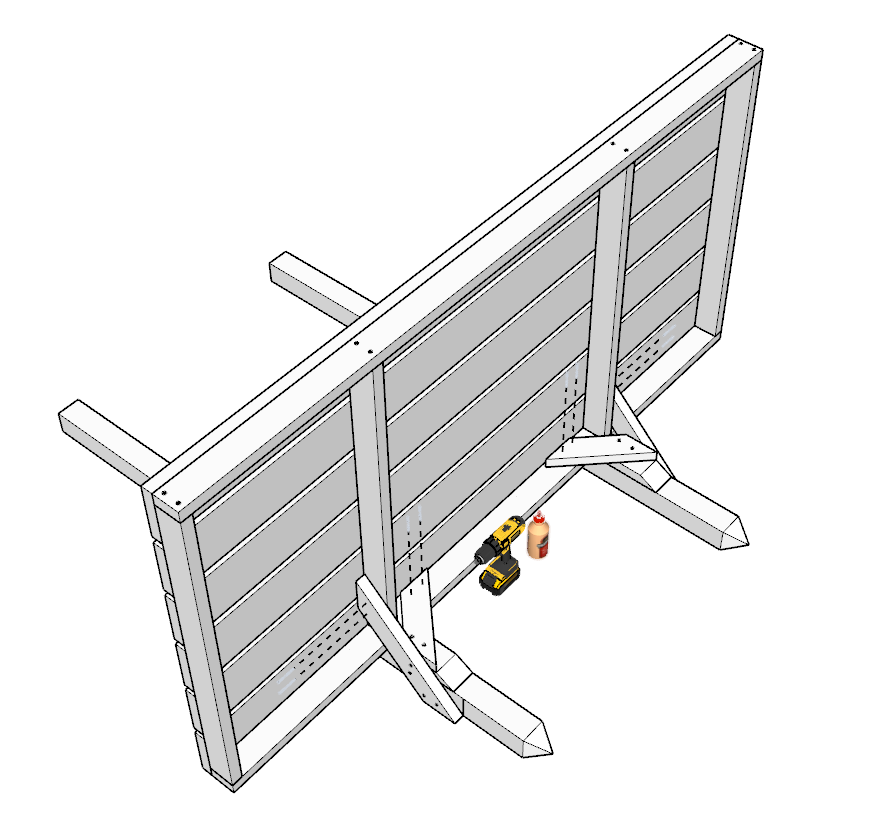
In this step you will need the help of at least one other person (best in a group of 3 or 4).
You will now be attaching the pillars to the frame and base of the playhouse.
First, take 2 pillars that are identical to the pillars shown in the diagram and place them on even ground or cement.
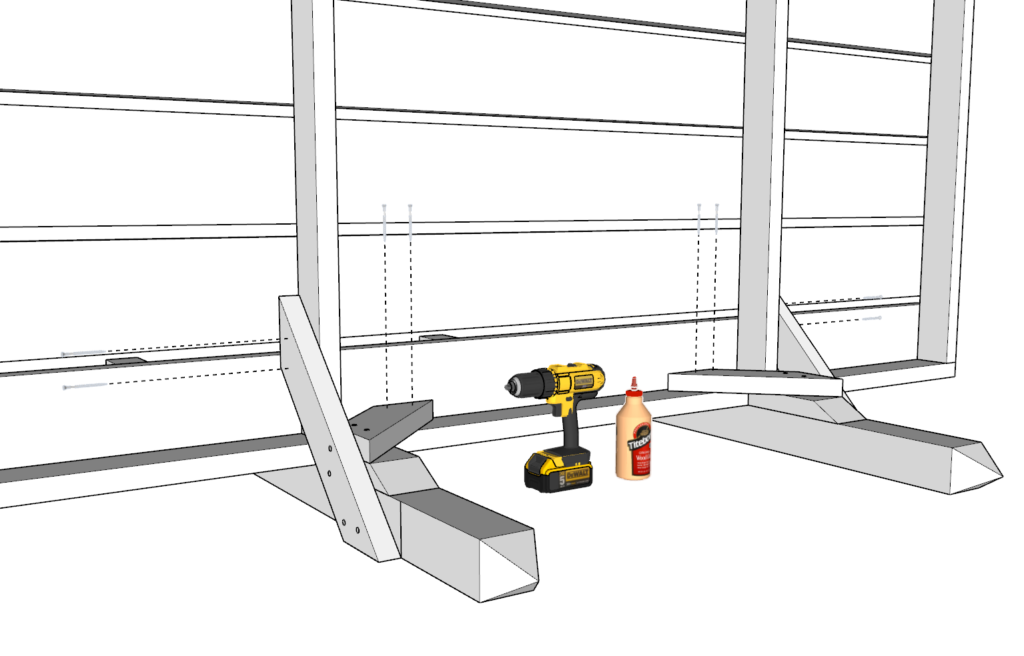
Next, apply glue to the areas of the pillars that will make contact with the base.
Next, take the base of the playhouse and fit it into the correct position (shown in diagram). The base should slide in and fit into place.
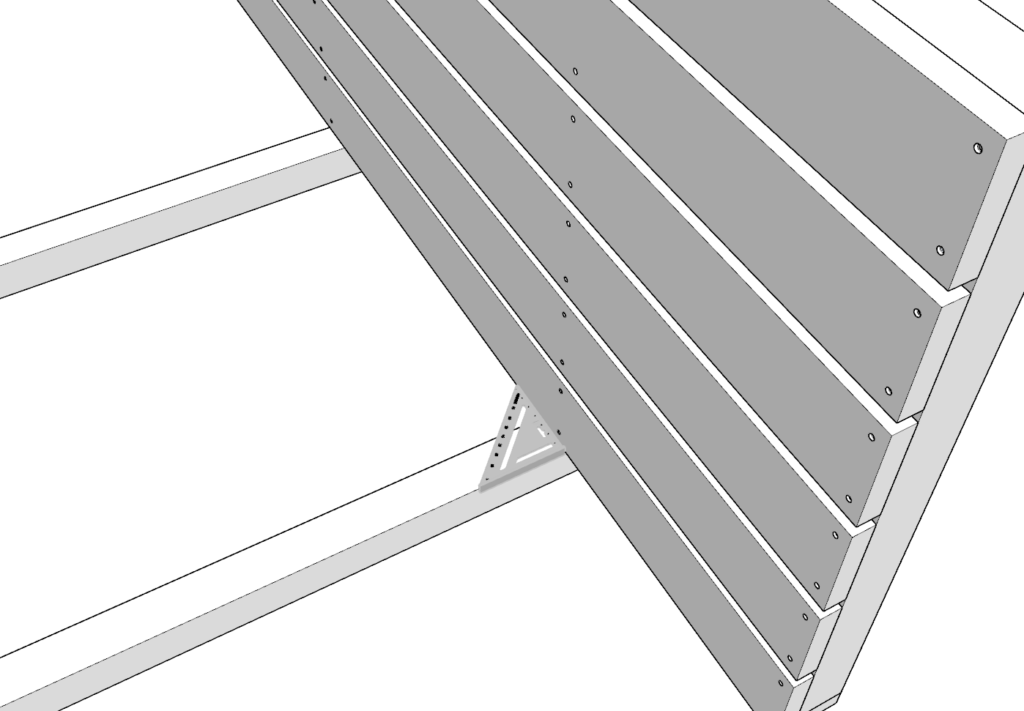
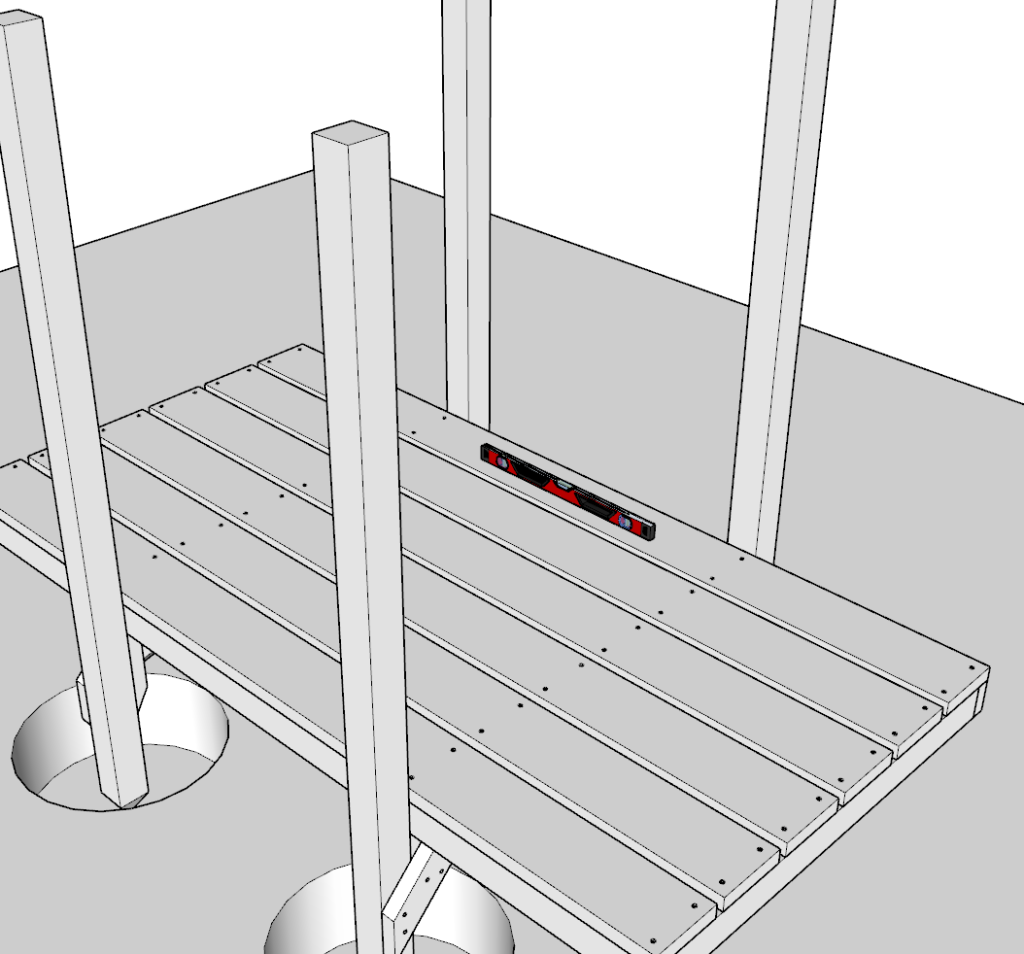
With the help of a friend, make sure the pillars are being attached at the correct angle.
I find that using a right-angle tool as shown in the image is the best way to make sure the alignment is correct.
Once the alignment is correct, add the screws to lock in the position.

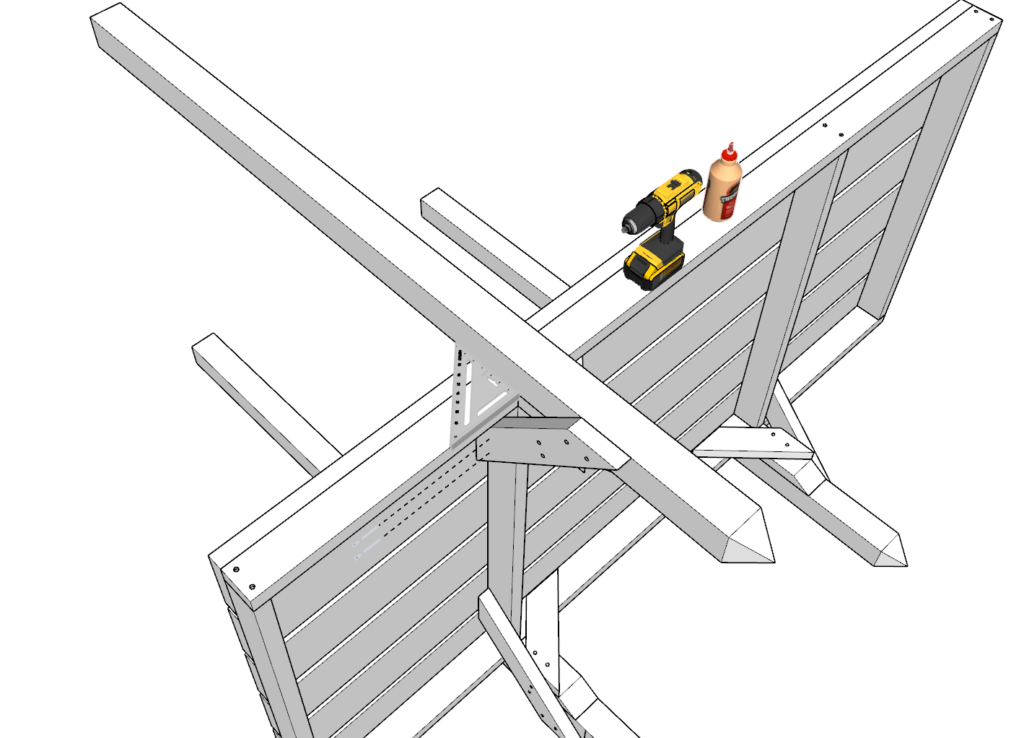
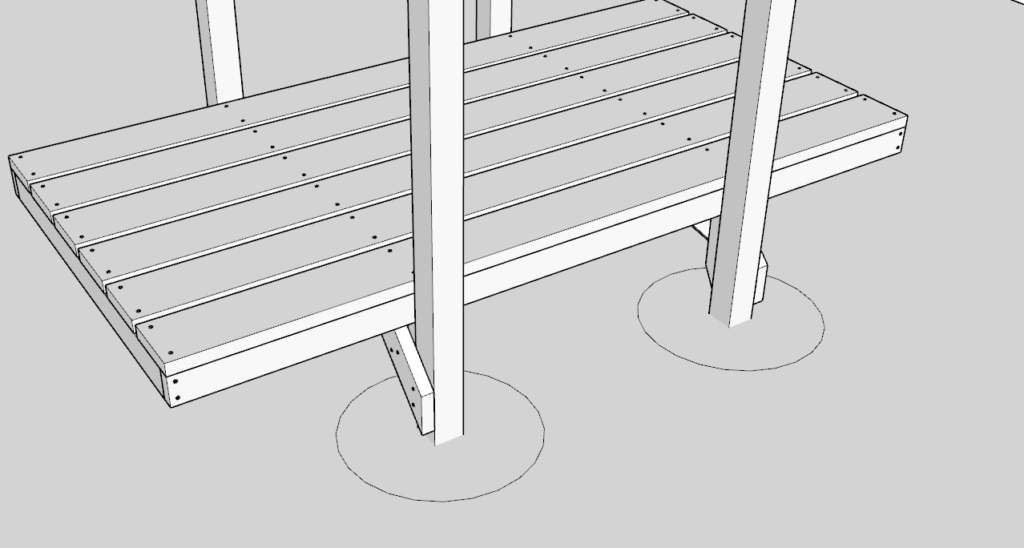
Step 25
Next, repeat the process for the other two pillars.
Apply glue before putting on the pillar.
Again, make sure the angle is correct before adding screws.
Step 26
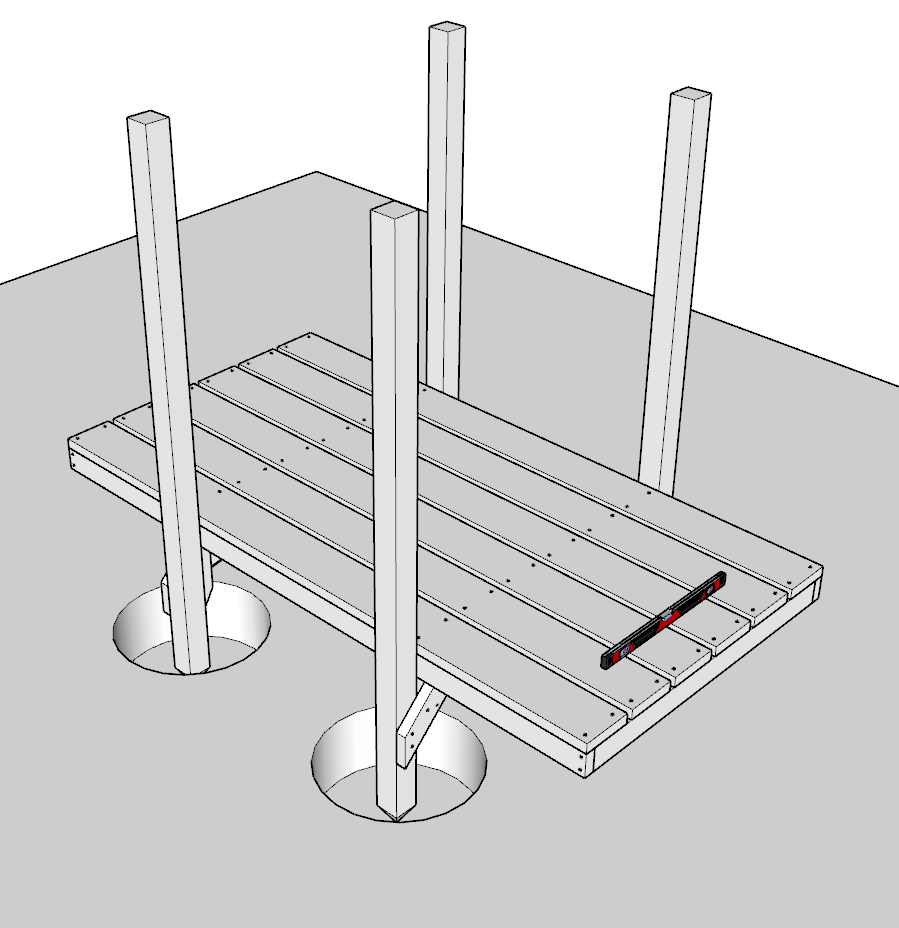
Next, you will need to flip the structure to be in the upright position.
IMPORTANT: YOU MUST FLIP IT IN THE AIR. The structure cannot be put under pressure at this point so that the alignment stays correct.
Once you flip the structure, with the help of a friend, walk it over to the final destination. Once there, place it on the ground. Spray the soil with paint or place a flag or marker where the pillars touch the ground. This will be the place where you will need to dig the soil to make a hole for the pillars.
Next, move the structure out of the way again and dig the holes. The holes need to be between 10-12 inches.
Next, place the structure into the holes.
At this point the structure may not be levered of sturdy.
Next focus on leveling the platform. NOT the pillars (this will be done in the following steps. Although make sure the pillars are not “way off”.)
Add dirt and compact it in areas that need it to make the structure leveled in all directions. Add stones or gravel to do this if needed. Make sure not to overfill the hole because it will need to be filled with cement (or compacted dirt).
Once the base is leveled, add cement or compact dirt into the holes until they are tightly packed.
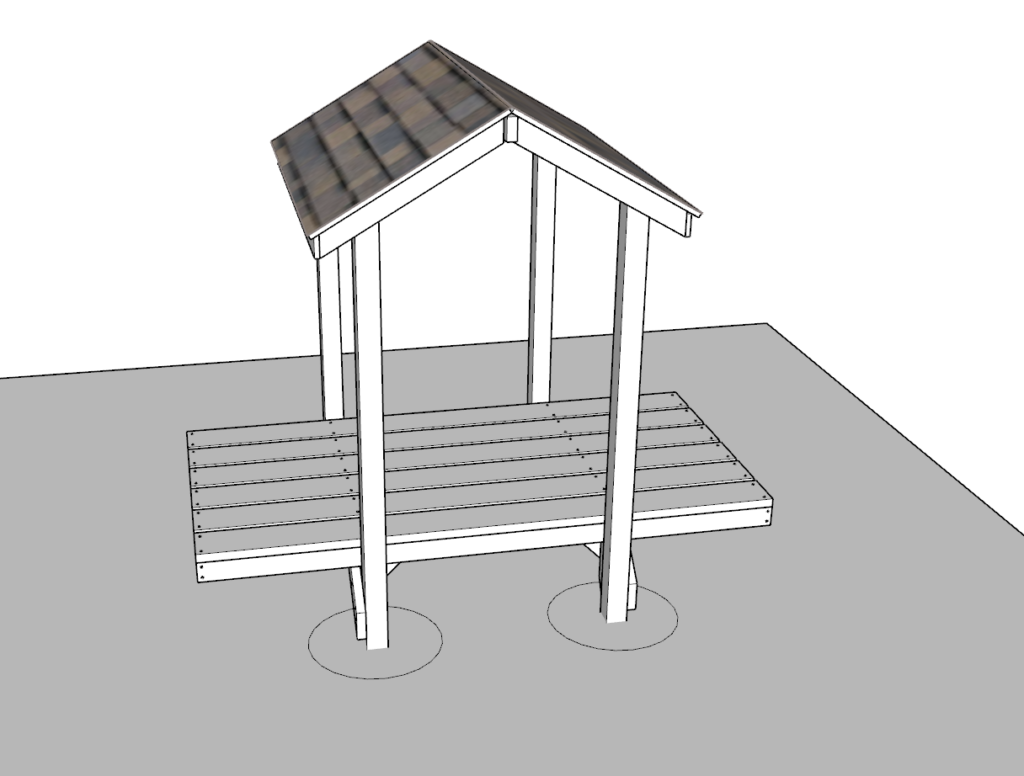
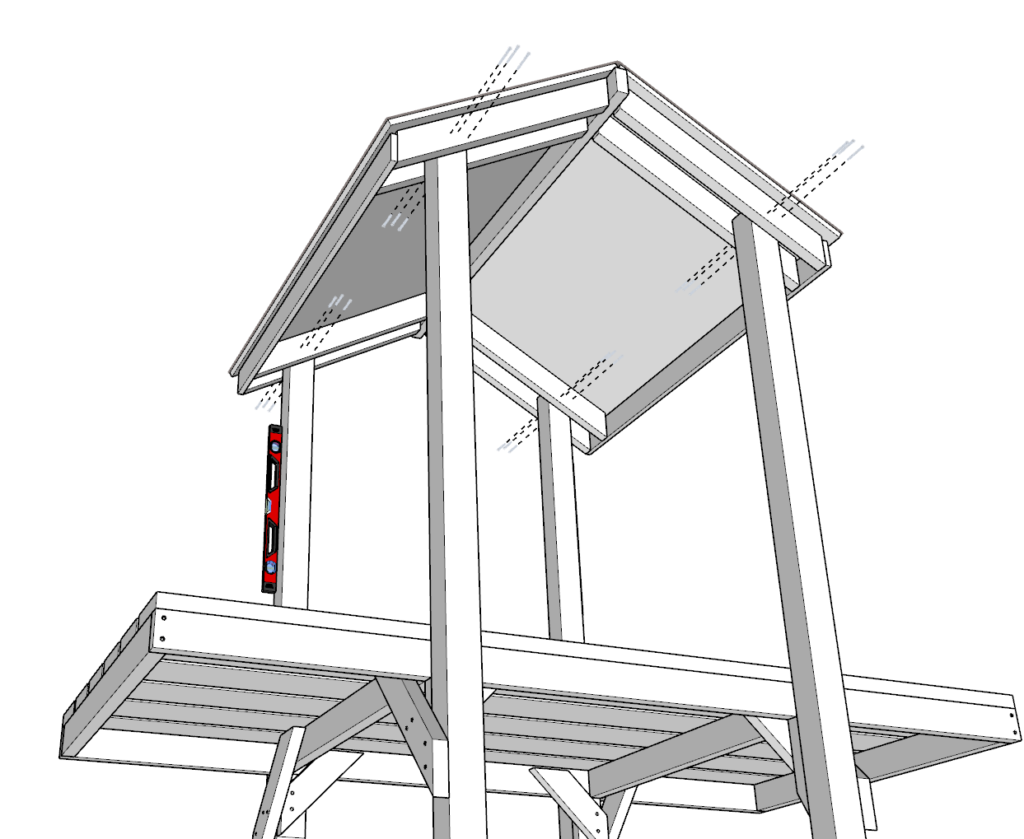
Step 27
Next, place the roof onto the pillars. This needs to be done with at least 2 people.
It is ok and is necessary to step on the platform.
Once the roof is placed, it may not be even. This is ok.
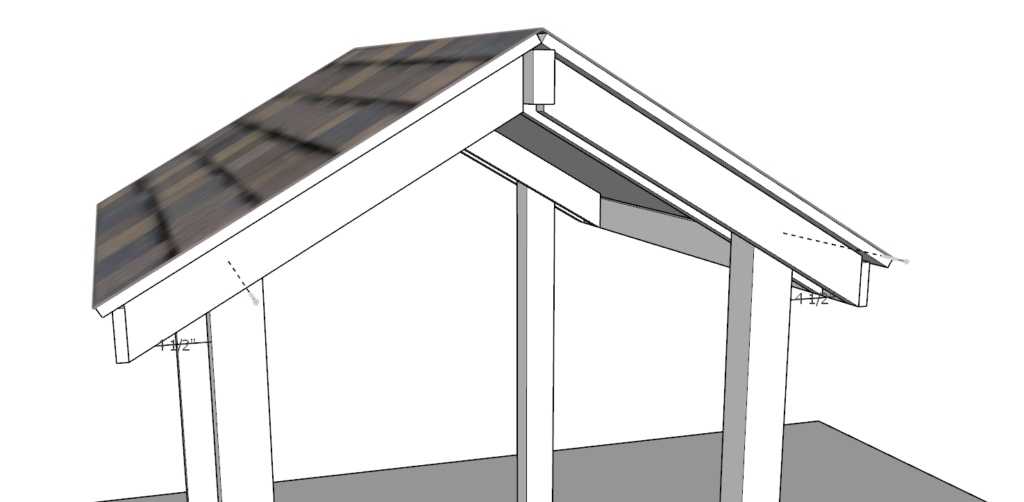
Next focus on making the roof equal distance on both sides in comparison to the pillars that are facing the same side. In the image the “ideal” distance is 4.5-in. This may not be the “ideal” distance for your playhouse because of minor differences. The point is to make the space between pillars equal up an down the pillar height. In this step do not focus on making the pillars perfectly at 90 degrees to the platform. These corrections will be done in future steps.
Once the pillars are equal distances from each other, add ONE screw to each pillar as shown in the diagram.
Step 28
In this step, make sure that the pillars are leveled in all directions. This may require some pushing and pulling.
Once the pillars are in the correct position, add screws to lock them into place.
Screws should be added from the outside as well as from the inside.

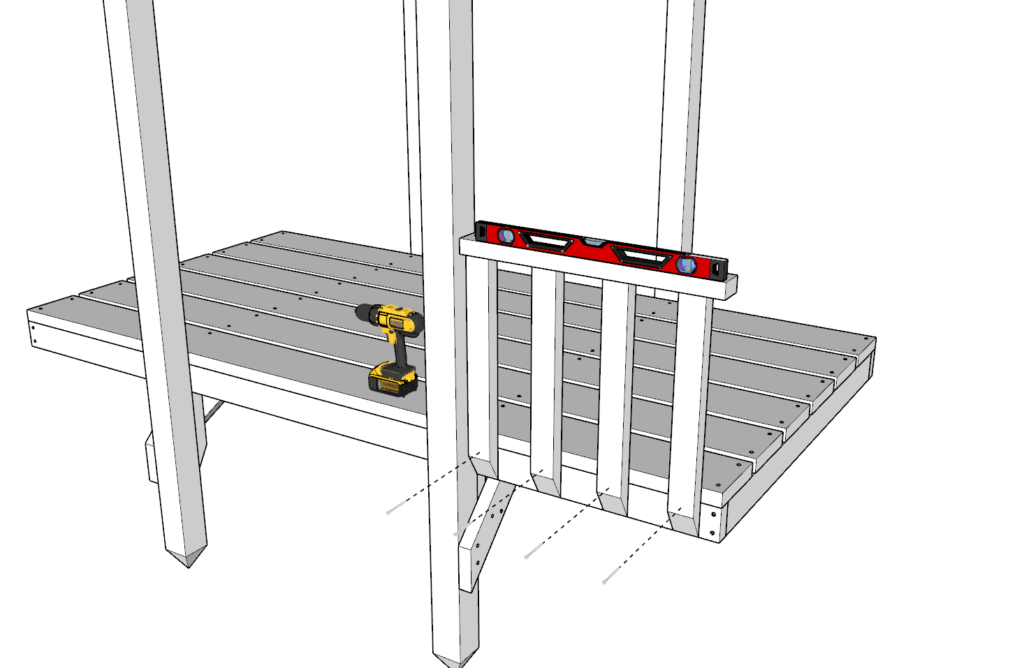
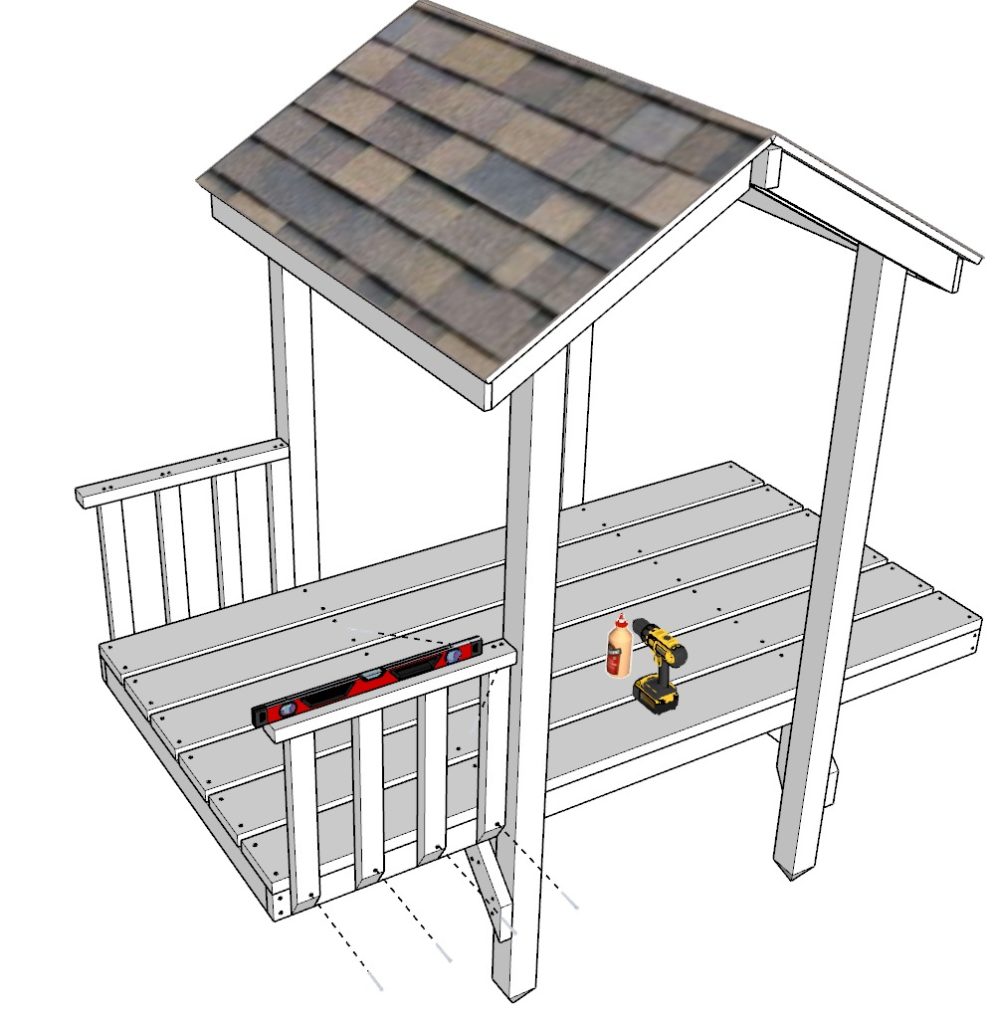
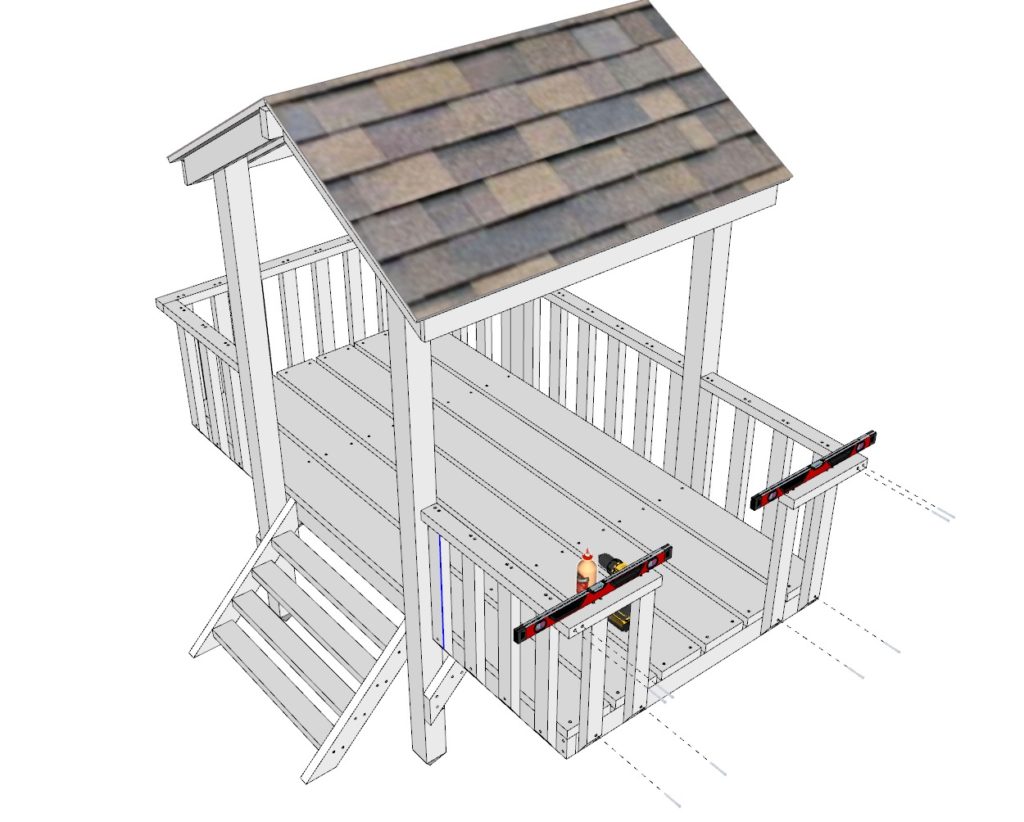
Step 29
Next, you will add the railing. Take one of the 26-in railing pieces made earlier and add it to the structure as shown in the diagram.
Add glue to all places that will be making contact.
Apply a lever before adding screws.
Predrill and add screws to the areas indicated.
Add diagonal screws to fix the railing to the pillars as shown in the diagram.
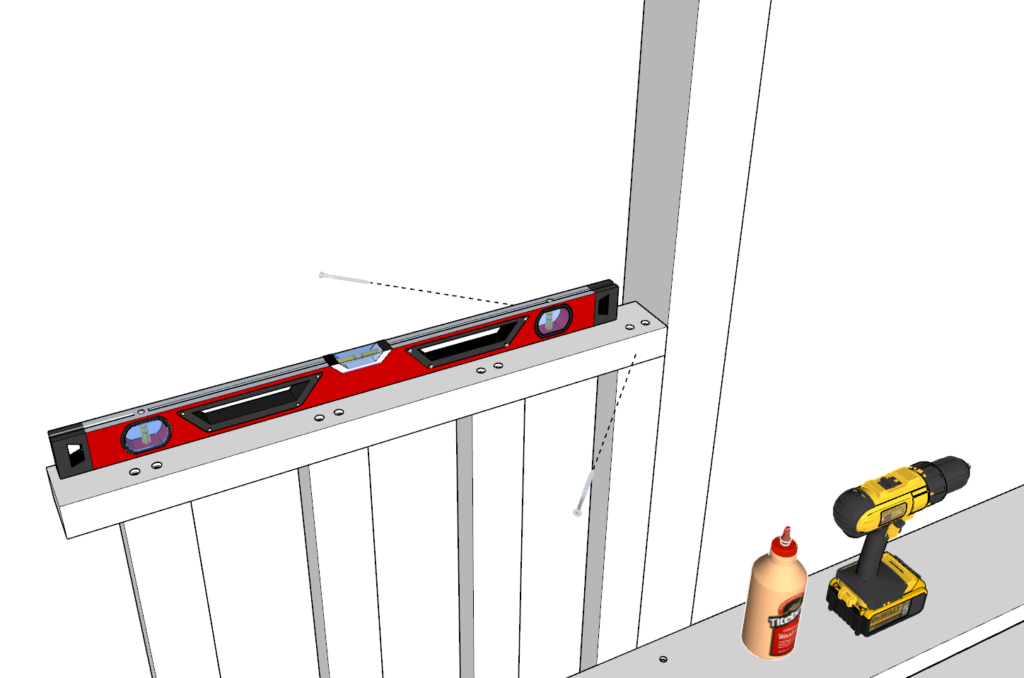
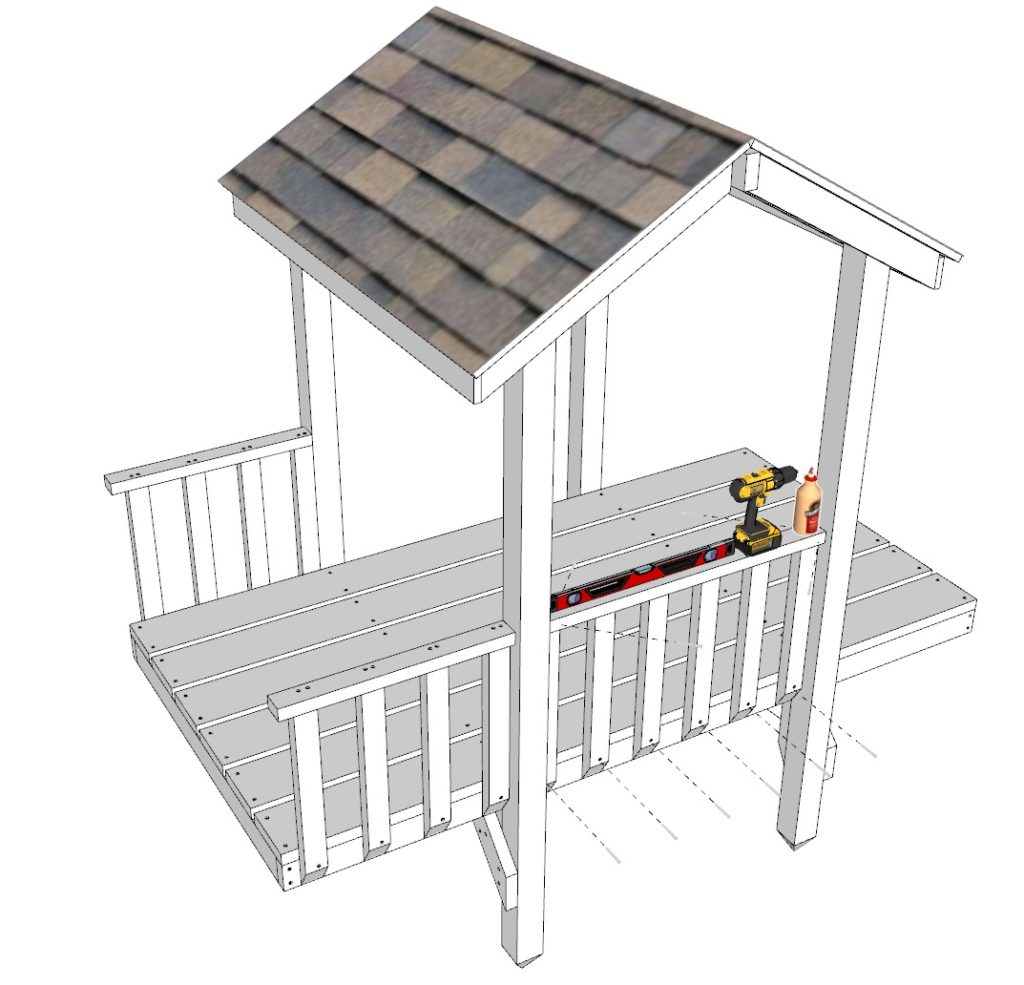
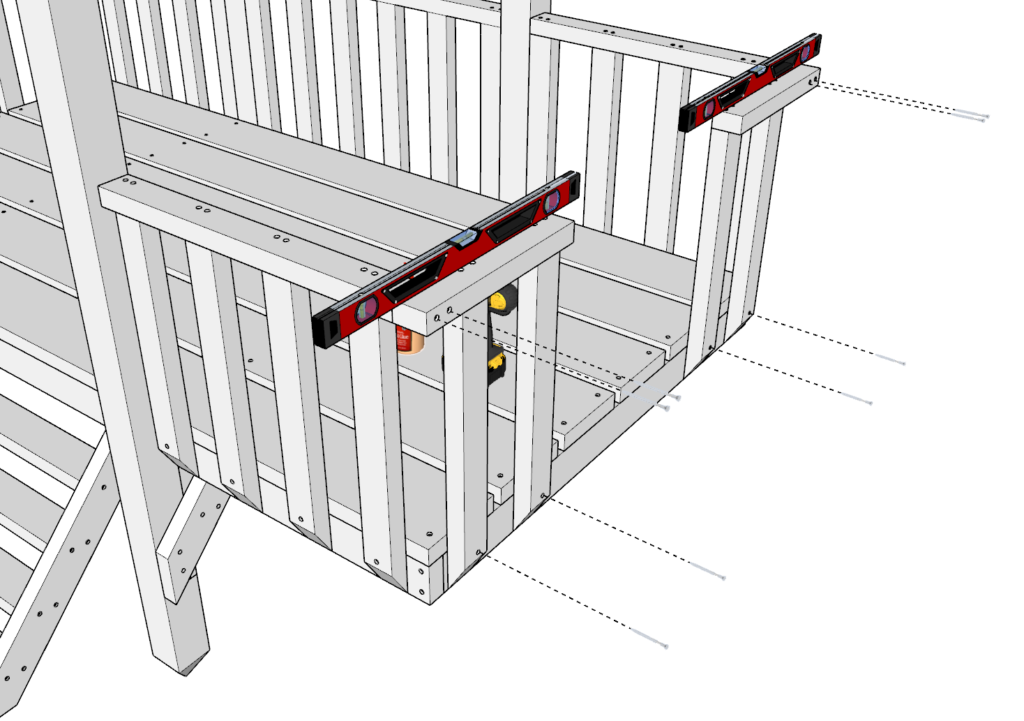
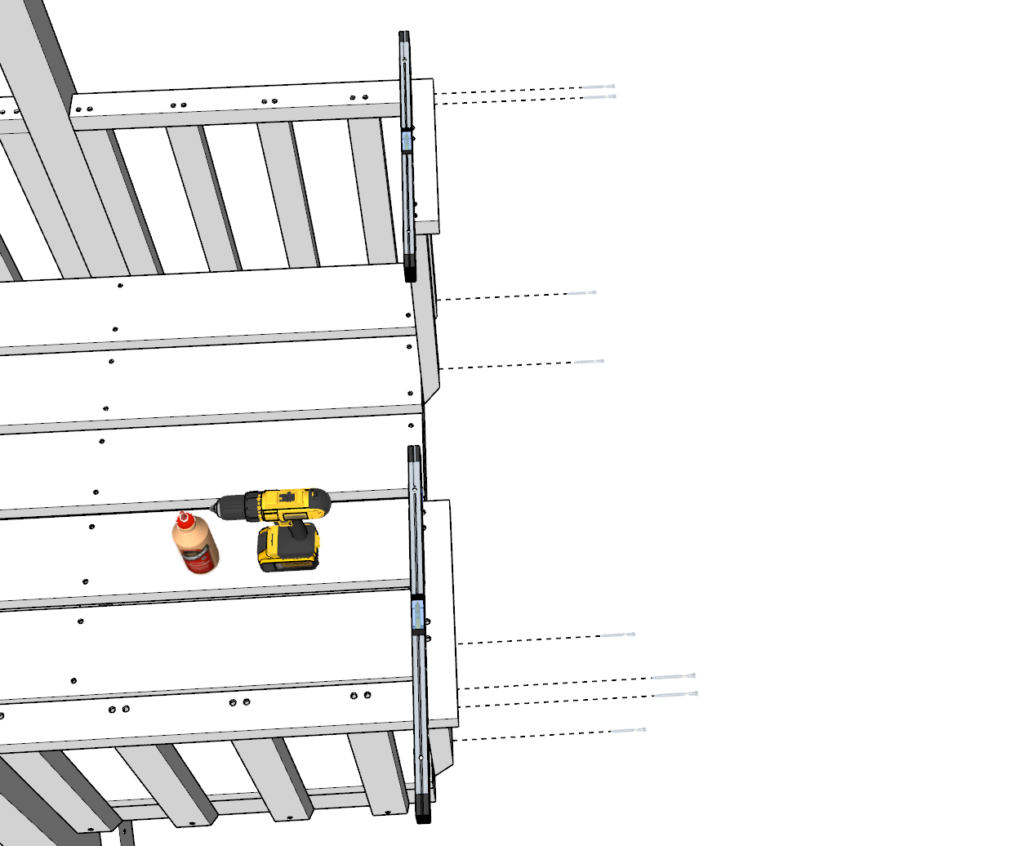
Step 30
Next, add all the railing pieces in the similar fashion as before. Not forgetting to glue, predrill, and level.
Tip: if the 37-in pieces is slightly off or does not fit, you may need to trim it a little to make it fit.
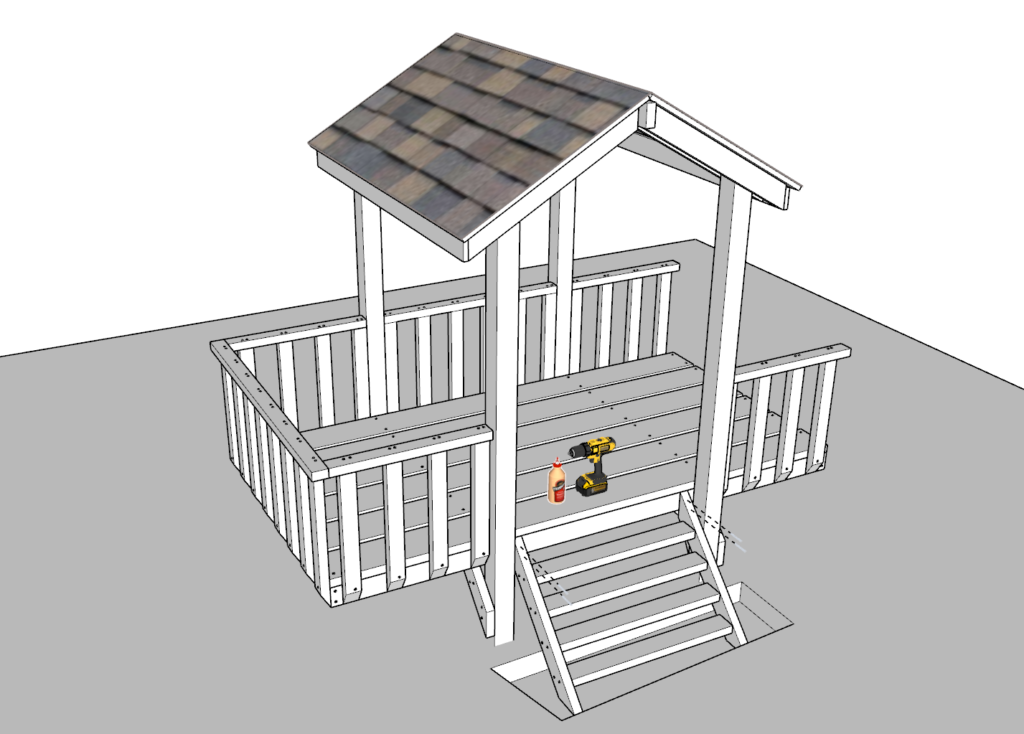
Once the railing is all attached you should have the house completely enclosed except where the stairs will be and where the bridge will connect.
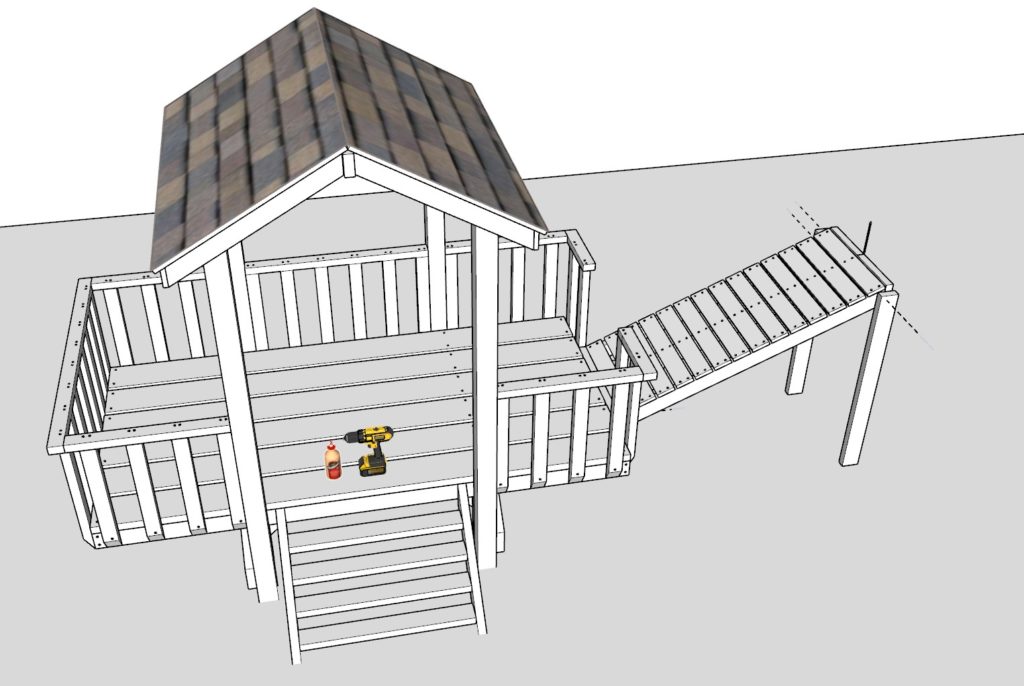
Step 31
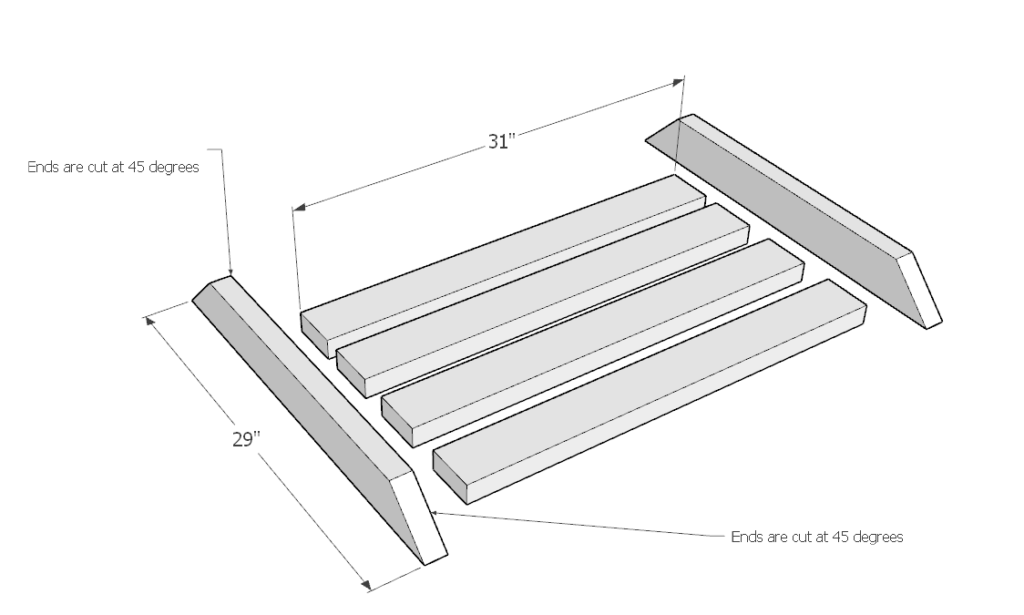
Next, you will need to build the stairs.
lay out four of the 31-in pieces and two of the 29-in pieces with 45-degree angles on both ends on the ground as shown in the diagram.
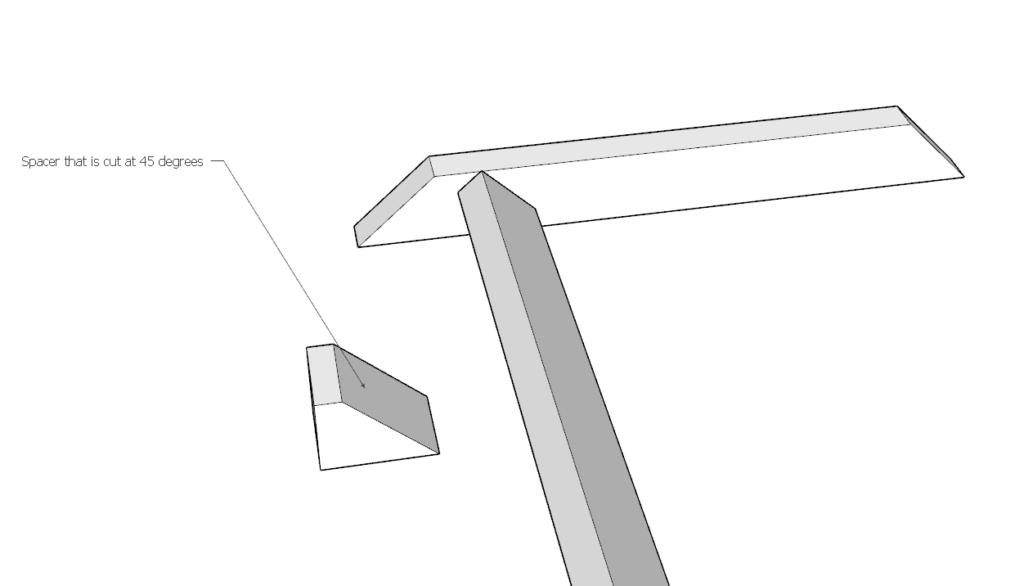
Make a spacer from the pillar cut aways. The spacer should be 4.5-in long and cut at 45 degrees. The size is important and is shown in the diagram.
Use the spacer as a guide for the angle of the first step.
Predrill, add glue, and add screws as shown.

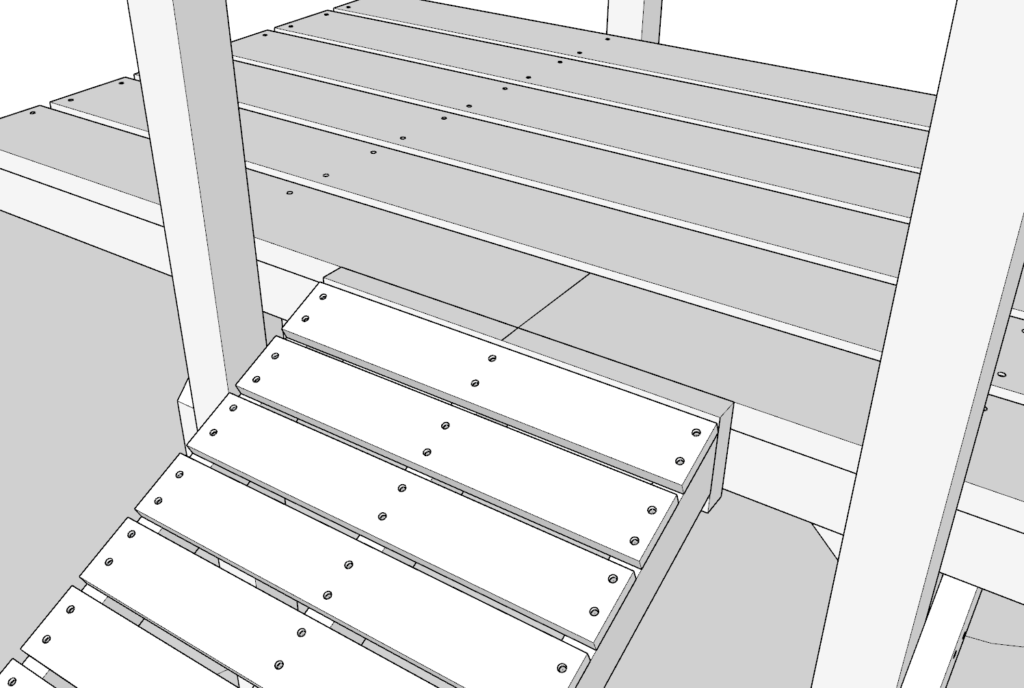
Step 32
continue to add more of the 31-in pieces using the spacer as a guide for the angle and space.
Lastly add the other 29-in angles piece. Again, the spacer can be used to ensure proper alignment.
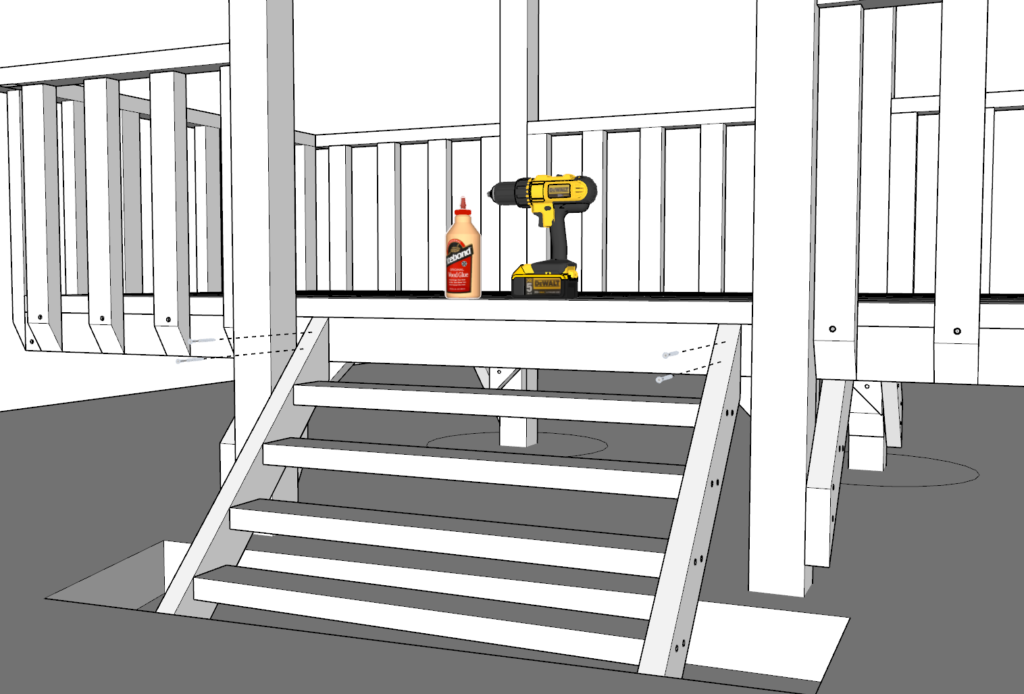
Step 33
Next, dig a small trench around the area where the stair will be attached.
apply the stairs to the structure, ensure appropriate position, and glue and screw it into place.
Pack the dirt around the stair again.
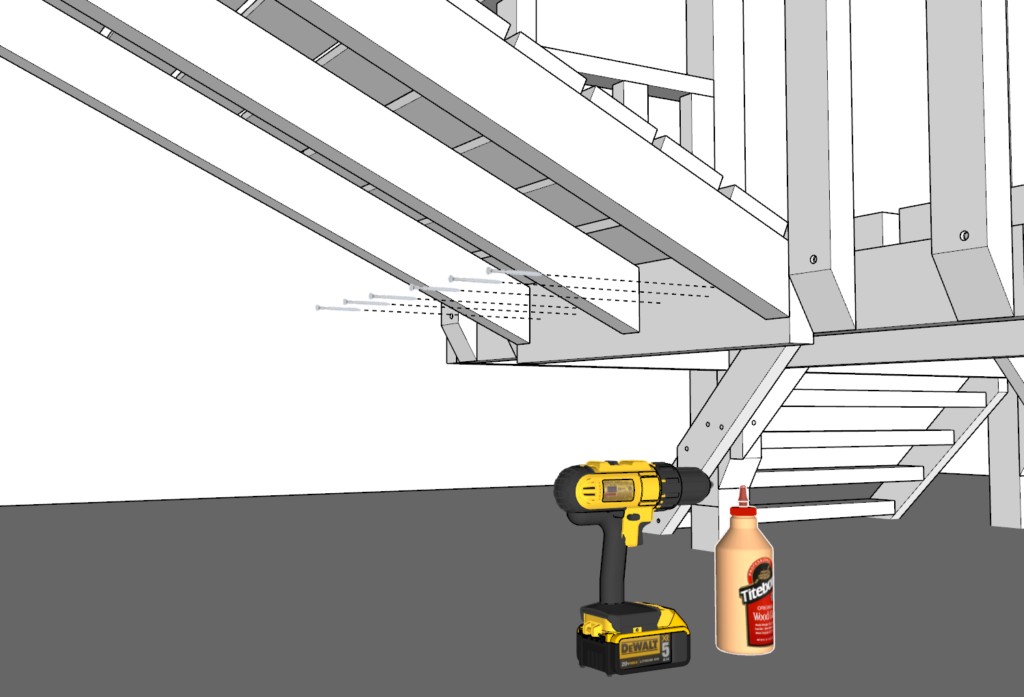
Step 34
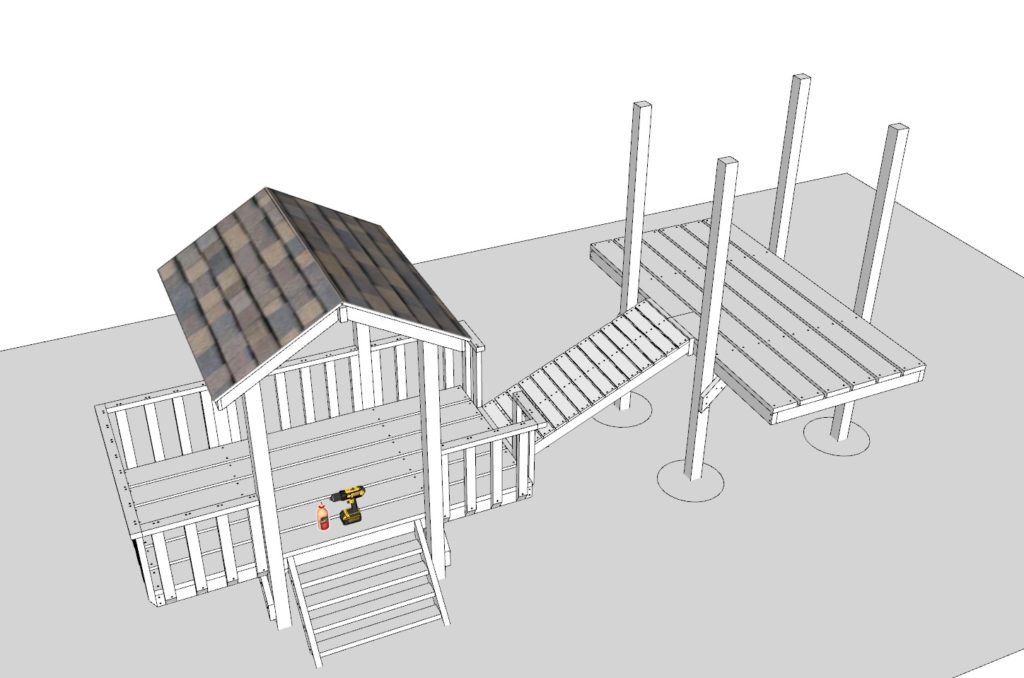
In the next step you will need to build the second, taller, kids playhouse. The steps are identical to building the shorter playhouse with some exceptions. Each of these exceptions will be discussed in greater details in the following steps.
- Instead of using 84-in pillars (cut from 4-in x 4-in x 8-ft lumber), you will need to use 108-in pillars (these are cut from 4-in x 4-in x 10-ft lumber pieces).
- The base of the second structure will be higher off the ground. Therefore, the reinforcement pieces that hold the platform will be attached higher up.
- You will need to make a bridge, along with additional railing, to connect the 2 structures.
- On the taller structure, you will not need to make a second staircase. Instead, you will need to attach the bridge.
Step 35
At this point, you need to repeat step 1-18. Once you have built all the components in step 1-18, you will now need to cut and construct the pillars for the taller second playhouse. The steps are very similar to the shorter playhouse with the exceptions of dimensions. See images below for dimension differences.
- Part A of step 35
- cut a 108-in piece from the 4-in x 4-in x 10-ft lumber.
- Cut the edges at 60 degrees on all sides, as shown.
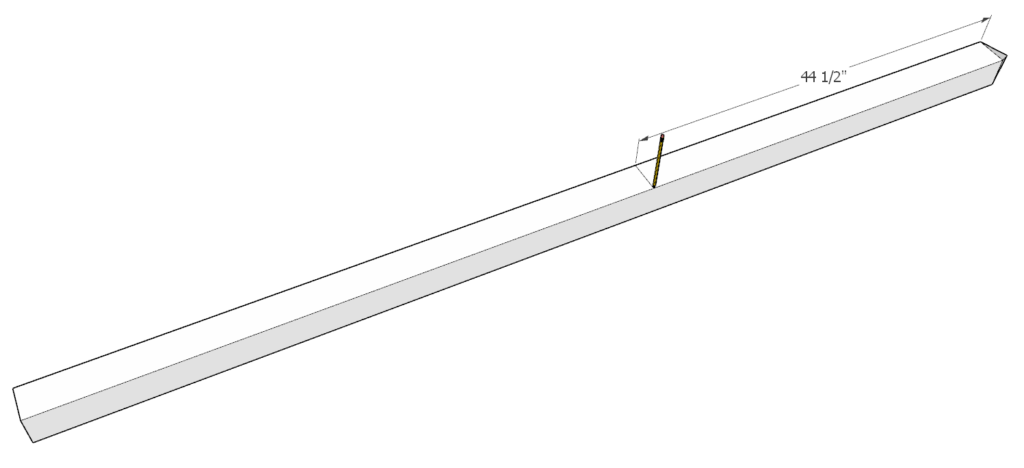
- Part B of step 35
- Draw a line with a pencil at 44.5-inches as shown in the diagram.
- Part C of step 35
- Next, cut a 10-in 2×4 piece that has one end cut at a 60-degree angle.
- Place it at the 44.5-in mark. Use the mark to note where the top of the 10-in piece should go.
- predrill, glue, and add screws.
- Make a total of 4 pillars just like this.
- Part D of step 35
- Next, add a 14 9/16-in piece as shown in the diagram. The edges are cut at 45 degrees.
- Predrill, glue, and add screws.
- Repeat this 2x on only 2 of the pillars.
- Part E of step 35
- On the other 2 pillars add the 14 9/16-in piece but in a mirror fashion (See image below).
- In the end you should have 4 pillars. two pairs, each pair should be identical identical.
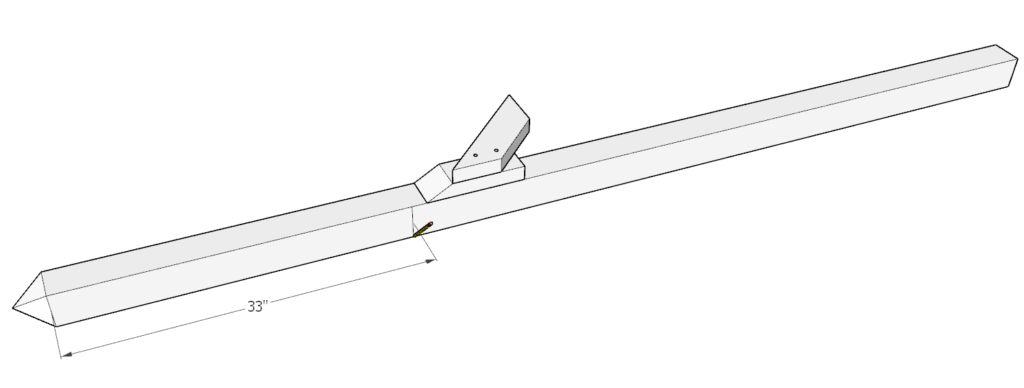
- Part F of step 35
- In this step take one of the pillars and draw a line 33 inches from the angled base (as shown in diagram).
- Part G of step 35
- add a 21-in piece that is cut at 45 degrees on both sides (as shown in diagram).
- Predrill, glue, and add screws.
- Part H of step 35
- Next, repeat step 22 on the remaining 3 pillars. IMPORTANT to note that the location of the 21-in piece needs to correspond to what is shown in the diagram.
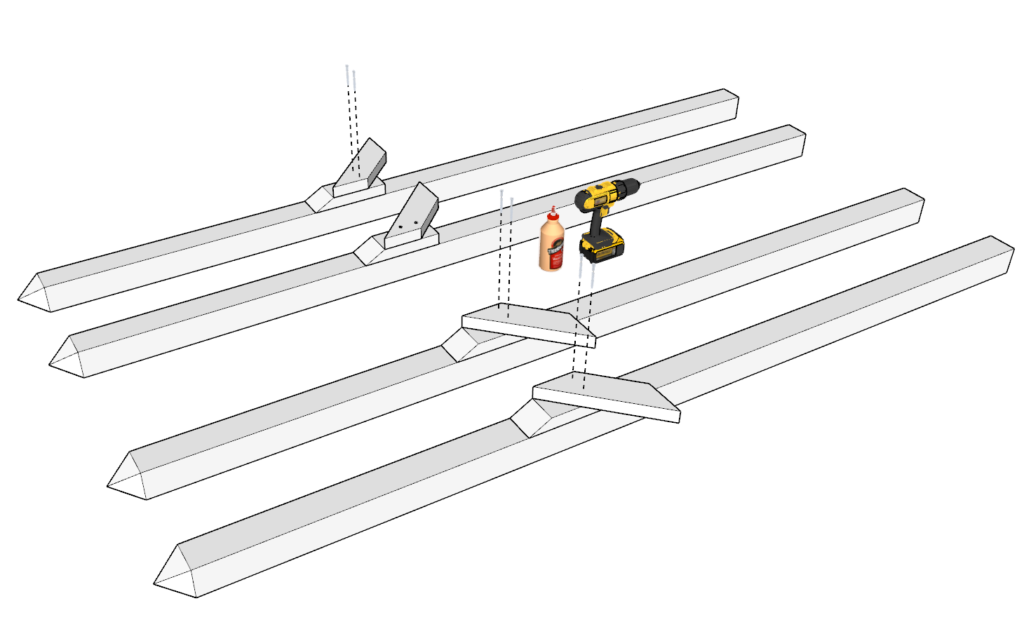
- Part I of step 35
- Once all the pillars are completed, they should look like the image in Part I of step 35.
Part A of step 35

Part B of step 35
Part C of step 35
Part D of step 35
Part E of step 35
Part F of step 35
Part G of step 35
Part H of step 35
Part I of step 35
Step 36
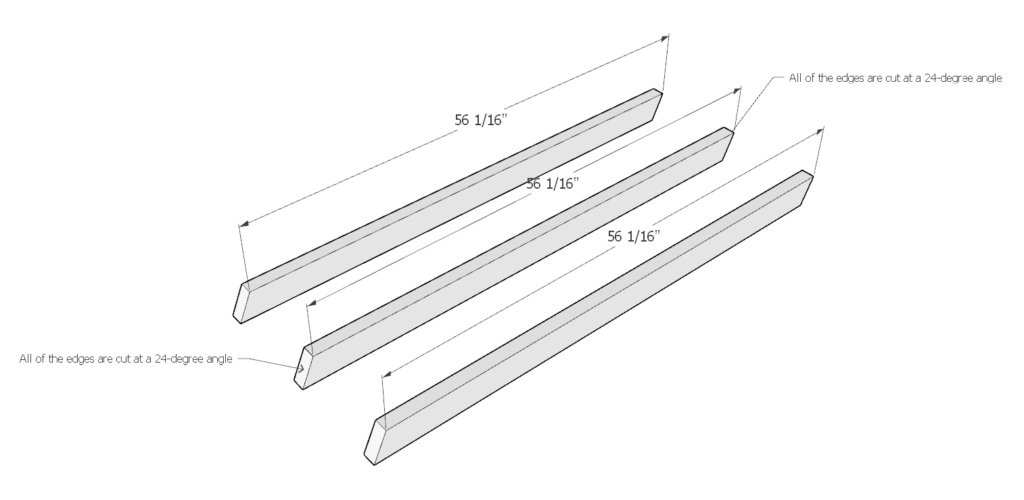
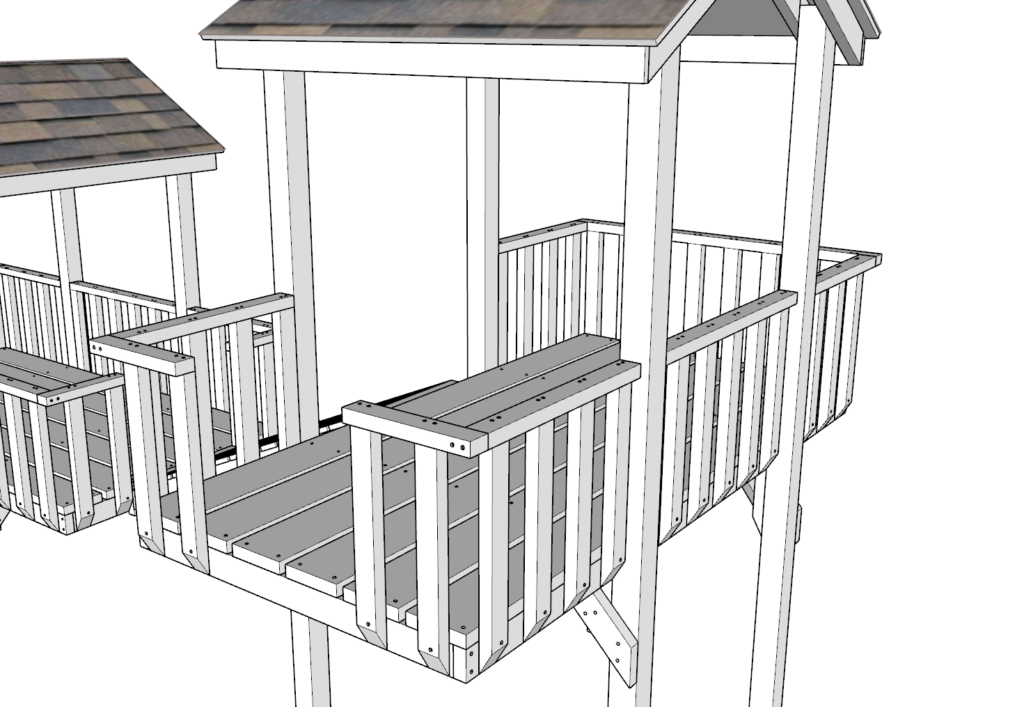
In the following steps you will need to construct the bridge and railing that will connect the two structures.
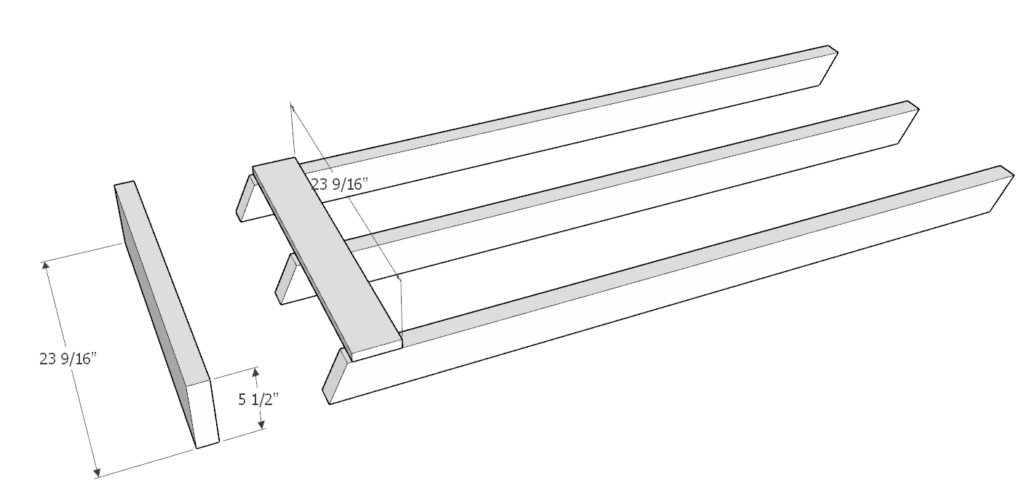
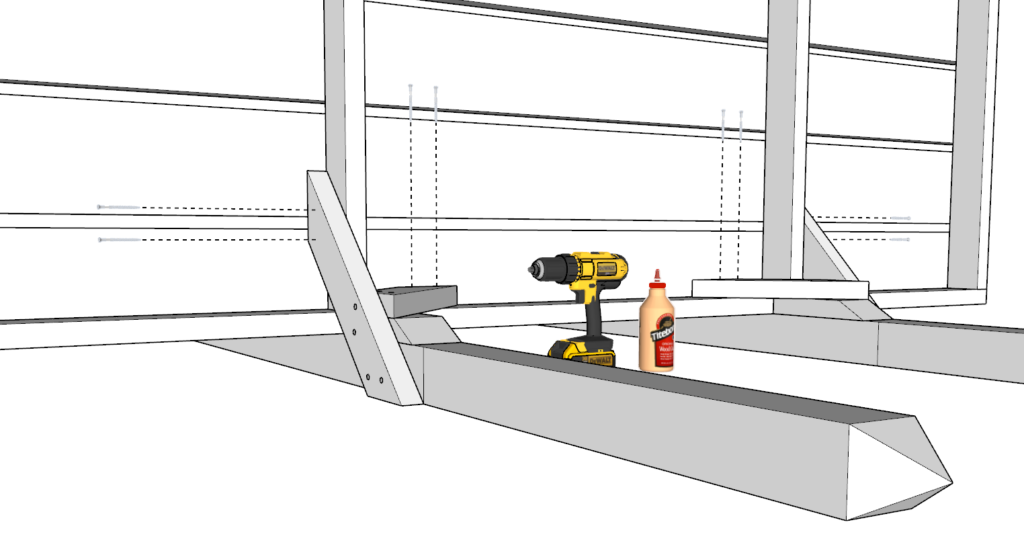
First, cut three identical 56 1/16-in pieces from 2×4 lumber. Cut the ends at 24 degrees as shown in the diagram.
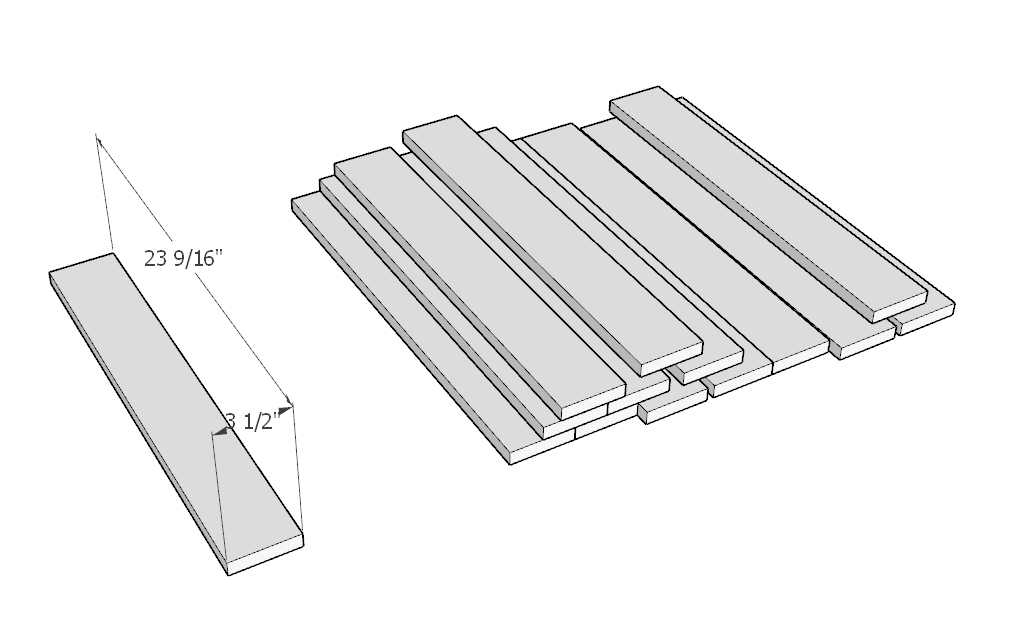
Next, cut 14 identical pieces at 23 9/16-in from 1×4 lumber.
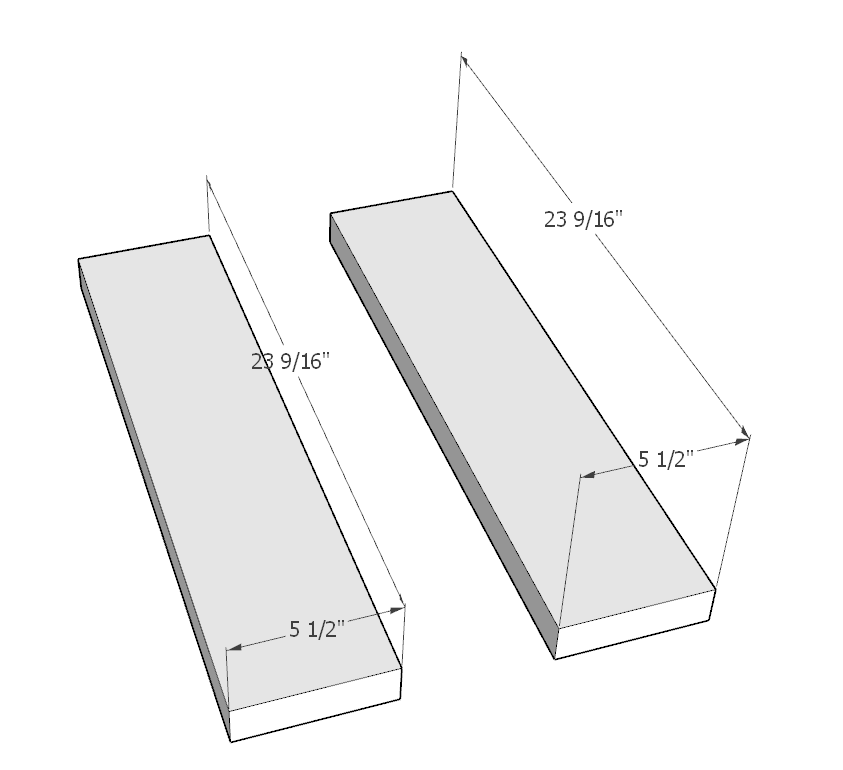
Next, cut two identical pieces at 23 9/16-in from 2×6 lumber.
These pieces will be used in the construction of the bridge in the following steps.
Step 37
Take the three 56 1/16-in pieces and add a 23 9/16-in piece from the 1×4 lumber on top of them as shown in the diagram. Space out the three 56 1/16-in pieces evenly.
add a 23 9/16-in piece from the 2×6 lumber to the side.
Make sure the joint matches the images bellow. The third image shows how the pieces come together.
Once everything is aligned, predrill, add glue, and add screws.
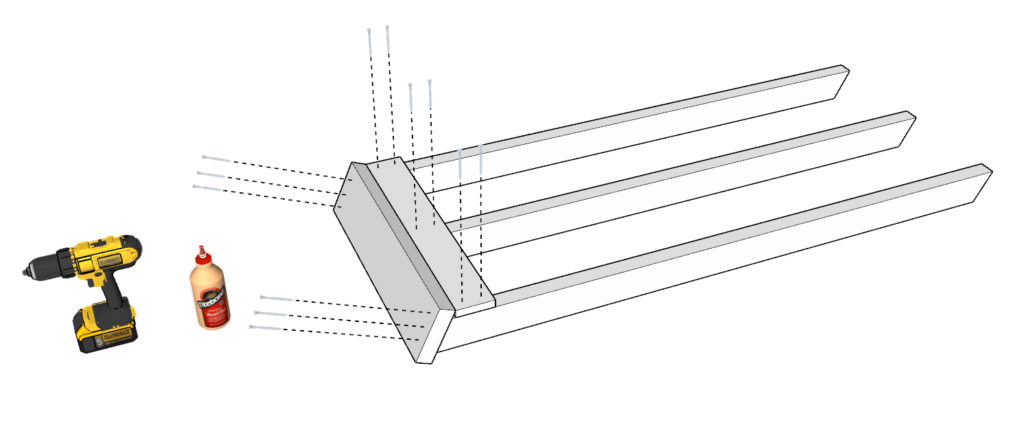
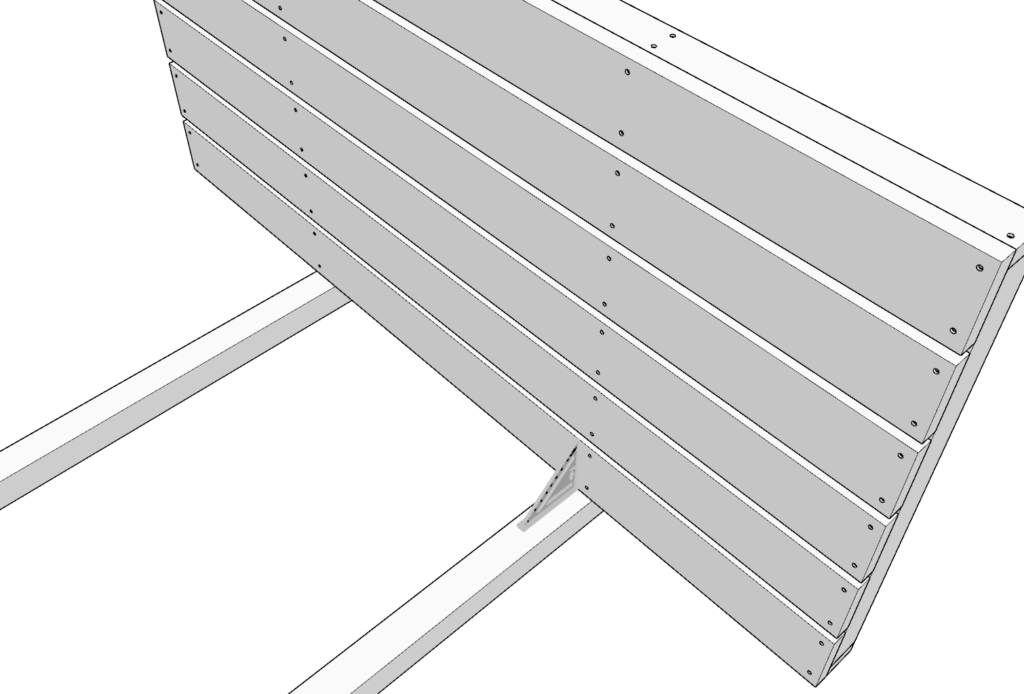
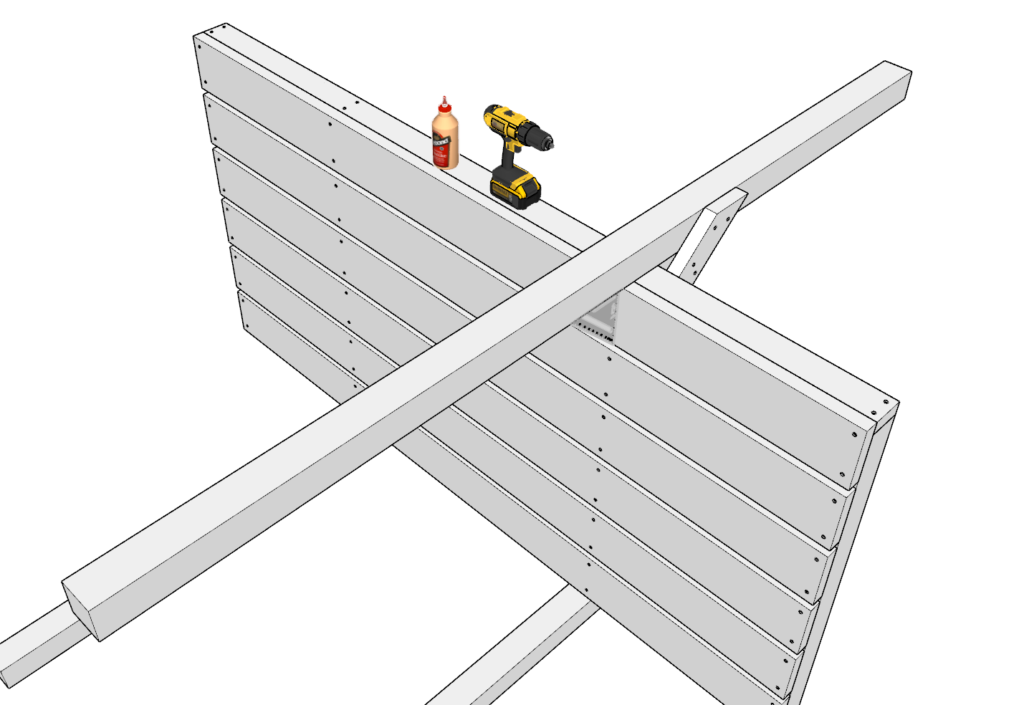
Step 38
In this step you first need to flip the bridge and add a 23 9/16-in piece from the 2×6 lumber to the other angled side as shown in the diagram. Use a 23 9/16-in piece from the 1×4 lumber as a spacer to get the proper alignment.
Next, predrill, add glue, and add screws.
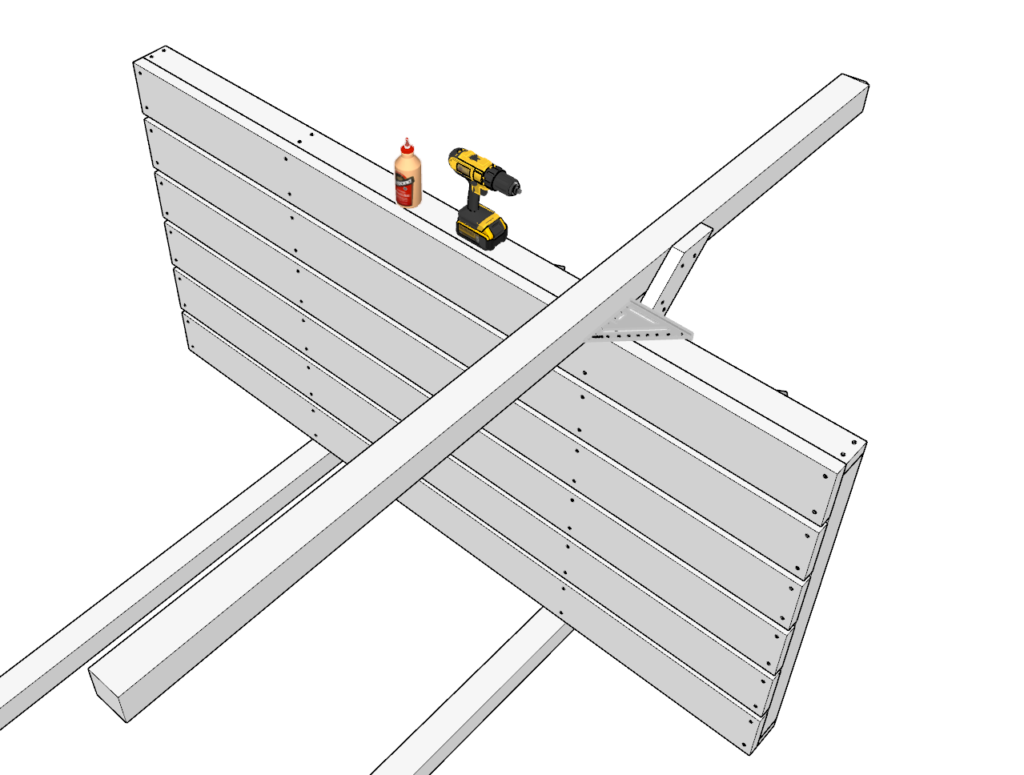
Next, flip the bridge and attach the 23 9/16-in piece from the 1×4 lumber with glue and screws.
Lastly, deck the whole bridge with the remailing 12 23 9/16-in pieces from the 1×4 lumber. Adding glue, predrilling, and adding screws.
Step 39
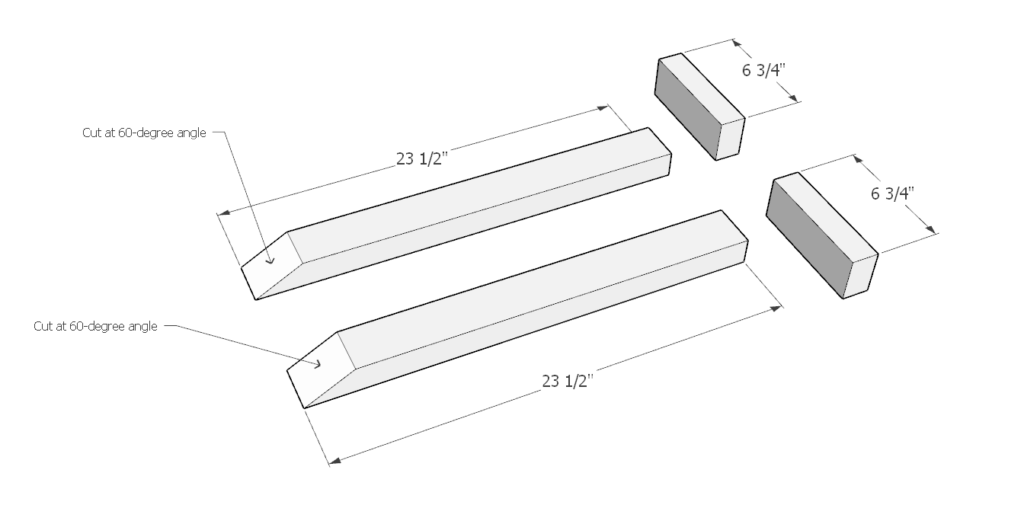
Next, you will need to make additional railing for the kid’s playhouse bridge.
First, cut two identical 23.5-in pieces from the 2×3 lumber. Cut these pieces at a 60-degree angle as shown in the diagram.
Cut tow identical 6 3/4-in pieces from the 2×3 lumber.
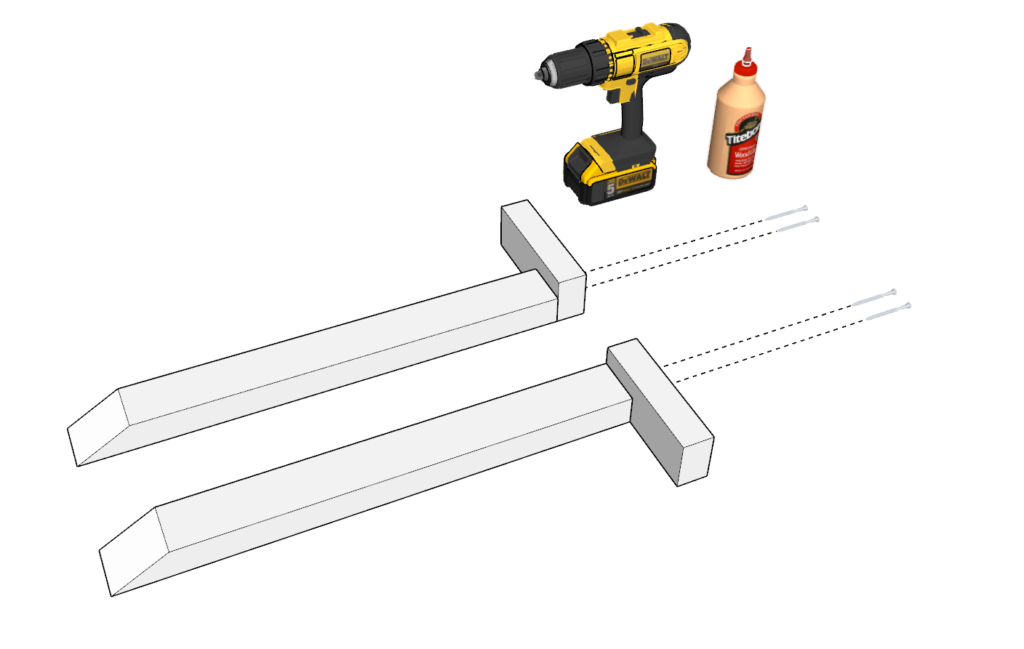
Next, attach the 23.5-in pieces to the 6 3/4-in pieces using glue and screws as shown in the diagram. Do not forget to predrill these delicate pieces before adding screws.
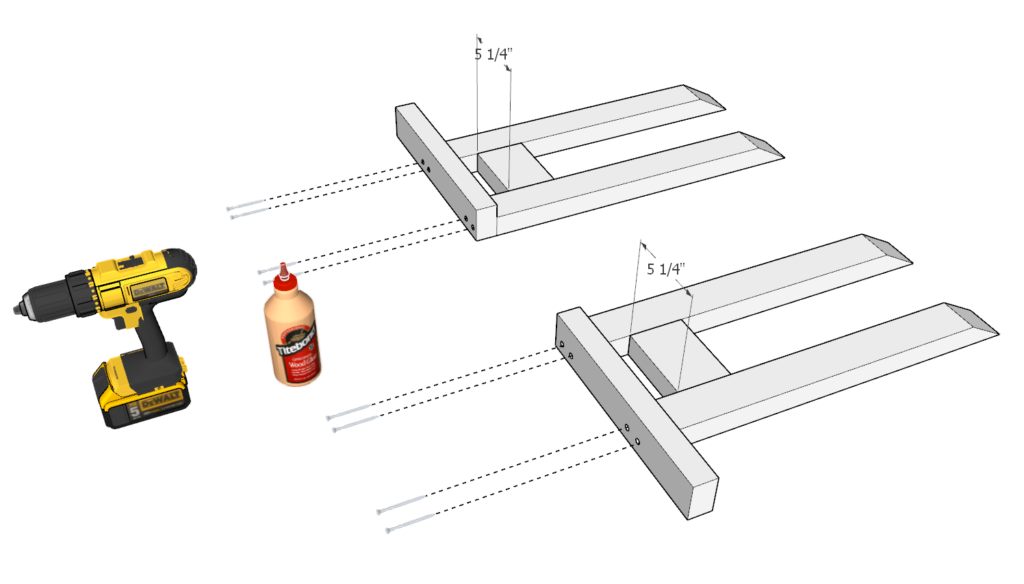
Step 40
In this step you will need to make addition railing for the bridge and the opening where the slide is attached.
First, cut eight identical 23.5-in pieces from the 2×3 lumber. Cut these pieces at a 60-degree angle as shown in the diagram.
Cut four identical 14 3/4-in pieces from the 2×3 lumber.
Cut a spacer from scrap lumber that is 5 1/4-in long.
Use the pacer to space out the 23.5-in pieces as shown in the diagram.
Next, attach the 23.5-in pieces to the 14 3/4-in pieces using glue and screws as shown in the diagram. . Do not forget to predrill these delicate pieces before adding screws.
In the end, you should have a total of four railing pieces. Two pairs that are a mirror of each other as shown in the last picture of this step.


Step 41
In this step you will need to build the bridge angled railing.
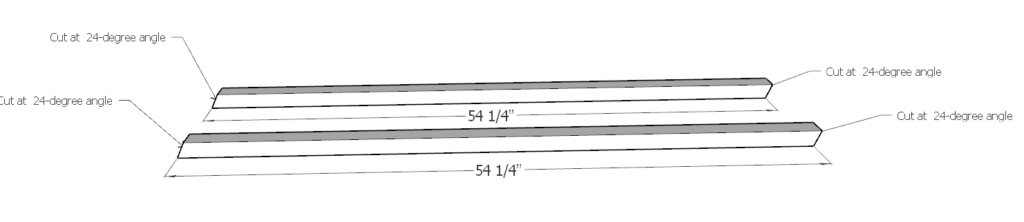
First, cut two identical pieces at 54 1/4-in from the 2×3 lumber.
Cut the ends at 24 degrees as shown in the diagram.
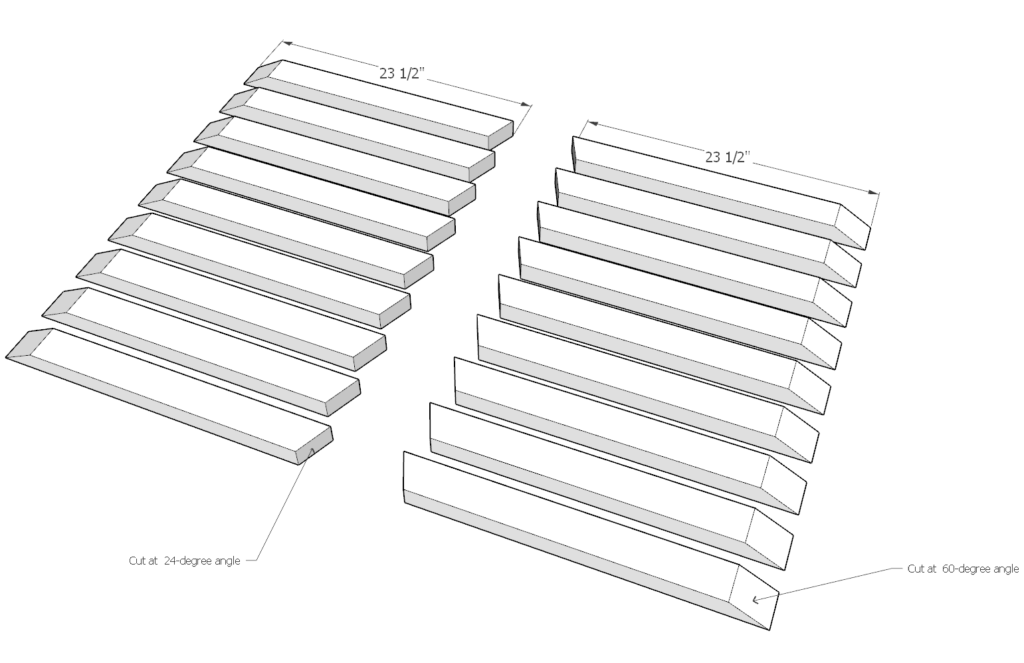
Next, cut eighteen 23.5-in pieces. Cut the ends at 60 degrees as shown in the diagram.
Next, take nine of the 23.5-in pieces and cut the untangled ends at a 24-degree angle as shown in the diagram.
Next, take nine of the 23.5-in pieces and cut the untangled ends at a 24-degree angle in the opposite direction from the previous nine as shown in the diagram.
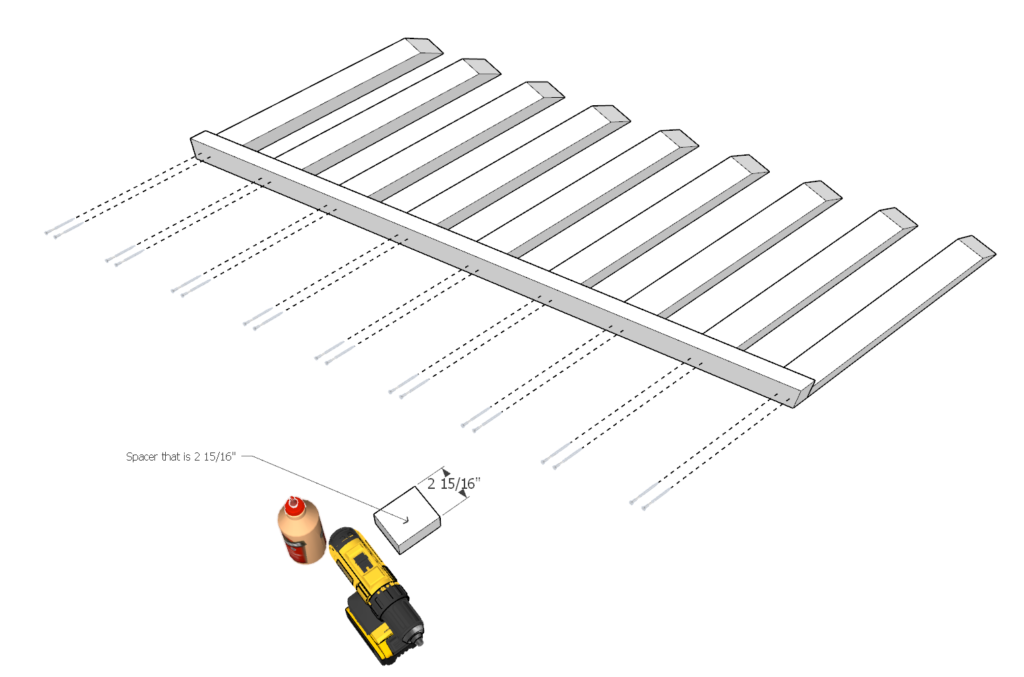
Next, cut a spacer that is 2 15/16-in long to help space out the railing.
Start attaching the 23.5-in pieces to the 54 1/4-in piece by starting on opposite ends and working your way inwards. This will make the spaces look more symmetrical if the spacer is slightly off in size.
As before, attach by predrilling, gluing, and adding screws.
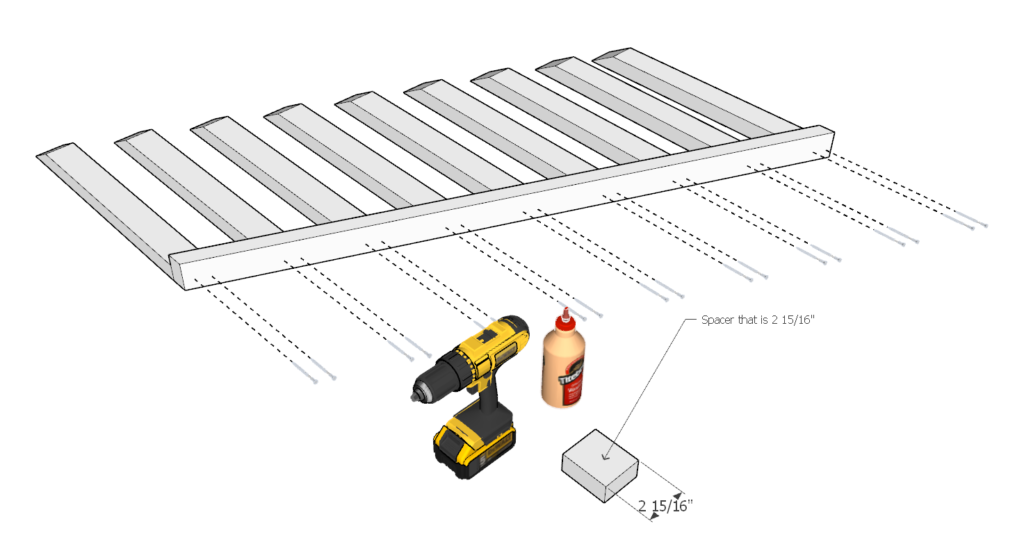
Finally, Repeat the previous step in attaching the other nine 23.5-in pieces to the 54 1/4-in piece in the opposite direction as shown below.

Step 42
In this step you will need to attach the railing made in step 39 to the shorter playhouse.
As before don’t forget to predrill, add glue, and screws.
Use a level to ensure that the railing is leveled and matches the rest of the railing pieces.
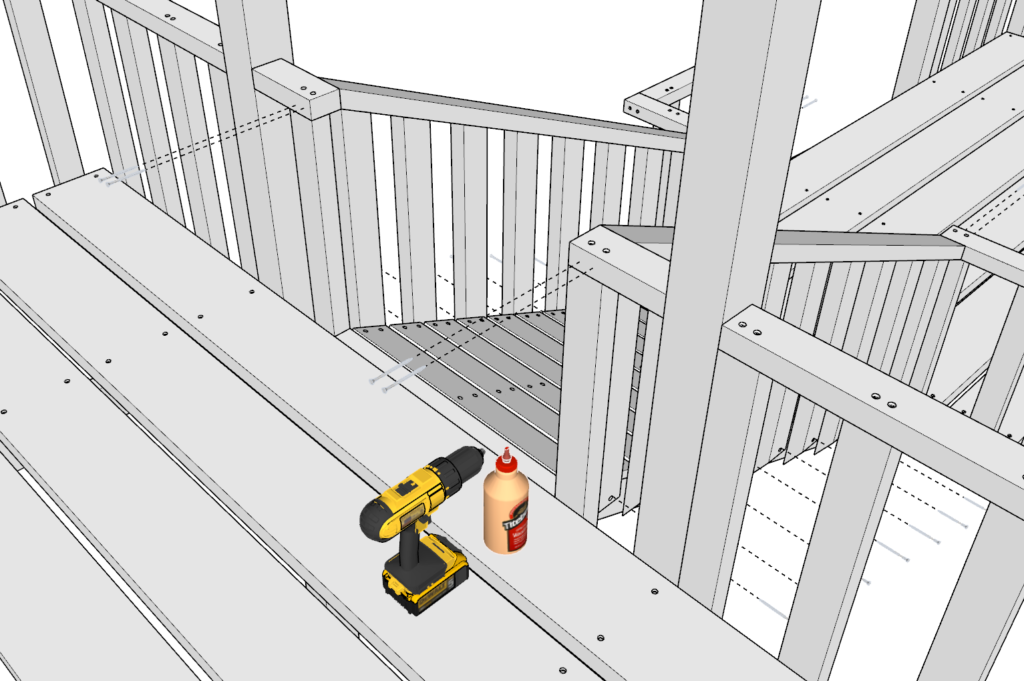
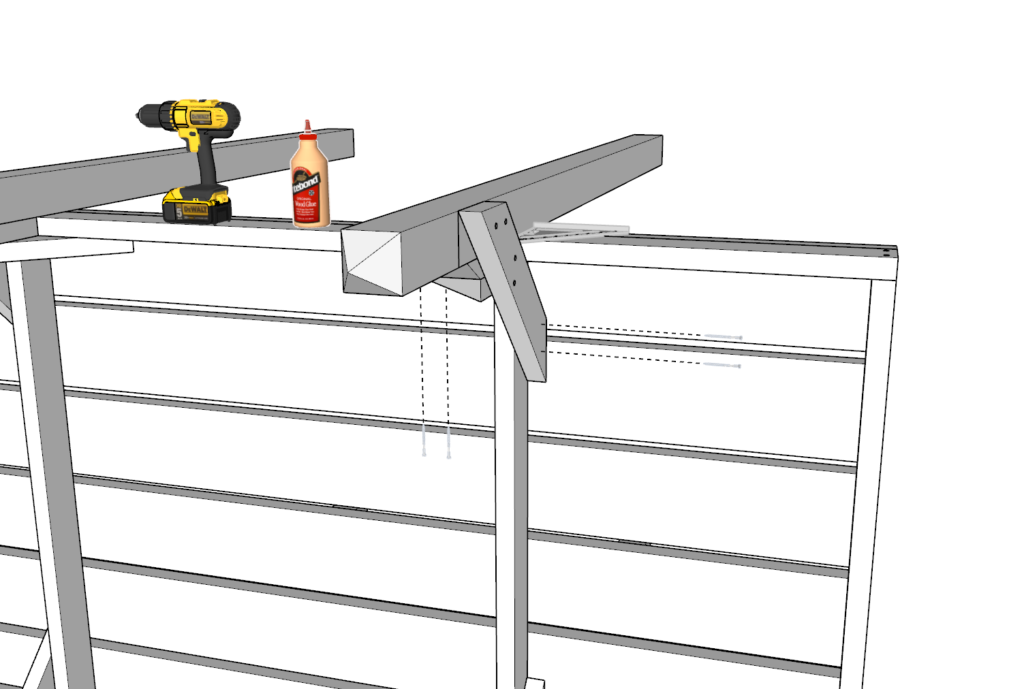
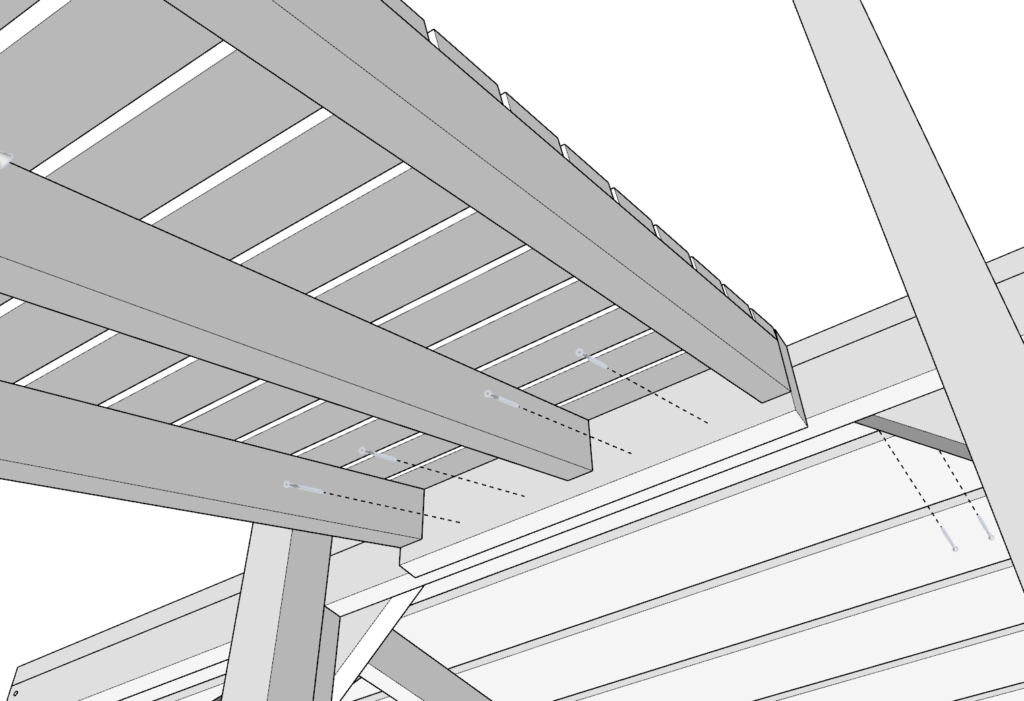
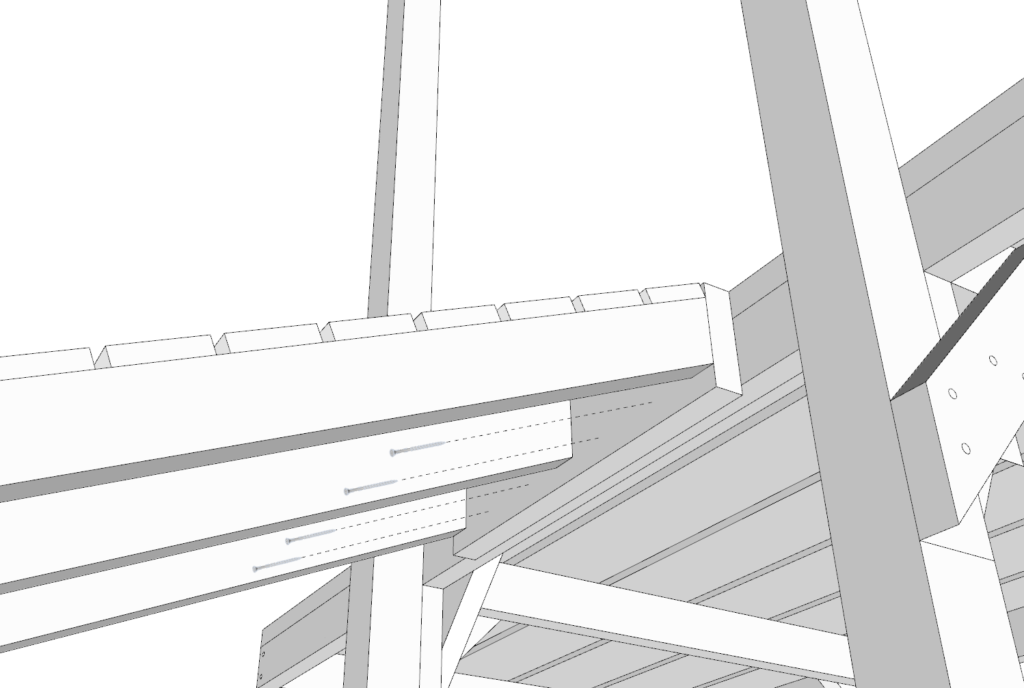
Step 43
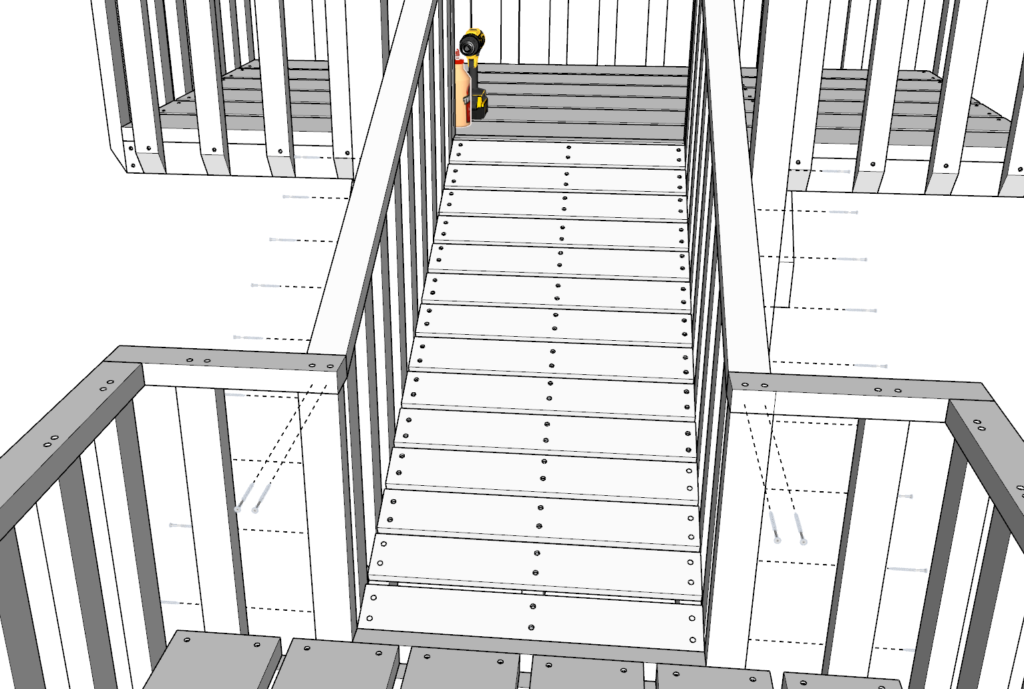
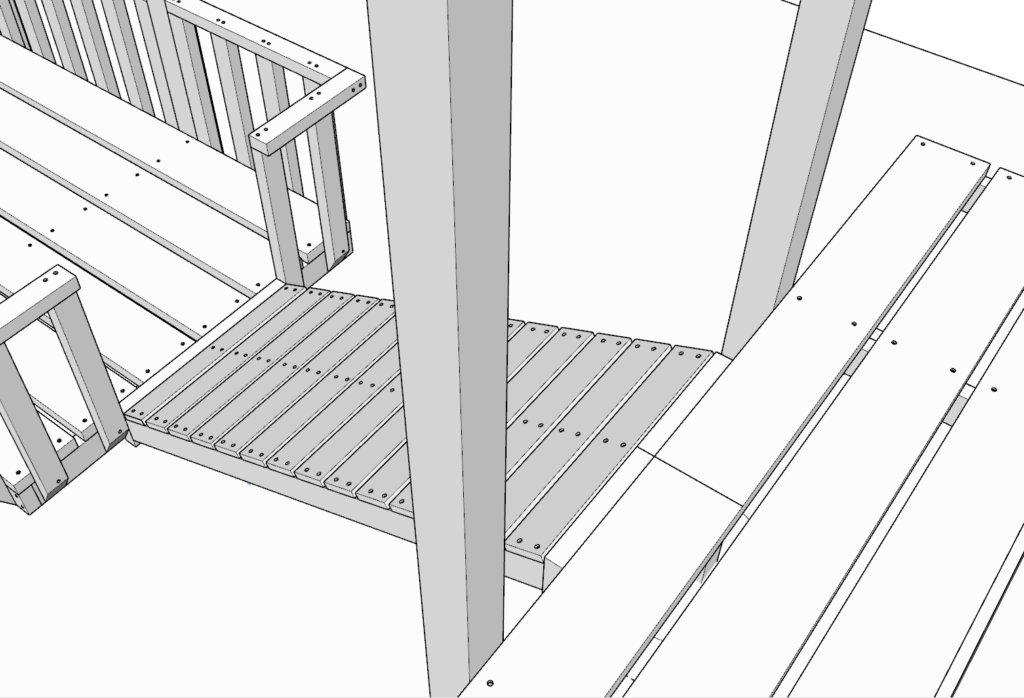
Next you will need to attach the bridge to the smaller playhouse.
Start by getting someone to help hold the bridge while you work on attaching it.
I recommend attaching two scrap pieces of 2×4 to hold up one end.
Make a marking with a pencil or pen in the middle of the top of the bridge to know how to properly align it with the second structure.
add glue, predrill, and add screws to the base of the bridge to secure it to the smaller playhouse.
Leave the temporary scrap pieces in place so that you can work on attaching the second playhouse.

Step 44
in this step you will need to attach the 108-in legs to the platform. The steps are identical to steps 24-25 (see steps 24-25 for reference).

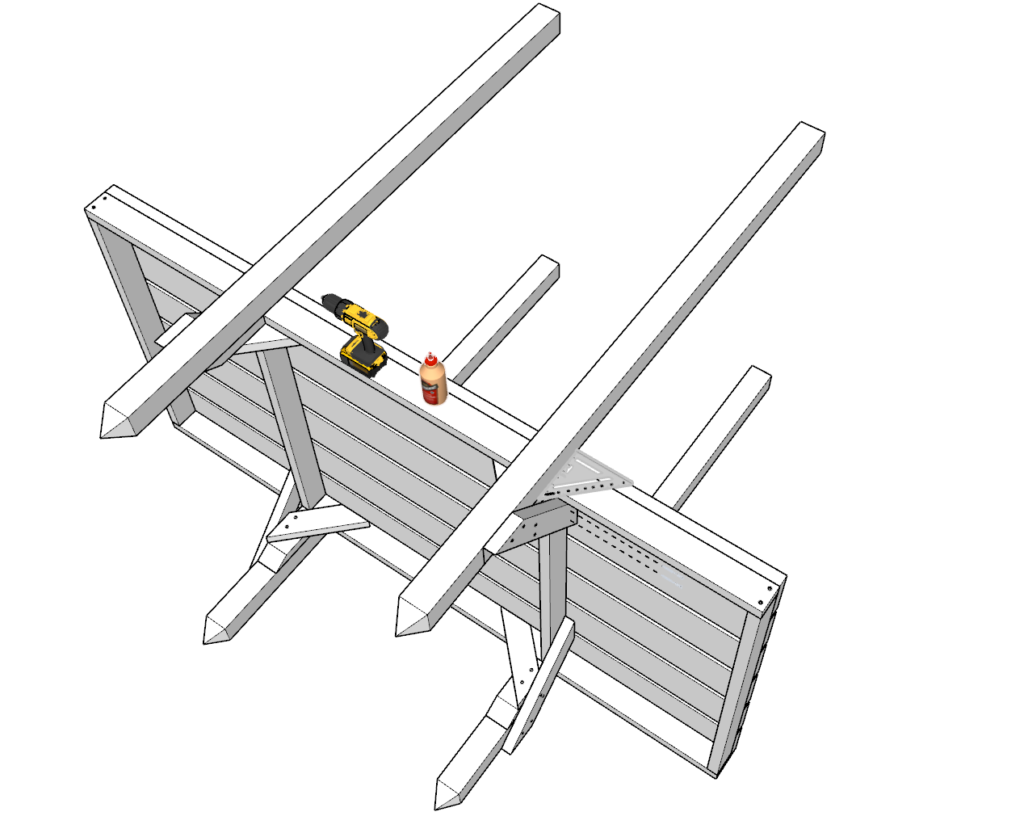
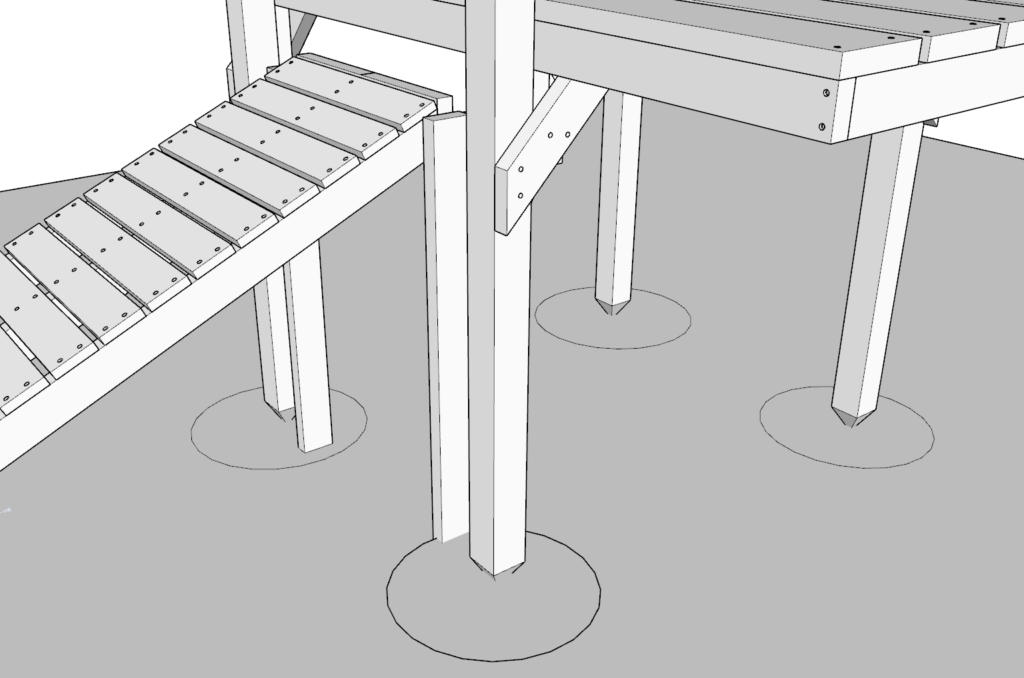
Step 45
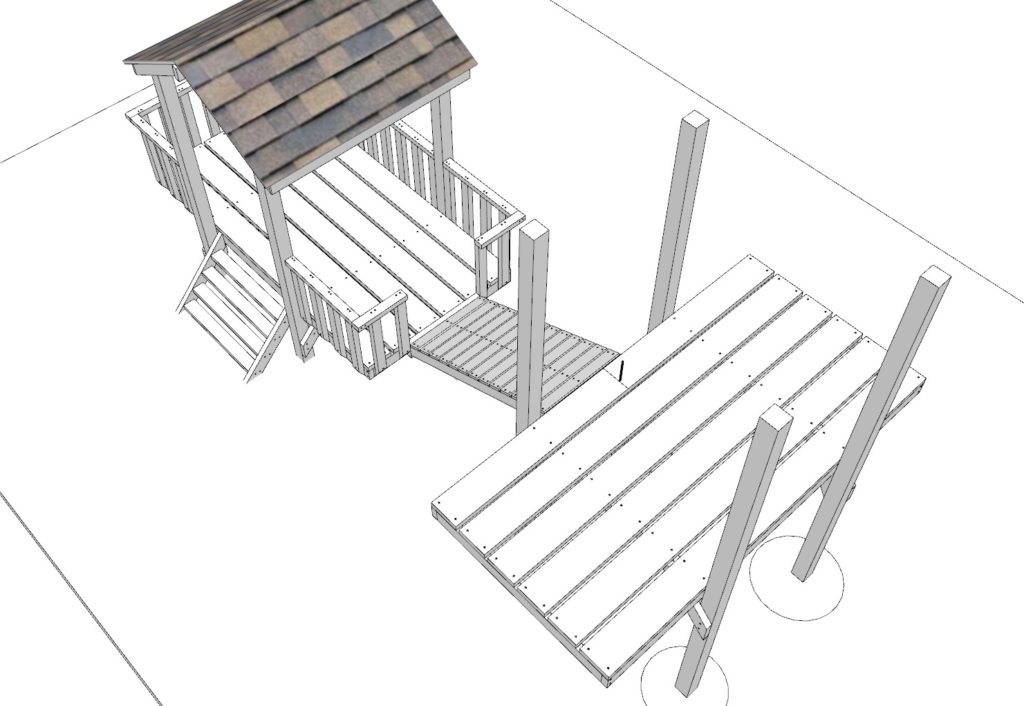
In this step you will need to add the second kids’ playhouse and align it correctly with the bridge.
This can be done by following the instructions in step 26-28 with a couple of additional instructions.
Make a marking on the second taller structures base to indicate the middle of the platform on the side that will connect to the bridge.
Follow steps 26-28 to be able to appropriately place and secure the second playhouse in place.
Make sure that the bridge and the second playhouse align correctly. This may require some additional leveling, digging and redigging.
Once the structures are aligned secure the bridge to the taller playhouse with screws and glue.
After the bridge is attached, remove the temporary 2x4s that held the bridge place.
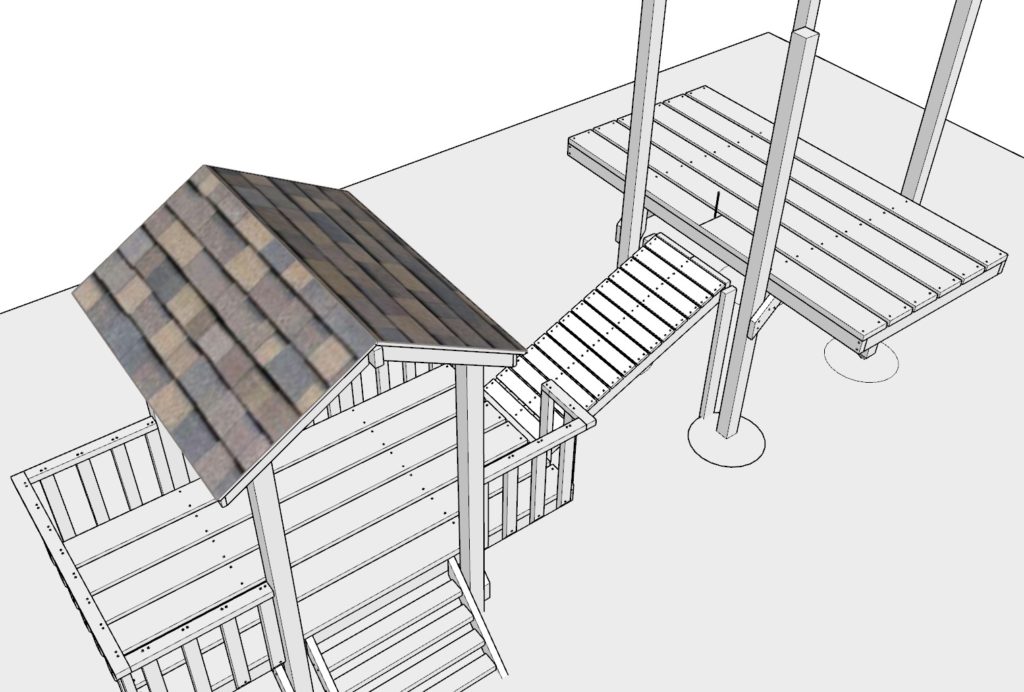
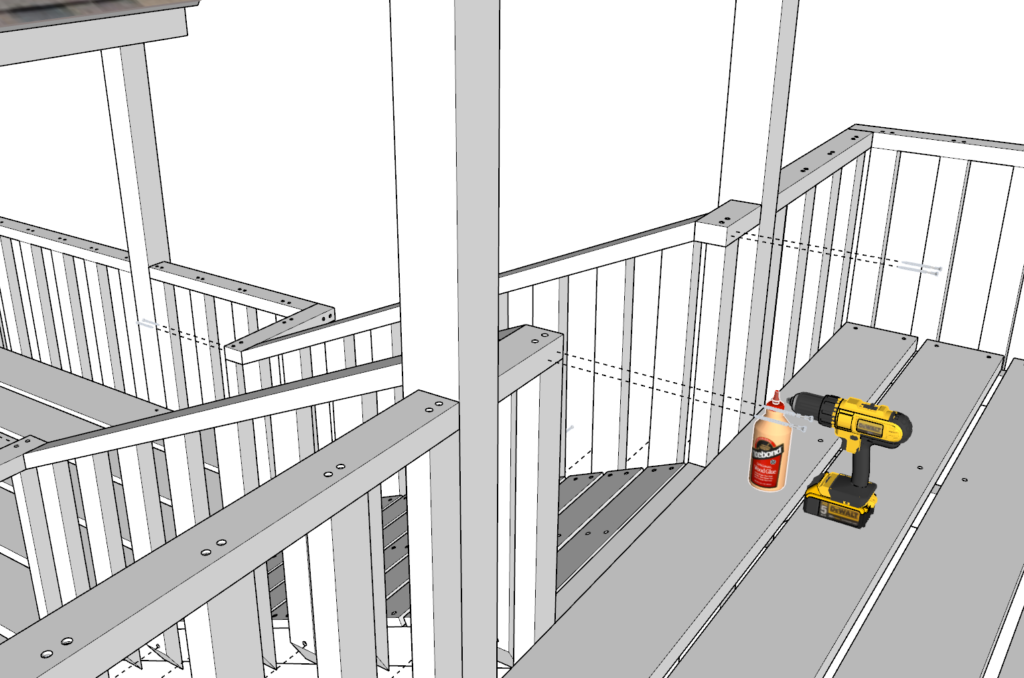
Step 46
Next, add the roof by following step 27-28.
Next attach the railing in a similar fashion as before. Se diagram for details.
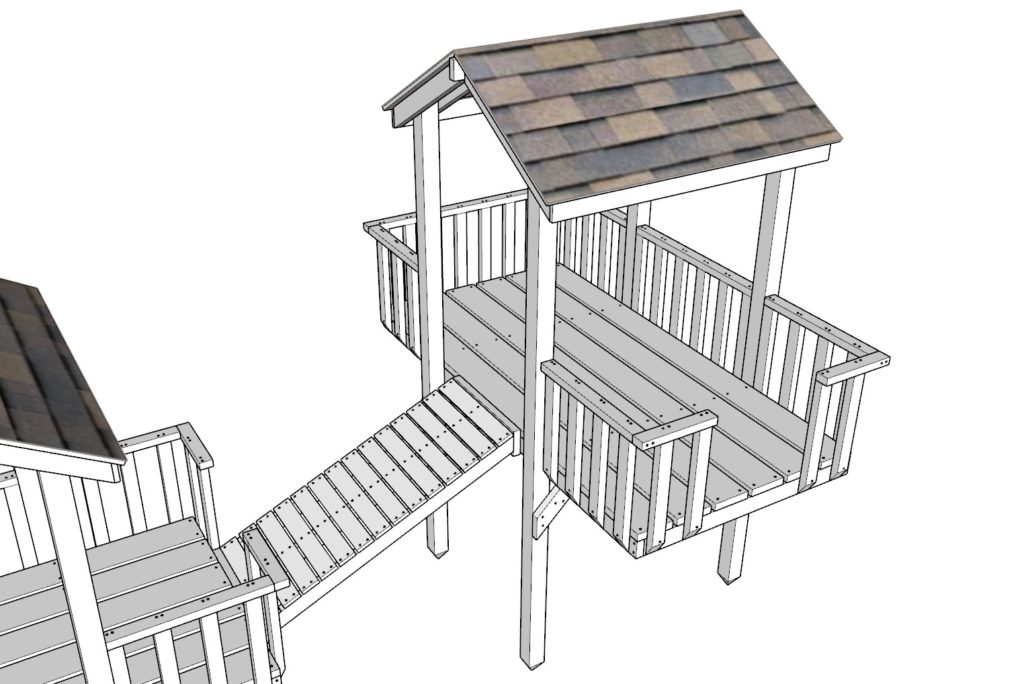
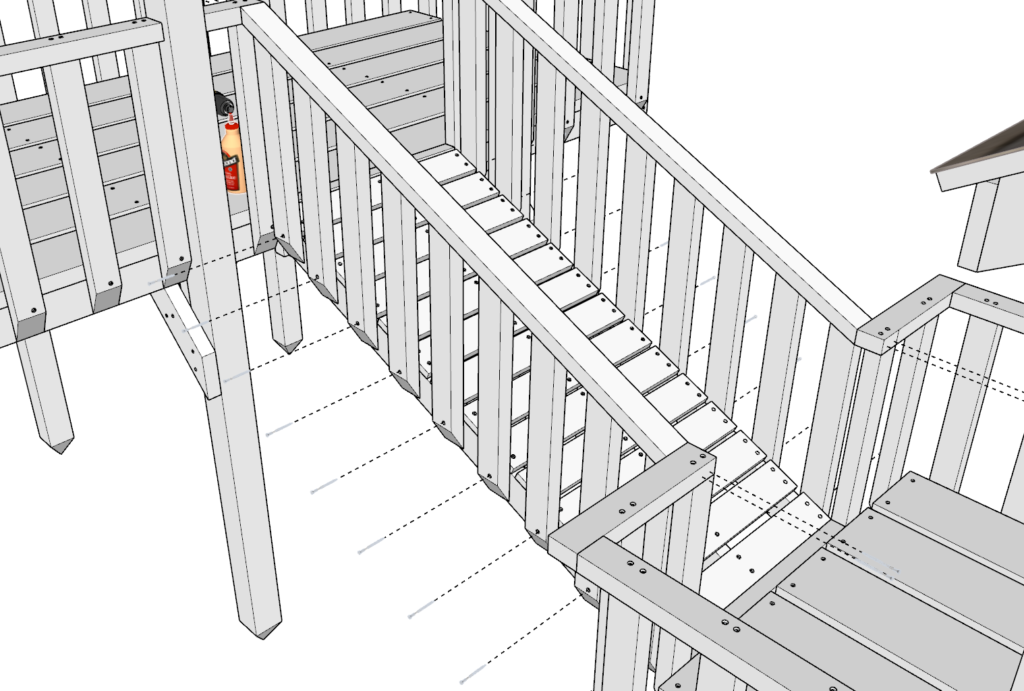
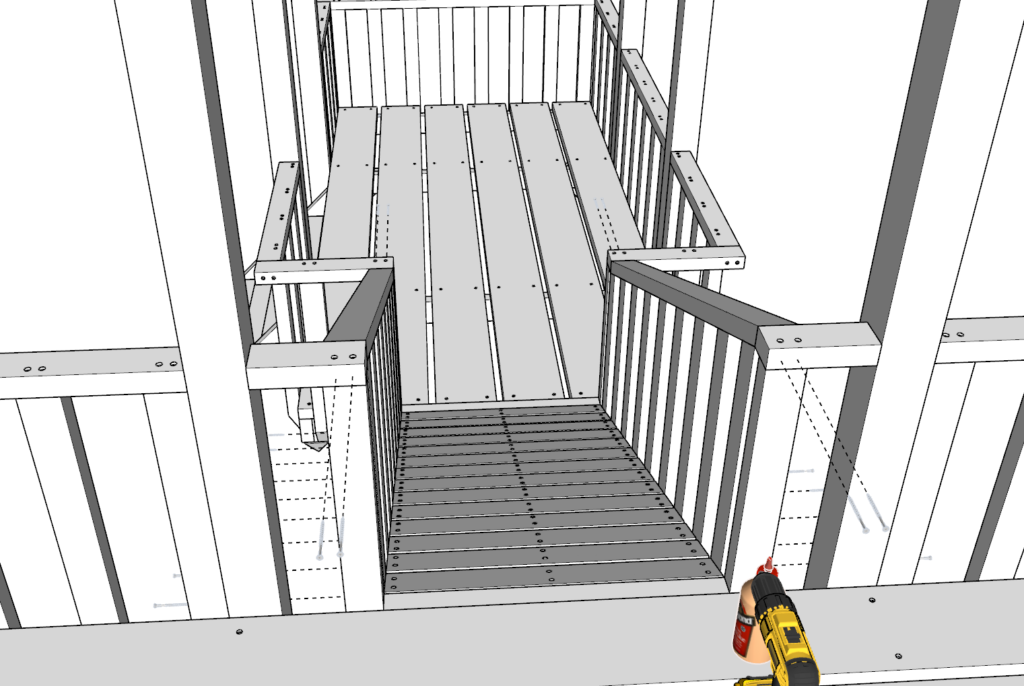
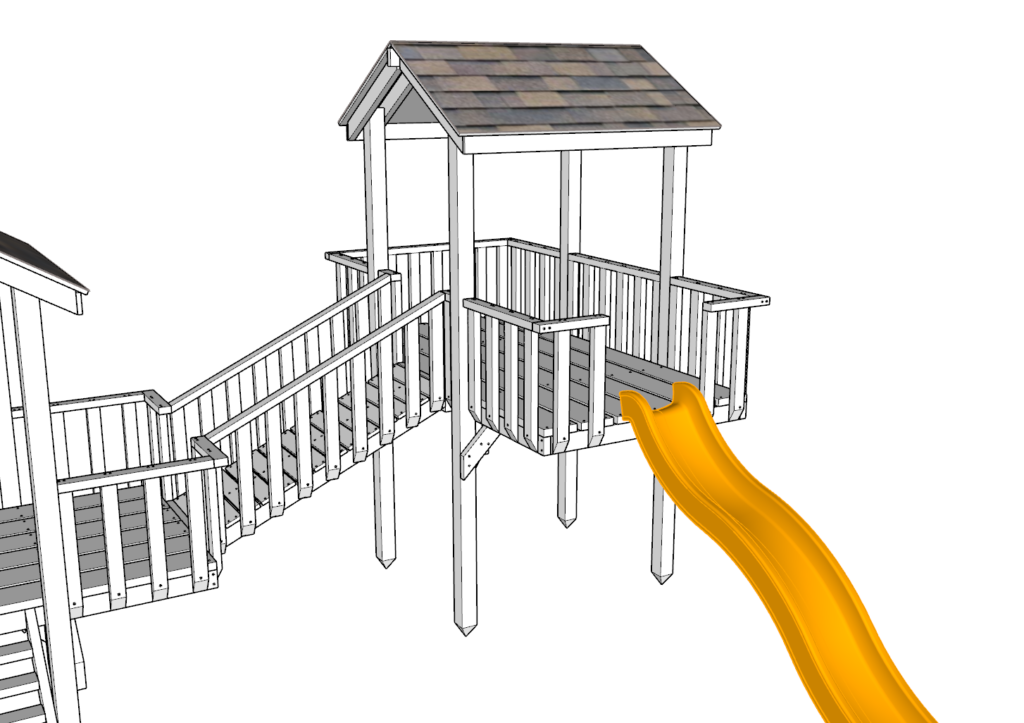
Step 47
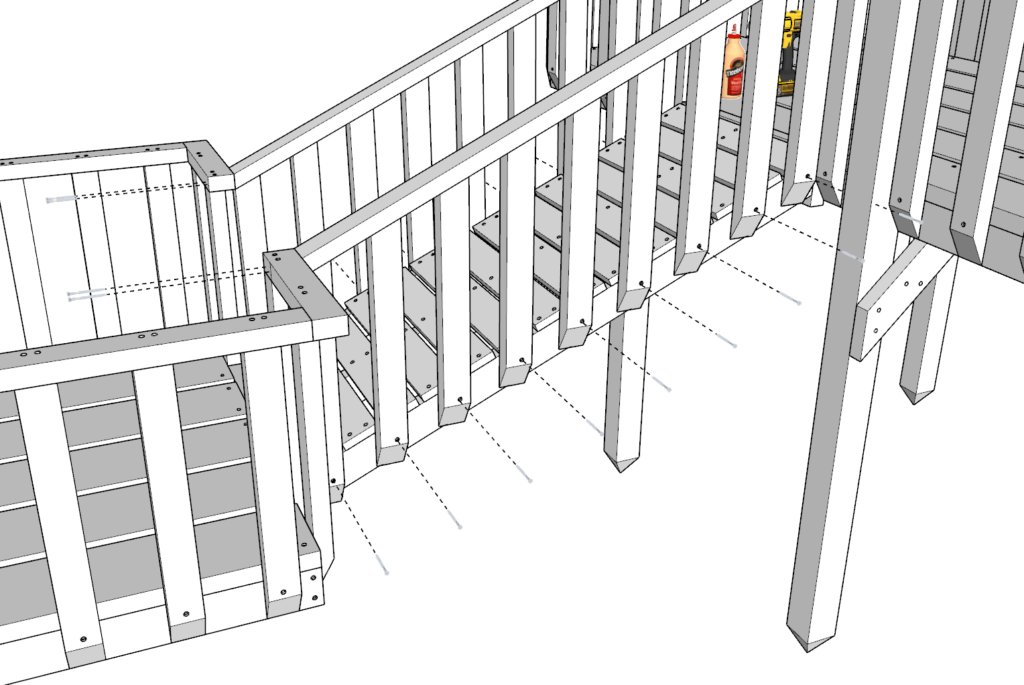
In this step you will need to add the railing to go around the bridge as well as attach additional railing the taller playhouse to completely enclose the platform around the bridge.
As before, predrill, add glue, and add screws.
Next, sand down the whole structures. This can be time consuming. I use an orbital sander to speed up the process.
I use a rough 80 grit paper first and then finish it with a 220-grit paper.
At this point the playhouses are ready to be stained or painted!
Once you have painted or stained the structure, add the slide. This post does not provide installation information for the slide. Attachment will differ manufacturer to manufacturer.