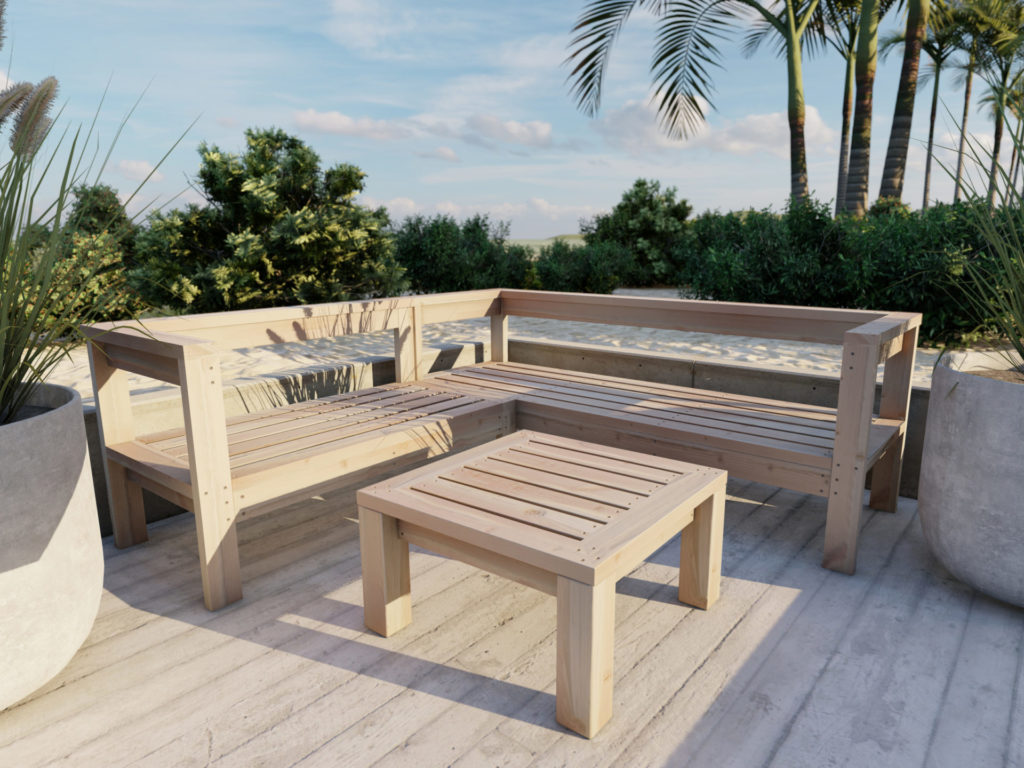
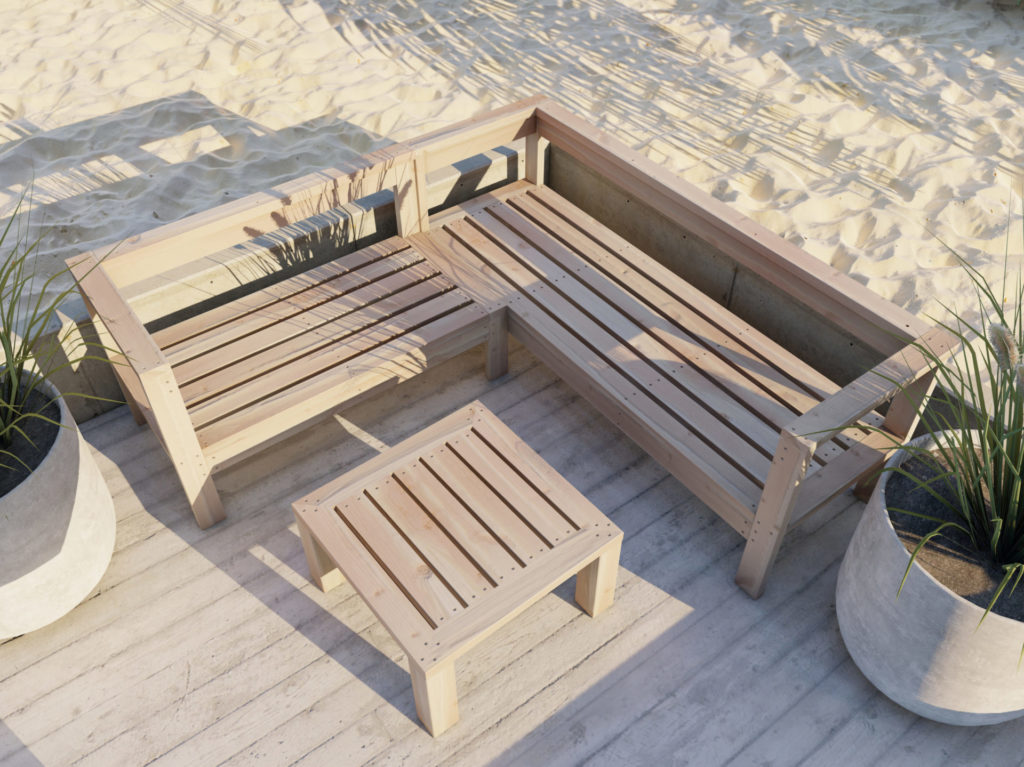
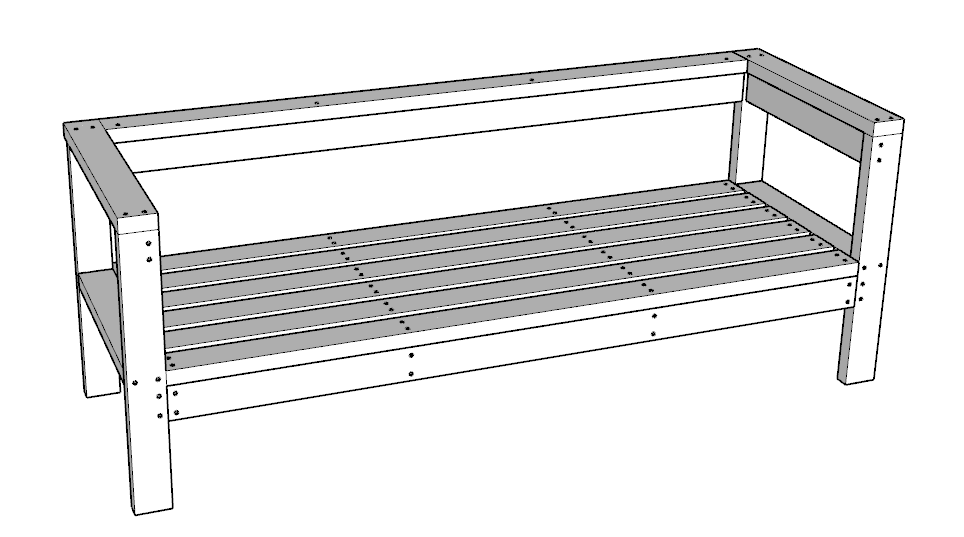
Use only $140 in supplies (cushions excluded in price estimate) to build this comfortable wood sectional bench. This Design set fits standard 24-in x 24-in cushions. The wood used is from common 2×4 lumber studs that can typically be purchased from any hardware store.
On this page you will find step by step instructions on how to build your own outdoor wood sectional couch for you deck or yard. I have also created PDF plans that can be purchased to help support this website and make more DIY plans available in the future.
Time to build
9 hours
Total cost of build
$140 (cushions and pillows not included in cost estimate)
Skill level required
Beginner-Intermediate
Download the PDF plans
Outdoor wood sectional patio bench PDF
What is included in the PDF download?
- Easy to read step by step instructions
- Material list
- Cut list
- Tools needed
- 3D illustrations
- Helpful links to tools needed for the project
Recommend tools for this project
- Miter saw
- Drill
- Impact driver with bit for screws
- GRIP Clamps
- Sander
- wood countersink drill bit
- will need 20 lb of 2.5-in screws (highly recommend T25 Star Drive screws)
- pencil
- Wood glue
- sand paper
- Pipe clamp grip, tie downs, or straps.
Disclosure: Some of these links are affiliate links.
Cut list and material list
Available with purchase of PDF plans.
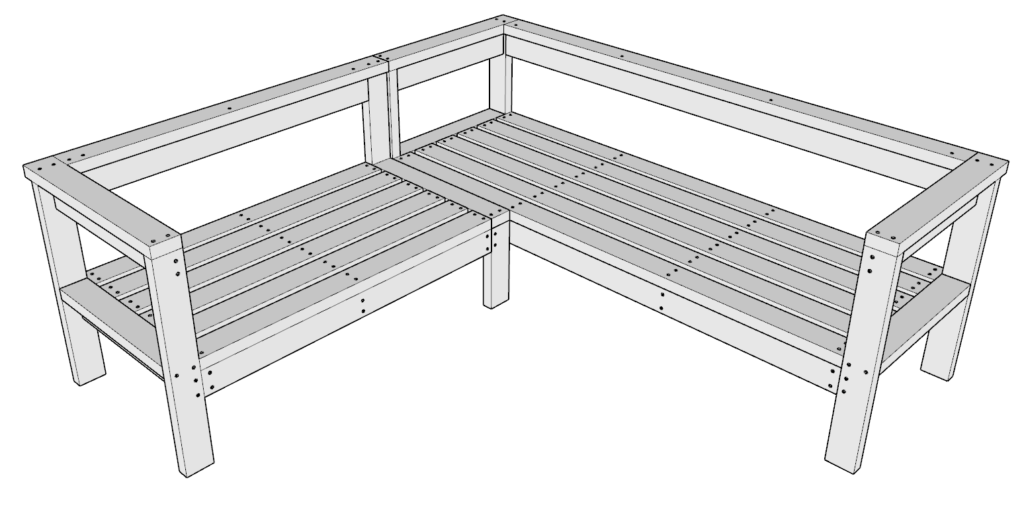
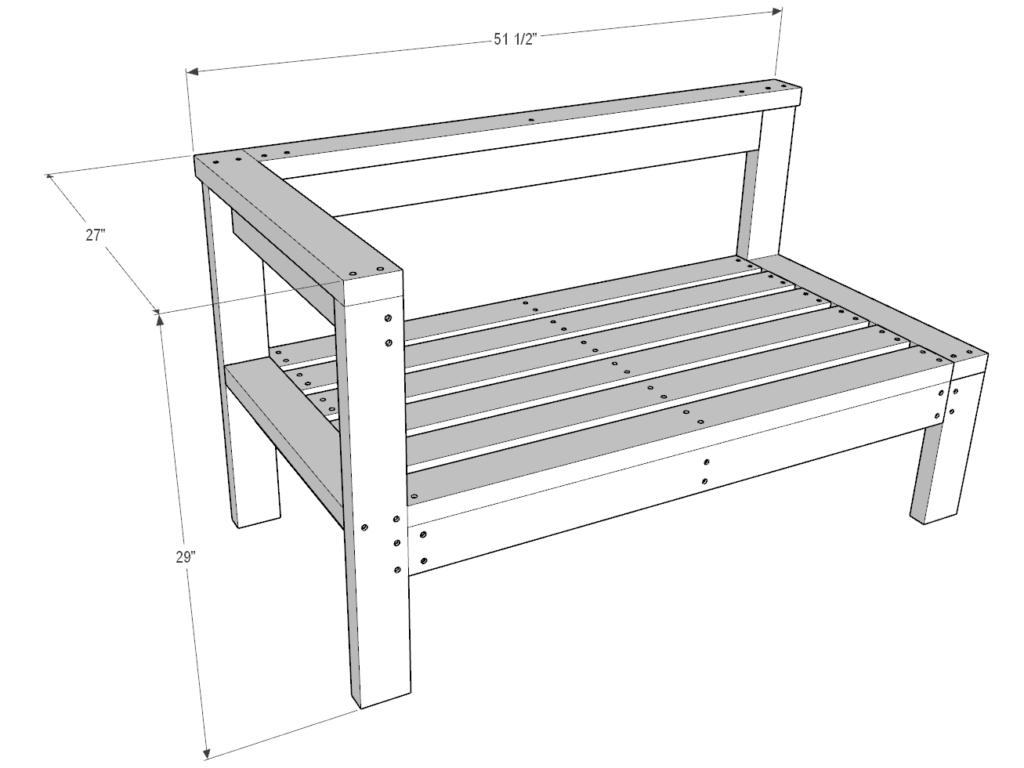
Instruction on how to build bench 1
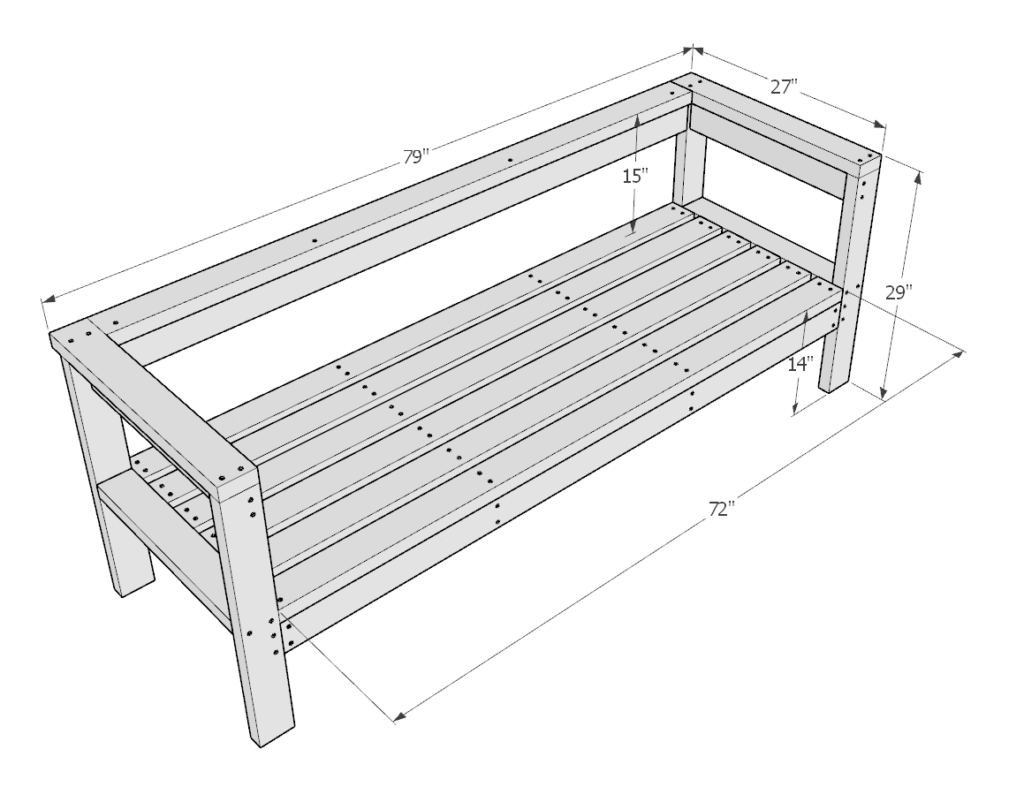
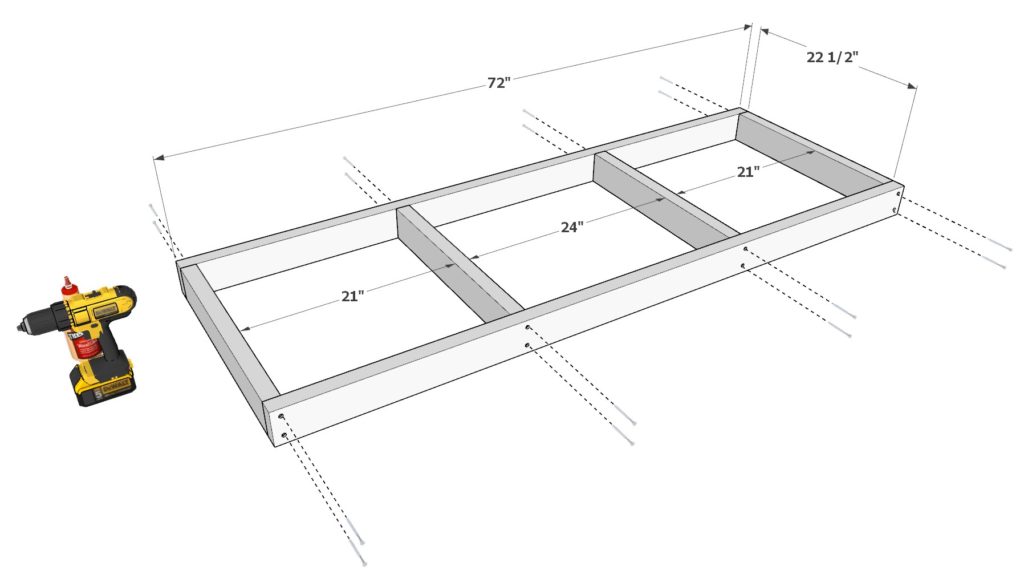
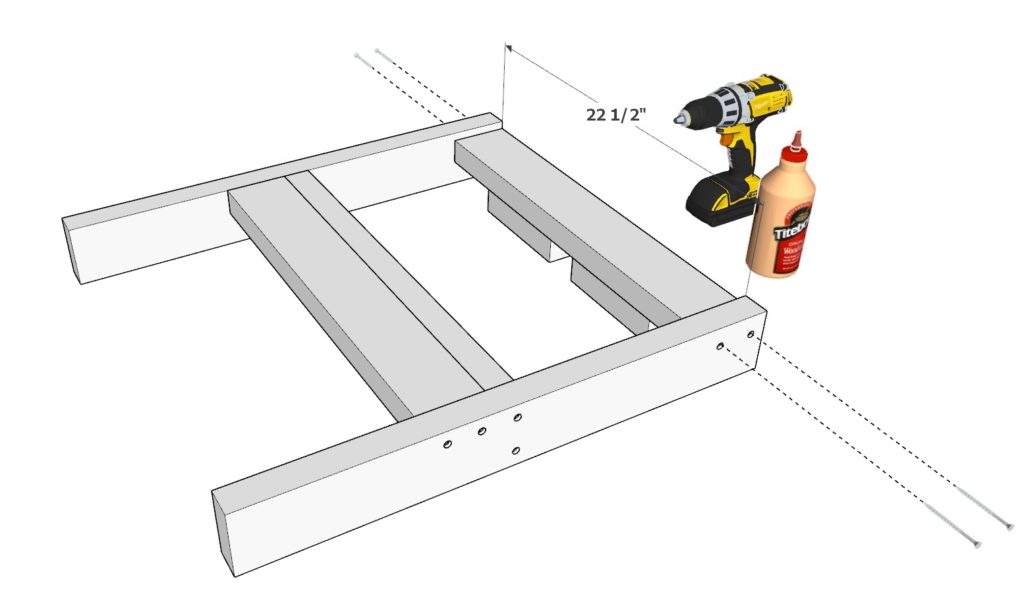
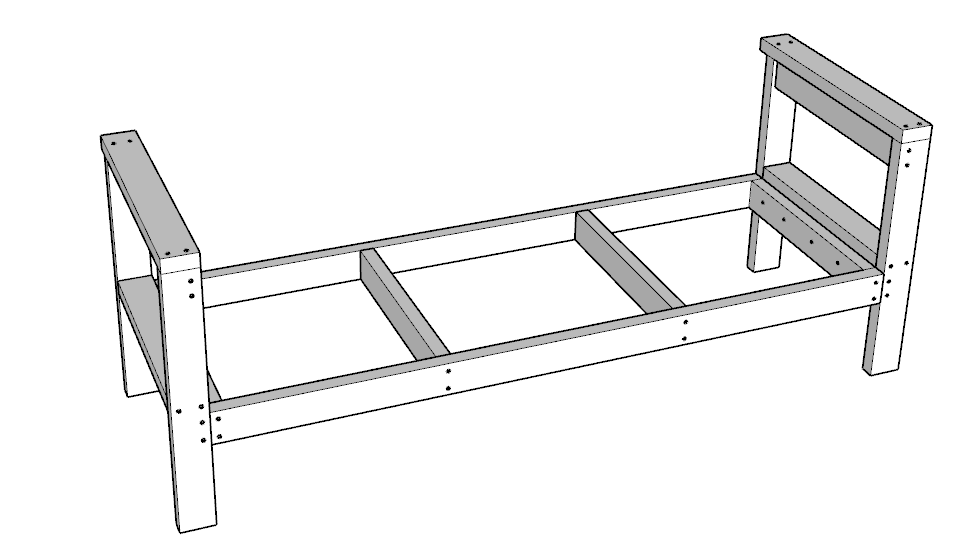
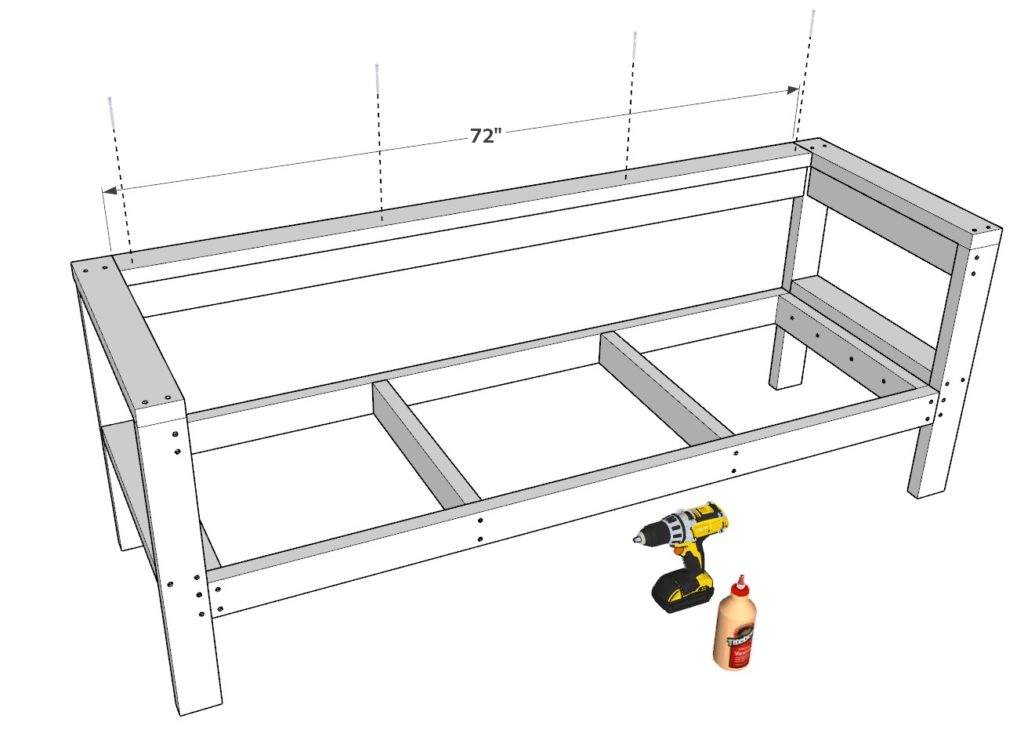
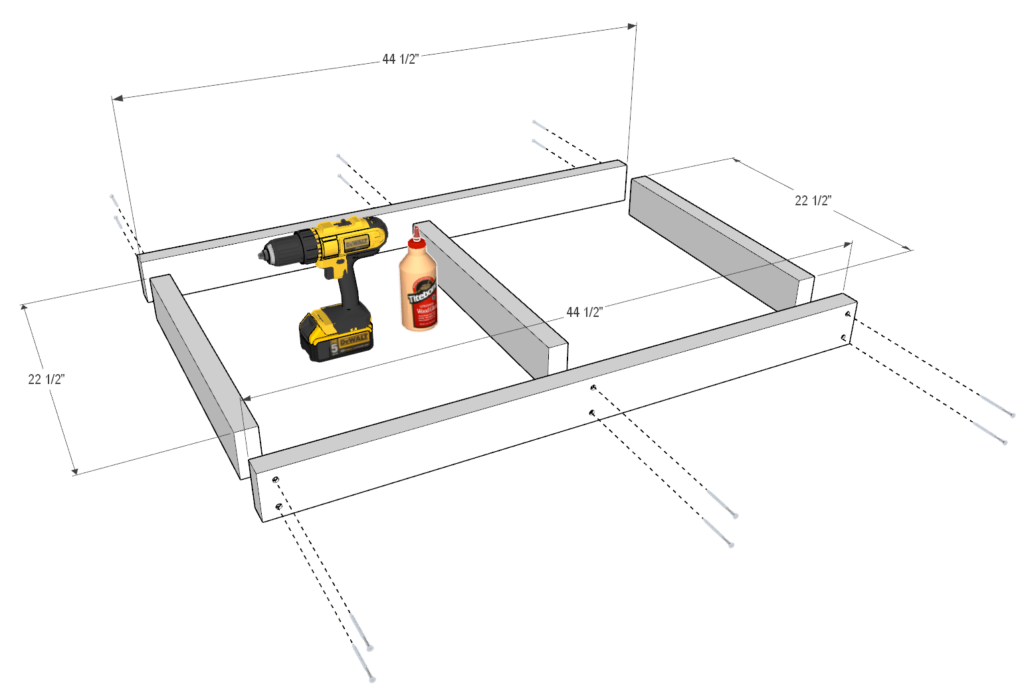
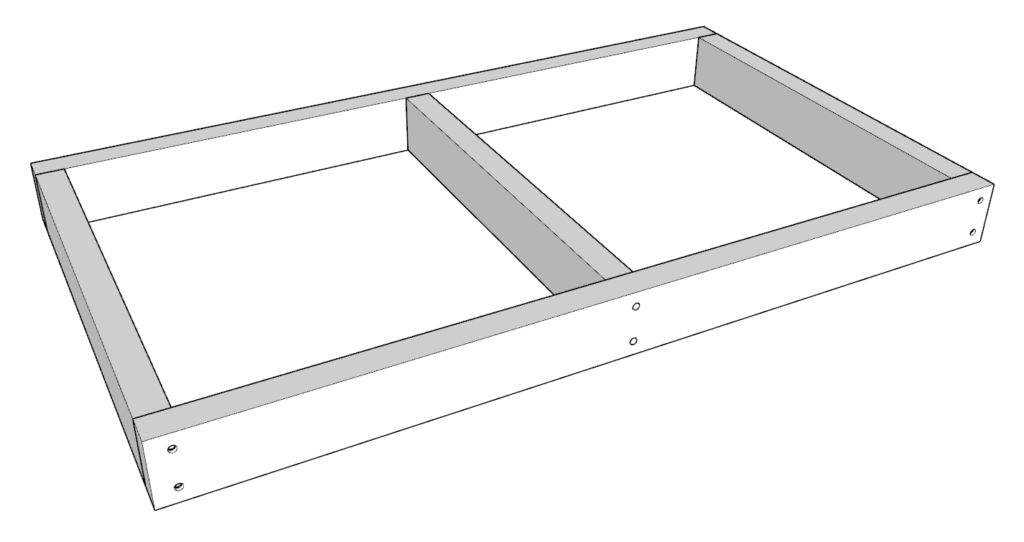
Step 1: DIY patio bench frame assembly (Bench 1)
Gather two of the 72-in pieces and four of the 22.5-in pieces. Lay them out as shown in the diagram. Space out the pieces as shown below. It is recommended to predrill the wood prior to putting in a screw to prevent the wood from splitting. What works for me is to us a wood countersink drill bit.
Apply wood glue to all surfaces that will be joined together. Too much dry glue can be difficult to sand off and does not stain well.
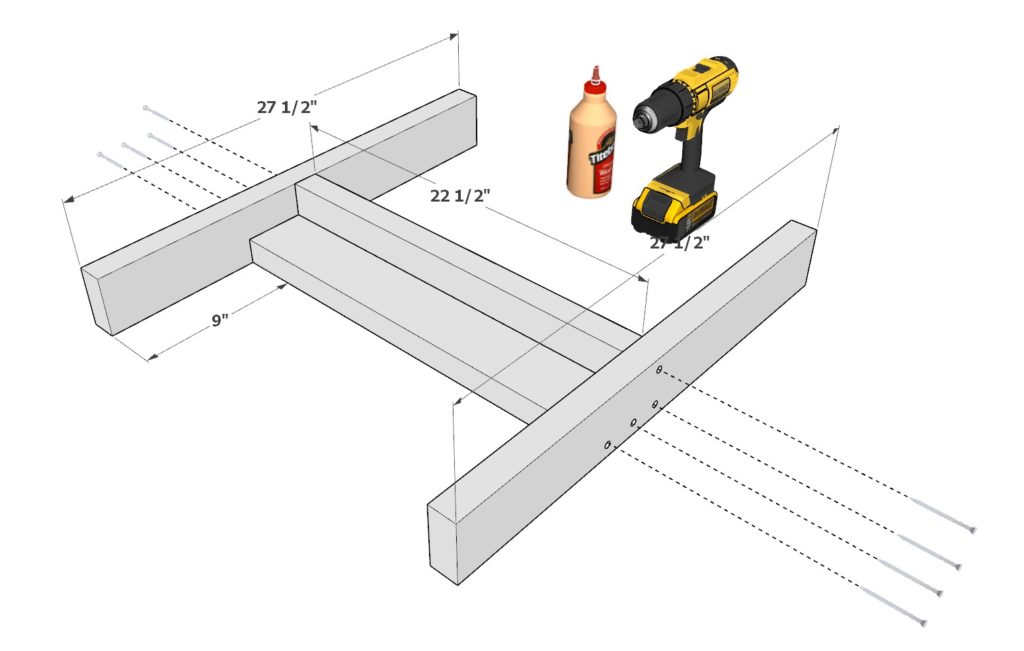
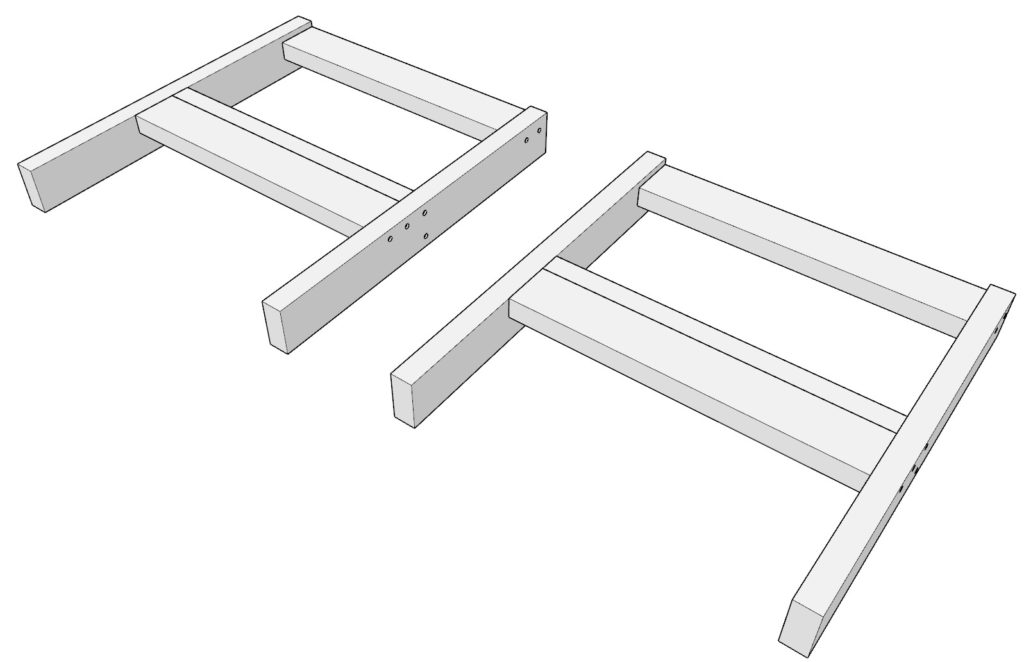
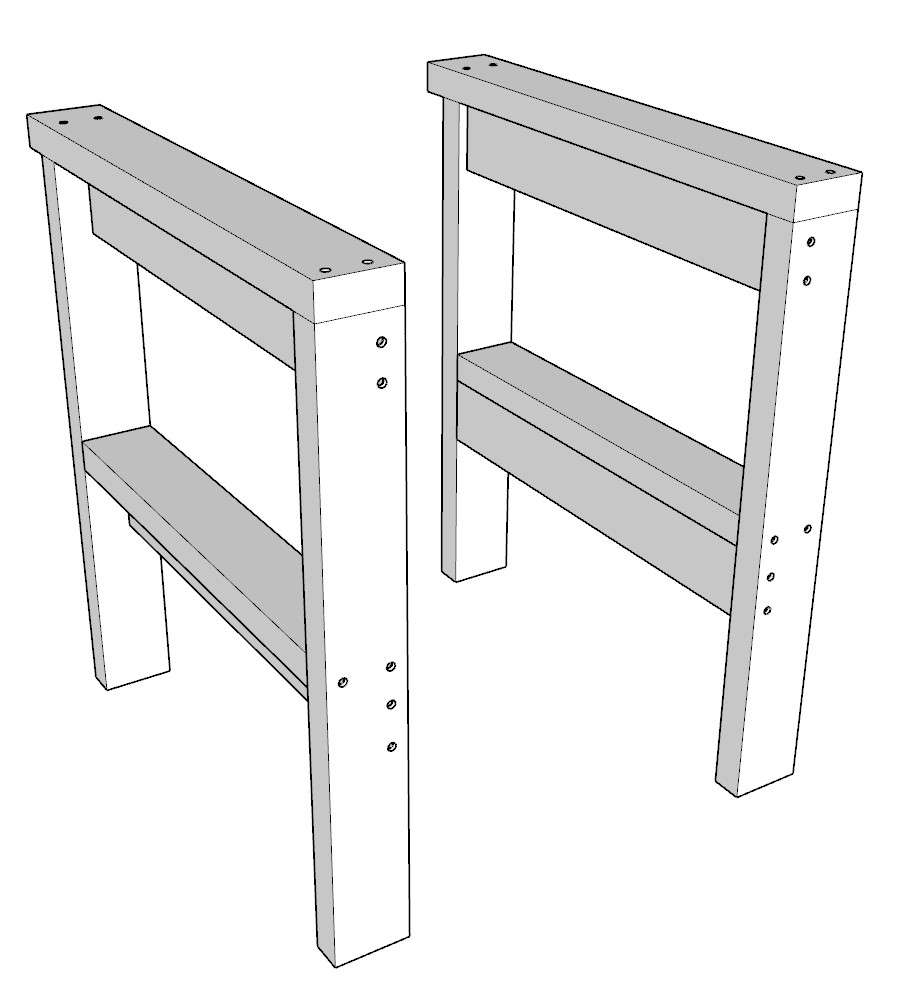
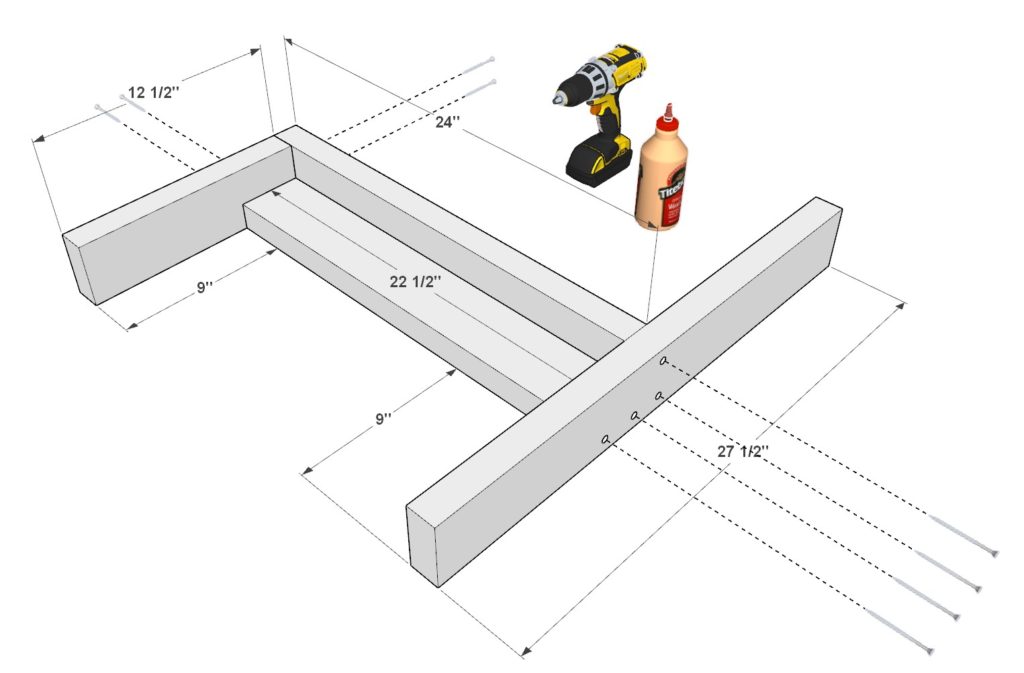
Step 2: DIY patio bench armrest assembly (Bench 1)
Next, take two 27-1/2 inch 2×4 lumber pieces and two 22-1/2 inch 2×4 lumber pieces and arrange them as shown below. Add glue, predrill holes, and add 2.5 inch screws.
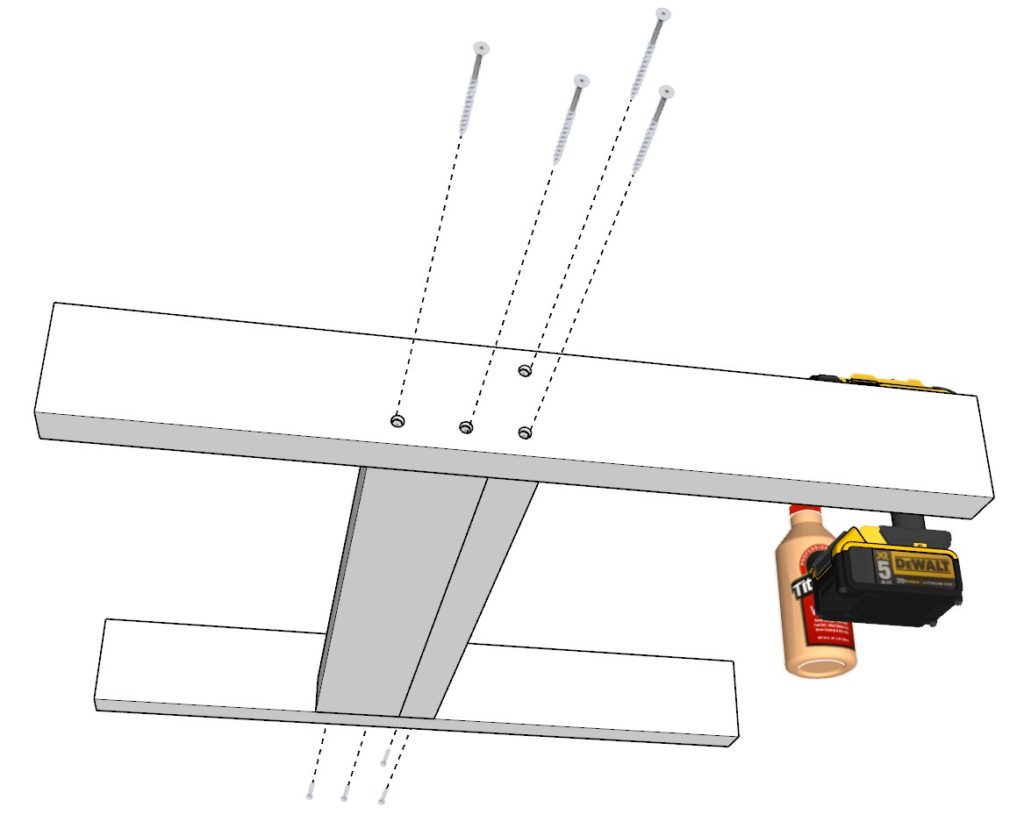
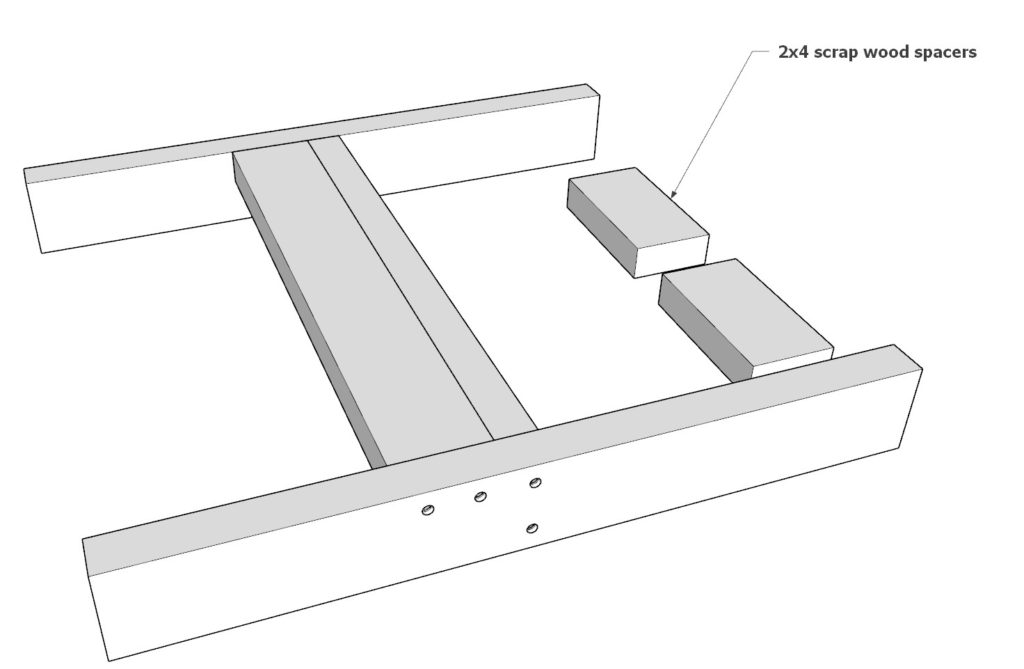
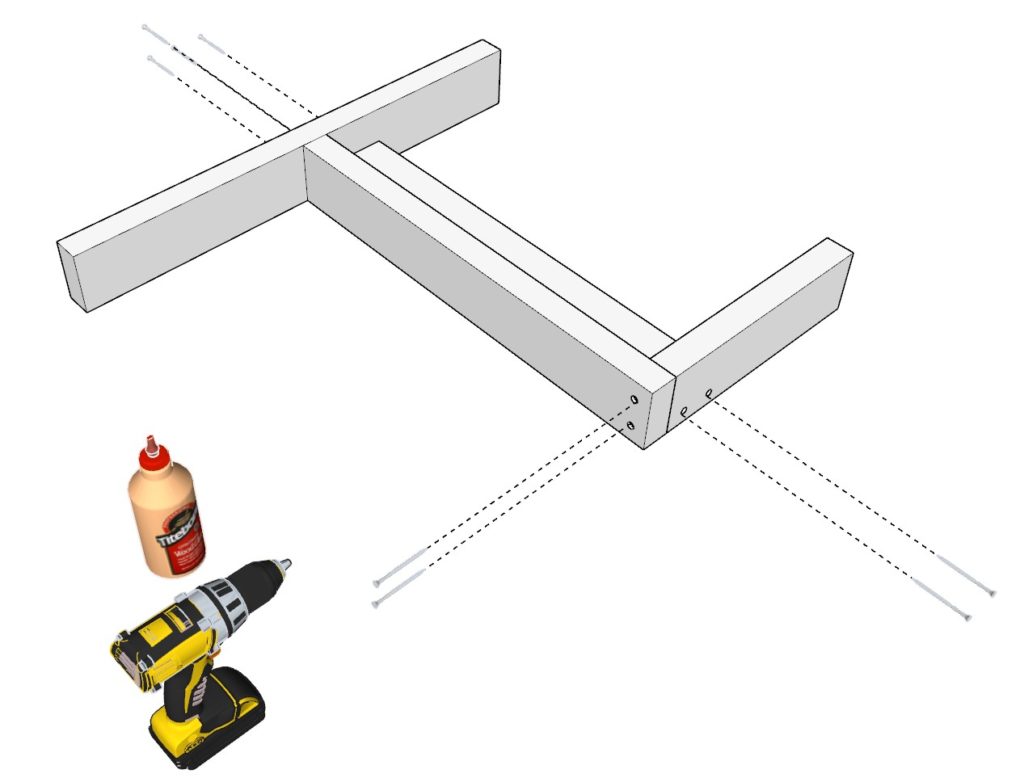
Step 3: DIY patio bench armrest assembly continued (Bench 1)
Next, add a 22-1/2 inch 2×4 lumber pieces to the arm rest. It needs to be indented by 1.5 inches. I use a spacer from 2×4 lumber scrap wood for this step since the 2×4 is 1.5 inches thick.
As before, add glue, predrill, and add 2.5 inch screws.
Next, make a second arm rest identical to the one you just made for a total of two arm rests.
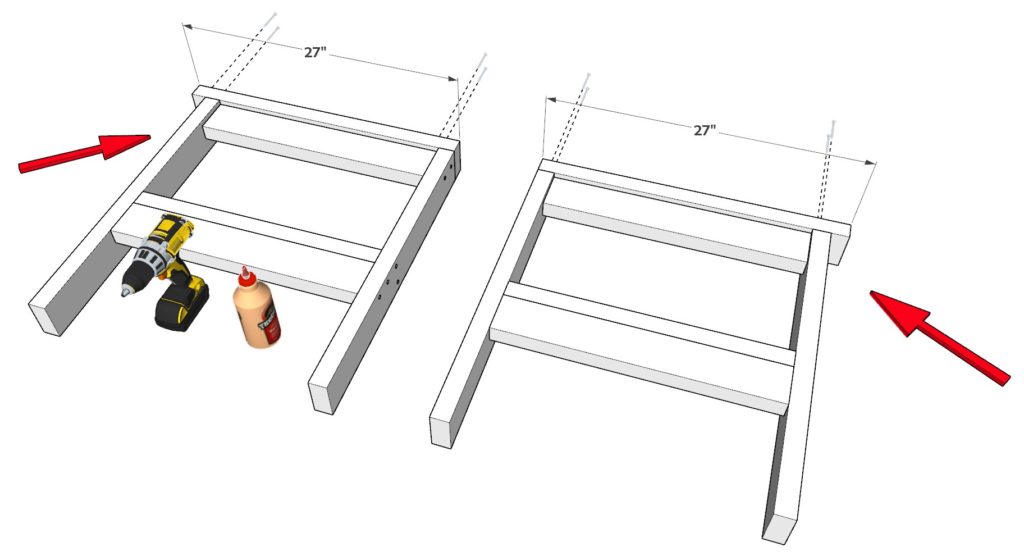
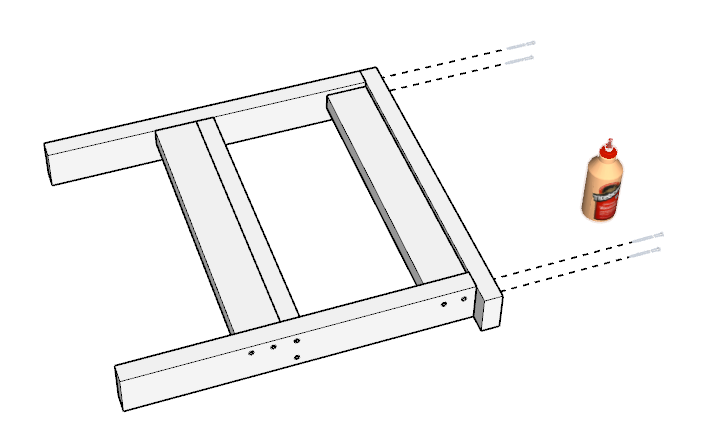
Step 4: DIY patio bench armrest assembly continued (Bench 1)
Next, add 27 inch long 2×4 lumber pieces to both of the arm rests.
BE CAREFUL! Make sure that the 27 inch long 2×4 pieces are places in a mirrored fashion to eachother. This is indicated by the red arrows in the diagram.
Once you ensure the proper placement of the 27 inch 2×4 lumber pieces then as before, add glue, predrill, and add screws.
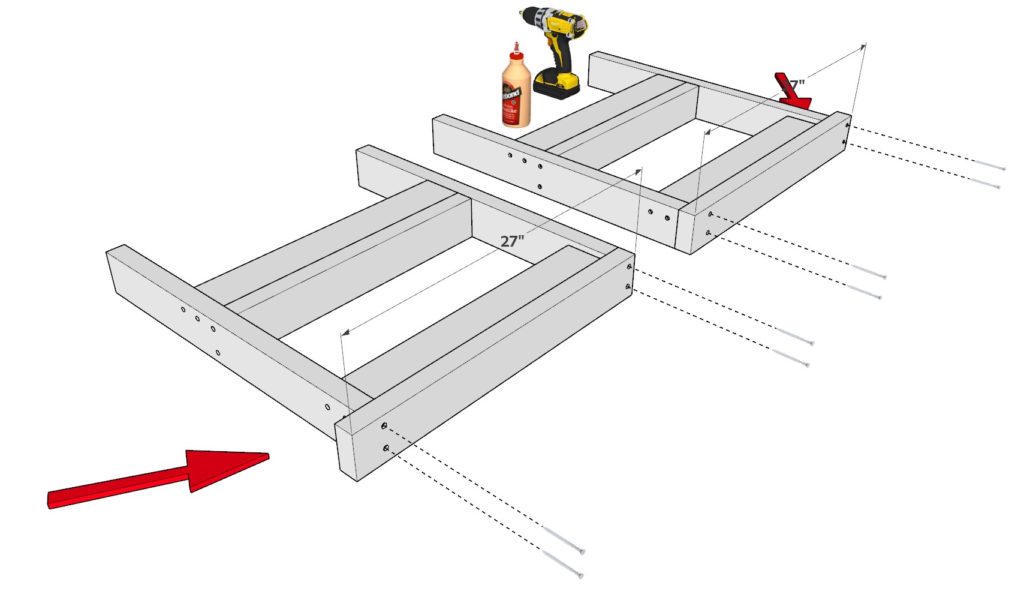
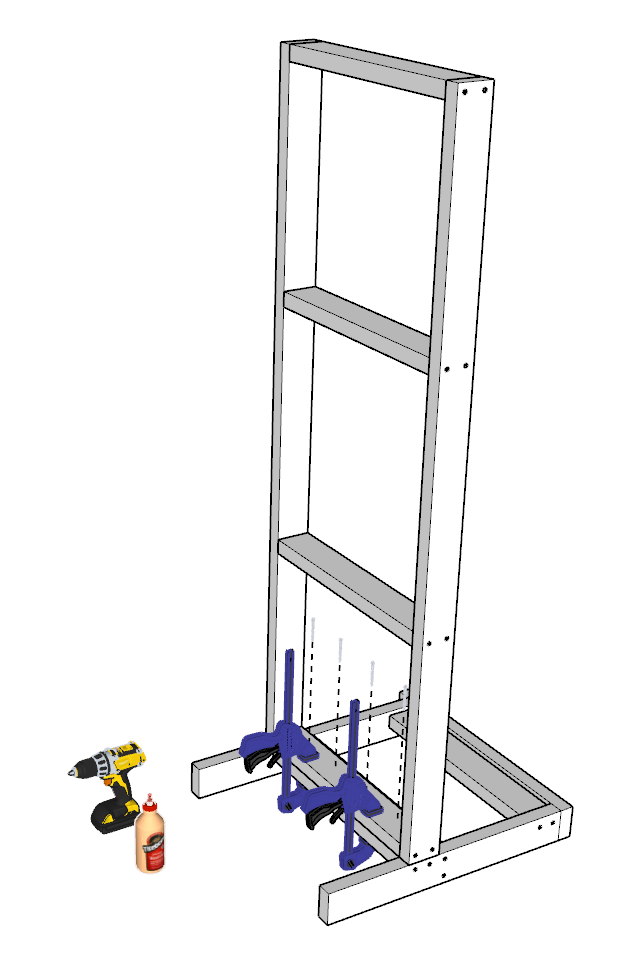
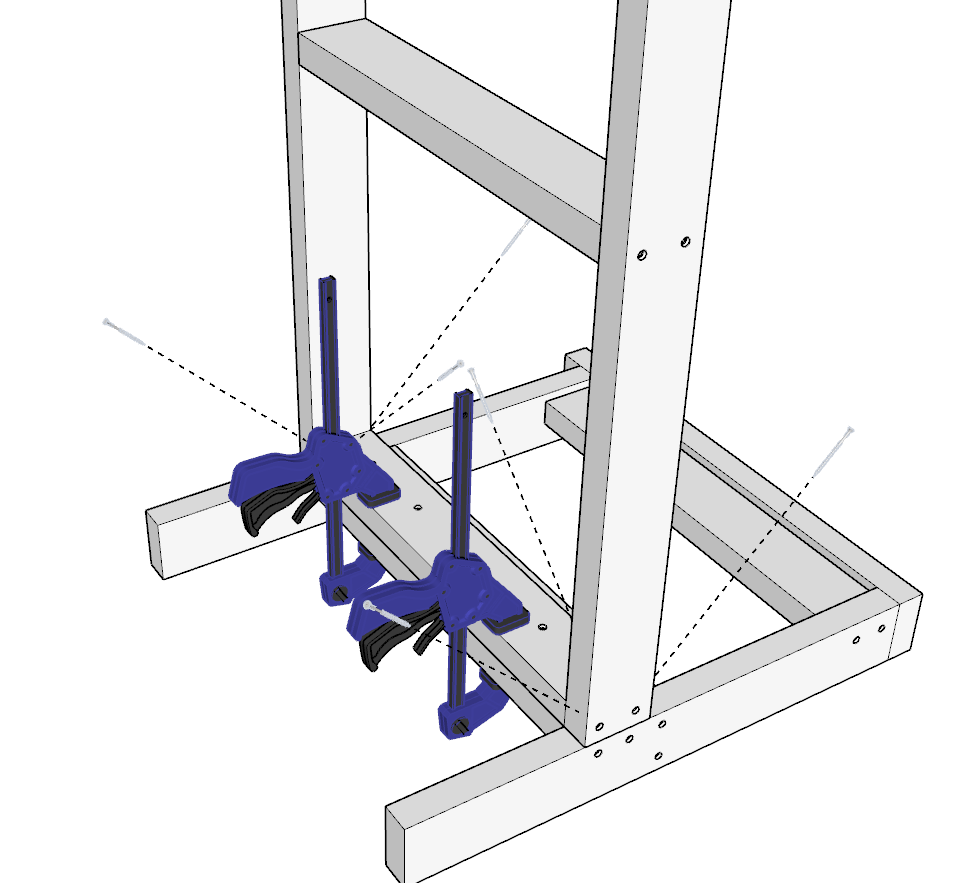
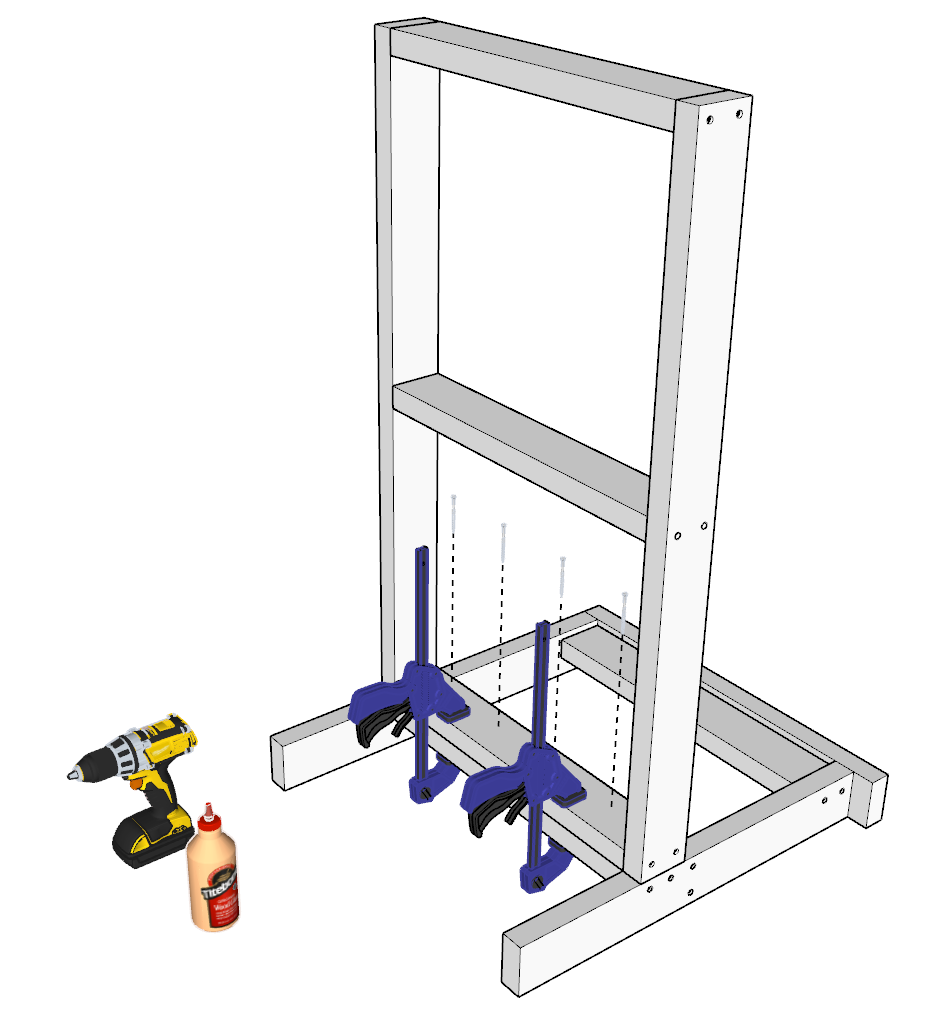
Step 5: Attaching arm rests to main frame of bench (Bench 1)
Next, set the frame up right on top of one of the armrests.
In this step make sure that glue is applied to the areas that will make contact. Get help to balance the frame. Secure the frame with clamps for stability and a more solid joint.
As before, predrill and add screws.
Add both vertical and diagonal screws as shown below for a secure joint.
Repeat this for the other arm rest as well.
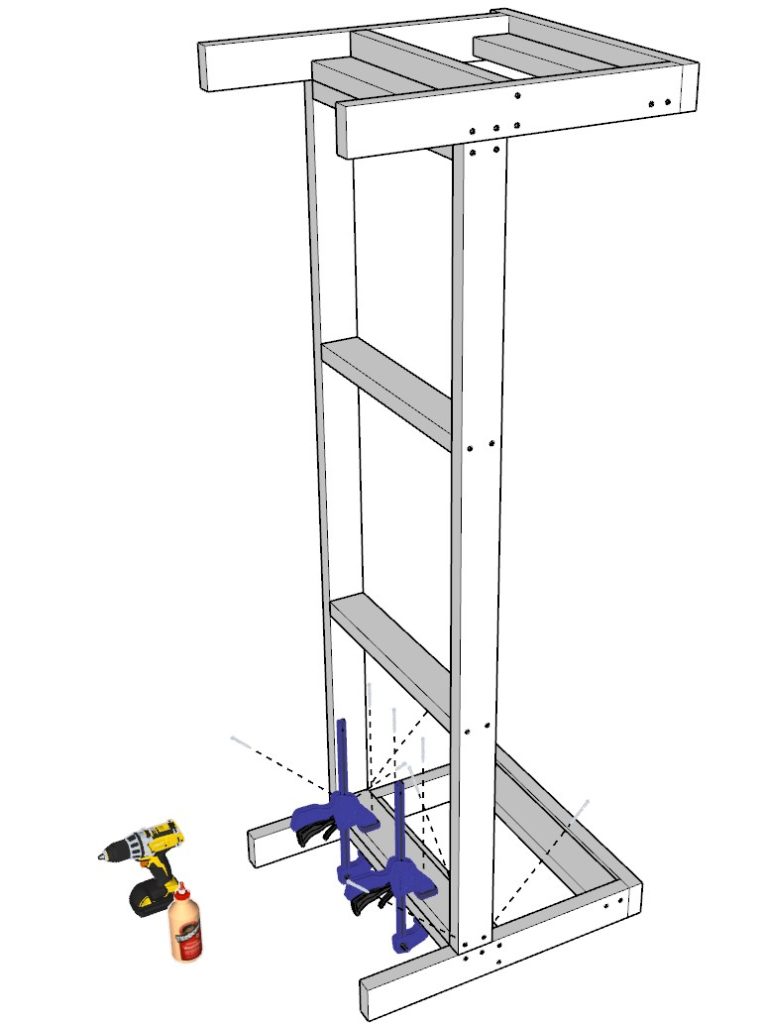
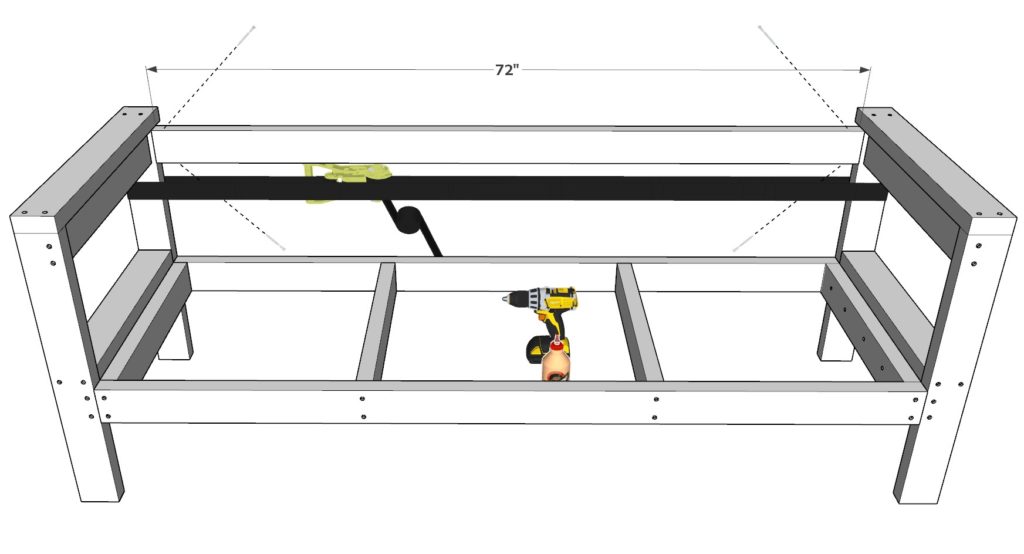
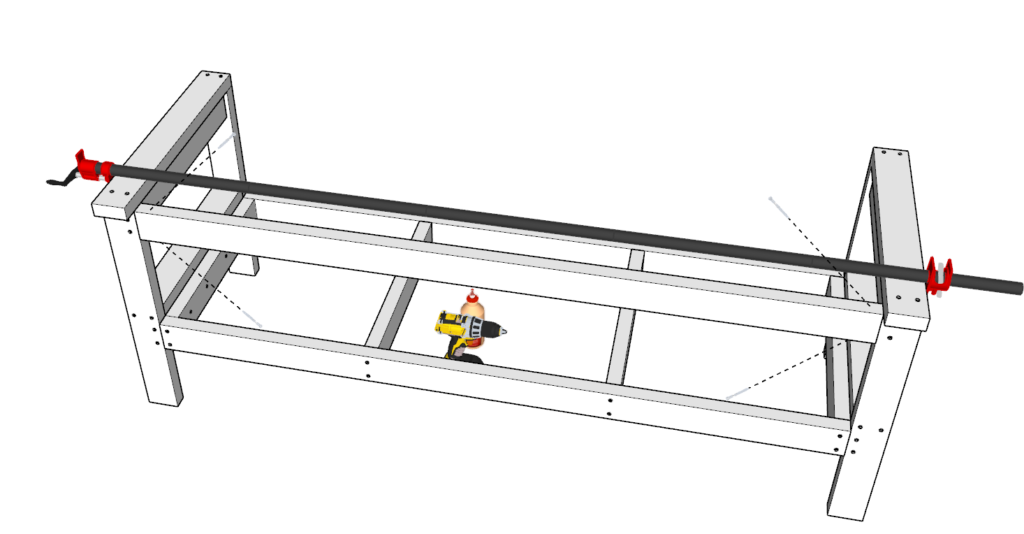
Step 6: Adding backrest to DIY patio bench (Bench 1)
Next, add a 72 inch 2×4 lumber pieces across the back of the bench for the back rest.
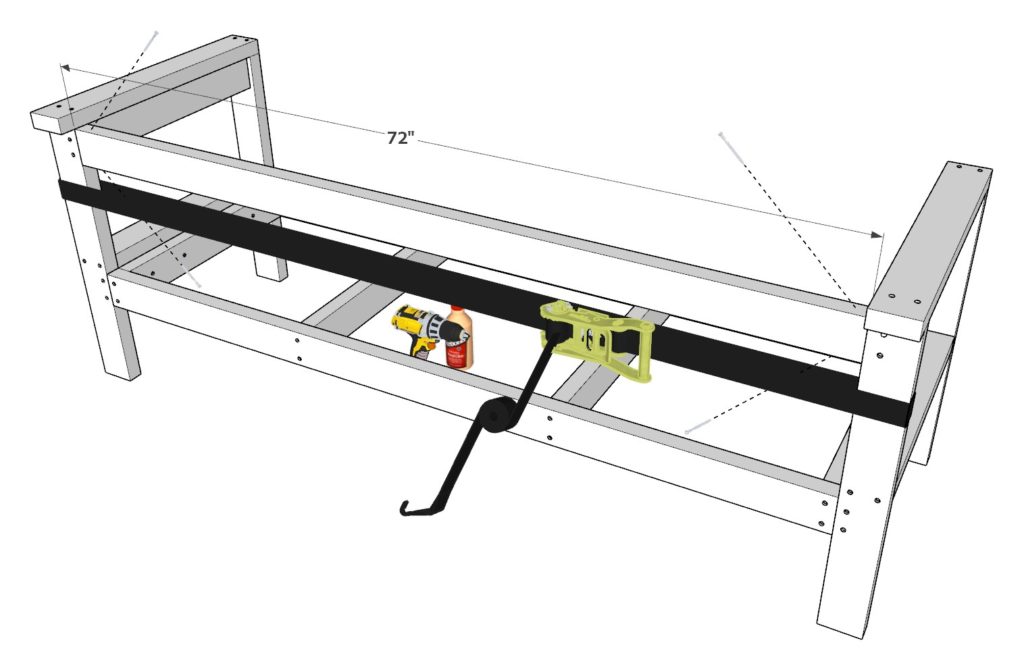
Secure the lumber piece with either a tie-down/ratchet strap, or a pipe clamp (Both options displayed below)
As before, add glue, predrill, and add the diagonal screws to secure the joint.
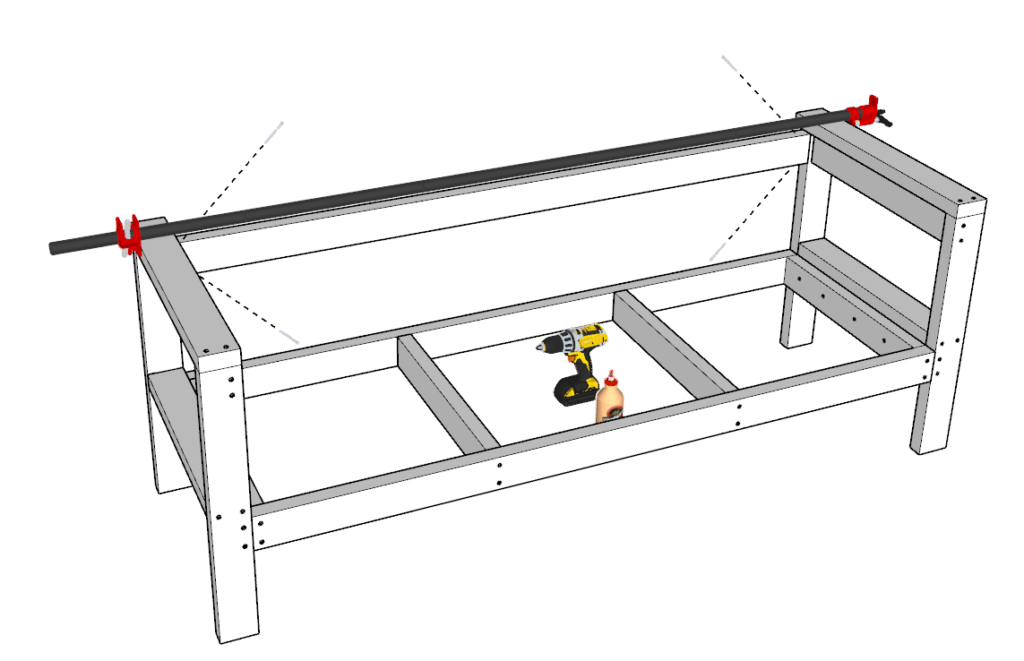
Step 7: Adding backrest to DIY patio bench continued (Bench 1)
Next, add a 72-inch 2×4 lumber pieces to the back rest ad shown below. Add glue, predrill, and add 2.5 inch screws.
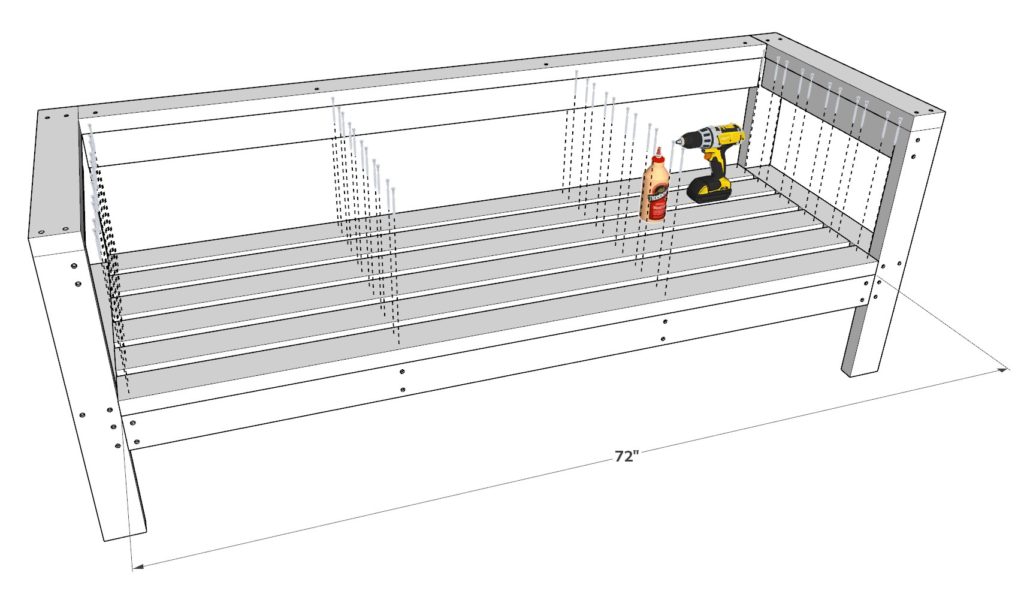
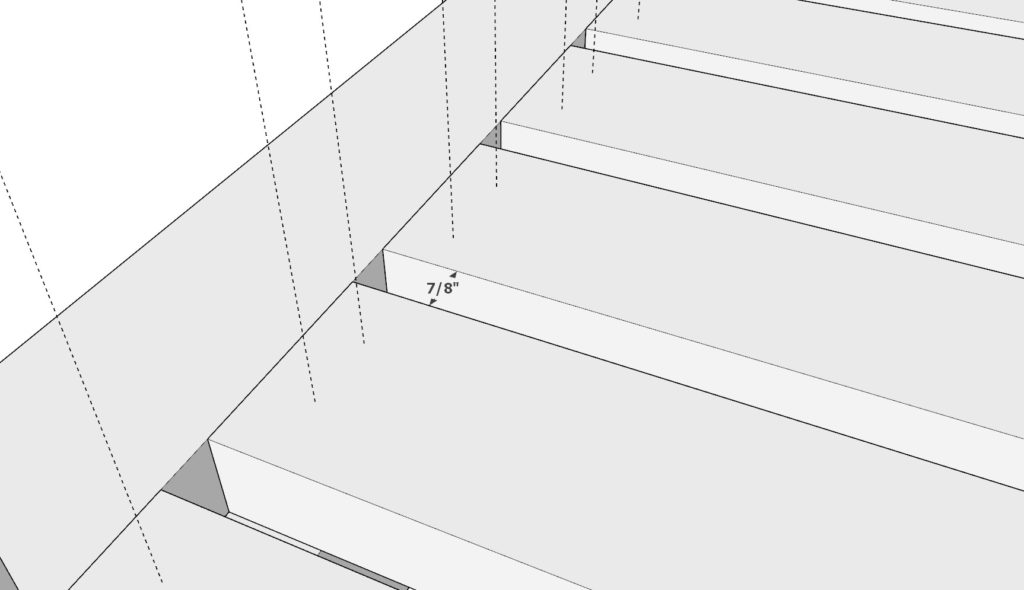
Step 8: Adding decking pieces to DIY patio bench (Bench 1)
Next, add six 72 inch 2×4 lumber pieces to make the seating platform of the bench.
Space them out about 7/8 inches apart.
As before, add glue, predrill, and add 2.5 inch screws.
Step 9: finishing touches (Bench 1)
Next, sand down the whole bench. This can be time consuming. I use an orbital sander to speed up the process
I use a rough 80 grit paper first and then finish it with a 220 grit paper.
Filling in the holes is optional.
At this point it is ready to be stained or painted!
Instruction on building bench 2
To create the full sectional sofa you need to build the side bench with one arm rest. The design is very similar as well as the construction method.
Step 1: Frame assembly (Bench 2)
First, place two 44.5-in pieces and three 22.5-in pieces in the arrangement shown bellow.
As before, predrill the holes, apply glue, and screw in the screws.
Step 2: Armrest assembly (Bench 2)
Next, assemble one of the armrests.
Take two 27-1/2 inch 2×4 lumber pieces and two 22-1/2 inch 2×4 lumber pieces and arrange them as shown below.
Once the pieces are in place, add glue, predrill, and add 2.5 inch screws.
Next, attach a 22-1/2 inch 2×4 lumber piece at the top of the armrest. Use 1.5 inch thick spacers to indent the 22-1/2 inch 2×4 lumber piece appropriately. These spacers can be from cut away 2×4 lumber.
Secure the 22-1/2 inch 2×4 lumber piece by predrilling, gluing, and adding 2.5 inch screws.
Step 3: Arm rest assembly continued (Bench 2)
Next, add a 27 inch 2×4 lumber piece to the top of the arm rest as shown below.
Secure by predrilling, adding glue, and adding screws.

Step 4: Second armrest assembly (Bench 2)
Next, assemble the second arm rest.
Take one 12-1/2 inch 2×4 lumber piece, one 22-1/2 inch 2×4 lumber piece, one 27-1/2 inch 2×4 lumber piece, and one 24 inch 2×4 lumber piece and arrange them as shown below.
Once they are in place, secure the joints by predrilling, using glue, and adding 2.5 inch screws.
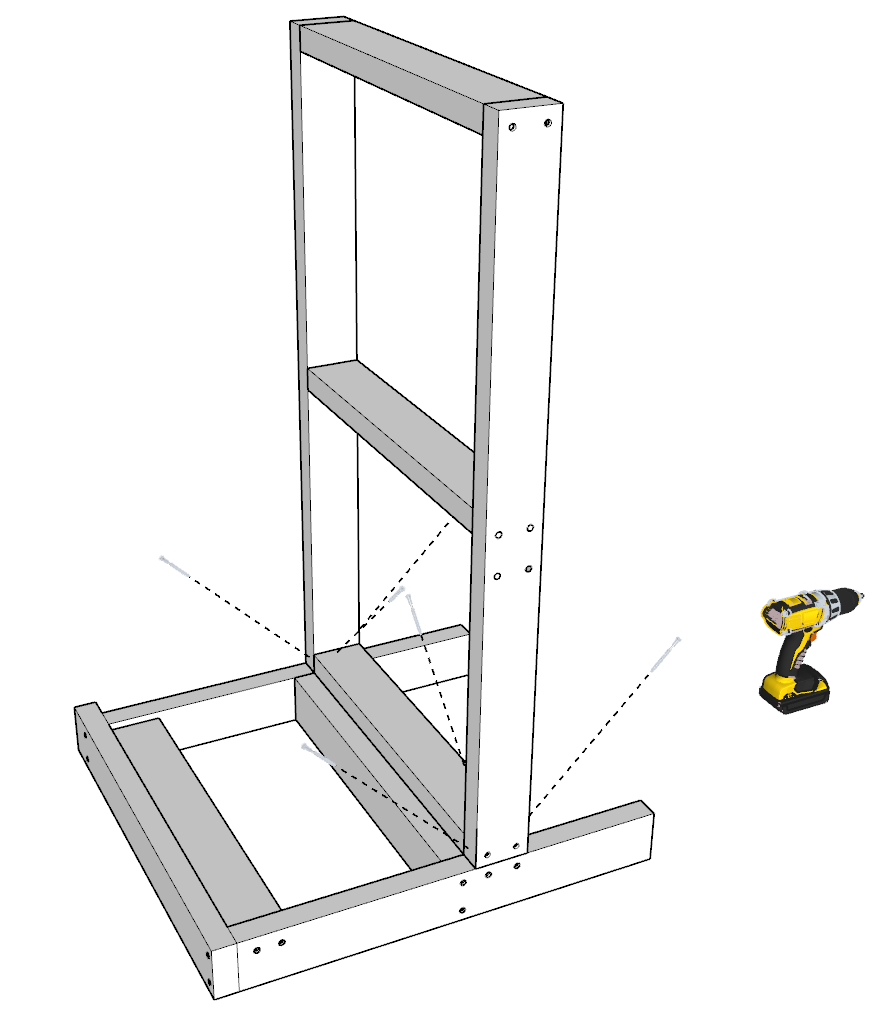
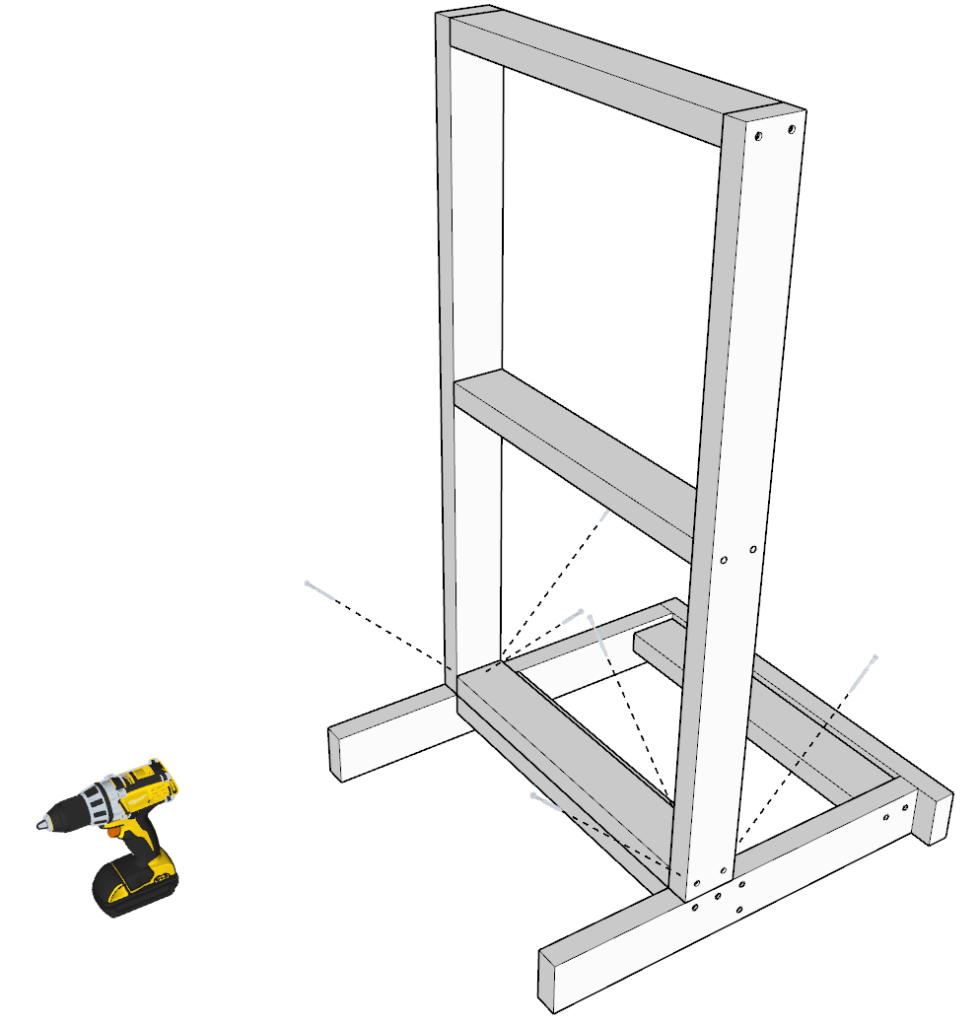
Step 5: Attaching arm rests to frame (Bench 2)
Next, attach the frame of the bench to the arm rests.
Take one of the arm rests and align it with the frame as shown below. Apply glue to all areas that will be joined together.
Use clamps to secure the frame in place as you place the vertical and diagonal screws into the wood.
Dont forget to predrill.
Repeat this for both arm rests.
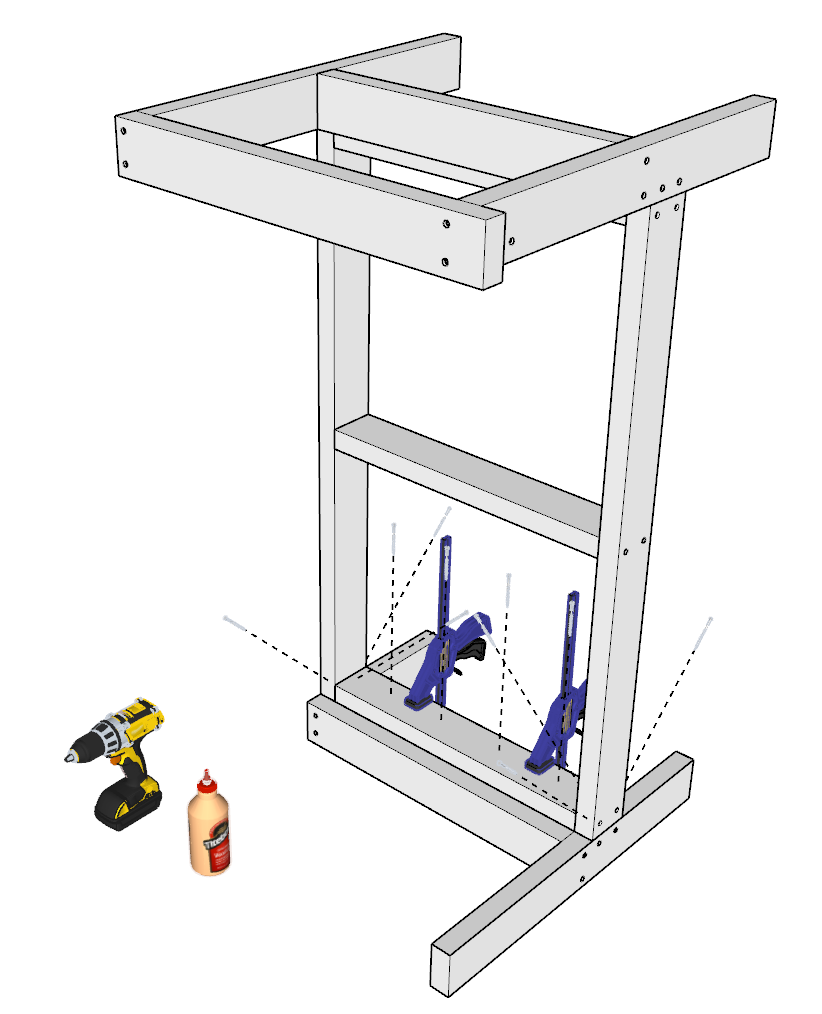

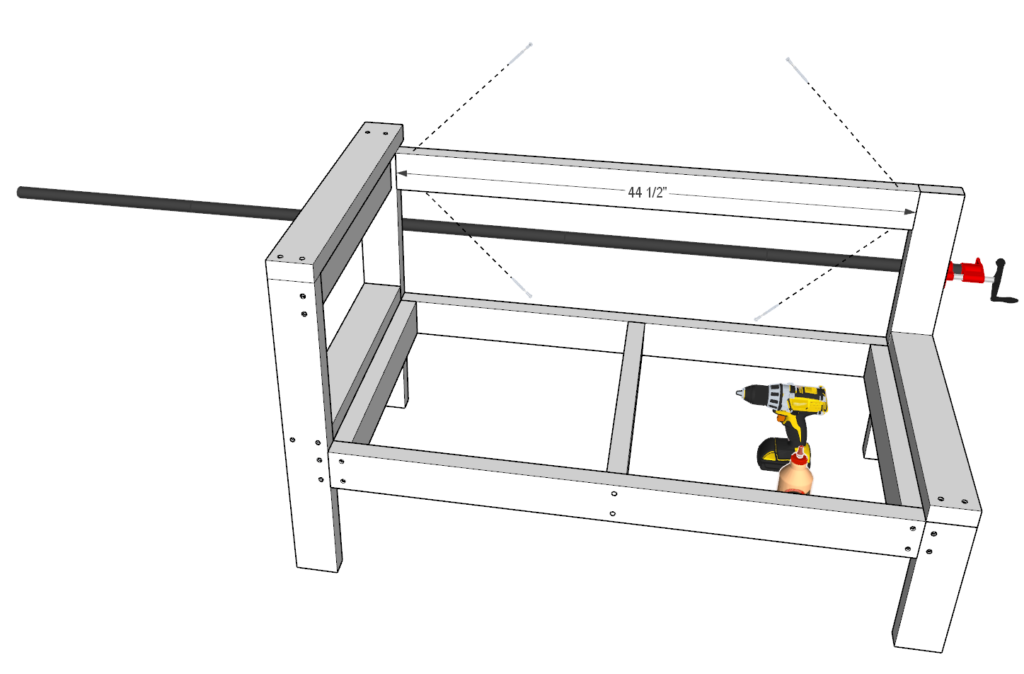
Step 6: Attaching backrest to patio bench (Bench 2)
Next, attach the back rest to the patio bench.
Take a 44-1/2 inch 2×4 lumber piece and add it to the back of the bench as shown below. Add glue to all areas that will be joined together.
Use a pipe clamp or a ratchet strap/tie-down to secure the 44-1/2 inch 2×4 lumber piece in place as you add the diagonal screws.
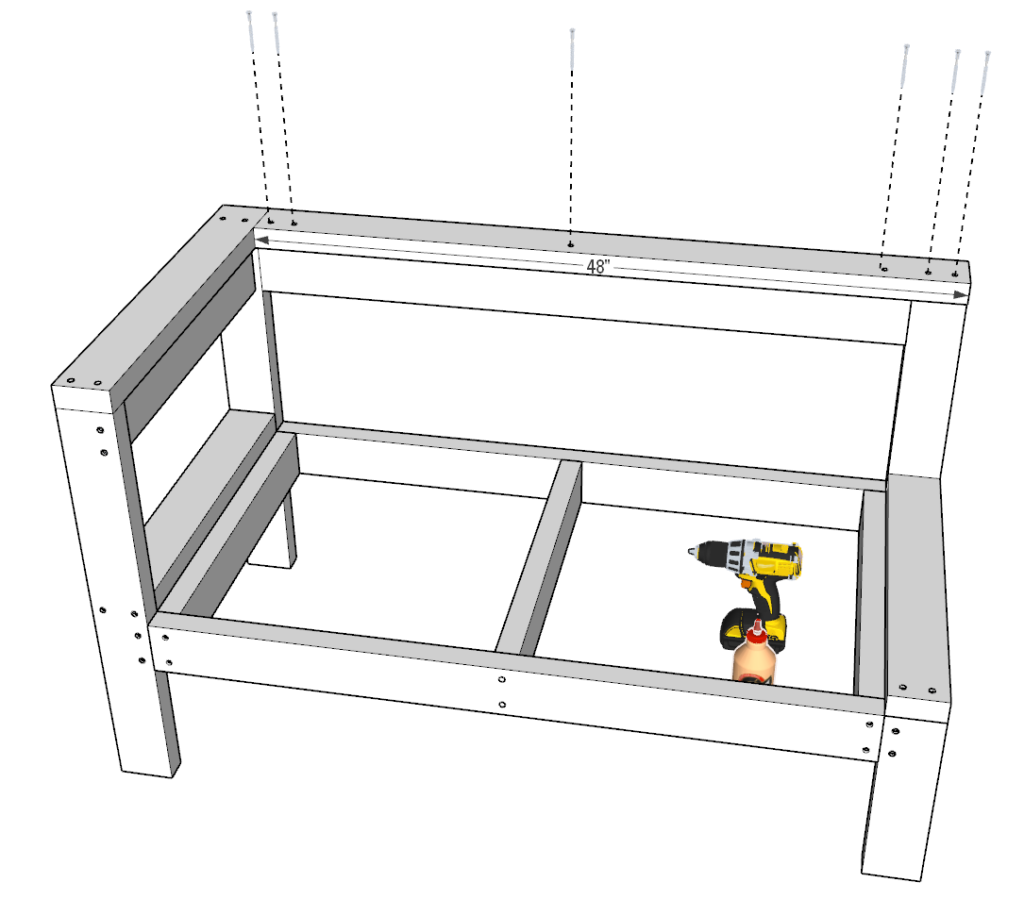
Next add the 48- inch 2×4 lumber piece on top of the back rest. Secure it by predrilling, adding glue and 2.5 inch screws.
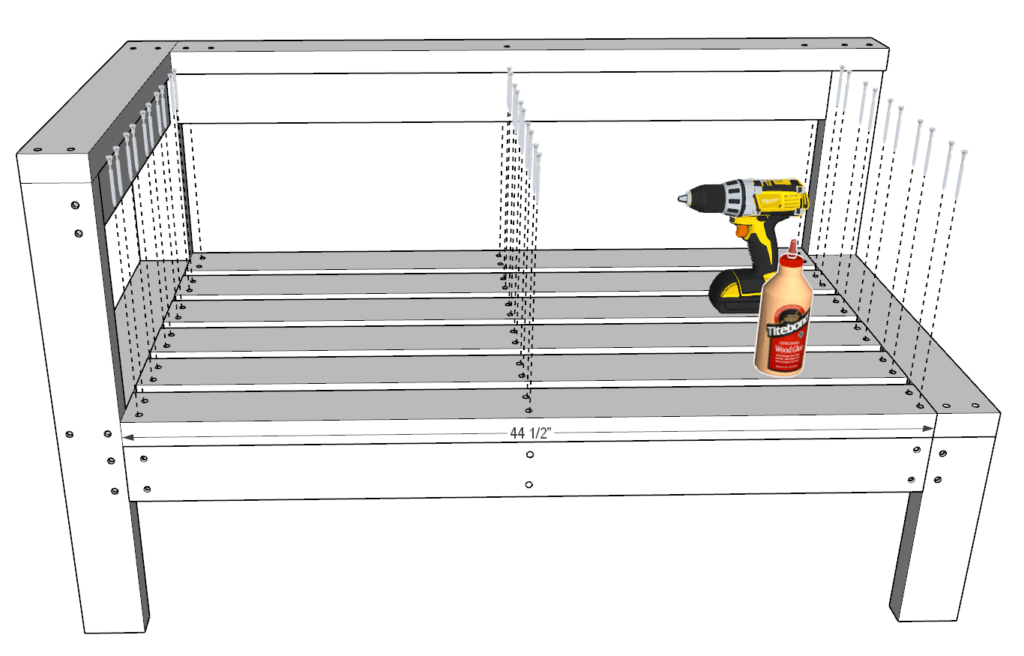
Step 7: adding decking pieces (bench 2)
Next, add six 44-1/2 inch 2×4 lumber pieces to deck the seating platform.
Space out the pieces 7/8 inches apart.
As before, add glue, predrill, and add 2.5 inch screws.
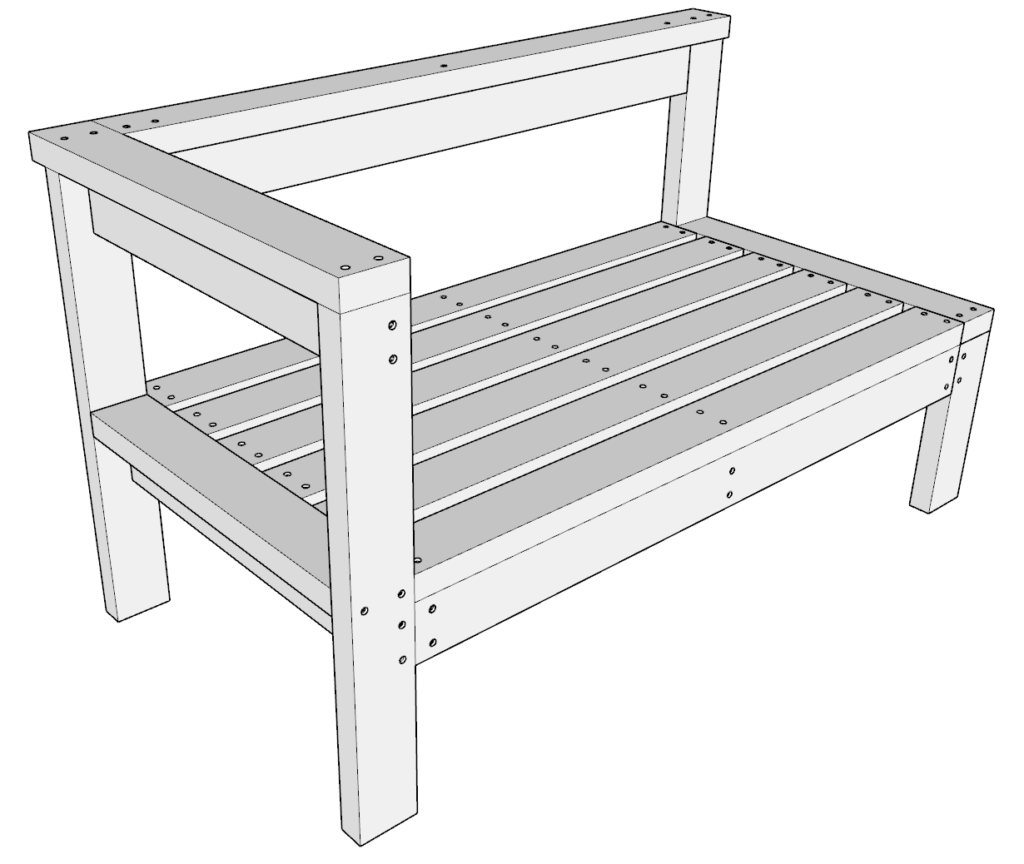
Step 8: finishing touches (bench 2)
At this point all the pieces have to be sanded down. I use a 80 grit paper for my orbital sander to help take away all major imperfections and then I follow up with a fine grit 220+ afterwards to have it be ready to be stained or painted.
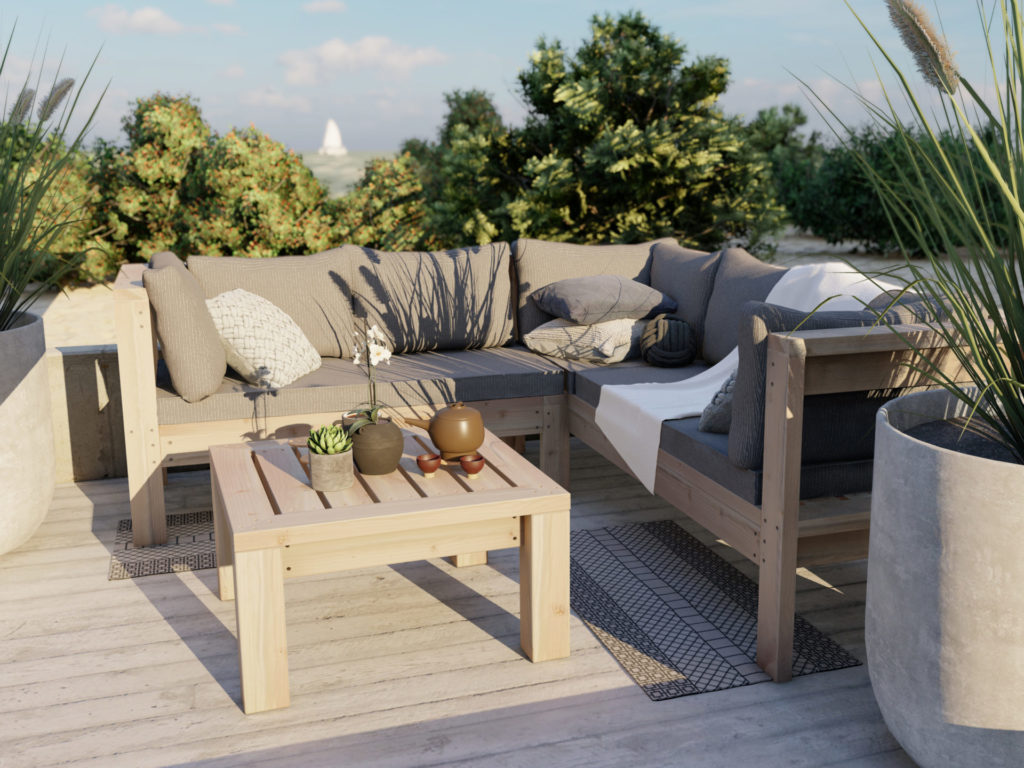
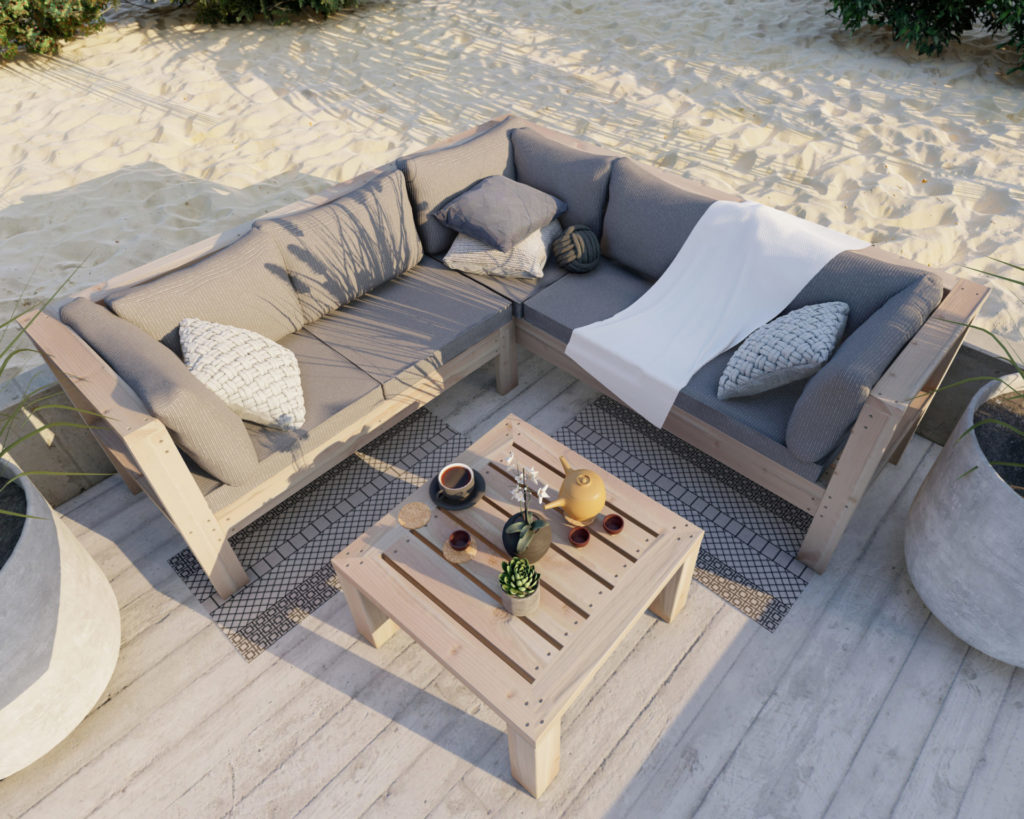
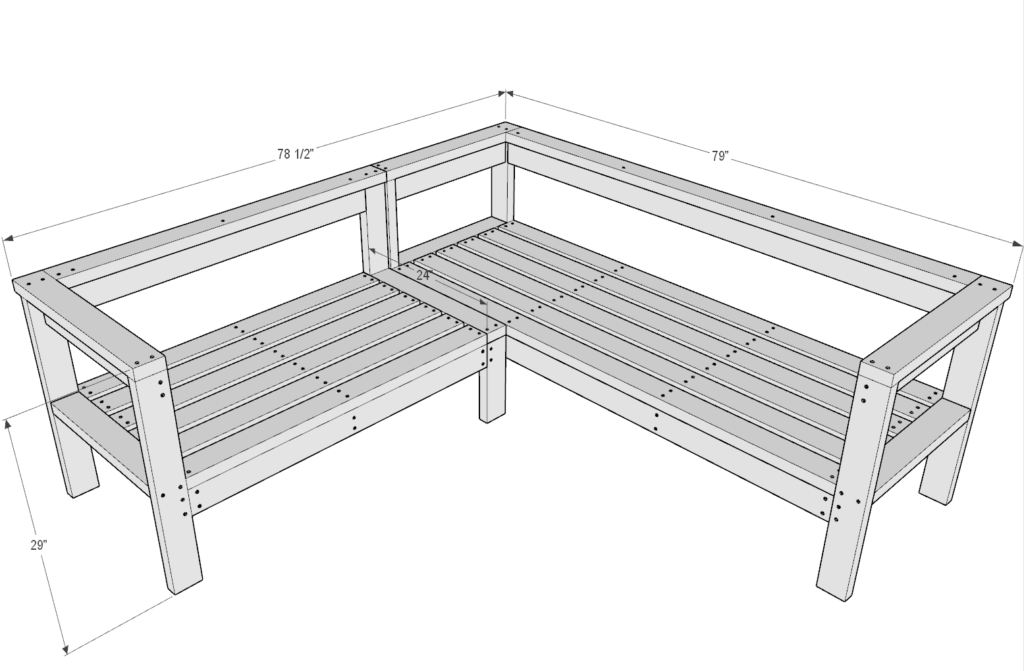
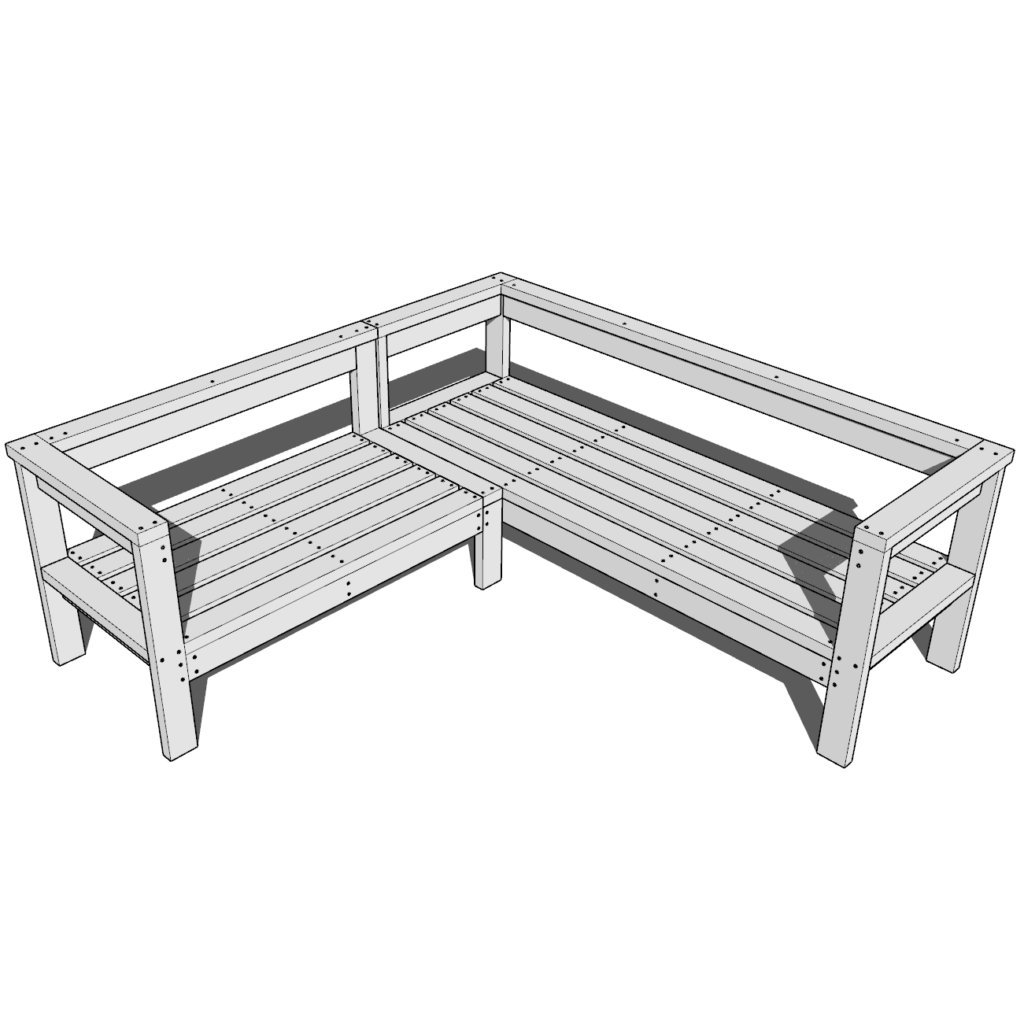
Putting it all together
The two benches will come together to for the sectional sofa. Once painted or stained, just add cushions and the sofa is ready to be enjoyed!
I highly recommend having a sofa cover for these during the winter time. This helps protect the wood and helps it to look great for many years. If you have a roof that covers the set, I would still buy a sofa cover because moisture and dew can settle on the wood regardless. I also take off the cushions and pillows and put them away into storage during the winter as well.
The set works great around a fire fit or coffee table and make a space feel so much more comfortable and enjoyable.