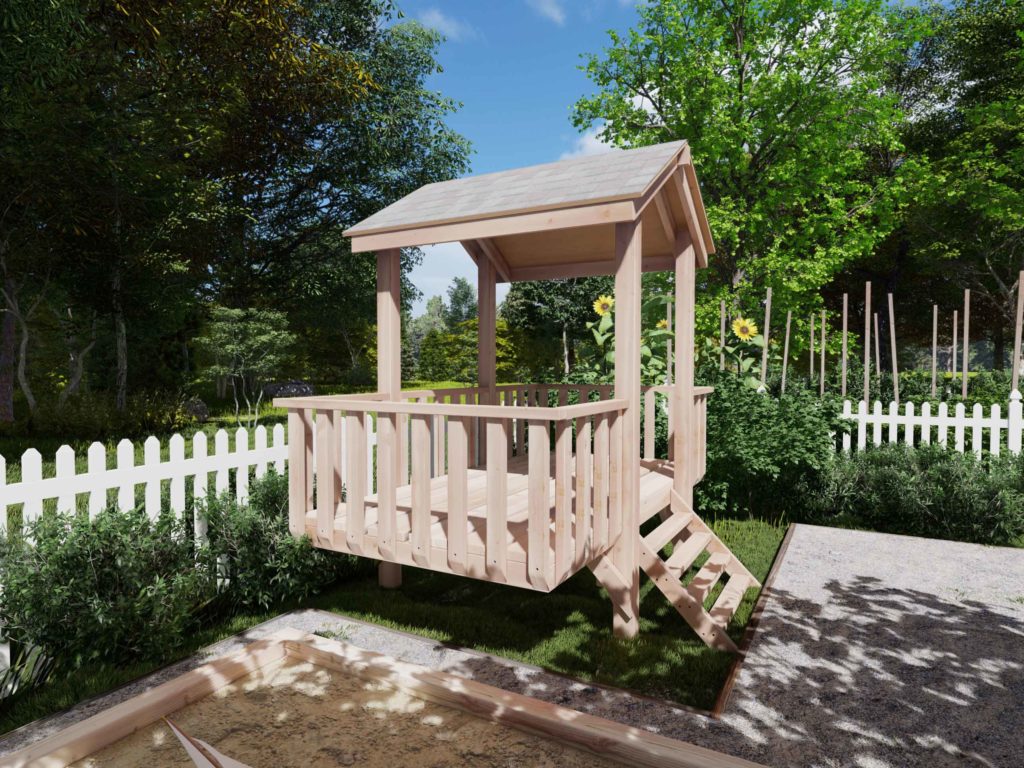
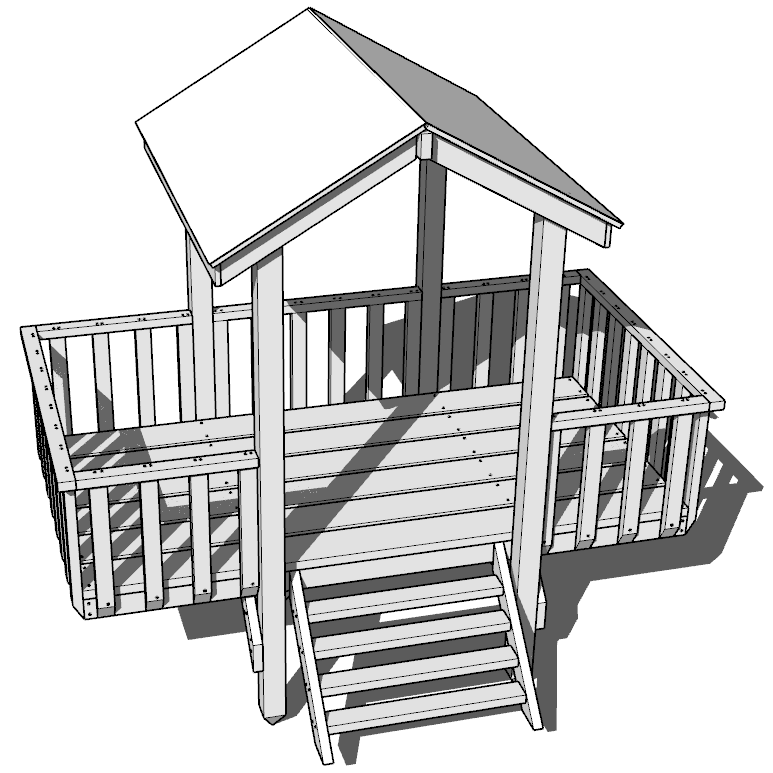
If you’re looking for ideas and plans for a fun and easy to build DIY playhouse or playground then you have come to the right place. In this post you can learn how to make this awesome wooden playhouse for kids. This playhouse castle is great for imagination games and pretend play!
This playhouse can be modified and added to as well to include swings, slides, and even to connect to other play structures as well (plans coming soon).
This playhouse is easy to build if you follow my step by step instructions. See below the tool kit needed and more information about this structure and the building process.

Time to build
14-18 hours
Total cost of build
About $280
Skill level required
Intermediate
Download the PDF plans
Outdoor wood Kids playhouse PDF
What is included in the PDF download?
Easy to read step by step instructions
Material list
Tools needed
3D illustrations
Recommend tools for this project
- Saw (miter saw recommended for precision cuts)
- Drill
- Impact driver with bit for screws
- Sander
- wood countersink drill bit
- 7 Inch Speed Square tool
- Level
- Pencil
- Hammer
Cut list and material list
Available with purchase of PDF plans.

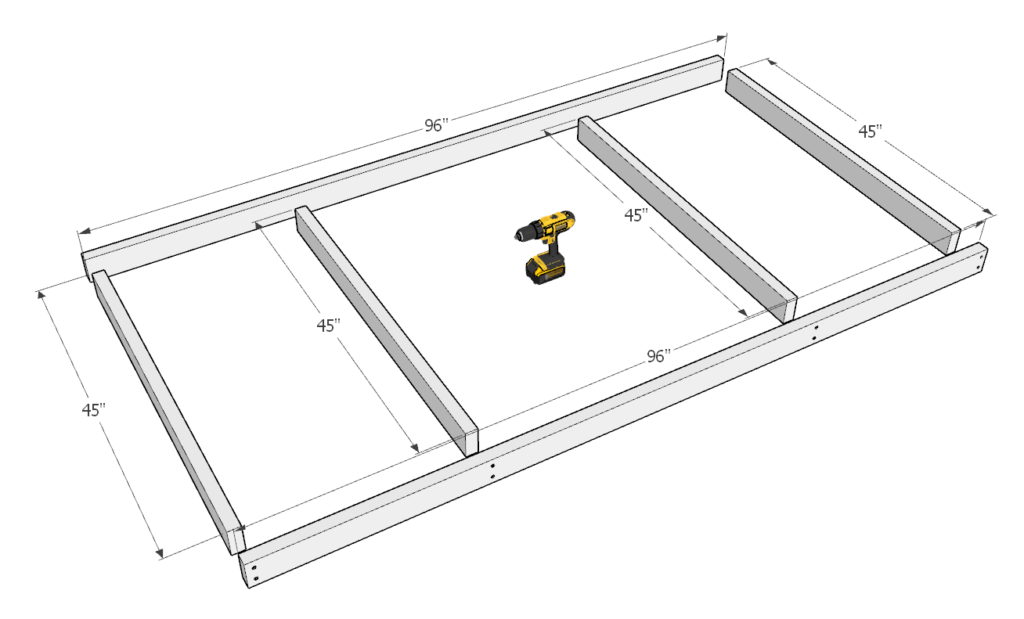
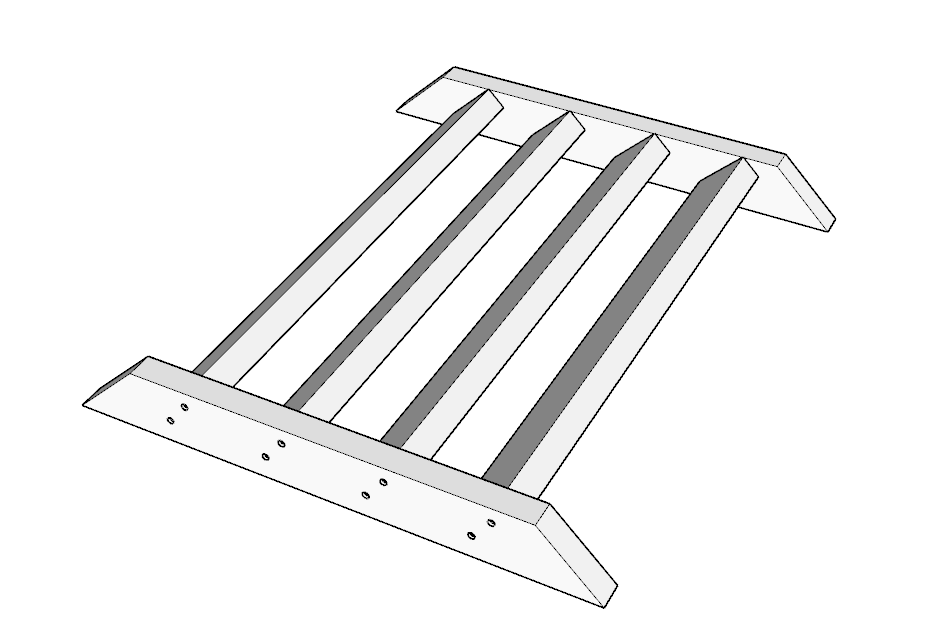
Step 1
First precut four 45-in 2x4s and place them together with two 96-in pieces as shown in the diagram.
Space them out as shown in the diagram. The spacing is going to very important later on when attaching the wood pillars. Ensure the spacing is correct.
Predrill with a countersink drill bit

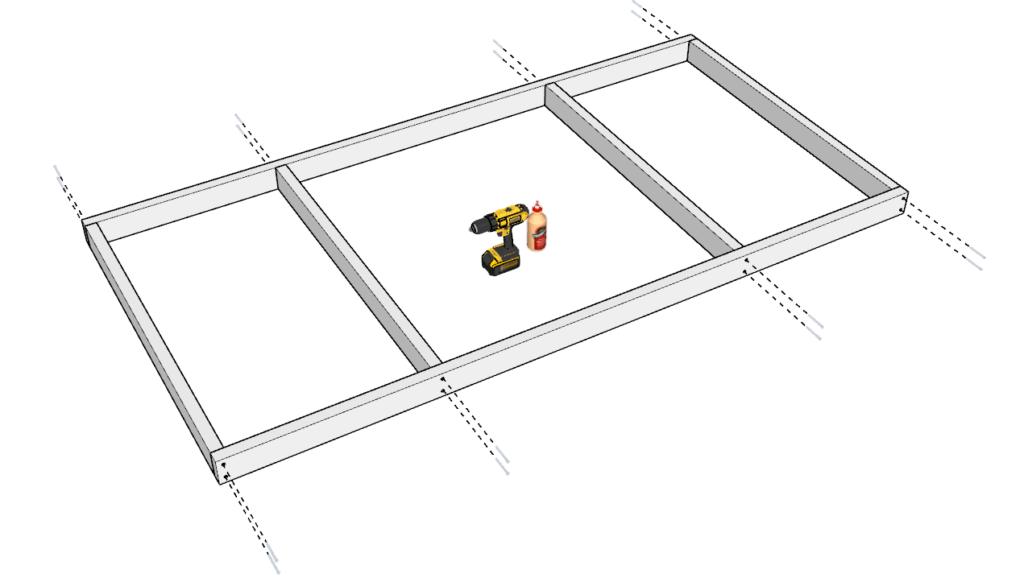
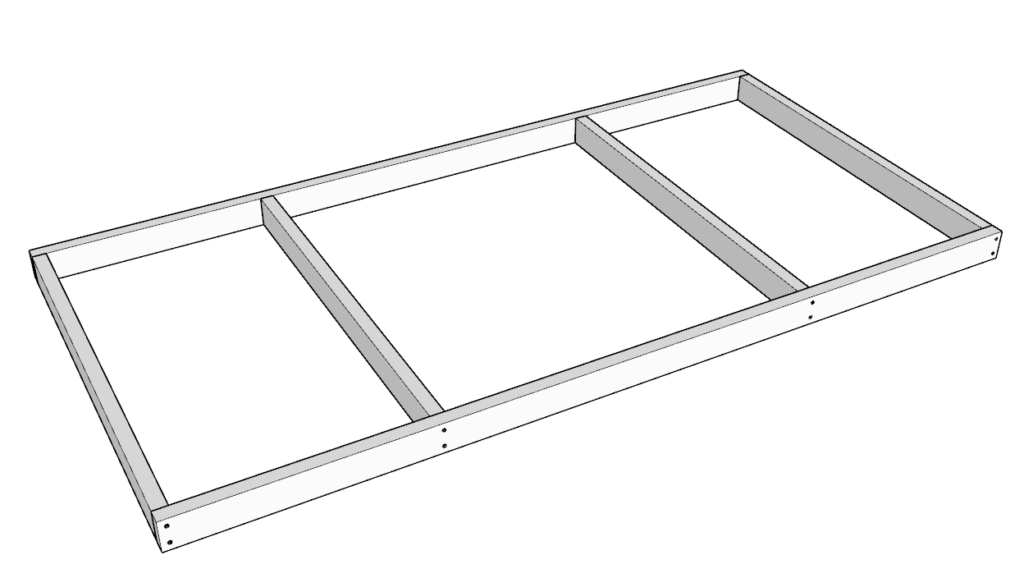
Step 2
Apply glue to all areas that will be joined together and add crews.
This will make the frame of the playhouse.
Step 3
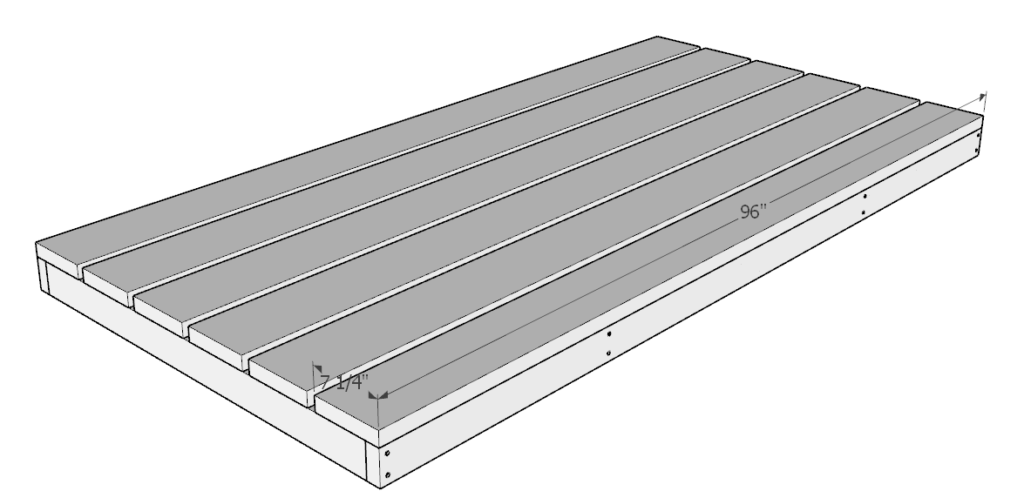
Next add 2x8x8s to the frame of the playhouse to give it a floor.
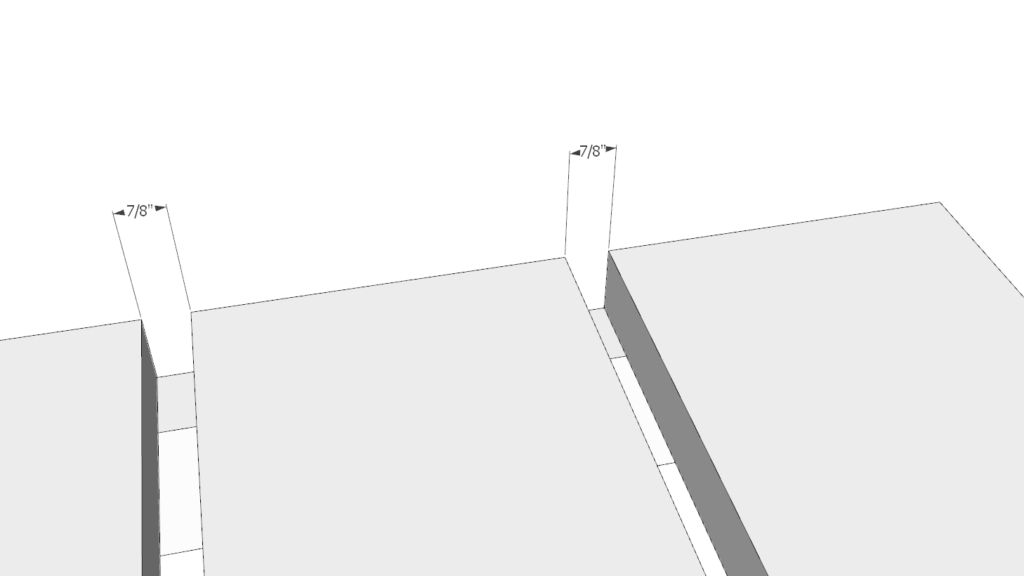
Align the 2x8x8s to the frame and space them out evenly. The spaces between them should be roughly 7.25-in.
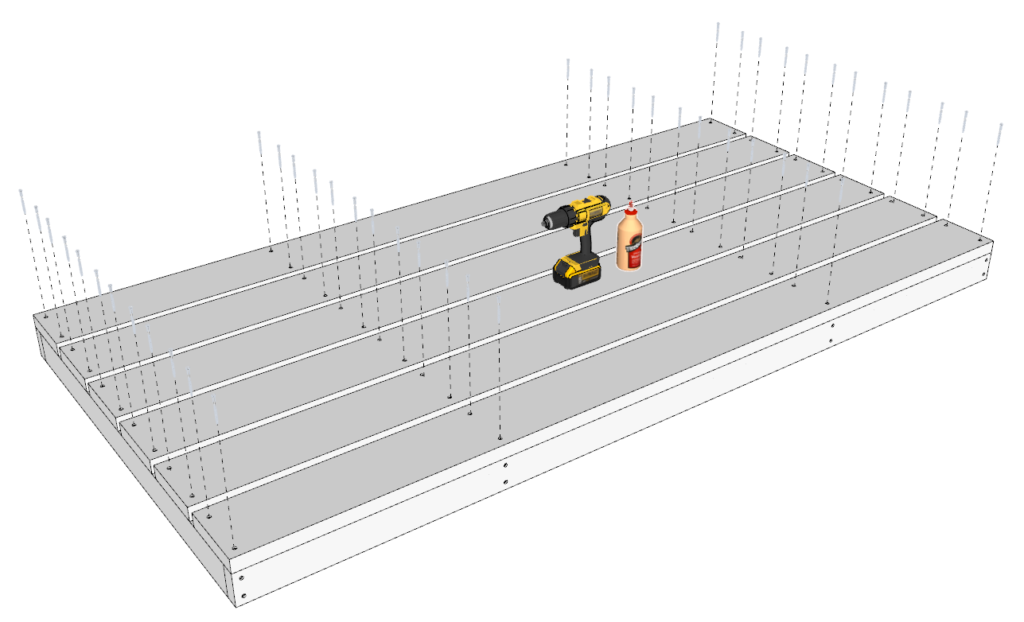
Step 4
Next remove each floorboard one by one and apply glue to the areas where the frame of the playhouse will meet the floorboards of the playhouse.
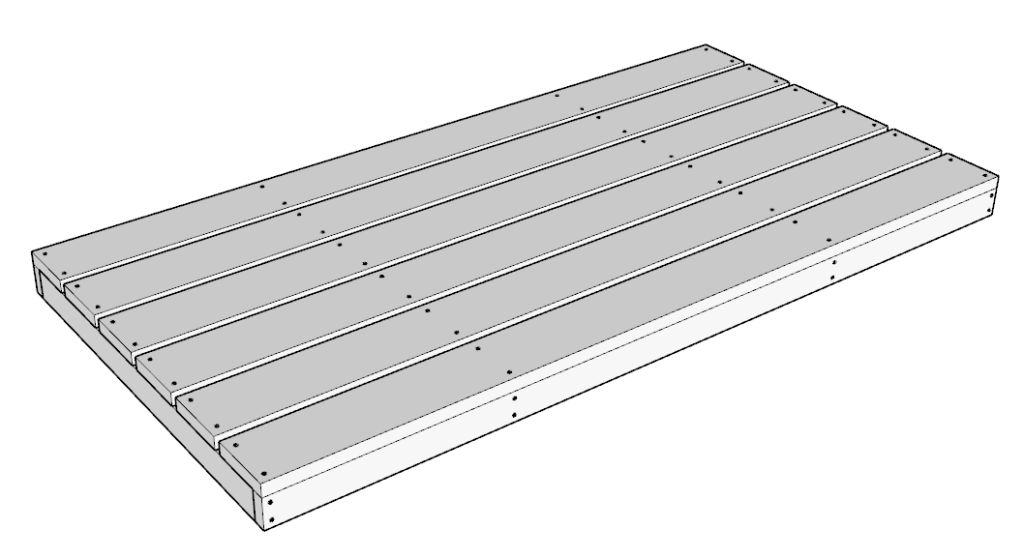
Predrill the holes and add crews to secure the platform together.
Step 5
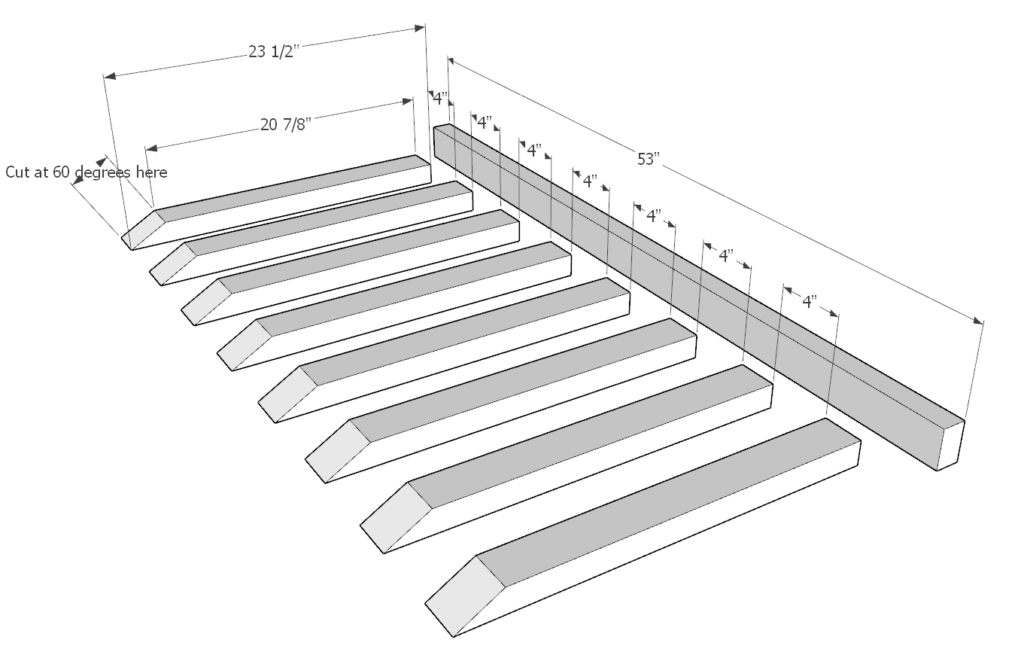
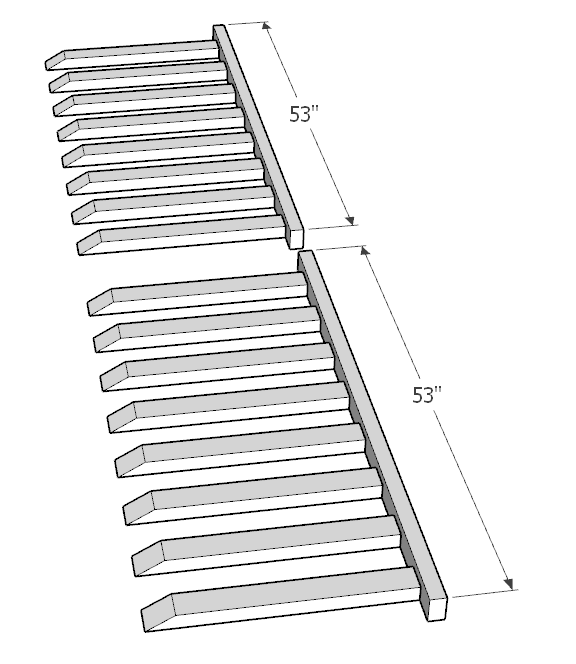
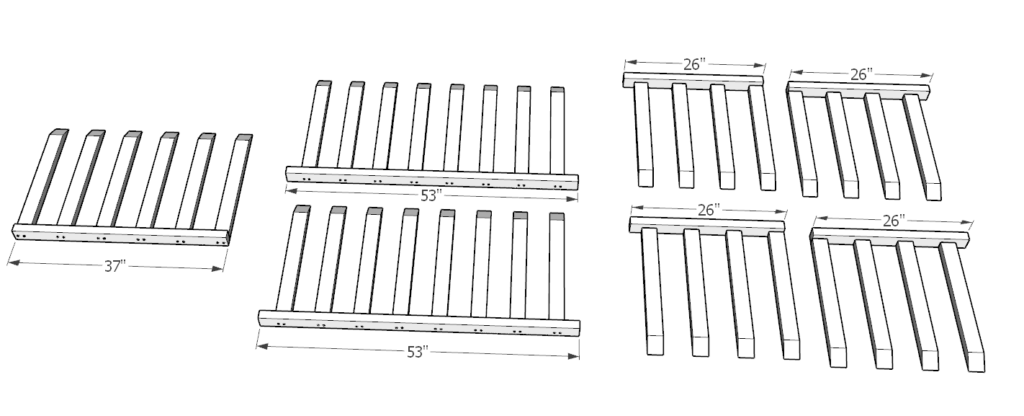
In this step we will begin making all the railing that will go around the play structure.
Cut the 2x3x8s into the sizes specified in the diagram.
You will need one 53-in piece and (8) 23.5-in pieces that are cut at 60 degrees on one end.
Make sure that when you are cutting at an angel that you cut along the correct side (see diagram).
The following steps will show how to put this railing together with the appropriate spacing.
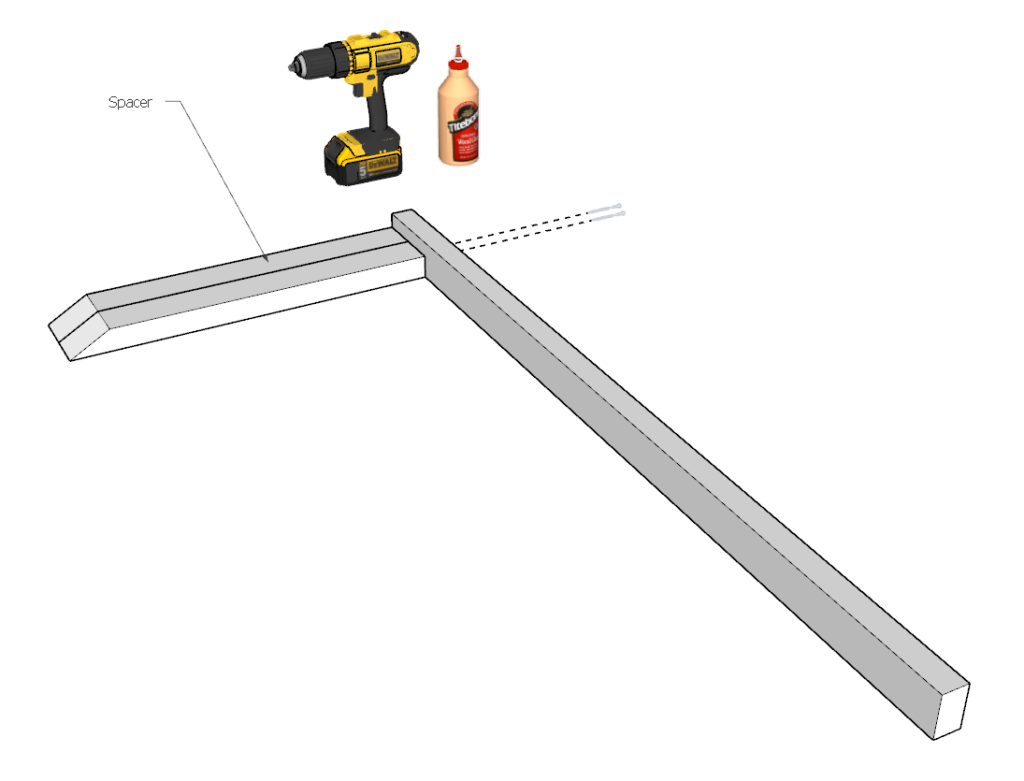
Step 6
Begin by using one of the railing pieces as a spacer. DO NOT attach it to the railing but only use it as a spacer. The idea is to have the first railing piece be attached with an indent.
Predrill 2 holes, add glue, and add screws. It is important to have 2 holes so that the railing does not turn of move.
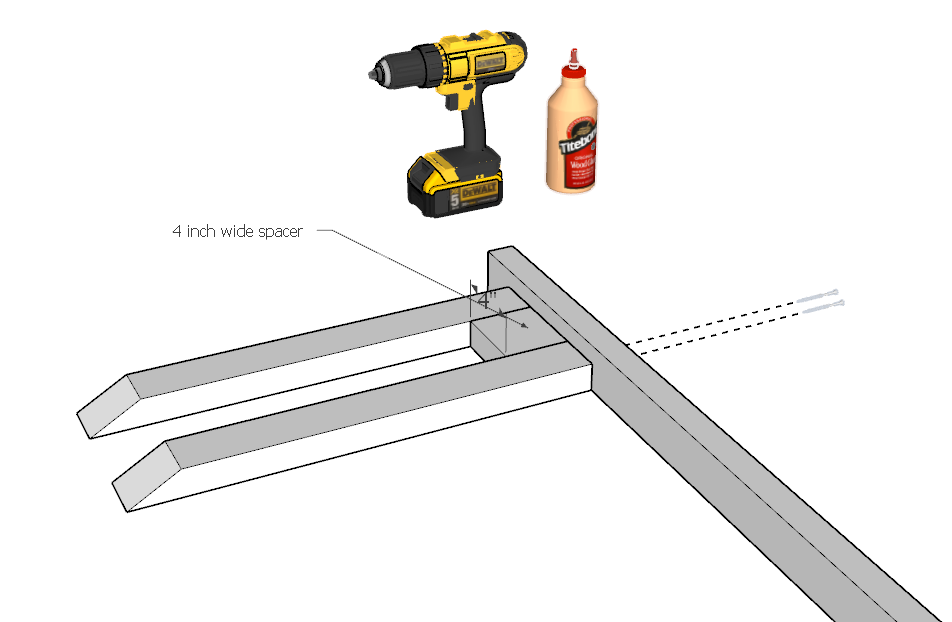
Step 7
In the next step you will need to cut a 4-in spacer. This can be cut from just some scraps.
Using the 4-in spacer continue adding railing pieces until you have 8 railing pieces added.
Tip: to make sure the spacing is perfect, you can add 4 pieces from one side, starting with at one end, and then add 4 remaining pieces on the other side starting on the opposite end. This will make any imperfection seem less noticeable. This will make the railing symmetrical.
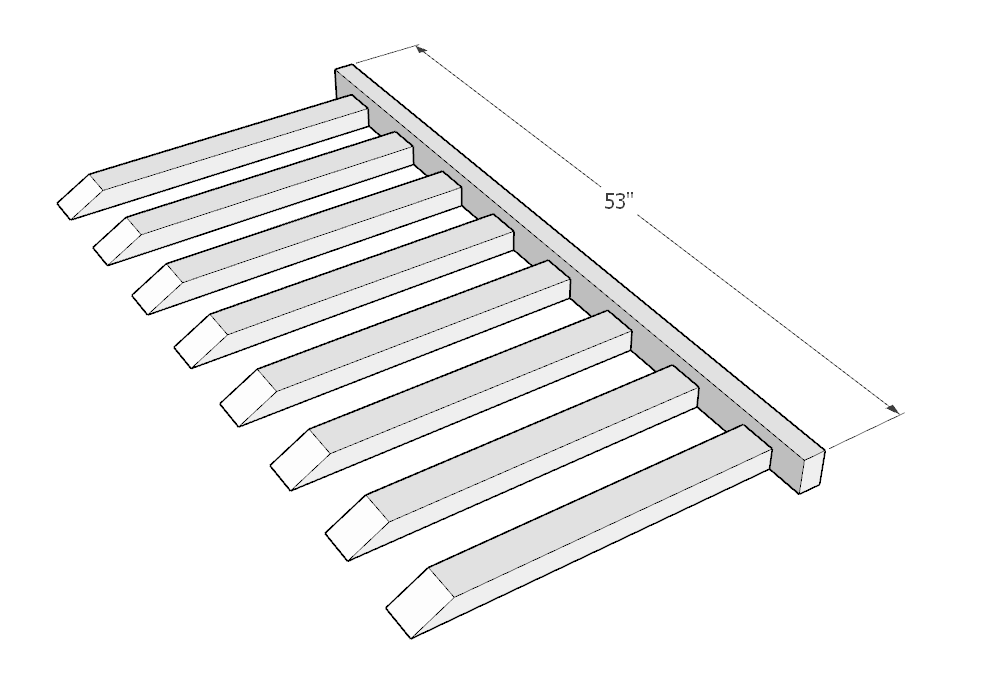
The final railing unit will have indentations on both sides (see next image).
Make a total of 2 identical railing sets.
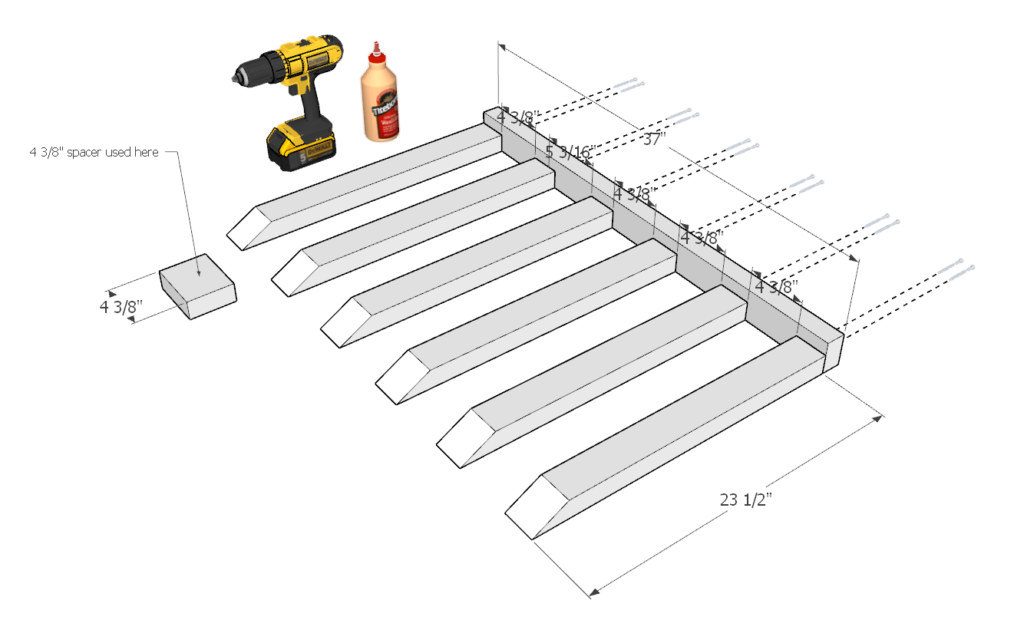
Step 8
Next, make a similar railing unit. This time the total length is 37-in, with 6 railing pieces.
Use a 4 3/8-in spacer.
predrill, add glue, and screws.
You only need to make one of these.
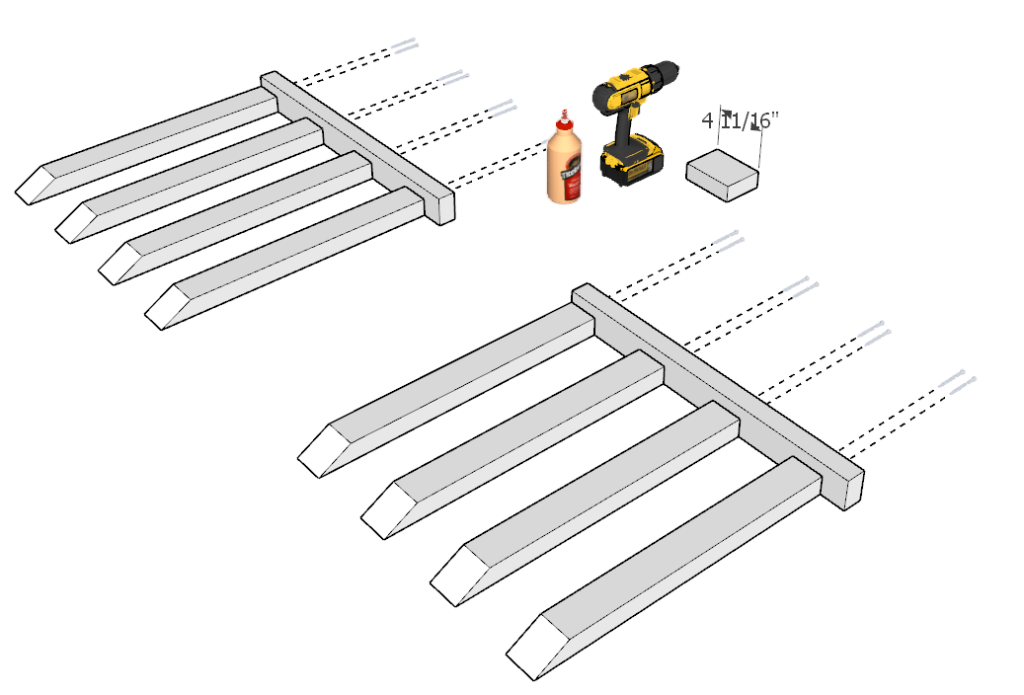
Step 9
Next, make two identical 26-in railing units. Each will have (4) 23.5-in pieces.
One side will be indented. Which indented side is very important (see diagram).
Use a 4 11/16-in spacer to achieve the correct space.
Predrill, add glue, and add 2 screws per railing piece as before.

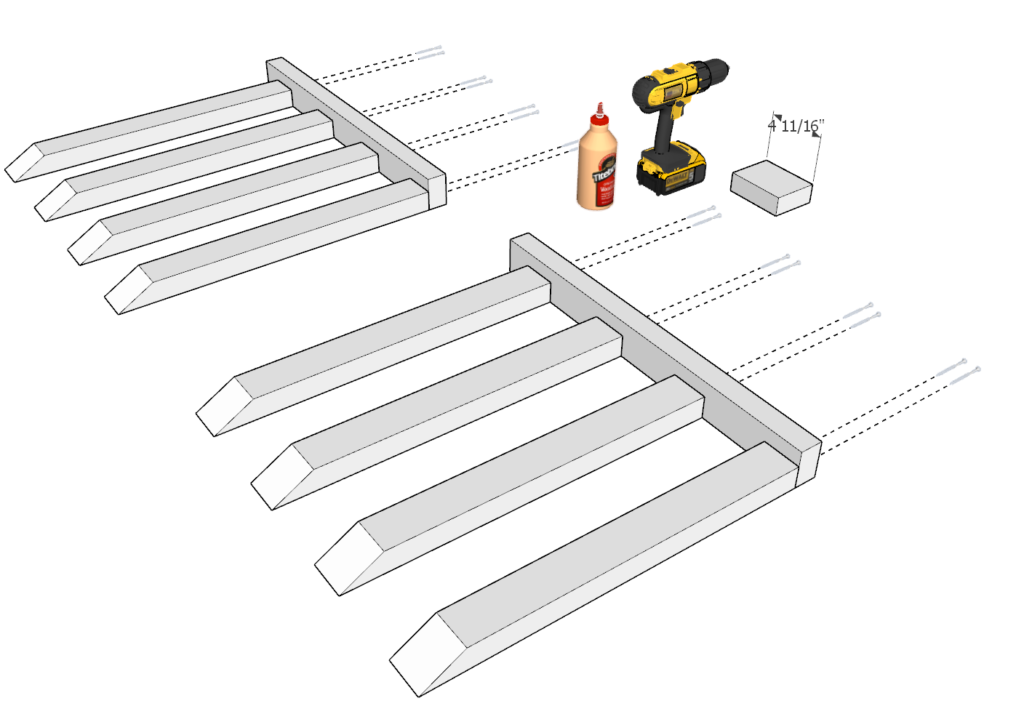
Step 10
Next, make 2 more units similar to step 9 but with ONE MAJOY DIFFERENCE. Make sure the 26-in pieces are indented on the OPPOSITE side.
Step 11
After making all the railing units, you should have a total 7 units.
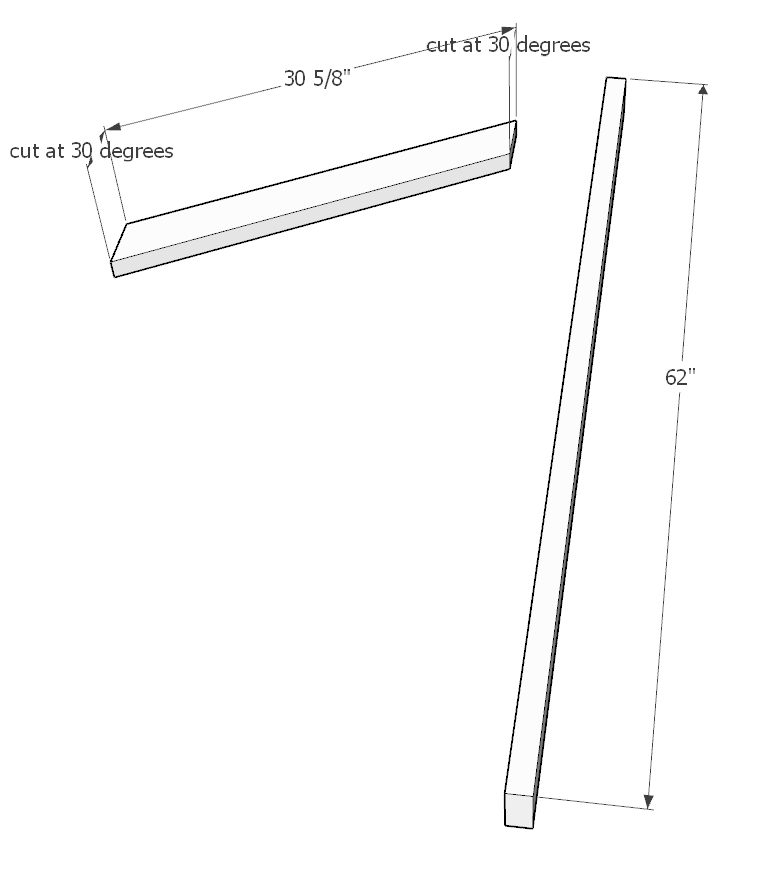
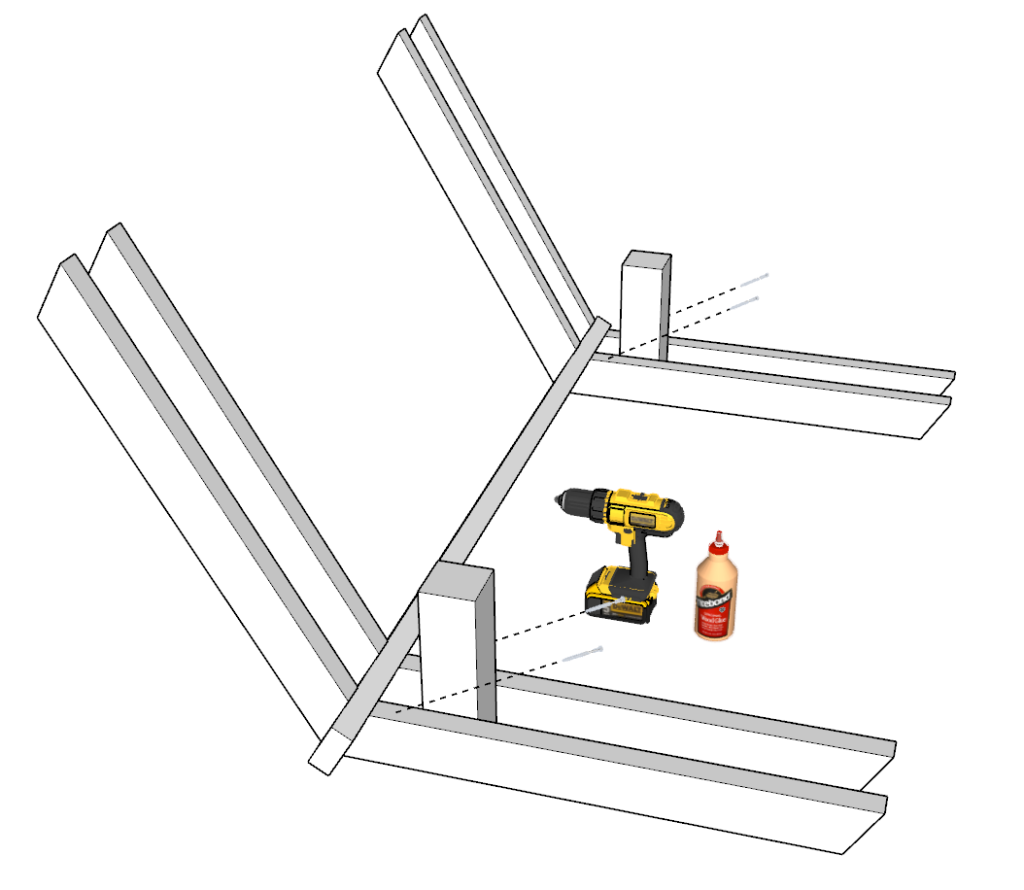
Step 12
Next, you will need to make the roof frame.
Star by cutting a 62-in piece of 2×4 and also a total of (8) 30 5/8-in pieces at a 30-degree angle on either side from 2x4x8 lumber pieces (see diagram).
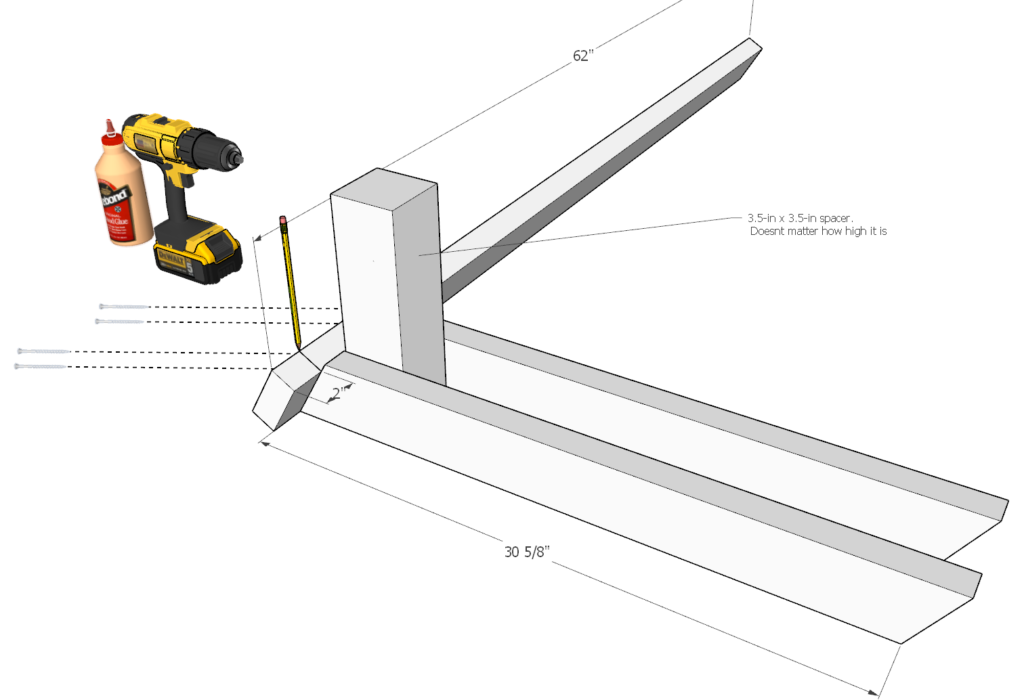
Once you have cut the appropriate pieces, arrange two of the 30 5/8-in pieces and one of the 62-in pieces as shown in the diagram below.
add a 3.5-in x 3.5-in spacer to separate the two 30 5/8-in pieces. The height of the spacer is not important.
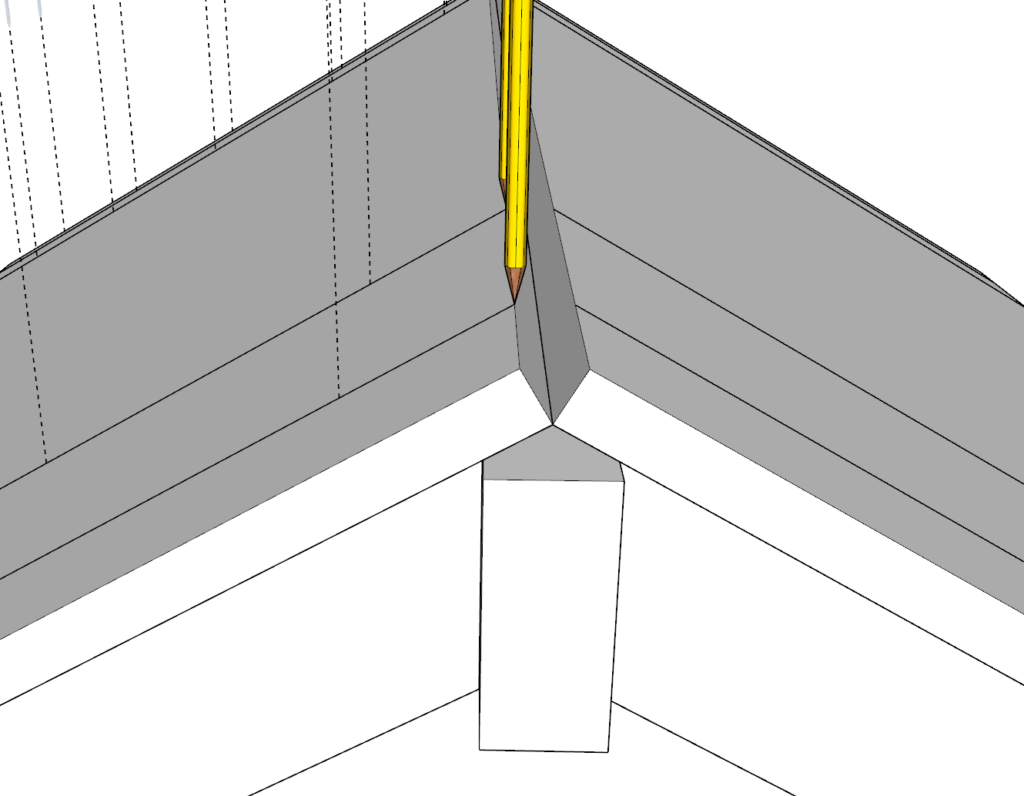
Draw a guideline that is 2 inches away from the edge of the 62-in piece (shown in diagram with a pencil).
The 2-in line will serve as a guide to know where to place the 30 5/8-in pieces.
As before, predrill, glue, and add screws.
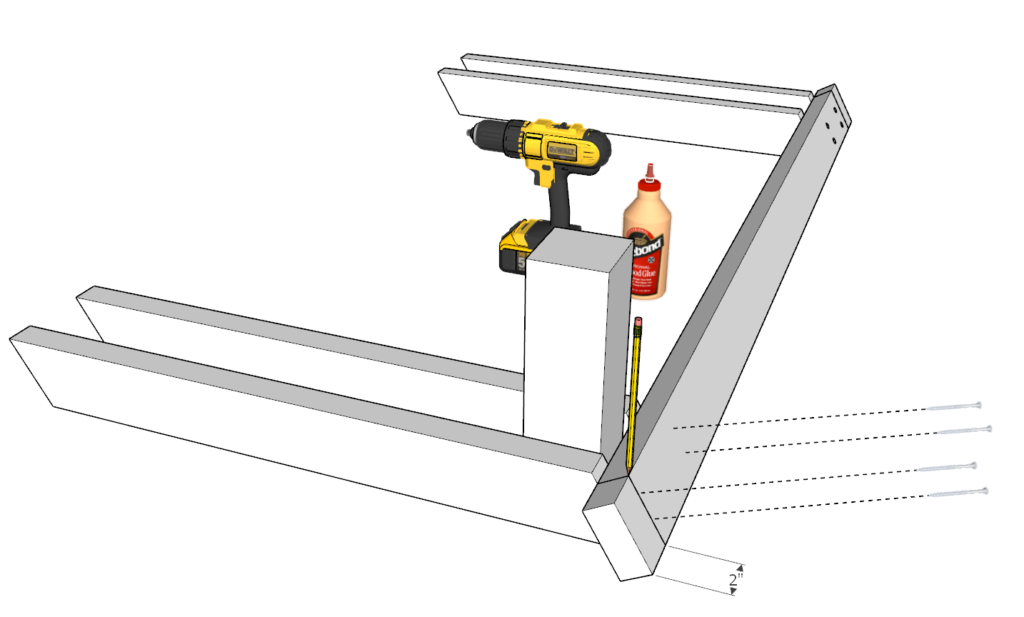
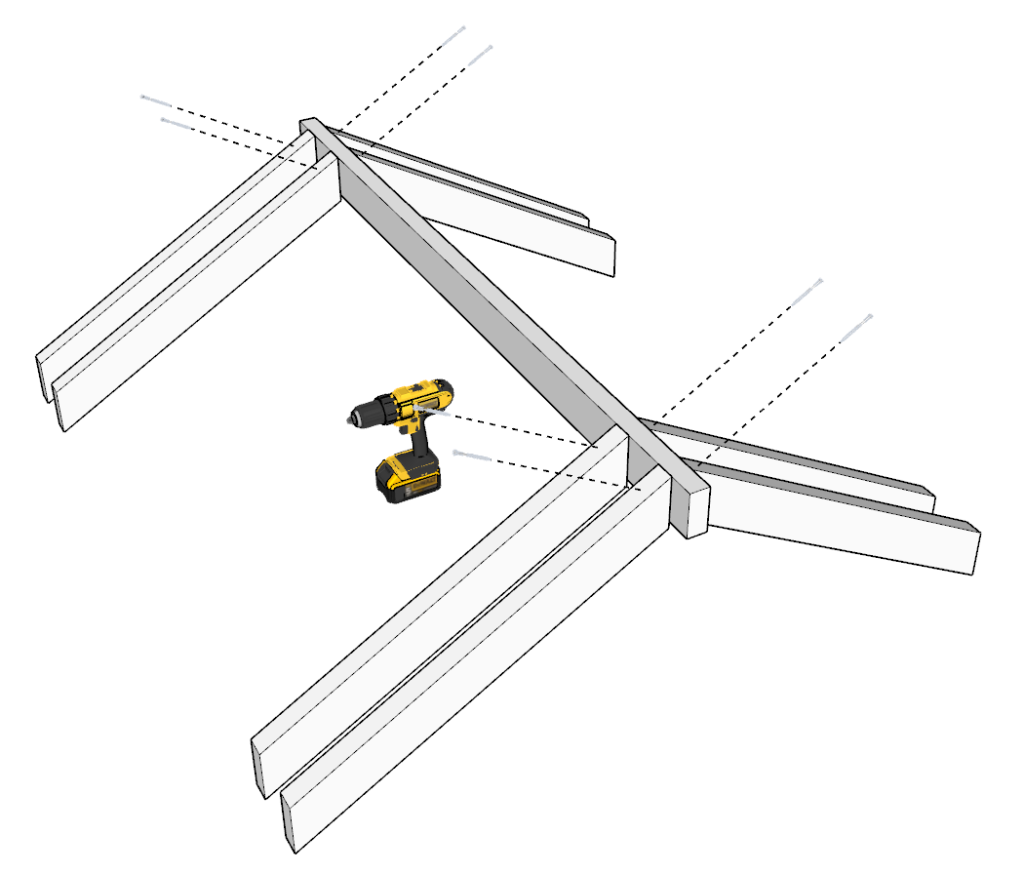
Step 13
Next, repeat the same steps as before to attach the next two 30 5/8-in pieces.

Step 14
Next attach the other four 30 5/8-in pieces using glue and screws.
If the pieces are moving around too much, then you can add two screws per each 30 5/8-in piece. They will be reinforced in the next few steps.
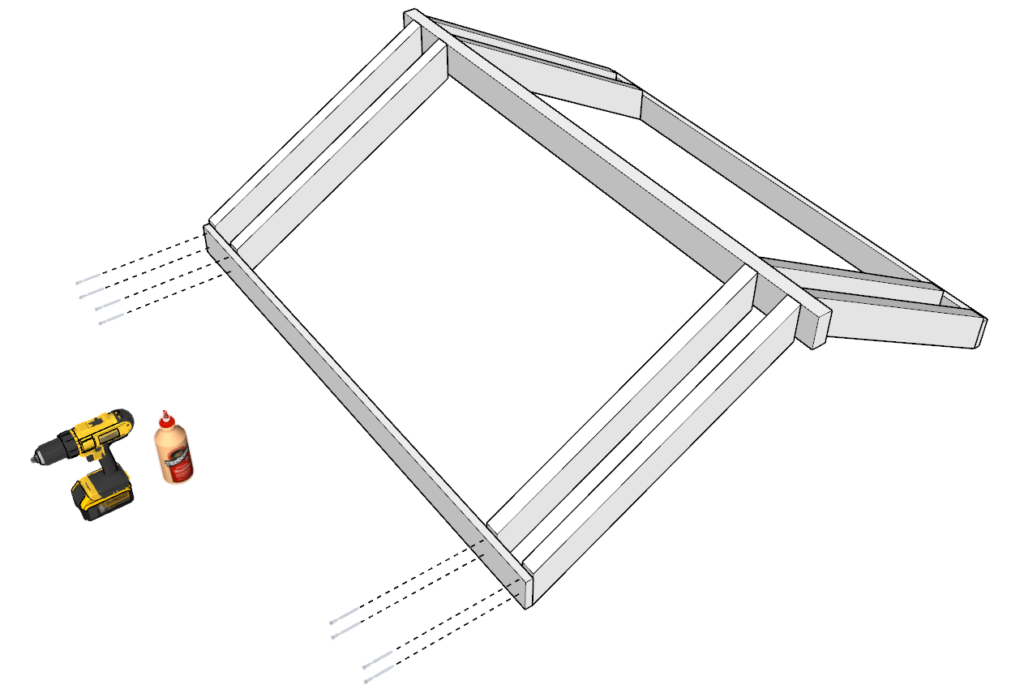
Step 15
Next flip the structure (best done with a friend so as to not take anything out of joint while it’s still fragile and unreinforced) and add screws to reinforce it.
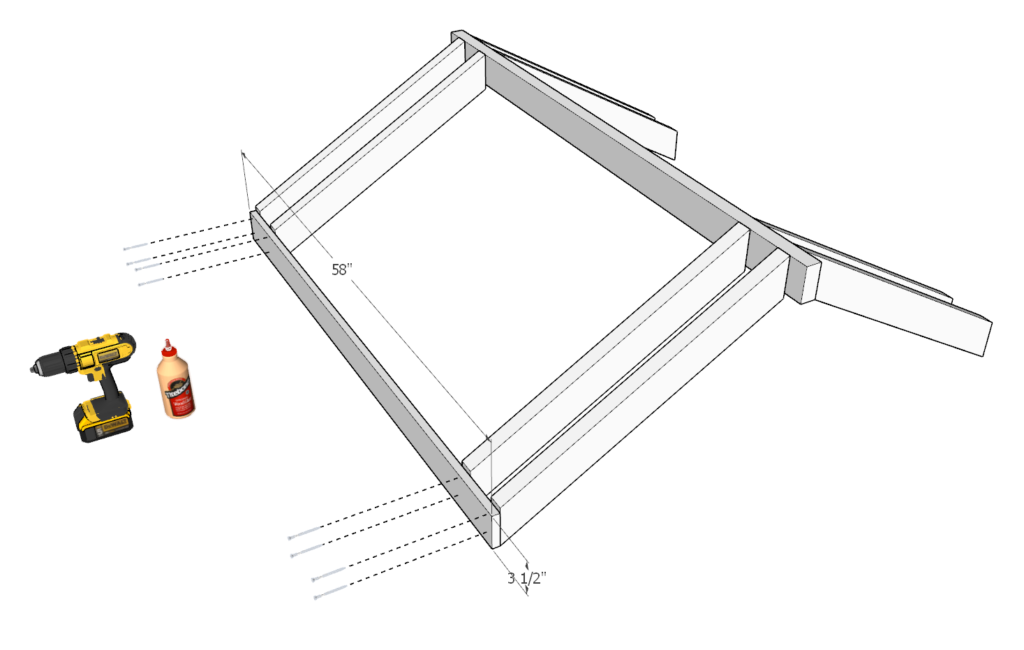
Step 16
In this step, add a 58-in 1×4 (actual size is 3.5-in x 0.75-in) to with end of the roof structure.
A little bit of space will exist between the roof 30 5/8-in pieces and the 58-in 1×4. This is ok.
As before, predrill, add glue, add screws.
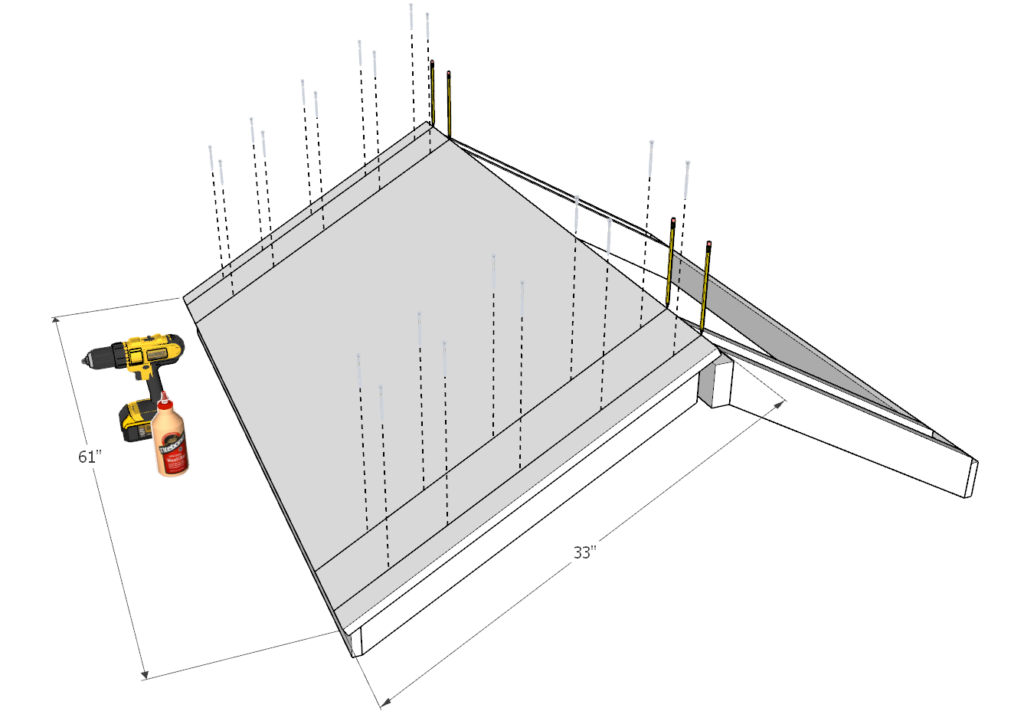
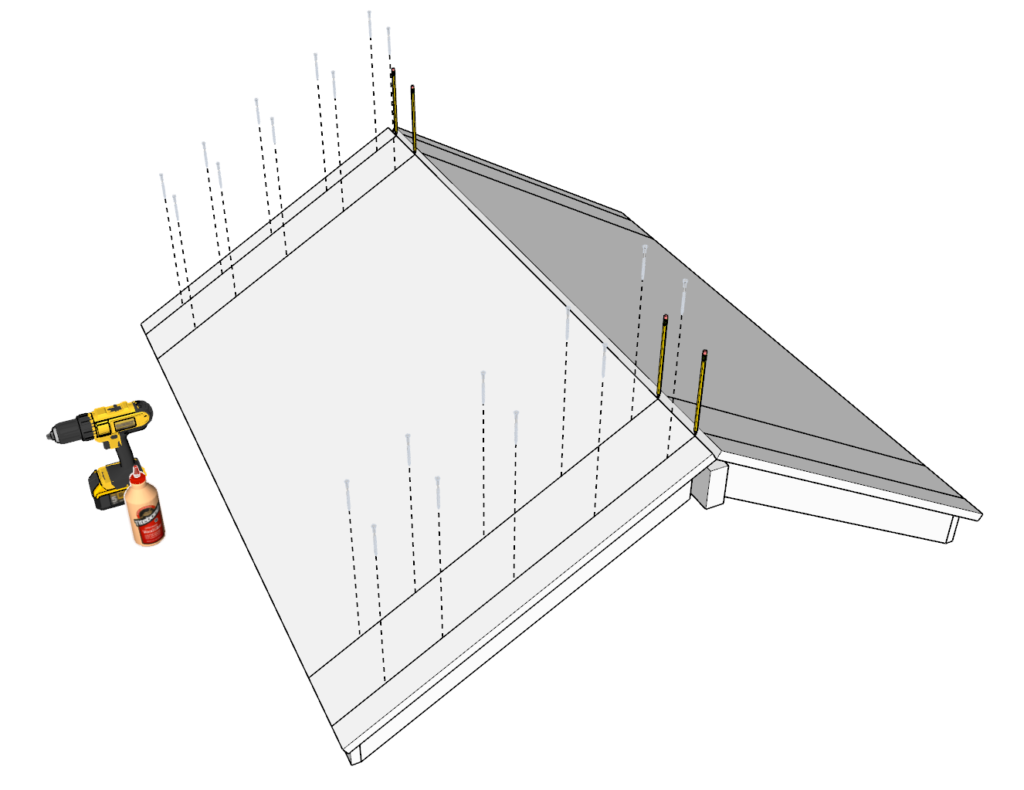
Step 17
In this step you will need to add the plywood sheets to the wood frame.
Cut two 61-in x 33-in pieces.
Place them on top of the structure as shown in the diagram. A little bit of the 62-in 2×4 will be showing. This is ok and is part of the design.
add lines to indicate where to add screws so that you don’t miss and create unnecessary holes.
If a screw is not correctly places REMOVE IT. This can be a hazard as it can injury a child’s head when the stand. After placing all the screws, inspect from underneath to make sure that no screws are sticking out.
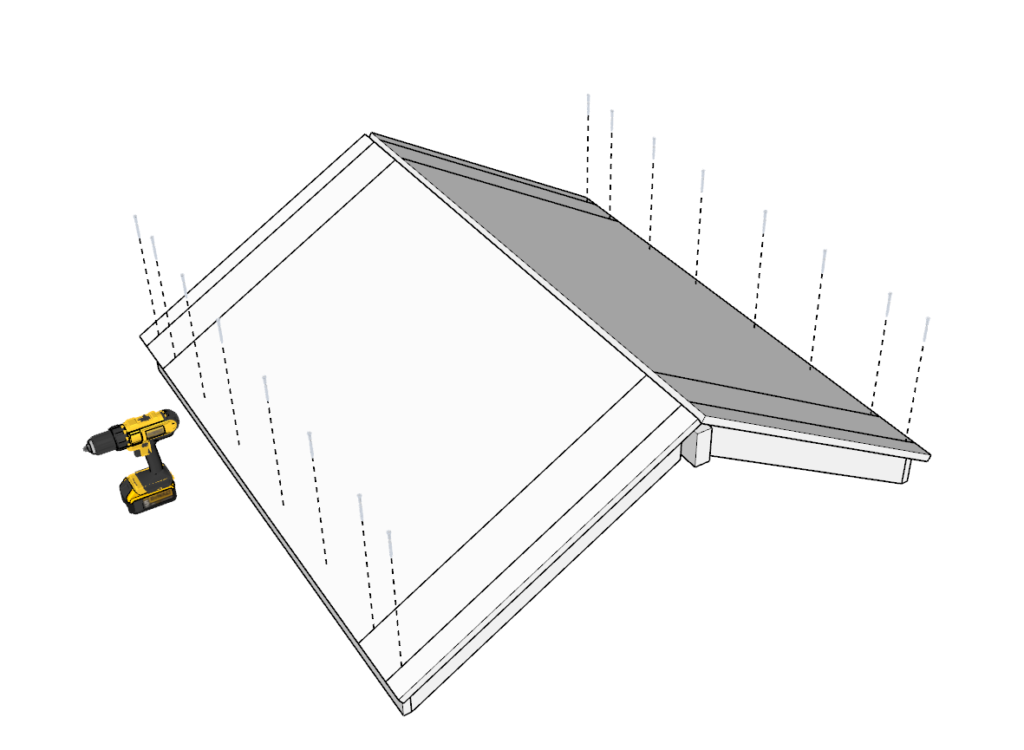
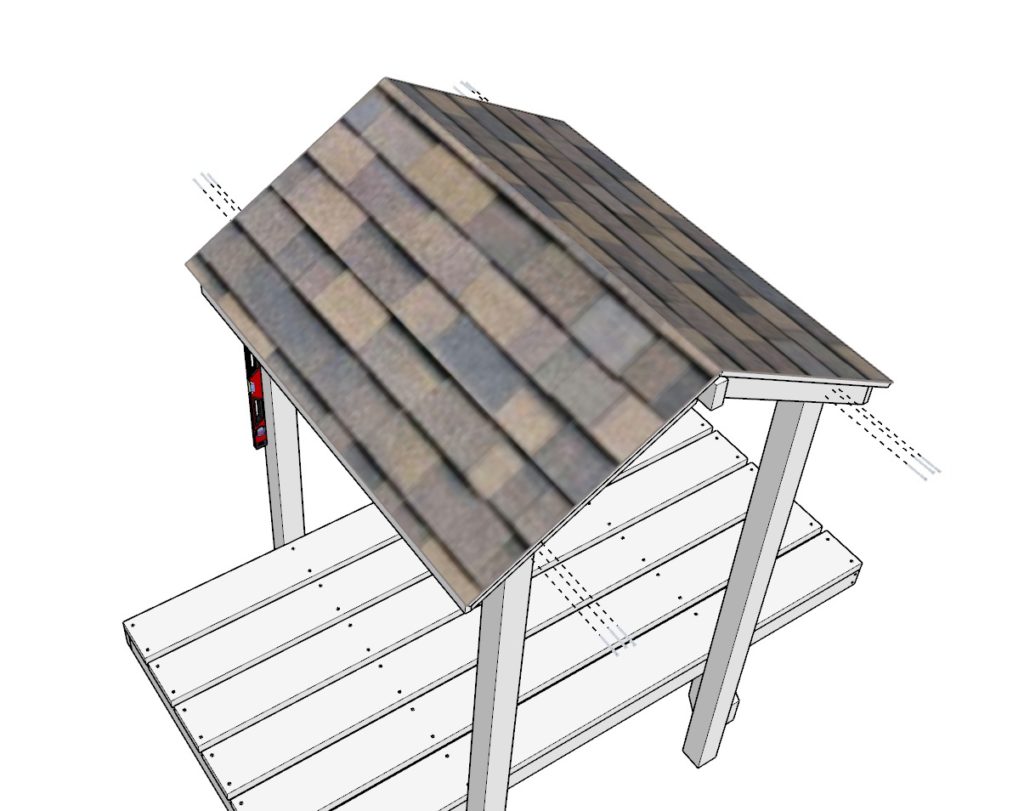
Step 18
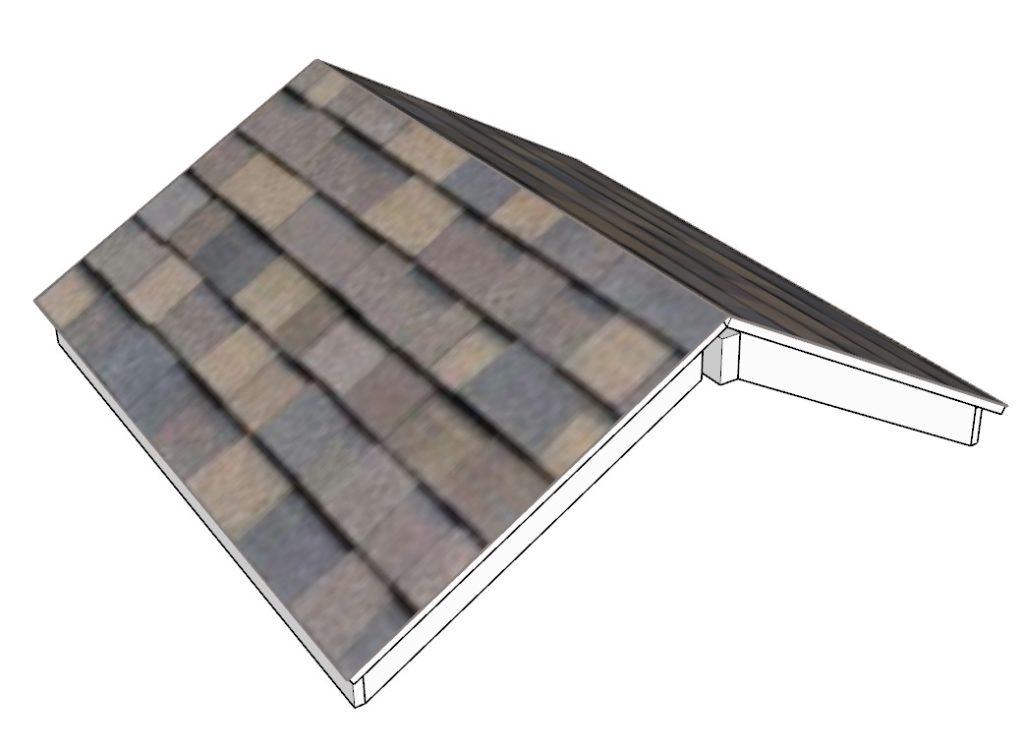
Next, add shingles.
This step can be done after the roof is on the playhouse. The pro of this option is that the roof will be lighter and easier to work with. The con is that you will have to add shingles to a structure that is over 8 feet high.
Step 19
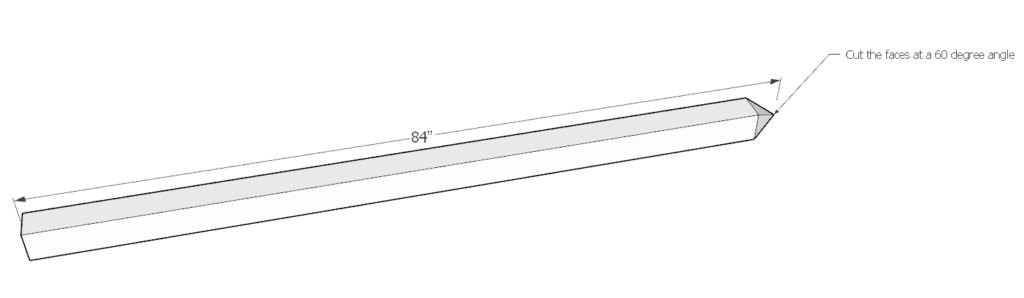
In this step, take the 4x4s and cut them down to 84 inches.
The ends of the 4x4s need to be cut at 60 degrees.
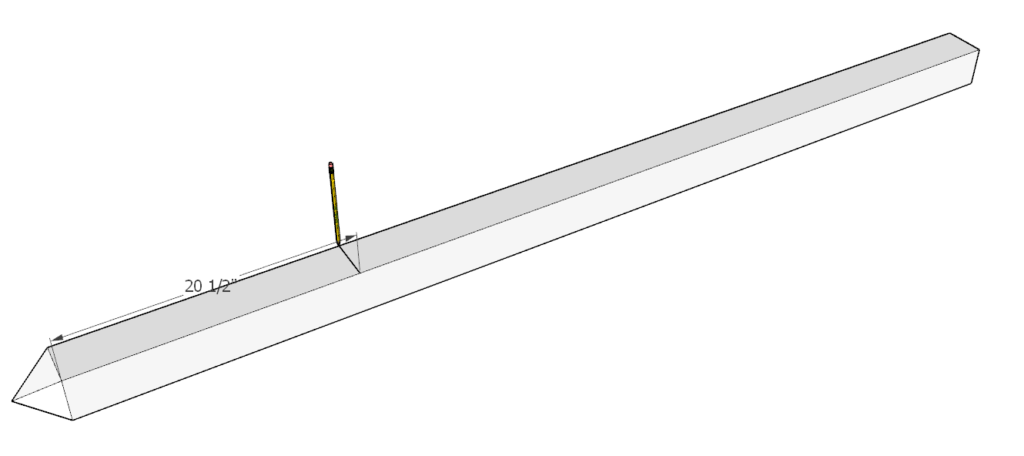
Draw a line with a pencil at 20.5-inches as shown in the diagram.
In this step, its a good idea to make sure the ends that are cut at a 60 degree angle all match. This will be important in the later steps.
Step 20
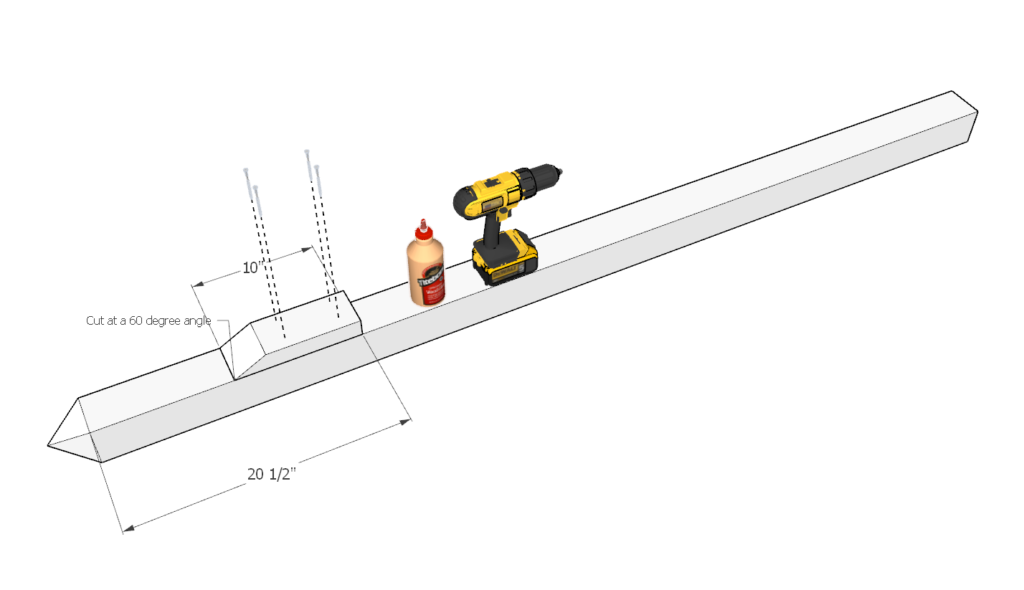
Next, cut a 10-in 2×4 piece that has one end cut at a 60-degree angle.
Place it at the 20.5-in mark. Use the mark to note where the top of the 10-in piece should go.
predrill, glue, and add screws.
Make a total of 4 pillars just like this.
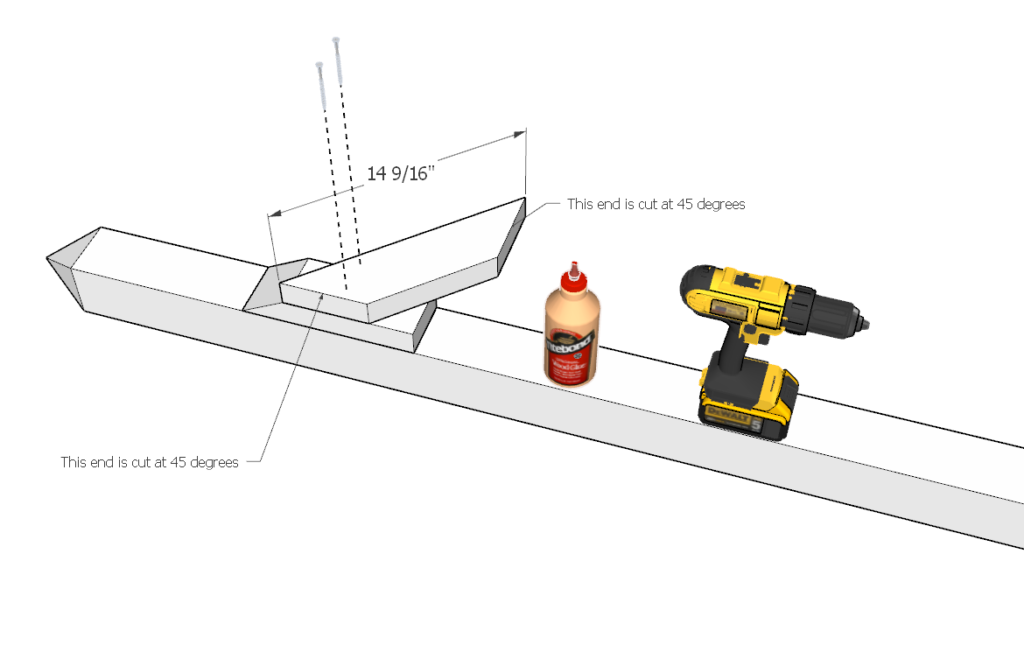
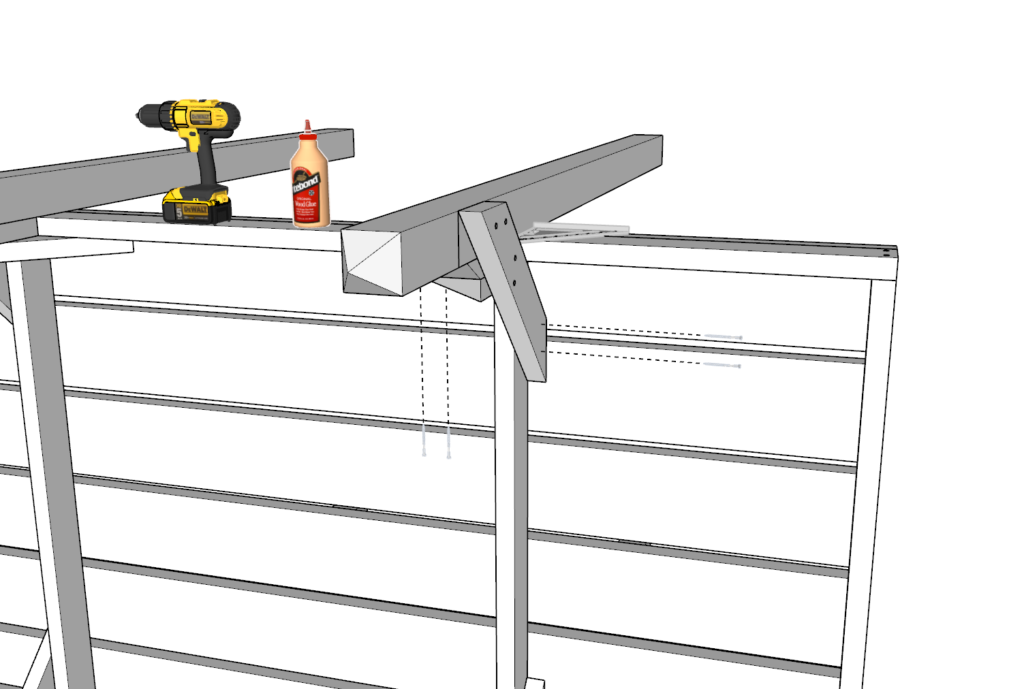
Step 21
Next, add a 14 9/16-in piece as shown in the diagram. The edges are cut at 45 degrees.
Predrill, glue, and add screws.
Repeat this 2x
On the last 2 pillars at the 14 9/16-in piece but in a mirror fashion (See image below).
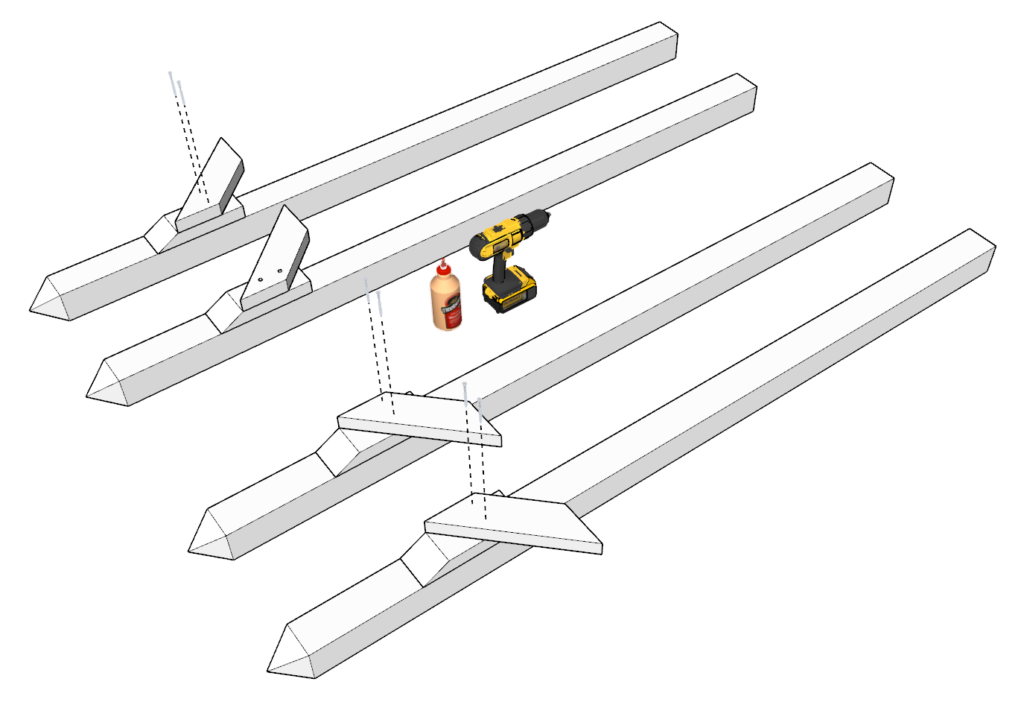
In the end you should have 4 pillars. two pairs that are identical.
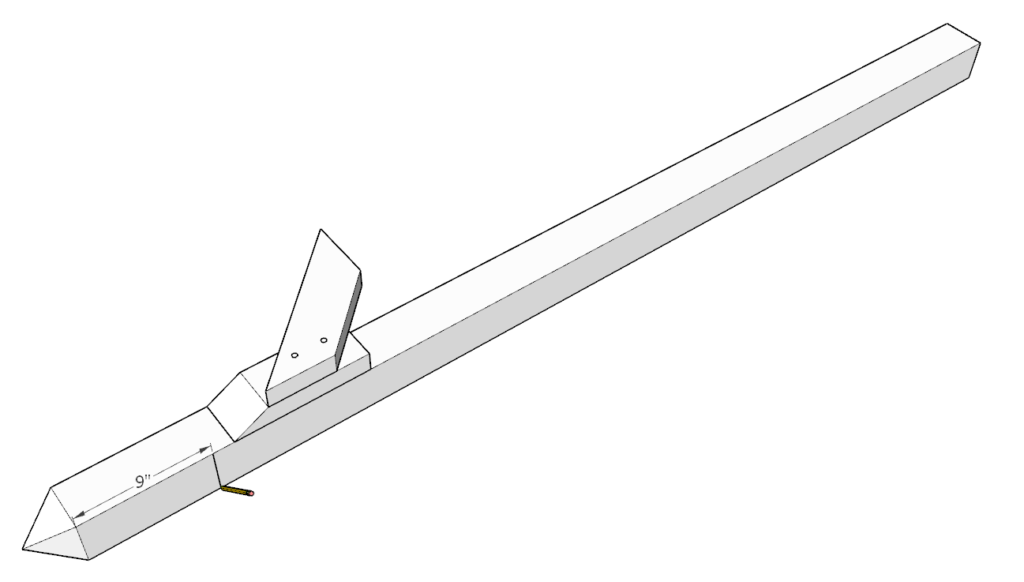
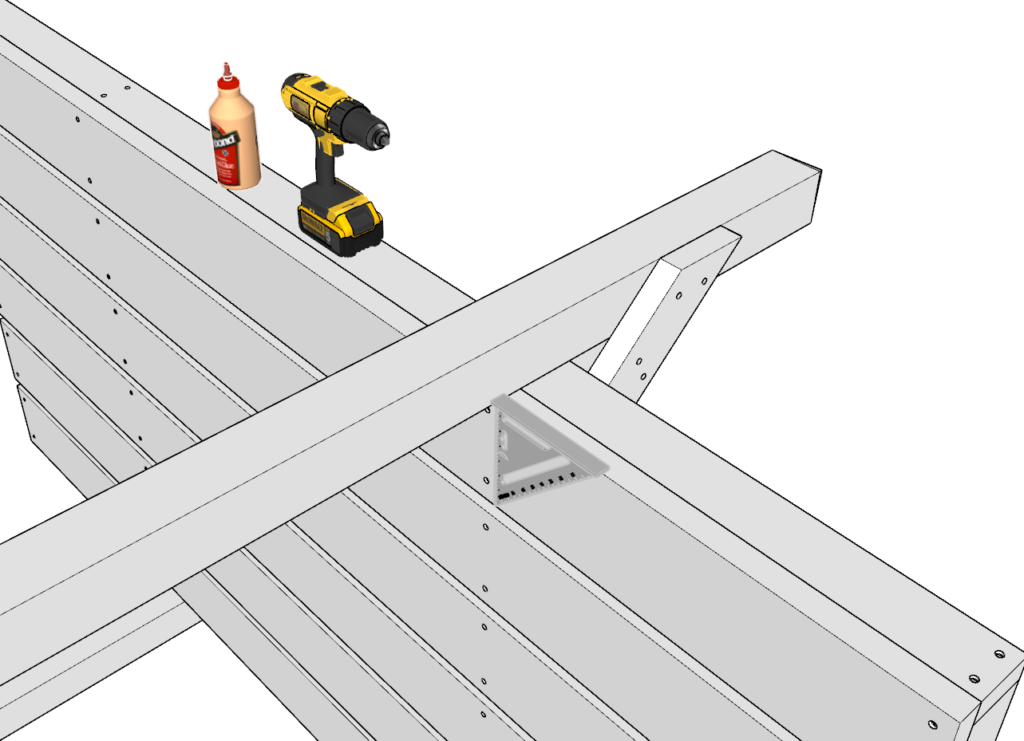
Step 22
In this step take one of the pillars and draw a line 9 inches from angled base (as shown in diagram).
add a 21-in piece that is cut at 45 degrees on both sides (as shown in diagram).
Predrill, glue, and add screws.
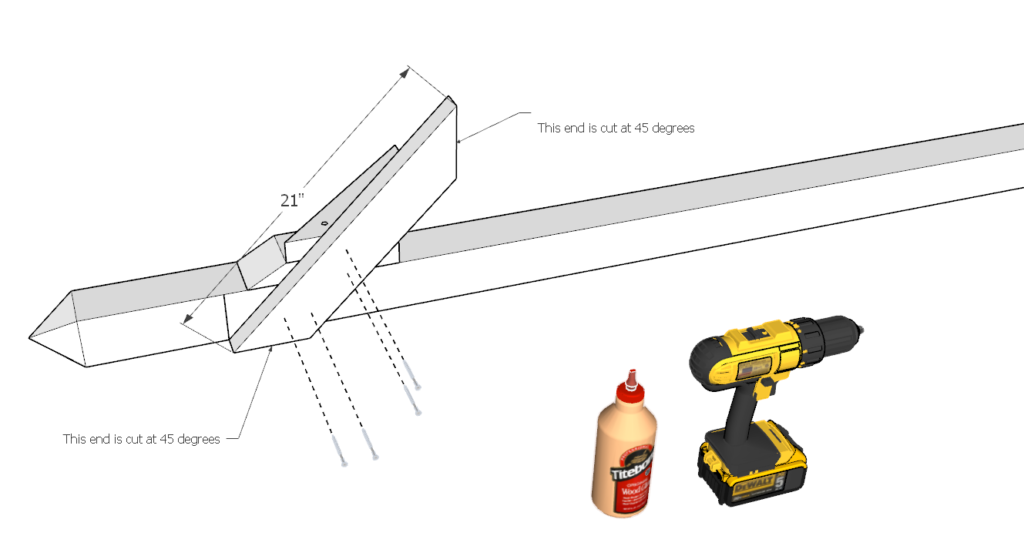
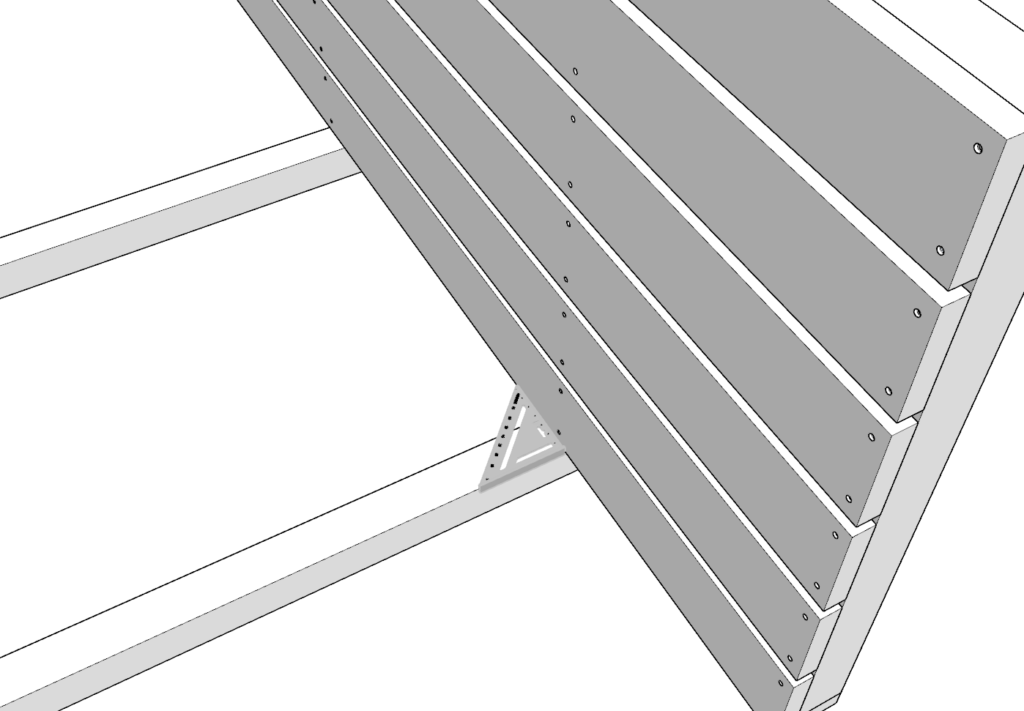
Step 23
Next, repeat step 22 on the remaining 3 pillars. IMPORTANT to note that the location of the 21-in piece needs to correspond to what is shown in the diagram.

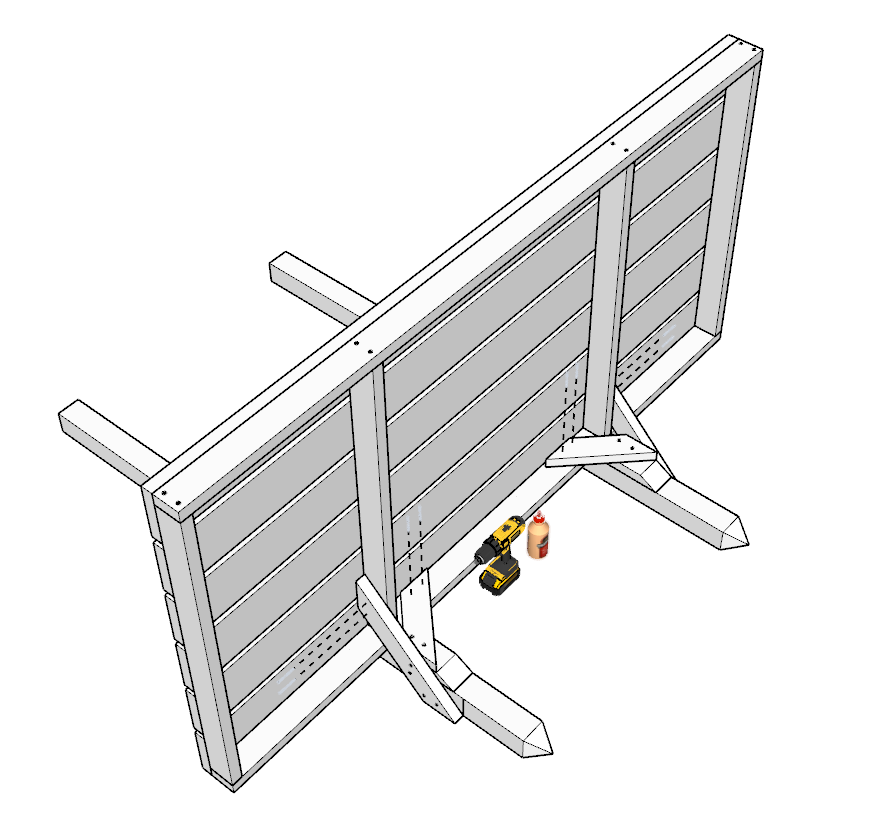
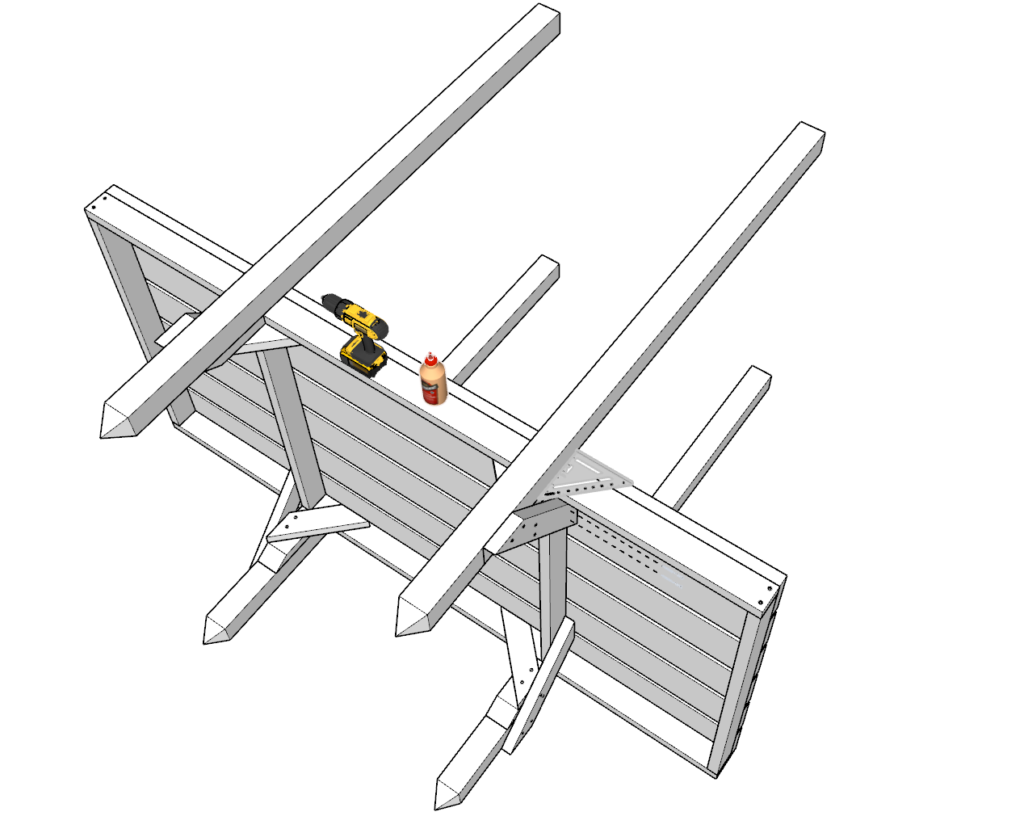
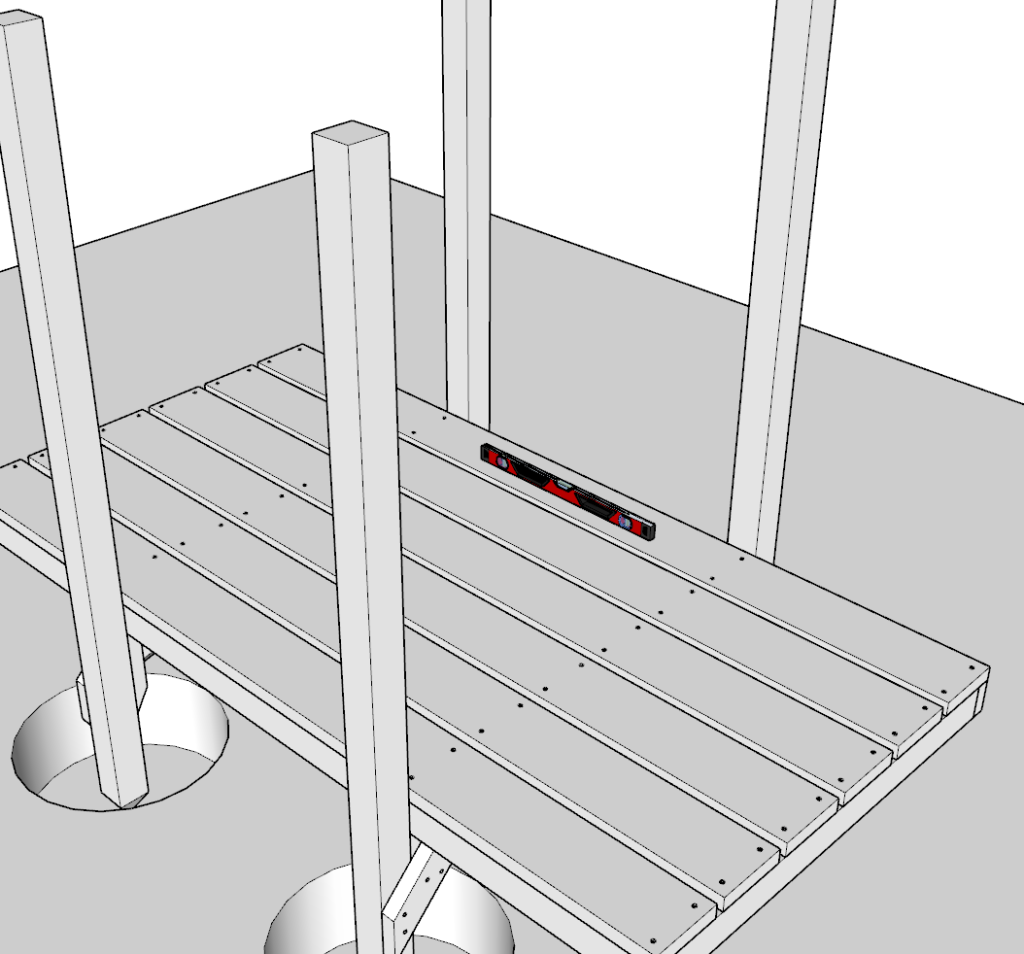
Step 24
In this step you will need the help of at least one other person (best in a group of 3 or 4).
You will now be attaching the pillars to the frame and base of the playhouse.
First, take 2 pillars that are identical to the pillars shown in the diagram and place them on even ground or cement.
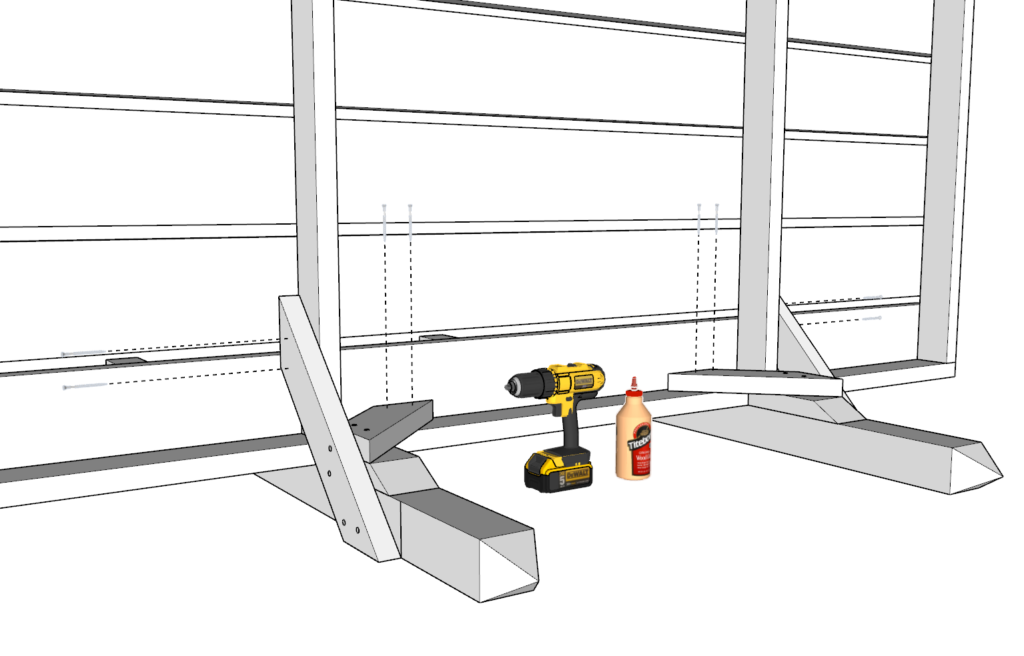
Next, apply glue to the areas of the pillars that will make contact with the base.
Next, take the base of the playhouse and fit it into the correct position (shown in diagram). The base should slide in and fit into place.
With the help of a friend, make sure the pillars are being attached at the correct angle.
I find that using a right-angle tool as shown in the image is the best way to make sure the alignment is correct.
Once the alignment is correct, add the screws to lock in the position.

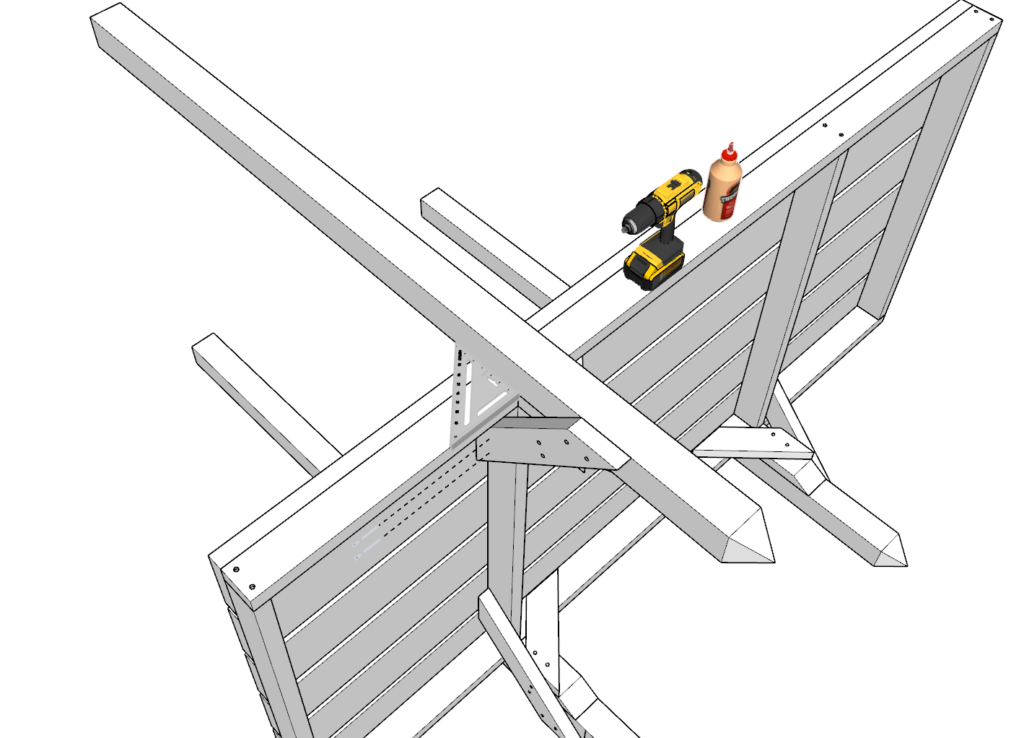
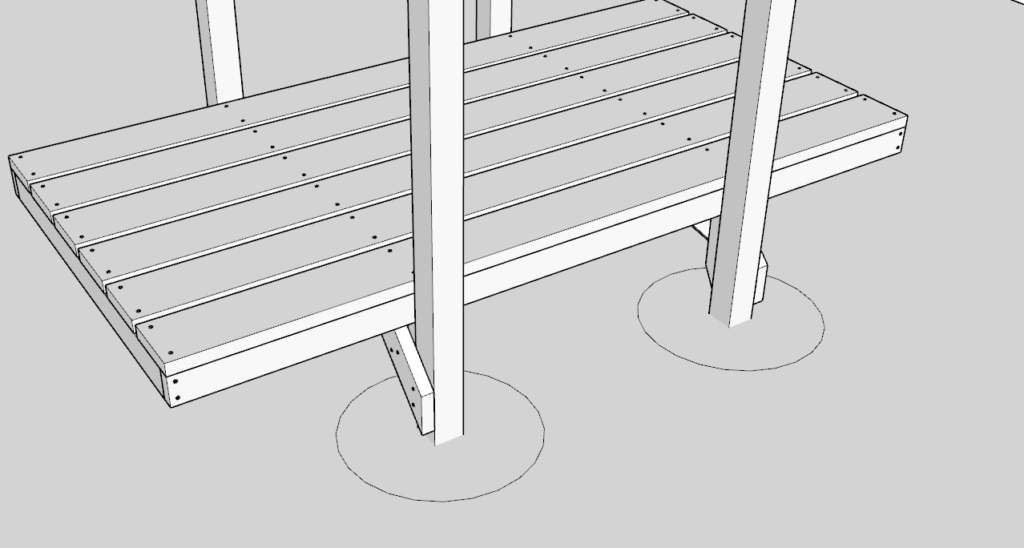
Step 25
Next, repeat the process for the other two pillars.
Apply glue before putting on the pillar.
Again, make sure the angle is correct before adding screws.
Step 26
Next, you will need to flip the structure to be in the upright position.
IMPORTANT: YOU MUST FLIP IT IN THE AIR. The structure cannot be put under pressure at this point so that the alignment stays correct.
Once you flip the structure, with the help of a friend, walk it over to the final destination. Once there, place it on the ground. Spray the soil with paint or place a flag or marker where the pillars touch the ground. This will be the place where you will need to dig the soil to make a hole for the pillars.
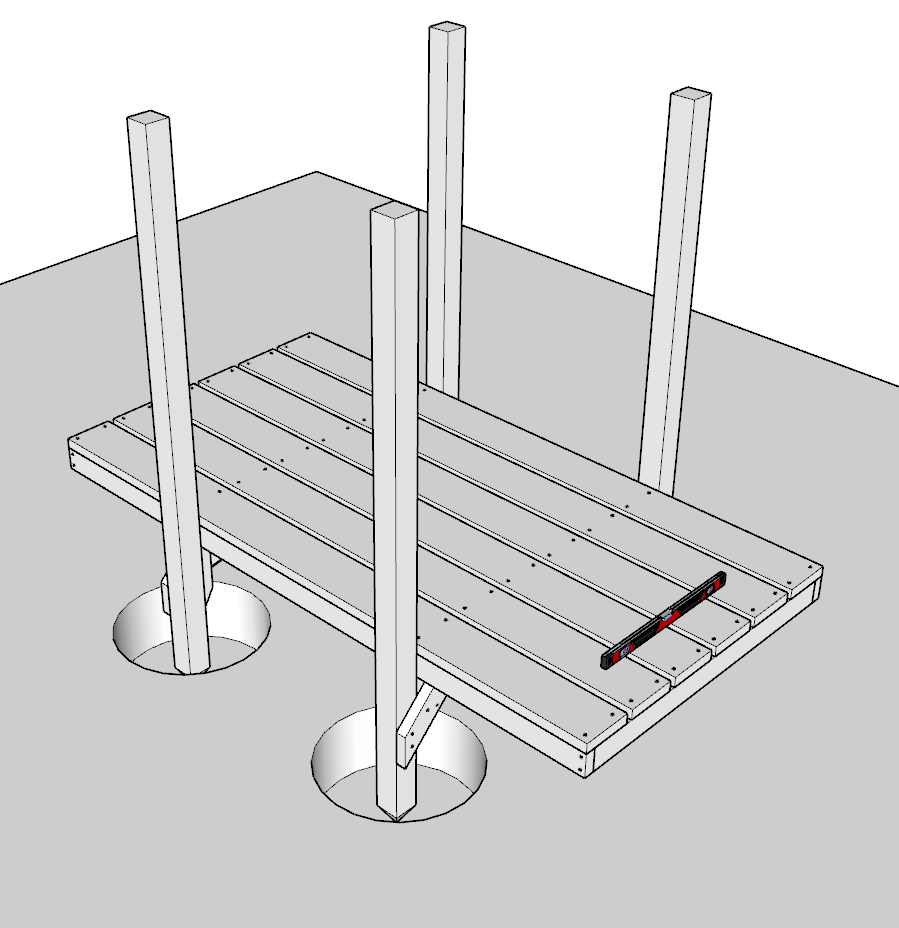
Next, move the structure out of the way again and dig the holes. The holes need to be between 10-12 inches.
Next, place the structure into the holes.
At this point the structure may not be levered of sturdy.
Next focus on leveling the platform. NOT the pillars (this will be done in the following steps. Although make sure the pillars are not “way off”.)
Add dirt and compact it in areas that need it to make the structure leveled in all directions. Add stones or gravel to do this if needed. Make sure not to overfill the hole because it will need to be filled with cement (or compacted dirt).
Once the base is leveled, add cement or compact dirt into the holes until they are tightly packed.
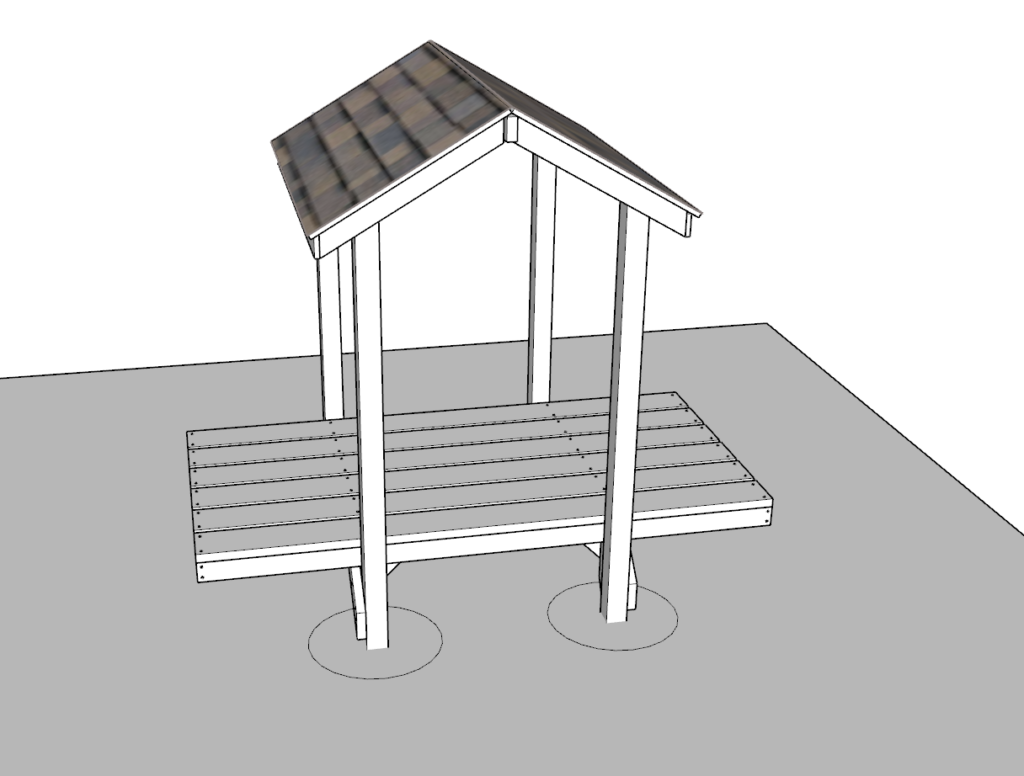
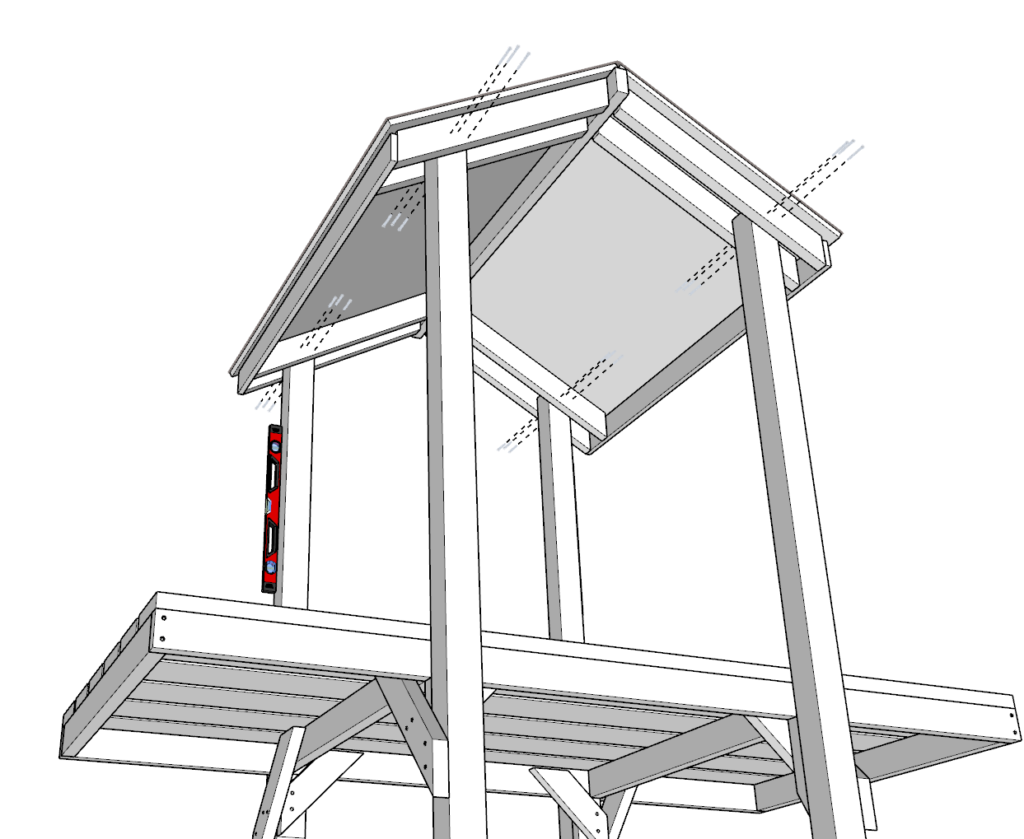
Step 27
Next, place the roof onto the pillars. This needs to be done with at least 2 people.
It is ok and is necessary to step on the platform.
Once the roof is placed, it may not be even. This is ok.
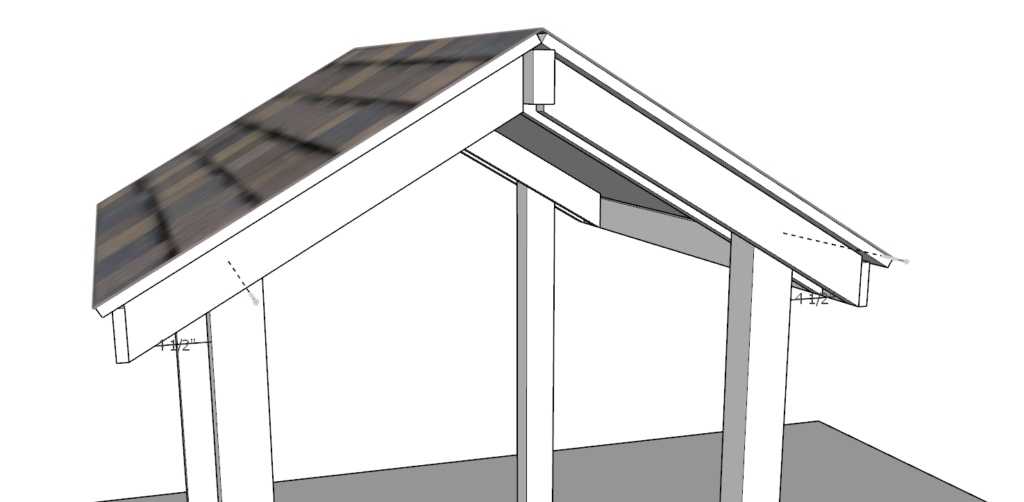
Next focus on making the roof equal distance on both sides in comparison to the pillars that are facing the same side. In the image the “ideal” distance is 4.5-in. This may not be the “ideal” distance for your playhouse because of minor differences. The point is to make the space between pillars equal up an down the pillar height. In this step do not focus on making the pillars perfectly at 90 degrees to the platform. These corrections will be done in future steps.
Once the pillars are equal distances from each other, add ONE screw to each pillar as shown in the diagram.
Step 28
In this step, make sure that the pillars are leveled in all directions. This may require some pushing and pulling.
Once the pillars are in the correct position, add screws to lock them into place.
Screws should be added from the outside as well as from the inside.

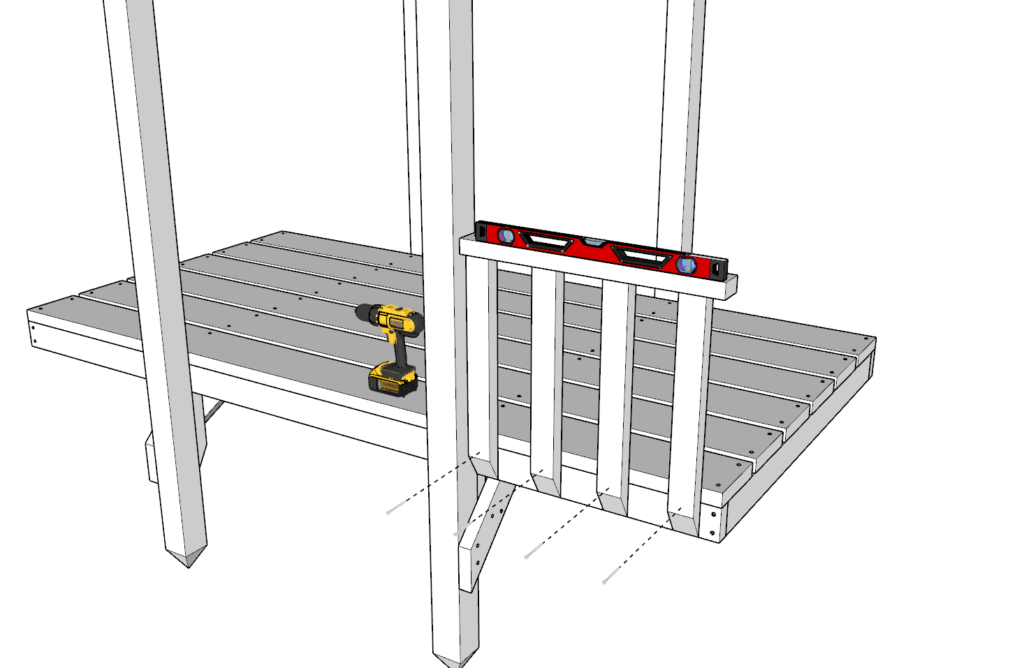
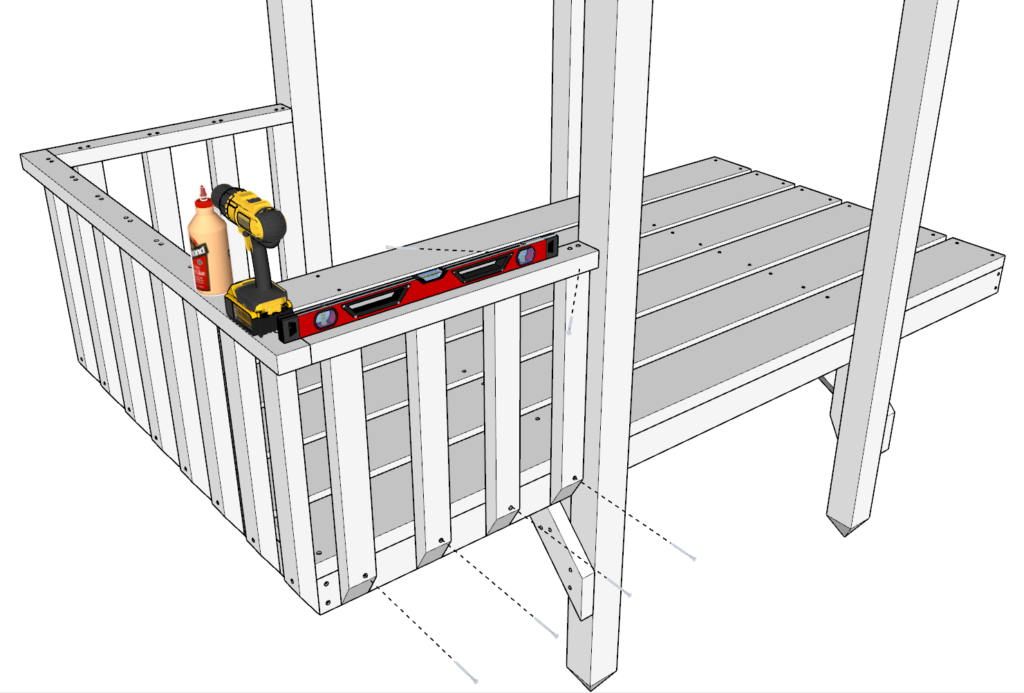
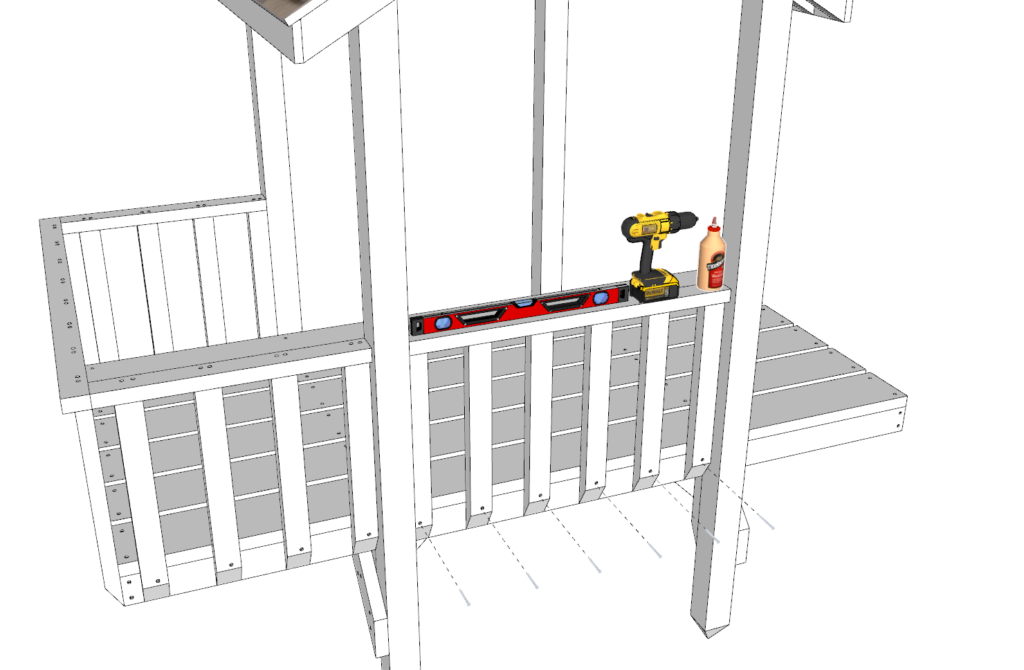
Step 29
Next, you will add the railing. Take one of the 26-in railing pieces made earlier and add it to the structure as shown in the diagram.
Add glue to all places that will be making contact.
Apply a lever before adding screws.
Predrill and add screws to the areas indicated.
Add diagonal screws to fix the railing to the pillars as shown in the diagram.
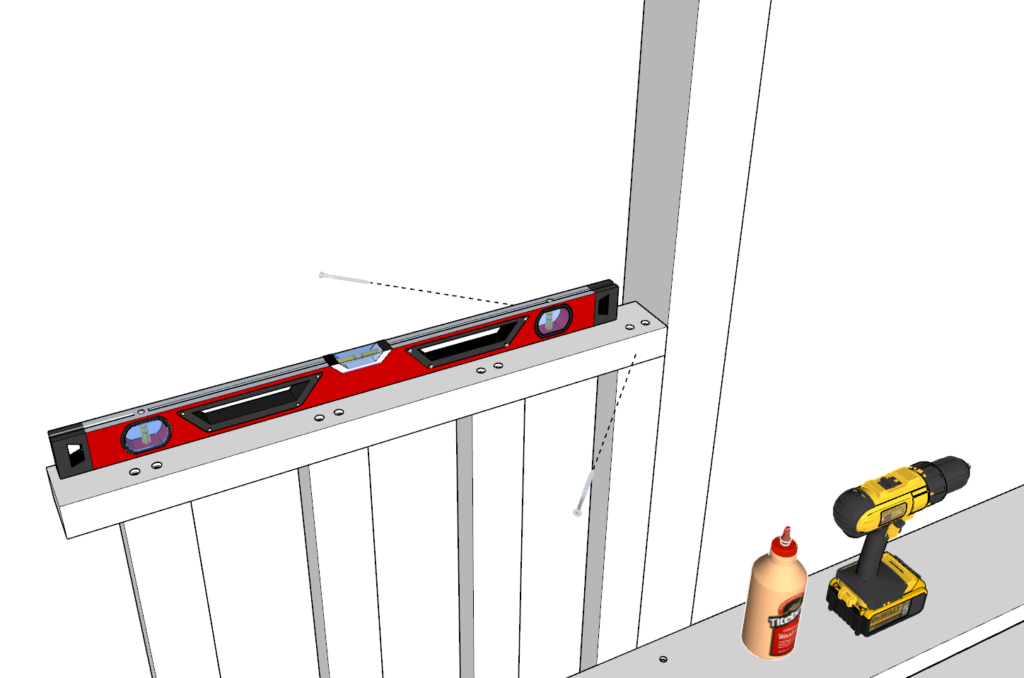
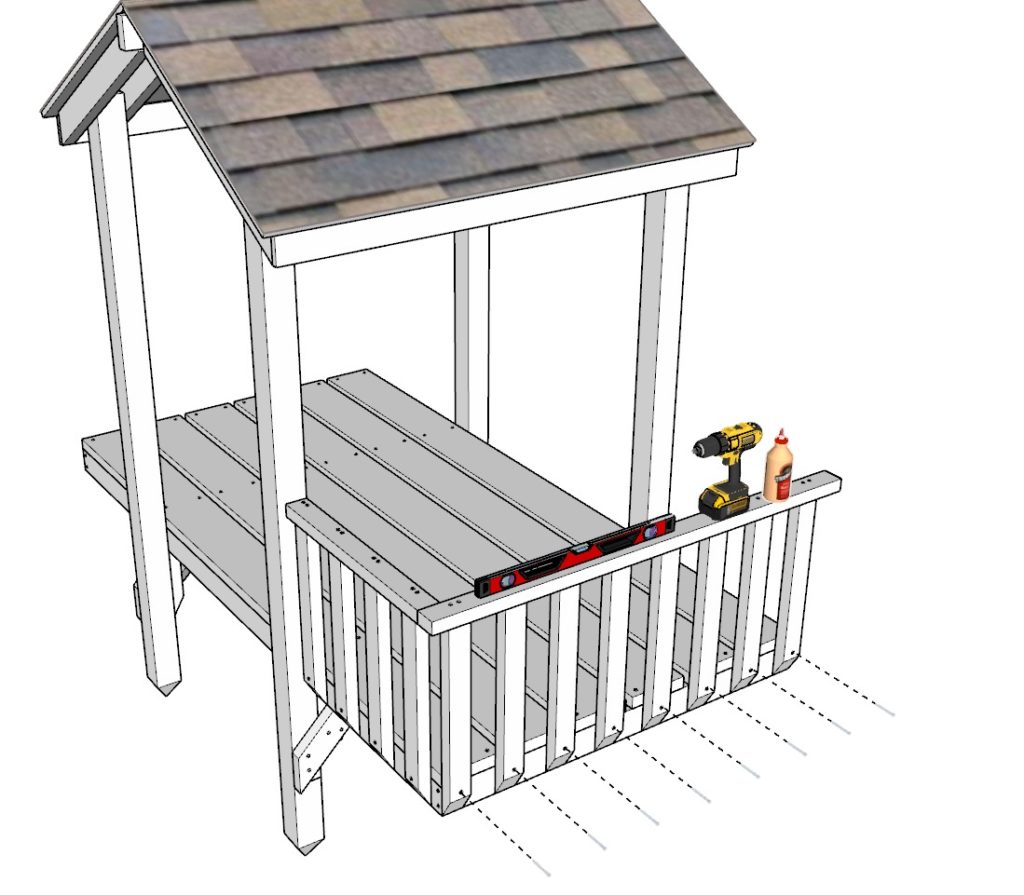
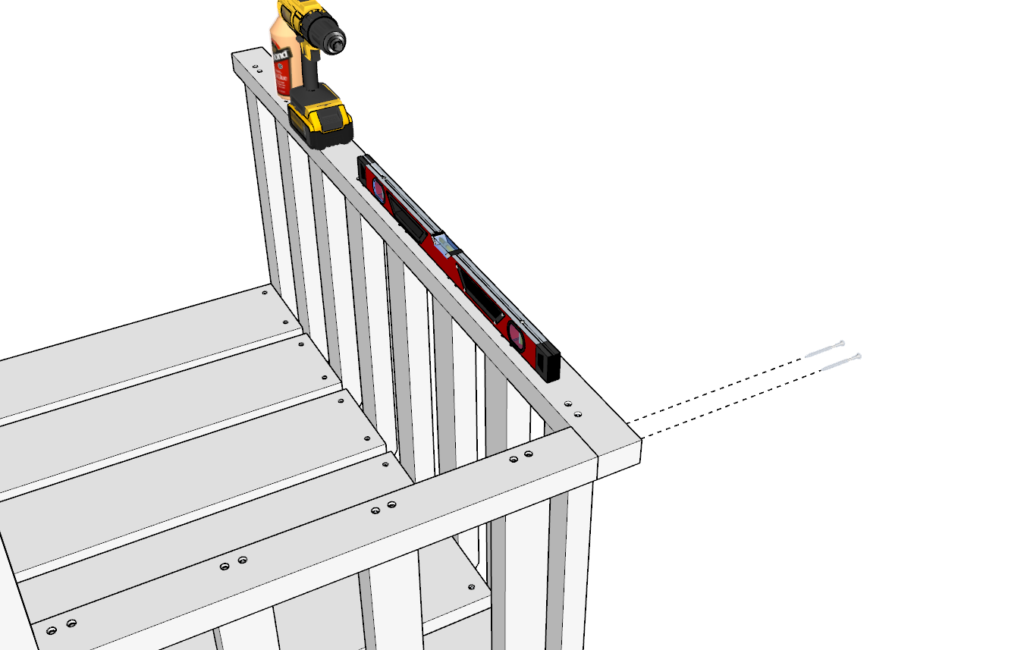
Step 30
Next, add the 53-in railing piece.
Add glue, predrill, and add screws as shown.
Predrilling is very important with the smaller 2x3s to prevent splitting.
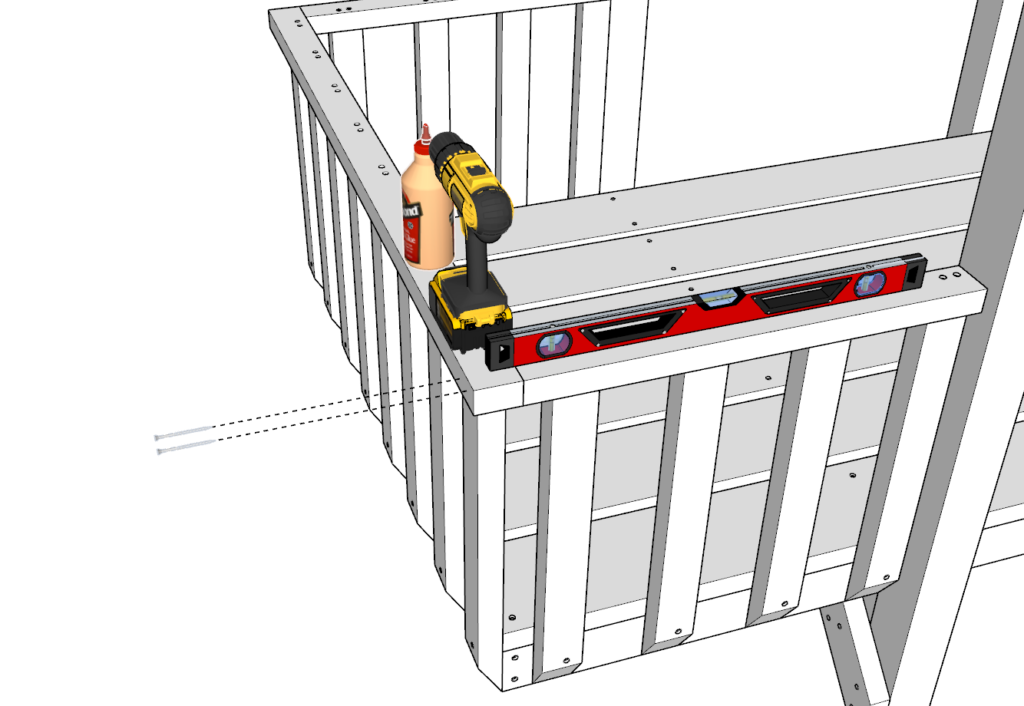
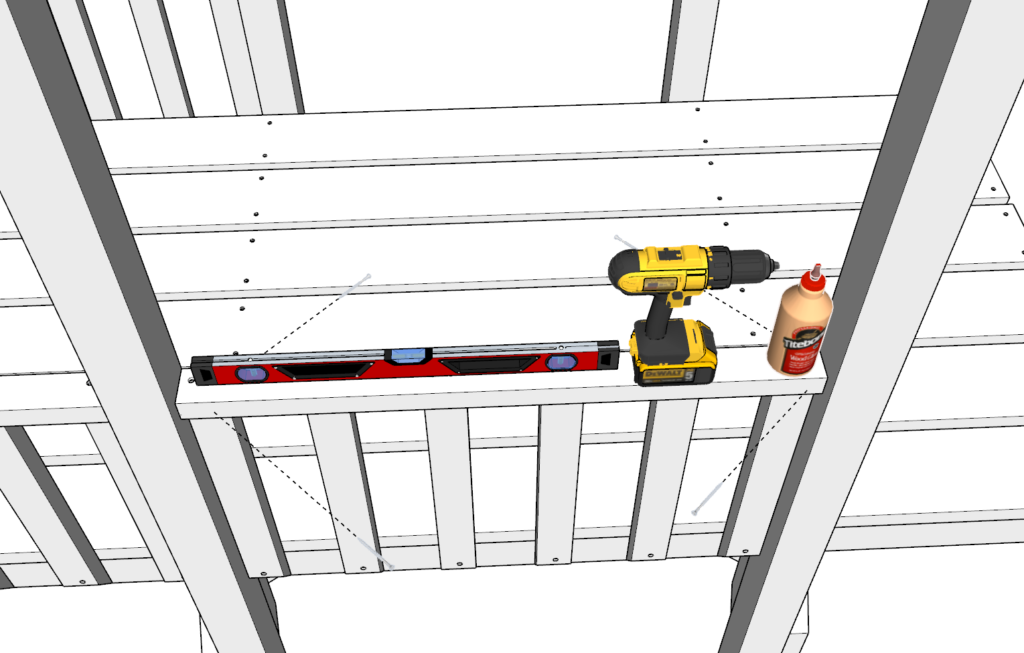
Step 31
Next, add all the railing pieces in the similar fashion as before. Not forgetting to glue, predrill, and level.
Tip: if the 37-in pieces is slightly off or does not fit, you may need to trim it a little to make it fit.
Once the railing is all attached you should have the house completely enclosed except where the stairs will be.
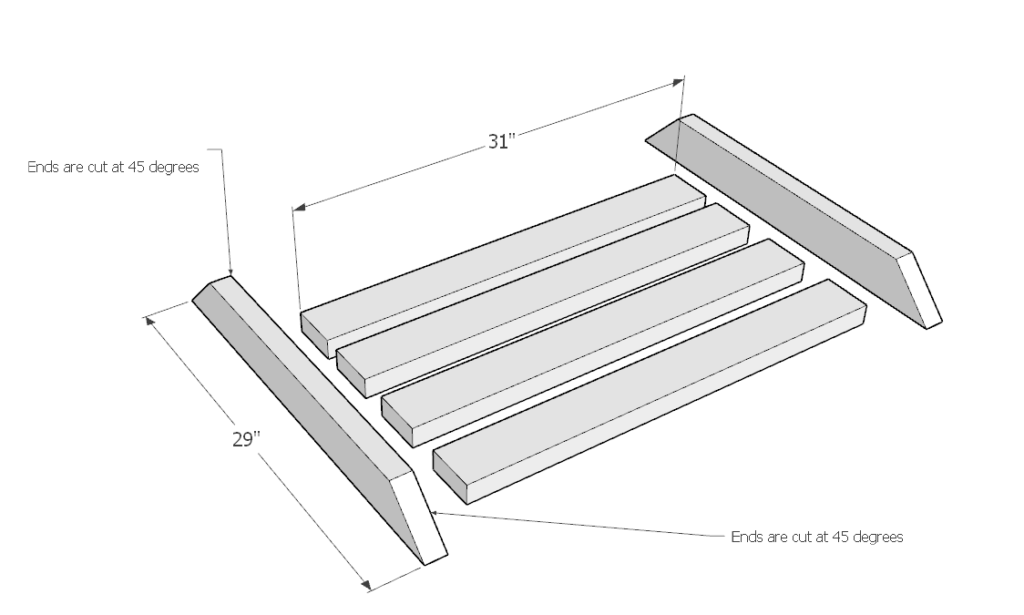
Step 32
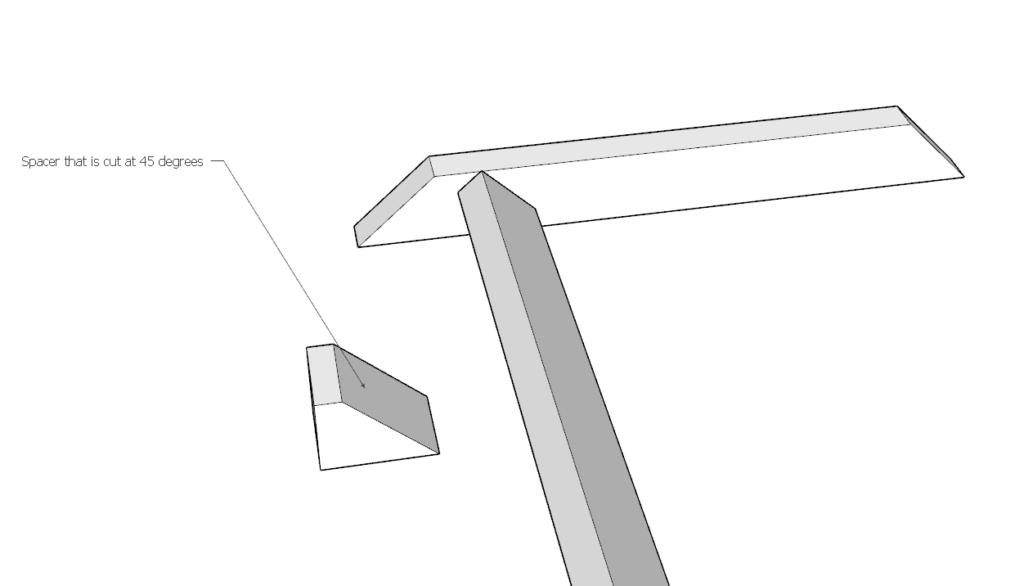
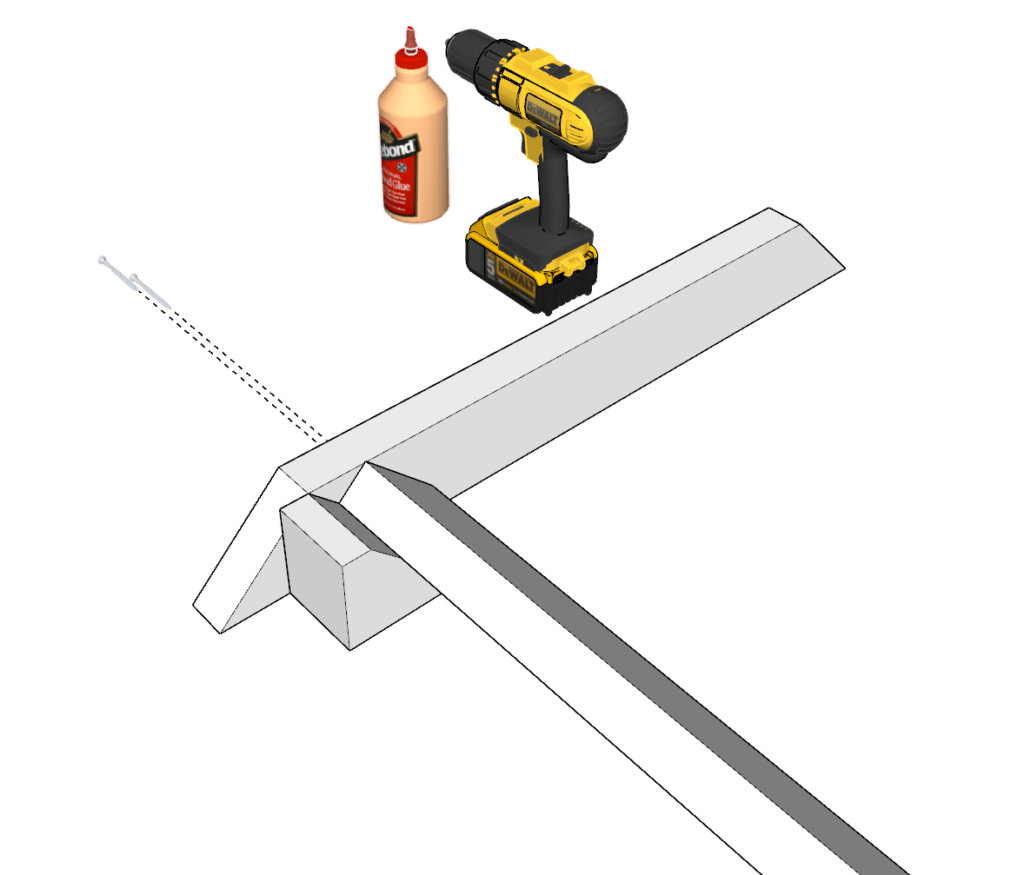
Next, you will need to build the stairs.
lay out four of the 31-in pieces and two of the 29-in pieces with 45-degree angles on both ends on the ground as shown in the diagram.
Make a spacer from the pillar cut aways. The spacer should be 4.5-in long and cut at 45 degrees. The size is important and is shown in the diagram.
Use the spacer as a guide for the angle of the first step.
Predrill, add glue, and add screws as shown.

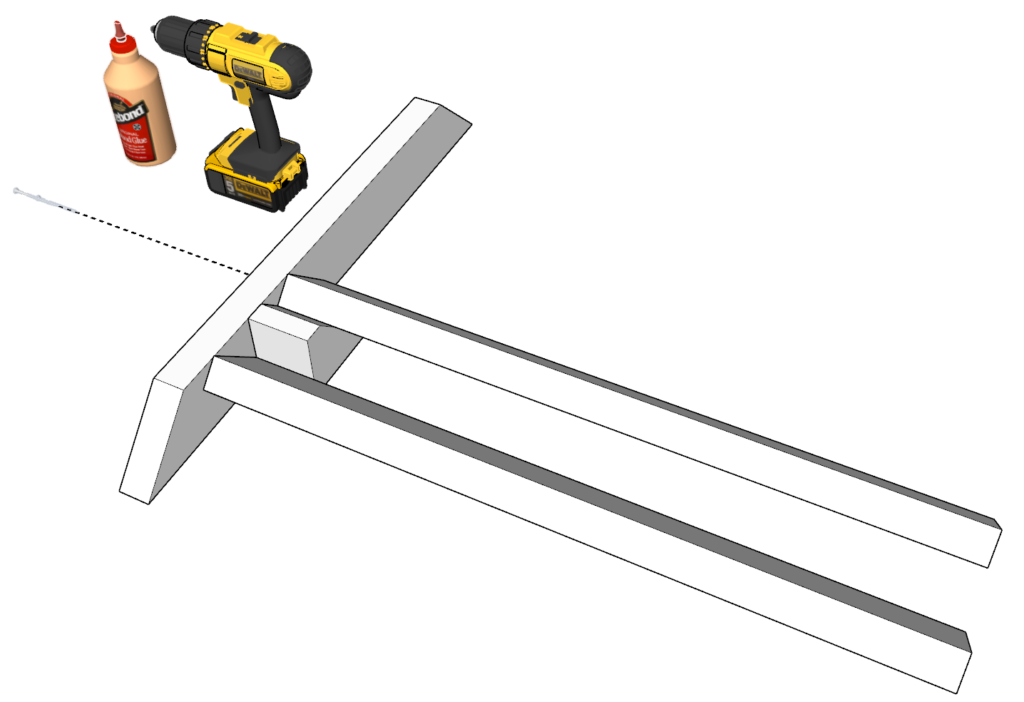
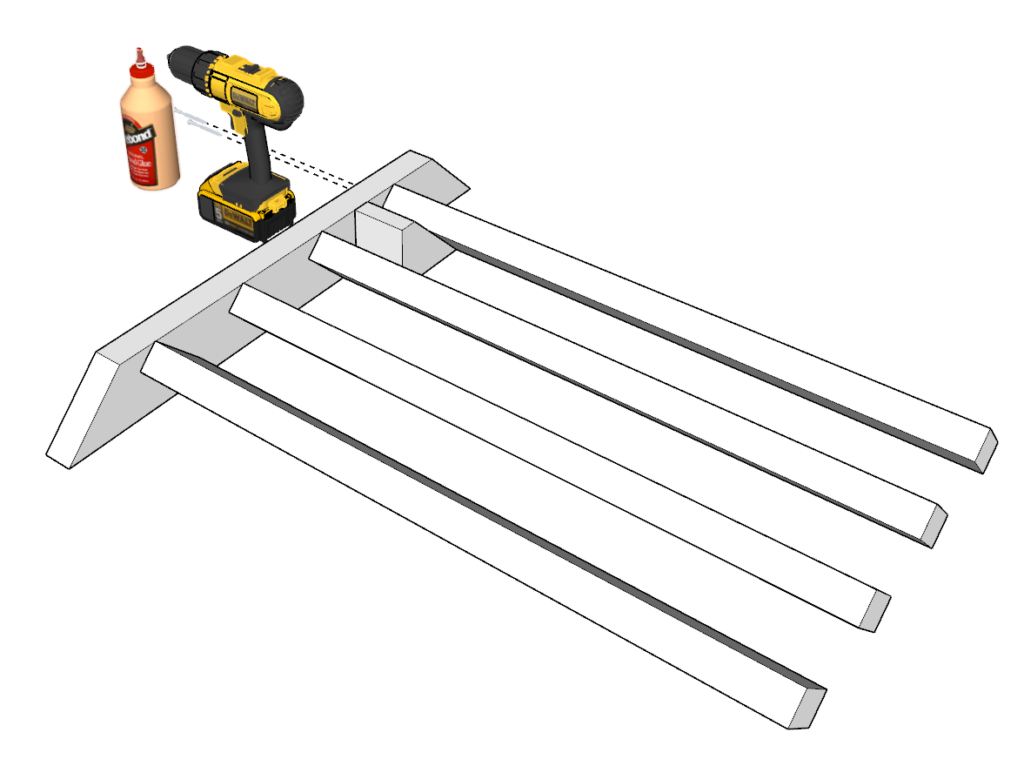
Step 33
continue to add more of the 31-in pieces using the spacer as a guide for the angle and space.
Lastly add the other 29-in angles piece. Again, the spacer can be used to ensure proper alignment.
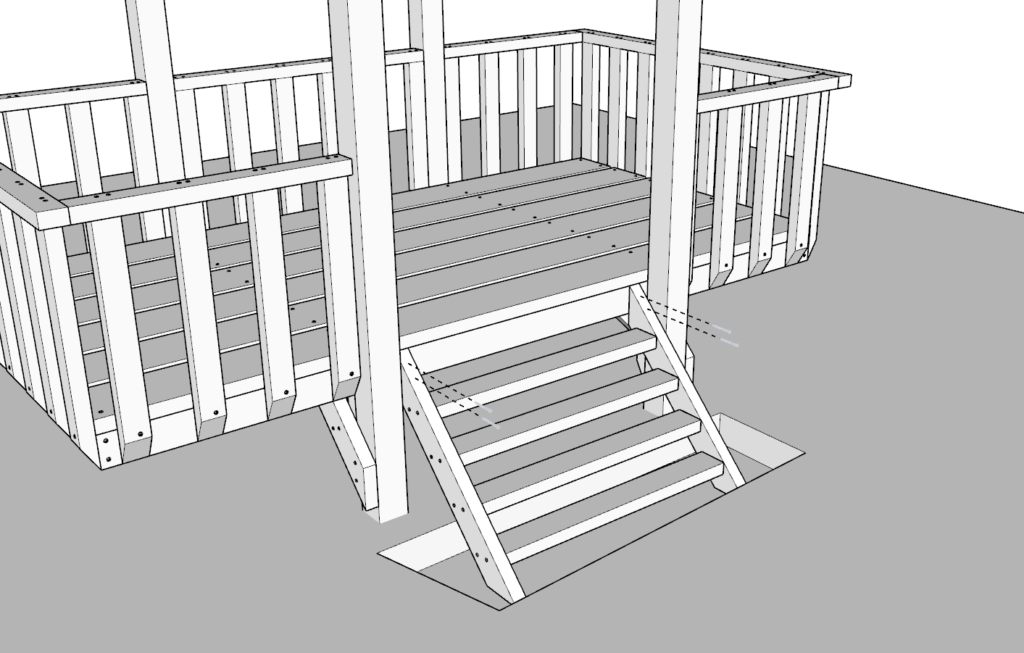
Step 34
Next, dig a small trench around the area where the stair will be attached.
apply the stairs to the structure, ensure appropriate position, and glue and screw it into place.
Pack the dirt around the stair again.
Step 35
You are almost done!
Lastly sand down the whole structure to make sure its safe for children to play in. At the same time, inspect for any screws that may be sticking out or may be a hazard.
I use a 80 grit paper for my orbital sander to help take away all major imperfections and then I follow up with a fine grit 220+ afterwards to have it be ready to be stained or painted.
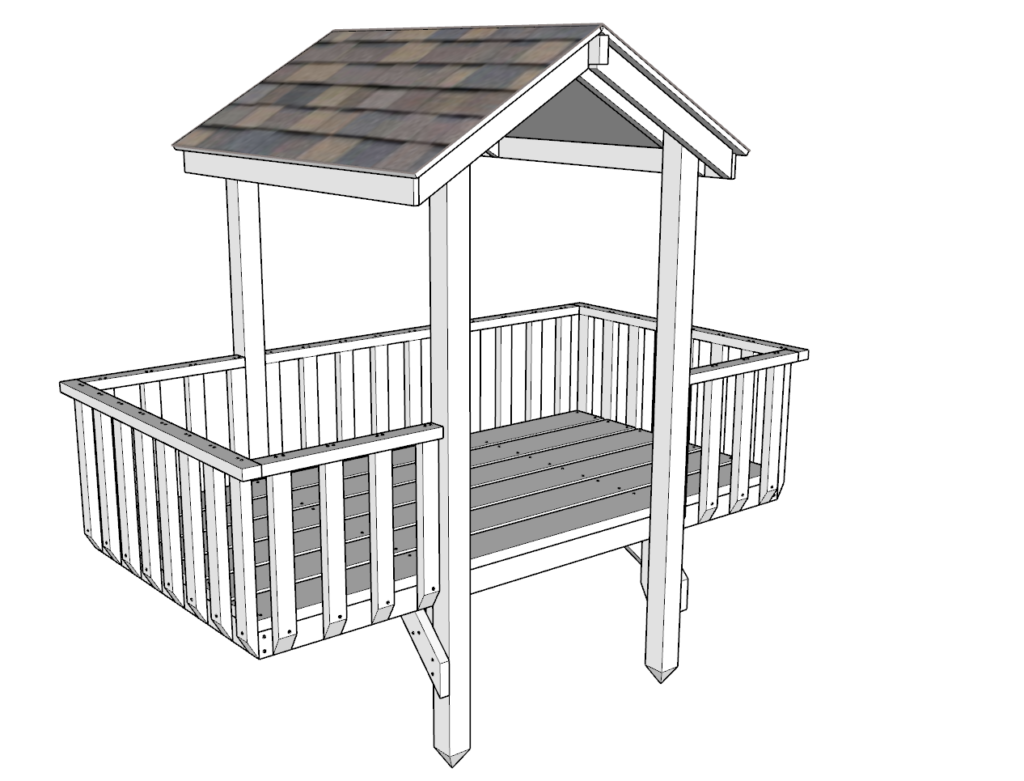
Step 35
After you paint it or stain it to protect it from the sun, you kids are now ready to enjoy this amazing and big outdoor playhouse!