Discover the Beauty of Crafting: A DIY Table and Bench for Your Home
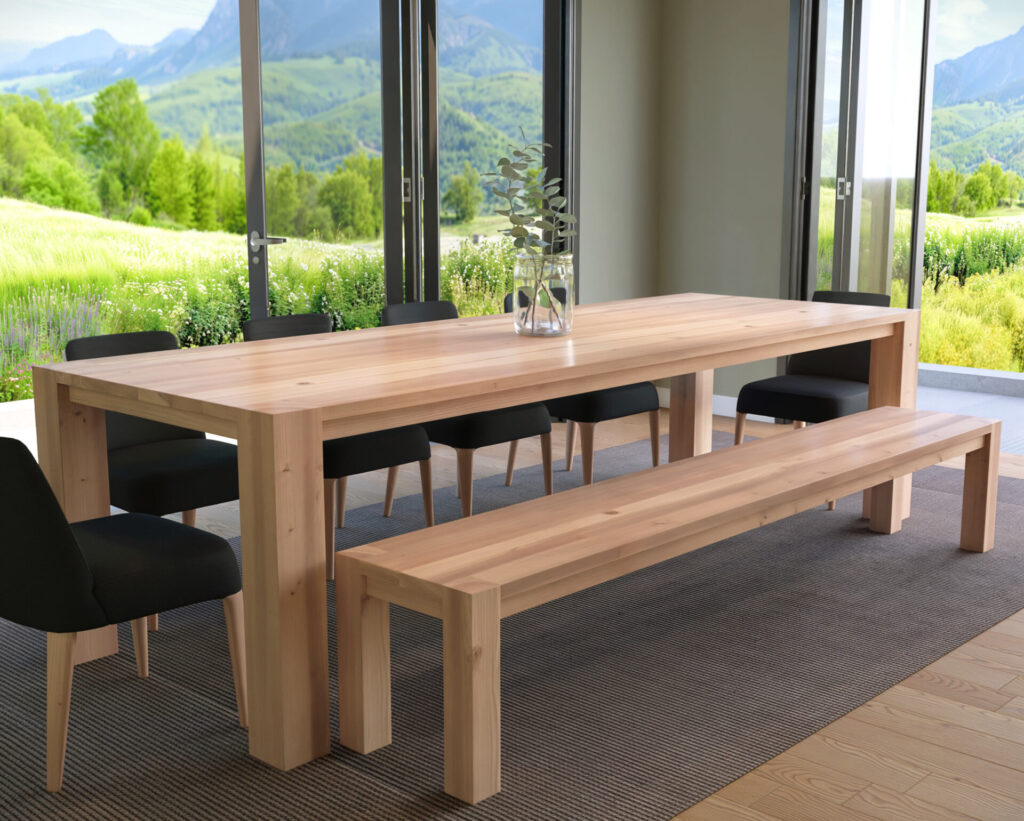
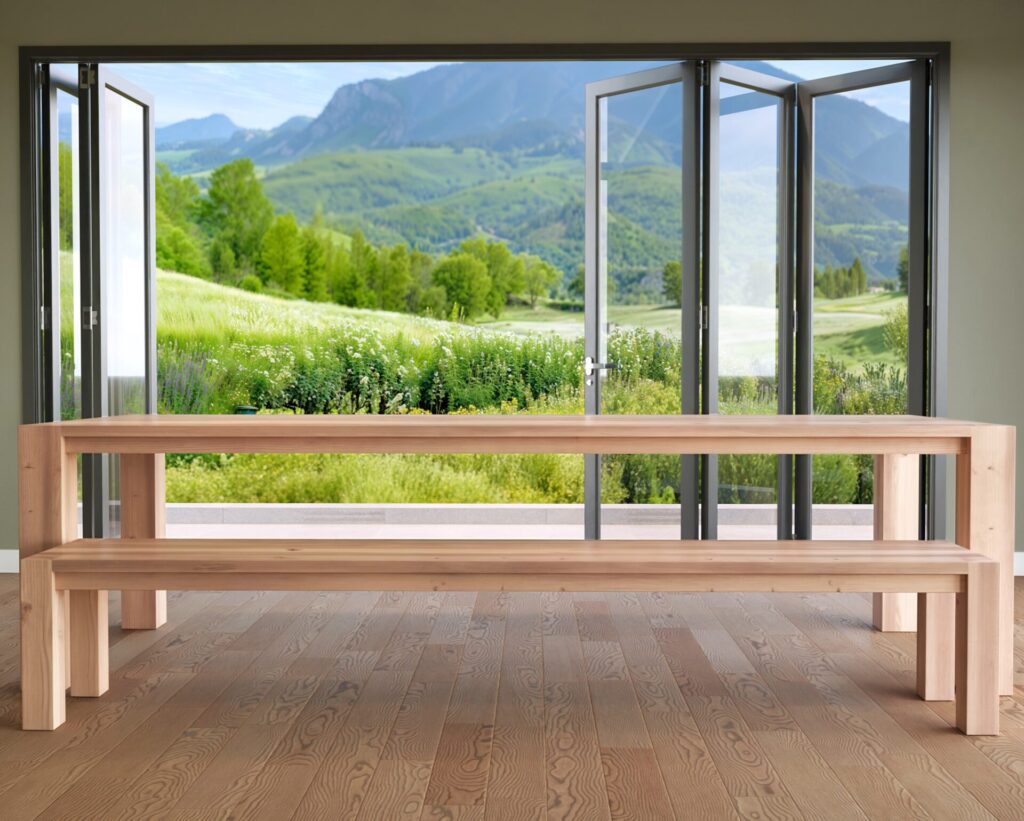
Are you ready to create a beautiful piece of furniture that combines modern design with farmhouse charm? Our DIY plan for a wooden table and bench offers you the perfect project to showcase your woodworking skills and add a stunning centerpiece to your dining area.
The Inspiration Behind the Design
Imagine a piece of furniture that not only looks exquisite but also feels like home. Our table and bench set brings warmth and comfort to any room. Designed with a modern farmhouse aesthetic, this set promises both style and functionality, perfect for large family gatherings or intimate dinners.
Features and Specifications
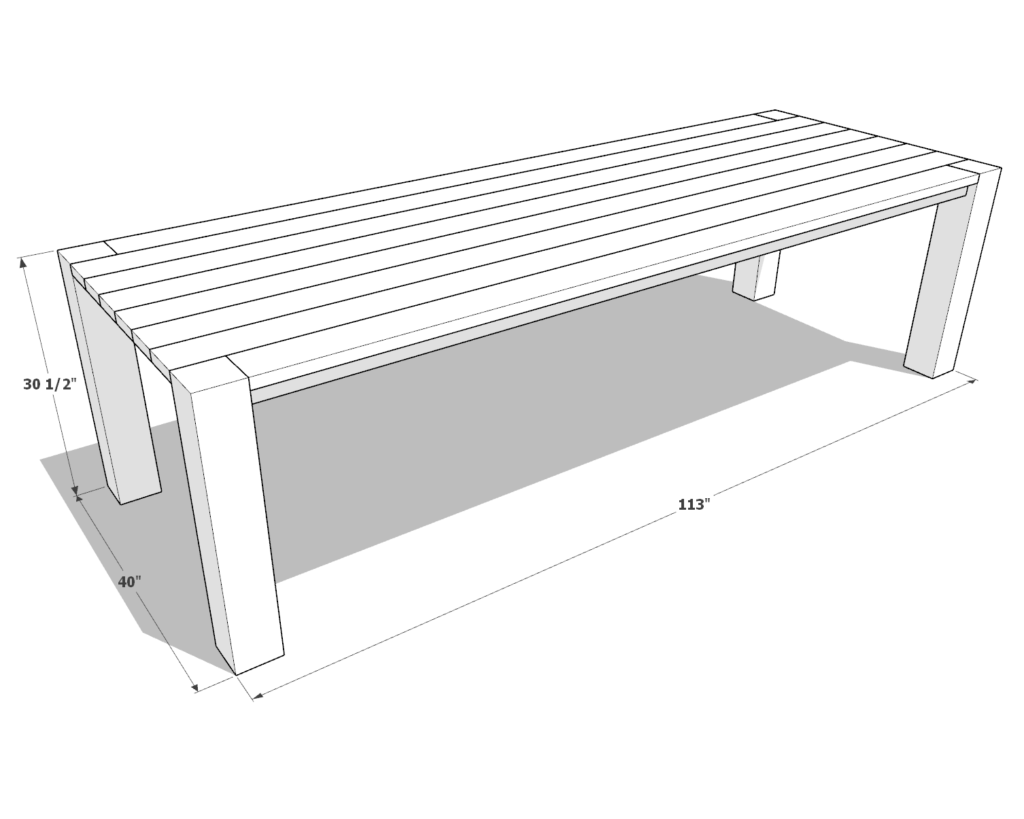
Table Dimensions
- Length: 113 inches
- Width: 40 inches
- Height: 30.5 inches
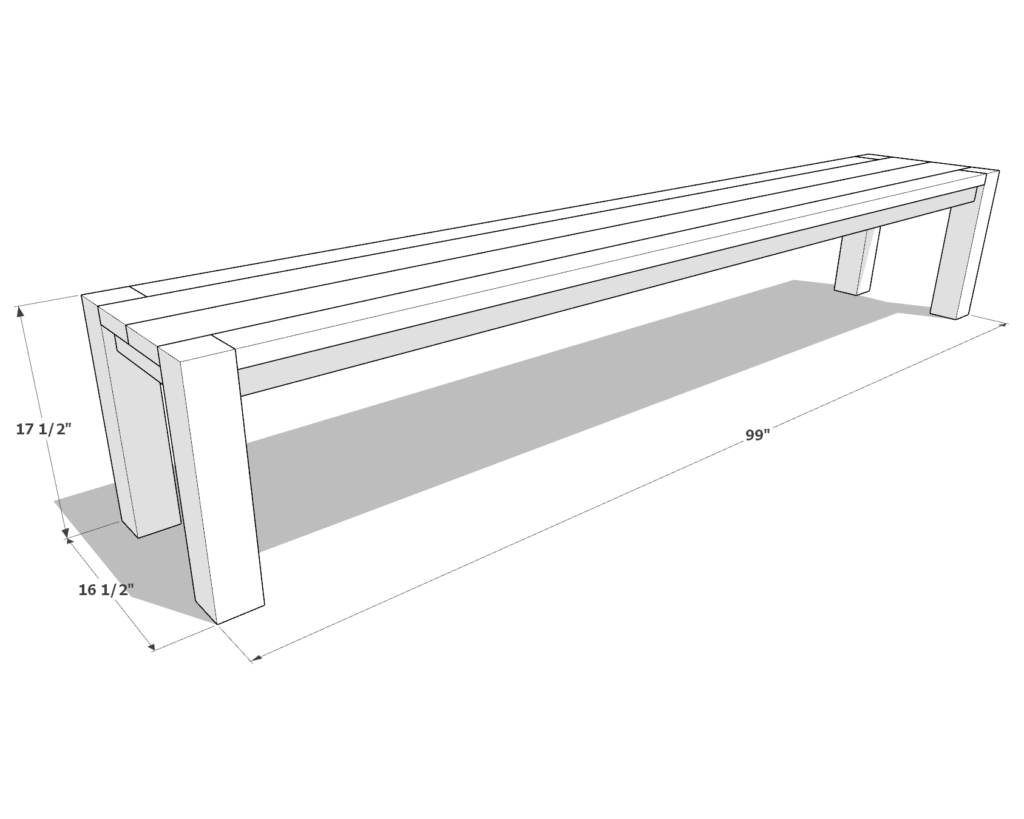
Bench Dimensions
- Length: 99 inches
- Width: 16.5 inches
- Height: 17.5 inches
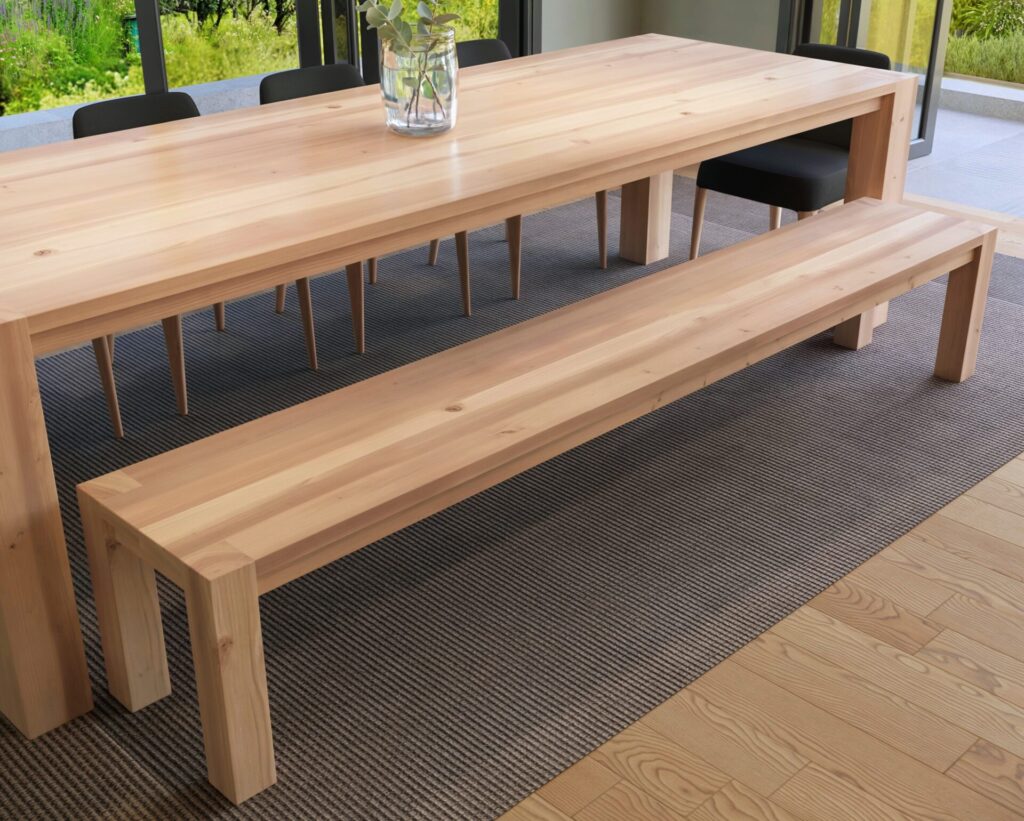
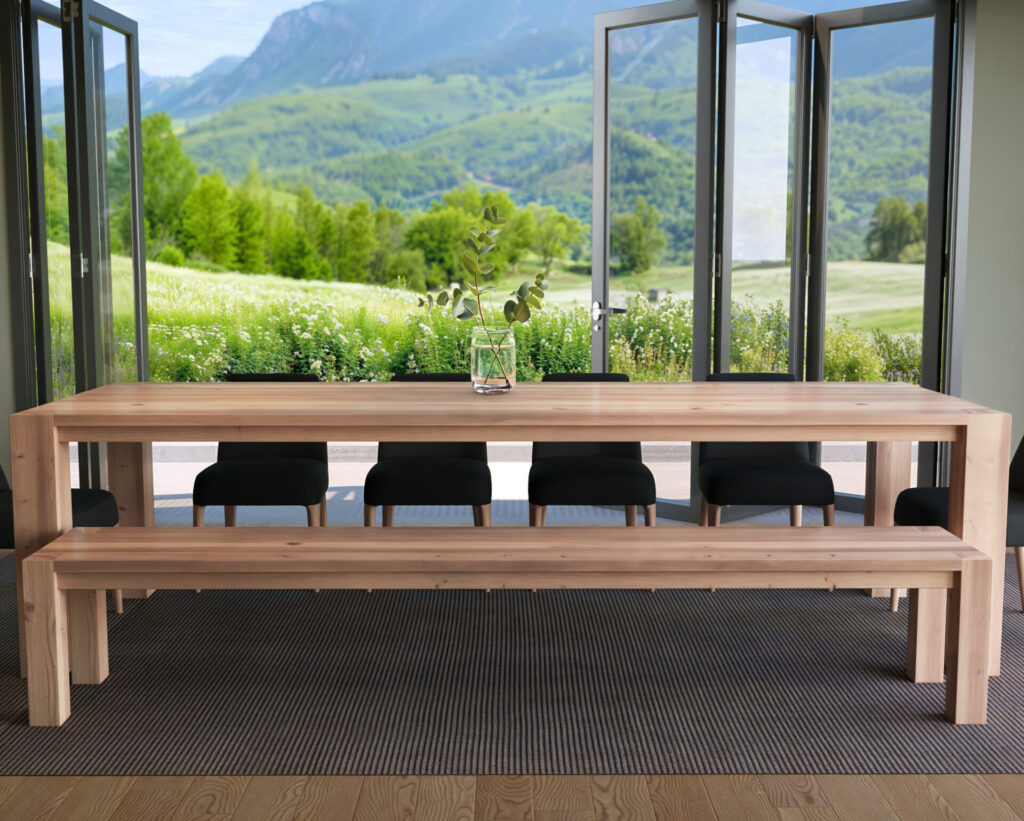
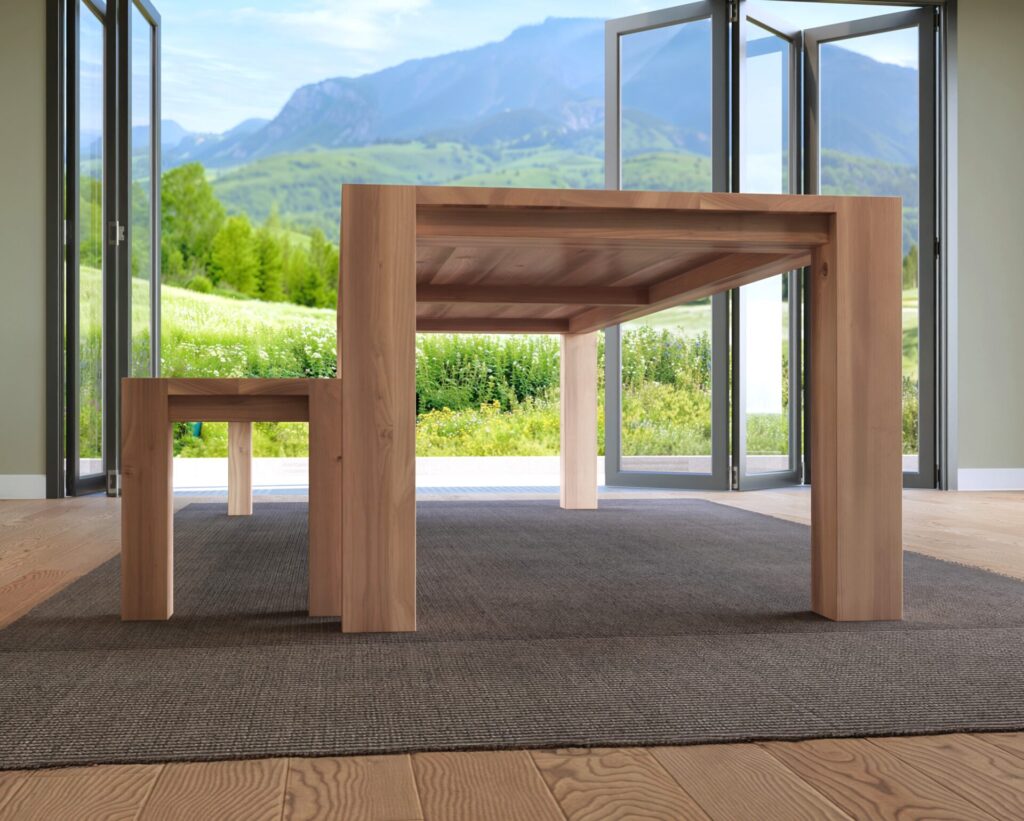
One of the key considerations in the design was ensuring that the bench could easily slide under the table. With 2 inches of clearance on either side, this design offers both practicality and a clean look. The table can comfortably seat ten people, making it ideal for hosting large gatherings.
Unique Joint Design
A significant aspect of this design is the innovative joint used to connect the table top to the legs. This joint is not only incredibly sturdy but also beginner-friendly. It’s a unique solution that ensures the table and bench can handle substantial weight while maintaining stability. This joint system is detailed in our DIY plan, providing you with the confidence to build a durable and safe piece of furniture.
Ergonomic and Aesthetic Considerations
We’ve paid close attention to the ergonomic aspects of the design. With a 9.75-inch space between the bench top and the table top, there’s ample room for comfortable seating. The minimalist design eliminates unnecessary elements, ensuring a sleek and clean appearance. The wood’s natural finish enhances the overall aesthetic, offering a warm and inviting feel to your dining area.
Why You Should Buy the DIY Plan
Our DIY plan is more than just a set of instructions; it’s a comprehensive guide designed to make your woodworking project as smooth and enjoyable as possible. When you download the PDF, you’ll get:
- Step-by-Step Instructions: Clear and detailed written directions to guide you through the entire building process.
- Diagrams: Color-coded, easy-to-follow diagrams that complement the written instructions.
- Tools List: A complete list of all the tools you’ll need.
- Materials List: Detailed information on the materials required.
- Lumber Shopping List: Exact specifications for the lumber needed.
- Lumber Cut List: Precise measurements and cutting instructions.
Our plan is tailored for beginners, with each step broken down to ensure you understand every aspect of the construction. You’ll find that the instructions are designed to be straightforward and easy to follow, eliminating any guesswork.
Transform Your Home with a Handmade Masterpiece
Creating this table and bench set is more than just a woodworking project; it’s an opportunity to craft a piece of furniture that will become the heart of your home. You’ll take pride in building something that is both functional and beautiful, a true testament to your skills and creativity.
So why wait? Embark on your next woodworking adventure and transform your dining area with our DIY table and bench. Download the plan today and start building your dream furniture!
Time to build
(varies with experience)
Cost
Estimated cost: $650 (material prices may fluctuate; verify current costs for accuracy. Estimate does not include the cost of chairs)
Skill level required
Beginner
DIY Dining Table & Bench PDF Plan
What is included in the PDF download?
-Step-by-Step Written Instructions
-Detailed Images
-Cut List
-Lumber Shopping List
-Materials List
-Tools List
-Project Estimates
Recommend Tools & Materials
Available with the purchase of the DIY plan PDF.
Lumber Shopping/Cut List
Available with the purchase of the DIY plan PDF.
Choosing the Ideal Wood for Your DIY Table and Bench
When embarking on a DIY project to build a beautiful table and bench set, selecting the right type of wood is crucial. This guide will help you navigate the common wood options available in the USA and provide insights into why certain choices might be better suited for your project.
Common Dimensional Lumber Choices
In the USA, you can typically find the following types of wood for your DIY projects:
- Douglas Fir
- Pine
- Redwood
- Cedar
These types of lumber can be easily procured from major stores like Home Depot, Lowe’s, or local lumber suppliers. For this project, you’ll need to ensure you have access to:
- 6×6 Lumber Posts
- 2×6 Lumber Boards (at least 10 ft long)
- 2×4 Lumber Boards (at least 10 ft long)
If 2×4 lumber boards are not available, you can cut them down from larger boards using a table saw.
My Personal Choice: Redwood
For my DIY table and bench, I chose to use redwood. Here are the reasons why I found it to be an ideal choice:
- Lightweight: Redwood is relatively light, making it easier to handle and work with.
- Dryness: Redwood is typically kiln-dried, and it often feels drier than other types of lumber available at stores like Home Depot or Lowe’s. This reduces the risk of warping and cracking.
- Fewer Knots: Redwood generally has fewer knots, making it more stable and aesthetically pleasing.
- Tool-Friendly: This softer wood is easy on tools, making the construction process smoother.
Drawback: The primary downside of redwood is that it’s relatively soft and can scratch easily. This might be a concern if you expect heavy use or if you have a bustling household.
Considerations for Douglas Fir
Douglas Fir is another common choice for DIY projects, there are a few considerations to keep in mind:
- Moisture Content: Douglas Fir sold in stores is often quite wet. High moisture content increases the risk of splitting and cracking as the wood dries.
- Knots: This wood tends to have more knots, which can make it prone to warping and bending.
- Drying Time: If you choose Douglas Fir, it’s advisable to let the table and bench components dry for about a month after construction before proceeding to staining. This allows any potential cracks to appear, which can then be filled with epoxy.
Tip: Houses with HVAC systems dry out the air. Allowing the wood to dry thoroughly in the garage before finishing will help prevent cracks from forming after the table is placed inside the house.
Other Considerations
When choosing wood for your DIY table and bench, consider the following:
- Hardness and Durability: Harder woods like oak or maple can be more durable but are also more challenging to work with. Softer woods like pine or redwood are easier to handle but may be more susceptible to damage.
- Aesthetics: Consider the grain pattern and color of the wood. Some woods have beautiful grains that can add character to your furniture.
- Workability: Some woods are easier to cut, plane, and join than others. Consider your tools and skill level when choosing your wood.
Final Thoughts
Choosing the right wood for your DIY table and bench is a balance between aesthetics, workability, and durability. Redwood offers a lightweight, dry, and aesthetically pleasing option, though it may scratch more easily. Douglas Fir, while more prone to moisture-related issues, can still be a good choice if given adequate drying time.
By carefully selecting your wood and allowing for proper drying and finishing, you can create a beautiful, functional piece of furniture that will be the heart of your home for years to come.
Step 1: Prepare and Plane the Table Top Lumber Boards
1.1 Cut Lumber to Length
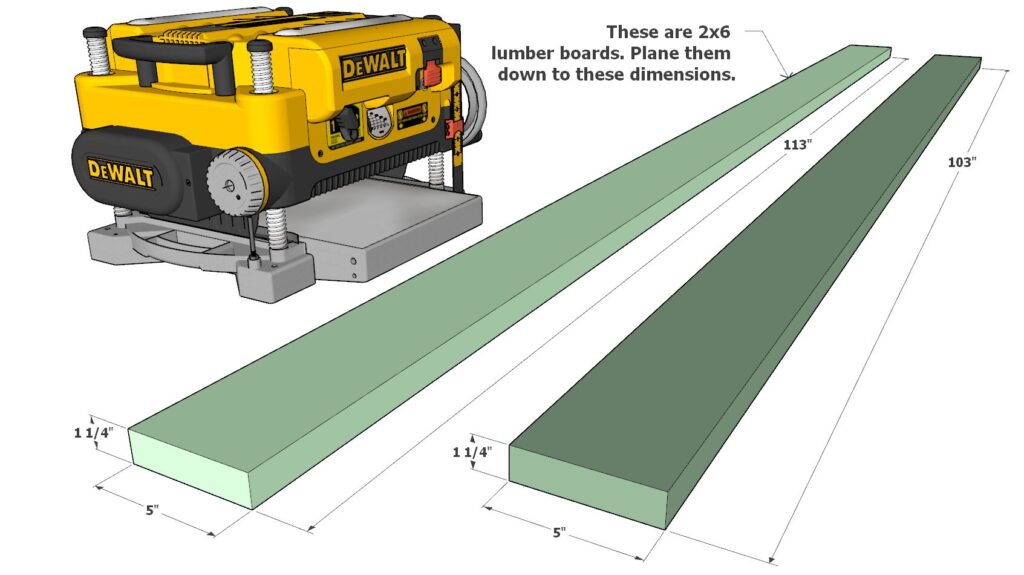
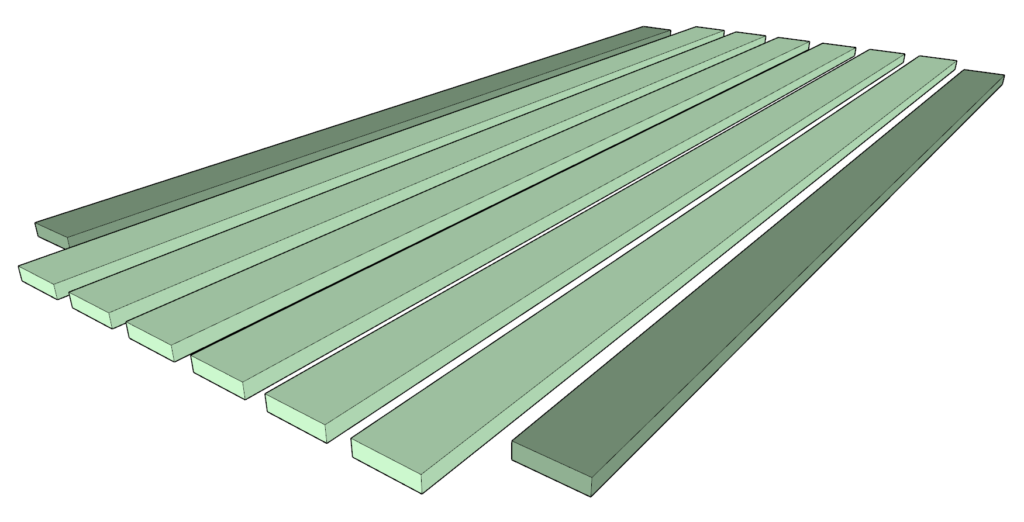
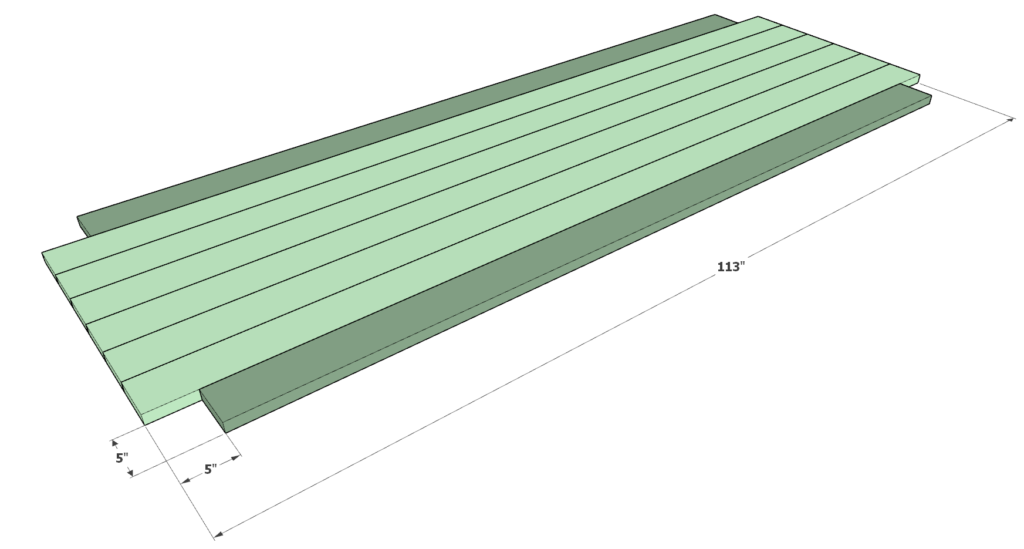
- Gather Materials: Two 103-inch long 2×6 lumber boards (dark green in images) and six 113-inch long 2×6 lumber boards (light green in images).
1.2 Plane the Lumber Boards
- Set Up the Planer: Use a benchtop planer to ensure all boards are consistently planed.
- Dimensions: Plane all boards down to 5 inches wide and 1-1/4 inches thick.
- Planing Tips:
- Do not remove too much material at once to avoid gouging the wood.
- Take multiple light passes, especially around knots, to protect the wood and achieve a smooth finish.
1.3 Mark the Joining Ends
- Mark Ends: Take two of the 113-inch boards and mark 5 inches from each end. These marks indicate where the boards will be joined.

1.4 Arrange the Boards
- Layout: Lay out all the boards to determine the best fit, considering wood grain and natural features.
- Alternating Ends: Alternate the end grain direction (arches facing up and down) to prevent the table top from bowing over time.
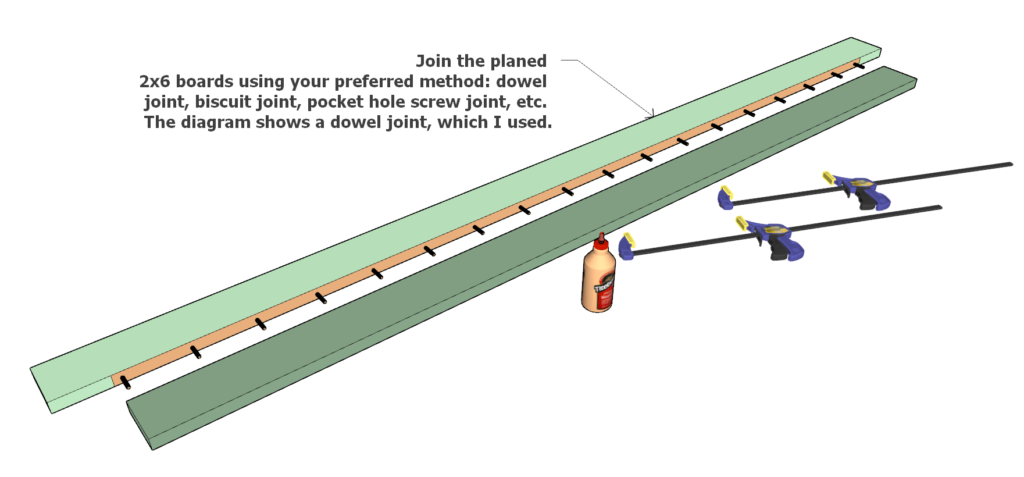
1.5 Join the Boards
- Joining Methods: Choose your preferred joining method:
- Dowel Joint: Shown in the diagram.
- Biscuit Joint
- Pocket Hole Screw Joint
- Join the Boards:
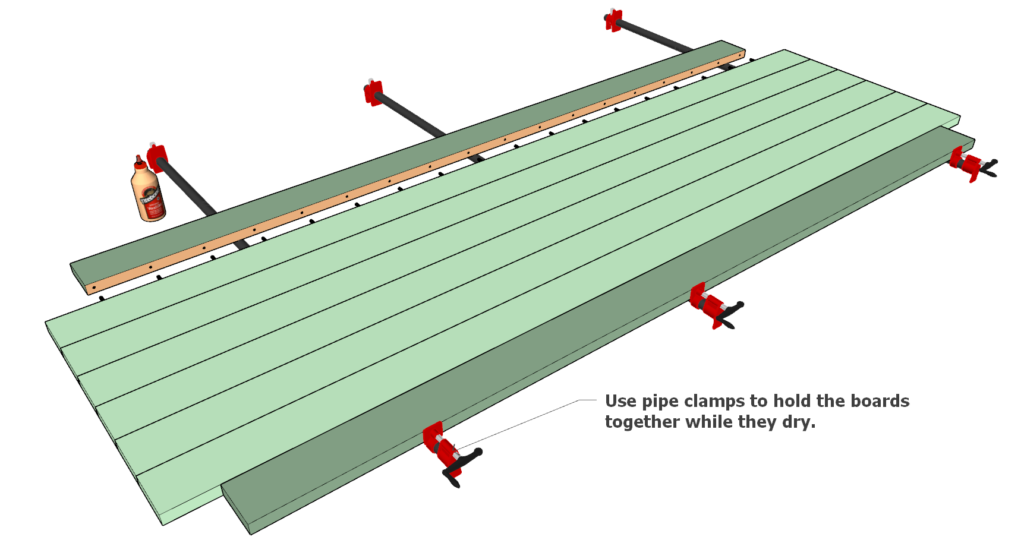
- Apply wood glue to the joining edges.
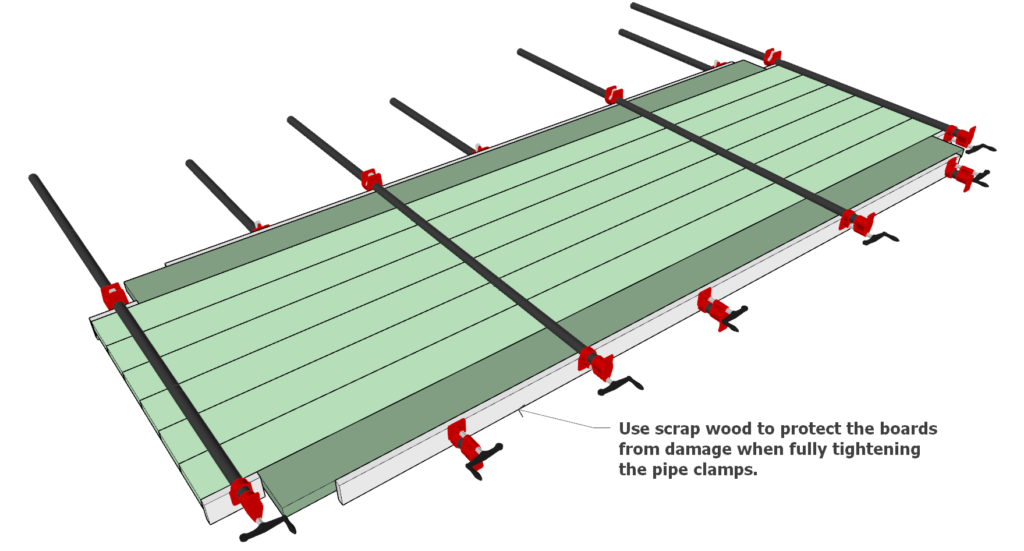
- Use pipe clamps to hold the boards together firmly.
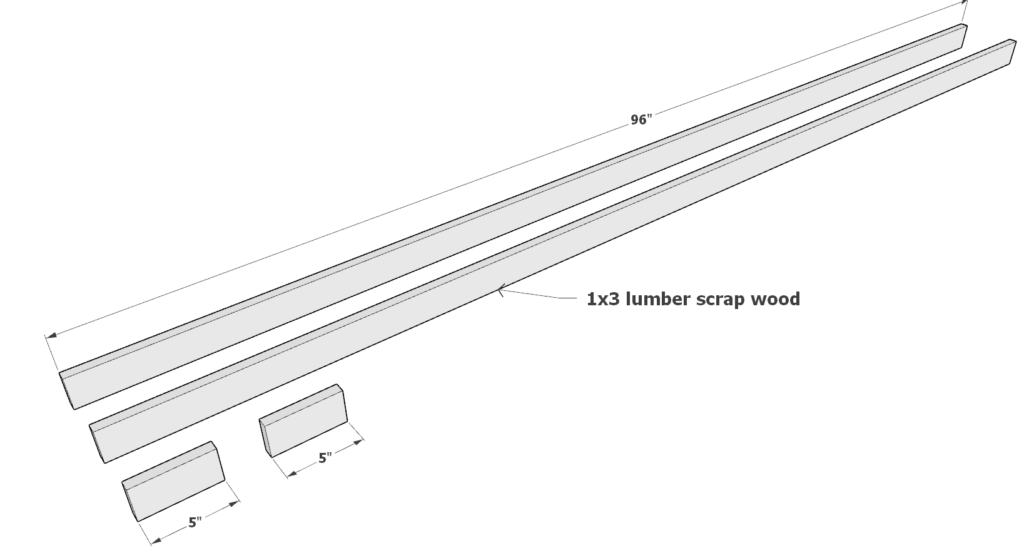
- Place scrap wood between the clamps and the boards to prevent damage.
1.6 Clamping Tips
- Clamp Placement:
- Place pipe clamps at both the top and bottom of the boards to prevent bowing.
- Tighten the clamps gradually to ensure even pressure.
1.7 Drying and Sanding
- Drying Time: Allow the glue to dry as per the manufacturer’s instructions (usually 24-72 hours).
- Initial Sanding:
- Start with coarse sandpaper to smooth the surface.
- Finish with finer sandpaper for a polished look.
- Final Sanding: The final sanding and finishing will be completed after the table is fully assembled.
Step 2: Prepare and Assemble the Tabletop Reinforcement Frame
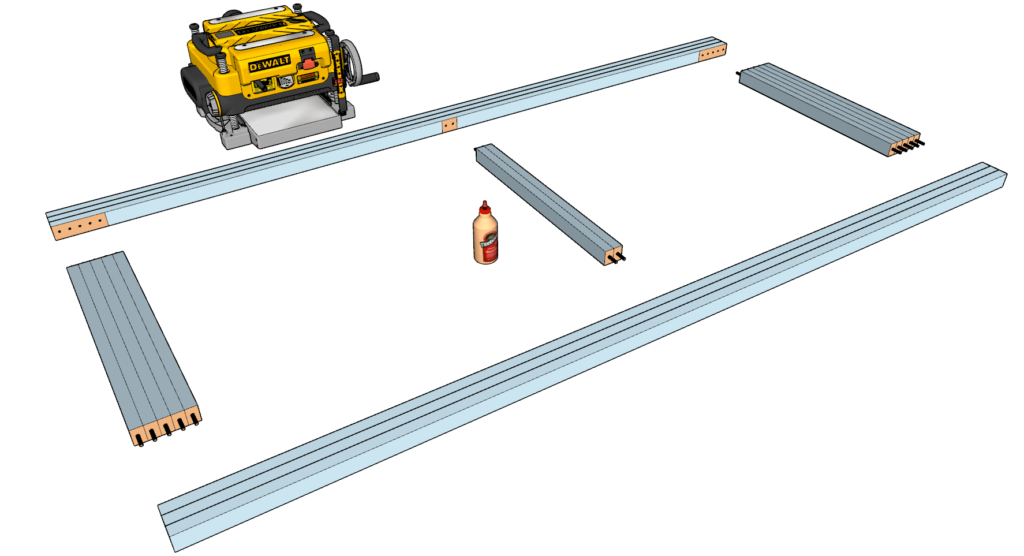
2.1 Cut and Plane the Reinforcement Pieces
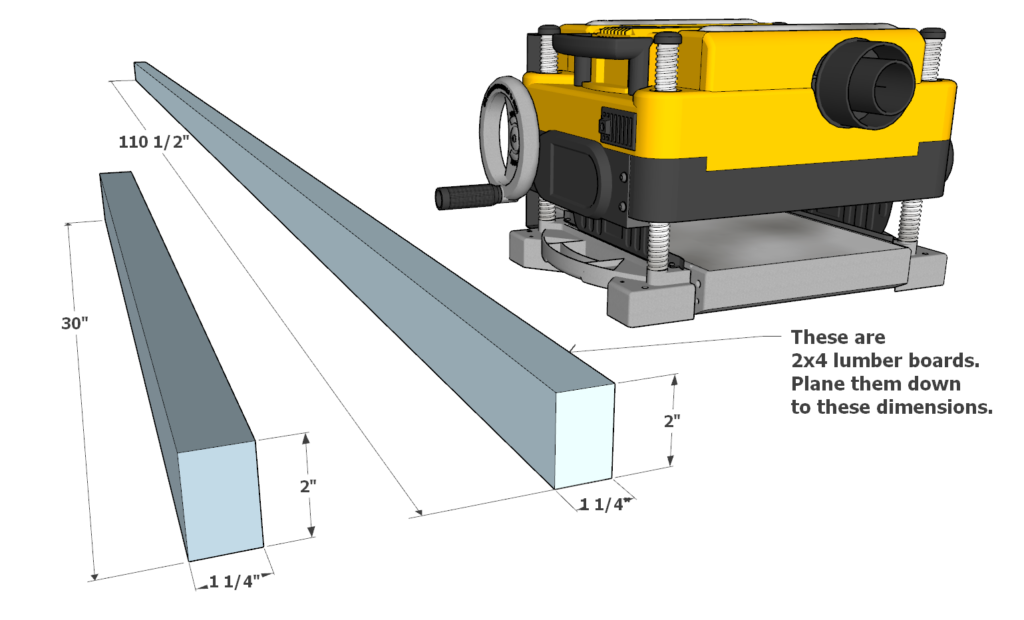
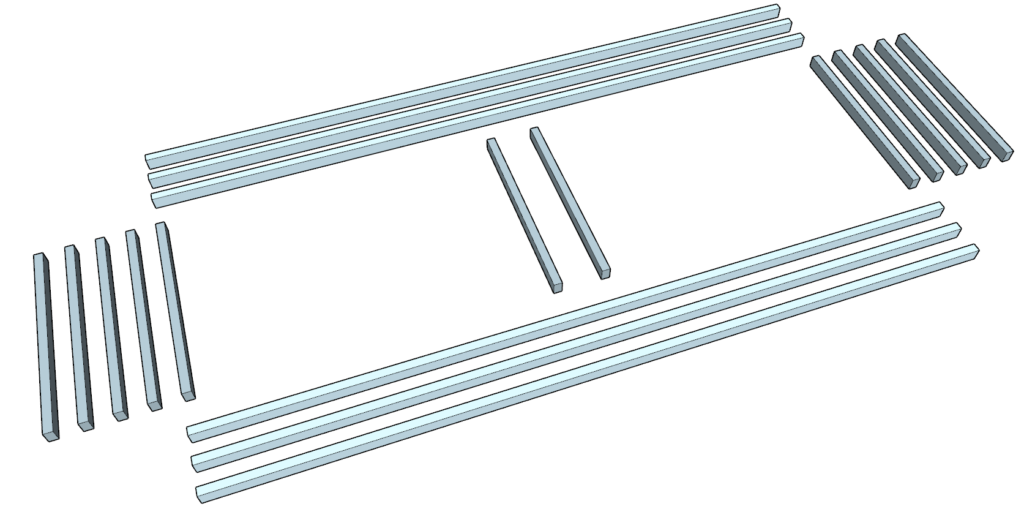
- Gather Materials: Twelve 30-inch 2×4 lumber boards (light blue) and six 110-1/2 inch long 2×4 lumber boards (dark blue).
- Measurements:
- Cut the twelve light blue boards to 30 inches in length.
- Cut the six dark blue boards to 110-1/2 inches in length.
- Planing Dimensions: Plane all boards down to 1-1/4 inches wide and 2 inches tall.
- Tip: If you prefer, you can hold off on planing the boards down to 2 inches until after gluing. This way, you can remove the dried glue and extra wood simultaneously, saving time in sanding.
2.2 Layout and Gluing
- Layout: Lay out all the boards to determine the best fit. Match the boards based on their natural fit and grain direction.
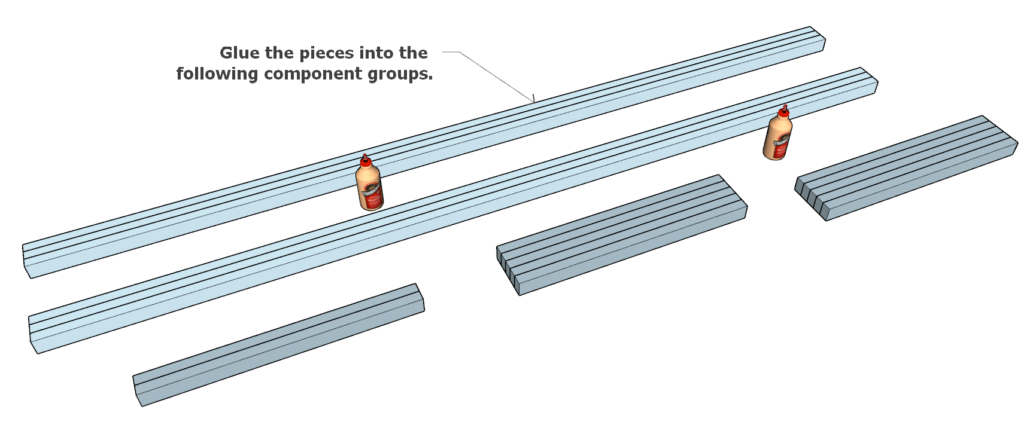
- Glue Boards:
- Dark Blue Boards: Glue the dark blue boards together as shown in the diagram.
- Light Blue Boards: Glue the light blue boards together as shown in the diagram.
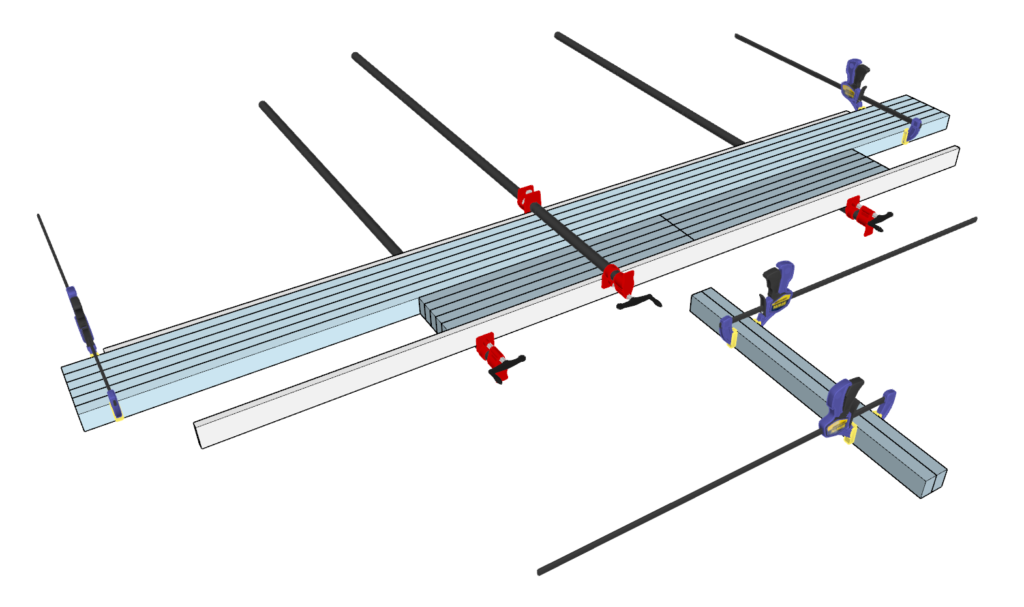
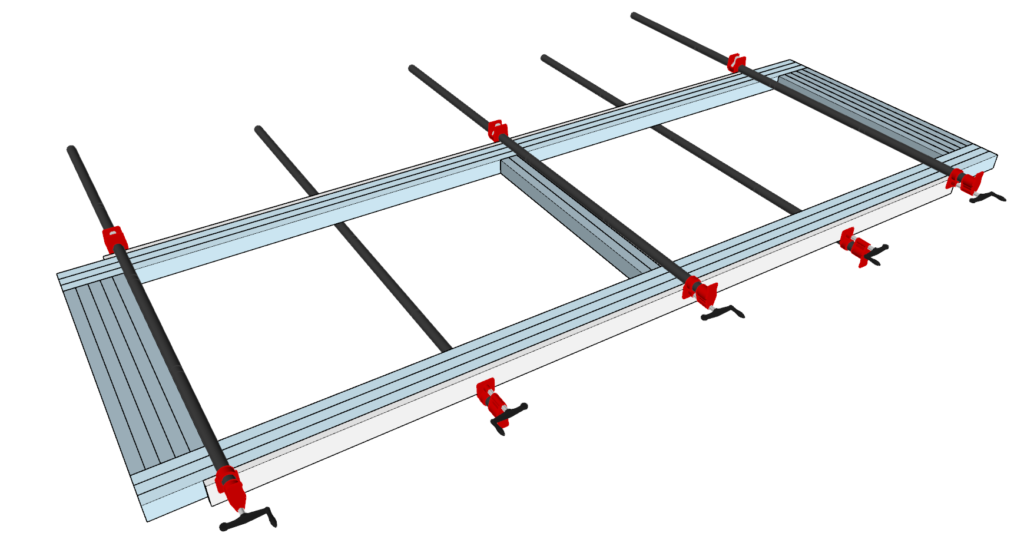
- Clamping: Use pipe clamps and handheld clamps to hold the glued boards together while they dry.
- Tip: Use scrap wood as spacers between the clamps and the boards to prevent the wood from being damaged by the clamp pressure.
2.3 Planing and Jointing the Assembled Components
- Planing: If you chose to plane the boards after gluing, plane the assembled components down to 2 inches tall at this point.
- Adding Joints: Add dowels, biscuit joints, or pocket holes to bring the frame together.
- Tip: Dowel joints are highly recommended for this step for their strength and reliability.
- Gluing: Apply wood glue to all joint areas.
- Clamping: Use pipe clamps and scrap wood spacers to hold the boards together securely while the glue dries.
2.4 Cutting the Reinforcement Frame Ends
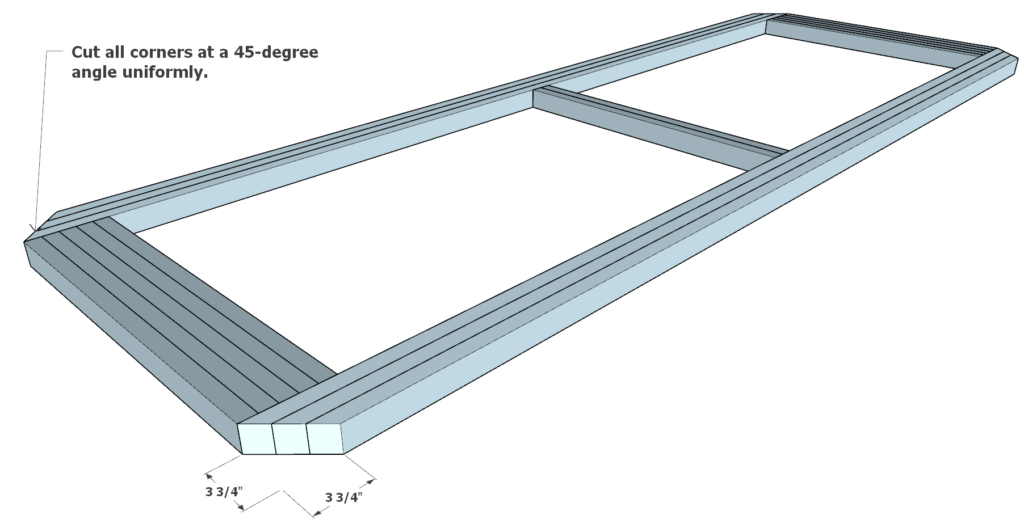
- Cut Ends: Once the rectangular reinforcement frame is dry, cut the ends at a 45-degree angle.
- Sanding: Rough sand and then fine sand the cut ends for a smooth finish.
- Tip: If your tabletop from step 1 isn’t perfectly aligned, overlay the tabletop and reinforcement frame to see how they fit together. This will help you determine the exact amount to cut from each corner.
2.5 Final Assembly
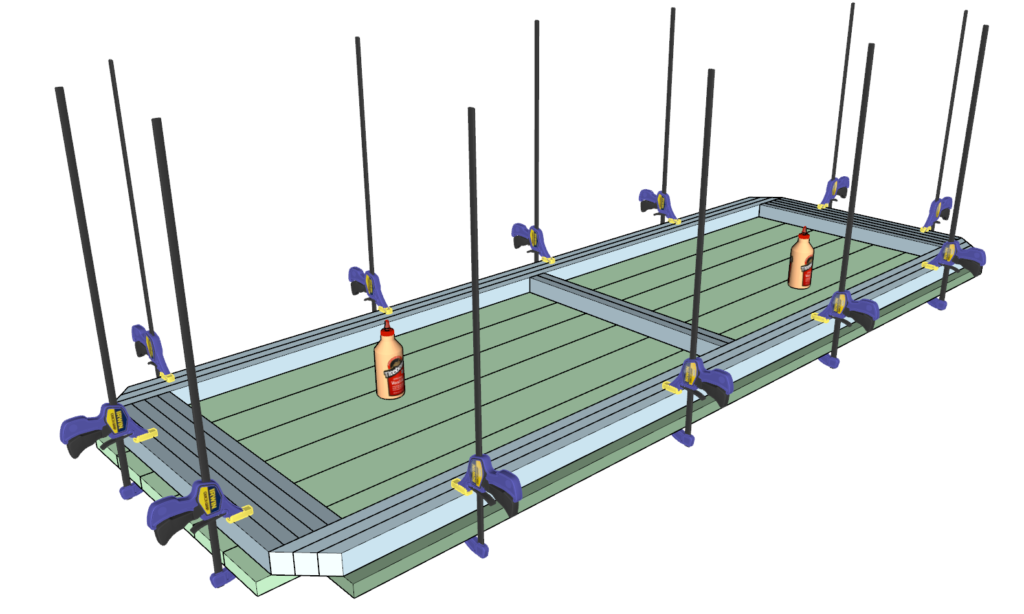
- Prepare for Gluing: Ensure both the tabletop and the reinforcement frame are free of dust and debris.
- Tip: Use a generous amount of wood glue, but remember to wipe away excess glue after clamping to avoid difficulty in sanding later.
- Glue the Frame to the Tabletop: Apply glue and use pipe clamps to secure the reinforcement frame to the tabletop.
- Drying Time: Allow the assembly to dry fully according to the glue manufacturer’s instructions.
2.6 Final Tips
- Cleaning Before Gluing: Wipe down both surfaces to remove any fine dust. This ensures a strong adhesive bond.
- Clamp Pressure: Apply adequate pressure with the clamps to ensure a tight bond, but not so much that it deforms the wood.
Step 3: Cut, Plane, and Attach the Table Legs
3.1 Cut and Plane the Table Legs
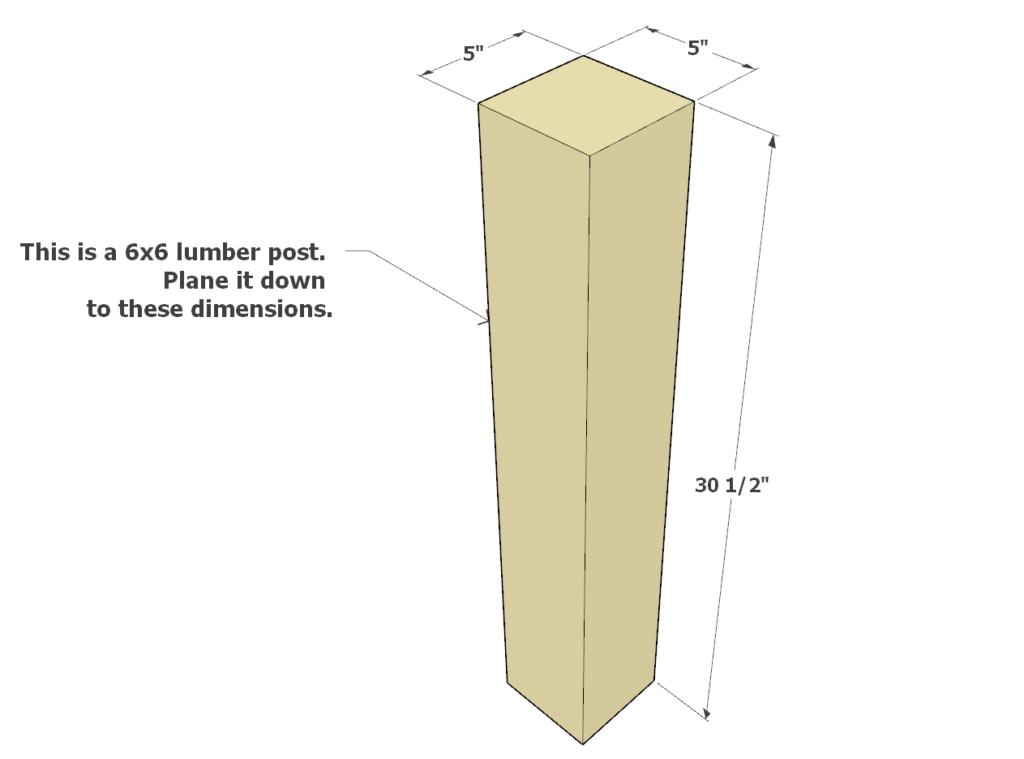
- Gather Materials: Four 30-1/2 inch long 6×6 lumber posts (pale yellow in diagrams).
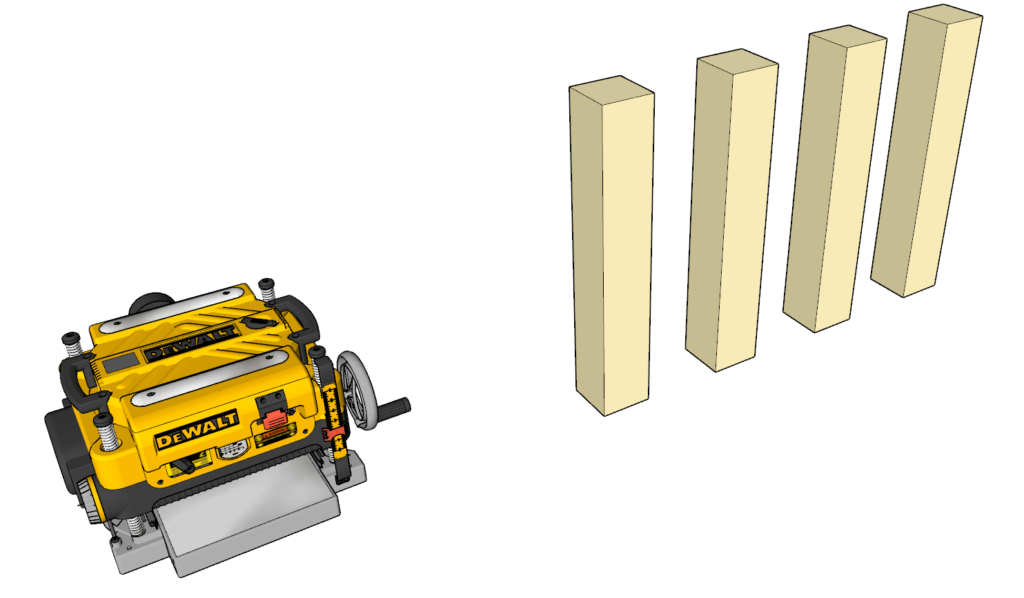
- Planing Dimensions: Plane each post down to 5 inches thick by 5 inches deep.
- Planing Tips: Follow the same benchtop planer instructions as in previous steps. Remove material gradually to avoid damaging the wood.
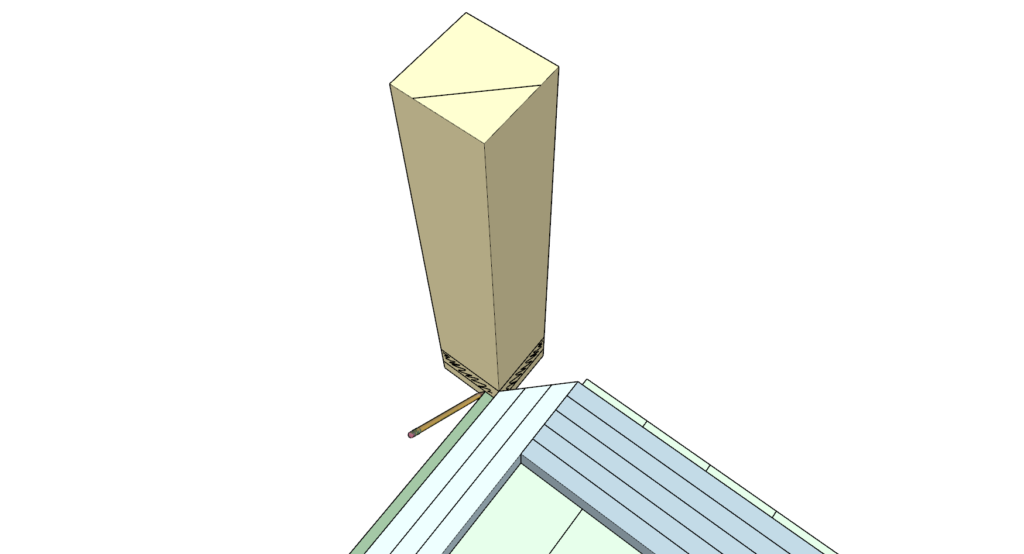
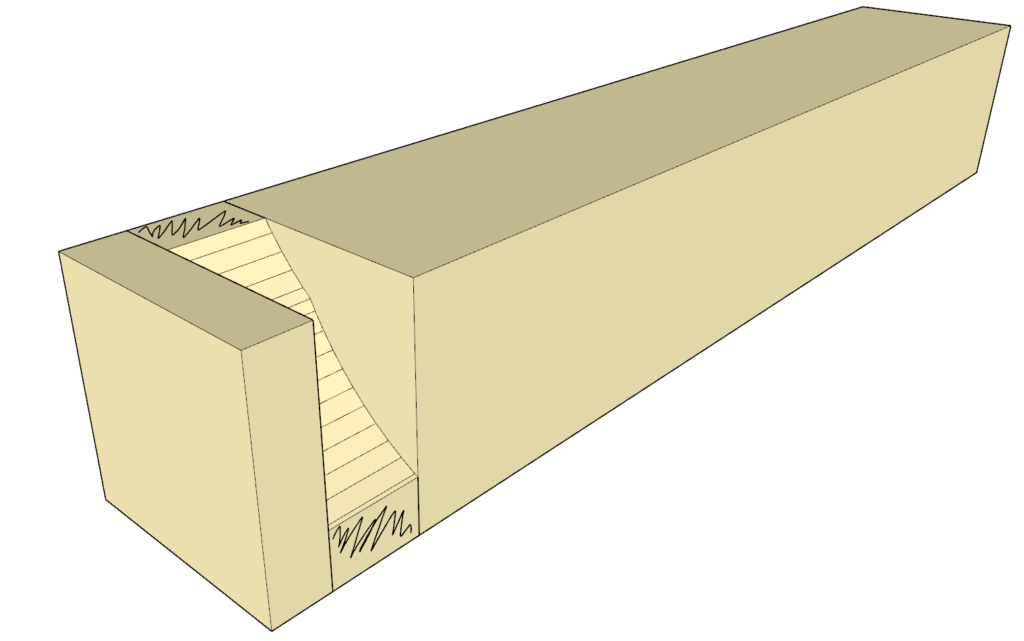
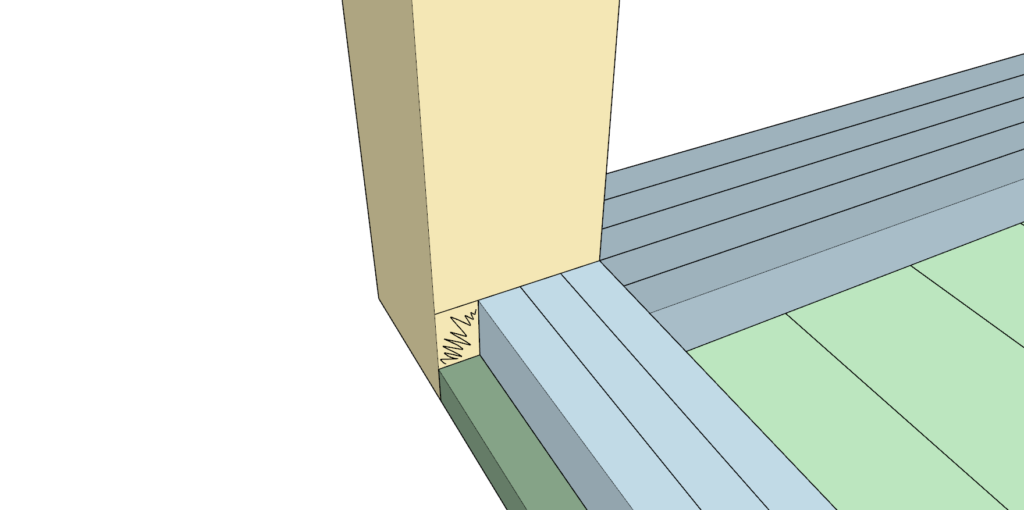
3.2 Mark and Cut the Semi-Circular Grooves
Position and Mark:
- Place each leg where it will be attached to the table reinforcement frame from Step 2.
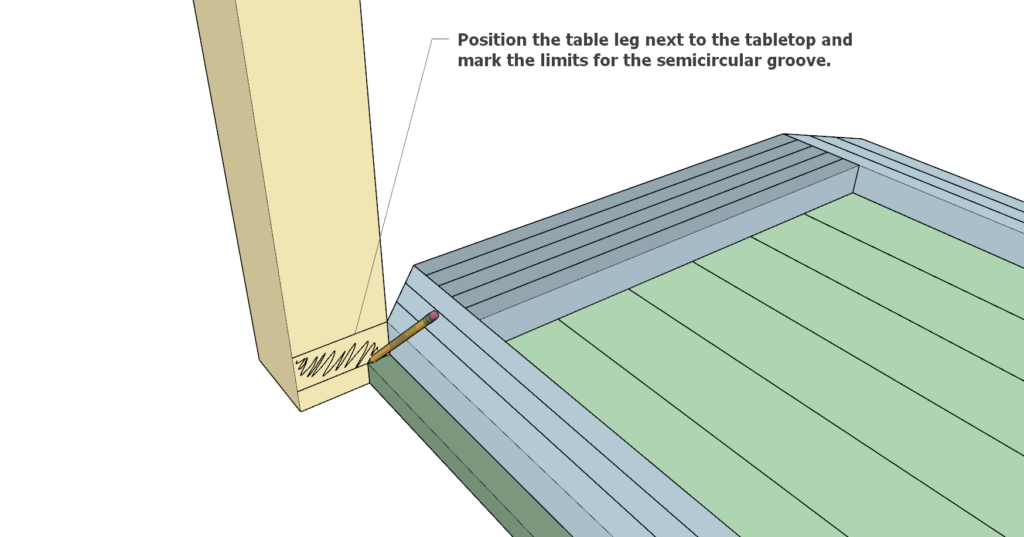
- Use a pencil to mark the depth of the semi-circular groove on the leg.
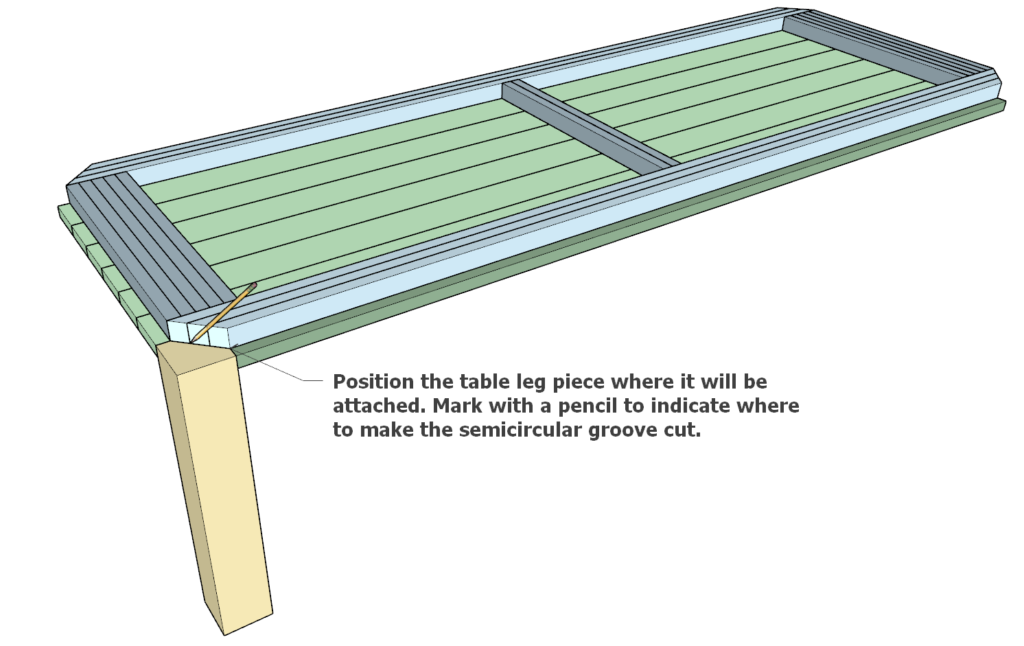
- Measure and mark the thickness of the groove to match the thickness of the table reinforcement frame (ideally 2 inches).
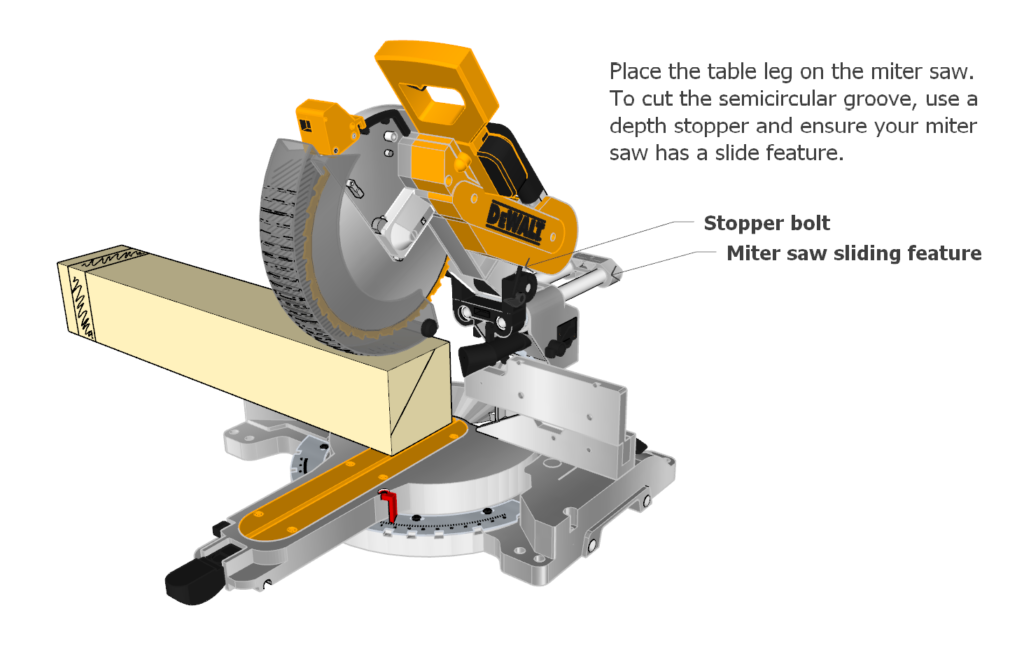
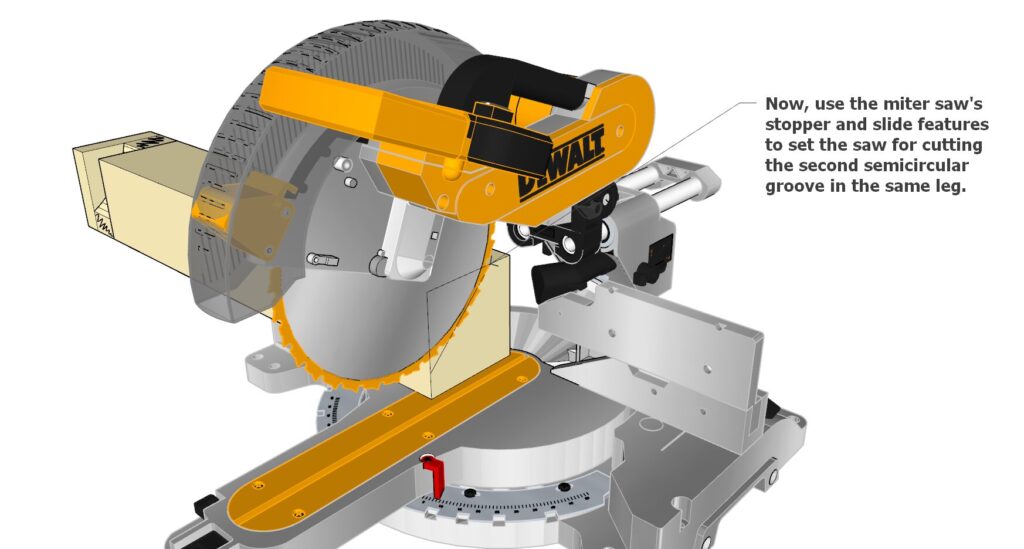
Set Up the Miter Saw:
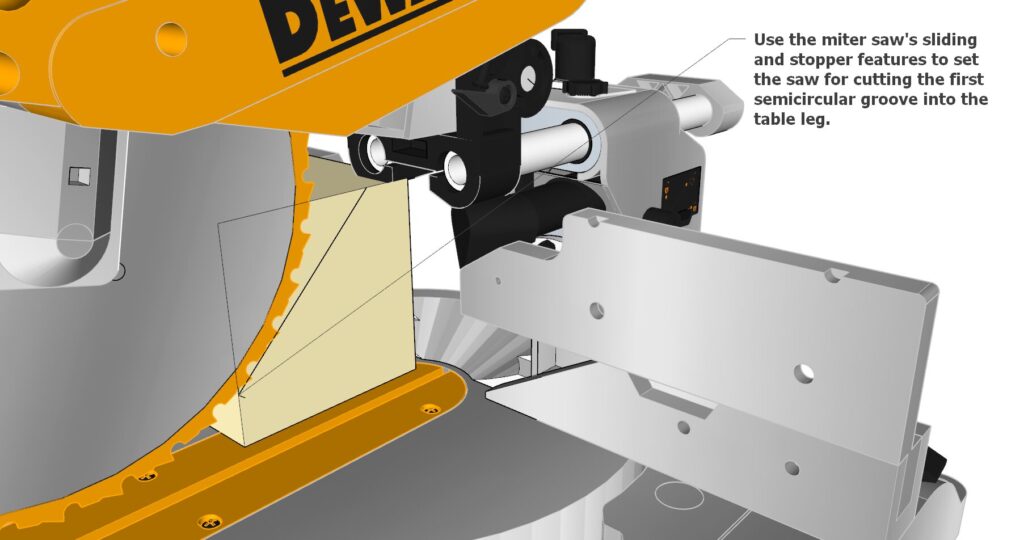
- Ensure the miter saw has a sliding feature, a depth stopper, and a standard 12-inch blade.
- Use the depth stopper and slider to set up the saw for cutting the first semi-circular groove.
- Important: Two semi-circular grooves are needed because the 12-inch blade cannot make a large enough arch in one cut.
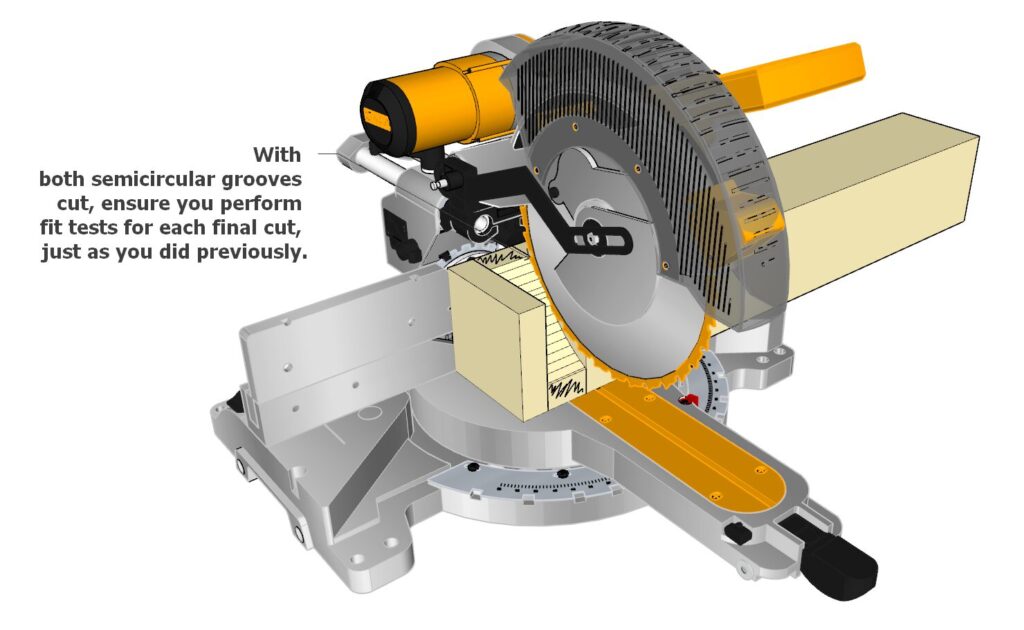
3.3 Cut the Semi-Circular Grooves
- Cut the First Groove:
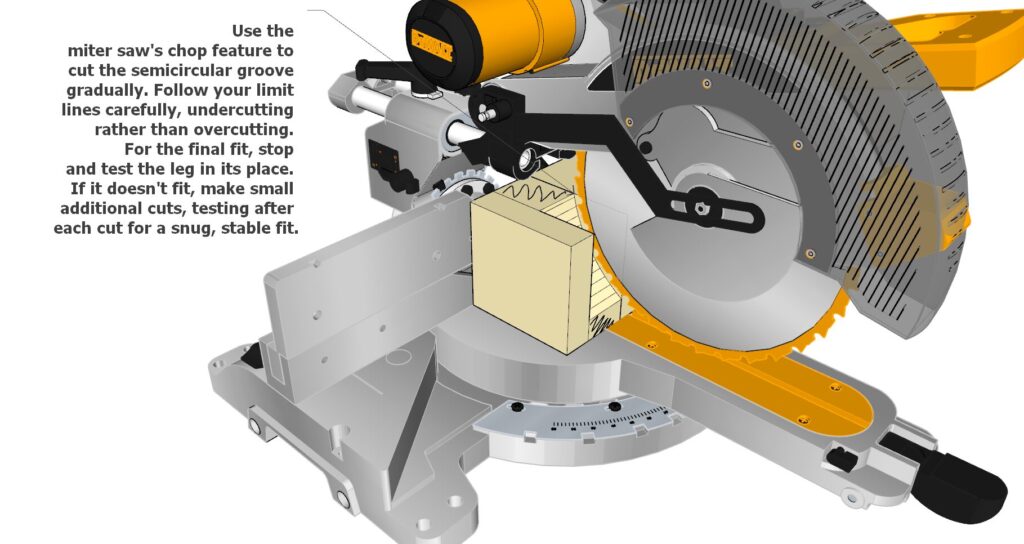
- Use the miter saw’s chop feature to gradually cut the first semi-circular groove.
- Follow the marked lines carefully, undercutting rather than overcutting.
- Test fit the leg to the table reinforcement frame to ensure a snug fit.
- Cut the Second Groove:
- Repeat the steps to cut the second semi-circular groove.
- Test fit the leg again to confirm it fits properly.
3.4 Test Fit and Final Adjustments
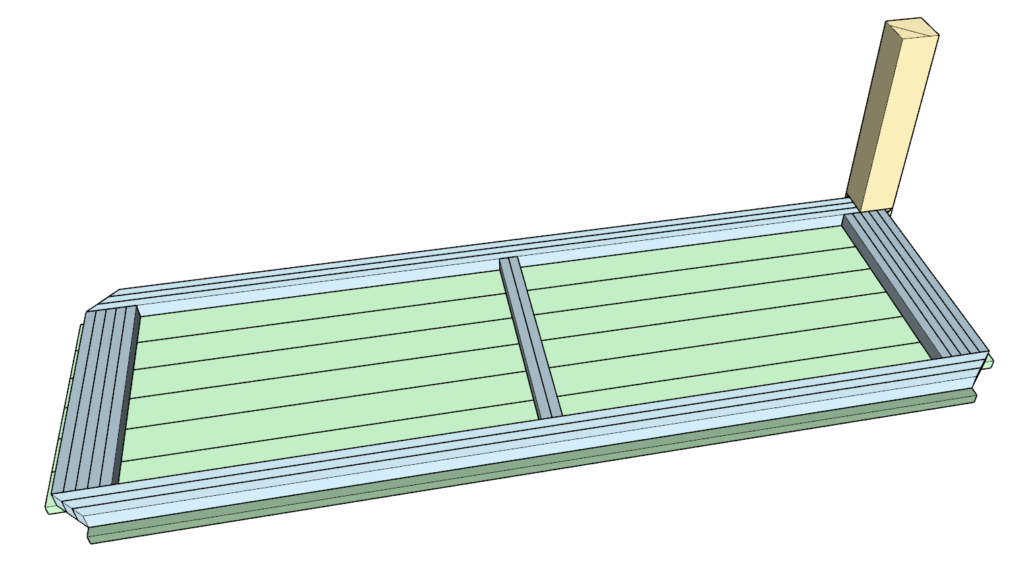
- Test Fit All Legs: Test fit all four legs to the table reinforcement frame and keep track of which leg goes to which corner.
- Final Adjustments: If needed, make final adjustments to ensure all legs fit snugly without gaps.
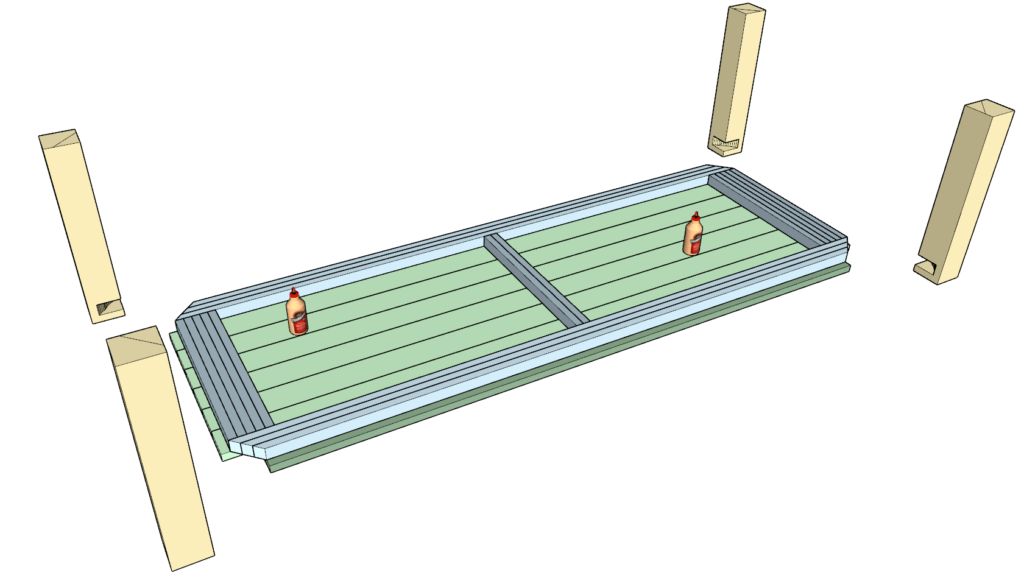
3.5 Attach the Legs to the Table
- Apply Glue: Apply a generous amount of wood glue to all areas that will be joined.
- Attach Legs:
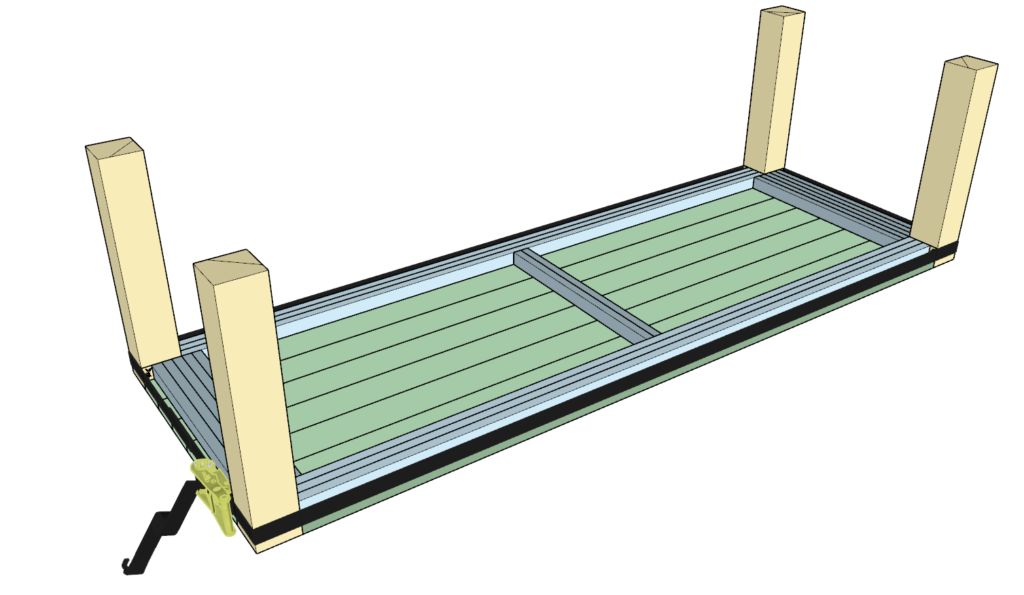
- Use a ratchet strap to hold the legs tightly against the table top and reinforcement frame.
- Ensure the legs are securely in place and let the glue dry completely.
- Tip: If one ratchet strap is not enough, combine two.
3.6 Optional Drying Period
- Additional Drying:
- If possible, let the entire table dry for an extended period (e.g., one month) in a controlled environment like a garage.
- Personal Experience:
- During my drying period, my table developed a slight crack. This was beneficial as it occurred before the finishing steps.
- The table legs dried out slightly, causing the table top boards to stick out a bit. I used a hand-held planer to smooth out these edges.
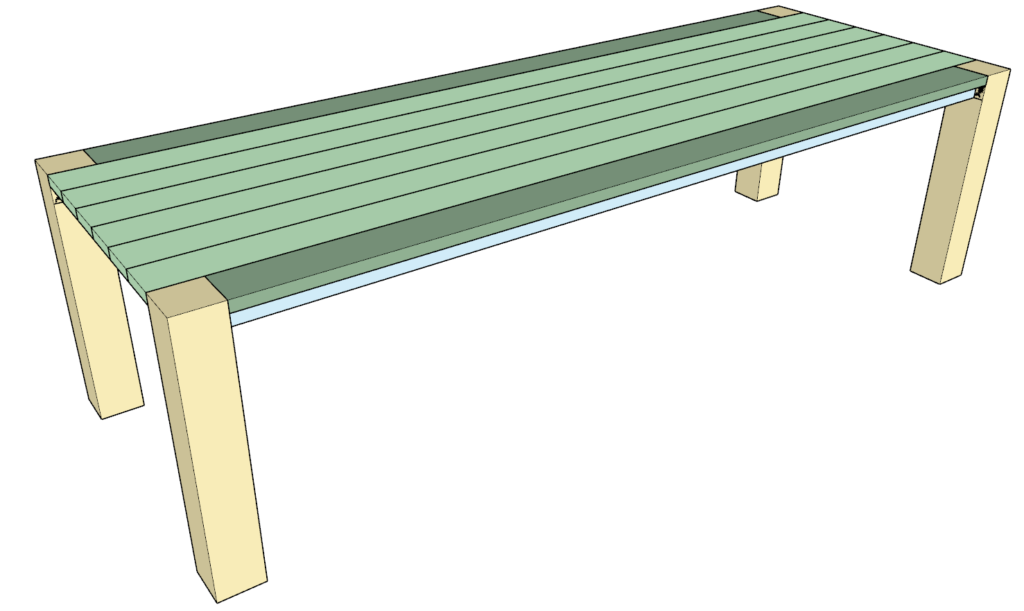
3.7 Final Sanding and Routing
- Sand the Entire Table:
- Use a coarse sandpaper first, followed by a finer sandpaper to ensure a smooth finish.
- Optional Routing:
- Use a router to round off the edges of the table. This prevents sharp edges and ensures comfort for those leaning on the table.
- Clean the Table:
- Wipe down the entire table to remove any dust and prepare it for the finishing process (covered at the end of this DIY plan).
Step 4: Prepare and Plane the bench Lumber Boards
4.1 Cut Lumber to Length
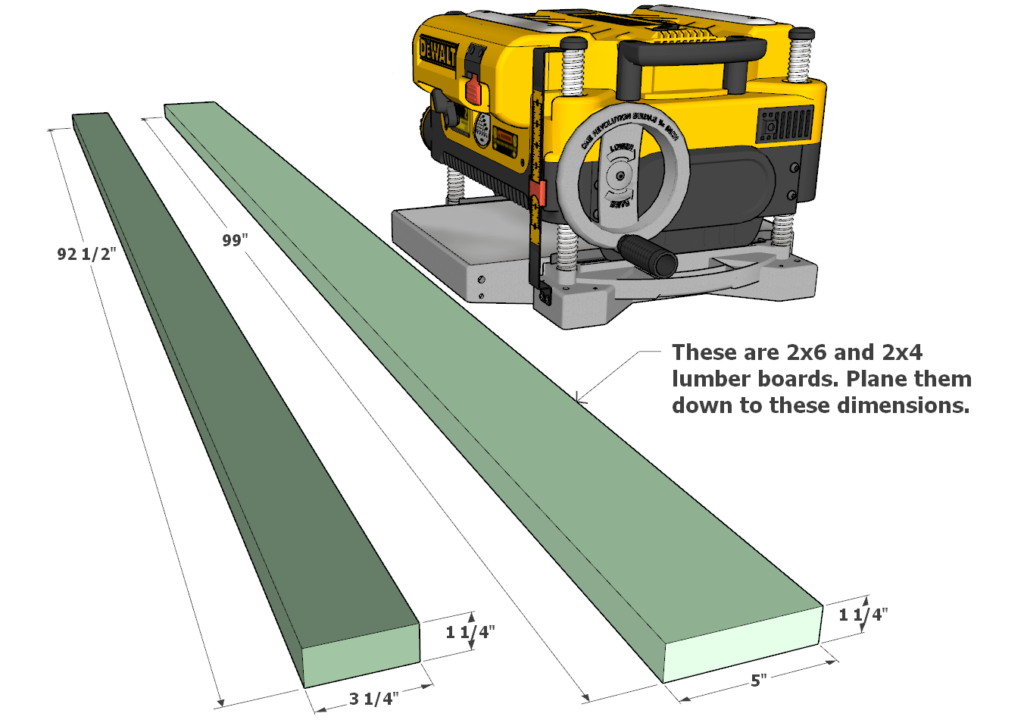
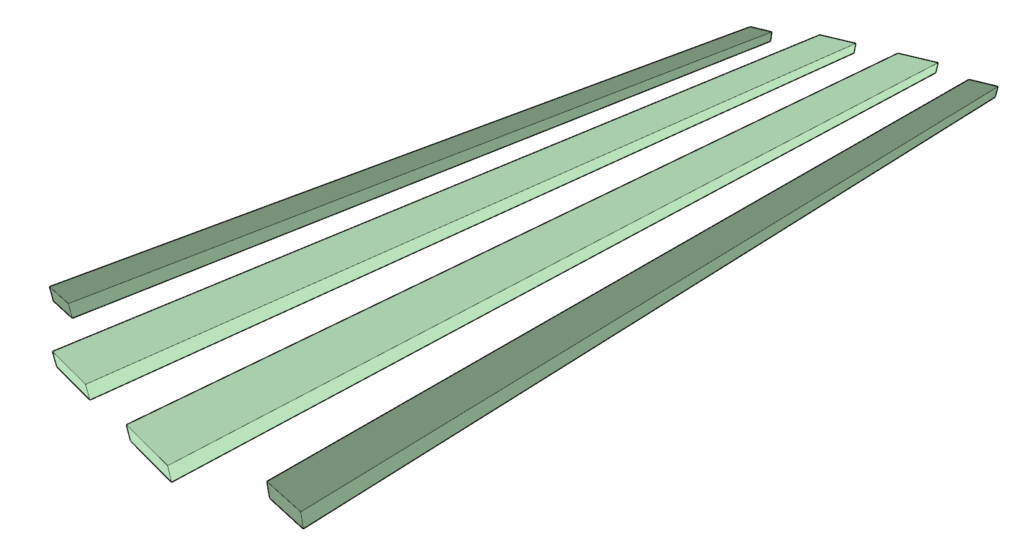
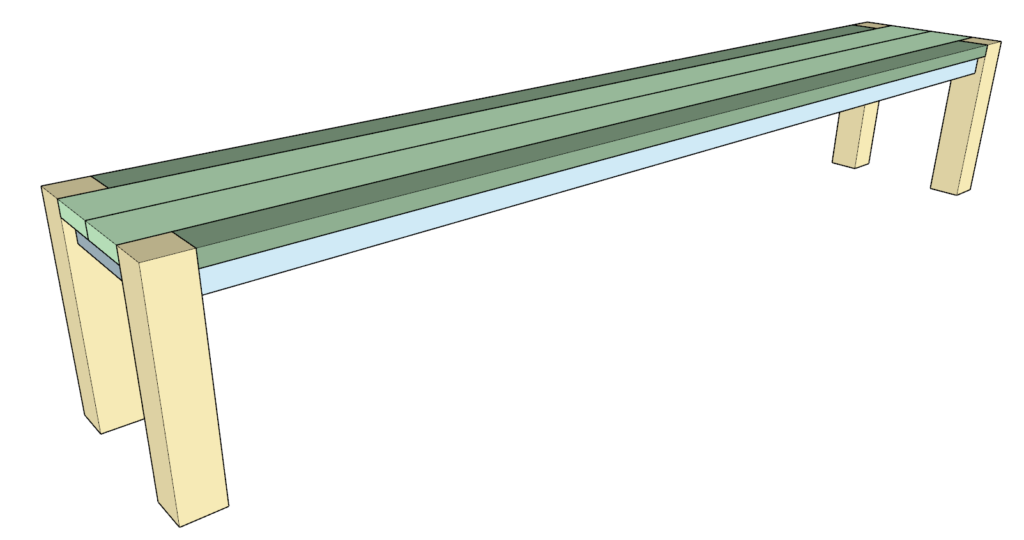
- Gather Materials: Two 92-1/2-inch long 2×4 lumber boards (dark green in images) and two 99-inch long 2×6 lumber boards (light green in images).
4.2 Plane the Lumber Boards
- Set Up the Planer: Use a benchtop planer to ensure all boards are consistently planed.
- Dimensions: Plane all boards down to 5 inches wide and 1-1/4 inches thick.
- Planing Tips:
- Do not remove too much material at once to avoid gouging the wood.
- Take multiple light passes, especially around knots, to protect the wood and achieve a smooth finish.
4.3 Mark the Joining Ends
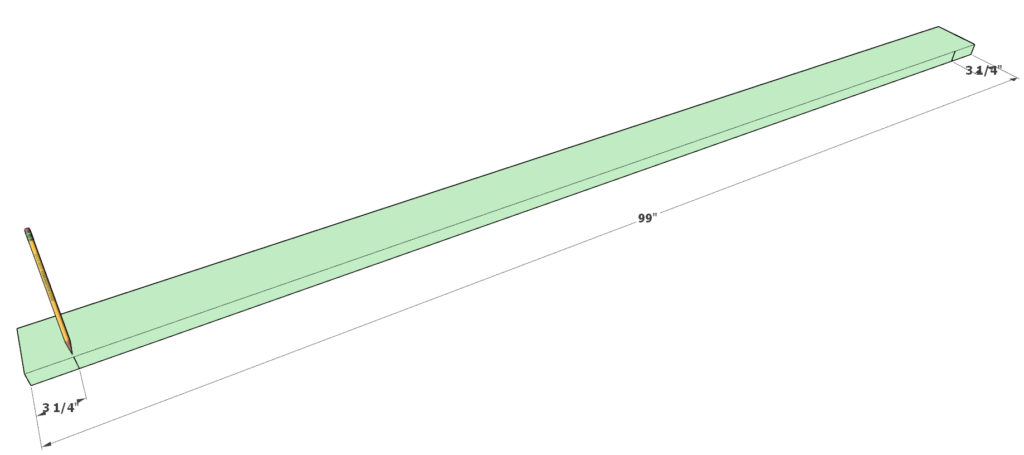
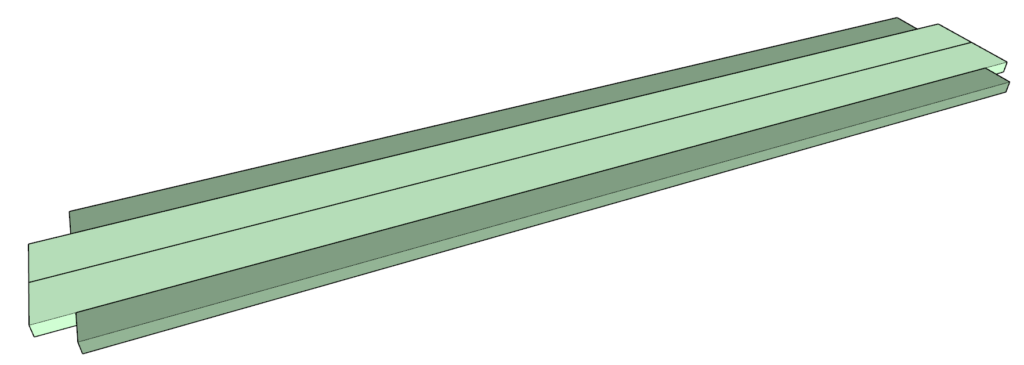
- Mark Ends: Take two of the 99-inch boards and mark 3-1/4 inches from each end. These marks indicate where the boards will be joined.
4.4 Arrange the Boards
- Layout: Lay out all the boards to determine the best fit, considering wood grain and natural features.
- Alternating Ends: Alternate the end grain direction (arches facing up and down) to prevent the table top from bowing over time.
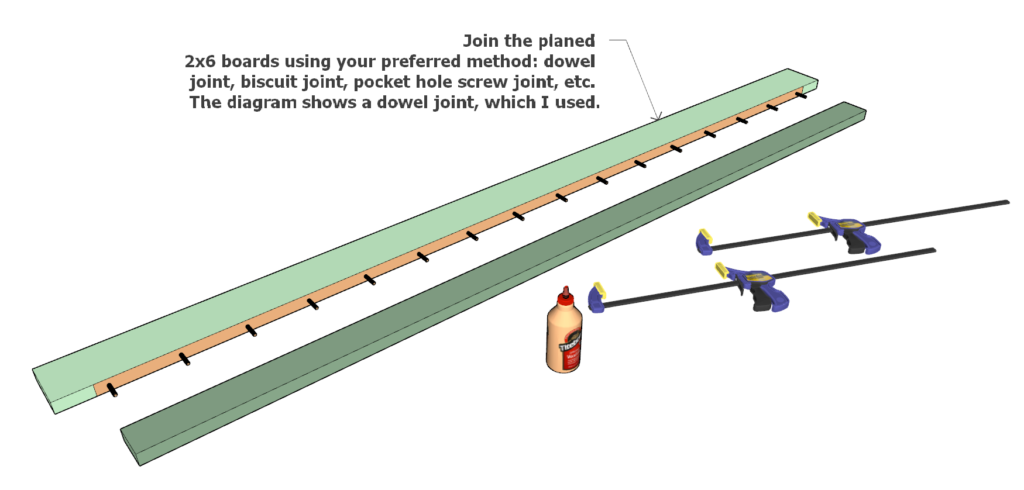
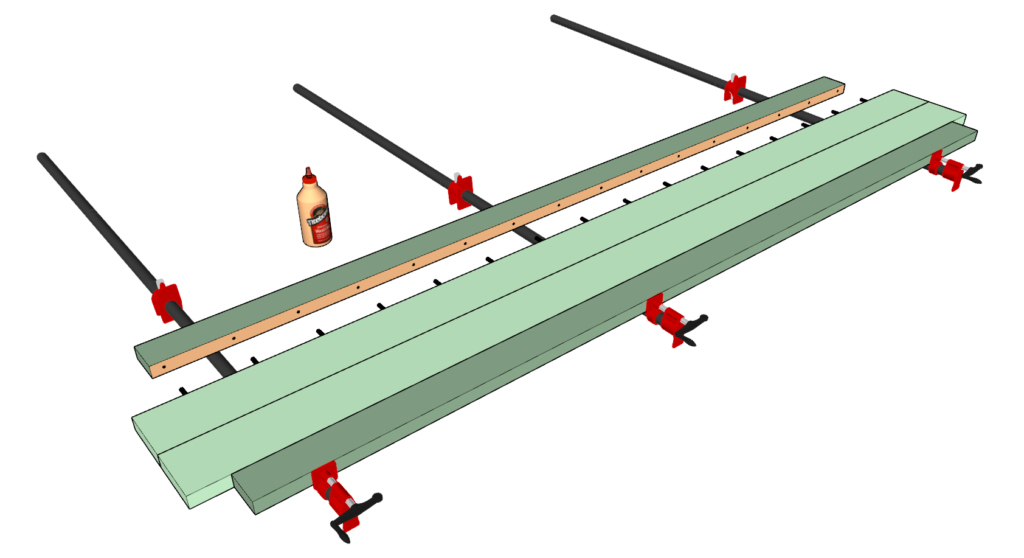
4.5 Join the Boards
- Joining Methods: Choose your preferred joining method:
- Dowel Joint: Shown in the diagram.
- Biscuit Joint
- Pocket Hole Screw Joint
- Join the Boards:
- Apply wood glue to the joining edges.
- Use pipe clamps to hold the boards together firmly.
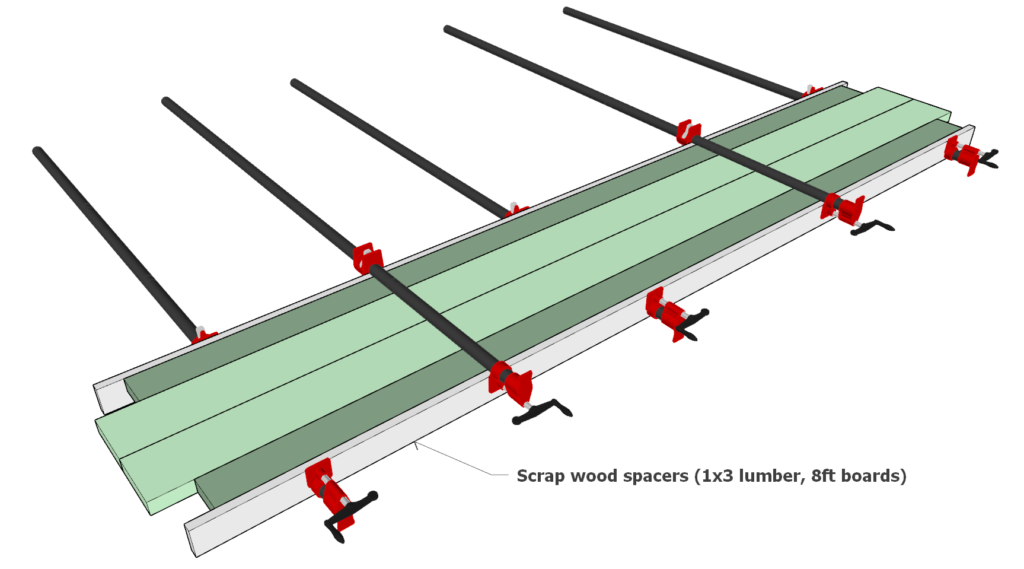
- Place scrap wood between the clamps and the boards to prevent damage.
4.6 Clamping Tips
- Clamp Placement:
- Place pipe clamps at both the top and bottom of the boards to prevent bowing.
- Tighten the clamps gradually to ensure even pressure.
4.7 Drying and Sanding
- Drying Time: Allow the glue to dry as per the manufacturer’s instructions (usually 24-72 hours).
- Initial Sanding:
- Start with coarse sandpaper to smooth the surface.
- Finish with finer sandpaper for a polished look.
- Final Sanding: The final sanding and finishing will be completed after the table is fully assembled.
Step 5: Prepare and Assemble the Benchtop Reinforcement Frame
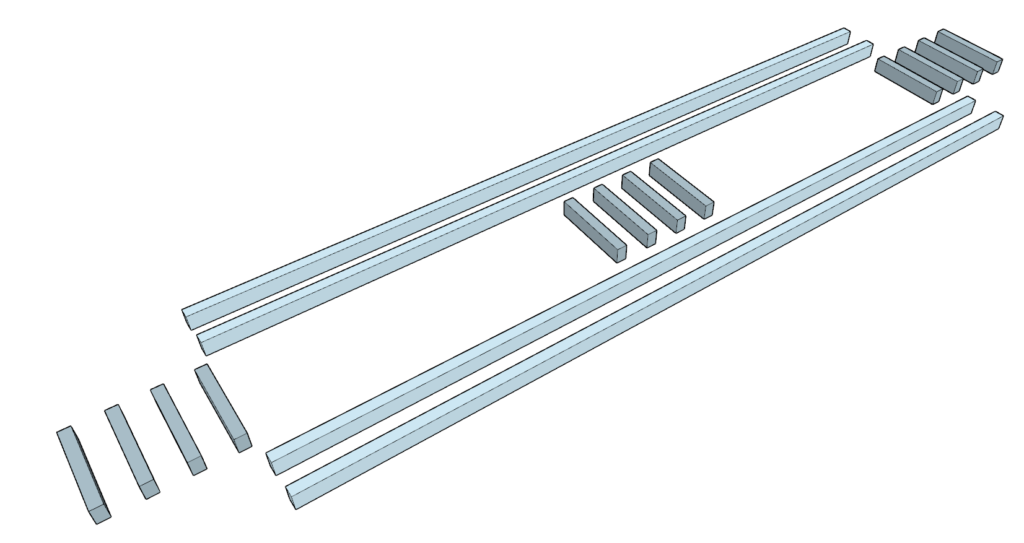
5.1 Cut and Plane the Reinforcement Pieces
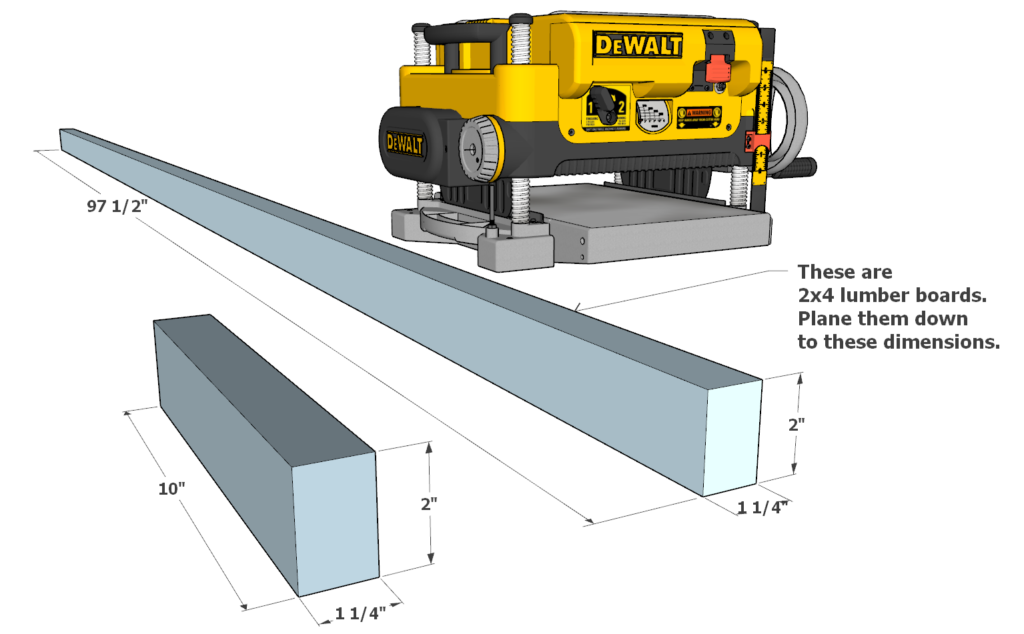
- Gather Materials: Twelve 30-inch 2×4 lumber boards (light blue) and six 110-1/2 inch long 2×4 lumber boards (dark blue).
- Measurements:
- Cut the twelve dark blue boards to 10 inches in length.
- Cut the four light blue boards to 97-1/2 inches in length.
- Planing Dimensions: Plane all boards down to 1-1/4 inches wide and 2 inches tall.
- Tip: If you prefer, you can hold off on planing the boards down to 2 inches until after gluing. This way, you can remove the dried glue and extra wood simultaneously, saving time in sanding.
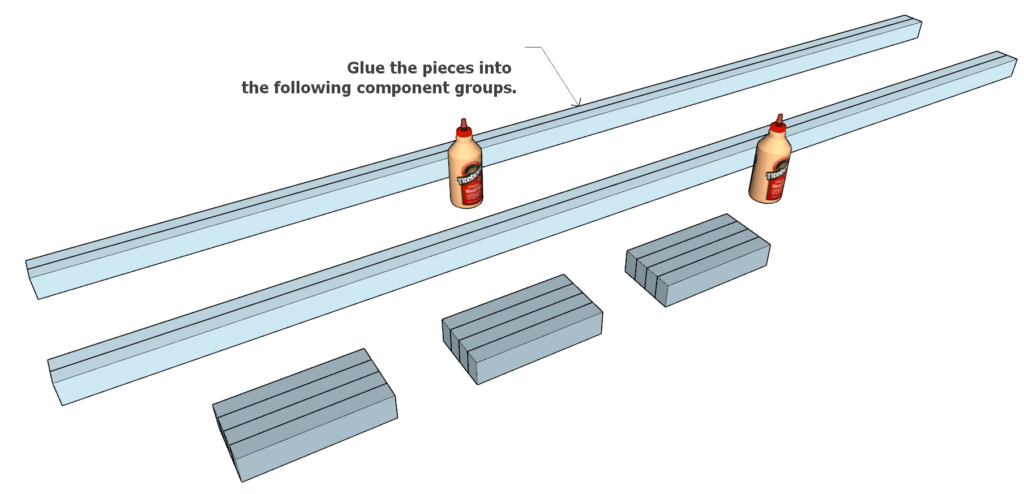
5.2 Layout and Gluing
- Layout: Lay out all the boards to determine the best fit. Match the boards based on their natural fit and grain direction.
- Glue Boards:
- Dark Blue Boards: Glue the dark blue boards together as shown in the diagram.
- Light Blue Boards: Glue the light blue boards together as shown in the diagram.
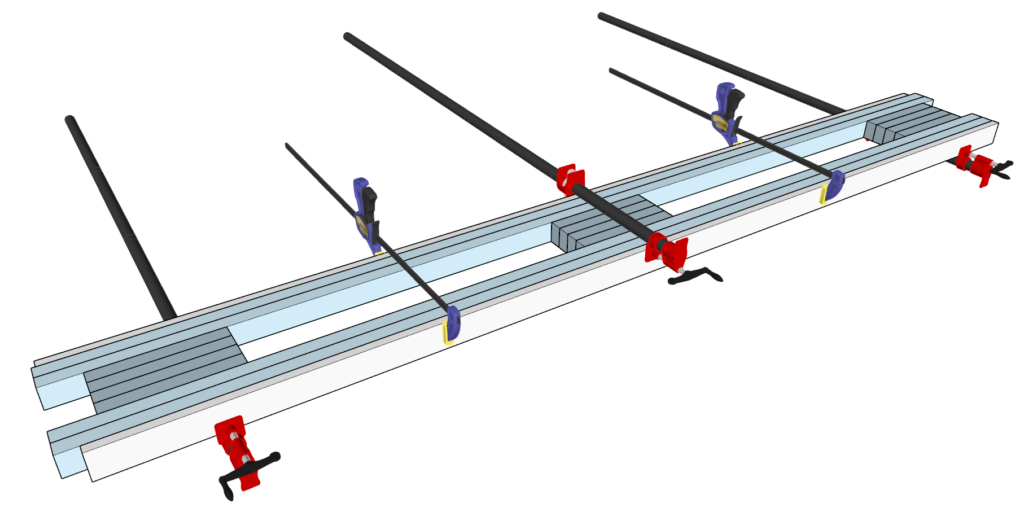
- Clamping: Use pipe clamps and handheld clamps to hold the glued boards together while they dry.
- Tip: Use scrap wood as spacers between the clamps and the boards to prevent the wood from being damaged by the clamp pressure.
5.3 Planing and Jointing the Assembled Components
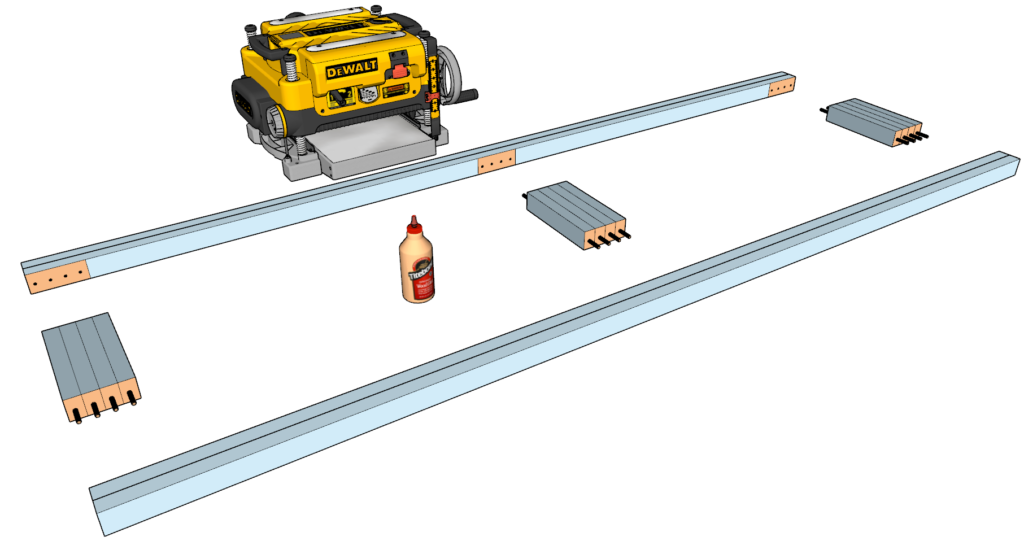
- Planing: If you chose to plane the boards after gluing, plane the assembled components down to 2 inches tall at this point.
- Adding Joints: Add dowels, biscuit joints, or pocket holes to bring the frame together.
- Tip: Dowel joints are highly recommended for this step for their strength and reliability.
- Gluing: Apply wood glue to all joint areas.
- Clamping: Use pipe clamps and scrap wood spacers to hold the boards together securely while the glue dries.
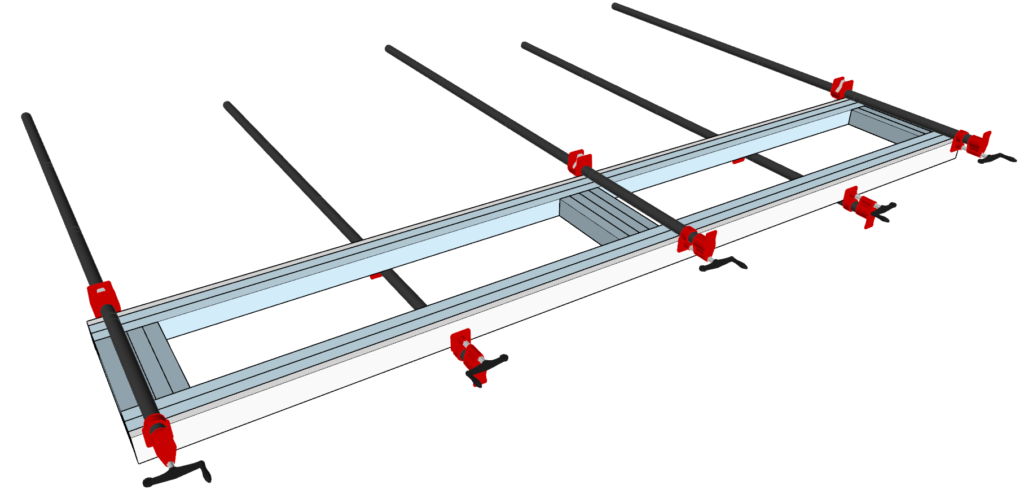
5.4 Cutting the Reinforcement Frame Ends
- Cut Ends: Once the rectangular reinforcement frame is dry, cut the ends at a 45-degree angle.
- Sanding: Rough sand and then fine sand the cut ends for a smooth finish.
- Tip: If your benchtop from step 4 isn’t perfectly aligned, overlay the benchtop and reinforcement frame to see how they fit together. This will help you determine the exact amount to cut from each corner.
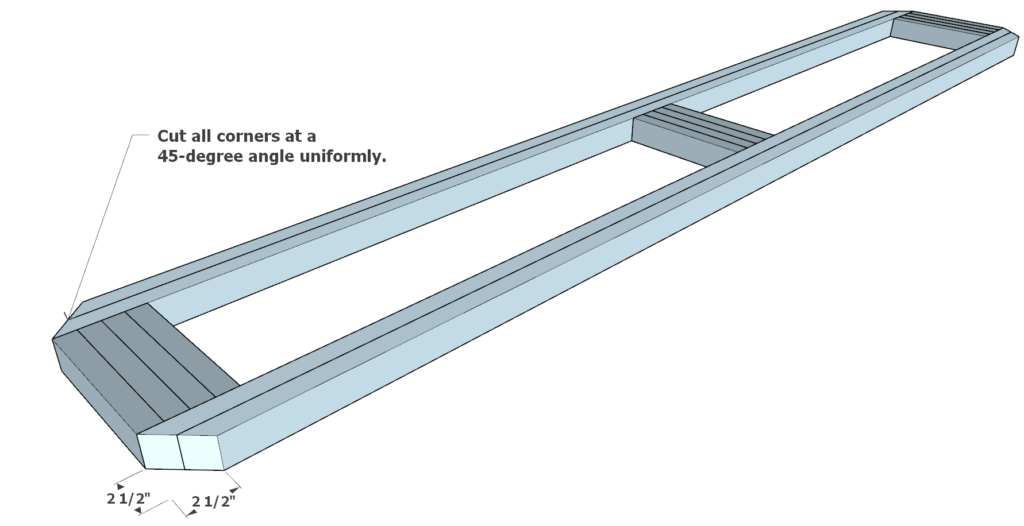
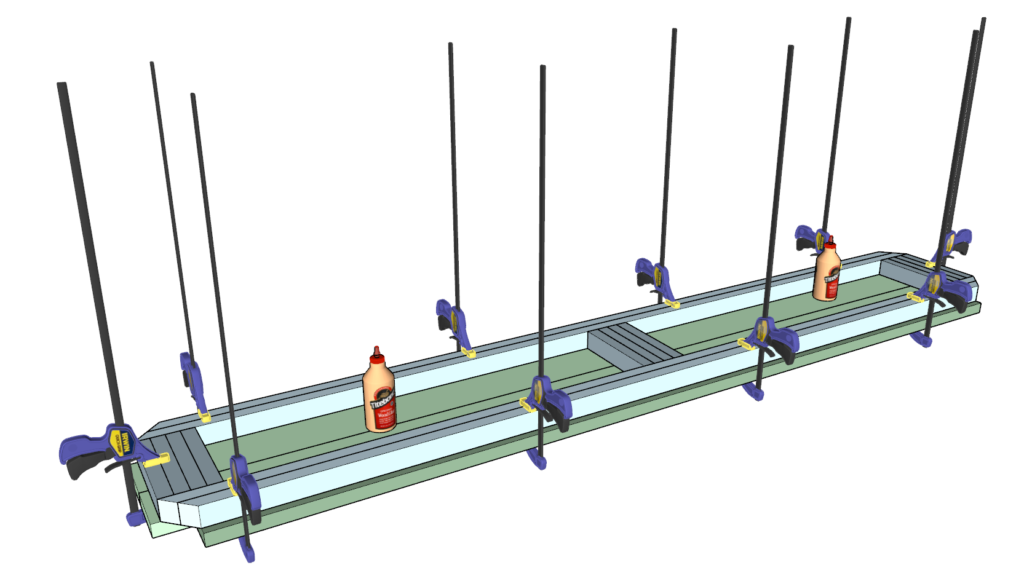
5.5 Final Assembly
- Prepare for Gluing: Ensure both the benchtop and the reinforcement frame are free of dust and debris.
- Tip: Use a generous amount of wood glue, but remember to wipe away excess glue after clamping to avoid difficulty in sanding later.
- Glue the Frame to the benchtop: Apply glue and use pipe clamps to secure the reinforcement frame to the benchtop.
- Drying Time: Allow the assembly to dry fully according to the glue manufacturer’s instructions.
5.6 Final Tips
- Cleaning Before Gluing: Wipe down both surfaces to remove any fine dust. This ensures a strong adhesive bond.
- Clamp Pressure: Apply adequate pressure with the clamps to ensure a tight bond, but not so much that it deforms the wood.
Step 6: Cut, Plane, and Attach the Table Legs
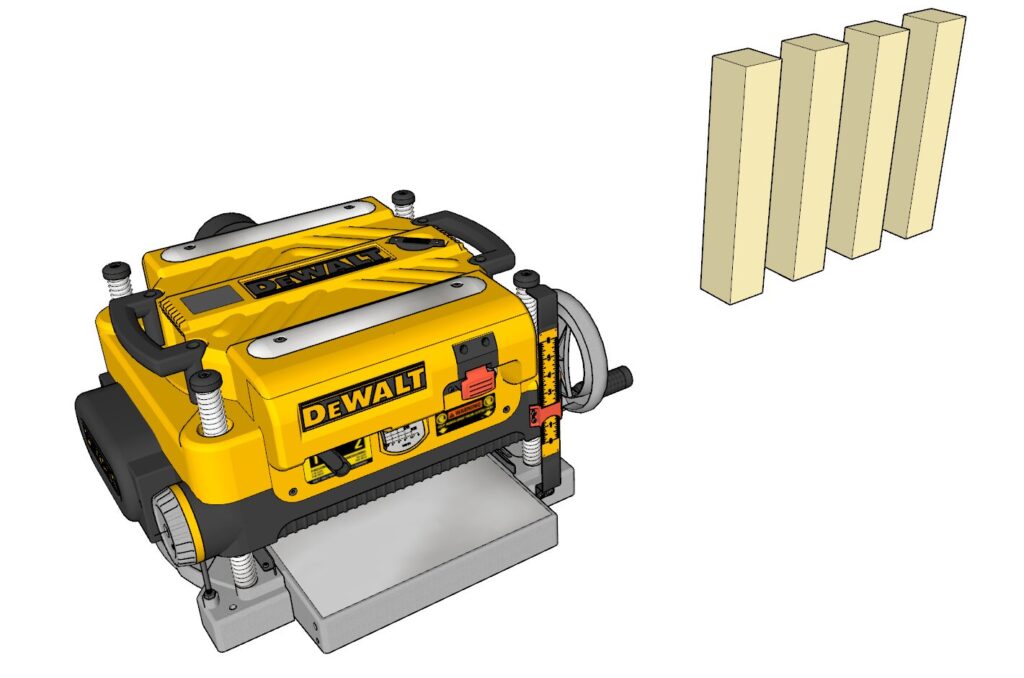
6.1 Cut and Plane the Bench Legs
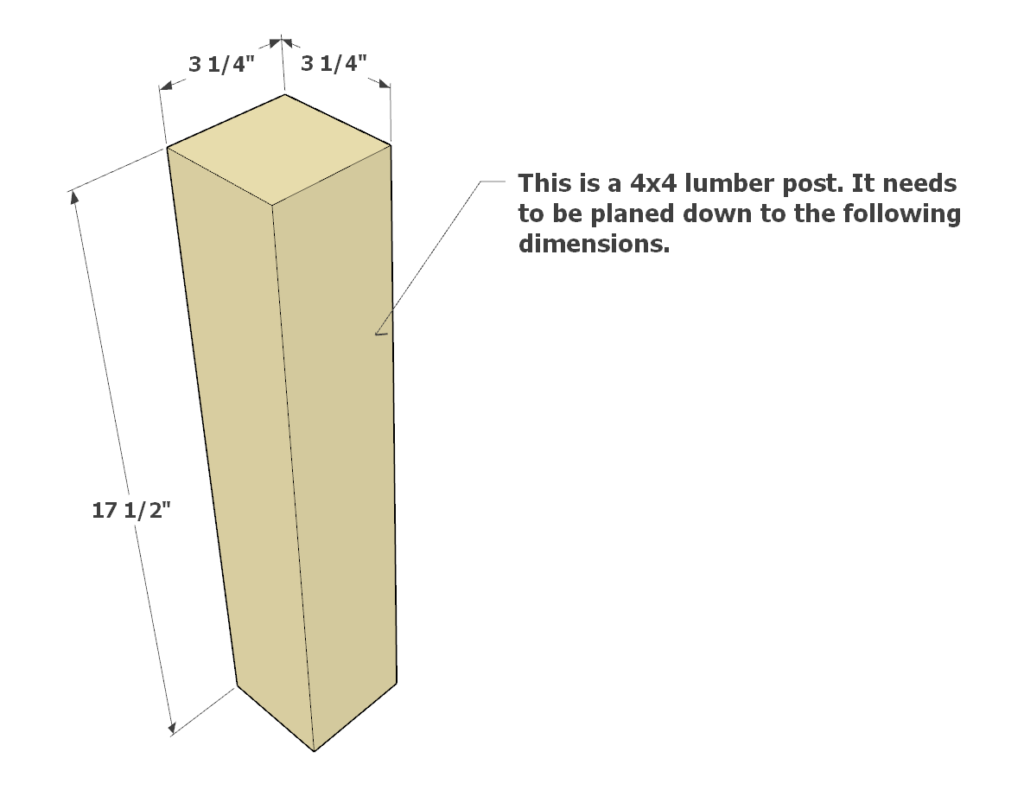
- Gather Materials: Four 17-1/2 inch long 4×4 lumber posts (pale yellow in diagrams).
- Planing Dimensions: Plane each post down to 3-1/4 inches thick by 3-1/4 inches deep.
- Planing Tips: Follow the same benchtop planer instructions as in previous steps. Remove material gradually to avoid damaging the wood.
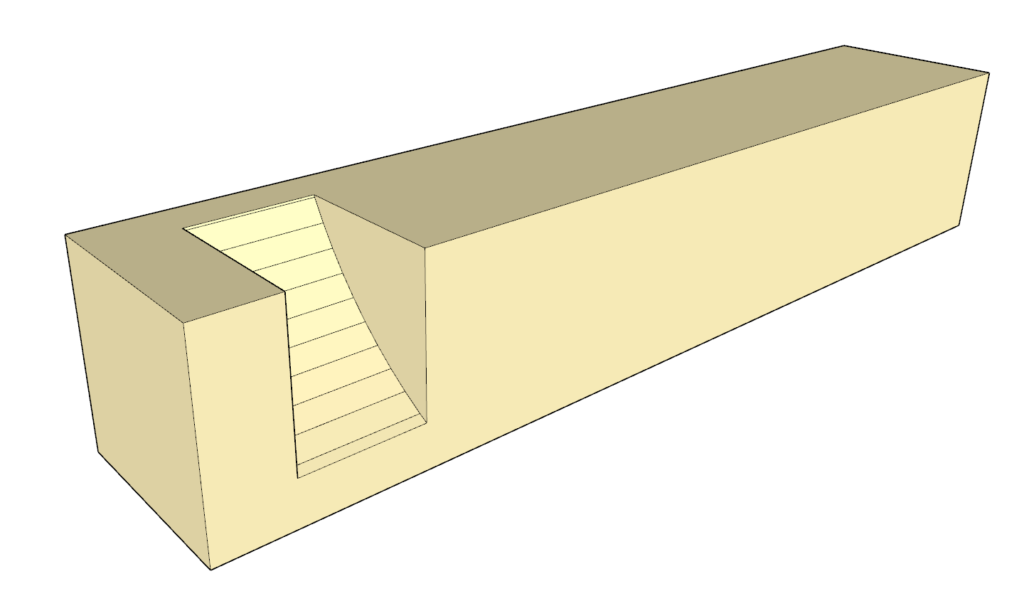
6.2 Mark and Cut the Semi-Circular Grooves
Position and Mark:
- Place each leg where it will be attached to the table reinforcement frame from Step 5.
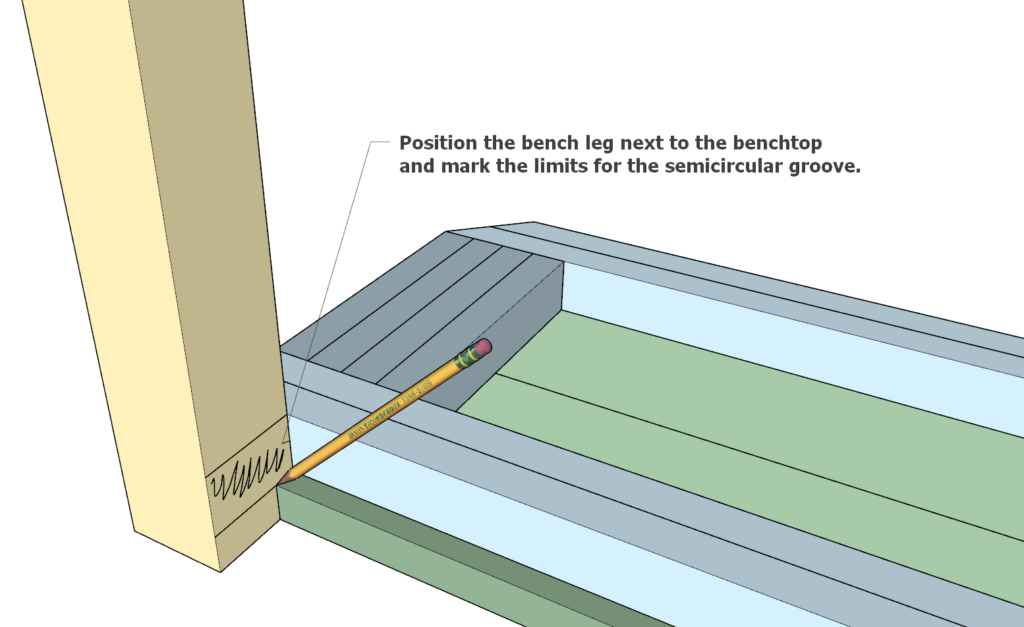
- Use a pencil to mark the depth of the semi-circular groove on the leg.
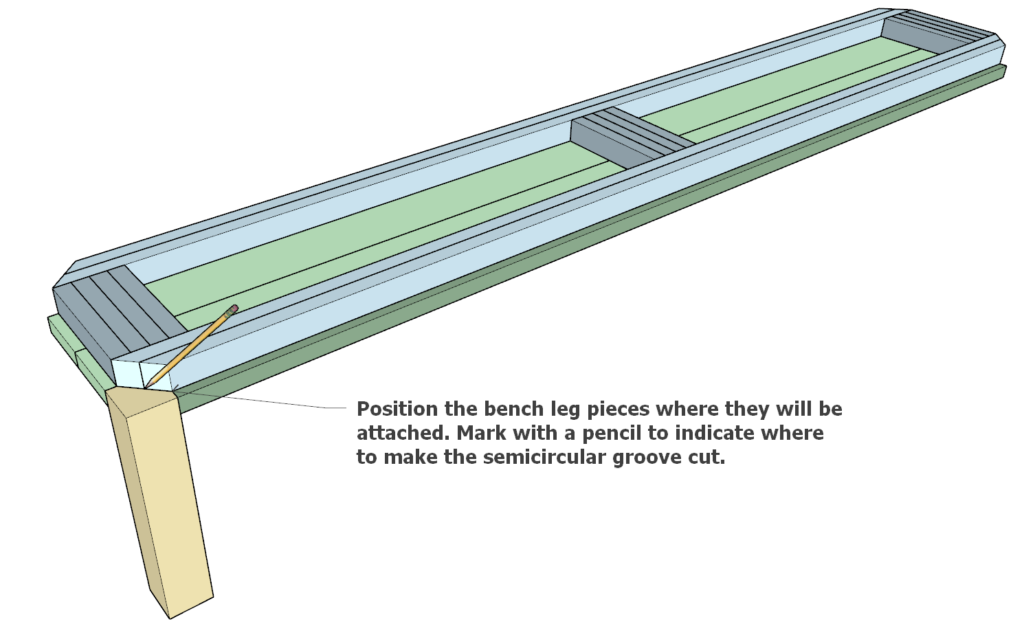
- Measure and mark the thickness of the groove to match the thickness of the table reinforcement frame (ideally 2 inches).
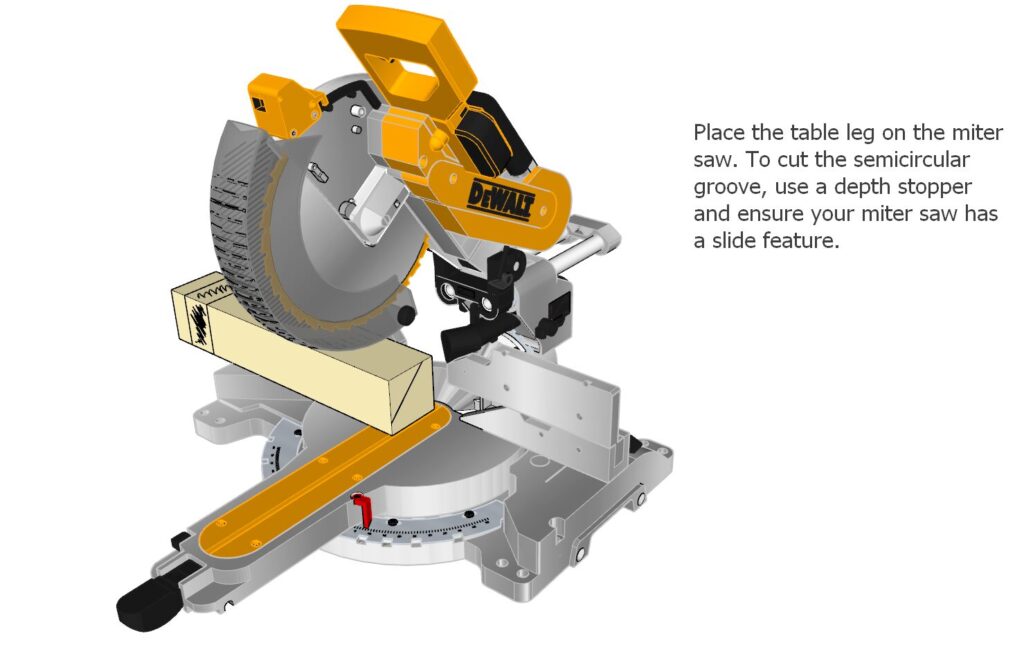
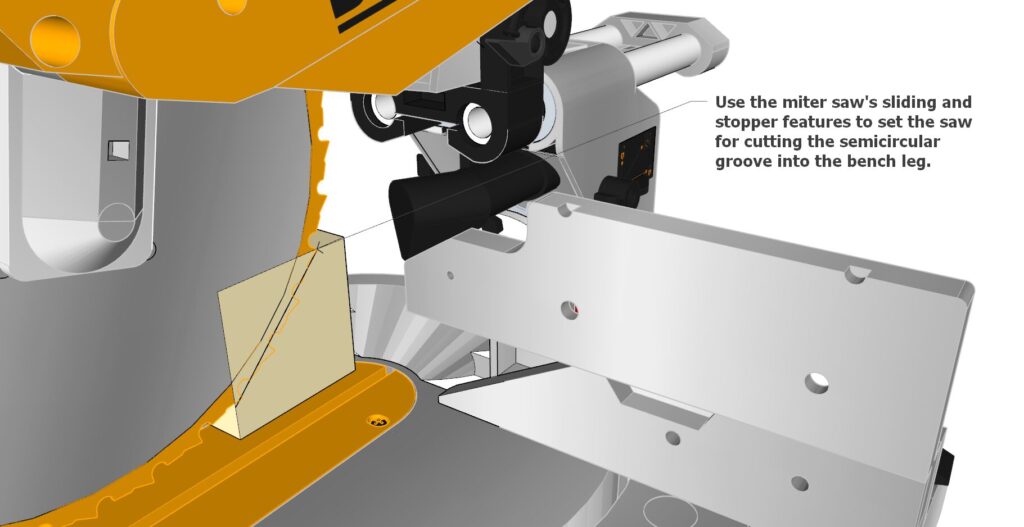
Set Up the Miter Saw:
- Ensure the miter saw has a sliding feature, a depth stopper, and a standard 12-inch blade.
- Use the depth stopper and slider to set up the saw for cutting the semi-circular groove.
6.3 Cut the Semi-Circular Grooves
- Cut the Groove:
- Use the miter saw’s chop feature to gradually cut the first semi-circular groove.
- Follow the marked lines carefully, undercutting rather than overcutting.
- Test fit the leg to the bench reinforcement frame to ensure a snug fit.
6.4 Test Fit and Final Adjustments
- Test Fit All Legs: Test fit all four legs to the bench reinforcement frame and keep track of which leg goes to which corner.
- Final Adjustments: If needed, make final adjustments to ensure all legs fit snugly without gaps.
6.5 Attach the Legs to the Bench
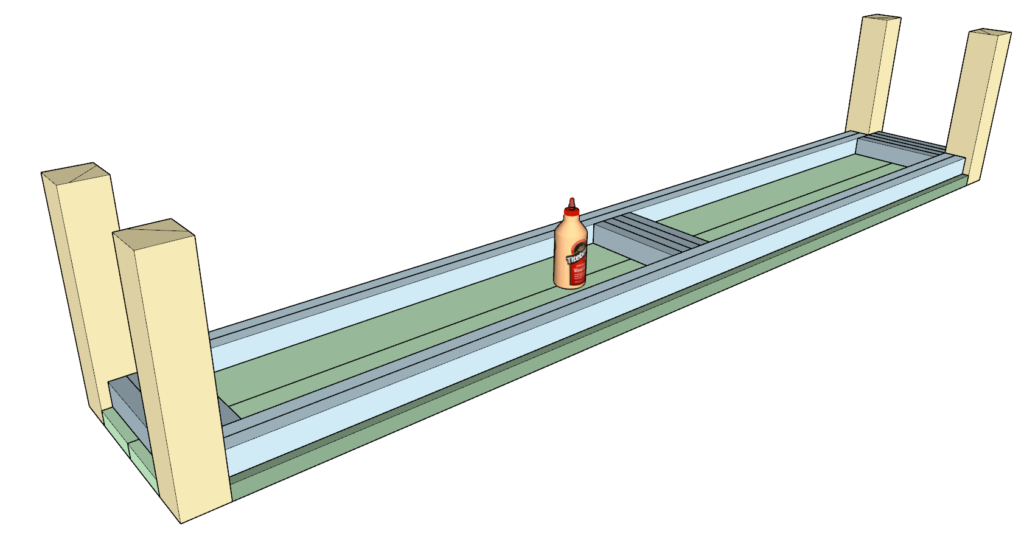
- Apply Glue: Apply a generous amount of wood glue to all areas that will be joined.
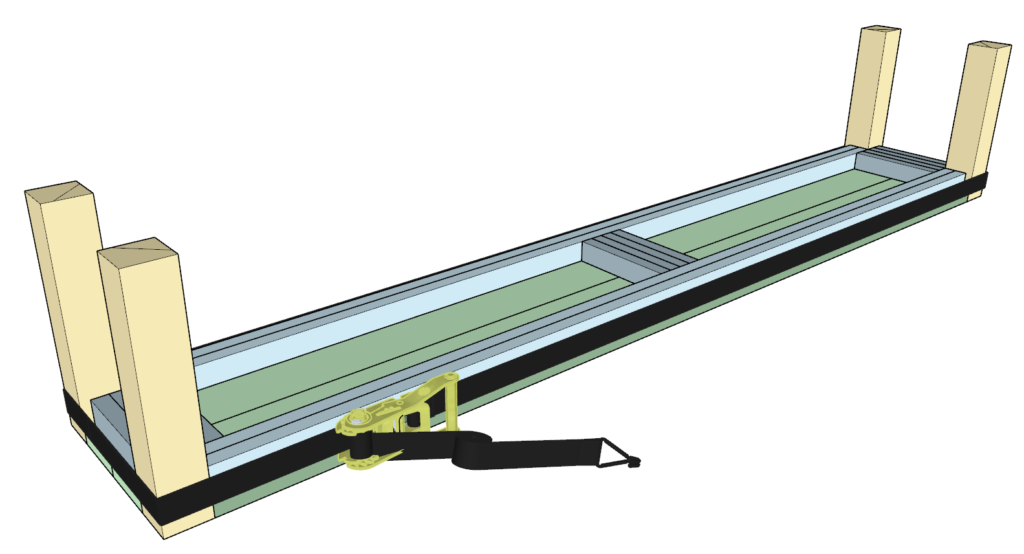
- Attach Legs:
- Use a ratchet strap to hold the legs tightly against the table top and reinforcement frame.
- Ensure the legs are securely in place and let the glue dry completely.
- Tip: If one ratchet strap is not enough, combine two.
6.6 Final Sanding and Routing
- Sand the Entire Bench:
- Use a coarse sandpaper first, followed by a finer sandpaper to ensure a smooth finish.
- Optional Routing:
- Use a router to round off the edges of the Bench. This prevents sharp edges and ensures comfort for those sitting on the bench.
- Clean the bench:
- Wipe down the entire bench to remove any dust and prepare it for the finishing process (covered at the end of this DIY plan).
Step 7: Finishing the Table
7.1 Sanding the Table
Coarse Sanding
Start with Coarse Sandpaper:
- Use 80-grit sandpaper to begin.
- Sand all surfaces of the table, including the tabletop, legs, and reinforcement frame.
- Sand in the direction of the wood grain to prevent scratches.
- Apply even pressure and ensure you sand out any rough patches, saw marks, or uneven areas.
Inspect for Imperfections:
- After coarse sanding, inspect the table for any holes, knots, or cracks that need filling.
- Ensure the surface is smooth and free of rough spots.
Fine Sanding
Switch to Fine Sandpaper:
- Use 220-grit sandpaper for the next sanding phase.
- Sand all surfaces again, following the wood grain.
- Focus on achieving a smooth, even finish.
Final Inspection:
- Inspect the table once more for any remaining imperfections.
- Ensure the surface is silky smooth and ready for the finishing process.
7.2 Filling Holes and Cracks with Epoxy
Preparing the Epoxy
Ventilation and Safety:
- Work in a well-ventilated area.
- Wear safety gloves, goggles, and a mask to protect yourself from fumes and contact with the epoxy.
Mixing the Epoxy:
- Follow the manufacturer’s instructions for mixing the epoxy resin (Part A) and hardener (Part B).
- Mix the two components and a dark pouder coloring thoroughly in a clean container, ensuring a uniform blend.
- Tip: Use a disposable stir stick for mixing.
Applying the Epoxy
Fill Holes and Cracks:
- Pour the mixed epoxy into any holes, knots, or cracks in the wood.
- Use a putty knife or a similar tool to spread the epoxy evenly and ensure it fills all gaps.
- Tip: Overfill slightly to allow for shrinkage during drying.
Allow to Cure:
- Let the epoxy cure as per the manufacturer’s instructions, typically 24-48 hours.
- Ensure the area is dust-free to prevent particles from settling in the wet epoxy.
Sand the Epoxy:
- Once cured, sand the epoxy-filled areas with fine sandpaper (220-grit) to ensure a smooth surface.
7.3 Applying the Gel Stain
Preparation
- Clean the Surface:
- Wipe down the table with a damp cloth to remove any dust from sanding.
- Allow the table to dry completely.
Applying the Stain
Apply MINWAX Aged Oak 602 Gel Stain:
- Use a clean cloth or brush to apply the gel stain.
- Work in small sections, applying a thin, even coat.
- Rub the stain into the wood, following the grain.
Wipe Off Excess Stain:
- After a few minutes, wipe off any excess stain with a clean, dry cloth.
- Ensure an even application with no blotches or streaks.
Drying Time:
- Allow the stain to dry as per the manufacturer’s instructions, usually 8-24 hours.
7.4 Applying the Vinegar and Steel Wool Concoction
Preparation
- Create the Concoction:
- Mix 8 cups of vinegar with five steel wool bundles in a container.
- Let the mixture sit for about three days to allow the steel wool to dissolve partially.
- Strain the mixture to remove any remaining steel wool fragments.
- Work in a well-ventilated area and wear gloves to protect your hands.
Applying the Concoction
Application:
- Use a regular brush to apply the vinegar and steel wool concoction to the stained wood.
- Apply an even coat over the entire table.
- Work in a well-ventilated area and wear gloves to protect your hands.
Drying Time:
- Allow the mixture to dry on the wood. The color will darken as it dries.
- This process can take several hours to a full day, depending on humidity and temperature.
7.5 Finishing with Furniture Wax
Preparation
- Clean the Surface:
- Ensure the table is completely dry and free of dust.
Applying the Wax
Apply Furniture Beeswax:
- Use clear, matte furniture beeswax for a smooth finish.
- Apply a small amount of wax with a clean, soft cloth.
- Rub the wax into the wood in circular motions, ensuring even coverage.
Buff the Surface:
- After applying the wax, buff the surface with a clean, dry cloth.
- Buffing will enhance the smoothness and bring out the natural shine of the wood.
Final Inspection:
- Inspect the table for any missed spots or uneven areas.
- Apply additional wax and buff as needed to achieve a perfect finish.
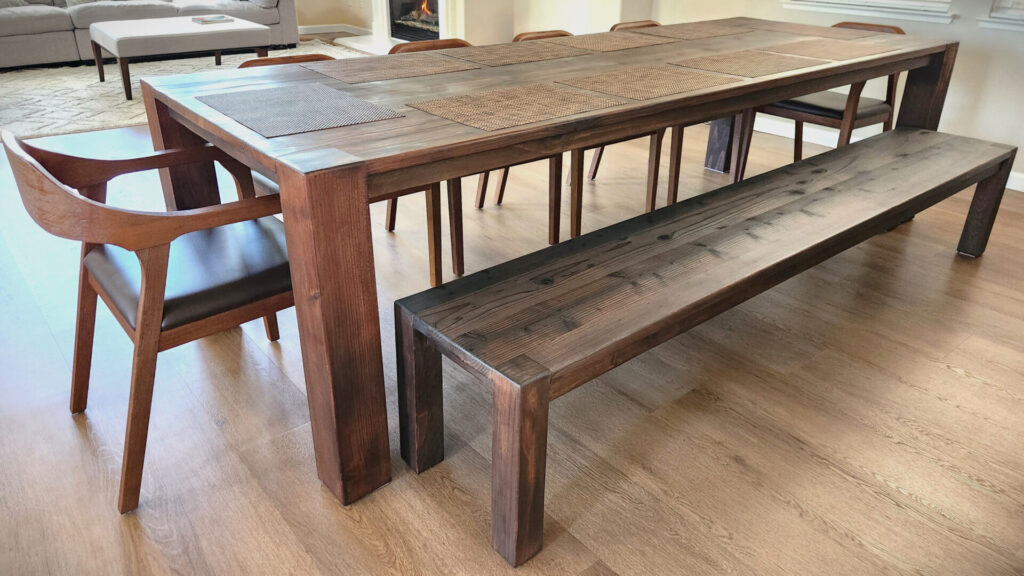
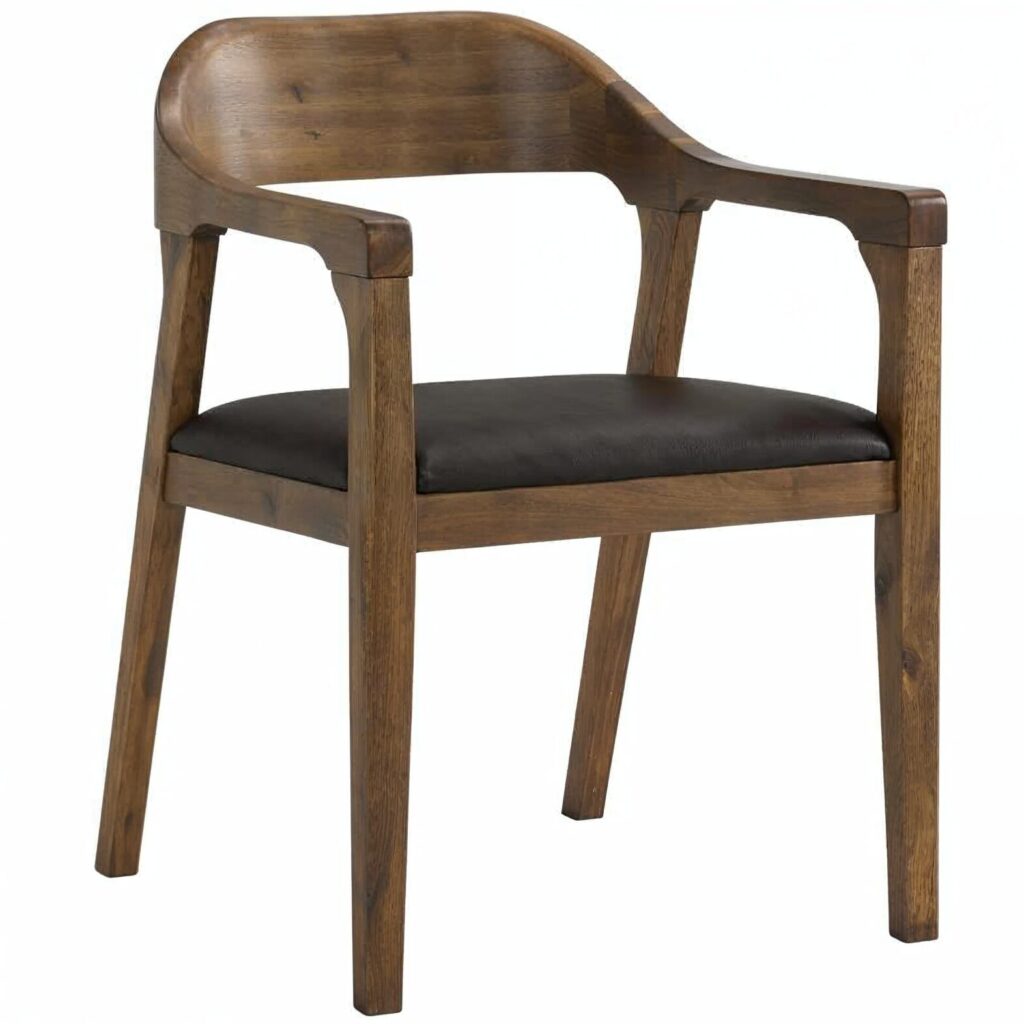
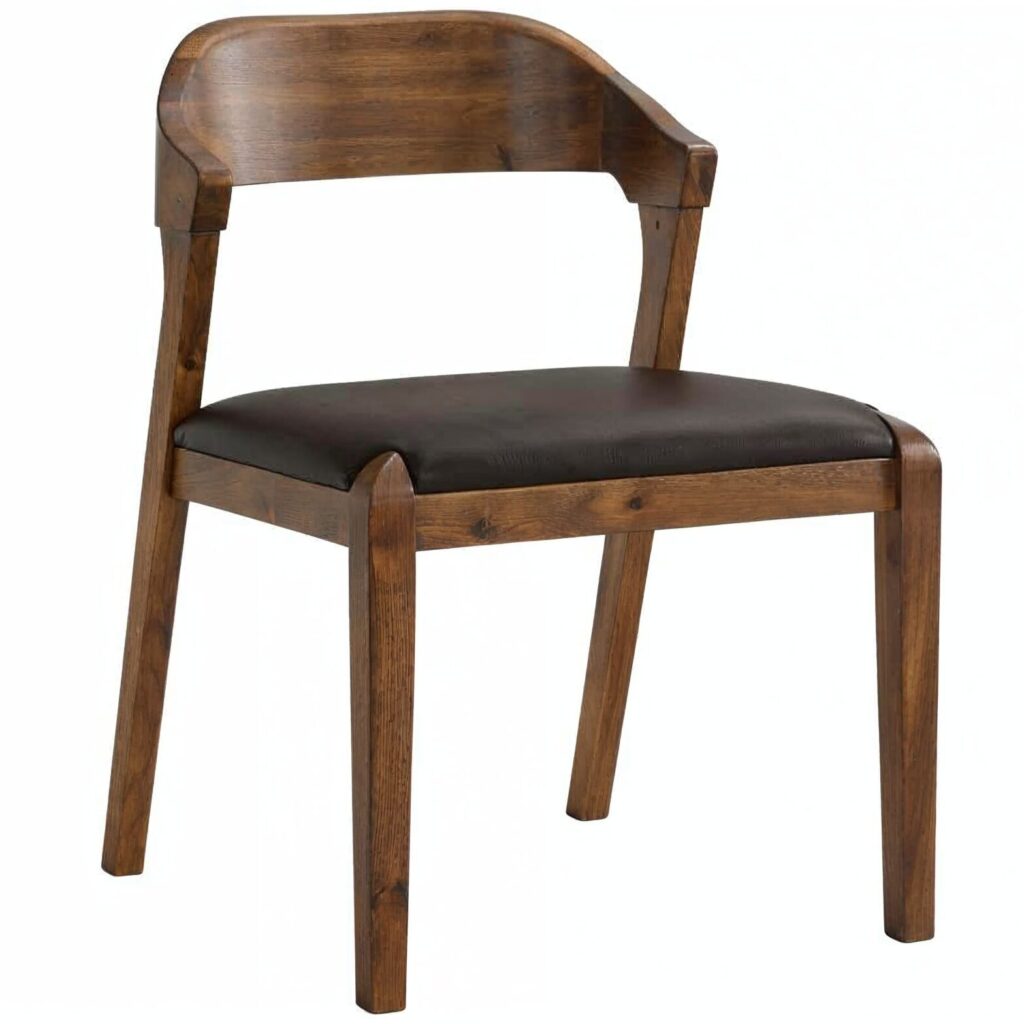
Perfect Dining Chairs: Boraam Rasmus Dining Arm Chairs [Chestnut Wire-Brush]
When completing my dining set, I chose the Boraam Rasmus Dining Arm Chairs in a beautiful Chestnut Wire-Brush finish. These chairs are not only stylish but also highly functional, making them a perfect addition to any dining room.
Why I Love These Chairs:
- Sturdy and Spacious: The chairs are wide, measuring 22″ D x 21″ W x 30.5″ H, ensuring they can comfortably accommodate people of all sizes. This makes them ideal for family gatherings and dinner parties where comfort is key.
- Solid Construction: Built from eco-friendly rubberwood, these chairs are incredibly durable. The high-density foam-padded seat cushion provides exceptional comfort, making long meals a pleasure.
- Stylish Design: The chestnut wire-brush finish adds a touch of rustic charm, while the open back design keeps the look modern and airy. They fit seamlessly with the overall style and color of my dining table.
- Easy Assembly: All tools and hardware are included, making the setup process quick and straightforward.
These chairs offer the perfect blend of sturdiness, comfort, and style. If you’re looking to complete your dining set with chairs that can withstand daily use while looking great, the Boraam Rasmus Dining Arm Chairs are an excellent choice.
Where to Get Them:
- With Armrests: Boraam Rasmus Dining Arm Chair [Chestnut Wire-Brush]
- Without Armrests: Boraam Rasmus Dining Chair [Chestnut Wire-Brush]
Note: These links are affiliate links, meaning I earn a commission if you purchase through them at no additional cost to you.

