Overwhelmed by Garage Clutter? Here’s the Solution
Garages often become cluttered dumping grounds where everything gets piled up, from tools and sports gear to seasonal decorations and storage bins. It’s frustrating, stressful, and even unsafe when items are stacked haphazardly, always at risk of toppling over. This chaos makes it impossible to find what you need when you need it, turning your garage from a useful space into a source of constant annoyance.
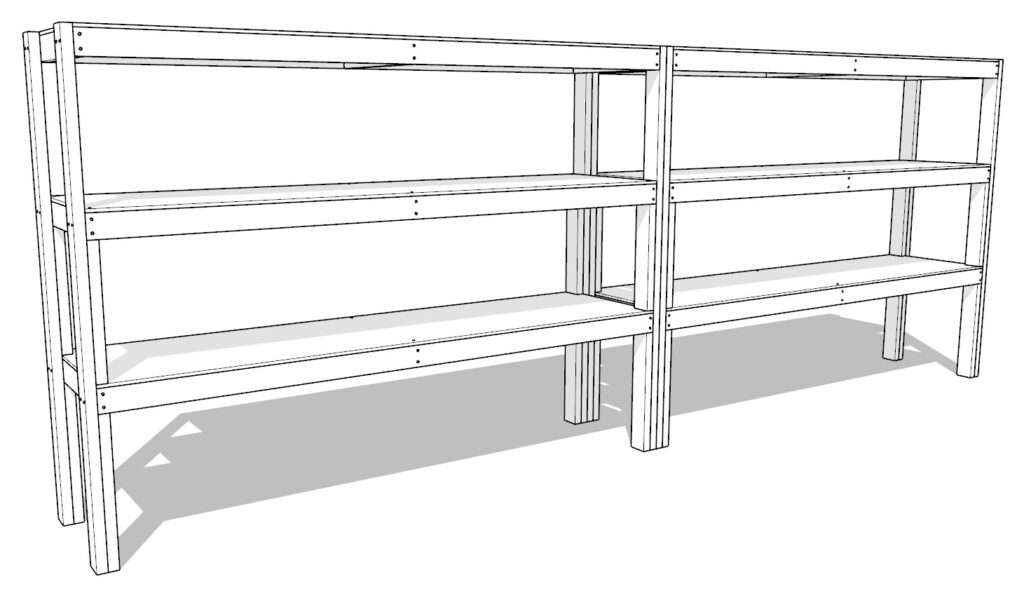
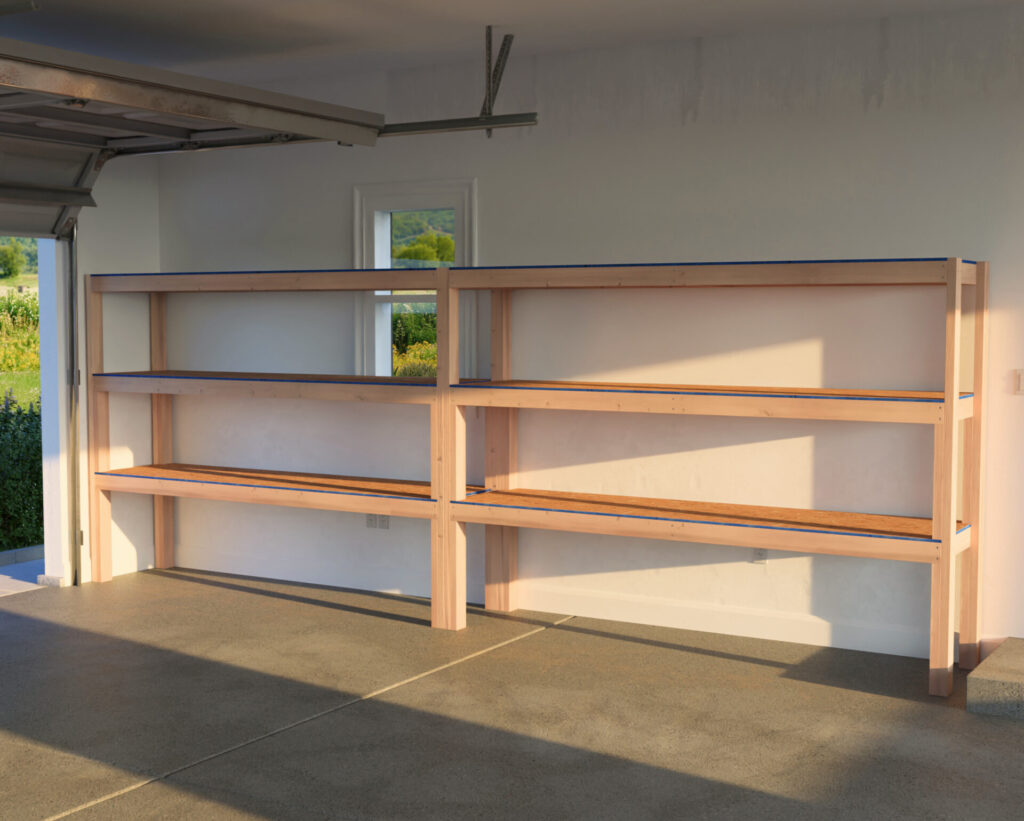
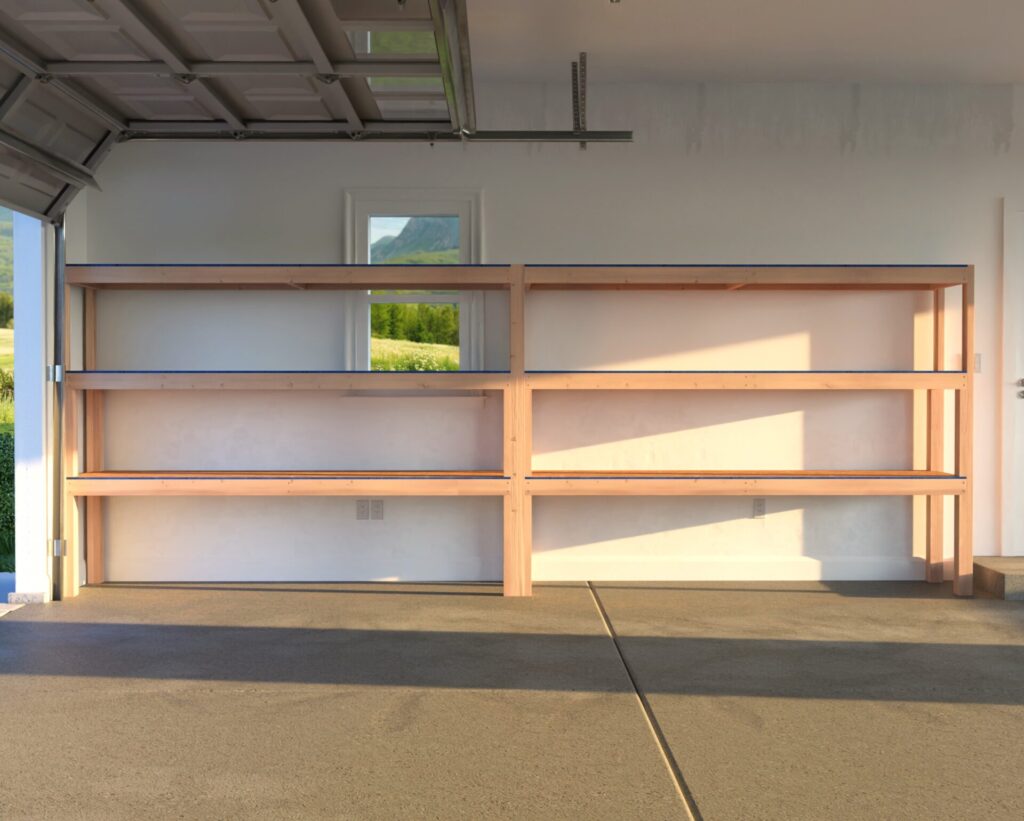
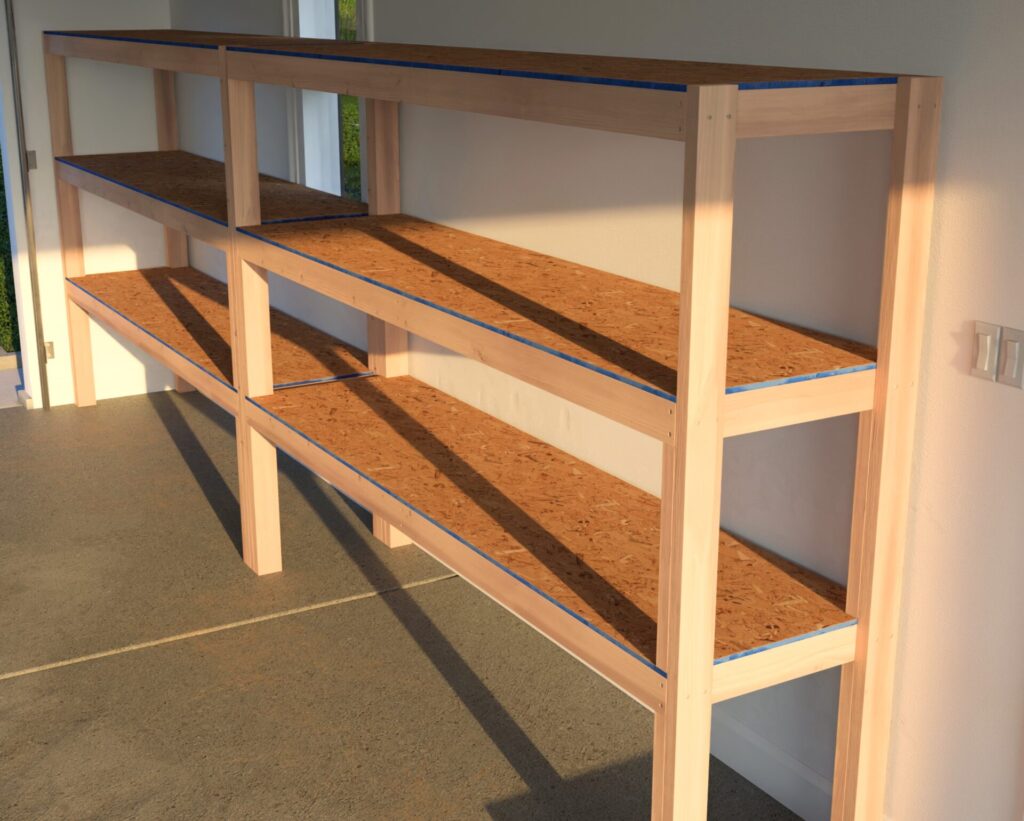
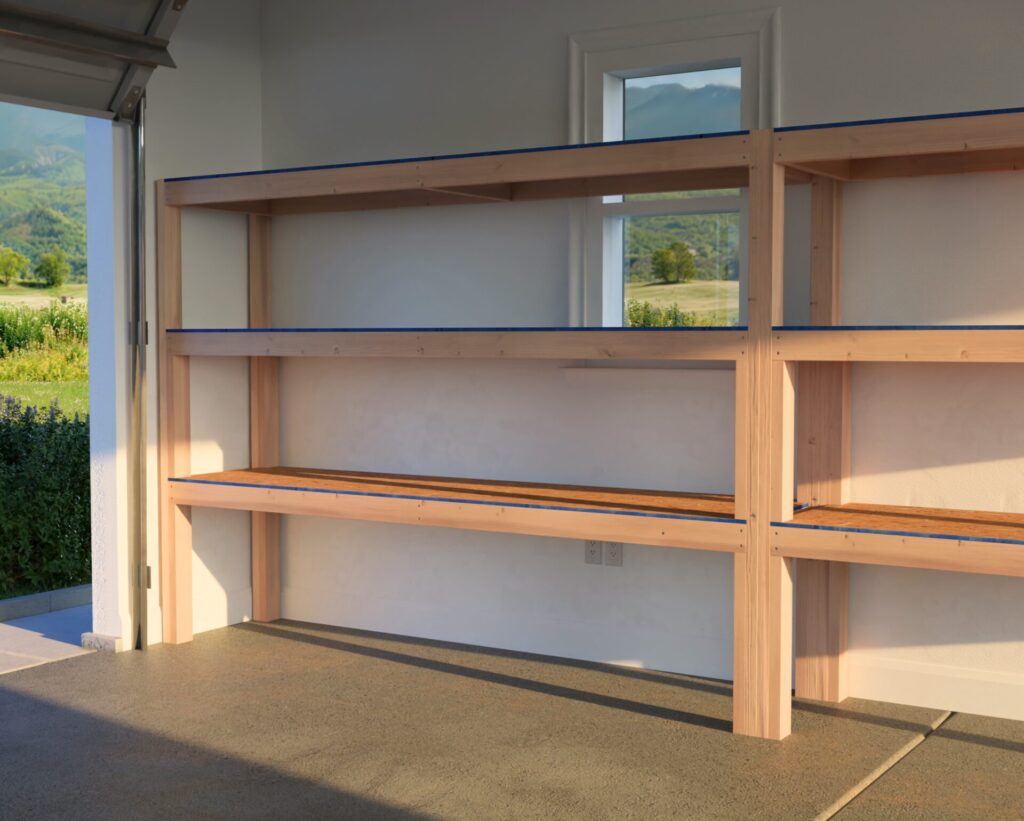
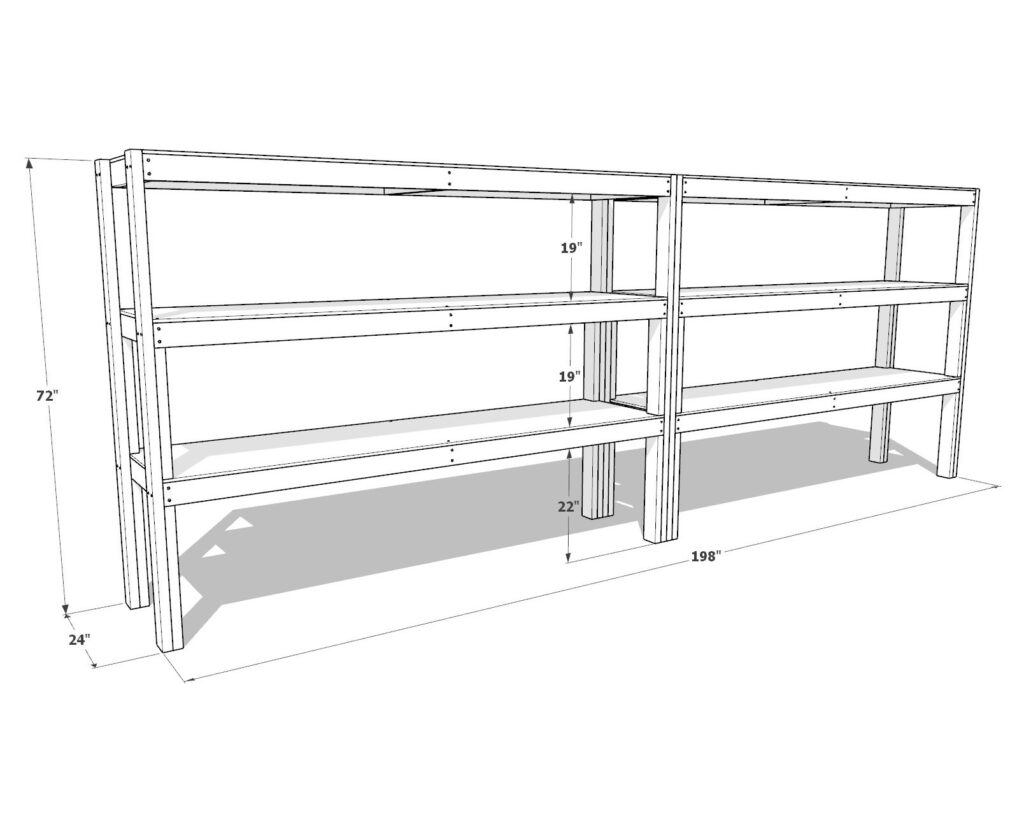
Our heavy-duty garage shelves are designed to solve this problem by helping you reclaim your space. With their impressive 198-inch width and 24-inch depth, these shelves maximize your garage’s vertical room, getting everything off the floor and neatly organized. Built with 2×4 lumber and reinforced with extra supports, these shelves are tough enough to handle just about anything—from car parts and engines to heavy metal tools. The design prioritizes safety and stability, securely anchoring your items and eliminating the worry of things falling or getting damaged.
Discover the Features and Specifications: Engineered for Your Needs
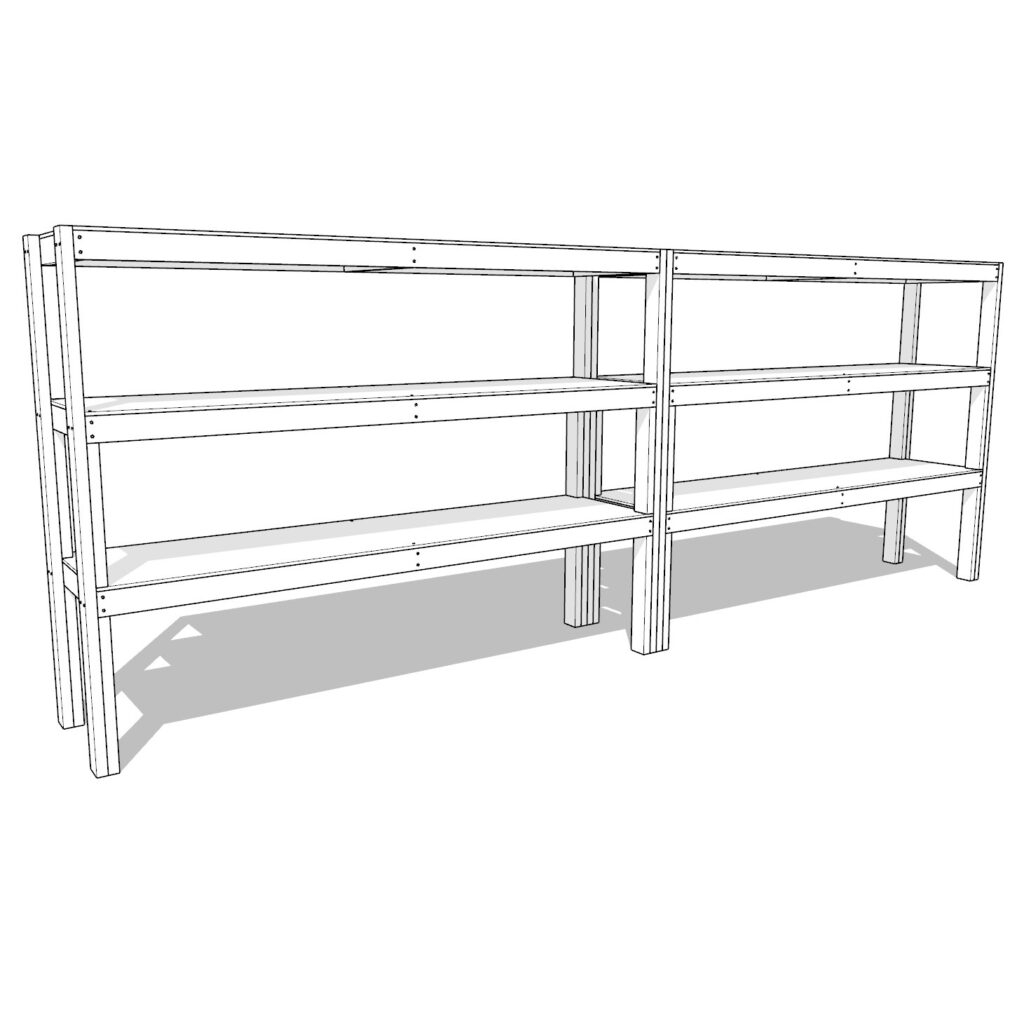
These shelves aren’t just about storage; they’re about creating an efficient, organized, and safe environment that works for you. Comprised of two robust units that connect seamlessly, they offer expansive, customizable storage with three adjustable shelves, each standing 72 inches high. This flexibility means you can adjust the shelves to fit anything from everyday tools to bulky seasonal gear. Whether you choose plywood or composite sheets, both options provide a durable surface that won’t buckle under pressure.
The design is tailored for beginners, with simple 90-degree joints and materials that are easy to source from any hardware store. Plus, the plywood can be pre-cut by stores like Home Depot or Lowe’s, simplifying the process even further. You only need three basic tools—a saw, a drill, and a driver—making this project accessible for anyone ready to take control of their garage clutter. Our guide walks you through each step with clear instructions and tips, ensuring a smooth assembly process.
Why Download the DIY Plan PDF? Unlock Expert Guidance for a Perfect Build
Our DIY plan PDF isn’t just a set of instructions; it’s a complete toolkit designed to ensure your success, especially if you’re new to woodworking. Here’s what you’ll get when you download the guide:
- Step-by-Step Instructions: Written guides that break down every part of the build, so you know exactly what to do from start to finish.
- Color-Coded Diagrams: Visual aids with clear labels and color coding to help you easily identify each piece and understand where it fits.
- Lumber Shopping List: A detailed list of the lumber you’ll need, with exact quantities to make your trip to the store quick and efficient.
- Cut List: Accurate measurements for every cut you need to make, minimizing errors and wasted materials.
- Tools and Materials List: A concise rundown of the basic tools and materials required, along with helpful links to find the right items.
- Project Cost Estimates: Clear budgeting information so you can plan your project with no surprises.
- Beginner Tips and Tricks: Guidance on attaching shelves securely, finishing options, and troubleshooting common issues to make your project go smoothly.
By purchasing our plan, you’re investing in a guide that does more than show you how to build shelves—it equips you with the confidence to create a professional-grade storage solution that’s customized to your space and needs. Every detail is carefully thought out, from the placement of screws to the layout of your tools, making it as easy as possible for you to achieve results that look and feel like they were done by a pro.
Get Started Today: Organize, Simplify, and Transform Your Garage
Don’t let your garage be a source of stress any longer. With our heavy-duty garage shelf plan, you’ll turn a cluttered, chaotic space into a well-organized, functional area that makes life easier. Imagine having everything neatly stored, accessible, and safe, with extra room to move around and work on projects. This isn’t just about building shelves; it’s about building a better garage—and by extension, a more organized and efficient life.
Download the DIY plan now and take the first step toward transforming your garage into a space that works for you, not against you. It’s time to reclaim your garage and make it a place where everything has its place. Let’s build something great together.
Are you ready to reclaim your garage with a DIY project that promises to enhance order and productivity? Our comprehensive, easy-to-download PDF plans are your first step to a decluttered space. Secure your plans now, gather your materials, and relish the fulfillment of crafting a functional masterpiece by hand.
Time
2 hours (varies with experience)
Cost
$190 (Costs may vary based on location and supplier.)
Skill level required
Beginner
DIY Garage Shelf PDF Plan
What is included in the PDF download?
- Easy to read step by step instructions
- Material list
- Tools needed
- Helpful links to materials and tools needed
Tools Needed for This Project:
Available with the purchase of the DIY plan PDF.
Lumber Shopping & Cut List
Available with the purchase of the DIY plan PDF.
Step 1: Determine if This DIY Plan Fits Your Garage
Before you start building, it’s important to make sure that this garage shelf plan is suitable for your space. Below, we’ve outlined some common garage layouts and provided guidance on where the shelves will best fit.
1.1 Check Your Garage Dimensions
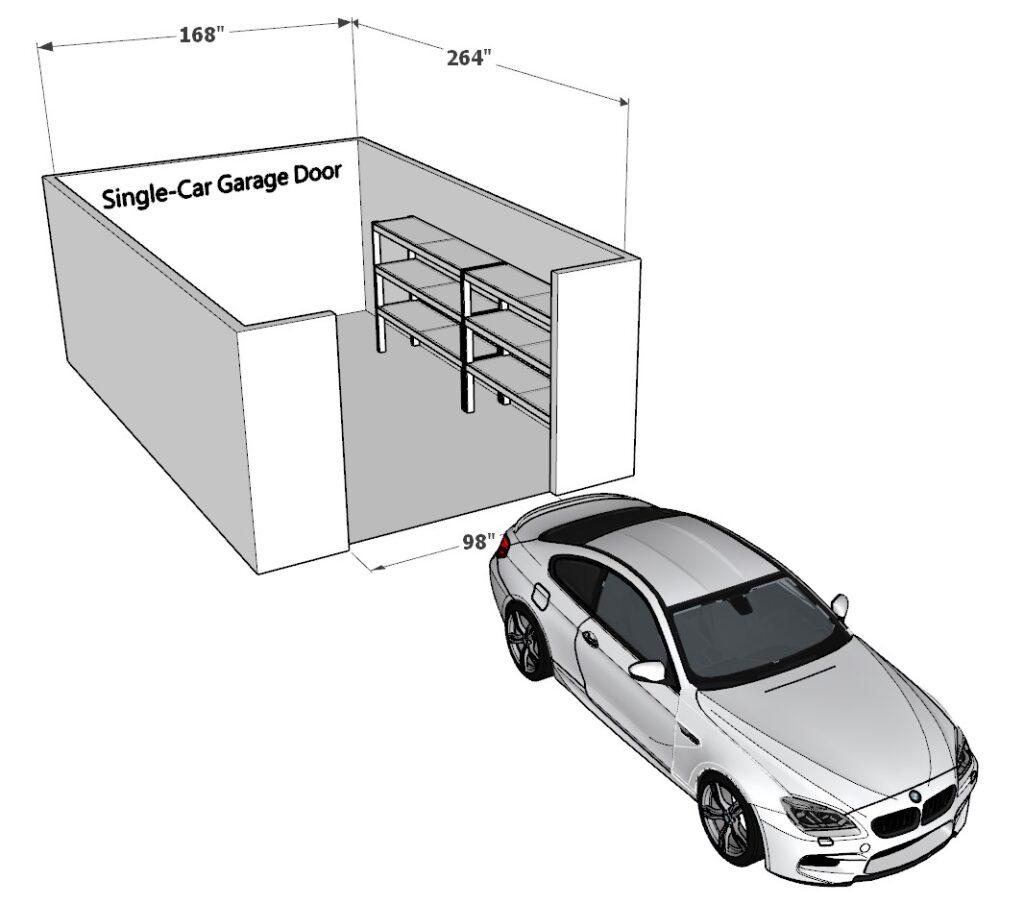
- Single-Car Garage: Typically measures about 168 inches wide by 264 inches long.
- Double-Car Garage: Typically measures about 264 inches wide by 264 inches long.
These dimensions are rough estimates of standard garage sizes, but your garage may vary. It’s crucial to measure your own space to ensure a good fit.
1.2 Determine Shelf Placement for Single-Car Garages
- For a single-car garage, the shelf can be installed along either the right or left side, but not both.
- Avoid placing the shelf along the back wall (opposite the garage door) as it will not fit.
- Tip: Choose the side where the shelf won’t interfere with opening and closing your car doors when parked.

1.3 Determine Shelf Placement for Double-Car Garages
- In a double-car garage, you have more flexibility:
- You can install the shelf along the back wall (opposite the garage door).
- Alternatively, the shelf can be placed on the right or left side, or in many cases, both sides.
- Tip: Ensure there’s enough space on both sides to park comfortably and access your stored items.
1.4 Measure Your Space
- Measure your garage carefully to make sure you have enough room for the shelves.
- Double-check your measurements to avoid complications, like blocking your car’s path or restricting door movement.
- Remember, it’s always better to measure twice and cut once!
By confirming that your garage has the necessary space for these shelves, you can avoid building something that complicates your garage setup. Always ensure there’s enough room for safe and convenient access to your car and stored items.

Step 2: Build the Garage Shelf Frames
Now that you’ve determined your garage space, it’s time to start building the shelves. The first step is to construct the shelf frames.
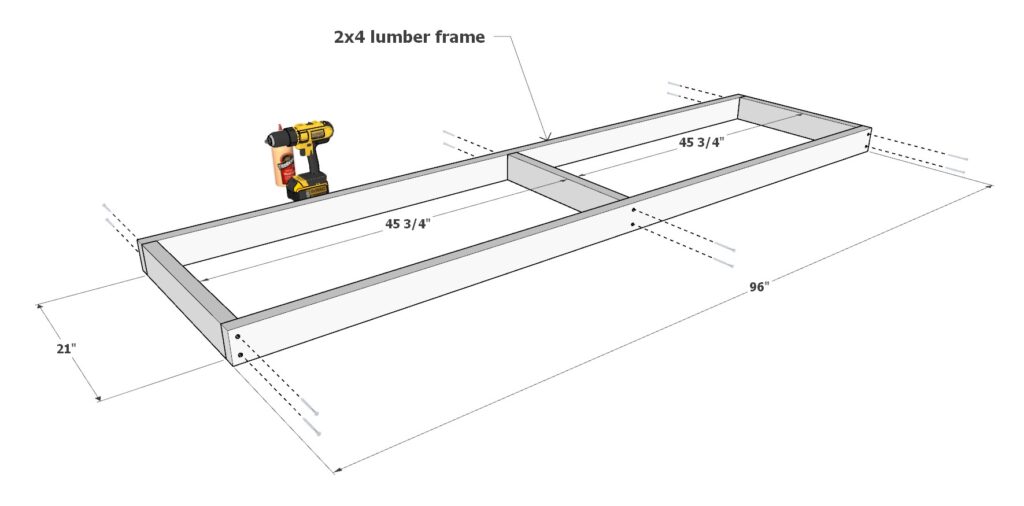
2.1 Build the Shelf Frame
Gather Materials:
- 2 pieces of 2×4 lumber, each 96 inches long.
- 3 pieces of 2×4 lumber, each 21 inches long.
Arrange the Frame:
- Lay the two 96-inch 2x4s parallel to each other on a flat surface.
- Position the 21-inch 2×4 pieces between them, one at each end and one in the center, as shown in the diagram.
Assemble the Frame:
- Apply wood glue to the ends of the 21-inch pieces where they meet the 96-inch pieces.
- Secure the frame together using 3.5-inch or 3-inch screws.
- Pre-drill pilot holes using a countersink drill bit before inserting the screws. This will help prevent the wood from splitting.
2.2 Add the Plywood Shelf Top
Prepare the Plywood:
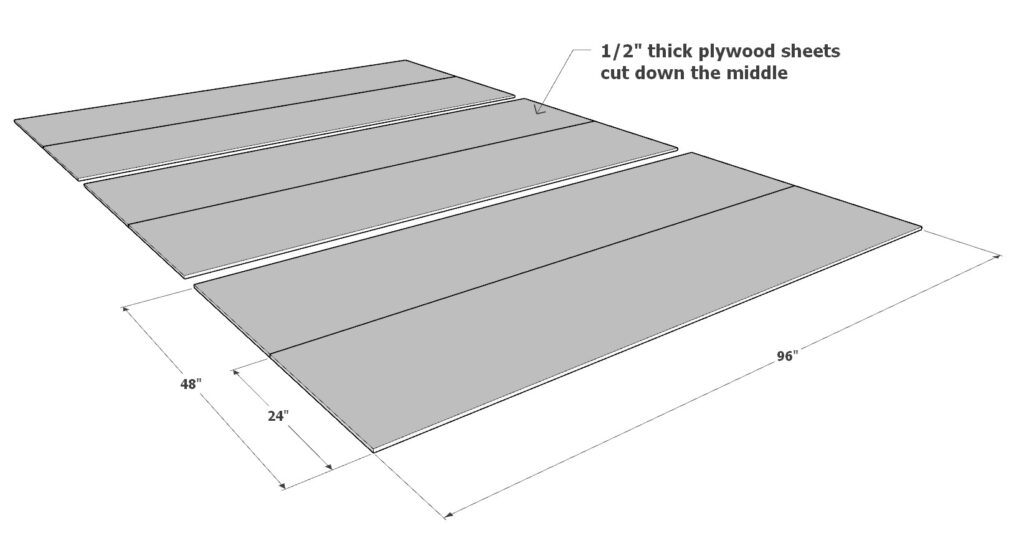
- Use a 1/2-inch thick plywood sheet.
- Cut the plywood to 24 inches x 96 inches. This cut can be made directly down the center of a full 96-inch x 48-inch plywood sheet.
- Tip: If you’re cutting at home, measure carefully and cut straight. Alternatively, you can have the plywood cut at stores like Home Depot or Lowe’s, which offer free cutting services.
Attach the Plywood to the Frame:
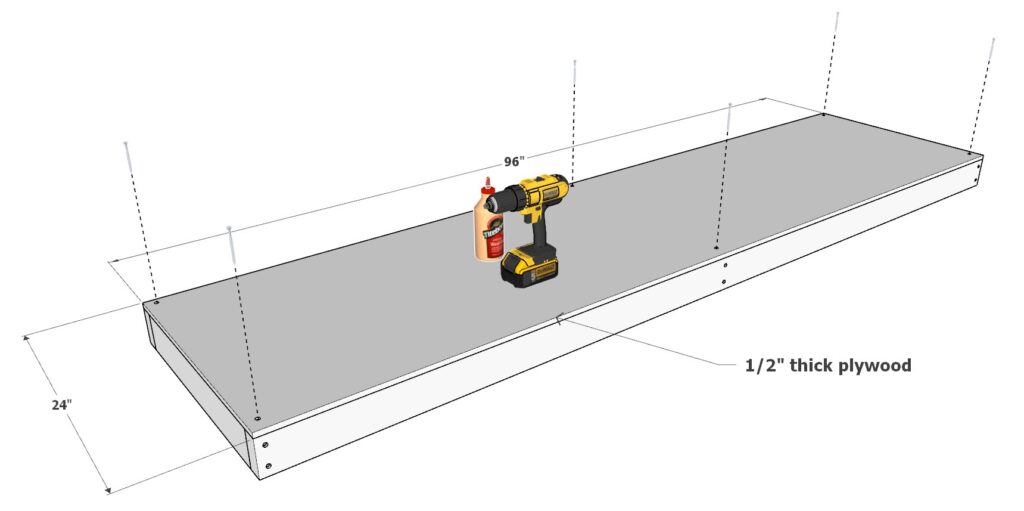
- Place the 24-inch x 96-inch plywood sheet on top of the assembled 2×4 frame.
- Apply wood glue along the top edges of the 2×4 frame.
- Secure the plywood to the frame using 2.5-inch screws.
- Pre-drill holes with a countersink drill bit to ensure smooth screw placement and to avoid splitting the plywood.
2.3 Repeat the Process
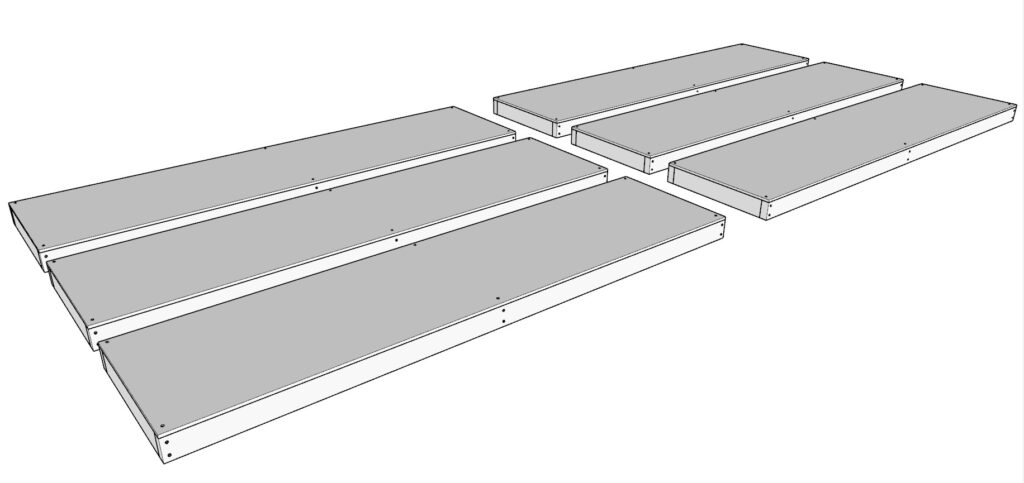
- Repeat Steps 2.1 and 2.2 to build a total of 6 shelf frames.
- You will need to cut 3 full-sized plywood sheets (each 96 inches x 48 inches) to get the necessary 24-inch x 96-inch pieces for all 6 shelves.
Step 3: Attach the Legs and Assemble the Shelf Units
Now that you’ve built the shelf frames, it’s time to attach the legs and assemble the complete shelf units. This step involves connecting the shelves to create sturdy units that will stand securely in your garage.
3.1 Prepare the Shelf Legs
Gather Materials:
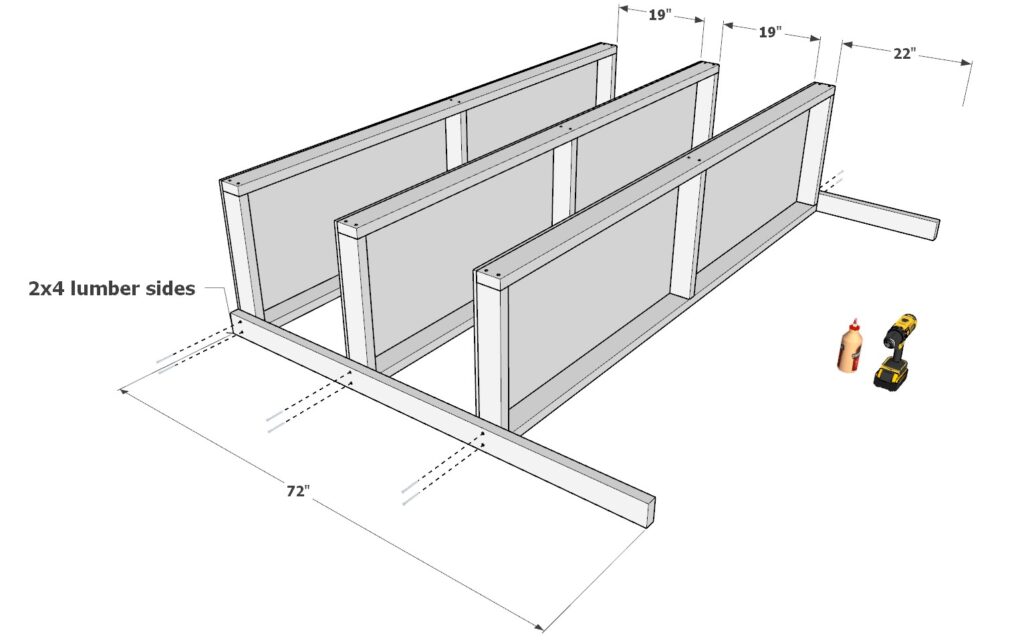
- You will need 8 pieces of 2×4 lumber, each 72 inches long.
Position the Shelves:
- Lay three of the shelf frames you built in the previous step on a flat surface.
- Space the shelves evenly as indicated in the diagram, keeping in mind the height at which you want each shelf.
3.2 Attach the Legs to the Shelves
Position the Legs:
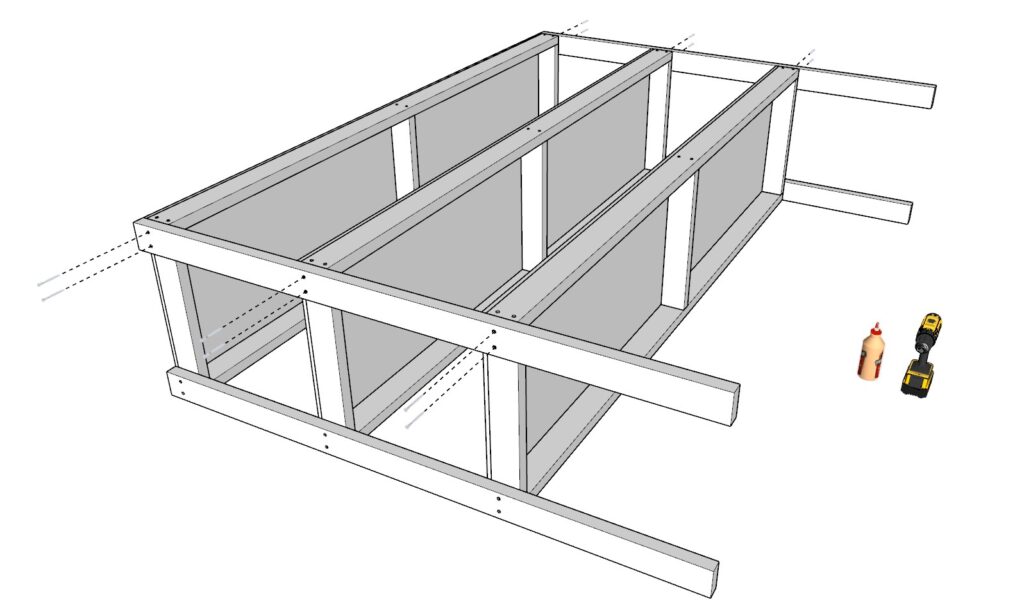
- Place the 72-inch 2×4 legs at each corner of the shelves.
- Ensure the legs are flush with the outer edges of the shelf frames.
Secure the Legs:
- Pre-drill holes in the legs at the points where they will attach to the shelves. This helps prevent splitting and ensures a tight fit.
- Apply wood glue to the contact points on the legs where they will meet the shelves.
- Use 2.5-inch screws to secure the legs to each shelf. Make sure the screws are driven straight and do not protrude through the other side of the leg. Note: Using screws longer than 2.5 inches may cause them to poke through the wood, so stick to the recommended size.
- Repeat this process for all four legs on the first shelf unit.
Repeat for the Second Shelf Unit:
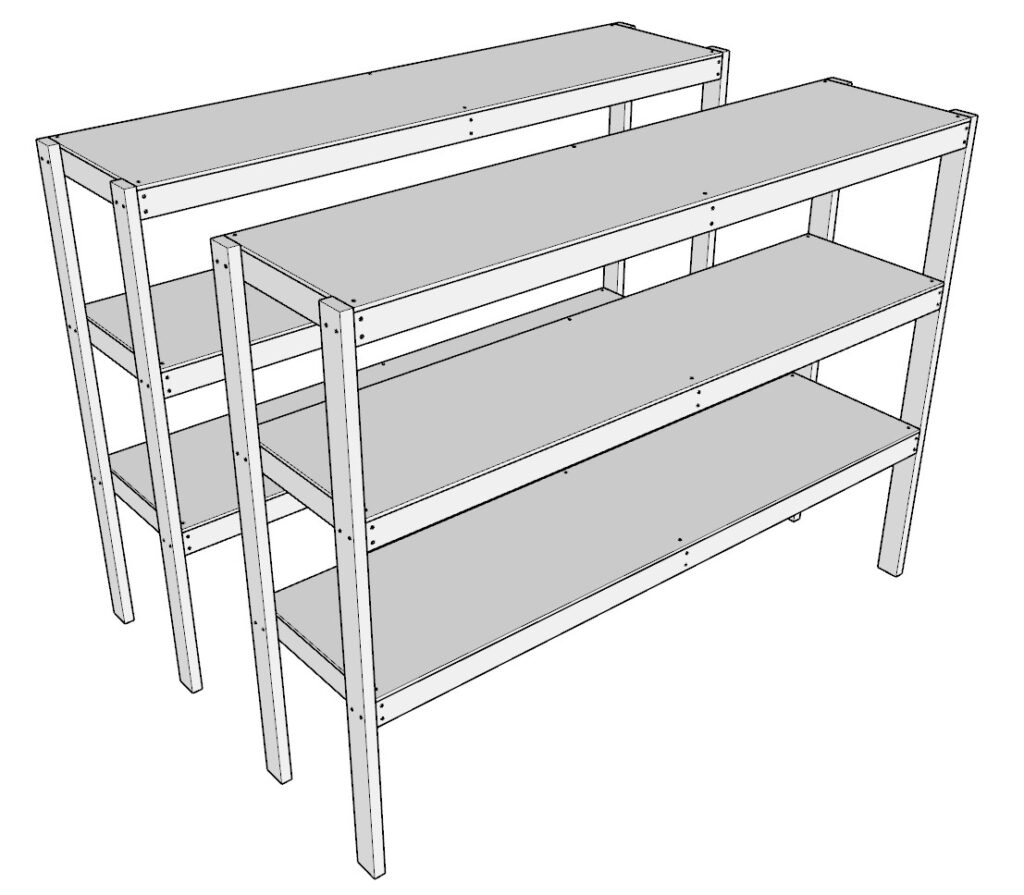
- Perform the same steps to attach the legs to the other three shelf frames, creating your second shelf unit.
- By the end, you should have two shelf units, each with three shelves attached to four legs.
3.3 Connect the Two Shelf Units
Move to Final Location:
- Position both shelf units in the area of your garage where you intend to install them. Ensure the location allows for stable attachment to the wall and easy access to stored items.
Join the Shelf Units:
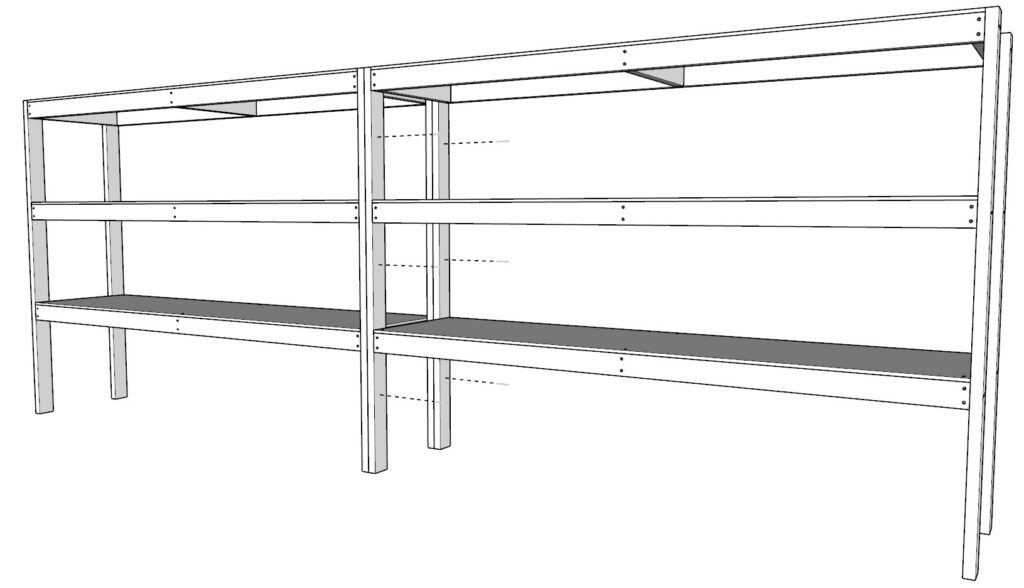
- Align the two shelf units side by side.
- Secure the units together using 2.5-inch screws. Note: You do not need to use glue for this step. This approach allows you to disassemble the shelves easily if you ever need to move them.
Final Check:
- Ensure that the units are securely connected and stable.
- Double-check that the shelves are level and properly spaced according to your needs.
Step 4: Reinforce the Shelves for Heavy-Duty Use
In this step, you’ll reinforce your garage shelves to make them heavy-duty and capable of handling significant weight. This reinforcement will ensure your shelves are strong enough to support heavy items like car parts, engines, and other bulky objects.
4.1 Prepare the Reinforcement Pieces
- Cut the Reinforcement Pieces:
- 8 pieces of 2×4 lumber, each 22 inches long (color-coded in blue in the diagram).
- 8 pieces of 2×4 lumber, each 19 inches long (color-coded in yellow in the diagram).
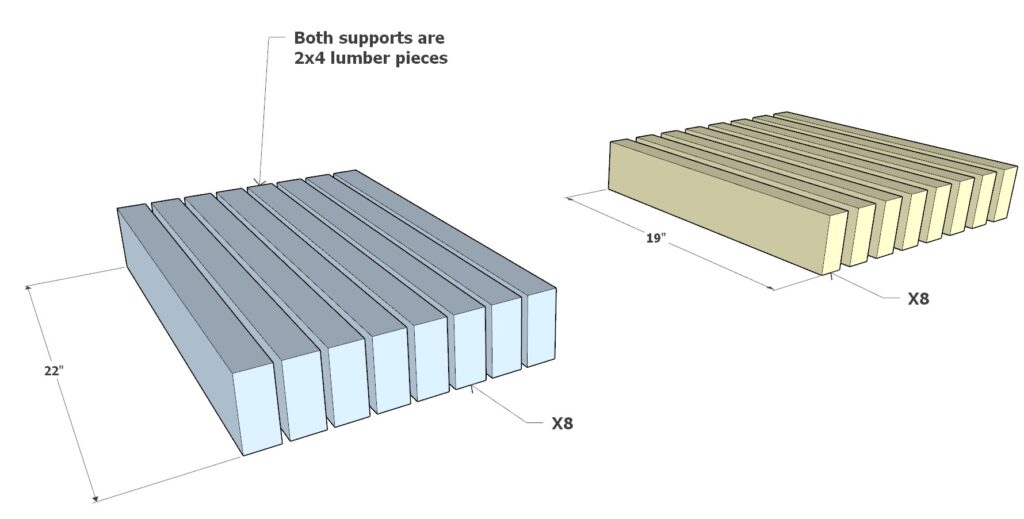
4.2 Attach the Reinforcement Pieces
Position the Blue Pieces (22 inches long):
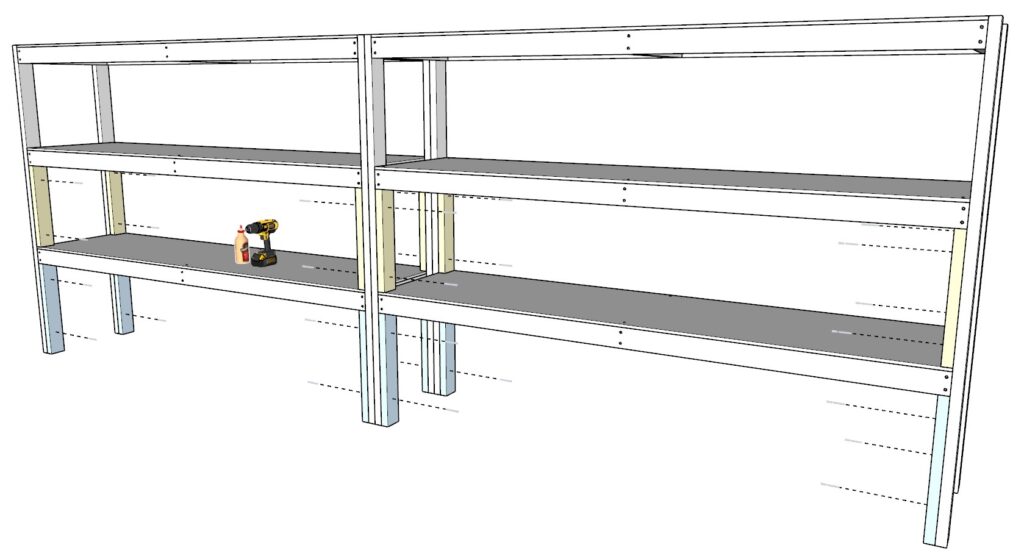
- Place the 22-inch blue pieces on the bottom sections of the shelf units.
- Ensure that each piece fits snugly against the existing shelves to provide solid reinforcement.
Position the Yellow Pieces (19 inches long):
- Place the 19-inch yellow pieces on the top sections of the shelf units.
- Again, make sure each piece sits tightly to maximize the reinforcement effect.
Secure the Reinforcement Pieces:
- Pre-drill holes in each reinforcement piece to prevent splitting.
- Apply wood glue to the outermost pieces for added stability.
- Use 2.5-inch screws to attach the reinforcement pieces securely to the shelf units. This screw length prevents them from protruding through the wood, keeping everything neat and safe.
- Note: Avoid using glue on the center pieces, so they can be unscrewed and removed if you ever need to disassemble the combined shelf units into two separate units.
4.3 Ensure Reinforcement is Effective
- Check for a Snug Fit: Make sure all reinforcement pieces are tightly fitted and secured to the shelf units. This snug fit is essential for the reinforcement to be effective.
- Verify Stability: Confirm that the shelves feel solid and do not wobble. Proper reinforcement will make each shelf unit sturdy and capable of supporting very heavy loads.
By reinforcing your shelves in this way, you ensure that both shelf units are robust and heavy-duty, allowing you to confidently store heavy and bulky items. The added support from the reinforcement pieces enhances the overall durability and longevity of your garage shelving system, making it a reliable storage solution for all your needs.
Step 5: Secure the Shelves to the Garage Studs
To ensure the safety and stability of your garage shelves, it’s crucial to secure them to the wall studs. This step will prevent the shelves from tipping over or shifting under heavy loads. There are two primary methods for attaching your shelves to the garage studs: using 90-degree angle brackets or directly screwing through the shelves into the studs.
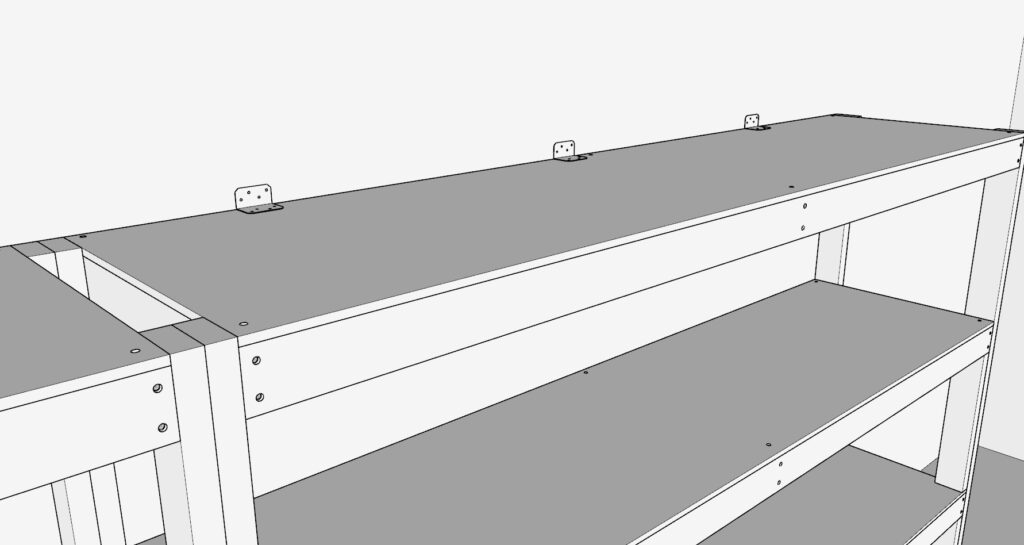
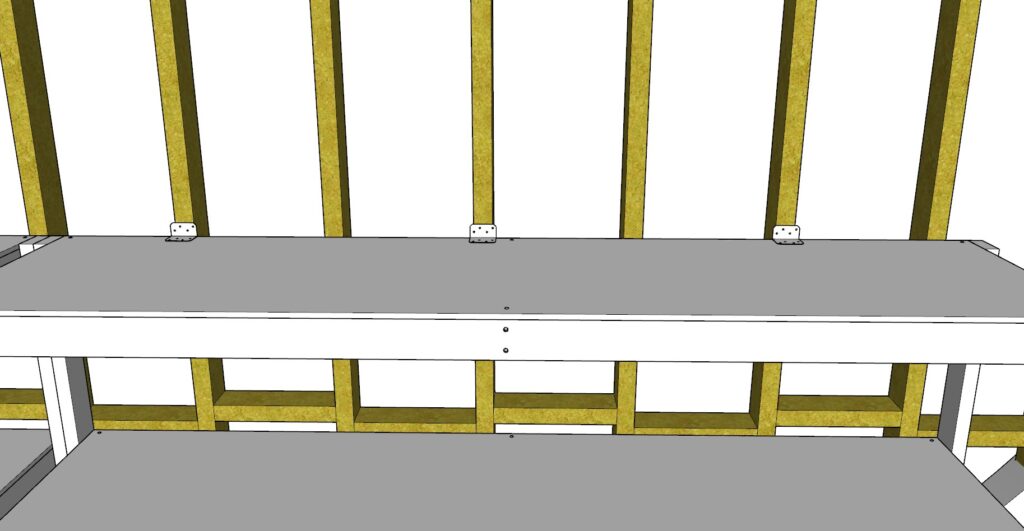
5.1 Method 1: Using 90-Degree Angle Brackets
Prepare the Angle Brackets:
- Gather the 90-degree angle brackets and screws needed for attachment.
- Position the brackets at key points along the shelf where they will align with the garage studs.
Attach the Brackets to the Shelves:
- Secure each bracket to the shelf frame first using 2.5-inch screws. Make sure the brackets are flush and tightly secured to provide strong support.
Locate the Garage Studs:
- Use a stud finder to locate the studs in your garage wall. Studs are typically spaced 16 inches apart, but this can vary, especially in older homes. Be sure to scan carefully to avoid missing a stud or drilling unnecessary holes.
- Mark the stud locations with a pencil.
Attach the Brackets to the Studs:
- Align the brackets with the marked stud locations.
- Use 3.5-inch screws or longer if necessary, to secure the brackets to the studs. Tighten the screws firmly to ensure a secure connection.
- Test for Stability: Check for any wobbling or shaking by gently pushing against the shelves. Tighten the screws further if needed.
5.2 Method 2: Direct Screwing Through the Shelves
Locate the Garage Studs:
- As with the bracket method, use a stud finder to locate and mark the garage studs.
Attach the Shelves Directly:
- Position the shelf unit against the garage wall, ensuring alignment with the marked studs.
- Pre-drill holes through the 2x4s of the shelves at the points where they will attach to the studs. This helps prevent the wood from splitting and makes screwing easier.
- Use 3.5-inch screws or longer (depending on your wall thickness) to drive directly through the 2×4 of the shelf into the stud. Ensure the screws are driven straight for a secure hold.
- Check for Stability: As before, test for any movement and tighten screws as necessary.
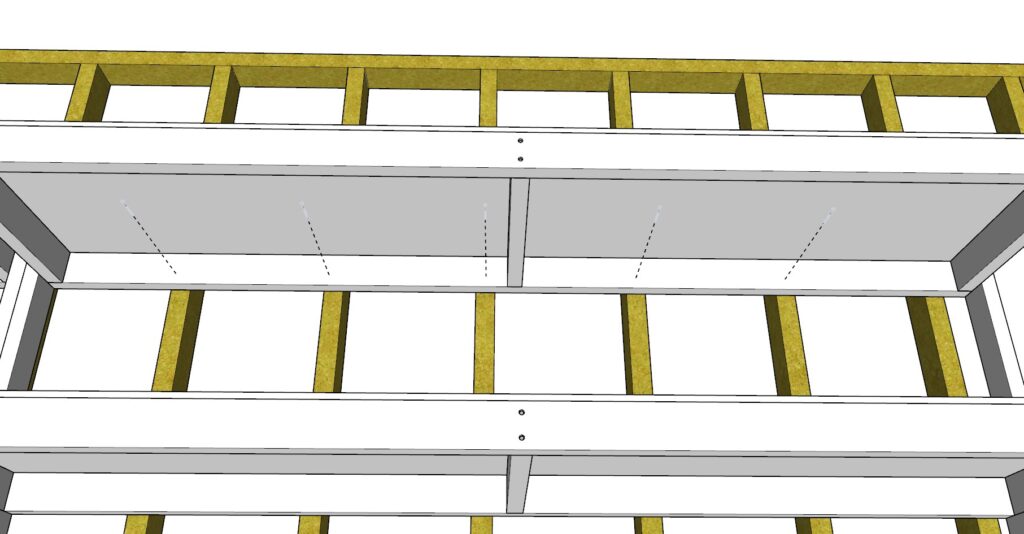
5.3 Addressing Garage Baseboards
If your garage has baseboards, you’ll need to account for the extra space to ensure the shelves are securely attached to the wall studs.
Measure the Baseboard Thickness:
- Measure the thickness of the baseboard to determine the gap between the shelf unit and the wall.
Add Spacers:
- Cut small spacer blocks from scrap 2×4 lumber to match the thickness of the baseboard.
- Attach these spacers to the back of the shelf unit at the points where it will meet the studs. Use 2.5-inch screws to secure the spacers to the shelf.
Attach to the Wall Studs:
- Once spacers are in place, follow the steps for using either angle brackets or direct screwing as described above. The spacers will ensure the shelves sit flush and securely against the wall despite the baseboards.
5.4 Final Safety Check
- Ensure all screws are tight and that the shelves are firmly attached to the studs.
- Test the shelves for wobbling by giving them a firm shake. If there’s any movement, double-check that all brackets or screws are securely fastened to the studs.
Properly securing your garage shelves to the wall studs is a critical step for safety, preventing accidents, and ensuring the shelves can handle heavy loads without risk of tipping. Whether using angle brackets or direct screws, taking the time to do this step correctly will give you peace of mind and a sturdy, reliable storage solution.
Step 6: Finishing Touches and Loading Your Shelves Safely
With your garage shelves built and securely attached to the wall, the final step is to add finishing touches and load your shelves safely. This step ensures that your shelves are not only functional but also safe and visually appealing.
6.1 Sanding and Smoothing the Shelves
Sanding the Shelf Unit:
- Use medium-grit sandpaper (around 120-150 grit) to sand down the entire shelf unit.
- Focus on areas where people might frequently touch, like the edges and corners, to prevent splinters.
- Smooth any rough surfaces on the 2x4s and plywood to create a safe and user-friendly finish.
Rounding Off the Corners:
- For added safety, round off the corners of the shelves with sandpaper or a sanding block. This step reduces the risk of injury from sharp edges.
- Sand the corners evenly to maintain a neat appearance and consistent shape.
Optional: Finishing for Appearance and Durability:
- If you want to improve the look of your shelves, consider applying a coat of wood stain or paint. Choose a finish that suits your garage environment and desired aesthetic.
- For extra durability and easier cleaning, you can apply a clear polyurethane coat to protect the wood from spills and stains.
6.2 Best Practices for Loading Your Shelves
Heaviest Items at the Bottom:
- Always place the heaviest items on the bottom shelf. This lowers the center of gravity and makes the shelf unit more stable, reducing the risk of tipping.
- Examples of heavy items include car parts, metal tools, or bulk storage bins.
Lighter Items on Higher Shelves:
- Store lighter items on the middle and top shelves. This makes accessing them easier and maintains a safe balance.
Distribute Weight Evenly:
- Distribute the weight evenly across each shelf to prevent warping or sagging.
- Avoid placing all the heavy items on one side, as this can cause the shelves to tilt or become unstable.
Consider the Center of Gravity:
- Keep the shelf unit’s center of gravity low by storing the bulkiest items on the bottom and organizing lighter items as you move up.
- Avoid placing heavy or unbalanced items on the top shelf, as this can make the unit top-heavy and increase the risk of tipping.
6.3 Practical Loading Tips and Safety Advice
Use Storage Bins for Organization:
- Use clear or labeled storage bins to organize smaller items. This keeps your shelves tidy and makes it easier to find what you need without digging through piles.
Secure Loose Items:
- For items that might roll or shift, consider using bungee cords or straps to secure them in place, especially on higher shelves.
Regularly Check for Stability:
- After loading your shelves, give the unit a gentle push to check for stability. If there’s any movement, review the attachment points to the wall and adjust the load as necessary.
Avoid Overloading:
- Stick to the recommended weight limits for your shelves. Overloading can cause shelves to sag or, worse, fail completely, leading to damage or injury.
Keep Pathways Clear:
- Make sure the area around your shelves is clear of obstructions. This ensures easy access and prevents tripping hazards, especially in a busy garage environment.
Safety Reminders:
- Always wear gloves when handling heavy or rough items to avoid injuries.
- Use a step stool or ladder safely when accessing higher shelves. Never climb on the shelves themselves.
6.4 Final Inspection
- Inspect for Rough Edges: Do a final check to make sure all surfaces are smooth and splinter-free.
- Check Stability: Confirm that the shelves are firmly secured and stable after loading.
- Safety First: Ensure all items are safely stored and nothing is precariously balanced or at risk of falling.
