Introduction
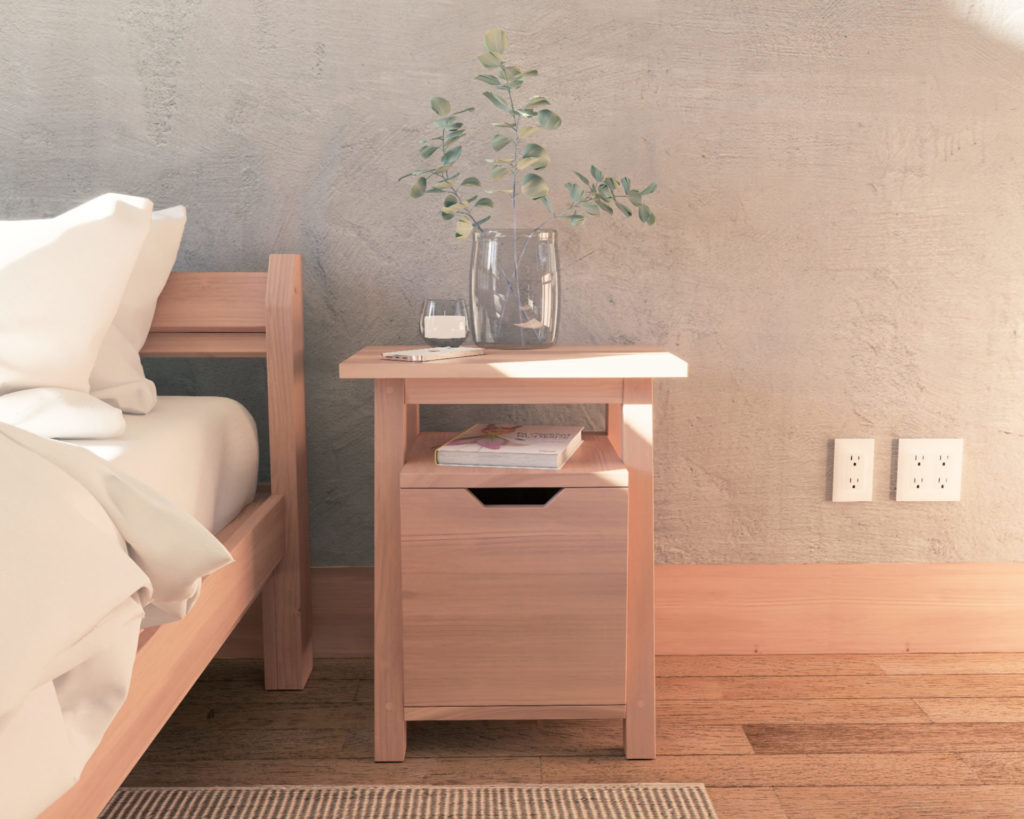
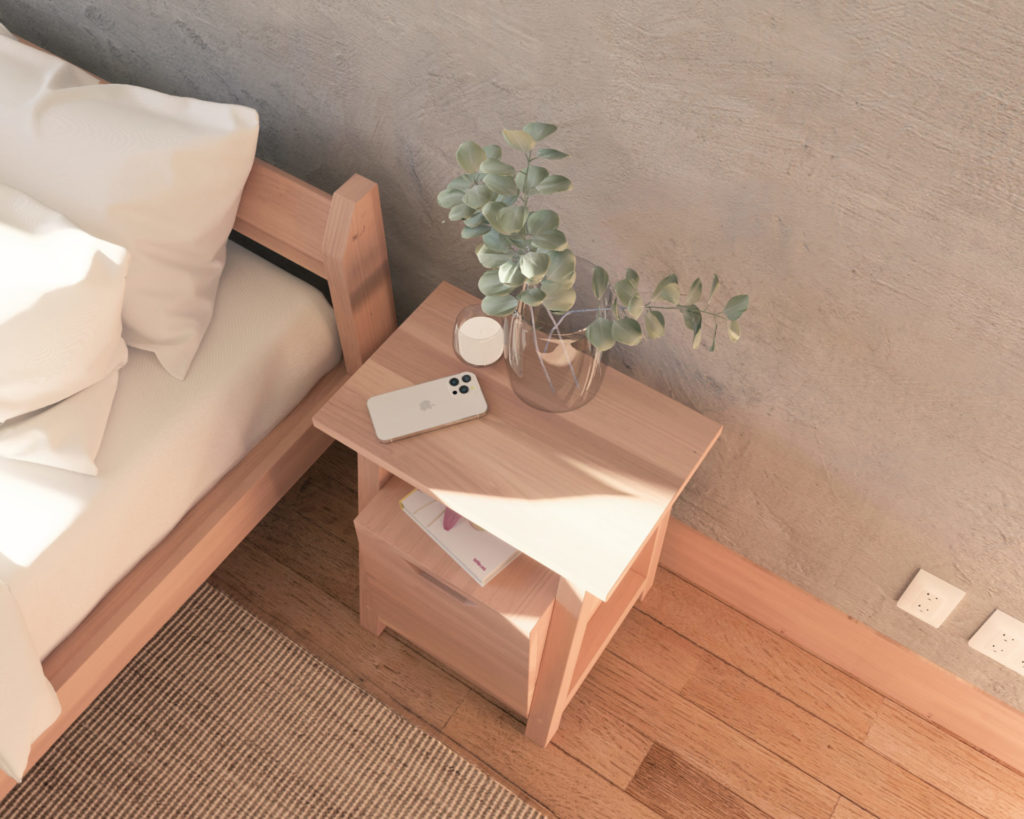
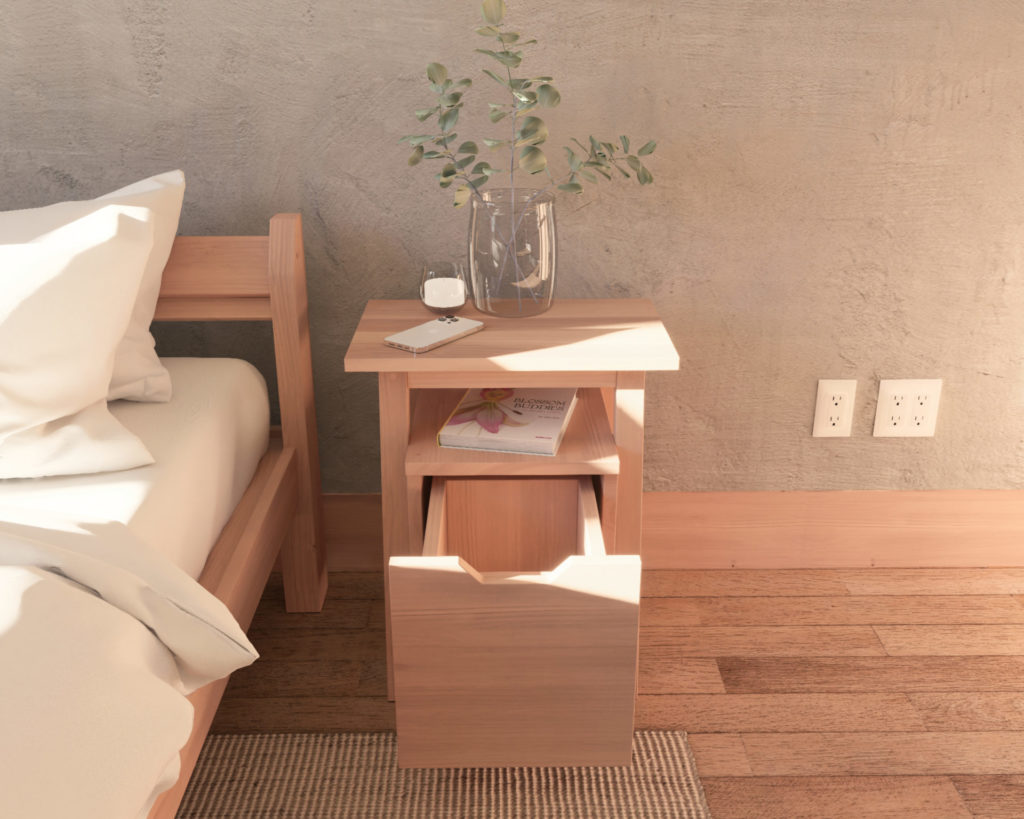
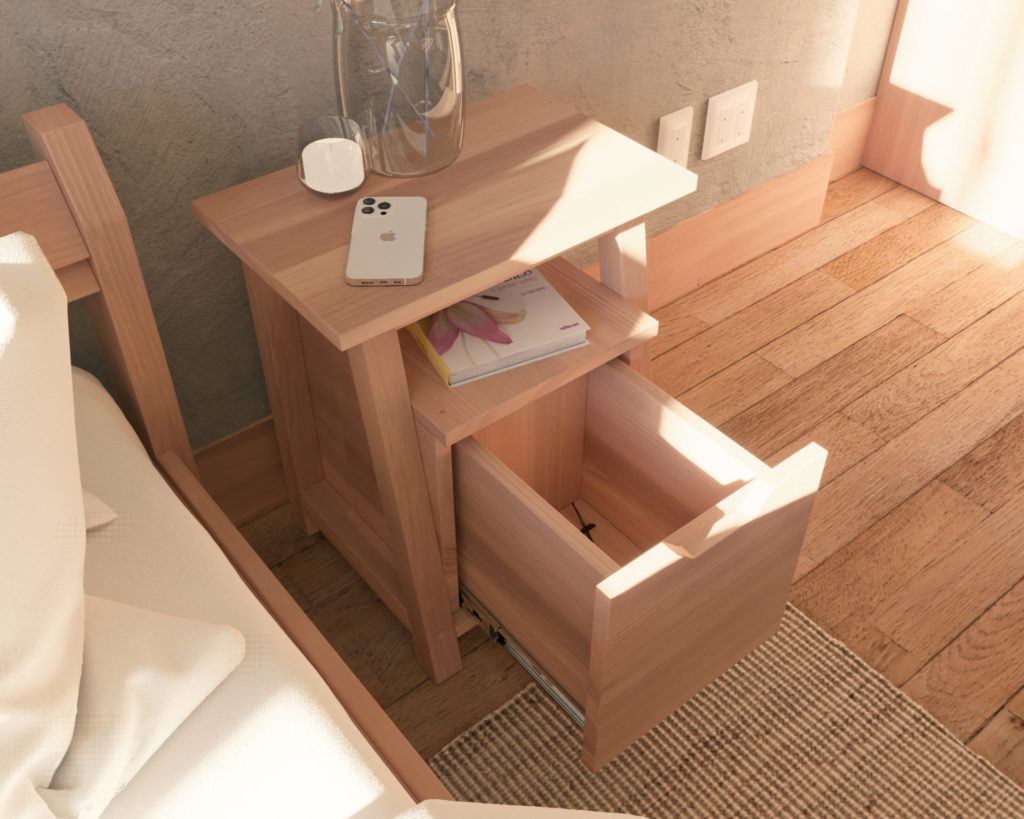
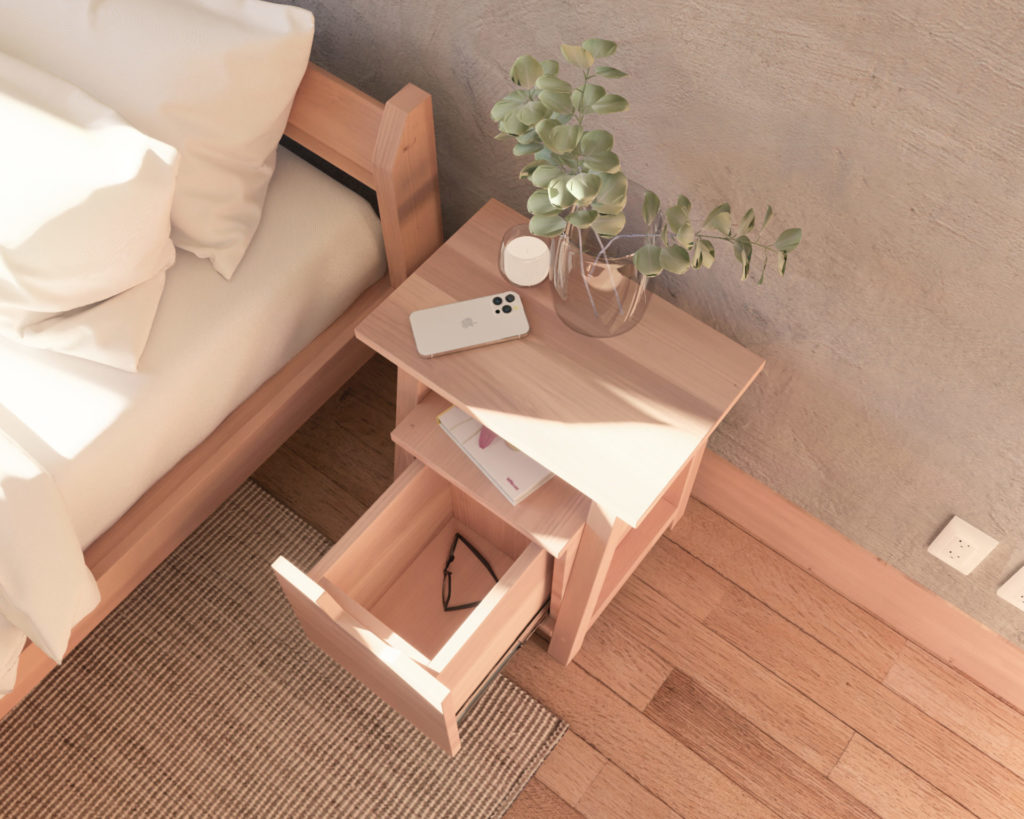
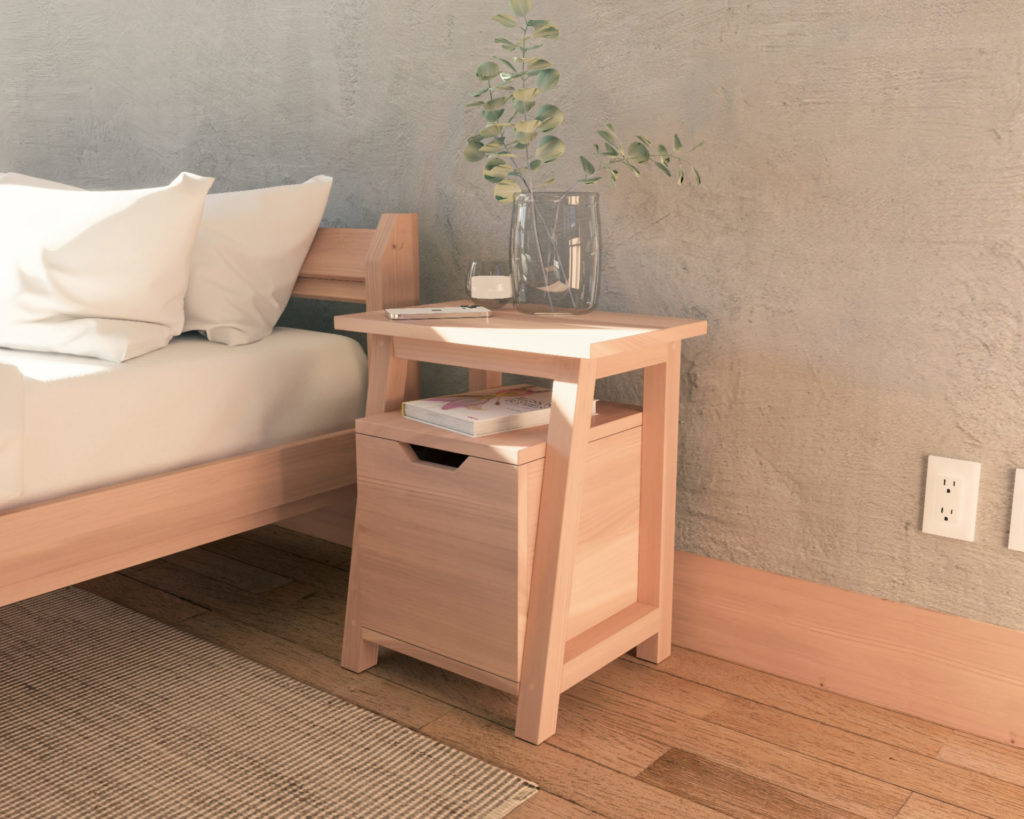
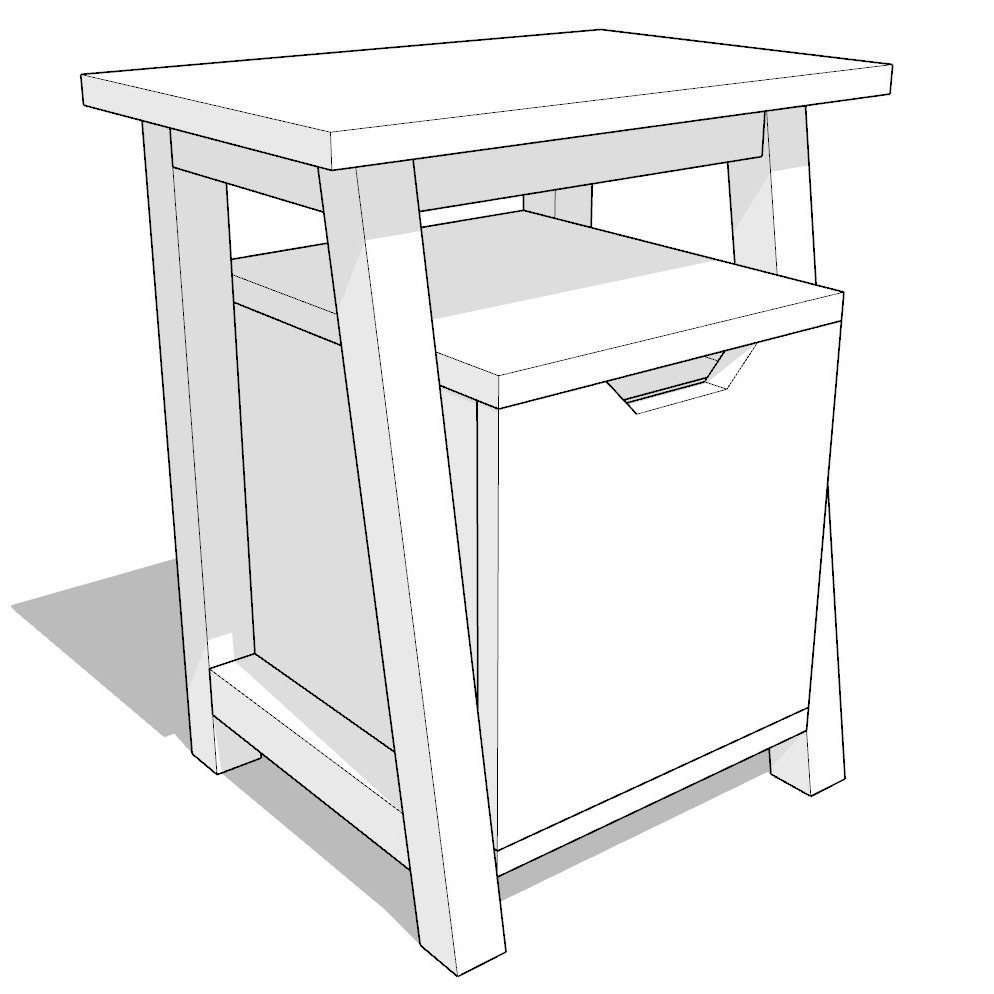
Transform your bedroom with our elegant, yet functional DIY nightstand, designed with both aesthetics and convenience in mind. A harmonious blend of style and utility, this wooden masterpiece is the perfect addition to any modern bedroom, offering a touch of sophistication while addressing practical needs.

Specifications
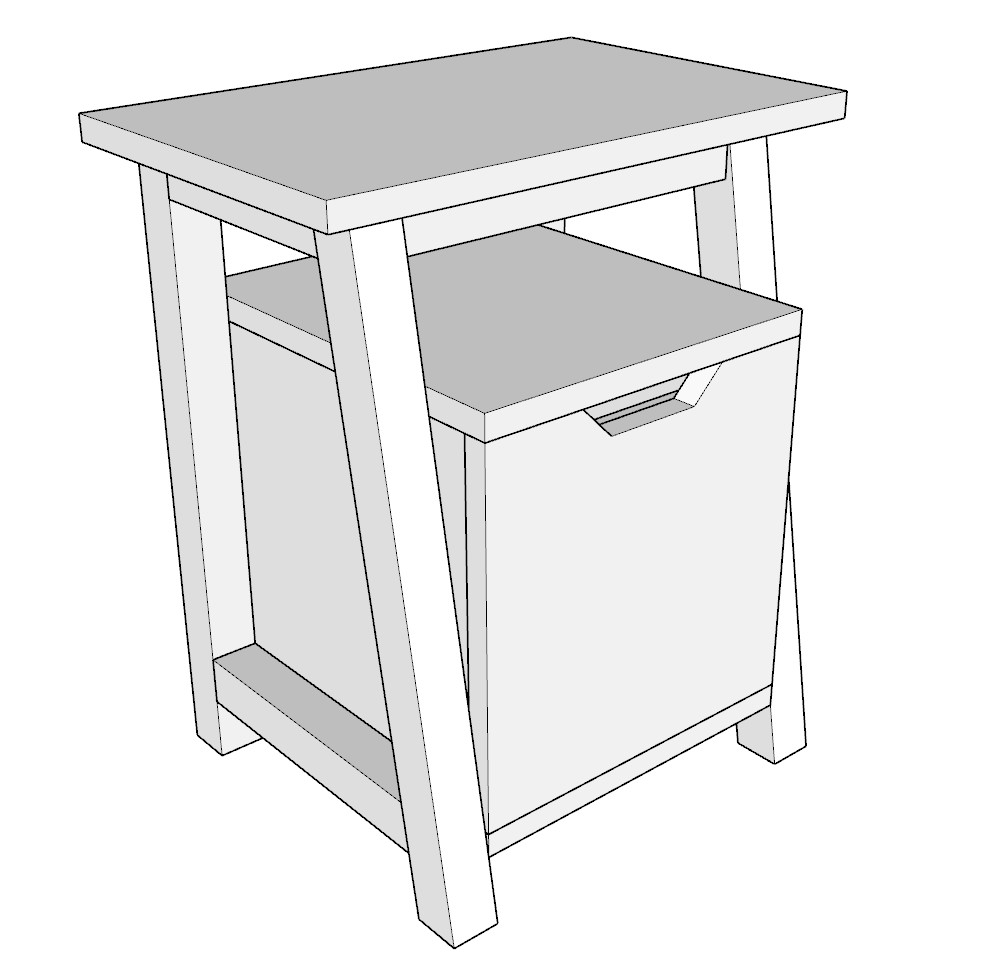
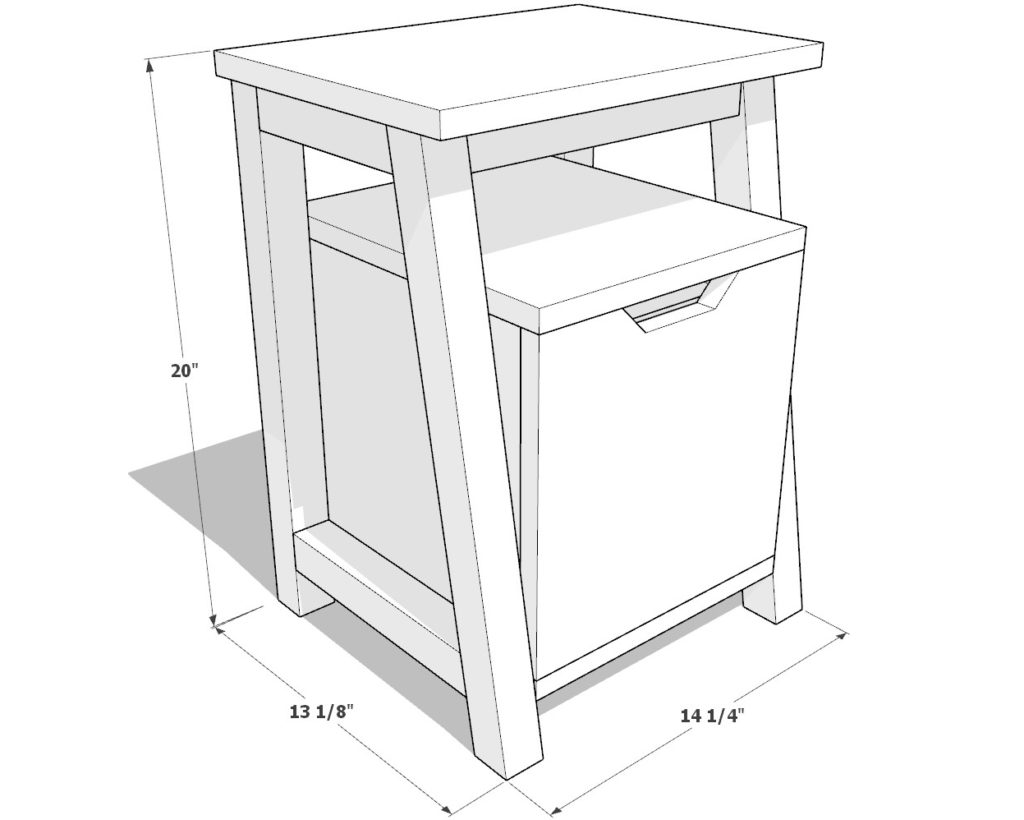
Crafted from 100% quality wood, this nightstand stands at a height of 20 inches, with a width of 14-1/4 inches, and length of 13-1/8 inches. Designed to be sturdy yet stylish, it’s a tangible testament to craftsmanship that marries form and function.
Functional and Aesthetic Features
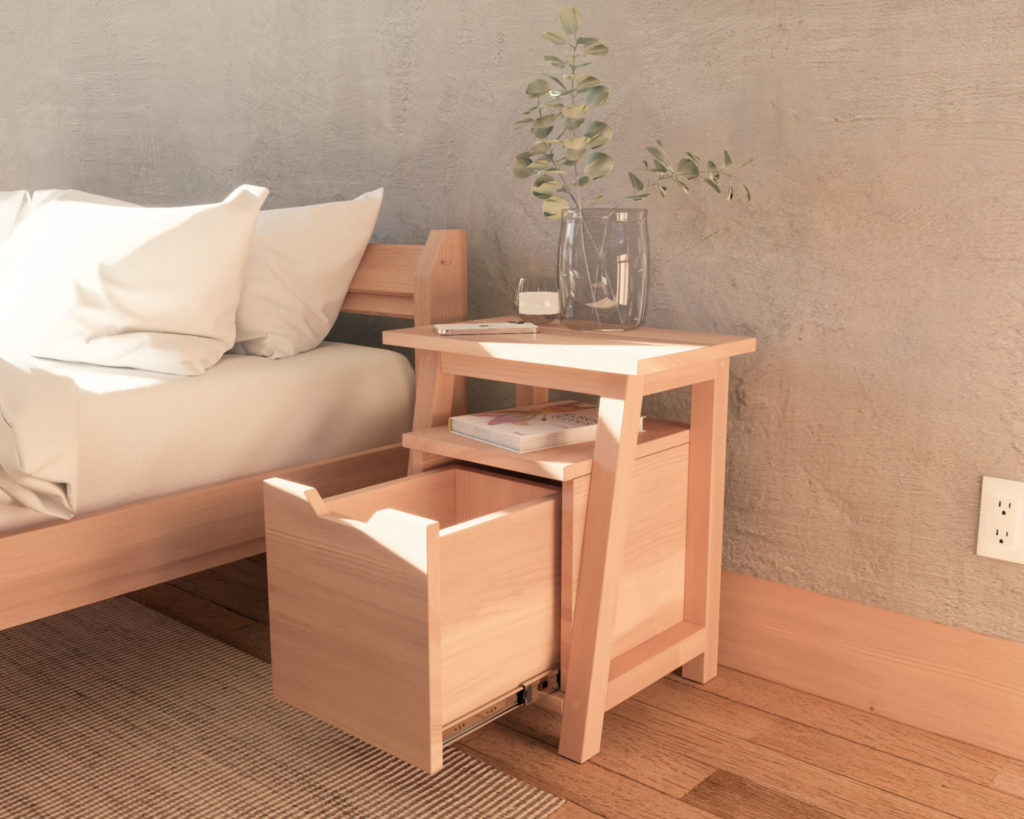
Boasting a sleek A-frame design, the nightstand is not just an aesthetic centerpiece but a storage solution. It features a smoothly sliding pull-out drawer, equipped with soft close stainless steel full extension drawer slides for silent and effortless access. The open shelf beneath the tabletop is an added storage boon, offering a convenient space that’s also perfect for tucking away charging cords, ensuring a clean and clutter-free appearance.
Ease of Assembly
Even for the novice woodworker, this nightstand is a delight to assemble. With no need for complex cuts or intricate joints, the design leverages simple lumber readily available at home improvement stores. The thoughtful design ensures that screw holes can easily be concealed with dowels, guaranteeing not just a straightforward assembly process but a polished, professional finish.
What’s Included in the DIY Plan
Our DIY plan is your comprehensive guide to transforming lumber into an elegant nightstand. Included are detailed step-by-step instructions, easy-to-follow diagrams, a complete list of required tools and materials, and helpful tips to guide you along the way. Visual and textual guides ensure a seamless building process, making this plan perfect for woodworkers of all skill levels.
Conclusion
Step into a world where elegance, functionality, and the joy of DIY converge. Our DIY nightstand plan offers a rewarding journey from simple materials to a bespoke piece of furniture that elevates both form and function in your space. Are you ready to build a nightstand that combines sleek design, practical storage, and the incomparable touch of handmade craftsmanship? Your journey begins here.
Time
4 hours (varies with experience)
Cost
$60 (Cost may vary)
Skill level required
Beginner
DIY Nightstand Table PDF Plan
What is included in the PDF download?
- Easy to read step by step instructions
- Material list
- Tools needed
- Helpful links to materials and tools needed
DIY Nightstand Table Dimensions
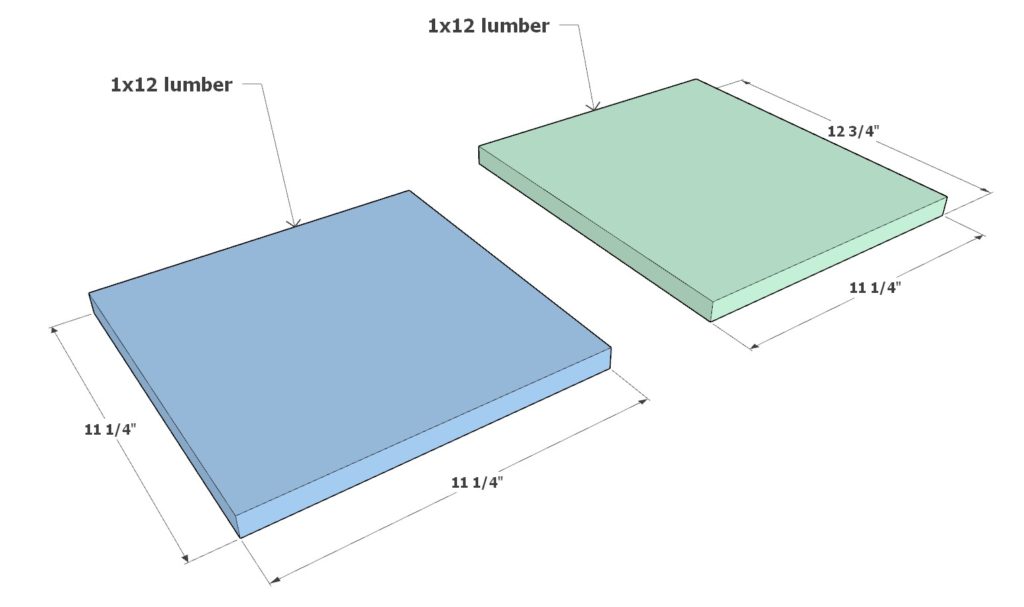
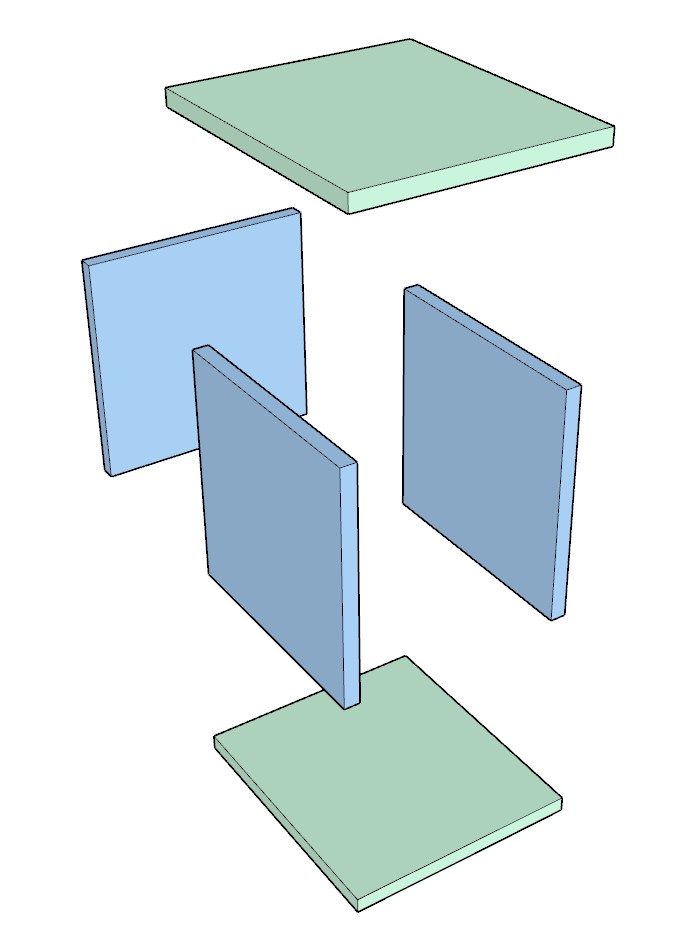
Step 1: Assembling the Drawer Housing
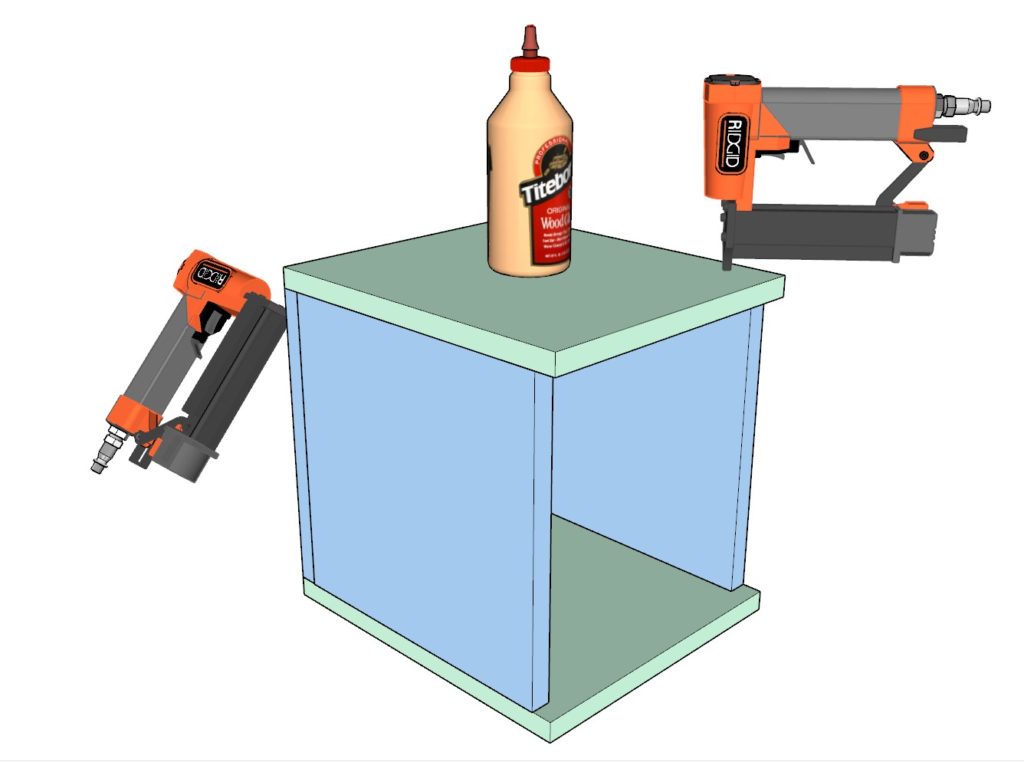
To start, we will focus on building the drawer housing using 1×12 lumber. For easy identification, the lumber pieces are color-coded:
- Blue: Measures 11-1/4 inch x 11-1/4 inch.
- Green: Measures 11-1/4 inch x 12-3/4 inch.
Take three blue pieces and two green pieces. Lay them out as illustrated in the second and third diagrams provided.
Once arranged, secure them together using wood glue and pin nails.
- Tip: Opt for 1.5-inch thin pin nails. Their slender size makes them discreet, often eliminating the need for covering up.
- Tip: For a refined and professional appearance, consider staining all wood pieces prior to assembly. After assembly, you can then do minor touch-ups as needed.
- Tip: Using wood clamps can assist in holding the lumber in place as you secure them with pin nails. This ensures accuracy and stability in your assembly.
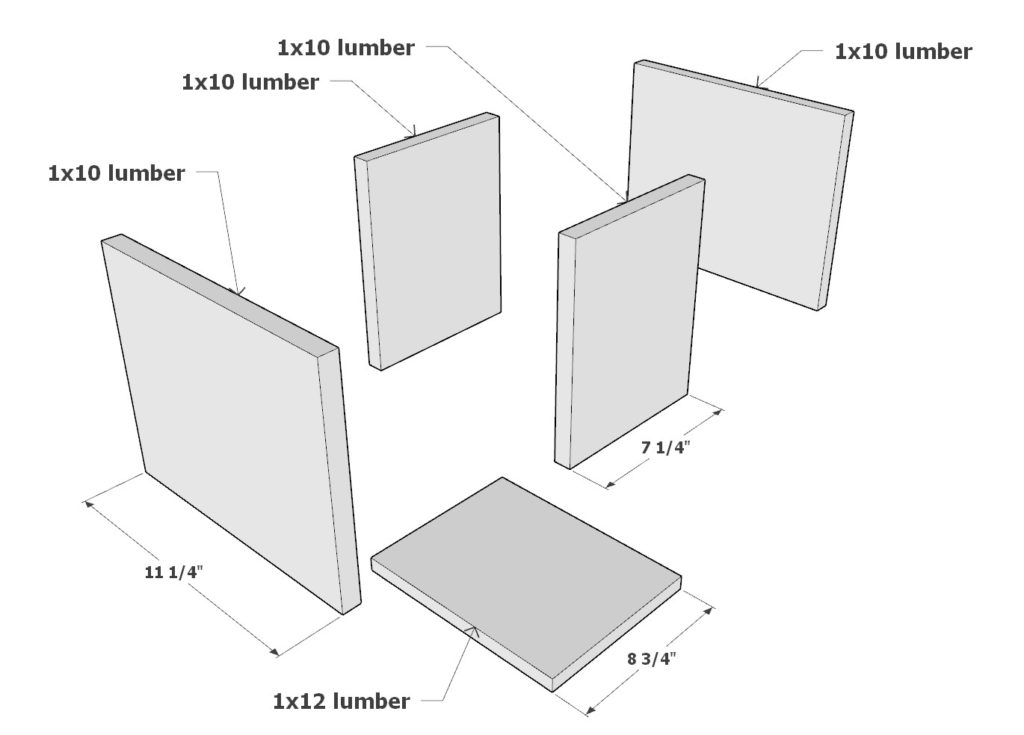
Step 2: Building the Drawer
Gather the following pieces of lumber:
- Two 7-1/4 inch long 1×10
- Two 11-1/4 inch long 1×10
- One 8-3/4 inch long 1×12
Arrange the 1×10 and 1×12 pieces to form the drawer. Follow the provided diagrams to ensure accurate alignment.
Use wood glue and pin nails to securely join the pieces together, ensuring the structure is stable and well-assembled.
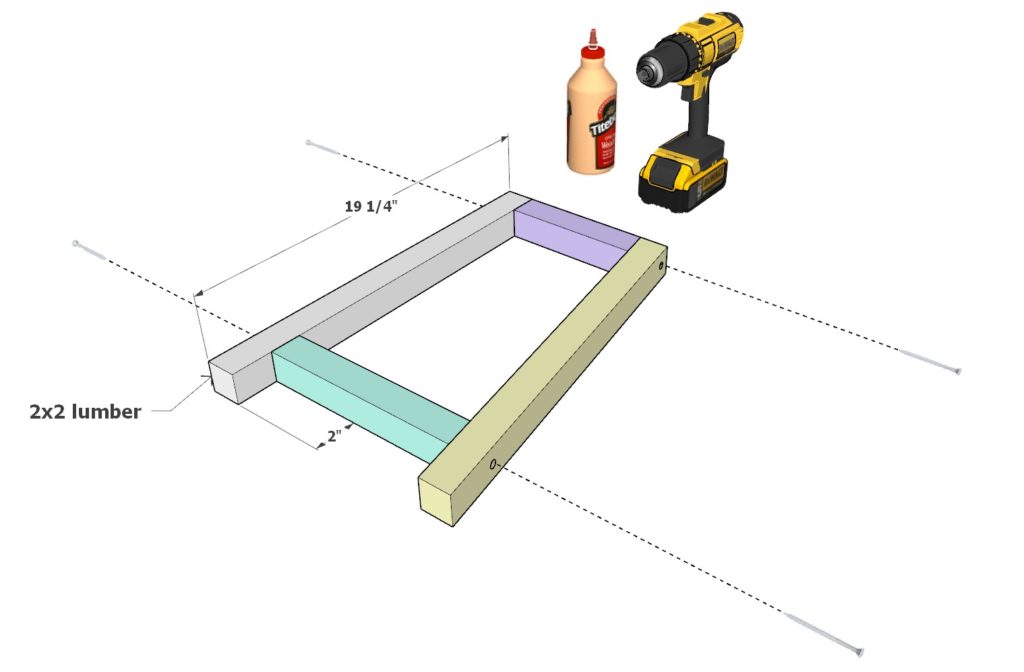
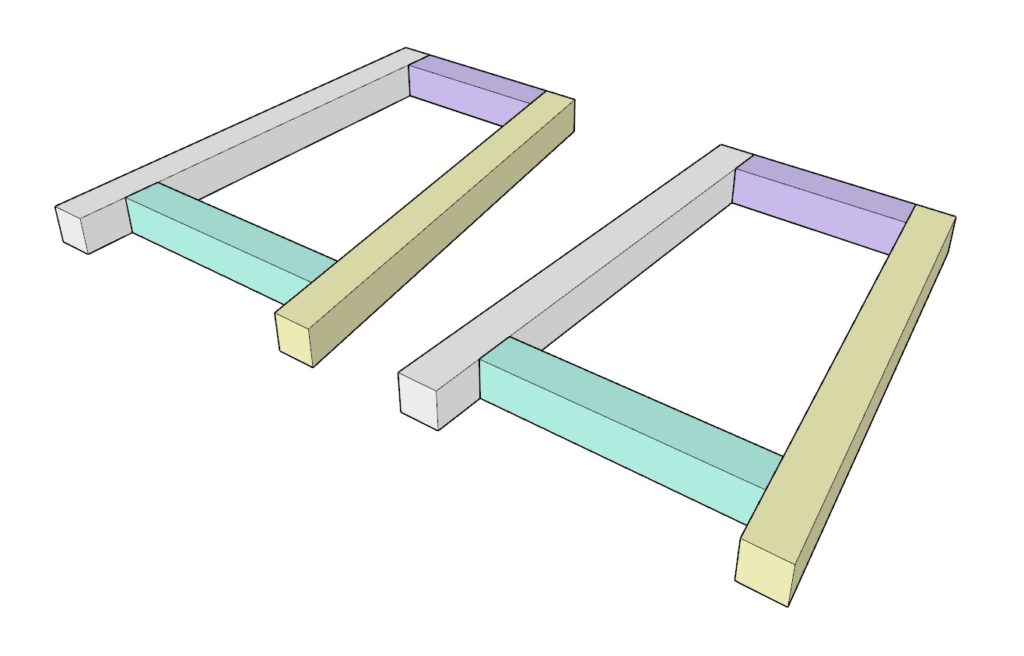
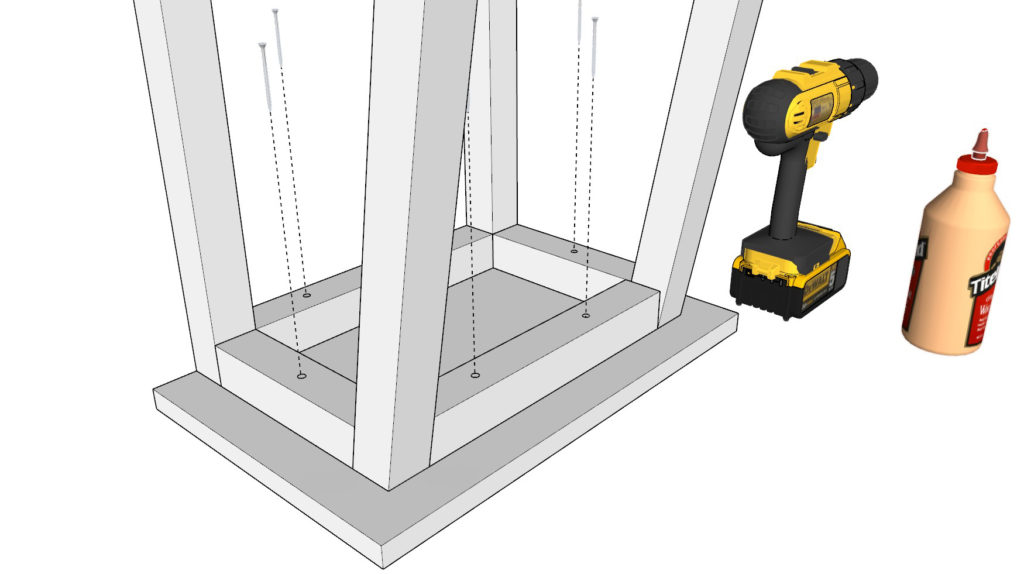
Step 3: Constructing the Nightstand Frame
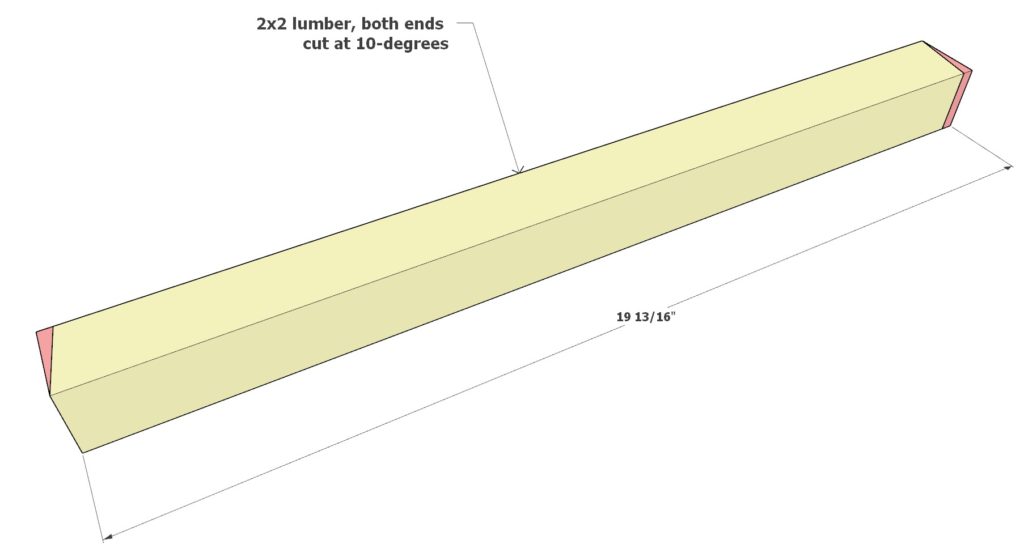
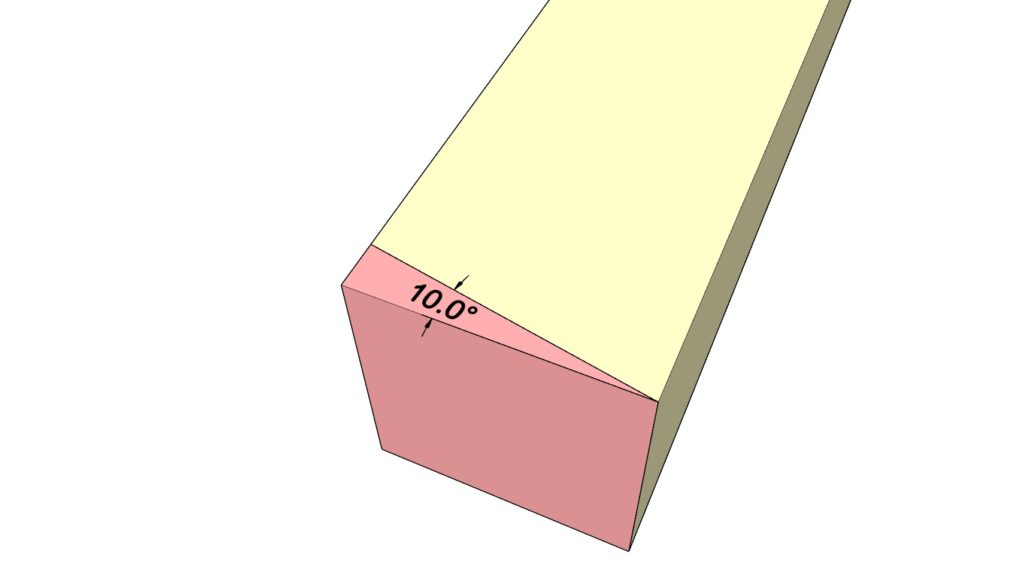
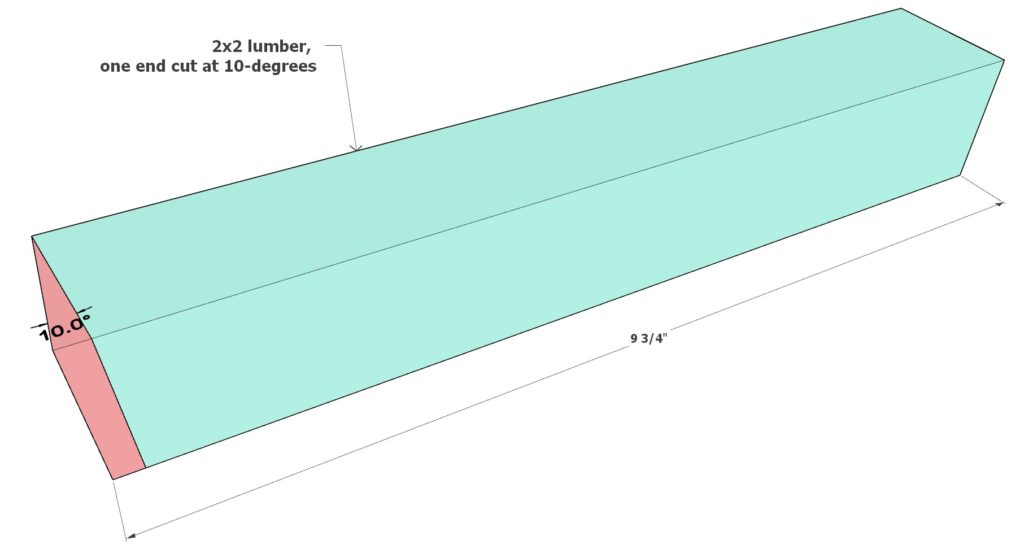
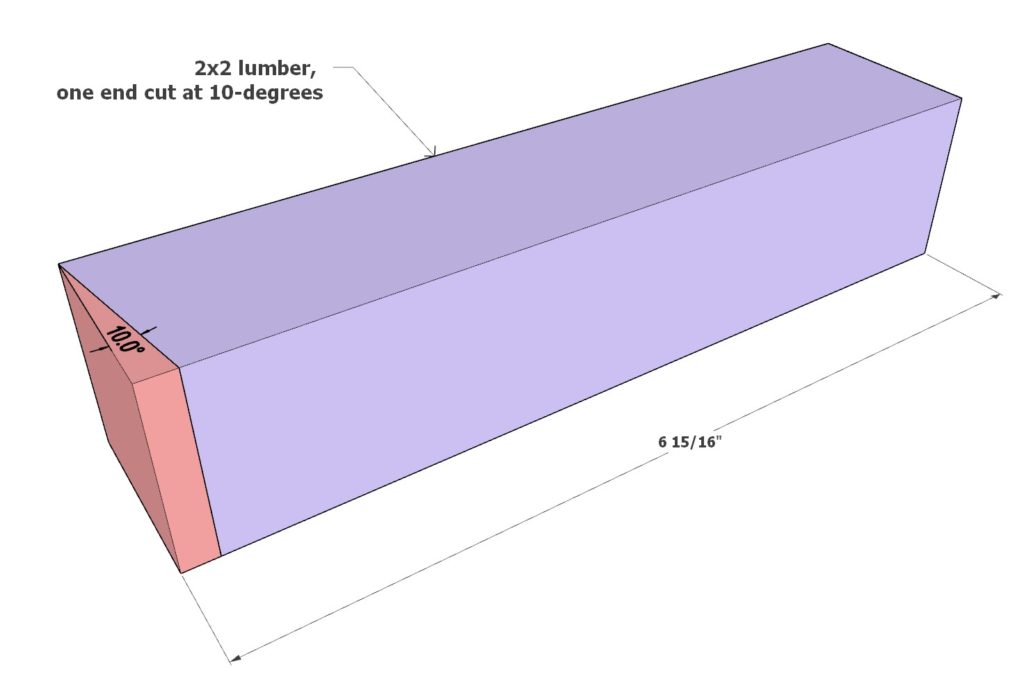
Begin by preparing the following pieces of 2×2 lumber, making angled cuts as specified:
- Yellow: Cut both ends of a 19-13/16 inch long piece at 10-degree angles.
- Teal: Cut one end of a 9-3/4 inch long piece at a 10-degree angle.
- Lavender: Cut one end of a 6-15/16 inch long piece at a 10-degree angle.
With the cut pieces ready, proceed to assemble them with a 19-1/4 inch long 2×2 lumber piece. Use 2.5-inch screws for securing, ensuring the structure is sturdy.
- Remember to pre-drill holes before inserting screws to prevent the wood from splitting.
- Apply wood glue at the joints for additional stability and strength.
Repeat the process to create a second identical frame structure, ensuring consistency in the build for balanced support and aesthetics of the nightstand.
- Tip: When pre-drilling the holes, make sure they are deep enough to allow for dowels to be inserted later. This will enable you to conceal the screw holes neatly, enhancing the finished look of the nightstand.
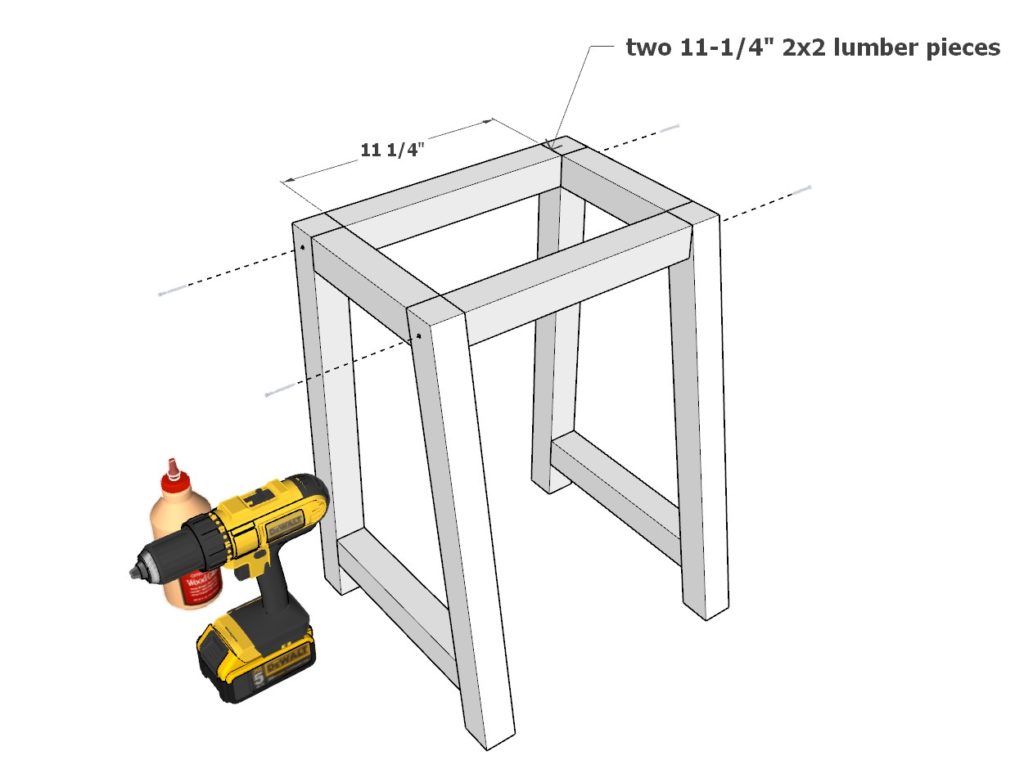
Step 4: Adding the Drawer Housing Frame and Side Table Top
Take two 11-1/4 inch 2×2 lumber pieces and attach them to the frame pieces assembled in Step 3.
- Secure them in place using 2.5-inch screws and wood glue, ensuring they are firmly fixed for sturdy support.
- Make sure the pre-drilled holes are deep enough to insert dowels later for a neat finish.
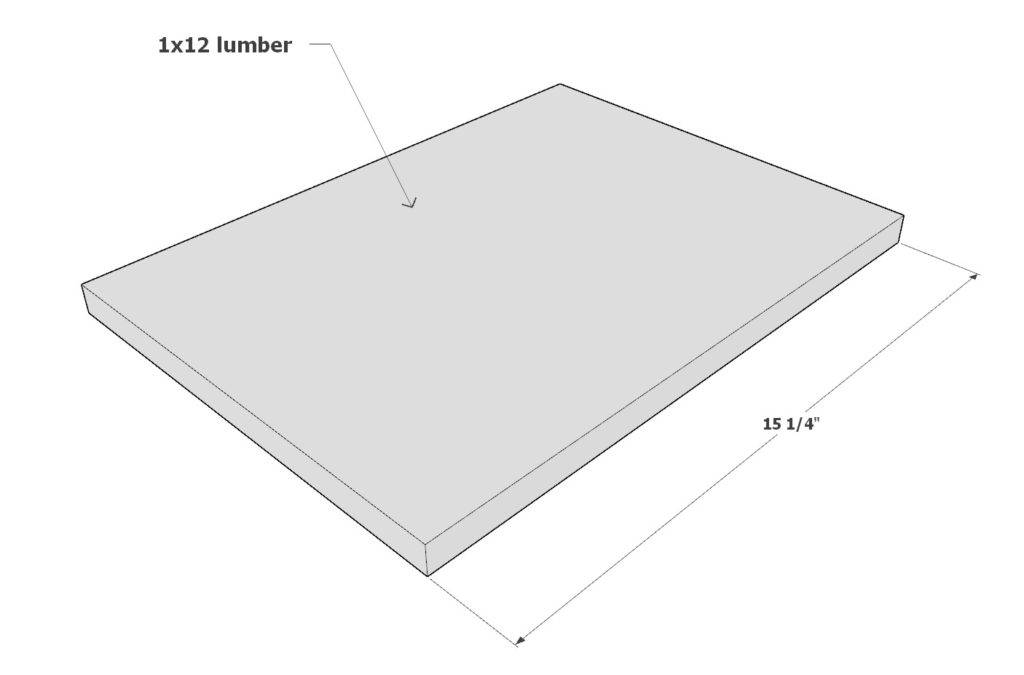
Now, position a 15-1/4 inch long 1×12 lumber piece on top of the assembled structure to form the side table top.
Attach it securely with wood glue and 2-inch screws, ensuring it is firmly affixed and aligned with the frame for a neat appearance and stable surface.
Tip: Always ensure that the pre-drilled holes for screws are deep enough to allow for the insertion of dowels afterward. This allows for the concealing of the screw holes, giving your nightstand a professional and polished look.
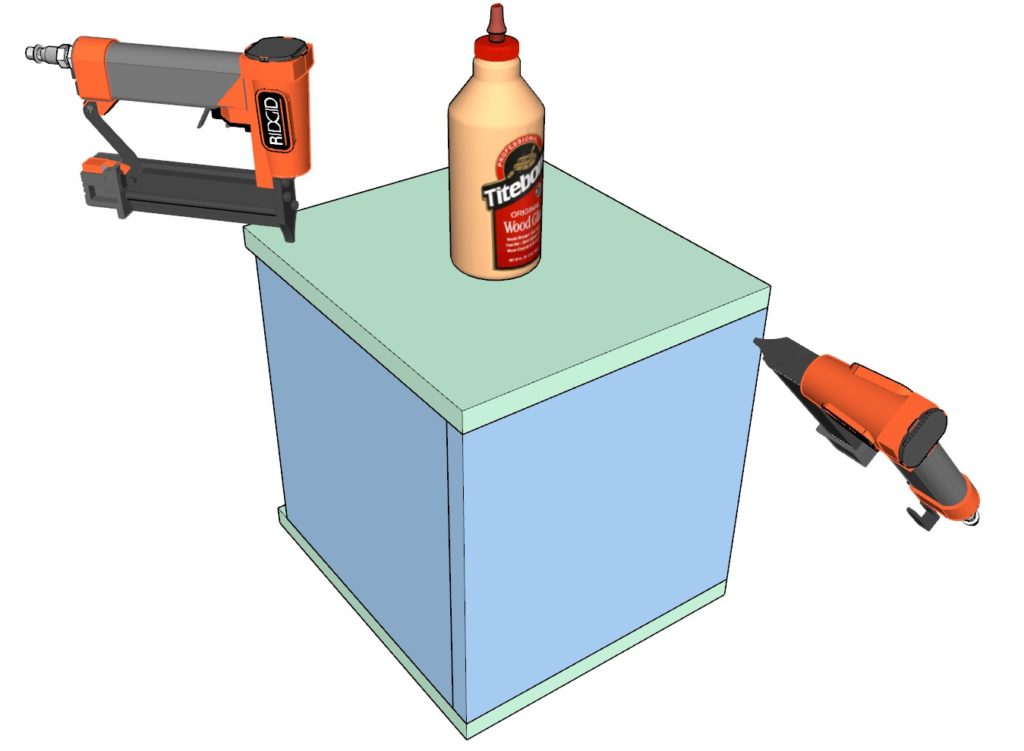
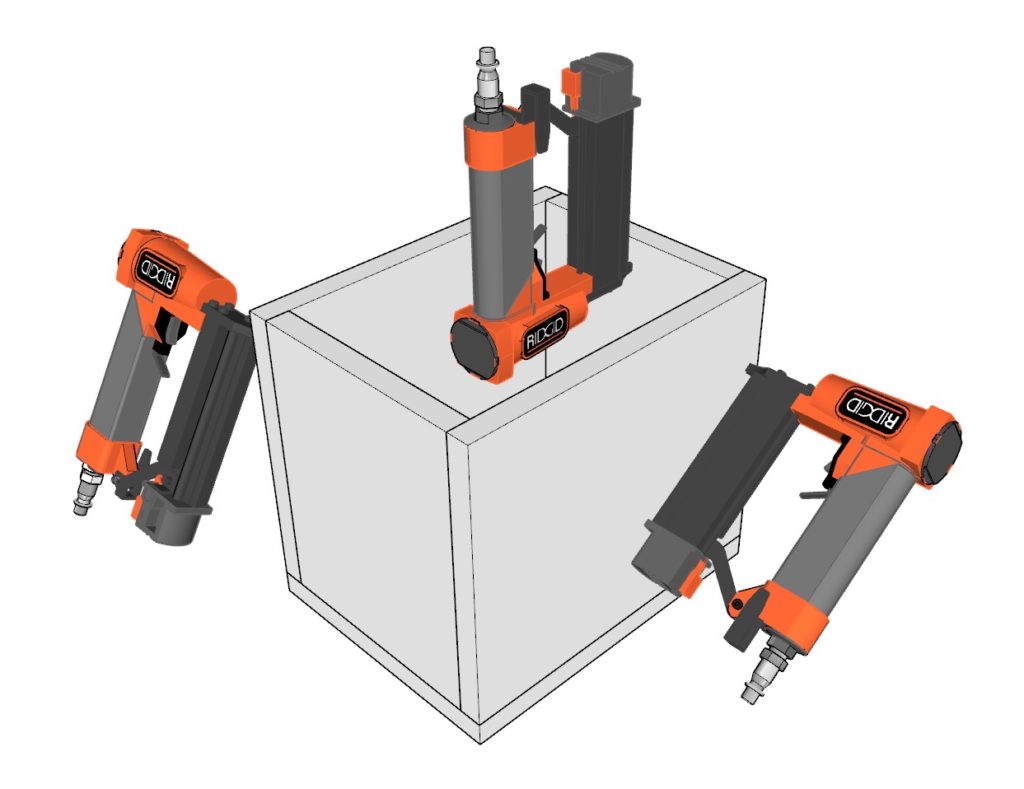
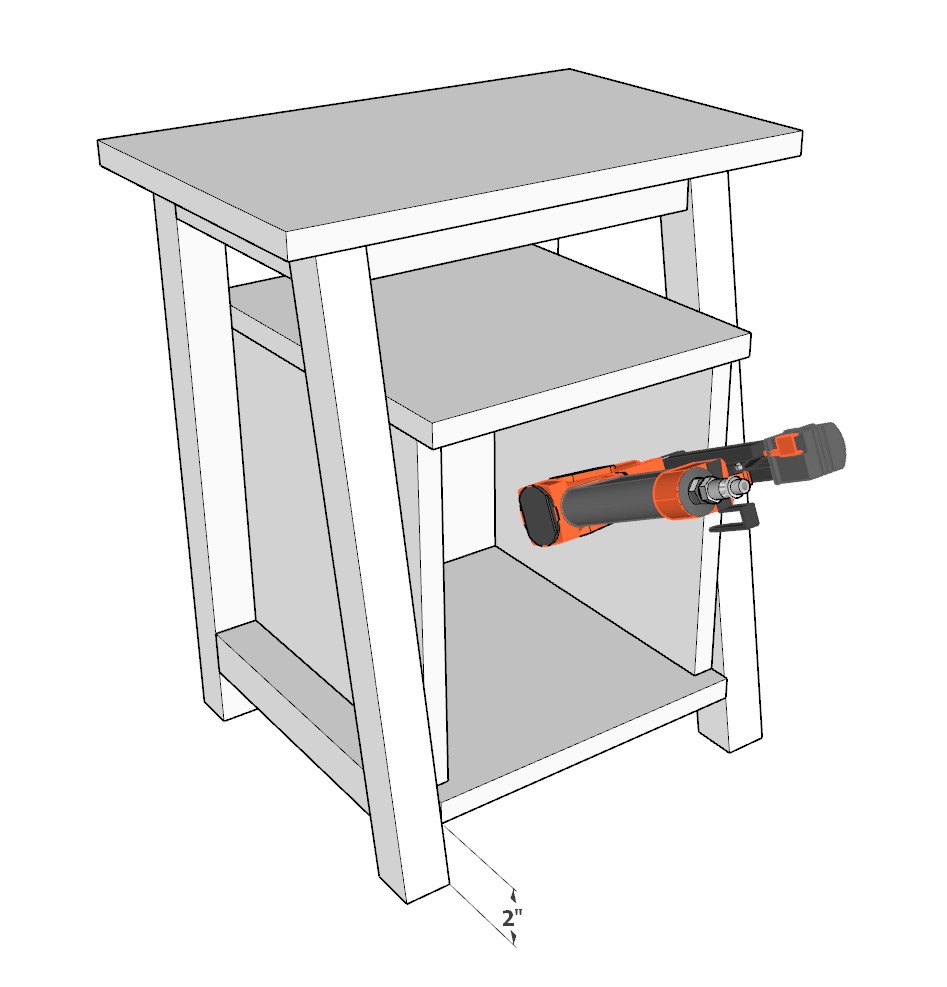
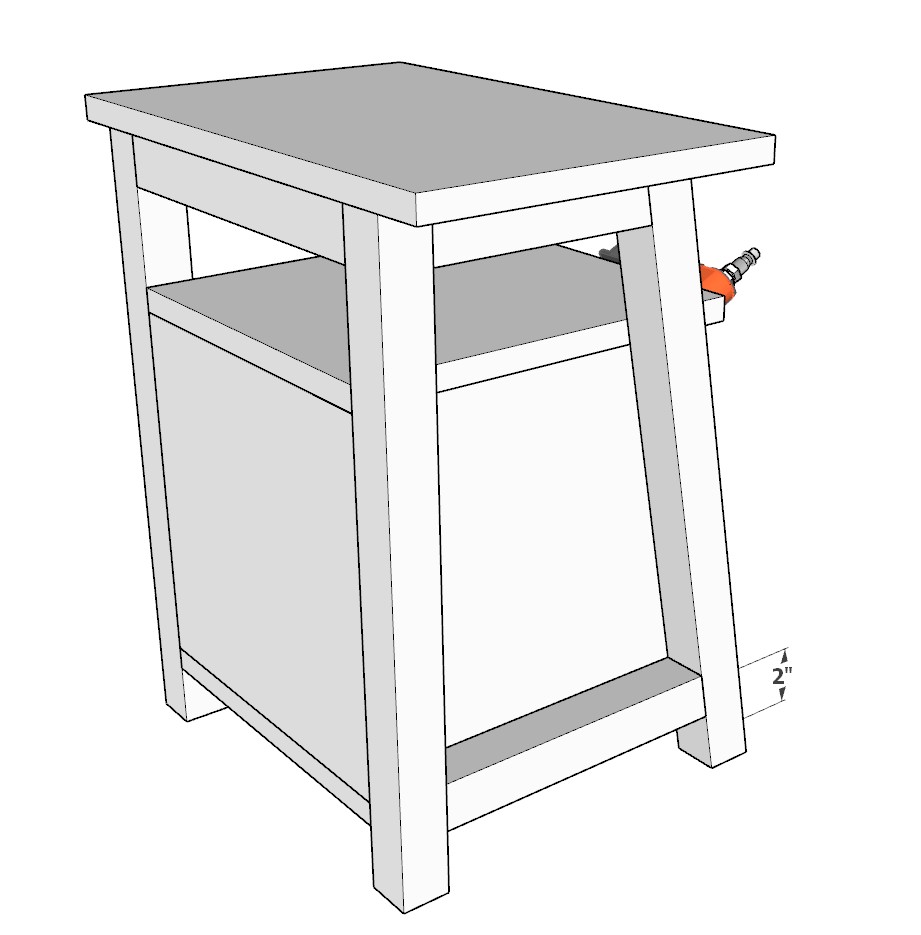
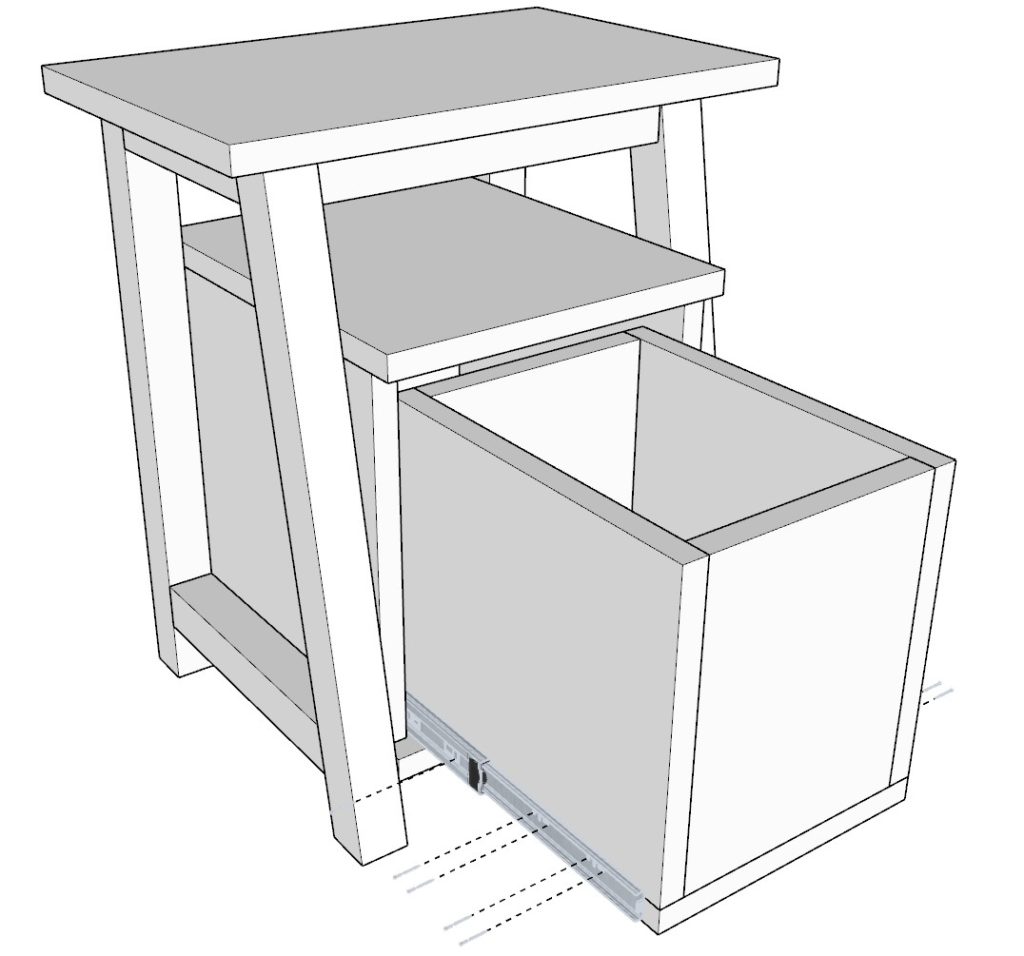
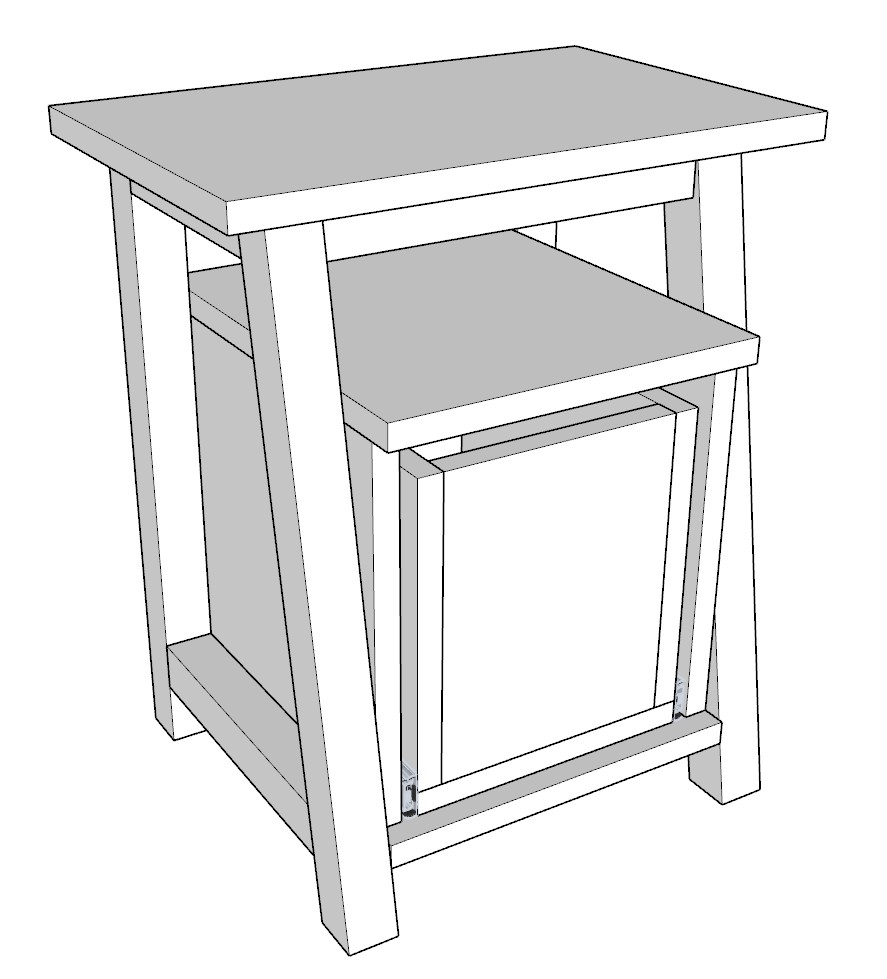
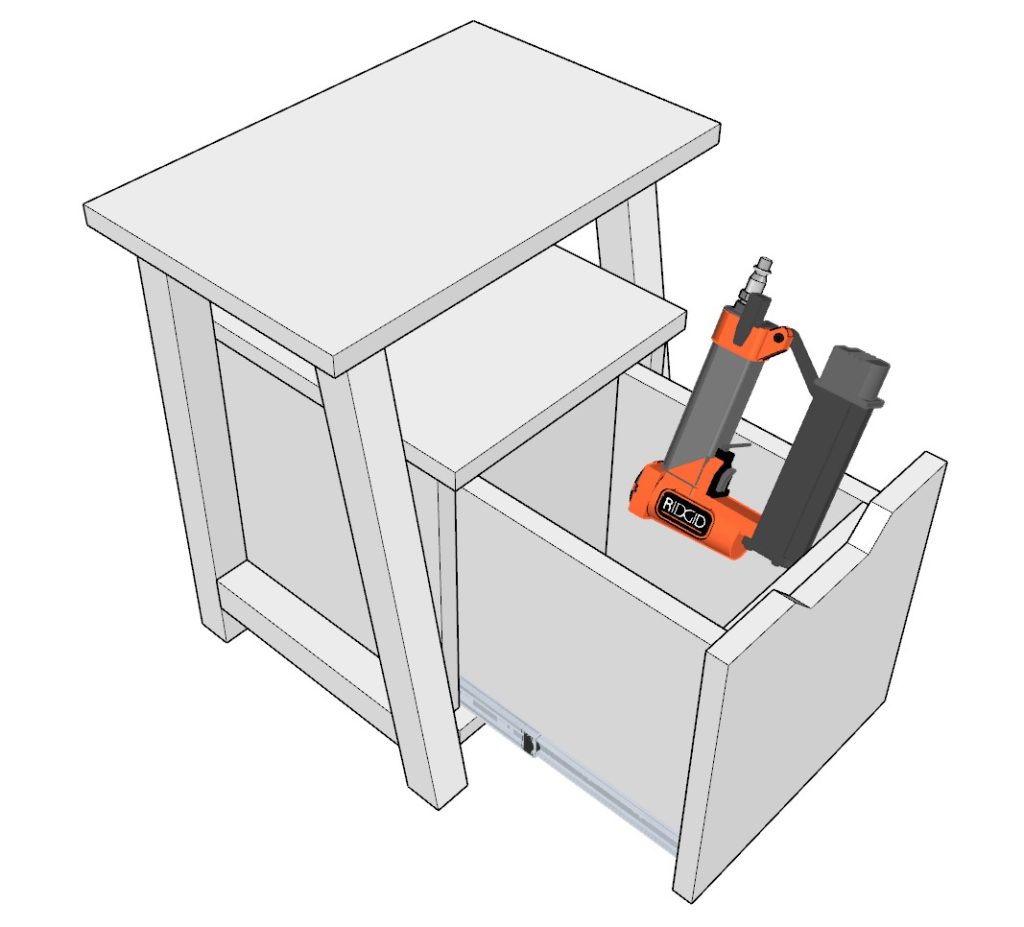
Step 5: Installing the Drawer Housing and Attaching the Drawer
Position the previously assembled drawer housing into the nightstand frame as indicated in the provided diagram.
- Affix it securely using wood glue and pin nails, ensuring it is well-anchored and aligns perfectly with the frame.
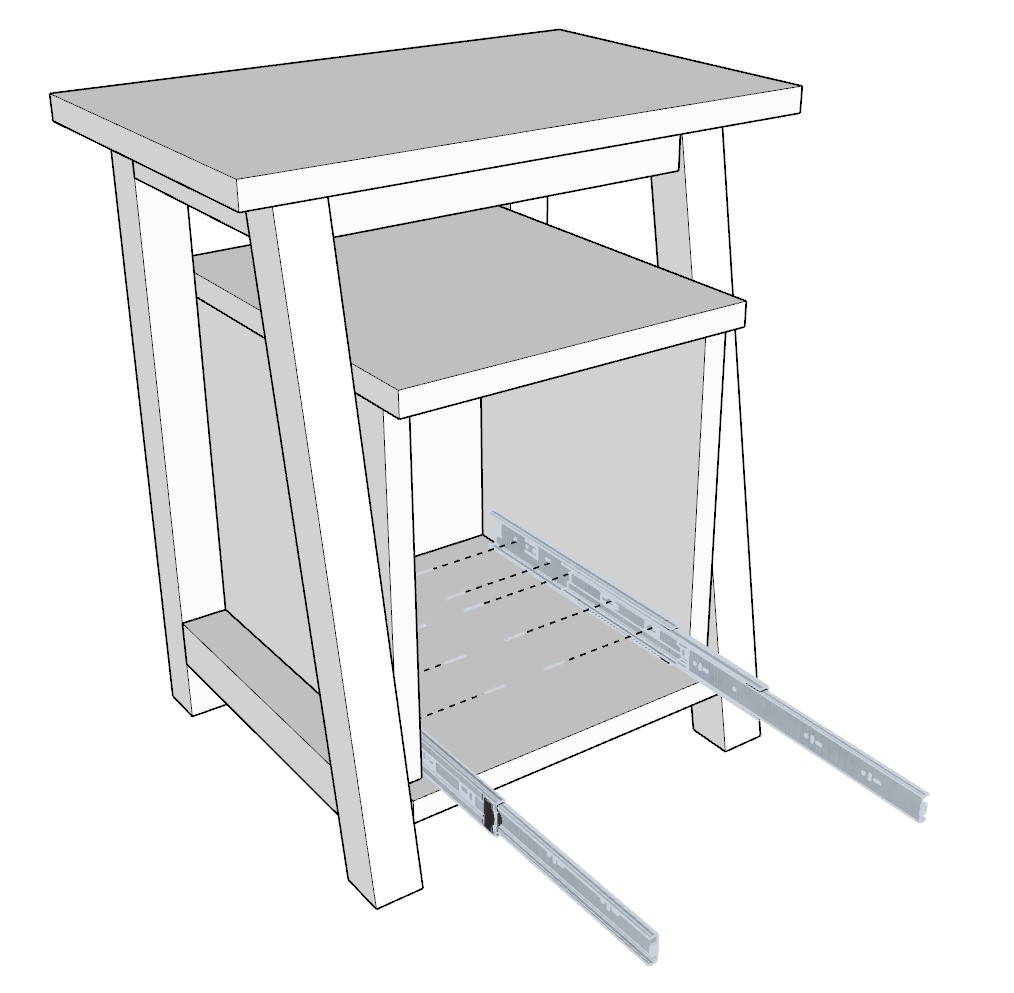
Proceed to install the drawer slides. Prepare two 10-inch long and 1/2-inch thick drawer slides for this step.
- Attach the slides to the drawer housing as demonstrated in the subsequent diagram, making sure they are fixed firmly and align correctly.
With the slides in place, extend them and carefully position the drawer onto the slides.
Attach the drawer to the slides, ensuring it is secured tightly and operates smoothly.
Test the drawer’s operation. It should slide effortlessly and sit flush with the drawer housing. If necessary, make any required adjustments to ensure optimal functionality and alignment.
Tip: Always double-check the alignment and operation of the drawer before proceeding to add the drawer face. This ensures any needed adjustments are made early for a seamless and functional outcome.
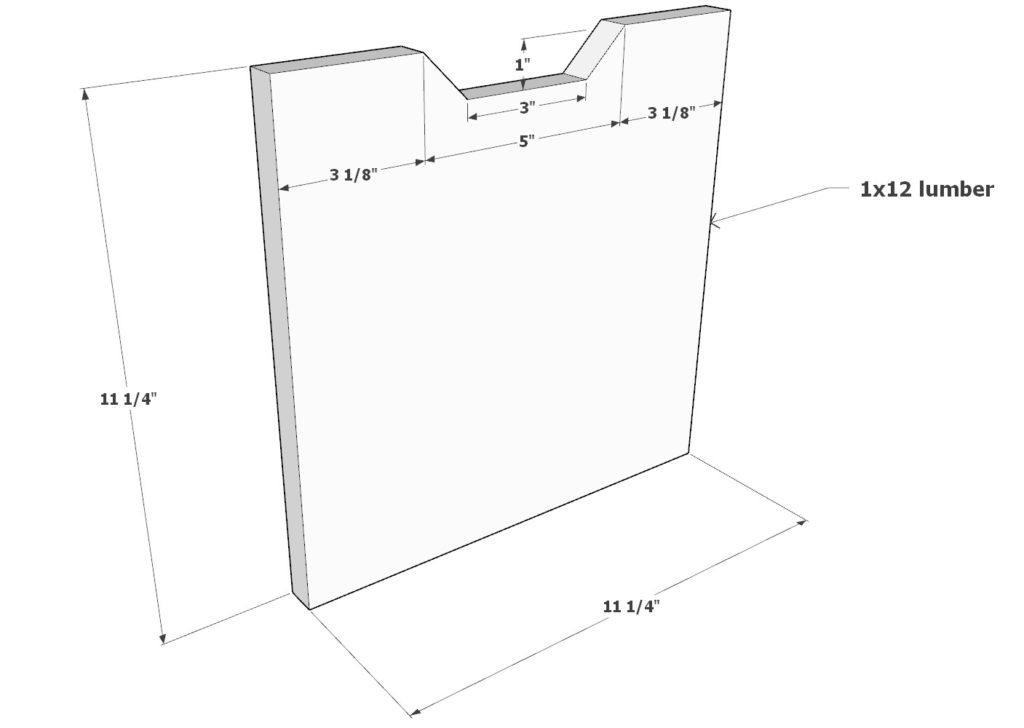
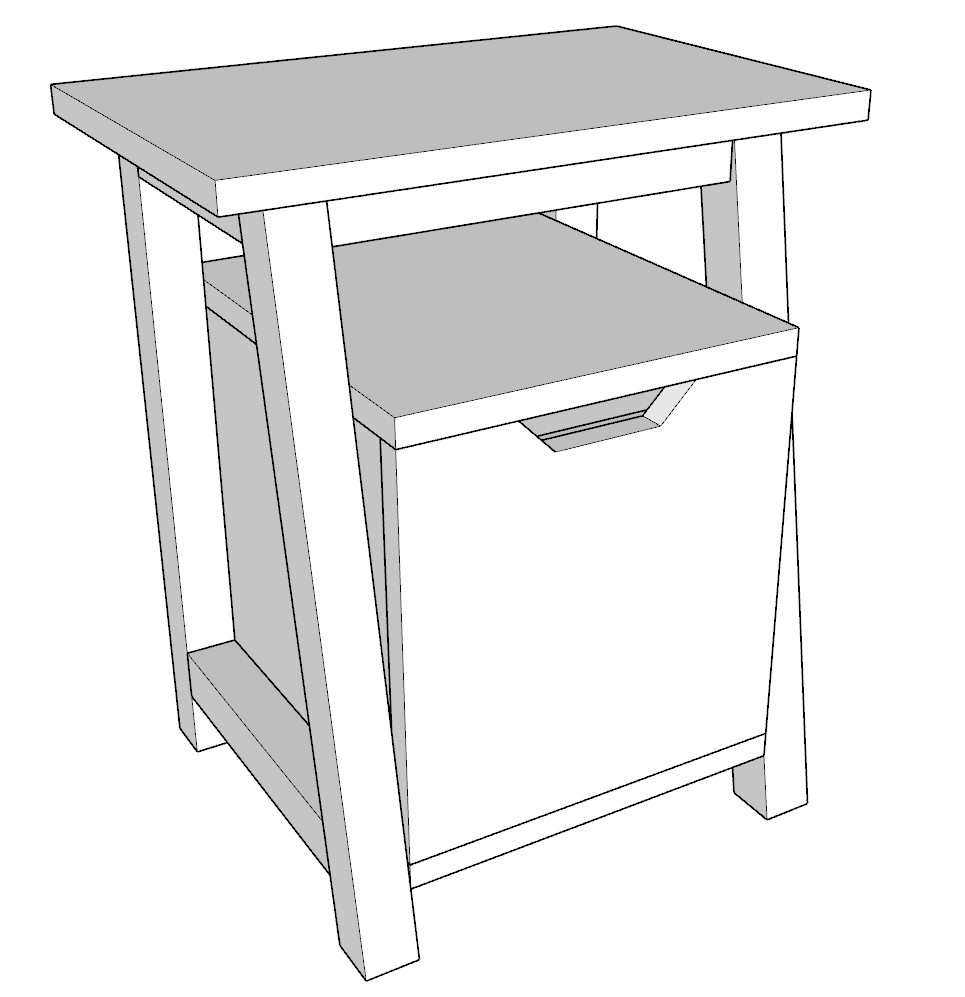
Step 6: Crafting and Installing the Drawer Face
Step 6: Crafting and Installing the Drawer Face
Prepare an 11-1/4 inch x 11-1/4 inch piece of 1×12 lumber to create the drawer face.
Decide on the handle style for the drawer face:
- Option A: Attach a simple handle for easy opening.
- Option B: Cut a notch at the top of the drawer face to act as a built-in handle. Use a regular saw or a jigsaw to make this cut, ensuring it’s wide enough for a comfortable grip.
Fit the crafted drawer face into the designated opening on the drawer housing.
- If the drawer face fits too tightly, use a sander to slightly reduce the sides until it sits snugly yet allows easy pull in and out.
Once the fit is confirmed to be perfect, secure the drawer face in place using wood glue and pin nails. Ensure it’s aligned and operates smoothly.
- Tip: Always check the fit before securing the drawer face. It should be snug but allow for smooth operation without sticking or wobbling. Adjust as necessary for a professional, polished finish.
Step 7: Preparing, Staining, or Painting the Nightstand
Preparing for Staining or Painting:
Sanding:
- Begin with sanding the entire surface of the nightstand using a medium-grit sandpaper to smoothen out all edges and surfaces. Focus on corners and detailed areas to ensure an even surface.
- Progress to a fine-grit sandpaper and repeat the process for a smoother finish.
Cleaning:
- Wipe the nightstand with a tack cloth to remove all sawdust and debris. Ensure the surface is clean to achieve a flawless finish.
Masking:
- If required, use painter’s tape to mask off areas that you do not want to stain or paint.
Staining Process (Three Stages):
1. Pre-Staining:
- Apply a pre-stain wood conditioner with a brush or cloth, covering all wooden surfaces evenly. It helps in achieving a uniform stain without blotches.
- Allow it to penetrate the wood for about 5-15 minutes, then wipe off excess conditioner with a clean cloth.
- Allow the wood to dry as per the instructions on the pre-stain conditioner’s label.
2. Staining:
- Choose your preferred wood stain color. Using a brush or cloth, apply the stain evenly along the grain of the wood. Ensure each stroke is smooth to avoid streaks or marks.
- Let the stain sit for about 5-15 minutes to penetrate the wood. The longer it sits, the deeper the color will be.
- Wipe off excess stain with a clean cloth and allow the wood to dry completely.
3. Applying Polyurethane:
- With a clean brush, apply a thin coat of polyurethane to seal the wood and protect it. Ensure to cover every surface evenly.
- Allow it to dry completely. Lightly sand the surface with fine-grit sandpaper, then wipe it clean with a tack cloth.
- Apply a second coat of polyurethane and allow it to dry.
Leaving Natural:
1. Pre-Stain:
- Even if leaving the wood natural, apply a pre-stain conditioner to ensure an even look and to prepare the wood for sealing.
- Follow the steps outlined in the pre-staining section above.
2. Applying Polyurethane:
- Follow the same procedure as in the staining process, applying two coats of polyurethane to protect the natural wood and enhance its beauty.
Final Touches:
Felt Pads:
Turn the nightstand upside down and attach felt pads to the bottom of each leg. It helps in easily moving the nightstand without scratching the floor and reduces noise.
Tip: Allow all coatings to dry thoroughly before moving to the next step or using the nightstand. Proper drying ensures durability and a professional finish. Make sure the workspace is well-ventilated when applying stains and sealants.