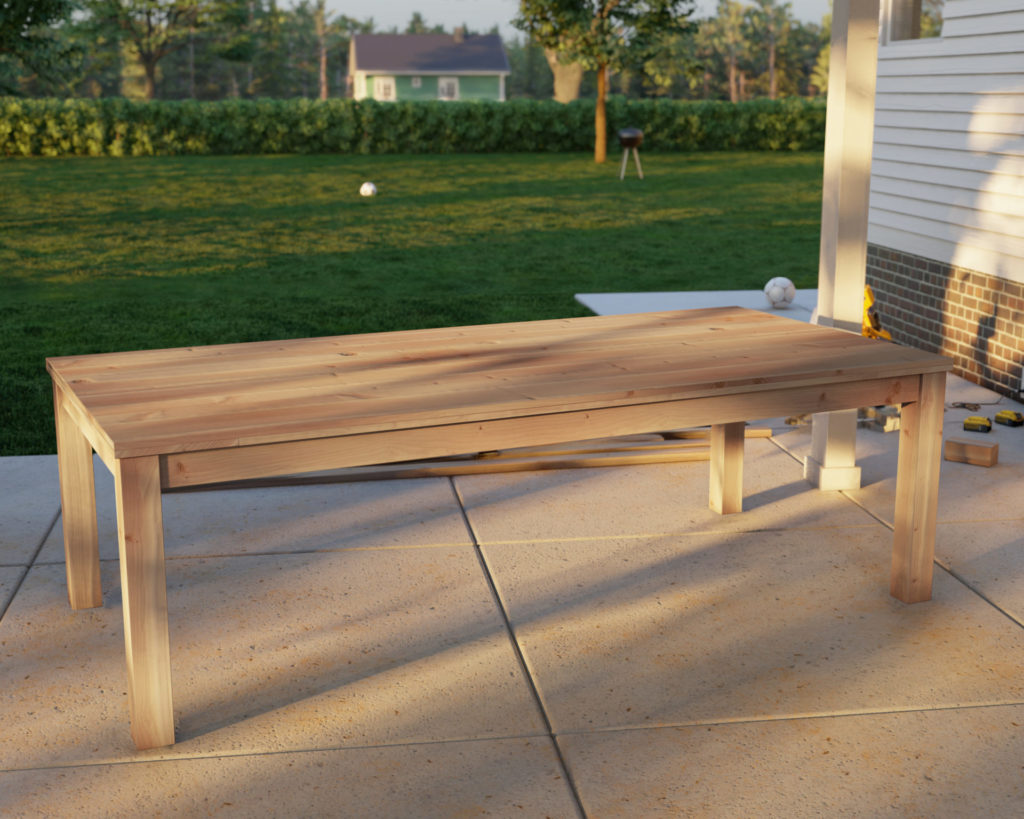
Introduction
Dive into a world where your creativity meets practicality with our user-friendly DIY table plan. It’s tailored for those who seek to blend the art of woodworking with everyday functionality, without the hefty price tag. In these economic times, we all appreciate the value of making something with our hands, something that is not only cost-effective but also a reflection of personal effort and creativity.
A Dream for Beginners
Imagine transforming simple pieces of lumber into a sturdy, functional table. That’s the beauty of our plan – it’s straightforward, accessible, and designed with the beginner in mind. You don’t need intricate skills or complex tools; just a dash of enthusiasm and a sprinkle of effort. It’s woodworking made easy, a journey where every step, every piece assembled, brings you closer to the gratifying moment of admiring your completed table.
Economical Elegance
When the economy tests our resilience, we respond with ingenuity. This DIY table plan is more than a guide; it’s an ally in maximizing value while minimizing costs. You’re not just crafting a table; you’re weaving affordability with utility, creating a piece that serves its purpose and stands as a testament to economic savvy and quality.
Unleash Your Creativity
Every table built is a unique entity, echoing the personal touch of its maker. Want it longer, shorter, stained, or painted? Your wishes are commands with our plan. It’s a canvas of opportunities, inviting you to imprint your style, preferences, and creativity, culminating in a table that’s as personal as it is practical.
Empowerment in Your Hands
As you stand before your completed table, you’re not just looking at a piece of furniture. You’re beholding a narrative of empowerment, the tangible result of your skill and effort converging. It’s an experience, a journey of transforming basic lumber into a utility, adorned with the intangible essence of personal achievement. This isn’t just about building a table; it’s about constructing a story of resilience, creativity, and triumph over economic challenges.
Are you ready to embark on this transformative journey? To meld practicality with creativity, economy with quality, and to witness the birth of a table that’s not just seen but is felt, experienced, and valued? Your odyssey of creation and empowerment begins with our DIY table plan. Make that choice, take that step, and let’s build not just a table, but a narrative of personal achievement and economic triumph. Your DIY journey awaits!
Time
6 hours
Cost
$200
Skill level required
Beginner

DIY Dinning Table PDF Plan
What is included in the PDF download?
- Easy to read step by step instructions
- Material list
- Tools needed
- Helpful links to materials and tools needed
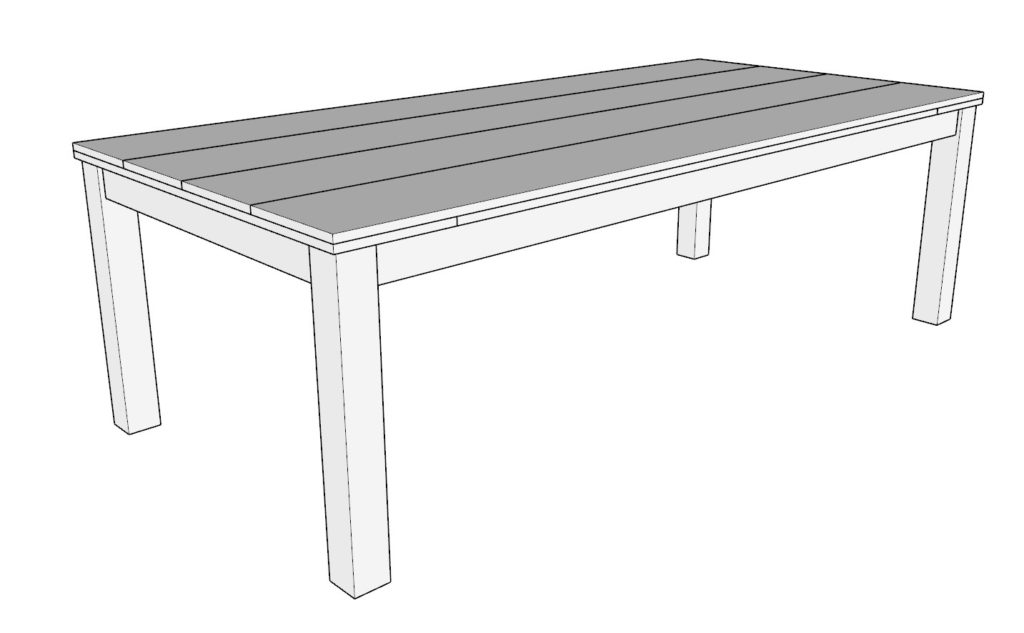
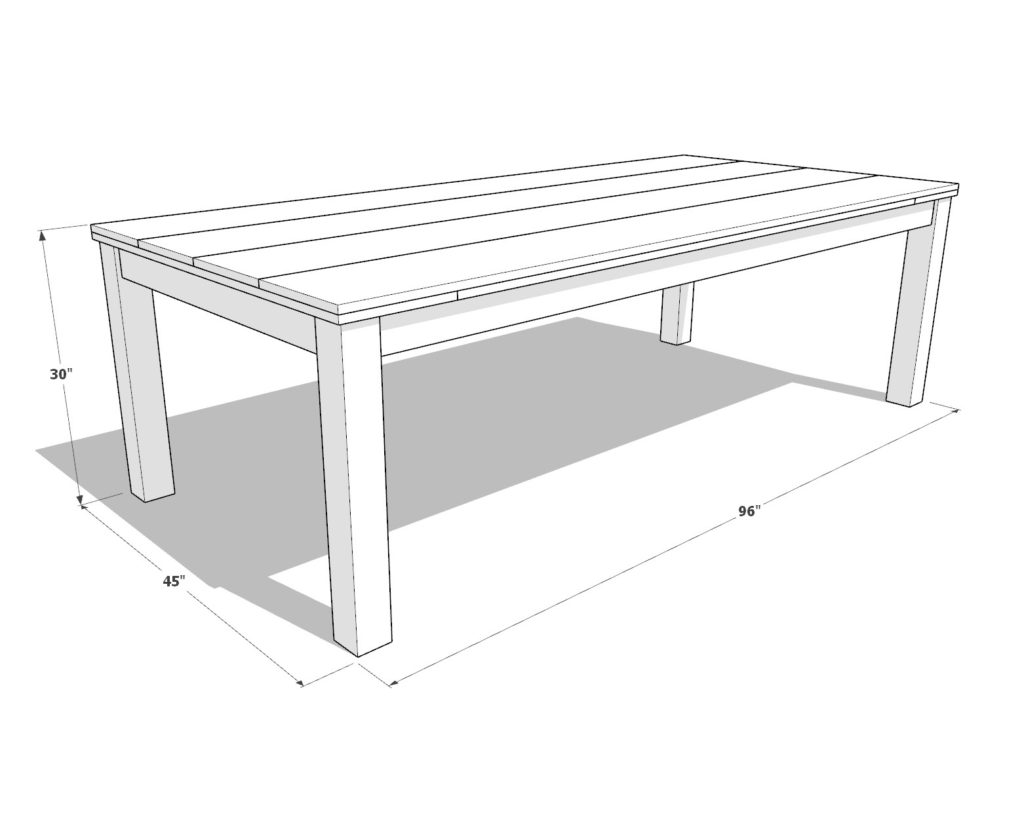
DIY Dinning Table Dimensions
Tools Needed for This Project:
Available with purchase of DIY plan PDF
Lumber Shopping & Cut List
Available with purchase of DIY plan PDF
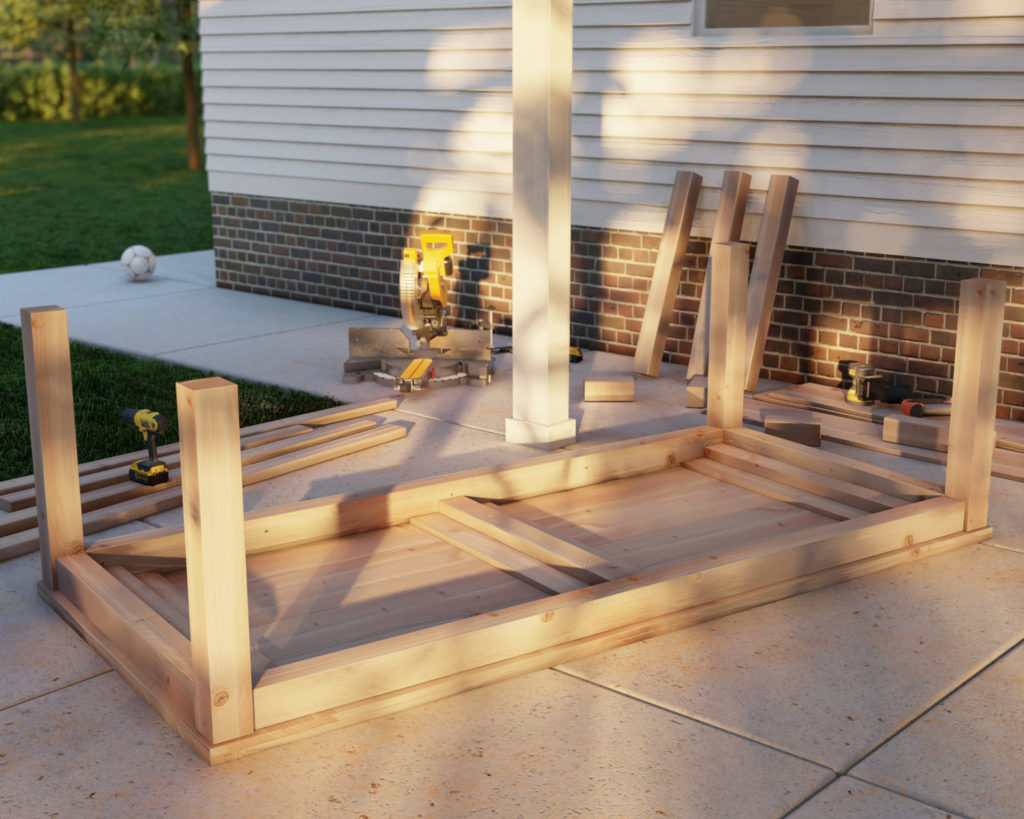
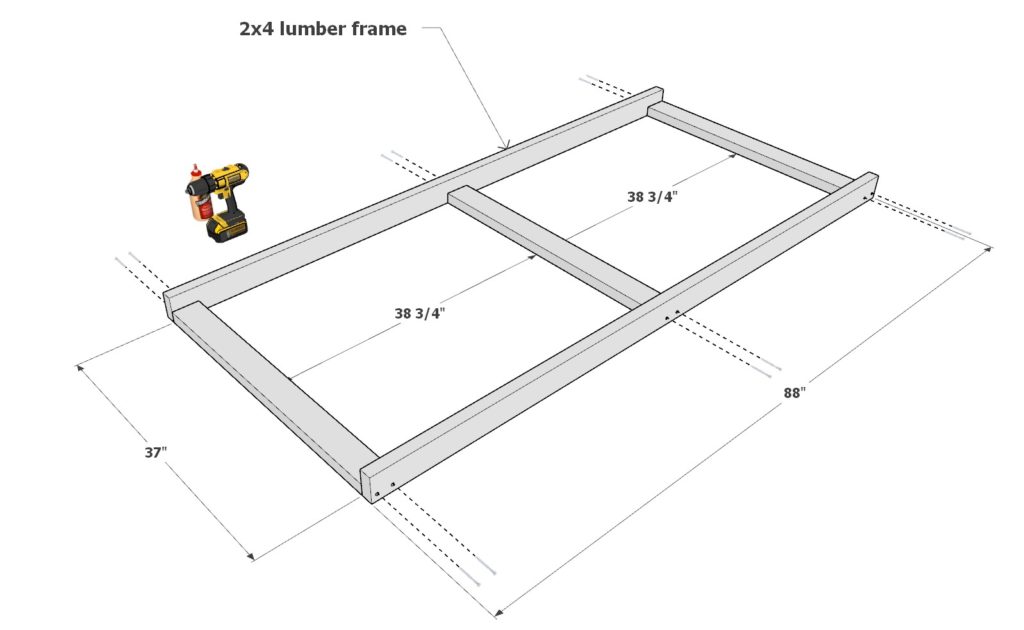
Step 1: Assembling the Table Frame
Preparation Tip: For a refined, clean finish, consider sanding and planing your lumber pieces before assembly. It simplifies the finishing process, requiring only touch-ups at the end.
Part A: Laying the Base
- Begin with two 88-inch long 2×4 lumber pieces and three 37-inch 2×4 pieces.
- Lay them out as illustrated in Diagram 1.
- Use 3.5-inch screws (2.5-inch can also be used if necessary) and wood glue to secure the pieces together, forming the base of the table frame.
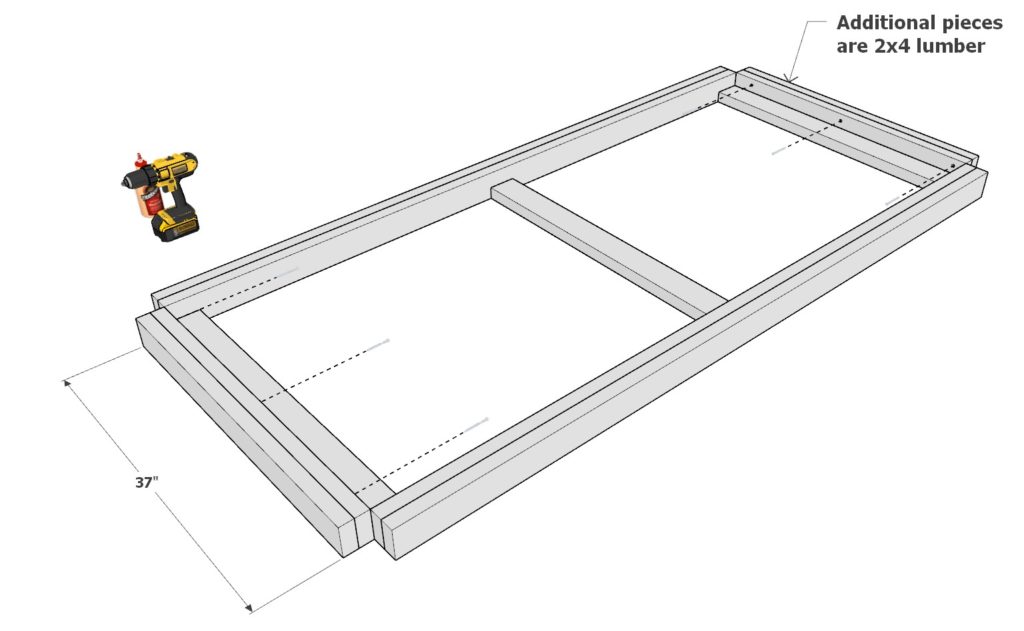
Part B: Adding the Second Layer
- Refer to Diagram 2 for the placement of the next set of pieces.
- Take two more 37-inch 2x4s and two 88-inch 2x4s and lay them on top of the base frame, aligning them as shown.
- Secure these pieces with 2.5-inch screws and wood glue to ensure they don’t protrude.
Part C: Completing the Frame
- For the final layer, refer to Diagram 3.
- Place the remaining two 37-inch pieces as indicated, and attach them using 2.5-inch screws and wood glue.
- Ensure all pieces are firmly secured, and the frame is stable.
4. Additional Tips for Easier Assembly
- Drill Pilot Holes: Consider drilling pilot holes for the screws to make the assembly smoother and prevent the wood from splitting.
- Assembly Surface: Ensure that the surface you’re assembling on is flat and stable to make the process smoother and the final frame leveled.

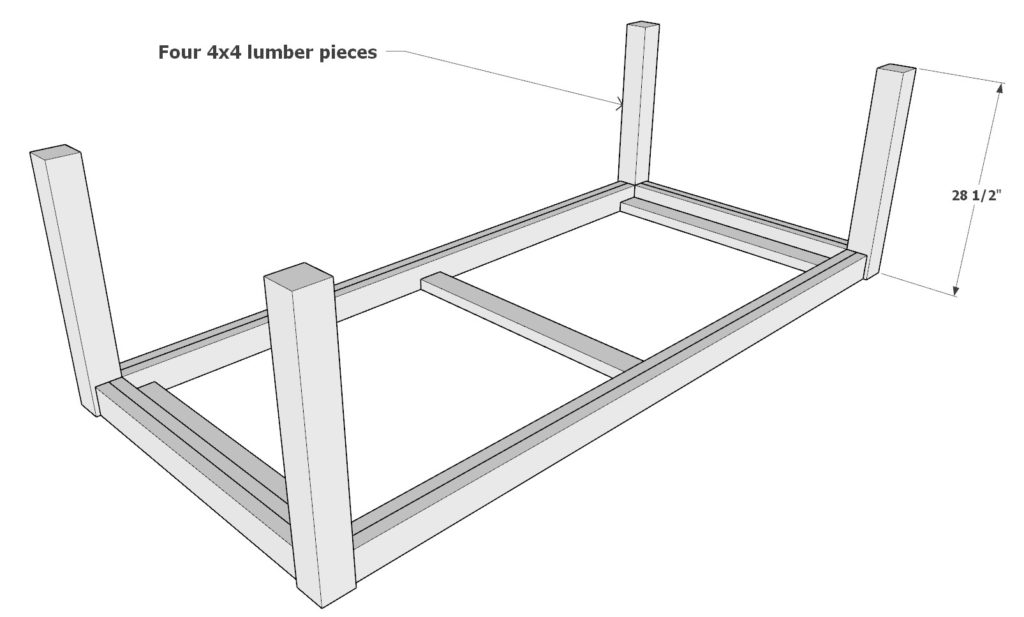
Step 2: Attaching the Legs to the Table Frame
Initial Setup
- Begin with the four 28-1/2 inch long 4×4 lumber pieces designated for the table legs.
- Place them as illustrated in the first diagram, ensuring you are working on a level surface.
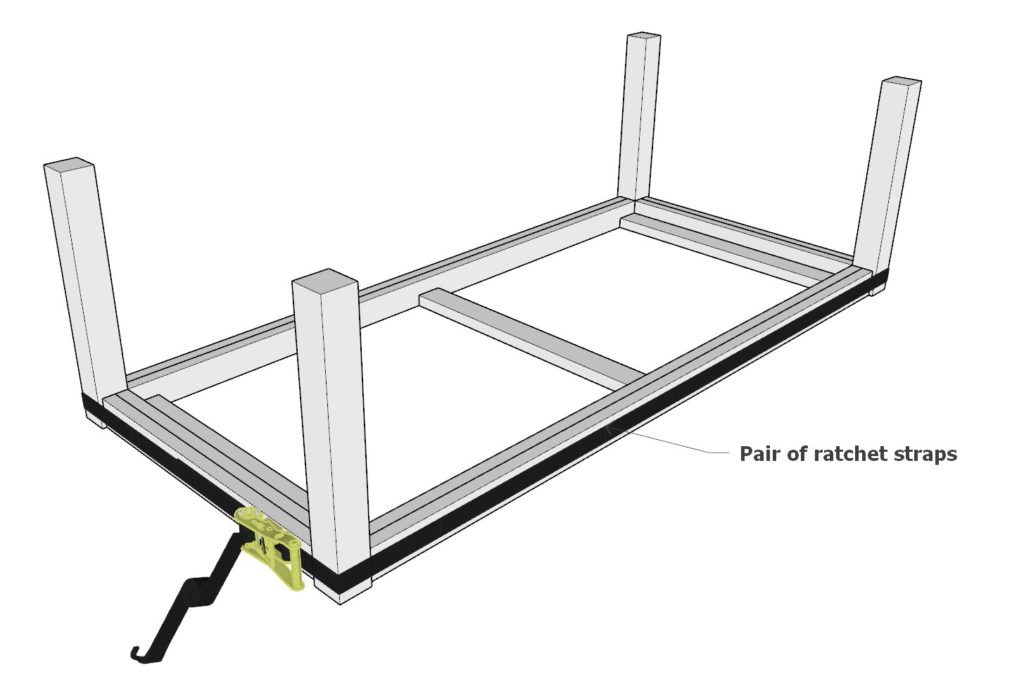
Gluing and Aligning
- Apply wood glue to all areas of the legs that will be joined with the table frame.
- Use one or two ratchet straps to pull the 4×4 pieces snugly against the table frame. Adjust each piece, if necessary, using a hammer to tap them gently into place, ensuring a flush fit.
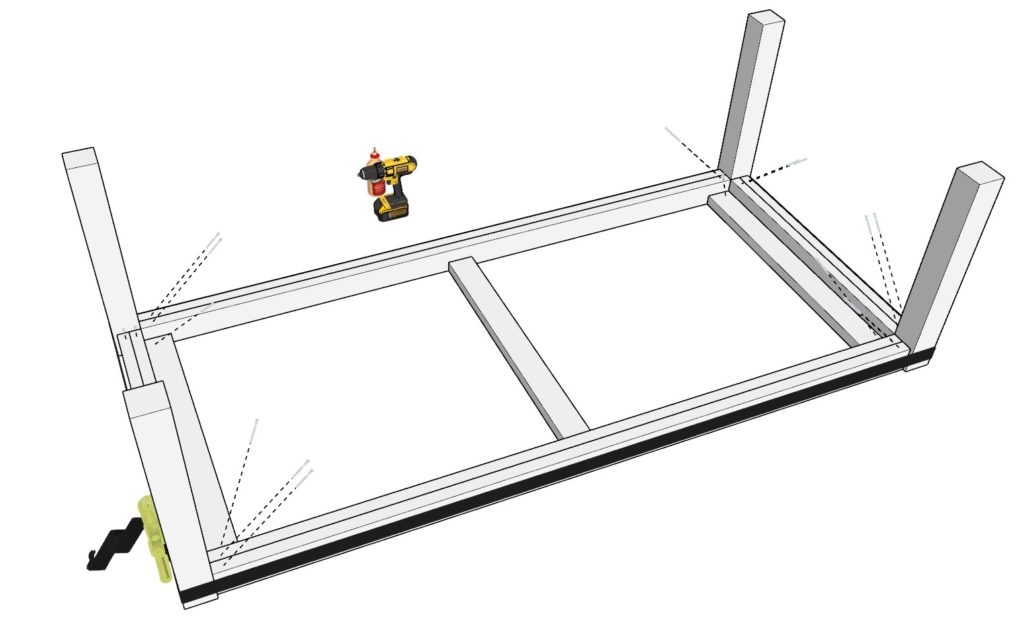
Securing the Legs
- Tighten the straps securely to hold the pieces in position.
- Predrill the holes to prevent the wood from splitting and then secure the table frame to the legs using 3.5-inch screws, as shown in the second diagram.
Flipping the Table
- With the help of a friend, carefully flip the table to bring it upright. Ensure the legs do not touch the ground during this process to prevent any strain on the unsecured legs.
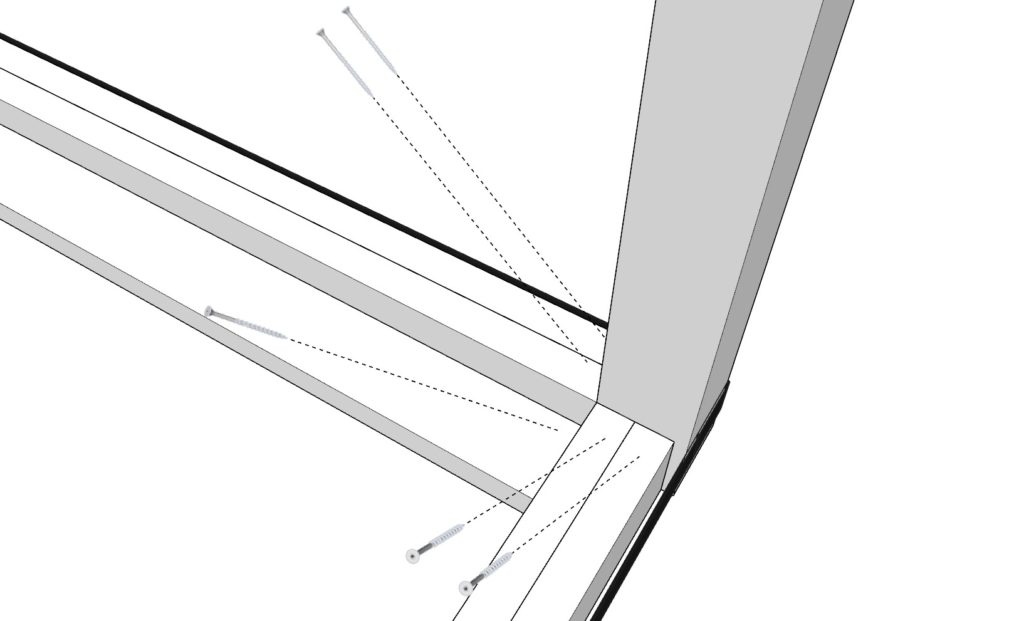
Final Securing
- Once the table is upright, add more screws as shown in the final diagram to strengthen the joint.
- Ensure each screw is tightened firmly to enhance the table’s stability.
Tip: Always predrill the holes before inserting screws to ensure a strong, split-free joint and enhance the table’s durability and stability.
4. Additional Tips for Easier Assembly
- Strap Usage: If you’re unfamiliar with using ratchet straps, consider watching a quick tutorial to ensure they are used effectively and safely.
- Leg Alignment: Use a carpenter’s square to check the alignment of the legs to the frame to ensure they are perfectly square for added stability.
- Screw Choices: Consider screws specifically designed for wood to ensure a stronger hold and longevity of the table.

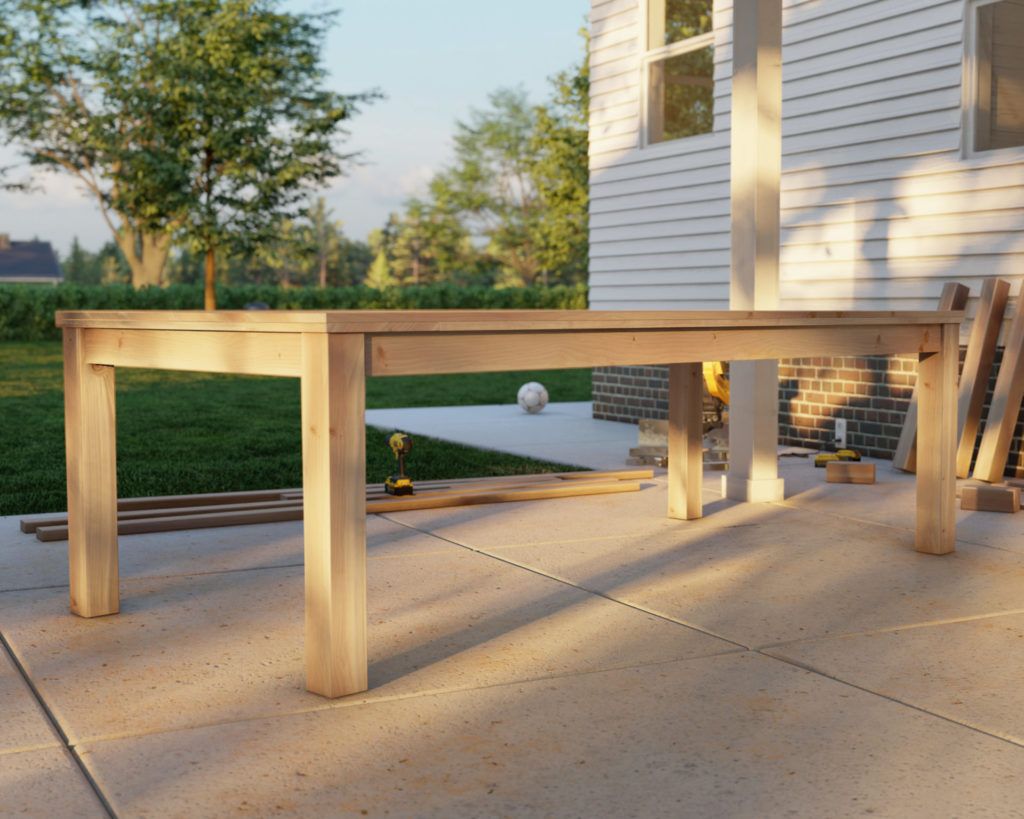
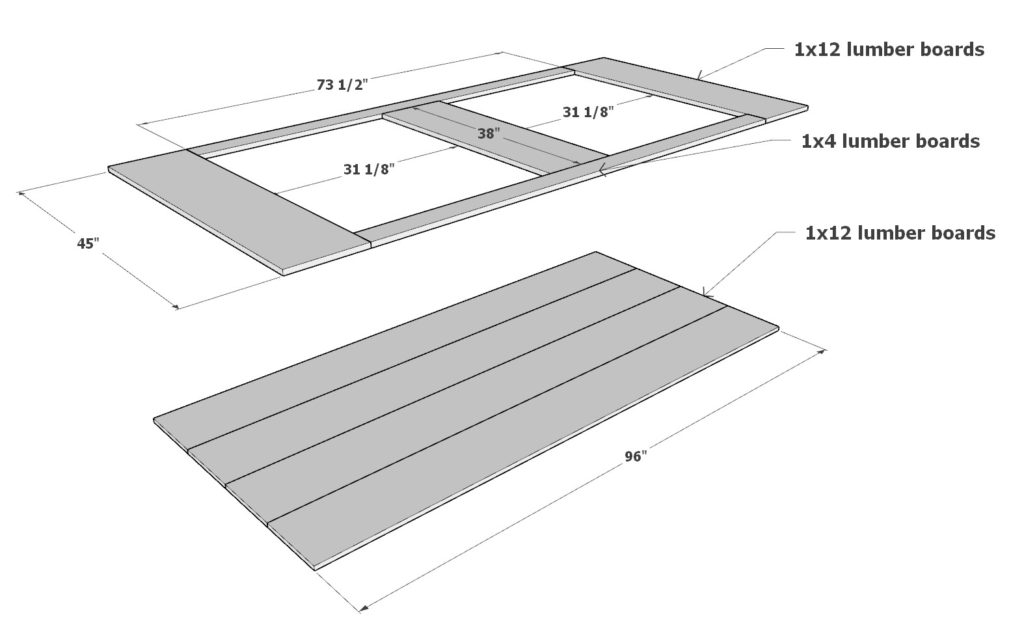
Step 3: Constructing the Table Top
Preparation
- Begin by selecting four 96-inch 1×12 lumber pieces for the base of the table top.
- For the second layer, you’ll need two 45-inch 1×12 pieces, one 38-inch 1×12 piece, and two 73-1/2 inch 1×4 pieces.
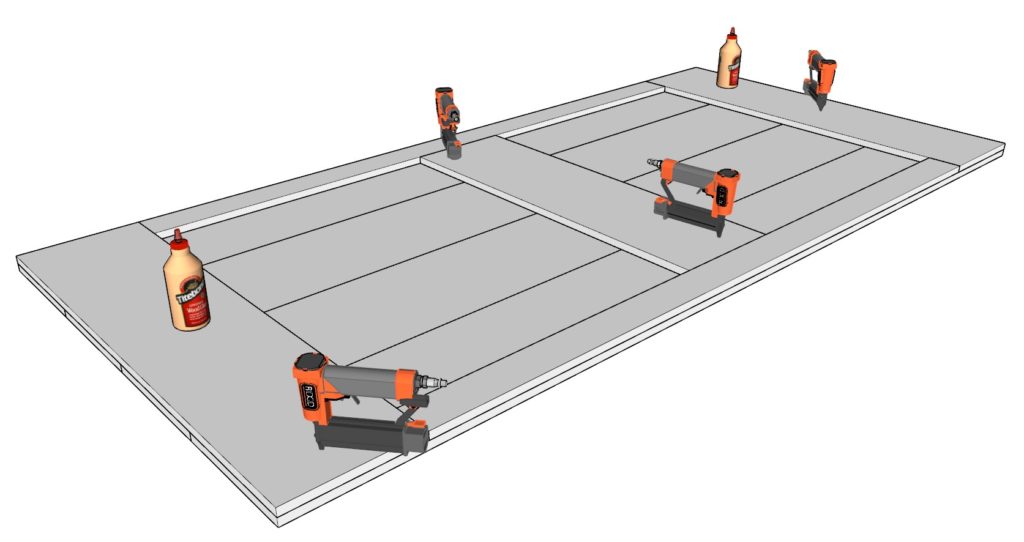
Tip: Before applying any glue or nails, lay out all pieces to ensure a good fit. Some boards may align better with others, so take the time to arrange and re-arrange until you achieve the best fit. Consider sanding the boards at this stage for a smoother finish.
Assembly
- Apply wood glue between the layers to hold the pieces together firmly.
- Using a nail gun and 1-inch nails, secure the pieces together, ensuring they are aligned and snug.
Tip: Use clamps to hold the boards together tightly, especially while the glue is drying, to ensure a solid, unified table top.
4. Additional Tips for Easier Assembly
- Nail Gun Safety: If this is your first time using a nail gun, acquaint yourself with its safety and operational guidelines to avoid accidents.
- Sanding: If not done in the preparation stage, ensure the table top is thoroughly sanded after assembly to achieve a smooth, refined finish.
- Visual Inspection: Always do a visual check to ensure all nails are flush with the surface and there are no protruding elements for a seamless look.
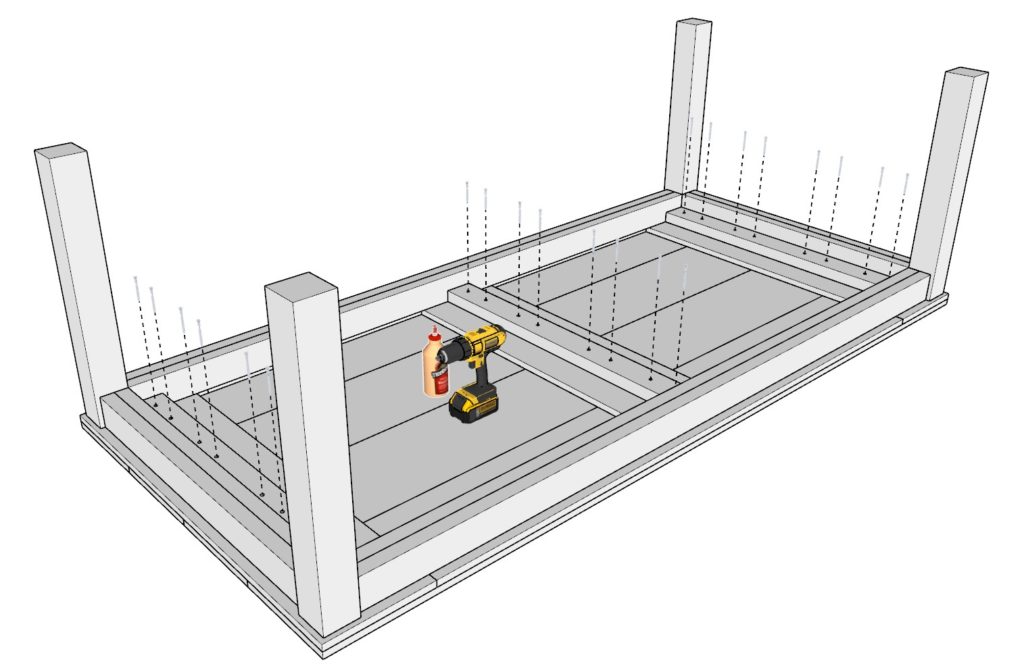
Step 4: Securing the Table Top to the Base
Alignment Check
- Begin by carefully aligning the constructed table top with the base to ensure a perfect fit. It should be centered and balanced to provide optimal stability and aesthetics.
Securing Process
- Apply wood glue at the joining surfaces to enhance the bond between the top and the base.
- Following the placements shown in the diagram, use 2.5-inch screws to firmly secure the table top to the base. Ensure each screw is driven in evenly for a flush finish, enhancing the table’s overall look and stability.
Tip: It’s advisable to predrill the holes for the screws to ensure easy assembly and prevent the wood from splitting. Always check the alignment as you proceed to ensure the top sits perfectly on the base.
4. Additional Tips for Easier Assembly
- Screw Spacing: Ensure screws are evenly spaced for uniform support and stability of the table top.
- Final Inspection: After securing, inspect the table from different angles to ensure the top is level and firmly attached to the base. Make any necessary adjustments promptly before the glue sets.
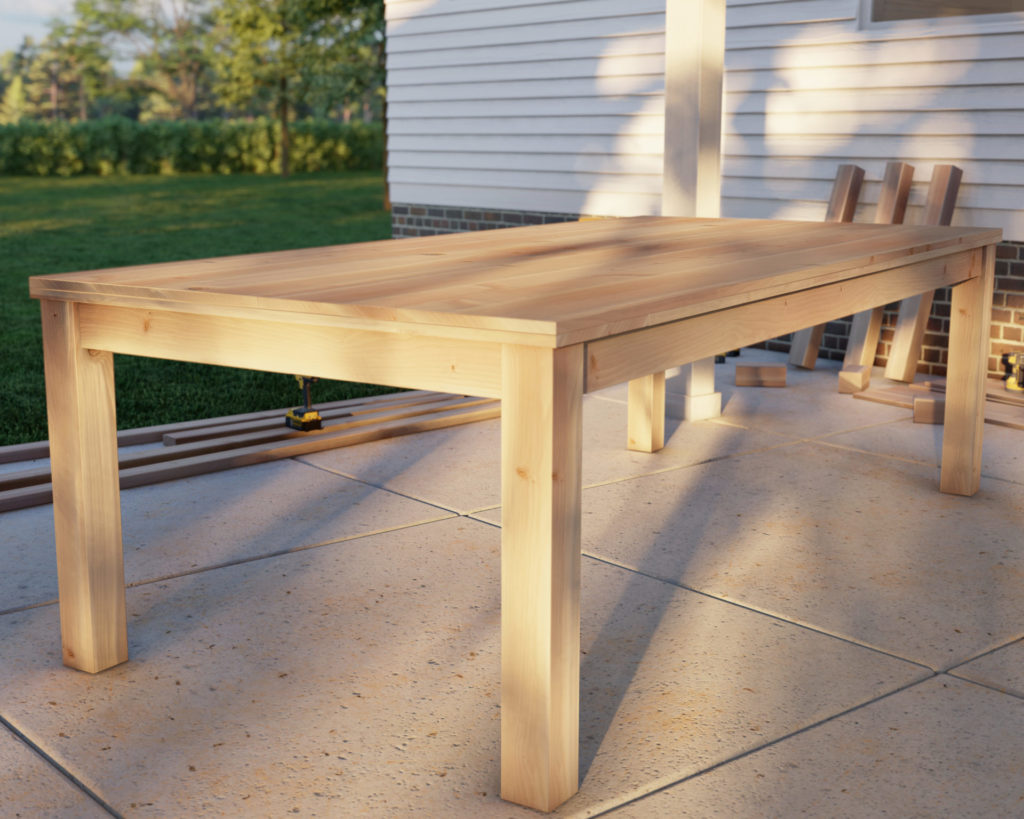
Step 5: Preparing, Staining, Painting, and Final Touches
Step 5: Preparing, Staining, Painting, and Final Touches
A. Preparing the Table for Staining and Painting
To achieve a stunning and durable finish, meticulous preparation of your DIY table is essential. Begin by cleaning the table to remove any sawdust, debris, or dirt. A tack cloth or soft, damp cloth works effectively to capture fine dust particles.
Sanding is the next pivotal step. Use a fine-grit sandpaper, preferably 220-grit, to smooth the entire surface of the table, paying close attention to the legs and edges. Every corner and crevice should be smooth to the touch. After sanding, another wipe down is necessary to ensure a completely dust-free surface.
If you’re opting to stain the table, applying a pre-stain wood conditioner is advised. This preparation aids in achieving an even and richly colored stain, preventing blotchiness.
B. Staining the Table
Select a wood stain that not only complements the wood’s natural hue but also aligns with your aesthetic preferences and room decor. Apply the stain evenly with a brush or cloth, moving in the direction of the wood grain to accentuate the natural beauty of the wood. Allow the stain to sit for 5-15 minutes, then wipe off any excess. Let the first coat dry completely before deciding if additional coats are necessary for a deeper hue.
C. Painting the Table
If painting is your chosen finish, start with a primer application to ensure enhanced adhesion and durability of the paint. Once the primer is dry, apply your chosen wood paint evenly with a brush or roller. Avoid visible stroke lines for a seamless look. Allow ample drying time, as recommended on the paint’s label, before considering a second coat for a richer appearance.
D. Installing Felt Pads
With the paint or stain completely dry, the final touch is adding protective felt pads to the bottom of each table leg. Turn the table upside down and attach the pads. These protect your floor from scratches and facilitate smoother movement of the table.
Each of these steps, from preparation to the final touches, is integral to transforming your hand-built table into a functional and aesthetically pleasing piece of furniture that adds character, warmth, and utility to your space.