Introduction
Are you ready to take your first dive into the world of woodworking? If you’re drawn towards creating practical pieces of furniture that blend aesthetics with functionality, then this is the beginning of a journey you won’t regret. We present to you an enthralling opportunity to craft your very own queen-sized bed frame.
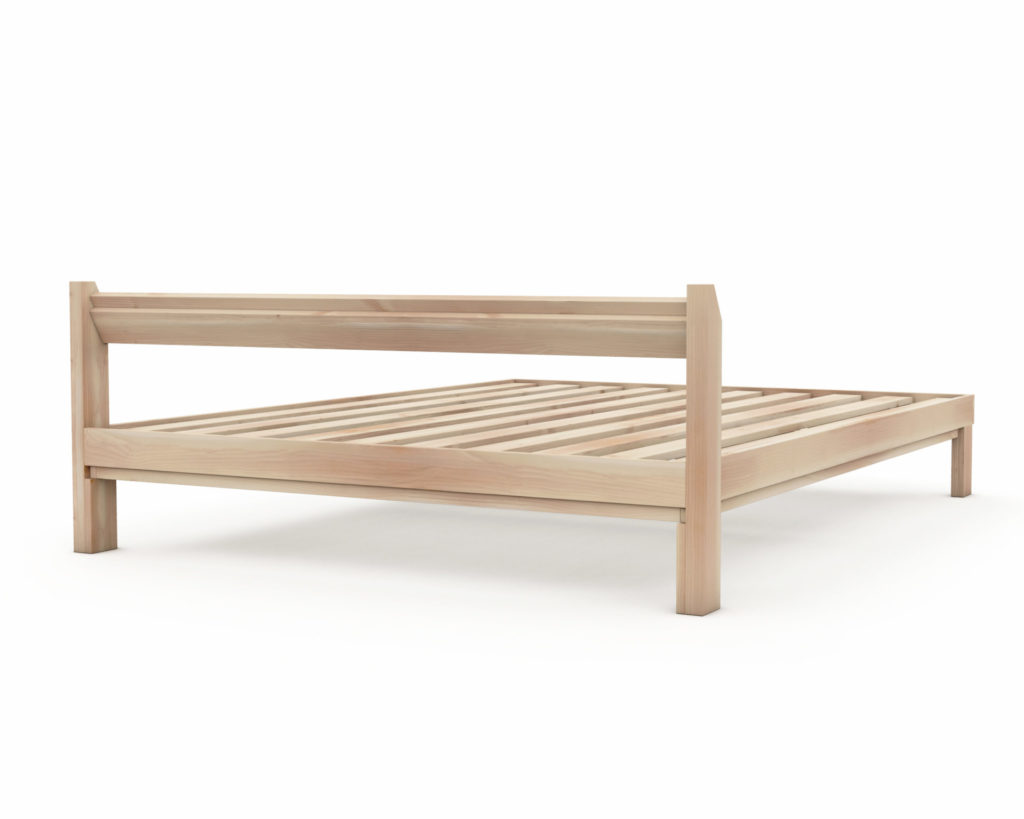
In the DIY world, using simple tools and raw materials to create something beautiful and useful is a rewarding experience like no other. Our project of the day – an elegant, minimalist-style wooden queen bed frame that you can fashion with your own hands.
Project Overview
The project aims to guide you through the intricate yet enjoyable process of creating your own queen-sized bed frame. Working around a relatively simple design, your raw planks of wood will be transformed into a blend of elegance and minimalism that’ll leave you in awe of your own capabilities. Not only does the bed prove functional, but it also beholds an aesthetic appeal that is adaptable to a wide array of room styles.
Unique Value of the Project
While there may be numerous DIY bed frame plans out there, what makes this project stand out is its simplicity and adaptability. The design provides enough of a challenge for you to feel a sense of accomplishment upon completion, without overstepping into advanced woodworking territory. This makes it equally appealing to both beginners and experienced DIYers looking for a quick and rewarding project.
Difficulty Level
This project is specifically targeted towards beginners in the world of woodworking. But fear not, because the complexity has been kept to a minimum without compromising on the elegance and functionality of the end product. The queen bed frame design is manageable, which makes it perfect for individuals who are beginning their woodworking journey.
Safety Guidelines
At the onset, we’d like to emphasize that every tool is a potential hazard if not utilized properly. We recommend you adhere to the safety guidelines that come along with every tool you use. It’s important to keep a tidy workspace to avoid accidents and always wear safety goggles while working. Remember, the goal is to enjoy the process of building your bed frame, and safety should always be a priority.
The Joy of DIY
Entering the world of DIY and woodworking opens up a spectrum of creative possibilities and practical skills that you probably never thought of acquiring. Every cut, every joint, and every nail brings you closer to the final masterpiece, there is an evident sense of satisfaction.
Grasping Woodworking Basics
The beauty of this project lies in its simplicity. The bed frame’s basic design introduces you to woodworking fundamentals while giving free rein to your creativity. In the process, you’ll grasp the basics about different types of wood, measurements, cuts, joinery, finishing, and much more!
Form and Function
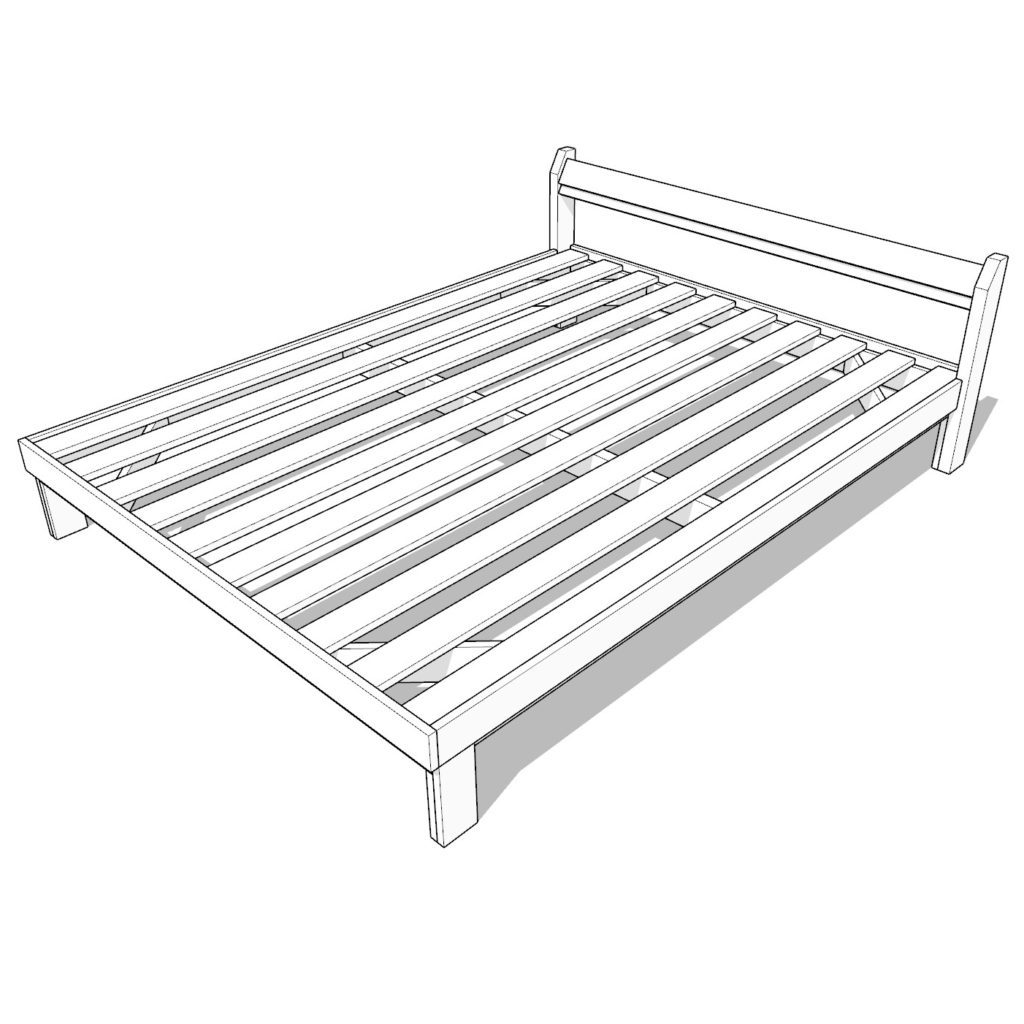
Woodworking projects like the queen bed frame create a delicate balance between form and function. Functionally, it provides a platform for your mattress with added support using crossbeams. But it isn’t just about practicality – the form or design element plays a significant role. The wooden bed frame exudes a natural charm that comes from its minimalist design and complements the functionality to result in a beautiful, sturdy piece you’d be proud to display in your bedroom.
Conclusion
So, are you ready to embark on this woodworking journey and create your first handcrafted wooden queen bed frame? This project beautifully encapsulates the essence of woodworking – crafting something durable, beautiful, and functional from a simple piece of raw material. Remember, woodworking is not just about the end result; it’s about the journey. It’s about the joy you derive from designing, measuring, cutting, and joining, all leading up to the final moment where you look at your creation with well-deserved pride.
This project serves as a perfect stepping stone into larger woodworking projects and lays a solid foundation by enhancing your understanding of various aspects like selecting the right materials, using tools safely, and understanding different construction techniques. You’ll find that the skills and experience gained, coupled with the immense satisfaction of building your furniture, will open the doors to a world of DIY possibilities.
Every venture begins with a single step, and there’s no time like the present to take that step. Embrace your creativity, arm yourself with patience, and bring your queen bed frame to life. Begin your DIY journey with this simple, rewarding project and open the gateway to a universe of exciting ventures hidden in the beautiful world of woodworking.
Time to build
5 hours
Cost of build
90
Skill level required
Beginner
Download the PDF Plans
Queen bed frame PDF Plan
In the PDF download, you can find:
– Clearly written, step-by-step instructions
– A comprehensive list of materials required
– A detailed cut list for each piece
– A list of essential tools for the project
– Visual diagrams to guide you through the process
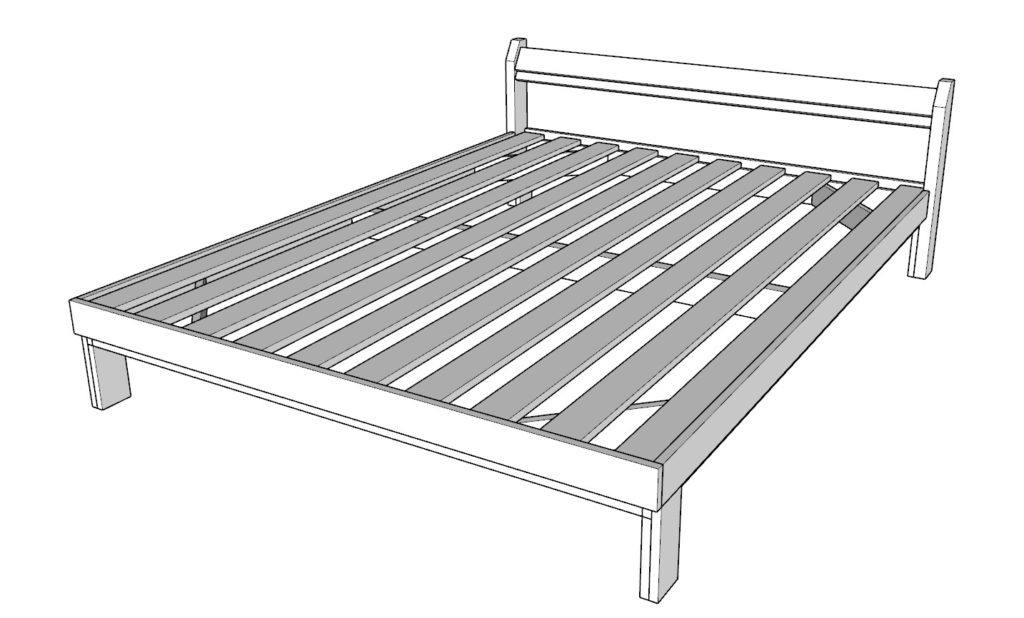
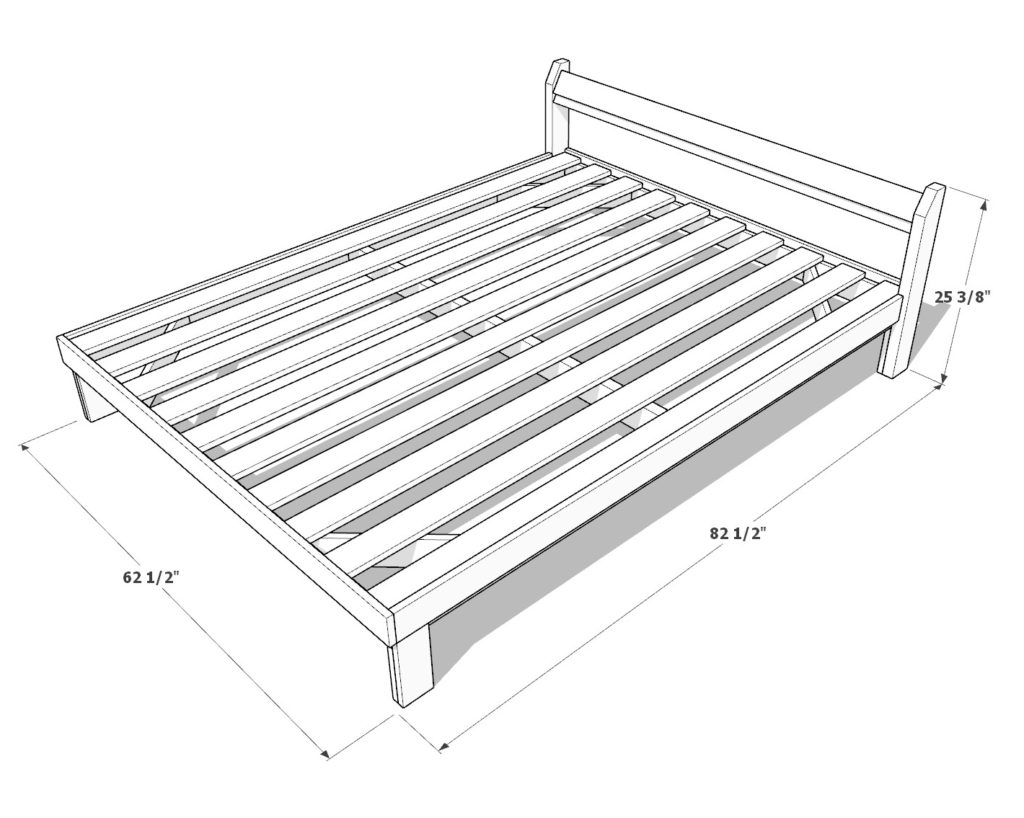
DIY Queen Bed Frame Dimensions
Step 1: Assembling the Main Frame
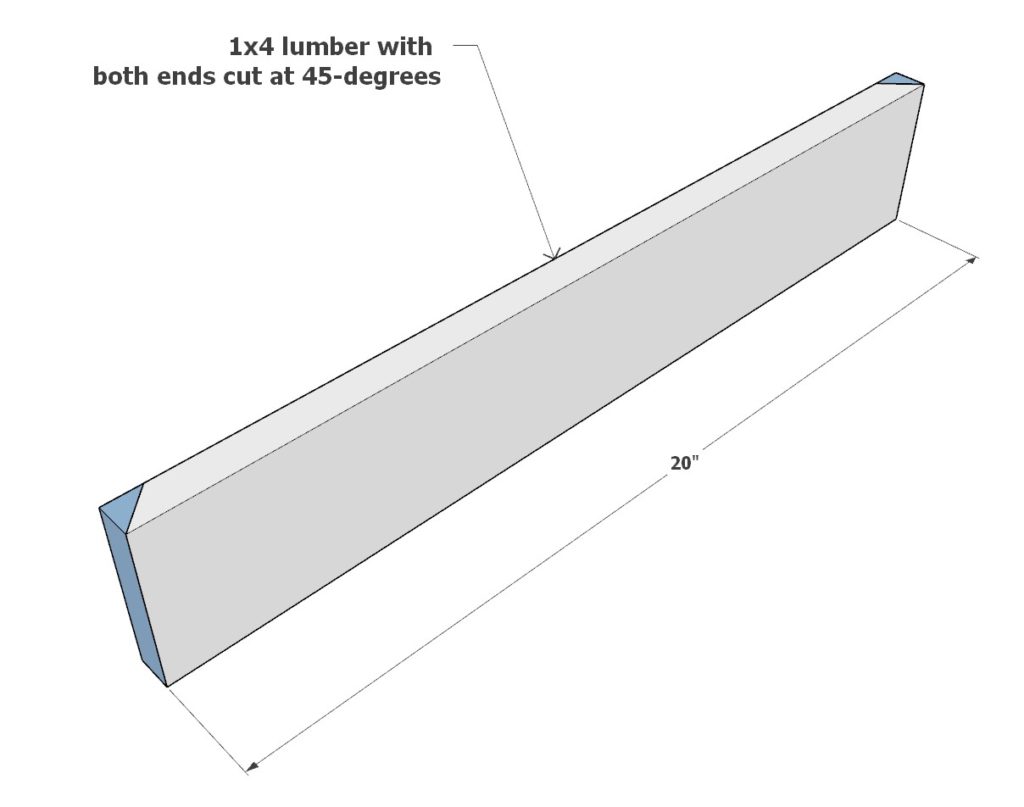
1.1 Creating Corner Posts
Kick off your woodworking project by crafting the cross-brace pieces of the bed frame. From 1×4 lumber, cut four pieces measuring 20 inches each. Ensure you trim off both ends at a 45-degree angle.
1.2 Assembling the Bed Frame
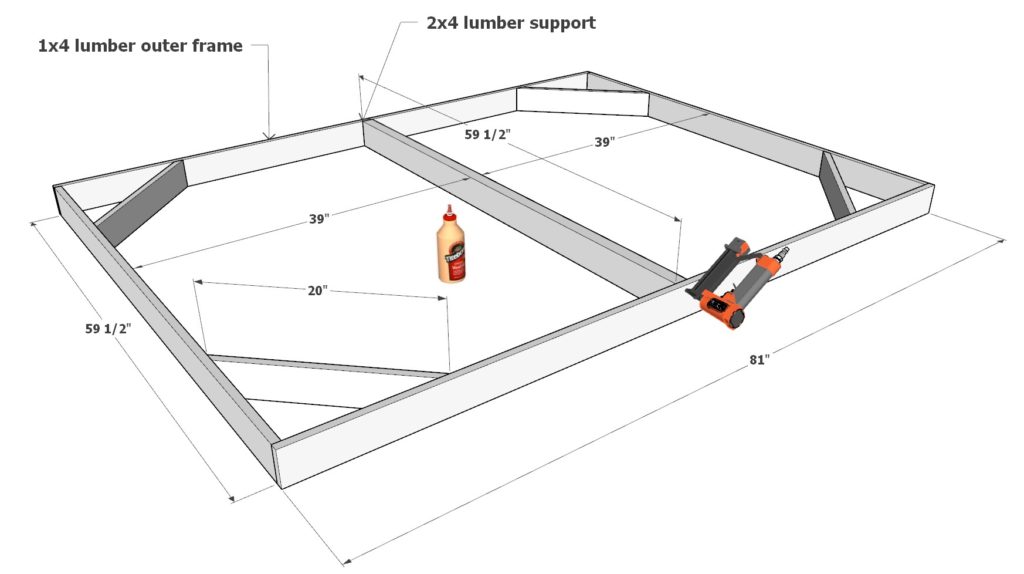
With your cross-braces ready, it’s time to form the essential structure of your queen bed frame. From 1×4 lumber, cut two pieces measuring 81 inches each and two more measuring 59-1/2 inches. This should resemble a rectangle when assembled.
Additionally, cut a piece of 2×4 lumber measuring 59-1/2 inches. This piece will serve as the center spine of your bed frame, offering vital support.
Line up these pieces according to the given diagram, and ensure that the 2×4 lumber piece is centered. Secure the structure using a modest amount of wood glue. Fasten together using 1 to 1.5 inch nails from a nail gun. Be cautious to avoid splitting the wood while nailing.
Tips & Tricks: Use thin nails to make the end result look neater and more professional.
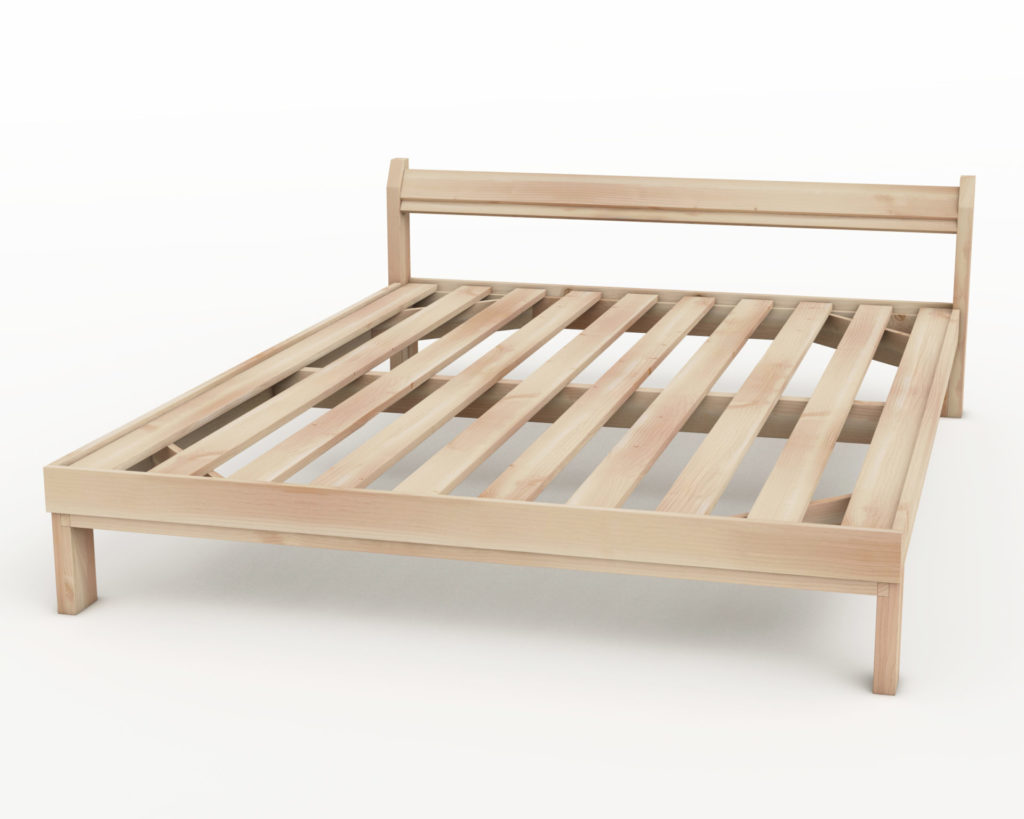
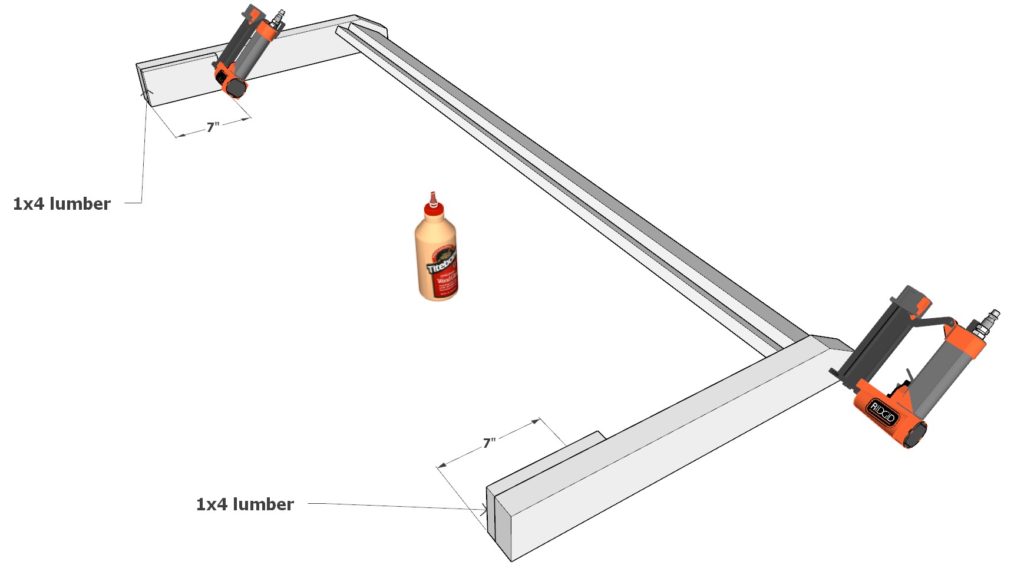
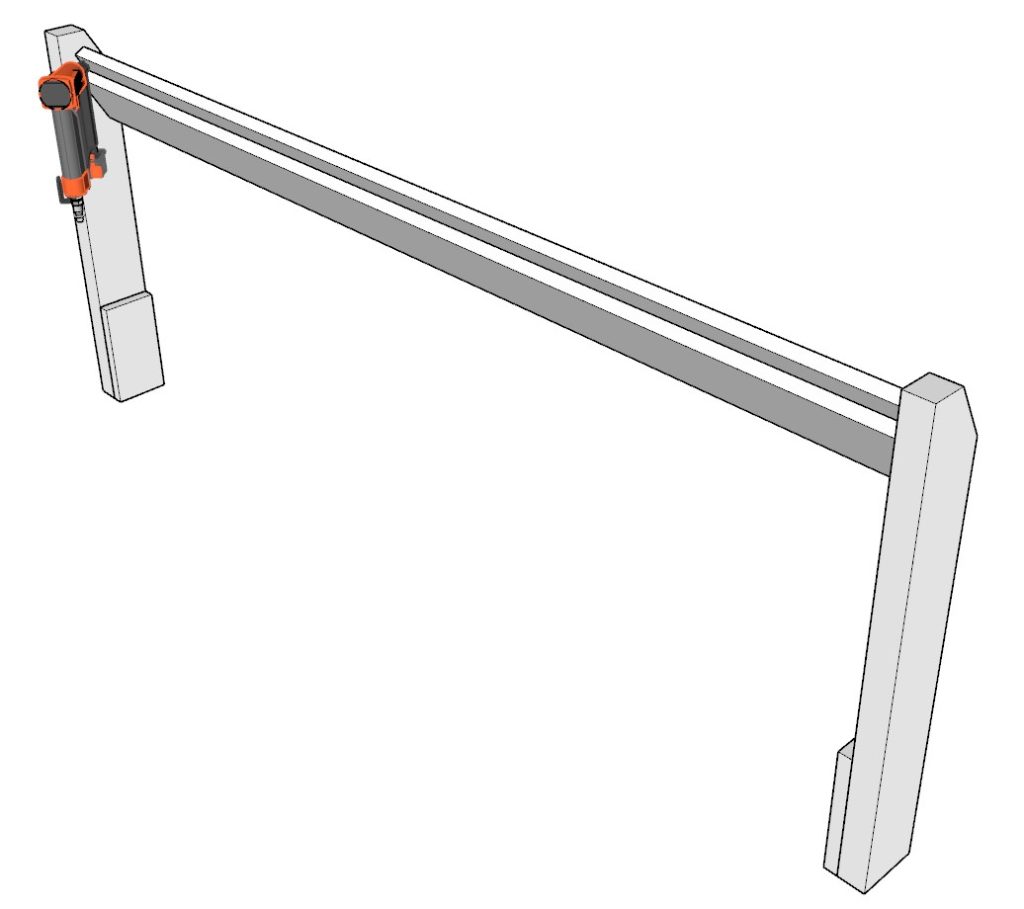
Step 2: Building and Attaching the Headboard
2.1 Creating the Headboard Posts
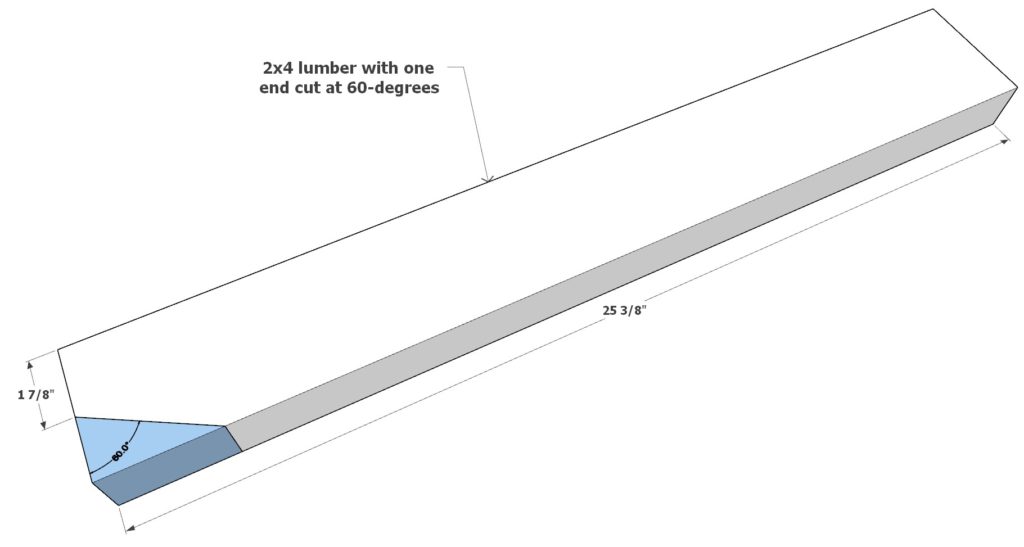
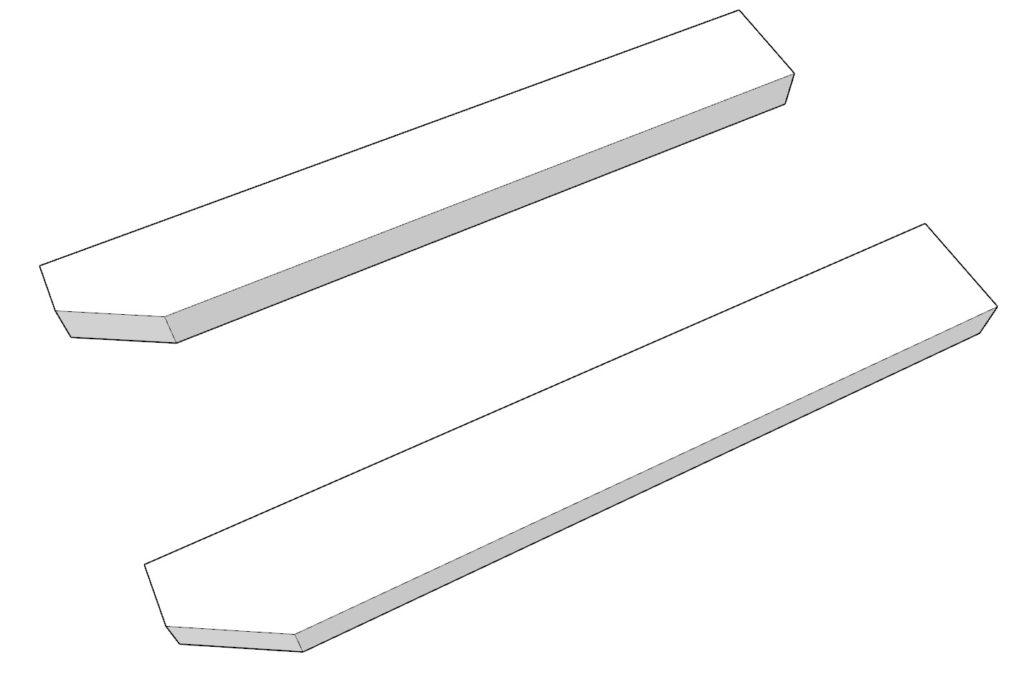
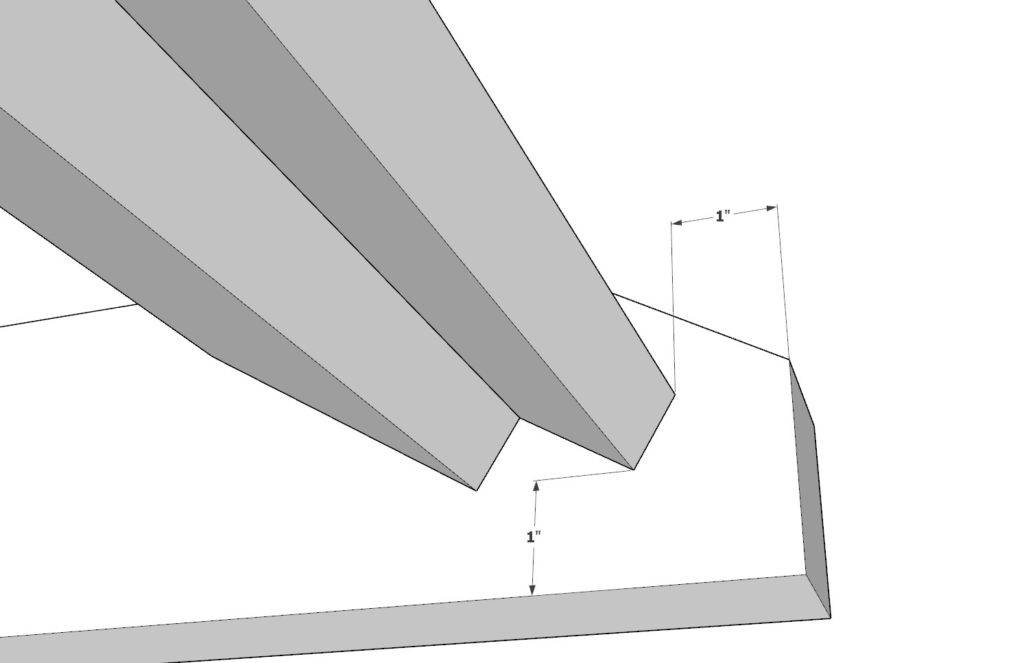
Designing the headboard starts by crafting side posts. Take a 2×4 lumber piece measuring 25-3/8 inches long and cut one end at a 60-degree angle. Cut one more identical piece to have two posts for your headboard.
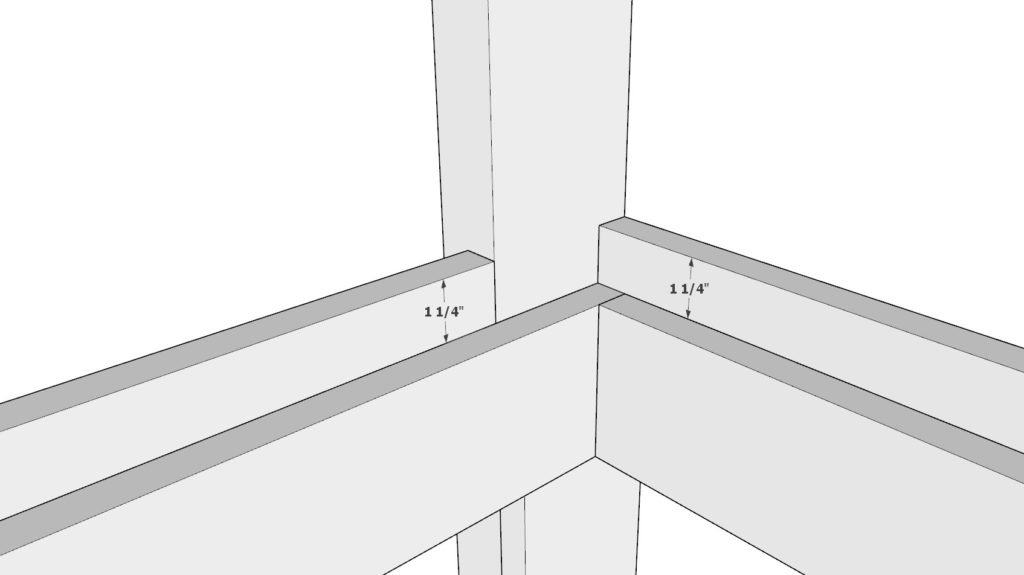
2.2 Crafting the Headboard
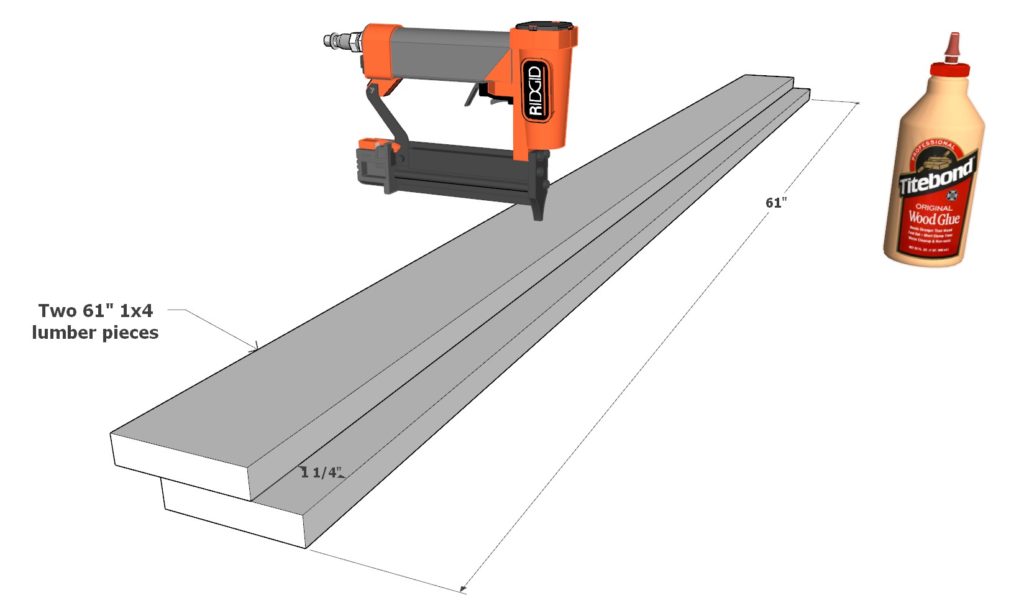
Next, pick two pieces of 1×4 lumber each measuring 61 inches. Stack them one on top of the other with a 1-1/4 inch indentation. Use wood glue for bonding and secure them together with 1-inch nails.
2.3 Attaching the Headboard
Proceed to attach the two 61 inch 1×4 lumber pieces to the 2×4 posts. Use wood glue first and reinforce the connection using 2 inch nails. This will provide strength to your headboard.
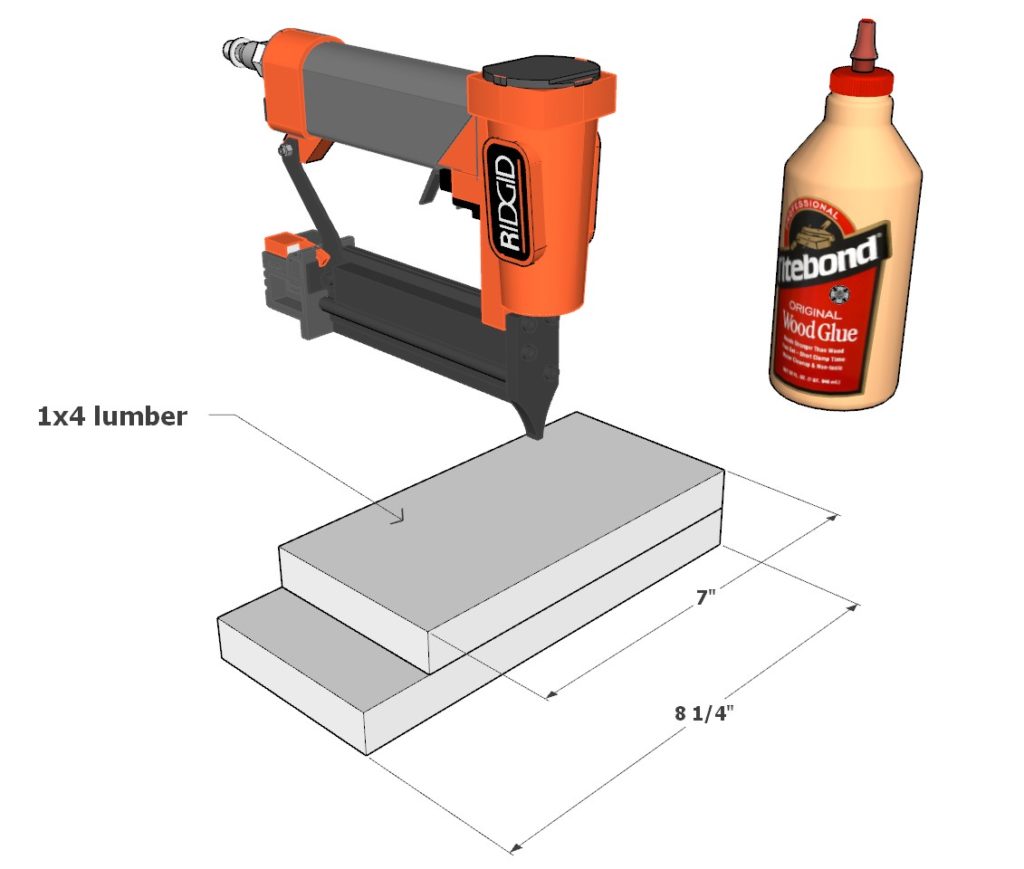
2.4 Creating Bed Frame Stoppers
Secure two 7-inch 1×4 lumber pieces to your headboard post as indicated in the diagram.
Next, use an 8-1/4 inch 1×4 lumber piece and one 7-inch piece to create additional leg stoppers. Glue them together and nail together with 1 inch nails. Make two of these leg stoppers.
2.5 Putting it all Together
Refer to the final diagram to assemble the pieces together. Apply wood glue at the joints and hold together with 1-inch nails from a nail gun. Make sure the nails are driven straight to ensure they hold everything firmly.

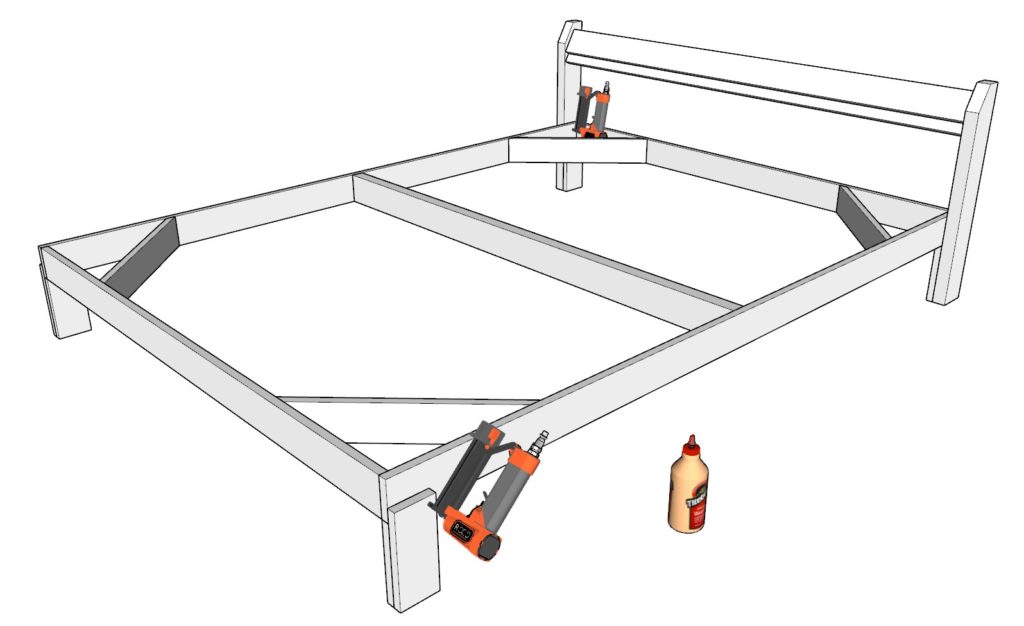
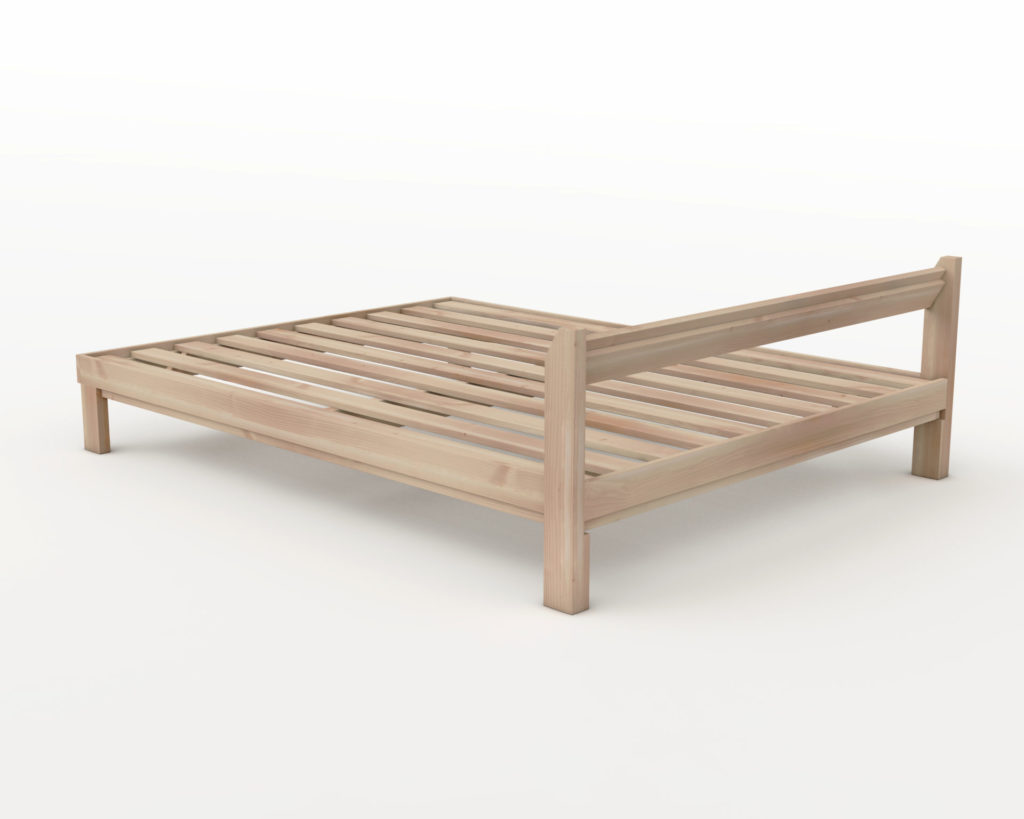
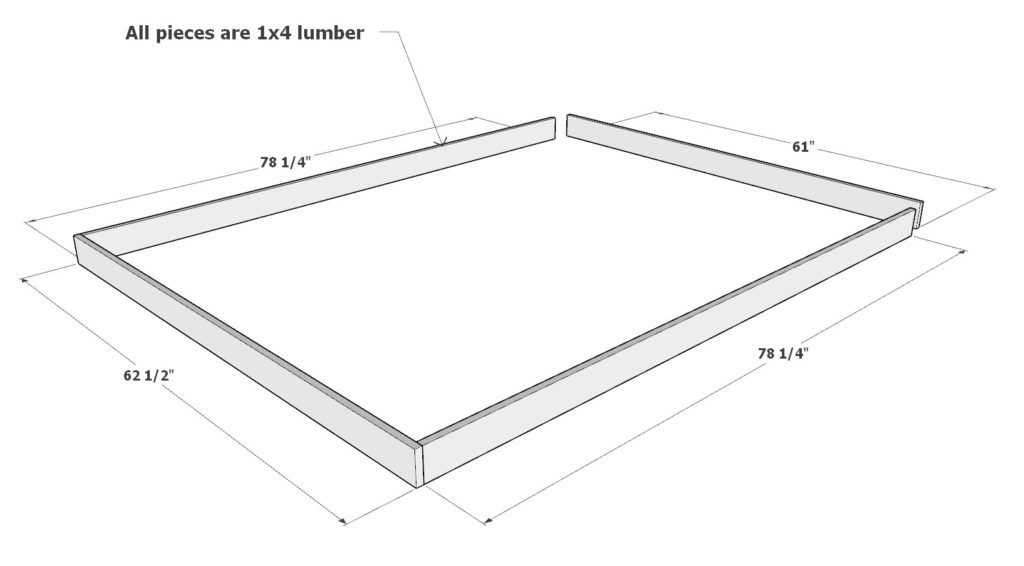
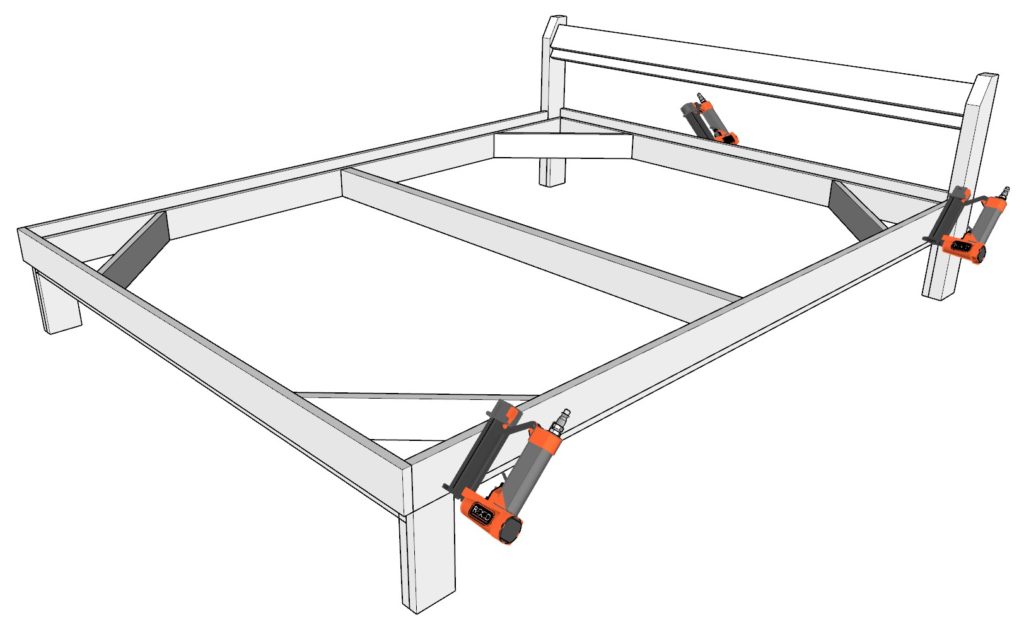
Step 3: Adding the Mattress Holder Frame
3.1 Constructing the Mattress Holder Frame
To ensure the mattress sits steadily in the bed without slipping around, adding a holding frame becomes crucial, providing the bed with extra support and durability.
To create this frame, you would need one piece of 1×4 lumber each measuring 61 inches and 61-1/2 inches. You also need additional two pieces measuring 78-1/4 inches each.
3.2 Securing the Mattress Holder Frame
Position these pieces as per the provided diagram, using wood glue to fasten them at the joints. For enhanced security at the joints, also use 1-inch nails from your nail gun. Make sure the nails penetrate deep enough to secure the pieces but not so deep that they protrude from the other end.
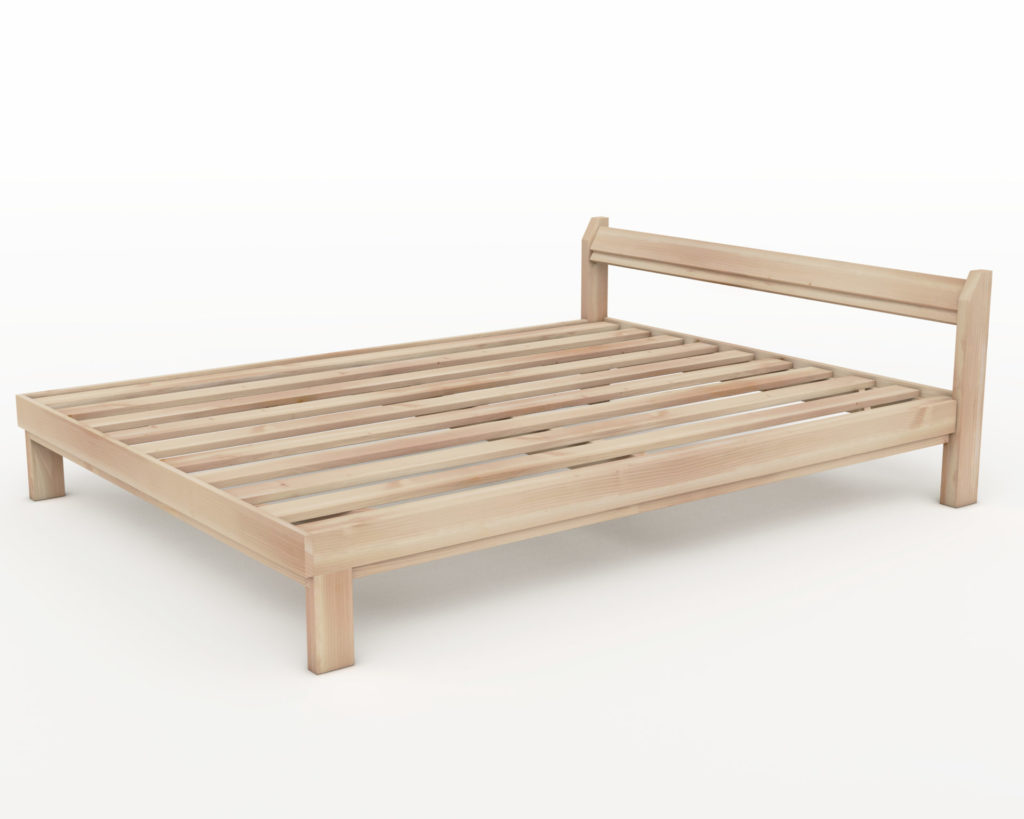
Step 4: Laying the Decking
4.1 Decking the Bed Frame
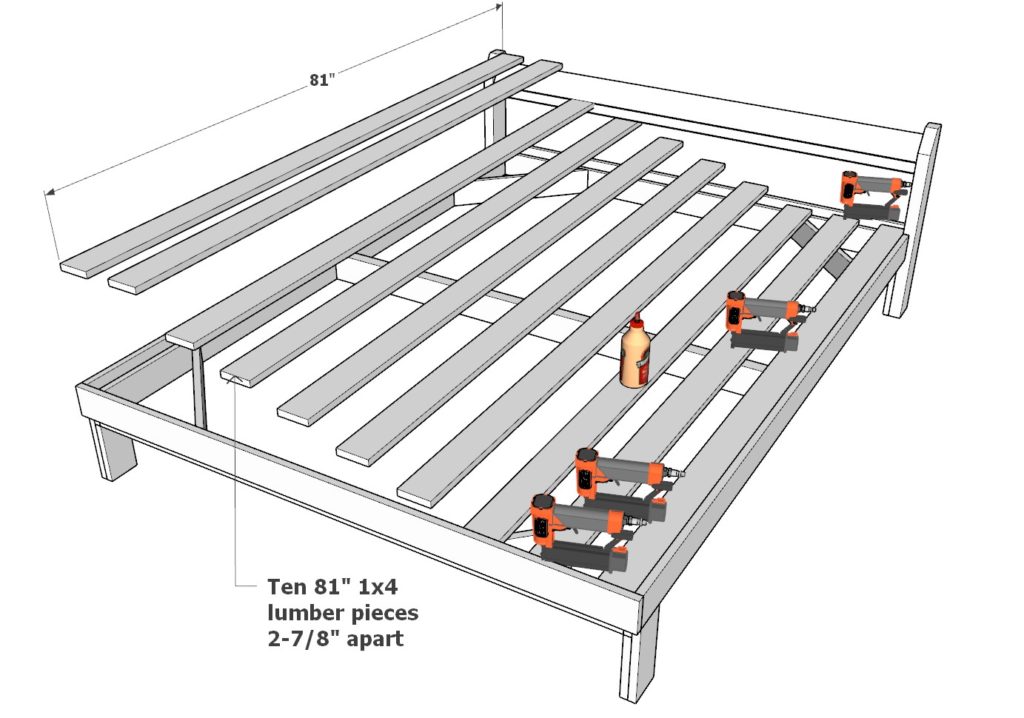
To provide a solid base for the mattress, deck the bed using ten pieces of 1×4 lumber each measuring 81 inches. Here’s where the essence of woodworking aesthetics comes into play with symmetrical alignment. These pieces need to be placed parallel to each other and uniformly spaced.
4.2 Spacing Out the Decking
The exact spacing between each deck piece is essential for the mattress’s even support. Ensure that each of these pieces is spaced 2-7/8 inches apart from the adjacent ones. The right alignment and spacing provide an evenly distributed base to support the mattress.
4.3 Tip for Decking
A word of caution here! The end pieces should connect flush with the ends of the bed frame at both sides. There should be no overhanging or gap – these pieces should be in contact with the ends of the bed frame, adding to the overall bed structure’s strength and stability. Paying attention to these little details will make a big difference in the final look and strength of your bed frame.
Step 5: Finishing Touches
5.1 Sanding
Perfecting your bed frame’s look begins with a thorough sanding process. Start with a coarse-grit sandpaper, such as 60 or 80 grit, to remove visible rough patches or splinters. Use brisk back-and-forth motions, moving with the grain of the wood to avoid unsightly cross-grain scratches.
Gradually progress to finer grit sandpapers, such as 100, 150, and finally 220 grit. The golden rule is not to skip grits – each subsequent grit abrades away the light scratches imprinted by the coarser previous one. Tread lightly with the finer grits – pressure isn’t necessary and could result in the sandpaper cutting too deeply into the wood.
5.2 Concealing Holes
Nails, even small ones, can leave visible holes that might be unsightly on your finished bed frame. There are several wood filler products available on the market, some of which accept stain while others don’t. The decision comes down to your desired finish.
If you’re painting or leaving the bed natural, any good-quality wood filler is acceptable. Just ensure it dries hard and can be sanded smooth. However, if you’re staining the wood, choose a filler that specifically mentions compatibility with stains.
5.3 Staining, Painting, and Natural Finish
Carefully considering how you want your bed frame to look will help choose the perfect finish.
**Staining**: This enhances the grain of the wood, giving it a rich and warm aesthetic. Apply a pre-stain conditioner first to ensure even penetration, then brush on your chosen stain. Always wipe off excess stain before it dries.
**Painting**: This provides an opaque finish in any color you fancy. Apply a primer first, then sand lightly for a smooth surface. Finally, apply two coats of your chosen paint.
**Natural Finish**: If you love the raw, natural look of the wood, opt for a clear varnish or wood preserver. These protect the wood without altering its original color. Always apply in thin, even coats.
5.4 Maintenance
Regardless of the finish, your bed frame will require maintenance. Dust it regularly to prevent buildup. For stains and varnished beds, re-coat every few years to maintain the finish’s quality. Painted beds might require touch-ups on chipped or worn areas. Always ensure the bed frame is kept away from extreme temperature changes and moisture. Regular care will prolong your bed’s lifespan and save you from hefty repair or replacement costs.