Introduction
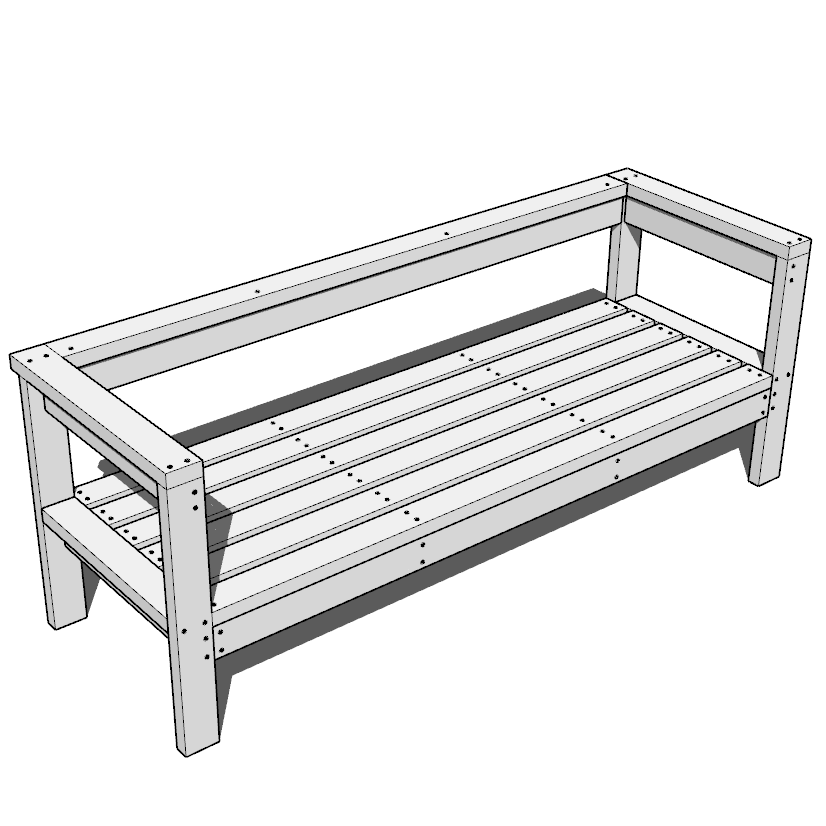
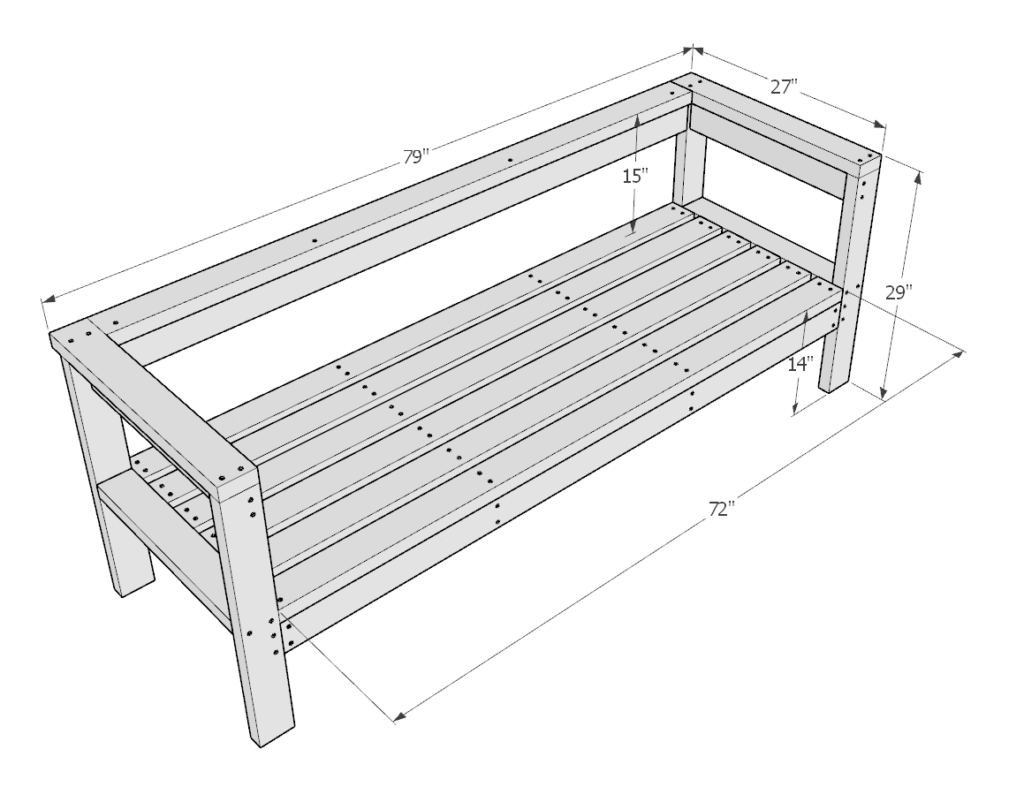
Outdoor living spaces have become increasingly popular as homeowners seek to expand their relaxation and entertainment areas. A comfortable and stylish seating option, such as a DIY 3-seater wooden sofa made from 2×4 lumber, can greatly enhance your patio, deck, or backyard. This article will provide a comprehensive look at creating a solid, durable, and beginner-friendly 2×4 wooden sofa, featuring simple joints, 90-degree cuts, and a design that accommodates standard 24×24 inch cushions. Discover how to stain and modify this versatile piece to fit any space and explore cushion options to create a cozy and inviting seating area in your outdoor oasis.
Section 1: The Benefits of 2x4 Lumber
When it comes to building a DIY outdoor sofa, 2×4 lumber offers numerous advantages. It is a readily available and affordable material that provides both strength and durability. The solid wood structure ensures that your sofa will withstand the test of time, while the simplicity of working with 2×4 lumber makes it an ideal choice for beginners to woodworking.
Section 2: Simple Joints and 90-Degree Cuts for Easy Assembly
One of the key features of this DIY 2×4 wooden sofa is its beginner-friendly design. The use of simple joints and 90-degree cuts ensures that even those new to woodworking can successfully construct this piece. With basic tools such as a saw, drill, and screws, you can quickly and easily assemble your outdoor sofa, making it a perfect weekend project.
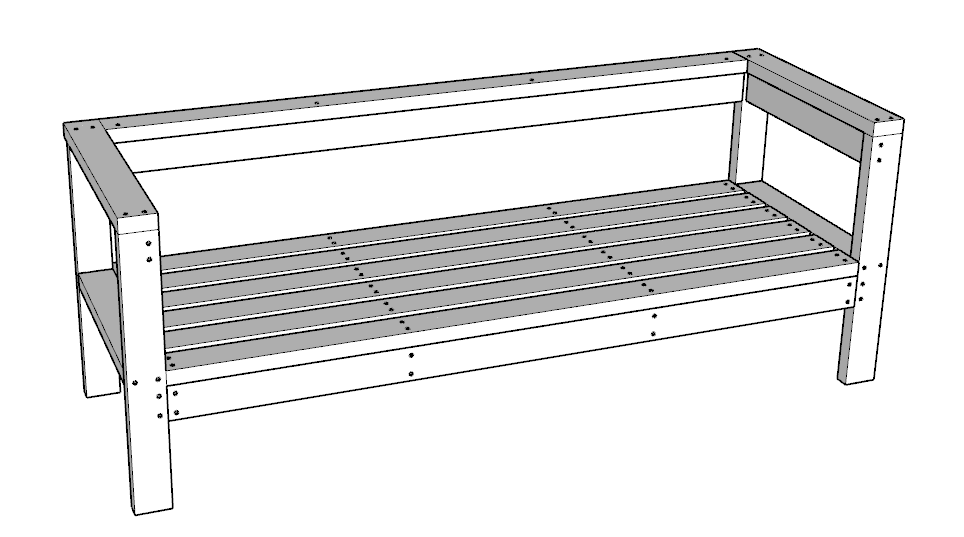
Section 3: Gaps in the Seating Platform for Water Drainage
A crucial aspect of outdoor furniture design is its ability to withstand various weather conditions. The gaps in the seating platform of this 2×4 wooden sofa allow water to drain efficiently, preventing damage and prolonging the life of your furniture. These gaps also provide added ventilation, helping to keep your seating area dry and comfortable.
Section 4: Customizing Your Sofa with Stains and Modifications
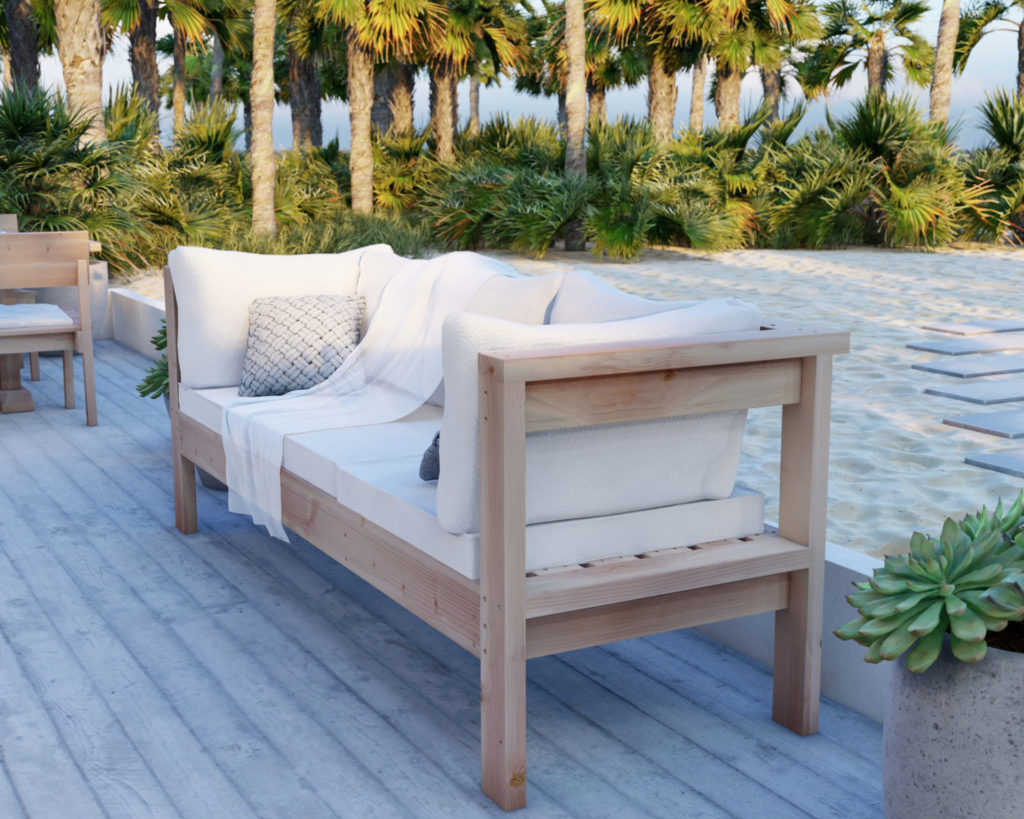
One of the most appealing aspects of this DIY 2×4 wooden sofa is its ability to be customized to suit your unique taste and space. By choosing a stain or paint color that complements your outdoor area, you can create a cohesive and visually appealing seating solution. Additionally, the sofa can be modified in size or design to fit your specific requirements, ensuring it integrates seamlessly into your outdoor living space.
Section 5: Accommodating Common 24x24 Inch Cushions
The DIY 2×4 wooden sofa is designed to accommodate standard 24×24 inch base cushions, offering a comfortable and inviting seating area for you and your guests. When selecting cushions for your sofa, consider factors such as comfort, durability, and weather resistance. Opt for cushions made from outdoor-friendly materials, such as Sunbrella or other water-resistant fabrics, to ensure they withstand the elements and maintain their appearance over time.
Section 6: Cushion Choices for Ultimate Comfort and Style
The choice of cushions for your DIY 2×4 wooden sofa can significantly impact the overall comfort and aesthetic of your outdoor seating area. Consider the following factors when selecting cushions:
- Comfort: Look for cushions with adequate padding and support to ensure your seating area is comfortable for extended periods.
- Durability: Choose cushions made from high-quality materials that can withstand regular use and outdoor conditions.
- Style: Select cushion colors and patterns that complement your outdoor décor and reflect your personal taste.
- Maintenance: Opt for cushions with removable covers for easy cleaning and care.
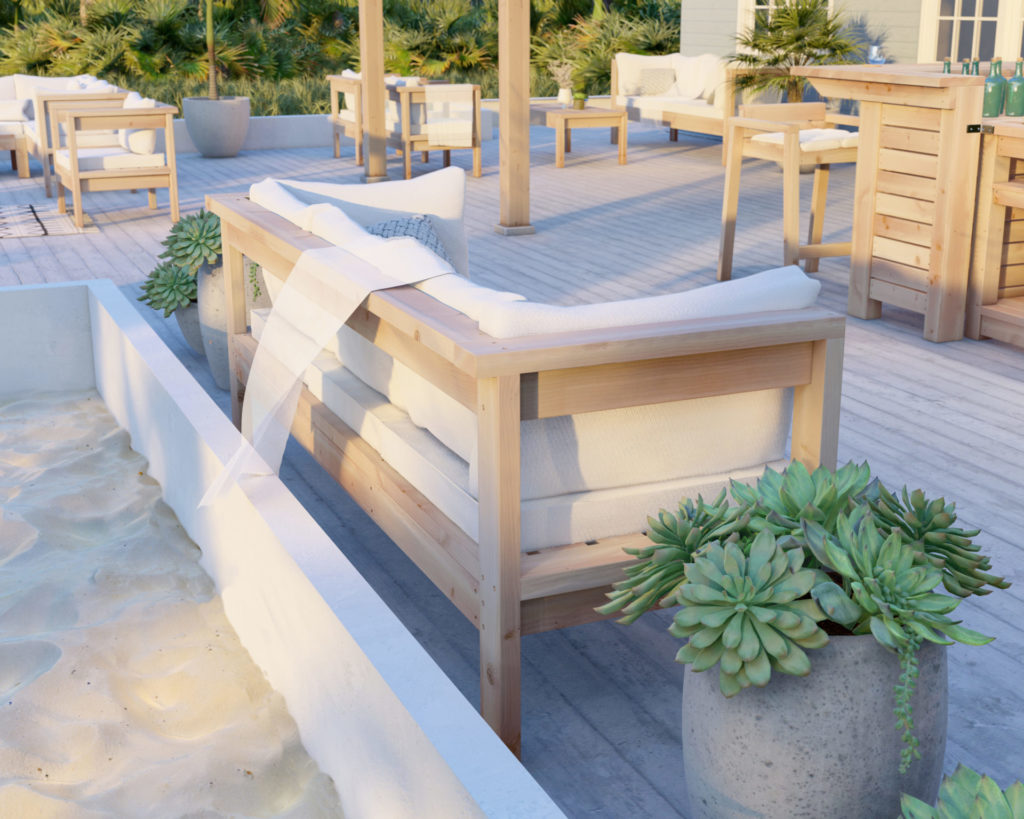
- Optional side cushions: To create a cozier seating area, consider adding side cushions to your wooden sofa. These additional cushions can enhance both the comfort and style of your outdoor seating area.
Section 7: Building Your Sofa in a Garage or Backyard
The DIY 2×4 wooden sofa can be easily constructed in a garage or backyard, making it a convenient project for any homeowner. With basic woodworking tools and a dedicated workspace, you can bring your outdoor seating solution to life. Be sure to follow safety precautions and guidelines when working with power tools and lumber to ensure a successful and accident-free project.
Section 8: The Importance of Proper Care and Maintenance
To keep your DIY 2×4 wooden sofa looking its best and lasting for years to come, regular care and maintenance are essential. Here are some tips for maintaining your outdoor wooden sofa:
- Regularly clean the wood surface with a mild soap and water solution to remove dirt and debris.
- Inspect your sofa for signs of damage or wear, such as loose screws or splintering wood, and address any issues promptly.
- Apply a weather-resistant sealant or stain to the wood annually to protect it from the elements and maintain its appearance.
- Remove cushions during inclement weather or store them in a dry, protected location when not in use to prolong their lifespan.
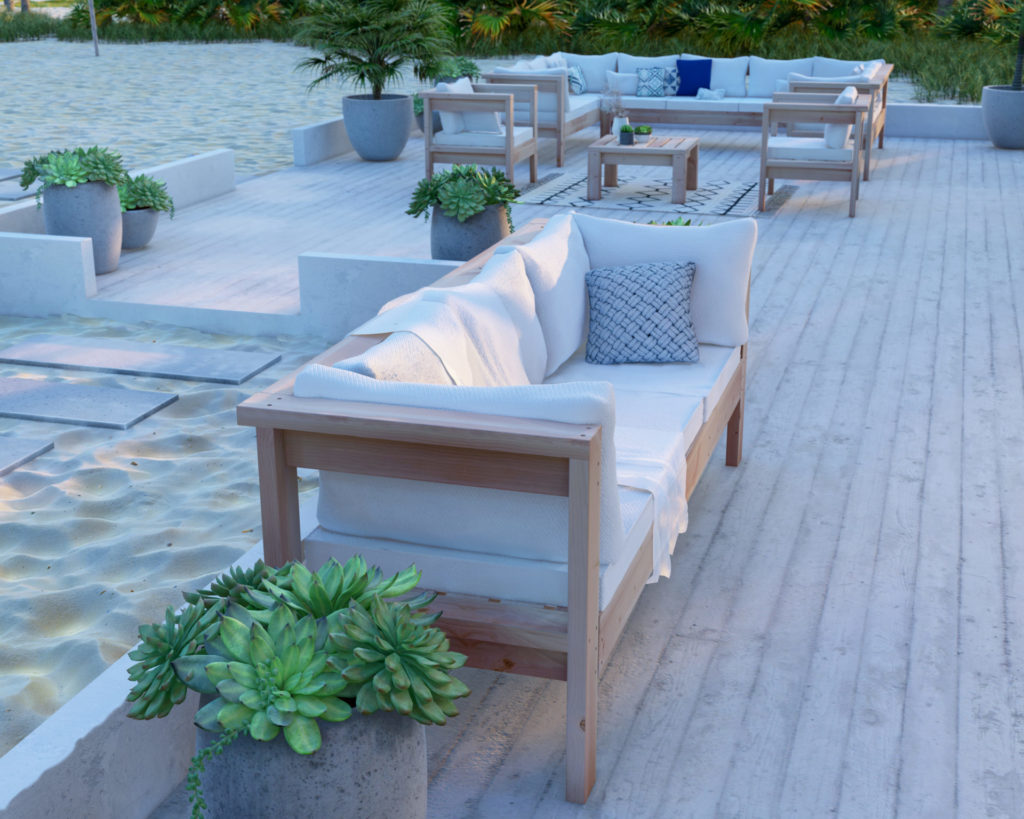
Section 9: Creating a Cohesive Outdoor Living Space with Your DIY 2x4 Wooden Sofa
Your DIY 2×4 wooden sofa can serve as the foundation for a beautiful and cohesive outdoor living space. To create an inviting and functional area, consider incorporating complementary elements such as:
- Additional seating options, such as lounge chairs or a matching 2×4 wooden loveseat.
- An outdoor coffee table or side tables for added functionality and convenience.
- Outdoor rugs and accent pillows to enhance the comfort and style of your seating area.
- Lighting options, such as string lights, lanterns, or solar-powered landscape lighting, to create a warm and inviting ambiance.
- Landscaping and decor elements that complement your outdoor furniture and reflect your personal style.
Conclusion
Building a DIY 2×4 wooden sofa for your outdoor living space is an achievable and rewarding project, even for beginners to woodworking. With its durable construction, customizable design, and compatibility with standard 24×24 inch cushions, this outdoor sofa is an ideal addition to any patio, deck, or backyard. By following this comprehensive guide and focusing on proper assembly, customization, and maintenance, you can create a comfortable, stylish, and long-lasting seating solution that will enhance your outdoor living area for years to come.
Time to build
5 hours
Total cost of build
About $85 (cushions and pillows not included in cost estimate)
Skill level required
beginner
Download the PDF plans
Outdoor wood patio bench PDF
What is included in the PDF download?
Easy to read step by step instructions
Material list
Cut list
Tools needed
3D illustrations
Recommend tools and materials
- Saw (miter saw recommended for precision cuts)
- Drill
- Impact driver with bit for screws
- GRIP Clamps
- Sander
- wood countersink drill bit
- Pipe clamp grip, tie downs, or straps.
- 5lbs of 2.5-inch-long screws (highly recommend T25 Star Drive screws)
- Wood glue
- Sand paper
- Pencil
Lumber purchase list and Cut list
Available with purchase of PDF plans.
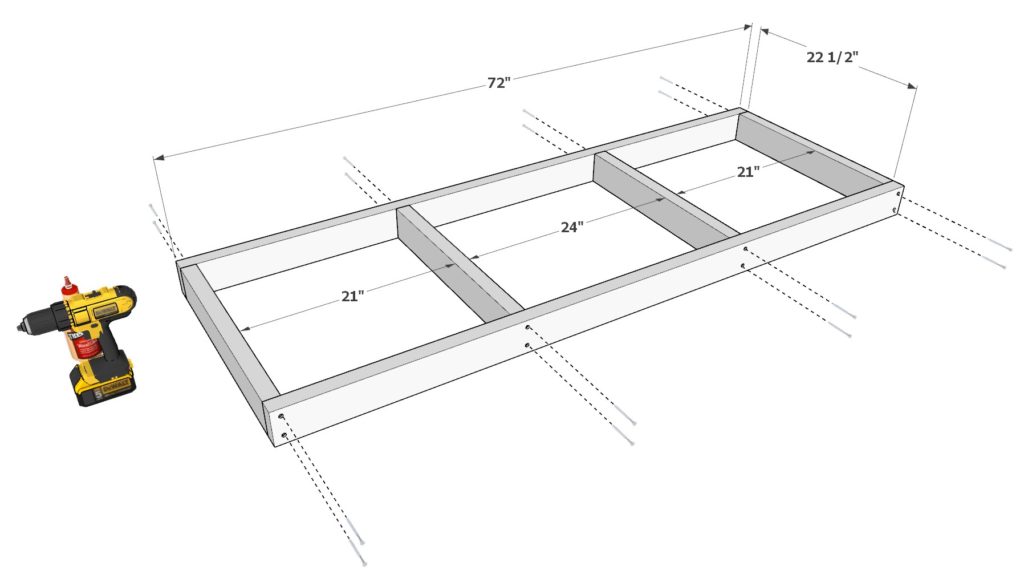
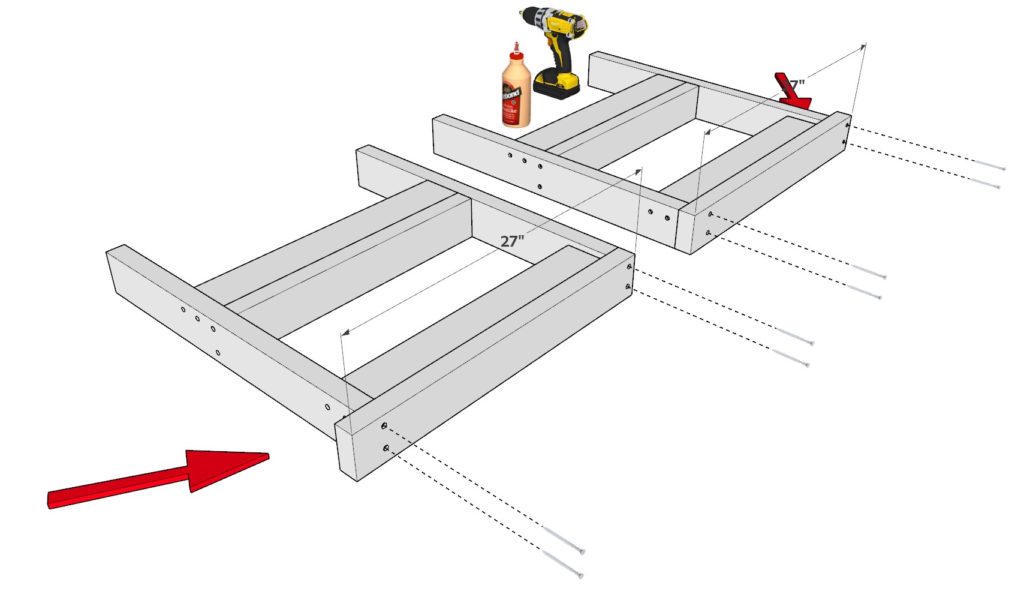
Step 1 (DIY patio bench frame assembly)
Gather two of the 72-in pieces and four of the 22.5-in pieces. Lay them out as shown in the diagram. Space out the pieces as shown below. It is recommended to predrill the wood prior to putting in a screw to prevent the wood from splitting. What works for me is to us a wood countersink drill bit.
Apply wood glue to all surfaces that will be joined together. Too much dry glue can be difficult to sand off and does not stain well.
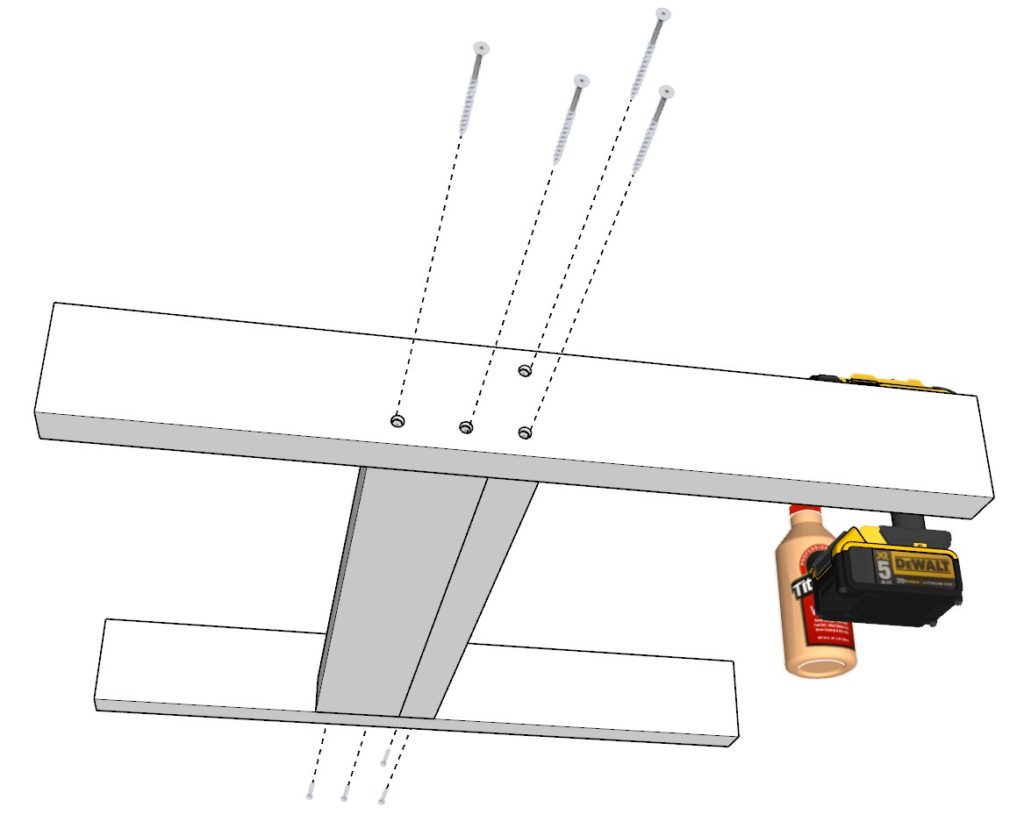
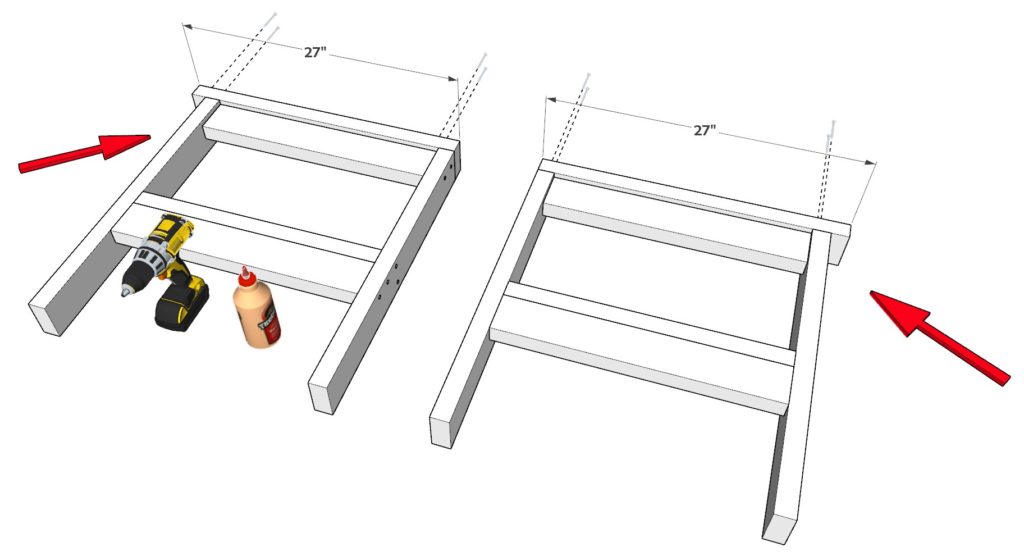
Step 2 (DIY patio bench armrest assembly)
Next, take two 27-1/2 inch 2×4 lumber pieces and two 22-1/2 inch 2×4 lumber pieces and arrange them as shown below. Add glue, predrill holes, and add 2.5 inch screws.
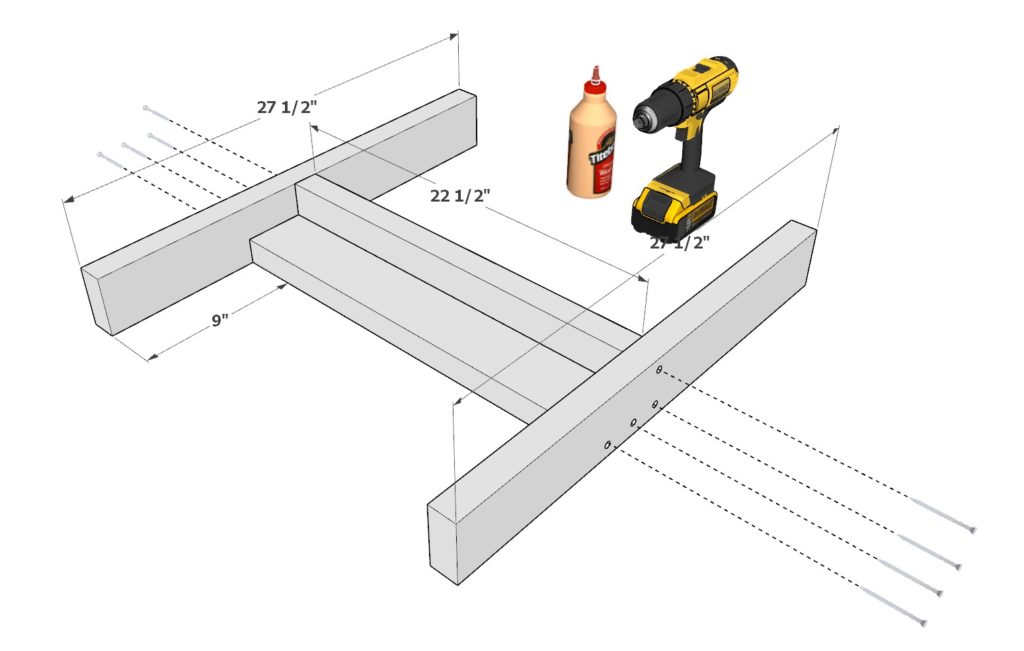
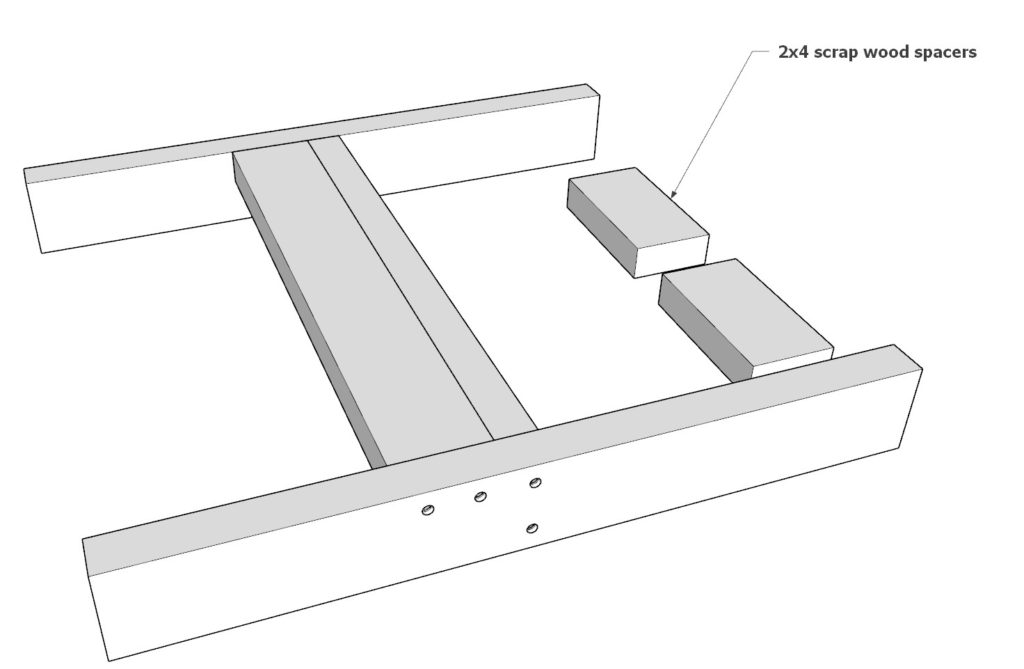
Step 3 (DIY patio bench armrest assembly continued)
Next, add a 22-1/2 inch 2×4 lumber pieces to the arm rest. It needs to be indented by 1.5 inches. I use a spacer from 2×4 lumber scrap wood for this step since the 2×4 is 1.5 inches thick.
As before, add glue, predrill, and add 2.5 inch screws.
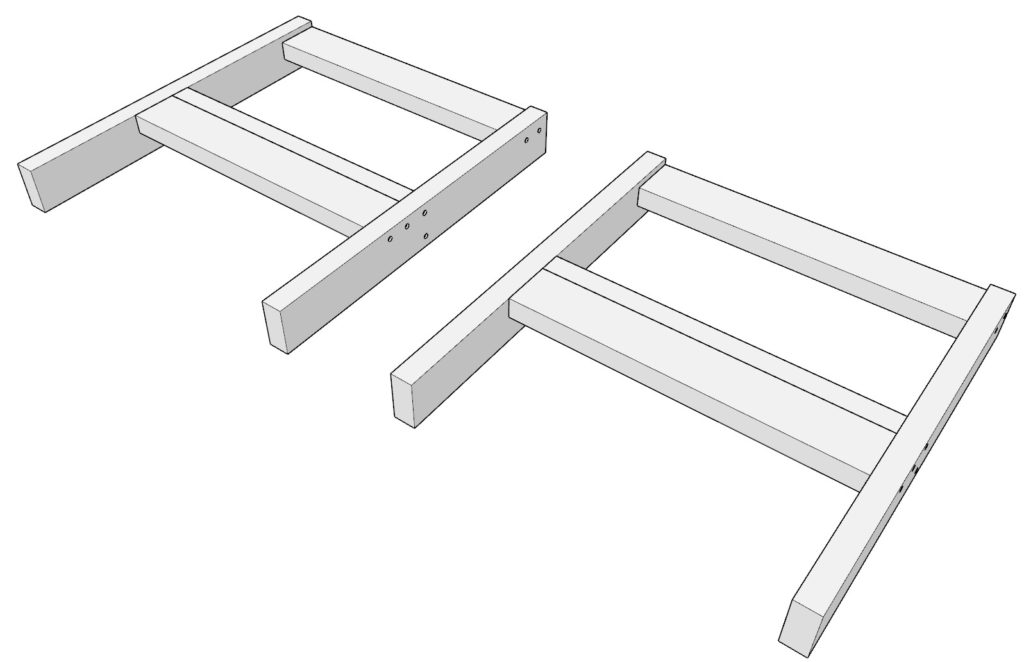
Next, make a second arm rest identical to the one you just made for a total of two arm rests.
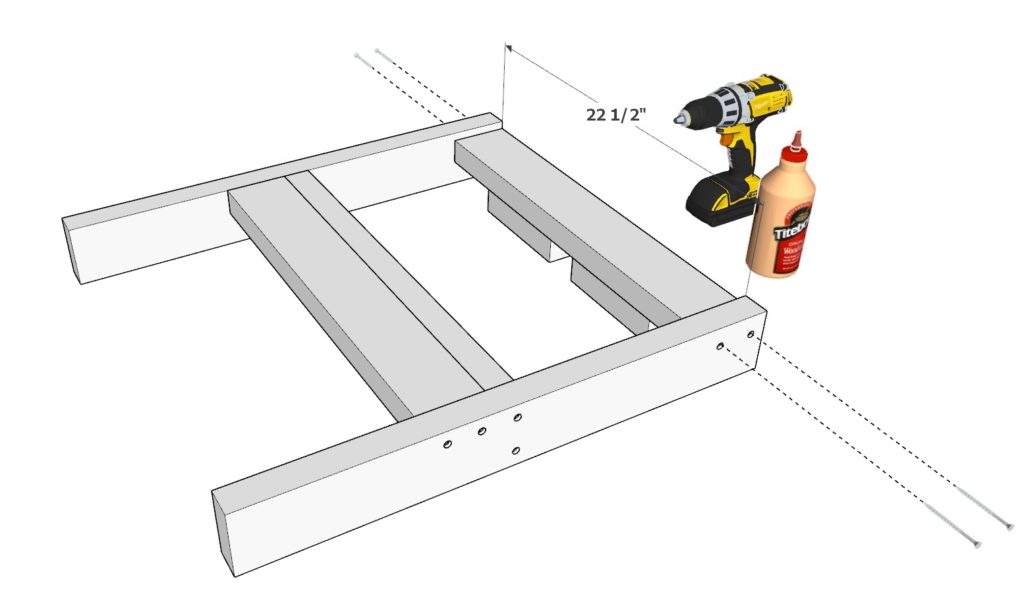
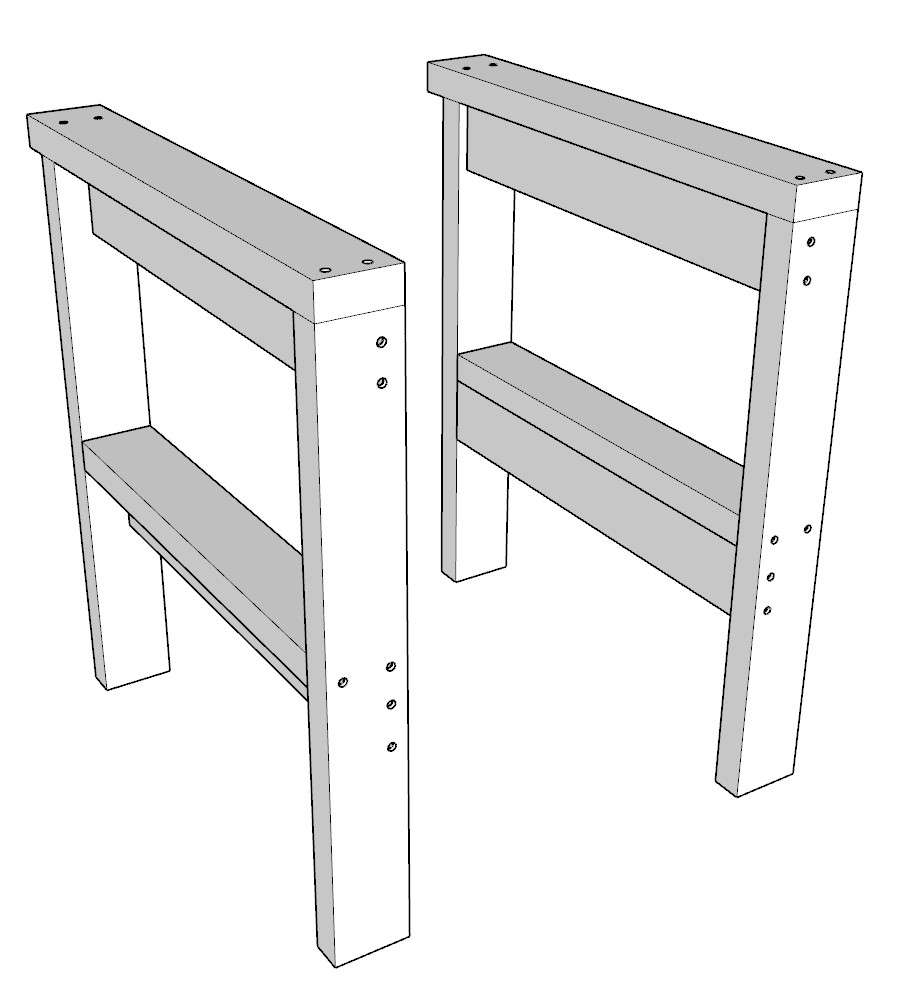
Step 4 (DIY patio bench armrest assembly continued)
Next, add 27 inch long 2×4 lumber pieces to both of the arm rests.
BE CAREFUL! Make sure that the 27 inch long 2×4 pieces are places in a mirrored fashion to eachother. This is indicated by the red arrows in the diagram.
Once you ensure the proper placement of the 27 inch 2×4 lumber pieces then as before, add glue, predrill, and add screws.
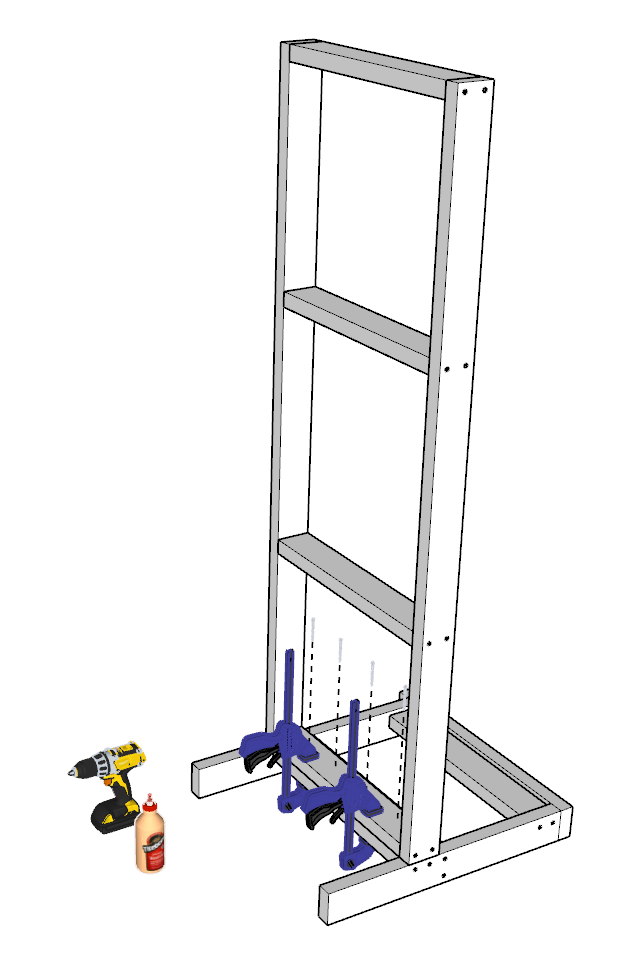
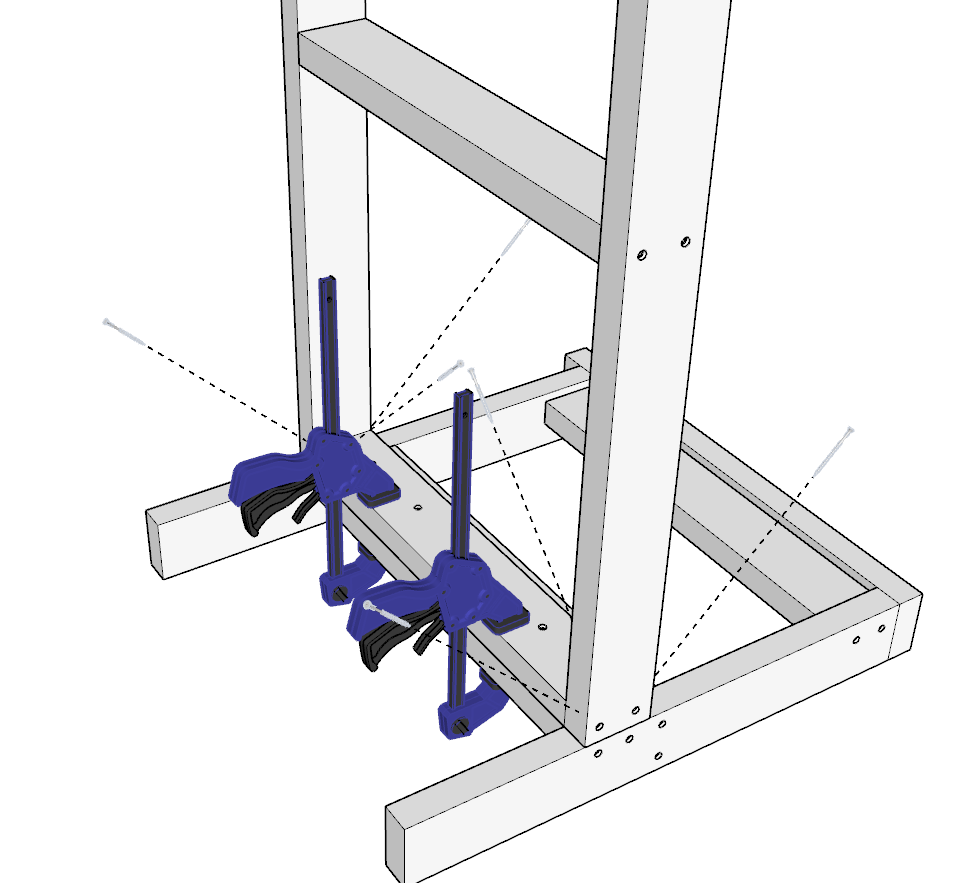
Step 5 (Attaching arm rests to main frame of bench)
Next, set the frame up right on top of one of the armrests.
In this step make sure that glue is applied to the areas that will make contact. Get help to balance the frame. Secure the frame with clamps for stability and a more solid joint.
As before, predrill and add screws.
Add both vertical and diagonal screws as shown below for a secure joint.
Repeat this for the other arm rest as well.
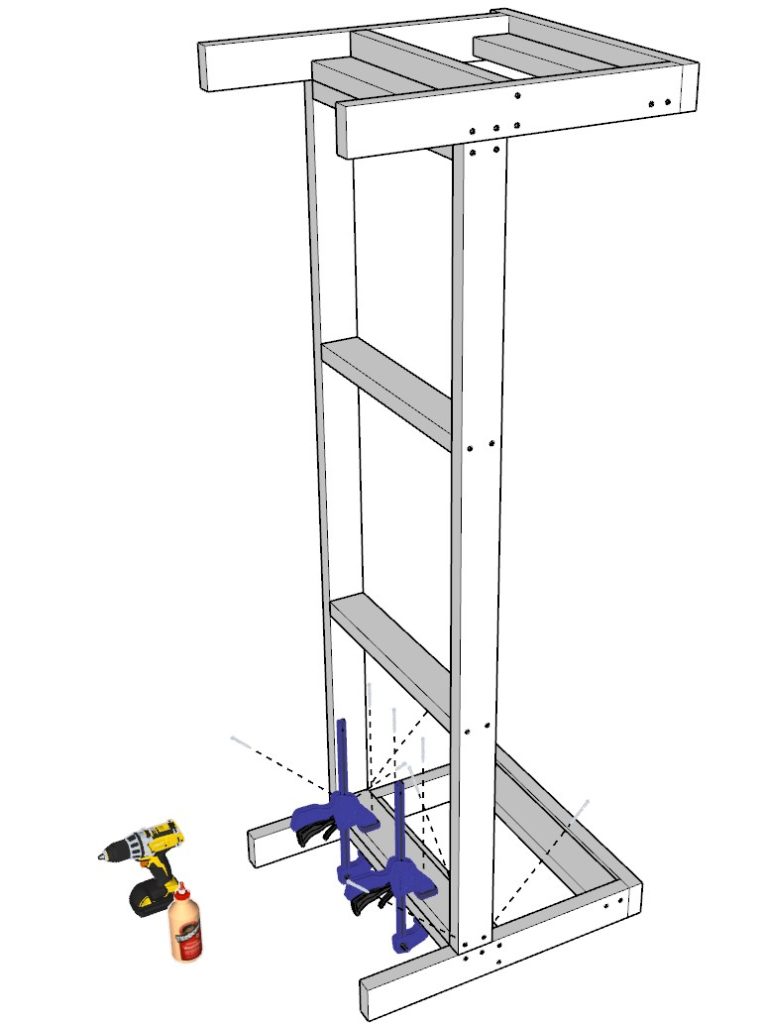
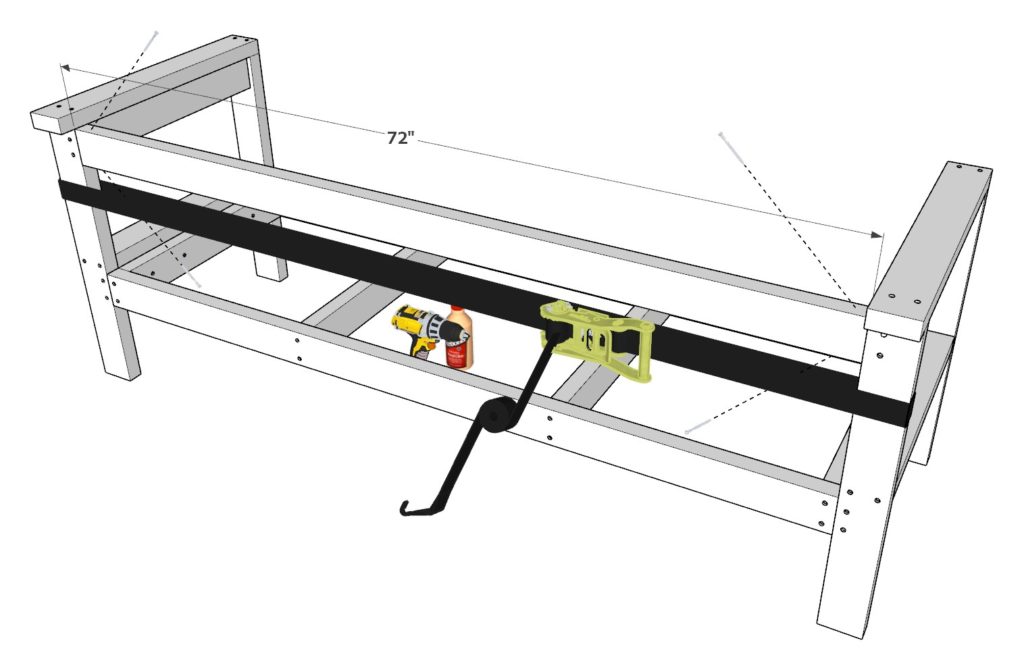
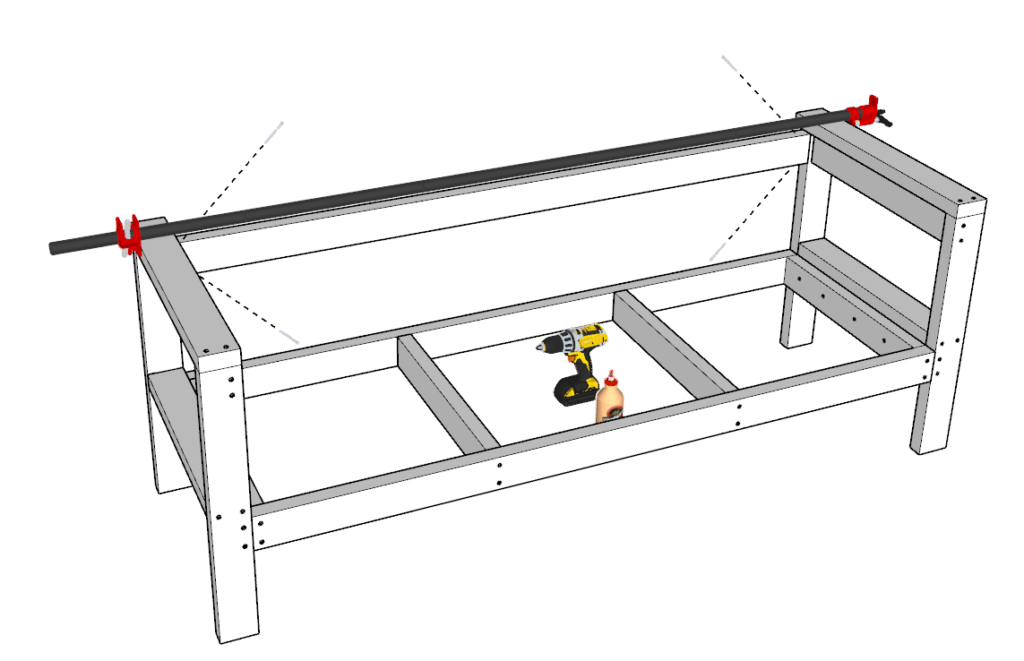
Step 6 (Adding backrest to DIY patio bench)
Next, add a 72 inch 2×4 lumber pieces across the back of the bench for the back rest.
Secure the lumber piece with either a tie-down/ratchet strap, or a pipe clamp (Both options displayed below)
As before, add glue, predrill, and add the diagonal screws to secure the joint.
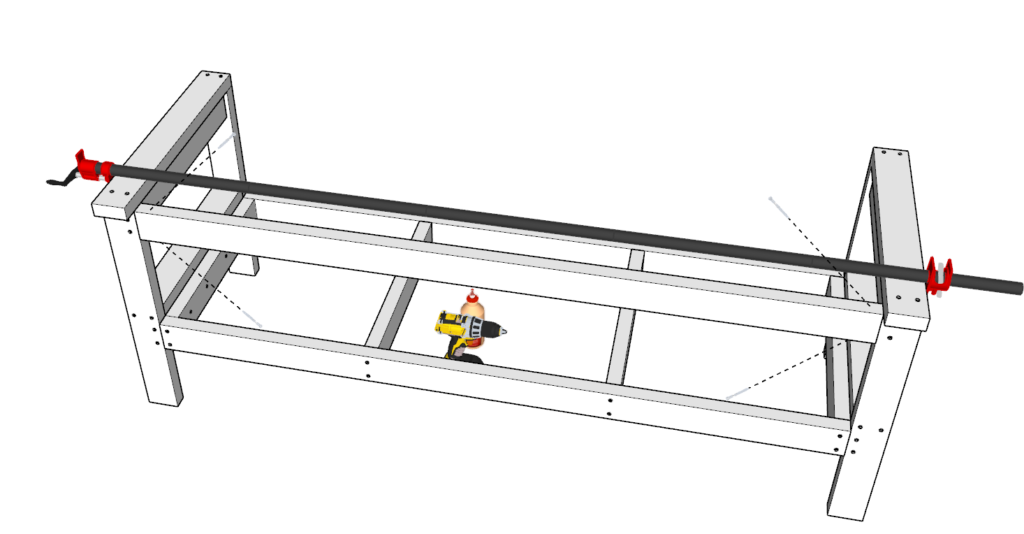
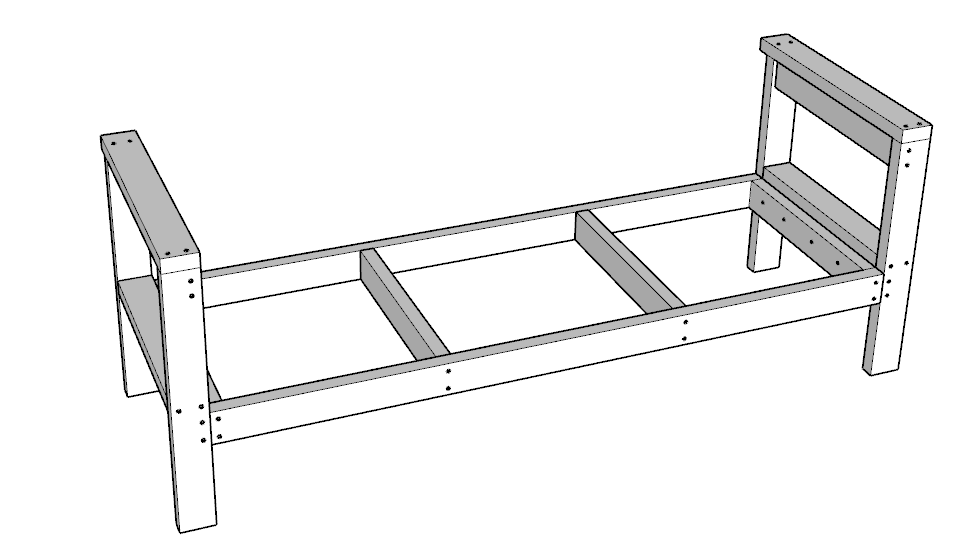
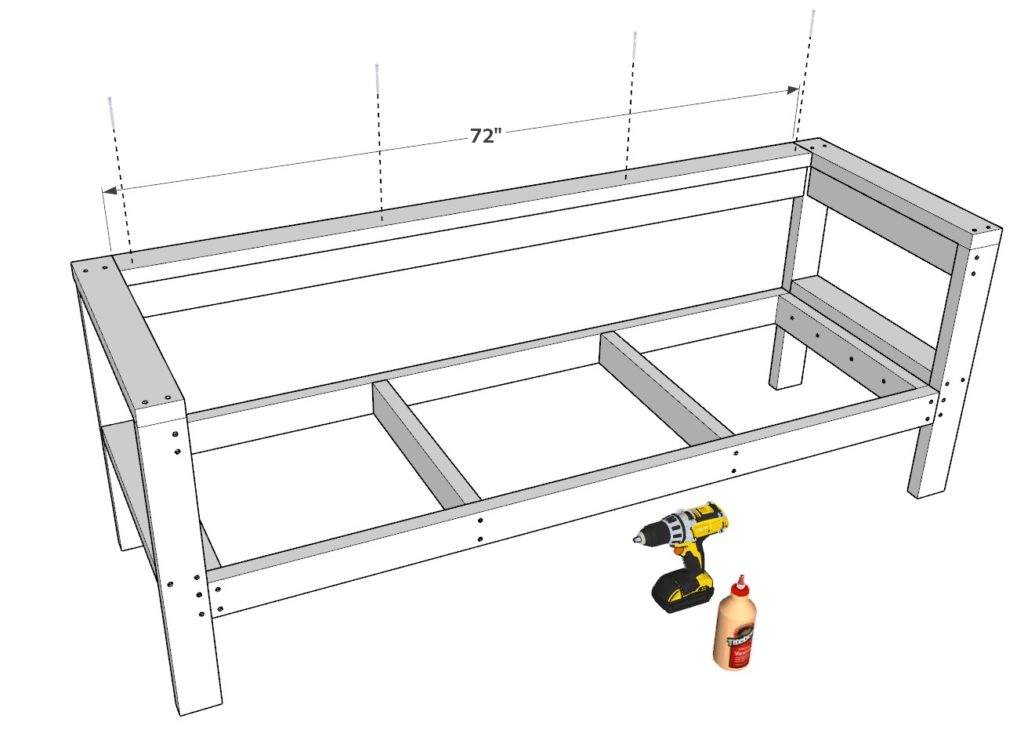
Step 7 (Adding backrest to DIY patio bench continued)
Next, add a 72-inch 2×4 lumber pieces to the back rest ad shown below. Add glue, predrill, and add 2.5 inch screws.
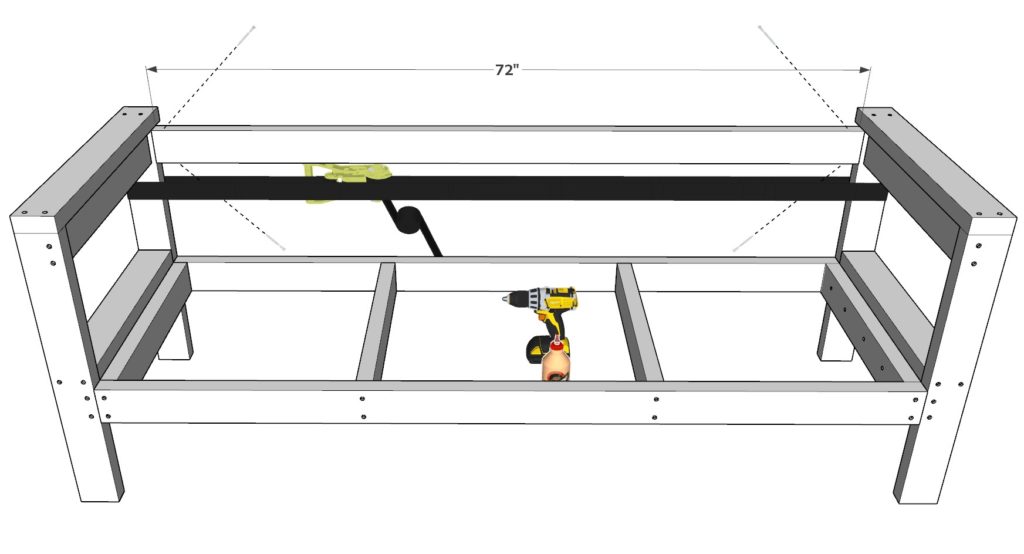
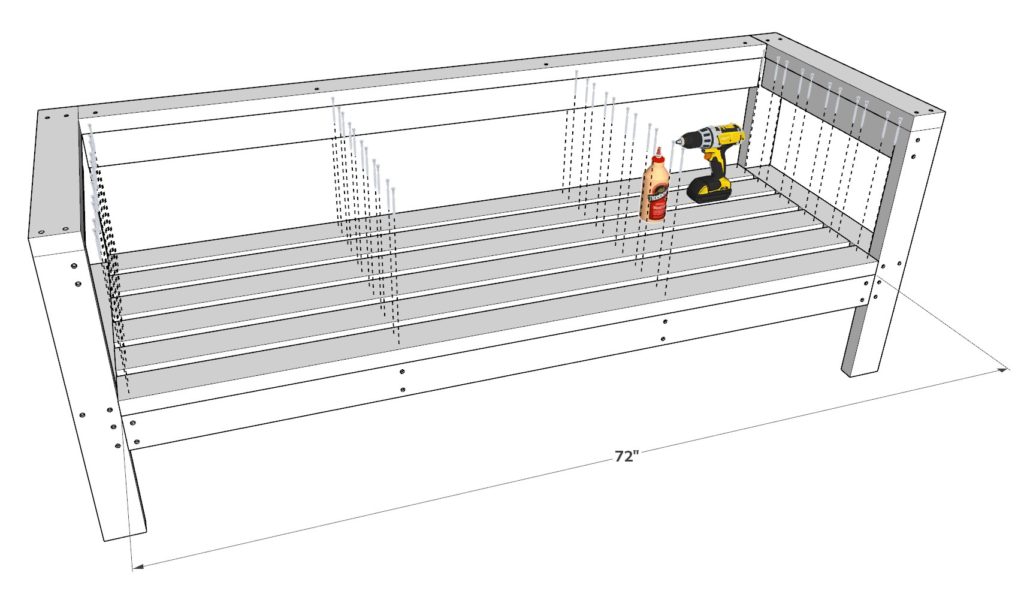
Step 8 (Adding decking pieces to DIY patio bench)
Next, add six 72 inch 2×4 lumber pieces to make the seating platform of the bench.
Space them out about 7/8 inches apart.
As before, add glue, predrill, and add 2.5 inch screws.

Step 9 (finishing touches)
Next, sand down the whole bench. This can be time consuming. I use an orbital sander to speed up the process
I use a rough 80 grit paper first and then finish it with a 220 grit paper.
Filling in the holes is optional.
At this point it is ready to be stained or painted!