Why build a DIY kitchen island?
I am so excited to share my latest DIY plans for a kitchen island on wheels! I have carefully considered the design features of this kitchen island and some of the key features and benefits of the Kitchen Island are outlined below.
Extra Storage:
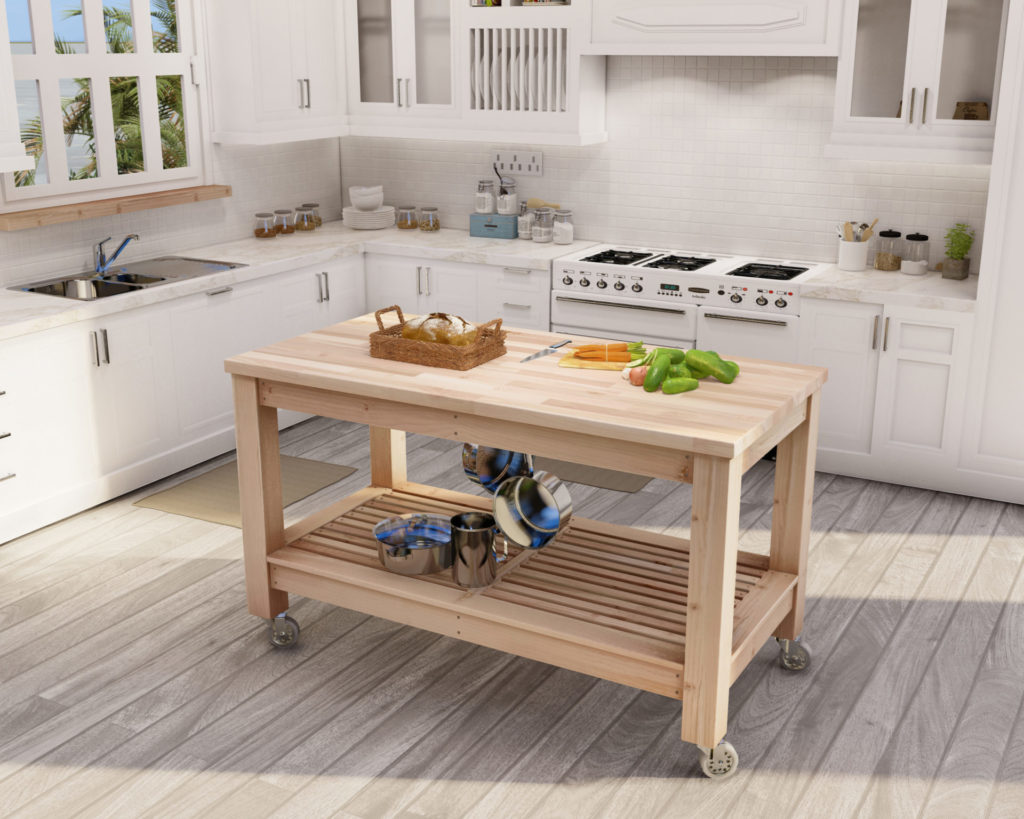
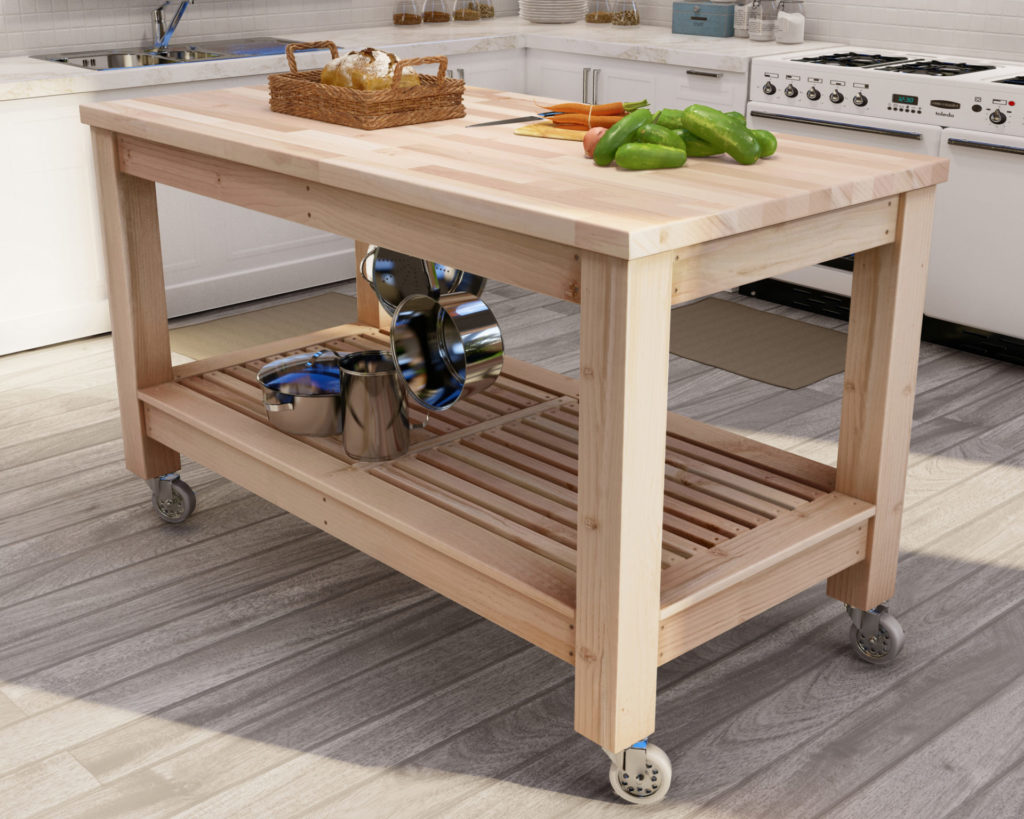
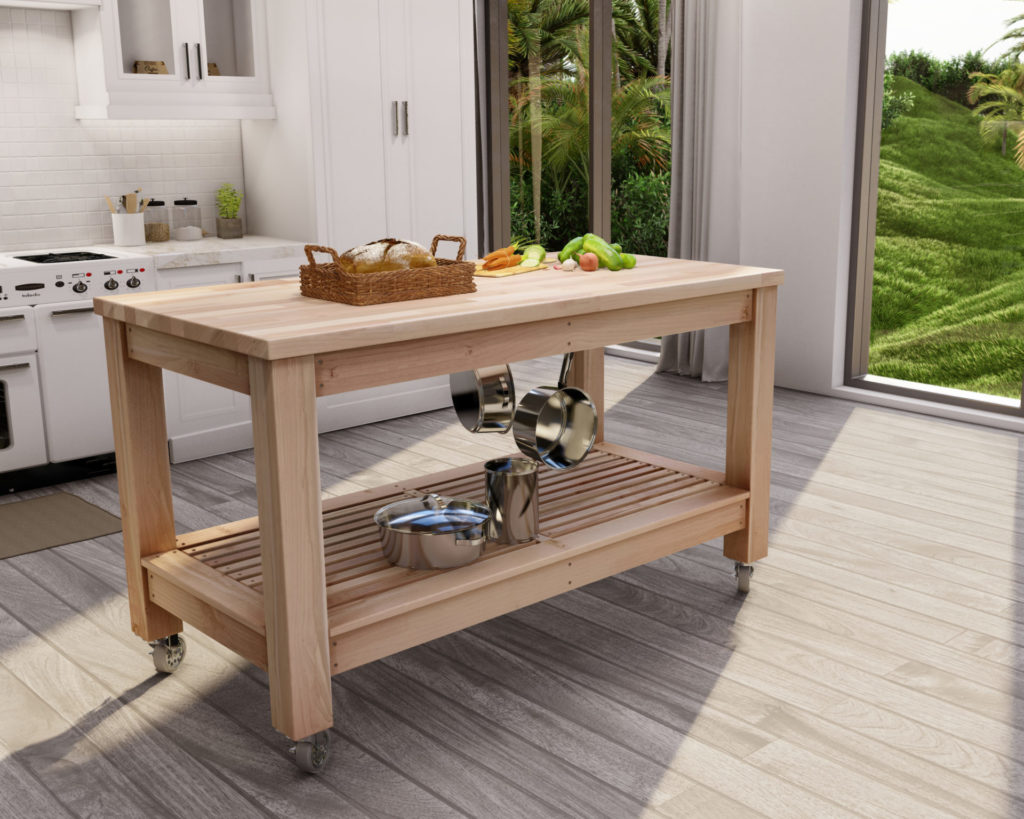
You can install hooks and hangers to store pots and pans, dishes, silverware, and other kitchen items and utensils. The bottom shelf of the island is perfect for storing larger items that may not fit under traditional counter space.
Prep Space:
Extra prep space is always a good thing to have in a kitchen. It allows you to have more space to work on when you are cooking or baking. A kitchen island can provide that prep space by giving you an extra counter to work on. You can also use the rolling feature of the island to bring the workspace closer or further away from the stove, the sink, or any area of the kitchen as needed.
Dining Space:
One of the great things about having a DIY island in your kitchen is the extra dining space it can provide. If you have a large family or entertain often, having an island with a built–in table can be a lifesaver. It can also be a great way to create a more intimate dining experience if you have a small kitchen.
Entertainment:
Whether you’re cooking for one or hosting a crowd, a kitchen island makes mealtime quick and easy. It provides extra space for entertaining guests and can be used as a breakfast bar or an extra prep area when entertaining guests.
Bar:
A kitchen island can serve as a perfect place to set up a small bar. It provides extra counter space for bartending and can easily be stocked with all of the supplies you need for making drinks. Plus, it‘s a great place to socialize while you‘re preparing food or drinks for your guests.
Coffee Station:
Your kitchen island can serve as the perfect coffee station. In the morning, you can sit behind the island and enjoy a cup of coffee while getting ready for the day. The extra counter space of the island provides a great place to set up your coffee maker, cups, and other supplies. Plus, the added storage space of the island is perfect for storing coffee beans, flavored syrups, and other coffee accessories.
Decorative part of a kitchen:
A kitchen island is a versatile piece of furniture that can serve as both a decorative and functional element in a kitchen. You can add extra personal touches to the kitchen island to make it feel more like home. Some examples include adding a vase of fresh flowers or a bowl of health snakes or fruit.
Who can build this DIY kitchen island?
This kitchen island design is good for beginners to woodworking because it is simple, easy, and straightforward. There are no complicated parts or pieces, and the overall design is relatively simple. This makes it a good project for someone who is just starting out in woodworking.
My goal is to make DIY woodworking plans that are specifically designed for beginners and include anyone willing to try to build. I want to make sure that the plans are easy to follow and that they include all the necessary information that someone new to woodworking would need. I also want to make sure that the plans are affordable and that they can be completed in a reasonable amount of time.
This project requires only basic tools.
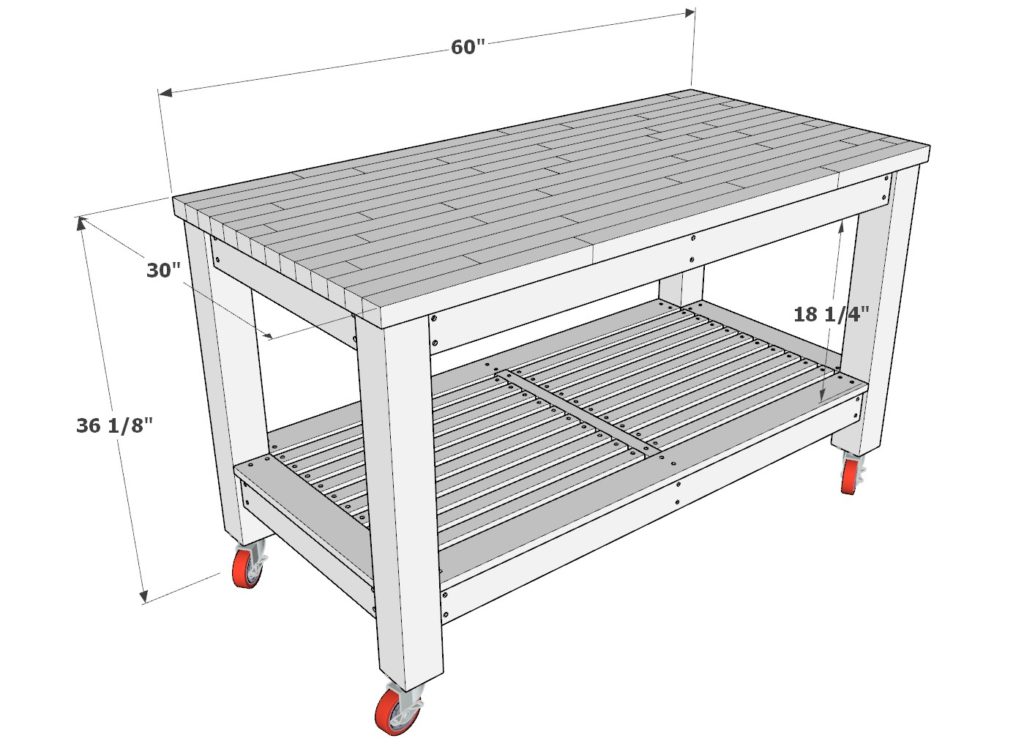
What are the specifications of the DIY kitchen island?
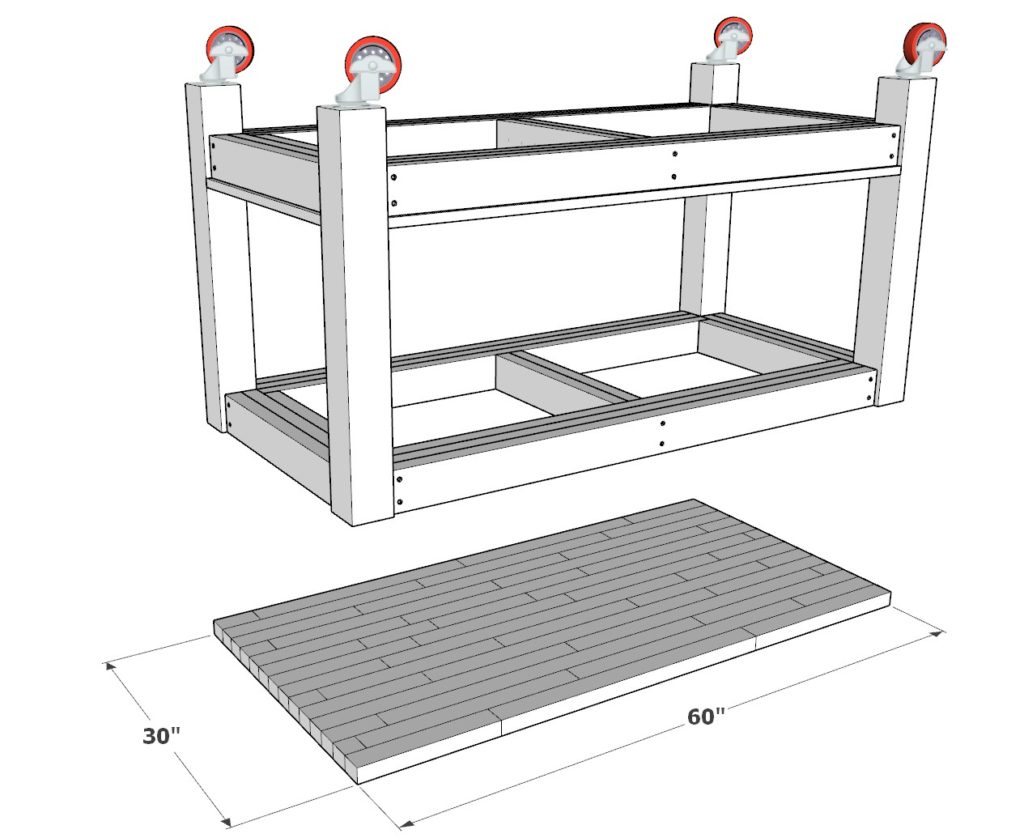
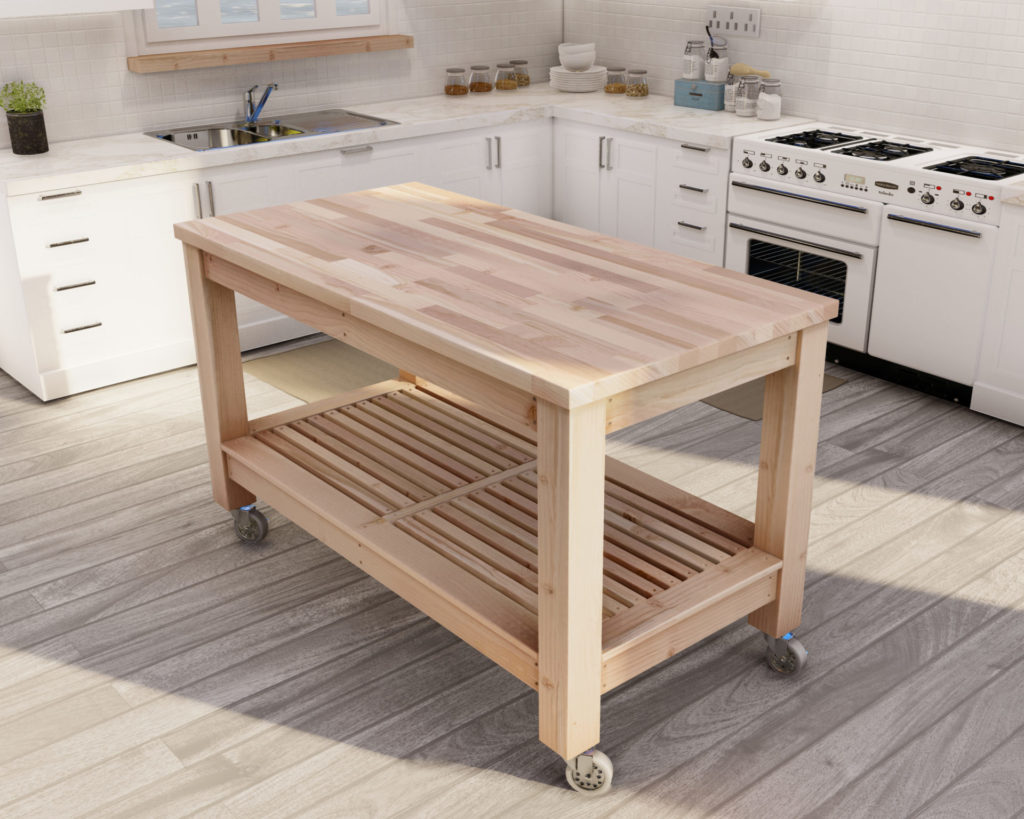
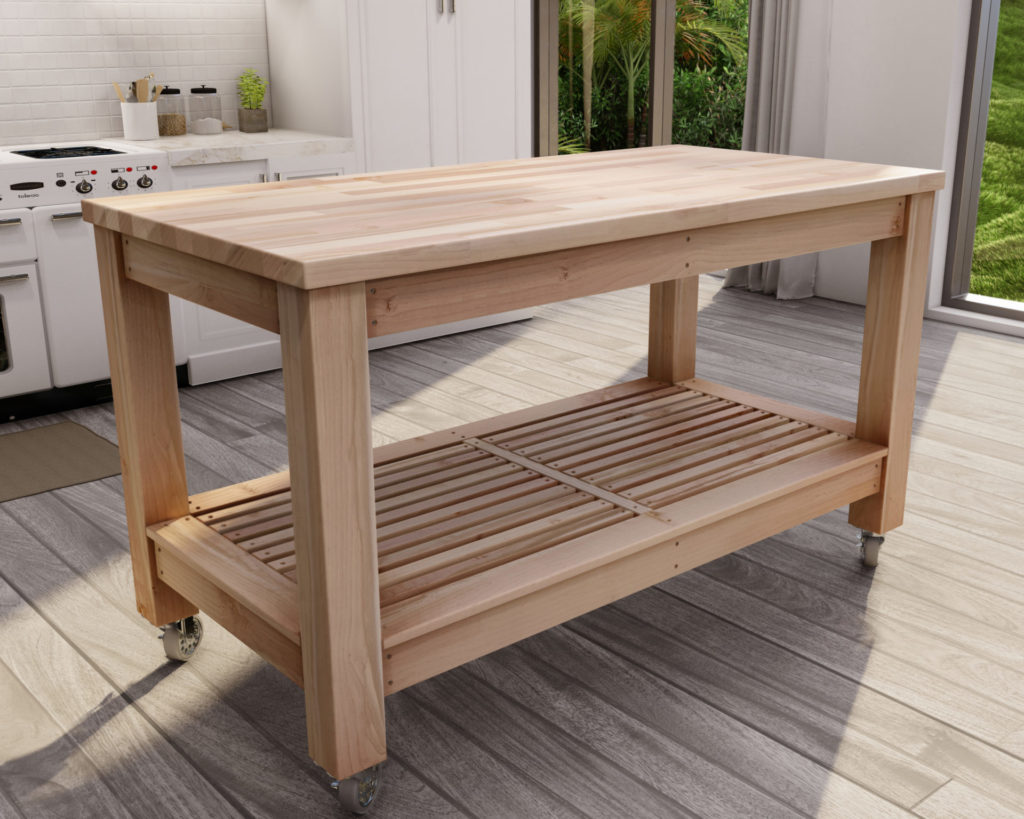
The island top is purchased unfinished from stores like Home Depot, Lowes, and other hardware stores across the country. It’s better to buy an unfinished wood butcher block kitchen island slab instead of making one yourself mainly because if you don‘t have the proper tools and equipment, it can be very difficult to make a butcher block tabletop. Leave it to the professionals so that your workspace looks beautiful.
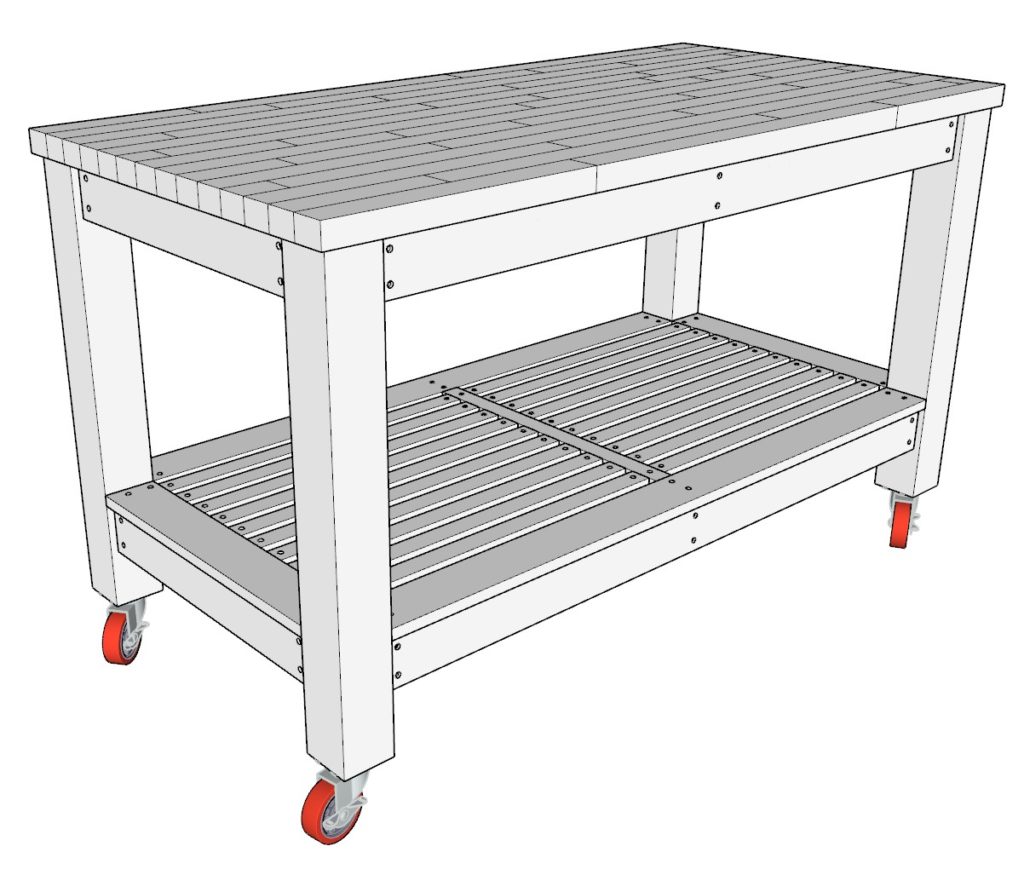
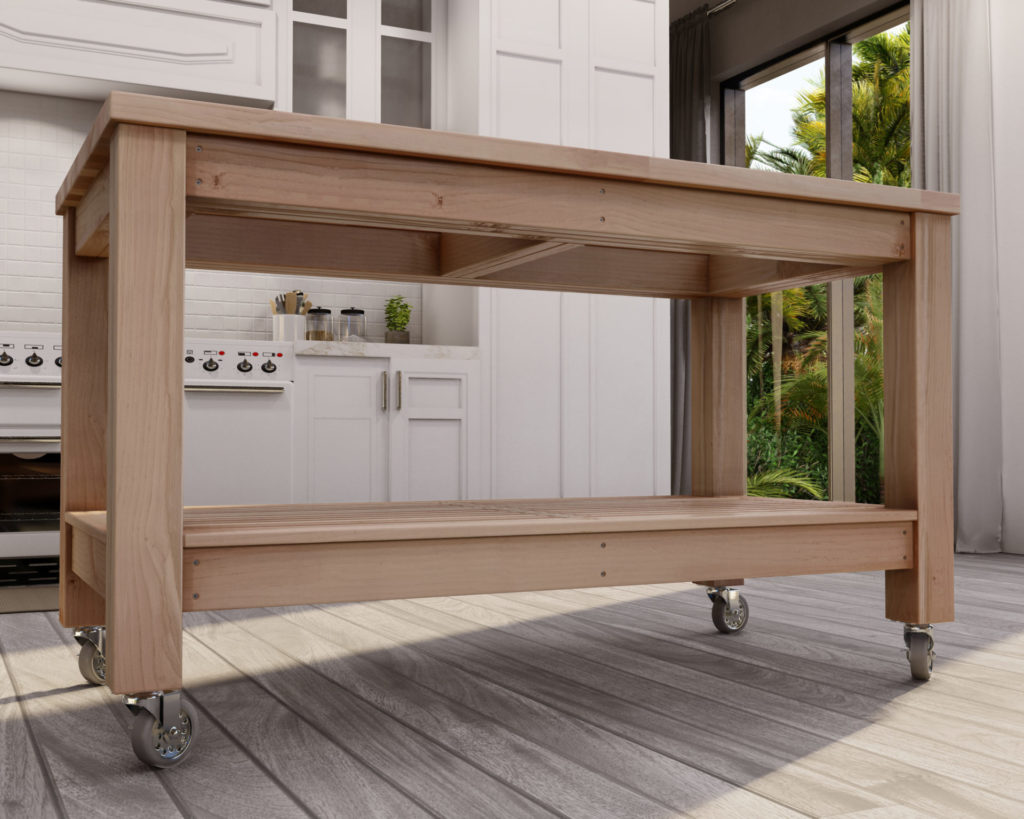
The frame of the kitchen island is made from multiple reinforced 2×4 lumber pieces at the top and the bottom of frame. This means that the island can hold a significant amount of weight and is very sturdy.
As wood ages, it tends to lose moisture and become dry. This causes the wood to shrink and change shape. By layering multiple pieces of wood like I did in this design, I find that the shape of the fame maintains its strength and form.
The slats on the bottom of the DIY kitchen island help keep the bottom storage area dry by allowing air to circulate. This prevents moisture from building up and causing mold or mildew to grow.
The table is on wheels. One benefit is that it can be moved around easily, so you can have it in the middle of the kitchen when you’re cooking, and then move it out of the way when you’re finished.
Why building the butcherblock wooden DIY kitchen island can be better than buying one.
There are a few reasons for why building a wooden DIY kitchen island is better than buying one. Firstly, when you build your own kitchen island, you can tailor it specifically to your kitchen‘s dimensions and your own personal needs and preferences. Secondly, building a kitchen island yourself will likely be much less expensive than buying a pre–made one. And lastly, DIY projects like this are simply more satisfying and give you a greater sense of ownership over your home and kitchen.
Additional benefits of using a butcher block instead of other common kitchen island tops includes:
- A butcher block kitchen island top is durable and easy to clean.
- It’s a great choice for a busy kitchen because it can withstand heavy use.
- Butcher block is a natural material that adds warmth to a kitchen.
- It’s a versatile material that can be used for both prep and serving.
- A butcher block kitchen island top is a stylish and unique choice.
What kind of wood should I use to build the kitchen island?
There are a few reasons why I use pine and Douglas fir to build the DIY kitchen island. First, pine and Douglas fir are extremely strong and durable, making them ideal for construction projects. Secondly, they have a beautiful, natural grain pattern that add a touch of elegance to the kitchen island. Finally, they are relatively inexpensive compared to other types of wood, making it a great option for budget conscious DIYers.
The butcher block top is typically made from birch wood. Birch 2x4s and 4x4s are not available typically. Pine wood or Douglas fir wood is a good choice when it comes to matching the grain and pattern of the birch wood top.
Wood can split when placed in the home because the air conditioning and heating can change the moisture content of the wood. When the moisture content of the wood changes, it can cause the wood to expand or contract. This can cause the wood to split. I used 1-inch-thick pine board for the bottom shelf. These board are typically sold drier because they are thinner and dry quicker in the kiln. This means that the more delicate bottom boards will not change shape, warp, or bend over time.
Time to build
About 5 hours
Total cost of build
About $400-$450
Skill level required
Beginner
Download the PDF plans
Plans for how to build the DIY kitchen island.
What is included in the PDF download?
- Easy to read step by step instructions
- Material list
- Cut list
- Tools needed
- 3D illustrations
- Helpful links to tools and materials needed for the project
Recommend tools for this project
- Saw (miter saw recommended for precision cuts)
- Drill
- Impact driver with bit for screws
- Sander
- wood countersink drill bit
- measuring tape
- Ratchet straps
- about 10lbs of 3.5 in long screws (highly recommend T25 Star Drive screws)
- Wood glue
- Sand paper
- 4 inch caster wheels (Many other options work just fine as well)
- 5 inch screws for attaching the wheels and wheel support
Affiliate links
Wood purchase list and cut list
Available with purchase of PDF plans.
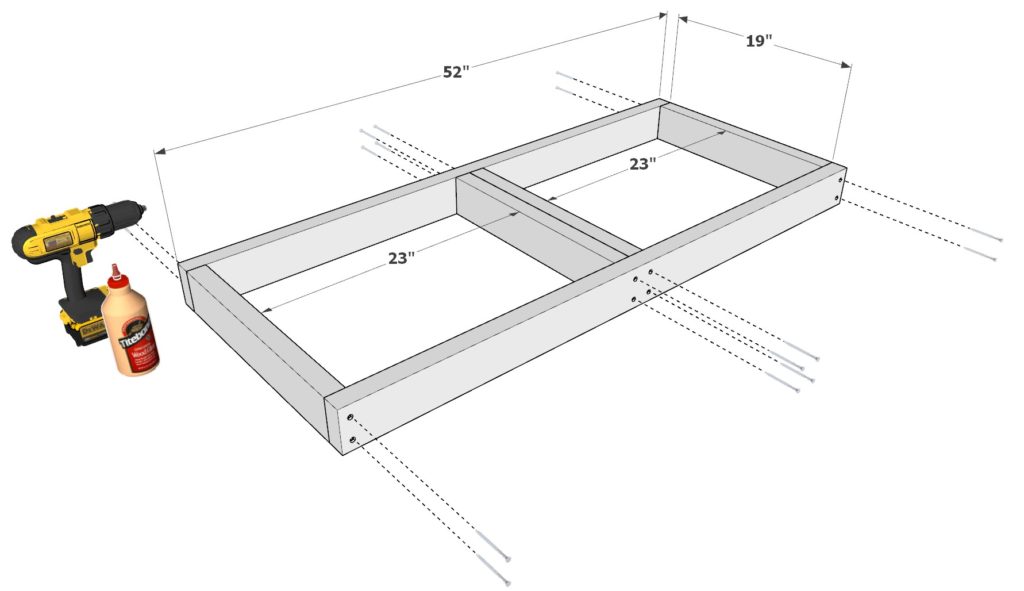
Step 1 (DIY kitchen island rolling grill and BBQ table)
First, we will build up the frame of the kitchen island table.
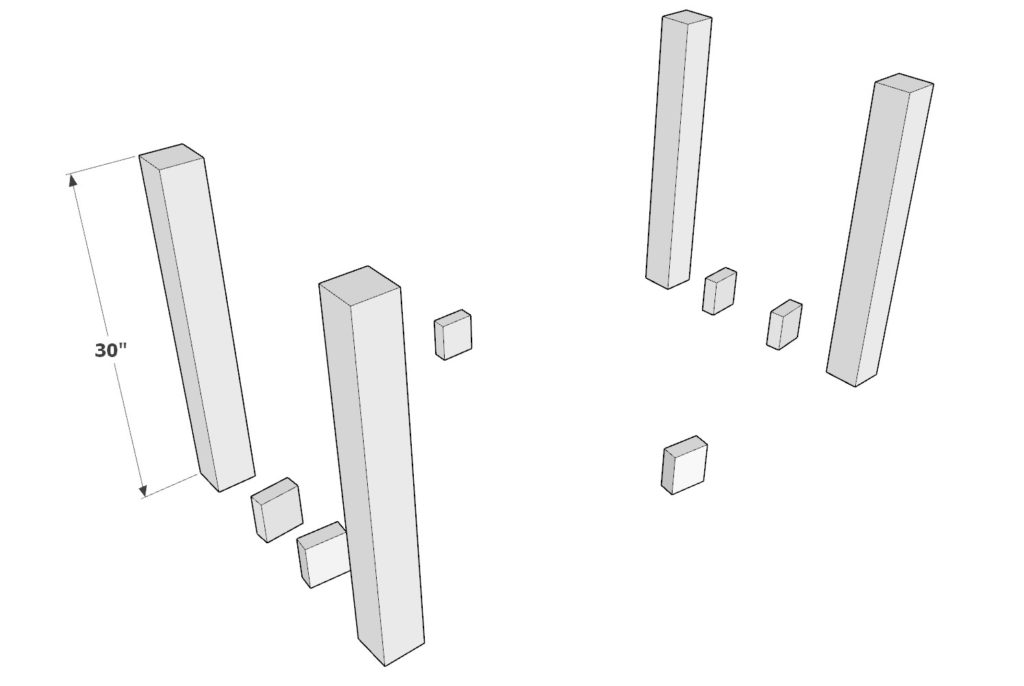
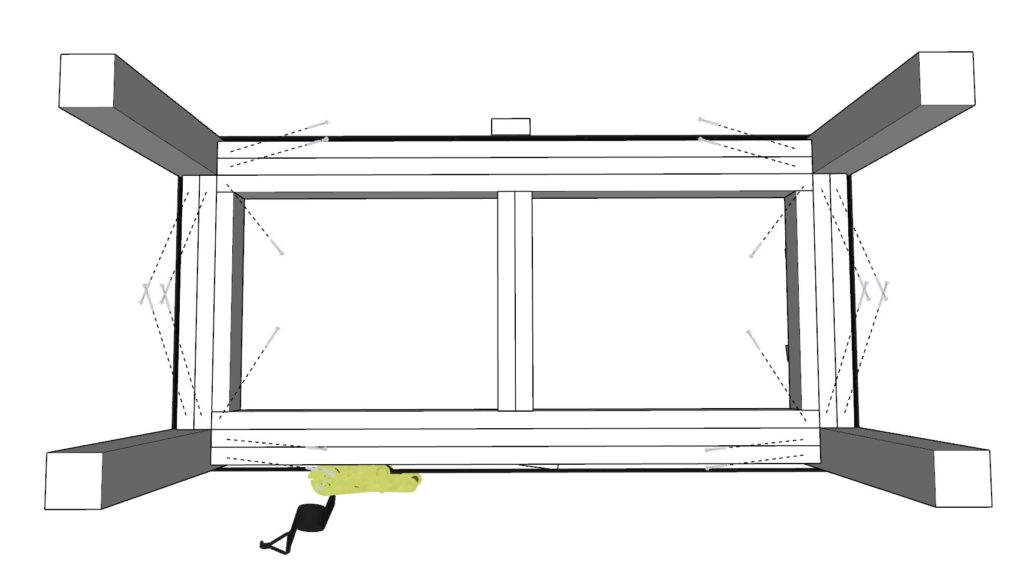
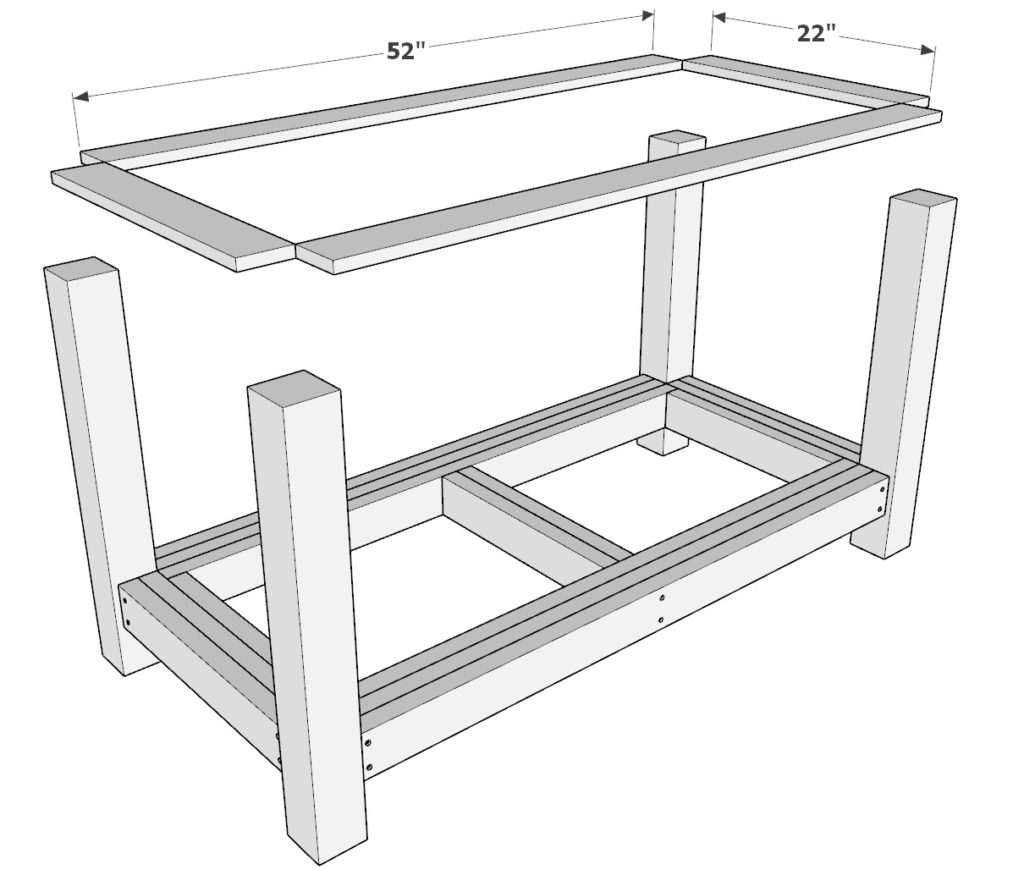
Take two 52 inch 2×4 lumber pieces and four 19 inch 2×4 lumber pieces and arrange them as shown in the first image below.
Join the lumber pieces by adding glue to all areas that are making contact, predrill the holes for the screws to prevent wood from splitting, and add 3.5 inch screws.
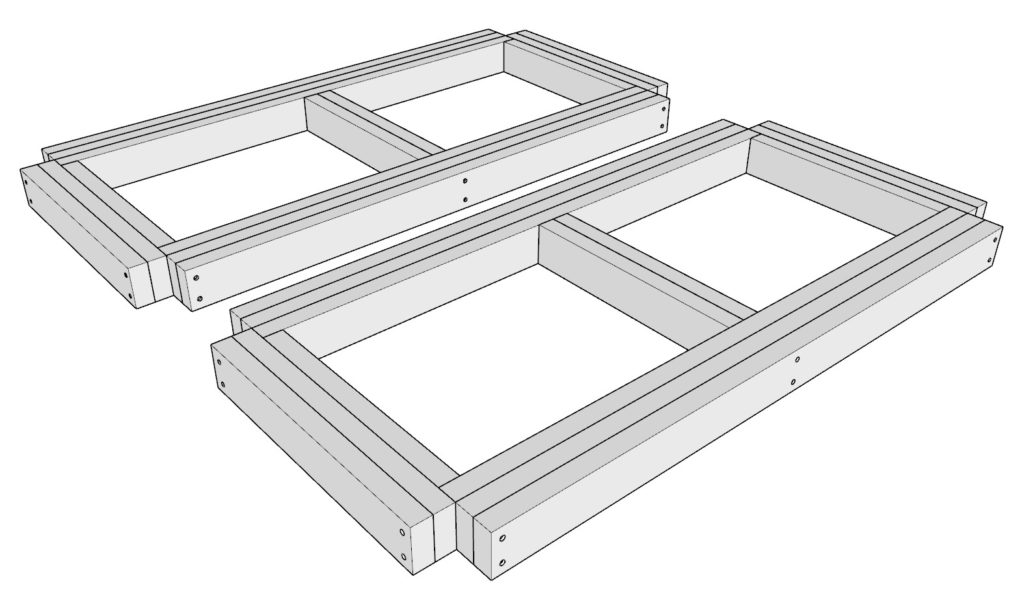
Next, build up the second layer of the frame. Take two 52 inch 2×4 lumber pieces and two 22 inch 2×4 lumber pieces and arrange them as shown in the second image below.
Join these in the same way as before but don’t forget to add glue to ALL areas that will be making contact. This means gluing the entire sides of the 2×4 faces that are touching.
Next build the final layer of the frame. Take two 52 inch 2×4 lumber pieces and two 22 inch 2×4 lumber pieces and arrange them as shown in the second image below. Join these in the same way as before.
Make two identical frames.


Step 2 (DIY kitchen island rolling grill and BBQ table
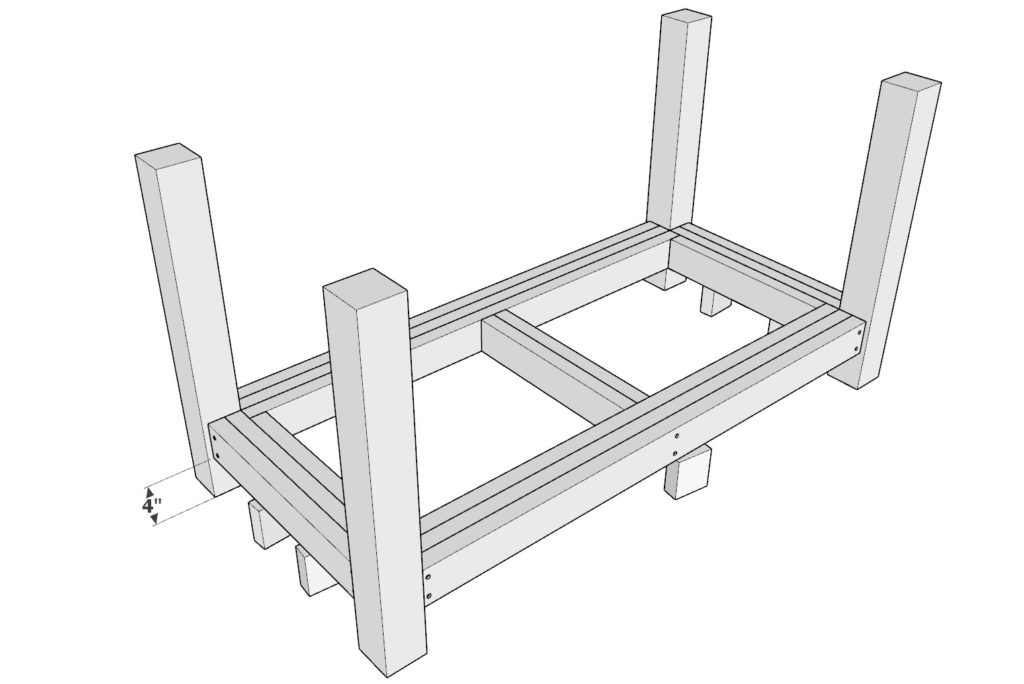
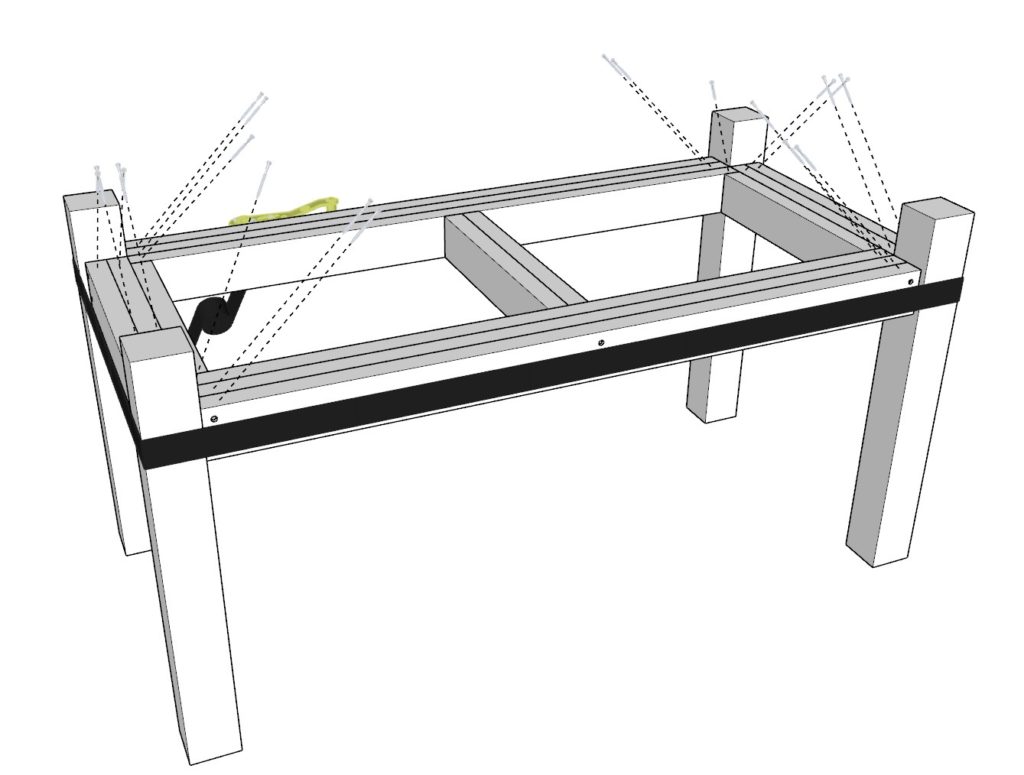
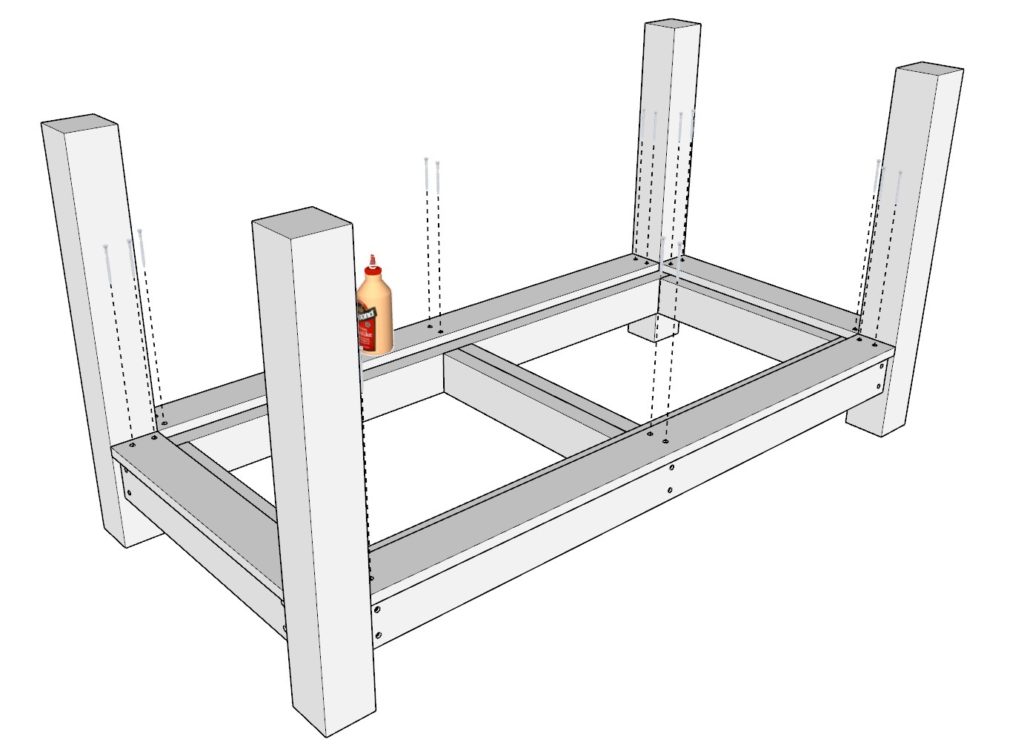
Next we will be attaching the kitchen island legs to the frame.
Take one of the frames you built in the previous step and lay it on top of some 1 inch spacers. These spacers can be cut from scrap wood.
Next, add four 30 inch 4×4 lumber pieces to the frame. Add generous amounts of glue to all areas that will be joined together.
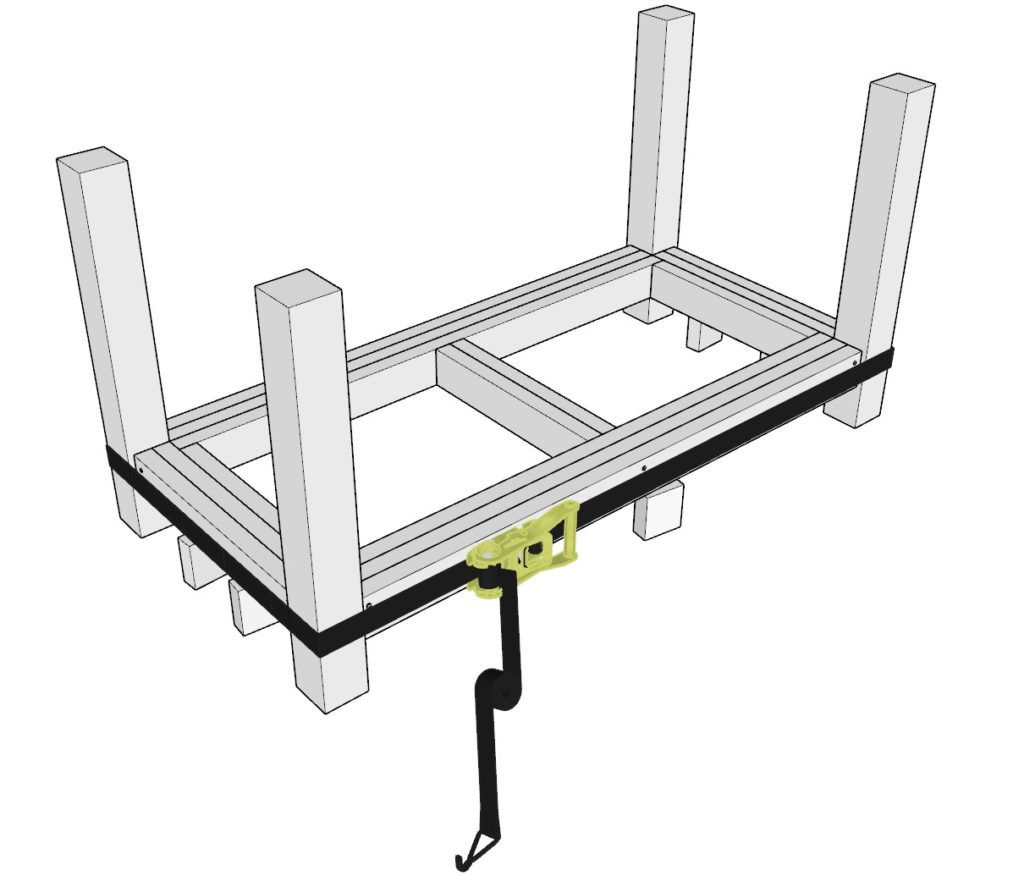
Next, take a ratchet strap and loop it around the island table legs as shown below. Tighten the straps well but not “all the way.” At this step “hammer” into place any stubborn legs or frame part that are not lining up. Once you have the perfect alignment, tighten the straps very tightly so that the 4x4s can not move.
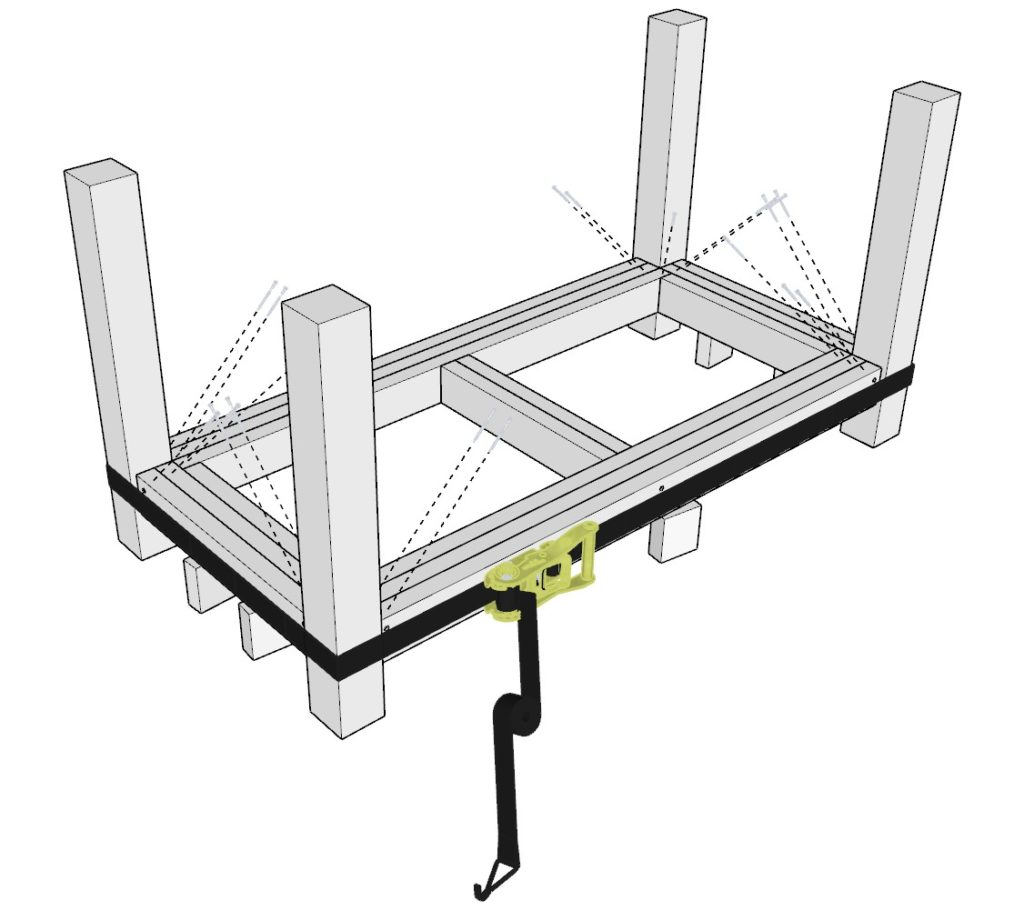
Next, add 3.5 inch screws as shown below. Predrill, and add the screws deep so that they make a good connection with the 4x4s. Repeat this for all four legs.


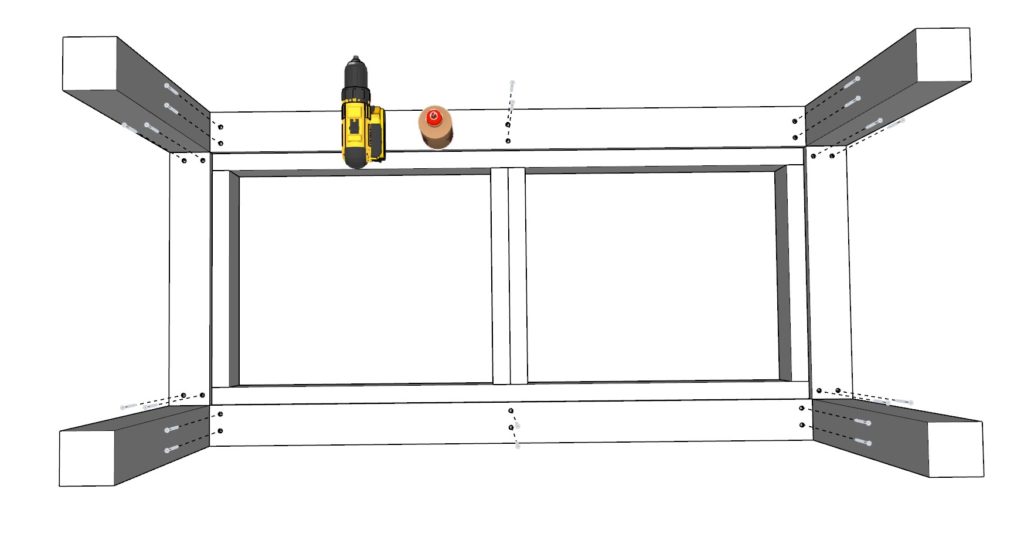
Step 3 (DIY kitchen island rolling grill and BBQ table)
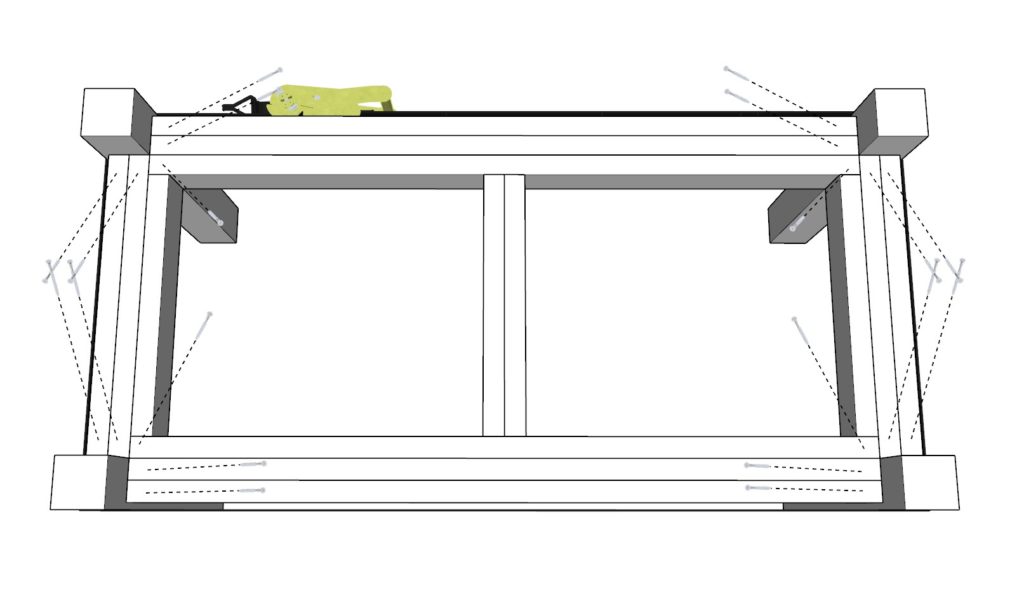
Next, flip the island grill table and over and add 3.5 inch screws in the same pattern as in the previous step.
Make sure you have someone to flip the table with. DONT PUT PRESSURE ON THE TABLE LEGS UNTILL THEY ARE FULLY ATTATHED. Pressure before that can cause the leg joints to be weak.
Add 3.5 inch screws in the pattern shown below.
Step 4 (DIY kitchen island rolling grill and BBQ table)
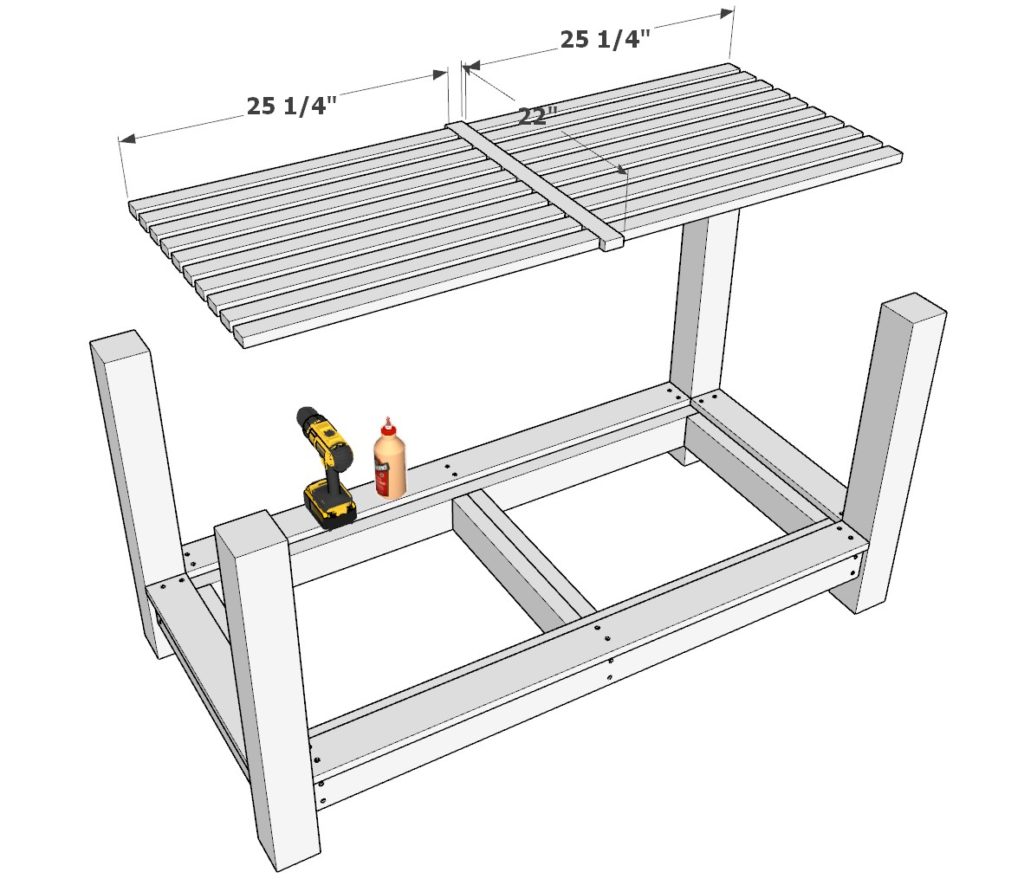
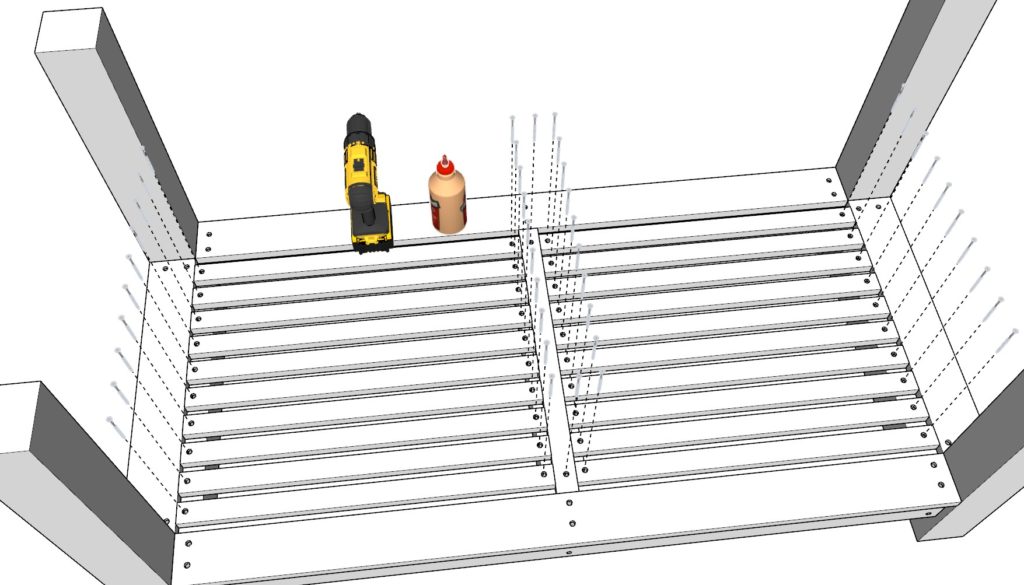
Next, attach the bottom shelf decking pieces to the main frame of the kitchen island.
Take two 52 inch 1×4 lumber pieces, and two 22 inch 1×4 lumber pieces and arrange the boards as shown below. Secure the 1×4 lumber pieces with 3.5 inch screws. Make sure to add glue to all areas being joined and don’t forget to predrill.
Next, add twenty 25-1/4 inch 1×2 lumber pieces and one 22 inch 1/2 lumber pieces and arrange them as shown below.
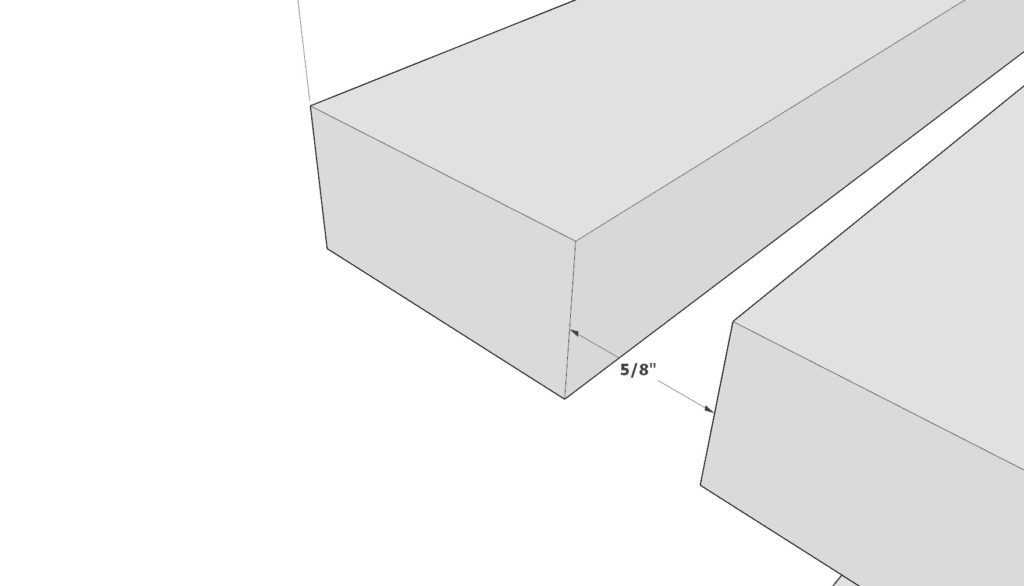
Add these pieces to make the floor of the bottom shelf. Predrill holes, add glue, and add screws once you have spaced them out appropriately. The spacing between the 1x2s should b about 5/8 inch. Use a spacer for a more even look when spacing.

Step 5 (DIY kitchen island rolling grill and BBQ table)
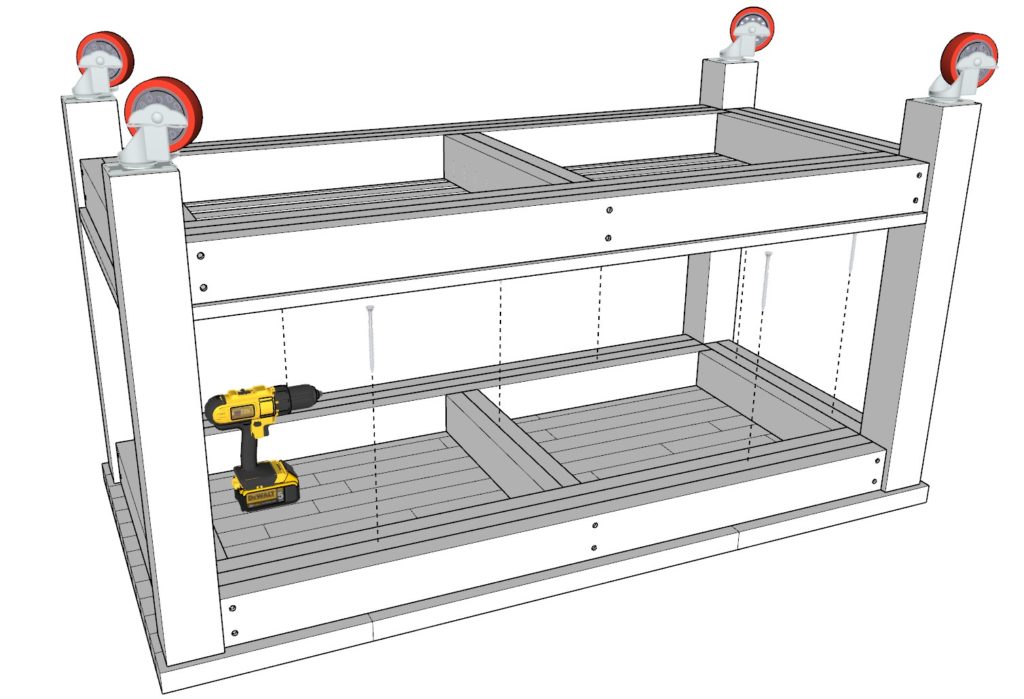
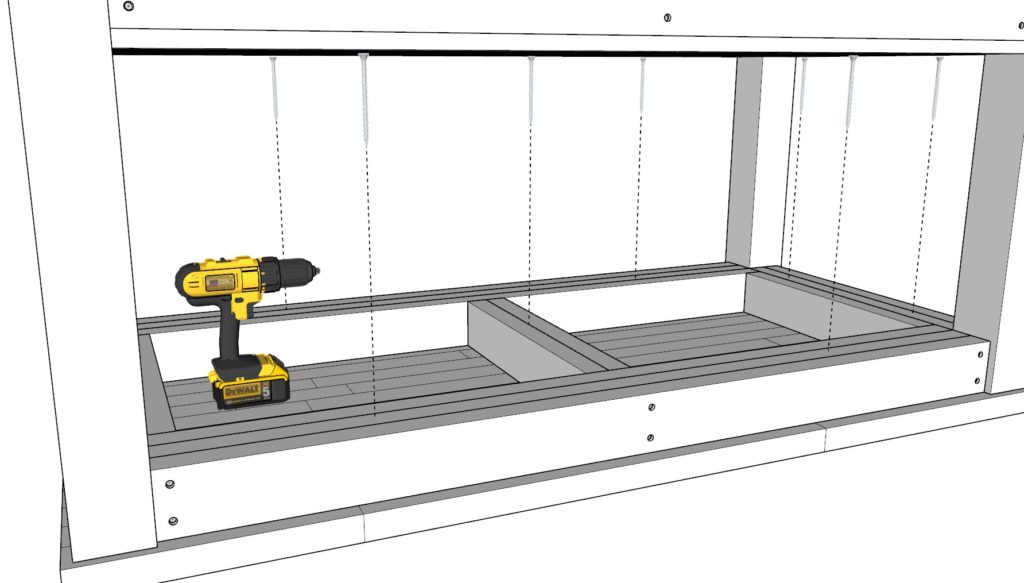
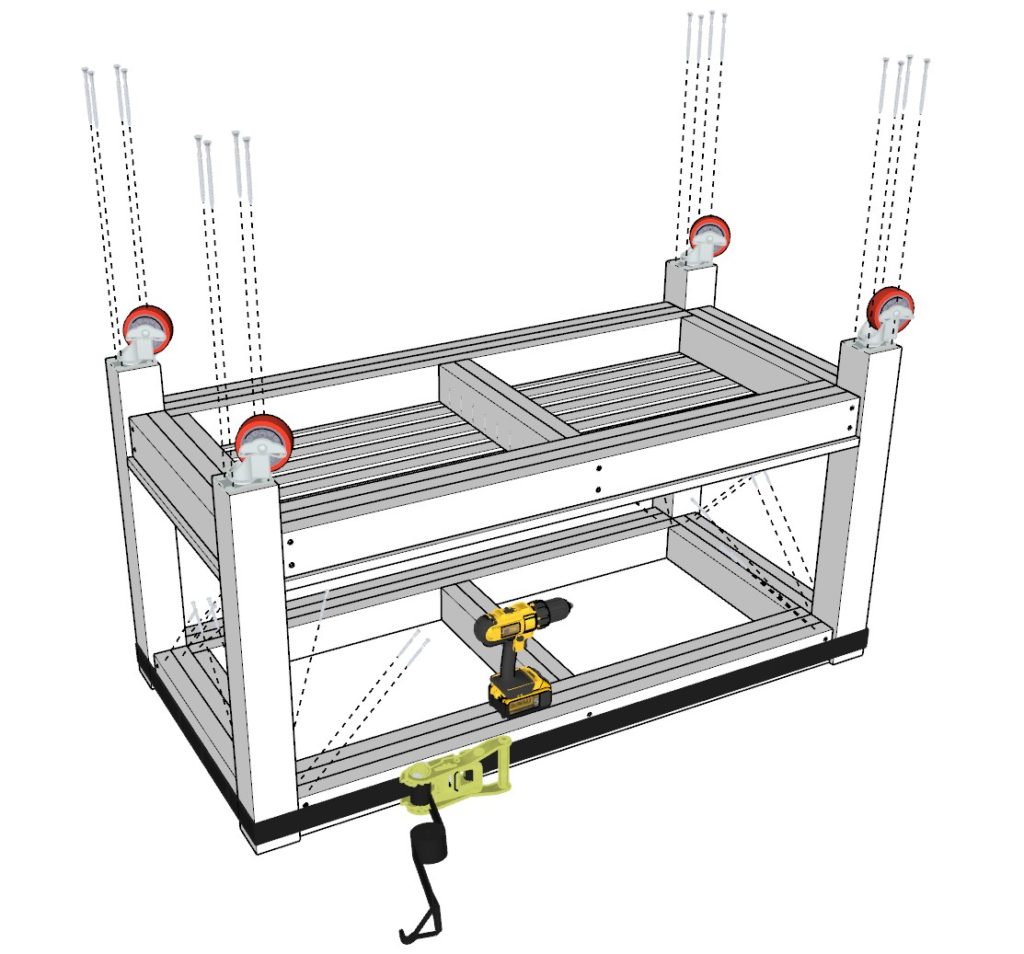
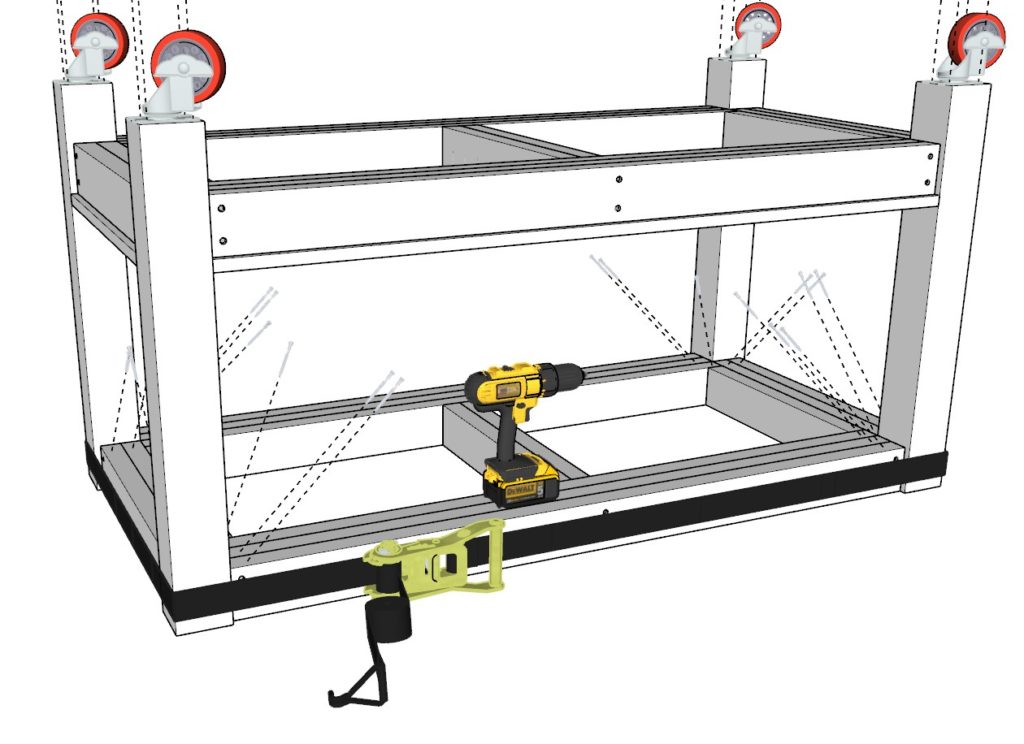
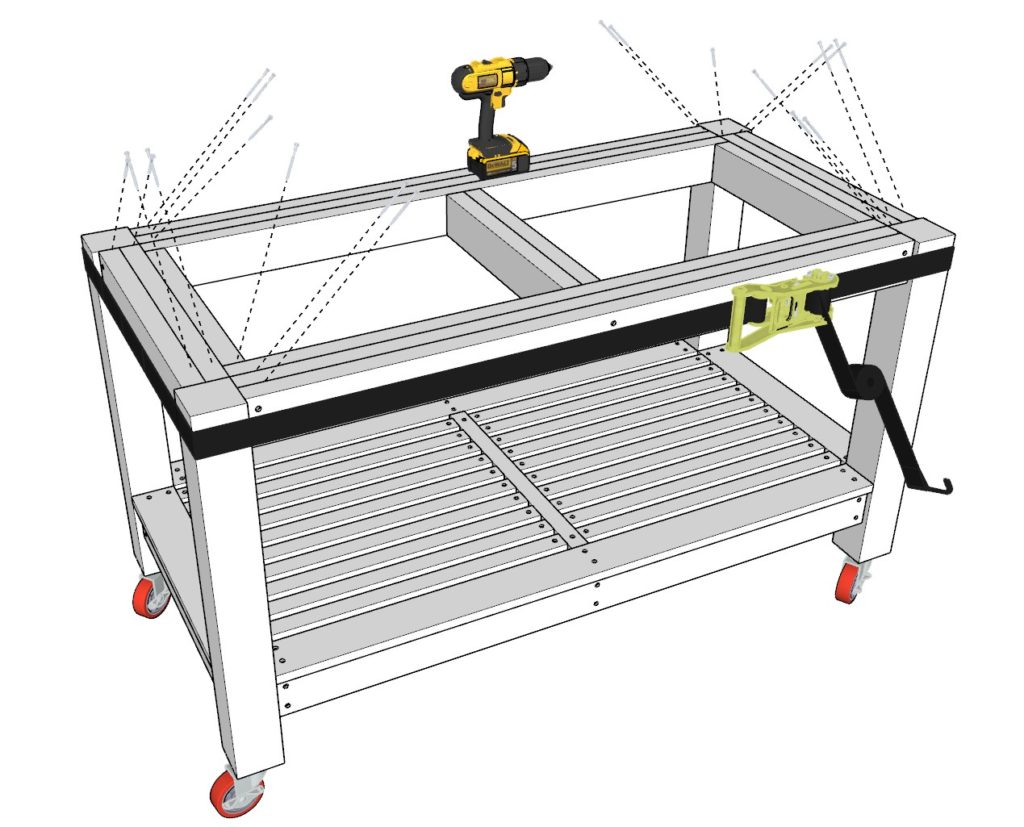
Next, attach the second frame piece you built in the first step to the main frame of the DIY island table.
Ad before, add glue, add straps, “hammer” into place any stubborn parts, tighten straps all the way, add 3.5 inch screws, flip the rolling table, add 3.5 inch screws to the top as well.
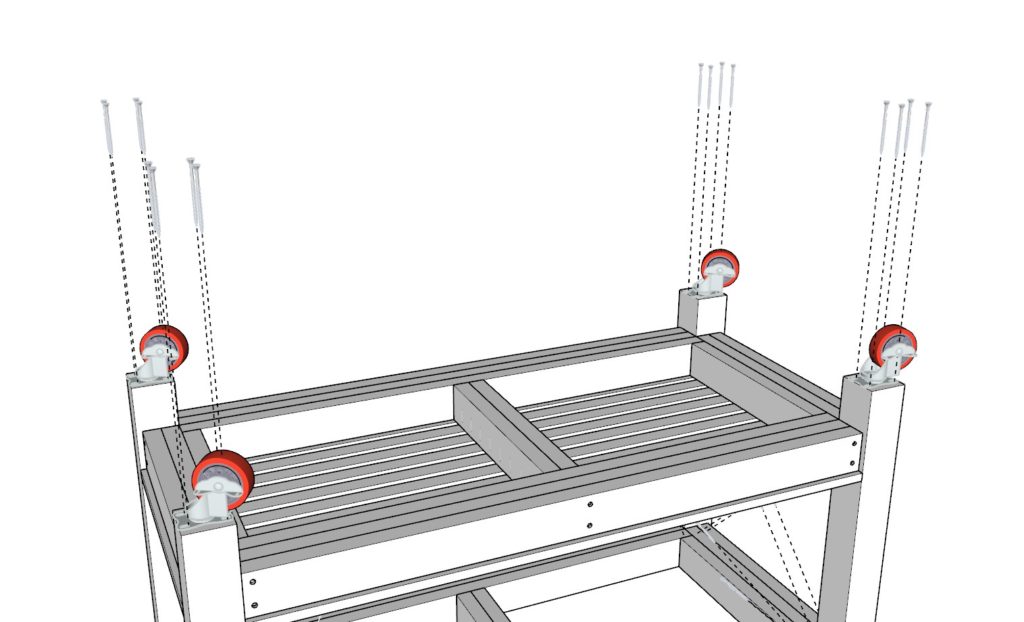
In this step also add the wheels to the table. Secure the wheels with 4 inch screws. Make sure to predrill the holes to prevent the legs from splitting.
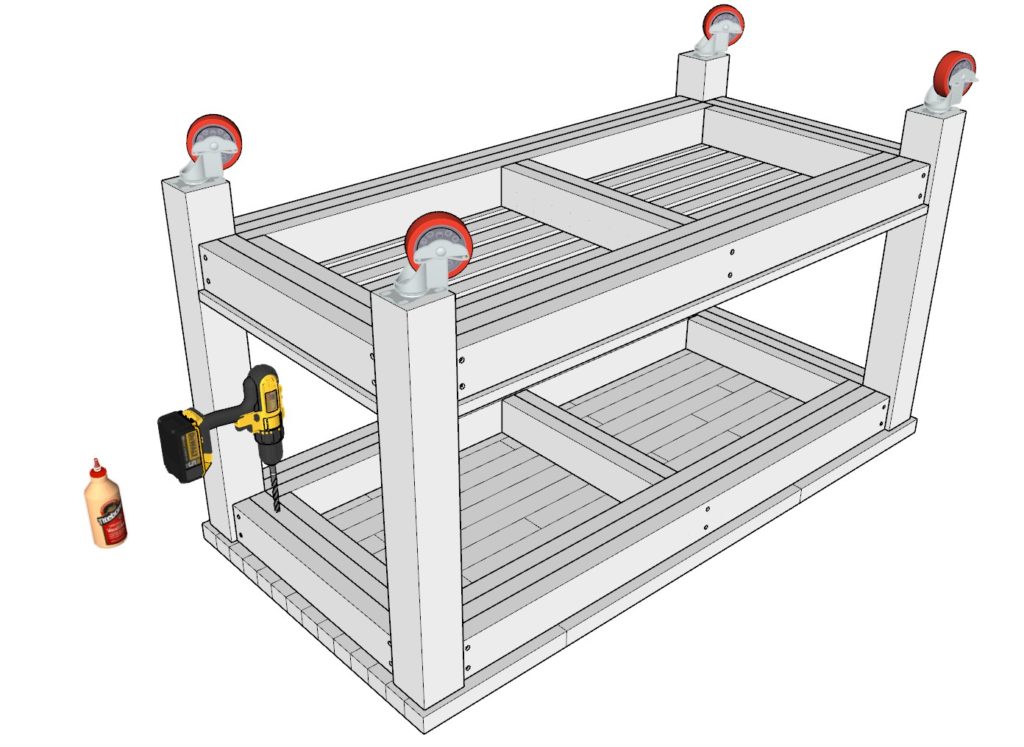
Step 6 (DIY kitchen island rolling grill and BBQ table)
Next, attach the island butcher block top and perform finishing touches.
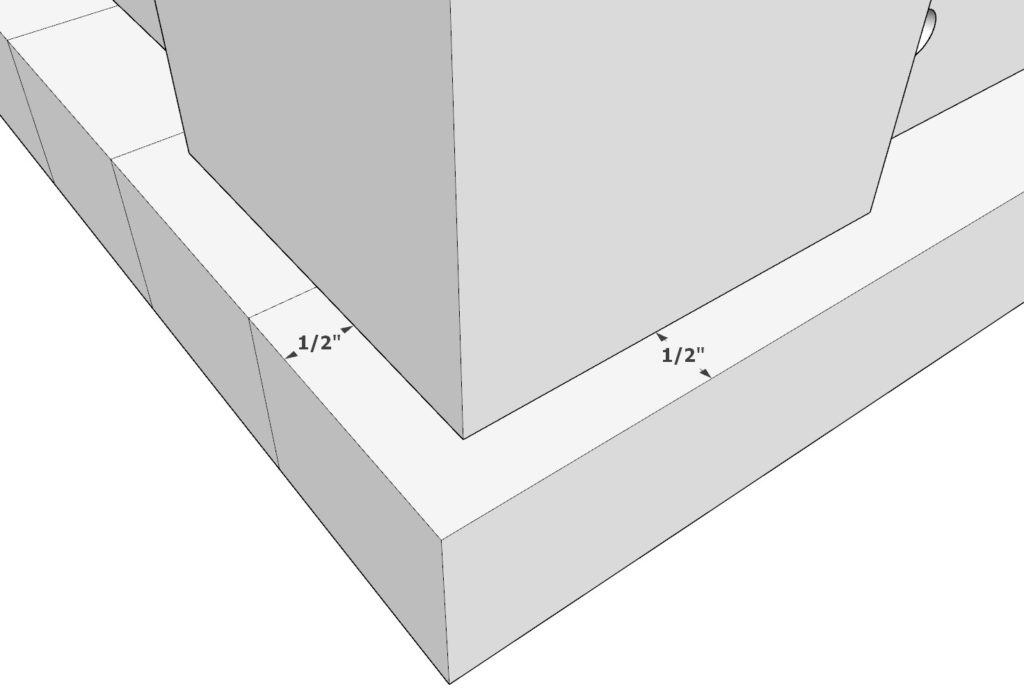
Lay the butcher block on the floor, place the island frame on top the butcher block. The edges need to top need to over hang by 1/2 inches on all sides.
Make sure to use plenty of glue on all the areas that wil be making contact.
Next, predrill holes to add the 4.5 inch screws.
Add screws.
Lastly sand down the whole kitchen island (except the butcher block because its already sanded). I start with a 80-grit sand paper to take out all major imperfections, next I follow with a 220 grit sandpaper to ensure a smooth surface that is ready for staining or painting. I use an orbital sander to speed up the process of sanding.