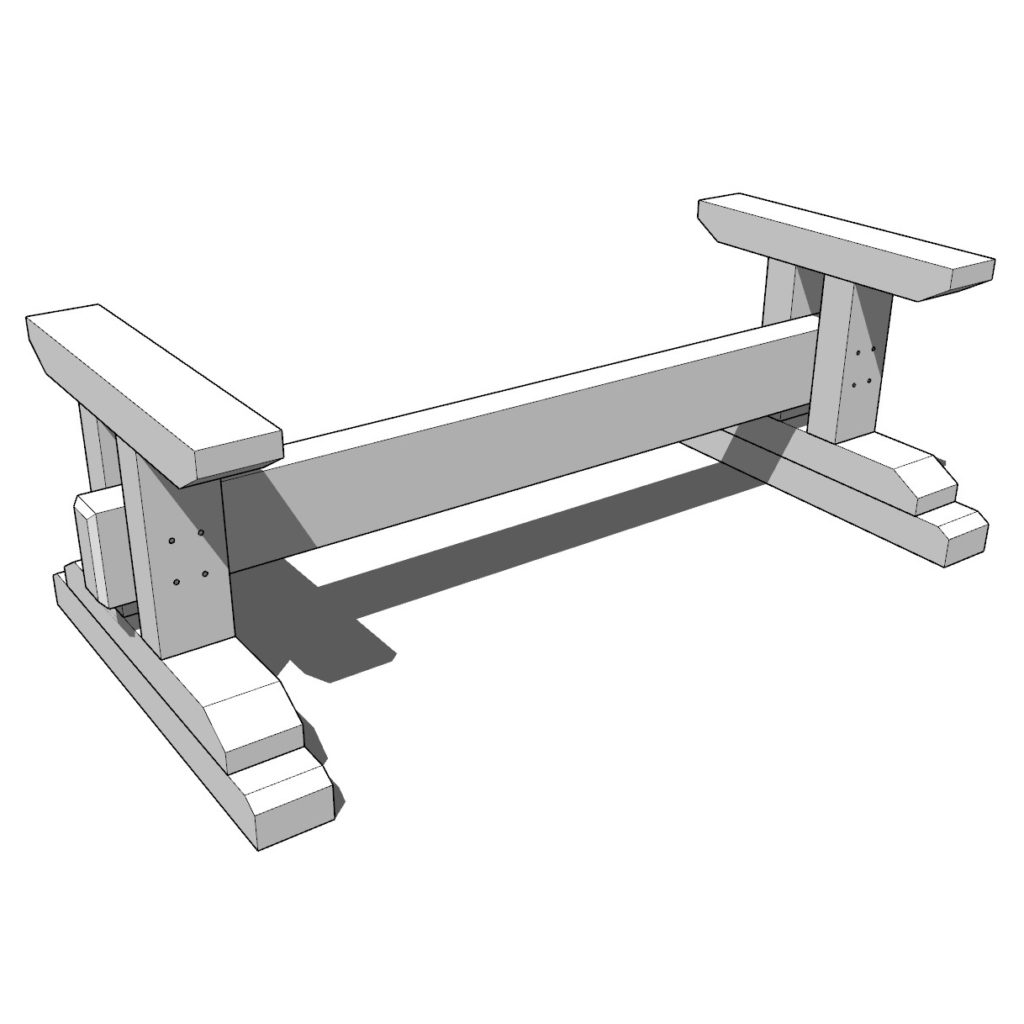
DIY farmhouse table base overview:
A table is a central piece of furniture in a home. It is a place where families gather to eat meals, share stories, and create memories. A table is a symbol of togetherness, and it brings people closer together.
I was inspired to create this DIY wooden farmhouse table base because I wanted to create a sturdy and stylish table that would be perfect for any farmhouse–style home. I love the look of farmhouse tables, and I wanted to create a table that would be both functional and stylish.
I chose to build it out of wood because I
think that a natural wooden look is better because it gives the table a more rustic and homier feel. I also think that it makes the table look more elegant.
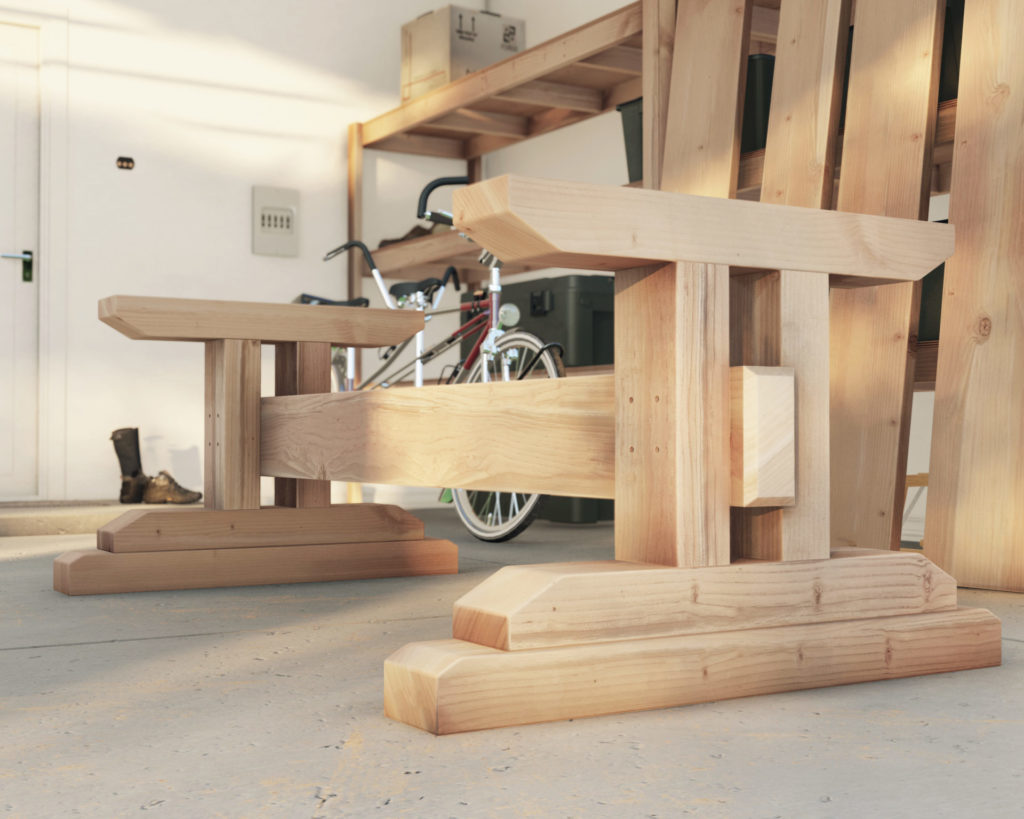
The entire table base is made from 4×6 lumber pieces and one 4×8 lumber for the center stretcher. Bulk lumber pieces are often used in rustic and farmhouse style furniture because they add a lot of character and charm. They can make a piece of furniture look more rustic and farmhouse because they are often made from reclaimed wood or recycled materials.
The table base is very versatile and can accommodate a full size tabletop. This means that the whole family can sit down for a meal behind the table.
What table top option go well with this farmhouse table base?
- A simple and classic wood finish.
- Painted white for a shabby chic look.
- A distressed finish for a rustic vibe.
- A natural stain for a more refined look.
- A dark stain for a dramatic and sophisticated look.
- A glossy finish for a modern and sleek look.
- A matte finish for a more muted and contemporary look.
- A metallic finish for a glamorous and luxurious look.
- A crackle finish for an antique and timeless look.
- A textured finish for a more unique and interesting look.
- A natural stone top for a rustic and earthy look.
- A marble top for a classic and luxurious look.
Is this farmhouse base for indoor or outdoor spaces?
If the table will be used indoors, you have more choices for the tabletop material.
If This table will be used outdoors, you need to make sure the tabletop is made of weather-resistant material. Some good choices for an outdoor tabletop include wood, metal, or stone.
When most people think of farmhouse tables, they envision a large, rustic table that is often seen in country kitchens or dining rooms. However, the farmhouse table base can also be used for an outdoor table. This type of table is often seen on porches or patios and can be a great way to bring the farmhouse look to your outdoor space.
Basic overview on how to seal and protect a table top from the elements
Table tops are often exposed to the elements, which can take a toll on the wood. To properly seal and protect a table top from the elements, follow these steps:
- Choose the right sealer. There are a variety of sealers on the market, so it’s important to choose one that is specifically designed for outdoor use.
- Prepare the surface. Before applying the sealer, the surface of the table top must be clean and free of any dirt, dust, or debris.
- Apply the sealer. Once the surface is prepared, apply the sealer according to the manufacturer’s instructions.
- Allow the sealer to dry. Once the sealer is applied, allow it to dry completely before using the table top.
- Enjoy your table top! With the proper sealer in place, your table top will be protected from the elements and will last for years to come.
Who can build this DIY table base?
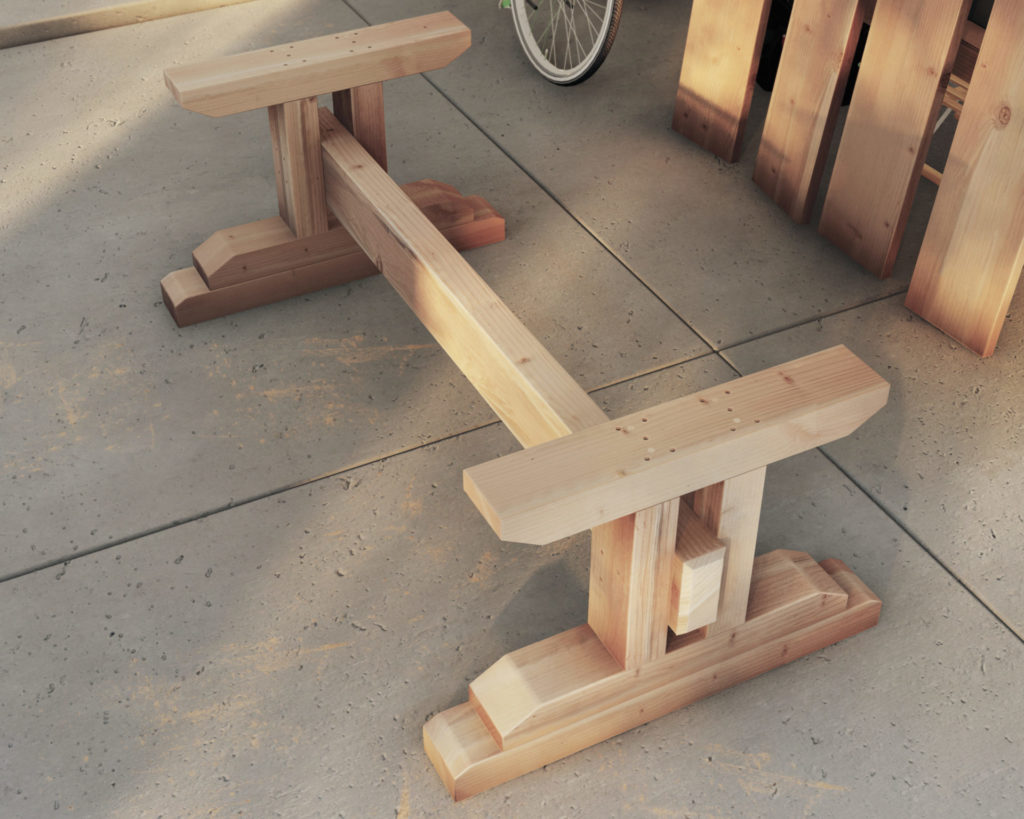
This base is easy to assemble with the step-by-step instructions provided in this post. I believe this base would be a great project for beginners to woodworking and anyone with minimal woodworking experience. The DIY plans offered in this post include helpful description, images, diagrams, helpful links, and more to ensure that the DIY build is smooth, efficient, and easy.
Where can I find DIY plans for the garage shelves in the background?
Plans for the garage shelves can be found here.
Time to build
About 2 hours
Total cost of build
About $90
Skill level required
Beginner
Download the PDF plans
Outdoor table base PDF plans
What is included in the PDF download?
Easy to read step by step instructions
Material list
Tools needed
3D illustrations
Tools for building the table base
- Miter saw
- Drill
- Impact driver with bit for screws
- GRIP Clamps
- Sander
- wood countersink drill bit
- 1 lb 3-1/2 screws
- pencil
- Wood glue
- sand paper
- 1/4-in x 12-in drill bit and 1/4-in dowels. The size or dowels and drill bit can vary (more detail in further steps). You will need at least four 48-in long dowels.
- Hammer
- hand held saw
- Long 6-in Driver Bit
Disclosure: Some of these links are affiliate links.
Shopping list and cut list
Available with purchase of DIY plans.
Thank you for your support and making this website possible!
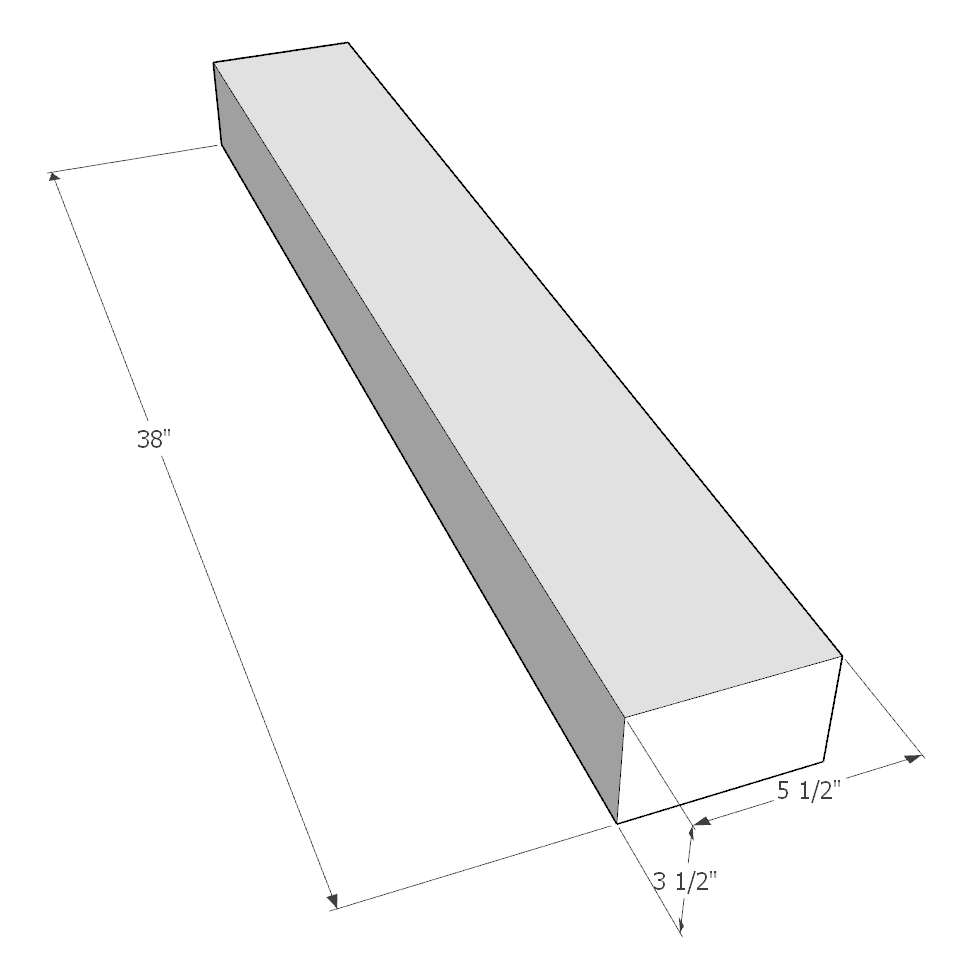
Step 1 (Farmhouse table base)
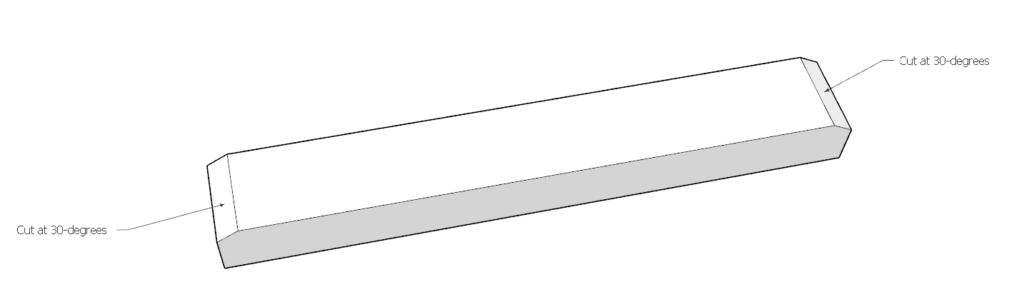
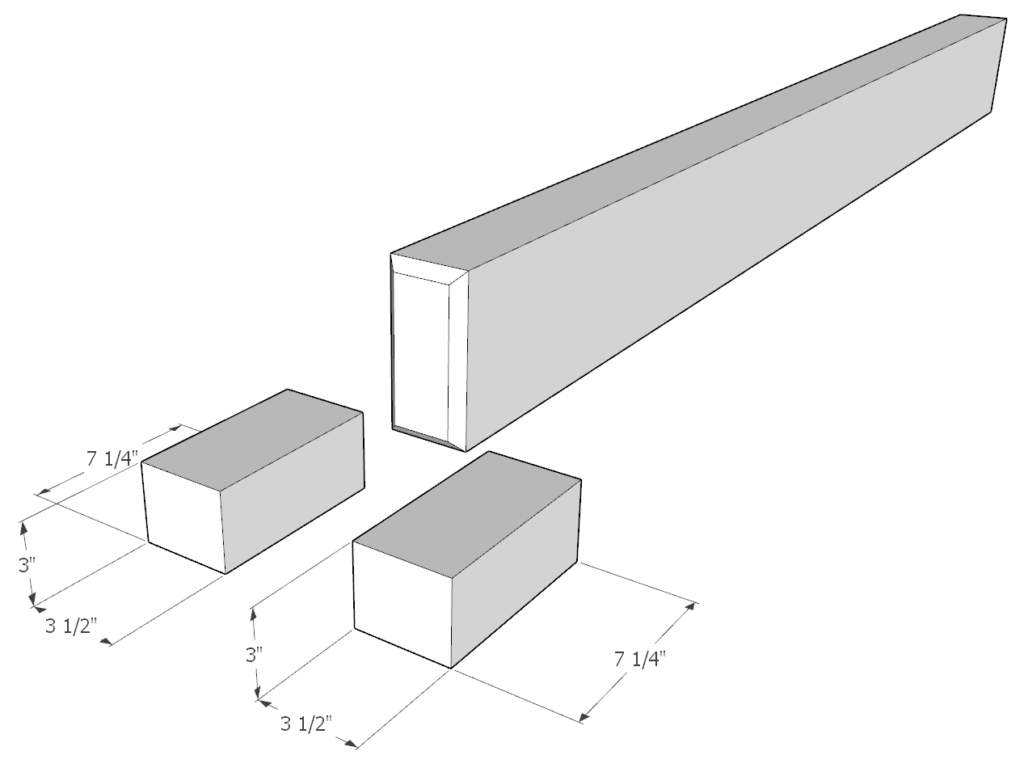
First, cut a 38-in piece from the 4×6 lumber.
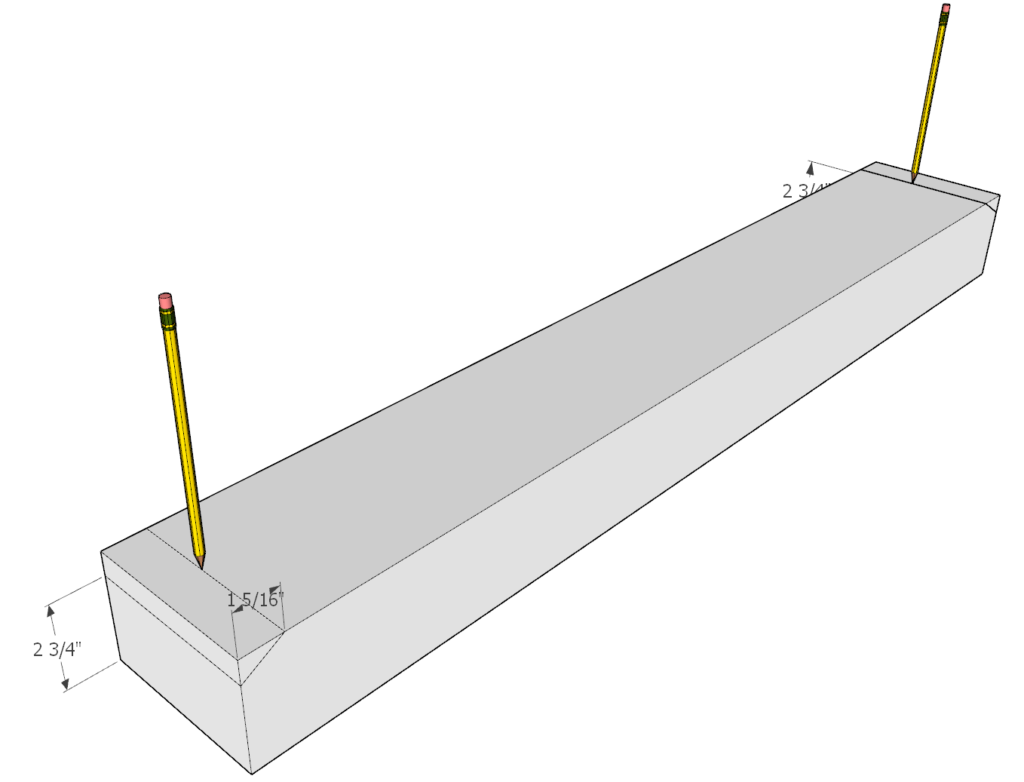
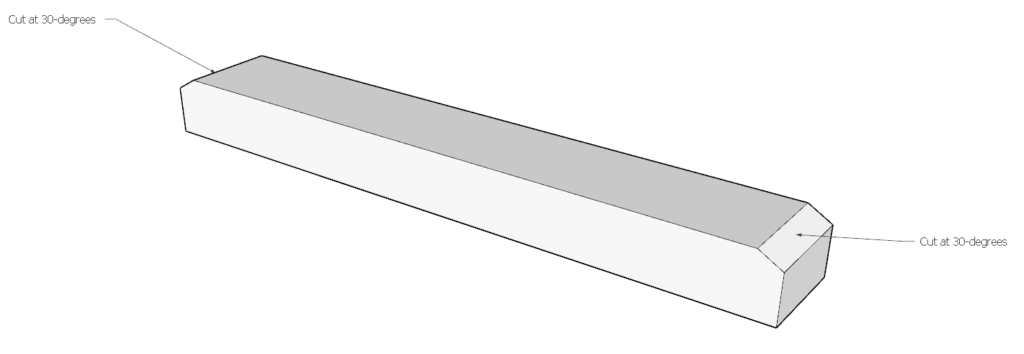
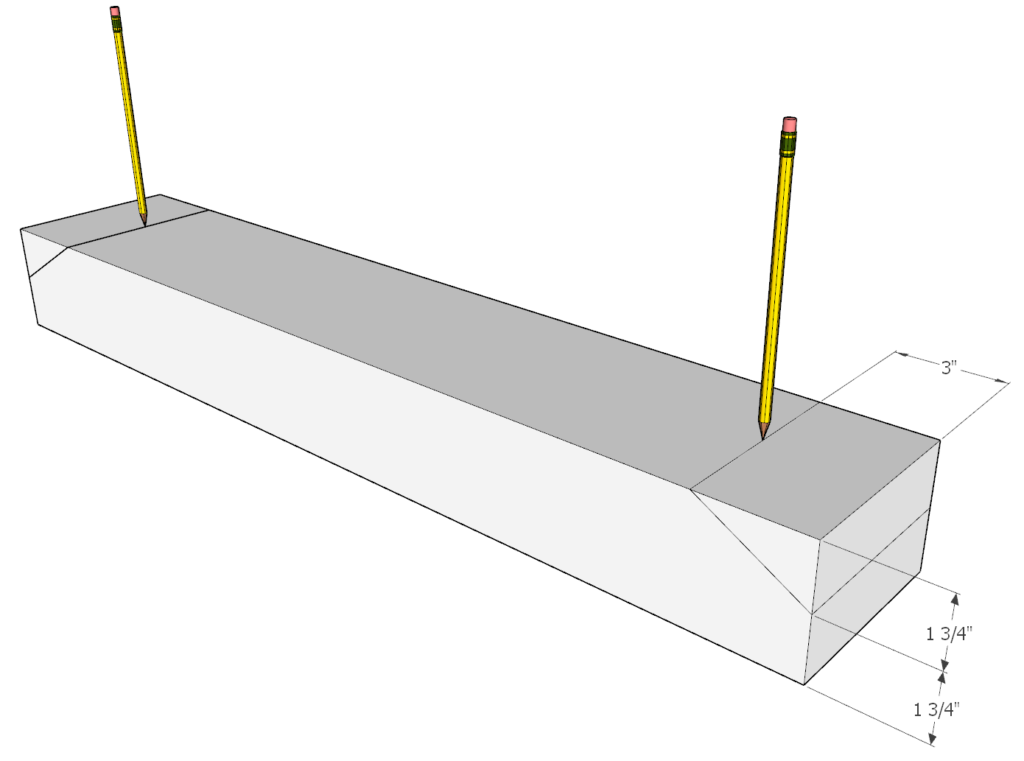
Next, draw lines on both ends of the 38-in piece with a pencil to indicate where to cut off the edges at 30-degrees (see diagram).
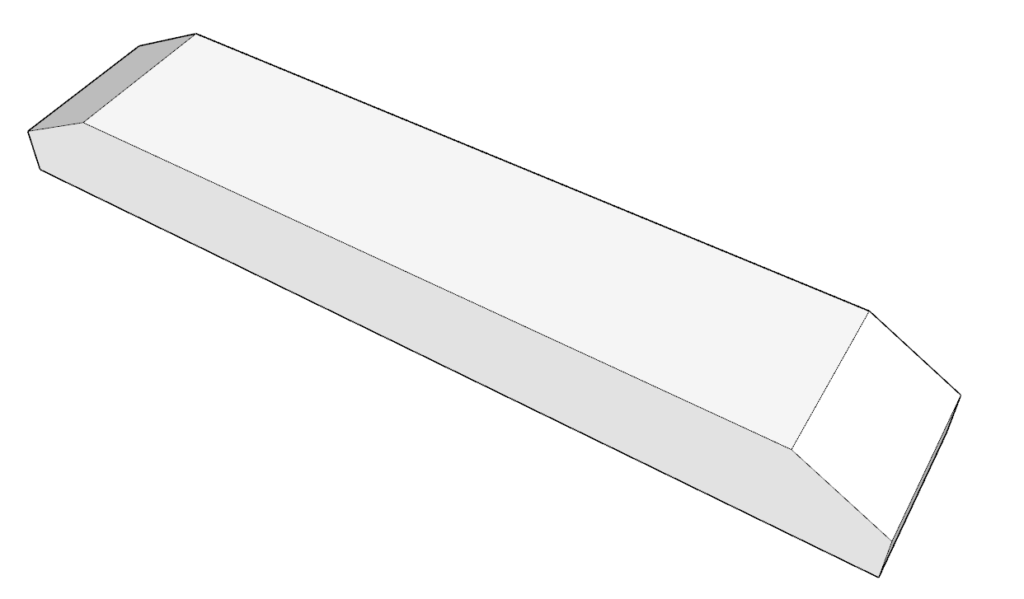
Next, cut the edges at 30 degrees.
repeat this set 2x

Step 2 (Farmhouse table base)
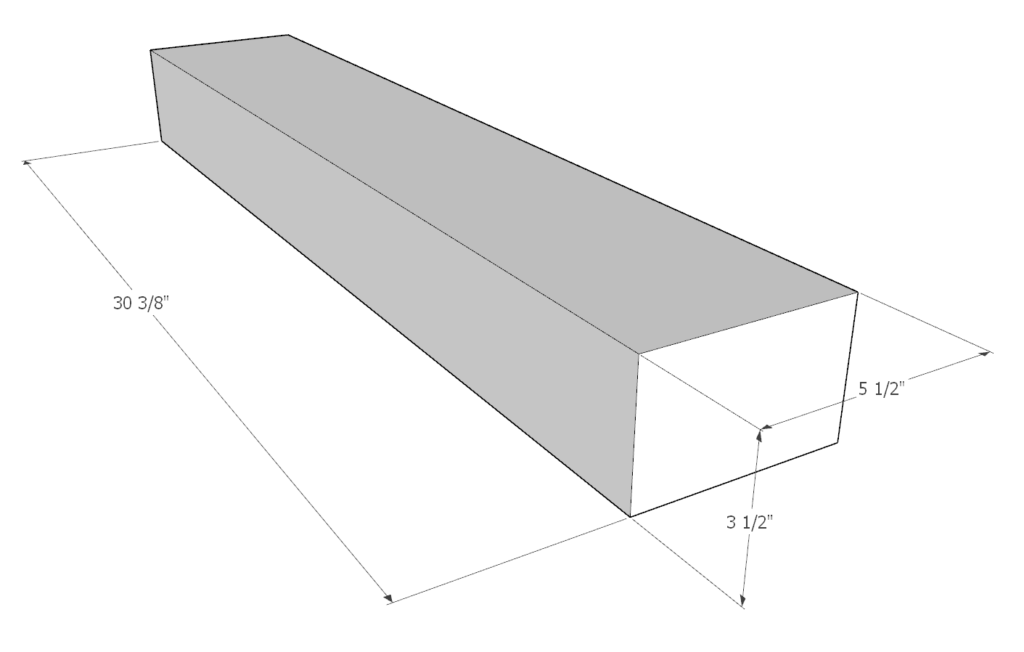
Next, cut a 30 3/8-in piece from the 4×6 lumber.
Next, draw lines on both ends of the 30 3/8-in piece with a pencil to indicate where to cut off the edges at 30-degrees (see diagram).
Next, cut the edges at 30 degrees.
repeat this set 4x
Step 3 (Farmhouse table base)
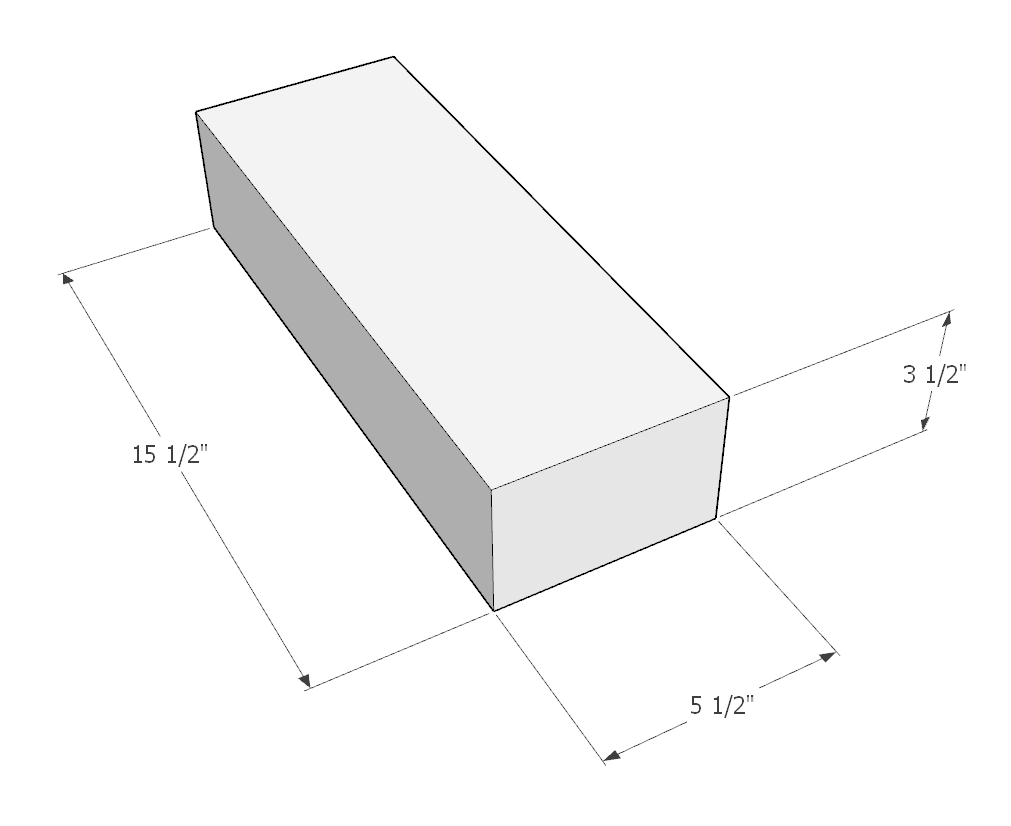
Next, cut a 15.5-in piece from the 4×6 lumber.
Repeat this set 4x
Step 4 (Farmhouse table base)
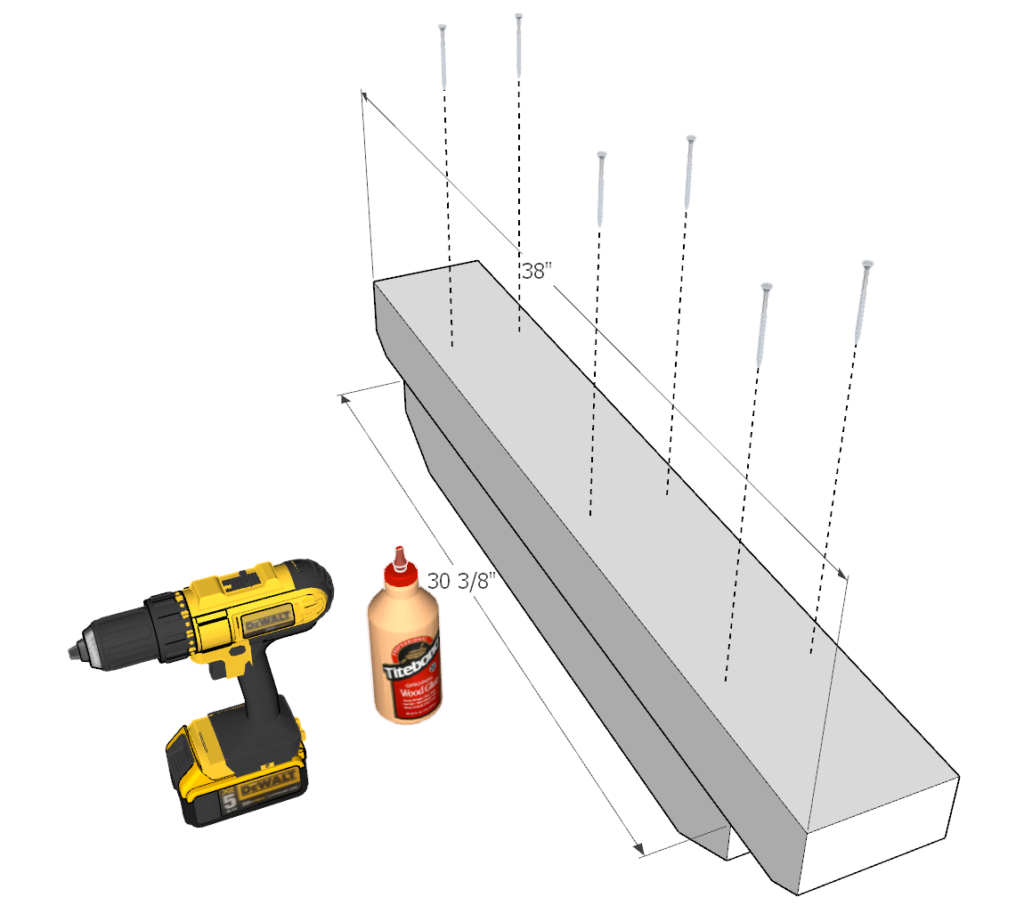
Next, take one of the 30 3/8-in pieces and one of the 38-in pieces (from the 4×6 lumber) and center them over each other as shown in the diagram.
Apply glue in all the areas where the lumber pieces will be contacting each other.
Predrill 6 holes as shown in the diagram and add the 3.5-in screws.
When adding screws, make sure they go deep enough to be able to penetrate both thick lumber pieces.
Step 5 (Farmhouse table base)
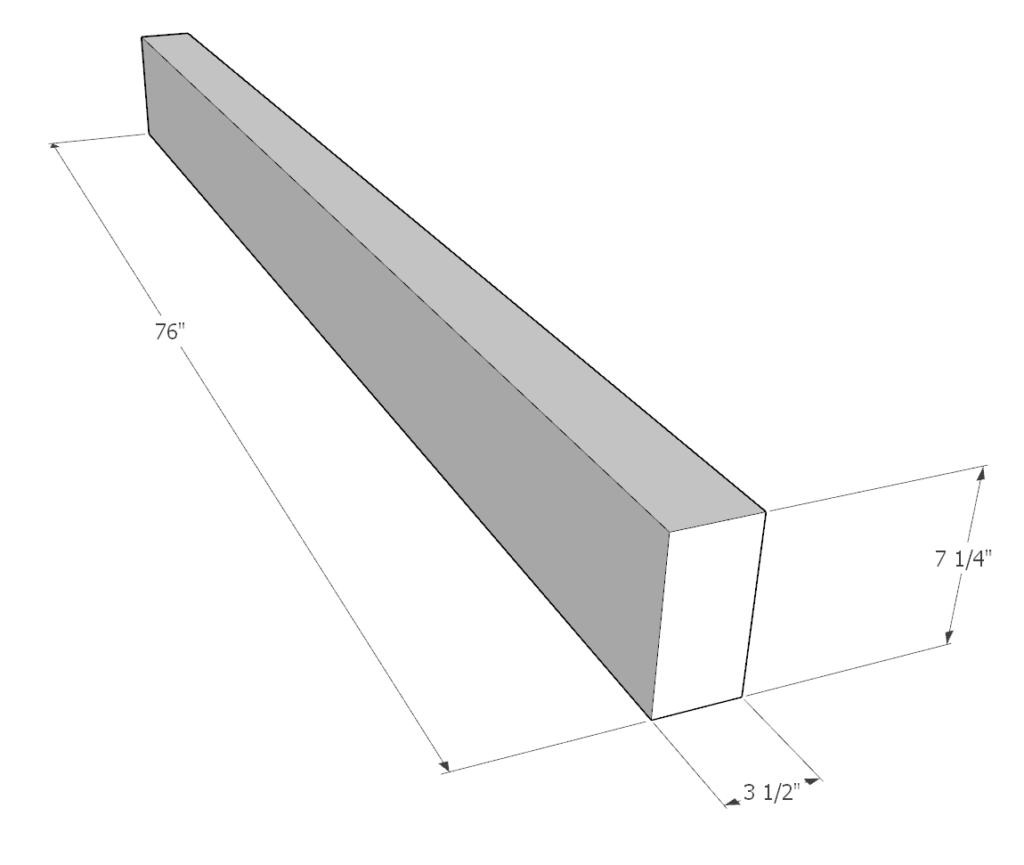
Next, cut a 76-in pieces from the 4×8 lumber.
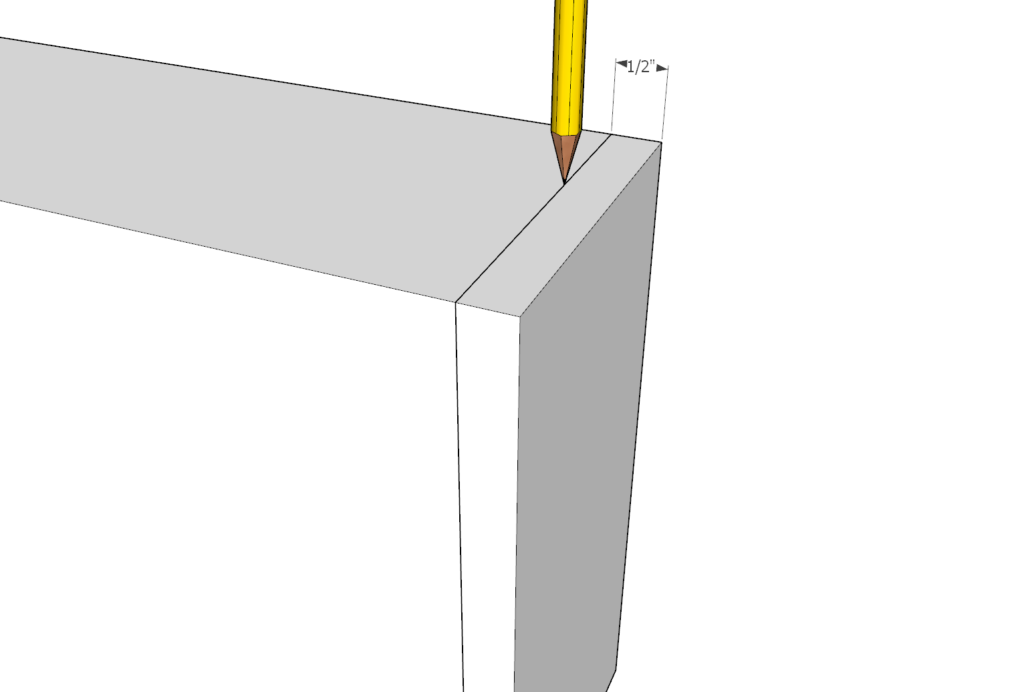
Draw a line all around the edges at 1/2-in to indicate where you will need to make a 45-degree cut.
Trim all the edges at 45 degrees as shown below.


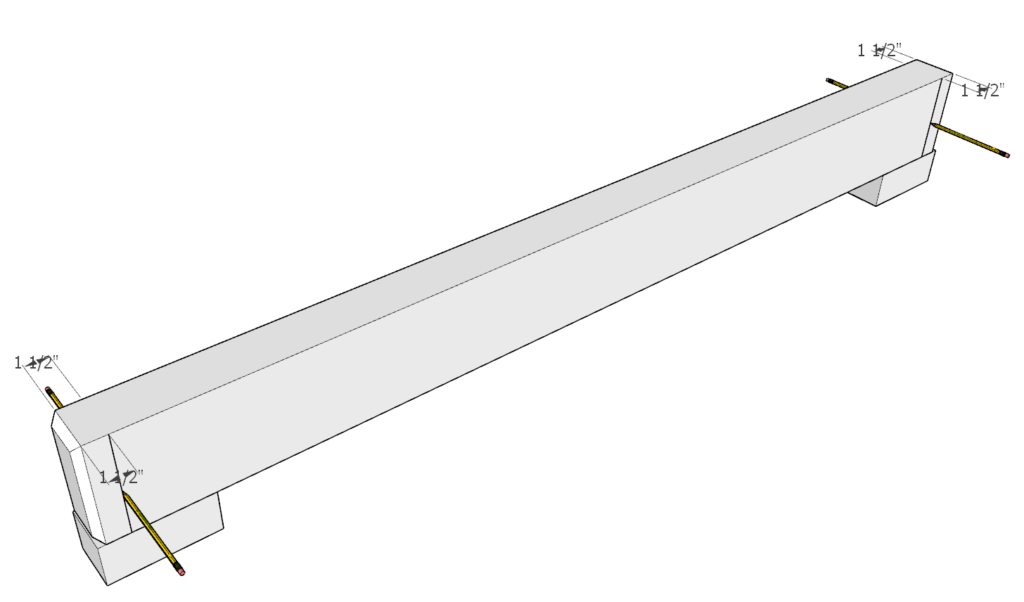
Step 6 (Farmhouse table base)
Next, cut two spacers at 3-in from the scrap 4×8 lumber. These spacers will allow the central beam to rest on them you assemble the table base.
Rest the 76-in lumber pieces on top of the spacers as shown below.
Next, draw a line on both end of the 76-in 3×8 lumber piece. It should be 1.5-in away from the angles edge (see diagram).
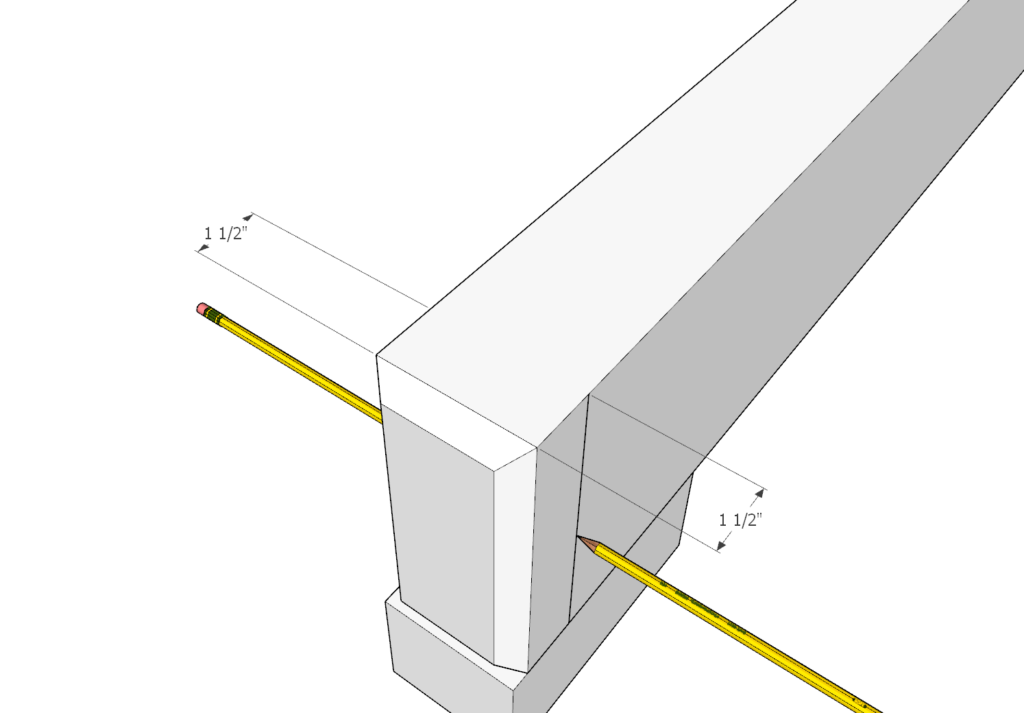
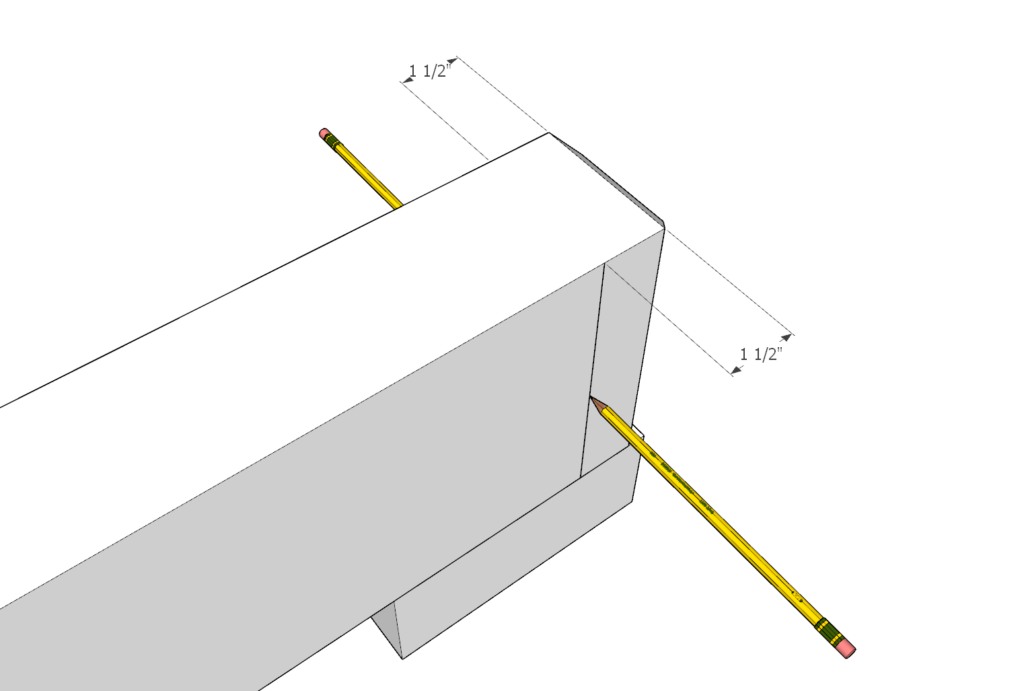
Step 7 (Farmhouse table base)
Next, add all four of the 15.5-in pieces to the 76-in central beam as shown in the diagram.
use the lines you drew in the previous step to place the 15.5-in pieces correctly and in alignment with each other.
It is important that this step is performed on a level surface.
Add glue, predrill, and add four screws to each of the 15.5-in pieces to secure them in place.
I use wood working clamps to hold the entire set up as I work. This is very helpful to ensure proper alignment.
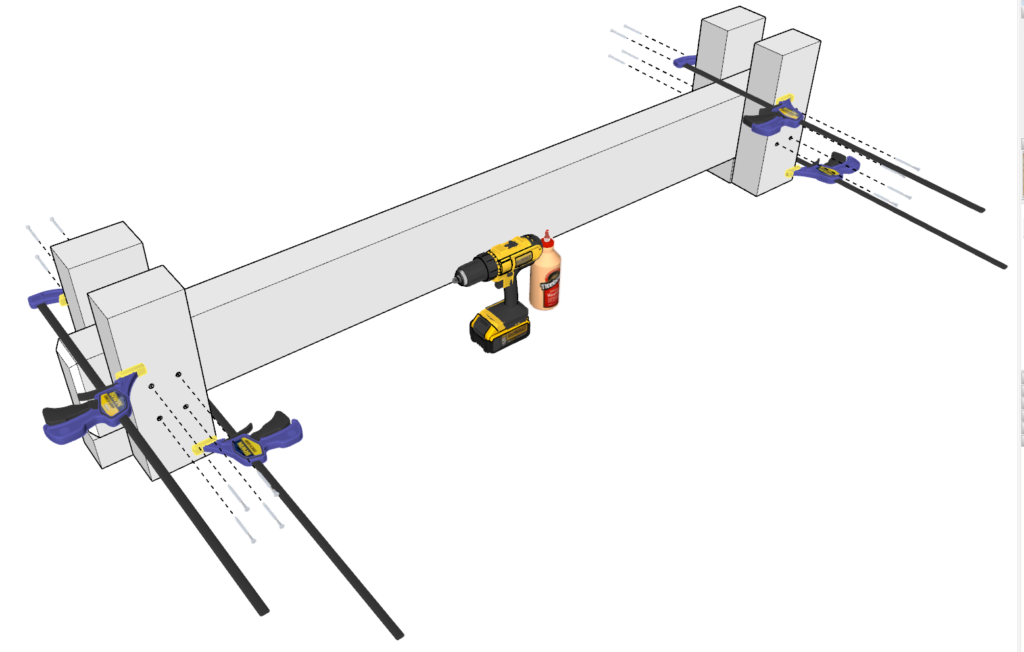
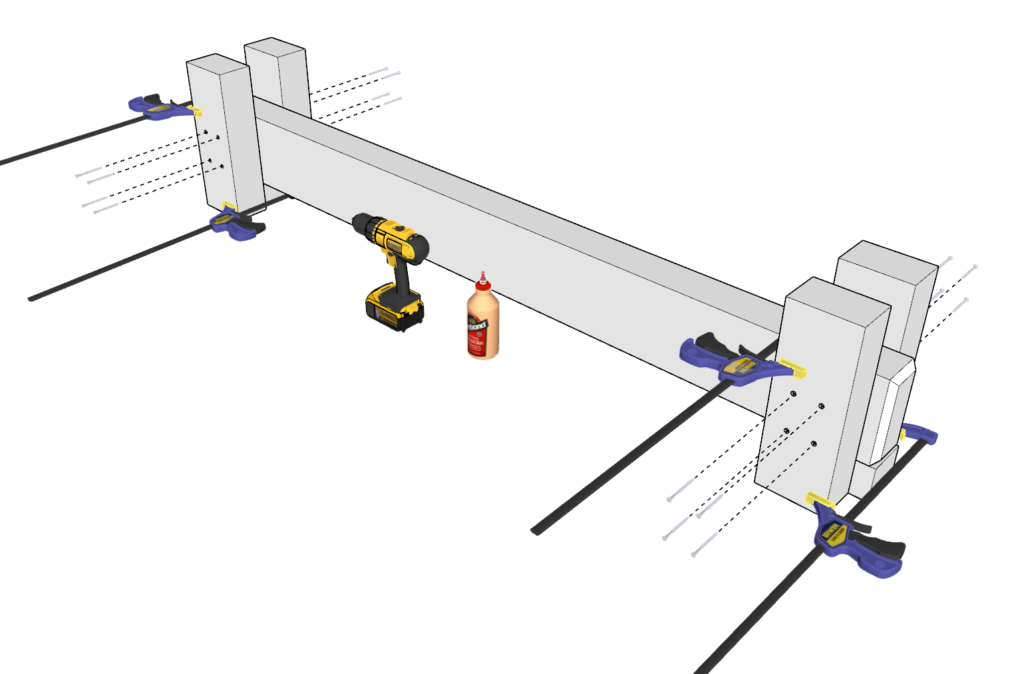
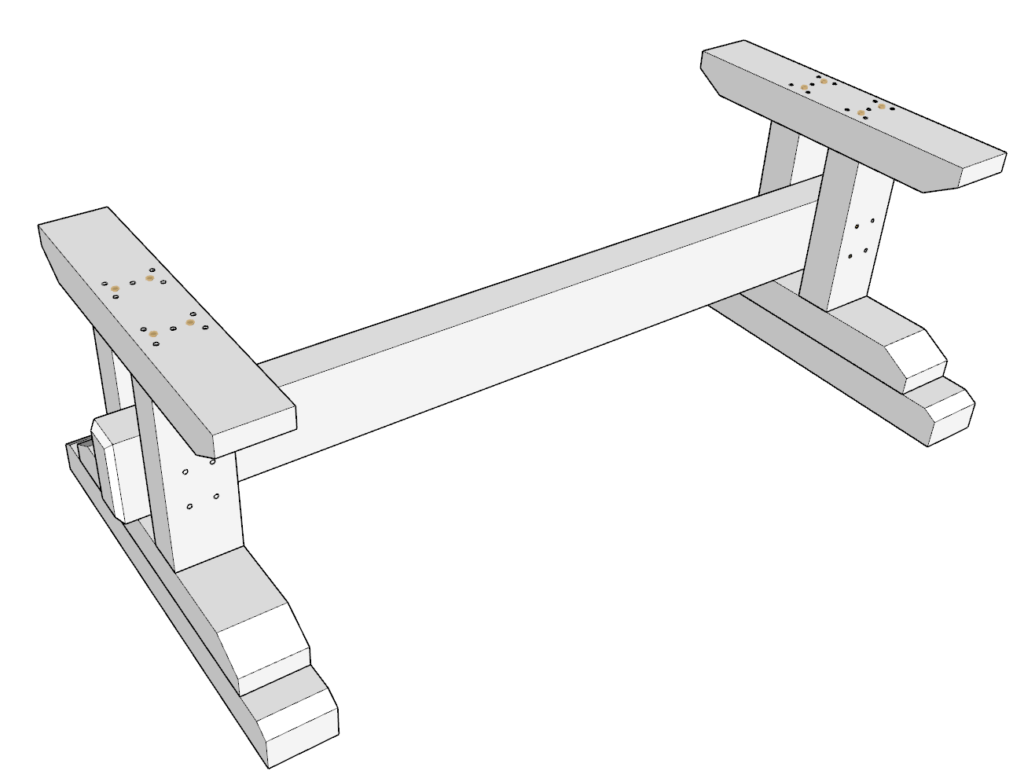
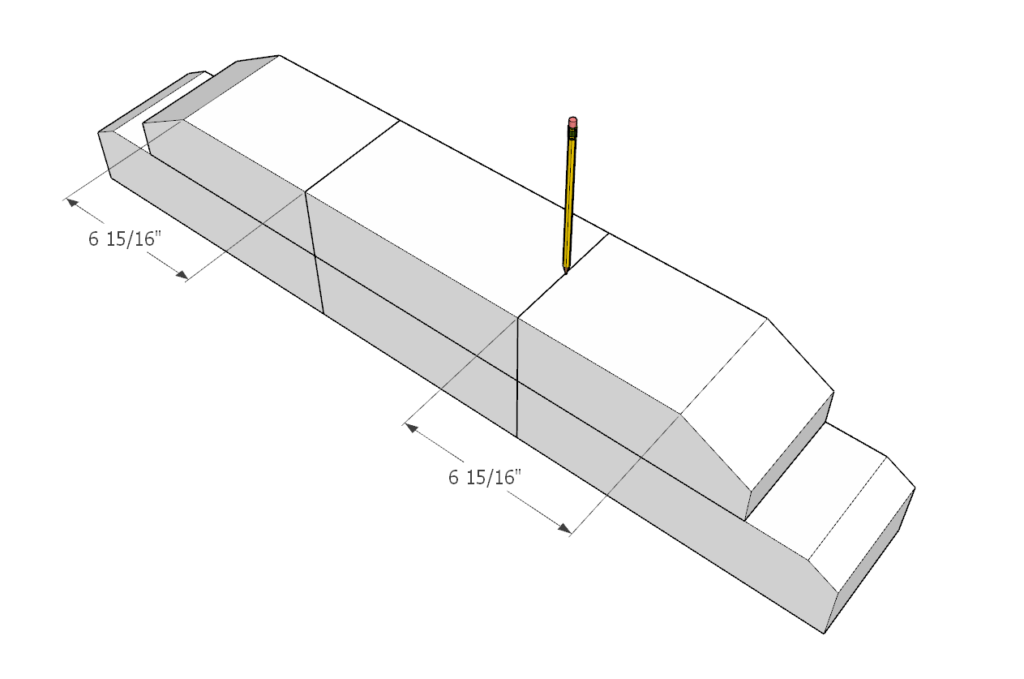
Step 8 (Farmhouse table base)
Next, using a pencil, draw two lines at 6 15/16-in as shown in the diagram on the assembled base pieces from step 5.
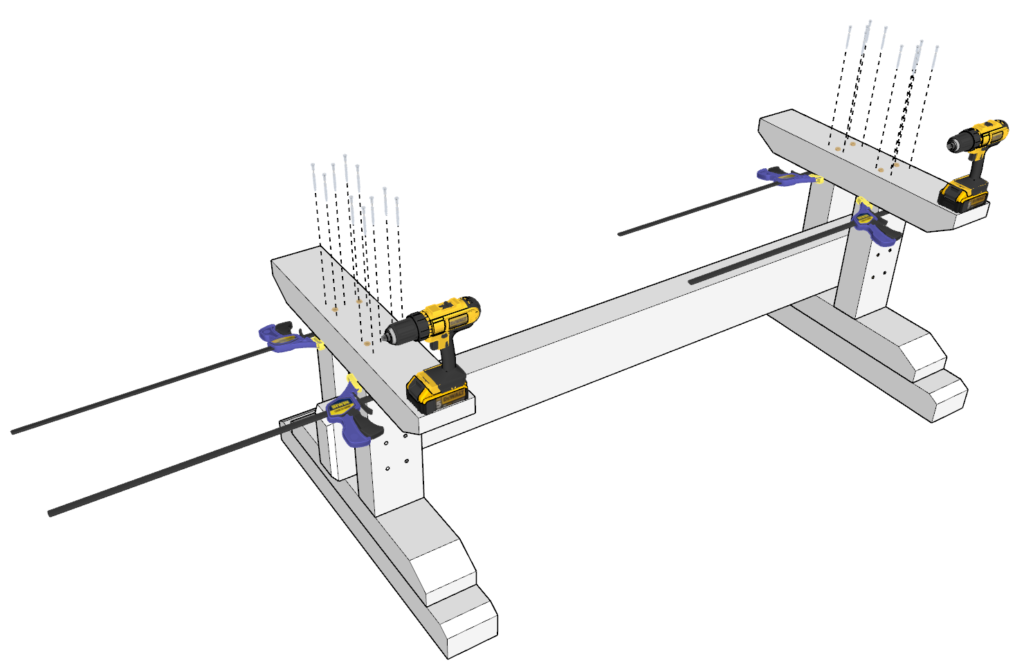
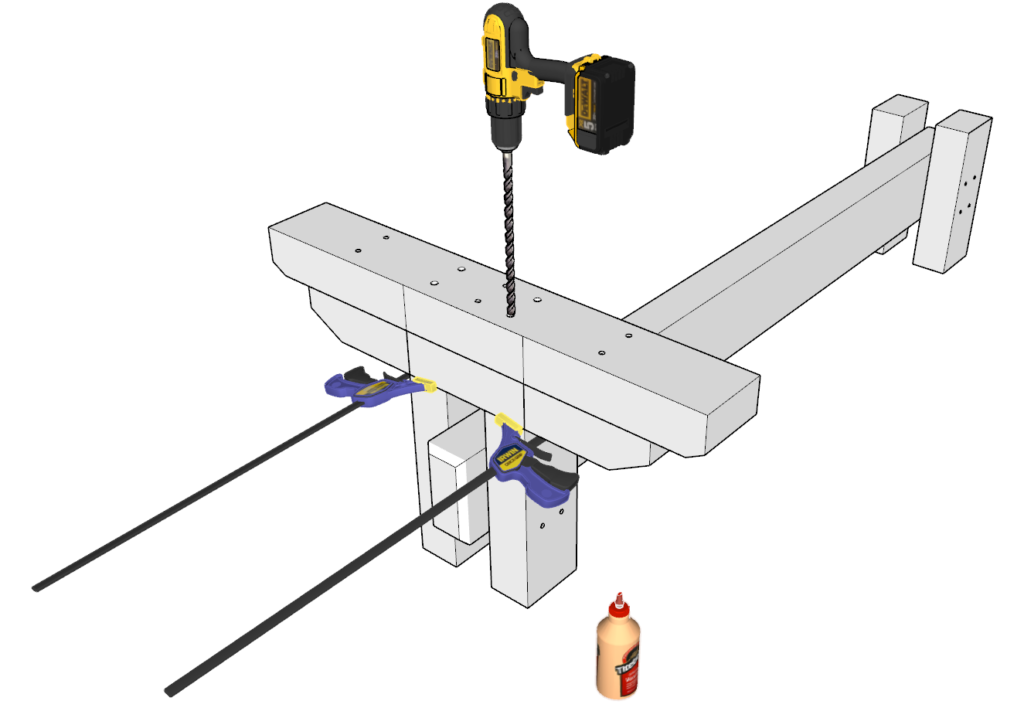
Step 9 (Farmhouse table base)
Next, take the assembled base pieces from step 9 and place them on top of the pieces from step 8 as shown in the diagram.
Add glue to all areas that will be making contact.
I use wood clamps to hold the two structures in place while I attach them together.
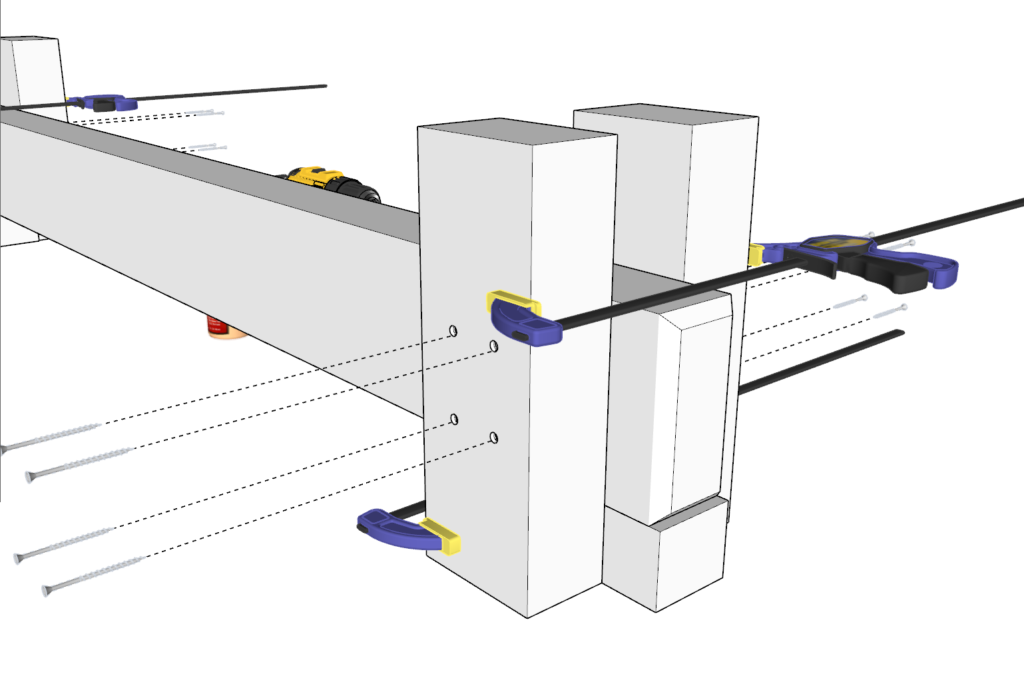
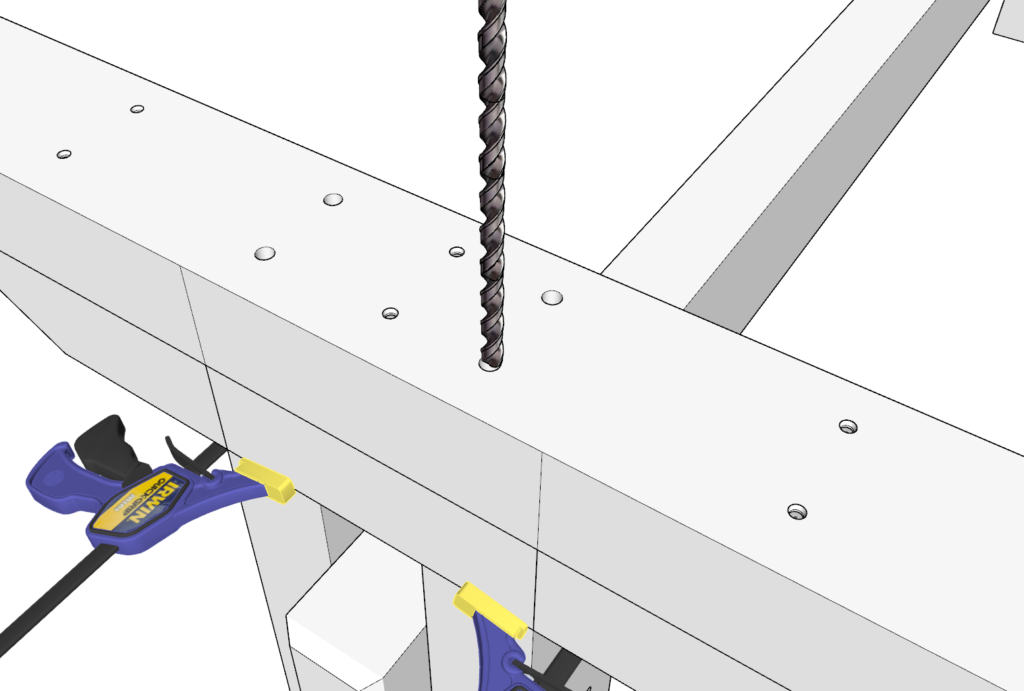
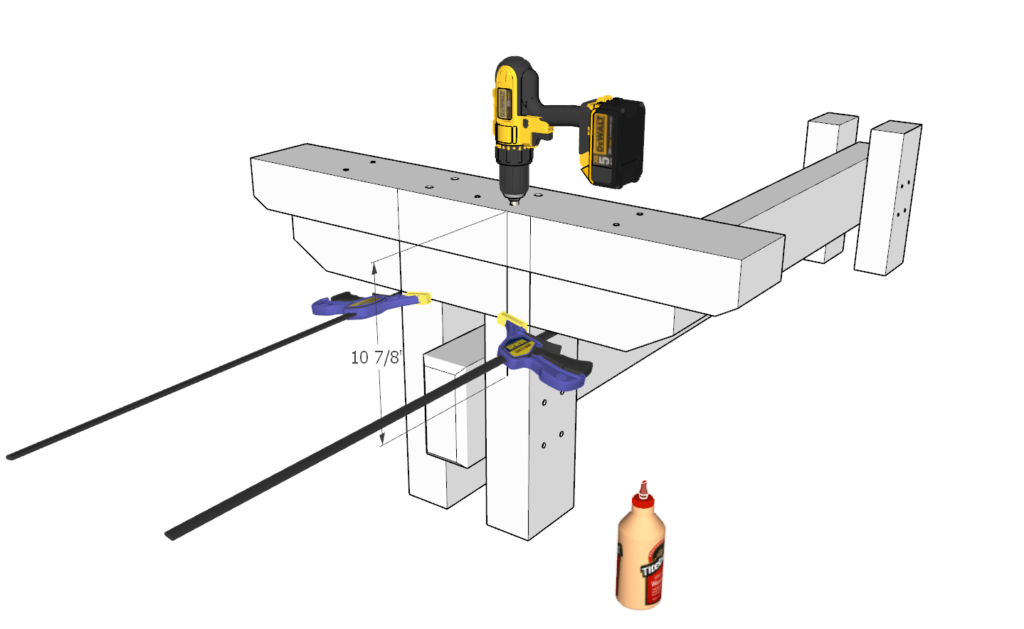
Next, using a 1/4-in or 1/2-in, long (at least 12-in) drill bit, drill four holes directly through the 38-in and 30 3/8-in pieces and deep into the 15.5 in pieces as shown in the diagram.
The size of the drill bit needs to be the same size as the dowels you will use in the next step.
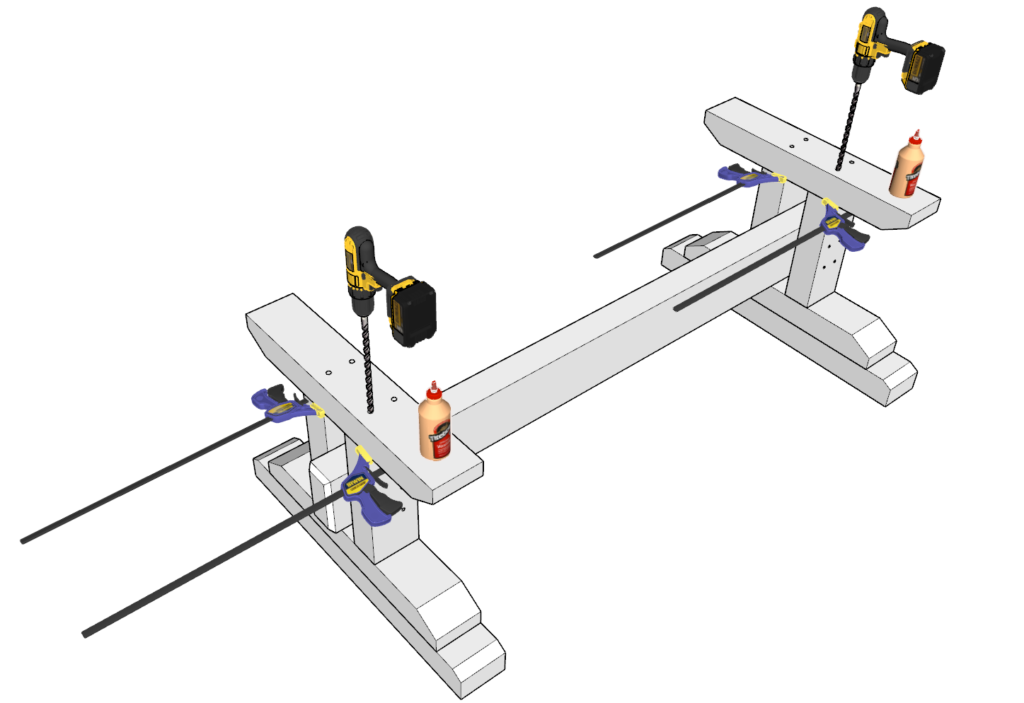
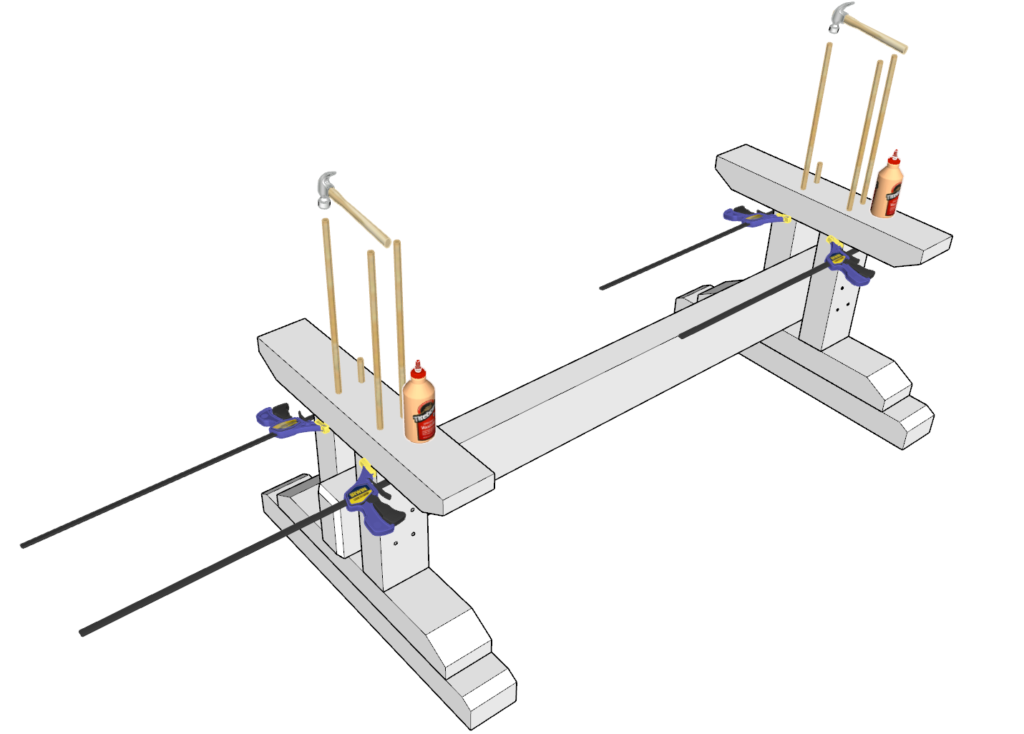
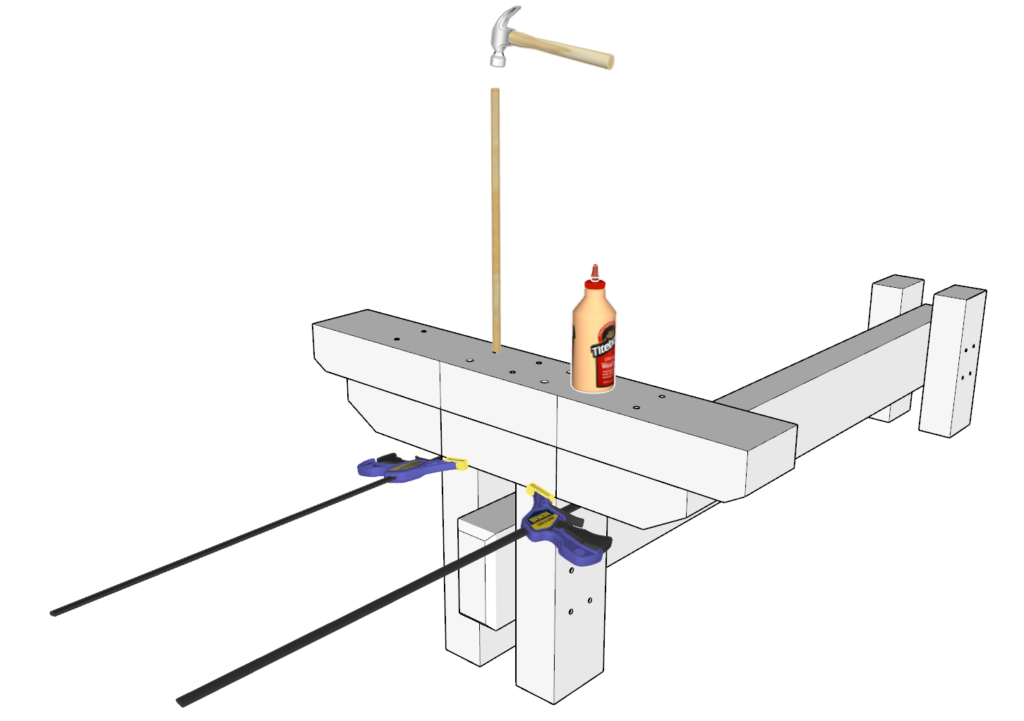
Step 10 (Farmhouse table base)
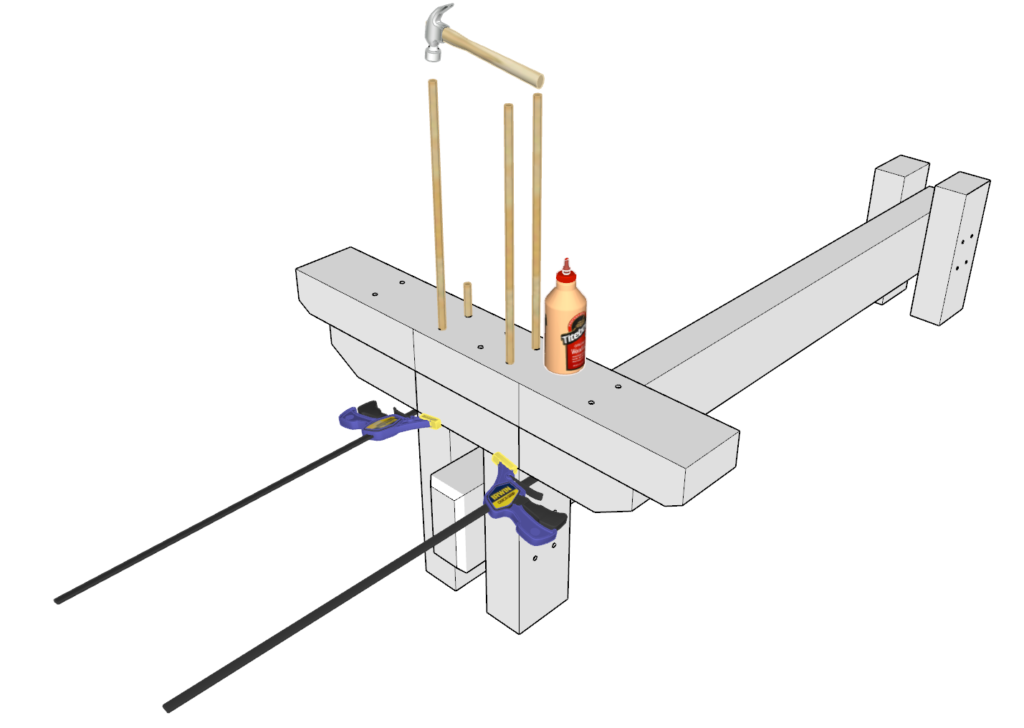
Next, you will be adding dowels to the holes you drilled in the previous step.
I like to pour glue directly into the hole and I apply glue to the dowel sides as well. I make sure that there is a lot of glue to ensure a strong table for this step.
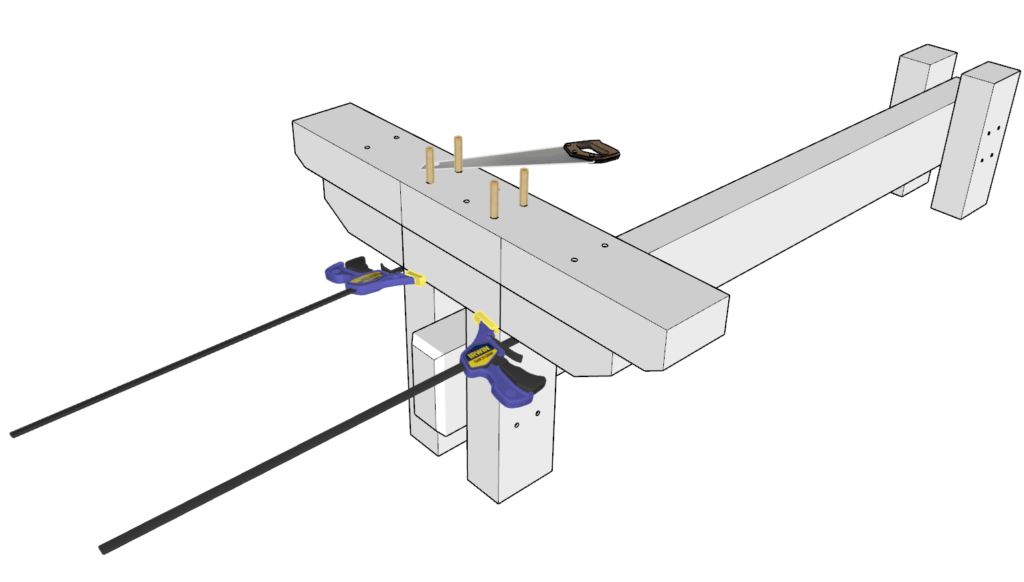
Cut dowels that are at least 12-in and hammer them into the holes.
Cut the parts of the dowels that are sticking out with a saw.
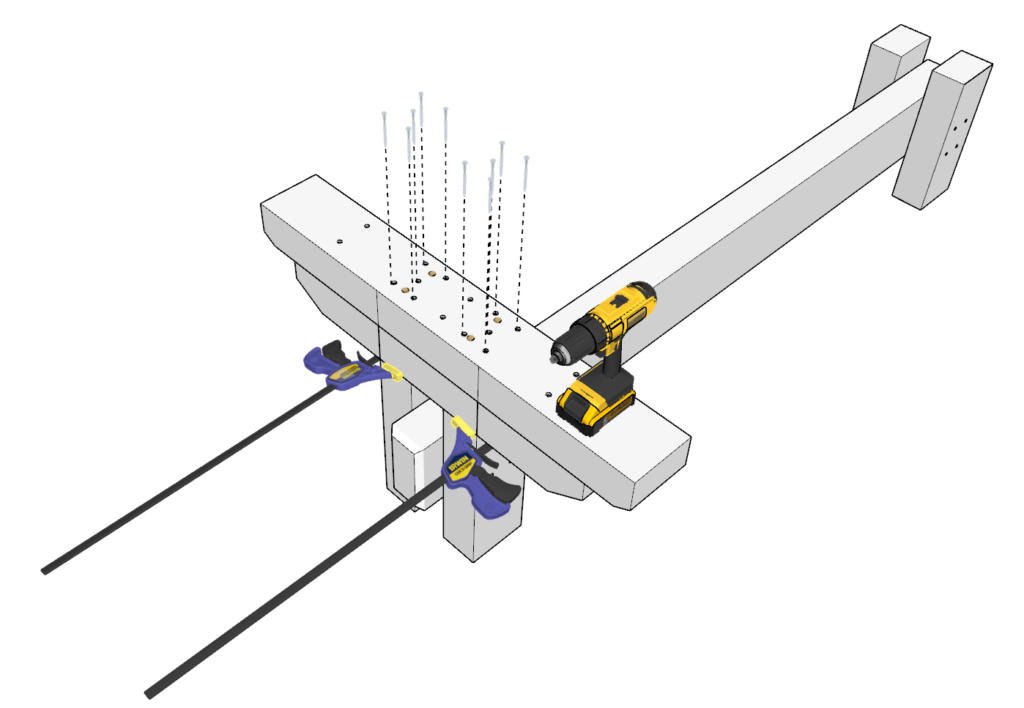
Next, predrill several deep holes to add 3.5-in screws to secure the structure together.
The depth of these screws needs to be at least 5.5 inches. You can use a the long screw driver bit to achieve this depth.
Repeat this step for the other side as well.


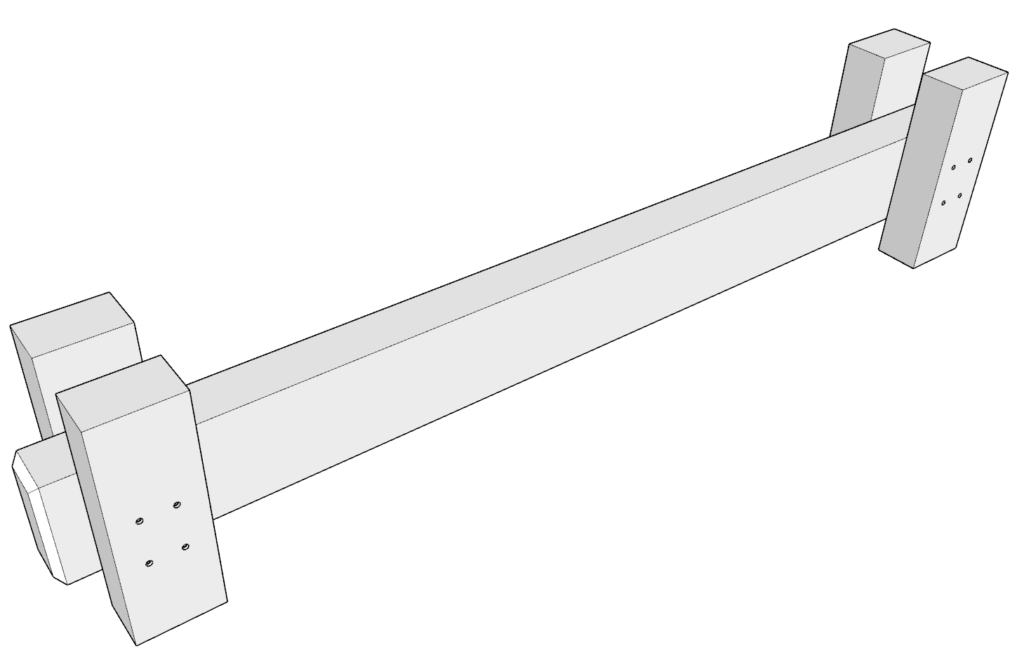
Step 11 (Farmhouse table base)
Next, flip the table base to lay on the upright direction.
Next, you will need to attach the two remaining 30 3/8 pieces you cut in step 2 to the table base.
The steps to attaching these parts are similar to the previous step with the exception of depth. The depth of the holes does not need to be as deep, and the dowels can be shorter too.