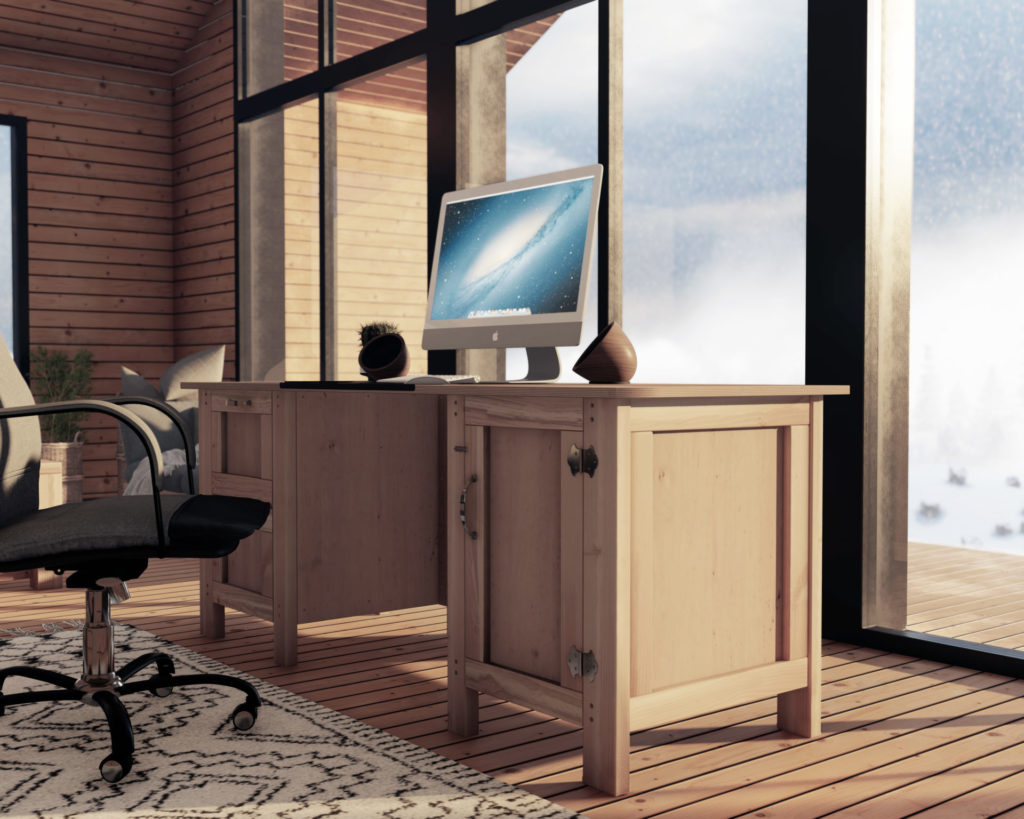
The DIY Desk Overview:
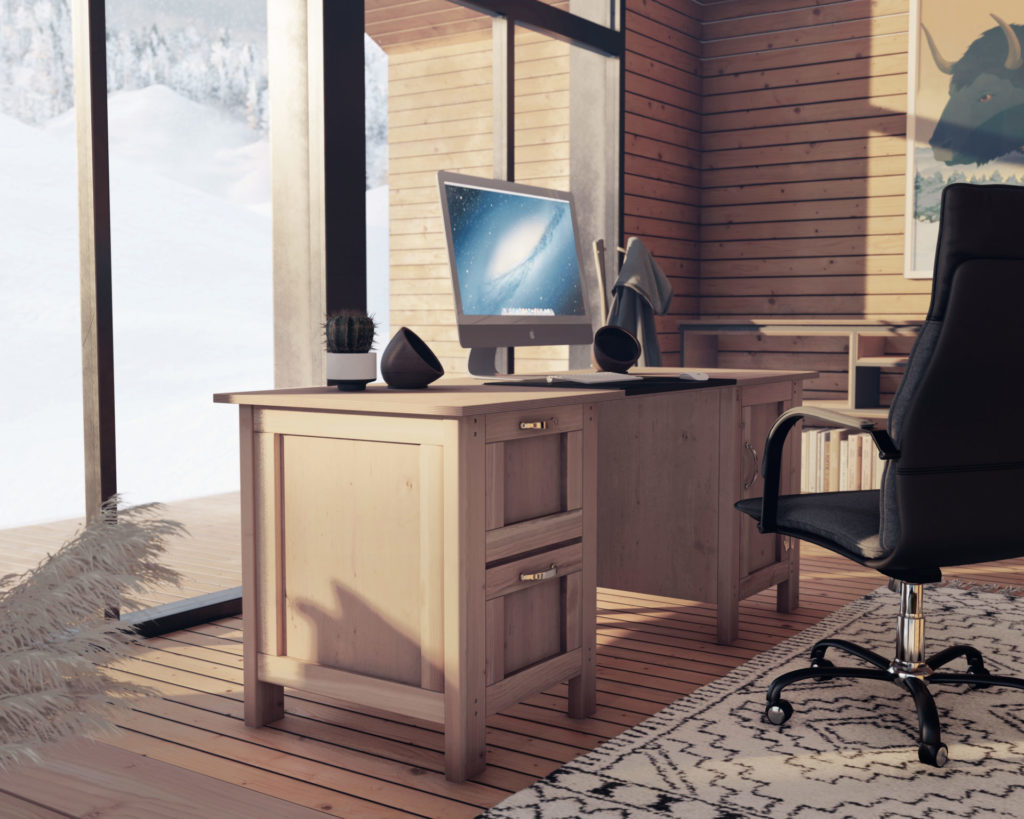
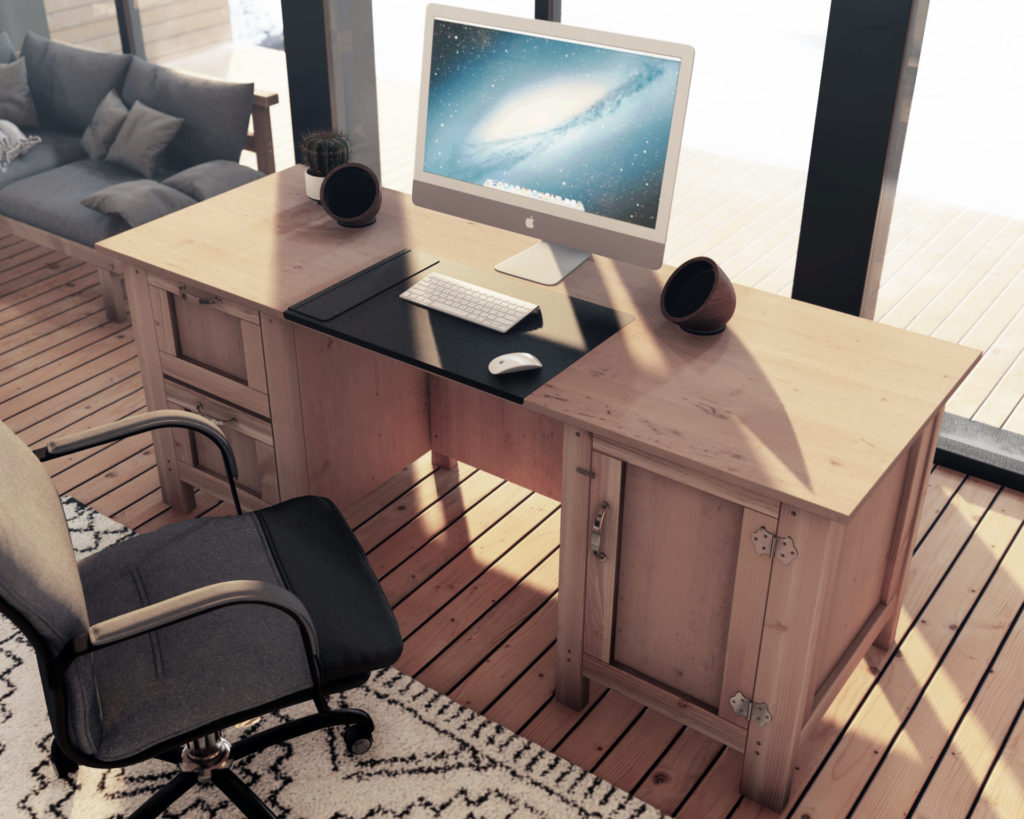
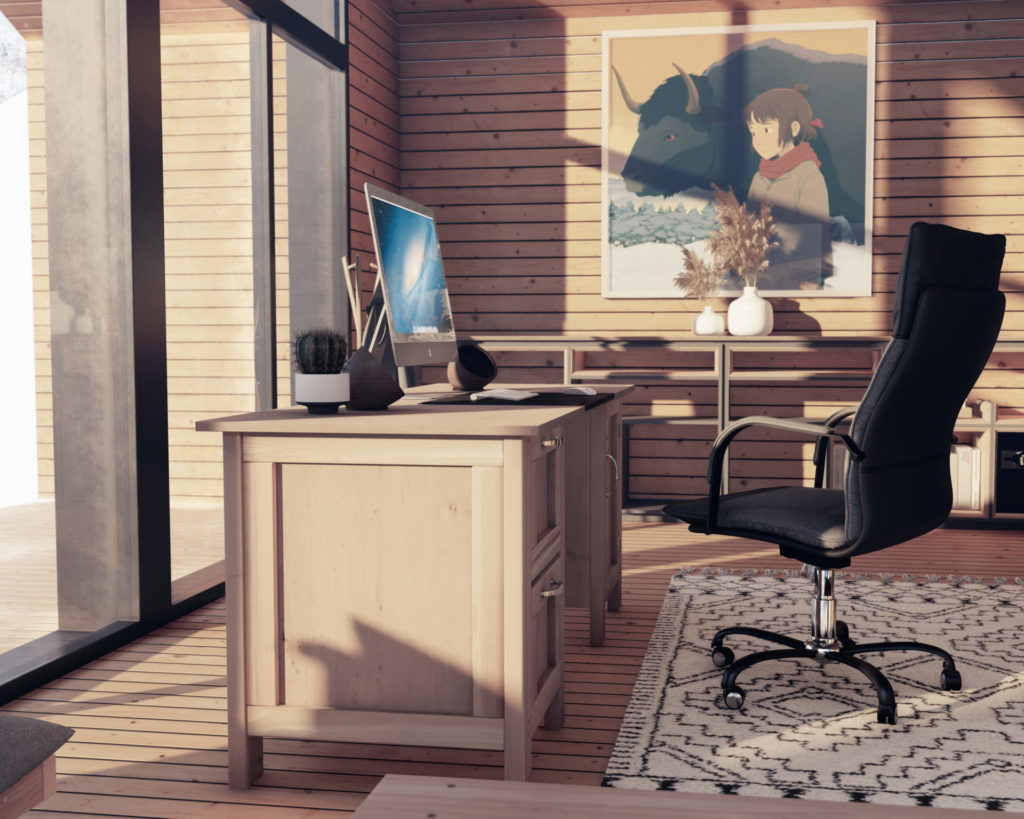
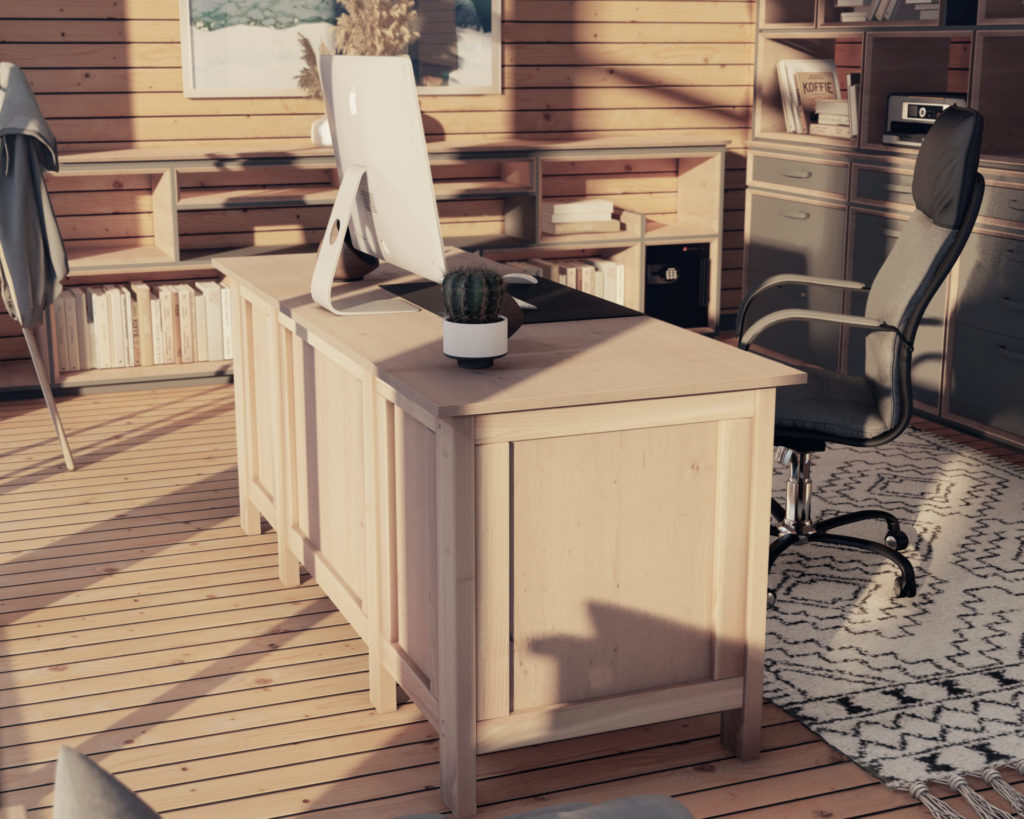
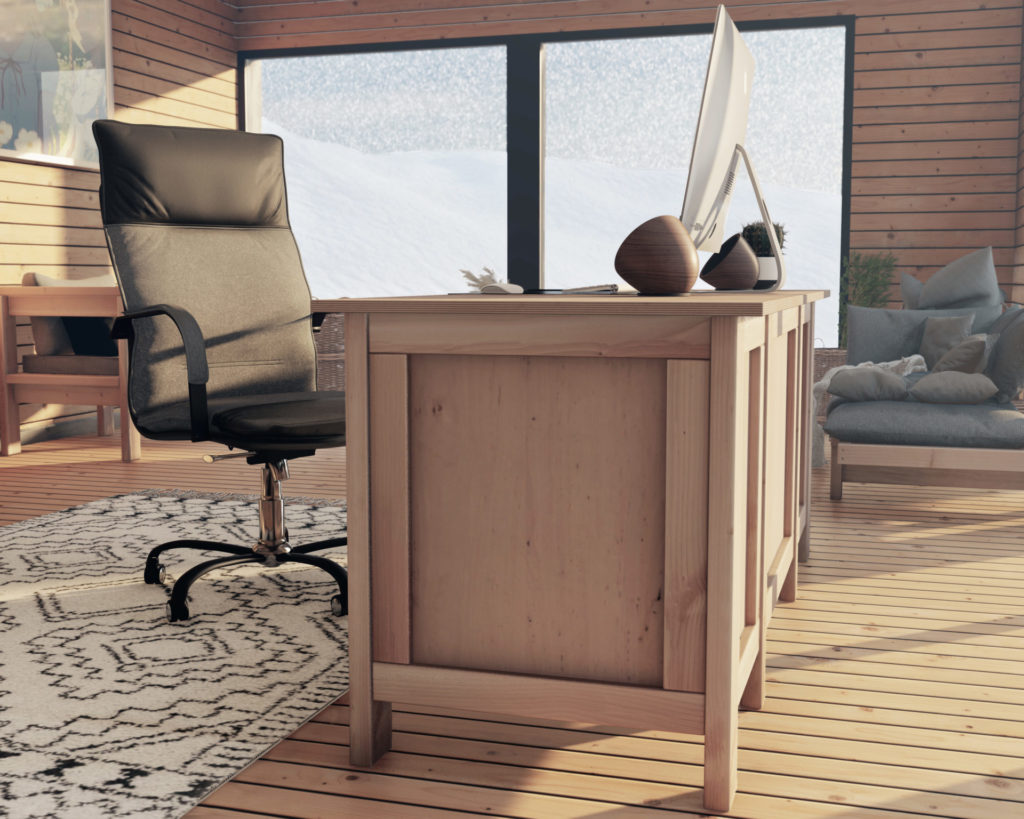
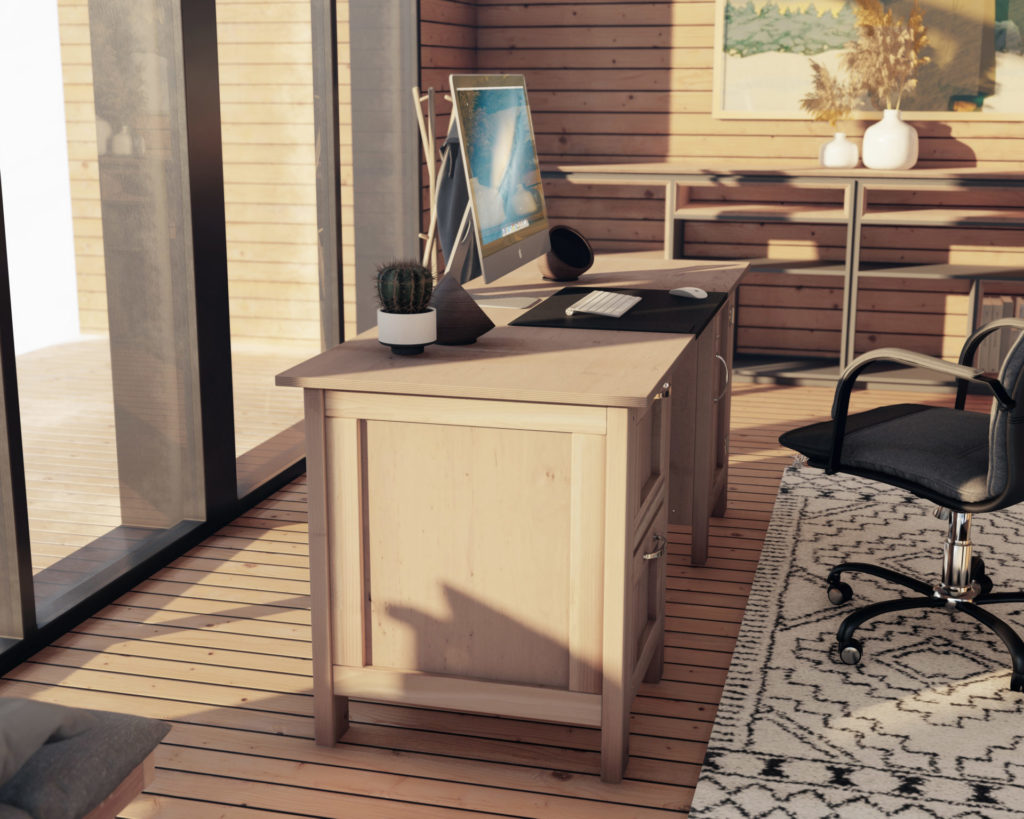
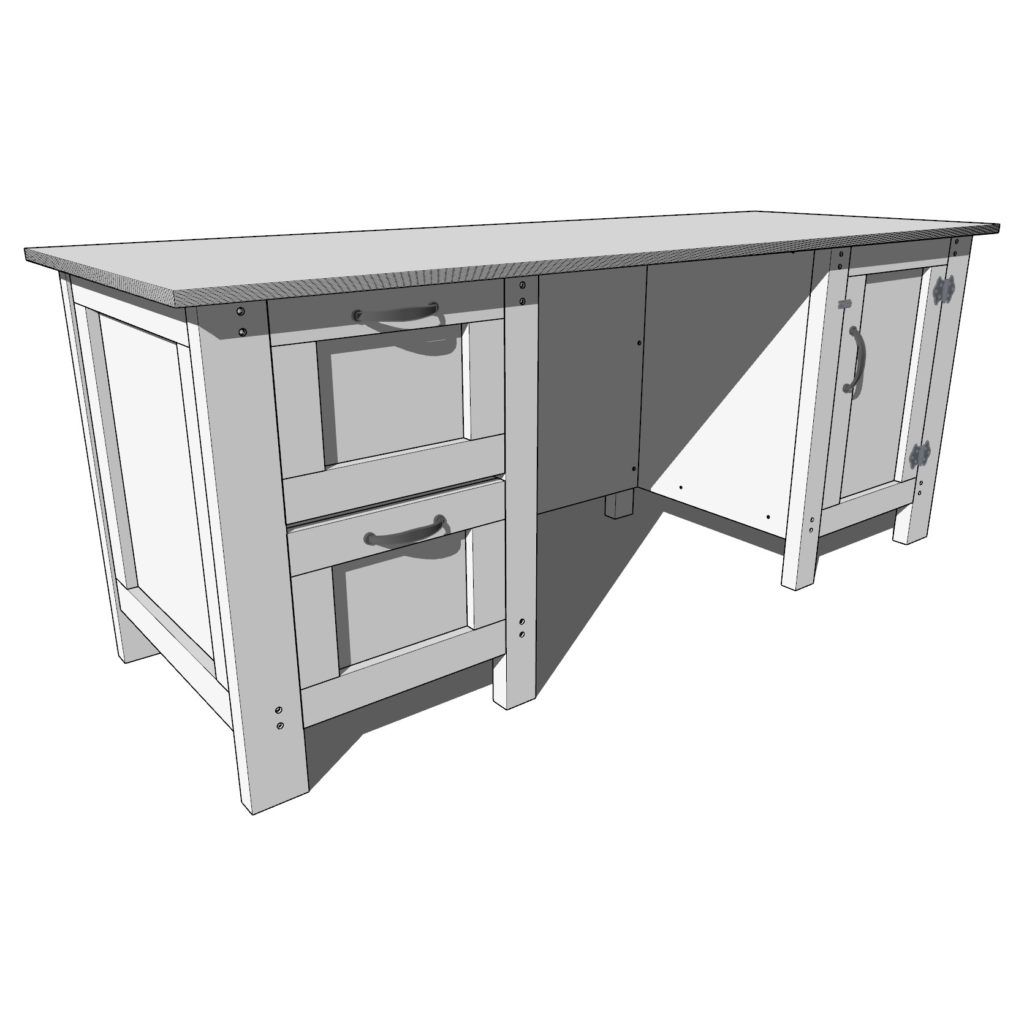
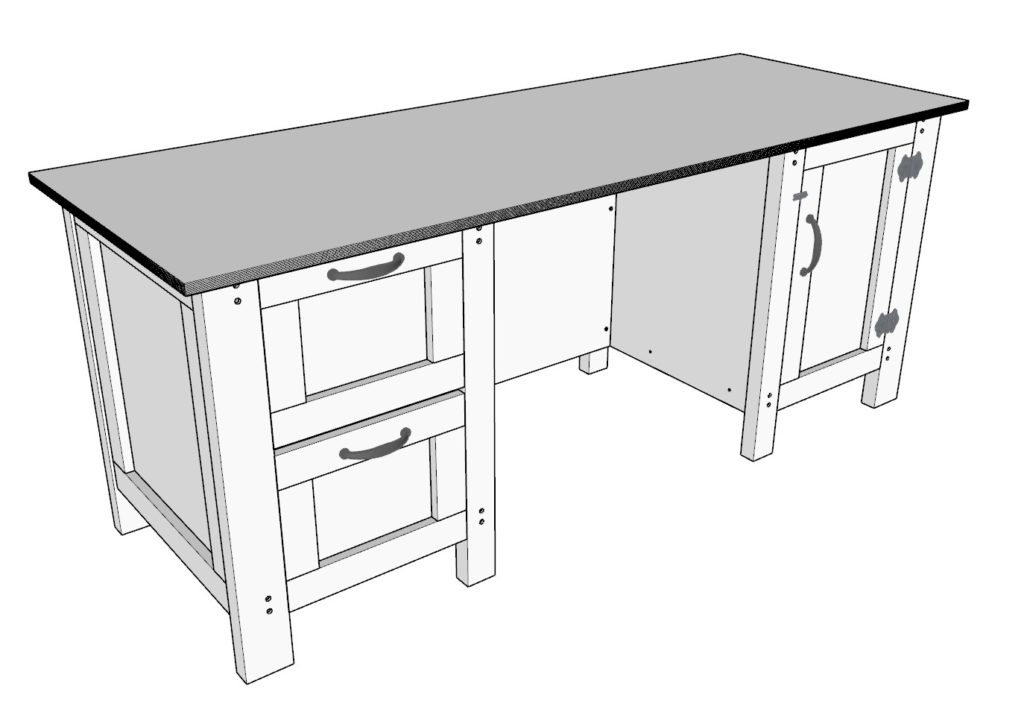
A DIY wood desk is a great option for those seeking a functional and stylish piece of furniture for their home office. This desk features a combination of solid wood and plywood, making it durable and able to withstand daily use. The desk includes two slide-out drawers, providing ample storage space for office supplies and documents. The drawers are designed to slide out smoothly, making it easy to access the contents without the need to search through a cluttered desk.
In addition to the drawers, the desk also has a storage compartment accessed through a hinged door. This cubby can be used to store a computer tower, printer, or other office equipment that you want to keep out of sight. The door can be easily opened and closed to access the cubby, and it can be locked closed with a latch system for added security.
The desk also has a wide open work area, providing plenty of space to spread out papers, a laptop, and other items needed for work. The desk has a sleek and modern design, making it a stylish addition to any home office.
While building a wood desk can be a challenging DIY project, the end result is a fully customized piece of furniture that meets the specific needs and preferences of the user. This desk is not only functional and stylish, but also offers a sense of accomplishment for those who choose to build it themselves.
DIY Wood Desk Plans: A Guide for Beginners
If you are considering building your own desk, our plans offer a variety of benefits for those with minimal woodworking experience.
Our step-by-step instructions are designed to be easy to follow, ensuring that the assembly process is smooth and efficient. We understand that building a desk can be a daunting task, especially for those who are new to woodworking, which is why we have included helpful descriptions, images, diagrams, and more to guide you through the process.
Our plans are fairly thorough and comprehensive, covering most aspects of the build from start to finish. We have included a list of all necessary materials and tools, as well as helpful tips and tricks to make your DIY project a success.
In addition to the convenience and ease of use of our plans, building a DIY desk can also save you money in the long run. Buying a store-bought desk can be expensive, especially if you are looking for a desk with specific features and customization options. By building your own desk, you can tailor it to fit your exact needs and preferences, all while saving money on the cost of a pre-made desk.
We hope our plans provide a fun and rewarding DIY project for you. Building a desk is a meaningful and essential piece of furniture that can add style and functionality to your home office. By using our plans, you can be more confident in your ability to build a beautiful and durable wood desk that meets all of your needs. Happy building!
Effective Cable Management Strategy
Effective cable management is essential for maintaining a clean and organized workspace, particularly when building a DIY wooden desk. One effective method for managing cords and wires is to incorporate the hollow spaces between the plywood sheets in the desk walls. These compartments allow cords to run up and down the desk, keeping them out of sight and out of the way while also minimizing clutter.
To further optimize cord management, you can drill small holes in the plywood at specific locations to allow cords to pass through and connect to electronic devices. For example, you may want to drill a hole in the top of the desk using a forstner bit to allow cords to pass through and reach devices such as a monitor or computer tower. A forstner bit is a type of drill bit that is designed to cut clean, flat-bottomed holes in wood and is ideal for drilling precise holes for cords or other purposes.
In addition to drilling holes in the plywood, you may also want to consider implementing cable management solutions such as cord covers or organizers to keep cords organized and out of sight. These solutions can help to eliminate tangles and reduce the risk of cords becoming damaged due to rough handling or accidental trips and falls.
By considering cord management during the design and build process of your DIY wooden desk, you can create a functional and organized workspace that is both efficient and visually appealing. By following proper safety guidelines and using the right tools and techniques, you can effectively manage cords and wires to create a streamlined and efficient workspace.
Time to build
About 6 hours
Total cost of build
About $200
Skill level required
Beginner
Download the PDF plans
DIY desk PDF plans
What is included in the PDF download?
Easy to read step by step instructions
Material list
Tools needed
3D illustrations
Recommended tools/materials
Available with purchase of DIY plan PDF. Thank you for your support and making this website possible!
Shopping list and cut list
Available with purchase of DIY plan PDF. Thank you for your support and making this website possible!

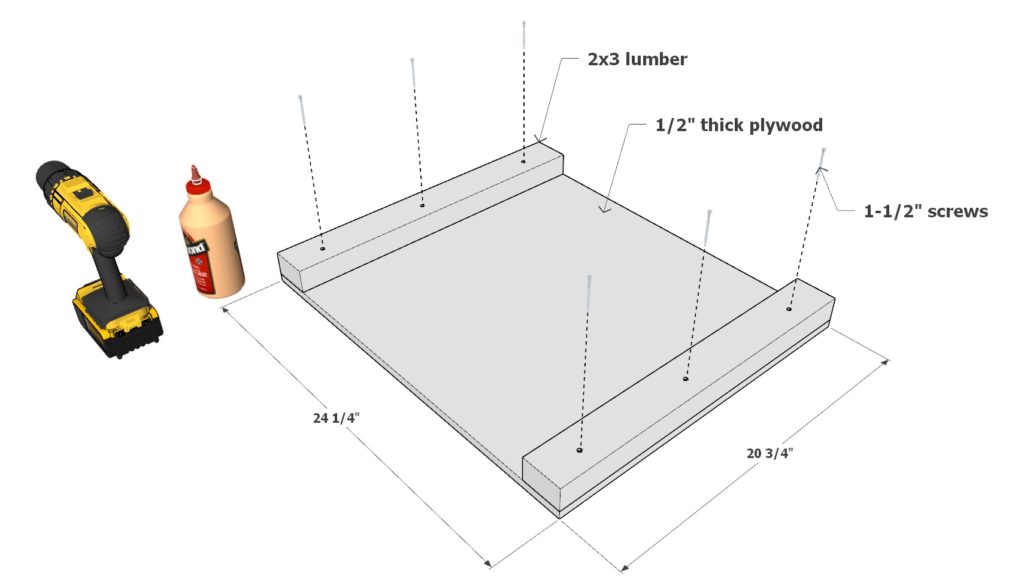
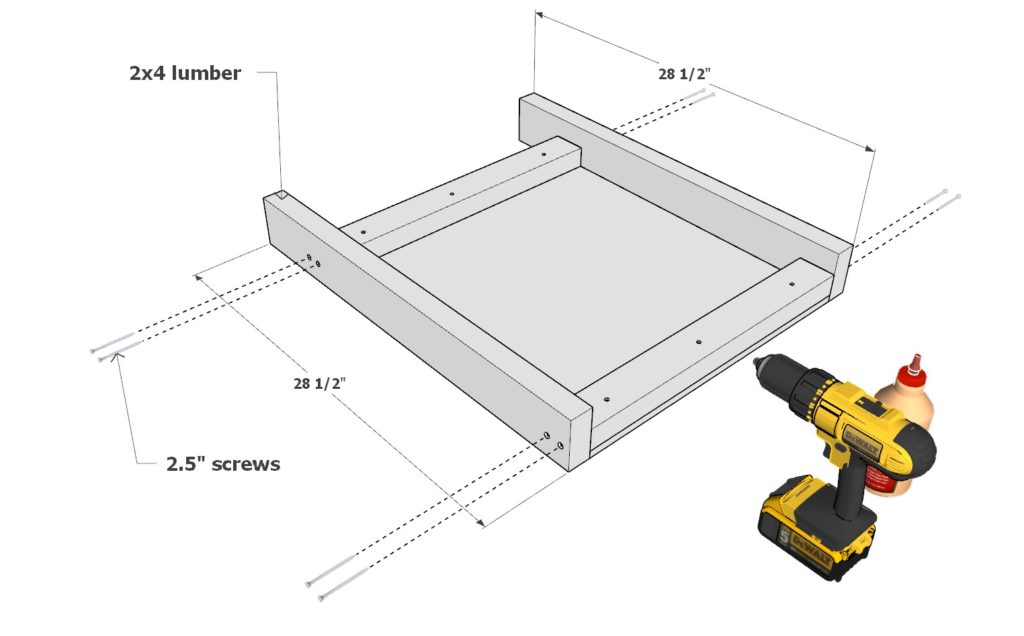
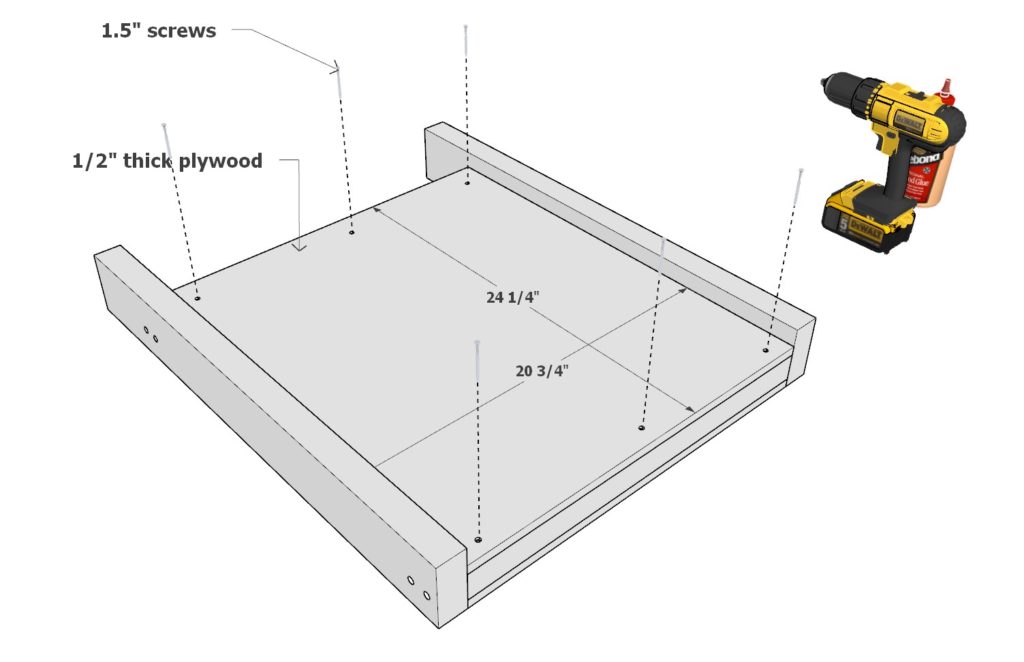
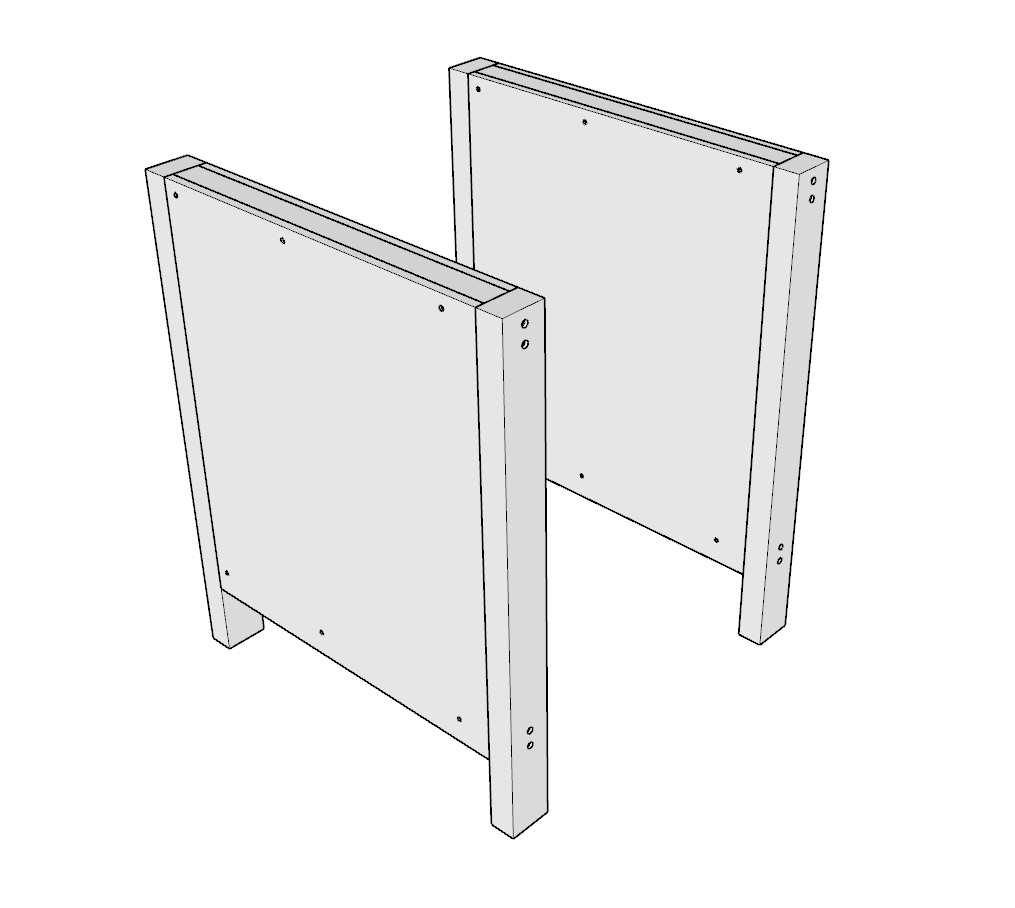
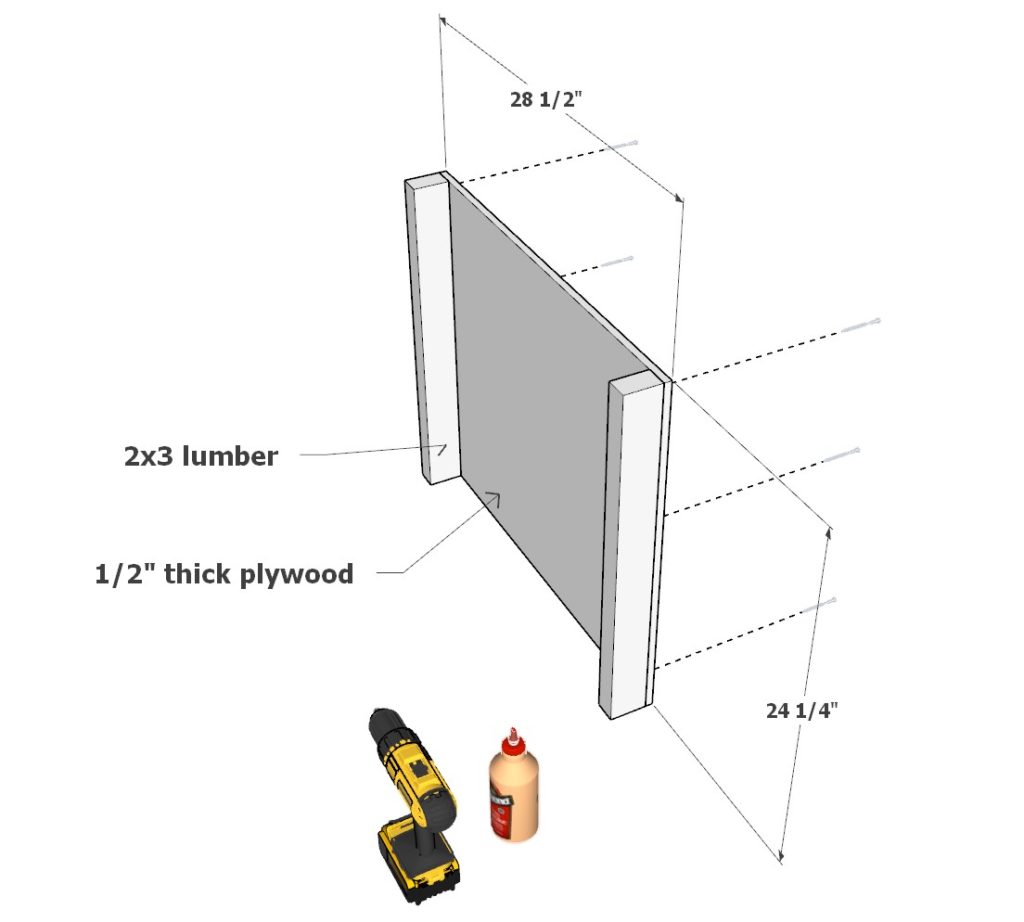
Step 1 (DIY desk side assembly)
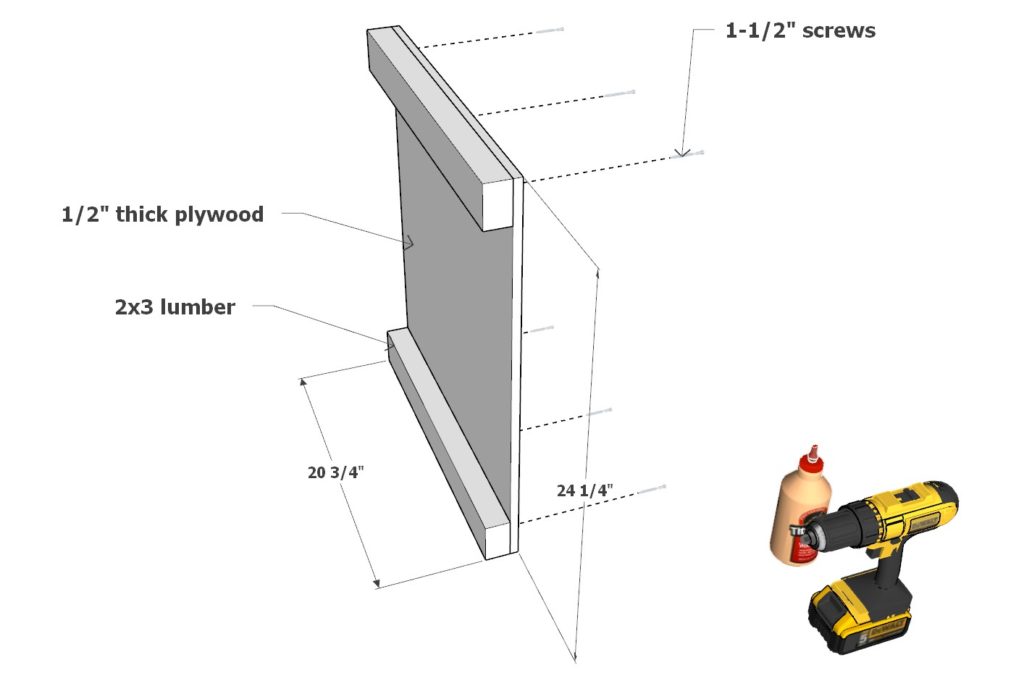
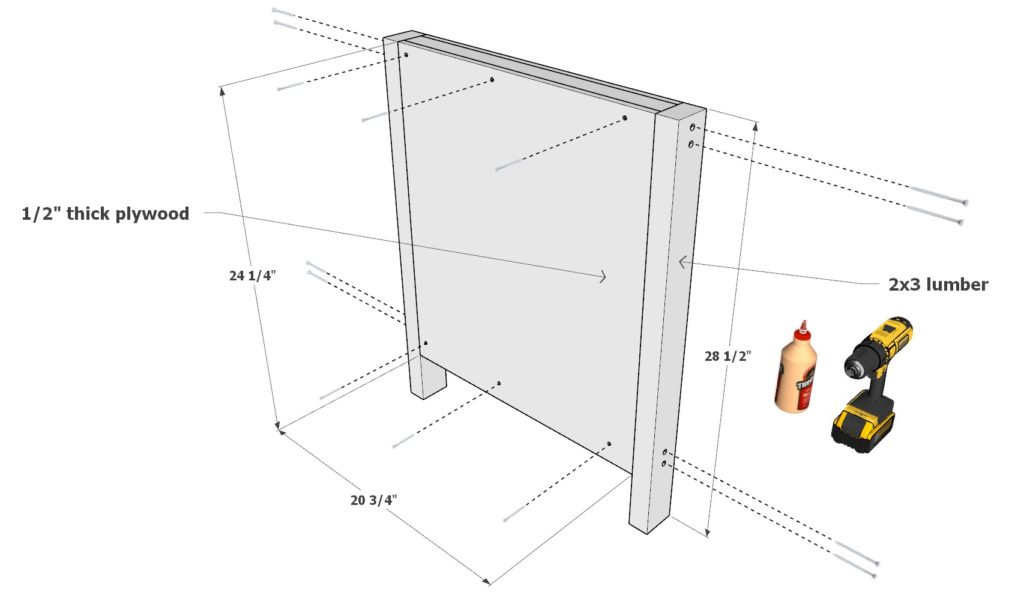
First, assemble the desk sides.
Take two 20-3/4 inch 2×3 lumber pieces and add them to a 24-1/4 inch x 20-3/4 inch plywood sheet (1/2″ thickness). Use 1.5″ screws and glue. Predrill holes to prevent the wood from splitting.
Next, add two 28-1/2 inch 2×4 lumber pieces using glue and 2.5 inch screws as shown below.
Lastly, enclose the 2×3 lumber pieces with a 24-1/4 inch x 20-3/4 inch plywood sheet (1/2″ thick) using 1.5 inch screws and glue.
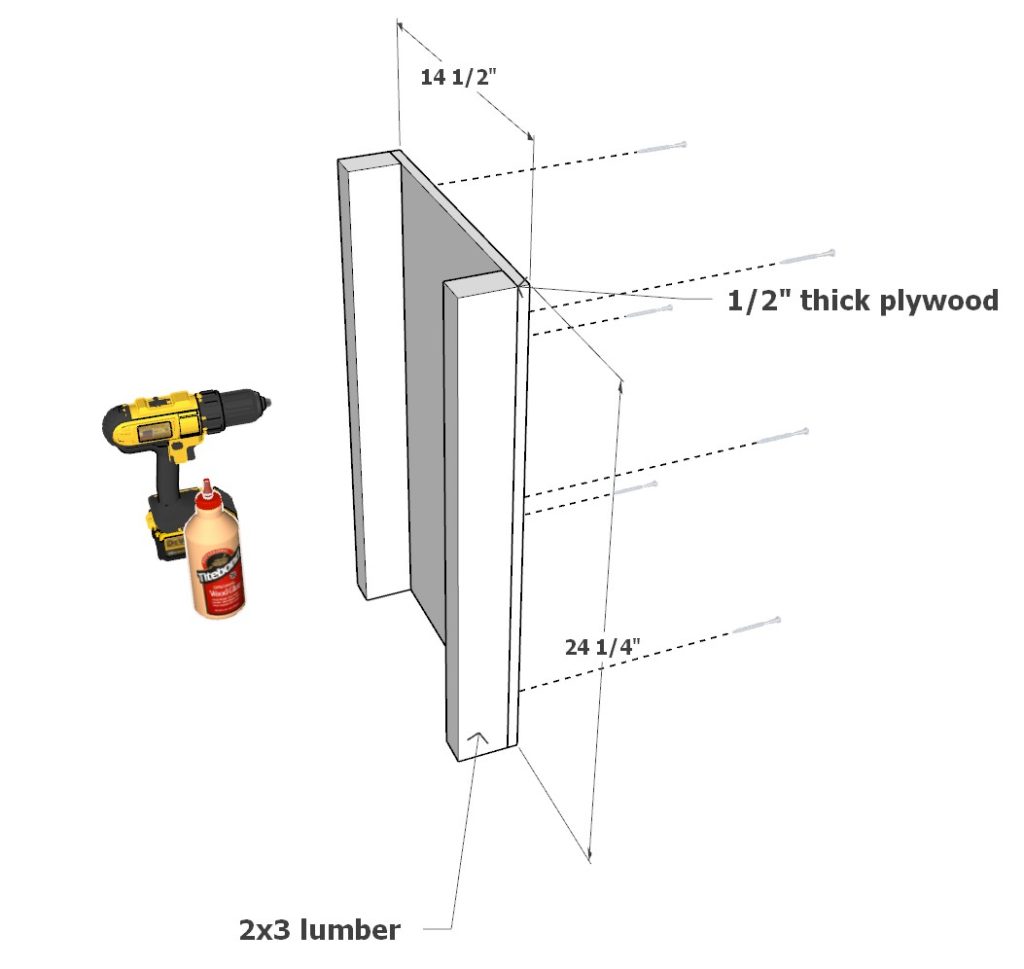
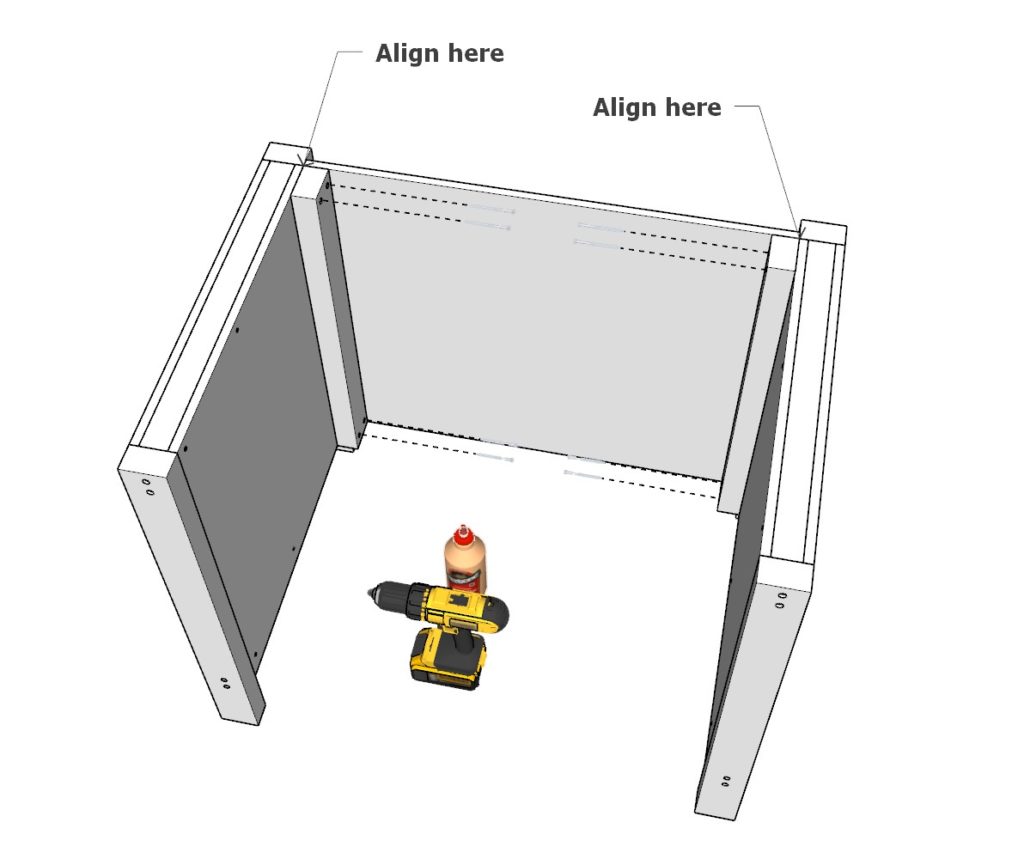
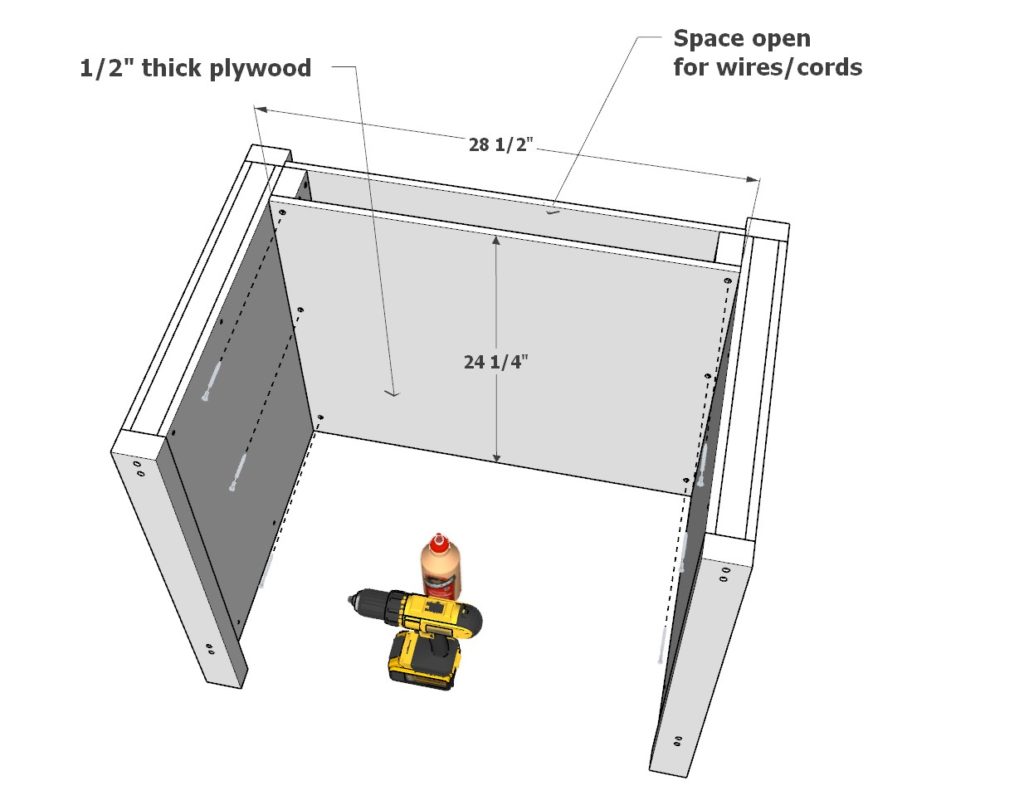
Step 2 (DIY desk frame construction)
Next, continue to add to the desk frame.
Take two 24-1/4 inch 2×3 lumber pieces and one 14-1/2 inch x 24-1/4 inch plywood sheet ( 1/2″ thickness) and secure them together using 2.5 inch screws and glue.
Attach this new frame piece to the frame piece from the previous step.
Next, make a mirror frame piece.
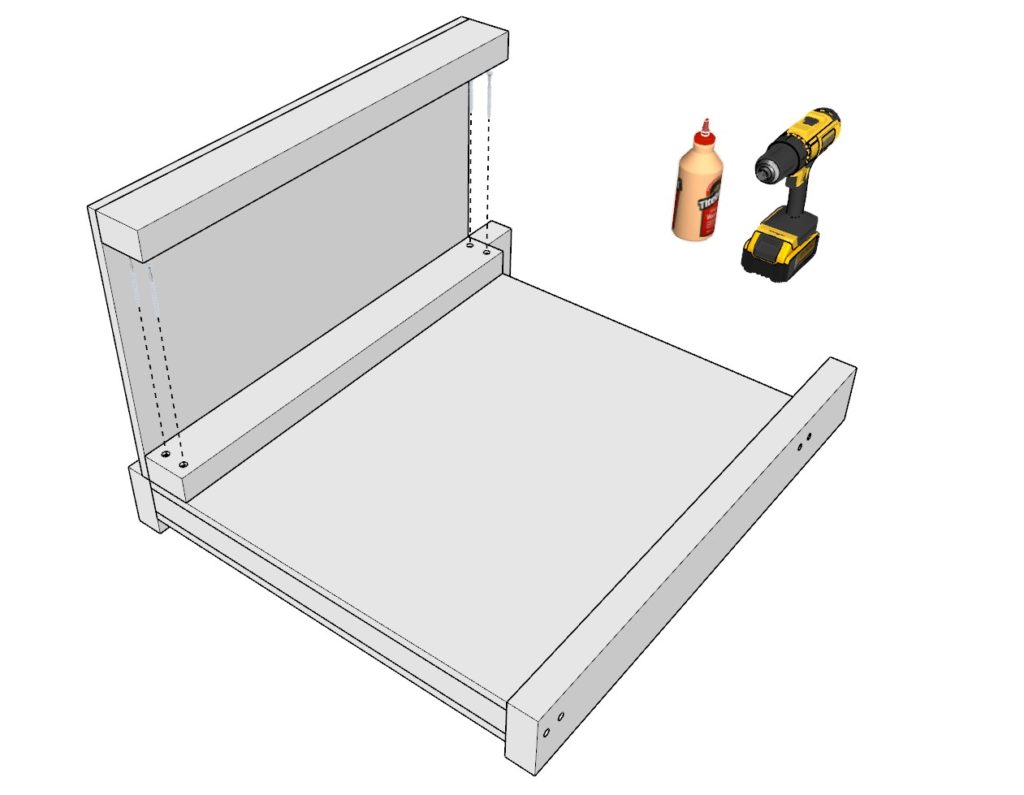
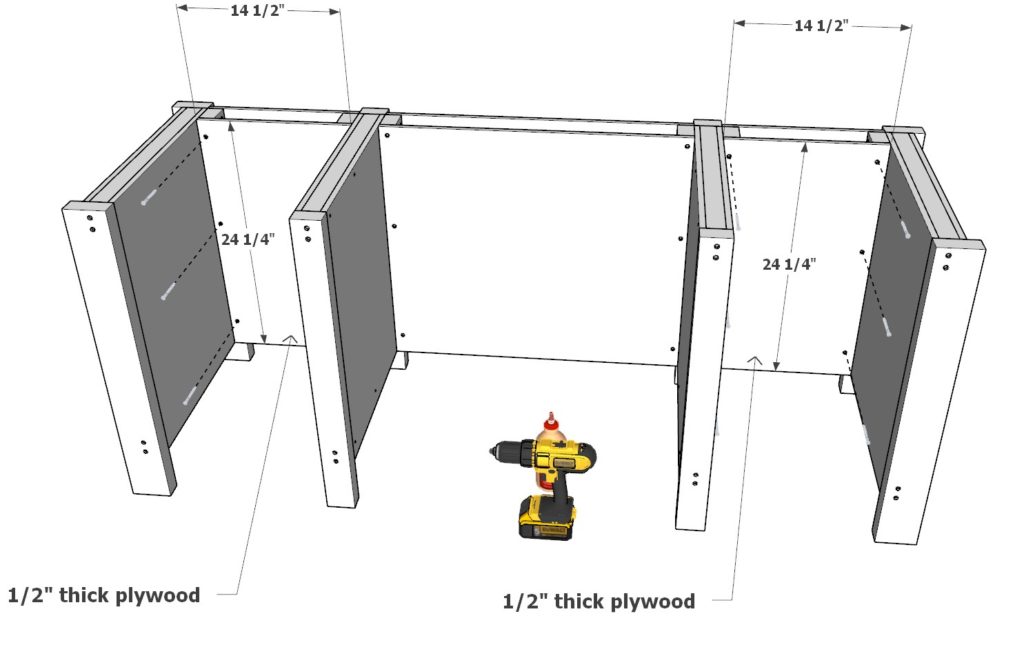
Step 3 (DIY desk middle frame pieces construction)
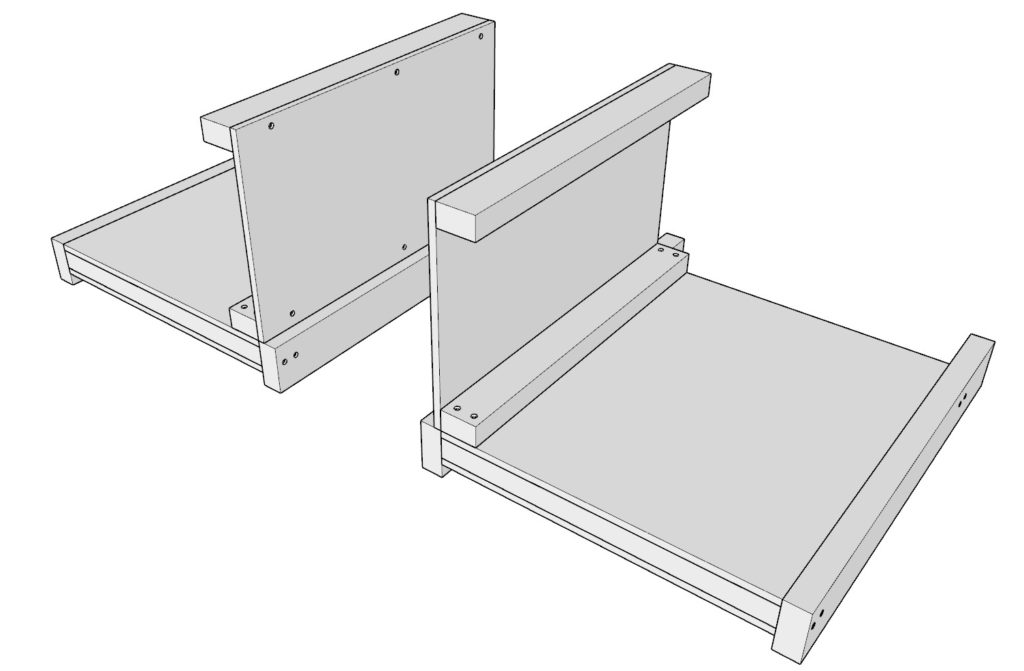
Next, build and the two middle desk walls.
Take two 20-3/4 inch 2×3 lumber pieces and one 24-1/4 inch x 20-3/4 inch plywood sheets (1/2″ thick) and secure them with 1.5″ screws and glue.
Next, add a 20-3/4 inch x 24-1/4 inch plywood cover (1/2″ thick) using glue and 1.5 or 2.5 inch screws.
Make two identical pieces.
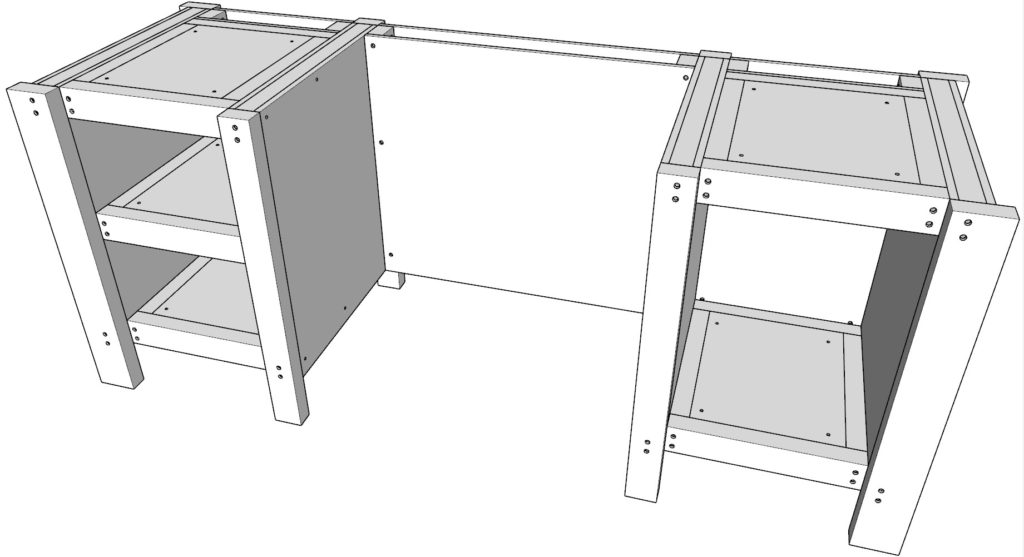
Step 4 (Assembly the middle desk frame component)
Next, build the center frame pieces for the desk.
Take two 24-1/4 inch long 2×3 lumber pieces and one 28-1/2 inch x 24-1/4 inch plywood sheets (1/2″ thick) and join them together using glue and 2.5 inch screws.
Join this new piece to the two middle frame pieces built in the previous step. Use 2.5inch screws, glue, and predrilling.
Attach a 24-1/4 inch x 28-1/2 inch plywood sheet (1/2″ thick) using glue and 2.5 inch screws.
A gap can be left without glue to allow space for cables to pass.
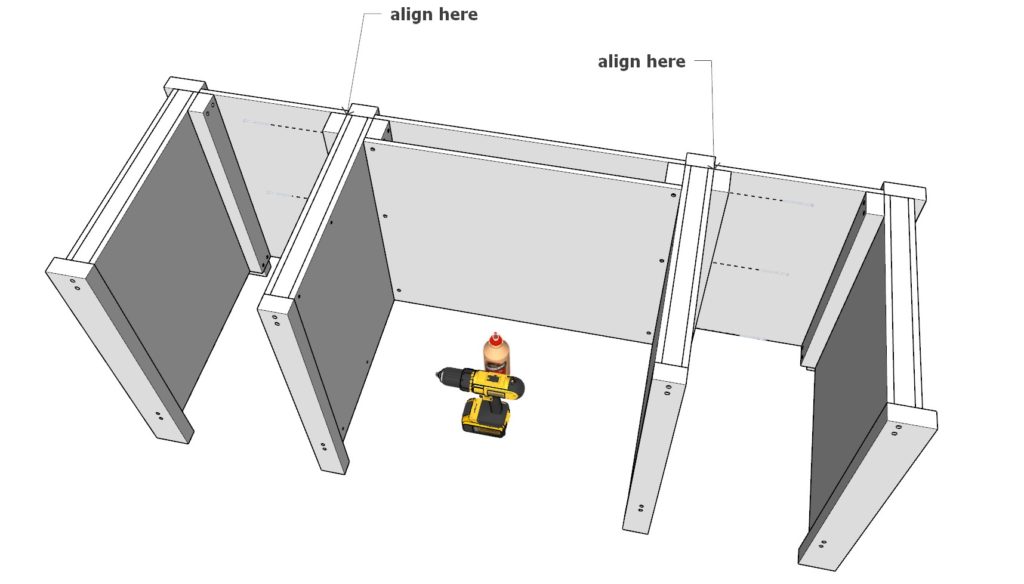
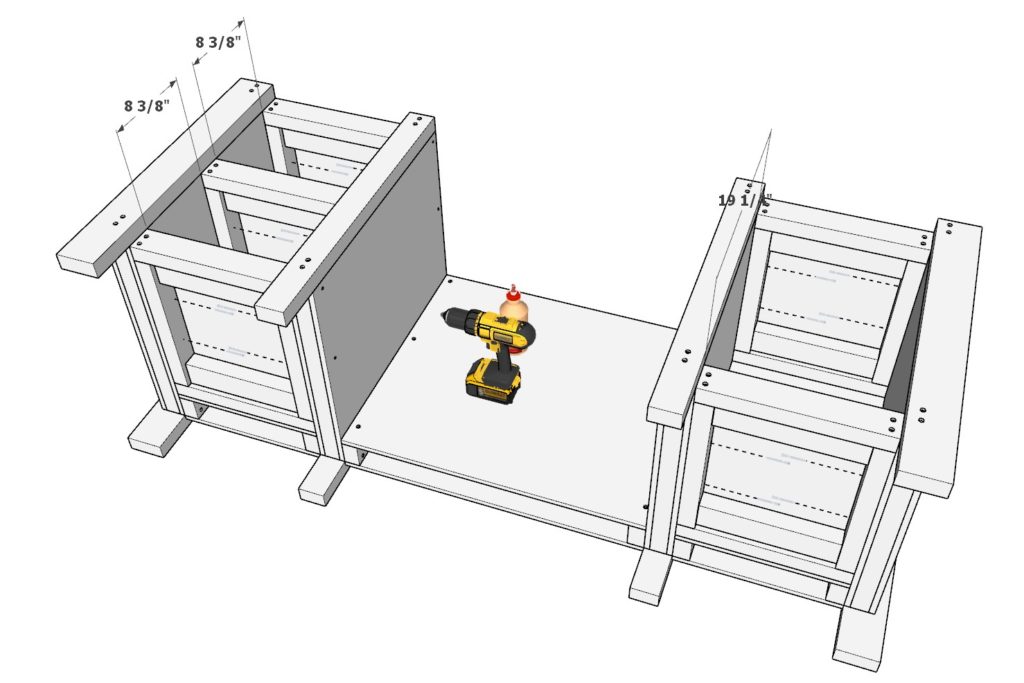
Step 5 (DIY desk putting all frame pieces together)
Next, assemble all the frame pieces together.
Arrange the frame pieces as shown below. Use glue and screws to secure the pieces together.
Next, add two 14-1/2 inch x 24-1/4 inch plywood sheets (1/2″ thick) to the open frame pieces as shown below. Use glue and 1.5 inch screws.
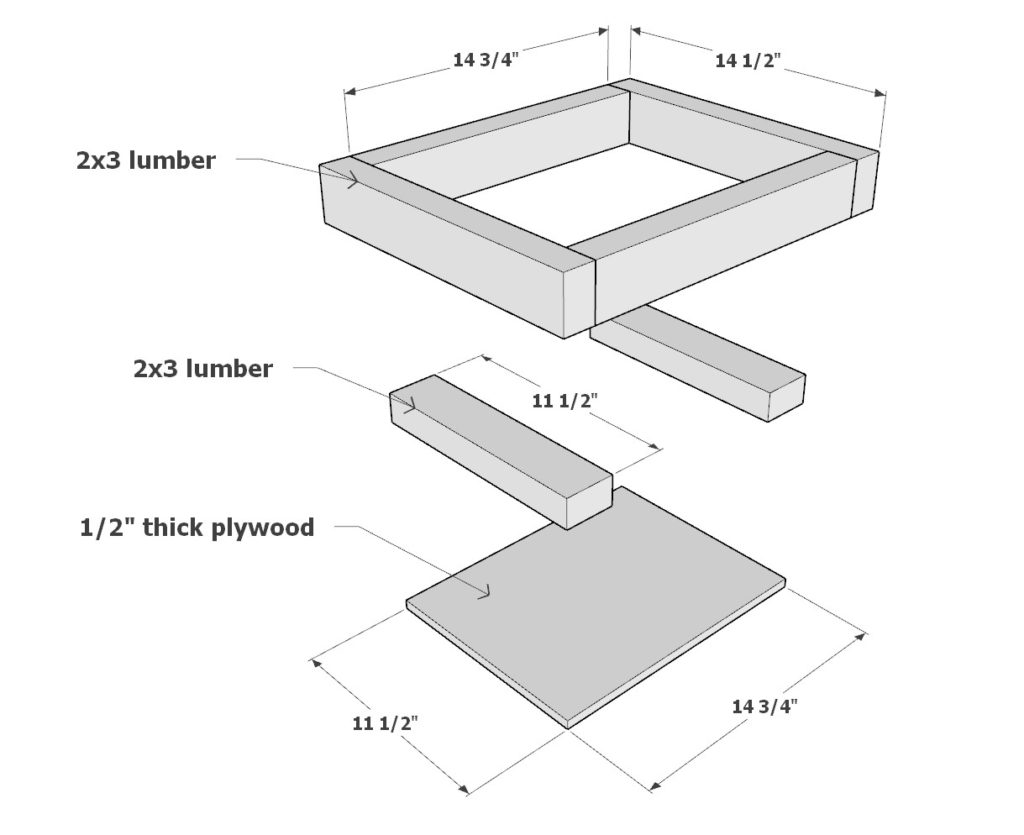
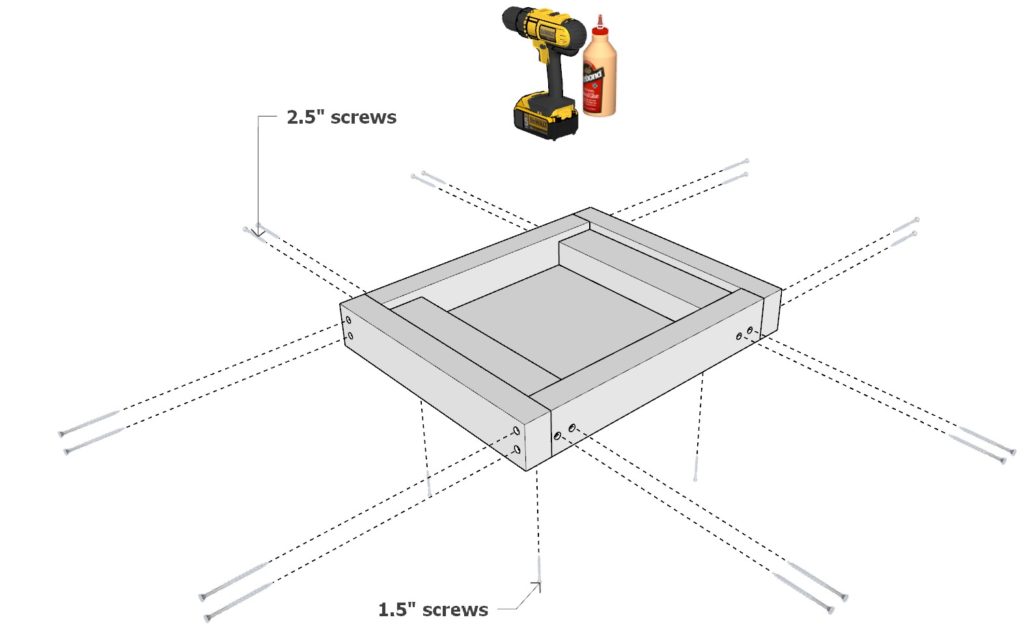
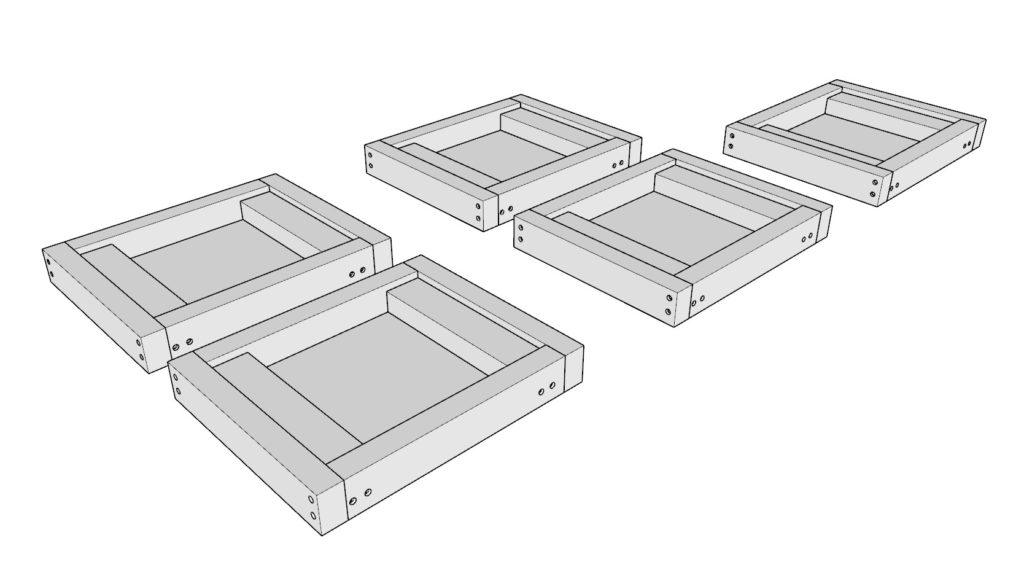
Step 6 (Attaching the storage shelves and storage cubby)
Next, build and assemble the shelves and cubby storage system.
Take two 14-3/4 inch 2×3 lumber pieces, two 14-1/2 inch 2×3 lumber pieces, two 11-1/2 inch 2×3 lumber pieces, and one 11-1/2 inch x 14-3/4 inch plywood cuts (1/2 inch thick) and join them together using glue and 1.5 and 2.5 inch screws as shown below.
Next, install the cubbies/shelves in the DIY desk at the appropriate level and space as shown below. Secure these with glue and screws.
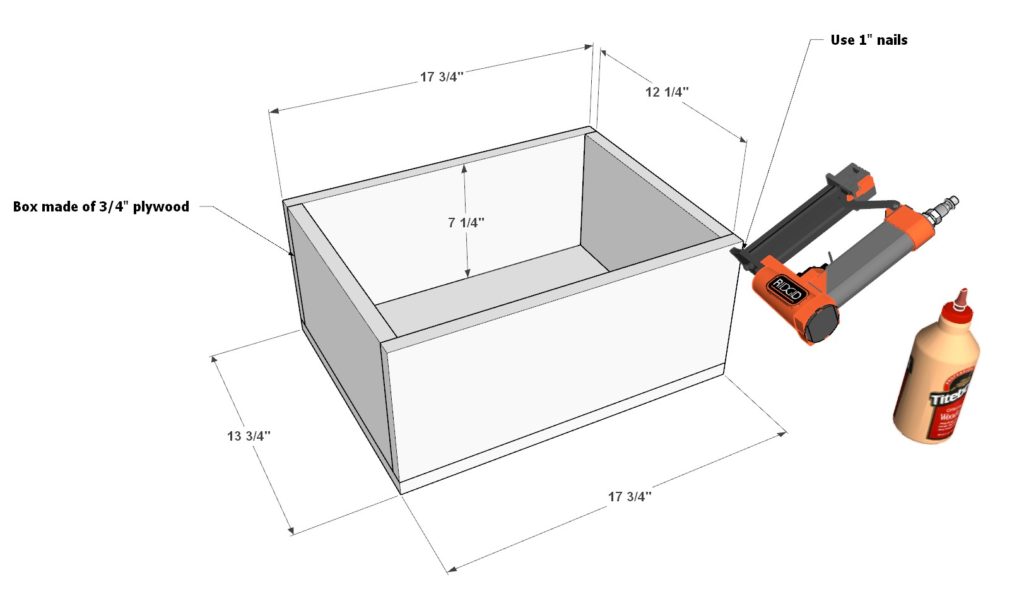
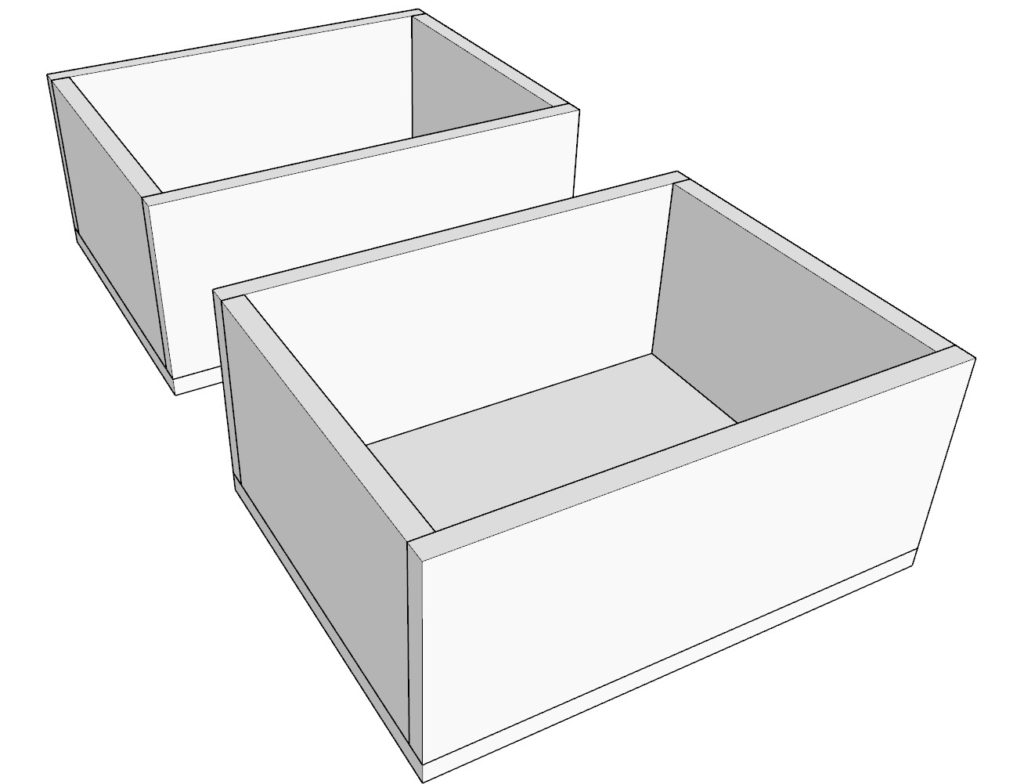
Step 7 (Building the drawer box and drawer face for DIY desk)
Next, build the two drawers for the desk. The drawer dimensions may not be the same. They may be lightly wider or more narrow depending on the side thickness of the sliding rails. I am using a 3/8″ thickness for the sliding rails. (Goal is to have an overall thickness with the drawer + drawer slides = 14.5 inches).
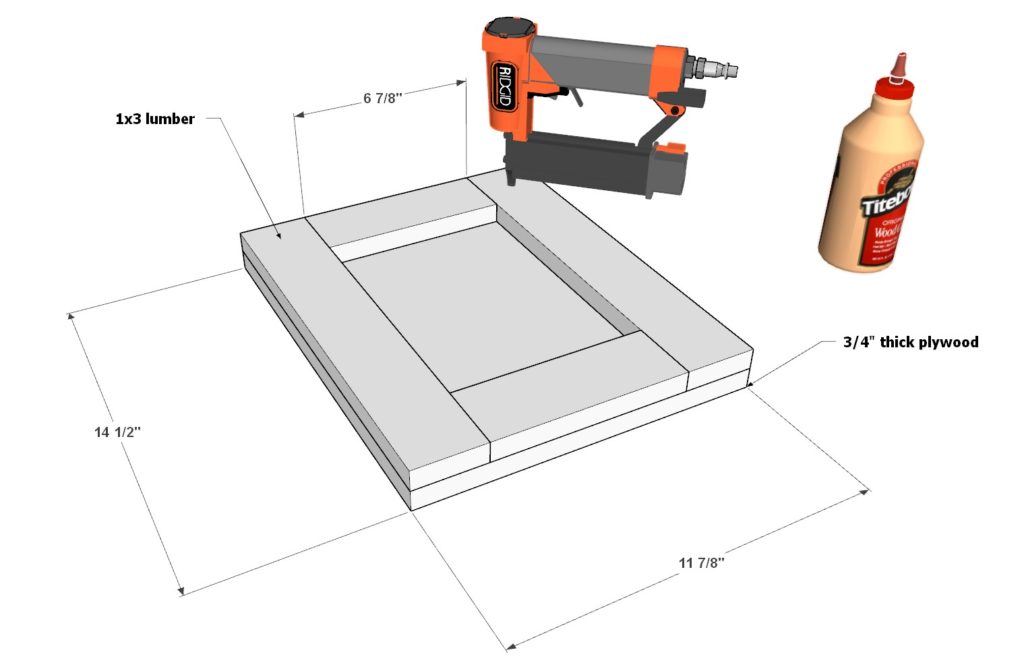
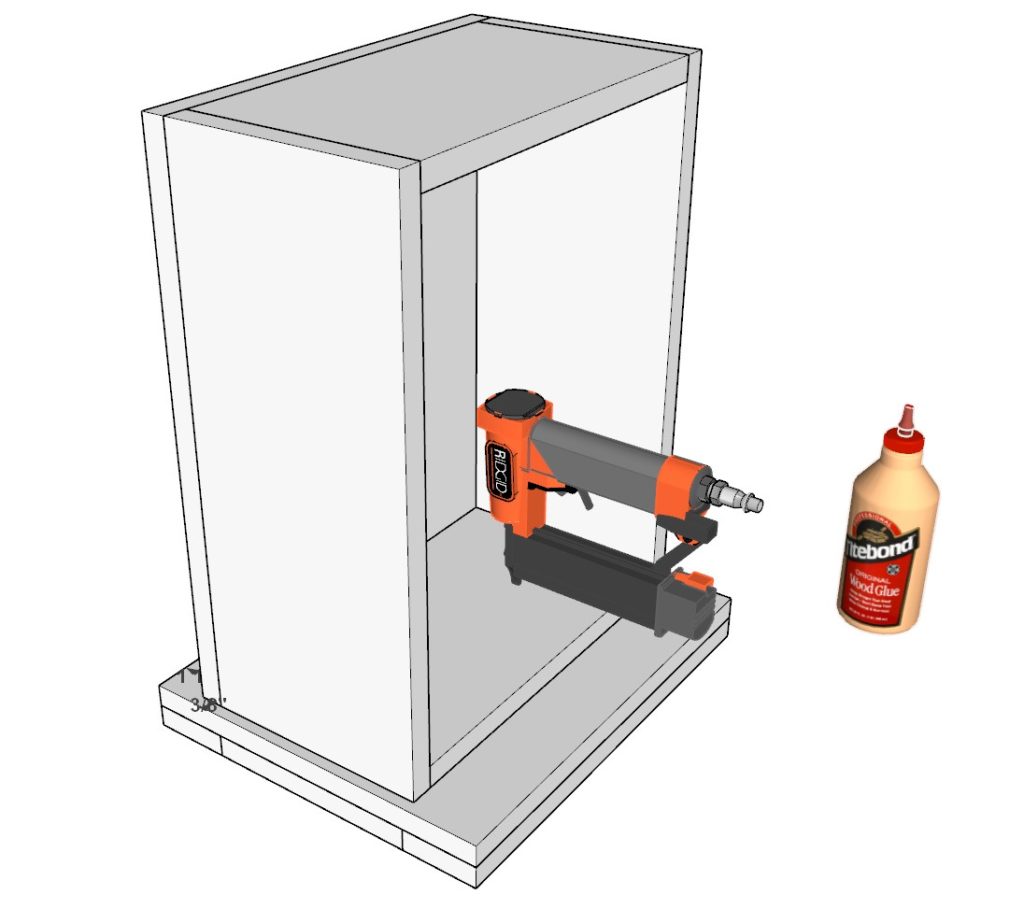
First, take two 17-3/4 inch x 7-1/4 inch 3/4″ thick plywood cuts, two 12-1/4 inch x 7-1/4 inch 3/4″ thick plywood cuts, and one 13-3/4 inch x 17-3/4 inch 3/4″ thick plywood cut. Arrange them as shown below. Use glue and a nail gun with 1″ nails to secure the pieces together.
Build two identical boxes.
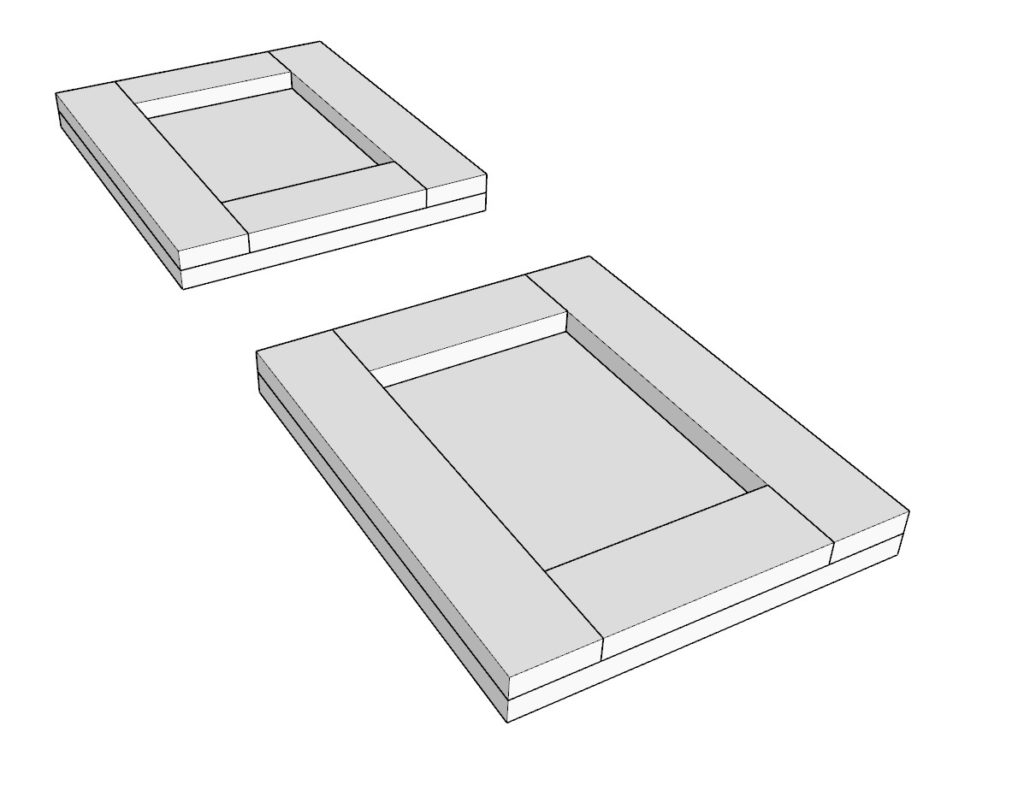
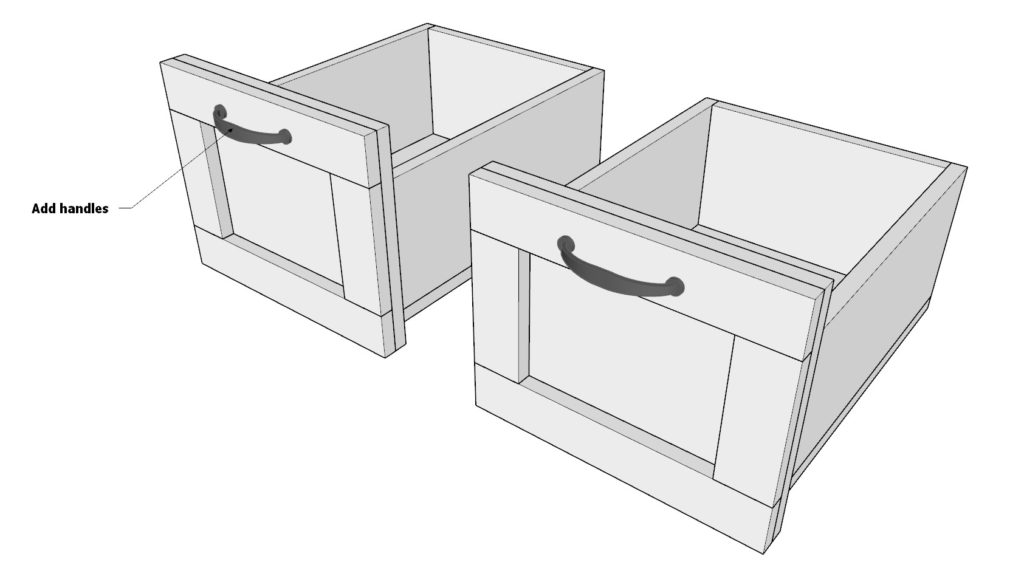
Next, build the face of the drawers. Use two 6-7/8 inch 1×3 lumber pieces, two 14-1/2 inch 2×3 lumber pieces, and one 14-1/2 inch x 11-7/8 inch 3/4″ thick plywood cut. Secure these together using glue and the nail gun with 1″ nails.
Make two identical drawer face components.
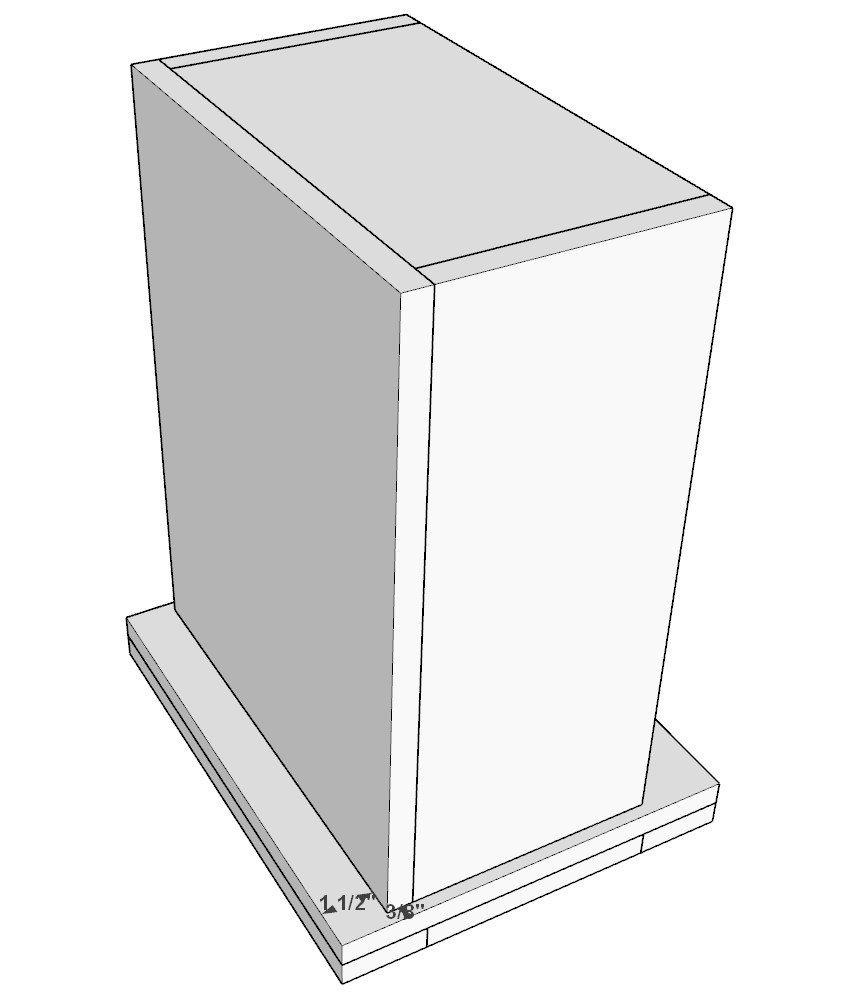
Next, attach the face components to the drawer boxes at the indicated dimensions. Secure with glue, and 1″ nails.
Lastly add handles.
Step 8 (Installing the drawers and cubby door for DIY desk)
Next, install the drawer slides using the manufacturers instruction and attach the drawers.
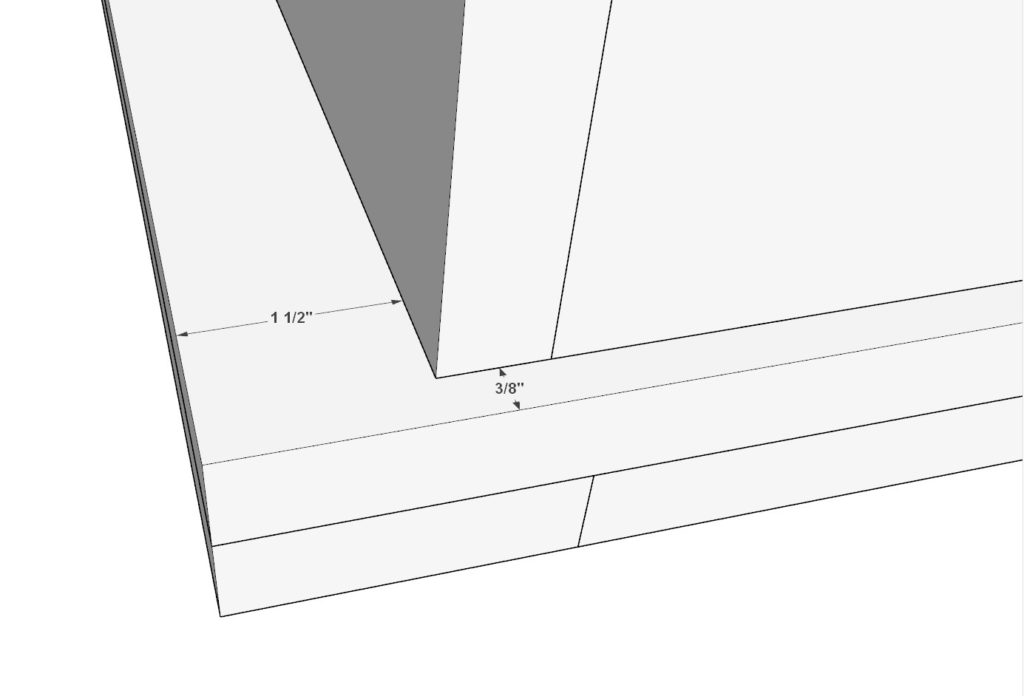
Indent by a 1/16 inch to make sure the drawer top does not touch the desk top.
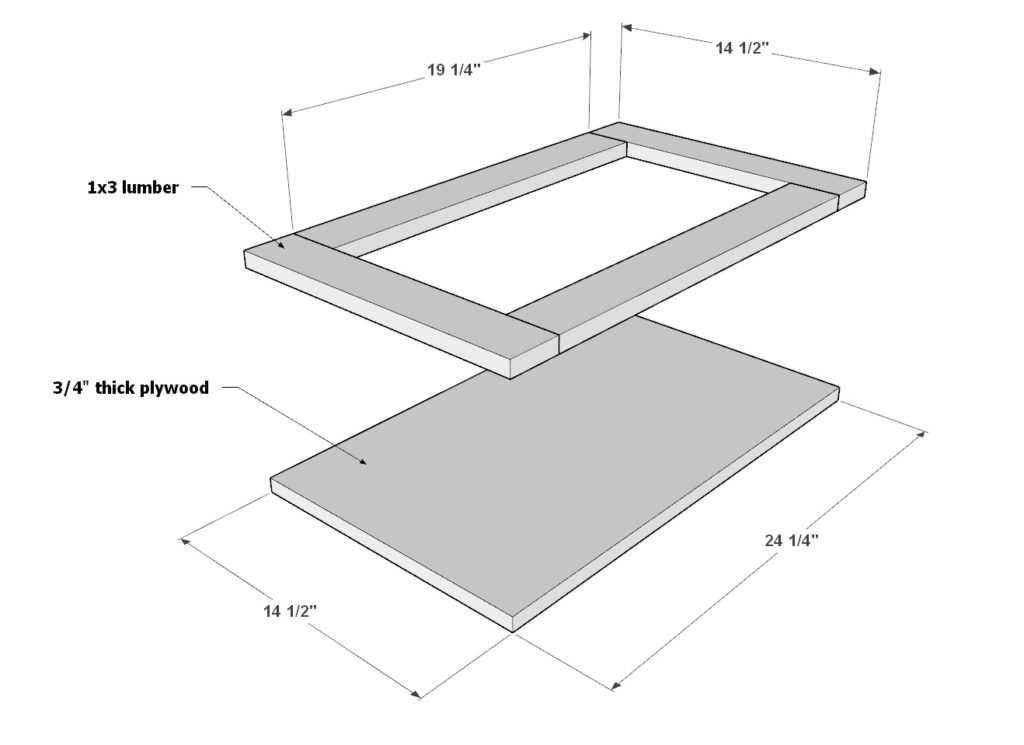
Next, build the cubby door. Take two 19-1/4 inch 1×3 lumber pieces, two 14-1/2 inch 1×3 lumber pieces, and one 14-1/2 inch x 24-1/4 inch 3/4″ thick plywood sheet and attach these together using glue and 1″ nails.
Attach the cubby door using two hinges and a door latch. Install the handle. Ensure the door opens and closes. You will need to use a sander to sand down the door so it can open and close easy. Make sure to indent the door by 1/16″ as with the drawers to prevent the door from hitting the desk top.


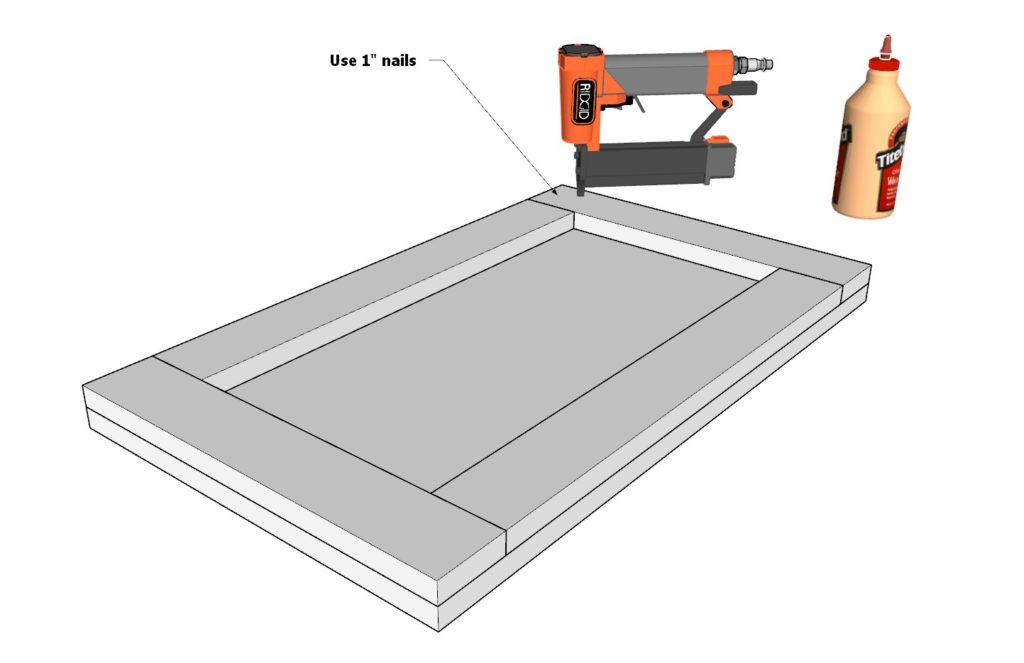

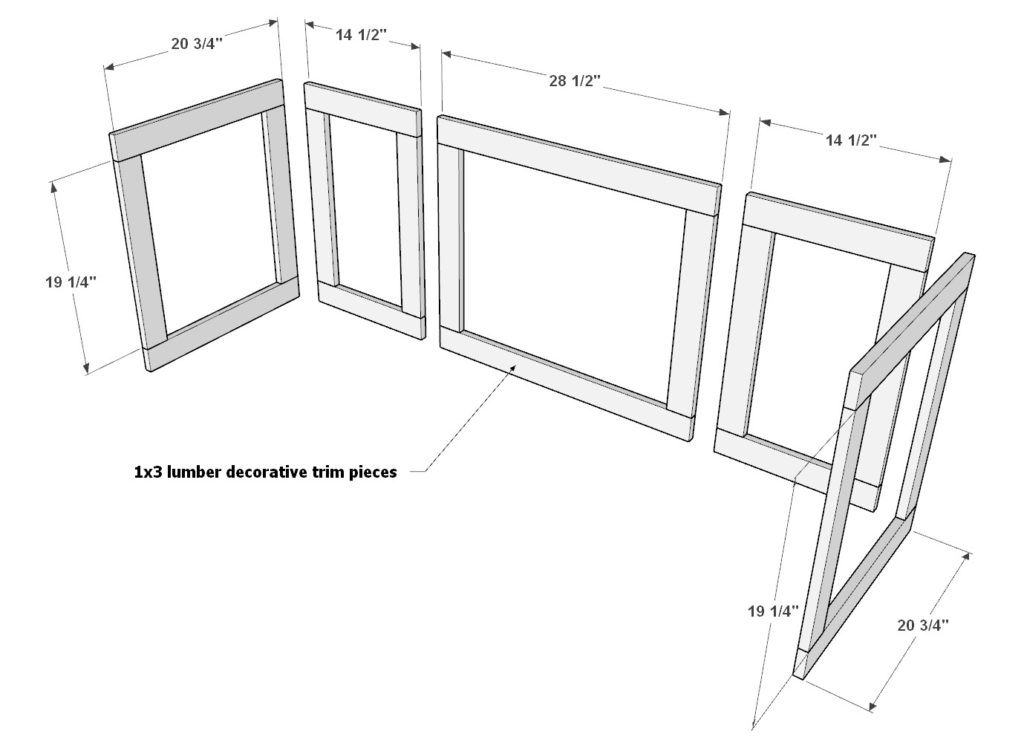
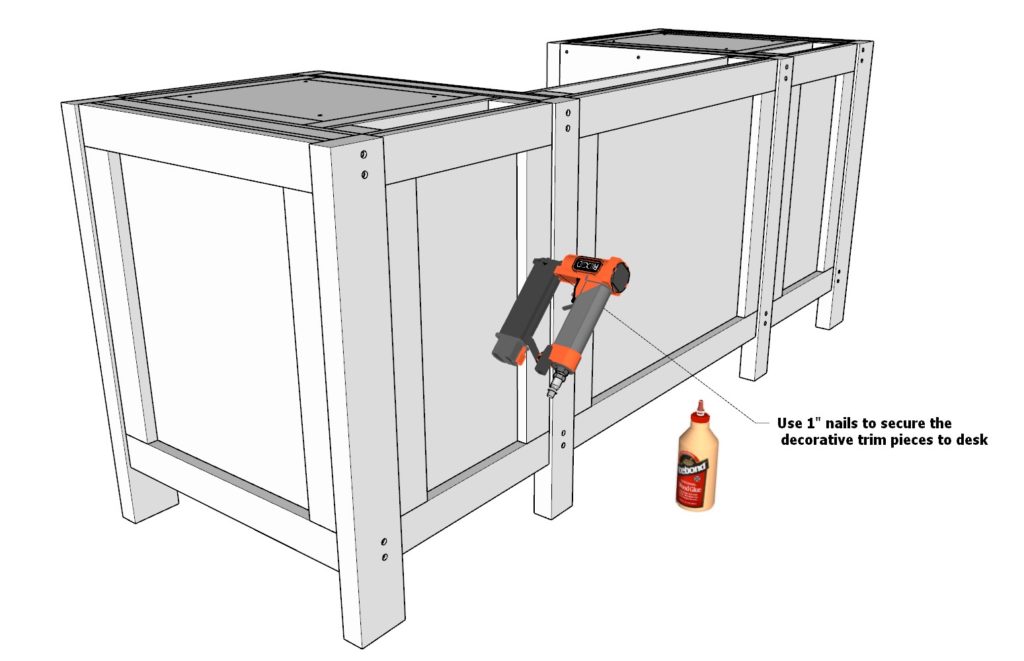
Step 9 (Adding decorative trim to DIY desk)
Next, install the trim of the DIY desk.
Take four 20-3/4 inch 1×3 lumber pieces, four 14-1/2 inch 1×3 lumber pieces, two 28-1/2 inch 1×3 lumber pieces, and ten 19-1/4 inch 1×3 lumber pieces, arrange them as shown below. Secure these trim pieces using glue and a nail gun with 1″ nails.
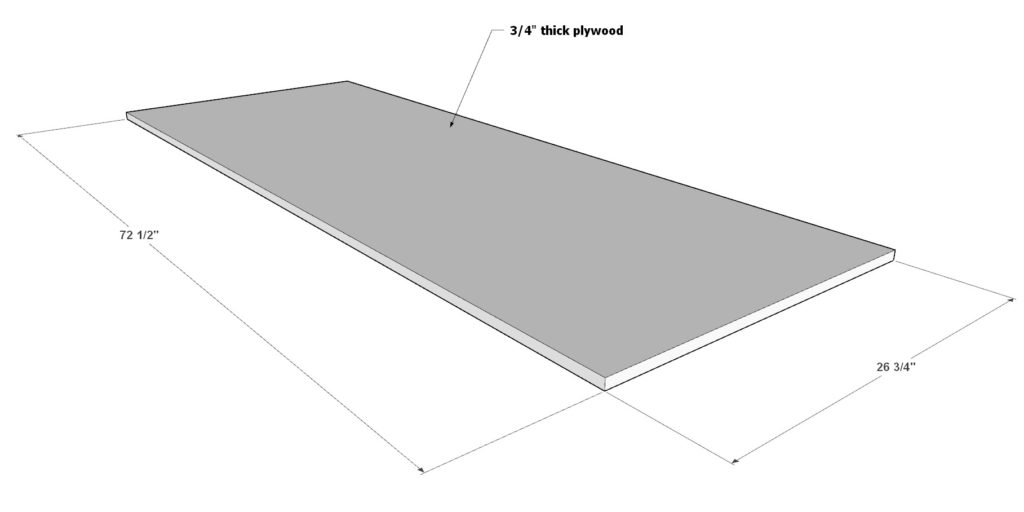
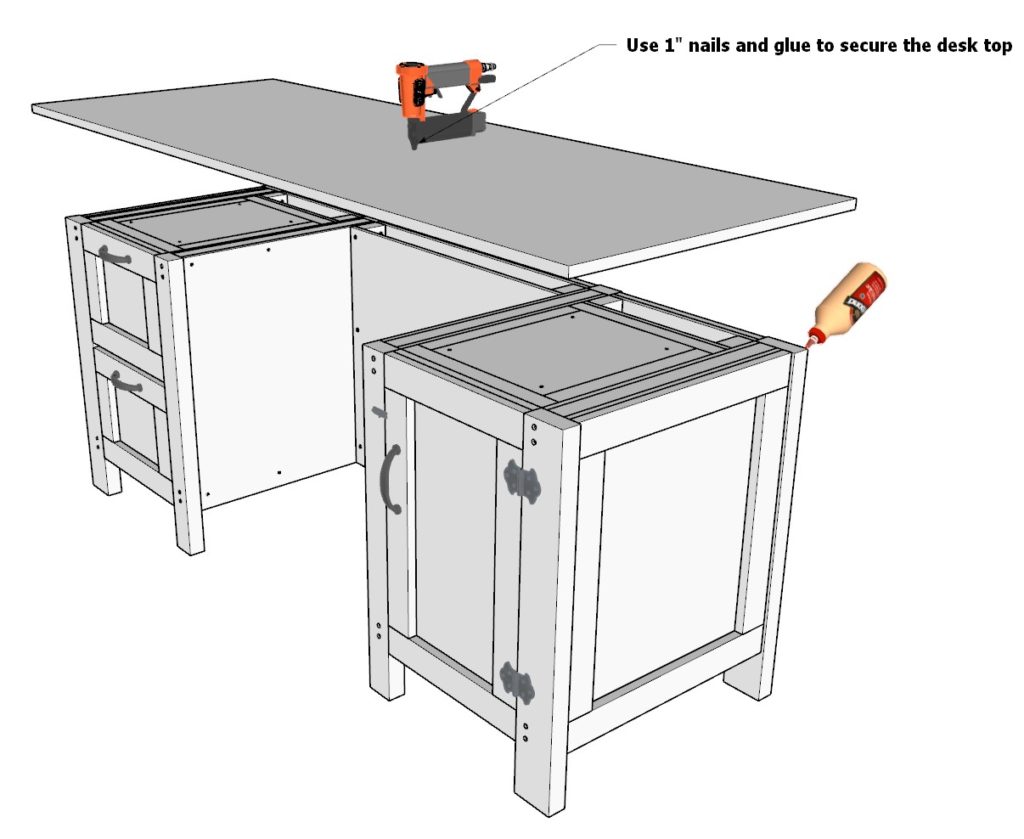
Step 10 (Adding desk top to desk base)
Next, add the desk top. This would be from a 72-1/2 inch x 26-3/4 inch 3/4″ thick plywood sheet.
Use plenty of glue and 1 inch nails to secure the desk top to the desk base.
Sanding down the desk and preparing it to be painted or stained.
Sanding down DIY desk to prepare it for painting or staining is a relatively straightforward process, but it does require some care and attention to detail to achieve a smooth, even finish. Here are the steps you can follow to sand your desk:
Gather your materials: You’ll need sandpaper in various grits (such as 60, 120, and 220), a sanding block or orbital sander, a dust mask, safety goggles, and a vacuum or dust cloth.
Sand with a coarse grit: Using a sanding block or orbital sander, start with a coarse grit of sandpaper (such as 60 grit) to remove any rough or uneven areas on the surface of the desk. Be sure to sand with the grain of the wood, and use long, even strokes to ensure a consistent finish.
Vacuum or dust the surface: Once you’ve finished sanding with the coarse grit, use a vacuum or dust cloth to remove any excess dust and debris from the surface of the desk.
Sand with a medium grit: Next, switch to a medium grit of sandpaper (such as 120 grit) and repeat the sanding process, using long, even strokes to smooth out the surface of the desk.
Vacuum or dust the surface again: Once you’ve finished sanding with the medium grit, vacuum or dust the surface again to remove any remaining dust and debris.
Sand with a fine grit: Finally, switch to a fine grit of sandpaper (such as 220 grit) and repeat the sanding process one more time. This will help to smooth out any remaining imperfections and give the desk a polished, professional finish.
Vacuum or dust the surface a final time: Once you’ve finished sanding with the fine grit, vacuum or dust the surface one last time to ensure that it is completely clean and ready for painting or staining.
Remember to wear a dust mask and safety goggles to protect yourself from any debris or dust generated during the sanding process, and take your time to ensure that you achieve a smooth, even finish on your desk.
How to stain the DIY desk
Staining a DIY desk is a simple way to add color and character to your furniture, and it can be accomplished with just a few basic tools and materials. Here are the steps you can follow to stain your desk:
Gather your materials: You’ll need a wood stain, a clean cloth or brush, a dust mask, safety goggles, and a drop cloth or protective cover for your work area.
Prepare the surface: Before you begin staining, it’s important to ensure that the surface of your desk is clean and free of any dust or debris. Use a vacuum or dust cloth to remove any excess dirt, and wipe the surface down with a clean, dry cloth to remove any remaining dust or particles.
Test the stain: Before applying the stain to your desk, it’s a good idea to test it on a small, inconspicuous area to make sure you like the color and finish. Simply apply a small amount of stain to the test area and let it dry completely to see the final result.
Apply the stain: Once you’ve chosen a wood stain that you like, it’s time to begin staining your desk. Using a clean cloth or brush, apply the stain to the surface of the desk in long, even strokes, working with the grain of the wood. Be sure to cover the entire surface of the desk, including the edges and corners.
Let the stain dry: Once you’ve applied the stain to the entire surface of the desk, let it dry according to the manufacturer’s instructions. This typically takes several hours or overnight, depending on the specific product you are using.
Apply a second coat: If desired, you can apply a second coat of stain to the desk for a deeper, more vibrant color. Simply repeat the process outlined in steps 4 and 5 to apply a second coat of stain.
Seal the desk: After the final coat of stain has dried completely, you may want to seal the desk to protect the finish and extend its life. You can use a clear polyurethane sealer or another suitable product to seal the desk, following the manufacturer’s instructions for application.
Remember to wear a dust mask and safety goggles to protect yourself from any dust or fumes generated during the staining process, and take your time to ensure that you achieve a smooth, even finish on your desk.
How to paint the DIY desk
Painting a DIY desk is a simple and cost-effective way to give your furniture a fresh new look, and it can be accomplished with just a few basic tools and materials. Here are the steps you can follow to paint your desk:
Gather your materials: You’ll need a paint, a paintbrush or roller, a dust mask, safety goggles, and a drop cloth or protective cover for your work area. You may also want to have sandpaper, a putty knife, and wood filler on hand to repair any imperfections in the surface of the desk.
Prepare the surface: Before you begin painting, it’s important to ensure that the surface of your desk is clean and smooth. Use a vacuum or dust cloth to remove any excess dirt, and sand the surface with a medium grit of sandpaper (such as 120 grit) to smooth out any rough or uneven areas.
Repair any imperfections: If your desk has any dents, cracks, or other imperfections, you can use wood filler and a putty knife to fill them in and smooth out the surface. Once the wood filler has dried completely, sand the repaired areas smooth with a fine grit of sandpaper (such as 220 grit).
Prime the surface: Once the surface of the desk is clean and smooth, it’s a good idea to apply a coat of primer. This will help the paint to adhere better to the surface and improve the overall finish of your desk. Simply apply the primer according to the manufacturer’s instructions, using a paintbrush or roller to evenly coat the surface of the desk.
Paint the desk: Once the primer has dried completely, it’s time to start painting your desk. Using a paintbrush or roller, apply the paint to the surface of the desk in long, even strokes, working with the grain of the wood. Be sure to cover the entire surface of the desk, including the edges and corners.
Let the paint dry: Once you’ve applied the paint to the entire surface of the desk, let it dry according to the manufacturer’s instructions. This typically takes several hours or overnight, depending on the specific product you are using.
Apply a second coat: If desired, you can apply a second coat of paint to the desk for a more vibrant color or to improve the overall finish. Simply repeat the process outlined in steps 5 and 6 to apply a second coat of paint.
Remember to wear a dust mask and safety goggles to protect yourself from any dust or fumes generated during the painting process, and take your time to ensure that you achieve a smooth, even finish on your desk.