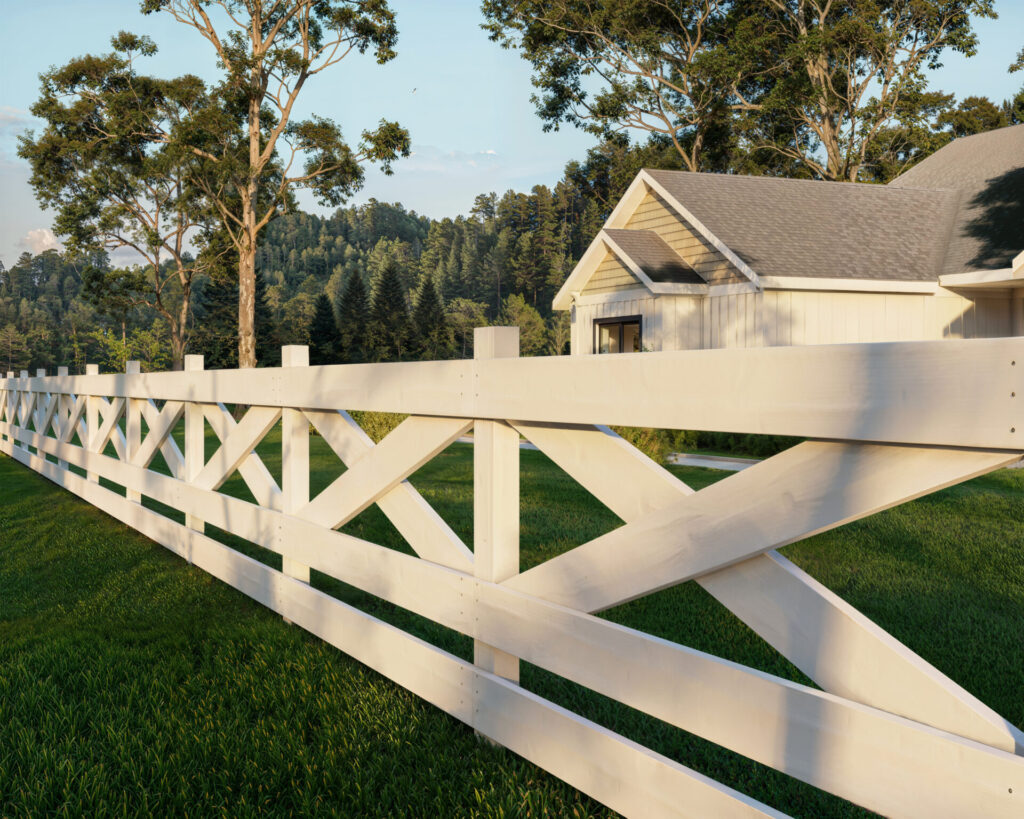
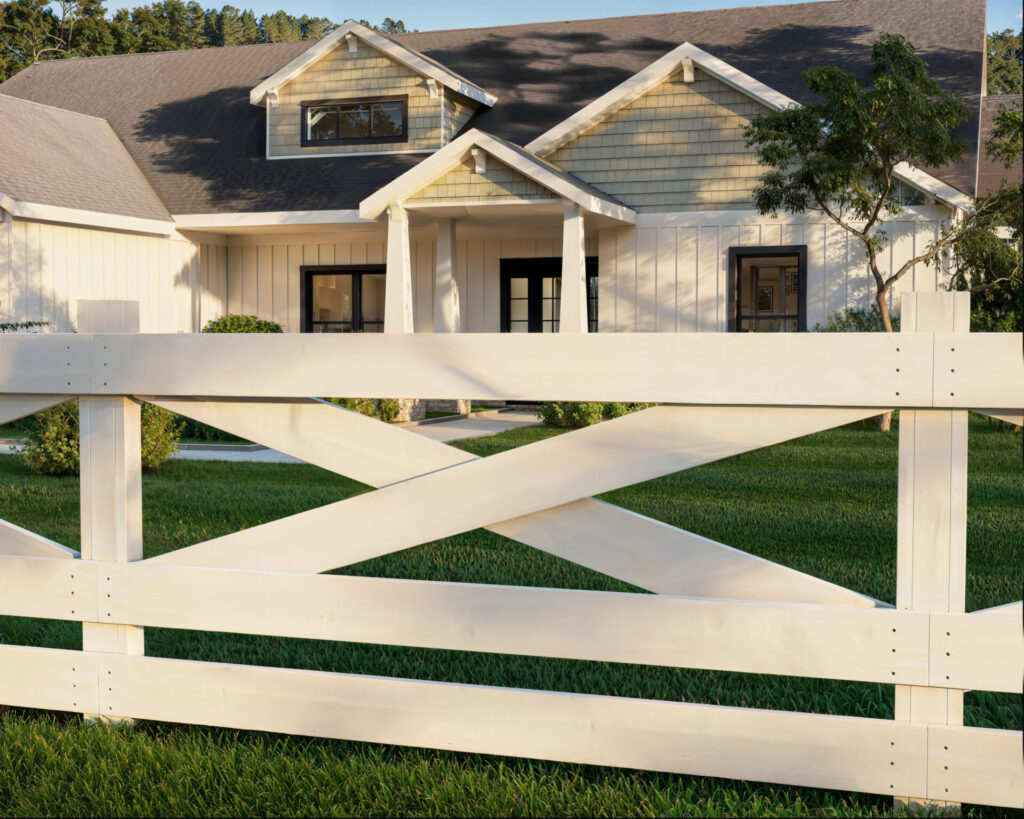
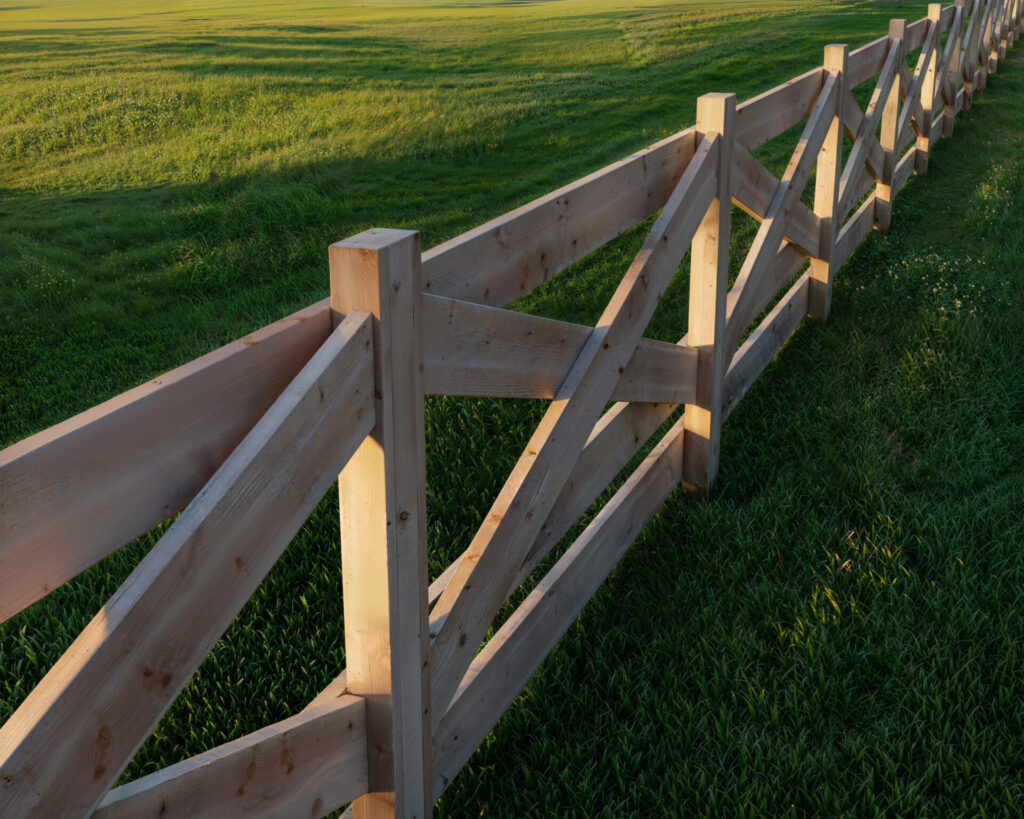
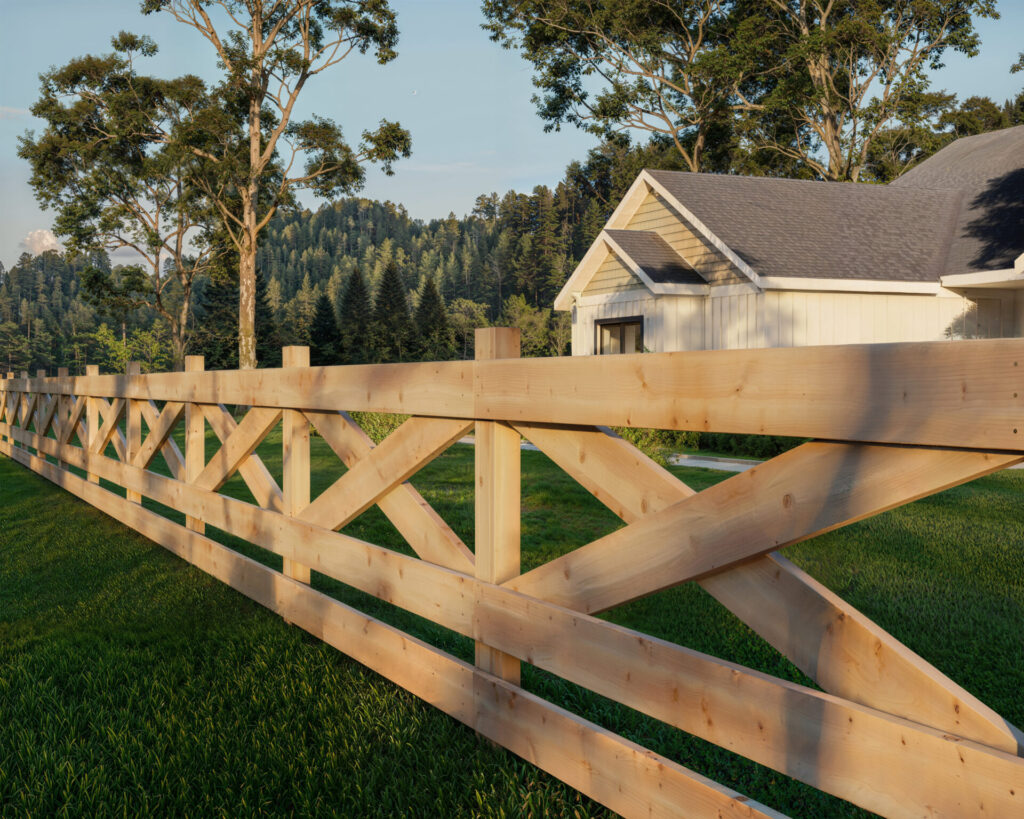
Discover the Elegance of Crossbuck Fencing
Embrace the harmony of classic design and open space with the crossbuck fence. This guide is your gateway to creating a boundary that is as practical as it is picturesque—perfect for framing the expansive views of rural estates, enclosing the playful charm of residential yards, or defining the serene boundaries of equestrian facilities.
Craftsmanship Meets Simplicity
Your journey to a self-made fence begins with our expertly crafted guide. Designed for novices yet robust for the seasoned builder, our DIY plan is a testament to simplicity, equipping you with:
- Straightforward Instructions: Concise, easy-to-follow steps accompany you from post to panel.
- Detailed Visuals: Clear diagrams eliminate guesswork, providing a visual path to success.
- Essential Lists: Cut lists, shopping lists, tools, and materials—curated to optimize your time and budget.
A Fence for the Future
A fence is more than a structure; it’s a safeguard for your home, a canvas for your garden, and a backdrop to life’s enduring moments. Our guide doesn’t just sell you a plan; it offers a sustainable, cost-effective solution that stands the test of time. Learn the ins and outs of maintenance to ensure your crossbuck fence remains a steadfast guardian of your grounds.
Begin Your Building Journey
Step into a world where tradition blends with modern DIY spirit. Secure your plan today and elevate your landscape with a fence that offers openness, safety, and a storied elegance. Join a community that values the art of building, and let your crossbuck fence be a landmark of your making.
Forge your space. Create with confidence. Start now.
Time
(varies with experience and fence length)
Cost
The DIY Crossbuck Fence costs approximately $7.50 per linear foot, with final expenses subject to variation based on location and chosen materials.
Skill level required
Beginner
DIY Crossbuck Fence PDF Plan
What is included in the PDF download?
- Easy to read step by step instructions
- Material list
- Tools needed
- Helpful links to materials and tools needed
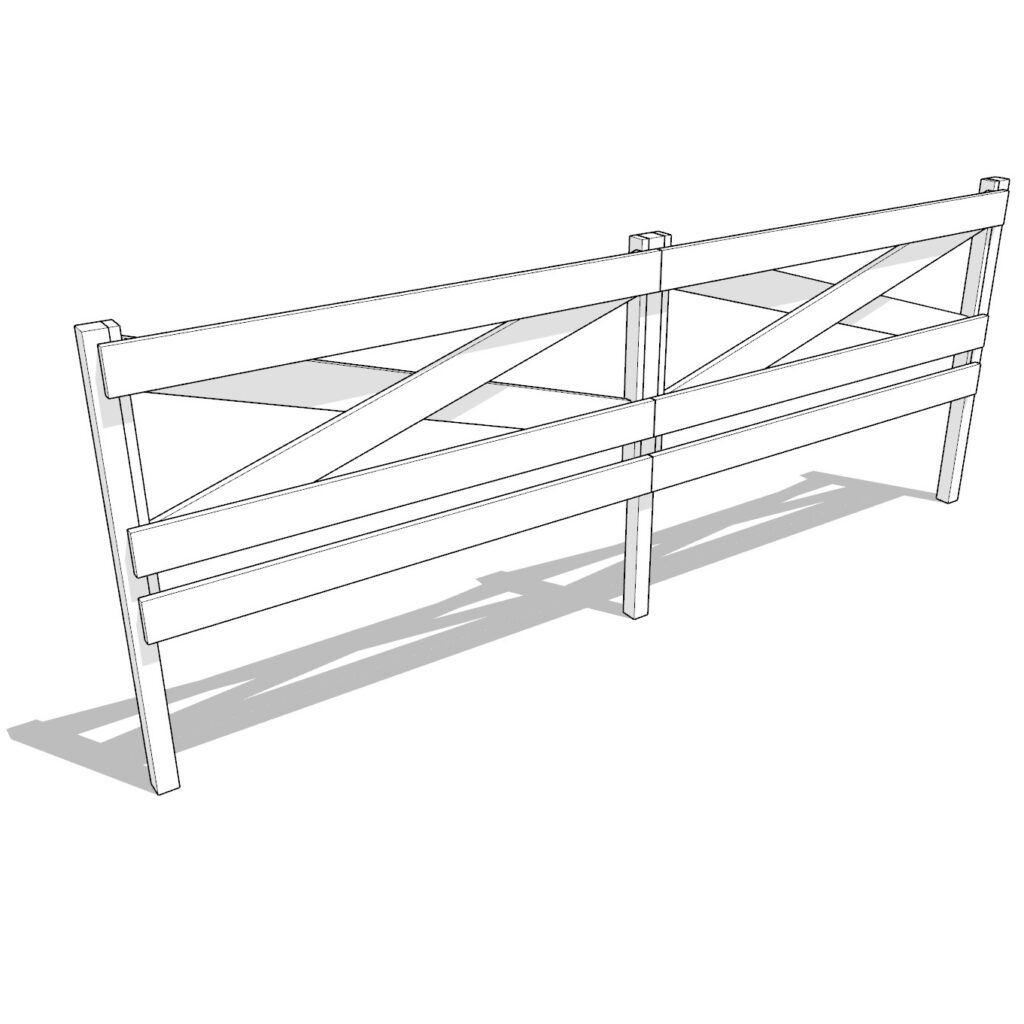
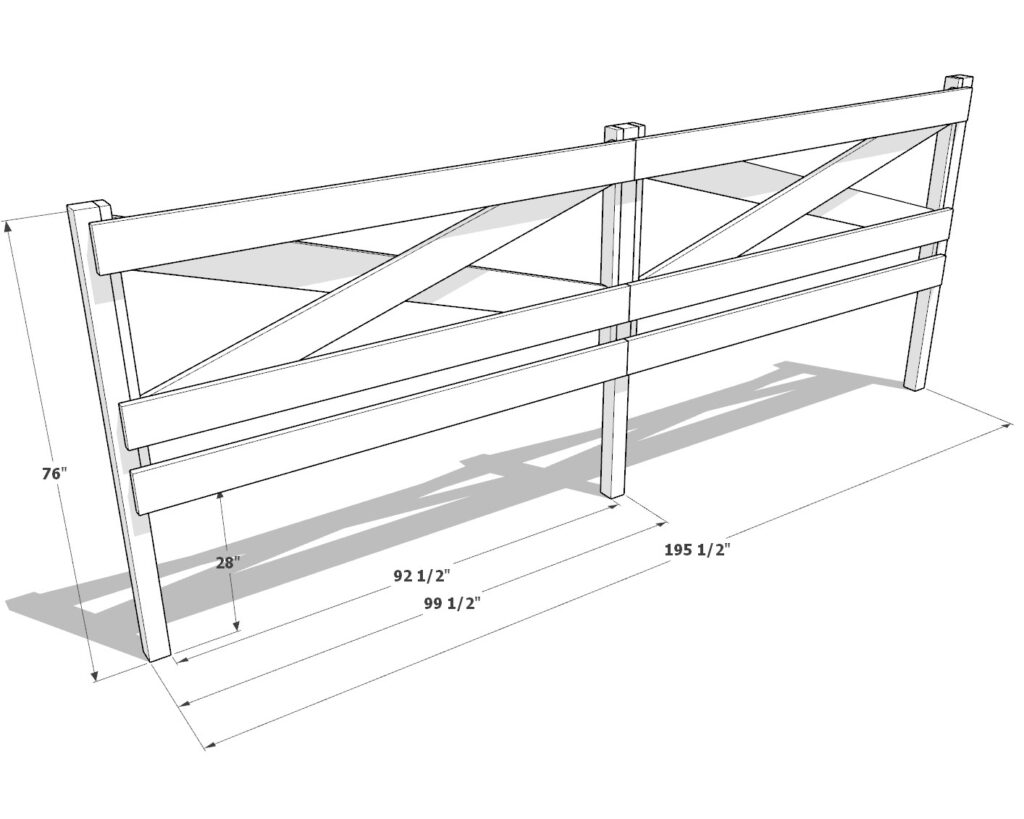
DIY Crossbuck Fence Dimensions
Tools and Materials List:
Available with the purchase of the DIY plan PDF.
Lumber Cut List:
Available with the purchase of the DIY plan PDF.
"Before You Build" Checklist
Legal and Preliminary Preparations:
Obtain Necessary Permits: Visit your local building department or their website to understand the permitting process. Secure any required permits before starting construction to ensure your project complies with local regulations.
Check Local Zoning Laws: Research local codes concerning fence height, style, and placement restrictions. This information is usually available on your city or county’s website or by contacting local authorities directly.
Locate Utility Lines: Call 811 or your local utility companies to mark any underground utility lines. This step prevents potential damage and ensures safety during the digging process.
Discuss with Neighbors: Communicate your fencing plans with adjacent property owners. This courtesy can prevent disputes and ensure your project respects property lines and local codes.
Choose the Right Time of Year: Plan your project during favorable weather conditions. Spring or early summer offers drier soil and more comfortable working conditions, reducing project delays.
Site and Material Preparation:
Soil Assessment: Evaluate the soil type where you plan to install the fence. Different soil conditions may require specific footing or drainage solutions to ensure post stability.
Budget Planning: Calculate the total cost of materials, tools, and any professional assistance you might need. Always add a 10-20% buffer to your budget for unexpected expenses.
Tool and Equipment Checklist: Assemble all necessary tools before starting. Essential tools include a post hole digger, level, saw, drill, and safety equipment. Rent specialized tools like a power auger if needed.
Landscape Preparation: Clear the fence line of vegetation, rocks, and debris. Consider the impact of existing landscape features on your fence layout and make adjustments as necessary.
Access Points: Plan for the number and placement of gates within your fence line. Ensure gates are wide enough for equipment access if needed.
Water Drainage Planning: Design your fence to accommodate natural water flow, preventing pooling and potential water damage to your fence.
Material Storage: Organize a secure, dry area to store your materials throughout the project. Proper storage prevents damage and loss.
Warranty and Return Policy Review: For all materials purchased, understand the warranty coverage and return policies. This knowledge is crucial in case of defective materials or over-purchase.
Construction Considerations:
Lumber Selection:
- Pros and Cons of Common Lumber Types: Cedar and redwood offer natural resistance but are more costly. Pressure-treated pine is cost-effective and durable when treated against rot and pests.
- Pressure-Treated Posts: Essential for ground contact, they resist decay and pests, significantly extending the lifespan of your fence. Regular wood posts, if not treated, can succumb to rot quickly. If using non-pressure-treated wood, consider applying a protective coating or using post sleeves.
Calculating Panel Requirements: Measure your total fence length requirement to determine the number of panels needed.
Additional Considerations:
Underground Hazards: Beyond utility lines, be aware of irrigation systems, septic lines, and other buried features that could impact where you dig.
Future Landscaping Plans: Consider how future landscaping changes could affect your fence. Plan for tree growth, garden expansions, or other modifications.
Wildlife Considerations: If wildlife is a concern, plan for deterrents or specific fence designs to protect your garden or property without harming local fauna.
Sustainability Considerations: Opt for eco-friendly materials and practices where possible to minimize environmental impact.
Back-up Plan: Have a contingency plan for delays, including weather-related setbacks or material shortages.
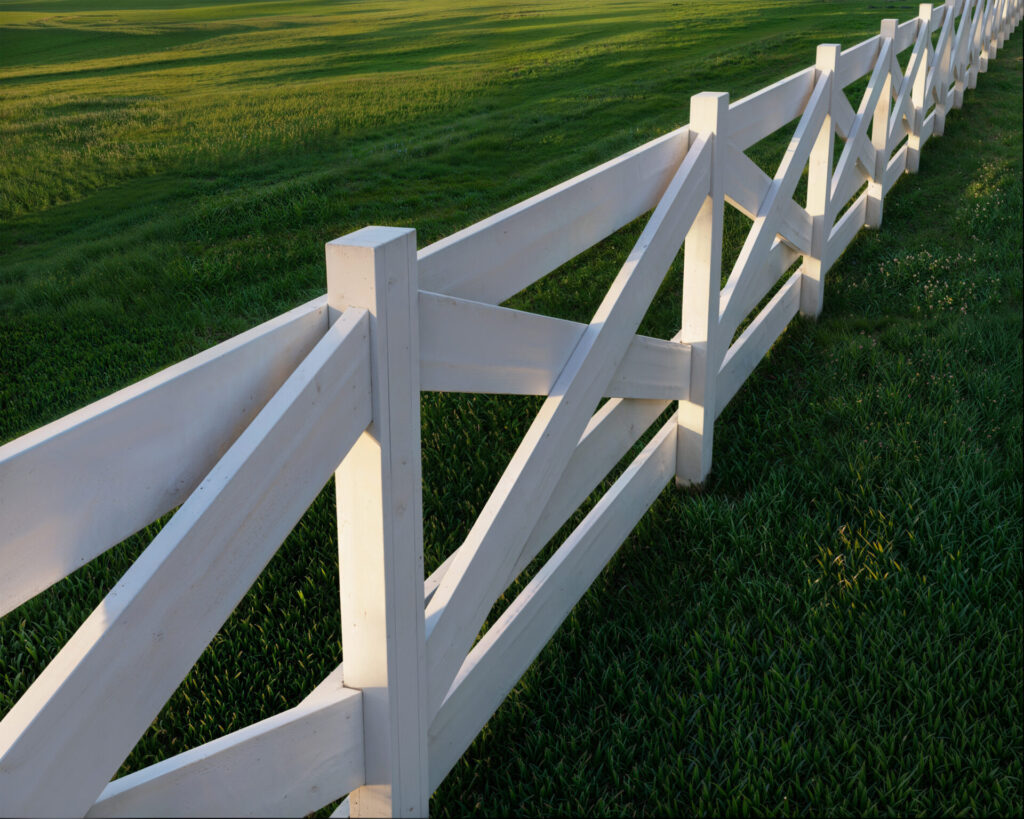
Step 1: Constructing the Fence Frame
Before diving into construction, review the entire guide to understand the process thoroughly. This will help avoid mistakes and unnecessary expenditure.
Building the Frame:
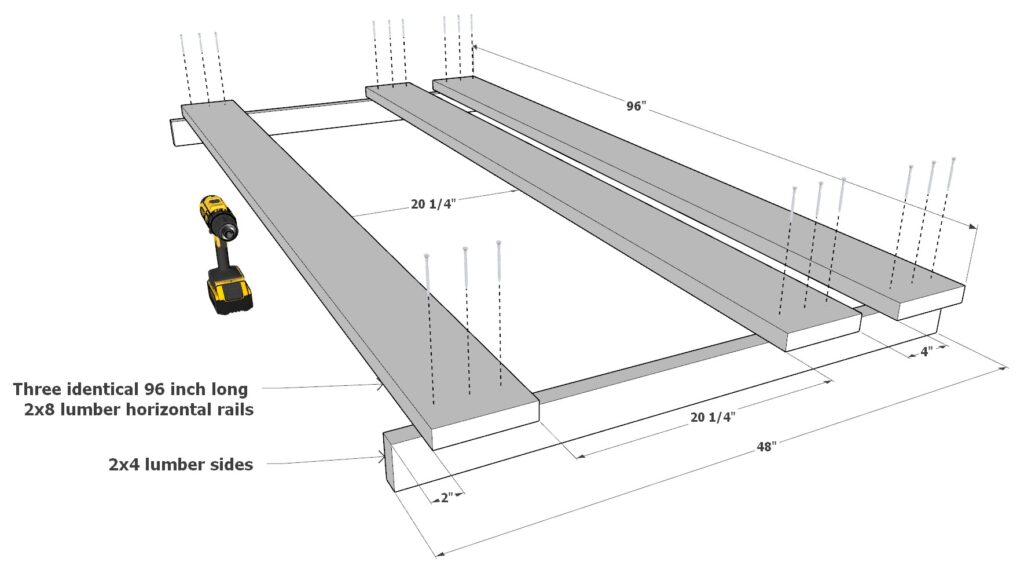
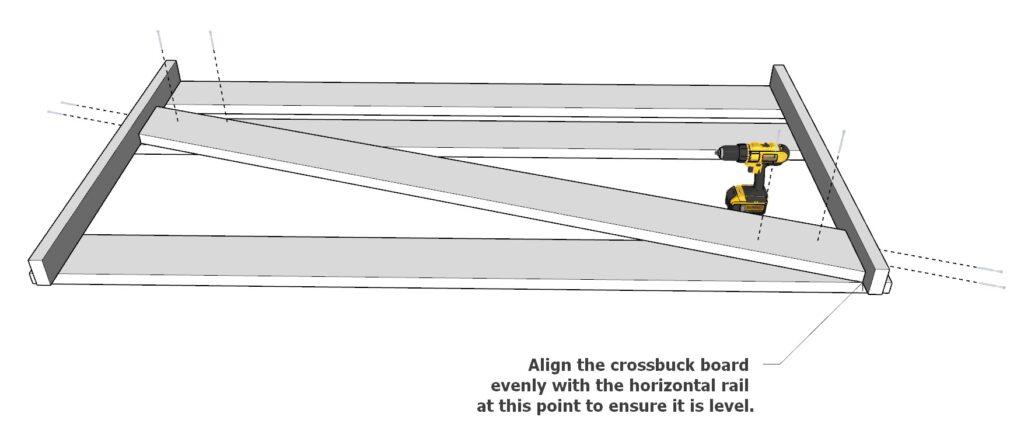
Gather two 2×4 lumber pieces, each cut to 48 inches, and three 2×8 lumber boards, each 96 inches long. These will form your horizontal rails.
Lay out the 2×4 and 2×8 boards according to the spacing shown in the accompanying diagram. This spacing is critical for structural integrity and visual symmetry.
Using 3.5-inch wood screws, fasten the boards together. Always pre-drill holes to prevent splitting the wood—this will contribute to the longevity of your fence.
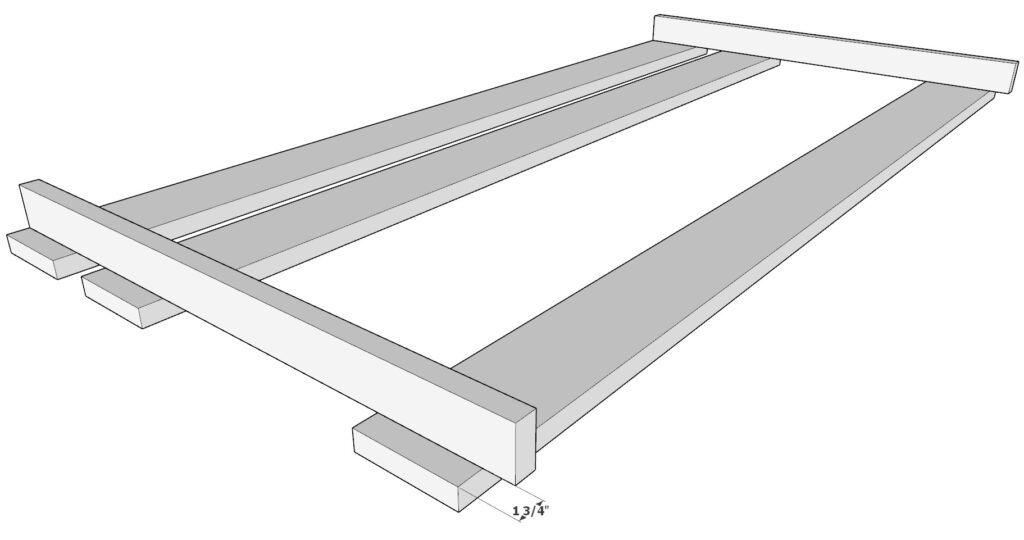
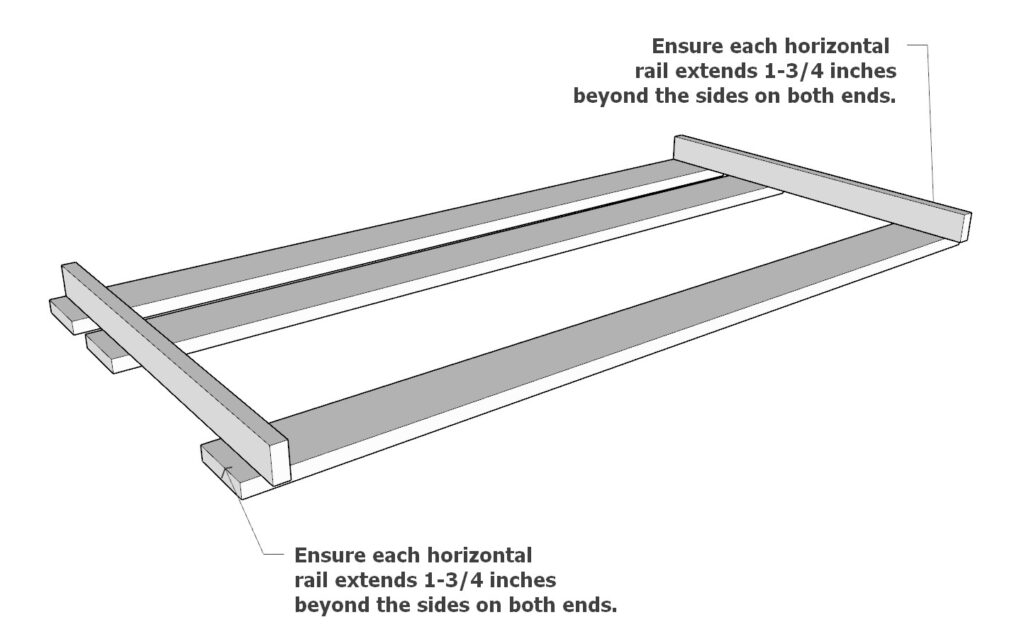
Ensure that each horizontal rail protrudes 1-3/4 inches beyond the vertical posts on both sides. It’s crucial to be precise here; less than 1-3/4 inches is preferable to more, as overextension can lead to connection issues with the 4×4 posts.
Pro Tips:
If constructing a lengthy fence, consider using spacers for consistency and uniformity. These can be particularly helpful for maintaining the 1-3/4 inch overhang on the horizontal rails.
Accuracy is more favorable than excess. If you’re unsure, err on the side of caution and aim for a slightly shorter overhang rather than a longer one. This will ensure a snug fit when attaching to the posts.
Step 2: Cutting and Attaching the Crossbucks
Now, it’s time to give your fence its distinctive character with the crossbucks.
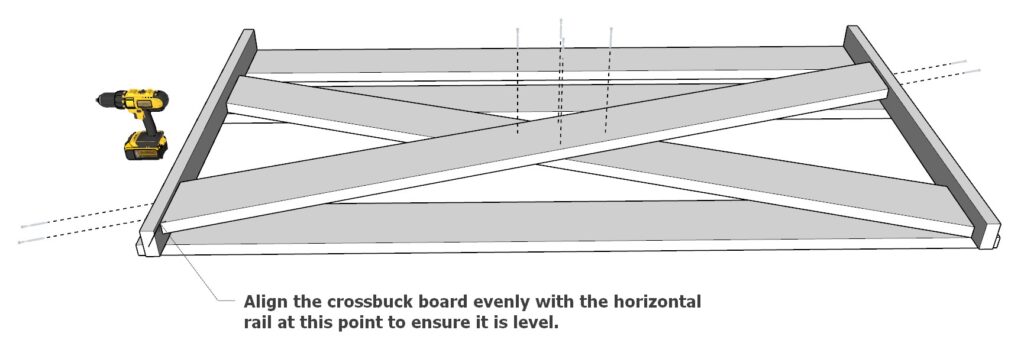
Cutting the Crossbucks:
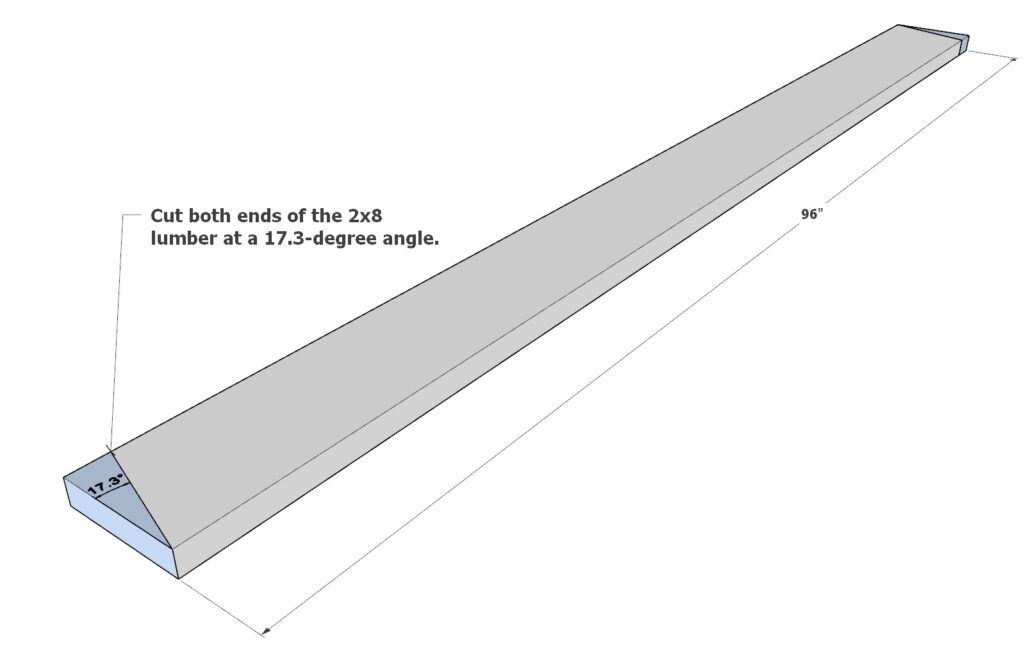
Begin with a 96-inch 2×8 lumber board. On both ends of the board, measure and mark a 17.3-degree angle cut—this specific angle is vital for the crossbucks to fit perfectly within the frame.
Make the angled cuts using a miter saw. For consistency, especially if you’re producing multiple panels, set up a stopper on your saw to ensure each cut is identical. You’ll need two of these angled boards for each panel of your fence.
Attaching the Crossbucks:
Position the first cut piece diagonally between the horizontal rails, aligning it with the 2×4 lumber sides as indicated in the diagram.
Secure the ends of the crossbuck to the 2×4 lumber using 3.5-inch screws, predrilling to maintain the wood’s integrity.
Fasten the crossbuck to the horizontal rails with 2.5-inch screws to prevent them from protruding on the opposite side.
Place and secure the second crossbuck piece in a symmetrical ‘X’ fashion to the first, following the pattern illustrated in your guide.
Pro Tip:
A miter saw with a preset stopper is invaluable for this step. It allows for quick, repetitive cuts without remeasuring, saving time and ensuring all your crossbucks are uniform in length and angle.

Step 3: Installing Posts to Fence Panels
It’s crucial to decide the fence height first. While our illustrations cater to a 4.5-foot fence, you have the flexibility to adjust this by using a longer 4×4 lumber post then shown in the plan here. Here are ideal heights for common scenarios:
- For Horses: At least 5 feet to prevent jumping over.
- Small Livestock: Around 4 feet to contain animals like goats.
- Privacy Needs: 6 feet to provide a sense of seclusion.
- Garden Enclosures: 3 to 4 feet to keep out small animals while displaying your garden.
- Decorative Perimeter: Height can vary based on design preference and function.
Installing Posts on Initial and Continuation Panels:
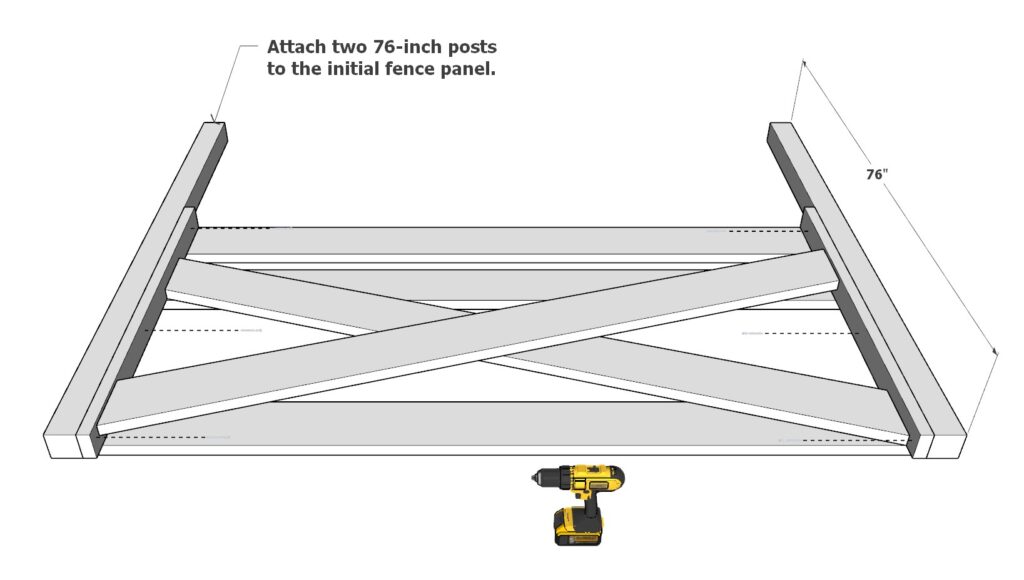
Initial Fence Panel Posts:
- Take two 76-inch 4×4 lumber posts for the starting panel of your fence.
- Align each post to the edges of the frame.
- Fasten the posts to the 2×4 side pieces using 3.5-inch screws, driving them in directly through the side lumber for a secure fit.
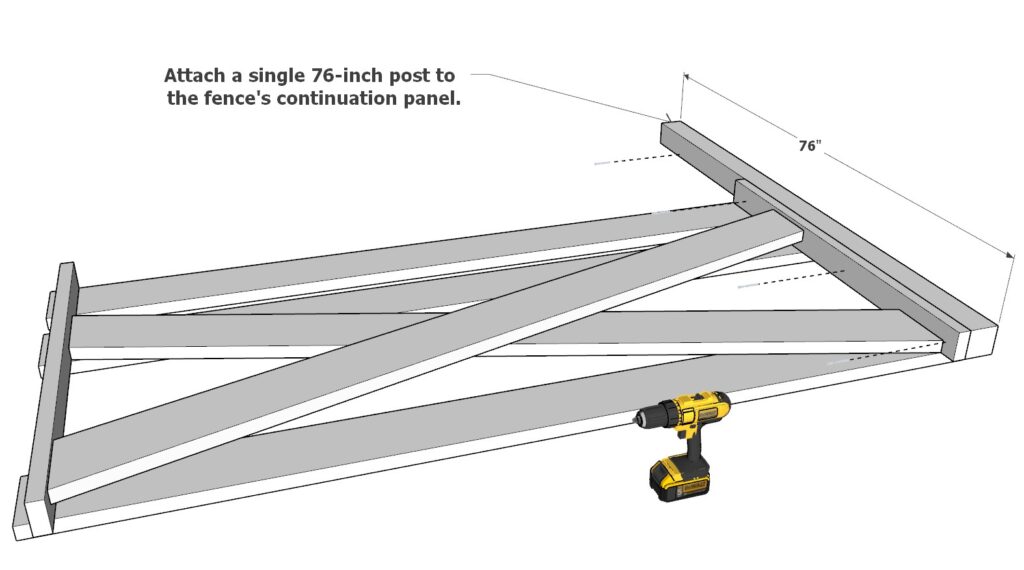
Continuation Fence Panel Posts:
- For the panels that will continue the fence line, you only need to add one 76-inch 4×4 post to each.
- Attach the single post in the same manner as the initial panel, using 3.5-inch screws for a robust attachment.
Key Considerations:
Pay attention to the orientation of the fence. The initial panel sets the precedent for the entire fence, so double-check the direction in which your fence will continue.
The side of the continuation panels that receives the 4×4 post should be determined based on the direction your fence is extending from the initial panel. Remember, each panel has a front and a back; align your posts accordingly to maintain a consistent appearance from the front-facing side.
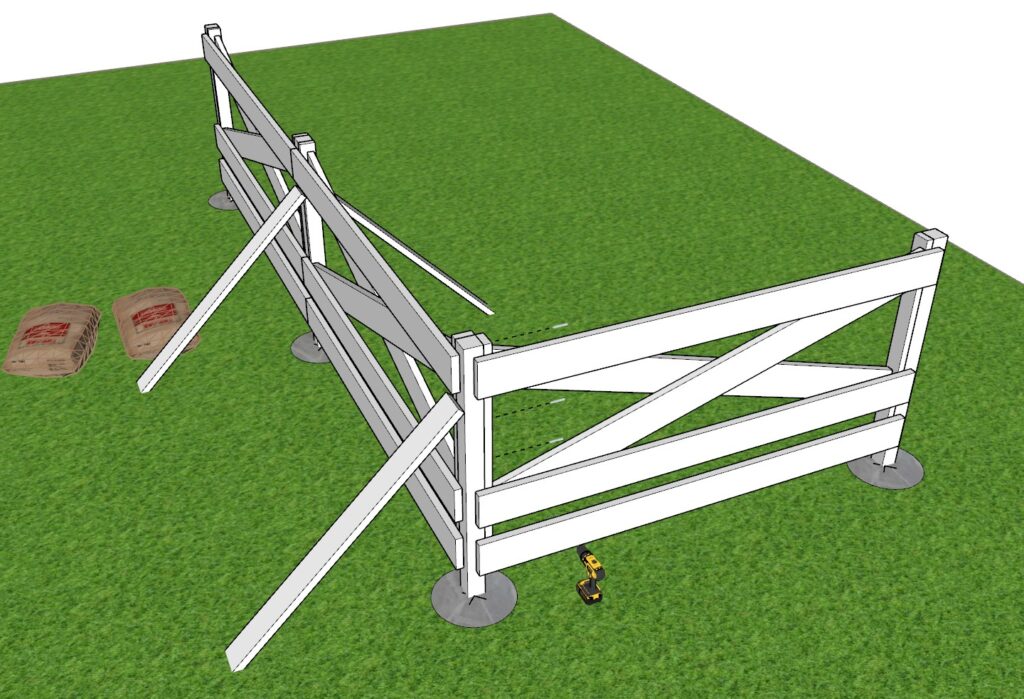
Step 4: Setting the Fence Panels and Posts
Preparing for Installation:
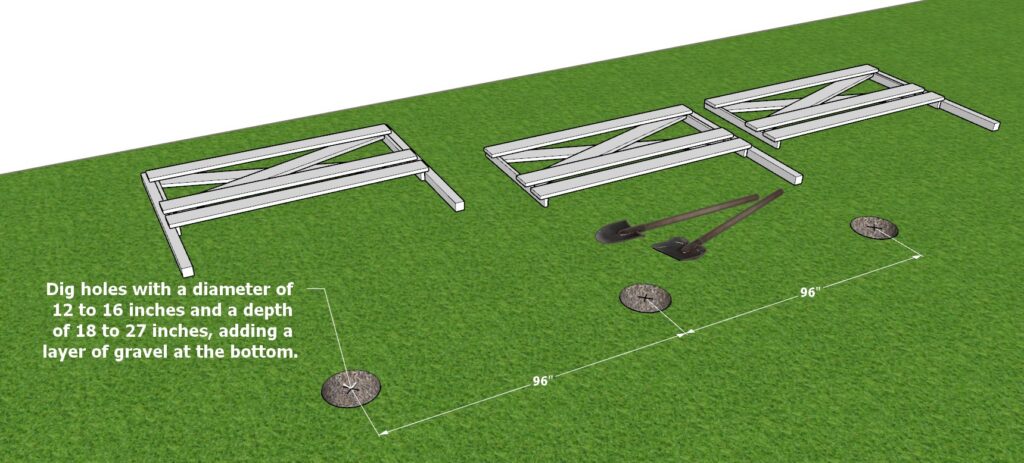
- Begin by ensuring the ground at your project site is as level as possible to facilitate an even fence line.
- Space the post holes precisely 96 inches apart, corresponding to the width of each fence panel for uniformity.
Digging Post Holes:
Hole Dimensions:
- Dig holes with a diameter of 12-16 inches to accommodate the posts, ensuring a snug fit.
- The depth should range from 18-27 inches to establish a firm base that extends below the frost line, which prevents heaving in cold weather.
Gravel Base:
- Place a layer of gravel at the bottom of each hole for drainage, preventing water accumulation that could lead to wood rot or post heave.
Hole Adjustment:
- If a hole is too deep, backfill with soil and compact it thoroughly until you reach the desired depth, maintaining a consistent post height for a uniform fence appearance.
Soil Considerations:
- Adjust the size of the hole depending on the soil type: widen it in loose, sandy soil for more stability, or reduce it in dense, compact soil that naturally provides support.
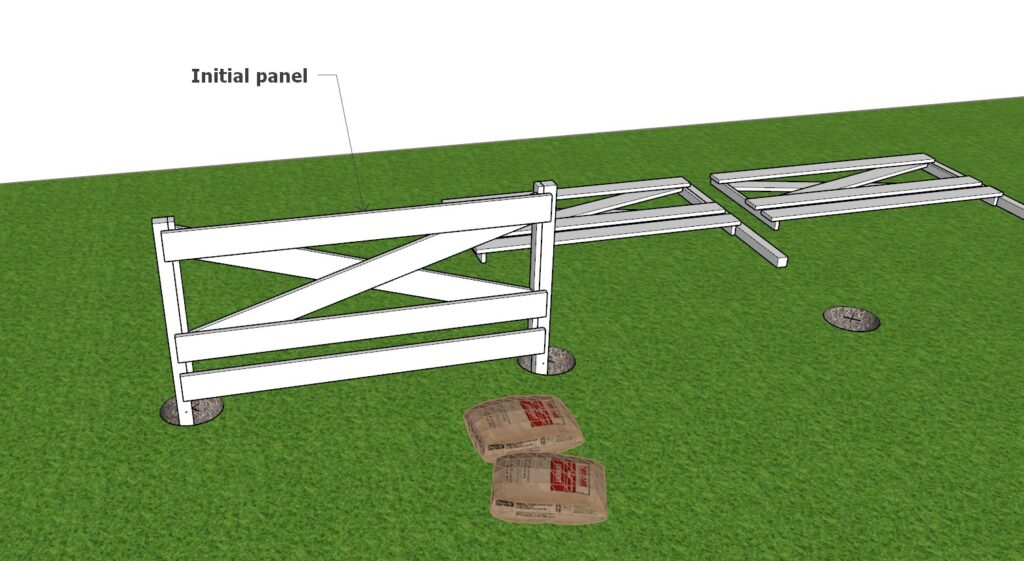
Installing the Initial Panel:
Set the initial panel onto the gravel, ensuring a 4-inch ground clearance beneath the bottom rail, which can be adjusted based on your specific requirements.
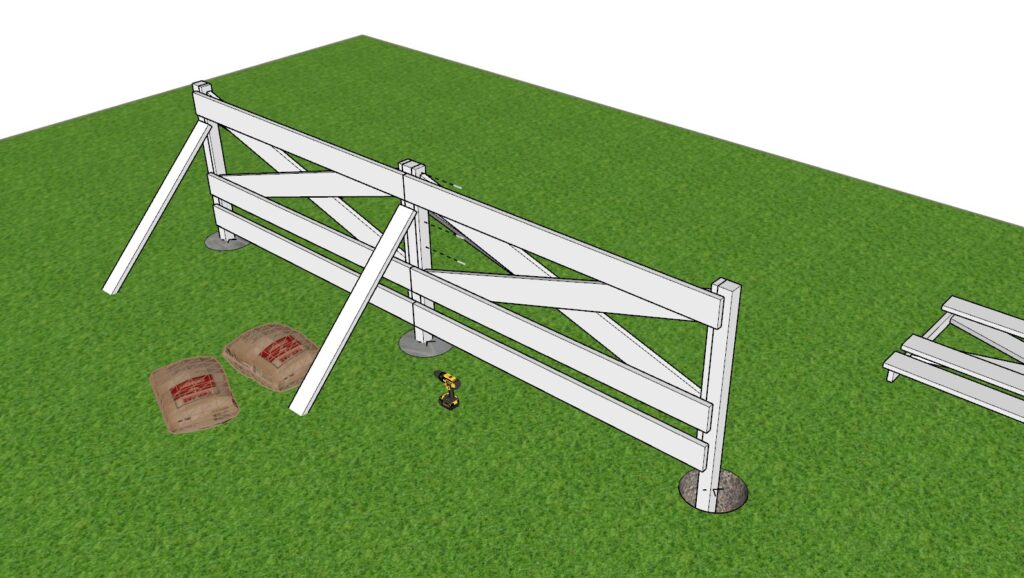
Use a level to confirm the panel is plumb. Then, temporarily brace it with scrap lumber to keep it in place.
Pour concrete around the post, checking the type recommended for outdoor posts; quick-setting concrete is often preferred for its strength and ease of use.
Connecting Continuation Panels:
Align the continuation panel with the initial one, sharing the post between them.
Secure by screwing directly through the 2×4 sides, ensuring a tight joint.
Navigating Turns and Slopes:
For turns, pivot the next panel at the shared post to create the desired angle.
On sloping ground, you can slightly step each panel to ascend with the gradient, but avoid steep slopes that require specialized design adjustments.
Pro Tips:
- For a professional finish, always check the alignment of each panel with a level before setting it in concrete, ensuring both vertical and horizontal lines are straight.
- When dealing with slopes, consider the visual flow of your fence. Minor adjustments to the panel height can maintain a cohesive look across uneven terrain.
- During the concrete setting process, periodically recheck the level and adjust the bracing as necessary to prevent any shifts.
Finalizing Your Fence:
- Allow the concrete to cure according to the manufacturer’s instructions before removing the temporary bracing. This ensures the posts remain stable and upright.
- After setting the posts, fill any remaining gaps around the posts with soil, compacting it to prevent air pockets, which could lead to instability.
Remember, the goal is to achieve a fence that is not only visually pleasing but also structurally sound. Taking the time to install each panel carefully will pay off in the durability and appearance of your fence. This hands-on approach, combined with attention to detail, will ensure your crossbuck fence stands as a testament to your craftsmanship and dedication to quality.
Step 5: Painting and Maintaining Your Crossbuck Fence
Ensuring your crossbuck fence not only stands the test of time but also maintains its aesthetic appeal requires careful painting and ongoing maintenance. Let’s delve into the details.
Painting Your Fence:
Choosing the Right Paint:
- Opt for high-quality, exterior-grade paint designed specifically for wood. Look for products that offer UV protection to prevent fading and are moisture-resistant to combat rot.
- Avoid cheap, interior paints that won’t withstand the outdoor elements, leading to peeling and frequent reapplications.
Preparation:
- Start with a clean surface. Use a power washer or a stiff brush and soapy water to remove dirt, debris, and any mildew. Allow the wood to dry completely.
- Sand the wood lightly to create a smooth surface for better paint adhesion.
Application:
- Apply a primer first if your paint doesn’t include it. This helps in sealing the wood and improving the longevity of the topcoat.
- Use a wide, flat brush or a paint sprayer for even coverage. Begin from the top to avoid dripping on finished areas.
- Apply at least two coats of paint, allowing ample drying time between applications as recommended by the paint manufacturer.
Maintaining Your Fence:
Regular Inspections:
- Conduct semi-annual inspections to check for any damage, focusing on areas where moisture may collect and cause rot.
Cleaning:
- Clean your fence annually with a mild soap solution and a soft brush to keep it free from dirt and grime. Avoid harsh chemicals that can strip paint and damage the wood.
Panel Replacement:
- If a panel becomes damaged beyond repair, it can be unscrewed and removed. Replace it with a new panel cut to size, following the original installation steps.
- Remember to paint the new panel before installing it to ensure a uniform look.
Preventive Measures:
- To prevent rot, ensure that the bottom of the fence does not directly contact the soil. Maintain the landscaping around your fence to avoid direct contact with plants and moisture.
Repainting:
- Depending on exposure to elements, your fence will need a fresh coat of paint every 5 to 7 years. This not only keeps it looking fresh but also adds an extra layer of protection against weathering.
Address Issues Promptly:
- Tend to minor repairs immediately to prevent them from becoming major problems. Tighten any loose screws and replace rotted or damaged sections as soon as they’re noticed.
By adhering to these detailed steps for painting and maintenance, your crossbuck fence will serve as a durable and attractive boundary for years to come. Regular care not only preserves the integrity of the fence but also enhances the overall beauty of your property.
