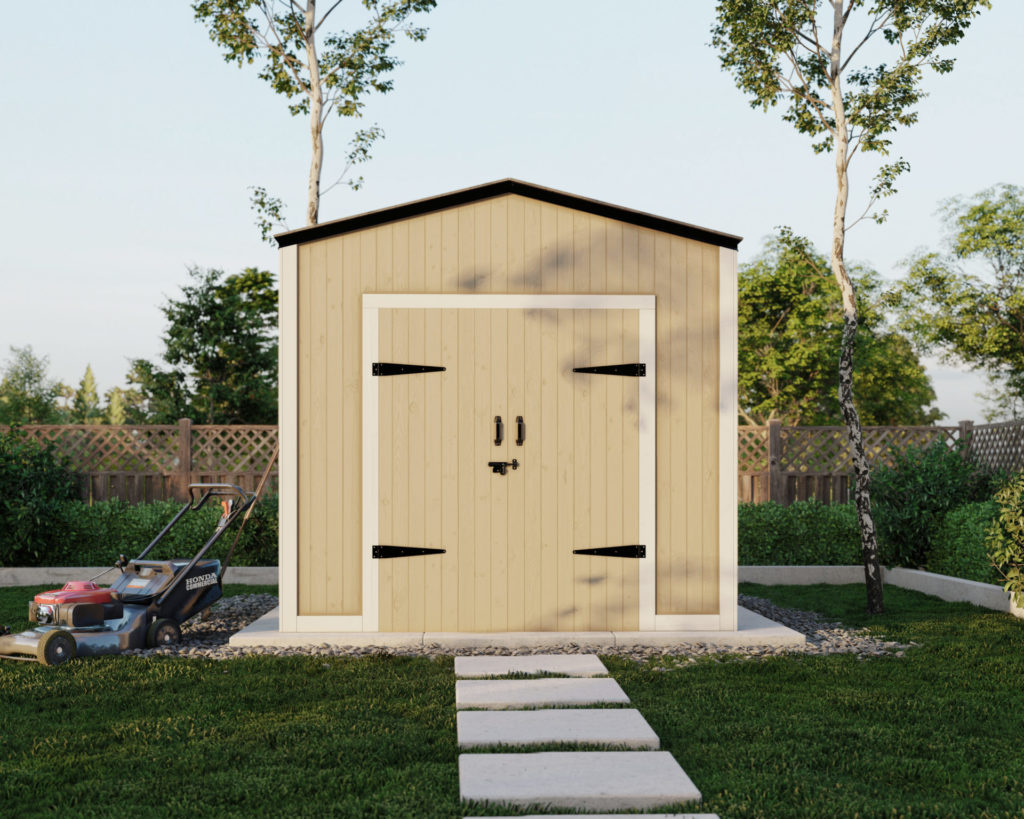
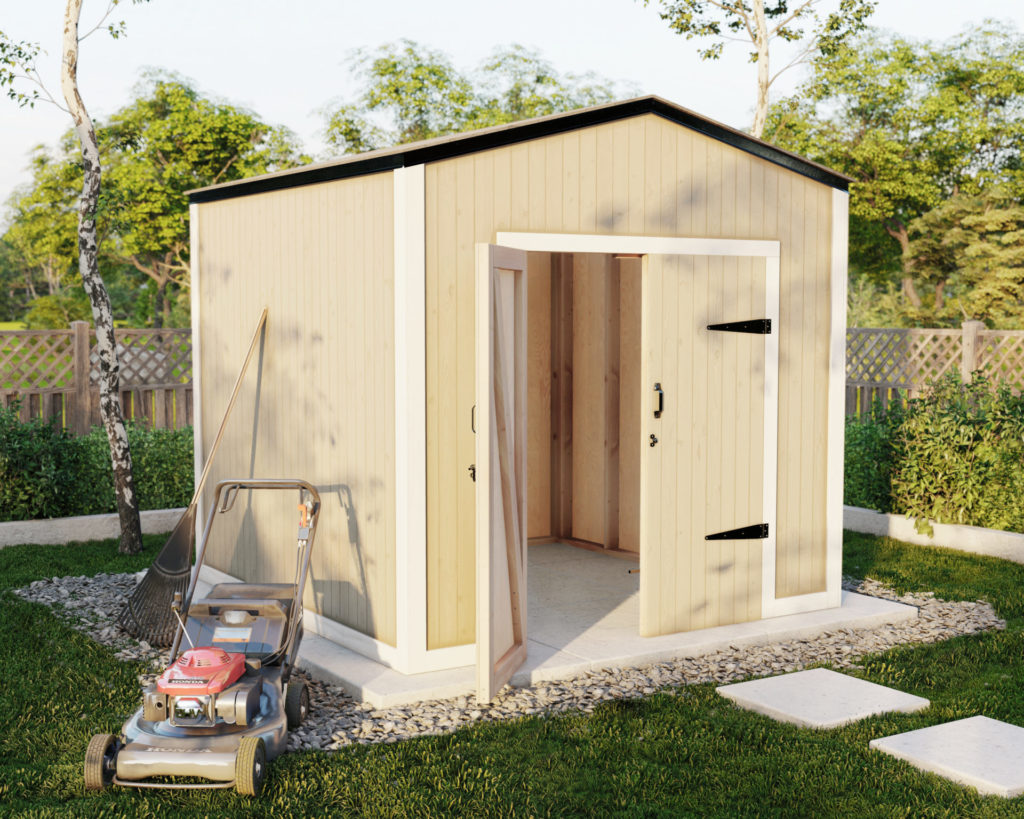
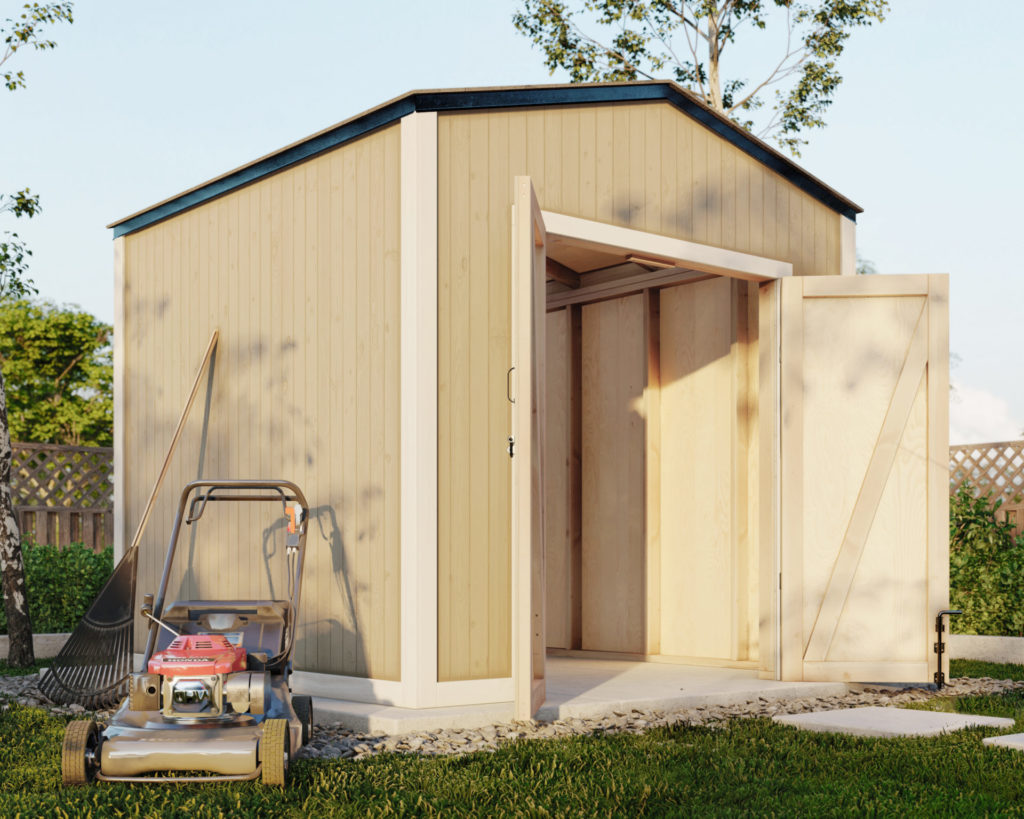
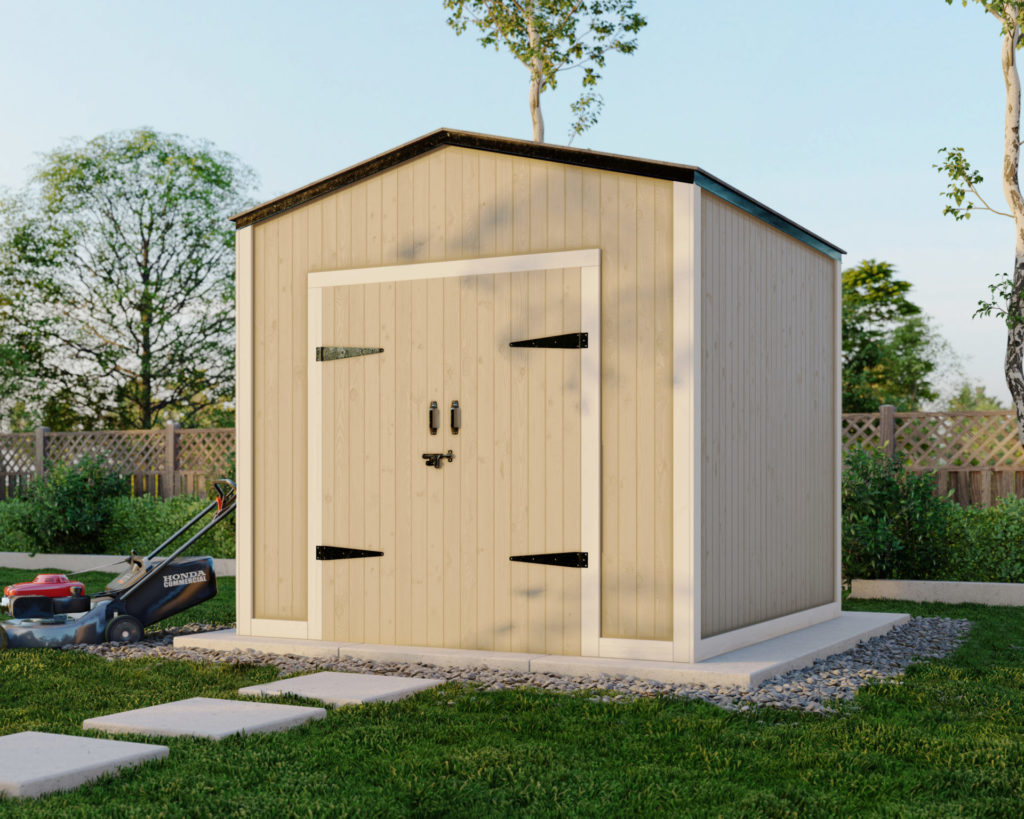
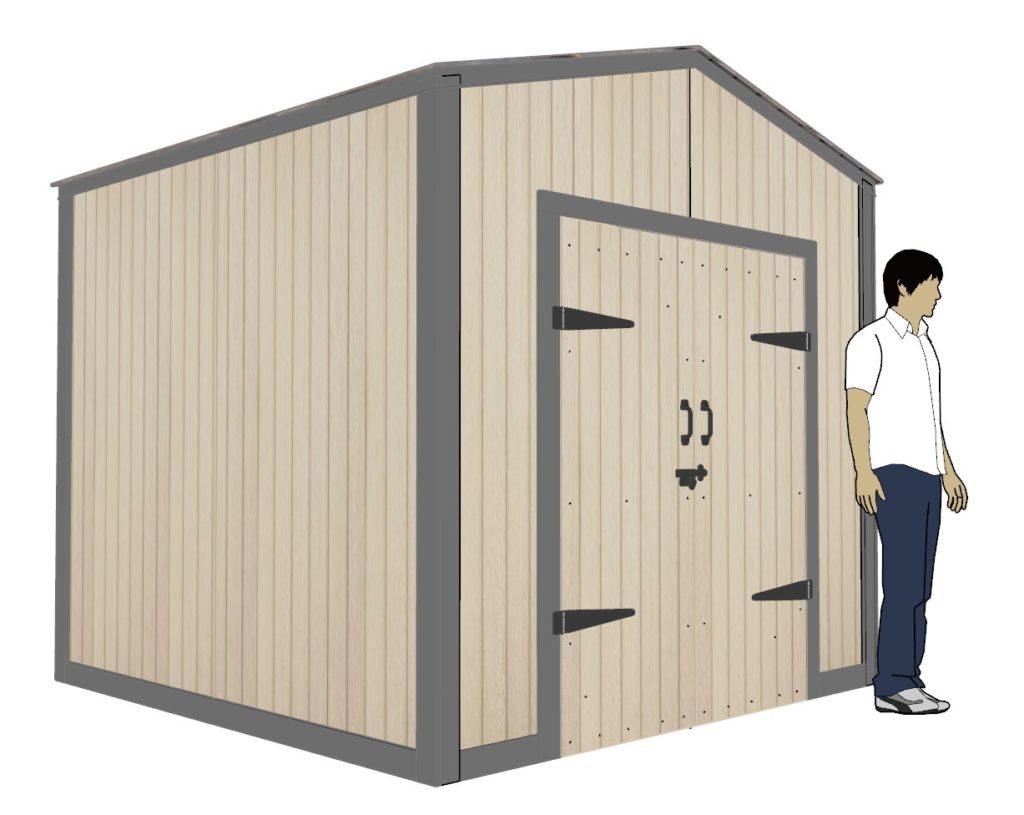
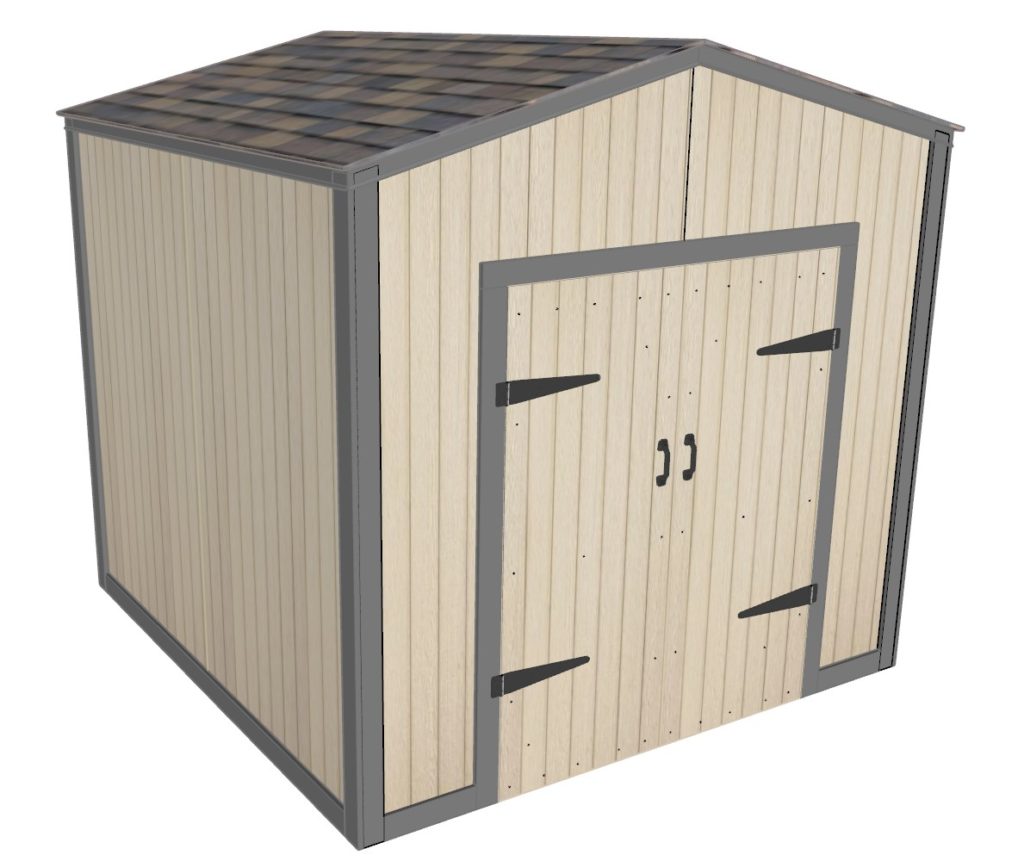
The DIY 8ft x 8ft shed overview:
A DIY 8ft x 8ft wooden shed is a great addition to any outdoor space. Perfect for storing outdoor equipment, tools, backyard furniture, and other items that you don’t have room for in the house. The DIY shed is perfect for storing garden tools, lawn mowers, bicycles, outdoor furniture, and other items. It also makes an ideal workshop or hobby room, and can be used for woodworking, crafts, and other DIY projects. The shed is also great for storing seasonal items, such as snow blowers, Christmas decorations, and other items you don’t want to leave outside. this shed is an easy and affordable way to increase your storage space. The shed is easy to construct, cost-effective, and can be customized to suit your needs.
The DIY shed specifications:
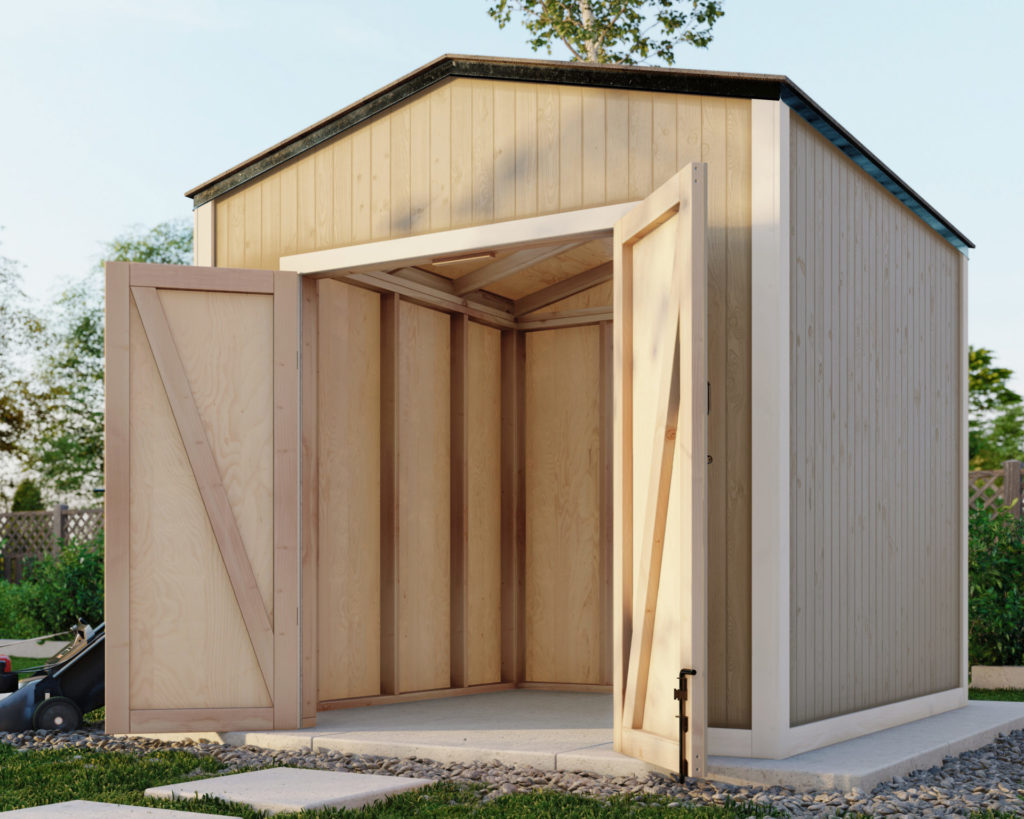
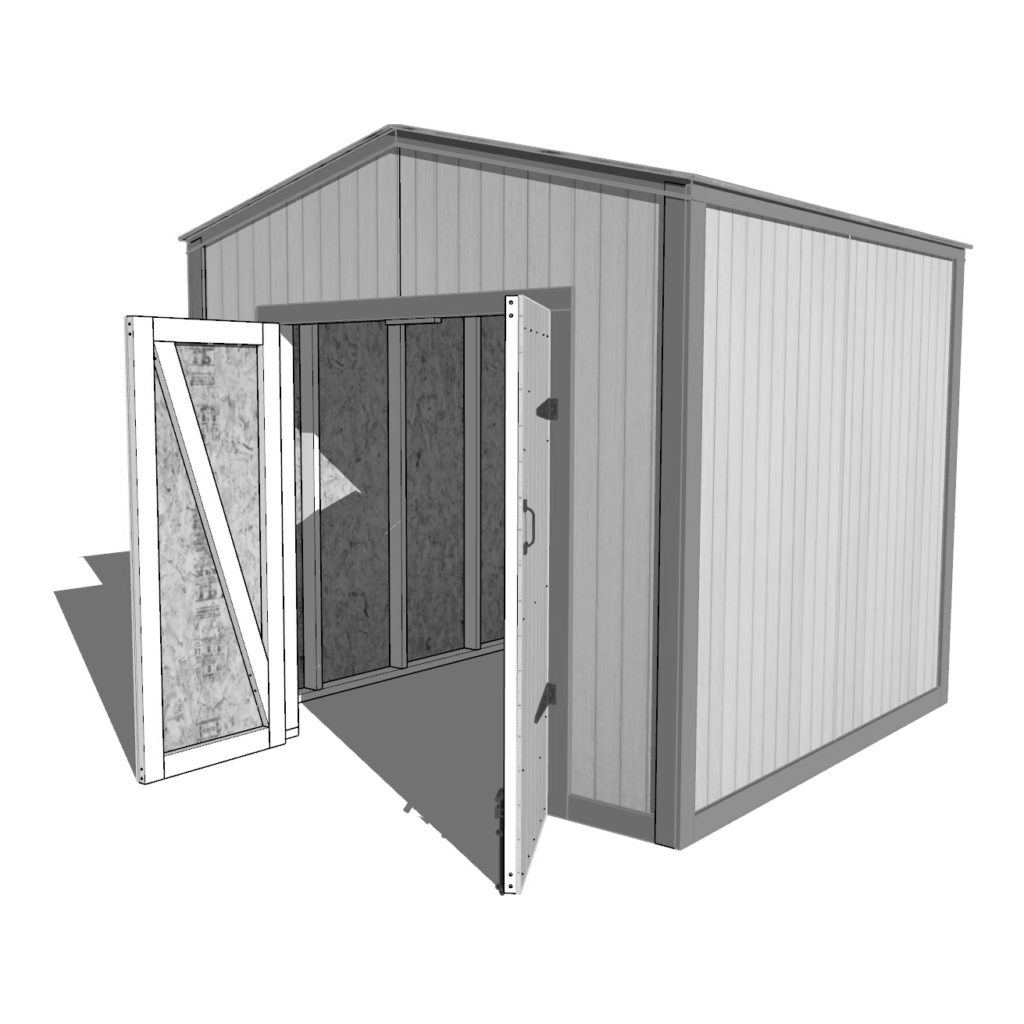
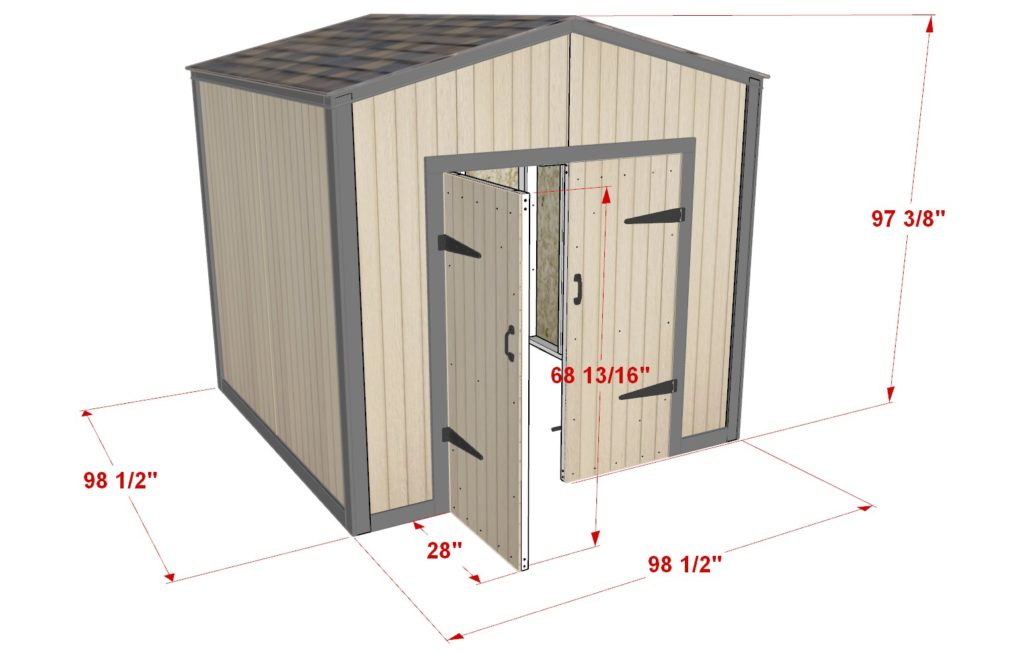
The sheds Double doors provide more convenience and accessibility than a single door. With two doors, it is much easier to enter and exit the shed, especially if you are planning to store large or awkwardly-shaped items. The double doors offer a more aesthetically pleasing look than single doors. This can be especially beneficial if the shed is located in view of the house or other structures. Double doors can give the shed a more finished, polished appearance.
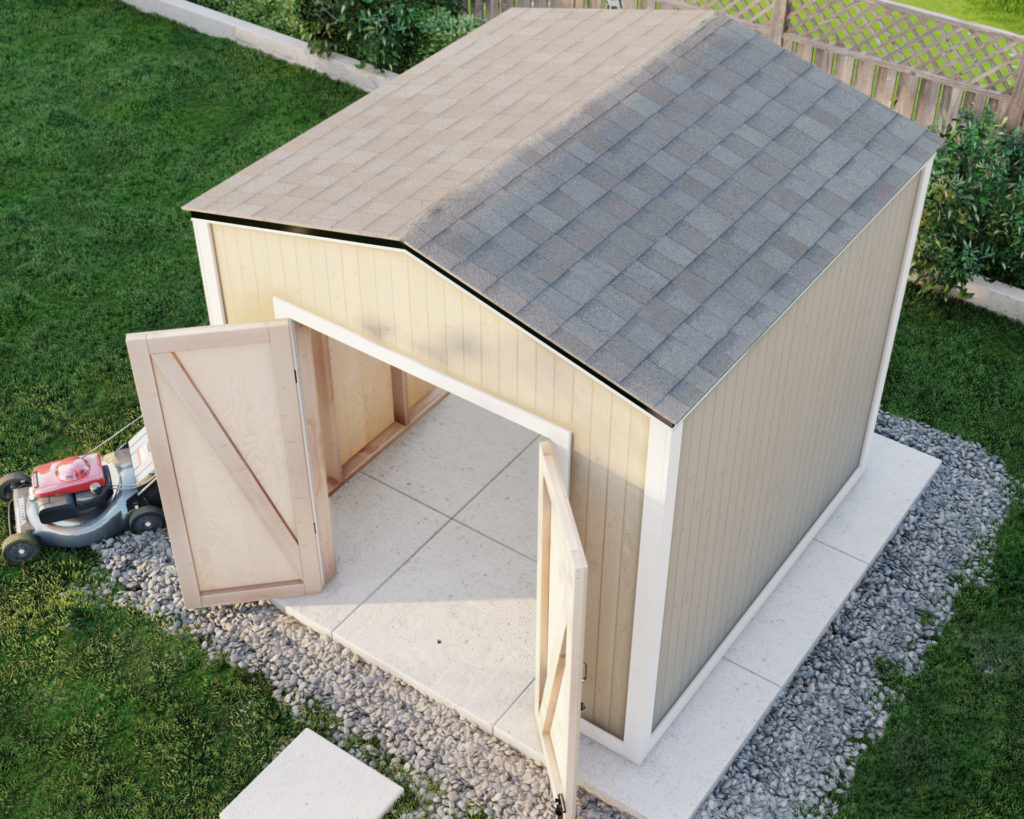
The slanted shed roof helps to keep the interior dry, as it allows for proper drainage and ventilation.
Wood:
The frame of the shed is made from common 2×4 lumber lumber. The exterior walls are made from siding sheets, while the roof is made with two plywood sheets. The roof is covered with asphalt shingles, and the trim is made from common 1×4 lumber.
Hardware:
The shed is held together with galvanized nails, screws, and bolts. The door is hung on hinges and is secured with a latch. One of the double doors is held in place with a cane bolt.
Other Components:
The shed is built on a concrete slab, and the walls can be insulated with fiberglass insulation. Finally, the shed is painted with an exterior paint.
What kind of shelves and storage can I build inside the shed?
The 8ft x 8ft DIY wooden shed can accommodate a variety of shelving options depending on the desired height and purpose of the shelving. The most common shelving options for a wooden shed include wall-mounted and freestanding shelves.
Wall-mounted shelves are typically built using plywood, 2×4 boards, and metal brackets. The plywood should be cut to the desired size and shape, and then secured to the 2×4 boards using screws. The 2×4 boards should be measured and cut to length, and then attached to the walls of the shed using nails and metal brackets. Once the shelves are in place, they can be used to store and organize items such as tools, decorations, and small containers.
Freestanding shelves are typically made from wood or metal and can be assembled onsite. Wooden shelves can be constructed from plywood and 2×4 boards, and metal shelves can be made from metal rods and brackets. Both types of shelves should be measured and cut to size and then assembled in the shed according to the manufacturer’s instructions.
No matter which type of shelving is chosen, it is important to make sure that the shelving is securely attached to the walls of the shed and that it is strong enough to hold the weight of the items being stored. Additionally, it is important to make sure that the shelves are not placed too close to the walls of the shed, as this could cause damage to the walls over time.
Who can build the 8ft x 8ft DIY shed?
This DIY shed is fairly easy to assemble with the step-by-step instructions provided in this post. I believe this would be a great project for beginners to woodworking and anyone with minimal woodworking experience. The DIY plans offered in this post include helpful description, images, diagrams, helpful links, and more to ensure that the DIY build is smooth, efficient, and easy.

Time to build
About 10 hours
Total cost of build
About $800
Skill level required
Beginner
Download the PDF plans
DIY 8ft x 8ft shed PDF plans
What is included in the PDF download?
Easy to read step by step instructions
Material list
Tools needed
3D illustrations
Recommended tools/materials
- Miter saw
- Drill
- Impact driver with bit for screws
- Sander
- wood countersink drill bit
- 15 lb 3-1/2 inch screws
- 1/2 lb 1.5 inch screws
- Wood glue
- sand paper
- Small roll of roofing underlayment
- 3/4 in. Smooth Galvanized Roofing Nails
- Caulking and caulking gun
- Steel Drip Edge Flashing (about 34 feet. See step 9 for details)
- 1 inch Galvanized Steel Roofing Nails (1 lb.-Pack)
- 2-3 packs of Roofing Shingles
- Four door hinges
- Two door handles
- One cane bolt assembly
- One door bolt latch
Shopping list and cut list
Available with purchase of DIY PDF plan. Thank you for your support and for making this website possible!
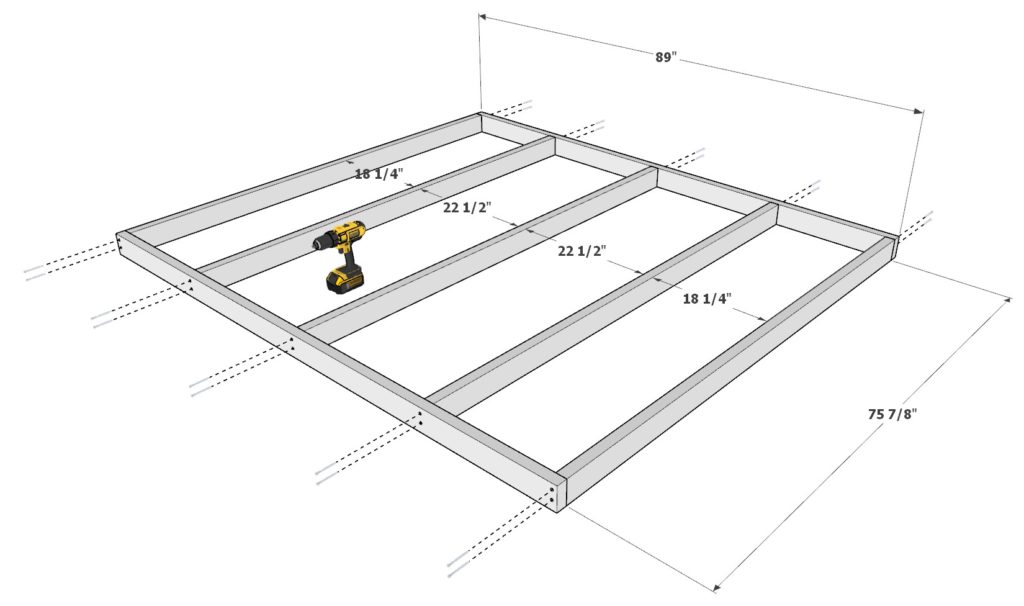
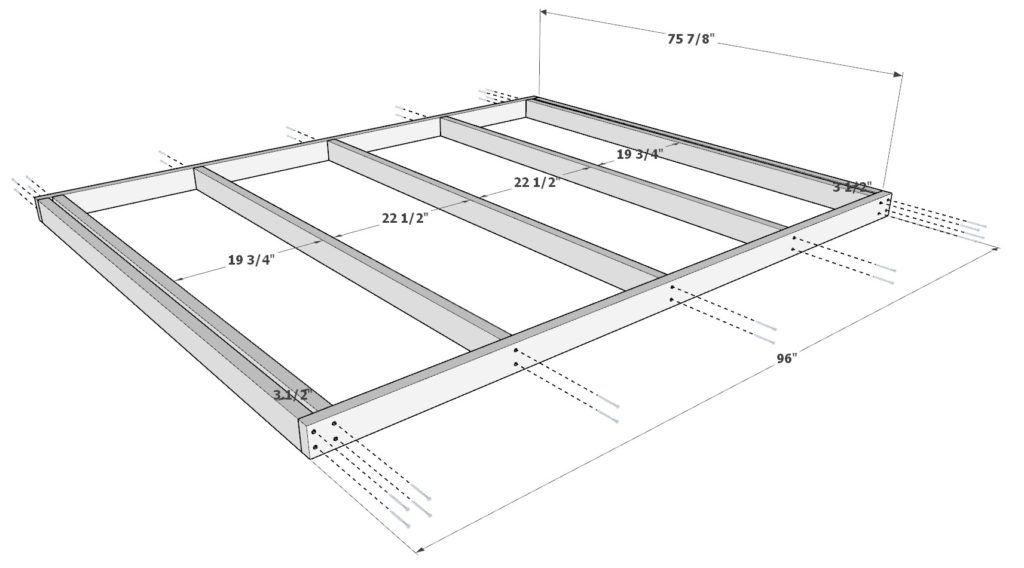
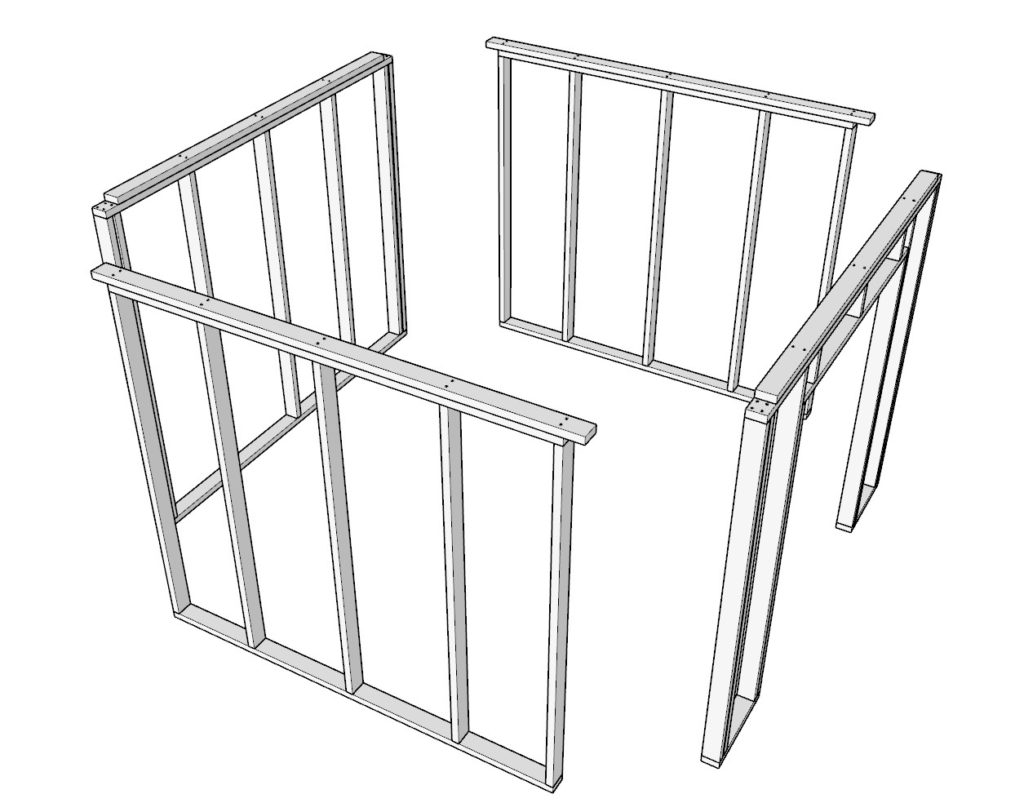
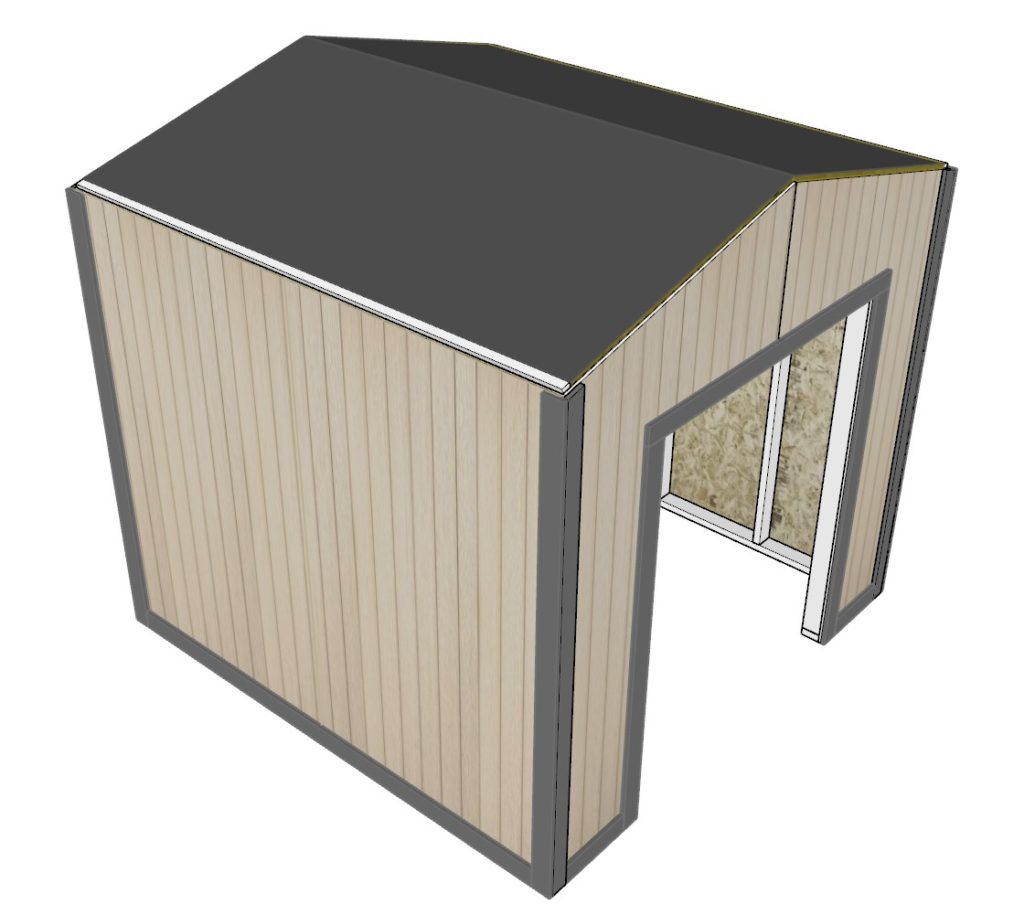
Step 1 (DIY shed side walls frame construction)
First, assemble to shed walls.
Take five 75-7/8 inch 2×4 lumber pieces and two 89 inch 2×4 lumber pieces and arrange them as shown below. Join the lumber pieces by predrilling holes and adding 3.5 inch screws.
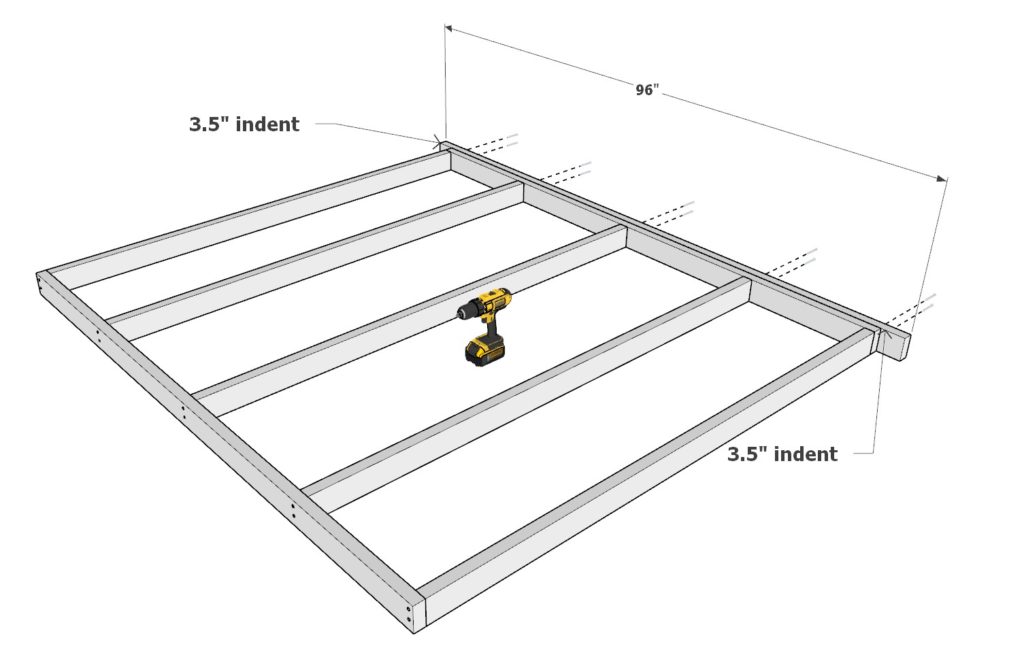
Next, add a 96 inch 2×4 lumber pieces to one of the sides of the wall frame. Ensure that the ends are indented by 3 1/2 inches.
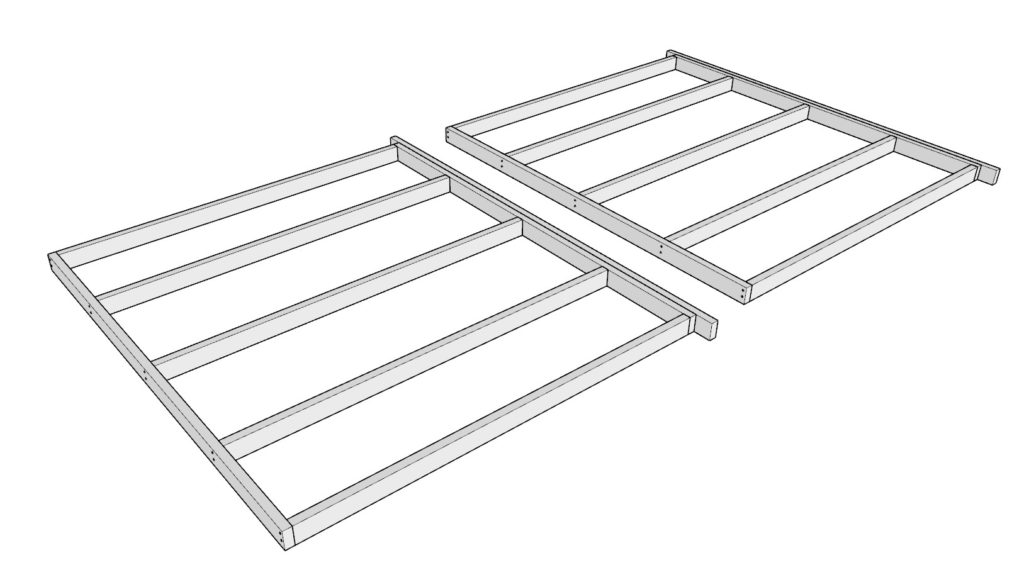
Make tow identical frame pieces.
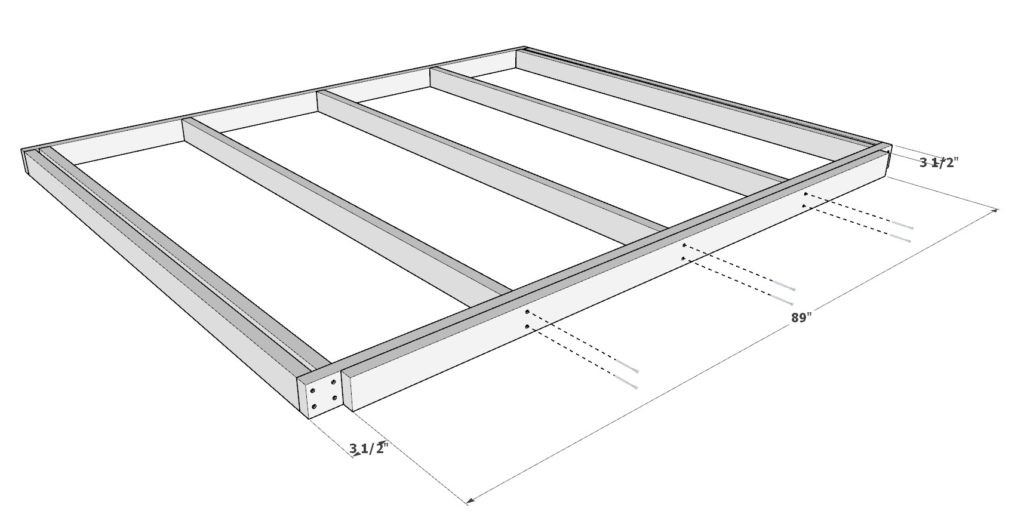
Step 2 (DIY shed back wall frame construction)
Next, assemble the back wall of the shed.
Take seven 75-7/8 inch 2×4 lumber pieces and two 96 inch 2×4 lumber pieces and arrange them as shown below (The total distance between the four end 2x4s (Two on each end) should be 3.5 inches wide as shown below). Join the lumber pieces by predrilling holes and adding 3.5 inch screws.
Next, add a 89 inch 2×4 lumber pieces to one of the sides of the wall frame. Ensure that the ends are indented by 3 1/2 inches.
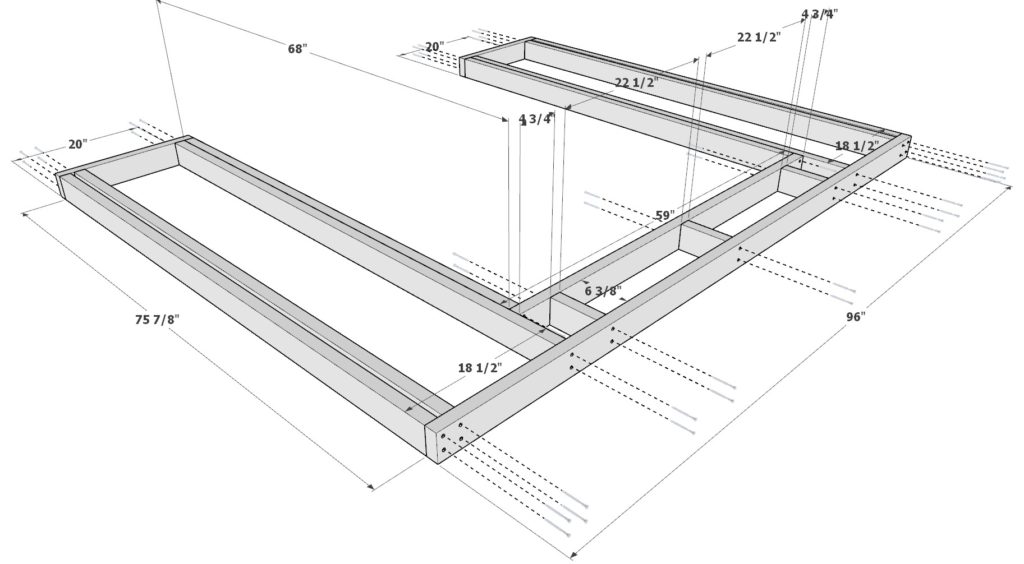
Step 3 (DIY shed front wall frame construction)
Next, assemble the front frame of the shed.
Take six75-7/8 inch 2x4s, two 68 inch 2x4s, two 20 inch 2x4s, one 96 inch 2×4, one 59 inch 2×4, and three 6-3/8 inch 2×4 lumber pieces, and arrange them as shown below. As before, predrill, and add 3.5 inch screws.
next, add a 89 inch 2×4 lumber piece to the top of the frame. The spacing on either end should be 3.5 inches.
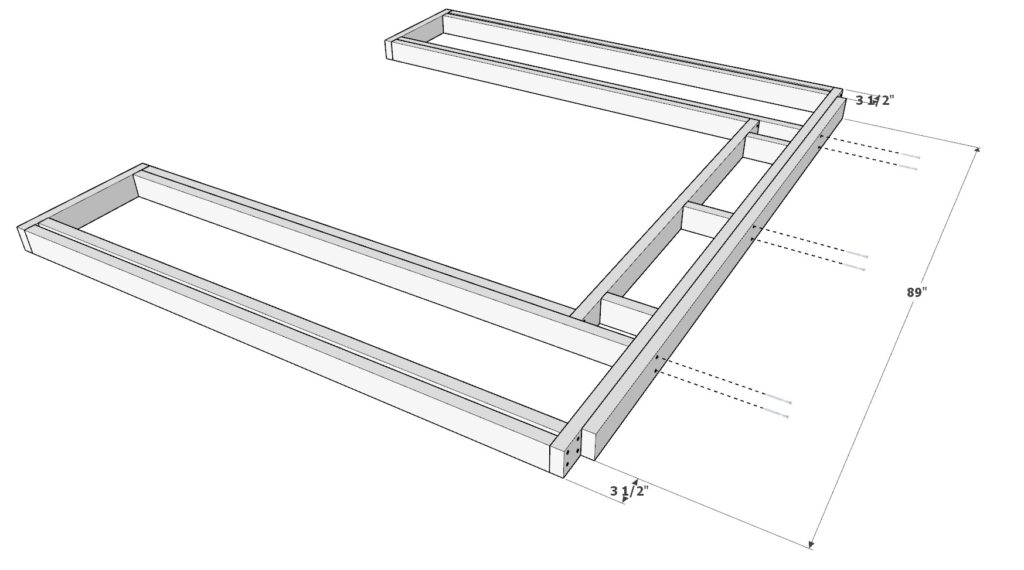
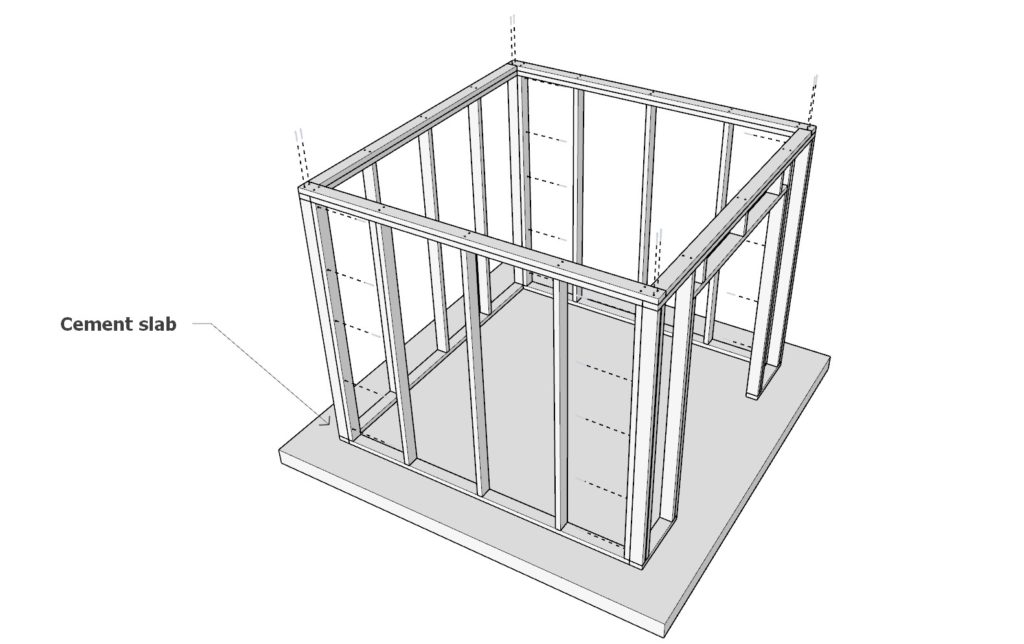
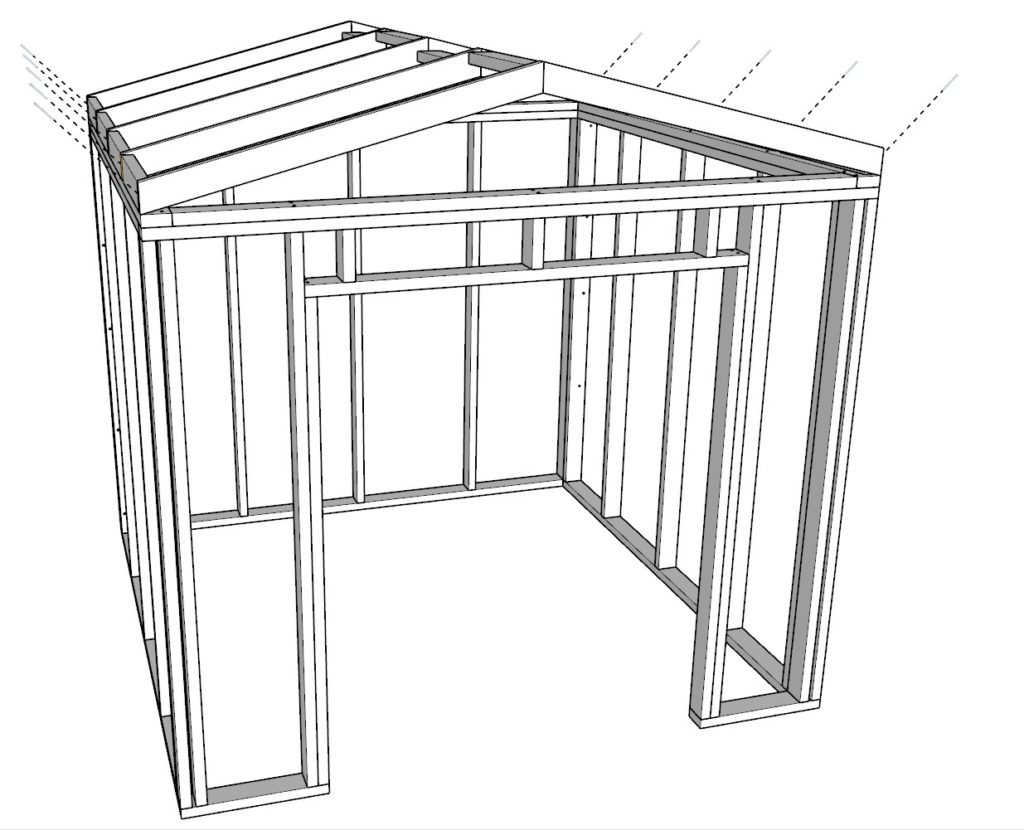
Step 4 (DIY shed frame assembly)
Next, assemble the four frame pieces into one shed frame.
These should be assembled on your slab site.
The DIY shed cement slab must be poured and installed correctly in order to ensure structural integrity. The slab should be set on a leveled and compacted gravel base, with a minimum of 4″ of crushed stone to allow water to drain away from the slab. Rebar should be embedded in the slab at predetermined spacing, then tied together and bent over the edges of the forms. The concrete should be poured to the desired depth and troweled smooth before the forms are removed and the slab is allowed to cure. After the curing period, any necessary joints should be cut and sealed to prevent water and moisture from entering the slab.
Use 3.5 inch screws to secure the frame pieces together.
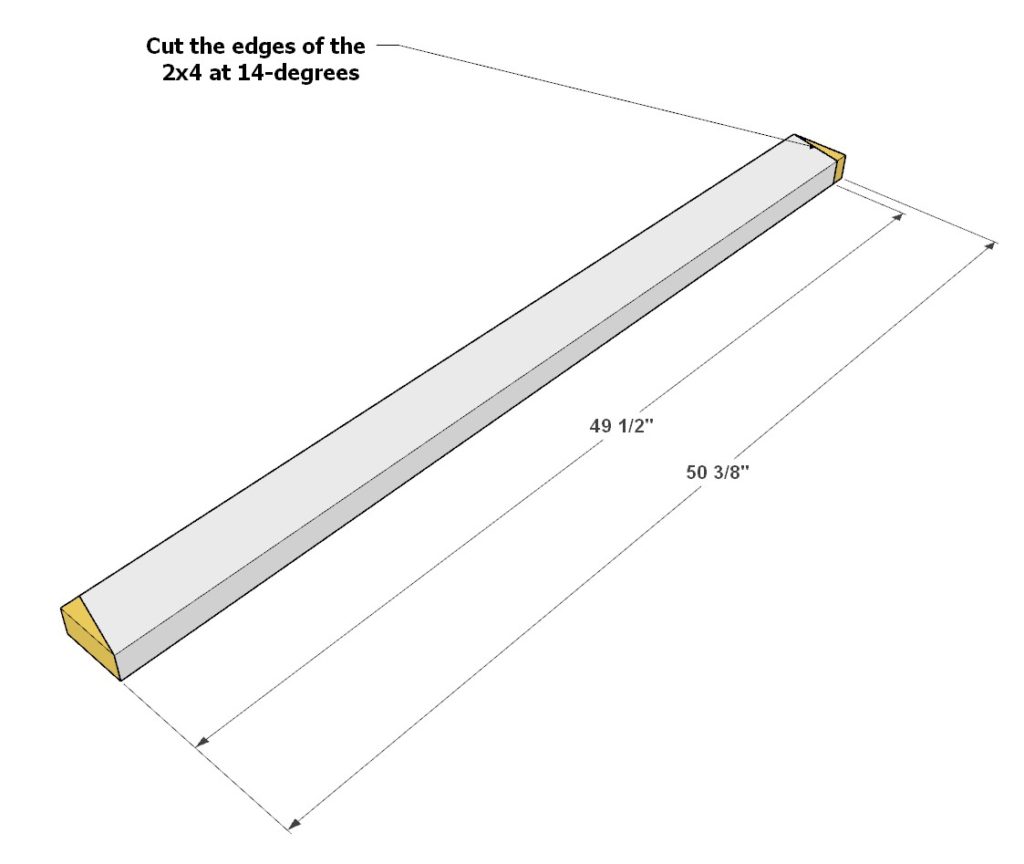
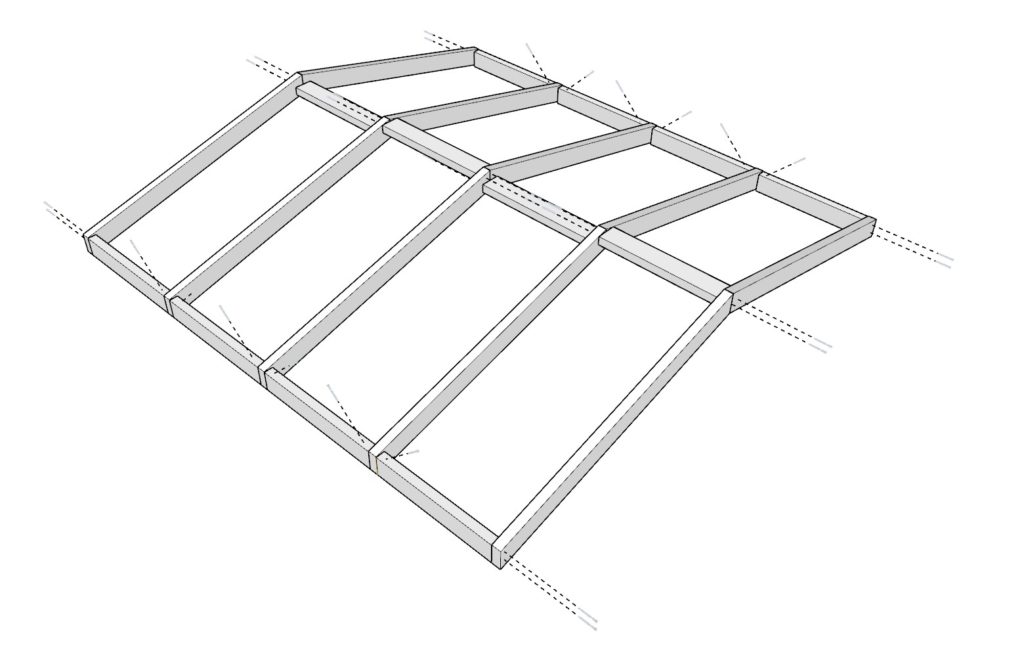
Step 5 (Assembly and installation of the shed roof)
Next, assemble the DIY shed roof.
First, cut the shed roof rafters or joists. These are cut from a 50-3/8 inch 2×4 lumber pieces. The ends need to be cut at 14-degrees as illustrated below.
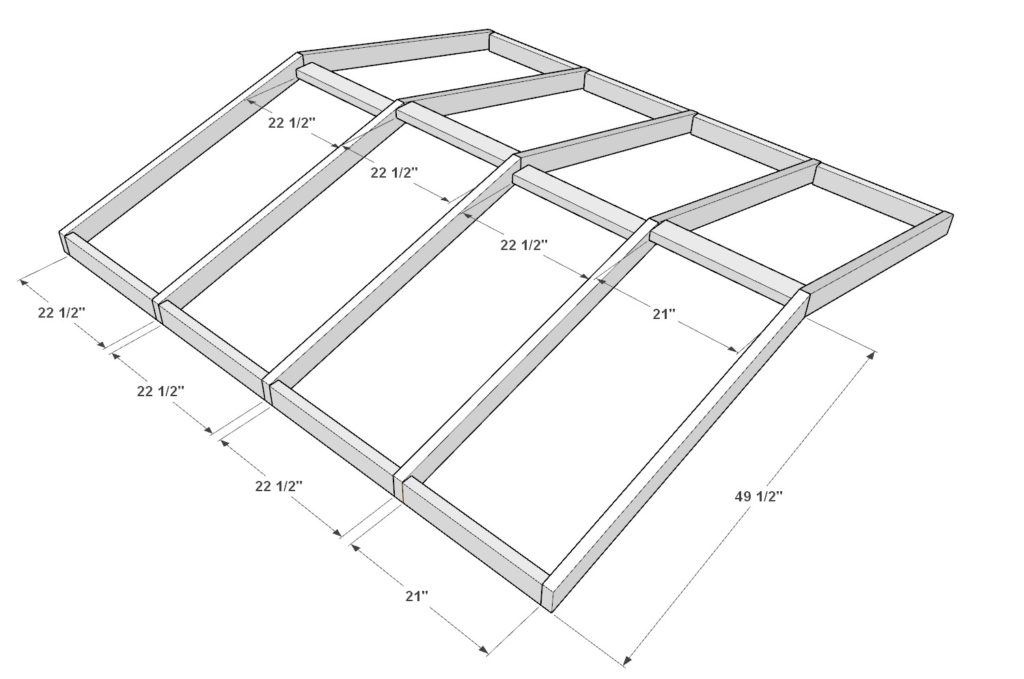
Take ten 49-1/2 roof fater pieces, three 21 inch 2×4 lumber pieces, and nine 22-1/2 inch 2×4 lumber pieces and arrange them as shown below. Join the lumber pieces by predrilling and adding 3.5 inch screws.
Take the assembled roof frame and attach it to the shed wall frame. Join the components with 3.5 inch screws.
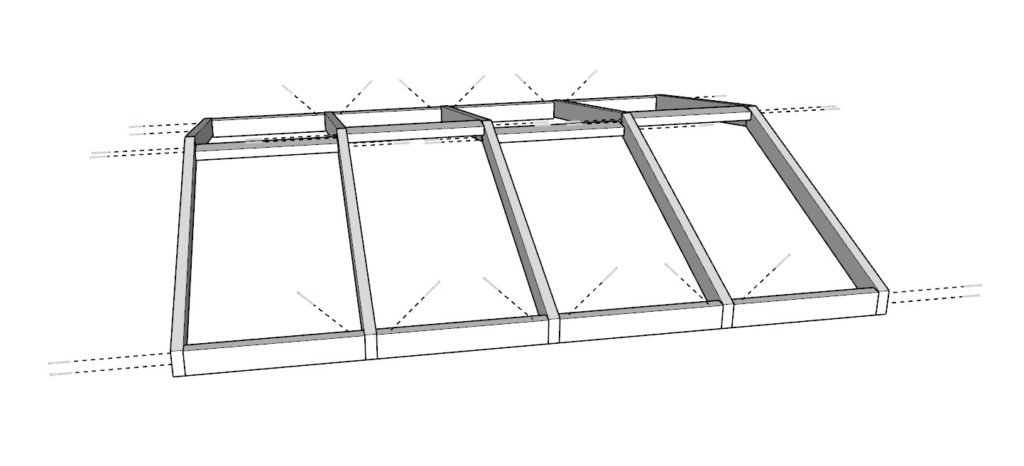
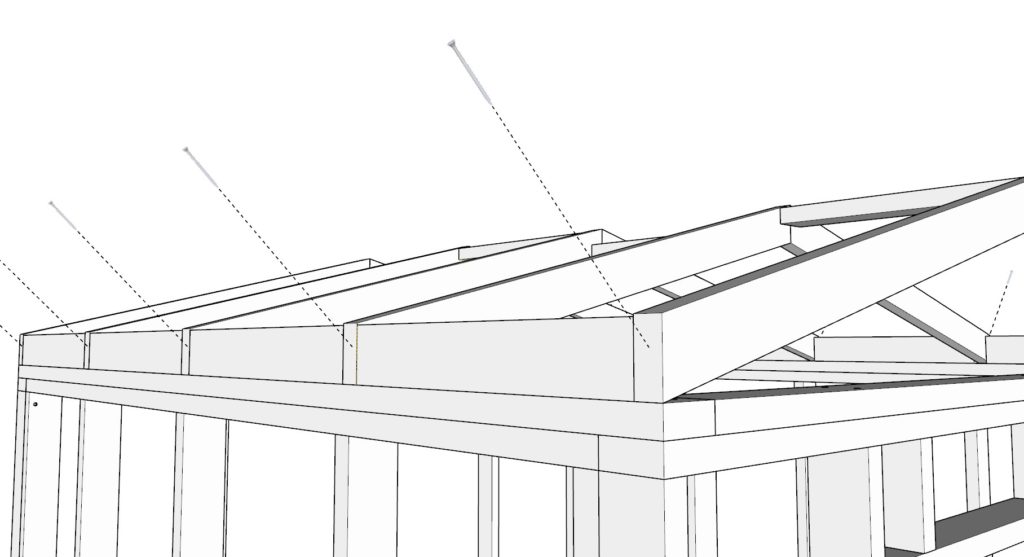
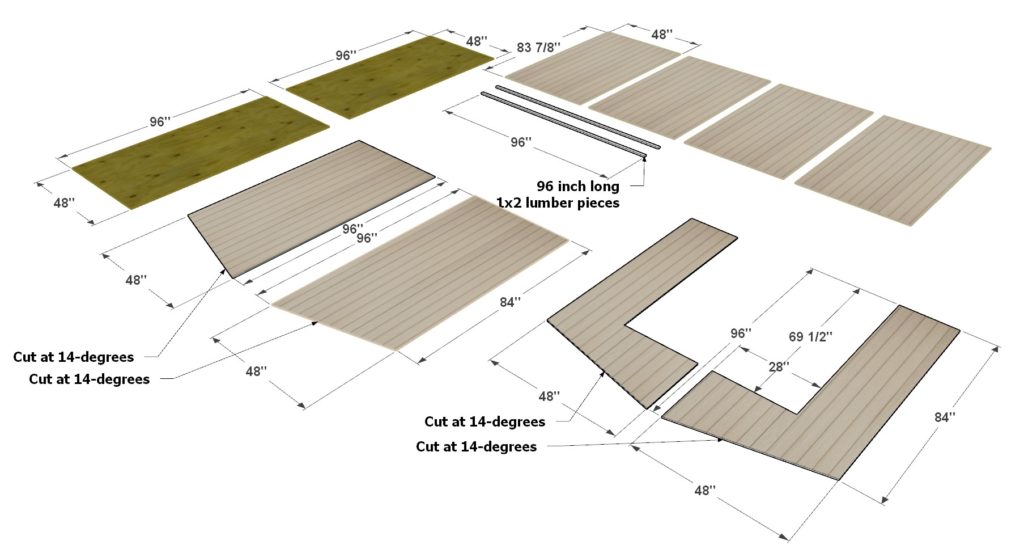
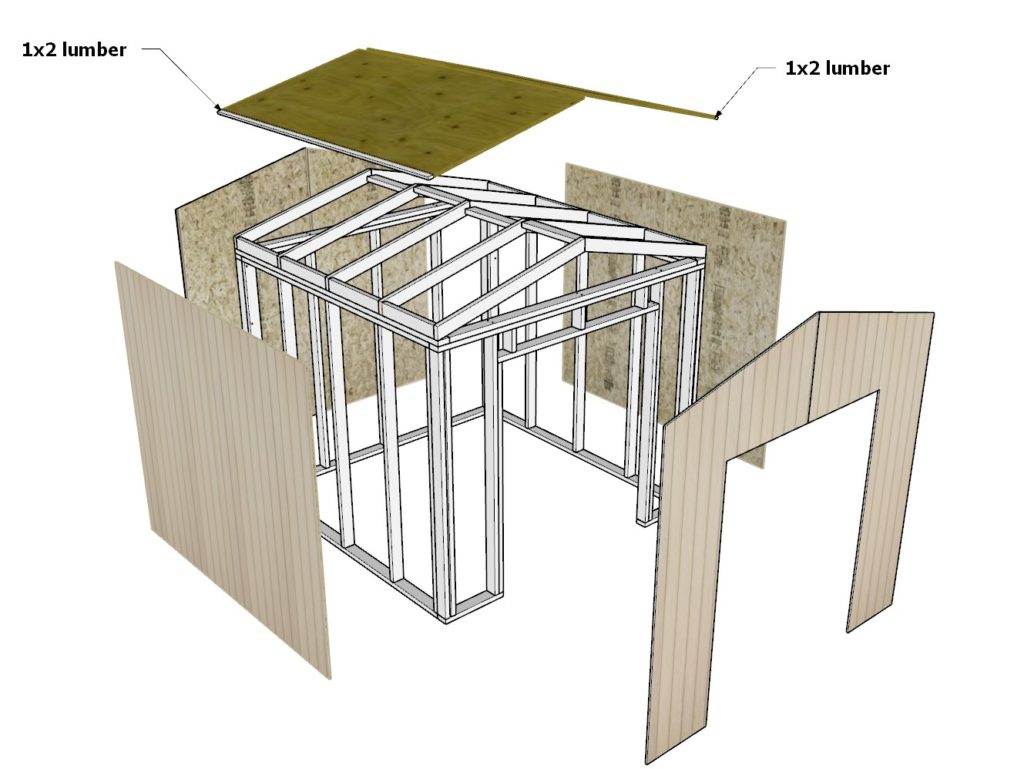
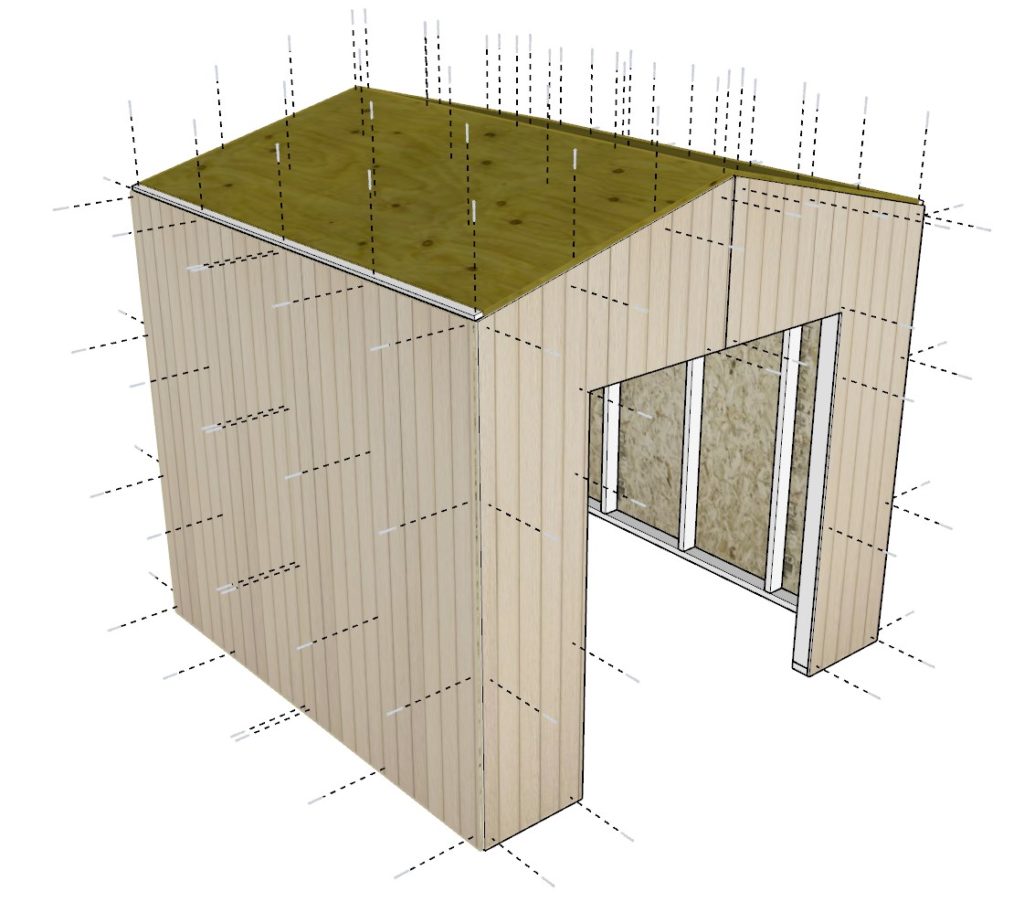
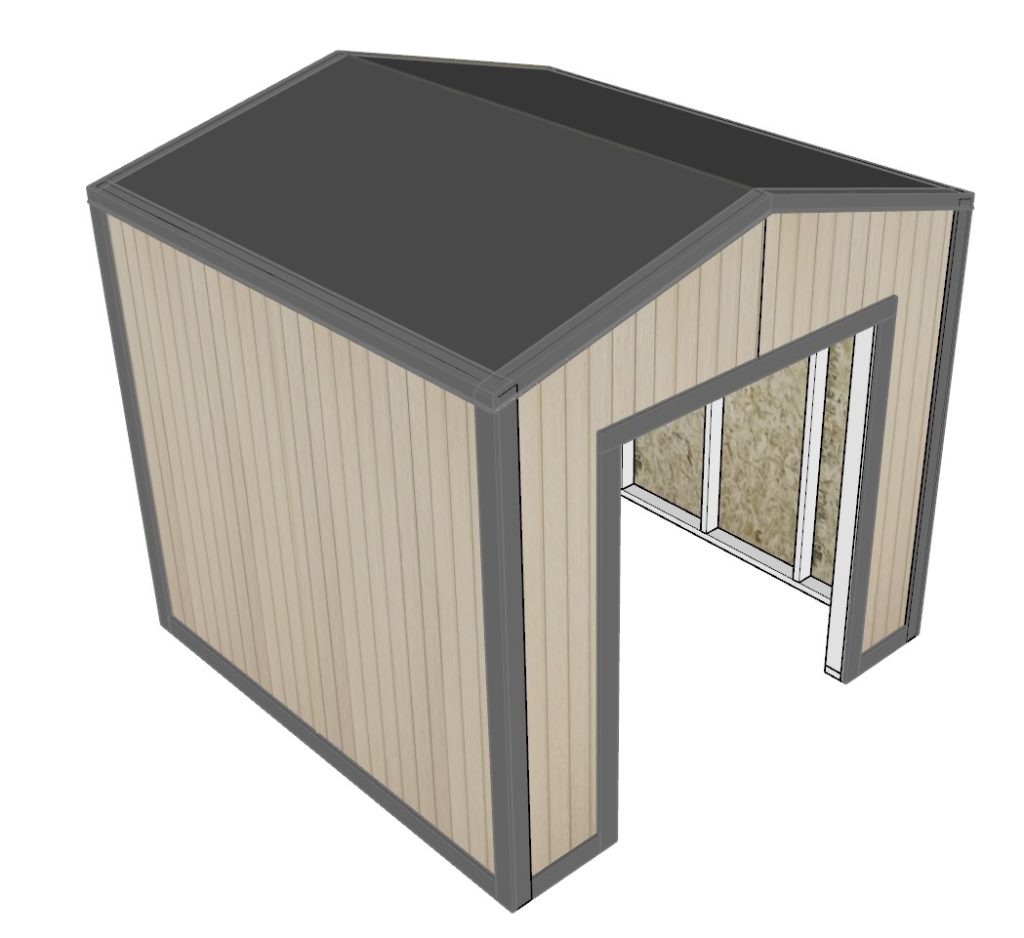
Step 6 (Cutting out, assembling, and installing the wood siding and roof plywood sheets)
Next, cut out, assemble, and install the wood siding panels along with the roof plywood sheets and two 96 inch 1×2 lumber roof pieces.
The roof plywood sheets need to be 3/4 inch thick in order for the 1×2 lumber pieces to sit flush with the rest of the roof.
Secure the shed components with 3.5 inch screws.
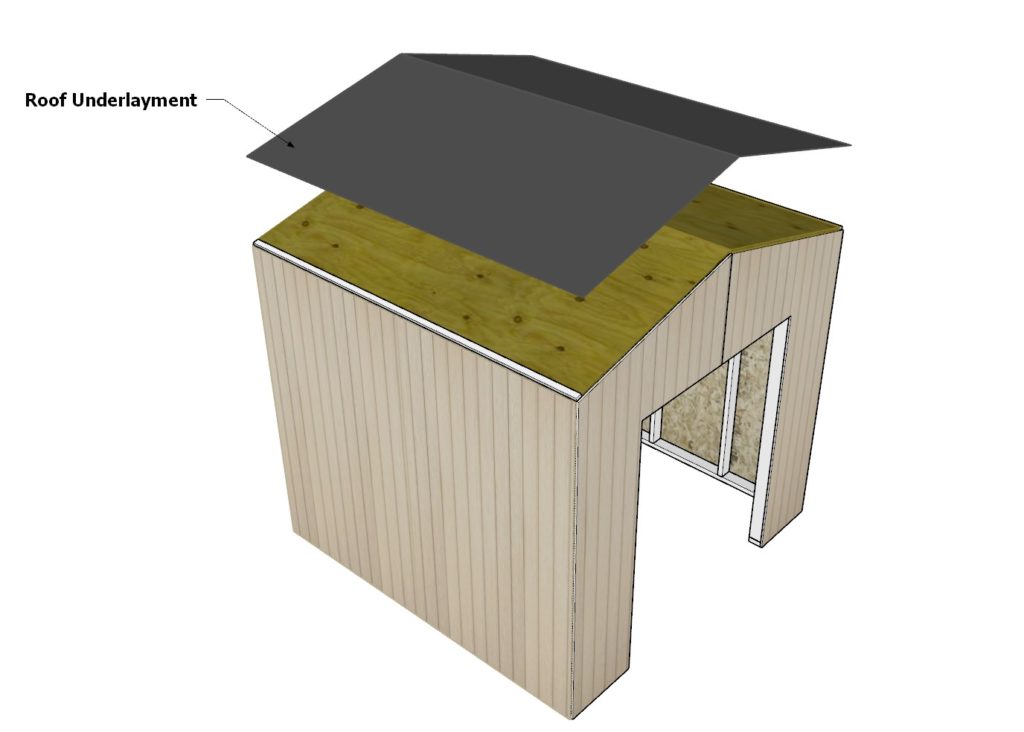
Step 7 (Adding roof underlayment to DIY shed)
Next, install the roof underlayment.
Installing a roof underlayment for a DIY shed is a relatively simple process that involves the following steps. Begin by measuring the shed’s roof and cutting the underlayment material to fit. Ensure the material is a suitable type of underlayment such as a breathable synthetic membrane, and that it is cut to size, with an additional 3-4 inches of material extending beyond the eaves and ridge of the roof.
Next, secure the underlayment to the roof deck in a shingle-style fashion, using galvanized roofing nails and starting at the bottom edge of the roof. Use a nail spacing of 4-6 inches, and overlap each row by about 4 inches. Secure the underlayment along the eaves and ridge with roofing nails, and use roofing cement or roofing tape to seal any seams or the edges of the roof deck.
Step 8 (Adding the trim to the DIY shed)
Next, add the wooden trim pieces to the DIY shed.
The trim pieces are cut from 1×4 lumber pieces. A total of 16 trim pieces need to be cut.
Attach these trim pieces using either a nail gun and small nails or screws.
Once all of the trim pieces are in place, use a caulking gun to apply a bead of silicone caulk along the outer edges of the trim.

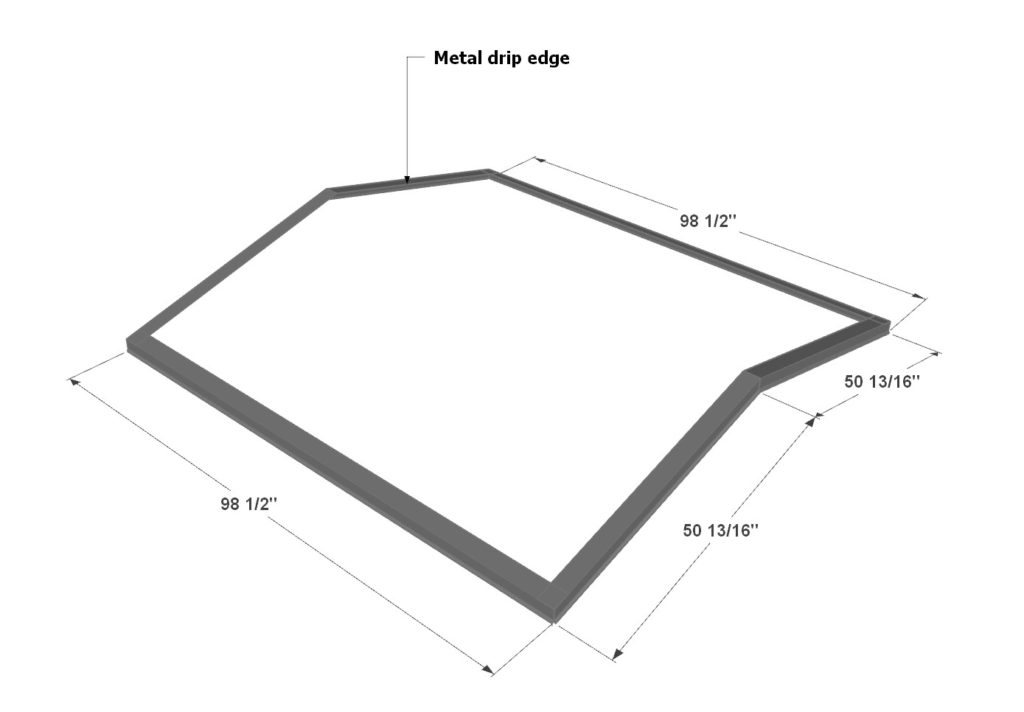
Step 9 (Installing the metal drip edge on DIY shed roof)
Next, install the drip edges along the eaves of the roof
Cut the metal drip edge pieces to the length specified below. The metal drip edge should be cut to the desired length using metal snips or tin snips.
It is best to overlap the drip edge when cutting the corners to ensure that water does not drip down the wood.
Use galvanized roofing nails to secure it to the roof deck. The drip edge should extend beyond the underlayment, creating an outward lip that will direct rainwater away from the roof.
Step 10 (Installing the DIY shed roof shingles)
Next, install the roof shingles.
First, lay the starter strip along the edge of the roof and use galvanized nails to secure it in place. Next, begin laying the shingles in rows, overlapping each row up the roof and securing each with galvanized nails. Make sure to leave an overhang of 1 inch at the eaves and 3 inches at the ridge. Continue up the roof until the entire area is covered. Finally, install a cap shingle at the ridge, using nails or adhesive to secure it. For a more secure installation, use roofing felt or ice and water shield along the eaves.

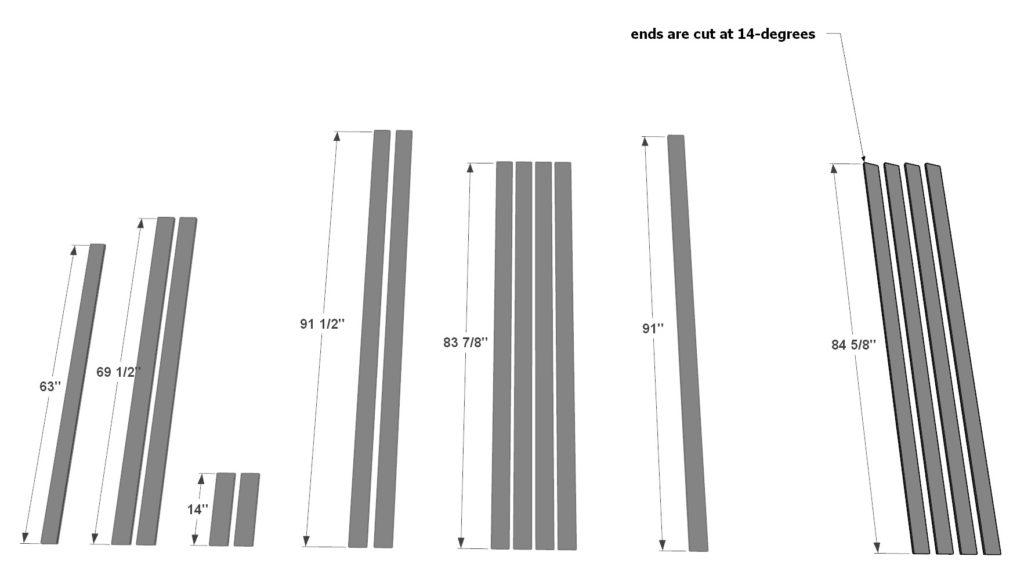
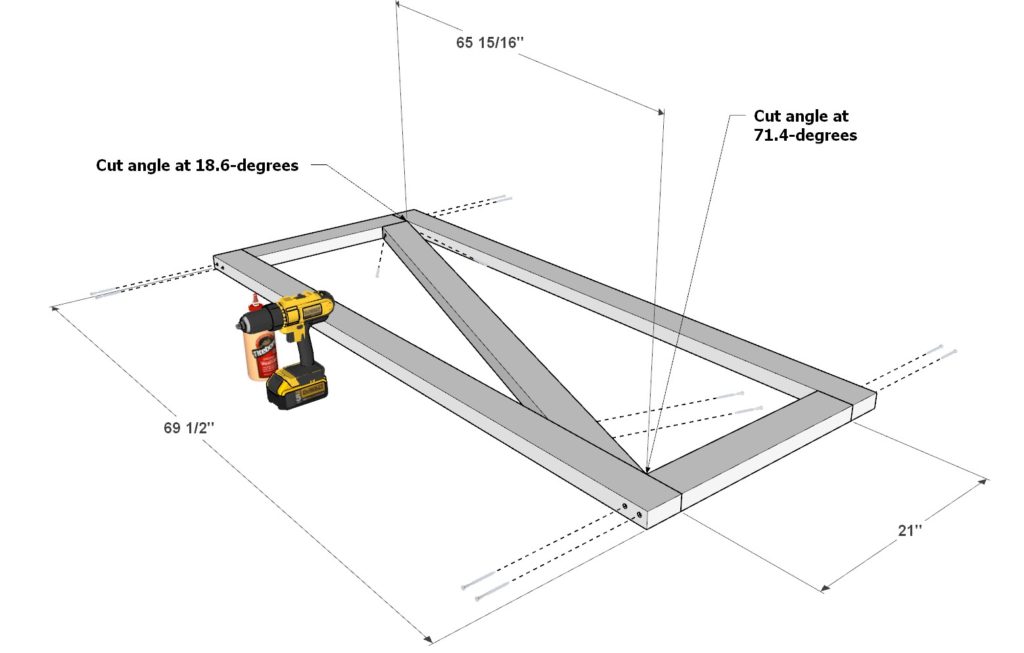
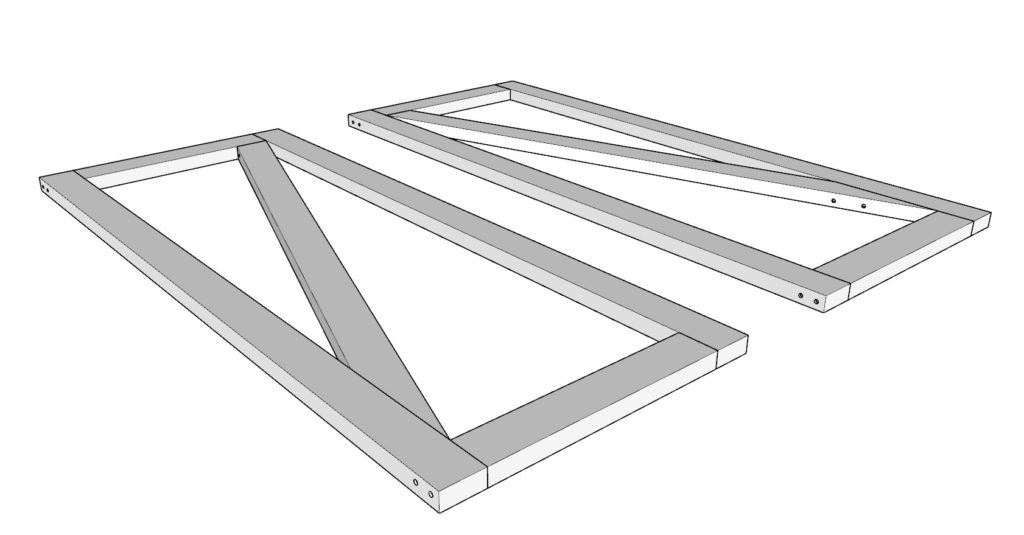
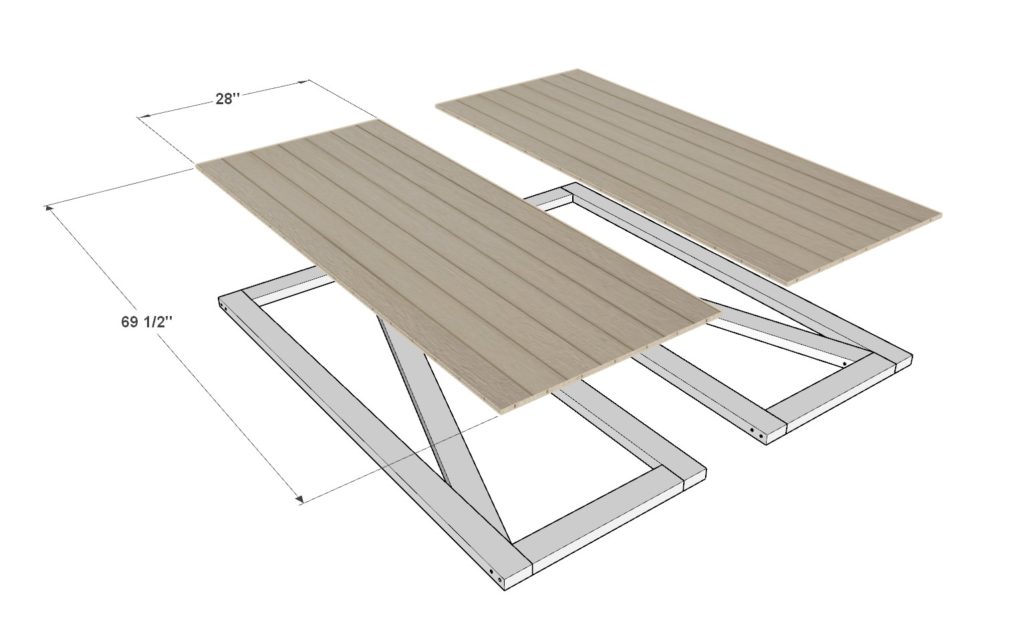
Step 11 (Assembly of DIY shed doors)
Next, assemble the shed double doors.
Take two 21 inch 2×4 lumber pieces, two 69-1/2 inch 2×4 lumber pieces, and one 65-15/16 inch diagonal 2×4 lumber pieces (one end is cut at 18.6-degrees while the other is cut at 71.4-degrees. It might be easiest to just trace the angle needed vs. cutting such precise angles) and arrange them as shown below. Use glue and 3.5 inch screws to secure the door frame together.
Make a second identical piece (flip it).
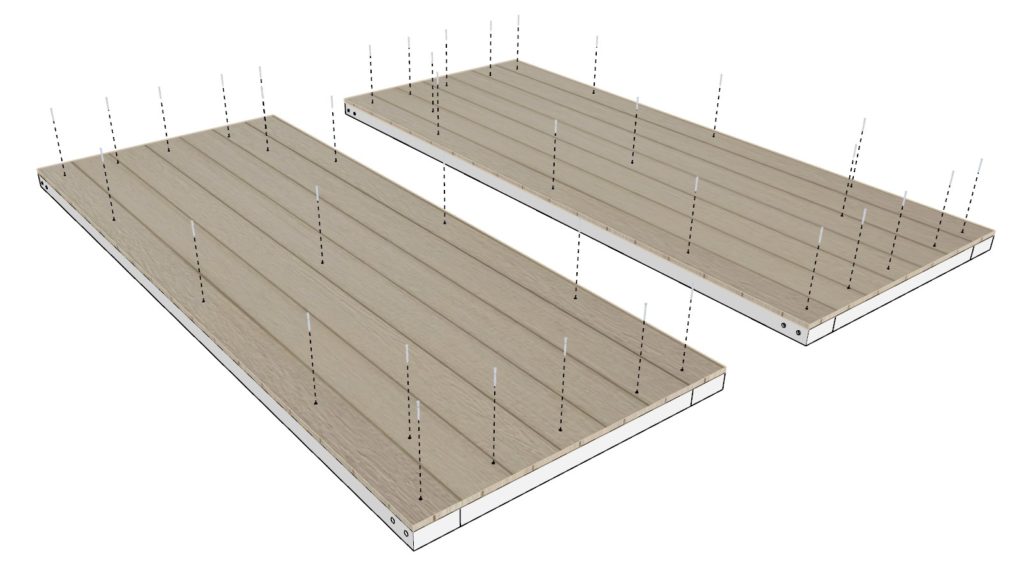
Next, add two 28 in x 69-1/2 in wall siding sheets to the door frames and secure with 1.5 inch screws.
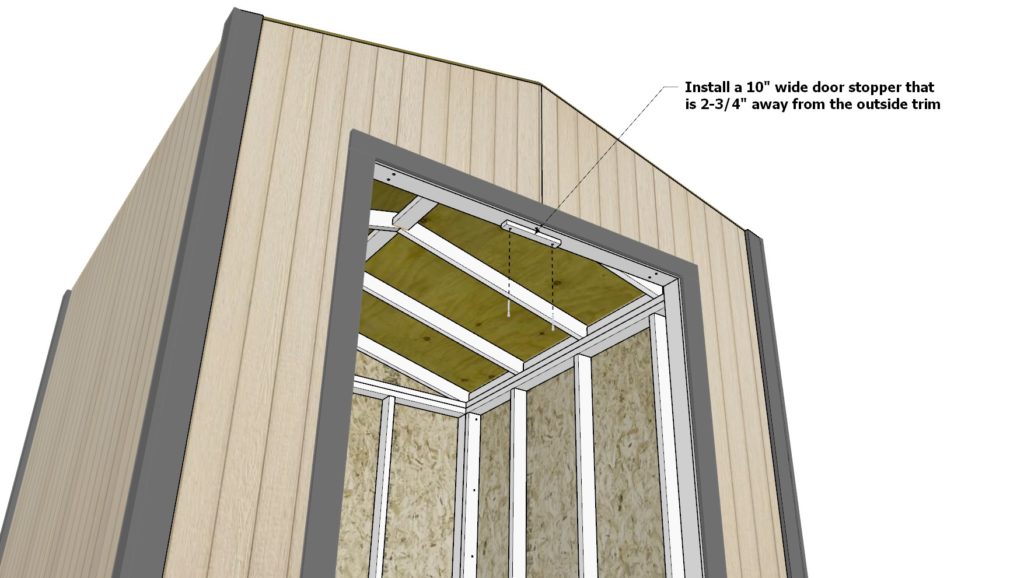
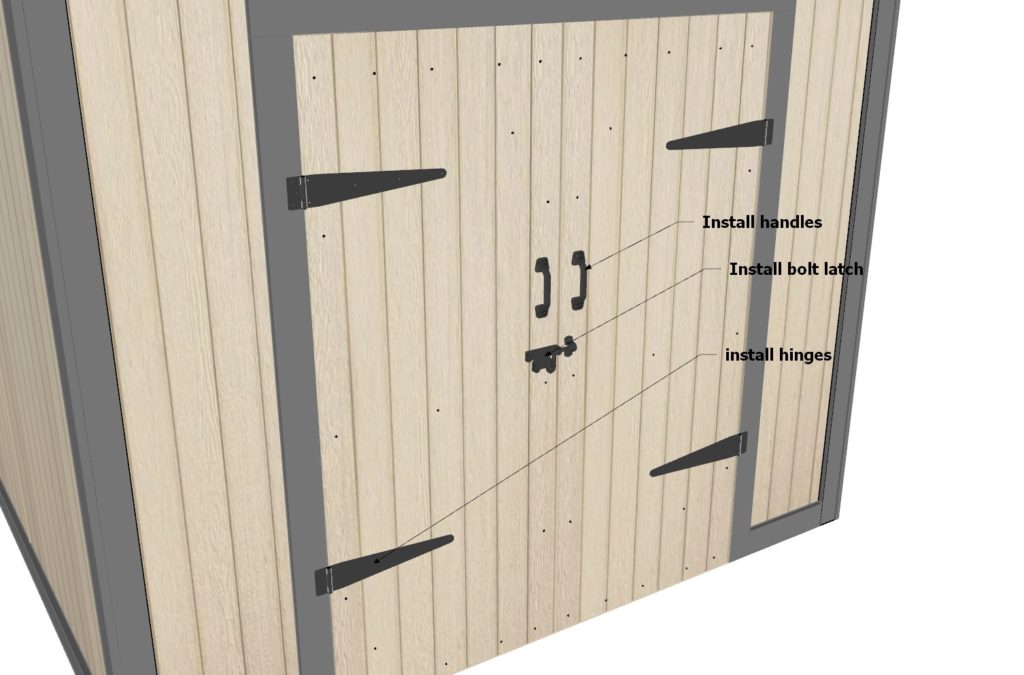
Step 12 (DIY shed door installation)
Next, install the shed doors.
First, install a 10 inch wide door stopper that is 2-3/4 inch away from the outside trim edge. This will serve as a stopper for the double doors so they do not swing the wrong way and tear off the hinges.
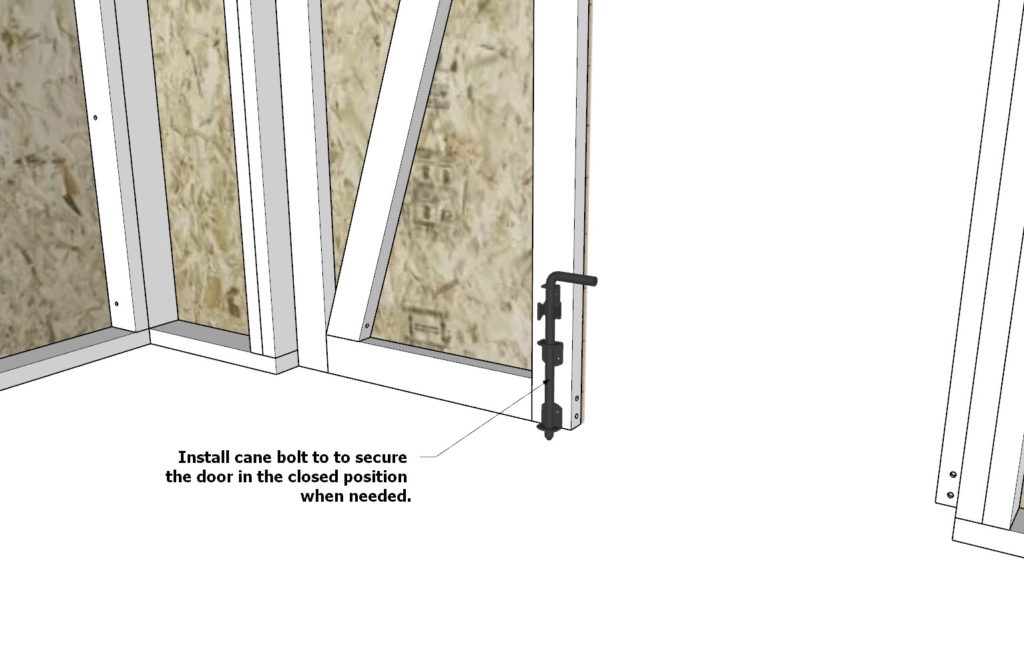
Next, install the hinges, bolt latch, handles, and the cane bolt.
The outside bolt latch allows for the shed doors to be closed and locked when needed. The Cane bolt prevent the doors from flopping or opening to the outside when closed.
How to paint the DIY shed
Painting a DIY wooden shed is a great way to add a unique touch to your outdoor space. Before you begin, make sure to thoroughly sand down the surface of the shed with a medium-grit sandpaper and a sanding block to ensure a smooth, even surface for the paint to adhere to. Once the sanding is complete, remove any sawdust with a tack cloth or vacuum.
Next, apply a coat of primer using a brush, roller, or sprayer. Make sure to use a primer specifically designed for wood. Allow the primer to fully dry before beginning the painting process.
Using a high-quality, exterior latex paint in your desired color, begin painting the shed using a brush or roller. For a flawless finish, use a brush for trim edges and a roller for larger surfaces. When applying the paint, begin at the top and work your way down in long, even strokes. Allow the first coat to dry for about two hours, then apply a second coat.
To maintain the look of the shed, at least once a year, inspect the shed for any damage or scratches, and repair or repaint as needed. With these steps, your DIY wooden shed will look great for years to come!
How to maintain your DIY shed
Maintaining a wooden shed is an important part of ensuring that it stands the test of time and remains in good condition for years to come. The following steps should be taken in order to properly maintain a wooden shed:
1. Cleaning: Regularly sweep away any dirt or debris from the shed’s exterior to prevent the buildup of dirt and mildew. For more thorough cleaning, use a pressure washer with a wide angle nozzle to remove any stubborn dirt and grime. Be sure to keep the nozzle moving to avoid damaging the wood.
2. Repairs: Check the shed for any loose or broken nails, hinges, etc. and repair as needed. It’s also important to check the shed for any signs of decay or rot, as this can cause structural damage if left unaddressed. Replace any decaying wood with new wood that is treated for outdoor use.
3. Sanding and Painting: For aesthetic purposes or to protect the wood from the elements, sand down any rough edges and apply a coat of primer followed by two coats of quality paint. Be sure to use paint specifically designed for outdoor use, such as a latex-based paint.
4. Sealing: If left unsealed, the wood on the shed can be prone to weathering and fading. To prevent this, apply a waterproof sealant such as a clear wood sealer or a stain-sealant blend.
5. Staining: If a more natural look is desired, apply a wood stain to the shed. Be sure to use a stain specifically designed for outdoor use.
By following these steps, a wooden shed can remain in good condition for years to come.When applying the paint, begin at the top and work your way down in long, even strokes. Allow the first coat to dry for about two hours, then apply a second coat.
To maintain the look of the shed, at least once a year, inspect the shed for any damage or scratches, and repair or repaint as needed. With these steps, your DIY wooden shed will look great for years to come!