Why build a counter height DIY outdoor dining table and chairs?
If you’re struggling to find the perfect outdoor table on a budget that fits well with your patio and deck, why not build it yourself?
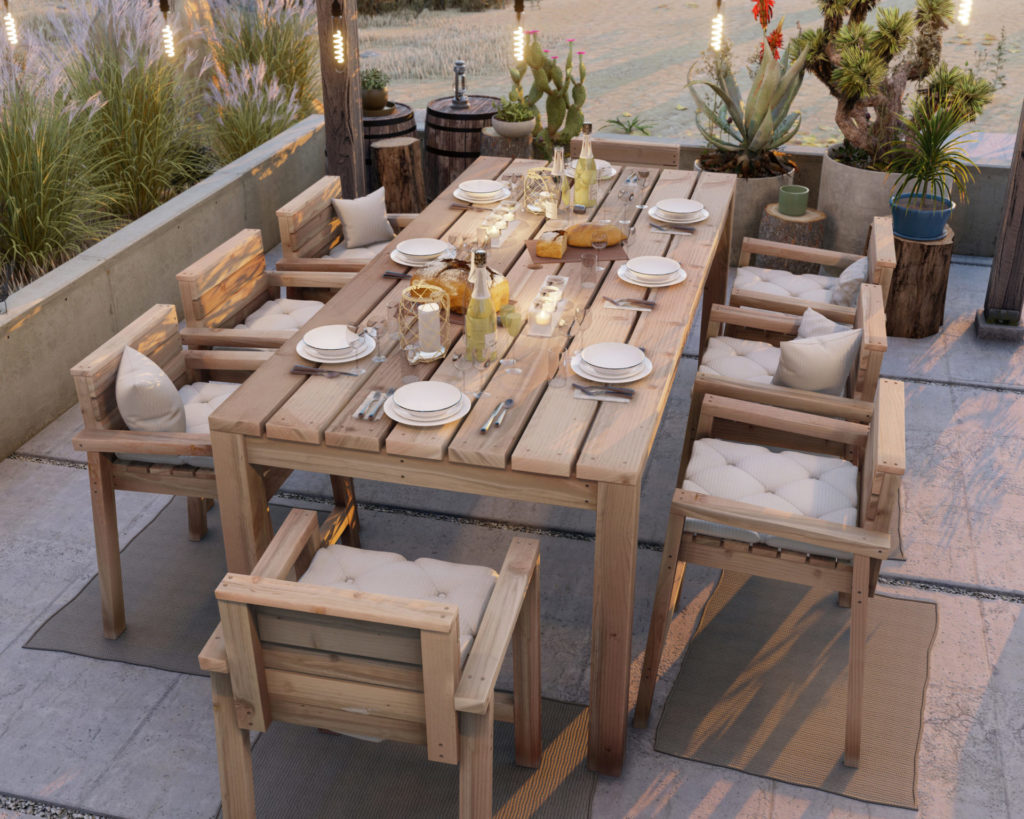
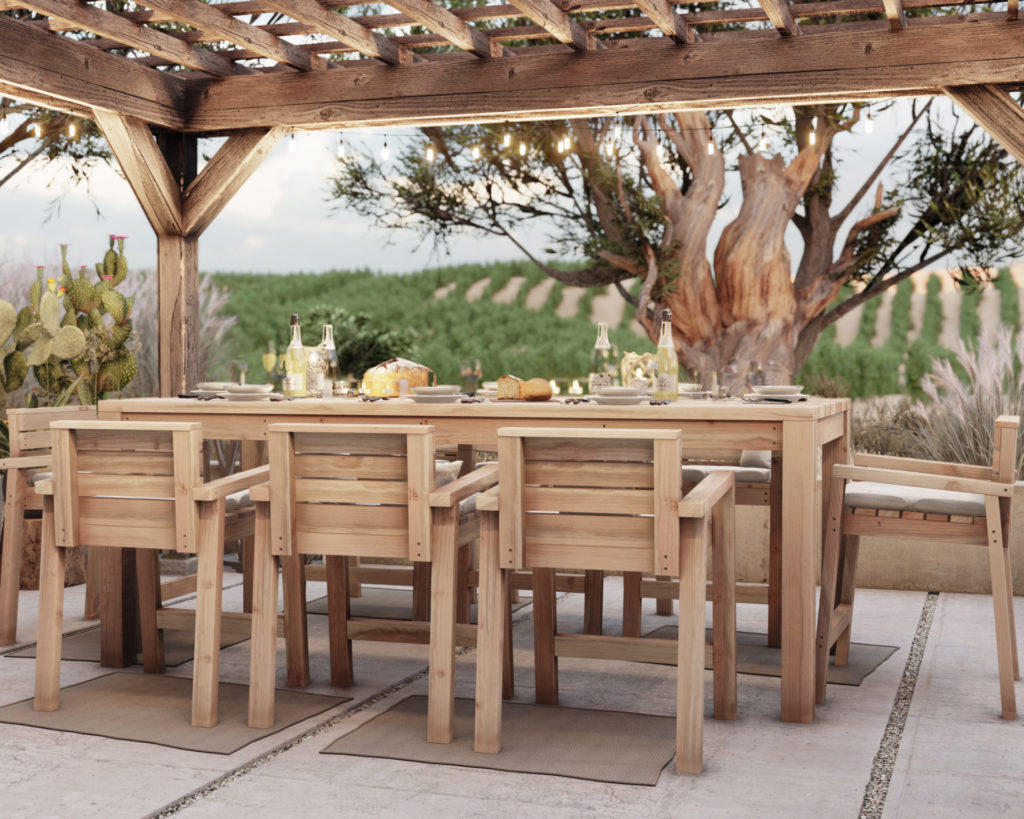
As the weather heats up and more time is spent outdoors, its important to have a space to entertain guests and bring people together. This beautiful garden dining table and chair set invites guests and family members to gather for a meal together.
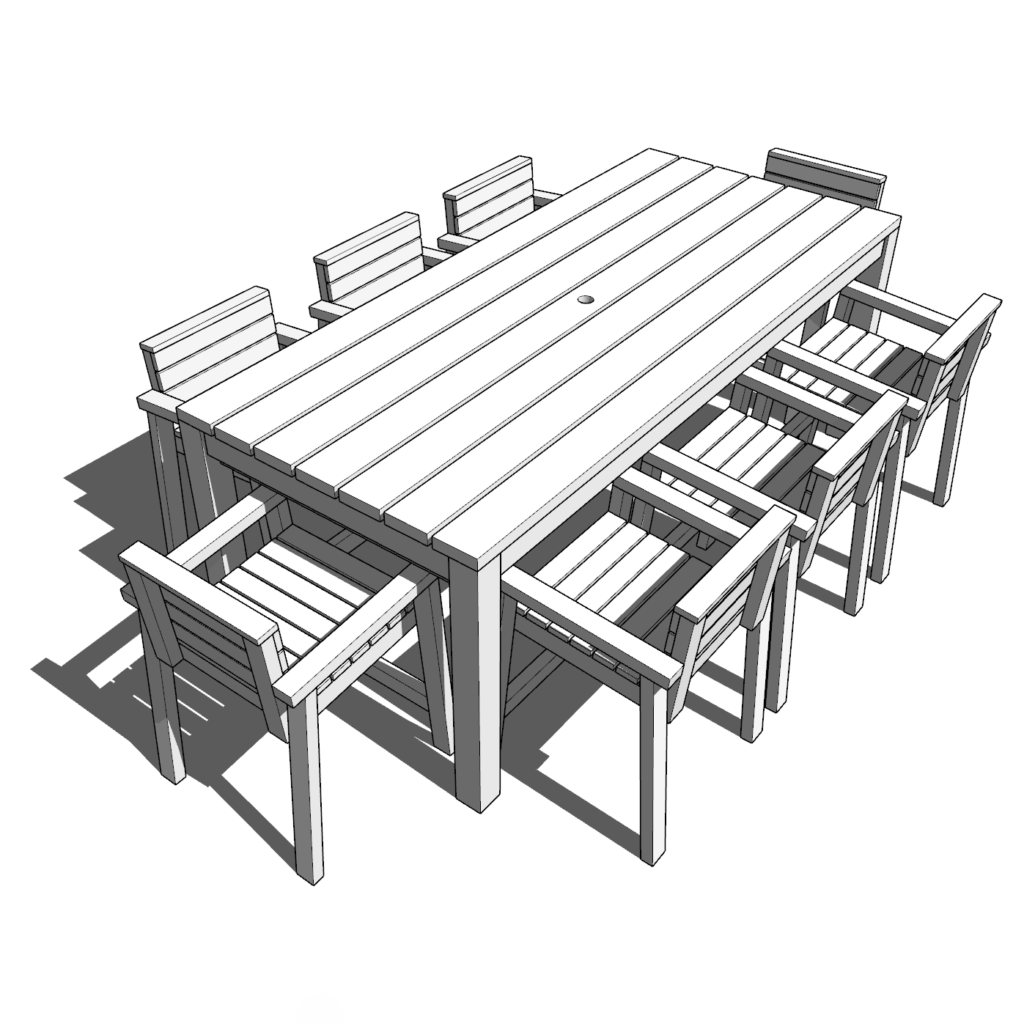
The full-size outdoor counter height or bar height dining table and chair set seats 6-8
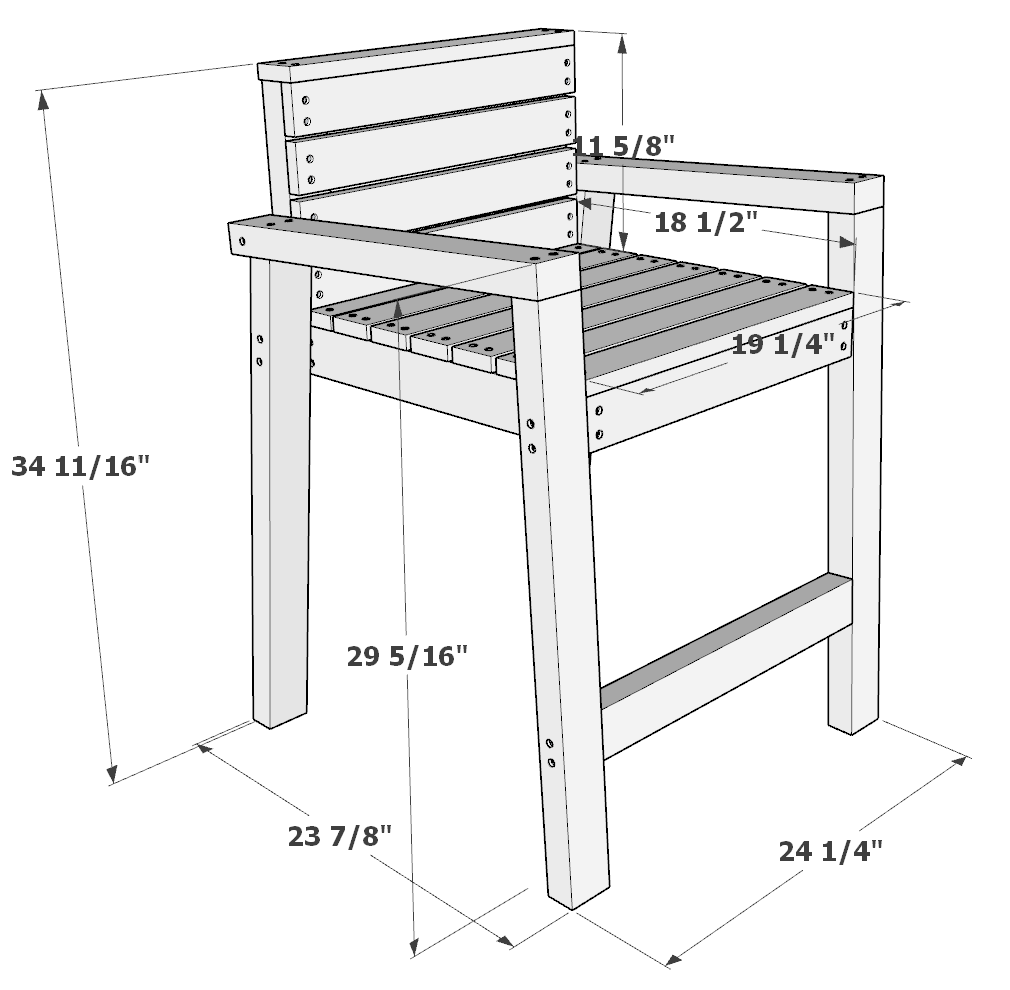
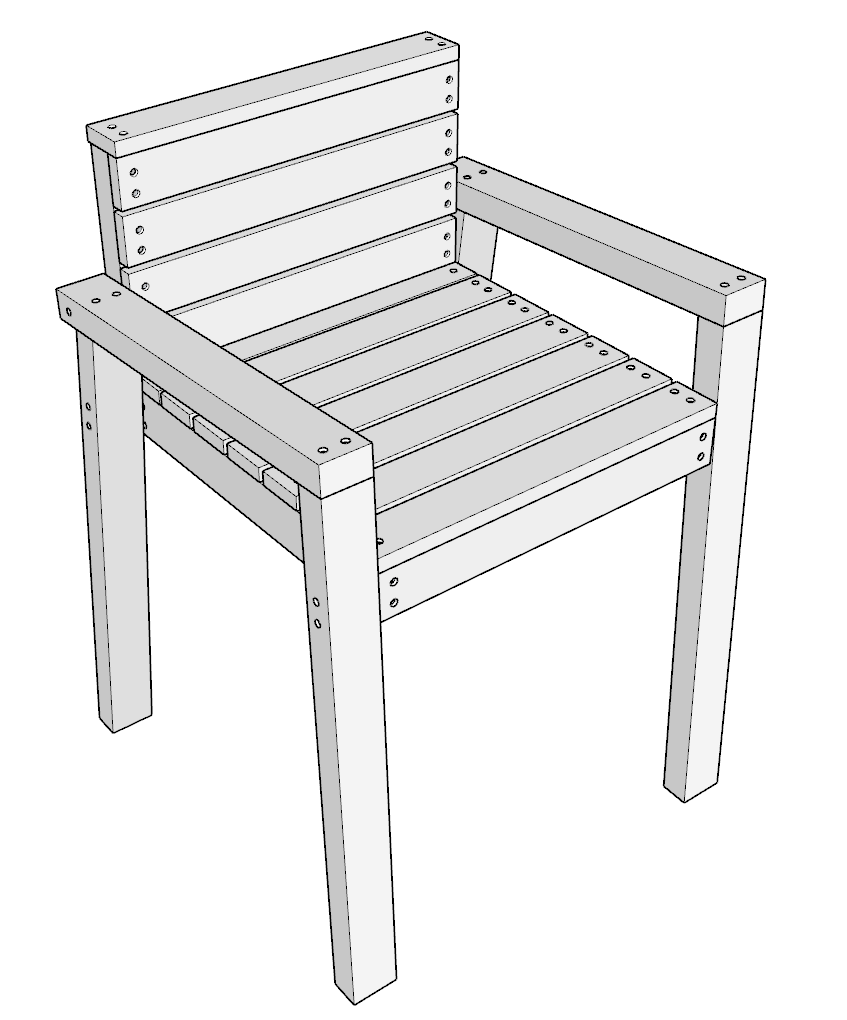
The counter height DIY chair
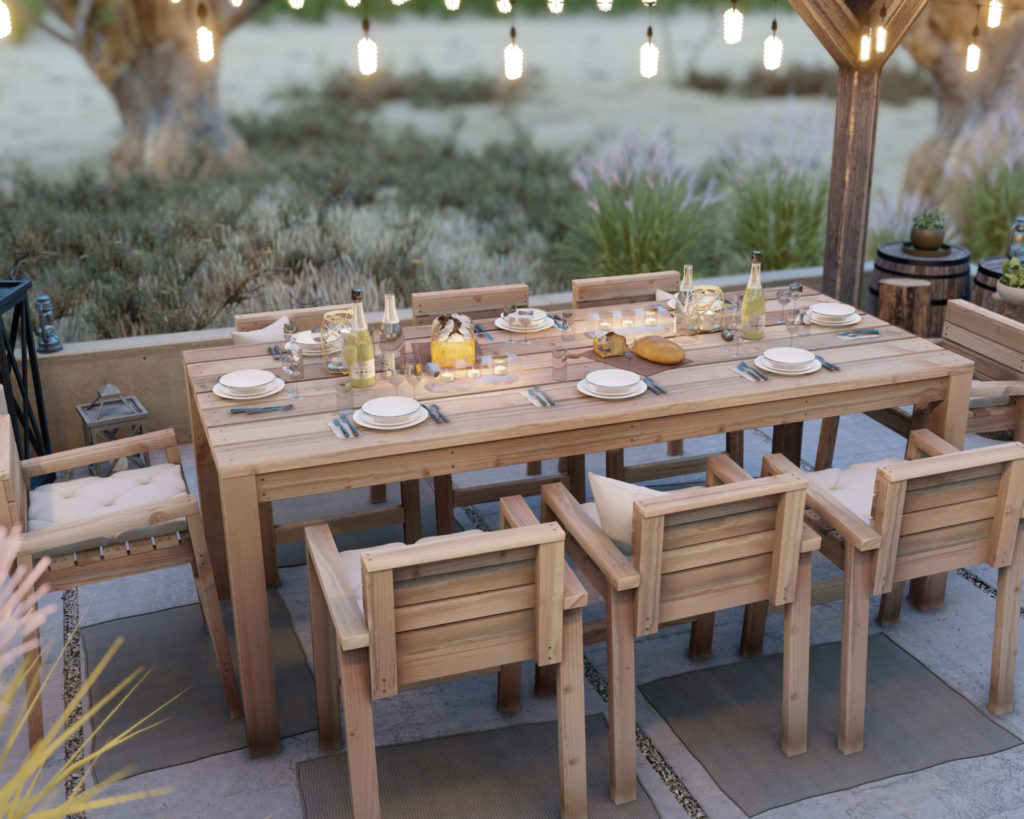
When designing the outdoor dining chair, I decided to use thinner 2x3s to reduce the bulky look that a lot of DIY furniture has. This makes the chair look more minimalistic, clean, and professional.
The slight incline of the chair makes sitting more comfortable and relaxing. With an incline it was very important that the design of the chair allows for the piece to slide under the table for a comfortable dining experience as well. I added the footrest to support to the legs to improve the sitting experience.
For individuals with back problems or back pain, the counter height or bar height table and chairs are a great option because sitting up higher means less pain. This is and ergonomic and back friendly design.
The chair is decked with thinner 1 inch lumber pieces that feature slats to allows for proper water draining in rainy weather.
Lastly, my goal with the design of this chair was to make it very easy to build. The joints are simple and easy for anyone to work with. The angles of the chair are also easy to cut and assemble if you follow my step-by-step plans. This is a great build for anyone who is new to woodworking.
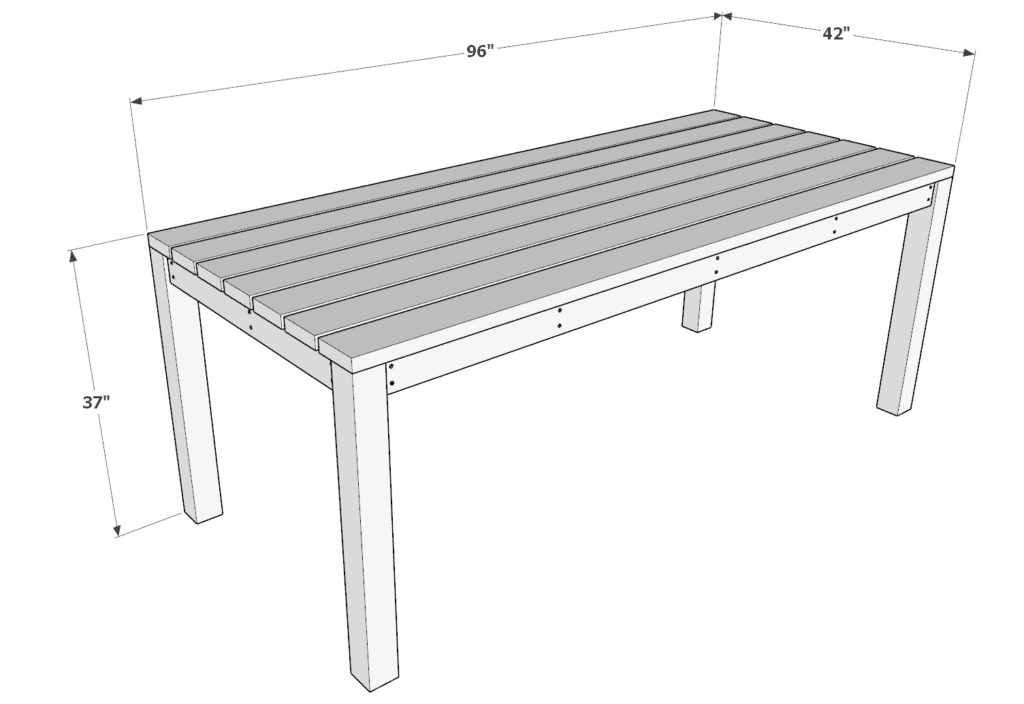
The counter height DIY table
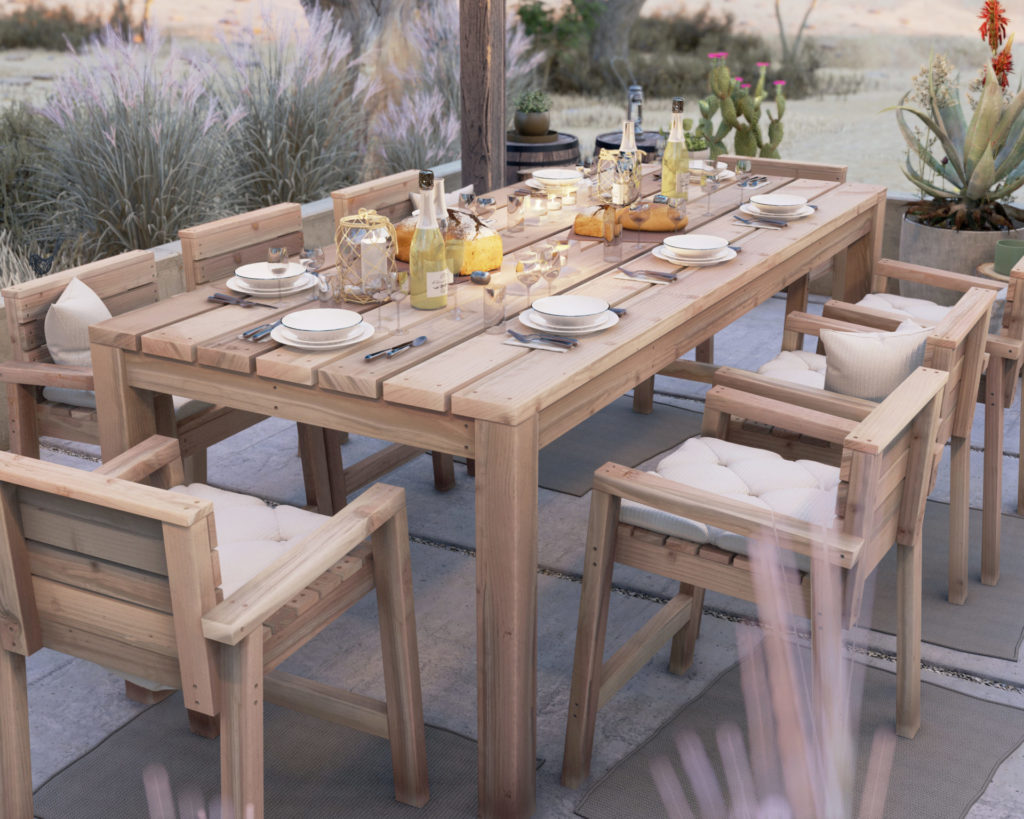
The table in this outdoor dining set is made from common 2×4’s, 2×6’s, and 4×4’s. My goal with this design was to make sure that its sturdy and can handle some real weight.
I used 2×6’s for the frame of the table. The 2×6 was a great option as it allows for the table legs to be attached in several places and be reinforced better then with 2×4’s alone. I did add 2×4’s around the perimeter of the frame to conceal the many screw holes, and to decrease the look of bulkiness that I would get with 2×6’s.
The table also features an umbrella hole in the center that is reinforced by the table frame. The table umbrella hole is optional but can be great if the table is going to stand in a sunny area where you would need some shade and cover.
Using wood for the build gives the dining table and chairs a warm and natural look. I love the grain variation that I can get with wood.
Table décor and setup can change based on season and mood to vary the style and allows for the table to be used year-round.


Time to build
About 1 hour per chair
About 4 hours for table
Total for the set 12 hours
Total cost of build
About $300 for the table.
About $60 per chair
Total for the set =$780
Skill level required
Beginner-Intermediate
Download the PDF plans
Outdoor dining table and chairs set PDF plans
What is included in the PDF download?
- Easy to read step by step instructions
- Material list
- Cut list
- Tools needed
Step-by-step instruction on building the counter height DIY chair.
Recommend tools for the DIY chair
- Saw (miter saw recommended for precision cuts)
- Drill
- Impact driver with bit for screws
- Sander
- wood countersink drill bit
Material list for the DIY chair
Available with purchase of PDF plans.
Step 1 (DIY chair)
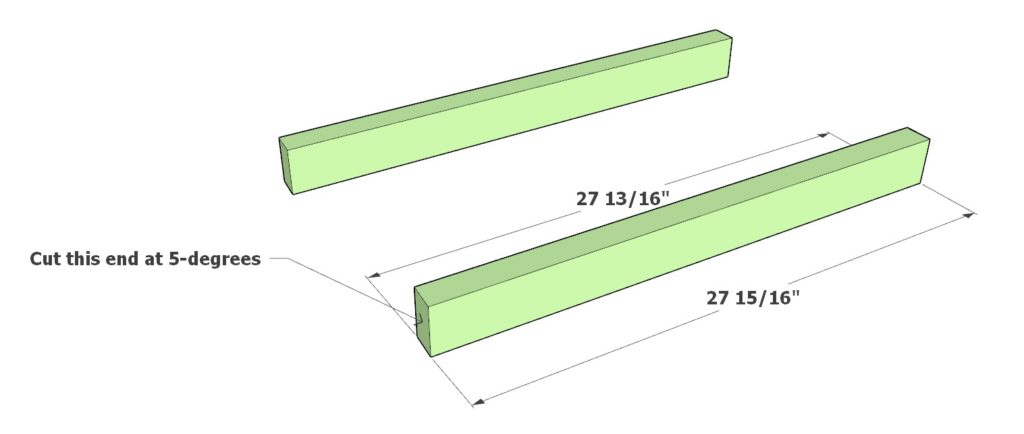
Precut all your wood pieces into the following dimensions shown below. If your building all eight chairs then multiply the cuts by 8.
Precut (2) pieces of 27-15/16 inch (or 27-13/16 inch, depending on what side your looking at) from 2×3 lumber pieces per chair. One side needs to be cut at 5-degrees. These pieces will be color coded green.

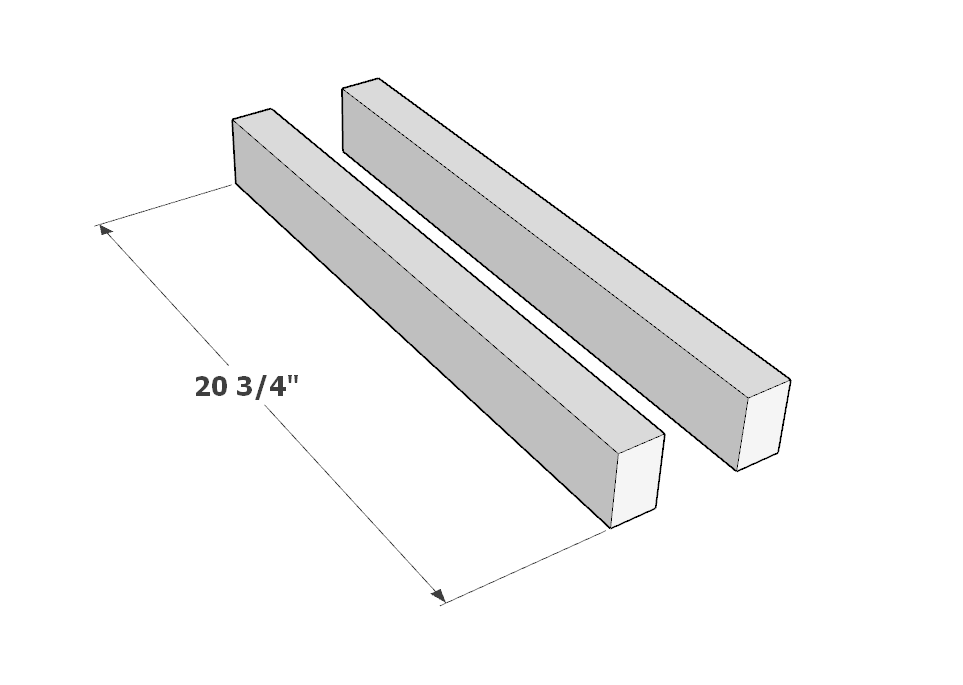
Precut (2) 20-3/4 inch long 2×3 lumber pieces per chair.
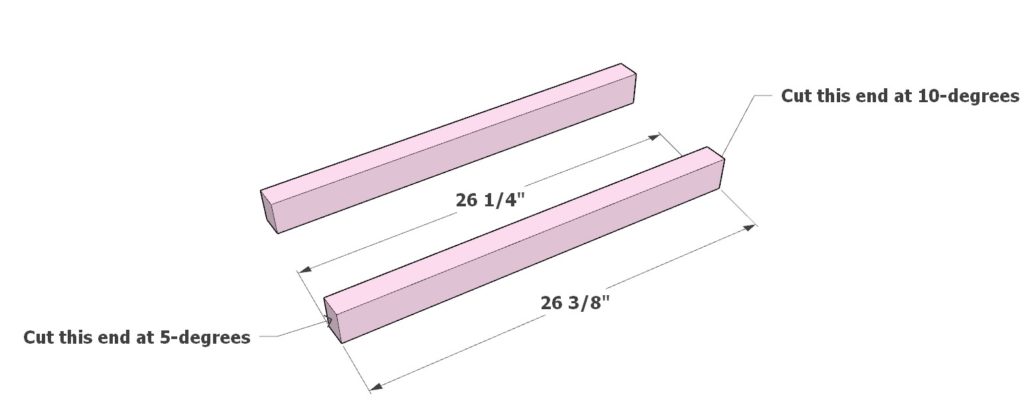
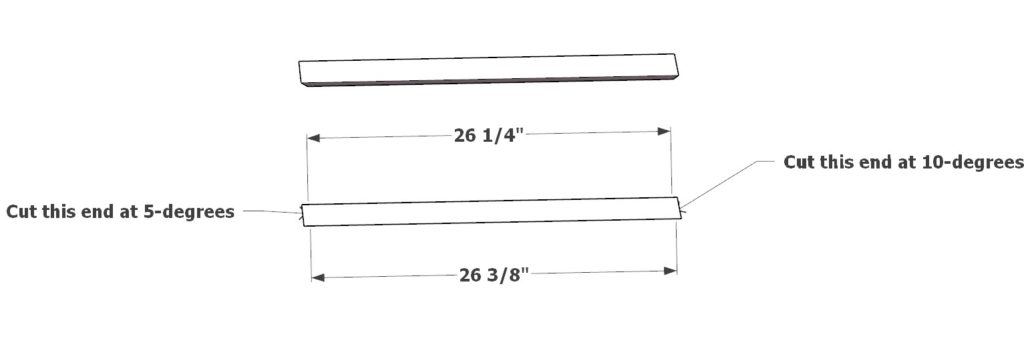
Precut (2) pieces of 26-1/4 inch (or 26-3/8 inch, depending on what side your looking at) from 2×3 lumber pieces per chair. One side needs to be cut at 5-degrees and the other side cut at 10-degrees. These pieces will be color coded pink.
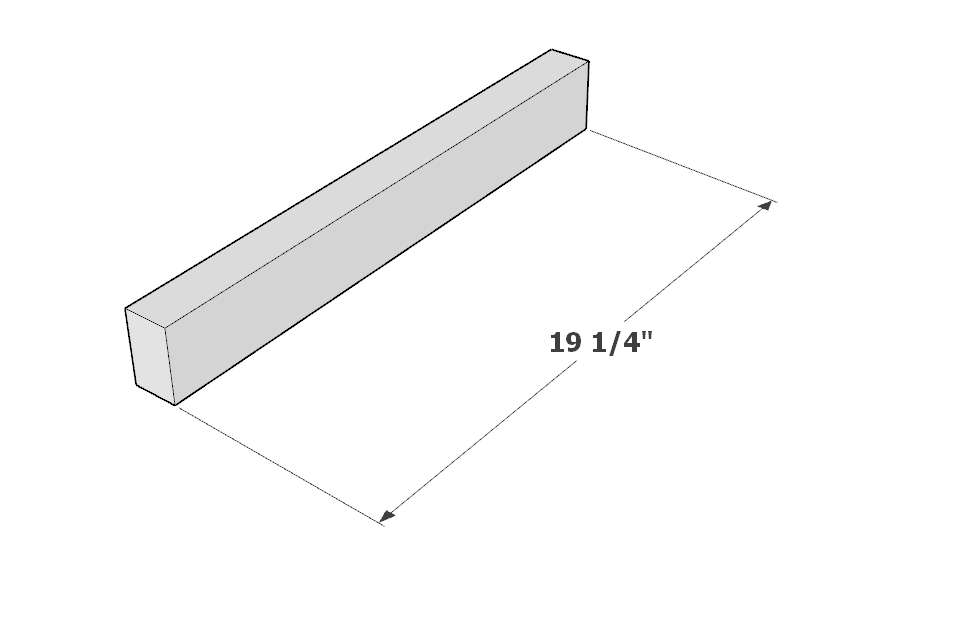
Precut (12) 19-1/4 inch long 1×3 lumber pieces per chair.
Precut (2) 19-1/4 inch long 2×3 lumber pieces per chair.
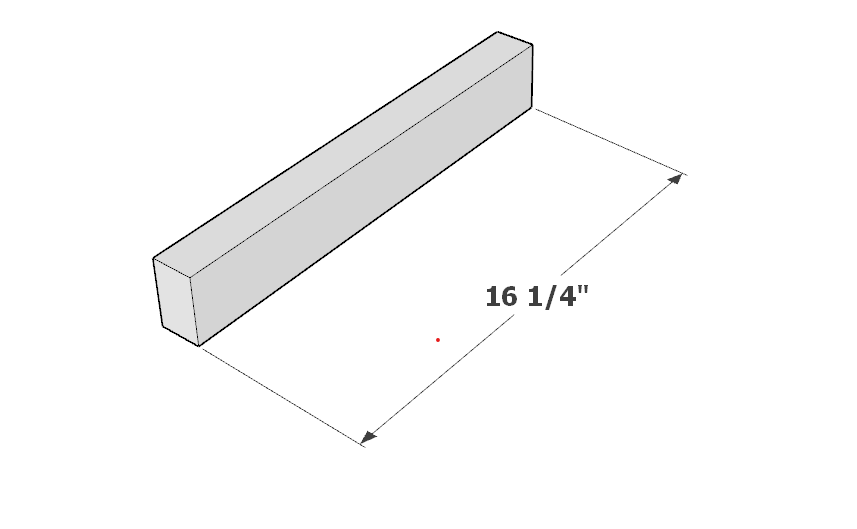
Precut (1) 16-1/4 inch long 2×3 lumber pieces per chair.
Precut (2) 14-1/8 inch long 2×3 lumber pieces per chair.
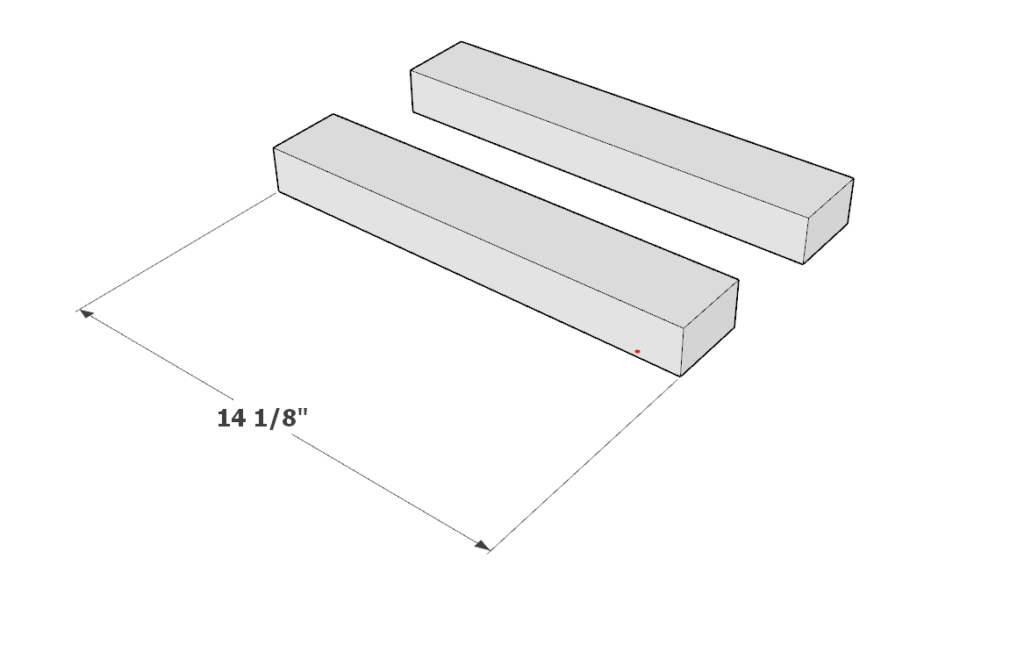
Precut (2) 17-3/4 inch long 2×3 lumber pieces per chair.

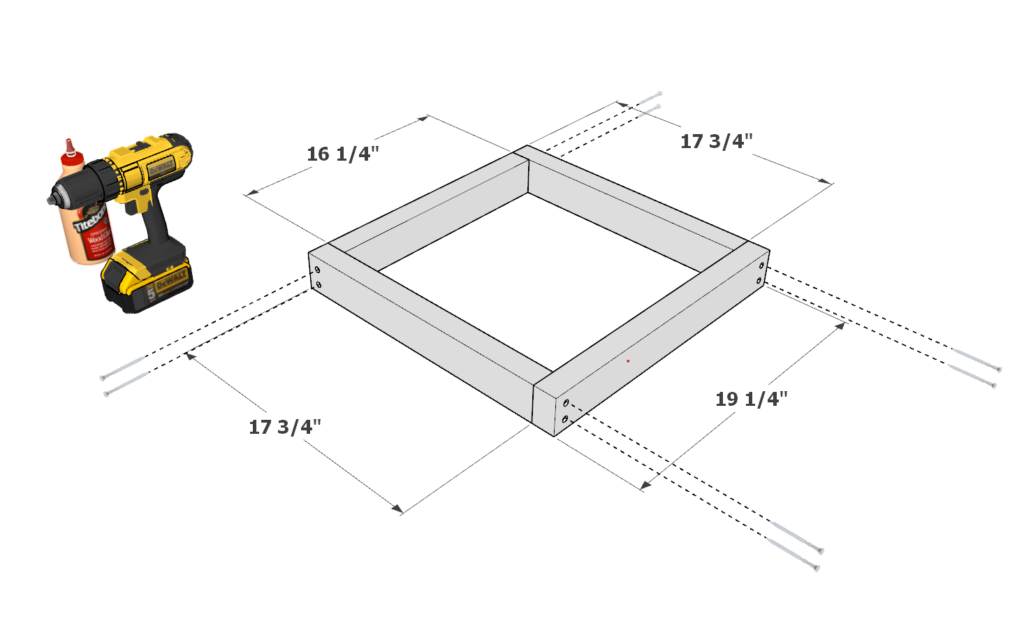
Step 2 (DIY chair)
Take two 17-3/4 inch 2×3 lumber pieces, one 16-1/4 inch 2×3 lumber pieces, and one 19-1/4 inch 2×3 -lumber pieces and arrange them as shown bellow.
Join the pieces by predrilling holes, add glue, and add 2.5 inch long screws.
It is recommended to predrill the wood prior to putting in a screw to prevent the wood from splitting. What works for me is to us a wood countersink drill bit.
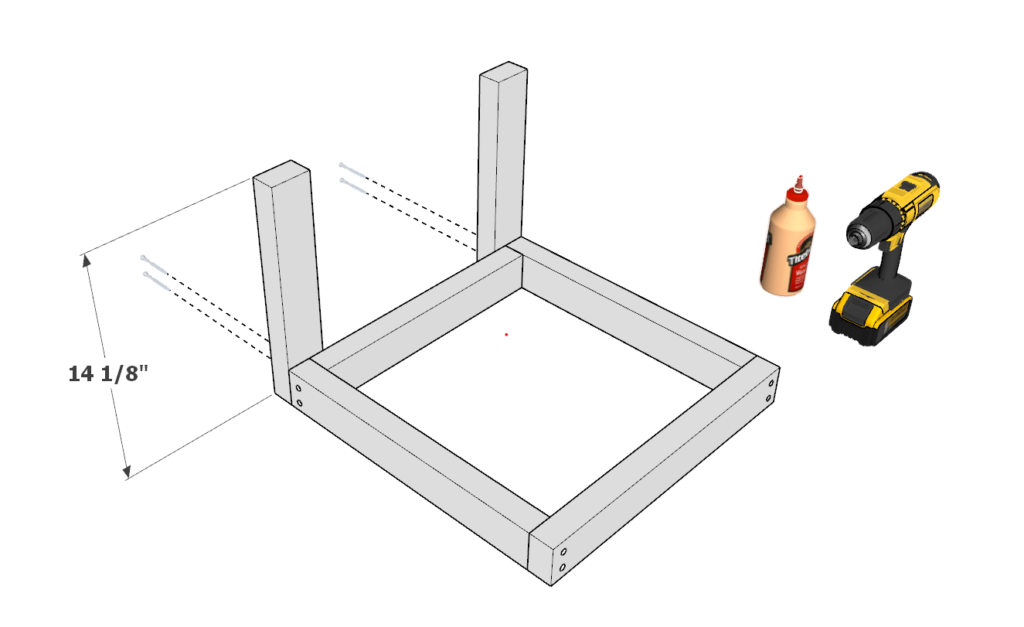
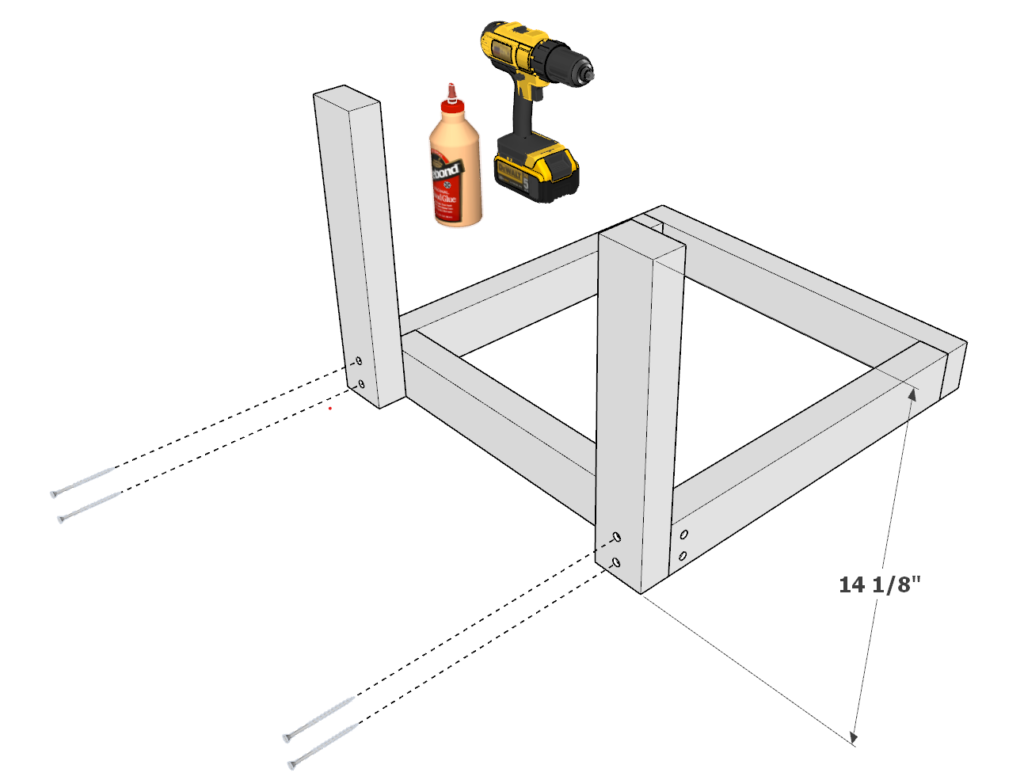
Step 3 (DIY chair)
Next, take two 14-1/8 inch 2×3 lumber pieces and arrange them as shown in the diagram. Add glue, predrill, and add screws to join the pieces together.
Step 4 (DIY chair)
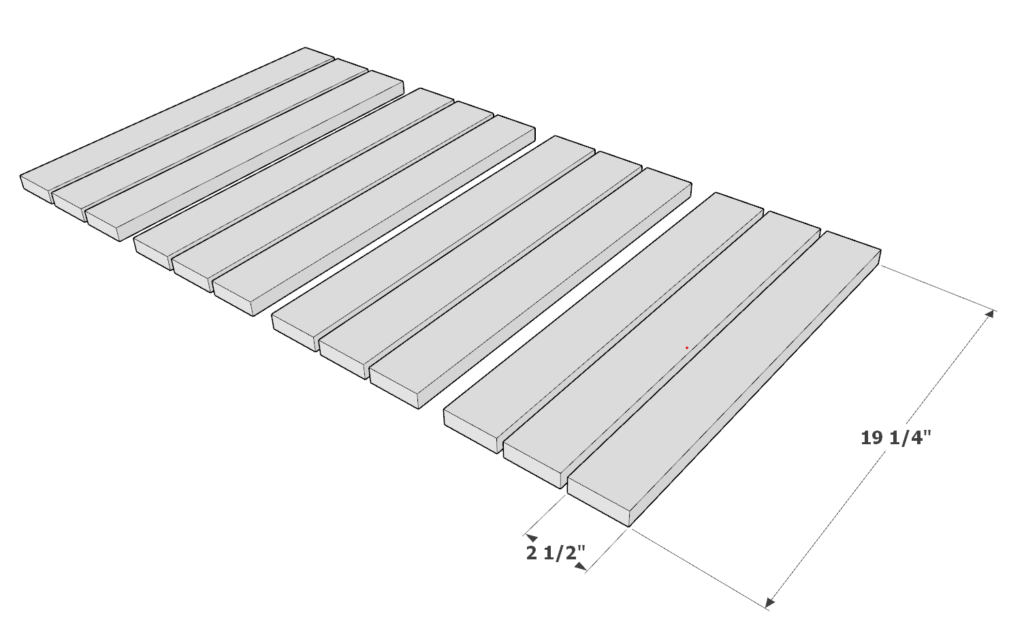
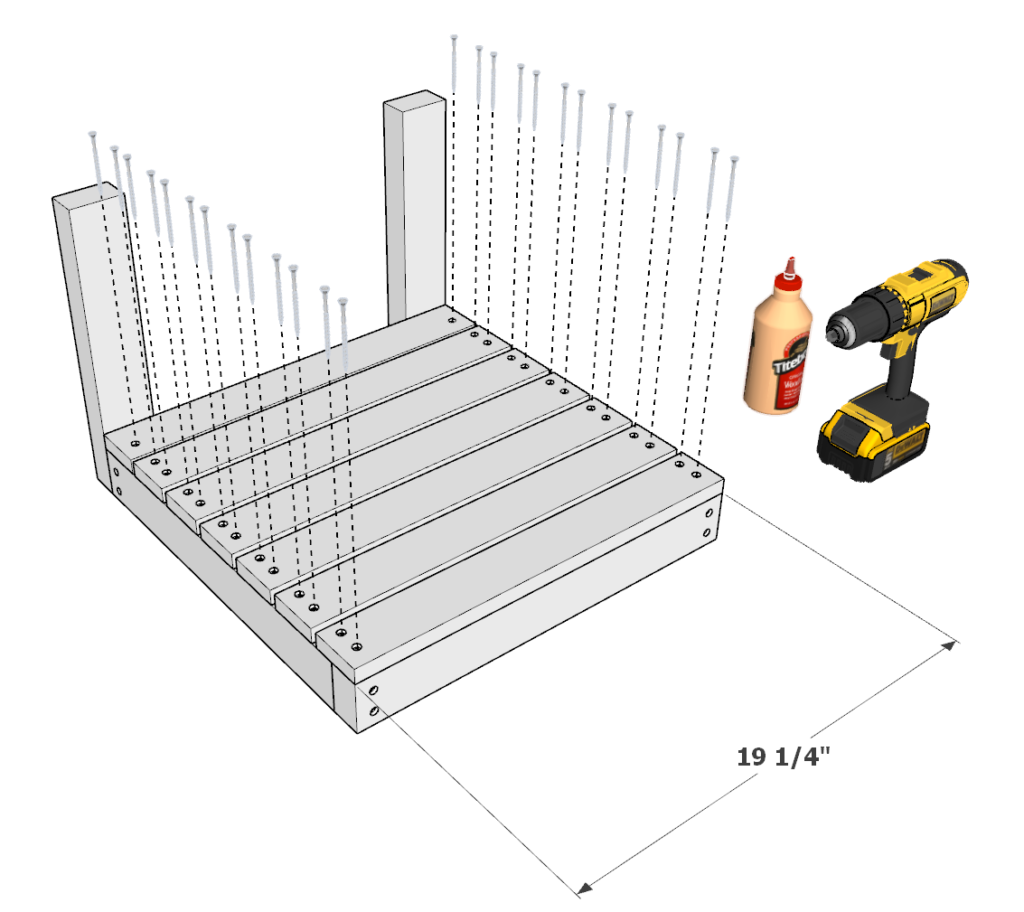
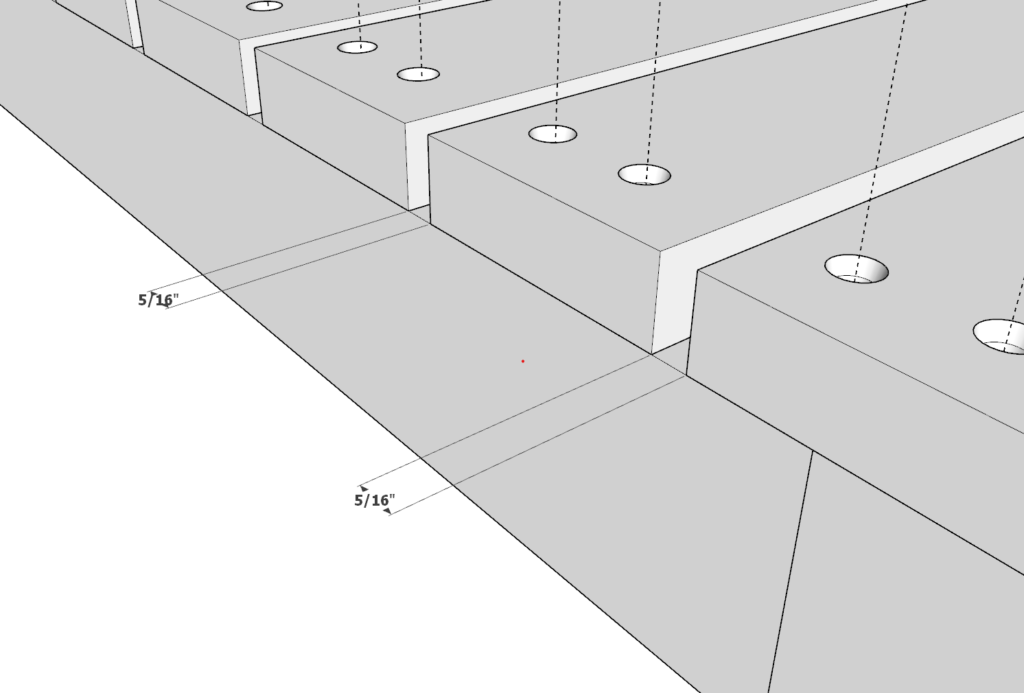
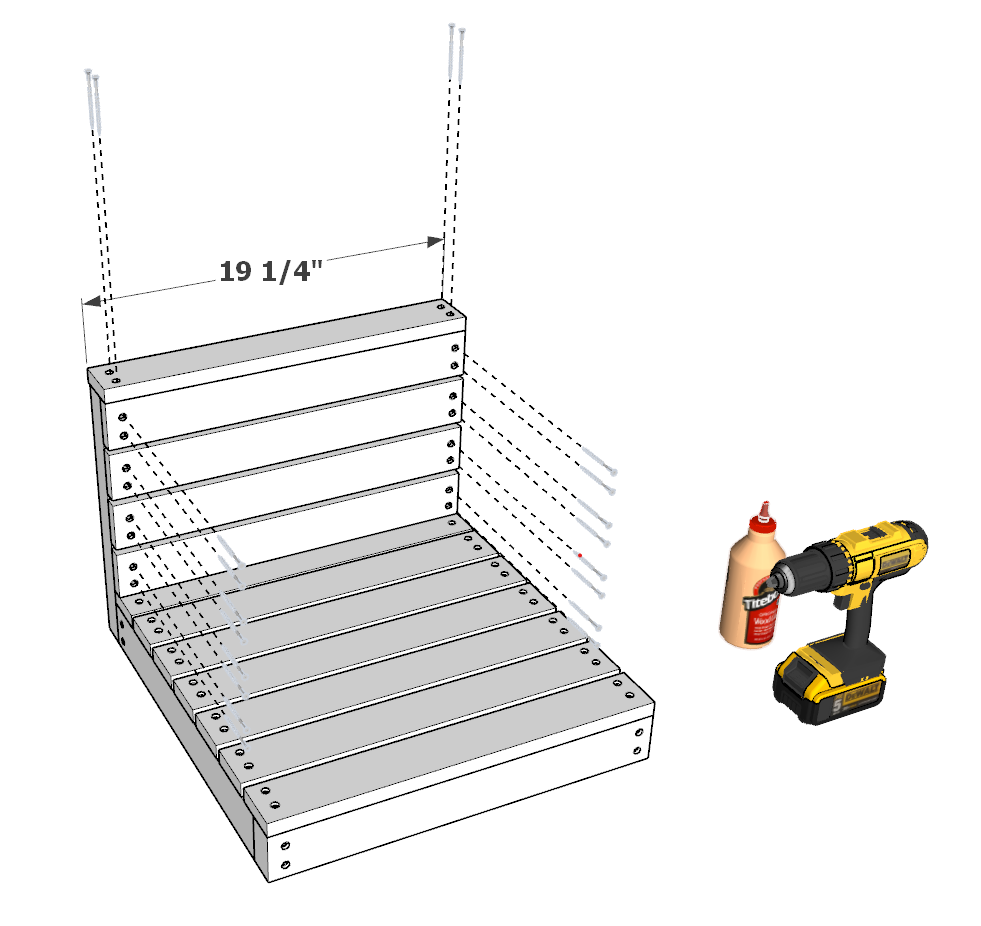
Next, add the 19-1/4 inch 1×3 lumber decking pieces. They must be about 5/16 inches apart. As before, predrill, add glue, and add screws.
Use 1.5 inch screws to make sure the screws don’t stick out of the back rest.
Step 5 (DIY chair)
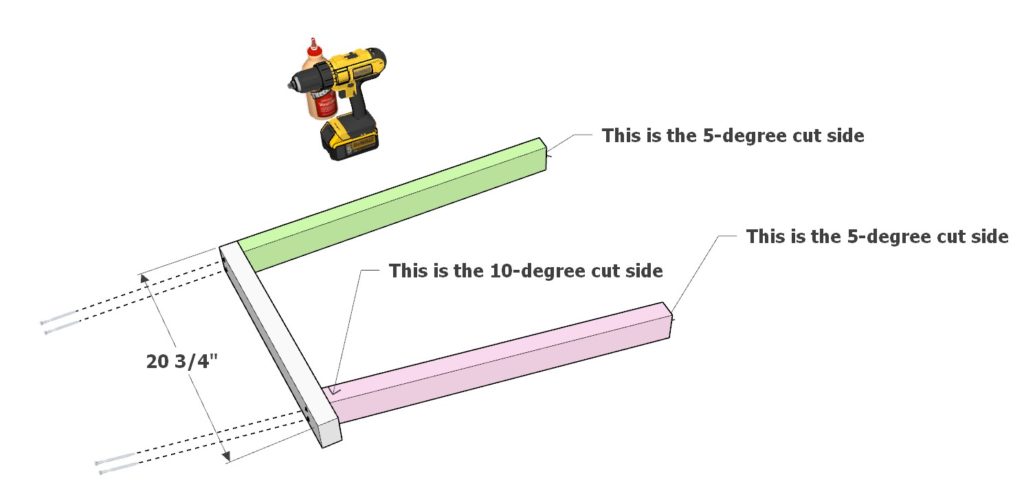
Next, take one green lumber piece, one pink lumber piece, and one 20-3/4 inch 2×3 lumber piece and arrange them as shown below.
Make sure that the correct sides are being joined together at the correct angle.
As before, predrill, add glue, and add screws.
Repeat this step 2x to have a total of two assembled armrests.
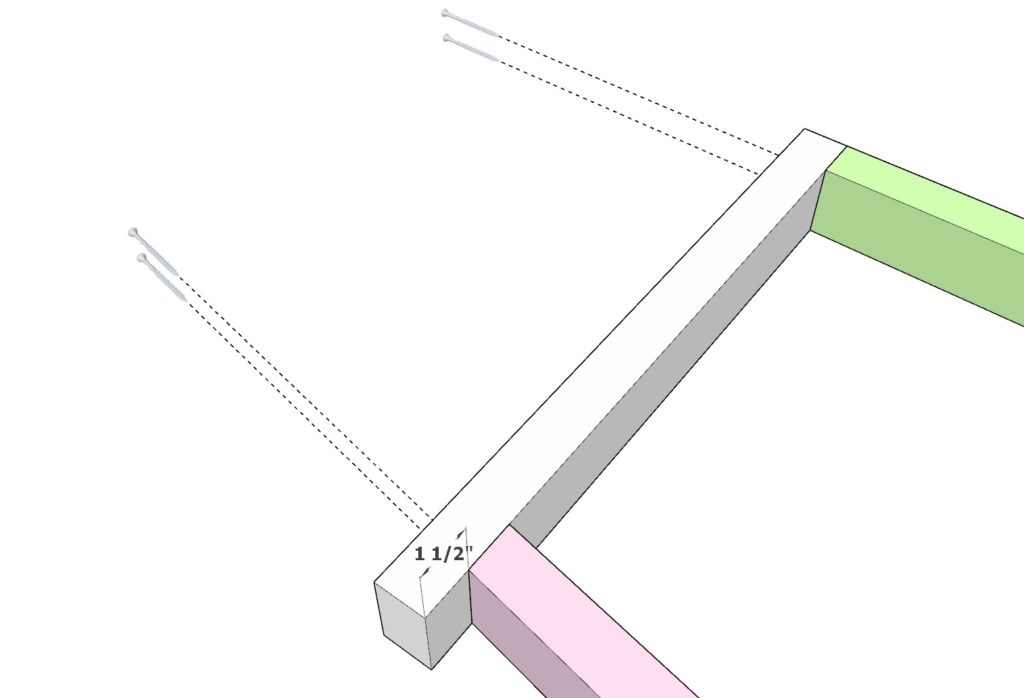

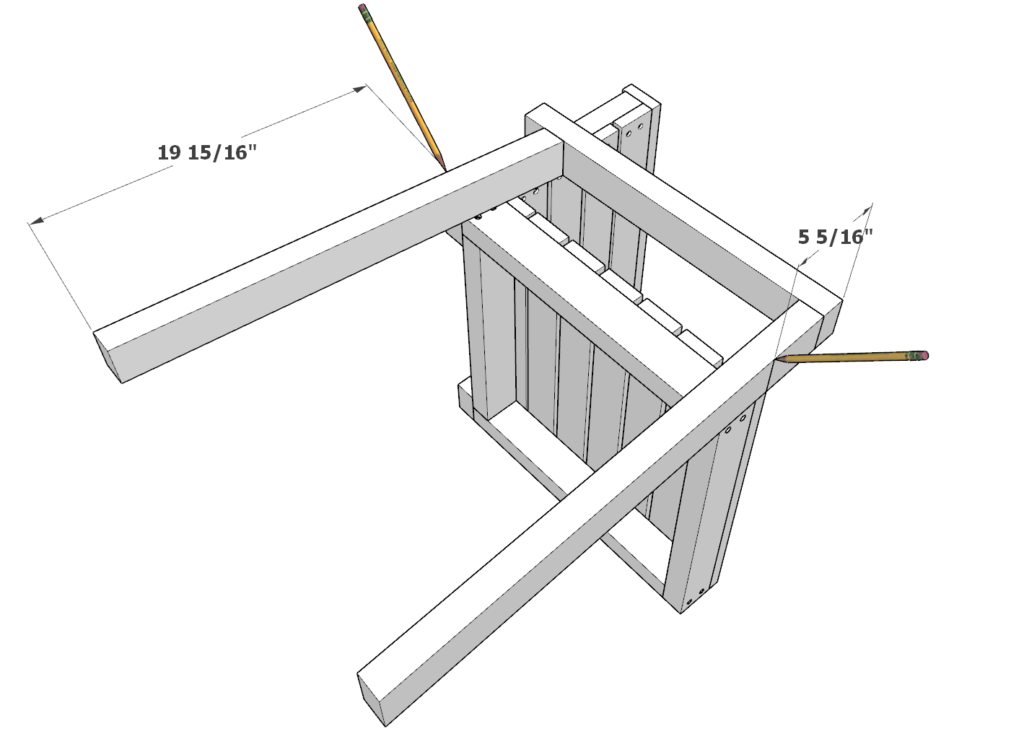
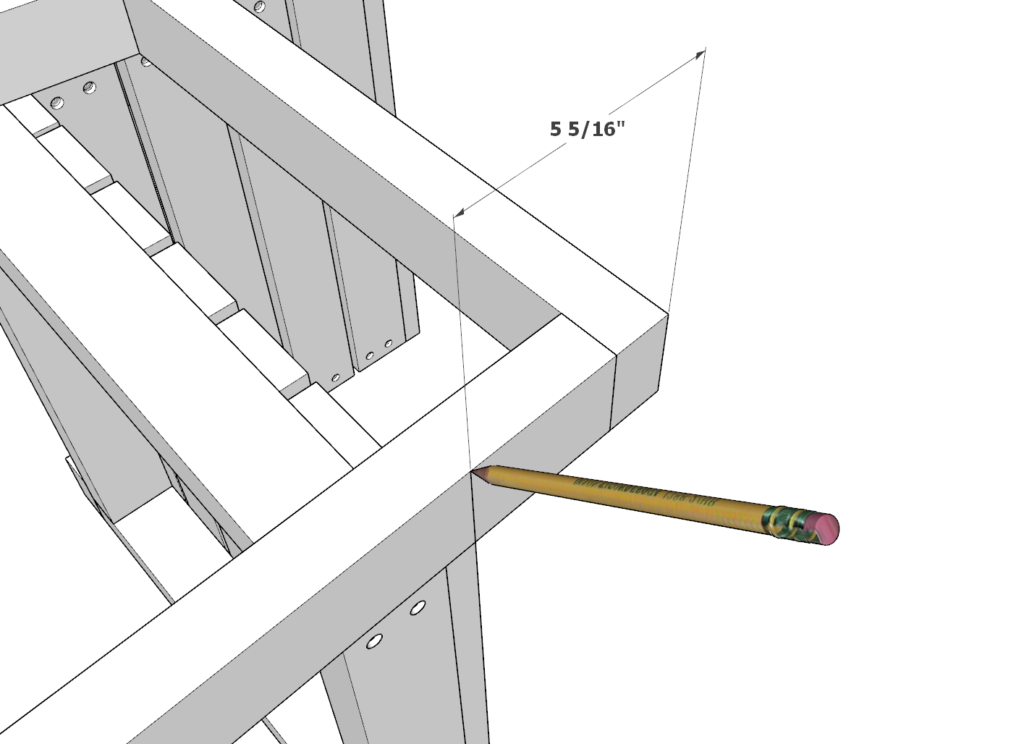
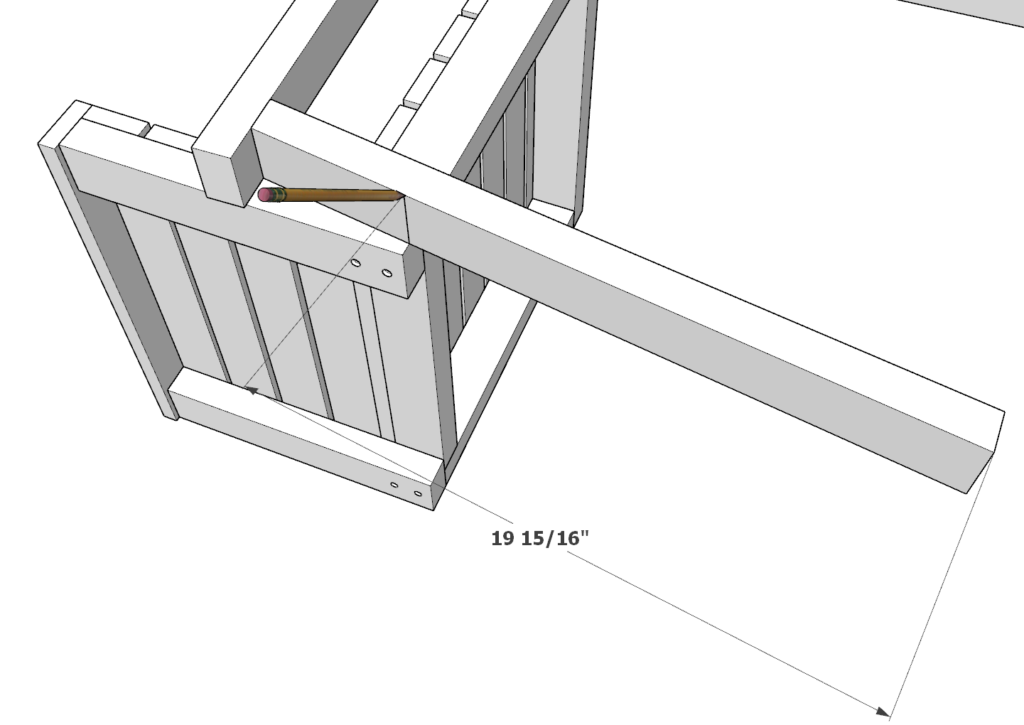
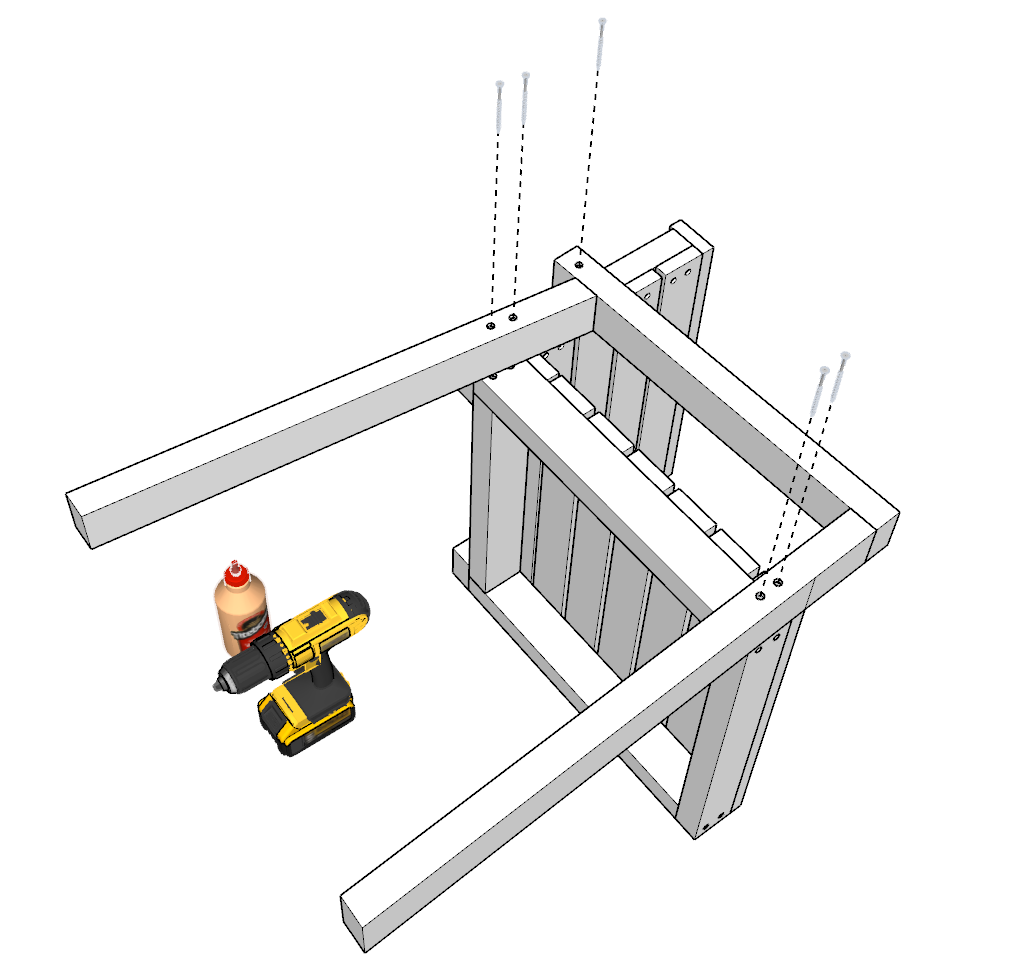
Step 6 (DIY chair)
Next, take one of the armrests and apply it to the seating component as shown below.
You can use a pencil to make a line where the seating component and the arm rest component need to light up. Appropriate spacing dimensions are shown below.
Next, add glue, predrill, and add screws as shown below. Use 3.5 inch screws and place them deep into the 2×3 to ensure a safe joint.
Repeat this step for both armrests.
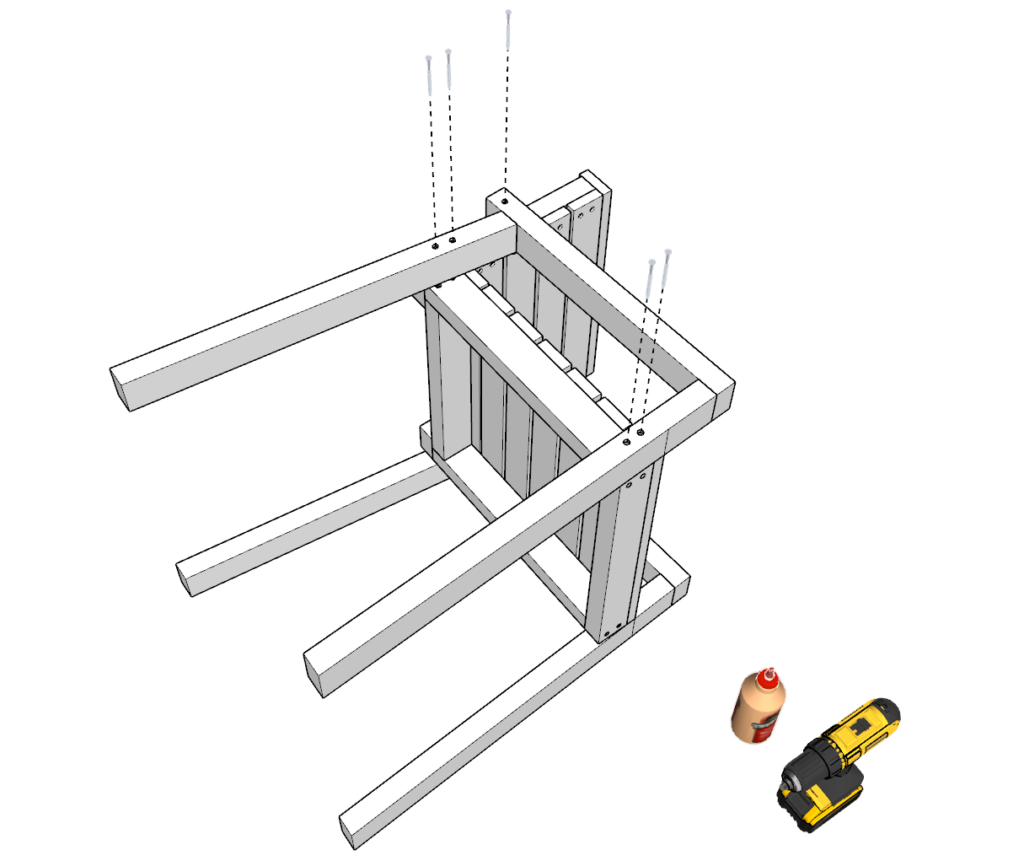
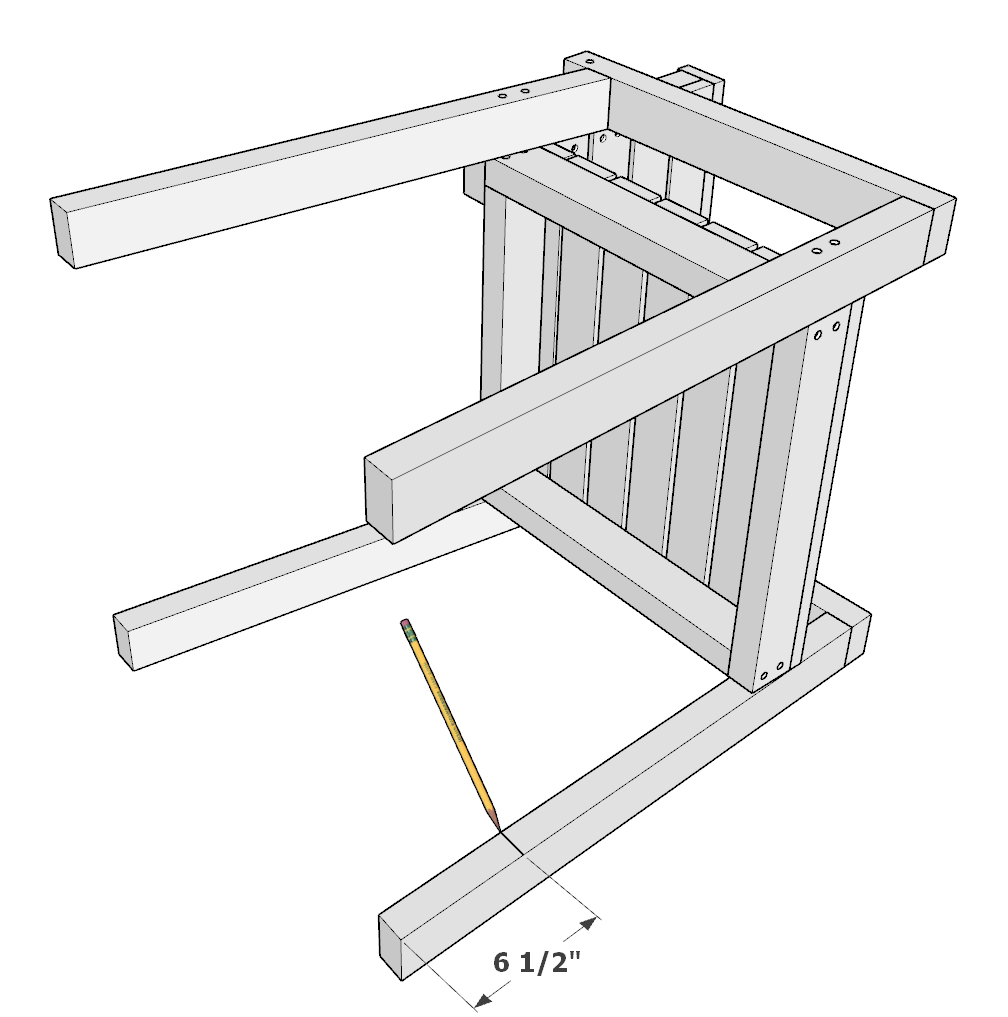
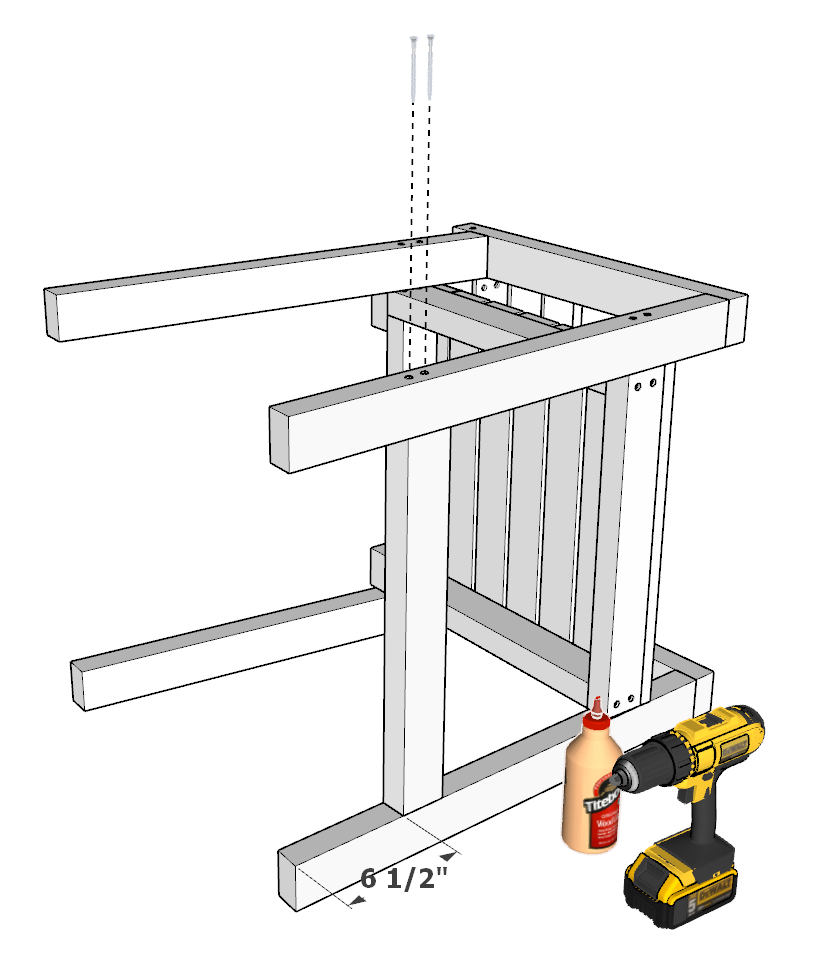
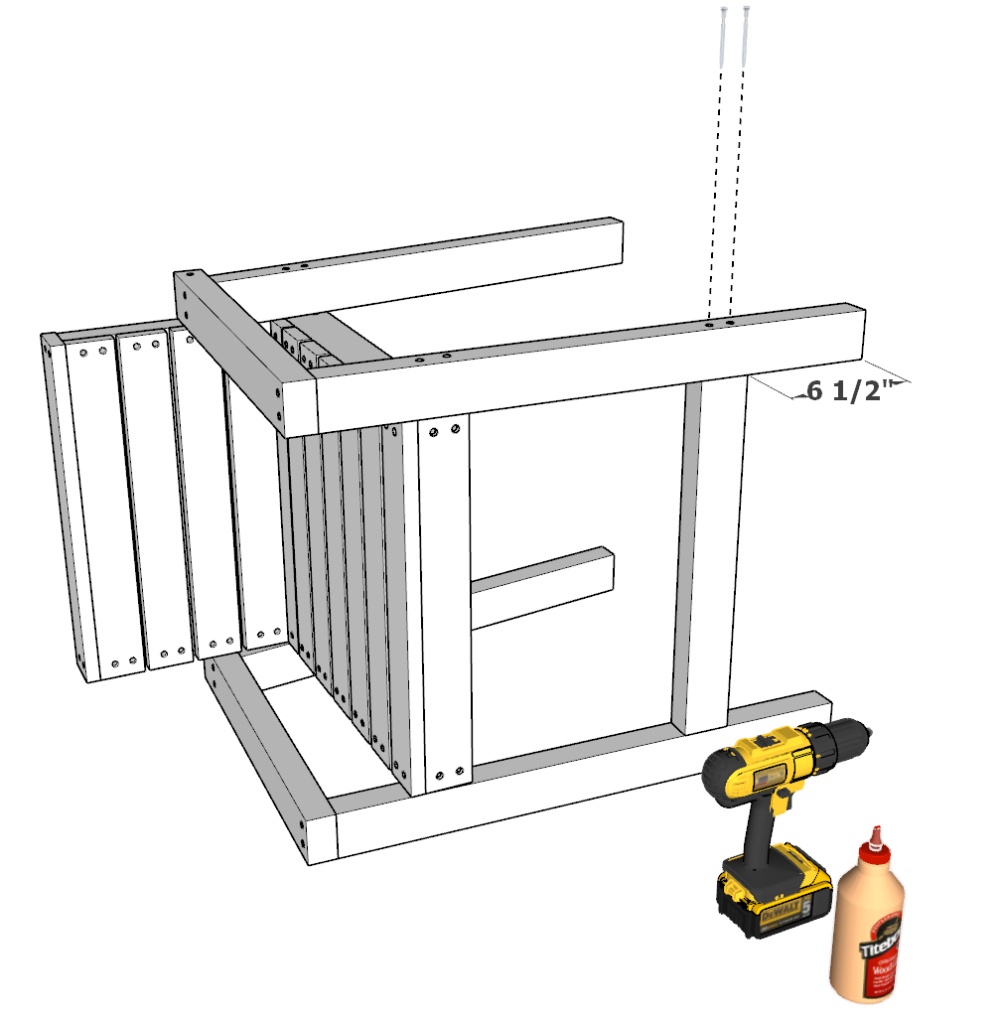
Step 7 (DIY chair)
Next, add the footrest.
Measure 6.5 inches from the base of the front legs and make a mark with a pencil to indicate where to place the footrest.
Next, add the 19-1/4 inch 2×3 lumber piece and join it together with the chair frame using glue, predrilling, and screws.
Repeat for both sides of the foot rest as shown below.
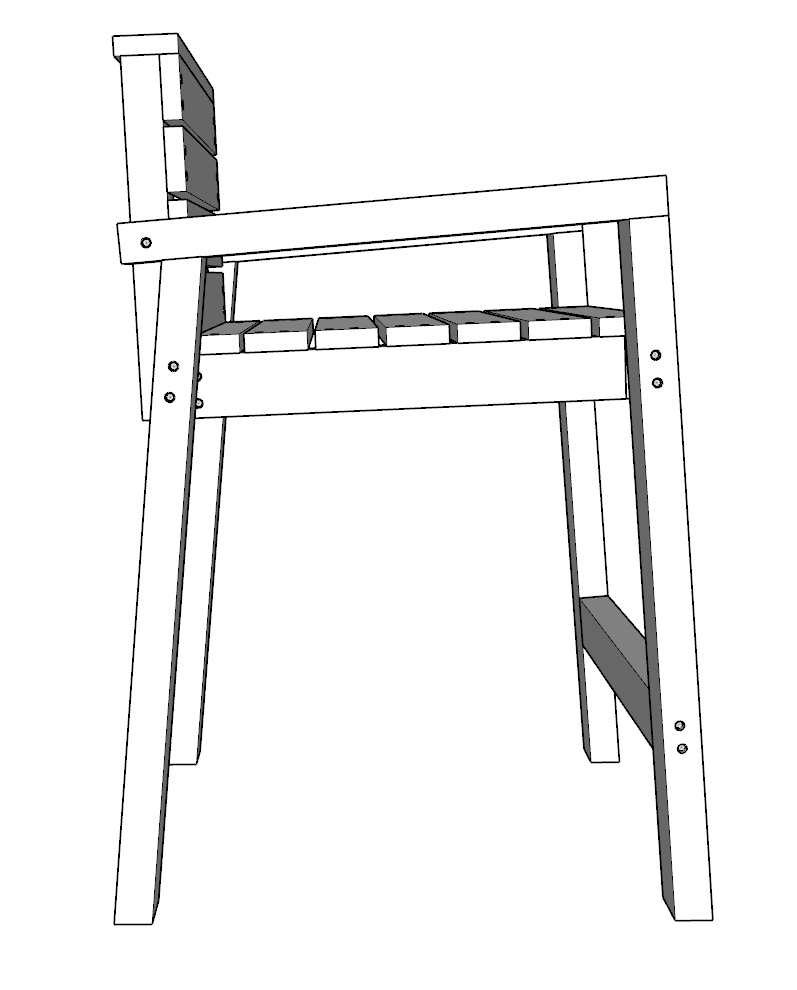
Step 8 (DIY chair)
Next, sand down the whole chair. This can be time consuming. I use an orbital sander to speed up the process
I use a rough 80 grit paper first and then finish it with a 220 grit paper.
Filling in the holes is optional.
At this point it is ready to be stained or painted!

Step-by-step instruction on building the counter height DIY outdoor dining table
Recommend tools for the DIY outdoor dining table
- Saw (miter saw recommended for precision cuts)
- Drill
- Impact driver with bit for screws
- Sander
- wood countersink drill bit
- Ratchet straps (at least 2 sets)
Cut list and material list for the DIY outdoor dining table
Available with purchase of PDF plans.
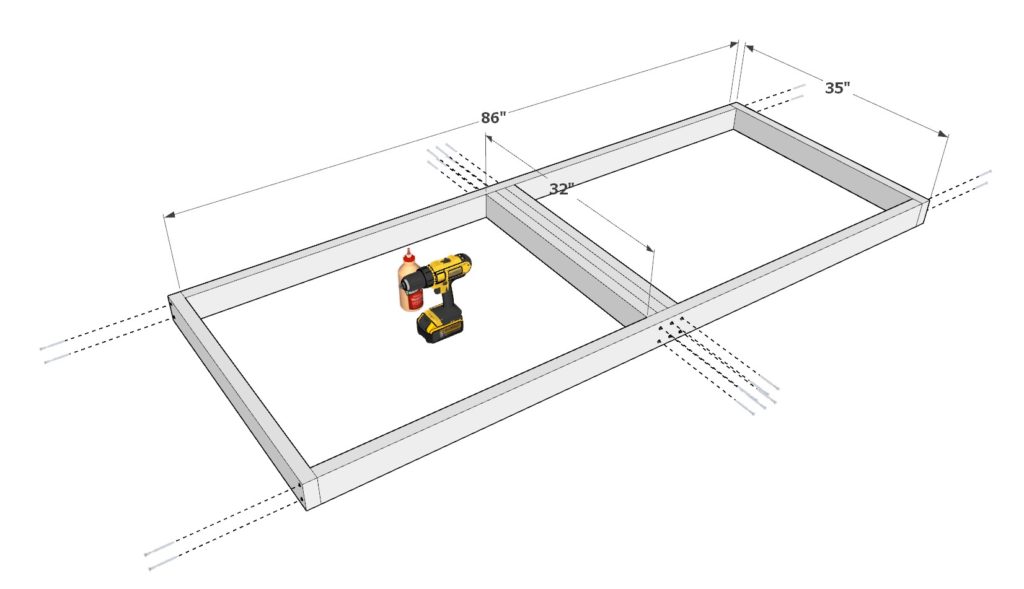
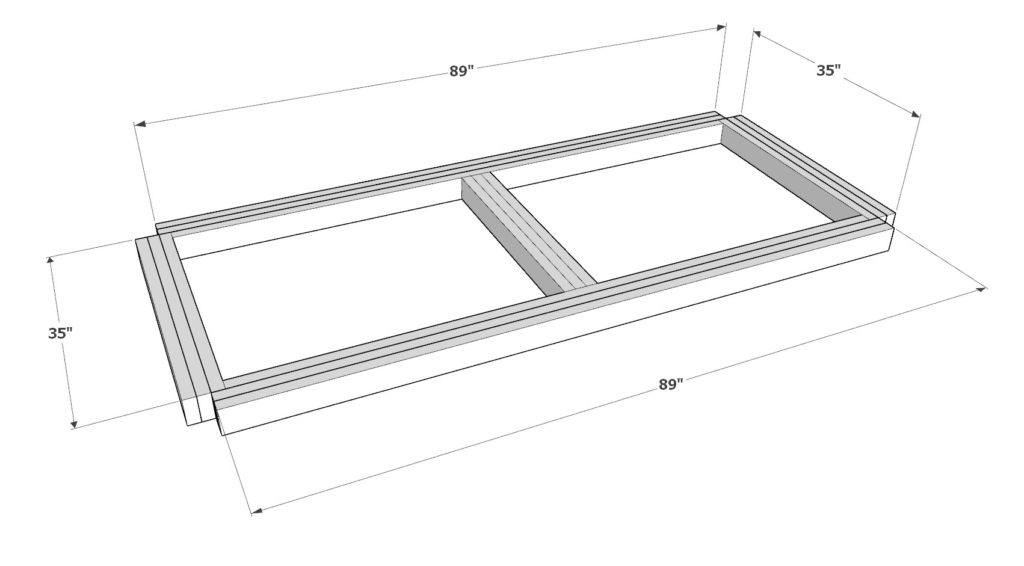
Step 1 (DIY Outdoor Dining table)
Start by taking two 86 inch 2×4 lumber pieces, two 35 inch 2×4 lumber pieces, and three 32 inch 2×4 lumber and arranging them as shown below.
join the pieces together using 3.5 inch screws. Add glue to all areas that will be making contact when joined, predrill, and add screws.
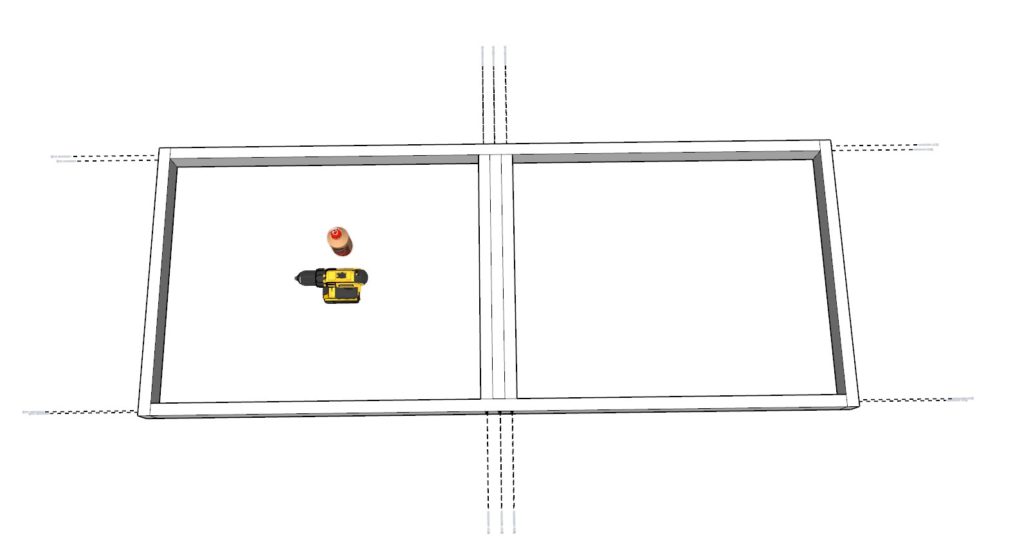
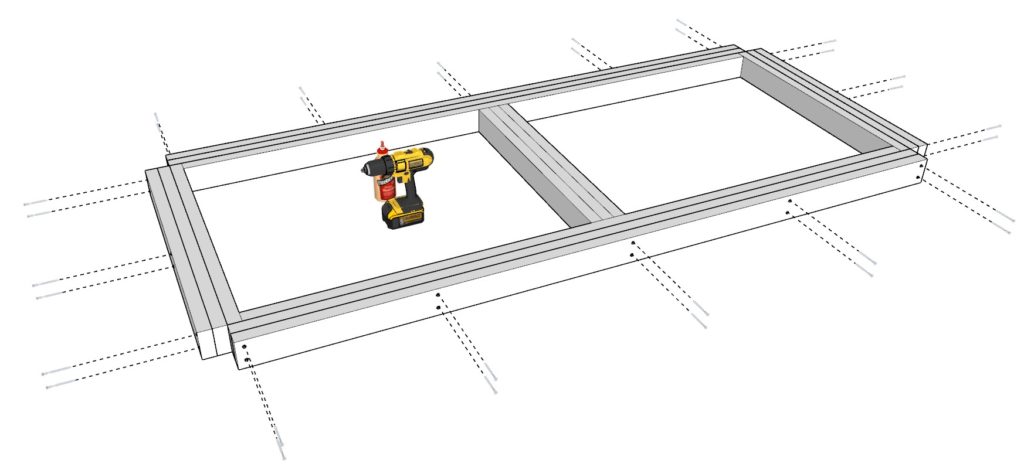
Step 2 (DIY Outdoor Dining table)
Next, take two 89 inch 2×4 lumber pieces and two 35 inch 2×4 lumber pieces and arranging them as shown below.
join the pieces together using 2.5 inch screws. Add glue to all areas that will be making contact when joined, predrill, and add screws.
Don’t use the 3.5 inch screws here because they will show up on the other side. They are too long. You could drill them in diagonally but that may be challenging.
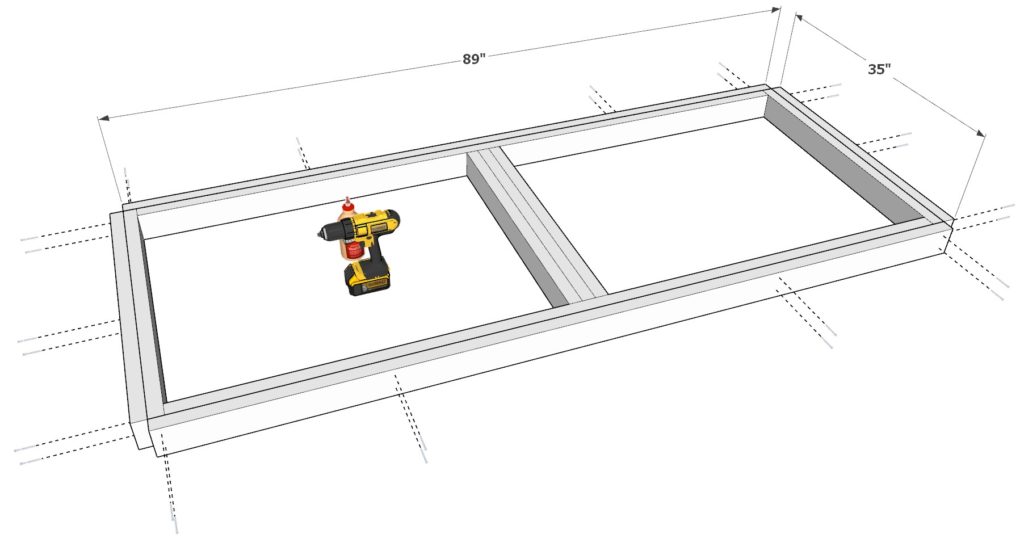
Step 3 (DIY Outdoor Dining table)
Next, take two 89 inch 2×4 lumber pieces and two 35 inch 2×4 lumber pieces and arranging them as shown below.
Join the pieces together using 3.5 inch screws. Add glue to all areas that will be making contact when joined, predrill, and add screws.
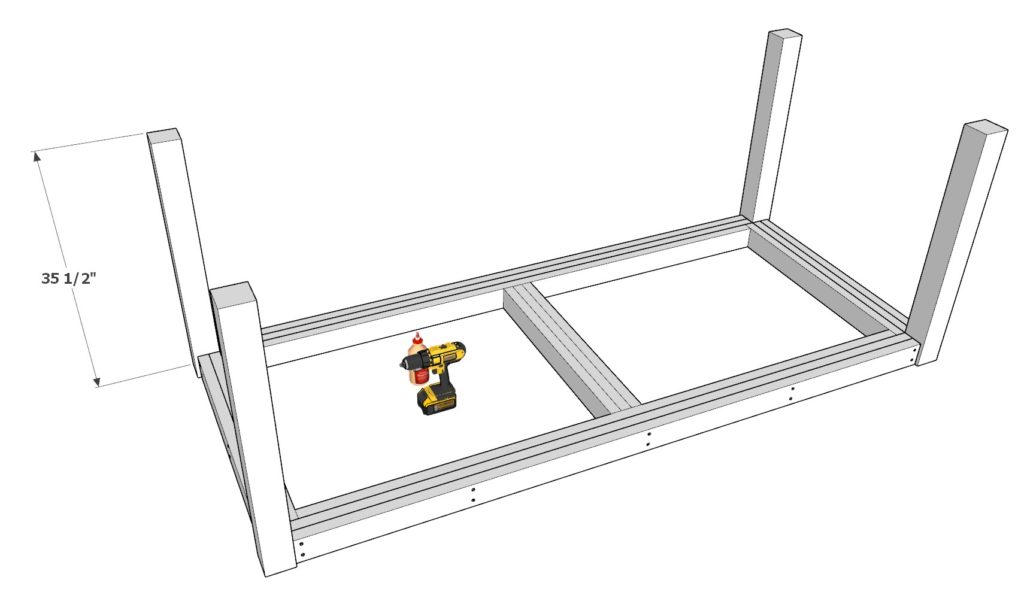
Step 4 (DIY Outdoor Dining table)
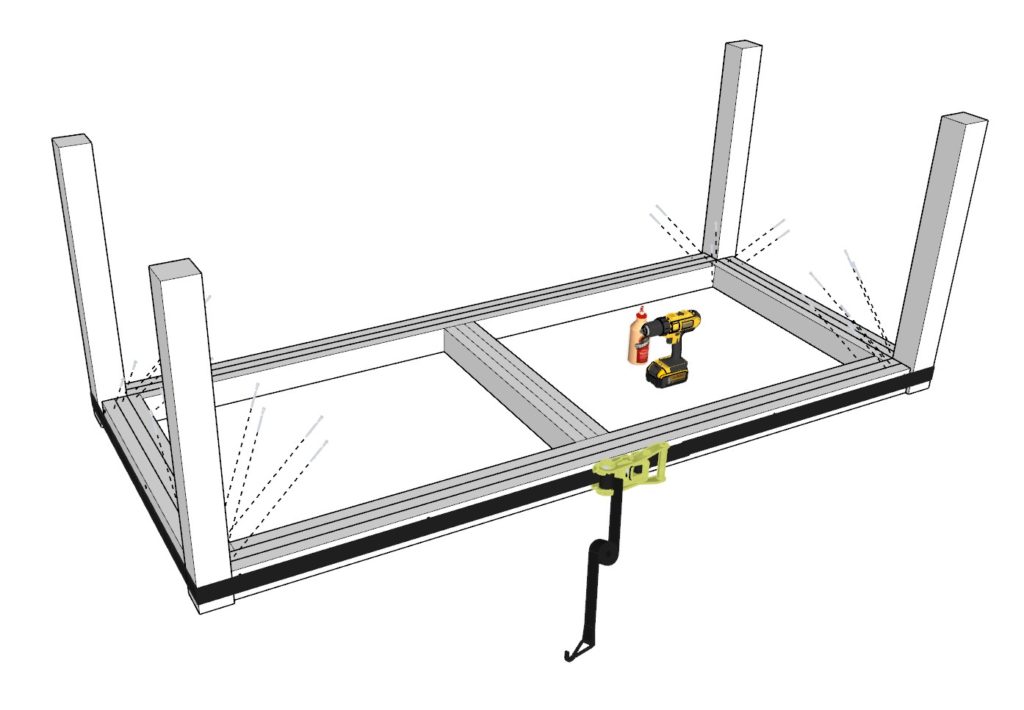
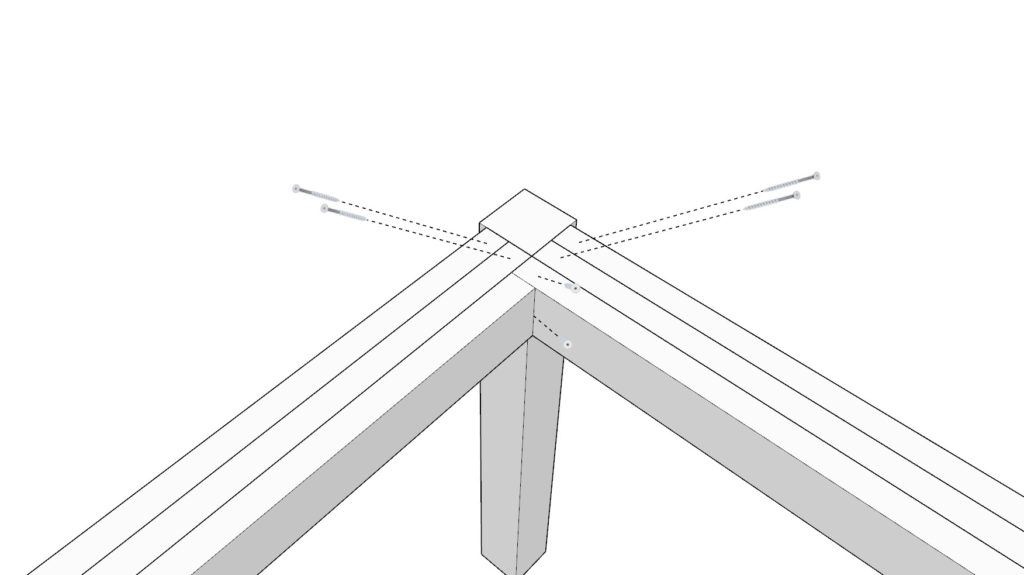
Next, add four 35 1/2 inch 4×4 lumber pieces to the table as shown below.
Next, take the table legs and add glue to all areas that will be making contact with the table frame. Be generous with glue but not so that it drips.
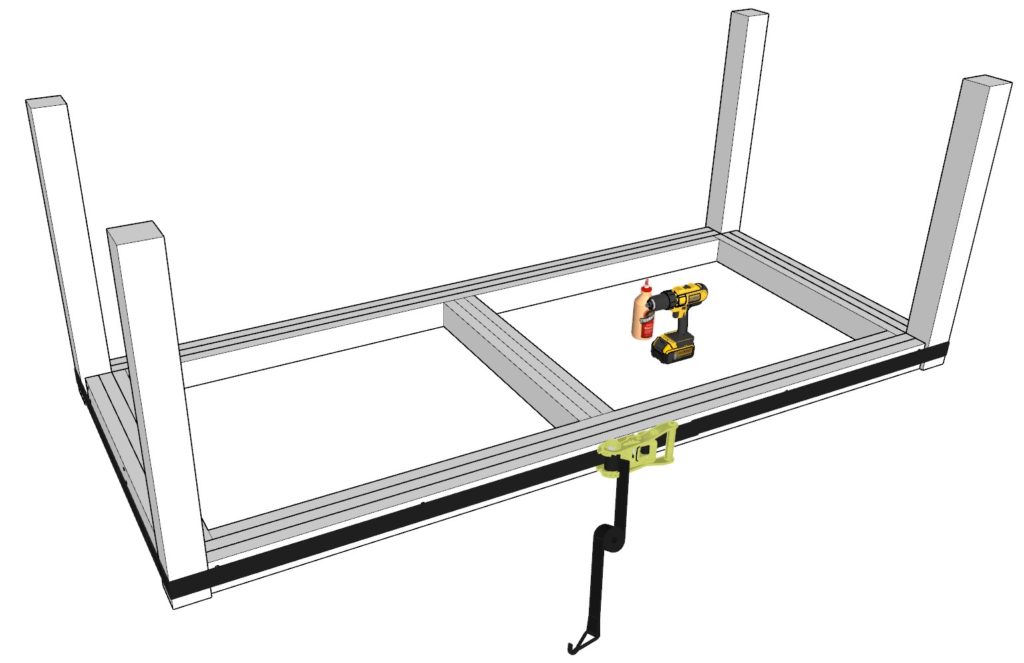
Next, take a ratchet strap and wind it around the table legs as shown below. This is to bring the table legs together so they can be tightly joined with screws. If your strap is too short, use two straps.
Next, tighten the straps. Use a hammer to “hammer” and parts of the table frame that are not aligned with the table legs. Make sure your using a flat surface for this part so that your table surface would turn out flat as well. Once you have “hammered” in all the stubborn parts, tighten the straps even more until the line is very tight.
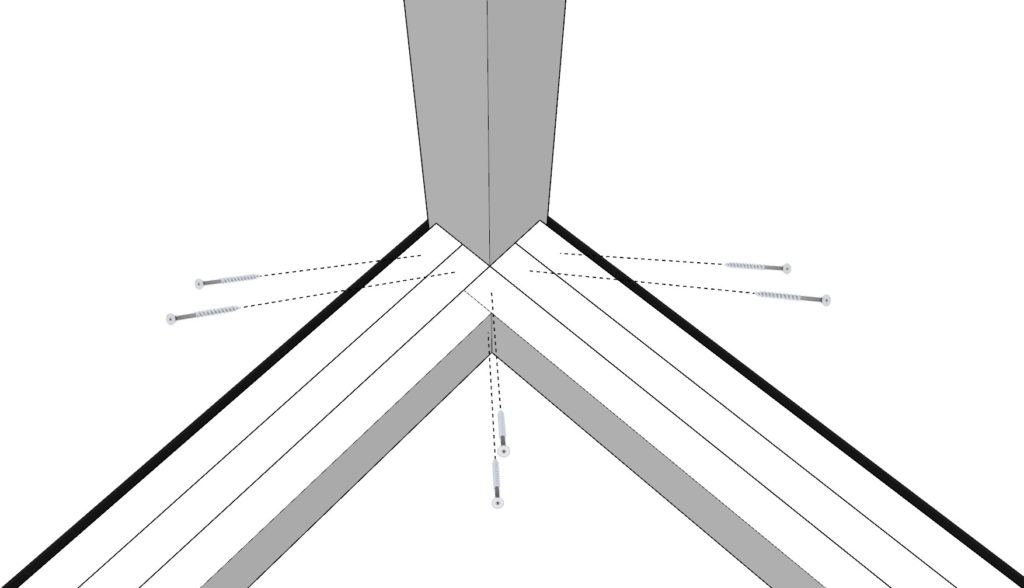
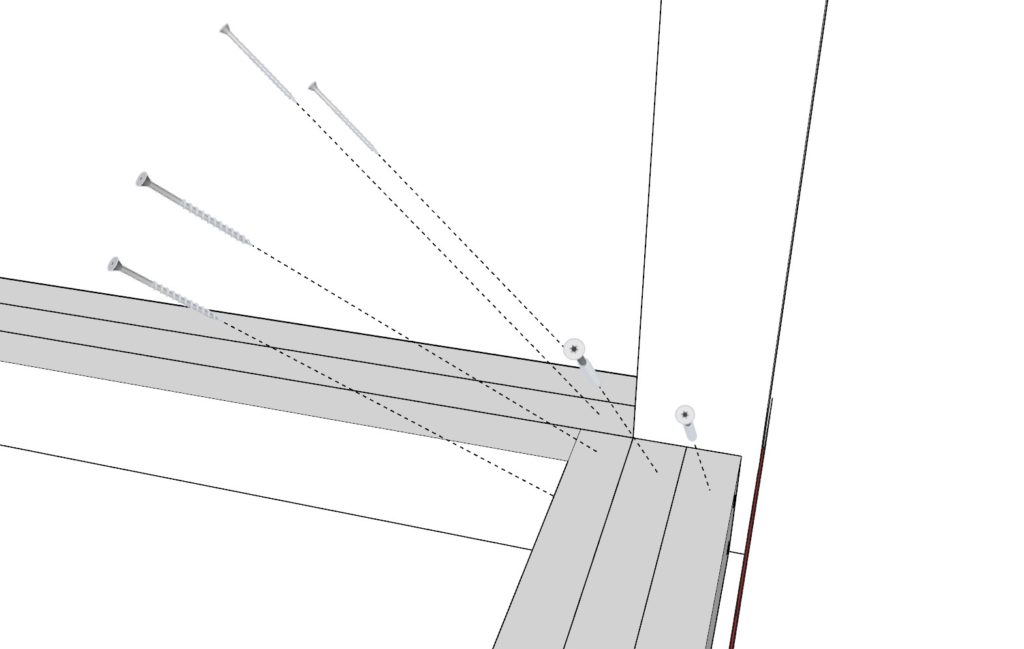
Next, add 3.5 inch screws as shown in the diagram below. Its 6 screws per side for under the table.
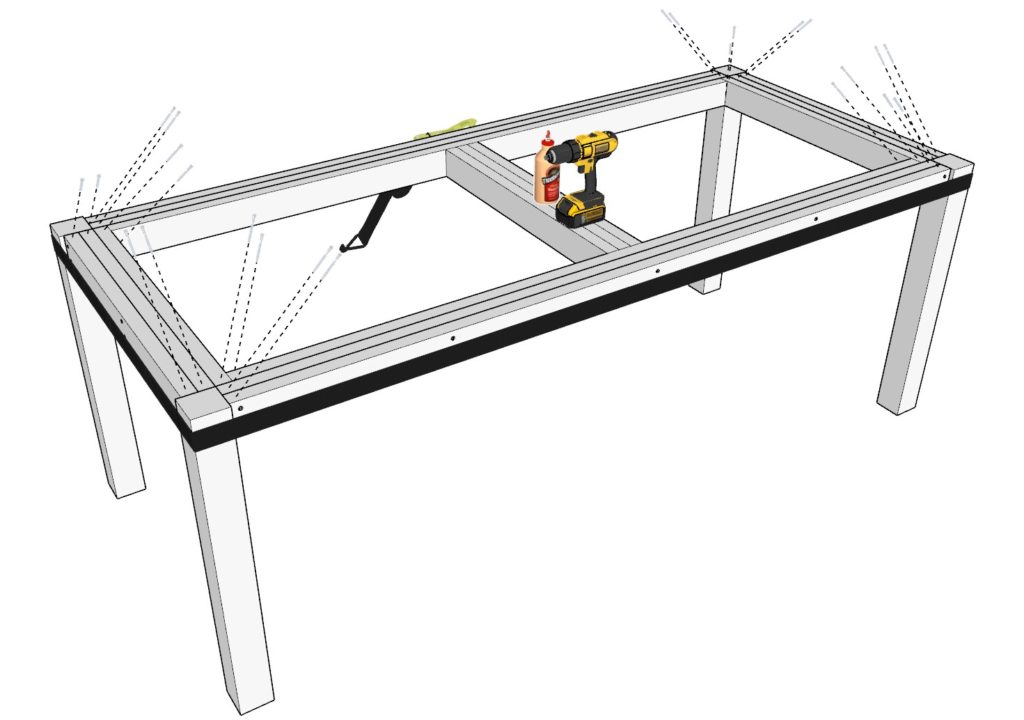
Next, flip the table. Do not rest the weight of the table on the table legs when turning. Turn the table mid-air with help.
Next, add screws in a similar way that you added them for under the table. Again 6 screws per side.

Step 5 (DIY Outdoor Dining table)
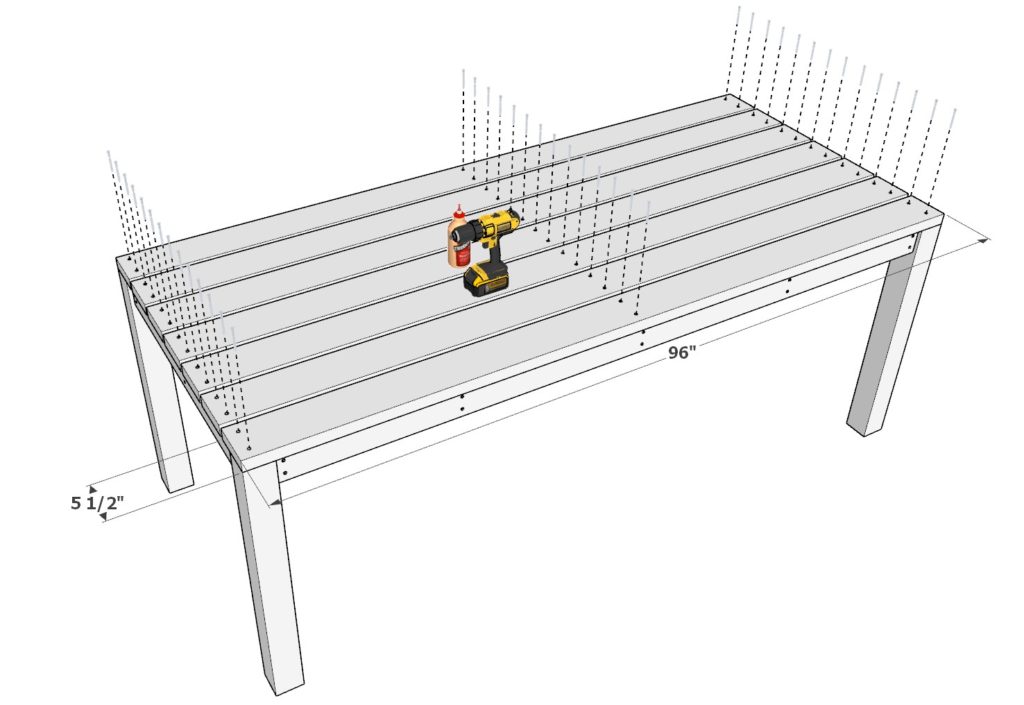
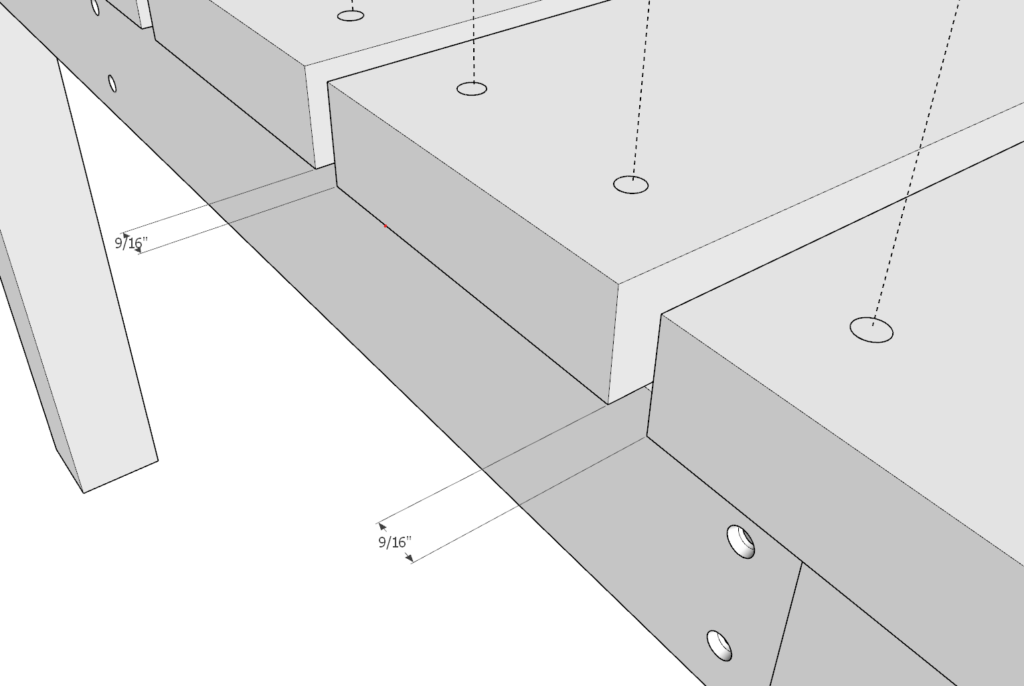
Next, add the seven table top 2×6 lumber pieces. you will need to add a total of seven 96 inch 2×6 lumber pieces. Space out the planks 9/16 inches apart.
As before, add glue, predrill, and add 3.5 inch screws.
Tip: Ensure all the lumber pieces are identical in length. Sometimes the 8 foot lumber pieces I buy are not all the same size even when they are from the same pallet and same store.
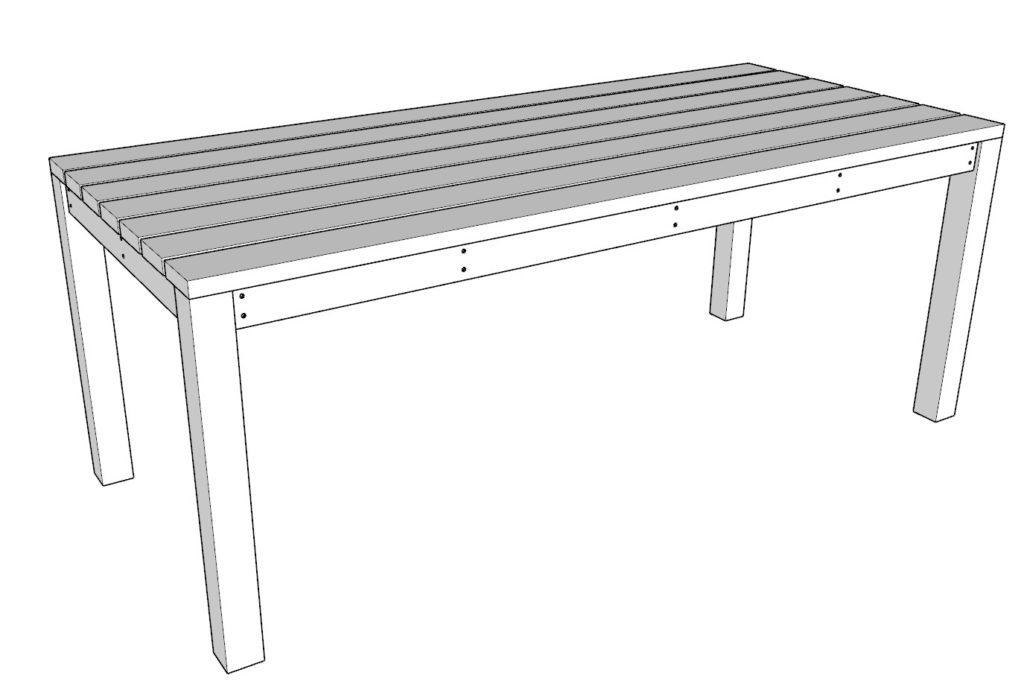
Step 6 (DIY Outdoor Dining table)
Next, sand down the whole table. I use an orbital sander to speed up the process
I use a rough 80 grit paper first and then finish it with a 220 grit paper.
Filling in the holes is optional.
I also like to use a router on the perimeter edges of the table top to round off my corners so that the table doesn’t press in on the forearms and elbows when its in use. This makes the table more comfortable. This can also be done with a sander if you don’t have a router on hand.
At this point it is ready to be stained or painted!
love the set plan on building one my self but instead of an 8 person i,m planning a10 person and chair,s