Introduction: Start Your DIY Woodworking Journey with Us
Embark on an exciting DIY woodworking journey with us. Whether you’re completely new to the woodworking world or you’ve handled a few projects before, our beginner-friendly guide on constructing a modular sofa provides a fantastic opportunity to cultivate and expand your skills, offering you the chance to handcraft a signature piece for your living space.
Why a DIY Modular Sofa Project?
Taking the DIY route in crafting your furniture, especially a modular sofa adds a unique and personalized touch to your home. Apart from the therapeutic benefits of engaging in a hands-on project, creating a piece instead of purchasing it gives you control over every aspect from materials and aesthetics to the size and functionality, making the home truly feel like your own personal haven.
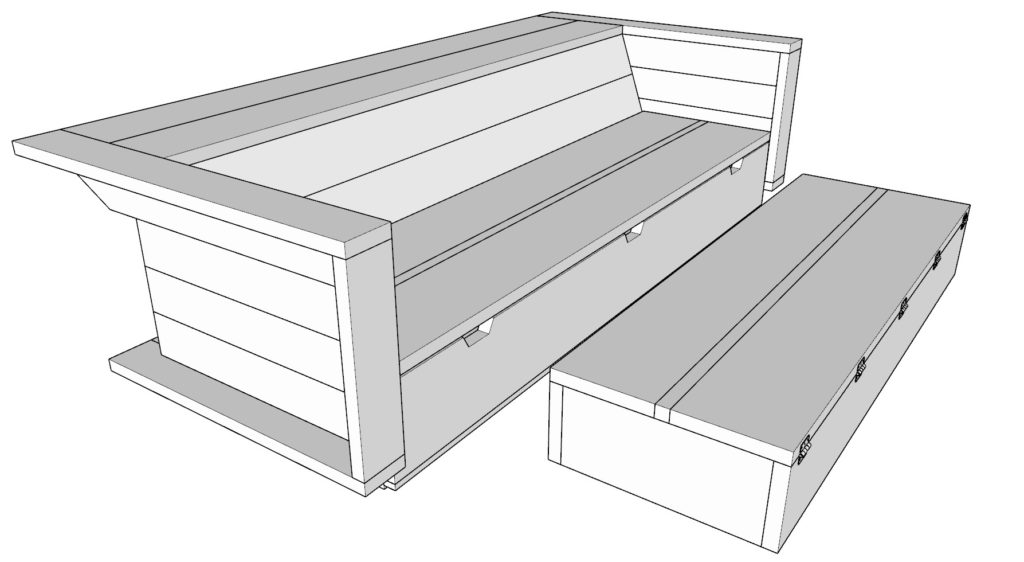
Transforming Your Living Space: The Multipurpose Modular Sofa
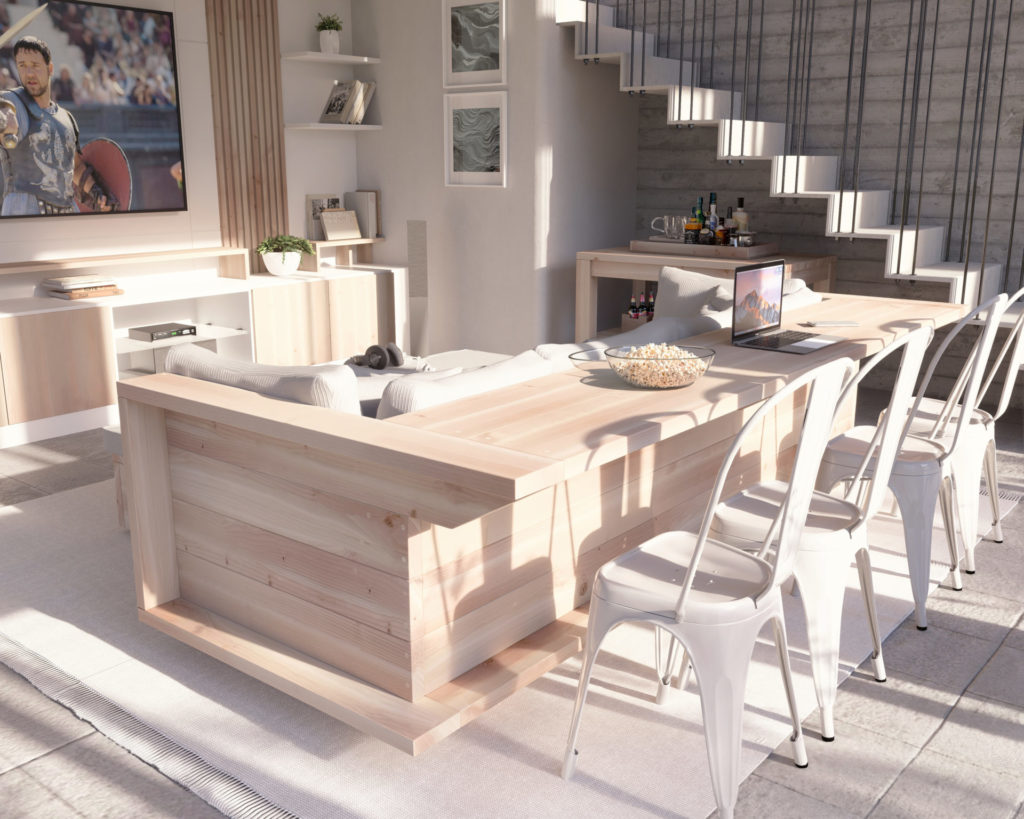
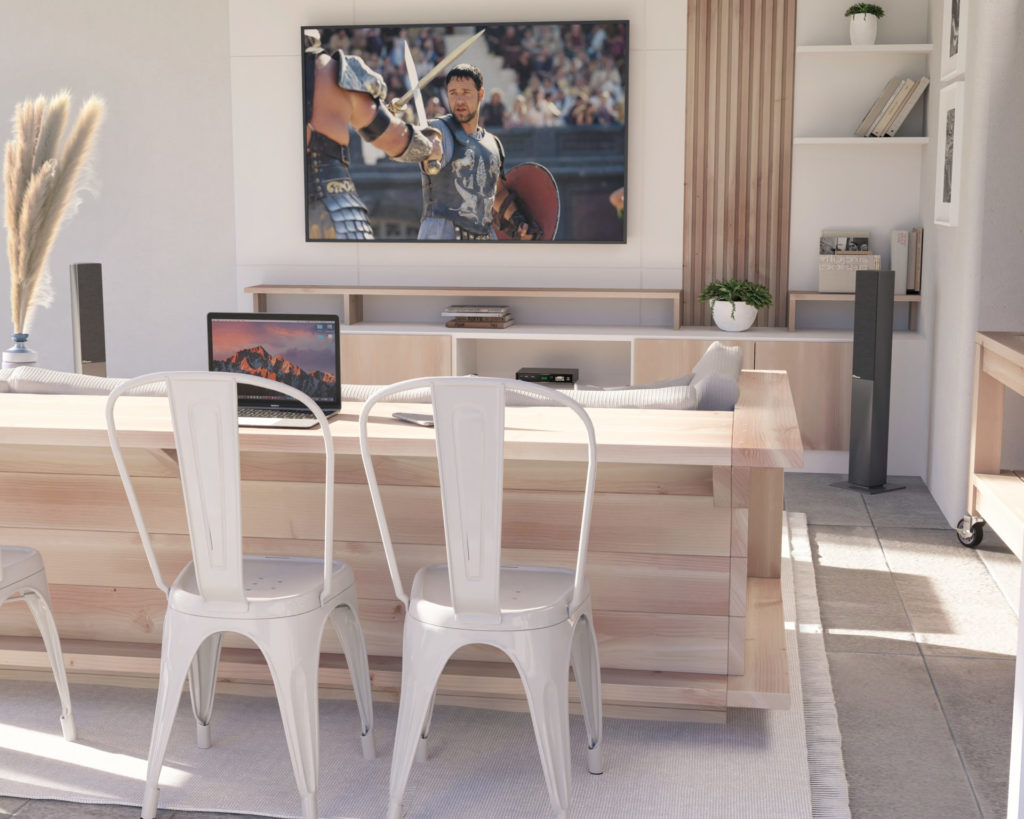
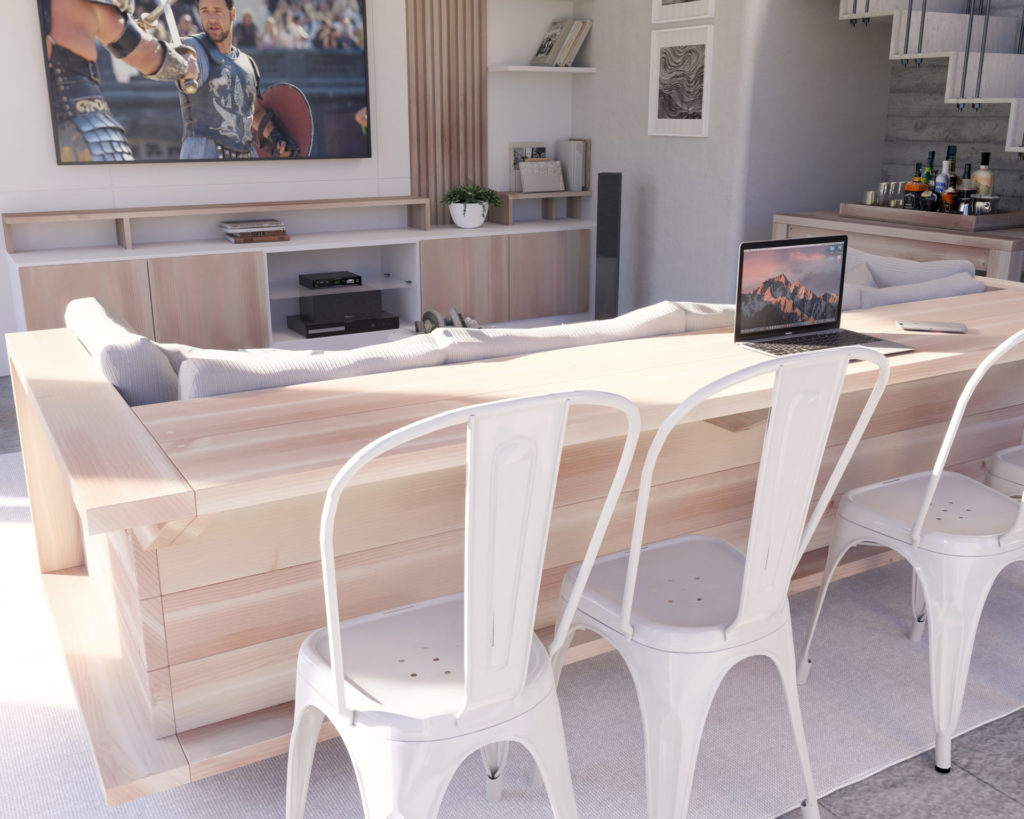
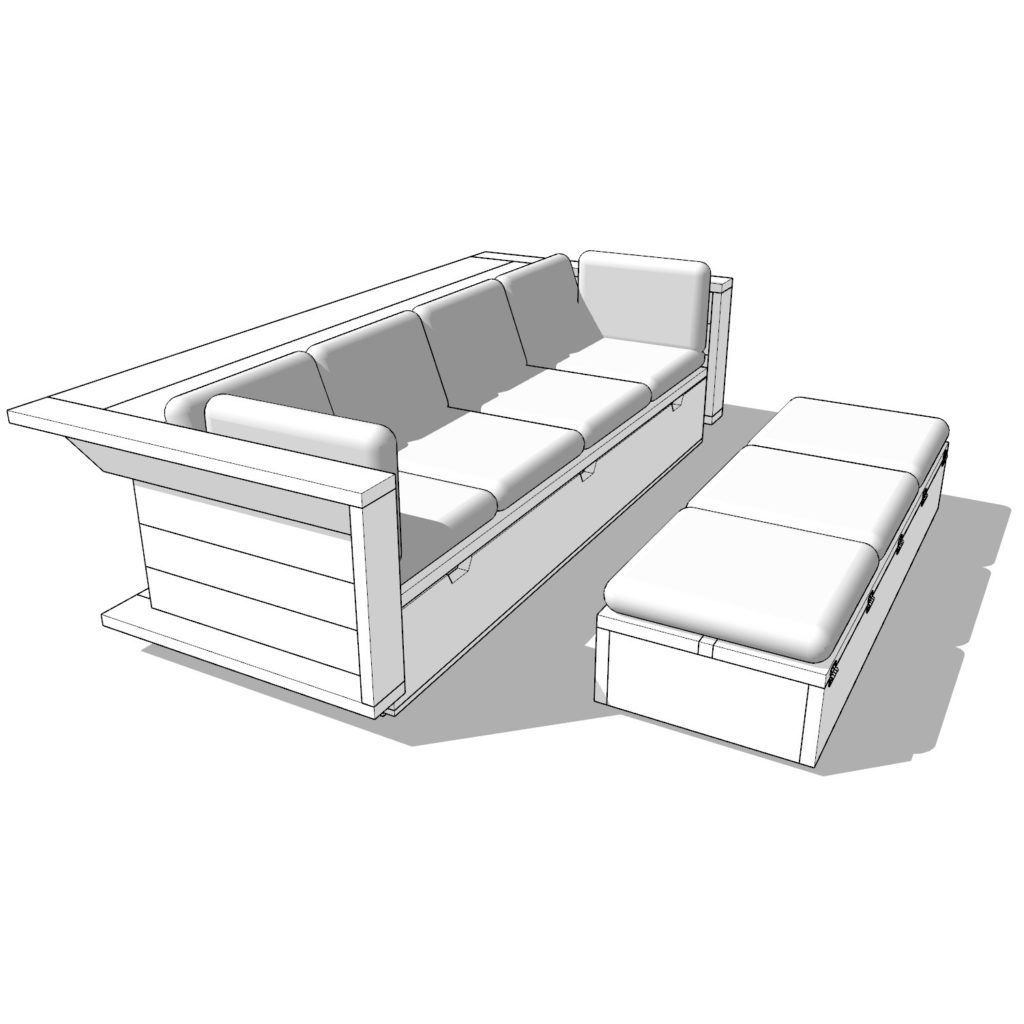
Our DIY modular sofa is not just furniture, it’s a multipurpose space facilitator. With a design that marries comfort with utility, our sofa provides a cozy sitting area by day and a section that easily transforms for various purposes- work, dining, or entertainment by night. With the bonus feature of accessible storage compartments, our design ensures a clutter-free environment, enabling you to maximize and enjoy your living space to its full potential.
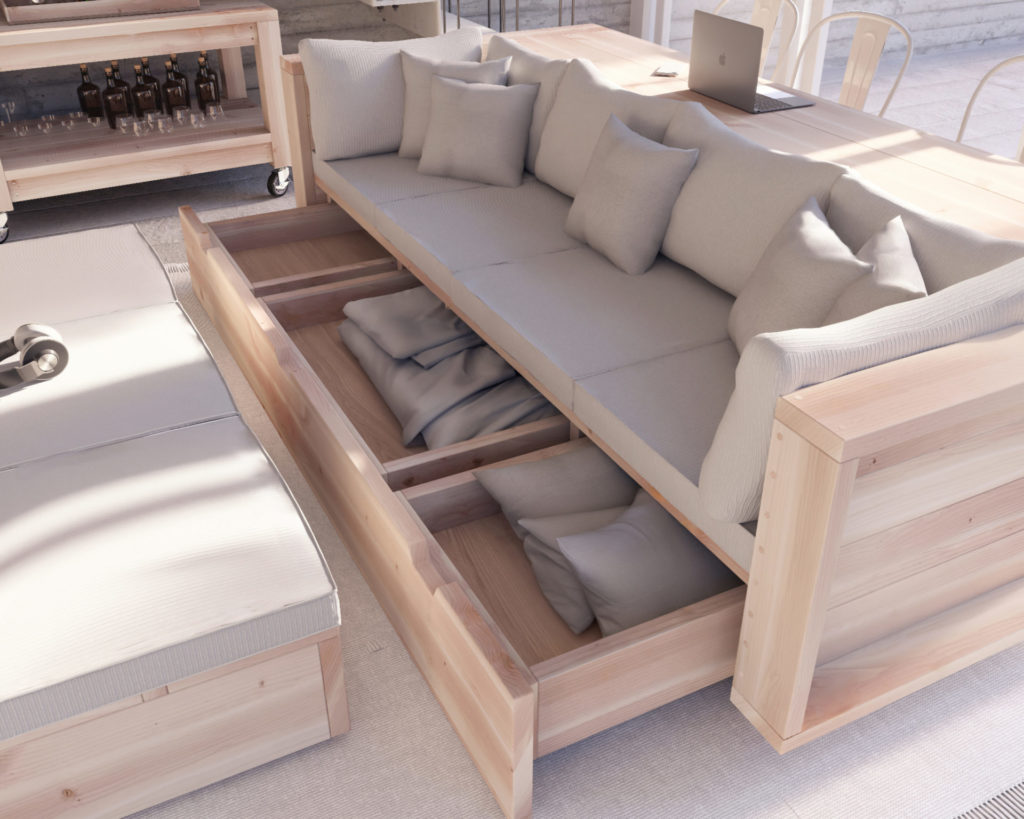
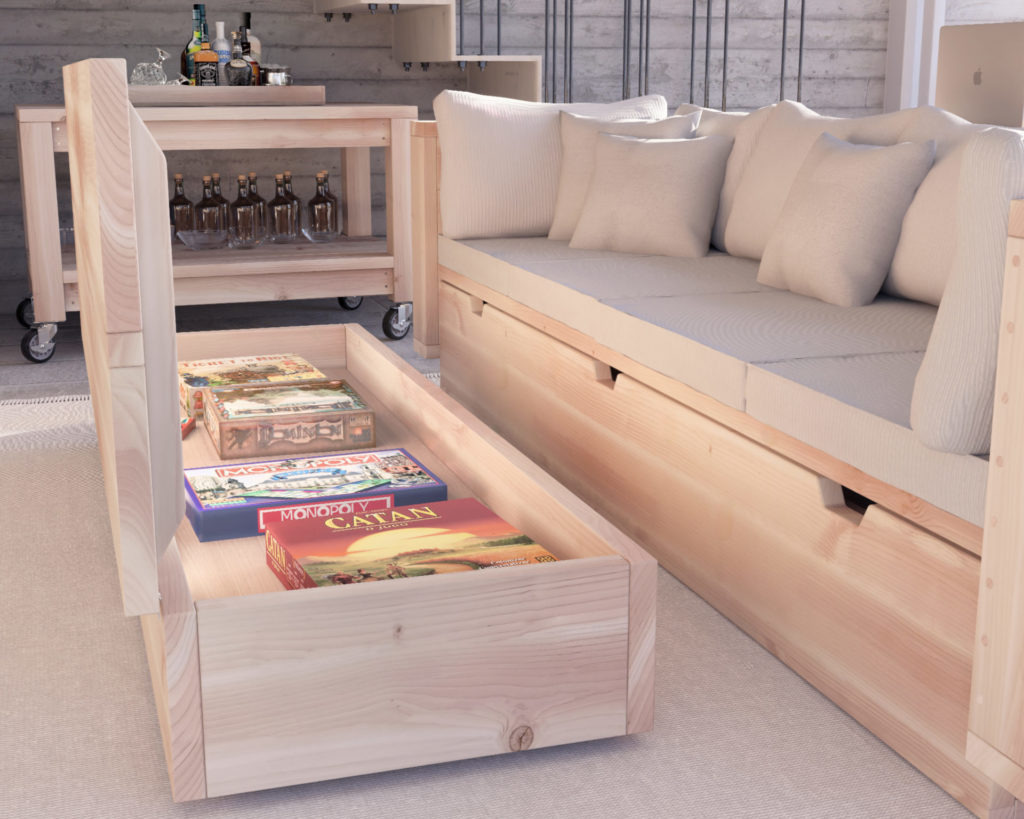
The Wonders of Built-in Storage: Learning More About Our Sofa's Hidden Compartments
Our DIY modular sofa ingeniously incorporates a hidden storage feature, offering you ample space to store a variety of items. These concealed compartments seamlessly integrated under the seating area allow you to keep your living space neat and tidy without needing additional storage furniture. A hidden home for your favorite books, a cozy warm blanket, or board games for an unexpected game night, it’s an innovative solution for efficient and stylish organization.
Where Leisure Meets Functionality: Unpacking the Sofa's Convertible Table Feature
A shining highlight of our DIY project is the sofa’s convertible table. Designed to transform seamlessly from a comfortable backrest to a sturdy and spacious table, this element of functionality ensures you don’t waste an inch of your space. Whether you need a home workspace, a casual dining setting, or an extra surface for entertaining guests, our sofa elegantly accommodates your needs.
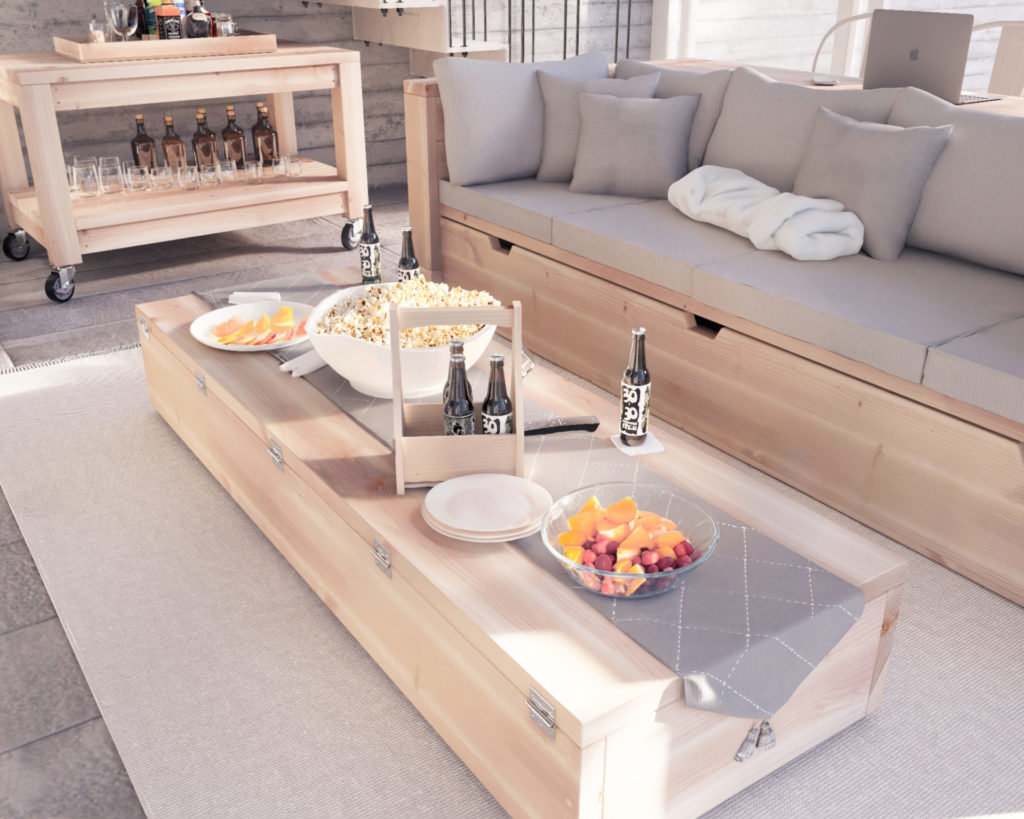
Extra Comfort, Extra Function: Our Dual-purpose Coffee Table/Ottoman
Complementing the DIY modular sofa is our dual-purpose coffee table that also acts as an ottoman. Whether you need an extra seating option when entertaining, a comfortable footrest for your movie night, or simply a stylish coffee table, this piece caters to it all. Its dual purpose design adds to the aesthetics and functionality of your living room, making it a perfect addition to any home.
Exploring the Simplicity: The Beginner-friendly Design Features of Our DIY Sofa
Our project’s beauty lies in its simplicity. Designed primarily for beginners, we’ve ensured that the woodworking aspects of our DIY sofa are beginner-friendly. The straightforward cuts and joints mean that someone with a basic woodworking skill set can tackle this project head-on. Plus, the simplicity of the design does not in any way compromise the stunning final product built with your own two hands.
A Perfect Fit: How Our DIY Modular Sofa Can Complement Your Living Space
Look forward to a versatile piece of furniture that blends effortlessly into any living room decor style. Whether you’re a fan of a contemporary, rustic, or traditional aesthetic, our sofa can offer a beautiful and functional addition to your living space. And as a DIY project, it allows you the flexibility to choose the finishing touches, whether you prefer a natural raw wood look, a varnish, or paint, so the finished product perfectly complements your space and represents your unique style.
Ready to Get Started: Taking the Next Steps in Your DIY Adventure
Equipped with our detailed guide and fueled up with excitement, it’s time to start your DIY woodworking journey. The process of building a piece of furniture from mere wooden pieces can be rewarding and engrossing. Remember, don’t rush; take your time to appreciate each step of the craft. It’s an adventure, and every moment is a part of your DIY story.
Conclusion: Embarking on Your Exciting DIY Journey
Crafting isn’t just about the end product; it’s a celebration of the journey. Each cut, each joint contributes to a final piece that’s a testament to your patience, hard work, and creativity. With our DIY modular sofa project, you’re stepping into an exciting realm of woodworking, creating a functional piece of furniture that offers great satisfaction and sense of accomplishment. Get started; we can’t wait to see how your DIY journey unfolds.
Time to build
12 hours
Cost of build
$500 (excluding cost of cushions)
Skill level required
Beginner
Download the PDF Plans
Modular Sofa with Built-In Storage Table PDF Plan
In the PDF download, you can find:
– Clearly written, step-by-step instructions
– A comprehensive list of materials required
– A detailed cut list for each piece
– A list of essential tools for the project
– Visual diagrams to guide you through the process
Recommend tools and materials
Available with purchase of DIY PDF plan. Thank you for your support and making projects like this possible!
Lumber list and cut list
Available with purchase of DIY PDF plan. Thank you for your support and making projects like this possible!
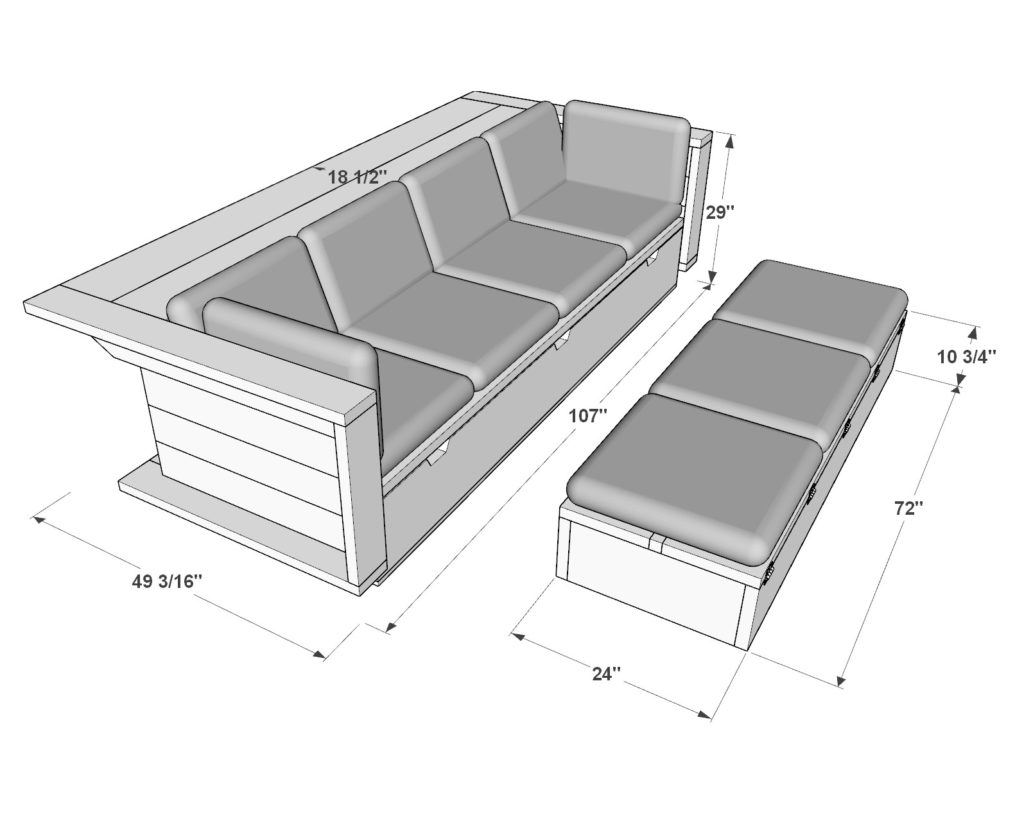
Modular Sofa with Built-In Storage Table Dimensions
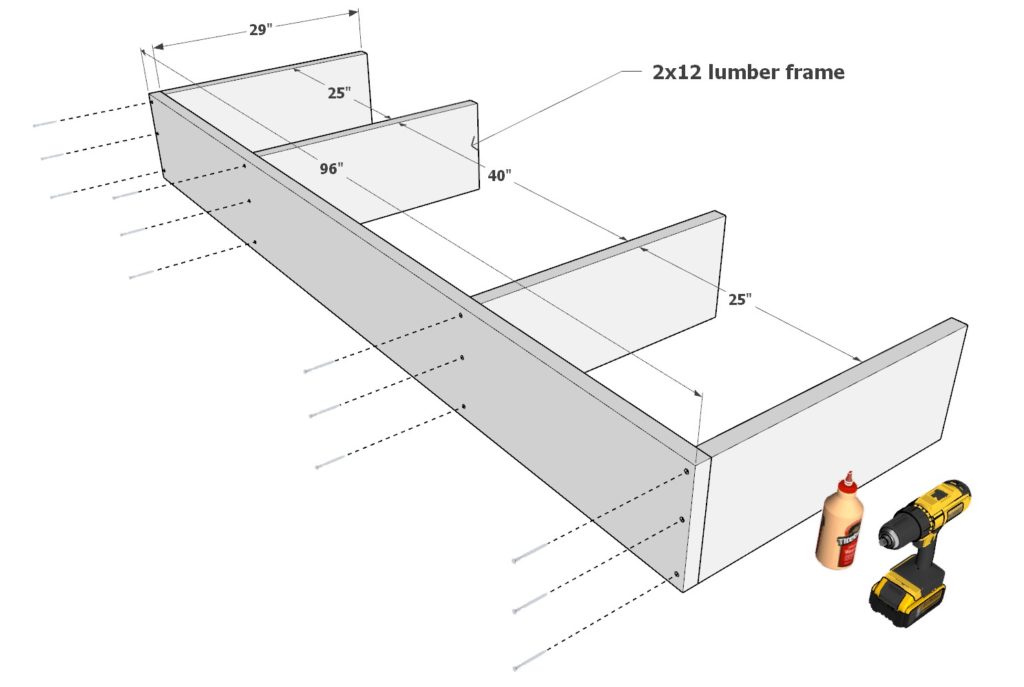
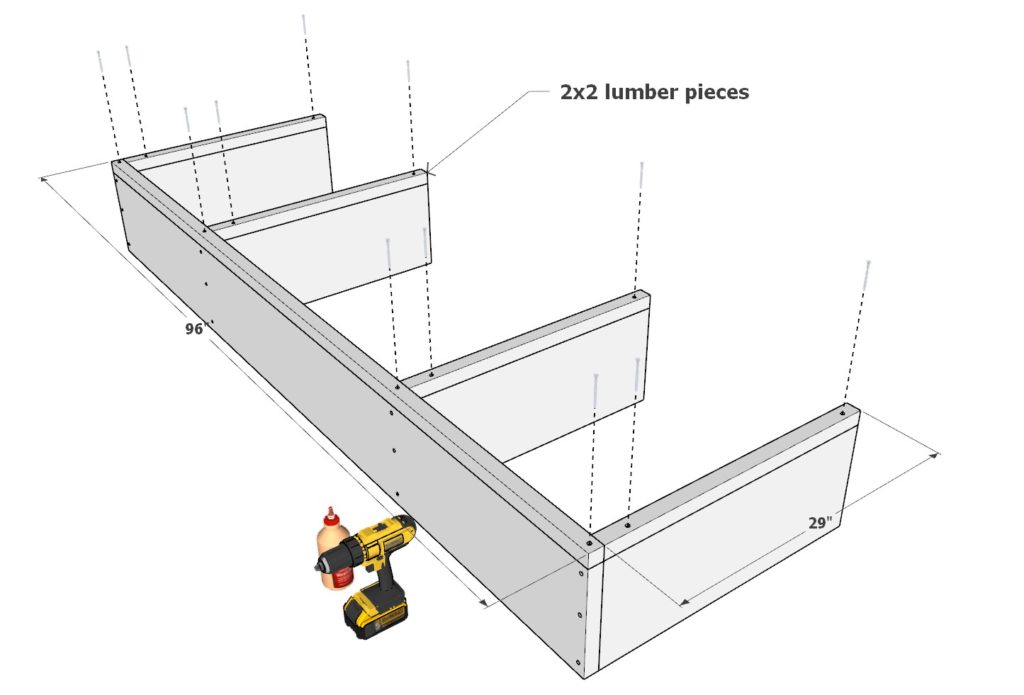
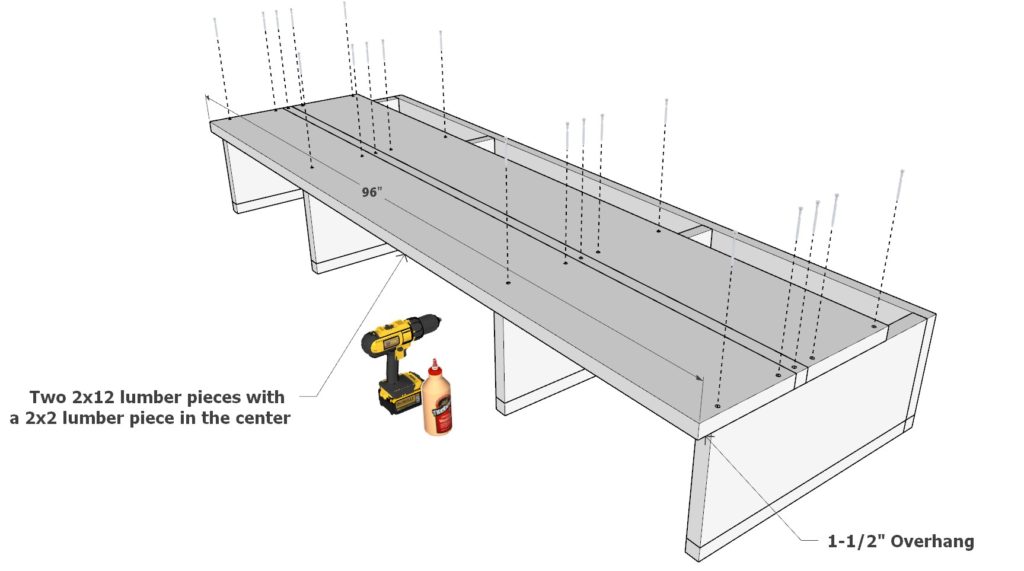
Step 1: Assembling the Primary Frame and Drawer Housing of the Modular Sofa
Begin your project by crafting the core structure of your modular sofa: the main frame and the drawer housing.
Begin with four 29-inch 2×12 pieces of lumber and one 96-inch 2×12 piece. Arrange these carefully using the diagram provided. To ensure a secure frame, apply woodworking glue and predrill holes for the screws. This step reduces the risk of splitting the wood while you’re working on it. Once predrilled, fasten the pieces together using 3.5-inch screws.
Next, secure a layer of 2×2 lumber over the 2×12 layer you’ve just created. You will need four 29-inch 2×2 lumber pieces and one 96-inch piece. Follow the same procedure as before – apply glue, predrill, and then ensure a firm fixing with screws.
Lastly, append two 96-inch 2×12 lumber pieces and a 96-inch 2×2 piece to the primary frame. Arrange these lumbers as indicated in the diagram. It is important to let the 2×12 lumbers overhang by 1-1/2″- this detail is highlighted in the last photograph of this step. As usual, begin with some glue, predrill holes accurately, and finalize the fixation with 3.5-inch screws.
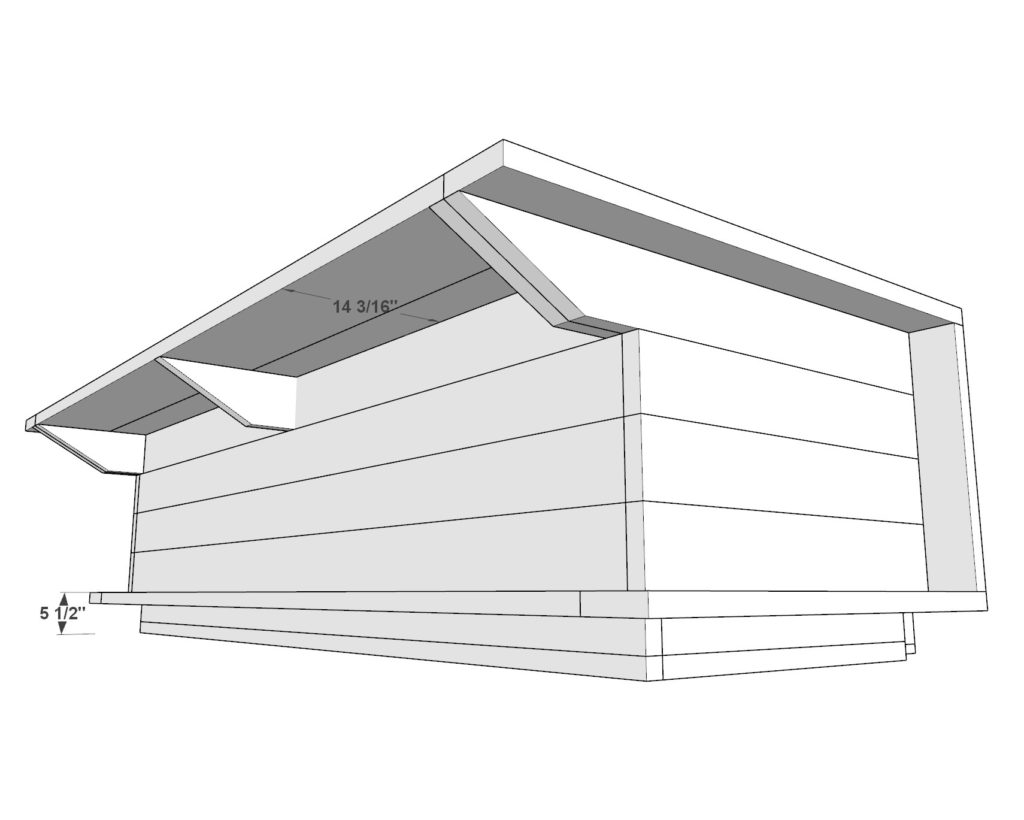
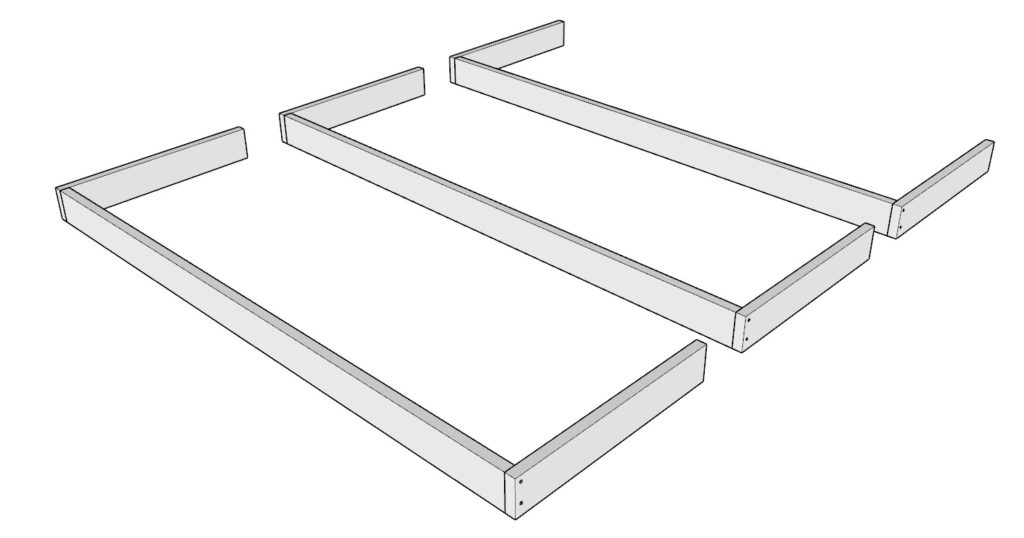
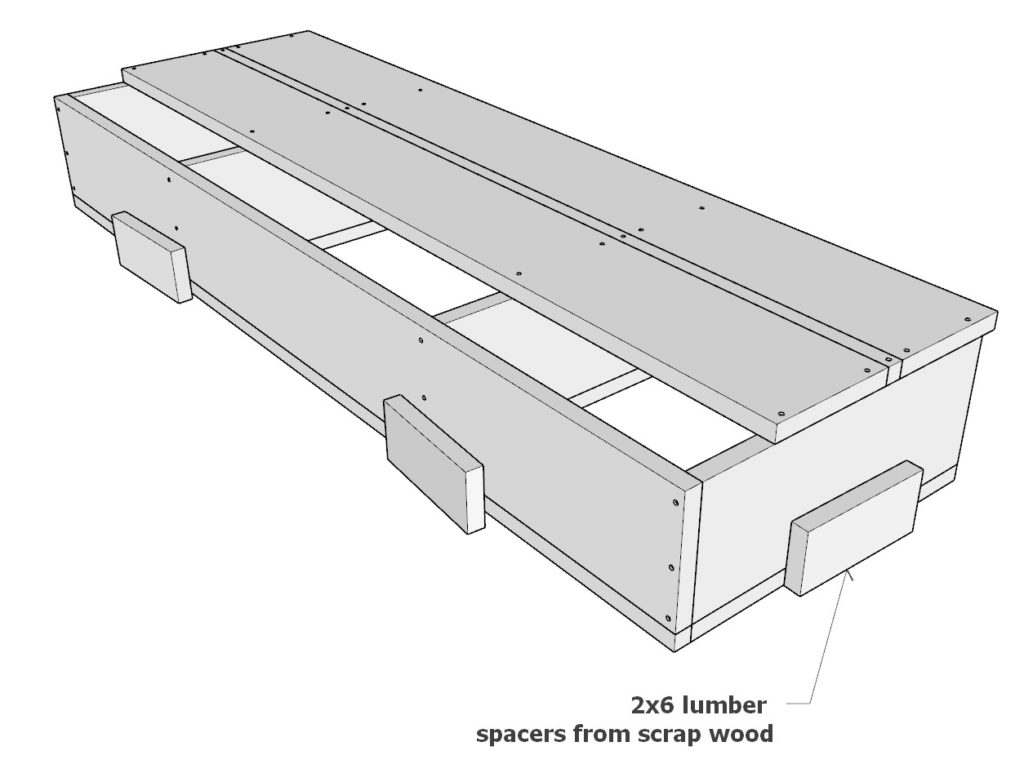
Step 2: Crafting and Installing the Sofa Sides and Table Support Frame
In this step, we add form and function to your sofa frame. Here, we will craft our sofa’s side panels and the support frame for the table extension.
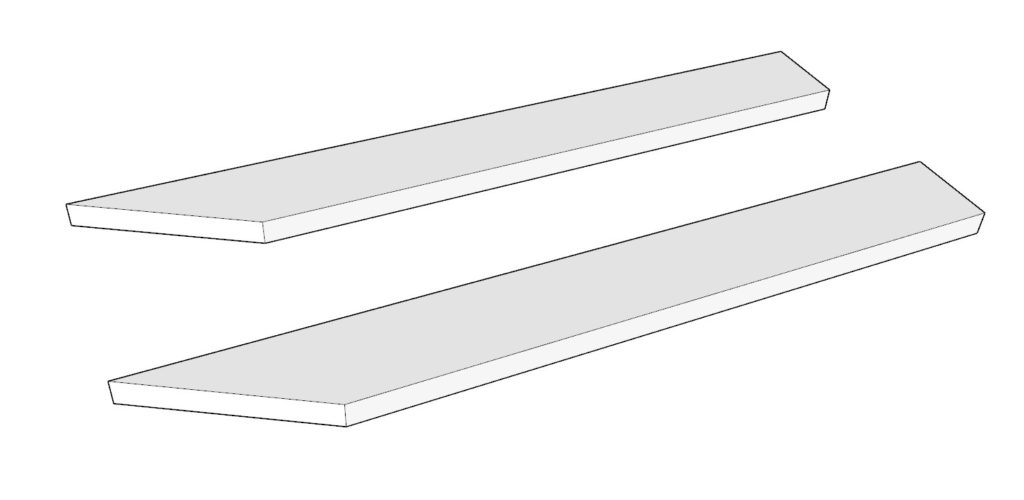
Begin with the assembly of three matching enclosure pieces. Each of these consists of two 33-9/16-inch 2×6 lumber pieces and one 96-inch 2×6 lumber piece. Consolidate these parts using 3.5-inch screws, remembering to apply your wood glue and predrill before driving in the screws. As always, predrilling is key to preserving your wood integrity.
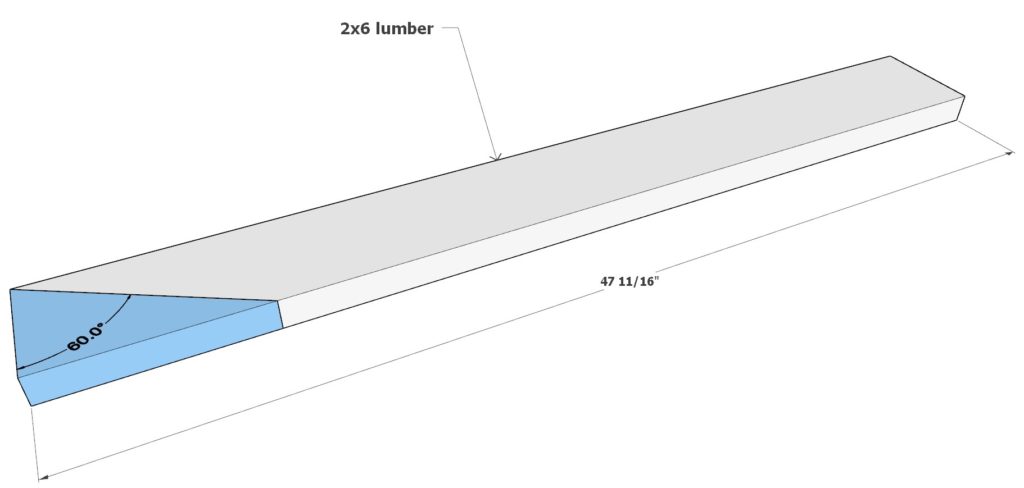
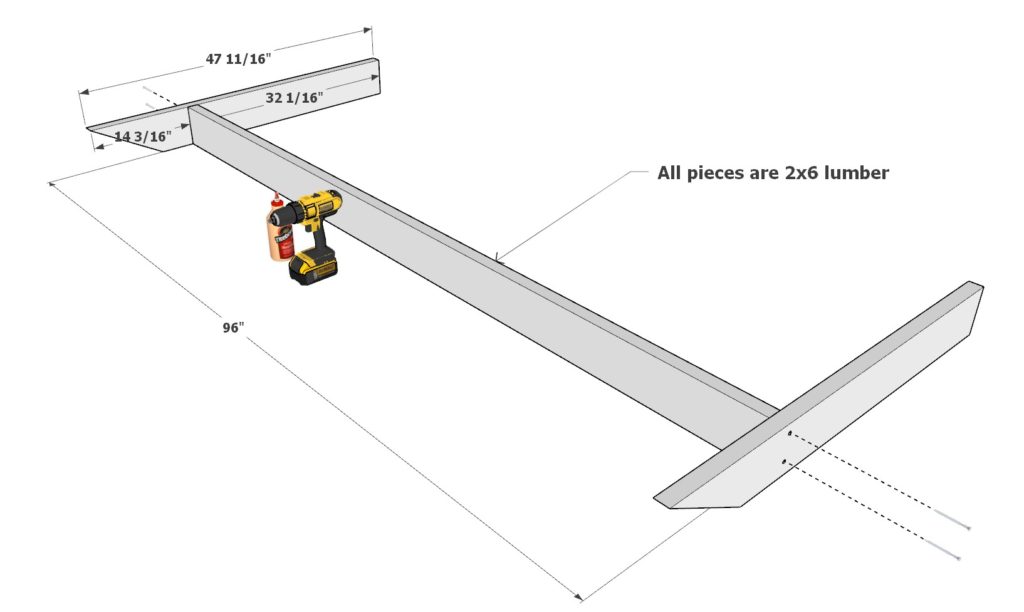
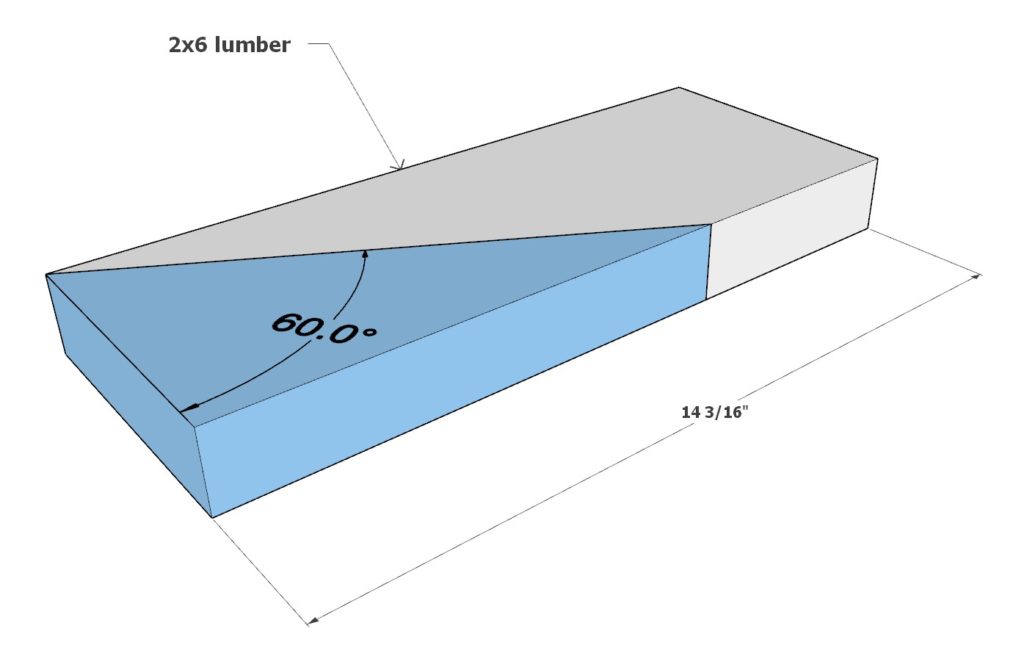
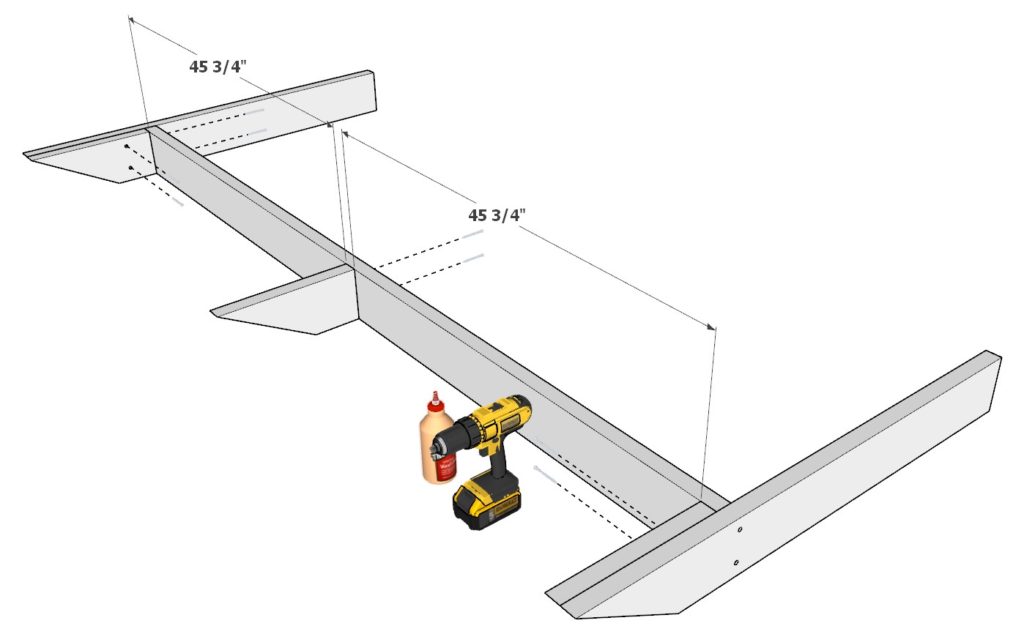
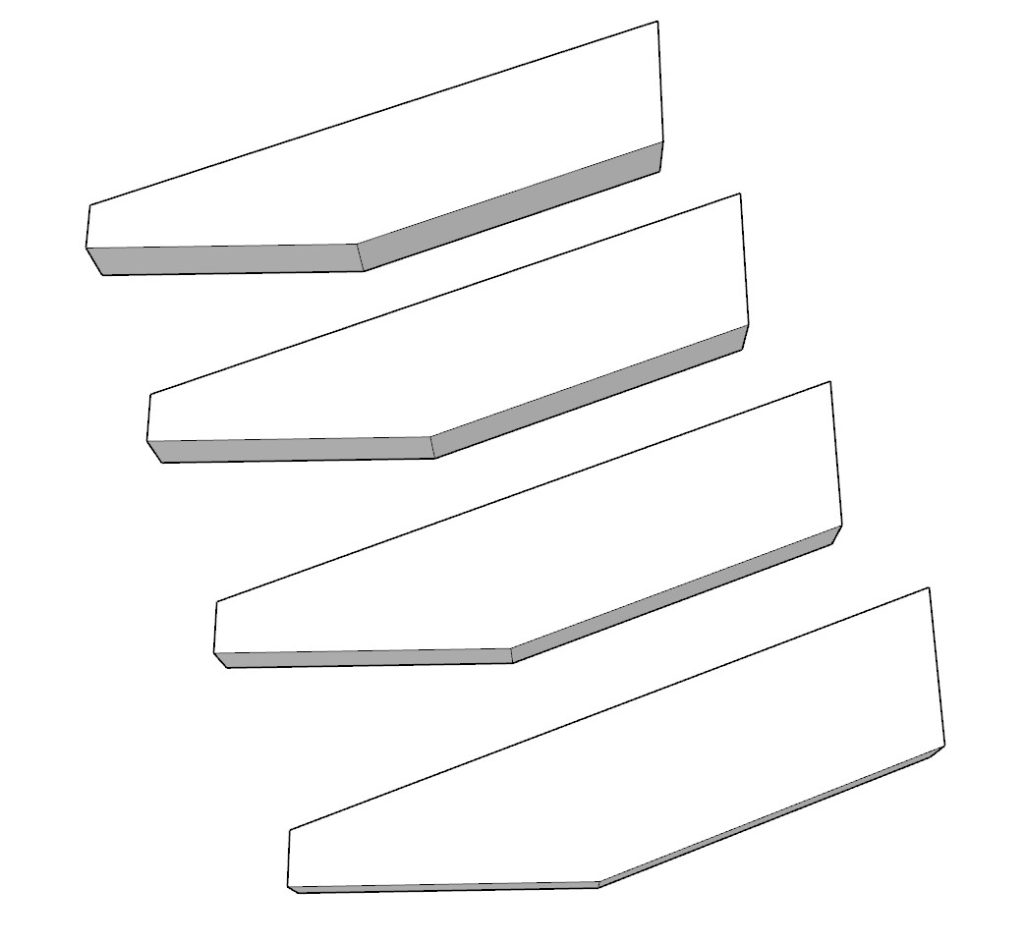
Next, shape the sofa’s convertible table support frame. For this, you’ll need two 47-11/16-inch 2×6 lumber pieces. One end of each piece should be cut at a 60-degree angle (the cut away area is marked in blue on the provided diagram). Mount these two pieces onto a 96-inch long 2×6 lumber piece—apply glue, predrill holes, and use 3.5-inch screws to ensure a sturdy frame.
Now, cut three additional 14-3/16 inch long 2×6 supports, each cut at a 60-degree angle at one end. Fit these additional supports to your table frame at the points illustrated in the diagram below, ensuring they spaced evenly along the length. Apply glue, then secure them into place with 2.5-inch screws (so that the screws don’t protrude), and remember always to predrill.
Now, we start to form the sofa sides. Position one of the enclosure pieces from earlier on top of four 2×6 spacer pieces – these can be any offcuts and serve as a temporary support to hold the enclosure piece at the right elevation. Then, layer on a second identical enclosure piece, ensuring all contact areas have a layer of wood glue before you align them. A generous coat of glue and an array of 2.5-inch screws (to avoid any unwanted sharp ends) assure your assembly is held securely together.


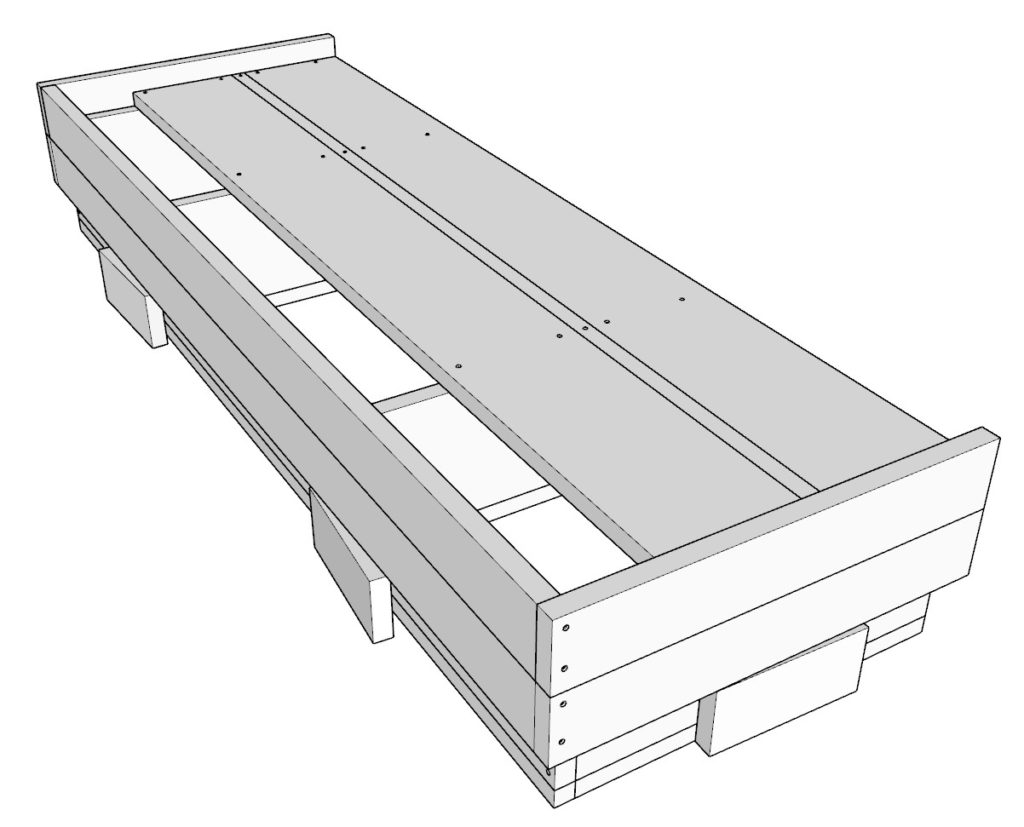
Step 3: Establishing the Sofa Backrest, Table Top, and Footrest Edges
Warning: It’s essential to read through this step in its entirety before proceeding as this step requires that you move quickly.
This step involves the assembly of the tilted backrest and the elegant trim across the sofa edge that also serves as a comfortable footrest for the table component.
Let’s get started by crafting four essential angle-cut parts from 2×4 lumber, each measuring 16-1/8 inches. As per the first diagram in this step, make two cuts at a 20-degree angles and one cut at a 70-degree angle on each piece. The 70-degree angles can be challenging as most miter saws don’t allow for it. You might have to use a handsaw or carefully handle a circular saw. Please exercise caution as these pieces are smaller and can be challenging to work with.
WARNING: Keep your fingers safe when cutting small pieces of wood by clamping the piece down with wood clamps. Keeps your hands a safe distance from the blade. Also use a sharp saw blade. Dull blades require more force to cut through the wood, increasing the chance of an accident. Don’t rush. Go slow, keep a firm grip, and keep your focus on the tool at all times. This 70-degree cut might be a challenge to beginners. If you don’t have experience with this kind of cut then use a hand saw. Its much safer.
Next, integrate the four angle-cut pieces into the sofa’s primary frame. Simultaneously, include the final unused enclosure piece and table frame support piece from the preceding step. Ensure sufficient adhesive is applied while securing components together using 2.5-inch and 3-inch screws where necessary.
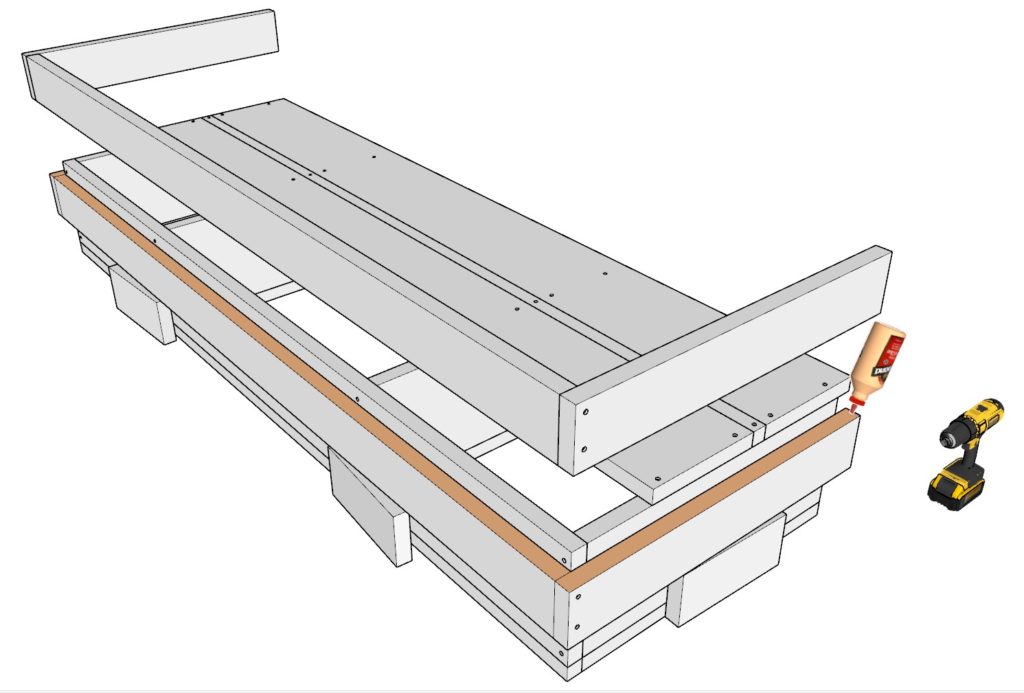
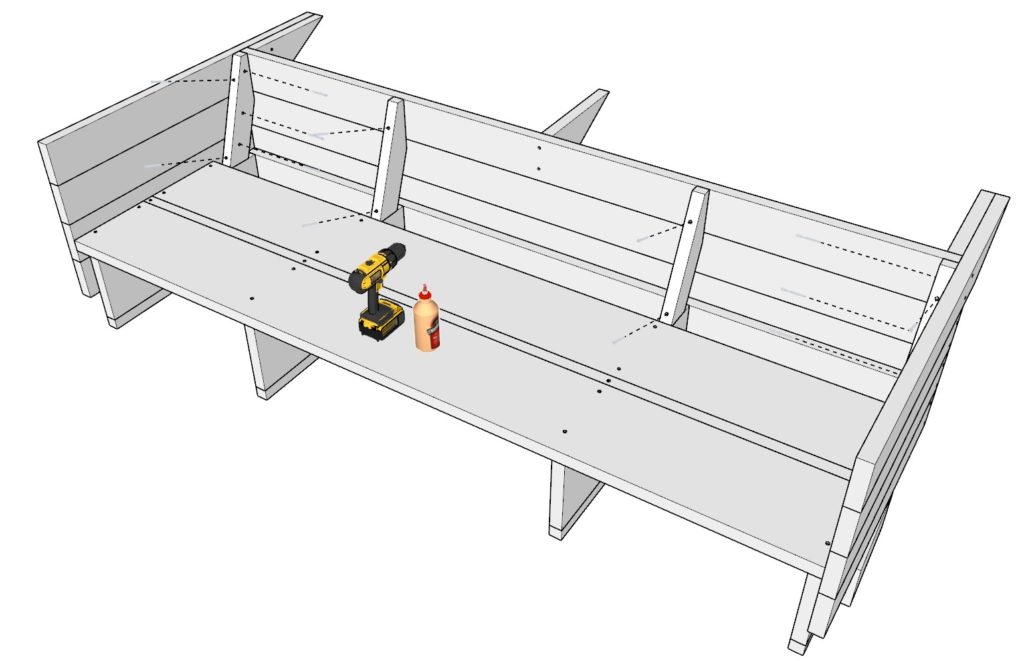
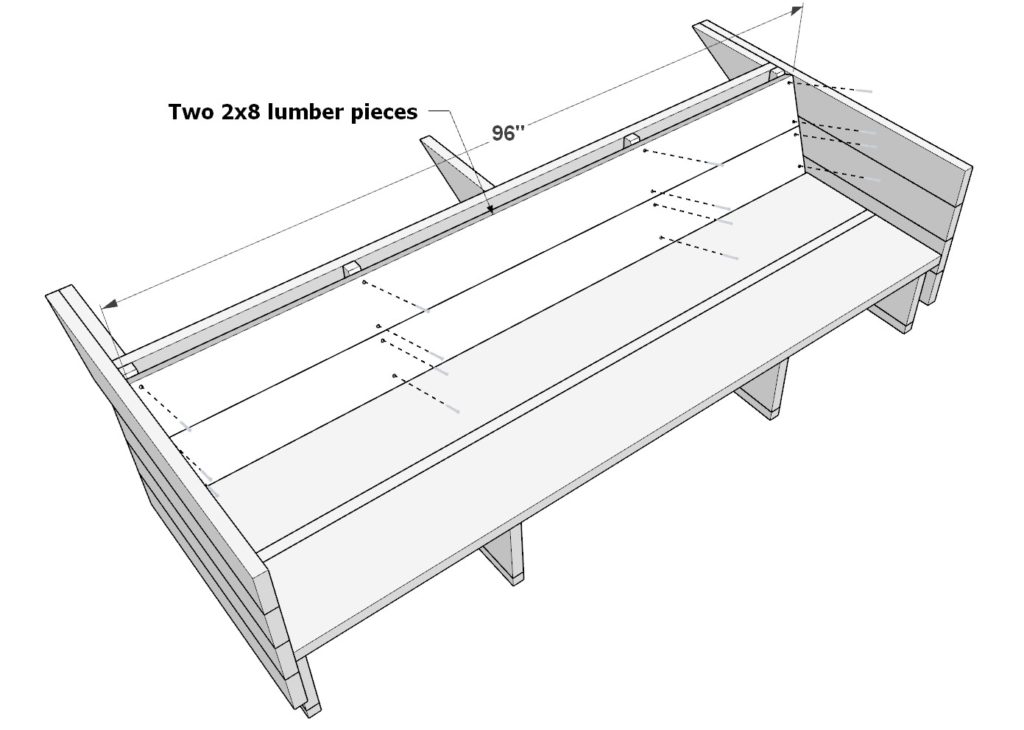
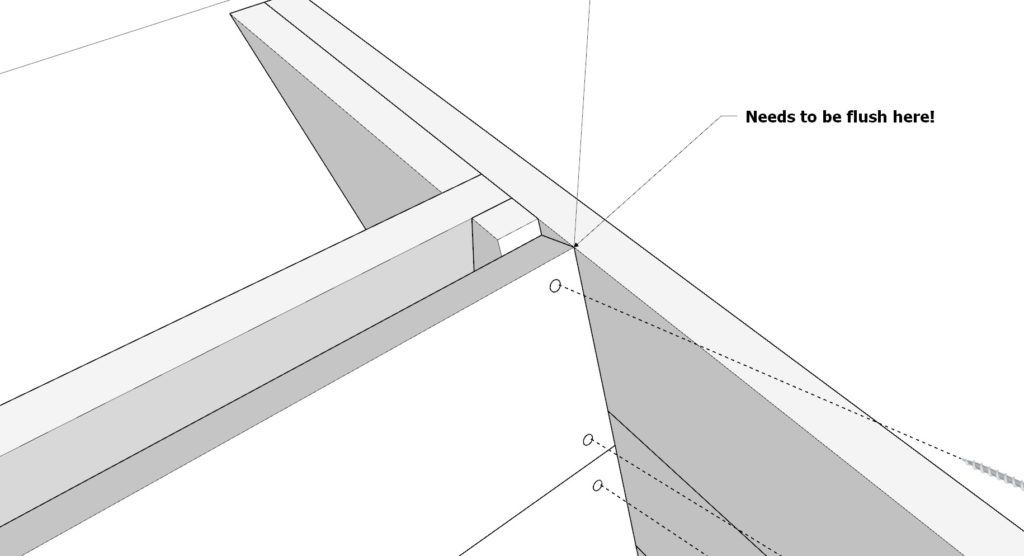
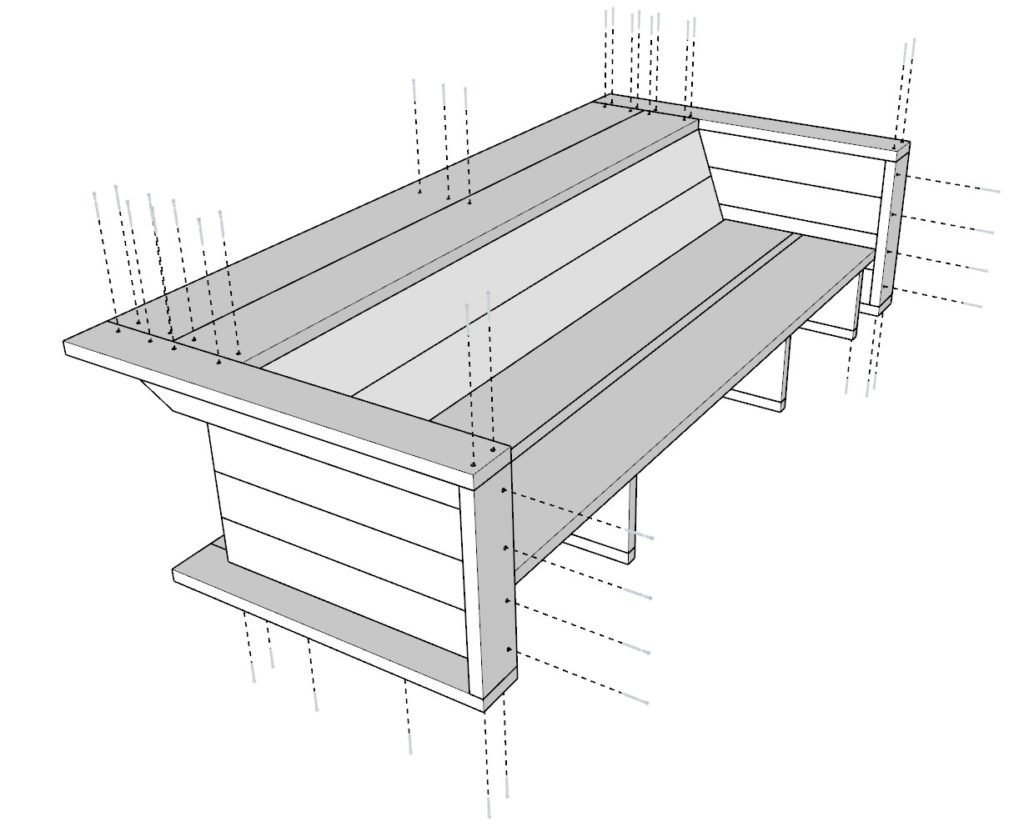
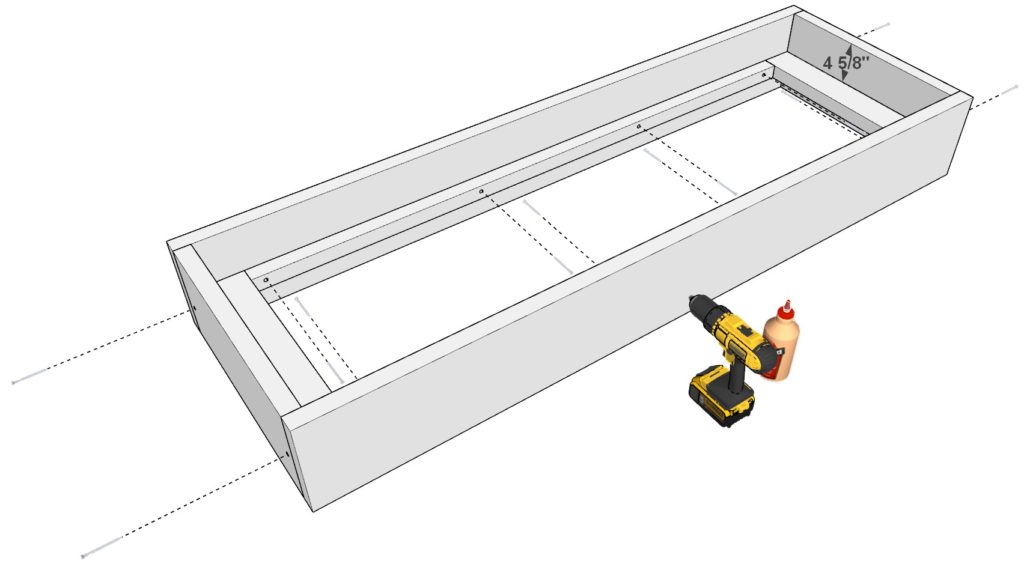
Follow by fixing two 96-inch long 2×8 lumber pieces to make up the backrest. Secure these to the backrest supports using glue and 3.5-inch screws (again, don’t forget to predrill). Additionally, ensure the 2×8 pieces align neatly with the uppermost enclosure piece/table support frame as highlighted in the diagram. The inclusion of the 22-inch 2×6 pieces is vital as they stabilize all the framework components allowing you to lay out the remaining pieces at a measured pace.
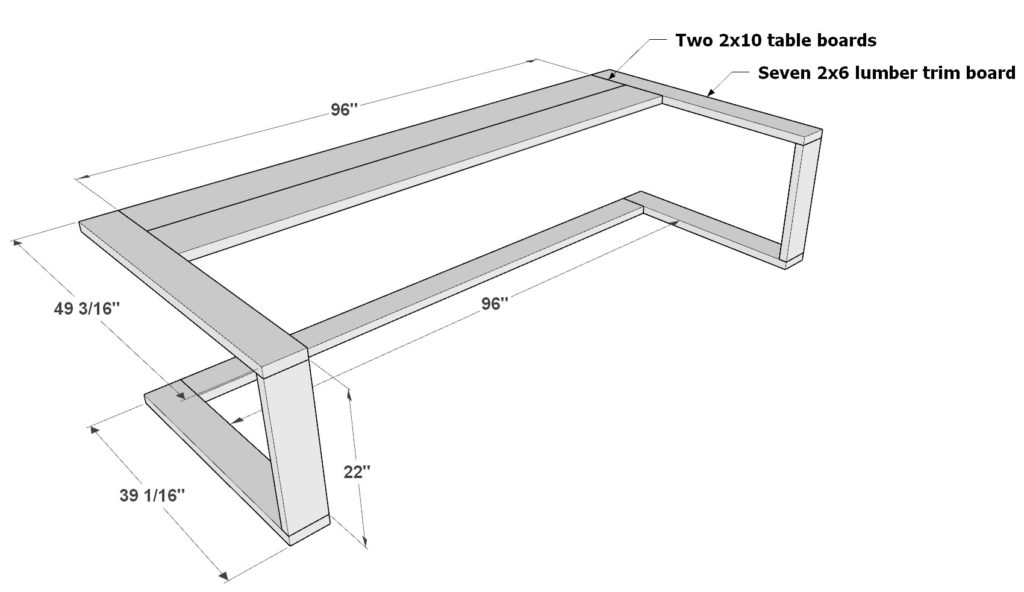
Finally, we move on to the trim, table top, and the footrest for the extended table. Fashion these features from two 96-inch 2×10 lumber pieces and seven 2×6 lumber pieces. For the trim, you need two 39-1/16-inch 2×6 pieces and two 49-3/16-inch 2×6 pieces; for supporting elements, you need two 22-inch 2×6 pieces. Firmly secure these parts to your building frame using 3.5-inch screws and a generous application of wood glue.
Tip: before adding the two 22-inch 2×6 lumber pieces, use clamps to bring together the enclosure pieces firmly together. Consider adding these 22 inch pieces first when adding the trim to ensure all components stay together in place.

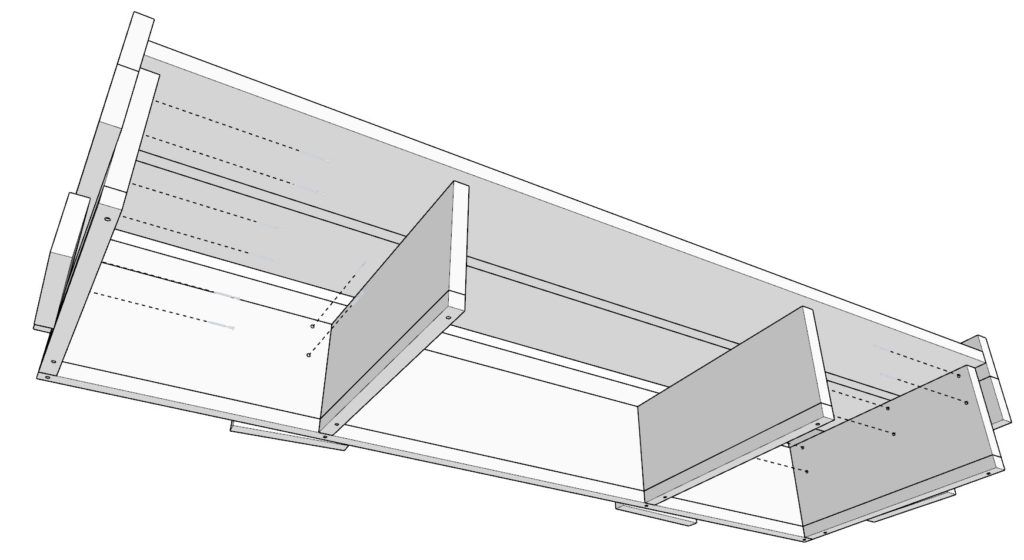
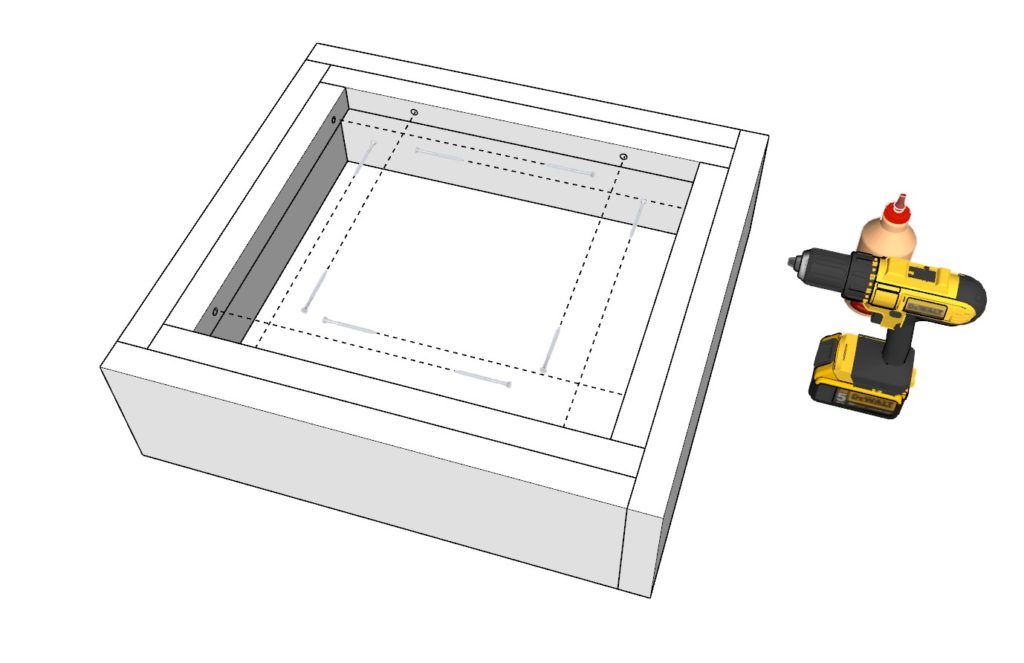
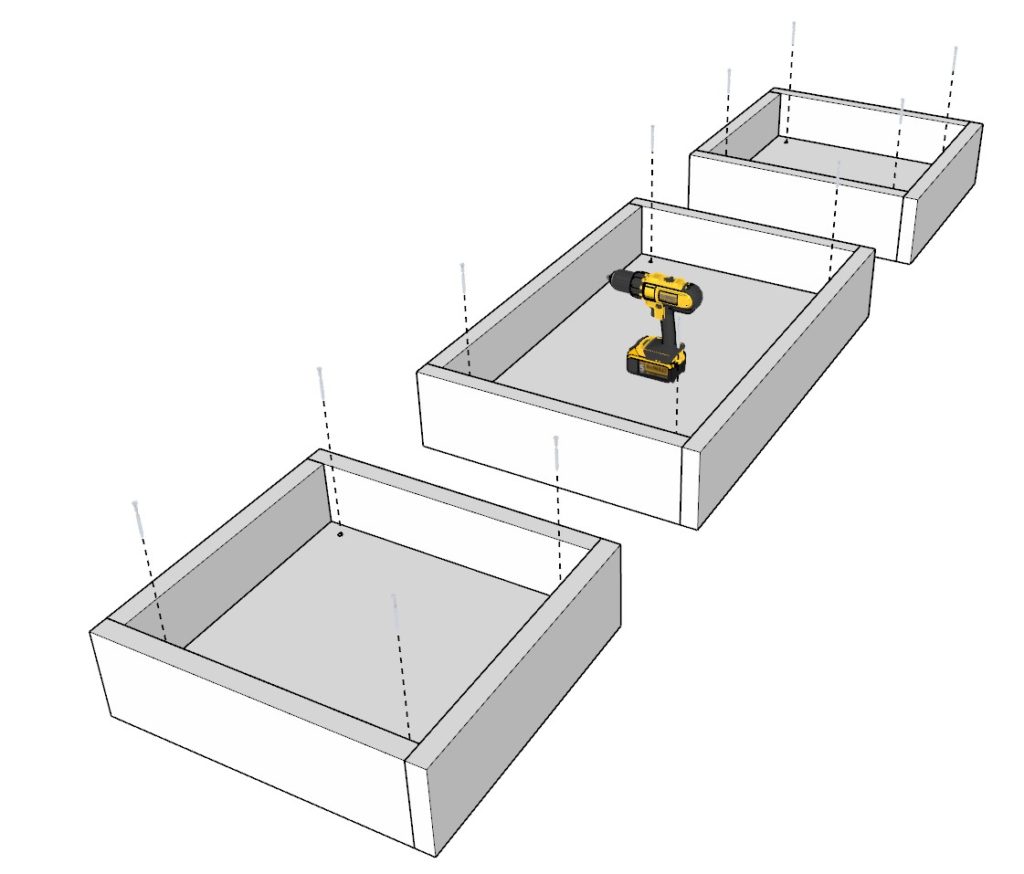
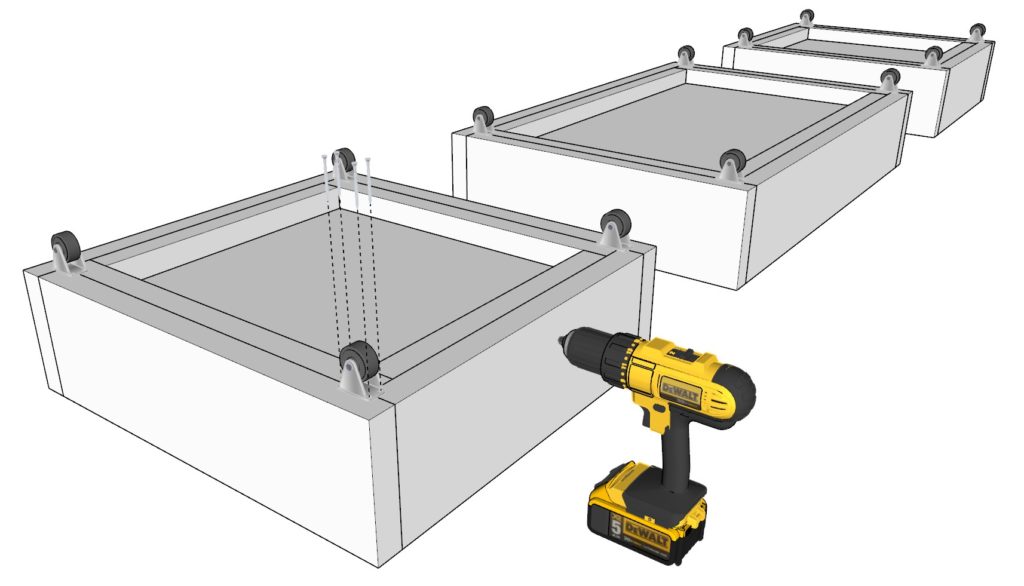
Step 4: Constructing the Drawer Section
Moving forward in our modular sofa journey, we will now work on providing the storage spaces by constructing functional drawers.
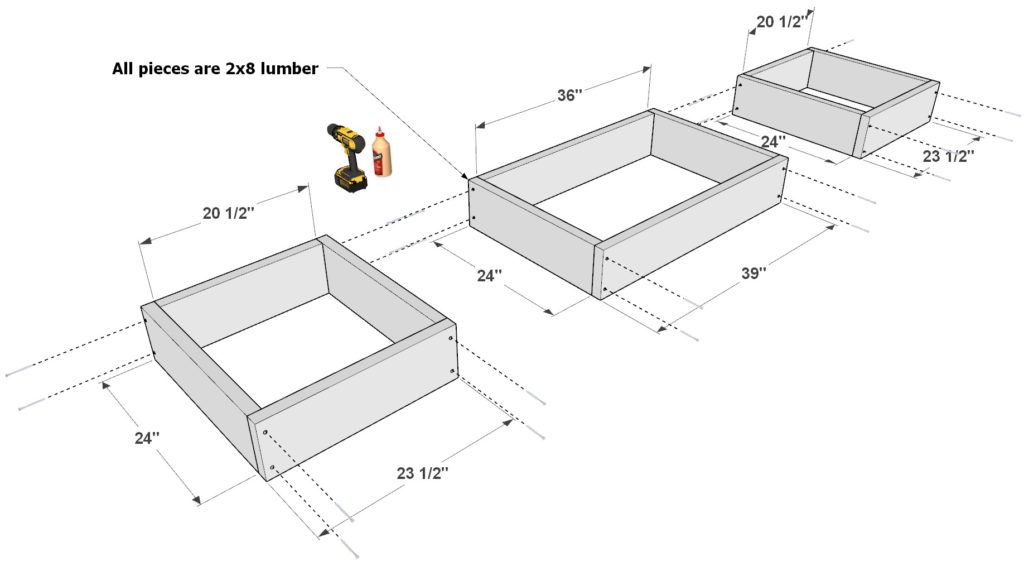
We start with the drawer frames. Combine six 24-inch 2×8 pieces, two 23-1/2 inch 2×8 pieces, two 20-1/2 inch 2×8 pieces, one 39-inch 2×8 piece, and lastly one 36-inch 2×8 piece. Form three structured boxes as represented in the given diagram. Secure them together using a generous amount of wood glue for bonding, predrilled holes for guide, and 3.5-inch screws.
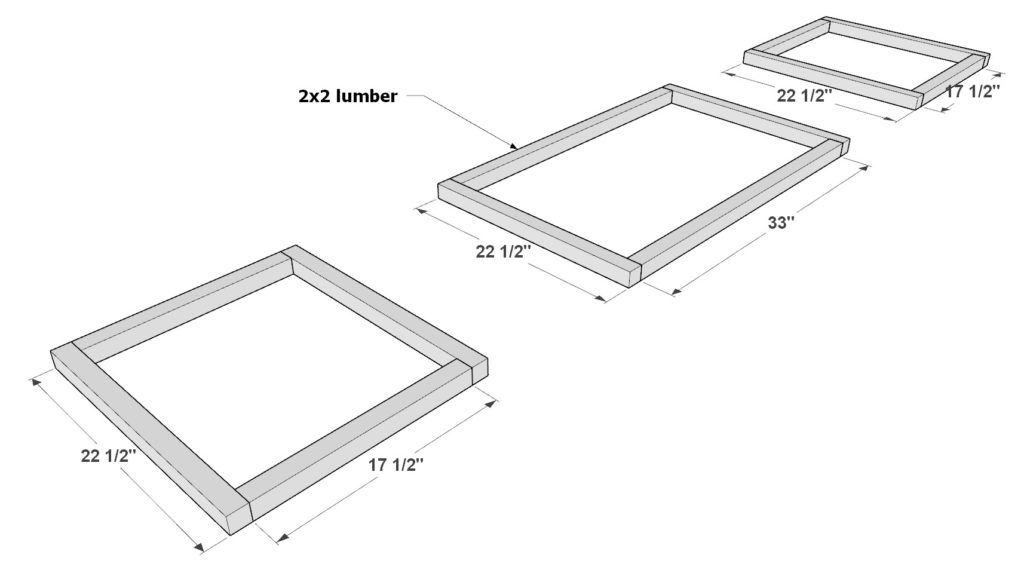
Follow up with the inclusion of drawer lining supports by adding 2×2 lumber. You require six 22-1/2 inch 2×2 pieces, four 17-1/2 inch 2×2 pieces, and two 33 inch 2×2 pieces for this. Attach these supports to the drawers as illustrated in the diagram below using wood glue and 2.5-inch screws to ensure firmness.
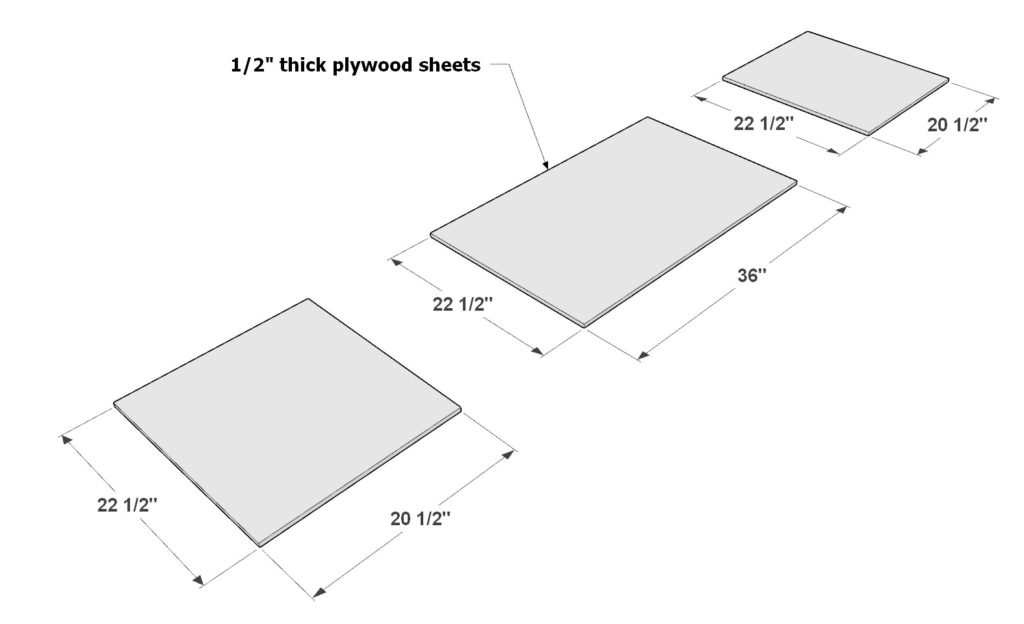
Line your drawer boxes using sheets of 1/2-inch thick plywood. For this, have ready two 22-1/2 inch x 20-1/2 inch sheets and one 36 inch x 22-1/2 inch sheet. Adhere these plywood sheets to the insides of the drawer boxes using wood glue and secure with 1-inch screws.
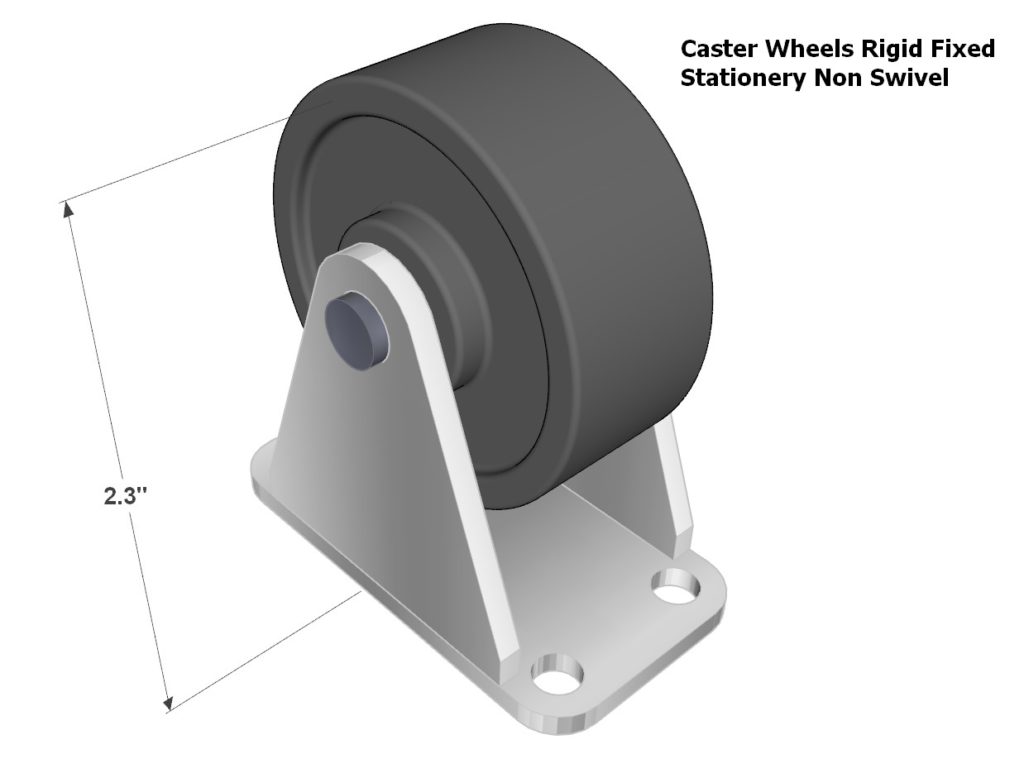
Adding castor wheels to your drawers makes them versatile and easy to maneuver. Attach non-swiveling cast wheels, ensuring they are aligned correctly for a smooth motion along the track.
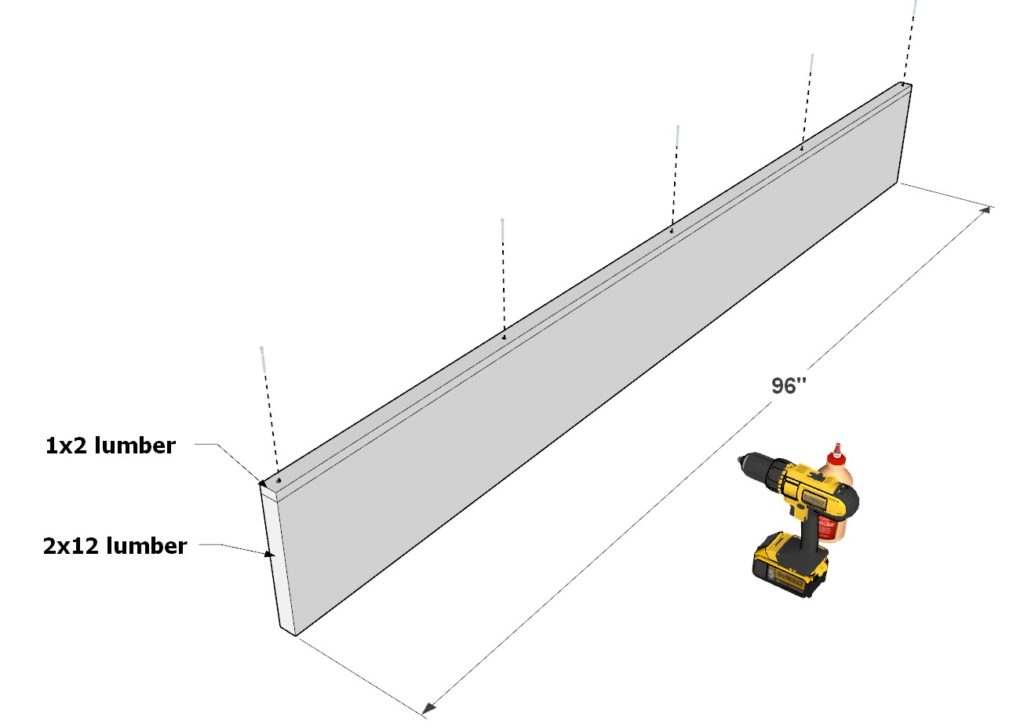
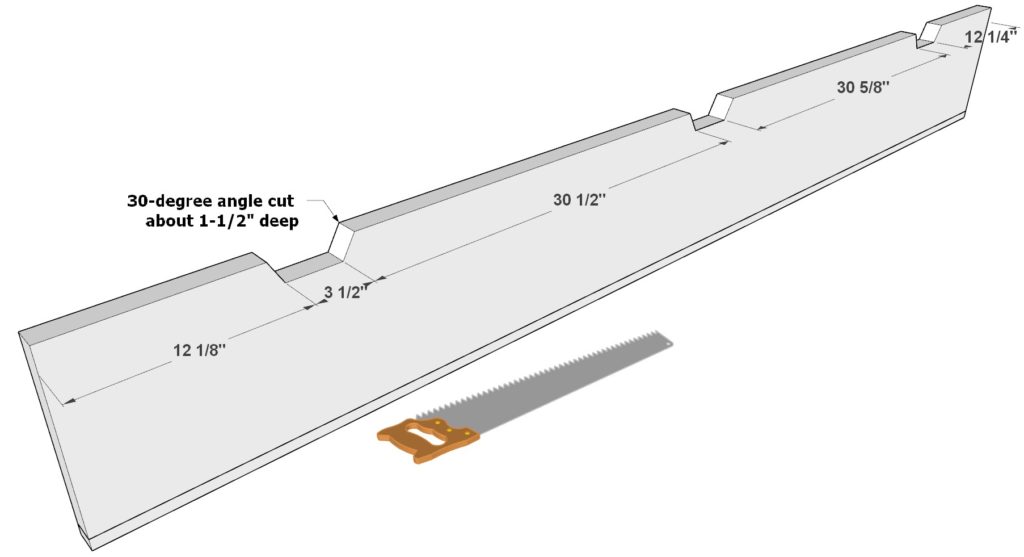
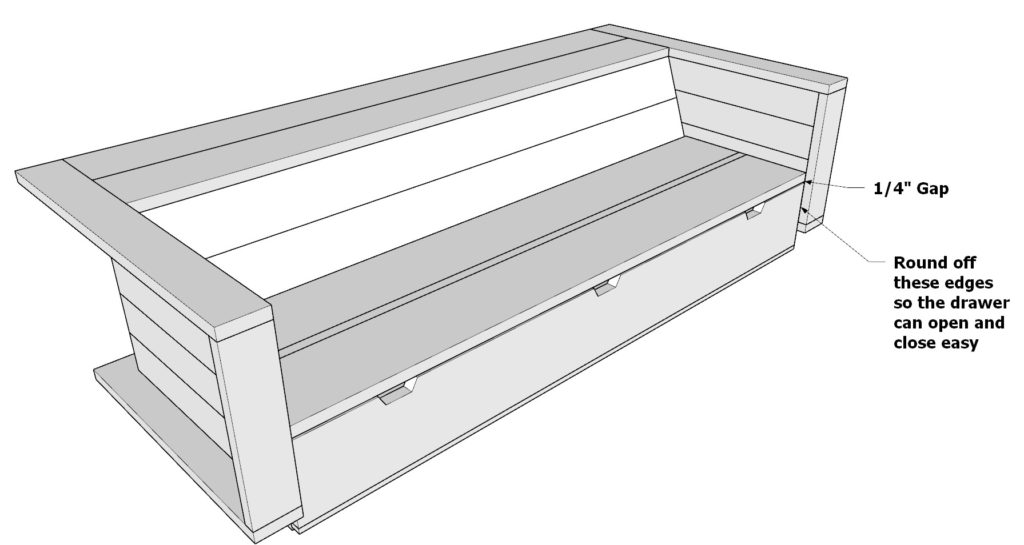
Constructing the drawer face is a crucial aesthetic element of your sofa. Fabricate this using one 96-inch long 2×12 lumber and one 96-inch long 1×2 lumber. Combine these pieces using wood glue and screws. Next, fashion three drawer handles onto the drawer face using a hand saw, as delineated on the provided diagram.
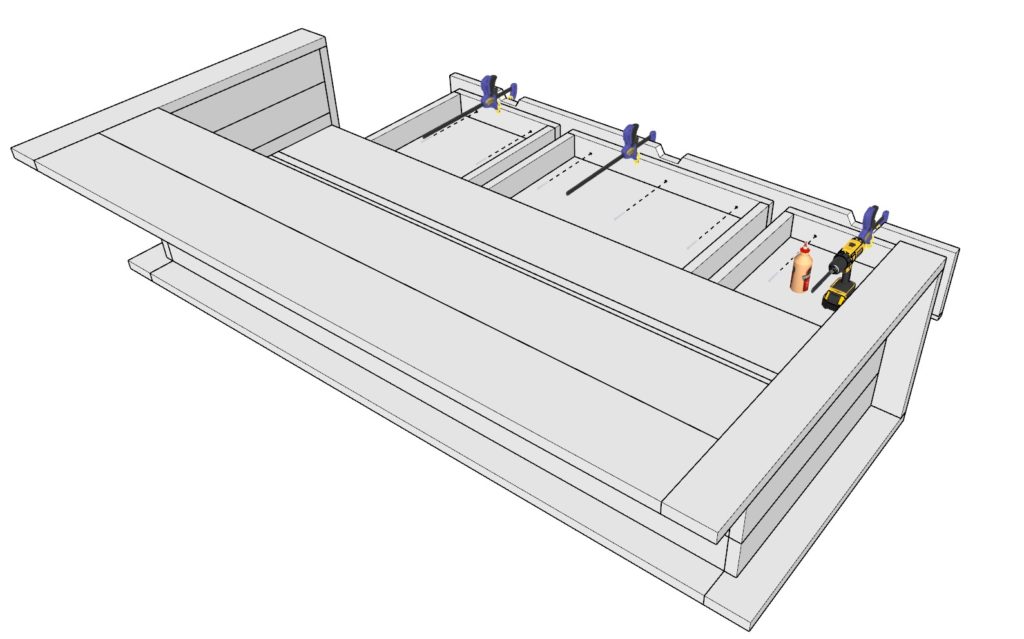
Now firmly fasten the drawer face to the individual drawers to create one large unified drawer front. Adhere it by using wood glue and 2.5-inch screws. Ensure that the drawer face is at a suitable distance of 1/4-inch from the edge of the seat board. Note the importance of rounding off the edges of the drawer face, providing it the allowance to slide in and out smoothly. If you find the drawer movement to be restricted, consider trimming down the ends of the drawer face slightly to get a better fit.
Step 5: Crafting the Multi-Functional Coffee Table and Footrest Unit
Now let’s head towards creating that coffee table/ footrest.
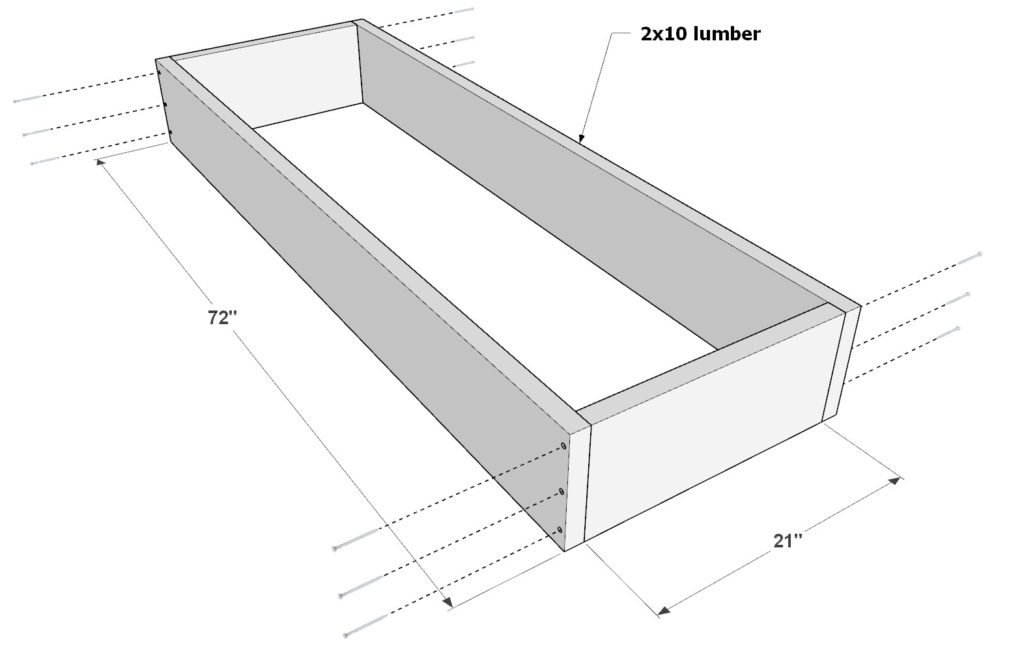
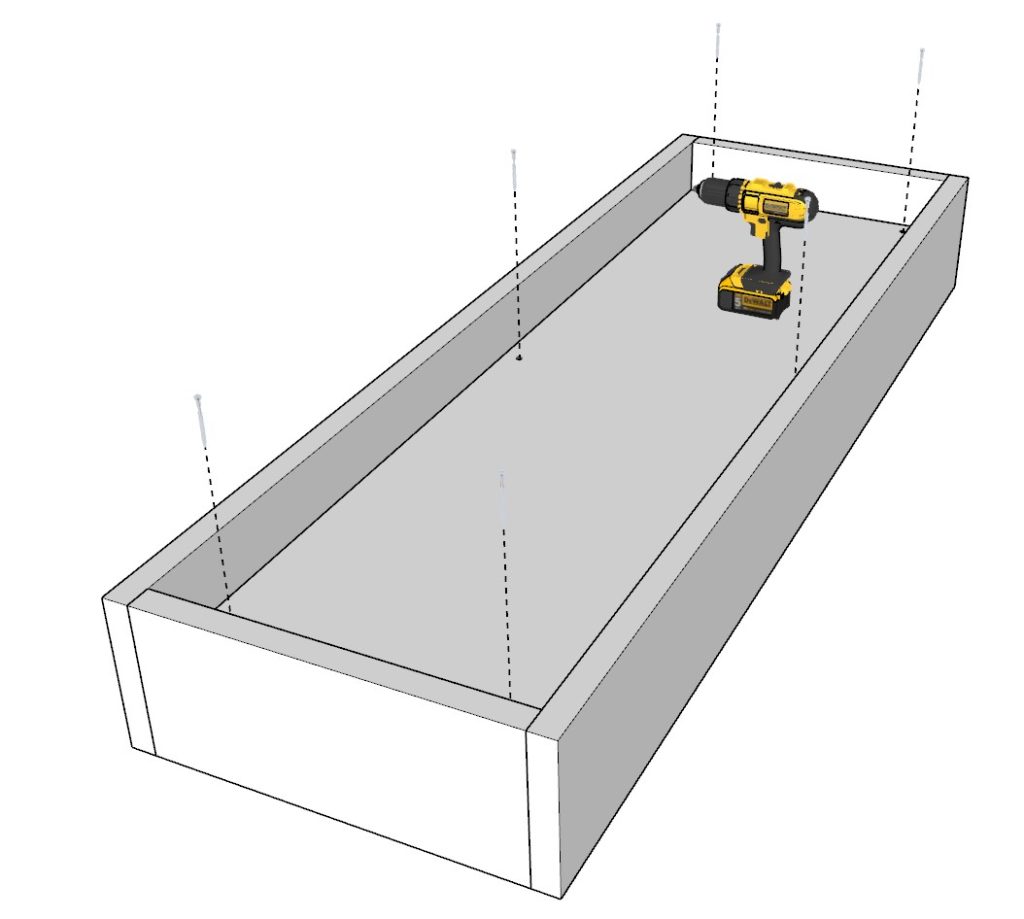
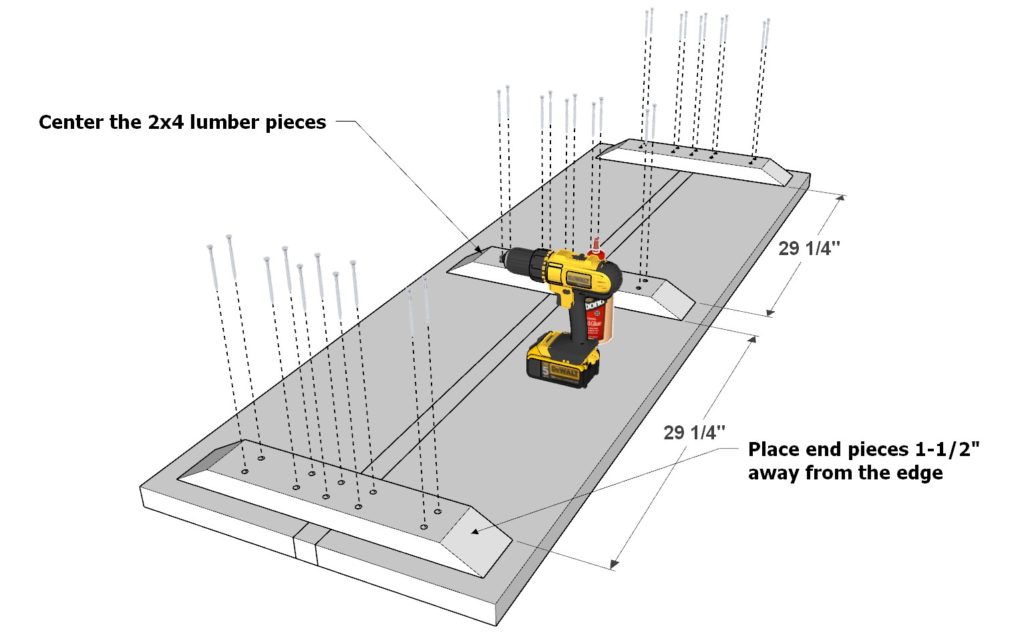
Start by crafting the table frame using two 72-inch 2×10 lumber pieces and two 21-inch 2×10 lumber pieces. Join these four pieces effectively to create a sturdy rectangle, ensuring each piece is bonded with wood glue, accurately predrilled, and fastened securely with 3.5-inch screws.
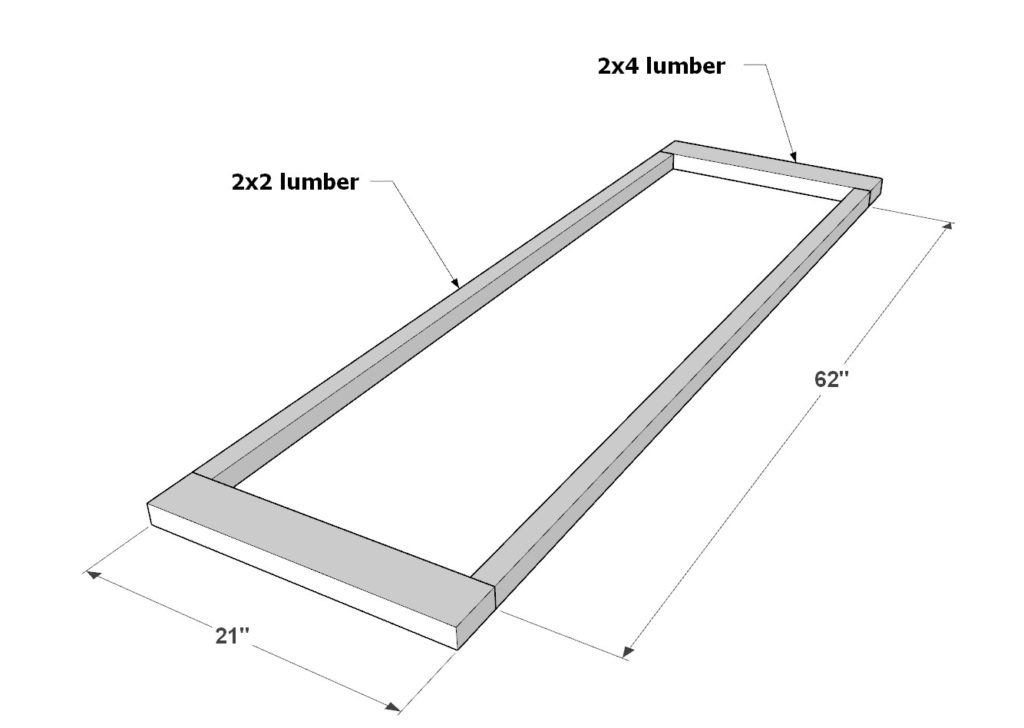
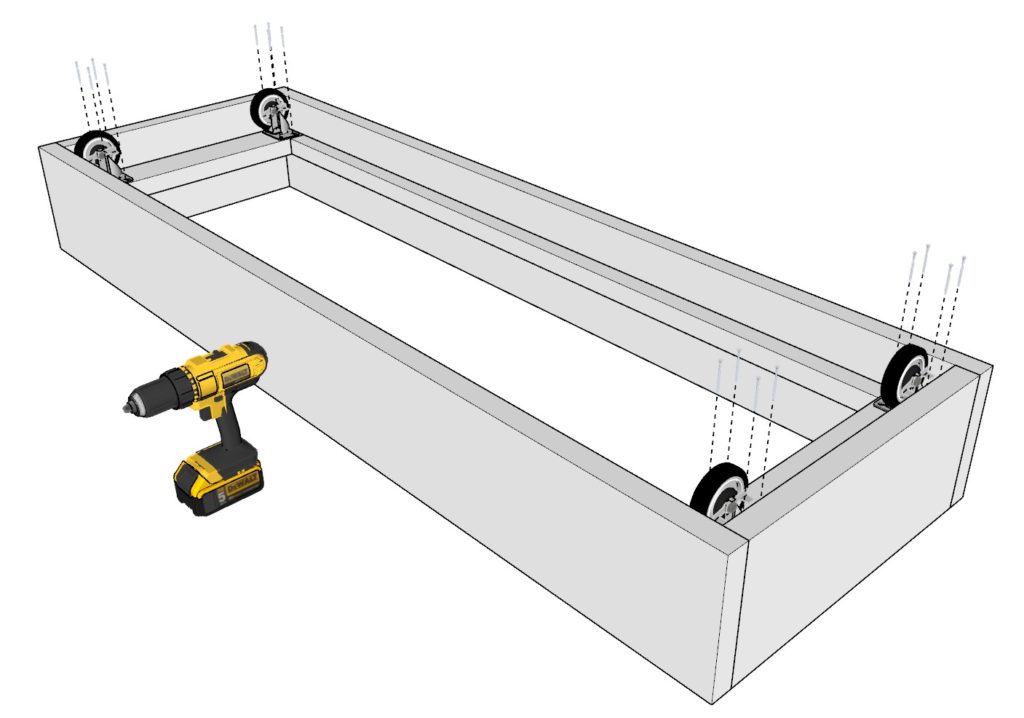
Now build the table’s interior liner frame or caster support. Utilize two 21-inch 2×4 lumber pieces and two 62-inch 2×2 lumber pieces, positioning them inside the coffee table/footrest unit. If you’re utilizing the suggested Home Depot casters, situate the internal lining 4-5/8 inches beneath the frame’s top end.
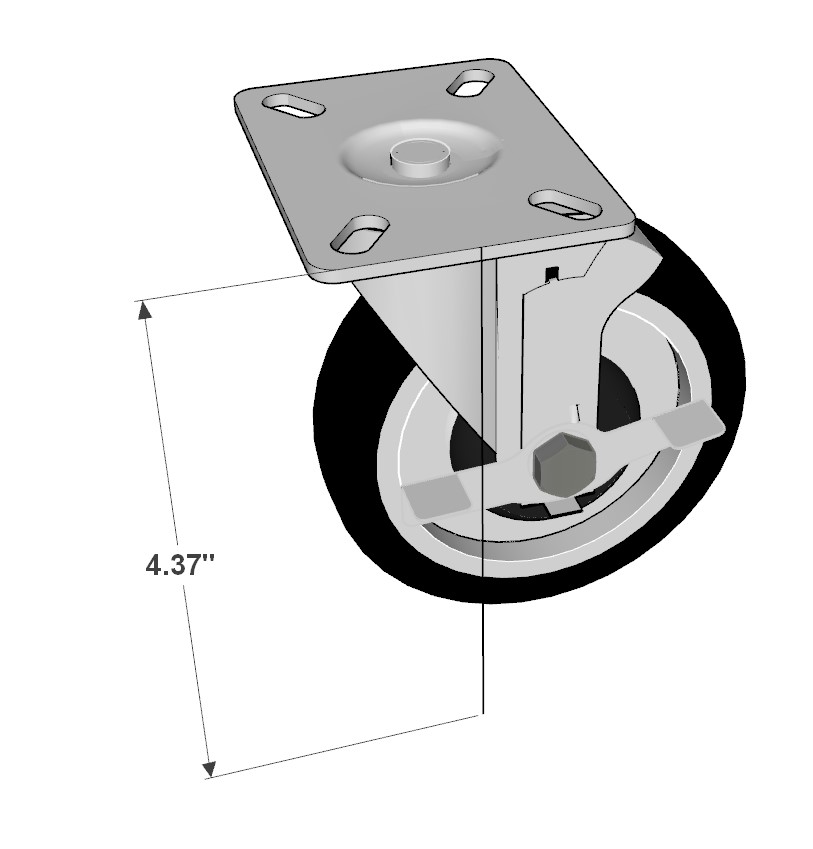
Afterward, install the swivel casters onto your table frame. Ensure their unrestricted 360-degree movement before affixing them firmly with screws.
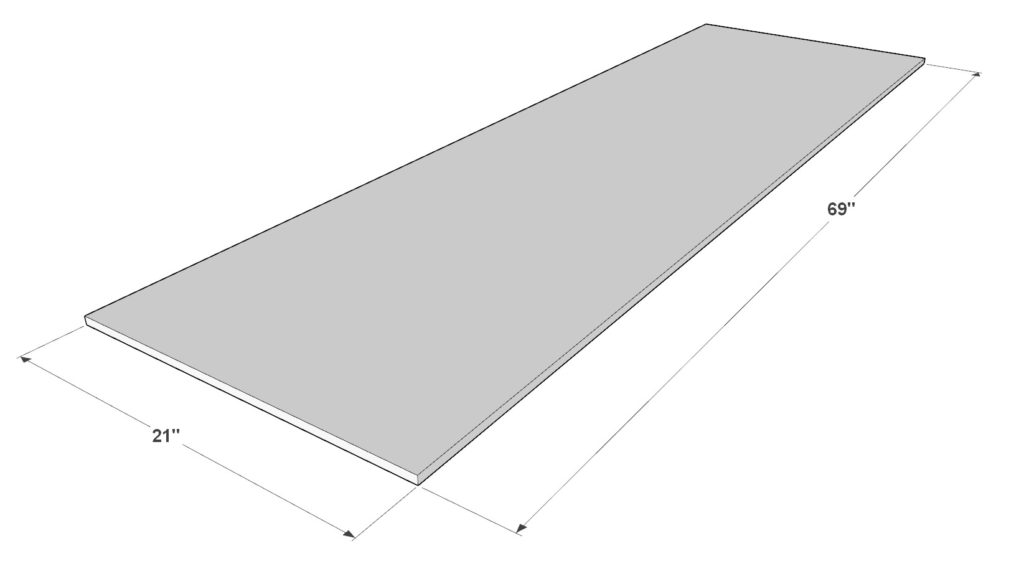
Follow up by lining the interior of your coffee table with a sheet of 1/2-inch thick plywood of dimensions 21 inches x 69 inches. Secure it to the inside lining of your table frame using wood glue and 1-inch screws.
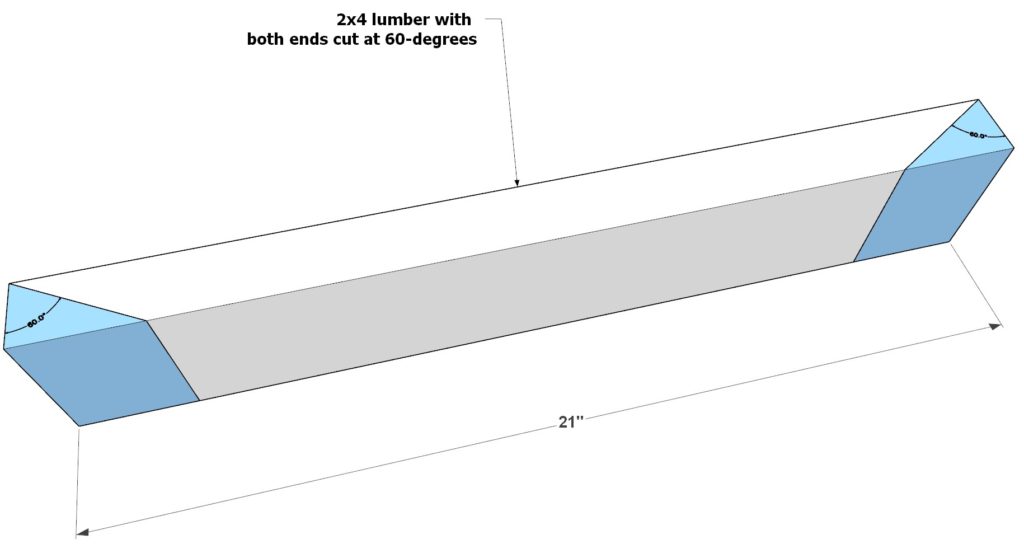
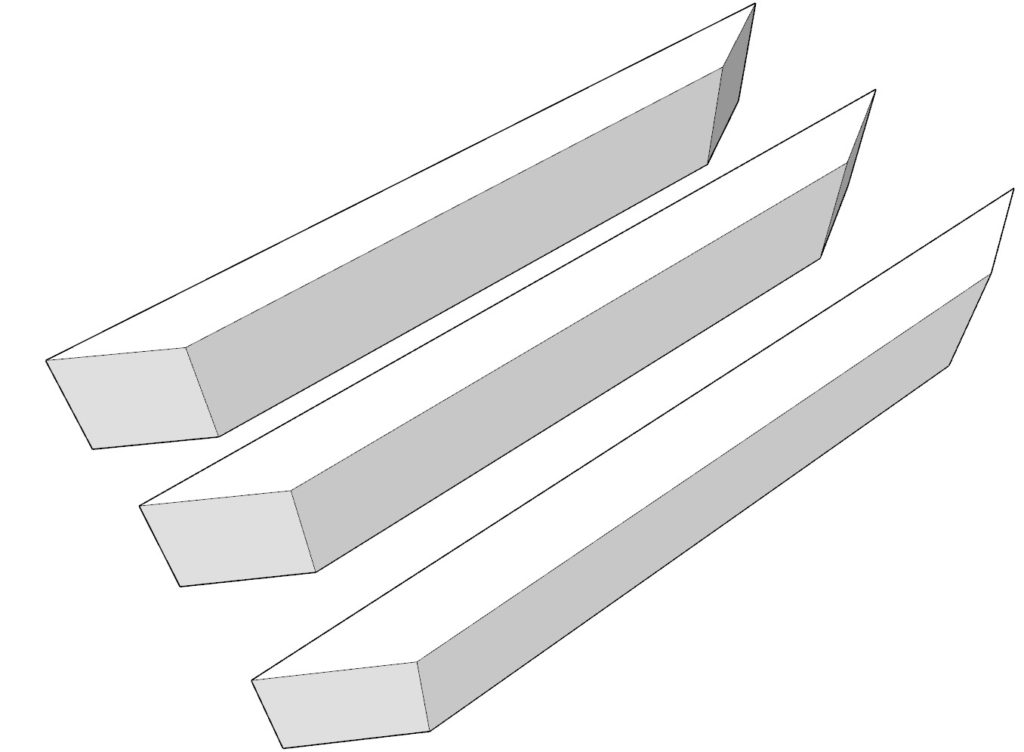
The next step is to cap your table with a functional top. Create two 60-degree angle cuts at both ends of a 21-inch 2×4 lumber piece. Make a total of three identical pieces. These cut pieces can now be added to two 72-inch 2×12 lumber pieces and a single 72-inch 2×2 lumber piece, as depicted in the diagram below. Secure each piece with wood glue and 2.5-inch screws. This addition completes the tabletop structure.
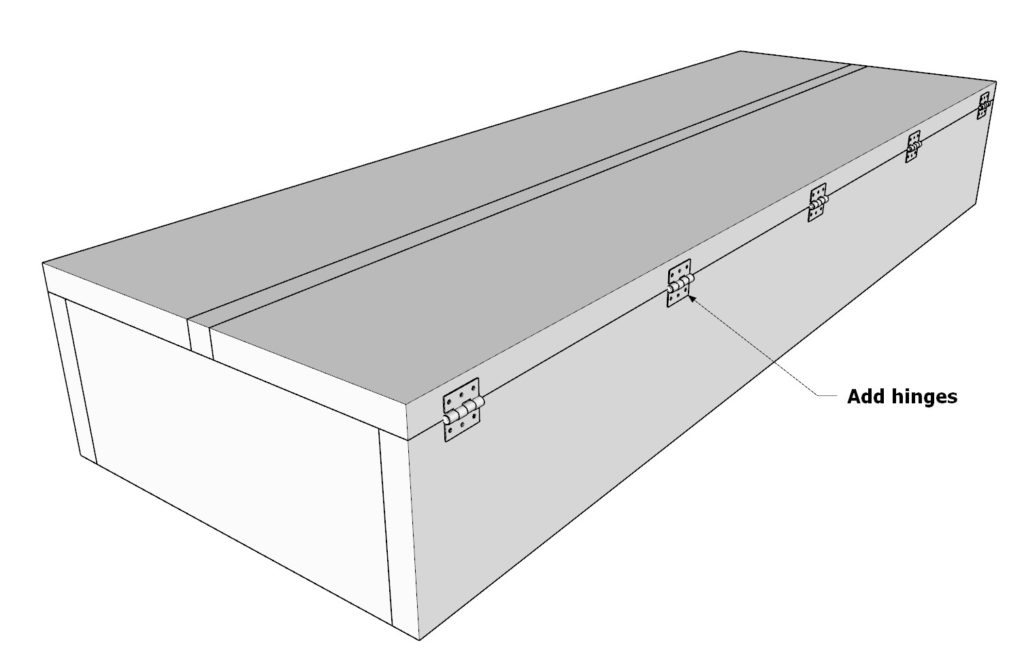
Finally, add hinges to your tabletop, allowing it to open and close with ease and access the storage area below.
Tip: There’s abundant room for creativity and nuances when it comes to designing the tabletop. The suggested design is one of the simplest and particularly beginner-friendly, but feel free to experiment with the design that best suits your taste and skill level.


Step 6: Finishing Touches
The primary construction is now complete, and it’s time to polish our project, smoothing out all the rough edges and truly making it one-of-a-kind.
Start by sanding down the entire structure. A thorough sanding process not only eradicates any splinters or rough spots but also opens up the pores of the wood, thus allowing a paint or stain to adhere effectively. Use graduated grits of sandpaper, beginning with a coarse grit and working your way up to a fine grit.
If you desire rounded, smooth edges, use a router with the appropriate bit. Always remember to apply a scrap piece at the ends of your cut to avoid tear-out and ensure a smooth, clean edge.
Next, decide how to conceal the screw holes. There are various options at your disposal. For instance, you can use wooden plugs for an interesting detail on your finished piece. Alternatively, you could use wood putty to seamlessly camouflage the holes. If you steam ahead using wood putty, remember it requires sanding after it dries to ensure a flat surface.
Now, it’s onto the part that truly brings the piece to life – staining or painting. This phase can significantly influence the final look of your furniture, so take some time to choose a color or stain that complements your decor.
If you’re using a stain, apply with a brush or lint-free cloth, going in the direction of the grain. Add the number of coats as per the darkness you desire, remembering to slightly sand between coats. When satisfied, seal the stain with a clear polyurethane finish to enhance its durability and protection.
If you choose to paint, begin by priming your piece to ensure the paint will adhere well. Then, paint your furniture in the color of your choice. Consider adding a couple of coats for a rich, even color. Finish with a clear sealant for added durability.
Step 7: Cushion Selection and Attachment Solutions
Step 7: Cushion Selection
With your DIY modular sofa constructed, it’s time to add the finishing touch that ensures your creation is not just a showpiece, but also a comfortable and inviting space to relax: the cushions.
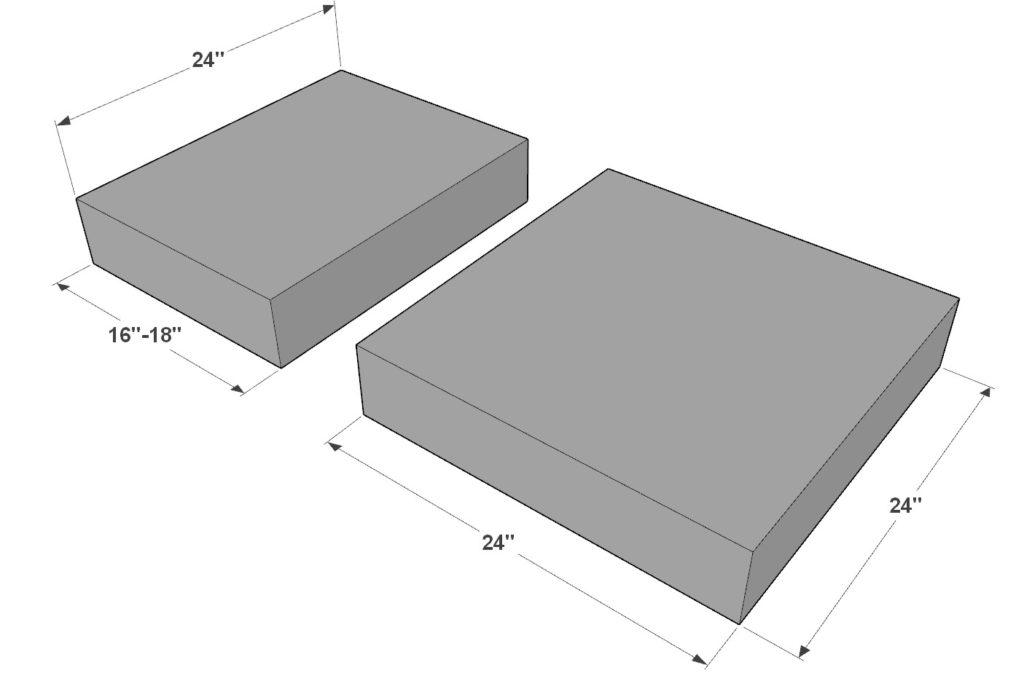
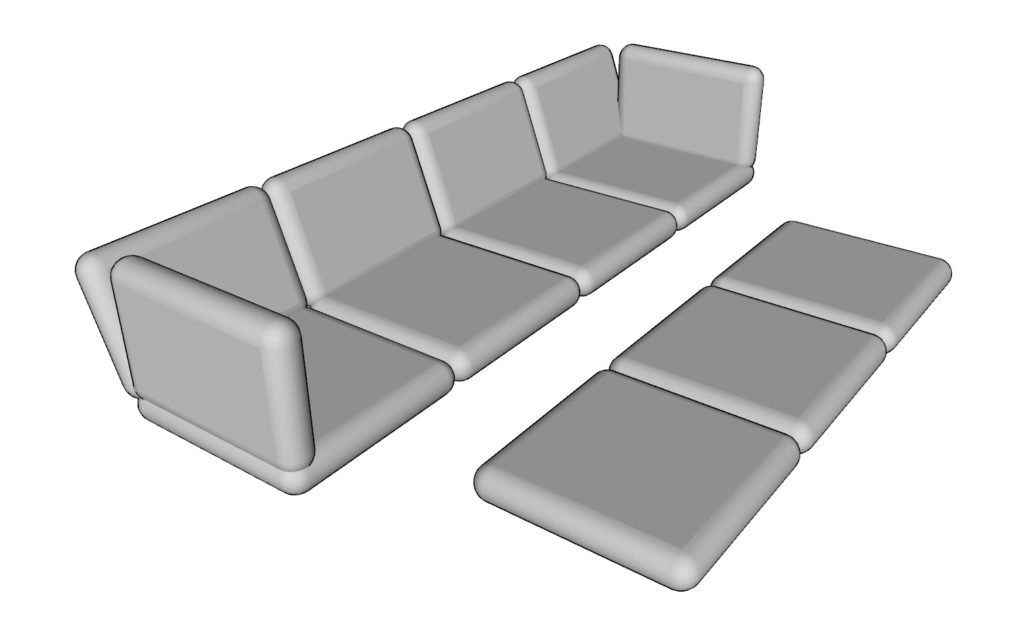
Determining the perfect set of cushions for your handmade sofa can be a challenge. The sofa unit needs four 24in x 24in seat cushions and three additional 24in x 24in cushions to use on the footrest for added comfort when seated. Regarding the backrest, the size can vary as per personal preference, but a good starting point would be cushions that are approximately 16-18 inches tall and 24 inches wide.
When it comes to cushion selection, comfort should be your top priority. Specialist sofa cushion fillings range from feather and down, foam, fiber, or a mixture. Feather-filled cushions provide the highest level of comfort, but they require regular plumping. Foam or fiber fillings may flatten out and lose their shape over time, but they require less maintenance. A combination of both as a foam core with a feather wrap can be a good compromise.
Likewise, the fabric of your cushions requires thoughtful consideration. It’s not only about color coordination with your décor but also about practicality. Remember, the cushions will experience a lot of wear and tear, especially if you have pets or children, so opt for a durable fabric that’s easy to clean.
While shopping for cushions, you may find that perfect filling and fabric, but not quite the desired size. Don’t worry! Cushions can be flexible. If your cushions are slightly bigger, they can be manipulated to fit into your sofa, creating an extra plush look. If they are a tad smaller, consider supplementing with throw pillows to fill in the gaps and add an extra element of comfort and style.
Purchasing Options:
Numerous retailers offer a wide variety of cushions. Chains like Home Depot, Lowe’s, Target, Walmart, and JC Penney provide an extensive selection. Alternatively, online marketplaces are a convenient avenue to explore, with Amazon, Wayfair, Overstock being popular options.
If you’re looking for something particular, consider custom-made cushions. Local upholstery shops, online stores like Cushion Source and Etsy, or even DIY routes can help tailor cushions that perfectly match your bespoke sofa.
Securing the Cushions
Having your cushions slip and slide can be a nuisance, disrupting the sofa’s comfort and aesthetics. Thus, securing them can significantly enhance your experience.
One option is Velcro strips. Sew one side of the Velcro to the cushion and attach the other adhesive side of the Velcro to the sofa. It’s easy to install and perfect for a removable option.
Non-slip rubber pads are also an excellent option, especially for seat cushions. These are easy to use; just place them directly under the cushions and let friction do the job.
Another option is using a gripper fabric. It provides a non-slip surface and can be cut to size to fit your cushions. This fabric is also easy to clean, which makes it a practical option.
For a more permanent solution, you may opt for snap fasteners or ties. Professional installation might be required to avoid damage to the sofa structure.
All these options offer different benefits; select one based on your preference for utility and aesthetics.
Choosing the right cushions and securing them effectively can dramatically enhance the comfort of your modular sofa. It completes the transformation of mere wooden structures into an inviting haven of relaxation. Happy lounging!