Introduction
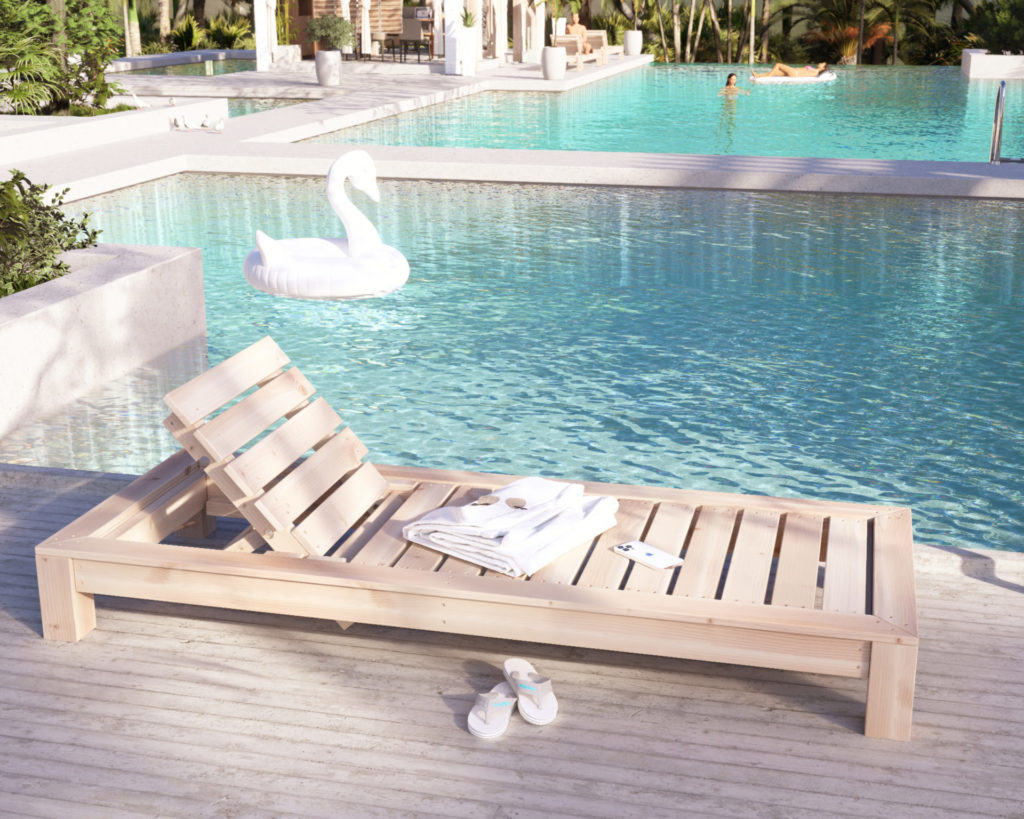
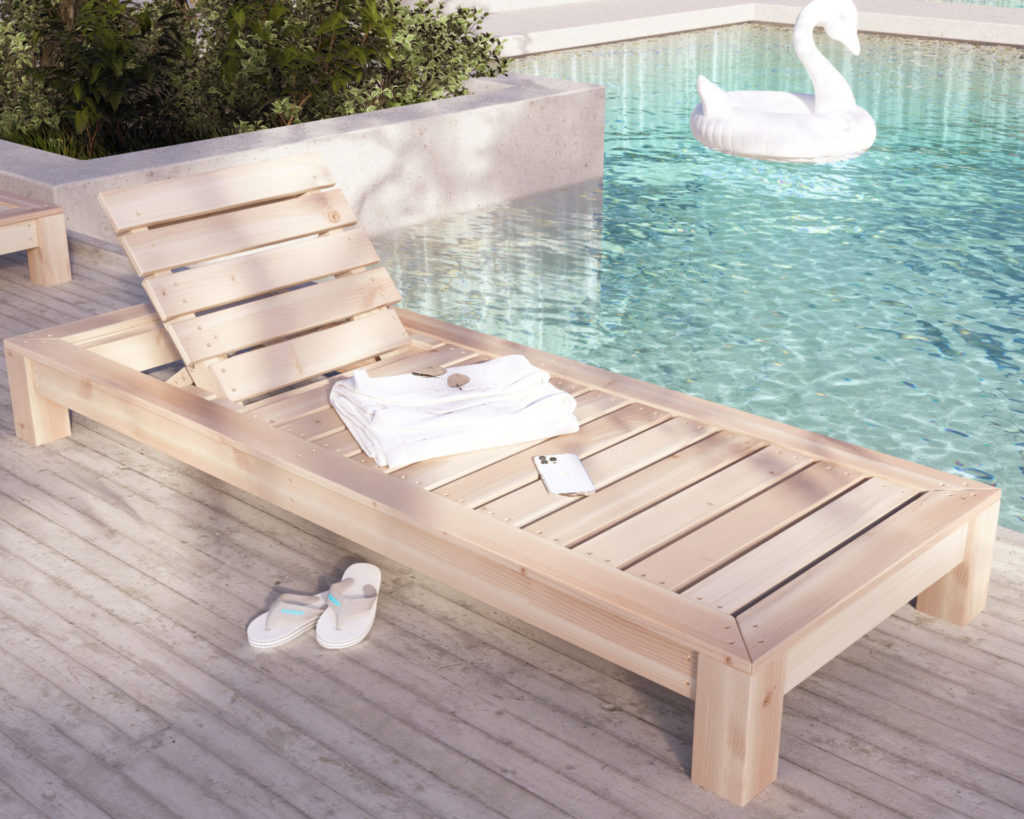
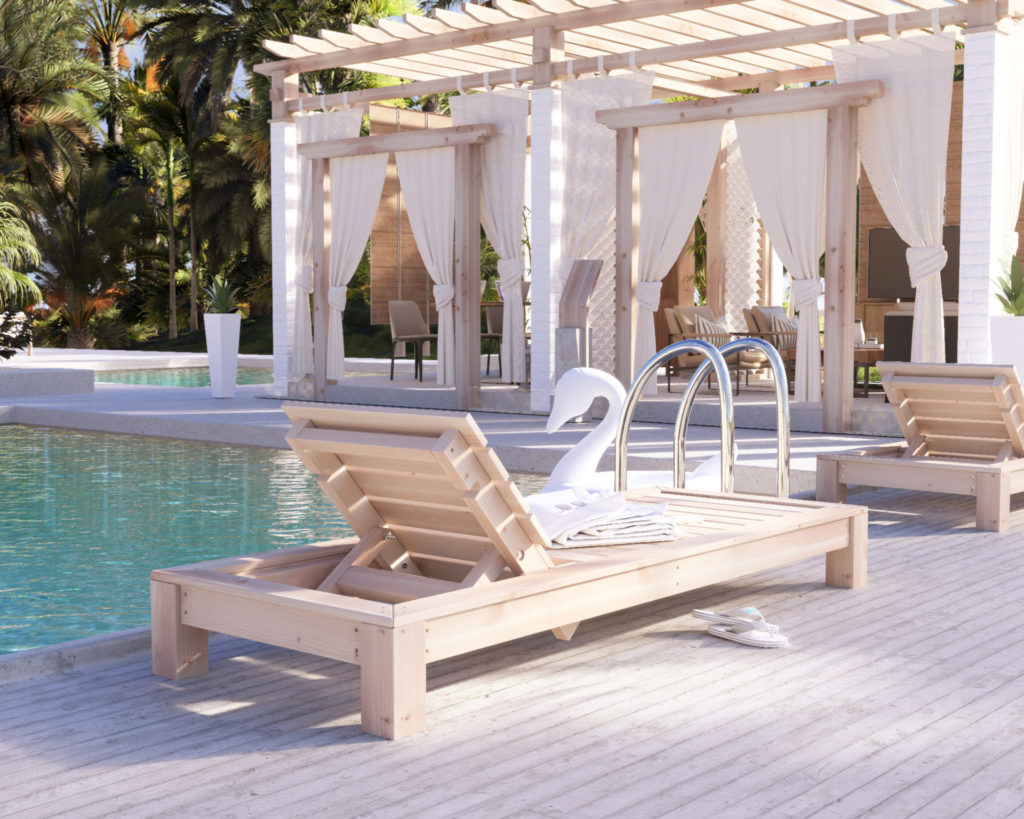
Transform your backyard into a relaxing sanctuary by building a custom chaise lounge for those lazy summer days. This comprehensive guide will take you through the process of creating your own chaise lounge, from choosing the right wood to adding a touch of personal style, ensuring that even beginner to intermediate woodworkers can complete this DIY project with ease. So, let’s dive into creating the perfect poolside chaise lounge for your outdoor oasis.
Section 1: The Perfect Project for Beginner to Intermediate Woodworkers
The chaise lounge project is perfect for those who are just starting in woodworking or those with some experience under their belt. Its simple wooden design makes it easy to follow, while still offering enough challenge to keep you engaged. With the right tools, materials, and step-by-step guidance, you’ll be well on your way to creating a comfortable and functional piece of outdoor furniture.
Section 2: Choosing the Right Wood for Your DIY Chaise Lounge
The choice of wood is crucial for the durability, appearance, and cost of your chaise lounge. Here are some popular options and their pros and cons:
Douglas Fir: This affordable and widely available softwood is relatively easy to work with, but it’s less resistant to decay and insect damage compared to other options. The cost for a Douglas Fir chaise lounge would be around $120.
Redwood: Known for its natural resistance to decay and insects, redwood is a durable and attractive choice for outdoor furniture. It’s more expensive than Douglas Fir, but its longevity and beautiful reddish color make it worth the investment.
Cedar: Similar to redwood, cedar is naturally resistant to decay and insects. It’s lightweight and has a pleasant aroma, making it a popular choice for outdoor furniture. Cedar is typically more expensive than Douglas Fir but less costly than Redwood.
Consider the availability, cost, and desired appearance when selecting the wood for your chaise lounge.
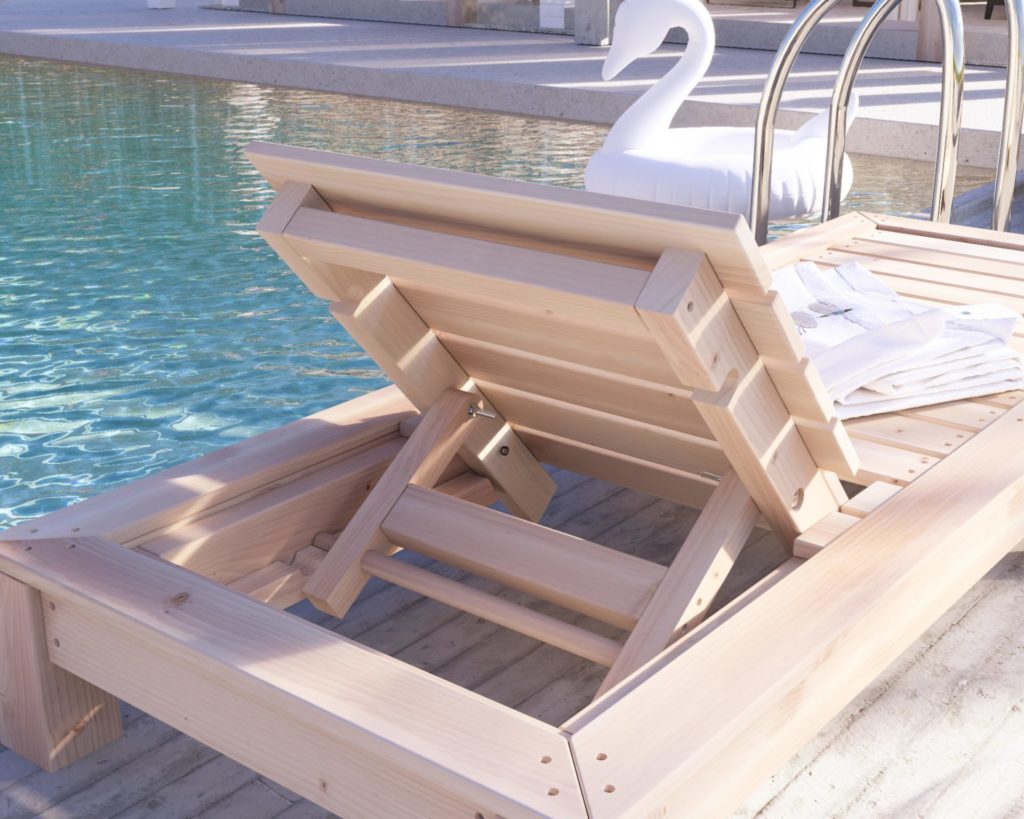
Section 3: Customizable Comfort with Three Adjustable Backrest Settings
A key feature of this chaise lounge design is the adjustable backrest, which offers three different settings for optimal comfort. Whether you prefer to lie flat, recline slightly, or sit up to read a book, the adjustable backrest ensures that you can customize your lounging experience to suit your preferences.
Section 5: Customizing Your Chaise Lounge for Personal Style Personalize your chaise lounge by adding decorative elements, such as:
Custom cushions: Select outdoor fabric in your favorite color or pattern to create comfortable and stylish cushions for your chaise lounge.
Paint: Add a pop of color to your chaise lounge by painting it in a hue that complements your outdoor décor.
Carvings or woodburning: If you’re skilled in woodworking, consider adding intricate carvings or woodburning designs to the chaise lounge for a truly unique piece.
Section 6: Woodworking Inspiration from Around the World Take inspiration from various woodworking traditions and styles from around the world to add a unique flair to your chaise lounge project. For example:
Japanese woodworking: Incorporate clean lines and minimalist design elements inspired by traditional Japanese joinery techniques.
Scandinavian design: Embrace the simplicity and functionality of Scandinavian design by focusing on clean lines, natural materials, and a neutral color palette.
Rustic Americana: Add a touch of rustic charm with distressed finishes, reclaimed wood, or hand-carved details reminiscent of traditional American craftsmanship.
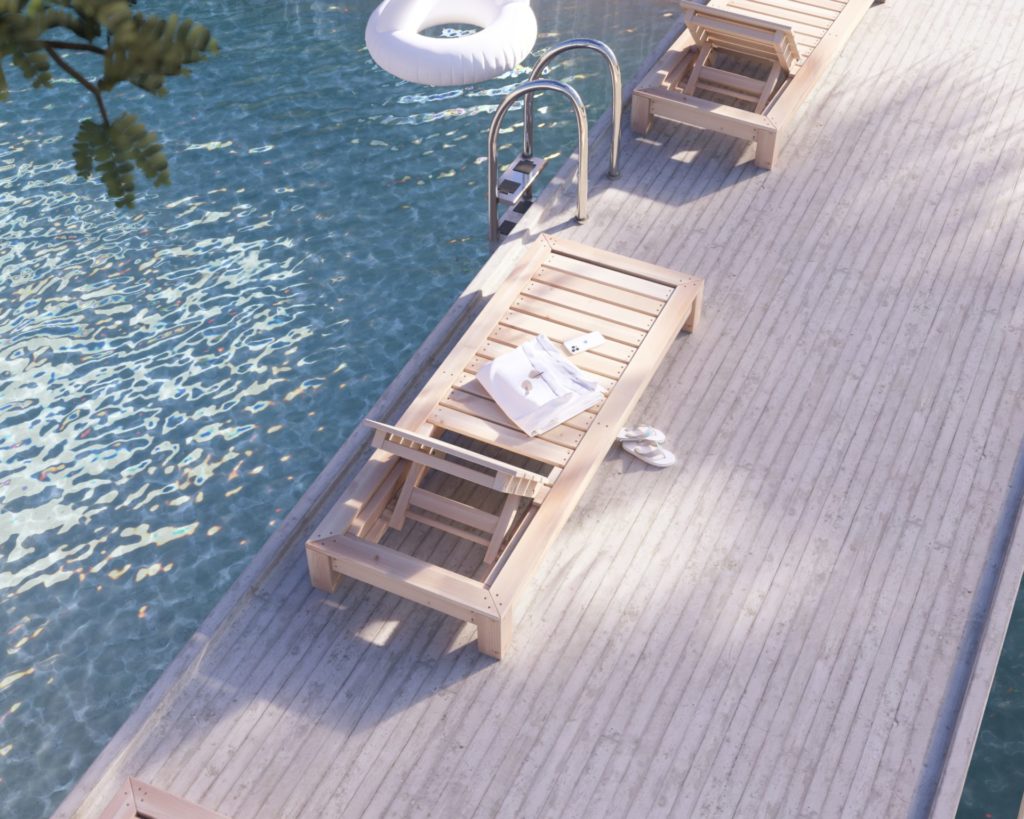
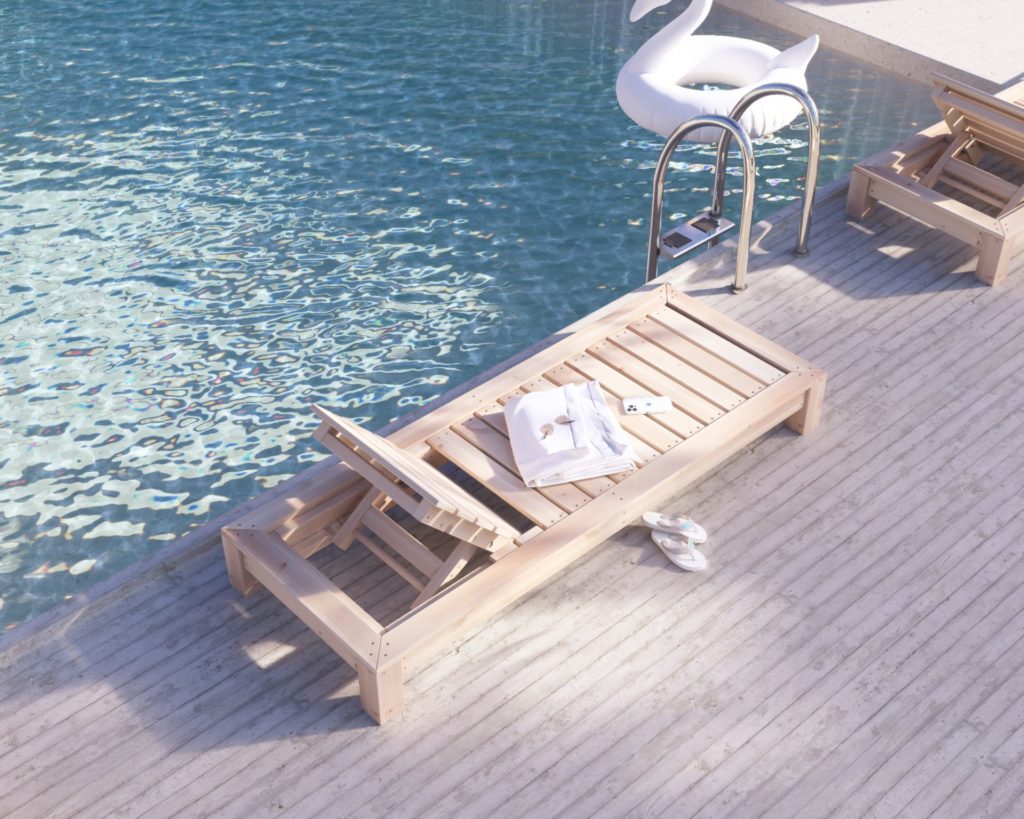
Section 7: Incorporating a Chaise Lounge into a Poolside Oasis Now that you've built your chaise lounge, it's time to create the perfect poolside oasis. Consider the following ideas to enhance your outdoor space:
Shade: Add a large umbrella or canopy to provide much-needed shade during hot summer days.
Side table: Build or purchase a small side table to hold your drinks, snacks, and other essentials while you relax on your chaise lounge.
Outdoor rug: Define your lounging area with an outdoor rug that complements the color and style of your chaise lounge and other outdoor furniture.
Lighting: Incorporate outdoor lighting, such as string lights or solar-powered lanterns, to create a warm and inviting atmosphere for evening relaxation.
Landscaping: Surround your pool area with lush plants, flowers, and even water features to create a tropical paradise in your backyard.
Conclusion
Building your own chaise lounge is an exciting and rewarding DIY project that can enhance your outdoor living space and provide endless relaxation by the pool. With the right materials, tools, and guidance, even beginner to intermediate woodworkers can create a beautiful and functional chaise lounge for their poolside oasis. So, grab your tools and let’s get started on this fun and fulfilling woodworking adventure.
Time to build
5 hours
Total cost of build
$100
Skill level required
Beginner-intermediate
Download the PDF plans
DIY poolside chaise and lounge PDF plans
What is included in the PDF download?
Easy to read step by step instructions
Material list
Tools needed
3D illustrations
Recommended tools/materials
- Miter saw capable of cutting 45-degree angles
- Hand held saw
- Drill
- Screw driving
- impact drill
- Sander
- Ratchet straps
- Countersink drill bit
- 2 lbs of 2.5 inch screws
- 2 lbs of 3.5 inch screws
- 1 lb of 1.5 inch screws
- Wood glue
- 6 inch long drill bit
- 1 inch diameter forstner drill bit
- Two 3.5-4 inch bolt assemblies (includes bolt, washer, nut)
- Two 6 inch bolt assemblies (includes bolt, washer, nut)
Shopping list and cut list
Don’t miss out! Our DIY Lounge Bed Plan comes with a full lumber shopping and cut list, ensuring a seamless project experience. Get yours now and start creating the perfect lounge bed for your outdoor space. Happy building!
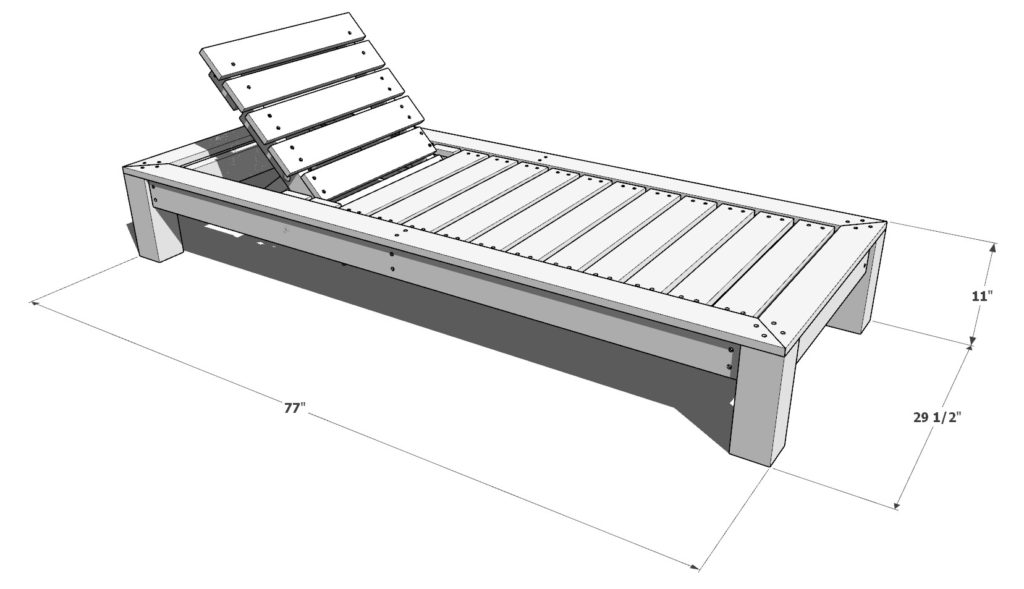
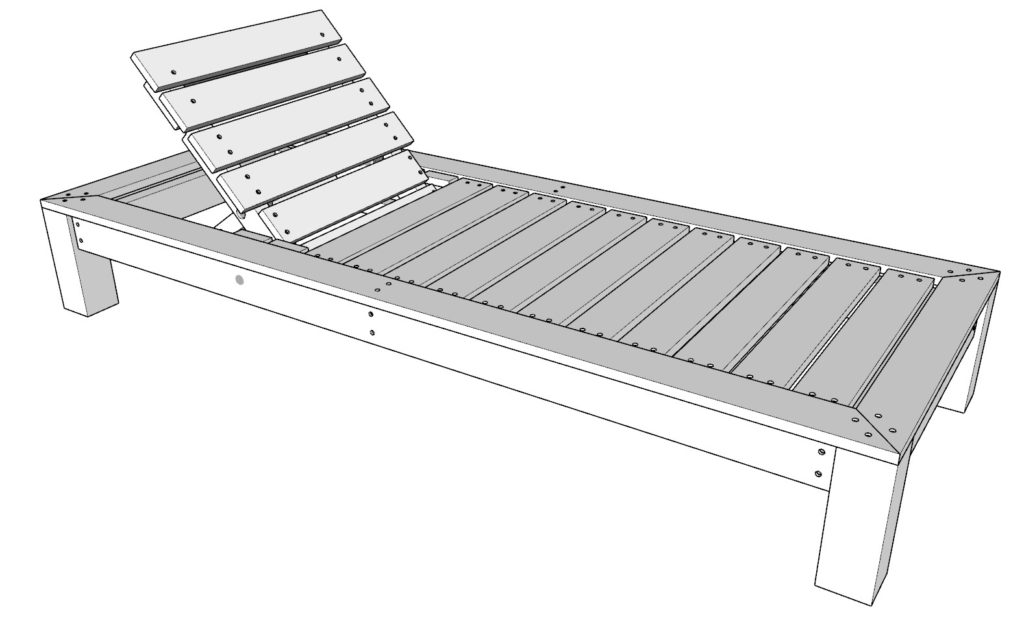
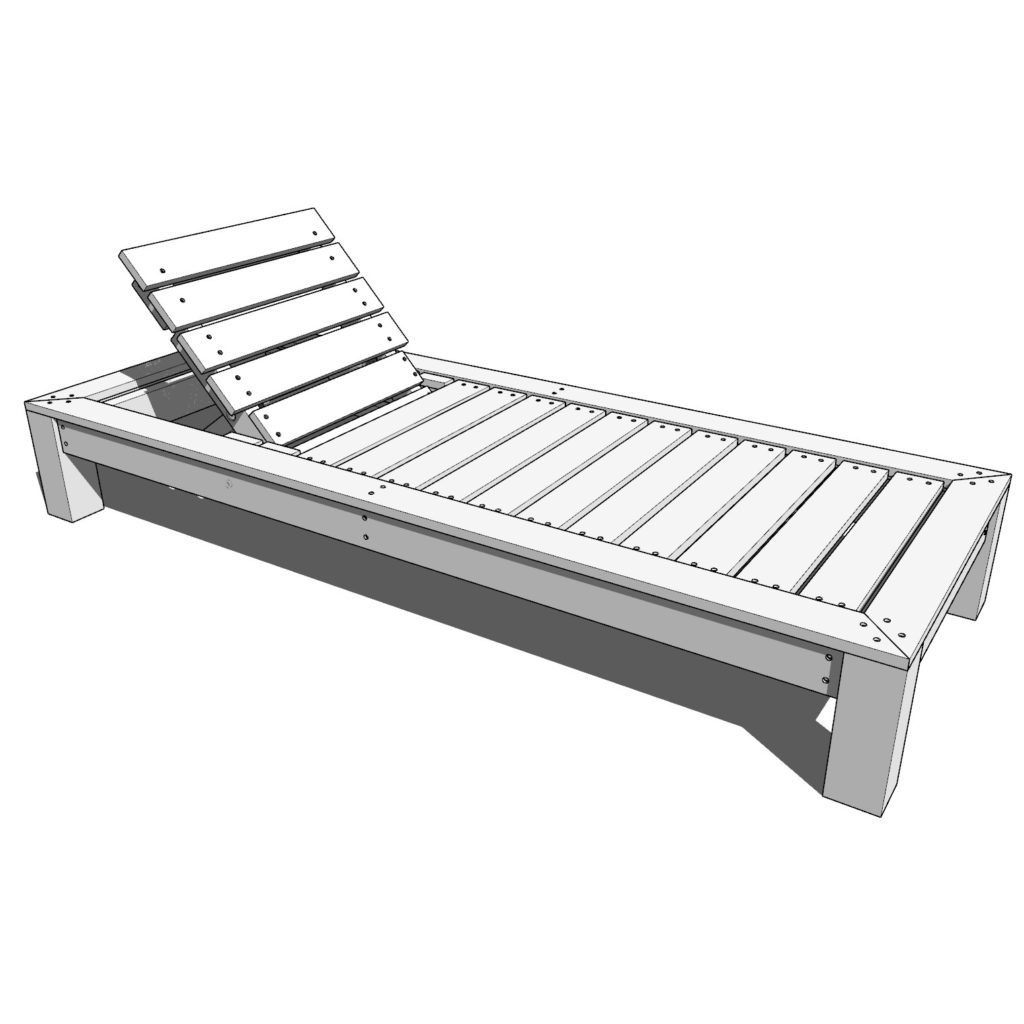
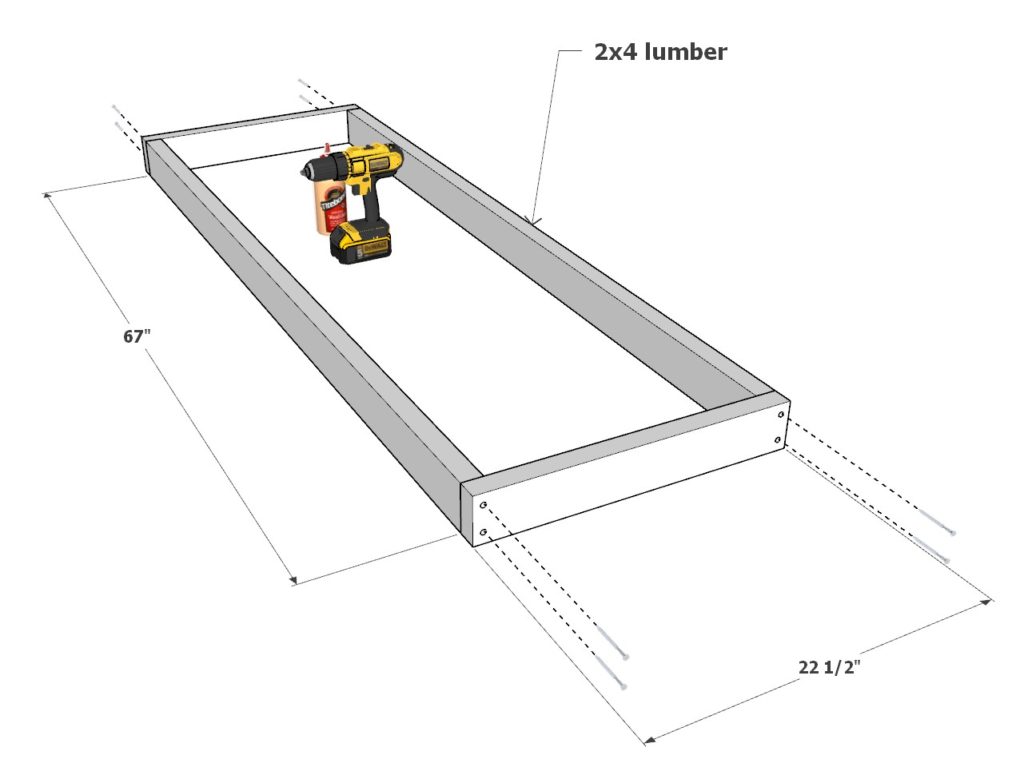
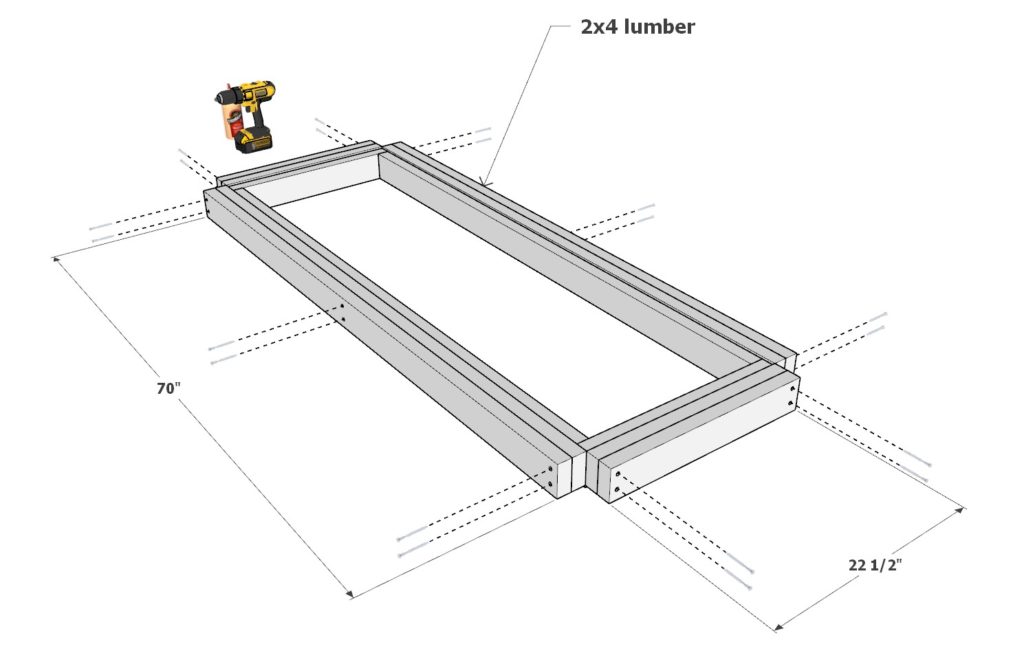
Step 1: Assemble the Multi-Layered Frame for the DIY Lounge Bed
First, build the frame for the DIY lounge bed.
Take two 67 inch 2×4 lumber pieces and two 22-1/2 inch 2×4 lumber pieces. Arrange them as shown below, predrill holes, add glue, and add 3.5 inch screws to secure the pieces together.
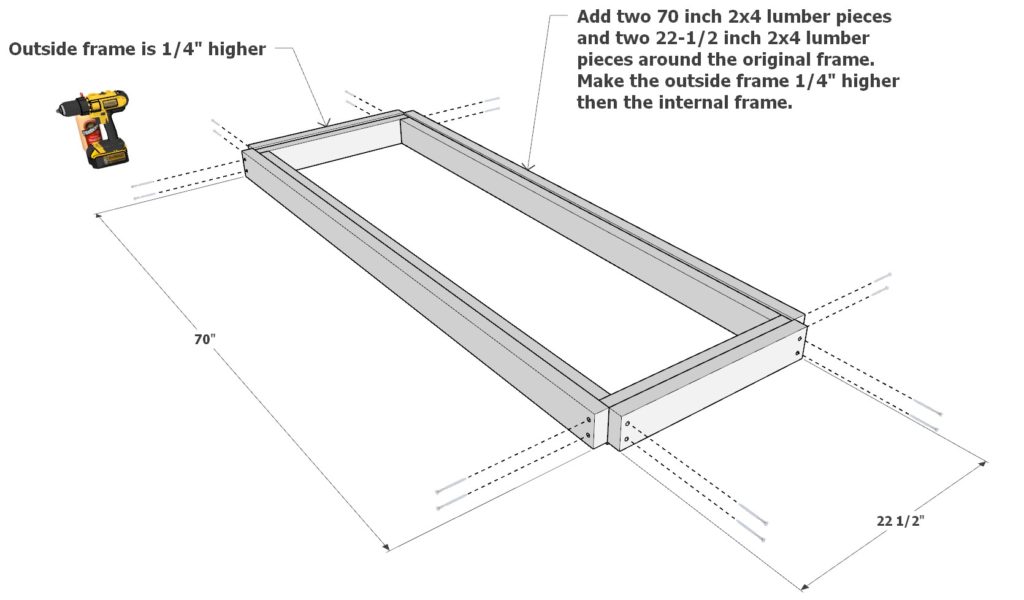
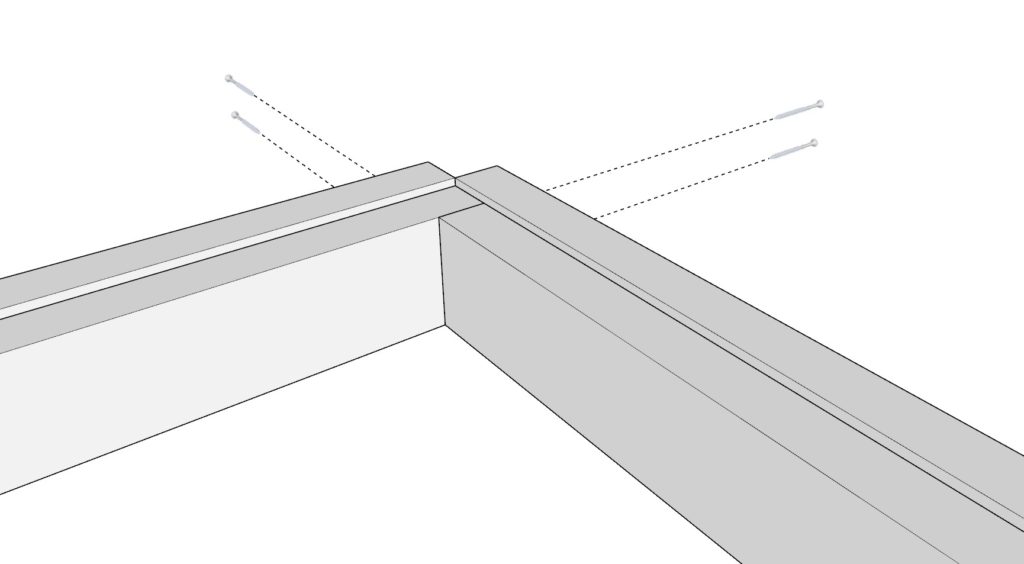
Next, take two 70 inch 2×4 lumber pieces and two more 22-1/2 inch 2×4 lumber pieces. Arrange them around lounge bed frame, add glue, predrill holes, and add 2.5 inch screws. THIS SECOND FRAME NEEDS TO BE 1/4″ HIGHER THEN THE FIRST FRAME.
lastly, add one ore layer to the lounge bed frame. Take two more 70 inch 2×4 lumber pieces and two more 22-1/2 inch 2×4 lumber pieces and add them to the frame as shown below. These must be secured with glue and 3.5 inch screws.
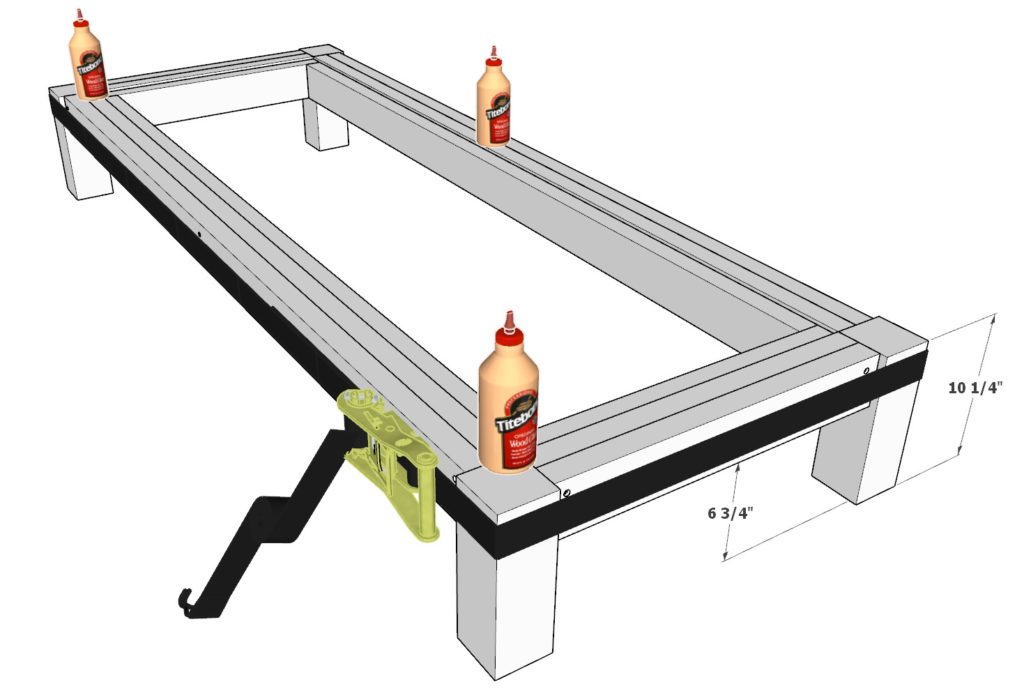
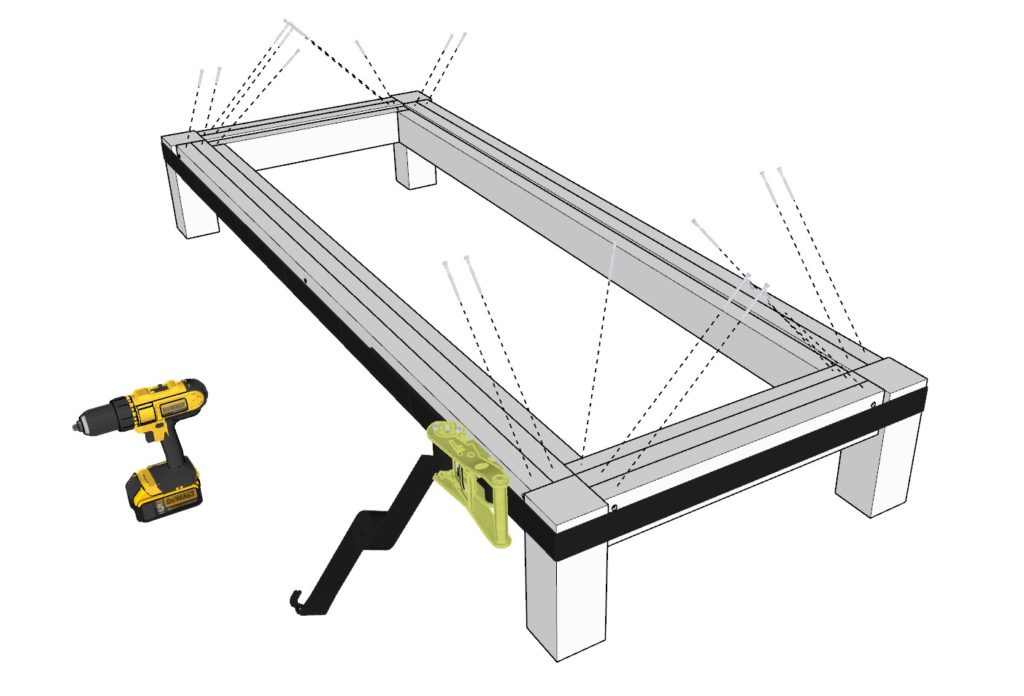
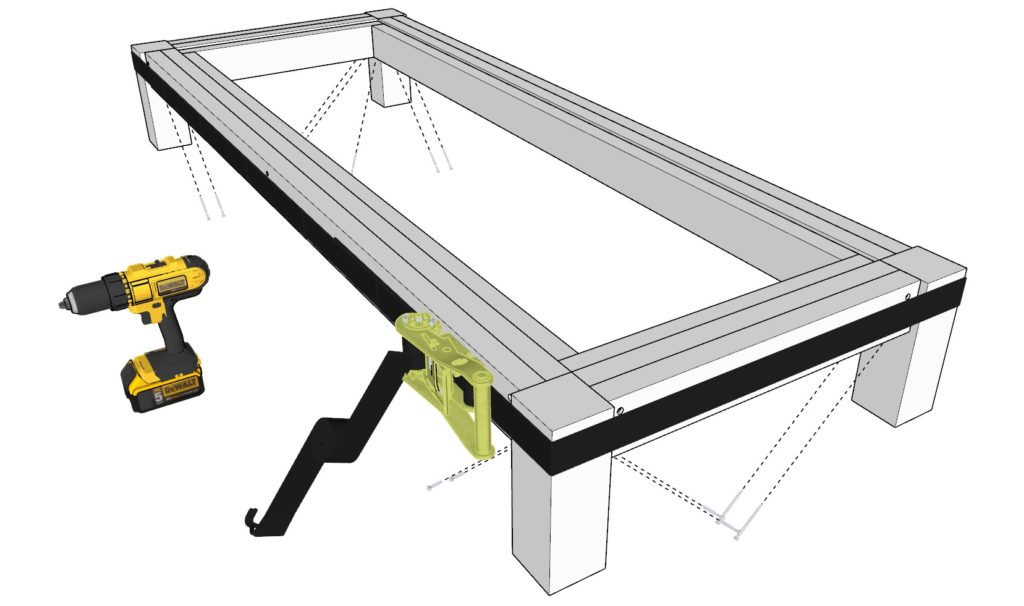
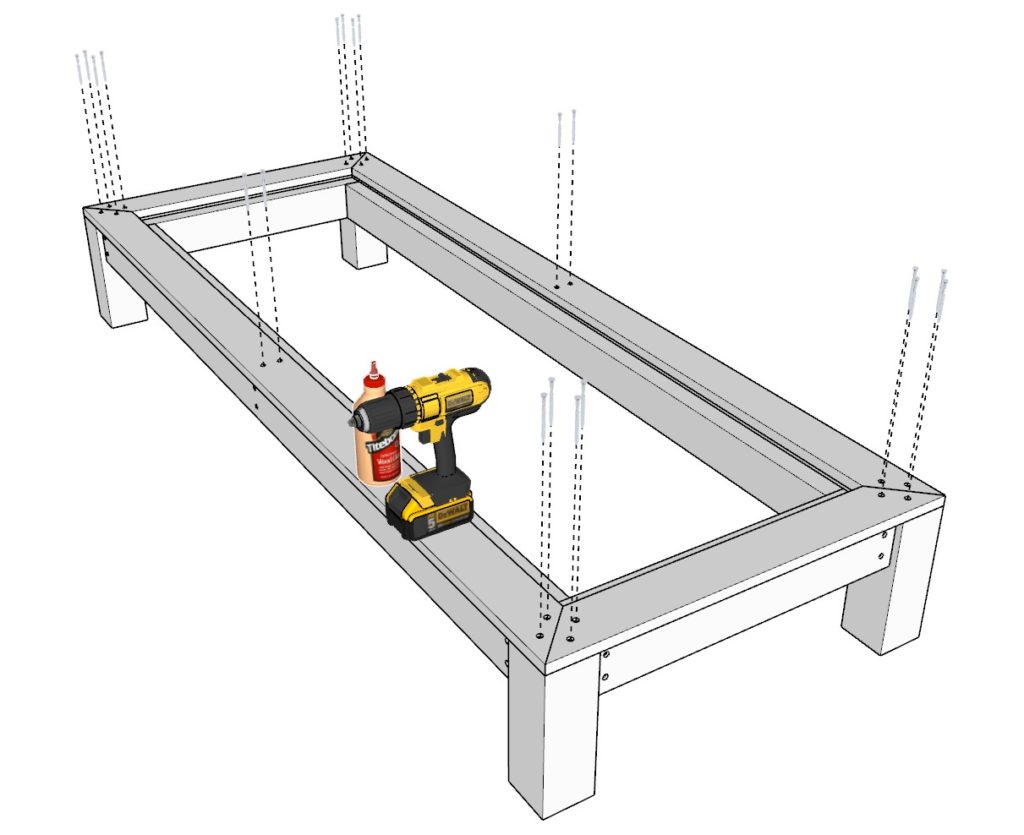
Step 2: Attach and Secure the Legs to the Lounge Bed Frame
Next, add the legs to the lounge bed.
Take four 10-1/4 inch 4×4 lumber pieces and add glue to all the areas that will be joined together.
Next, add a ratchet strap to go around the legs and the perimeter of the lounge bed frame. Tighten the straps once all the pieces are aligned correctly. (use 6-3/4 inch spacers to suspend the frame to make this step easier).
Next, tighten the straps to a point where none of the components are able to move. Add 3.5 inch screws as shown below. Add the screws from the top and from the bottom as well.
Step 3: Install the Lounge Bed Lip
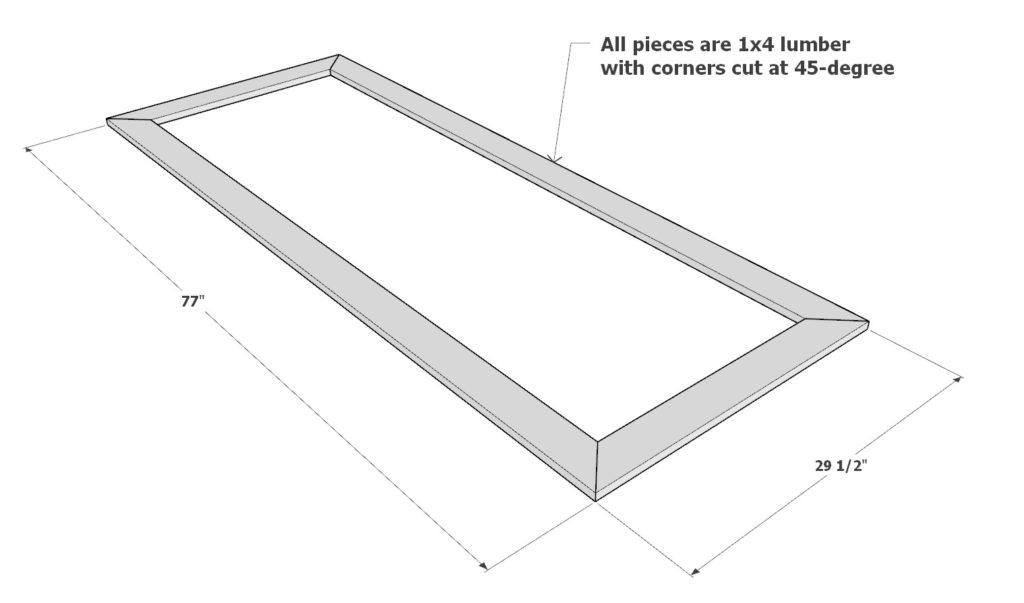
Next, add the lounge bed lip.
First, take two 29-1/2 inch 1×4 lumber pieces with both ends cut at 45-degrees and two 77 inch 1×4 lumber pieces with both ends cut at 45-degrees. Arrange them as shown below, add glue, predrill, and add 2.5 inch screws.
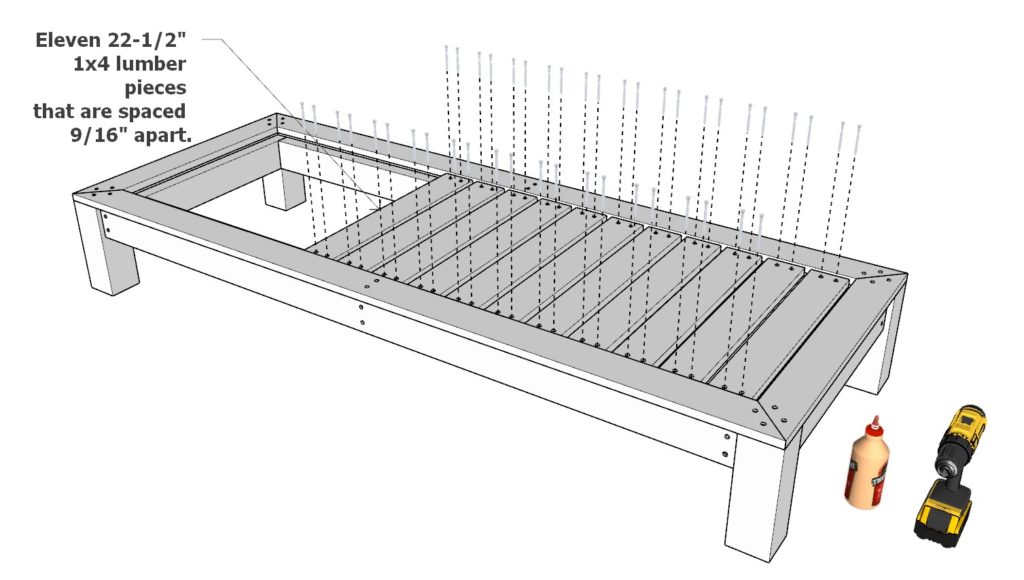
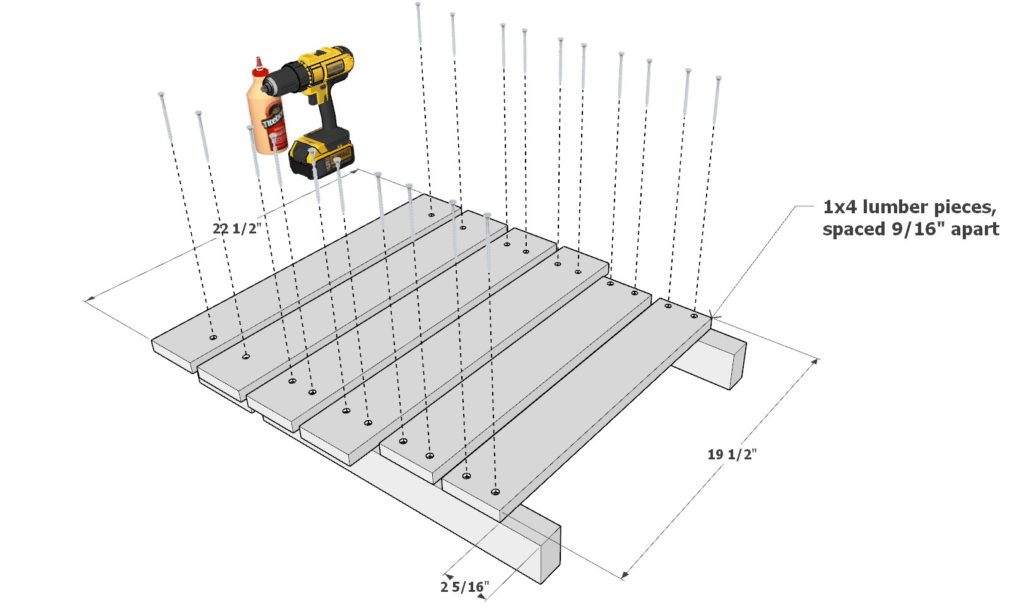
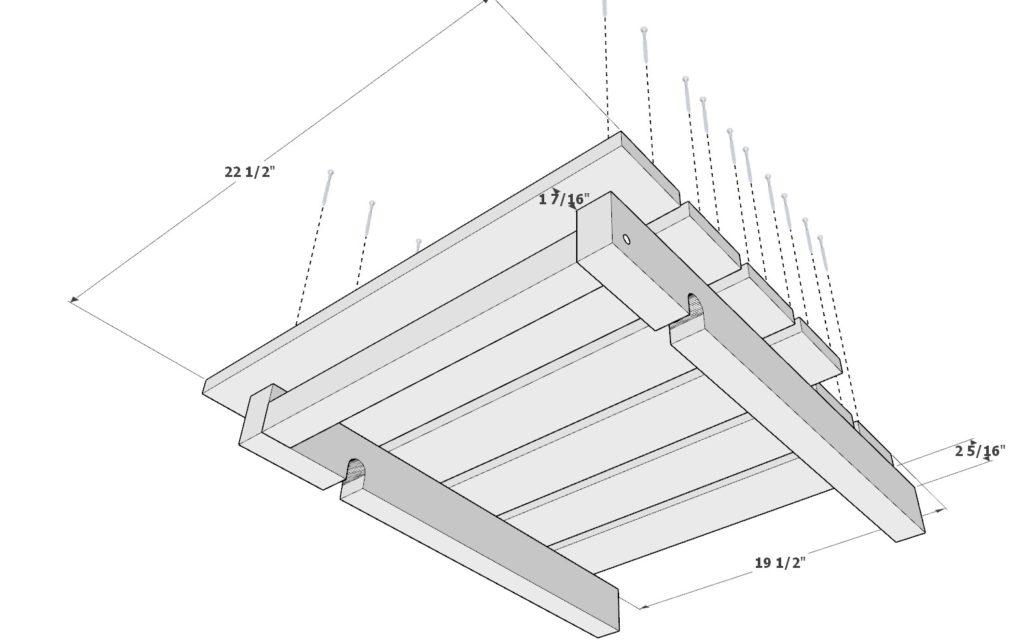
Step 4: Attach the Lounge Bed Decking Pieces
Next, add the lounge bed decking pieces.
Take eleven 22-1/2 inch 1×4 lumber pieces and add them to the frame as indicated below using glue and 2.5 inch screws.
Step 5: Construct of the Lounge Bed Backrest
Next, build the back rest of the lounge bed.
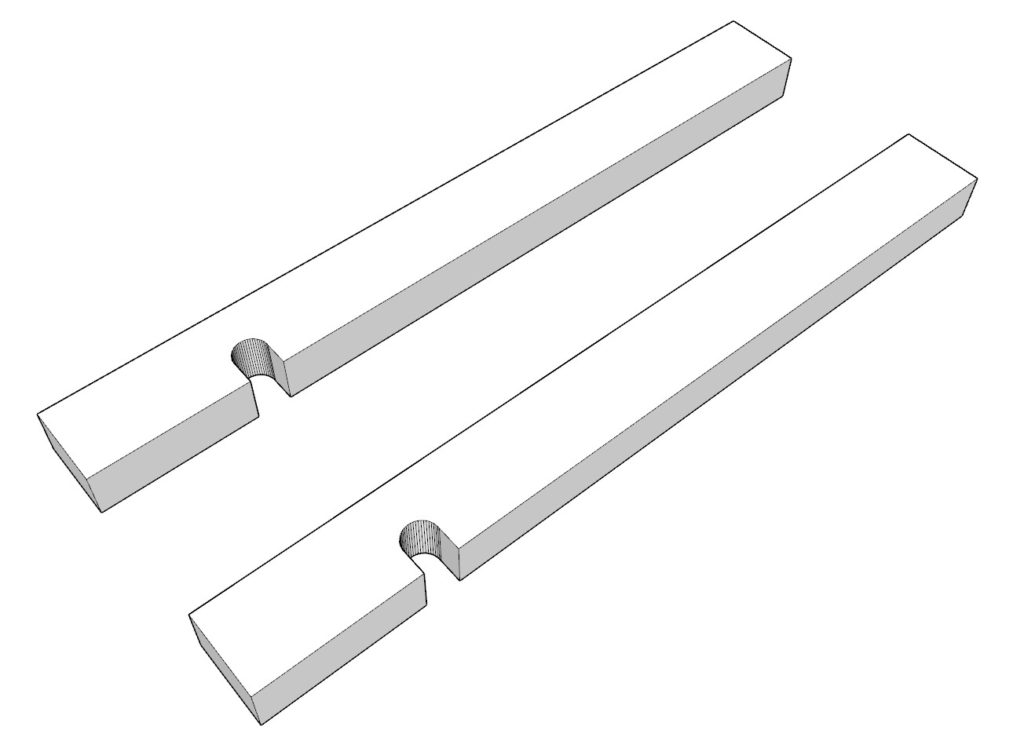
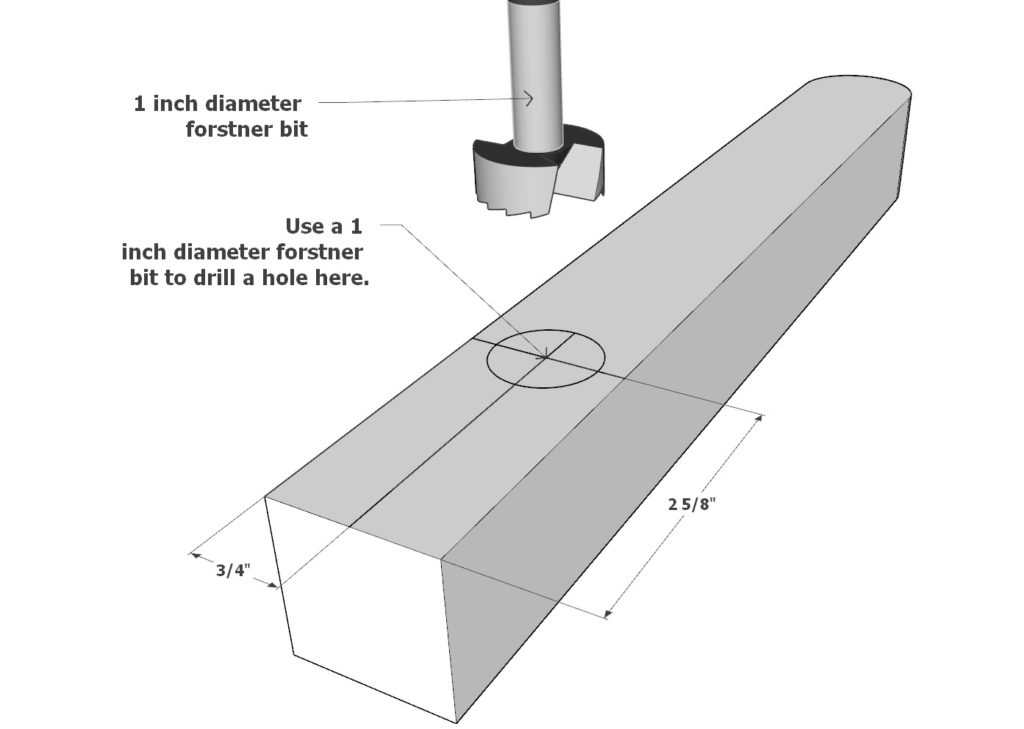
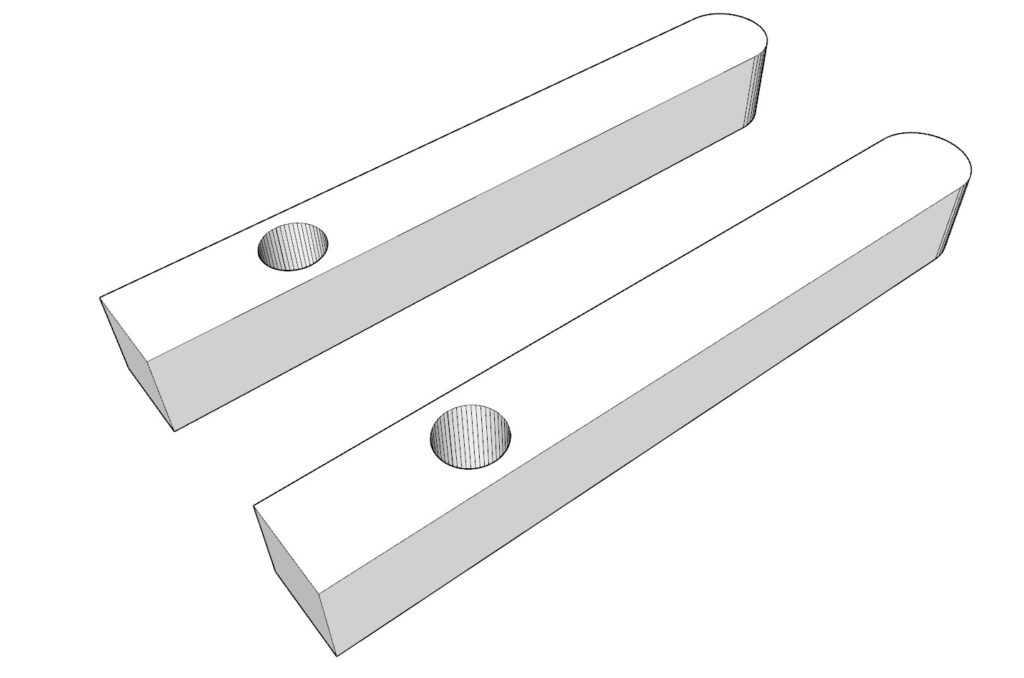
First, take one 24-13/16 inch 2×3 lumber pieces and using a 1 inch diameter forstner bit, drill a hole that is 1-1/4 inch away from the edge of the 2×3 lumber piece. Use a hand held saw to connect the 1 inch diameter hole to the edge of the 2×3 lumber to make an arch as shown below.
Make two identical pieces.
Next, add these 2×3 lumber pieces to a 16-1/2 inch 2×2 lumber piece as shown below. Join using glue and 2.5 inch screws.
Next, add the back rest decking pieces. The back rest is made of four 22-1/2 inch 1×4 lumber pieces and two 19-1/2 1×4 lumber pieces. Space them out as indicated below and secure with glue and 2.5 inch screws.
Tip: Once your done with this step, test to see if the 1 inch diameter dowel will sit comfortably in this space. It is likely that you may need to widen the space a little to ensure that the dowel can come in and out with ease. Use the hand saw and sand paper to accomplish this.


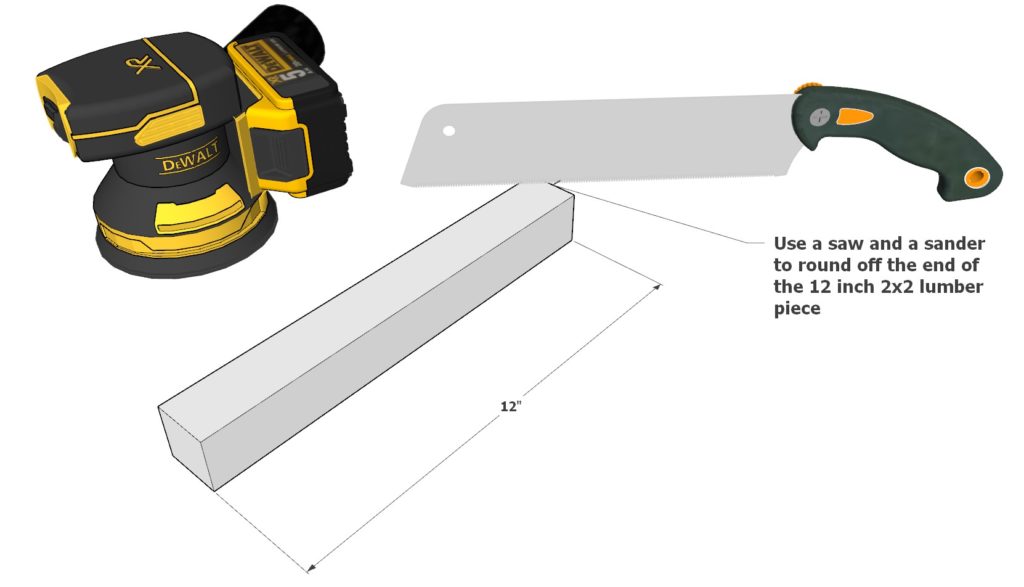
Step 6: Create and Assemble the Backrest Stopper
Next, build the back rest stopper.
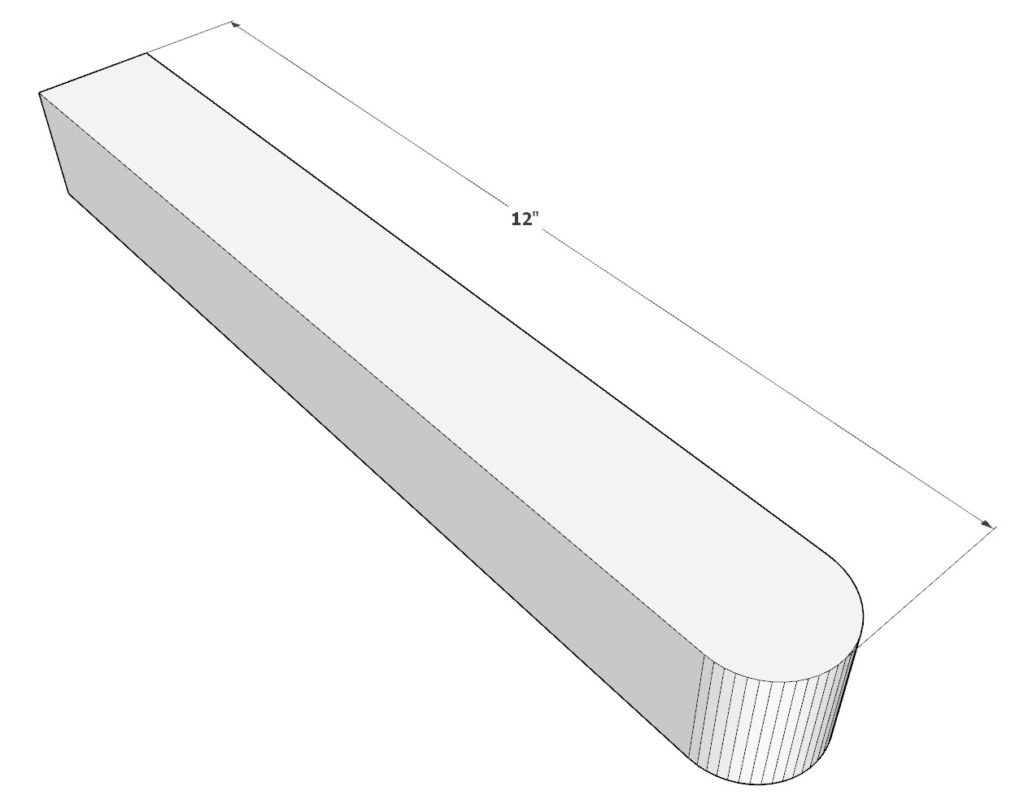
Take a 12 inch 2×2 lumber piece and round off one end using a hand held saw and a sander.
Next, drill a hole using a 1 inch diameter forstner drill bit as indicated below.
Make two identical pieces.
Lastly, add a 19-1/4 inch long 1 inch diameter wooden dowel and a 13-1/2 inch 2×3 lumber pieces to make the back rest stopper. Use glue and 2.5 inch screws.
Tip: It is best to use a drill press or a drill press jig for this step to ensure that the holes are drilled at an exact angle. If a drill press is not available, make accurate measurements on both sides and drill from both sides and have the drill bit meet in the middle. After both sides have been drilled, pass the forstner bit through the hole over and over again to ensure the hole is clear of any obstruction.

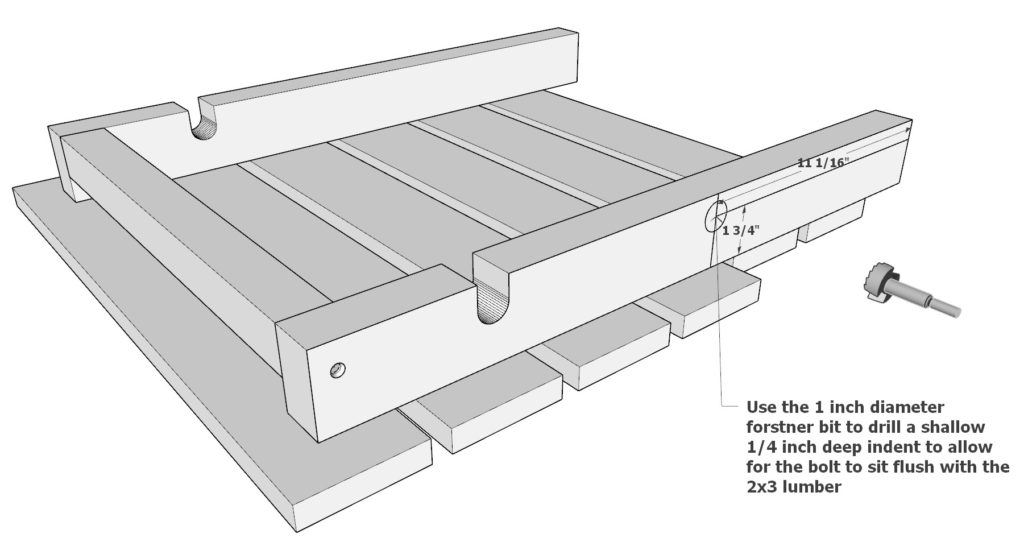
Step 7: Attach the Backrest Stopper to the Lounge Bed Backrest
Next, add the back rest stopper to the back rest of the lounge bed.
First, using a 1 inch diameter forstner drill bit, drill a shallow 1/4 inch deep hole to allow for the fastening bolt to sit flush with the 2×3 lumber back rest frame.
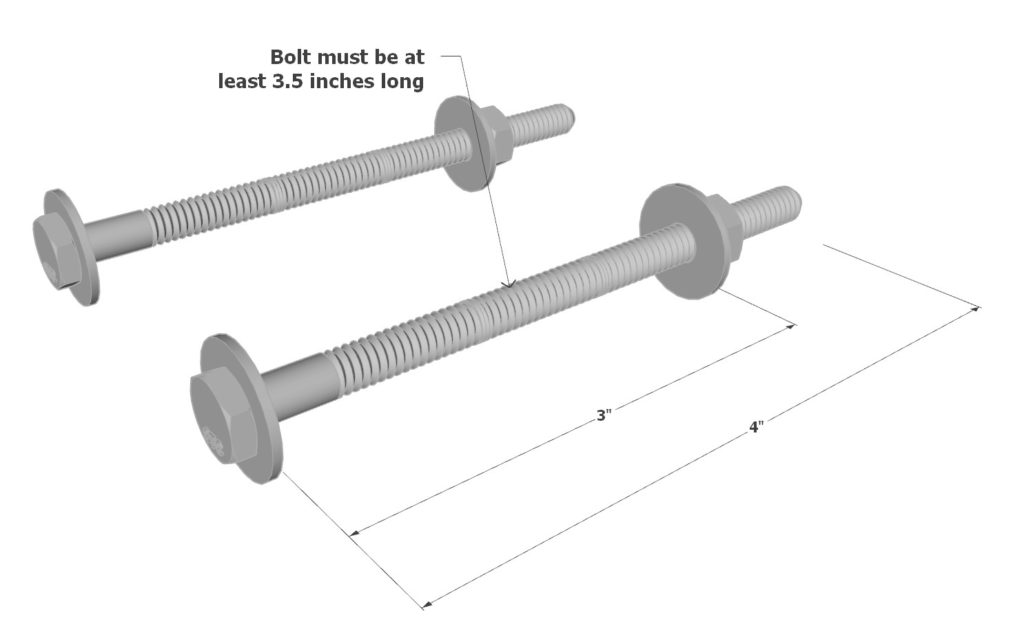
Use two bolts that are at least 3.5 inches long to secure the back rest stopper to the bed rest of the lounge bed.

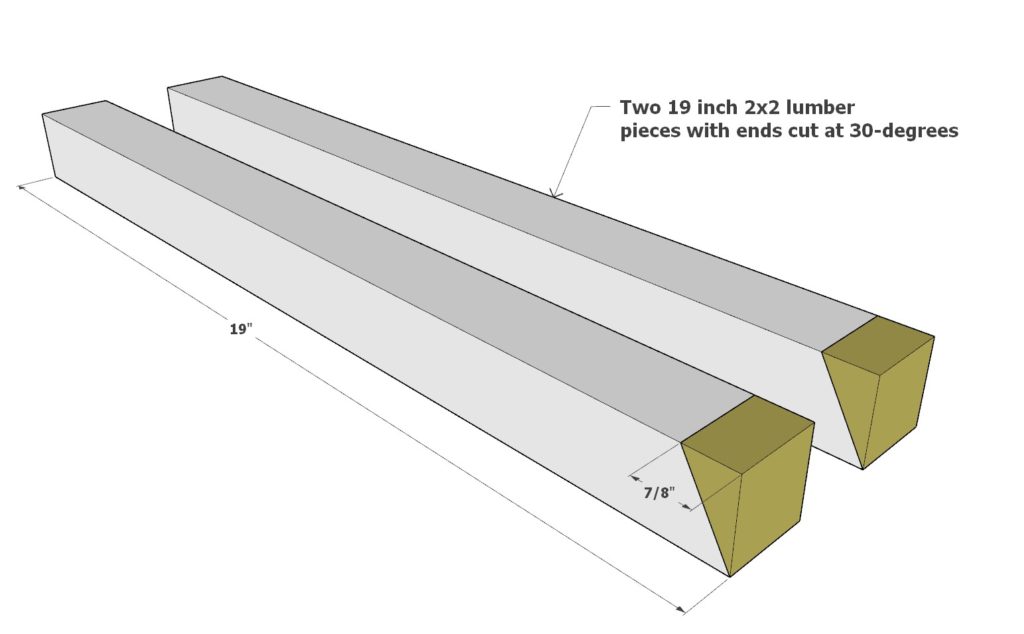
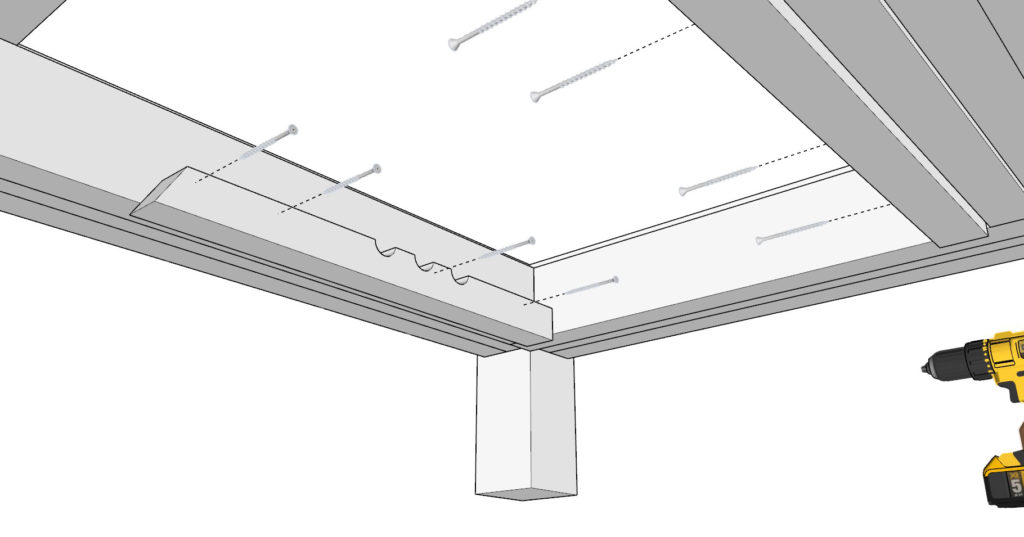
Step 8: Install Grooved Wooden Braces for Backrest Stopper Support
Next, add the grooved wooden lumber pieces to brace the back rest stopper.
Take two 19 inch 2×2 lumber pieces and cut off the ends at 30-degrees as shown below.
Next, put the two 2×2 lumber pieces together using clamps. Drill three holes using a 1 inch diameter forstner bit as shown below.
Add the two grooved wooden braces to the lounge frame as indicated below. Use glue and 3.5 inch screws.
Tip: You can drill more then 3 holes. The more holes, the more back rest settings. Keep in mind that holes drilled closer to the end of the 2×2 lumber pieces that are at 90-degree angle, will need to be cut deeper into the 2×2 lumber (otherwise the back rest may slip when being used).

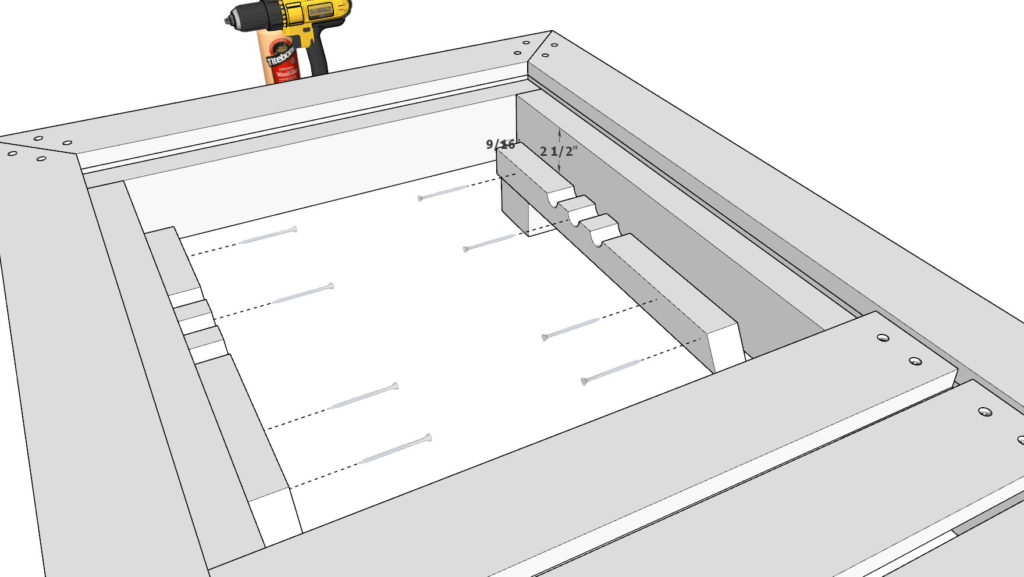
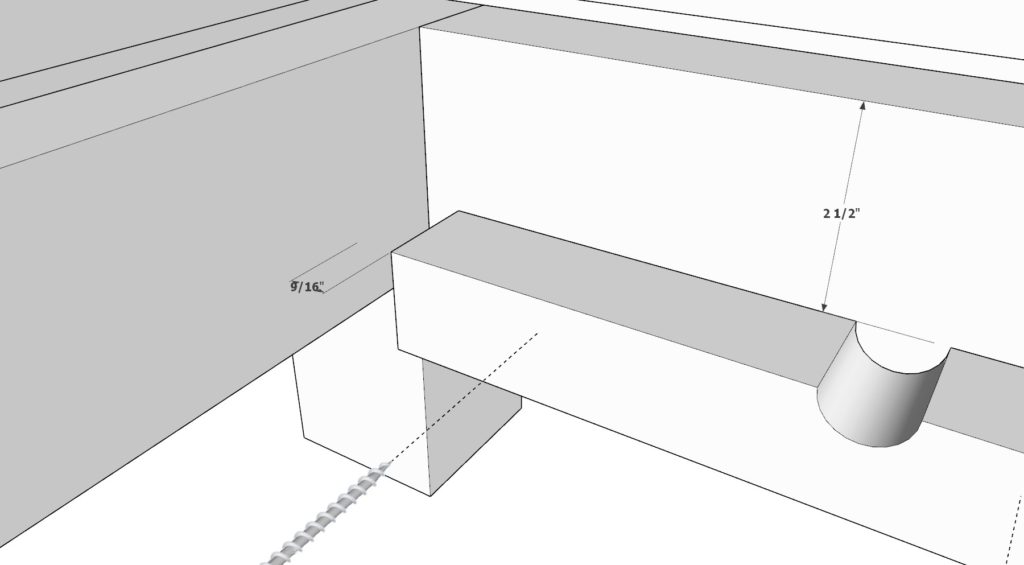
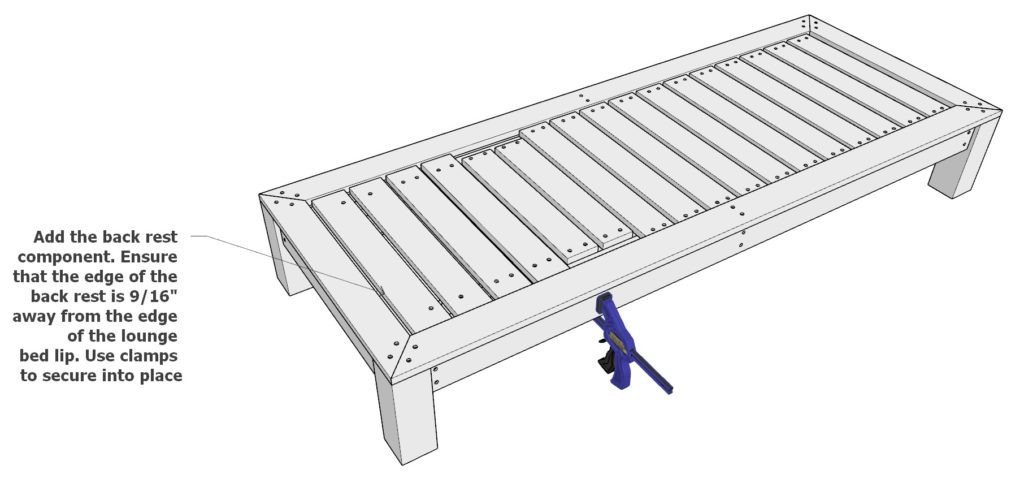
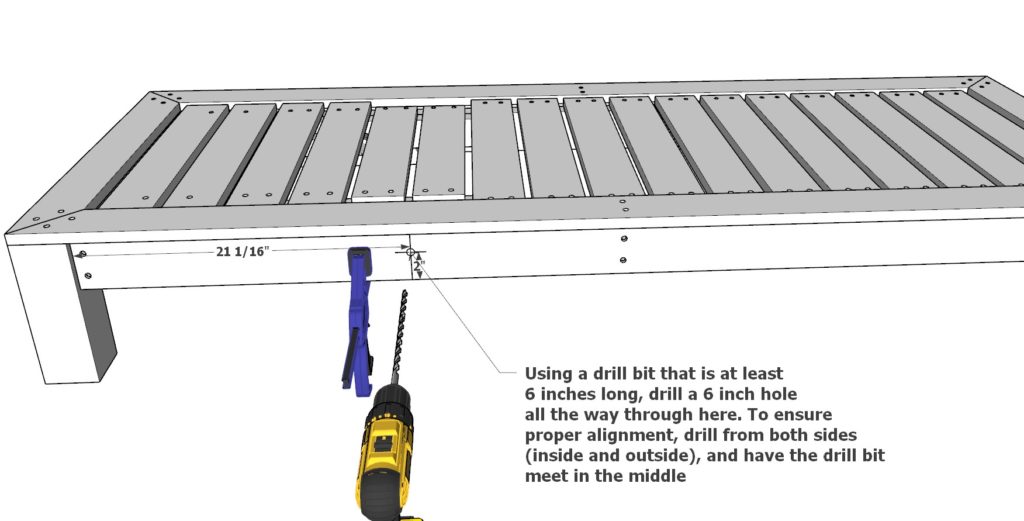
Step 9: Secure the Backrest Components to the Lounge Bed Frame
Next, secure the back rest components to the lounge chair bed
Add the back rest components to the lounge bed and ensure that the edge of the back rest is 9/16 inch away from the edge of the lounge bed lip. Use clamps to hold the back rest in place.
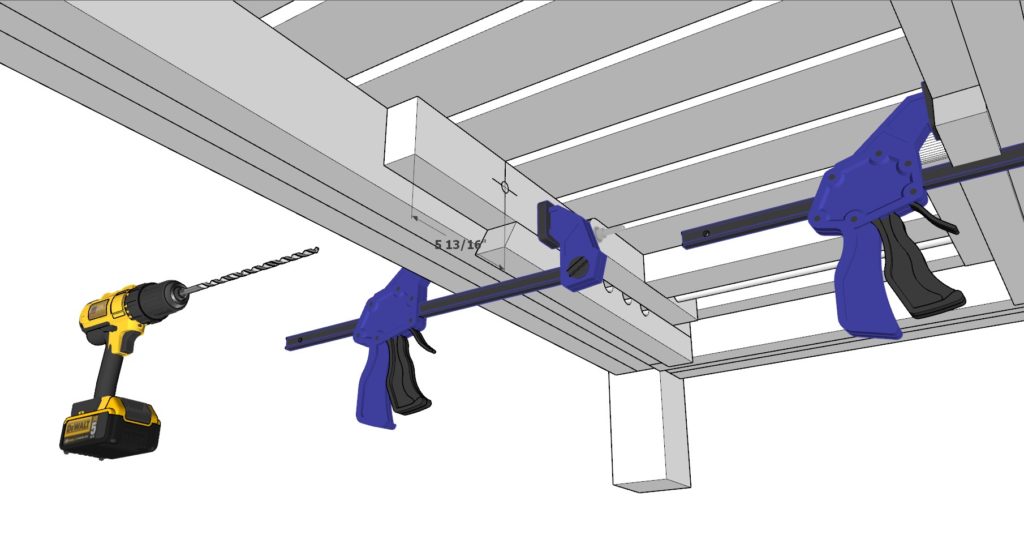
Use a long 6 inch drill bit to drill a hole all the way though the bed frame. To ensure that the proper alignment is achieved, drill from both sides (one side at a time) and have the drill bit meet in the middle.
Use six inch bolts to attach the back rest to the lounge bed.
Lastly, add four 1-1/2 inch long 1×4 lumber pieces to the lounge bed as shown below.


Staining Your Wooden Lounge Bed: A Step-by-Step Guide
Achieving a professional and even finish on your wooden lounge bed requires careful preparation and staining. Follow these painstakingly detailed steps to ensure your lounge bed not only looks stunning but is also protected from the elements.
Sanding: Begin by sanding the entire surface of the lounge bed, starting with a lower grit sandpaper (80 to 100 grit) to remove any rough spots, marks, or imperfections. Progress to a medium grit (120 to 150 grit) and finish with a fine grit (180 to 220 grit) for a smooth surface. Remember to sand in the direction of the wood grain to avoid scratches.
Cleaning: After sanding, use a vacuum or a soft brush to remove all dust and debris from the surface. Follow up with a tack cloth or a slightly damp cloth to pick up any remaining particles. Make sure the lounge bed is completely dry before proceeding to the next step.
Wood Conditioner (Optional): If you’re working with a softwood, like pine or cedar, applying a wood conditioner can help achieve a more even stain. Follow the manufacturer’s instructions for application and drying time.
Testing the Stain: Before applying the stain to the entire lounge bed, test a small, inconspicuous area to ensure you’re satisfied with the color and finish. Allow the test area to dry completely before evaluating the result.
Applying the Stain: Using a brush, foam applicator, or clean cloth, apply the stain in the direction of the wood grain. Work in manageable sections to ensure even coverage. Allow the stain to penetrate the wood for the recommended time (usually 5 to 15 minutes) before wiping away any excess with a clean cloth.
Additional Coats (Optional): If you desire a darker color or richer finish, apply additional coats of stain, allowing each coat to dry as per the manufacturer’s recommendations before applying the next one. Remember to test the additional coats on your test area first.
Sealing: Once the stain has dried completely (typically 24 hours), apply a clear wood sealer or topcoat to protect your lounge bed from moisture, UV rays, and daily wear. Choose an appropriate product based on your desired finish (e.g., matte, satin, or glossy). Apply the sealer following the manufacturer’s instructions and allow it to dry completely before using your lounge bed.
Painting Your Wooden Lounge Bed for a Pop of Color
Sanding: Begin by sanding the entire surface of the lounge bed using the same process as described in the staining section. Start with a lower grit sandpaper and progress to a fine grit for a smooth surface.
Cleaning: Remove all dust and debris using a vacuum or soft brush, followed by a tack cloth or a slightly damp cloth. Ensure the lounge bed is completely dry before proceeding.
Priming: Apply a high-quality, stain-blocking primer to the entire surface of the lounge bed. Priming helps to create a smooth, even base for the paint and increases its adhesion, preventing peeling or chipping. Follow the manufacturer’s instructions for application and drying time.
Painting: Choose a high-quality exterior paint suitable for wooden surfaces. Use a brush, roller, or paint sprayer to apply the paint in thin, even coats, following the direction of the wood grain. Allow the first coat to dry as per the manufacturer’s recommendations before applying the second coat. Two to three coats are typically required for full coverage and optimal durability.
Sanding Between Coats (Optional): For an ultra-smooth finish, you may lightly sand the surface with a fine grit sandpaper (220 to 320 grit) between coats. Be sure to remove any dust and debris with a tack cloth or slightly damp cloth before applying the next coat of paint.
Finishing Touches: Inspect the painted surface for any uneven spots or drips. If necessary, lightly sand these areas and touch up with paint. Allow the paint to dry completely before proceeding.
Sealing (Optional): Although most exterior paints provide adequate protection, you may choose to apply a clear, water-based polyurethane sealer for added durability and weather resistance. Follow the manufacturer’s instructions for application and drying time. Keep in mind that adding a sealer may alter the sheen of the paint, so choose a product with a compatible finish (e.g., matte, satin, or glossy).
Reassembly and Curing: Once the paint and sealer (if used) have dried completely, reassemble your lounge bed, taking care not to scratch or damage the painted surface. Allow the paint to cure for the recommended time, usually 7 to 14 days, before subjecting your lounge bed to heavy use or exposure to moisture.
By following these detailed and methodical steps, you’ll achieve a professional, eye-catching finish on your wooden lounge bed. Whether you choose to stain or paint, the end result will be a stunning, durable piece of outdoor furniture that will provide comfort, style, and functionality for years to come.
Ideas for Styling and Accessorizing Your Lounge Bed
Once you’ve built your beautiful and comfortable wooden lounge bed, it’s time to add some personal touches to create a truly inviting and cozy outdoor oasis. Here are some ideas for styling and accessorizing your lounge bed to make it uniquely yours:
Cushions and Pillows: Choose comfortable and weather-resistant cushions in colors and patterns that match your personal style and outdoor decor. Add an assortment of throw pillows to create a plush and inviting space. Consider mixing and matching different patterns and textures for a more dynamic look.
Outdoor Rugs: An outdoor rug under your lounge bed can help define the space and add an extra layer of comfort. Look for rugs made from durable materials that can withstand outdoor conditions, such as polypropylene or recycled plastic.
Blankets and Throws: Keep a few cozy blankets and throws on hand for chilly evenings. Choose lightweight, quick-drying fabrics that can be easily washed and dried.
Side Tables: A small side table or two can provide a convenient spot for drinks, snacks, and other essentials. Look for tables that complement your lounge bed’s design and materials.
Ambient Lighting: Add some soft, ambient lighting to create a relaxing atmosphere for your lounge bed area. String lights, lanterns, or solar-powered garden lights can provide the perfect amount of illumination without overpowering the space.
Plants and Greenery: Surround your lounge bed with potted plants, hanging planters, or a vertical garden to create a lush, natural environment. Choose low-maintenance plants that thrive in your climate and consider adding some fragrant flowers or herbs for an extra sensory experience.
Privacy Solutions: If your lounge bed is located in a more exposed area, consider adding privacy screens, curtains, or trellises with climbing plants to create a more secluded and intimate atmosphere.
Umbrellas and Shade Solutions: Protect yourself from the sun with a stylish umbrella or shade sail that complements your lounge bed design. Choose a durable and UV-resistant fabric to ensure long-lasting protection.
Personal Touches: Add unique and personal touches to your lounge bed area with decorative items like outdoor sculptures, wind chimes, or a small water feature. These elements can make your space feel more welcoming and reflect your personality.
By incorporating these styling and accessorizing ideas, you can create a personalized, inviting, and relaxing space around your DIY lounge bed that you and your guests will enjoy for years to come.