Introduction
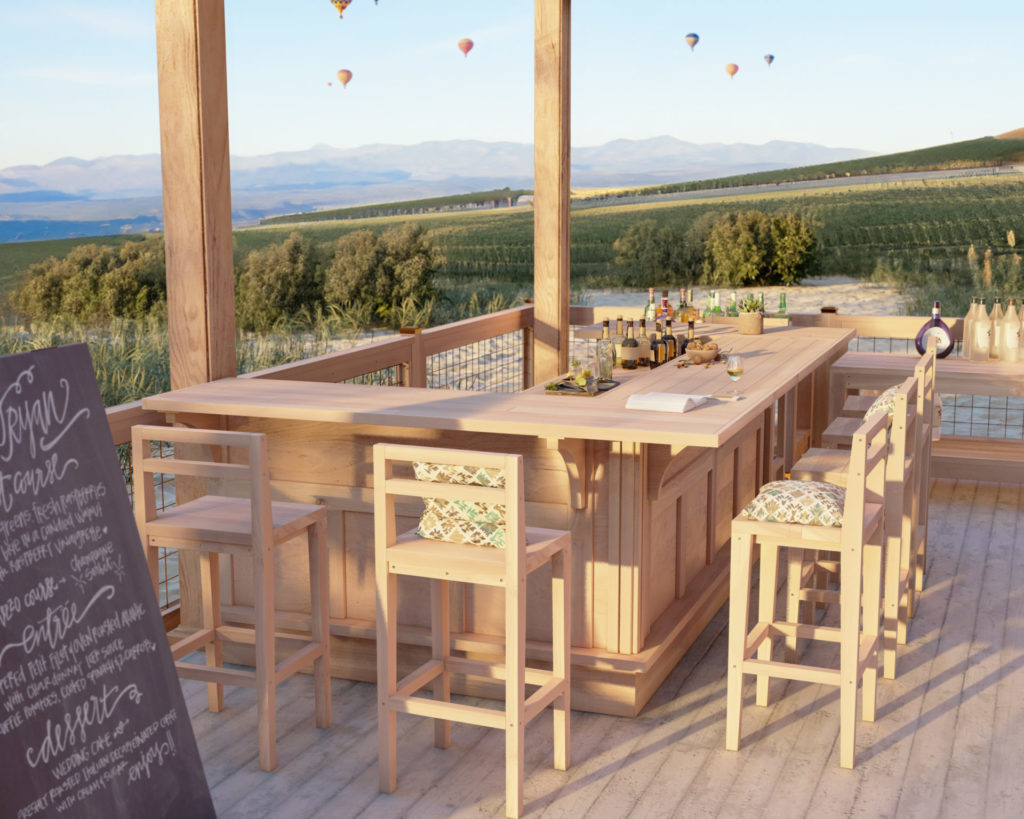
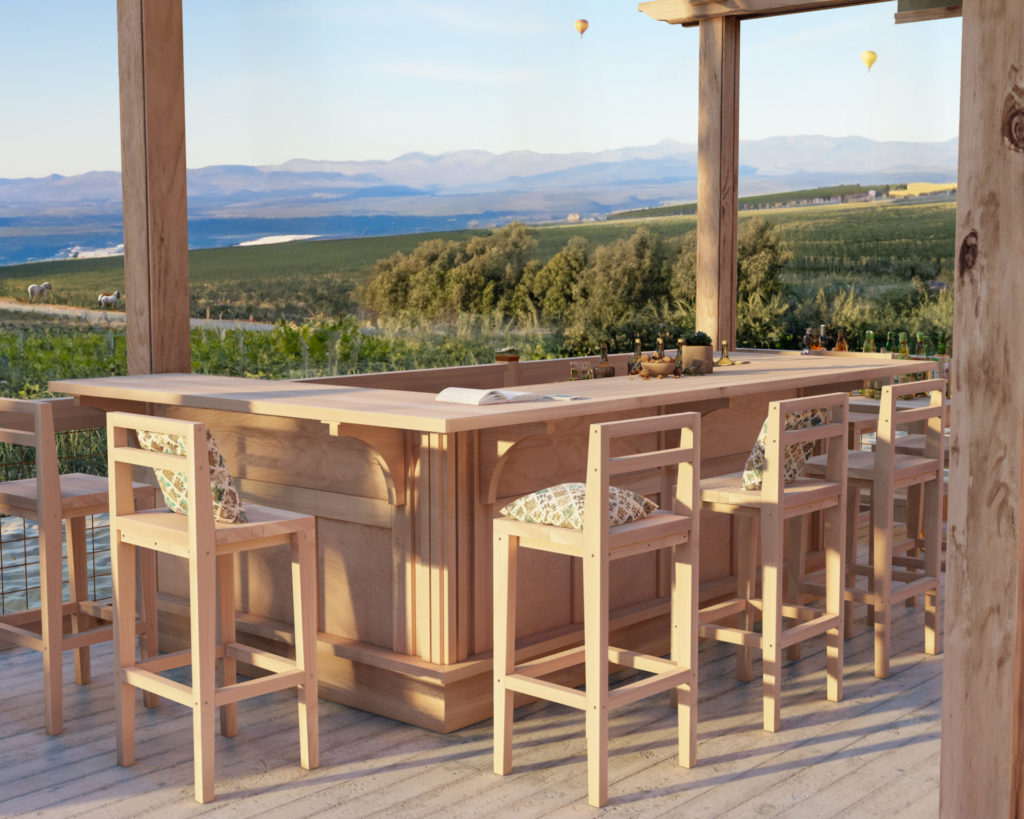
In the age of customization and personal touch, nothing resonates more than crafting something with your own hands. Experience the thrill of creation with our DIY U-shaped bar, a testament to modern design that promises both form and function, elevating any entertainment space.
The Vision Behind the Bar Design
Every creation has a story, a driving force. The U-shaped bar is inspired by the desire for communal experiences and designed with practical benefits. In a world where connections matter, this design ensures everyone has a seat at the bar, promising unique functional advantages and making it a true conversation starter.
Key Features of the Bar
Beyond its shape, the bar stands out for several reasons:
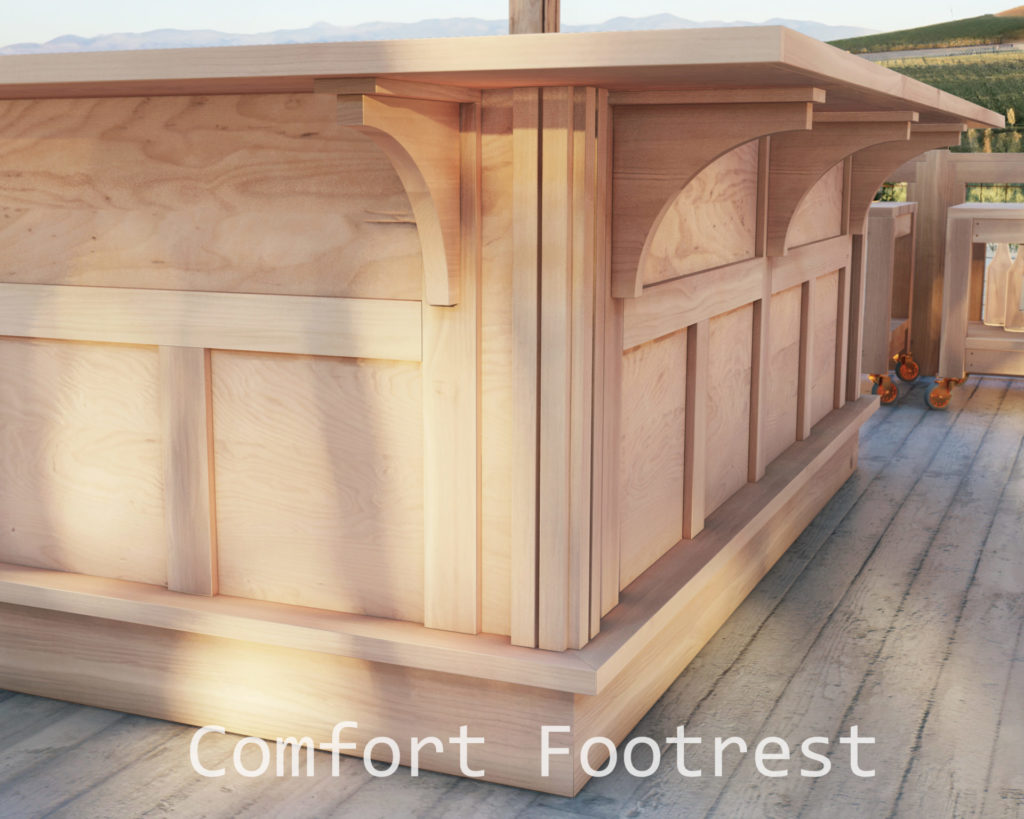
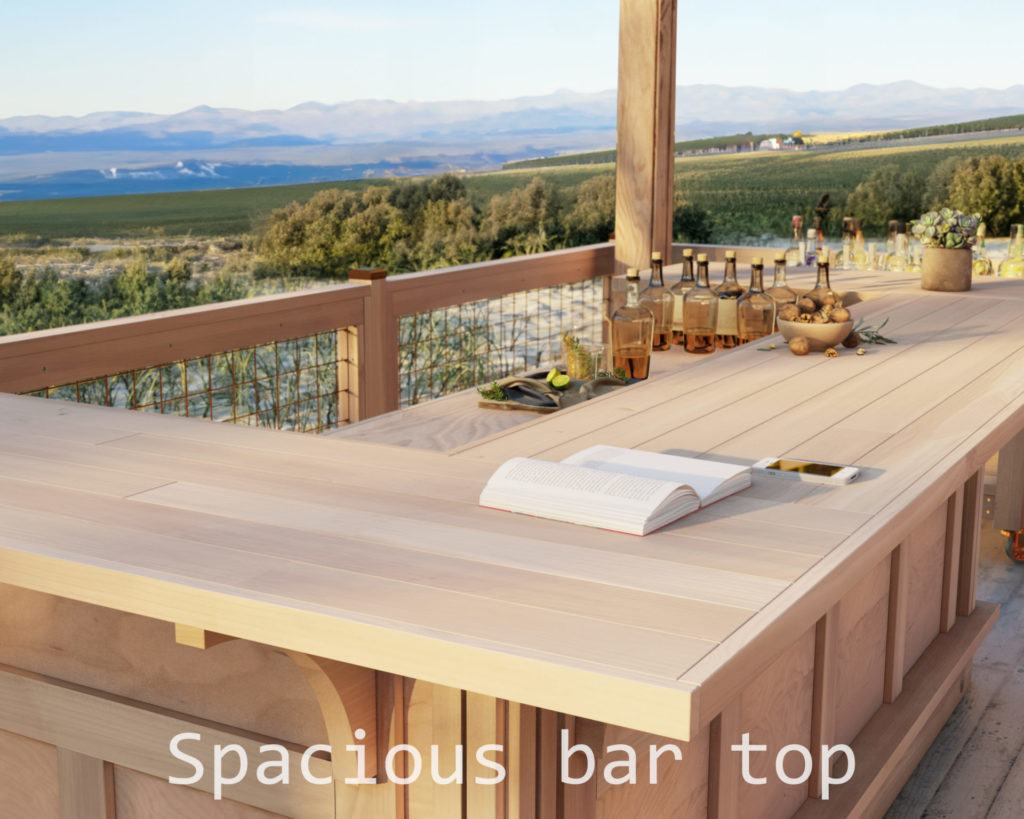
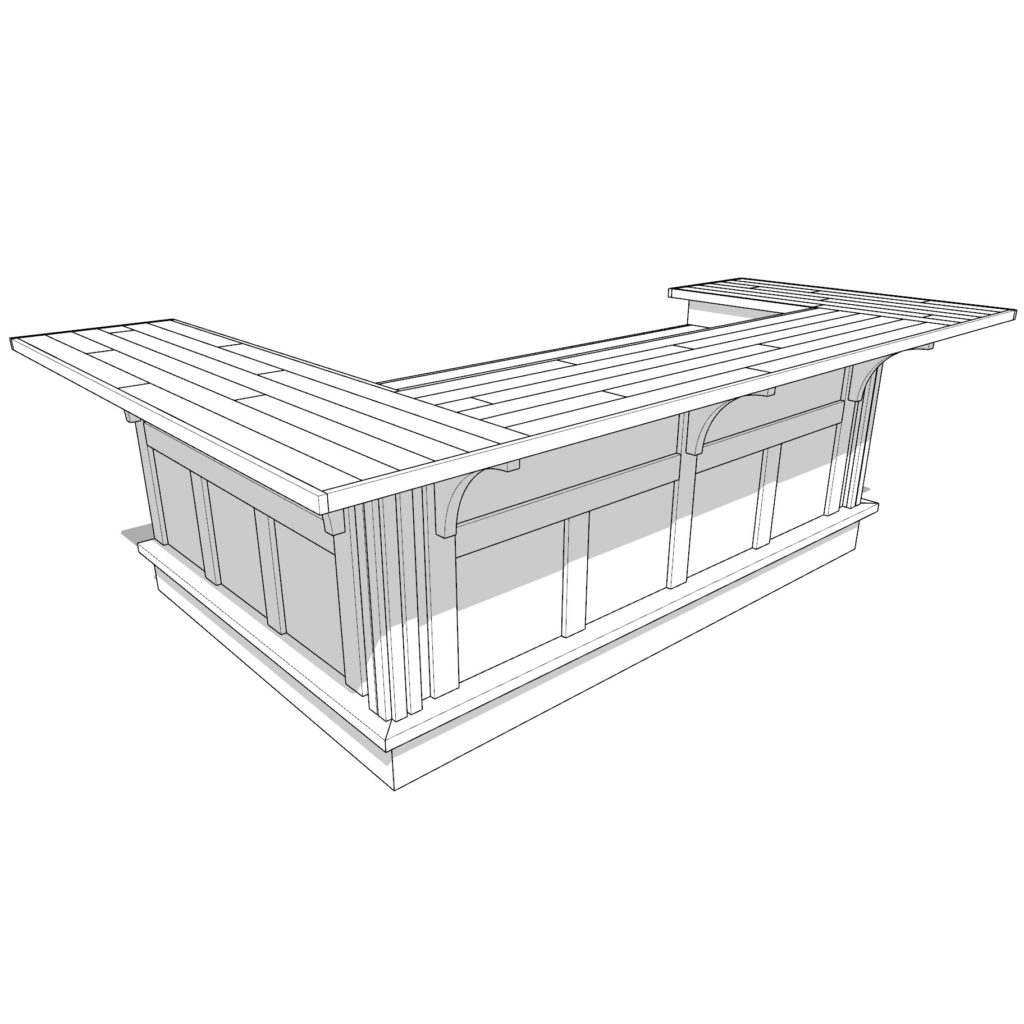
- Comfort: An overhang ensures guests can comfortably lean, chat, or dine.
- Stability: Reinforced bar top guarantees durability.
- Aesthetics: Decorative trim accentuates the bar’s elegance.
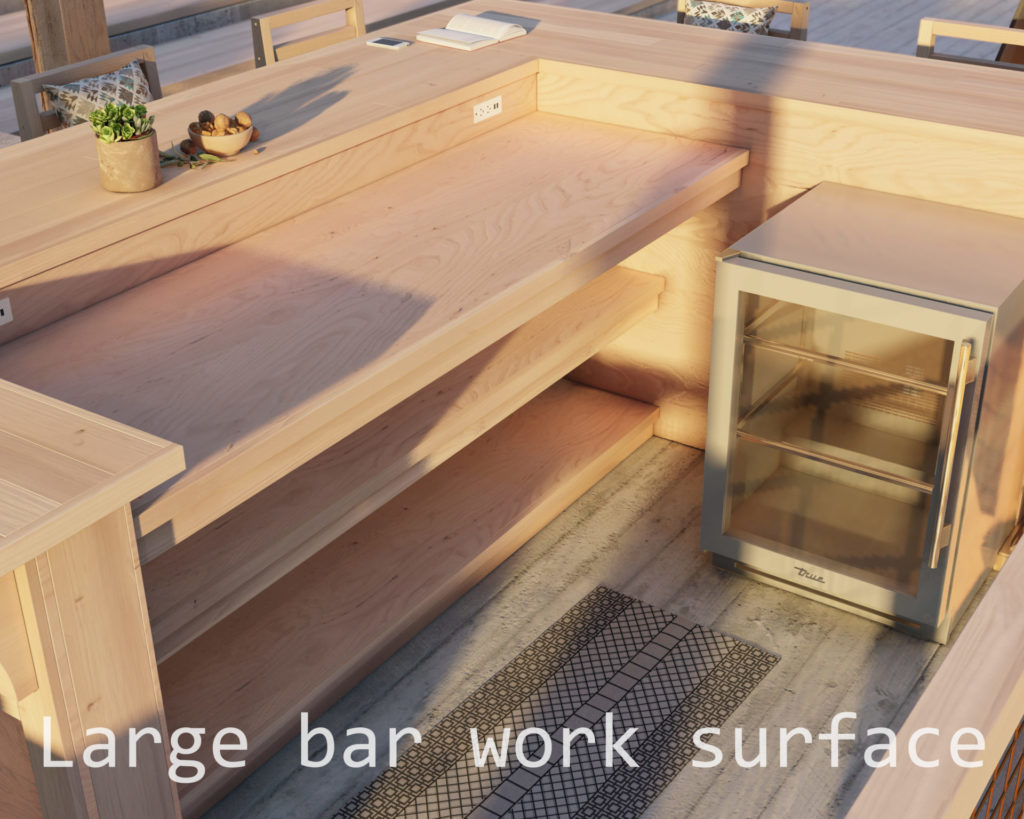
- Functionality: Ample shelving, a vast work surface, dedicated outlets, and cooling zones.
Designed for All Skill Levels
While its features scream sophistication, this beginner-friendly DIY U-shaped bar welcomes all, from novice woodworkers to seasoned craftsmen, offering a fulfilling building experience.
Benefits of Building the Bar
Why invest time and energy in this project? The benefits are manifold:
- Personal Pride: The joy of sipping a drink at a self-built bar.
- Economical: DIY bar benefits include significant cost savings over buying pre-made.
- Tailored to You: Customize to reflect your style.
Why Purchase the DIY Plan?
Our comprehensive DIY plan isn’t just a set of instructions. It’s a holistic guide, ensuring every step feels natural. Added maintenance tips and finishing insights ensure your bar is built to impress and last. Get your DIY plan today and embark on this crafting journey.
Conclusion
Crafting is more than just building. It’s an expression of self. As you consider this DIY venture, imagine a space that mirrors you, where memories are crafted, stories shared, and connections deepened. Our DIY U-shaped bar plan promises simplicity and an outcome worth cherishing.
Time
Several days (varies with experience)
Cost
$750 Costs may vary based on location and supplier.)
Skill level required
Beginner
DIY Bar PDF Plan
What is included in the PDF download?
- Easy to read step by step instructions
- Material list
- Tools needed
- Helpful links to materials and tools needed
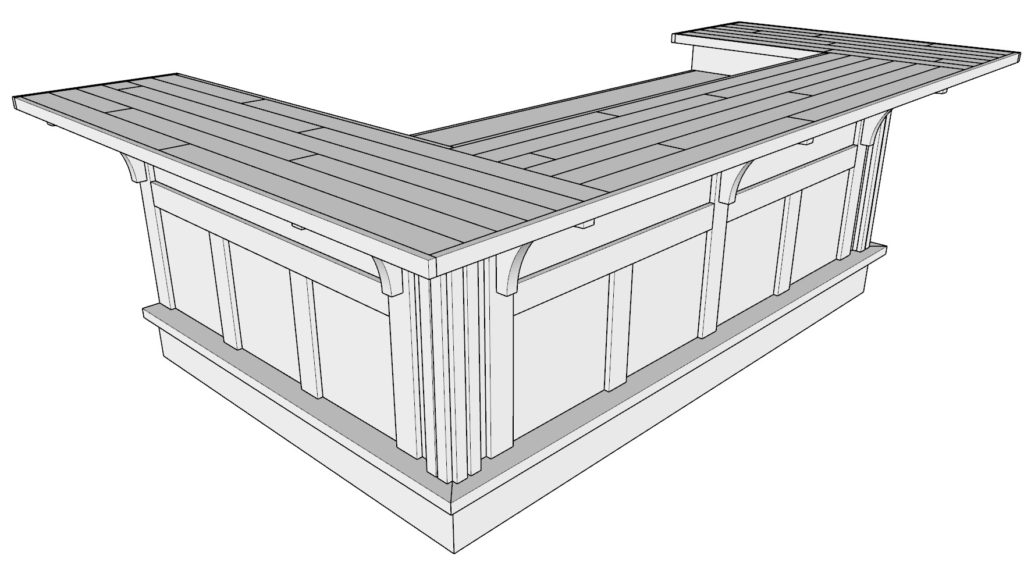
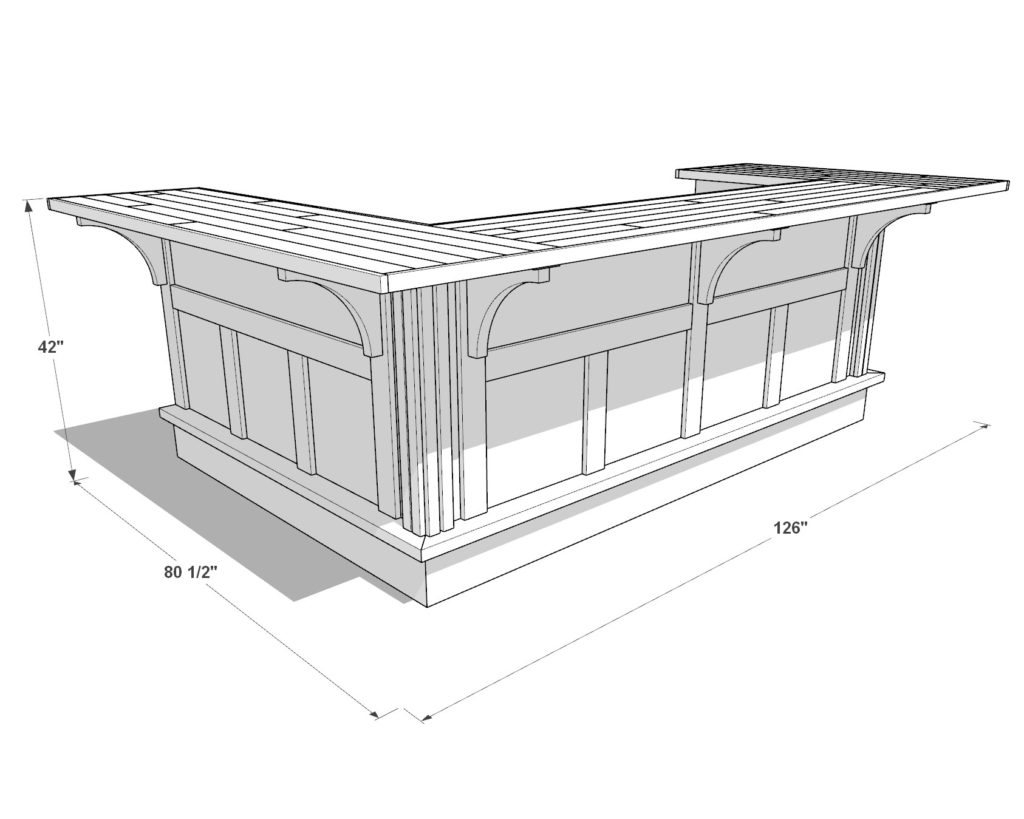
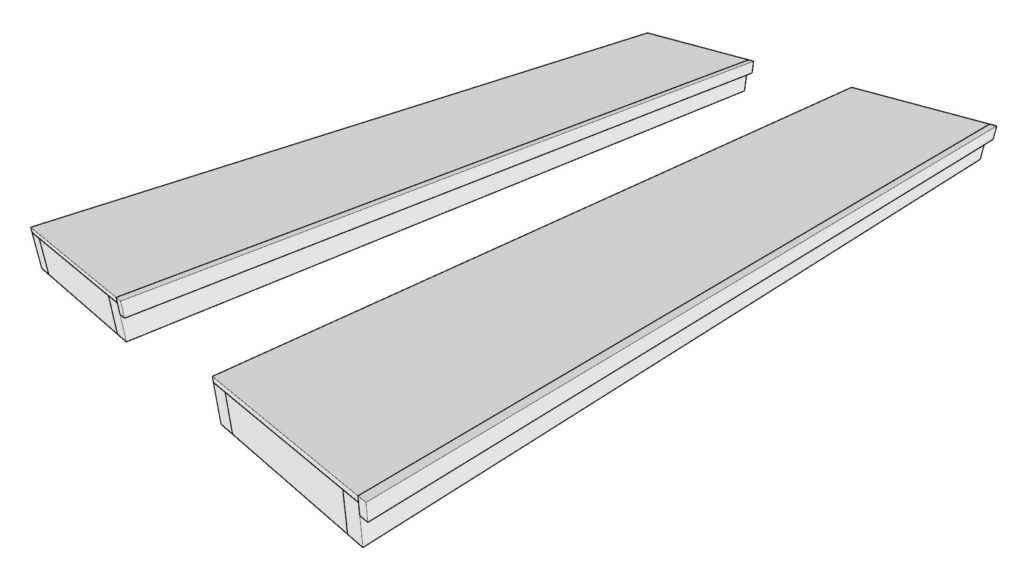
DIY Bar Dimensions
Tools Needed for This Project:
Available with the purchase of the DIY plan PDF.
Lumber Shopping & Cut List
Available with the purchase of the DIY plan PDF.
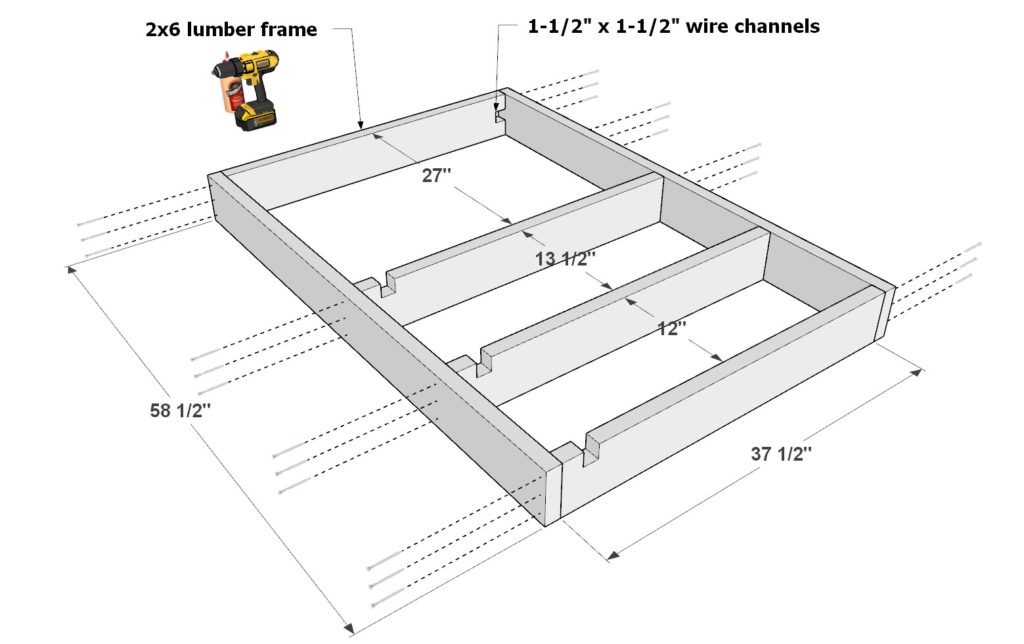
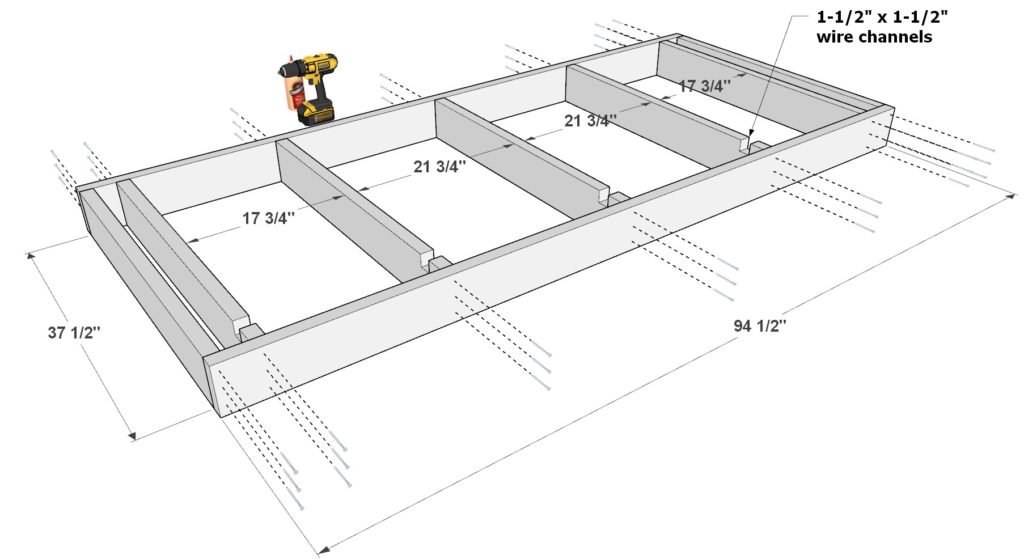
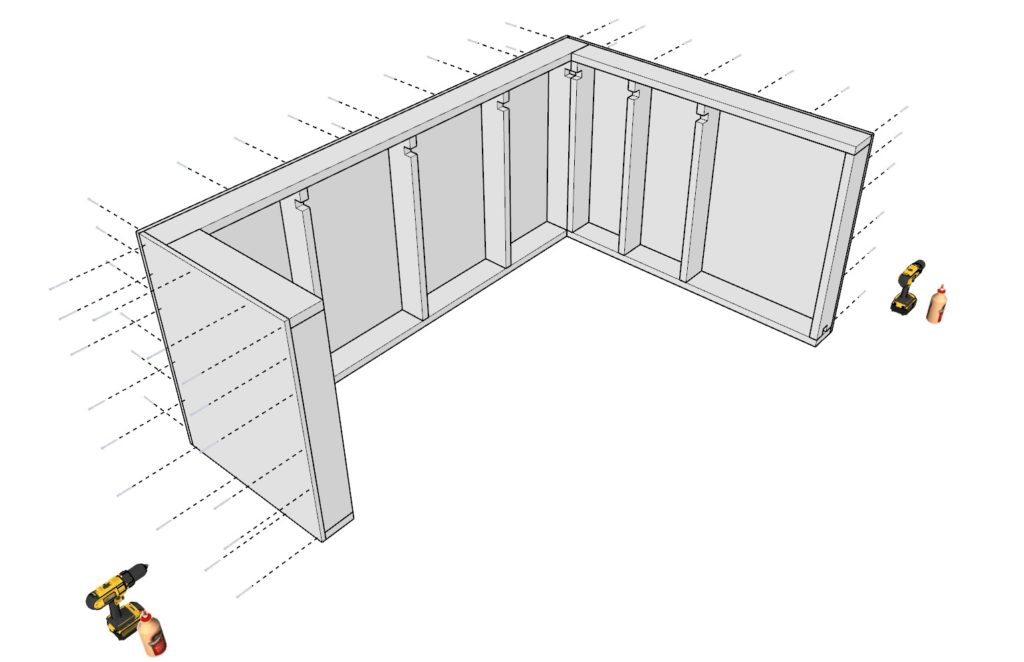
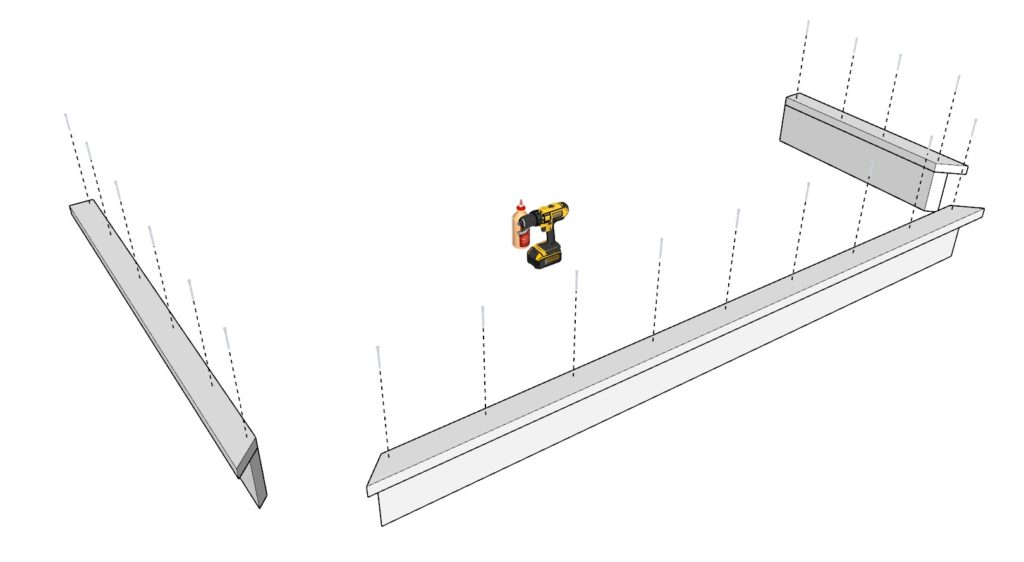
Step 1: Constructing the Bar Frame
1.1 Building the First Side of the Frame
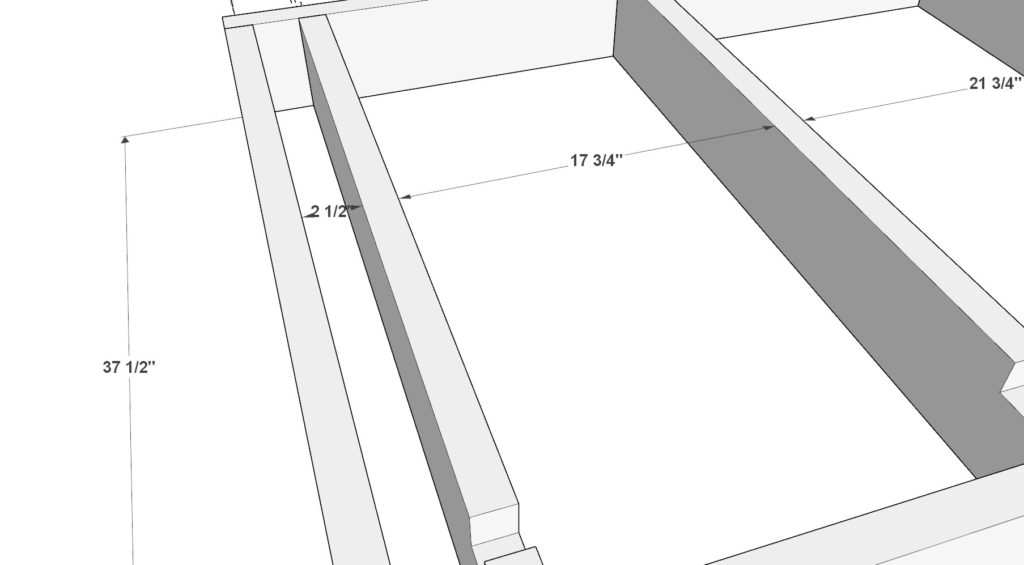
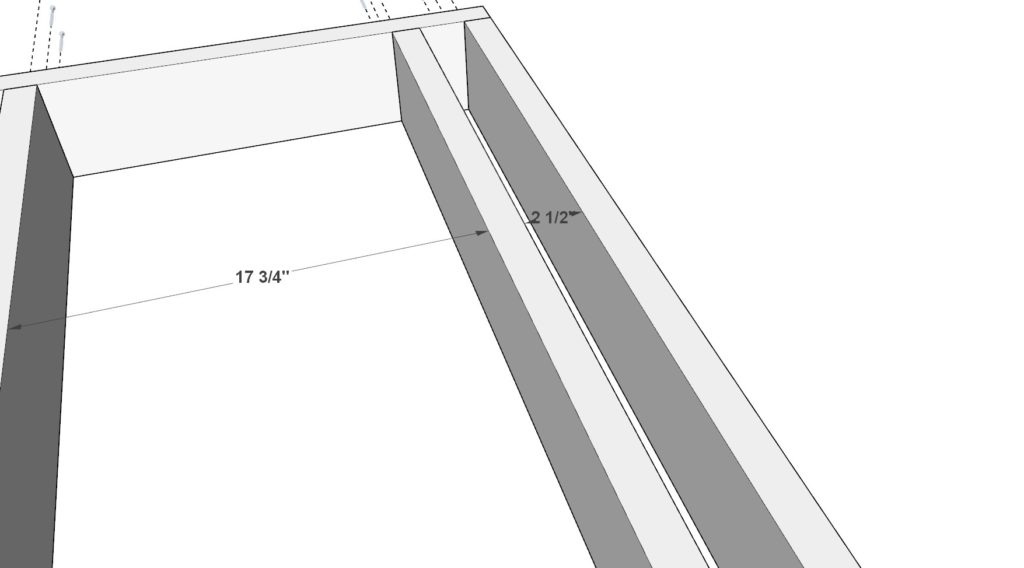
- Start with the frame’s foundation using 2×6 lumber pieces.
- Gather four 37-1/2 inch 2×6 lumber pieces and two 58-1/2 inch 2×6 lumber pieces.
- Lay them out as illustrated in Diagram 1.
- Before screwing them together, predrill with a countersink drill bit to prevent the wood from splitting.
- Use wood glue and 3.5-inch screws to bond the lumber pieces securely.
- Remember to carve four 1-1/2″ x 1-1/2″ wire channels or notches for outlet wiring. As an alternative, drilling holes for wire passage is also an option.
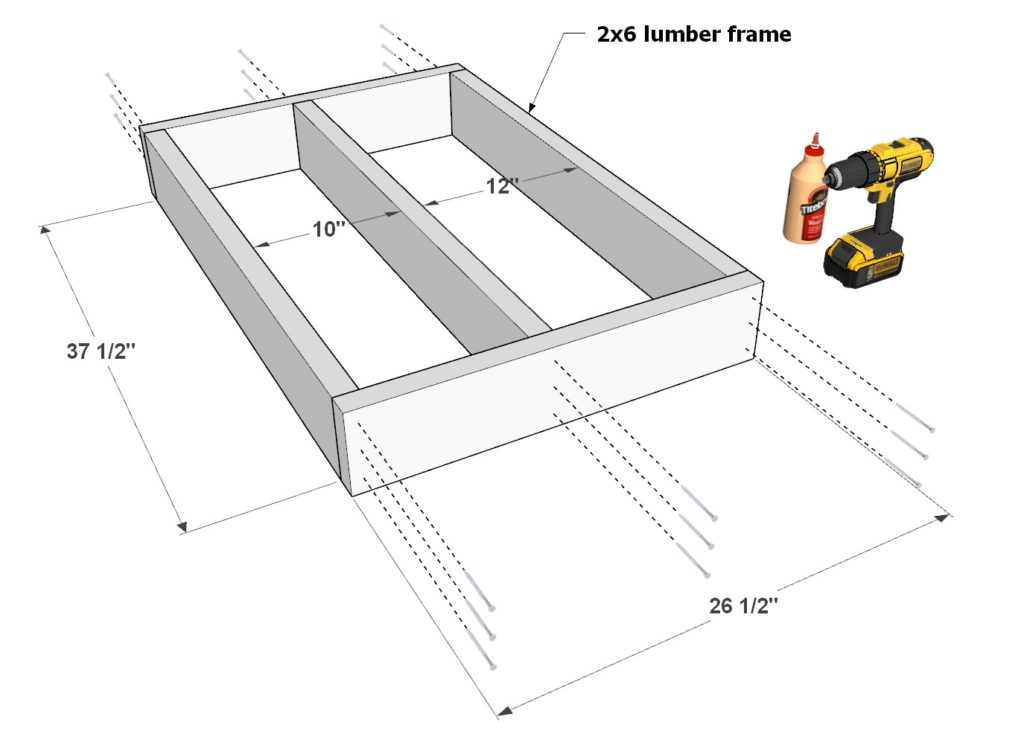
1.2 Assembling the Opposite Side of the Frame
- For the opposite side, procure two 26-1/2 inch 2×6 lumber pieces and three 37-1/2 inch 2×6 lumber pieces.
- Position them as indicated in Diagram 2.
- Use wood glue and 3.5-inch screws for bonding, ensuring you’ve predrilled to avoid wood damage.
1.3 Crafting the Front Frame Piece
- This is the most extensive frame section.
- Combine two 94-1/2 inch 2×6 lumber pieces with seven 37-1/2 inch 2×6 lumber pieces.
- Introduce wire channels or notches as demonstrated in the relevant diagram.
- Follow the spacing guidelines in the diagrams for accurate alignment.
- Affix everything securely using wood glue and 3.5-inch screws.
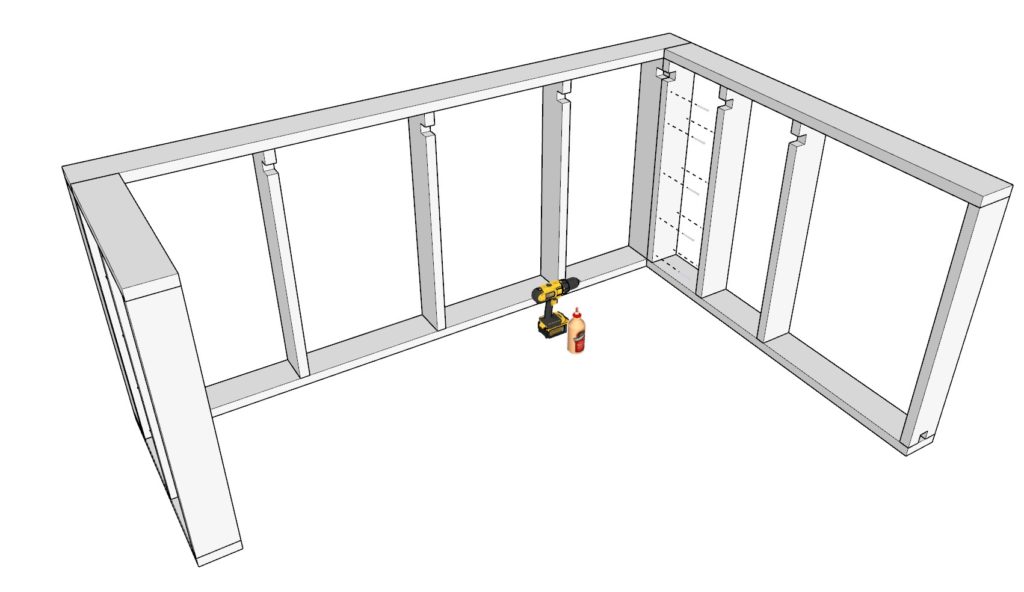
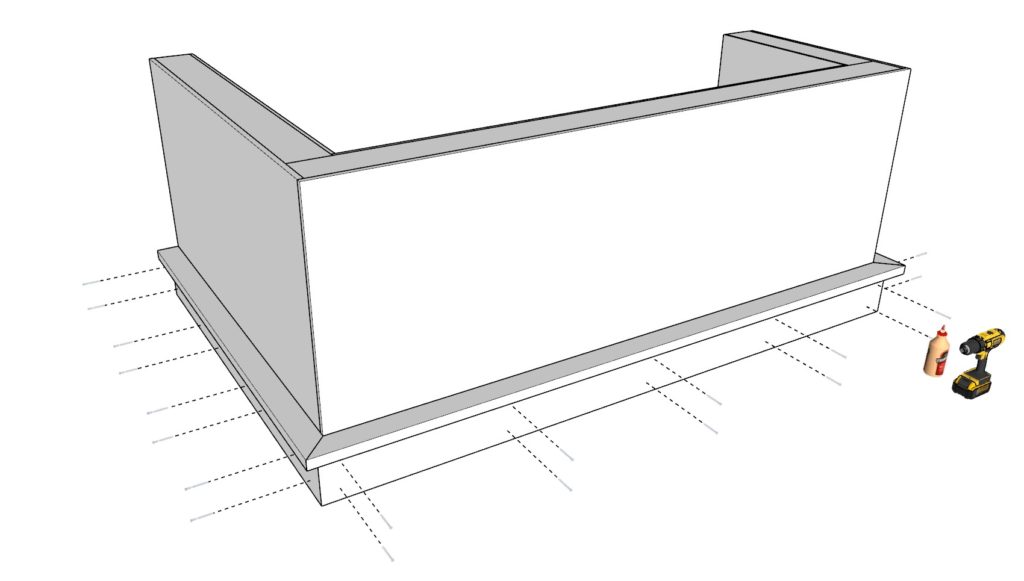
1.4 Erecting the Framework
- Once the individual sections are ready, stand them upright.
- Intertwine and attach them together, using wood glue and 3.5-inch screws, to shape the bar’s skeletal structure.
Tip: Always use a countersink drill bit while predrilling to ensure the wood doesn’t split, leading to a smoother and safer construction experience.

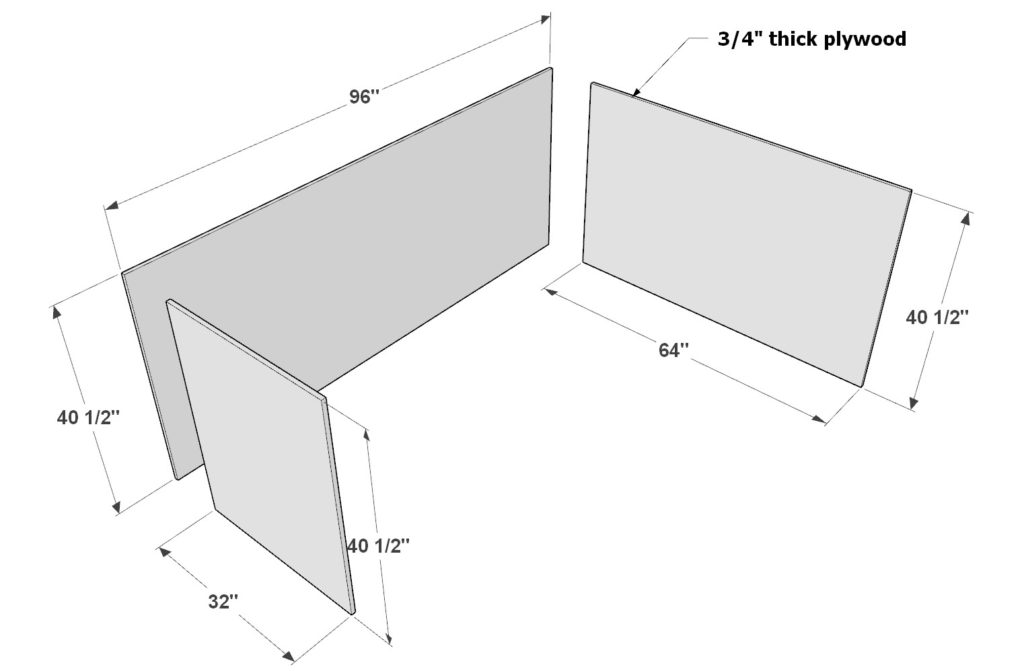
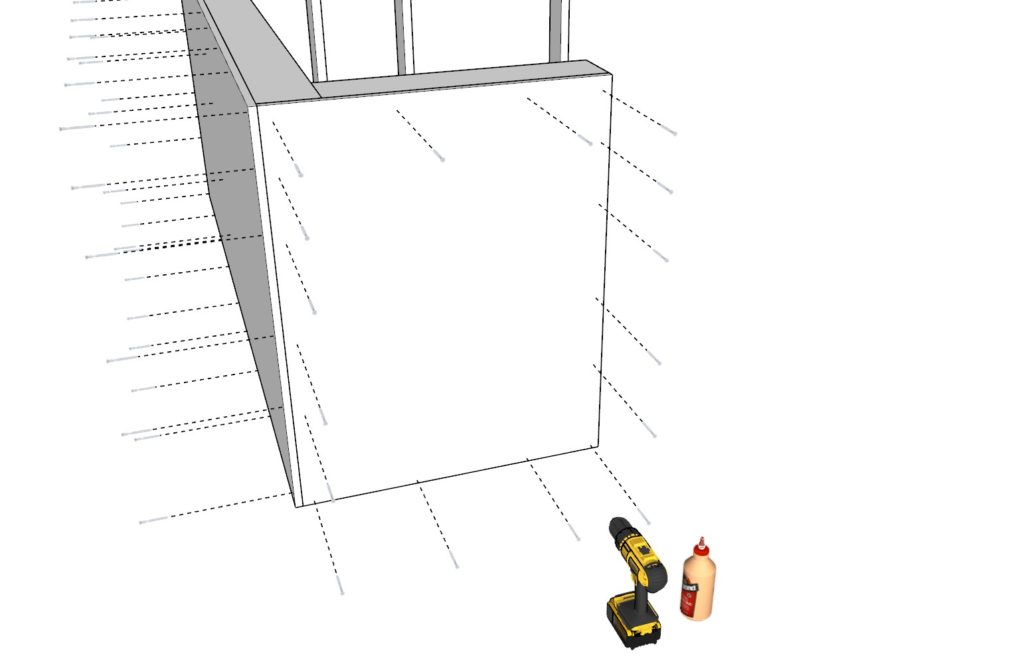
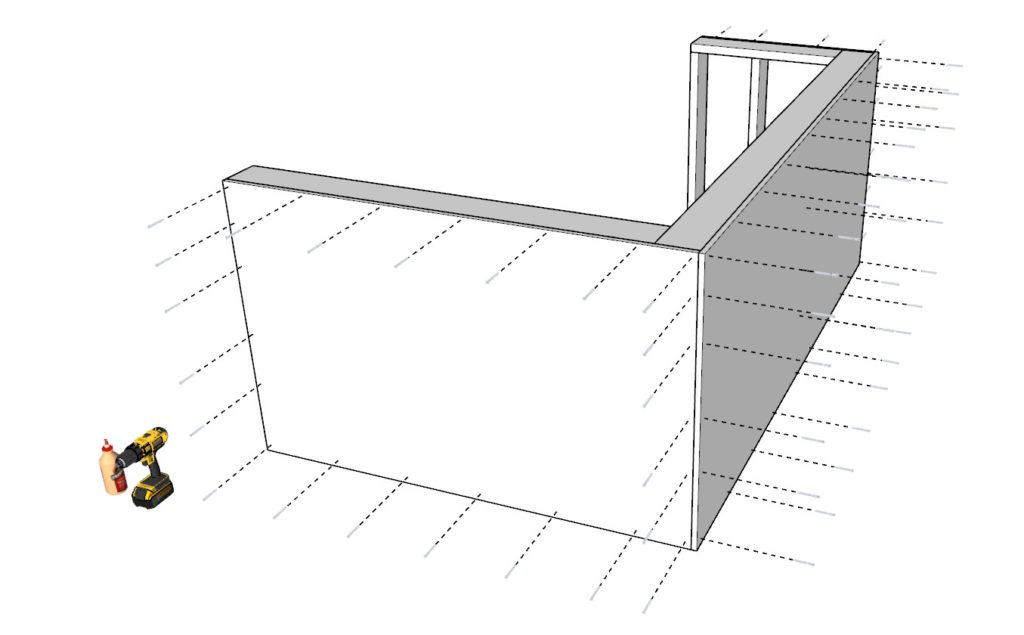
Step 2: Installing Plywood Faces & Electrical Outlets
2.1 Adding the Exterior Plywood Face
- Begin with the exterior of the bar.
- Obtain the following plywood sheets, all 3/4″ thick:
- 96 inch x 40-1/2 inch
- 32 inch x 40-1/2 inch
- 64 inch x 40-1/2 inch
- Align them onto the bar’s skeletal frame as illustrated.
- Secure the plywood sheets using screws that are at least 1.5 inches long. The screw placement pattern provided in the diagrams ensures the screws will be concealed by trim pieces later, offering a seamless look.
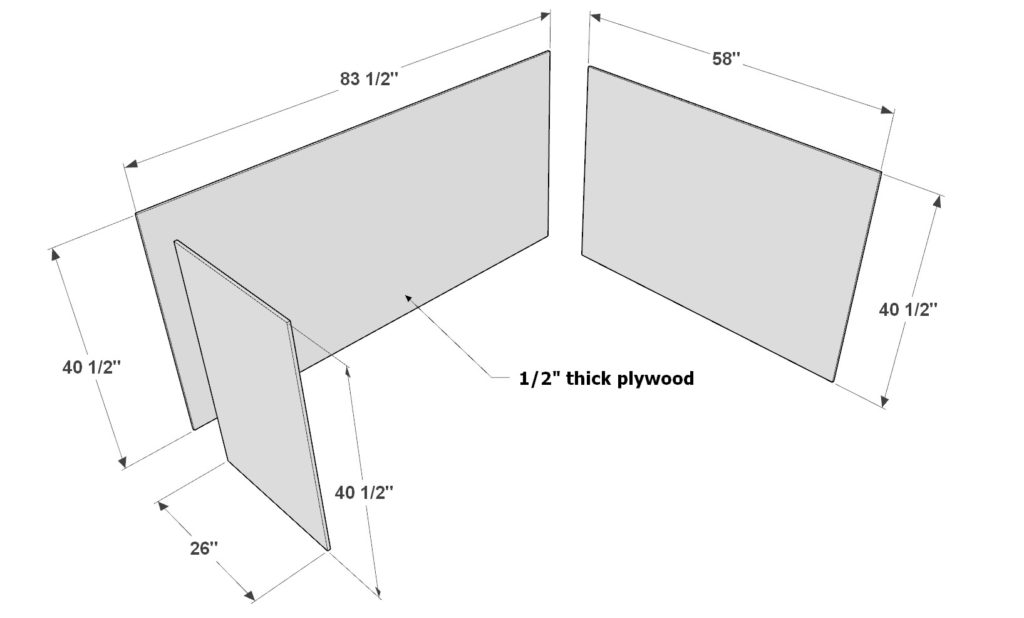
2.2 Installing the Interior Plywood
- Now, focus on the bar’s inner section.
- You’ll need the following plywood sheets, all 1/2″ thick:
- 83-1/2 inch x 40-1/2 inch
- 26 inch x 40-1/2 inch
- 58 inch x 40-1/2 inch
- Fit them to the interior side of the bar frame.
- Use 1-inch pin nails and glue for a firm attachment.
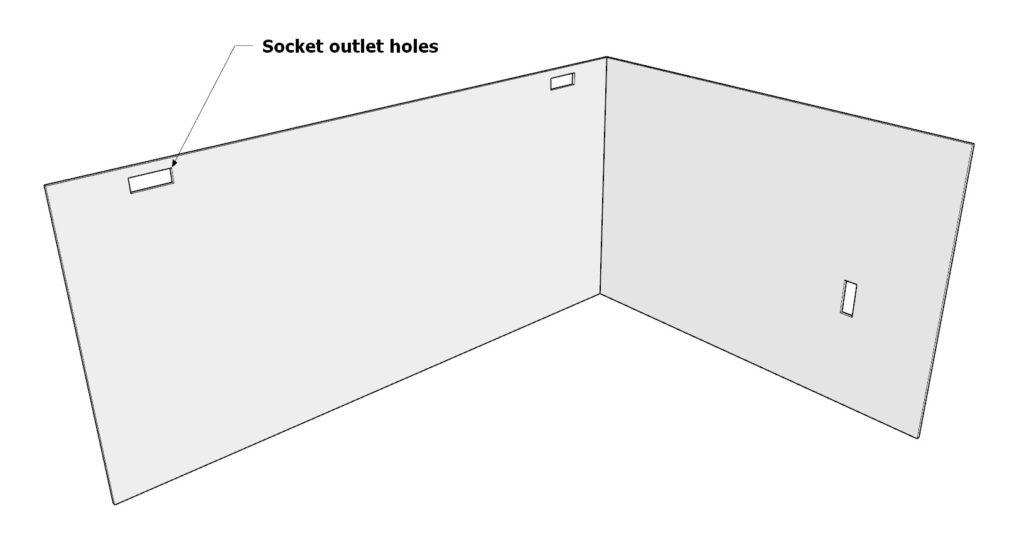
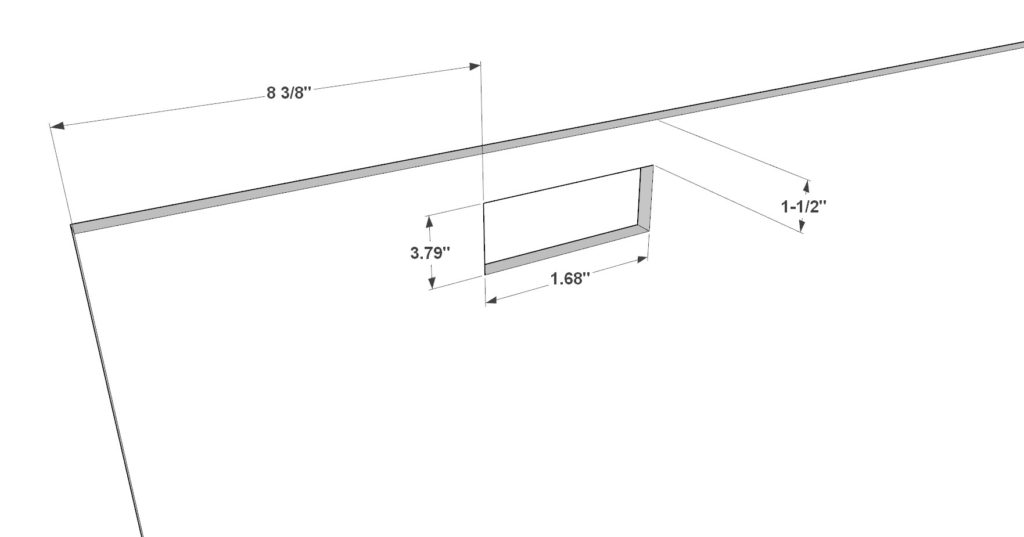
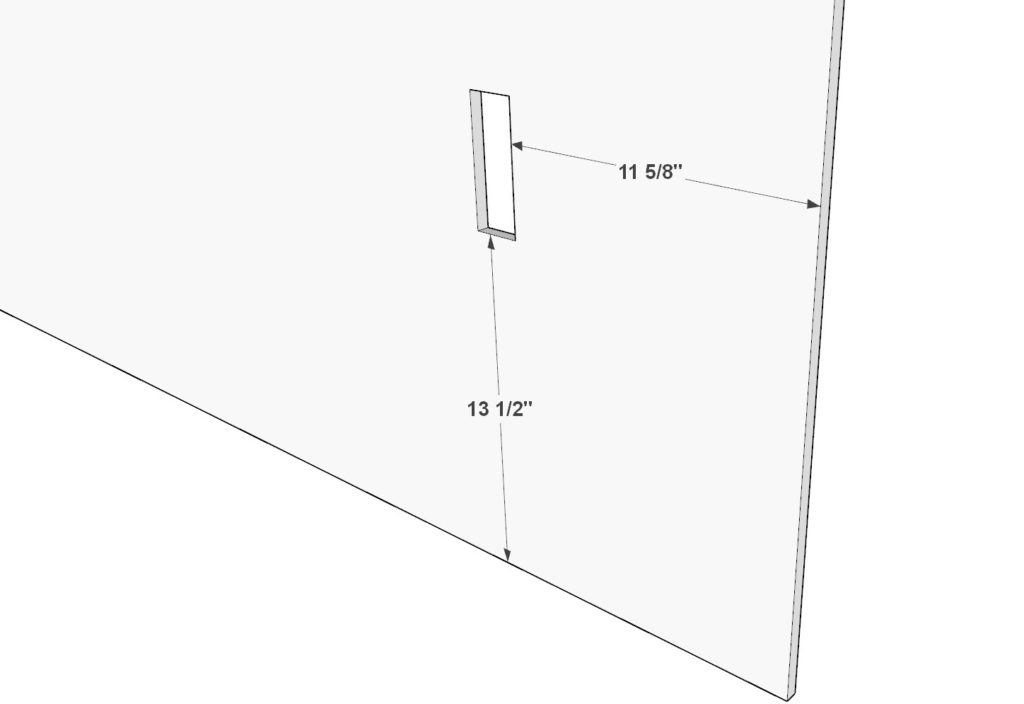
2.3 Crafting Outlet Openings
- The provided diagrams specify exact dimensions for the outlet cut-outs, tailored for a particular Amazon-sourced outlet.
- If you’re utilizing a different outlet type, adjust the hole size accordingly.
- A straightforward method to create a neat rectangular opening is to drill four holes at the rectangle’s corners using a large diameter drill bit. Then, connect these holes using a small saw.
- Tip: For ease, consider crafting the outlet openings before attaching the interior plywood face.
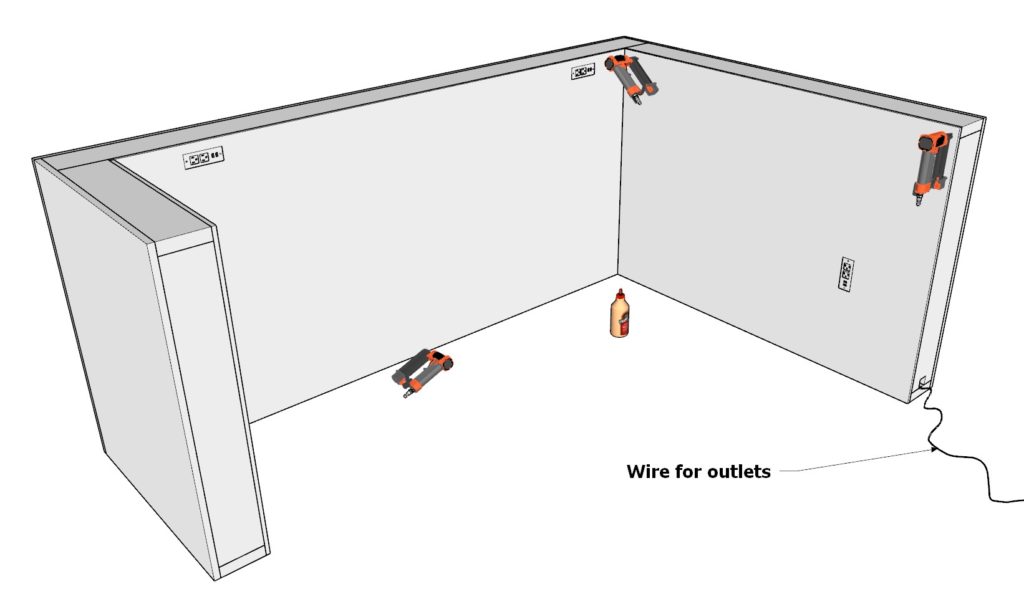
2.4 Wiring and Safety Protocols
- Safely route the wiring for the outlets through the wire channels or drilled holes, ensuring the wires emerge from the specified wire outlet.
- Safety Note: Adherence to safety is paramount. When using a nail gun, avoid piercing any wires. Always refer to and follow the safety guidelines given by the outlet manufacturers. Ensure your outlet cords are of suitable lengths.
- After the plywood is nailed down, gently tug on the cords to ensure they are free and not pinned in any spots.
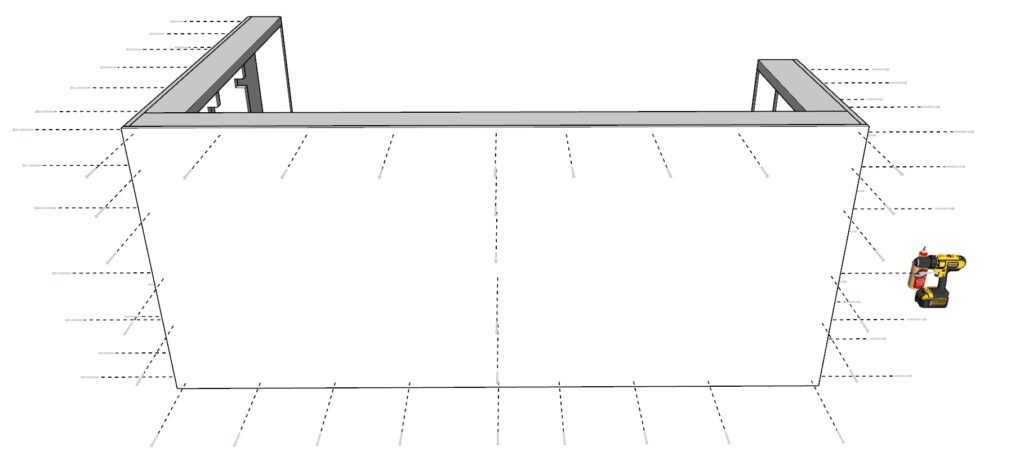

Step 3: Crafting and Installing the Bar Footrest
3.1 Crafting the Footrest
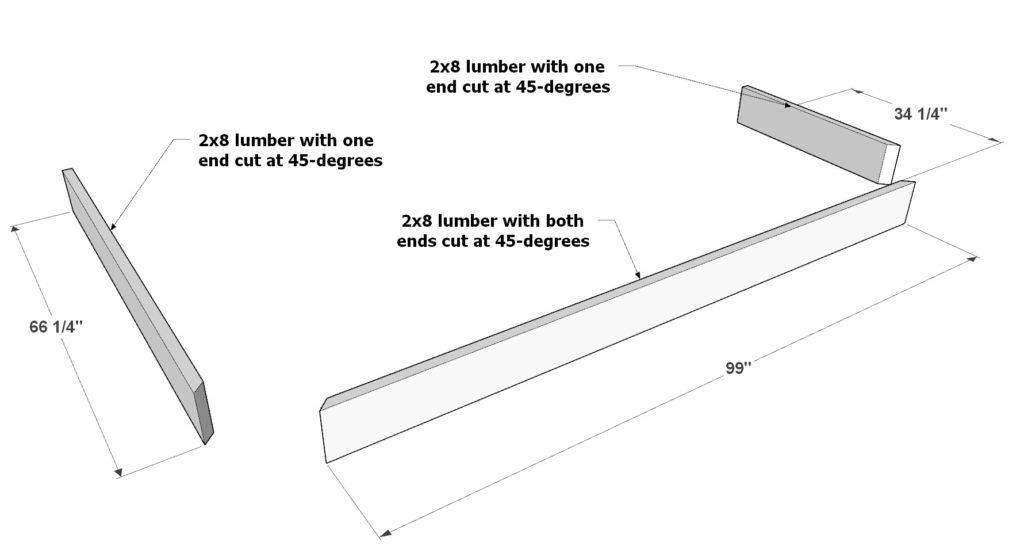
Begin with the main footrest components made from 2×8 lumber boards:
- One board at 99 inches, both ends angled at 45-degrees.
- A second board of 66-1/4 inches, one end cut at 45-degrees.
- The final board is 34-1/4 inches with one side angled at 45-degrees. Reference Diagram 1 for visual guidance.
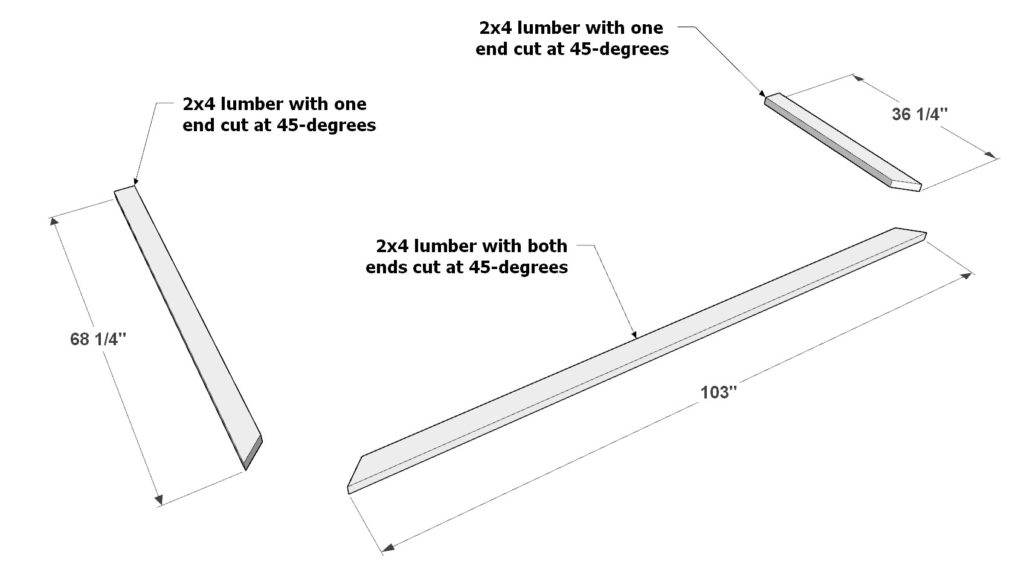
For additional support, you’ll need 2×4 lumber pieces in the following specifications:
- A piece measuring 103 inches, both ends cut at 45 degrees.
- Another at 68-1/4 inches, with a single end at a 45-degree angle.
- And the last one, 36-1/4 inches long, with one end cut at 45-degrees.
Align the 2×8 and 2×4 components as depicted in Diagram 3. Using wood glue and a countersink drill bit, bond the pieces securely with 3.5-inch screws.
3.2 Installing the Footrest to the Bar
- With the footrest assembled, it’s time to affix it to the bar frame.
- Position the footrest as indicated in the given diagram. When securing, it’s crucial to aim for the foundational 2×6 lumber studs of the bar’s skeleton. This ensures maximum sturdiness, as anchoring only to the plywood may not offer the required stability.
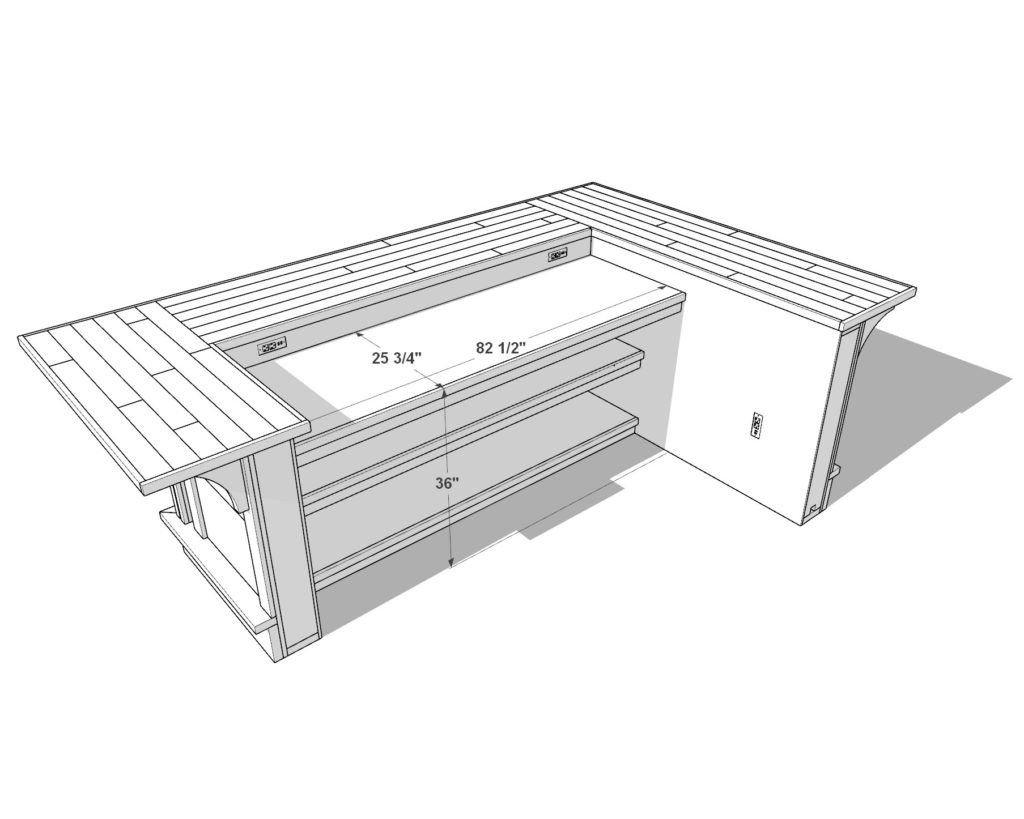
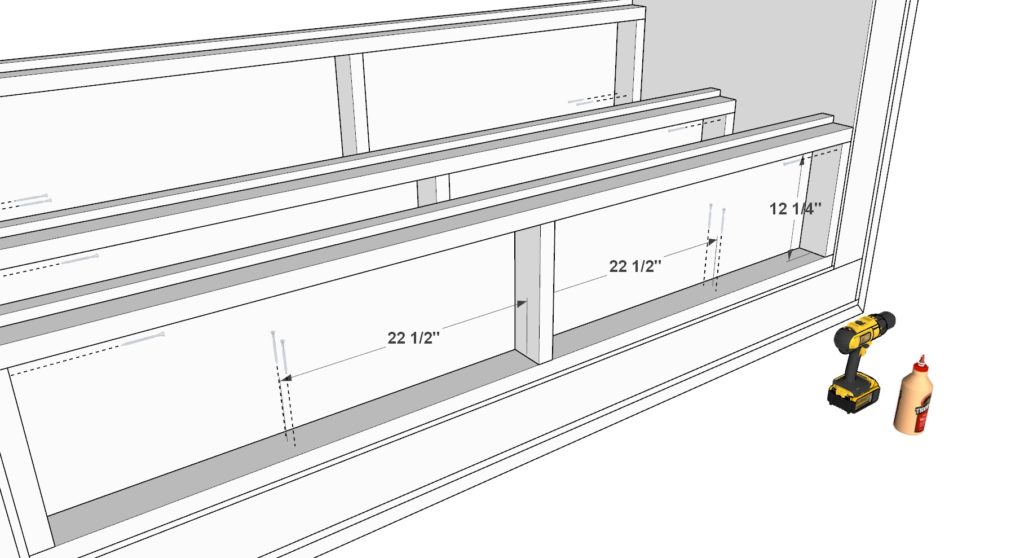
Step 4: Assembling and Installing the Bar Shelves and Work Counter
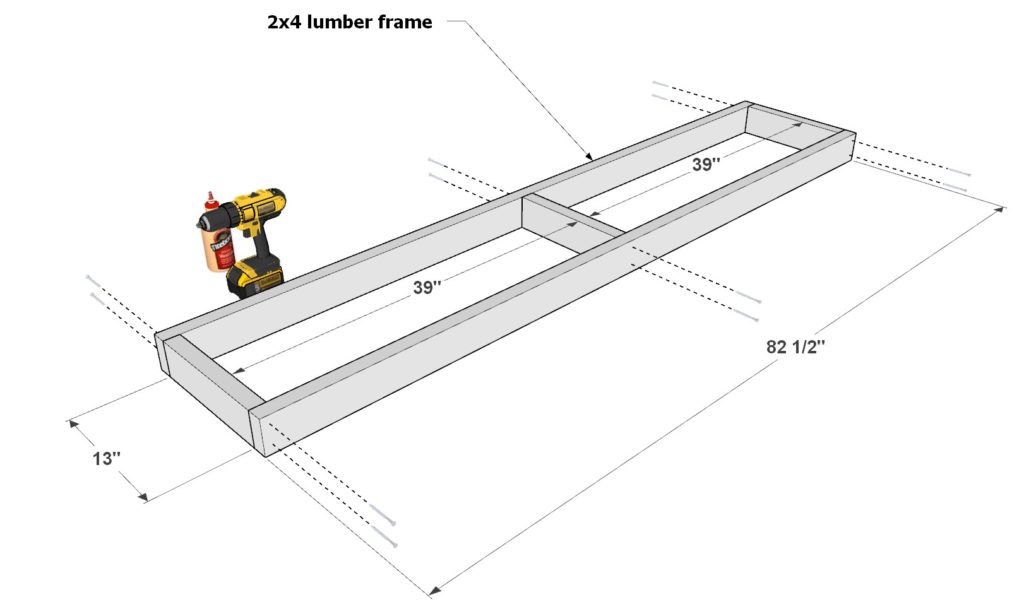
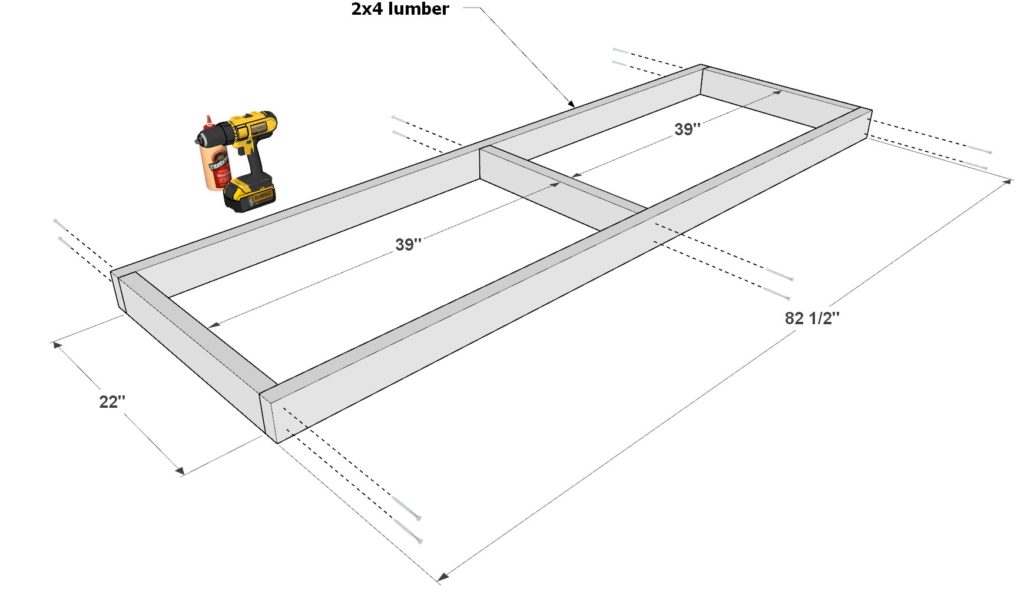
4.1 Crafting the Shelves
- Begin with constructing the base framework for the shelves:
- Use two 82-1/2 inch long 2×4 lumber pieces combined with three 13 inch 2×4 pieces.
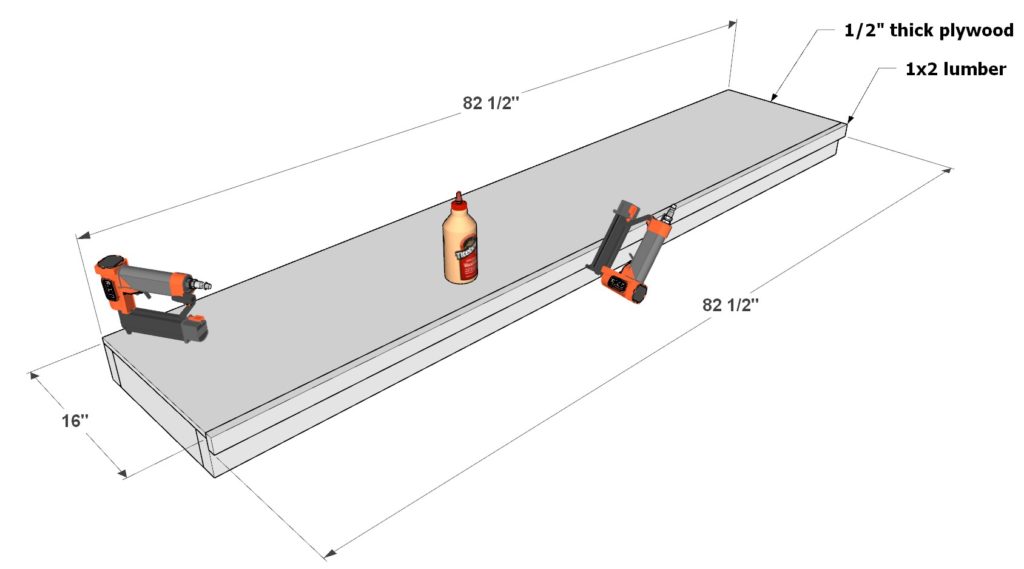
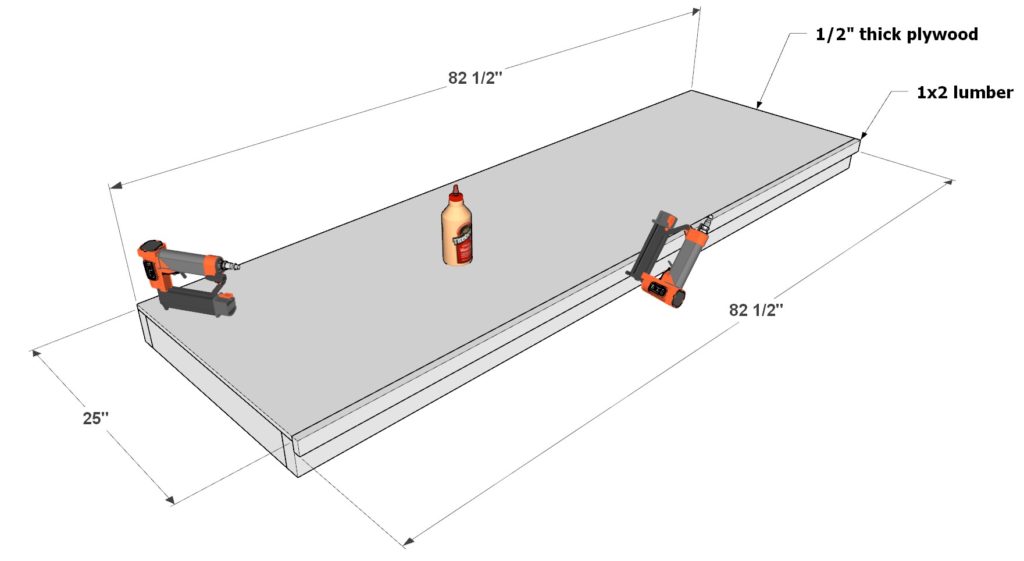
- Follow the layout in Diagram 1, connecting the pieces using wood glue and 3.5-inch screws.
- Layer a 1/2 inch thick plywood sheet, sized 82-1/2 inch long x 16 inch wide, atop the frame. Affix it securely using wood glue and 1-inch pin nails.
- To enhance the shelf’s aesthetics and functionality, add an 82-1/2 inch long 1×2 lumber piece along the shelf’s edge.
- Construct two shelves following this pattern.
4.2 Constructing the Work Counter
- For the work counter’s base framework:
- Use two 82-1/2 inch long 2×4 lumber pieces and combine them with three 22 inch 2×4 pieces.
- Adhere to the assembly pattern in Diagram 1, securing the components with wood glue and 3.5-inch screws.
- Overlay a 1/2 inch thick plywood sheet, sized 82-1/2 inch long x 25 inch wide, on the assembled frame. Bind it in place using wood glue and 1-inch pin nails.
- For a polished finish and added utility, fix an 82-1/2 inch long 1×2 lumber piece to the counter’s edge.
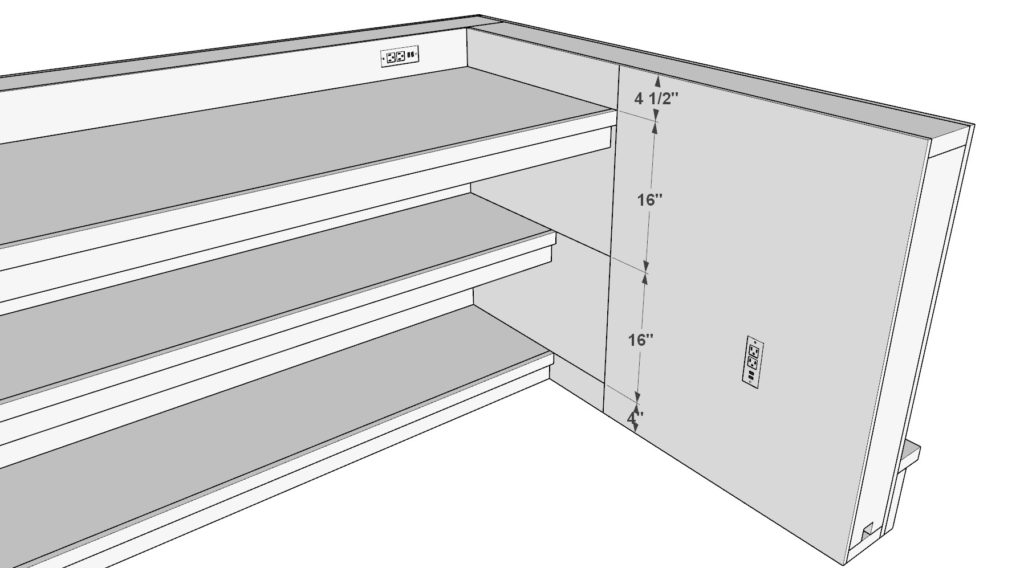
4.3 Installation of Shelves and Work Counter
- With the components ready, move to the installation phase.
- Reference the proposed spacing layout provided in the diagrams. Adjustments are allowed based on your preference or bar design.
- Using wood glue and 3.5-inch screws, affix the shelves and work counter.
- Key Point: Guarantee the shelves and counter are anchored securely to the 2×6 lumber frame studs within the bar (the main bar skeleton). This ensures they can safely support substantial weight. The additional measurements guide you to the precise 2×6 lumber locations, ensuring sturdy installation.

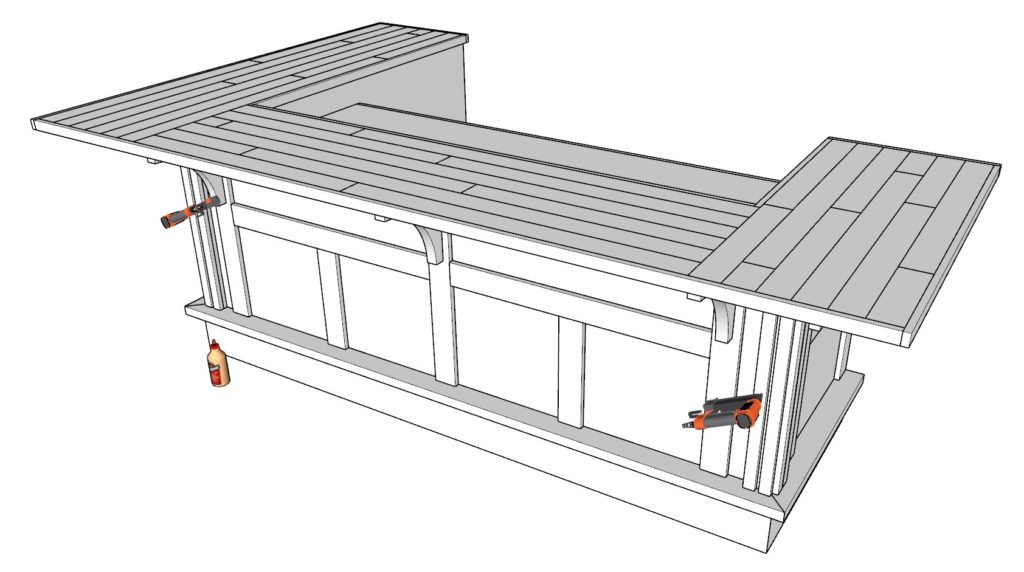
Step 5: Designing and Installing Corbels & Adding Decorative Trim
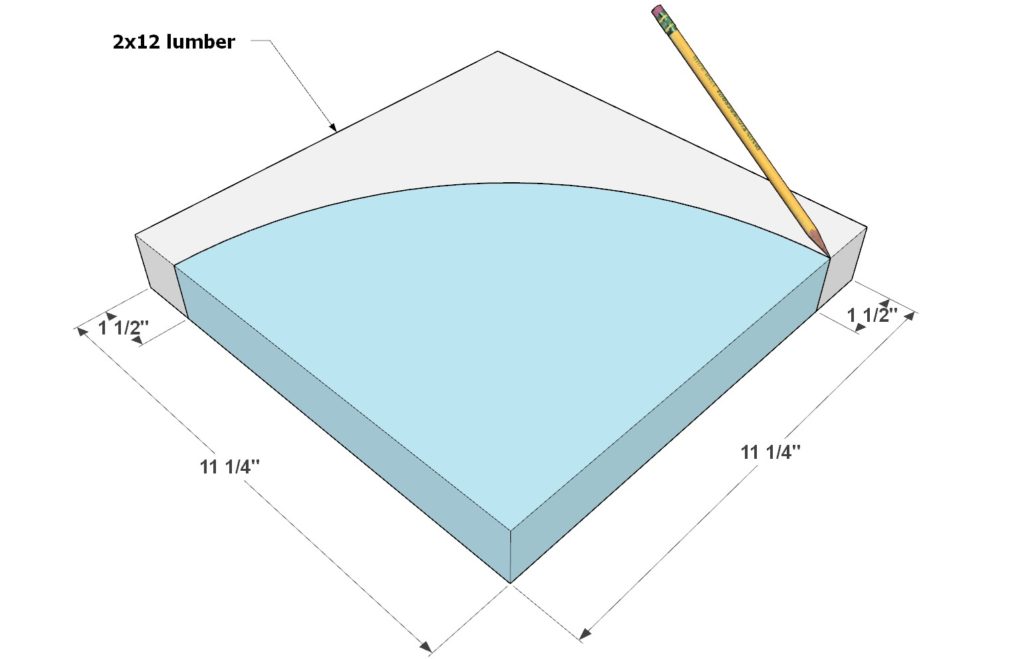
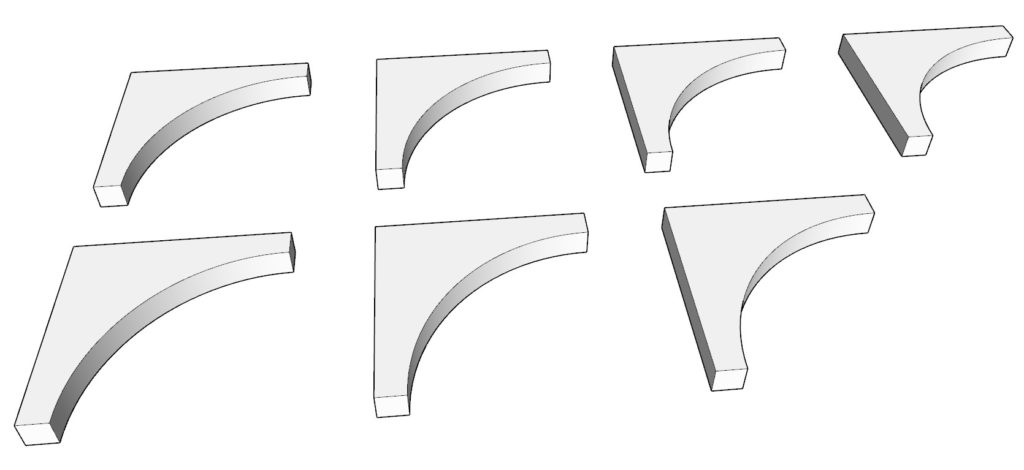
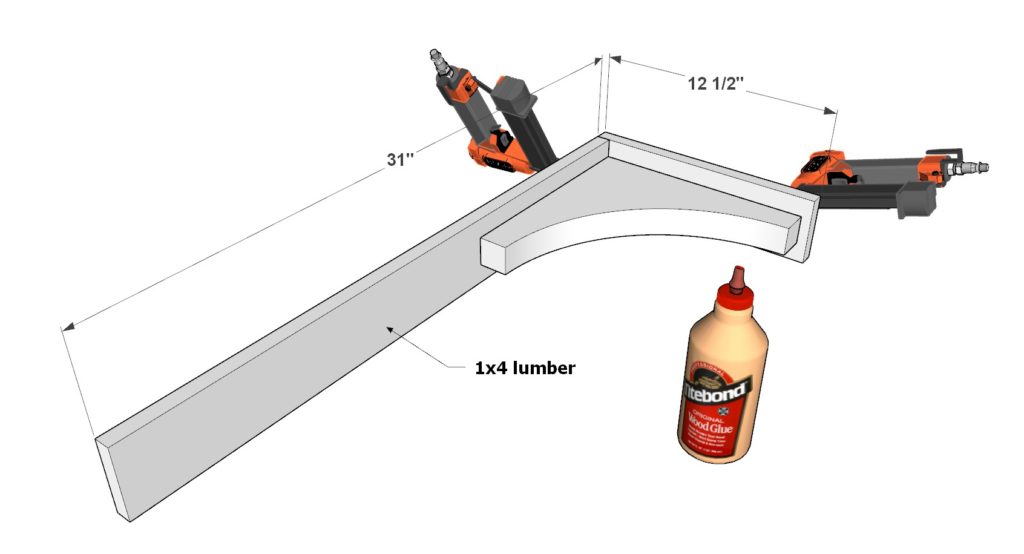
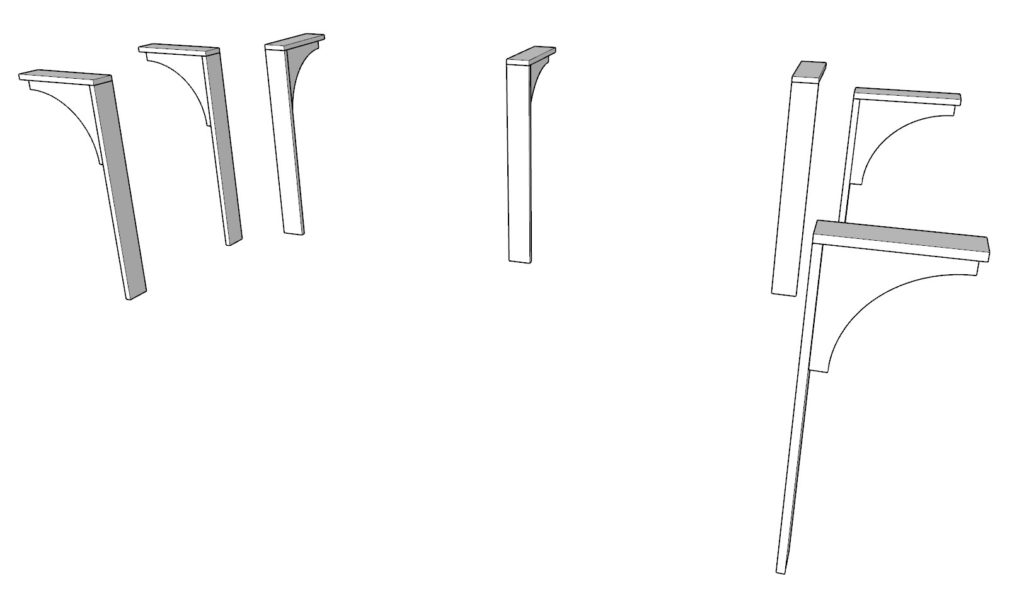
5.1 Crafting the Corbels
- What are Corbels? Corbels are decorative brackets, typically made of wood, that are used to support structures like shelves or countertops. They often feature intricate designs and add a touch of elegance to furniture and architectural designs.
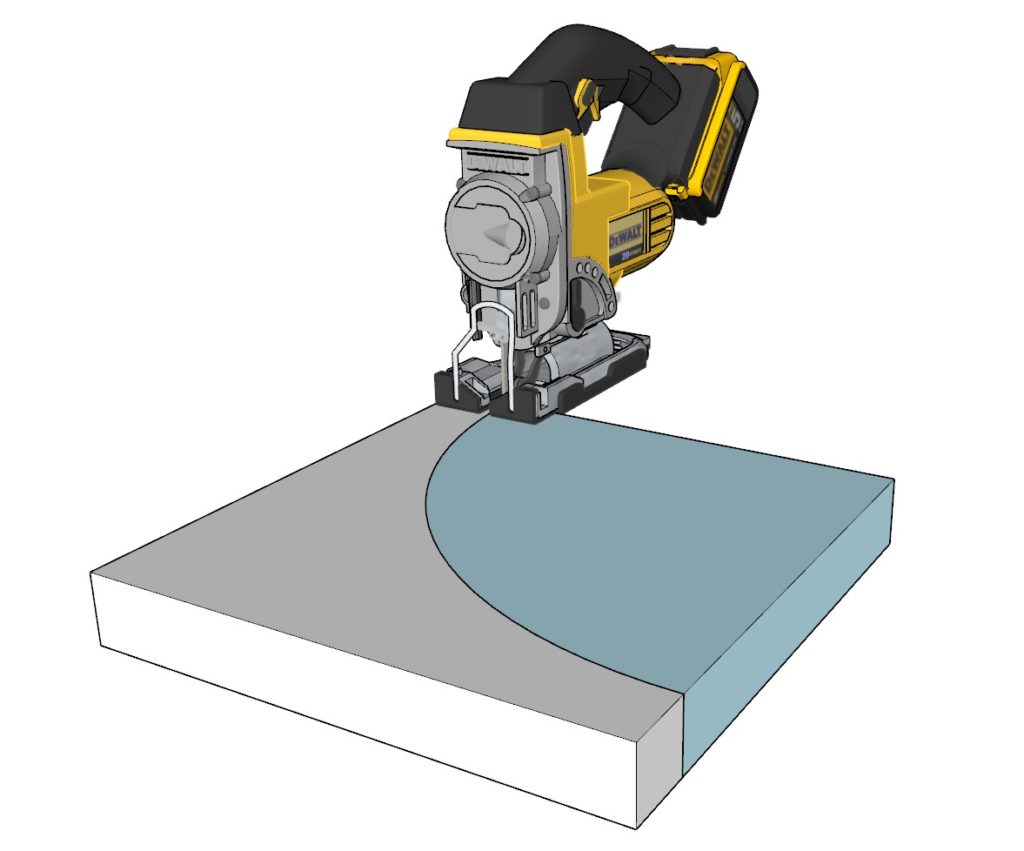
- To craft a corbel, begin with an 11-1/4 inch long 2×12 lumber piece.
- Sketch a quarter arch on the lumber, ensuring it mirrors the design you desire.
- With the outline in place, use a scroll saw, band saw, or jigsaw to meticulously cut along the drawn line.
- Produce seven identical corbels following this method.
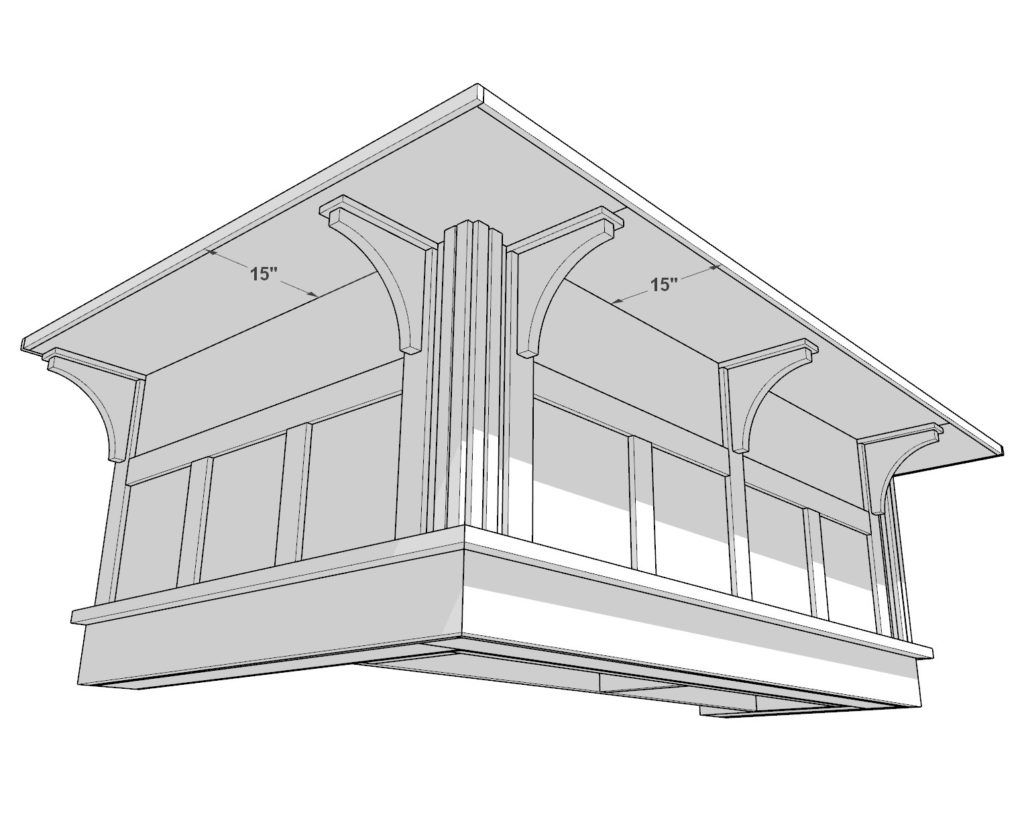
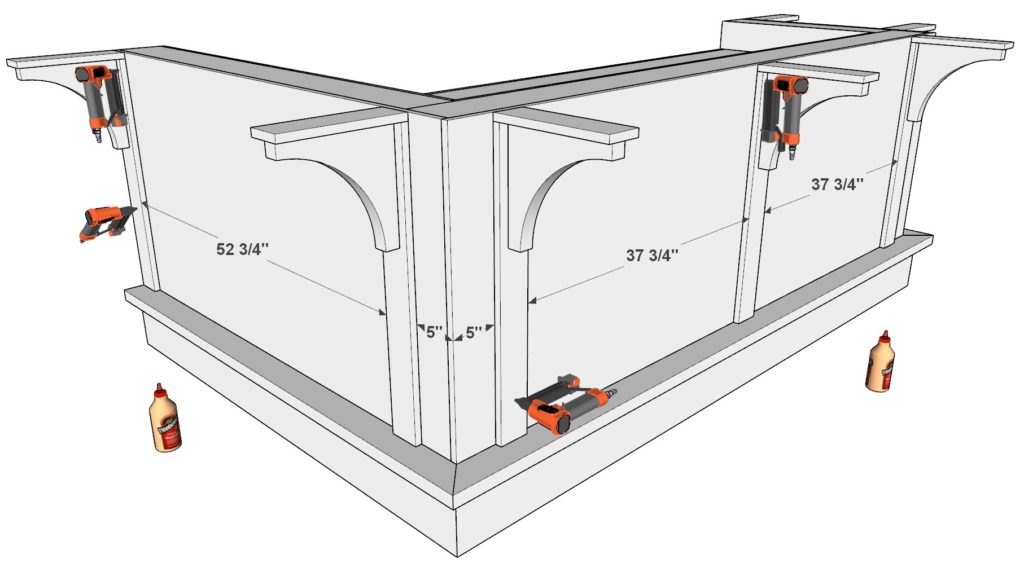
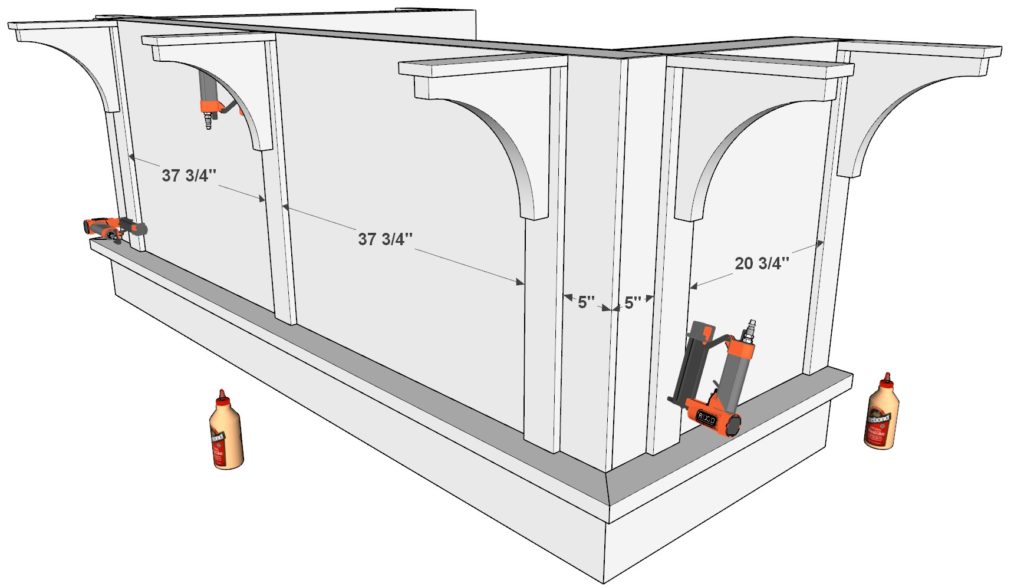
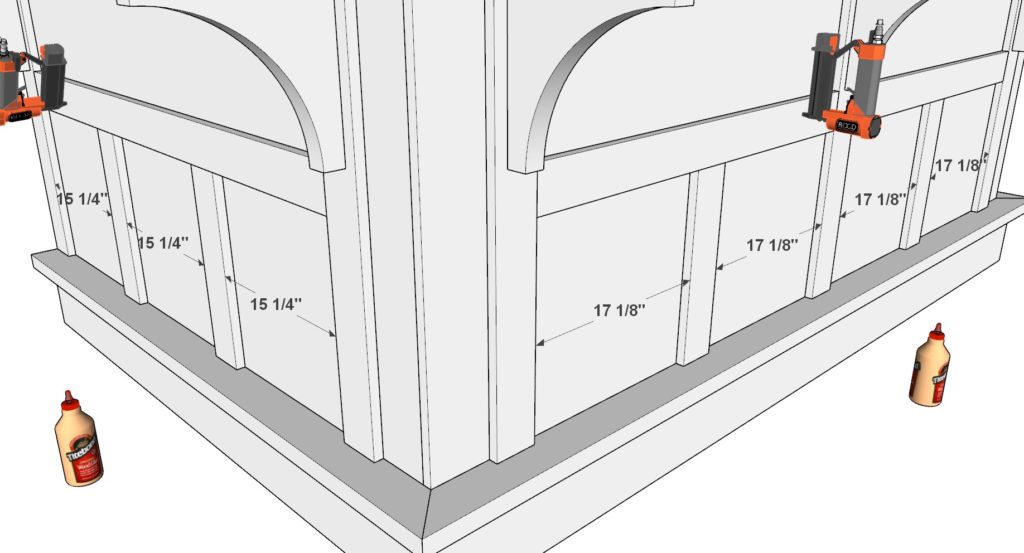
5.2 Assembling and Installing the Corbels
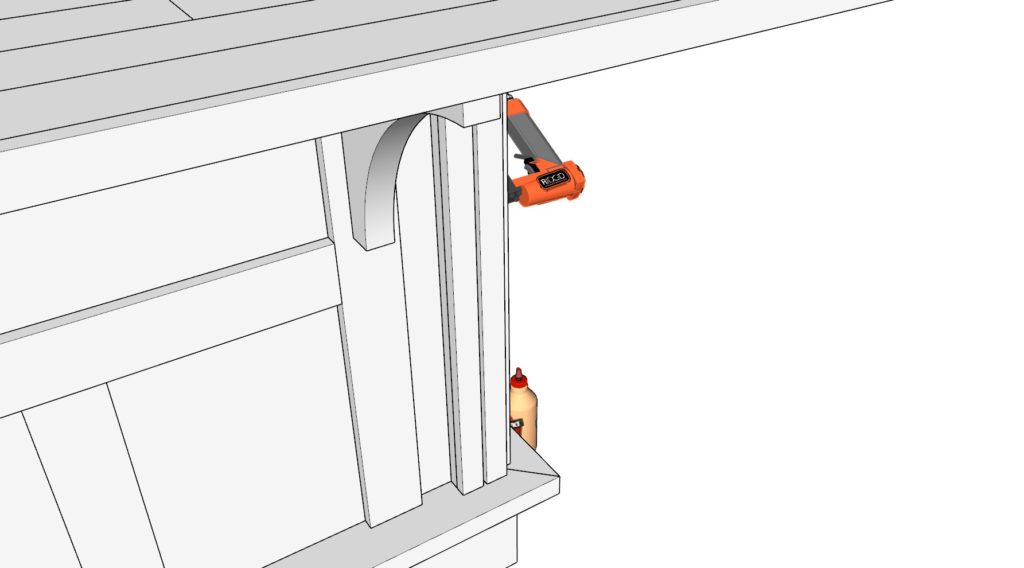
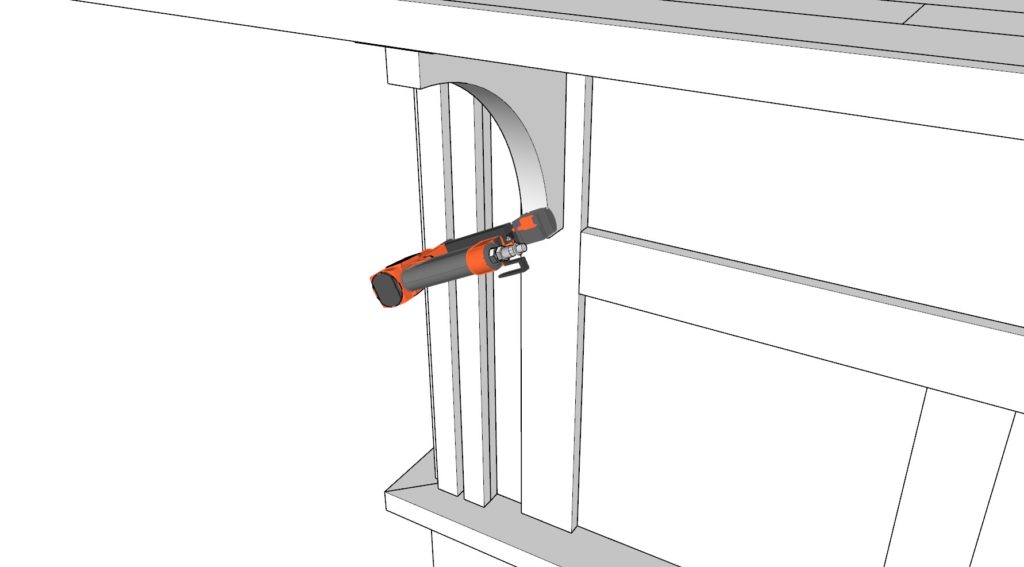
- Further, refine each corbel by attaching a 31 inch long and a 12-1/2 inch long 1×4 lumber piece. Use wood glue and 1-inch nails to ensure they’re firmly affixed.
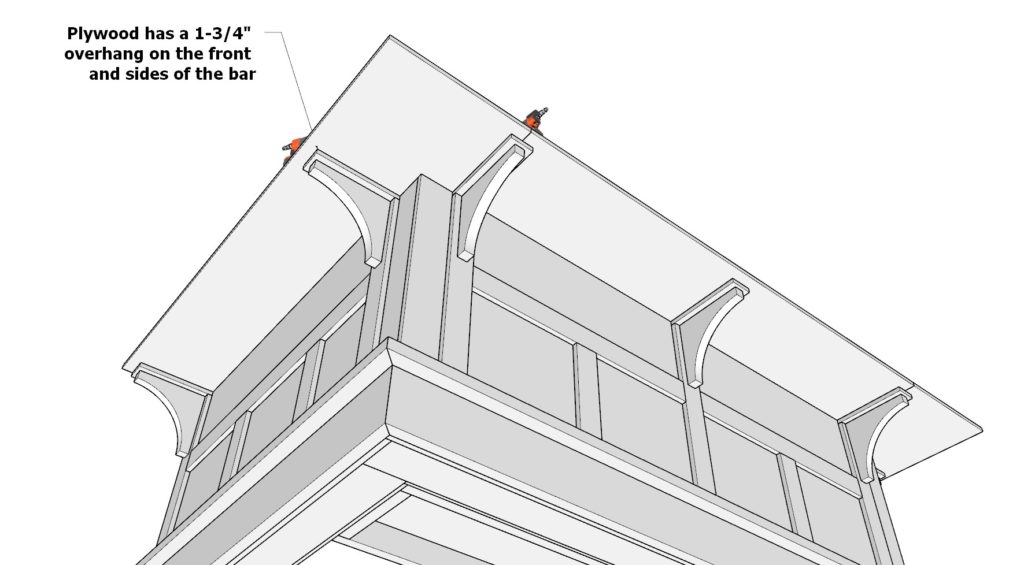
- Once your corbels are ready, position them onto the bar’s 3/4″ thick plywood, adhering to the spacing highlighted in the provided diagram.
- Fasten them in place using 1-inch pin nails and wood glue. Proper spacing is crucial as the bar’s top plywood will rest on these corbels, drawing support from them.
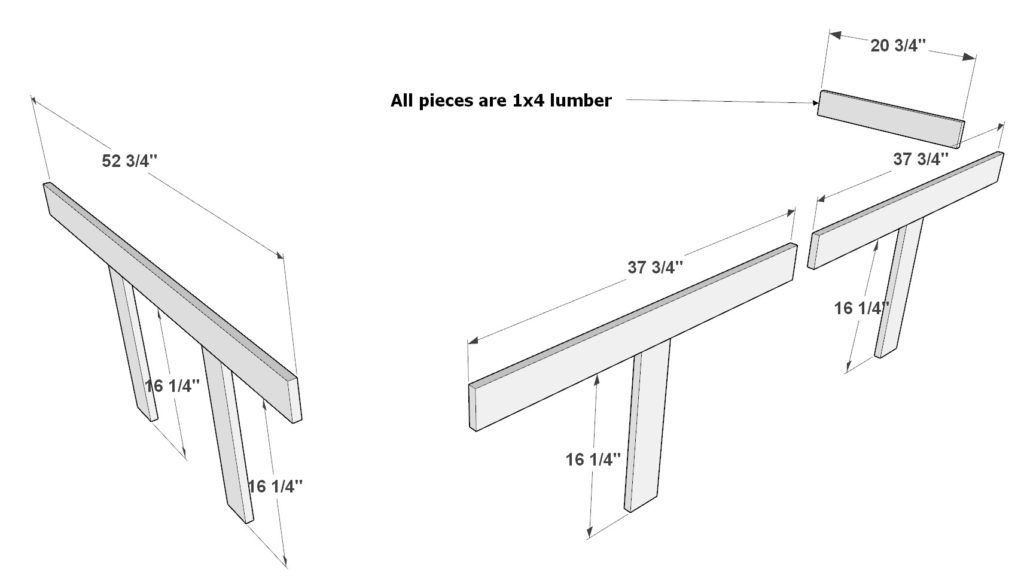
5.3 Decorating with Trim Pieces
- Enhance the bar’s aesthetic appeal with decorative 1×4 lumber trim pieces.
- Procure the following cut sizes:
- Four pieces at 16-1/4 inches
- One piece at 52-3/4 inches
- Two pieces at 37-3/4 inches
- One piece at 20-3/4 inches
- Attach these trim pieces to the bar’s exterior 3/4″ thick plywood. Secure them using wood glue and 1-inch pin nails for a seamless finish.
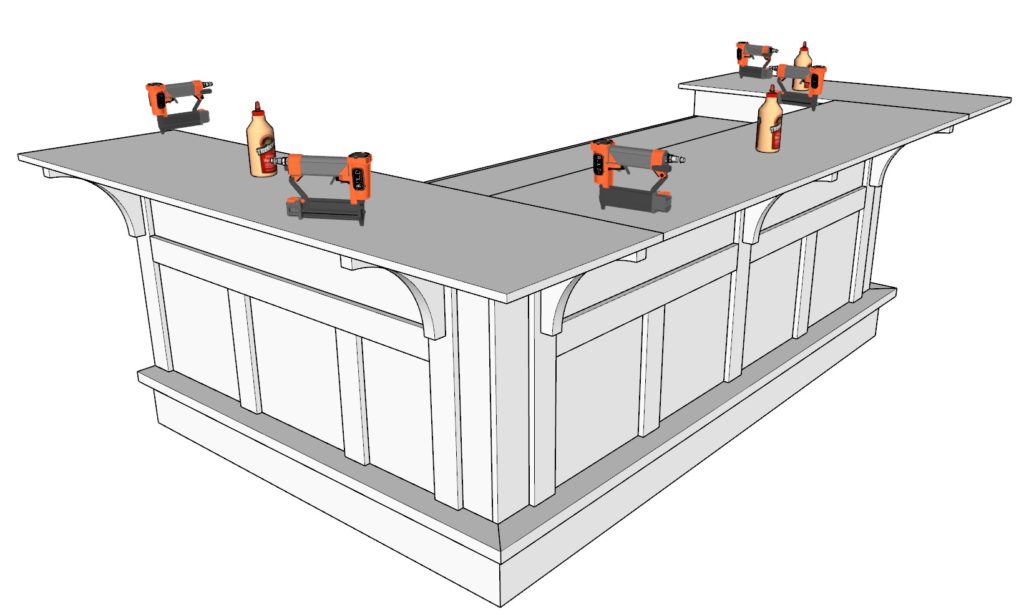
Step 6: Installing the Bar Top & Exploring Customizations
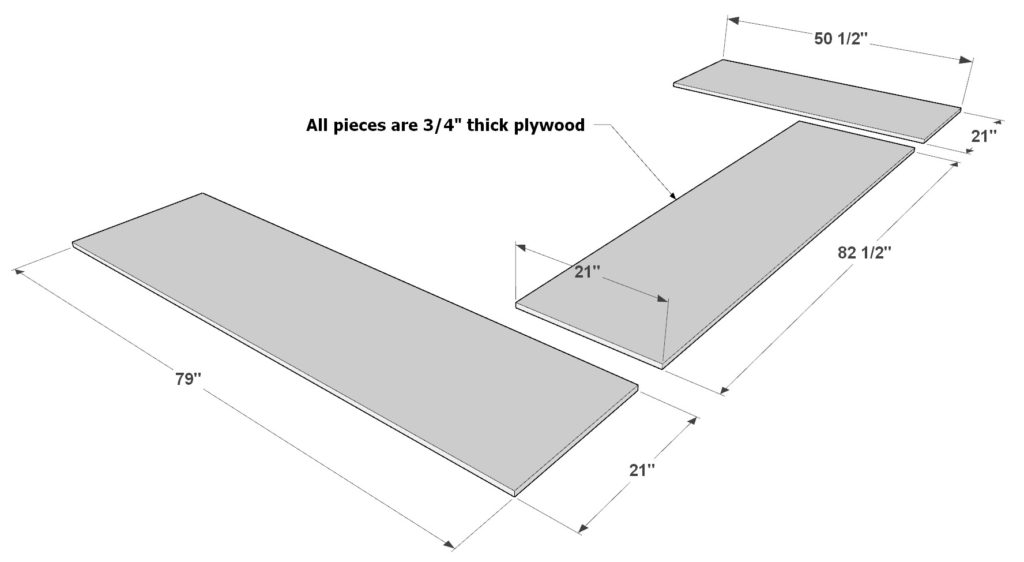
6.1 Setting Up the Plywood Bar Top
- Begin with your primary bar top foundation:
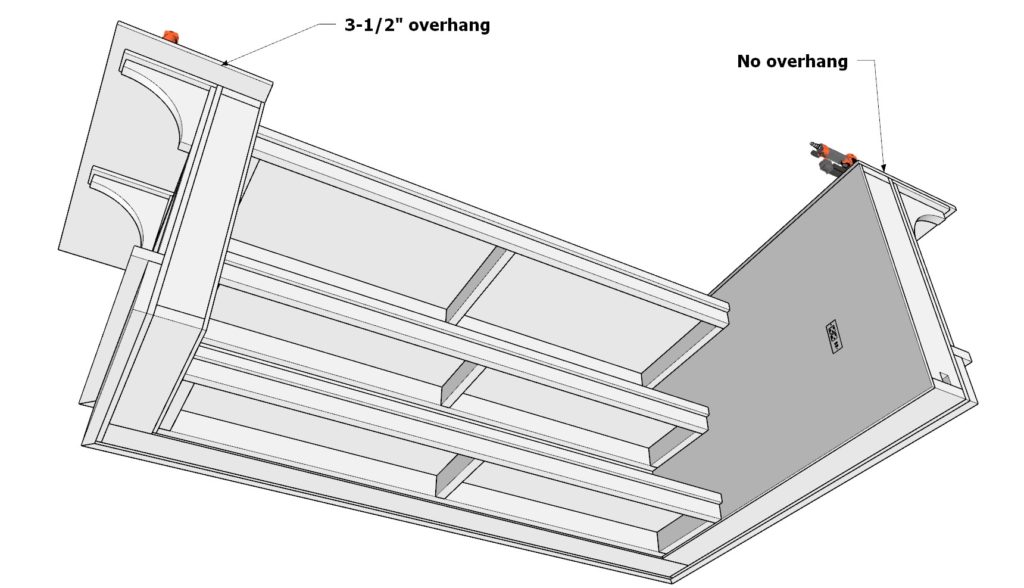
- Take the following plywood sheets, all 3/4″ thick:
- 79 inch x 21 inch
- 82-1/2 inch x 21 inch
- 50-1/2 inch x 21 inch
- Take the following plywood sheets, all 3/4″ thick:
- Arrange them atop the bar, ensuring the overhang aligns with the visuals provided in the diagrams and is adequately supported by the corbels.
- Secure these sheets in place using wood glue and 1.5-inch pin nails for a solid finish.
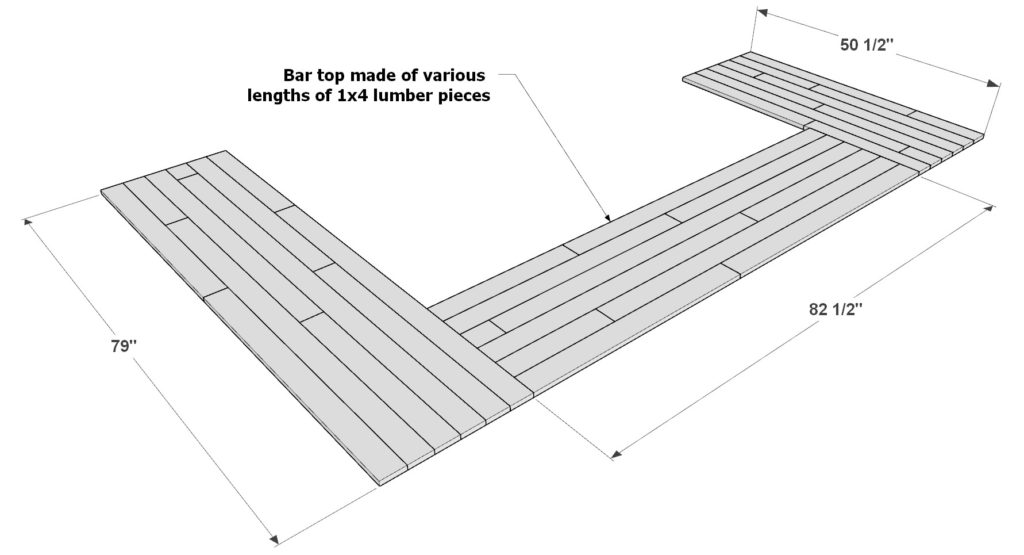
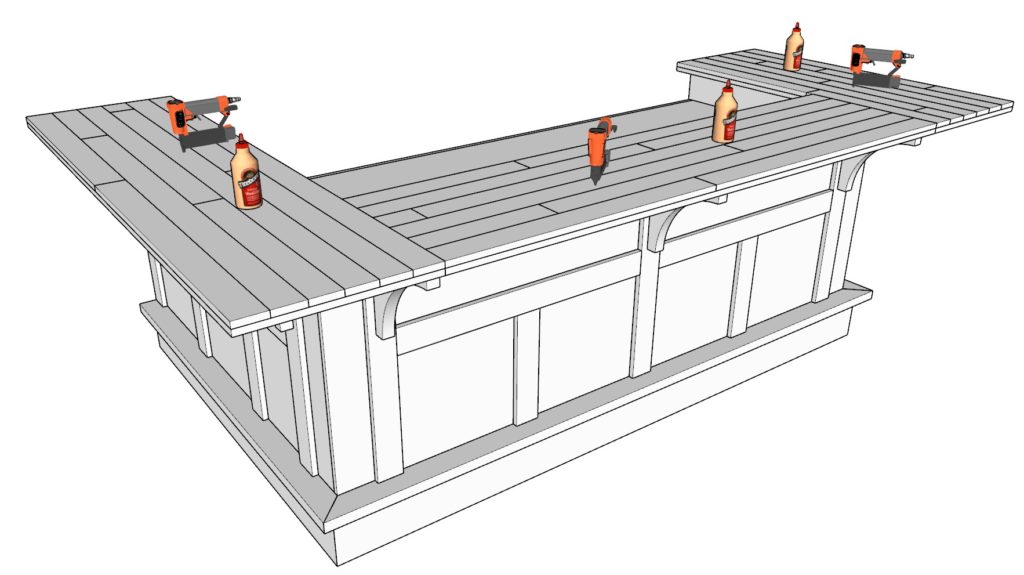
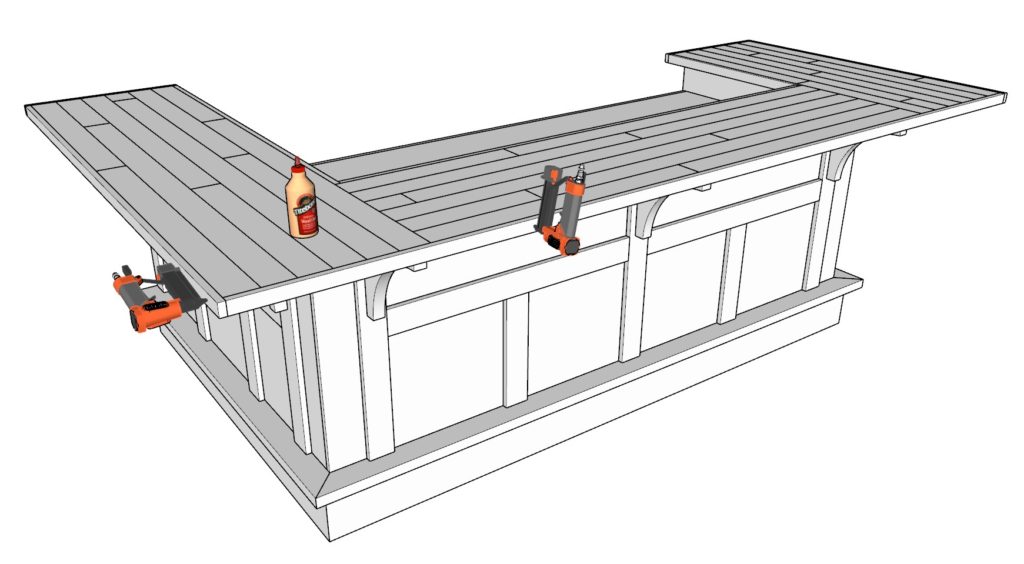
6.2 Adding Decorative 1×4 Lumber Countertop
- To infuse a unique, wooden charm to your bar top:
- Use 1×4 lumber cut into diverse lengths.
- Lay these pieces directly atop the 3/4″ plywood, creating an intricate wooden patchwork.
- Ensure they’re firmly in place with wood glue and 1-inch pin nails.
- Approximately 110 feet of 1×4 lumber boards will be required to achieve this distinctive look.
6.3 Exploring Alternate Designs
- The above bar top design is a suggestion, and there’s room for innovation.
- Alternatively, you could layer another sheet of 3/4″ thick plywood atop the base for a simplified bar top version.
- Strength Tip: If you opt for this approach, position the plywood layers in a brick-laying pattern, meaning they should overlap in varied ways. Just as bricks aren’t stacked directly over one another but are offset for added strength, apply the same principle here for a robust bar top.
Step 7: Embellishing with Decorative Finishing and Edging
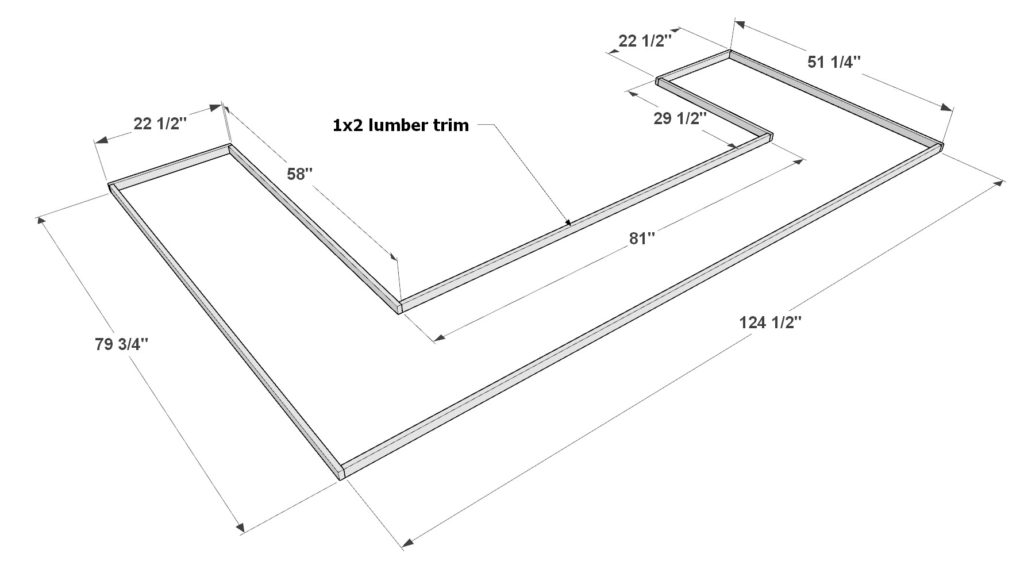
7.1 Applying Decorative Trim to Bar Top Sides
- The trim will add an aesthetic finish to the sides of the bar top:
- Using 1×2 lumber pieces, measure and cut the following lengths:
- 124-1/2 inches (if this specific length isn’t available, consider combining shorter lengths to achieve the required measurement)
- 79-3/4 inches
- Two pieces of 22-1/2 inches
- 58 inches
- 81 inches
- 29-1/2 inches
- 51-1/4 inches
- Affix these pieces onto the sides of the bar top using wood glue and pin nails for a snug fit.
- Using 1×2 lumber pieces, measure and cut the following lengths:
7.2 Crafting Decorative Edge Pieces
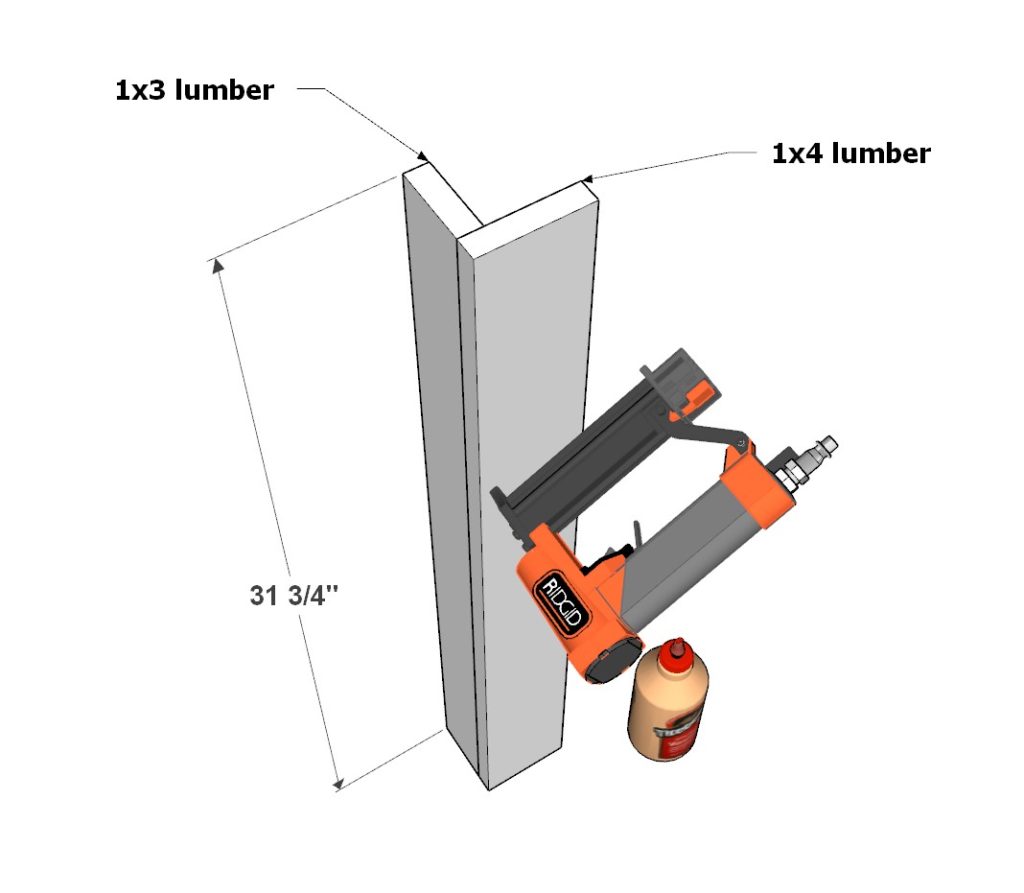
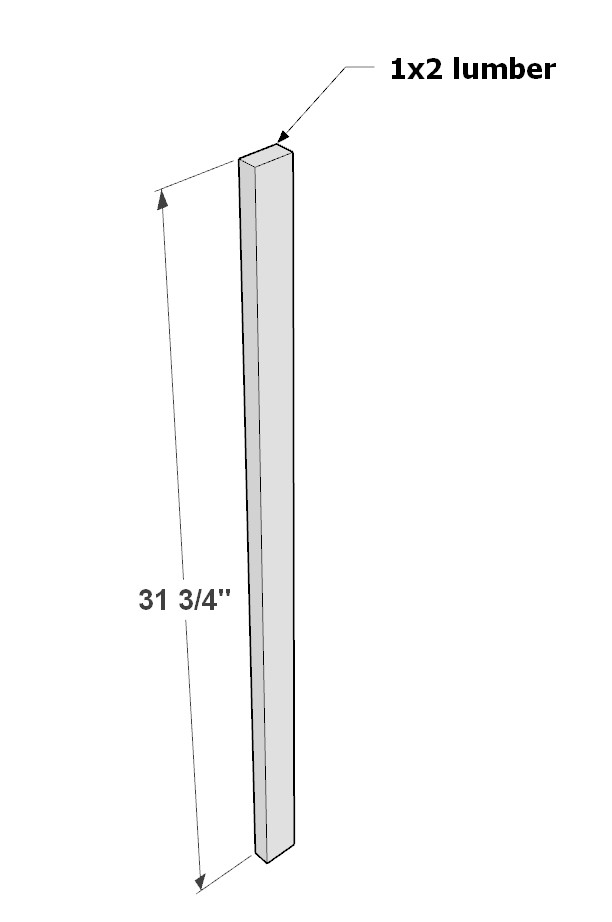
- Construct a decorative edge for the ends of the bar to accentuate its design:
- Take a 31-3/4 inch long 1×4 lumber piece and an identically sized 1×3 lumber piece.
- Attach these together as displayed in the provided diagram using wood glue and pin nails.
- Create a second matching piece following the same method.
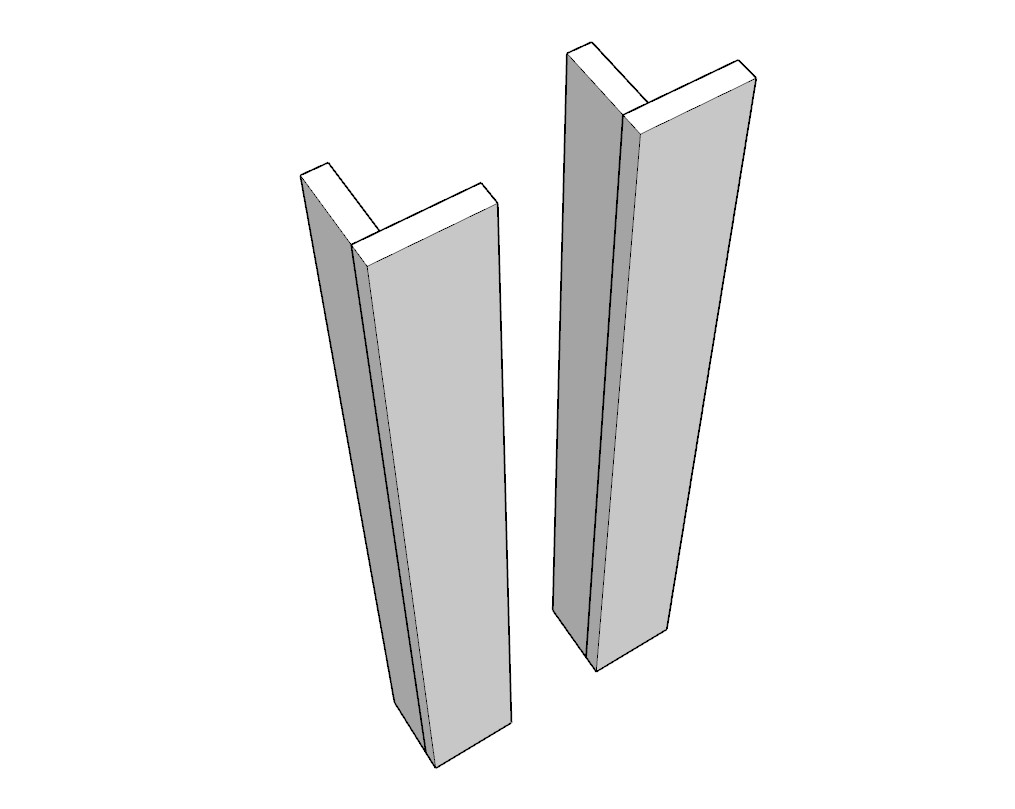
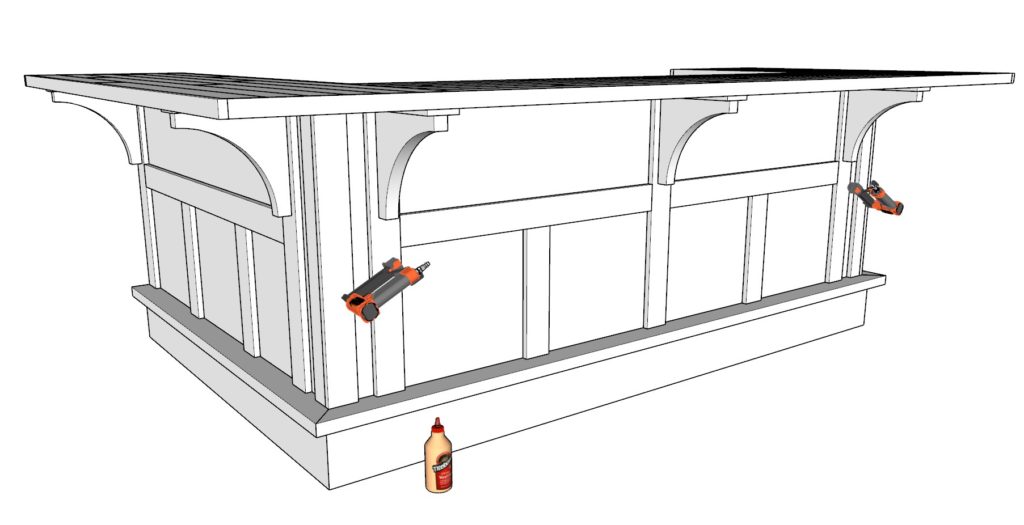
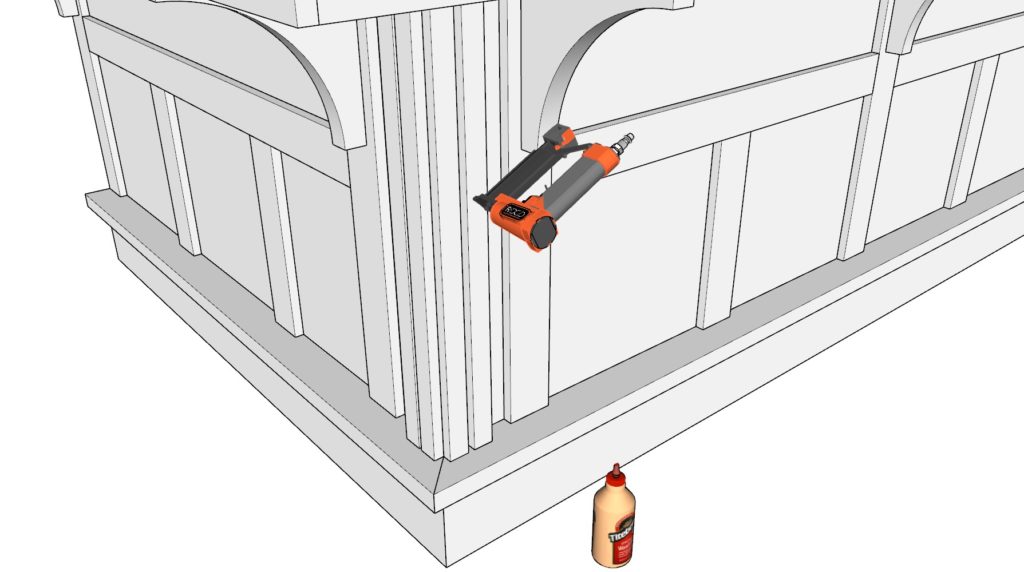
7.3 Installing the Decorative Edge Pieces
- Anchor these crafted decorative pieces to the bar ends:
- Use wood glue and pin nails to ensure they’re sturdily attached and blend seamlessly with the bar’s design.
7.4 Finishing with Decorative Edge Detailing
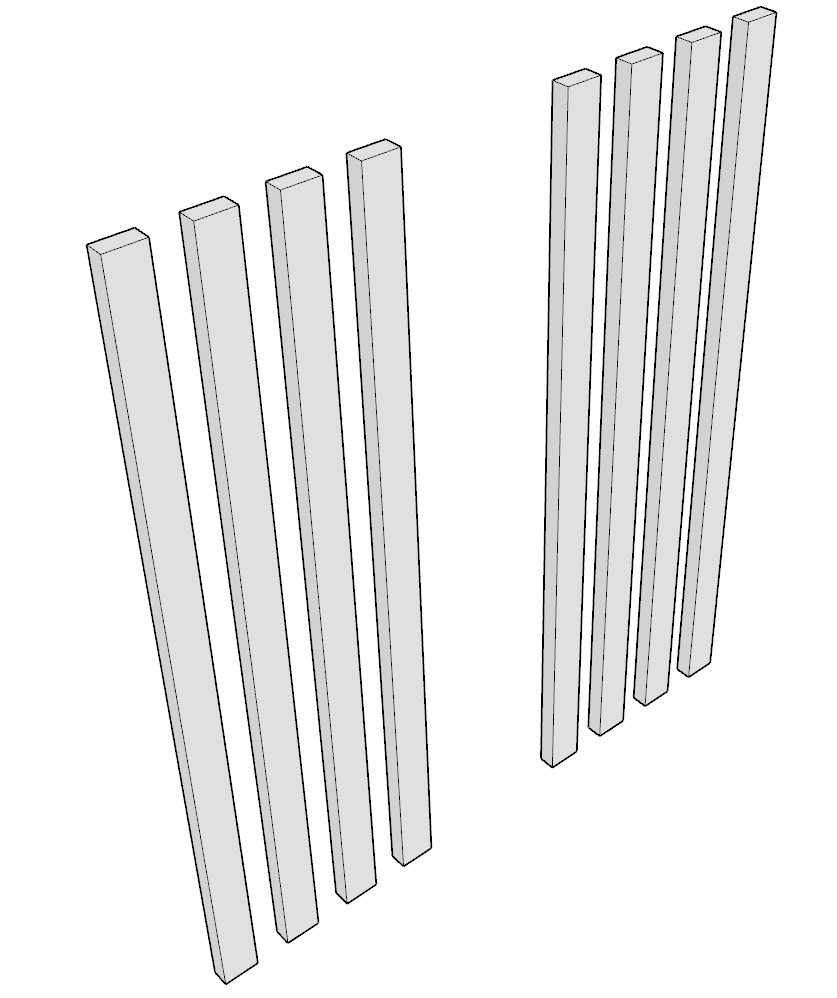
- To enhance the bar corners and infuse a polished look:
- Position four 31-3/4 inch long 1×2 lumber pieces onto the previously attached decorative edges.
- Follow the pattern showcased in the diagram for precise placement.
- Employ wood glue and pin nails for a secure and neat finish.
Step 8: Prepping, Sanding, and Finishing Your Bar for a Premium Look
8.1 Sanding for a Smooth Finish
Why Sanding is Essential: Sanding prepares the wood by smoothing out any rough areas, ensuring the paint or stain adheres evenly. It also opens up the wood’s pores, which is especially important for staining.
Choosing the Right Grit:
- Start with a coarse-grit sandpaper (80-grit). This will help remove any major blemishes or imperfections.
- Progress to a medium-grit (120 to 150-grit). This helps to smooth the surface further, preparing it for finer sanding.
- Finish with a fine-grit (180 to 220-grit). This will polish the wood to a smooth touch, ready for staining or painting.
8.2 Ergonomic Edging with a Router
Using a router on the edges serves a dual purpose. It gives the bar a polished look and ensures the edges are rounded, making them comfortable to the touch and preventing them from pressing into the skin.
Router Basics:
- Choose a round-over bit for your router. This will provide a smooth, rounded edge.
- Adjust the router’s depth so the bit protrudes to the desired amount.
- Always move the router from left to right along the wood’s edge. Hold the tool firmly to maintain control.
8.3 Three-Stage Staining Process
1. Pre-Stain Treatment:
- The pre-stain is an oily substance that fills the wood’s pores, ensuring the stain is absorbed evenly.
- Apply a generous amount using a brush or cloth. Allow it to penetrate the wood for 5-15 minutes.
- Wipe off any excess pre-stain using a clean cloth.
2. Staining:
- Choose a stain color that complements the overall design.
- Apply the stain using a brush or cloth, moving with the grain of the wood.
- Allow the stain to sit for a few minutes before wiping off the excess with a clean cloth. The longer it sits, the deeper the color will be.
- Let the stain dry for 24 hours.
3. Polyurethane Application with a Spray Gun:
- Polyurethane acts as a sealant, providing protection and enhancing the wood’s beauty.
- Ensure the spray gun is clean and free of any debris.
- Hold the spray gun approximately 10-12 inches away from the wood’s surface.
- Apply in a steady, even motion to ensure a uniform coat.
- Allow each coat to dry for 24 hours. If desired, sand lightly between coats using a 320-grit sandpaper for a smoother finish.
8.4 Professional Painting and Hole Filling
Filling Holes:
- Use a quality wood filler or putty. Apply it to any holes or imperfections using a putty knife. Allow it to dry as per the manufacturer’s instructions.
- Once dry, sand the area to ensure it’s flush with the surrounding wood.
Painting:
- Begin with a primer, especially if you’re transitioning from a dark to a light color.
- Use a brush or roller to apply even coats of paint. Multiple thin coats often result in a smoother finish than one thick coat.
- Allow each coat to dry thoroughly before applying the next. Refer to the paint can for specific drying times.