What are the benefits of a DIY towel rack?
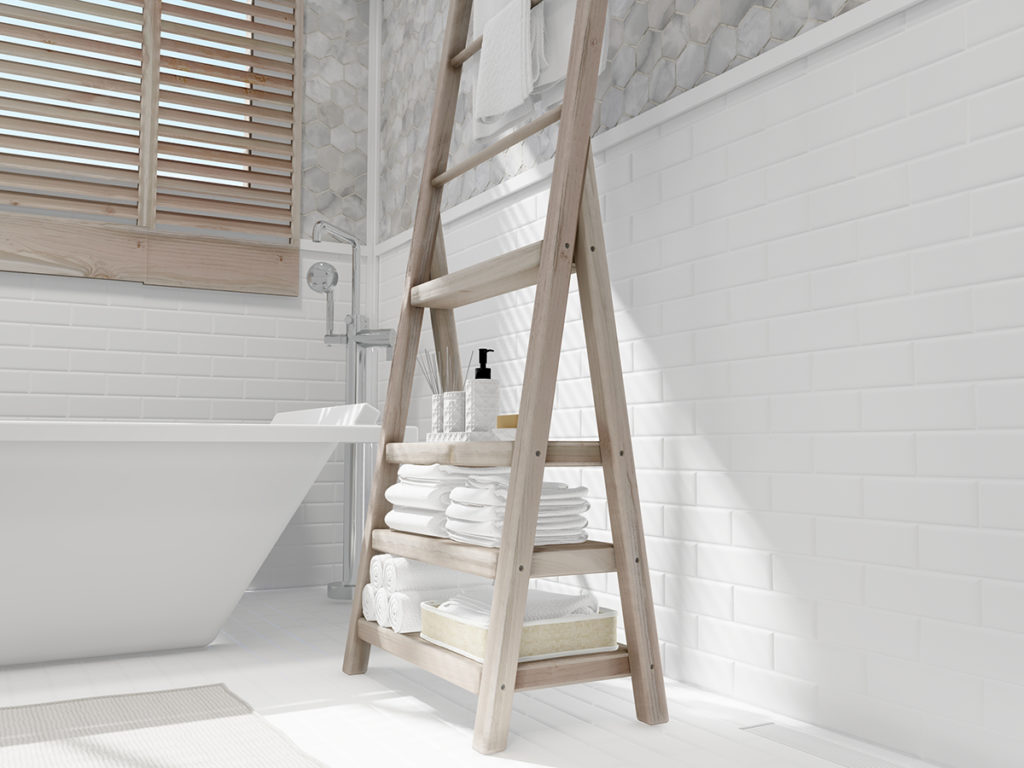
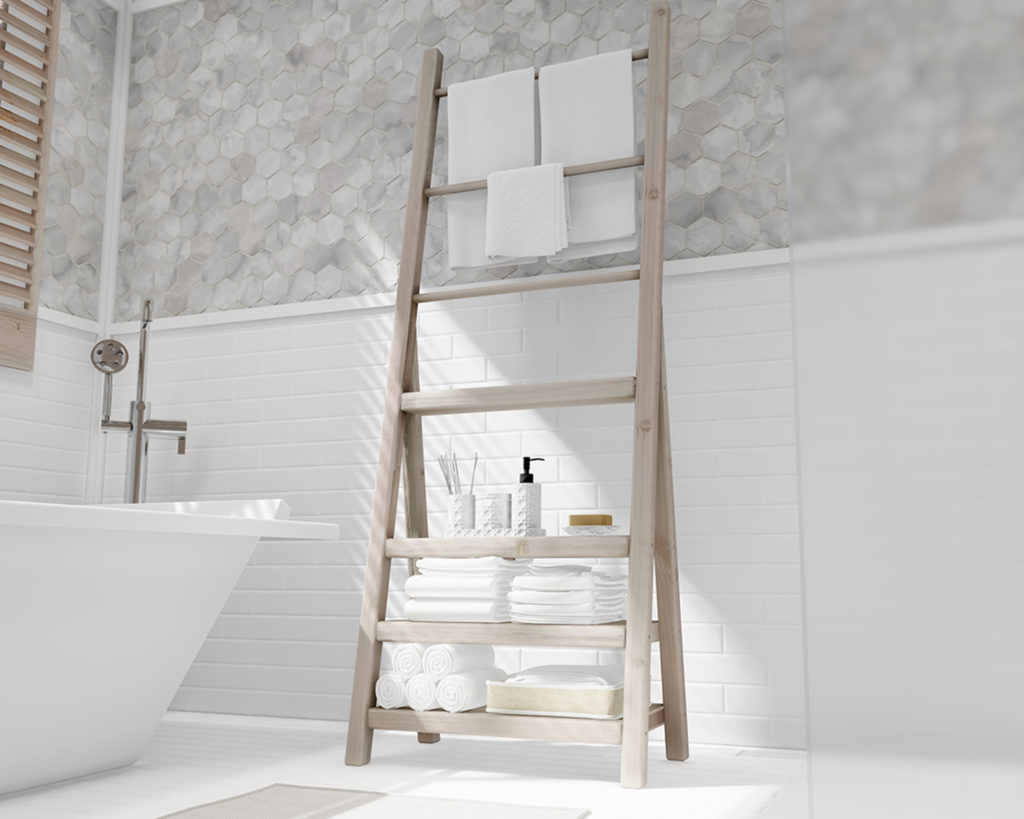
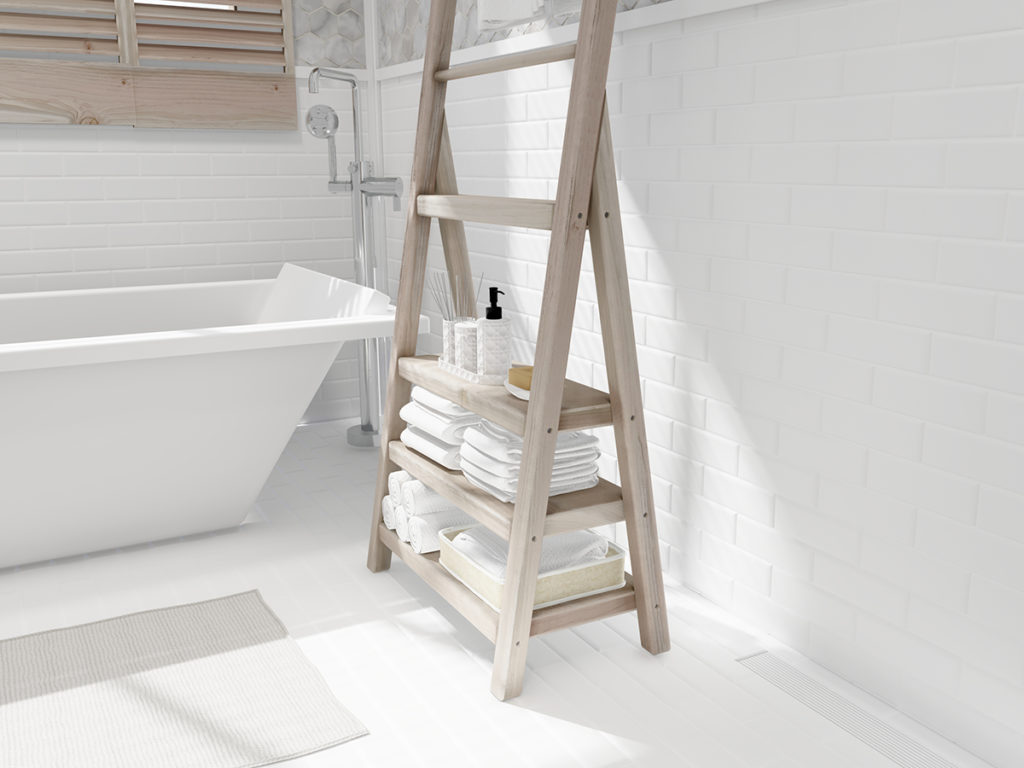
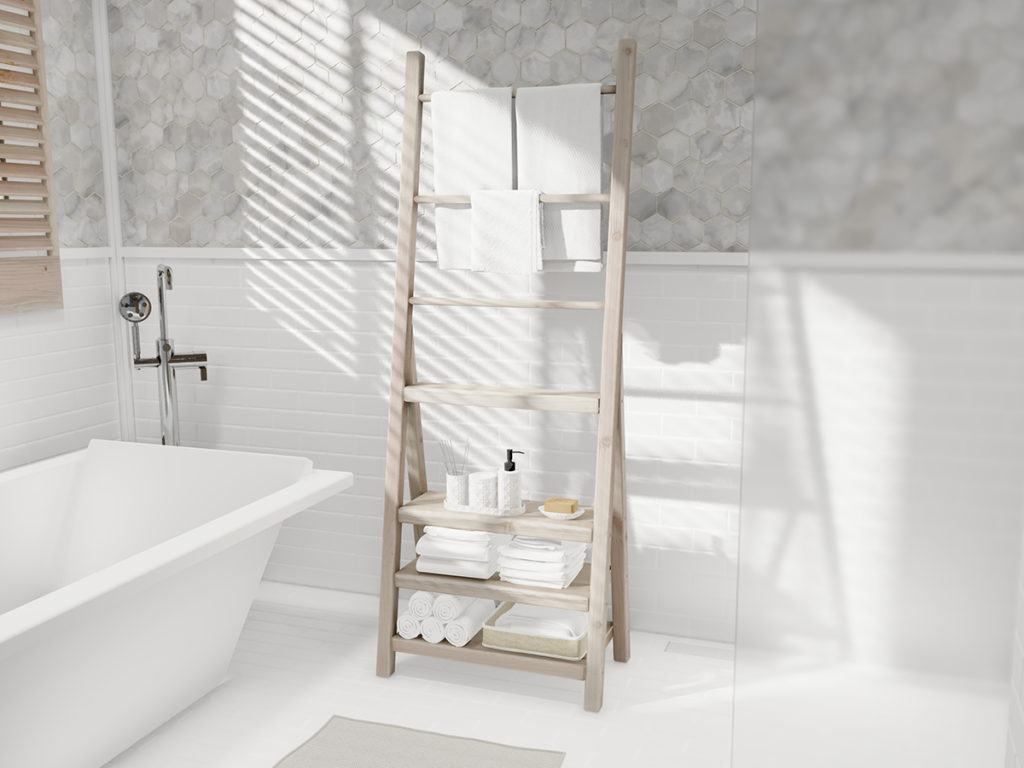
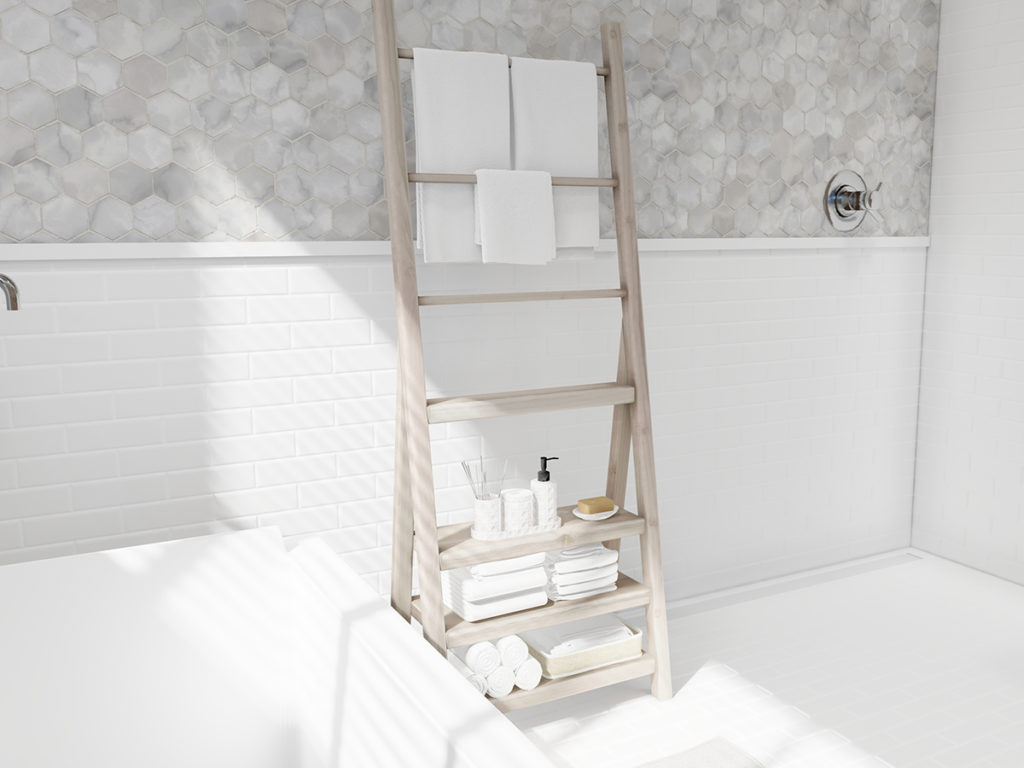
The resort style DIY towel rack allows for storage of multiple towels and bathroom supplies in an attractive and stylish way. The towel rack is also ideal for guest bathrooms or any bathroom where multiple towel storage, toilet paper, or toiler supplies need to be stored. You can get the storage needed without compromising on style and the decorative touch.
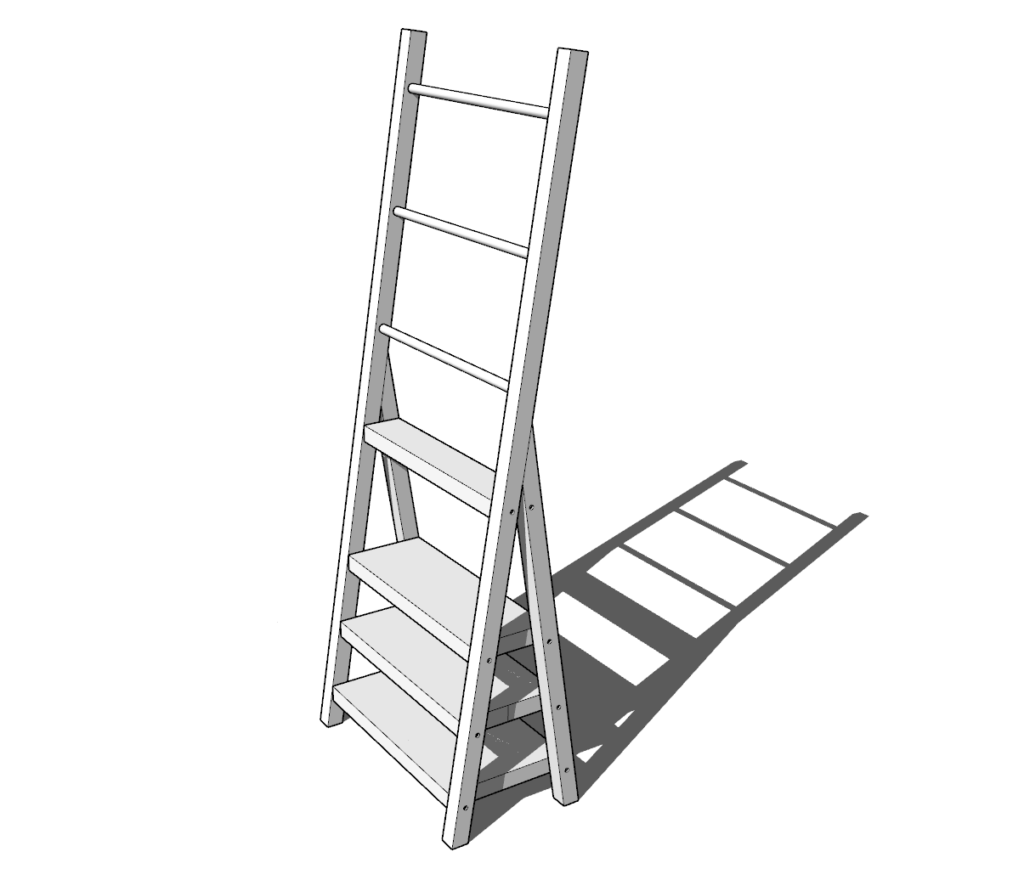
This DIY towel rack, with its 4 shelves, allows you to maximize on your restroom by taking advantage of vertical space instead of taking up large area of floor space that counters and cabinets usually take.
The neutral and natural color and texture of the wood can add a warmth to your restroom which can often feel cold with tile walls/floors and metal fixtures.
You don’t have to worry about your kids pulling off the wall mounted towel rack anymore. This is a great way to use some of the left-over common lumber pieces and put them to great use in your home.
The towel tower is a perfect solution for tiding up the restroom and for holding up multiple bath/hand towels. You can use your bathroom space optimally by being able to store and have easy access to items on the 4 shelves.
What is special about this DIY towel rack design?
Quick and easy assembly and installation.
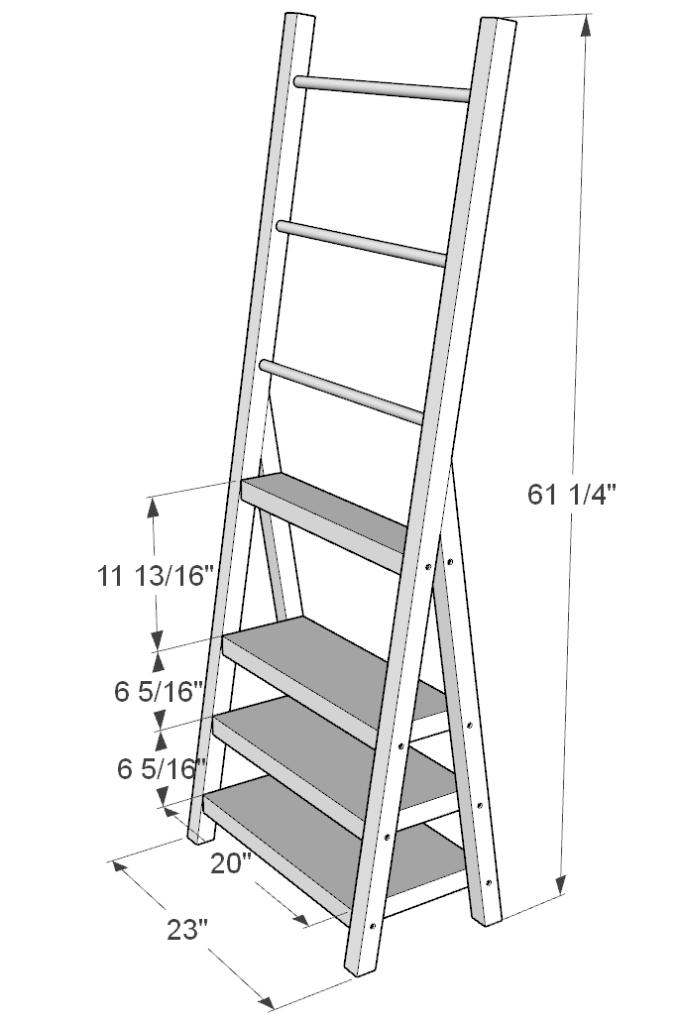
Bottom two shelves of the towel rack are about 6 inches apart, while the top shelve is a spacious 12 inches to fit taller decorative items.
This simple design is great for beginners to wood working and the DIY community. The wood can be found in most hardware stores and the simple step by step instructions will make this an easy project to build in one day.
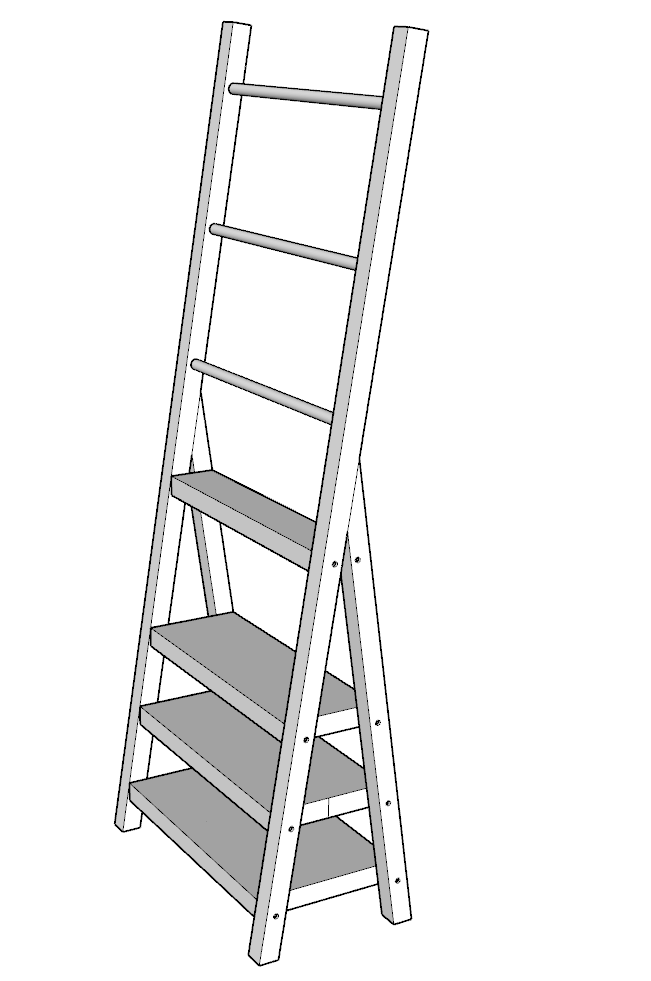
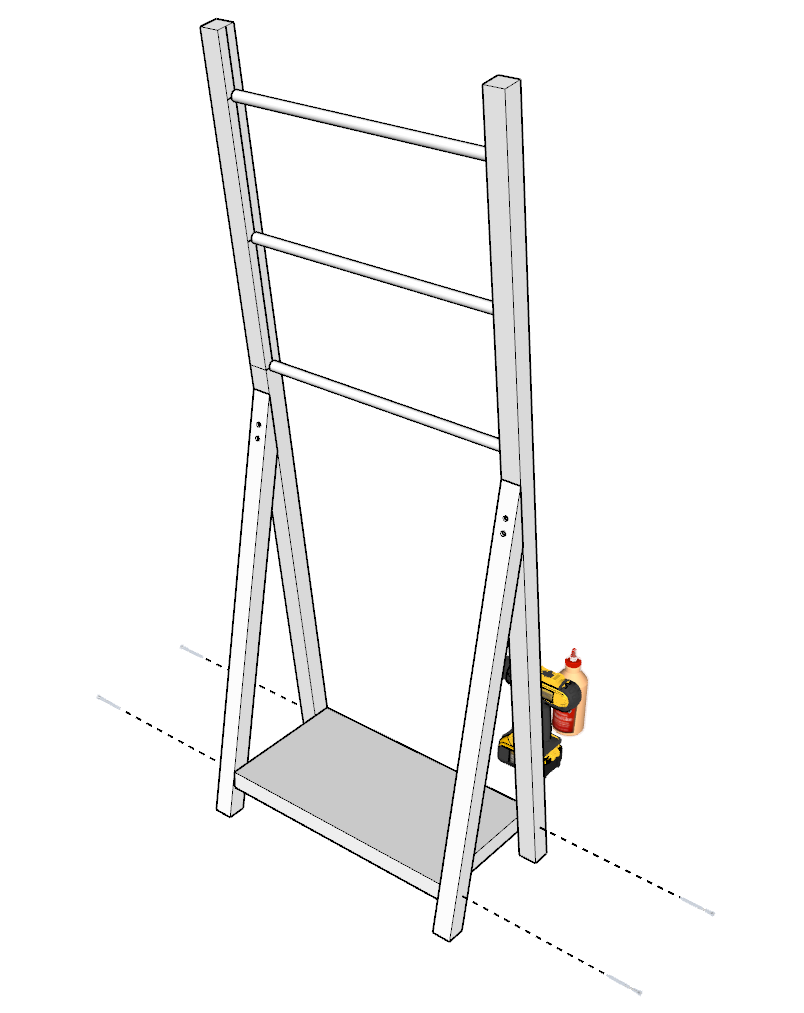
This DIY towel rack is 61 tall, 23 inches wide, 13 inches long. It has 4 shelves and 3 towel rack rods.
Time to build
1-2 hours
Total cost of build
About $45
Skill level required
Beginner
Download the PDF plans
Plans for how to build the DIY towel rack
What is included in the PDF download?
- Easy to read step by step instructions
- Material list
- Cut list
- Tools needed
- 3D illustrations
- Helpful links to tools and materials needed for the project
Recommend tools for this project
- Saw (miter saw recommended for precision cuts)
- Drill
- Impact driver with bit for screws
- Sander
- wood countersink drill bit
- Drill press (recommended)
Discloser: Some links are affiliate links
Cut list and material list
Available with purchase of PDF plans.
Step 1 (Towel rack)
First, precut your lumber pieces in the following dimensions and angles specified in the diagrams below.
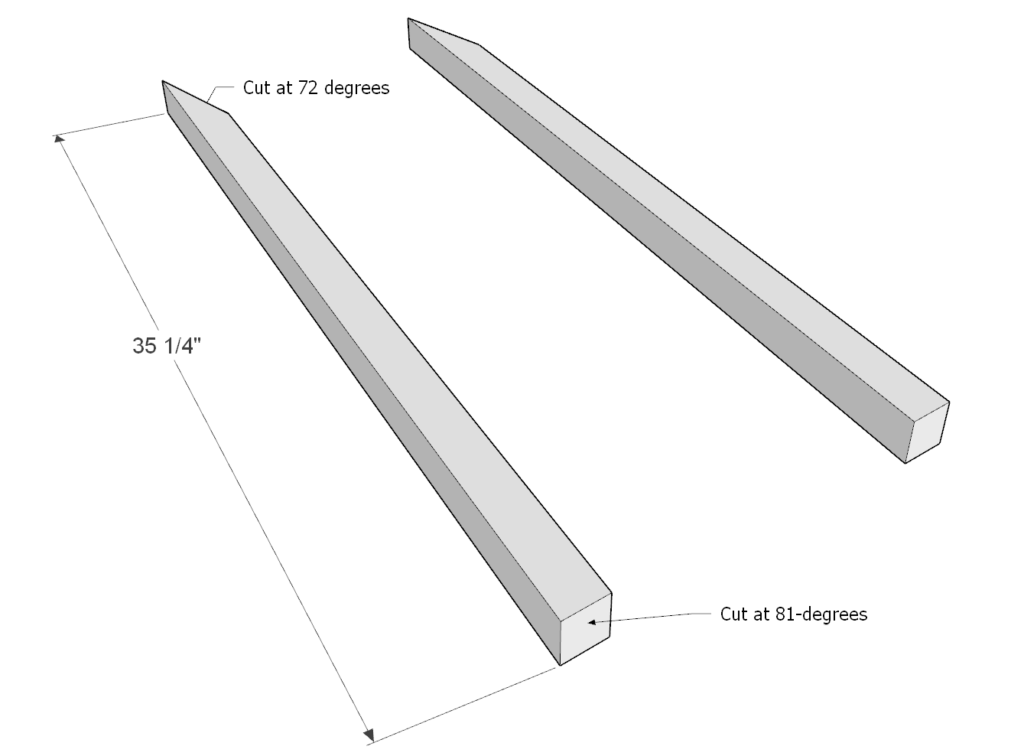
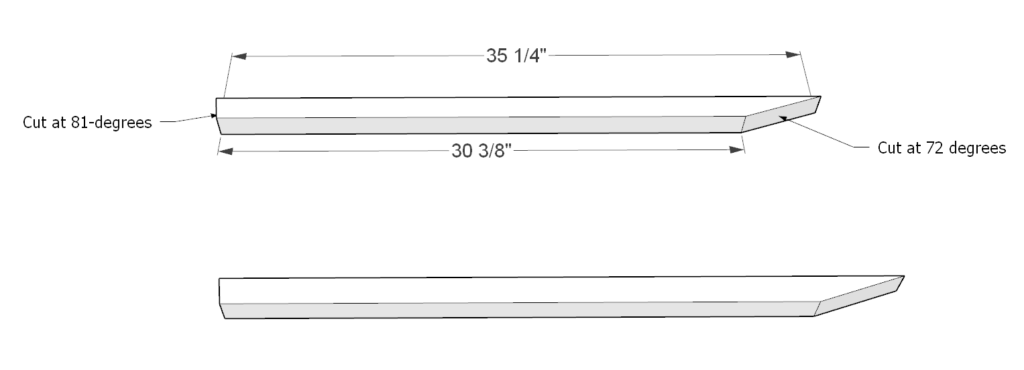
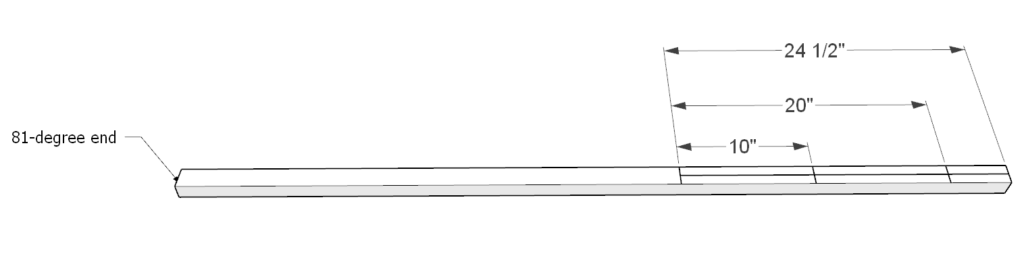
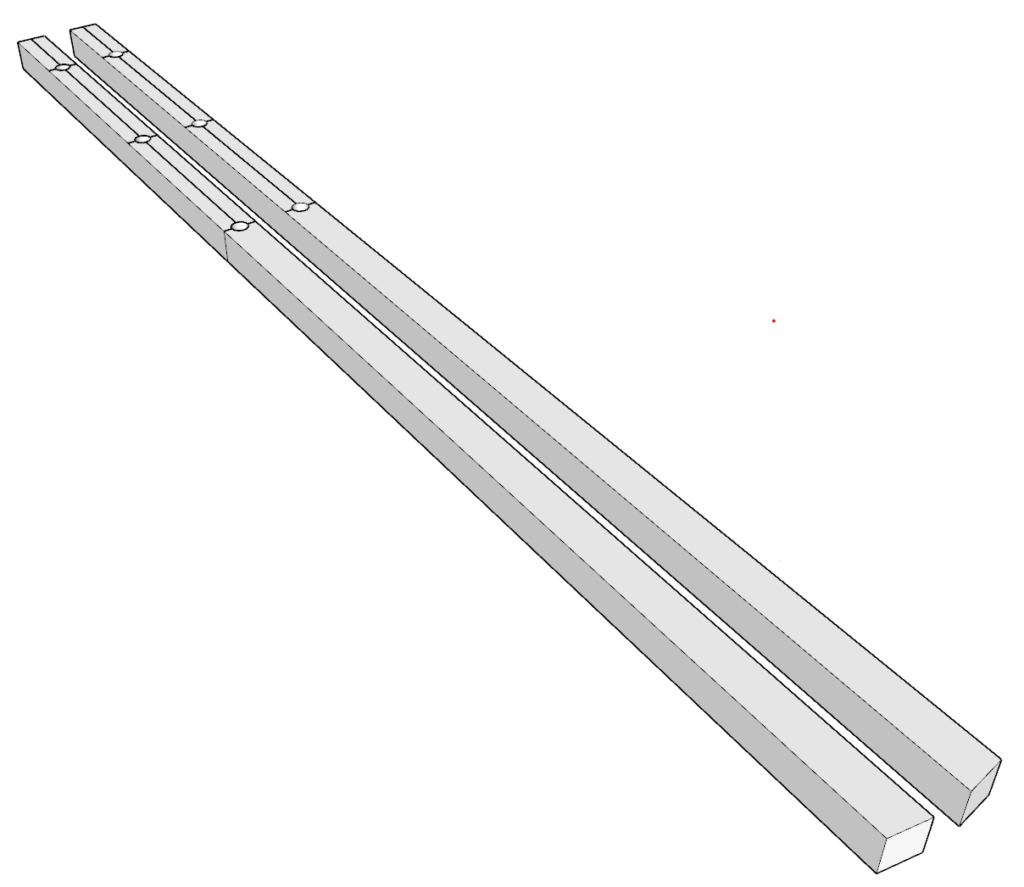
Cut two 35 1/4 inch pieces from 2×2 lumber. One end needs to be cut at a 81-degree angle and the opposite end needs to be cut at 72-degrees. Make two identical pieces like this.
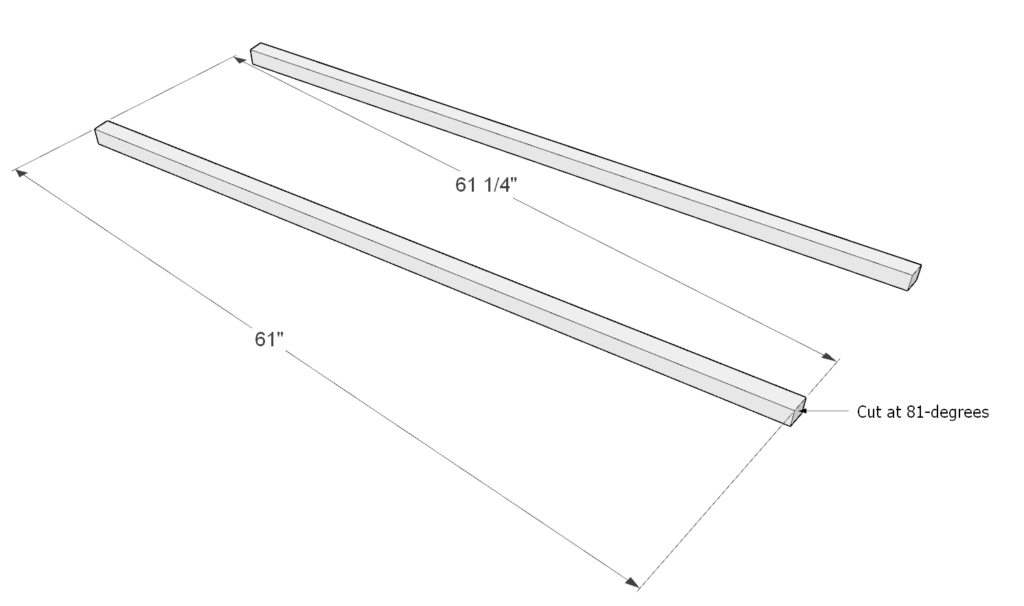
Next, cut two 61 1/4 inch pieces from 2×2 lumber. One end needs to be at an 81-degree angle. The other side needs to remain at 90-degrees.
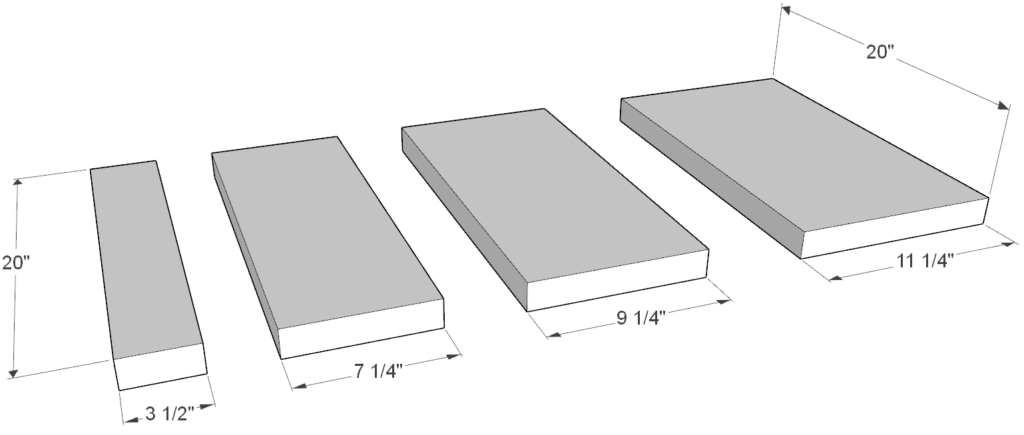
Next, cut the shelve pieces. They are all 20 inches long. Cut a 20 inch 2×4 piece, 20 inch 2×8 piece, 20 inch 2×10 piece, and a 20 inch 2×12 piece.
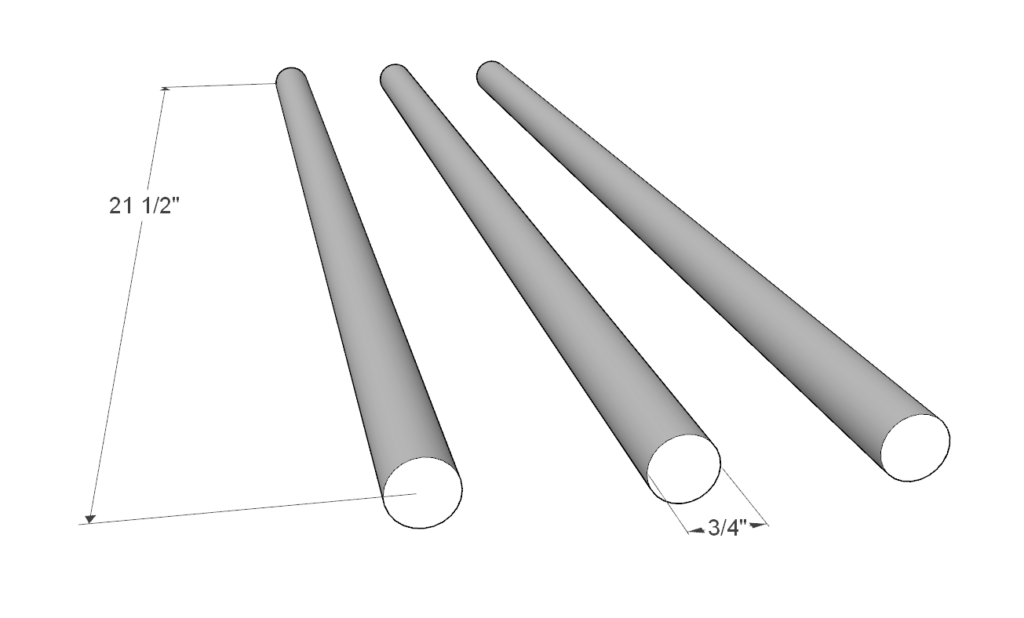
Lastly, cut three identical 20 inch long 3/4 inch diameter dowel pieces.

Step 2 (Towel rack)
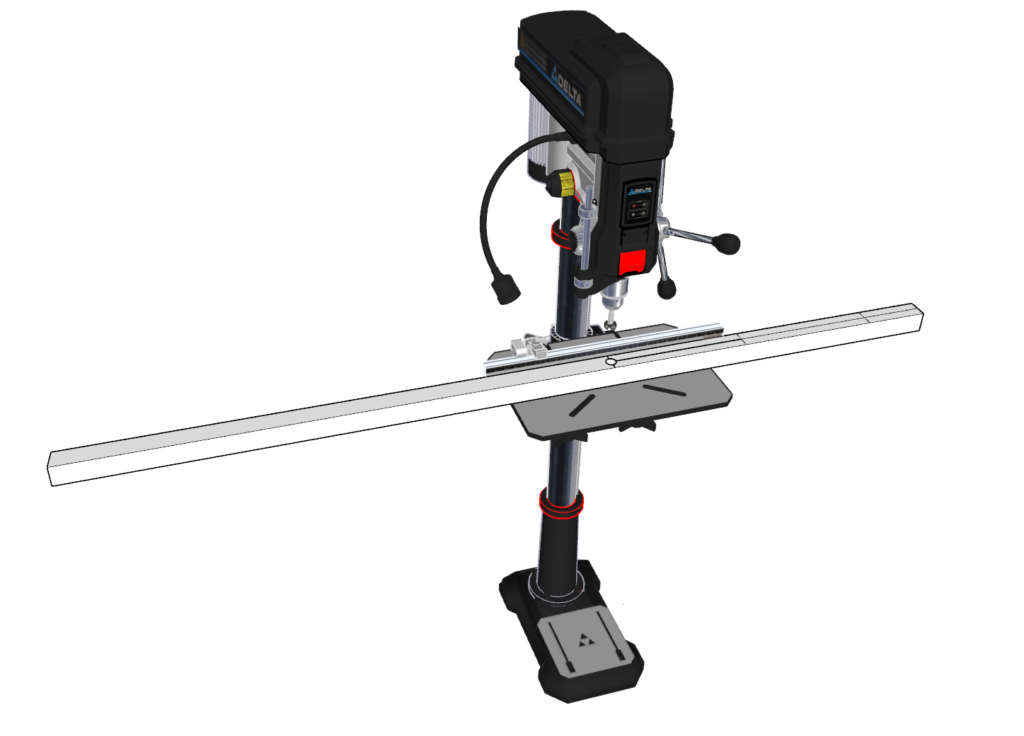
Next, take the 61 inch long 2×2 pieces and make markings for the area that you will drill 3/4 inch deep holes. Make markings as shown below. Repeat this for both 61 inch pieces.
Make sure not to mark the 81-degree end. That end needs to be left alone.
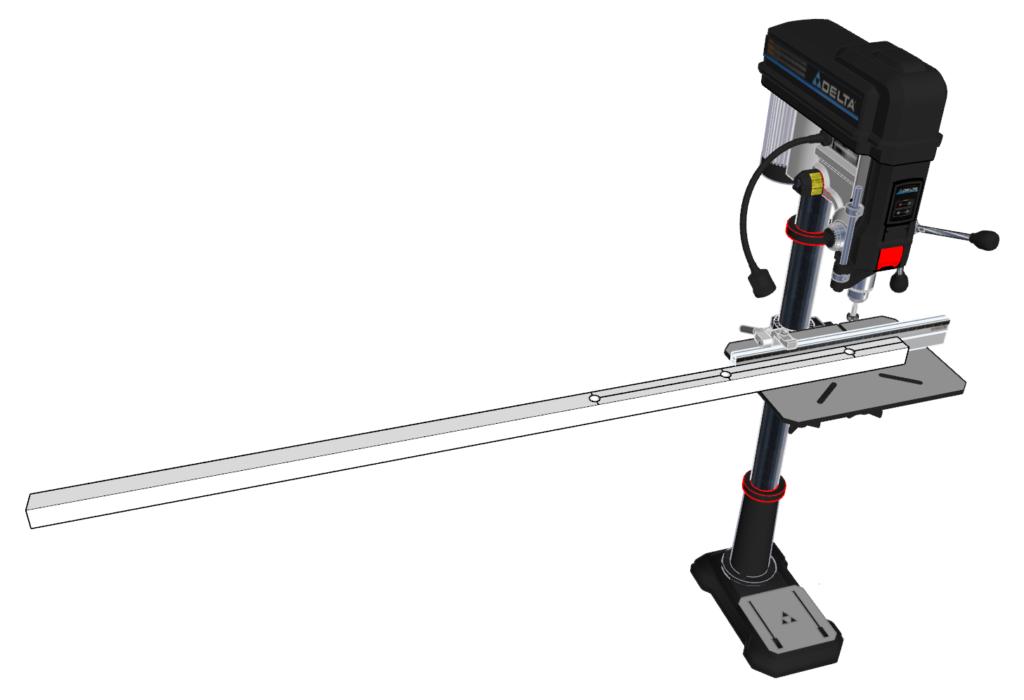
Step 3 (Towel rack)
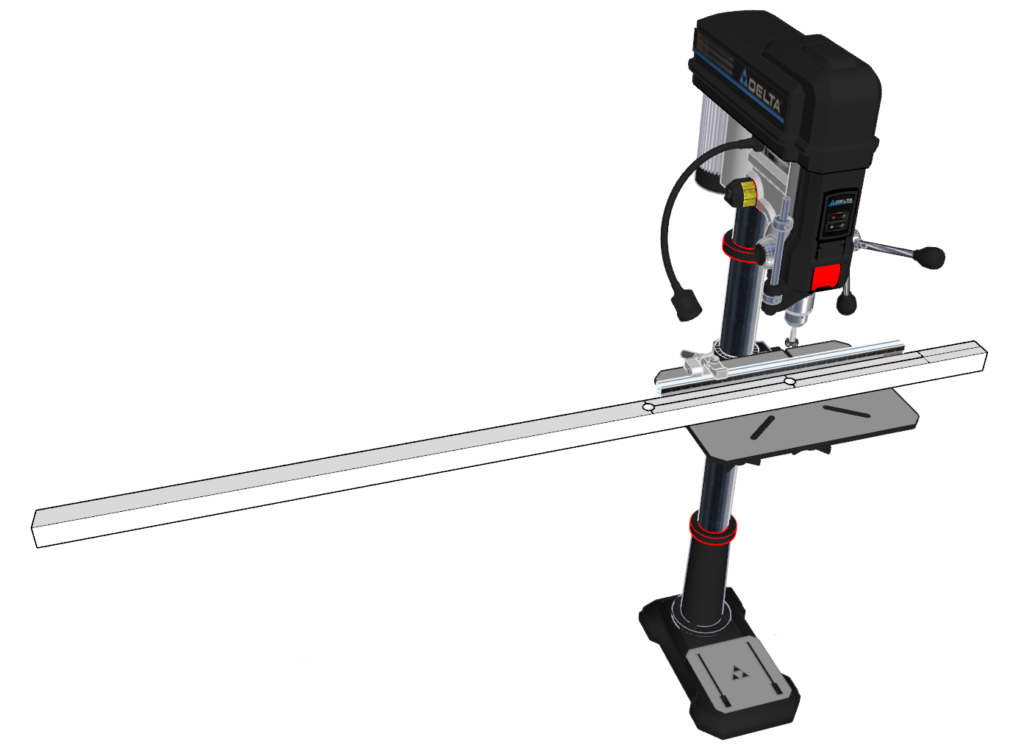
Next, use a drill press to make holes at the “x” you marked on the previous steps. Make the holes 3/4 inch deep (its ok to go just a little deeper to ensure that you have a little slack room when putting it all together).
You need to repeat this for the other 61 inch piece as well. NOTE THAT THE HOLES ARE DRILLED ON THE OPPOSITE SIDE OF THE 2×2. Make sure that the final two 61-inch pieces are a mirror of each other and not identical.

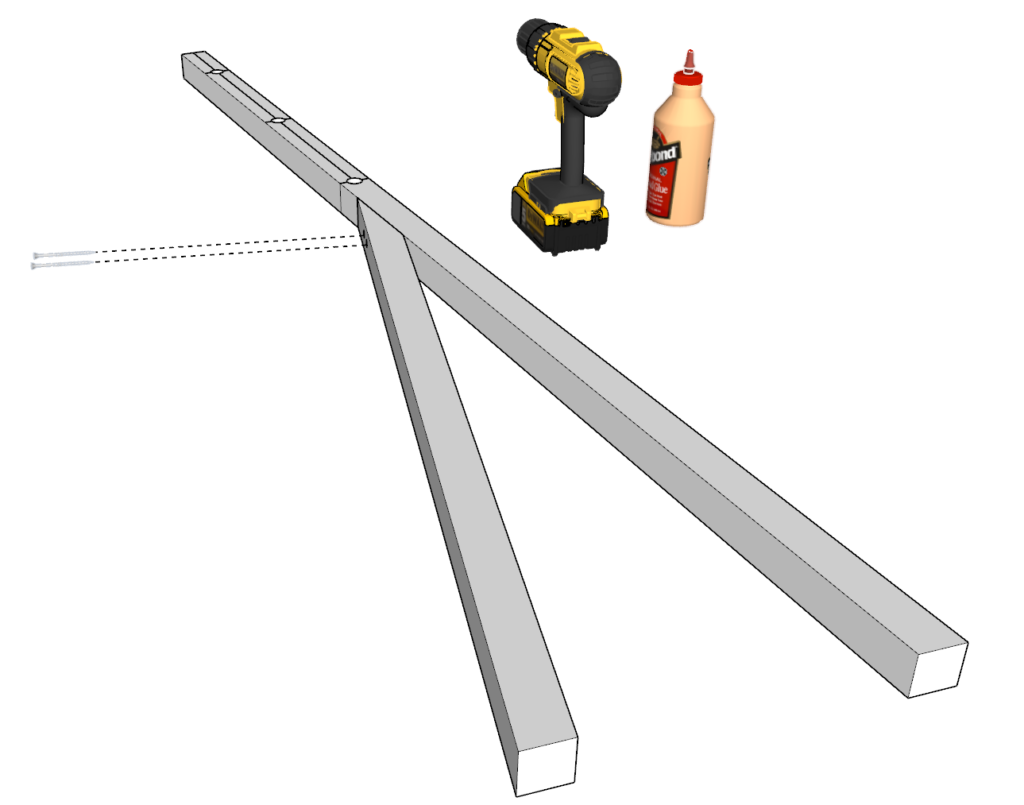
Step 4 (Towel rack)
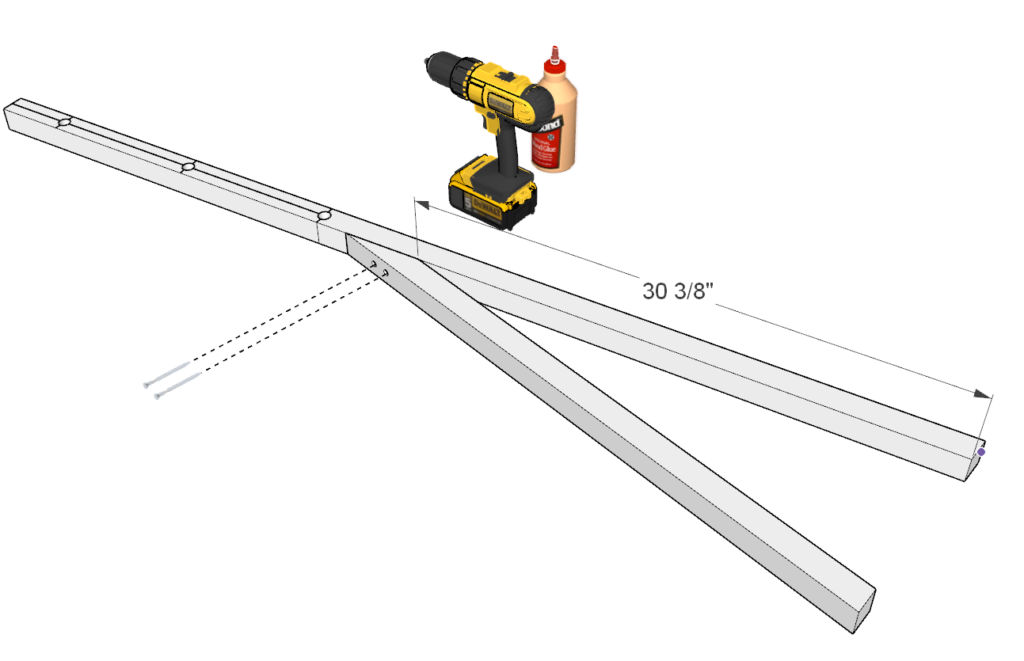
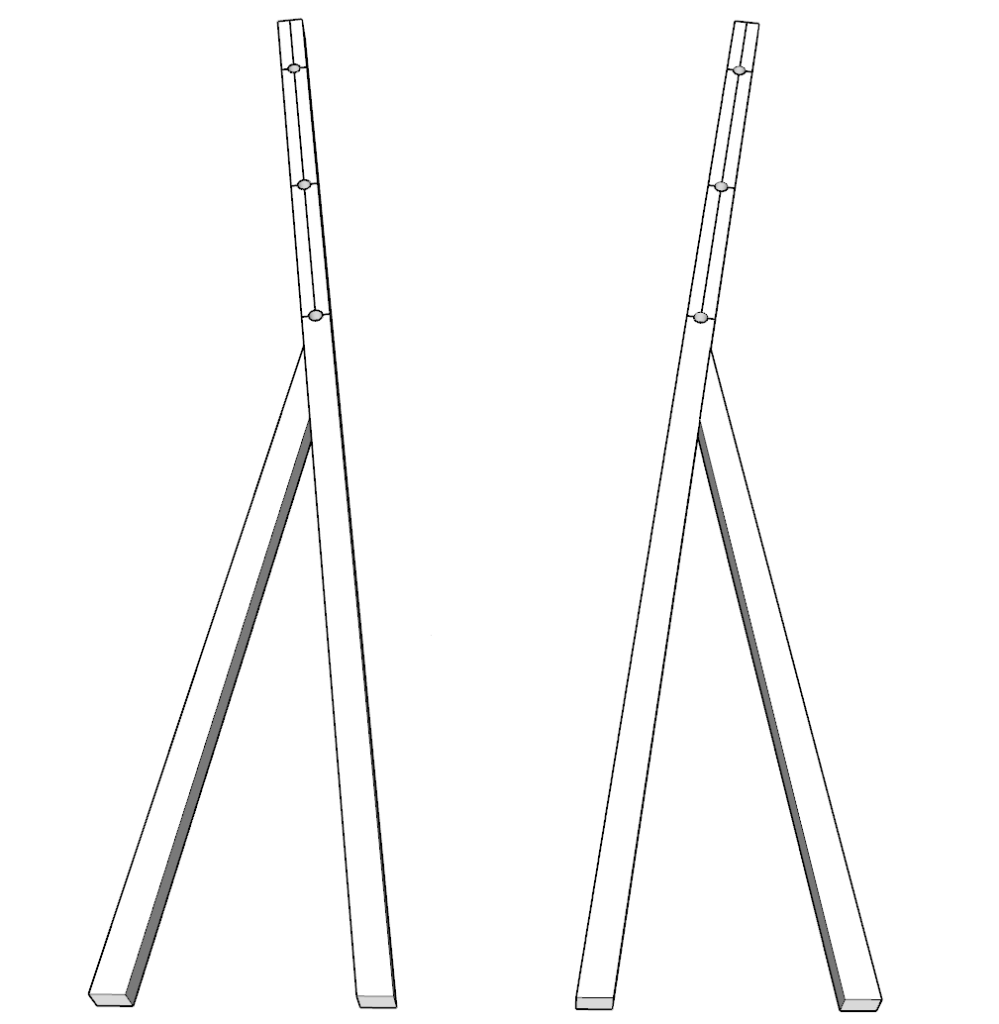
Next, join the 61-inch pieces with the 35 1/4 inch pieces.
Properly align them as shown in the diagram. The heigh should be around 30 3/8 inches.
Apply glue to all areas that will be joining together, predrill two holes and add the 2.5 inch screws.
repeat this step for the next pair. In the end you should have two mirror leg pieces.
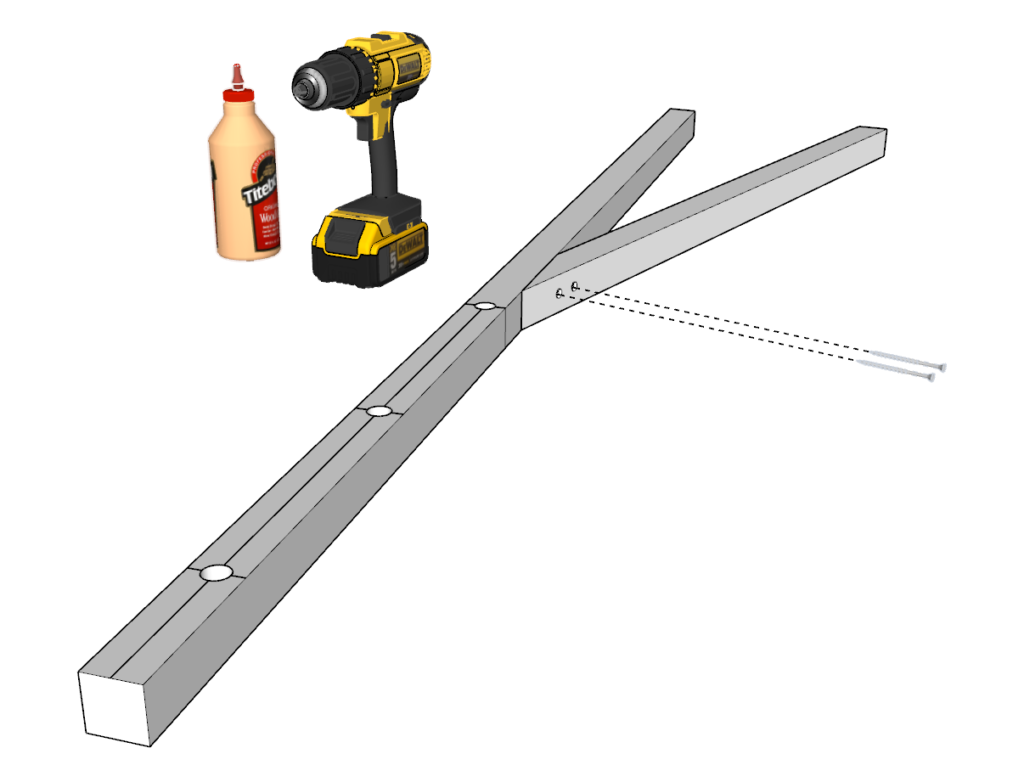
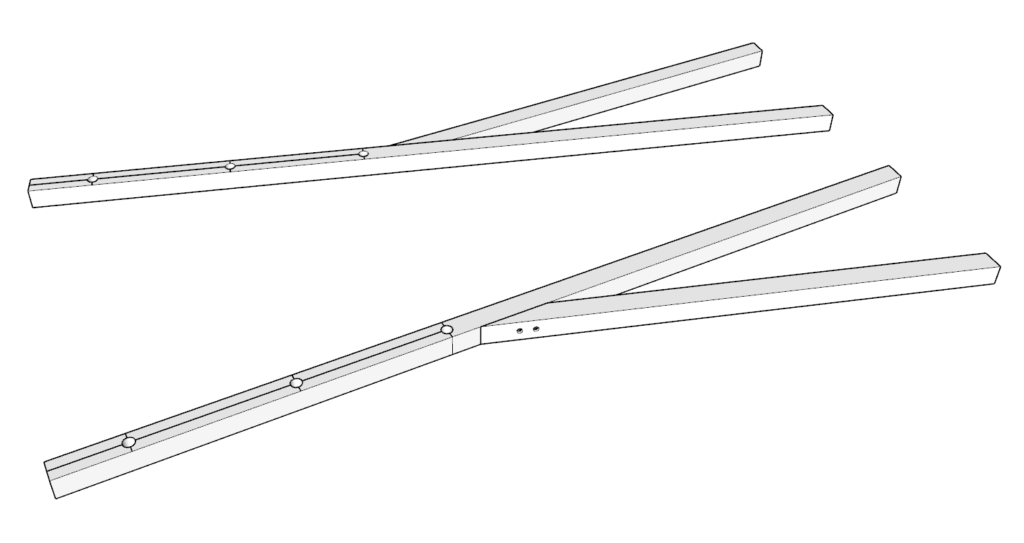
Step 5 (Towel rack)
Next, add glue and the 3/4 inch diameter dowels to the predrilled holes.
Step 6 (Towel rack)
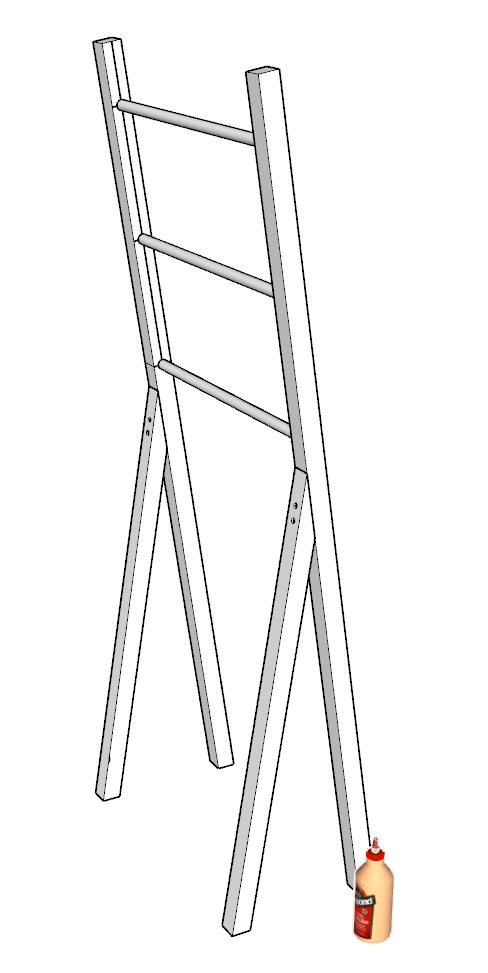
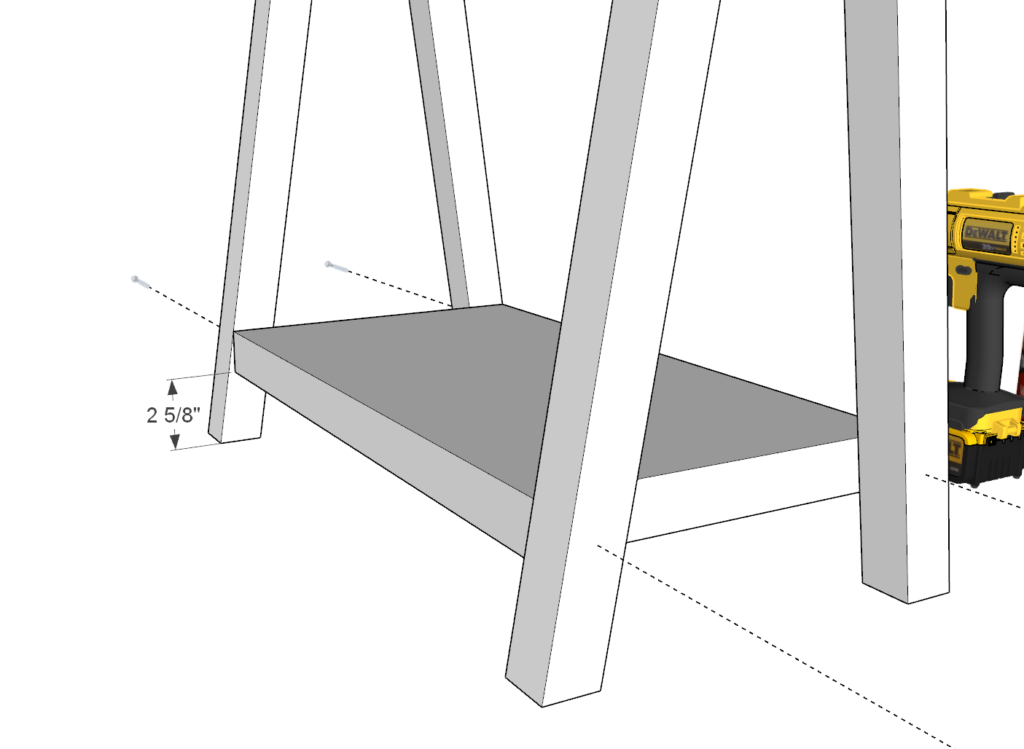
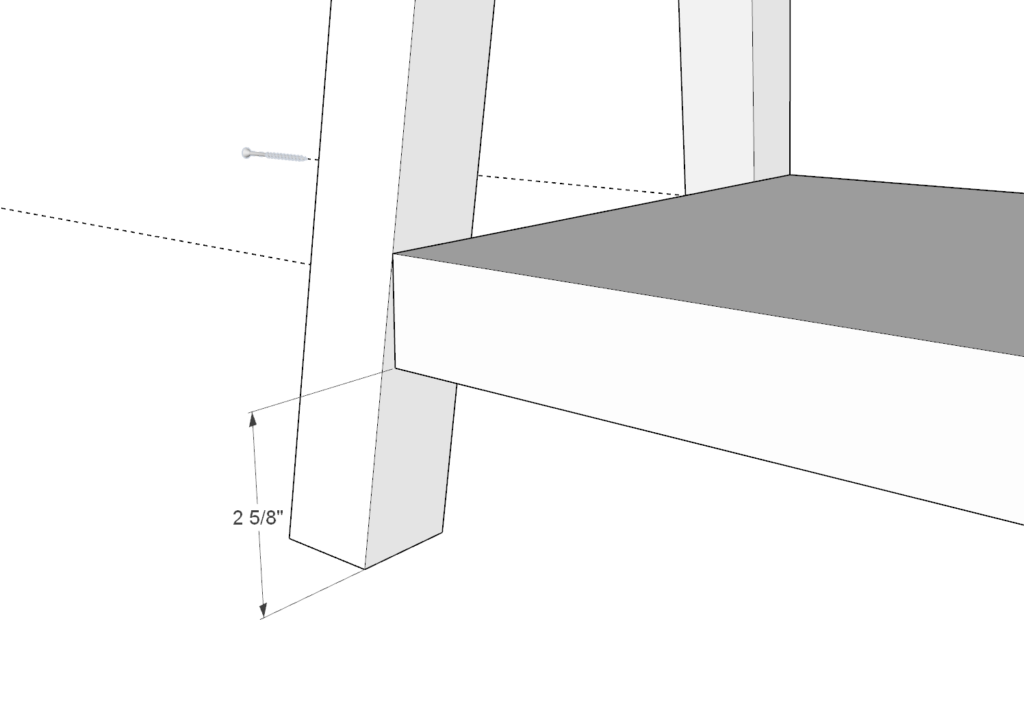
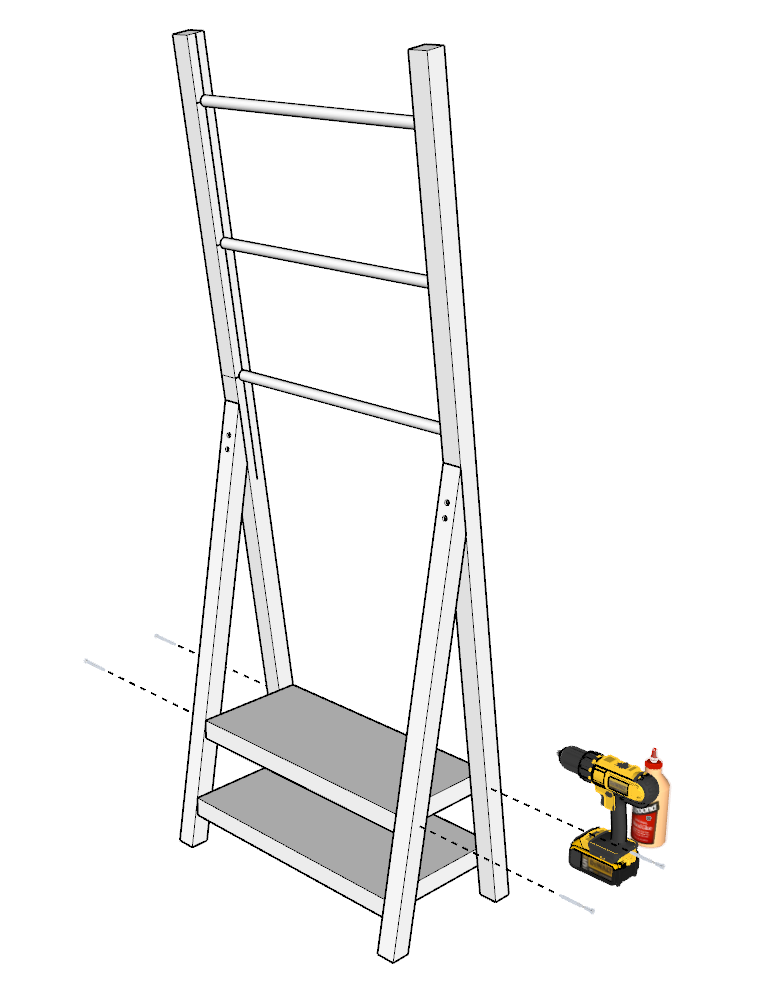
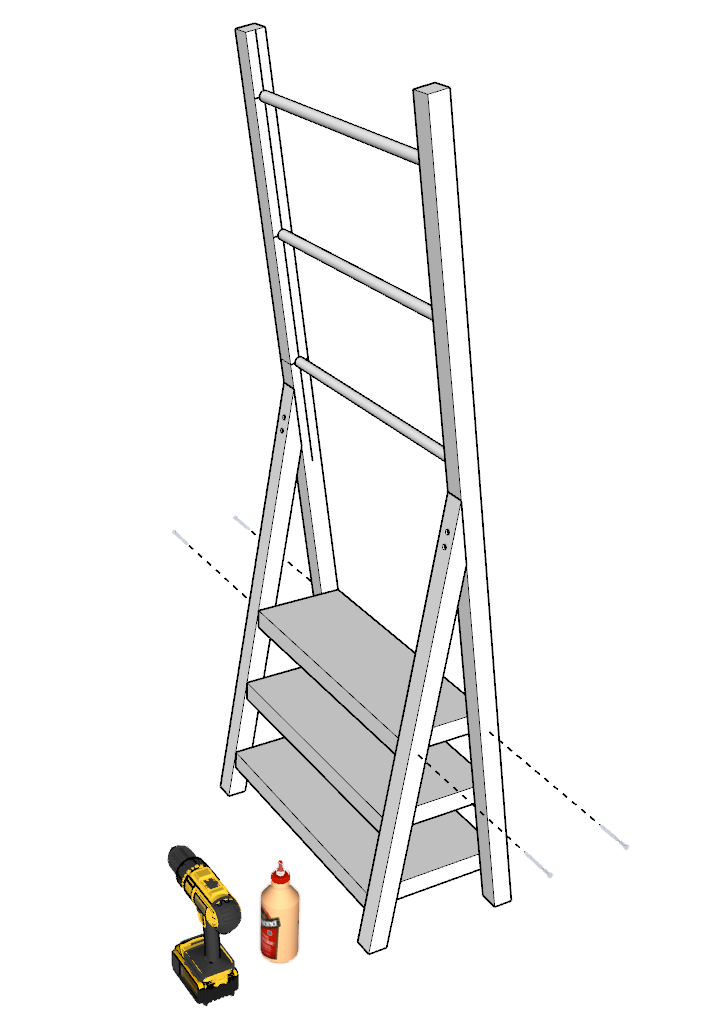
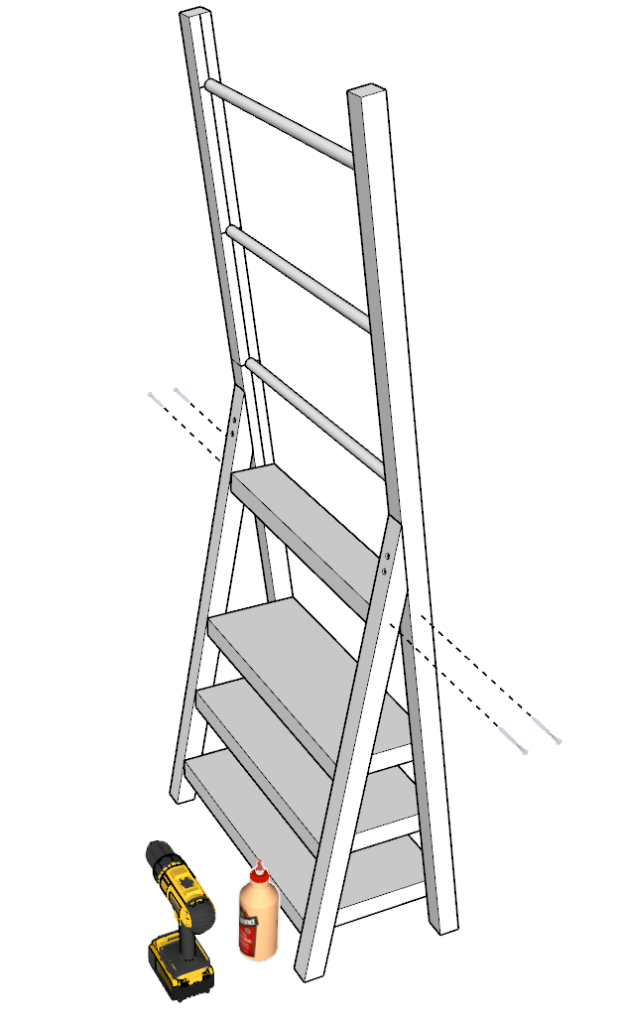
Next, you will need to add the shelves to the DIY towel rack.
Start by adding the 20 inch 2×12 shelve. Make sure that the shelve is about 2 5/8 inches off the ground. Apply glue to all areas that will be making contact with the legs. Predrill holes to prevent the 2×2 from splitting. Add screws.
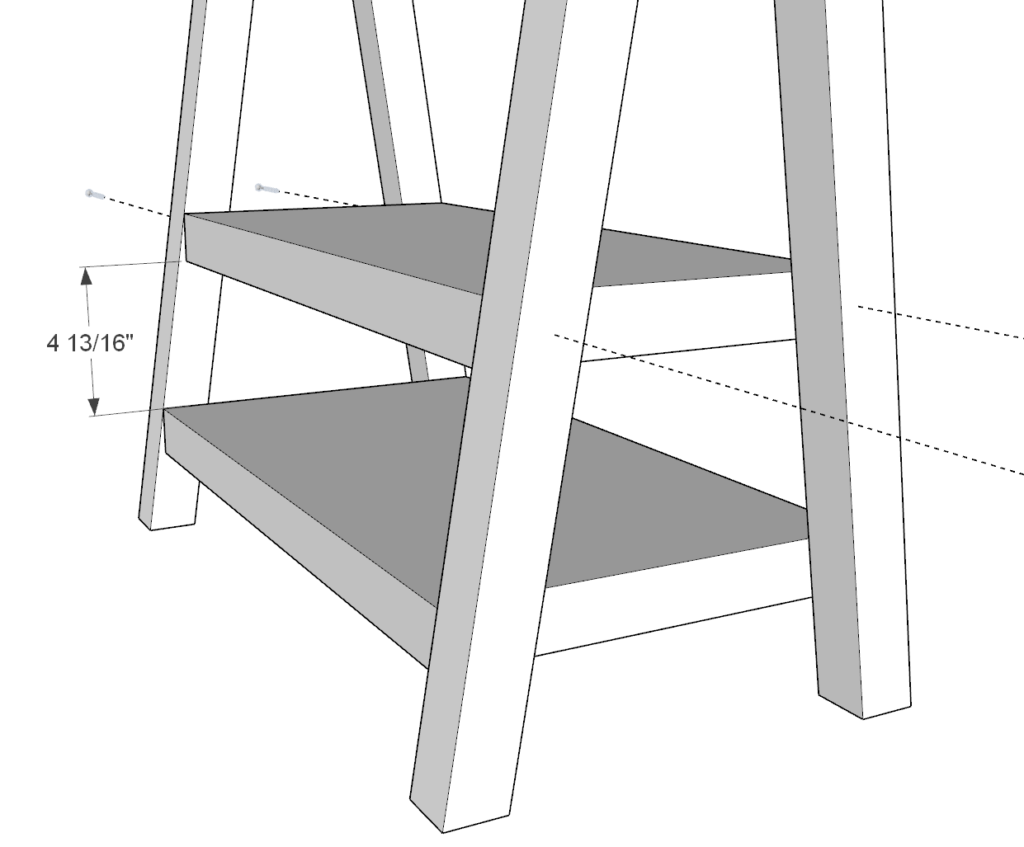
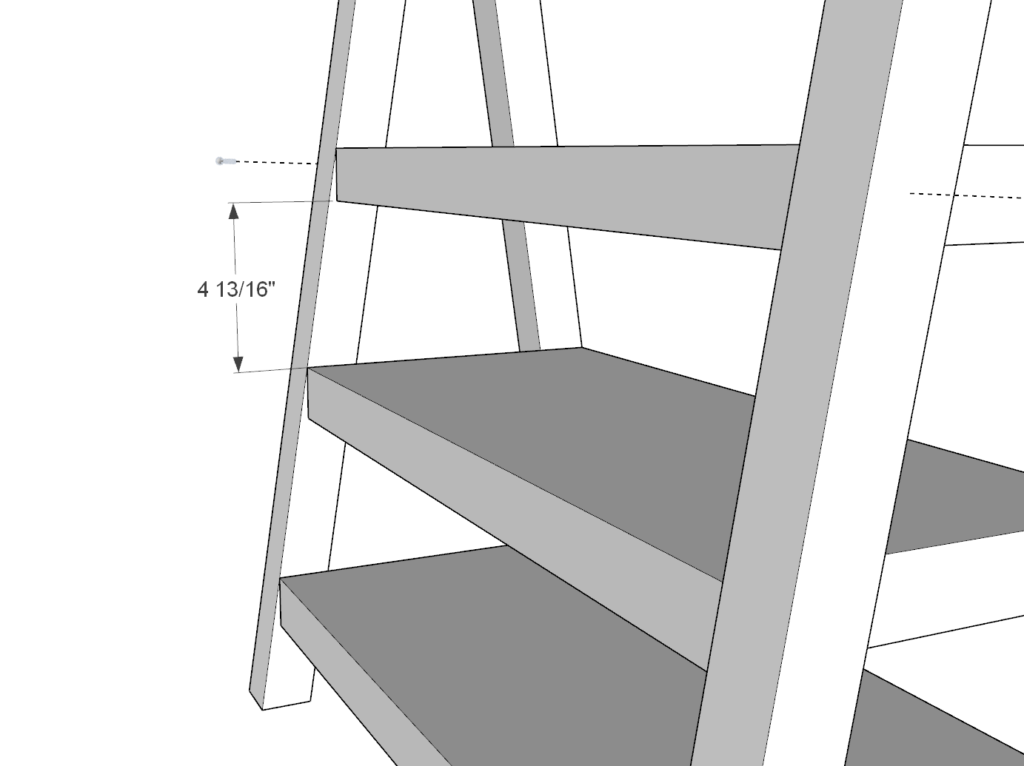
Repeat this for the 2×10 shelve as well. Space it about 4 13/16 inches from the base shelve. Predrill, add glue, and add screws.
Repeat this for the 2×8 shelve as well. Space it about 4 13/16 inches from the 2×10 shelve. Predrill, add glue, and add screws.
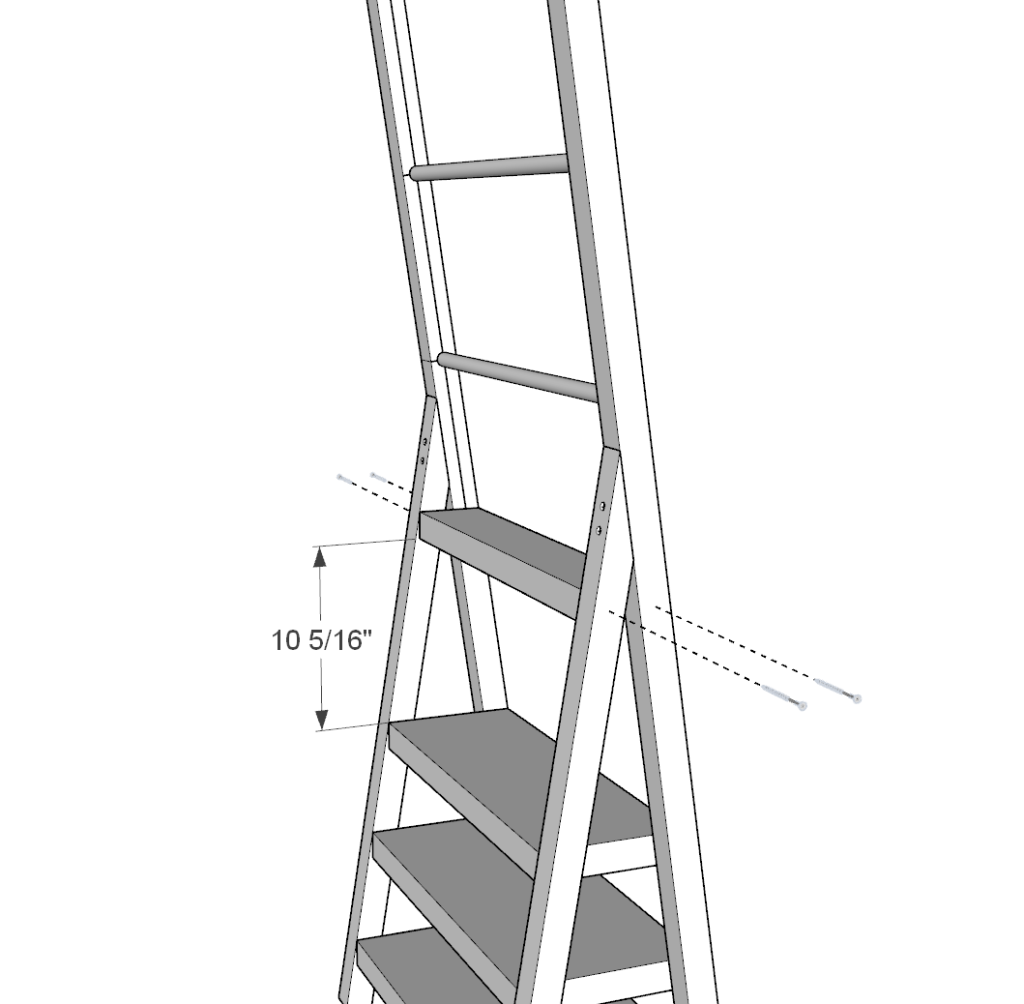
Repeat this for the 2×4 shelve as well. Space it about 10 5/16 inches from the 2×8 shelve. Predrill, add glue, and add screws.

Step 7 (Towel rack)
The final step is to sand down the towel rack.
I start sanding with a rough grit sandpaper. Usually about 80-grit. Then, for the final touch I use a fine grit. Usually, a 220-grit.
The towel holder rack with shelves is now ready to be stained or painted. You can additionally leave it without staining in order to have a more natural look. The photos you see are natural colored Douglas Fir wood studs from stores like Home Depot or Lowes.