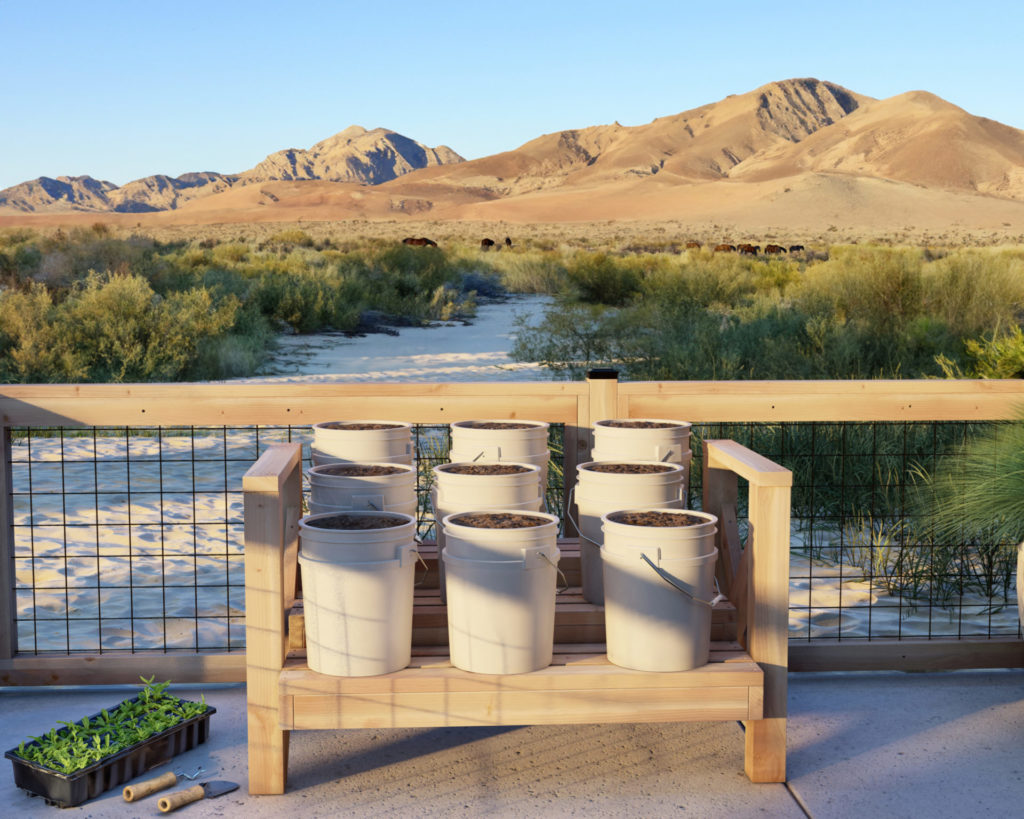
Discover the Benefits of DIY Bucket Gardening with Our Small 6-Bucket Planter Stand
Gardening is a rewarding hobby that offers numerous mental and physical health benefits – and what could be better than transforming your outdoor space with your own hands while cultivating a beautiful, thriving garden? Our smaller version of the DIY bucket garden stand, which holds just six buckets, is perfect for those with limited space or looking to have a more compact and manageable gardening experience. Read on to learn more about why this 6-bucket planter stand may be a great addition to your outdoor space and how you can purchase our step-by-step DIY plan to create your personalized planter stand!
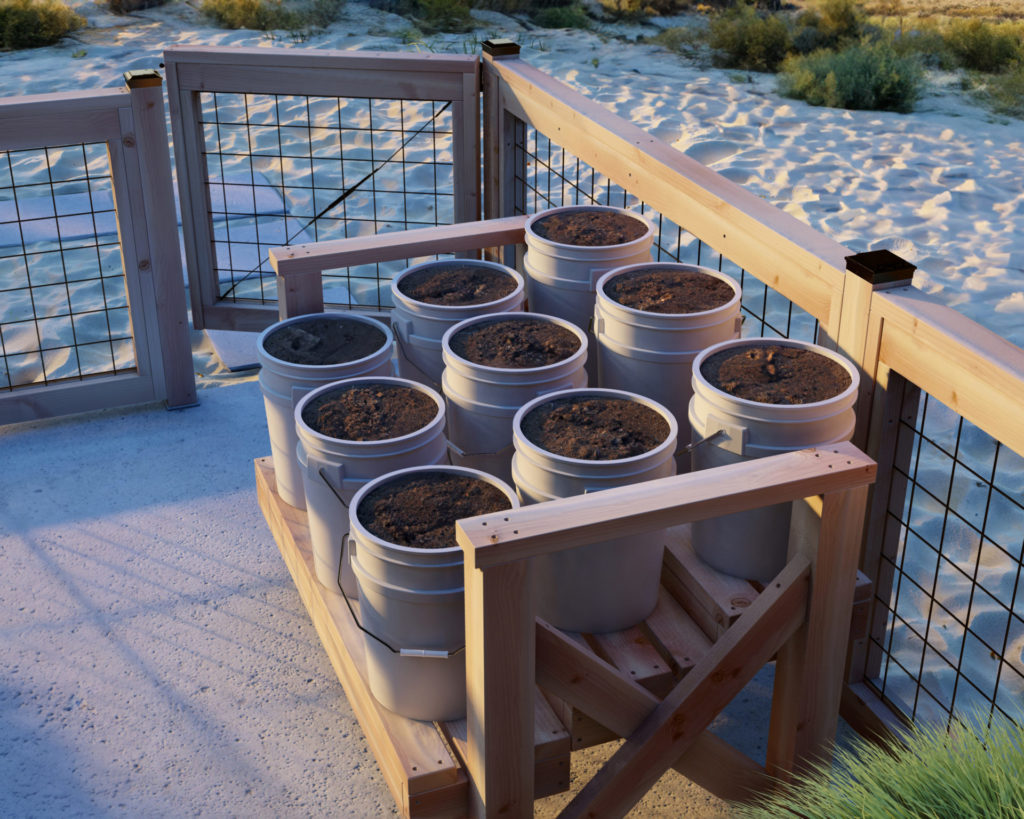
Boost Your Garden Vibes with Our Compact 6-Bucket Stand
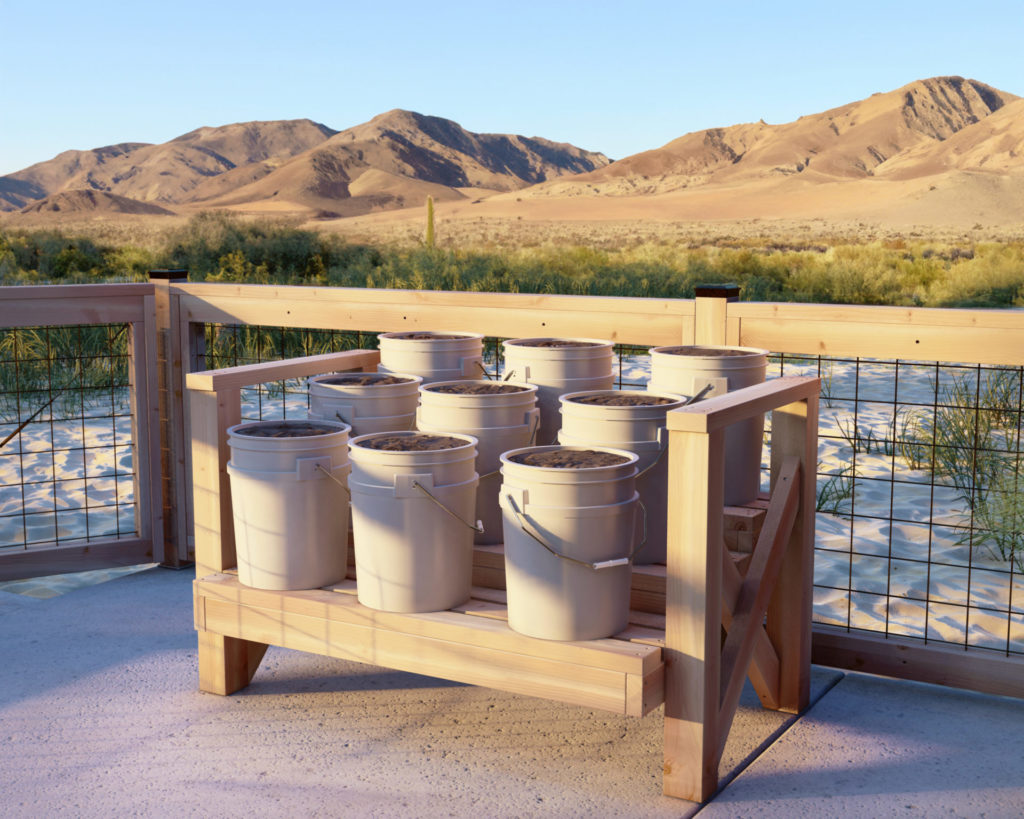
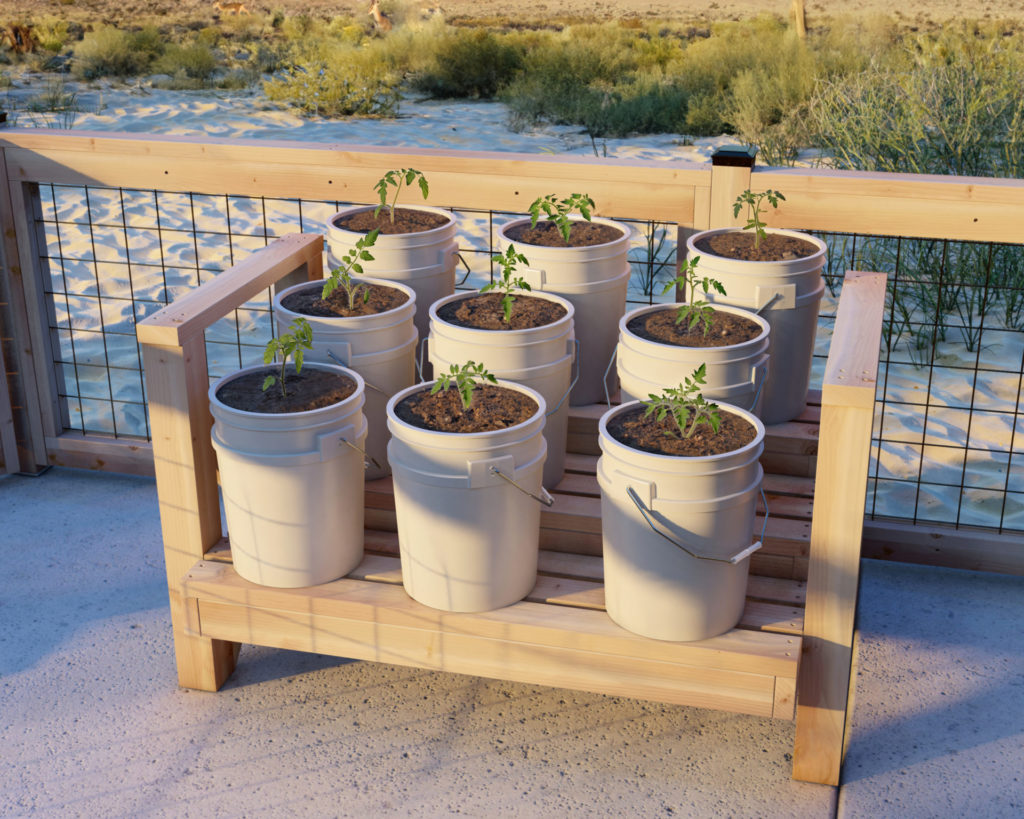
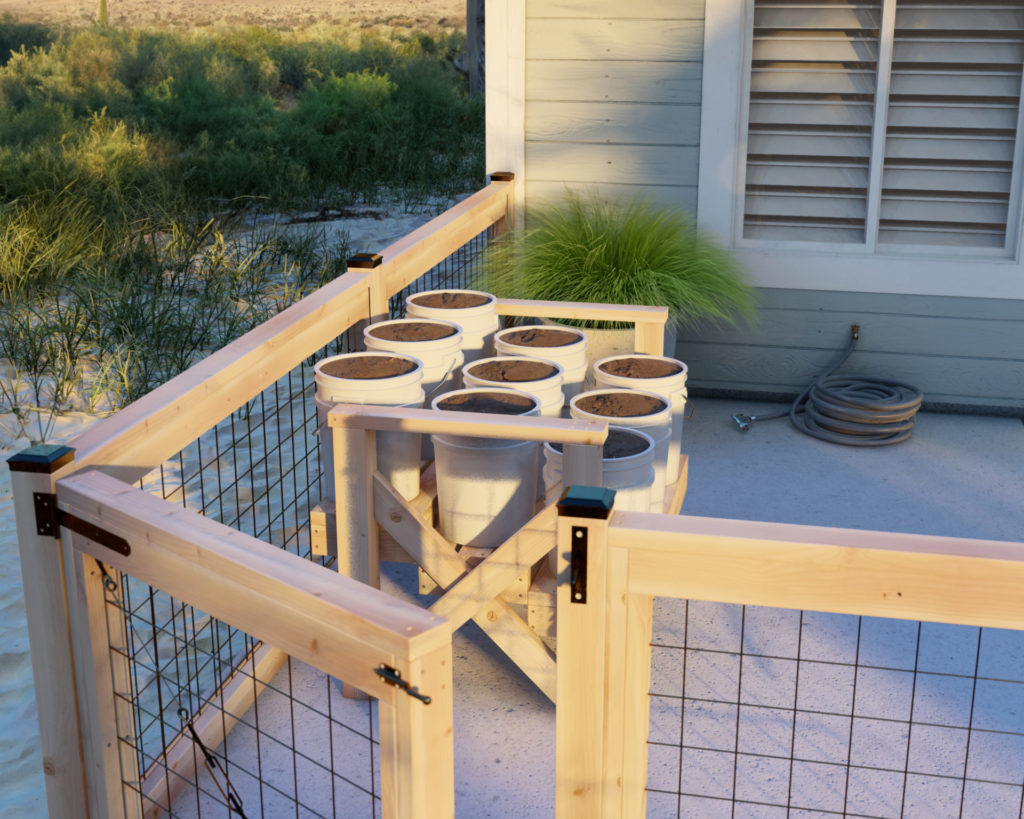
This scaled-down version of our larger planter stand is designed to accommodate six buckets, offering a space-friendly option for townhouses, balconies, patios, or small backyards. The smaller size makes it easier to manage, move around, and customize, while still retaining the benefits of vertical gardening and the ability to grow a variety of plants with different soil and pH requirements.
Transform Your Garden with this Easy-to-Build Planter Stand
Say goodbye to dull-looking gardens and hello to functional, eye-catching vertical gardening with an easy-to-build 6-bucket planter stand. This innovative and practical solution lets you create a multi-level garden wherever you desire – be it on your small patio, terrace, or backyard corner. With our step-by-step PDF plan, even woodworking beginners can successfully build a solid, customizable planter stand designed to hold up to six buckets for an elevated gardening experience.
Maximize Space and Creativity with a DIY 6-Bucket Garden Stand
Whether you have limited outdoor space or simply desire a unique approach to gardening, a DIY 6-bucket garden stand offers versatility and customization, making it an exciting departure from traditional gardening methods. Its innovative vertical design allows you to maximize your plant display while accommodating various plant types with different soil and pH requirements – all while saving valuable real estate. Its suitability for both indoor and outdoor use means that endless gardening possibilities are within reach with this versatile garden stand.
Simple Woodworking Techniques to Create Your Own Vertical Garden
Even if you are new to woodworking, building a 6-bucket garden stand can be a breeze with our beginner-friendly PDF plan. No fancy joints or complicated cuts are required – just basic tools such as a saw, drill, and screwdriver. The plan utilizes inexpensive and widely available construction lumber, making it an affordable and accessible project for any aspiring woodworker. As a result, you will not only enjoy the satisfaction of constructing your garden stand from scratch but also appreciate its sturdiness and functionality in showcasing your favorite plants.
Customize Your Garden: Tips for Personalizing Your DIY 6-Bucket Stand
One of the greatest joys of gardening is that it encourages creativity and self-expression. Building a DIY 6-bucket garden stand allows you to incorporate your personal touch into the design, as you have full control over the stand’s size, configuration, and even the type of buckets used. Stain or paint each individual bucket to create a cohesive color palette that reflects your style, or unleash your artistic flair by adding patterns, artwork, or decorative accents. As your gardening interests evolve, you can easily modify or expand the stand to accommodate a changing plant collection, making this garden stand a true testament to your gardening journey.
Elevate Your Small Garden Today
Whether you’re short on space or looking for a manageable vertical gardening project, our 6-bucket DIY planter stand is the perfect solution. With easy-to-follow construction steps, affordable materials, and endless customization options, you’ll enjoy the satisfaction of building and growing the perfect garden in your limited outdoor area. Start your 6-bucket garden stand project today and elevate your gardening experience to new heights!
Time to build
About 2 hours
Total cost of build
About $75
Skill level required
Beginner
Download the PDF plan
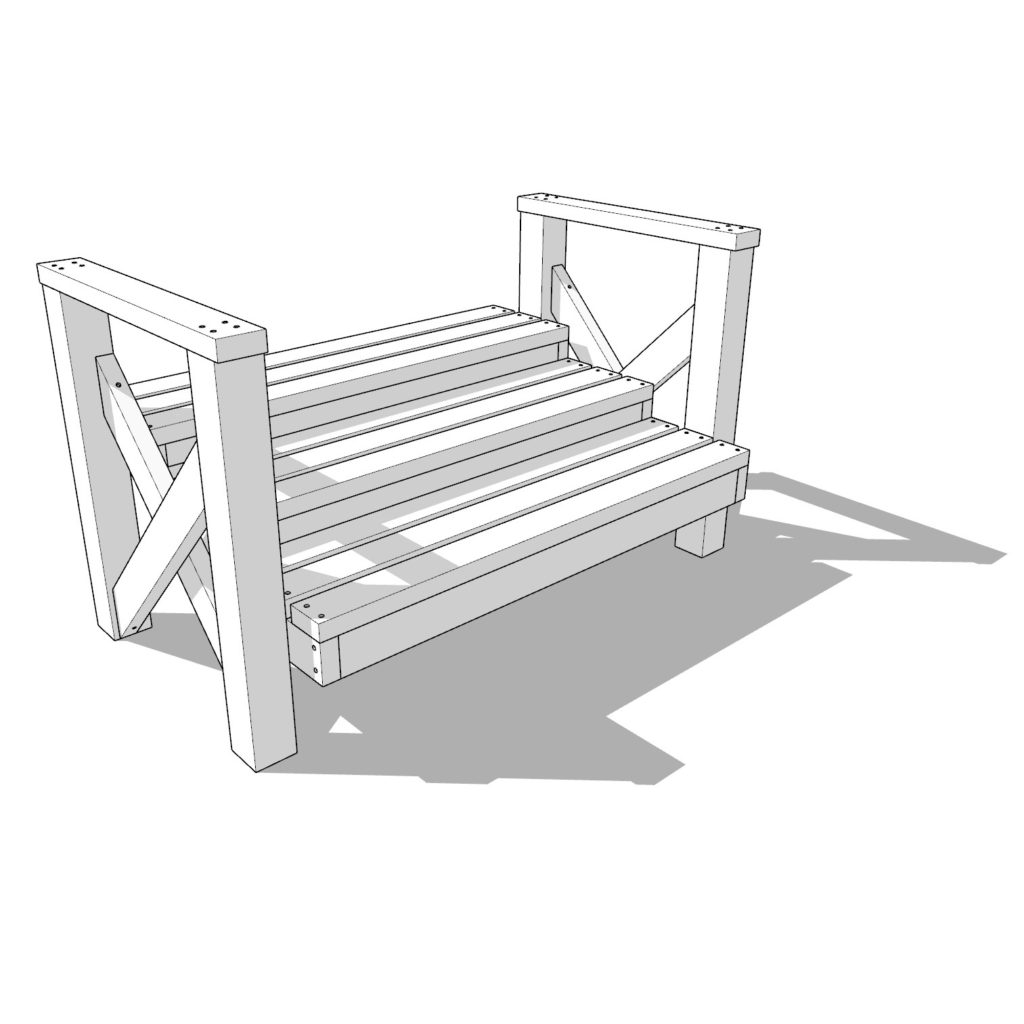
5-Gallon Bucket Garden Stand PDF plan
What is included in the PDF download?
- Easy to read step by step instructions
- Material list
- Tools needed
- Helpful links to materials and tools needed
Bucket Garden Stand Dimensions
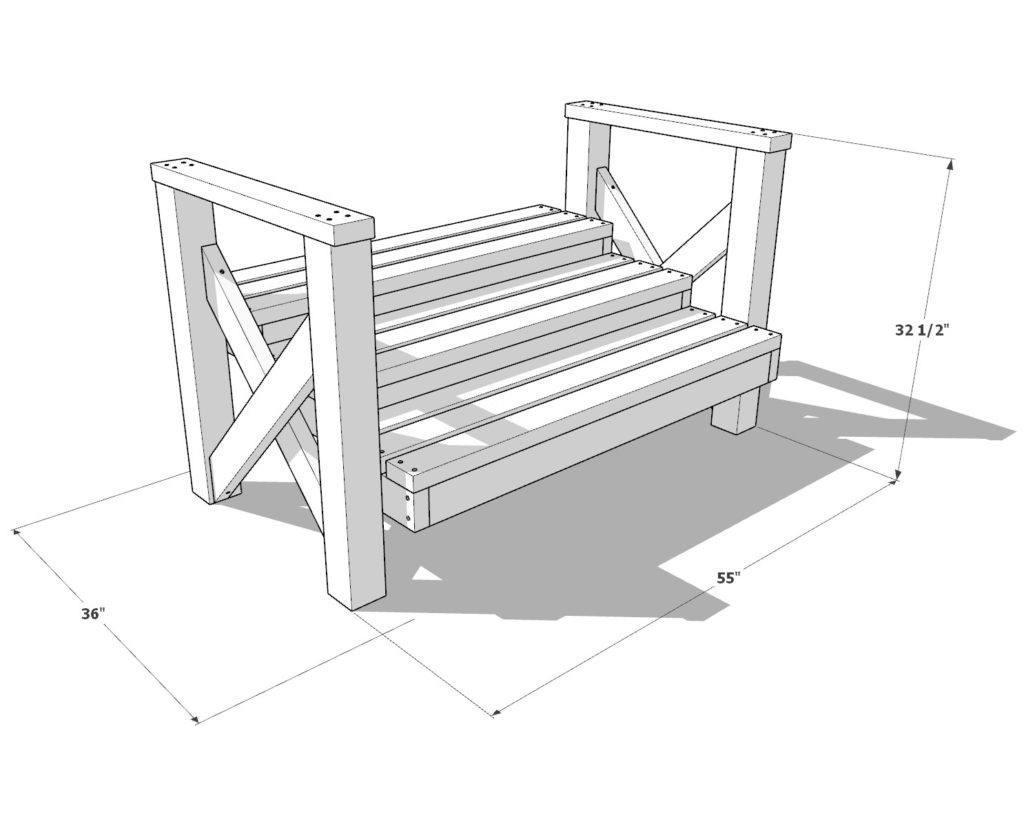
Recommend tools and materials
- Miter saw or circular saw (capable of cutting a 45-degree angle)
- Drill (with countersink drill bit to predrill holes) and impact driver for screws (with bit for driving screws)
- Wood glue
- Less then 1 lb of 2.5 inch screws
- 1 lb of 3.5 inch screws.
Lumber shopping list and cut list
Lumber Shopping List:
(11) 2in x 4 in x 8ft
(2) 4in x 4 in x 8ft
2×4 Lumber Cut List:
(6) 2in x 4 in x 45in
(6) 2in x 4 in x 12in
(9) 2in x 4 in x 48in
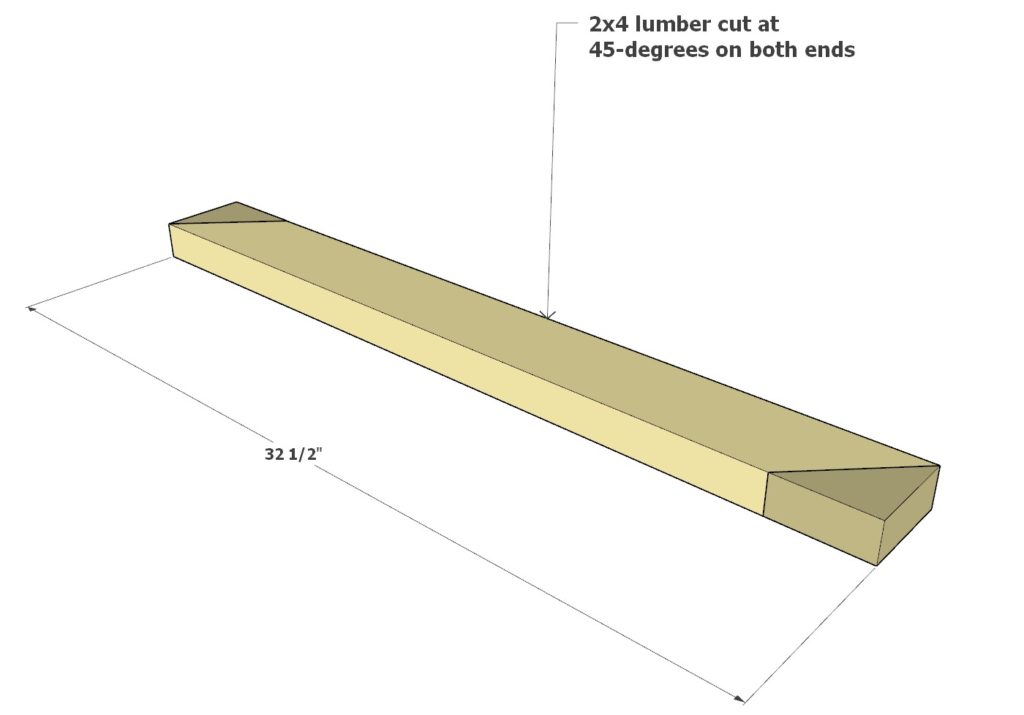
(4) 2in x 4 in x 32-1/2in (both ends cut at 45-degrees. See step 3)
(2) 2in x 4 in x 28-1/2in
4×4 Lumber Cut List:
(4) 4in x 4 in x 31in
Step 1: Construct the Garden Stand Base Frame
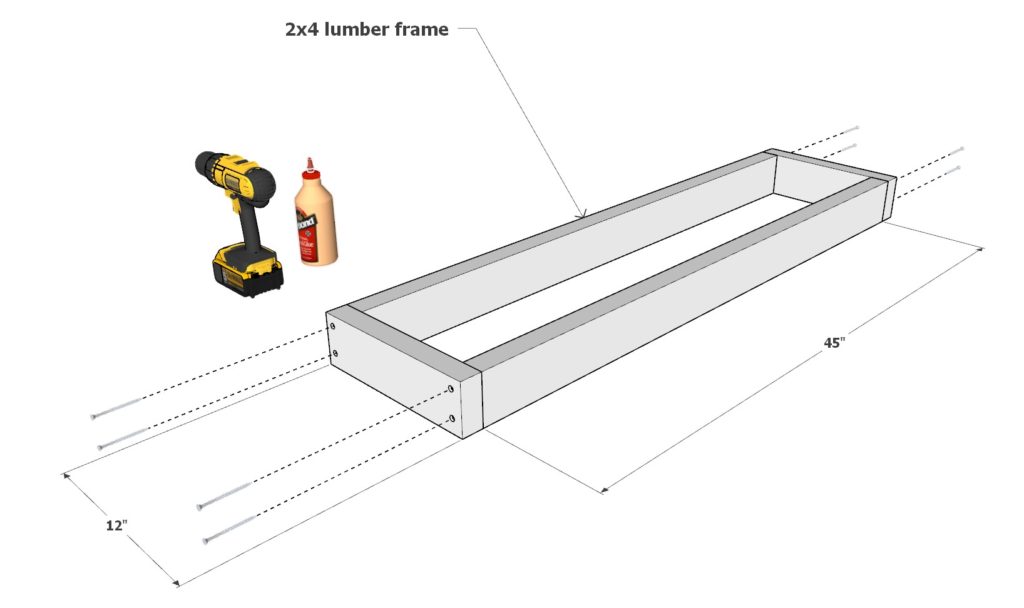
To begin, let’s create the garden stand base frame.
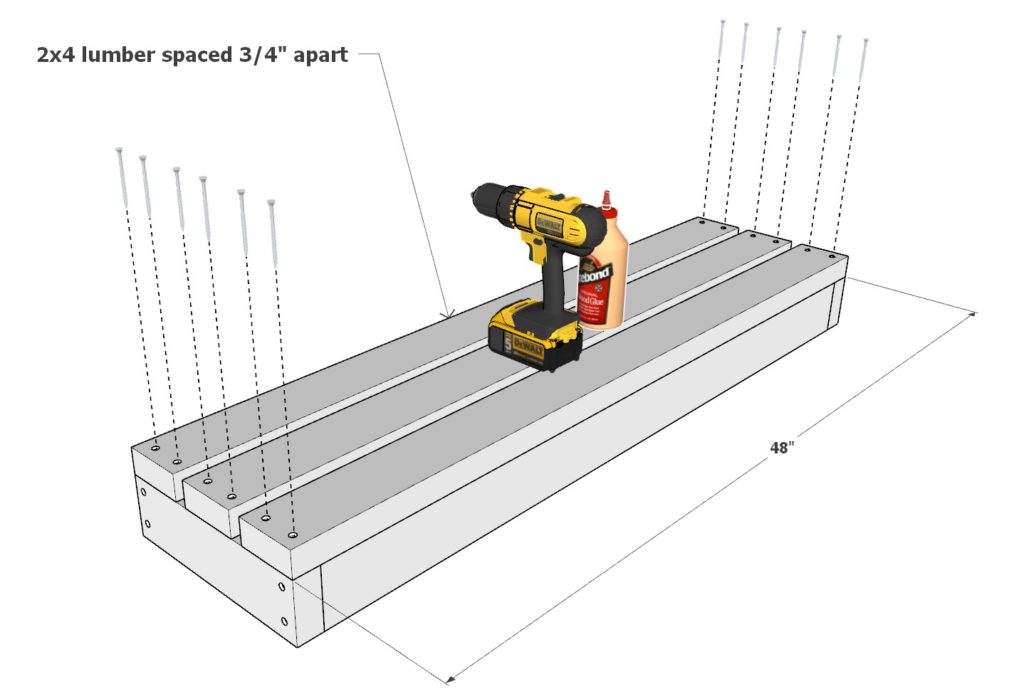
First, gather two 45-inch 2×4 lumber pieces and two 12-inch 2×4 lumber pieces. Arrange them as illustrated below. To prevent the wood from splitting, predrill screw holes and secure the pieces together using 3.5-inch screws and wood glue.
Following that, attach three 48-inch 2×4 lumber pieces to the frame with wood glue and 3.5-inch screws. Ensure the spaces between the 2×4 lumbers are 3/4-inch apart.
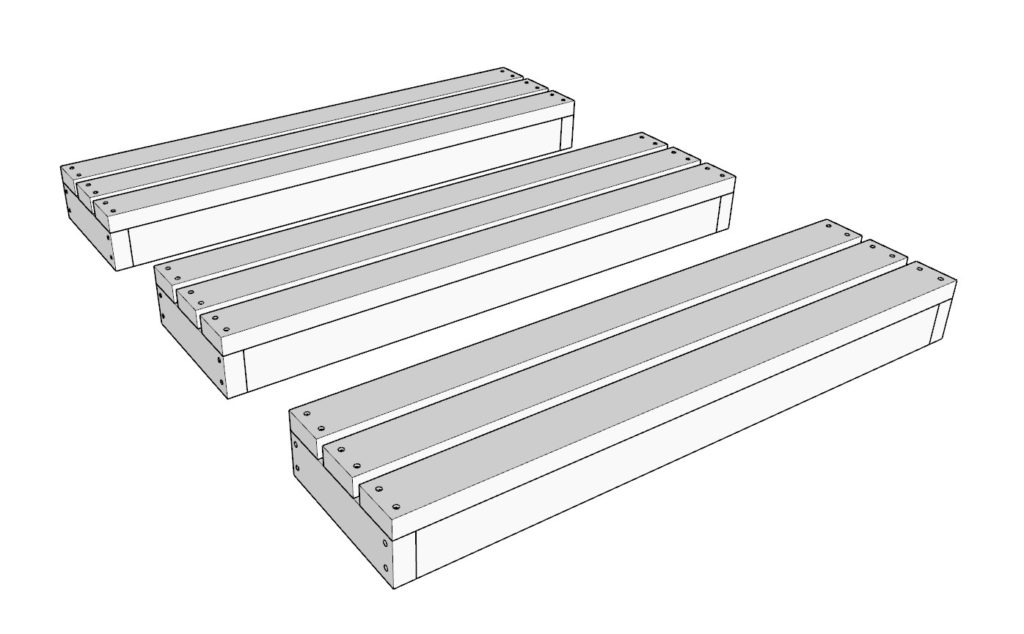
Finally, construct three identical garden stand base frame pieces to complete Step 1.
Step 2: Assemble the Garden Stand Pieces
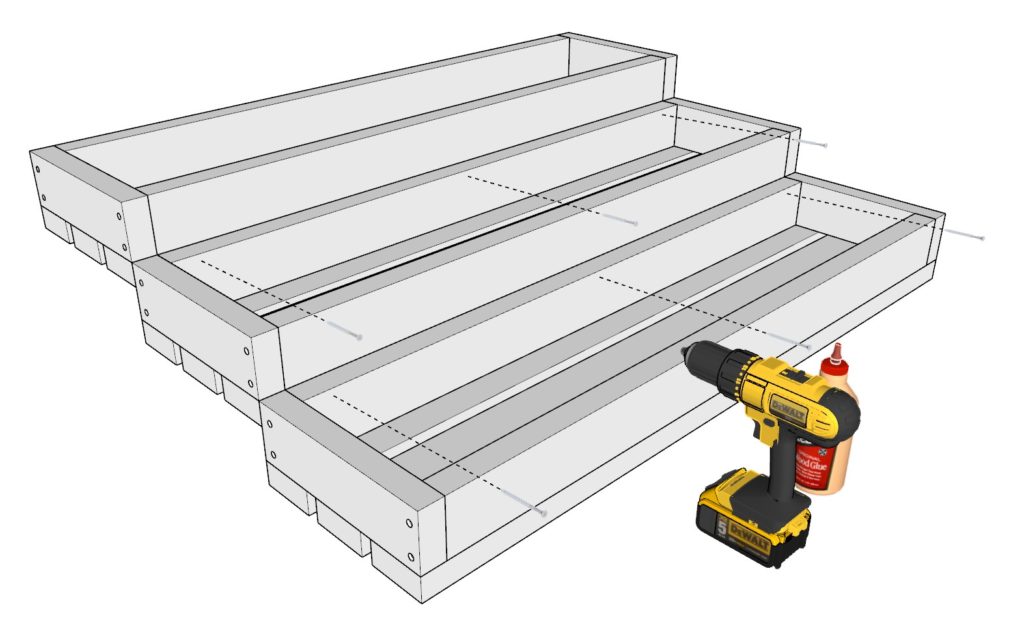
Now, let’s connect the three garden stand base frames together.
Start by flipping the frames over to expose the 2×4 structure and arrange them as demonstrated below. Use 2.5-inch screws to fasten the pieces securely. While 3.5-inch screws can also be used, be mindful that they might protrude through to the other side since the 2×4 boards are only 1.5 inches thick. Since the screws are on the bottom, they might not pose much of an issue; however, if you have pets, such as cats, that love to hide under the garden stand, ensure that the screws don’t cause any potential harm.
Step 3: Construct the Garden Stand Arms
In this step, we will focus on building the garden stand arms for added stability.
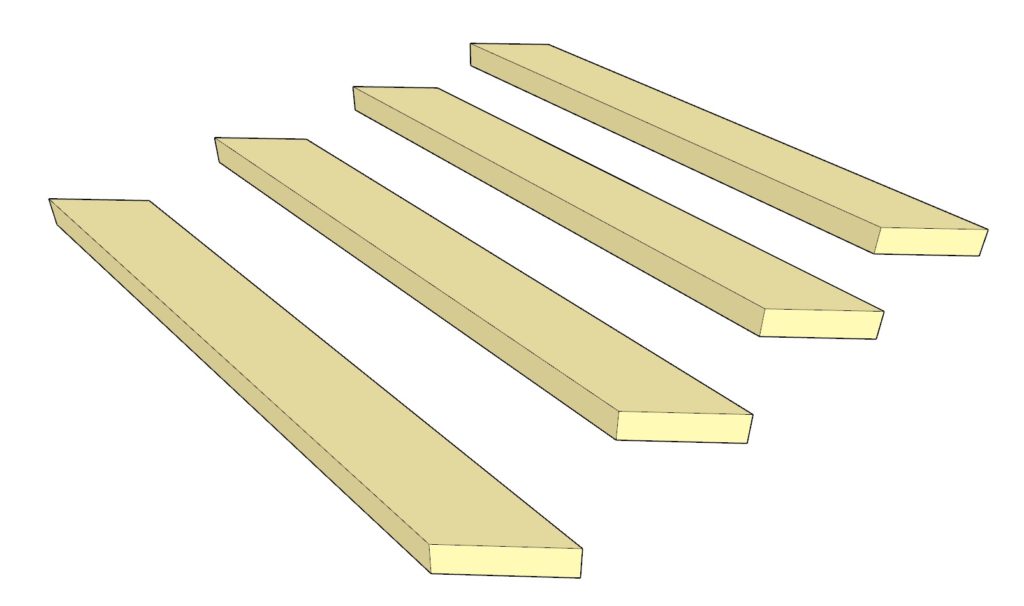
First, take a 32-1/2 inch long 2×4 lumber piece and cut both ends at 45-degree angles, as illustrated in the diagram. Create a total of four such cuts (indicated in yellow). These angled pieces will function as “X” braces to prevent the garden stand from swaying side-to-side.
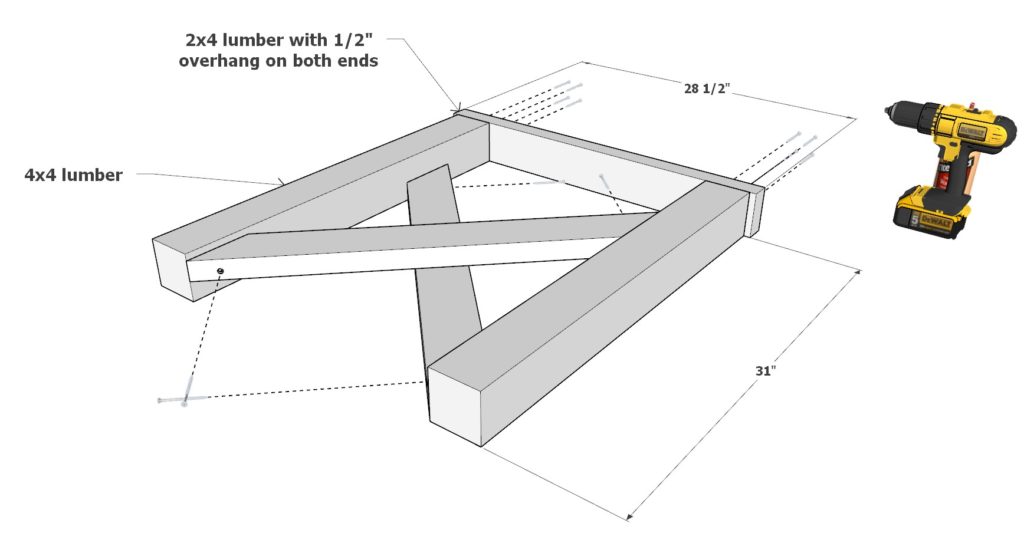
Next, gather two 31-inch 4×4 lumber pieces, one 28-1/2 inch 2×4 lumber piece, and two of the 32-1/2 inch long pieces (angle-cut on both ends). Arrange these components as displayed in the diagram below.
Once arranged, secure all the pieces together with 3.5-inch screws and wood glue for added strength.
Step 4: Attach the Garden Stand Arms to the Base Frame
Now, let’s secure the garden stand arms to the base frame for additional support.
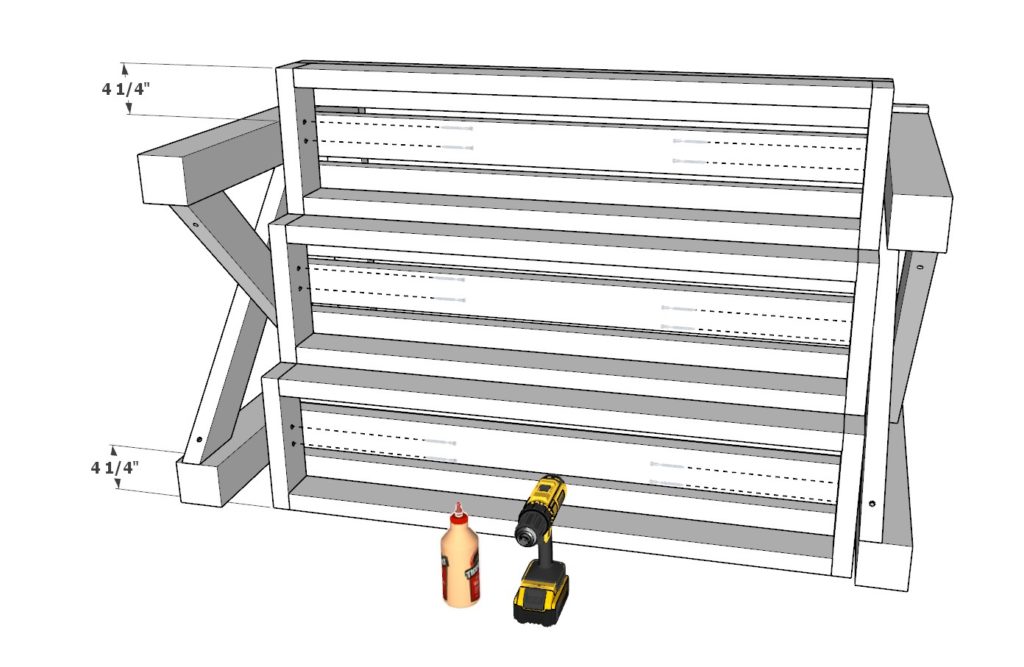
To do this, use wood glue and 3.5-inch screws to fasten the stand arms to the base frame. Ensure that the arm rests are centered according to the diagram provided below. This alignment is essential for maintaining the structure’s balance and stability.
Step 5: Apply the Finishing Touches to Your Garden Stand
Finally, it’s time to put the finishing touches on your garden stand and bring it to life.
Begin by sanding down the entire structure to smooth out any rough edges and create an even surface. Optionally, you may fill the screw holes with putty or wood filler for a seamless finish. Explore different filler options to find the one best suited to your project.
Next, choose whether you want to stain or paint the garden stand to complement your outdoor space. Follow the staining or painting instructions meticulously to achieve an impeccable and long-lasting finish.
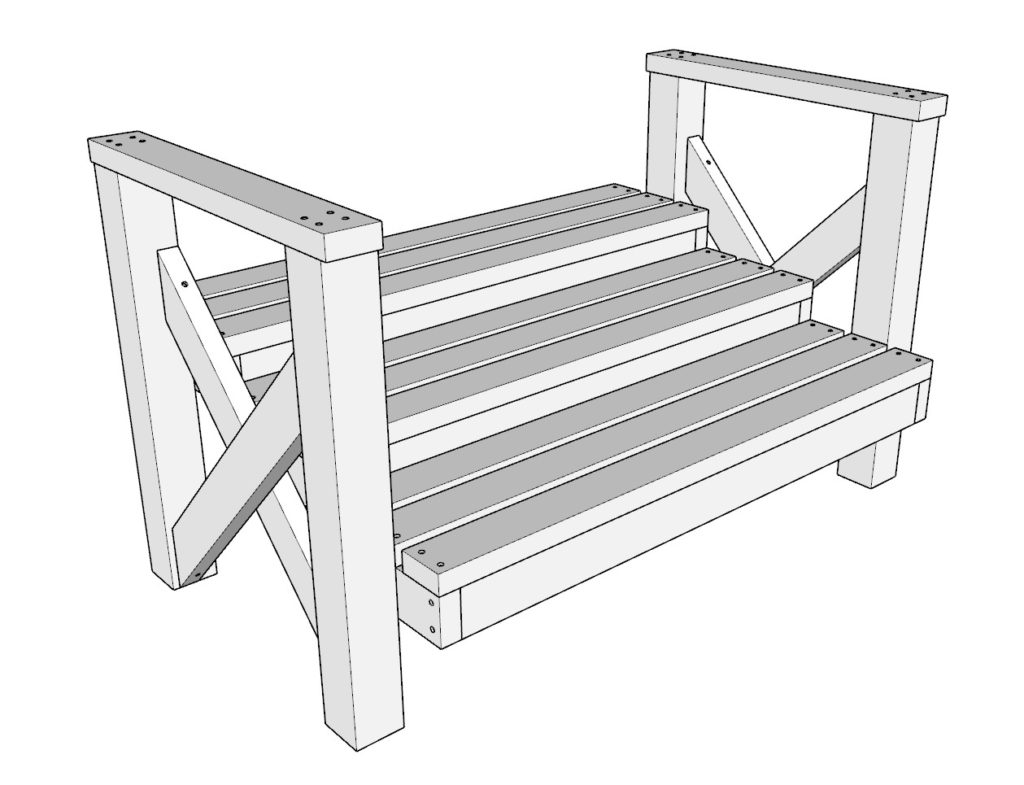
Once the finishing is complete, you’re ready to add your buckets or pots. The stand is designed to accommodate up to 6 standard 5-gallon buckets. However, feel free to mix and match with different pots and containers to create a stunning, personalized vertical garden.
With these final touches, your DIY garden stand is now complete and prepared to transform your gardening experience to new heights. Enjoy the benefits of vertical gardening and the sense of pride that comes from constructing your own unique garden fixture.
The Importance of Soil Drainage in 5-Gallon Bucket Gardening: Tips and Tricks for Success
Introduction:
When it comes to 5-gallon bucket gardening, ensuring proper soil drainage is crucial to the health and success of your plants. In this blog post, we will dive into the pros and cons of creating drainage holes in your buckets, discuss the appropriate soil types for various plants, and share some helpful tips for maintaining healthy soil in your bucket garden setup.
Pros and Cons of Drainage Holes in 5-Gallon Buckets:
Pros:
1. Prevents root rot: Proper drainage prevents excess water from accumulating around the roots, which can lead to root rot and the eventual death of the plant.
2. Encourages stronger root growth: Properly drained soil allows room for air in the soil, which promotes better root growth and overall plant health.
3. Reduces the risk of nutrient leaching: With appropriate drainage, essential nutrients are less likely to be washed away, ensuring plants receive what they need for optimal growth.
Cons:
1. Potential for water loss: Improperly sized holes or a poorly designed drainage system can lead to excessive water loss, requiring more frequent watering.
Soil Types and pH for Different Plants:
1. Cacti and succulents: These plants thrive in well-draining, sandy soils with a pH level between 6.0 and 6.5. Mixing regular potting soil with perlite or coarse sand can help achieve the desired texture and drainage.
2. Vegetable plants: Most vegetables prefer a loamy soil with a pH level between 6.0 and 6.5. It should be well-draining and contain adequate amounts of organic matter (compost or aged manure) to provide essential nutrients.
3. Acid-loving plants (e.g., azaleas, blueberries, and rhododendrons): These plants require an acidic soil with a pH of 4.5 to 6.0. Mix peat moss, pine bark, or other acidic organic matter into a well-draining soil to achieve the desired pH level.
How Many Holes to Drill?
A general guideline for drainage holes in 5-gallon buckets is to drill four to six evenly spaced holes, approximately 1/4 in diameter. This provides adequate drainage without compromising the bucket’s structural integrity. Consider using a drill bit specifically designed for plastic materials to avoid cracking or chipping.
Drainage Tips and Tricks:
1. Test your soil: Use a soil test kit to measure your soil pH and nutrient levels. Adjust the soil components as needed to provide the optimum growing conditions for your specific plant varieties.
2. Elevated planters: Place your buckets on a slight elevation to allow the water to drain freely out of the drainage holes. This plan is perfect as the 2×4 slats allow for water to drain in between them.
3. Proper watering: Monitor soil moisture and only water when necessary. Over-watering can lead to soggy soil and root rot, even with adequate drainage.
4. Monitor plant health: Keep an eye on your plants for signs of nutrient deficiency, wilting, or yellowing leaves, as these can be signs of improper drainage or unsuitable soil conditions.
In conclusion, ensuring proper soil drainage and choosing the right soil mix for your plants are critical aspects of successful 5-gallon bucket gardening. By following the tips outlined in this blog post, you can create a thriving vertical garden with healthy plants that are sure to delight and impress.

