Introduction
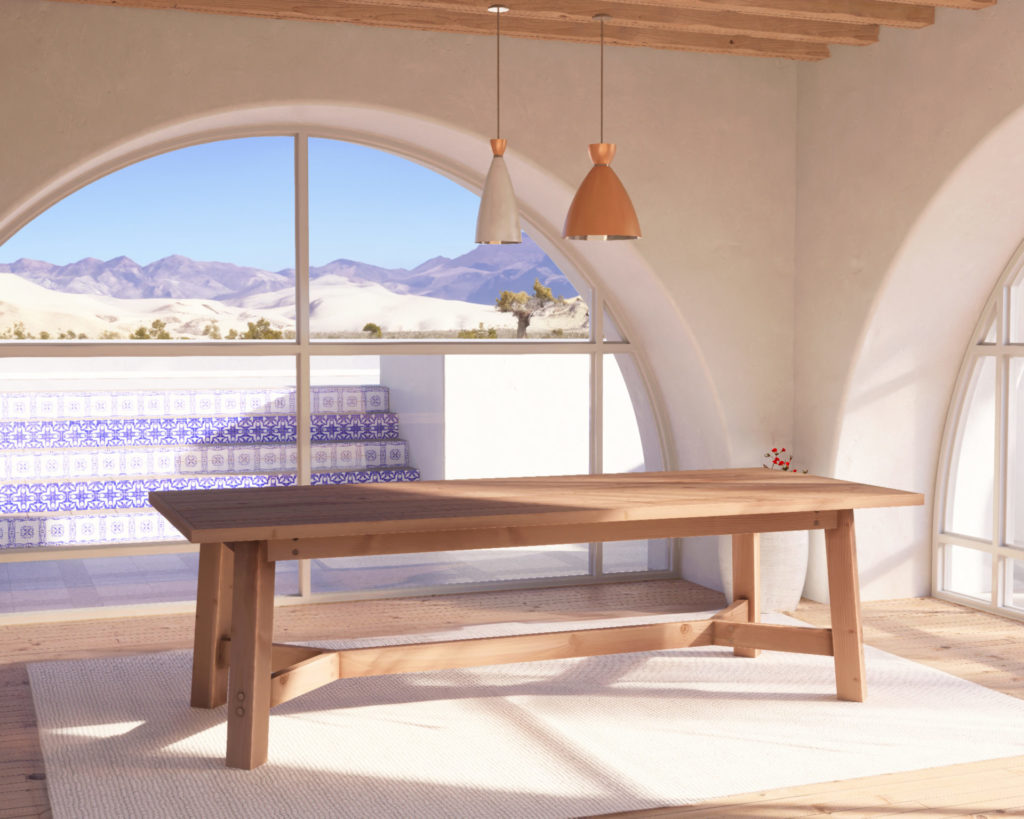
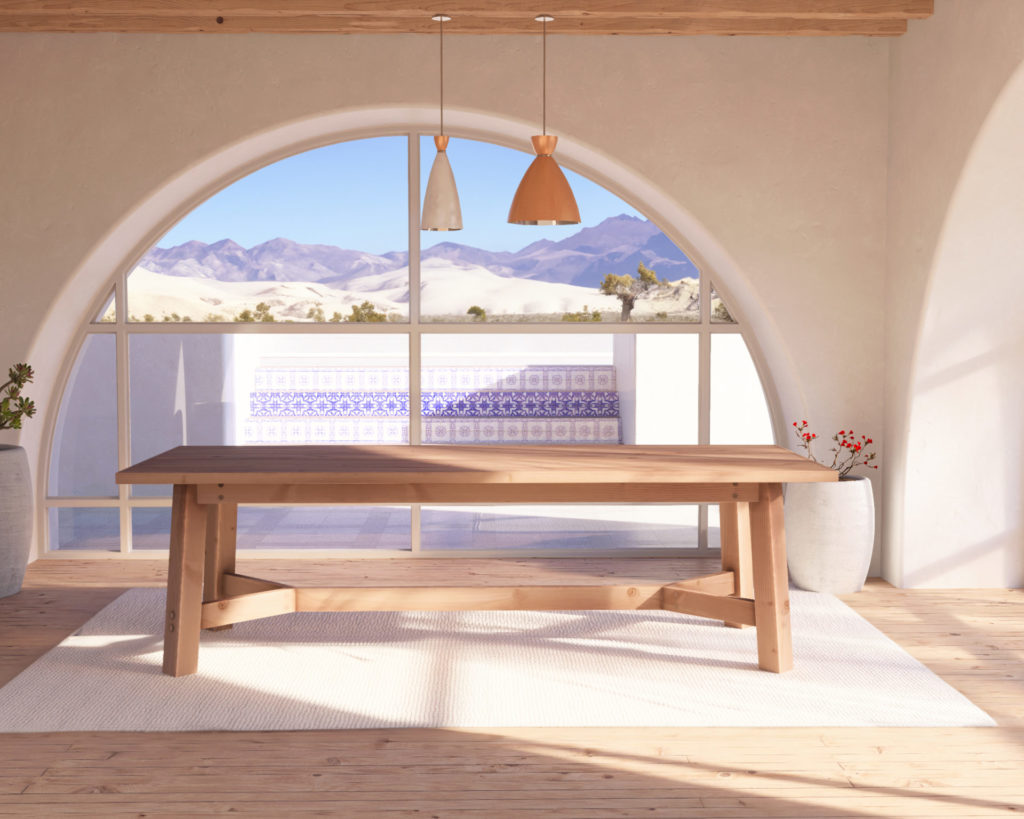
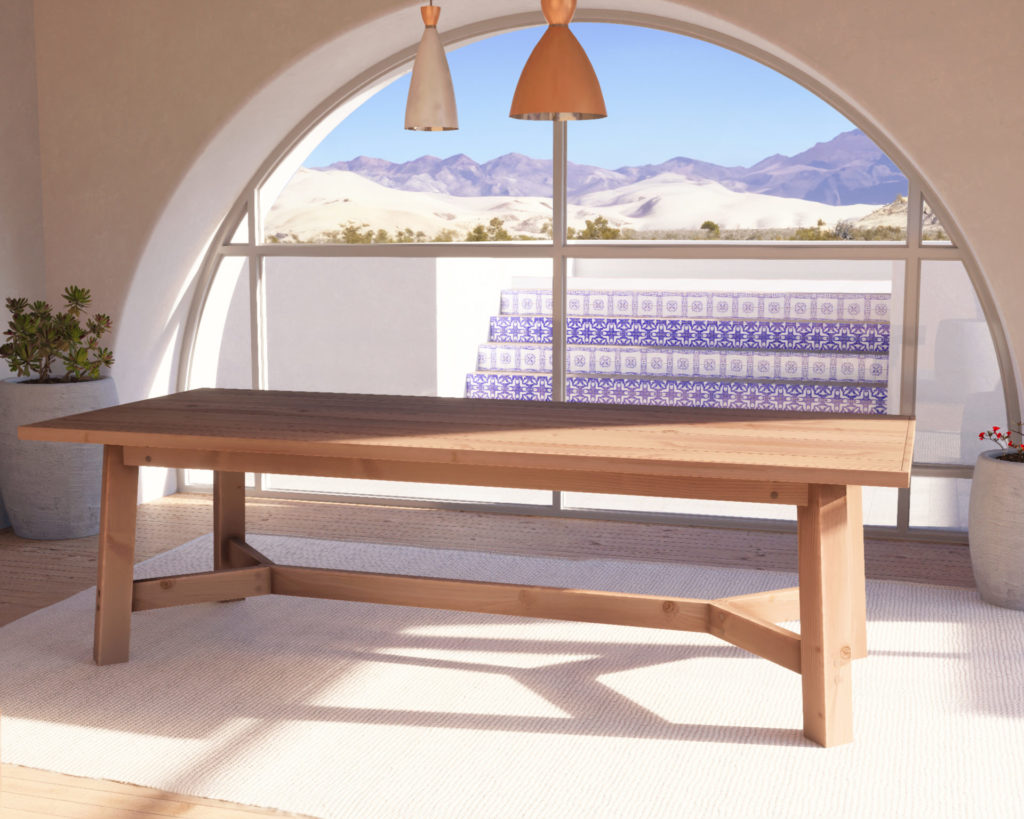
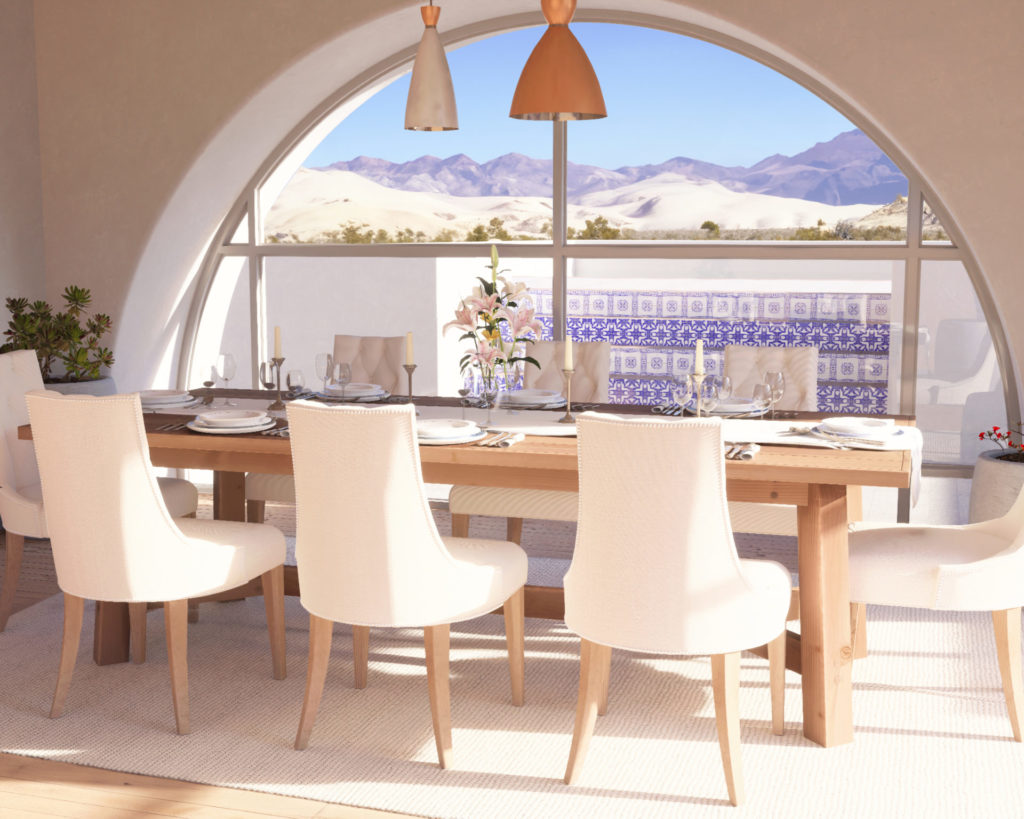
Every home tells a story. At the center of many of those stories is a gathering place, a spot where meals are shared, stories are told, and memories are created. That’s where our Rustic Farmhouse Dining Table comes in. Designed to fit seamlessly into any decor, from a Mojave desert Spanish-styled home to an urban apartment, this table is more than just furniture—it’s a conversation starter.
Why Choose the Rustic Farmhouse Design?
It’s all in the name: rustic yet refined. This table design celebrates the beauty of natural wood, bringing a touch of tradition to any setting. It’s the kind of table that feels like it has stories to tell, perfectly blending charm and functionality.
The DIY Edge
There’s something truly special about creating something with your own two hands. The sense of accomplishment, the personal touch, and, let’s admit it, the bragging rights. Our DIY plan ensures you not only craft a table but also create an experience. And for those thinking, “Can I really do it?” Yes, you can!
What Our DIY Plan Offers
-Step-by-Step Guide: No prior woodworking experience? No problem.
-Material List: We break down what you need, so there’s no guesswork.
-Design Flexibility: Want to tweak the design? Our plan offers customization options to make sure your table fits your space just right.
-Expert Tips: We sprinkle in pro-tips to ensure your table isn’t just sturdy, but also a standout piece.
Conclusion
Imagine the satisfaction of sitting around a table you built, admiring its craftsmanship and the warmth it brings to your home. Our Rustic Farmhouse Dining Table plan makes that dream accessible and achievable. Ready to roll up your sleeves and bring this project to life? Dive into our DIY plan, and in no time, you’ll have a centerpiece that’s sure to spark conversations and compliments. Plus, for those who act soon, we’re offering insights on perfect finishing touches to make your table truly shine. Grab your plan today!
Time
12 hours
Cost
$200
Skill level required
Beginner
DIY rustic table PDF plan
What is included in the PDF download?
- Easy to read step by step instructions
- Material list
- Tools needed
- Helpful links to materials and tools needed
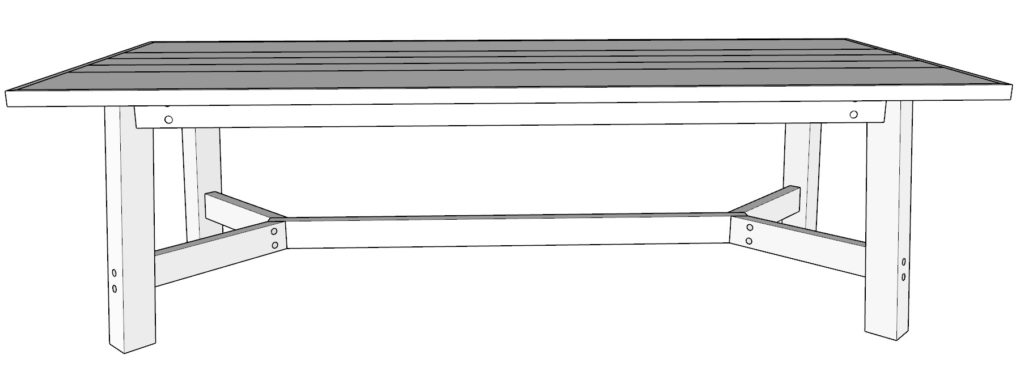
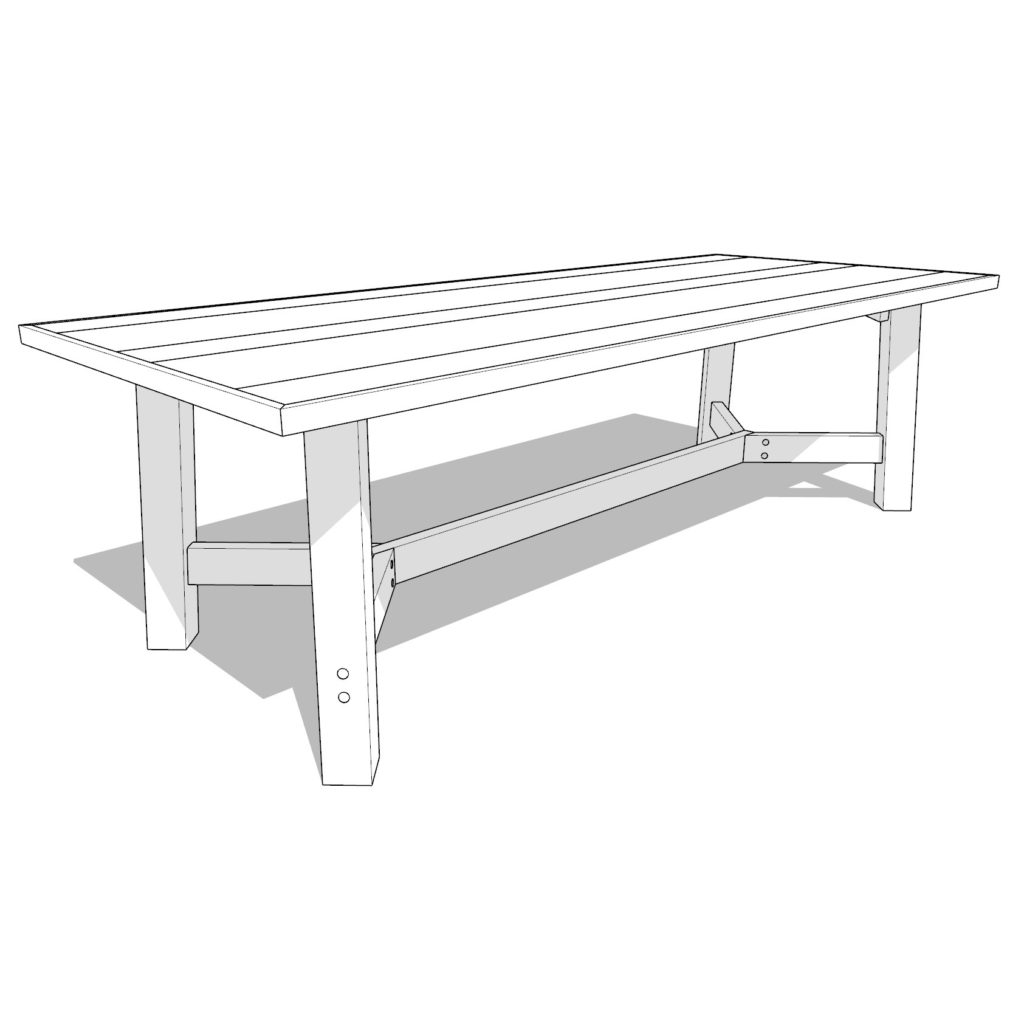
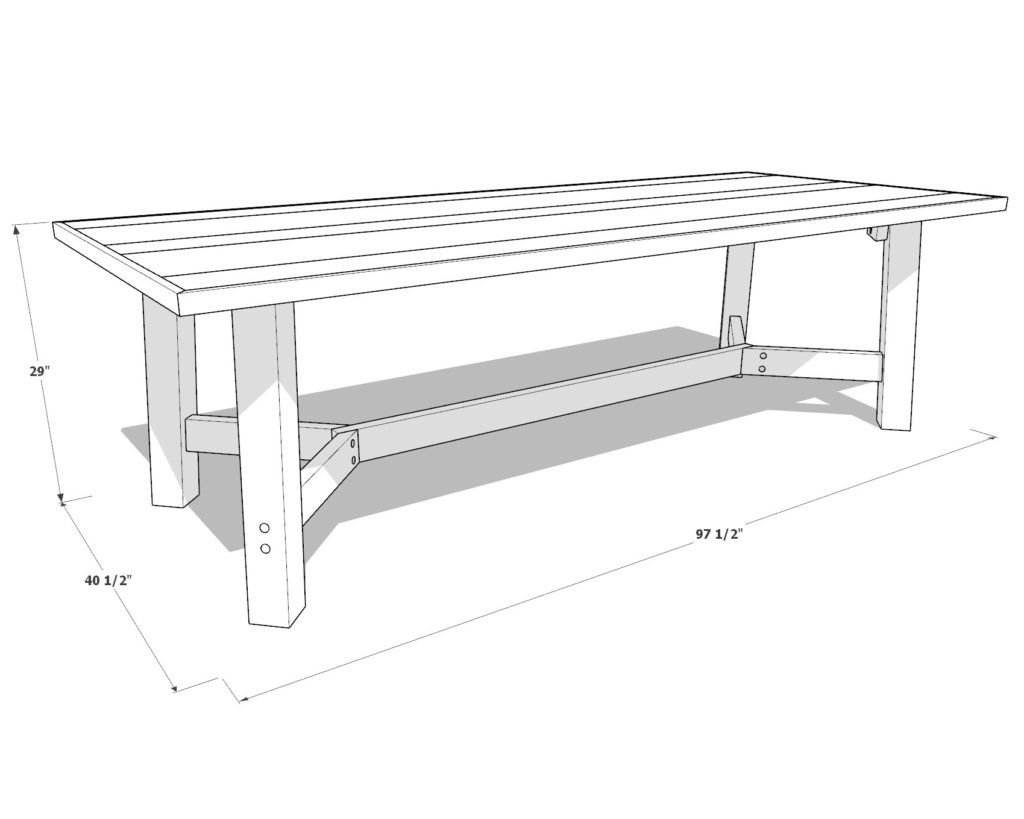
DIY Rustic Table Dimensions
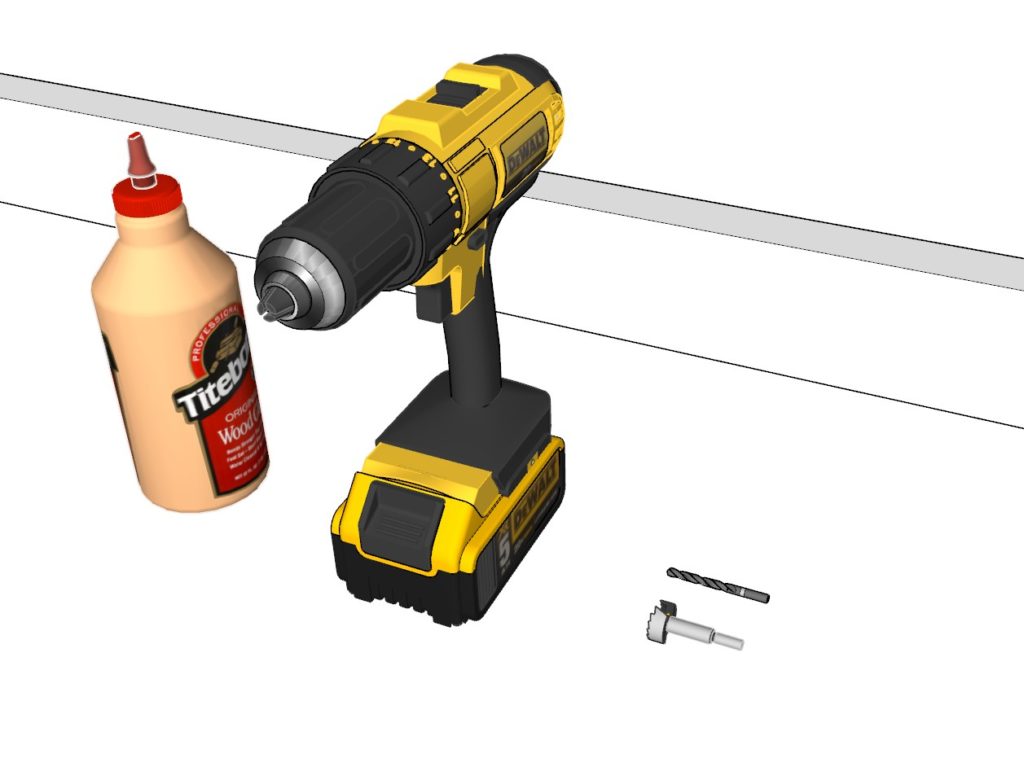
Essential Tools & Materials
Available with the purchase of the DIY plan PDF.
Lumber Shopping & Cut List
Available with the purchase of the DIY plan PDF.
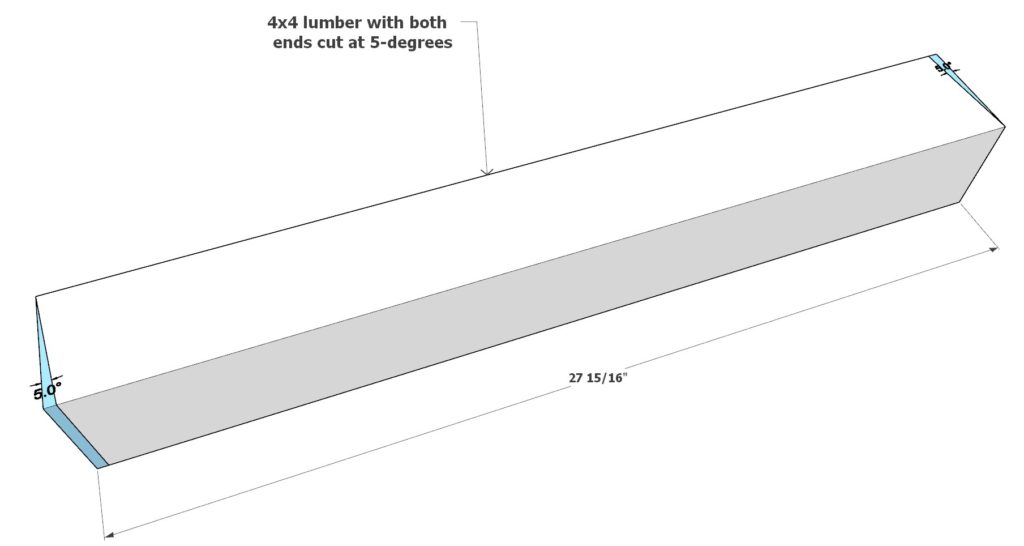
Step 1: Cutting the Table Legs
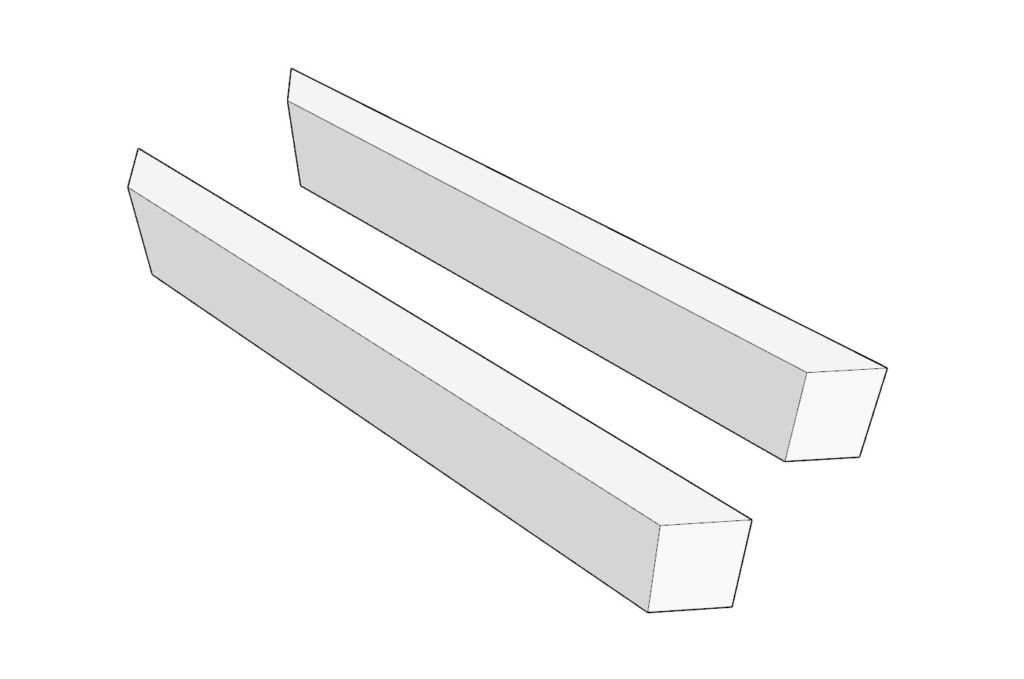
Begin with the table legs. Take a 27-15/16 inch 4×4 lumber piece and cut both ends at a 5-degree angle, following the provided diagram. Prepare four of these legs.

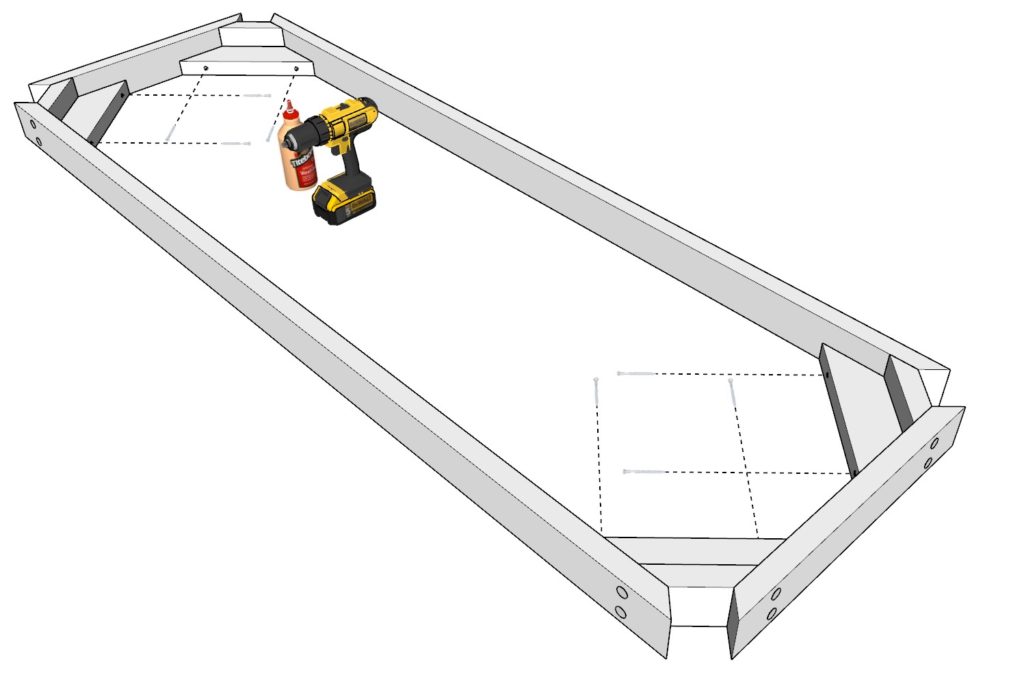
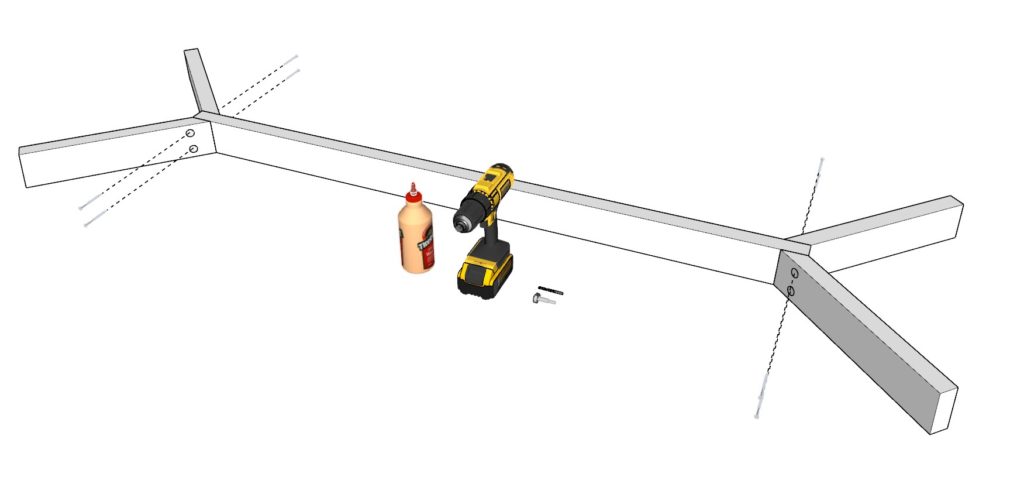
Step 2: Crafting the Table Top Support Frame
Crafting the Support Frame Components:
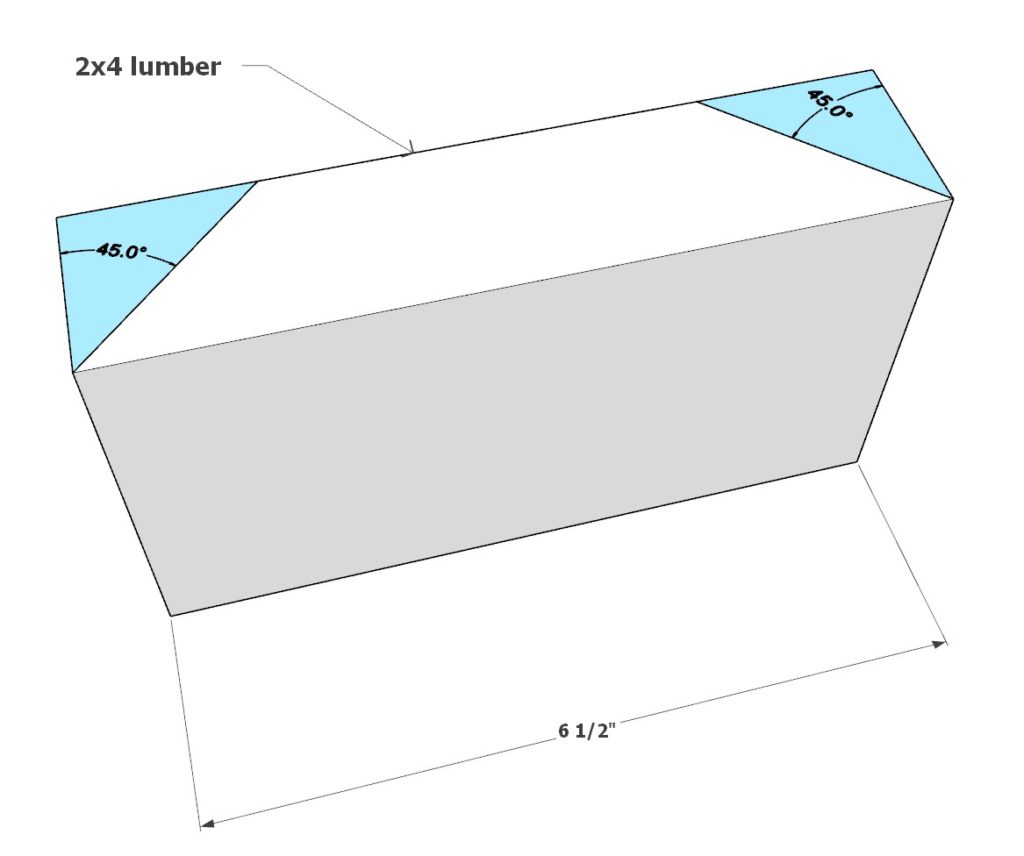
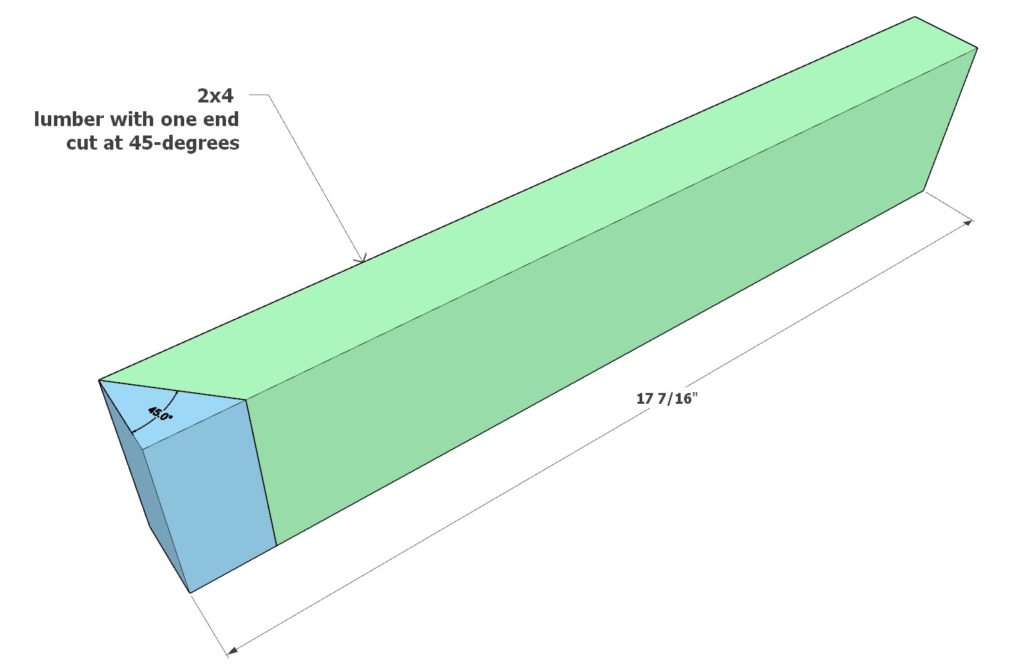
- Start with cutting a 6-1/2 inch 2×4 lumber piece. Angle-cut both ends at 45-degrees. Produce four of these.
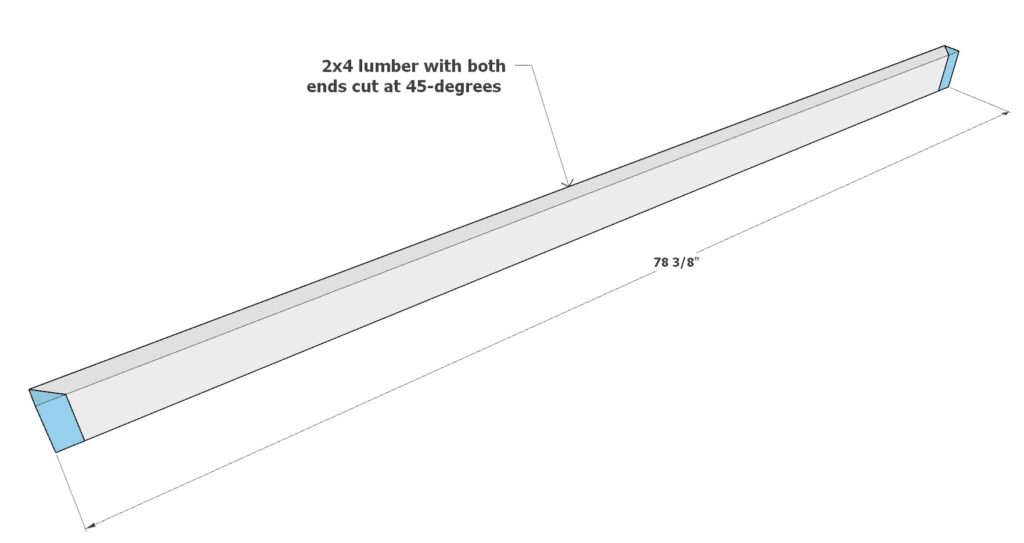
- Cut a 78-3/8 inch long 2×4 lumber piece, similarly angle-cut both ends. You’ll need two of these.
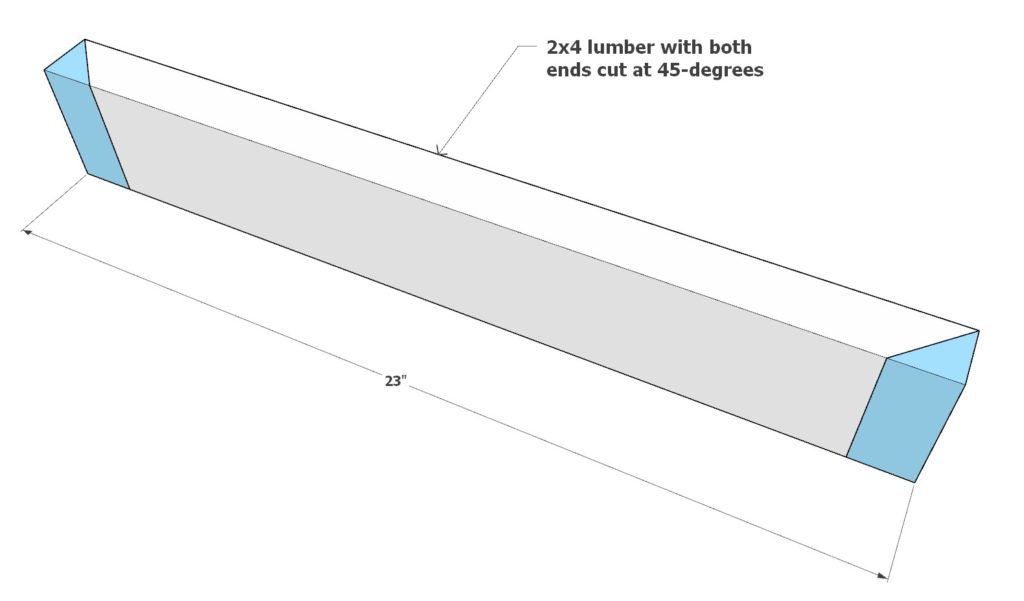
- Cut a 23-inch 2×4 lumber piece, angle-cut both ends. Again, make two of these.
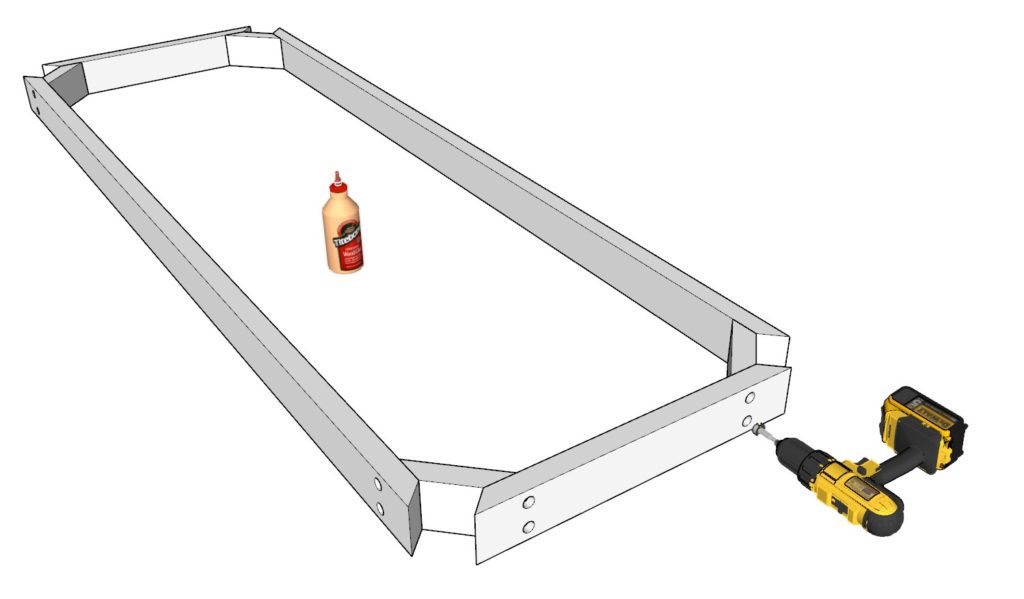
Assembling and Finishing:
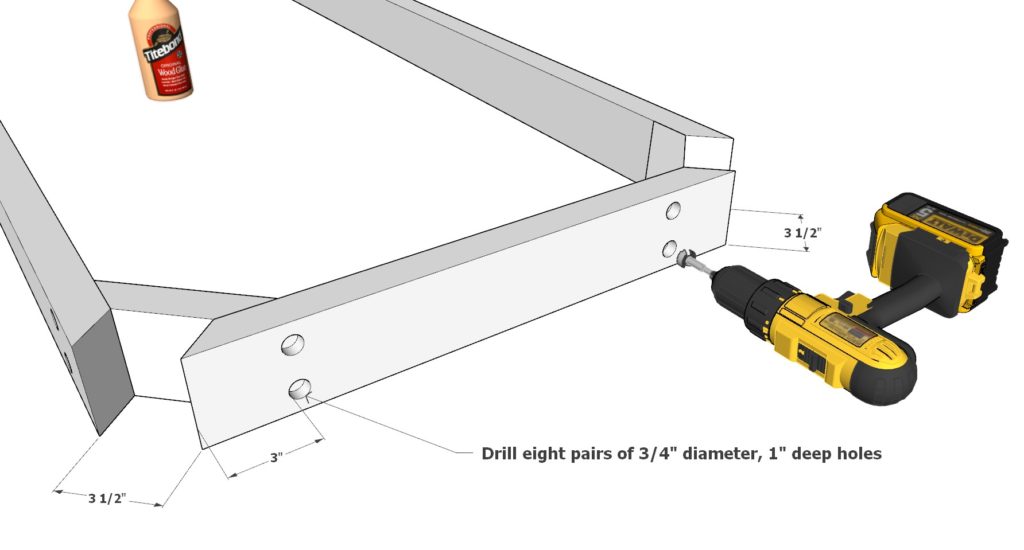
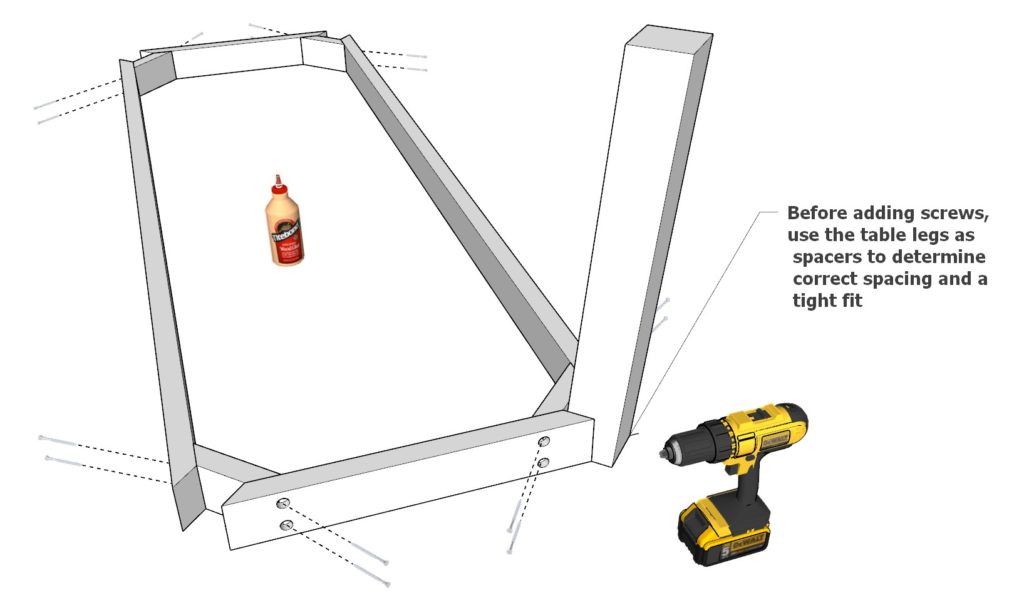
- Position your cut pieces as shown in our diagram.
- With a forstner bit, drill eight pairs of 3/4 inch holes based on the diagram’s indications (drill the holes about 3/4′ deep).
- Deepen these holes with a standard drill bit to avoid wood splitting during assembly.
- Coat all joining sections with wood glue.
- Using the table legs as a guide, ensure correct alignment before securing with 3.5-inch screws.
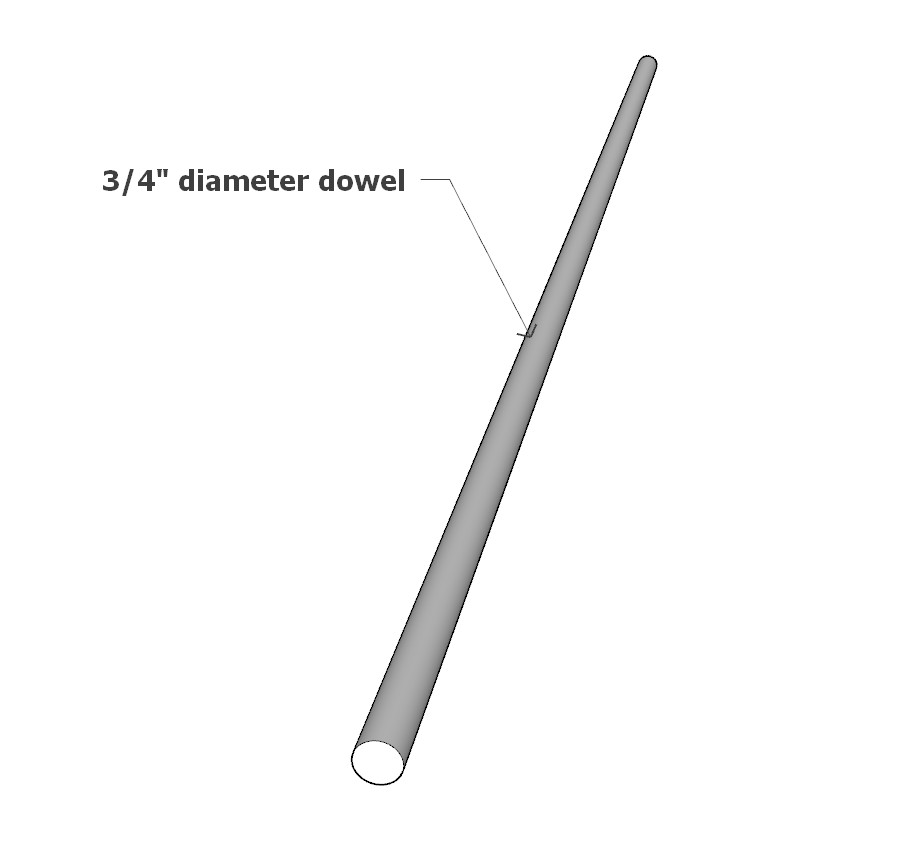
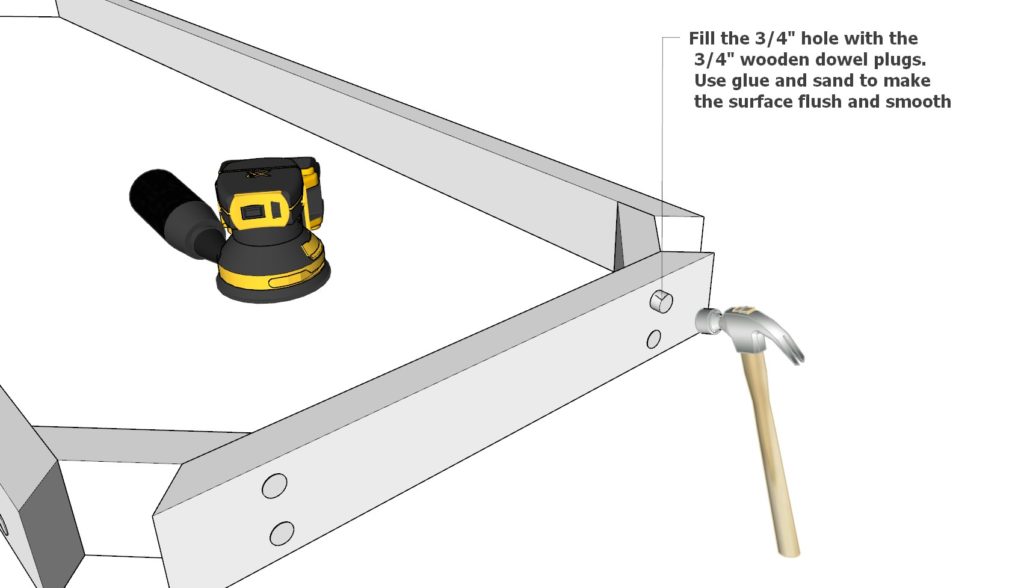
- For a refined appearance, take 3/4 inch dowels, cut them to 1-1/4 inches, and plug them into the forstner bit holes using glue. Hammer gently and sand for a seamless finish.


Step 3: Crafting the Table Top Securing Components
Fashioning the Table Top Attachment Points:
- Cut a 13-1/2 inch 2×4 lumber piece.
- For accurate alignment, cut both ends at a 45-degree angle, as detailed in the diagram. Ensure you have four pieces with matching cuts.
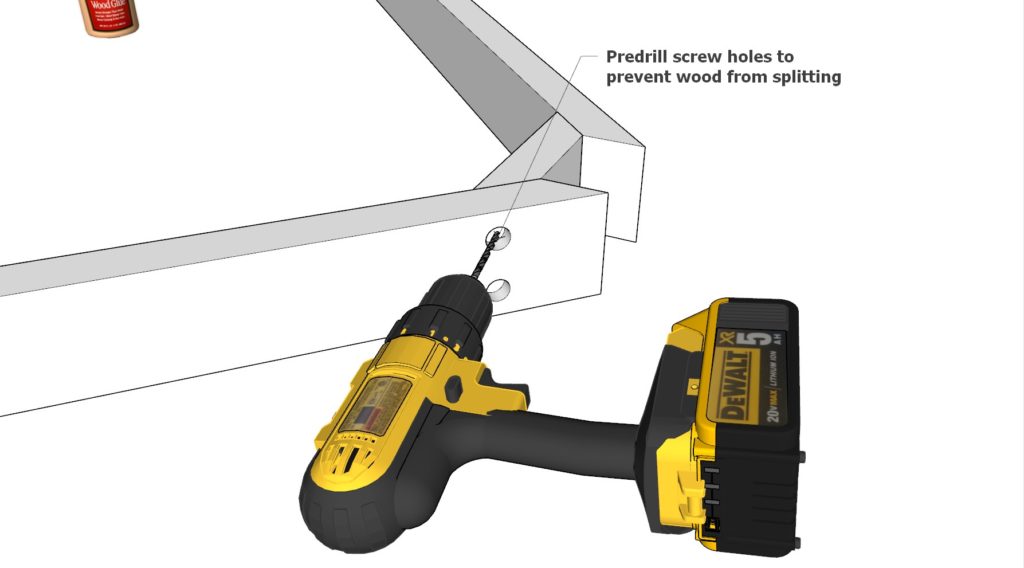
Securing the Components:
- Using the diagram as a reference, position these pieces appropriately.
- Predrill to safeguard against wood splitting during the attachment process.
- Brush on some wood glue at the attachment points for enhanced durability.
- Firmly fasten each component using 3.5-inch screws.

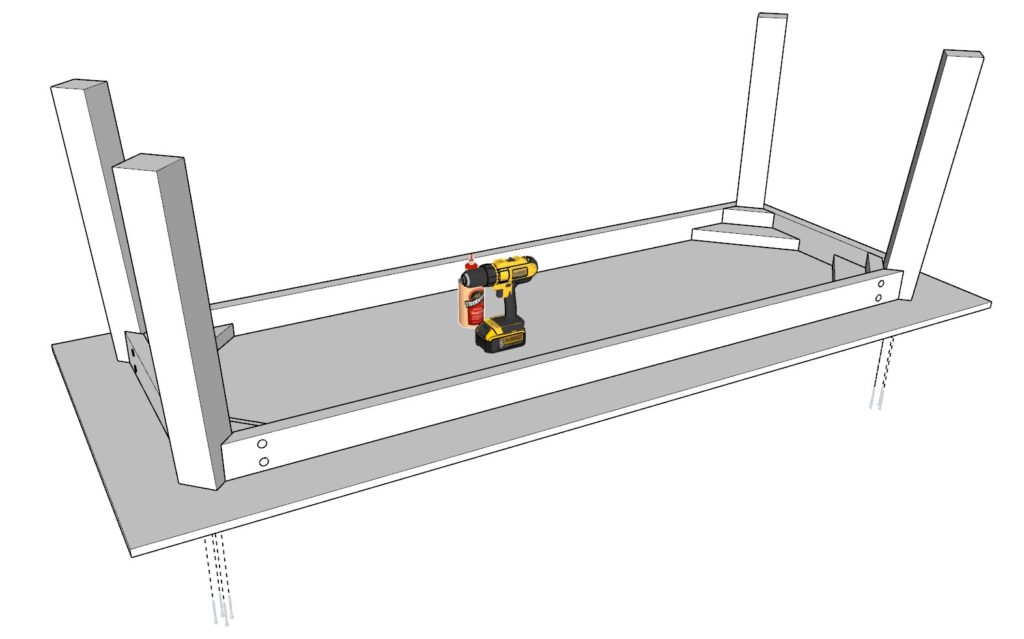
Step 4: Crafting and Assembling the Table Base Frame
Fashioning the Table Base Frame Components:
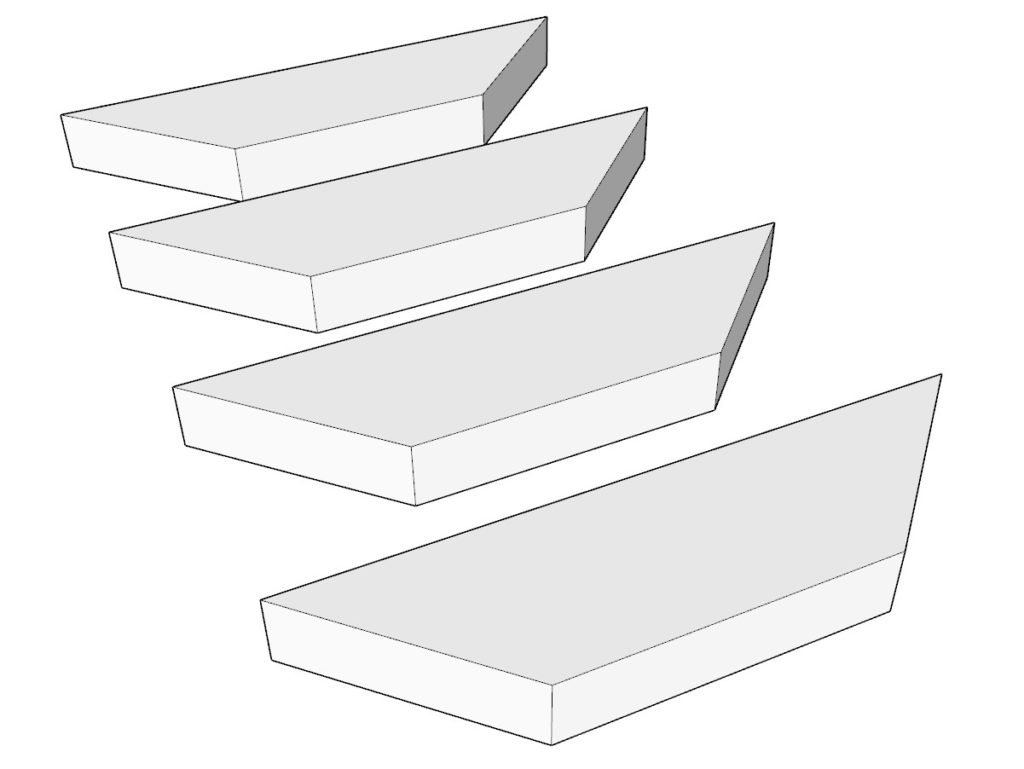
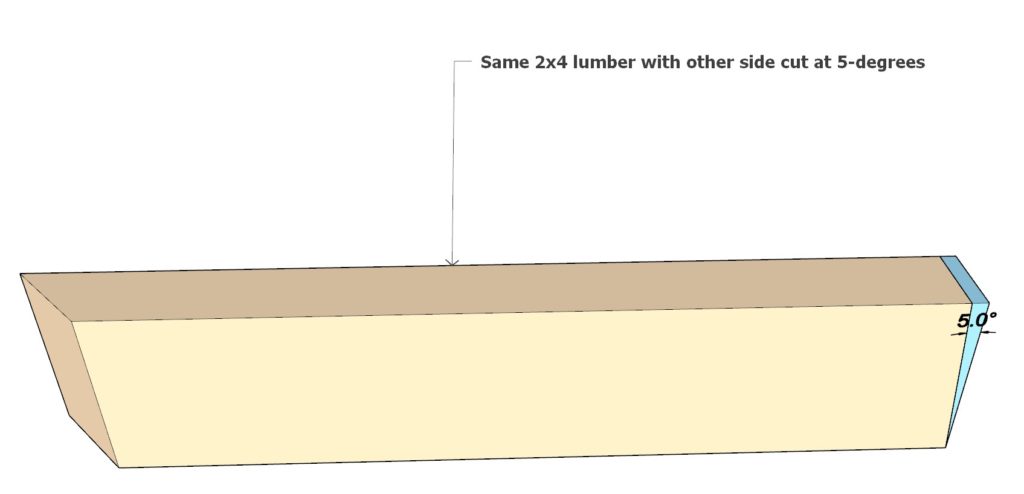
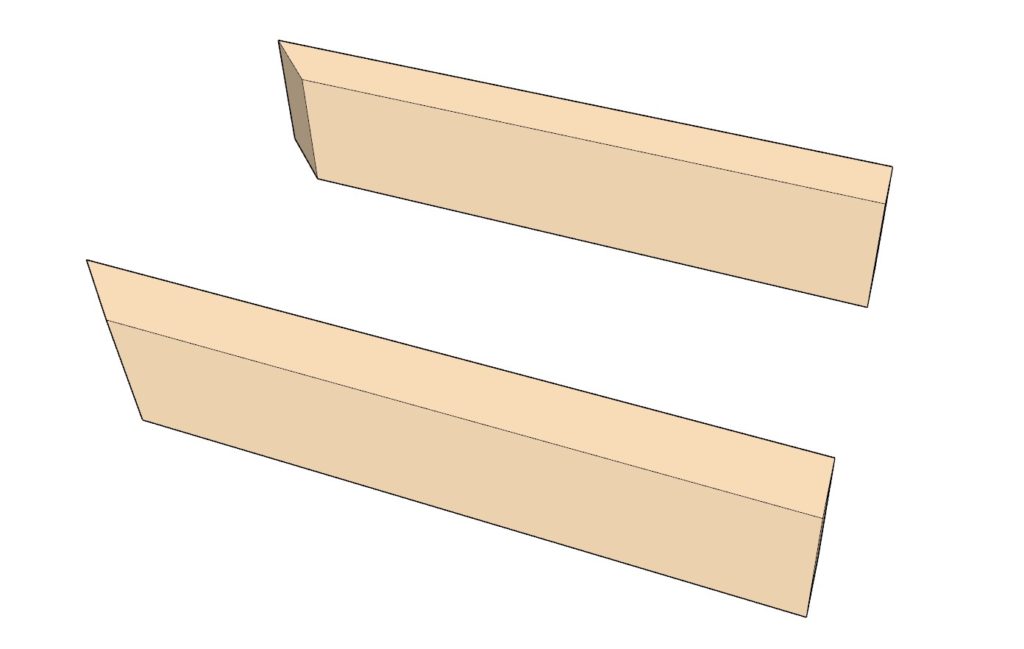
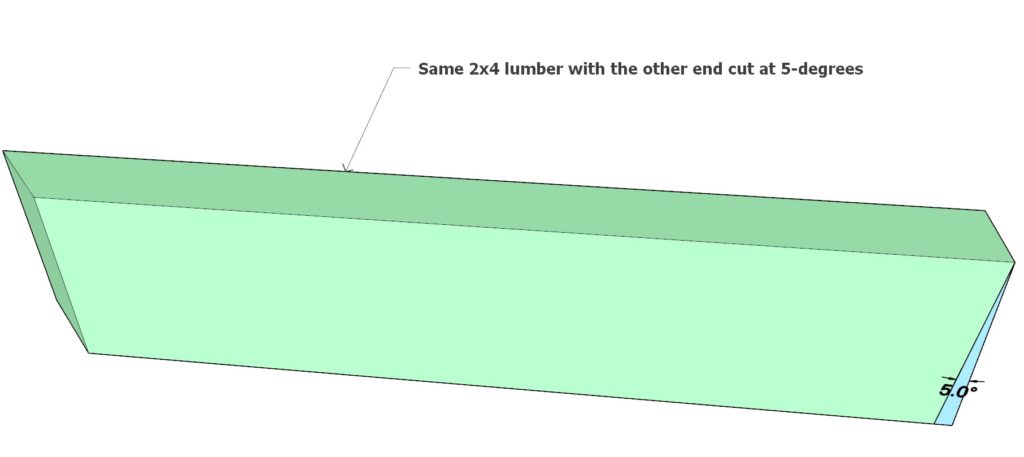
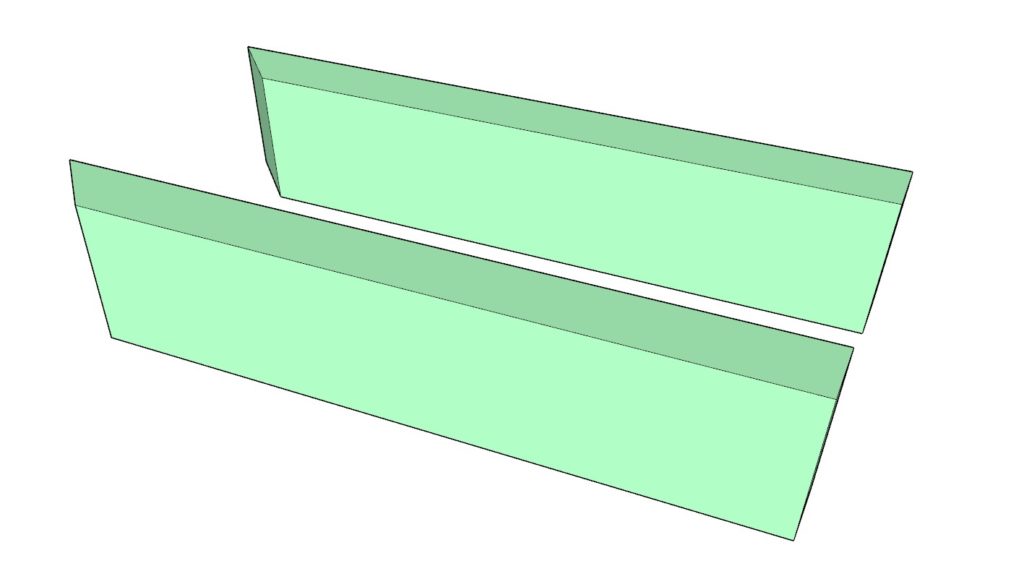
- Cut a 17-7/16 inch 2×4 lumber piece. Make a 45-degree cut on one end and a 5-degree cut on the other, as illustrated in the diagram. Craft two of these pieces, highlighted in peach on the diagram.
- For the complementary pieces, cut a 17-7/16 inch 2×4 lumber piece. Repeat the cuts, ensuring the 5-degree angle is opposite to the previous pieces (cross-check with the diagram). Produce two of these, which are shown in green on the diagram.
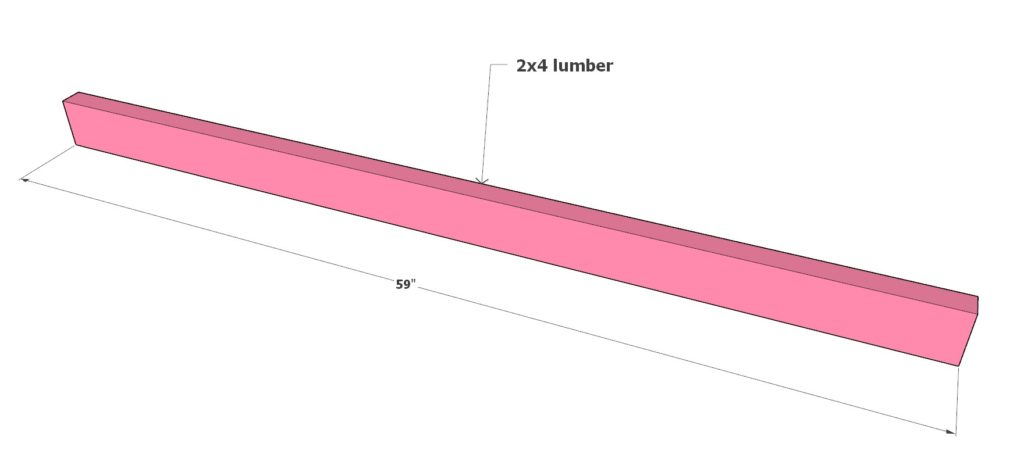
- Lastly, cut a straightforward 59-inch 2×4 lumber piece.
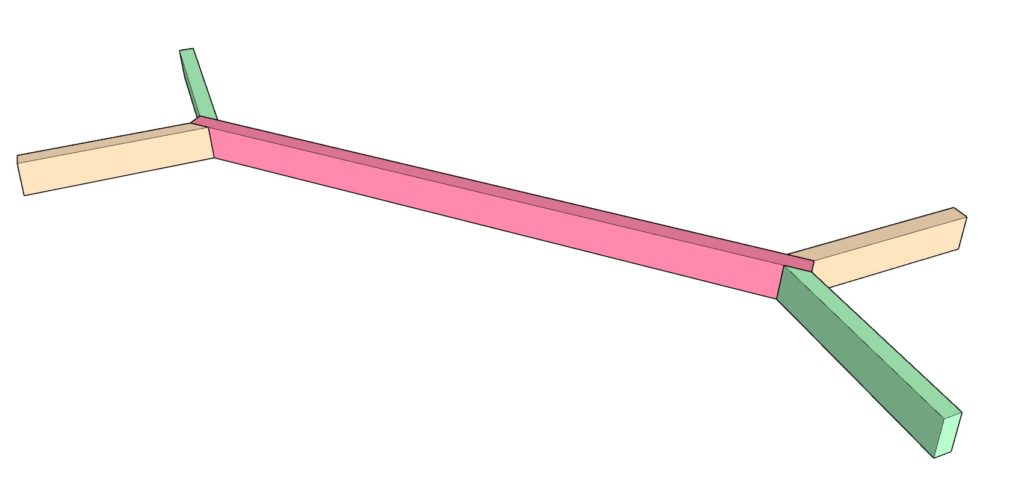
Setting Up the Base Frame:
- Organize the freshly cut components as depicted in the color-highlighted diagram.
- With a 3/4″ forstner bit, prep the sections for attachment. Follow up with a standard drill bit for depth.
- Dab some wood glue at the junctions and solidify using 3/4-inch dowel plugs, achieving a sturdy bond.

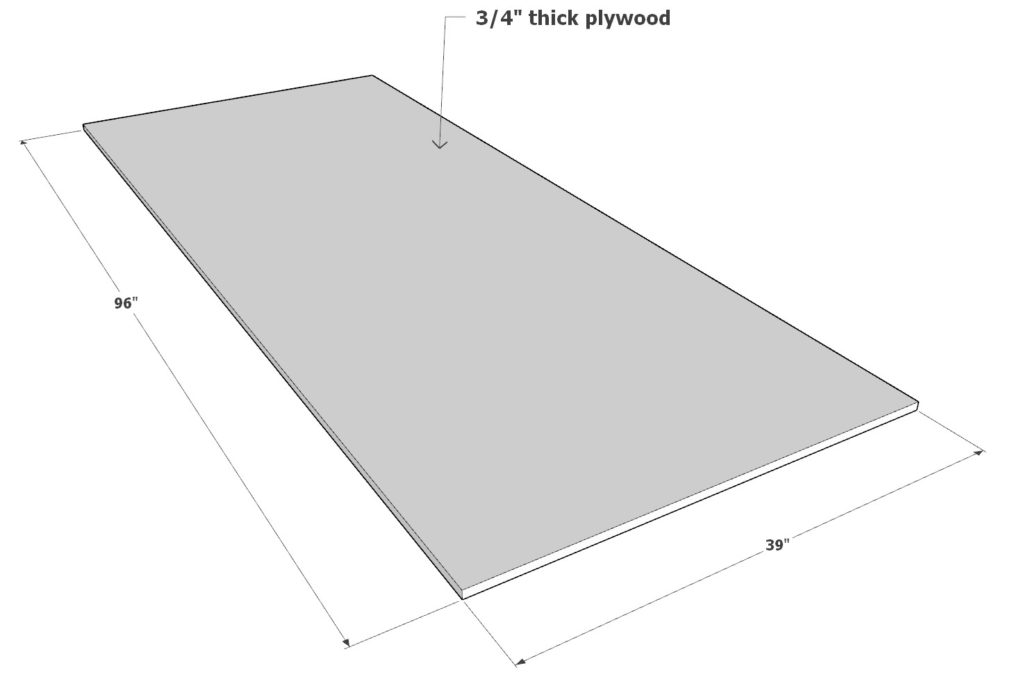
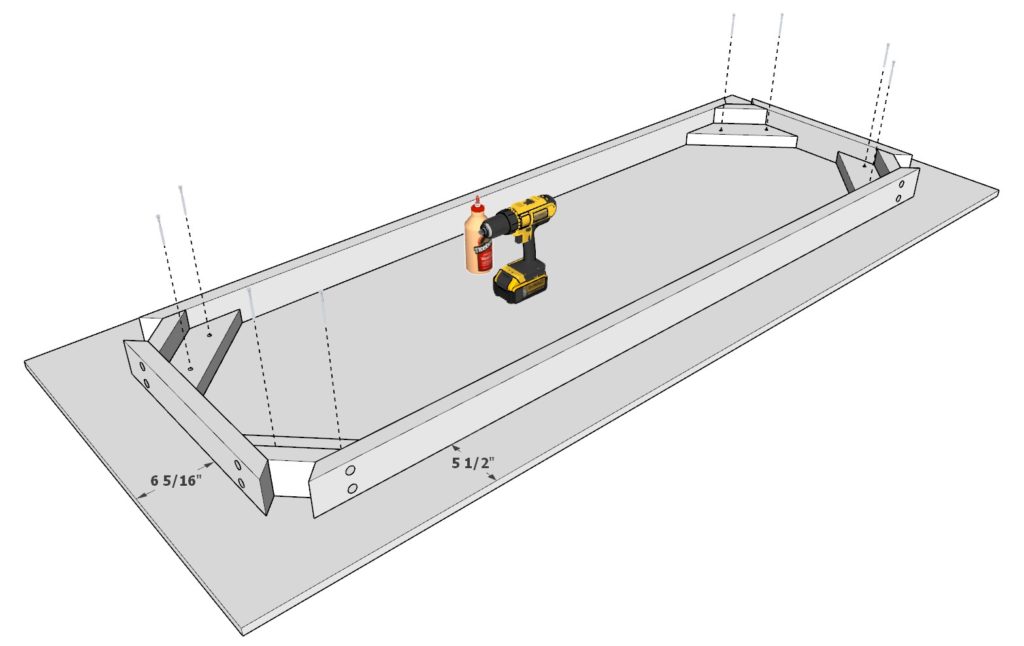
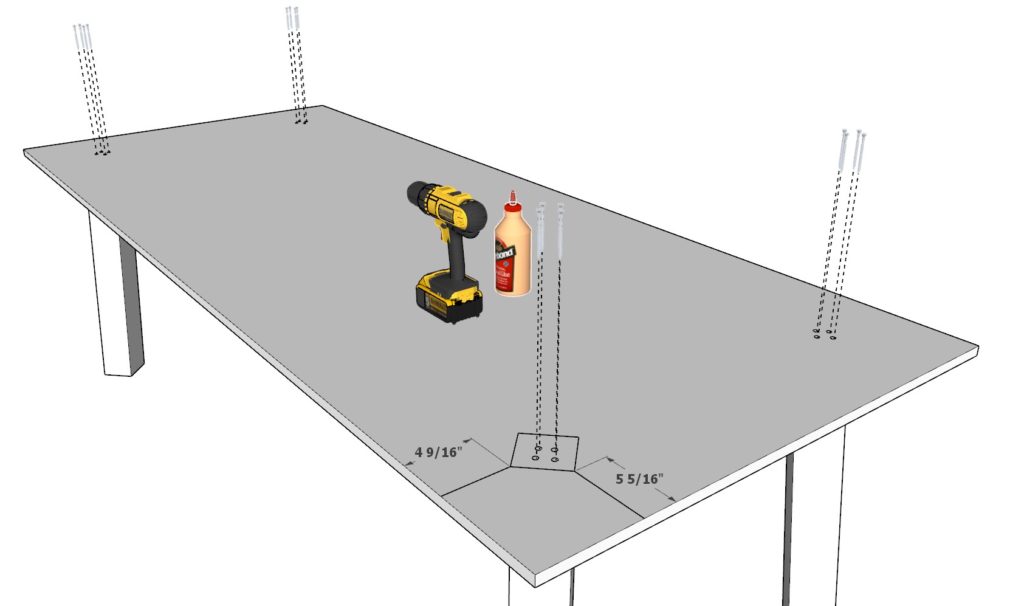
Step 5: Constructing the Table Top
Crafting the Plywood Base:
- Take a full plywood sheet, ensuring it’s 3/4 inch thick, and trim it to 96 inches by 39 inches.
- Secure it in position as illustrated in the diagram, using 2-inch screws. Apply glue generously on all surfaces that touch.
Attaching the Table Legs:
- Use the diagram to accurately position the legs.
- Firmly anchor each leg with 3.5-inch screws, reinforcing with glue for durability.
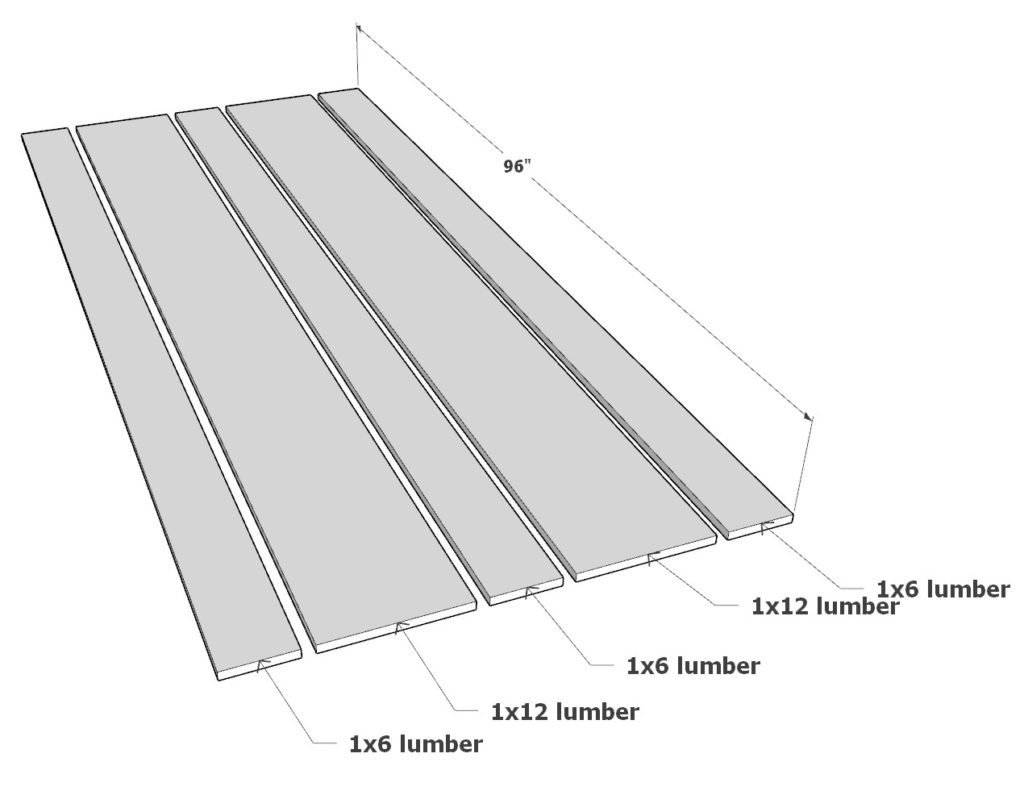
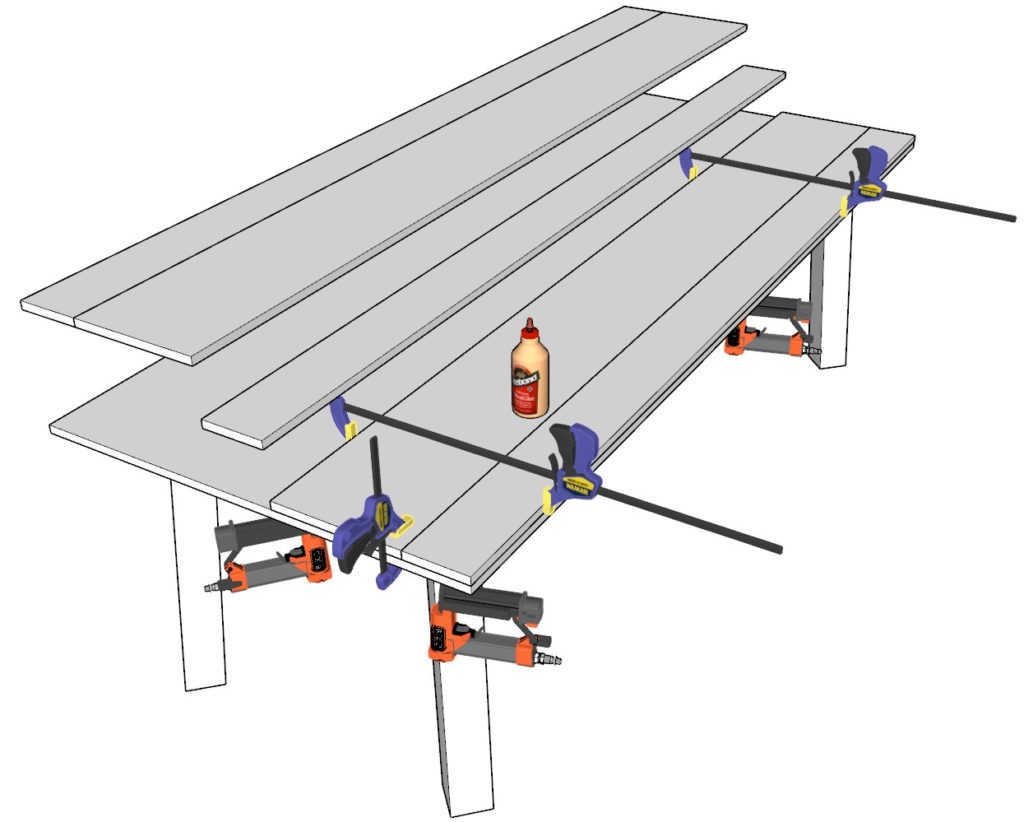
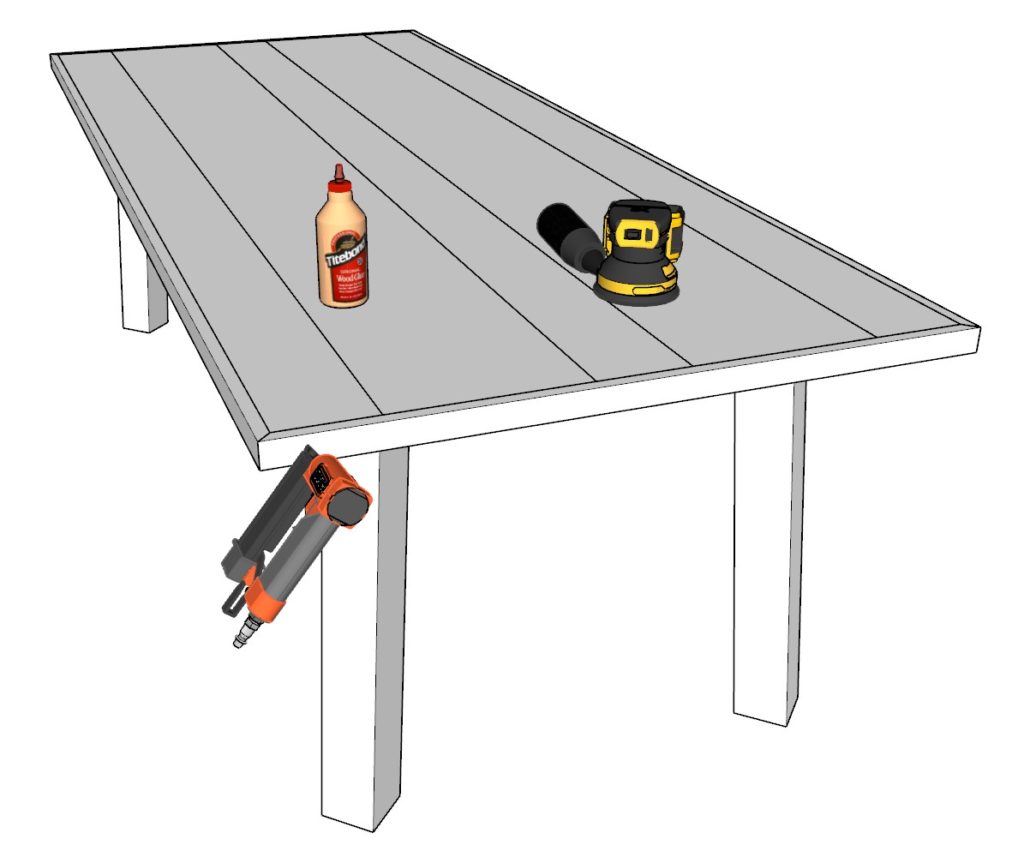
Laying the Table Top Boards:
- On the plywood base, position two 96-inch 1×12 lumber boards and three 96-inch 1×6 boards.
- Firmly bond them to the plywood using glue, clamps, and 1 to 1.25-inch nails. For a neat finish, nail from the underside of the table.
Finishing Touches:
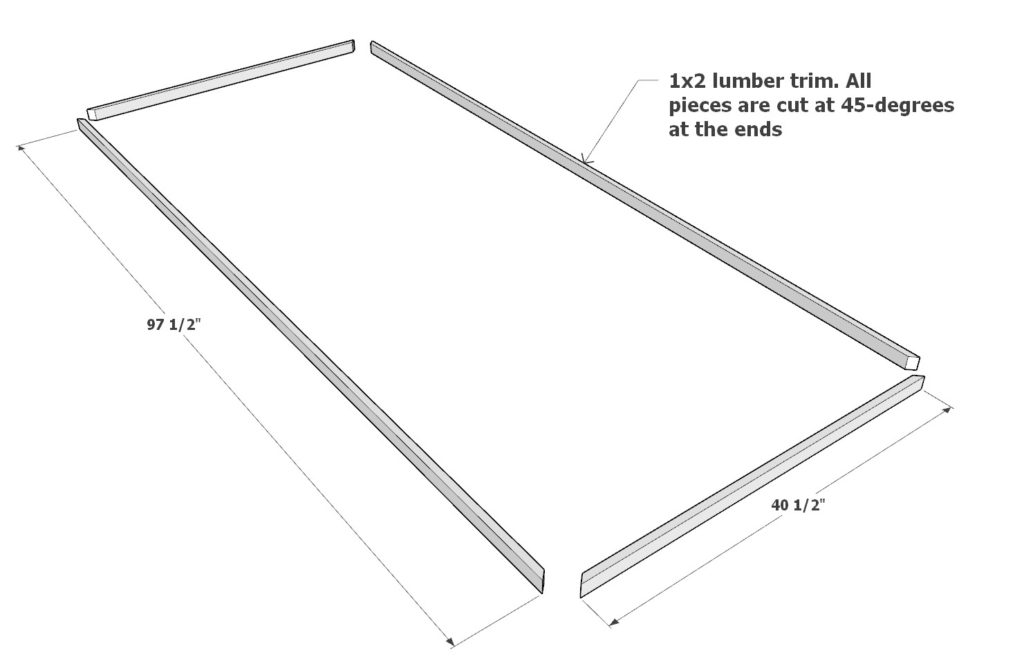
- Frame the table edges with 1×2 lumber for a polished look. Use two 40-1/2 inch segments and two 97-1/2 inch segments.
- Adhere the trims with glue and fine pin nails, ensuring a snug fit.
- Sand the table top uniformly for a sleek, smooth surface.
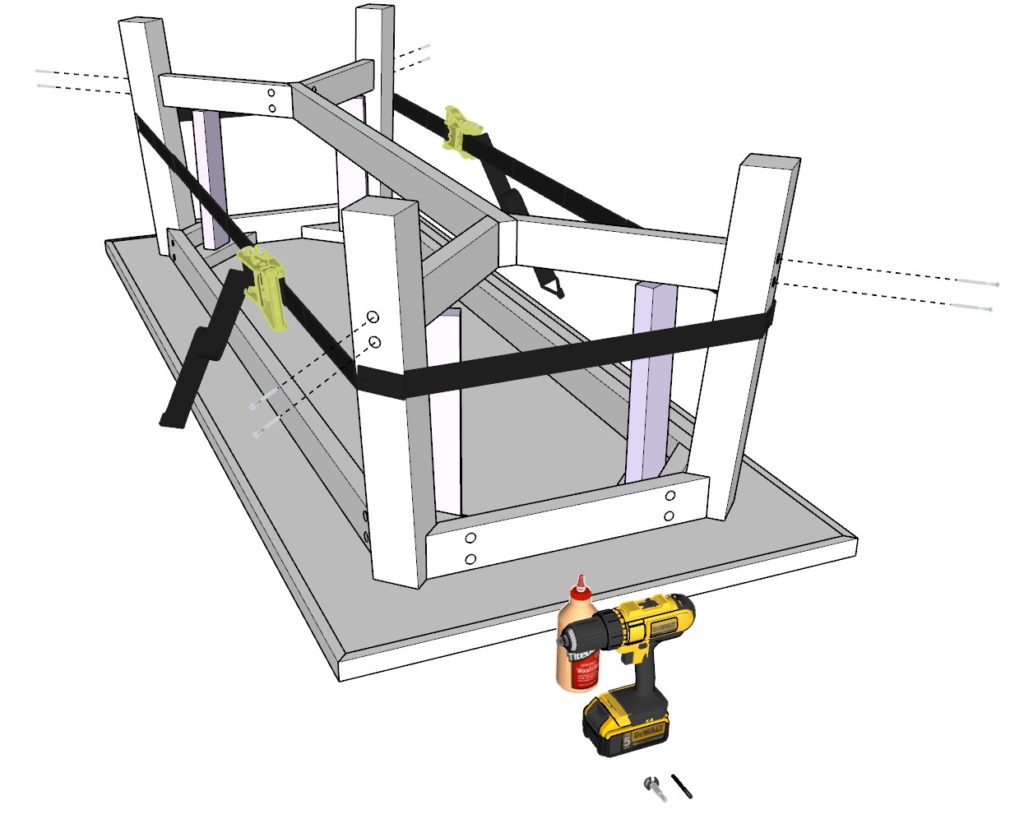
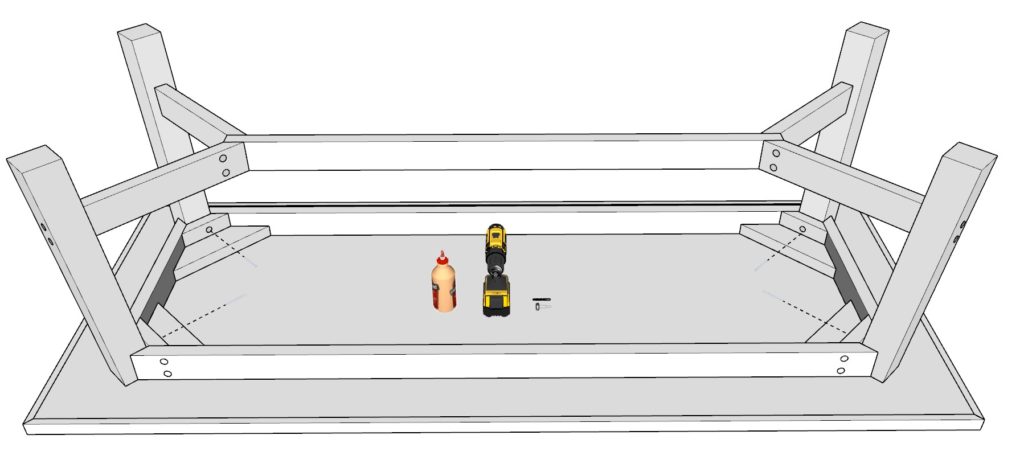
Step 6: Securing the Table Support Base to the Legs
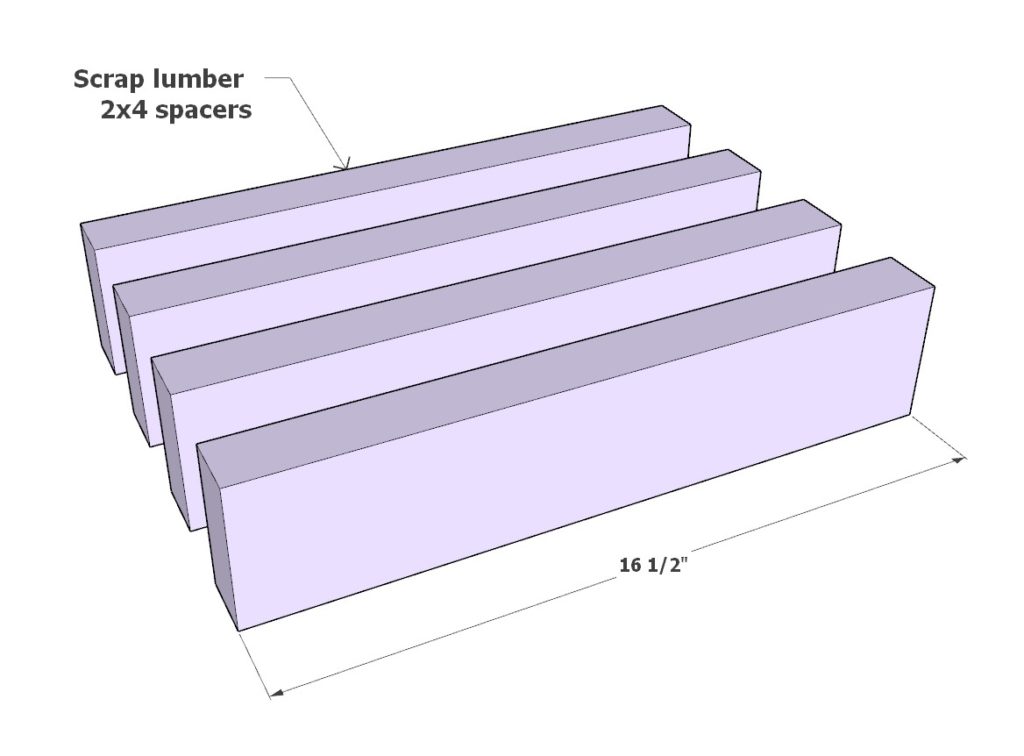
Preparing Temporary Spacers:
- Using any available scrap wood, craft four 16-1/2 inch spacers. These will be discarded post-use.
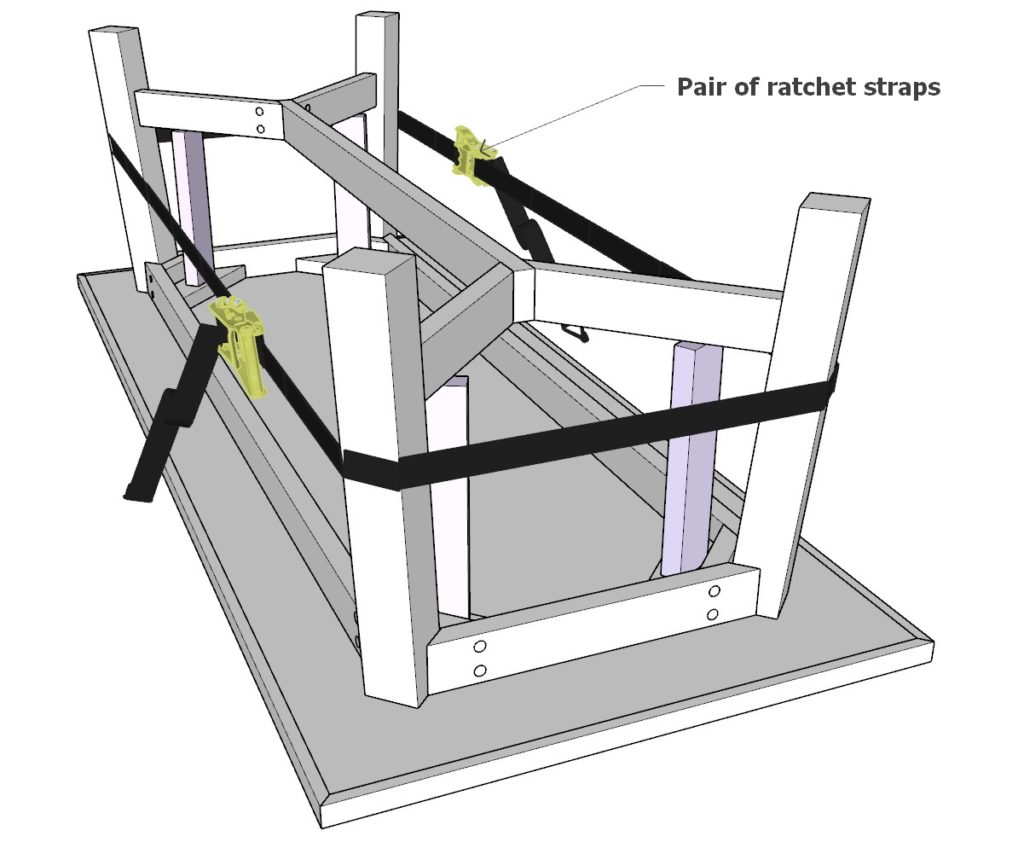
Aligning the Base Supports:
- Utilizing the provided diagram, set up the spacers.
- Lay the table base frame supports on these, ensuring you spread glue on every joining surface.
Binding with Ratchet Straps:
- Wrap ratchet straps around the legs, combining two if one falls short.
- Achieve a tight bind, ensuring all parts are closely held. Adjust any misaligned sections gently with a hammer. Once aligned, further tighten the straps.
Securing the Structure:
- Using the forstner bit, carve out four pairs of 3/4″ holes, and deepen with a standard drill bit.
- Attach with 3.5-inch screws.
- Embed 3/4″ diameter plugs into these holes, securing with glue. Give it an even sanding to finish.
Concluding Attachments:
- Secure the top of the legs with four screws, following the concluding diagram. For a polished look, consider concealing these screws with plugs. When upright, their presence is barely noticeable.
Step 7: Mastering the Final Touches
Refining the Table Surface:
- Begin the sanding process with an 80-grit sandpaper, tackling any rough spots or imperfections. Transition to a 150-grit to smoothen further, and finish with a 220-grit for a silky texture.
- For ergonomic edges, especially where one might lean, utilize a router. A round-over bit can transform sharp edges into gentle curves, marrying form with function.
Choosing Between Stain & Natural Finish:
- For a stained finish, cleanse the table of residual dust. Employ strokes in alignment with the wood grain when applying the stain. Let it permeate for a few minutes before wiping off excess. The deeper the shade desired, the longer the stain should be left on before wiping.
- If you’re captivated by wood’s inherent beauty, retain its natural hue. Nonetheless, a clear wood sealer is instrumental in conserving its charm and ensuring longevity.
Painting & Crafting An Aged Look:
- Lay the groundwork with a wood primer, paving the way for an even paint job. Post drying, brush on your chosen paint, layering as needed for depth and richness.
- To teleport your table back in time, distressing is the key. Tools like chains or nails can be your time machine, introducing deliberate dents and marks. Darker stain in these scars can amplify the timeworn feel