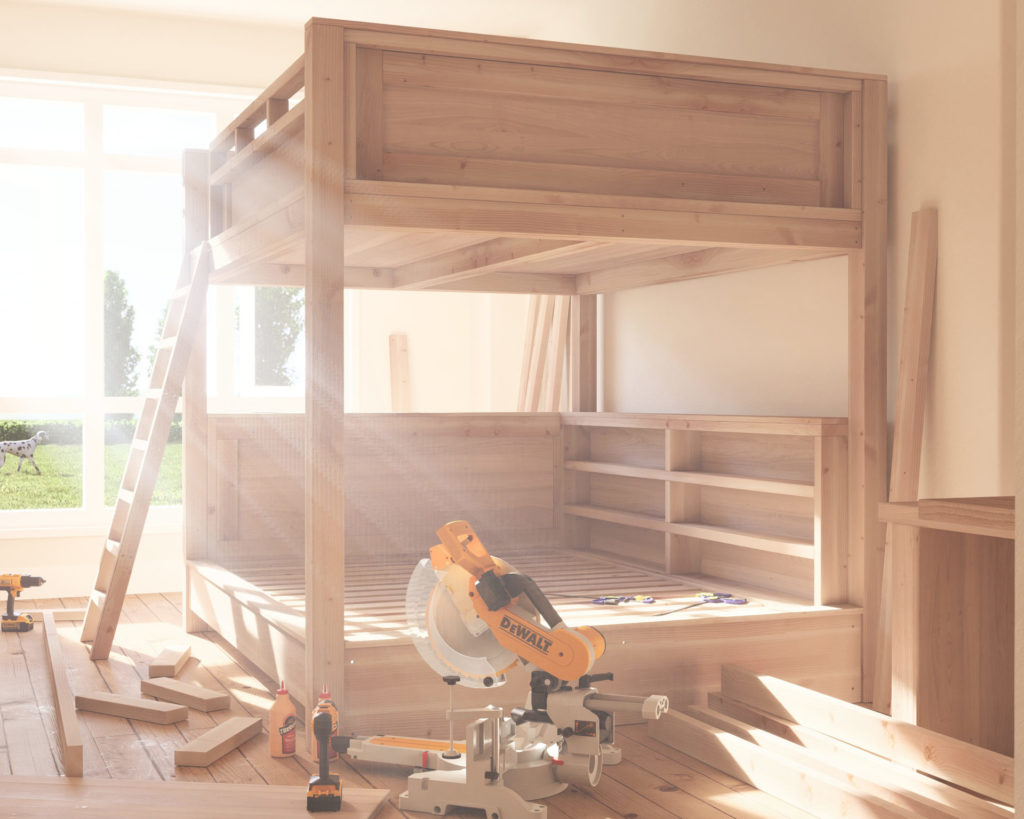
Introduction
Are you looking to maximize space in your bedroom or give it a unique touch? A queen over queen loft bed might be the perfect solution! In this guide, we will walk you through everything you need to know about this versatile and beginner-friendly woodworking project. Get ready to transform your bedroom into a cozy and functional haven, while gaining confidence in your woodworking skills.
The Ideal Loft Bed for Beginners
The DIY queen over queen loft bed is an excellent project for woodworking beginners. With its straightforward design and no fancy joints or cuts, you can easily follow step-by-step instructions to create a beautiful and functional piece of furniture. As you progress through the project, you’ll gain valuable experience and improve your woodworking skills, preparing you for more advanced projects in the future.
Benefits of Building a DIY Loft Bed
There are several advantages to building a DIY loft bed:
- Cost Savings: By building your loft bed, you can save money compared to purchasing a pre-made bed.
- Customization: You can tailor your loft bed to your specific needs and preferences, creating a truly unique and personal piece of furniture.
- Skill Development: As you work on this project, you’ll hone your woodworking skills and gain confidence in tackling more complex projects.
- Satisfaction: There’s a sense of pride and accomplishment that comes from building something with your own hands.
Transform Your Bedroom with a Multipurpose Loft Bed
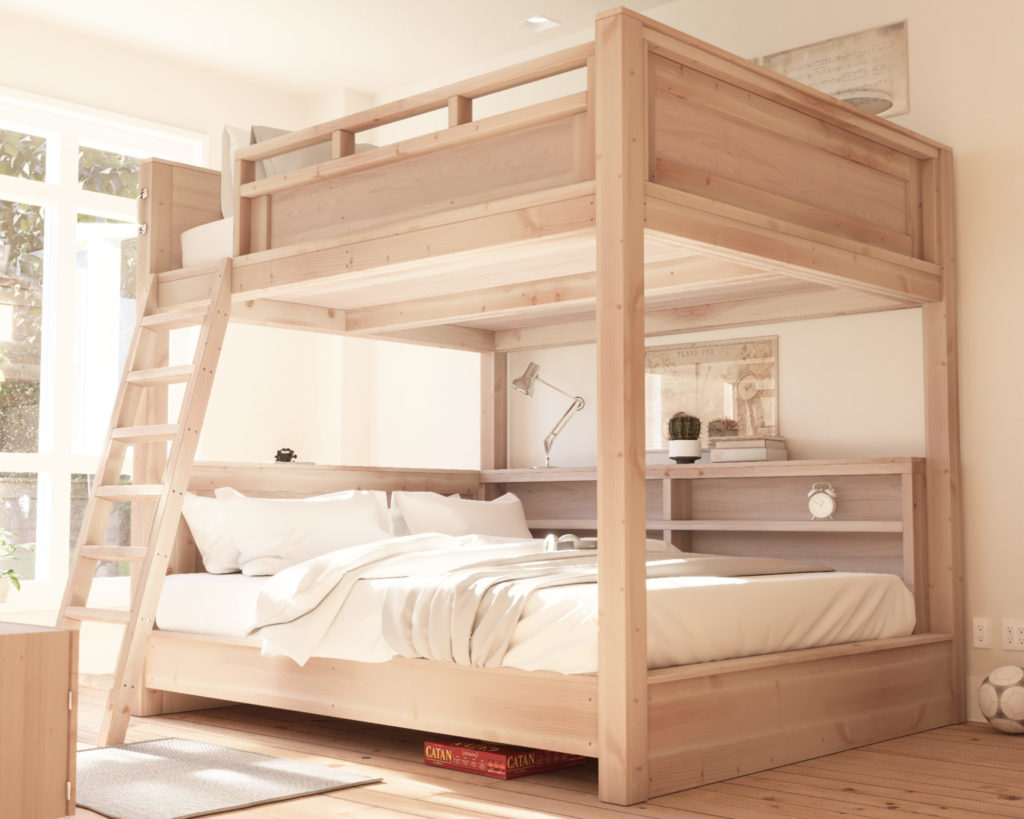
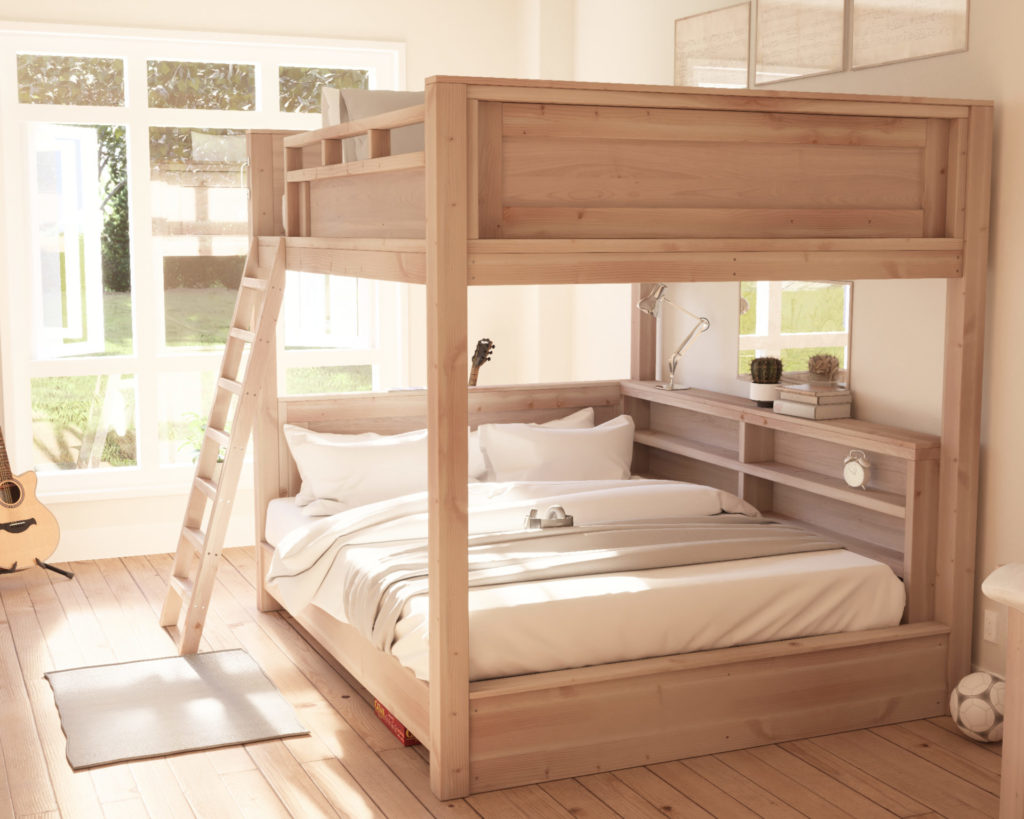
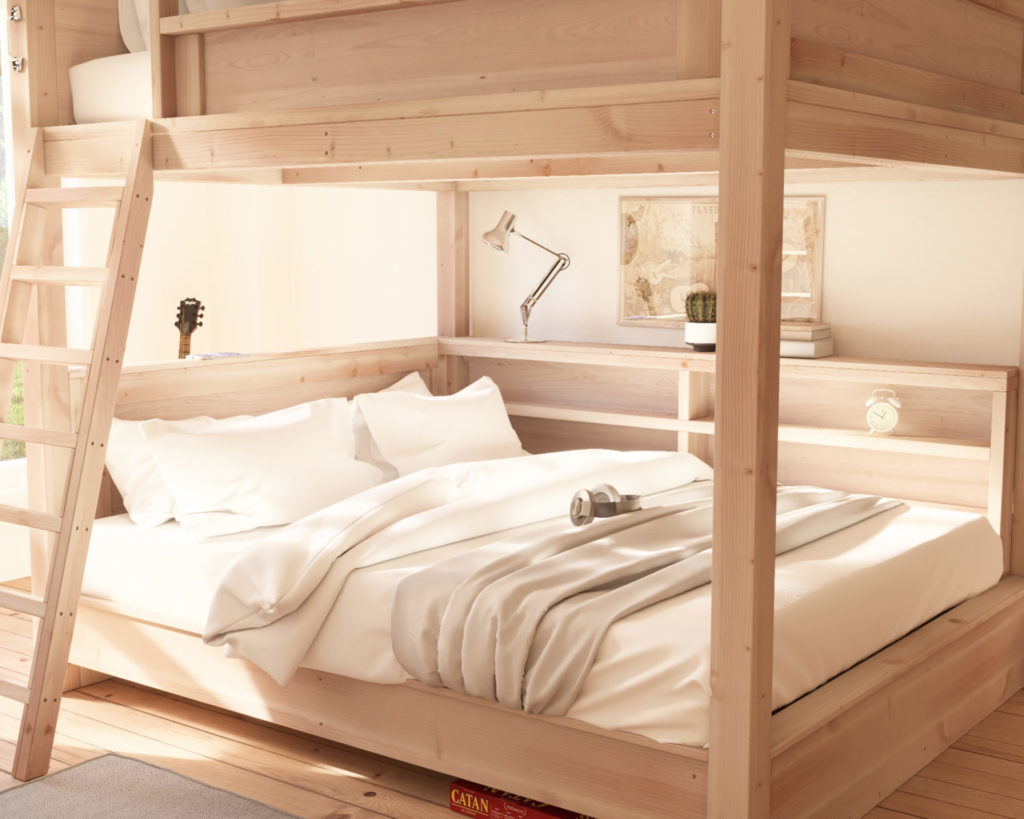
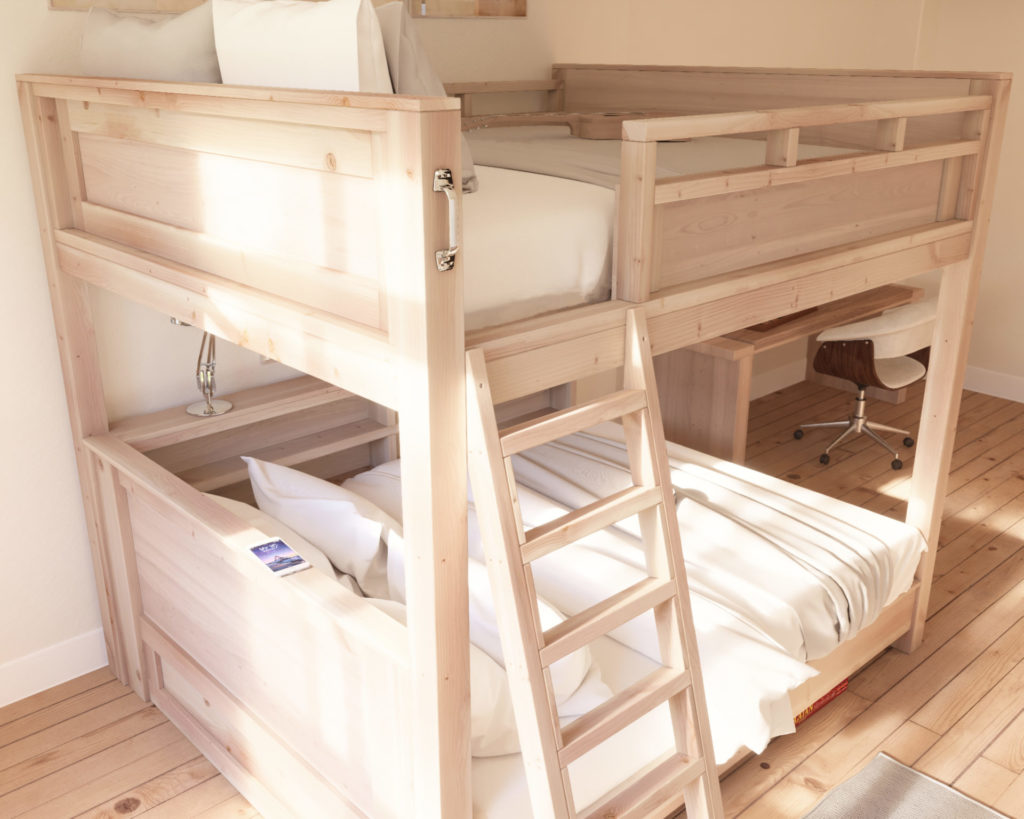
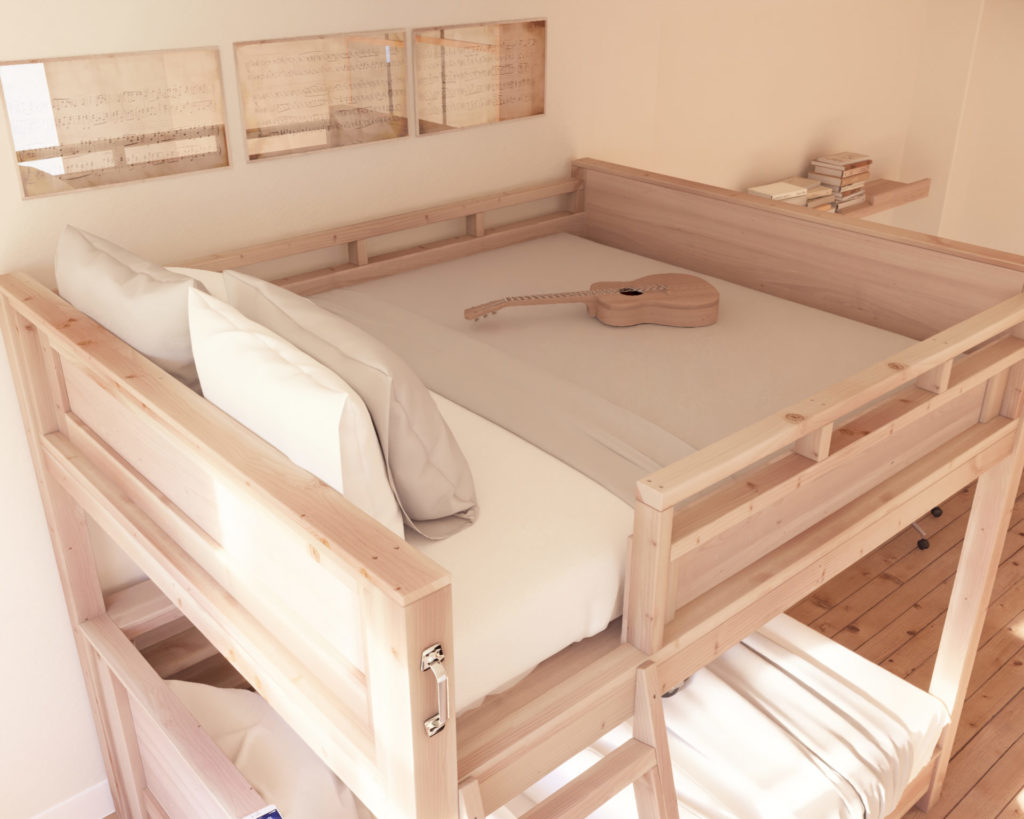
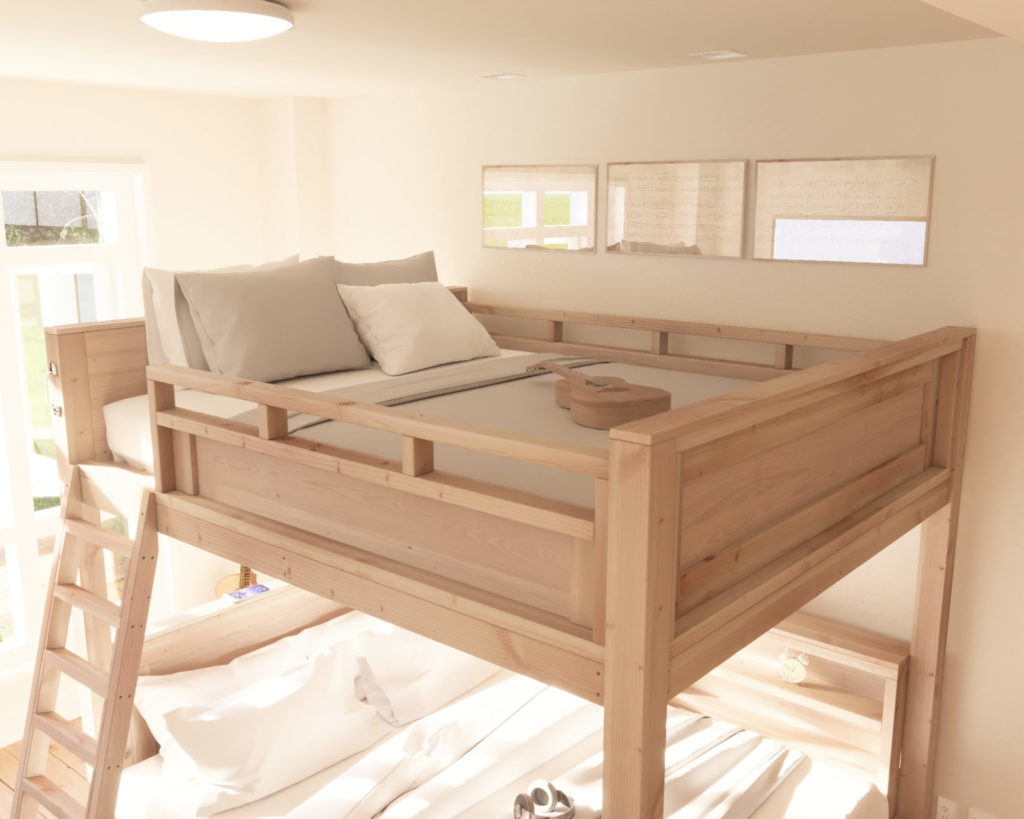
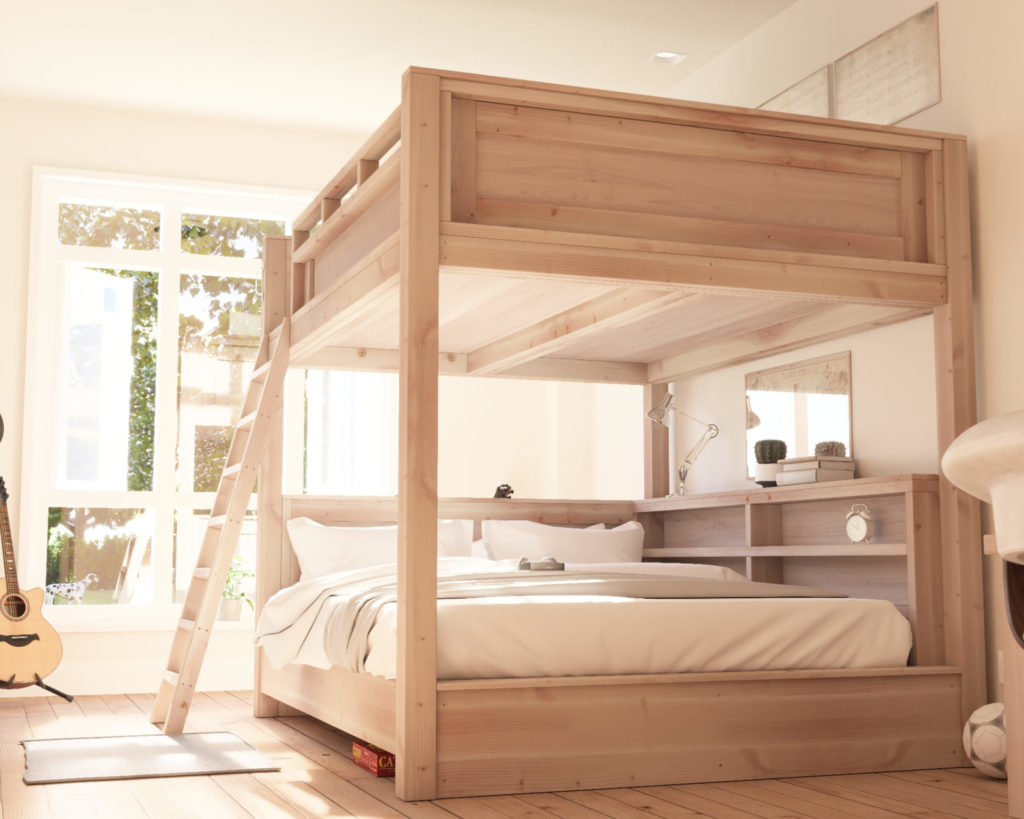
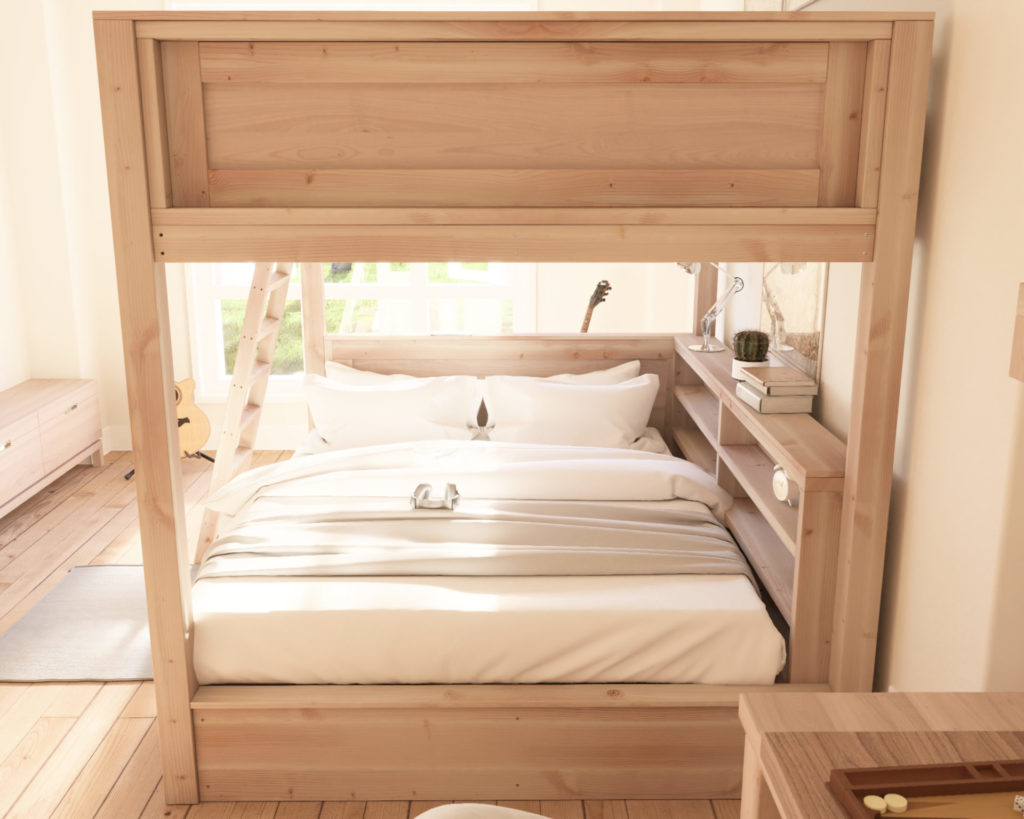
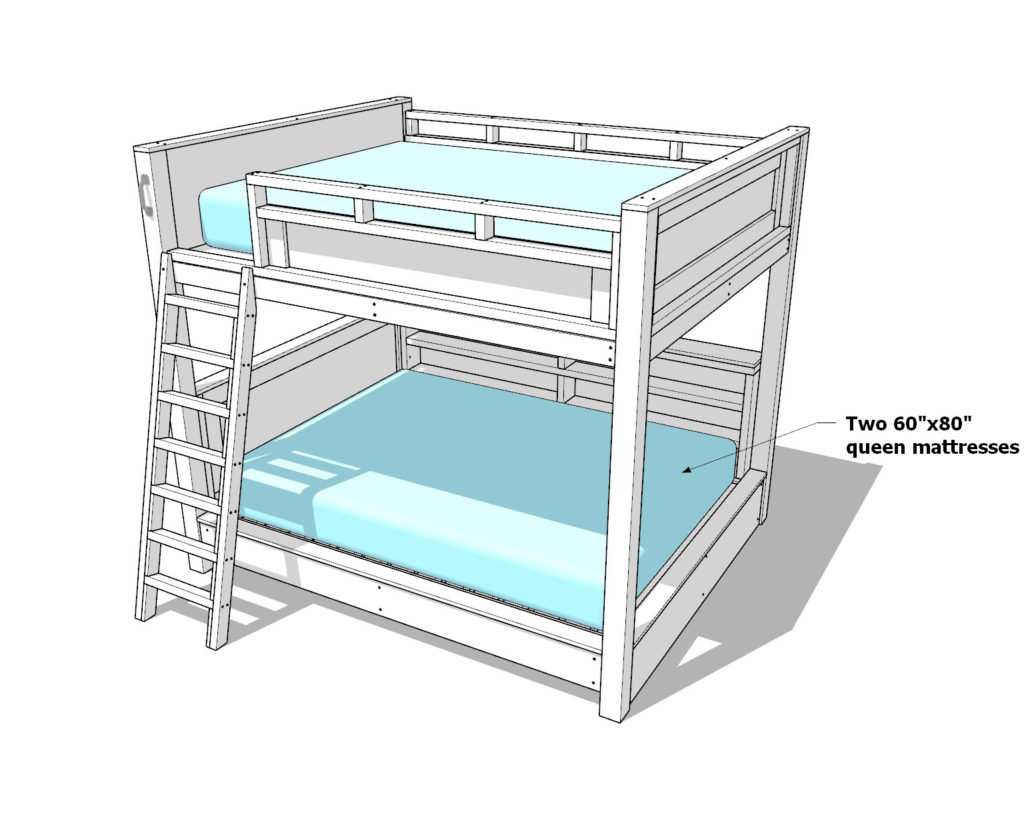
The queen over queen design provides two sleeping areas while optimizing space in your bedroom. This versatile bed also features shelves for storage and privacy, as well as a headboard that encloses the lower sleeping area. With this bed, you can create a comfortable and personalized space for yourself or your loved ones.
Queen Over Queen: A Space-Saving Solution
A queen over queen loft bed is a fantastic space-saving solution, especially for those with limited room. The stacked design allows you to fit two queen-sized mattresses in the footprint of a single bed, freeing up valuable floor space for other furniture or activities.
Loft Bed Design: Functionality and Aesthetics
This loft bed design strikes the perfect balance between practicality and style. The use of common construction lumber and plywood ensures durability and affordability, while the simple yet elegant design can easily blend with various decor styles.
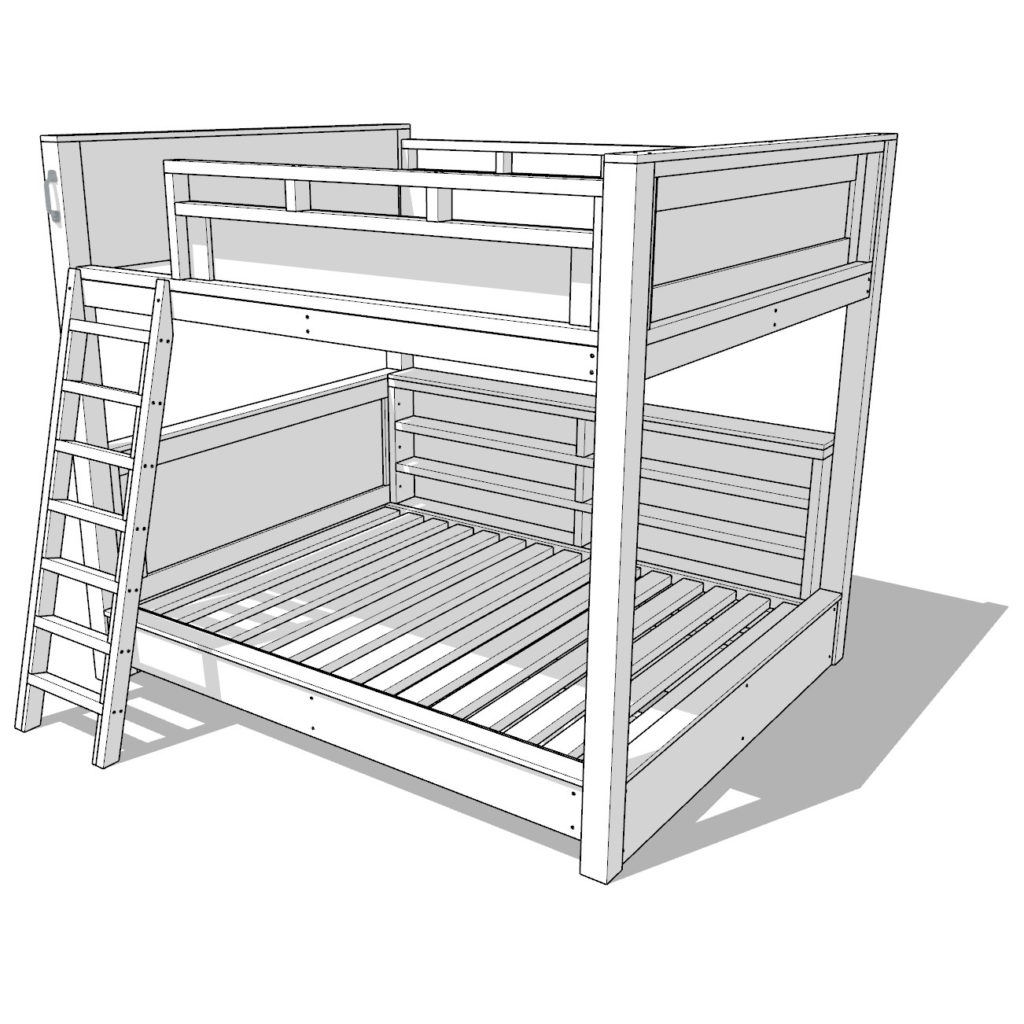
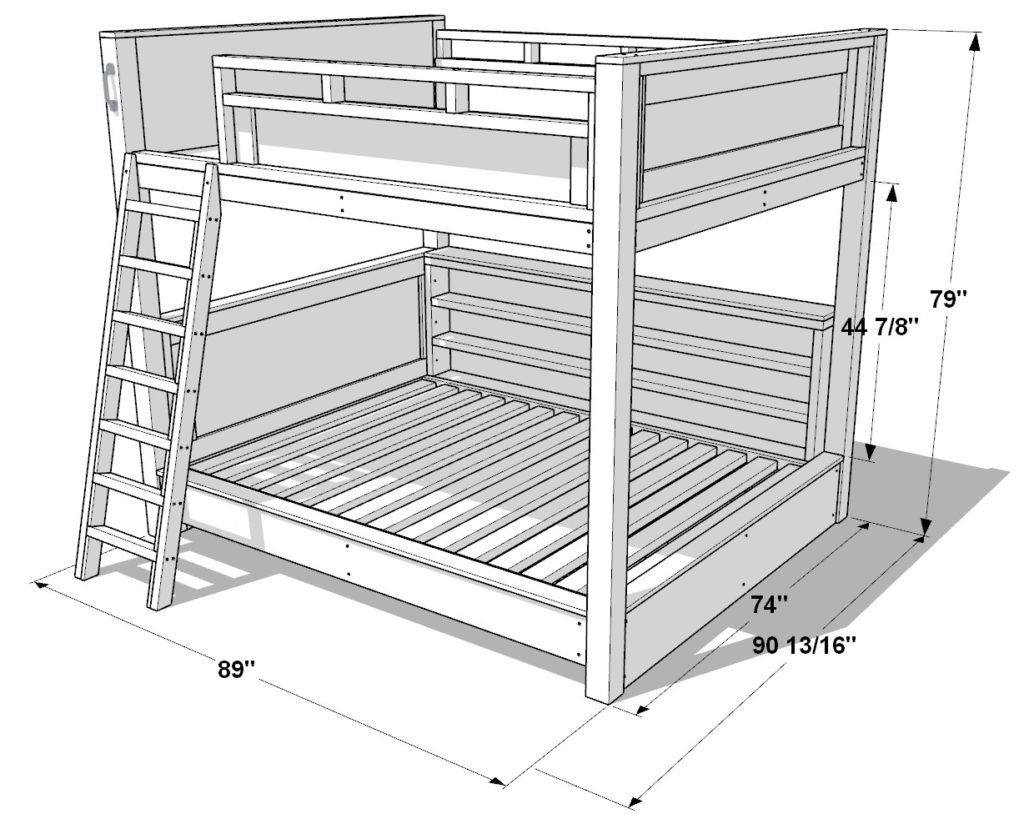
Loft Bed Specifications and Dimensions
The overall dimensions of the queen over queen loft bed (including ladder) are 90-13/16″ wide x 89″ long x 79″ high, with a ladder projection of about 17″. The space under the bed measures 44-7/8″ high, offering plenty of room for storage or a cozy reading nook.
The Beauty of Customization: Personalize Your DIY Loft Bed to Suit Your Needs
One of the most significant advantages of building a DIY loft bed is the ability to customize it according to your needs and preferences. From the type of wood used to the paint or stain color, you have complete control over the final product. You can even add built-in shelves, lighting, or other features to make your bed truly one-of-a-kind.
How to Properly Measure Your Space for a DIY Loft Bed: Avoiding Common Mistakes
Before starting your loft bed project, it’s essential to measure your space accurately. Here are some tips to help you avoid common mistakes:
- Measure the height, width, and length of your room, taking into account any ceiling fans or hanging fixtures.
- Consider the ladder’s projection when measuring the width.
- Don’t forget to account for any additional built-in features you plan to include.
- Always double-check your measurements to avoid costly errors.
Creative Ideas for Decorating and Personalizing Your DIY Loft Bed
Add a personal touch to your DIY loft bed with these creative decorating ideas:
Incorporate a theme: Choose a theme that reflects your personality or interests, such as a nautical, rustic, or minimalist design, and incorporate it into your loft bed through colors, fabrics, and accessories.
Add colorful bedding: Choose vibrant and patterned bedding to make your sleeping area pop and create a cozy atmosphere.
Personalize with accessories: Add personal touches like framed photos, artwork, or decorative pillows to make your loft bed feel like a unique and special space.
Create a reading nook: Set up a cozy corner with cushions, blankets, for a comfortable reading area.
How to Choose the Best Lighting Options for Your DIY Loft Bed Space
Proper lighting is essential for creating a comfortable and inviting atmosphere. Here are some tips for choosing the best lighting options for your loft bed:
Layer your lighting: Combine ambient, task, and accent lighting to create a well-lit and versatile space.
Use LED lights: LED lights are energy-efficient and long-lasting, making them perfect for use in a loft bed.
Install dimmer switches: Dimmer switches allow you to adjust the lighting to your preference, making your space more comfortable and adaptable.
Add string lights: String lights add a warm and cozy ambiance to your loft bed, making it feel more like a personal retreat.
The Psychological Benefits of a DIY Loft Bed: Creating a Personal Sanctuary
Having a personal sanctuary, such as a DIY loft bed, can provide numerous psychological benefits, including:
- Reduced stress: A comfortable and personalized space can help reduce stress and promote relaxation.
- Improved sleep quality: A well-designed sleeping area can contribute to better sleep, leading to better overall health and well-being.
- Increased productivity: A clutter-free and organized space can enhance focus and productivity.
- Enhanced creativity: A unique and inspiring environment can stimulate creativity and encourage self-expression.
How to Make Your DIY Loft Bed a Safe and Comfortable Space for Children and Teens
Safety is a top priority when designing and building a loft bed for children and teens. Here are some tips to ensure your DIY loft bed is safe and comfortable:
- Use sturdy materials: Choose high-quality lumber and hardware to ensure the stability and durability of your bed.
- Install safety rails as instructed: Adding safety rails on the top bunk can prevent falls and accidents.
- Add non-slip treads to the ladder: Non-slip treads can help prevent slips and falls when climbing the ladder.
- Opt for rounded edges: Smooth and round the edges of the bed to avoid sharp corners that could cause injuries.
- Choose age-appropriate design: Consider the age and needs of the child or teen when designing the loft bed, and make adjustments as necessary.
Conclusion
Building a DIY queen over queen loft bed is an exciting and rewarding project that will not only enhance your woodworking skills but also provide a functional and stylish piece of furniture for your home. With proper planning, customization, and attention to safety, you can create a unique and comfortable space that reflects your personality and meets your needs. So gather your tools, follow this guide, and start your journey towards creating your dream loft bed!
Time to build
12
Total cost of build
$800
Skill level required
Beginner
Download the PDF plans
Queen loft bed PDF plans
What is included in the PDF download?
- Easy to read step by step instructions
- Material list
- Tools needed
- Helpful links to materials and tools needed
Dimensions the DIY queen over queen loft bed
Recommend tools/materials
Hello there! Please note that our recommended tools and materials list is exclusively available when you purchase the DIY loft bed plan. Don’t miss out on this valuable information! We appreciate your support in making our website possible. If you’re ready to get started, click “here” to buy the plan now. Happy building!
Lumber purchase list
Hey there! Just a heads up: shopping & material lists are exclusive perks when you buy the DIY loft bed plan. Don’t miss out on them! Thanks for making our website possible! Ready to start? Click “here” to buy now!
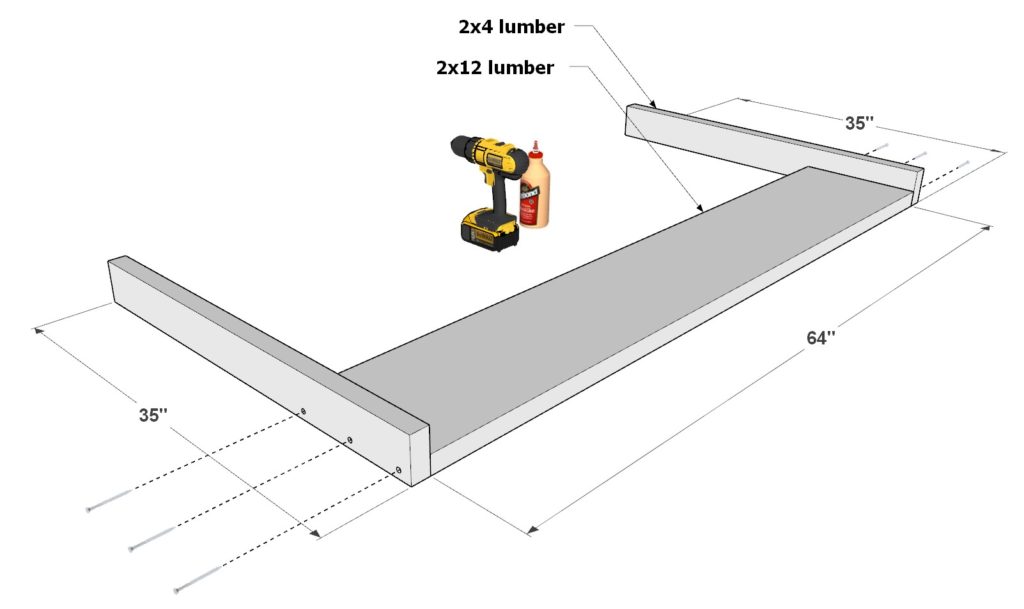
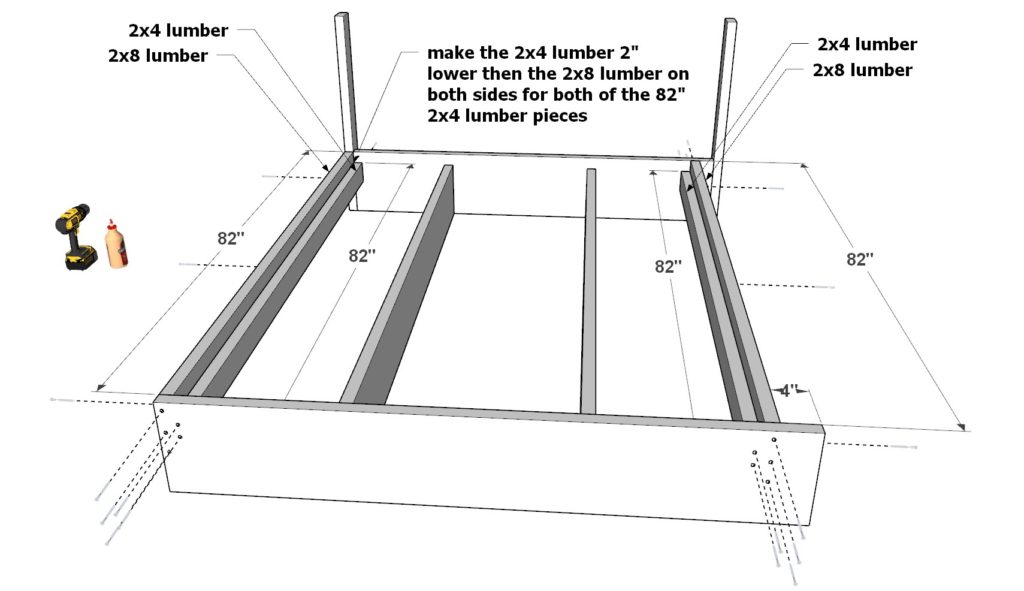
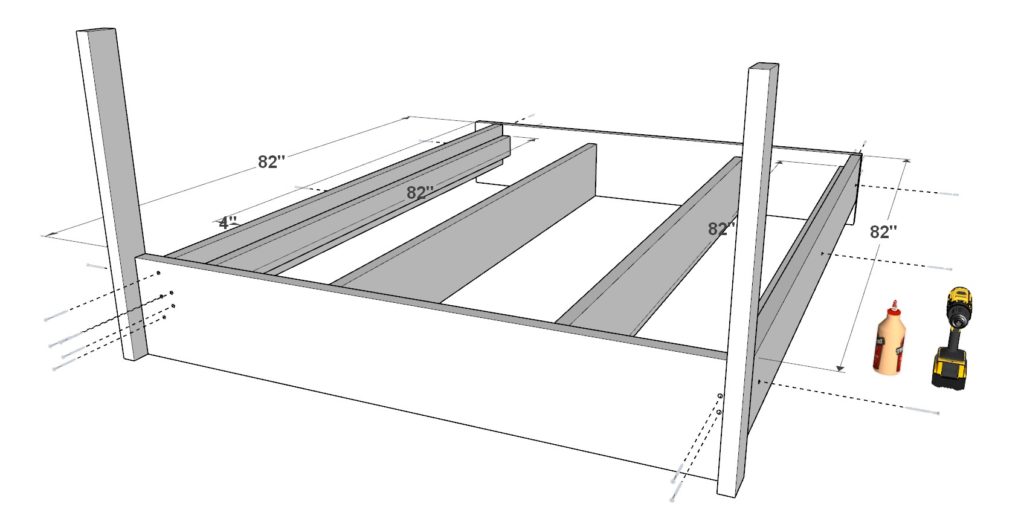
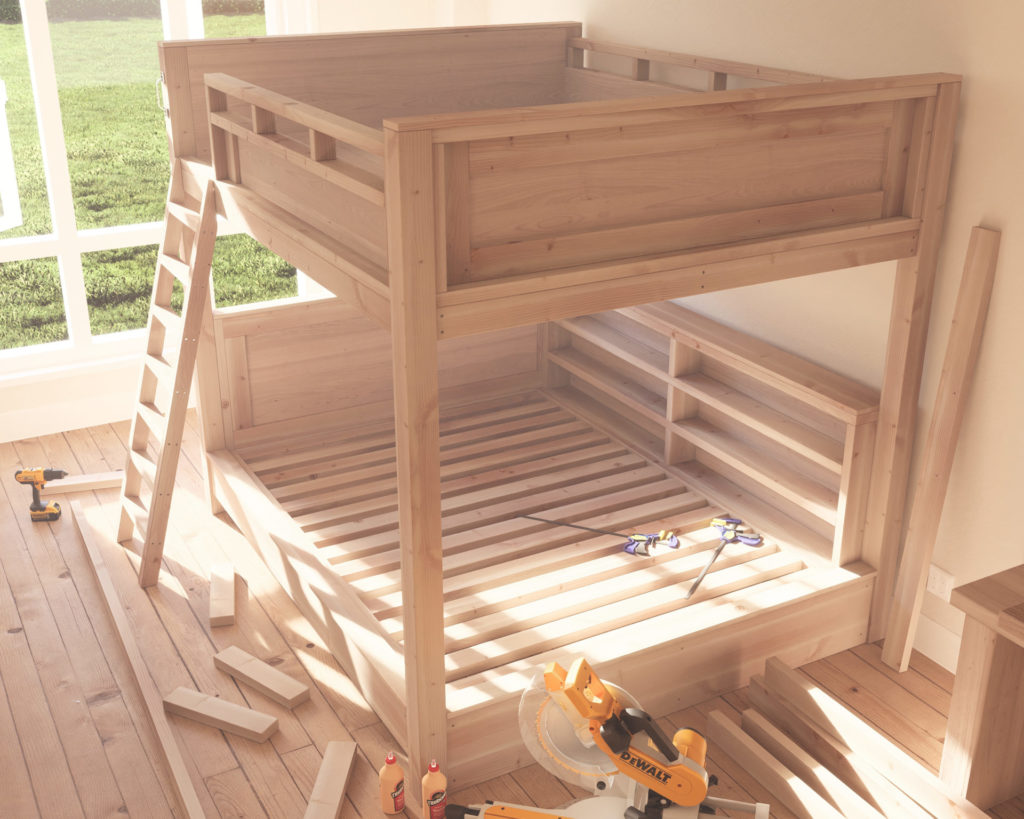
Step 1: Constructing the Lower Bed Frame and Back Board
First, build the fame of the lower bed and the lower back board frame.
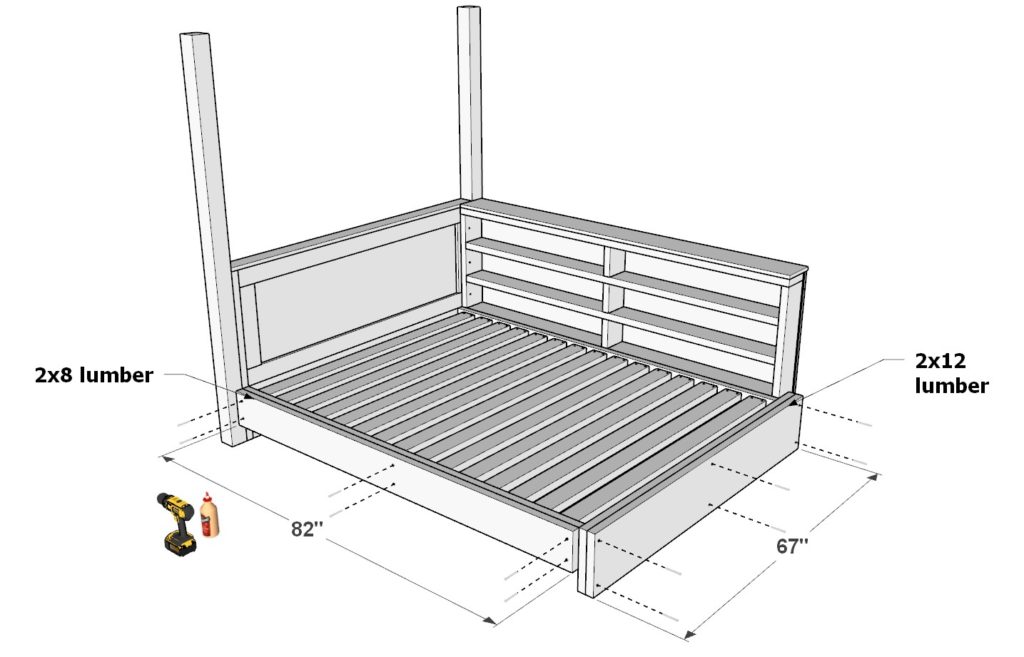
Start by taking one 64 inch 2×12 lumber piece and two 35 inch 2×4 lumber pieces and arranging them as shown below. {redrill holes in the 2x4s to prevent the wood from splitting, add glue, and join the pieces using 3.5 inch screws.
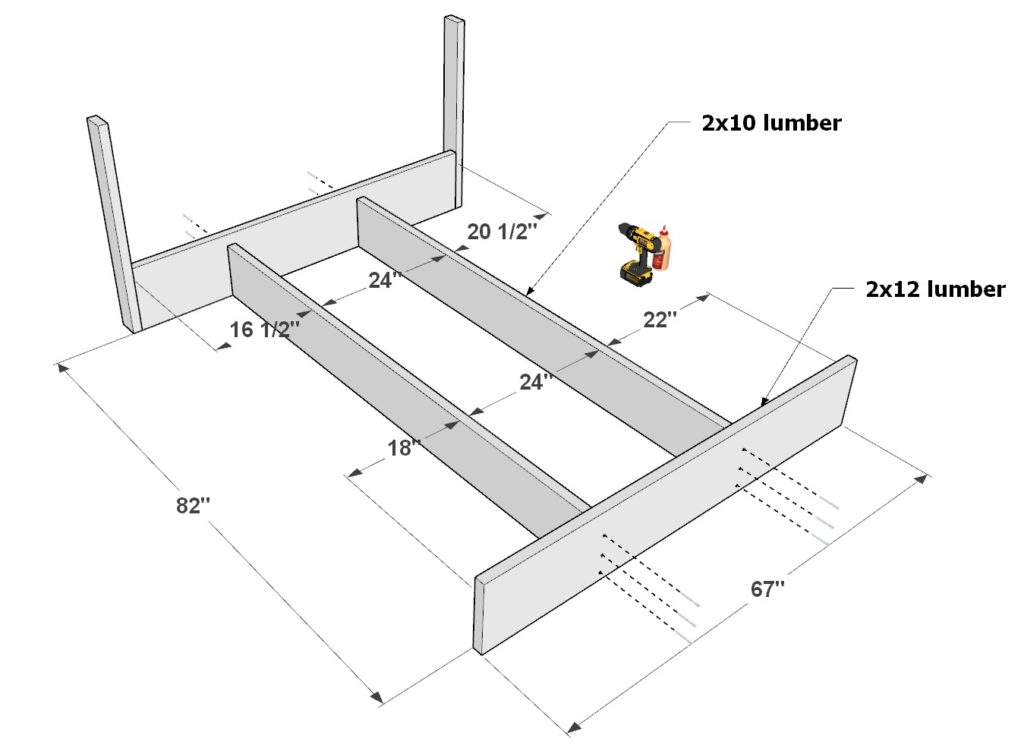
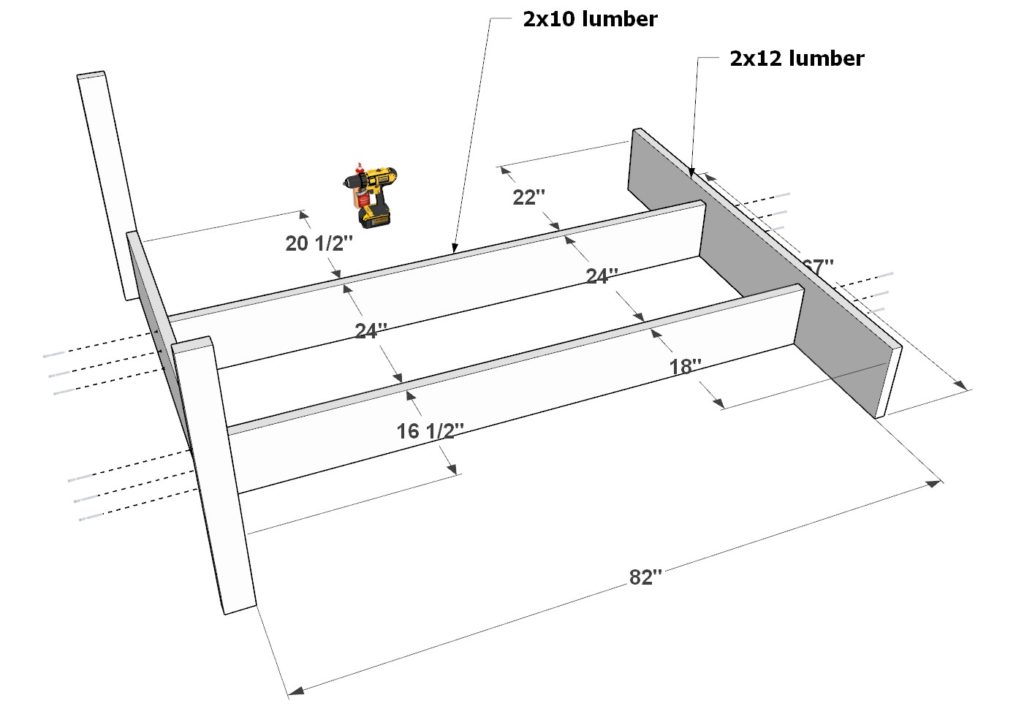
Next, add two 82 inch 2×10 lumber pieces to the bed headboard and add a 67 inch long 2×12 lumber pieces that will serve as the frame for the base board. Secure these using glue, predrilling, and 3.5 inch screws. Space them out as indicated.
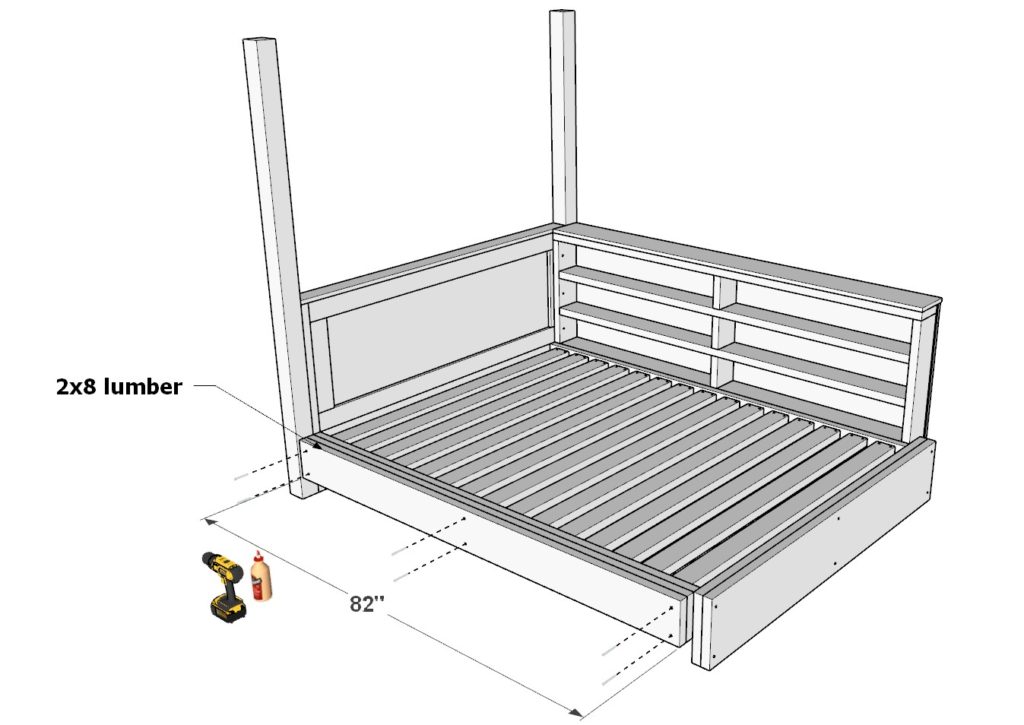
Next, add two 82 inch 2×4 lumber pieces and two 82 inch 2×8 lumber pieces to the bed frame. These are also secured with glue, predrilling, and 3.5 inch screws.
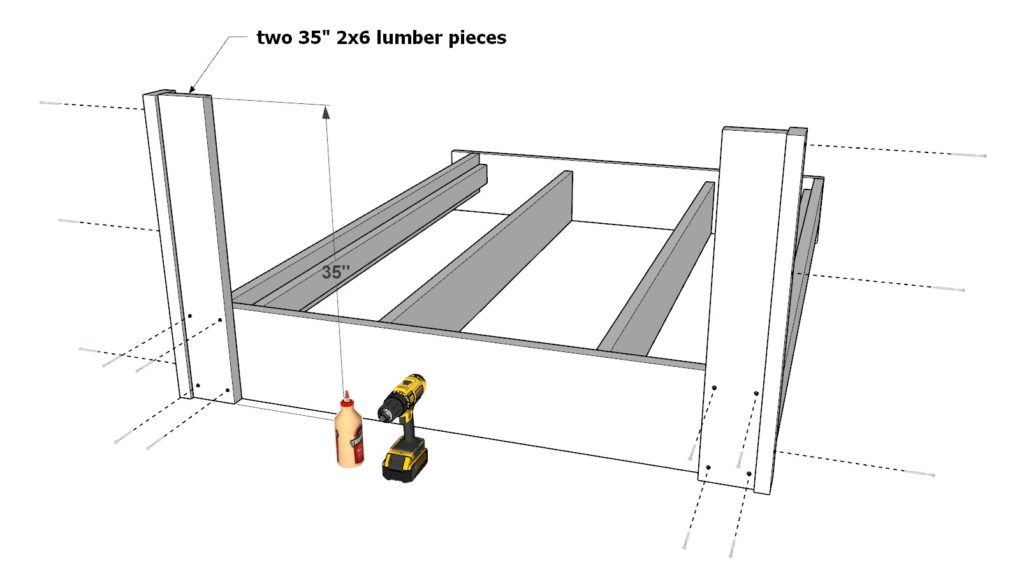
Lastly, add two 35 inch 2×6 lumber pieces to the back board of the lower bed frame. Secure with glue, predrilling, and 3.5 inch screws.

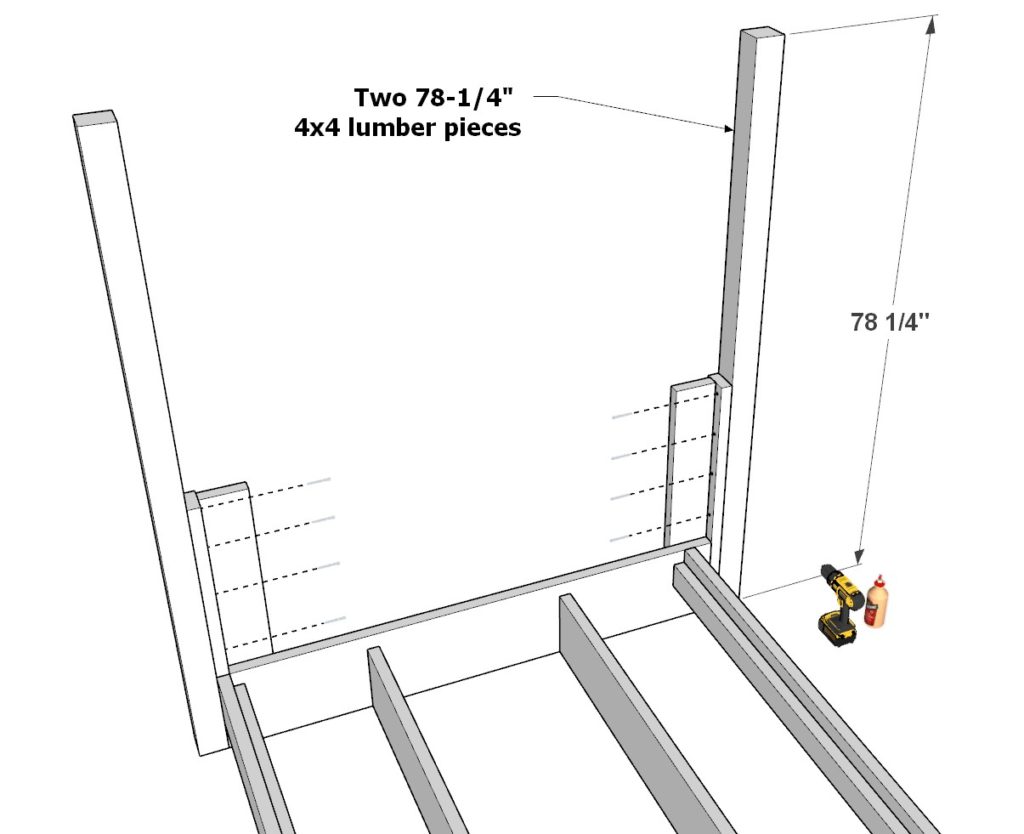
Step 2: Installing Loft Bed Pillars, Mattress Boards, and Decorative Headboard Elements
Next, add two loft bed pillars, add the lower bed mattress boards, and add decorative headboard lumber pieces.
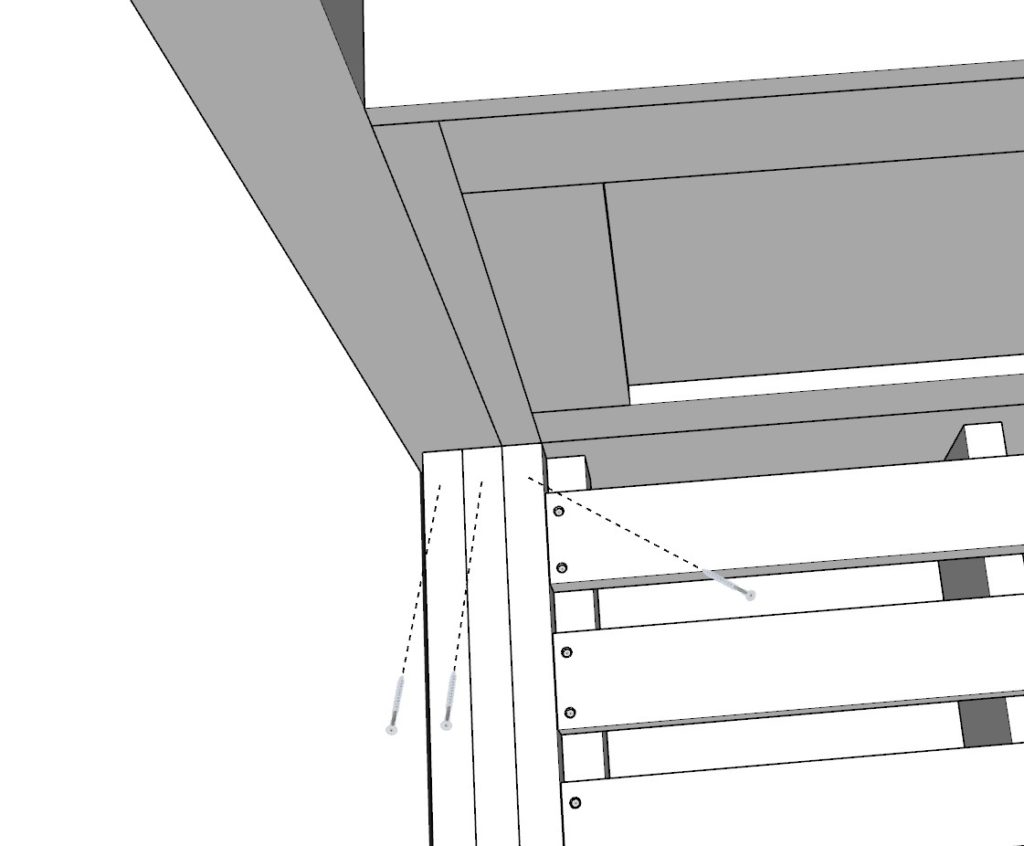
First, take two 78-1/4 inch 4×4 lumber pieces and secure them to the main bed frame using glue, predrilling, and 3.5 inch screws.
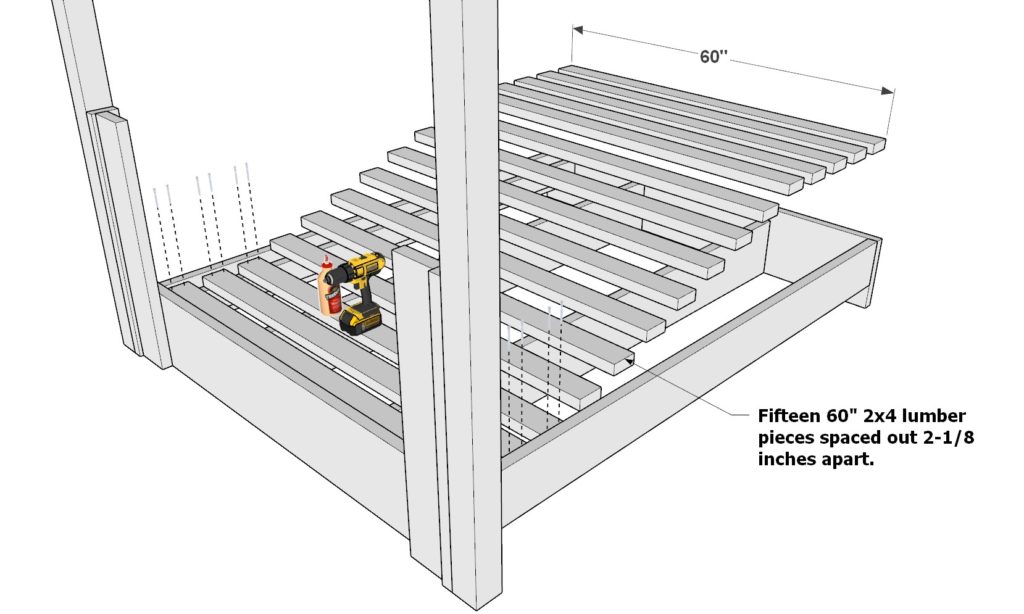
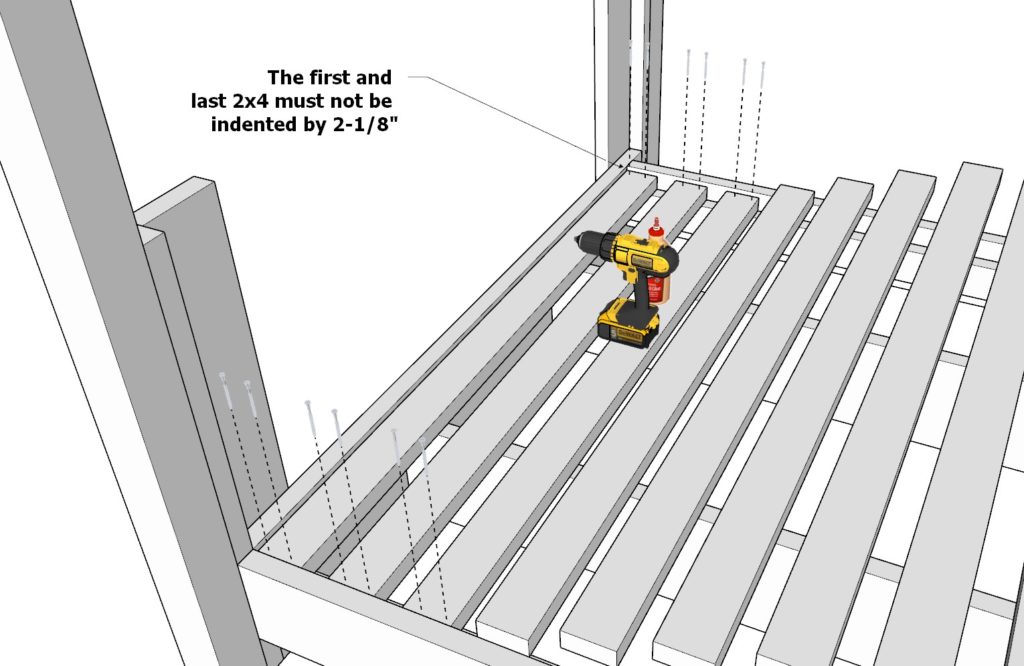
Next, add fifteen 60 inch 2×4 lumber pieces to serve as the bed slats that will support the mattress. Space these out 2-1/8 inches apart.
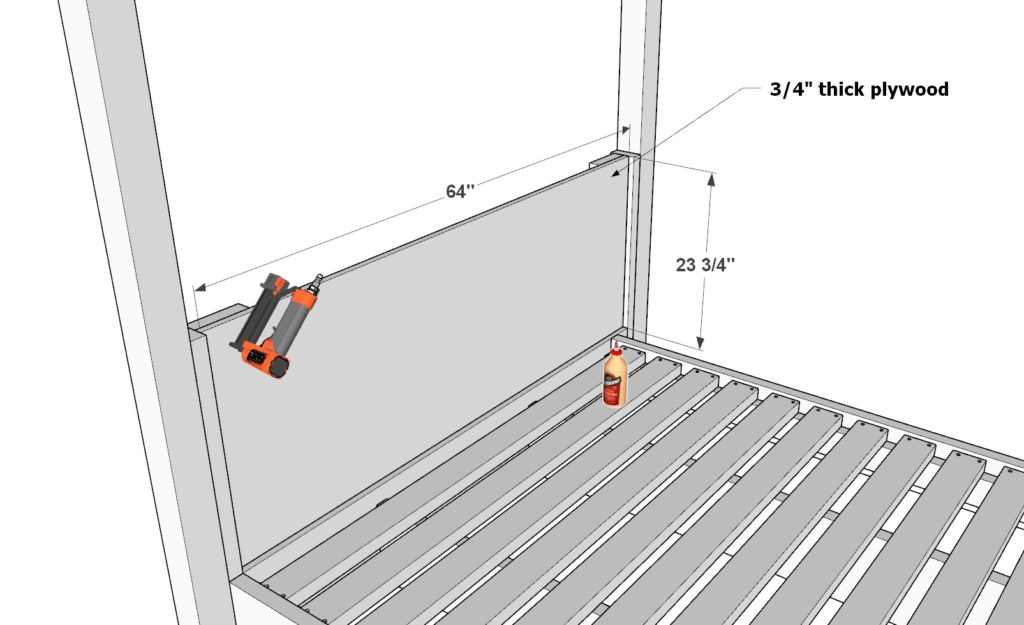
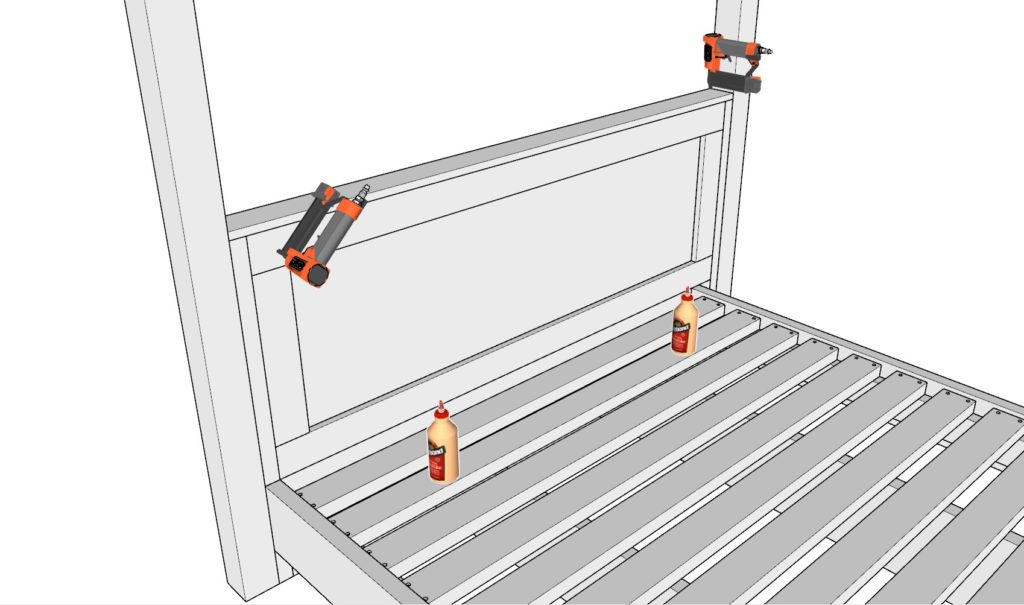
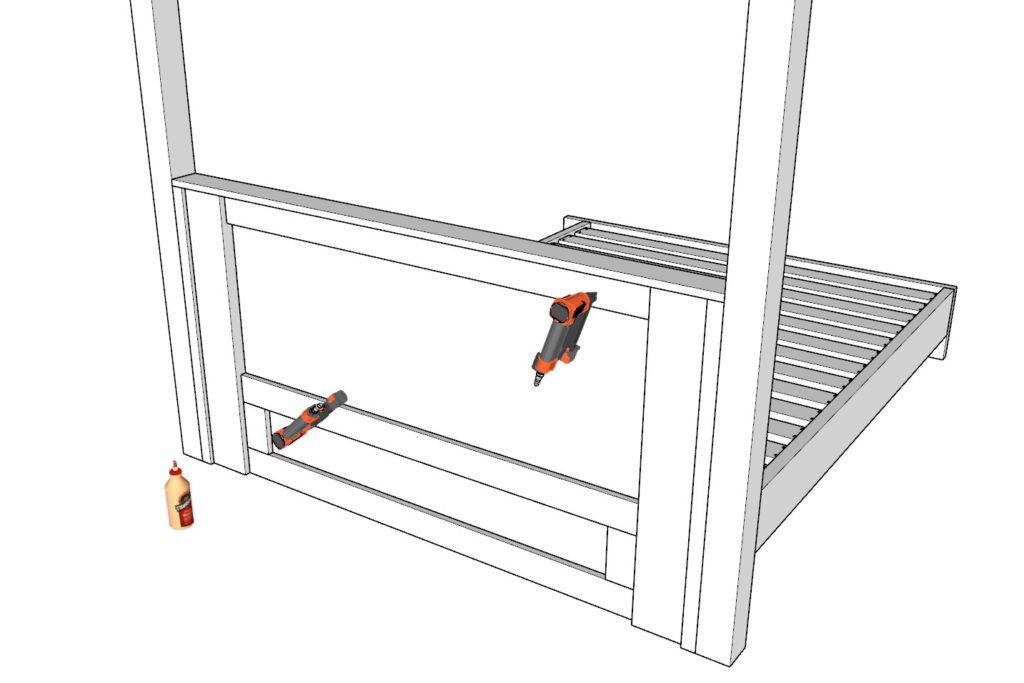
Next, add a 64 inch x 23-3/4 inch 3/4′ thick plywood sheet to the backrest. Secure in place with glue and 1.5 inch nails from a nail gun.
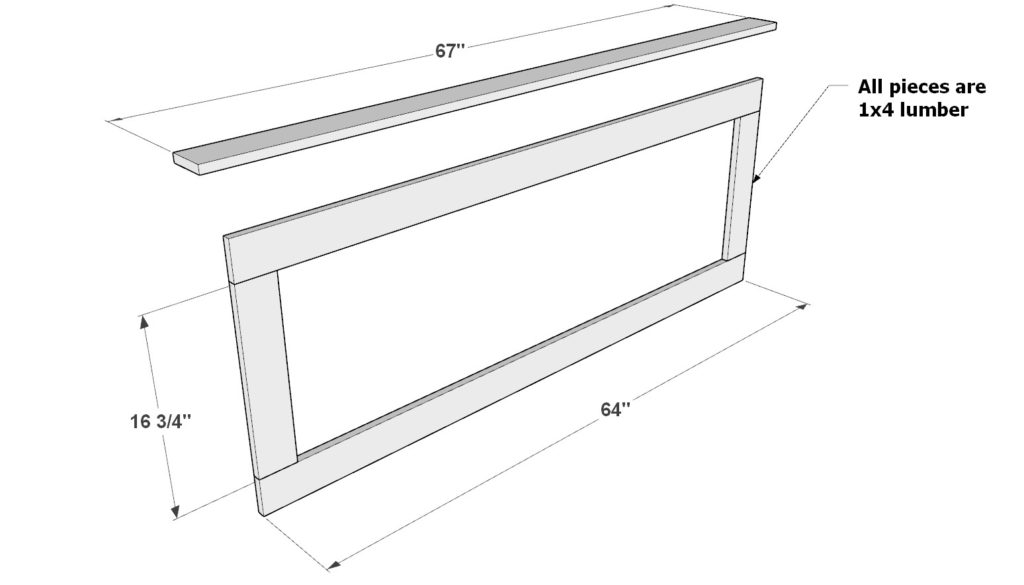
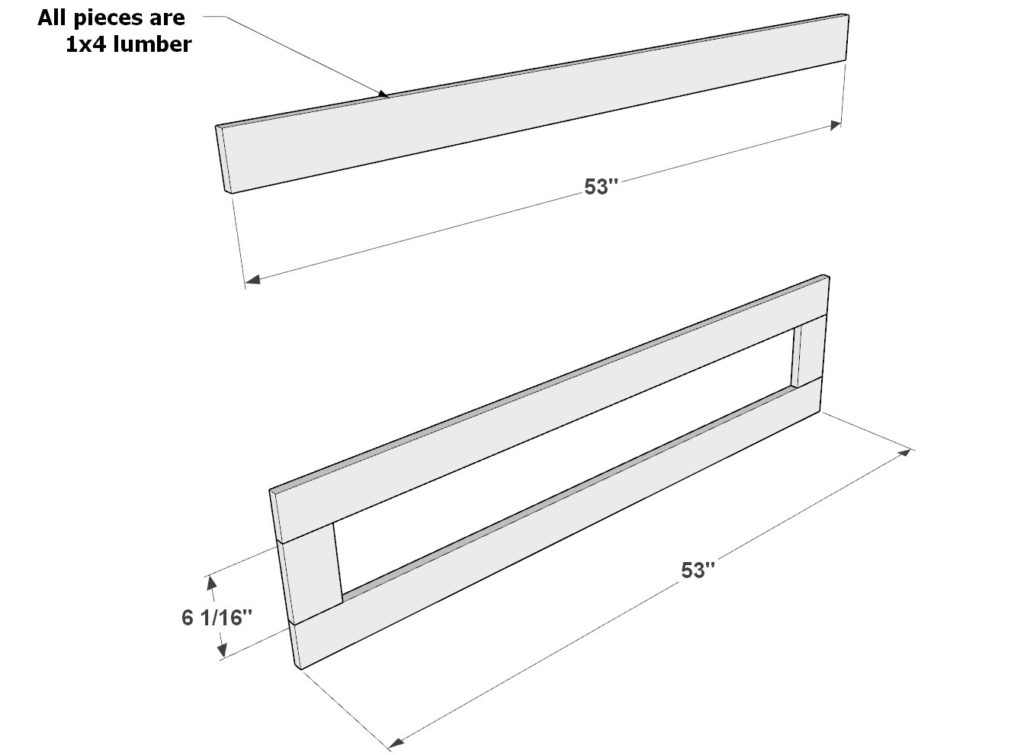
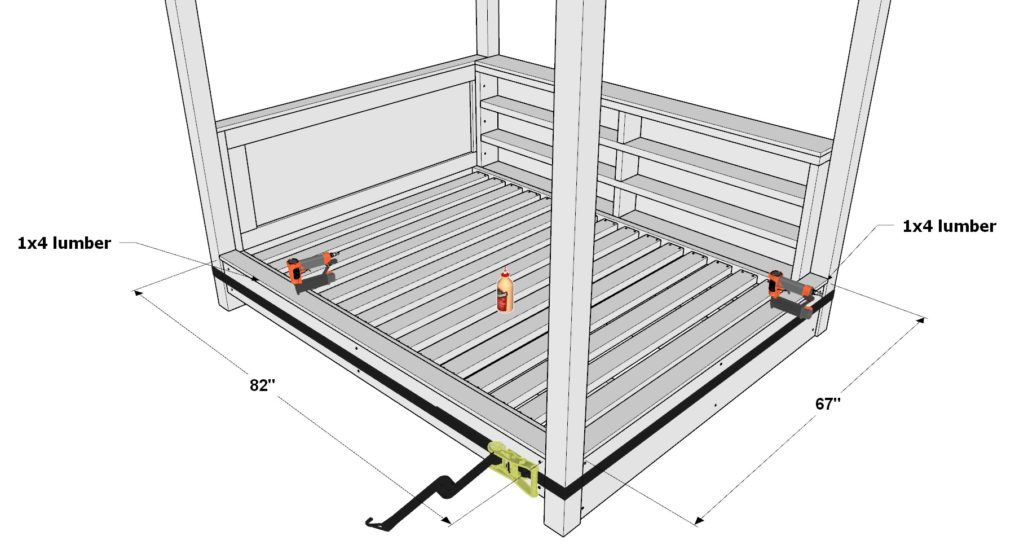
Next, add decorative trim pieces to the back board both in the front and back as indicated in the illustrations. These are all made of 1×4 lumber and are all secured with glue and 1.5 inch nails from a nail gun.
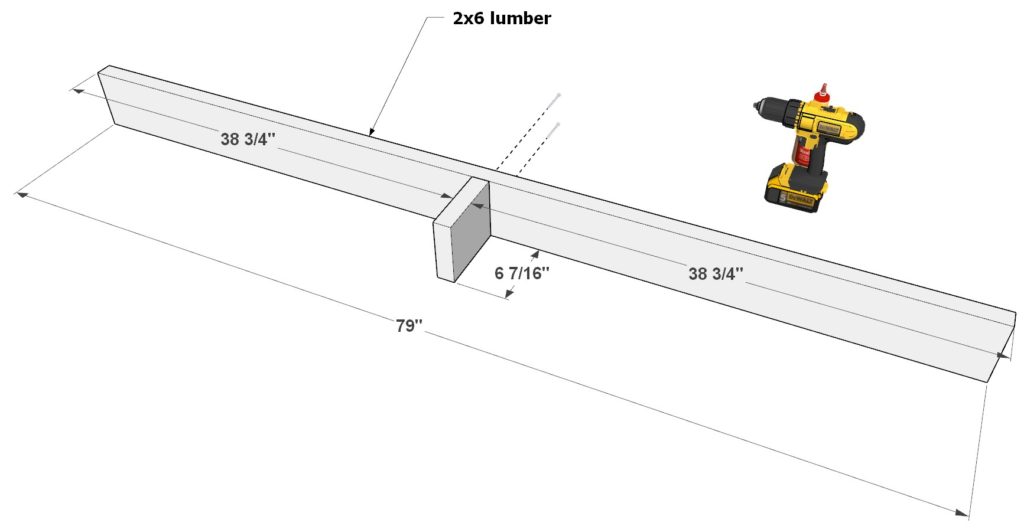
Step 3: Assembling and Installing the Bottom Bed Shelf Component
Next, assemble the bottom bed shelf component.
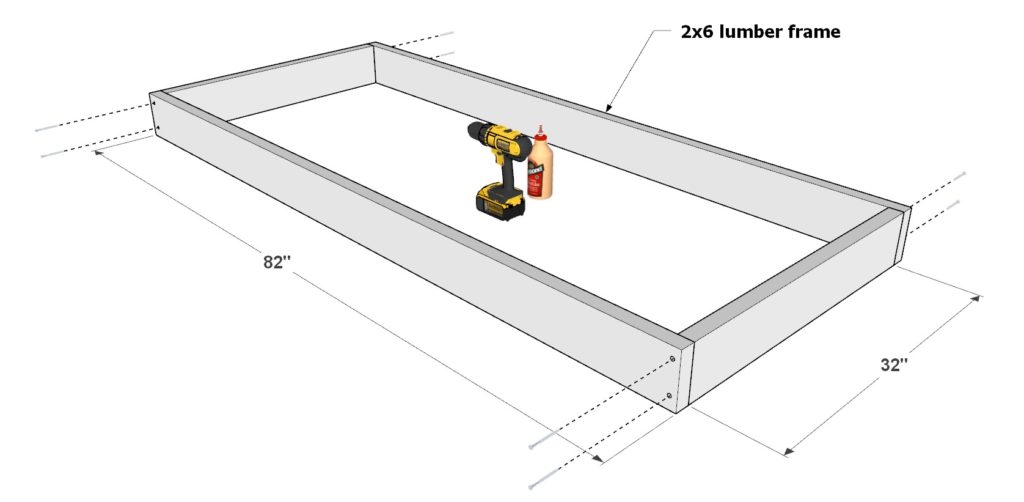
Take two 32 inch 2×6 lumber pieces and two 82 inch 2×6 lumber pieces and arrange them as shown below. Add 3.5 inch screws, predrill, and add glue.
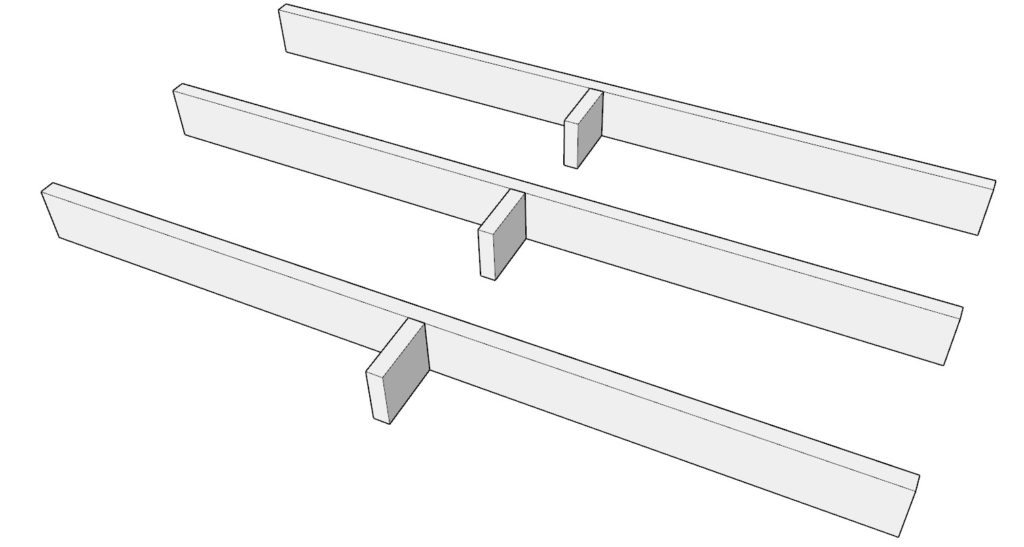
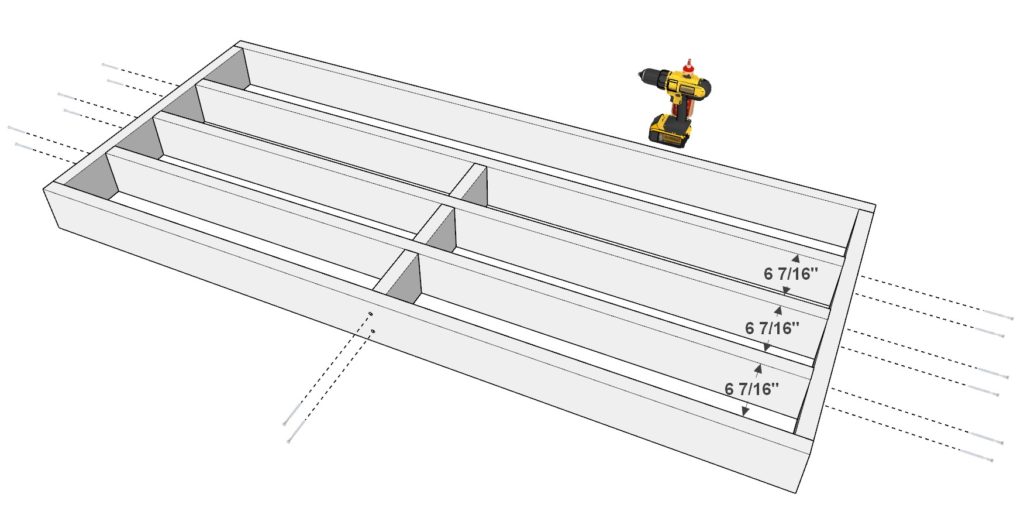
Next, build the shelves. Take one 79 inch 2×6 lumber piece and one 6-7/16 inch 2×6 lumber piece and secure these together with 3.5 inch screws and glue. Make three identical shelf pieces.
Secure the shelf pieces into the shelf frame using glue and 3.5 inch screws.. Space them out as indicated.
Next, add a 1/2″ thick plywood sheet measuring 35 inches x 82 inches. Add a decorative 1×4 lumber trim frame on top consisting of two 82 inch 1×4 lumber pieces and two 28 inch 1×4 lumber pieces. Secure the plywood and the trim pieces with glue and 1.5 inch nails.
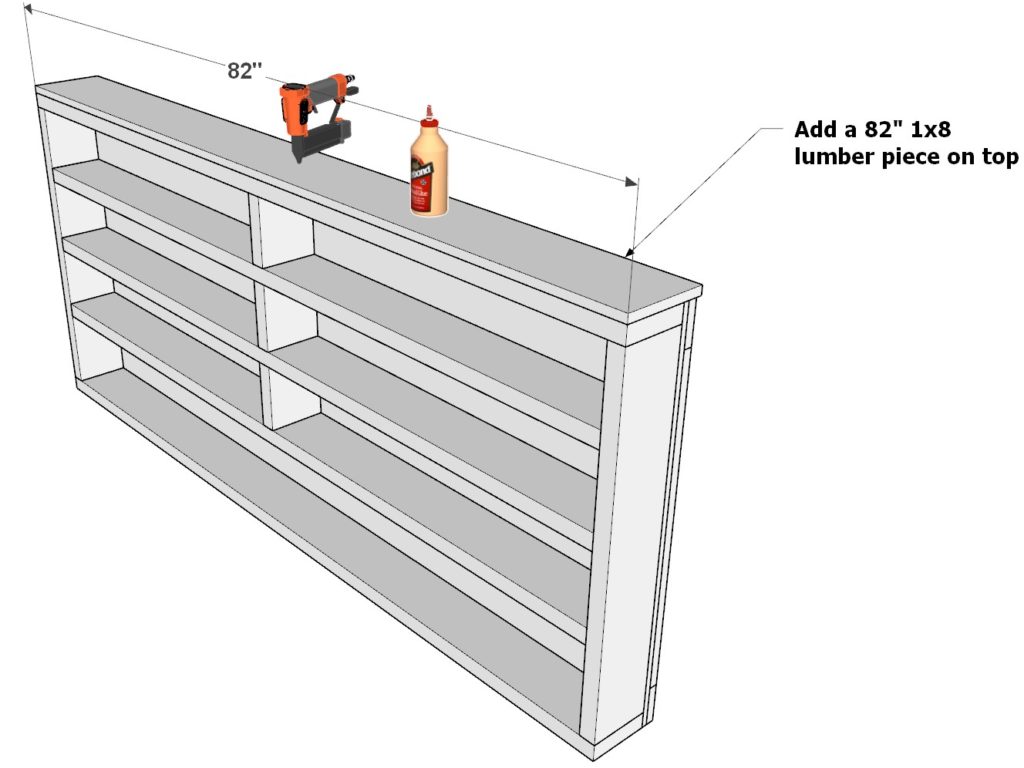
Lastly, add a 82 inch 1×8 lumber piece on top of the shelf component. Secure with glue and 1.5 inch nails from a nail gun.

Step 4: Integrating the Shelf Component with the Main Bed Frame and Strengthening the Bed Structure
Next, add the shelf component to the main frame of the bed and add additional lower bed frame pieces.
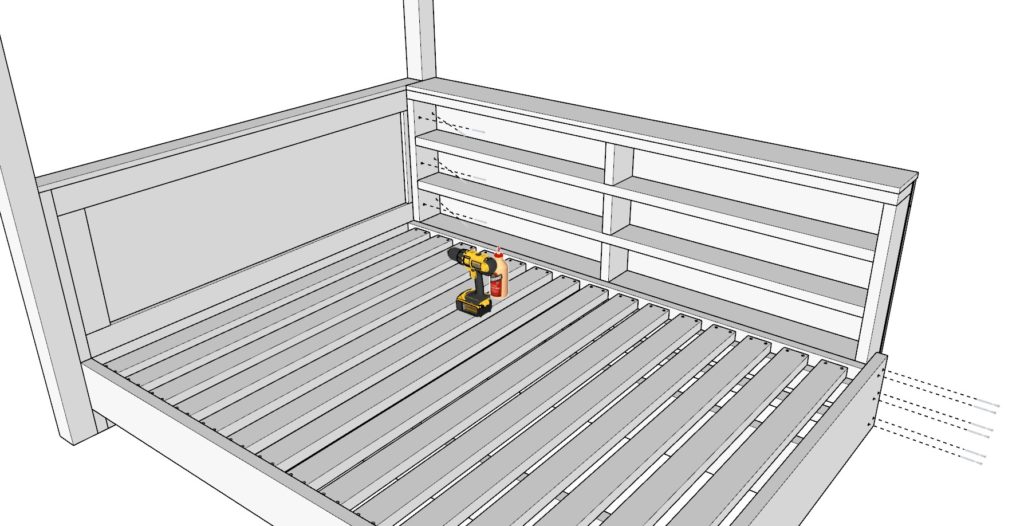
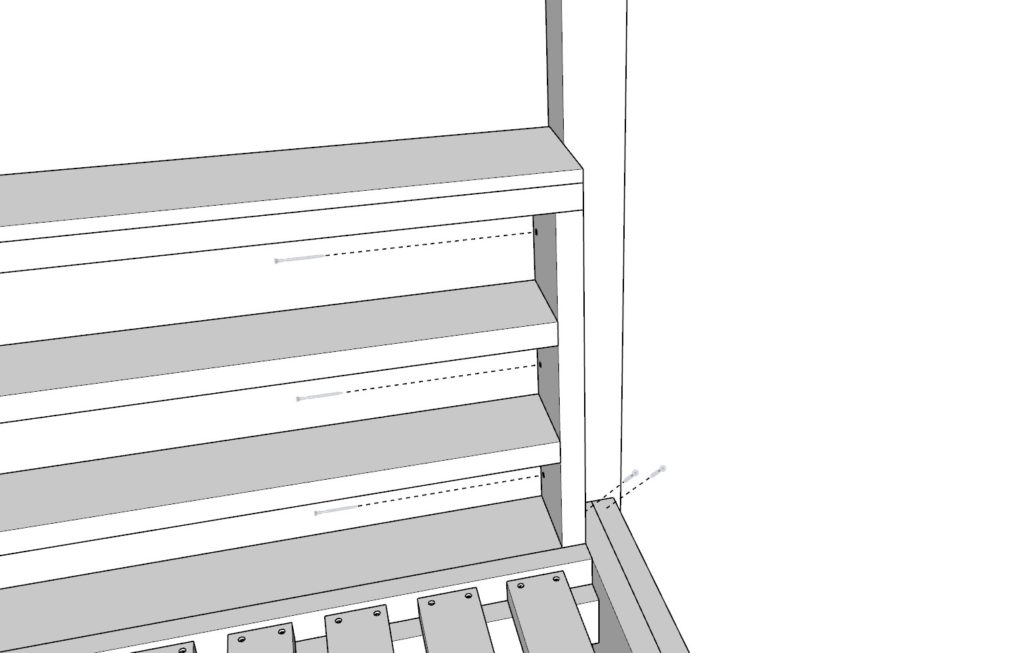
First, take the shelf component from the previous step and add it to the main frame of the bed using a combination of 2.5 (to prevent the screws from showing through to the other side) inch screws and 3.5 inch screws along with glue. Ensure that you predrill the holes. Add screws diagonally as indicated.
Next, bulk up the frame of the loft bed by adding two additional 82 inch 2×8 lumber pieces and one 67 inch 2×12 lumber piece as indicated in the diagram. Use glue, predrill, and secure with 2.5 inch screws.
Step 5: Adding Additional Loft Bed Pillars and Securing Them with Ratchet Straps
Next, add two additional pillars to the loft bed frame and secure them.
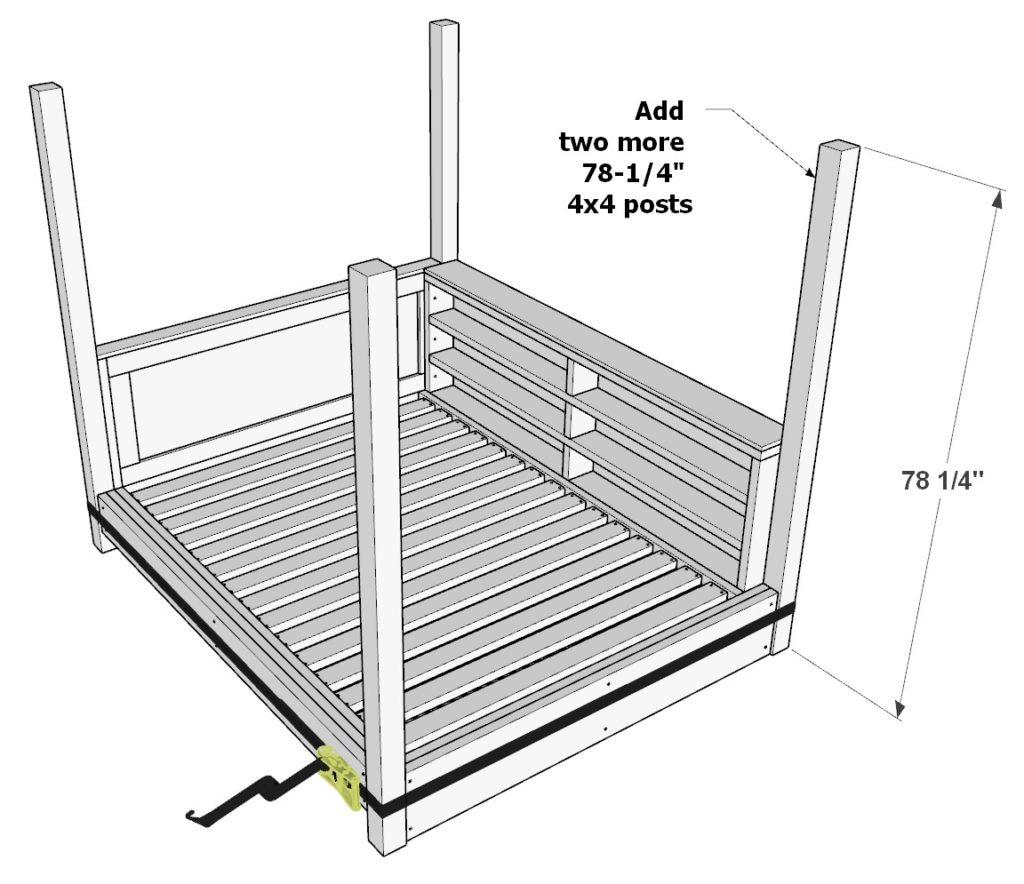
First, take two more 78-1/4 inch 4×4 lumber posts to the bed frame.
To hold everything tightly in place while you are working to add the remaining bed components, use ratchet straps.
First, add glue to all areas that will be joined together.
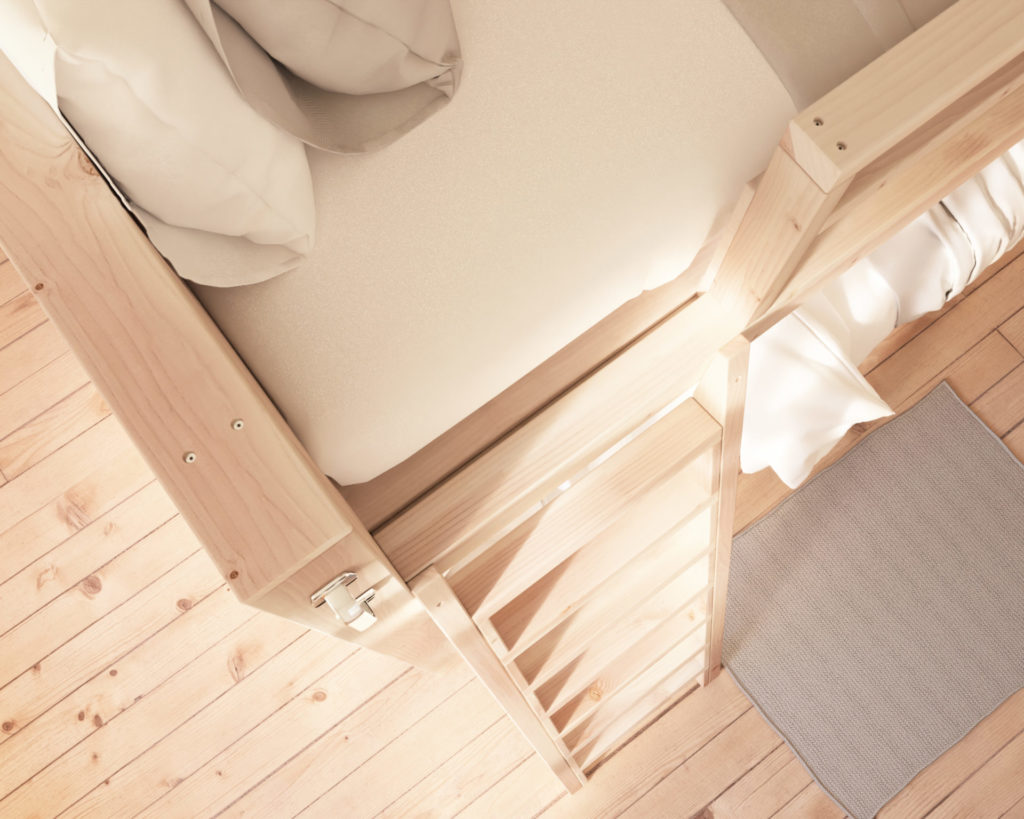
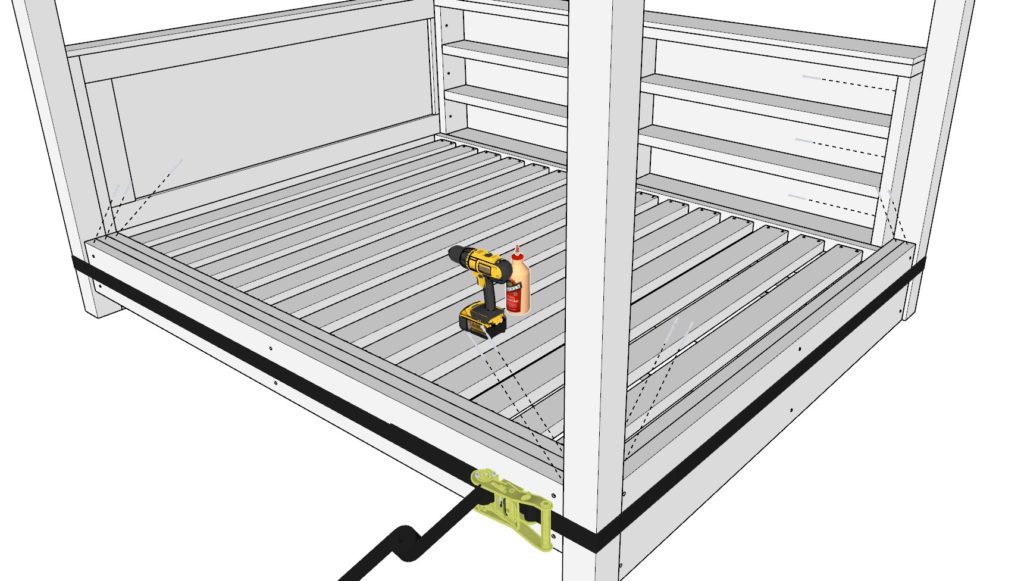
Take 1-2 ratchet straps and encircle the bed base as indicated below. Tighten the straps so that none of the pieces are able to move. Add 3.5 inch screws to secure the pillars to the bed frame as indicated below. DO NOT REMOVE THE STRAPS DURING THIS STEP.
Lastly, add a 67 inch 1×4 lumber piece and one 82 inch 1×4 lumber piece to serve as a lip for the border of the lower bed frame. Secure with glue and 1.5 inch nails from the nail gun.
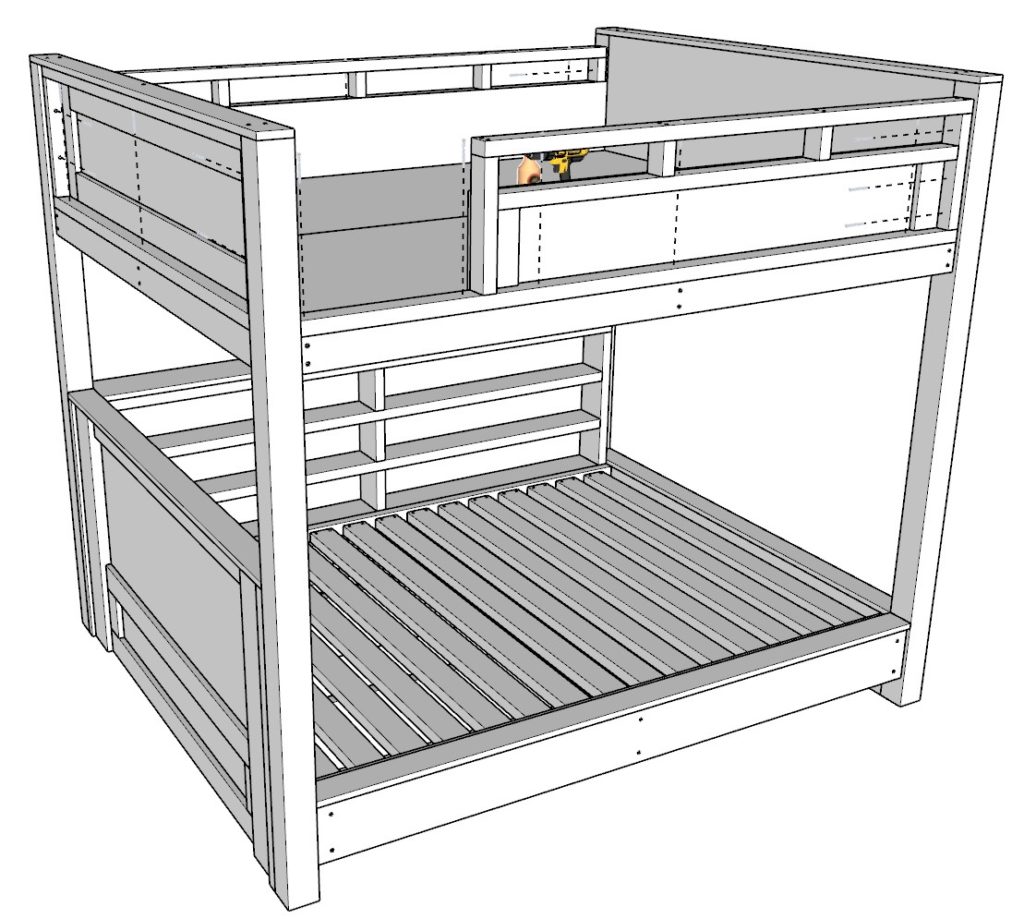
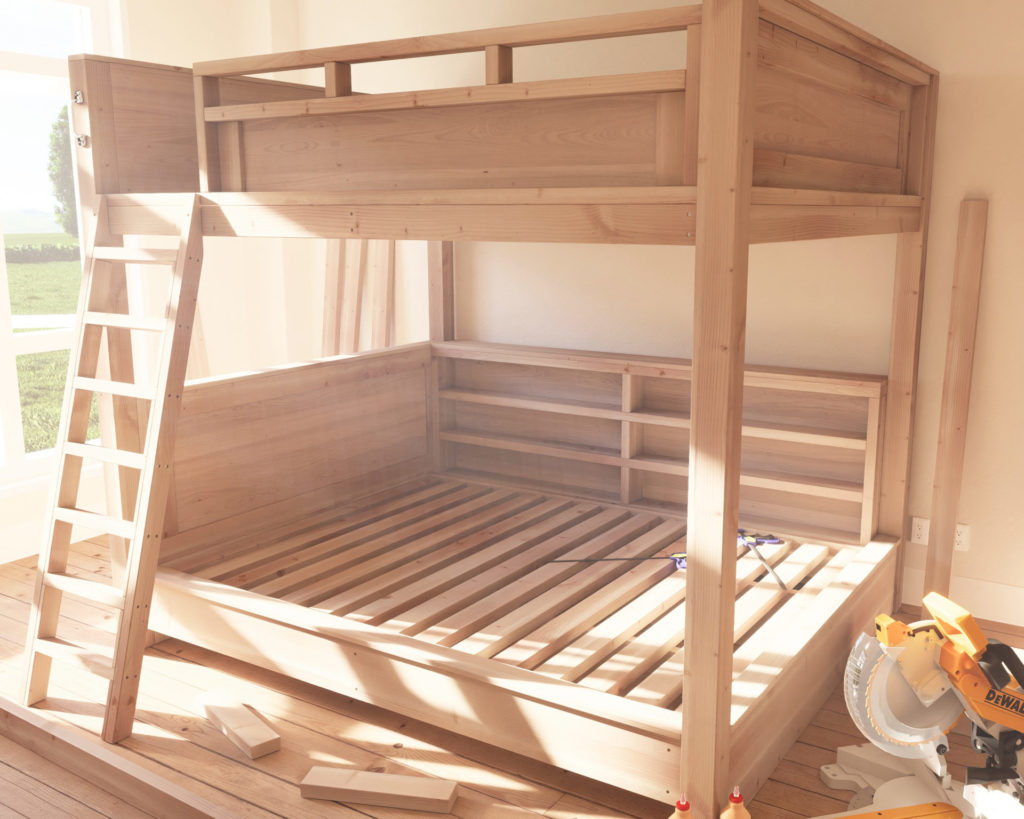
Step 6: Constructing and Installing the Loft Bed Frame
Next, build and install the loft bed frame.
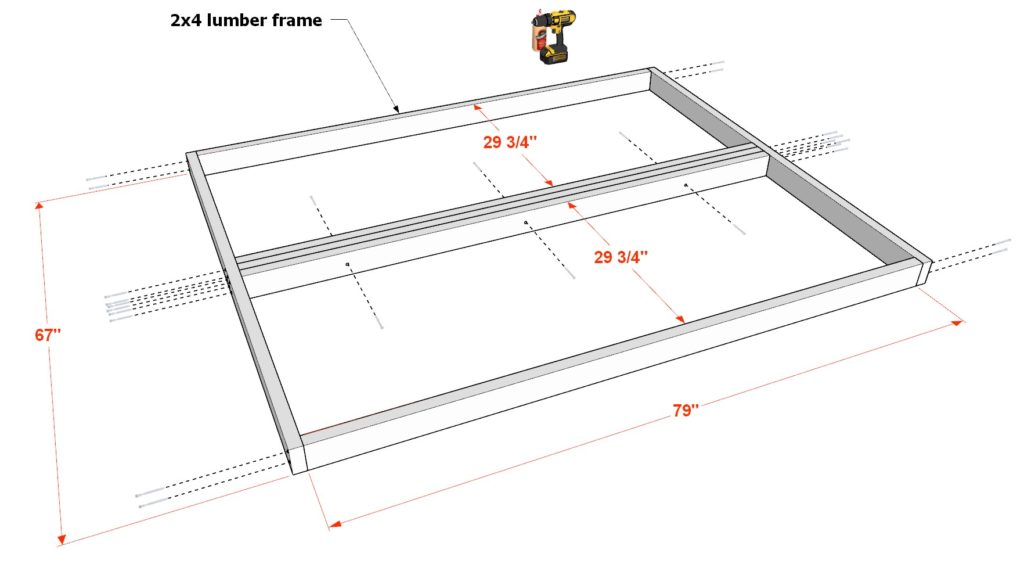
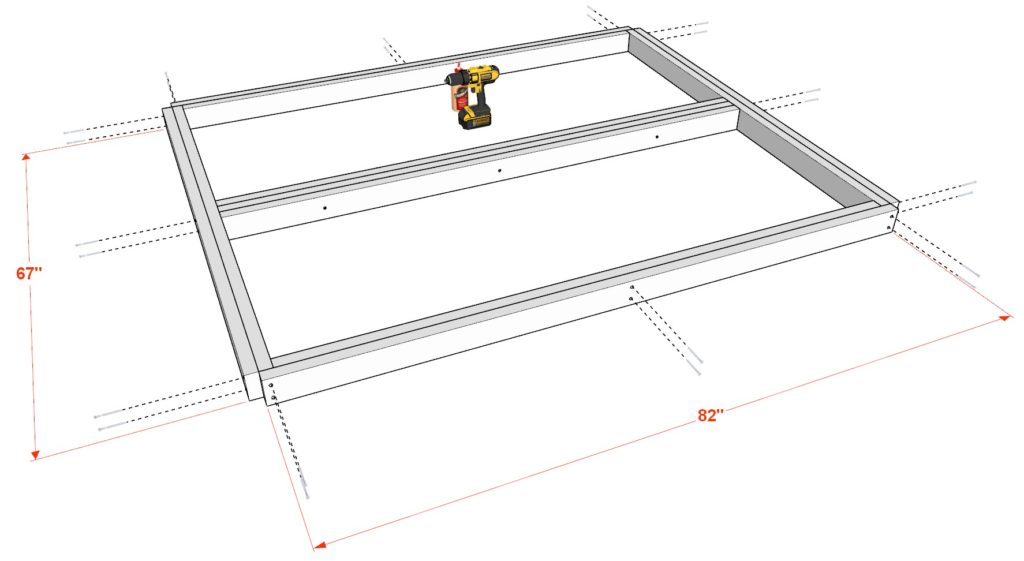
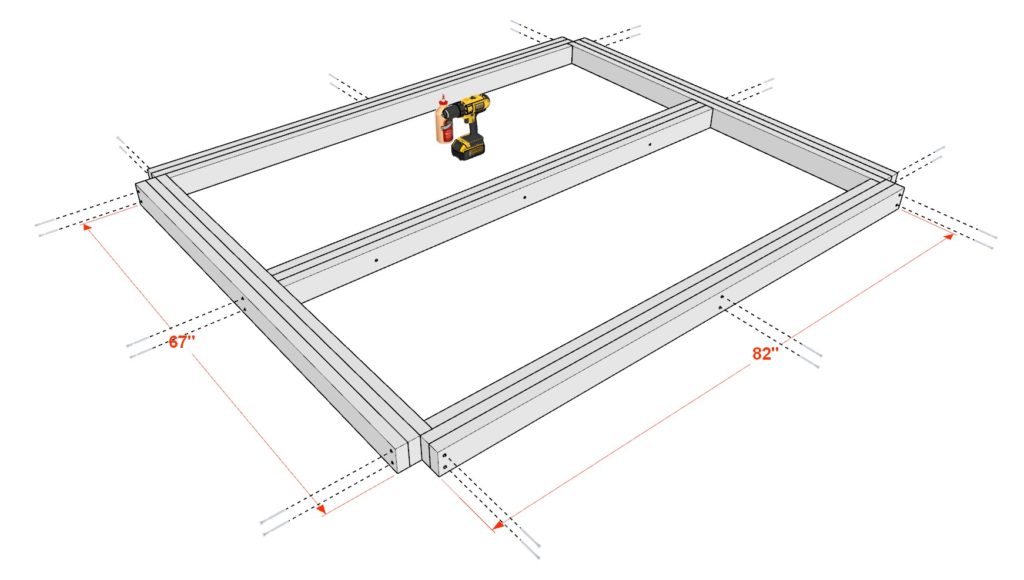
First, take five 79 inch 2×4 lumber pieces and two 67 inch 2×4 lumber pieces. Arrange them as shown below. Predrill, add glue, and add 3.5 inch screws. Next, build up the frame by adding a later of two more 67 inch 2×4 lumber pieces and two 82 inch 2×4 lumber pieces. Secure these with glue, predrill, and add 3.5 inch screws on the ends and in the middle 2.5 inch screws to prevent the screws from showing though. Lastly, add one last layer to the bed frame. Take two more 82 inch 2×4 lumber pieces and two more 67 inch 2×4 lumber pieces and secure them in the same way as before.
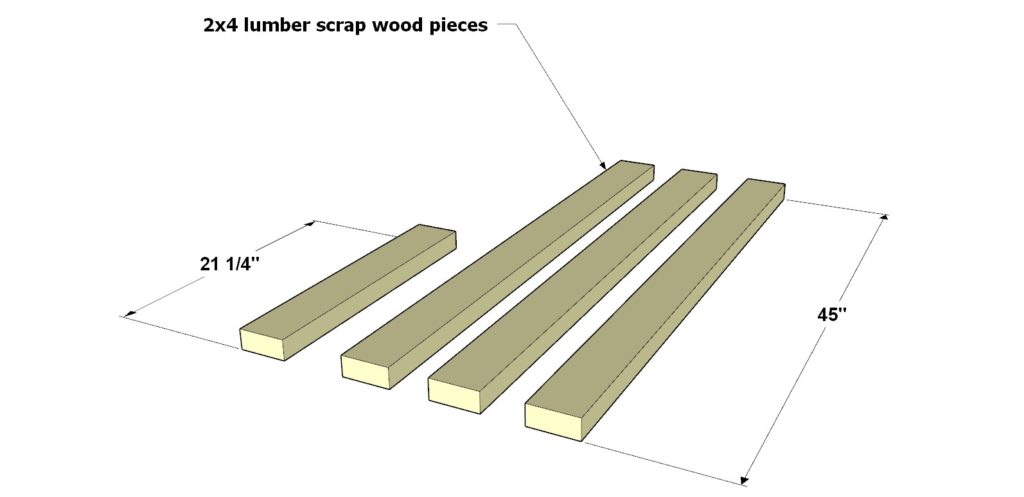
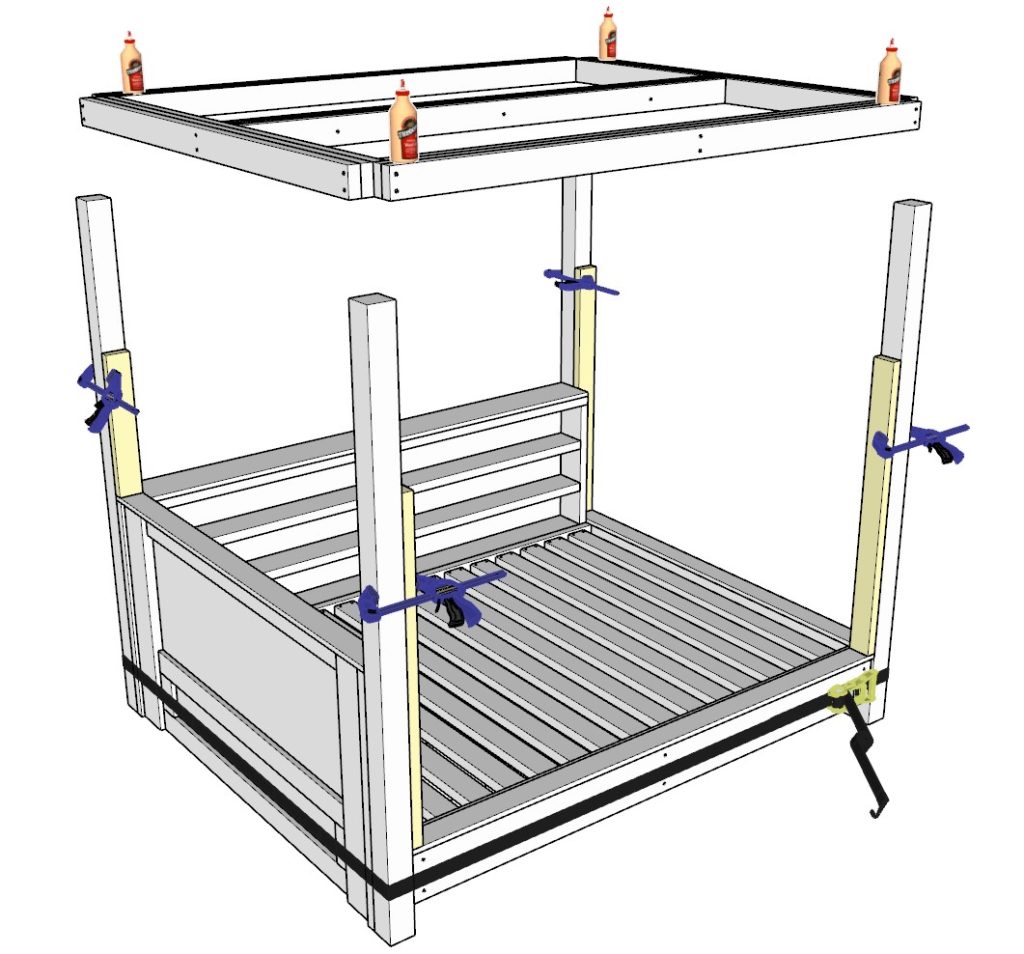
Cut three 45 inch and one 21-1/4 inch spacers from scrap wood. These will be discarded after this step. Add the spacers to the 4×4 lumber pillars as indicated below. Use wood clamps to hold them in place.
Next, add glue to all the areas on the loft bed frame that will be joined to the pillars and set the loft bed frame on top of the spacers.
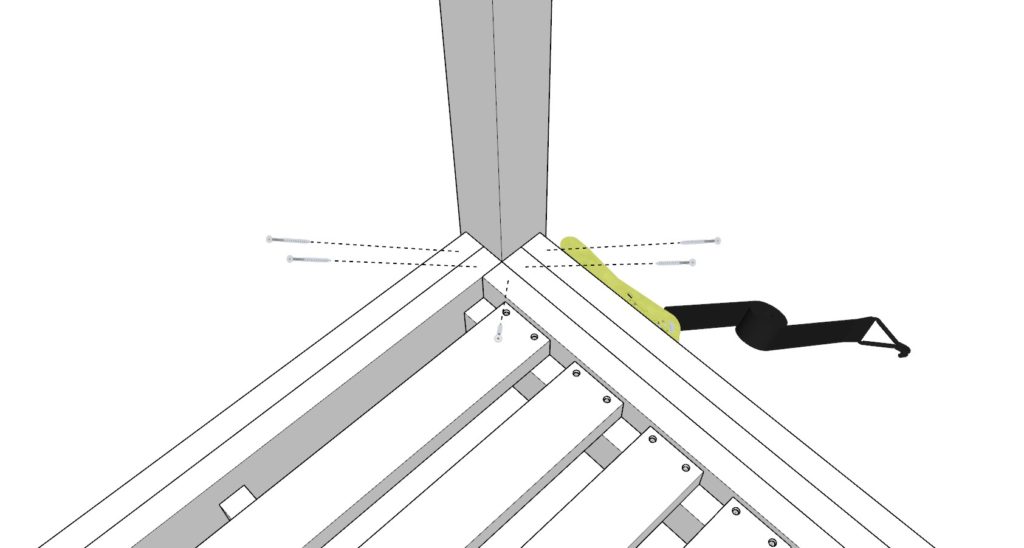
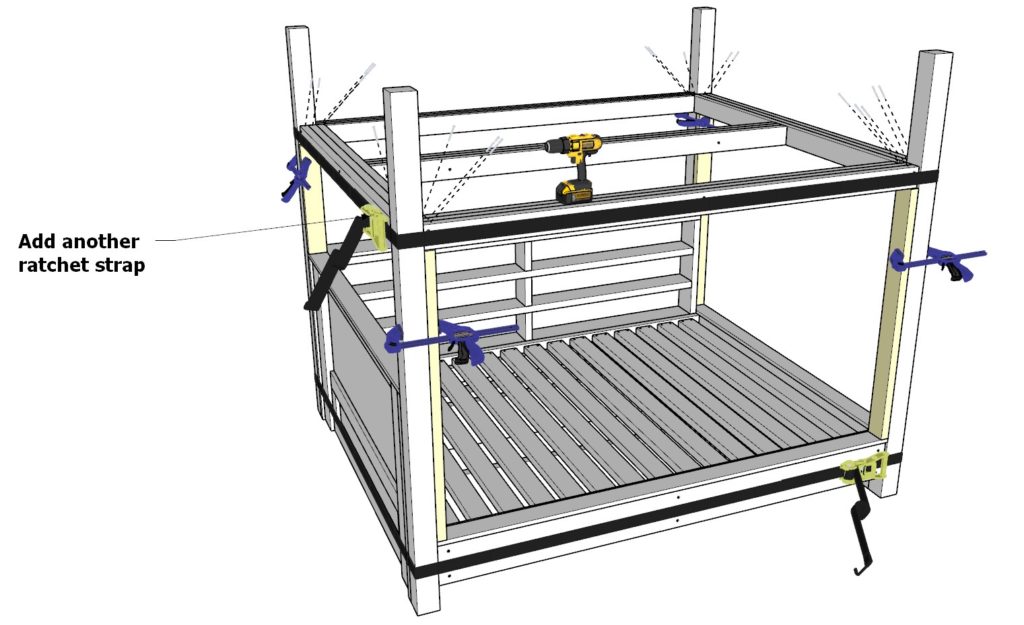
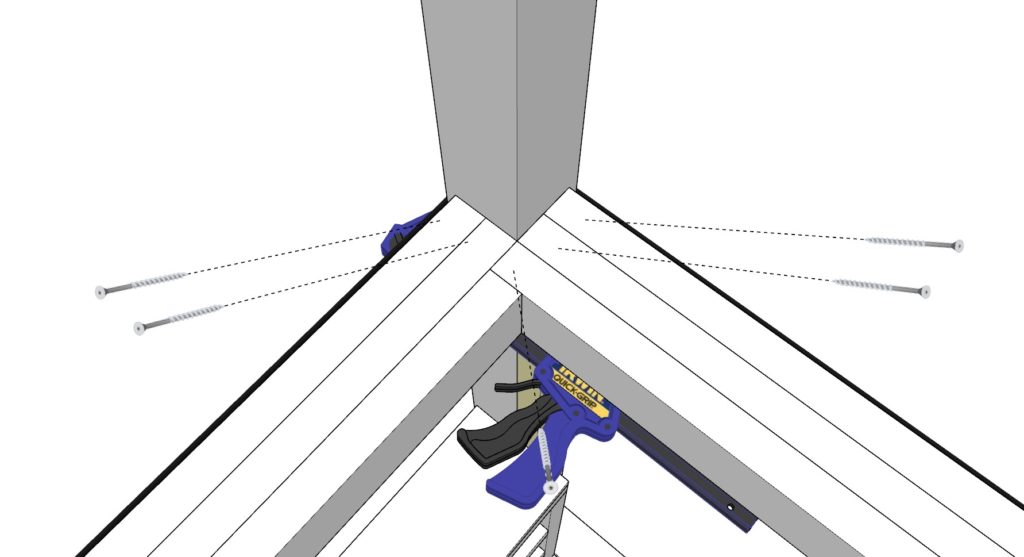
Next, add one-two ratchet straps connected together and wrapped entirely around the perimeter of the loft bed frame and pillars. Tighten the straps after you ensure the frame is leveled. Add 3.5 inch screws diagonally as indicated in the diagram from the top and the bottom to secure the bed frame into place.
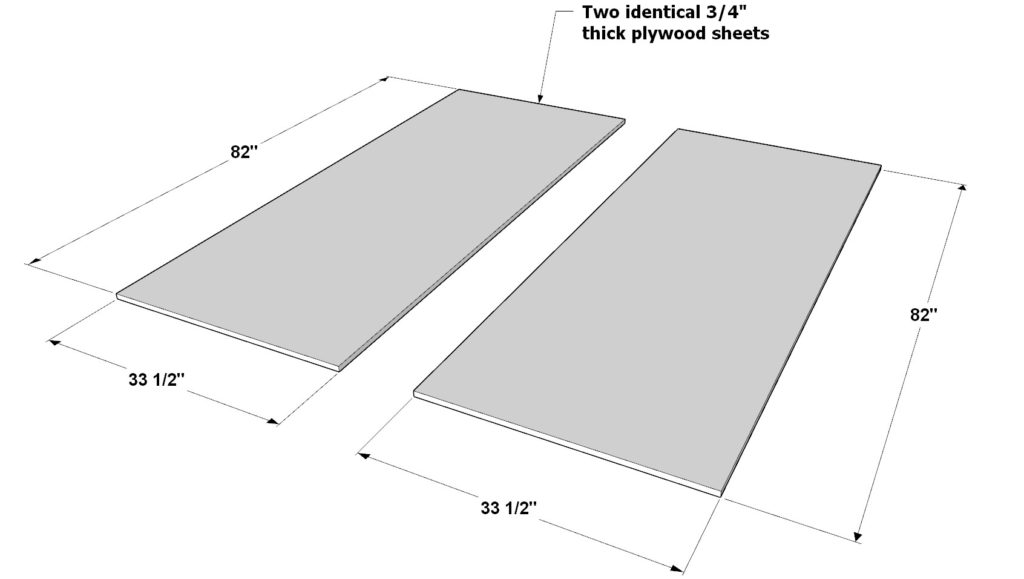
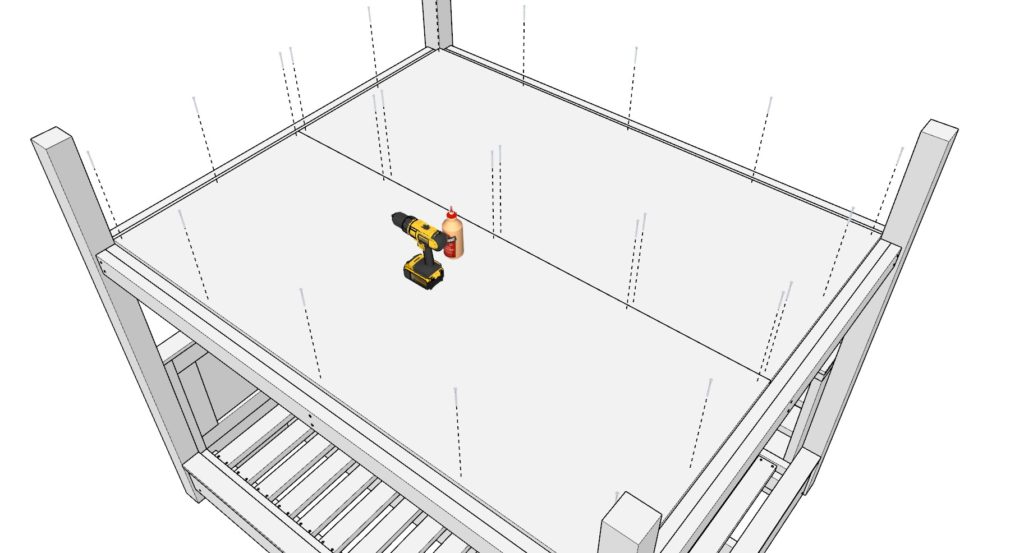
Lastly add two 82 inch x 33-1/2 inch 3/4″ thick plywood sheets to the loft bed frame. Secure the plywood with glue, predrilling, and 2.5 inch screws. Remove the spacers. Remove the straps. The frame will continue to be reinforced with additional railing for added stability.

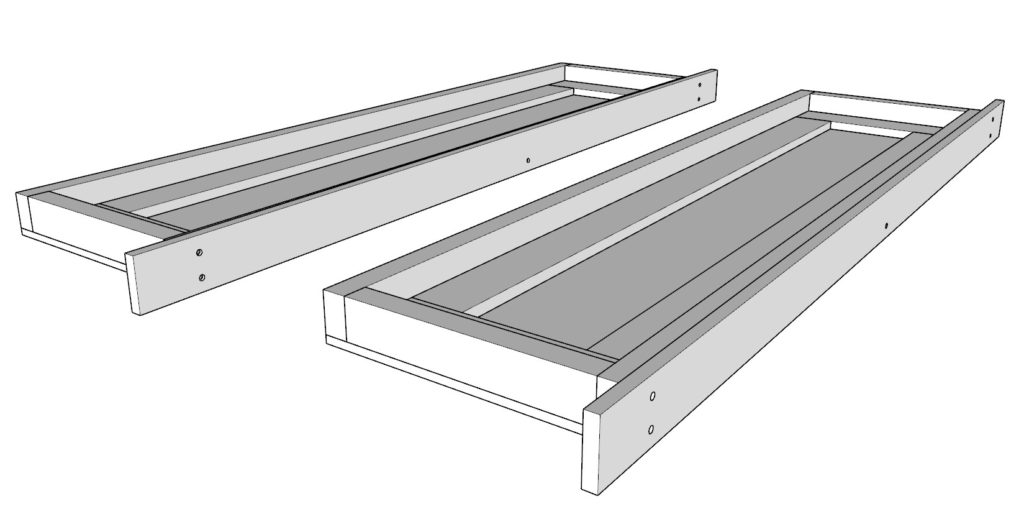
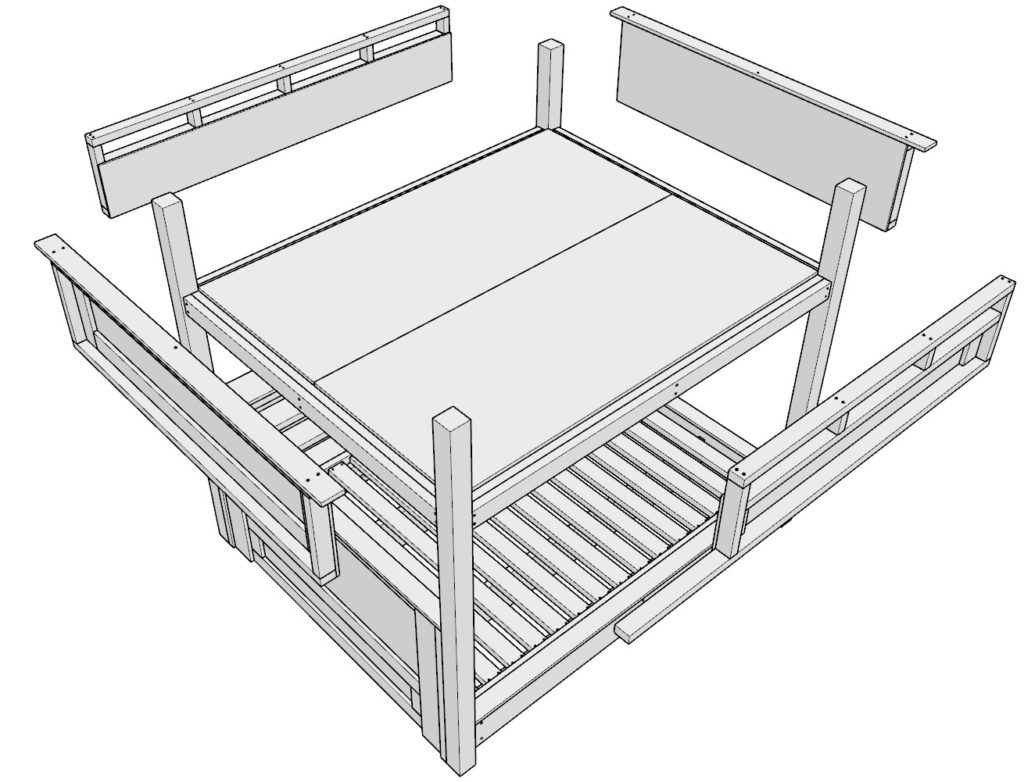
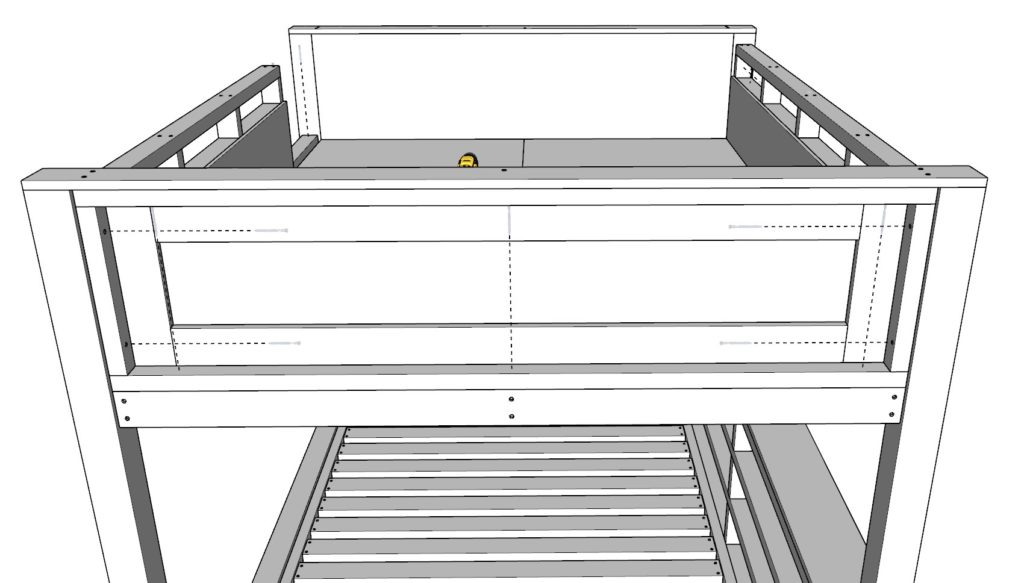
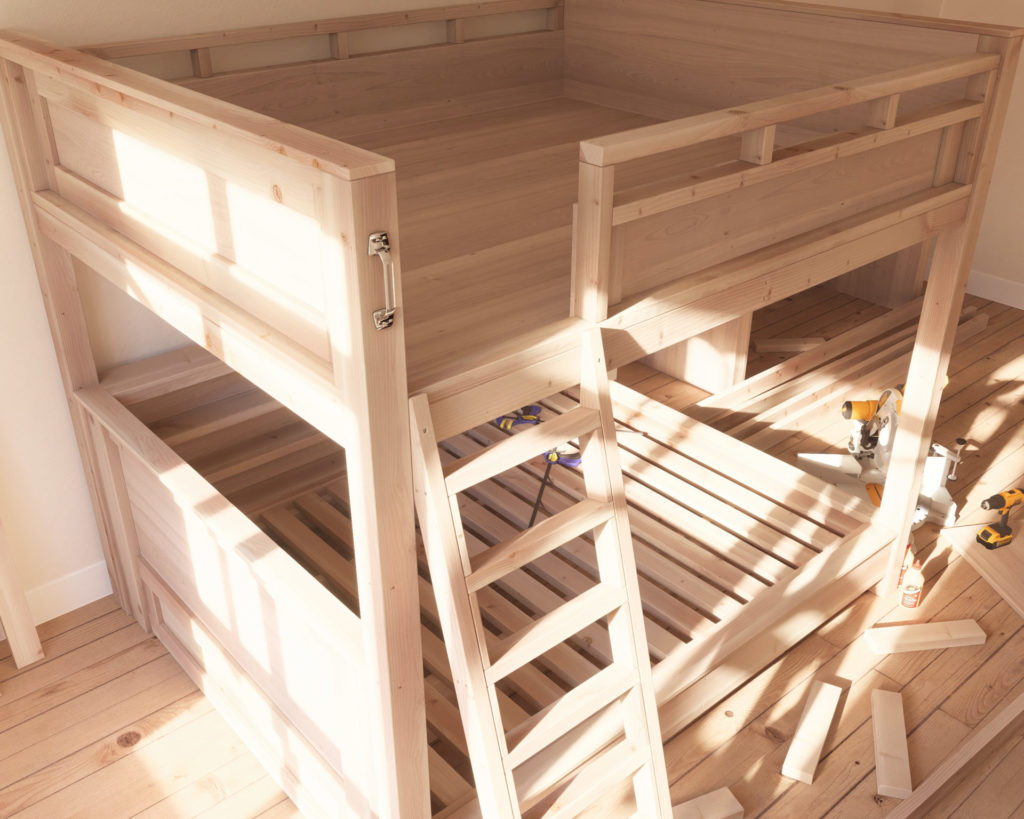
Step 7: Build and Install the Railing/Enclosure for the Loft Bed
Next, build and install the railing/enclosure for the loft bed.
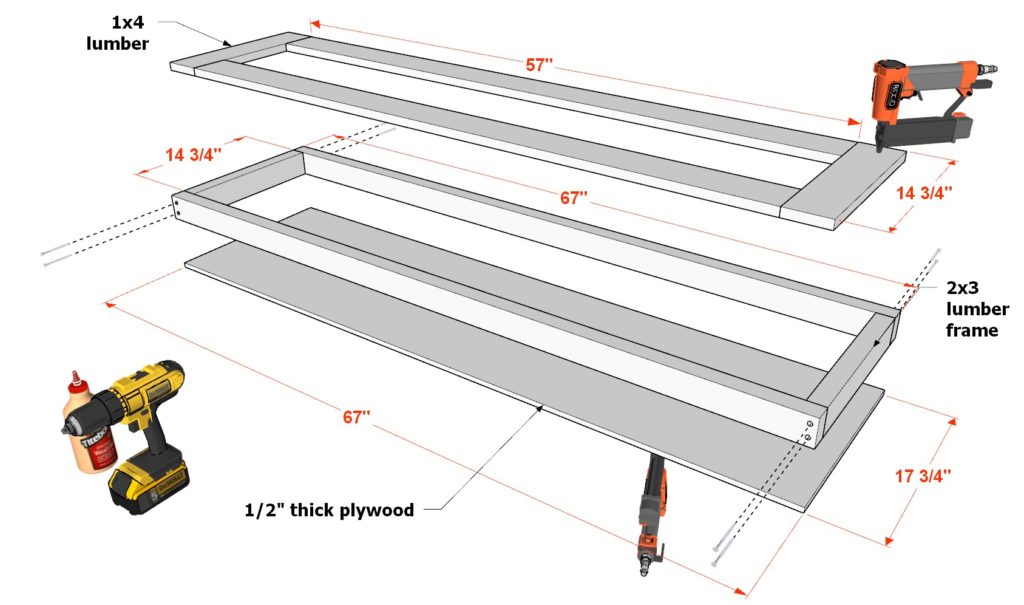
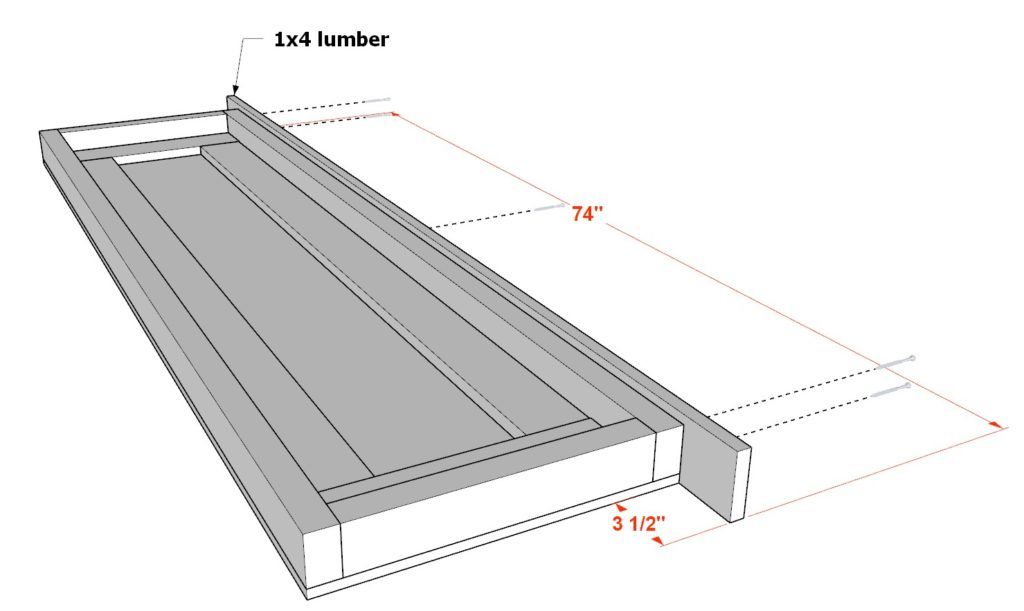
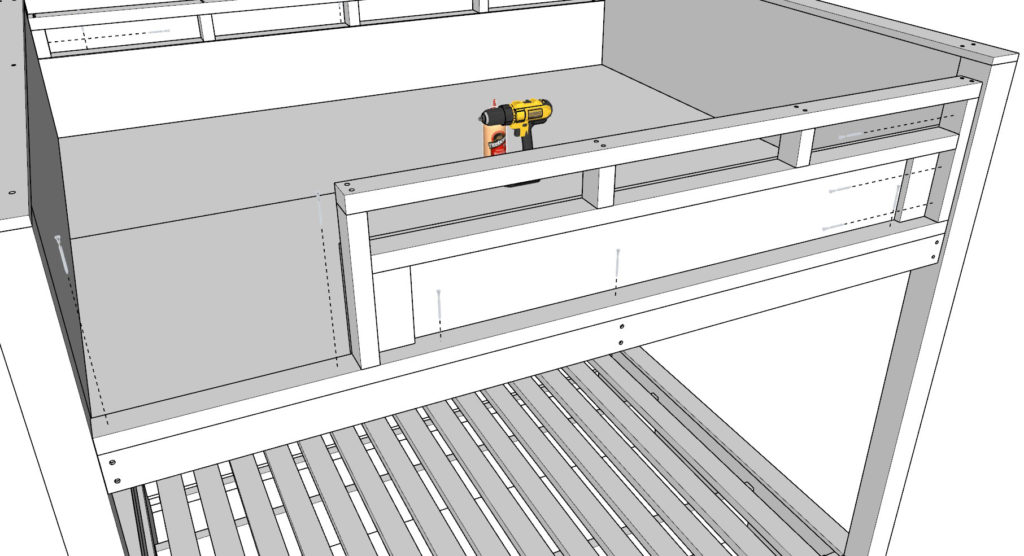
First build the headboard and the footboard. Take a 67 inch x 17-3/4 inch 1/2″ thick plywood sheet, two 67 inch 2×3 lumber pieces, two 14-3/4 inch 2×3 lumber pieces, two 57 inch 1×4 lumber pieces, and two 14-3/4 inch 1×4 lumber pieces and arrange them as shown below. Add a combination of 2.5 inch screws, glue, predrilling, 1 inch nails, and a nail gun to secure the components together. Next, add a 74 inch 1×4 lumber piece and secure with 2.5 inch screws and glue as indicated below.
Make two identical pieces (one will be the head board and one will be the footboard.
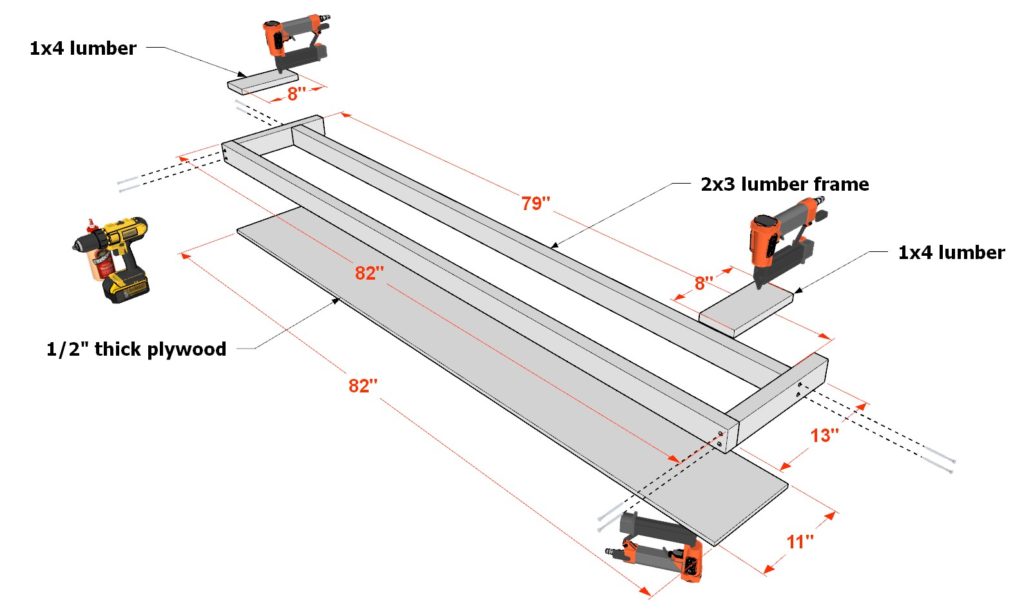
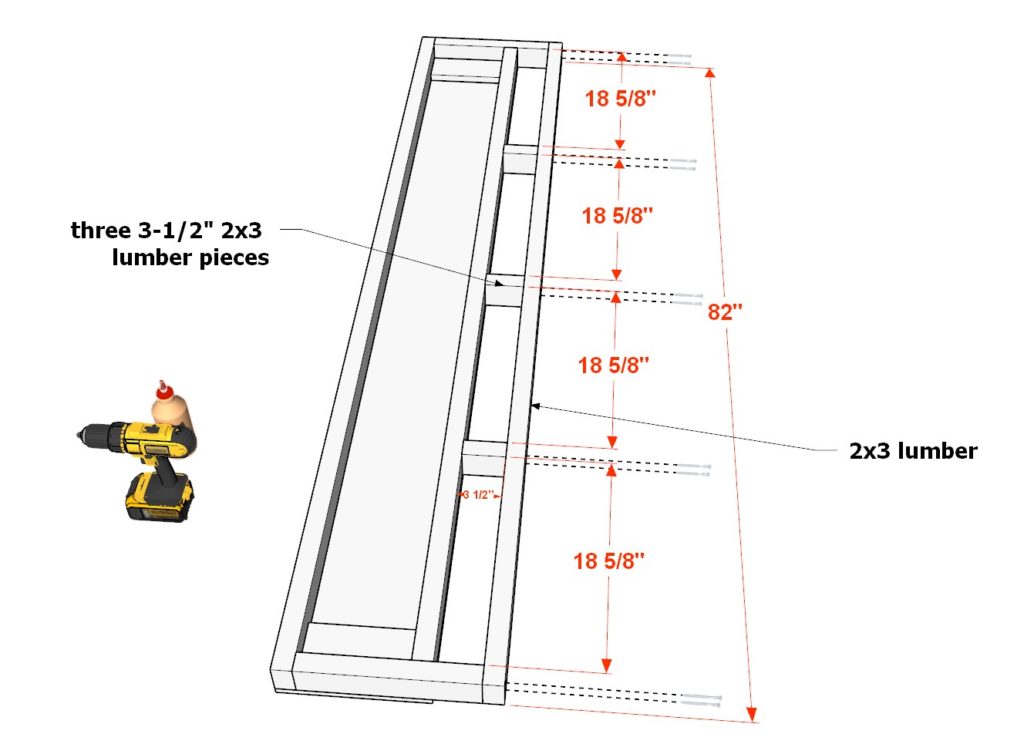
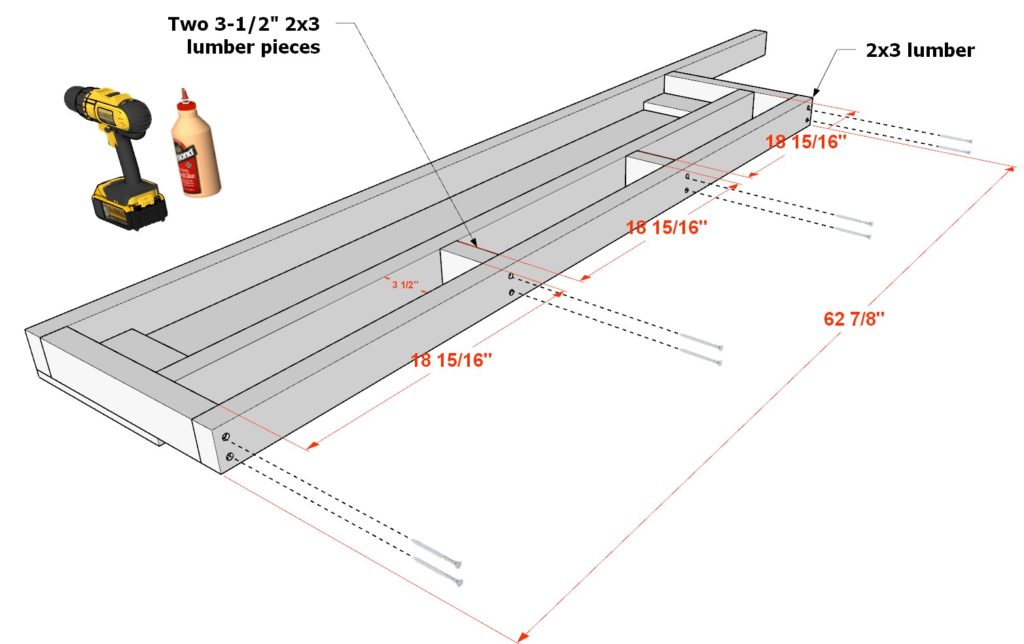
Next make one of the side railings. Take a 82 inch x 11 inch 1/2″ thick plywood sheet, one 79 inch 2×3 lumber piece, one 82 inch 2×3 lumber piece, two 13 inch 2×3 lumber pieces, and two 8 inch 1×4 lumber pieces and arrange them as shown below. Add a combination of 2.5 inch screws, glue, predrilling, 1 inch nails, and a nail gun to secure the components together. Next, add a 82 inch 2×3 lumber piece and three 3-1/2 inch 2×3 lumber pieces as indicated in the diagram. Space them out appropriately and secure with glue, predrilling, and 2.5 inch screws.
Next, make the other side railing component.
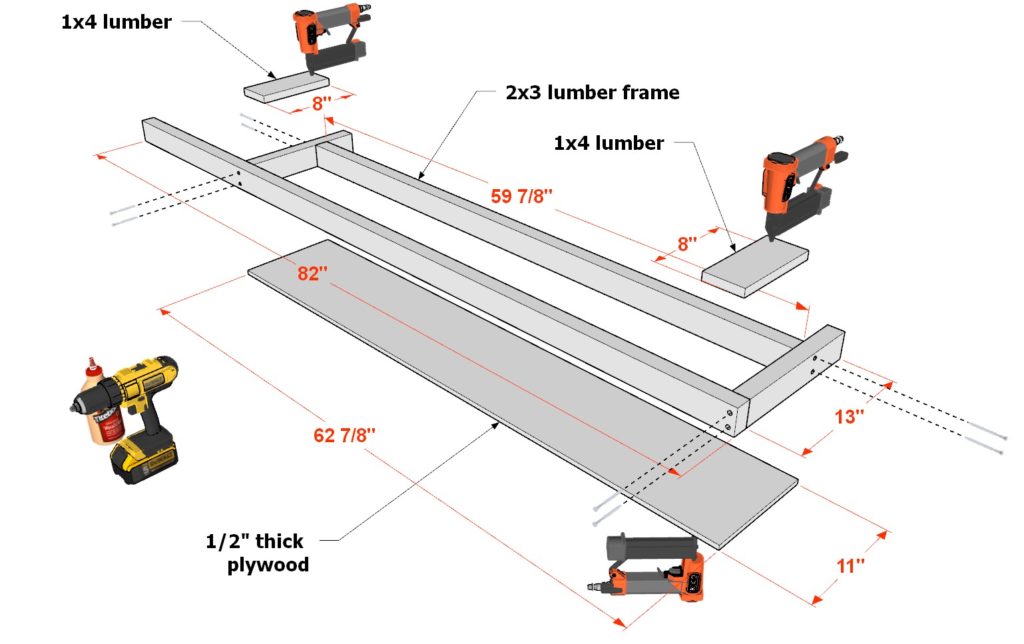
Take a 62-7/8 inch x 11 inch 1/2″ thick plywood sheet, one 82 inch 2×3 lumber piece, one 59-7/8 inch 2×3 lumber piece, two 13 inch 2×3 lumber pieces, and two 8 inch 1×4 lumber pieces and arrange them as shown below. Add a combination of 2.5 inch screws, glue, predrilling, 1 inch nails, and a nail gun to secure the components together. Next, add a 62-7/8 inch 2×3 lumber piece and two 3-1/2 inch 2×3 lumber pieces as indicated in the diagram. Space them out appropriately and secure with glue, predrilling, and 2.5 inch screws.
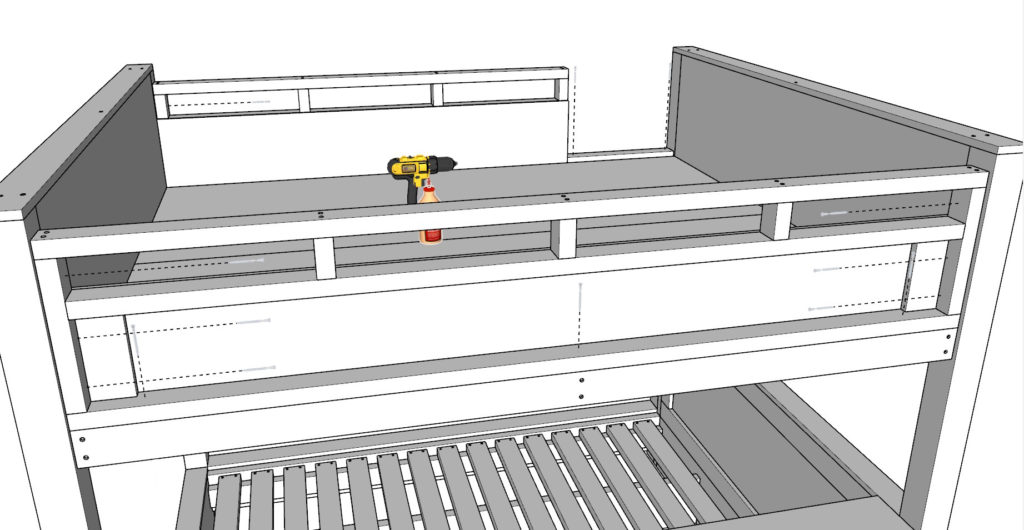
next, add these side components to the loft bed as shown below. Secure them with glue, predrilling, and 3.5 inch screws.

Step 8: Assemble and Install the Loft Bed Ladder
Next, assemble and install the loft bed ladder.
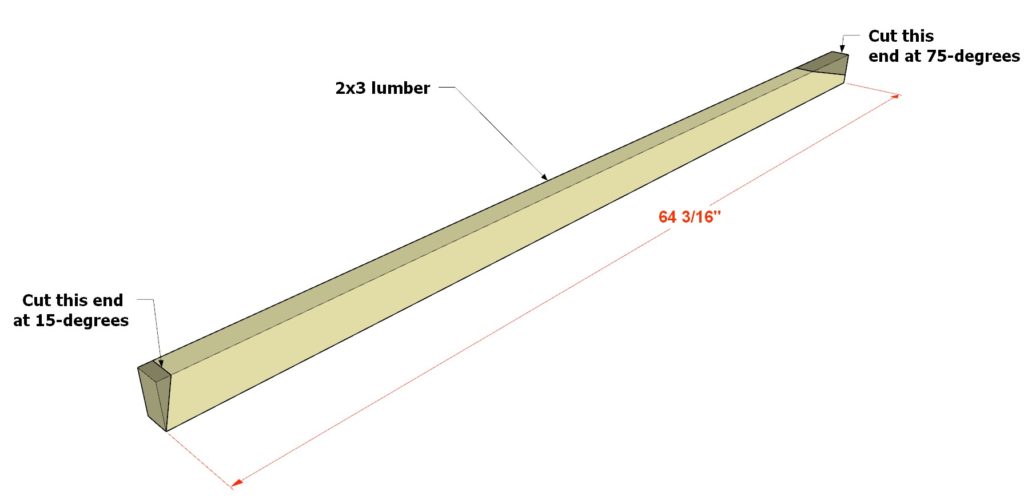
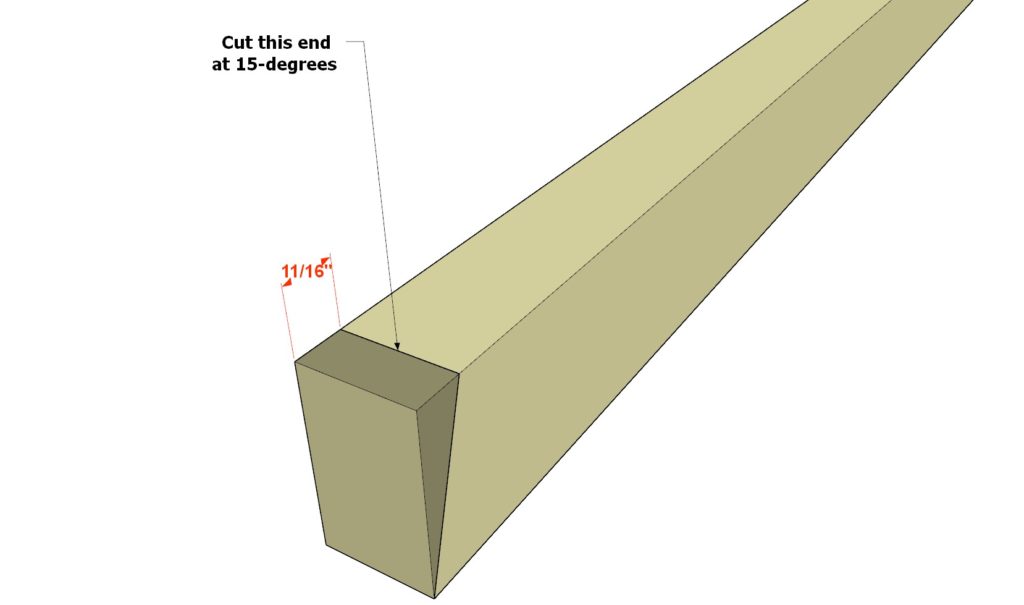
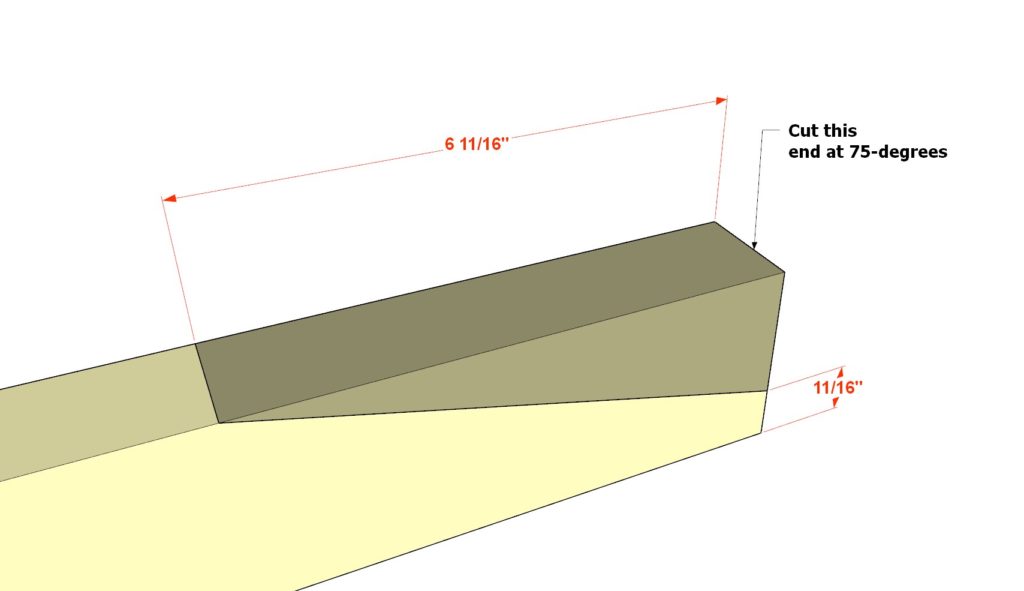
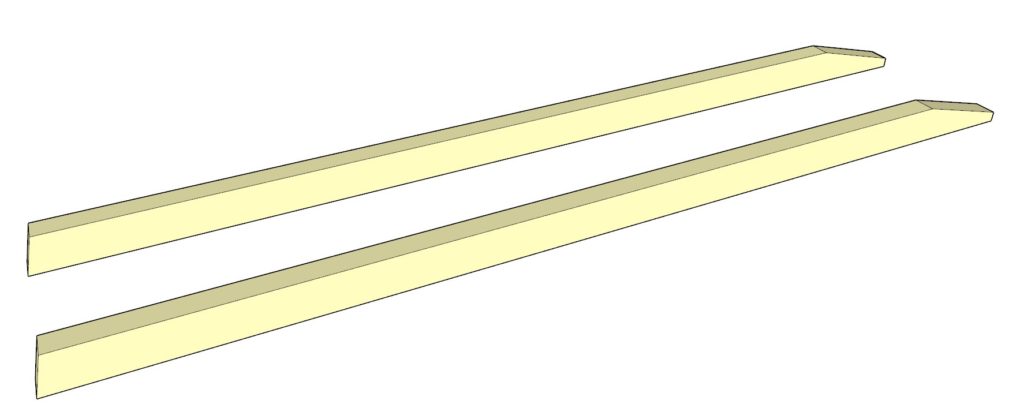
Take a 64-3/16 inch long 2×3 lumber piece and cut the ends off as indicated below (one at 75-degrees and one at 15-degrees).
Cut another 2×3 lumber piece in the same way.
Next, cut fourteen 1×3 lumber pieces to size as indicated in the diagram. two 6-7/8 inch long with one end cut at 12-degrees, and twelve 6-11/16 inches long.
Cut seven 16-1/8 inch long 2×3 lumber pieces.
Add all the components to make a ladder as indicated in the diagram. Use a combination of 3.5 inch screws, glue, predrilling, and 1 inch nails from a nail gun to secure the pieces together.
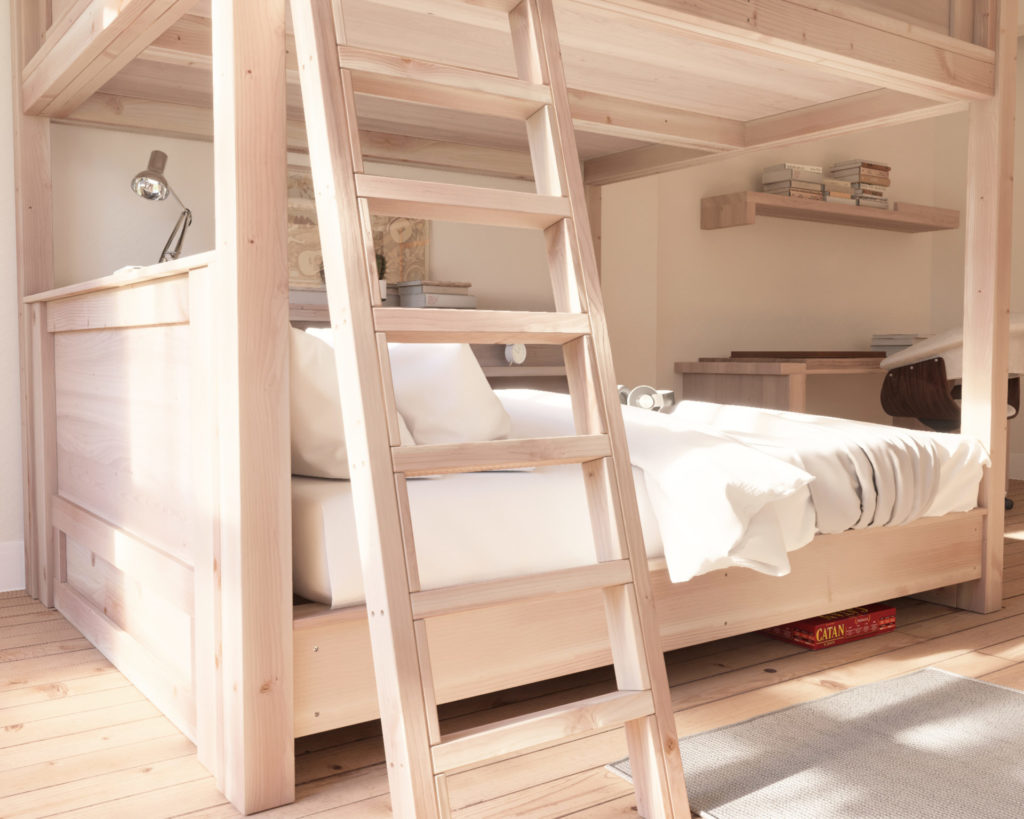
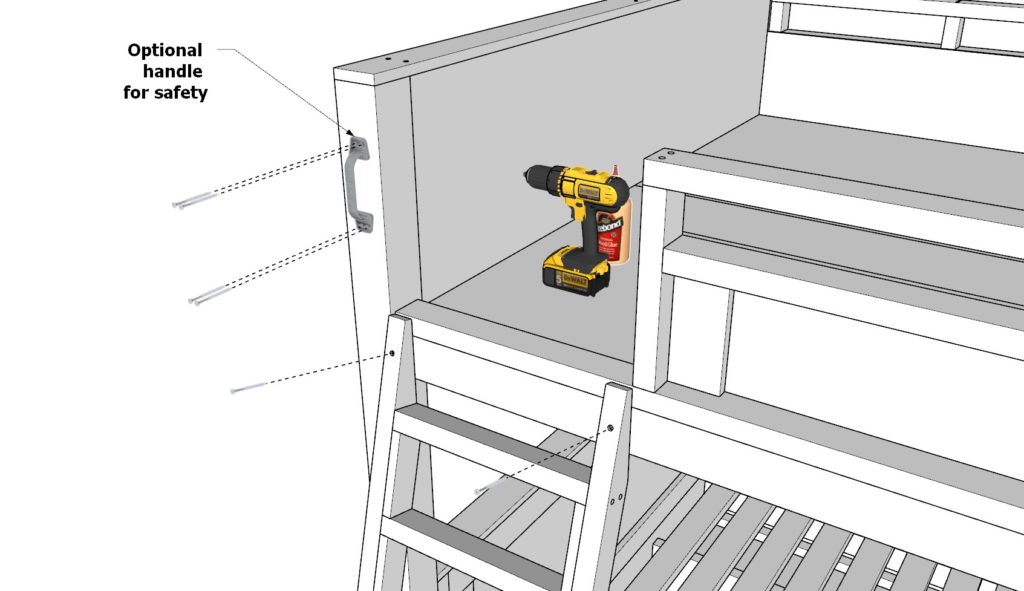
Next, add the ladder to the loft bed and secure with two 3.5 inch screws. Add a handle for safety.


How to stain the loft bed
Staining the Loft Bed:
Step 1: Prepare the Workspace
Choose a well-ventilated area to stain your loft bed. Lay down a drop cloth or plastic sheeting to protect the floor from any spills or drips.
Step 2: Sand the Surface
Using a medium-grit sandpaper (120-150 grit), sand all the wooden surfaces of the loft bed, following the grain of the wood. Sanding will help remove any rough spots and ensure an even stain application.
Step 3: Clean the Surface
Remove any dust or debris from the wood surfaces using a vacuum cleaner or a tack cloth. This step is essential to ensure a smooth stain application.
Step 4: Choose the Stain
Select the desired wood stain color and type. Oil-based stains are more durable and provide a deeper color, while water-based stains are easier to clean up and have lower VOCs.
Step 5: Apply the Stain
Put on gloves and use a clean, lint-free cloth or a foam brush to apply the stain. Work in small sections, following the grain of the wood. Apply the stain evenly to avoid blotchy spots.
Step 6: Wipe off Excess Stain
After allowing the stain to penetrate the wood for the recommended time (typically 5-15 minutes), use a clean, lint-free cloth to wipe off any excess stain. Wipe in the direction of the wood grain to ensure a smooth and even finish.
Step 7: Allow to Dry
Let the stain dry completely, as per the manufacturer’s recommended drying time, usually 24 hours.
Step 8: Apply Additional Coats (Optional)
If desired, apply additional coats of stain to achieve a deeper or richer color. Remember to let each coat dry completely before applying the next one.
Step 9: Apply a Protective Finish
After the final coat of stain is completely dry, apply a clear protective finish, such as polyurethane, to seal and protect the wood. Allow the finish to dry for the recommended time before reassembling the loft bed.
Decorating Your Loft Bed: Embrace the Rustic Country Charm
Introduction
Nothing beats the serene appeal of a country-style loft bed. It’s a blend of simplicity, comfort, and a touch of nostalgia that gives your space a unique personality. The key lies in choosing the right elements, colors, and accessories that harmoniously bring together the rustic charm and modern conveniences a teenager needs. Here’s our fun and exciting guide to achieving this look with effortless grace.
The Allure of White Sheets
White sheets are the quintessential base of any country-style décor. Their crisp, clean appearance exudes an inviting sense of calm and tranquility, making your loft bed a cozy retreat. The sheets serve as a blank canvas, allowing the rest of your décor to shine. They also reflect light, brightening the space and making it appear larger – perfect for maximizing the appeal of your loft bed.
Time Flies When You’re Having Fun
Every busy teenager needs a stylish way to keep track of time. A vintage-style clock not only adds to the country theme but also teaches time management, a valuable skill for every young adult. A clock, ticking away, also provides a soothing rhythm that can lull you to sleep, making it a functional and aesthetic addition to your loft bed setup.
A Prickly Companion and the Joy of Reading
Adding a small potted cactus on the shelf can inject some life and texture into the room. This low-maintenance plant adds a touch of greenery and pairs well with the country theme. Pair it with an array of books – a timeless element in any space. Whether they’re novels, graphic novels, or textbooks, they showcase the inhabitant’s interests while encouraging a love for reading.
Light It Up!
The lower bunk of your loft bed needs proper lighting to ensure comfort and functionality. A stylish table lamp, preferably with adjustable brightness, allows for late-night reading sessions or a soft glow for ambiance. Remember, the right lighting can make all the difference between a dreary space and a cozy nook.
Celebrating Creativity with Decorative Posters
Decorative music posters celebrate creativity and passion. They serve as an excellent form of self-expression and keep the inspiration flowing. Aesthetically, these posters add layers of depth to your décor, and their vibrant colors and graphics bring life to your walls.
Games, Sports, and Music
The presence of board games like Settlers of Catan beneath the bed hints at fun-filled nights with friends, fostering a sense of community and strategic thinking. A soccer ball in the room subtly encourages physical activity – a healthy balance to indoor pastimes.
Music is a universal language that resonates with all ages. Having guitars and a ukulele within the room fosters a love for music and opens a window to endless creative potential.
Staying Connected
In this digital age, electronic devices like phones and tablets are essential. They can be neatly tucked away when not in use, but still within reach from the loft bed, ensuring connectivity without cluttering the space.
The Final Touch: A Cozy Floor Mat
A small, cozy floor mat can add a touch of warmth and comfort to the room. Its texture contrasts the hardwood floor, while its size ensures it doesn’t overpower the space. Choose a mat that complements the overall color palette for a unified look.
Conclusion
Decorating your loft bed in a country style is all about balancing aesthetics with function. It’s about creating a space that reflects your personality and caters to your needs. So, embrace the rustic charm, make it your own, and enjoy the cozy retreat you’ve created!
What a joyride this project has been! Our labor of love brought to life this country-style haven of comfort and charm. Gotta admit, we’re crushing on the rustic warmth of the wood and those crisp white sheets – it’s like a cozy country song you can live in. Happy to see it all come together so beautifully!