Introduction
Unleash Your Inner Carpenter with the Ultimate DIY Loft Bed Project Are you eager to reclaim your bedroom floor space while also adding a touch of panache to your surroundings? If so, you’re in the right place! We’re about to embark on an exciting woodworking journey to build the ultimate DIY loft bed. This guide will take you through the diverse features, specific measurements, and unique design elements of this versatile sleep, study, and storage system. Along the way, we’ll share invaluable tips and insights to help you craft the loft bed that perfectly fits your lifestyle.
A Woodworker's Dream: Beginner-Friendly, Wallet-Friendly, Stylish Loft Bed
Our DIY loft bed is a fantastic project for woodworking rookies. Utilizing common construction lumber and plywood, you can create an elegant, robust, and functional loft bed without burning a hole in your pocket. We’ve broken down the assembly process into manageable steps, simplifying transportation and on-site assembly. This project isn’t just budget-friendly – it’s a practical and rewarding way to hone your woodworking skills.
The Triple Threat of DIY Loft Beds: Space-Saver, Multi-Functional, and Stylish
Creating your own DIY loft bed comes with a plethora of benefits.
- Space-Saver: With a design that cleverly maximizes vertical space, you’ll have plenty of room on the floor for additional furnishings or activities.
- Multi-Functional: Combining a bed, storage, a desk, and a bookcase, this loft bed is a compact solution for all your bedroom needs.
- Style Galore: The adaptable design empowers you to create a unique, eye-catching centerpiece that reflects your personal style.
Your Bedroom Transformation: A Loft Bed That Checks All Boxes
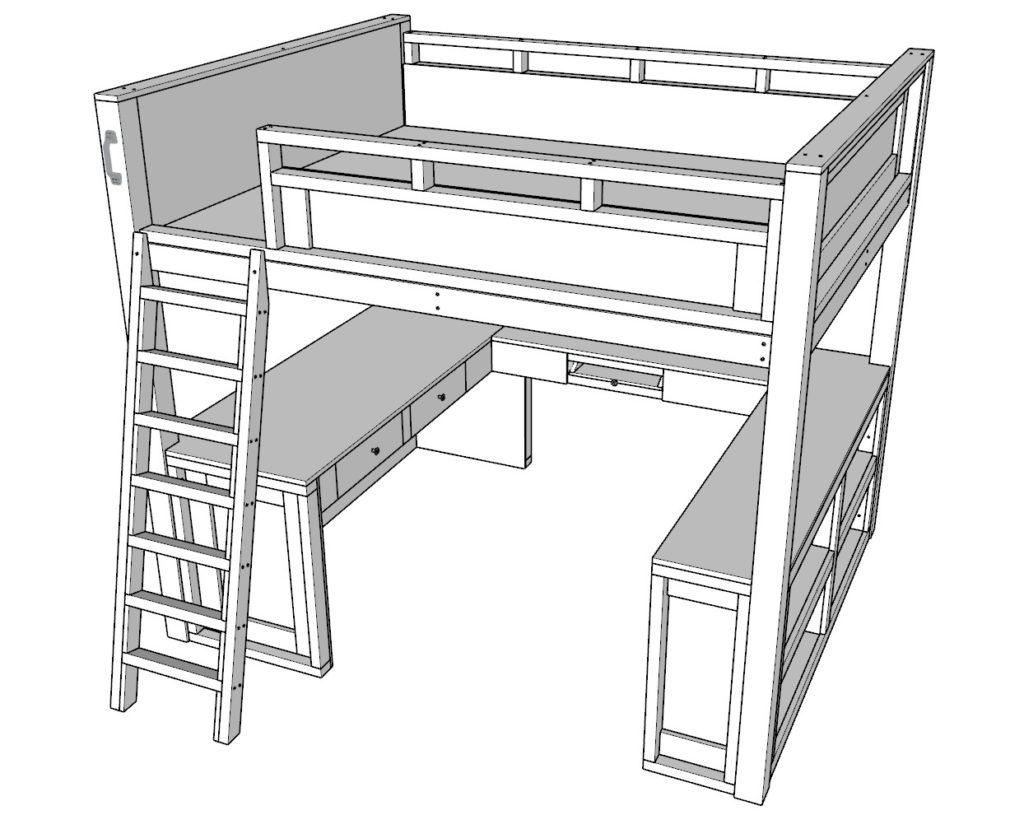
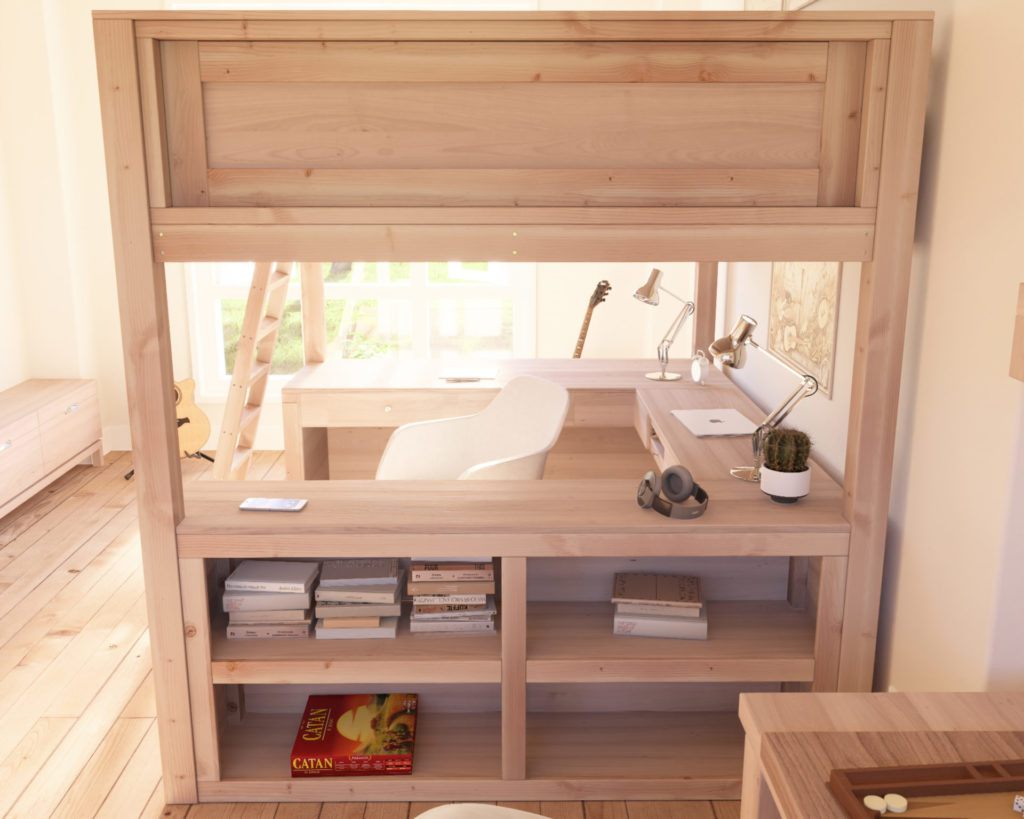
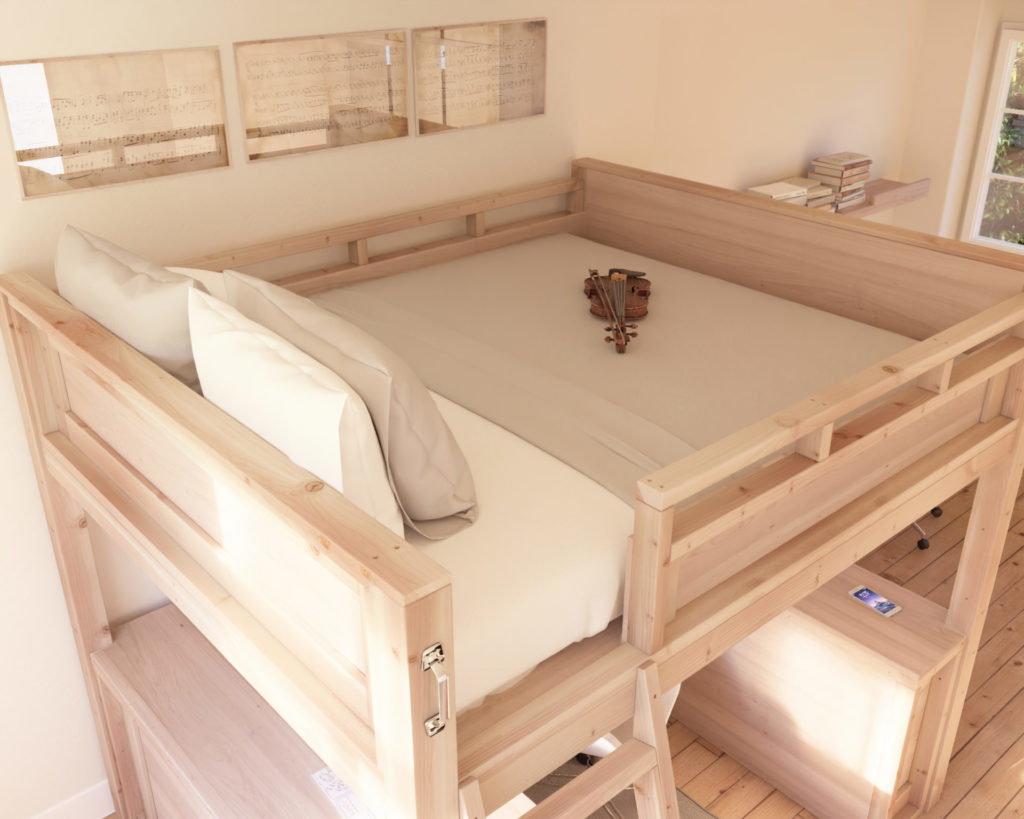
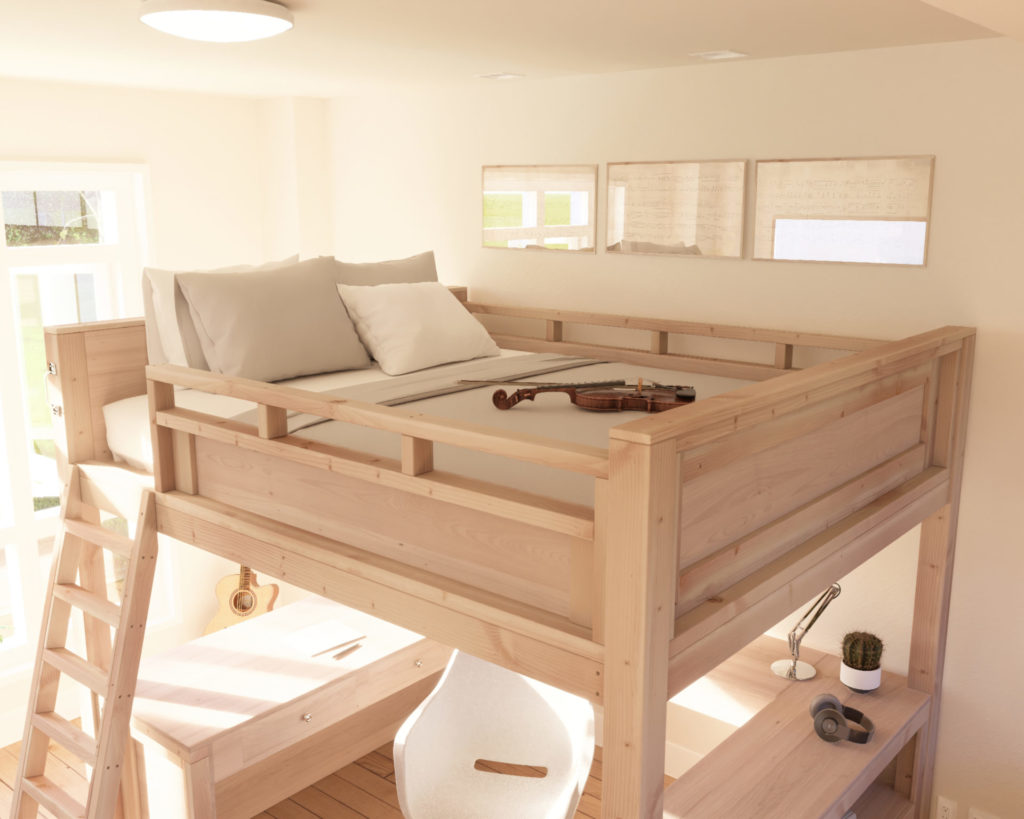
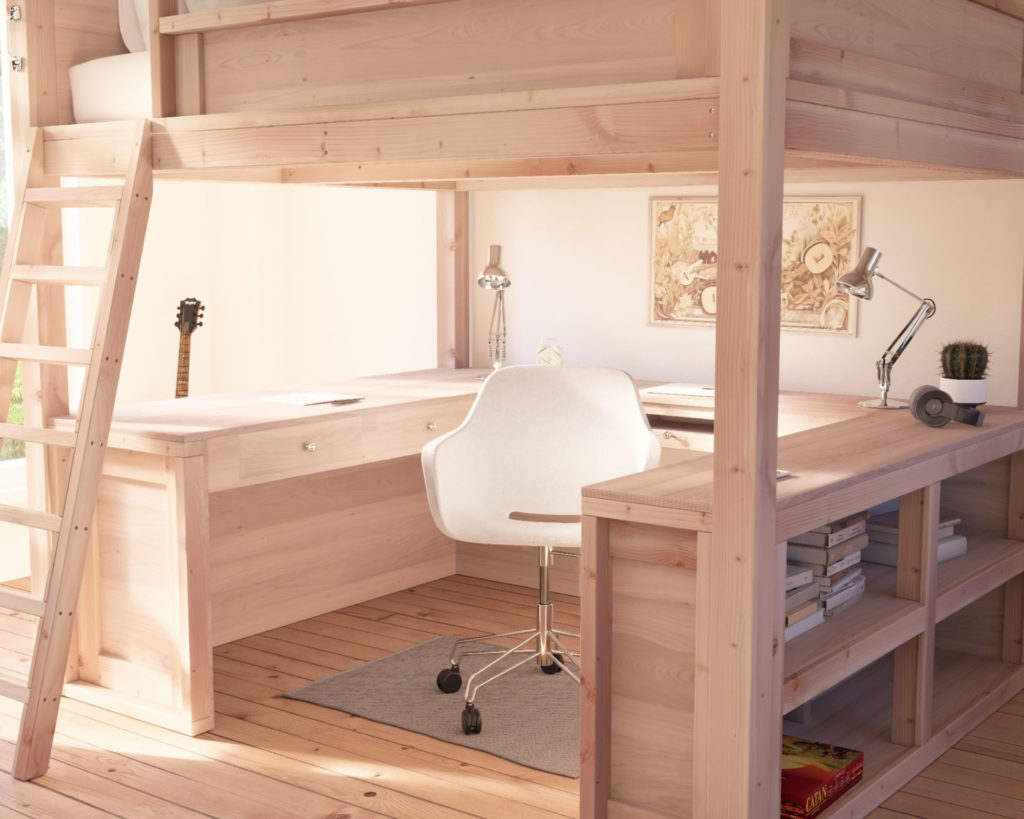
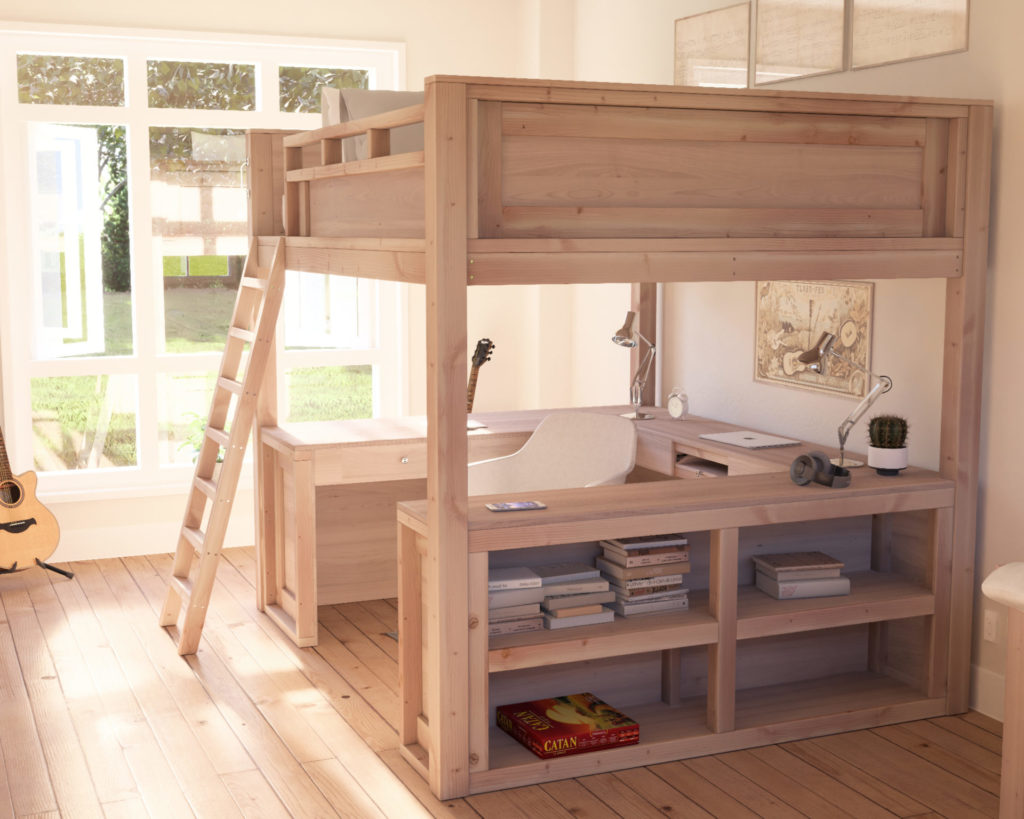
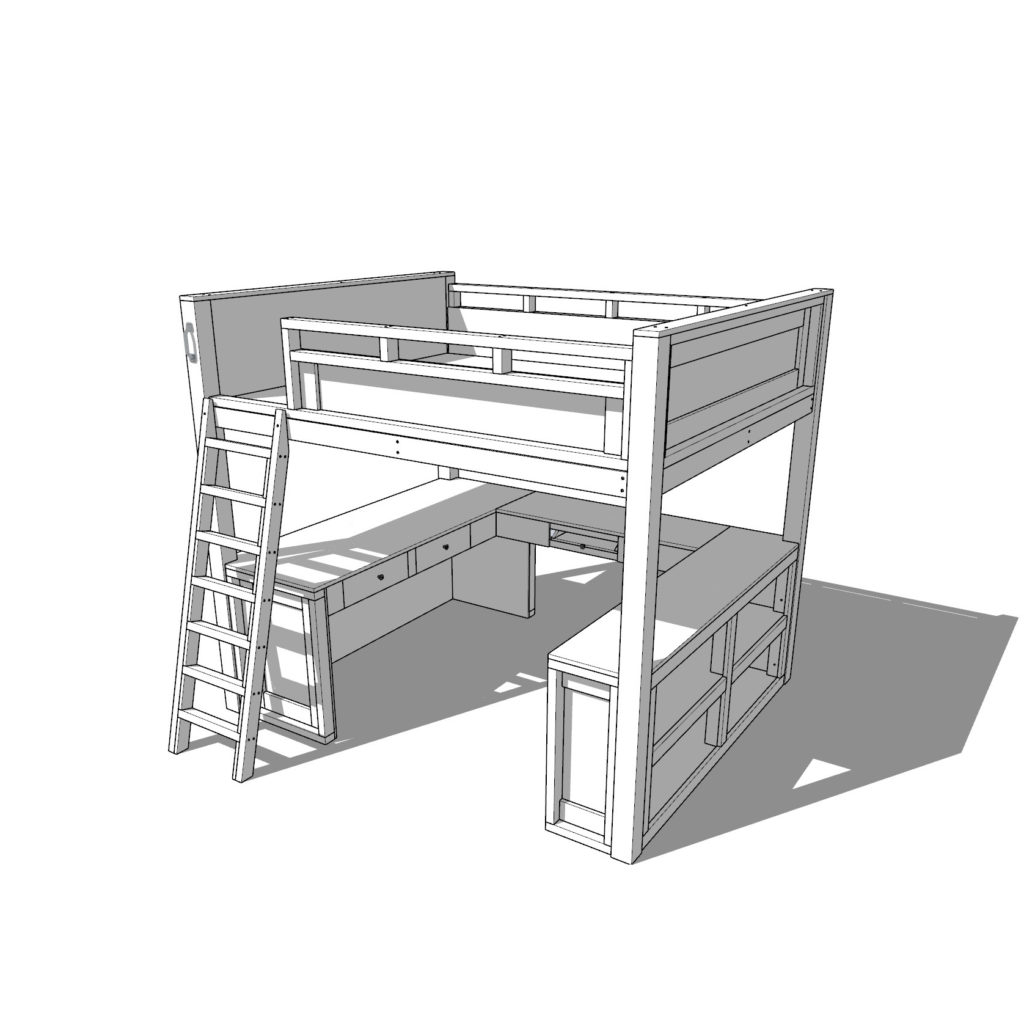
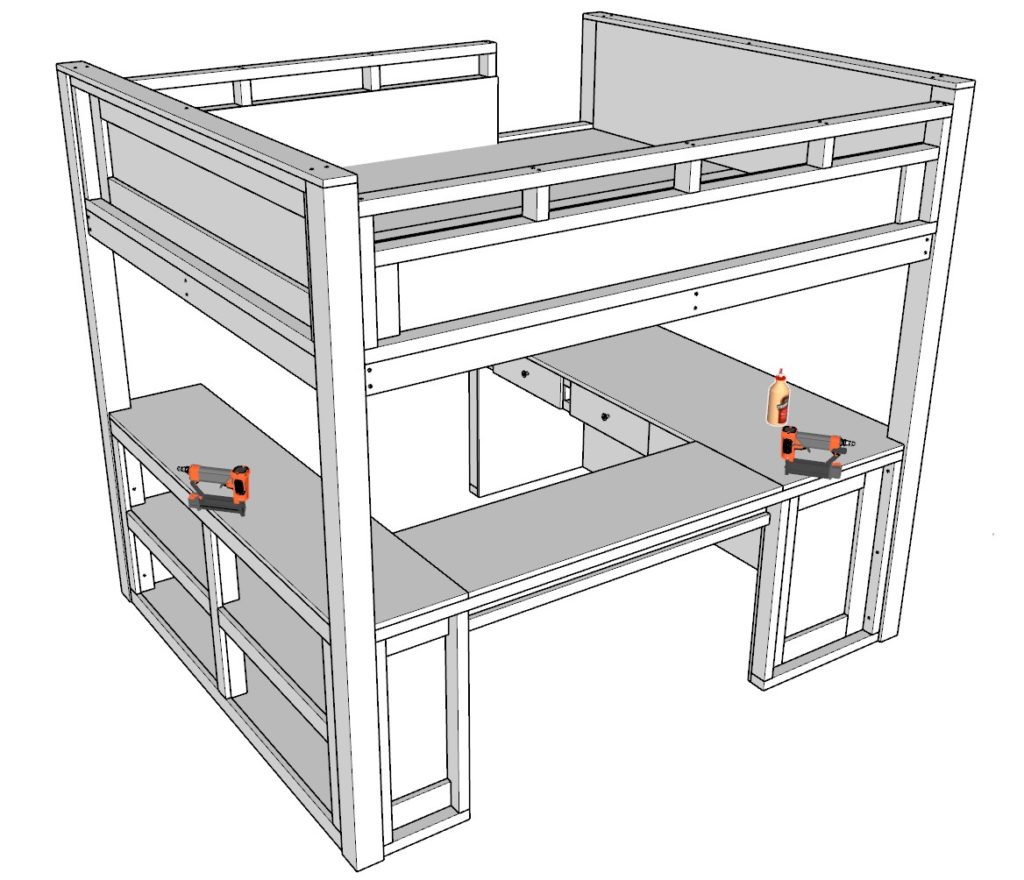
The DIY loft bed we’re going to build is a perfect blend of style and utility. It boasts a comfortable sleeping area, a generous desk for study or work, and an abundance of storage for your necessities. The bed includes two spacious drawers for organizing smaller items such as electronics, stationary, and personal items. The bookcase provides four cubbies, ideal for storing books, displaying decor, or housing bins for clothes and artwork.
Loft Bed Specifications and Dimensions
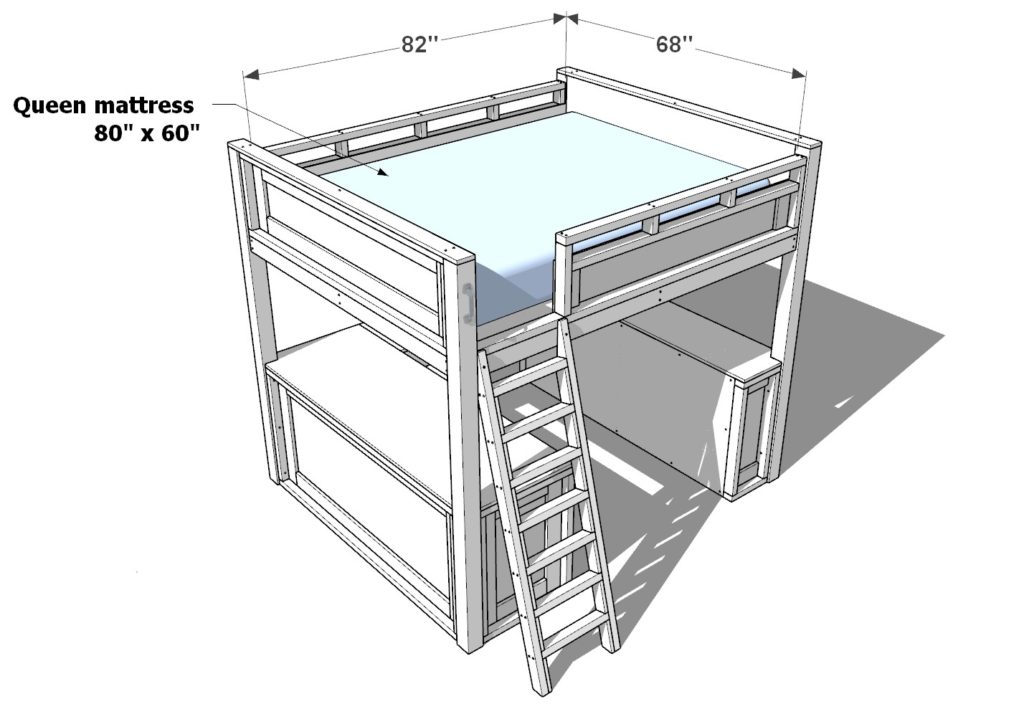
Let’s get down to the details. The overall dimensions of the DIY loft bed, including the ladder, are 90-13/16″ wide x 89″ long x 79″ high, with the ladder projecting out about 17″. The open space beneath the bed measures 47-1/2″ wide x 56-1/2″ long x 57″ high, providing ample room for the built-in desk and storage. The desk/vanity top is set at a comfortable height of 31″, ideal for working or studying.
Aesthetic Meets Practicality: The Design of Your Loft Bed
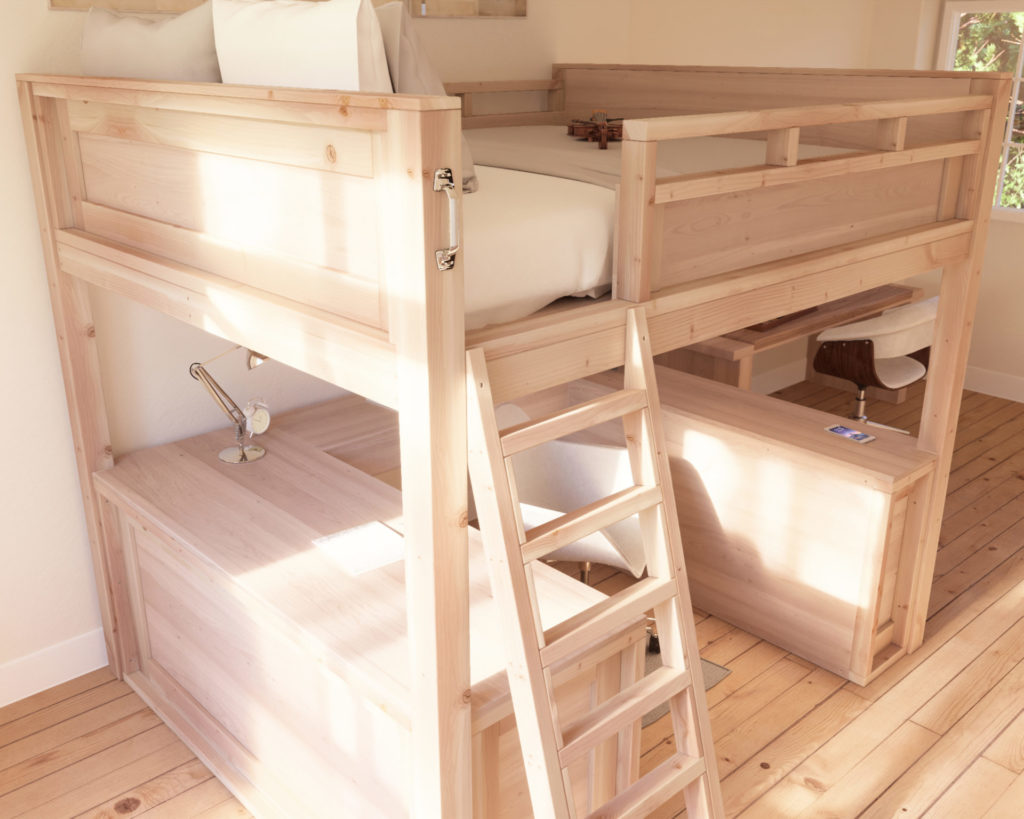
Our DIY loft bed marries form and function beautifully. Its wooden construction gives it a timeless, classic appeal, while the built-in features offer practical storage and organization solutions. The bed is designed to accommodate a queen-size mattress without the need for a box spring, considering the height restrictions. Don’t forget to account for ceiling fans and hanging fixtures when measuring your space!
Quality Assurance: Comfort, Durability, and Safety of Your DIY Loft Bed
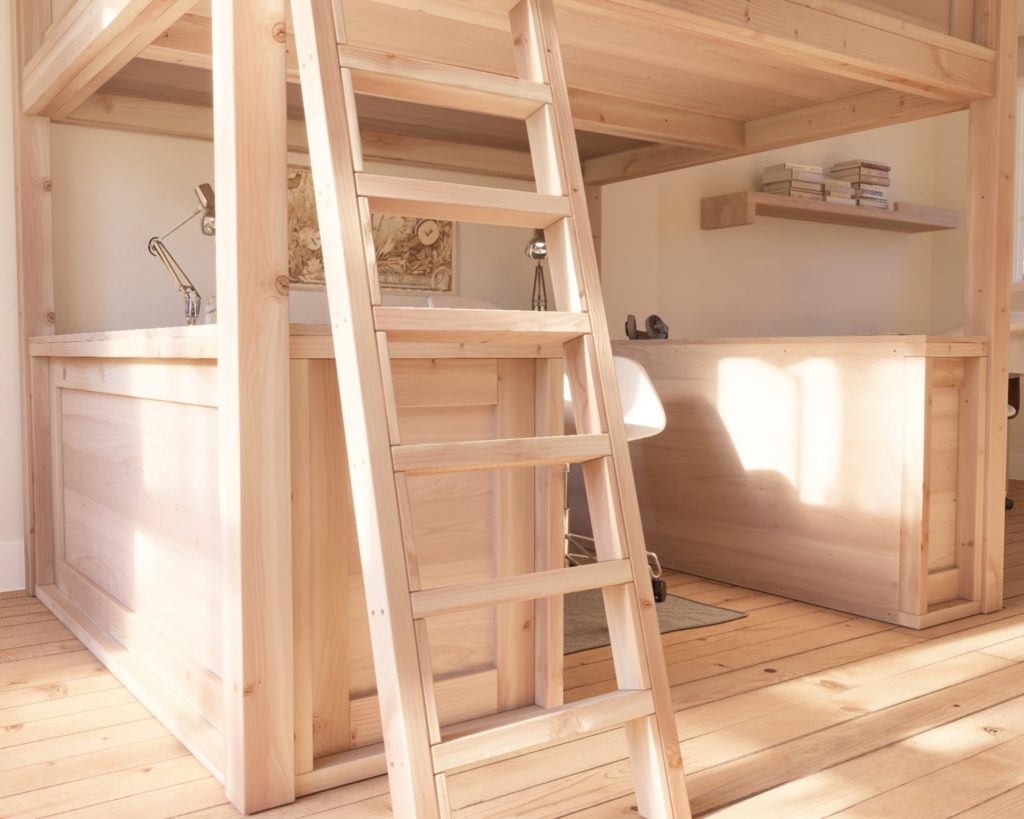
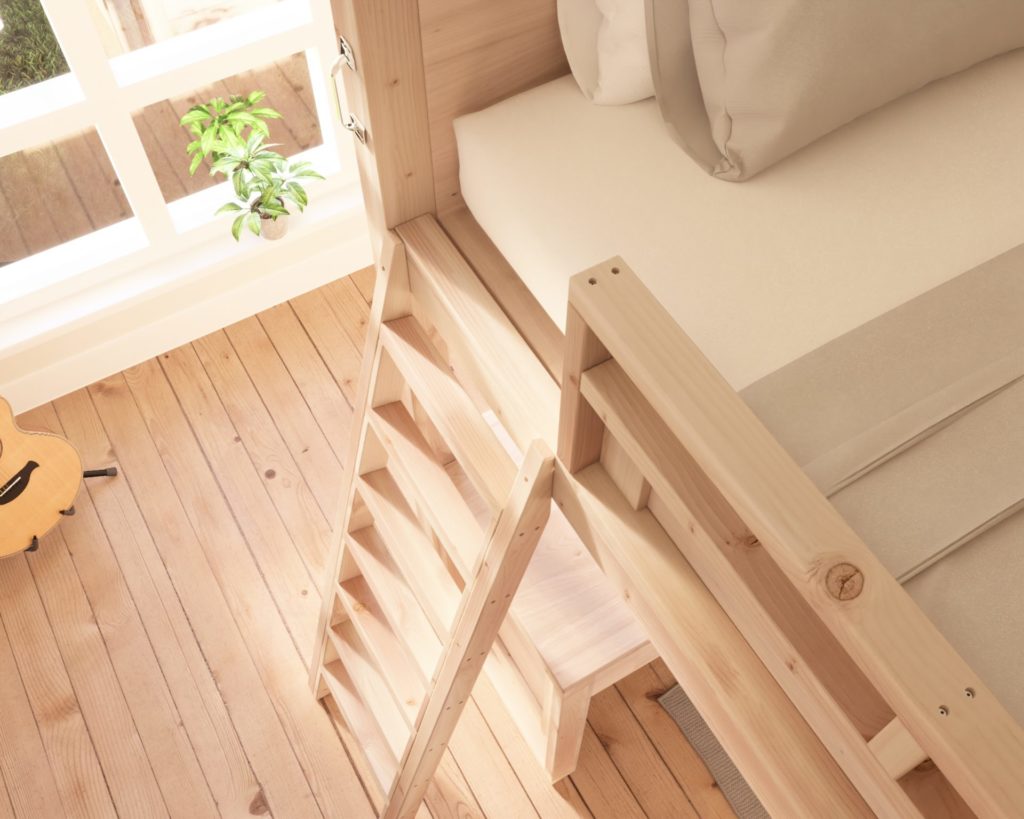
A top-notch DIY loft bed should focus on comfort, durability, and safety. The wooden frame, triple-reinforced with 2×4 lumber, guarantees stability, while the reinforced ladder can bear a significant load. The bed also features a handle at the top of the ladder, facilitating safe and easy access. The bed railing is thoughtfully designed, lower in the middle for visibility, and higher on the ends for privacy, ensuring safety and a cozy sleeping area.
The Power of Personalization: Making the Loft Bed Your Own
One of the joys of DIY is the freedom to customize. From selecting the perfect paint or stain color to adding personal touches like unique hardware or lighting, the possibilities are limitless. You can even modify the design to include extra storage or workspace, tailoring it to your specific needs.
Measuring 101: Avoiding Common Mistakes
Accurate measurement is crucial when planning your DIY loft bed project. Consider the bed’s dimensions, including the ladder projection, and take into account any ceiling fans or hanging fixtures that could impact the bed’s placement. Additionally, measure your ceiling height to ensure sufficient clearance for the loft bed and its occupants.
Adding a Personal Touch: Incorporating Unique Features
Beyond the built-in desk and storage drawers, our DIY loft bed design offers a customizable bookcase with four spacious cubbies. Each cubby measures 67″ wide x 14-3/4″ deep x 12-3/8″ high, offering ample space to move around and for a rolling desk chair. Why not add decorative bins, baskets, or shelving inserts to further organize and personalize your storage space?
Creative Ideas for Decorating and Personalizing Your DIY Loft Bed
Once your DIY loft bed is complete, have fun decorating and personalizing the space to reflect your style and interests. Consider adding:
1. Colorful bedding and pillows for a cozy sleeping area.
2. A stylish desk lamp or task lighting for the workspace.
3. Artwork, photos, or a bulletin board above the desk for inspiration and personalization.
4. Decorative storage bins or baskets for the bookcase cubbies.
5. Hanging plants, string lights, or curtains for added ambiance and privacy.
How to Choose the Best Lighting Options for Your DIY Loft Bed Space
Proper lighting is essential for both the sleeping and working areas of your loft bed. Consider installing adjustable task lighting or a desk lamp for the workspace, and ambient or accent lighting for the sleeping area. Be mindful of the placement of any hanging lights, as they should not interfere with the bed’s structure or safety features.
Loft Bed: Your Personal Sanctuary
Crafting your own loft bed offers psychological benefits as well. It can serve as a personal haven, a space where you can relax, refresh, and focus on your passions or work. The sense of accomplishment from constructing the bed yourself adds to the overall satisfaction and enjoyment of the space.
Safety First: Creating a Safe and Comfortable Space for Children and Teens
When crafting a DIY loft bed for children or teens, safety should be paramount. Ensure the bed is built using sturdy materials and includes features like reinforced ladders, railings, and handles for safe entry and exit. Also, consider incorporating fun and age-appropriate design elements to create a comfortable and inviting space.
Maintenance Matters: Keeping Your Loft Bed in Top Shape
To ensure your loft bed remains in optimal condition, regular cleaning, repairs, and upkeep are necessary. Dust and clean the bed routinely, paying special attention to hard-to-reach areas like the ladder and railing. Regularly inspect the bed for any signs of wear or damage, and make necessary repairs promptly.
Conclusion: The Joy and Satisfaction of Building Your Ultimate DIY Loft Bed
Constructing the ultimate DIY loft bed is a gratifying endeavor that blends functionality, style, and the joy of creating something with your own hands. By following this comprehensive guide and considering the various design elements, dimensions, and features, you can create a personalized space that fits your needs and mirrors your unique style. With careful planning, customization, and maintenance, your DIY loft bed will serve as a comfortable and functional centerpiece in your bedroom for years to come.
So, what are you waiting for? Let’s get to work and create something extraordinary together!

Time to build
12 hours
Total cost of build
$900
Skill level required
Beginner
Download the PDF plans
loft bed PDF plans
What is included in the PDF download?
- Easy to read step by step instructions
- Material list
- Tools needed
- Helpful links to materials and tools needed
Step-by-step instruction on building the DIY loft bed

Recommend tools/materials
Available with the purchase of the PDF. Thank you for making this website possible with your support.
Lumber purchase list
Available with the purchase of the PDF. Thank you for making this website possible with your support.
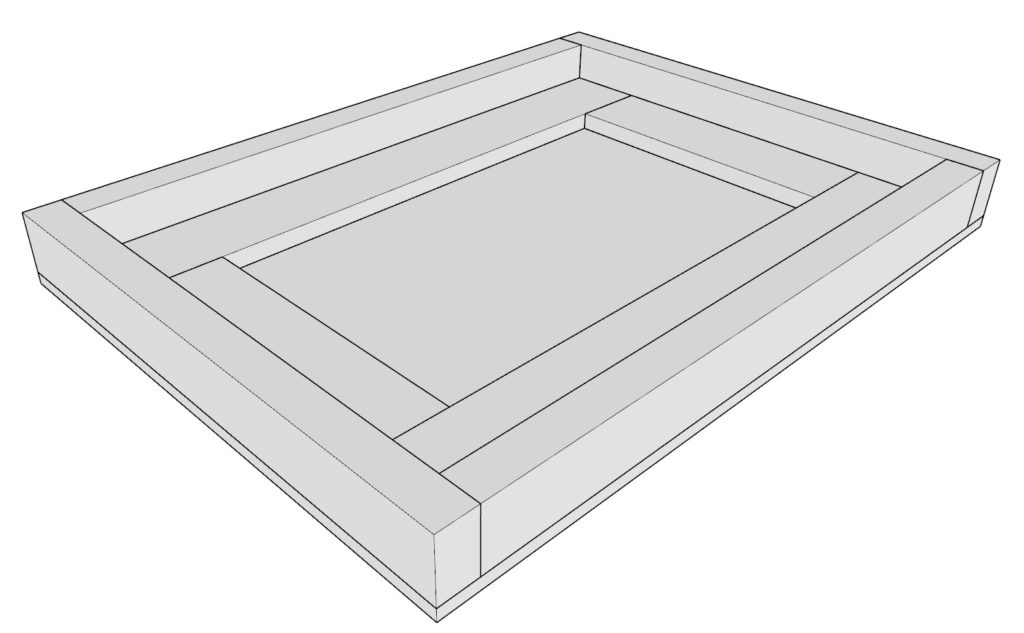
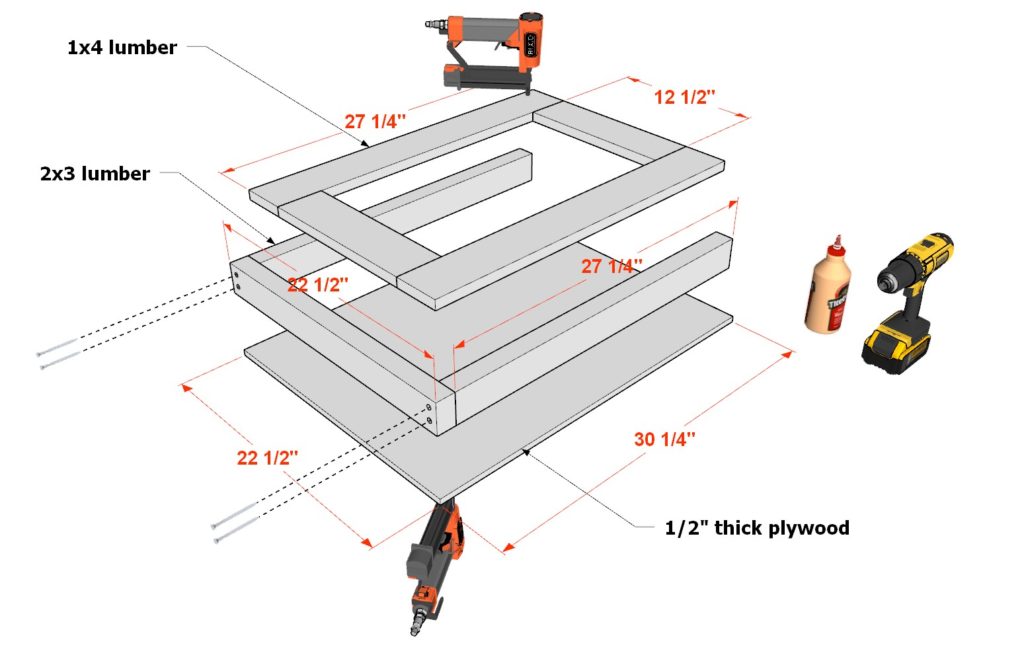
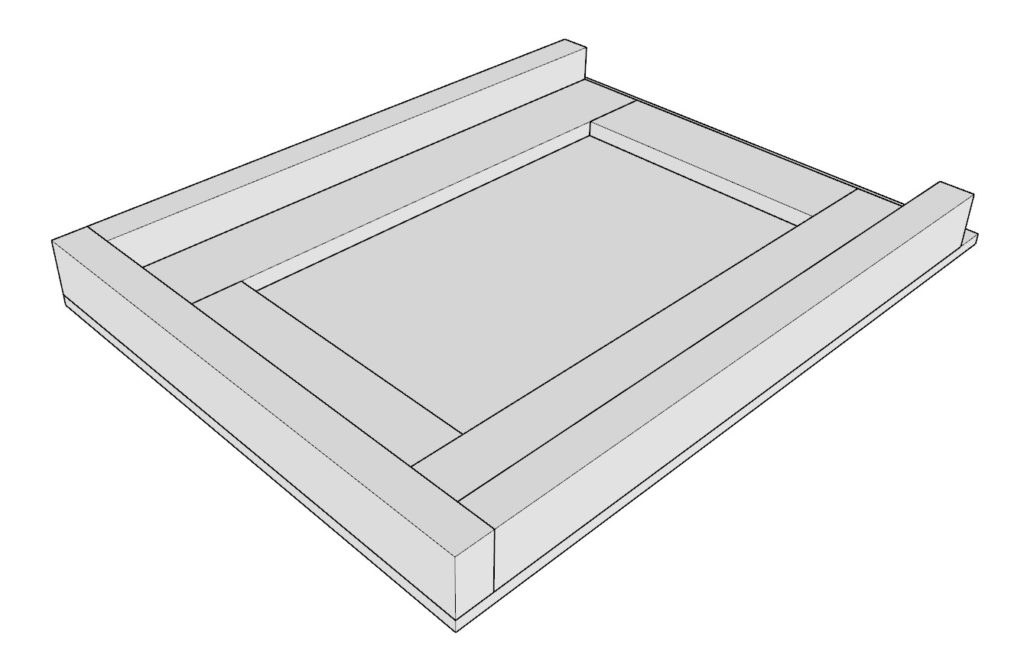
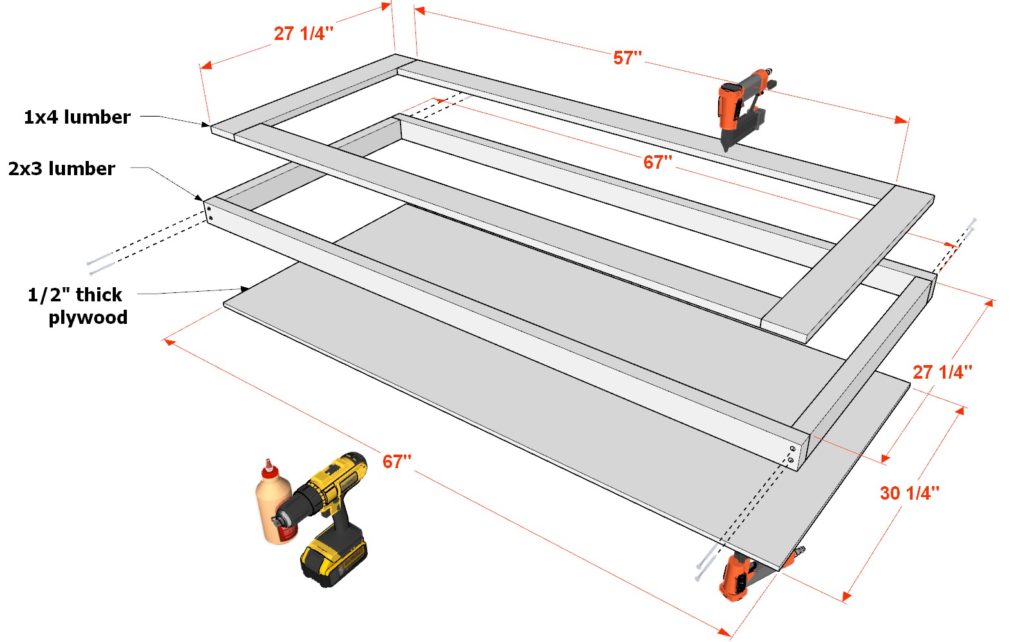
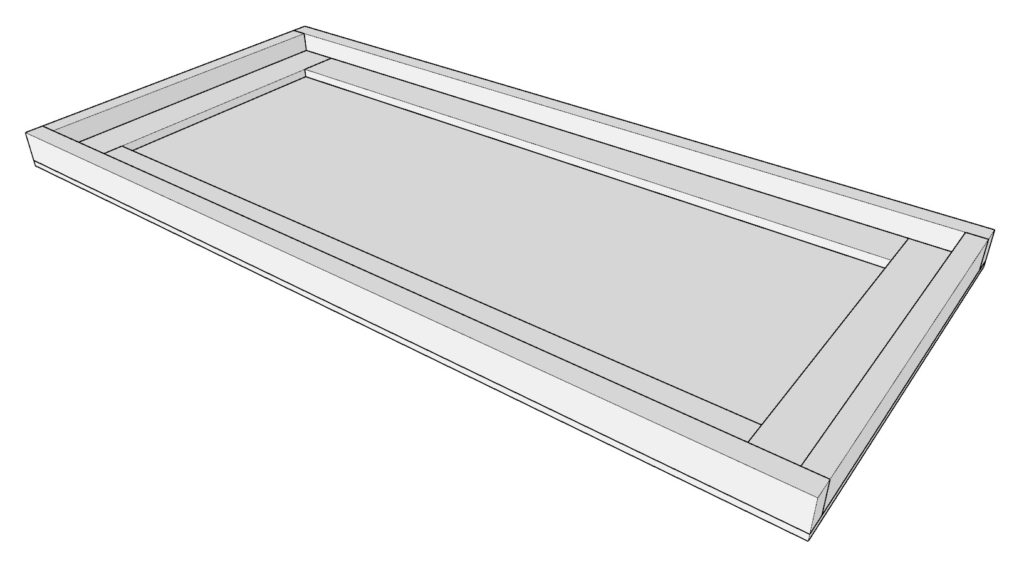
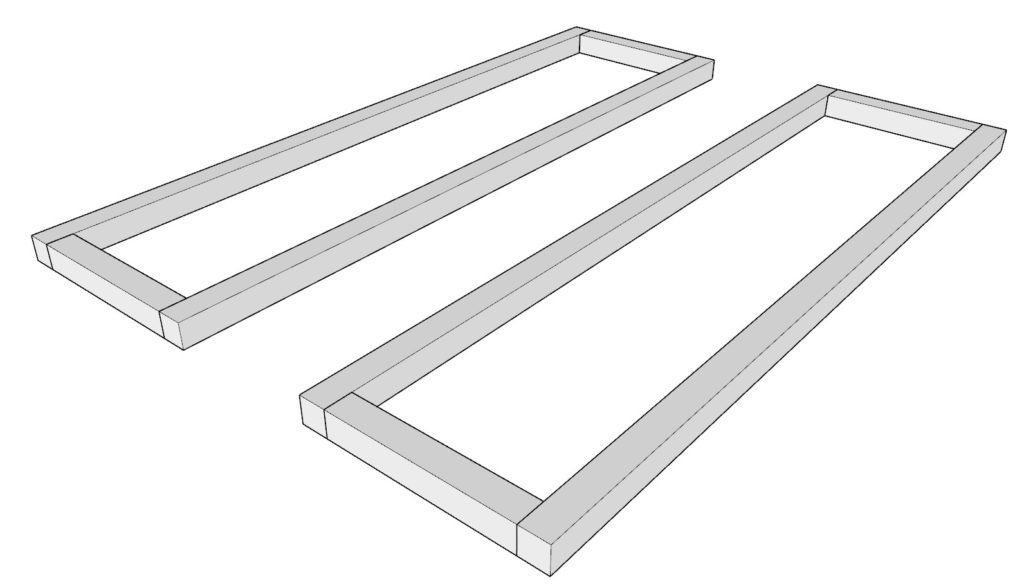
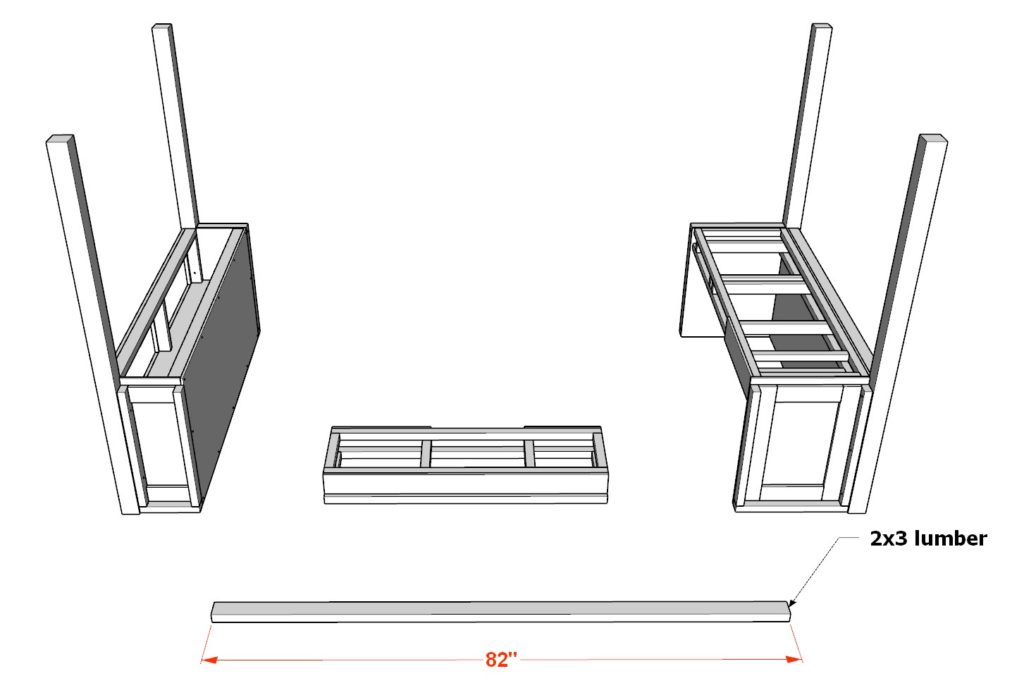
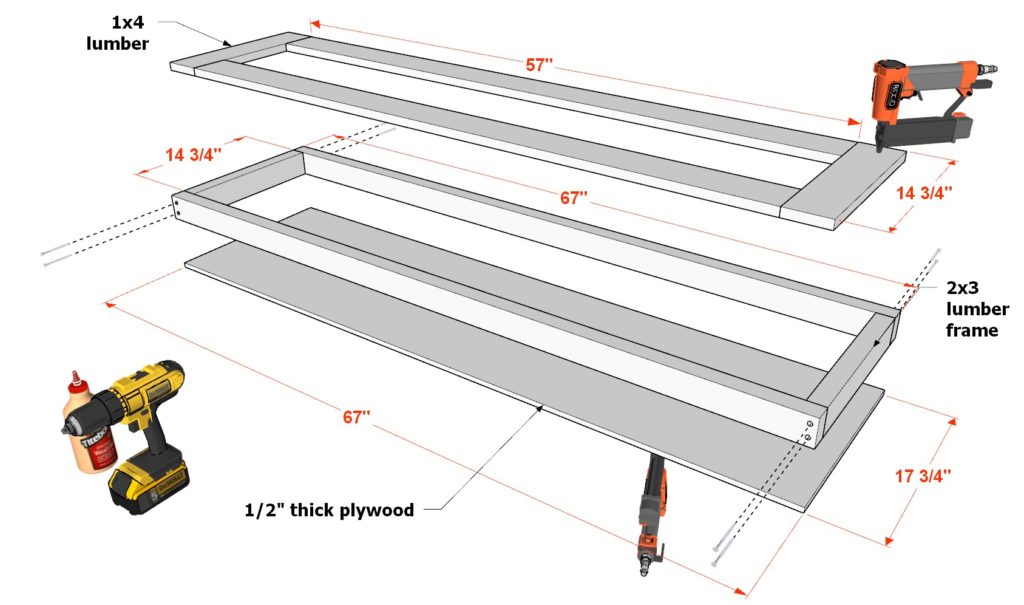
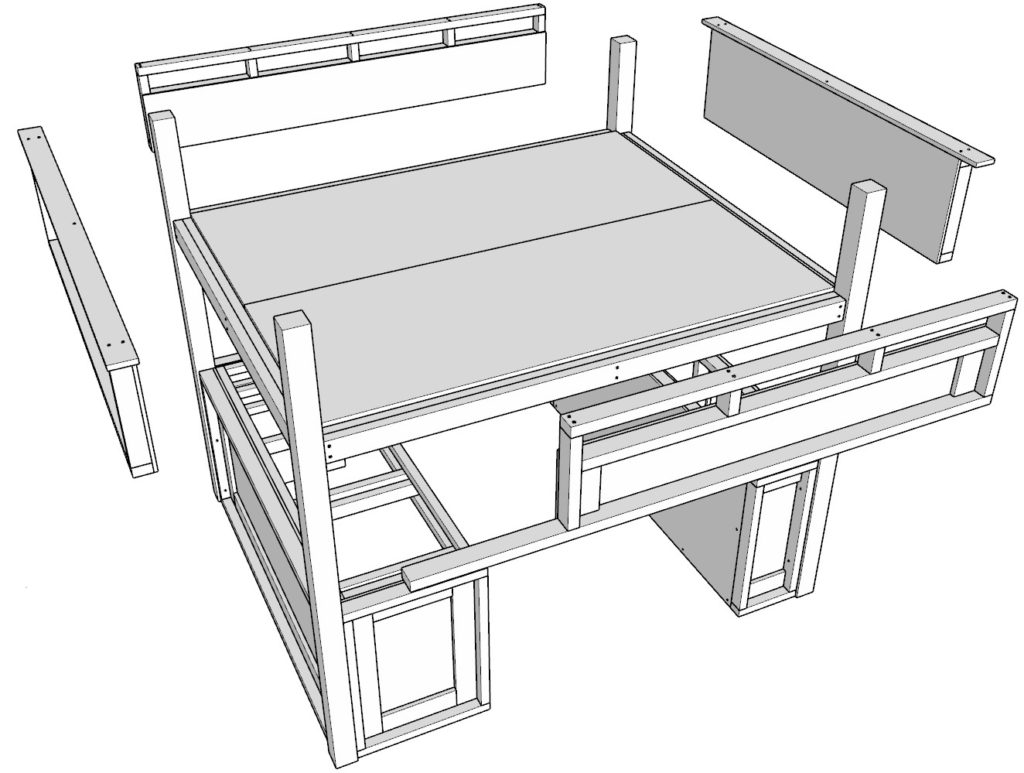
Step 1: Construct the Desk Sides and Longer Wall
Build the desk sides.
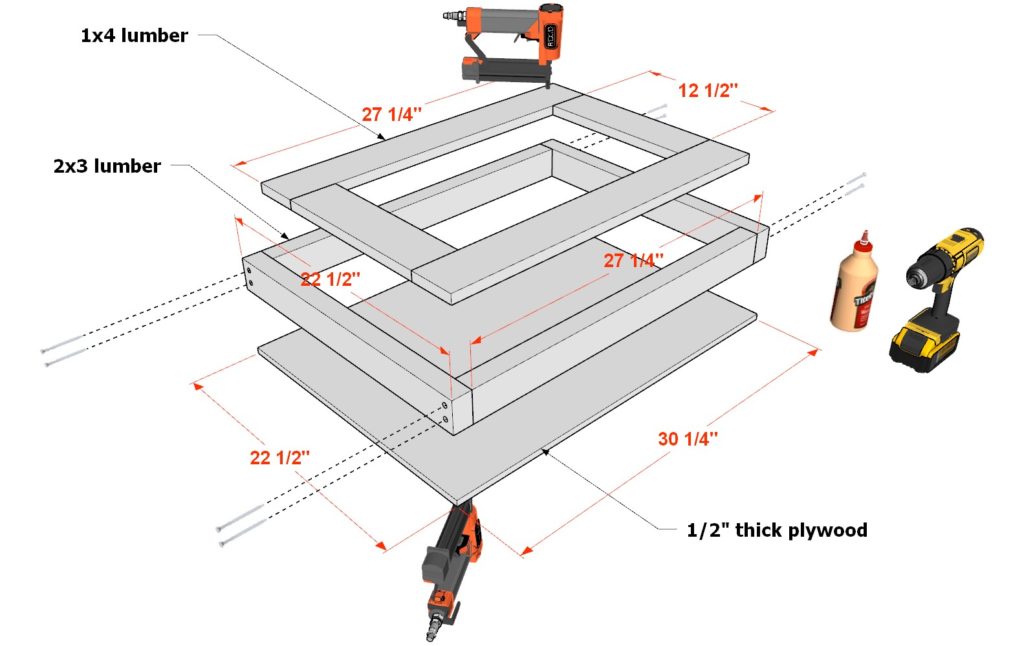
Build the first side, take one 1/2″ thick plywood sheet that is 22-1/2 inch x 30-1/4 inch, two 27-1/4″ 2×3 lumber pieces, two 22-1/2 inch 2×3 lumber pieces, two 27-1/4 inch 1×4 lumber pieces, and two 12-1/2 inch 1×4 lumber pieces. Arrange them as shown below. Join the 2×3 frame together using 2.5 inch long screws and glue. Make sure to predrill the wood to prevent it from splitting. Secure the plywood and 1×4 lumber pieces using glue and 1 inch nails from a nail gun.
Next, build another wall sin the same way but this time, exclude one of the 22-1/2 inch 2×3 lumber pieces.
Lastly, build the longer desk wall. Take a 67 inch x 30-1/4 inch 1/2″ thick plywood sheet, two 27-1/4 inch 2×3 lumber pieces, two 67 inch 2×3 lumber pieces, two 57 inch 1×4 lumber pieces, and two 27-1/4 inch long 1×4 lumber pieces. Arrange them as shown below. Join these in a similar fashion as before.
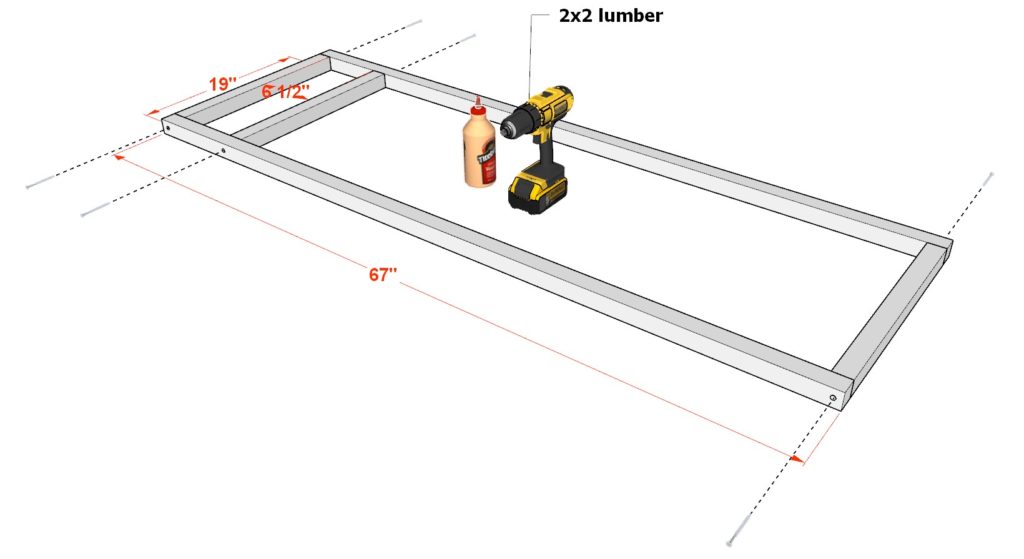
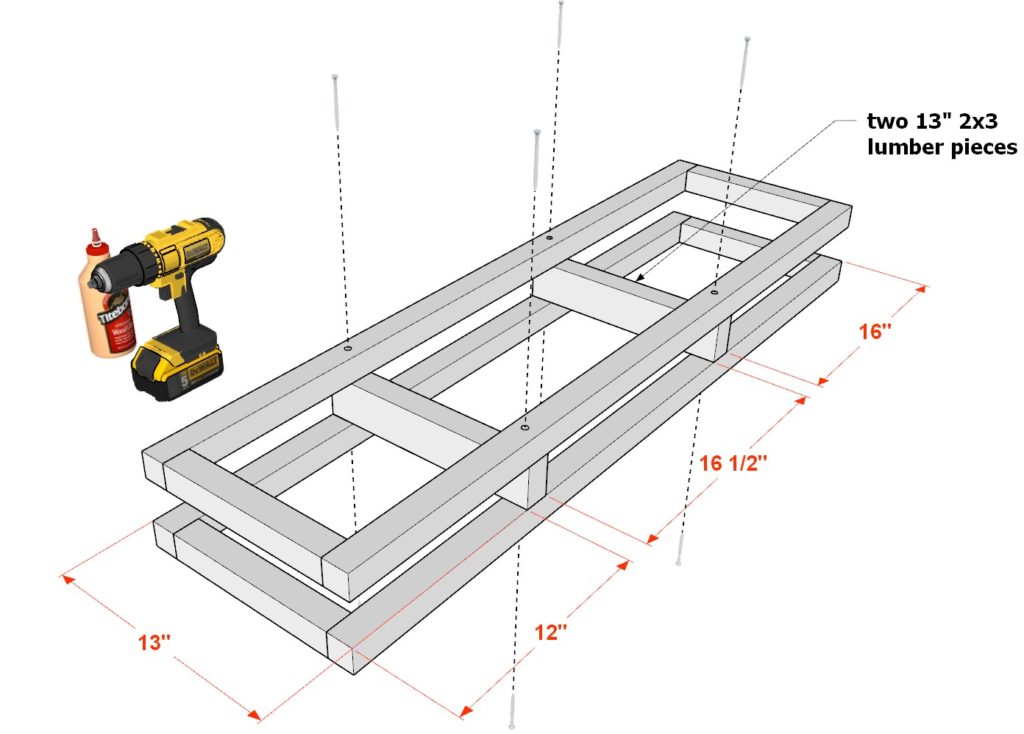
Step 2: Assemble the Desk Drawer Frame and Desk Top Support
Next, assemble the desk drawer frame and desk top support.
Take two 67 inch 2×2 lumber pieces and three 19 inch 2×2 lumber pieces. Arrange them as shown below. Use glue and 2.5 inch screws to secure the frame together. Make sure to predrill to prevent the wood from splitting.
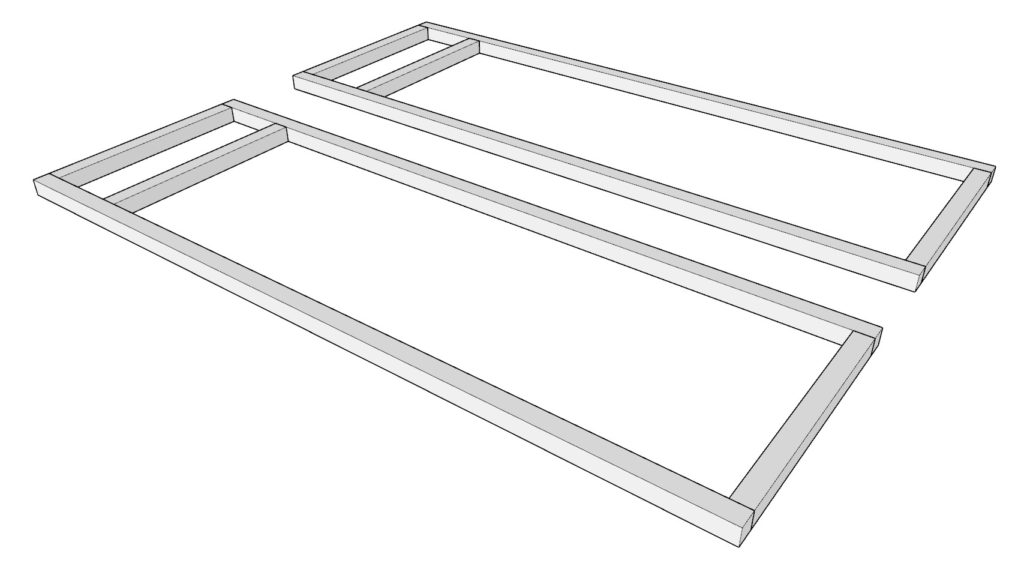
Make two identical 2×2 lumber frame pieces.
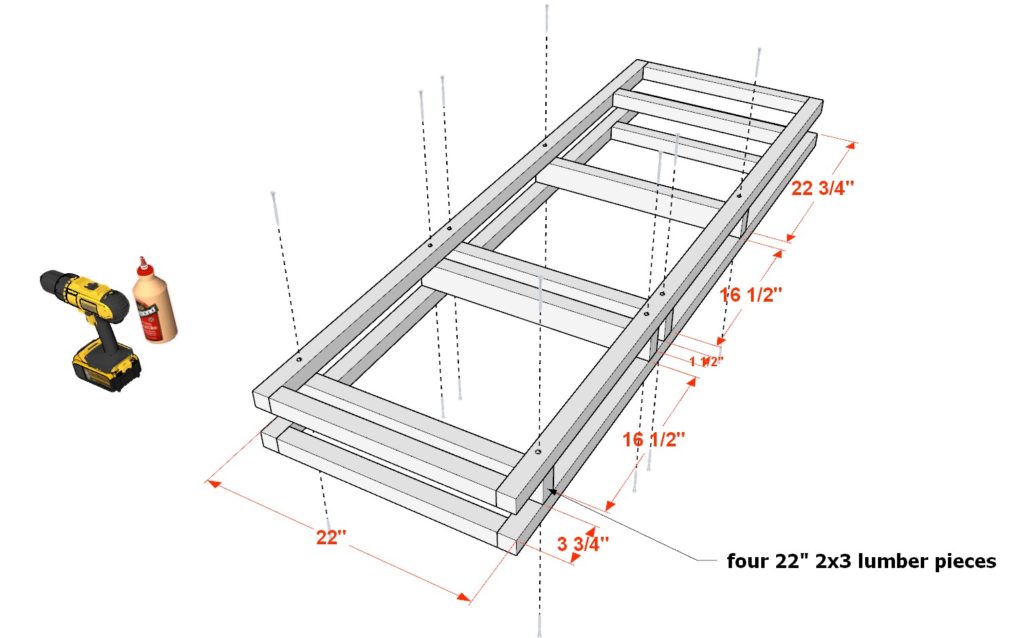
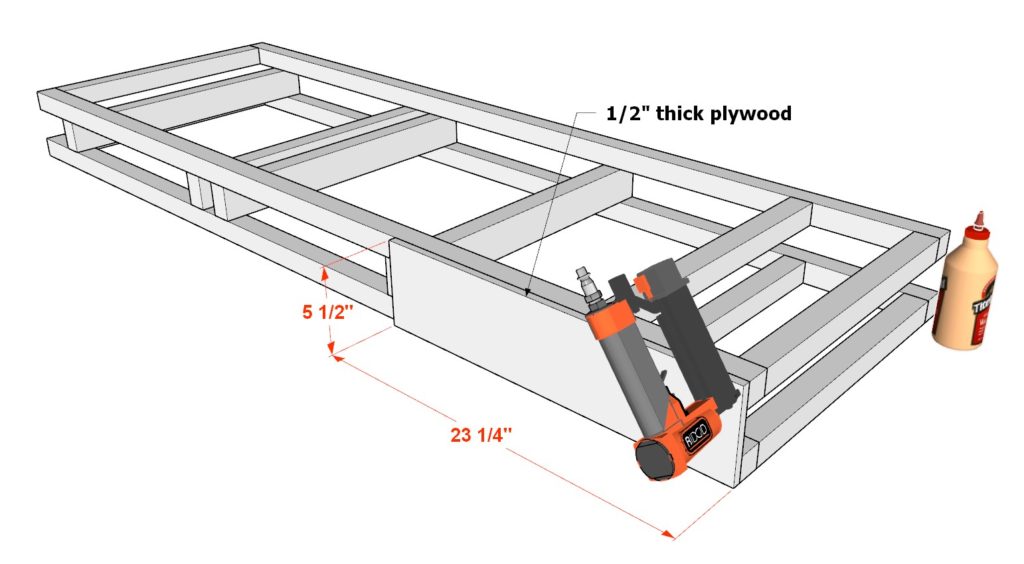
Next, add four 22 inch 2×3 lumber pieces. Space them out as shown below. Add 3.5 inch screws, glue, and predrill to secure the pieces together.
Lastly, use a nail gun and 1 inch nails along with glue to secure a small 23-1/4 inch x 5-1/2 inch 1/2″ thick plywood sheet as indicated below.
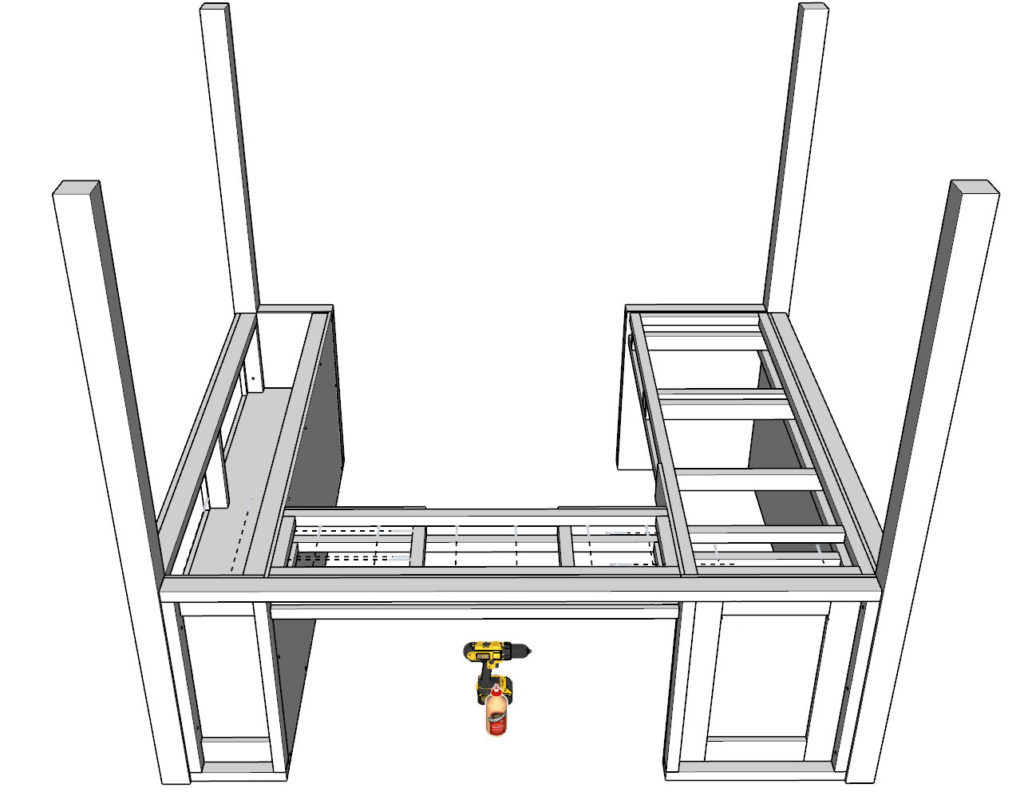
Step 3: Combine Desk Components and Add Loft Bed Pillars
Put together the desk components and add two loft bed pillars.
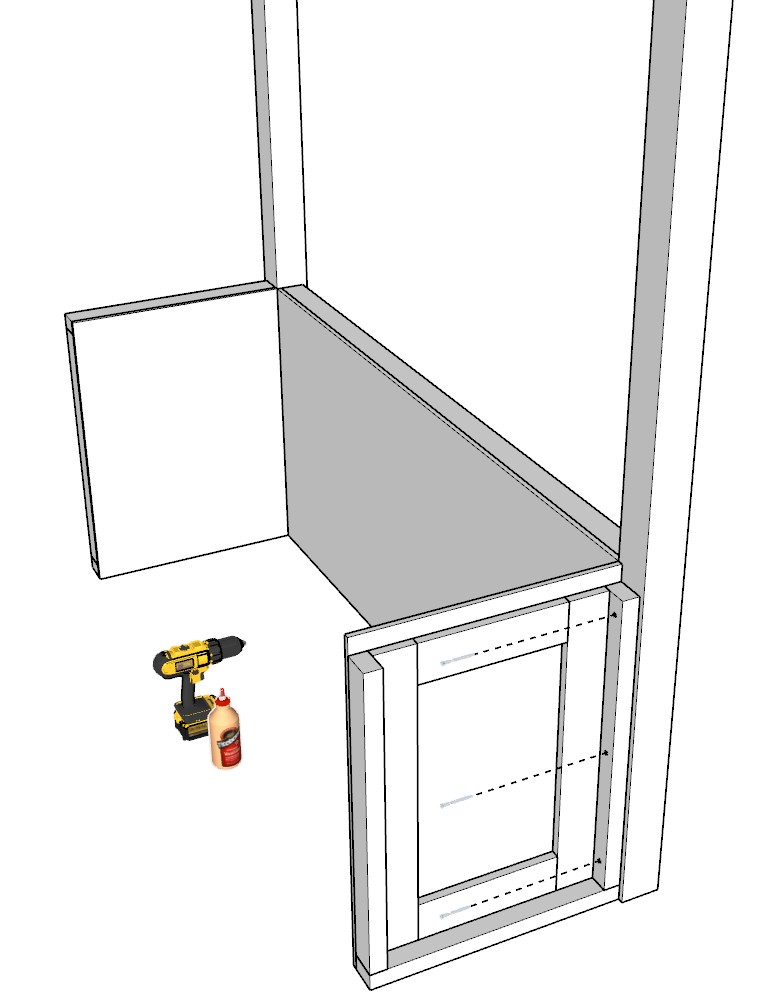
First, take two 78-1/4 inch 4×4 lumber pieces and the longer desk side component and secure it to the 4×4 posts with glue, predrilling, and 3.5 inch screws.
Next, add the two smaller side components in a similar fashion. Be careful to place the wall component that only has one 22-1/2 inch 2×3 lumber piece in the correct spot.
Secure the desk top frame and drawer frame to the side components and pillars as well. Use a combination of 2.5 and 3.5 inch long screws, predrilling, and glue to secure it to the rest of the desk frame.


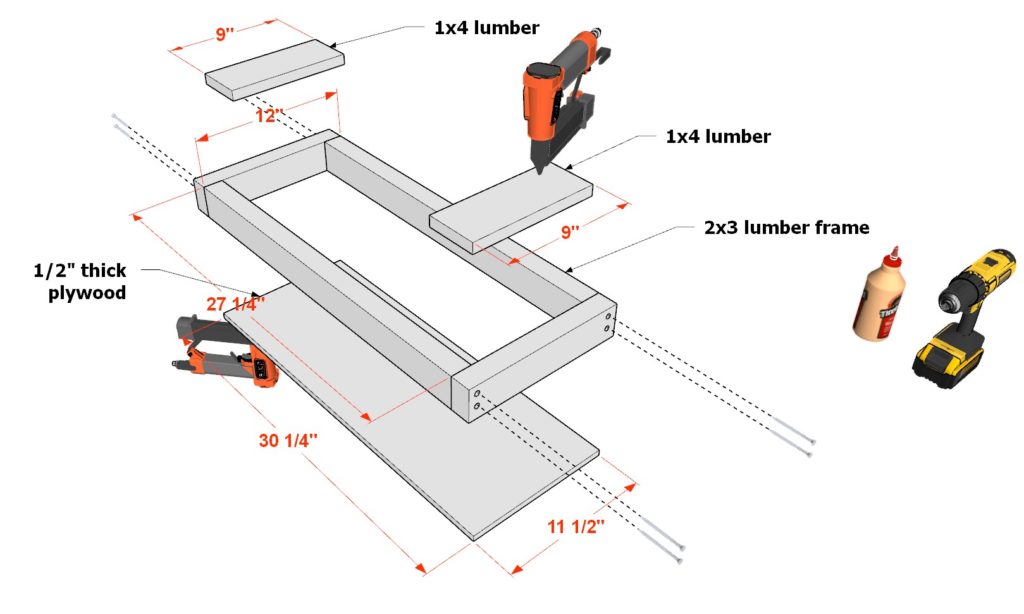
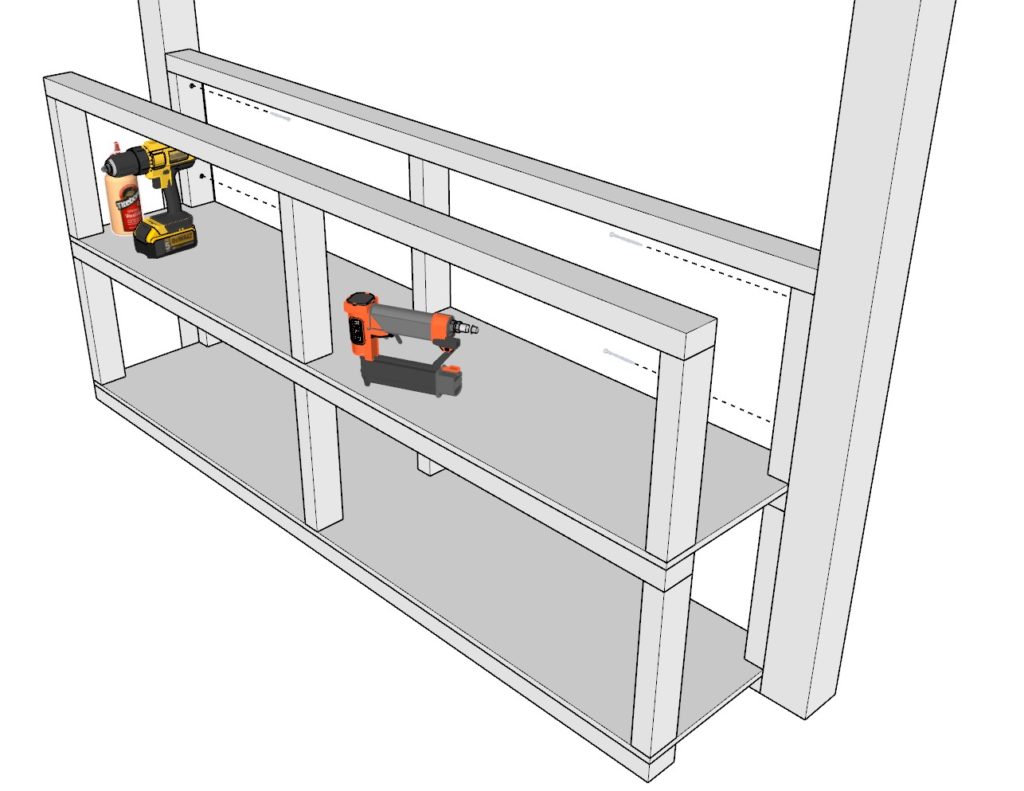
Step 4: Construct Shelf/Cubby Storage Wall Components
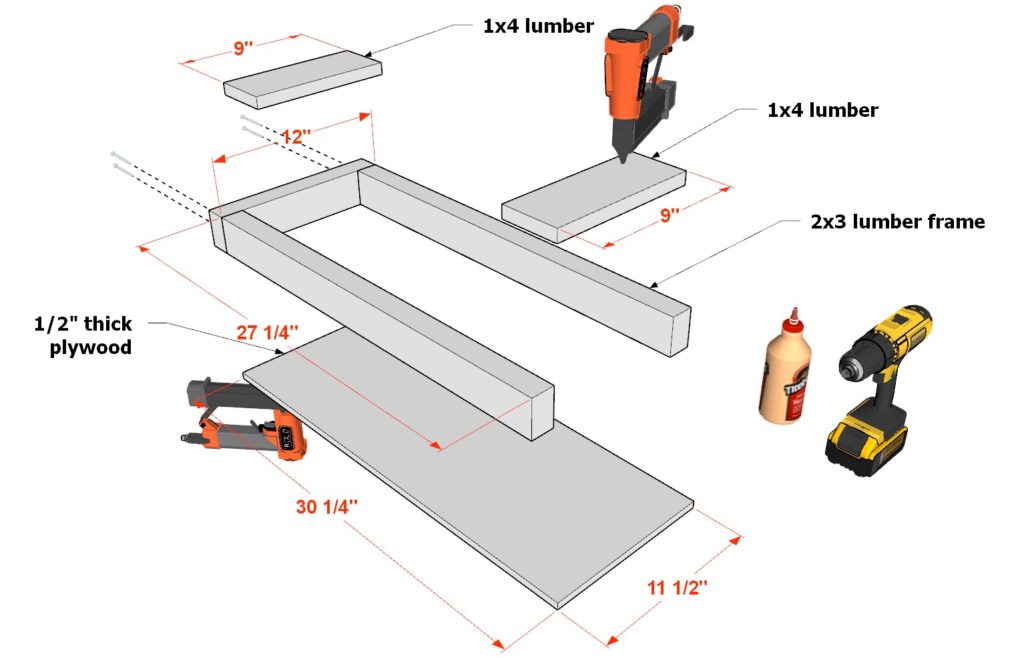
Next, build the shelf/cubie storage wall components.
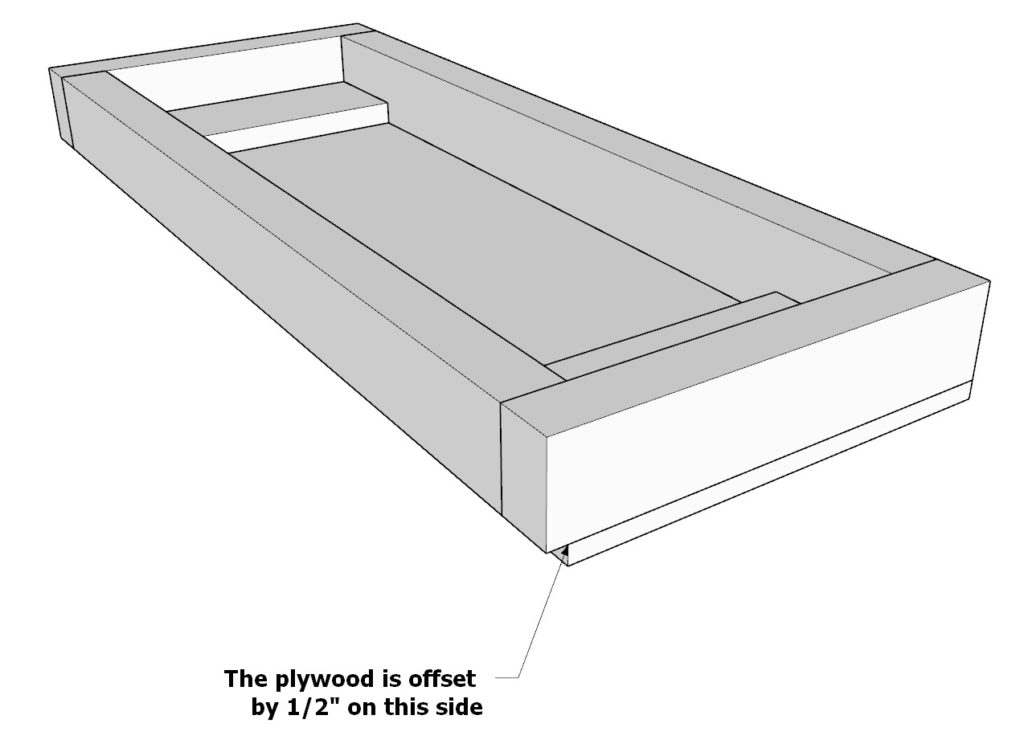
First, take one 11-1/2 inch x 30-1/4 inch 1/2″ thick plywood sheet, two 12 inch 2×3 lumber pieces, two 27-1/4 inch 2×4 lumber pieces, and two 9 inch 1×4 lumber pieces and arrange them as shown below. Secure these together using a combination of 2.5 inch screws, 1 inch nails from a nail gun, and glue. Make sure to predrill holes as needed. Make sure that the plywood is offset by 1/2″ on one side as shown in the second diagram.
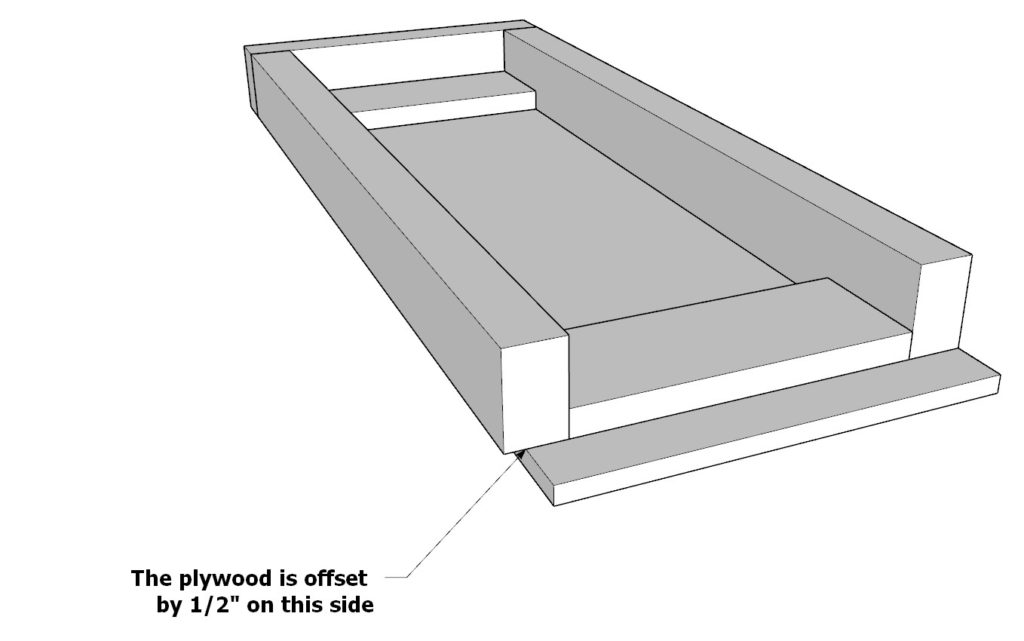
Next, build another identical side wall component except only use one 12 inch 2×3 lumber piece instead of two. Still ensure that the plywood is offset by 1/2″ on one side as shown below.
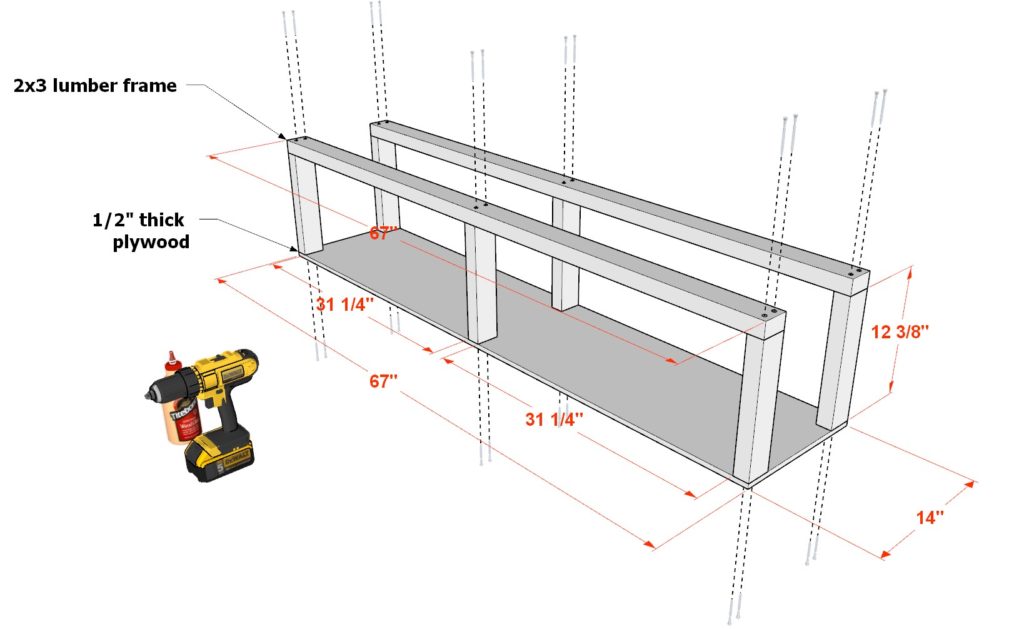
Step 5: Assemble the Storage Cubby Component of the Loft Bed
Next, assemble the storage cubie component of the loft bed.
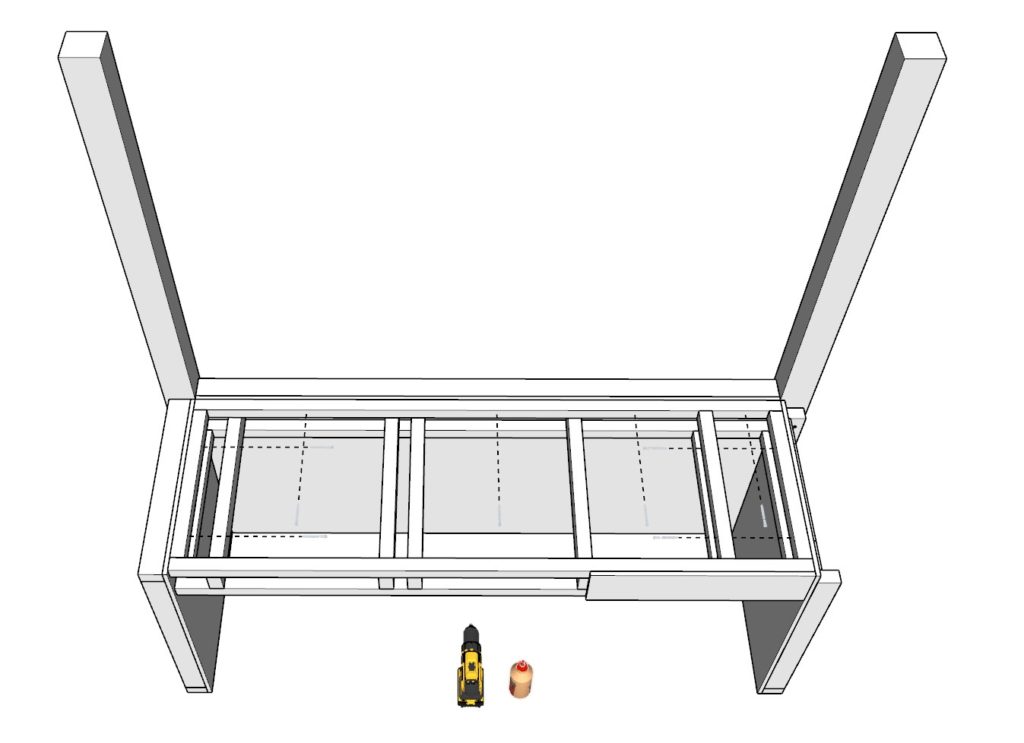
Start by building the shelves. Take one 67 inch x 14 inch 1/2″ thick plywood sheet, six 12-3/8 inch 2×3 lumber pieces and two 67 inch 2×3 lumber pieces and arrange them as shown in the first diagram. Secure the pieces together using glue, predrilling, and 2.5 inch screws.
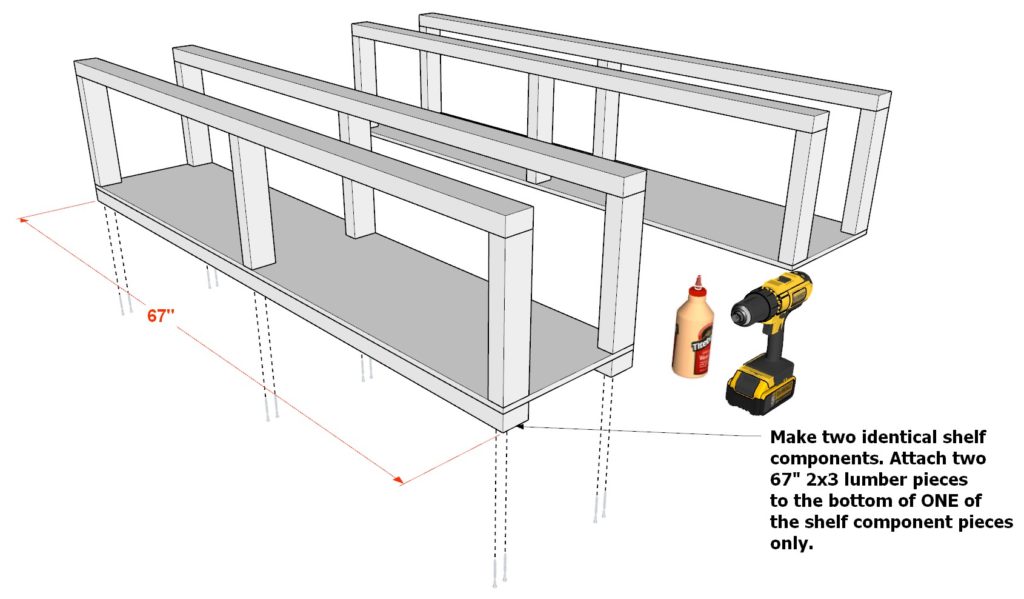
Build an identical shelf component.
Next, add two 67 inch long 2×3 lumber pieces to only ONE of the shelf components.
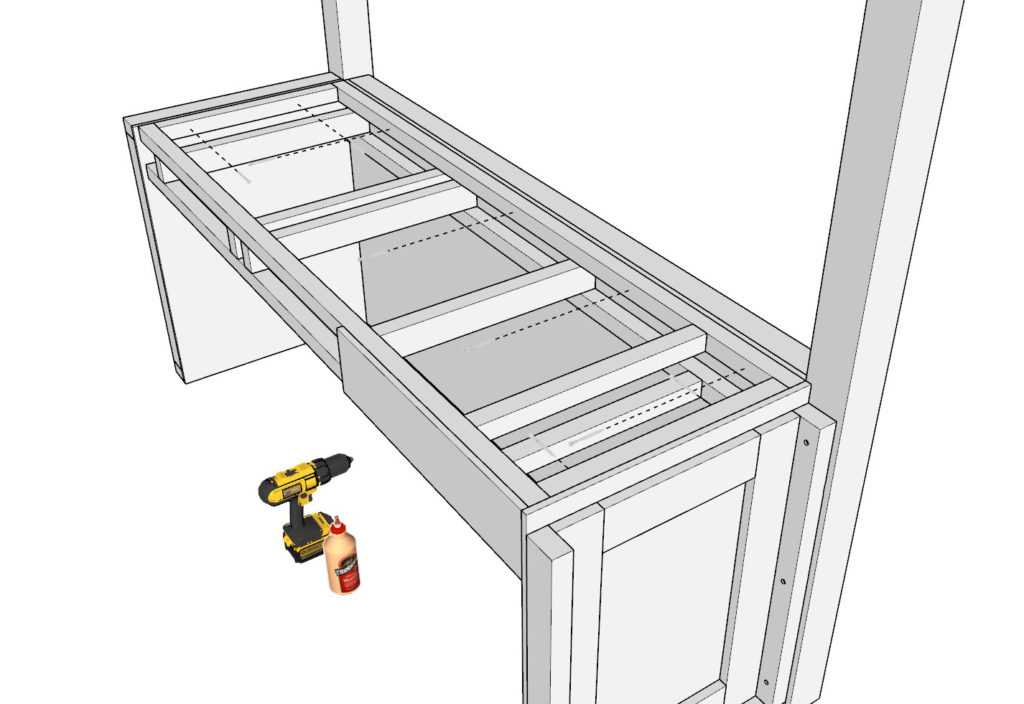
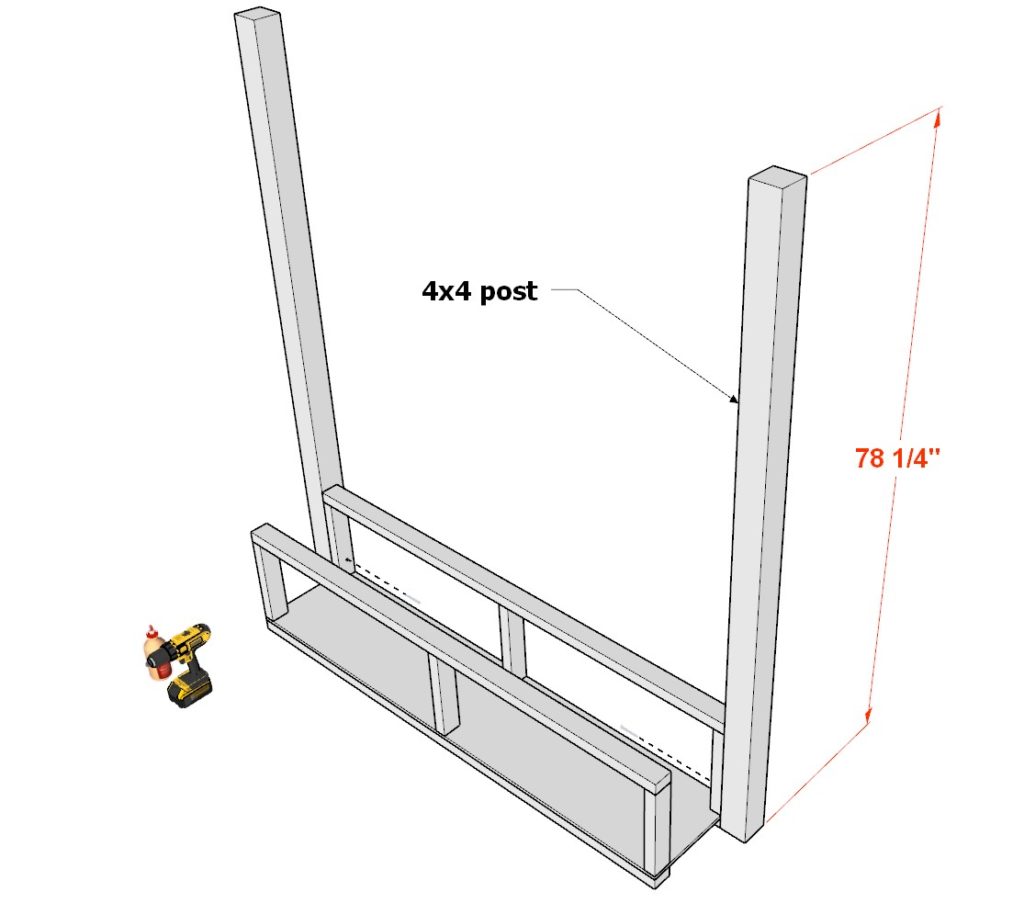
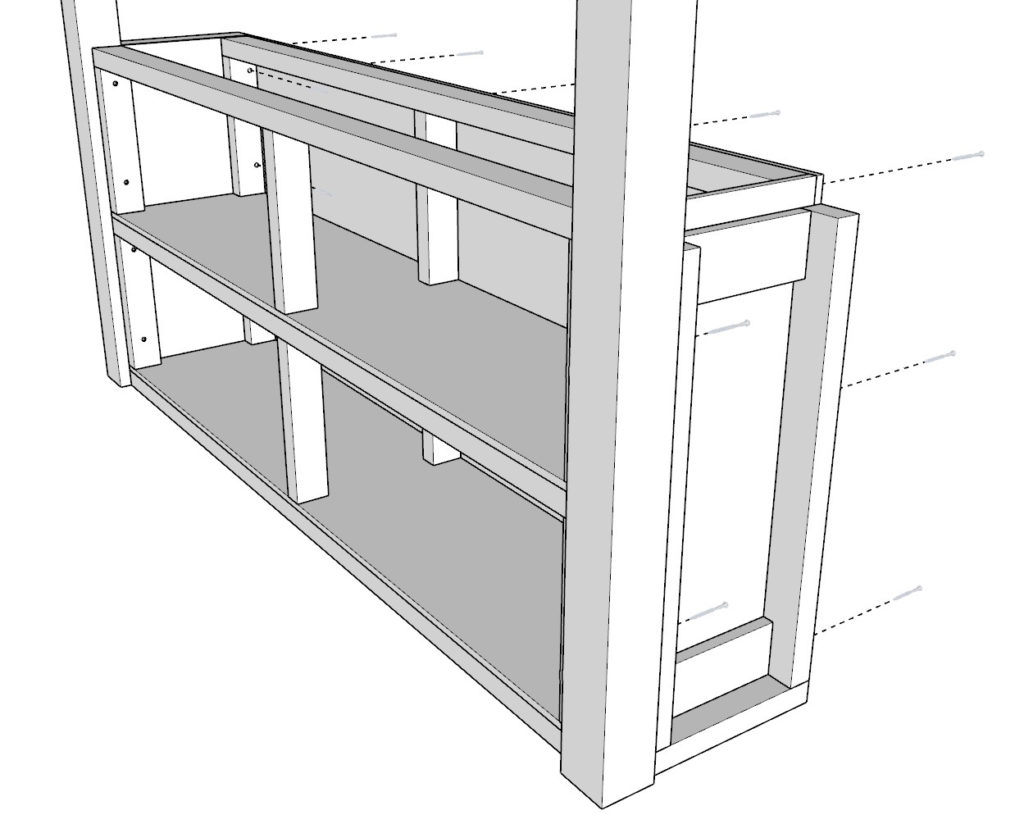
Next, add one of the shelf components (the one with the two extra 67 inch 2×3 lumber pieces added to the bottom) to two 78-1/4 inch 4×4 lumber posts. Secure the shelf component to the pillars using glue, predrill, and add 3.5 inch screws.
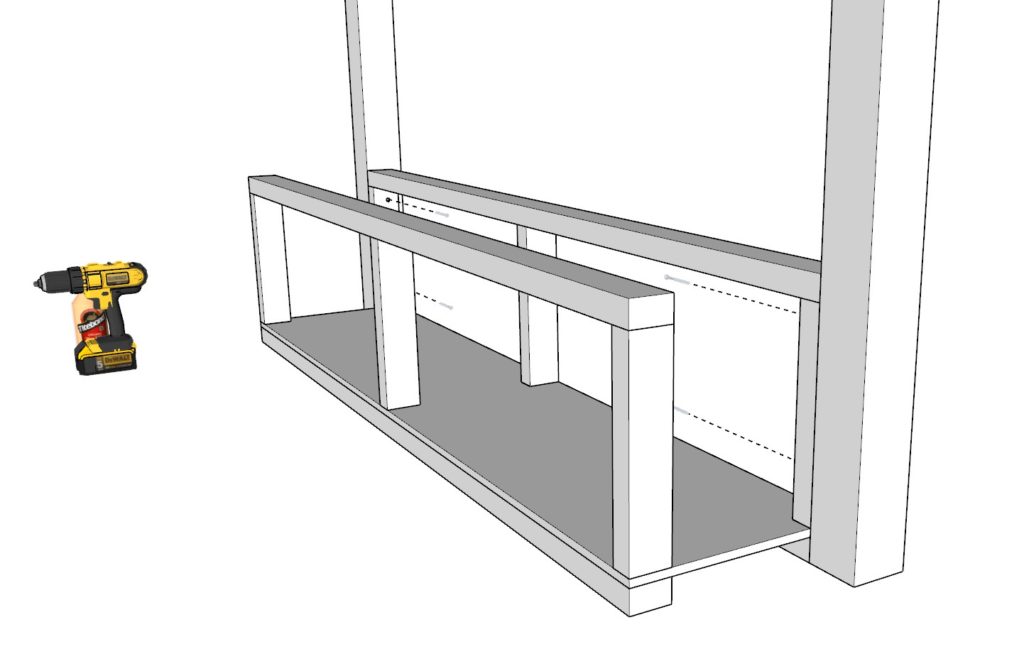
Next, add directly on top the second shelf component. Use glue, predrilling, and 3.5 inch screws to secure it to the pillars. Use 1 inch nails, glue, and a nail gun to secure the two shelves together.
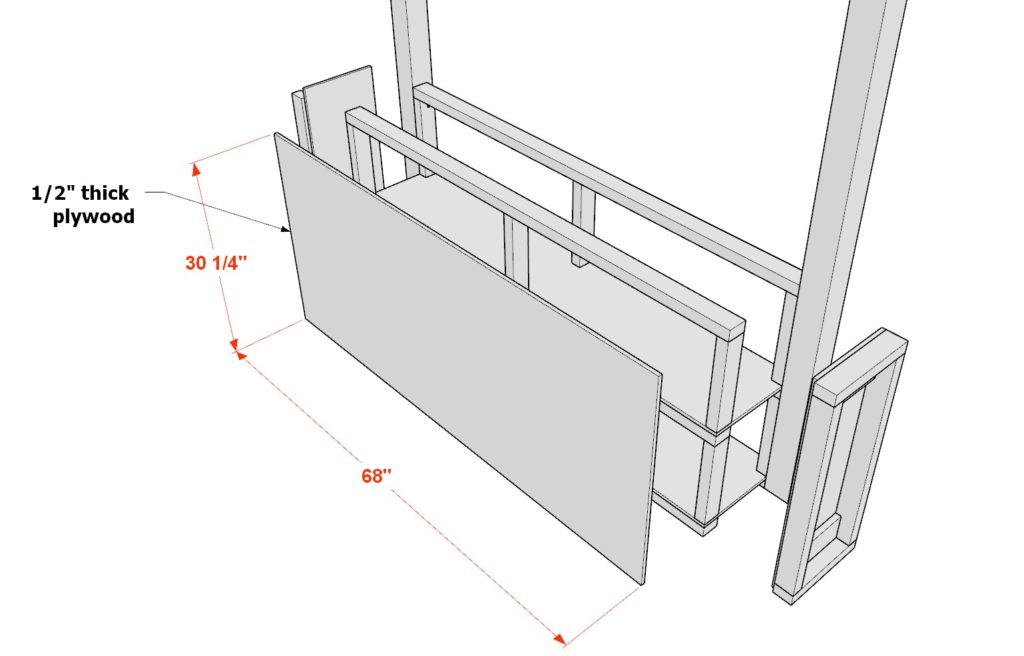
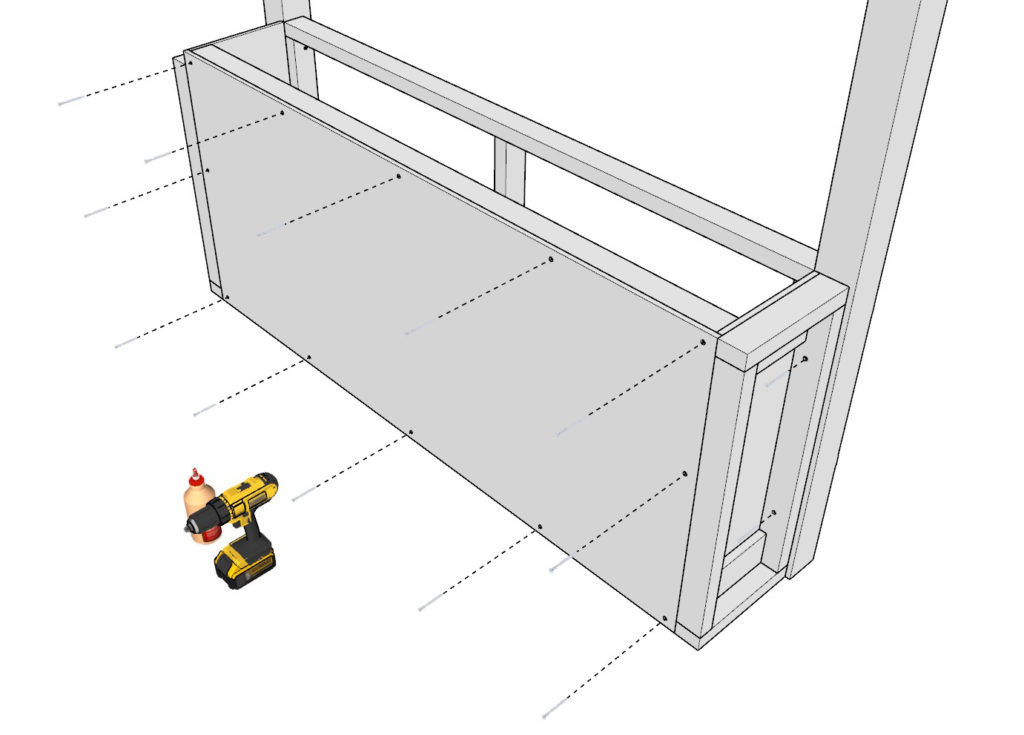
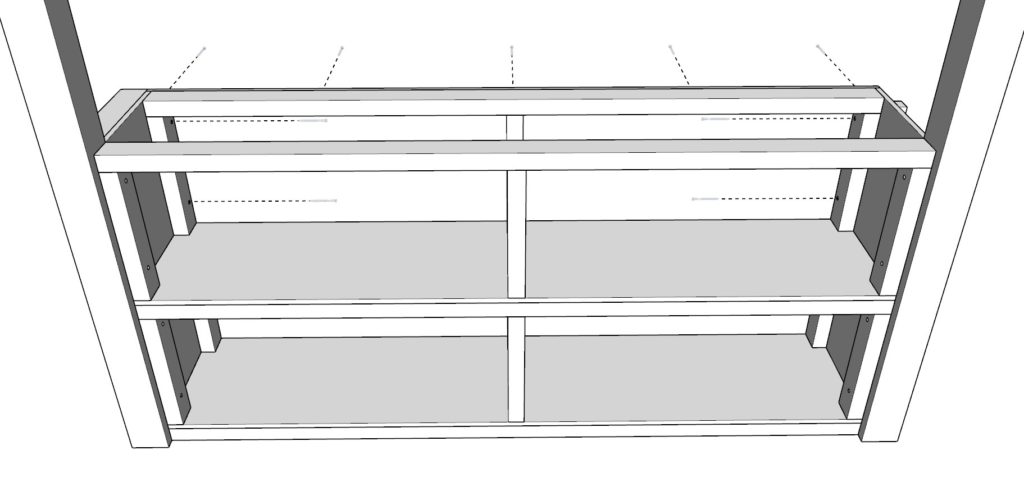
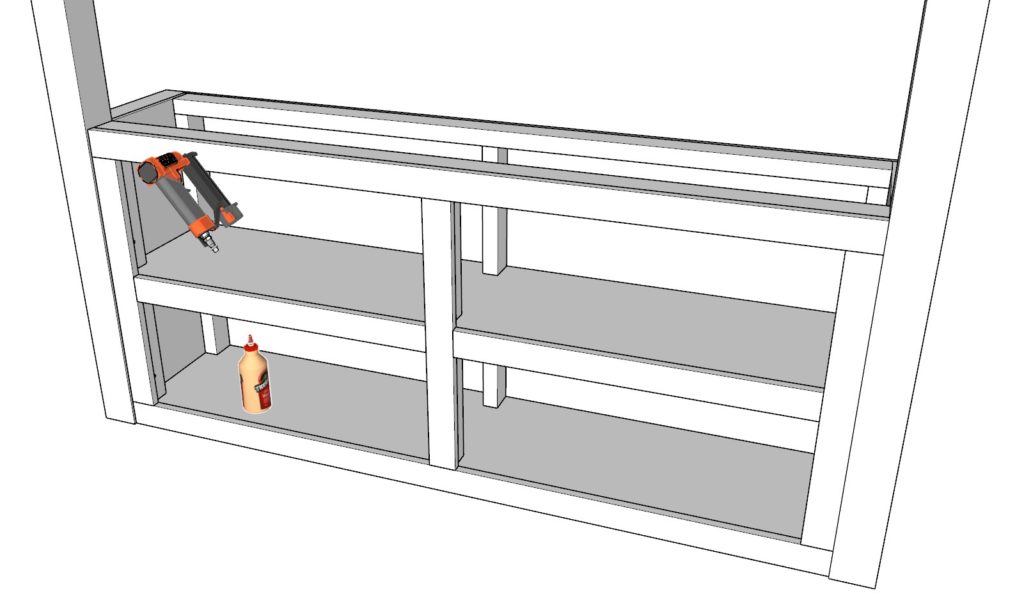
Lastly add the two shelf sides build in the previous step along with a 68 inch x 30-1/4 inch 1/2″ thick plywood sheet to the shelf components as shown below. Secure these with glue, predrilling, and a combination of 2.5 and 3.5 inch screws.
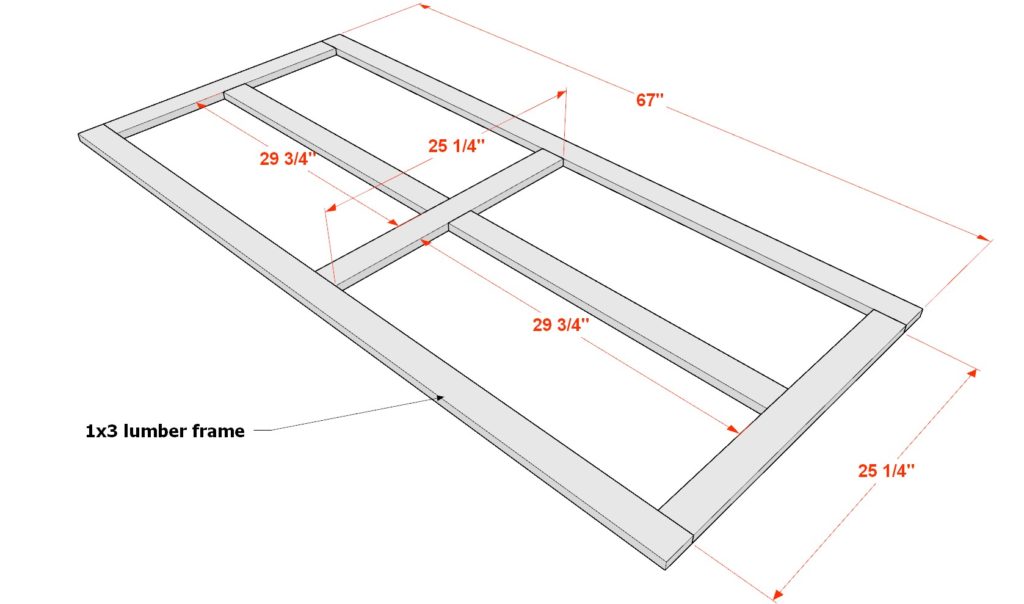
lastly, add a 1×3 lumber trim to the shelf cubbies. You will need two 67 inch 1×3 lumber pieces, two 29-3/4 inch 1×3 lumber pieces, and one 25-1/4 inch 1×3 lumber piece. Secure these trim pieces using glue and 1 inch nails from a nail gun.
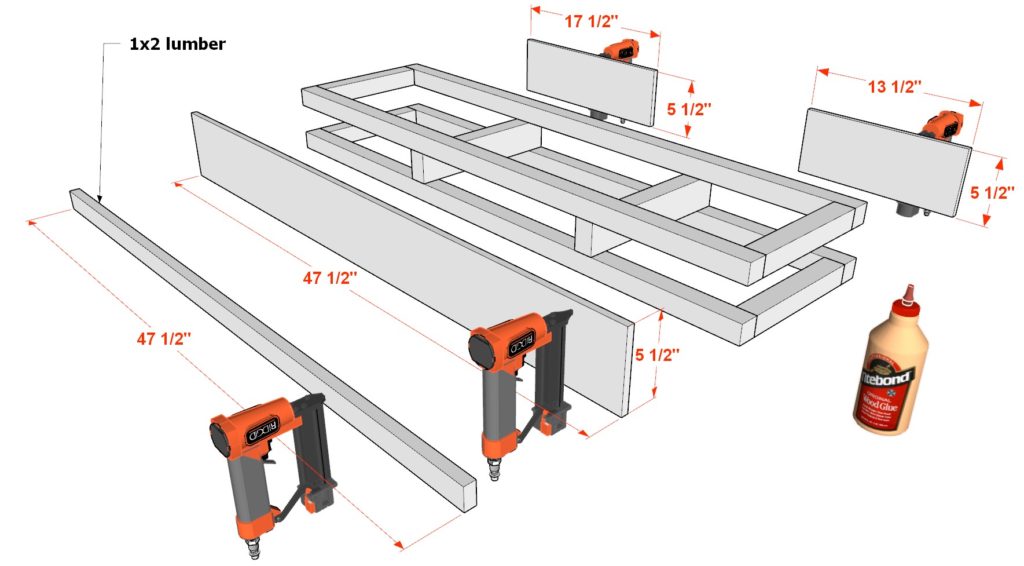
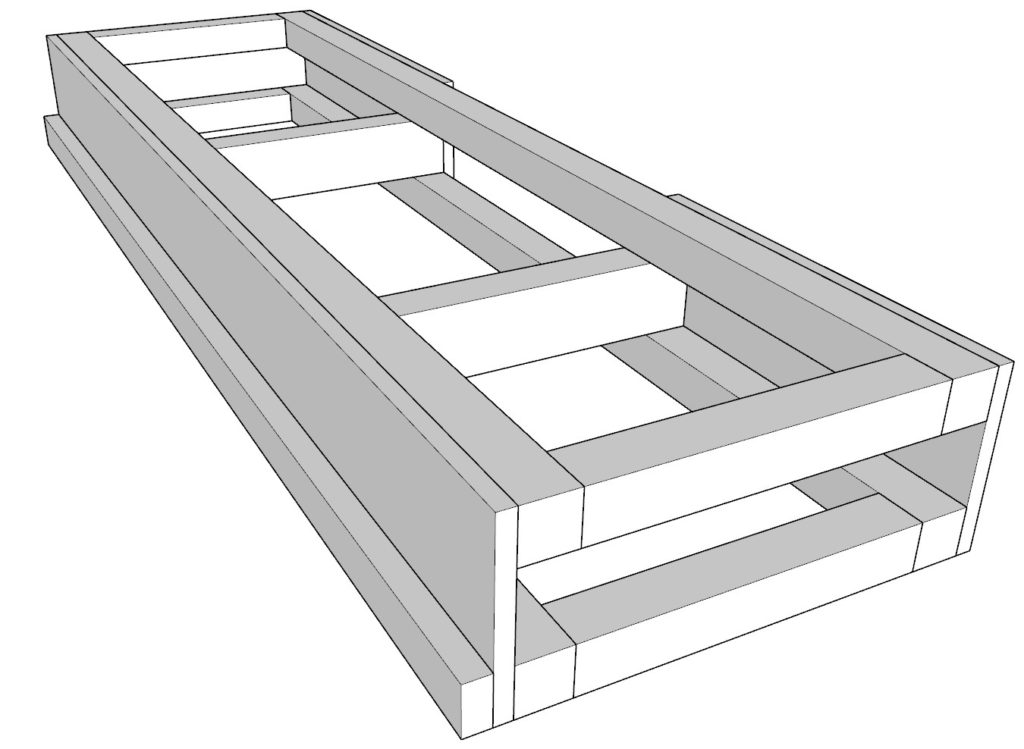
Step 6: Assemble the Suspended Desk Component Frame
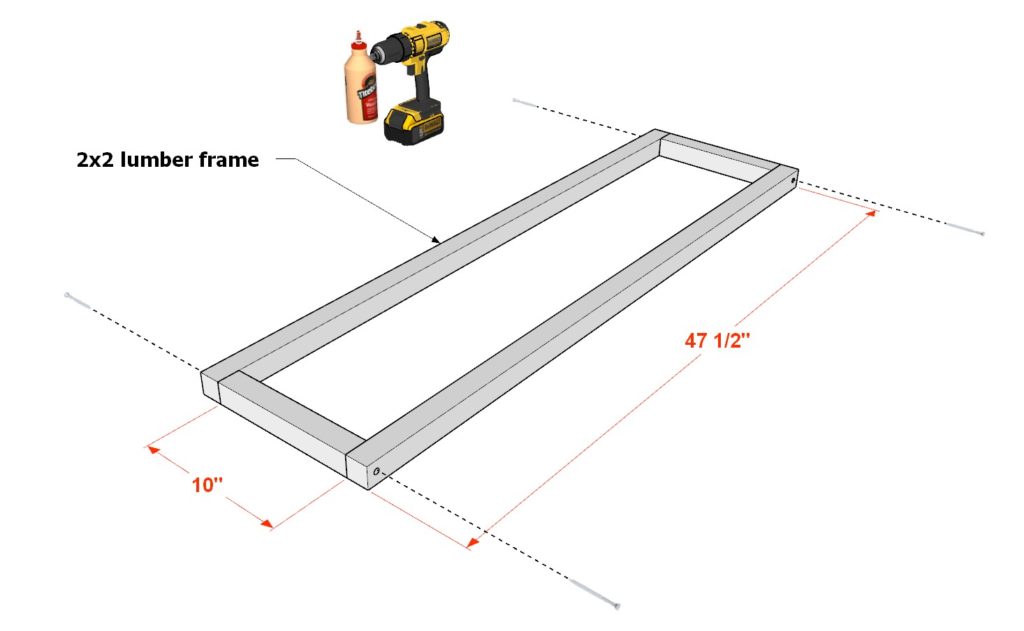
Next, assemble the suspended desk component frame.
Take two 47-1/2 inch 2×2 lumber pieces and two 10 inch 2×2 lumber pieces and arrange them as shown below. Add glue, predrill, and add 3.5 inch screws.
Make two identical frame pieces.
Next, add two 13 inch 2×3 lumber pieces in the spaces indicate. Secure these using glue, predrilling, and 3.5 inch screws.
Next, add one 47-1/2 x 5-1/2 inch 1/2″ thick plywood sheet, one 17-1/2 x 5-1/2 inch 1/2″ thick plywood sheet, one 13-1/2 x 5-1/2 inch 1/2″ thick plywood sheet, and one 47-1/2 inch 1×2 lumber pieces to the 2×2 lumber frame. Secure these components using glue and 1 inch nails from a nail gun.
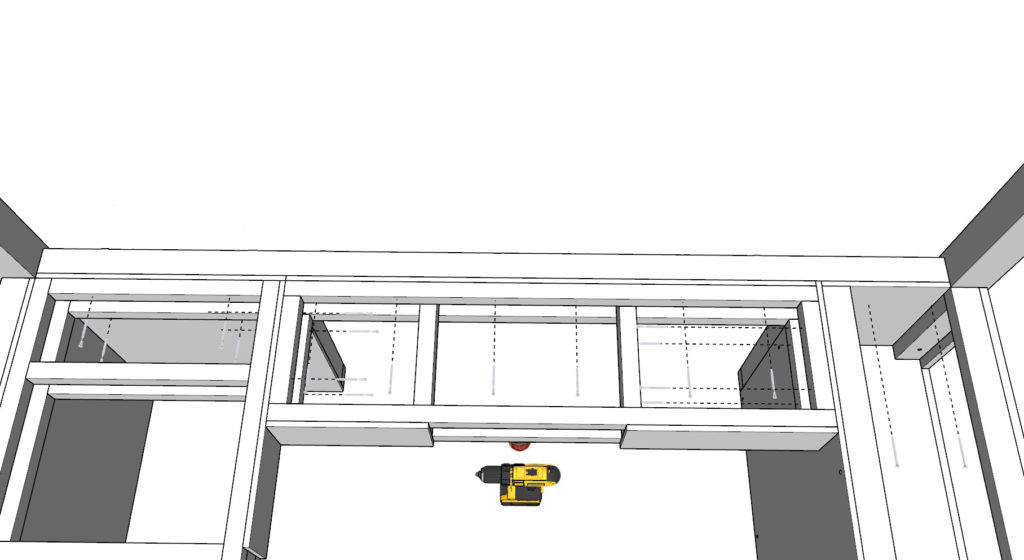
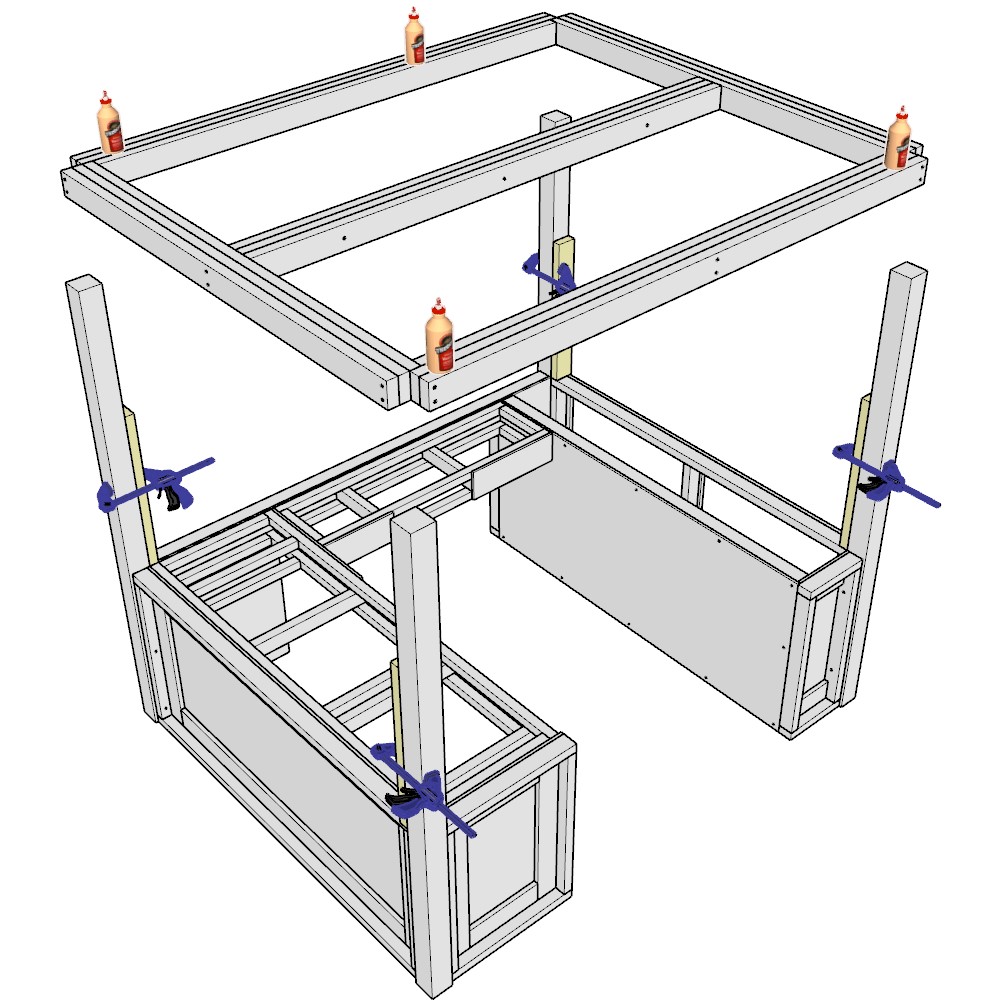
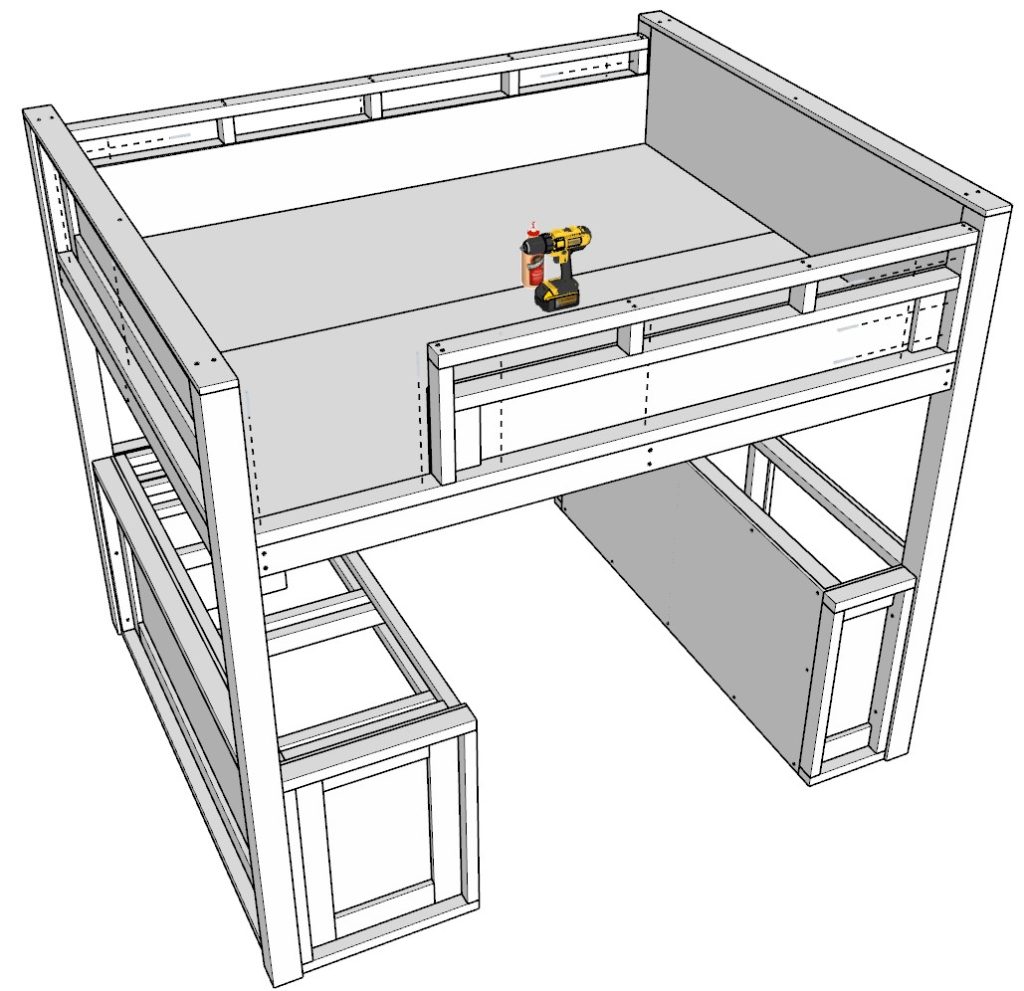
Step 7: Combine the Three Loft Bed Components
Next, put the three components together.
once you are ready to assemble the loft bed, take the three components to the designated bedroom before fully assembling the loft bed.
Next, take one 82 inch 2×3 lumber piece and add it to the loft bed frame as indicated below.
Secure all three component together using glue and a combination of 2.5 and 3.5 inch screws as shown below. Don’t forget to predrill holes to ensure the build is strong.
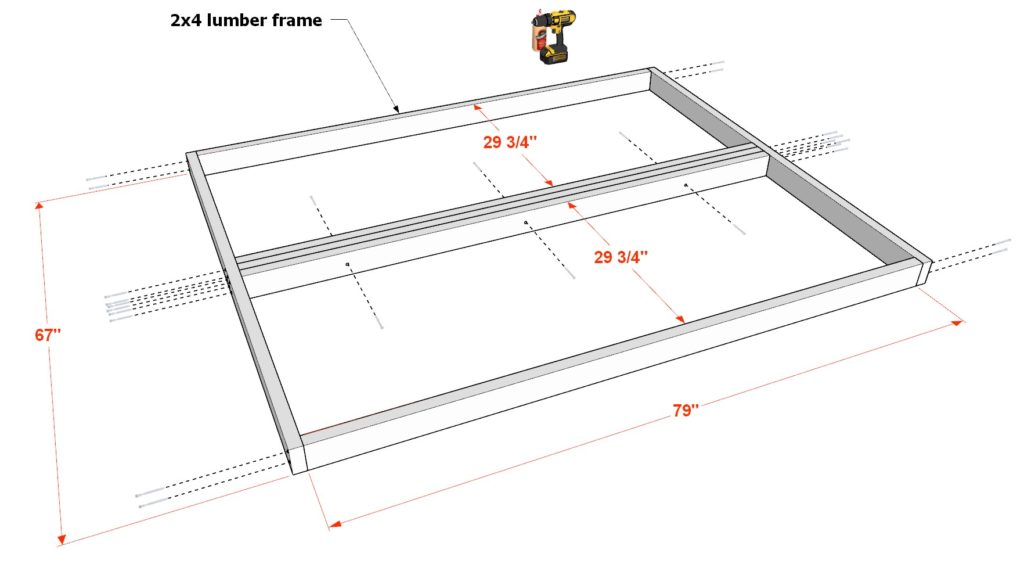
Step 8: Build and Install the Loft frame
Next, build and install the loft bed frame.
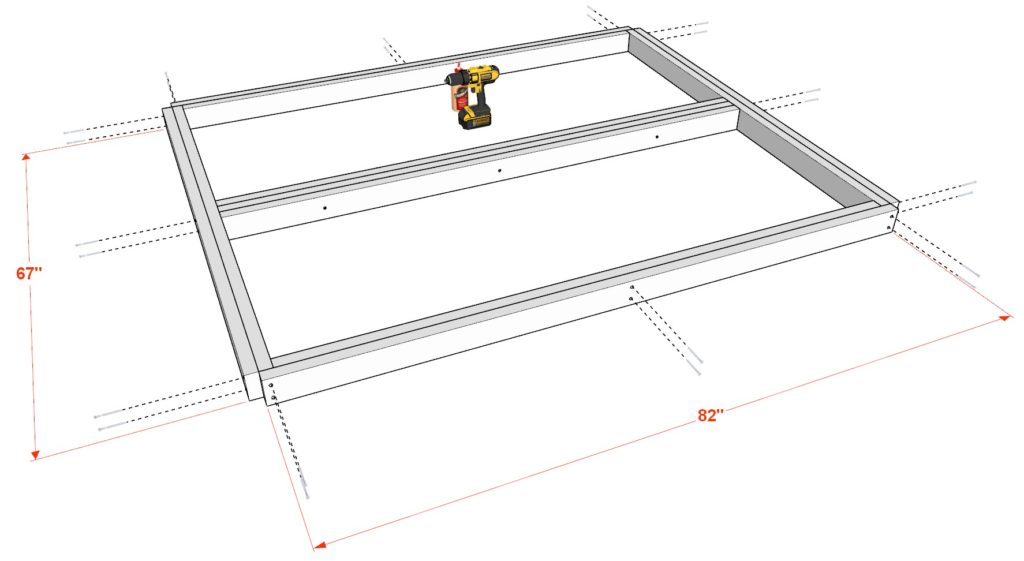
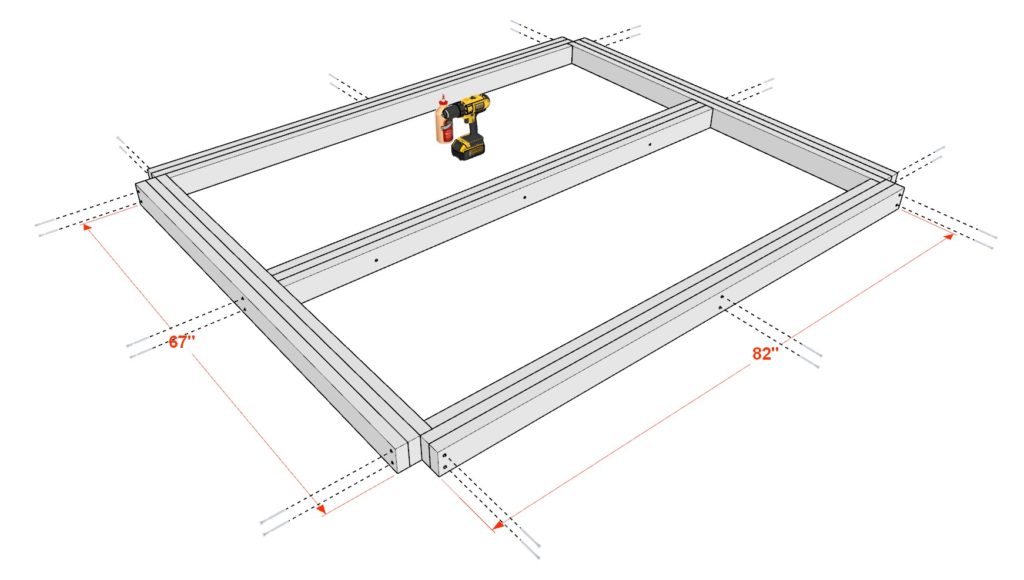
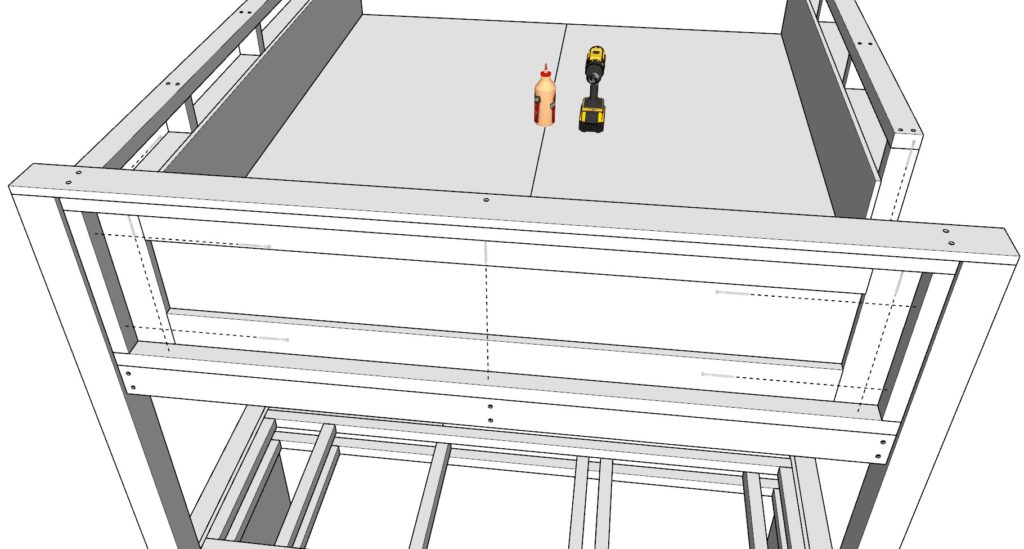
First, take five 79 inch 2×4 lumber pieces and two 67 inch 2×4 lumber pieces. Arrange them as shown below. Predrill, add glue, and add 3.5 inch screws. Next, build up the frame by adding a later of two more 67 inch 2×4 lumber pieces and two 82 inch 2×4 lumber pieces. Secure these with glue, predrill, and add 3.5 inch screws on the ends and in the middle 2.5 inch screws to prevent the screws from showing though. Lastly, add one last layer to the bed frame. Take two more 82 inch 2×4 lumber pieces and two more 67 inch 2×4 lumber pieces and secure them in the same way as before.
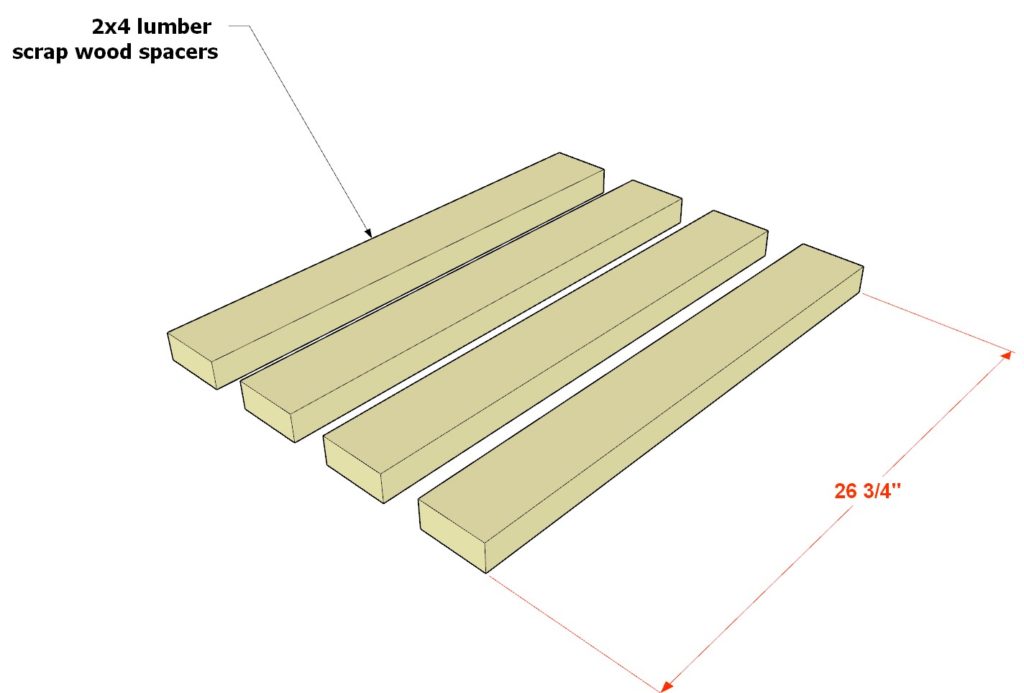
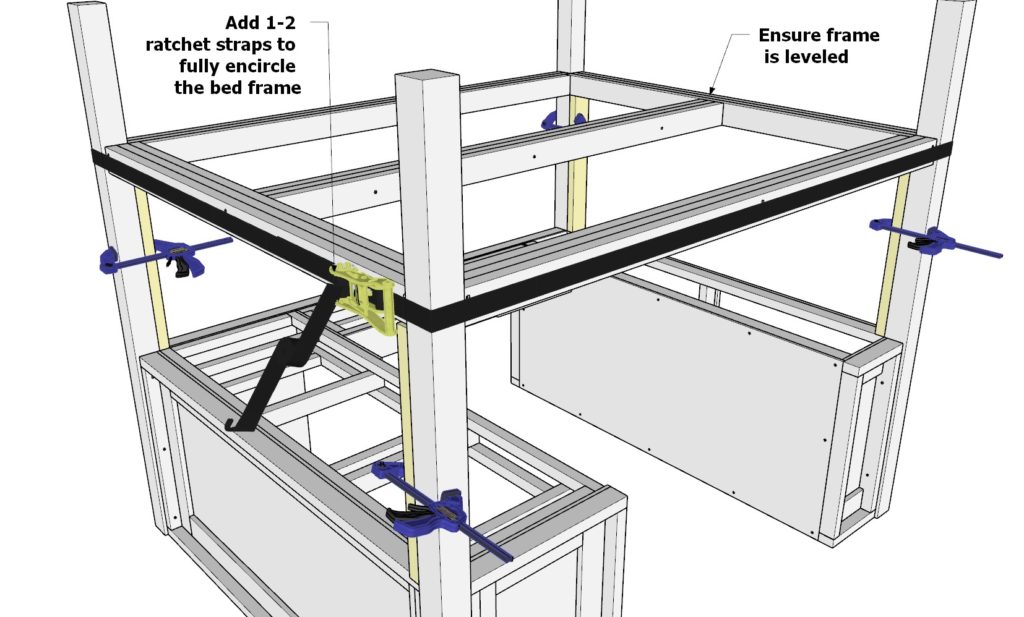
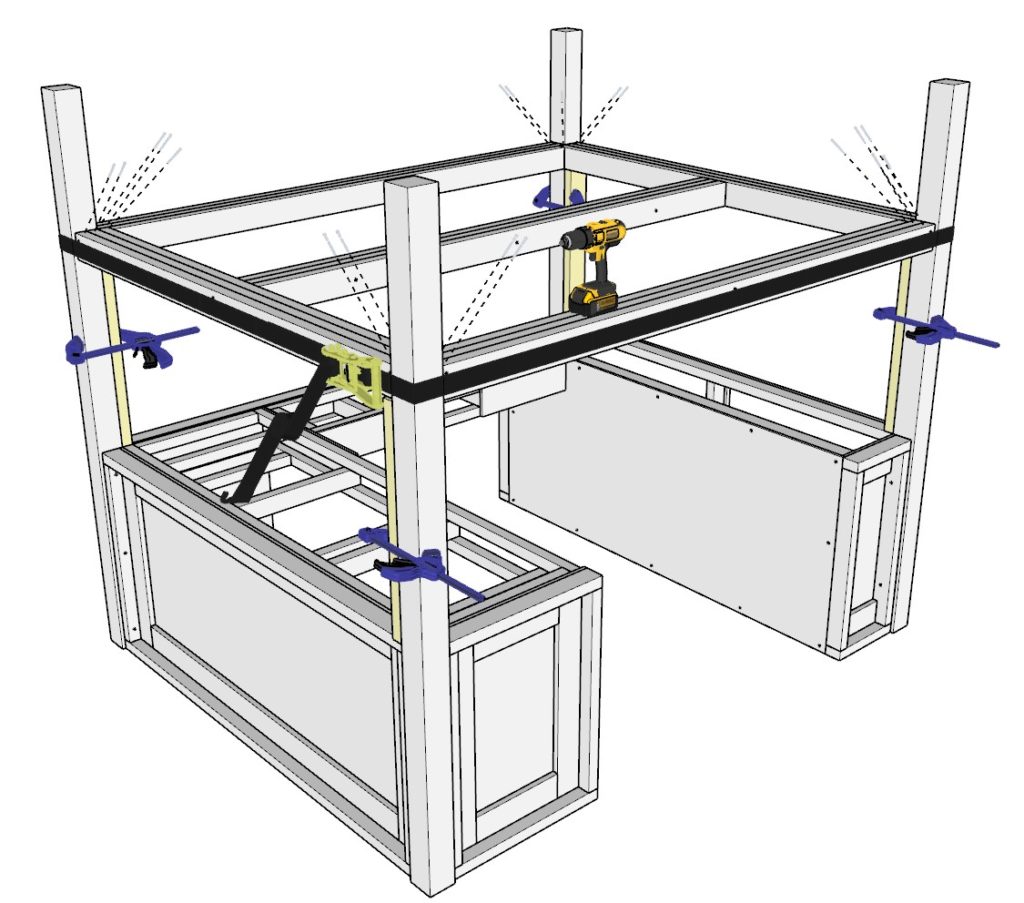
Cut four 26-3/4 inch spacers from scrap wood. These will be discarded after this step. Add the spacers to the 4×4 lumber pillars as indicated below. Use wood clamps to hold them in place.
Next, add glue to all the areas on the loft bed frame that will be joined to the pillars and set the loft bed frame on top of the spacers.
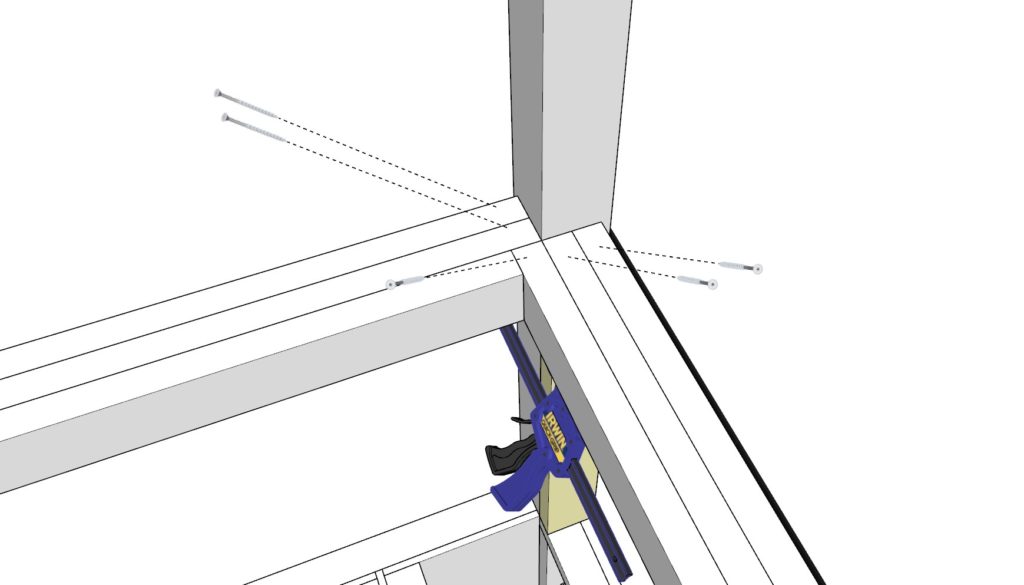
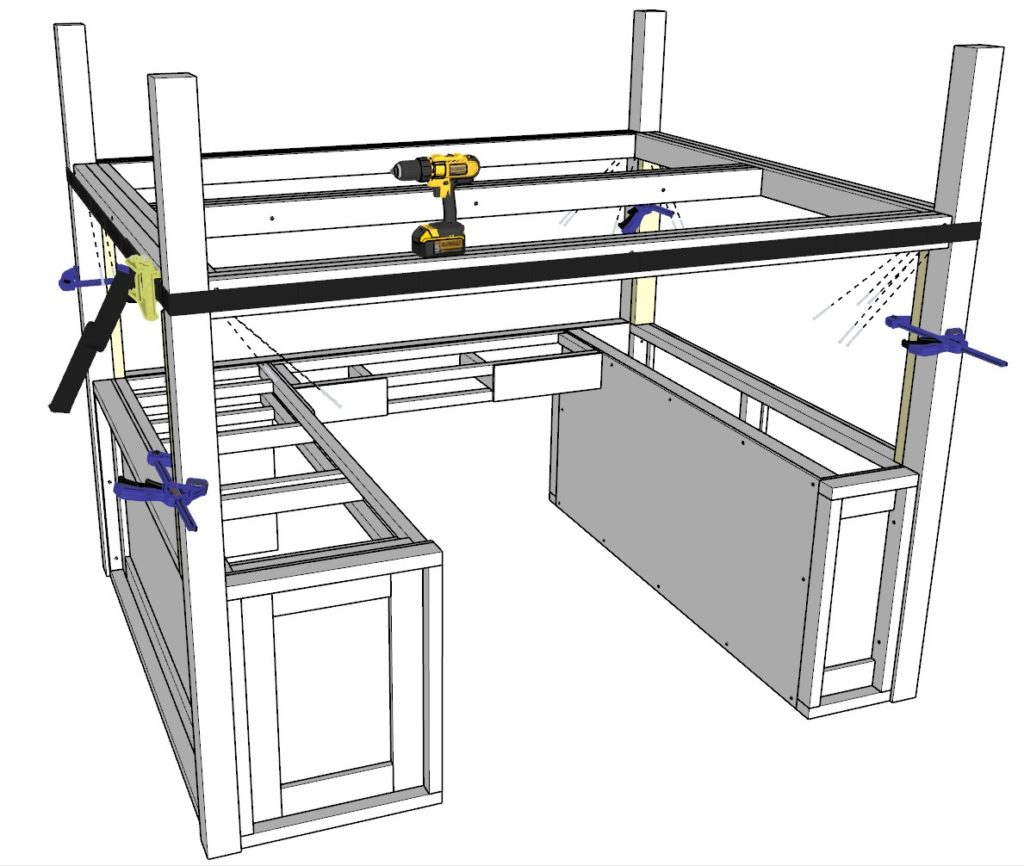
Next, add one-two ratchet straps connected together and wrapped entirely around the perimeter of the loft bed frame and pillars. Tighten the straps after you ensure the frame is leveled. Add 3.5 inch screws diagonally as indicated in the diagram from the top and the bottom to secure the bed frame into place.
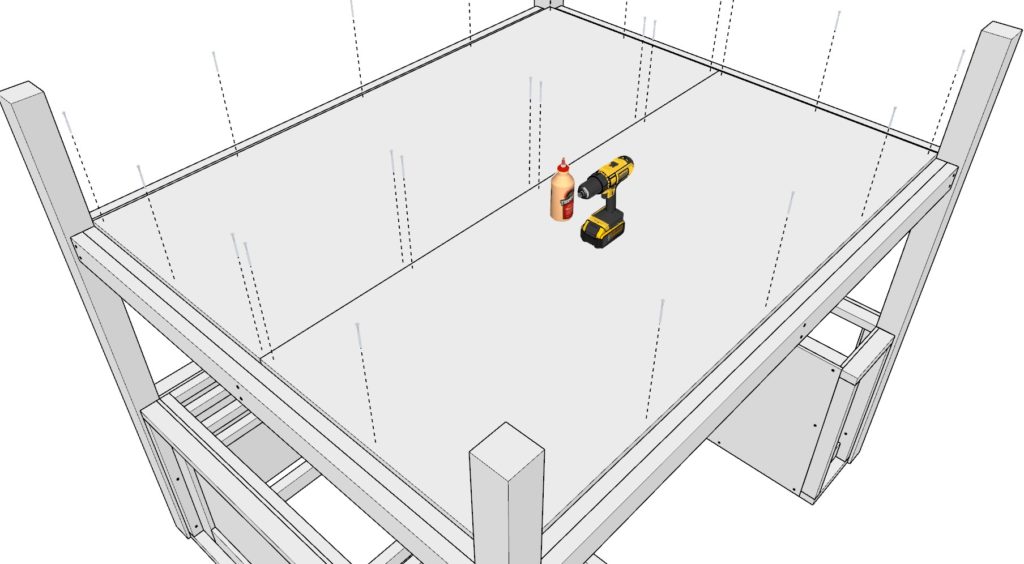
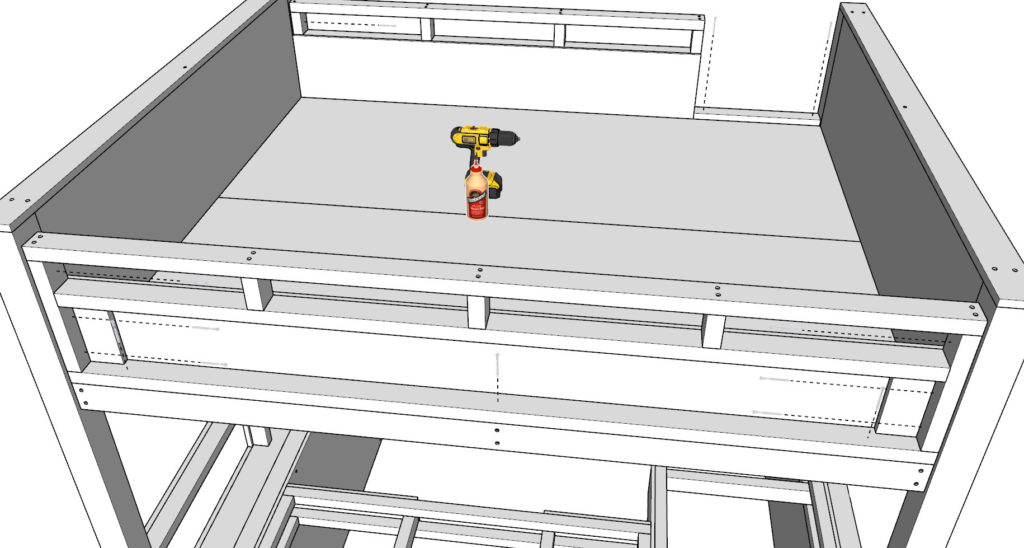
Lastly add two 82 inch x 33-1/2 inch 3/4″ thick plywood sheets to the loft bed frame. Secure the plywood with glue, predrilling, and 2.5 inch screws. Remove the spacers.

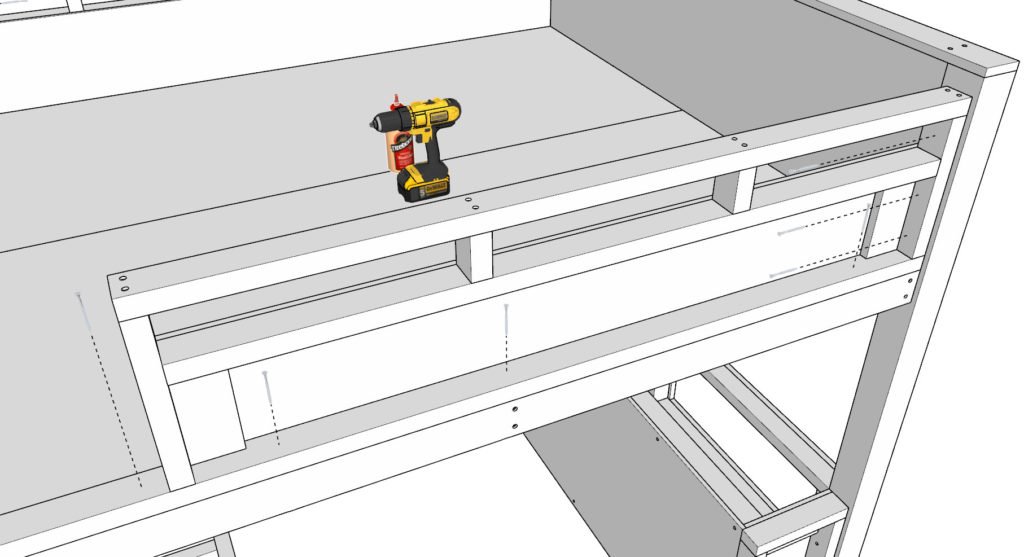
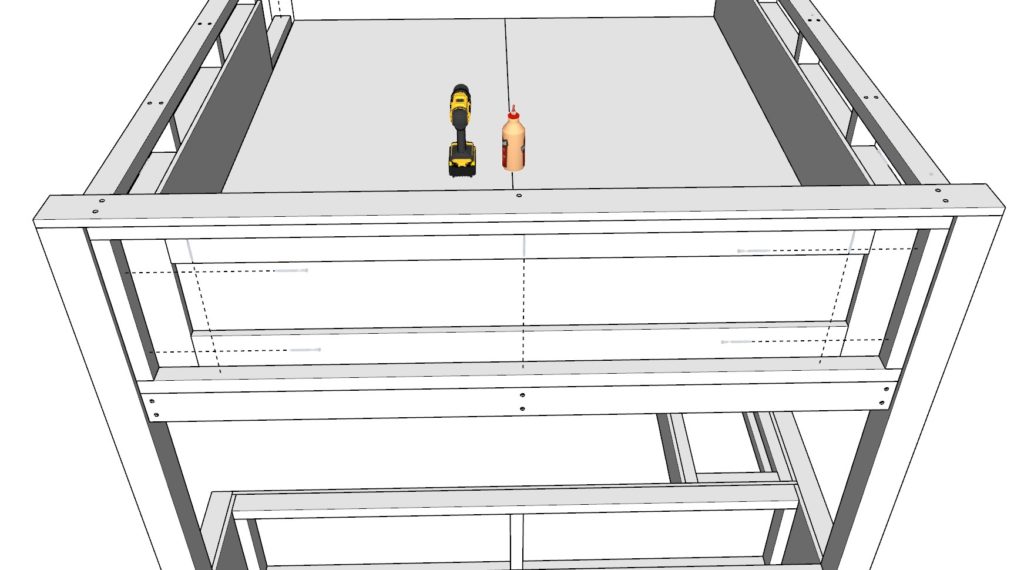
Step 9: Build and Install the Railing/Enclosure for the Loft Bed
Next, build and install the railing/enclosure for the loft bed.
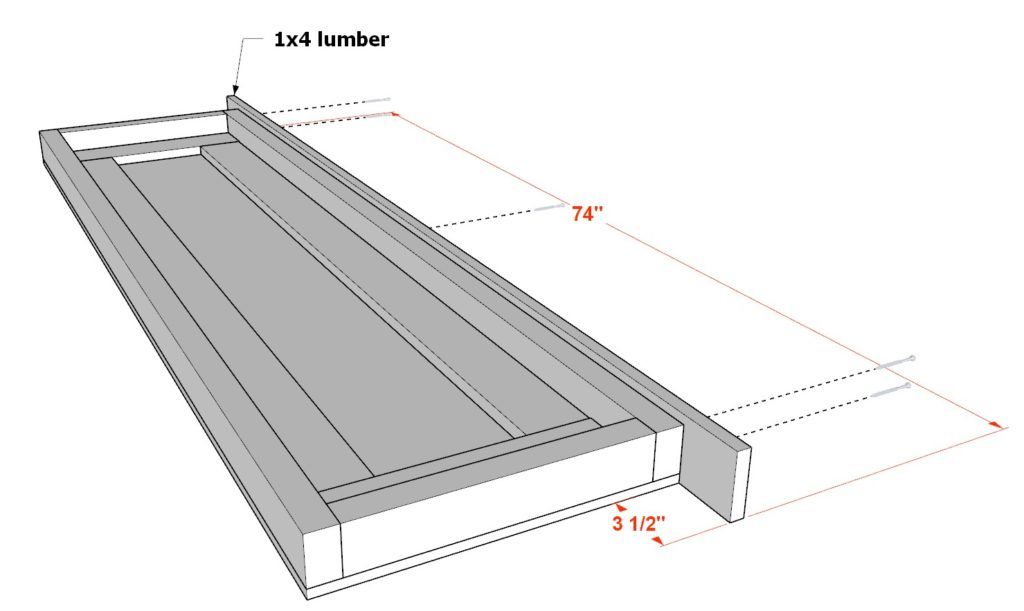
First build the headboard and the footboard. Take a 67 inch x 17-3/4 inch 1/2″ thick plywood sheet, two 67 inch 2×3 lumber pieces, two 14-3/4 inch 2×3 lumber pieces, two 57 inch 1×4 lumber pieces, and two 14-3/4 inch 1×4 lumber pieces and arrange them as shown below. Add a combination of 2.5 inch screws, glue, predrilling, 1 inch nails, and a nail gun to secure the components together. Next, add a 74 inch 1×4 lumber piece and secure with 2.5 inch screws and glue as indicated below.
Make two identical pieces (one will be the head board and one will be the footboard.
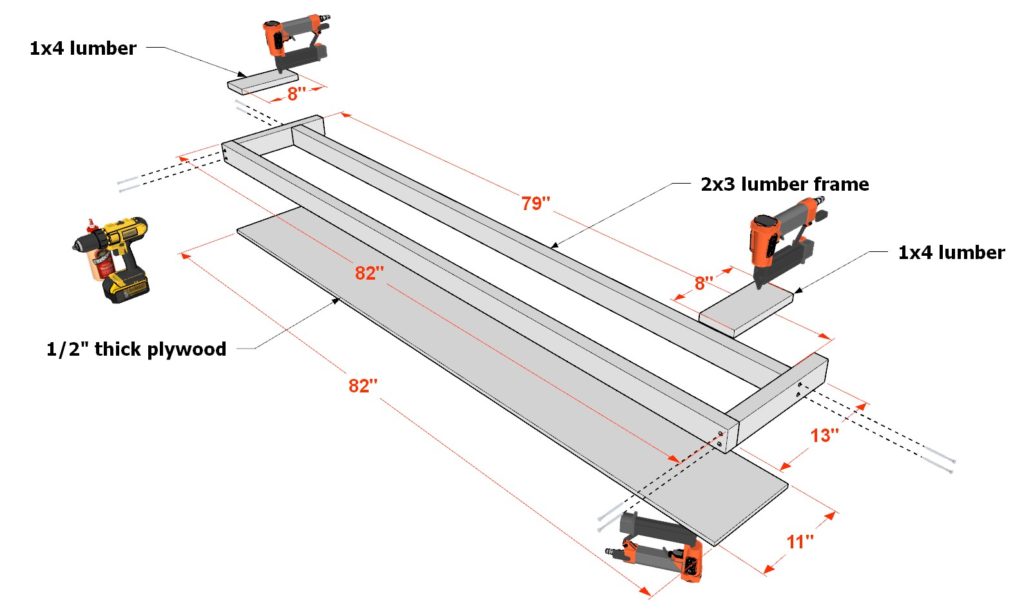
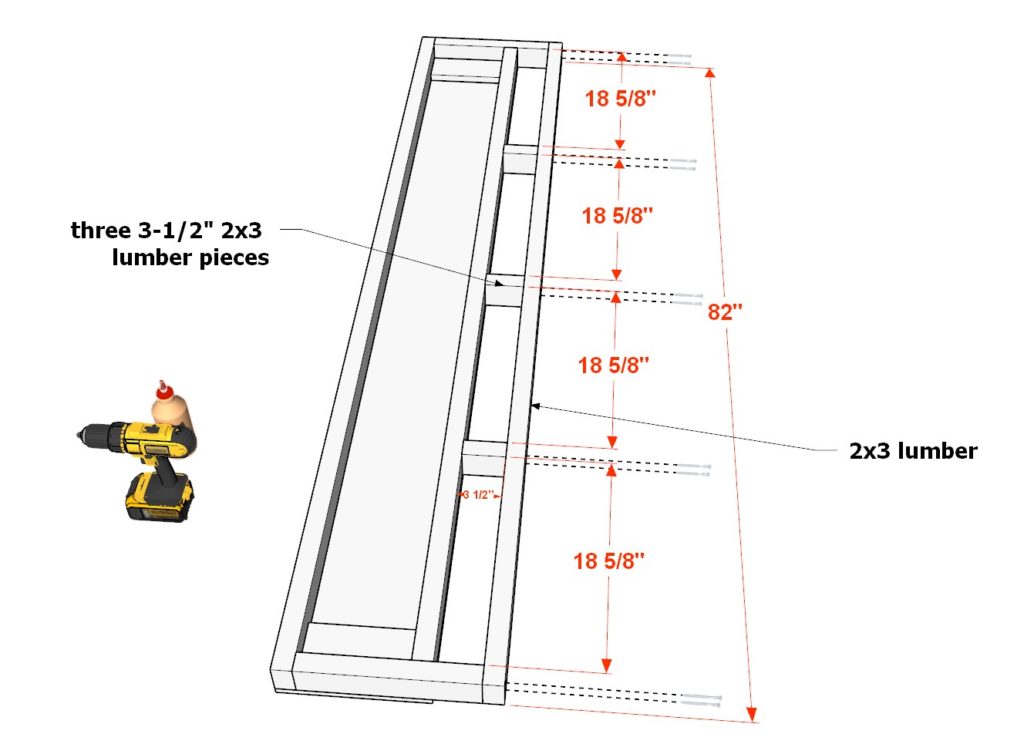
Next make one of the side railings. Take a 82 inch x 11 inch 1/2″ thick plywood sheet, one 79 inch 2×3 lumber piece, one 82 inch 2×3 lumber piece, two 13 inch 2×3 lumber pieces, and two 8 inch 1×4 lumber pieces and arrange them as shown below. Add a combination of 2.5 inch screws, glue, predrilling, 1 inch nails, and a nail gun to secure the components together. Next, add a 82 inch 2×3 lumber piece and three 3-1/2 inch 2×3 lumber pieces as indicated in the diagram. Space them out appropriately and secure with glue, predrilling, and 2.5 inch screws.
Next, make the other side railing component.
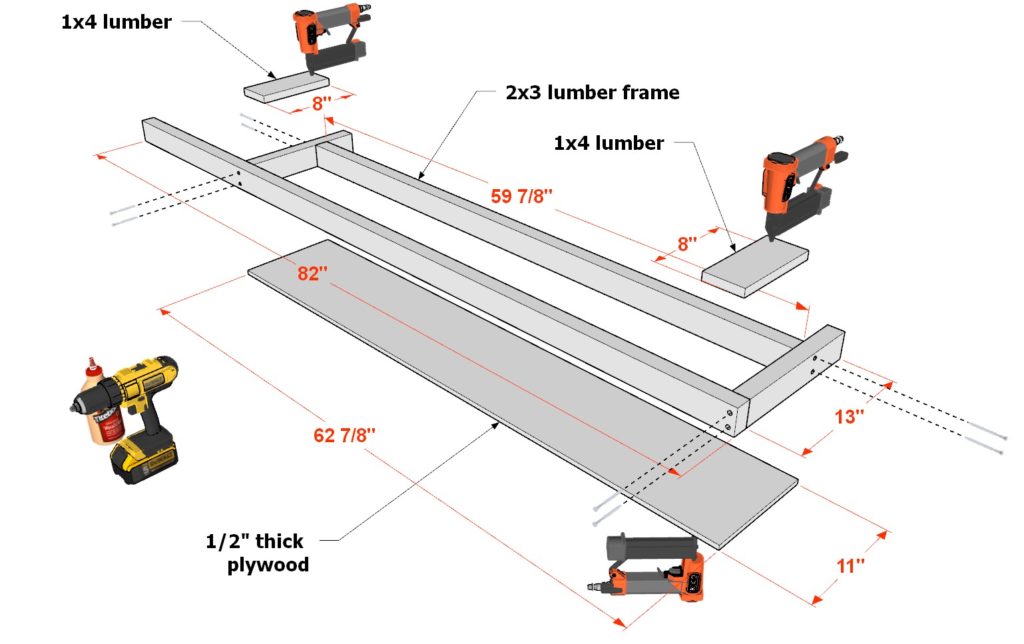
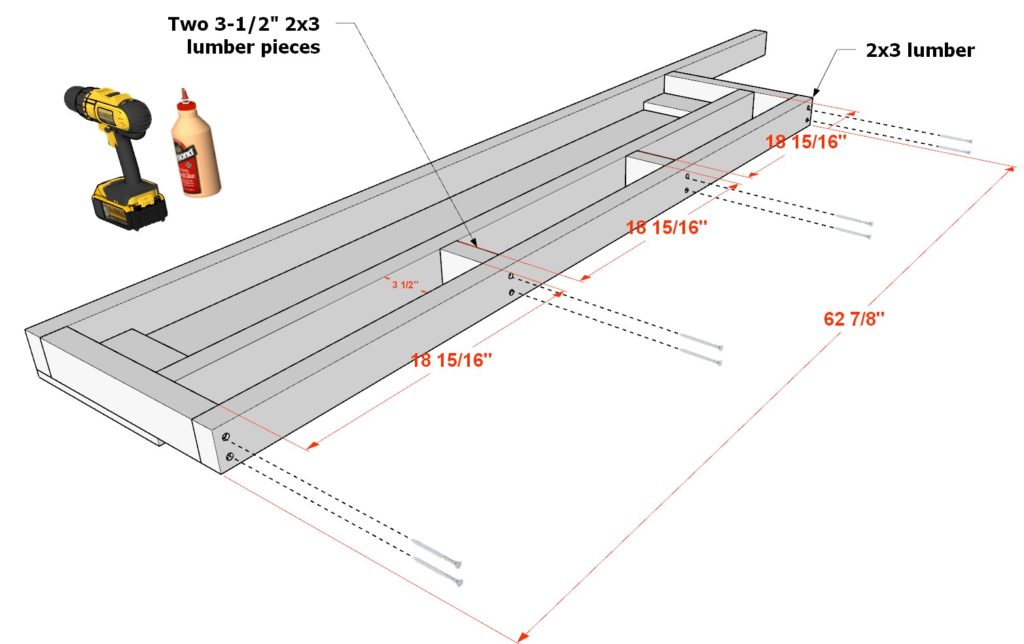
Take a 62-7/8 inch x 11 inch 1/2″ thick plywood sheet, one 82 inch 2×3 lumber piece, one 59-7/8 inch 2×3 lumber piece, two 13 inch 2×3 lumber pieces, and two 8 inch 1×4 lumber pieces and arrange them as shown below. Add a combination of 2.5 inch screws, glue, predrilling, 1 inch nails, and a nail gun to secure the components together. Next, add a 62-7/8 inch 2×3 lumber piece and two 3-1/2 inch 2×3 lumber pieces as indicated in the diagram. Space them out appropriately and secure with glue, predrilling, and 2.5 inch screws.
next, add these side components to the loft bed as shown below. Secure them with glue, predrilling, and 3.5 inch screws.
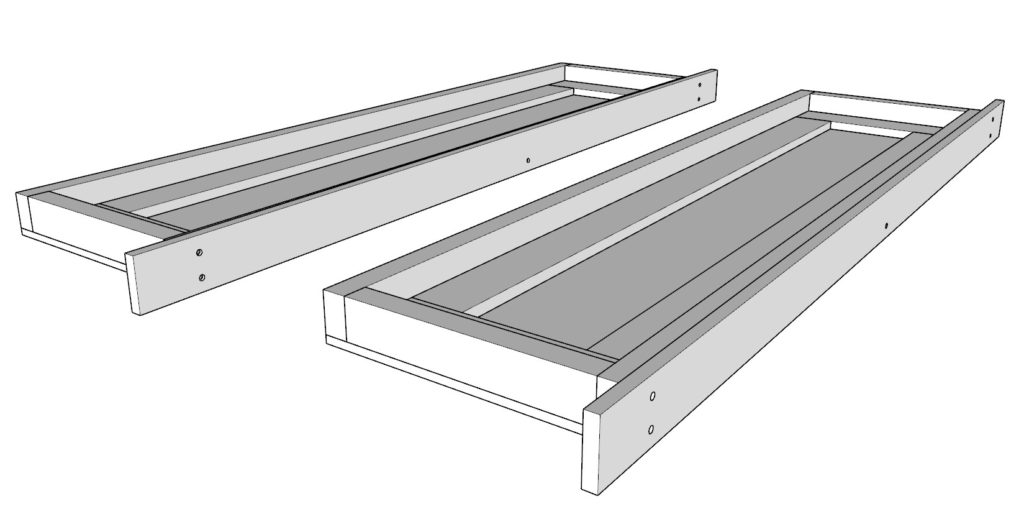
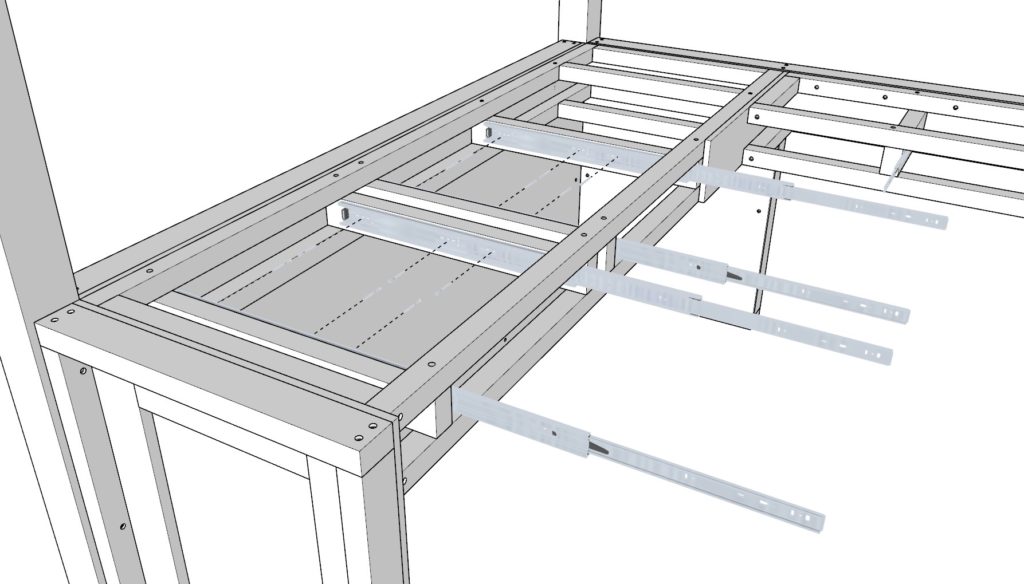
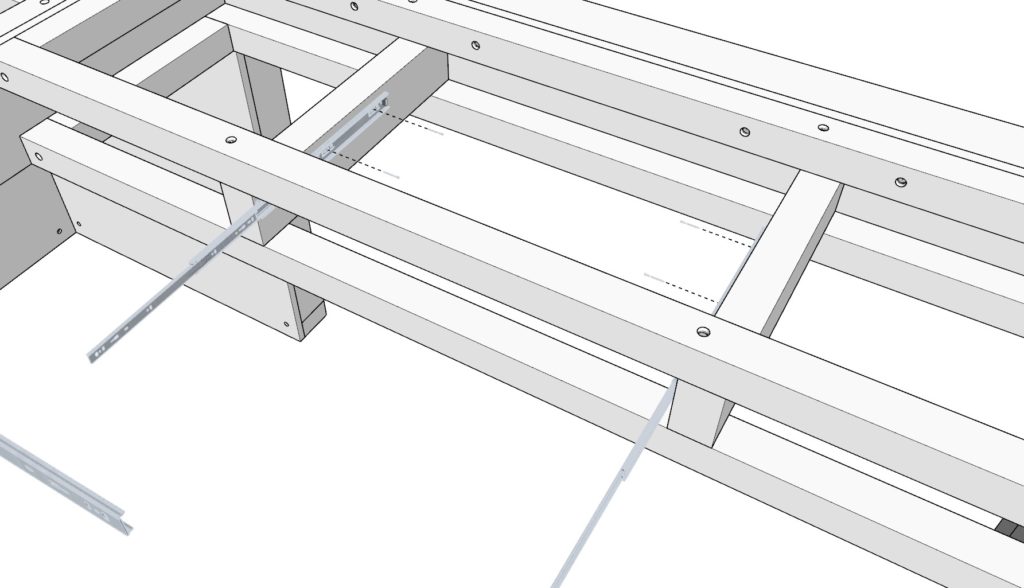
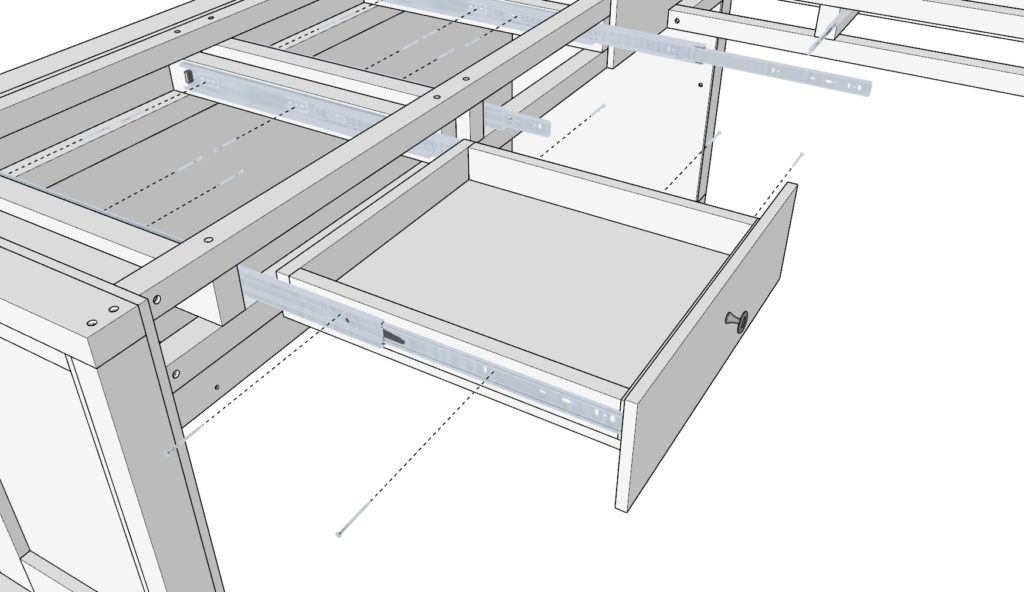
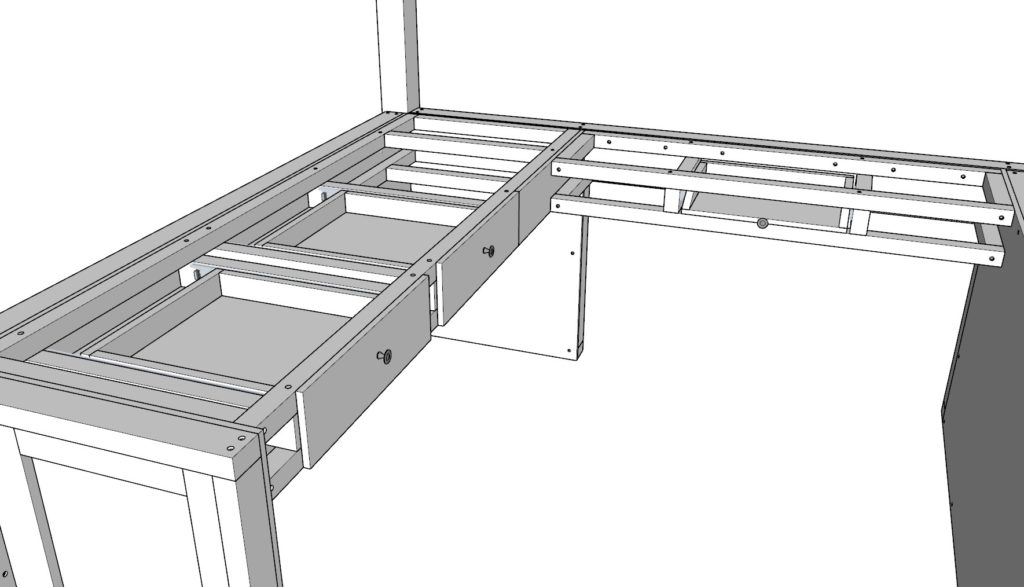
Step 10: Assemble the Drawers and Keyboard Drawer
Next, assemble the drawers.
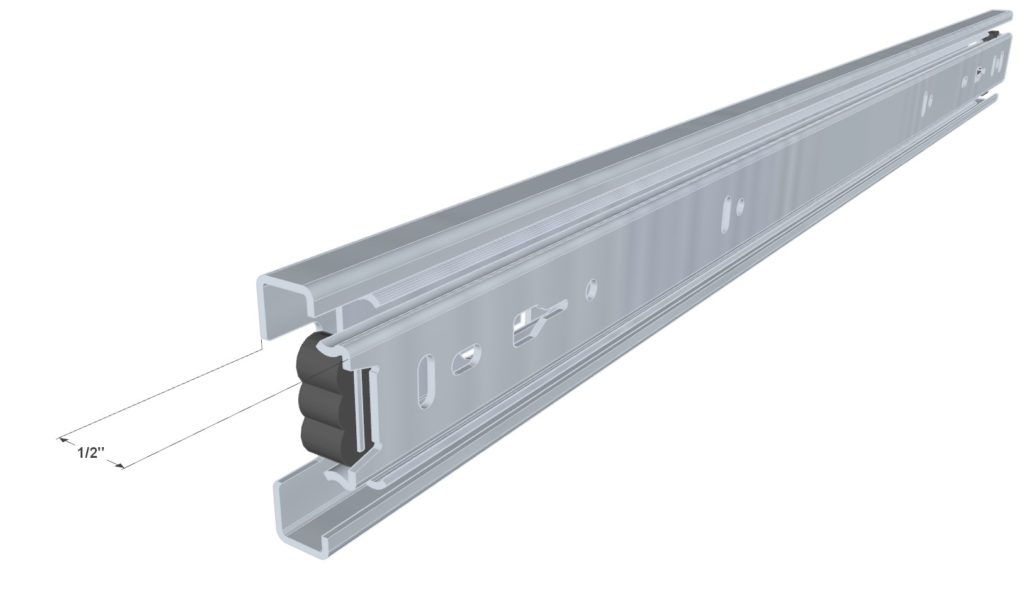
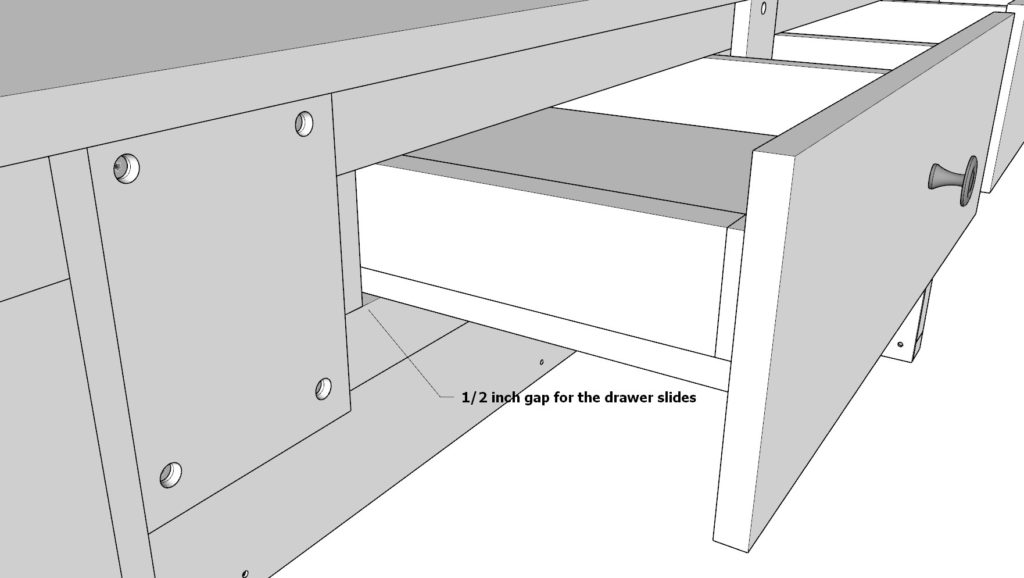
This step can vary depending on the type and size of drawer slides you buy. If you buy drawer slides that are wider then the dimensions of the drawer slides I used (1/2 inch wide) then change the dimensions of the drawer accordingly. MEASURE the drawer slides prior to making the drawers.
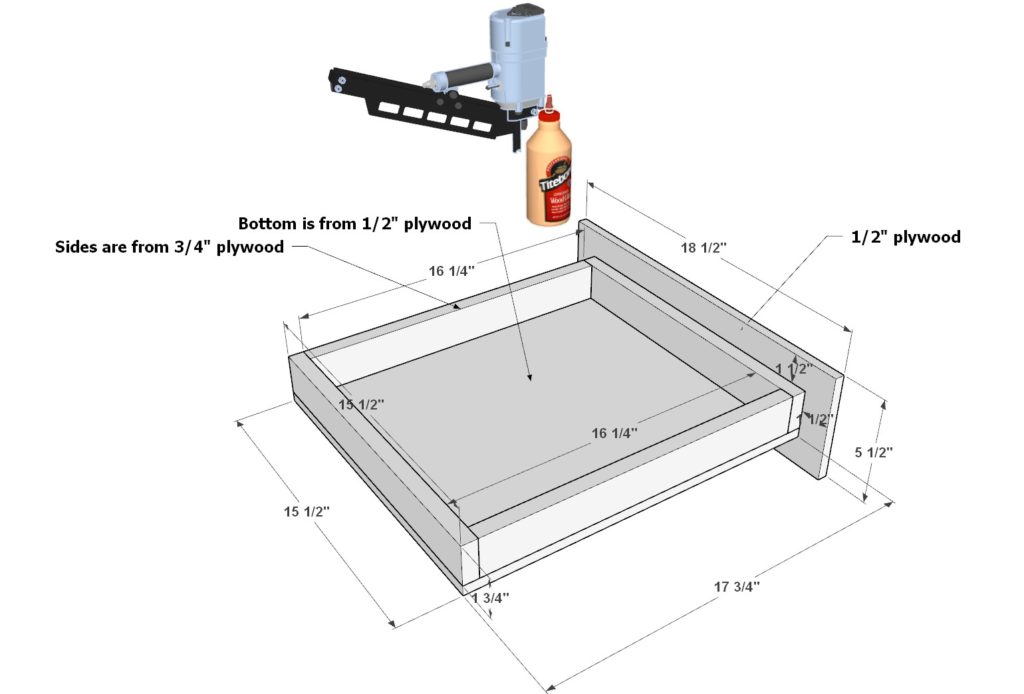
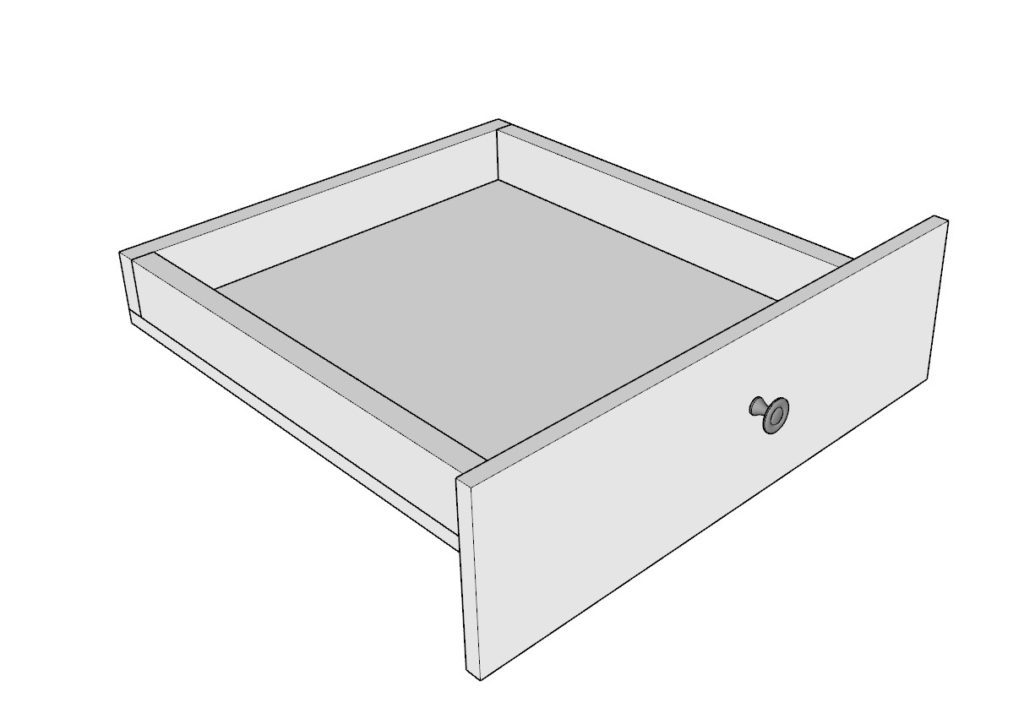
To make the drawer, take two 16-1/4 in x 1-3/4 inch (3/4 inch thick) plywood pieces, two 15-1/2 in x 1-3/4 inch (3/4 inch thick) plywood pieces, one 17-3/4 in x 15-1/2 in (1/2 inch thick) plywood piece, and one 18-1/2 in x 5-1/2 in (1/2 inch thick) plywood piece and arrange them as shown below. Use glue and a nail gun to secure the plywood pieces together.
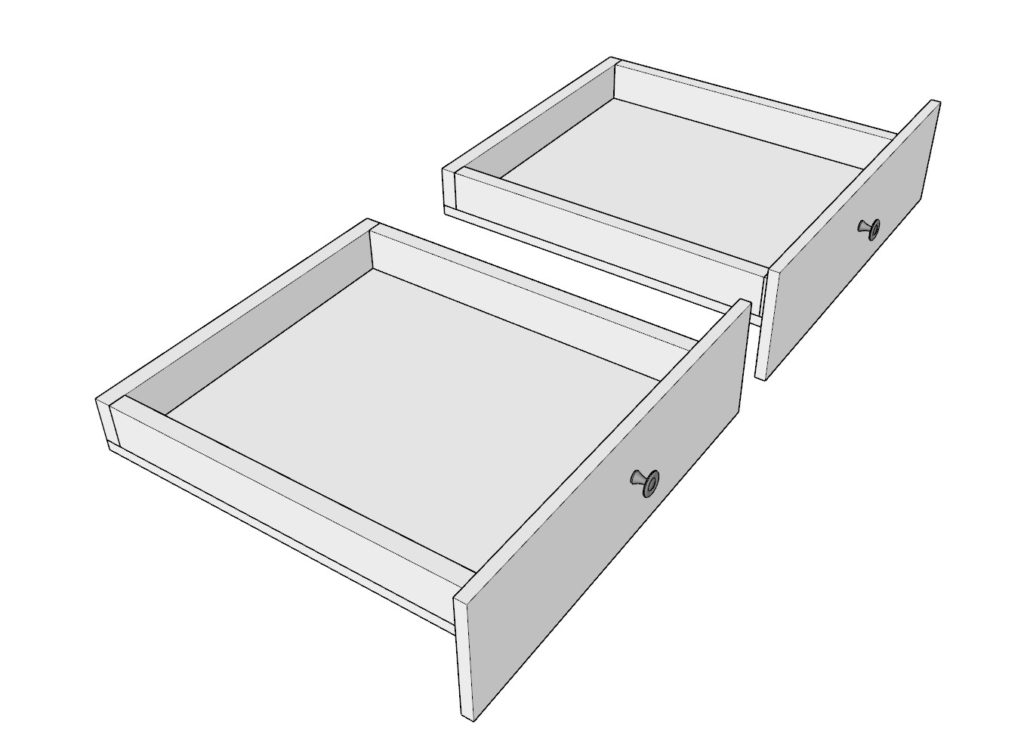
Make an second identical drawer and attach nobs.
Next, make the keyboard drawer.
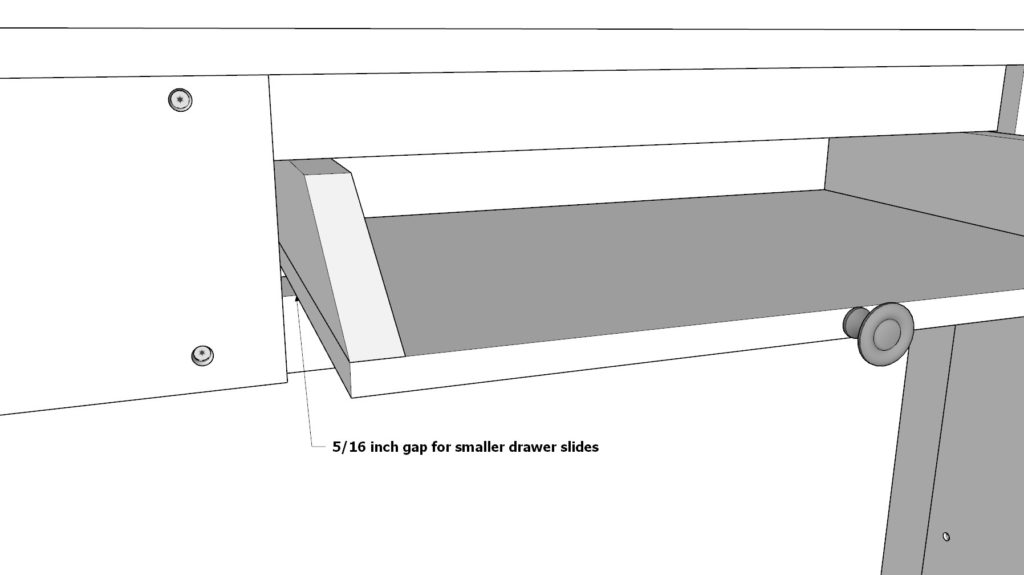
Again, the dimensions of the drawer will change depending on the size of drawer slides you buy. I used a 5/16 inch wide slide. Its smaller then the ones I used for the other two drawers.
Take two 10-3/4 inch x 1-3/4 inch (3/4 inch thick) plywood pieces that are cut at a 60-degree angle on one end, one 15-7/8 inch x 1-3/4 inch (3/4 inch thick) plywood piece, and one 10-3/4 in x 15-7/8 in (1/2 inch thick) plywood sheet and arrange them as shown below. Use glue and nail gun to secure the drawer together.
Next, attach the slides to the drawers and to the drawer inserts. Use small screws to attach the slides to the drawers

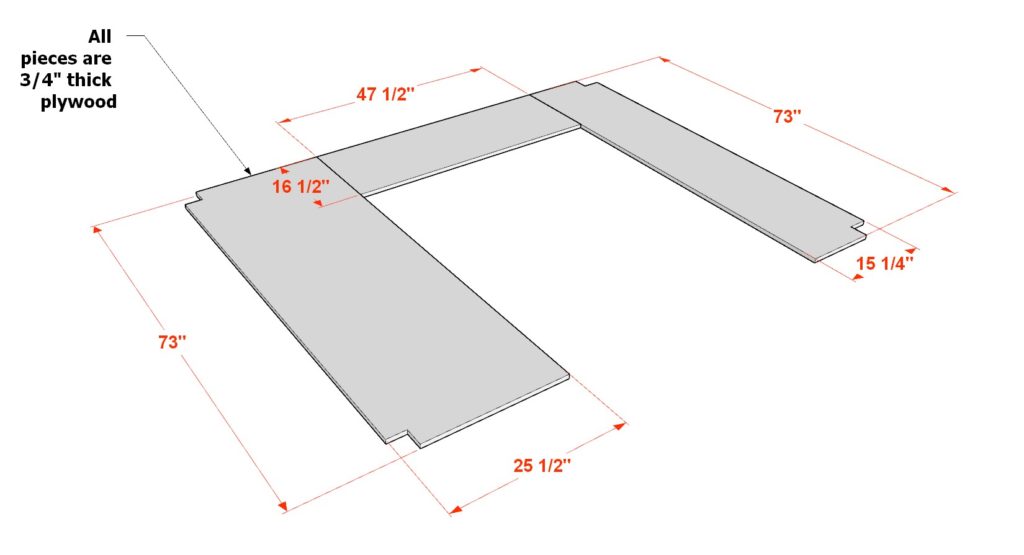
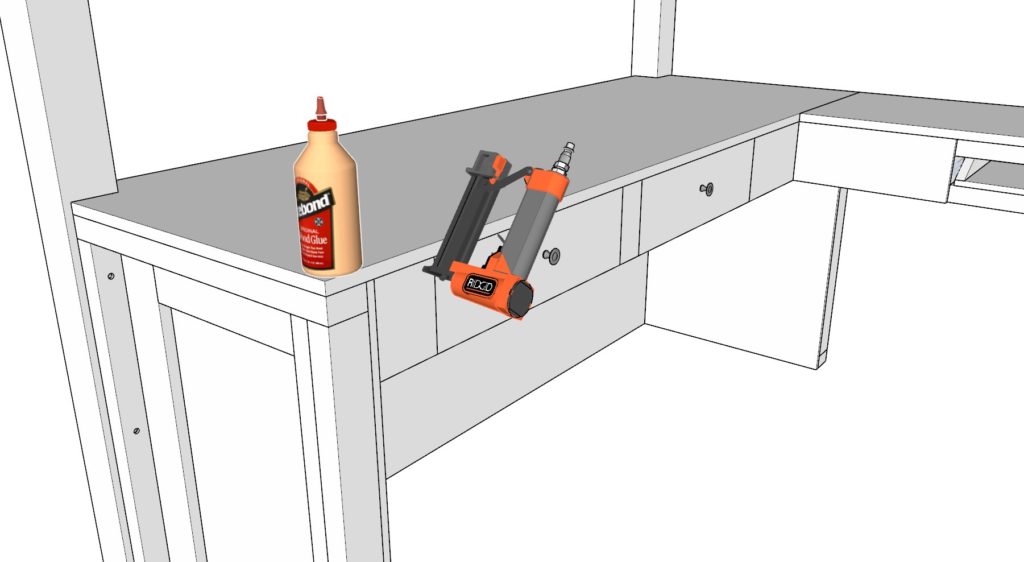
Step 11: Install the Desk Top and Additional Plywood Pieces
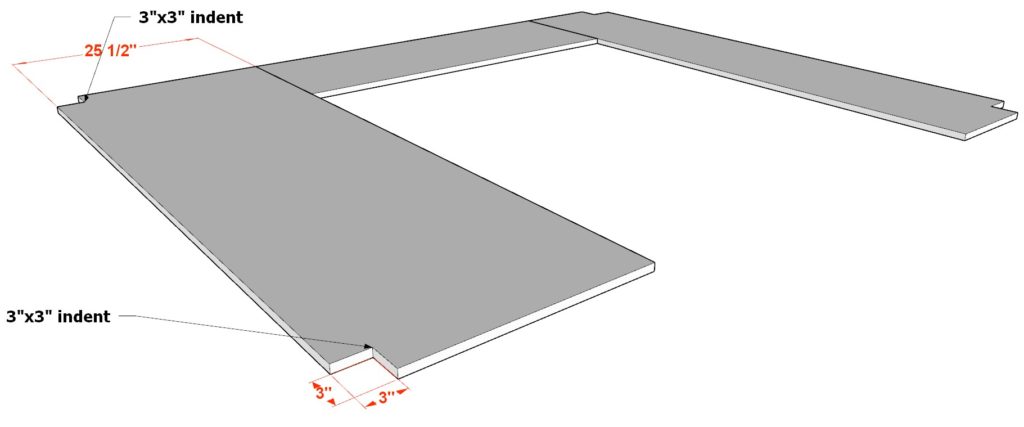
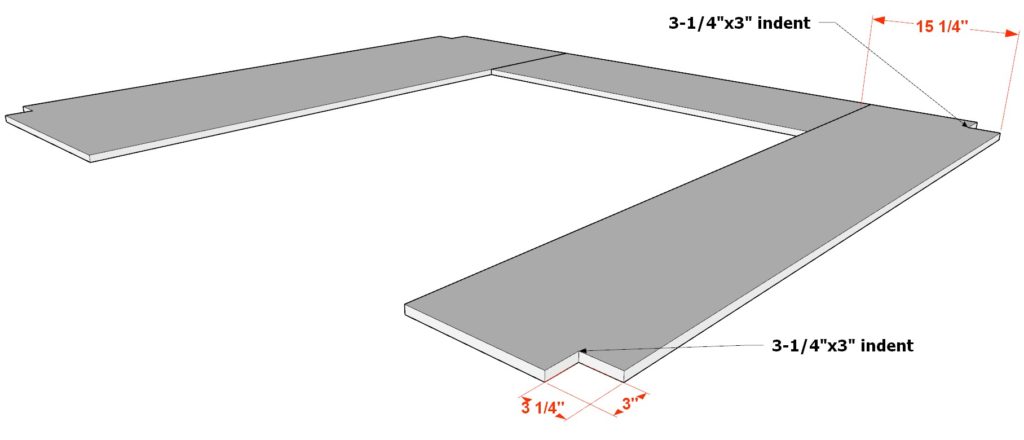
Next, add the three 3/4 inch thick plywood sheet cuts shown in the image below to serve as a desk top in the study area.
Make sure you cut the appropriate size notches as shown below to accommodate the pillars.
Secure the plywood sheets using glue and 1.5 inch nails.
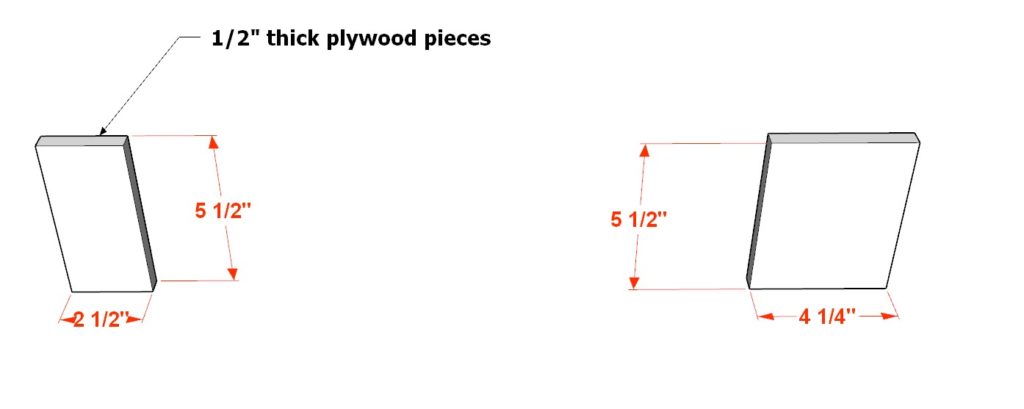
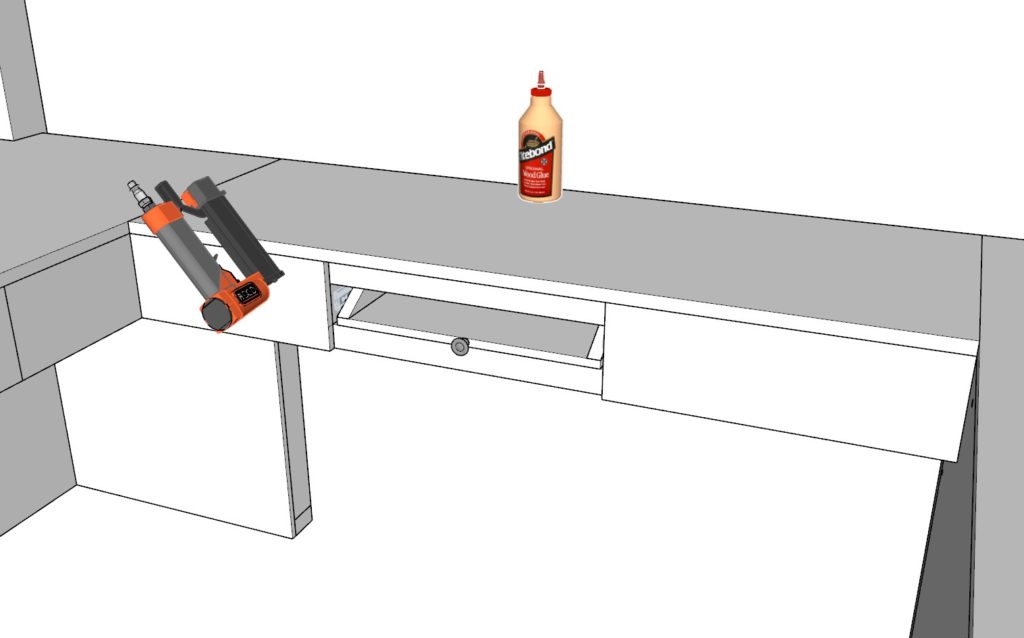
Add two additional plywood pieces measuring at 5-1/2 inch x 2-1/2 inch and 5-1/2 inch x 4-1/4 inch (bother 1/2″ inch thick plywood) to the spaces near the desk drawers. Secure them with glue and 1 inch nails from a nail gun.
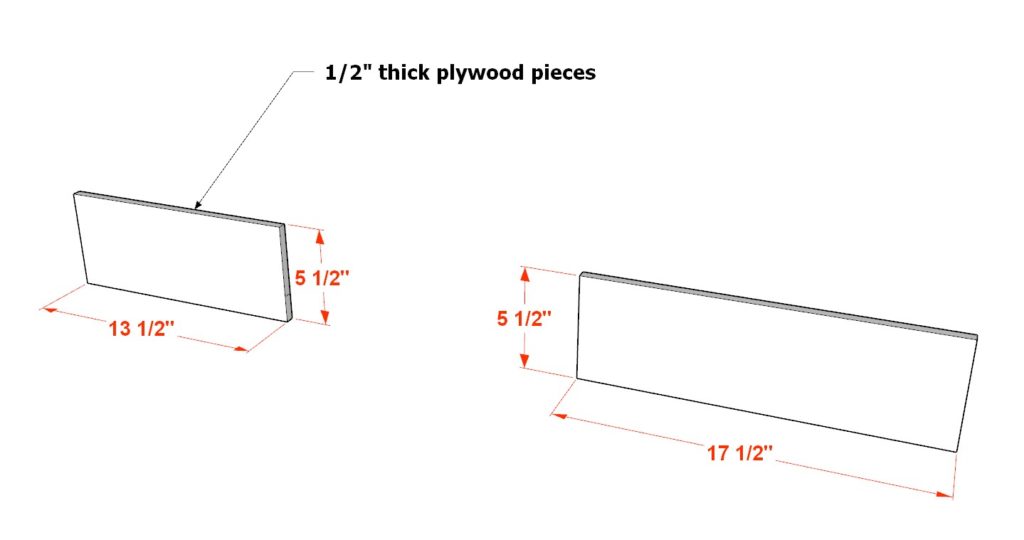
Add two additional plywood pieces measuring at 5-1/2 inch x 13-1/2 inch and 5-1/2 inch x 17-1/2 inch (bother 1/2″ inch thick plywood) to the spaces near the keyboard drawer. Secure them with glue and 1 inch nails from a nail gun.
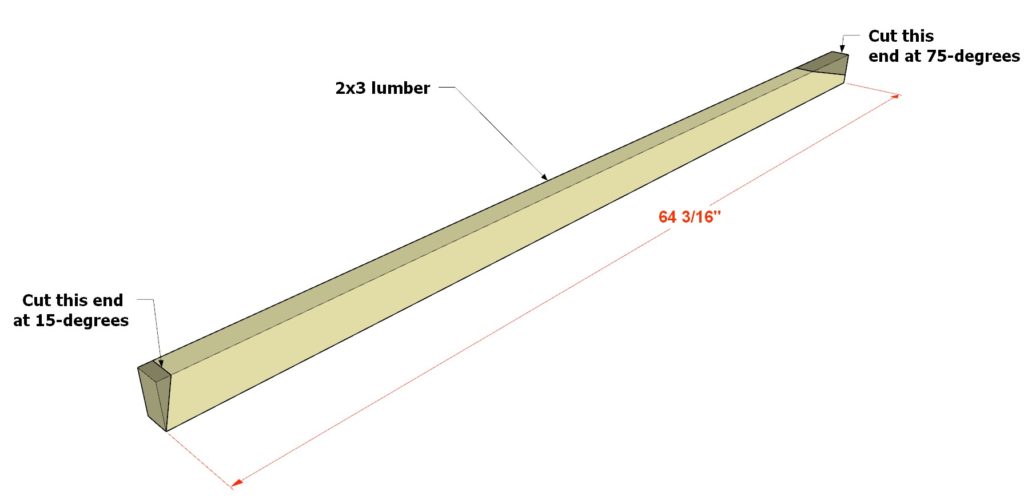
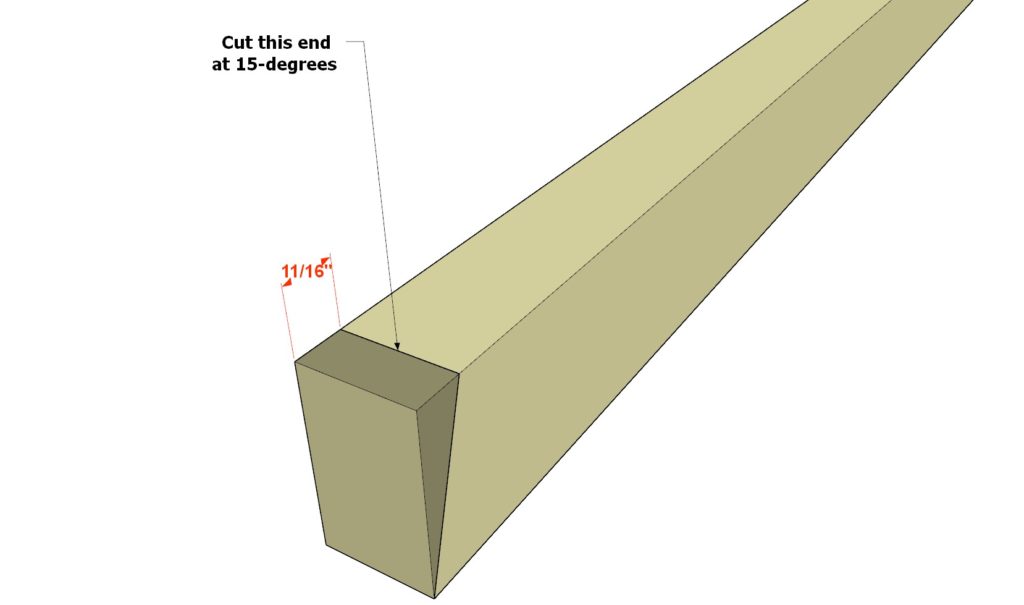
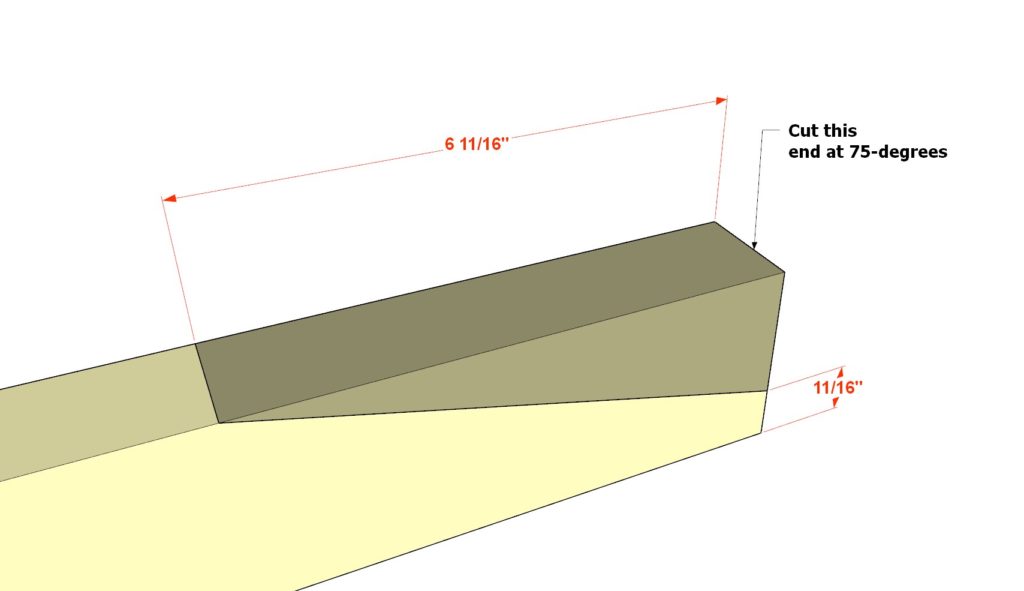
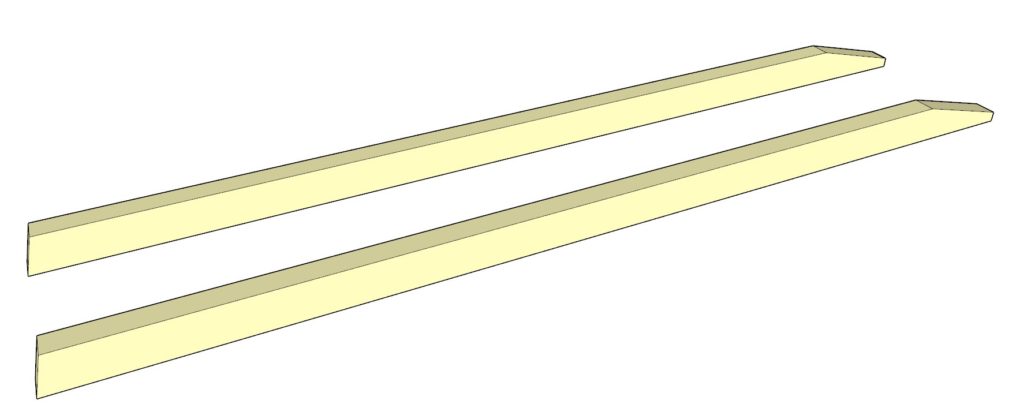
Step 12: Assemble and Install the Loft Bed Ladder
Next, assemble and install the loft bed ladder.
Take a 64-3/16 inch long 2×3 lumber piece and cut the ends off as indicated below (one at 75-degrees and one at 15-degrees).
Cut another 2×3 lumber piece in the same way.
Next, cut fourteen 1×3 lumber pieces to size as indicated in the diagram. two 6-7/8 inch long with one end cut at 12-degrees, and twelve 6-11/16 inches long.
Cut seven 16-1/8 inch long 2×3 lumber pieces.
Add all the components to make a ladder as indicated in the diagram. Use a combination of 3.5 inch screws, glue, predrilling, and 1 inch nails from a nail gun to secure the pieces together.
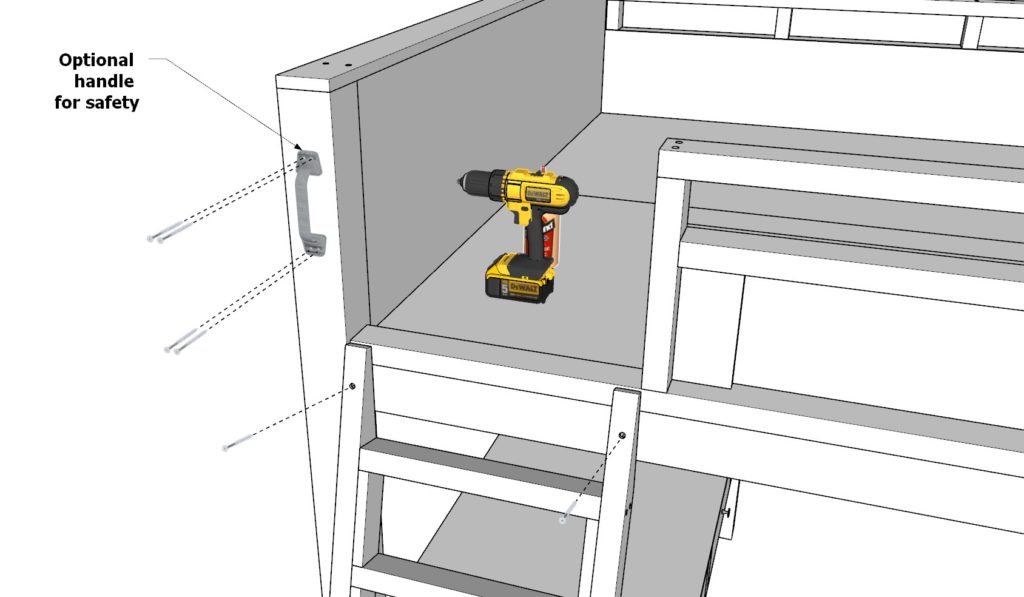
Next, add the ladder to the loft bed and secure with two 3.5 inch screws. Add a handle for safety.


How to stain the loft bed
Staining the Loft Bed:
Step 1: Prepare the Workspace
Choose a well-ventilated area to stain your loft bed. Lay down a drop cloth or plastic sheeting to protect the floor from any spills or drips.
Step 2: Sand the Surface
Using a medium-grit sandpaper (120-150 grit), sand all the wooden surfaces of the loft bed, following the grain of the wood. Sanding will help remove any rough spots and ensure an even stain application.
Step 3: Clean the Surface
Remove any dust or debris from the wood surfaces using a vacuum cleaner or a tack cloth. This step is essential to ensure a smooth stain application.
Step 4: Choose the Stain
Select the desired wood stain color and type. Oil-based stains are more durable and provide a deeper color, while water-based stains are easier to clean up and have lower VOCs.
Step 5: Apply the Stain
Put on gloves and use a clean, lint-free cloth or a foam brush to apply the stain. Work in small sections, following the grain of the wood. Apply the stain evenly to avoid blotchy spots.
Step 6: Wipe off Excess Stain
After allowing the stain to penetrate the wood for the recommended time (typically 5-15 minutes), use a clean, lint-free cloth to wipe off any excess stain. Wipe in the direction of the wood grain to ensure a smooth and even finish.
Step 7: Allow to Dry
Let the stain dry completely, as per the manufacturer’s recommended drying time, usually 24 hours.
Step 8: Apply Additional Coats (Optional)
If desired, apply additional coats of stain to achieve a deeper or richer color. Remember to let each coat dry completely before applying the next one.
Step 9: Apply a Protective Finish
After the final coat of stain is completely dry, apply a clear protective finish, such as polyurethane, to seal and protect the wood. Allow the finish to dry for the recommended time before reassembling the loft bed.