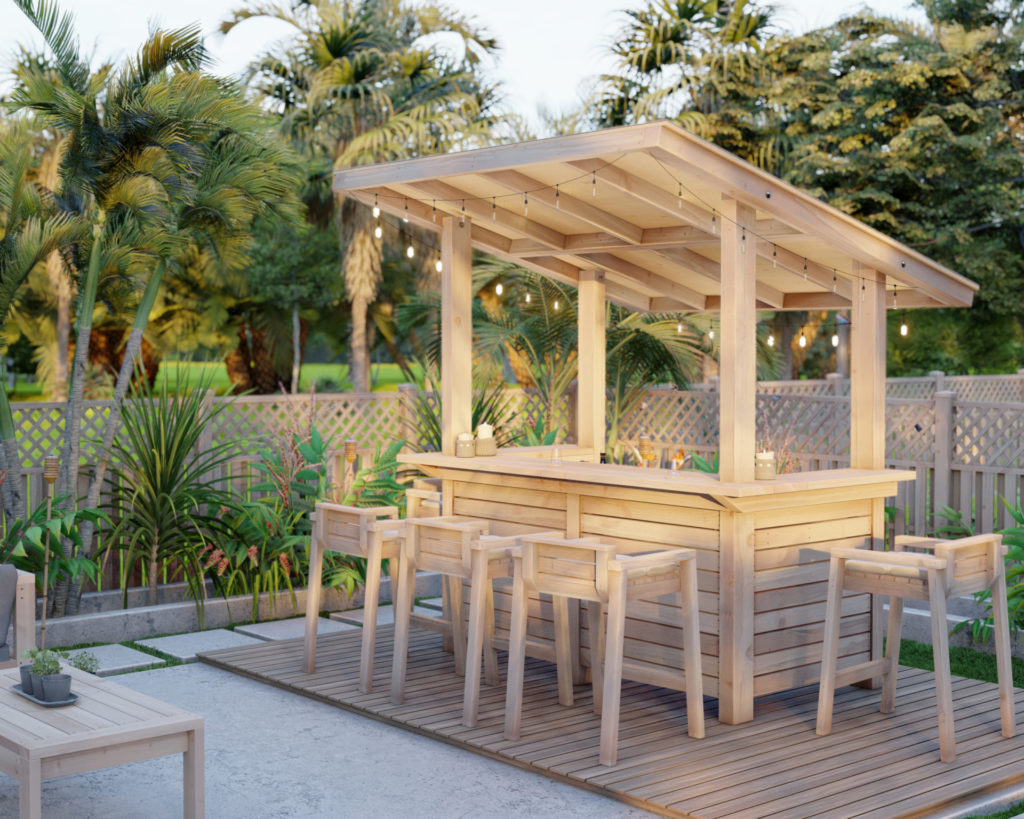
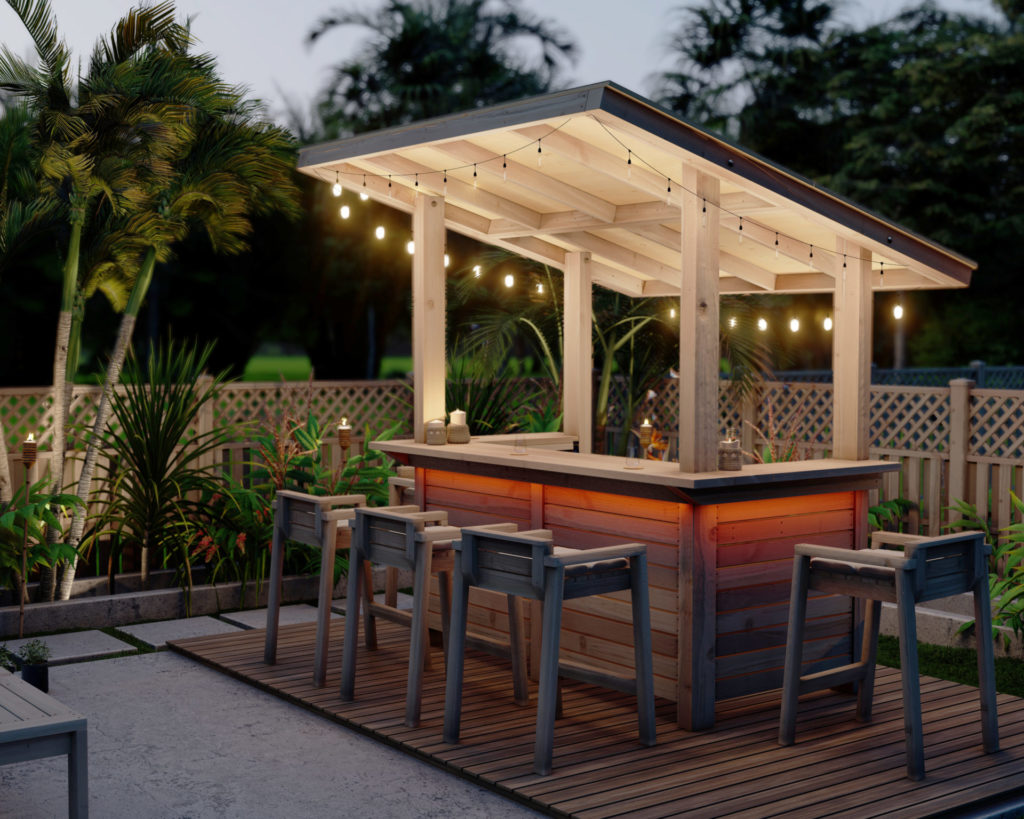
Get the party started with your own DIY outdoor bar!
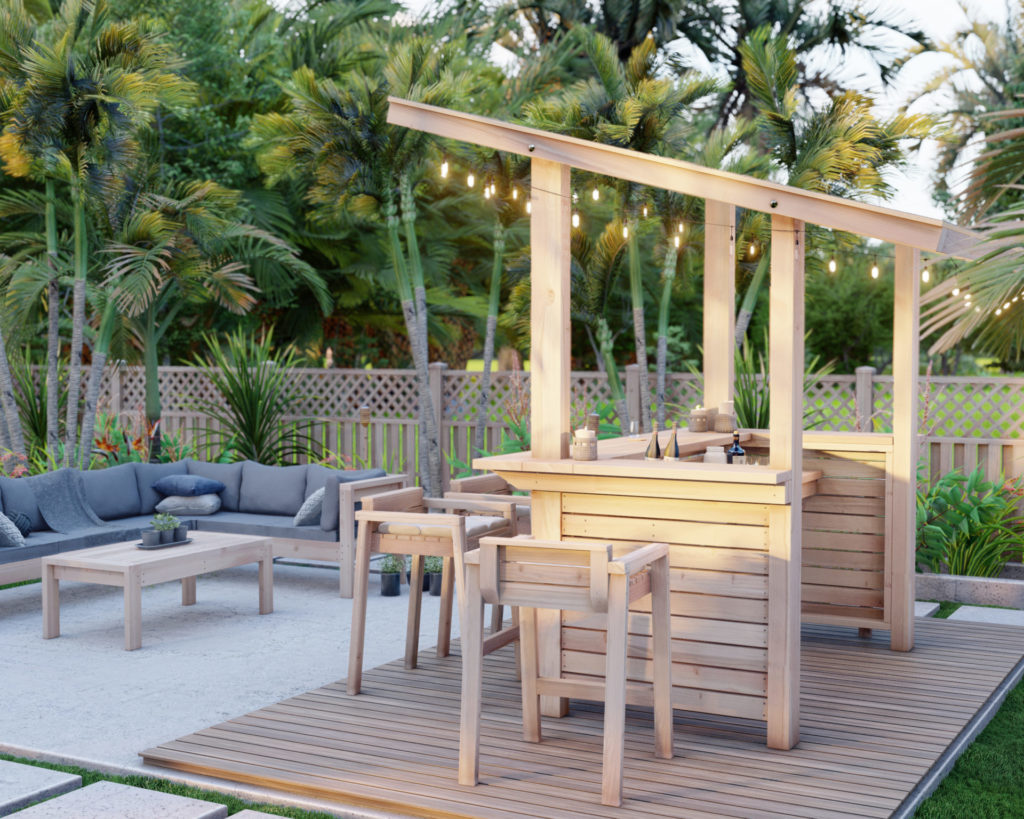
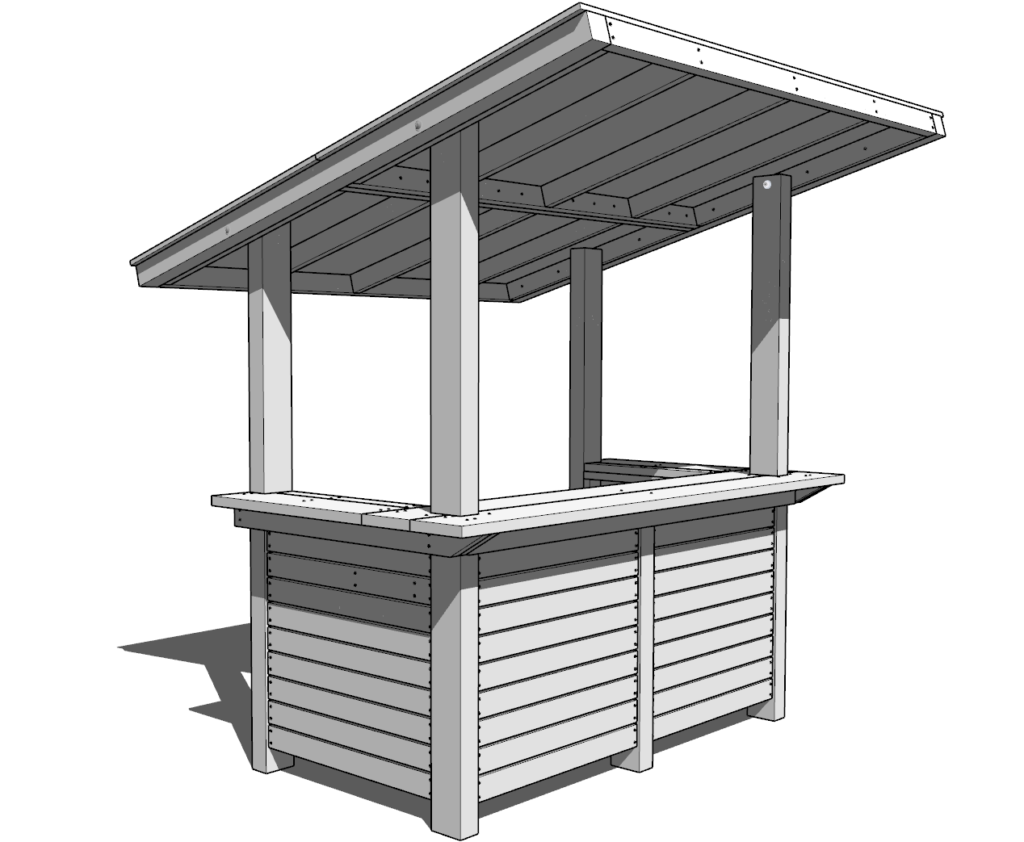
Enjoying time at a DIY bar can be a great way to spend a summer evening or weekend afternoon. This fantastic DIY outdoor bar oasis can be used for a variety of purposes, such as a place to entertain guests, a spot to relax and enjoy the outdoors, or a place to simply store and serve drinks.
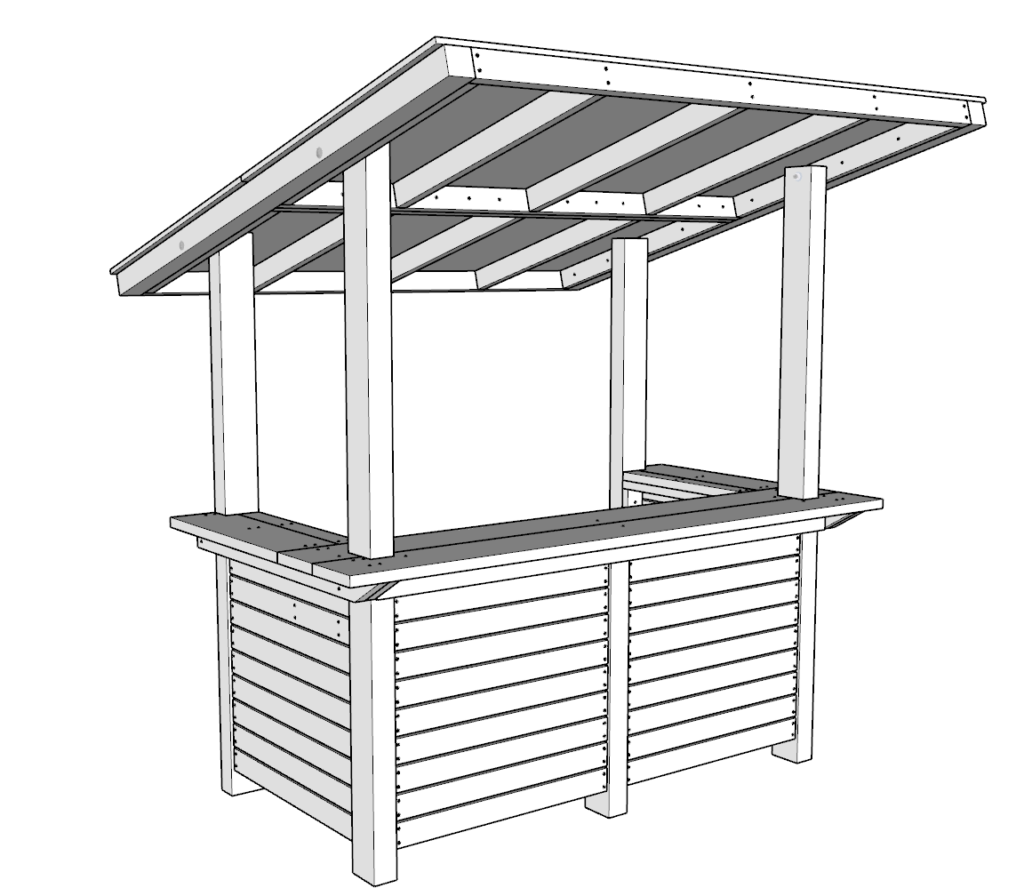
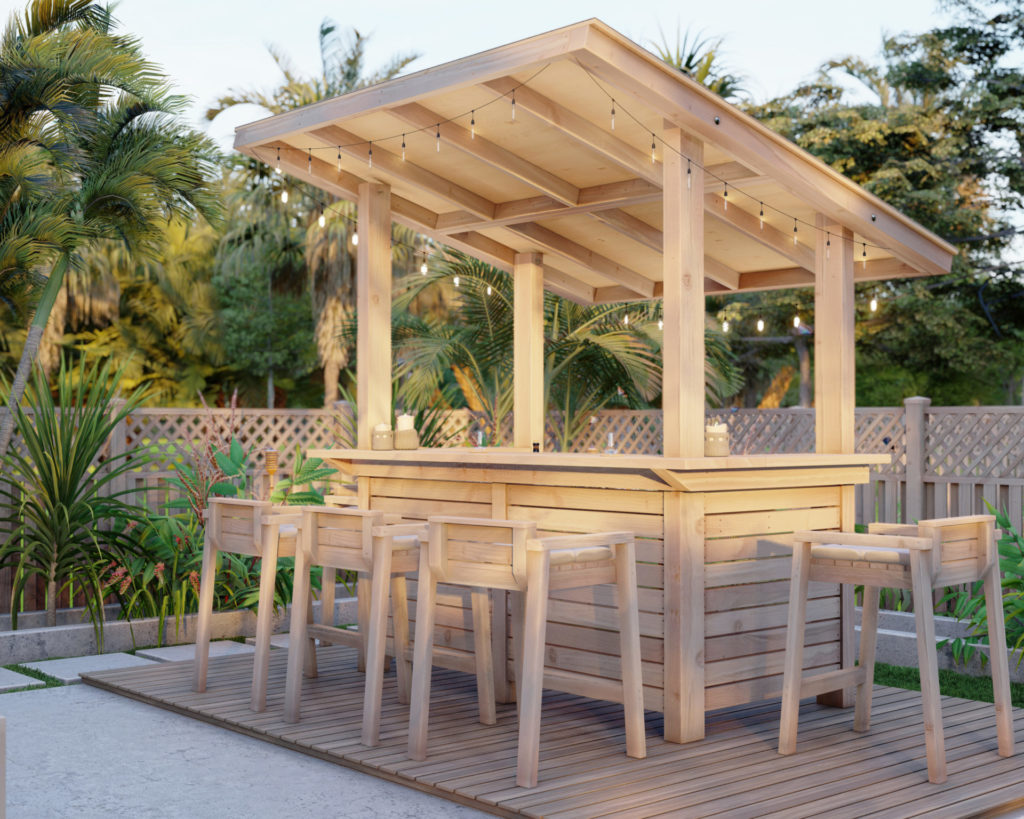
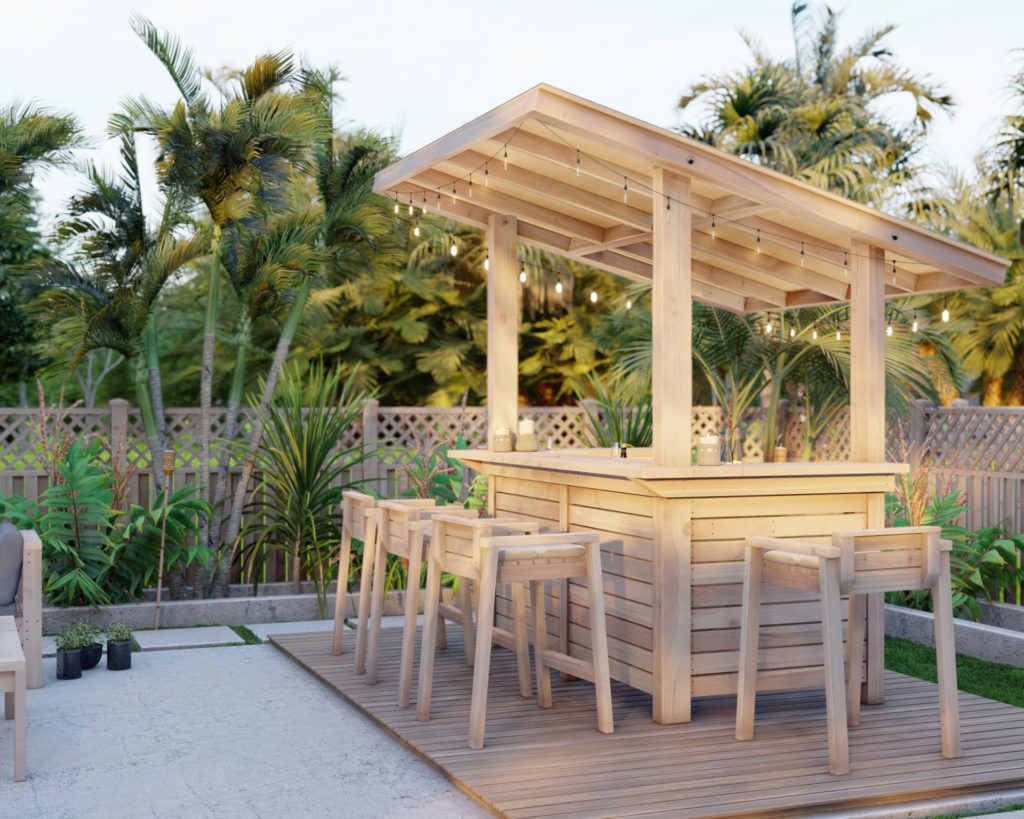
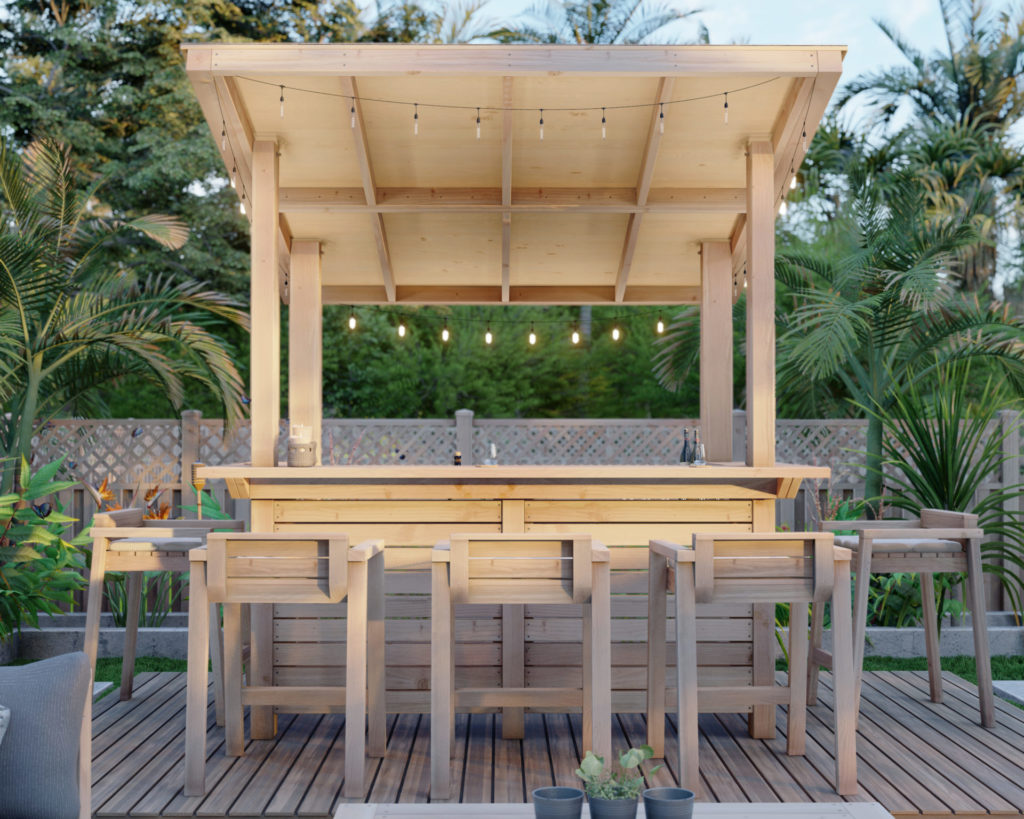
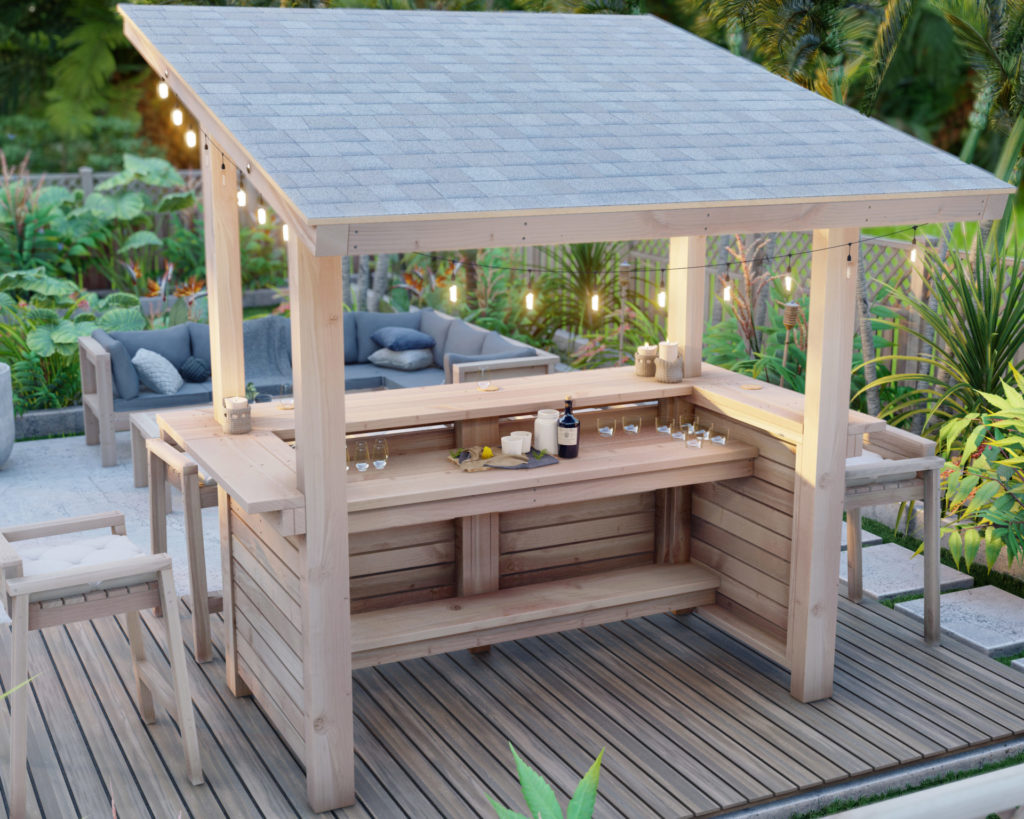
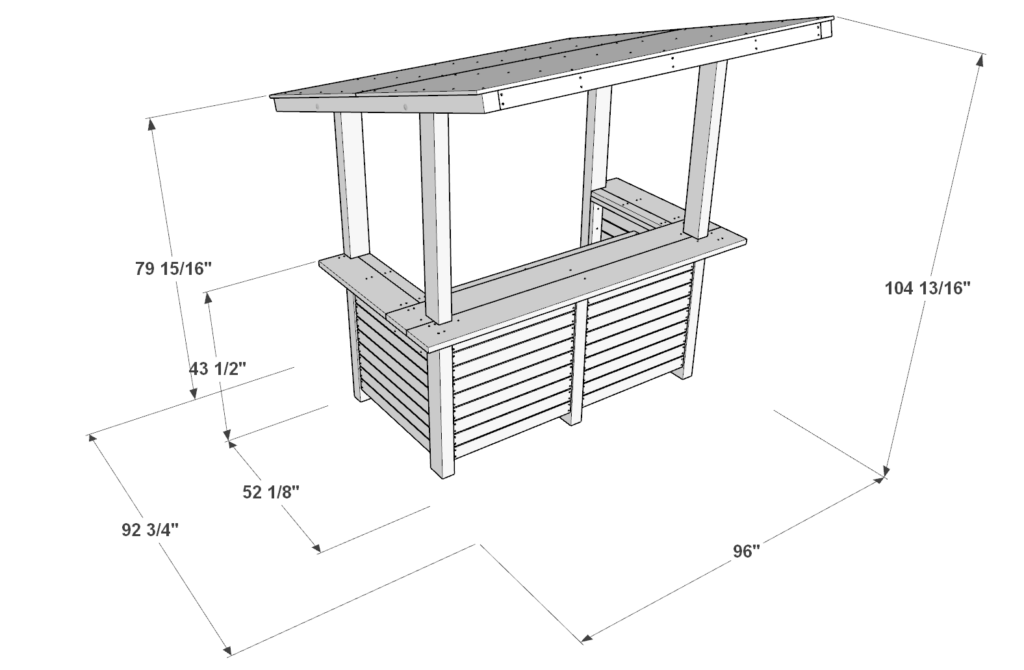
One of the most important features of the outdoor deck bar is spacious seating under an open roof. The bar top that is can comfortably seat 5 people so that your guests can enjoy their food and drinks without feeling crammed for your next cookout.
The roof helps protect you and your guests from the sun and rain. You can utilize the roof to adding personal touches to customize the look and feel of your bar to match your personal style. One way is to add string lights around the perimeter of the roof or by adding hanging plants or flowers. You could also add a sign or banner to the roof.
This DIY outdoor bar is more than just seating, it provides a space that enables you to host and service the guests and family in a more organized and professional way. The two arms of the DIY bar provide an area where a mini refrigerator, kegerator, ice maker, or wine cooler can be set up.
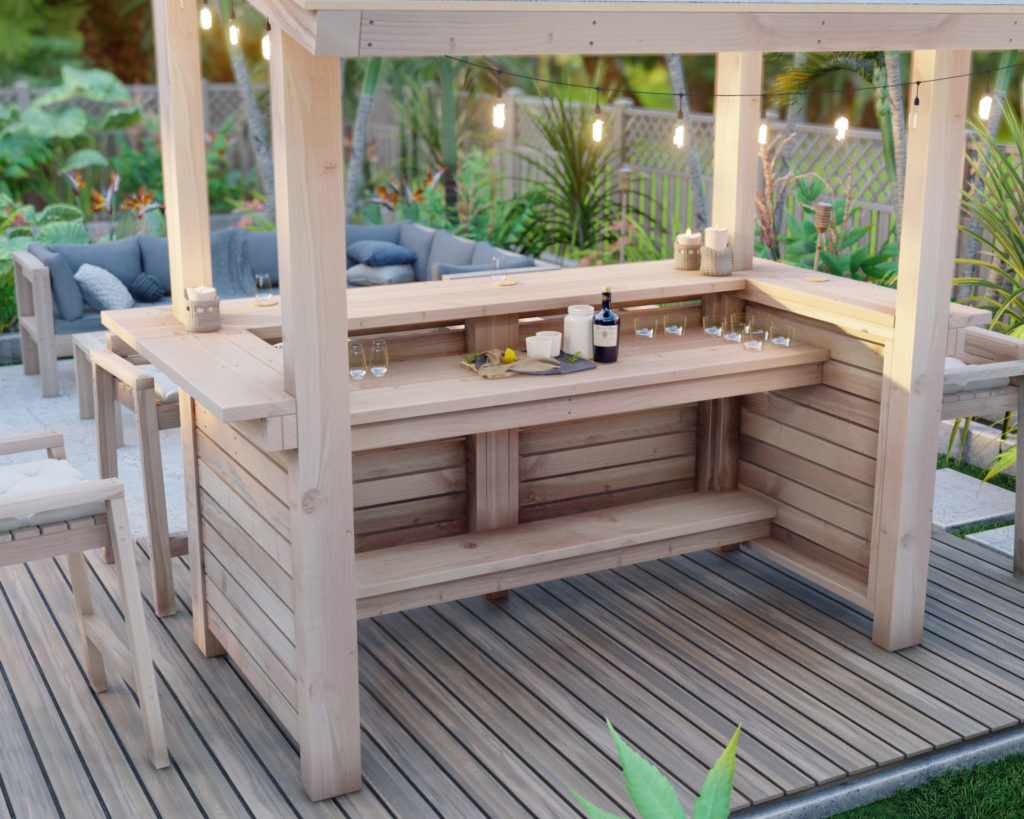
You can also use this bar center as a DIY outdoor buffet stand, taco bar, beverage stand, and area for dispensing food for guests to take to their seats. You can place ice bins and coolers to keep drinks cold for the duration of a backyard, deck, or patio event.
This bar is good for storage because it not only provides a spacious working space but also a shelf underneath that can be used to store a variety of items. It can be used to store glasses, bottles, and other barware, glassware, napkins, as well as bar tools and accessories.
When you do it yourself and build the home bar, you can save you a lot of money. If you were to buy a pre-made outdoor bar, it would likely cost you hundreds, if not thousands, of dollars. With a DIY outdoor bar, you can easily spend a fraction of that amount.
So easy, even a beginner can do it!
I think this bar would be a great project for anyone who is new to woodworking. You will need at least two people in some of the building step, so get a friend to help! The joints and cuts are simple and beginner friendly. If you follow the step-by-step instructions, you will be able to avoid mistakes, waste material, and in the end create the bar table without much hassle or worry.
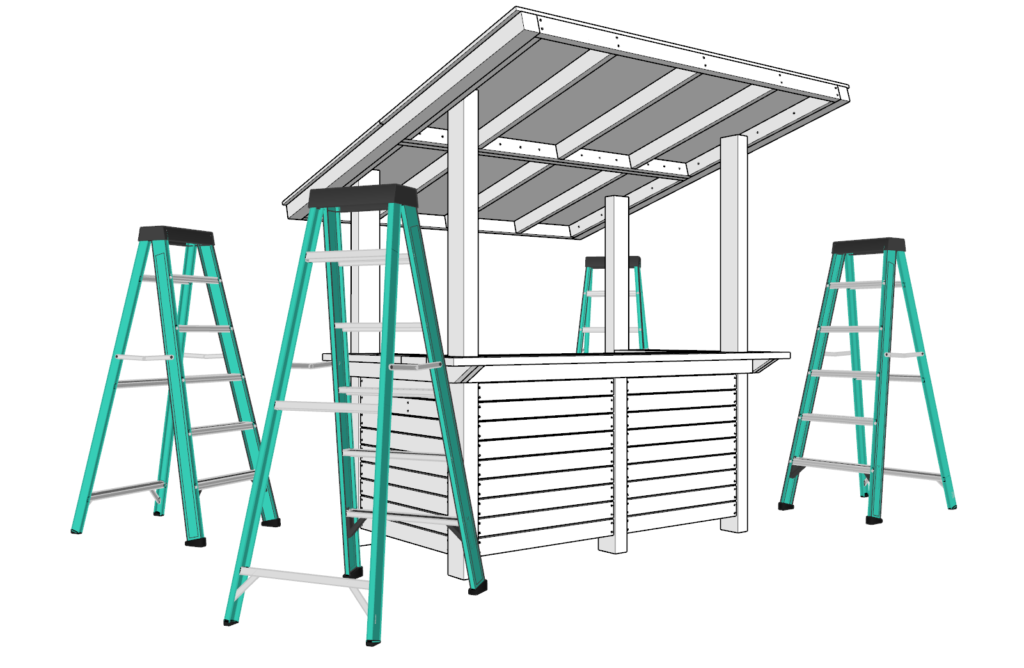
What about the other furniture pieces I see in the pictures?
Time to build
About 8 hours
Total cost of build
About $600
Skill level required
Beginner-intermediate
Download the PDF plans
Outdoor bar center PDF plans
What is included in the PDF download?
- Easy to read step by step instructions
- Material list
- Tools needed
- Helpful links to materials and tools needed
Step-by-step instruction on building the DIY outdoor bar
Recommend tools/materials
- Note: These are my personal recommendations based on experience, but feel free to use alternatives that suit your preferences.
- Saw: Miter Saw (12 Inch, Double Bevel)
- Great for precision cuts. My go-to for over 10 years.
- Needed for cutting angles.
- Impact Driver + Bit: DEWALT ATOMIC 20V MAX* Cordless Impact Driver
- Perfect for securing pieces. Lightweight and reliable.
- Drill: DEWALT 20V MAX XR Drill/Driver
- Pair with a countersink bit for a smooth finish. A staple in many toolkits.
- Countersink Drill Bit: FTG USA Set
- Essential for clean finishes.
- Screws (5lb 3.5 inch long and 3lb 2.5 inch long): WoodPro Fasteners
- I always use star bits for a solid grip.
- Screw Driver Bit (T25 Torx Head): COMOK 10pcs Set
- T25 bits match the screws listed above.
- Sander: DEWALT 5-Inch Variable Speed Random Orbit Sander
- Wood Glue: Franklin International Titebond Original (16-Ounce, 2 Pack)
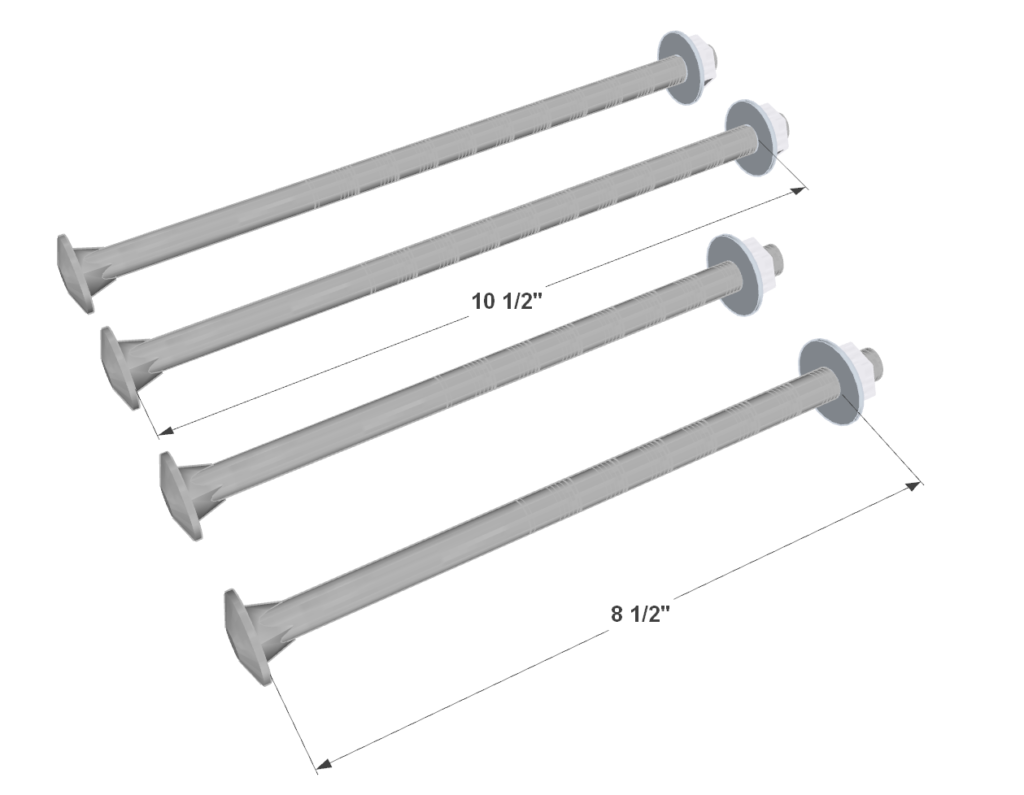
- (2) minimal length of 10-1/2 inch Stainless Steel Hex Head Screws Bolts, Nuts, Flat & Lock Washers (see roof assembly steps for bolt details)
- (2) minimal length of 8-1/2 inch Stainless Steel Hex Head Screws Bolts, Nuts, Flat & Lock Washers (see roof assembly steps for bolt details)
- A long drill bit that can drill through a minimal depth of 5.5 inches with a diameter to accommodate the large bolts described in the two bullet points above. (see roof assembly drill bit details)
- Saw: Miter Saw (12 Inch, Double Bevel)
Disclosure: The links provided are affiliate links. I may earn a commission if you purchase through these links, at no extra cost to you. Your support is appreciated.
Lumber purchase list
Available with purchase of the DIY plan. Thank you for your support and for making this site possible
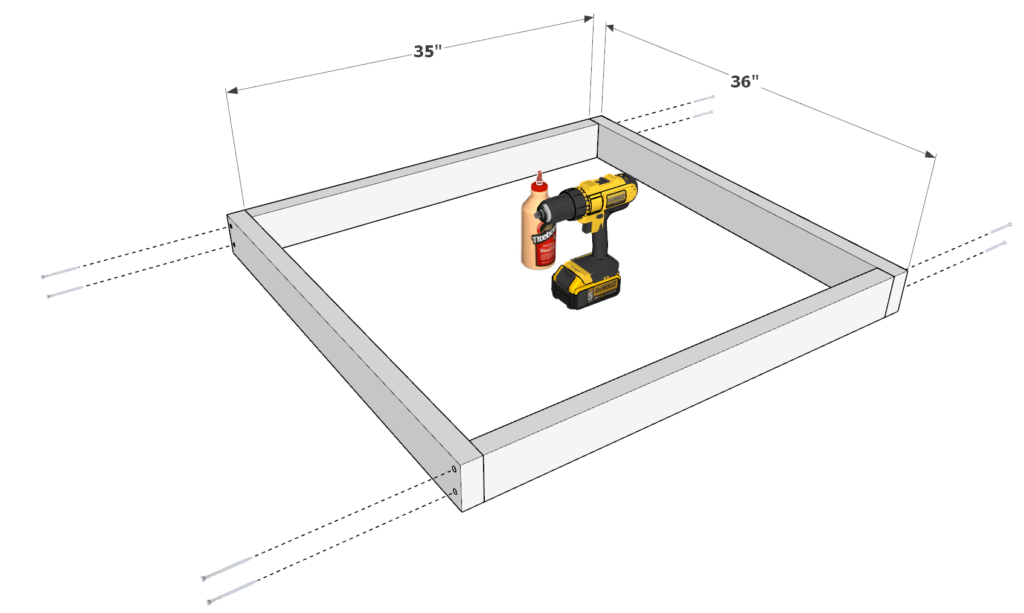
Step 1 (DIY outdoor bar frame assembly)
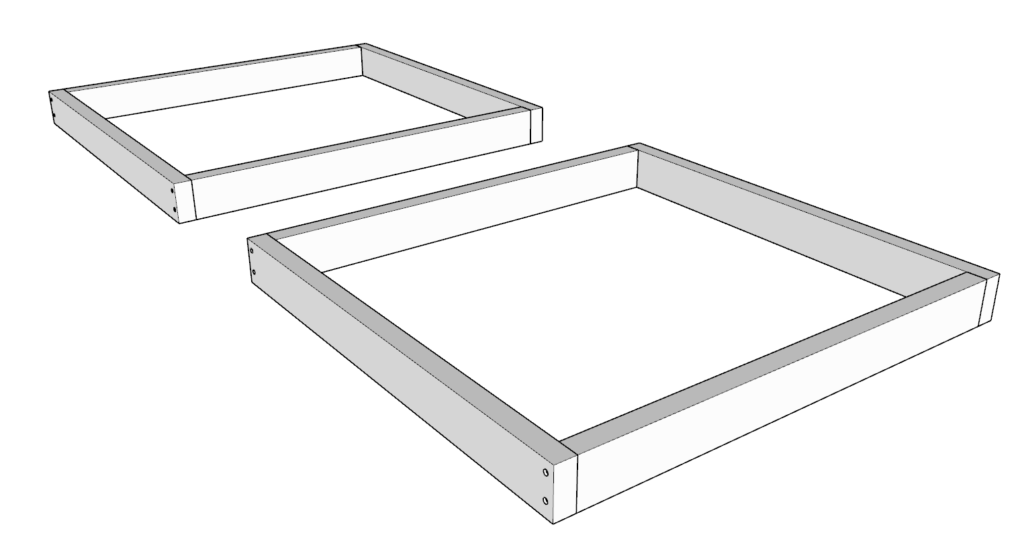
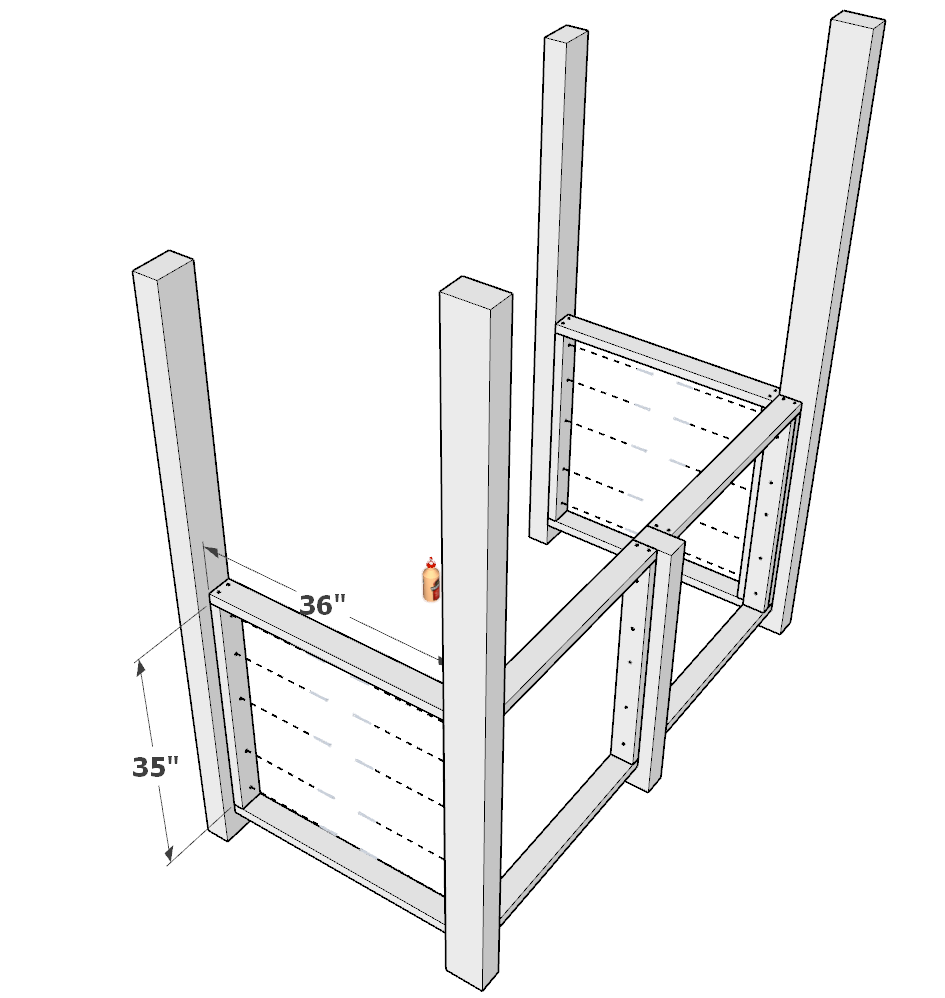
First, take two 35 inch 2×4 lumber pieces and two 36 inch 2×4 lumber pieces and arrange them as shown below. Add glue to the areas of the 2x4s that will be joined together, predrill (to prevent wood splitting), and add 3.5 inch screws.
Repeat to make an identical second frame piece for a total of two pieces.
Step 2 (DIY outdoor bar frame assembly)
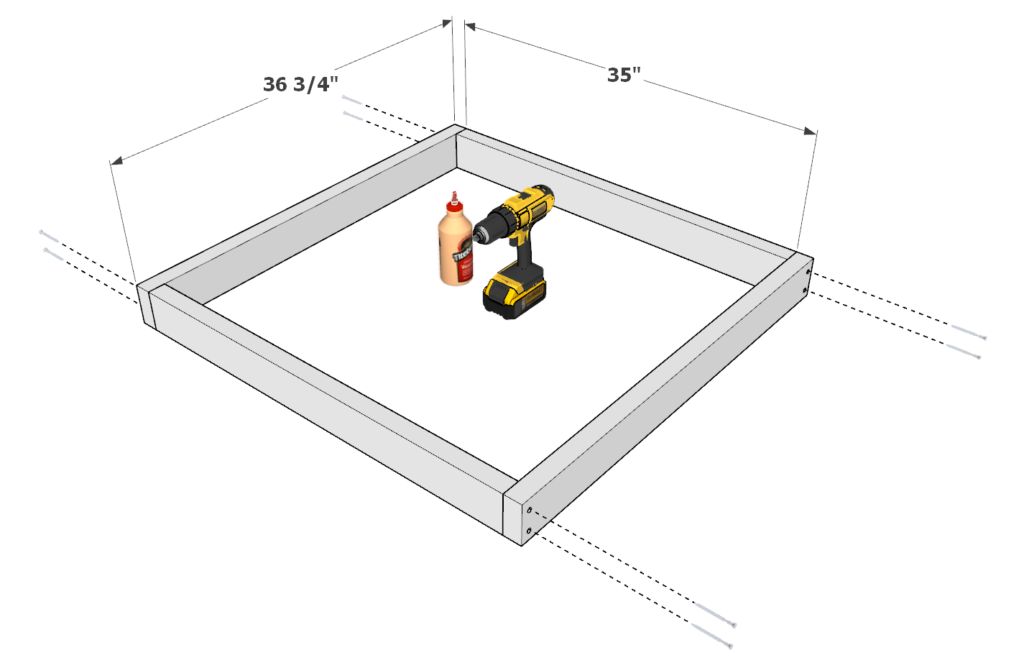
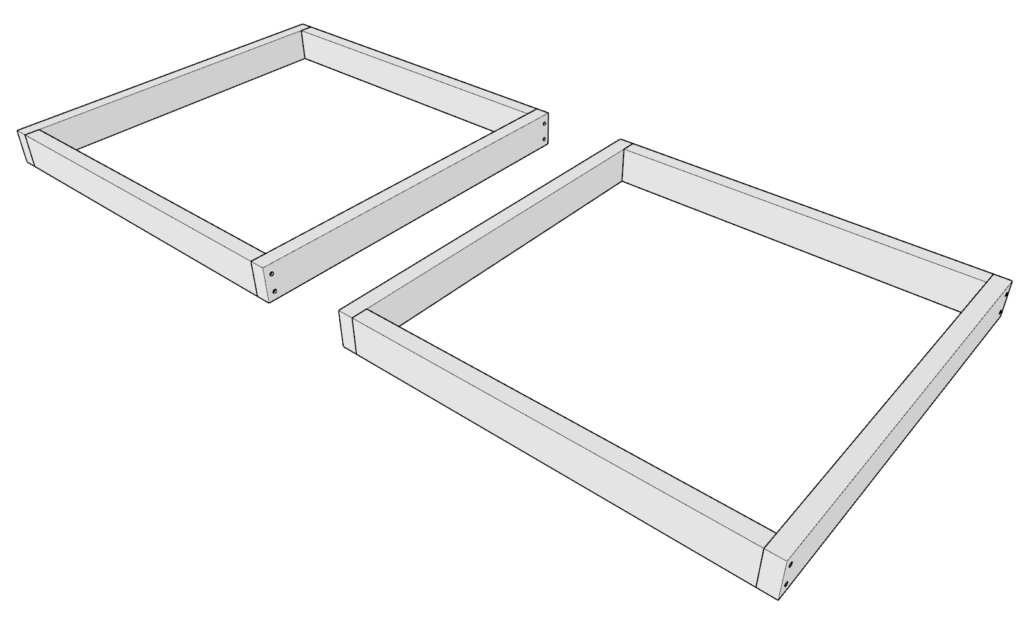
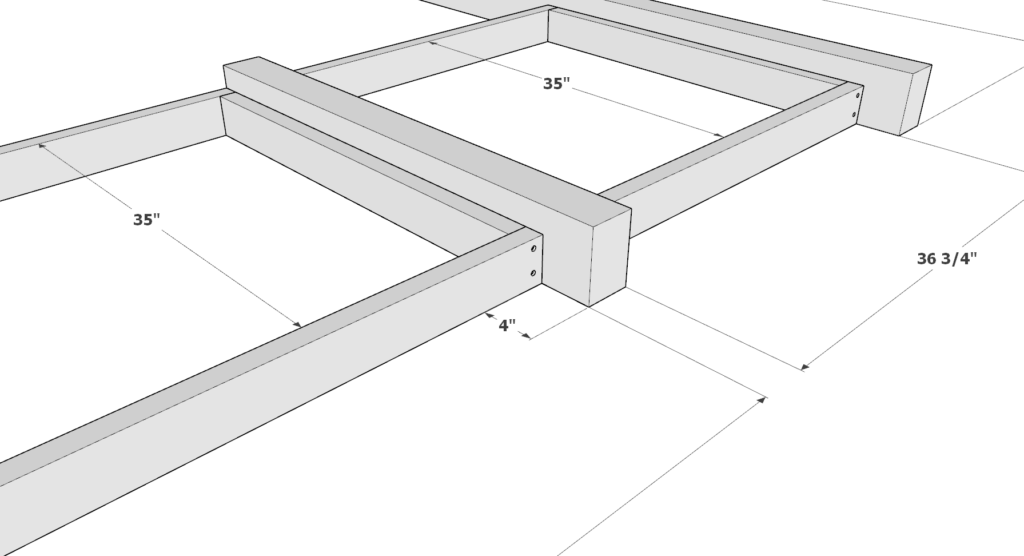
Next, take two 35 inch 2×4 lumber pieces and two 36-3/4 inch 2×4 lumber pieces and arrange them as shown below. Add glue to the areas of the 2x4s that will be joined together, predrill, and add 3.5 inch screws.
Repeat to make an identical second frame piece for a total of two pieces.
Step 3 (DIY outdoor bar frame assembly)
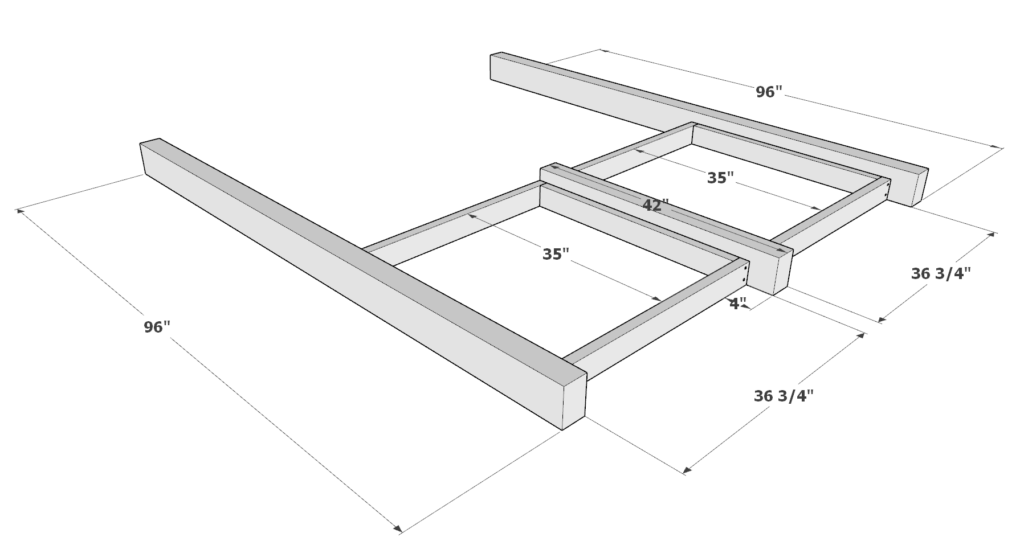
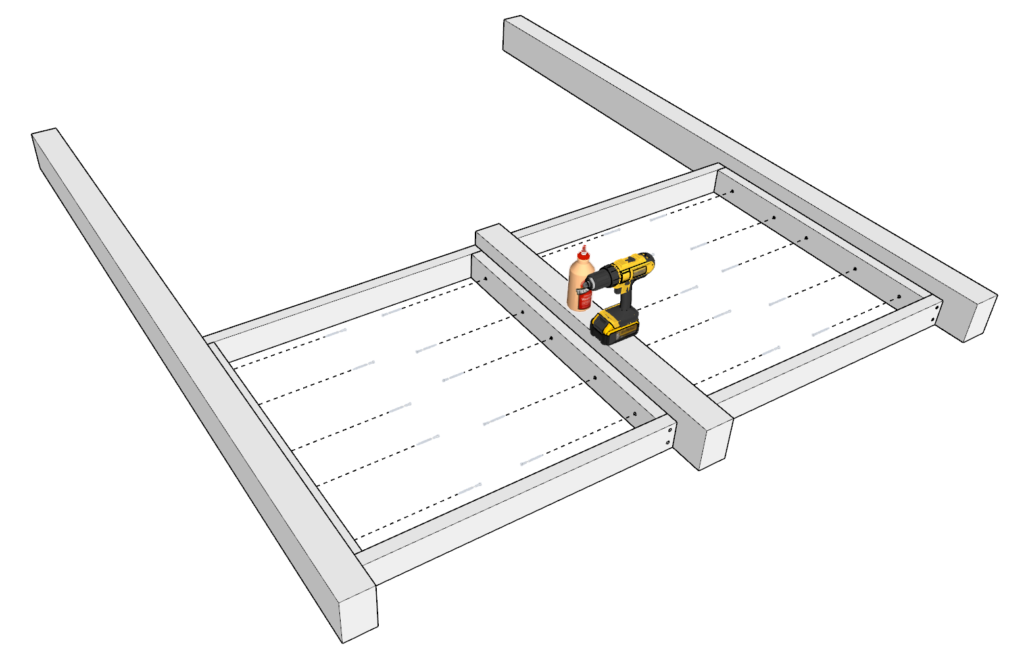
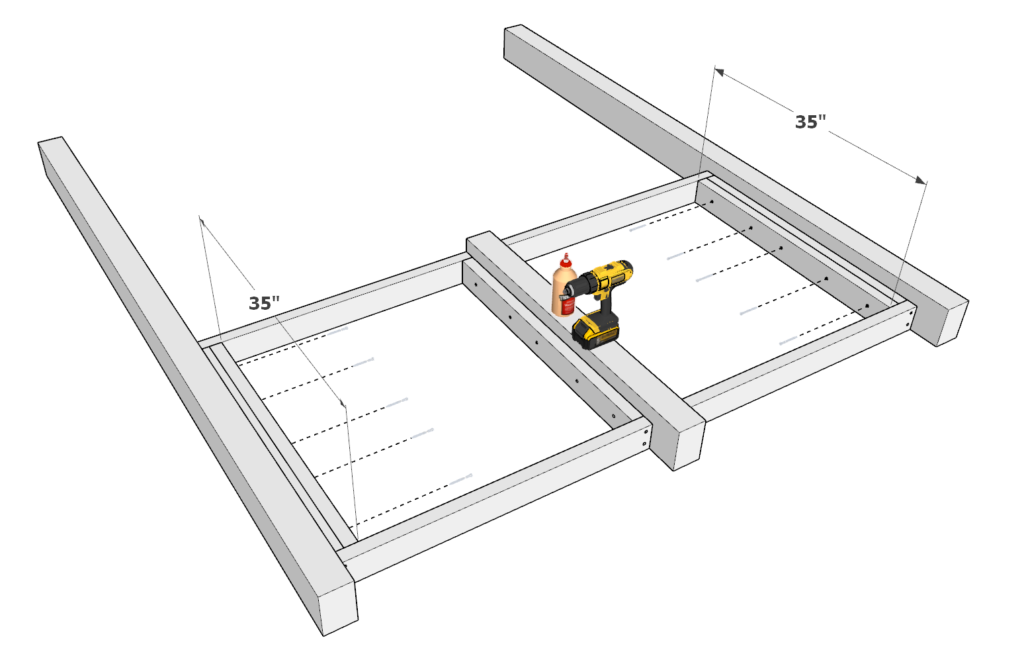
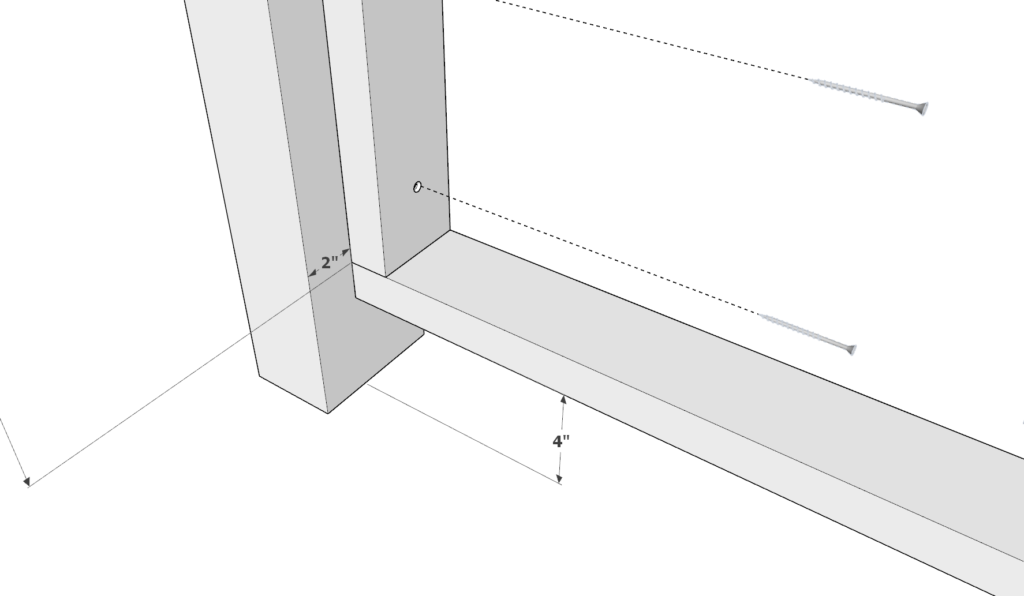
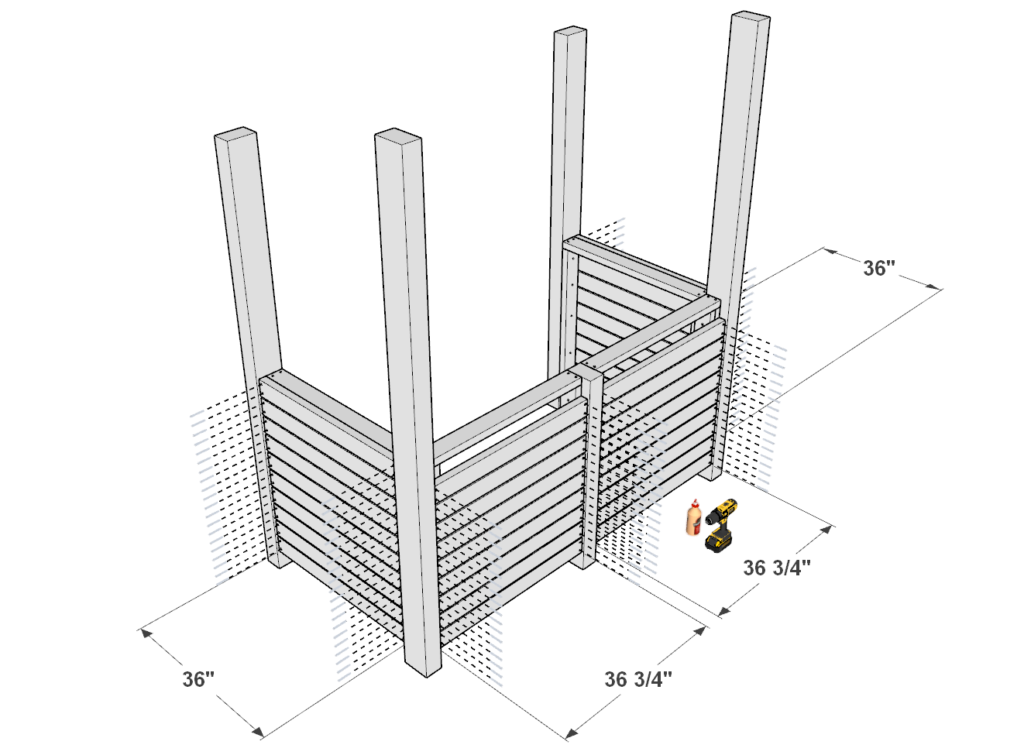
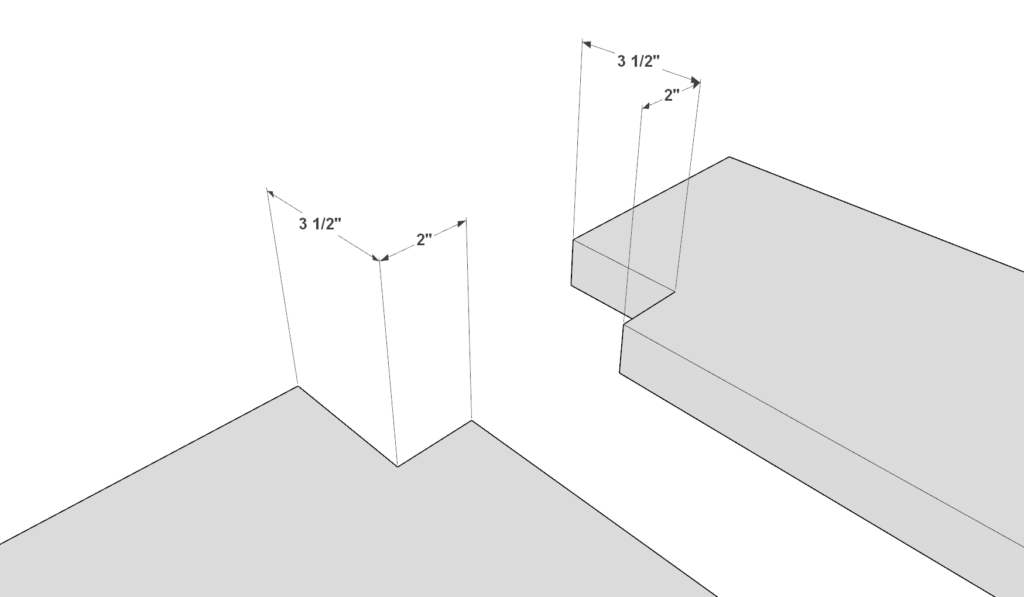
Next, take one 42 inch 4×6 lumber piece, two 96 inch 4×6 lumber pieces, and the two larger 35 x 36-3/4 inch frame pieces you just assembled and arranged them as shown below.
Make sure that the legs/pillars are indented by 4 inches as shown below.
Add glue to all areas that will be joined together.
Predrill holes and add 3.5 inch screws to all areas that need to be joined.
Next, take two more 35 inch 2×4 lumber pieces and add them to the outdoor bar frame as shown in the last picture in this step. Again, add glue, predrill, and add 3.5 inch screws.
Step 4 (DIY outdoor bar frame and pillar assembly)
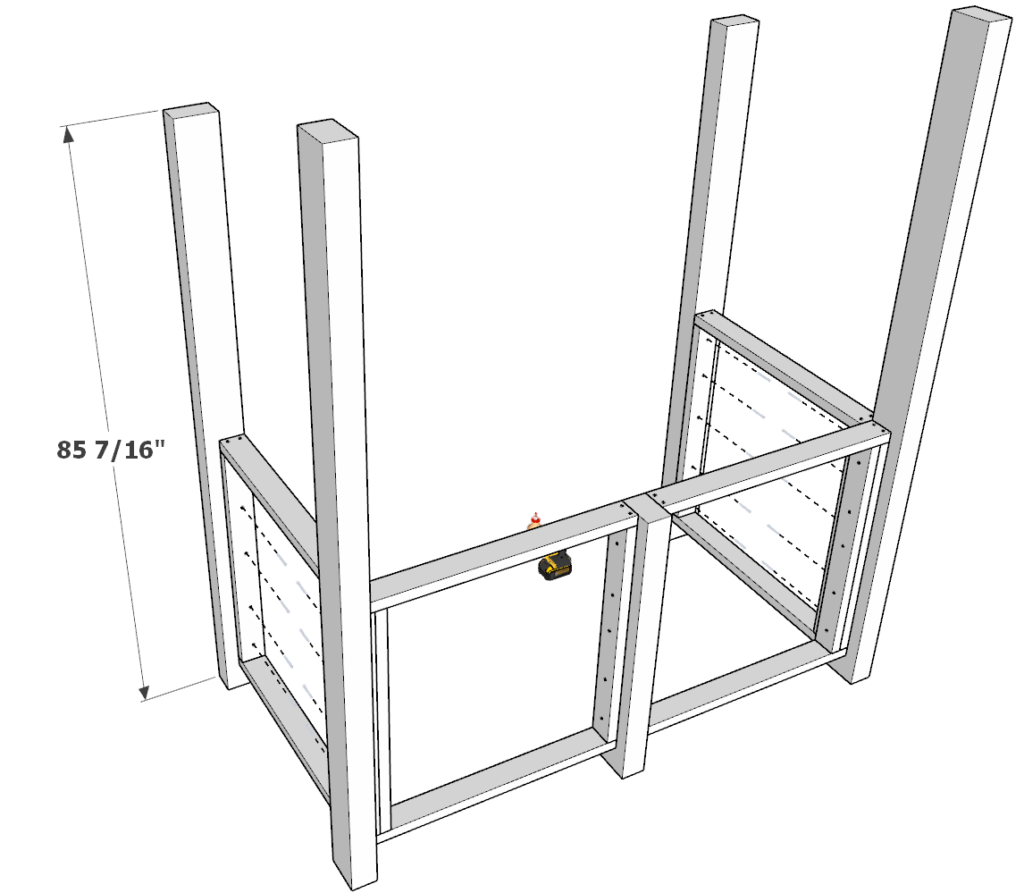
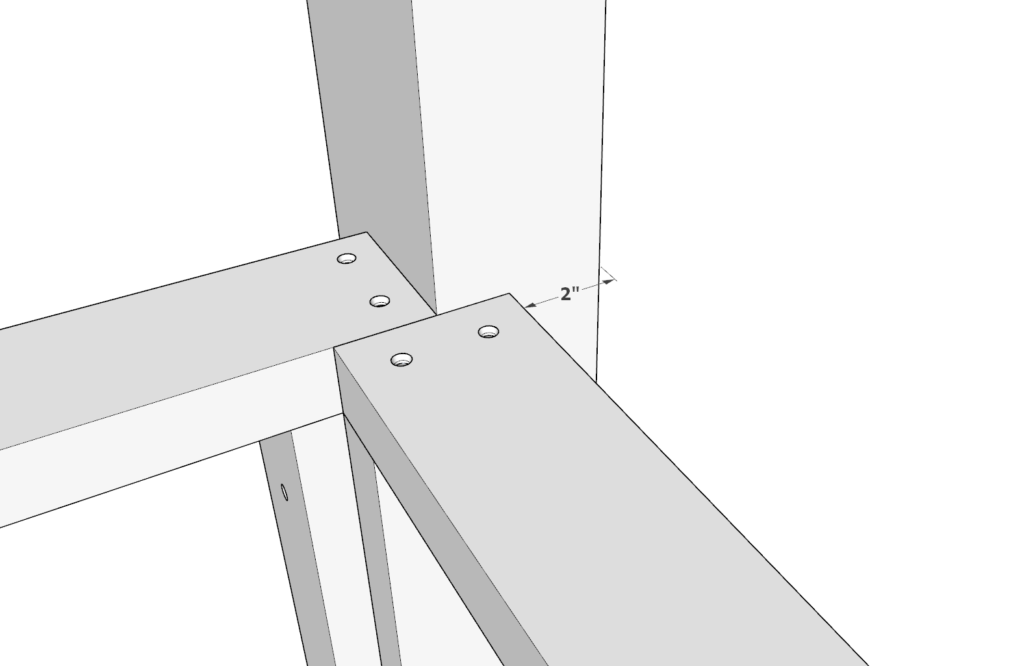
Next, take the other two 36 in x 35 in frame pieces you assembled in the previous steps, and two 85-7/16 inch 4×6 lumber pieces, and add them to the main frame of the bar as shown below.
When adding, indent the 4×6 lumber pillars by 2 inches as shown below.
When adding, elevate the 36 in x 35 in lumber frames 4 inches off the ground as shown below.
When adding the 36 in x 35 in lumber frames, indent by 2nchines from the 96 inch 4×6 lumber pieces as shown below.
Secure the frame pieces with glue, predrilling, and screws.
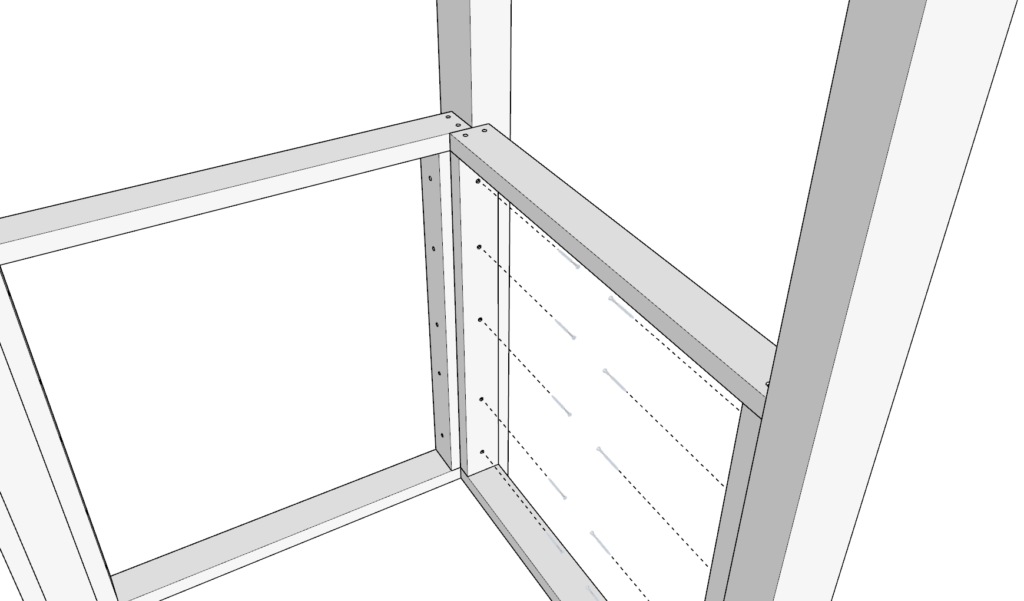
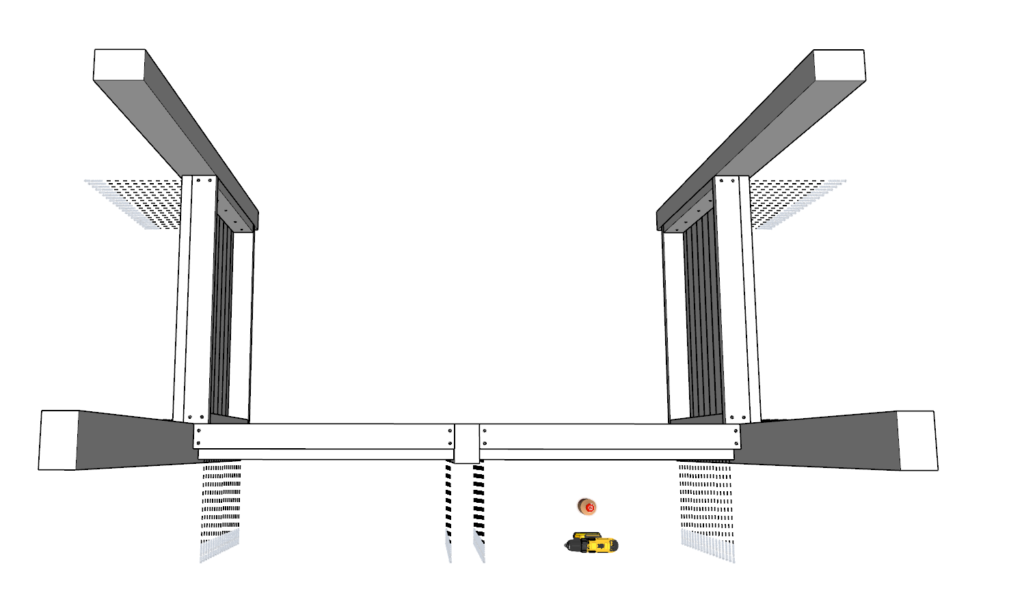
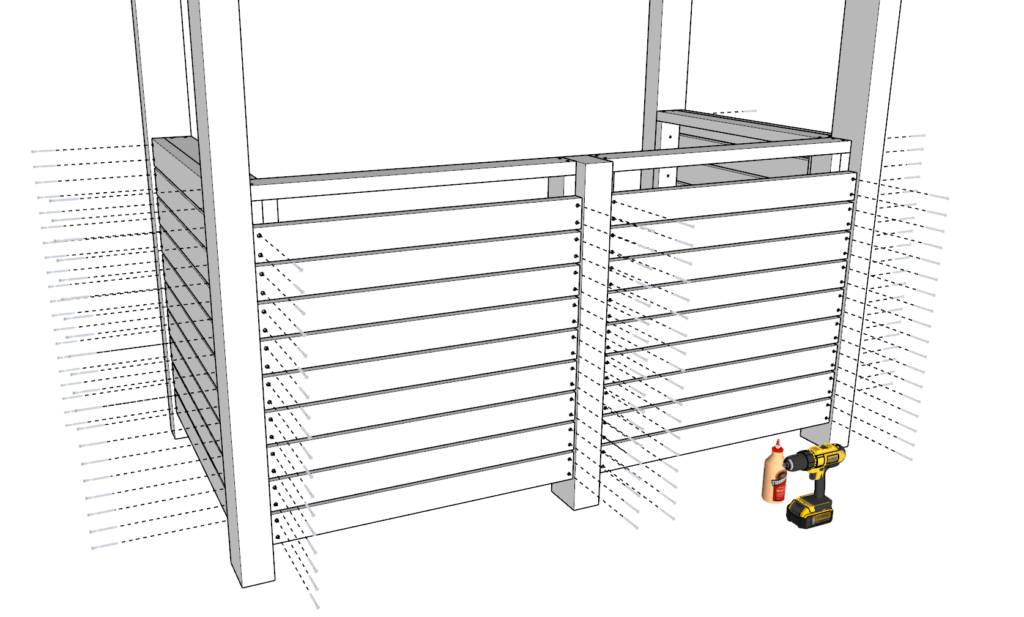
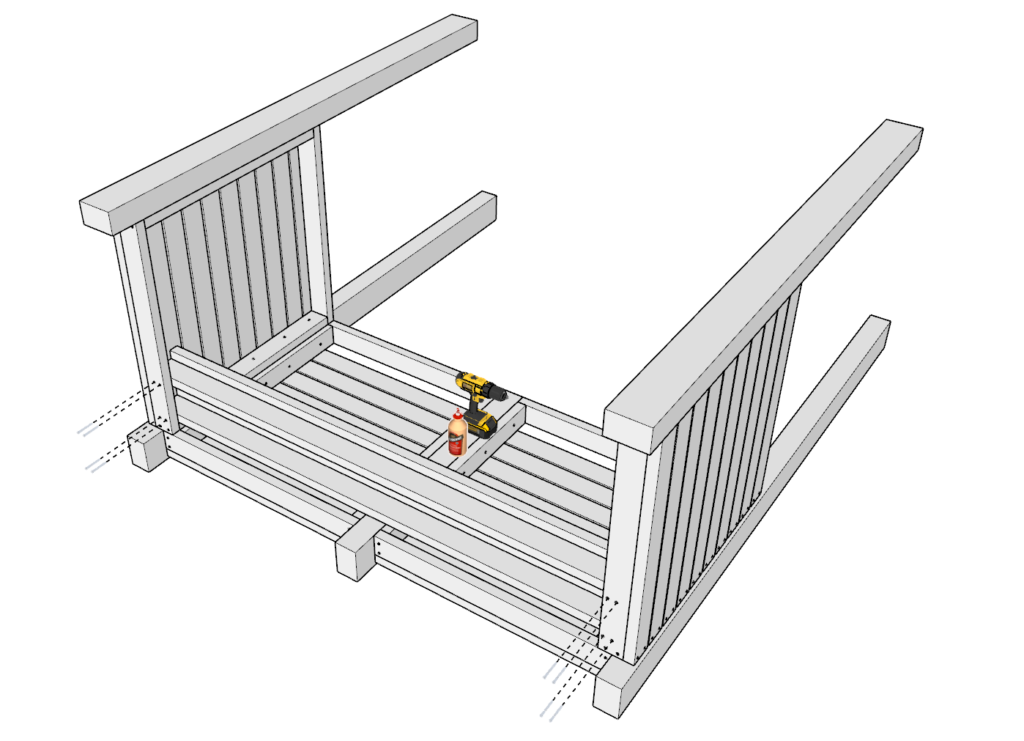
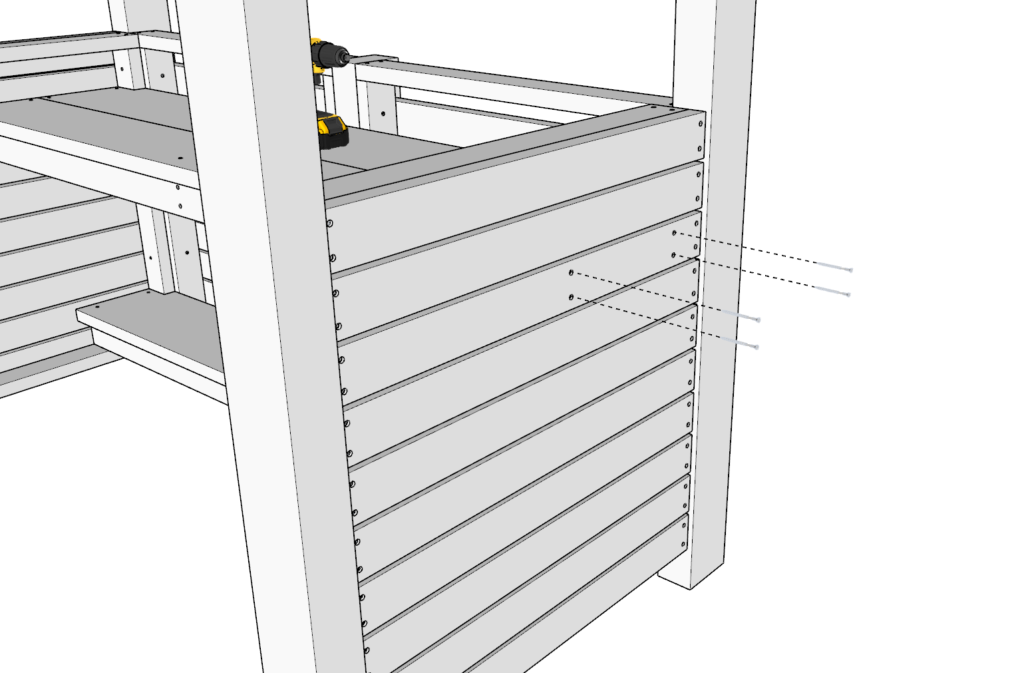
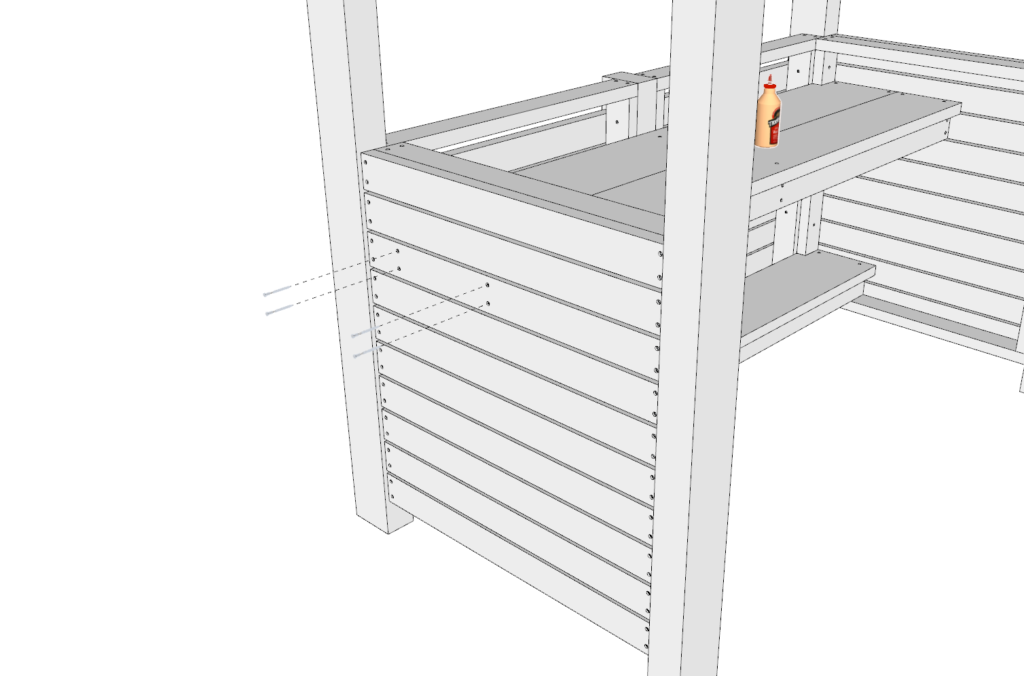
Step 5 (DIY outdoor bar siding)
Next, add the siding pieces.
Take twenty 36 inch 2×4 lumber pieces and eighteen 36-3/4 inch 2×4 lumber pieces and add them to the outdoor bar frame as shown below.
Begin by attaching the first 2x4s on the sides of the bar flushed and leveled with the in place 2×4 frame from the previous step as shown below.
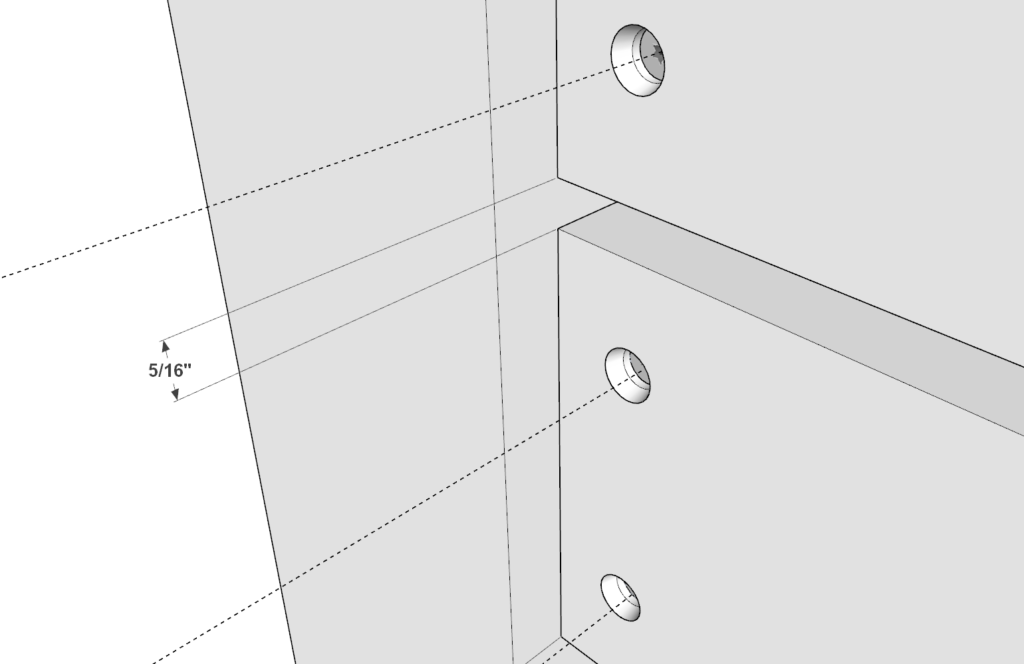
In the front of the bar, attach the first 2×4 lumber pieces about 3-13/16 inches down from the square frame pieces in that place as shown below.
The remaining pieces need to be about 5/16 inches apart.
To space out the pieces evenly you can use a spacer. This spacer can be cut from a scrap piece of wood on hand.
As before, glue, predrill, and add 3.5 inch screws.


Step 6 (DIY outdoor bar shelve assembly)
Next, built the top and bottom shelf of the DIY bar.
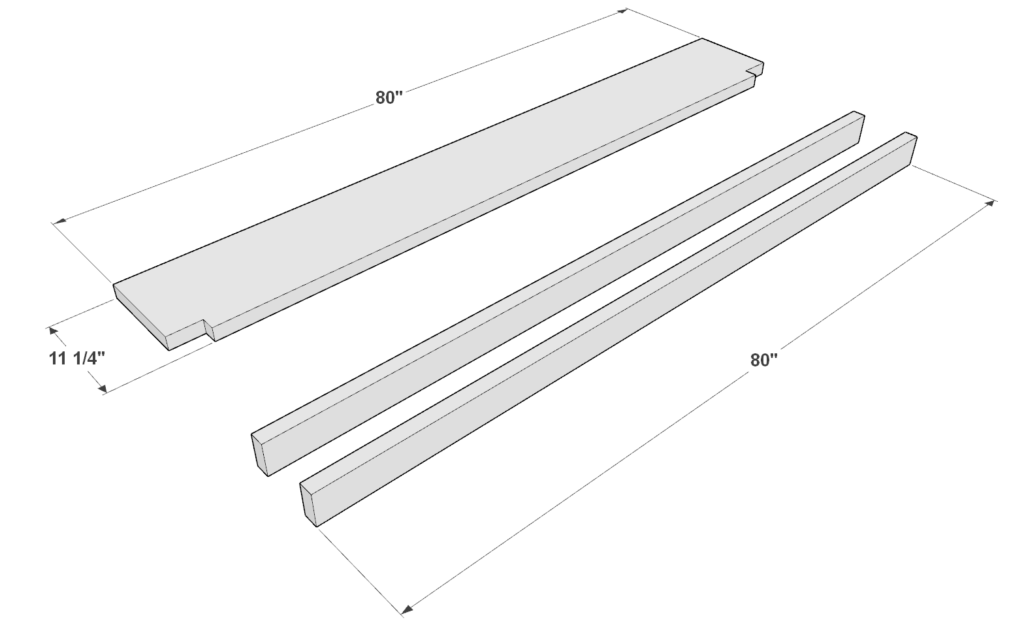
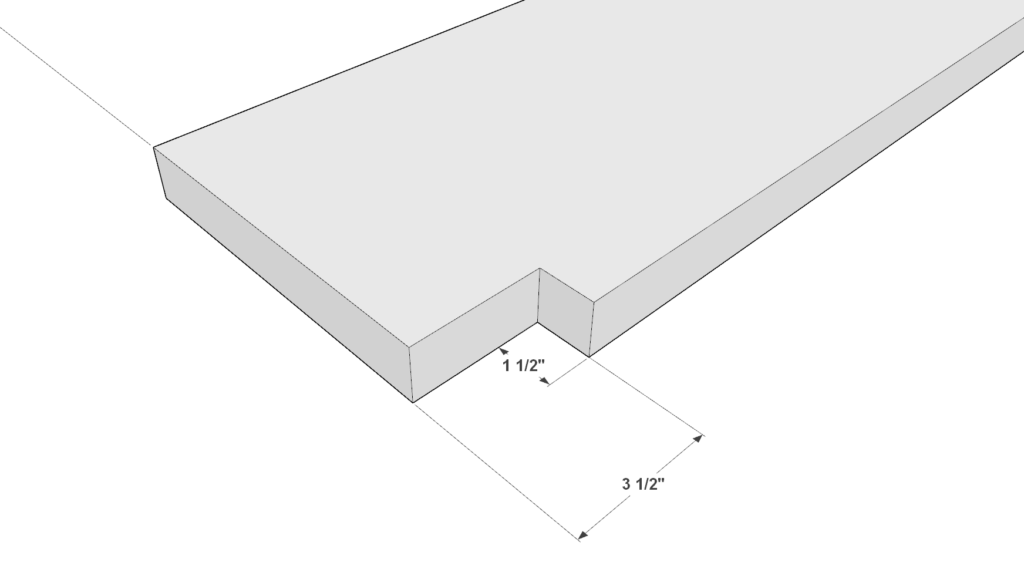
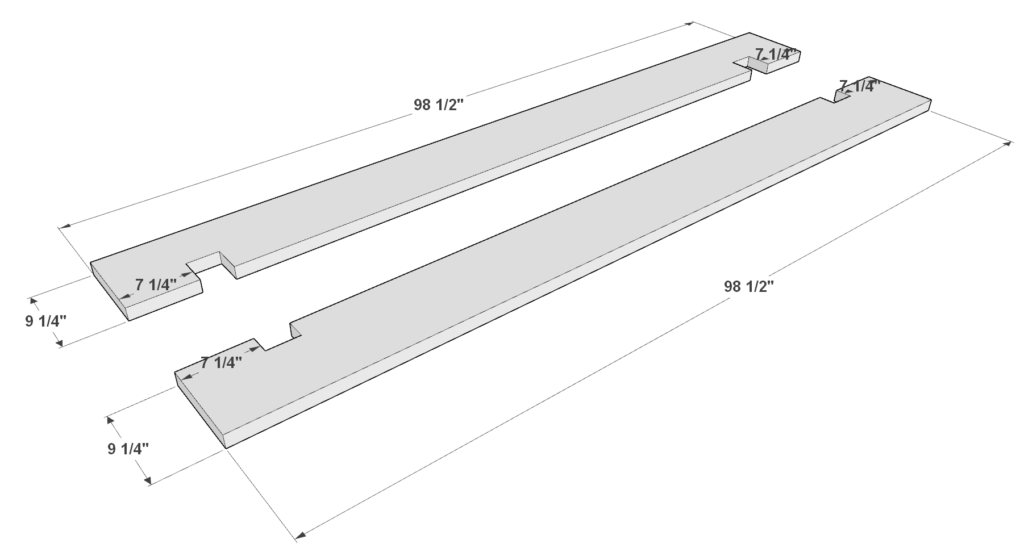
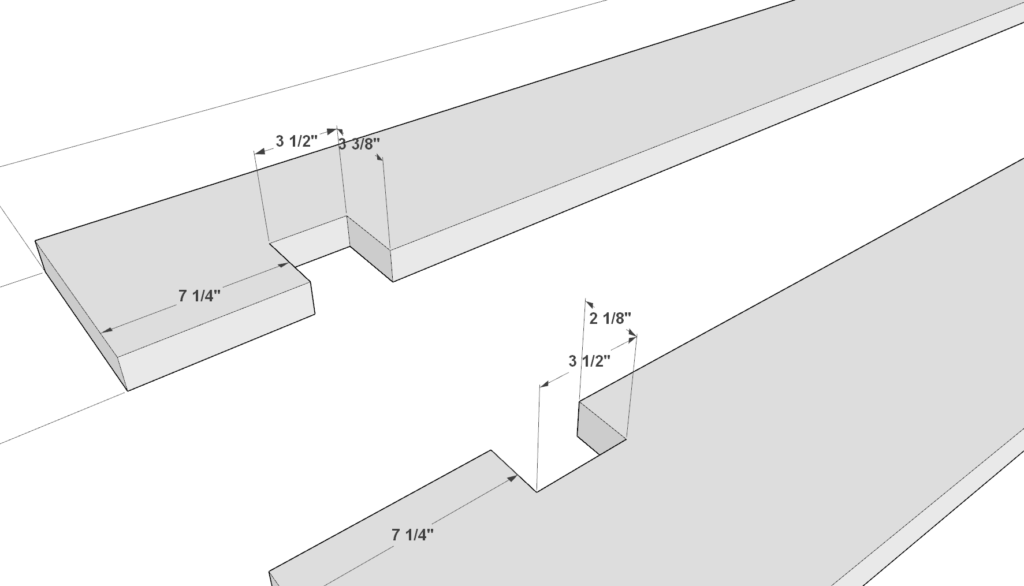
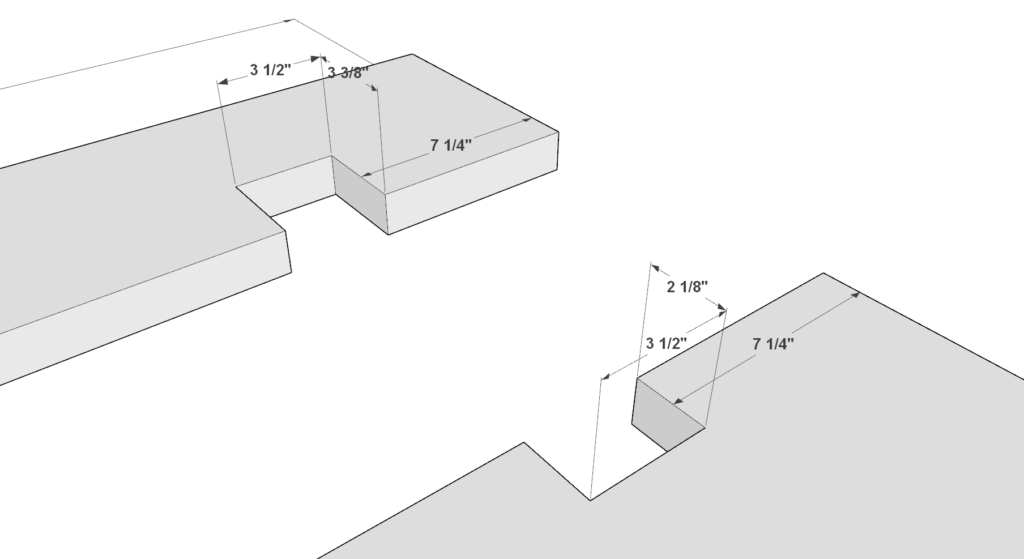
Start by making the bottom shelf. Take one 80 inch 2×12 lumber pieces and two 80 inch 2×4 lumber pieces. Cut a small 1-1/2 inch x 3-1/2 inch indent into the 2×12 lumber board on both sides as shown below.
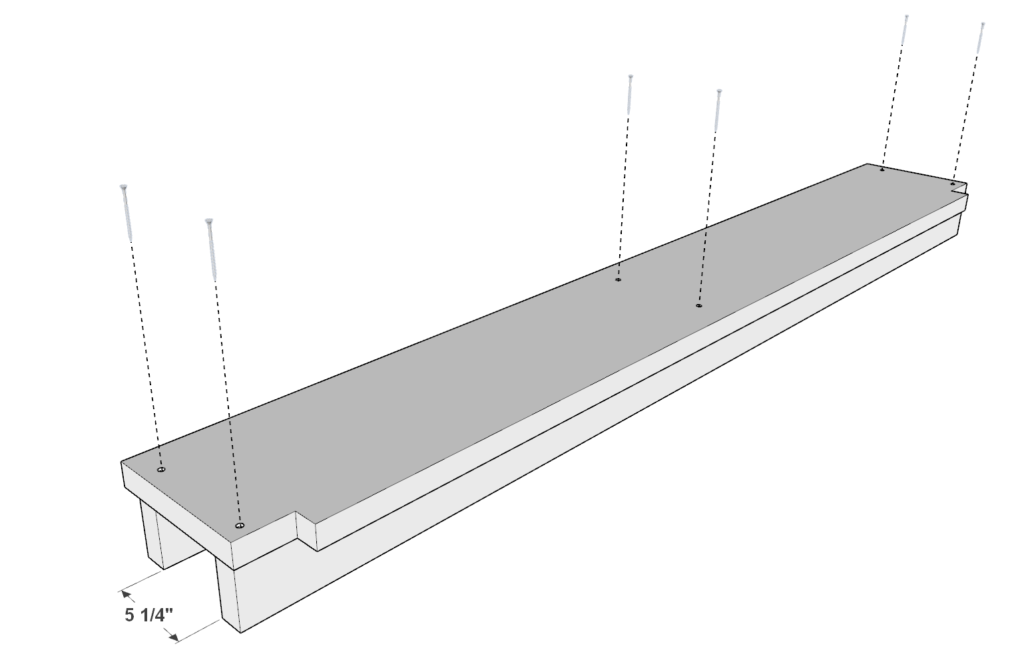
Next, attach the 80 inch 2x4s to the 80 inch 2×12 as shown below. Space out the 2x4s about 5-1/4 inches apart.
Predrill, add glue, and add 3.5 inch screws.
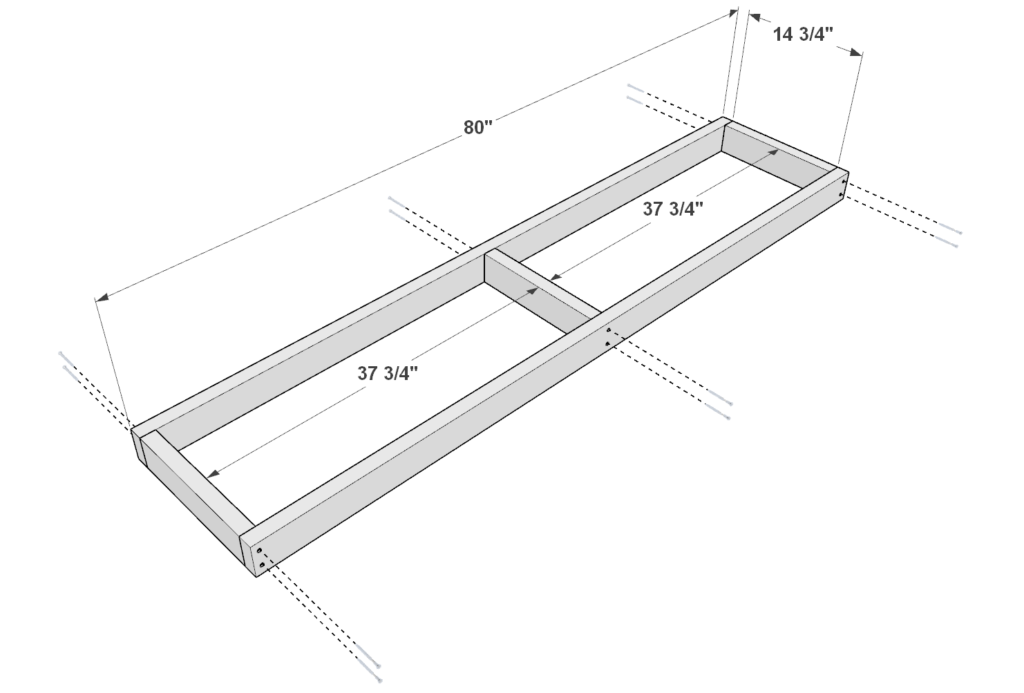
Next, make the top shelf of the bar.
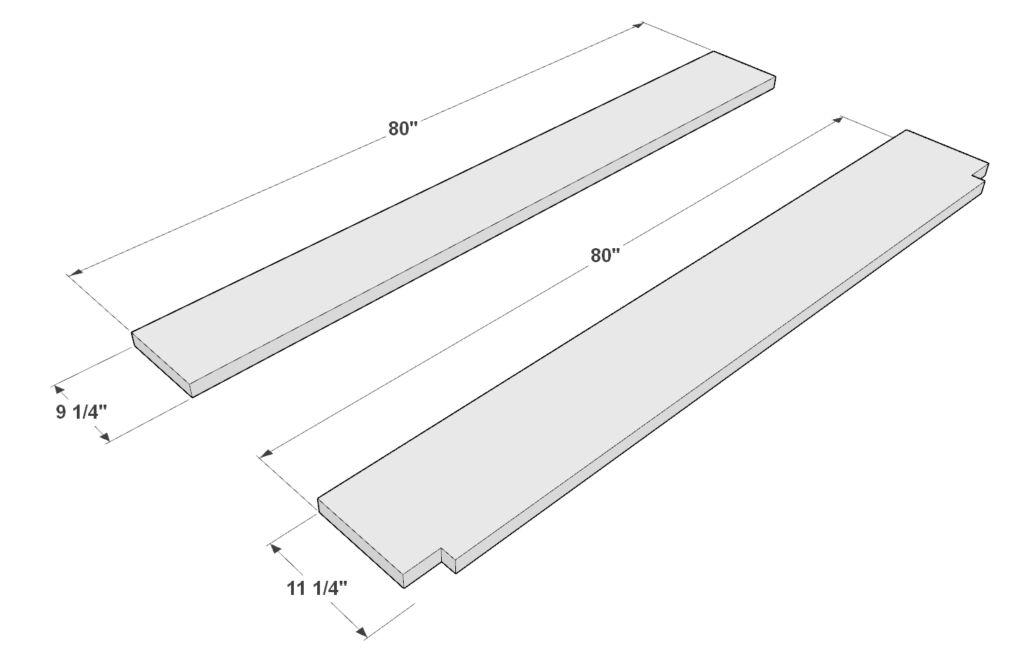
Take on 80 inch 2×10 boards and one 80 inch 2×12 inch boards. Cut a 1-1/2 inch x 3-1/2 inch indent into the 2×12 lumber board on both sides as shown below.
Next make a small shelf frame by taking two 80 inch 2×4 lumber pieces and three 14-3/4 lumber pieces and arrange them as shown below. Join them by predrilling, adding glue, and adding 3.5 inch screws.
Lastly, attach the 80 inch 2×10 board and the 80 inch 2×12 board to the shelf frame as shown below. Predrill, add glue, and add screws.

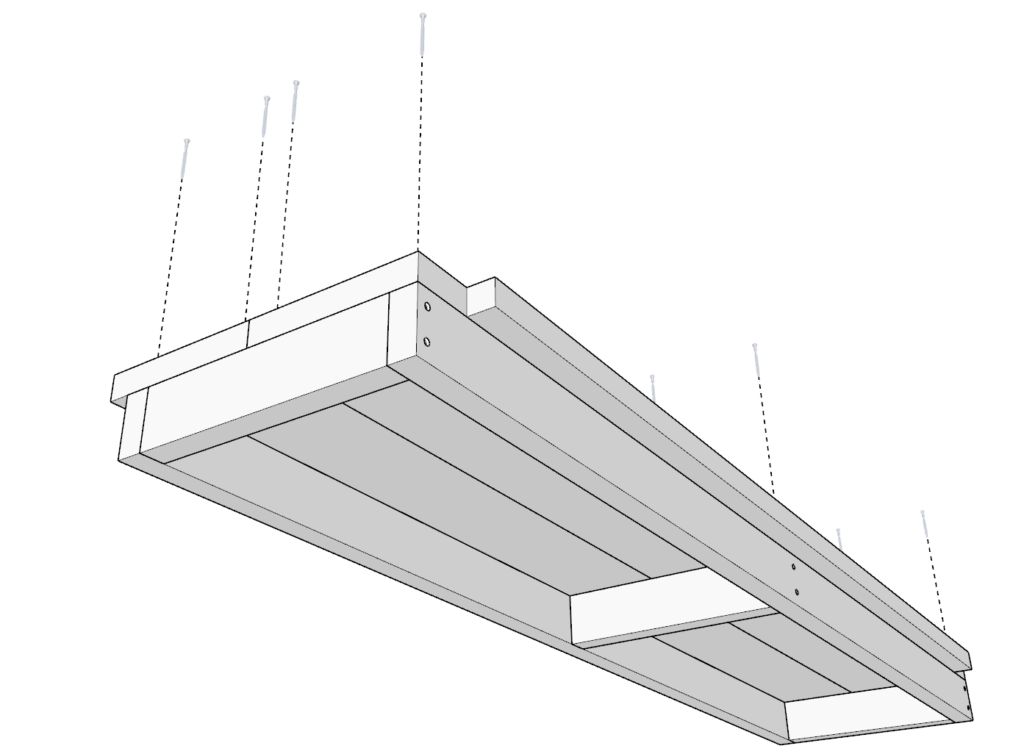
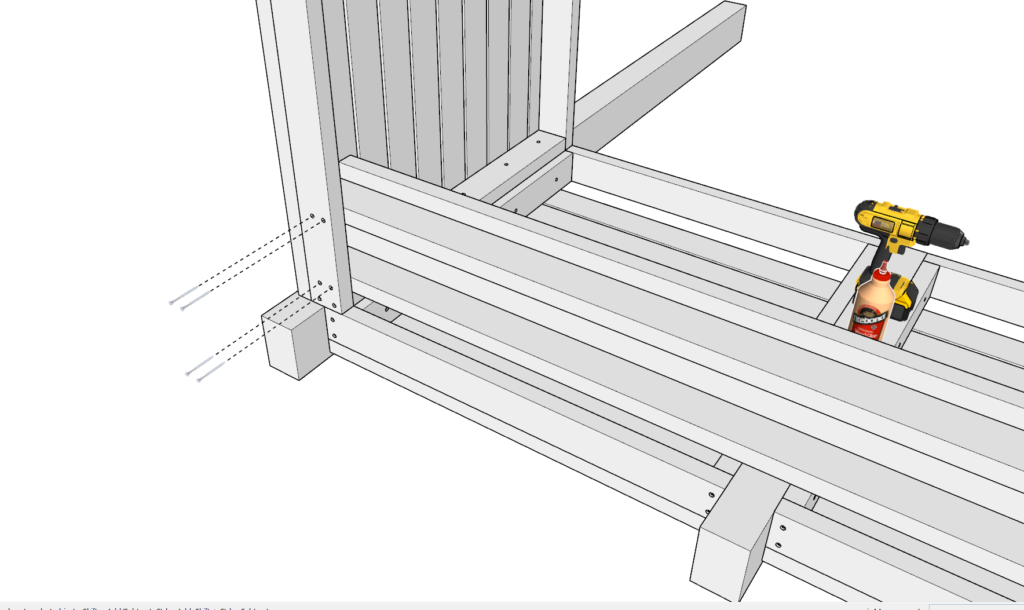
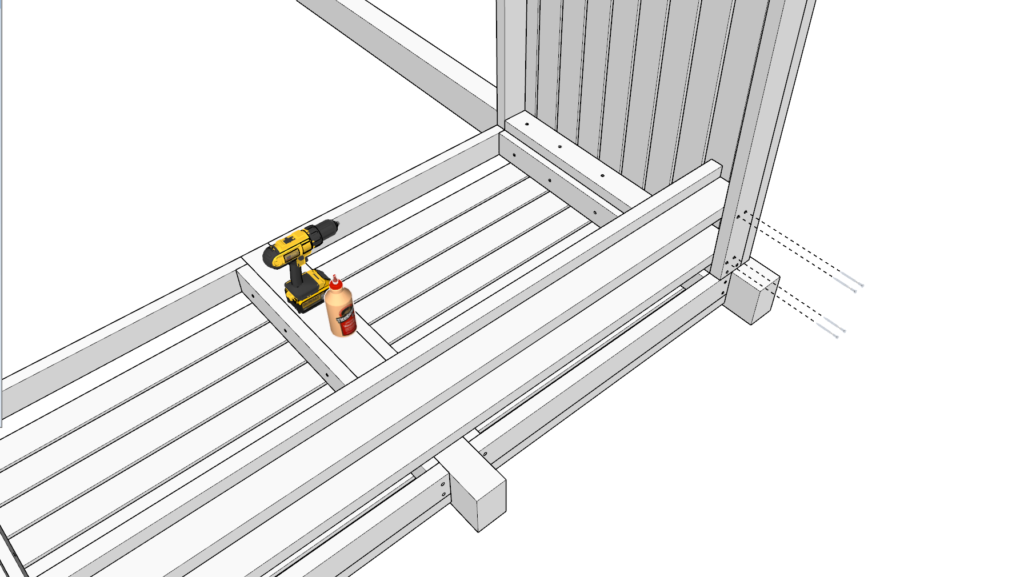
Step 7 (DIY outdoor bar shelve installation)
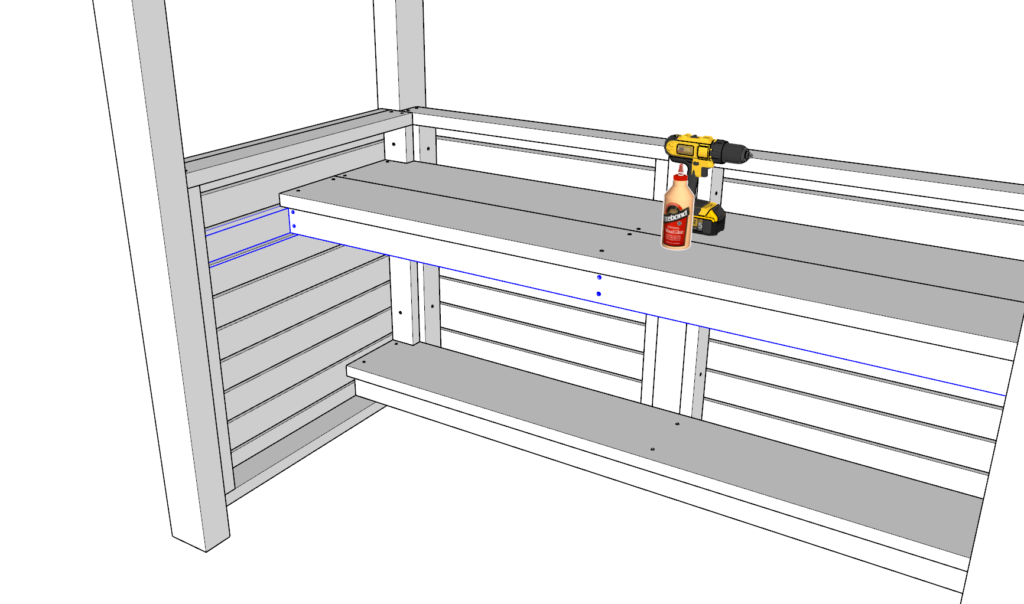
Next, attach the bottom shelf by tilting the bar on the side. Place the shelf into position as shown below. Make sure the 1-1/2 x 3-1/2 indented parts of the board lock into place. Add glue, predrill, and secure the shelf with 3.5 inch screws as shown below.
Next, attach the top shelf. The top shelf frame needs to be aligned with the 3rd 36 inch 2×4 siding pieces as highlighted in blue below. Once the shelf is aligned and the indented part of the shelf has locked into place, then predrill directly though the siding pieces, add glue, and add 3.5 inch screws.
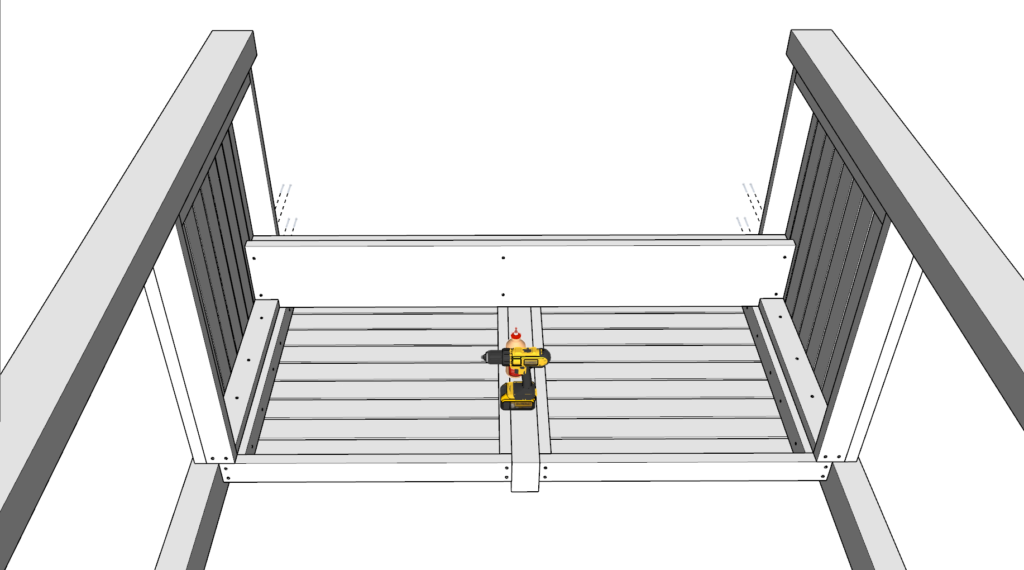
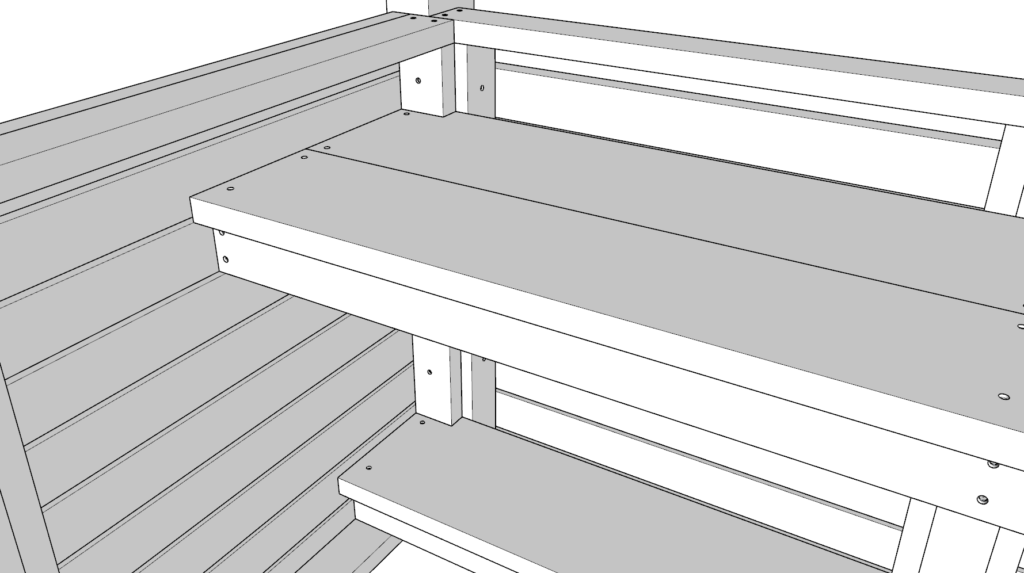
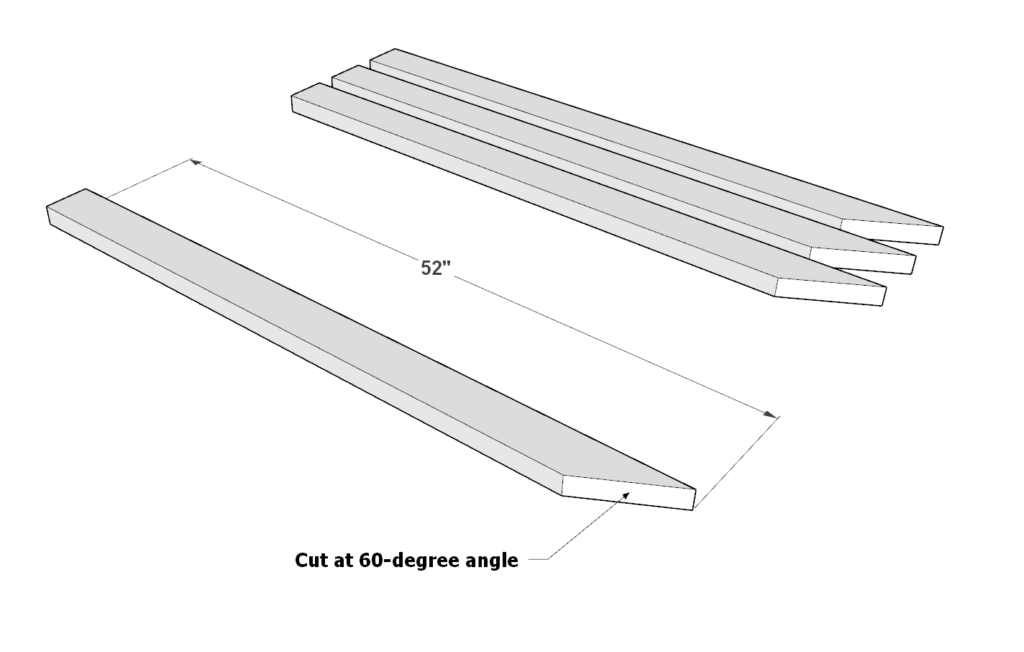
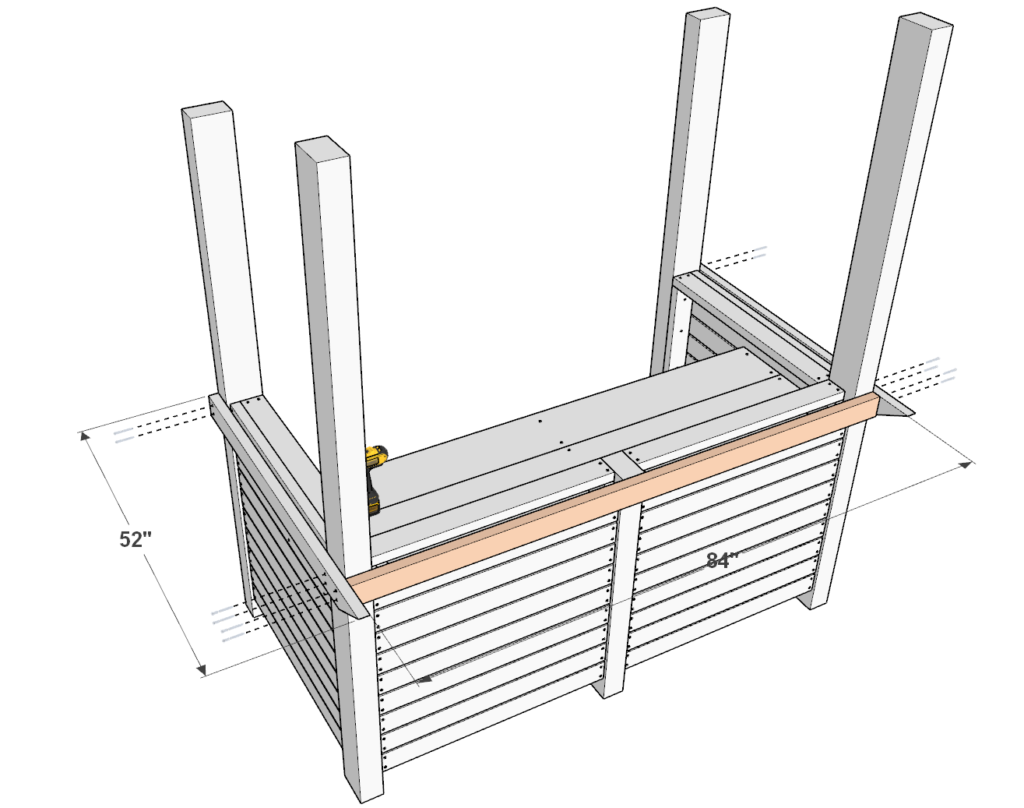
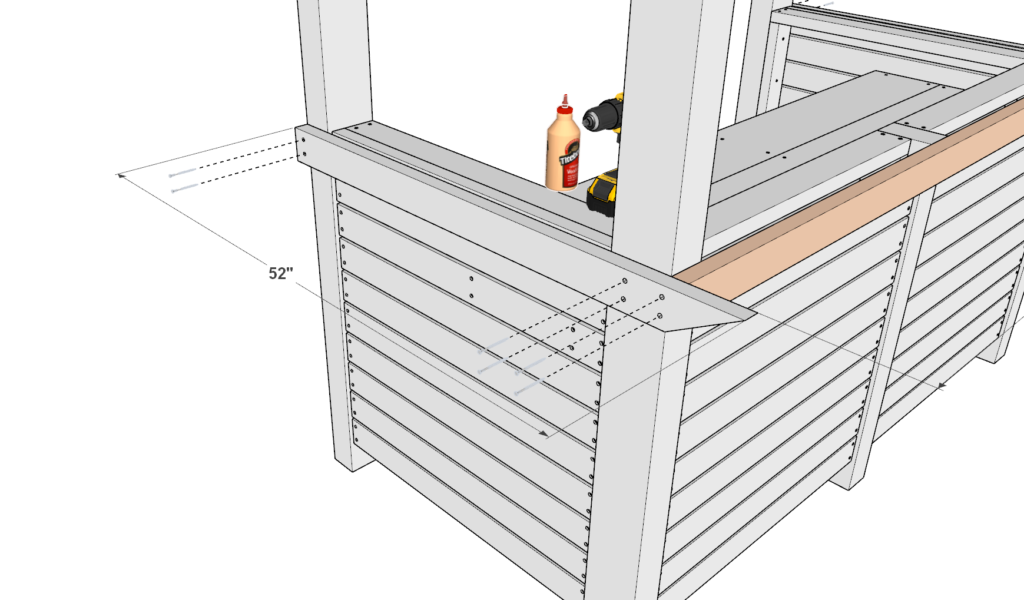
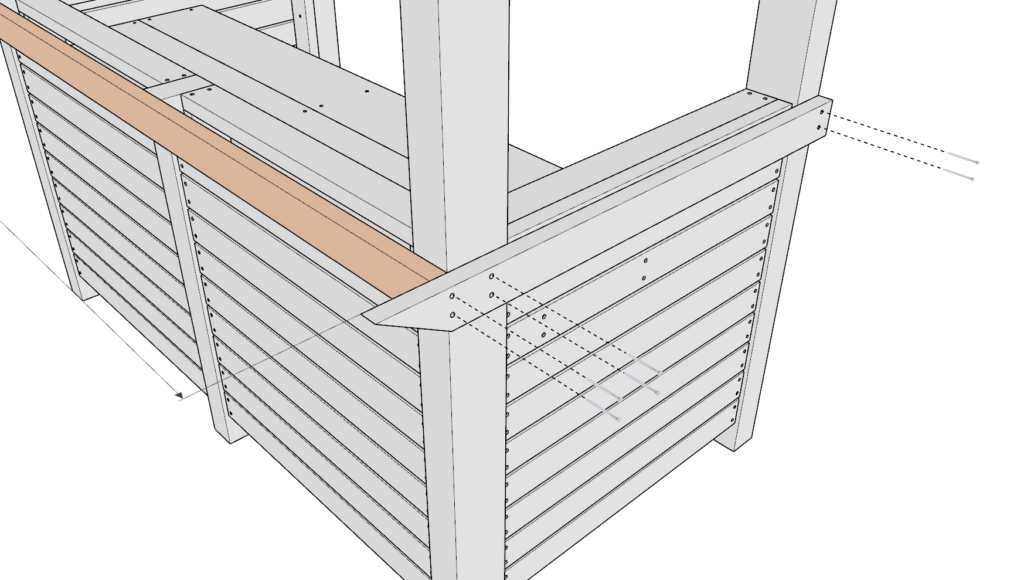
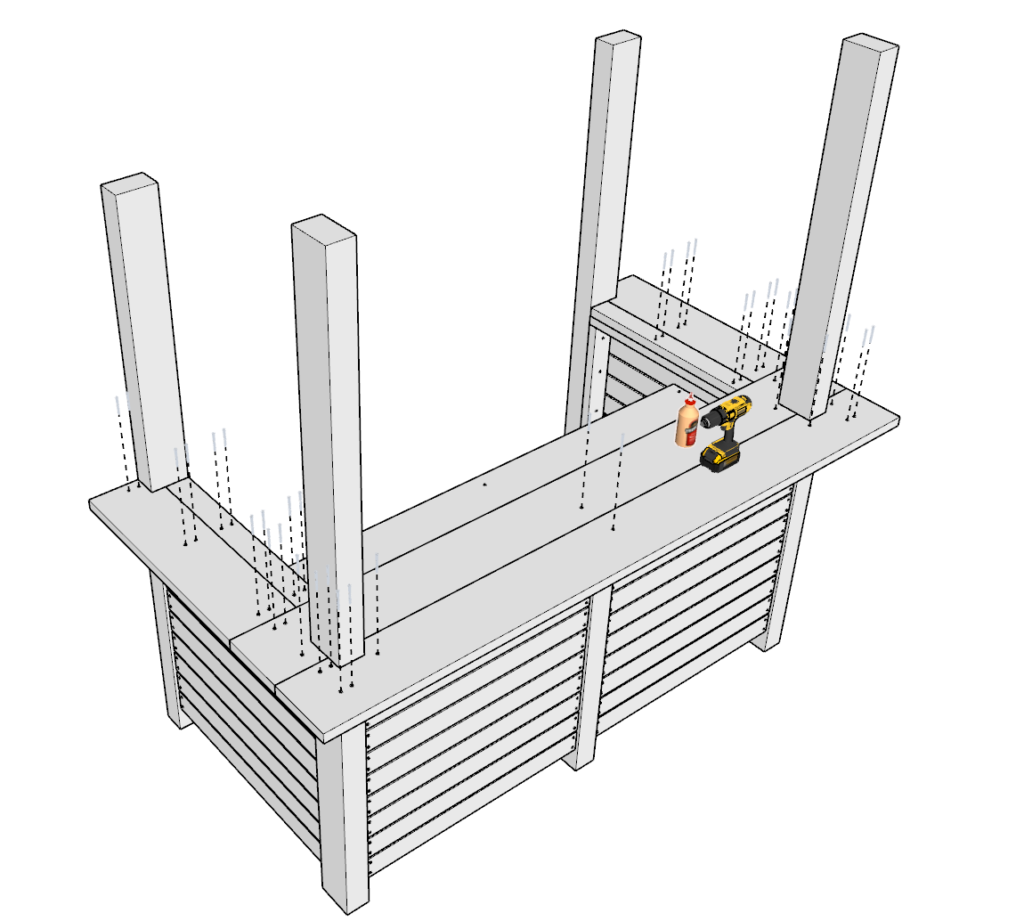
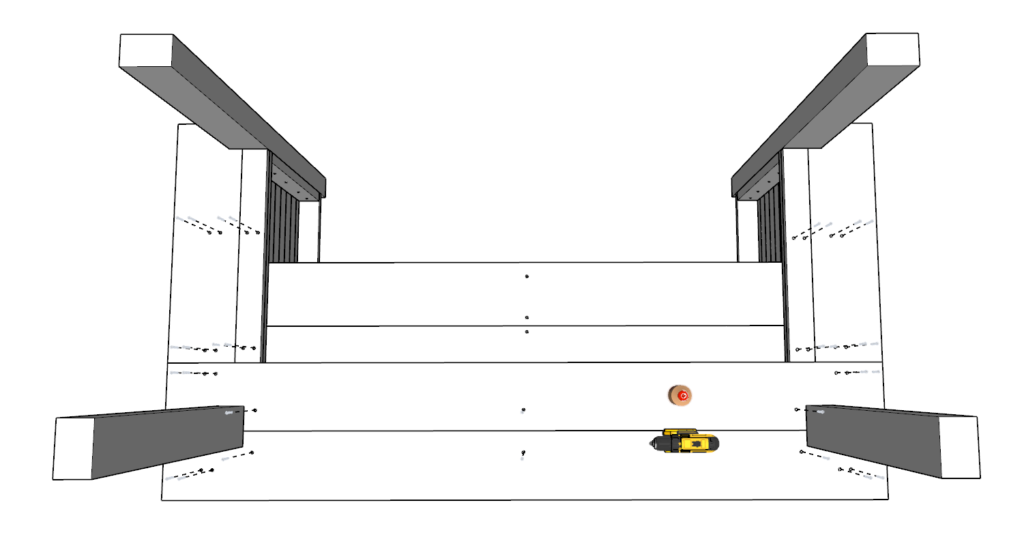
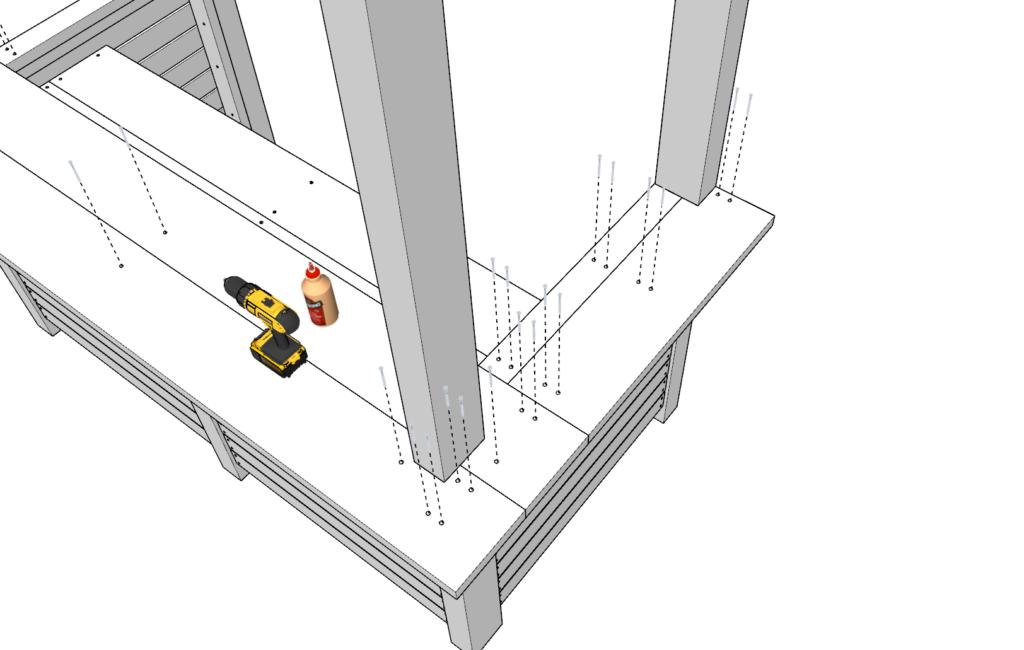
Step 8 (DIY outdoor bar top support assembly)
Next, add the bar top supporting lumber pieces.
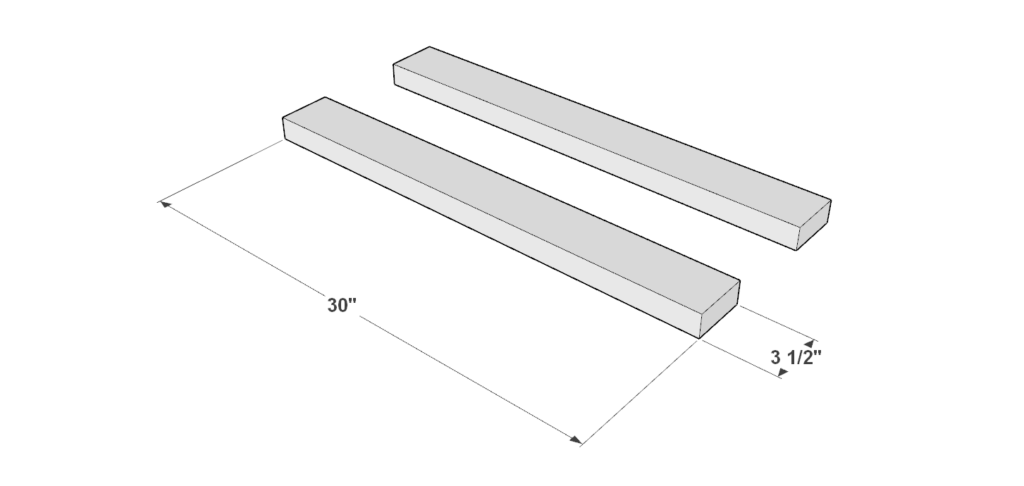
Cut four 52 inch 2×4 lumber pieces with one end cut at 60-degrees as shown below.
Next add two 52 inch 2×4 lumber pieces and one 84 inch 2×4 lumber piece (highlighted in orange) to the bar frame as shown below.
Predrill holes, add glue to all areas being joined, and add 3.5 inch screws.
Next, add one more layer of 52 inch 2×4 lumber pieces directly on top on the old 52 inch 2×4 lumber pieces as shown below.
Add glue, predrill, and add 3.5 inch screws.
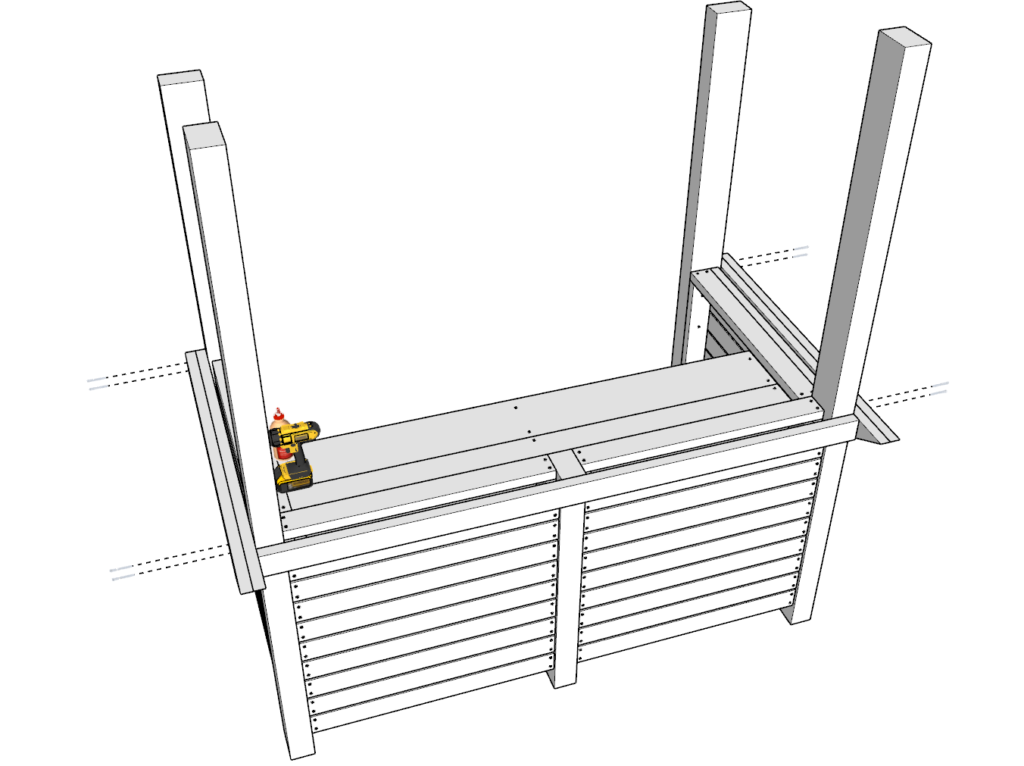

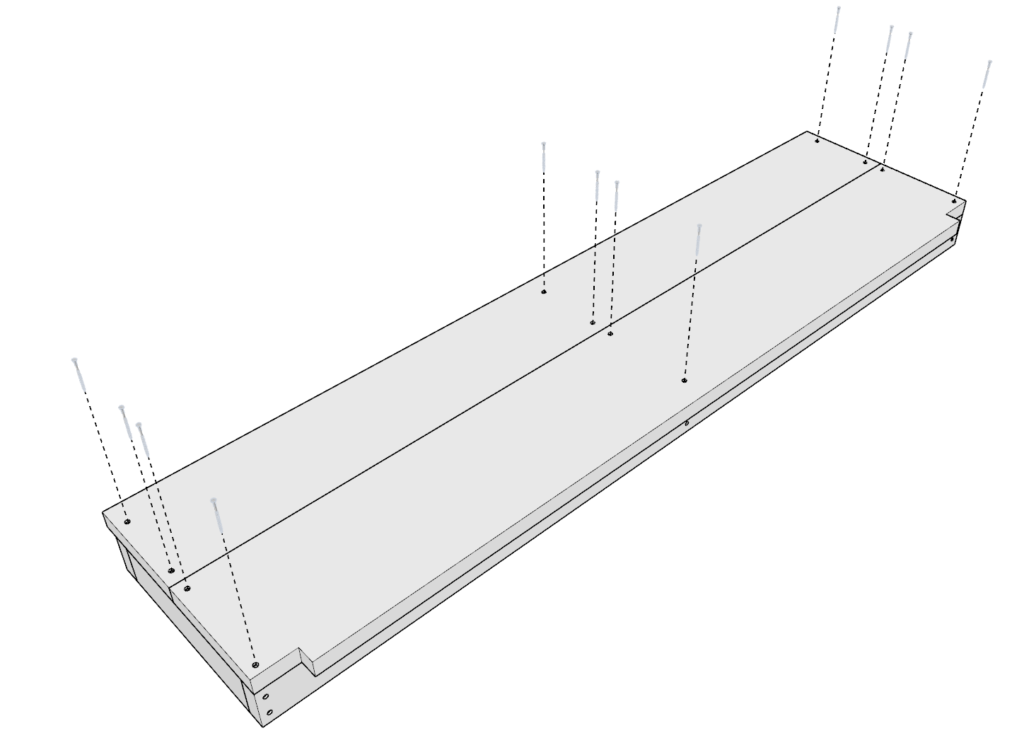
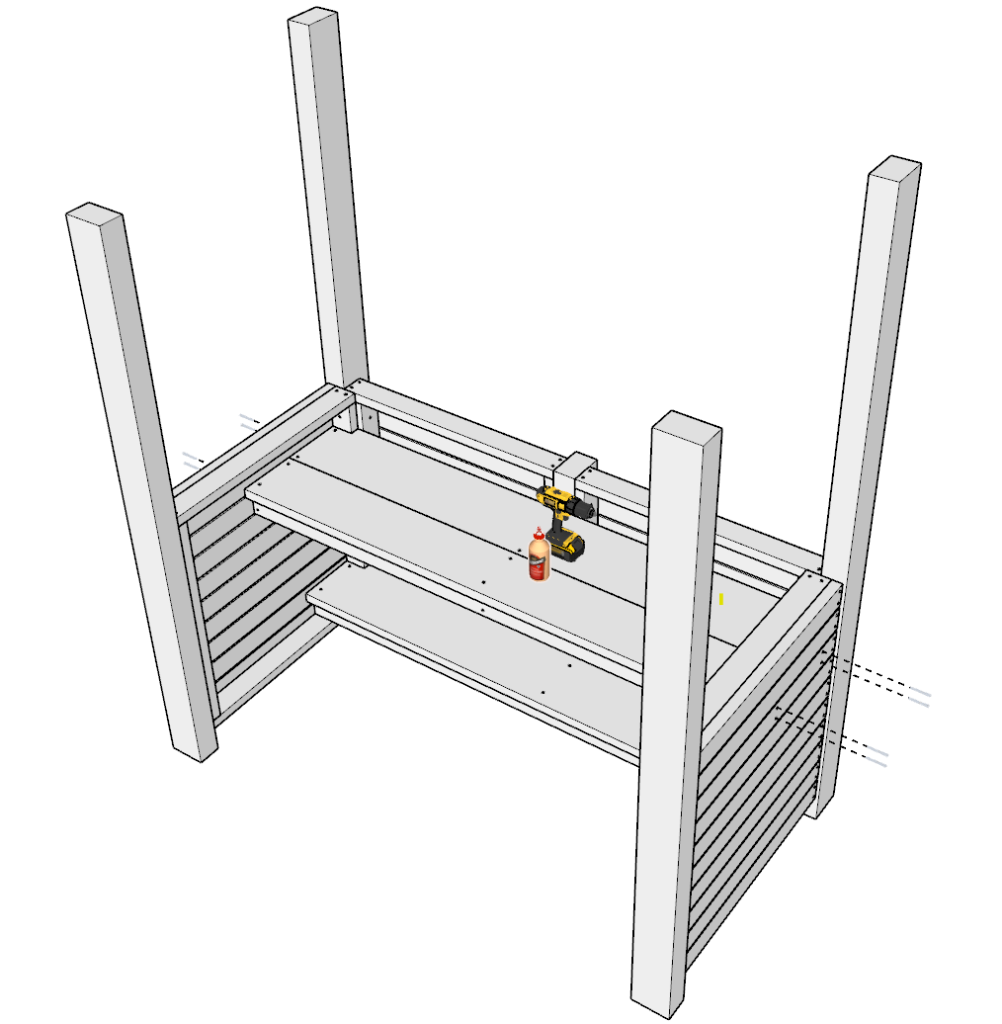
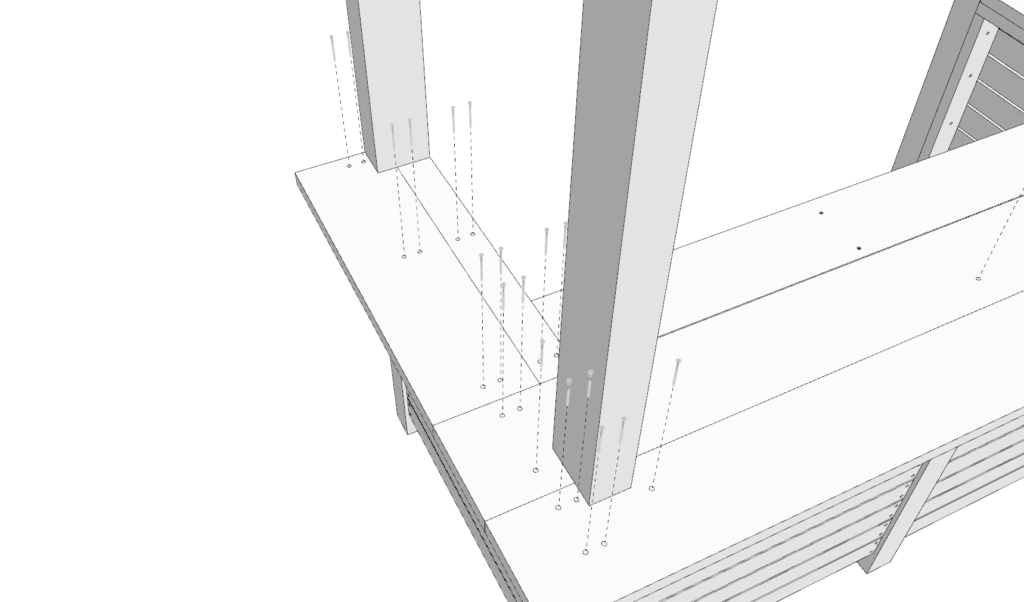
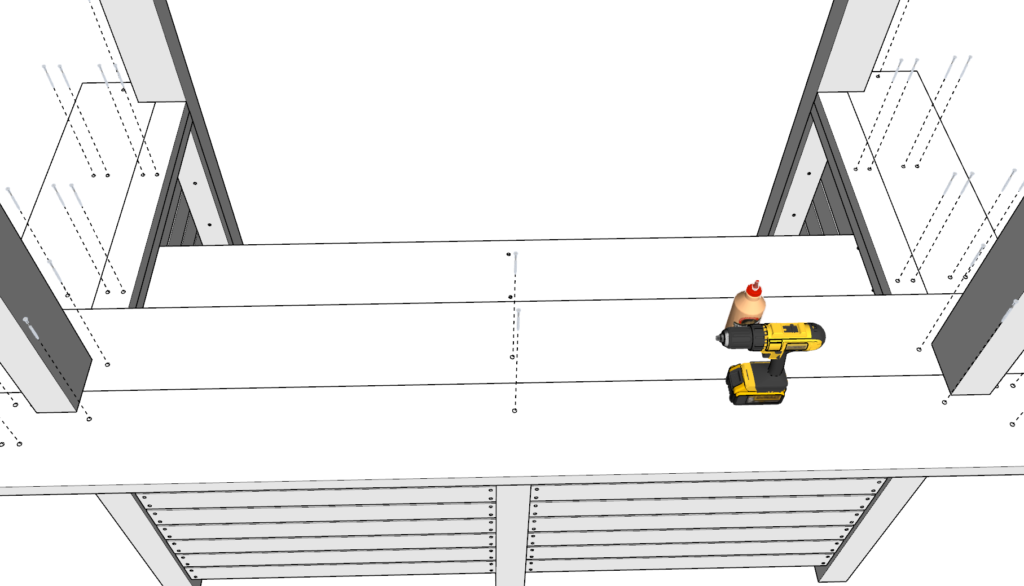
Step 9 (DIY outdoor bar top assembly)
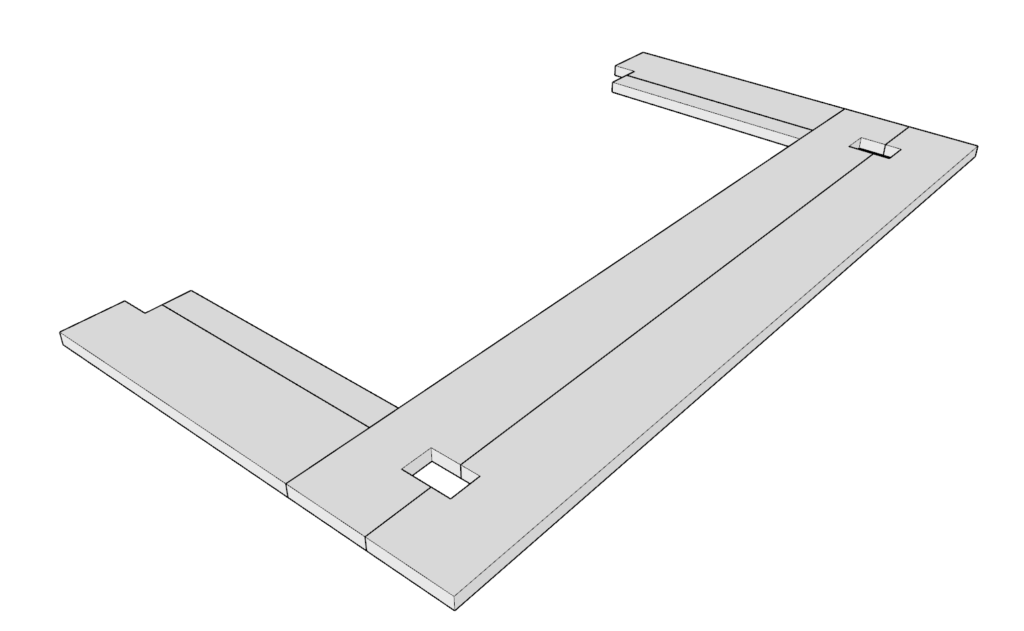
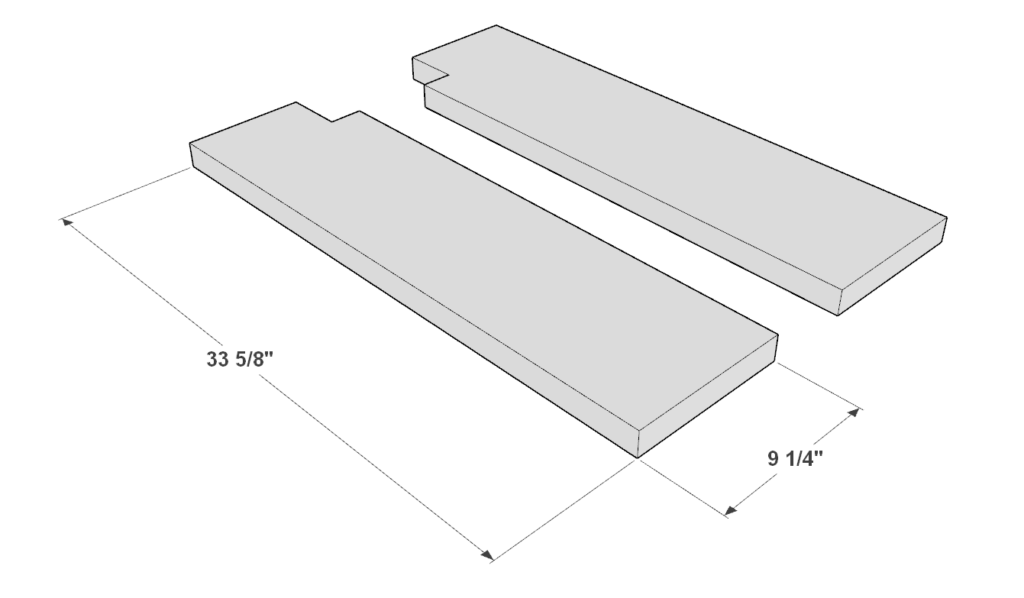
Next, add the bar top lumber pieces.
The shape of the bar top board must accommodate the pillars, The shape and indents are illustrated below.
Attach the bar top boards by adding glue, predrilling, and adding 3.5 inch screws.
The images below show the recommended place for the placement of the screws. You can however choose to place them defiantly.
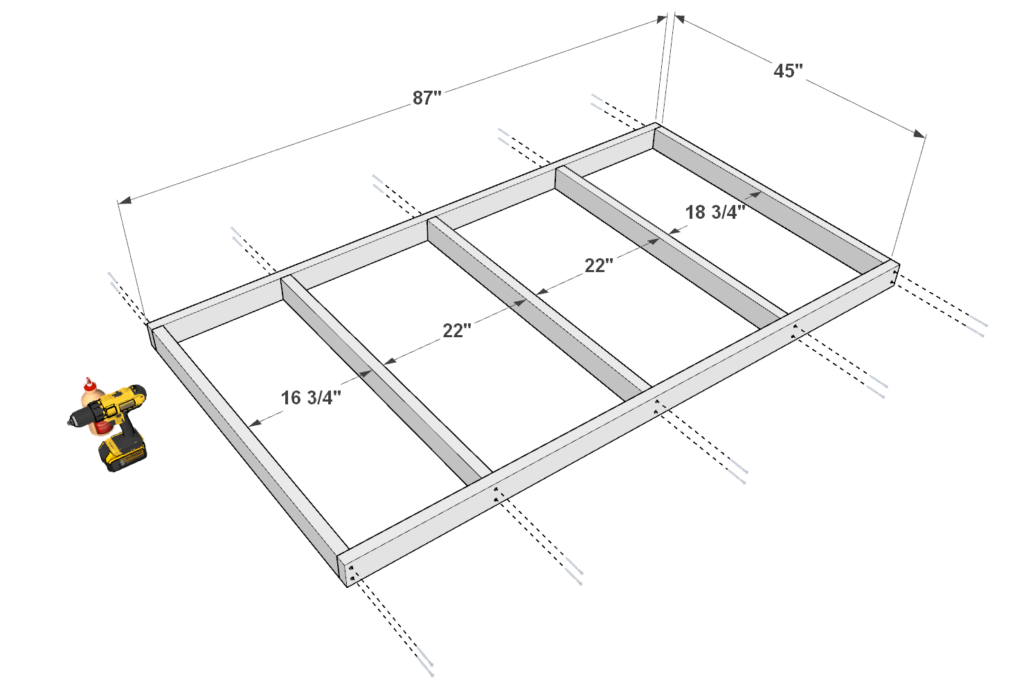
Step 10 (DIY outdoor bar roof assembly)
Next, assemble to outdoor bar roof.
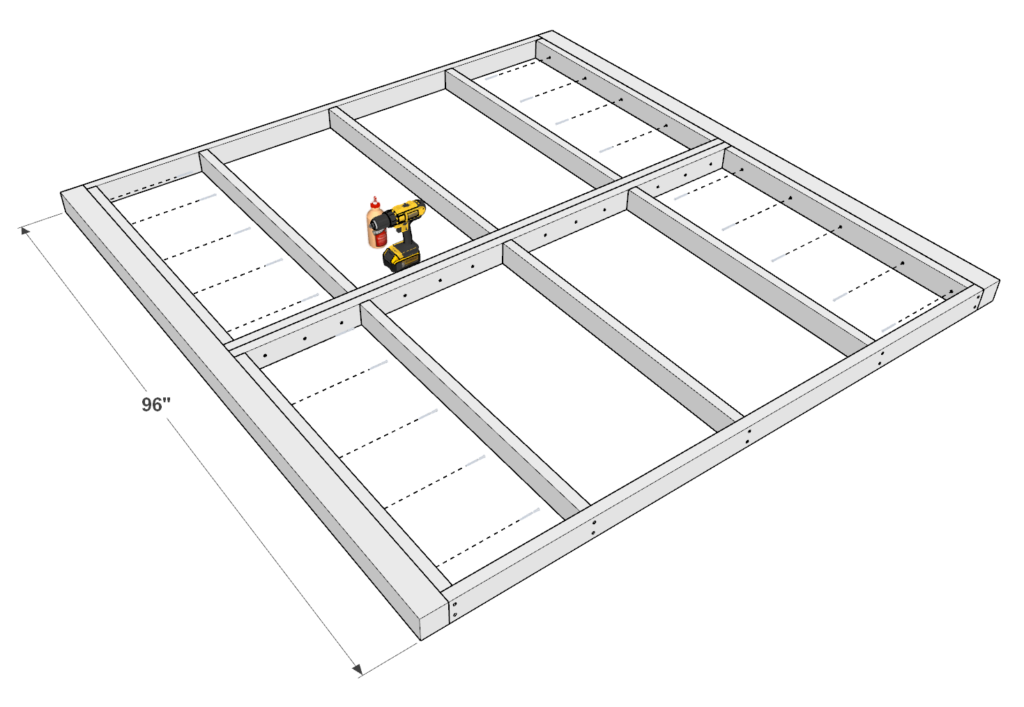
First, take two 87 inch 2×4 lumber pieces and five 45 inch 2×4 lumber pieces and arrange them as shown in the first image. Space them out as shown below. Join the 2x4s with screws and glue.
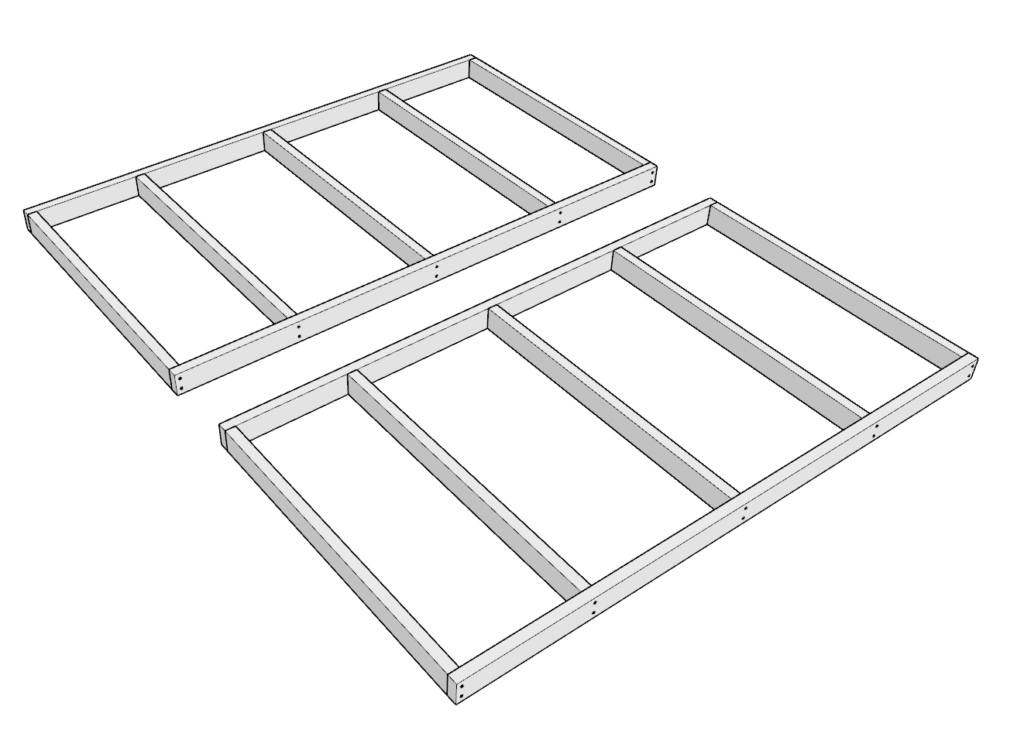
Next, make a second identical frame.
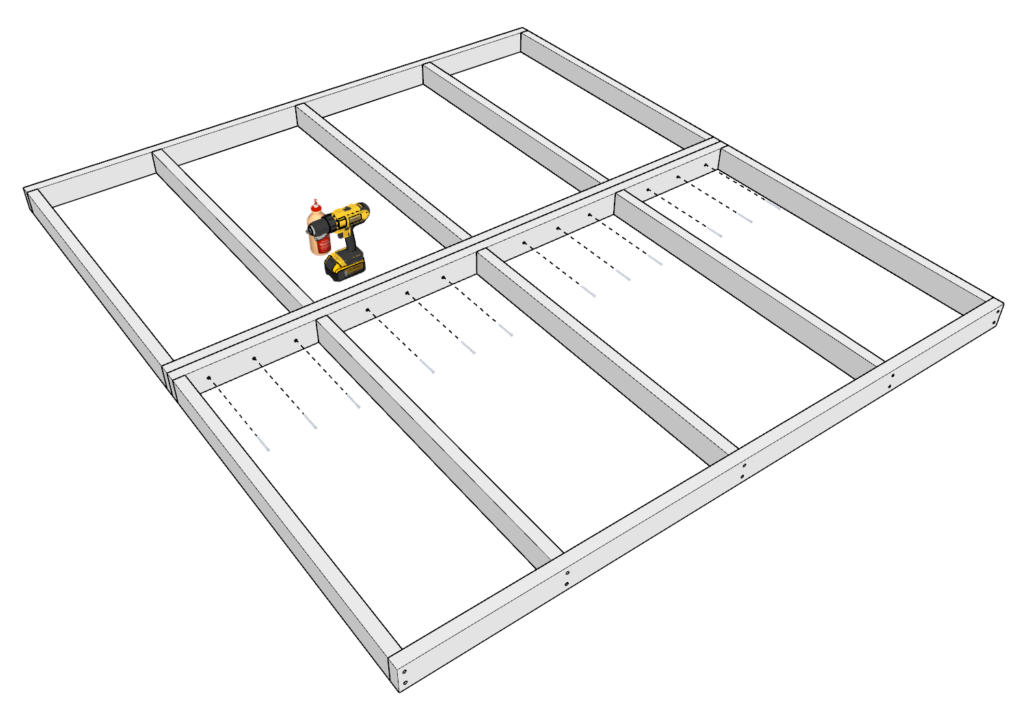
Next, attach the two frame pieces. Use 2.5 inch screws so that the screws don’t show through. Predrill, and add glue.
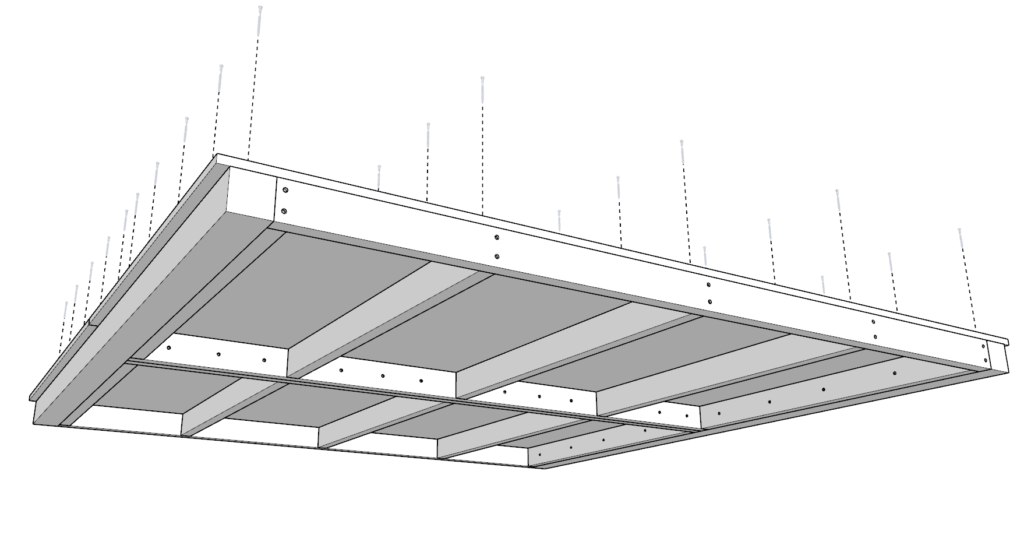
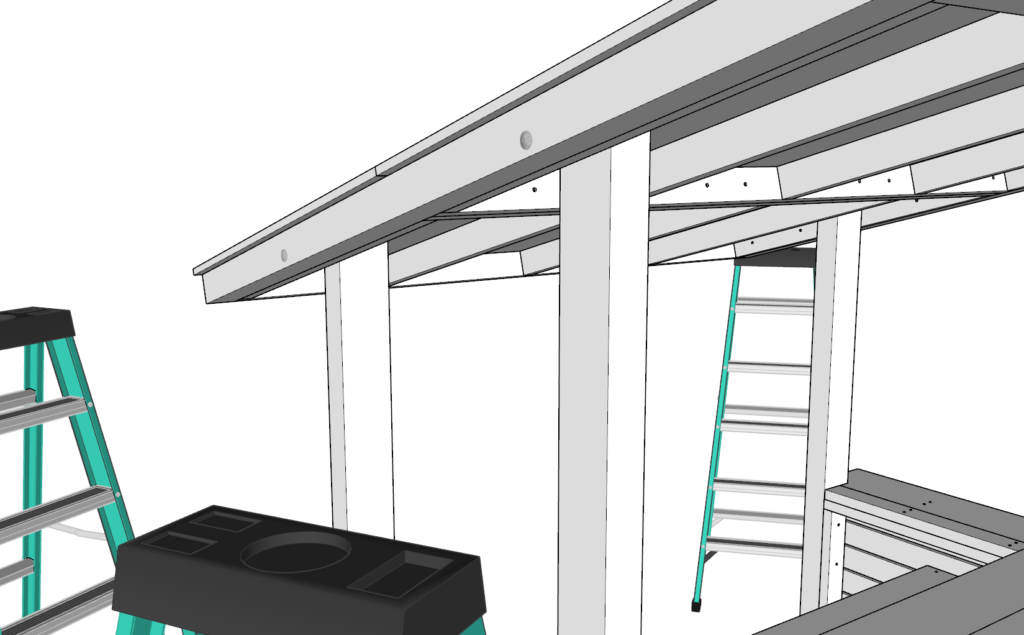
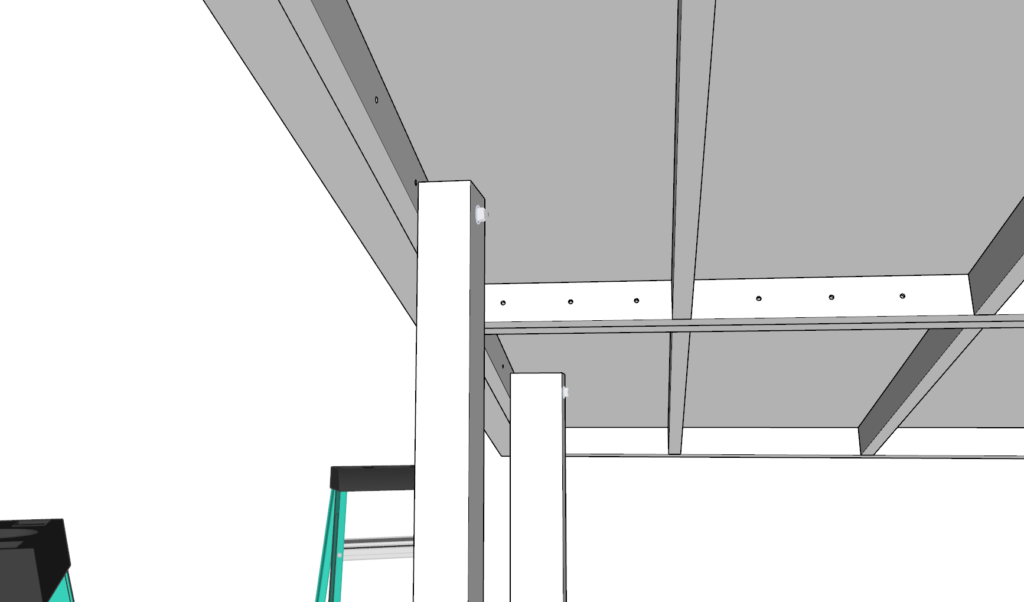
Next, add two 96 inch 4×4 lumber pieces to the sides of the frames for added strength. Attach the frame pieces with 3.5 inch screws and glue.
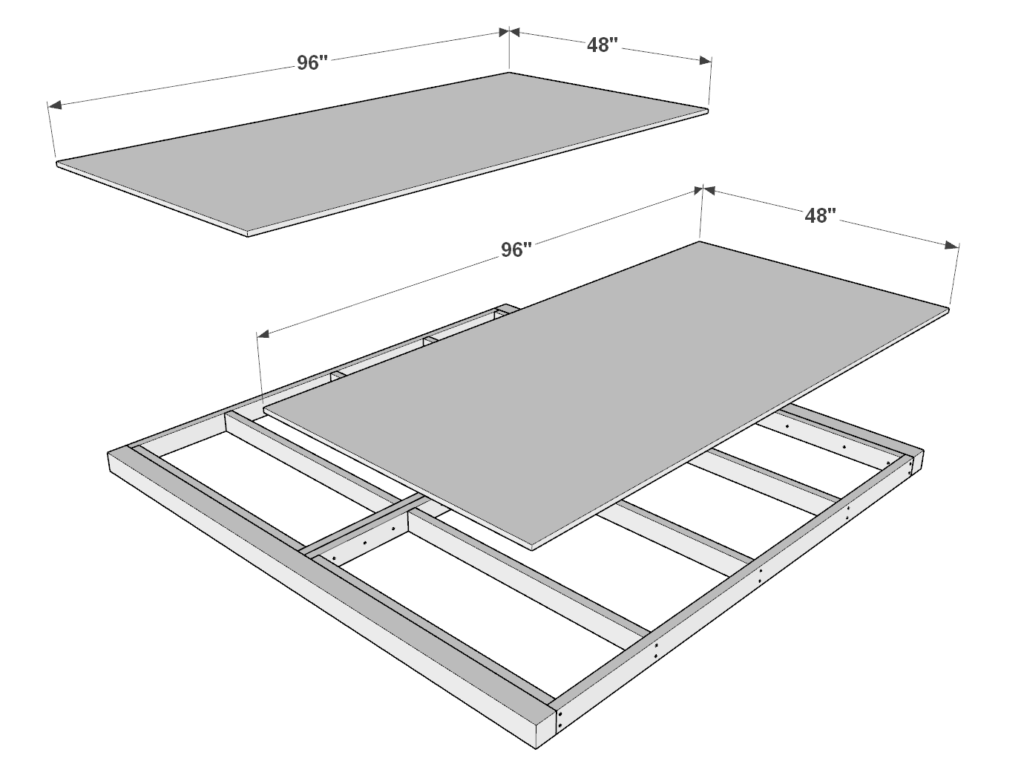
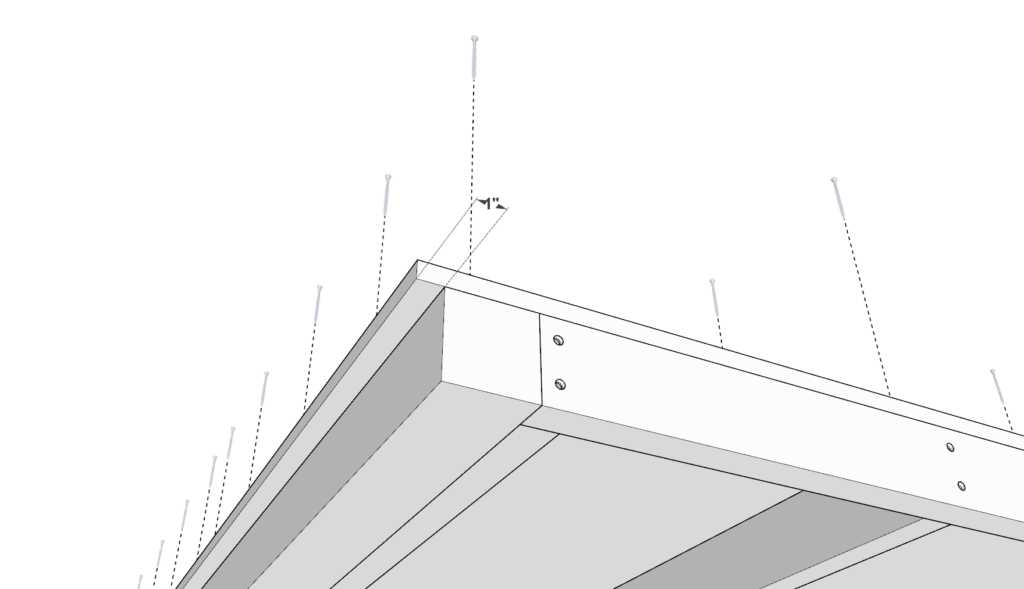
Next, add two 48 inch x 96 inch plywood sheets to the frame. The plywood sheets will stick out by 1 inch on two sides of the roof. predrill, add glue, and add 3.5 inch screws to secure the rood panel.

Step 11 (DIY outdoor bar roof installation)
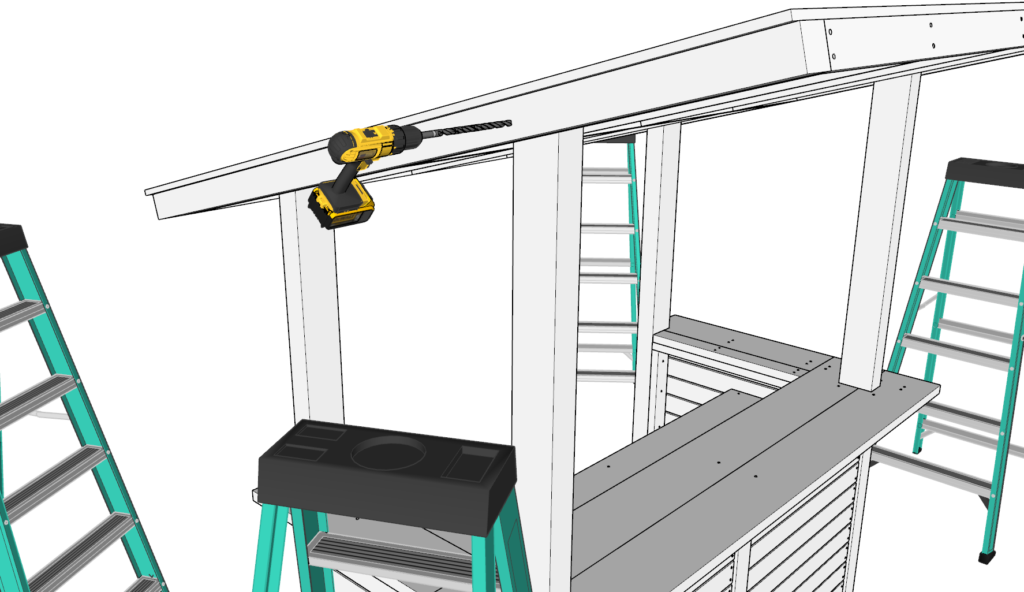
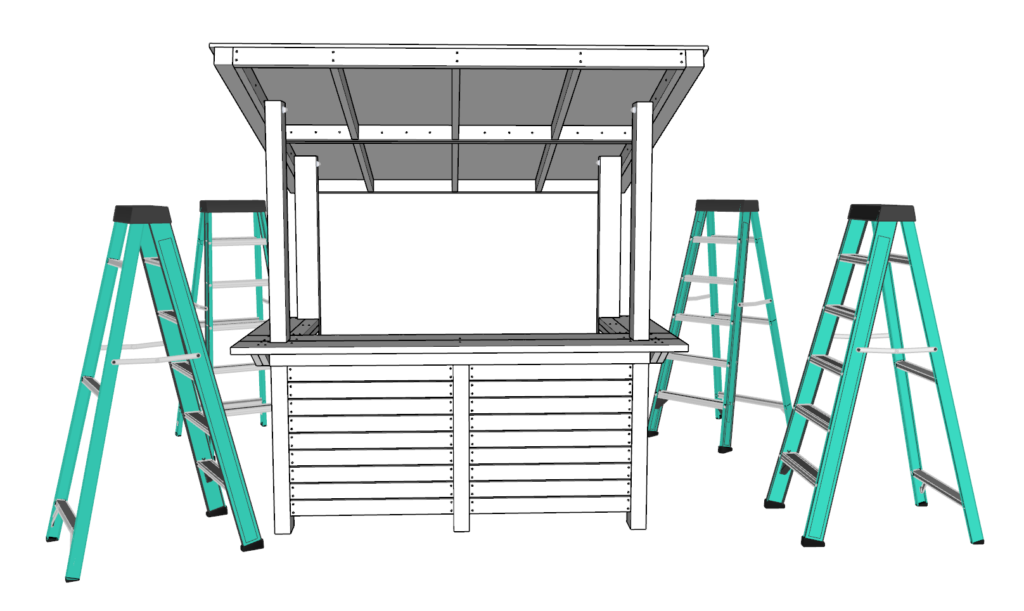
Next, attach the roof of the bar to the bar pillars.
This is the heavy part that will require help.
First, place ladders around the parameter of the bar and lift the bar roof with the help of at least 4 people.
Place the roof on top of the pillars.
Adjust the height of the roof in the back of the bar so that you can comfortably walk in and out of the bar area. If your taller then move the roof higher up. if your shorter then bring it down.
Once you choose a comfortable roof height, drill through the roof frame and the pillars with a long drill bit.
Attach the roof and pillars with nuts and bolts.
Step 12 (DIY outdoor bar finishing touches)
Next add material to protect the plywood sheets and roof. This can be either a thatched roof, shingle roof, tile roof, or metal roof. These DIY plans do no go into detail about how to attach the various roof options
Lastly, sand down the whole bar. I use an orbital sander to speed up the process
I use a rough 80 grit paper first and then finish it with a 220 grit paper.
Filling in the holes is optional.
I also like to use a router on the perimeter edges of the bar top to round off my corners so that the top doesn’t press in on the forearms and elbows when its in use. This makes the table more comfortable. This can also be done with a sander if you don’t have a router on hand.
At this point it is ready to be stained or painted!