
The Benefits of a DIY Mudroom Locker
A mudroom locker is essential for any home with an active family. It provides a place to store all of the family‘s outdoor gear, including coats, boots, hats, and gloves. This way, the family can be organized and ready to head out the door for any activity. A mudroom locker can also be a great place to store sports equipment, garden tools, and other items that need to be kept out of the way.
Specifications of this DIY Mudroom Locker
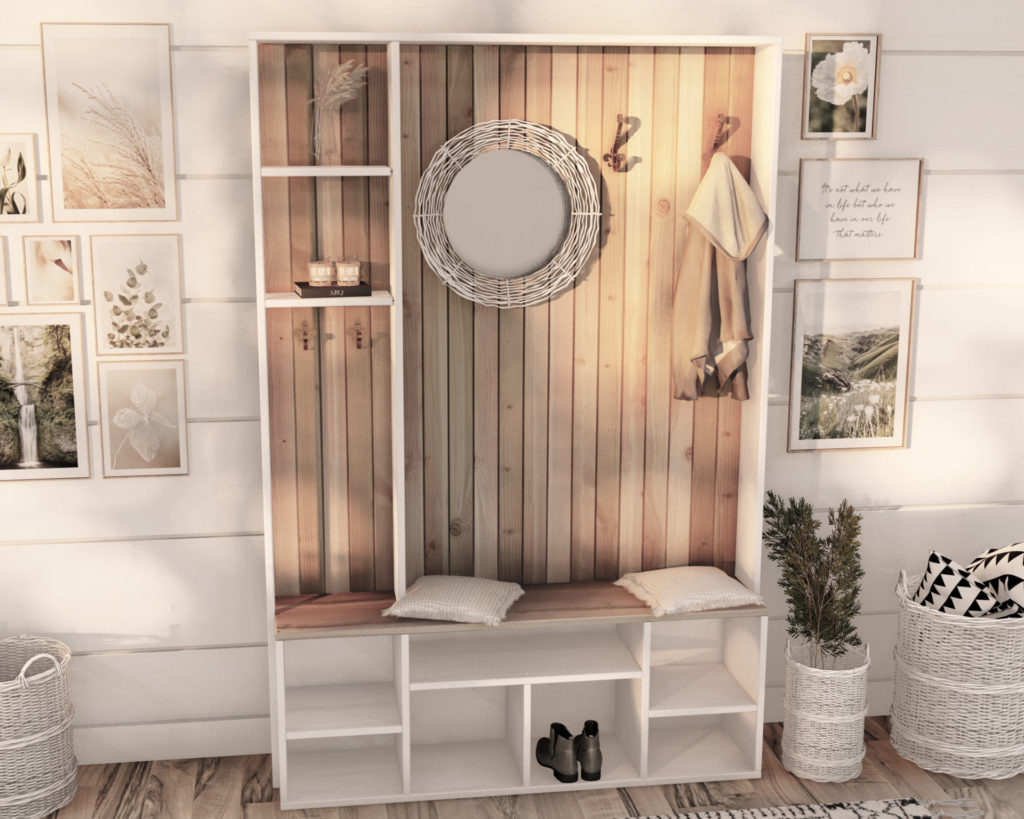
DIY plan for farmhouse mudroom bench with cubbies and hall tree bench organizer
The Mudroom locker, farmhouse hall tree, or hallway organizer with cubbies has many different names but serves a few very important purposes for your home.
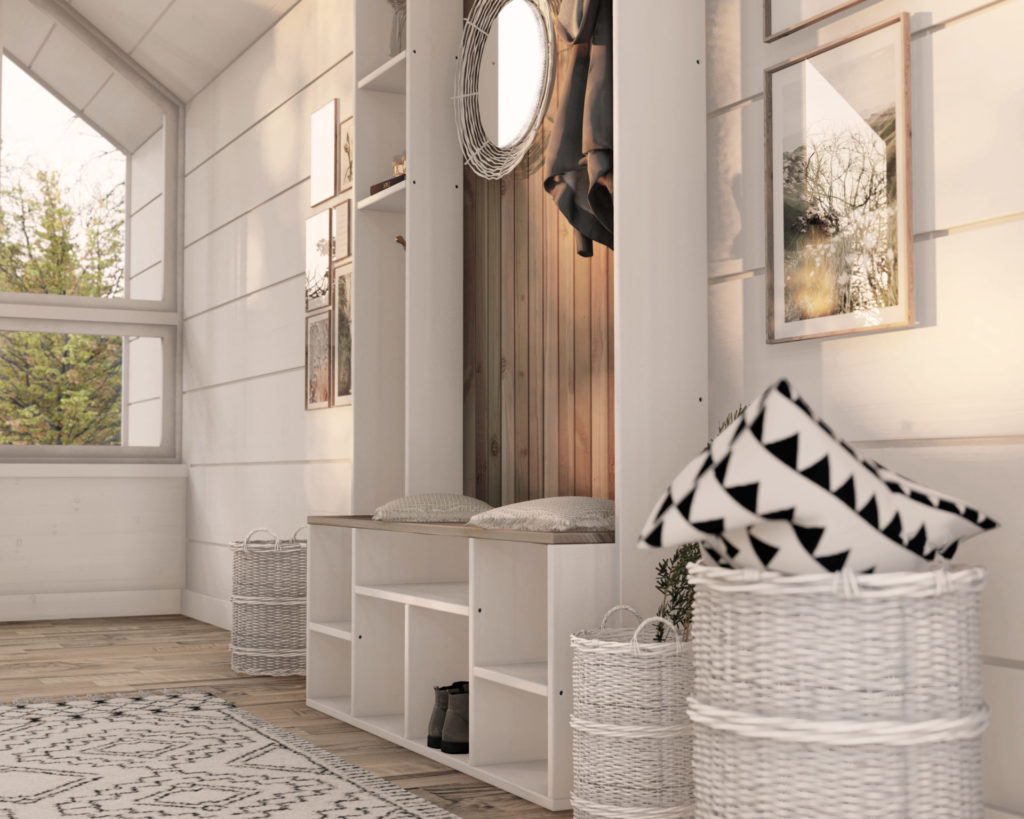
This design features seven cubbies that are a perfect storage system for boots, shoes, hats, gloves, sporting equipment, toys, etc.
The upper portion of the mudroom locker is divided into two parts. One has additional storage shelves that can serve as a place to store keys, cards, décor, and baskets.
Directly beneath it is a coat rack where kids can hang up sweaters, coats, and hats. The second part of the hall organizer is a coat rack for adult sized clothing. This is the section where you can add a mirror and additional décor.
This design also features a bench that is 18 inches high to comfortably enable guests and family members to sit while slipping on shoes. The bench can also serve as a place to leave a purse or bag.
How to incorporate your DIY mudroom and hallway organizer into your home.
When it comes to mudroom lockers, function is key. But that doesn’t mean your locker can’t also be stylish. With a little bit of creativity, you can turn your mudroom locker into a design feature that enhances your home’s overall look and feel.
Here are some tips for decorating your mudroom locker:
Choose a color scheme.
Your mudroom locker is likely to see a lot of traffic, so it’s important to choose a color scheme that can withstand the wear and tear. Go for colors that are easy to clean and won’t show dirt and grime. Neutrals are always a good choice, but you can also experiment with brighter hues to add a pop of color to your space.
Add some storage.
Mudroom lockers are the perfect place to add some extra storage. If you’re short on space, consider adding some shelves or hooks to your locker to store items like hats, gloves, and scarves. You can also use baskets or bins to store items like sports equipment or gardening tools.
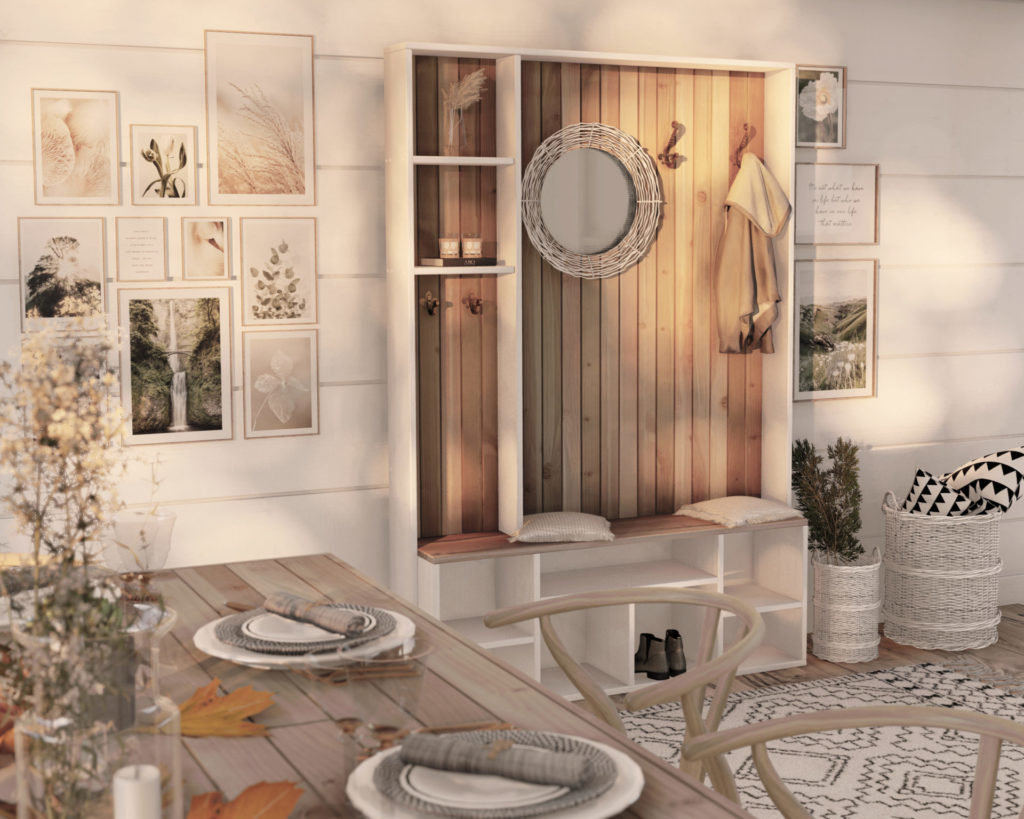
Hang some art.
Your mudroom locker is the perfect place to showcase some of your favorite art pieces. Choose pieces that complement your color scheme and add a personal touch to your space.
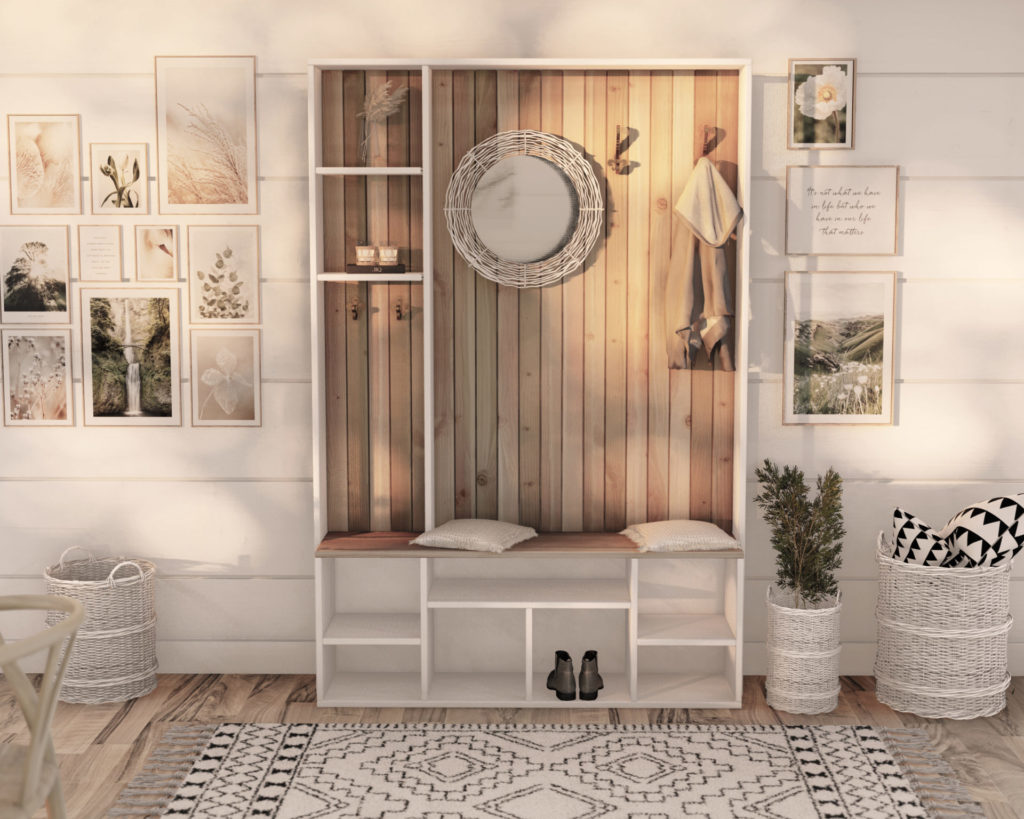
Add a rug.
A rug can help to define your mudroom locker and make it feel like an extension of your home. Choose a rug that is easy to clean and can withstand heavy traffic.
Add some plants.
Plants can help to freshen up your mudroom locker and add a touch of nature to your space. Choose low-maintenance plants that can thrive in a low-light environment.
With a little bit of effort, you can turn your mudroom locker into a stylish and functional space that enhances your home’s overall look and feel.
Who can build this DIY mudroom/farmhouse hall tree?
This mudroom closet is easy to assemble with the step-by-step instructions provided in this post. I believe this essential piece of furniture would be a great project for beginners to woodworking and anyone with minimal woodworking experience. The DIY plans offered in this post include helpful description, images, diagrams, helpful links, and more to ensure that the DIY build is smooth, efficient, and easy.

Time to build
About 2 hours
Total cost of build
About $125
Skill level required
Beginner
Download the PDF plans

DIY mudroom storage PDF plans
What is included in the PDF download?
Easy to read step by step instructions
Material list
Tools needed
3D illustrations
Tools for building the table base
- Miter saw
- Drill
- Impact driver with bit for screws
- Sander
- wood countersink drill bit
- 1 lb 2-1/2 screws
- Nail gun and small pack of 1 inch nails.
- Wood glue
- sand paper
Shopping list and cut list
Shopping list and cut list are available with purchase of PDF plans. Thank you for supporting us and making this website possible!

Step 1 (DIY mudroom cubby storage assembly)
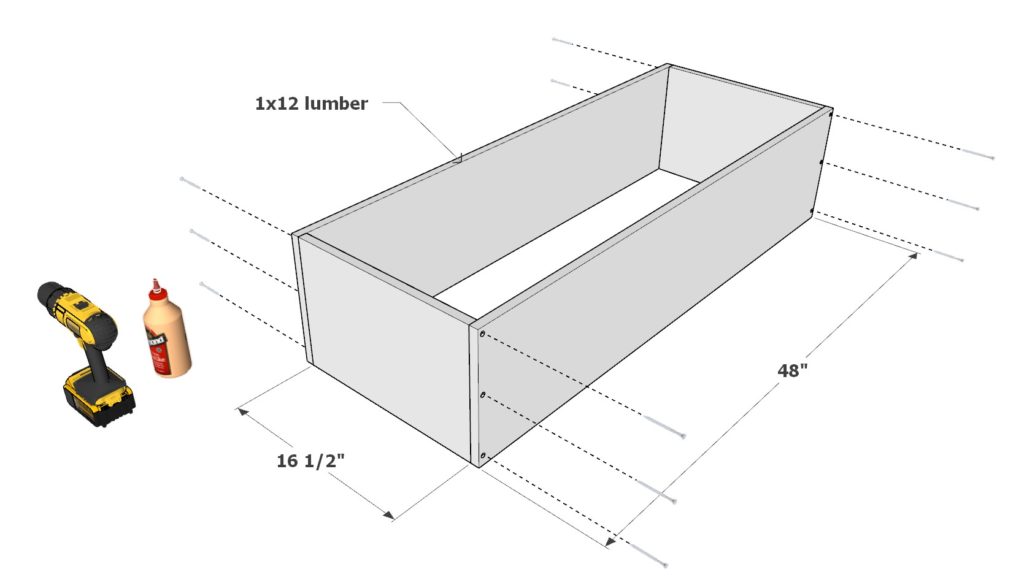
First, assemble to shoe rack and cubby storage system.
Take two 48 inch 1×12 lumber pieces and two 16-1/2 inch 1×12 lumber pieces and arrange them as shown below. Predrill holes for the 2.5 inch screws, add glue, and add screws.
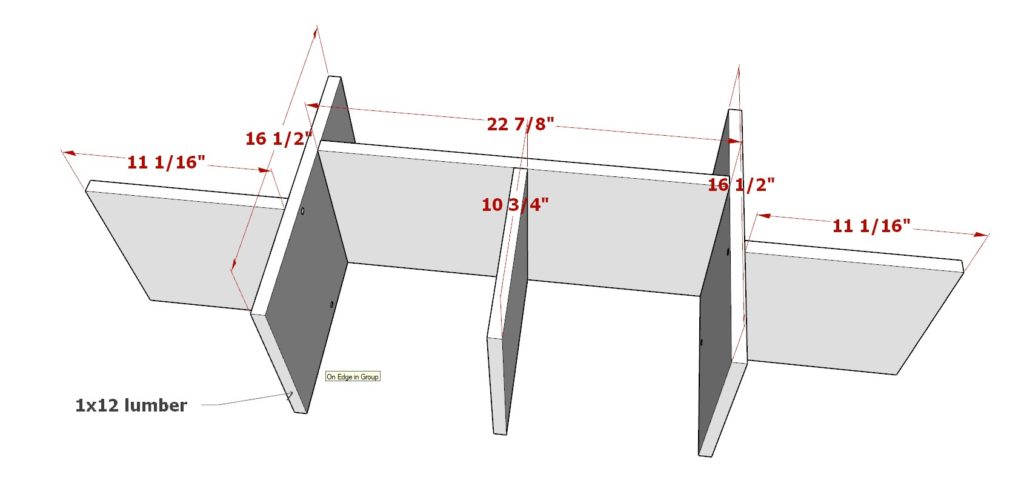
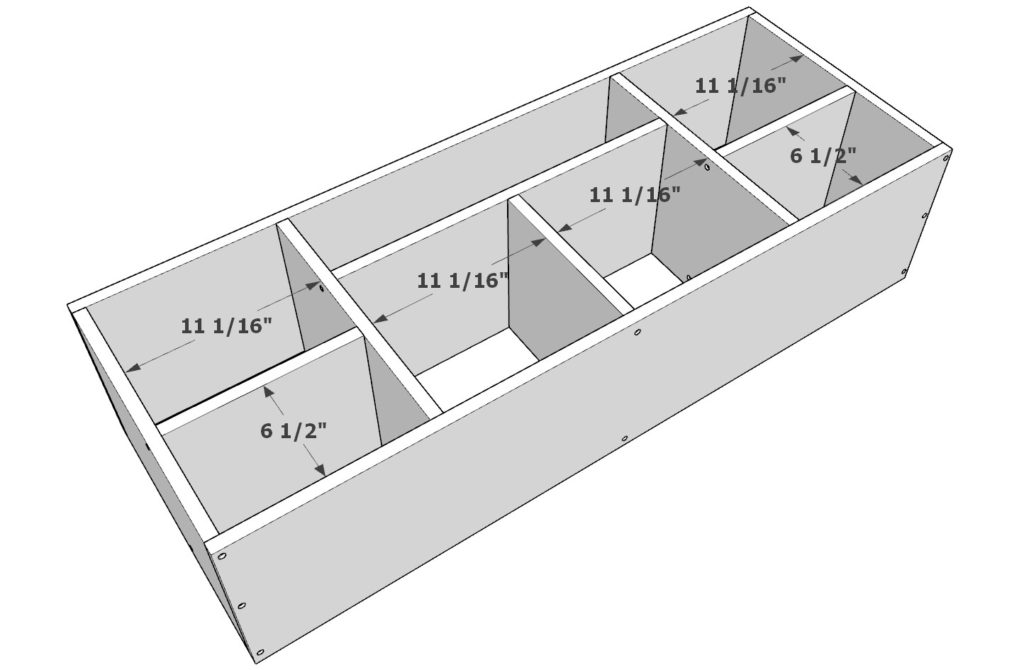
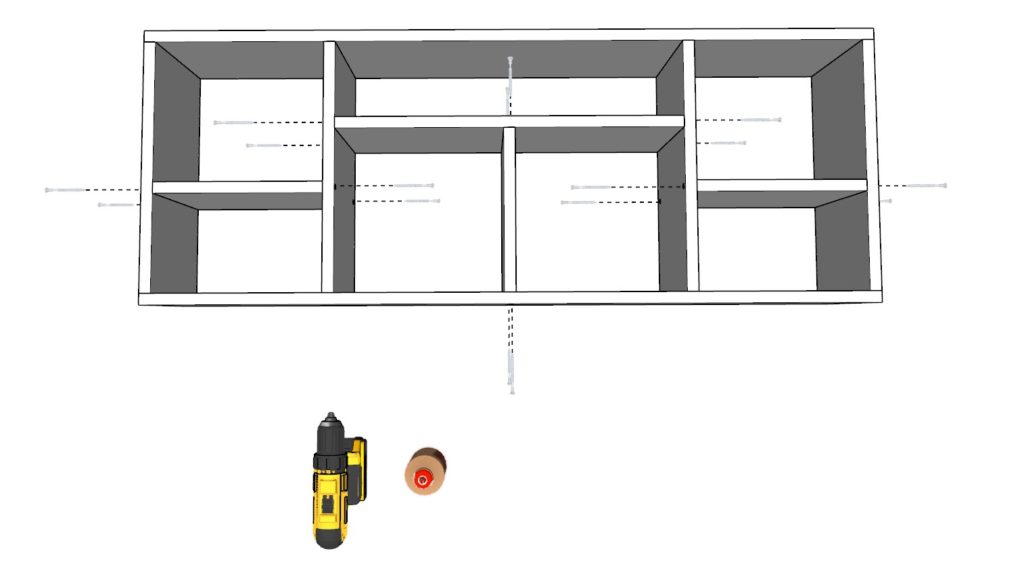
Next, install all the shelf pieces. Take two 11-1/16 inch 1×12 lumber pieces, two 16-1/2 inch 1×12 lumber pieces, one 10-3/4 inch 1×12 lumber piece, and one 22-7/8 lumber piece. Arrange them as shown below. Predrill holes, add screws and glue to secure the storage shelves in place.
The placement of shelves can be modified as needed for your homes particular needs.

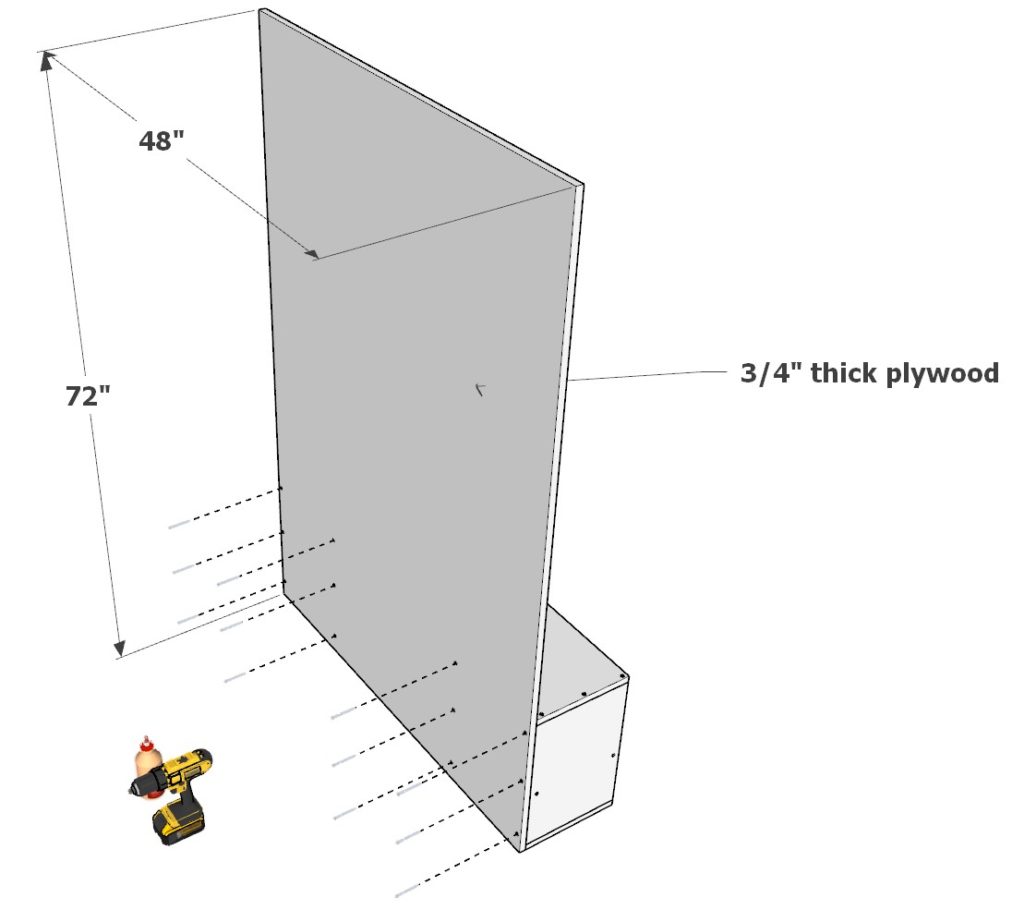
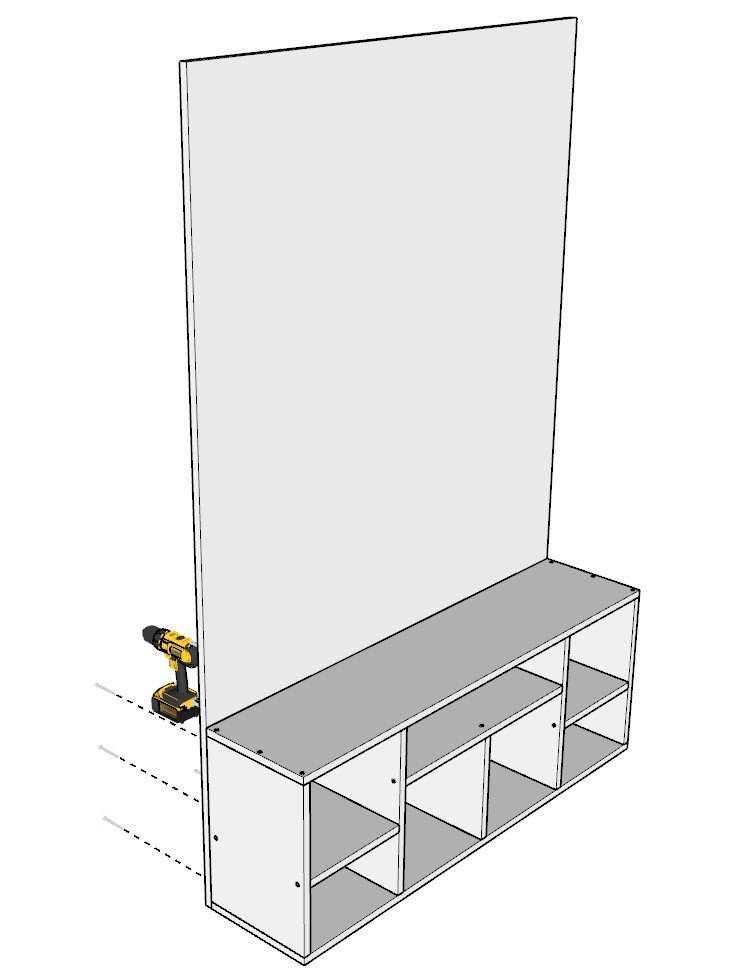
Step 2 (Installing the back wall of the DIY mudroom)
Next, add the back wall of the mudroom to create a space to add a coat rack and additional storage shelves.
Take a 48 inch x 72 inch plywood sheet and join it to the storage cubbies using glue, predrilling, and adding 2.5 inch screws. (It might be helpful to draw indication lines to know where to add screws prior to adding the plywood sheet.)
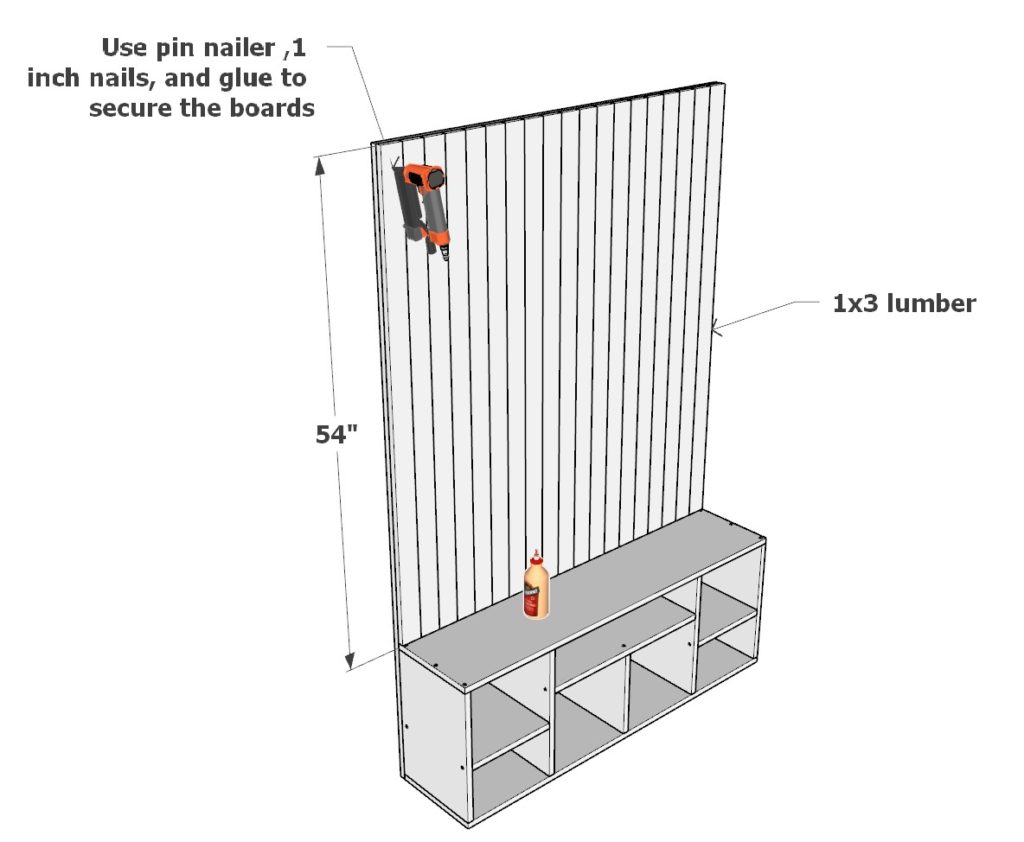
Next, add the backdrop of the mudroom to add character. This backdrop is made of 1×3 lumber pieces. You can use glue and a simple nail gun to add them into place. Make sure the 1×3 lumber pieces are being added straight (as some may be sold slightly bend) so that they fit appropriately.
The 1×3 lumber pieces can also be added after painting has taken place if you are going to a half painted half stained look (as shown in product images).
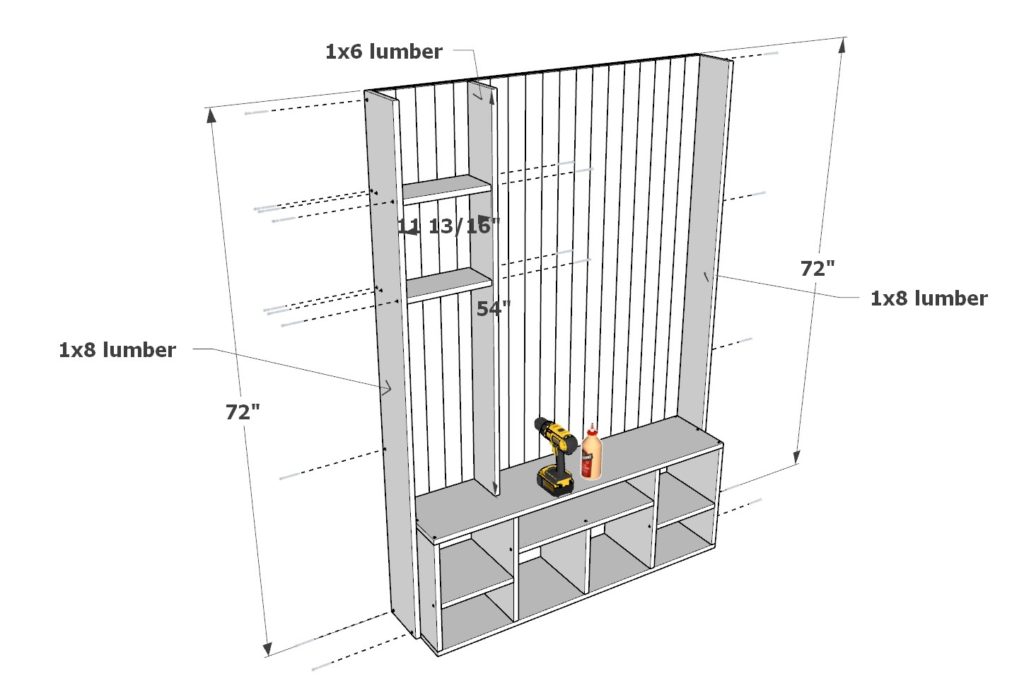
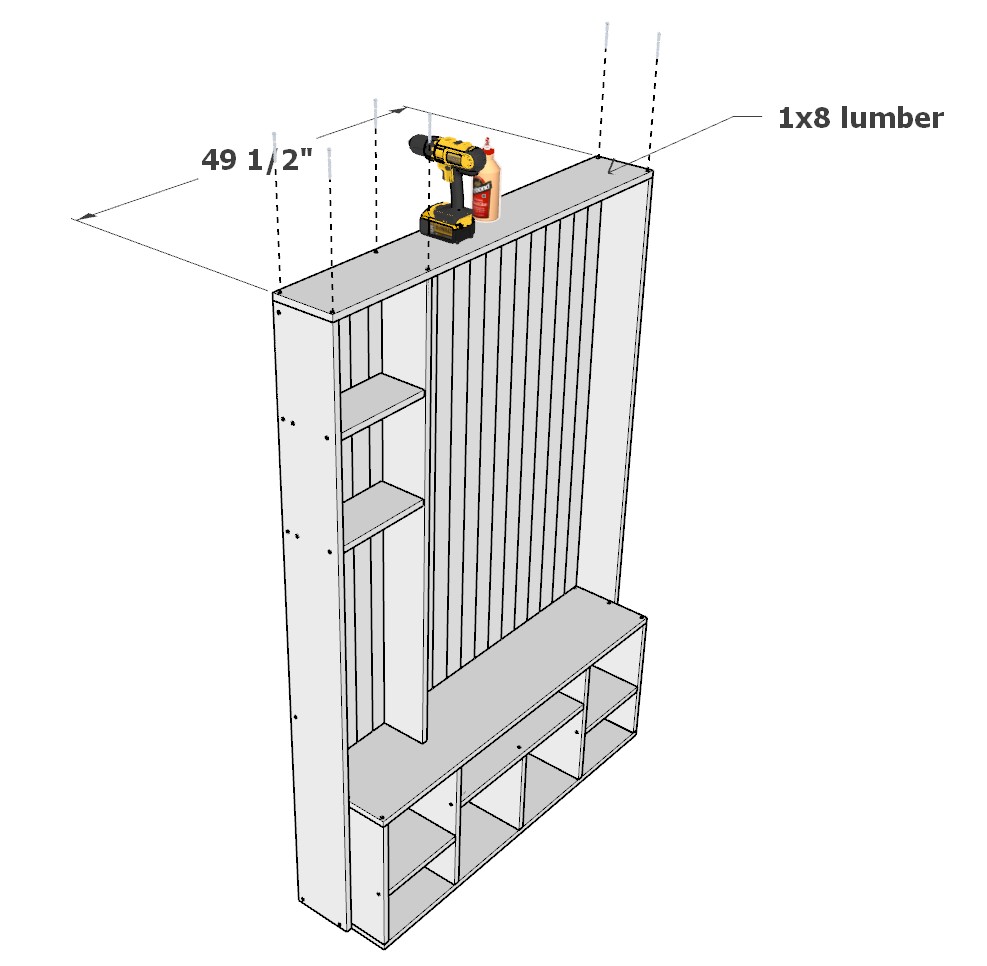
Step 3 (Adding sides and additional shelves to the DIY mudroom)
Add the sides to the mudroom and additional shelves as well as a crown to finish it off.
Take two 72 inch 1×8 lumber pieces, one 54 inch 1×6 lumber pieces, and two 11-13/16 inch 1×6 lumber pieces and arrange them as shown below. As before, predrill ,add glue, add 2.5 inch screws.
Lastly, add a crown to the top of the DIY mudroom. Take a 49-1/2 inch 1×8 lumber piece and join it ad before.
At this point your mudroom is ready to be sanded down, painited, and installed.
To complete installation MAKE SURE TO SECURE THE MUDROOM TO A WALL TO PREVENT INJURY.
Tips for Creating a Functional Mudroom
Choose a location for your mudroom that is near your home’s entrance. This will make it easy to access when you are coming in and out of the house. Make sure that the location you choose for your mudroom is well-ventilated. This will help to keep the mudroom smelling fresh and clean. If possible, choose a location for your mudroom that has a floor drain. This will make it easier to clean the mudroom floor.
Build your mudroom using sturdy materials that can withstand heavy foot traffic. This will help to keep your mudroom looking new for longer. Hang hooks on the walls of your mudroom. This will provide a place to hang jackets, coats, and other outerwear. Place a mat or rug in front of the entrance to your mudroom. This will help to keep dirt and mud from being tracked into the mudroom.
How to Stain a Wooden Mudroom
When it comes to staining a DIY wooden mudroom, there are a few things you need to keep in mind in order to get the best results. First of all, make sure that you sand the wood down completely before applying any stain. This will help to ensure that the stain goes on evenly and that the final product looks professional. If you have any rough spots on the wood, sand them down as well so that the stain can penetrate evenly.
After sanding, I add a wood conditioner. A wood conditioner helps to even out the absorbency of the wood, so that the stain is applied more evenly. If you don’t use a conditioner, the stain can come out patchy and uneven.
Once the wood is sanded, it’s time to apply the stain. Make sure to wear gloves and protective clothing, as stain can be messy. Apply the stain evenly with a brush, making sure to get into all the nooks and crannies. Once the stain is applied, let it sit for a few minutes before wiping off any excess with a rag. Allow the stain to dry completely before moving on to the next step.
If you want to add a topcoat to the mudroom, now is the time to do it. Apply a thin layer of topcoat evenly over the whole surface. This will help to protect the stain and make it last longer. I use a spray gun and a water based polyurethane so that the result comes out looking more professional.
How to paint a Wooden Mudroom
When painting a mudroom, it is important to choose a paint color that is durable and easy to clean. A high-gloss or semi-gloss paint is a good choice for a mudroom since it will be easy to wipe down and will resist dirt and stains. It is also important to consider the amount of foot traffic the mudroom gets when choosing a paint color. A light color may show dirt and scuffs more easily than a dark color.
Before beginning to paint, it is important to prep the surface. This means removing any staples, nails, or screws, sanding down rough spots, and cleaning the surface with a degreaser or TSP. Once the surface is prepped, you can begin painting. Start with a primer, then paint the mudroom with your chosen color. A high-quality paintbrush, paint gun, or roller will give the best results.
After the mudroom is painted, you can add any finishing touches like hooks or shelves.