Introduction
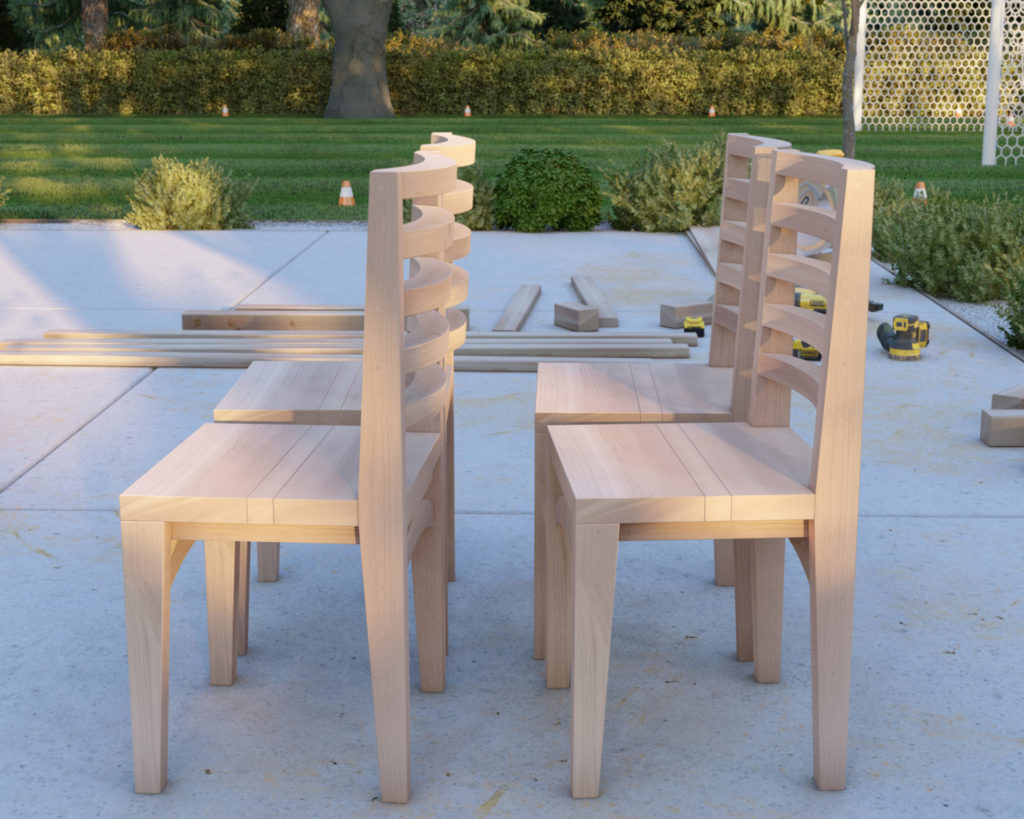
Imagine a serene Sunday morning; the aroma of freshly brewed coffee fills the air as you step into a dining space that exudes comfort, style, and a touch of personal charm. Every chair around the table isn’t just a seat but a story, a testament to your skill and creativity. This isn’t a distant dream but a reachable reality with our comprehensive DIY Dining Chair Plan.
Crafting Distinction
In the ocean of mass-produced furniture, individuality and quality often get lost in the waves. Our DIY plan isn’t merely a set of instructions but a compass guiding you to a haven where each piece of furniture is a reflection of your style, preference, and craftsmanship. It’s less about building and more about creating – an experience where each stroke of the brush, every tightened screw, echoes the sentiments of personal touch and quality.
Your Companion in Creation
Every artist needs a muse, and every builder, a guide. Our meticulously crafted plan, delivered in a comprehensive PDF, is designed for clarity, offering you a seamless journey from raw materials to a finished masterpiece. While I am available to assist through messages, the plan’s intuitive design ensures a smooth, self-reliant crafting experience.
Embarking on the Creative Path
The allure of this venture isn’t confined to the elegant end products. It’s a passage marked by discovery, skill enhancement, and the unmatched gratification of seeing raw materials morph into functional art. It’s a testament to the fusion of utility and aesthetic, each chair embodying the dexterity and creative spirit of its maker.
A Lifetime Companion
Our guide accompanies you beyond the assembly stage. With insightful maintenance tips and tailored advice on staining and painting, your crafted pieces are not just built to charm but engineered to last, blending durability with aesthetic allure.
Invitation to Craft
There lies an untapped world of creativity, self-reliance, and individuality awaiting your step. Each chair, every curve and cut, is an unspoken narrative of a journey embarked upon – a silent yet eloquent testimony to a space where skill meets art, and utility dances with elegance.
A Canvas Awaits
Envision the transformation, not just of wood and materials but of a space and, indeed, a craftsman. With each plan purchased, we are not offering a mere guide to building chairs but an opportunity to “Empower Creativity, Enhance Self-Reliance.” The canvas is spread, the materials await – are you ready to wield the brush, to write a silent sonnet of elegance, craftsmanship, and individuality?
Time
2 hours per chair (varies with experience)
Cost
$25 per chair
(Costs may vary based on location and supplier.)
Skill level required
Beginner
DIY Dinning Chair PDF Plan
What is included in the PDF download?
- Easy to read step by step instructions
- Material list
- Tools needed
- Helpful links to materials and tools needed
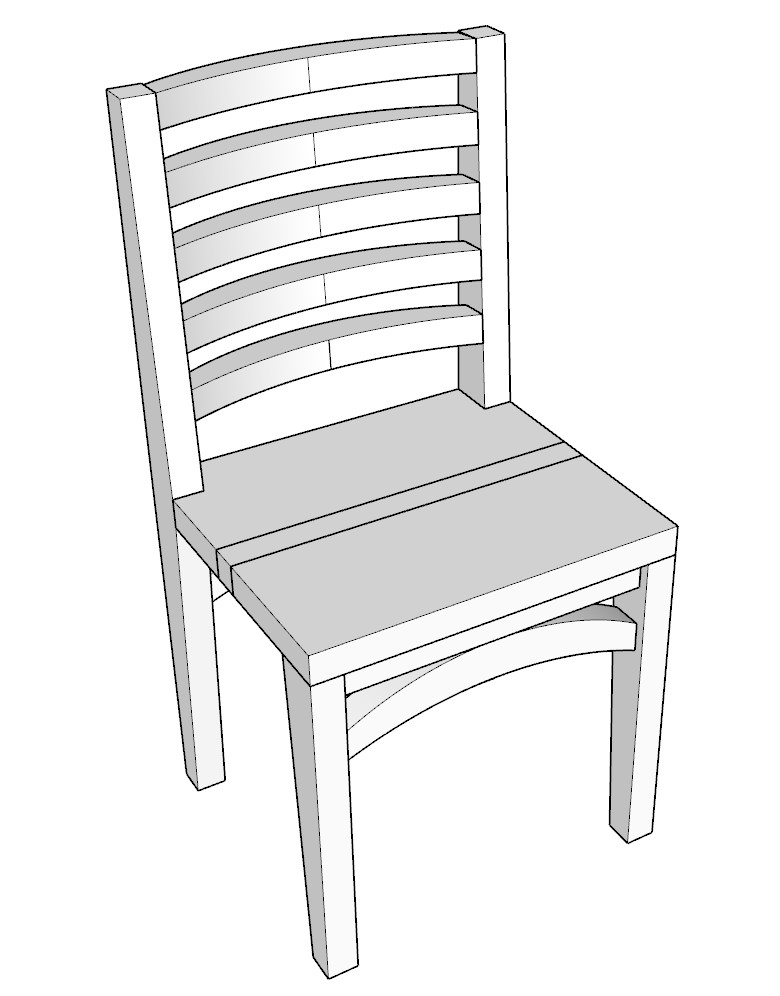
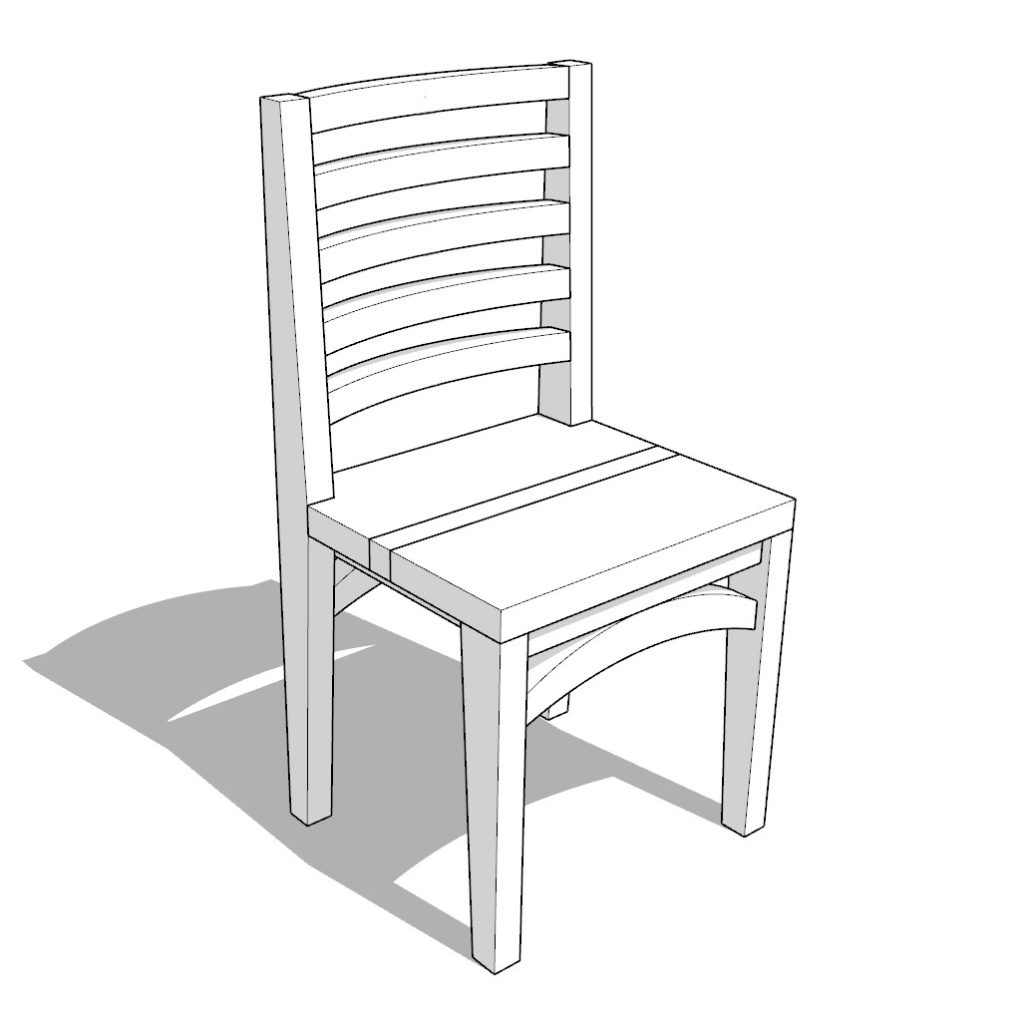
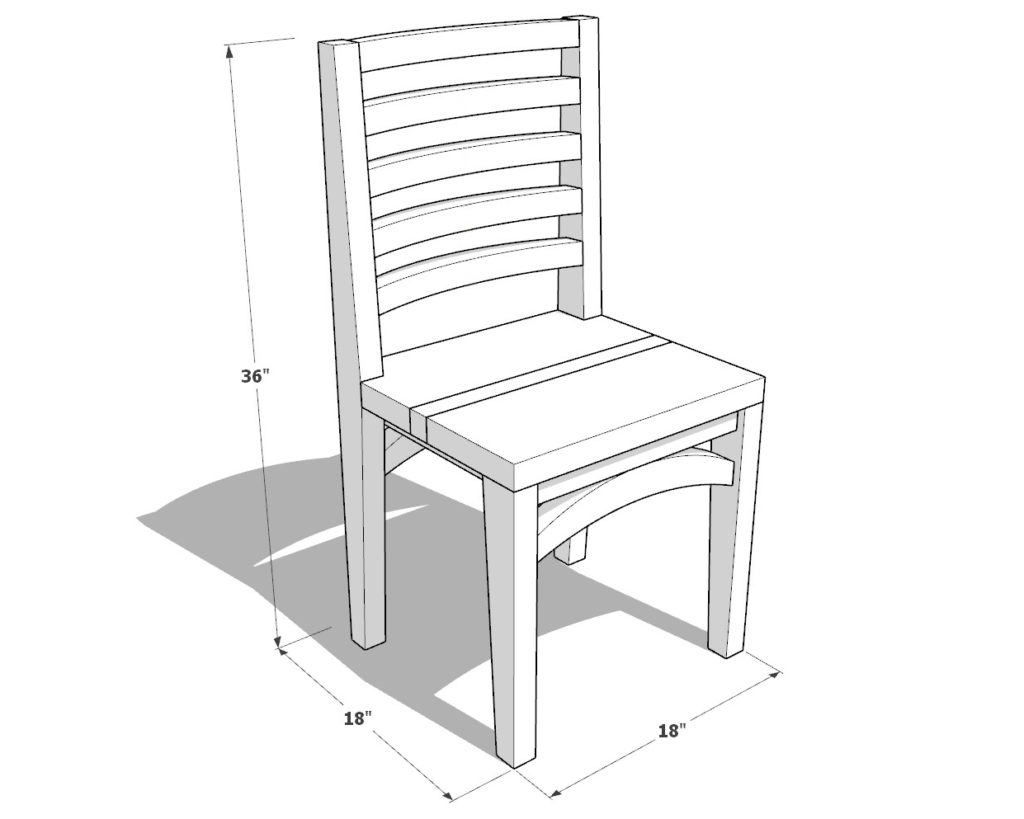
DIY Dinning Chair Dimensions
Step 1 - Preparing the Components
Start the process by cutting the necessary components for your chair build. Ensure precision and accuracy to facilitate a smooth assembly later on.
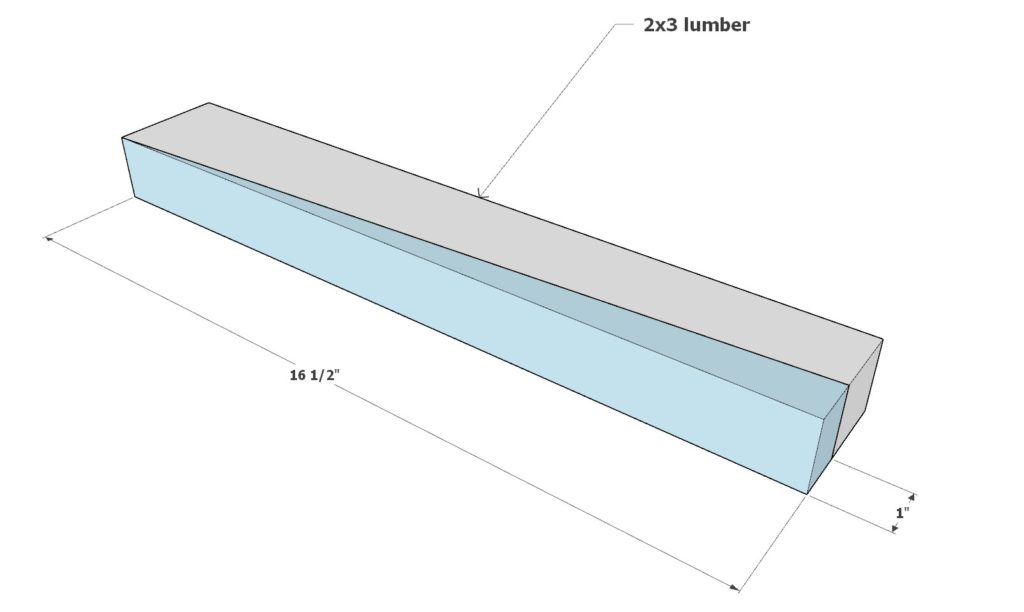
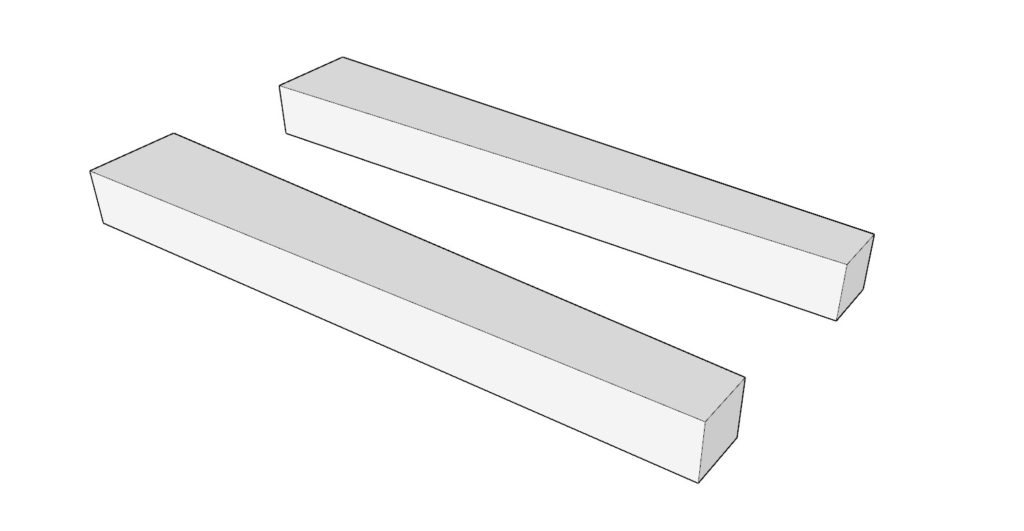
Front Legs: Cut two 16-1/2″ long 2×3 lumber pieces at the angle depicted in Diagram #1. Follow the guide and remove the blue marked portion. These pieces will form the front legs of your chair.
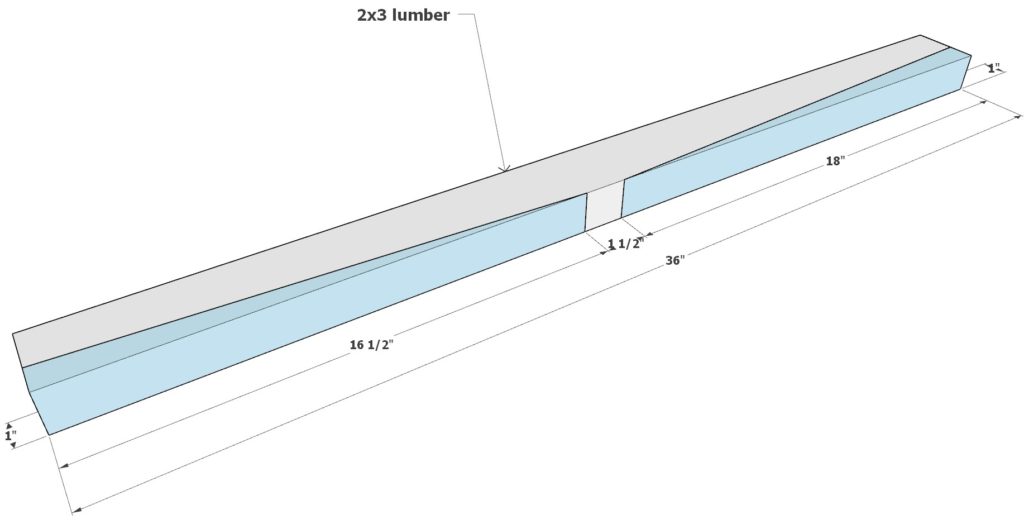
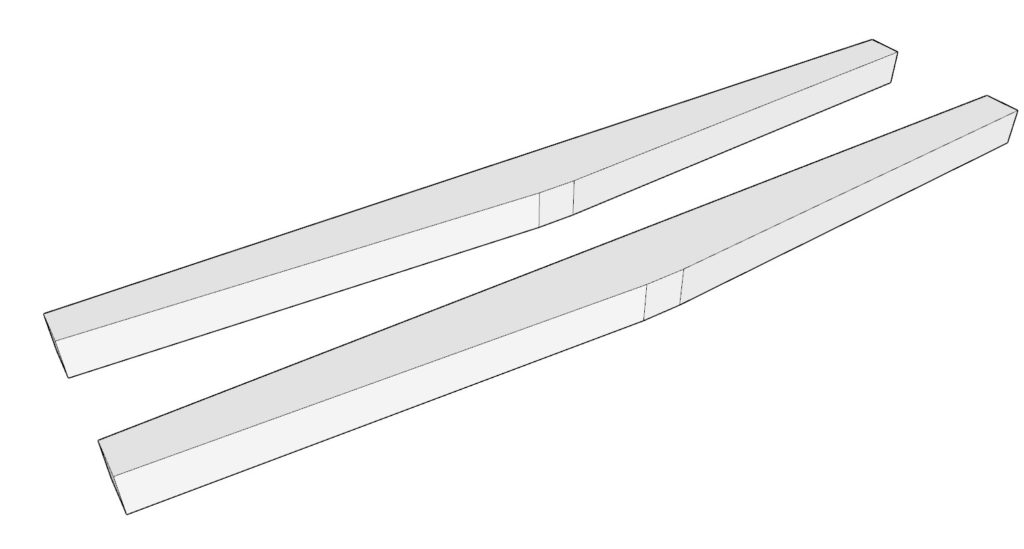
Back Legs: Refer to Diagram #3 to cut the back legs. Use 36″ long 2×3 lumber pieces and carefully cut away the blue illustrated portion. Ensure both pieces are identical for symmetry and stability.
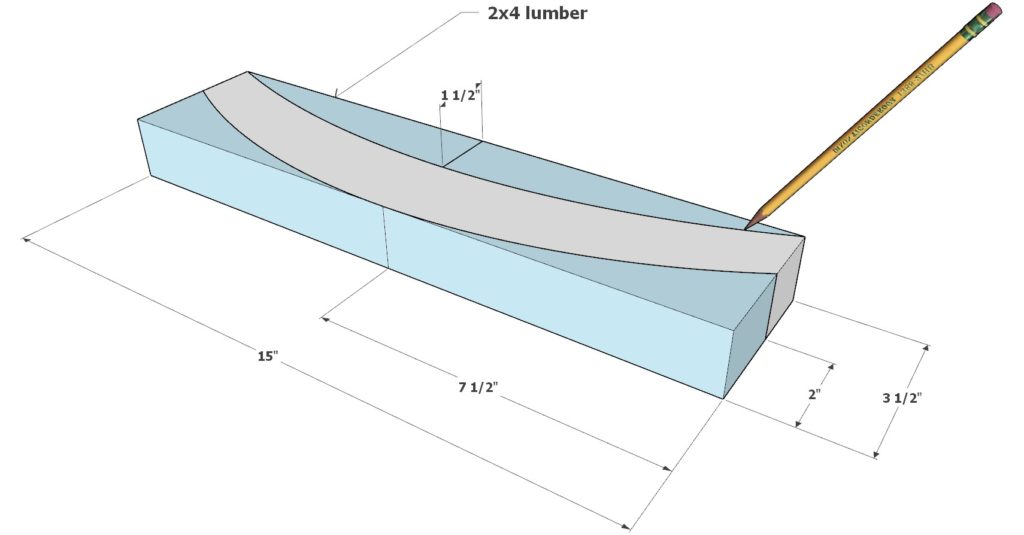
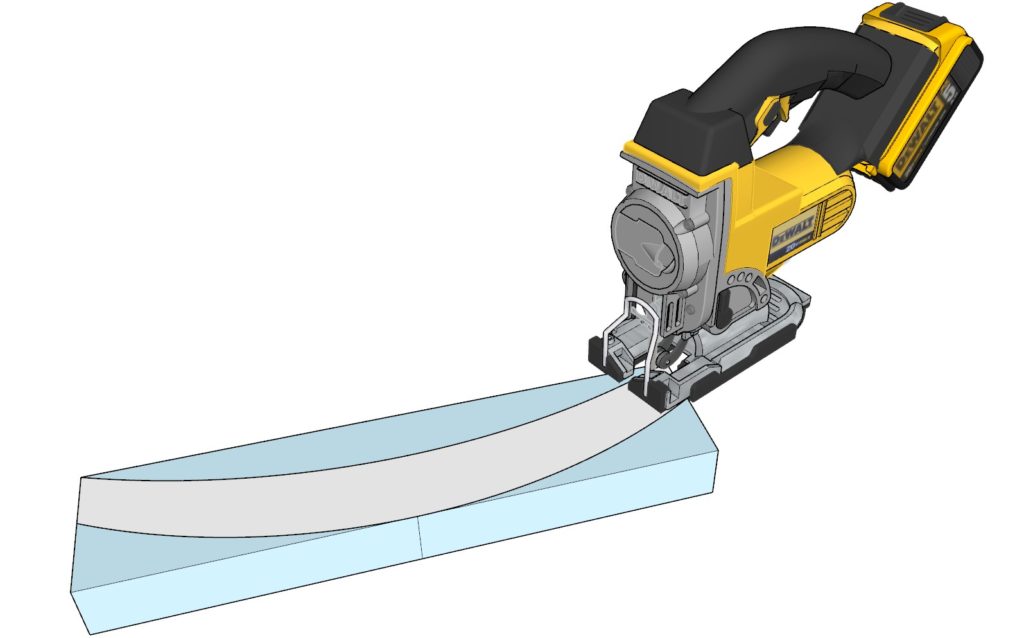
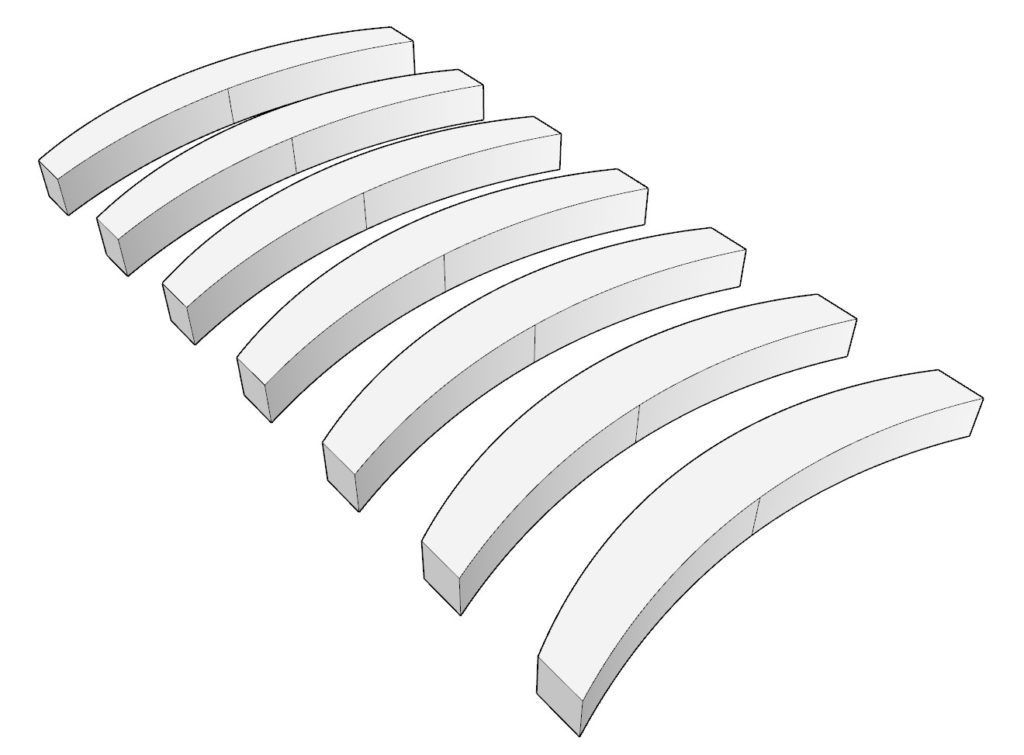
Curved Back and Brace Pieces: Take a 15″ long 2×4 lumber piece and trace the curve from the provided diagram. Utilize a jigsaw or a scroll saw to cut off the blue marked portion, creating seven identical curved pieces.
Tips for Perfection:
- Uniformity: If you’re building multiple chairs, consider creating a template for the curved and angled components. It ensures uniformity and consistency across all pieces.
- Cutting Angles: Utilize a scroll saw or a jigsaw for precise angle cuts. A template can be handy for repetitive, accurate cuts.
- Finishing Touches: For a polished, professional appearance, sand and plane all the components before assembly. It not only enhances the look but also ensures smooth surfaces and edges.
- Color Application: Consider applying the chosen stain or paint to all components before assembly. It allows for an even application and avoids the challenges of coloring assembled structures.
Ensure all cuts are clean and precise, adhering to the measurements and diagrams to ensure a flawless assembly process. Your attention to detail at this initial stage sets the foundation for the final look and durability of your chairs.
Step 2 - Assembling the Seating Platform and Frame
Embark on the assembly of the seating platform.
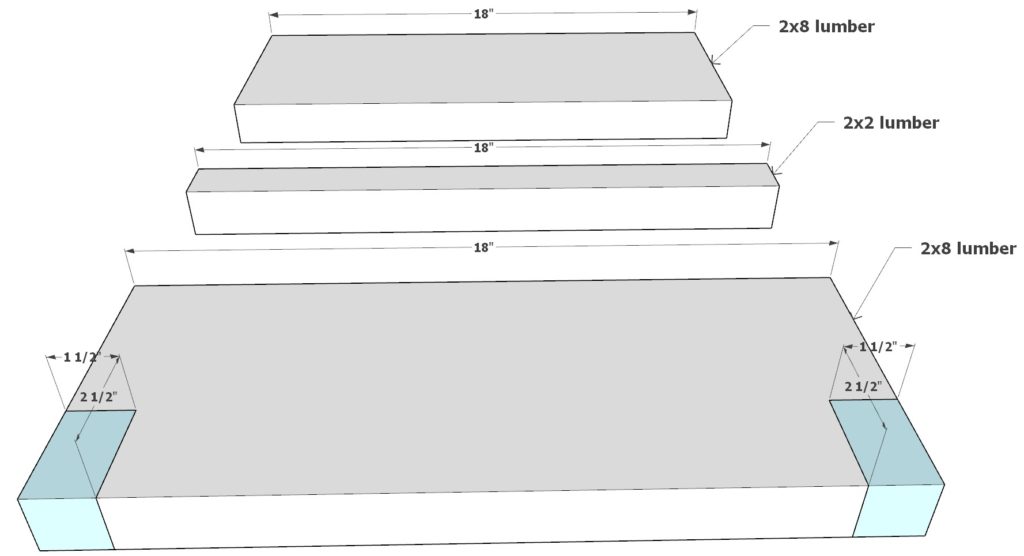
A. Seating Platform Preparation: Start with two 18-inch long 2×8 lumber pieces. Carve out 1-1/2″ x 2-1/2″ notches on one piece as shown in blue in the provided diagram to fit the back legs securely. Keep the other 2×8 piece unmodified. Acquire an 18-inch long 2×2 lumber piece for incorporation into the seating platform.
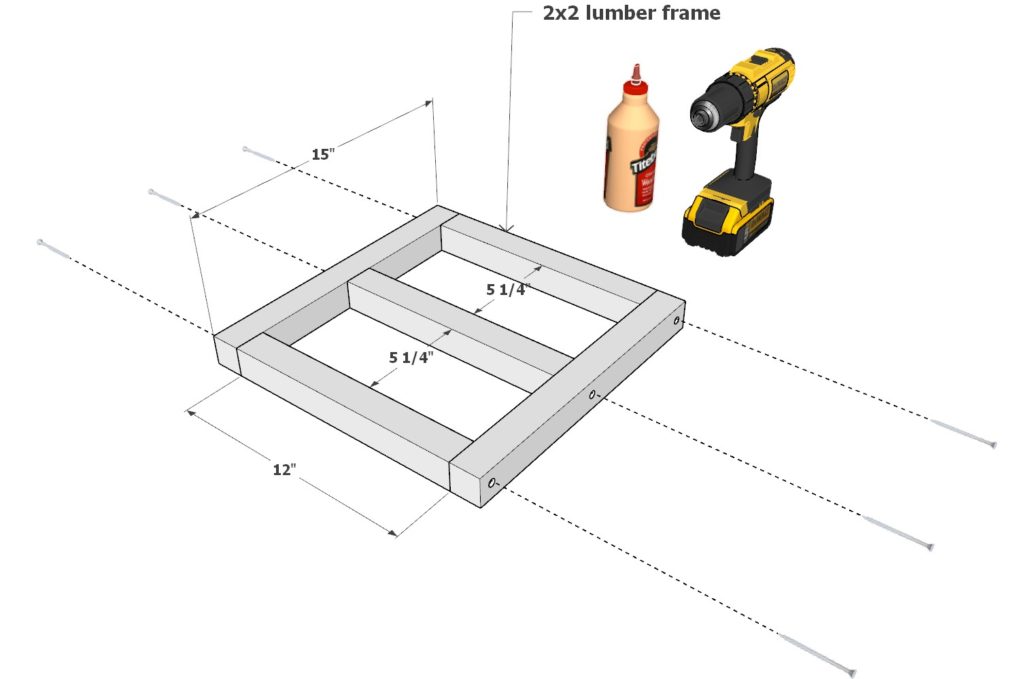
B. Constructing the Seating Frame: Collect two 15-inch and three 12-inch long 2×2 lumber pieces. Use 2.5-inch screws and wood glue for assembly, ensuring the frame is sturdy and even.
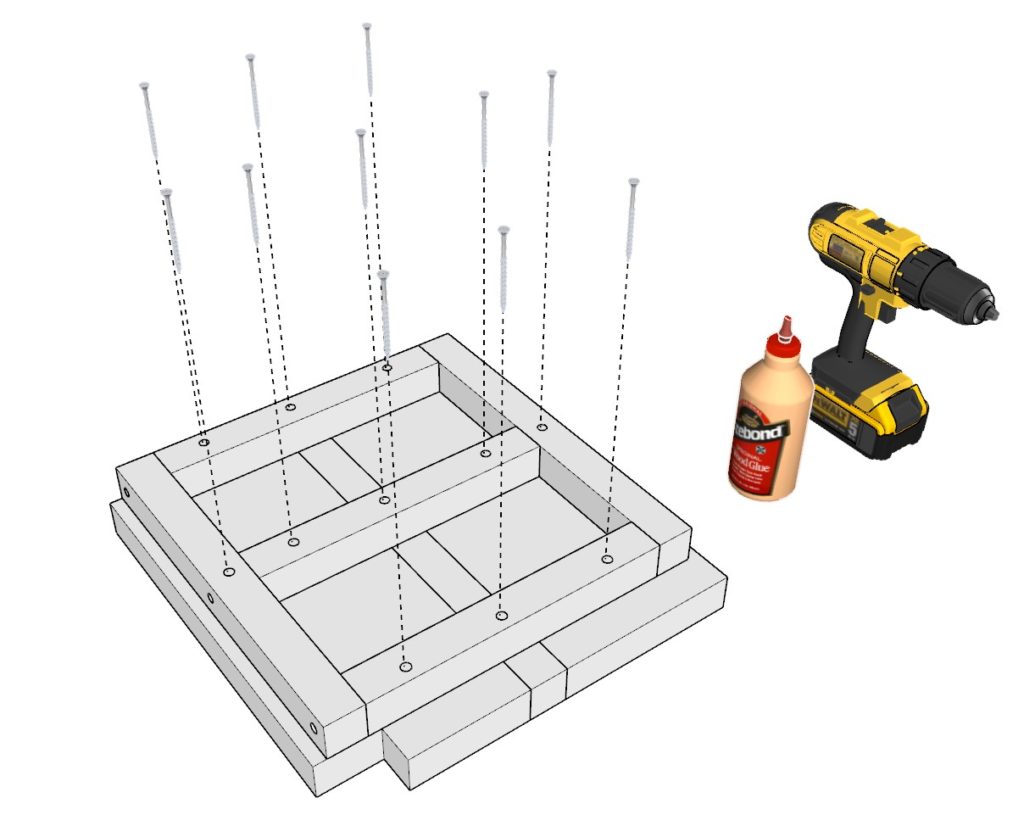
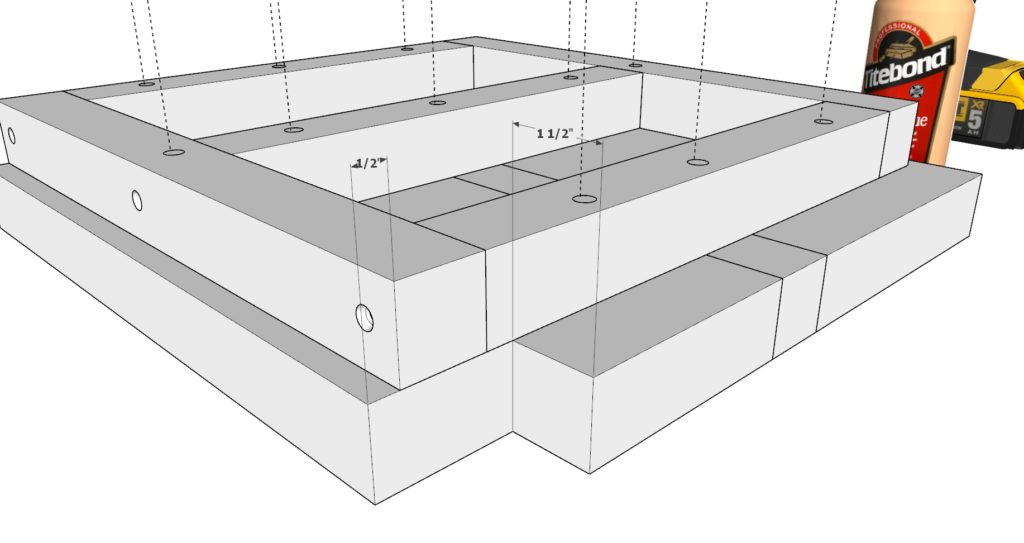
C. Attaching the Seating Platform to the Frame: Align the prepared 2×8 and 2×2 lumber pieces onto the assembled frame. Utilize wood clamps to hold them in place, ensuring even distribution and alignment. Attach the seating platform components to the frame using wood glue and 2.5-inch screws for a secure fit.
Tips:
- Precision: Utilize wood clamps during assembly for precision and ease.
- Stability: Ensure all components are securely fastened to enhance the chair’s durability.
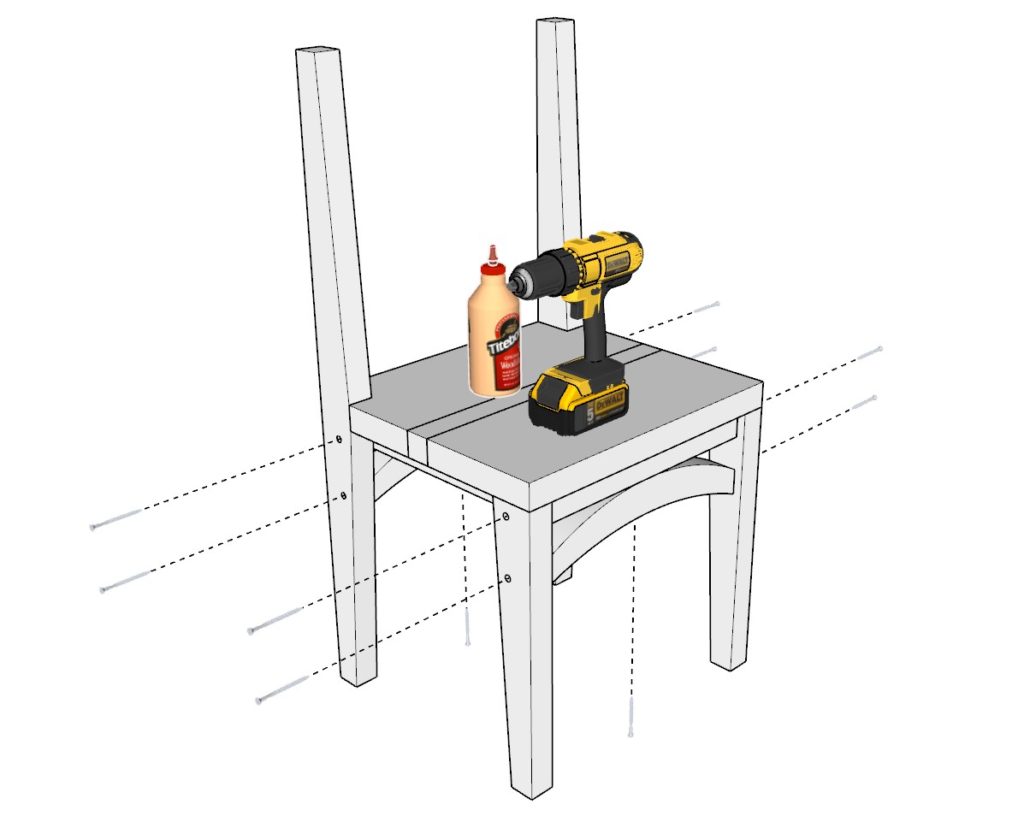
Step 3 - Securing Legs and Assembling Backrest
Proceed to attach the legs and begin the assembly of the backrest, ensuring each component is securely and accurately fixed for optimal stability and aesthetic appeal.
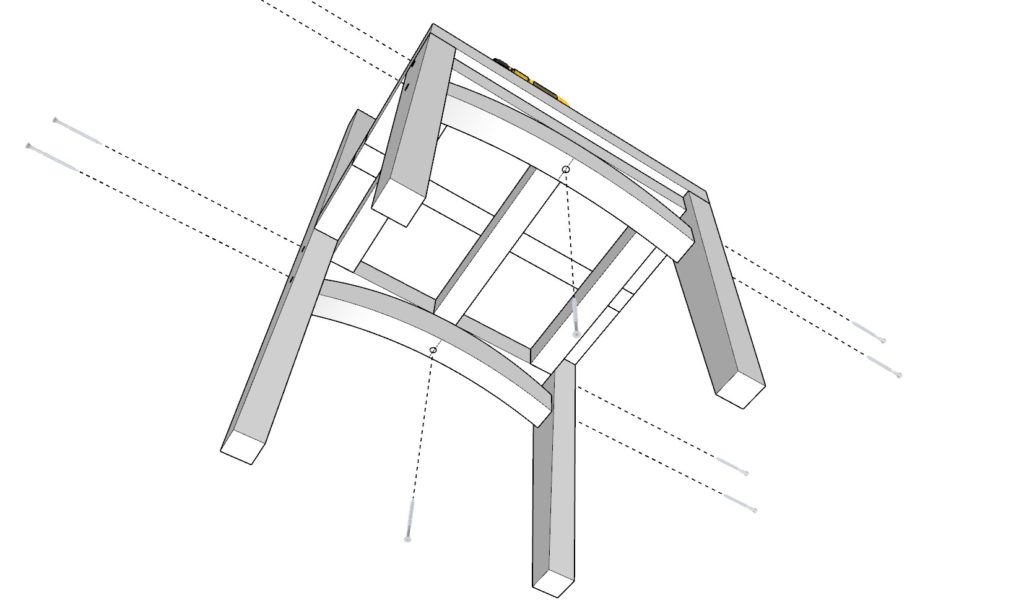
A. Attaching the Legs: Secure the front and back legs to the seating platform using 2.5-inch screws and wood glue. Ensure the components are spaced out as illustrated in the provided diagram for balanced support and aesthetics.
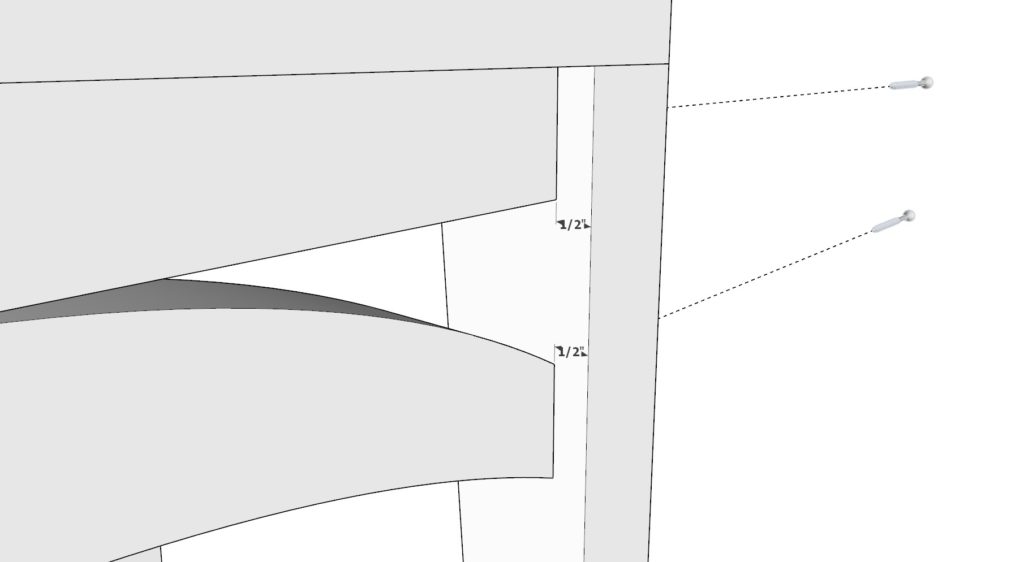
B. Adding Leg Braces: Attach two of the curved pieces to brace the legs. Ensure they are evenly spaced and secured firmly with screws and wood glue to enhance stability.
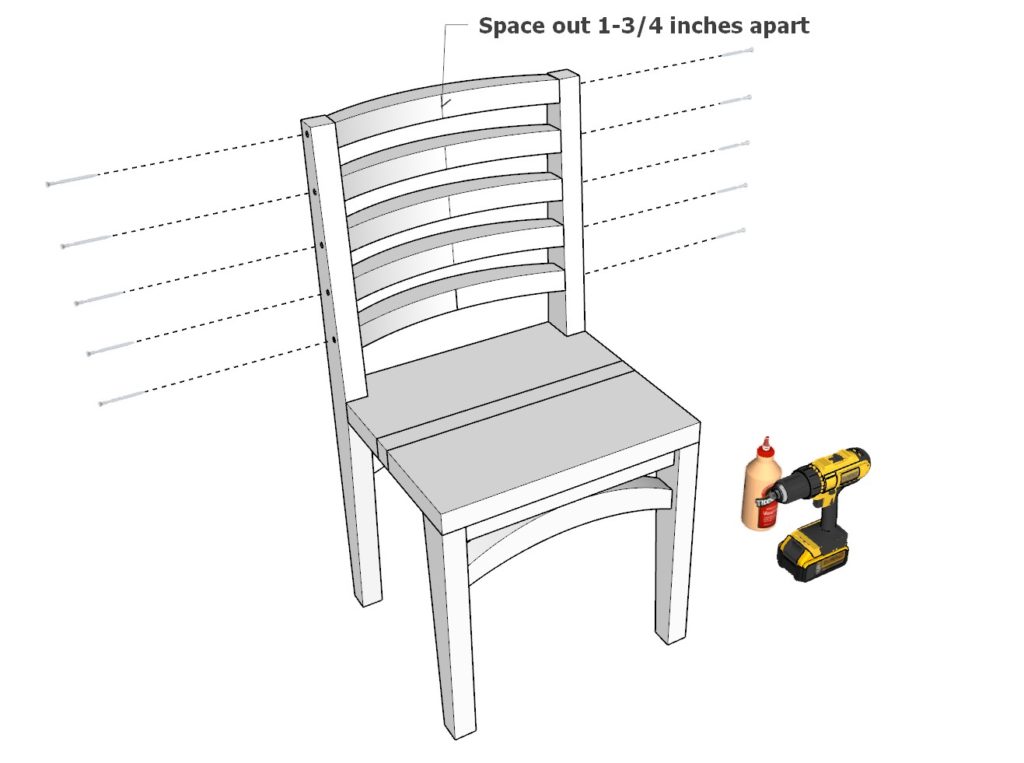
C. Back Rest Assembly: Attach the five curved backrest components, spacing them out approximately 1-3/4 inches apart. Utilize wood glue and 2.5-inch screws for a sturdy and secure assembly.
Tips:
- Consistency: Use a spacer for the backrest components to ensure consistent spacing, aiding in uniformity across all chairs.
- Concealing Screw Holes: Ensure the holes are deep enough to allow for the addition of dowels for a clean finish. Consider using a wider drill bit for the dowels and a thinner one for the screws, or a countersink drill bit for efficiency. Fill the holes with dowels or wood putty as preferred, though keep in mind wood putty may not stain uniformly with the rest of the wood.
- Bonus Insights: For comprehensive guidance on seamlessly concealing screw holes, consider exploring the bonus page available with the purchase of the DIY plan.
Step 4 - Finishing and Protecting the Chair
This step is pivotal in ensuring your handcrafted chair is not only visually appealing but also enduring, resisting wear while showcasing a polished, professional appearance.
A. Preparing the Chair:
- Sanding: Start with medium-grit sandpaper to smooth out rough surfaces and edges. Gradually progress to fine-grit for a refined, polished surface.
- Cleaning: Use a tack cloth or a damp cloth to eliminate all sawdust and debris. Allow the chair to dry completely before proceeding.
- Choosing the Finish: Decide on paint, stain, or a natural finish. Each choice entails specific preparation to optimize the finish’s durability and aesthetics.
B. Painting the Chair:
- Primer Application: Apply a coat of wood primer for enhanced paint adhesion and additional wood protection. Allow drying as directed.
- Paint Application: Choose an appropriate wood paint. Apply the first coat evenly and allow drying before considering a second coat for richer coloration.
C. Staining the Chair:
- Wood Conditioner Application (optional): For softwoods, a wood conditioner ensures even stain absorption. Follow the label’s directions for application and drying time.
- Stain Application: Apply the wood stain with a brush or cloth, following the wood grain. Remove excess and allow drying. Apply additional coats as needed for desired color depth.
D. Natural Finish:
- Sealing: Apply a clear wood sealer to protect and enhance the wood’s natural beauty. Ensure it is completely dry before usage.
E. Leg Protection:
- Adding Felt Pads: Select appropriate-sized felt pads. Clean the chair legs’ bottoms, peel off the pads’ adhesive backing, and affix them firmly to protect both the chair and flooring.
Tips:
- Attention to Detail: Ensure thorough sanding and cleaning to achieve a professional, polished finish.
- Patience: Allow ample drying time at each stage to enhance the durability and aesthetic quality of the finish.