Some benefits of making a DIY bar
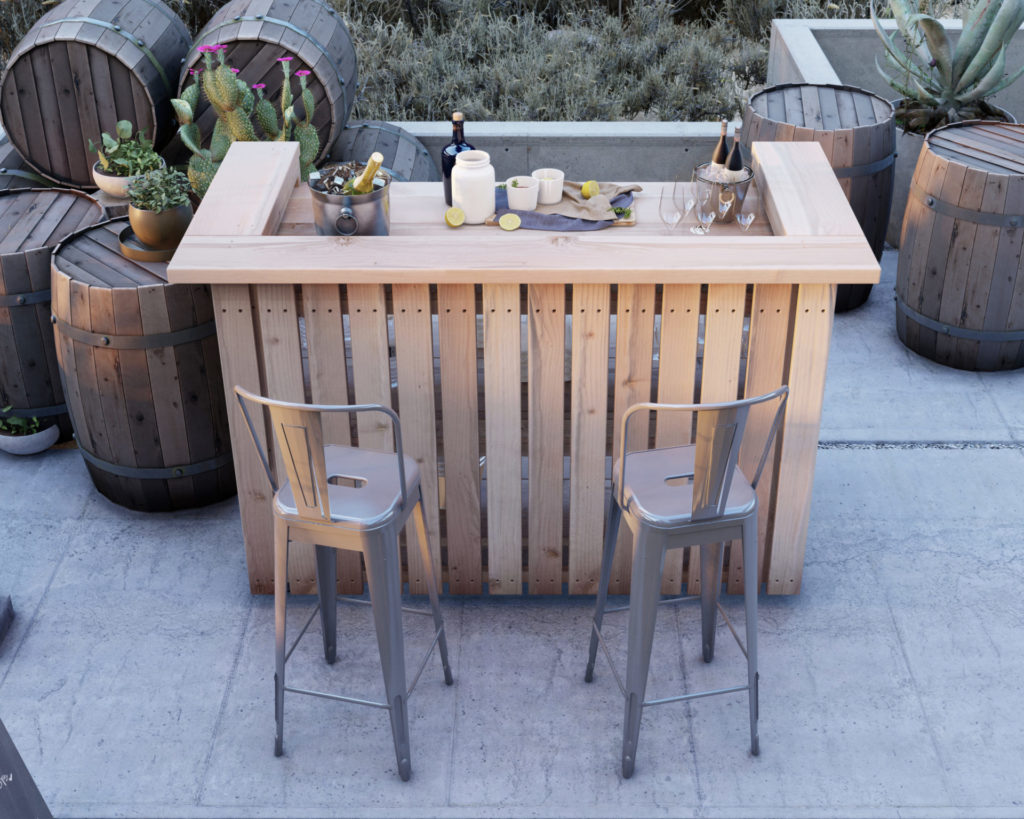
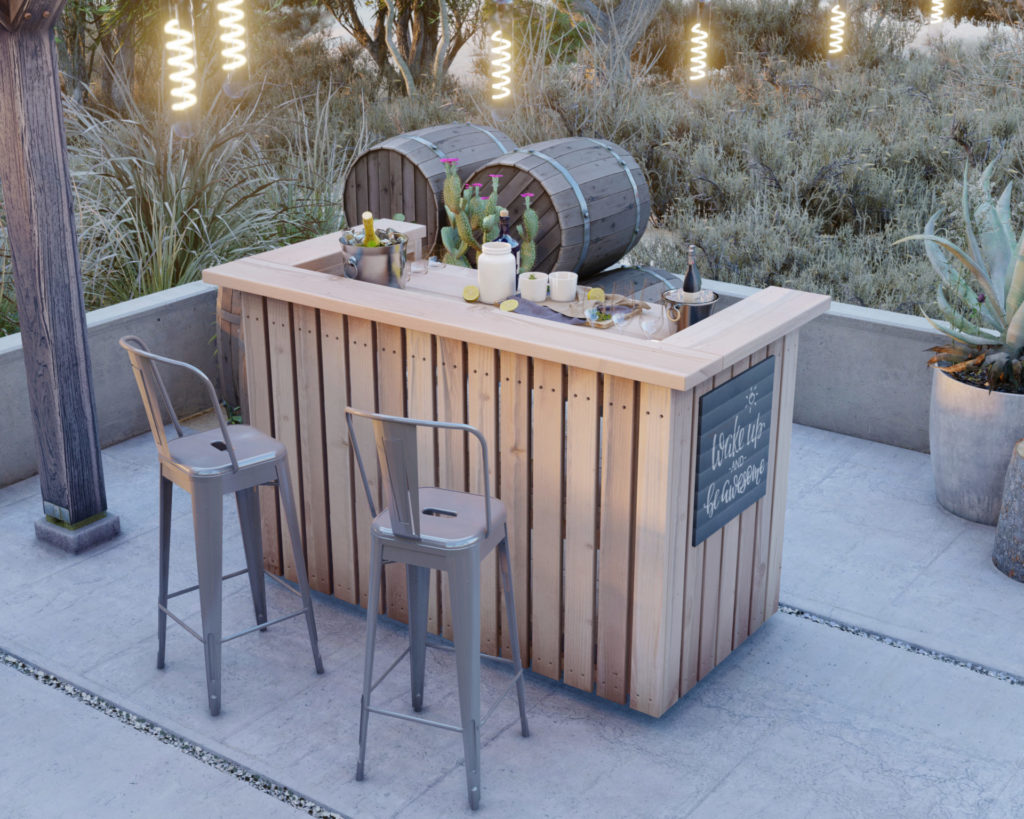
A Home-built bar can be a great way to entertain guests
A DIY wooden bar can be a great way to entertain guests for a few reasons. First, it can provide more space to serve drinks than a traditional table would. This is especially helpful if you‘re expecting a lot of guests or if you want to have a separate area for drinks. Second, a DIY bar can serve as a focal point for your party. It‘s a great way to make your party more interactive and fun for everyone.
The Do-it-yourself bar can be a great way to save money on buying expensive liquor at a bar or restaurant.
A DIY wooden bar can be a great way to save money on buying expensive liquor at a bar or restaurant. Not only is it more economical to make your own liquor, but you can also customize the flavors to your own liking. When you‘re out at a bar or restaurant, drinks can be expensive. So why not save some money and make your own?
The Custom bar can be a great way to show off your handy work and DIY skills.
If you are someone who loves to entertain, a wooden bar can be a great conversation starter and a way to show off your bartending skills. Additionally, a wooden bar can add a touch of class and sophistication to your home. If you are looking for a way to make your home more inviting and enjoyable, a DIY wooden bar may be the perfect solution.
The Homebrew bar can be a great way to bond with friends or family members, and can be a great way to make new friends.
A home bar is a great place for conversation because it is a place where people can relax and be themselves.
A DIY wooden bar can be a great way to pass the time, and can be a great way to relax after a long day.
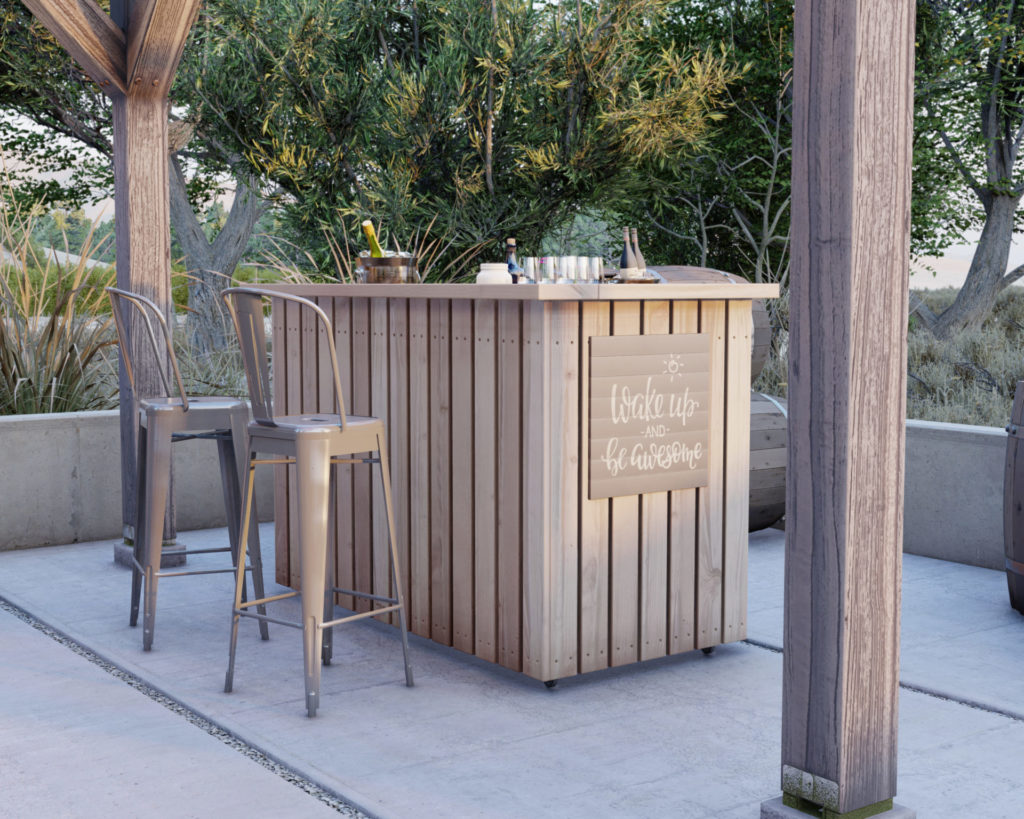
A Handcrafted bar can be a great way to make lasting memories, and can be a great way to create a special atmosphere in your home.
How difficult is it to make this outdoor DIY bar?
If you are a beginner when it comes to woodworking, you may feel overwhelmed trying to build a home bar on your own. Building a home bar can be a fun and rewarding project, but it‘s important to have a plan before you start. This project is beginner–friendly, and my step–by–step instructions will help you save time, money, and frustration. I‘m not using any advanced woodworking techniques or creating complicated designs, so you can feel confident tackling this project on your own
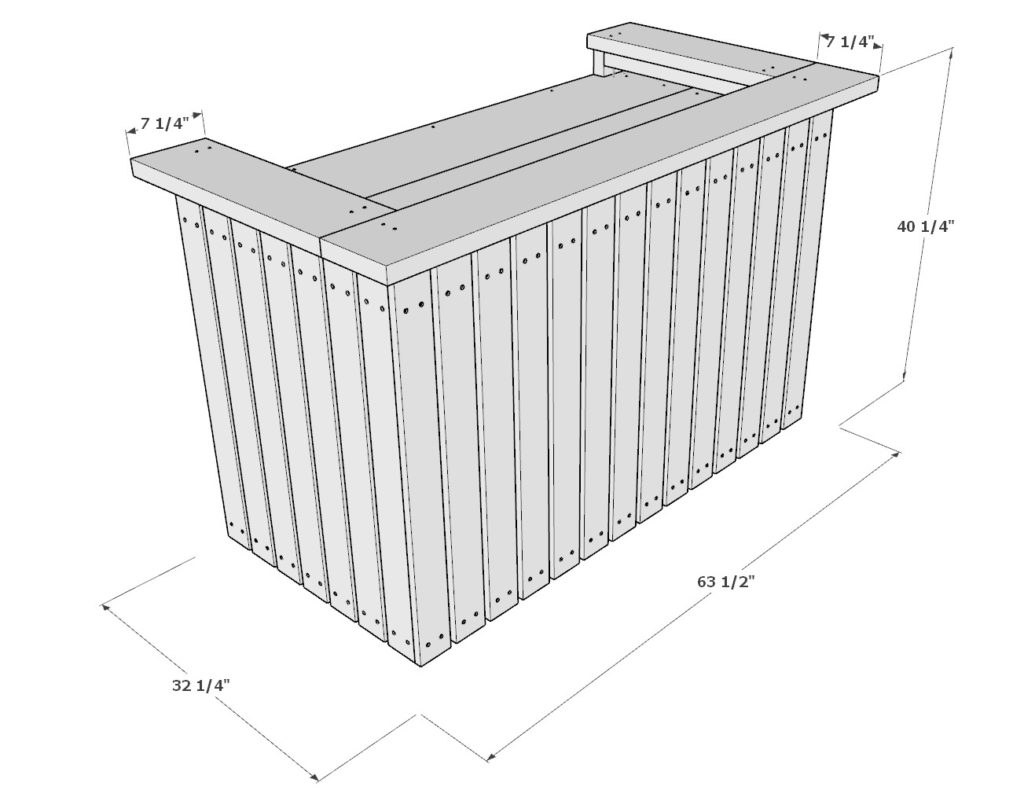
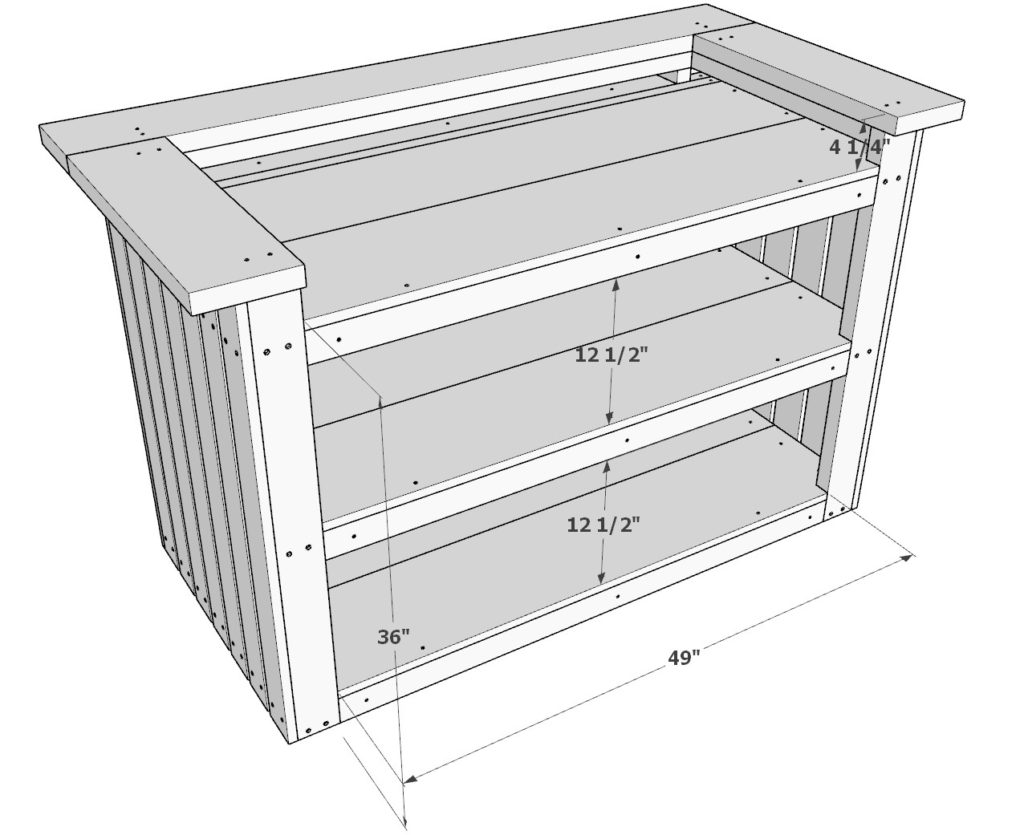
Specifications of the DIY bar
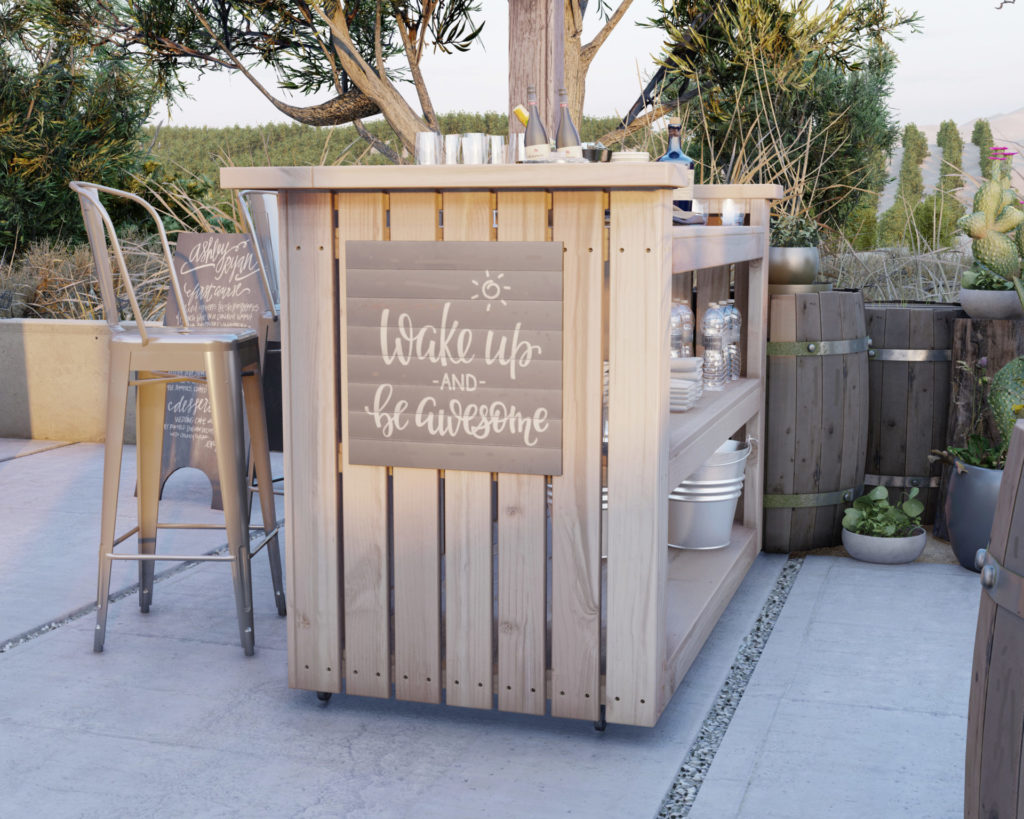
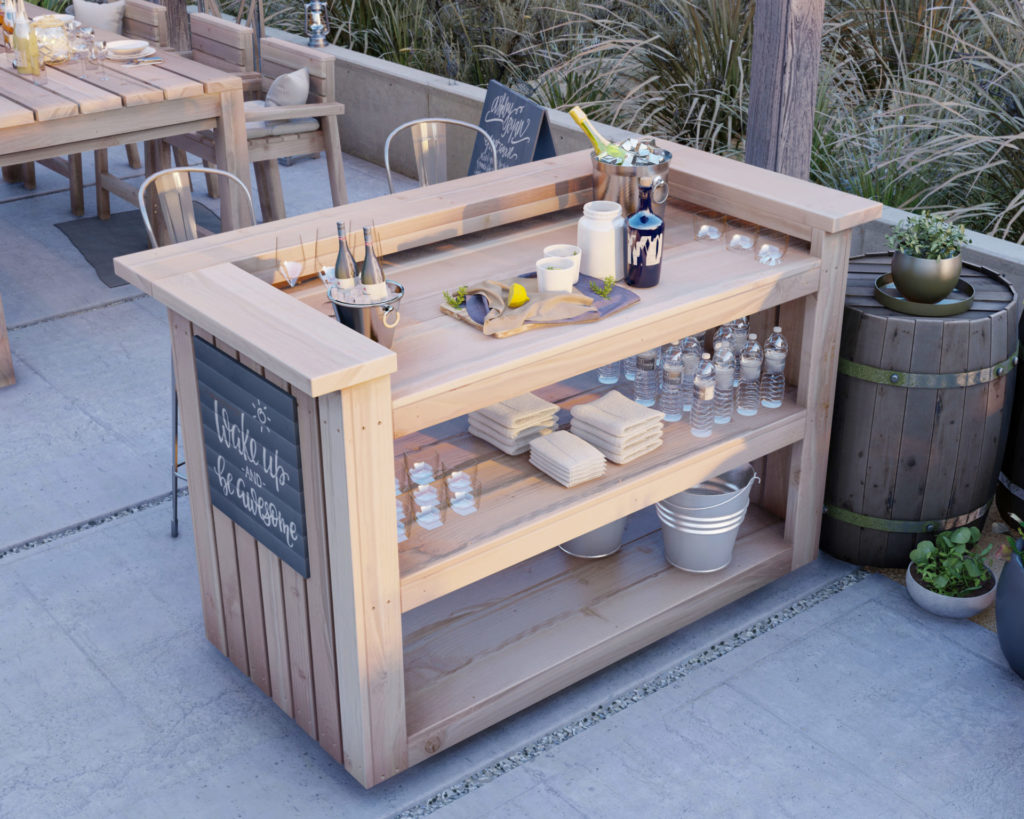
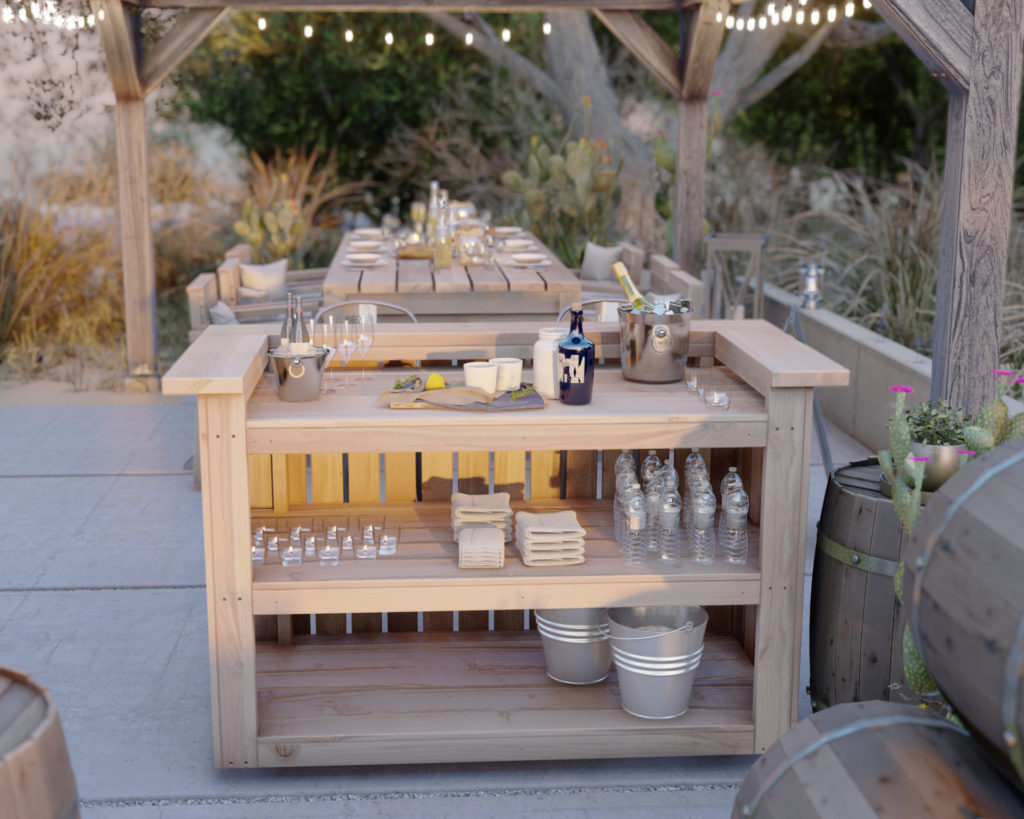
A bar needs to have enough storage area so that it can keep all of its supplies organized and easily accessible. Having enough storage space will also help to prevent the bar from becoming cluttered and messy.
The storage of the DIY bar cab be utilized in a few different ways.
Bottom two shelves can be used to:
- Store glasses
- Store bottles
- Store bar supplies
- Store cocktail shakers
- Store mixers
- Store bartending supplies
- Store bar towels
- Store bar menus
- Store bar accessories
The bar top working area is used for making and serving, pour, and garnishing drinks.
Why choose to make the DIY bar out of wood?
There are many reasons why someone might choose to make a bar out of wood. Wood is a durable and sturdy material that can be easily worked with to create a variety of different looks. It is also a relatively inexpensive material, making it a good option for those on a budget.
What are some benefits of having the DIY bar on wheels?
Some benefits of having the DIY bar on wheels is that it is more convenient to move around, it can be used both indoors and outdoors, it is easier to clean, and it can be stored away when not in use.
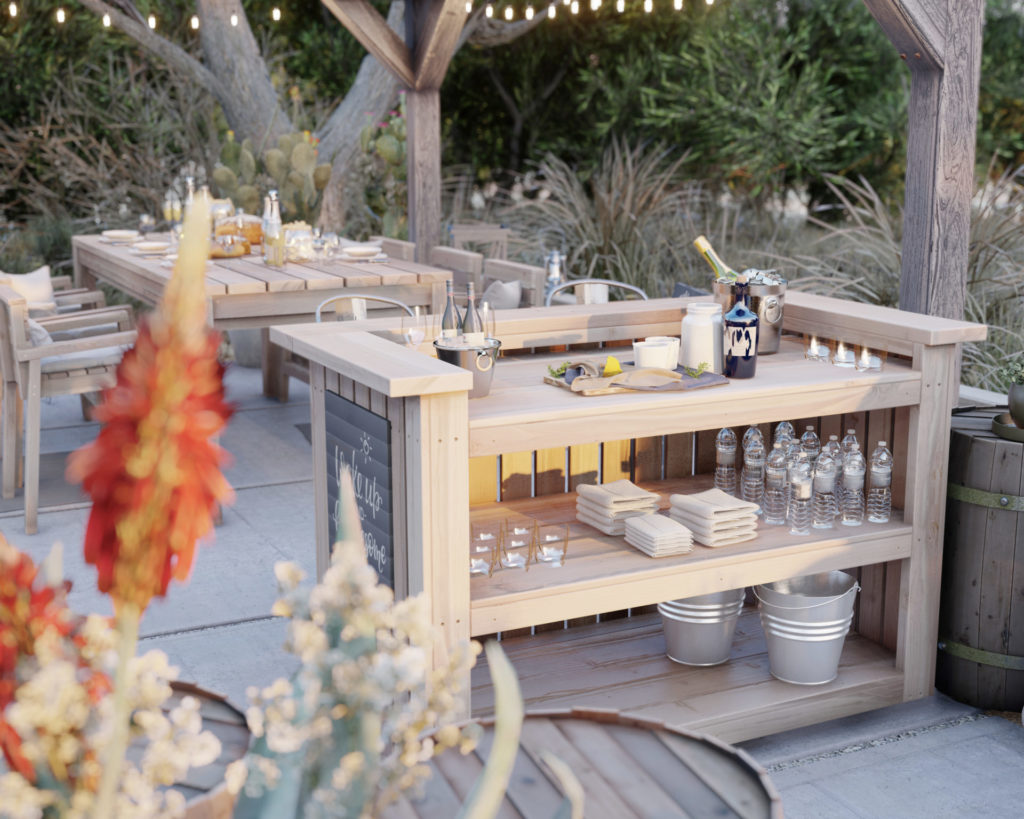
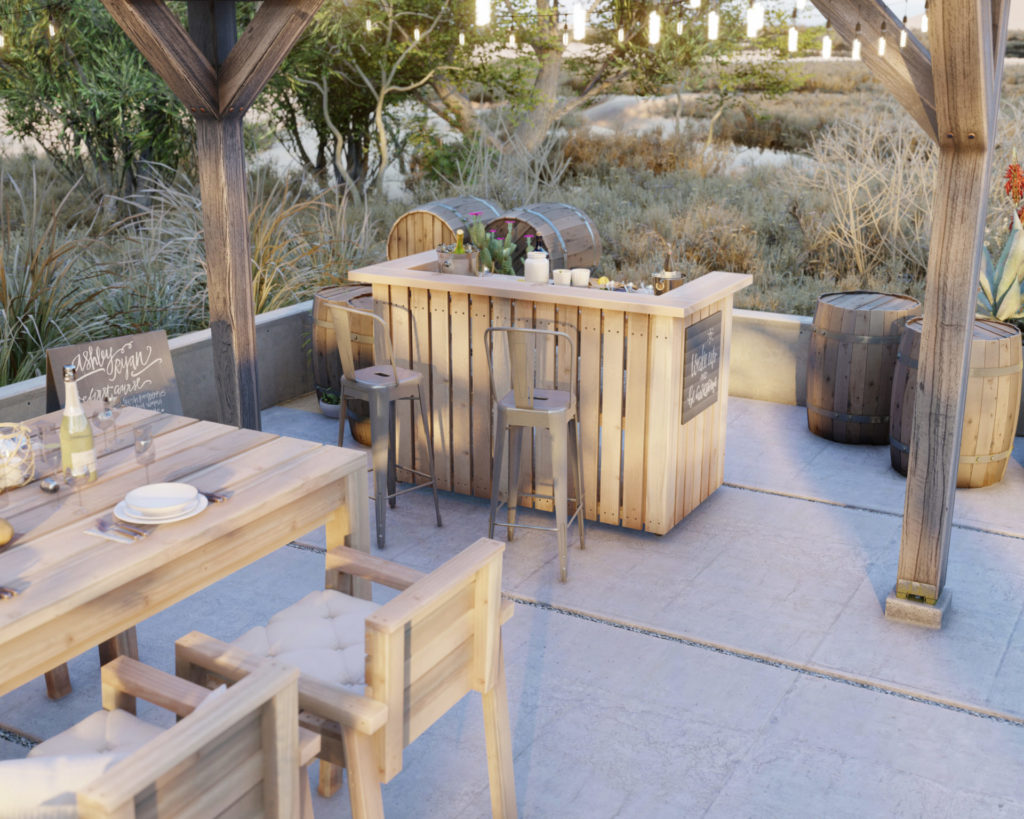
What about the other furniture pieces I see in the pictures?
Plans for the full-size counter-height table and chairs can be found here.
Time to build
About 5 hours
Total cost of build
About $300
Skill level required
Beginner
Download the PDF plans
DIY bar PDF plans
What is included in the PDF download?
- Easy to read step by step instructions
- Material list
- Tools needed
- Helpful links to materials and tools needed
Step-by-step instruction on building the DIY bar
Recommend tools
- Saw (miter saw recommended for precision cuts)
- Drill
- Impact driver with bit for screws
- Sander
- wood countersink drill bit
- measuring tape
- pencil
- (16) 1 inch screws
- 10 lb 3.5 inch screws
- 5 lb 2.5 inch screws
Material list and cut list
Available with purchase of PDF plans.
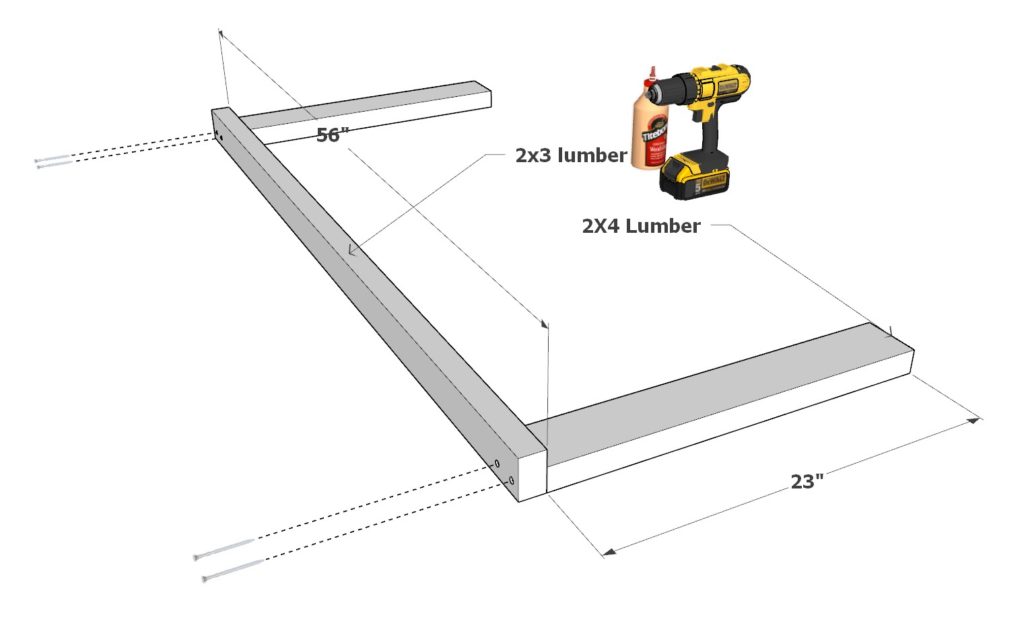
Step 1 (DIY bar)
First, take tow 23 inch 2×4 lumber pieces and one 56 2×3 lumber pieces and arrange them as shown below. Add glue to the areas that will be joined together and add 3.5 inch screws. Predrill the screw holes to prevent the wood from splitting.
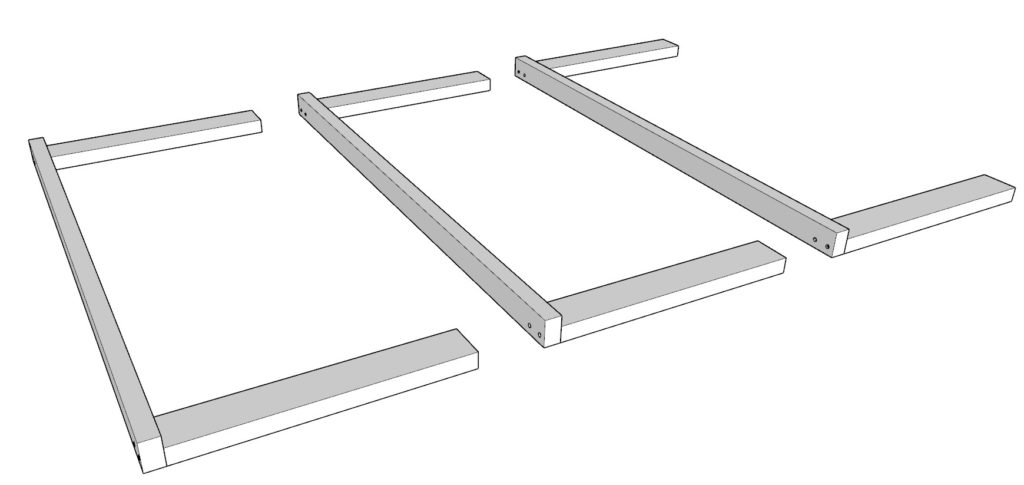
Make three identical frame pieces.
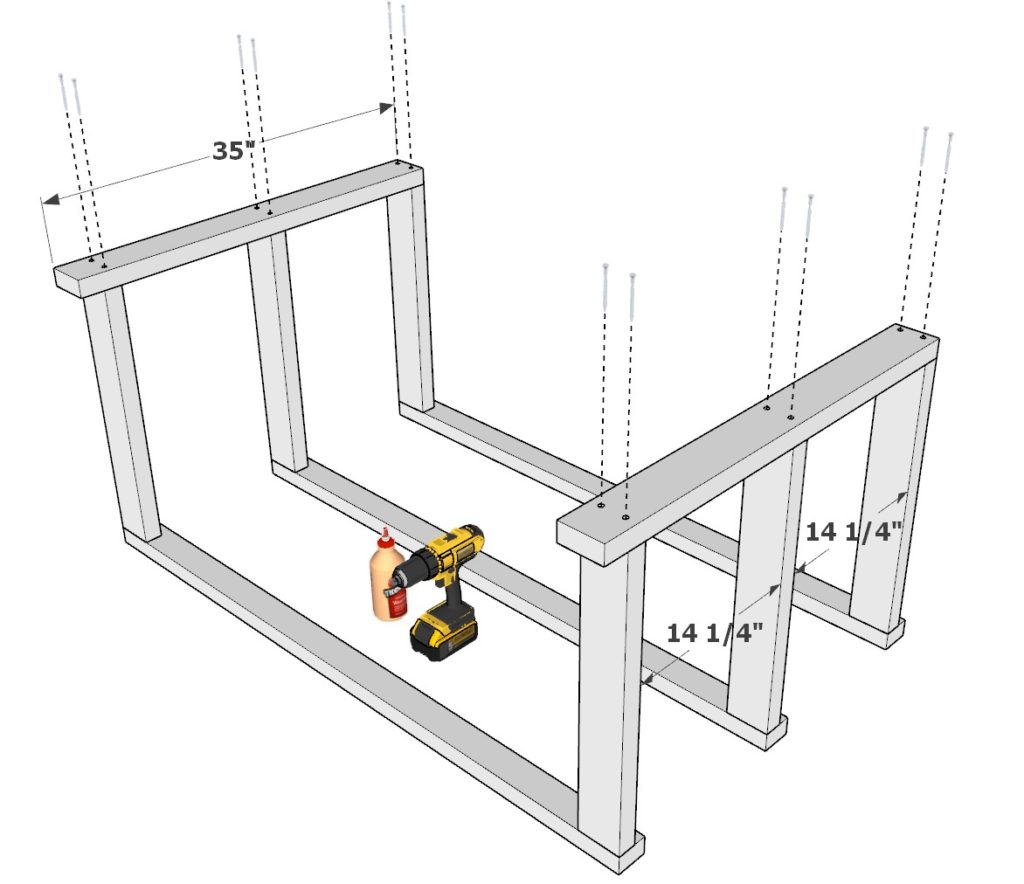
Step 2 (DIY bar)
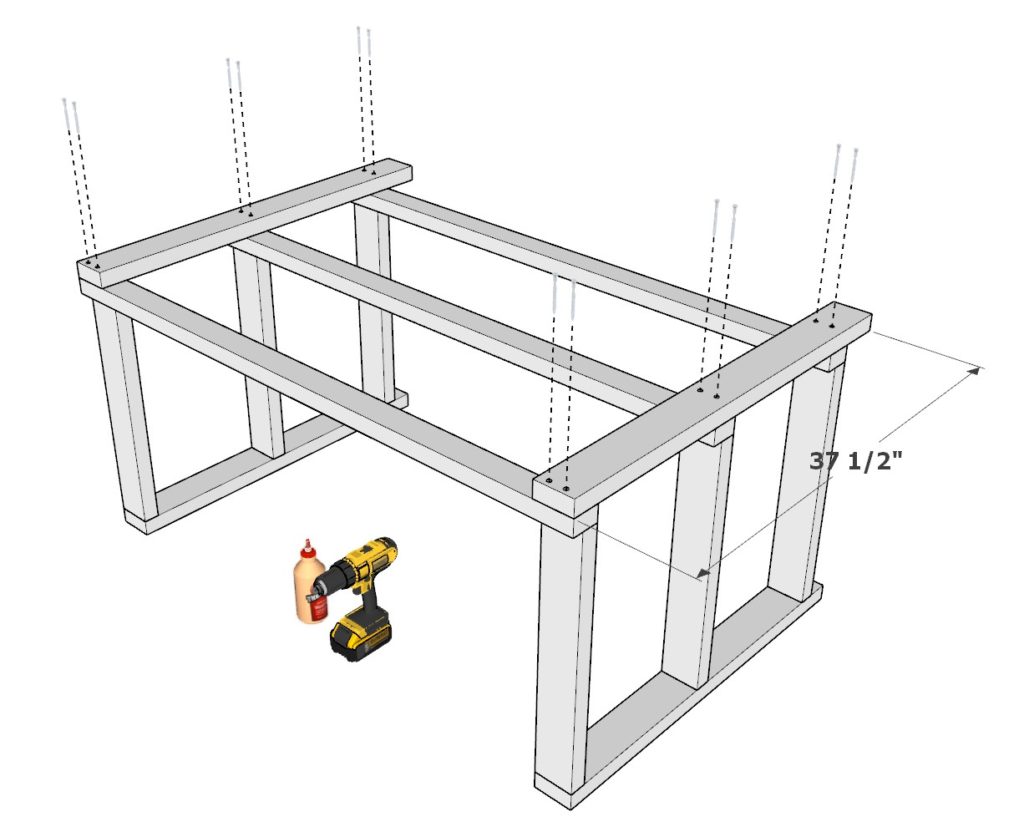
Next, add two 35 inch 2×4 lumber pieces as shown below and add glue and 3.5 in screws. Don’t forget to predrill.
Next, add two 37-1/2 inch 2×4 lumber pieces as shown below. Predrill, add glue, and add 3.5 inch screws.
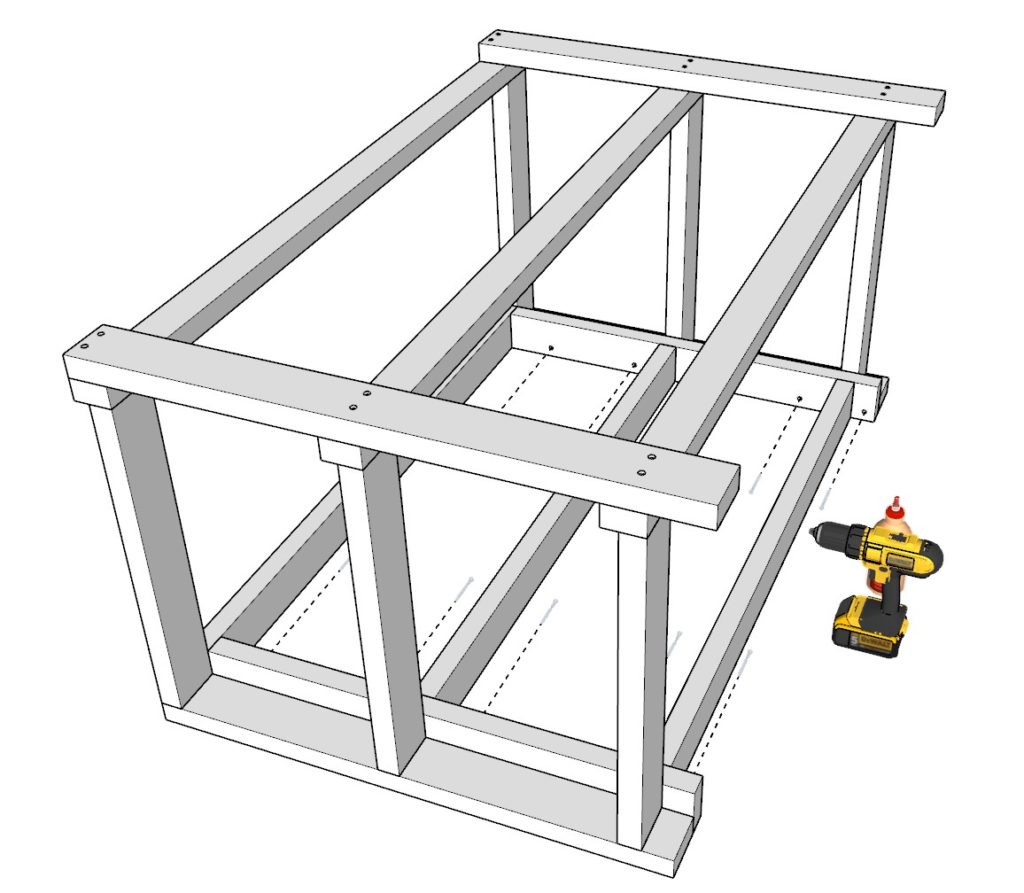
Step 3 (DIY bar)
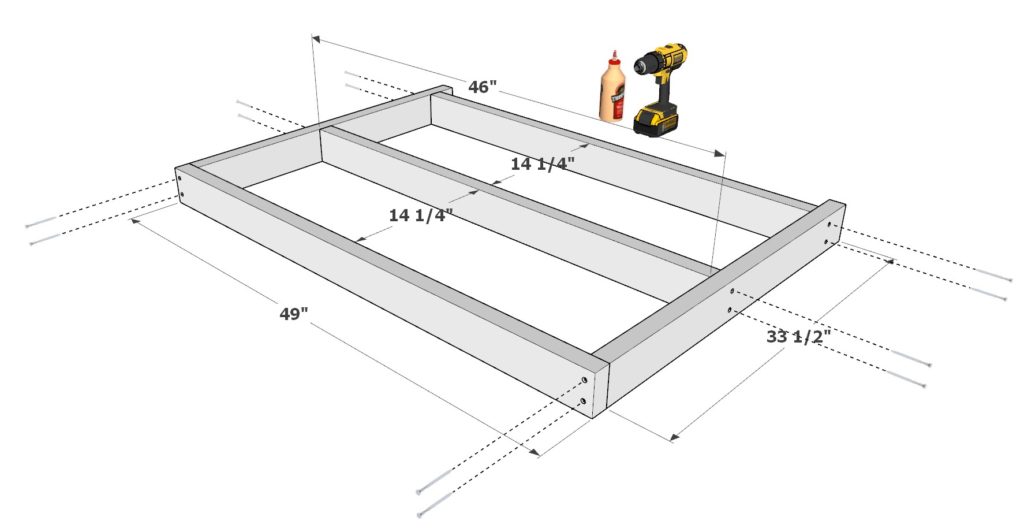
Next, construct the final piece of the frame.
Take two 33-1/2 inch 2×4 lumber pieces, tow 46 inch 2×4 lumber pieces, and one 49 inch 2×4 lumber piece and arrange them as shown below.
Predrill, add 3.5 inch screws, and add glue.
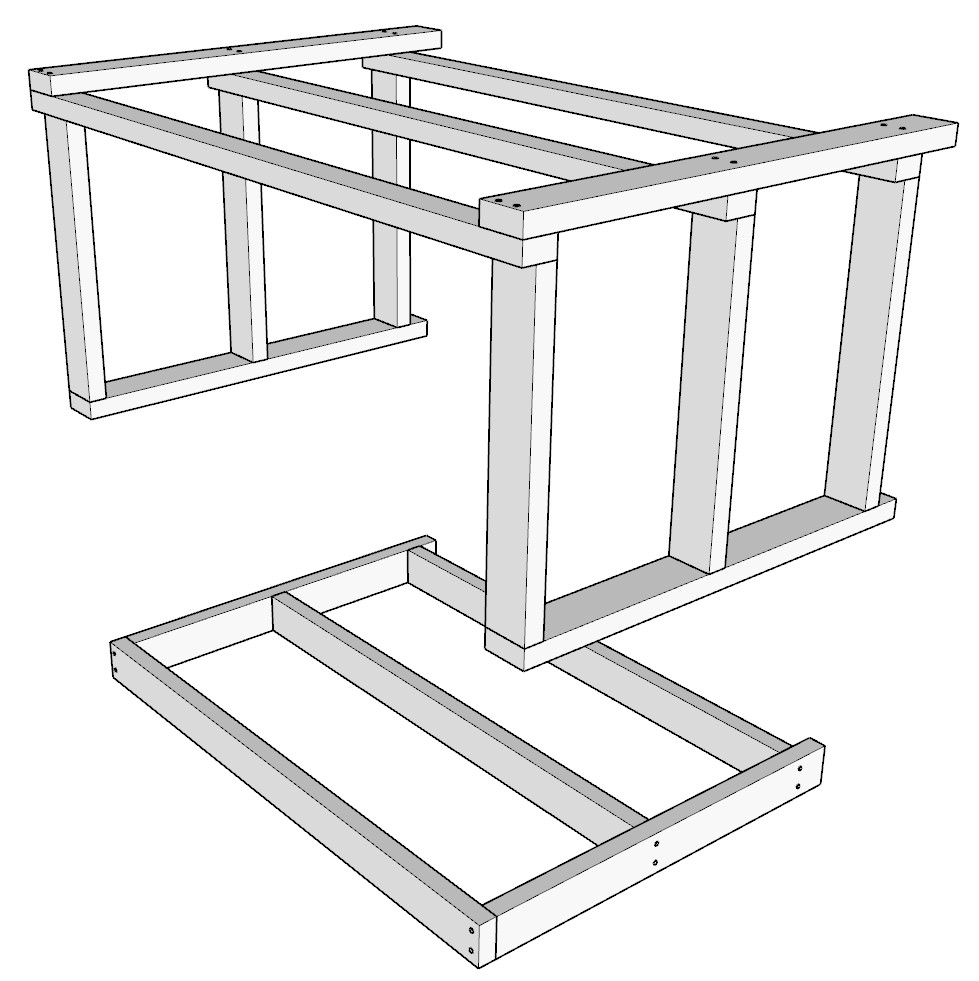
Next, take the frame piece you just made and add it to the main frame of the bar as shown below.
Secure the frame pieces with glue and 3.5 inch screws. Don’t forget to predrill holes.
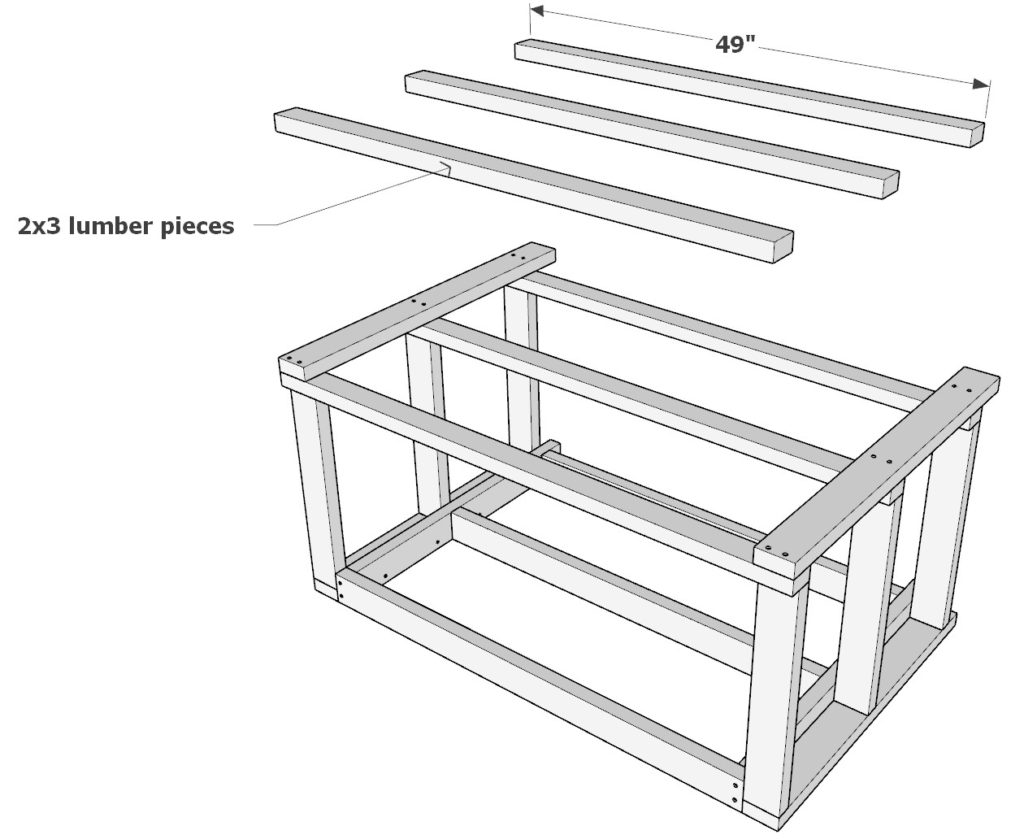
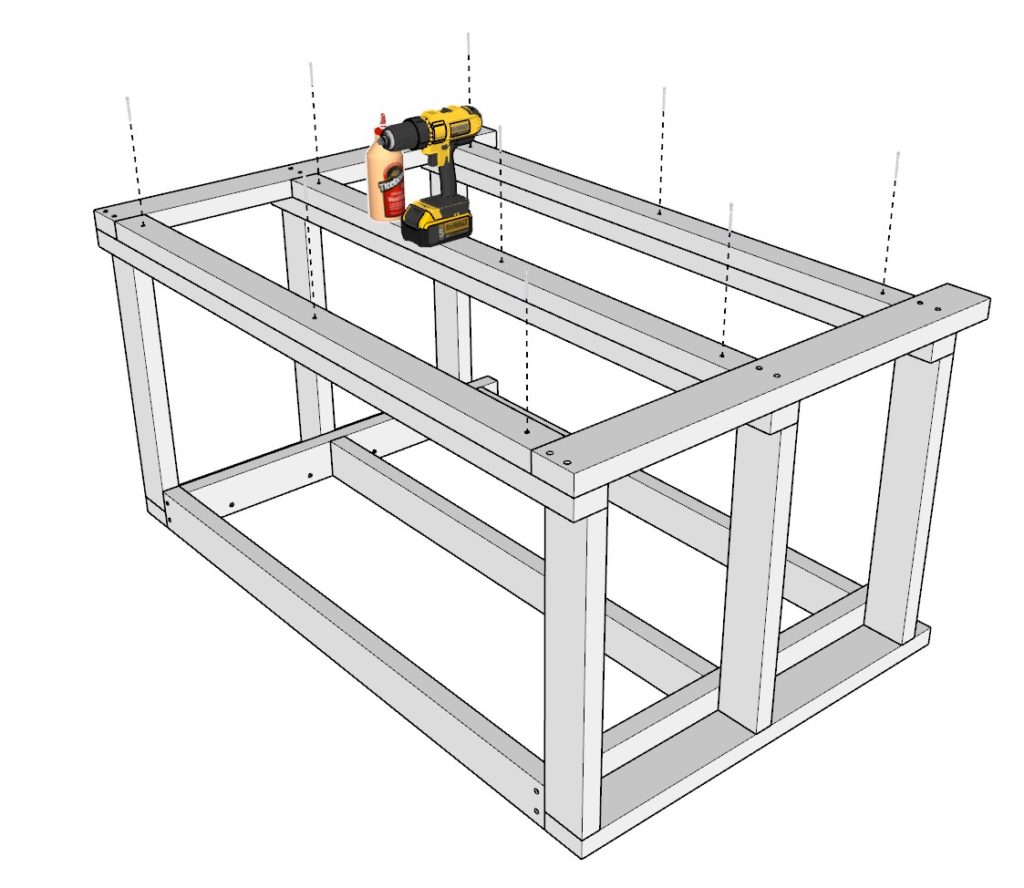
Step 4 (DIY bar)
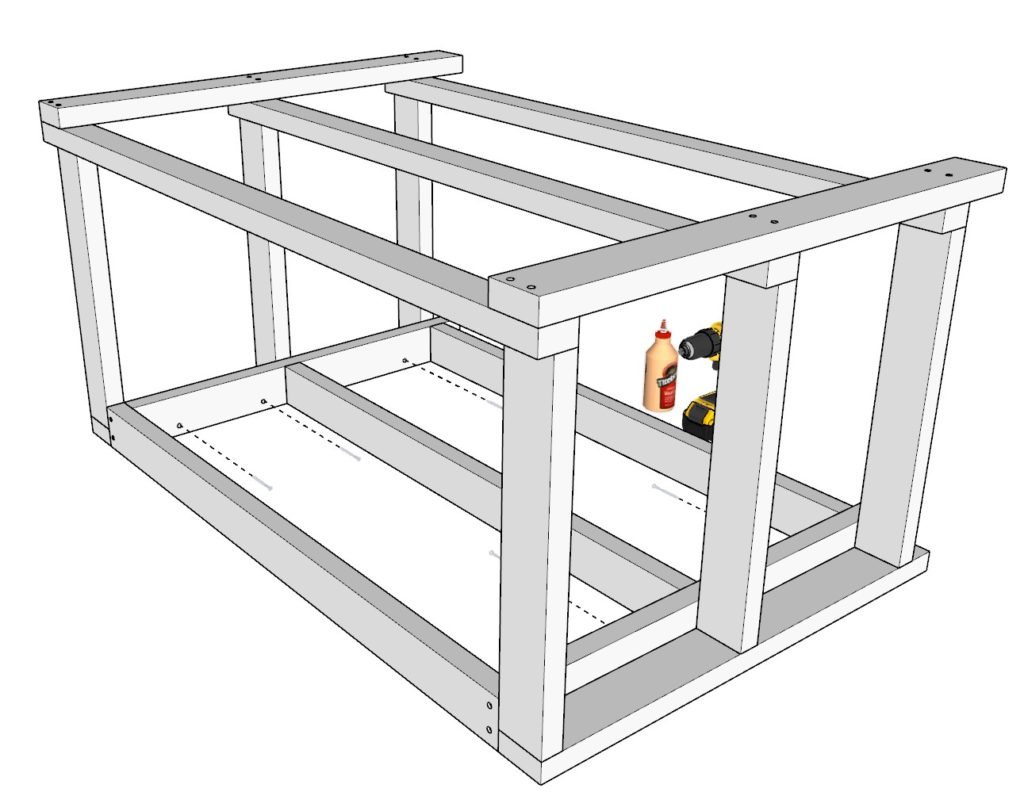
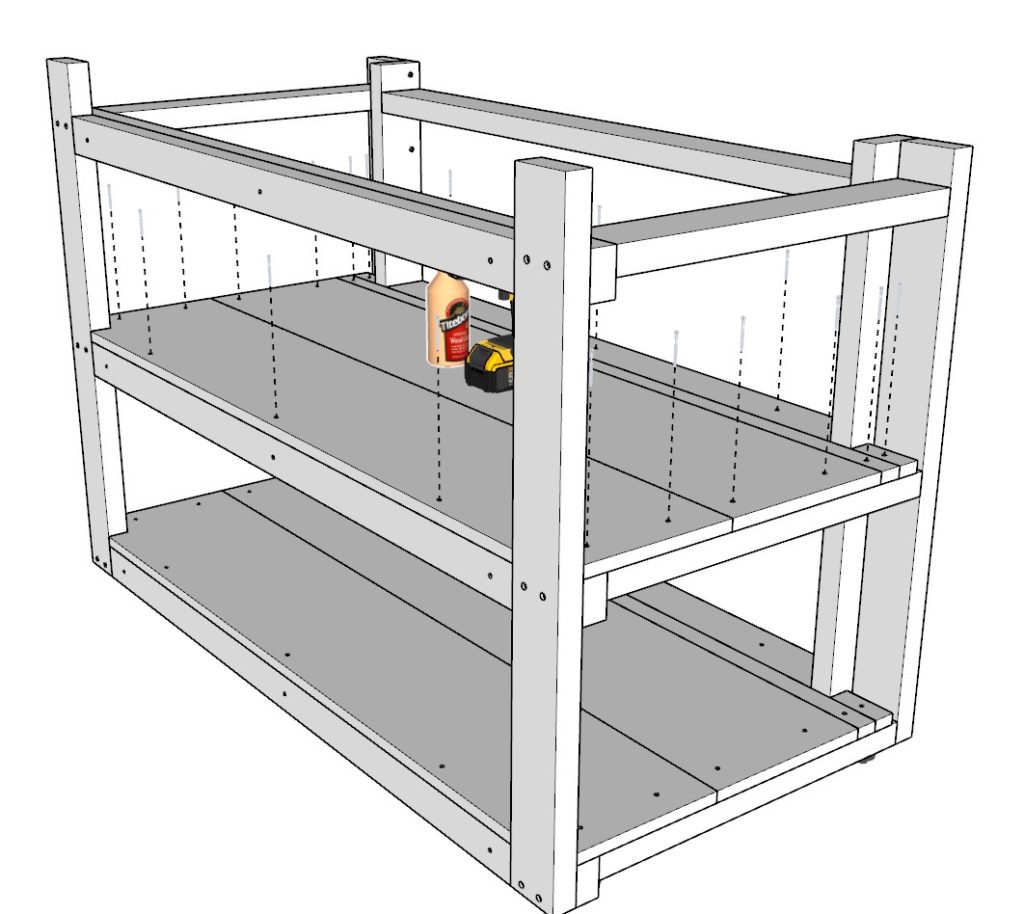
Next, add three 49 inch 2×3 lumber pieces to the main frame of the bar to reinforce it. Predrill holes, add glue and add 2.5 inch screws.
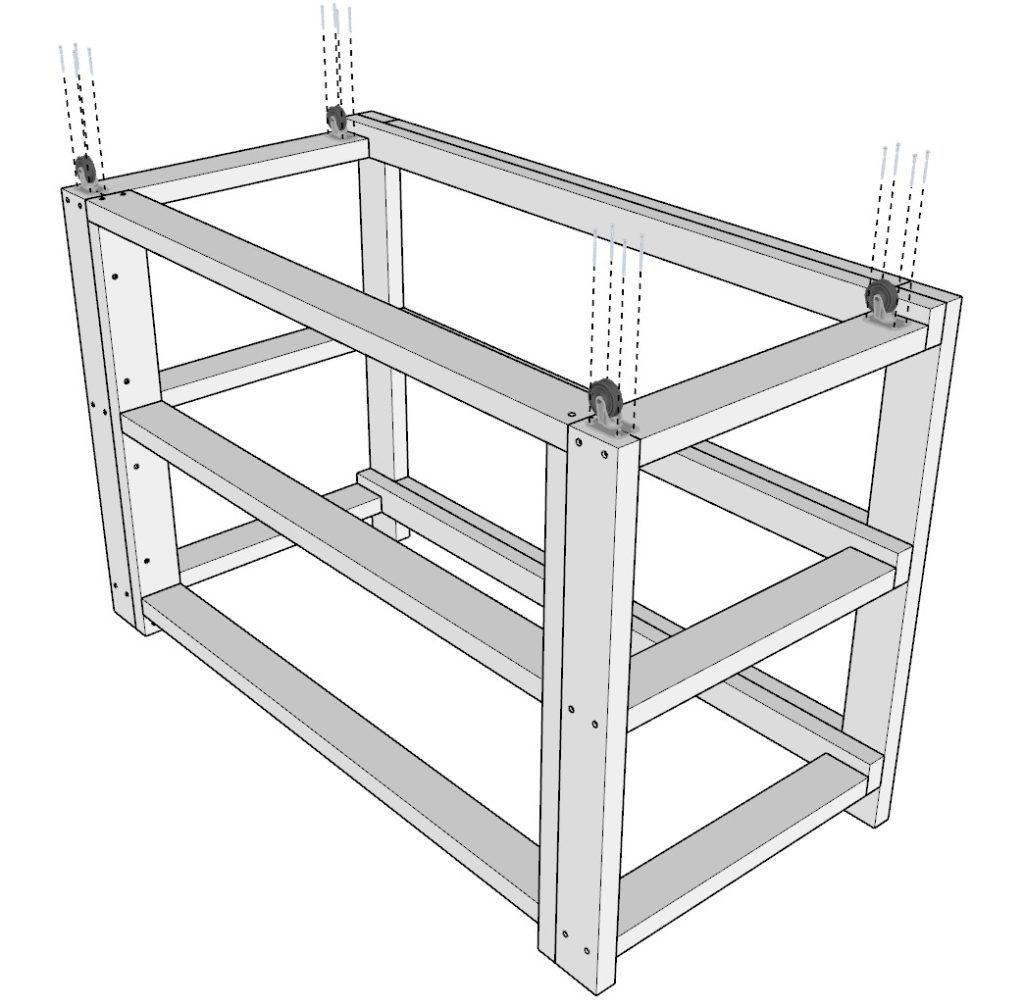
Add the wheels in this step as well. secure the wheels with 1 inch screws.
Step 5 (DIY bar)
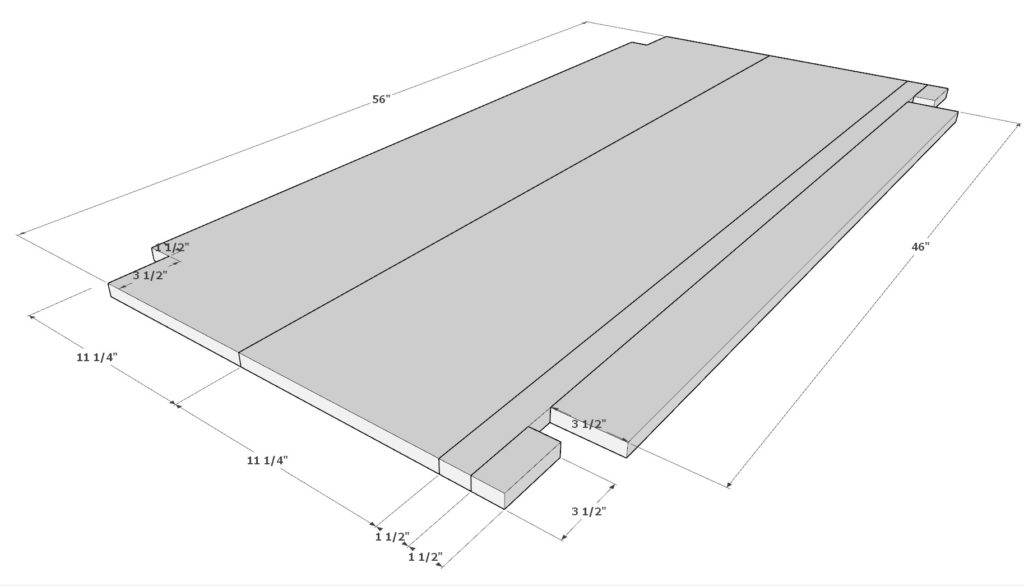
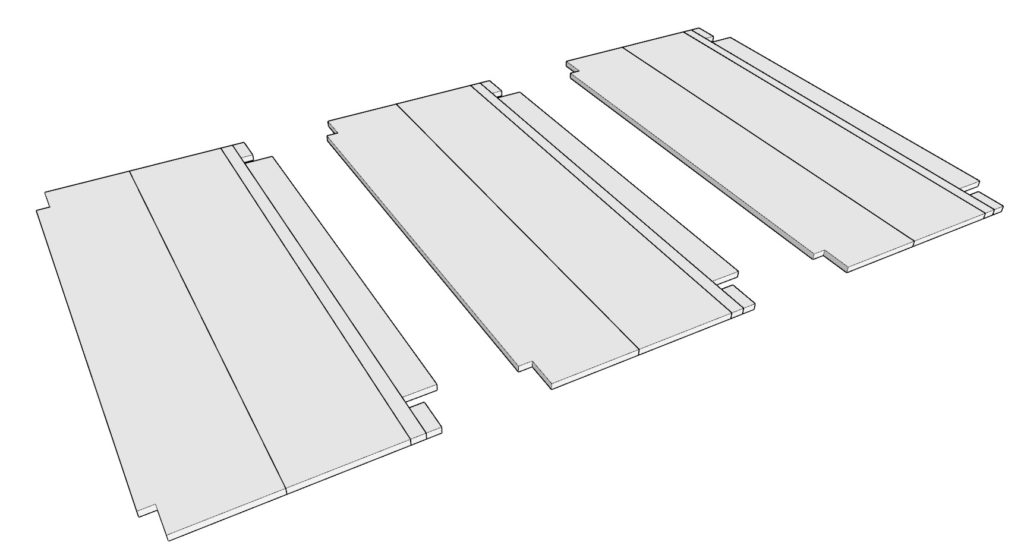
Next, make the bar shelf and bar top pieces.
You will need to make a total of three identical shelves/bar tops.
Take two 56 inch 1×12 lumber pieces (one of which needs to have 3-1/2 in x 1-1/2 inch notches cut out), one 56 inch 1×2 lumber pieces, two 3-1/2 inch 1×2 lumber pieces, and one 46 inch 1×3 lumber pieces and have them ready to install.
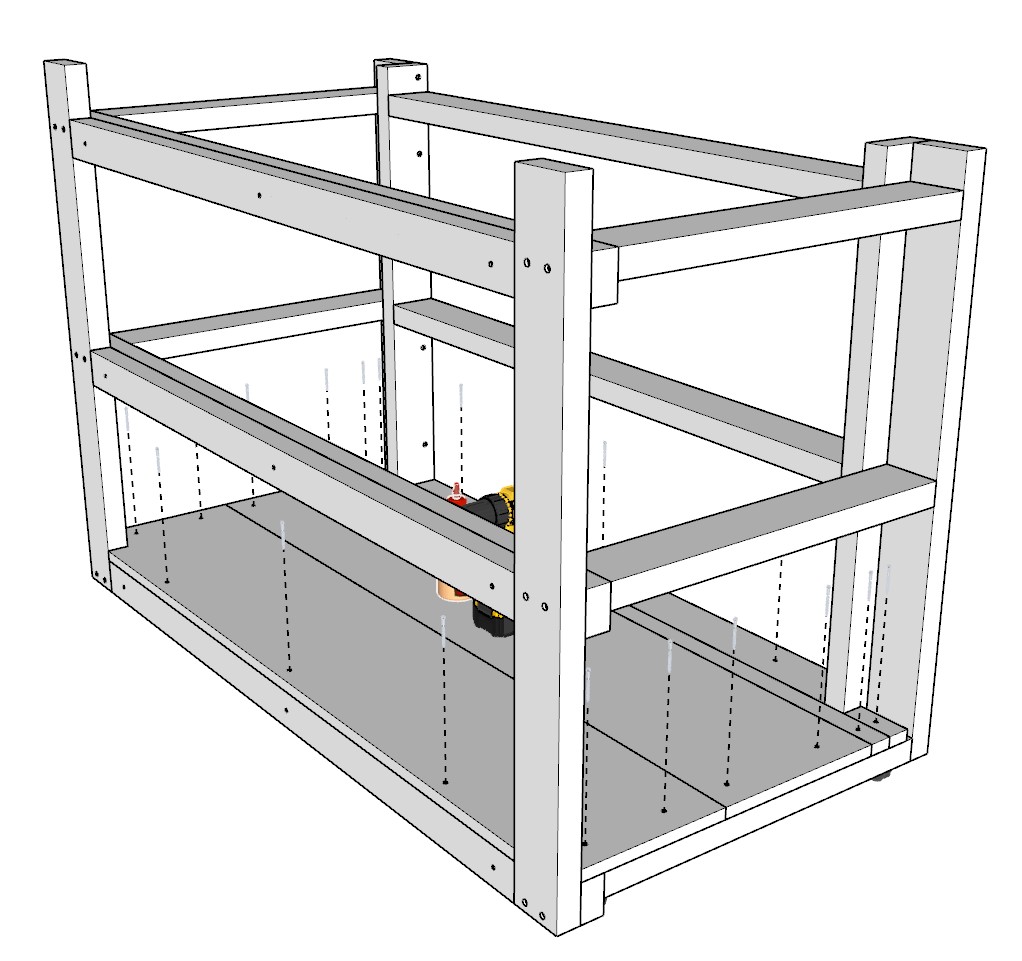
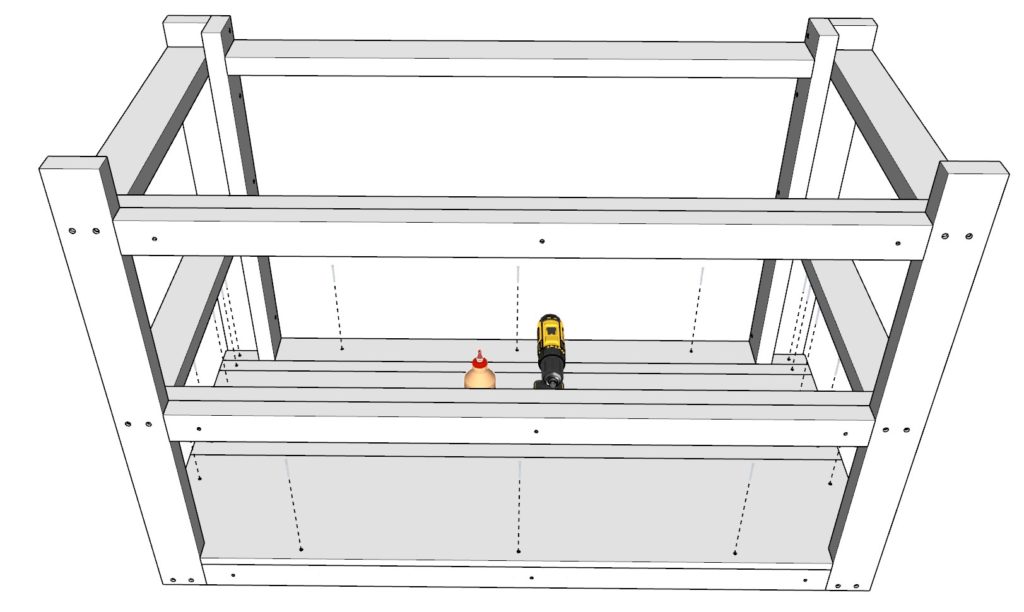
Step 6 (DIY bar)
Next add the shelves and bar top as shown below. Make sure to use plenty of glue and to predrill the holes in the thinner lumber pieces.
Add 1.5 inch long screws.
Repeat the same process until all 3 levels are installed.

Step 7 (DIY bar)
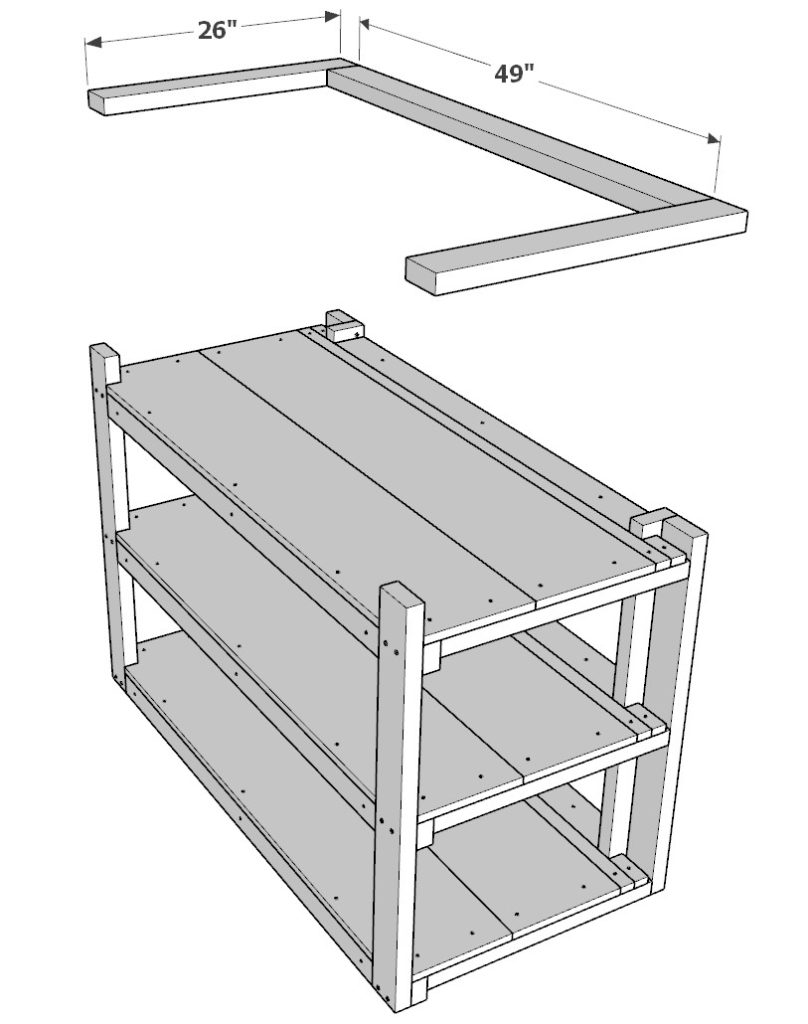
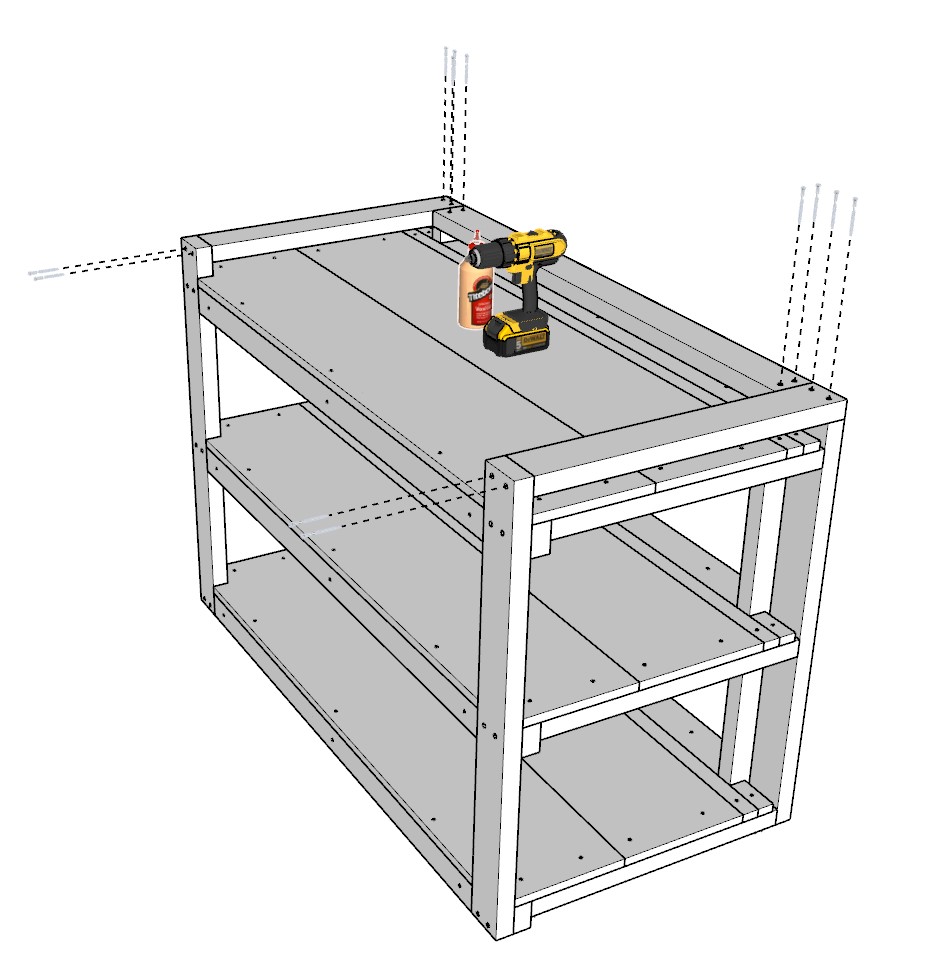
Next, add the bar top.
Take two 26 inch 2×4 lumber pieces and one 49 inch 2×4 lumber piece and arrange them as shown below. Predrill, add glue, and add 3.5 inch screws.
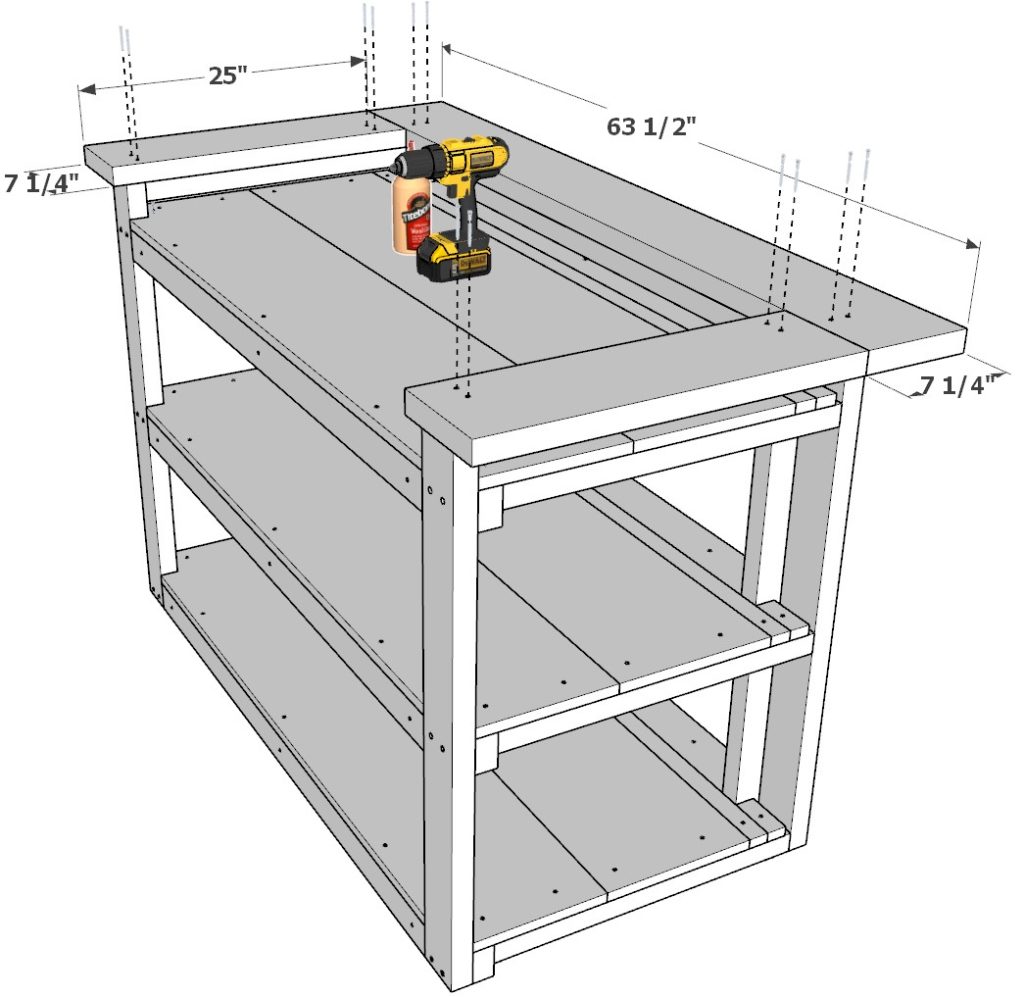
Next add the bar serving counter top. Take two 25 inch 2×8 lumber pieces, and one 63-1/2 inch 2×8 lumber piece and attach these pieces to the counter frame using 2.5 inch screws and glue. Make sure to predrill the holes.
Step 8 (DIY bar)
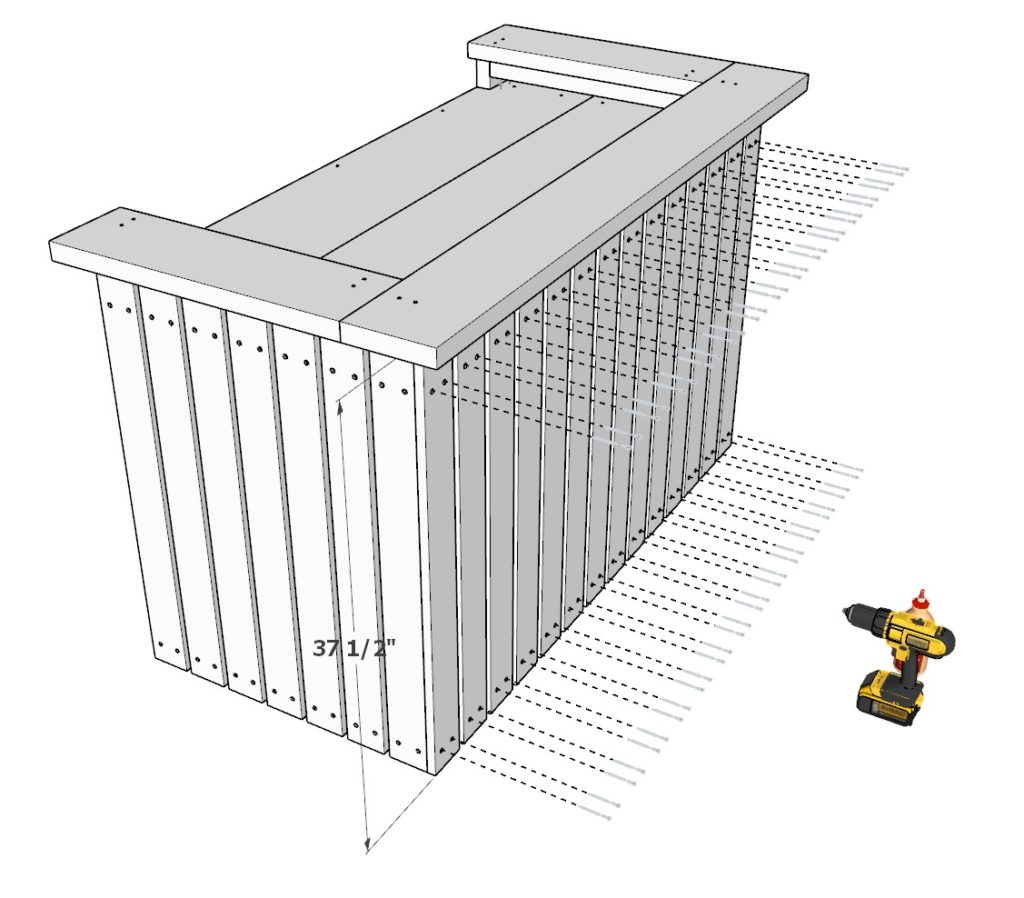
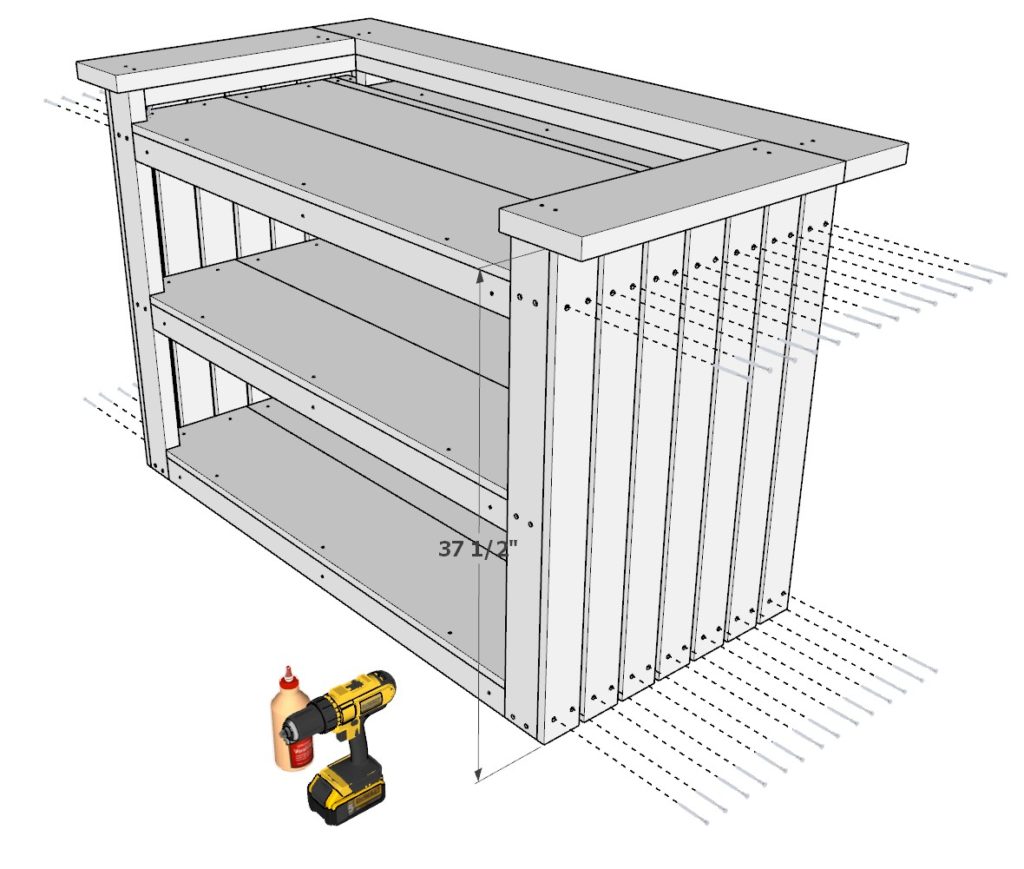
Next add the siding pieces to the home bar.
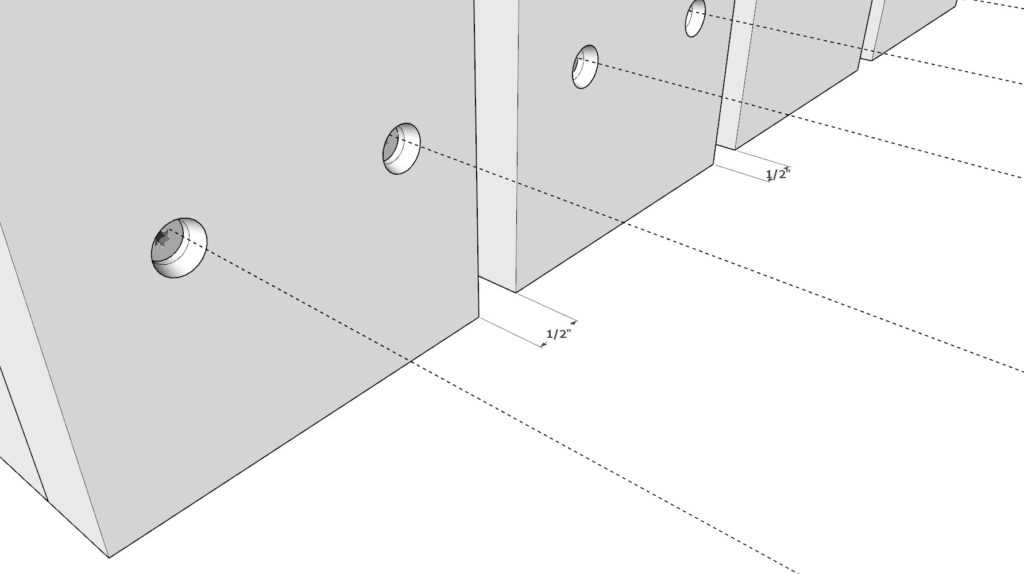
Take fourteen 37-1/2 inch 1×4 lumber pieces and add them as siding to the bar as shown below. Space them out 1/2 inch apart. I recommend using a spacer to have nice even spaces. The spacer can be cut from scrap wood and needs to be exact.
Add either 2.5 or 3.5 inch screws. Add glue, and predrill the holes.
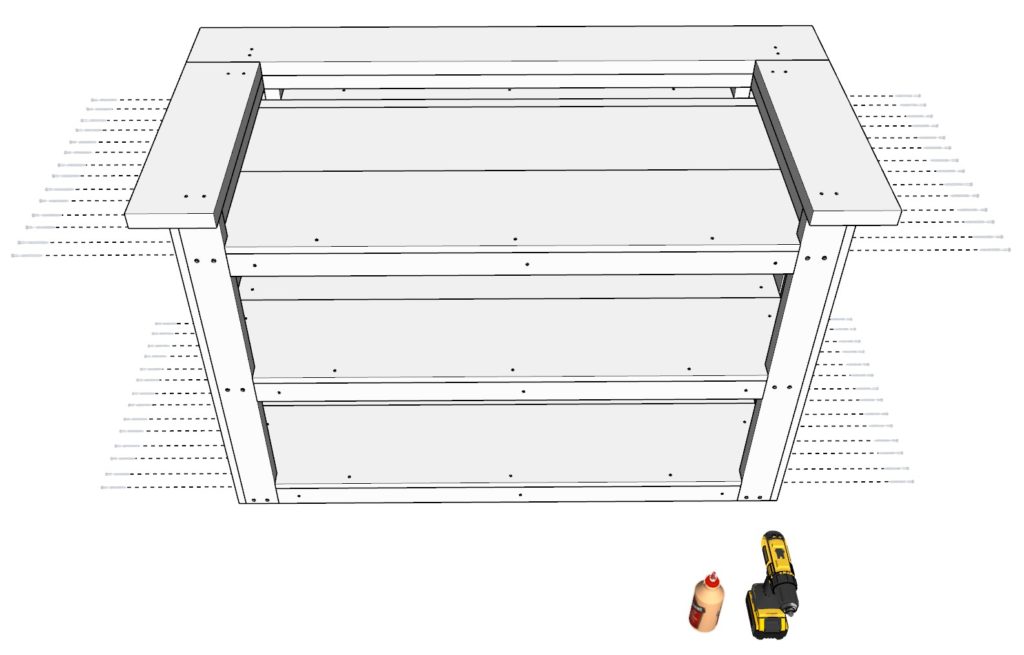
Step 9 (DIY bar)
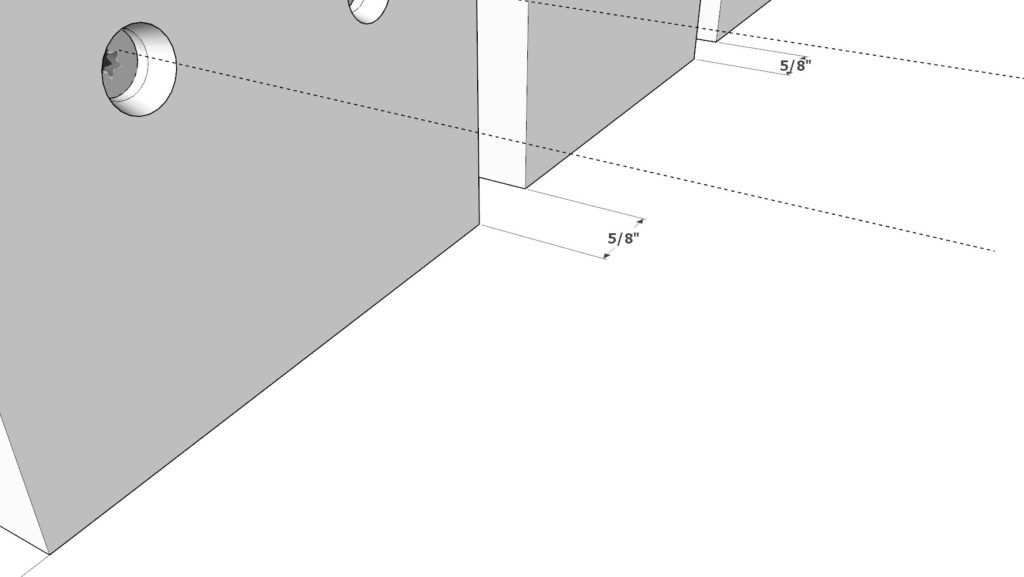
Lastly add the final siding pieces.
Add fourteen more 37-1/2 inch 1×4 lumber pieces to the front of the bar. The spacing is 5/8 inch apart.
As before, predrill, add glue, and add 2.5 or 3.5 inch screws.
Sand down the whole bar. I use an orbital sander to speed up the process
I use a rough 80 grit paper first and then finish it with a 220 grit paper.
Filling in the holes is optional.
I also like to use a router on the perimeter edges of the bar top to round off my corners so that the top doesn’t press in on the forearms and elbows when its in use. This makes the table more comfortable. This can also be done with a sander if you don’t have a router on hand.
At this point it is ready to be stained or painted!