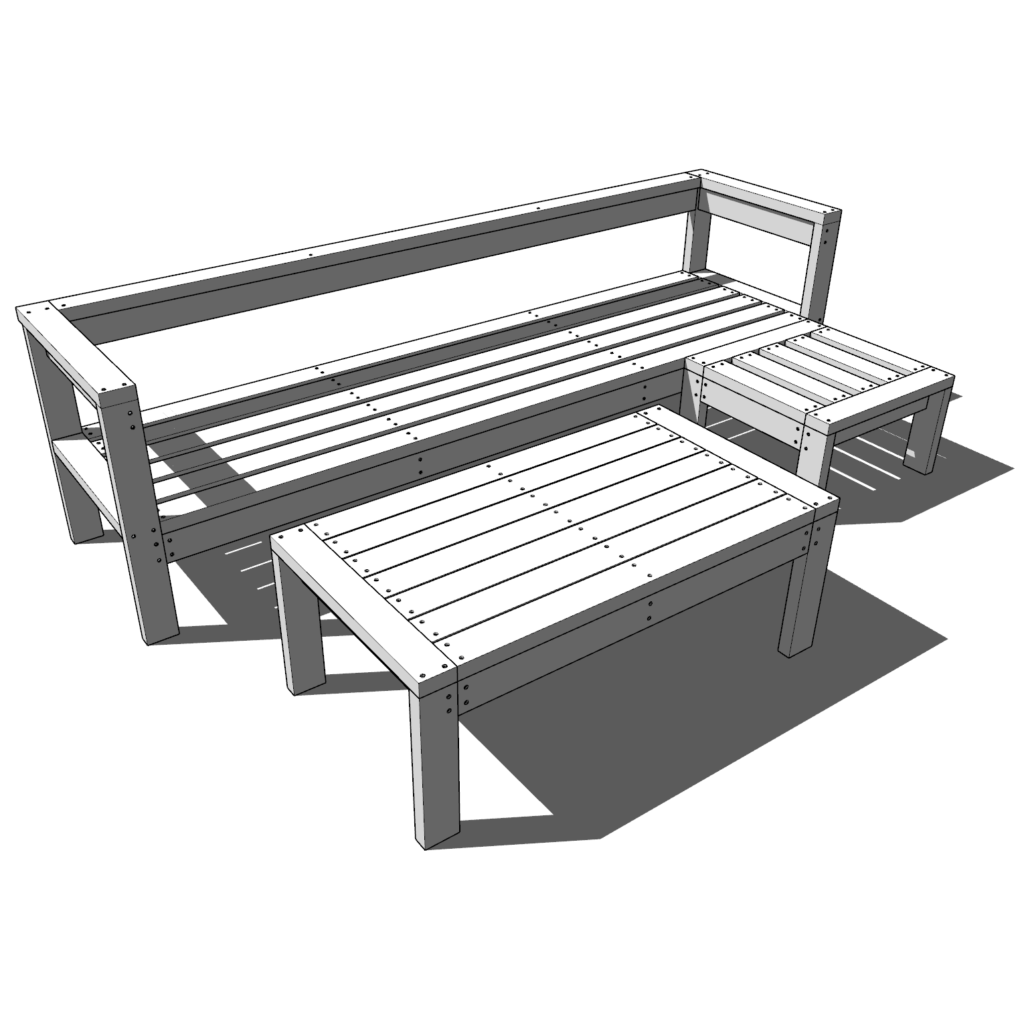
Why build a DIY outdoor sectional?
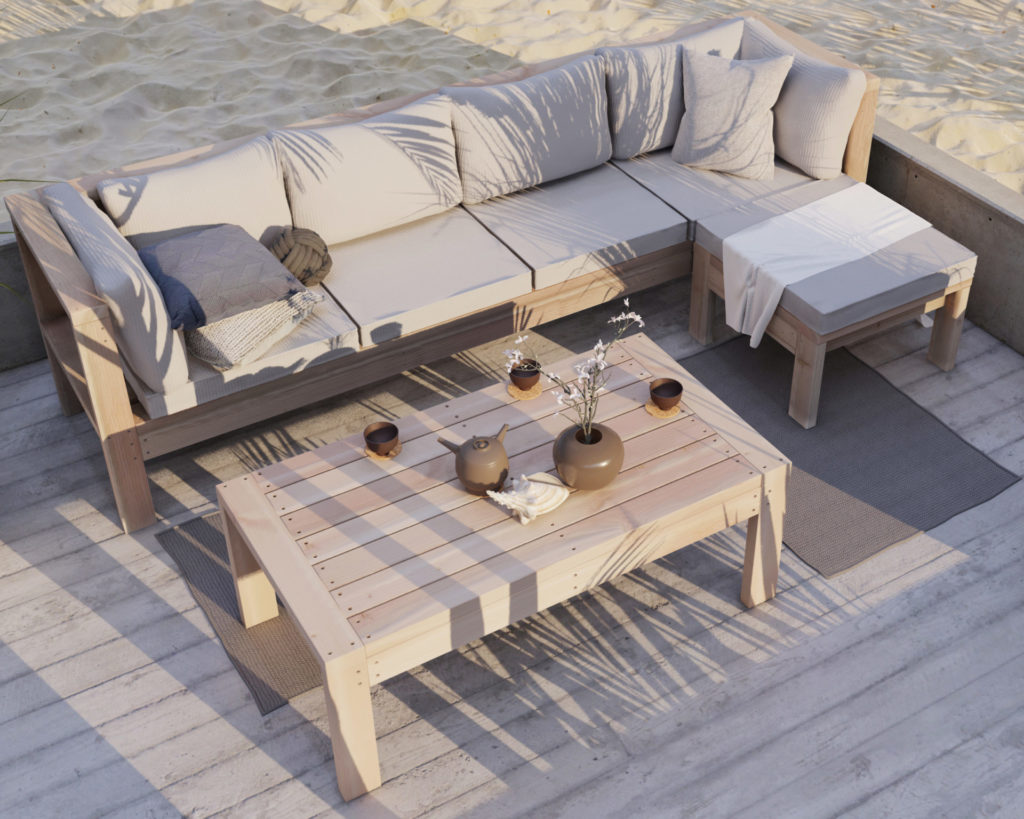
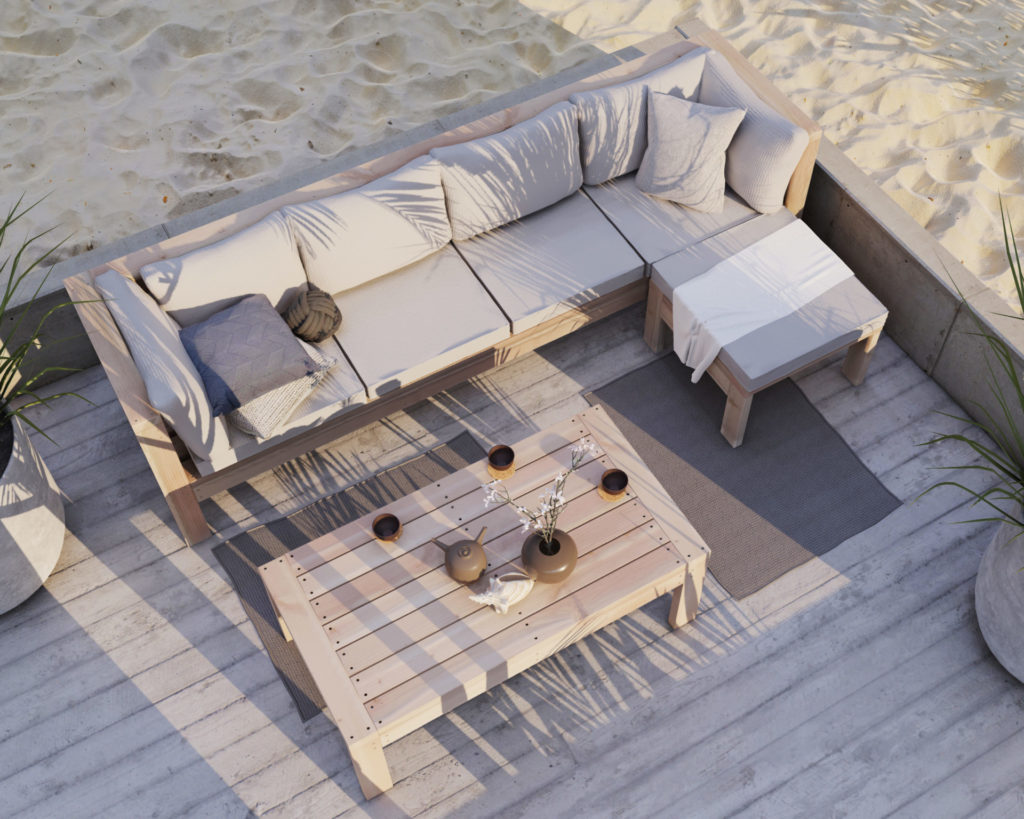
The DIY outdoor sectional is simple, inviting, and is perfect for enjoying the outdoors, the fresh breeze, the garden, and greenery. You can better enjoy your backyard space all year round and be inspired by the changes of the seasons.
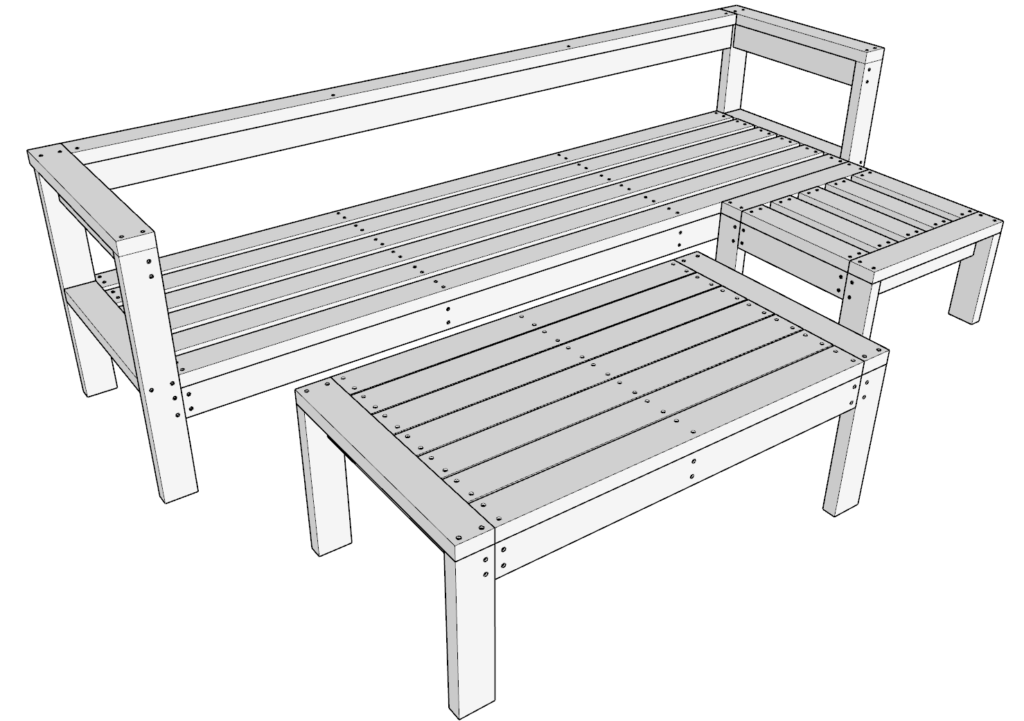
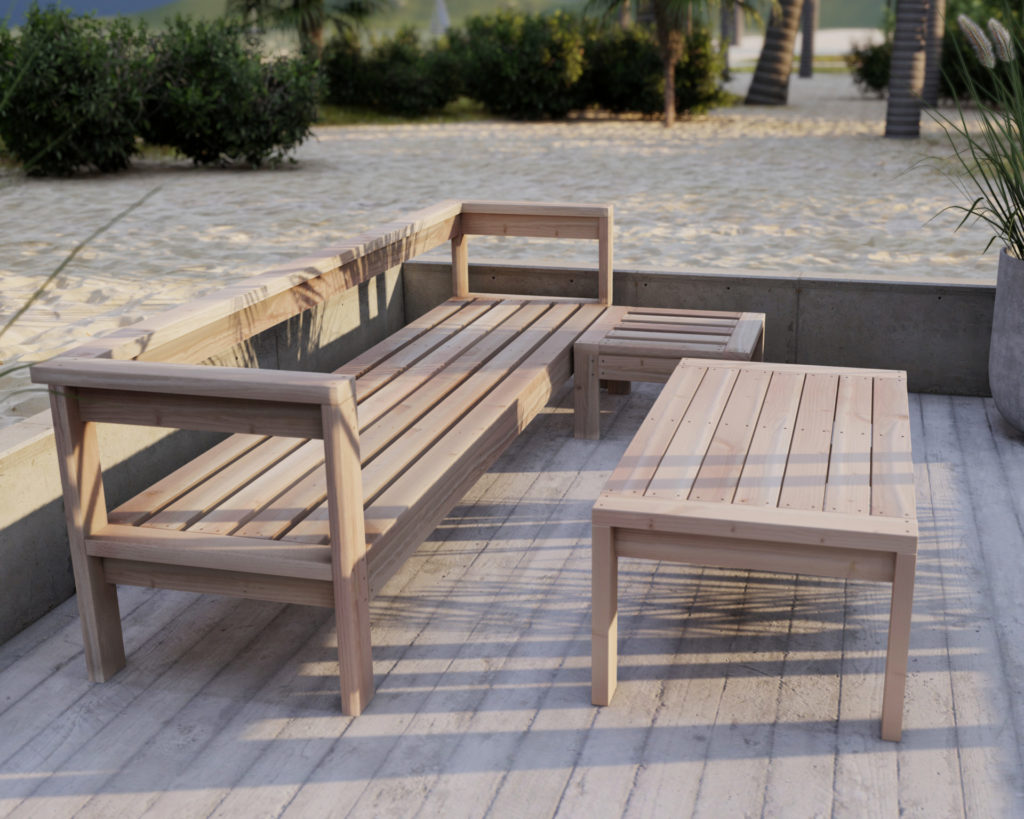
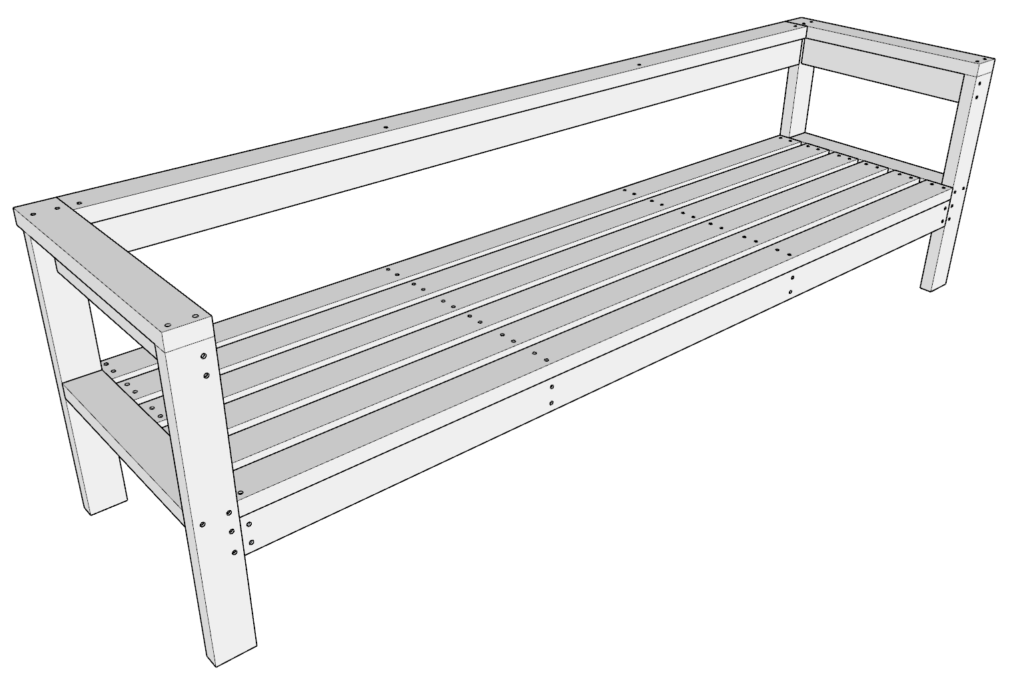
The minimalistic and simple wood bench design is built from inexpensive 2×4’s but looks like a million bucks! The DIY patio bench is great for creating a space for entertaining. You can create a more perfect space that offers comfortable seating for parties, barbecues, and get togethers at home.
This DIY outdoor sectional bench is inexpensive to make and is an ideal project for those who don’t have a lot of tools or experience with woodworking. The step-by-step instructions offered in this post will ensure that you get the result you want without making mistakes or wasting material. This entire build is from 2×4’s lumber that can be purchased from most hardware stores.
Why build using our DIY outdoor sectional plans?
We don’t just have one-off pieces available for our customers, we design entire sets.
Every home is different, and the versatility of building using our outdoor furniture plans allows for you to configure the outdoor living space in a manner that suit your needs.
Check out the “outdoor” section of the site for additional plans that fit this set.
Specifics of the DIY outdoor sectional.
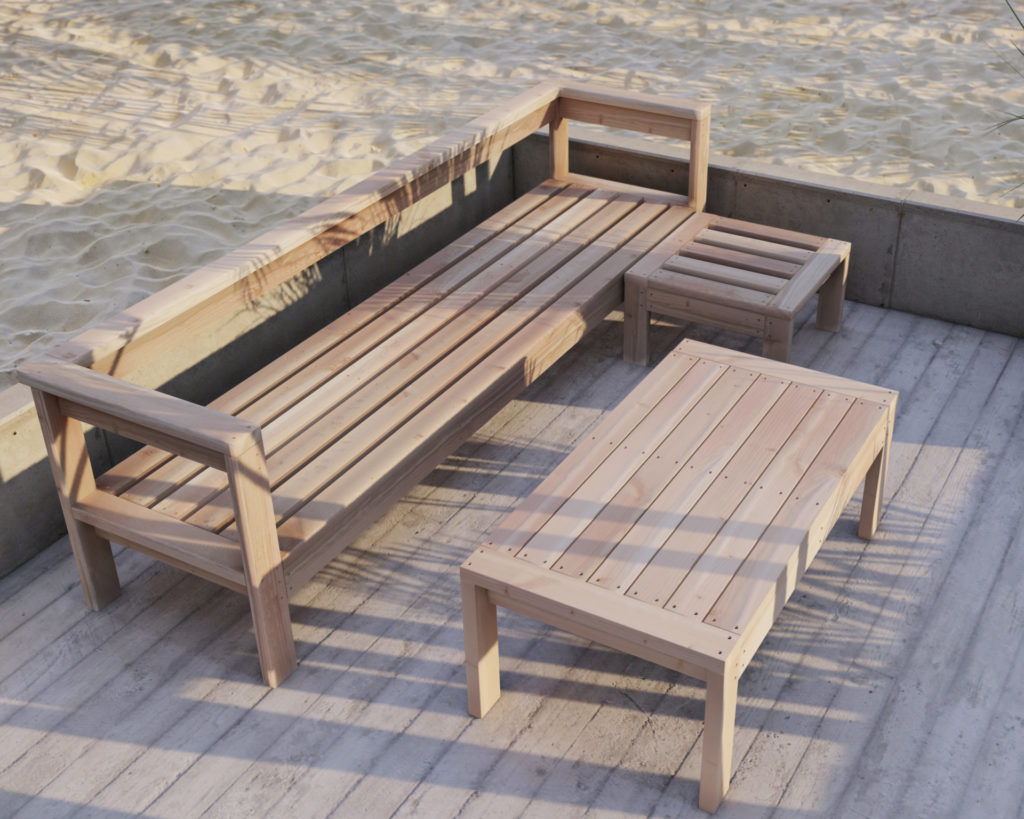
These DIY outdoor sectional sofa plans not only features the beauty of natural wood, but are also extremely resilient and requires minimal maintenance. Using sold 2×4 lumber pieces ensures a long lasting and quality piece of furniture that will last through years of use, abuse, wear, and tear. Wood furniture can often last for generations.
I got the inspiration for this build from Ana White a few years ago and decided to modify and improve on it. I have been building this modified version for customers for years now with great success. This Ana White inspired DIY outdoor sectional is a great option for anyone thinking about building custom seating.
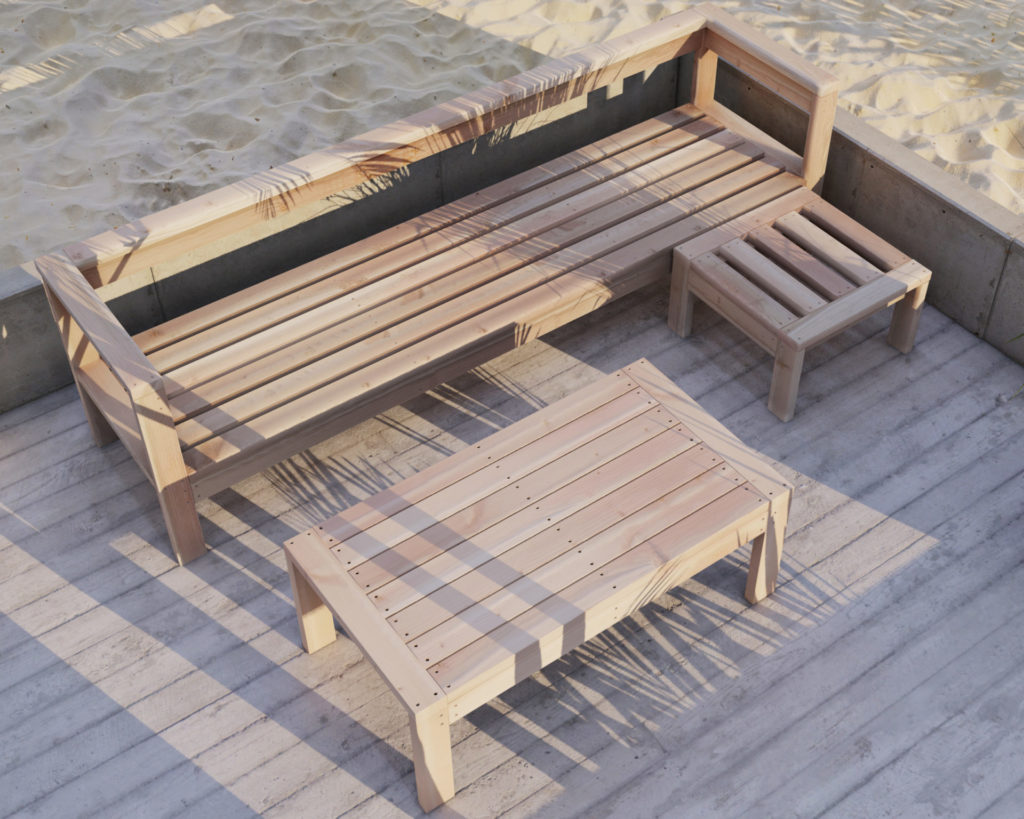
The arm rests of the DIY patio bench are reinforced by additional 2×4 lumber pieces to prevent pillows and cushions from falling through.
The sturdy frame is jointed with simple screws and reinforced with glue. This not only makes the build easy and beginner friendly, but it also makes the bench able to support multiple people sitting on it at one time.
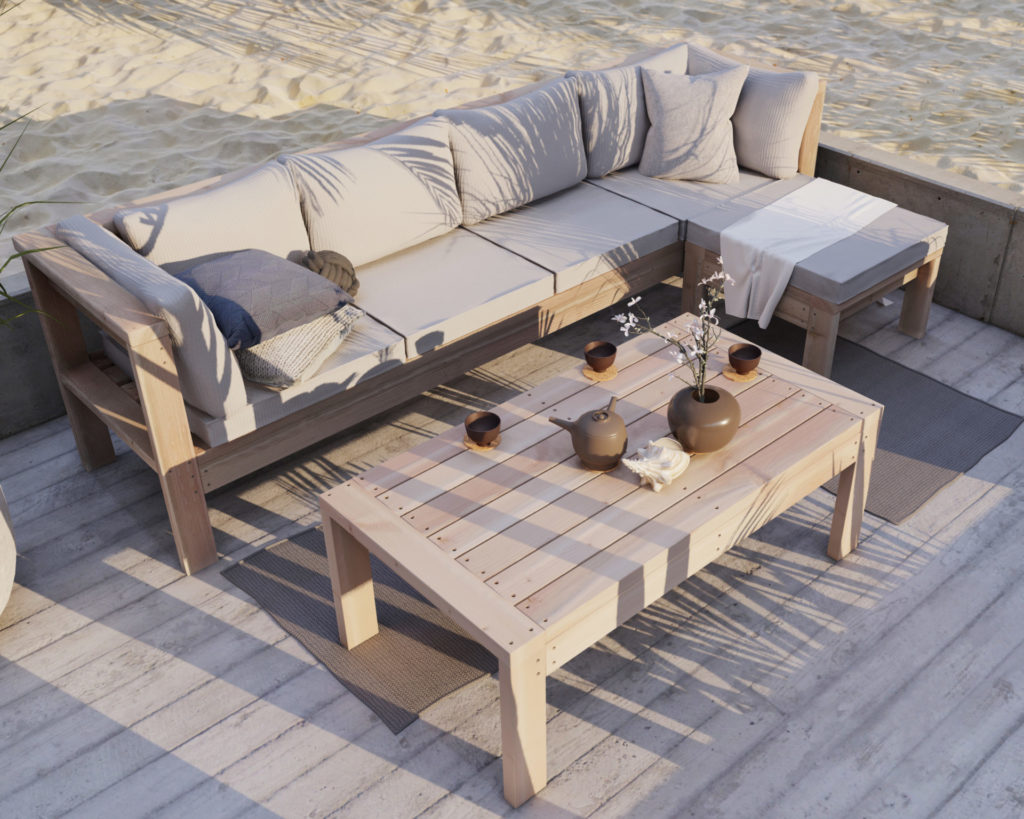
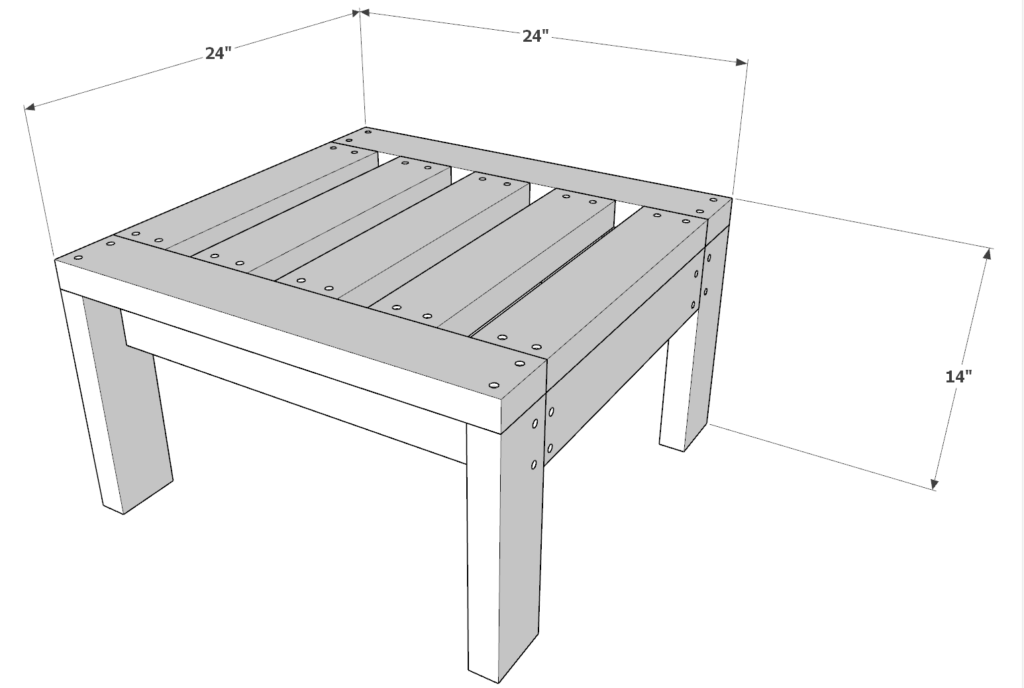
Once the outdoor sofa is done, you can make it comfy and cozy by adding cushions, pillows, and blankets. Cushions can be purchased at stores like Home Depot, Lowes, Ikea, Target, etc. You can also have cushions custom made for the DIY patio bench. The seating platform of the bench is made to accommodate 24 in x 24 in base cushions and variable height (minimal 12 inches tall) back rest cushions. Cushions that are a little different then 24 in x 24 in typically work just fine.
Time to build
About 4-5 hours
Total cost of build
About $190 (cushions and pillows not included in cost estimate).
Skill level required
Beginner-Intermediate
Download the PDF plans
Outdoor wood chaise sectional patio bench PDF
What is included in the PDF download?
- Easy to read step by step instructions
- Material list
- Cut list
- Tools needed
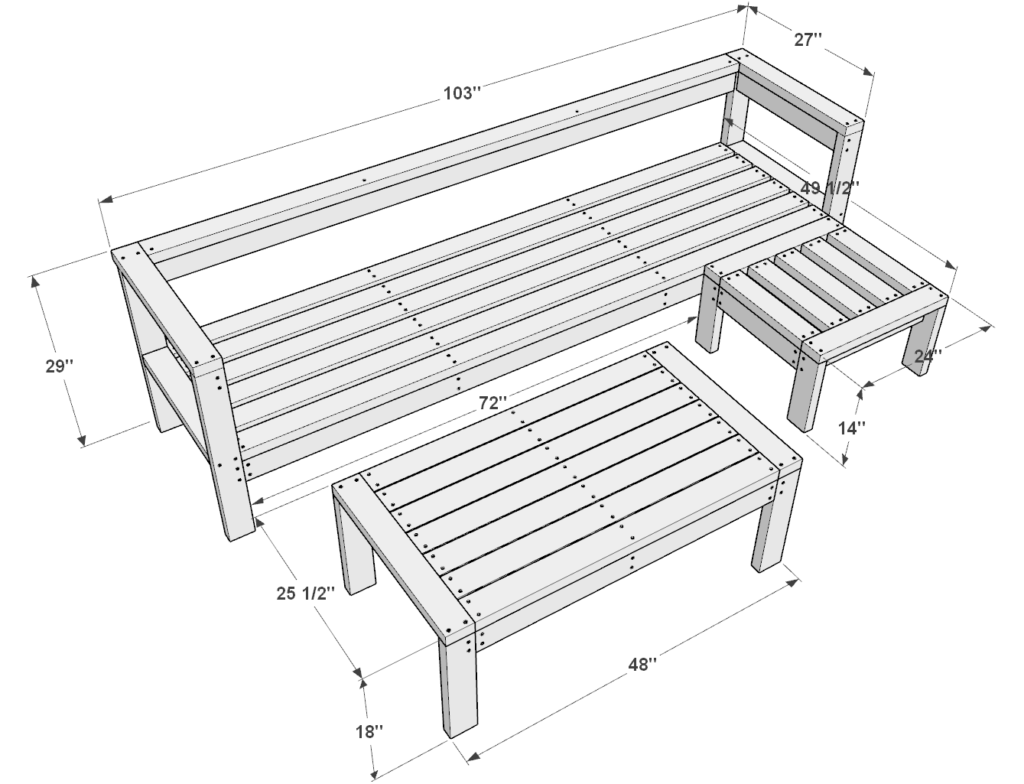
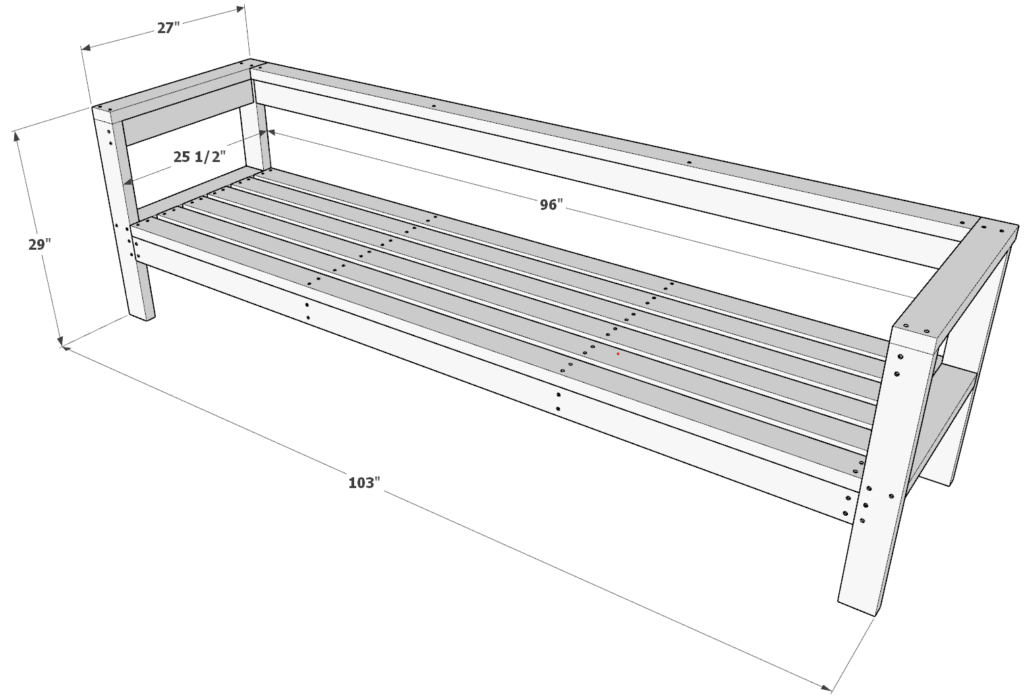
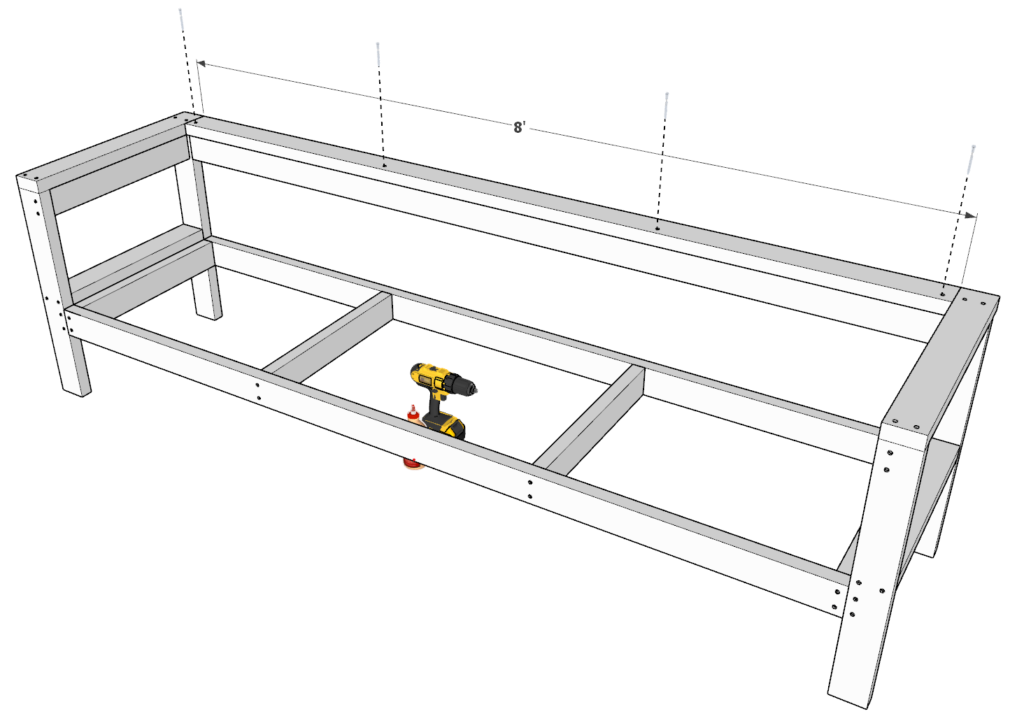
Step-by-step instruction on building the 103 inch 4-seater bench
Recommend tools for the 103 inch bench
- Saw (miter saw recommended for precision cuts)
- Drill
- Impact driver with bit for screws
- GRIP Clamps
- Sander
- wood countersink drill bit
- Pipe clamp grip, tie downs, or straps.
Cut list and material list for the 103 inch bench
Available with purchase of PDF plans.
Step 1 (4-seater component)
Precut all your wood pieces into the following dimensions:
- (10) 2in x 4in x 96in
- (4) 2in x 4in x 27.5in
- (2) 2in x 4in x 27in
- (10) 2in x 4in x 22.5in
Tip: I have noticed that the 2x4x8s are not always 96 inches long. Most of the time they are a little longer and often vary in size. For this reason, for the ten 96 inch pieces, I just cut them all down to 95.5 inches. If your using 24 in x 24 in cushions, this will not make a significant difference when adding flexible cloth cushions. Cutting down the pieces to 95.5 inches makes a huge difference when assembling the bench. Its important to have all pieces uniform and identical when needed.
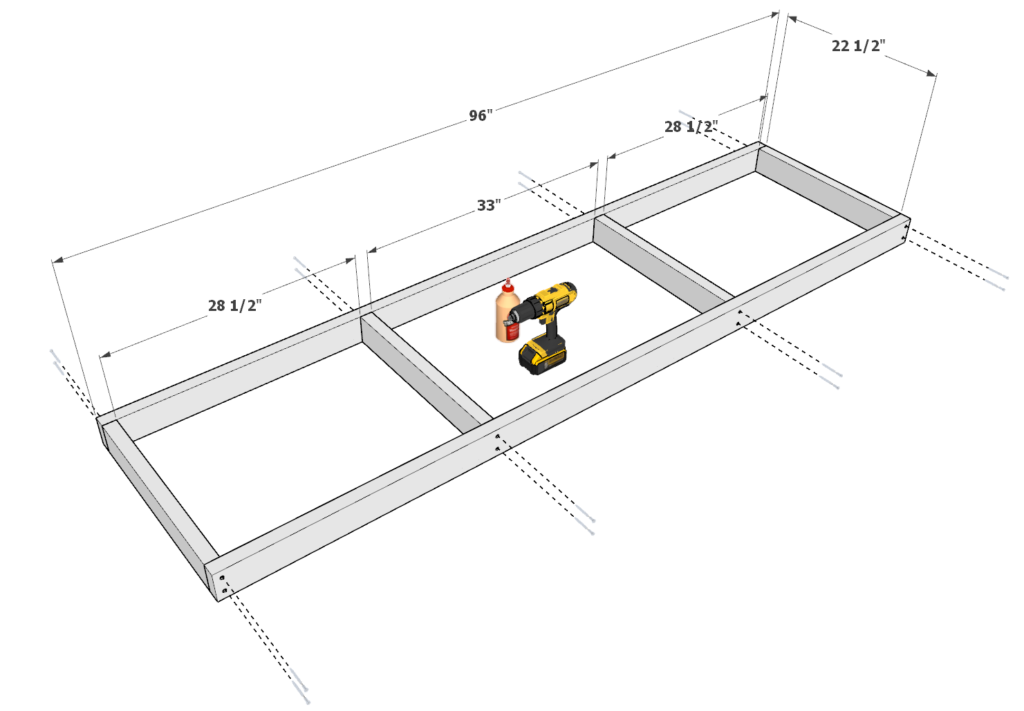
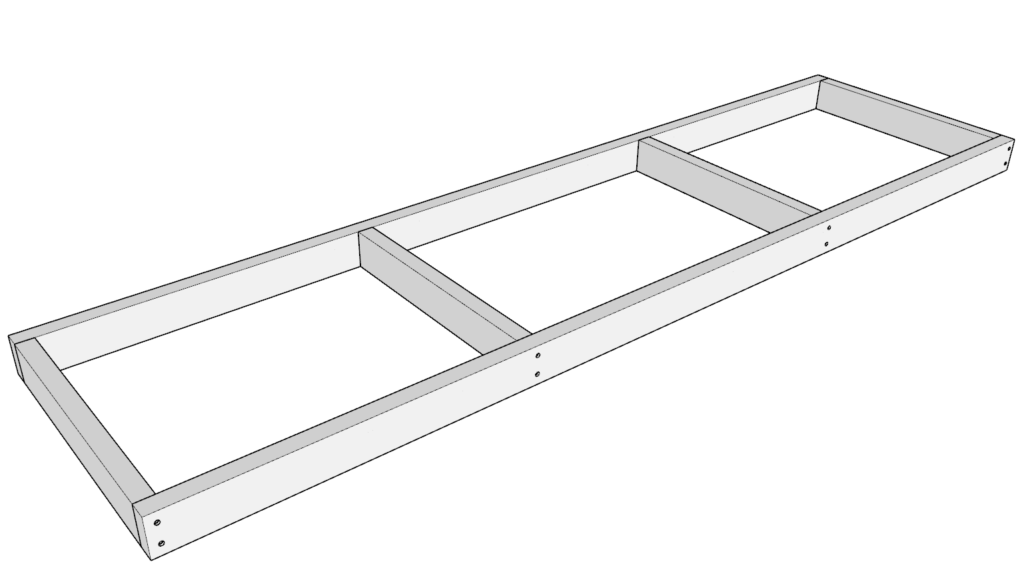
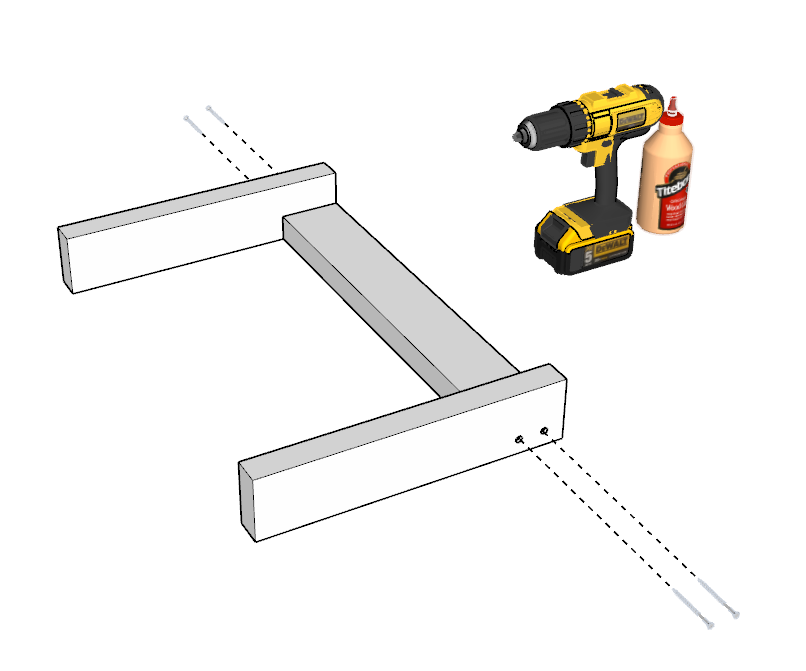
Step 2 (4-seater component)
Take two 96 inch 2×4 lumber pieces and four 22.5 inch 2×4 lumber pieces and arrange them as shown bellow.
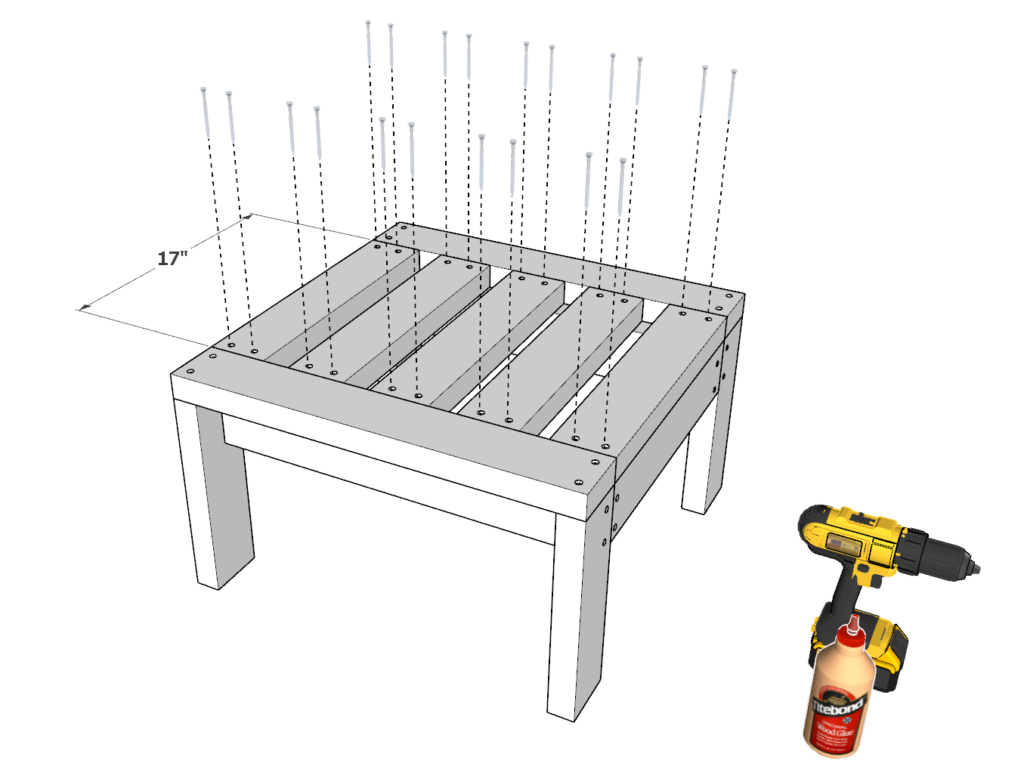
Join the pieces by predrilling holes, add glue, and add 2.5 inch long screws.
It is recommended to predrill the wood prior to putting in a screw to prevent the wood from splitting. What works for me is to us a wood countersink drill bit.
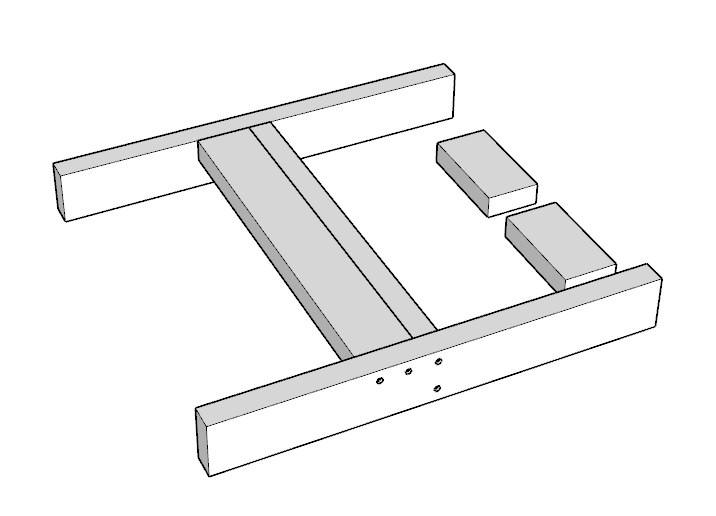
Step 3 (4-seater component)
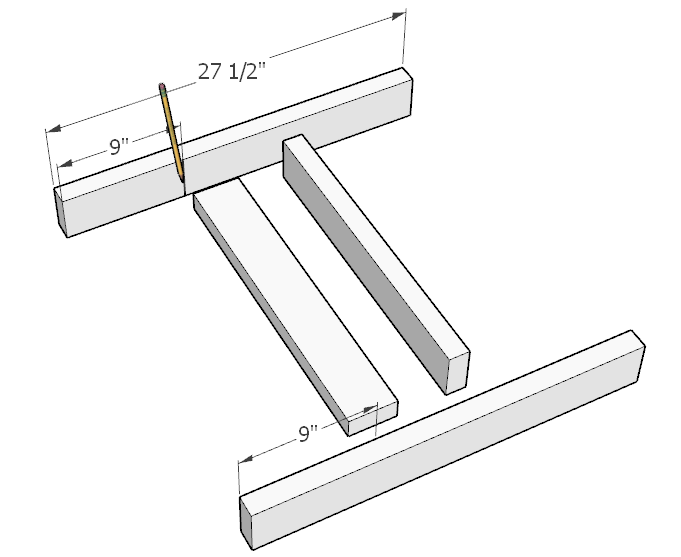
Next, take two 22.5-in and two 27.5-in pieces and arrange them as shown in the diagram. Take a pencil and a straight edge and make a 9-in marking on the inside of the 27.5-in pieces. This will be the boundary line where the 22.5-in piece will align to.
Step 4 (4-seater component)
Predrill as before and apply glue.
Step 5 (4-seater component)
Add the screws. Make sure that the 22.5-in middle pieces are aligned correctly and that they do not cross the 9-in boundary line that was drawn earlier.
Step 6 (4-seater component)
Next, flip the structure over so that you can attach the next piece. I use a spacer to do this. The spacer is just cut always from cutting the cut list. They can be any sizer as long as they lay on the side.
Step 7 (4-seater component)
Next insert the 22.5-in piece into the opening. Make sure to apply glue and to wipe of any extra glue that may leak.
Sometimes the two 27.5-in pieces may not want to come together if they are not perfectly straight. In a case like this I use a clamp to bring them together.
Screw in the screws to secure it all together.
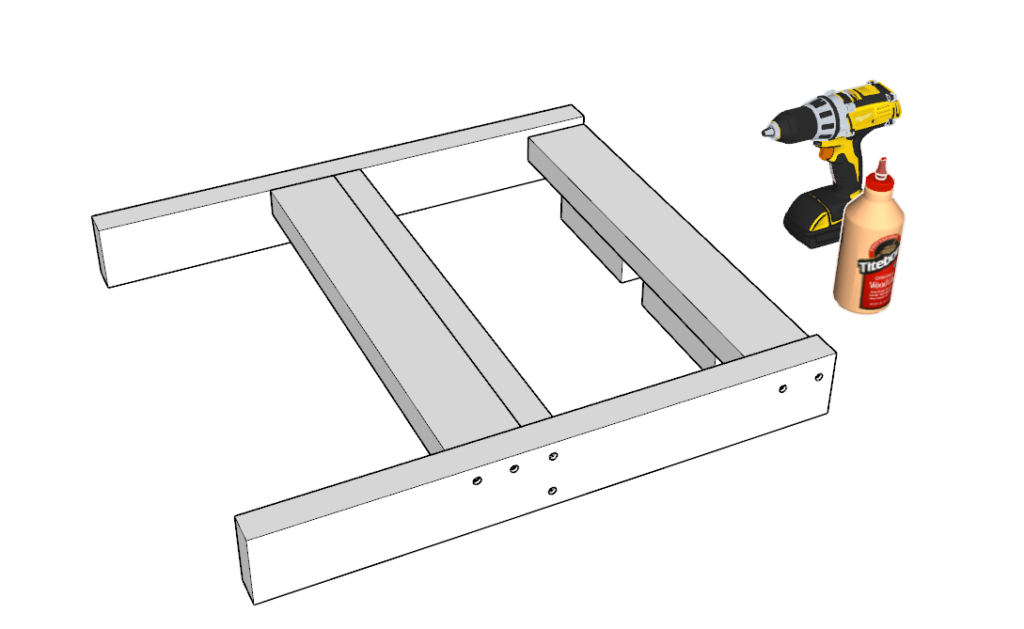
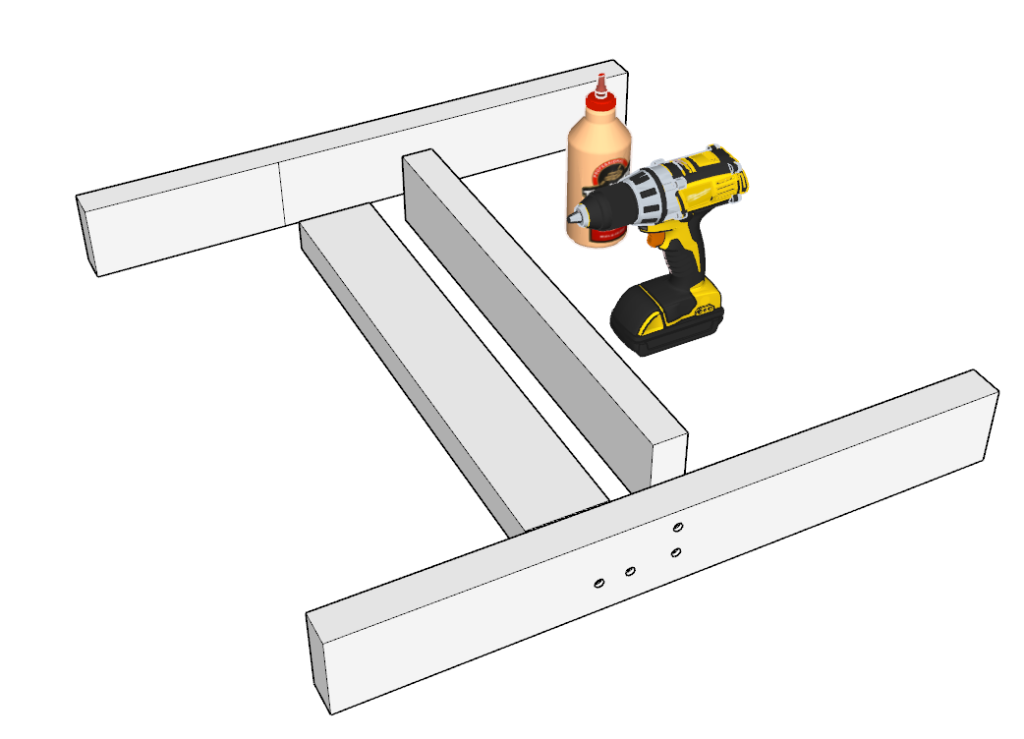
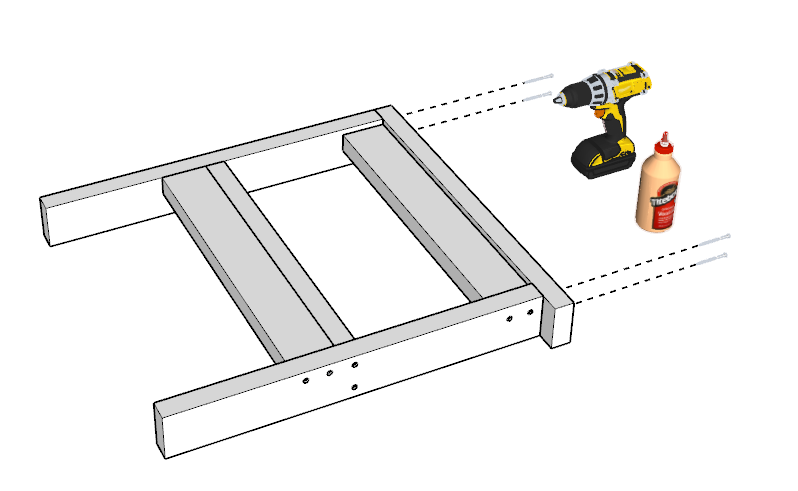
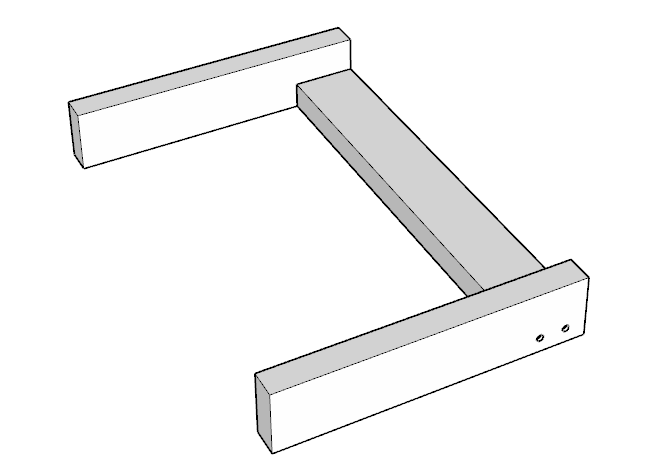
Step 8 (4-seater component)
In this step you need to add the 27-in piece to the top for the arm rest. Make sure to apply glue along the entire side that will be making contact with the 27-in piece for strength.
As before, predrill before adding the screws. Add the screws to secure it all together and wipe off extra glue.

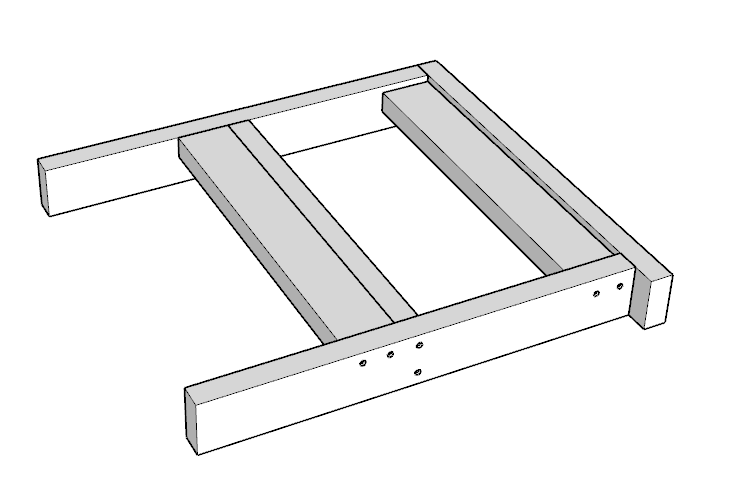
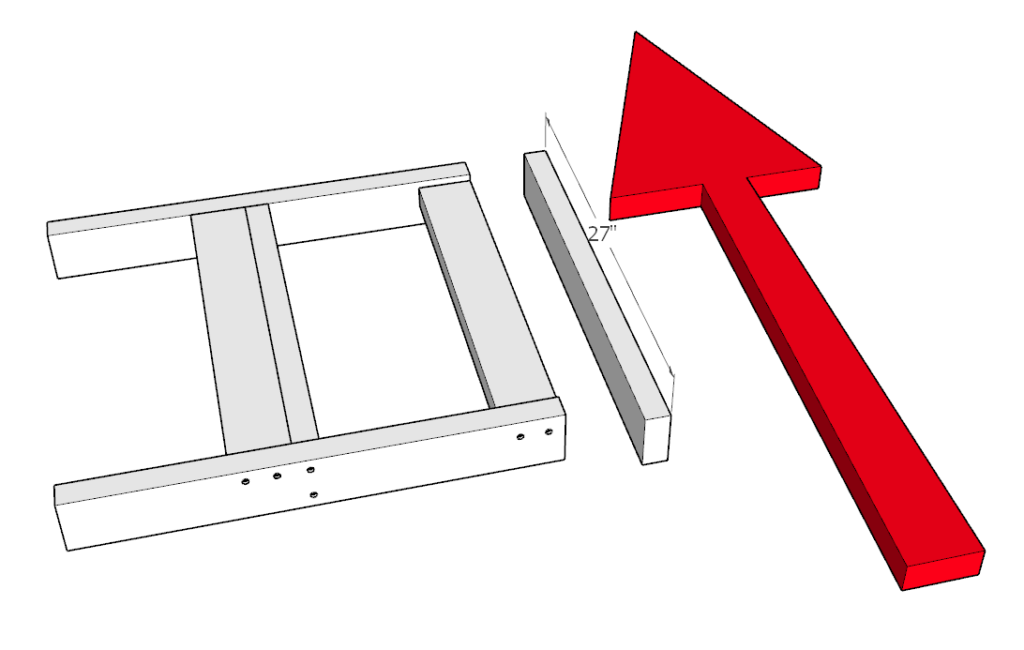
Step 9 (4-seater component)
The next step is to repeat step 3-8 to create the second arm rest.
The major difference here is that when adding the 27-in piece to the top, MAKE SURE that is attached flush on the opposite side (see diagram. slide it up as indicated by the red arrow).
Step 10 (4-seater component)
As before attatch the 27-in pieces with screws and glue.
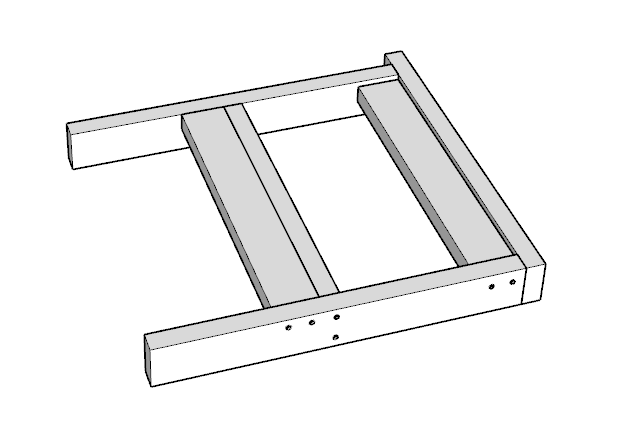
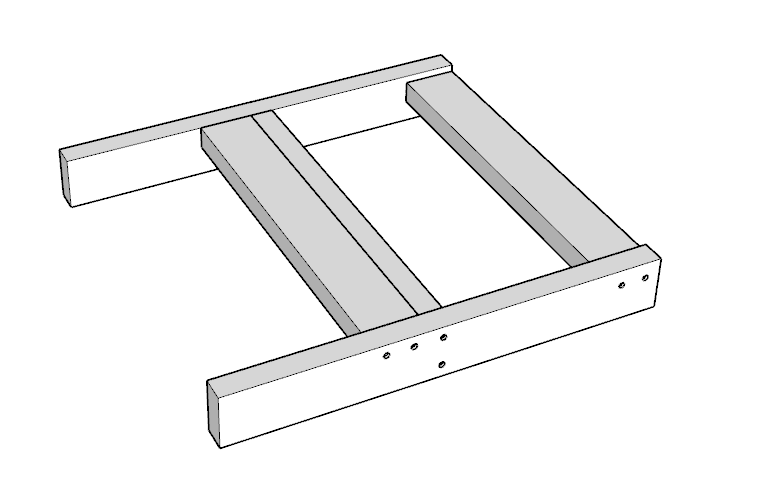
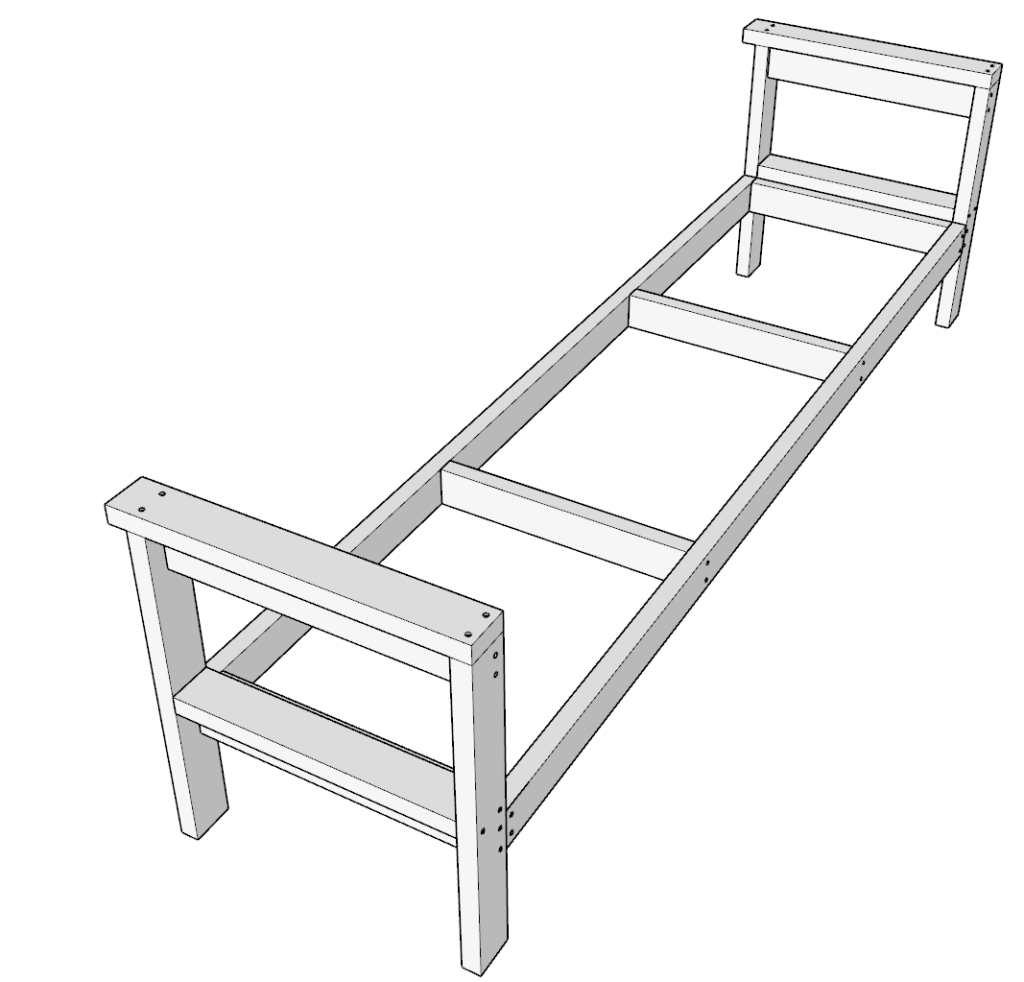
Step 11 (4-seater component)
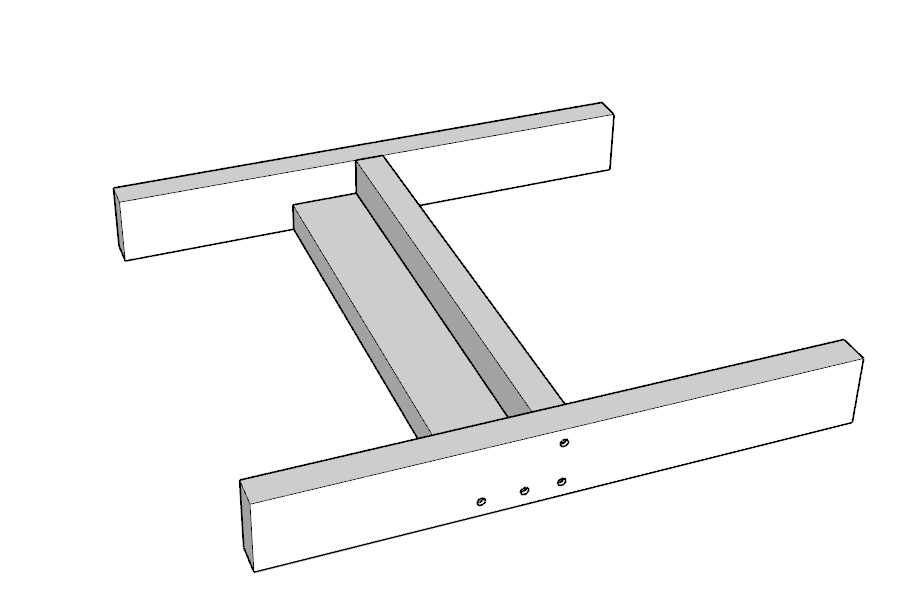
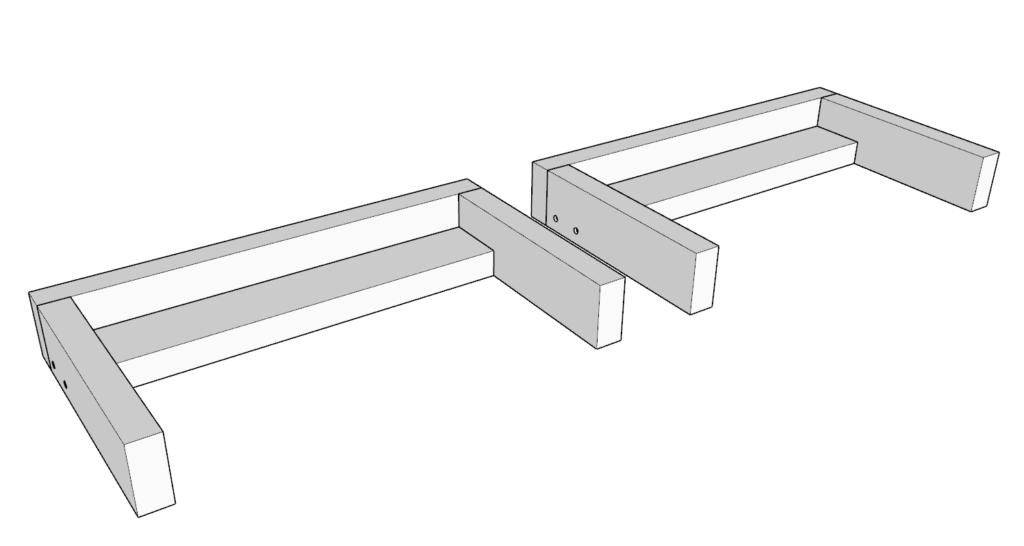
When the two arm rests are complete, you should have two pieces that are mirror of each other.
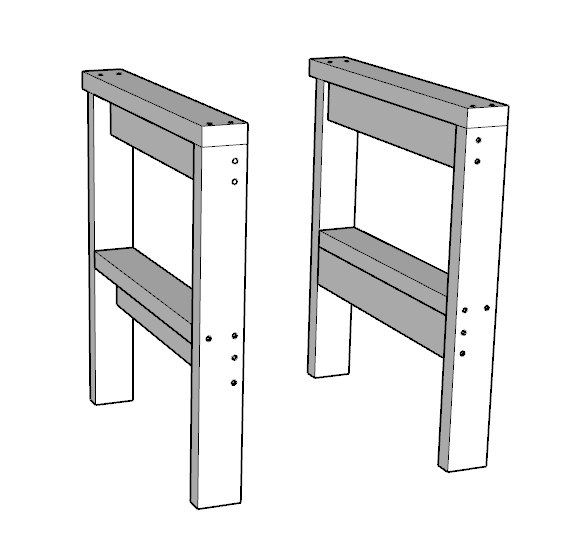
Step 12 (4-seater component)
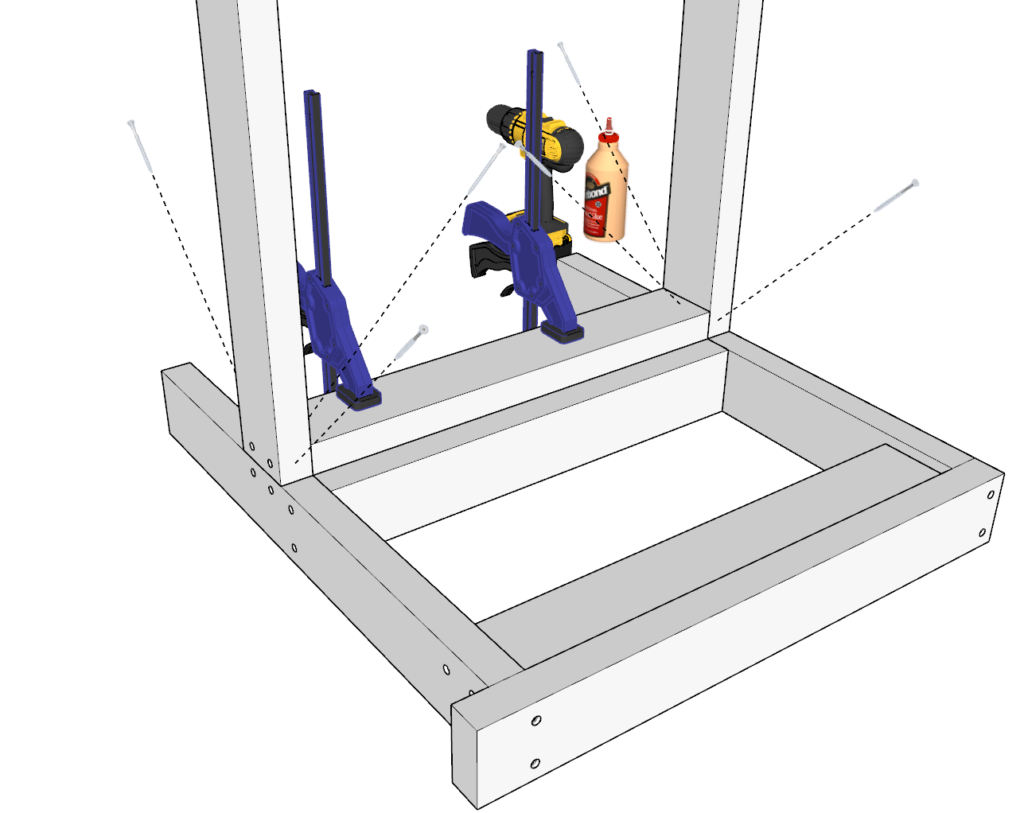
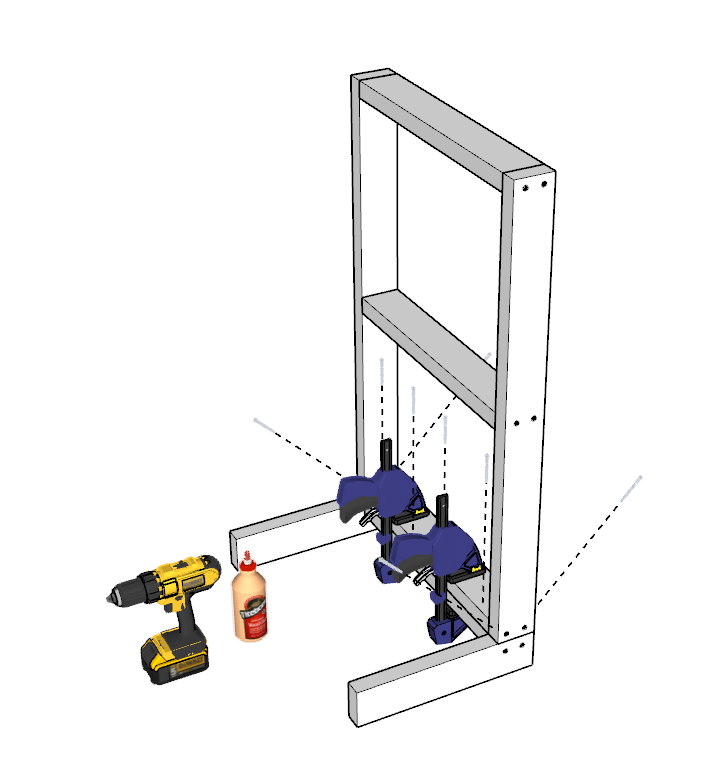
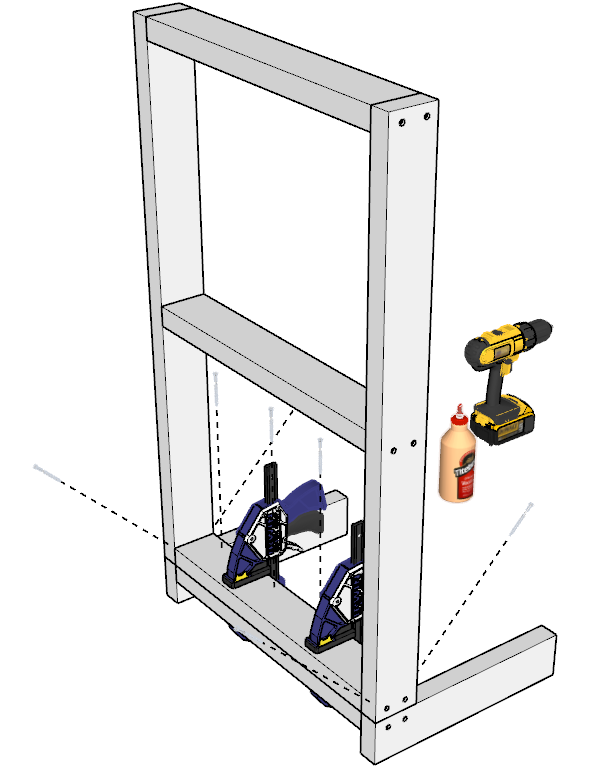
Next, take the frame that was built earlier and set it up right on top of one of the armrests.
In this step make sure that glue is applied to the areas that will make contact. even though the frame can balance, if you do not have help from another person while building, it is a good idea to secure the frame with clamps to prevent injury
As before predrill the area and screw in 4 screws.
The ideal placement of these screws will be right under the decking pieces that will be on top to make sure the screw holes are not visible. This can be done with some measurement.
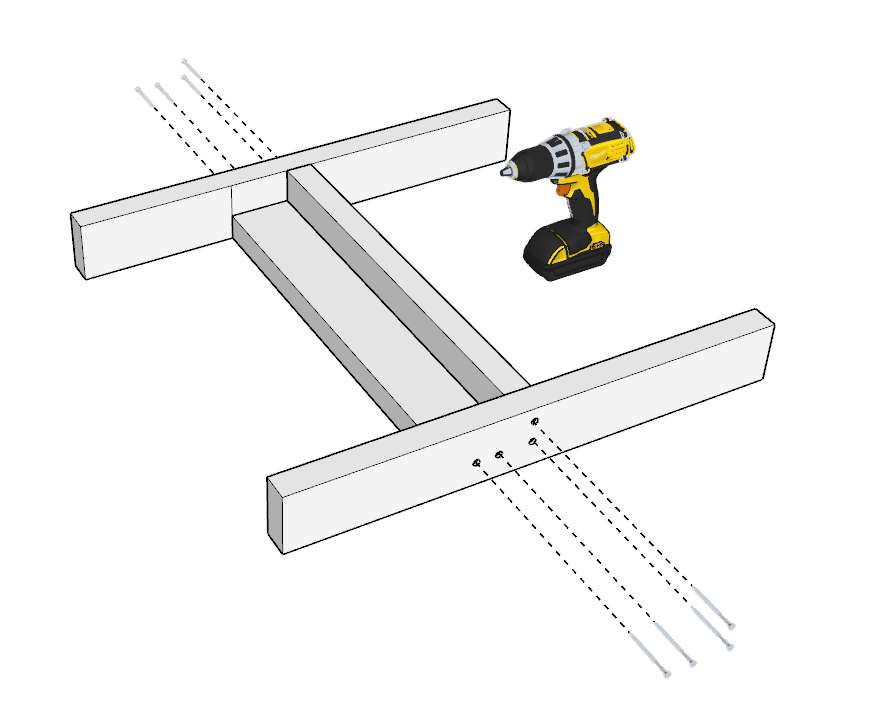
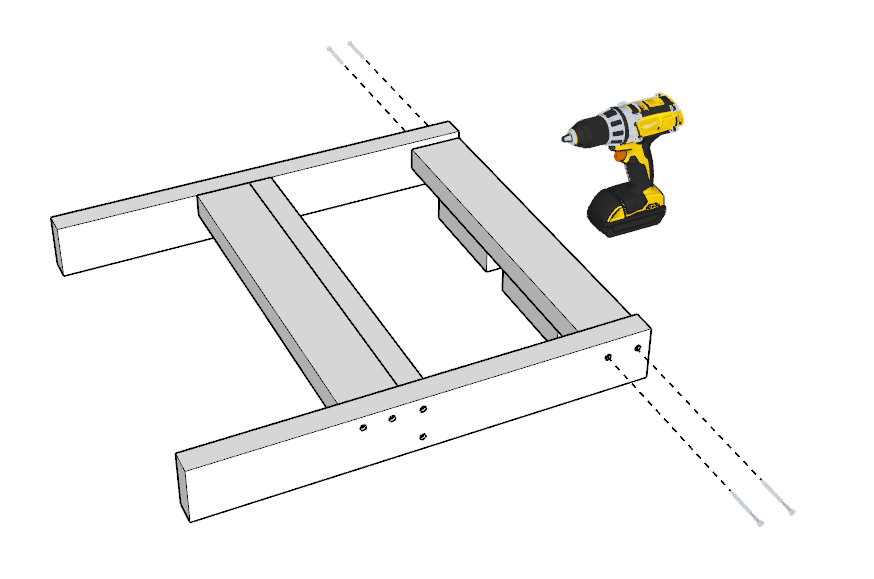
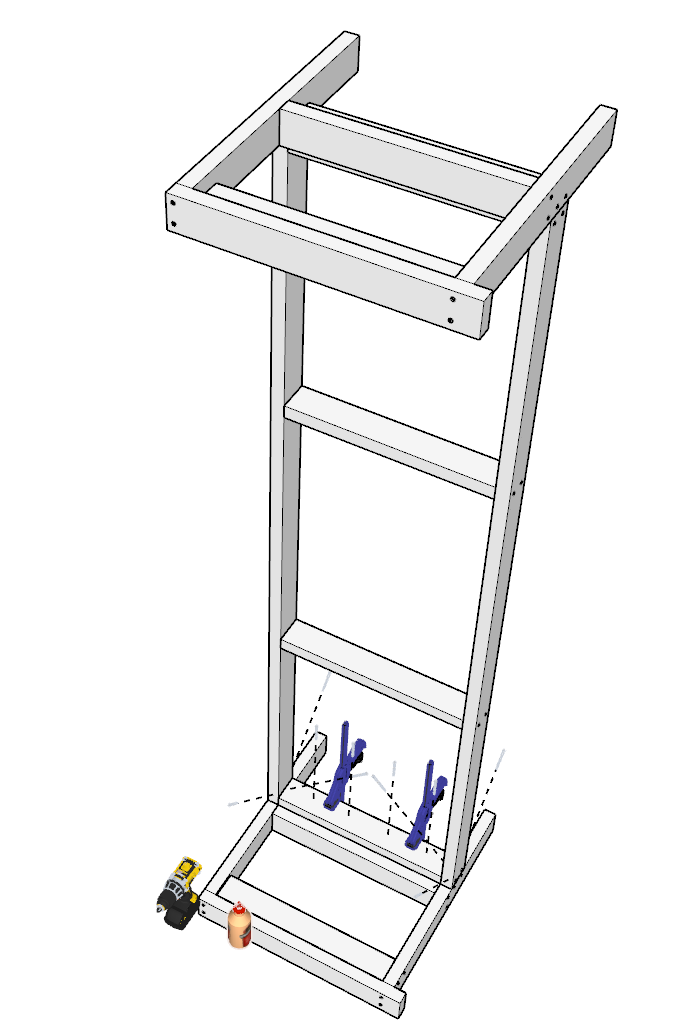
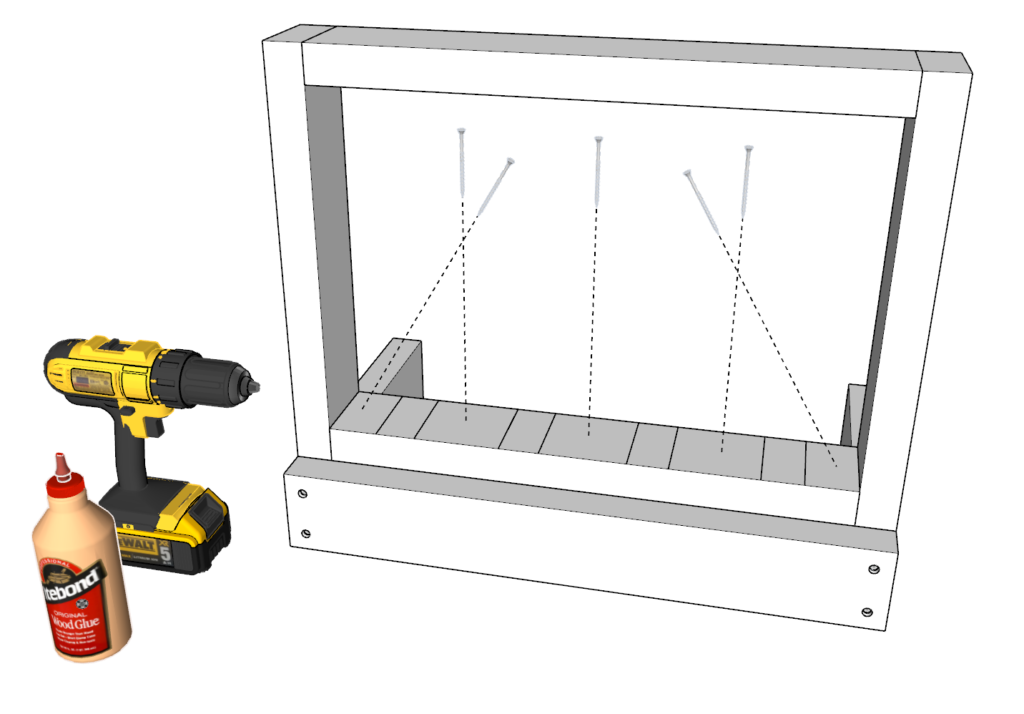
Step 13 (4-seater component)
Next add some diagonal screws to reinforce the frame to the armrests. Again predrill to prevent splitting. Careful not to hit the crews inside the wood with the drill bit. I would recommend not forcing the drill bit so that you can catch it before it breaks off if you hit a screw.
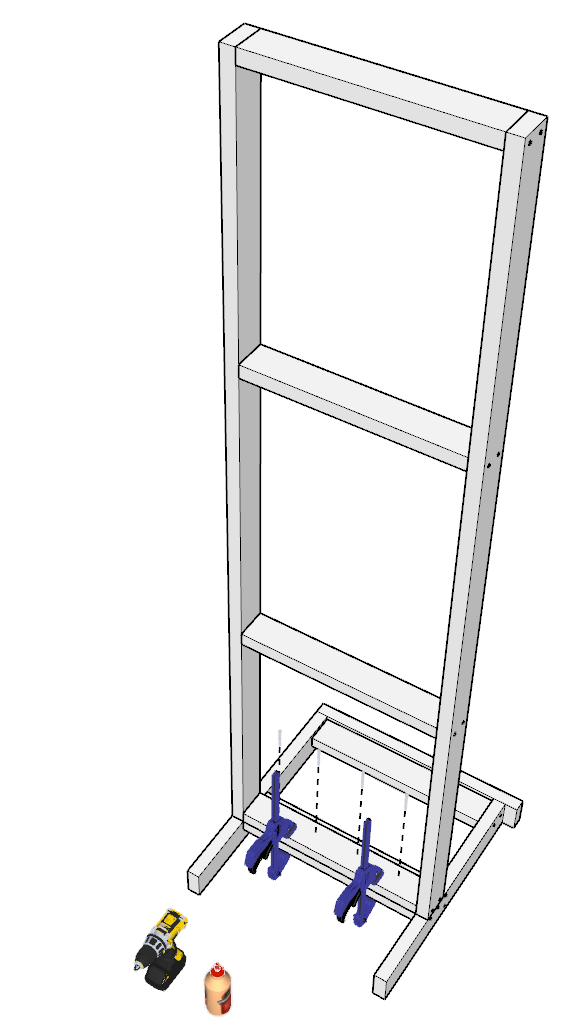
Step 14 (4-seater component)
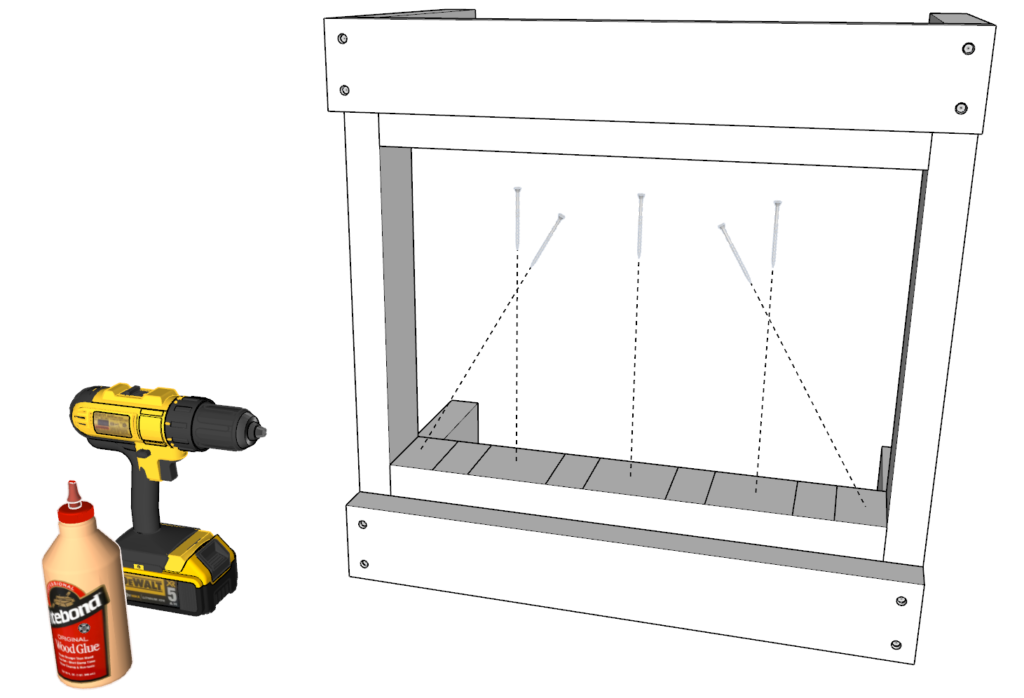
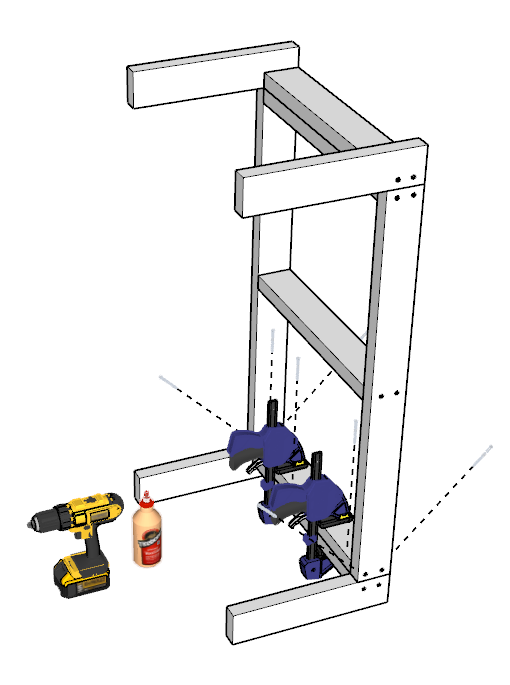
Attach the second arm rest in the same way. It is very important to have clamp or help when attaching the second arm rest as center of gravity will not be balanced as before.
Step 15 (4-seater component)
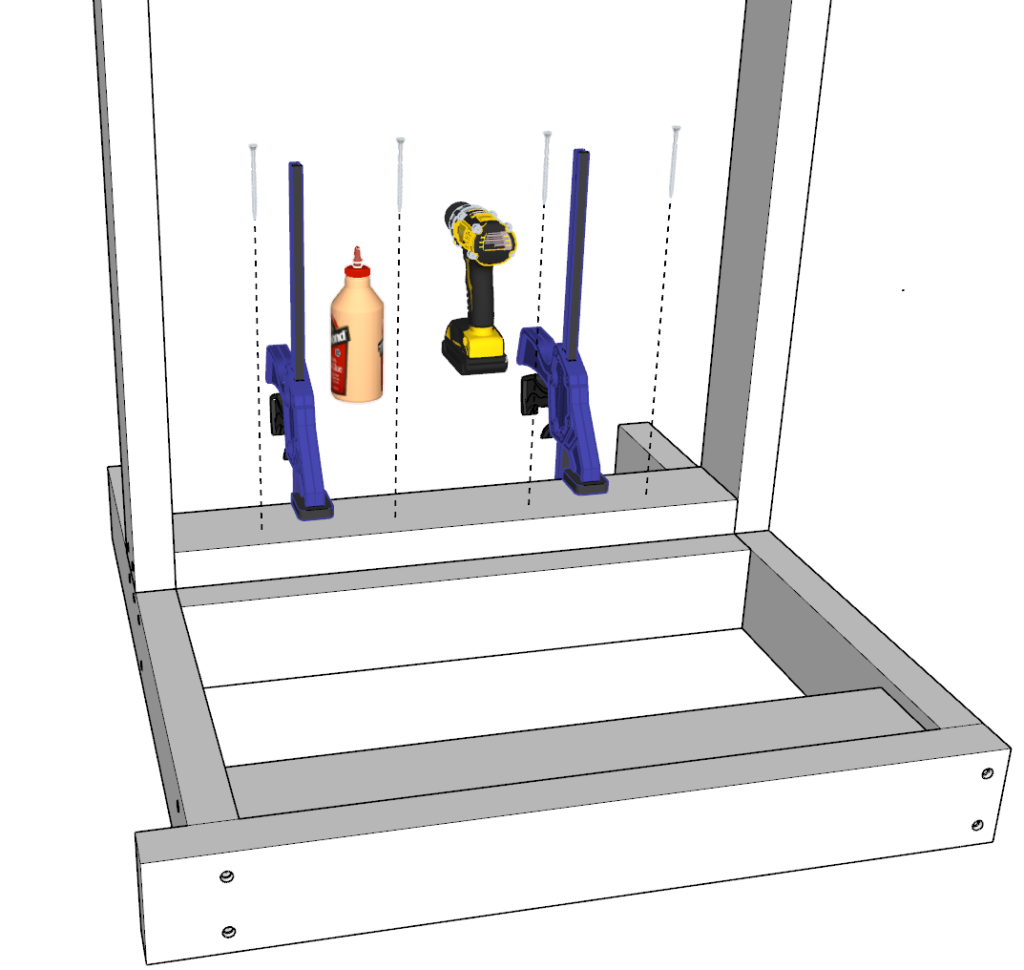
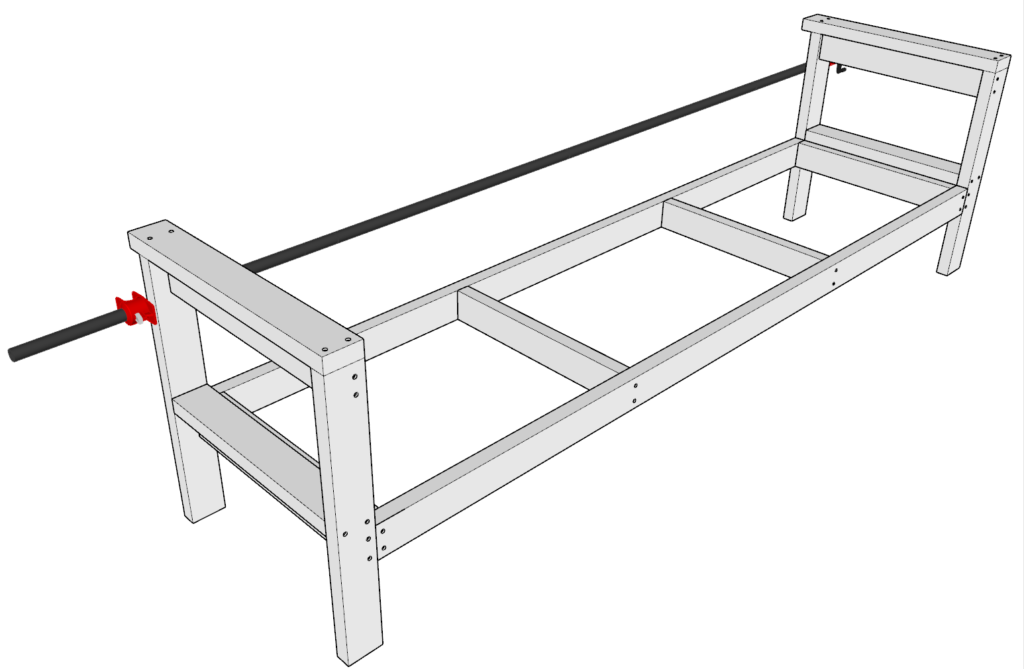
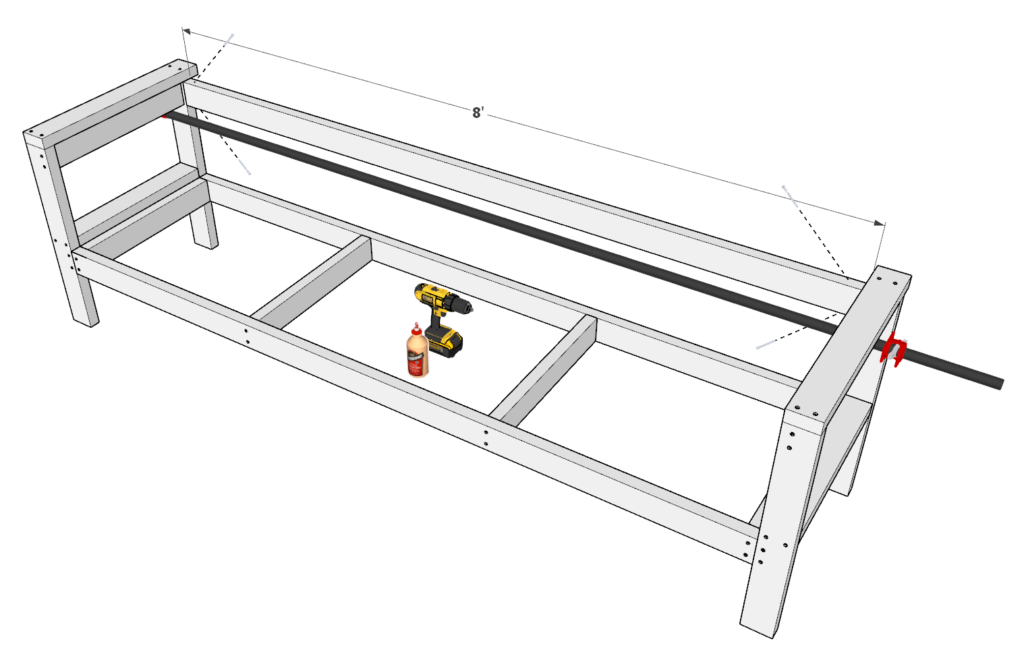
Next, add a 96-in piece across the back. This needs to be glues on the ends and have screws put in diagonally.
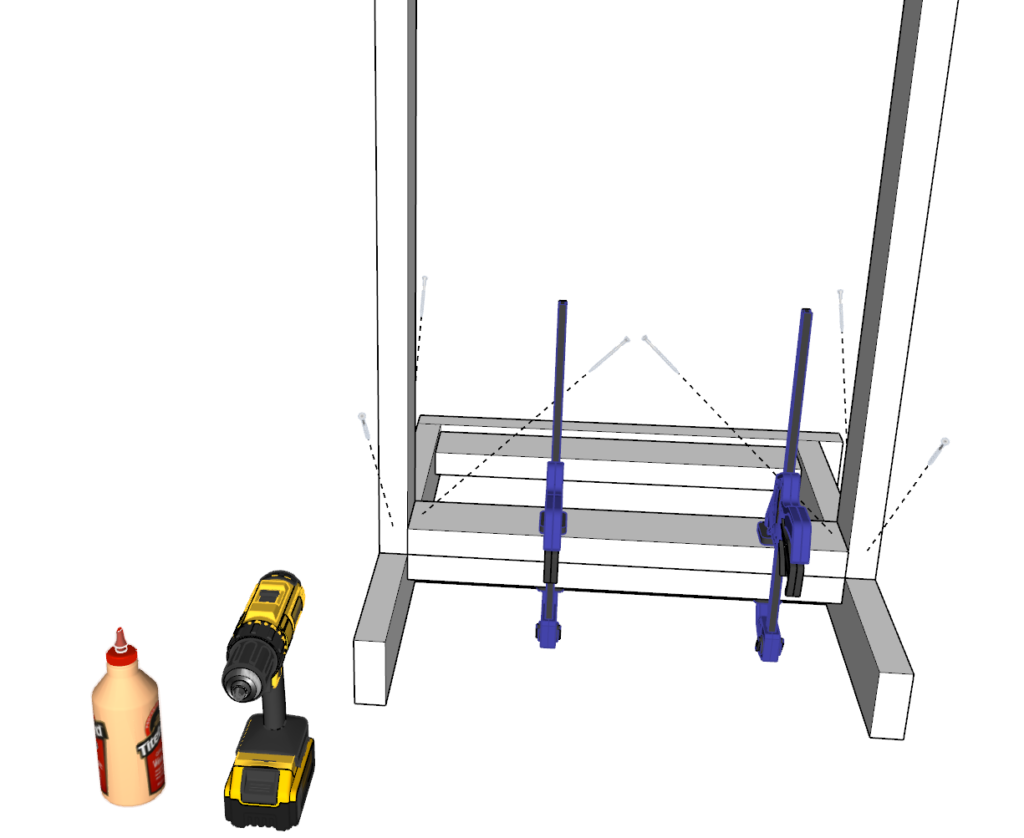
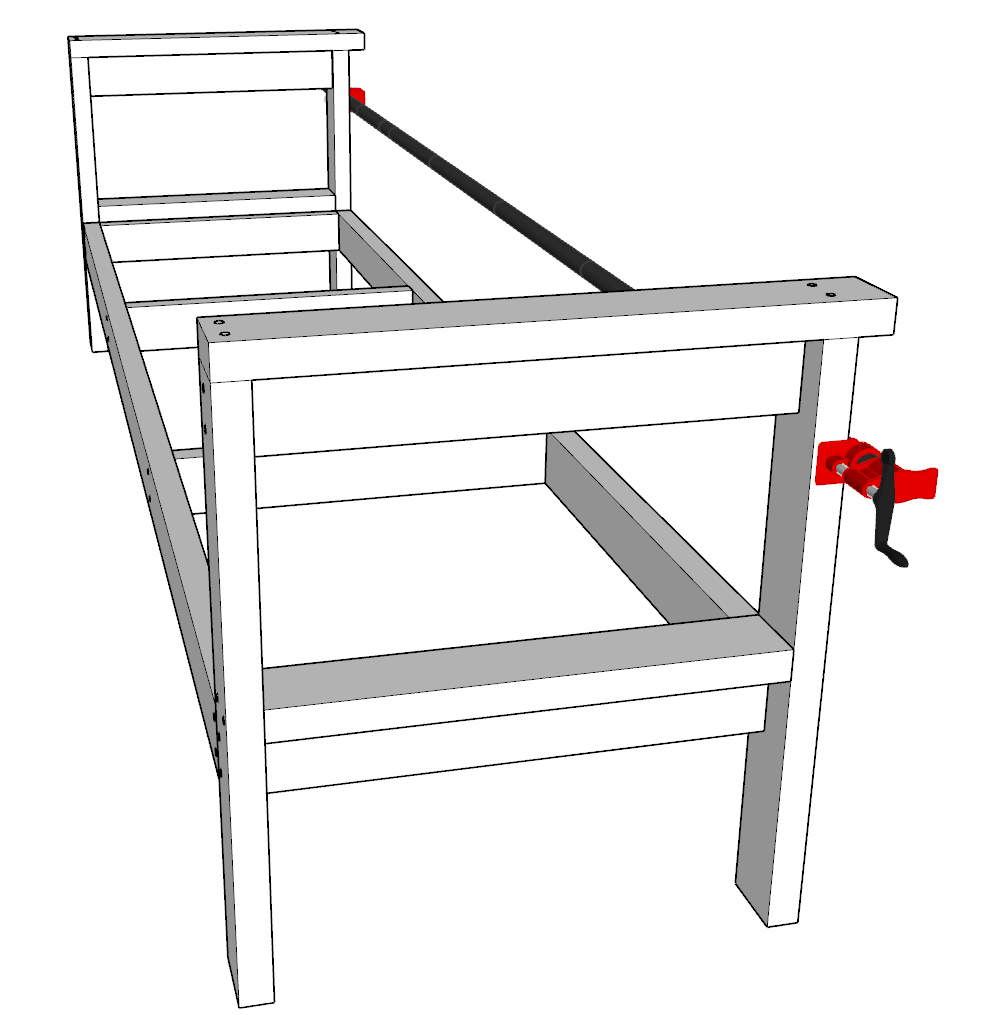
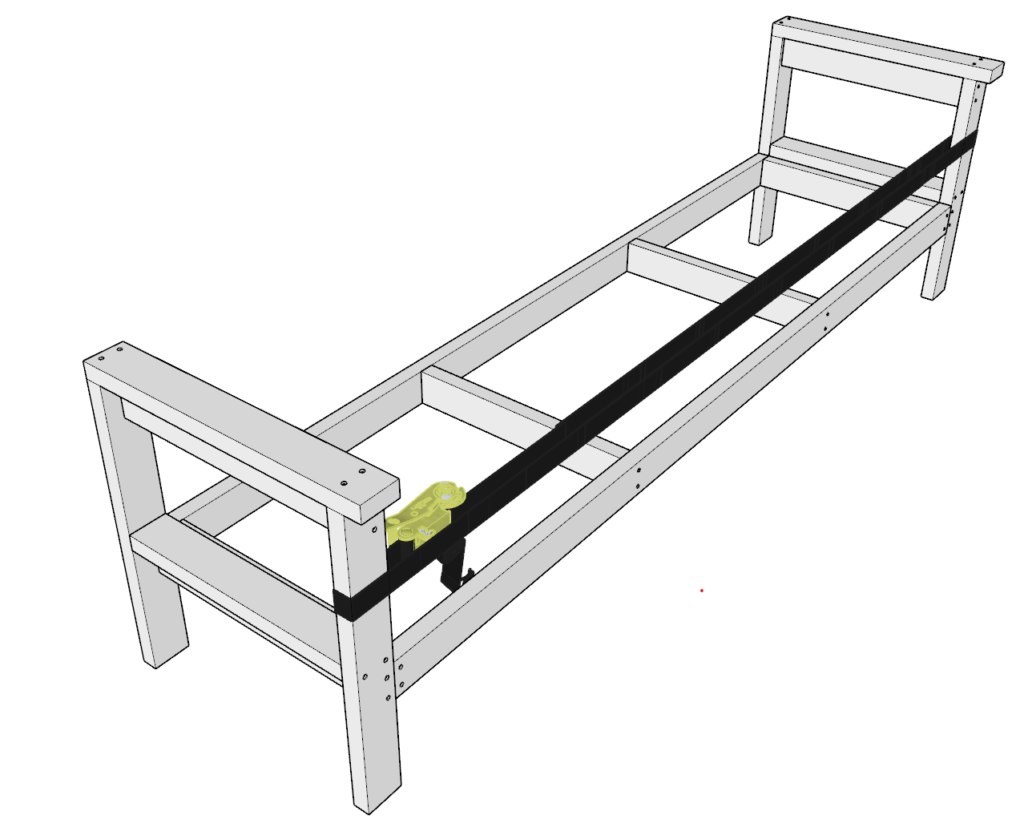
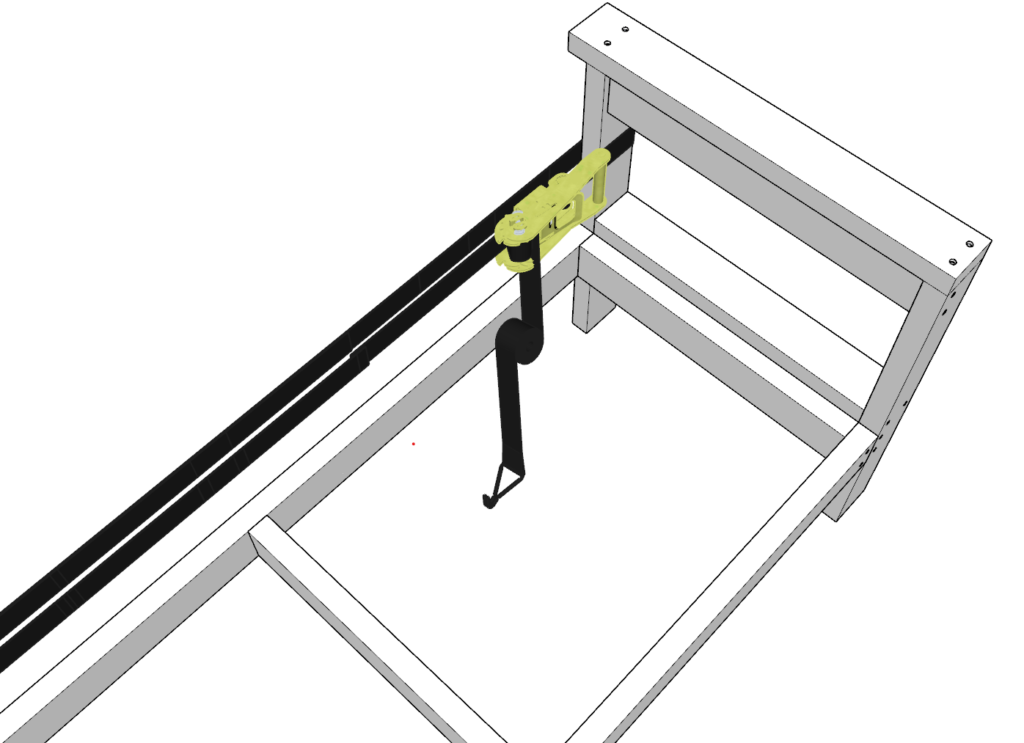
Two options exists for installing the 96 inch lumber piece. you can either use a pipe clamp or ratchet straps. (both options shown below).
Pipe clamp: The pipe clamp is the easiest way to keep everything in place and tight as you add the back rest.
Ratchet strap: Using a strap, or several linked together, is another way to add the back rest piece. This is usually less expensive and most households have straps on hand. Link several together is needed to bring the two armrests together and clamp into place the 96 inch 2×4 lumber piece as shown below.

Step 16 (4-seater component)
Next, add a 96-in piece on top of the back, glue it (apply across the entire length of the 96-in piece added in the previous step). Add screws and secure it into place.
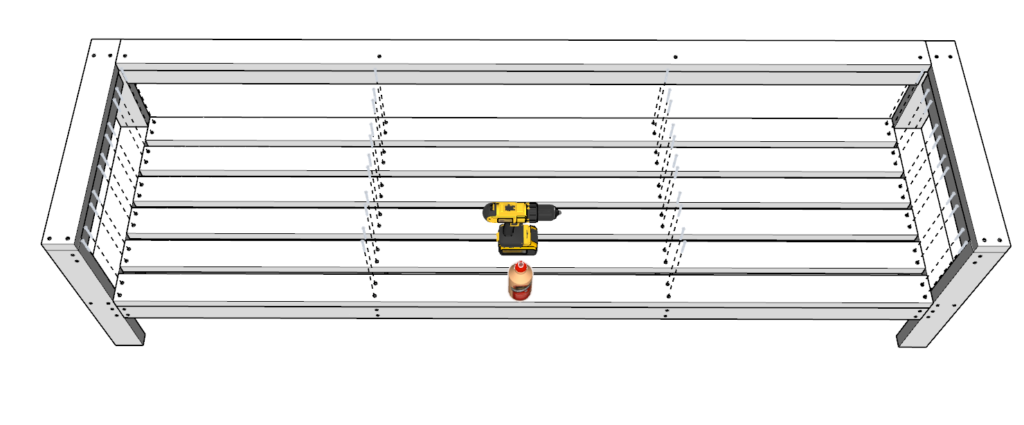
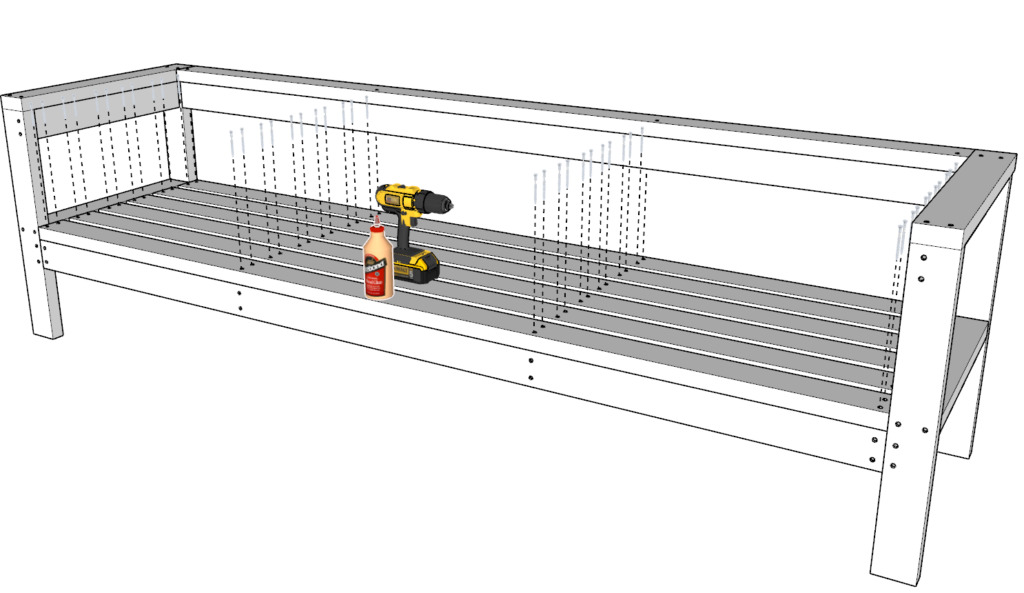
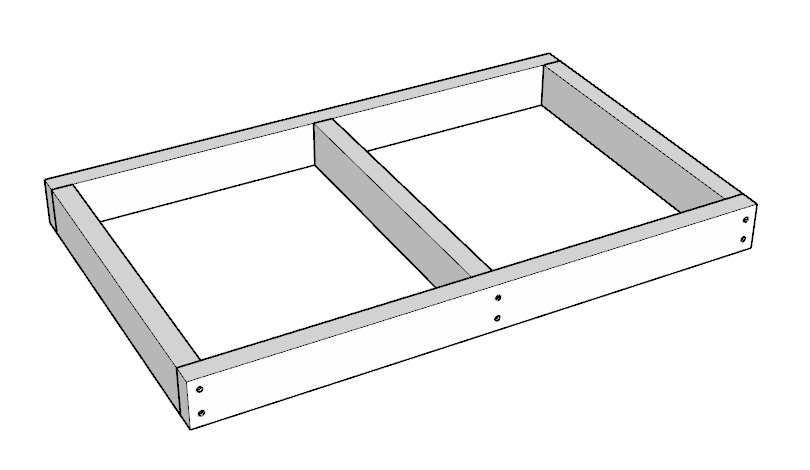
Step 17 (4-seater component)
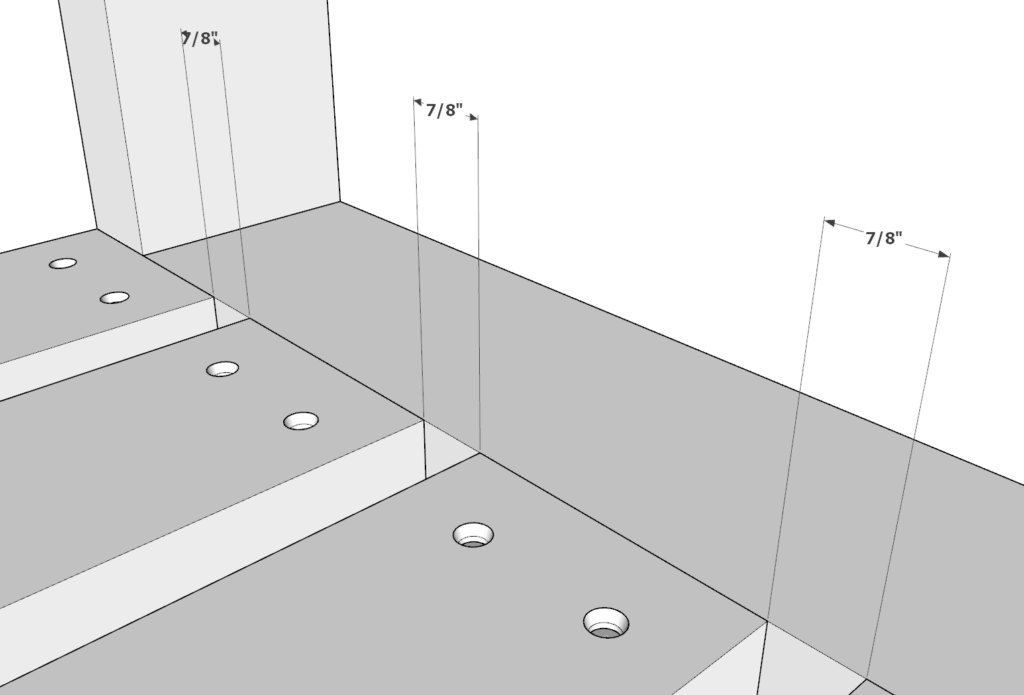
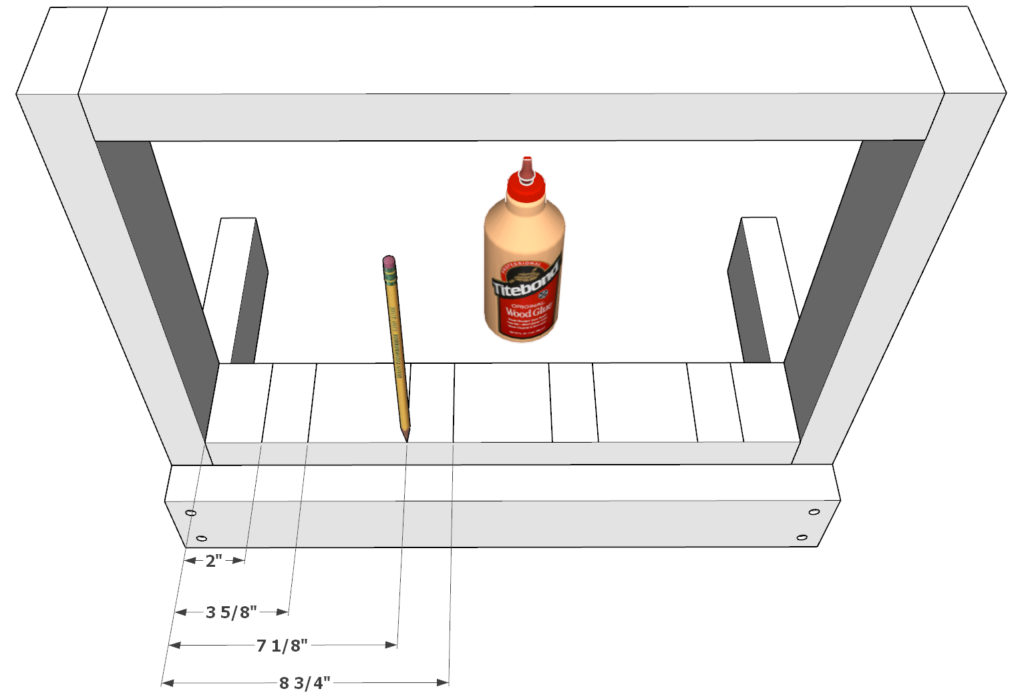
Next, add the 96-inch decking pieces. Space them apart evenly. The space is about 7/8 inches.
I like to attach the two opposite end pieces first so that I have more control on setting up the middle pieces.
Predrill all the holes and secure with screws.
Step 18 (4-seater component)
Next, sand down the whole bench. This can be time consuming. I use an orbital sander to speed up the process
I use a rough 80 grit paper first and then finish it with a 220 grit paper.
Filling in the holes is optional.
At this point it is ready to be stained or painted!
Step-by-step instruction on building the chaise component of the DIY outdoor sectional
Recommend tools for the chaise component
- Saw (miter saw recommended for precision cuts)
- Drill
- Impact driver with bit for screws
- Sander
- wood countersink drill bit
Cut list and material list for the chaise component
Available with purchase of PDF plans.
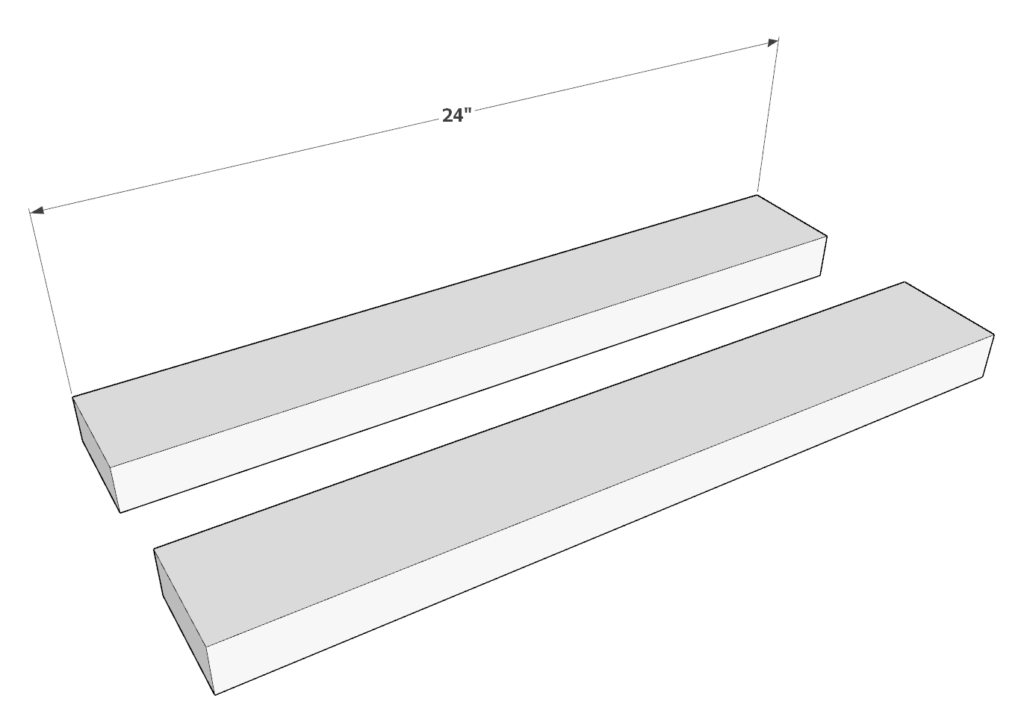
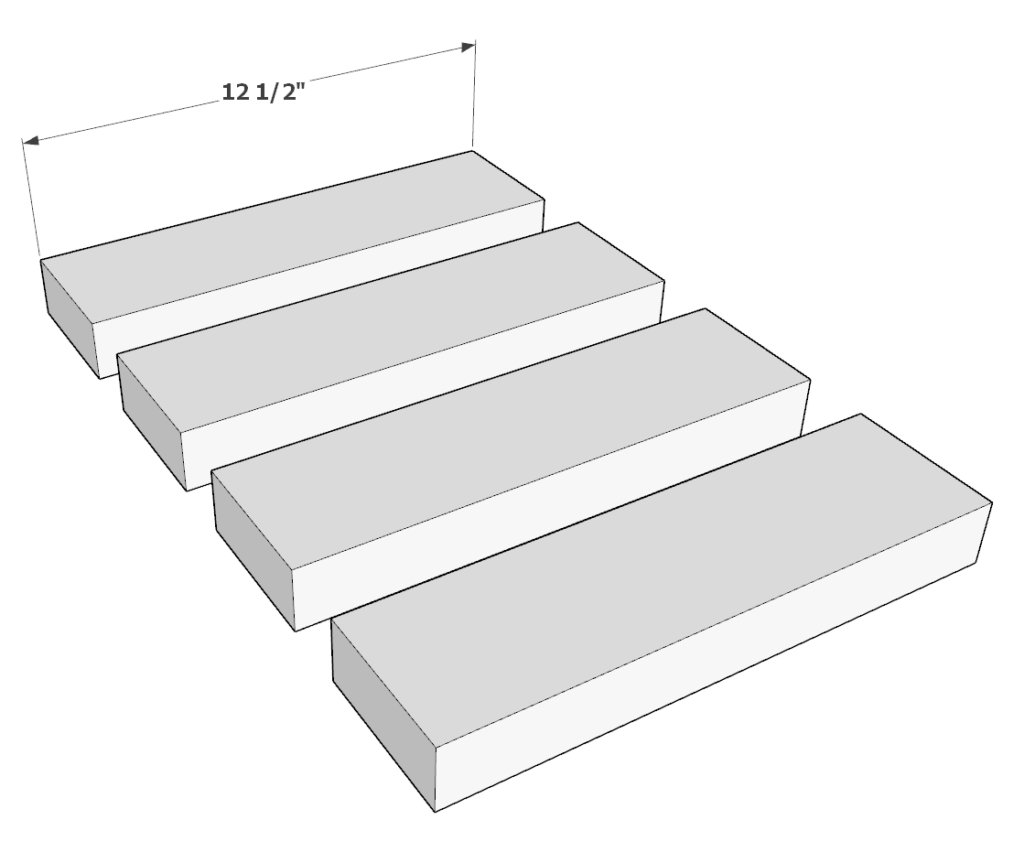
Step 1 (DIY chaise component)
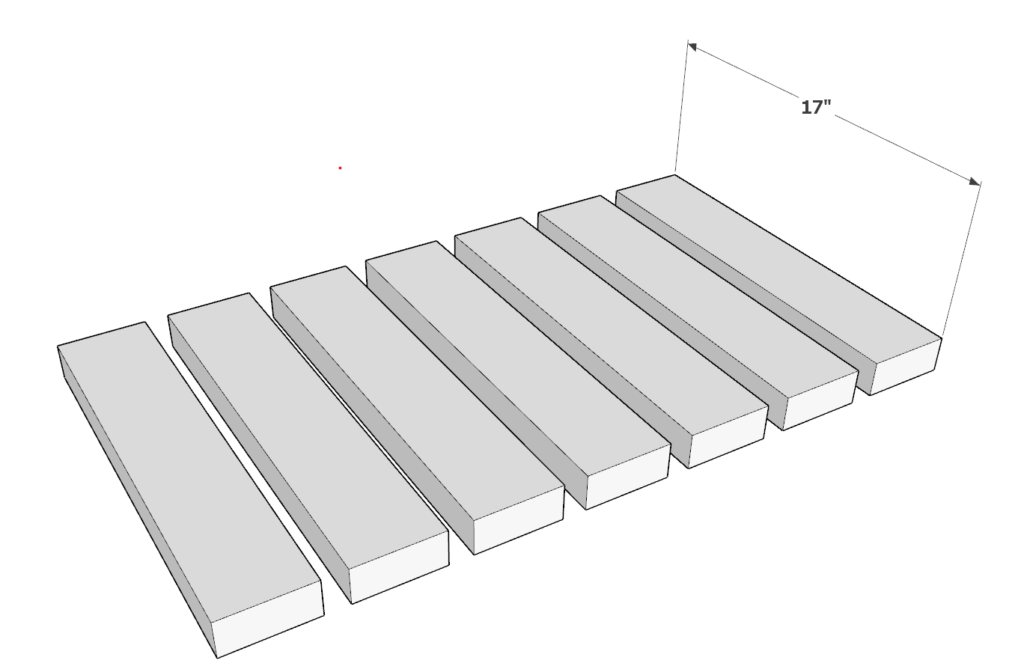
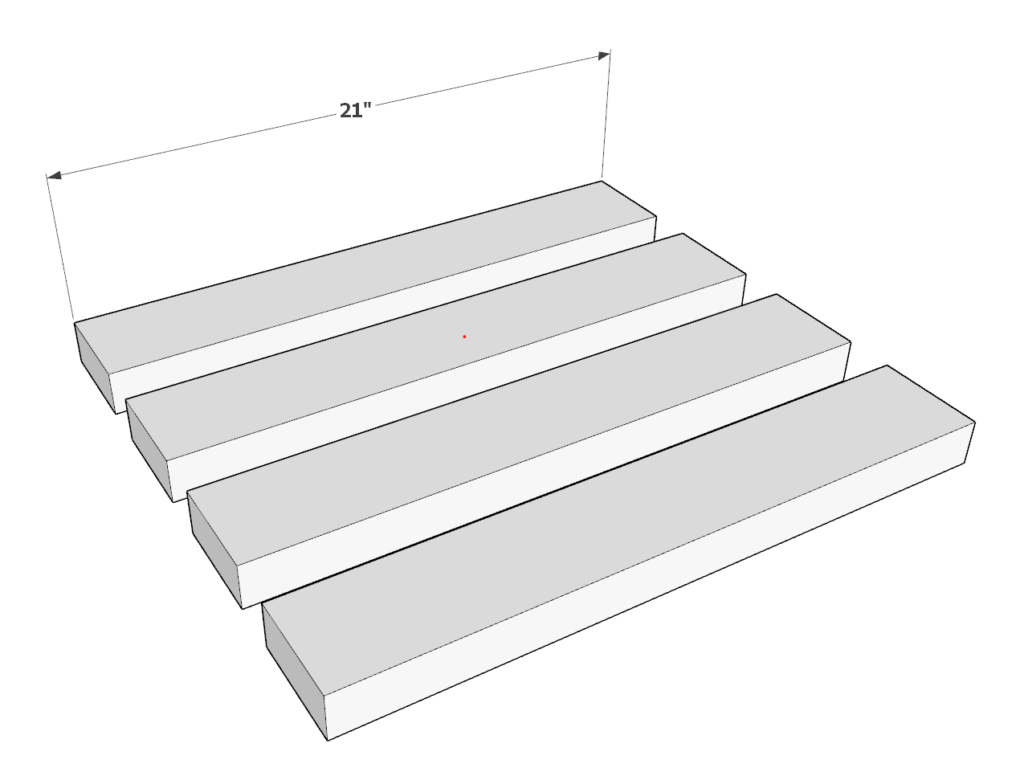
Precut all your wood pieces into the following dimensions:
- (7) 2in x 4in x 17in
- (4) 2in x 4in x 21in
- (2) 2in x 4in x 24in
- (4) 2in x 4in x 12.5in
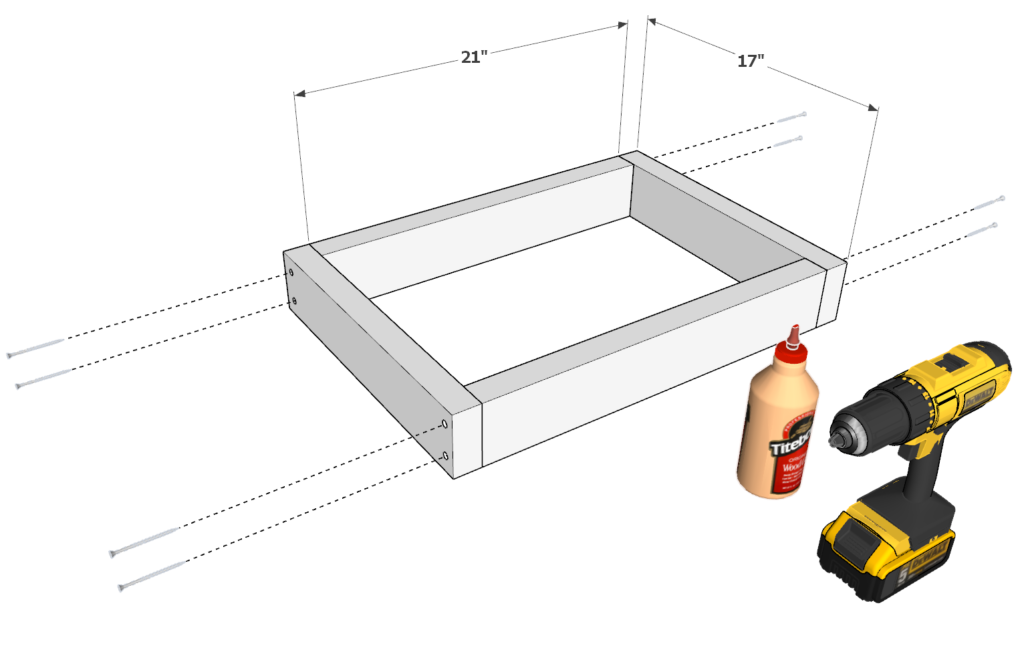
Step 2 (DIY chaise component)
Take two 21 inch 2×4 lumber pieces and two 17 inch 2×4 lumber pieces and arrange them as shown bellow.
Join the pieces by predrilling holes, add glue, and add 2.5 inch long screws.
It is recommended to predrill the wood prior to putting in a screw to prevent the wood from splitting. What works for me is to us a wood countersink drill bit.
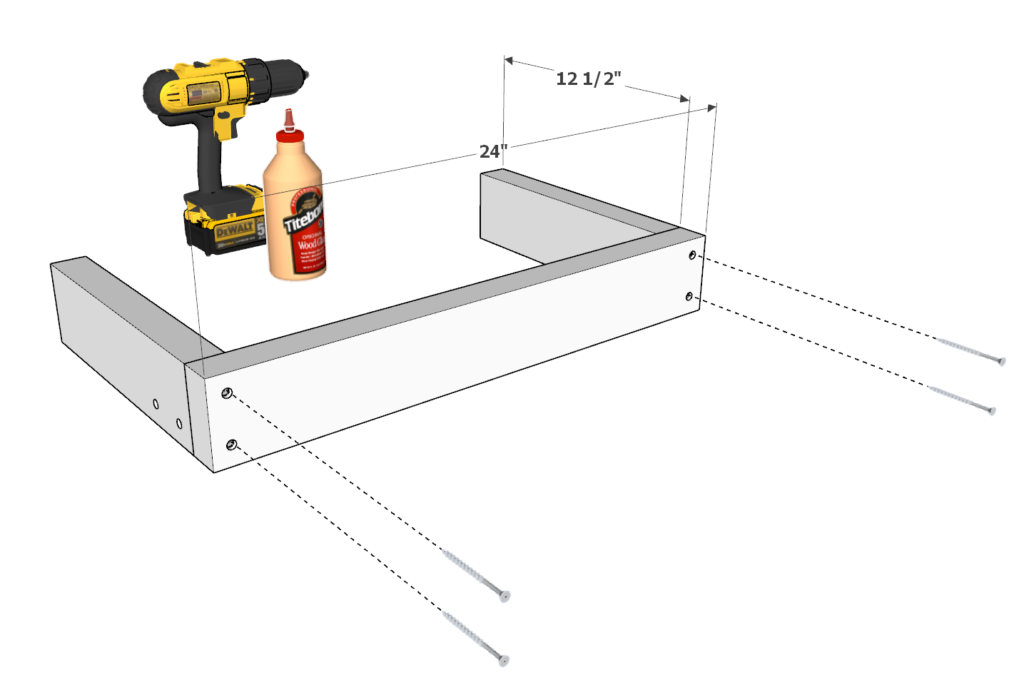
Step 3 (DIY chaise component)
Next, take two 12.5 in 2×4 pieces and one 21 in 2×4 lumber pieces and arrange them as shown in the diagram.
Join together by gluing, predrilling, and adding screws as before.
Repeat this step to have two identical leg frame pieces.

Step 4 (DIY chaise component)
Next, take the frame from the previous step and one of leg pieces and arrange them as shown below.
Use a pencil to draw some boundary lines for where the screws should go. The spaces are the with of the 2×4 decking pieces that will go on top. I place the screws in these specific spaces to make sure they are hidden from view.
As before, add glue, predrill, and add screws.
Add additional screws diagonally for added strength.
Repeat this for the second leg piece as well.
Step 5 (DIY chaise component)
next, add the 17 inch decking pieces to the frame. Space them out evenly. I like to start with the outer tow most decking pieces and work my way in.
As before, add glue, predrill, and add screws.
Step 6 (DIY chaise component)
Next, sand down the whole chaise. I use an orbital sander to speed up the process.
I use a rough 80 grit paper first and then finish it with a 220 grit paper.
Filling in the holes is optional.
At this point it is ready to be stained or painted!
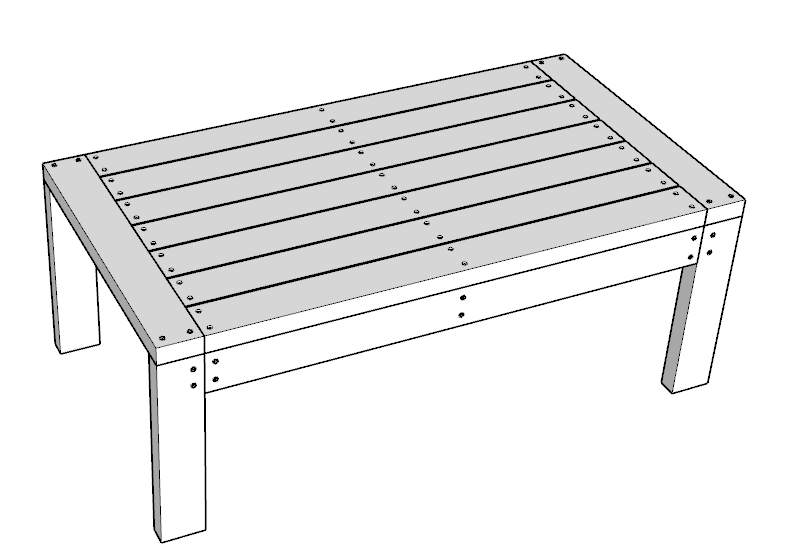
Step-by-step instruction on building the coffee table
Recommend tools for the coffee table
- Saw (miter saw recommended for precision cuts)
- Drill
- Impact driver with bit for screws
- GRIP Clamps
- Sander
- wood countersink drill bit
Cut list and material list for the coffee table
- Need a total of (8) 2x4x8s (can buy a couple extra in case of an accident) These will be cut into the dimensions listed in the following bullets.
- (5) 2in x 4in x 22.5in
- (2) 2in x 4in x 25.5in
- (4) 2in x 4in x 16.5in
- (9) 2in x 4in x 41in
- will need 5-10 lbs of 2.5 in screws (highly recommend T25 Star Drive screws)
- Wood glue
- Sand paper
Step 1 (coffee table component)
precut all your wood pieces into the following dimensions:
- (5) 2in x 4in x 22.5in
- (2) 2in x 4in x 25.5in
- (4) 2in x 4in x 16.5in
- (9) 2in x 4in x 41in
You can cut the 2x4x8s into the 41-in pieces. Each 2x4x8 will yield 2 41-in pieces. Next call all the other remaining pieces
I try to make sure that the most beautiful pieces are the 41-in and 25.5-in pieces. These will be the tabletop.
Step 2 (coffee table component)
Start by placing the 16.5-in pieces and the 22.5-in piece into place as show in the diagram. Predrill the holes with a countersink drill bit.
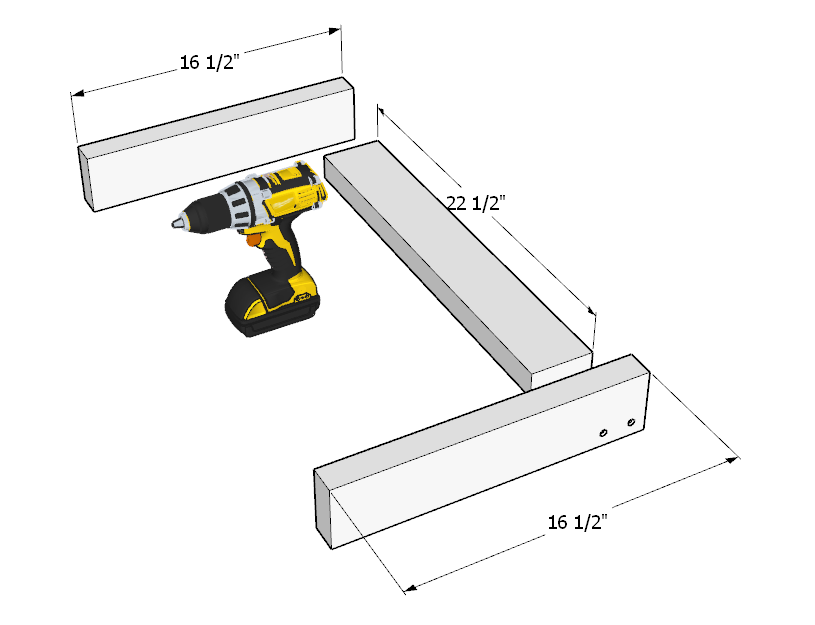
Step 3 (coffee table component)
Next, apply glue to all areas of the 22.5-in piece that will contact with the 16.5-in pieces. Screw in the screws.
Repeat step 2-3 again to make a second set of legs for the table.
Step 4 (coffee table component)
Next, put together the pieces that will make up the frame as shown. Predrill, glue, and put in the screws.

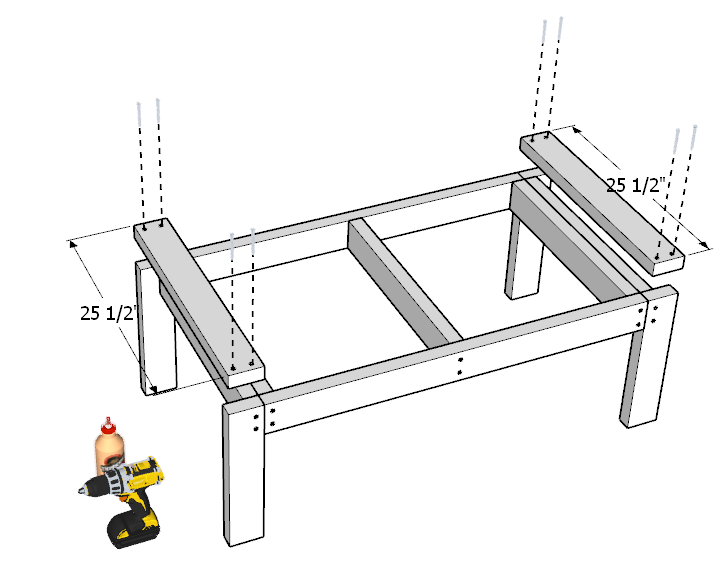
Step 5 (coffee table component)
Next, attach the frame to the legs. You will need to use 8 screws to do this. Make sure that you use plenty of glue and spread it to all the areas that will be in contact.
I use wood grips to help clamp down the frame to the legs. Working with clamps not only helps to make the work easier but the finished result is neater as well.
Tip: when putting in the screws make sure you do not go too deep. They will pierce through the other side.
Step 6 (coffee table component)
In this step attach the frame and legs to the second pair of legs. Again, apply glue, predrill, and use at least 8 screws.
Having help to balance the pieces is great. If you don’t have help, then use wood clamps.
Step 7 (coffee table component)
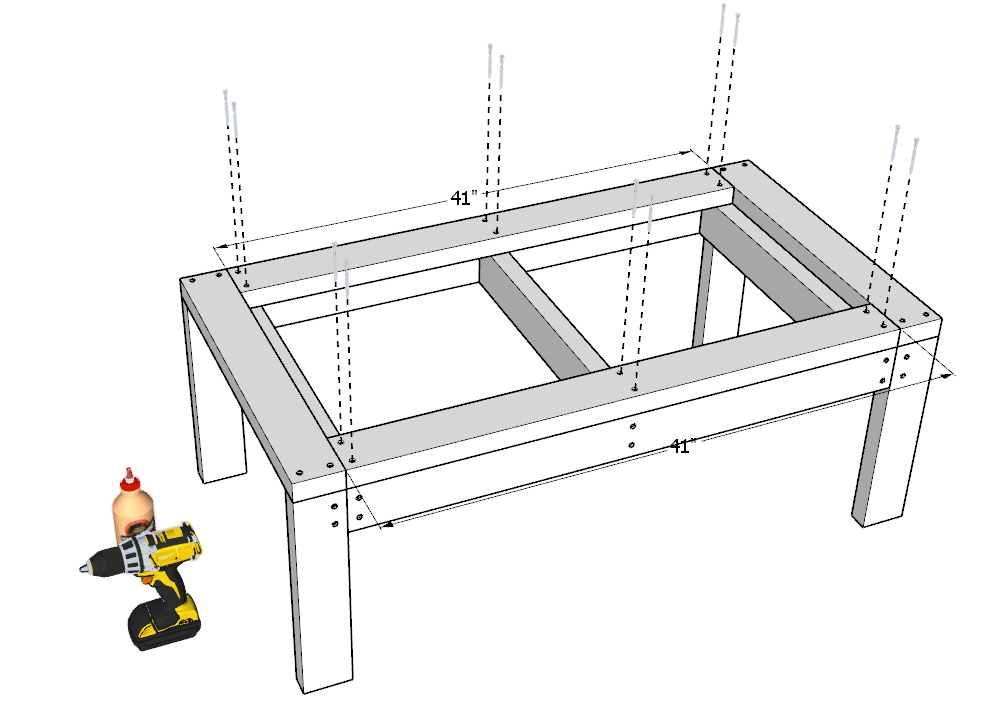
Next, place two 25.5-in pieces onto the edges. Predrill the holes, apply glue along the entire side that will make contact, and put in the screws.
Tip: make sure that these are straight and very well aligned with the edges. If they are not aligned, then putting in the decking pieces may be difficult.

Step 8 (coffee table component)
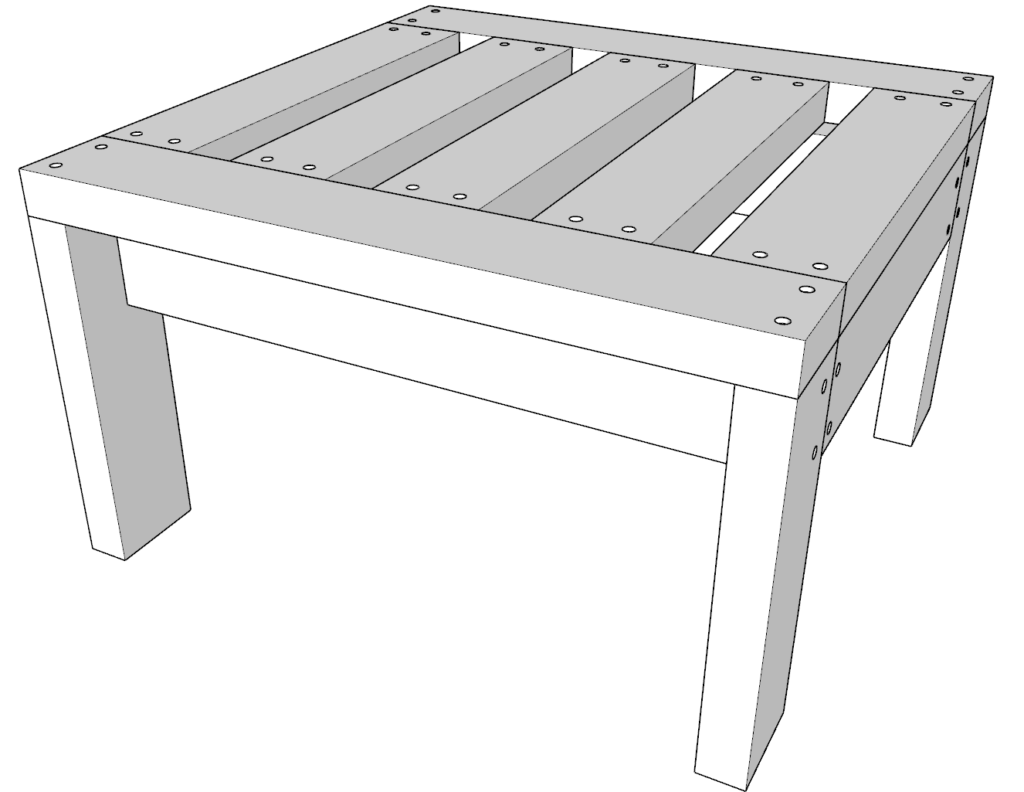
In this step, add two of the 41-in pieces to the two sides as shown. Predrill the holes, add glue, and put in screws.
Step 9 (coffee table component)
In this step, first predrill all the decking pieces. Then apply glue and space them out evenly. Put in the screws and you are almost done!
Tip: I lay out all the predrilled decking pieces into the correct place first and then pick them up one by one and apply glue. I do this without disturbing the other pieces. In this way I can ensure the spacing is correct and not have a glue mess.

Step 10 (coffee table component)
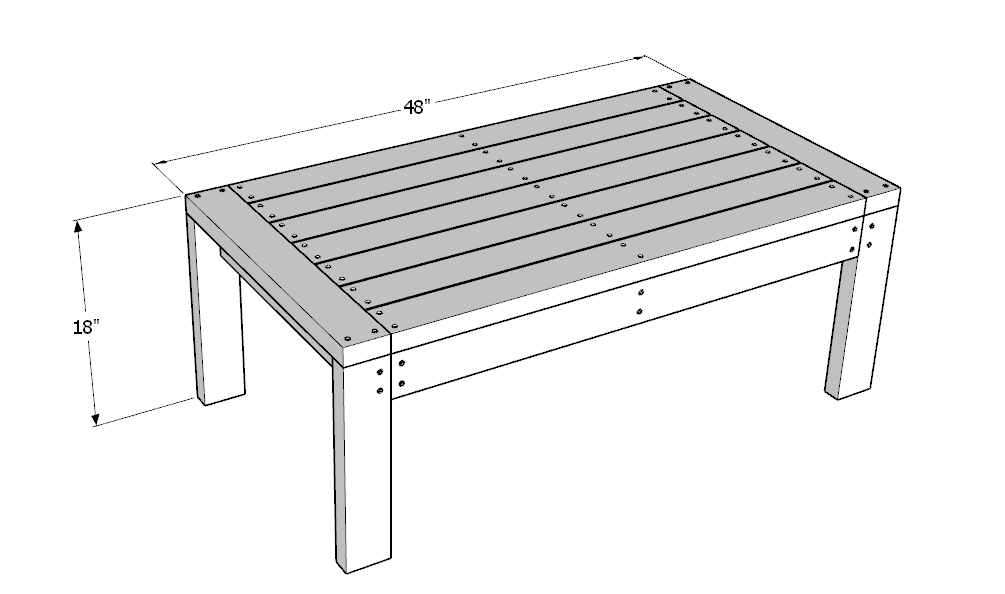
Lastly, sand down the whole table. I like to use an orbital sander to take off major imperfections and then I follow up with a fine grit sand disk.
Once this is sanded down you can choose to stain the piece. I highly recommend putting some sort of protection on it as it may be exposed to water, sunlight, cups, spills, etc.
Putting it all together
Lastly, your now ready to set up your patio set! Add cushions and pillows to make the sectional comfy.