Introduction
Imagine lounging in your own private backyard retreat, enjoying a meal, and entertaining friends and family. Our beginner-friendly DIY outdoor picnic table plans can turn that daydream into reality. This simple, cost-effective, and eye-catching picnic table design is perfect for those embarking on their woodworking journey. Let’s explore what makes this project stand out and why it’s the ultimate DIY adventure.
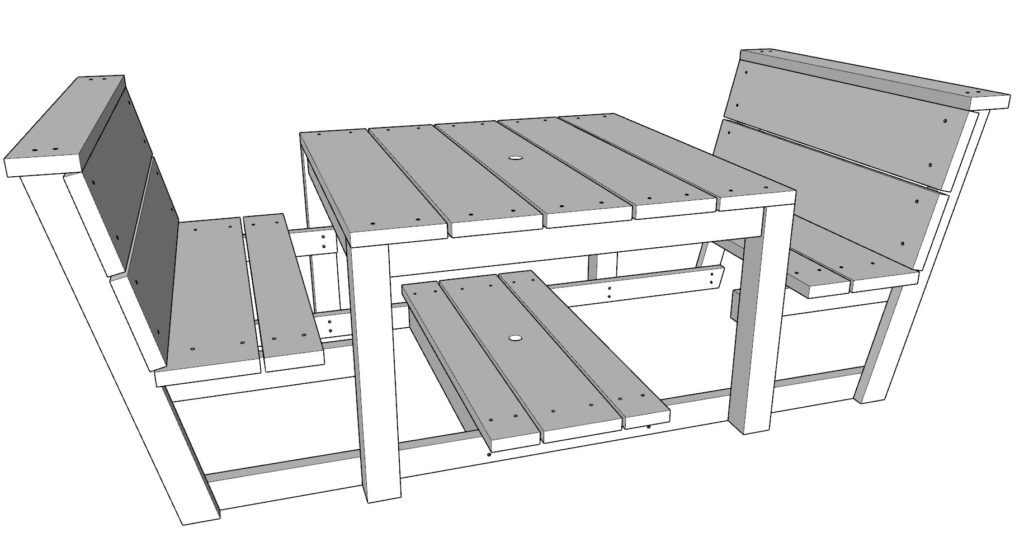
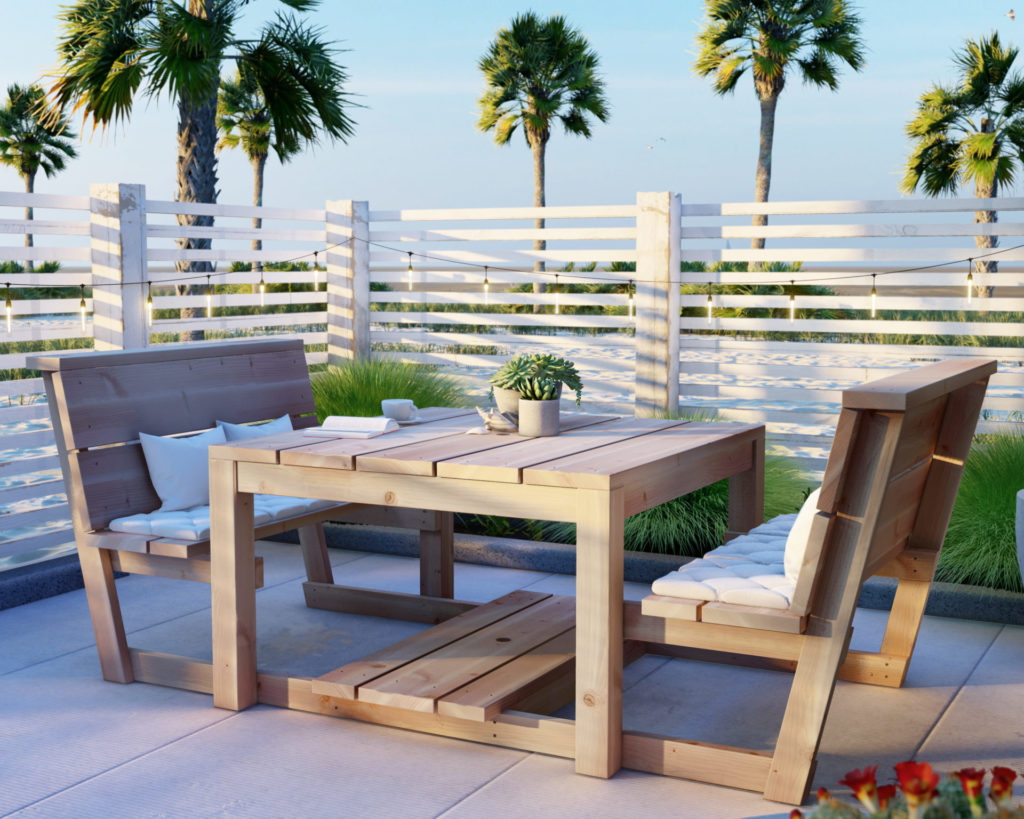
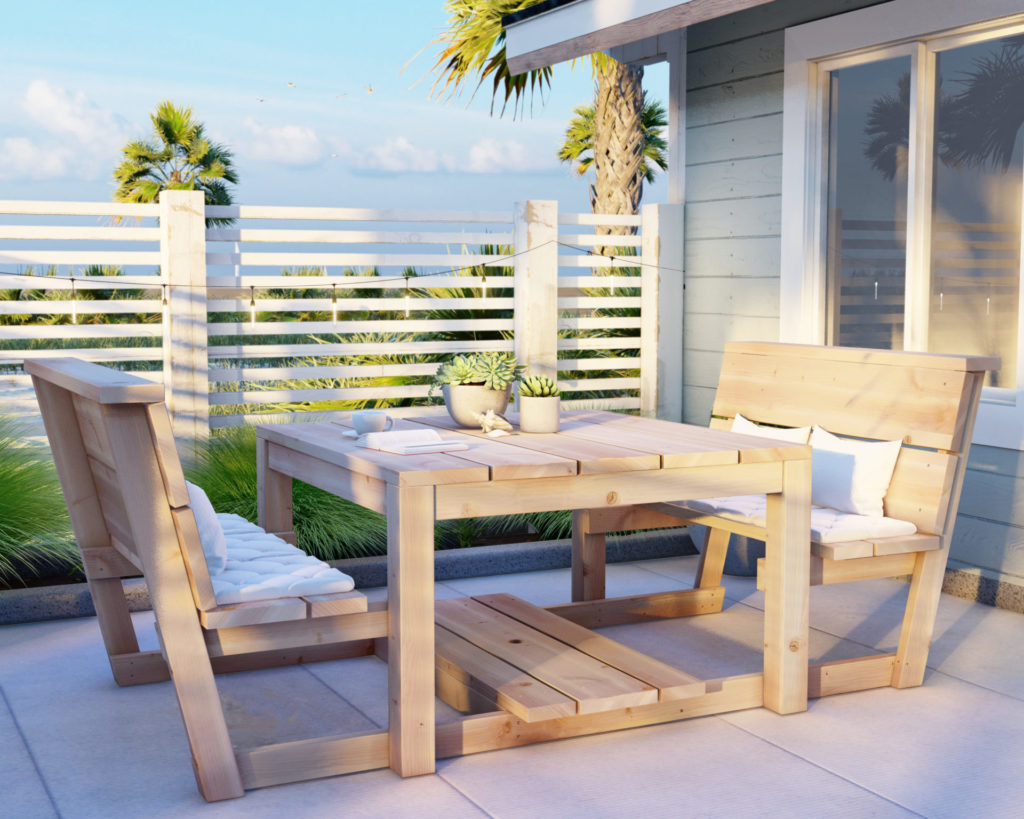
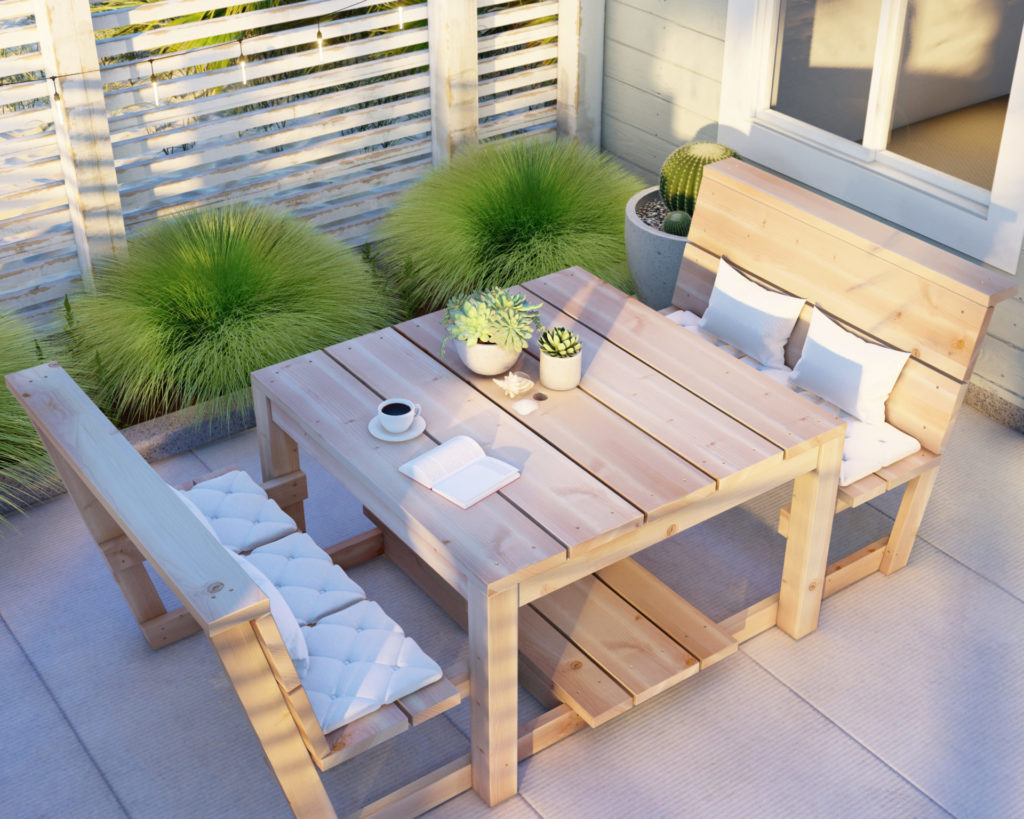
Section 1: A Design that Prioritizes Comfort
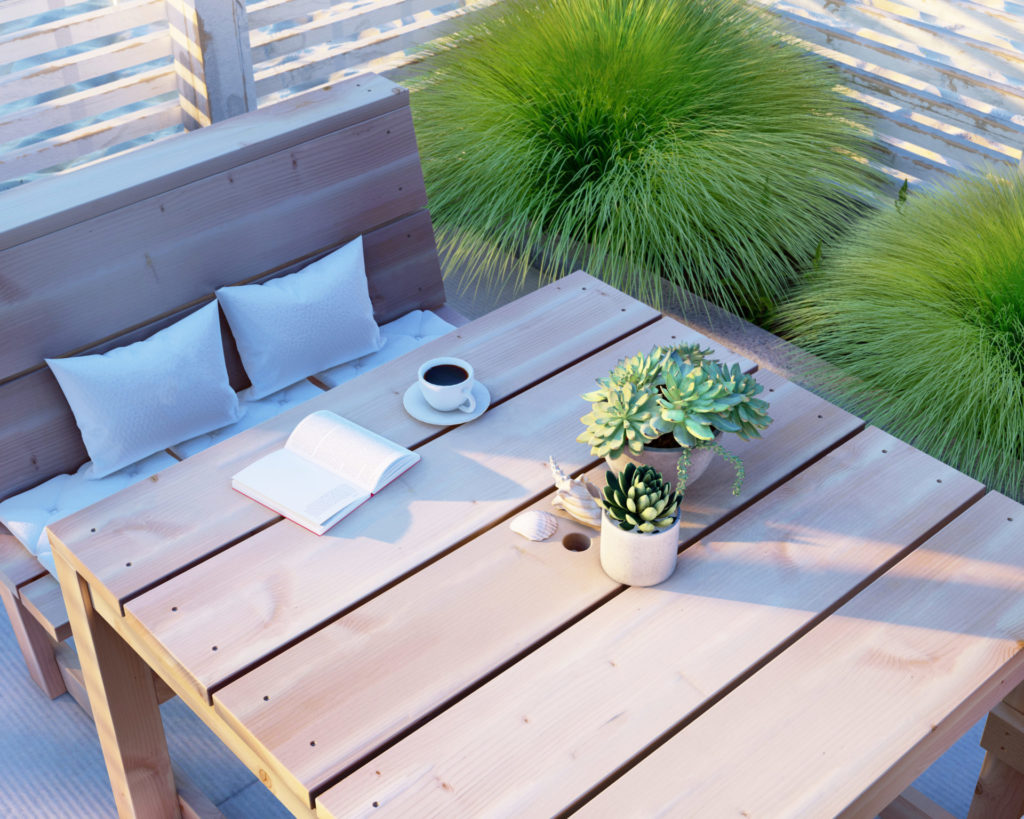
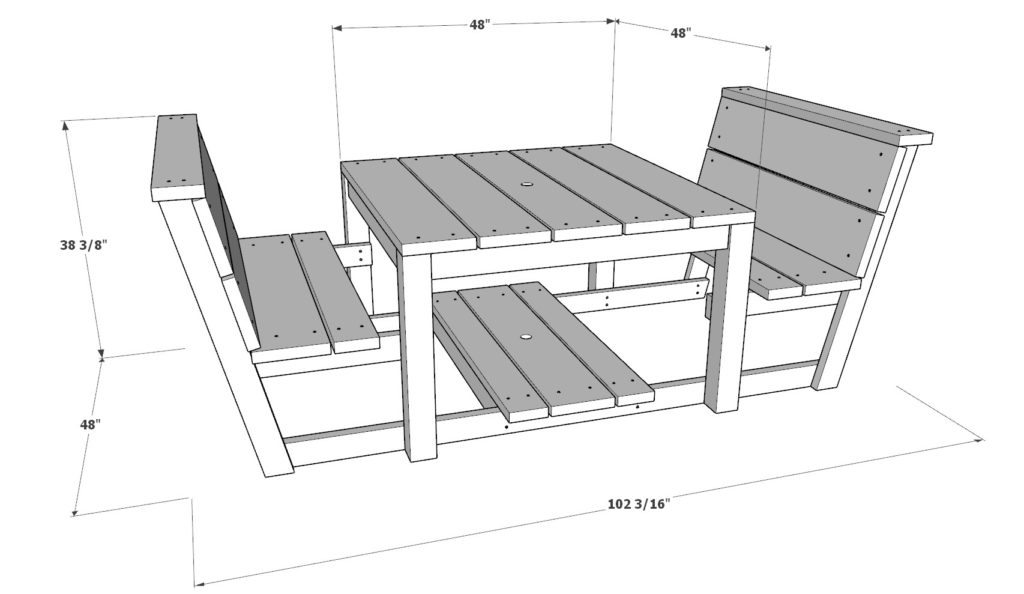
Our outdoor picnic table plans go beyond a mere dining surface; they feature built-in comfort elements to ensure your outdoor gatherings remain enjoyable for hours. The attached 48-inch seating benches boast a 13-degree incline for backrests, guaranteeing optimal relaxation. Additionally, the table incorporates a footrest for added support and comfort. Say goodbye to achy backs and tired feet with this ergonomic masterpiece.
Section 2: Functional & Stylish
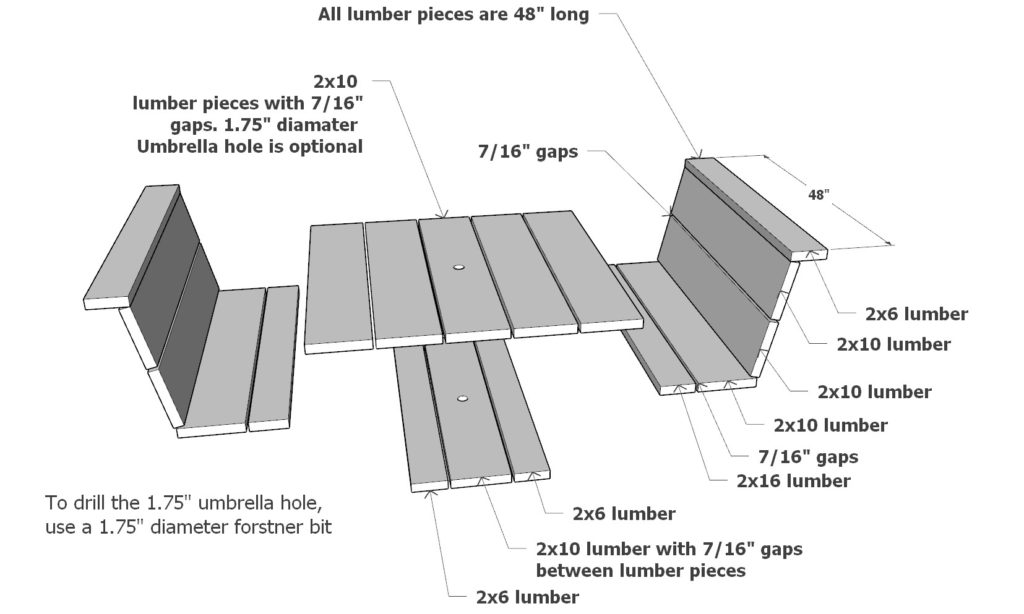
This picnic table isn’t solely focused on comfort; it’s also crafted for functionality and visual appeal. The spacious 48-inch x 48-inch tabletop accommodates outdoor dining with ease, while the bench seating boards’ 7/16-inch spacing ensures water drainage and table freshness. The option to drill a standard-size umbrella hole adds versatility, allowing you to insert an outdoor patio umbrella for sun protection and a touch of elegance.
Section 3: Beginner-Friendly Woodworking
New to woodworking? This project is tailor-made for you. The DIY outdoor picnic table eliminates the need for complex joints or intricate cuts. Utilizing 2x4s, 2x6s, and 2×10 lumber pieces, the plan remains affordable and straightforward. Watch your woodworking skills flourish as you craft a stunning piece of outdoor furniture.
Section 4: A Project That Won't Break the Bank
We know that DIY projects can strain budgets, which is why we designed this outdoor picnic table with cost-efficiency in mind. By using affordable lumber and maintaining a simple construction process, you can build an impressive piece of furniture without depleting your savings.
Section 5: Unleash Your Creativity
Our DIY outdoor picnic table plans lay the groundwork for your creative expression. Customize the project by selecting your preferred wood stain or paint colors to complement your outdoor decor. Enhance bench seating with cushions or outdoor pillows for added comfort and pizzazz.
Conclusion:
Are you prepared to embark on an exciting DIY woodworking journey? Our easy-to-follow, beginner-friendly outdoor picnic table plans are the ideal starting point. Combining comfort, style, and budget-friendly construction, this project is a must-try for any aspiring woodworker. Transform your backyard into a welcoming sanctuary and become the go-to destination for gatherings with family and friends. Happy building!
Time to build
3 hours
Total cost of build
$150
Skill level required
Beginner
Download the PDF plans

Outdoor wood DIY picnic table plan PDF plans
What is included in the PDF download?
- Easy to read step by step instructions
- Material list
- Cut list
- Tools needed
- 3D illustrations
- Helpful links to materials/tools needed
Recommend tools for this project
- Saw (miter saw recommended for precision cuts)
- Drill (with wood countersink drill bit for predrilling)
- Impact drill driver with bit for screws
- Sander and sand paper
- 1 lb of 2.5-inch-long screws
- 2 lb of 3.5-inch-long screws
- Wood glue
- Ratchet straps
Cut list and material list
Cut list and material list are available with the purchase of the DIY plan. Thank you for supporting this website and making these plans possible!.
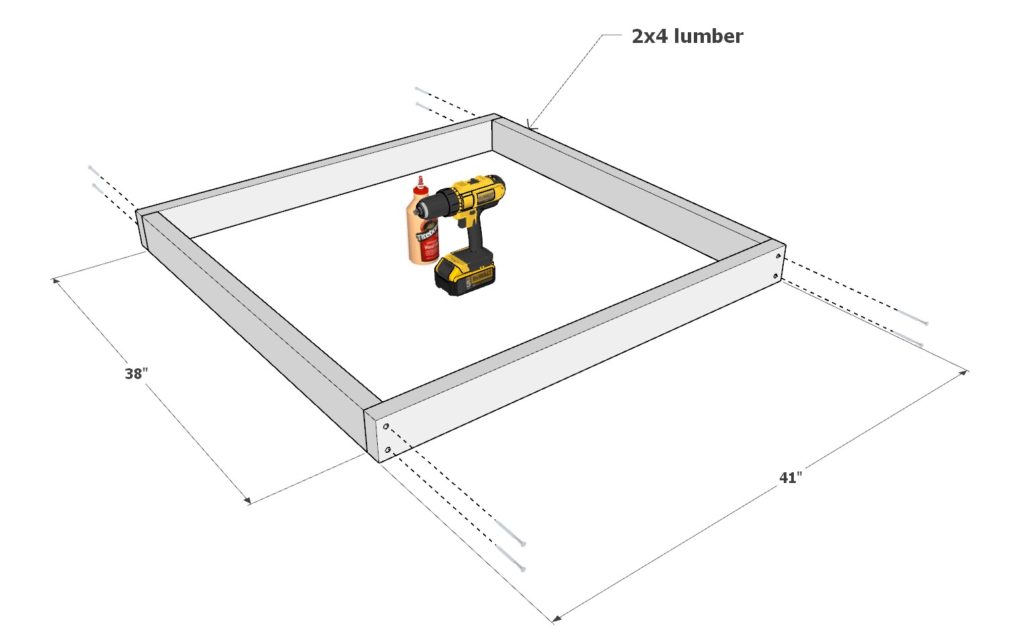
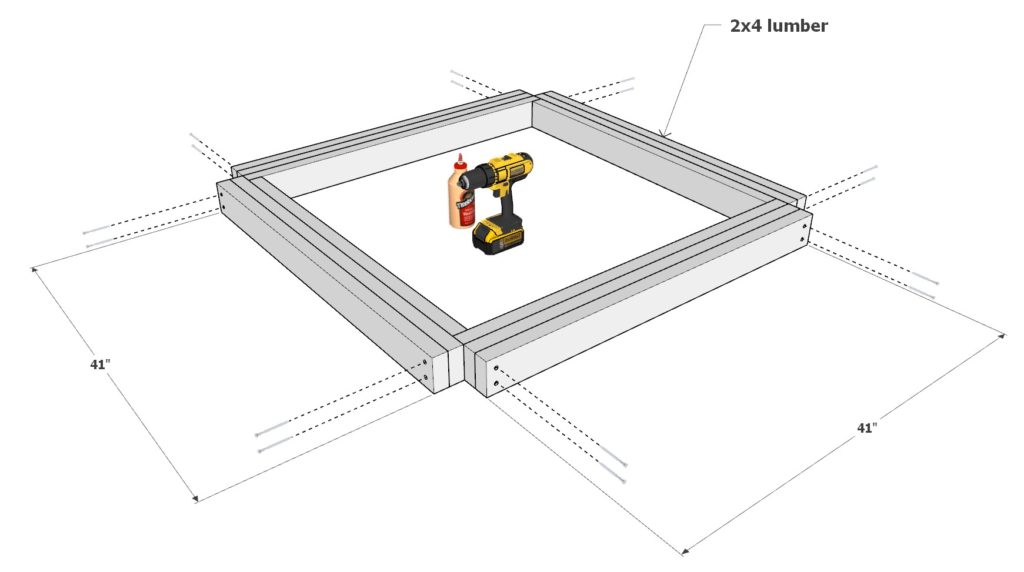
Step 1: Construct the Table Top Frame
First, make the table top frame.
Being by taking two 41 inch 2×4 lumber pieces and two 38 2×4 lumber pieces. Arrange them as shown in the first image. Attach the boards using glue, predrill holes, and add 3.5 inch screws to secure everything together.
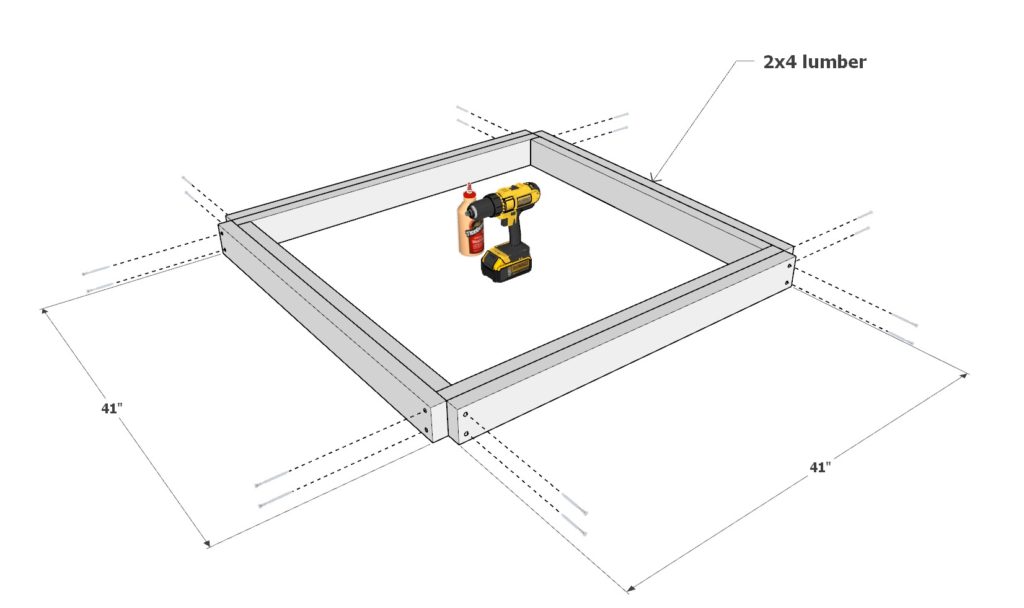
Next, add another layer of four 41 inch 2×4 lumber pieces, secure them in the same manner.
Next, add a third layer of 41 inch 2×4 lumber pieces. Secure them in the same way.
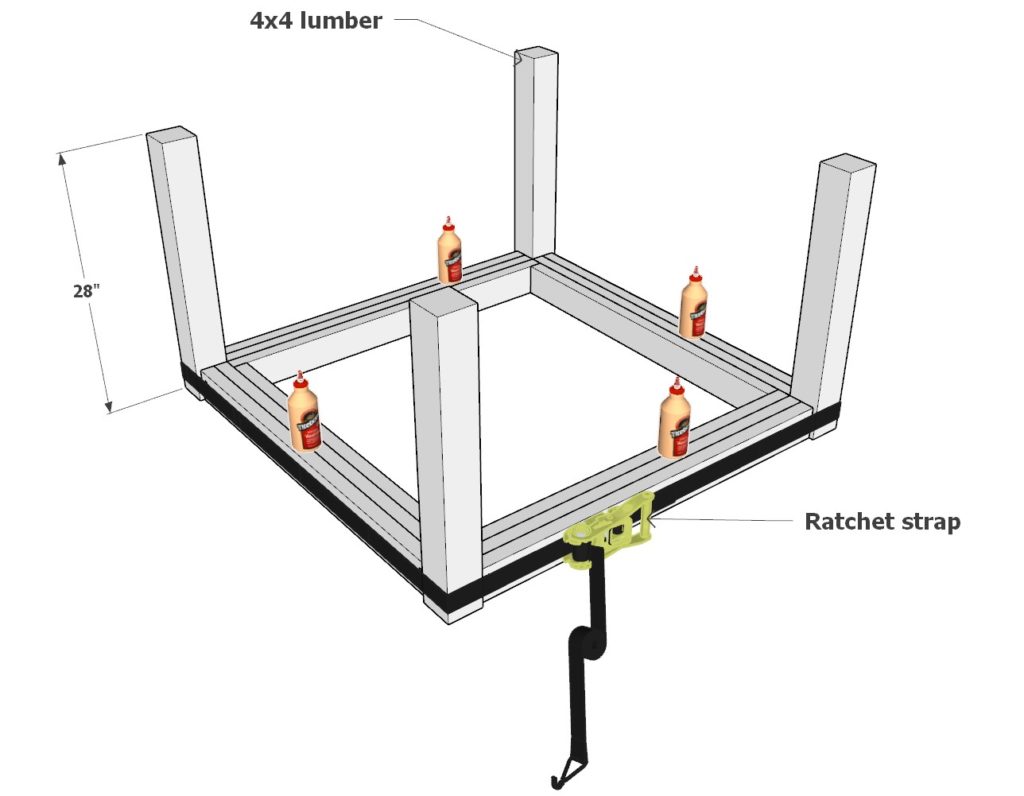
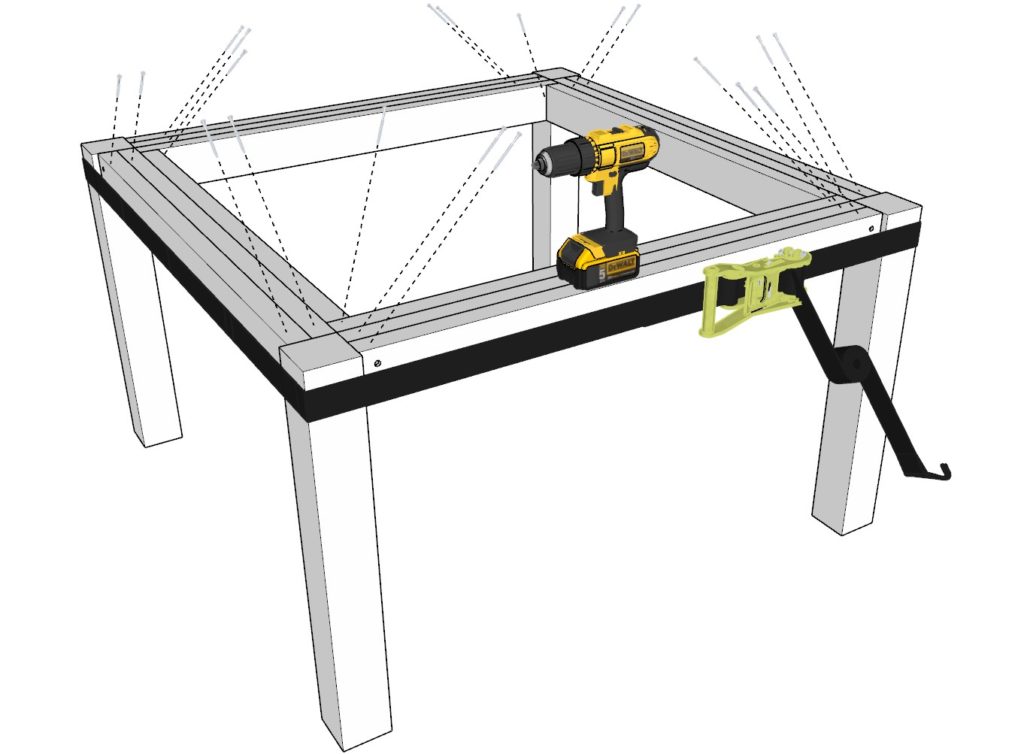
Step 2: Attach the Table Legs
Next, add the table legs.
Take four 28 inch 4×4 lumber pieces, add glue to all the areas that will be joined together and add them to the indents on the 2×4 lumber table top frame from the previous step. Use a ratchet strap to bring all the pieces together. I would suggest tightening the ratchet strap lightly at first, make sure all the table legs are in correct alignment (need level ground to do this). Once all the pieces are where you want them to be, tighten the straps so that no components are able to move.
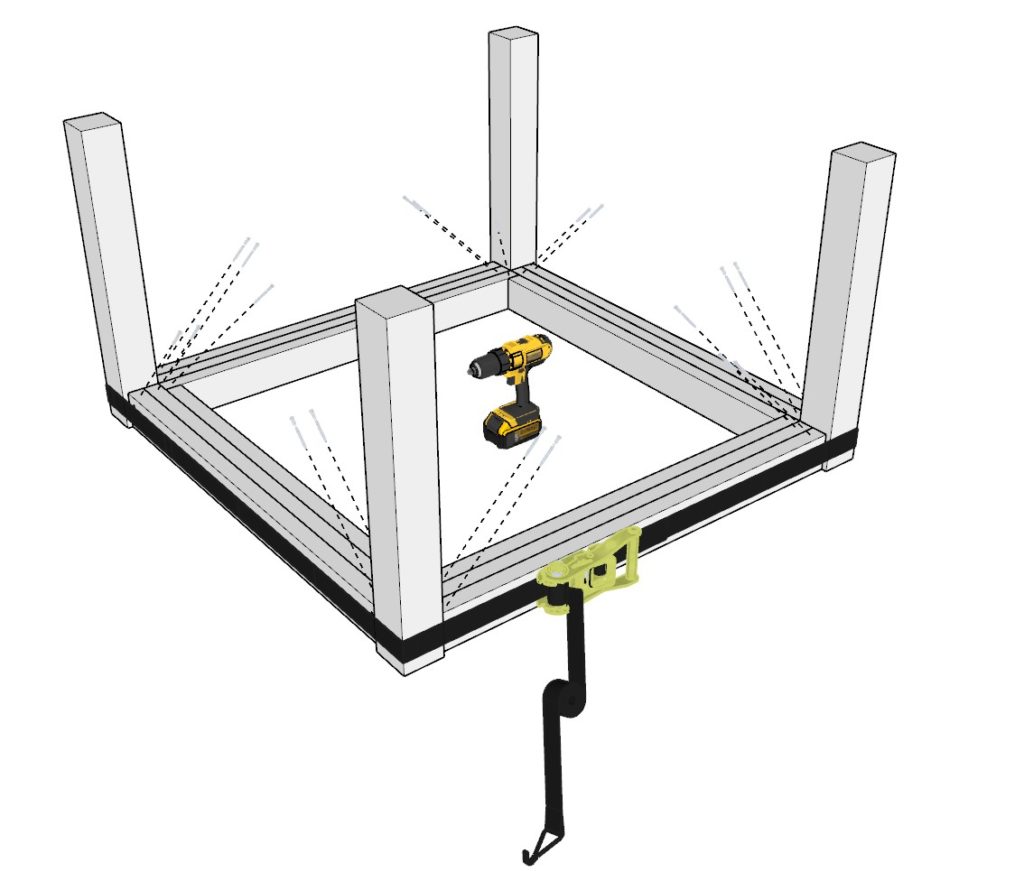
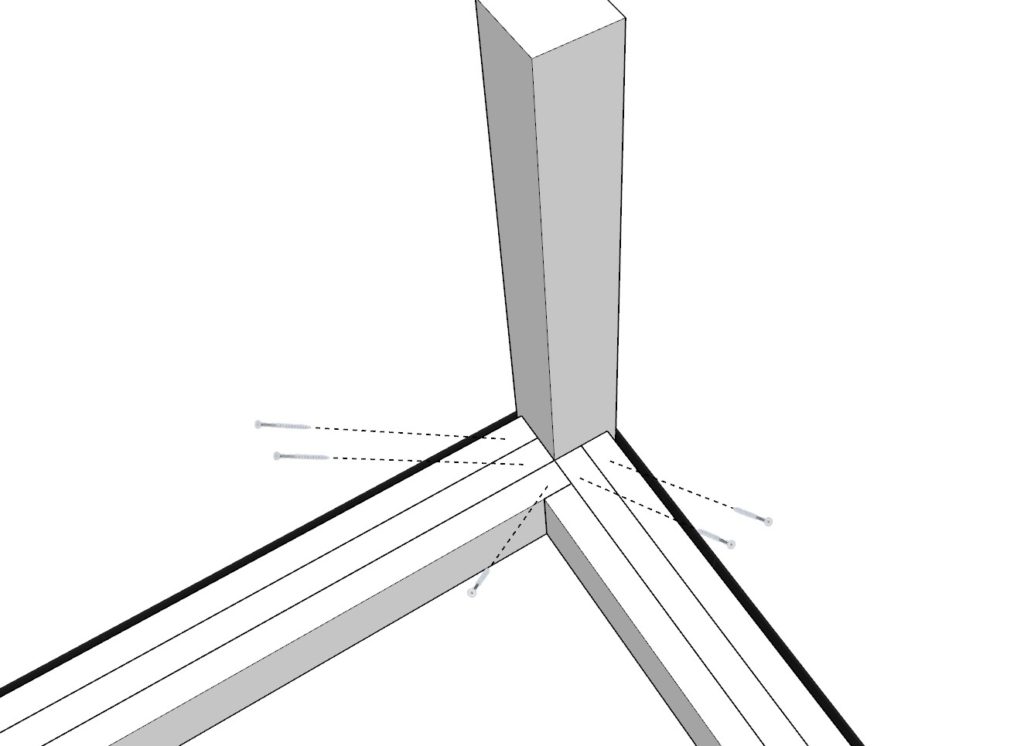
Next, add five 3.5 inch screws diagonally as shown below to secure the table top frame to the legs.
Flip the table over (flip it with a friend mid-air. Don’t put any pressure on the legs at this stage)
Remove the straps.
Step 3: Prepare and Assemble the Seating Components
Next, cut and attach all the components that will comprise the seating portion of the picnic table.
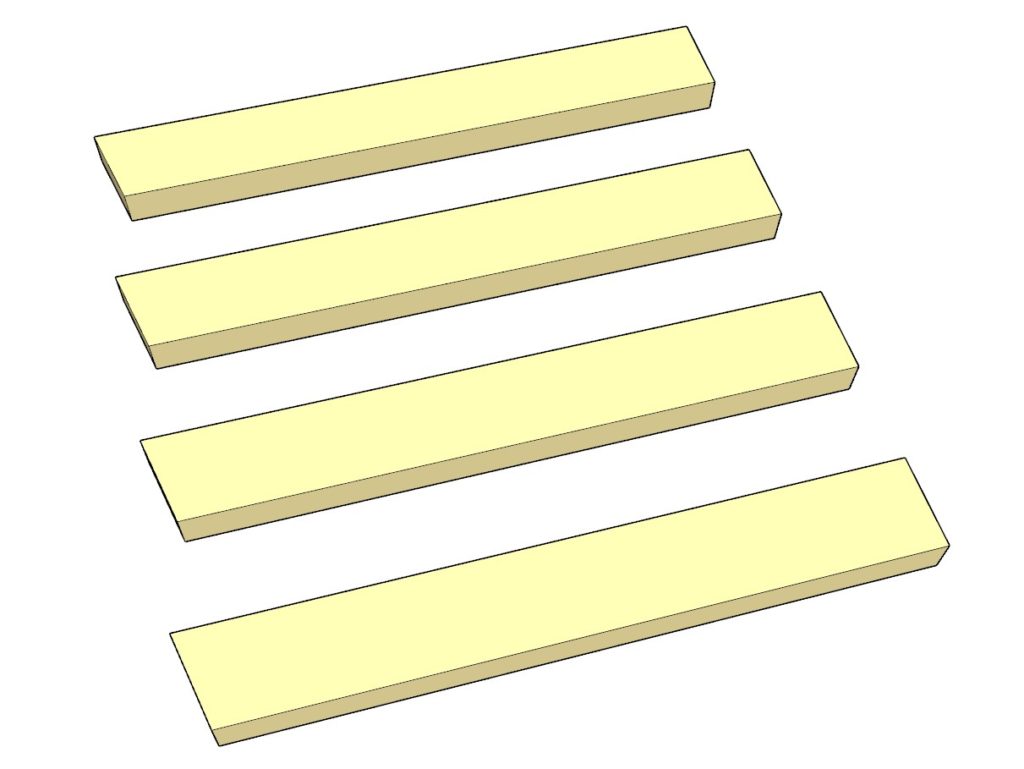
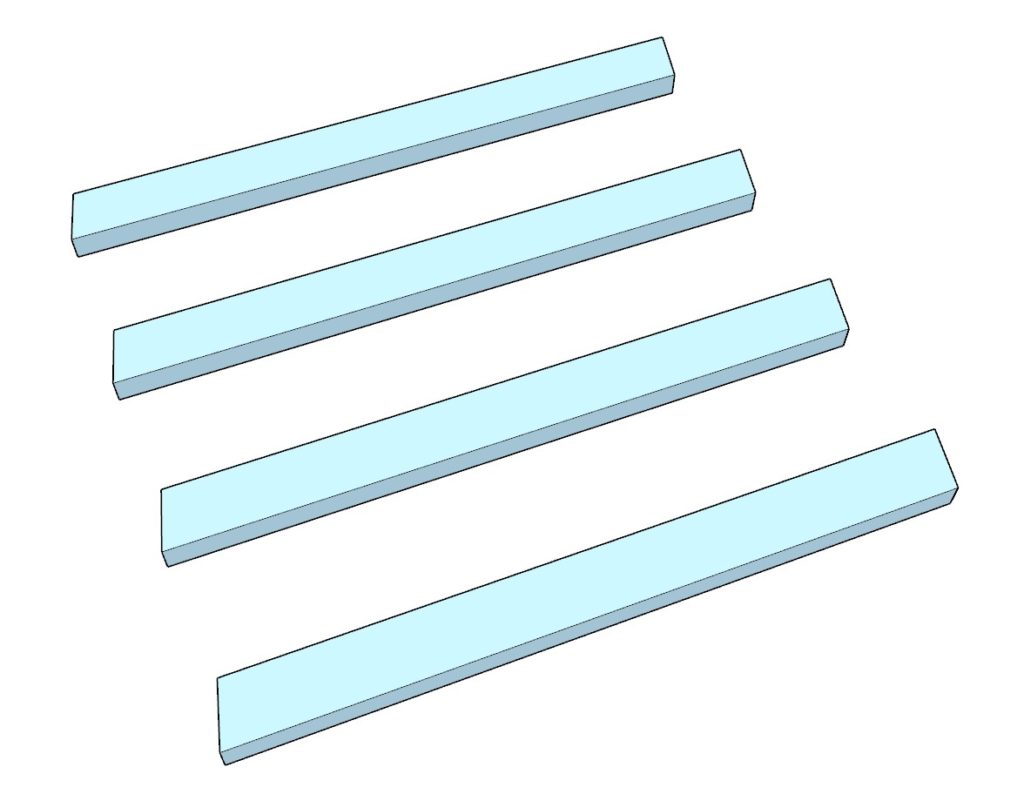
First, cut four identical 25-1/2 inch 2×4 lumber pieces with one end cut at 13-degrees as shown below (in yellow).
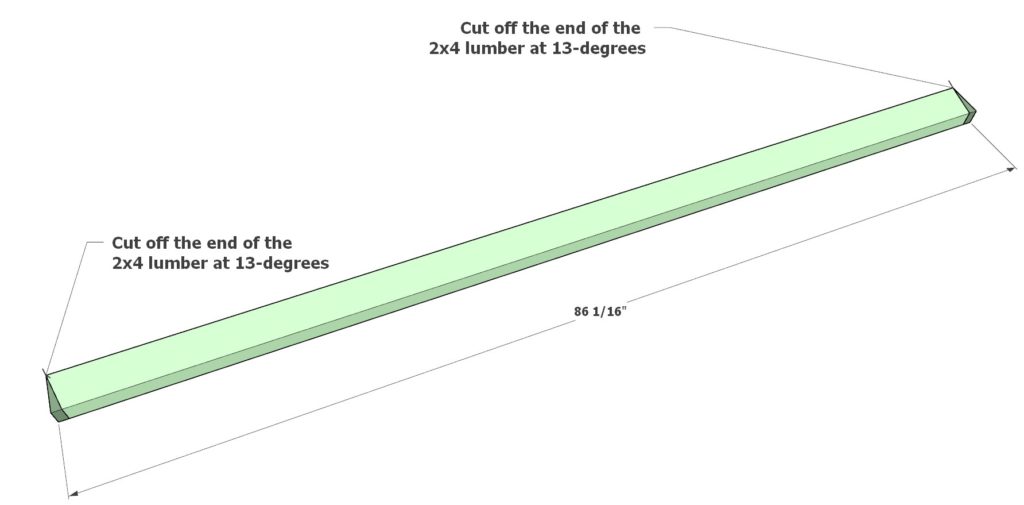
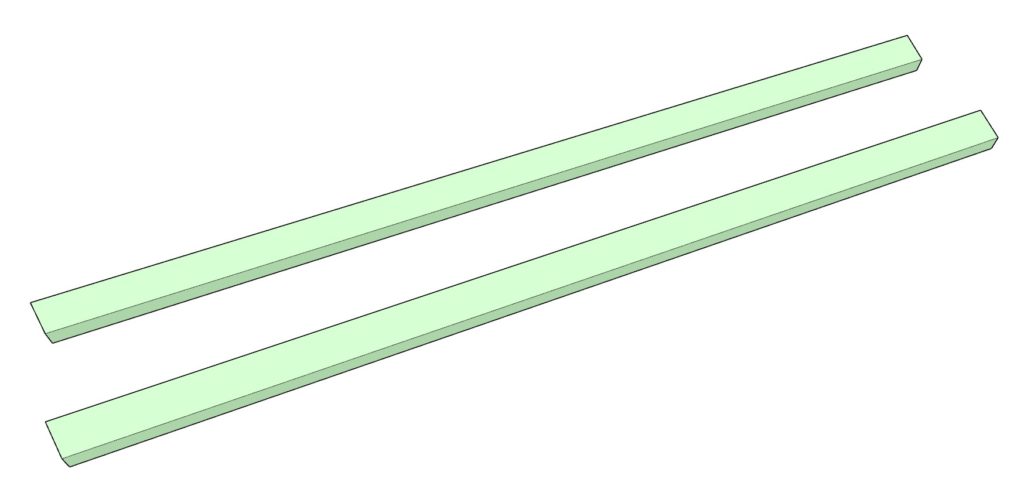
Next, cut two identical 86-1/16 inch 2×4 lumber pieces with both ends cut at 13-degrees as shown below (in green).
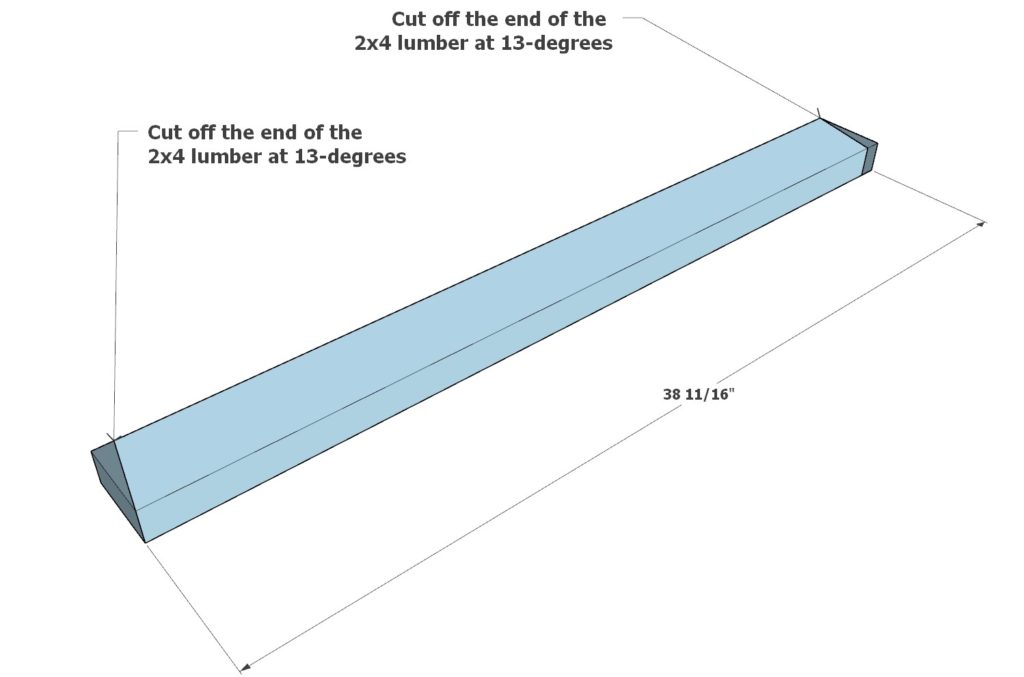
Next, cut four identical 38-11/16 inch 2×4 lumber pieces with both ends cut at 13-degrees as shown below (in blue).
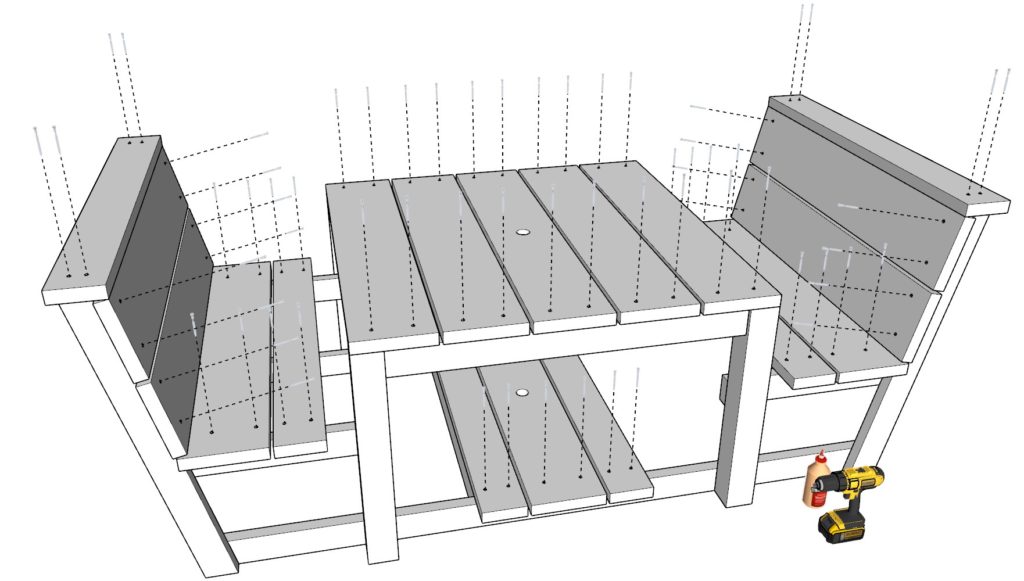
Next, attach all the components together following the spacing and screw placement illustrated below. Use glue, predrill, and add 2.5 inch screws

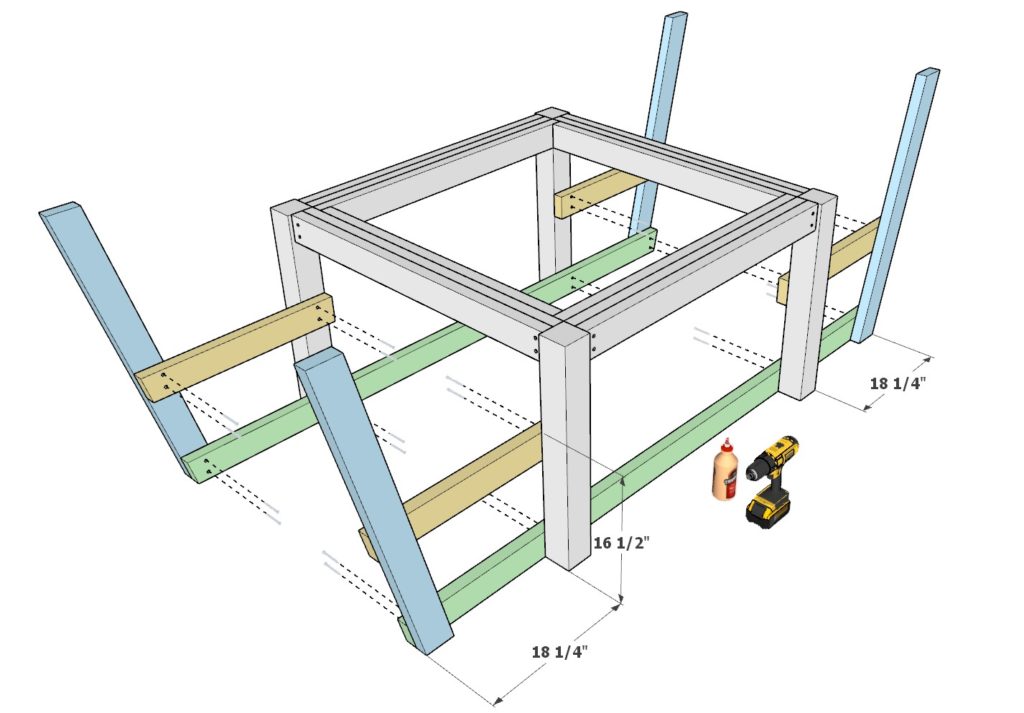
Step 4: Install the Footrest frame
Next, add two 38 inch 2×4 lumber pieces for the picnic table footrest. Use glue, predrill, and add 3.5 inch screws. Space out the pieces as shown below.
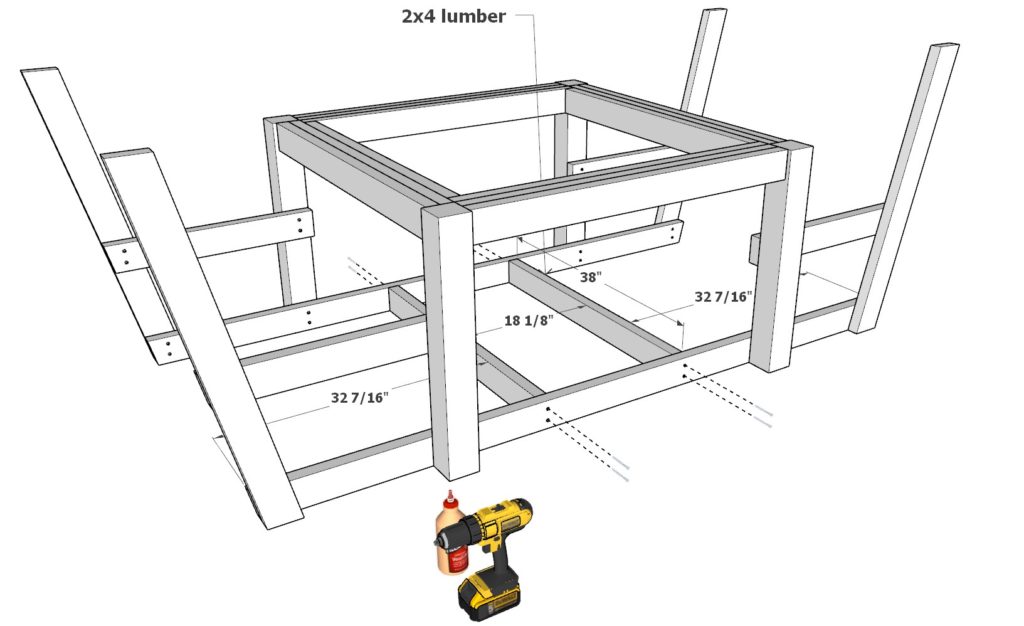
Step 5: Attach Table Top, Seating, and Footrest Boards
Next, attach all the table top boards, seating boards, and the footrest boards.
You will need a total of six 48 inch 2×6 lumber pieces and twelve 48 inch 2×10 lumber pieces.
Space them out as shown below.
If you wish to add an umbrella hole, use a 1.75″ (standard size umbrella hole) forstner bit to drill the hole though the table top board and the foot rest board.
Attach the boards by predrilling holes, adding glue, and adding 3.5 inch screws.
Step 6: Stain or Paint Your DIY Picnic Table
Protect and Enhance Your DIY Picnic Table with a Perfect Stain or Paint Application for a Lasting and Beautiful Finish
Choose your desired stain or paint: Select a high-quality outdoor wood stain or paint that complements your outdoor decor and protects your table from the elements.
Prepare the surface: Before applying the stain or paint, ensure the table is clean and free of any debris. Lightly sand the wood surfaces with fine-grit sandpaper (120 to 220 grit) for a smooth finish.
Apply a wood conditioner (optional): If staining your table, consider applying a wood conditioner to ensure even color absorption. Follow the manufacturer’s instructions for application and drying time.
Stir the stain or paint: Gently stir your chosen stain or paint to ensure a consistent color and texture.
Test the color (optional): Before applying the stain or paint to the entire table, test a small, inconspicuous area to ensure the color meets your expectations.
Apply the first coat: Using a high-quality brush or roller, apply the stain or paint to your table following the wood grain. Work in sections, applying thin, even coats to prevent drips and runs.
Allow to dry: Follow the manufacturer’s recommended drying time for the stain or paint you’ve chosen. Ensure the table is dry to the touch before proceeding to the next coat.
Apply additional coats (if needed): Depending on the desired color intensity and coverage, you may need to apply additional coats. Allow each coat to dry fully before applying the next.
Seal the wood (if staining): If you’ve chosen a stain, apply a clear, protective wood sealer to ensure long-lasting protection against the elements. Follow the manufacturer’s instructions for application and drying time.
Enjoy your finished DIY picnic table: Once the paint or stain is completely dry, your table is ready for use! Admire your handiwork and enjoy your beautiful, custom outdoor picnic table for years to come.