Introduction
Stepping into the world of DIY is not just about creating objects but about crafting experiences. Imagine enhancing your outdoor space with a wooden bar, a project that not only elevates the aesthetics of your patio but also becomes the heart of many unforgettable moments.

Why Our Plan Stands Out
In a landscape filled with DIY guides, our plan shines with its blend of comprehensive details and user-friendly approach. We believe that every DIY enthusiast, whether a seasoned woodworker or a novice, should have access to a plan that’s intuitive and results in a piece of art they’re proud of.
Simplicity in Execution
We champion simplicity. By focusing on clear steps, common materials, and tools likely already in your arsenal, this plan ensures a smooth journey from the first cut to the final polish.
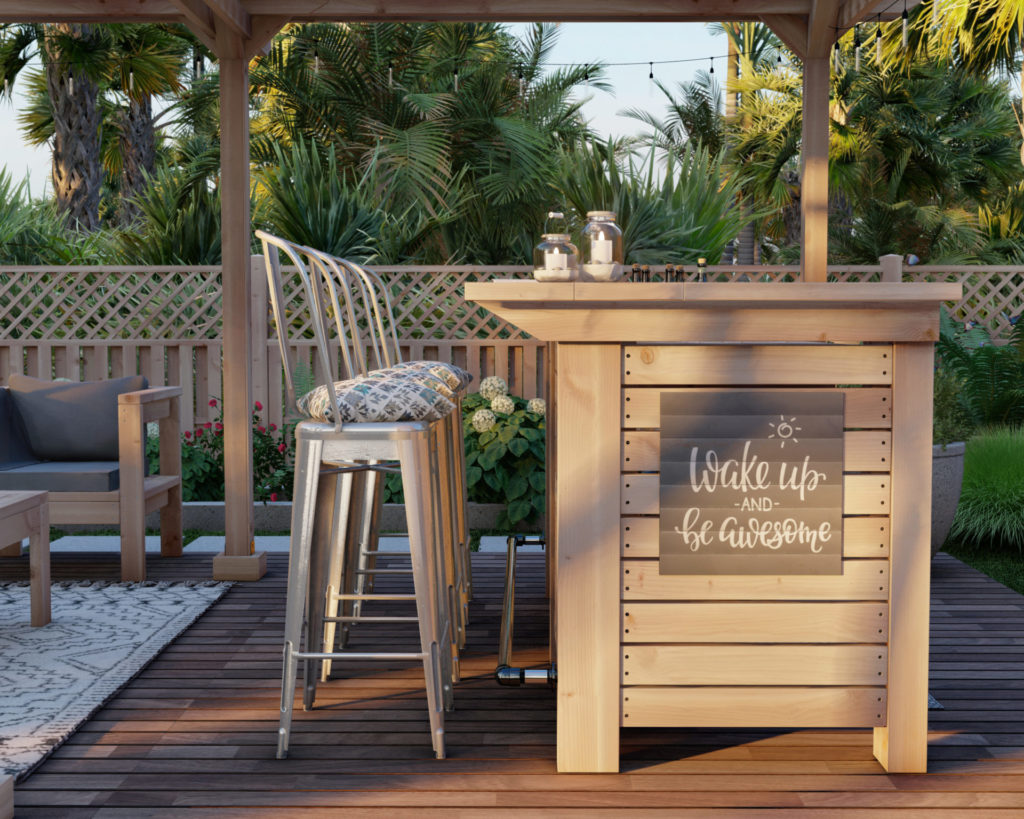
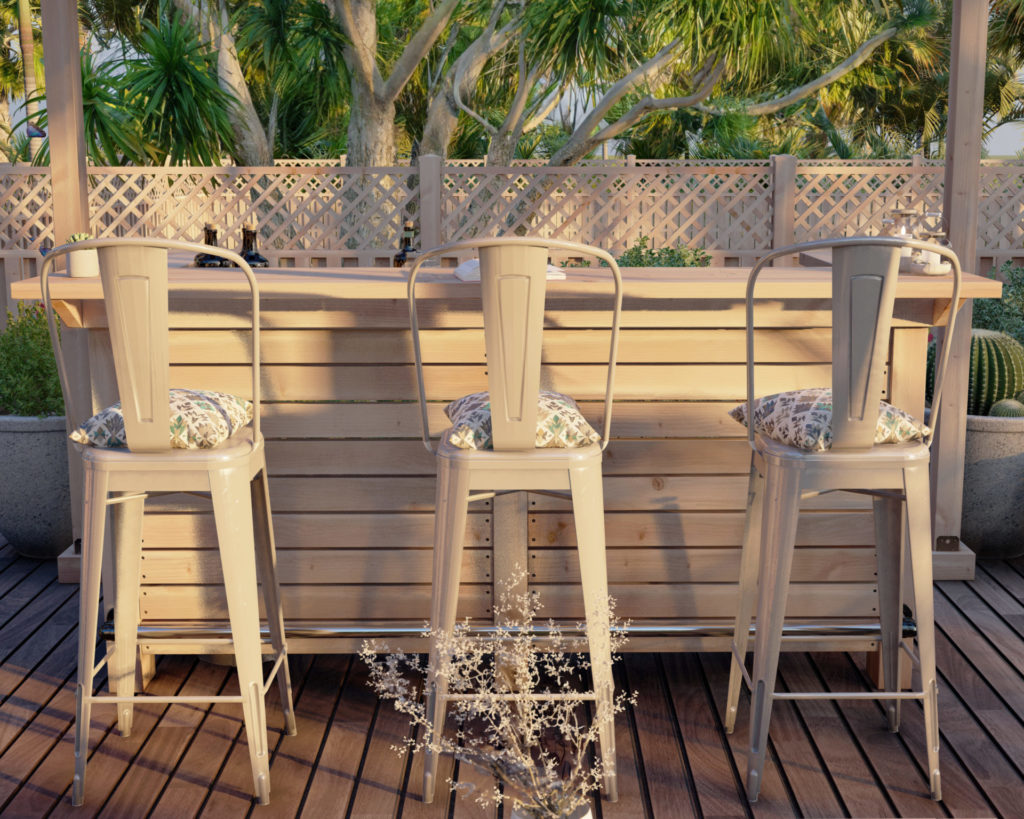
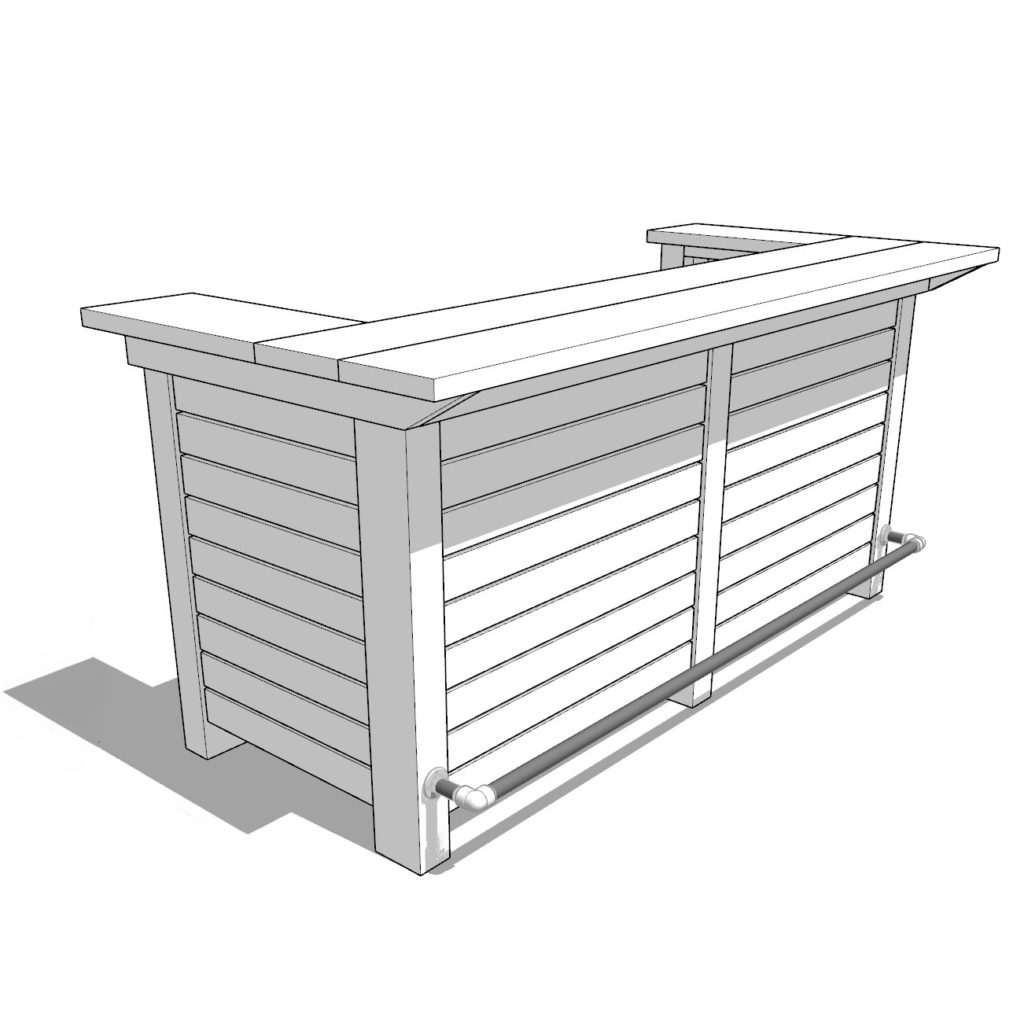
The Charm of the U-Shaped Counter
Our design is both functional and engaging. The U-shaped counter ensures you can engage with guests from every angle, turning every gathering into an inclusive and memorable event.
Make It Uniquely Yours
An outdoor bar should be more than just functional; it should resonate with its creator’s personality. Our plan acts as a canvas, allowing you ample freedom to infuse your touch. Choose finishes that reflect your style, add decorative elements that speak to you, or modify dimensions to fit perfectly in your space. The power to personalize is in your hands.
What You Should Know
- Time Estimation: Roughly 8 hours, but if you’re new to woodworking, it could take a bit longer.
- Cost of Materials: Estimated at around $400 based on Douglas Fir wood. However, Redwood, Cedar, and Pine are excellent alternatives.
- Skills Needed: This plan is beginner-friendly.
Supporting Your Journey
Encountered a challenge or need clarification on a step? We’re here to help. Our dedicated support ensures you’re never alone in this journey.
More Ways to Beautify Your Space
Once your bar stands tall and proud, consider exploring our other DIY plans. From ambient lighting ideas to cozy seating arrangements, we offer a suite of projects that can transform your outdoor space into a haven.
Take the Leap
The joy of DIY lies in the journey as much as the result. With our guide by your side, you’re set to embark on a fulfilling adventure, culminating in a masterpiece that’s both functional and personal. Why wait? Dive in and let the magic of creation unfold.
In Closing
At the heart of every DIY project lies passion, creativity, and the spirit of adventure. With this plan, you’re not just building a bar; you’re crafting memories. So, gather your tools, ignite your passion, and let the crafting begin.
Time to build
About 8 hours
Total cost of build
About $400
Skill level required
Beginner
Download the PDF plans
Bar PDF plans
What is included in the PDF download?
- Easy to read step by step instructions
- Material list
- Tools needed
- Helpful links to materials and tools needed
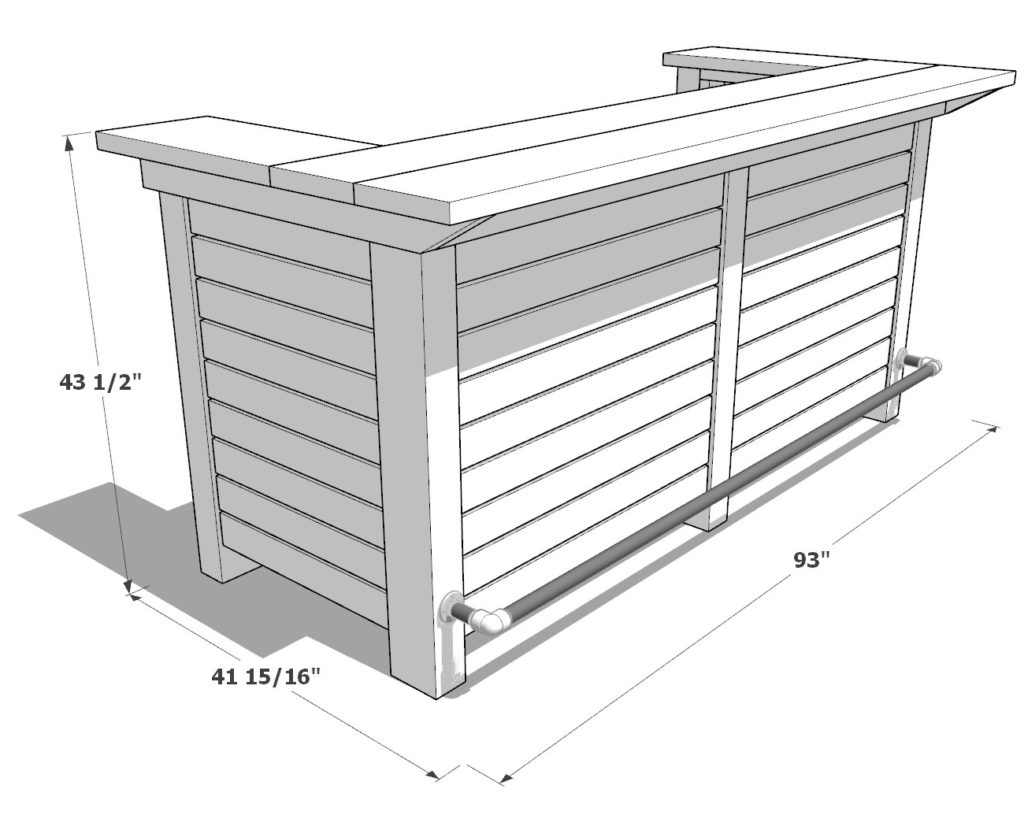
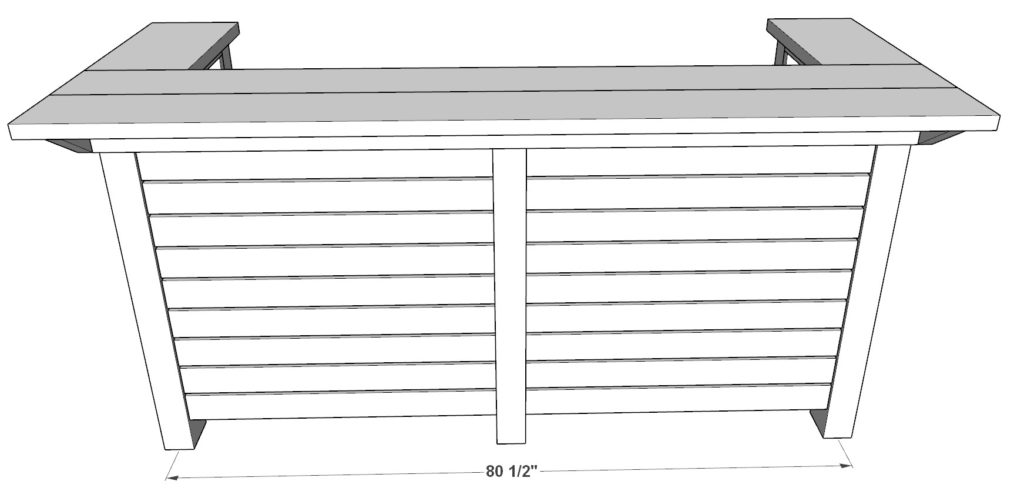
Bar Dimensions
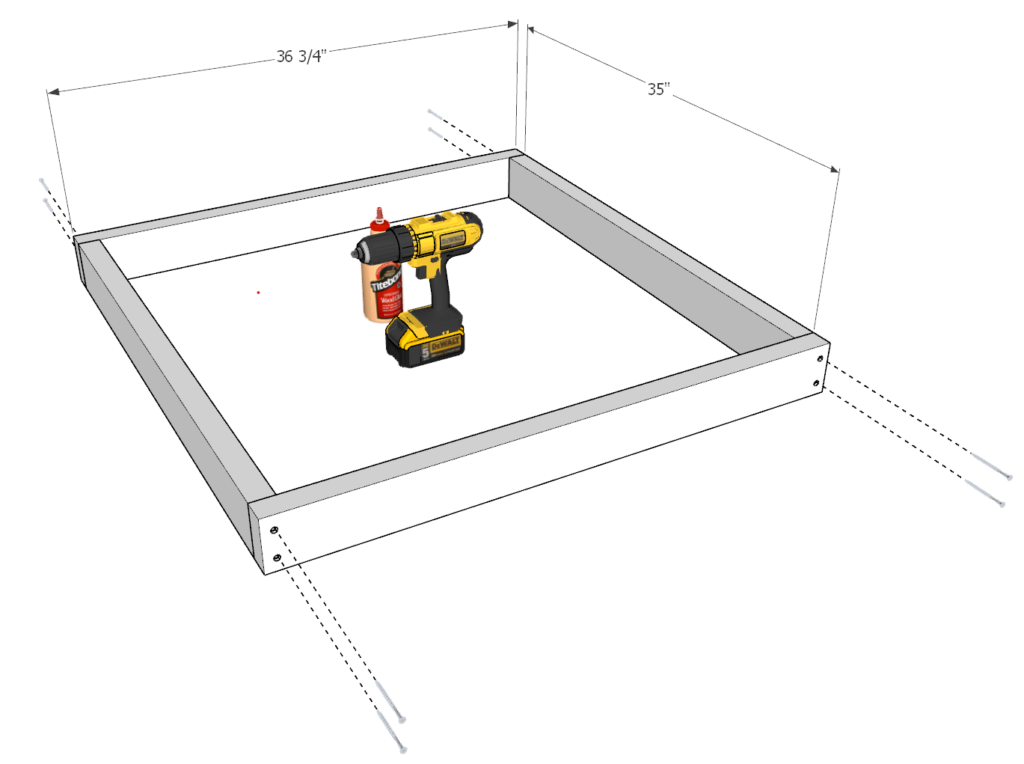
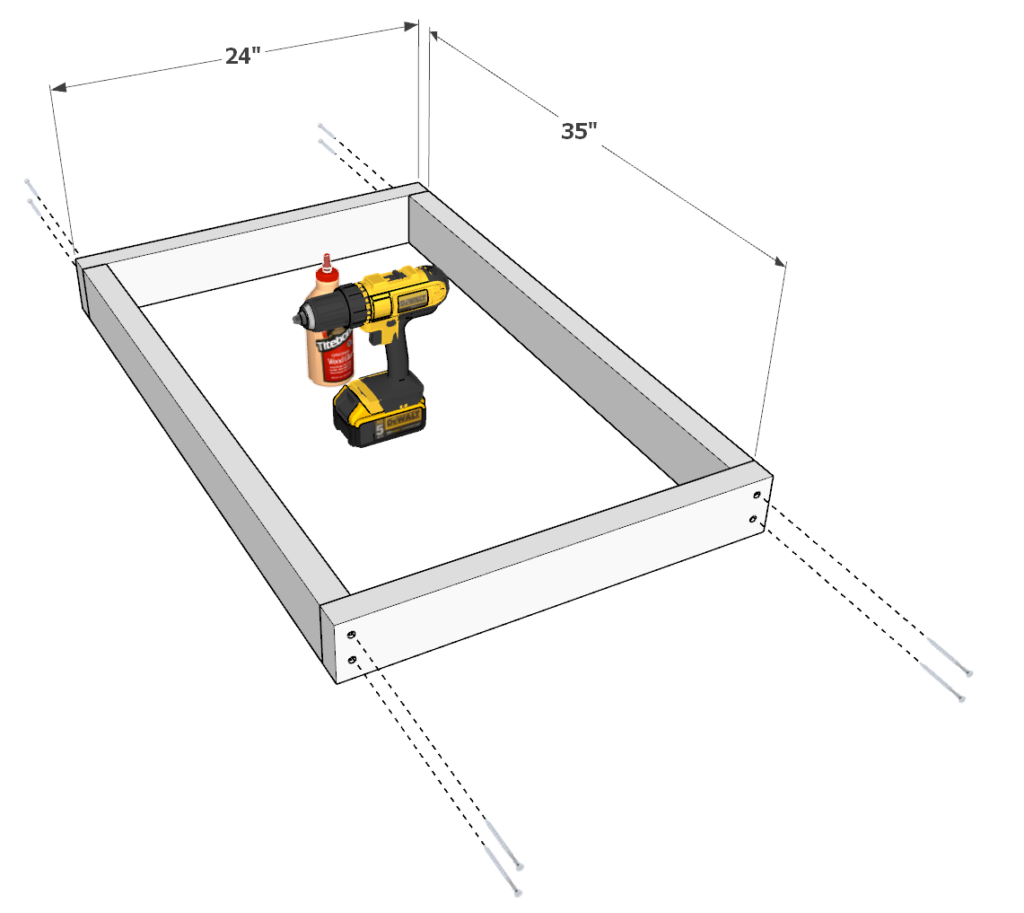
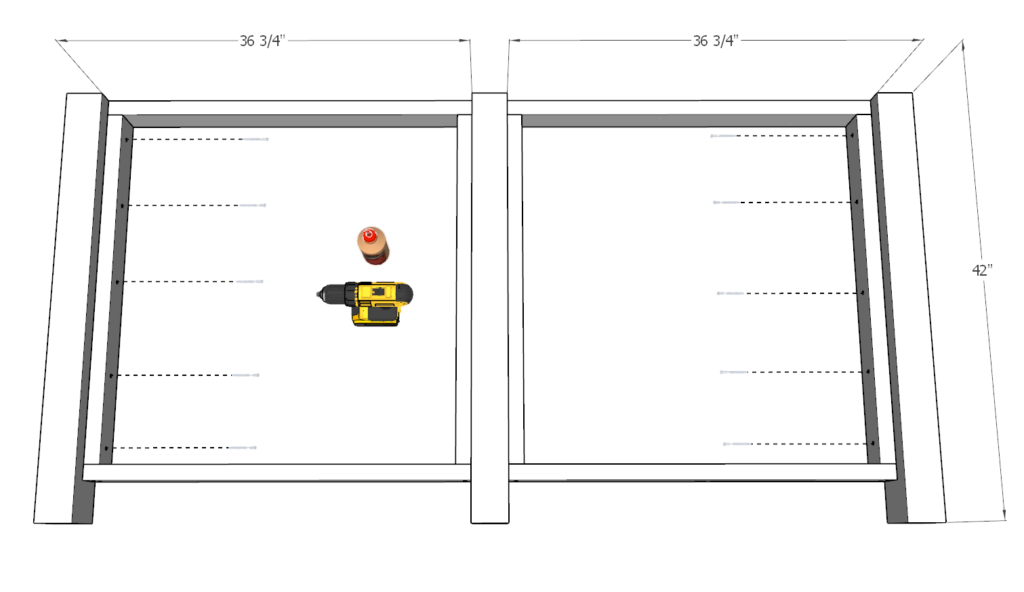
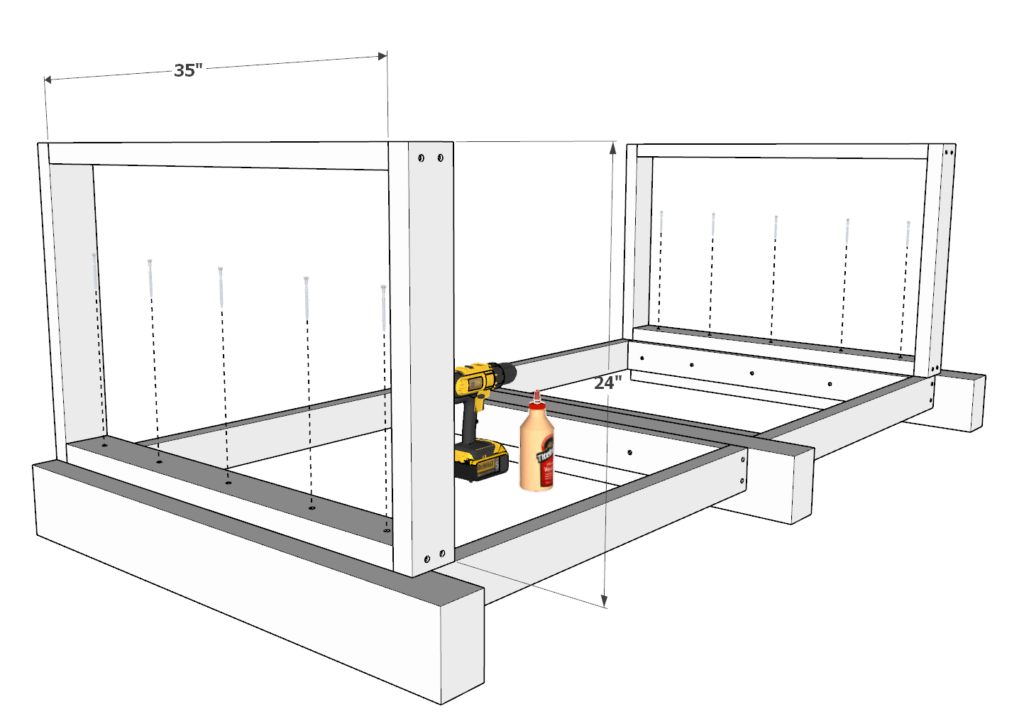
Step 1: Assemble the Initial Frame Pieces
First, take two 35 inch 2×4 lumber pieces and two 36-3/4 inch 2×4 lumber pieces and arrange them as shown below. Add glue to the areas of the 2x4s that will be joined together, predrill (to prevent wood splitting), and add 3.5 inch screws.
Repeat to make an identical second frame piece for a total of two pieces.
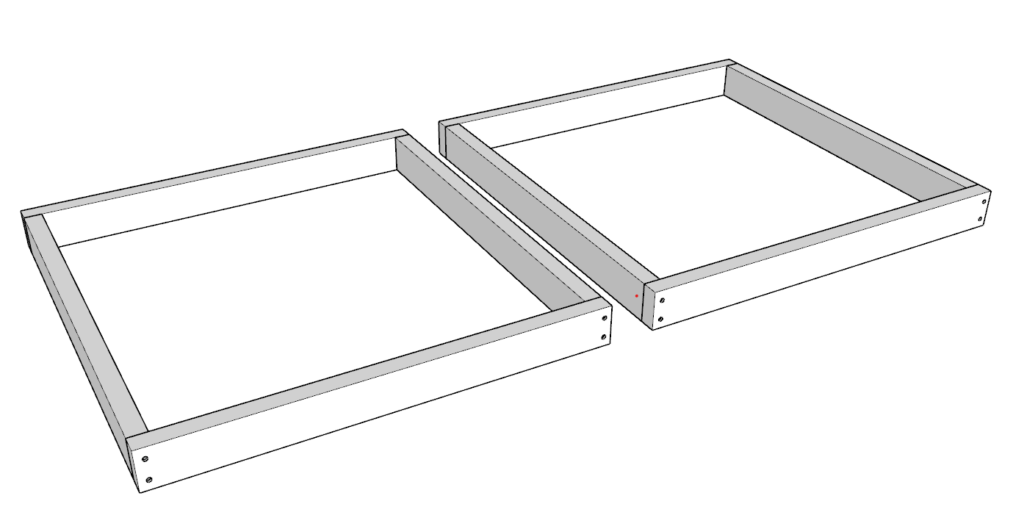
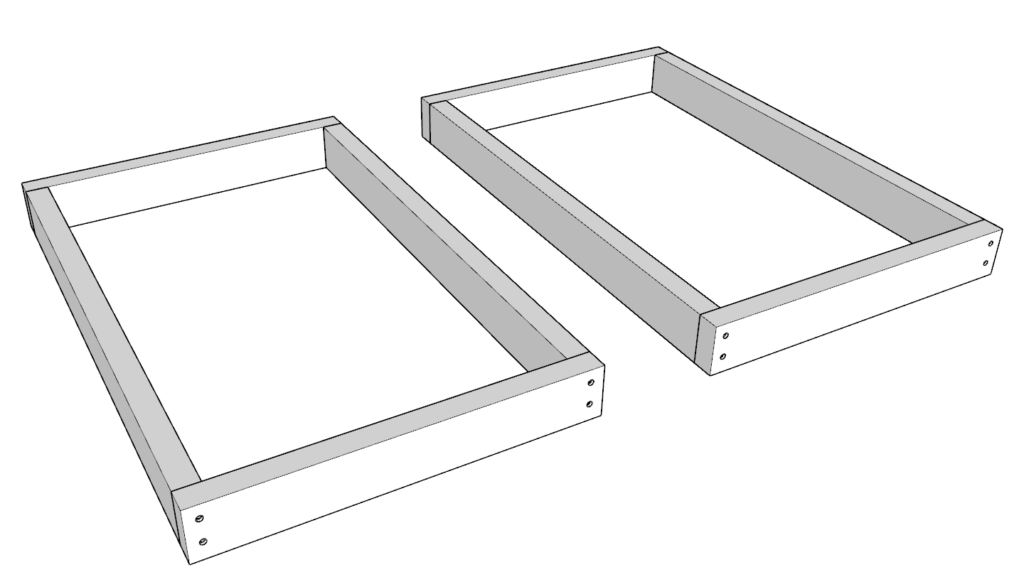
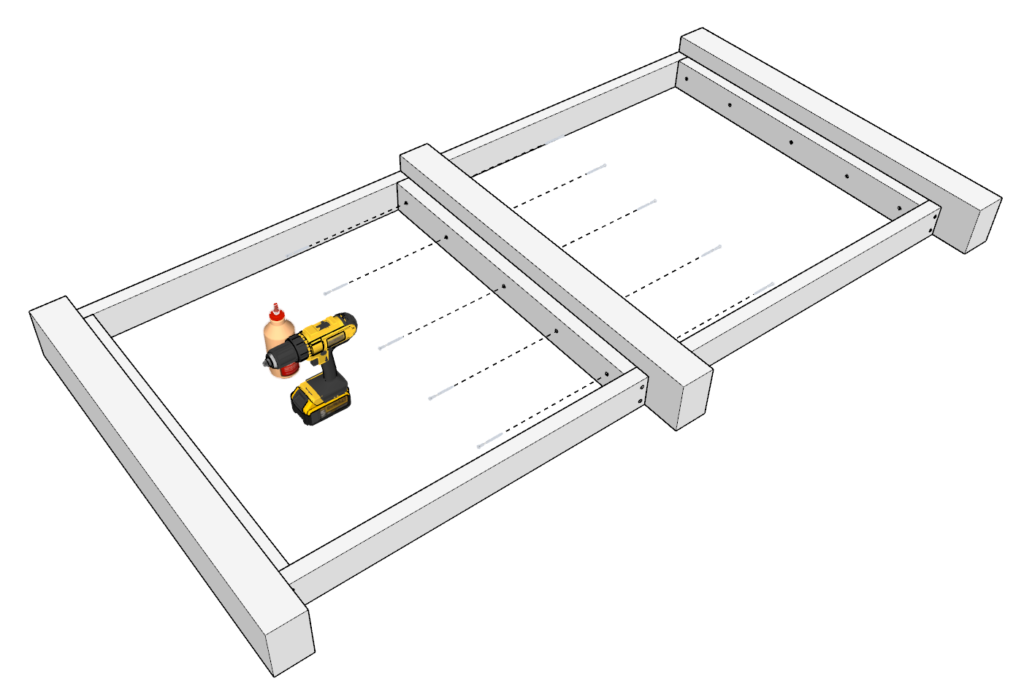
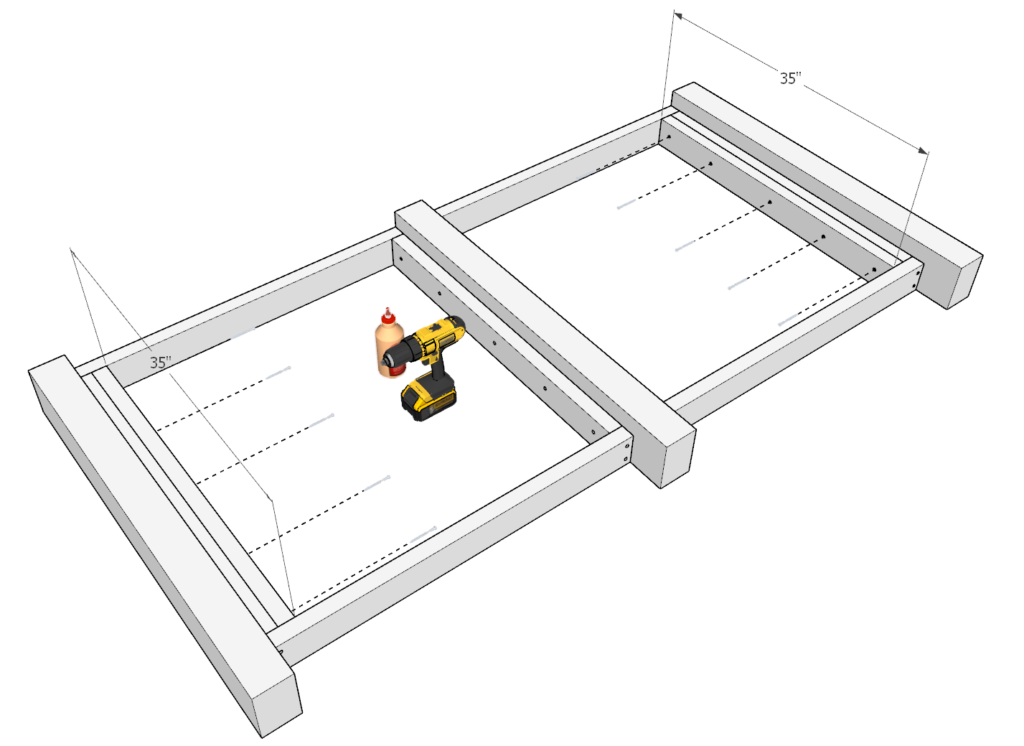
Step 2: Assemble Additional Frame Pieces
Next, take two 35 inch 2×4 lumber pieces and two 24 inch 2×4 lumber pieces and arrange them as shown below. Add glue to the areas of the 2x4s that will be joined together, predrill, and add 3.5 inch screws.
Repeat to make an identical second frame piece for a total of two pieces.
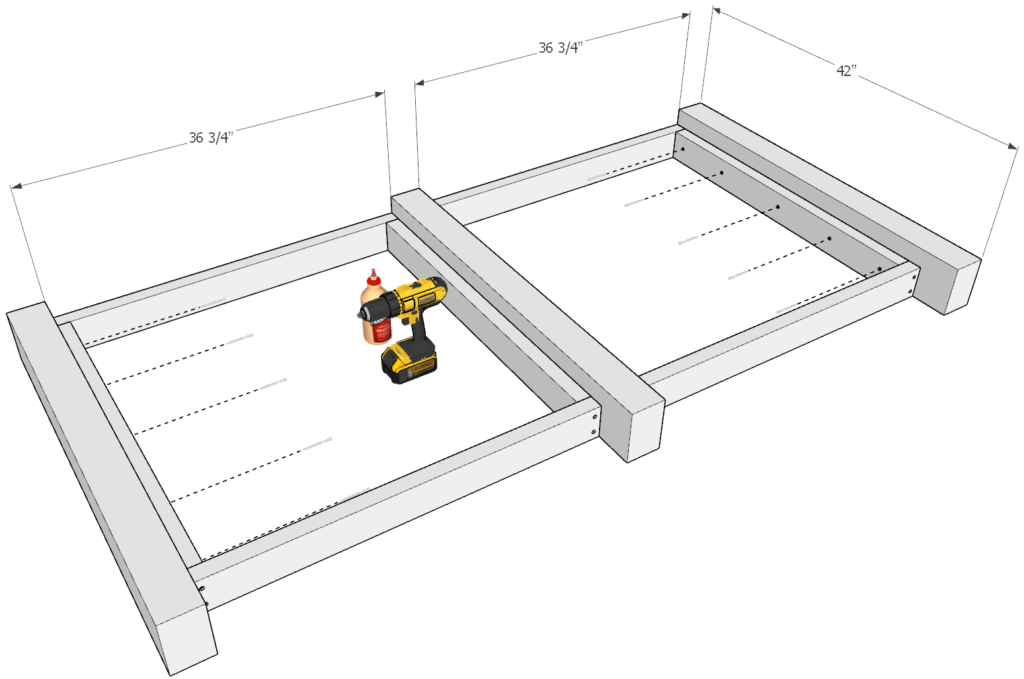
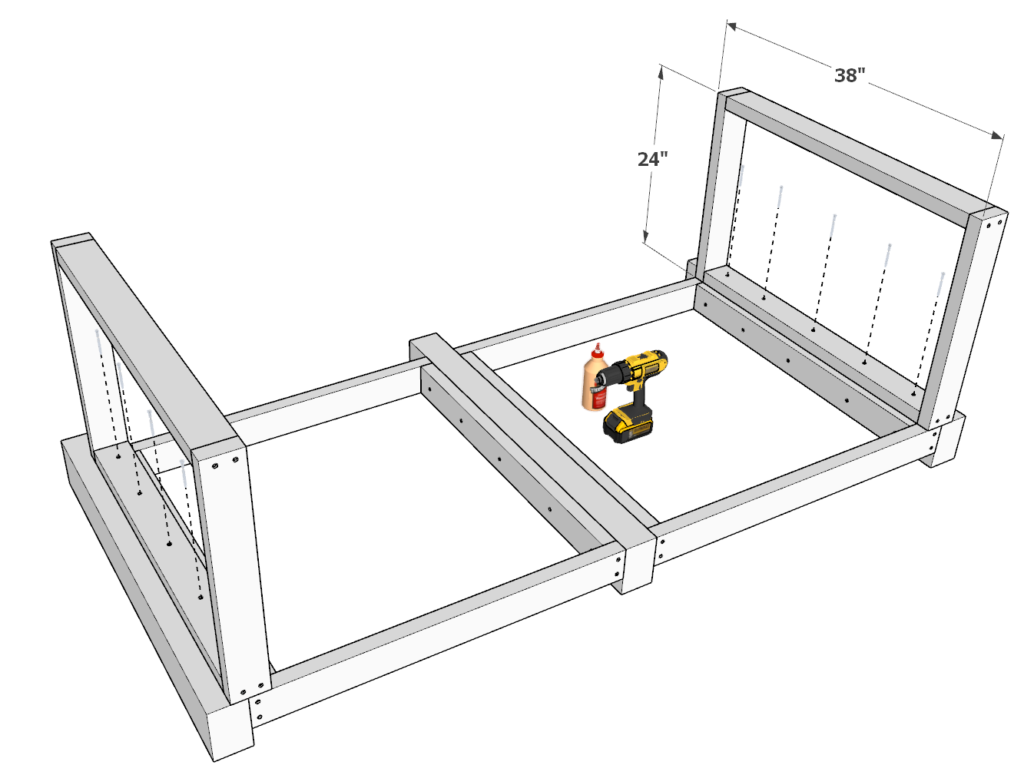
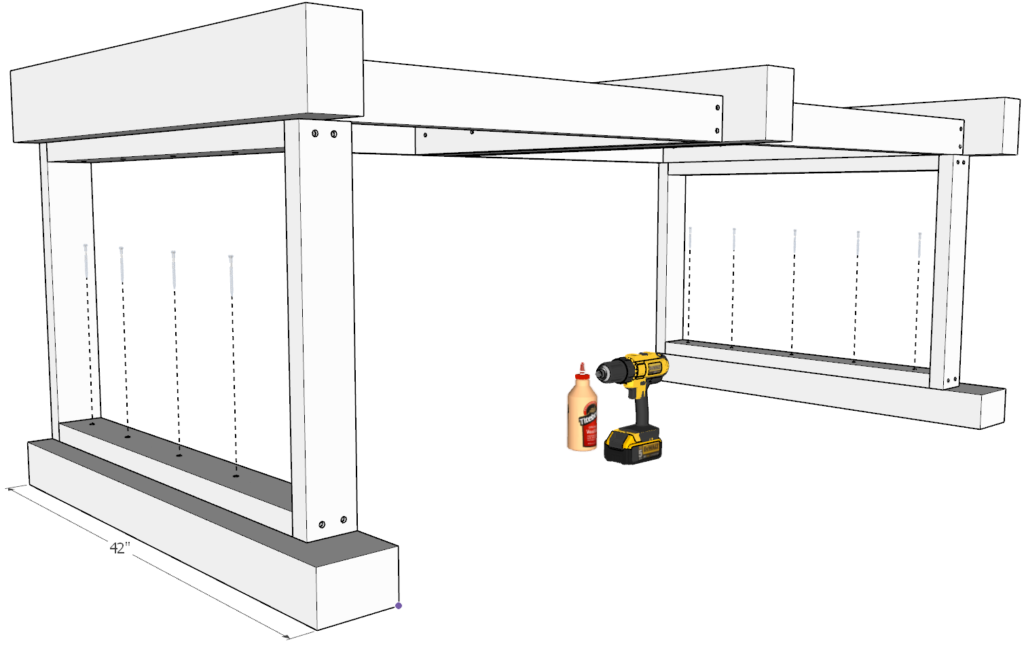
Step 3: Construct the Bar Base
Next, take three 42 in 4×6 lumber pieces and the two larger frame pieces you just assembled and arranged them as shown below.
Add glue to all areas that will be joined together.
Predrill holes and add 3.5 inch screws to all areas that need to be joined.
Next, take two more 35 inch 2×4 lumber pieces and add them to the outdoor bar frame as shown in the last picture in this step. Again, add glue, predrill, and add 3.5 inch screws.
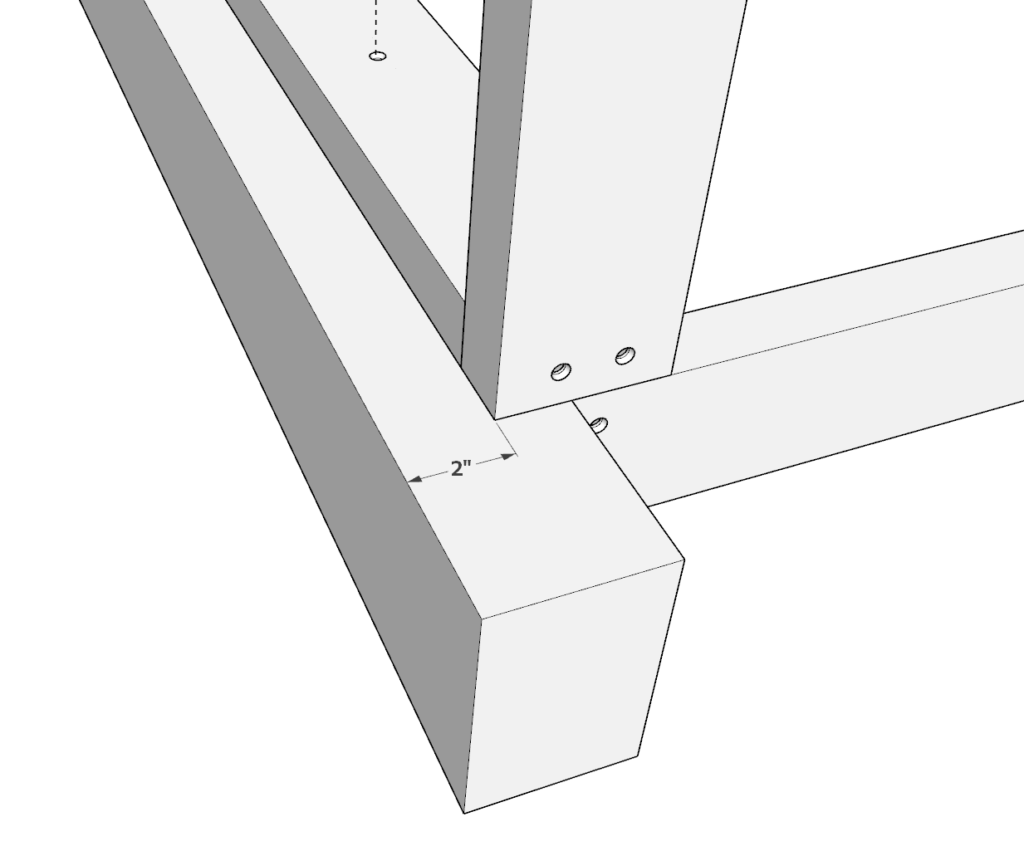
Step 4: Attach Smaller Frames and Additional Supports
Next, take the other smaller 38 in x 24 in frame pieces you assembled in the previous steps and add them to the main frame of the bar. When adding, indent by 2 inches as shown below.
Secure the frame pieces with glue, predrilling, and screws.
Next, take two more 42 inch 4×6 lumber pieces and add them to the main frame as shown in the last picture of this step. Make sure to add glue, predrill, and add screws.
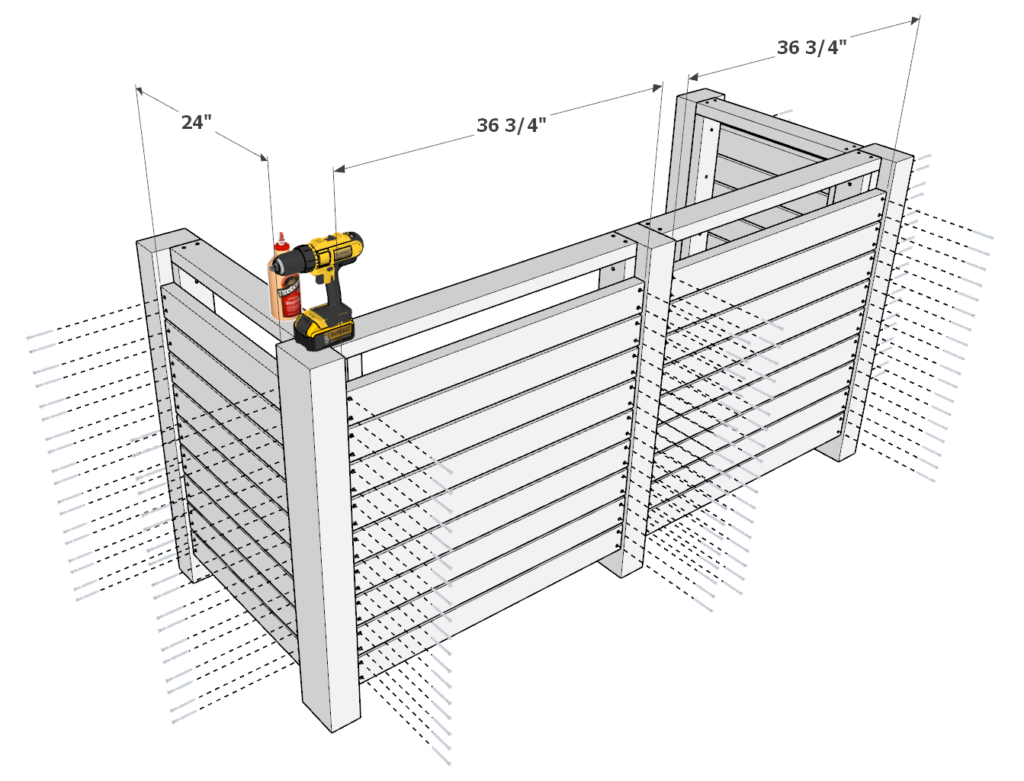
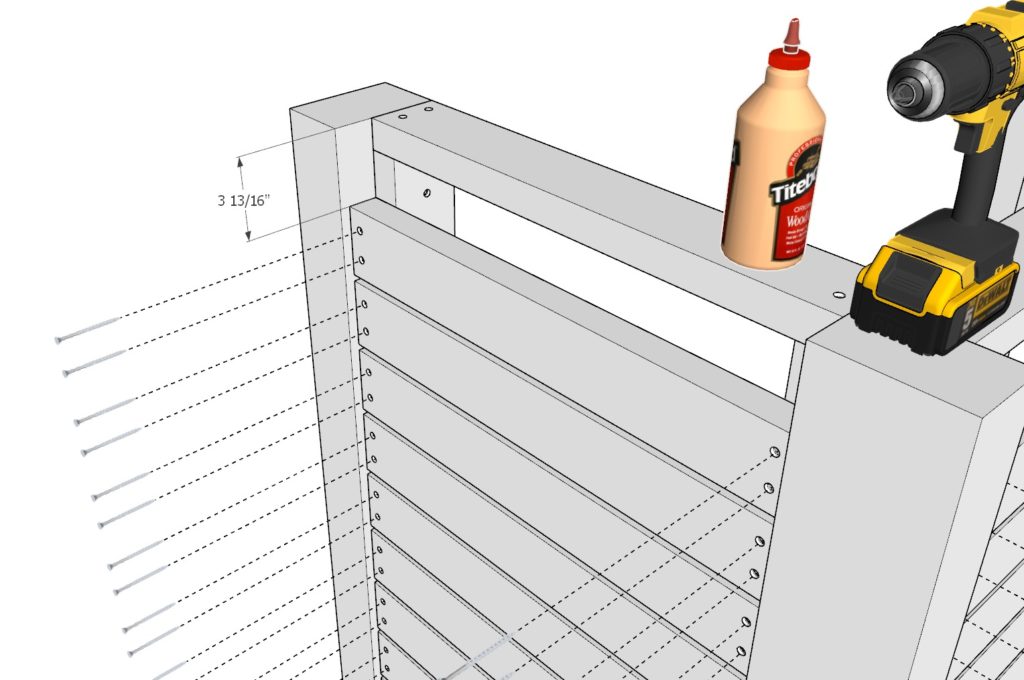
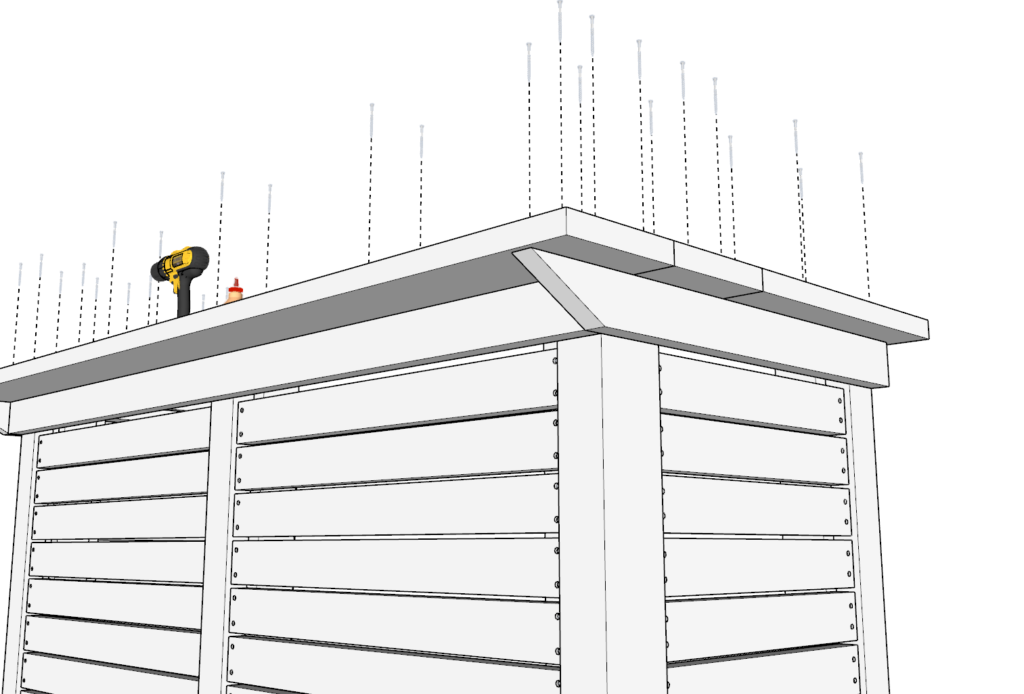
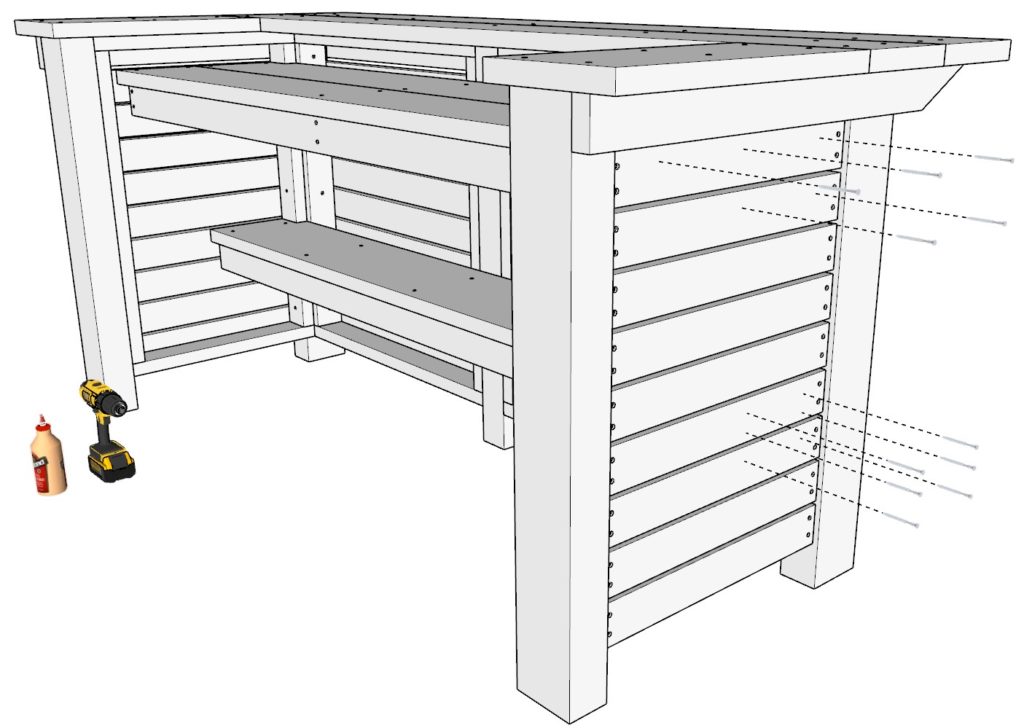
Step 5: Install the Siding for the Outdoor Bar Frame
Next, add the siding pieces.
Take eighteen 36-3/4 2×4 lumber pieces and eighteen 24 2×4 lumber pieces and add them to the outdoor bar frame as shown below.
Begin by attaching the first 2x4s about 3-13/16 (or about 4 inches) away from the top of the bar frame as shown below.
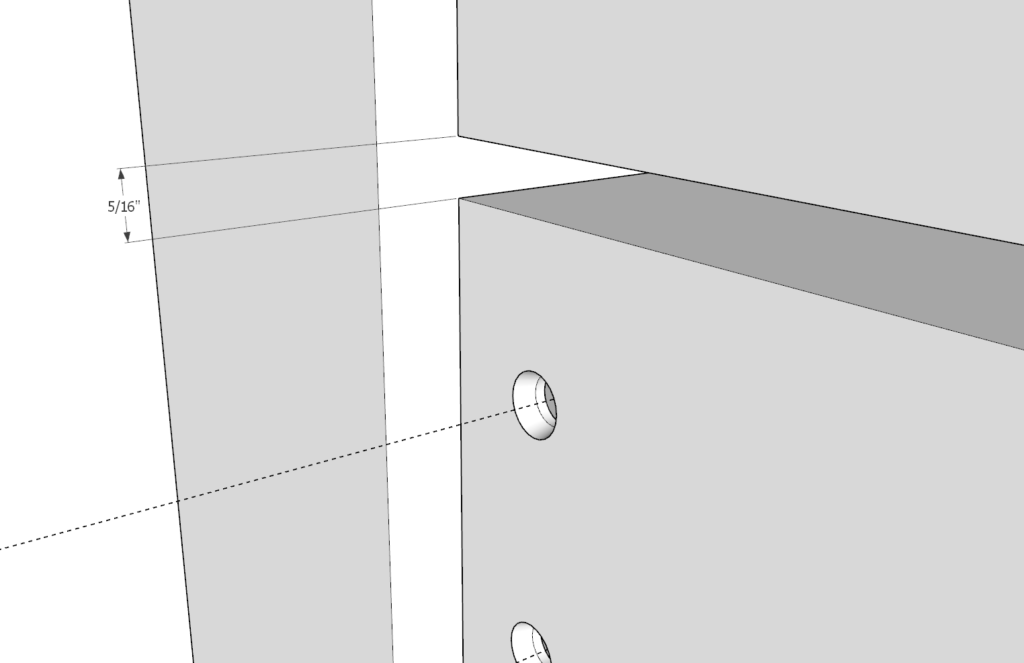
The remaining pieces need to be about 5/16 inches apart.
To space out the pieces evenly you can use a spacer. This spacer can be cut from a scrap piece of wood on hand.
As before, glue, predrill, and add screws.
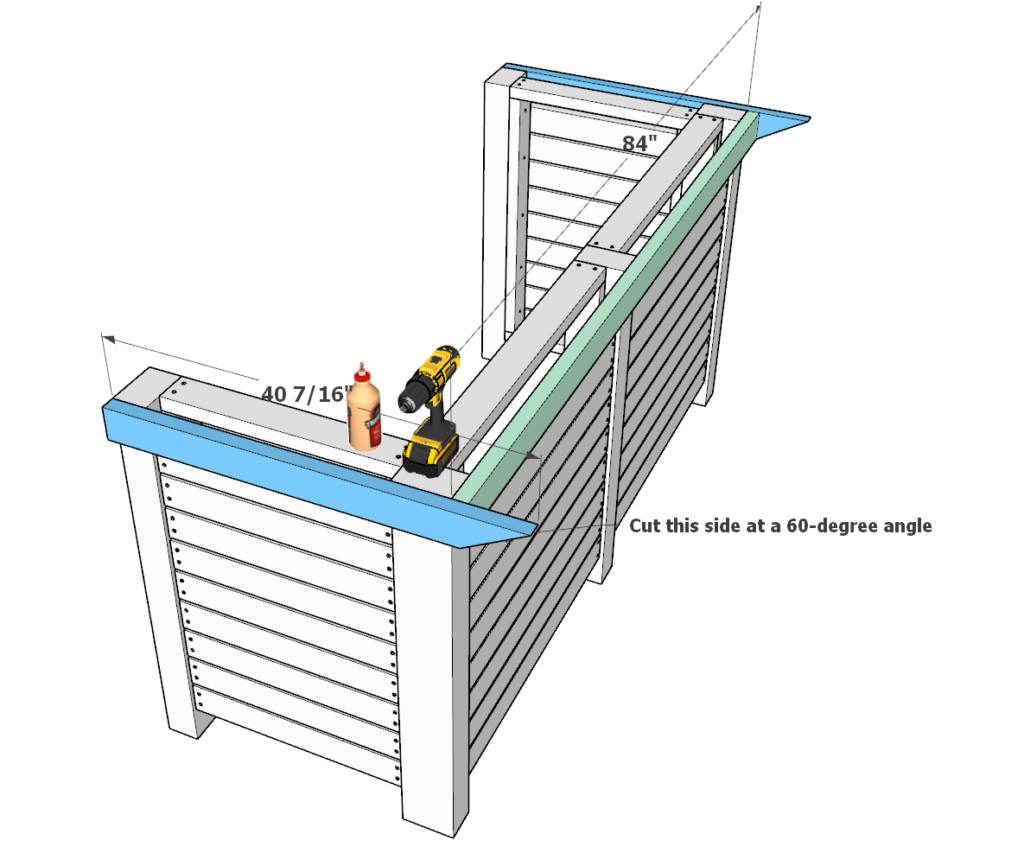
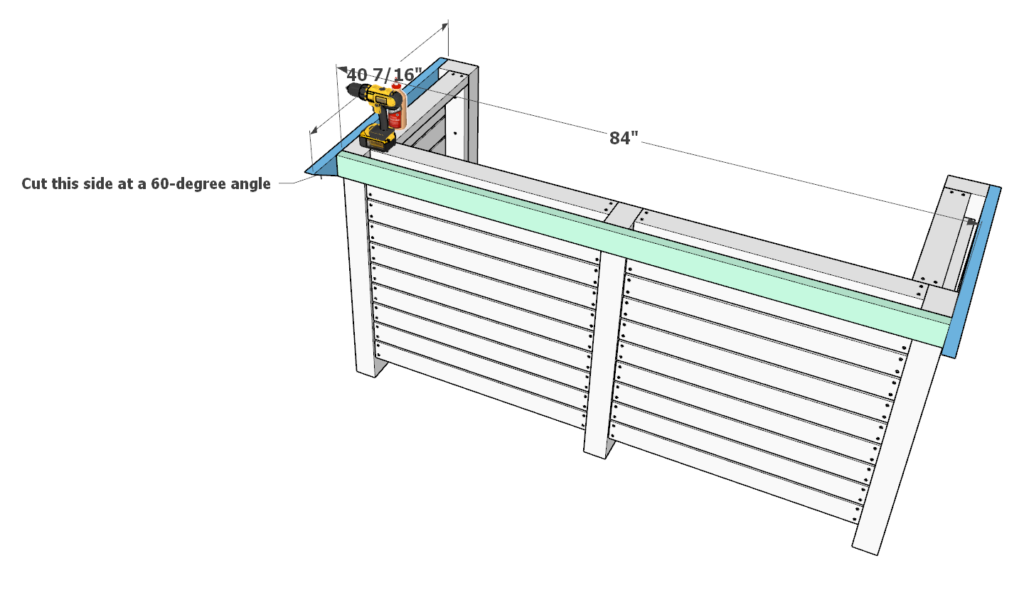
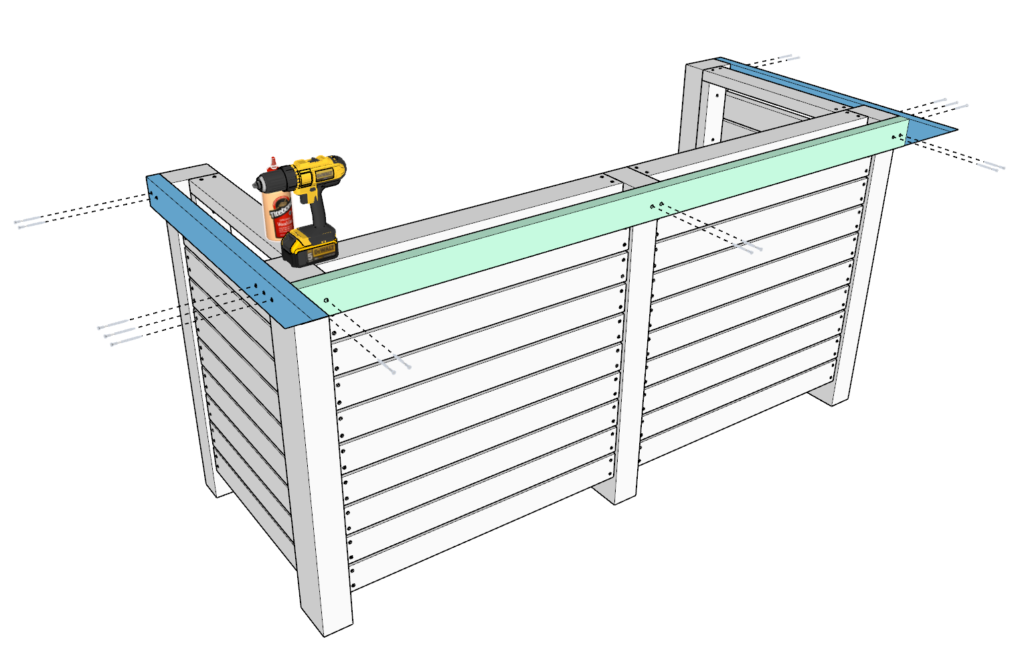
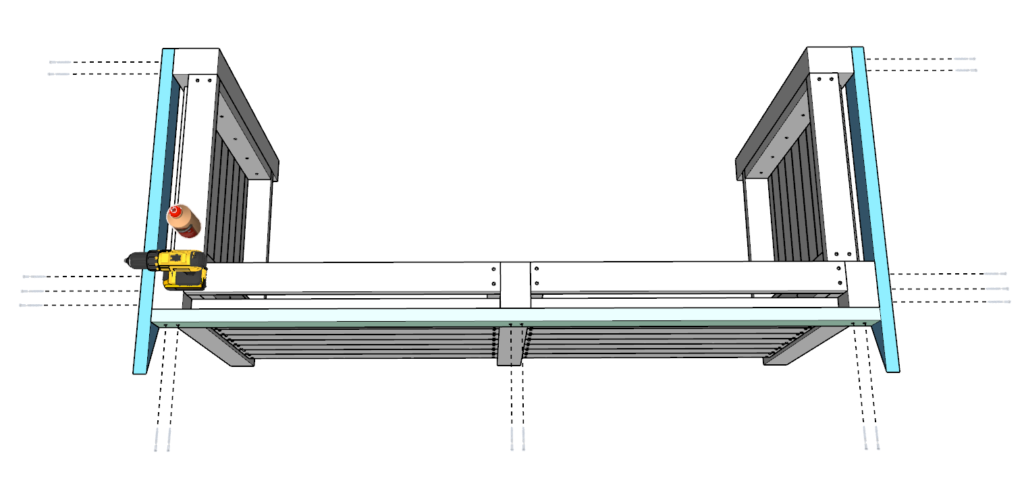
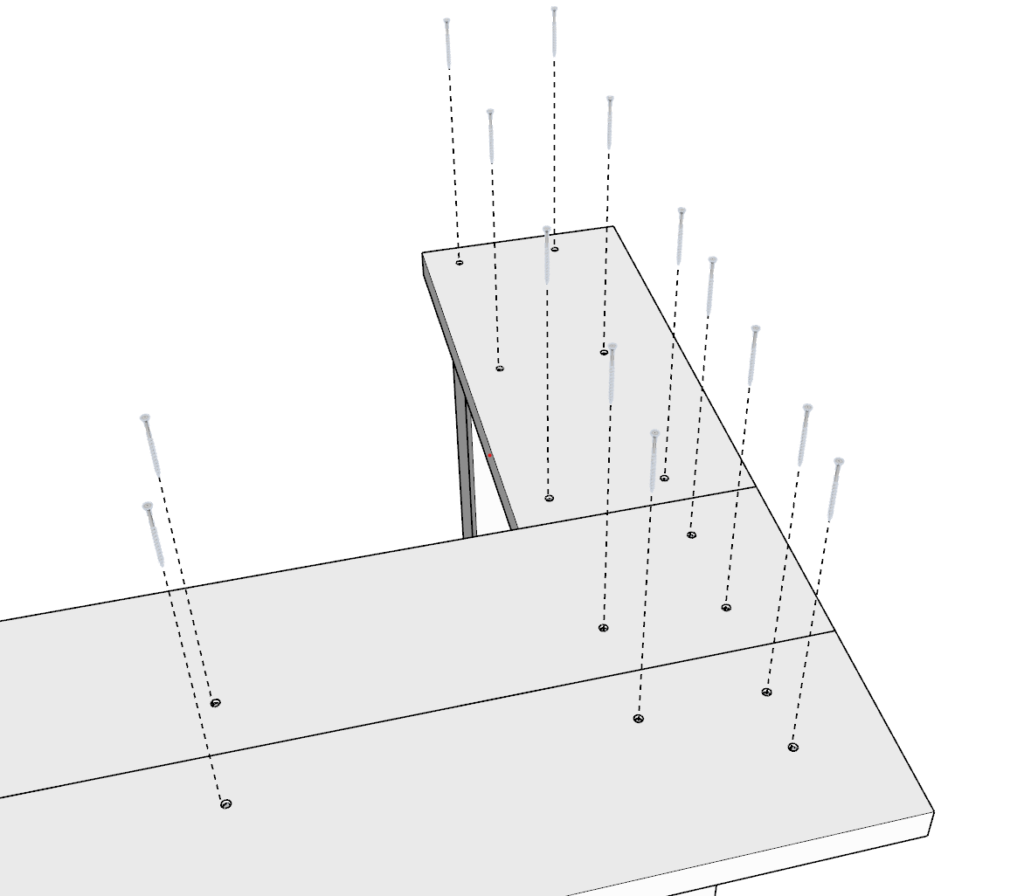
Step 6: Attach Angled and Horizontal Support Beams
Next, add two 40-7/16 in 2×4 pieces that are cut at 60-degrees on one end and one 84 inch 2×4 lumber piece to the frame of the bar as shown below.
As before, predrill, add glue, and add 3.5 inch screws.
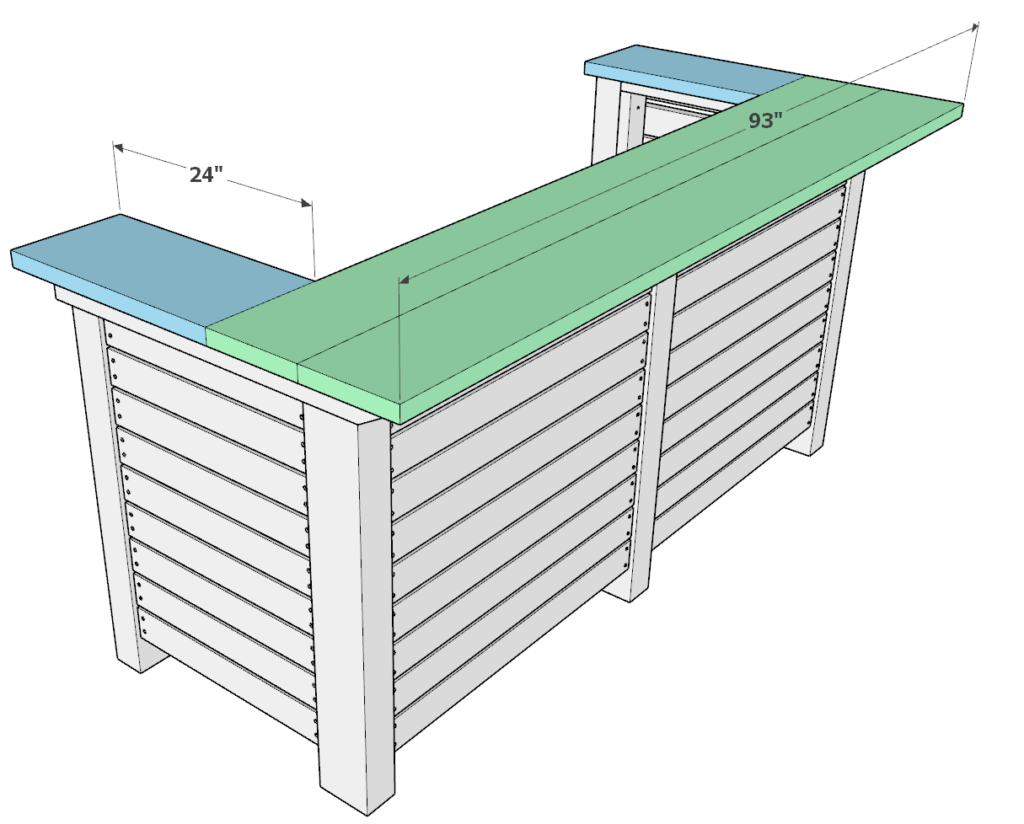
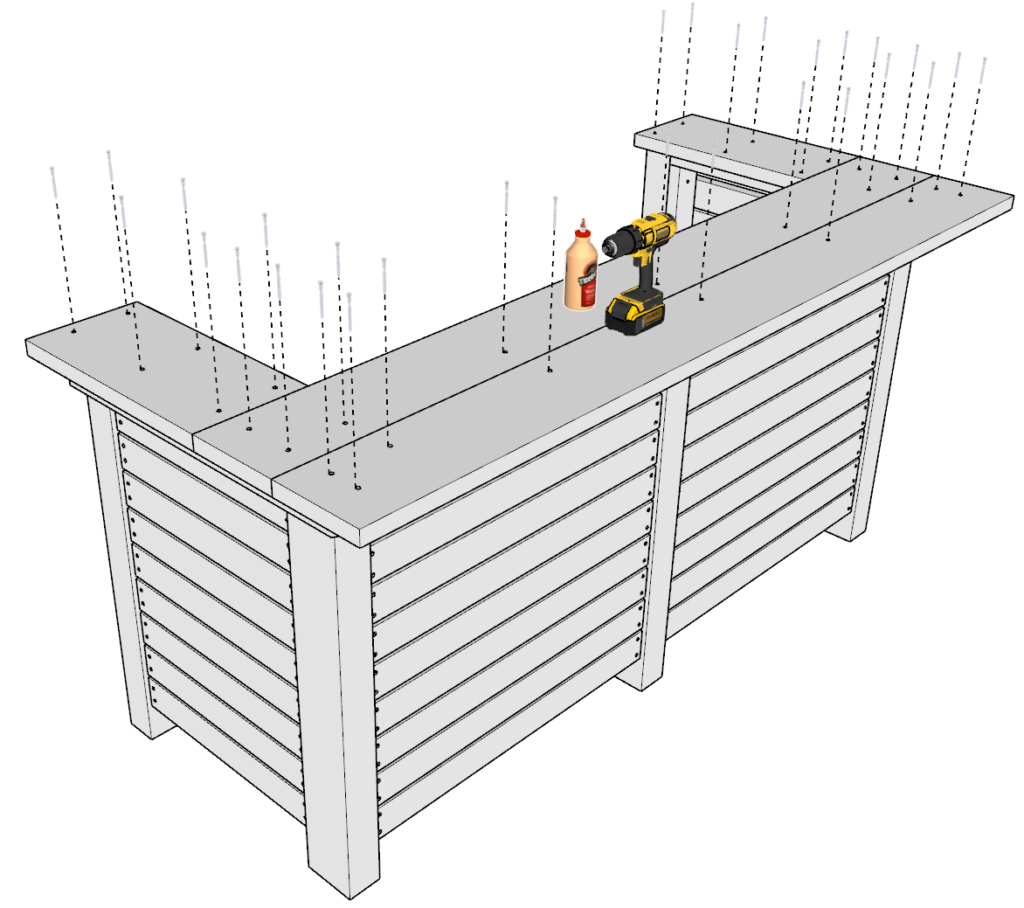
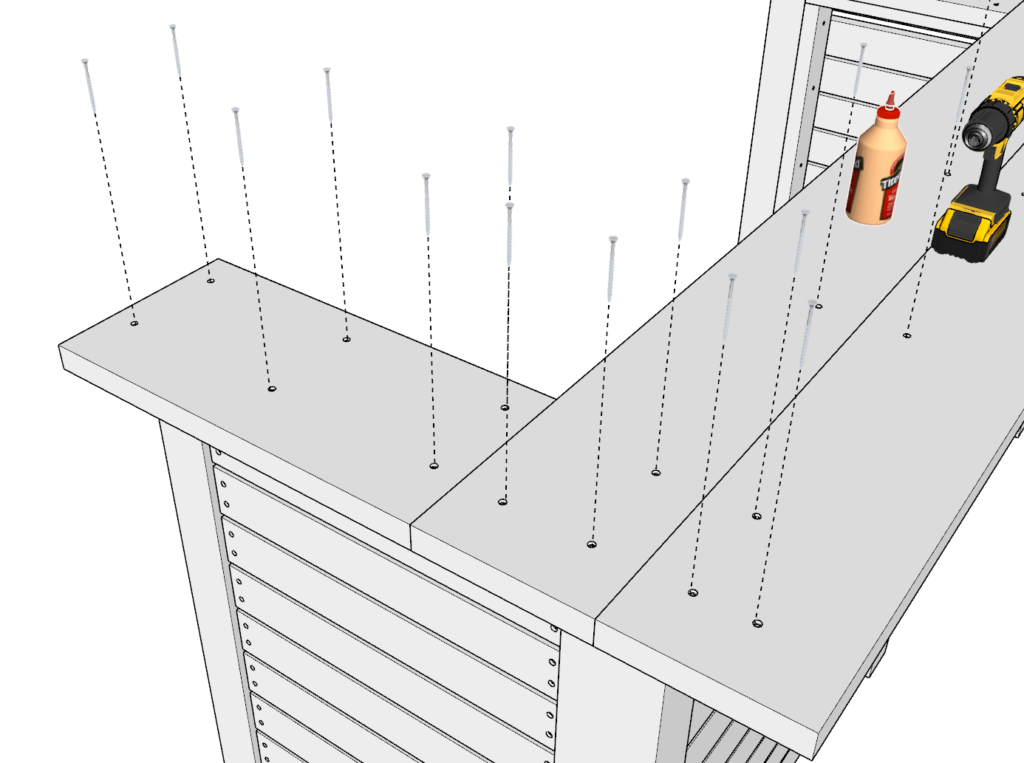
Step 7: Attach the Bar Top
Next, add two 93 inch 2×10 lumber pieces and two 24 inch 2×12 lumber pieces to the bar frame as shown below.
Add glue to all areas that will hold up the bar top, including the parts of the top that will join to the other bar top planks.
As before, predrill, add plenty of glue, and add screws.
The screw pattern I have in the photo is just one way to secure the top.
These screw holes can later be covered up to have a flush and clean looking surface.
I would also recommend using some sort of clamp or vice to bring all the bar top board together to minimize the gaps. This will make the bar top look more clean and nice.

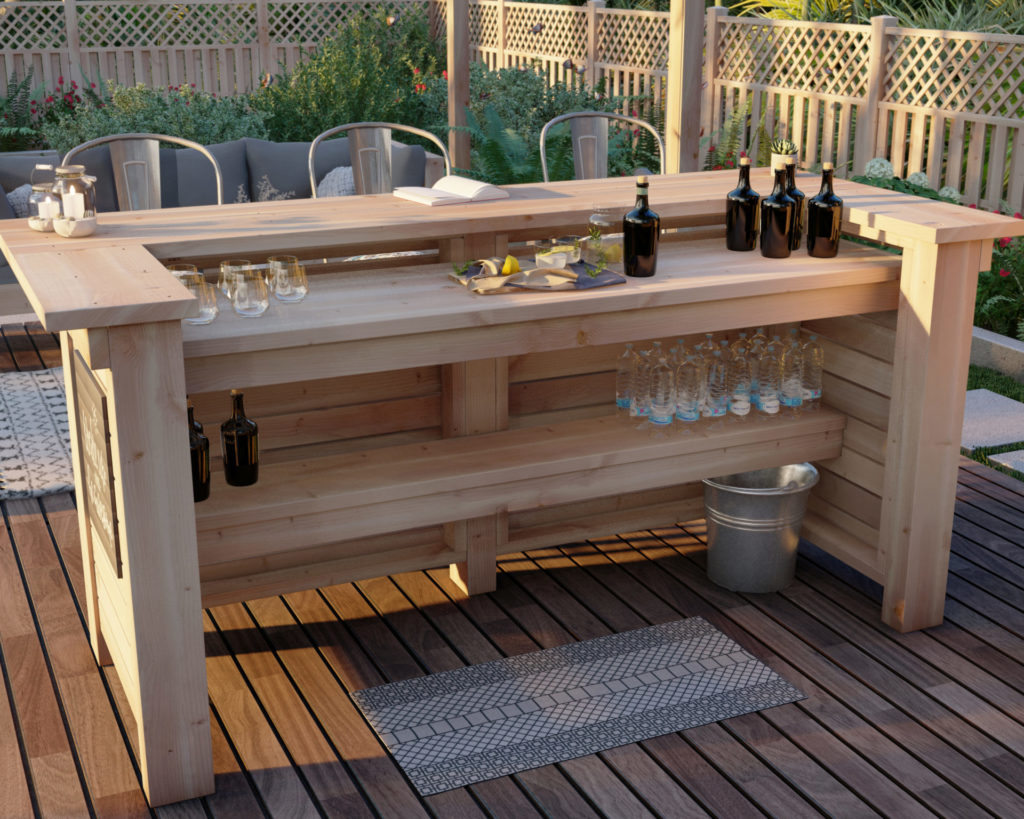
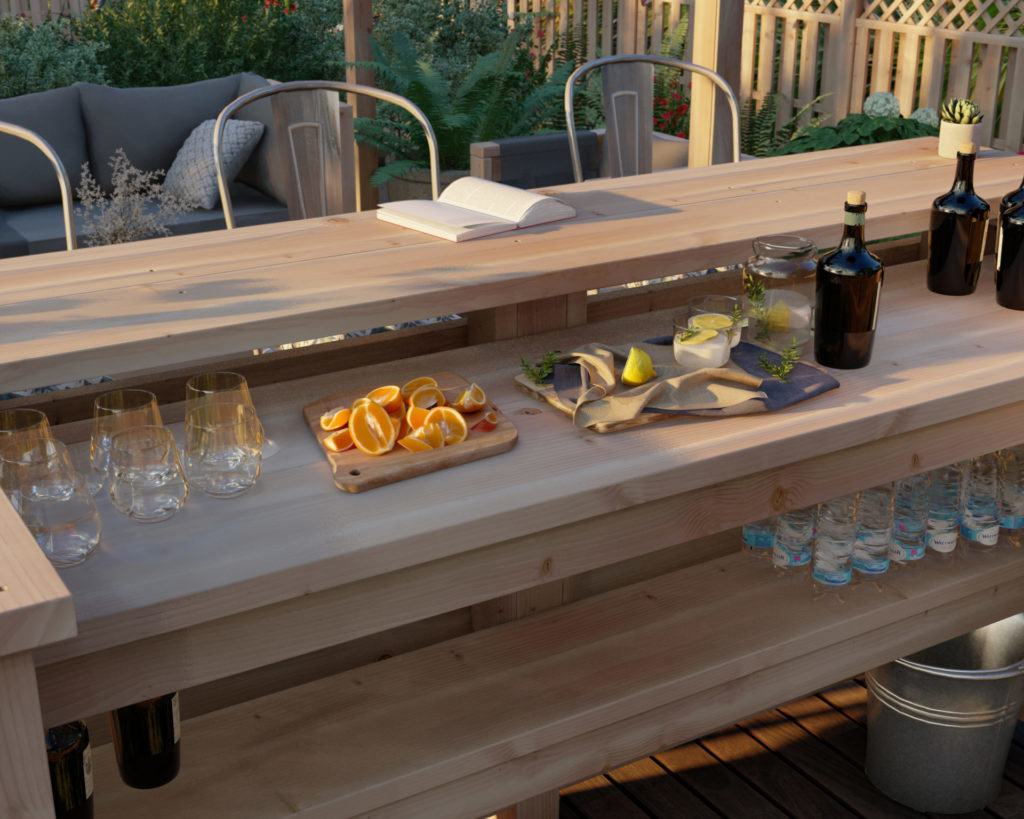
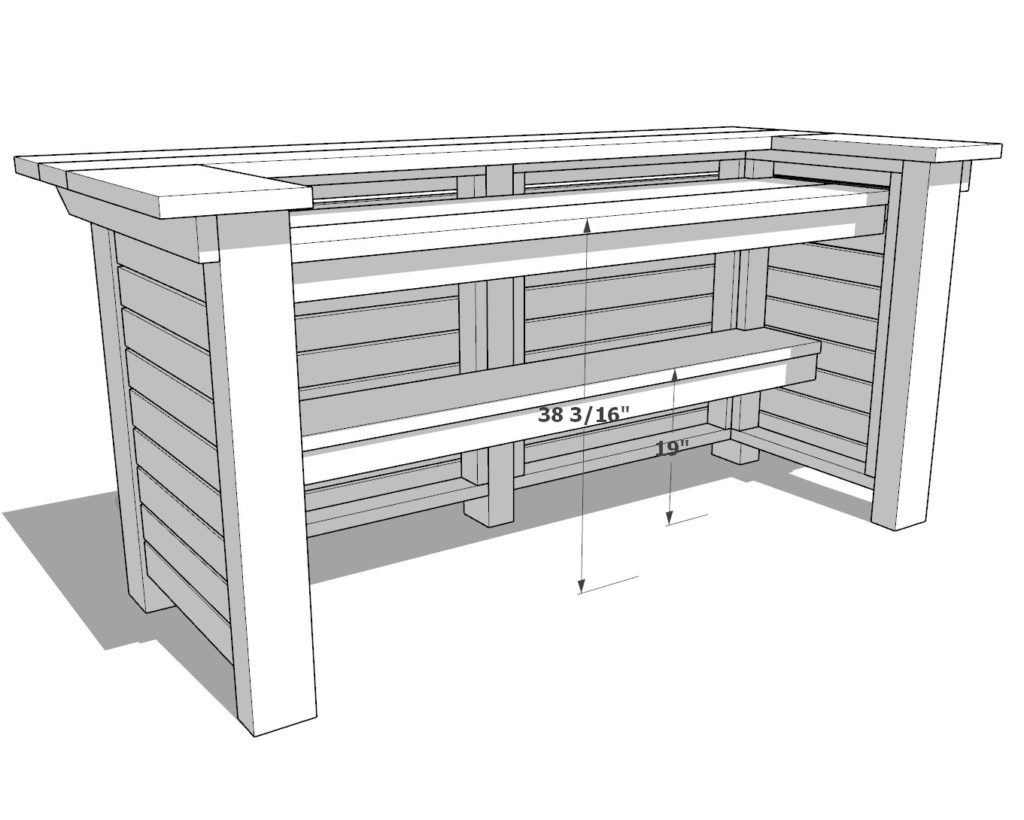
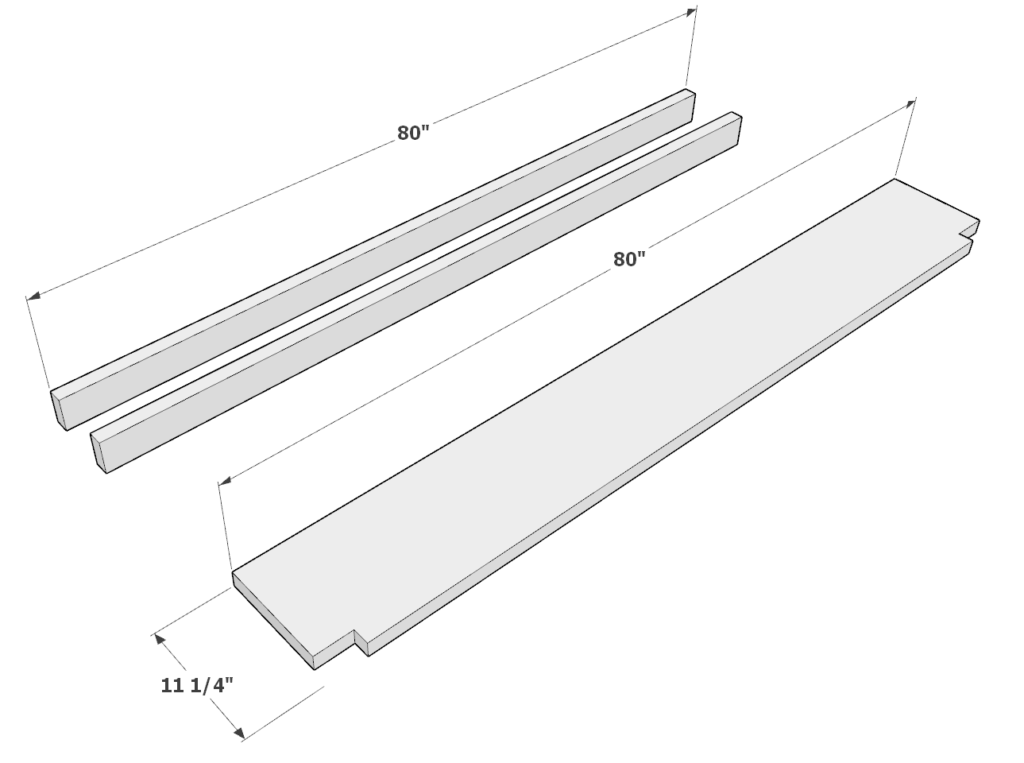
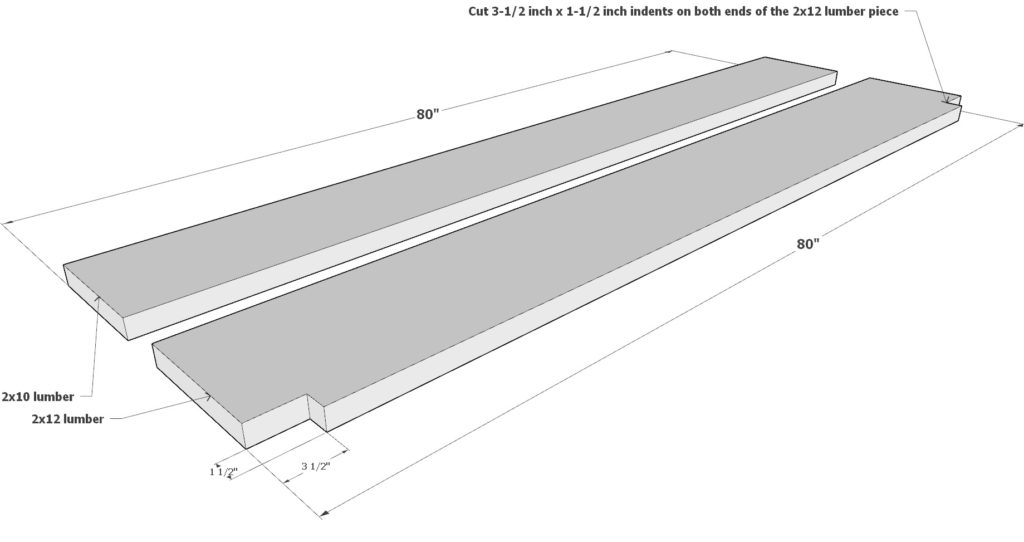
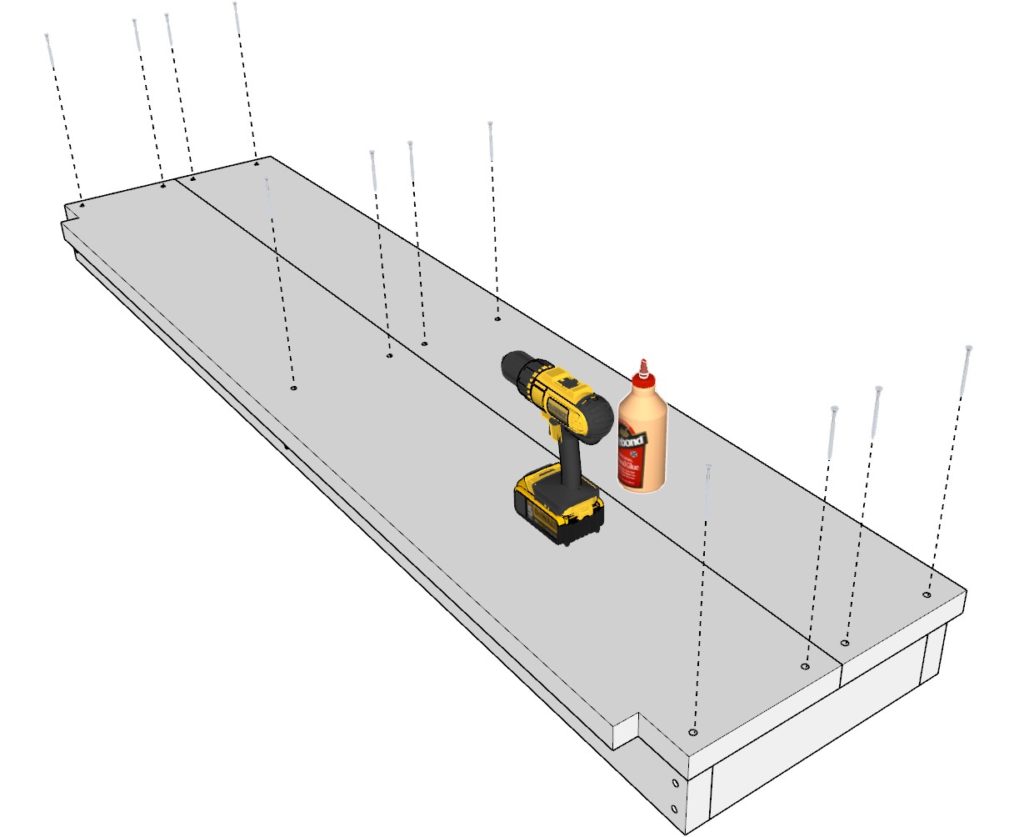
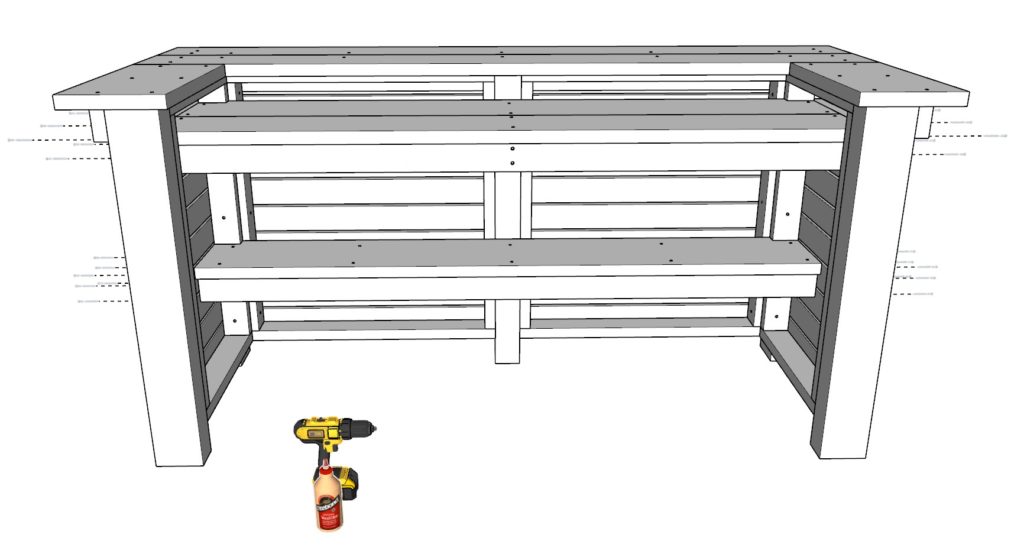
Step 8: Install the Work Surface and Shelf
Install the working surface and a shelf below it.
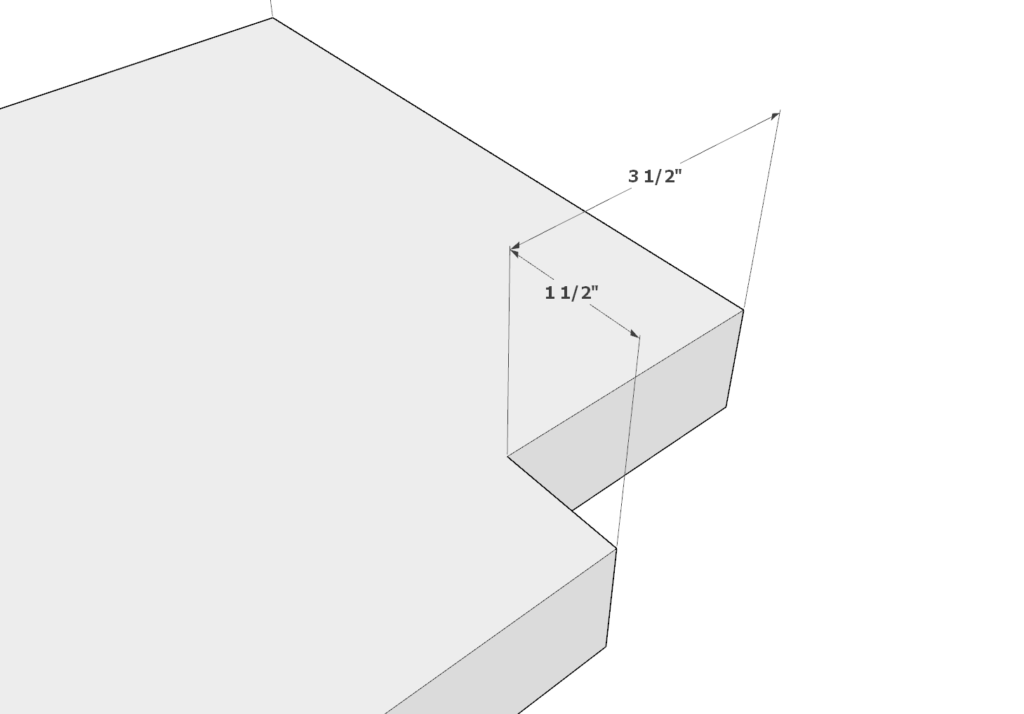
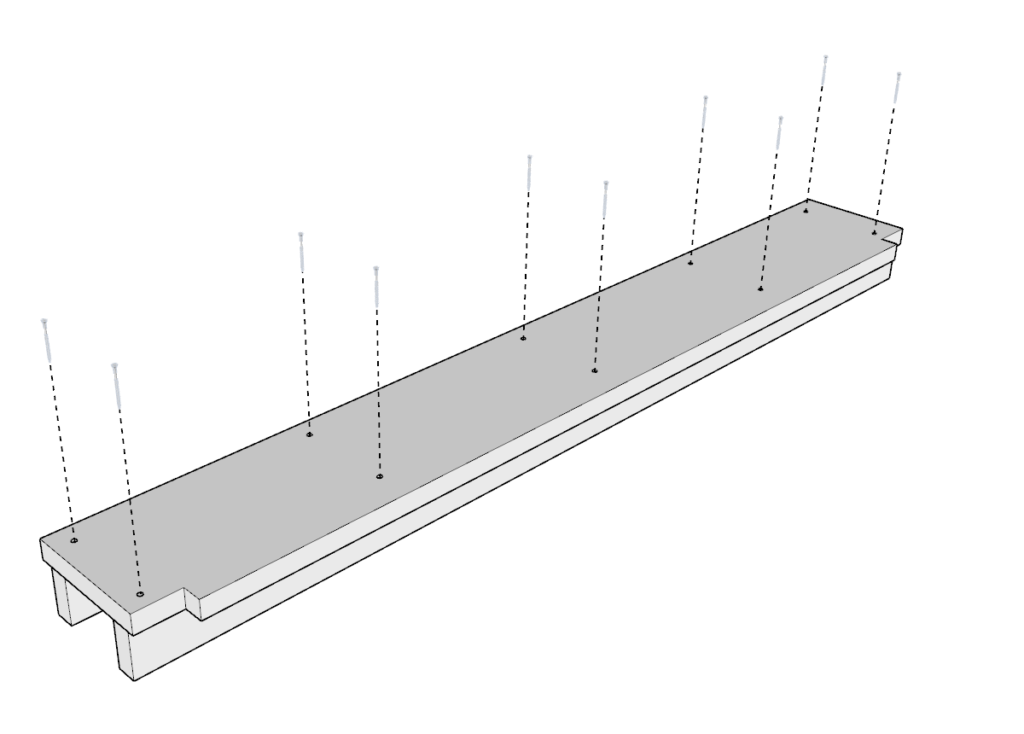
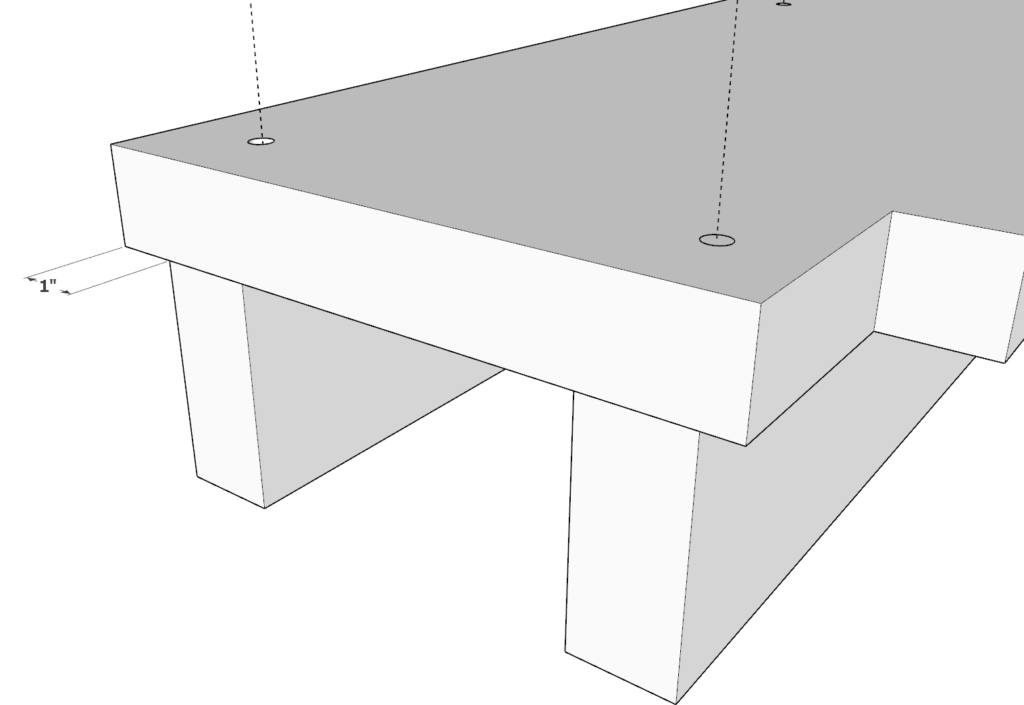
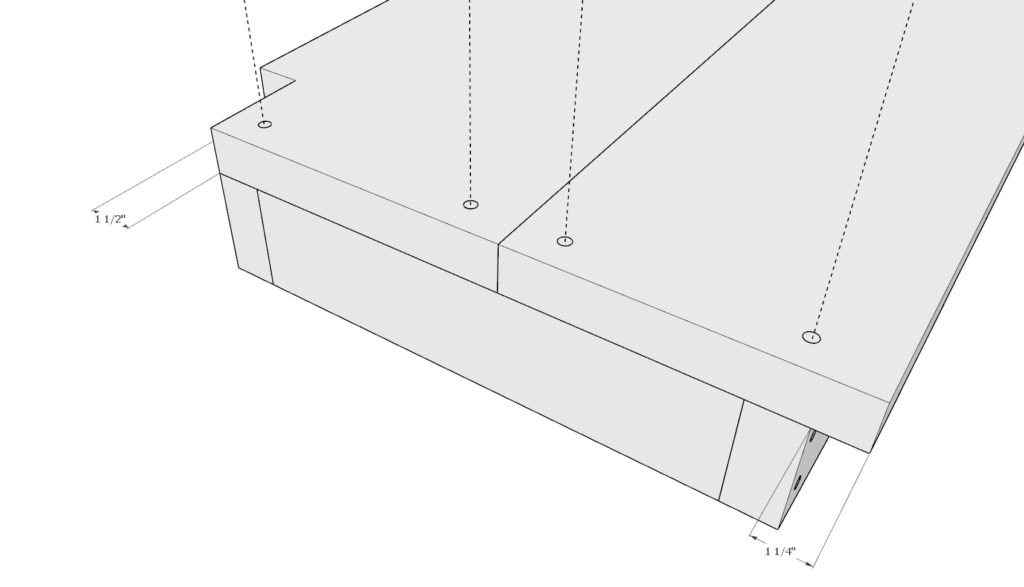
Take two 80 inch 2×4 lumber pieces and one 80 inch long 2×12 lumber pieces to make the shelve. Cut 3-1/2 inch x 1-1/2 inch indents on both ends of the 2×12 lumber piece as shown below. Next, attach the frame of the shelve to the shelve top using glue and 3.5 inch screws. I indent the shelve frame 2x4s by 1 inch on each side as shown below.
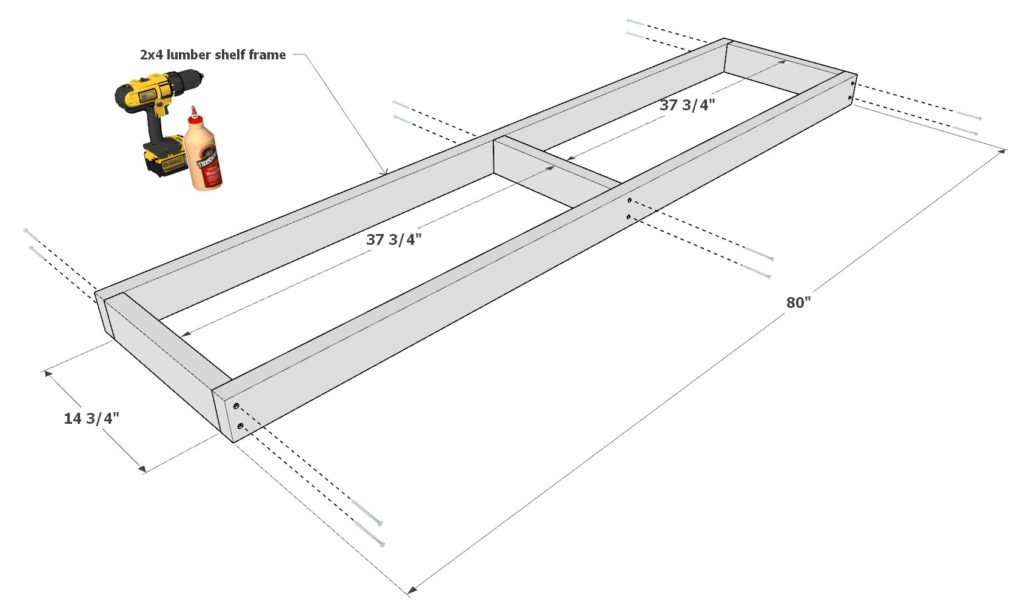
Next, assemble to DIY bar work surface. Take two 80 inch 2×4 lumber pieces and three 14-3/4 inch long 2×4 lumber pieces. Arrange them as shown below and attach with 3.5 inch screws and glue. Next, attach one 80 inch 2×12 lumber piece (with 1-1/2 inch x 3-1/2 inch indentations on both ends) and one 80 inch 2×10 lumber piece to the working surface frame using glue and 3.5 inch screws.
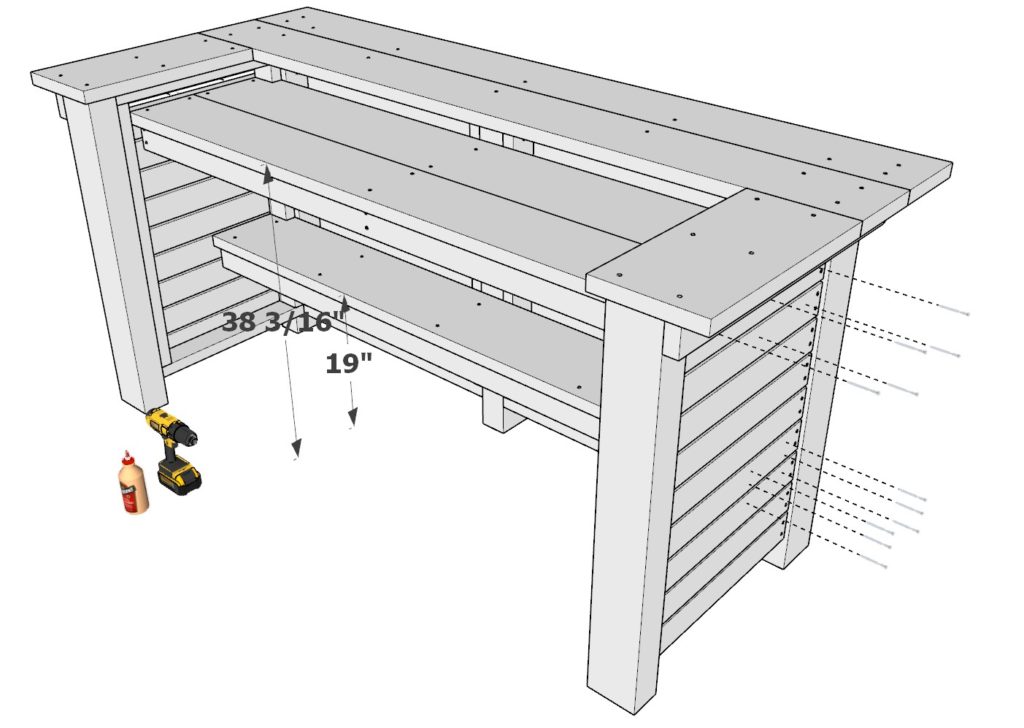
Step 9: Secure the Work Surface and Shelf to the Bar Frame
Next, attach the working surface and the shelve to the main bar frame.
Install the working surface at 38-3/16 inches off the ground. This makes for a comfortable working surface. Attach the shelf at 19 inches off the ground. The shelf and work counter heights can be adjusted to suit your needs an preference. Secure the shelf and working counter by adding screws directly through the bar siding. Add glue and predrill to prevent wood from splitting.
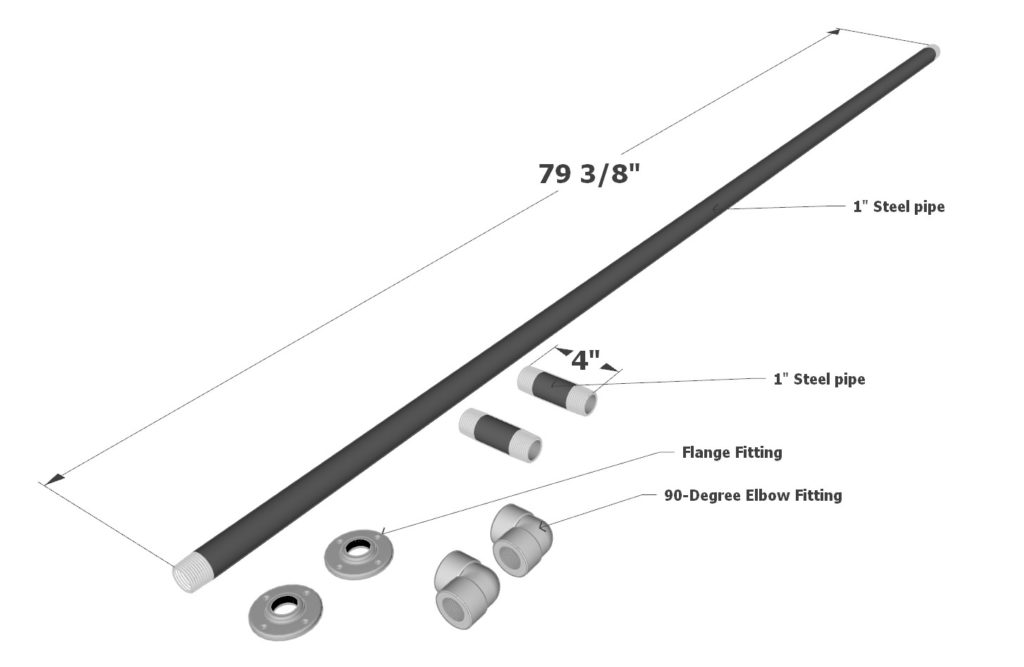
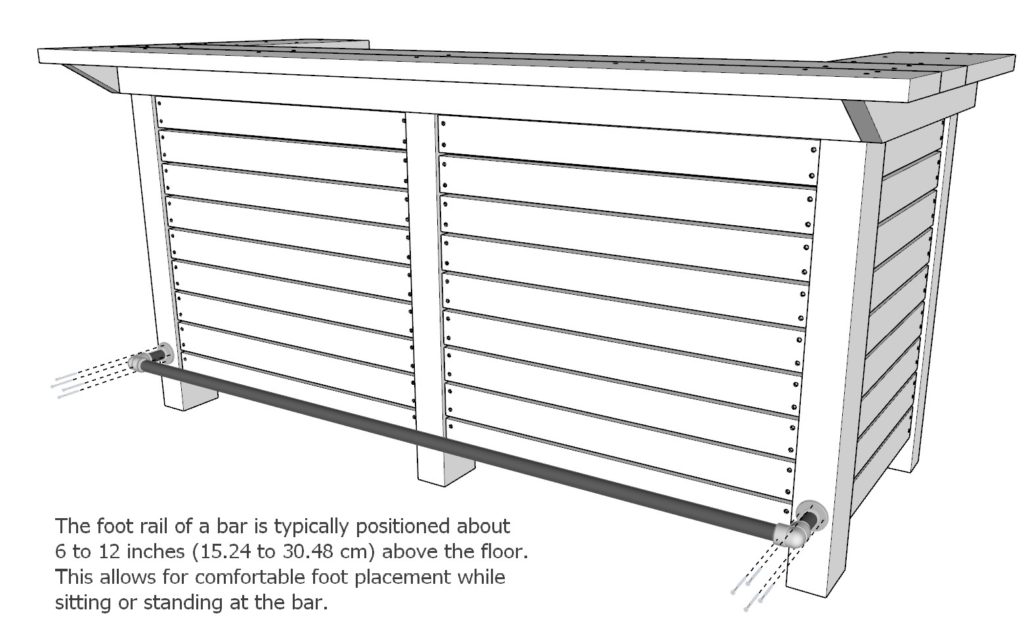
Step 10: Install the Bar Footrest
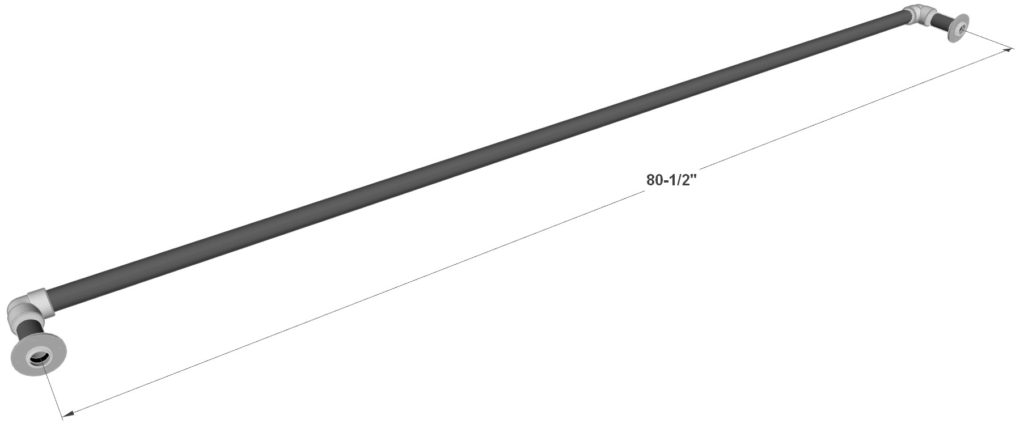
Next, install the bar footrest. This can be a little tricky as there are many pipe and fitting options and each on has slightly different measurements. The ideal “center to center” length of the footrest pipe set up needs to be 80-1/2 inches long.
In this example I am using a 79-3/8 inch long 1 inch diameter steel pipe, with two 1 inch 90-degree elbow joints, two 1 inch flanges, and two four inch steel pipes for the assembly.
I highly recommend that you lay everything out at the hardware store and test out all the connections so that your center to center length is 80-1/2 inches. Most hardware stores will cut and thread the pipes for you.
Install the footrest by adding screws to secure it in place as shown below.
Step 11: Sanding and Prepping the Outdoor Wooden Bar for Staining or Painting
Ensure your DIY bar project has a flawlessly smooth finish by diligently sanding and prepping the wooden surface before applying your choice of stain or paint.
Detailed guide:
1. Begin by removing any screws, nails, or hardware that might obstruct your sanding process. Ensure the wood surface is free of any debris or imperfections.
2. Equip yourself with the appropriate safety gear, including gloves, goggles, and a dust mask to protect from wood particles and sanding debris.
3. Start sanding with a coarse-grit sandpaper (60-80 grit) to remove any roughness or uneven areas. Use an electric hand sander or sanding block for larger surfaces to ensure consistent results.
4. Progress to a medium-grit sandpaper (100-150 grit) to further smooth the wood surface and remove any scratches left by the coarser sandpaper.
5. Finish with a fine-grit sandpaper (180-220 grit) to create a perfectly smooth surface that’s ready for staining or painting.
6. After sanding, wipe down the wood surface with a soft cloth or tack cloth to remove any remaining dust or particles. You may also use a vacuum cleaner with a brush attachment to remove dust.
7. If opting for staining, apply a wood conditioner as per the manufacturer’s instructions to ensure even absorption of the stain.
Step 12: Staining Guide for Your Outdoor Wooden Bar
Enhance the natural wood grain of your DIY outdoor bar by following this step-by-step guide to applying a wood stain.
Detailed guide:
1. Select a high-quality wood stain in your desired color. Note that oil-based stains provide depth and richness, while water-based stains are eco-friendly and faster drying.
2. Don a pair of gloves and shake or stir the stain well before use.
3. Test the stain on a scrap piece of the same wood or an inconspicuous area of the bar to ensure the color aligns with your expectations.
4. Apply the stain with a high-quality brush, following the wood’s grain. Move in long and even strokes to prevent overlapping.
5. Allow the stain to penetrate the wood surface for the time specified on the stain’s label (typically 5-15 minutes).
6. Wipe off any excess stain with a clean, lint-free cloth to ensure an even finish. Always follow the direction of the wood grain while wiping.
7. Allow the stain to fully dry, as per the manufacturer’s instructions.
8. Assess the color of the stain. If a darker shade is desired, repeat the staining process.
9. To protect the stained wood surface, apply a clear wood sealant or topcoat, following the manufacturer’s instructions.
Step 13: Painting Guide for Your Outdoor Wooden Bar
Give your DIY outdoor wooden bar a fresh and vibrant look with this comprehensive guide for painting your project.
Detailed guide:
1. Select a high-quality outdoor paint that’s designed for wood surfaces.
2. Prime the wood surface using an appropriate wood primer, following the manufacturer’s instructions. Priming prepares the wood for painting and ensures better adhesion, resulting in a long-lasting, vibrant paint job.
3. Allow the primer to fully dry before proceeding to the painting stage.
4. When the primer is dry, stir the paint well and pour it into a paint tray.
5. Use a high-quality brush or paint roller to apply the paint evenly on the wood surface. Work in long, even strokes while following the wood grain, and avoid overloading the brush or roller with paint.
6. Allow the first coat of paint to dry thoroughly, as per the manufacturer’s instructions.
7. Assess the coverage after the first coat. If a second coat is needed, be sure to lightly sand and wipe down the surface between coats for a smooth, even finish.
8. Apply a second coat of paint, if necessary, and allow it to dry as per the manufacturer’s instructions.
9. Once the paint has dried, you may choose to apply a clear wood sealant or topcoat for additional protection, ensuring long-lasting beauty and durability.