Introduction
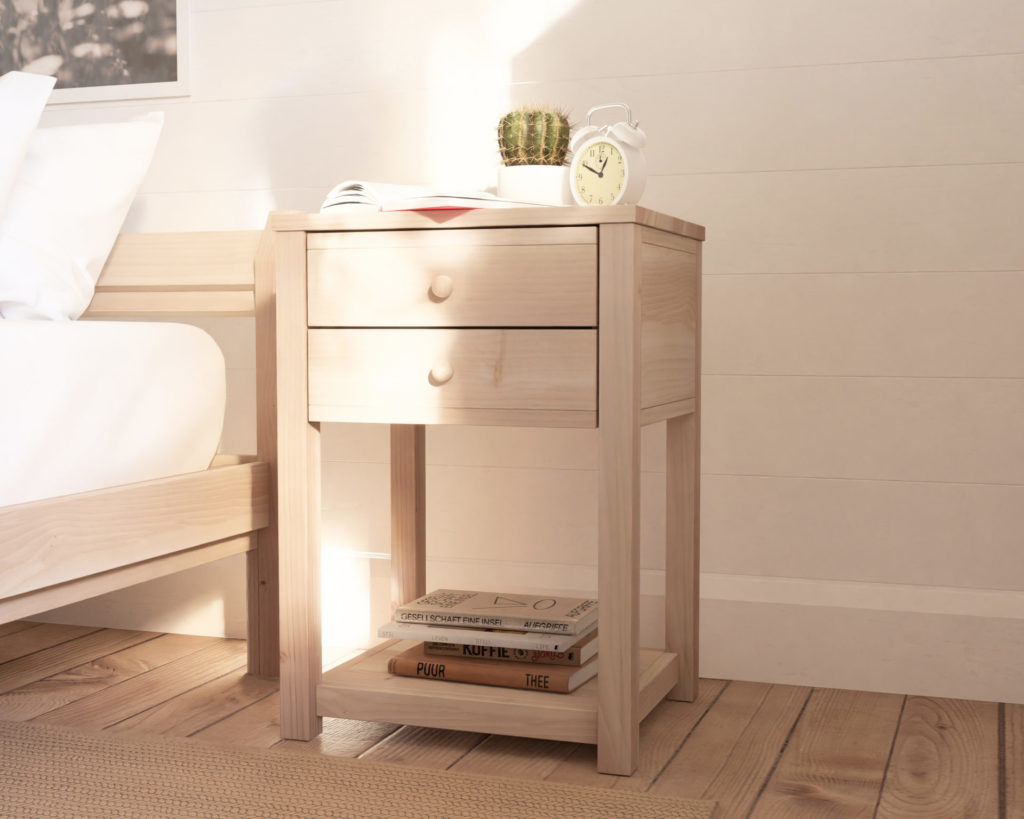
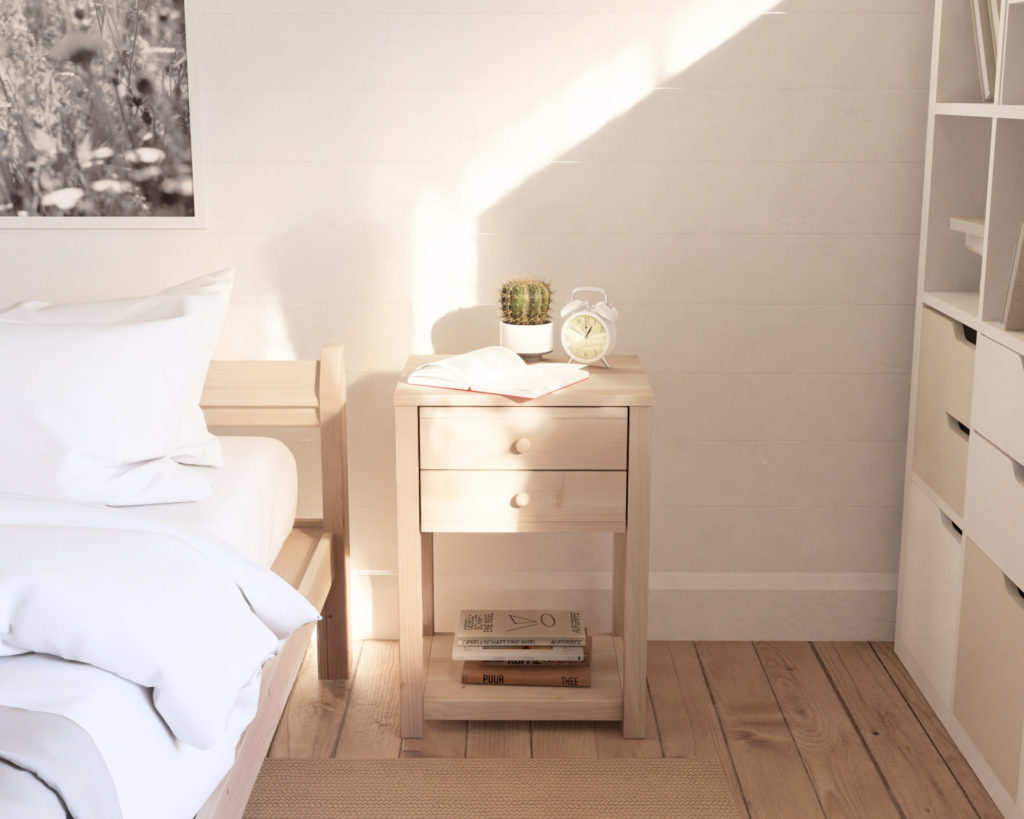
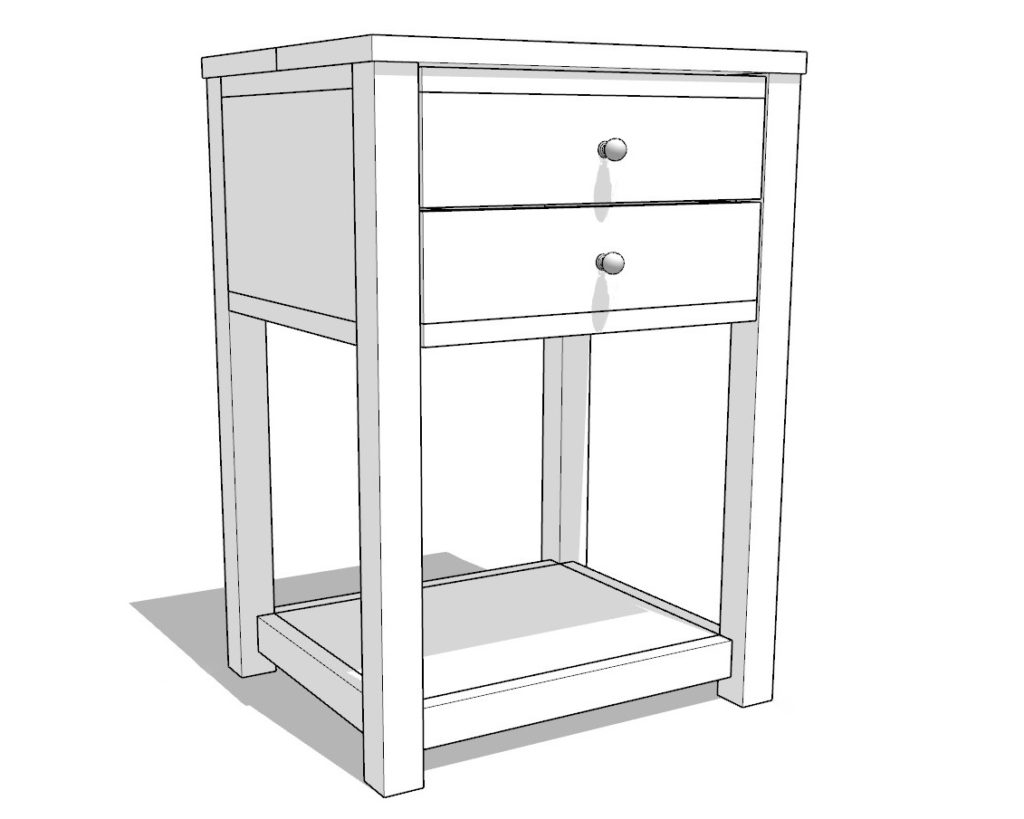
During a routine visit to Home Depot, amidst the myriad of furniture pieces, a nightstand stood out. Its clean, minimalistic design was both modern and timeless. It sparked an idea: could this be the perfect DIY project for those new to woodworking? From that inspiration, we’ve crafted a comprehensive DIY plan, ensuring you can recreate this elegant piece in your home with ease.
Unpacking the Night Stand's Blueprint
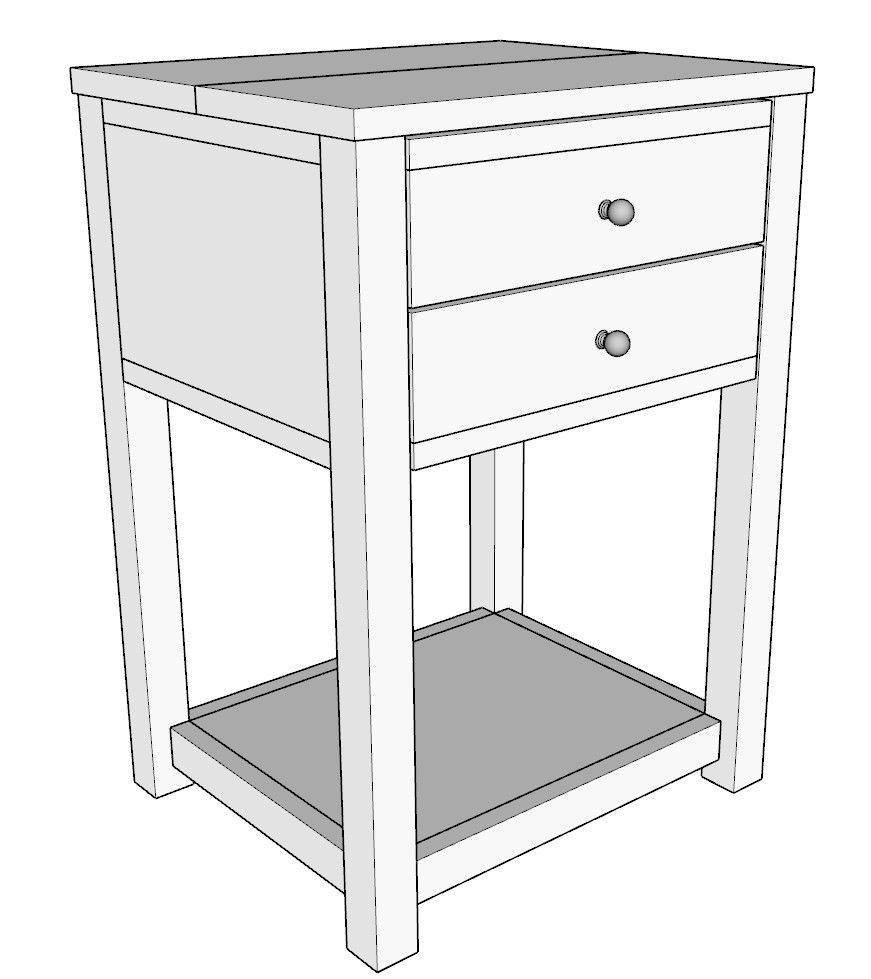
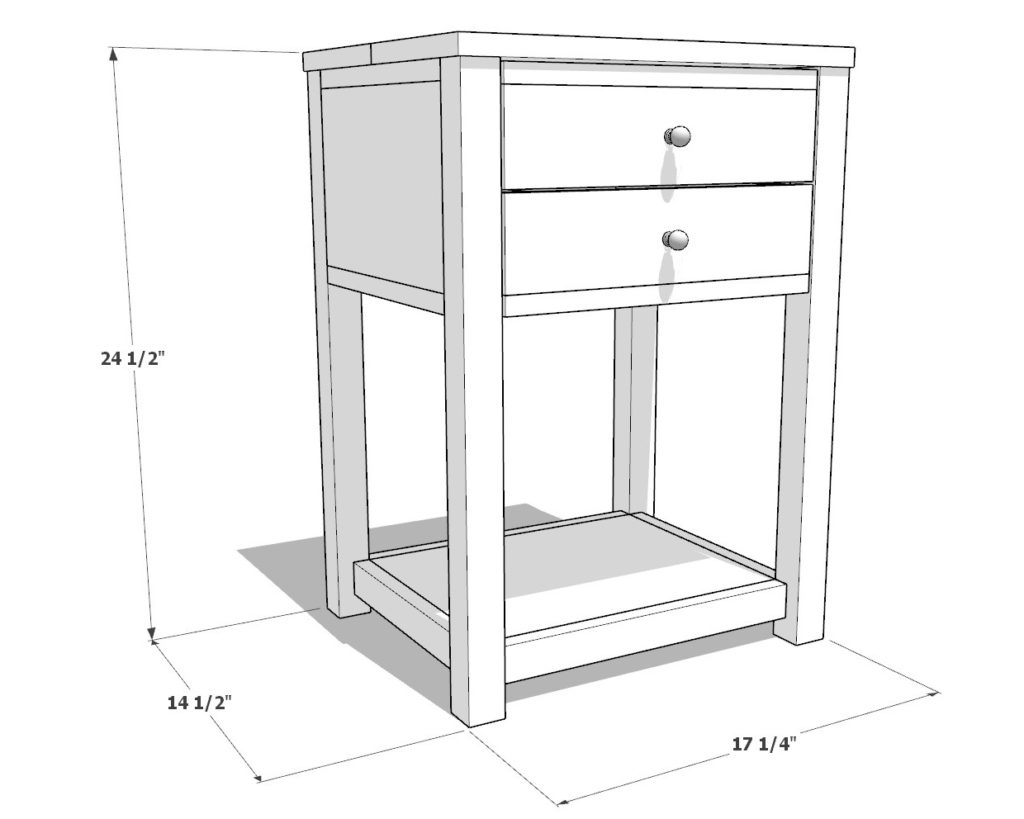
Dimensions: Standing at a comfortable height of 24.5 inches with a top space of 14-1/2″ x 17-1/4″, this nightstand is the ideal blend of form and function, designed keeping contemporary aesthetics in mind.
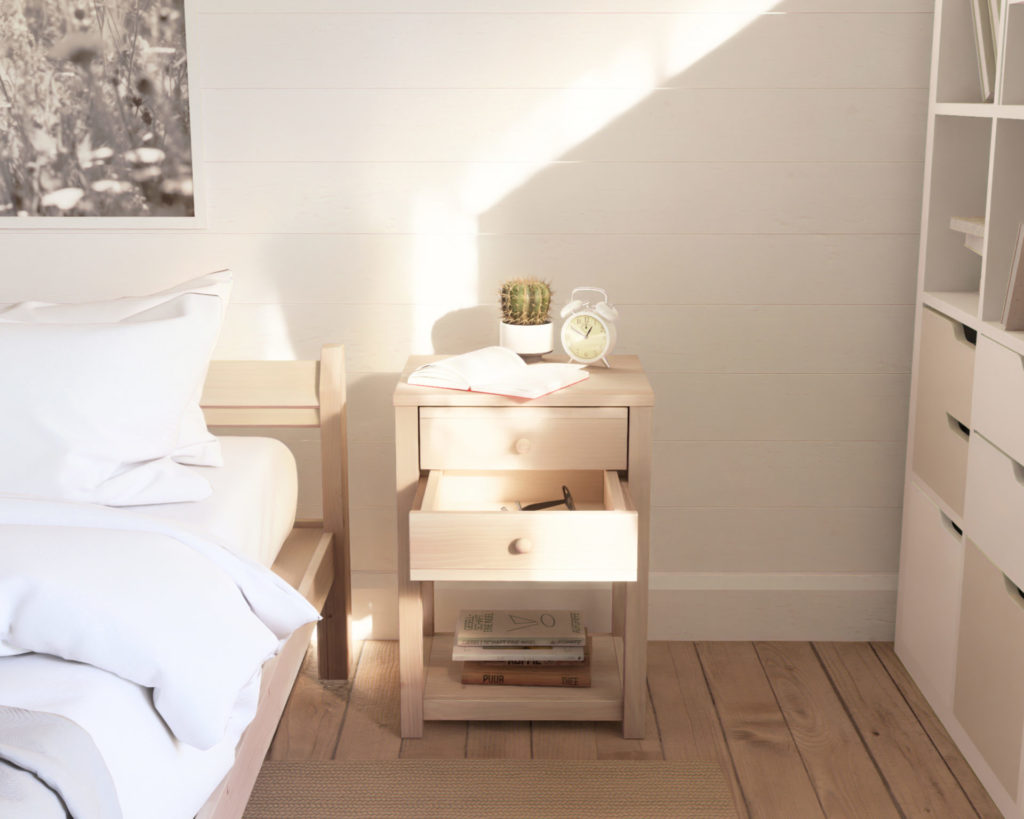
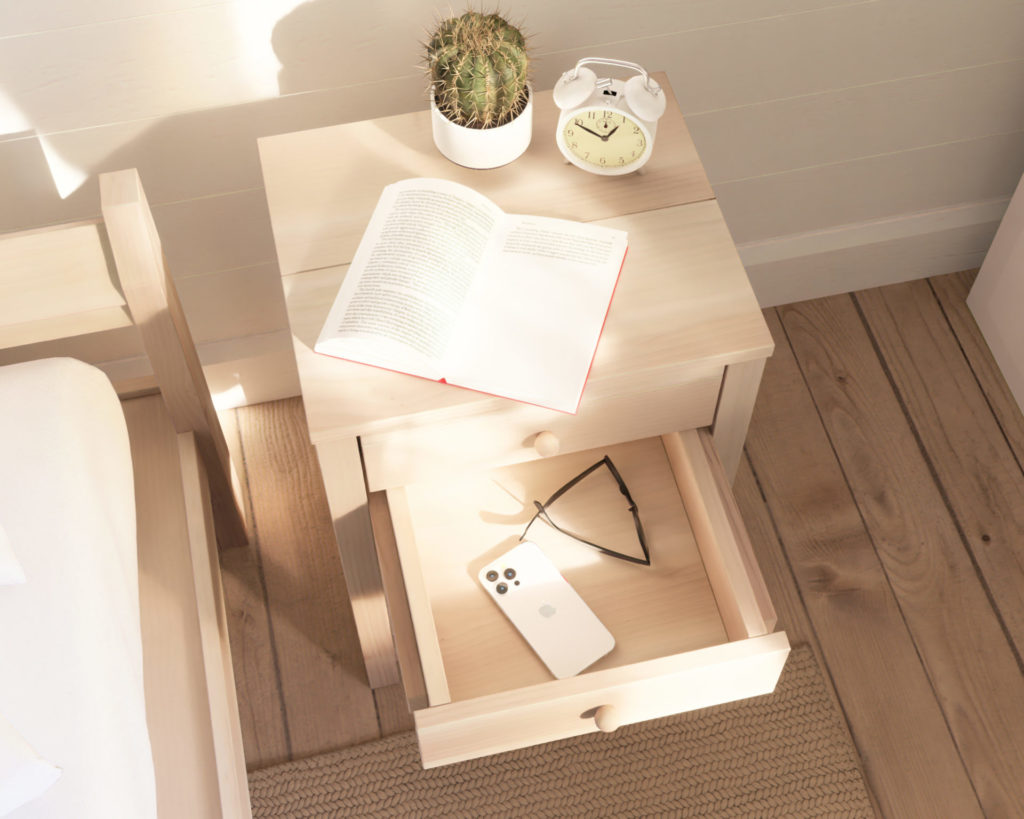
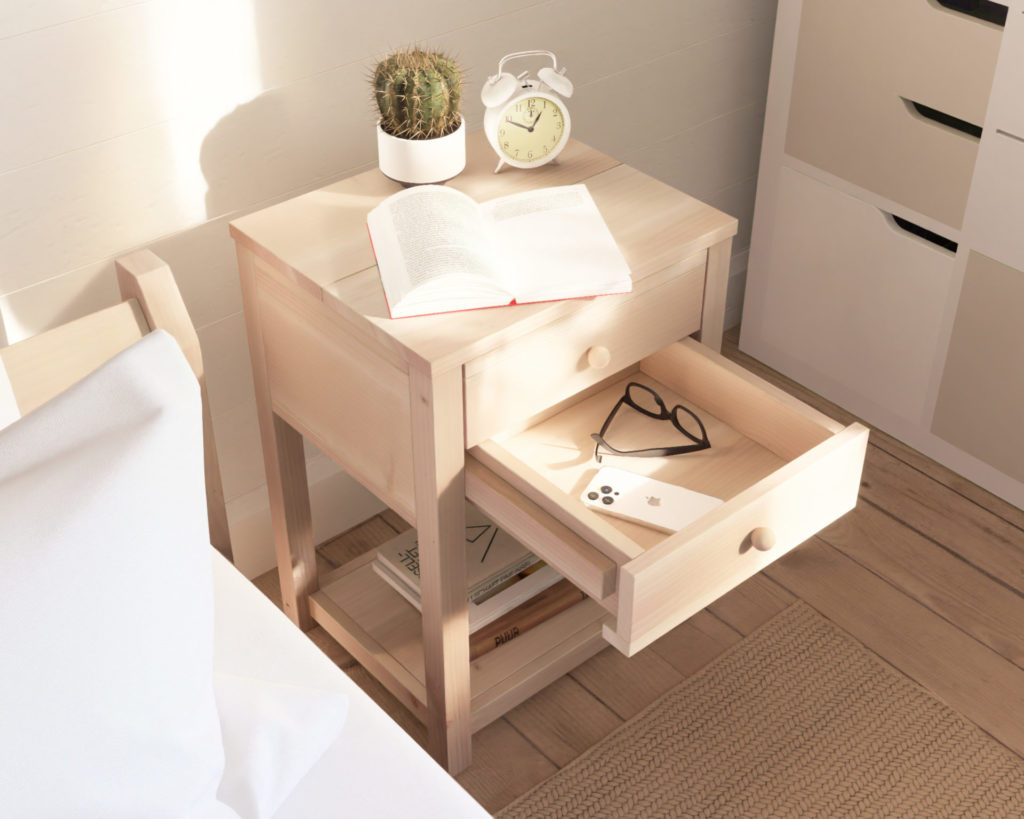
Deep Storage: The well-designed drawers not only store but help organize, turning chaotic spaces into peaceful sanctuaries.
Additional Shelf: This added space is perfect for those cherished reads or decorative pieces, ensuring every inch serves a purpose.
Wooden Slides: Elegant and straightforward, these wooden slides are built for durability and ease, eliminating the need for complex mechanisms.
The Distinction of Our DIY Plan
Our plan is more than just a set of instructions; it’s a curated journey designed especially for woodworking novices.
- Detailed Guidance: Each phase is articulated with clarity, offering a seamless building experience.
- Cost-Efficient Crafting: Build a premium piece of furniture without the premium price tag.
- A Canvas for Creativity: Our plan lays the groundwork, but there’s ample room for your unique touch.
Addressing Novice Woodworker Concerns
- Skill Level: Tailored for beginners, this plan simplifies complex procedures into easy-to-follow steps.
- Time Commitment: Set aside a weekend, and by its end, you’ll have a nightstand ready to grace your room.
- Tools and Materials: We’ve kept it basic and accessible, ensuring you have everything you need without unnecessary complications.
Conclusion
Woodworking is more than just a hobby; it’s a journey of creativity, precision, and accomplishment. With our meticulously designed plan, you’re set to embark on a rewarding adventure. Are you ready to craft your own elegant nightstand? Dive into our guide and let your woodworking tale unfold.
Time
2 hours
Cost
$50
Skill level required
Beginner
DIY Nightstand PDF Plan
What is included in the PDF download?
- Easy to read step by step instructions
- Material list
- Tools needed
- Helpful links to materials and tools needed
DIY Nightstand Table Dimensions
Tools Needed for This Project:
Available with the purchase of the DIY plan PDF. Thank you for your support and for making this website possible!
Lumber Shopping & Cut List
Available with the purchase of the DIY plan PDF. Thank you for your support and for making this website possible!
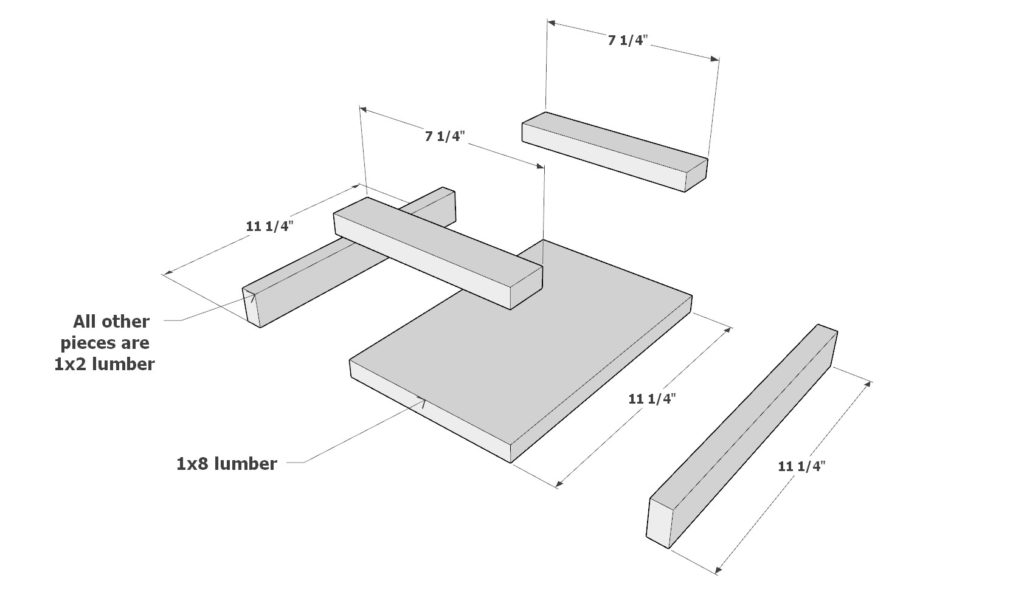
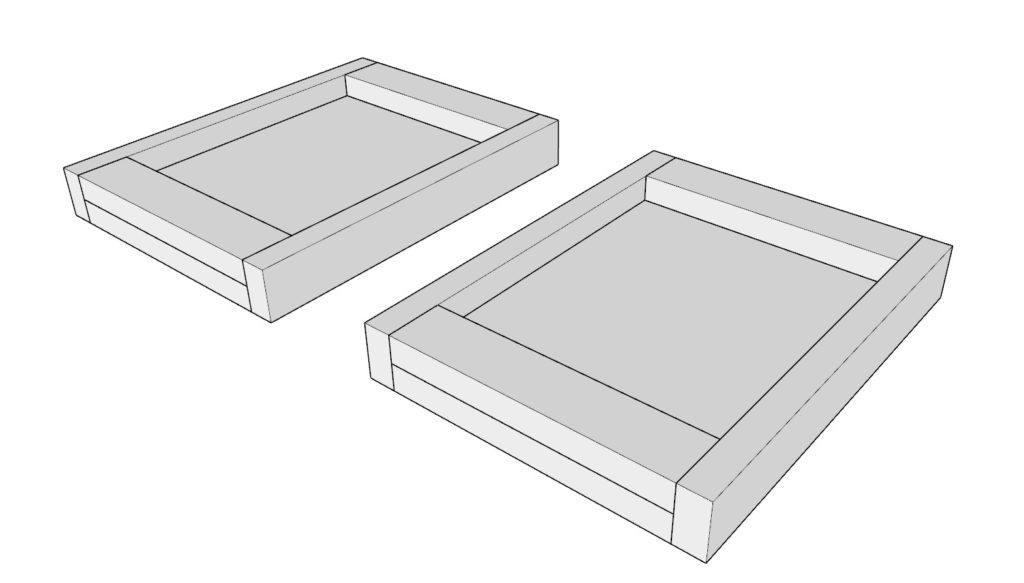
Step 1: Constructing the Night Stand Frame
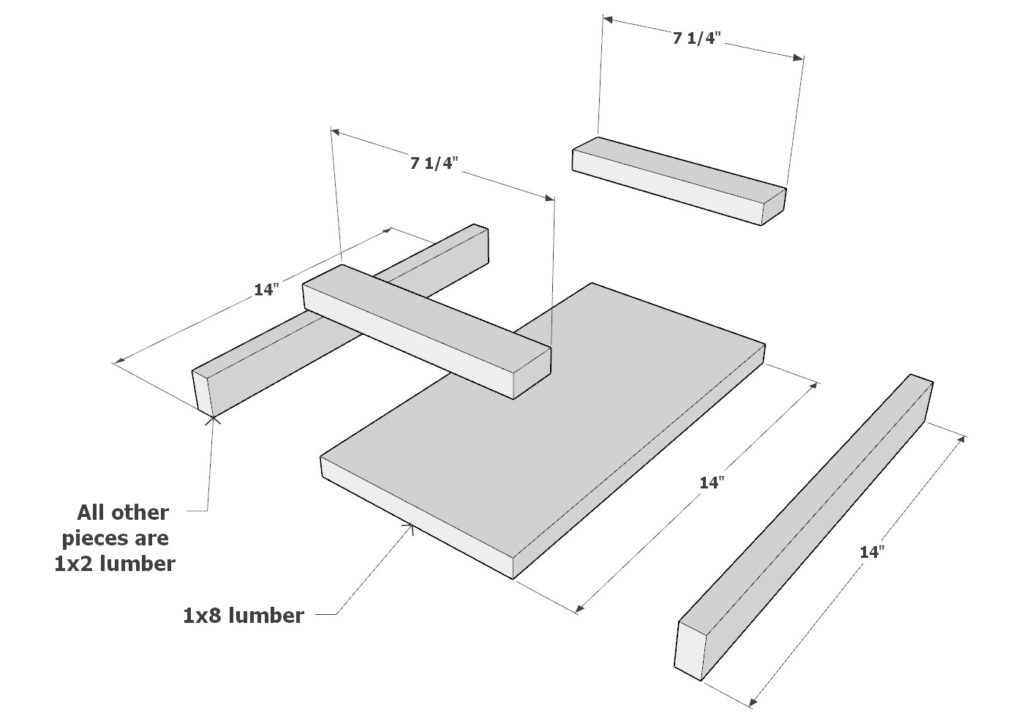
Materials for Sides:
- Two 7-1/4″ 1×2 lumber pieces
- Two 11-1/4″ 1×2 lumber pieces
- One 11-1/4″ 1×8 lumber piece
Materials for Back:
- Two 7-1/4″ 1×2 lumber pieces
- Two 14″ 1×2 lumber pieces
- One 14″ 1×8 lumber piece
Assembly:
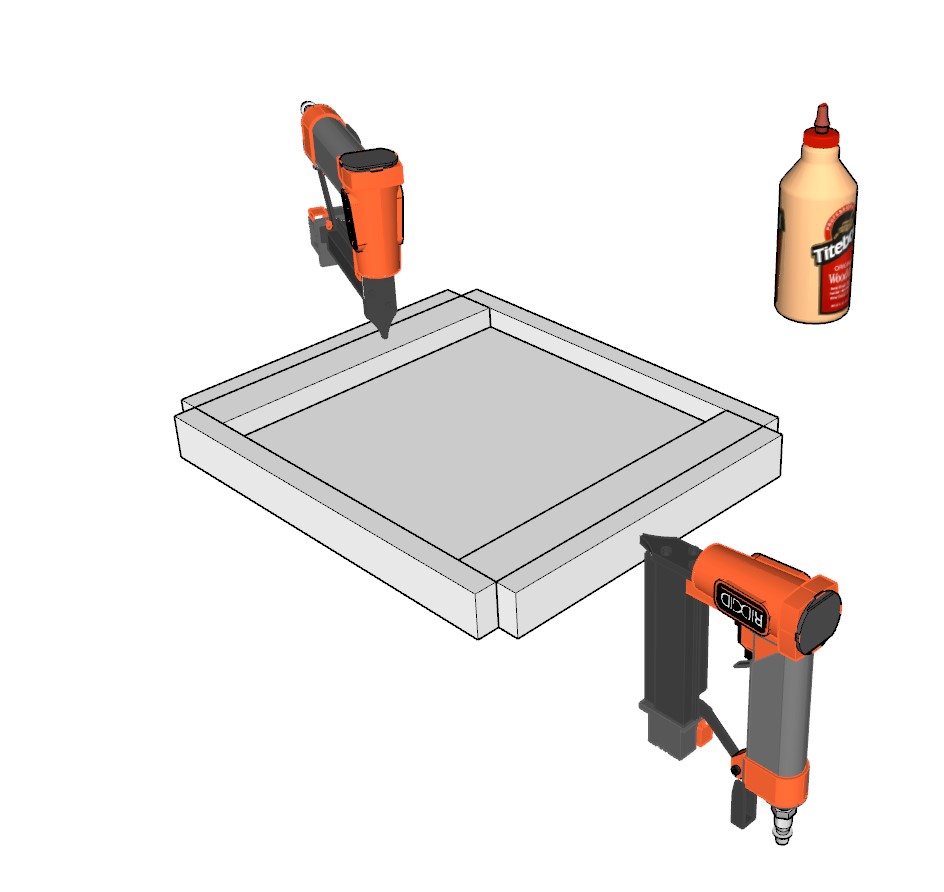
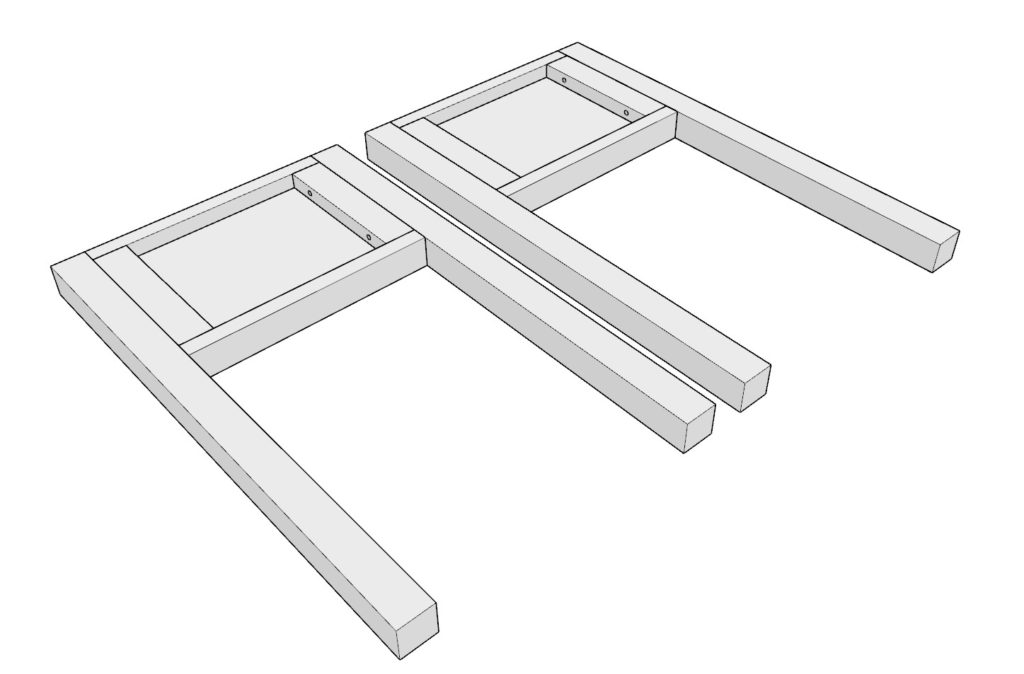
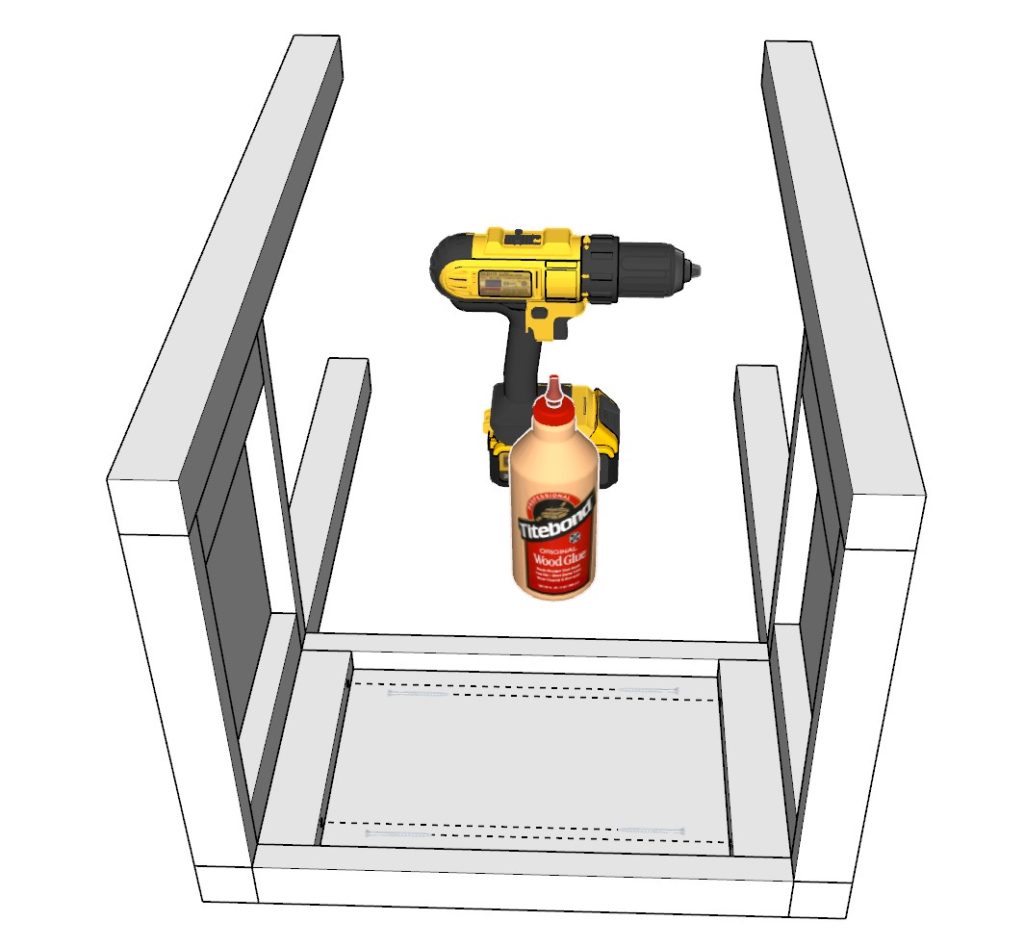
Building the Sides:
- Arrange the side materials as illustrated
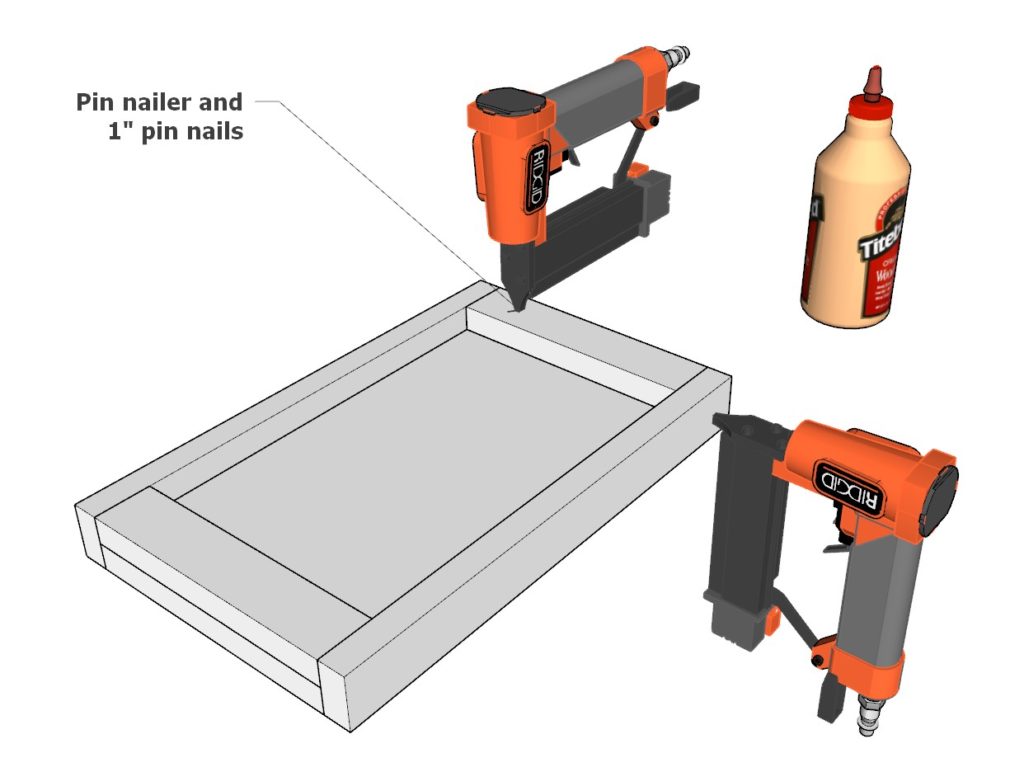
- Secure the pieces together using glue and 1-inch pin nails with a nail gun.
- Ensure you construct two of these side frames.
Building the Back:
- Arrange the back materials as depicted
- Fasten the pieces together with glue and 1-inch pin nails using a nail gun.
Attaching the Sides to Legs:
- Now, take the side components and the back component you’ve just built.
- Attach them to four 23-3/4″ long 2×2 lumber legs.
- Use 2.5-inch screws and glue for a secure attachment. Ensure you predrill holes to prevent the wood from splitting.
Pro Tips:
- Smooth Finish: Sand each component as you go along and plane the wood to eliminate rough surfaces. This ensures a polished finish.
- Pre-Staining: Consider staining or painting all the pieces before assembly. This minimizes touch-ups post-assembly, providing a more professional look. However, you can also choose to sand, paint, or stain at the end.

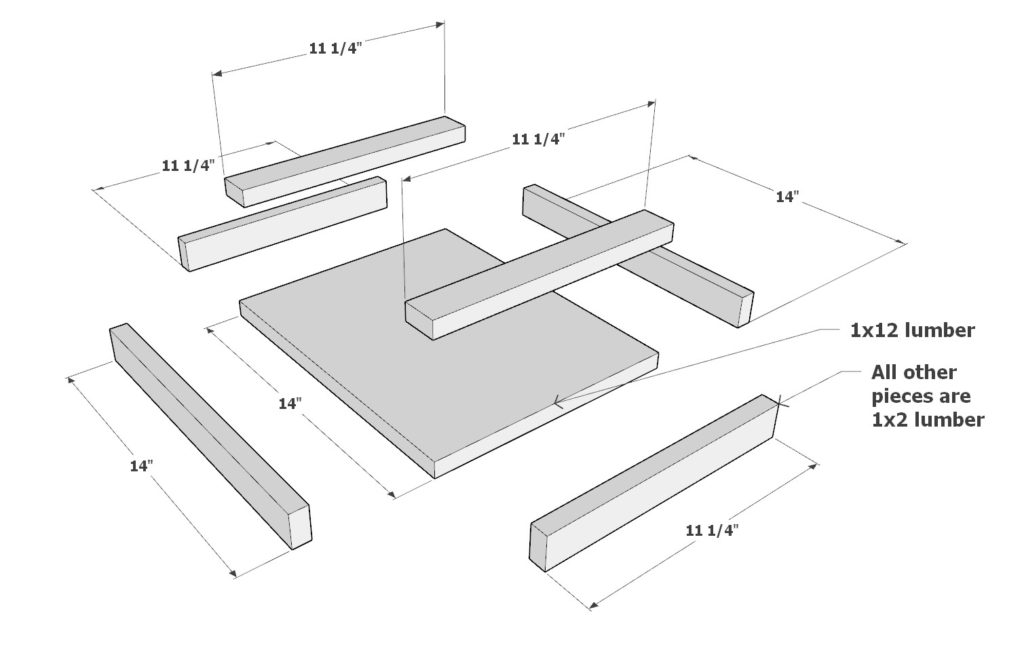
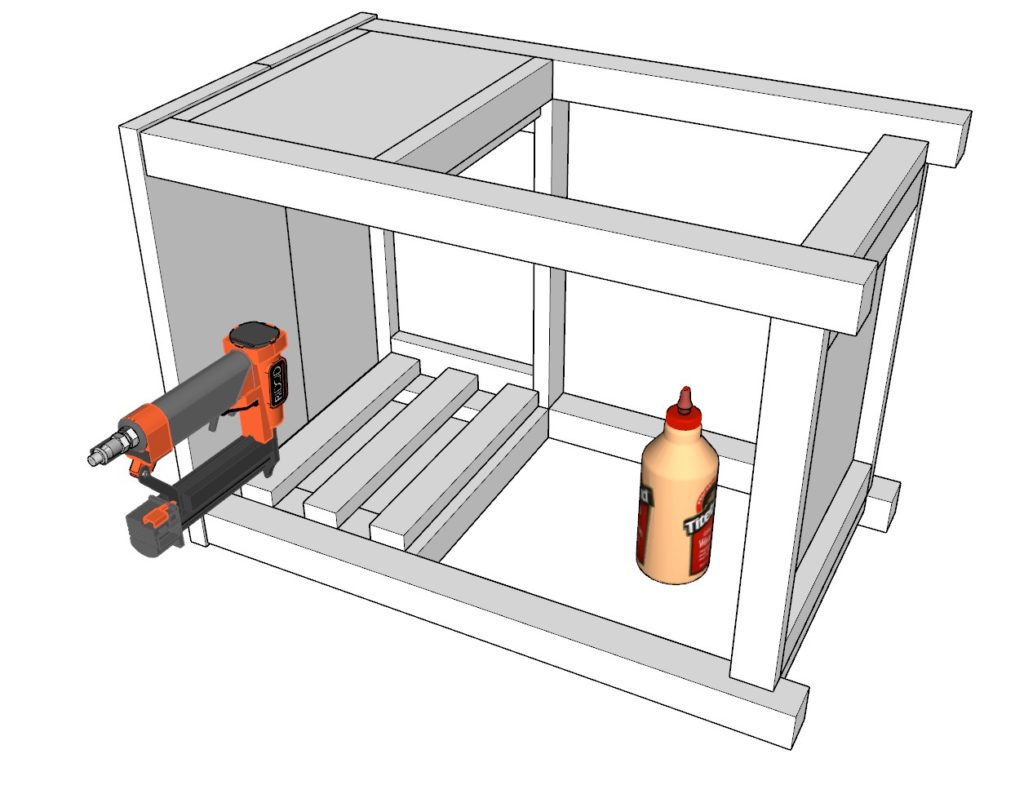
Step 2: Crafting and Installing the Bottom Shelf
Materials for Bottom Shelf:
- Four 11-1/4″ long 1×2 lumber pieces
- Two 14″ long 1×2 lumber pieces
- One 14″ long 1×12 lumber piece
Assembly:
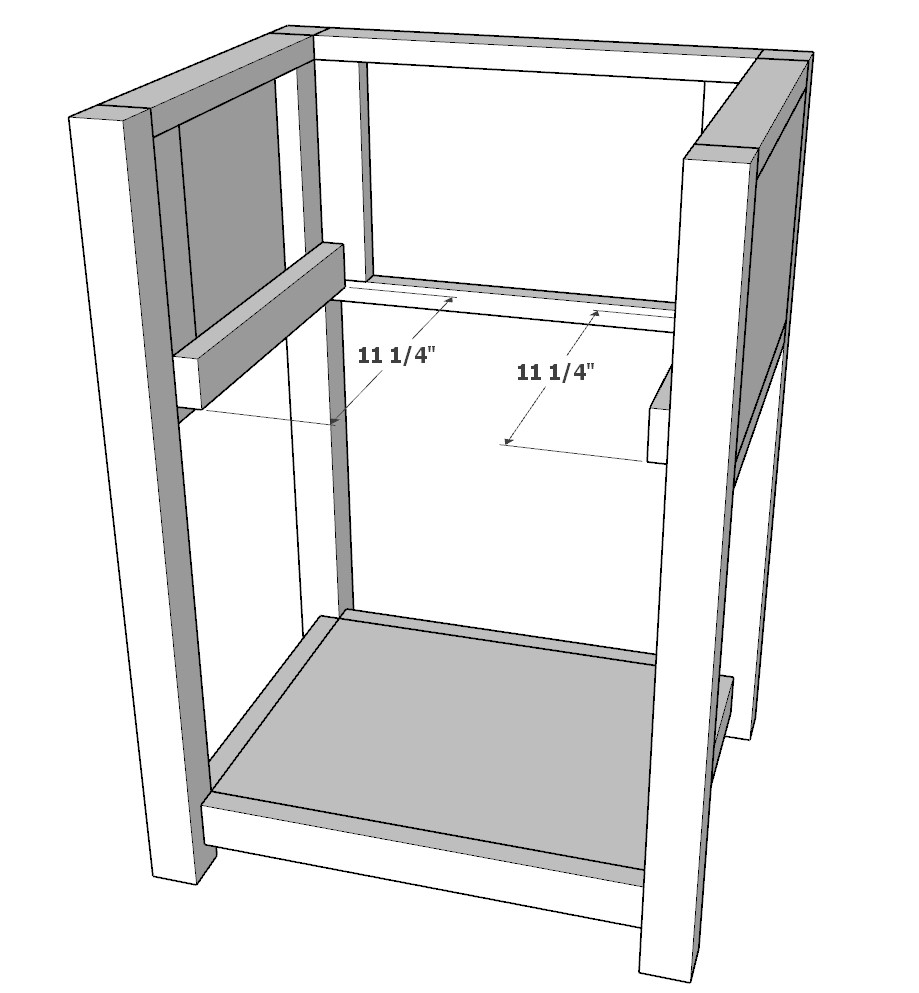
Constructing the Bottom Shelf:
- Lay out the lumber pieces as depicted in Diagram
- Firmly join the pieces together, using wood glue and pin nails.
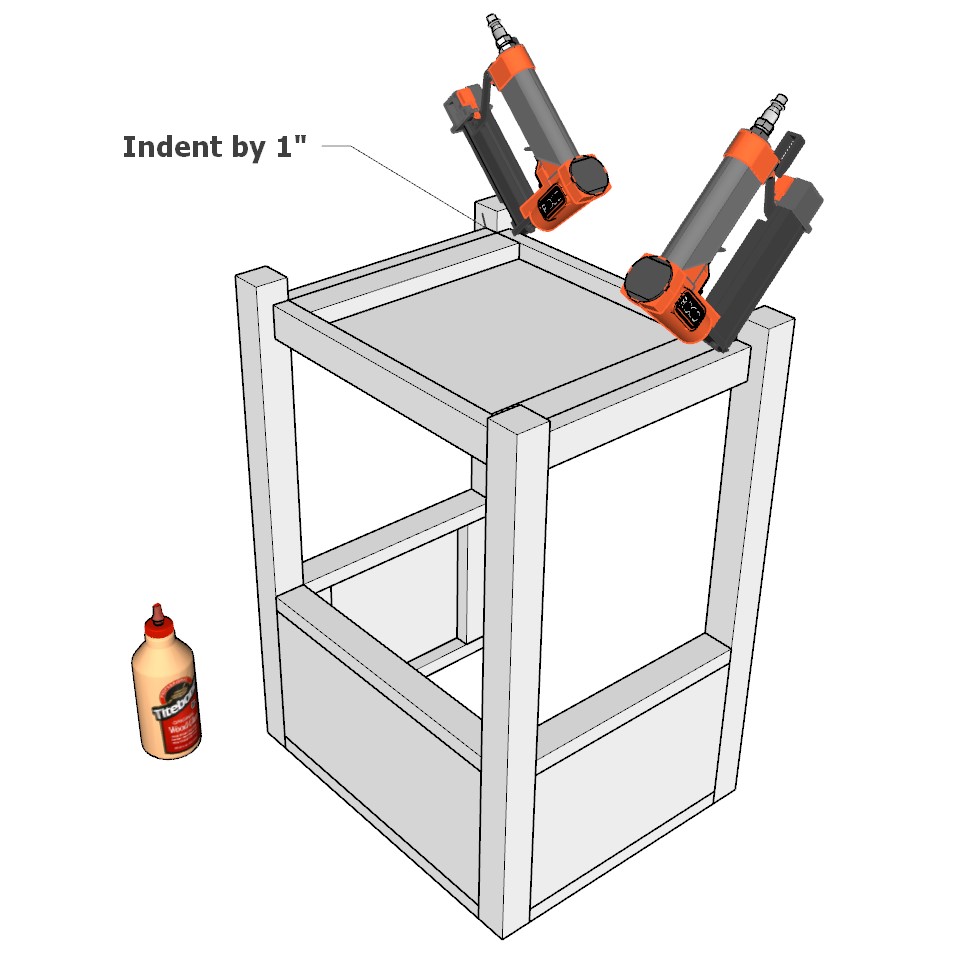
Attaching the Shelf to the Night Stand:
- Position the constructed shelf onto the nightstand frame, ensuring it aligns with the reference points shown in Diagram
- Maintain a gap of 1 inch between the bottom of the shelf and the base of the legs.
- Secure the shelf in place with wood glue and pin nails, ensuring stability.
Step 3: Constructing the Night Stand Shelves
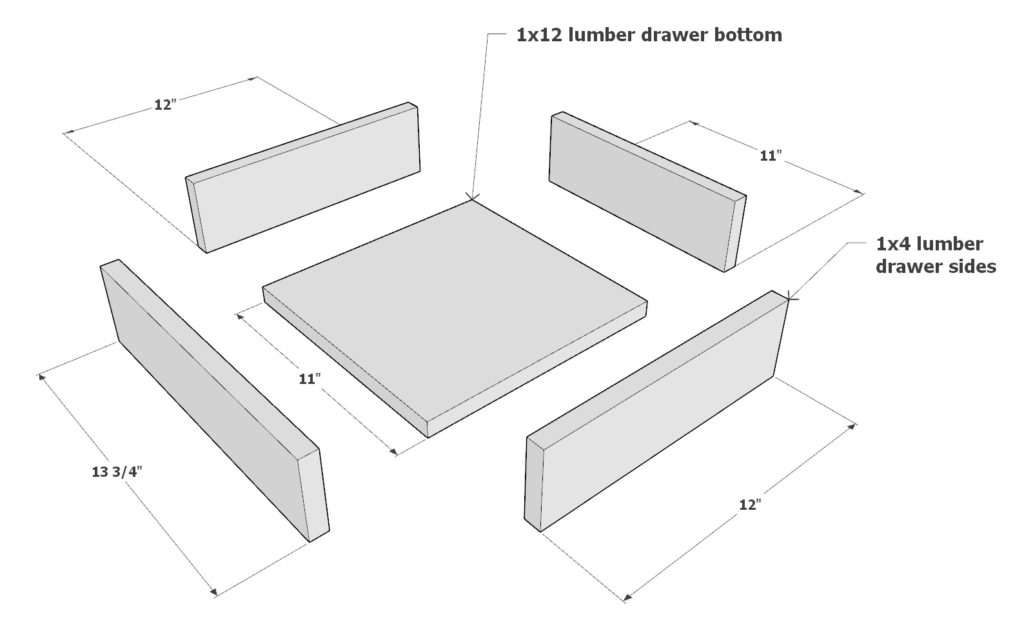
Materials for Drawers:
- One 11″ 1×12 lumber piece (for the base of each drawer)
- One 11″ 1×4 lumber piece (for the back of each drawer)
- Two 12″ 1×4 lumber pieces (sides of each drawer)
- One 13-3/4″ 1×4 lumber piece (face of each drawer)
Assembly:
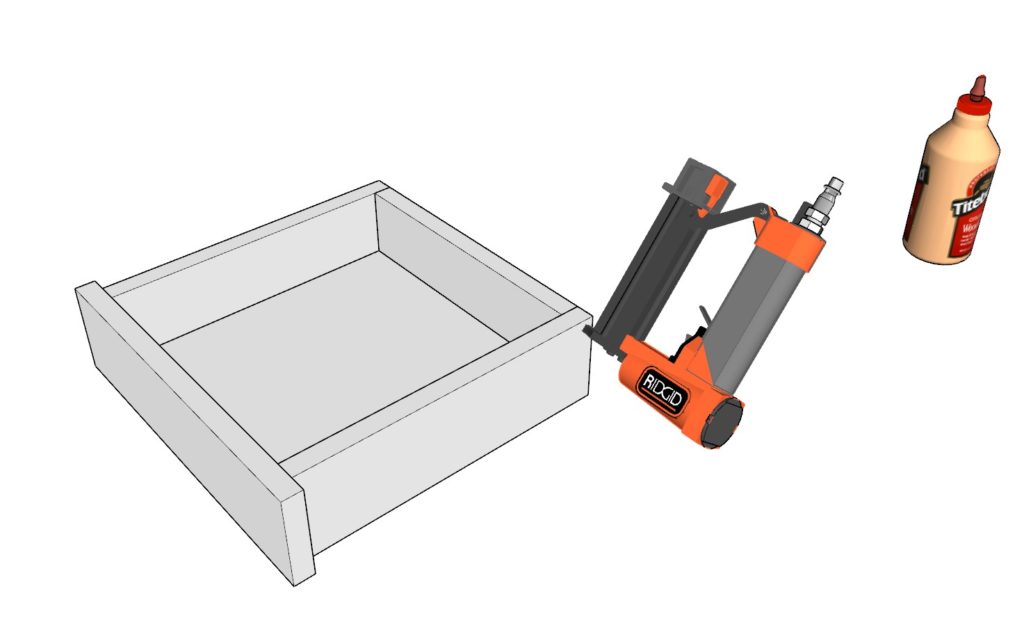
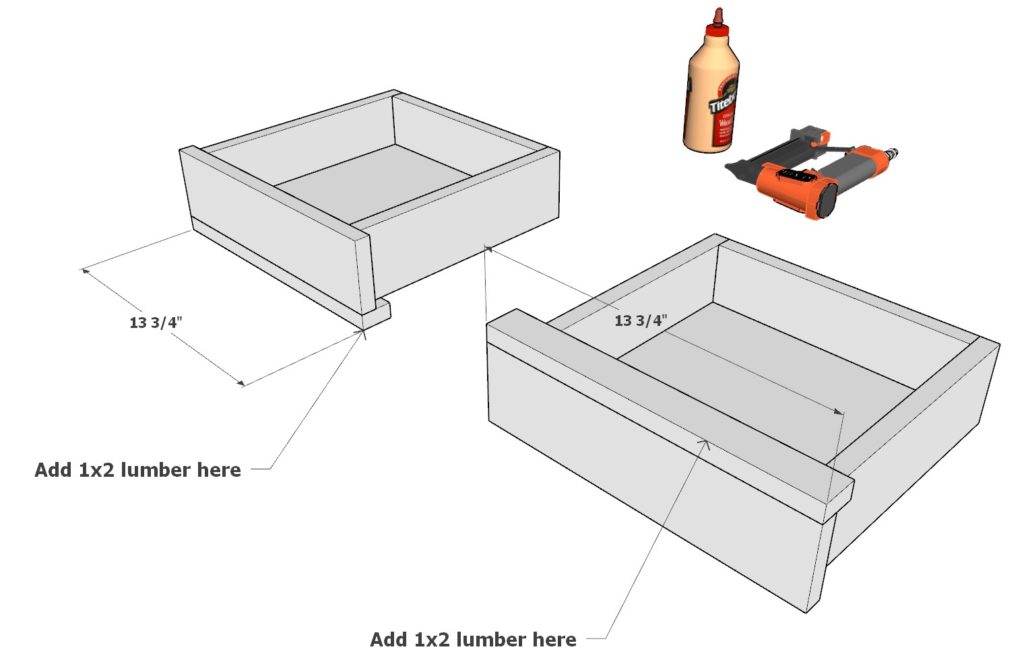
- Building the Drawers:
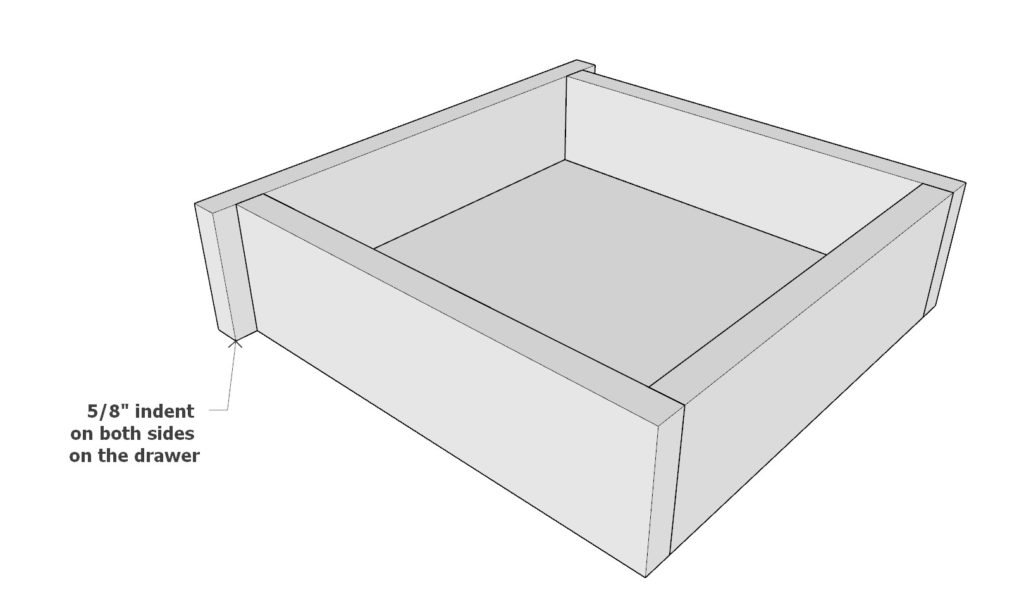
- Begin by laying out the 11″ 1×12 as the base, the two 12″ 1x4s as the sides, one 11″ 1×4 as the back, and the 13-3/4″ 1×4 as the drawer’s face. When selecting the face piece, choose one with an appealing grain for an aesthetic touch.
- Ensure the face 1×4 piece is centered, with 5/8″ indents on both sides.
- Secure the components together using wood glue and pin nails.
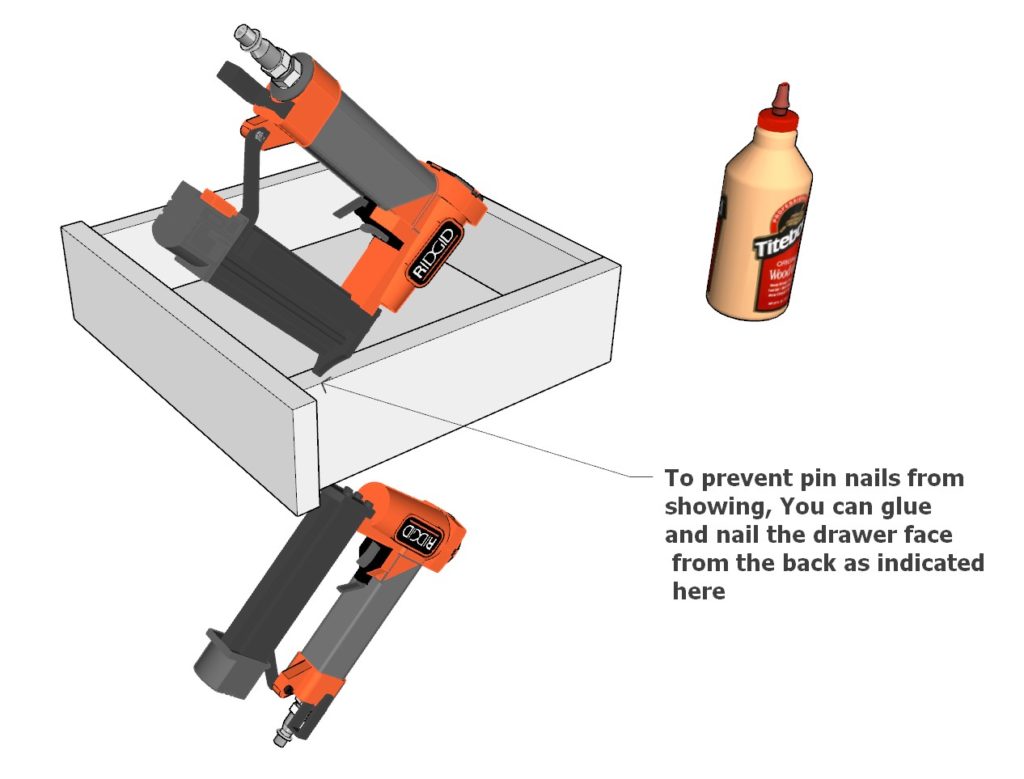
Pro Tip: For a cleaner look on the drawer’s face, avoid visible pin nails. Instead, attach from the back, as shown in the diagram. This method might offer slightly less stability but results in a more polished appearance.
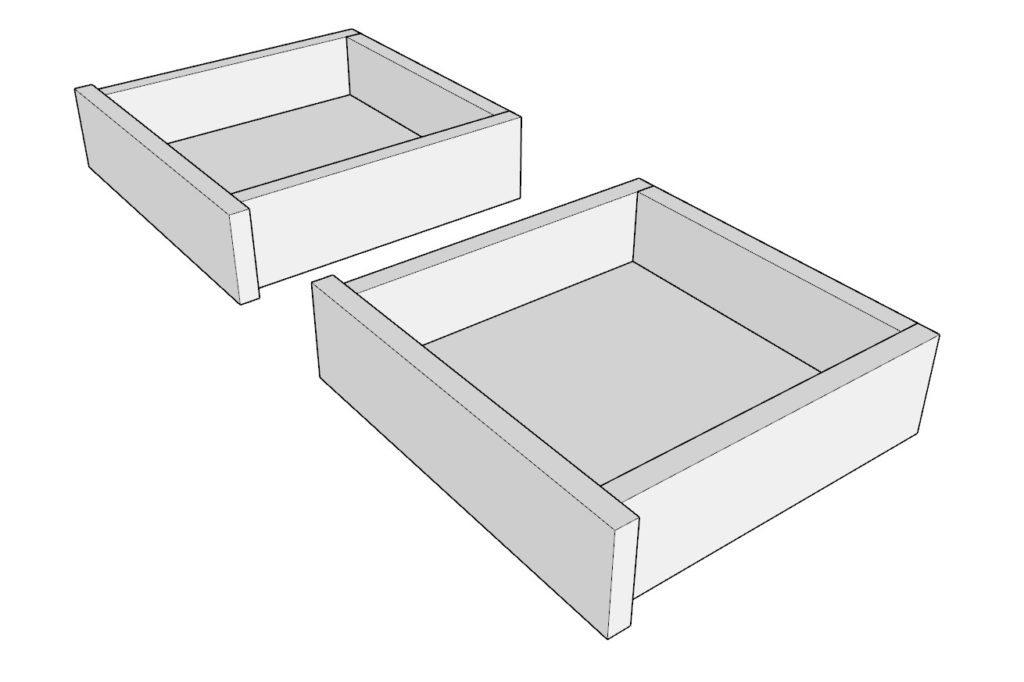
- Differentiating the Drawers:
- Now, add a 13-3/4″ long 1×2 lumber piece to each drawer. The placement of these pieces will create a subtle difference between the two drawers, ensuring they fit perfectly within the nightstand’s frame.
With these steps, you’ll have two nearly identical drawers, ready to be integrated into the nightstand.
Step 4: Installing the Drawers and Wooden Drawer Slides
Materials:
- Six 11-1/4″ long 1×2 lumber pieces (for drawer slides)
Assembly:
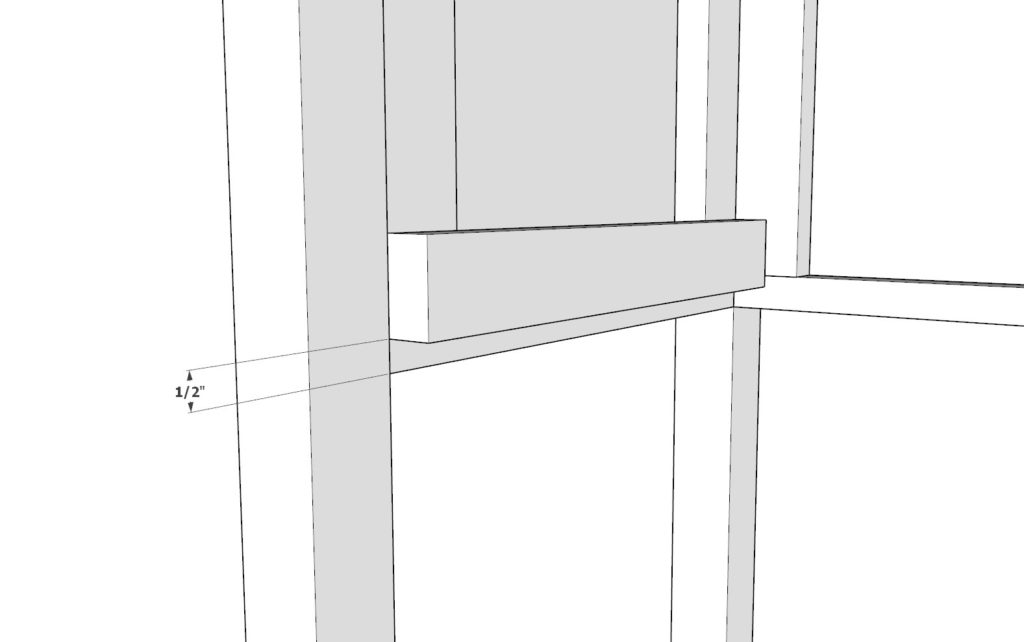
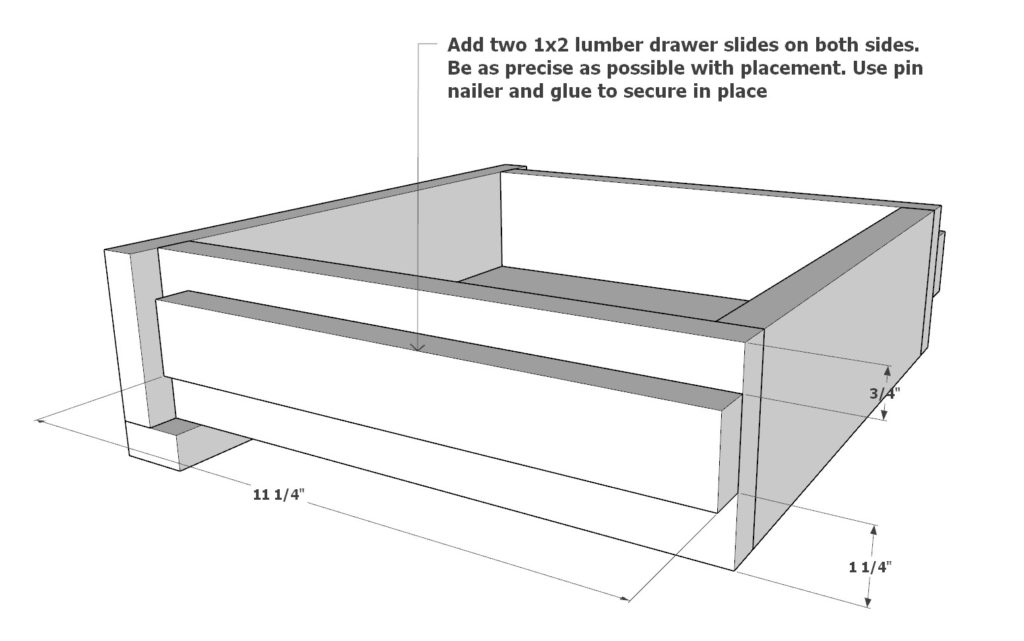
Setting Up the Night Stand Slides:
- Sand two of the 11-1/4″ 1×2 lumber pieces until they are smooth, as these will serve as the drawer slides.
- Position these pieces 1/2″ away from where the nightstand sides end, as illustrated in Diagram 2.
- Affix these pieces using wood glue and pin nails.
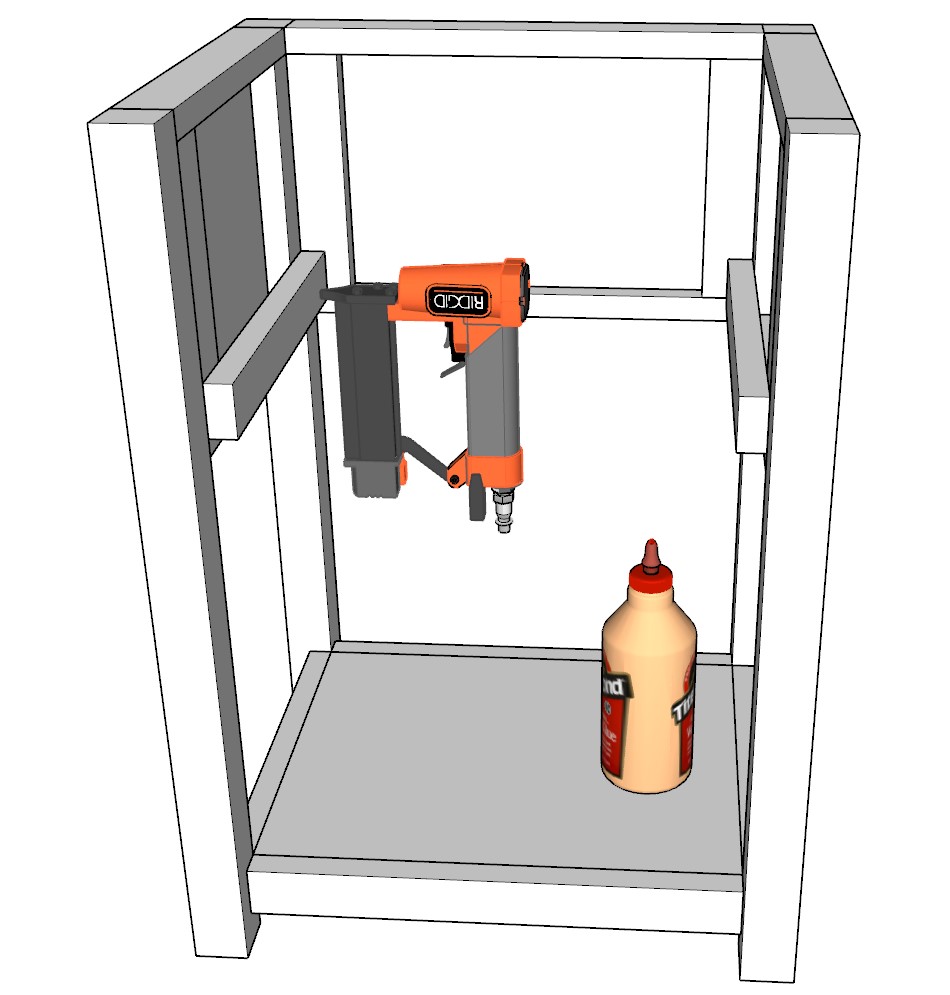
Attaching Slides to the Drawers:
- Identify the correct drawer for this step. While the drawers are similar, they are not identical.
- Adhere two 11-1/4″ 1×2 lumber pieces to the drawer’s sides, ensuring precise placement.
- Secure these with wood glue and pin nails.
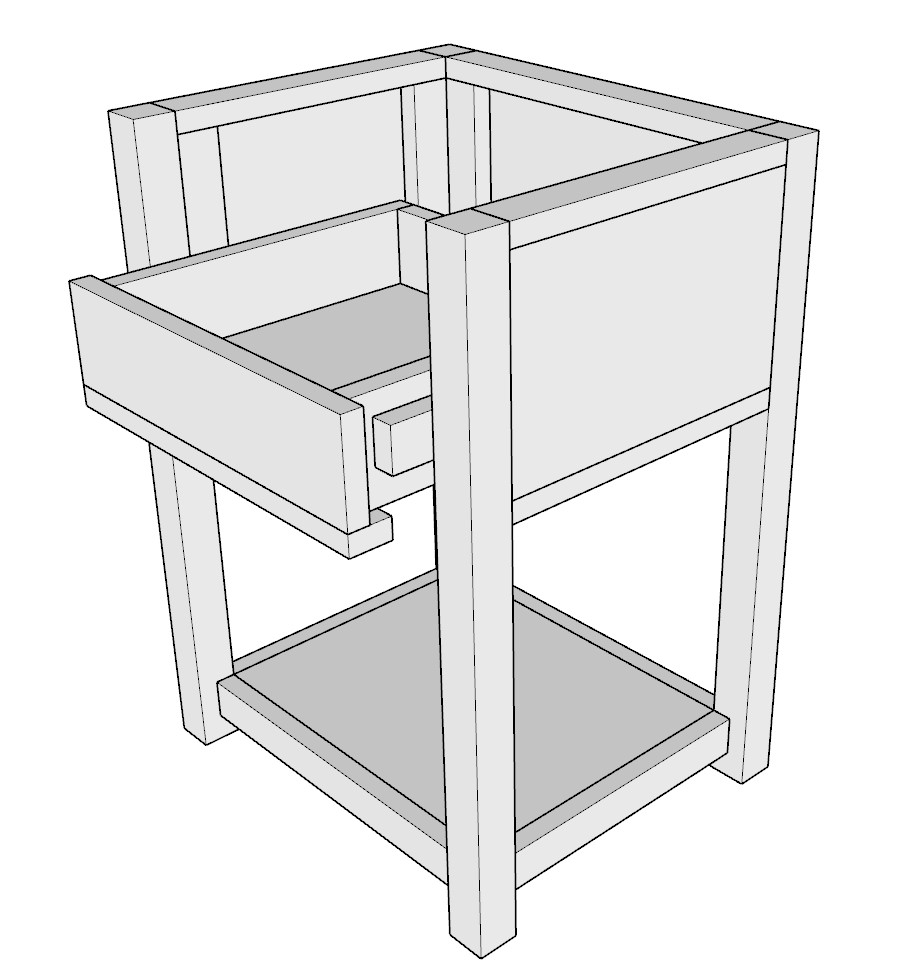
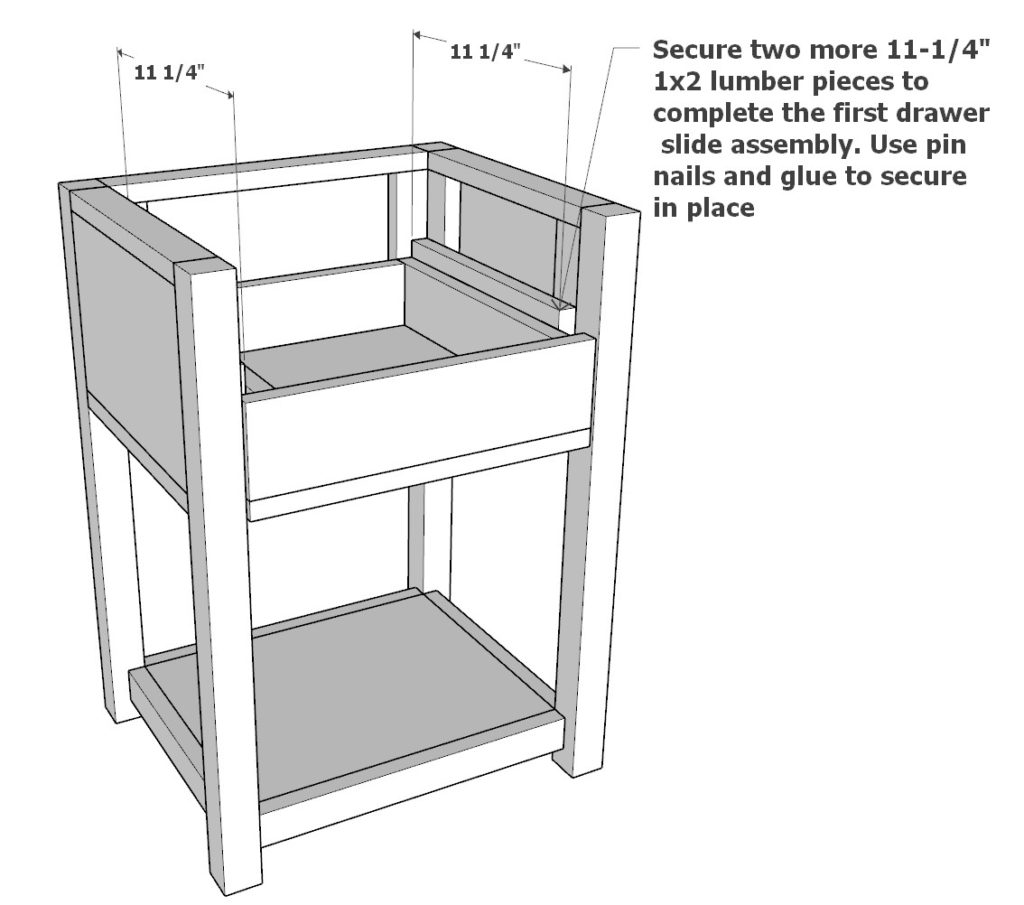
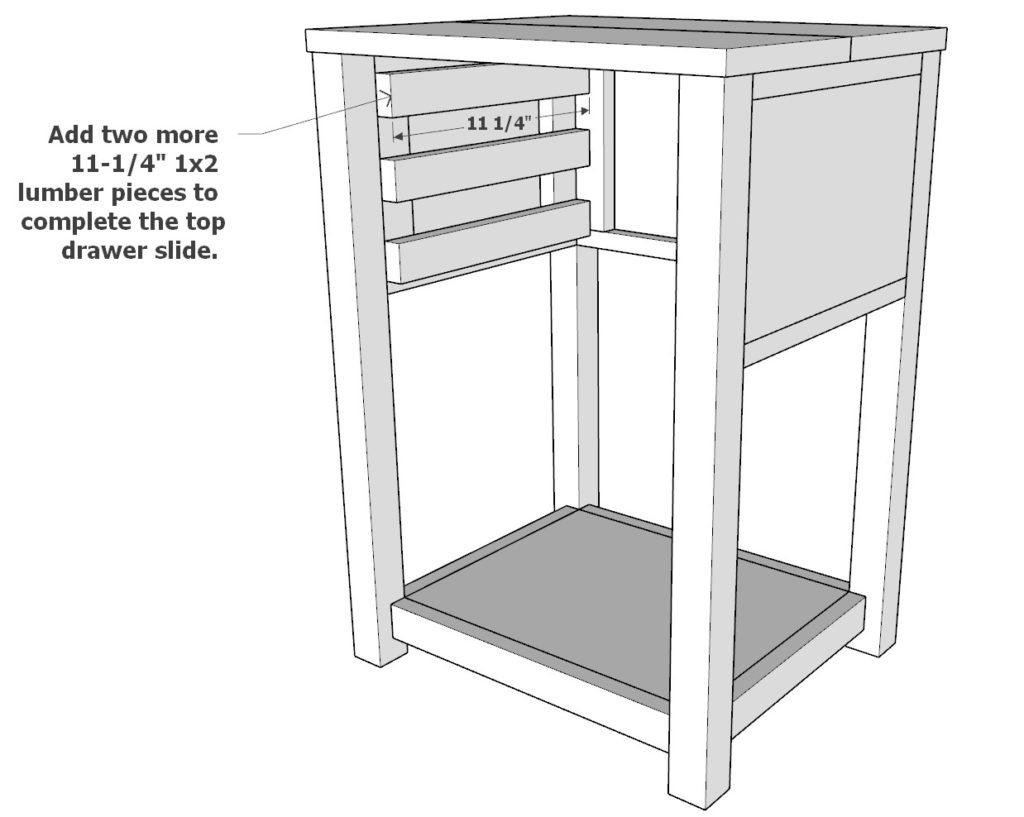
Finalizing the Drawer Slides:
- Slide the drawer into its slot within the nightstand.
- Over the sides of the drawer, where the slide components are, position another set of 11-1/4″ 1×2 lumber pieces.
- Fasten these in place using wood glue and pin nails.
- Test the drawer’s movement. It should slide in and out with ease.
Pro Tips: If the drawer isn’t sliding smoothly:
- Wax Application: Apply a layer of wax to enhance the sliding motion.
- Sanding: If wax doesn’t provide the desired result, consider sanding down parts of the components to improve the slide.
With these steps, your nightstand drawers should operate smoothly, combining functionality with aesthetics.
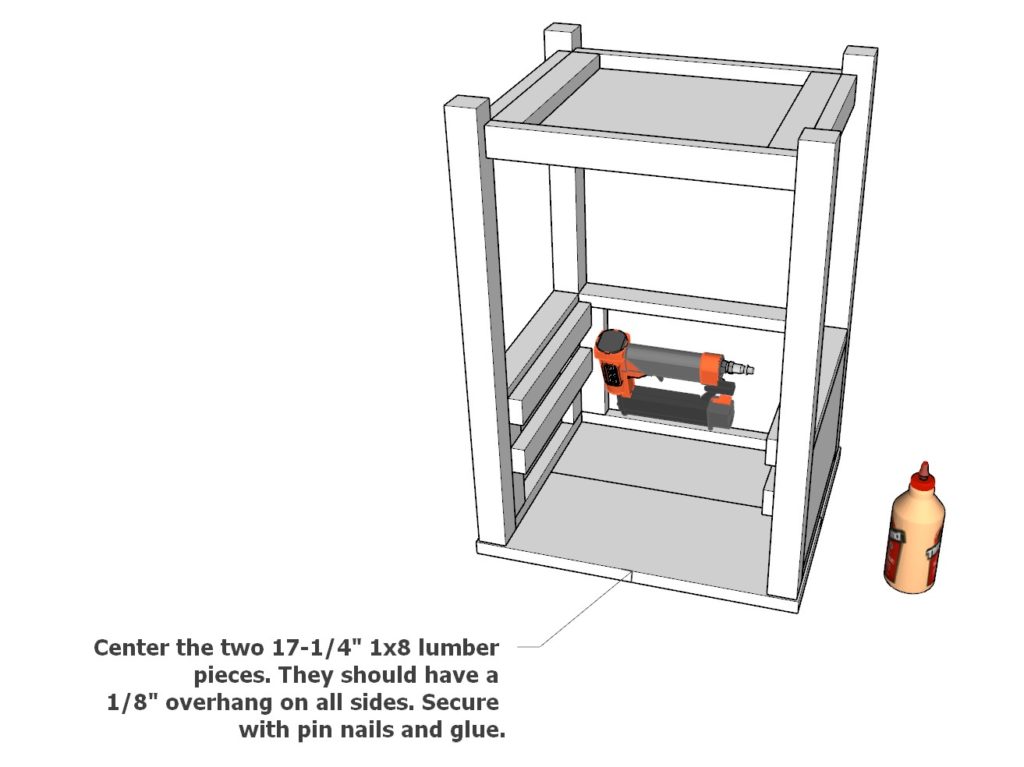
Step 5: Attaching the Night Stand Top
Materials:
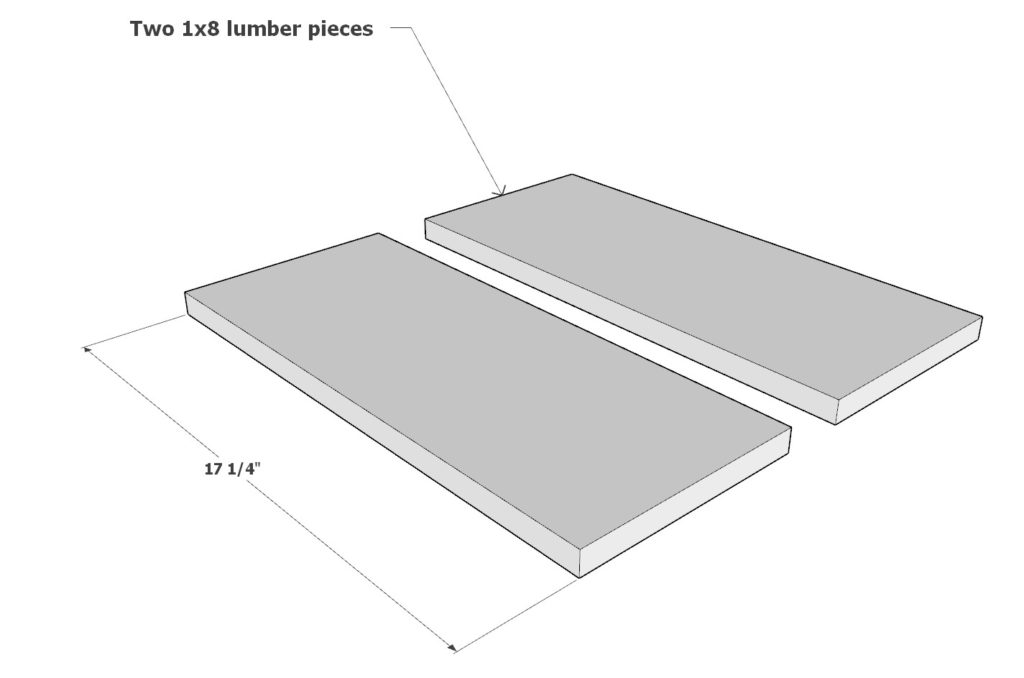
- Two 17-1/4″ long 1×8 lumber pieces (for the nightstand top)
Assembly:
Positioning the Top:
- Lay out the two 17-1/4″ 1×8 lumber pieces to form the top of the nightstand.
- Ensure that when they are placed, there’s an overhang of 1/8″ on all sides. This gives the nightstand a refined look and also provides a small ledge that can be useful.
Securing the Top:
- Once positioned correctly, affix the top to the nightstand using wood glue.
- For added stability, secure it further with pin nails, ensuring an even distribution for a strong hold.
Step 6: Installing the Second Drawer and Final Touches
Materials:
- Four 11-1/4″ long 1×2 lumber pieces (for the drawer slides)
- Drawer knobs (quantity depending on preference, typically one for a drawer of this size)
Assembly:
Preparing the Second Drawer:
- Take two of the 11-1/4″ 1×2 lumber pieces and align them to the sides of the second drawer, as illustrated in Diagram 1 of this step.
- Once positioned correctly, secure them to the drawer using wood glue and pin nails.
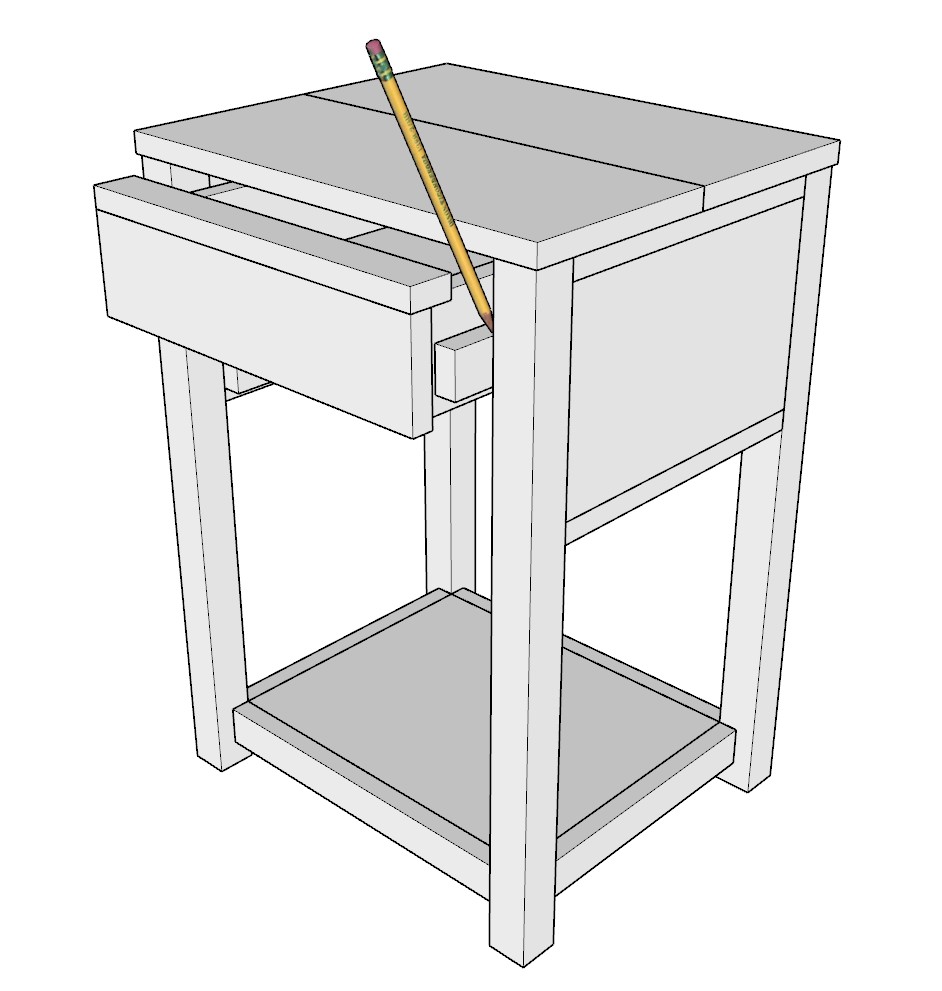
Positioning the Drawer:
- Slide the drawer into its designated slot within the nightstand.
- With the drawer in place, use a pencil to mark the positions for the remaining two 11-1/4″ 1×2 lumber pieces. These marks will guide where the next set of slides should be attached to the nightstand.
- Following the pencil marks, attach the lumber pieces using wood glue and pin nails.
Testing the Drawer:
- Ensure that the drawer slides in and out smoothly, mirroring the ease of the previously installed drawer.
Adding the Knobs:
- Choose a spot on the drawer face where you’d like the knobs to be positioned, typically at the center of the drawer face for aesthetic and functional reasons.
- Mark the spot(s) with a pencil.
- Pre-drill a small hole at the marked spot(s) to ensure the wood doesn’t split when attaching the knob.
- Screw in the knob(s) securely.


Step 7: Preparing, Staining, Painting, and Finalizing the Night Stand
1. Preparing the Night Stand for Sanding or Staining:
Materials Needed:
- Fine-grit sandpaper (around 220-grit)
- Tack cloth or a damp rag
- Wood filler (if there are any gaps or holes)
Instructions:
- Inspection: Begin by thoroughly inspecting the night stand for any visible nails, rough edges, or imperfections.
- Filling Gaps: If you discover any gaps or holes, fill them with wood filler. Allow the filler to dry as per the manufacturer’s instructions.
- Sanding: Using the fine-grit sandpaper, sand the entire surface of the night stand. Always sand in the direction of the wood grain to prevent scratches.
- Corner and Edge Attention: Pay special attention to corners and edges. These areas often have sharp points which can be rounded slightly for a smoother finish and to prevent potential splinters.
- Cleanup: Once you’ve sanded the entire piece, wipe it down with a tack cloth or damp rag to remove any sawdust or debris. Ensure the night stand is completely clean and dry before moving on to staining or painting.
2. Staining the Night Stand:
Materials Needed:
- Wood stain (color of your choice)
- A clean rag or brush
- Rubber gloves
- Ventilation mask
- Clear wood sealer or polyurethane
Instructions:
- Safety First: Wear rubber gloves and a ventilation mask to protect against fumes. Work in a well-ventilated area.
- Stain Application: Dip your rag or brush into the stain. Apply the stain onto the wood, following the direction of the grain.
- Absorption: Allow the stain to penetrate the wood. The longer you leave it, the deeper and richer the color will be.
- Wiping: Wipe off any excess stain with a clean rag, again following the direction of the wood grain.
- Drying: Allow the stained night stand to dry completely. This can take several hours to days, depending on the stain and environmental conditions.
- Sealing: Once dry, apply a clear wood sealer or polyurethane to protect the stain and add a glossy or matte finish, depending on your preference.
3. Painting the Night Stand:
Materials Needed:
- Primer
- Paint (color of your choice)
- Paintbrush or roller
- Painter’s tape
Instructions:
- Taping: Use painter’s tape to protect any areas you don’t want painted, such as hardware or knobs.
- Priming: Apply a coat of primer to the night stand. This helps the paint adhere better and provides a more even finish. Allow the primer to dry completely.
- Painting: Once the primer is dry, apply your chosen paint color using a brush or roller. Use even strokes and avoid loading too much paint onto the brush to prevent drips.
- Multiple Coats: Depending on the color and type of paint, you may need multiple coats. Allow each coat to dry thoroughly before applying the next.
- Drying: Once you’ve achieved the desired coverage and look, let the night stand dry completely.
4. Adding Felt Pads:
Materials Needed:
- Felt pads (self-adhesive)
- Scissors (if trimming is needed)
Instructions:
- Clean the Surface: Ensure the bottom of the night stand legs are clean and free of any debris.
- Positioning: Determine the placement of the felt pads. They typically go on the bottom of the legs to prevent scratching the floor.
- Attachment: Peel the backing off the self-adhesive felt pad and press it firmly onto the bottom of the leg.
- Trimming: If your felt pads are too large, use scissors to trim them to the desired size before attaching.
- Pressure: Once all pads are in place, press down on the night stand or apply pressure to each leg to ensure the pads adhere well.
With these steps, your night stand is not only beautifully finished but also ready for use in any room without the risk of damaging your floors.