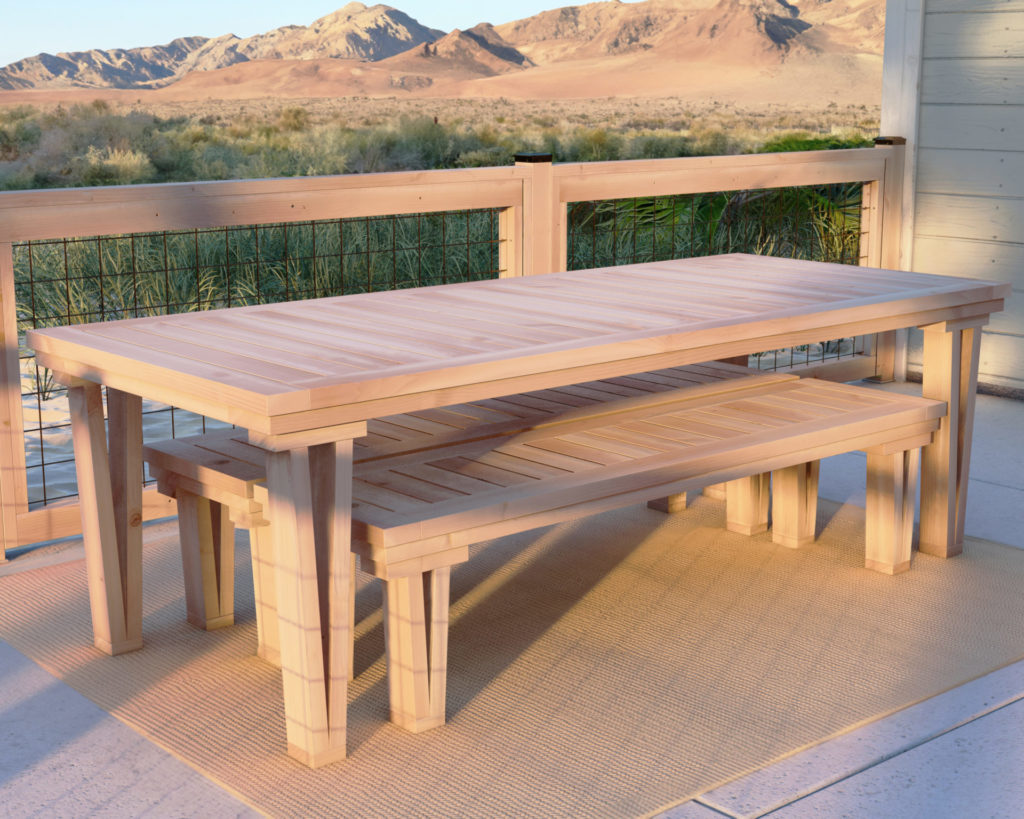
Introduction: The Magic Touch in Your Outdoor Space
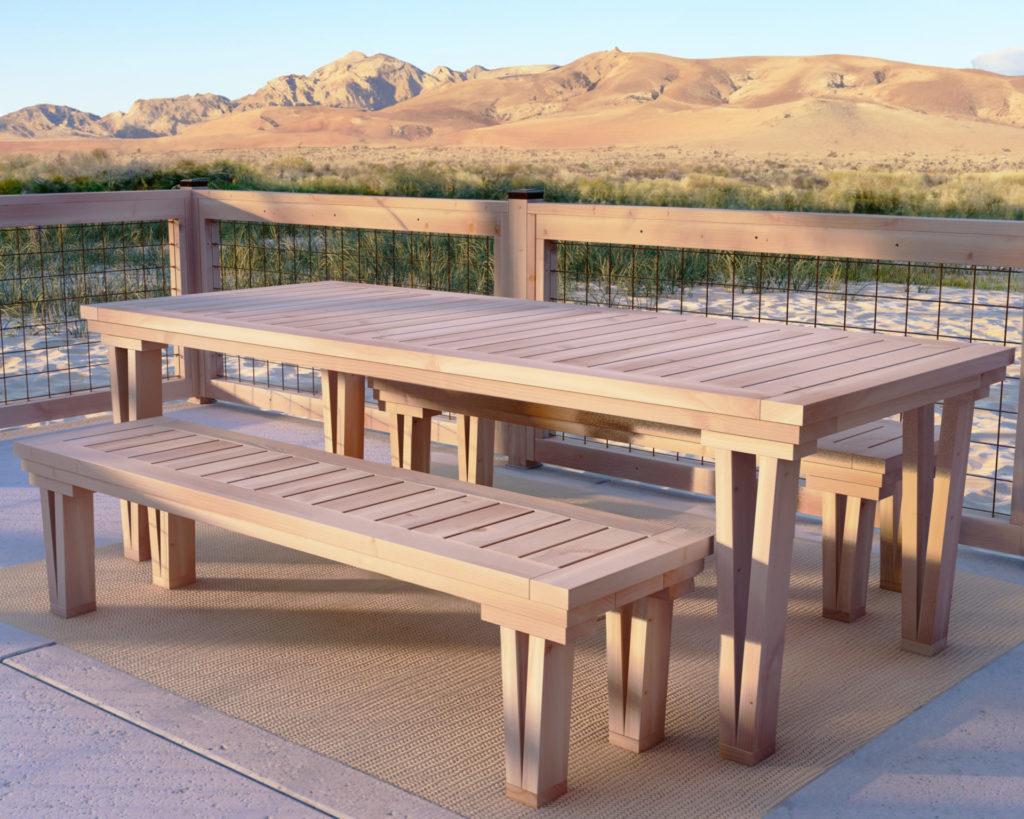
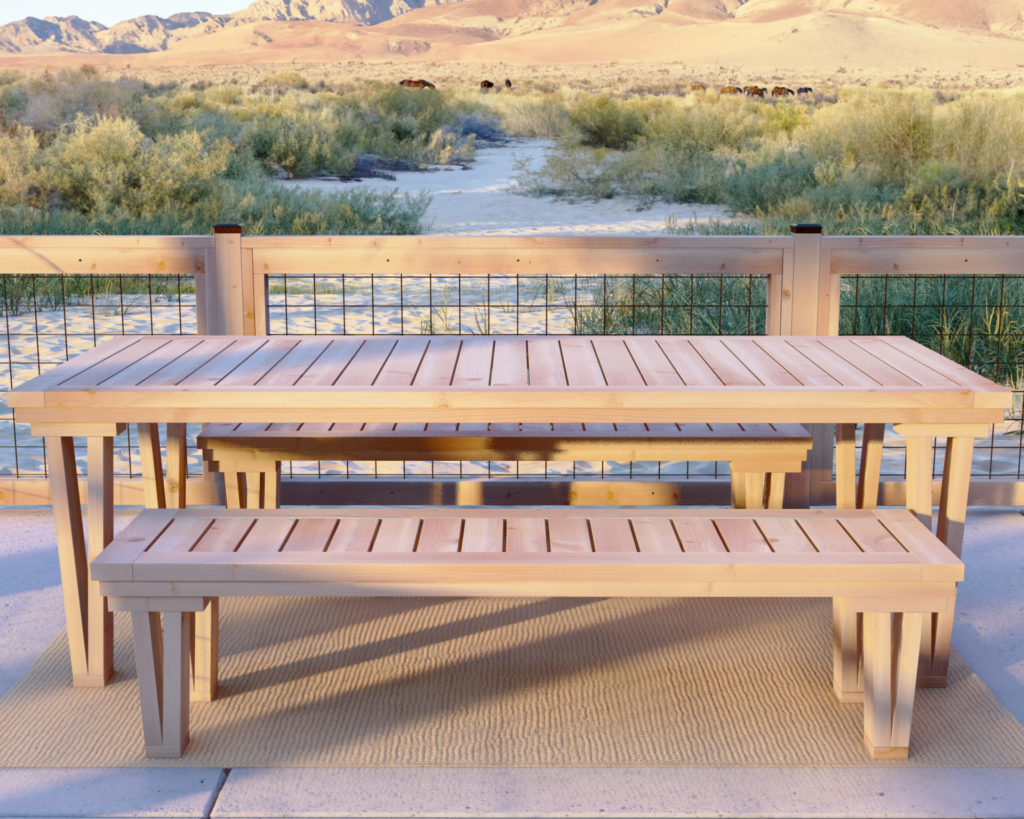
Every patio or garden deserves furniture that enhances its unique atmosphere. A modern, elegant table and bench set can become the centerpiece of countless enjoyable moments with friends and family. Our DIY outdoor table and bench set seamlessly blends with your outdoor surroundings while effortlessly standing out as an artistic masterpiece. With a simple design addressing the needs of beginners, this project promises impressive results without the need for complex woodworking skills.
Reimagine Your Outdoor Space with a Modern Farmhouse Appeal
The modern farmhouse style has captivated the world of home design, blending the coziness of rustic charm with sleek, contemporary elements. Our table and bench set brings this picturesque style to your outdoor space, elevating your patio or garden’s aesthetic. The minimalist design, combined with sturdy wooden construction, reflects the beauty and resilience of the Mojave Desert environment while capturing a sense of sophisticated elegance.
Functionality Meets Impeccable Design: A Table and Bench Set for Every Season
Our DIY table and bench set not only provides visual appeal, but also addresses the practical aspects of outdoor living. The slatted tabletop and bench top design allows rainwater to drain easily, making them ideal for all-weather conditions. The sturdy construction, utilizing 2×4 and 2×6 lumber, ensures durability and longevity. This table and bench set is not only gorgeous to look at but will also stand the test of time.
Beginner-Friendly DIY Project: No Fancy Joints or Cuts Needed
Crafting an elegant piece of outdoor furniture doesn’t have to be an intimidating task. This table and bench set has been designed with simplicity in mind, perfect for those just beginning their woodworking journey. Avoiding complex joints and cuts, our step-by-step DIY guide and PDF blueprint will empower you to confidently build a sleek and modern centerpiece for your outdoor oasis.
Unleash Your Creativity: Customizable Options for Your Unique Style
One of the greatest benefits of a DIY furniture project is the ability to customize every aspect to suit your personal taste. With our table and bench set, you can let your creative flair shine by selecting the perfect stain or paint to match your outdoor décor. Whether you opt for a natural wood finish or a bold pop of color, your handcrafted table and bench will reflect your unique style and vision.
The Heart of Your Outdoor Entertainment: A Place for Unforgettable Gatherings
Imagine hosting an alfresco dinner party under the stars or a casual weekend barbecue with your loved ones, gathered around your modern farmhouse table and bench set. With its eye-catching design and pristine functionality, this DIY project will quickly become the heart of your outdoor gatherings, creating the backdrop for cherished memories and countless moments of laughter and connection.
Transform Your Outdoor Space Today: The Ultimate DIY Modern Table and Bench Set
By embarking on this DIY journey, you’ll not only enhance your outdoor space but also cultivate a sense of accomplishment and satisfaction. Our step-by-step guide and PDF blueprint provide clear instructions to create your very own table and bench masterpiece. Don’t let another beautiful day go by without a stylish, functional, and captivating outdoor setting for your home. Dive into this beginner-friendly DIY project today and build your dream outdoor table and bench set.
Your Beautiful Bench: A Welcoming Outdoor Statement
Your outdoor space should be a reflection of your style, character, and passions. With our DIY modern farmhouse table and bench set, you’ll create a welcoming space that exudes elegance, resiliency, and undeniable charm. A masterpiece crafted with your own hands, this table and bench set will be the perfect testament to your creativity and ambition, transforming your outdoor oasis into the ideal backdrop for shared moments and unforgettable experiences. Embrace your inner artist, and let the magic unfold one step at a time.
Time to build
About 6 hours
Cost of fence build
Table-$100
Each bench -$50
Skill level required
Beginner
Download the PDF plans
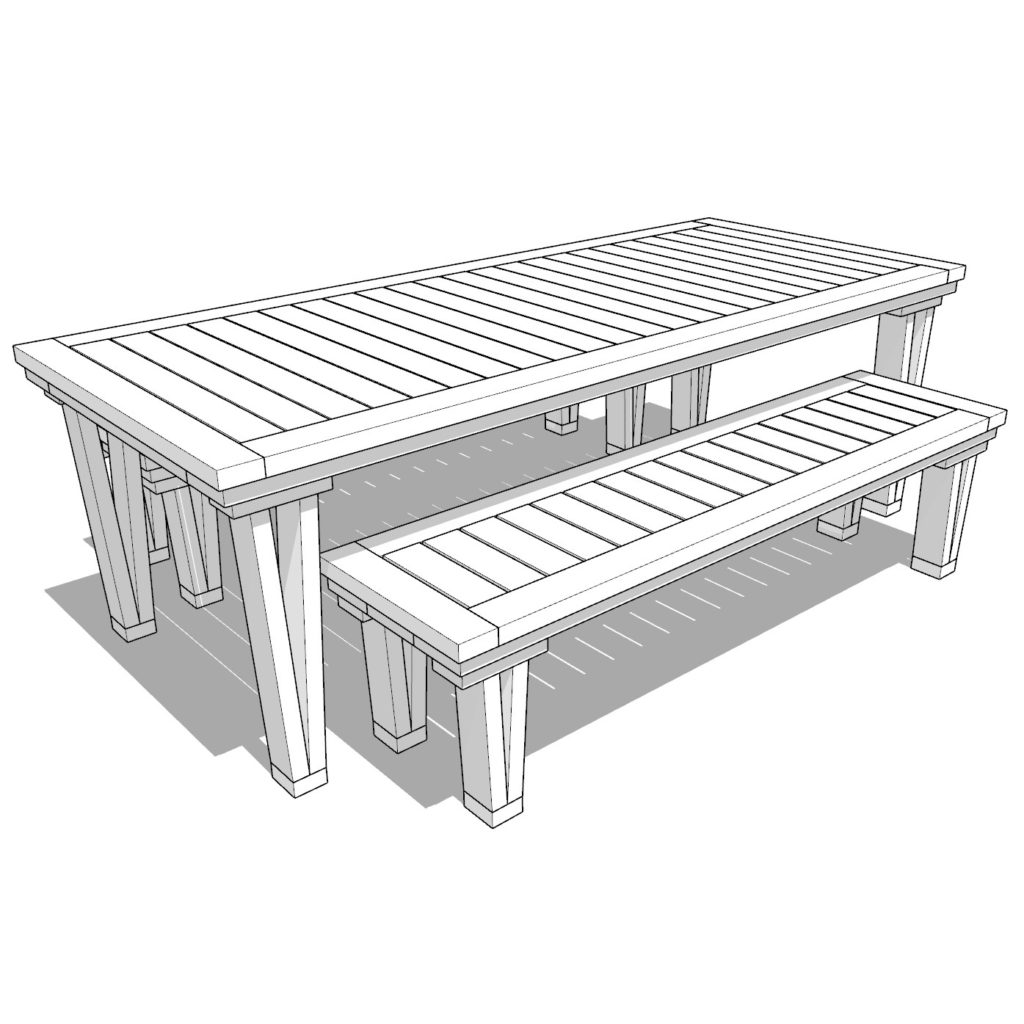
Table and bench PDF plan
In the PDF download, you can find:
– Clearly written, step-by-step instructions
– A comprehensive list of materials required
– A detailed cut list for each piece
– A list of essential tools for the project
– Visual diagrams to guide you through the process
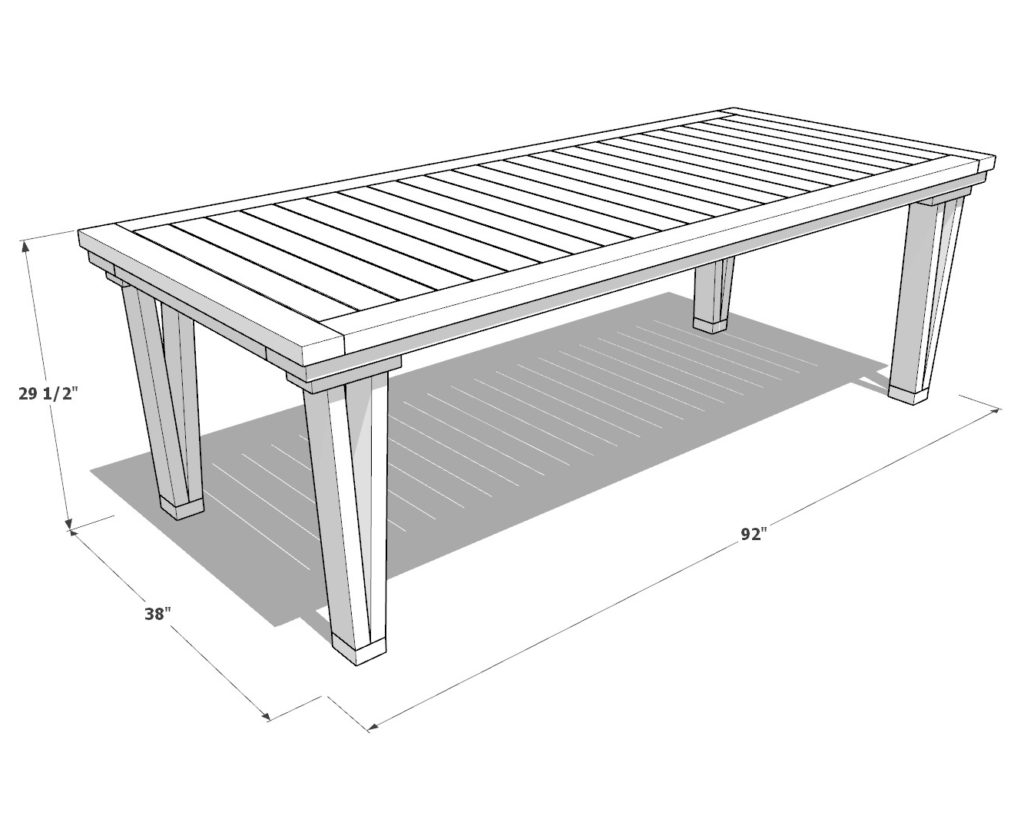
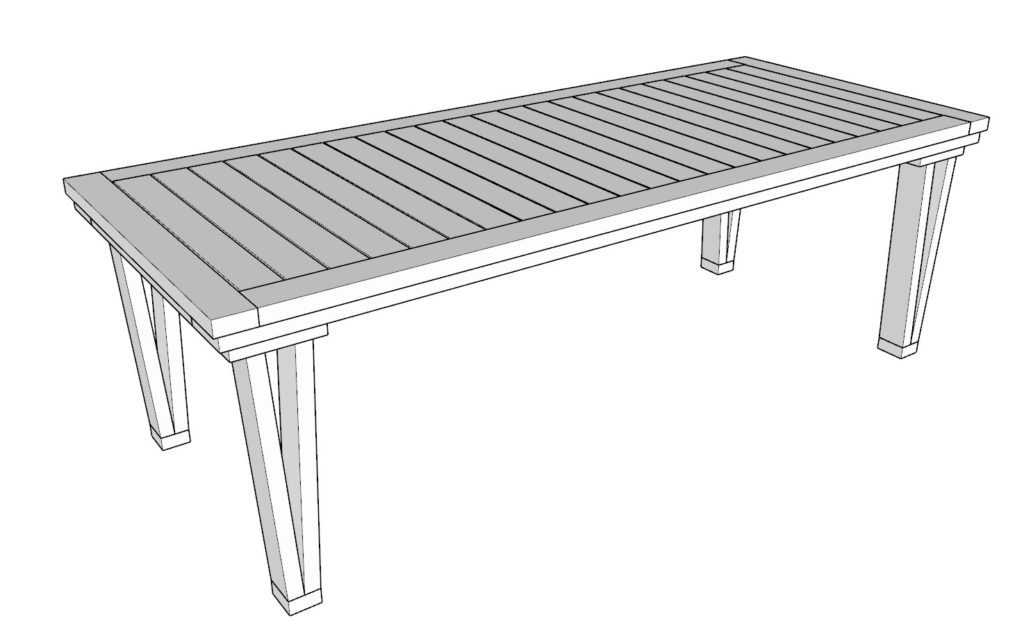
DIY Modern Farmhouse Table Dimensions
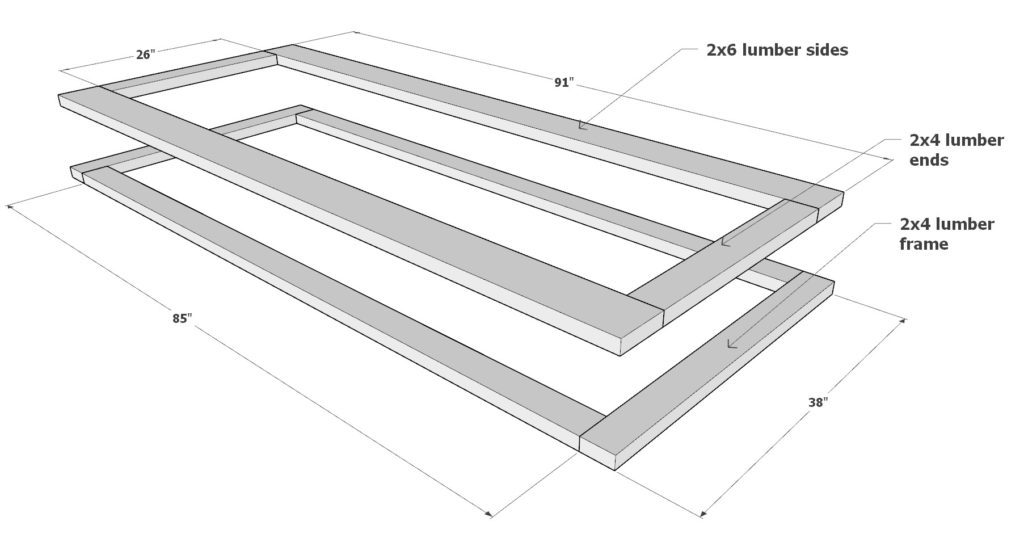
Step 1: Construct the Table Top
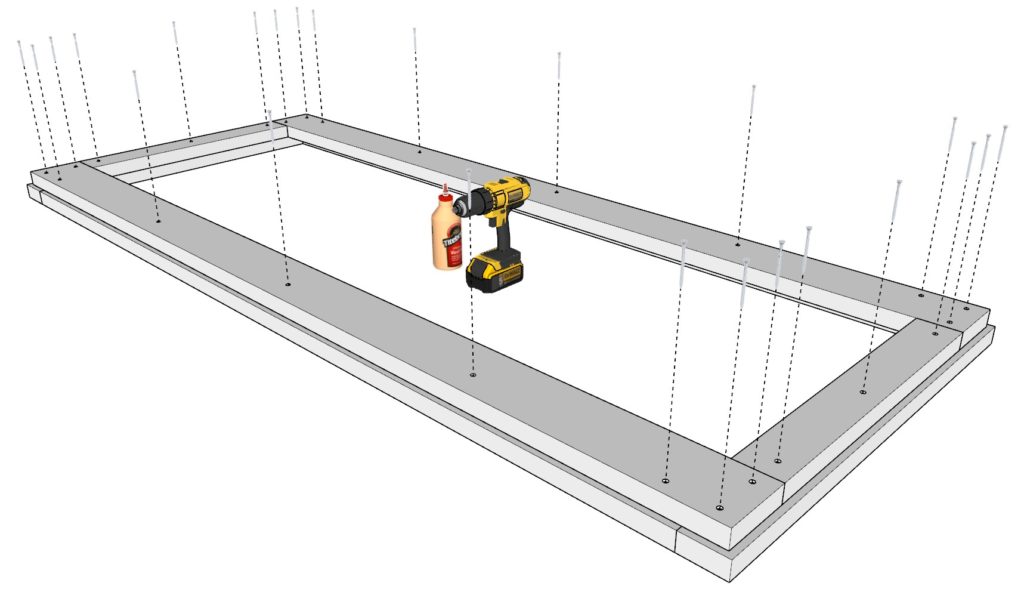
Begin by creating the table top frame using two 91-inch 2×6 lumber pieces and two 26-inch 2×4 lumber pieces. Align them atop two 85-inch 2×4 lumber pieces and two 38-inch 2×4 lumber pieces, as illustrated in the image provided. Firmly secure them with ample wood glue and 2.5-inch screws, ensuring optimal stability. It’s recommended to use countersunk screws and predrill holes to avoid wood splitting.
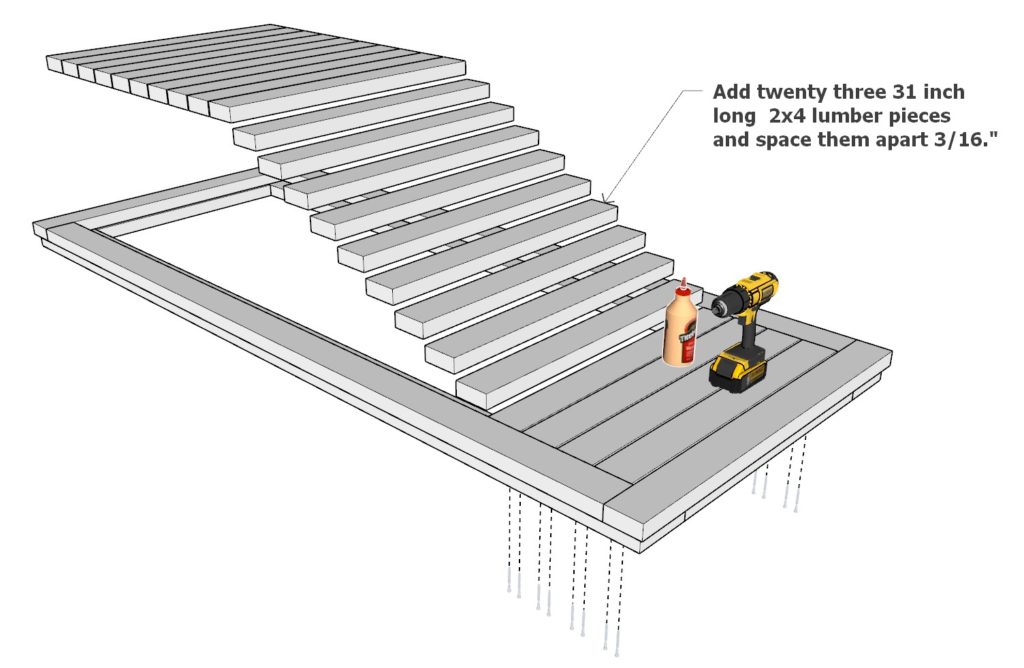
Now that you’ve formed the table top frame, add twenty-three 31-inch long 2×4 lumber pieces for the decking. Space them 3/16″ apart to facilitate water drainage. Attach each piece using 2.5-inch screws from the bottom of the table top, keeping the top surface free from visible screw heads. Don’t forget to use wood glue and predrill holes when securing the decking.
Tip: If you’re unsure about ideal spacing or alignment, using a spacer such as a wooden yardstick or other thin, flat object can help you maintain consistent 3/16″ gaps between the decking boards. This will ensure that your table top has a clean, uniform appearance while still allowing for proper drainage.
Step 2: Construct the Table Legs
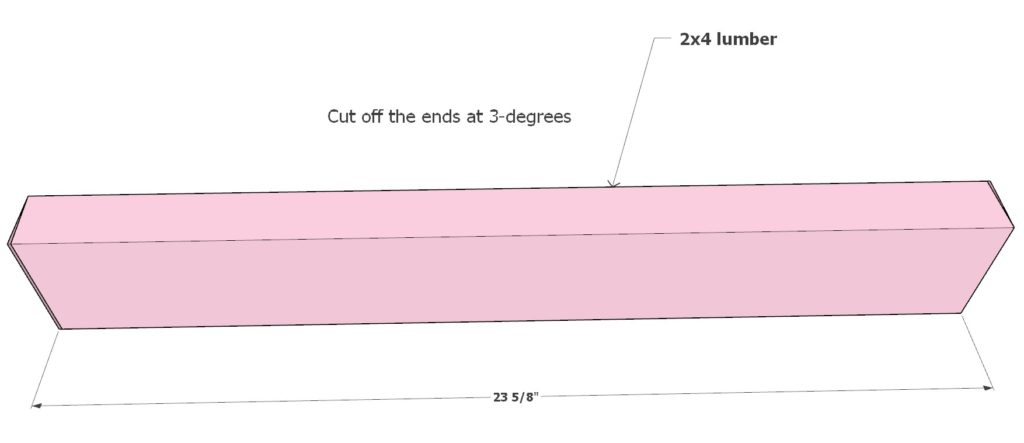
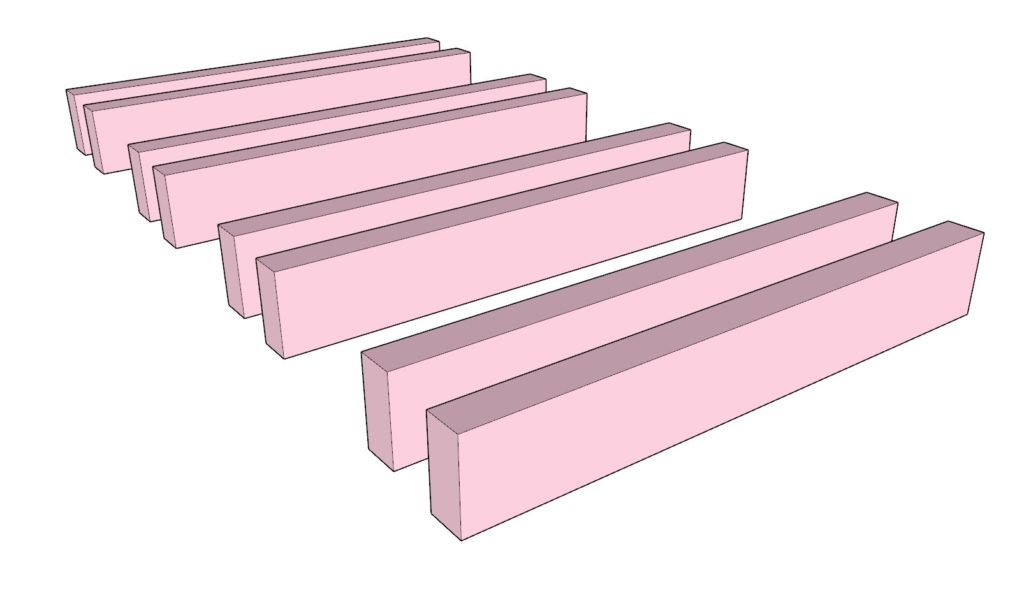
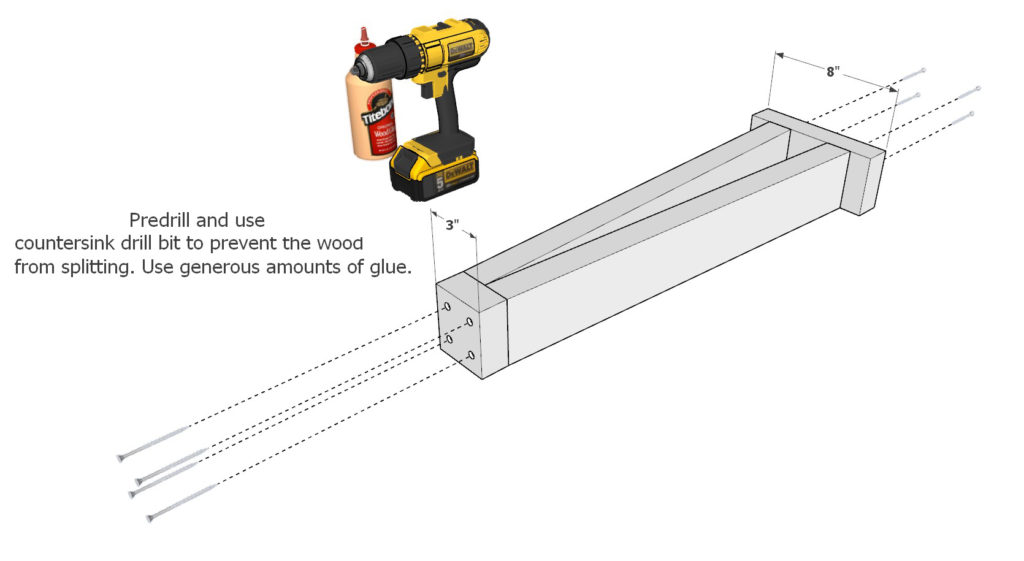
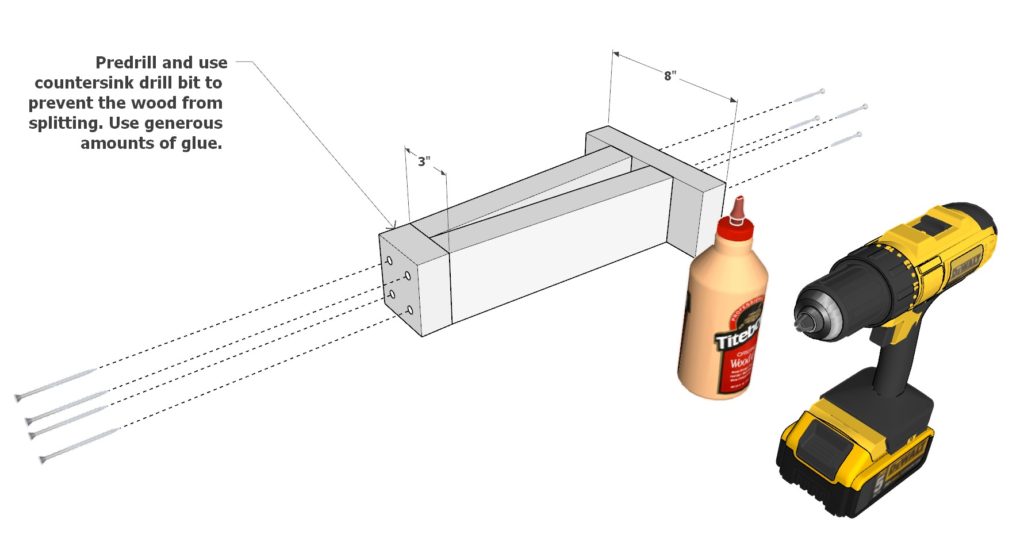
Begin by cutting eight 23-5/8 inch 2×4 lumber pieces and trimming the ends at a 3-degree angle, as shown in the provided image. These will serve as the primary components of your table legs.
Next, attach a 3-inch long 2×4 lumber piece to the base of each leg for added stability. Then, secure an 8-inch long 2×4 lumber piece to the top of each leg to serve as an attachment point or anchor for the table top. While assembling the legs, make sure to predrill holes and use countersunk screws to prevent wood from splitting. Don’t forget to apply a generous amount of wood glue, and fasten the pieces with 2.5-inch screws.
To protect your flooring during table movement and avoid catching or tearing wood, gently sand the ends of each leg on all sides. For additional protection, consider attaching rubber or felt pads to the bottom of each leg.
Repeat this process to create a total of four legs for your table.
Tip: To maintain the quality of your table and protect your floors, periodically check the condition of the protective pads on the leg bottoms and replace them if needed. This will ensure smooth and scratch-free movement of your table.

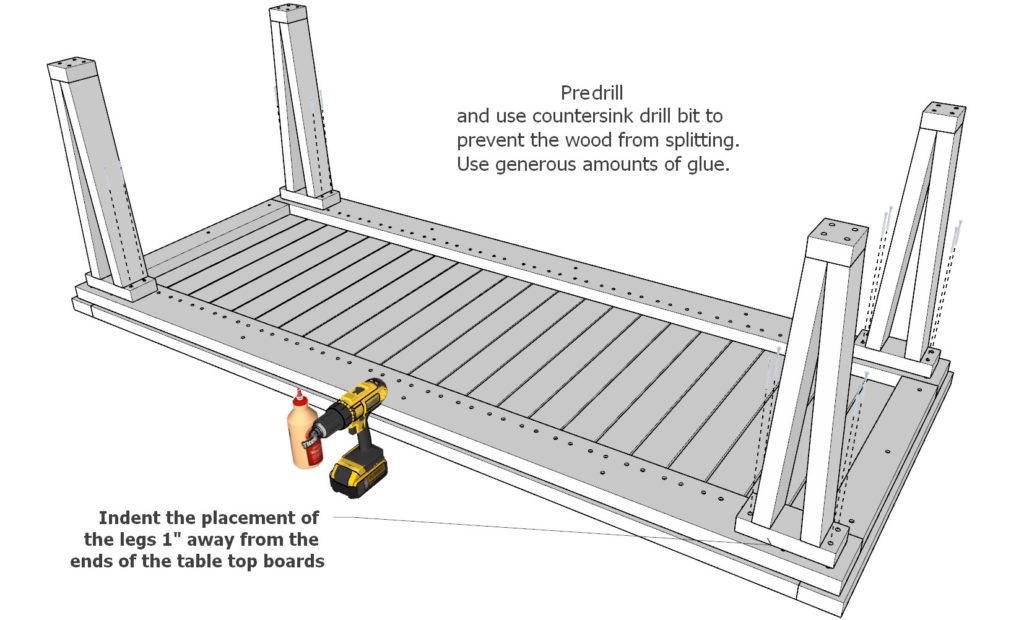
Step 3: Attach the Legs to the Table Top
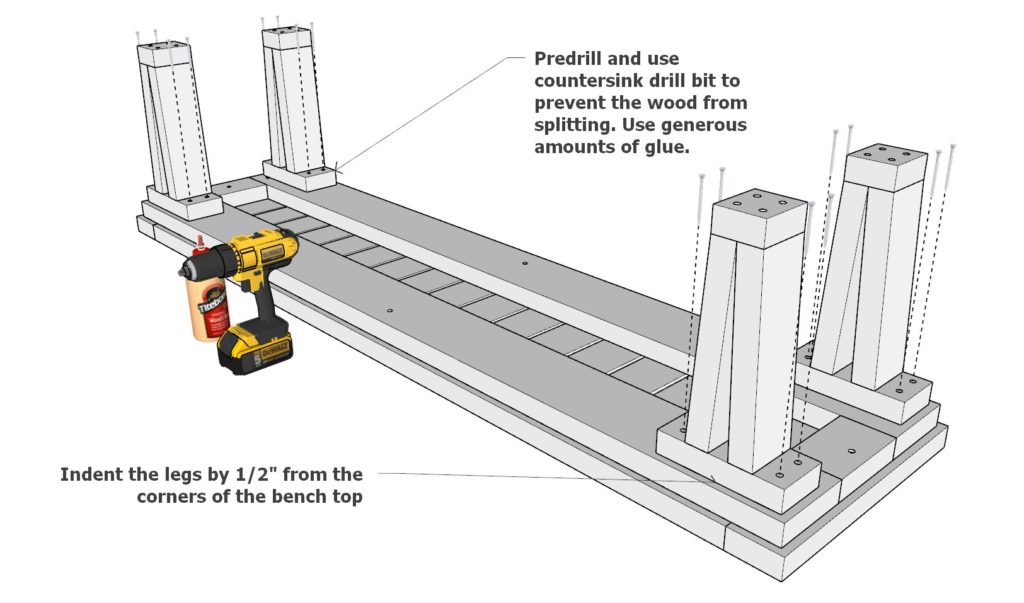
Now that you’ve assembled the legs, it’s time to connect them to the table top. Carefully position each leg 1 inch inward from the ends of the table top boards. This indent will give your table a refined look while ensuring adequate support for the entire structure.
As you attach the legs, make sure to countersink the screws, predrill the holes, and apply a generous amount of wood glue for optimal adhesion. Use 2.5-inch screws to securely fasten the legs to the table top.
Step 4: Sanding and Finishing Touches
With the table assembled, it’s time for the finishing touches. Begin by sanding down the entire table surface and edges, ensuring a smooth and comfortable feel. Pay special attention to the edges – rounding them off with a sander or router will prevent any discomfort for users when leaning or resting their forearms on the table.
When it comes to finishing your table, there are multiple options to choose from, including staining or painting the wood or simply leaving the natural wood exposed. To prepare for staining or painting, ensure the surface is thoroughly sanded and cleaned of any dust or debris. Apply the chosen finish in thin, even coats, allowing adequate drying time between applications.
If you prefer to display the natural beauty of the wood, you must still protect it for outdoor use. Consider applying a clear coat of outdoor sealant, such as polyurethane or varnish, to shield the wood from weather elements and preserve its longevity.
Tip: Periodically examine your table’s protective finish, regardless of the chosen finish type. Reapply the finish or sealant as necessary to maintain the table’s appearance and durability in the long run.
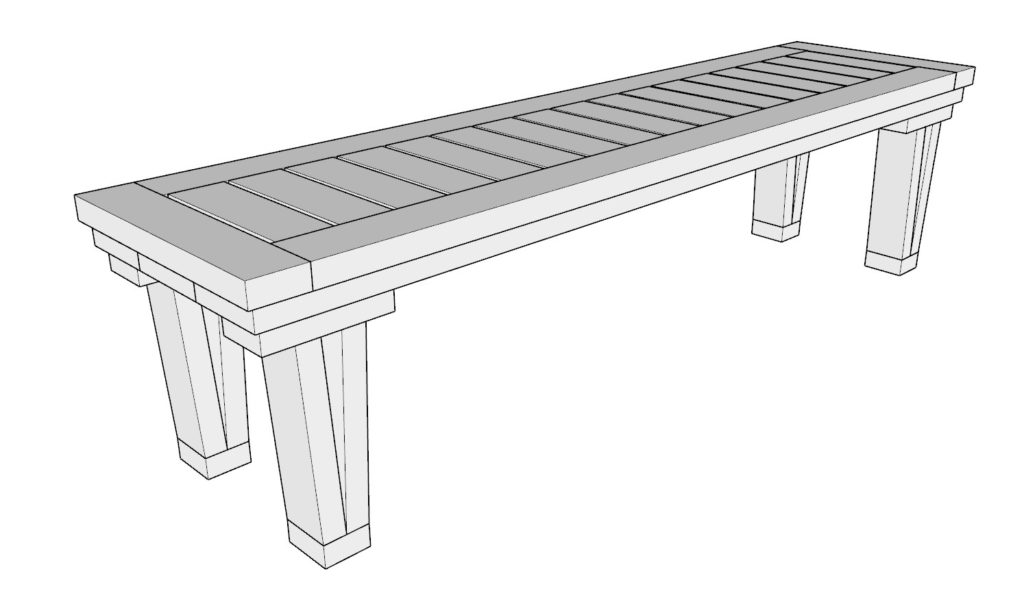
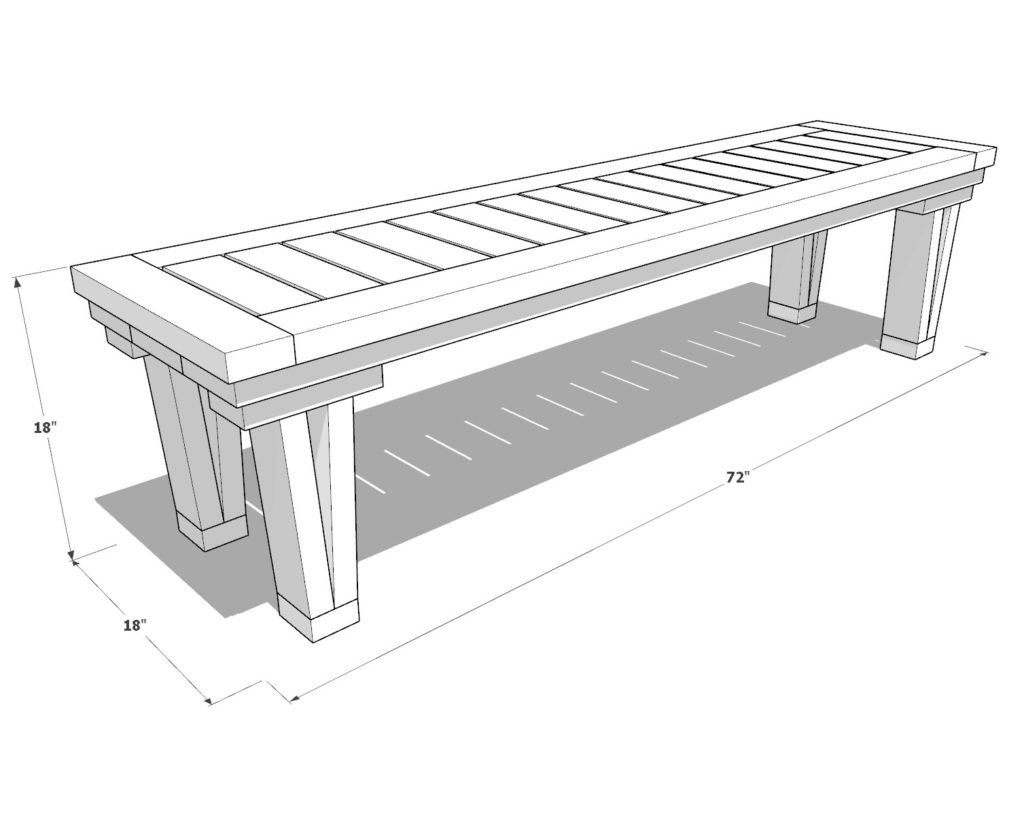
DIY Modern Farmhouse Bench Dimensions
Step 1: Build the Bench Frame
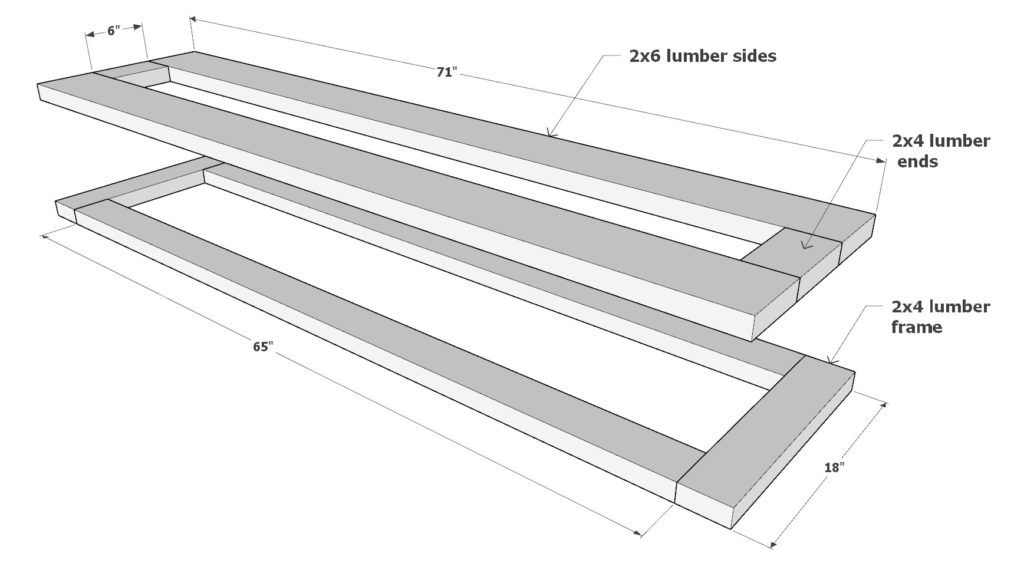
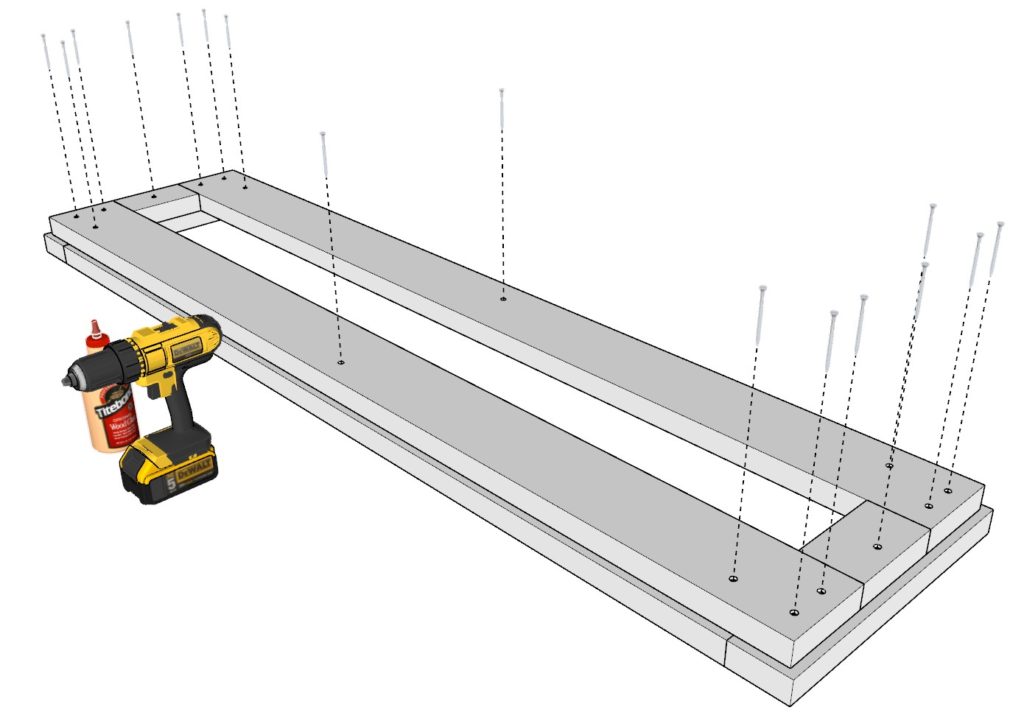
Begin by constructing the frame for your bench using techniques similar to those employed for the table. Take two 71-inch 2×6 lumber pieces and two 6-inch 2×4 pieces, and superimpose them on top of two 65-inch 2×4 lumber pieces and two 18-inch 2×4 lumber pieces. As with the table, ensure a solid connection by using generous amounts of wood glue, predrilling holes, and employing countersunk 2.5-inch screws to attach the pieces securely.
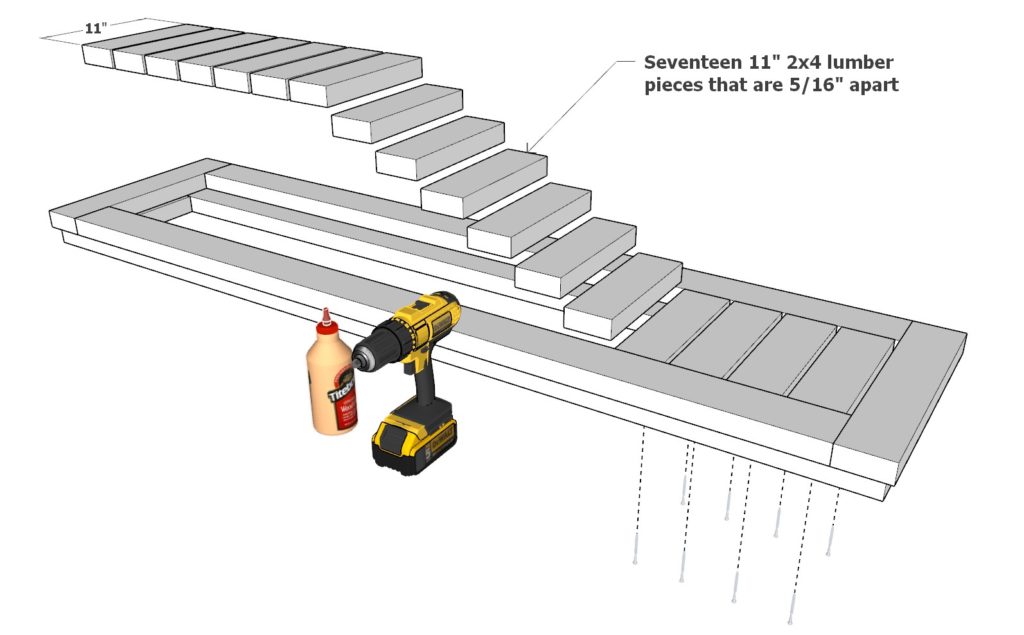
Once the bench frame is in place, start adding the seventeen 11-inch 2×4 lumber pieces for the decking. Space them 5/16″ apart to maintain a consistent appearance and proper drainage. This spacing will also mirror the design of the table, creating a cohesive outdoor furniture set.
Tip: When installing the decking pieces, use a spacer such as a wooden yardstick or another thin, flat object to maintain consistent 5/16″ gaps between the boards. This small detail will enhance the overall appearance and functionality of your bench.
Step 2: Construct and Attach the Bench Legs
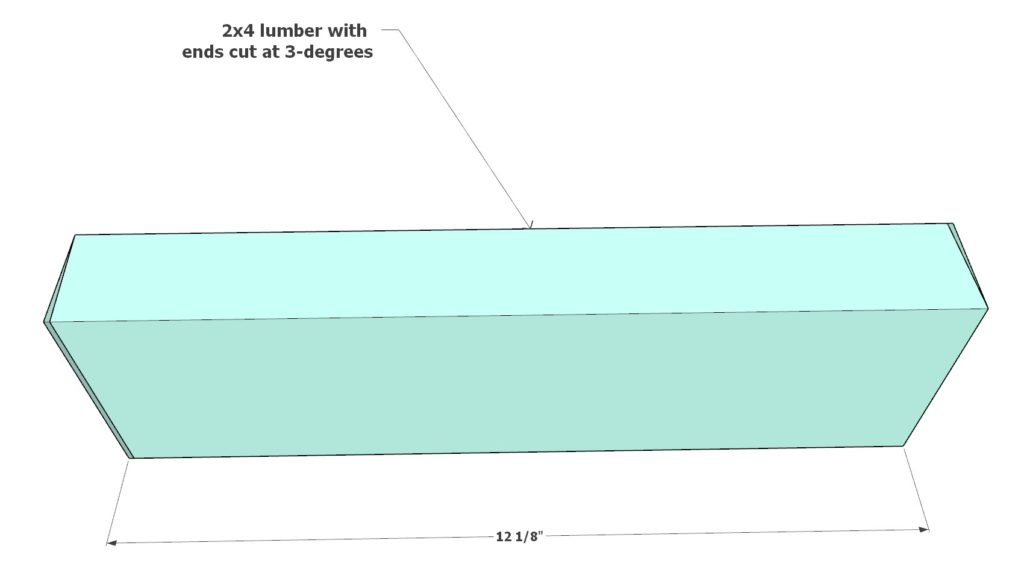
To build the bench legs, begin by cutting eight 12-1/8 inch long 2×4 lumber pieces and trimming the ends at a 3-degree angle, replicating the technique used for the table legs.
Attach a 3-inch 2×4 lumber piece to the end of each leg for stability and an 8-inch lumber piece to the top, which will function as an attachment point for the bench frame. Secure each piece using generous amounts of wood glue, predrilled holes, countersunk 2.5-inch screws, and proper alignment.
Be sure to sand down the leg ends thoroughly, as benches tend to move more frequently than tables. Protecting the legs with felt or rubber pads will prevent them from catching on surfaces and minimize potential damage.
When attaching the legs to the bench, indent them inward by 1/2″ to match the table’s design. Use countersunk screws, predrilled holes, a generous amount of wood glue, and 2.5-inch screws to secure the legs to the bench frame.
Tip: Periodically inspect the protective pads on the bench leg bottoms and replace them as needed. This will ensure that your bench legs remain protected and minimize the risk of damage when moving your bench.
Step 3: Finishing Touches for the Bench
Just as with the table, the final step for your bench involves perfecting the finishing touches. Begin by sanding down the entire bench surface and edges to ensure a smooth, comfortable seating experience. Pay special attention to the edges – rounding them off using a sander or router will prevent any discomfort when leaning or sitting on the bench.
When deciding on finishes for your bench, the same options apply as for the table – staining, painting, or showcasing the natural wood. Prepare the surface by sanding and cleaning thoroughly. Applying the finish in thin, even coats will result in a smooth and appealing appearance.
If you prefer the natural wood look, protect the bench with a clear outdoor sealant such as polyurethane or varnish. This will shield the wood from external elements and prolong the bench’s lifespan.
Tip: To maintain a cohesive look between the table and bench, opt for a similar or identical finish. Additionally, periodically check the protective finish on both pieces, reapplying as needed. This proactive approach will keep your outdoor furniture set looking flawless and ensure its durability.