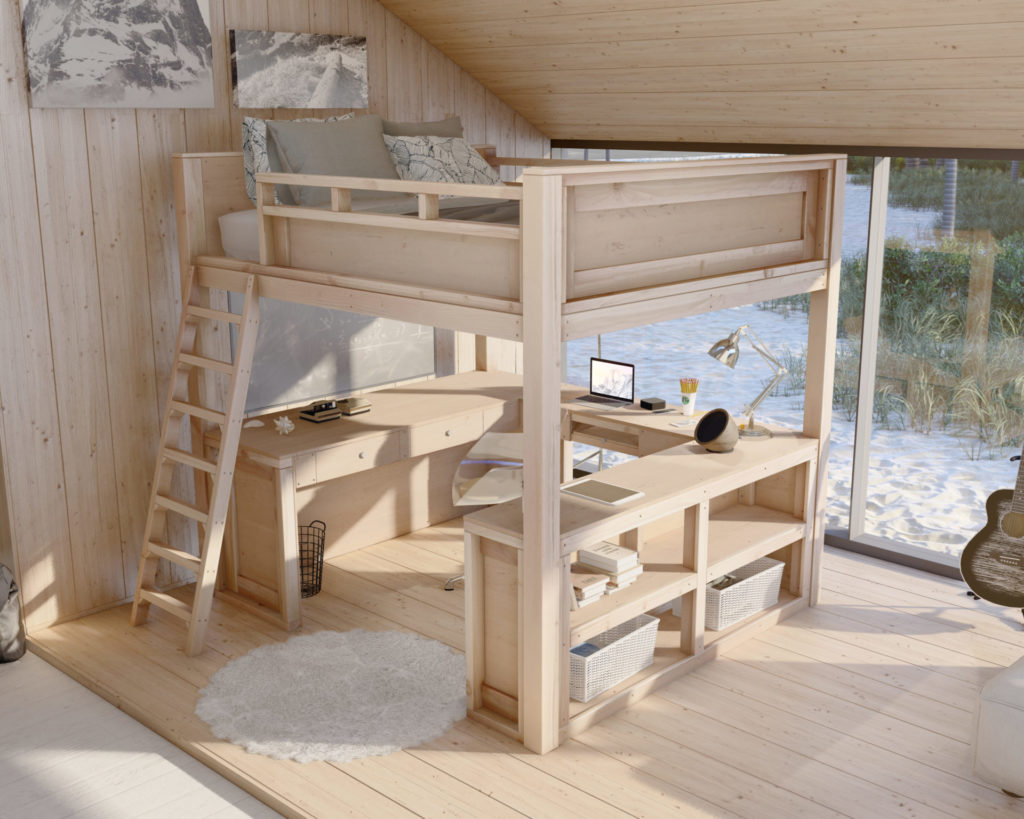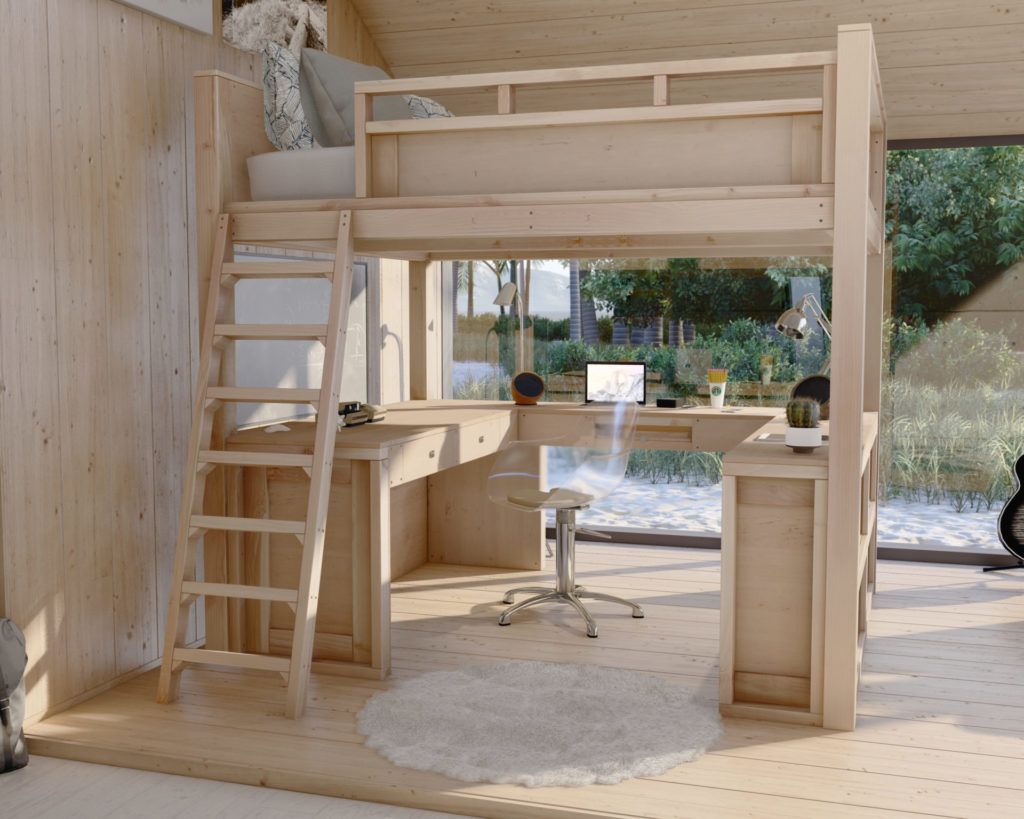
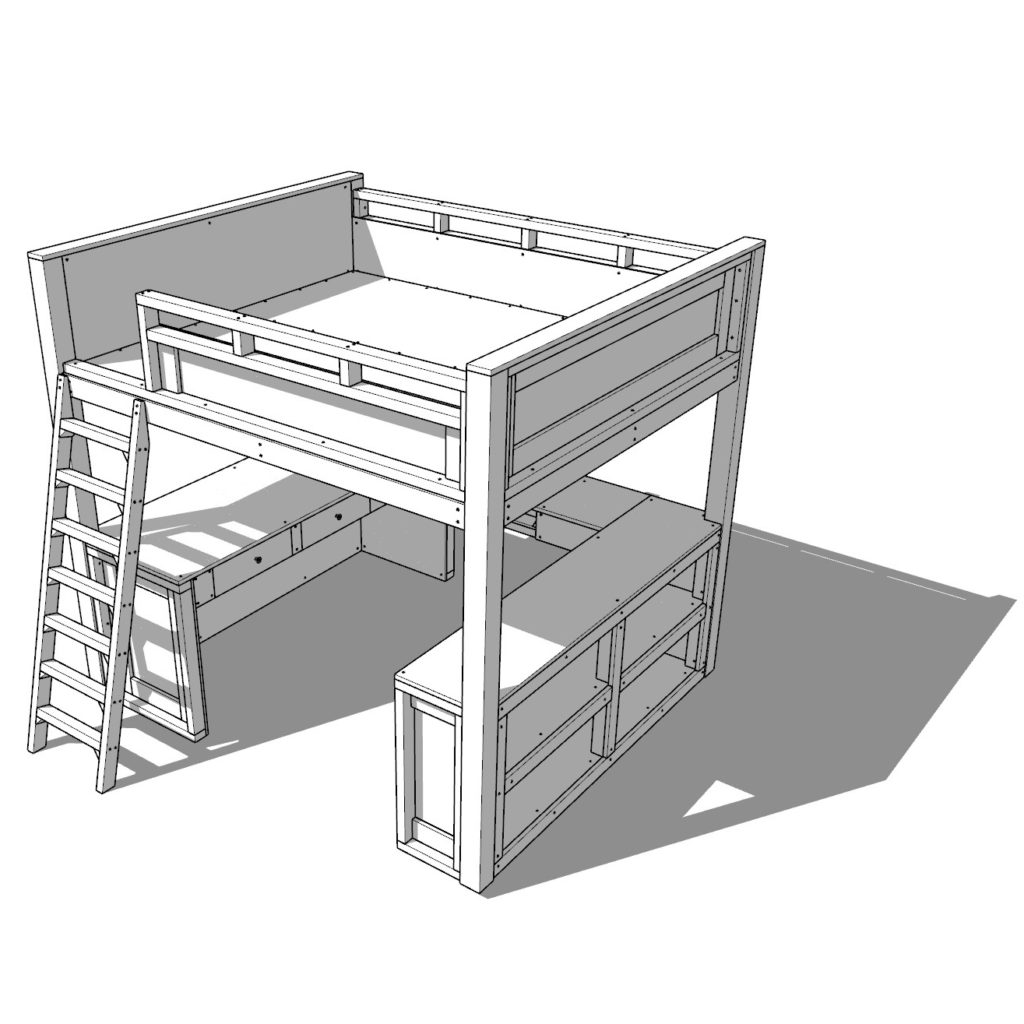
Overview DIY loft bed:
The loft bed is perfect for those who want style, function, and plenty of storage space in their bedroom. It’s also perfect for small bedrooms because it takes up less space than a traditional bed. Some of the benefits of this design are listed below:
Sturdy and safe
- The design of the DIY loft bed is made from several components that are assembled in the room. Once assemble the loft bed is sturdy and designed to handle a fair amount of weight. The posts are reinforced on all sides to give the loft bed stability.
Fun to decorate
- Decorating the loft bed will vary depending on the individual’s personal style and preferences. However, once built, some tips include adding personal touches such as photos, artwork, and laying out personal items; selecting bedding and pillows in colors and patterns that reflect one’s personality and uniqueness.
Stylish
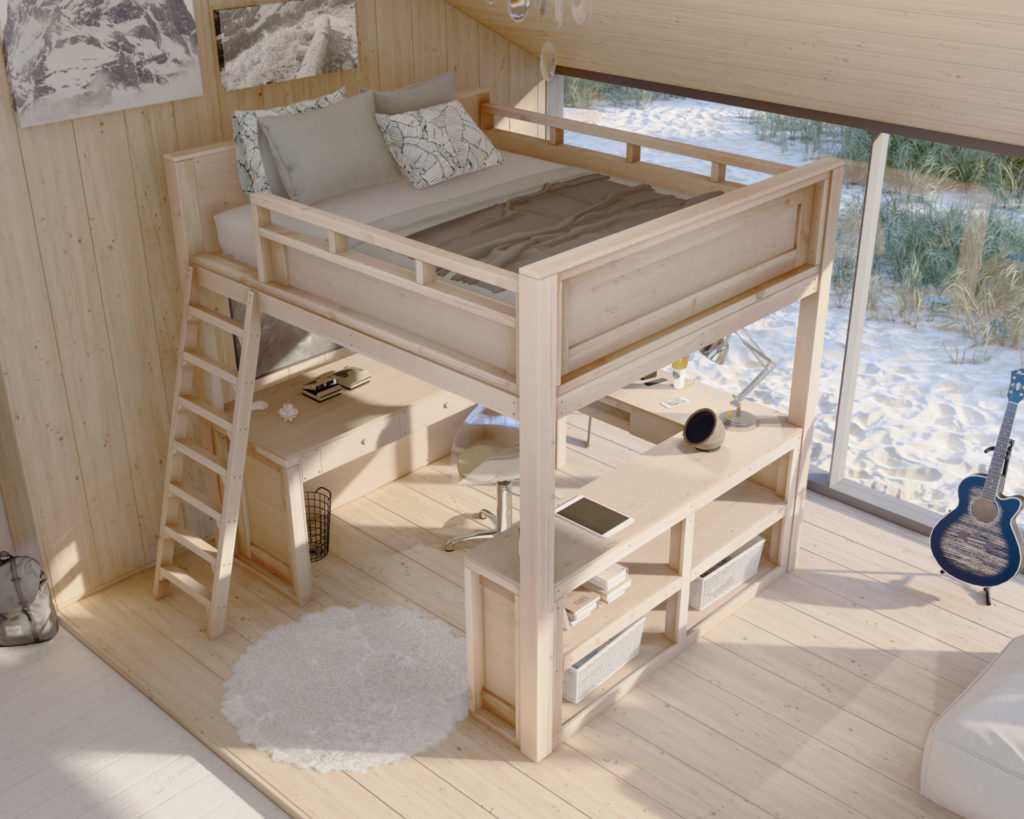
- The DIY loft bed is a stylish piece of furniture because it is a bed that is elevated off the ground, making it a great solution for taking advantage of vertical space in any room.
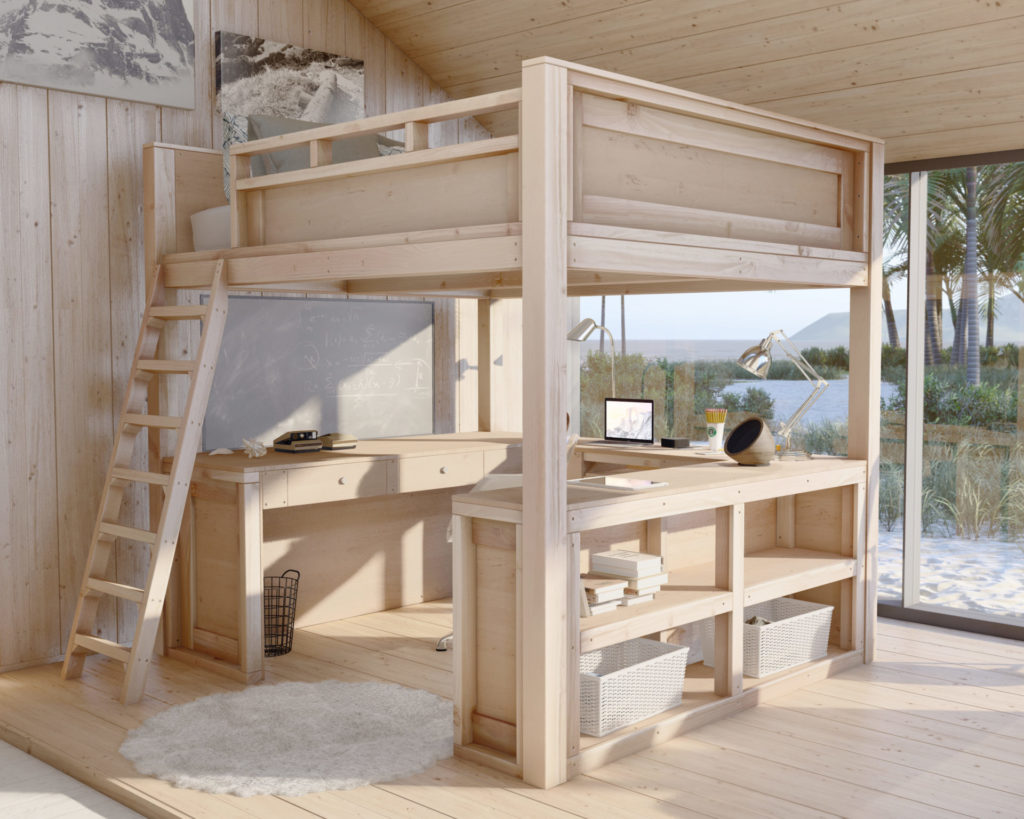
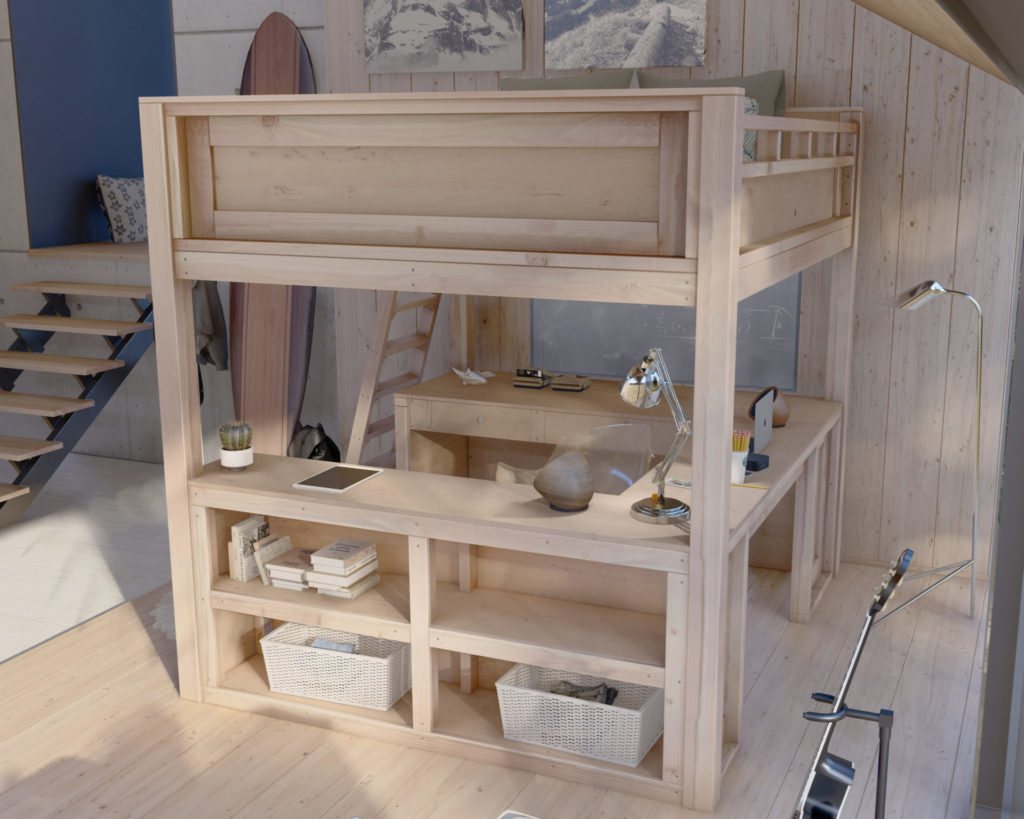
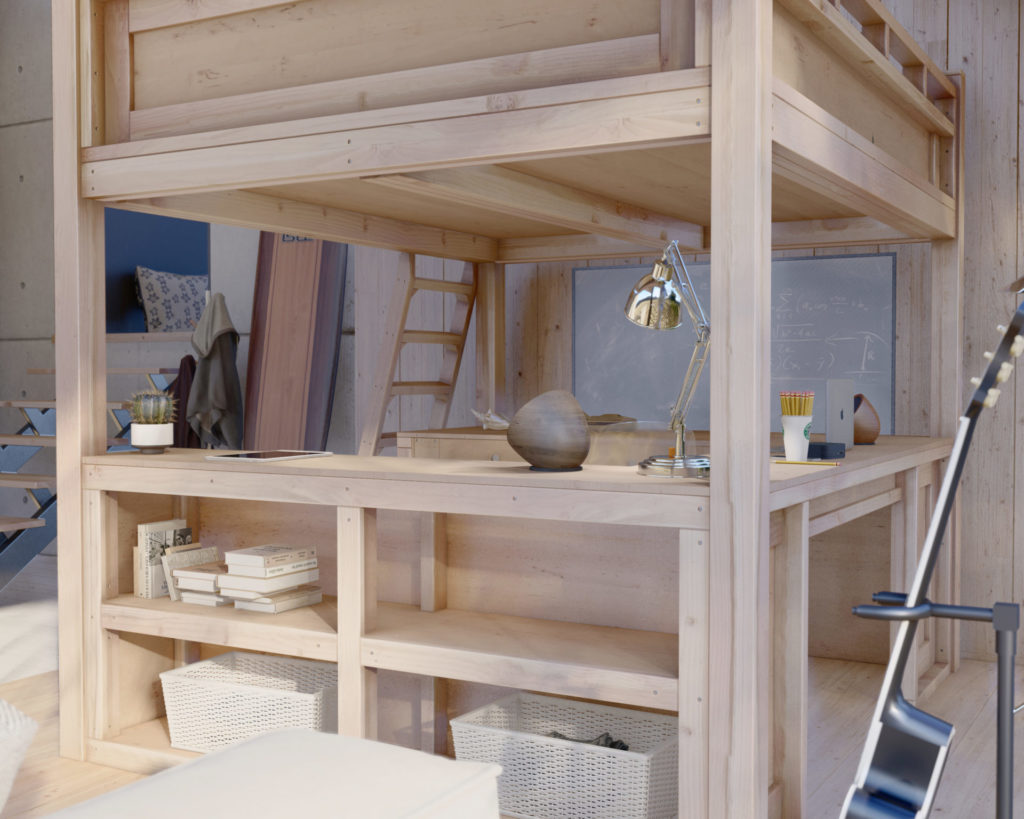
Ample storage space
- This bed has open cubie shelves that are perfect for displaying personal items, storage of books, or housing storage baskets. Storage under the desk is also available for larger items.
Easy reach
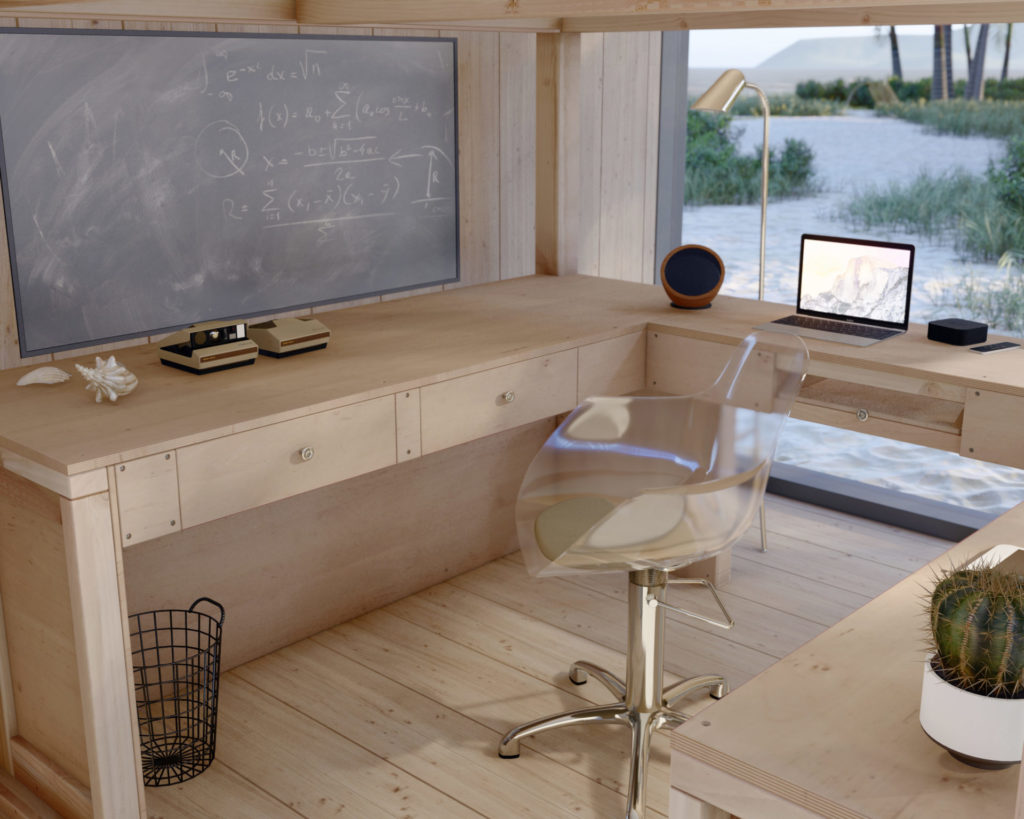
- Because of the nature of the design of the loft bed, everything that is needed is within reach. The bottom level is used for study. With a comfortable chair, good lighting, books, a computer, and other office supplies, the loft bed study level can be a perfect and quiet place needed for study and concentration.
compact desk
- The compact desk can help you be more productive by keeping your work area tidy and organized while providing a comfortable place to work.
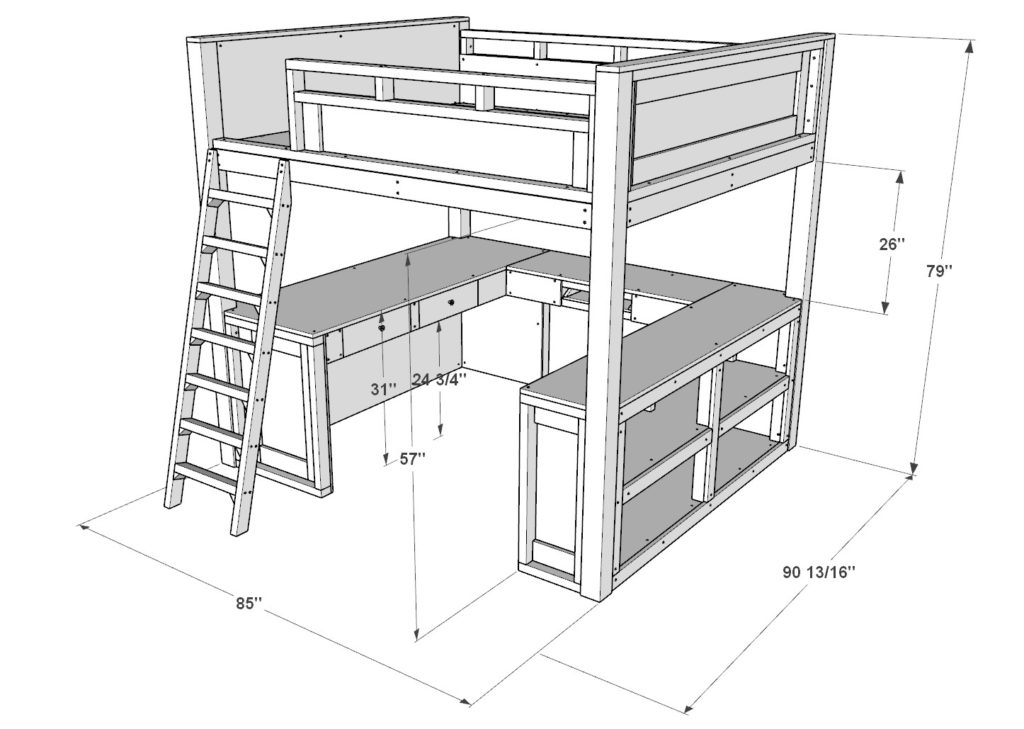
Specifications of DIY study loft bed:
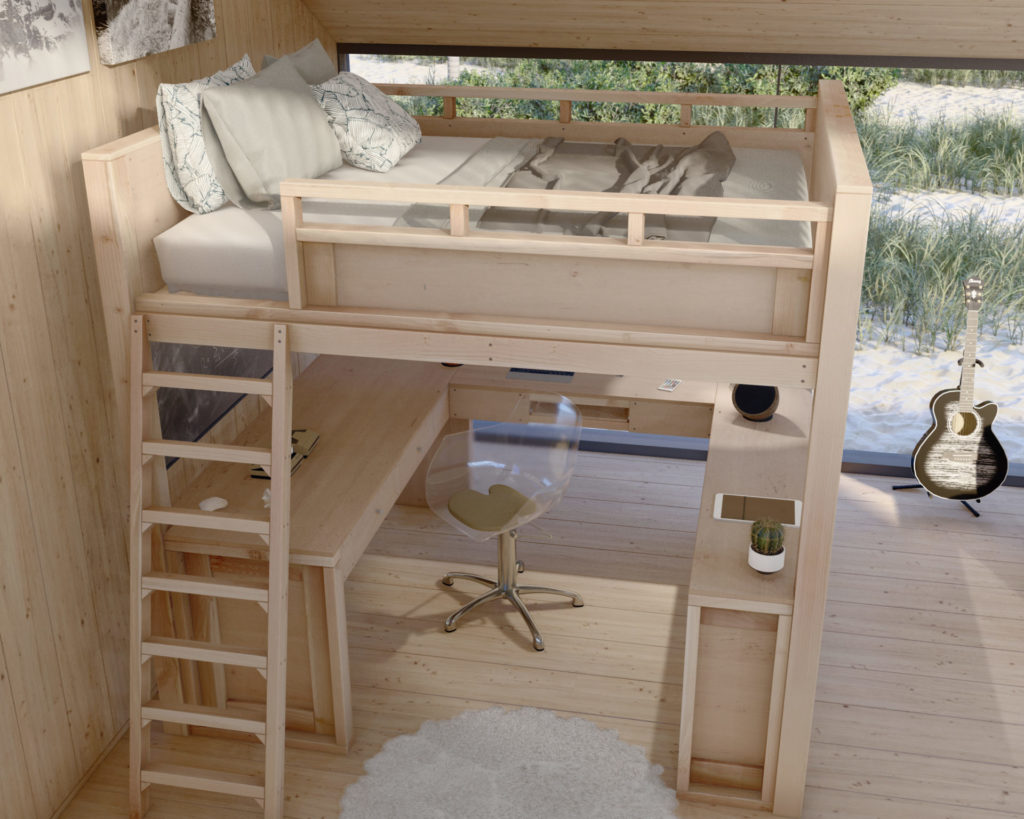
- Designed for a twin sized mattress. Do not use box springs on this loft bed.
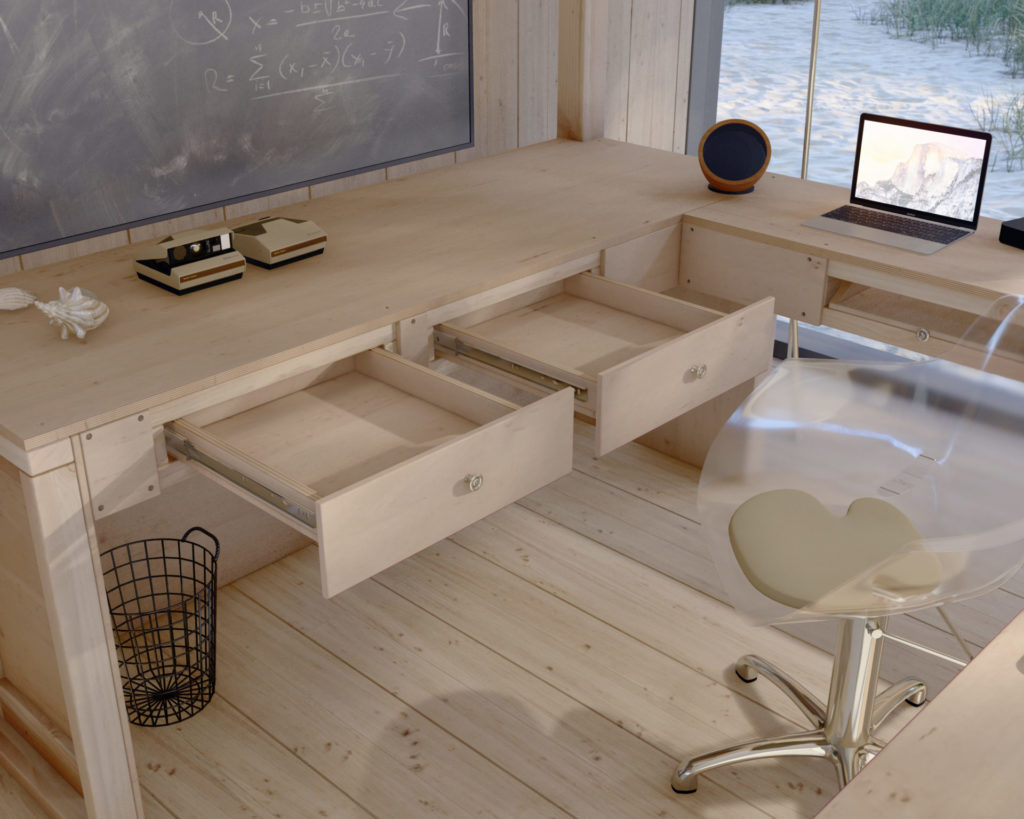
- Features a desk with a keyboard drawer, open cubbies, two pull out drawers, and a loft bed on top that can be accessed with a ladder.
- Ladder is fastened directly to the bed frame and is stationary for safety
- The recommended minimum ceiling height for a room is 8 feet. This should be taken into account when measuring the room, as ceiling fans or hanging fixtures will add to this height.
- Study space is designed with an open concept on all four sides. This means that you can have more option regarding the direction the bed can face.
- The frame is heavily reinforced with multiple joints, screws, and glue for safety.
- This bed is too large to fit through a door. Assembly is done is several stages with several components (covered in the DIY PDF plans).
How Good DI I have to be to build this loft bed?
This loft bed is a great project for beginners to woodworking because it uses simple 90-degree joints and doesn‘t require any fancy cuts or tools. My goal is to help those who love being creative and working with their hand. The PDF step by step instructions are a great way to help guide you through the building process, to save time, and to optimize building material.
How much money can I save building the DIY loft bed?
Building a DIY loft bed will be significantly cheaper than purchasing a pre-made loft bed from a store. The designs that I have researched while putting together this design ranged from $2,000- $4,000. Building the bed yourself can help cut that price down to a fraction of the cost.


Time to build
About 14 hours
Total cost of build
About $700
Skill level required
Beginner
Download the PDF plans
loft bed PDF plans
What is included in the PDF download?
- Easy to read step by step instructions
- Material list
- Tools needed
- Helpful links to materials and tools needed
Step-by-step instruction on building the DIY loft bed
Recommend tools/materials
Available with the purchase of the PDF. Thank you for making this website possible with your support.
Lumber purchase list
Available with the purchase of the PDF. Thank you for making this website possible with your support.
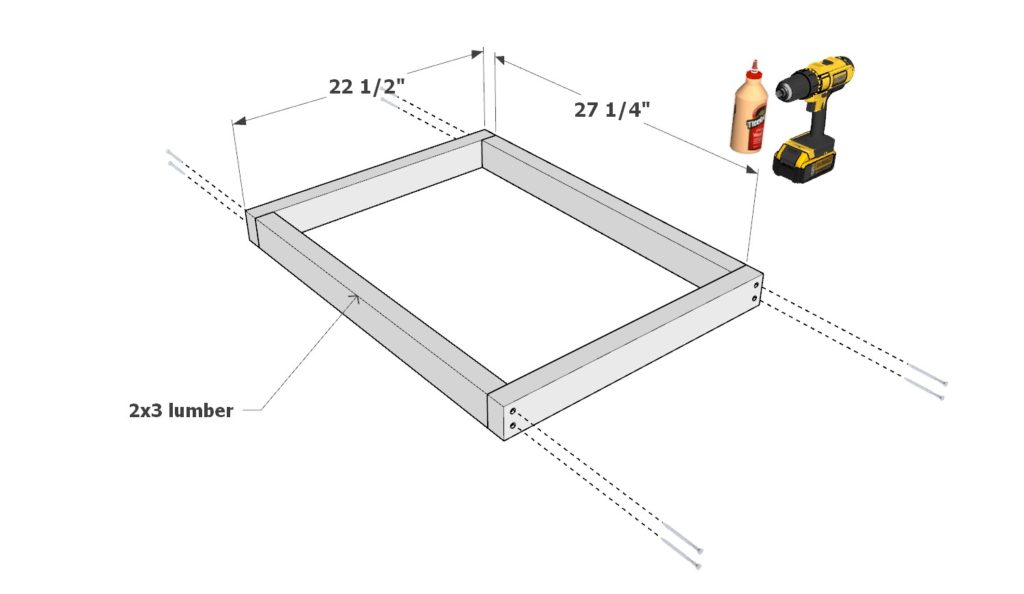
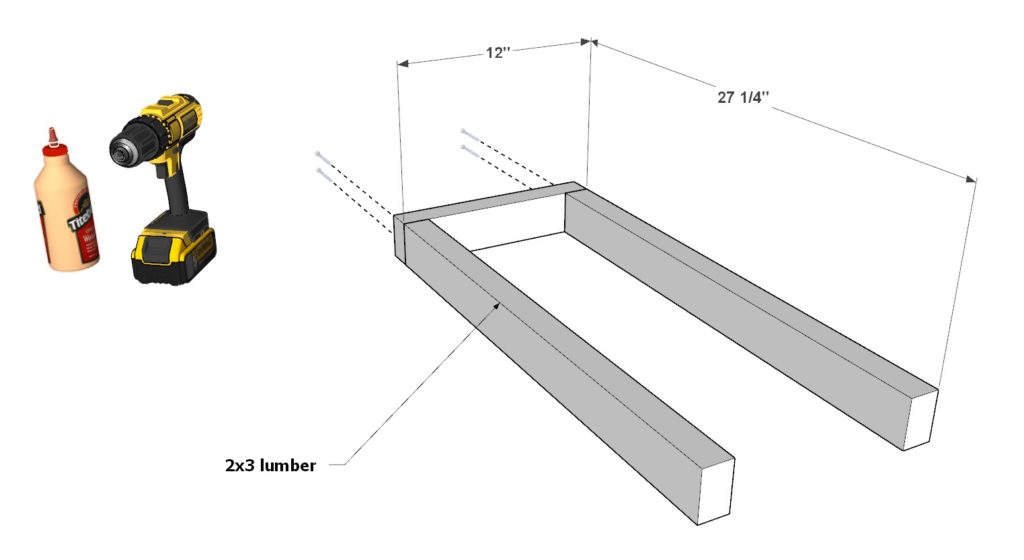
Step 1 (DIY loft bed desk frame assembly)
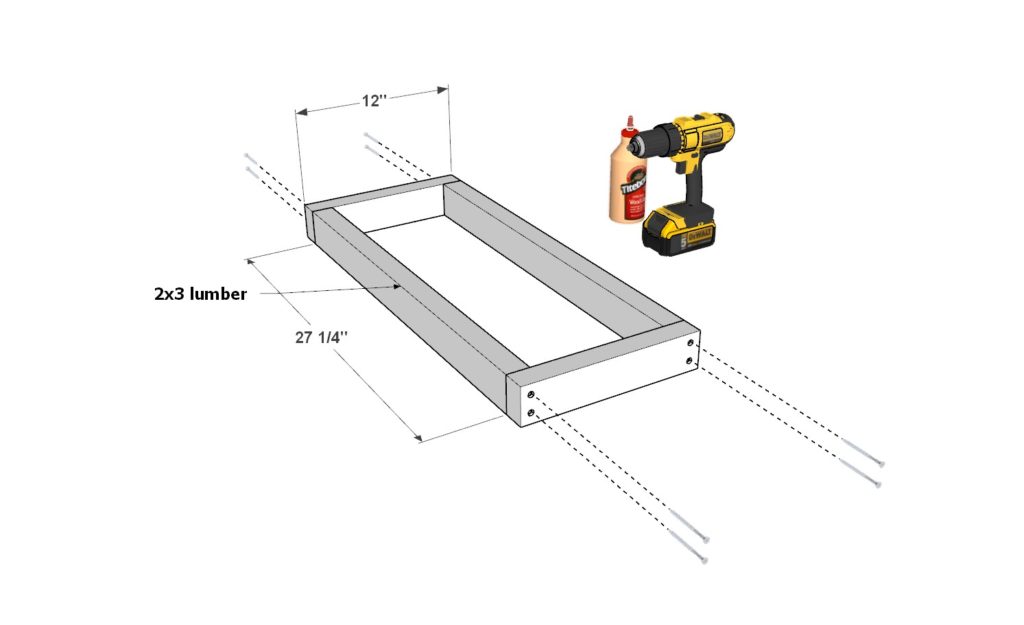
Begin the assembly of the desk frame side panels.
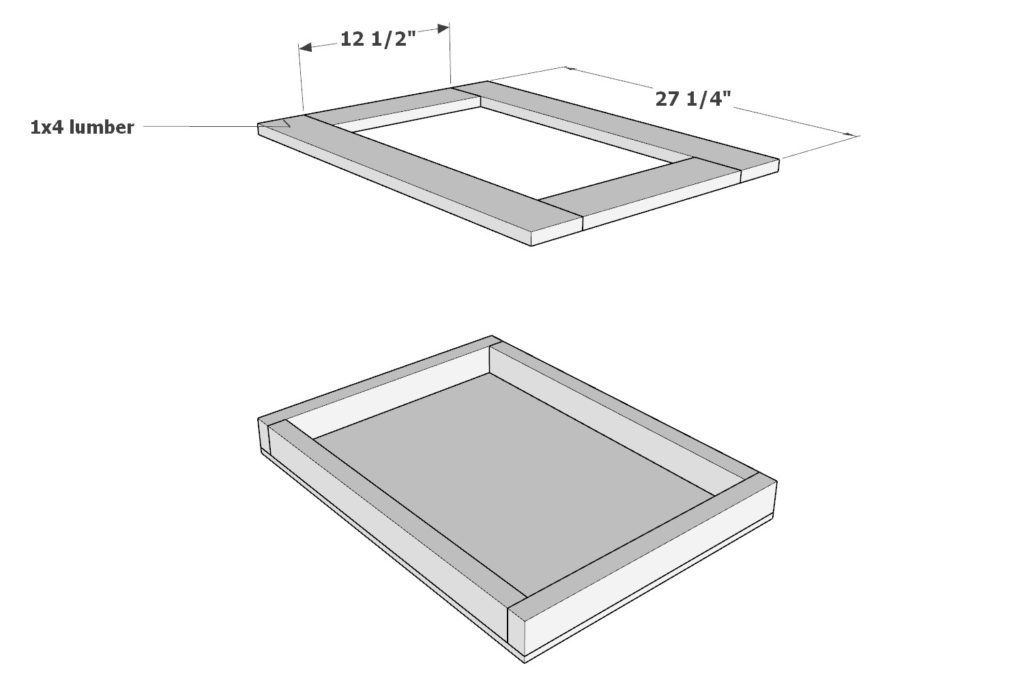
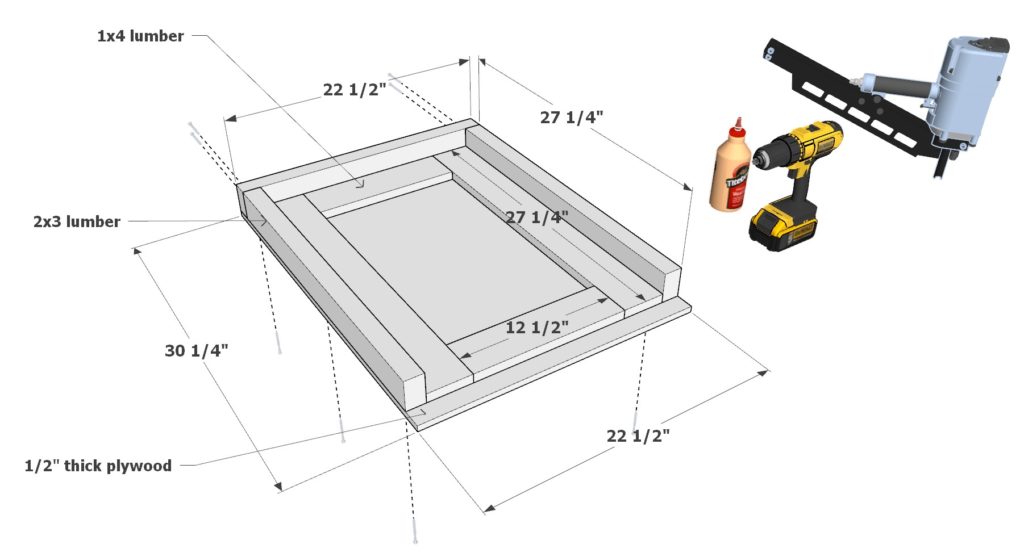
First, take two 27-1/4 inch 2×3 lumber pieces and two 22-1/2 inch 2×3 lumber pieces and arrange them as shown below. Add glue to all the areas that will be joined together, predrill holes to prevent the wood from splitting, and add 3.5 inch screws.
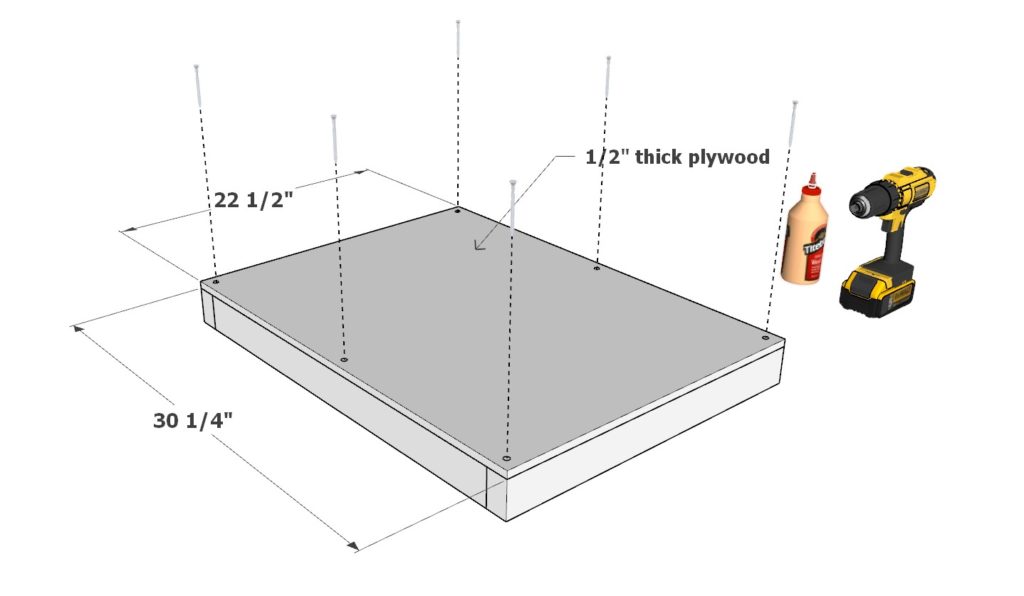
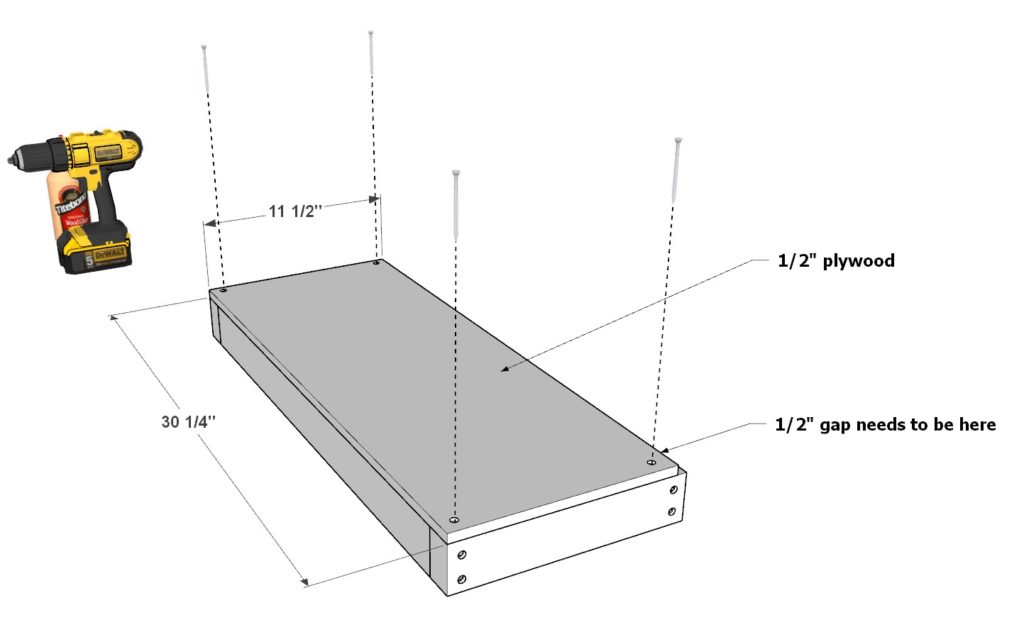
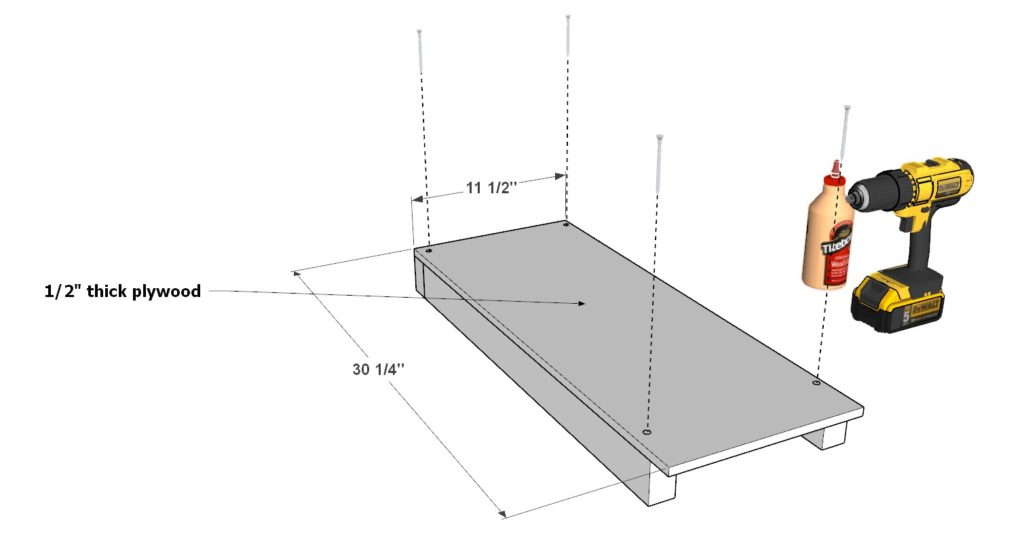
Next, add a 1/2″ thick 22-1/2 x 30-1/4 inch plywood sheet as shown below. Add 2.5 inch screws to secure the plywood sheet. Make sure to add glue and predrill holes.
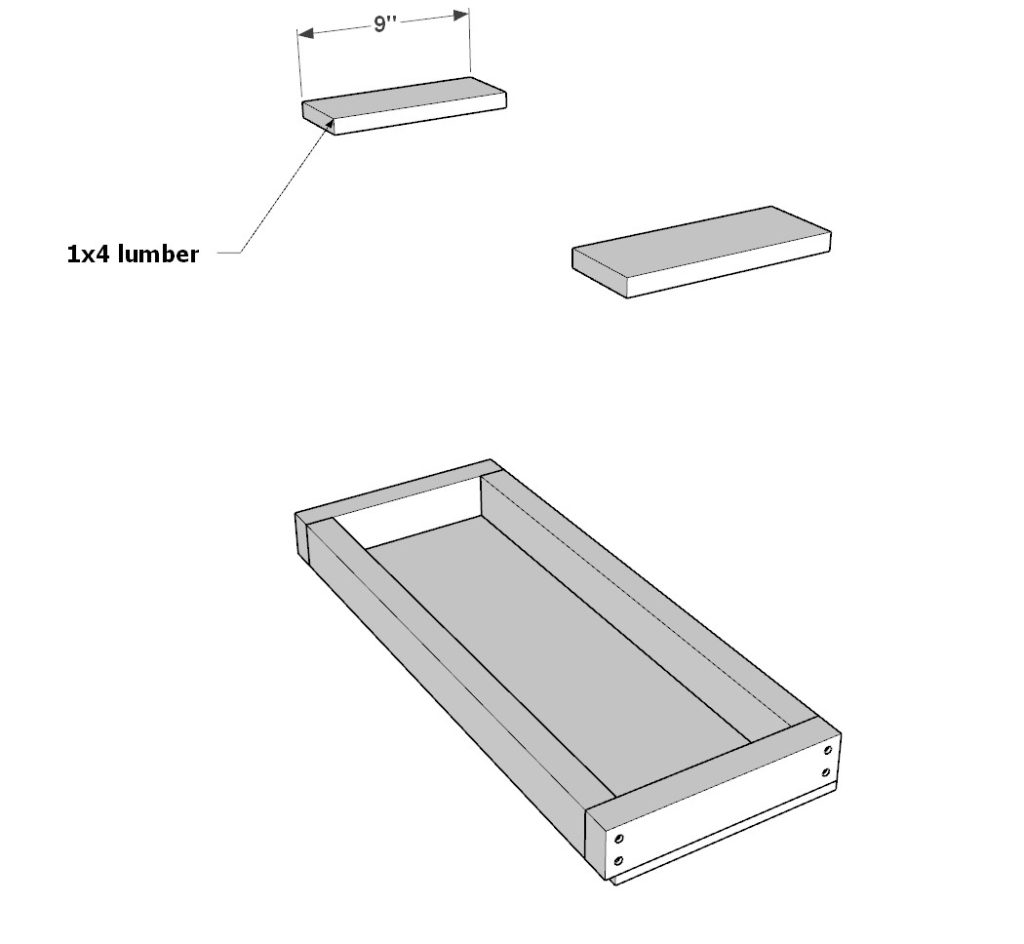
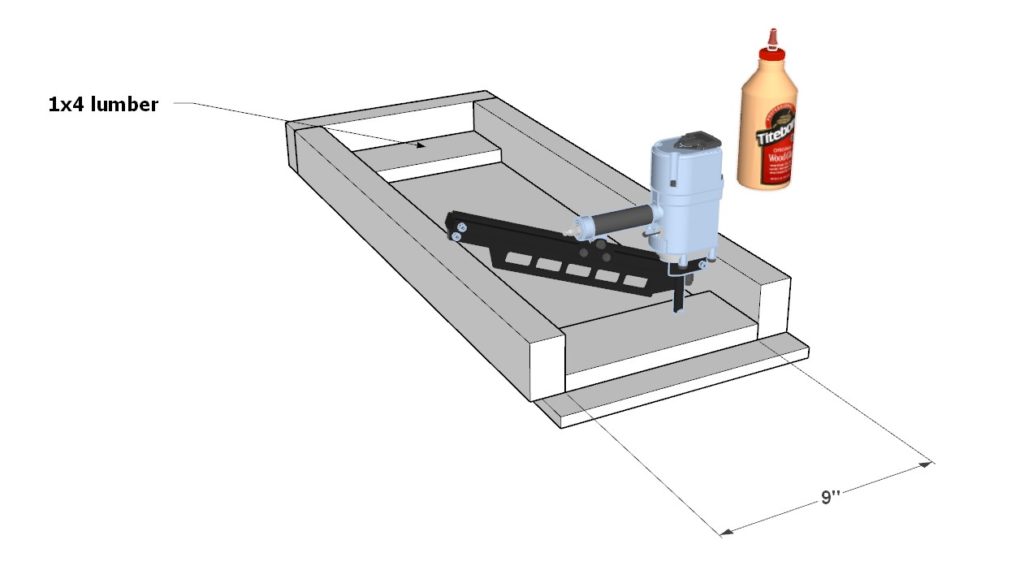
Next, add two 12-1/2 inch 1×4 lumber pieces and two 27-1/4 inch 1×4 lumber pieces to the frame. Add glue and a use a nail gun to secure these pieces in place.
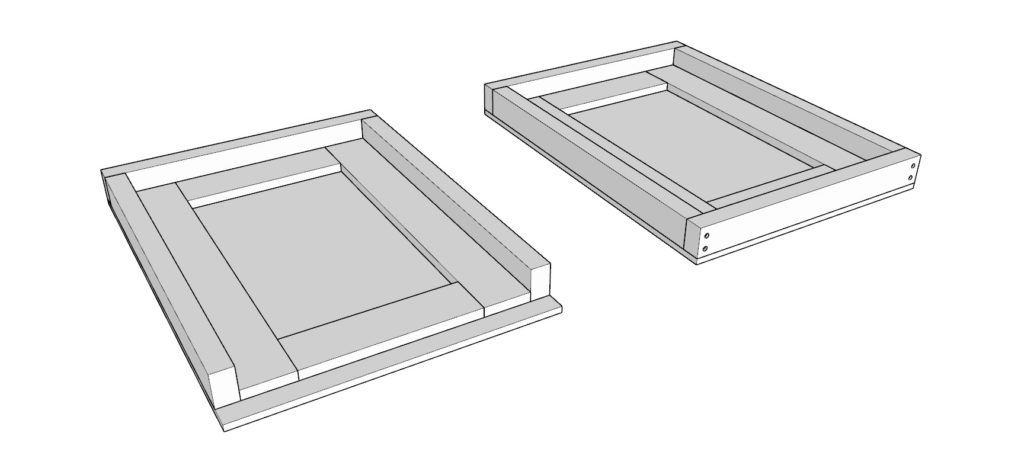
Lastly make a second frame just like the first with the exception of one change; omit one of the 22-1/2 inch 2×3 lumber pieces.
You should have two almost identical frame pieces.

Step 2 (DIY loft bed desk frame assembly)
Next, assemble the longer frame pieces for the desk.
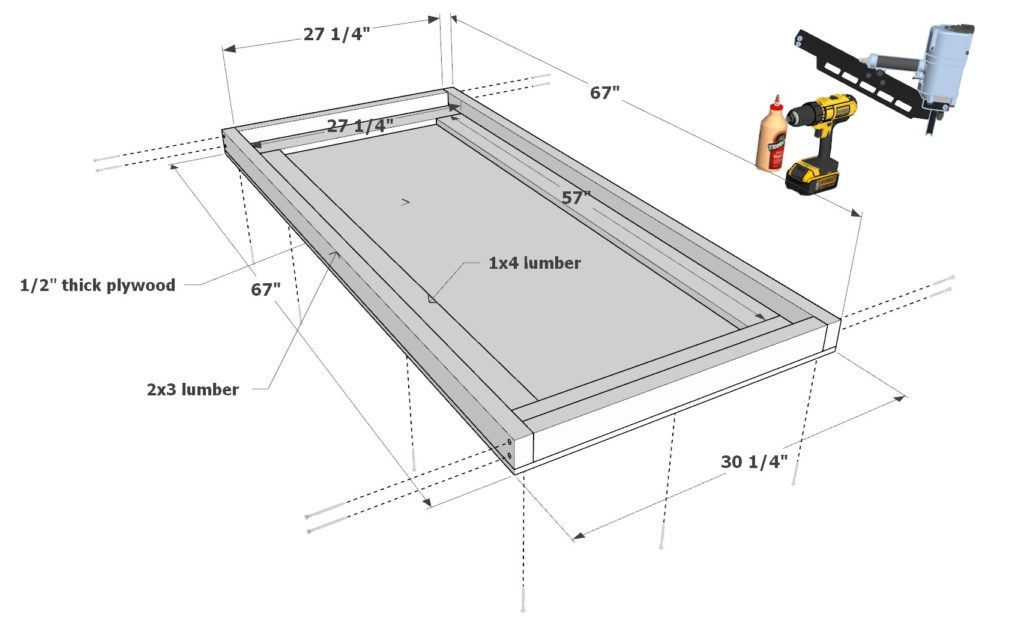
First, take two 27-1/4 inch 2×3 lumber pieces and two 67 inch 2×3 lumber pieces and arrange them as shown below. Add glue to all the areas that will be joined together, predrill holes and add 3.5 inch screws.
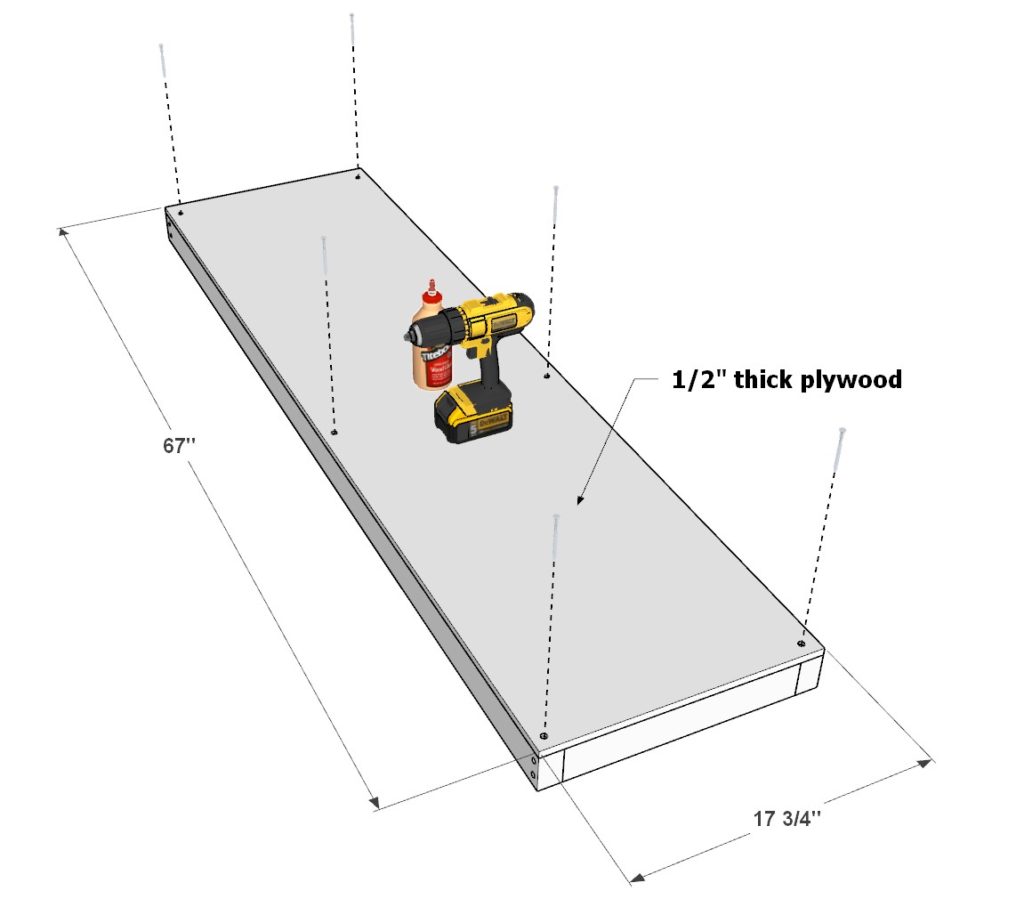
Next, add a 1/2″ thick 67 inch x 30-1/4 inch plywood sheet as shown below. Add 2.5 inch screws to secure the plywood sheet. Make sure to add glue and predrill holes.
Next, add two 27-1/4 inch 1×4 lumber pieces and two 57 inch 1×4 lumber pieces to the frame. Add glue and a use a nail gun to secure these pieces in place.
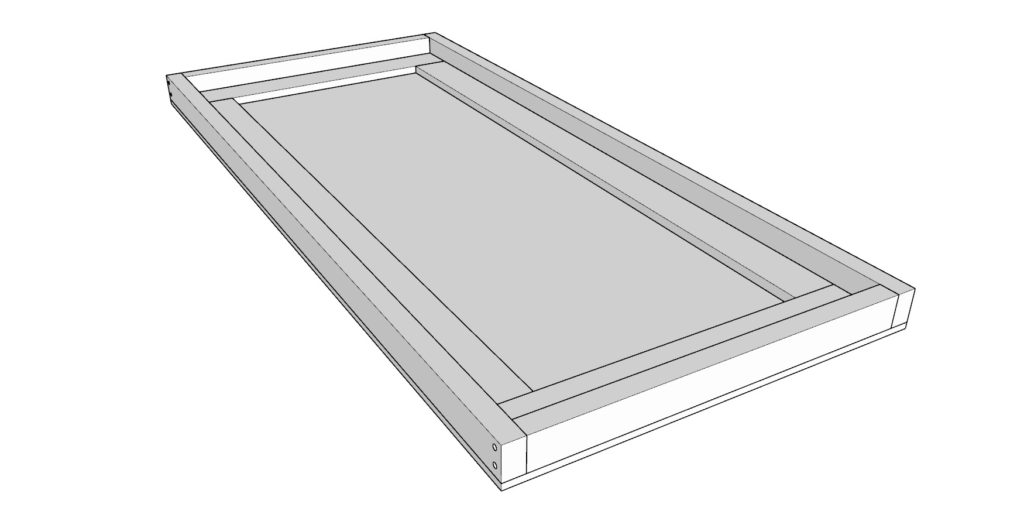
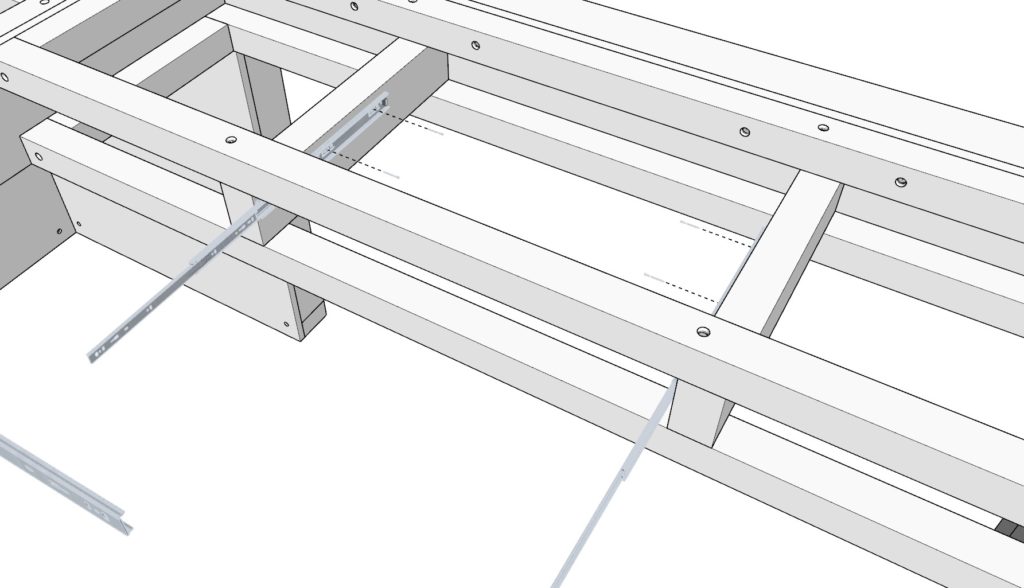
Step 3 (DIY loft bed drawer assembly)
Next, assembly the desk drawer frame.
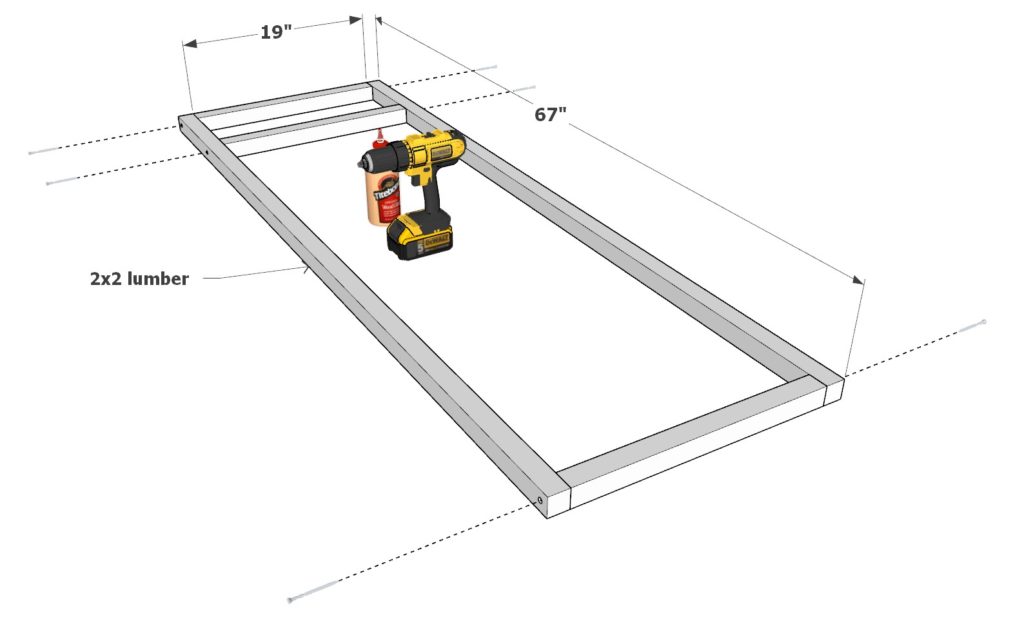
Take two 67 inch 2×2 lumber pieces and three 19 inch 2×2 lumber pieces and arrange them as shown below. Add 3.5 inch screws after adding glue and predrilling.
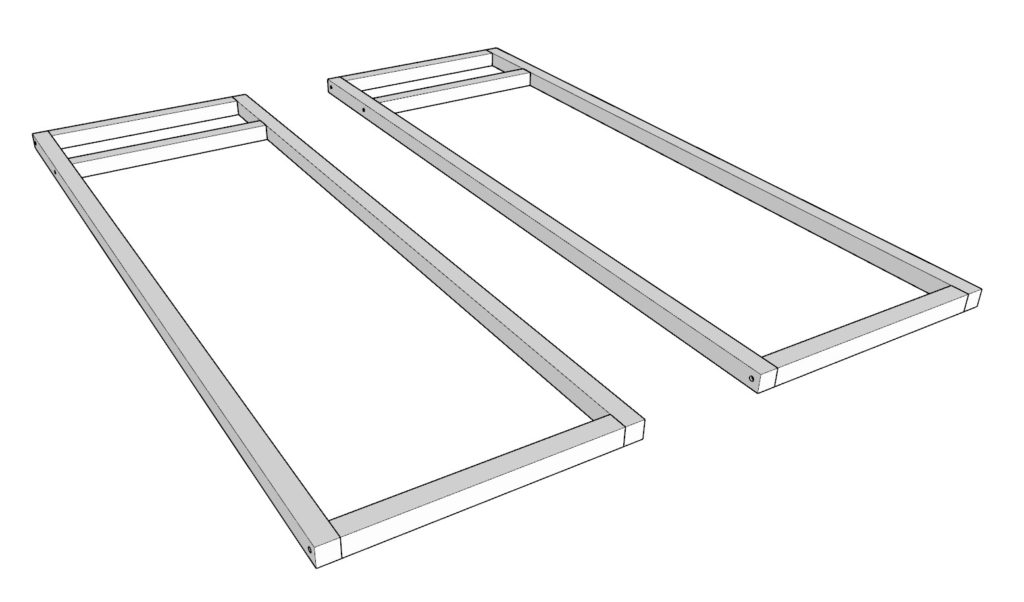
Make two identical frames.
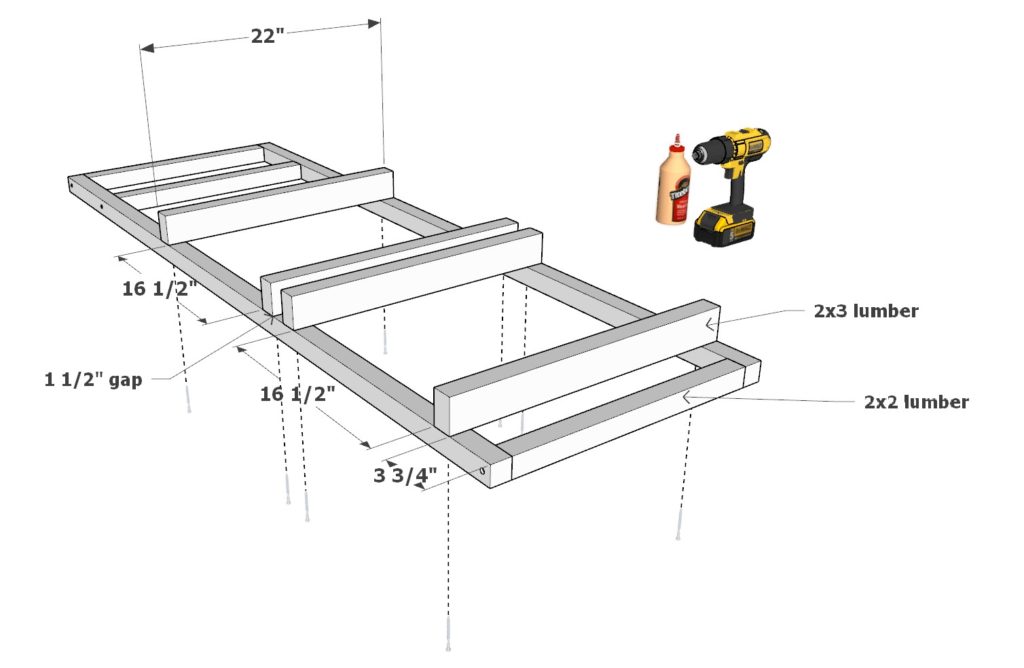
Next, add four 22 inch 2×3 lumber pieces, secure them in place with 3.5 inch screws after you add glue and predrill holes.
Next, add the second identical frame you made for 2×2 lumber and add it directly on top of the other pieces as shown below.
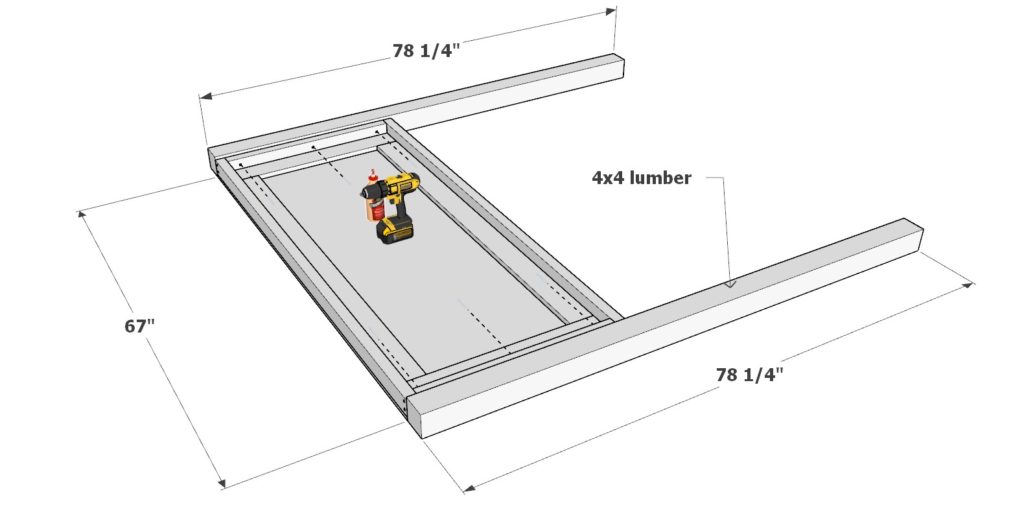
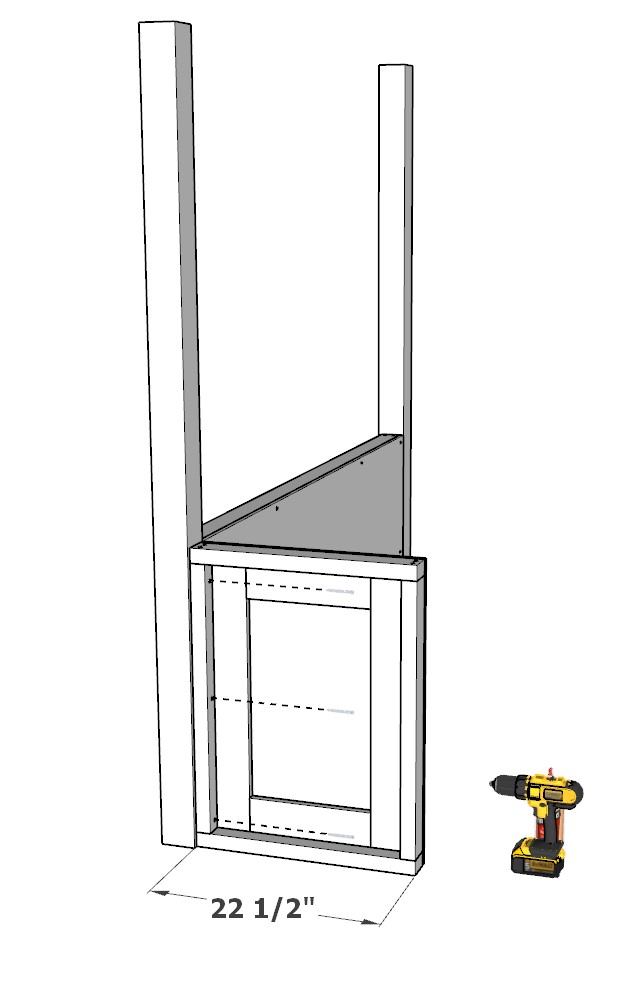
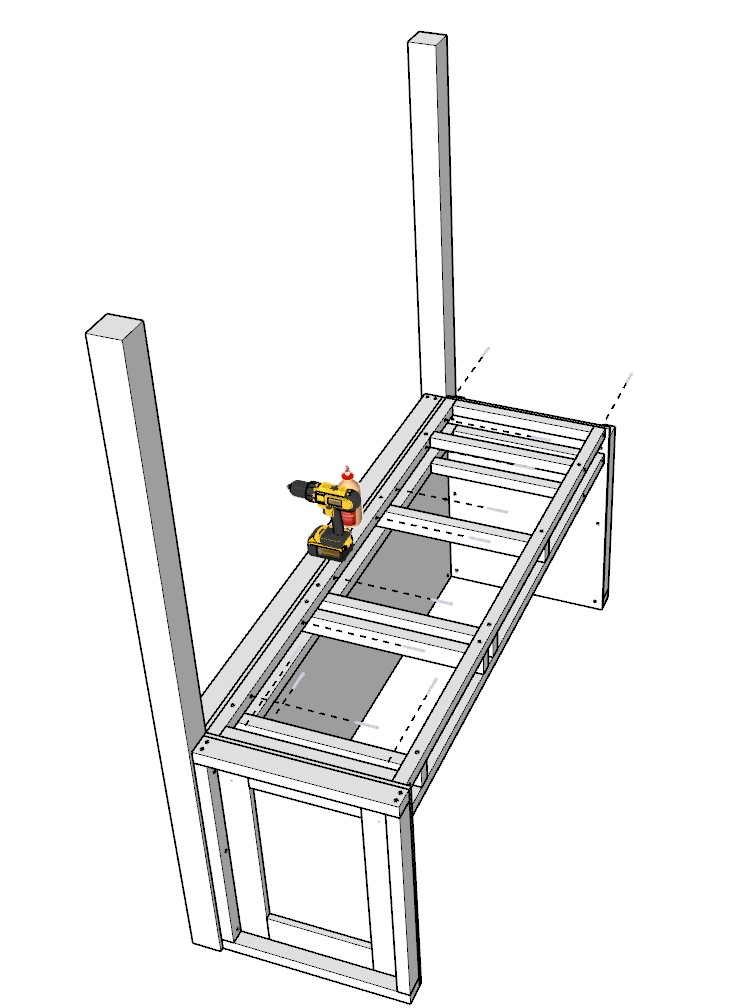
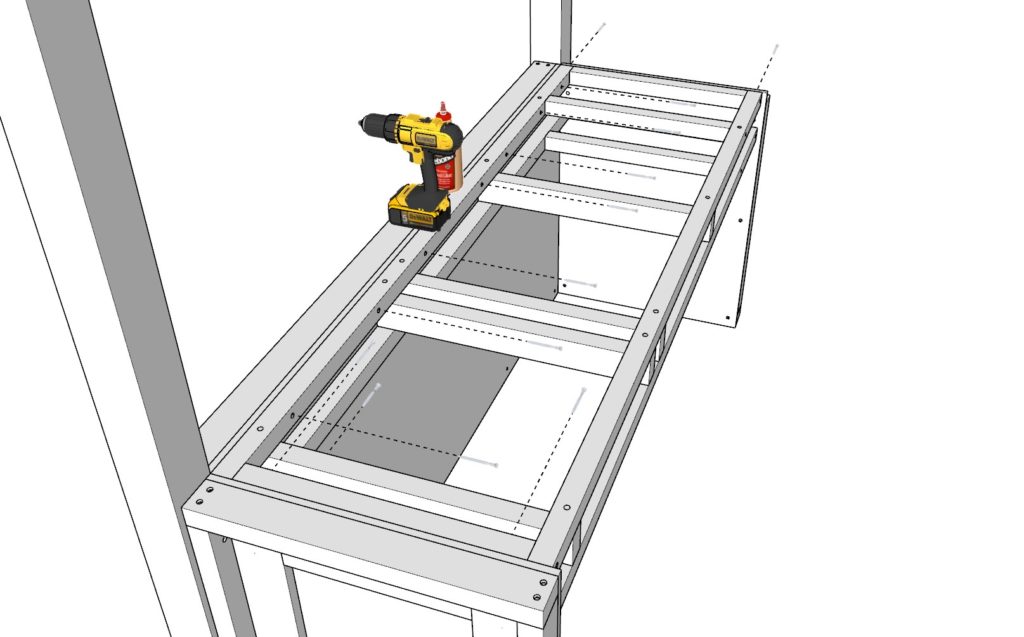
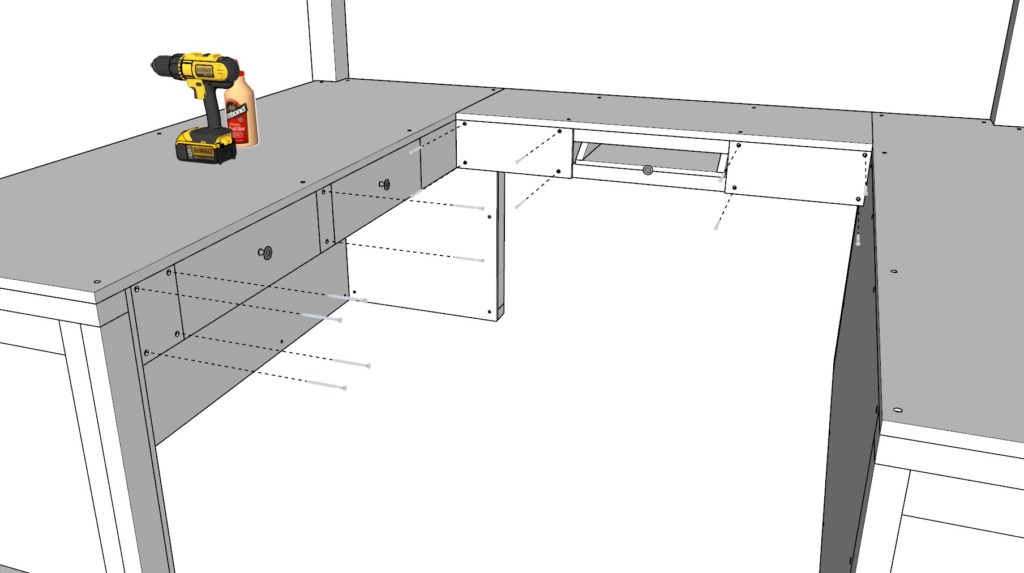
Step 4 (DIY loft bed desk frame component assembly)
Next, assemble the desk parts.
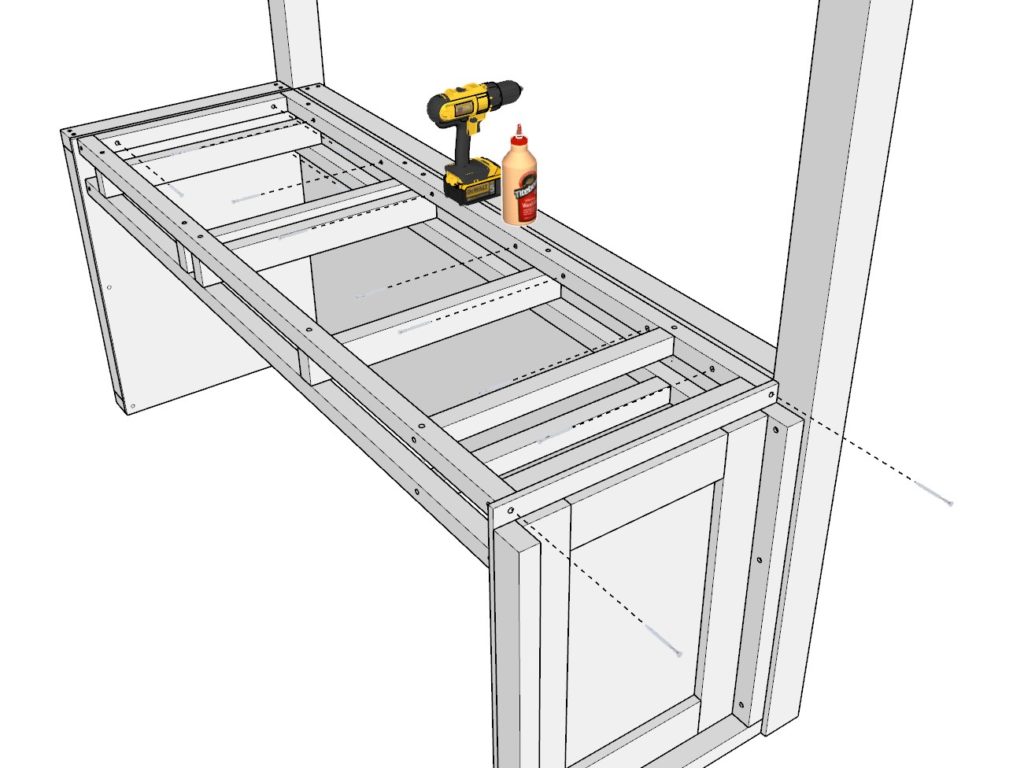
Take two 78-1/4 inch 4×4 lumber posts and the 67 inch long desk frame component and arrange them as shown below. Add glue, predrill, and add 3.5 inch screws into the sides of the 67 inch frame piece to secure the parts together.
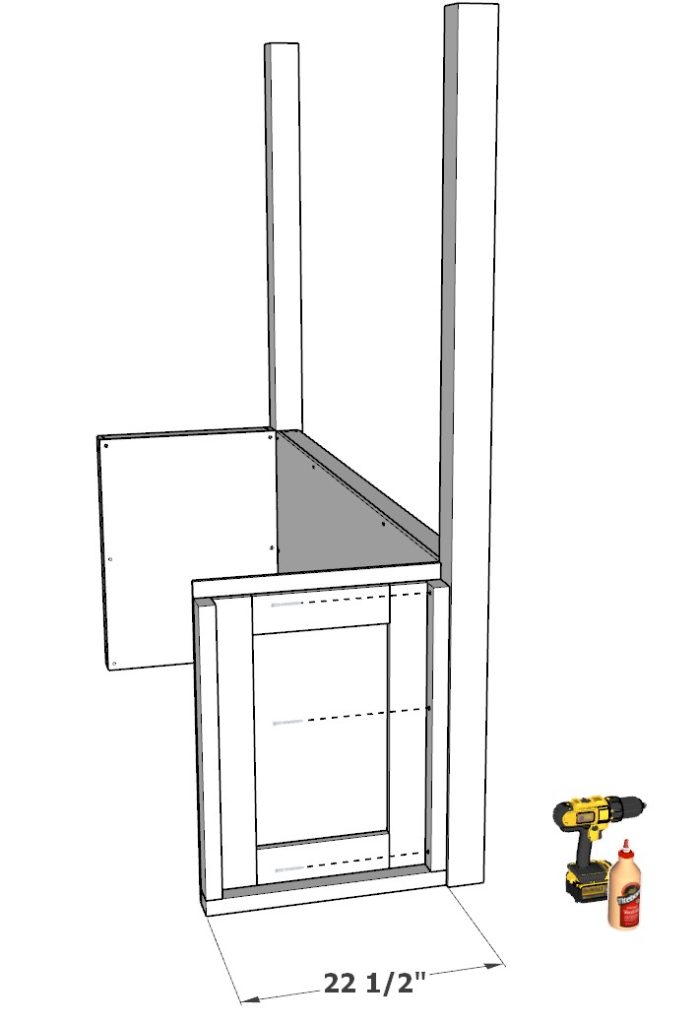
Next, take the shorter 22-1/2 inch desk side components and add them in a similar fashion.
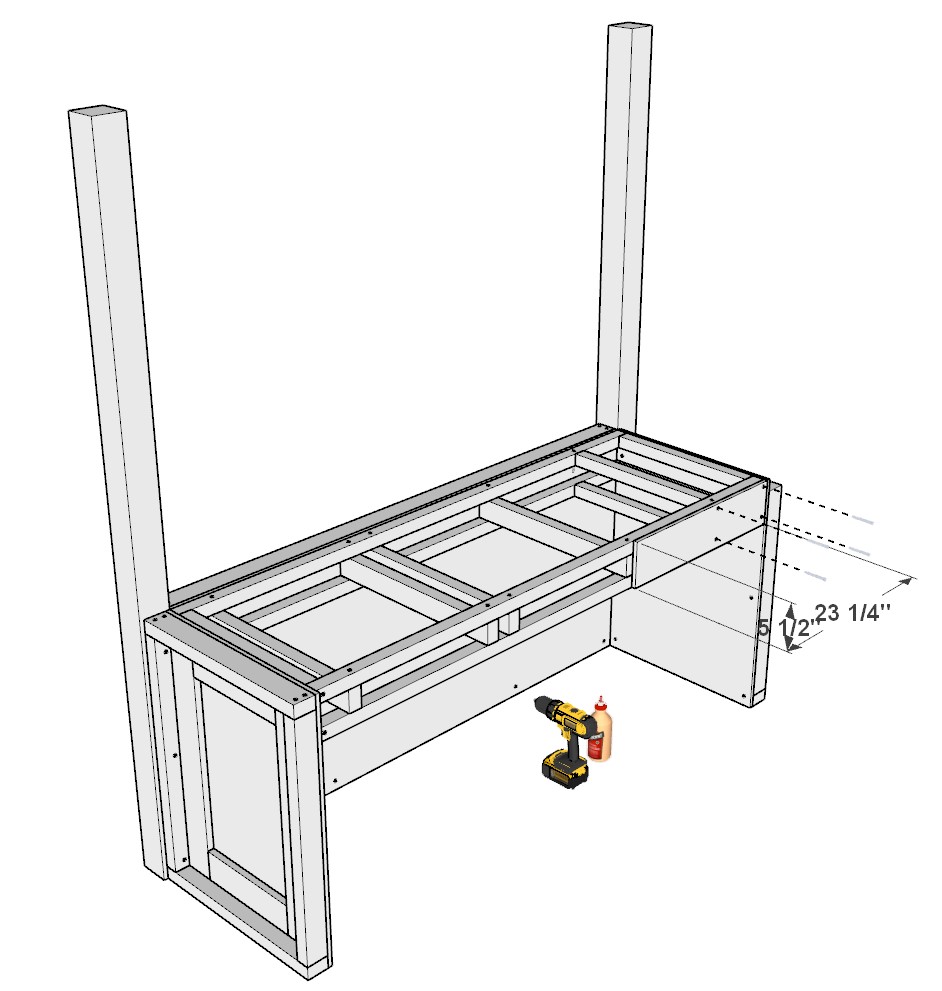
Next, take the drawer frame and add it to the other components as well. Add plenty of glue and predrill before adding 3.5 inch screws.
Next, add a small 23-1/4 x 5-1/2 inch half inch thick plywood sheet as shown below. Secure this by predrilling, adding glue, and adding 2.5 inch screws.
The first component of the loft bed is complete. Set it aside and move on to the second component.

Step 5 (DIY loft bed shelf and cubie frame assembly)
Next, begin the assembly of the shelfs and cubies for the bunk bed.
First, take two 12 inch 2×3 lumber pieces and two 27-1/4 inch 2×3 lumber pieces and arrange them as shown below. Add glue, predrill, and add 3.5 inch screws.
Next add a 11-1/2 x 30-1/4 half inch thick plywood sheet to the frame. Mind the 1/2 inch gap that needs to be there. Secure the plywood as before.
Next add and secure two 9 inch 1×4 lumber pieces in the same way as before.
Next, make a secondary shelf frame.
Take two 12 inch 2×3 lumber pieces and two 27-1/4 inch 2×3 lumber pieces and join them as before. Take a 30-1/4 x 11-1/2 half inch plywood sheet and add it to the frame as shown below. Add and secure two 9 inch 1×4 lumber pieces to the frame as well.
You should have two semi-identical shelf frame pieces.
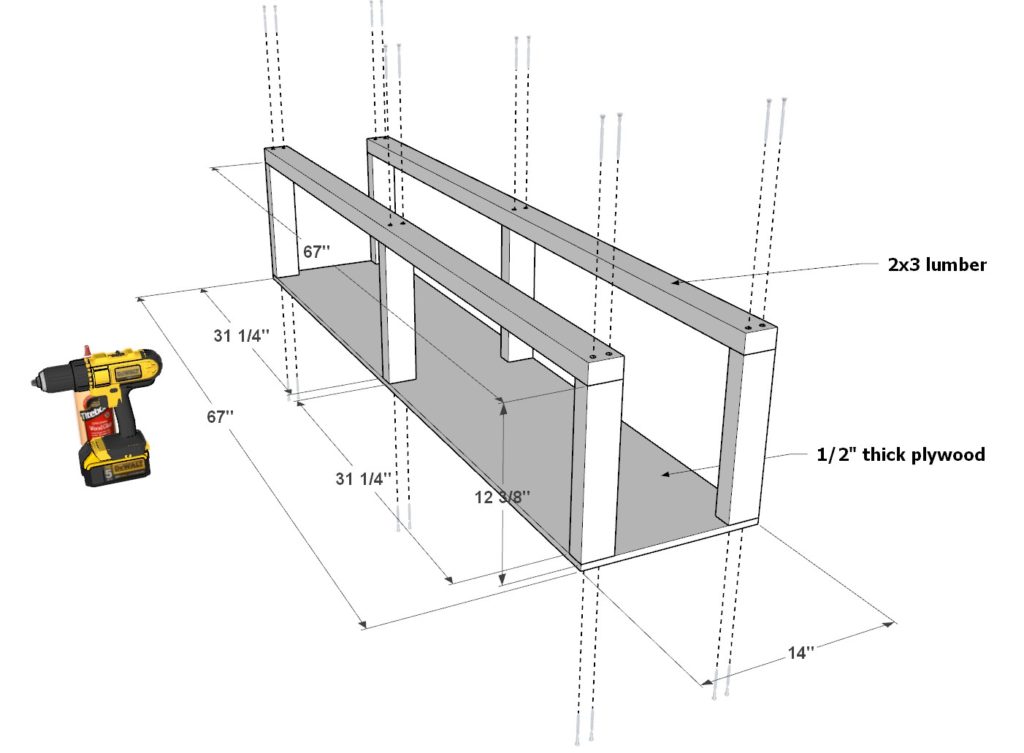
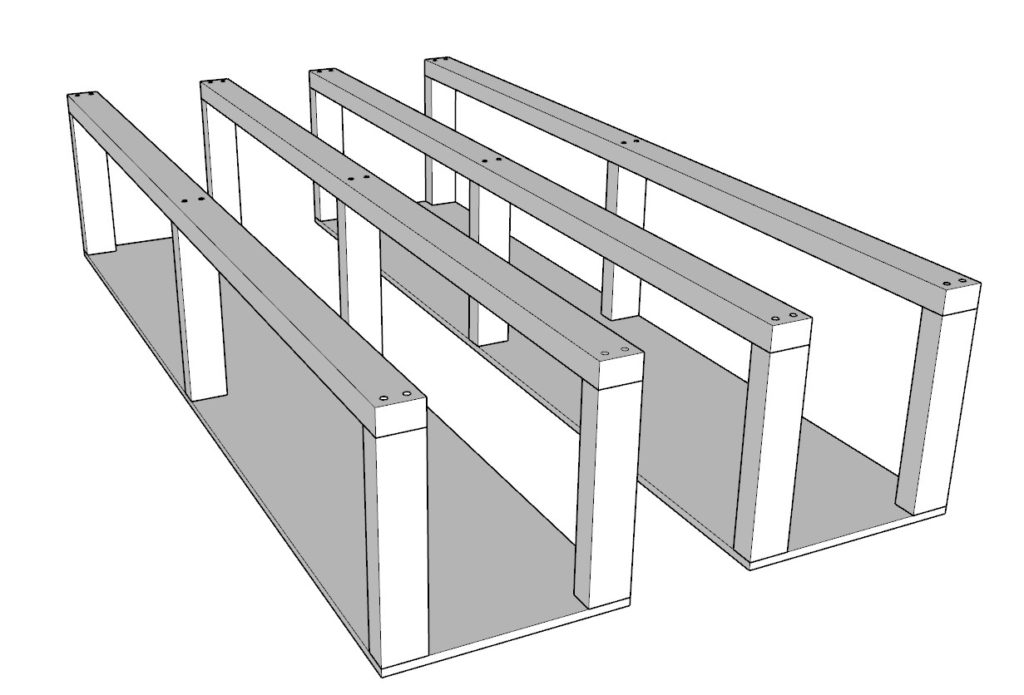
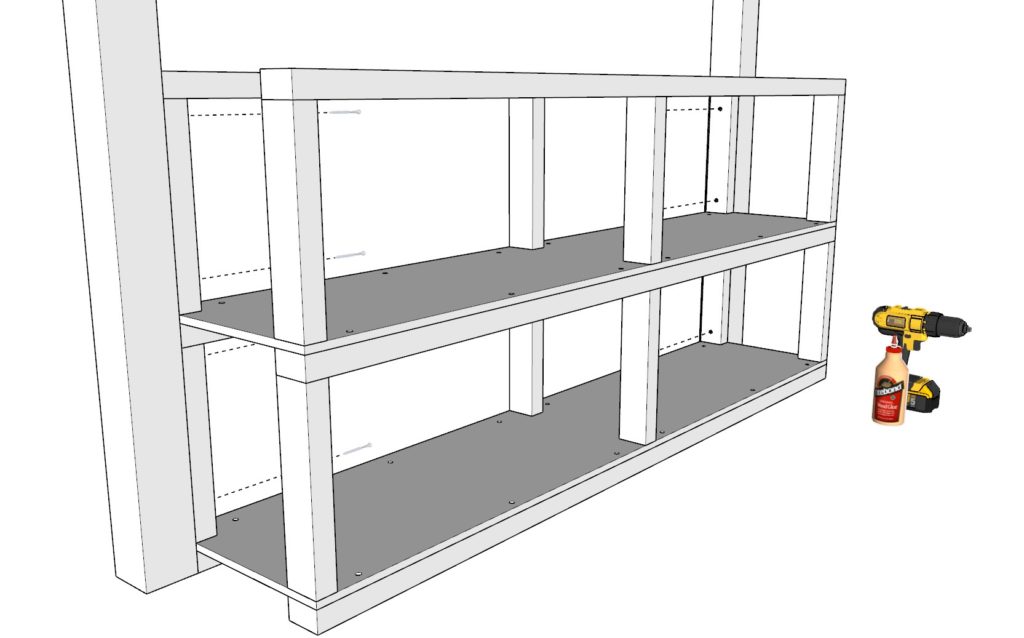
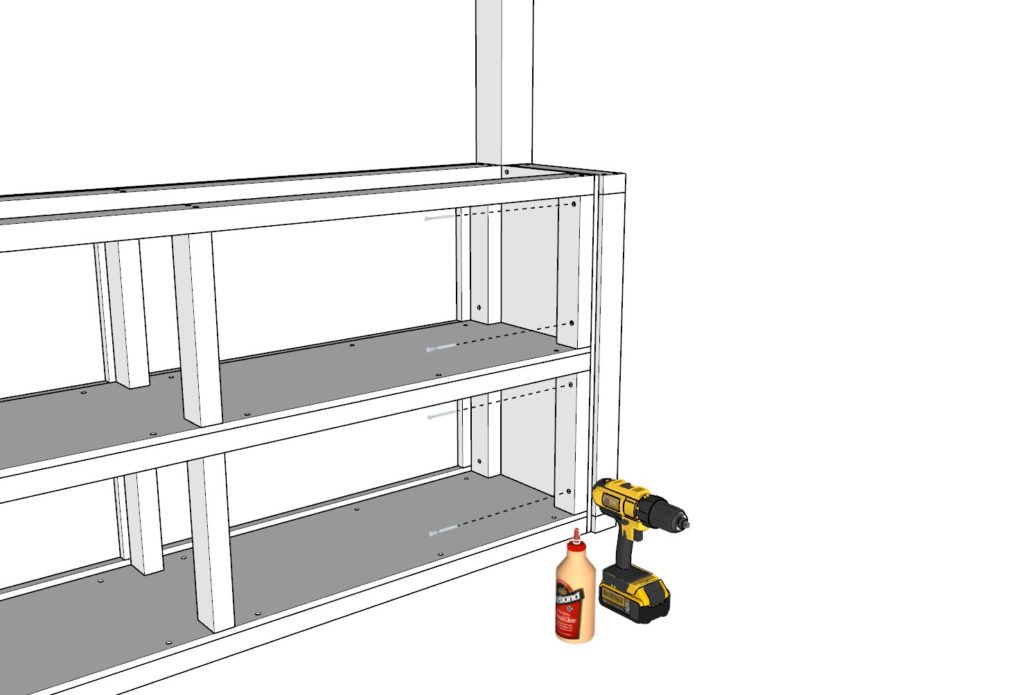
Step 6 (DIY loft bed shelve and cubby storage system assembly)
Next, build and assemble the shelve and cubby storage system for the DIY loft bed.
First, take two 67 inch 2×3 lumber pieces, six 12-3/8 inch 2×3 lumber pieces, and one 67 inch x 14 inch half inch thick plywood sheet and arrange them as shown below. Add glue, predrill, and add 3.5 inch screws as shown below.
Make a second identical shelf frame pieces.
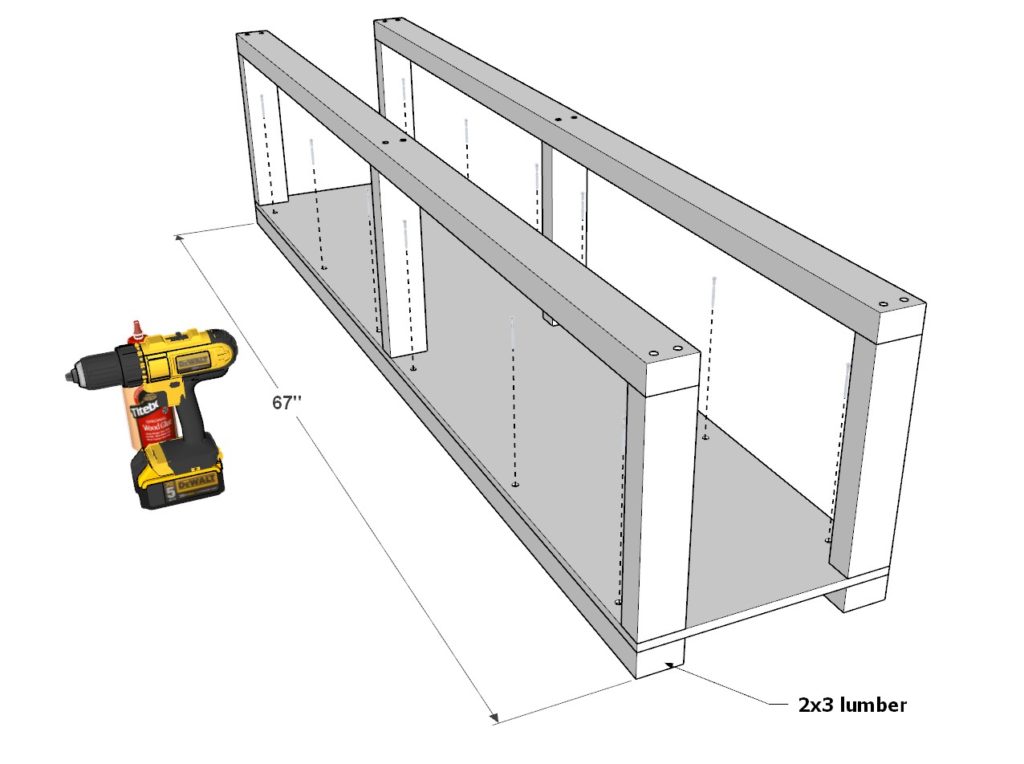
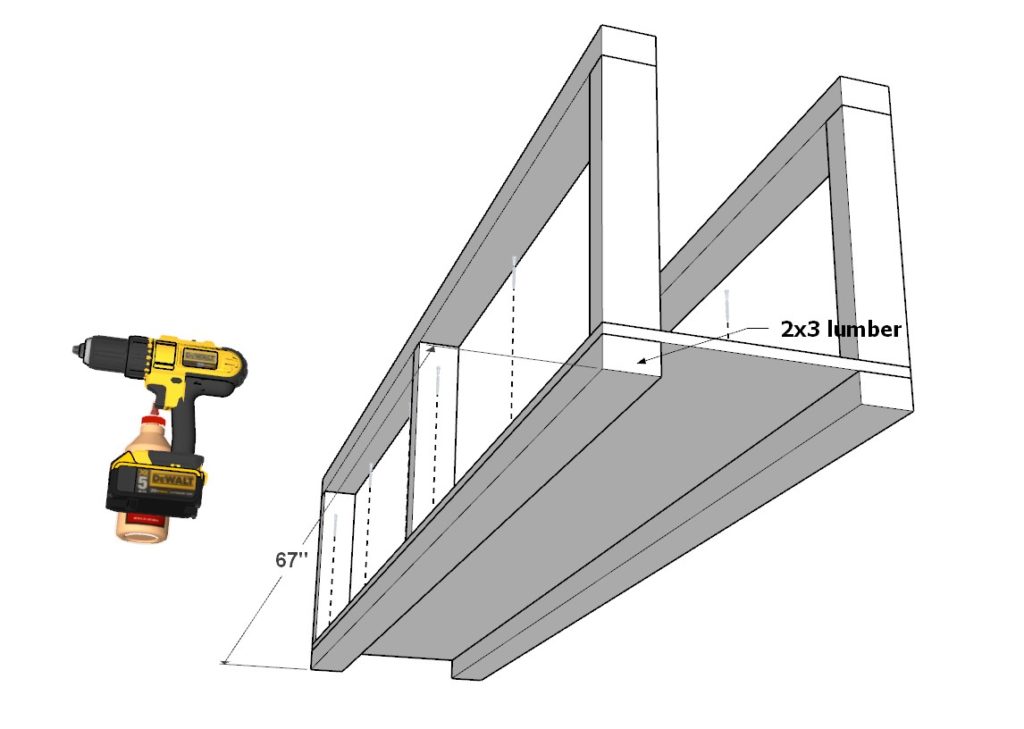
Next, add two 67 inch long 2×3 lumber pieces to the bottom of ONE of the shelf frame pieces. Secure the 2×3 lumber by predrilling, adding glue, and adding 2.5 inch long screws.
Next, stack the two shelf frame pieces on top of each other and secure them together with glue, predrilling, and 2.5 inch long screws.

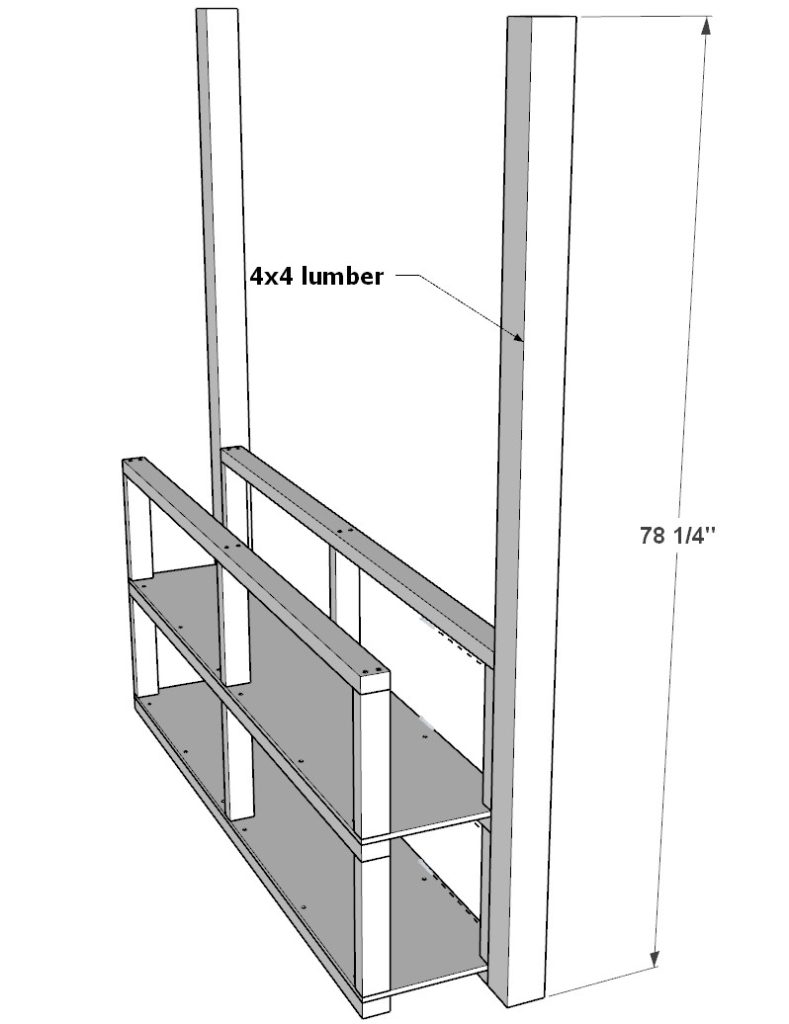
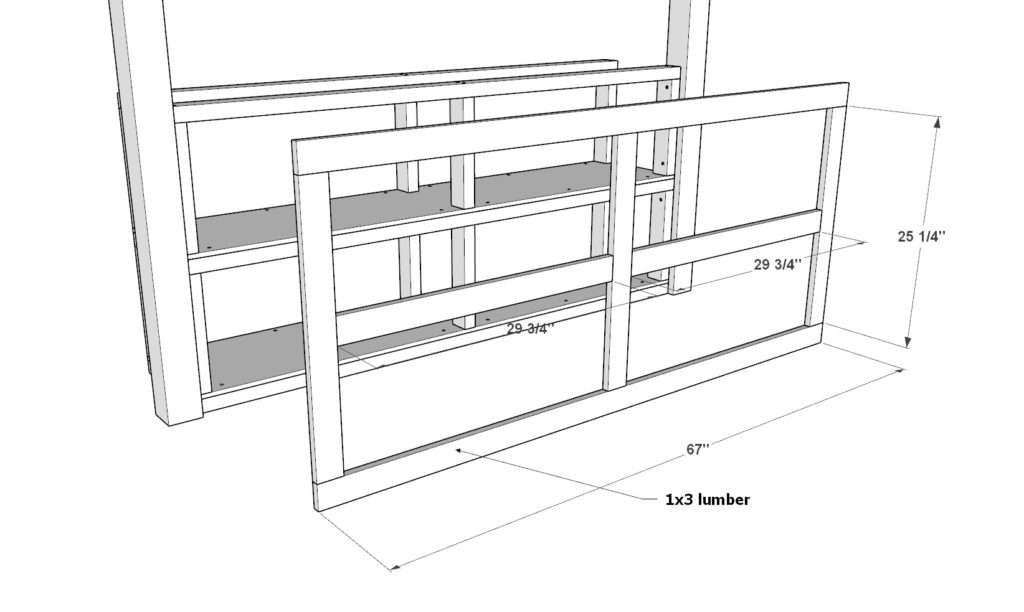
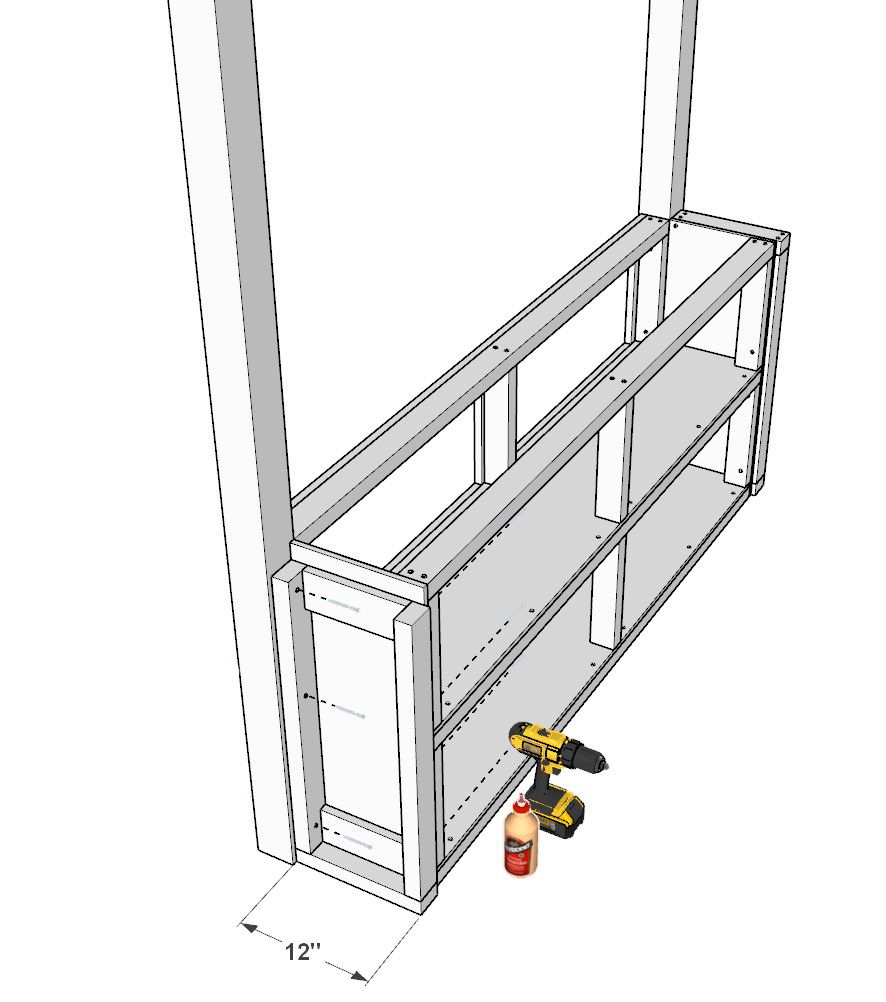
Step 7 (Putting together the parts of the DIY loft bed shelf and cubie storage system)
Next, assembly the parts of the cubie and shelf storage system.
Take two 78-1/4 inch 4×4 lumber frame pieces and add them to the shelf component you built in the previous step. Secure them together with glue, predrilling, and 3.5 inch screws.
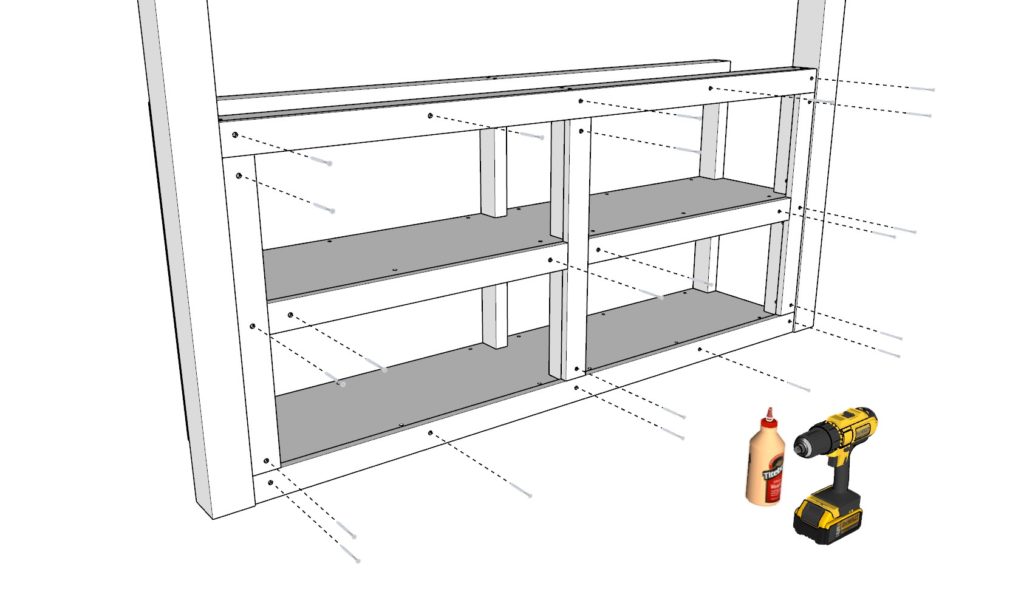
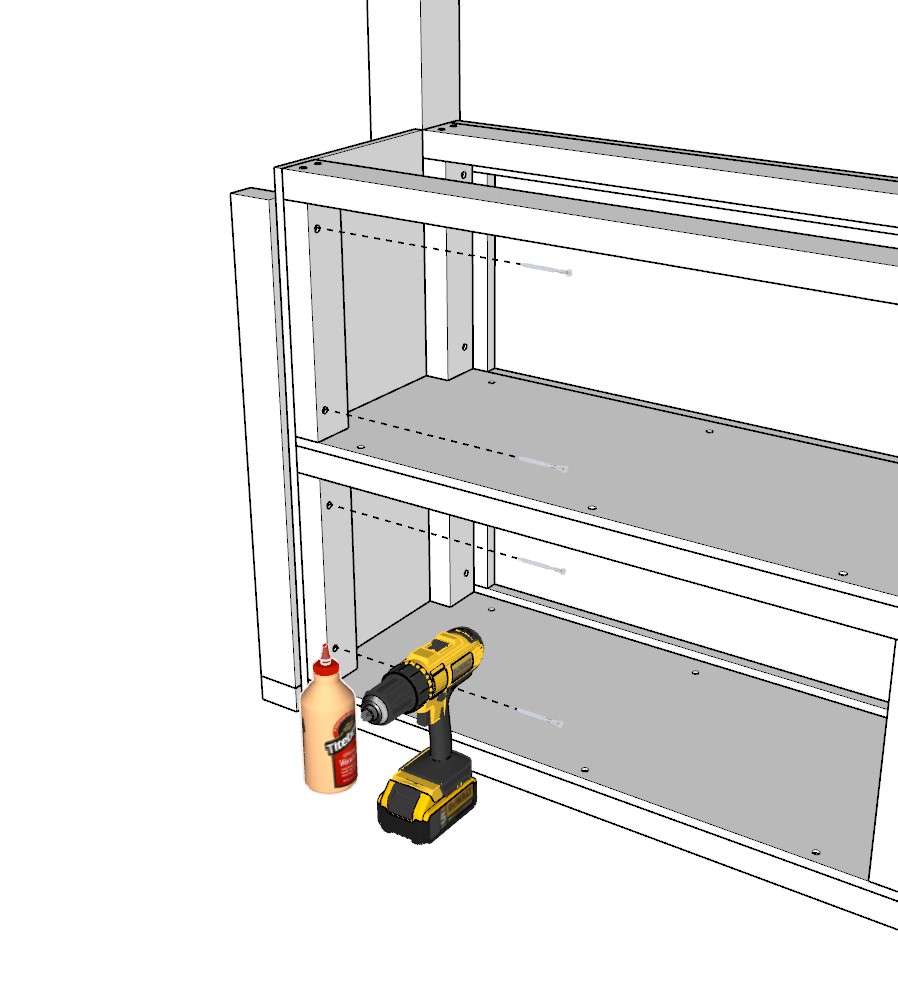
Next, add a trim to the shelves and cubbies. Take two 29-3/4 inch 1×3 lumber pieces, two 25-1/4 inch 1×3 lumber pieces, and two 67 inch 1×3 lumber pieces and secure them to the shelves as shown below. Uses 2.5 inch screws, glue, and predrilling.
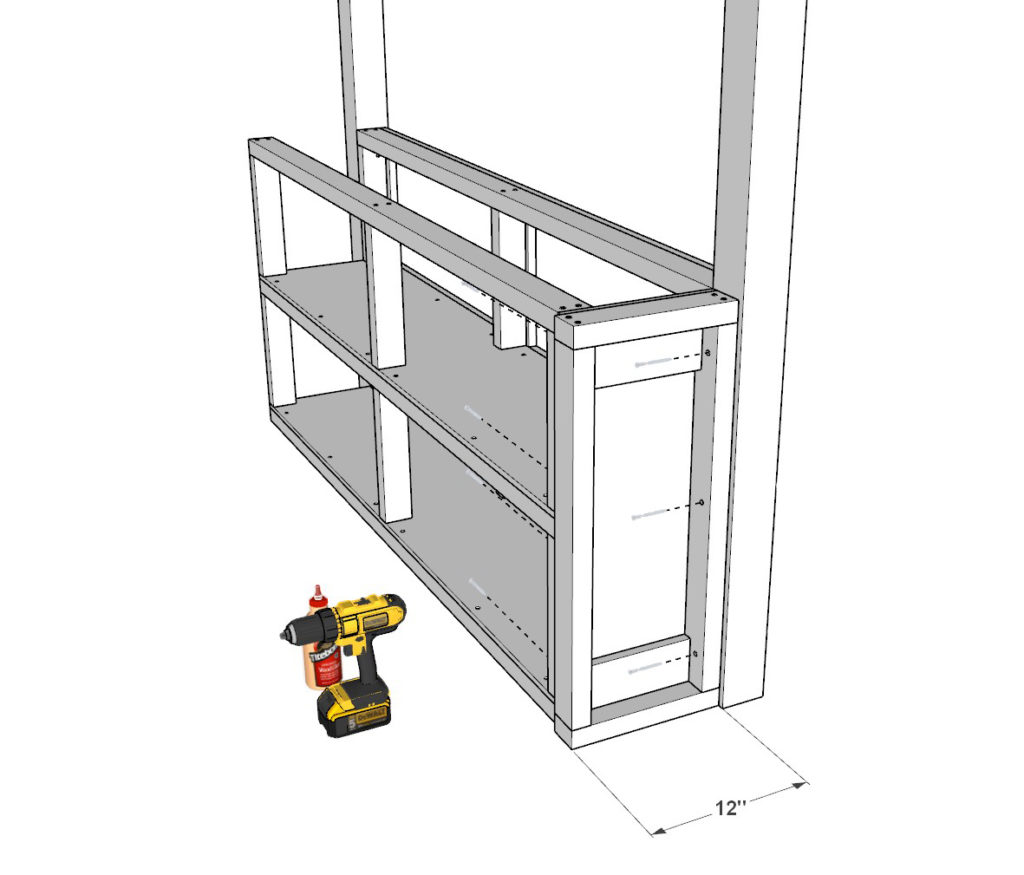
Next, attach the two 12 inch long side frame panels to the frame of the shelves. As before, add glue, predrill, and add 3.5 inch screws.
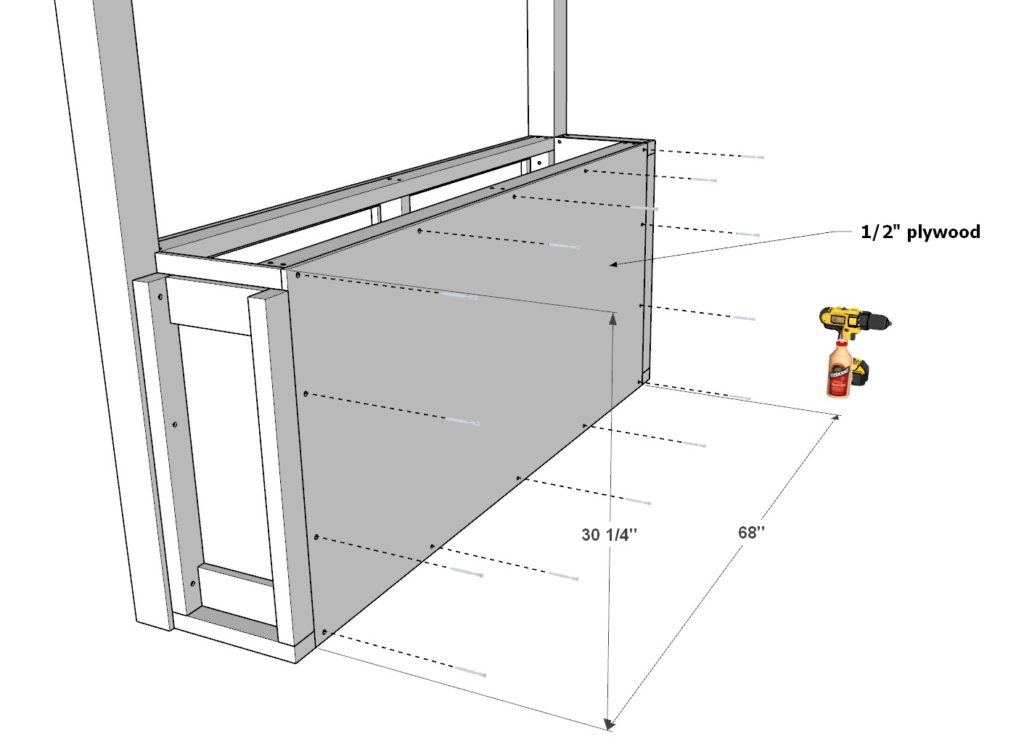
Next, add a 68 inch x 30-1/4 inch half inch thick plywood sheet tot the back of the shelves. Secure this plywood sheet with 2.5 inch screws and glue. Don’t forget to predrill holes.
The second component of the loft bed is complete. Set it aside and move on to the third component.
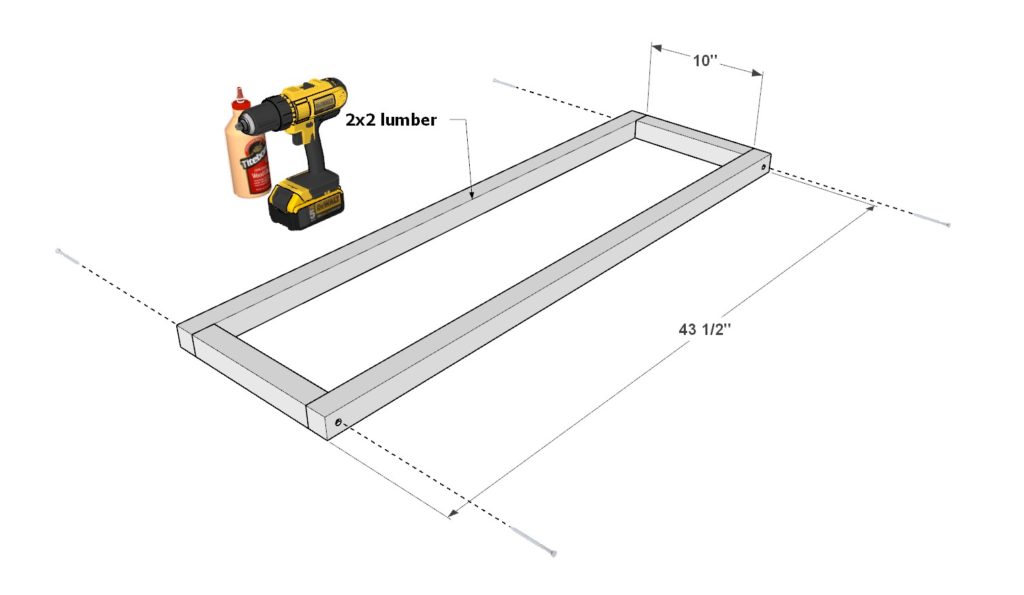
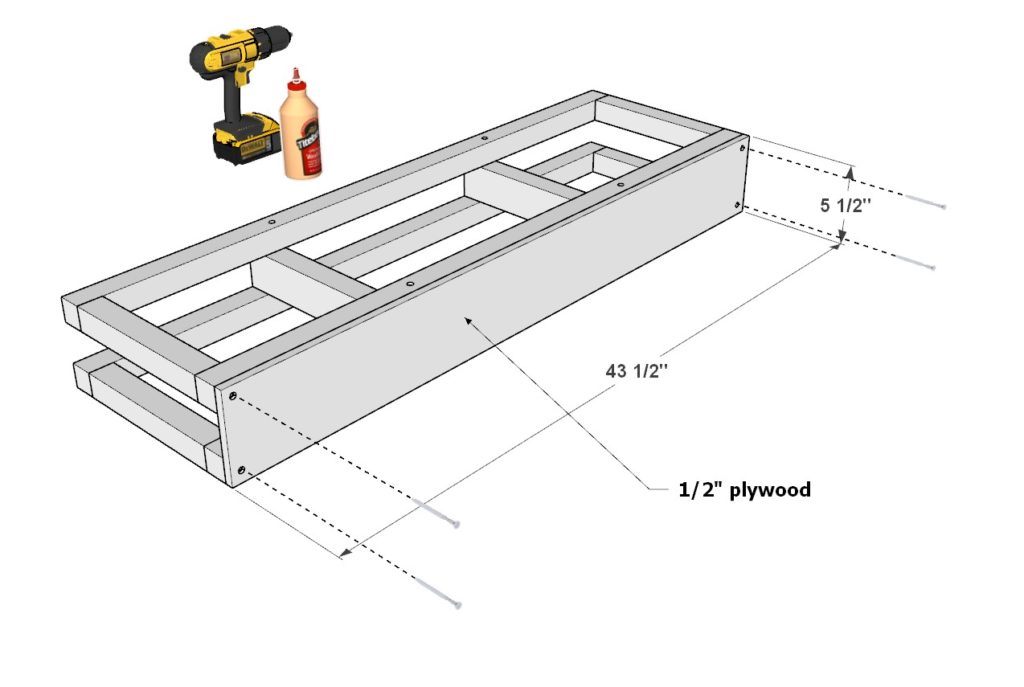
Step 8 (Computer frame assembly)
Next, assemble to loft bed computer desk frame.
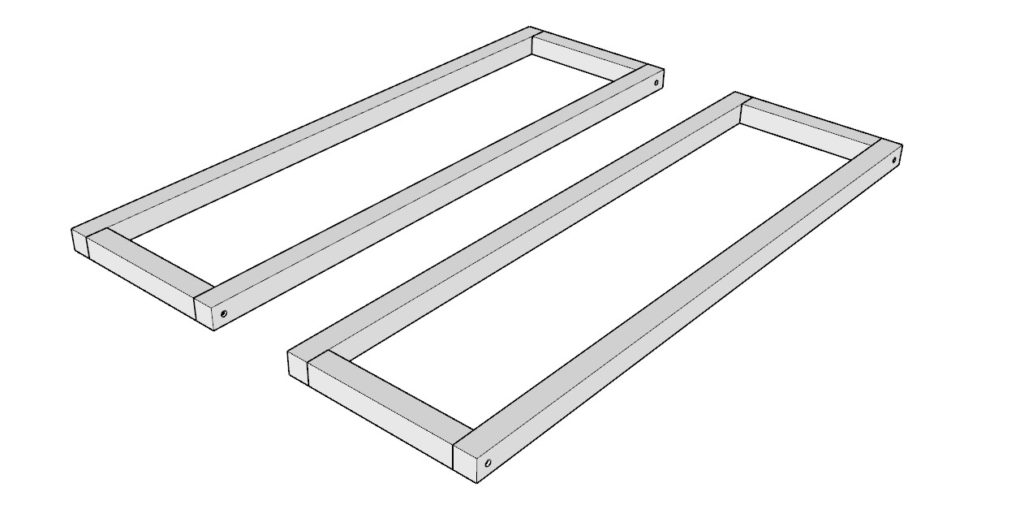
Take two 10 inch 2×2 lumber pieces and two 43-1/2 inch 2×2 lumber pieces and arrange them as shown below. Add 3.5 inch screws, predrill, and add glue.
Make two identical frame pieces.
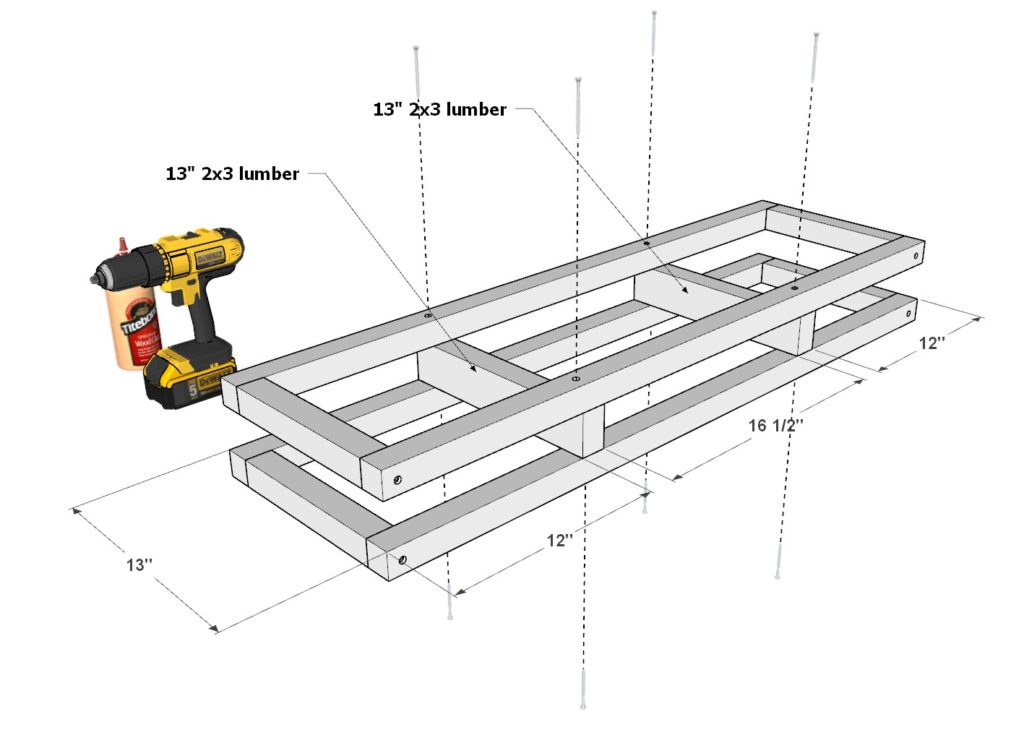
Next, add the two 13 inch 2×3 lumber pieces and sandwich them in between the two 2×2 lumber frames as shown below. Add glue, predrill, and add 3.5 inch screws.
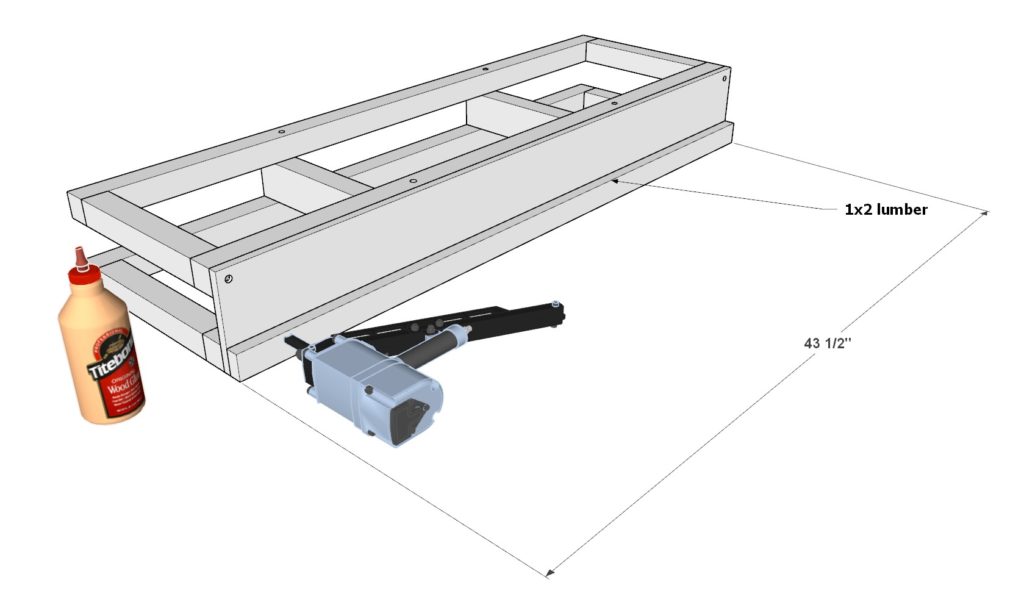
Next, add a 5-1/2 x 43-1/2 inch half inch thick plywood sheet to the side of the desk frame. Secure it by predrilling, adding glue, and adding 2.5 inch long screws.
Next, add a 43-1/2 long 1×2 lumber piece. Secure it with glue and a nail gun.
Component three is completed. Now your ready to assemble the loft bed in the room.
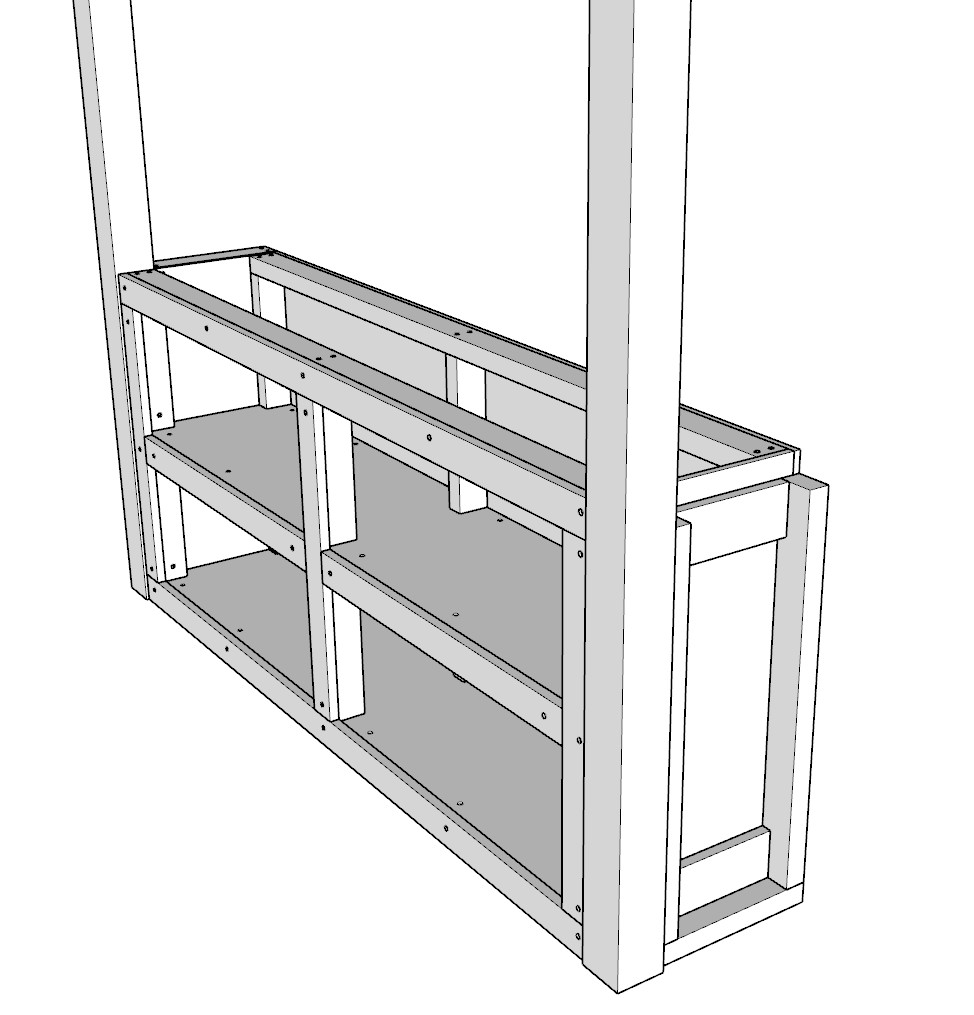
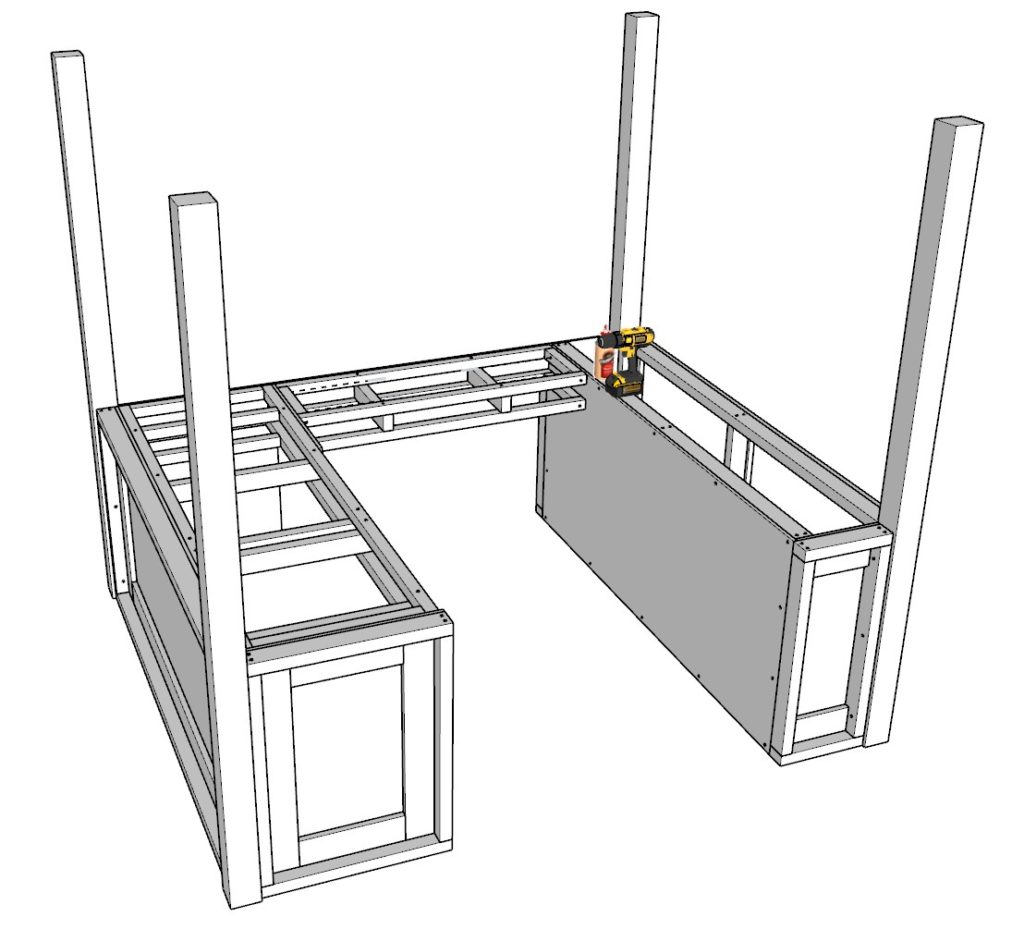
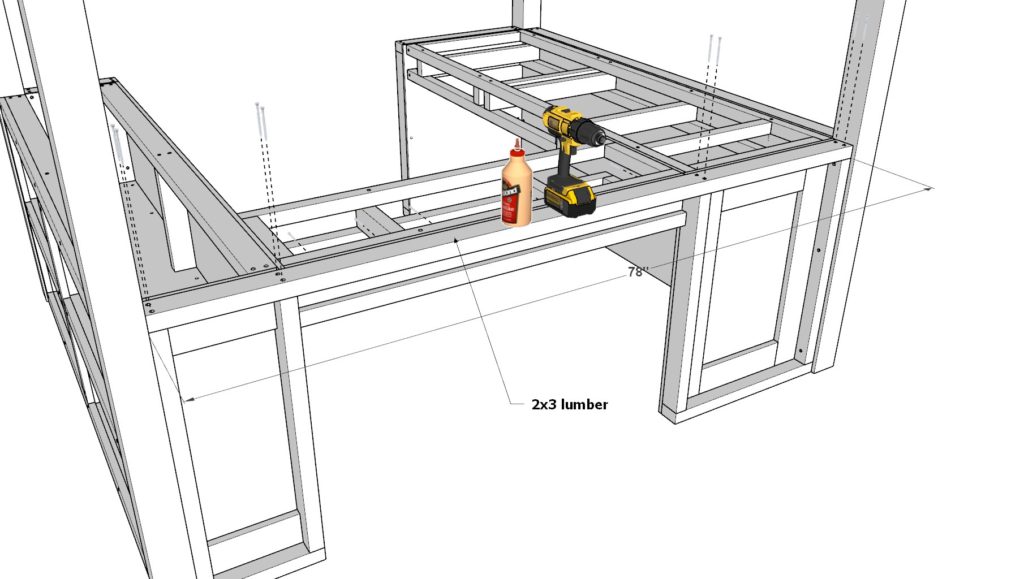
Step 9 (Assembly of the thee parts in the room)
Next, assembly the three components in the bedrooms or in the final destination. The bed is too large to fit though a door and needs to be brought in pieces by pieces.
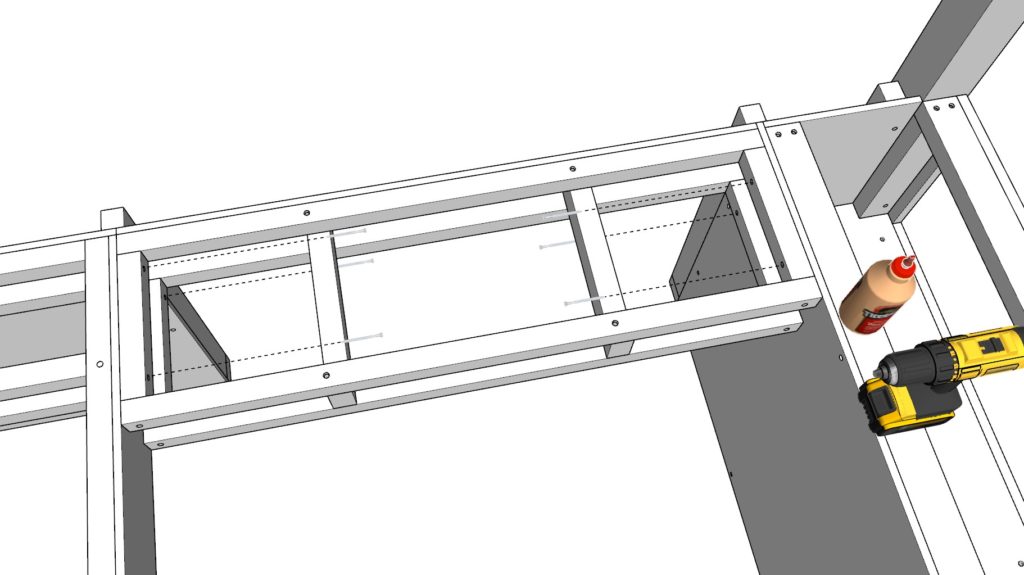
Take the three loft bed components you have built so far and secure them together. Predrill, add glue, and add 3.5 inch screws.
Also add a 78 inch long 2×3 lumber pieces to join the components together. Secure it by predrilling, adding glue, and adding 3.5 inch screws.

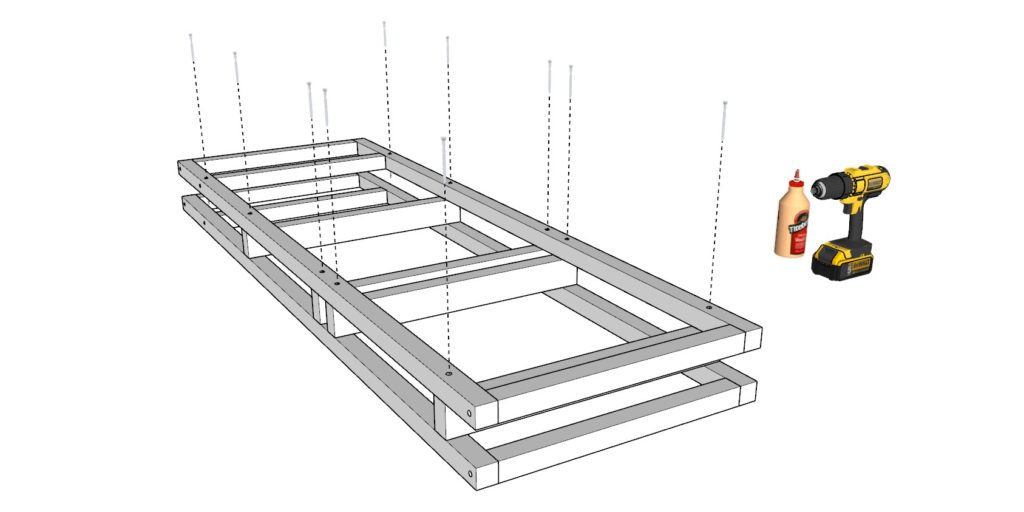
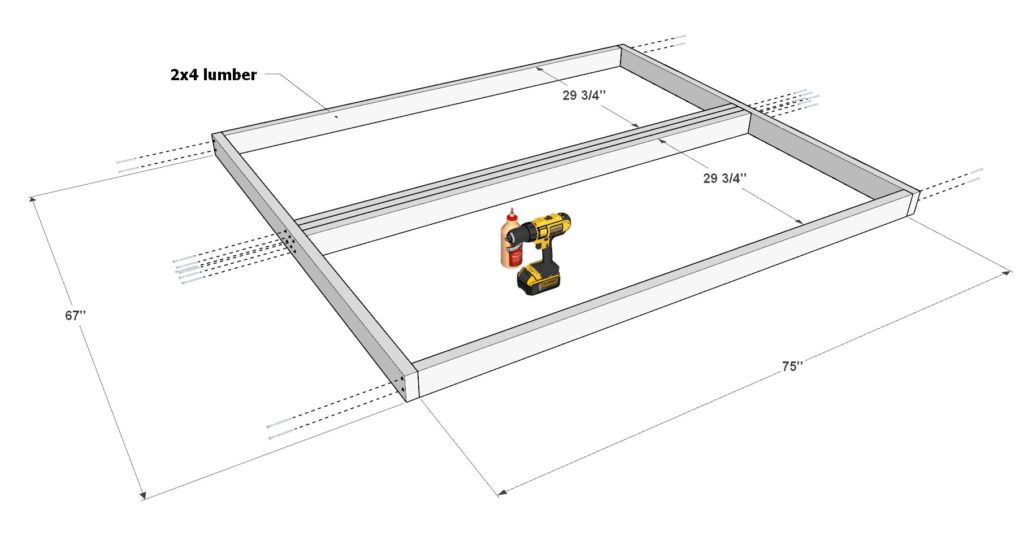
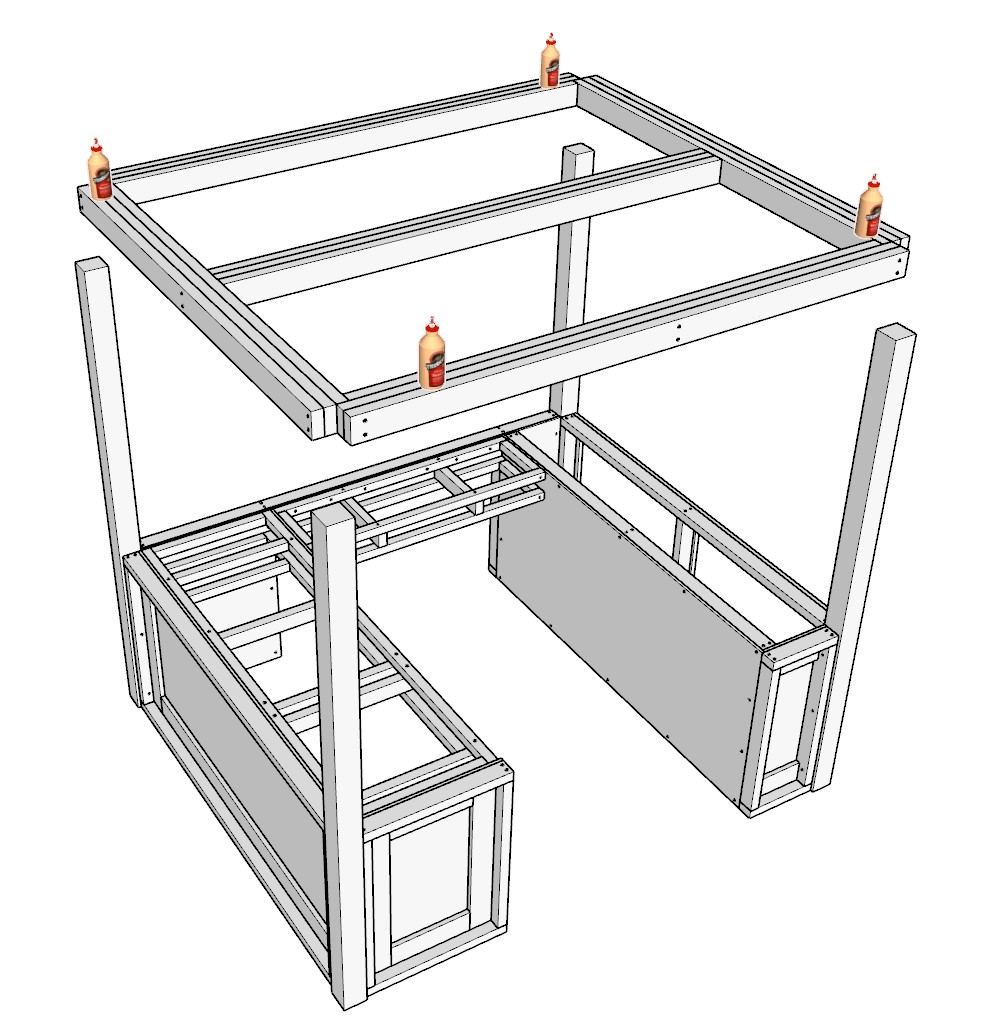
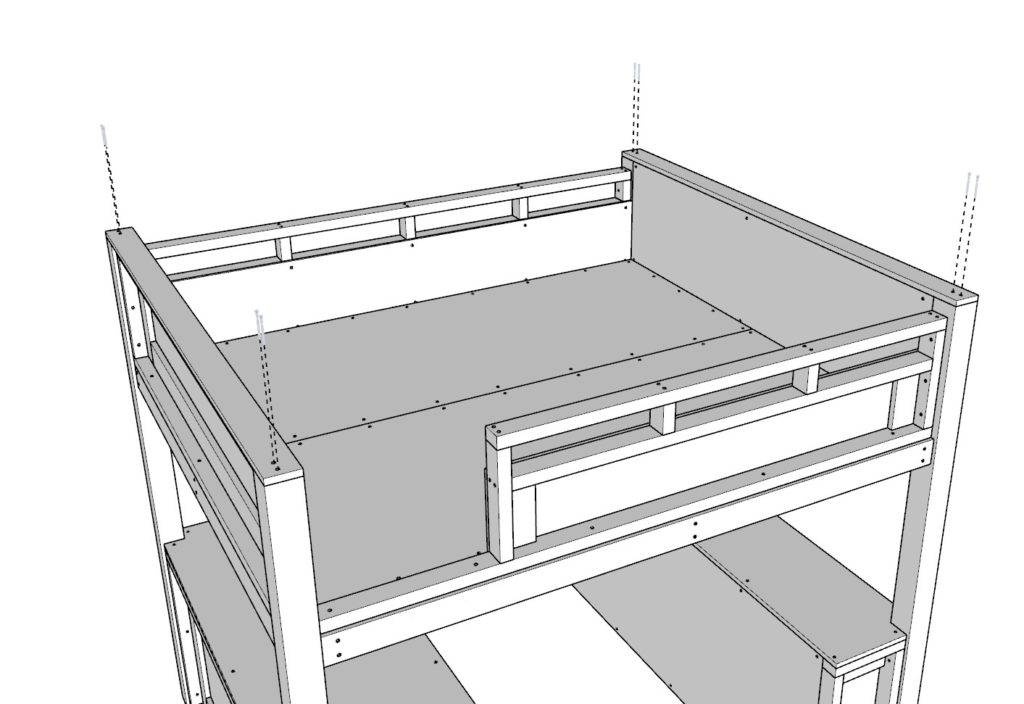
Step 10 (Assembling and adding the loft bed frame)
Next assemble and add the loft bed frame to the study area frame.
First, take two 67 inch 2×4 lumber pieces, and five 75 inch 2×4 lumber pieces and arrange them as shown below. Secure them by predrilling, adding glue, and adding 3.5 inch screws.
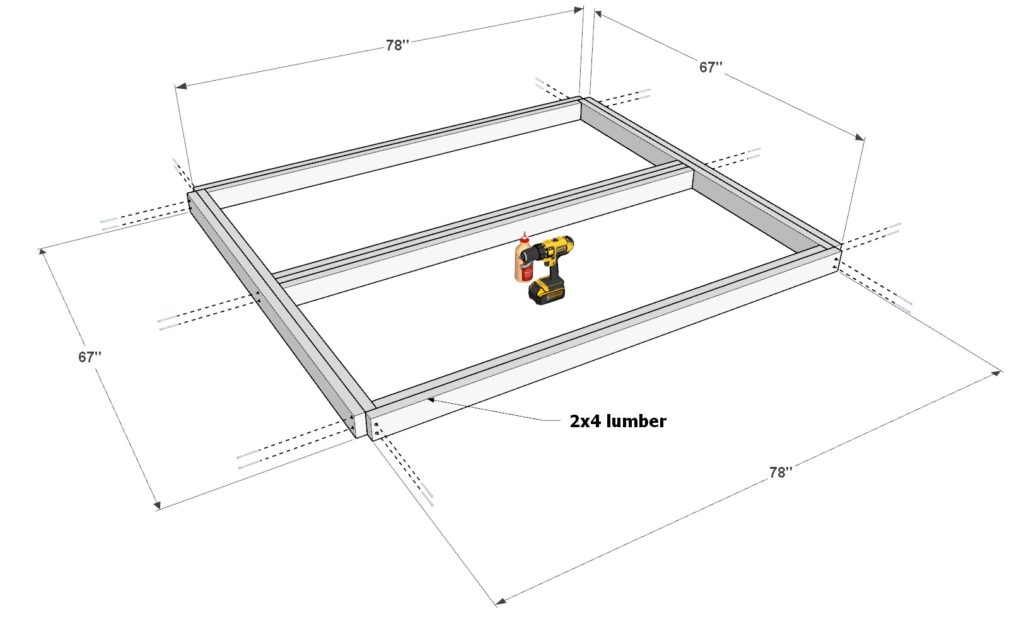
Next, add to the frame an additional two 67 inch 2×4 lumber pieces and two 78 inch 2×4 lumber pieces. Secure them as before.
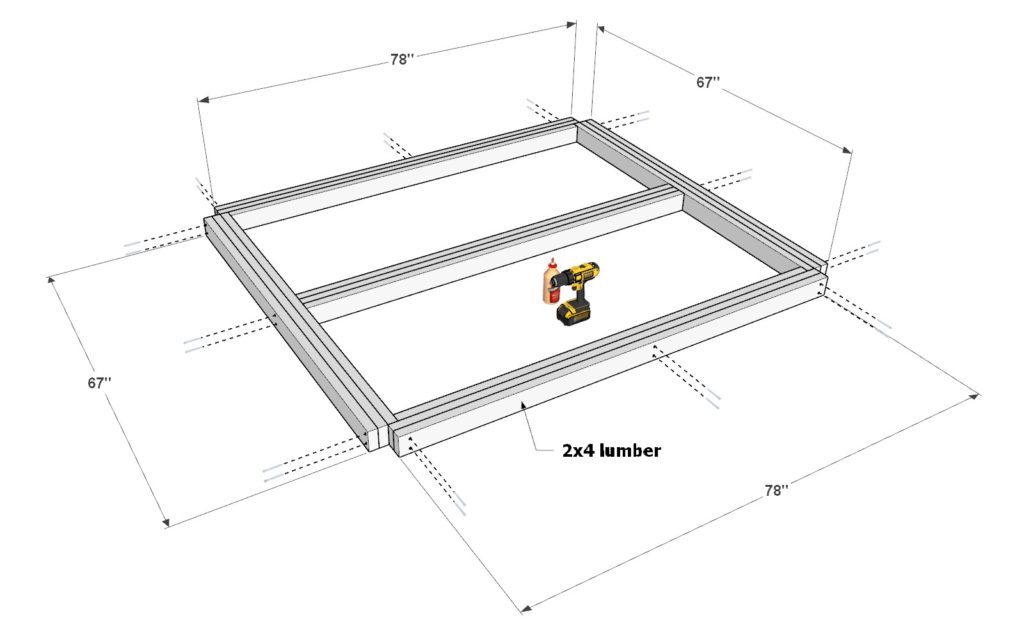
Next add tow more 67 inch 2x4s and two more 78 inch 2x4s. Secure them as before.
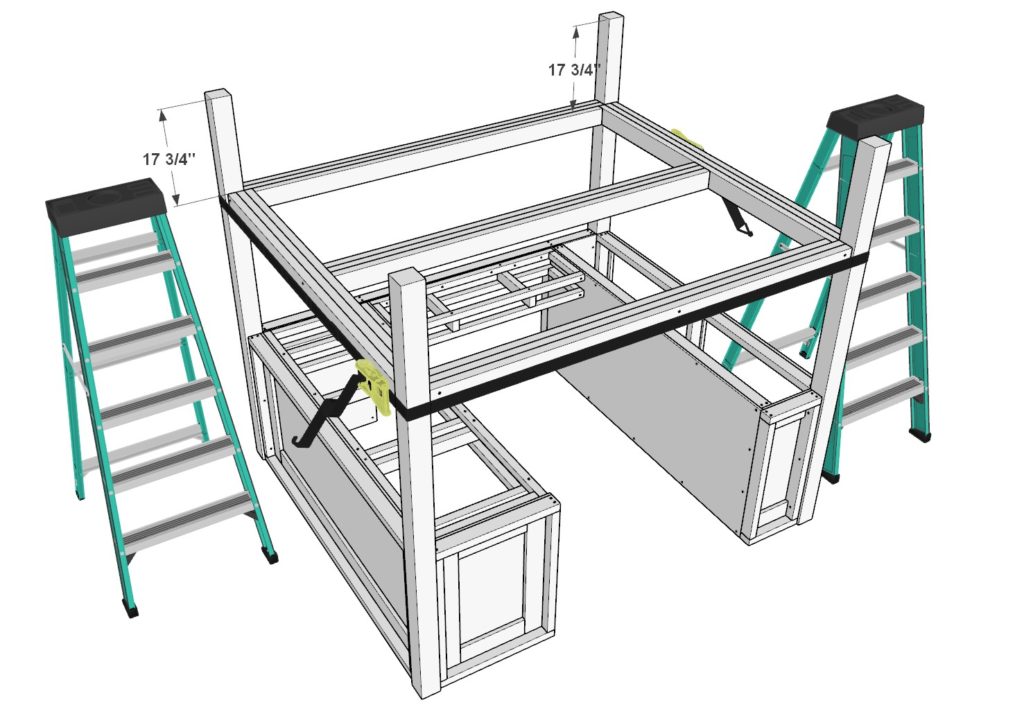
Next, add the bed frame you just made to the pillars. You will need several people to help with this step.
Add glue to all areas that will be joined together. Join two or three ratchet straps together and wrap them around the pillars as shown below. Tighten them tight enough so that the bed frame doesn’t move much. Use a level to determine the optimal pitch of the frame. “Hammer” into place an stubborn corners. The bed frame needs to sit 17-3/4 inches away from the top of the 4×4 pillars.
Once the frame is in place, tighten the straps even more so that the frame does not move at all.
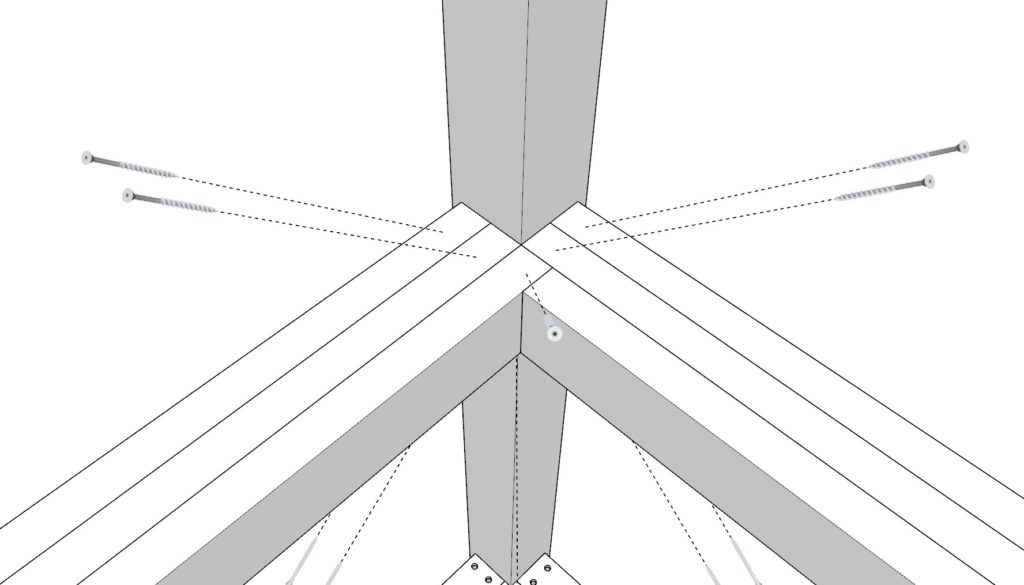
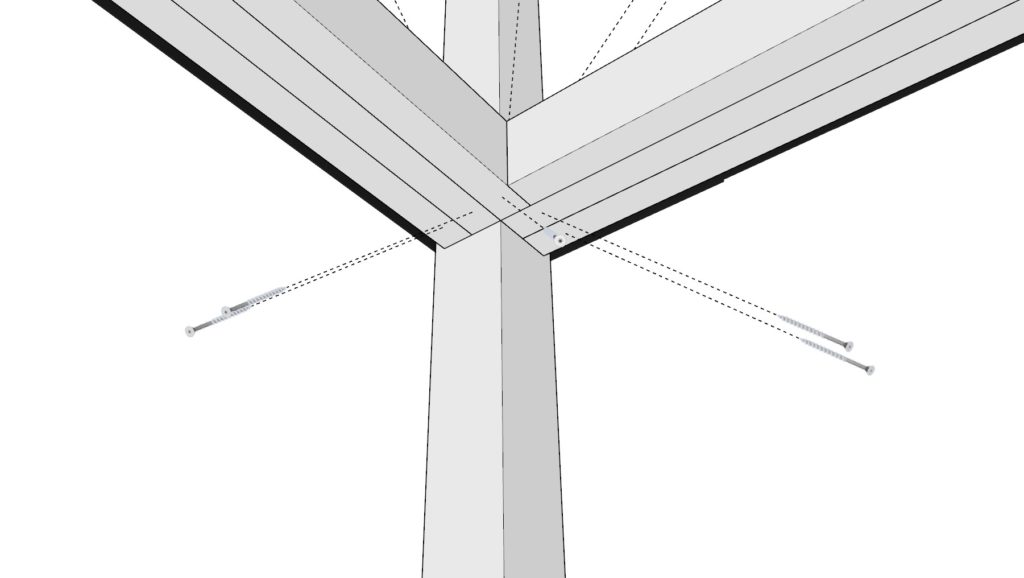
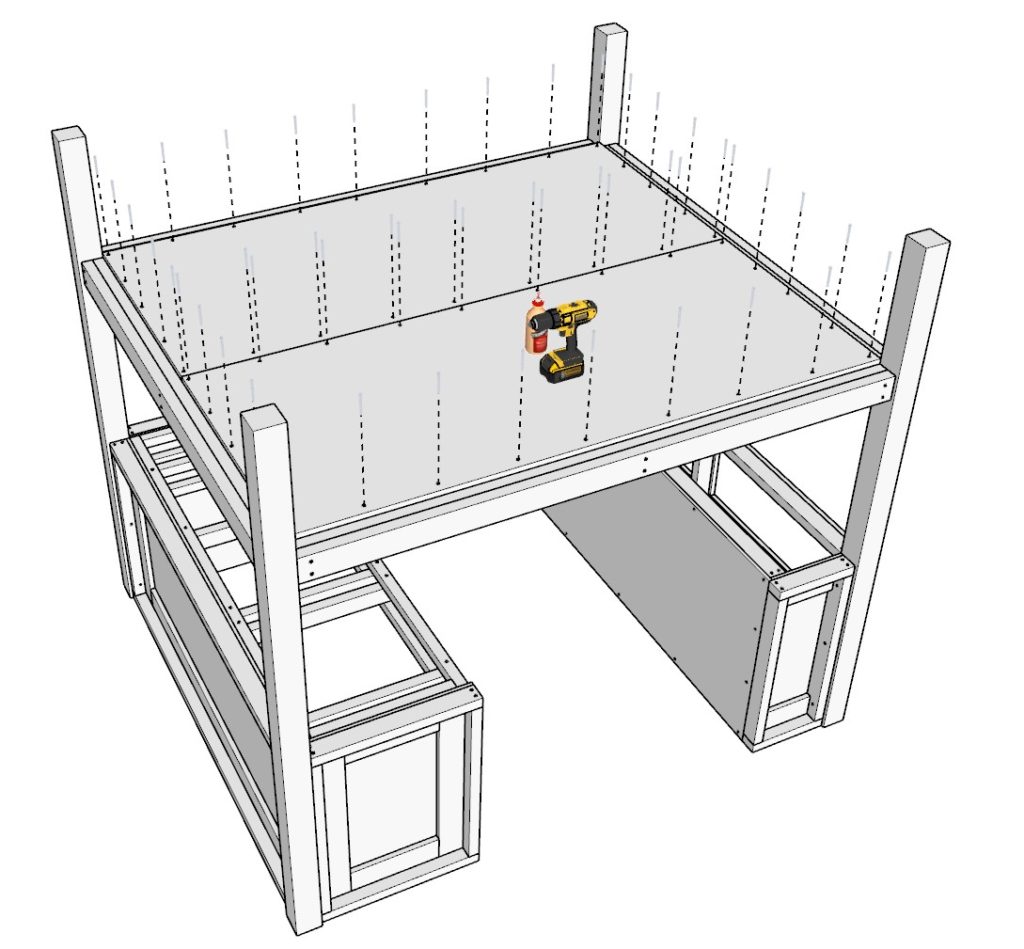
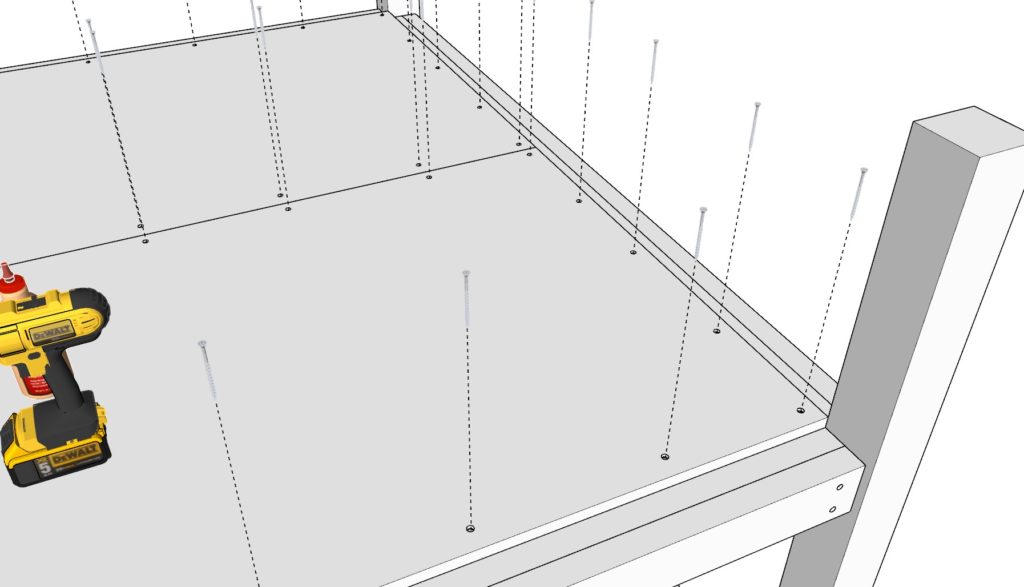
Add 3.5 inch screws as shown below. Make sure the screws go in deep and make good contact with the 4×4 lumber pillar to ensure a safe joint. Repeat this both for the top and bottom of the bed frame.
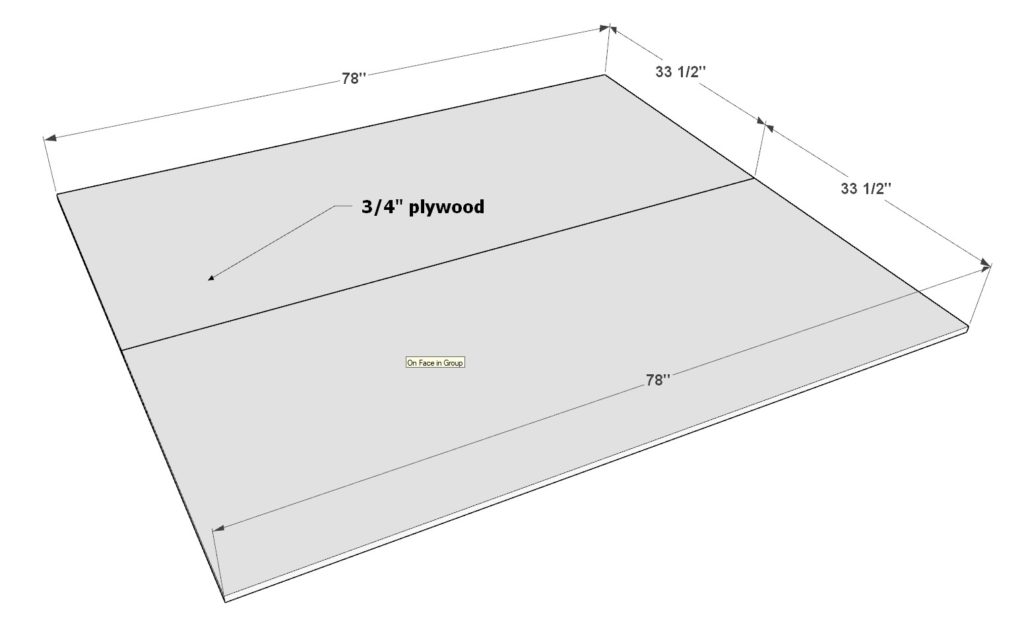
Next, add two 78 in x 33-1/2 inch plywood sheets that are 3/4 inch thick. Secure them with 2.5 inch screws and glue. Don’t forget to predrill.
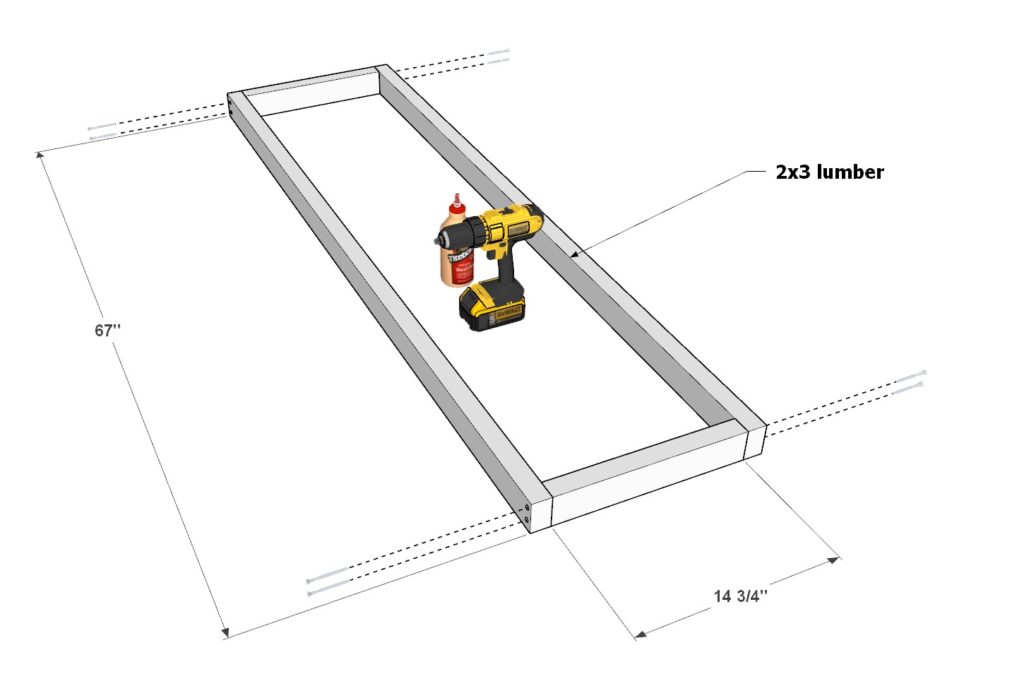
Step 11 (DIY loft bed side rail assembly)
Next, assemble two identical bed side frame pieces.
First, take two 67 inch 2×3 lumber pieces and two 14-3/4 inch 2×3 lumber pieces and secure them together as before.
Add a 67 inch x 17-3/4 inch plywood sheet that is 1/2 inch in thickness. Secure it as before.
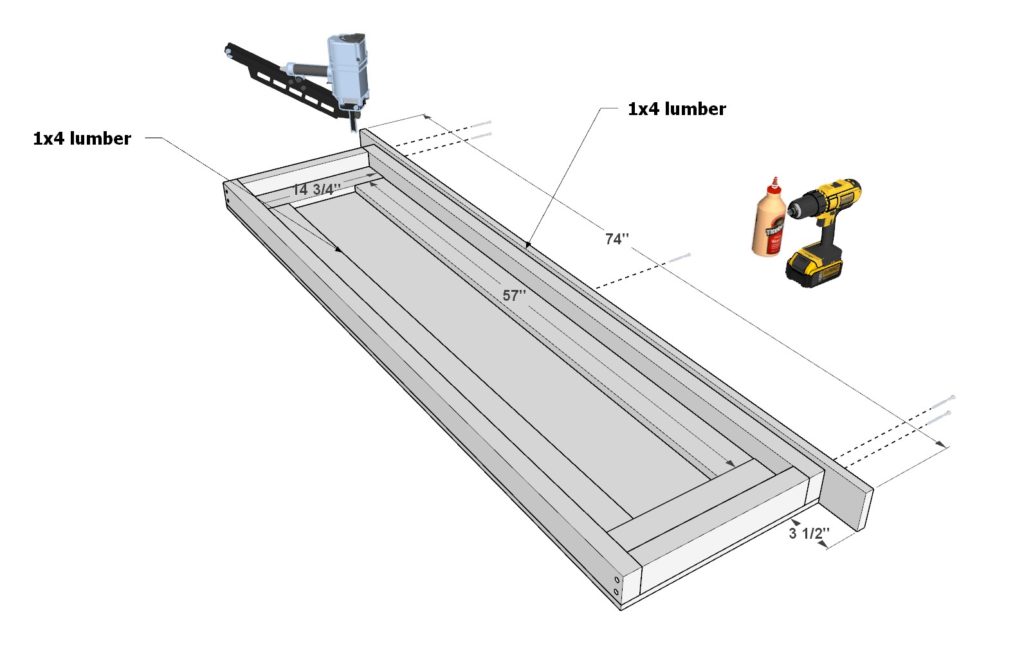
Next, add two 57 inch 1×4 lumber pieces, tow 14-3/4 inch lumber pieces, and one 74 inch lumber piece and attach them as shown below. The 74 inch 1×4 lumber pieces needs to have an over hang of 3-1/2 inches on both ends. Secure the 1×4 pieces by gluing, predrilling, and using a staple gun and 2.5 inch screws for the 74 inch 1×4 lumber.
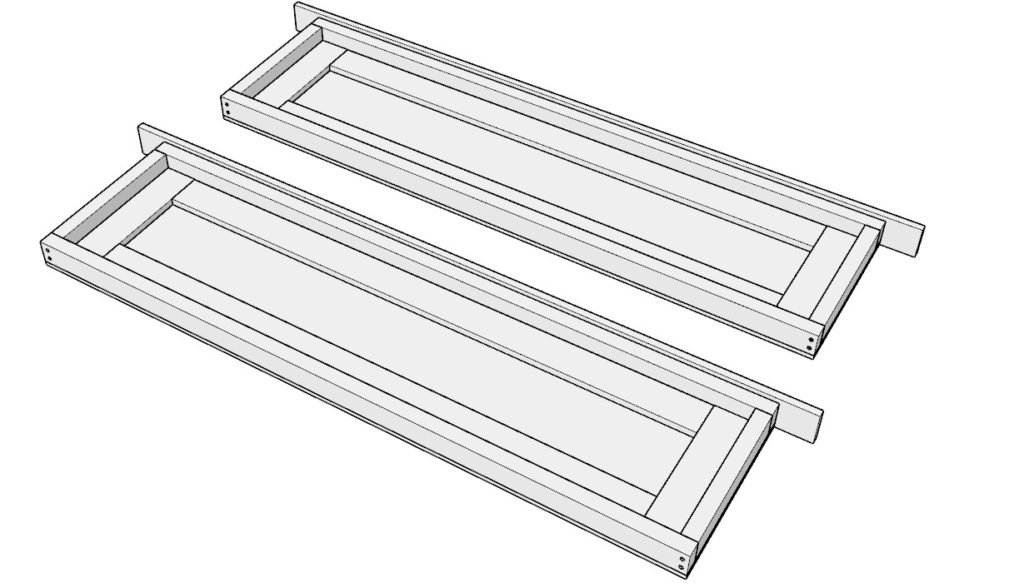
Make two identical frame pieces.
Step 12 (Assembly of bed railing components)
Next assemble the two loft bed railing components.
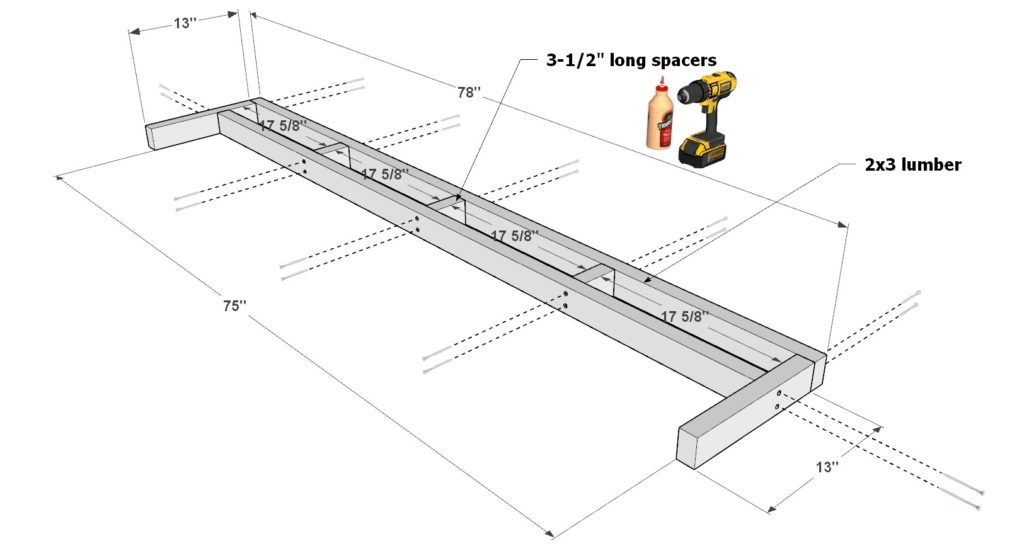
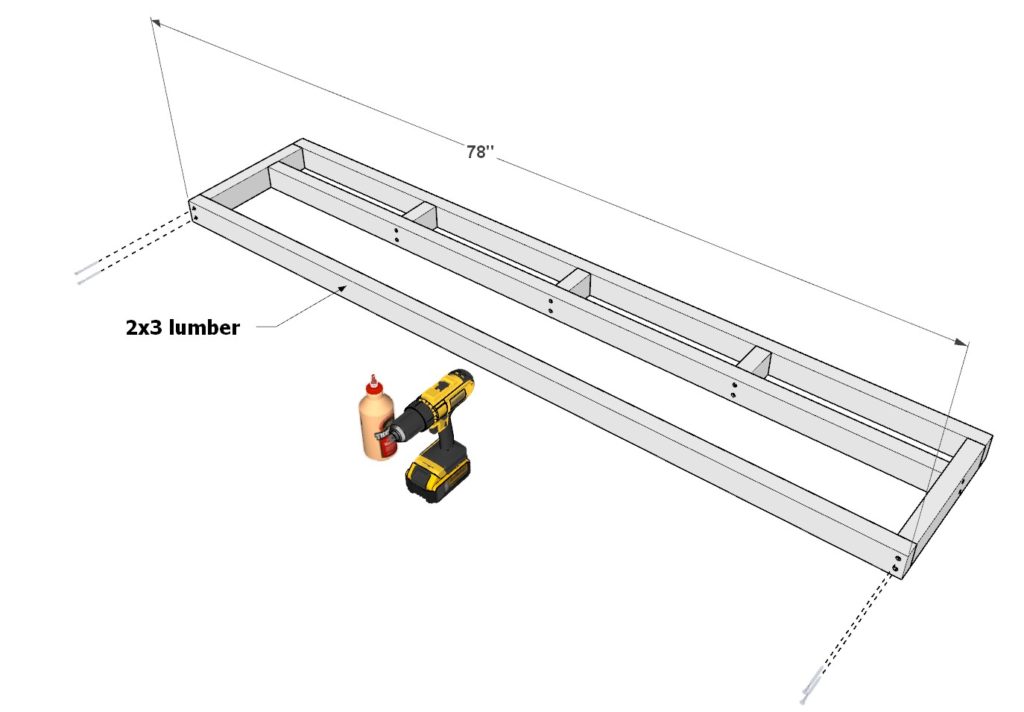
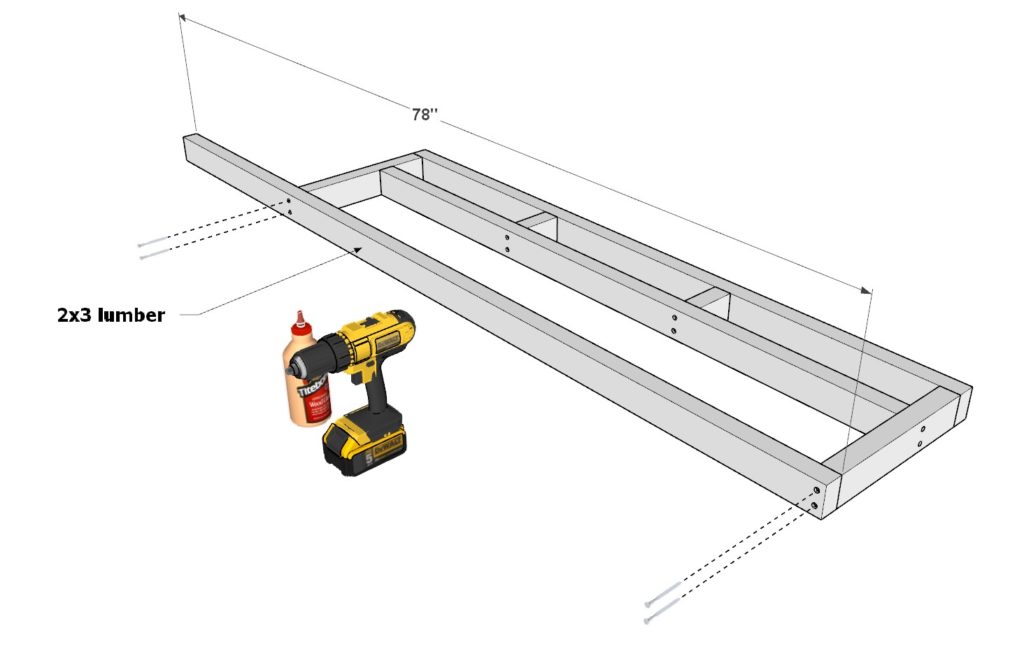
First, take two 13 inch 2×3 lumber pieces, one 75 inch 2×3 lumber piece, one 78 inch 2×3 lumber piece, and three 3-1/2 inch 2×3 lumber pieces and arrange them as shown below. Predrill, add glue, and add 3.5 inch screws.
Next, add a 78 inch 2×3 lumber pieces and secure it as before.
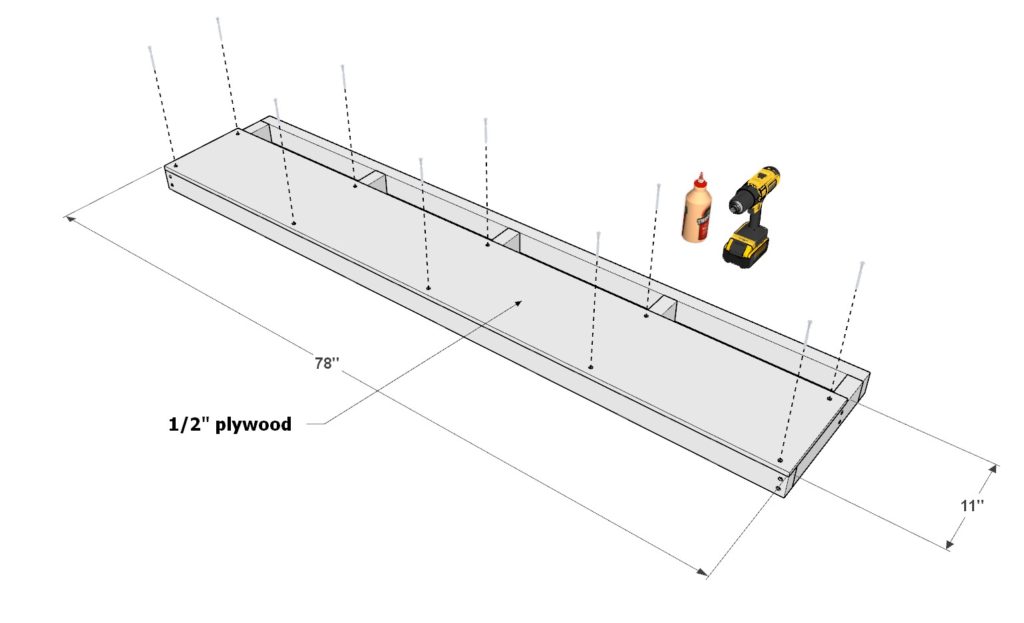
Next, add a 78 inch x 11 inch plywood sheet that is 1/2 inch thick. Secure it by predrilling, adding 2.5 inch screws and glue.
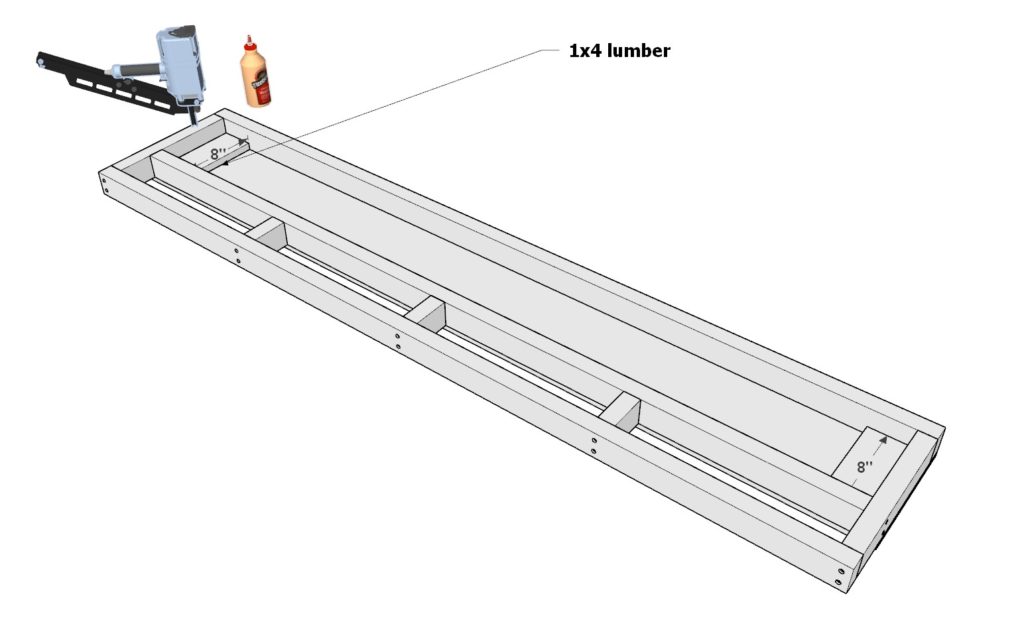
Next, add two 8 inch 1×4 lumber pieces to the edges of the railing as shown below. Secure with glue and nail gun.
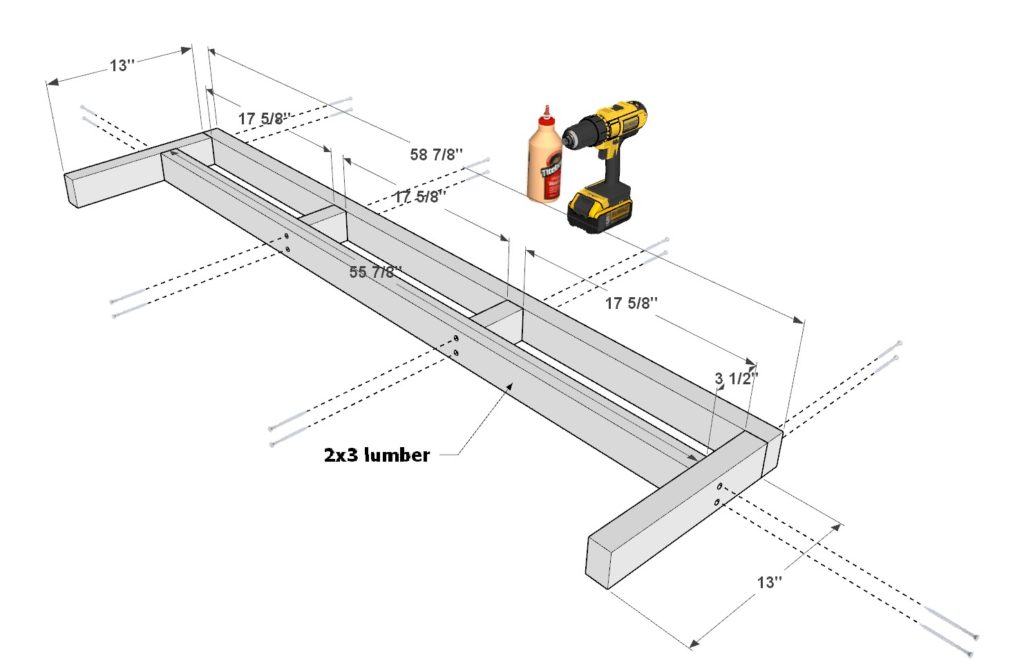
Next build the second railing pieces.
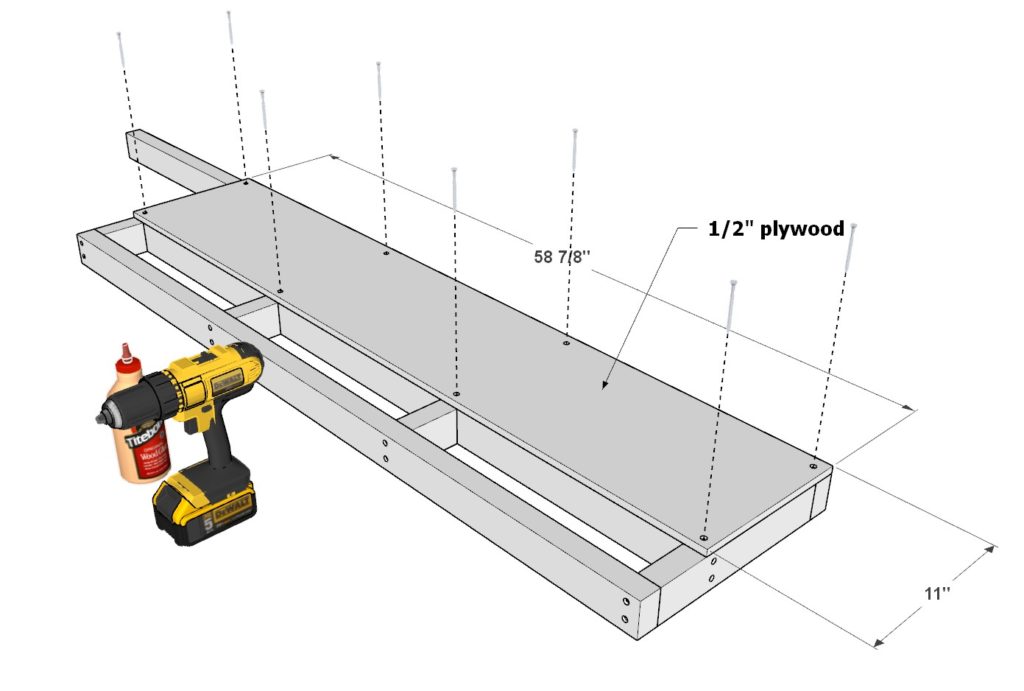
Take two 13 inch 2×3 lumber pieces, one 55-7/8 inch 2×3 lumber piece, one 58-7/8 inch 2×3 lumber piece, and two 3-1/2 inch 2×3 lumber pieces and arrange them as shown below. Predrill, add glue, and add 3.5 inch screws.
Next, add a 78 inch 2×3 lumber pieces and secure it as before.
Next, add a 58-7/8 inch x 11 inch plywood sheet that is 1/2 inch thick. Secure it by predrilling, adding 2.5 inch screws and glue.
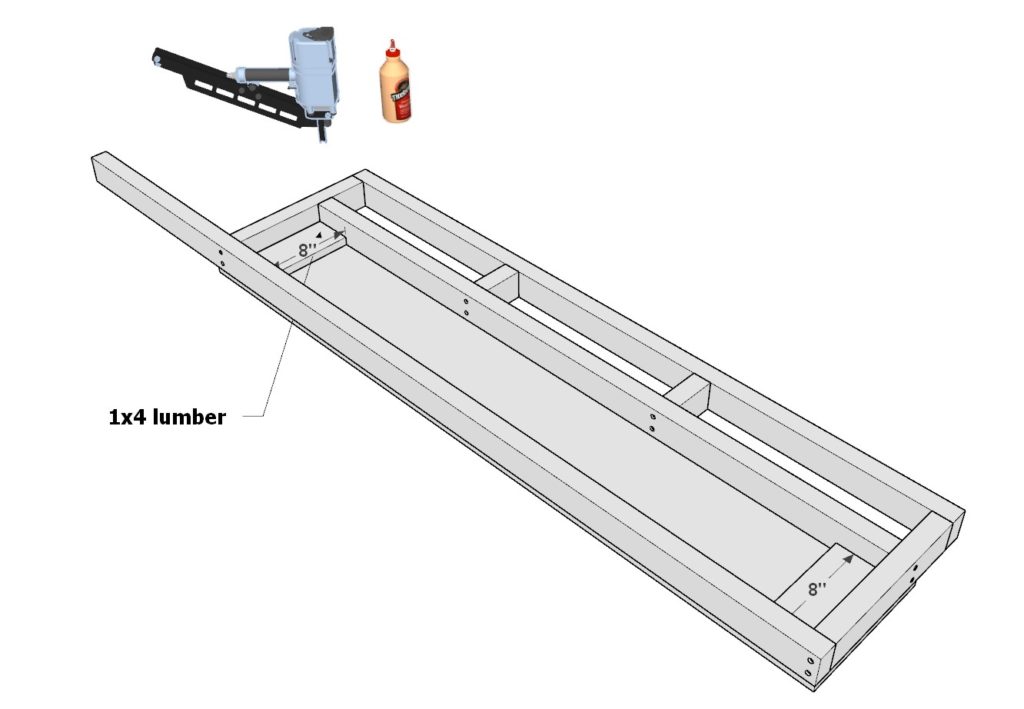
Next, add two 8 inch 1×4 lumber pieces to the edges of the railing as shown below. Secure with glue and nail gun.
Step 13 (Adding railing to DIY loft bed)
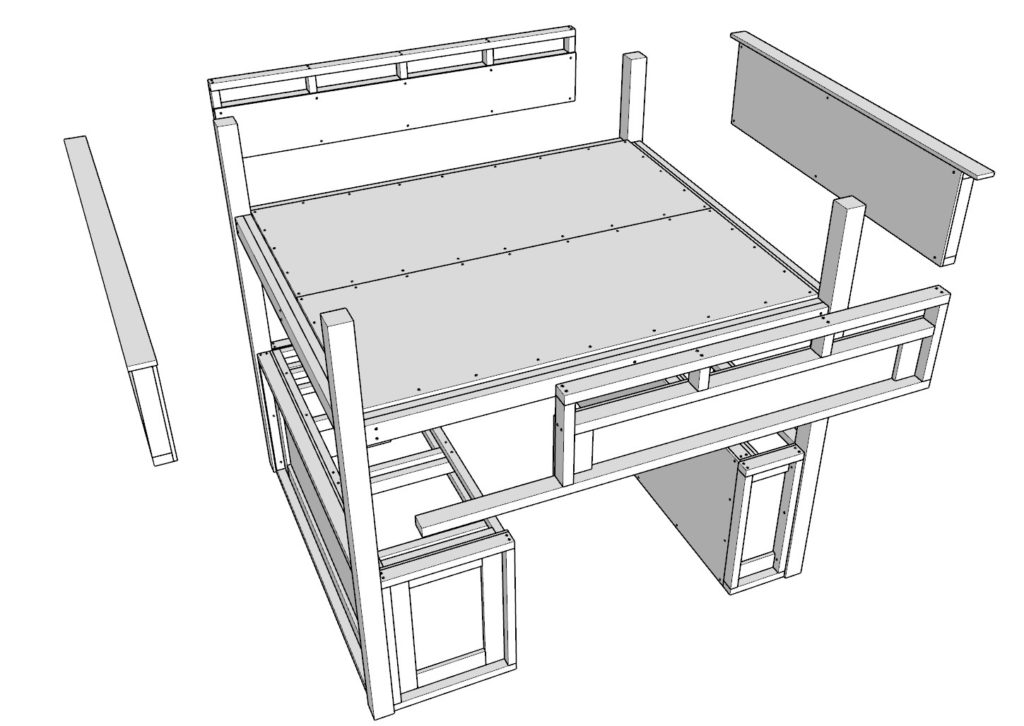
Next, attach the loft railing to the loft bed frame.
Add all four components to the frame as shown below. Secure the railing pieces with 3.5 inch screws and predrilling. Be generous with glue and screws in this step as it makes the lofted bed more secure and able to hold more weight safely.
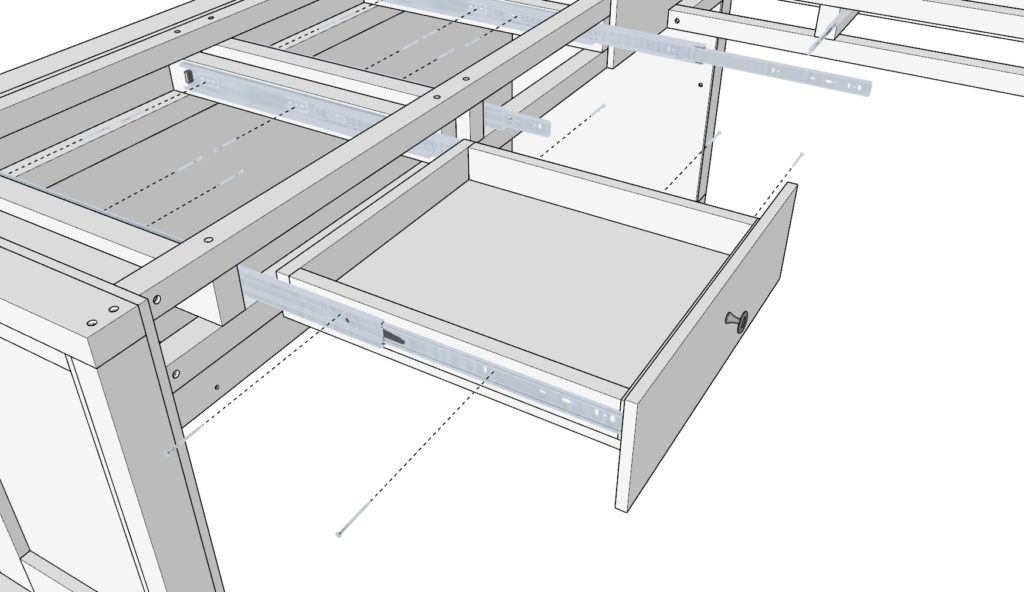
Step 14 (Drawer storage assembly)
Next, assemble the drawers.
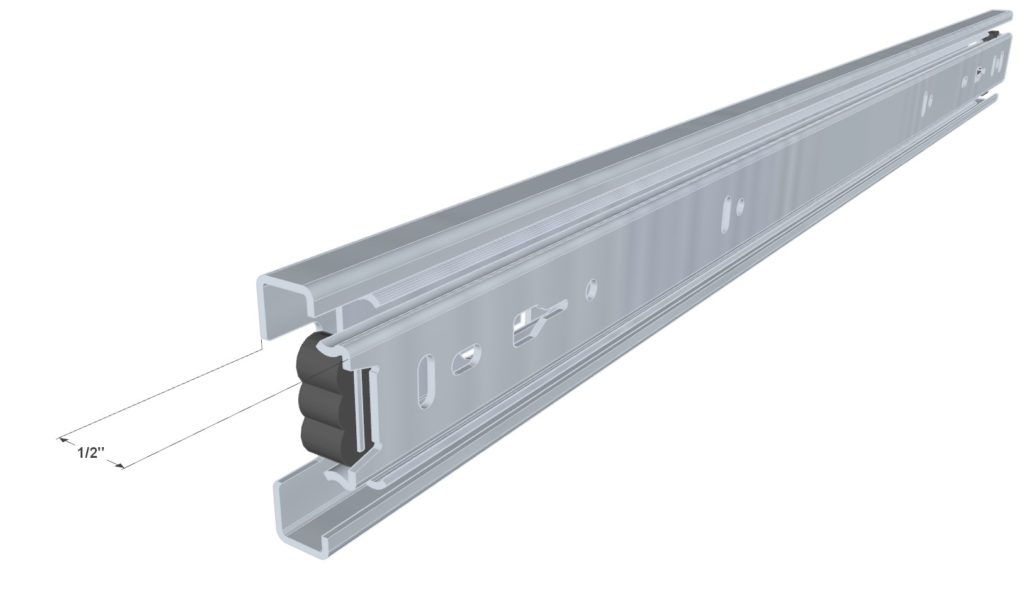
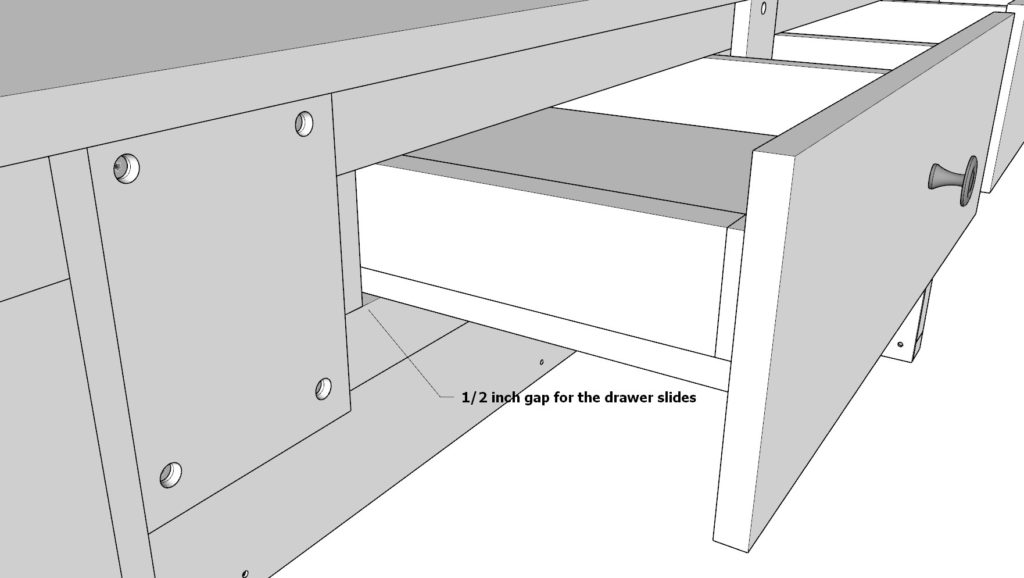
This step can vary depending on the type and size of drawer slides you buy. If you buy drawer slides that are wider then the dimensions of the drawer slides I used (1/2 inch wide) then change the dimensions of the drawer accordingly. MEASURE the drawer slides prior to making the drawers.
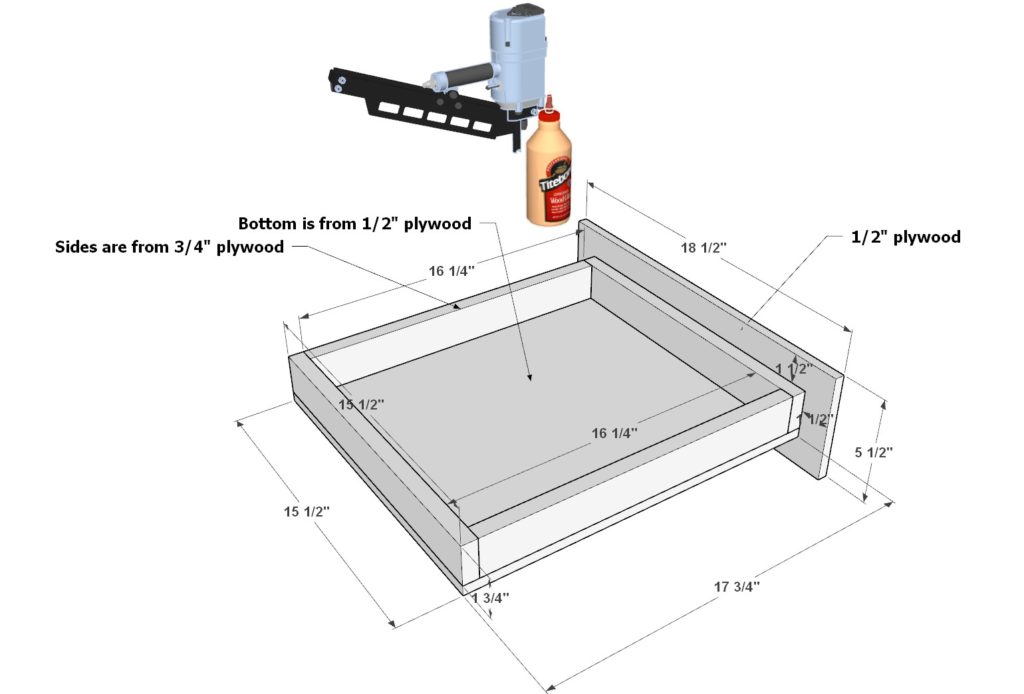
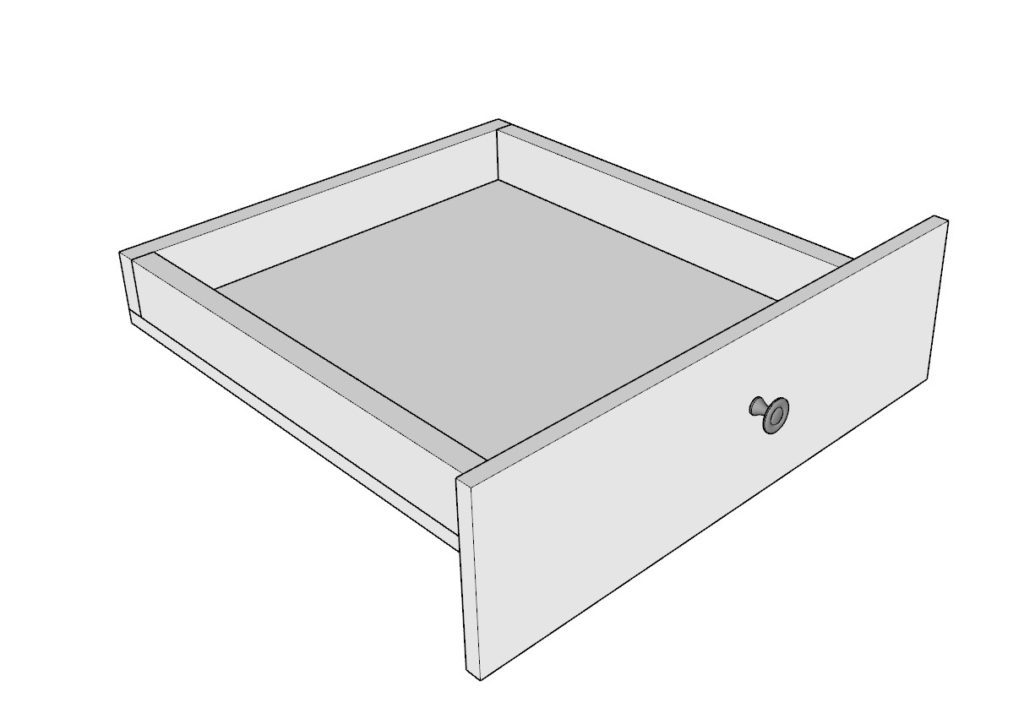
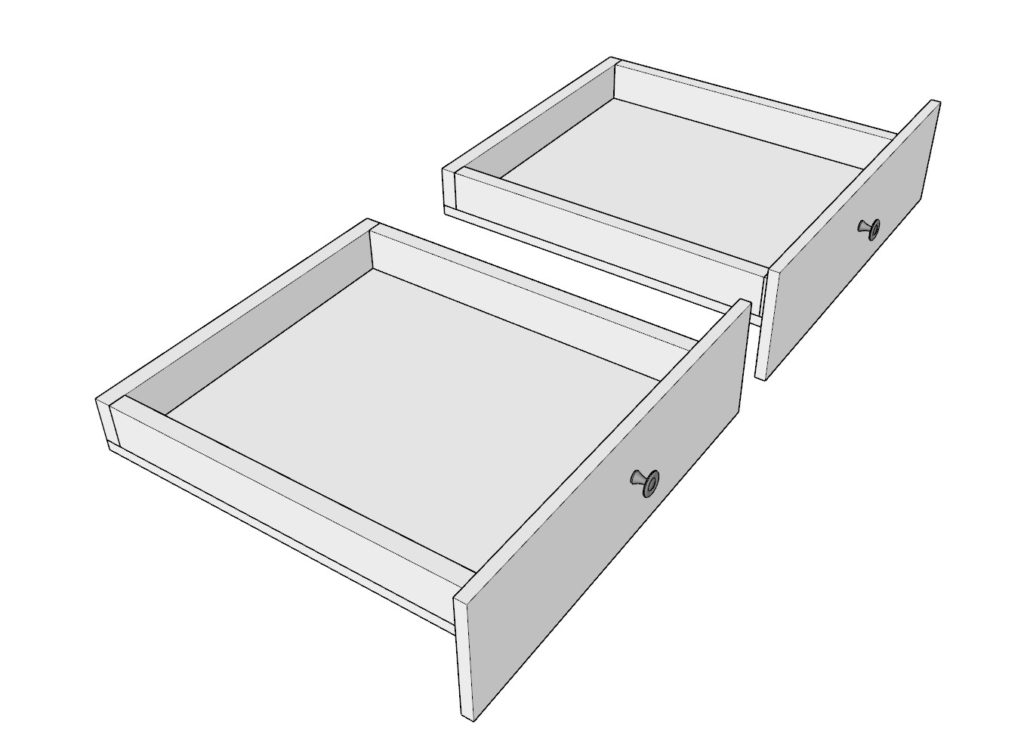
To make the drawer, take two 16-1/4 in x 1-3/4 inch (3/4 inch thick) plywood pieces, two 15-1/2 in x 1-3/4 inch (3/4 inch thick) plywood pieces, one 17-3/4 in x 15-1/2 in (1/2 inch thick) plywood piece, and one 18-1/2 in x 5-1/2 in (1/2 inch thick) plywood piece and arrange them as shown below. Use glue and a nail gun to secure the plywood pieces together.
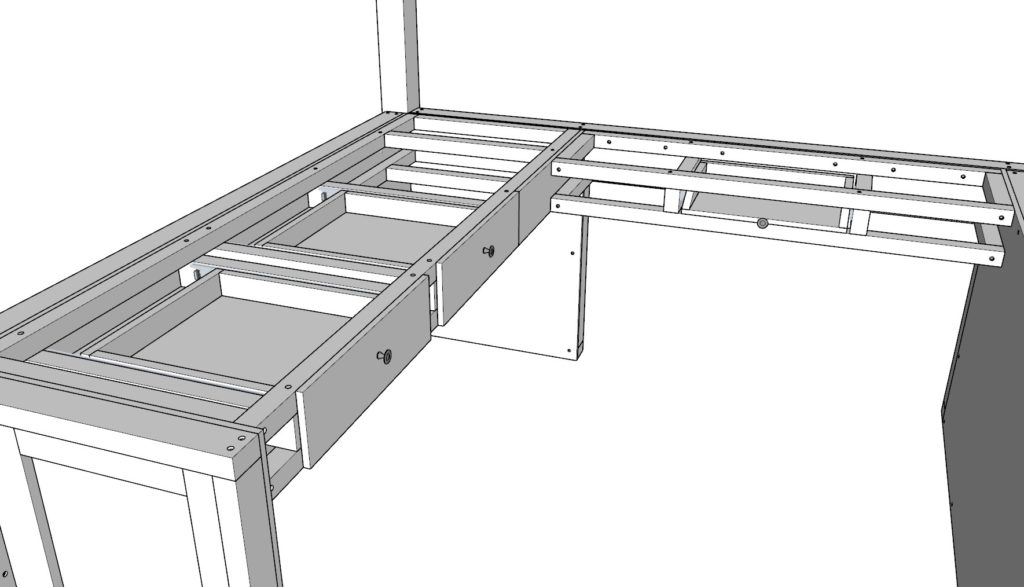
Make an second identical drawer and attach nobs.
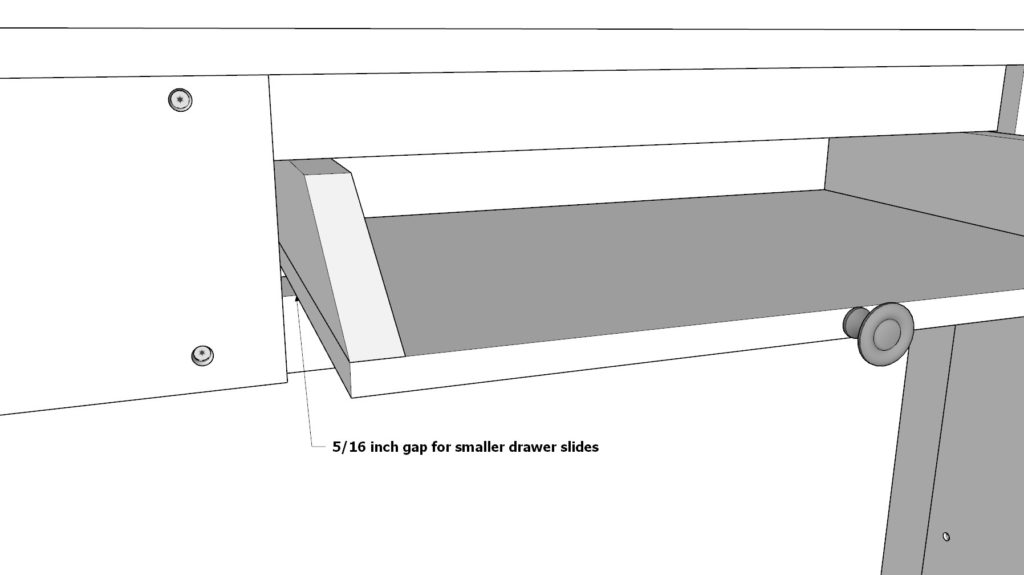
Next, make the keyboard drawer.
Again, the dimensions of the drawer will change depending on the size of drawer slides you buy. I used a 5/16 inch wide slide. Its smaller then the ones I used for the other two drawers.
Take two 10-3/4 inch x 1-3/4 inch (3/4 inch thick) plywood pieces that are cut at a 60-degree angle on one end, one 15-7/8 inch x 1-3/4 inch (3/4 inch thick) plywood piece, and one 10-3/4 in x 15-7/8 in (1/2 inch thick) plywood sheet and arrange them as shown below. Use glue and nail gun to secure the drawer together.
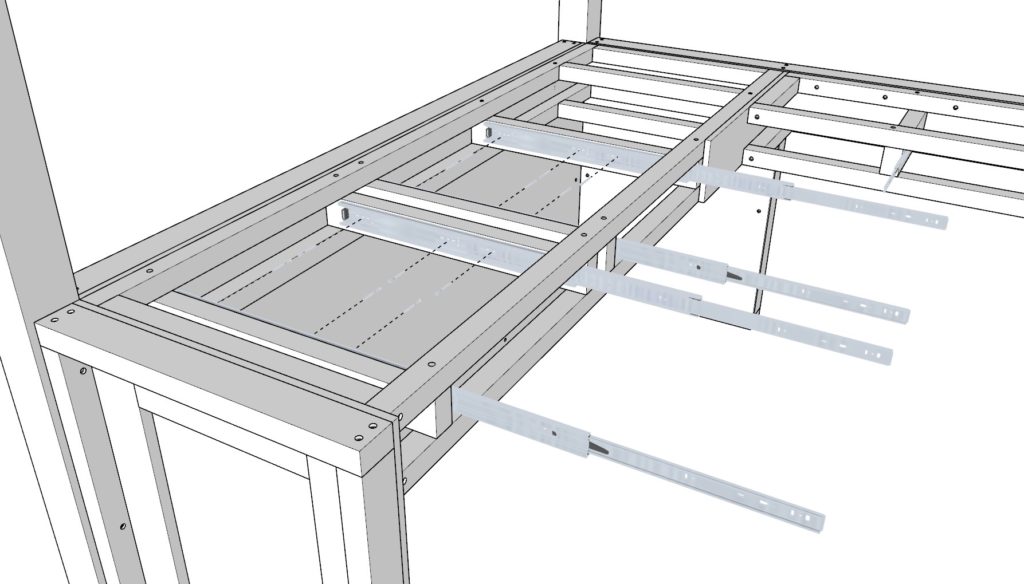
Next, attach the slides to the drawers and to the drawer inserts. Use small screws to attach the slides to the drawers

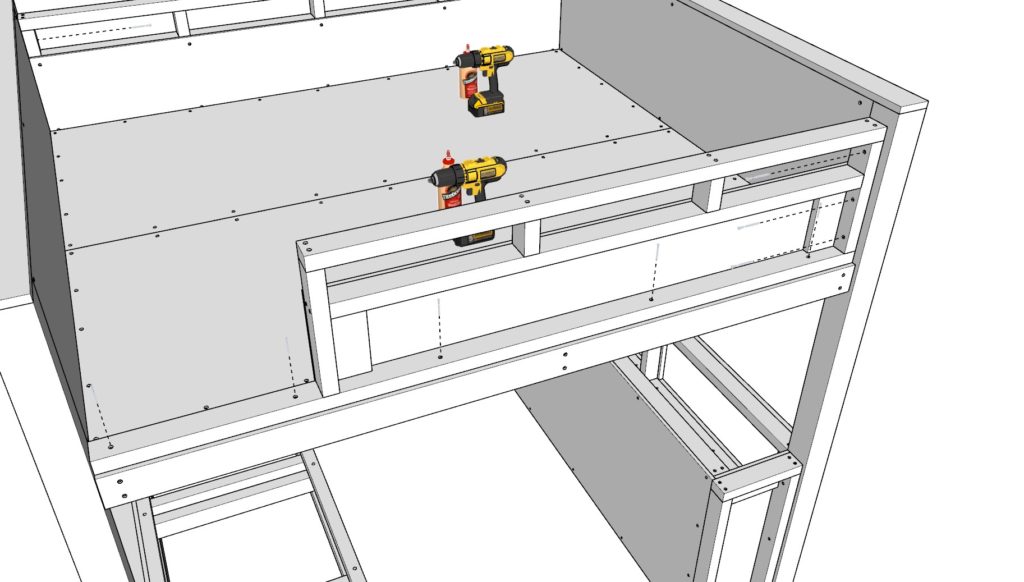
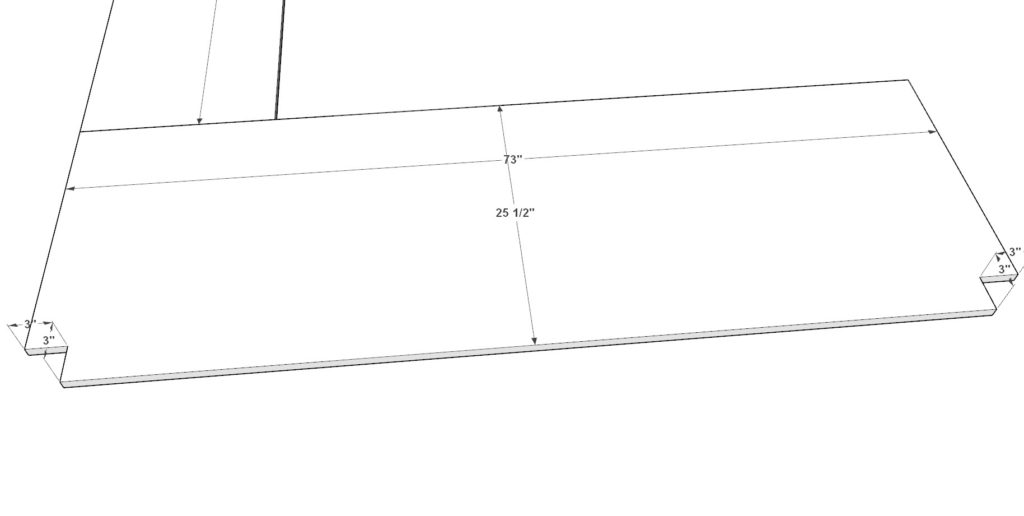
Step 15 (Adding desk top to study area of DIY loft bed)
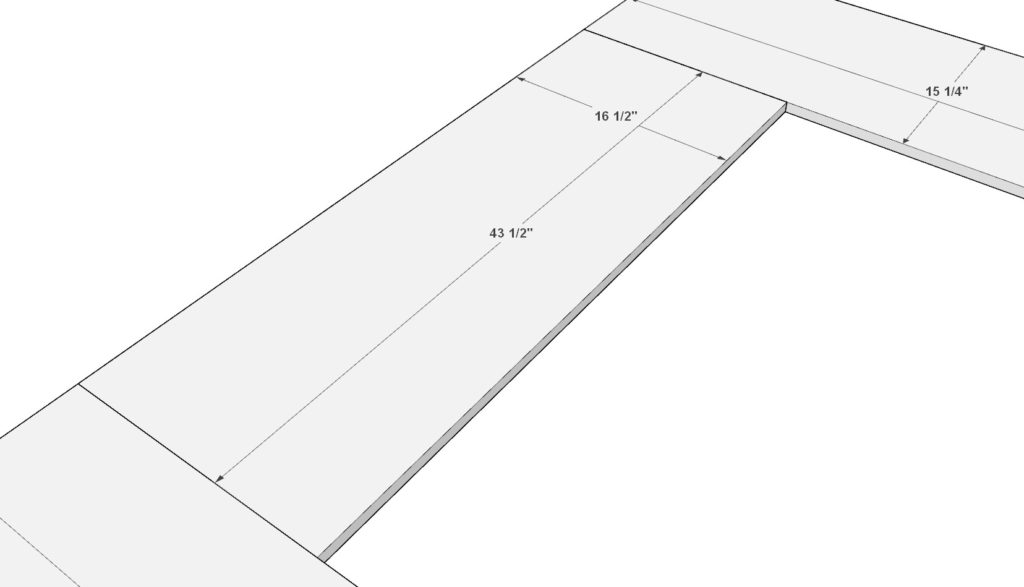
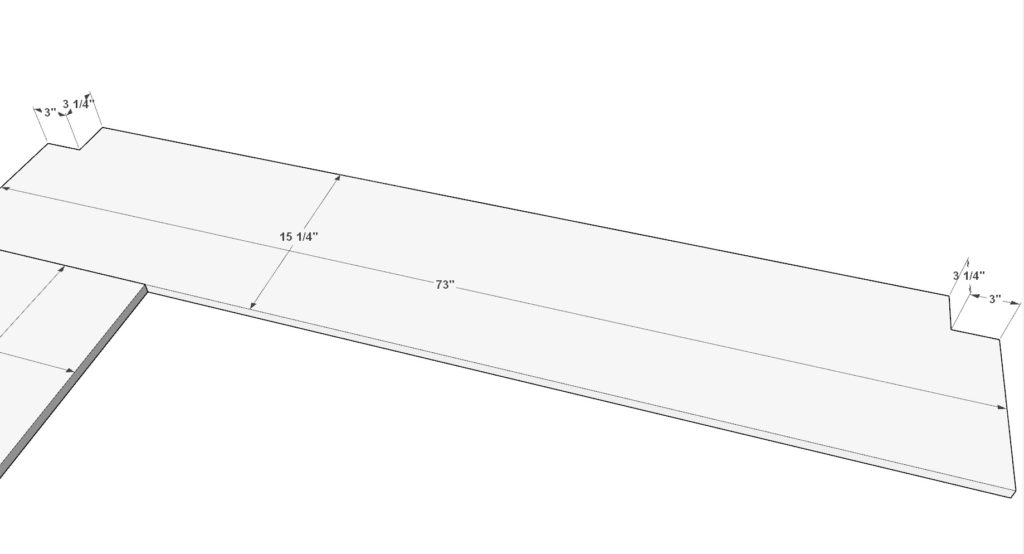
Next, add the three 3/4 inch thick plywood sheet cuts shown in the image below to serve as a desk top in the study area.
Make sure you cut the appropriate size notches as shown below to accommodate the pillars.
Secure the plywood sheets with 3.5 inch screws to the frame of the loft bed. Use glue and don’t forget to predrill.

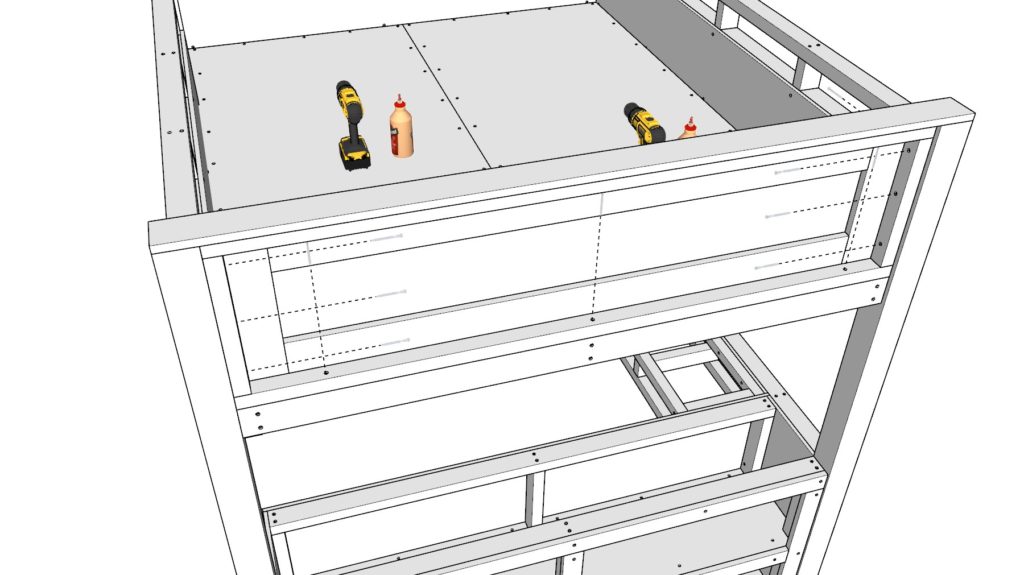
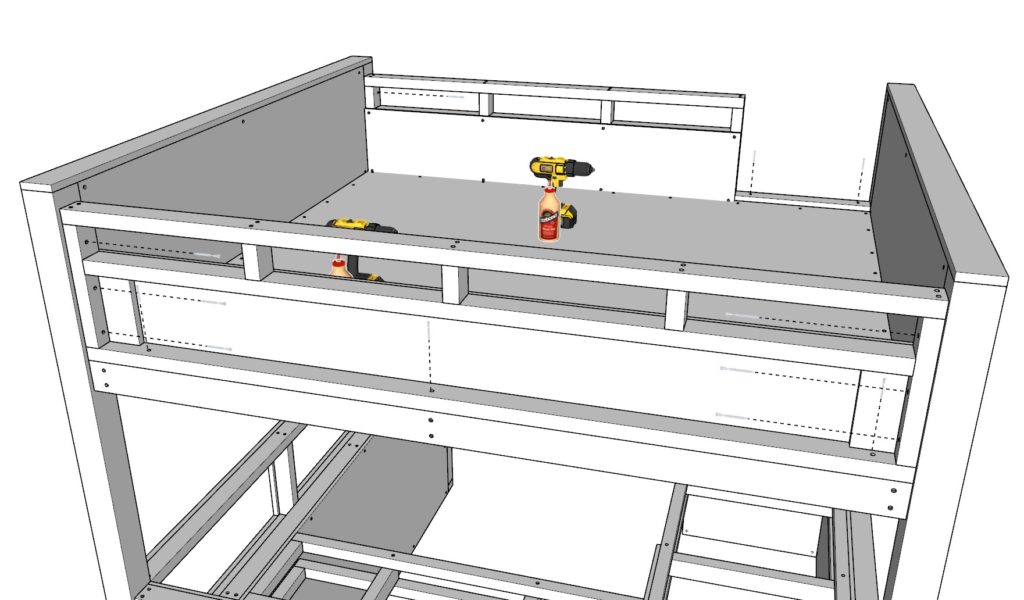
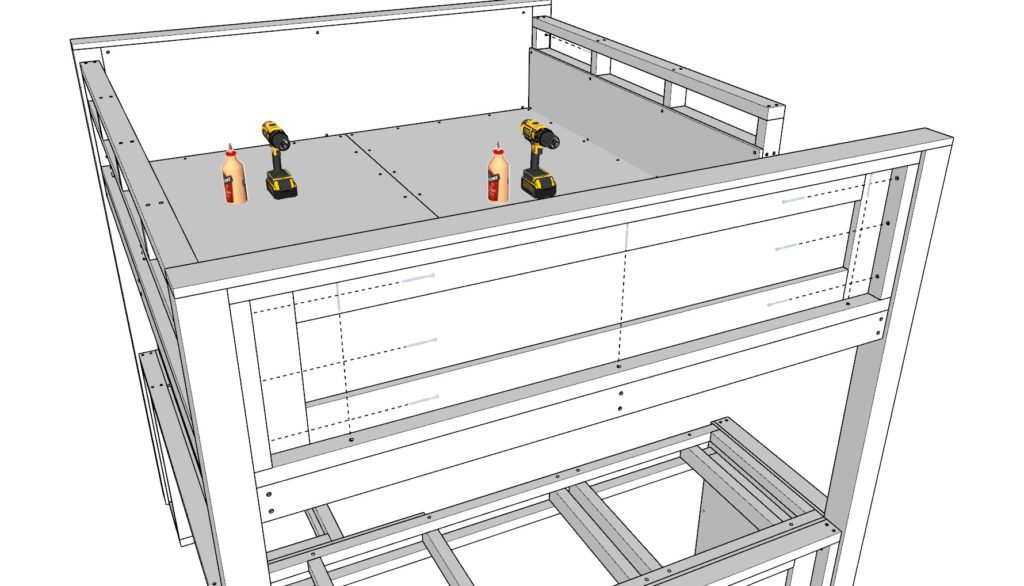
Step 16 (Finishing touches to DIY loft bed)
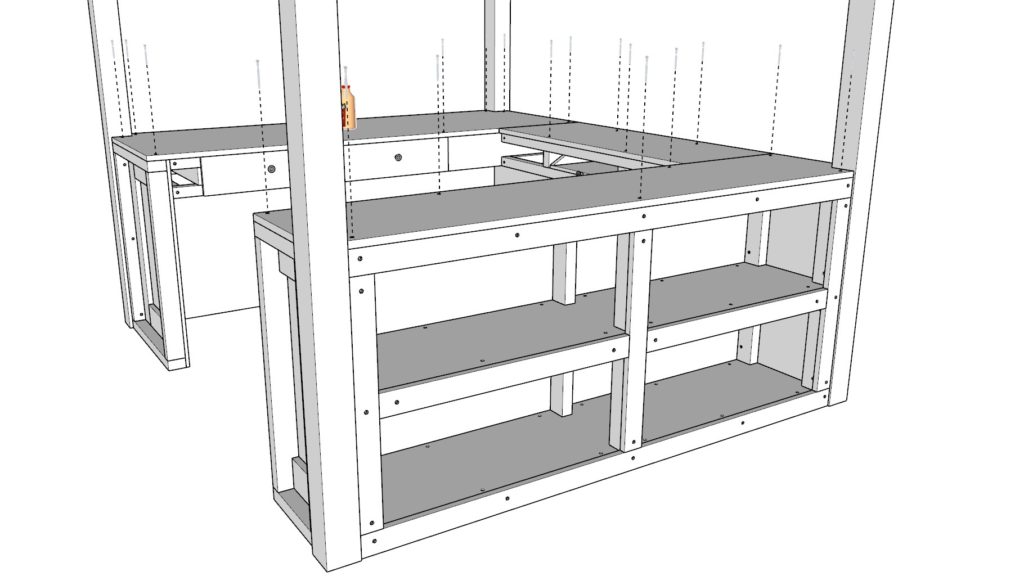
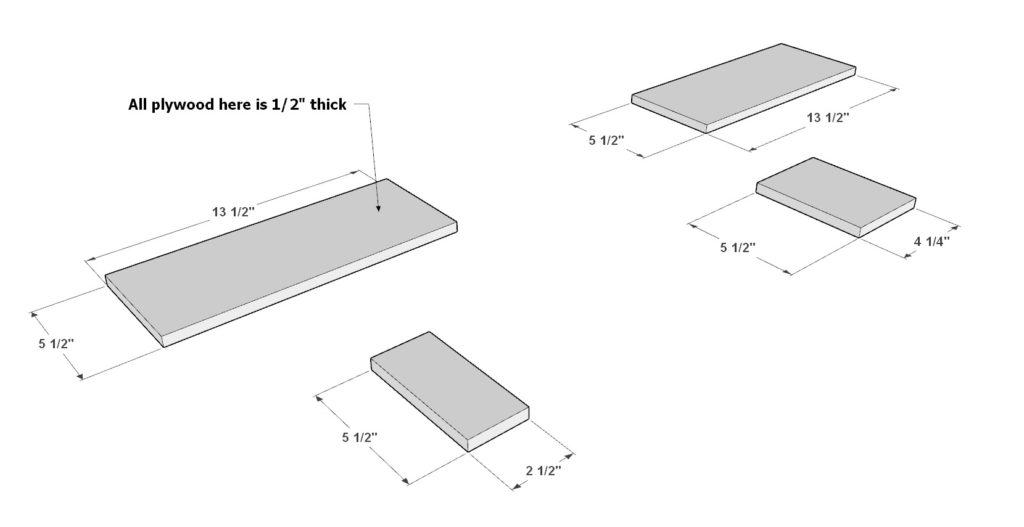
Next, add the four plywood sheet cuts shown below to the DIY loft bed to cover up and gaps in the study area frame. Use 1.5 inch screws, glue, and predrill.
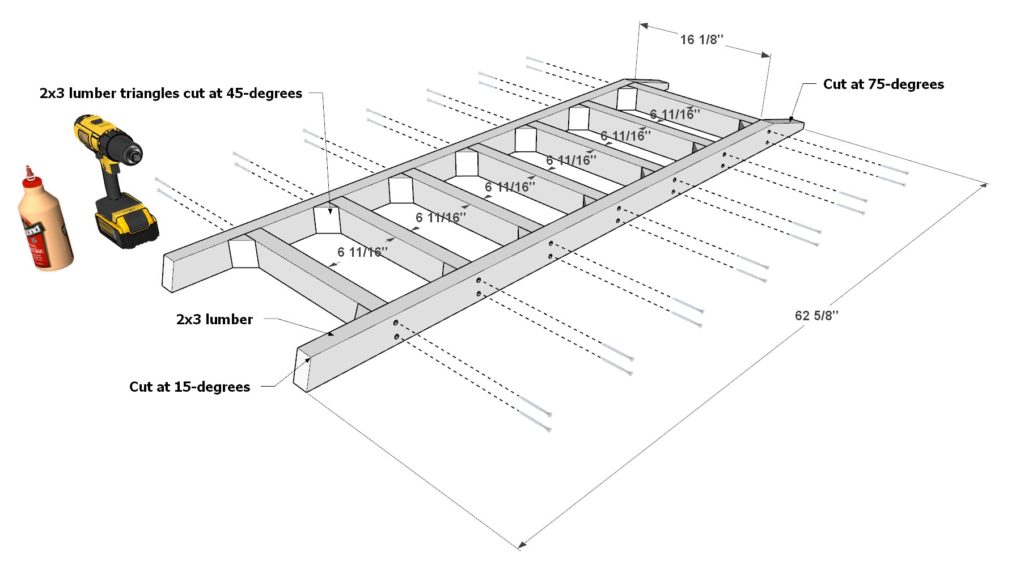
Step 17 (DIY loft bed ladder assembly)
Next, assemble and attach the ladder.
Take two 62-5/8 inch long 2×3 lumber pieces (cut at 75-degrees on one end with a slight indent, and 15-degrees on the other end), sever 16-1/8 inch long 2×3 lumber pieces, and fourteen 2×3 triangles cut at a 45-degree angle and arrange them as shown below. Use screws to attach the larger 2×3 lumber pieces to the step pieces. Use glue and a nail gun to secure the 2×3 triangles to the ladder.
If the user of the bed needs a ladder that can handle more weight, then use 2x4s instead for additional safety.
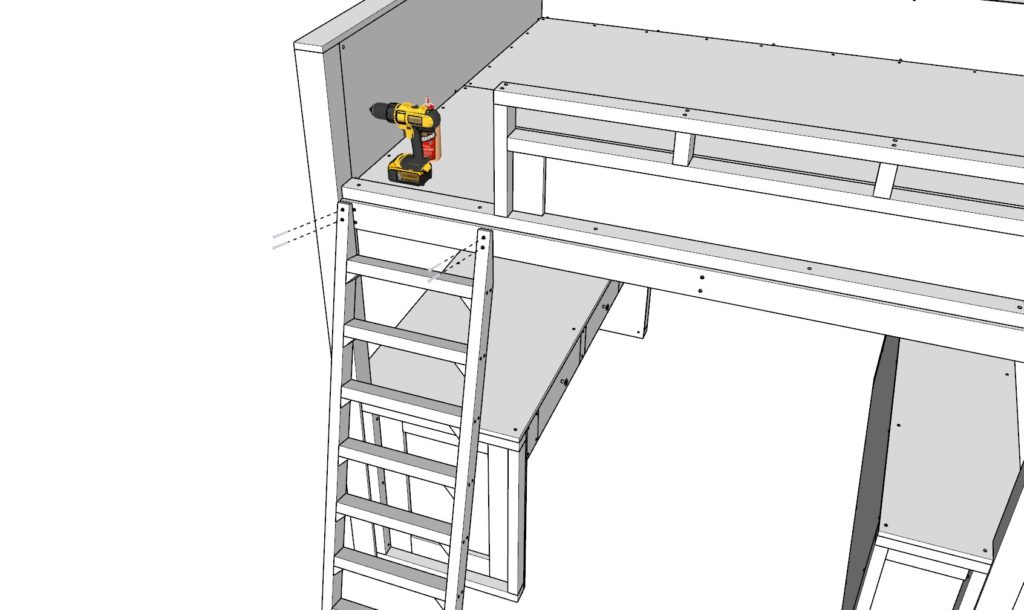
Next, secure the ladder with glue and four 3.5 inch screws to the bed frame.
next, sand down the whole structure. I use an orbital sander to speed up the process.
Initially I use a 80 grit paper to sand out all the rough edges and then a more fine 220 grit paper to smooth everything out.
At this point you can paint or stain the DIY loft bed.