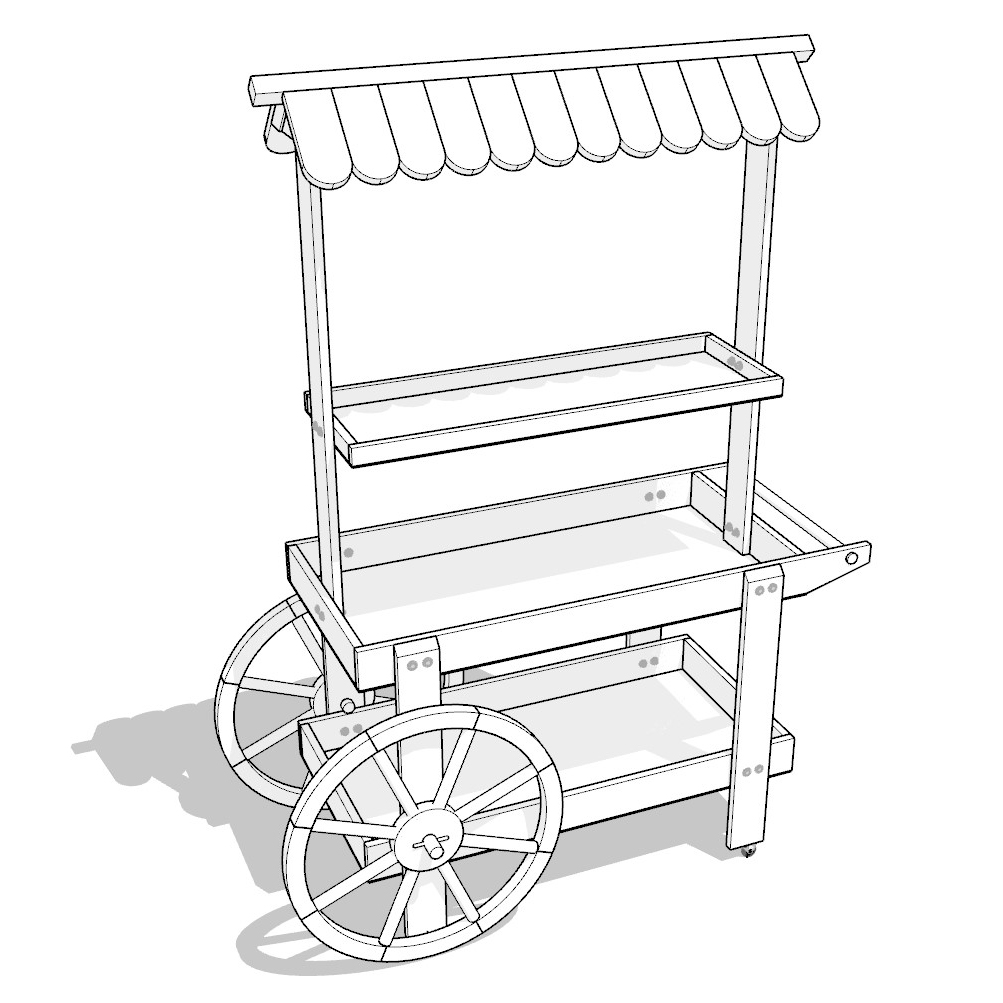
Introduction: Crafting Elegance on Wheels
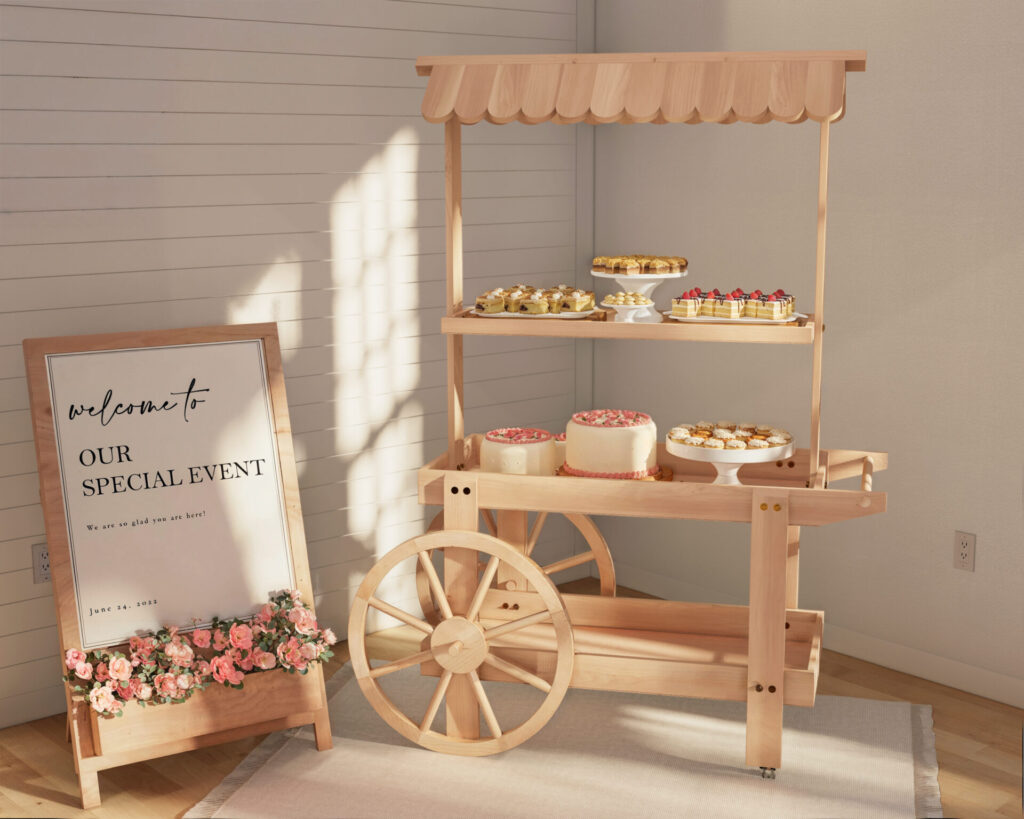
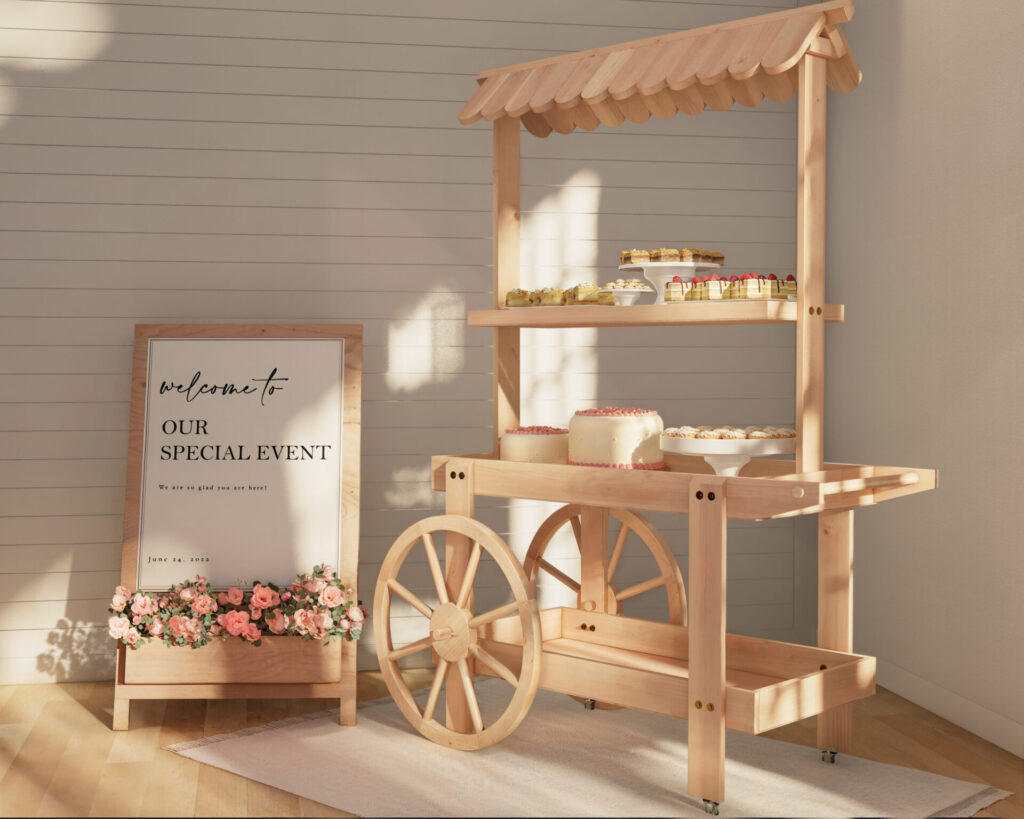
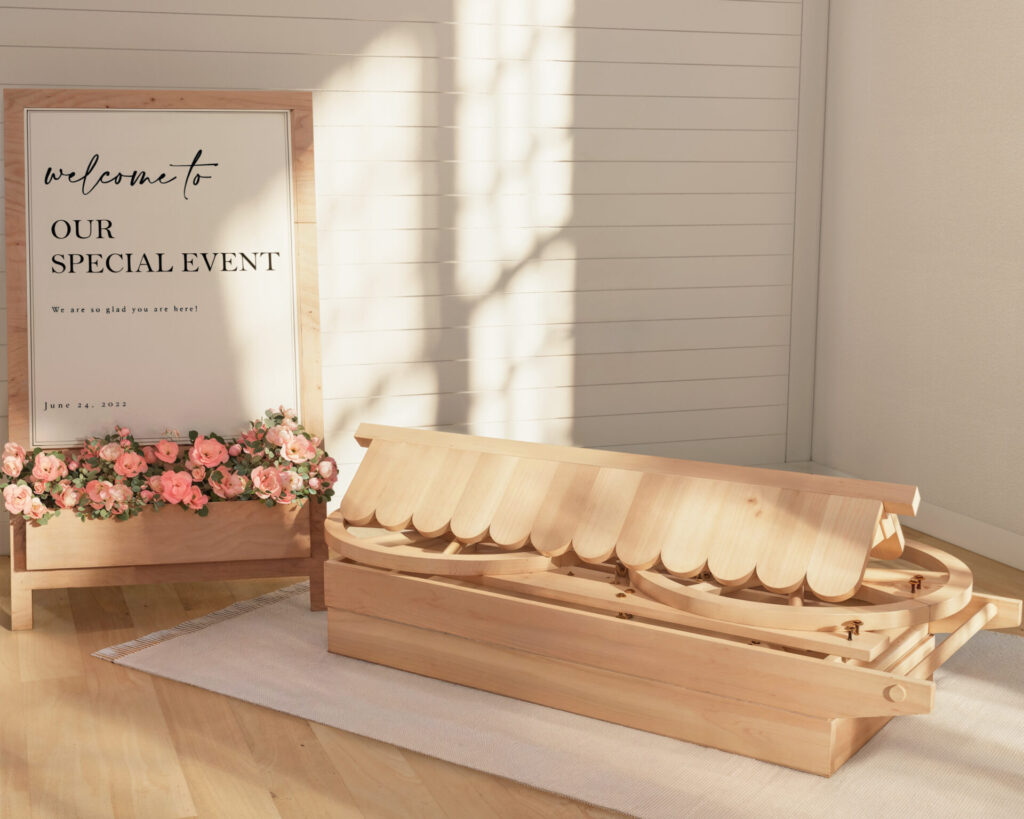
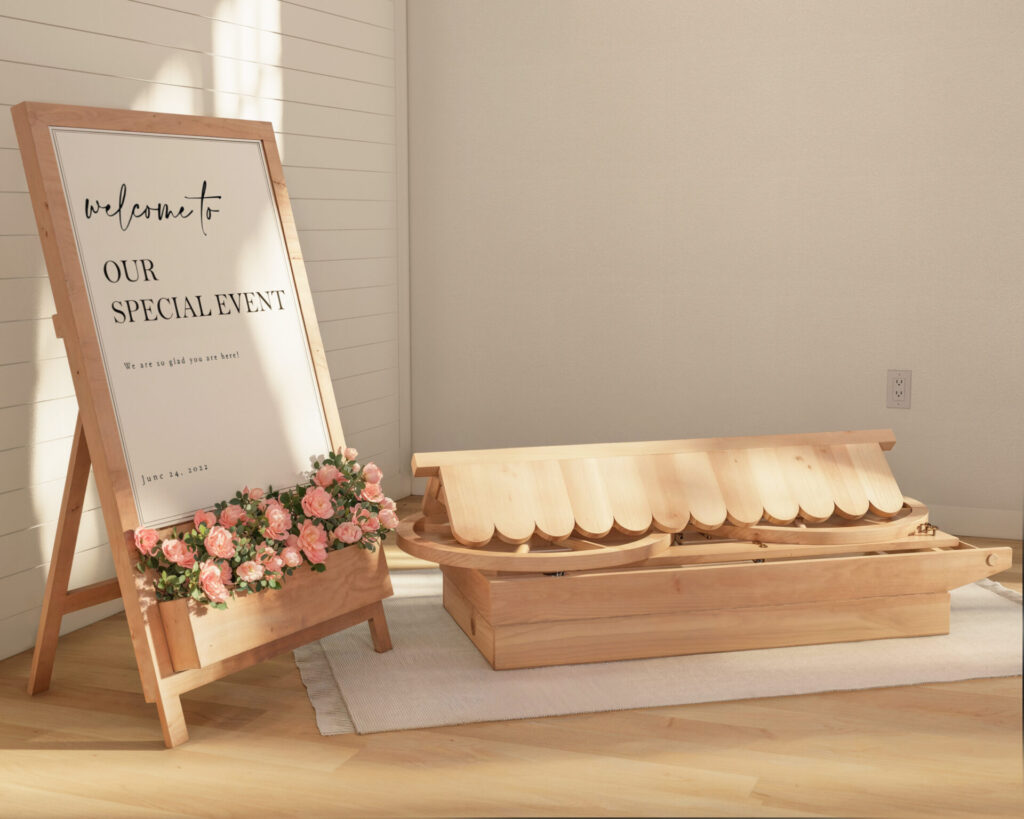
Elevate your hosting game with a project that merges DIY delight with sleek design. Introducing the handmade event cart: a versatile, stylish, and mobile piece that’s perfect for any soiree or celebration. It’s more than just a functional item; it’s a showcase of your craftsmanship and a potential pathway to profit through event rentals. Let’s dive into the world where utility meets sophistication, all within the realm of DIY.


Feature Spotlight: The Allure of Functionality
Imagine a cart that not only serves as a beautiful backdrop for your gatherings but also embodies the spirit of practicality with its collapsible design for easy transport. From intimate backyard celebrations to grand weddings, this cart is engineered for adaptability and flair. It’s a buildable project that invites not only admiration but also interaction, becoming a central piece of your event’s storytelling.
Materials and Make
Every great project begins with quality materials that are easy to source and even easier to work with. Our event cart is crafted from simple construction boards, plywood, and dowels found at local hardware havens like Home Depot and Lowe’s. It’s a blank canvas awaiting your personal touch, be it a rich stain or a vibrant paint job, complemented by decorations that resonate with the occasion.
The Building Journey: From Blueprint to Reality
This is where your DIY aspirations turn into tangible results. Our guide is a testament to simplicity and clarity, offering a complete rundown from material selection to the final assembly. Expect a visual feast with our color-coded images and concise instructions that promise an enjoyable building process. We’re stripping away the complexities to offer a plan that’s all about the joy of crafting and the satisfaction of completion.
Conclusion
Your journey with us is just beginning. The event cart you’re about to build is not merely a structure of wood and screws; it’s the cornerstone of your future events and a potential staple in the local event scene. With the sawdust cleared and the final piece in place, you’ll stand back and see more than just a cart—you’ll see a piece of yourself in every detail. Stay tuned for our in-depth construction guide, and let the anticipation of your next creation be the perfect prelude to the memories you’ll craft and the opportunities you’ll seize.
Time
(varies with experience)
Cost
Estimated Project Cost: $150 (Note: Costs can vary by location and supplier.)
Skill level required
Beginner
DIY Event Cart PDF Plan
What is included in the PDF download?
- Easy to read step by step instructions
- Material list
- Tools needed
- Helpful links to materials and tools needed
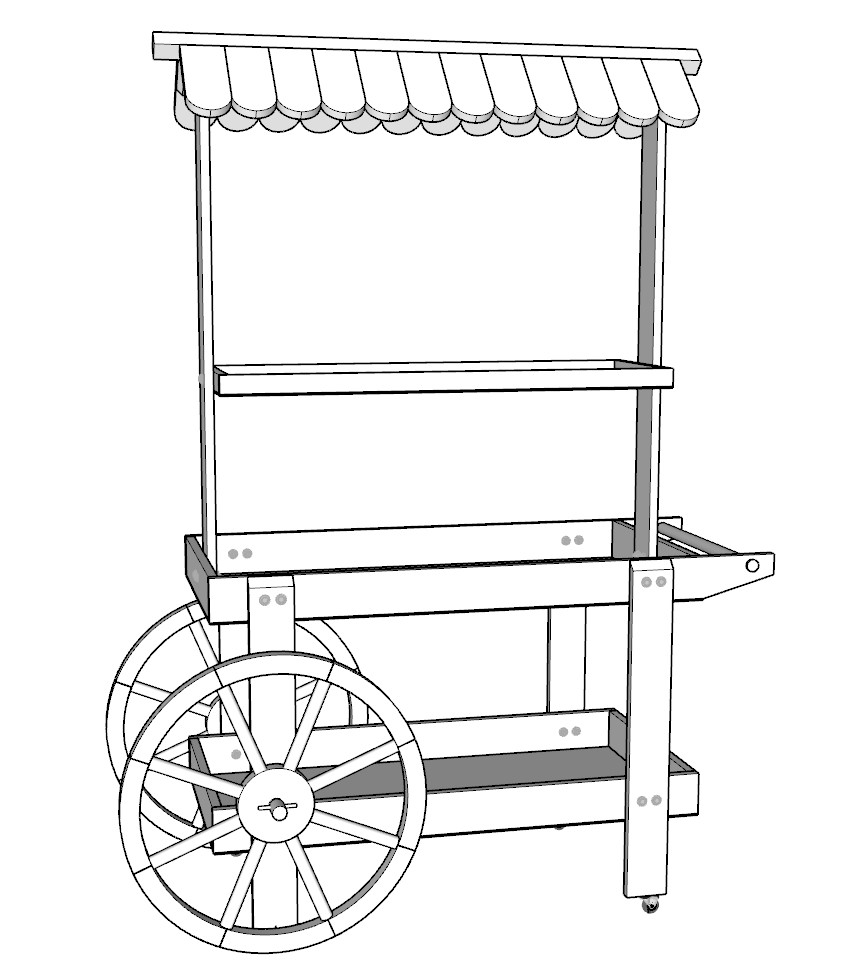
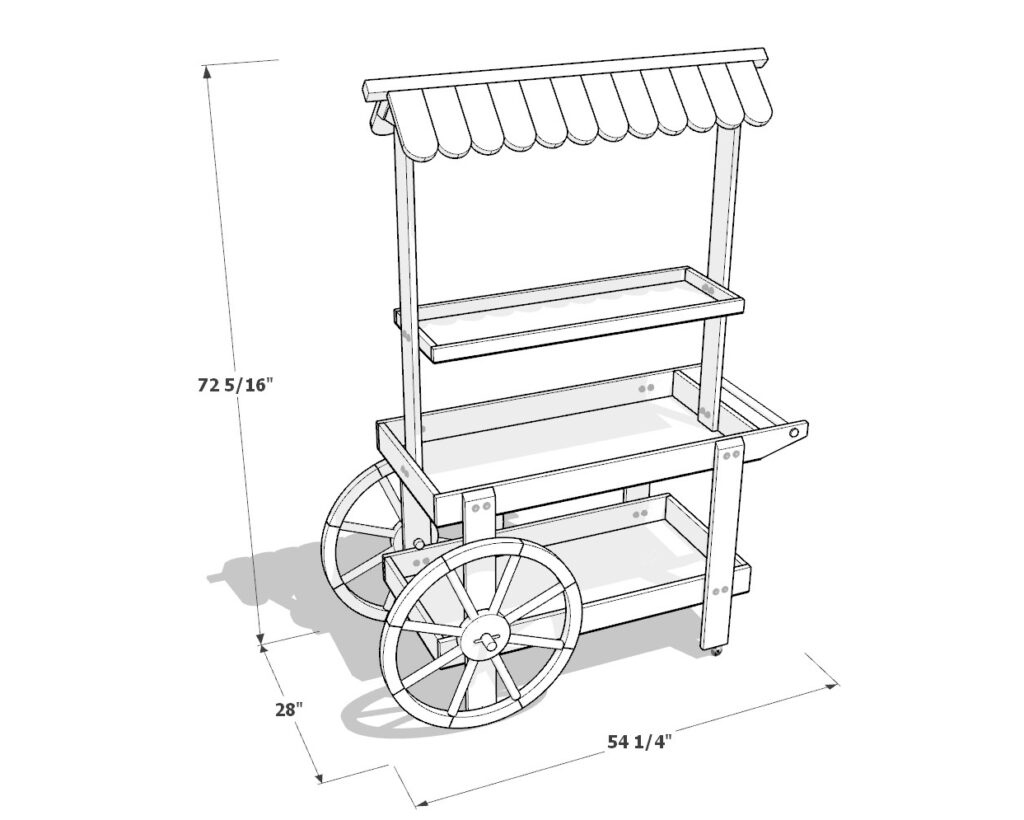
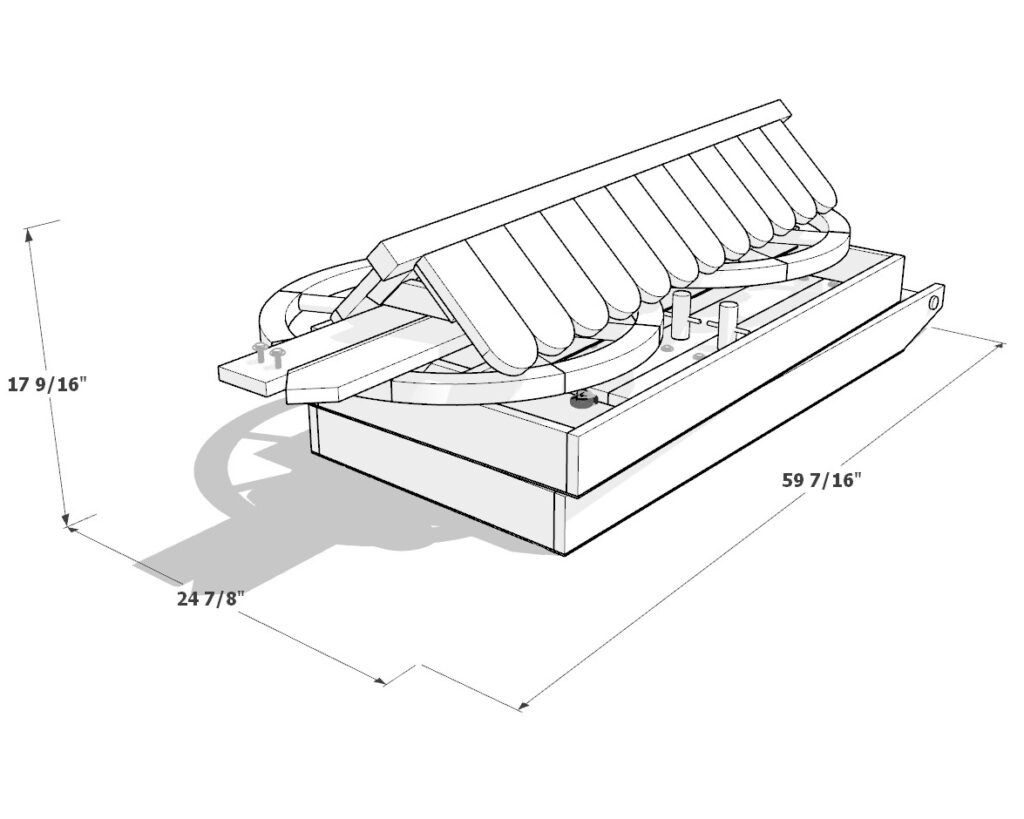
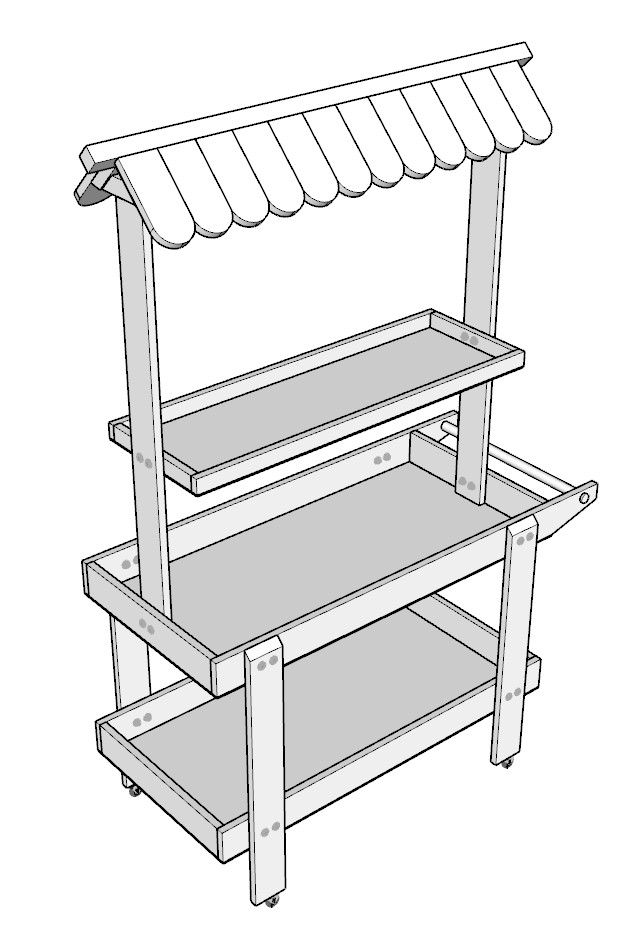
DIY Event Cart Dimensions
Tools and Materials List:
Available with the purchase of the DIY plan PDF.
Lumber Cut List:
Available with the purchase of the DIY plan PDF.
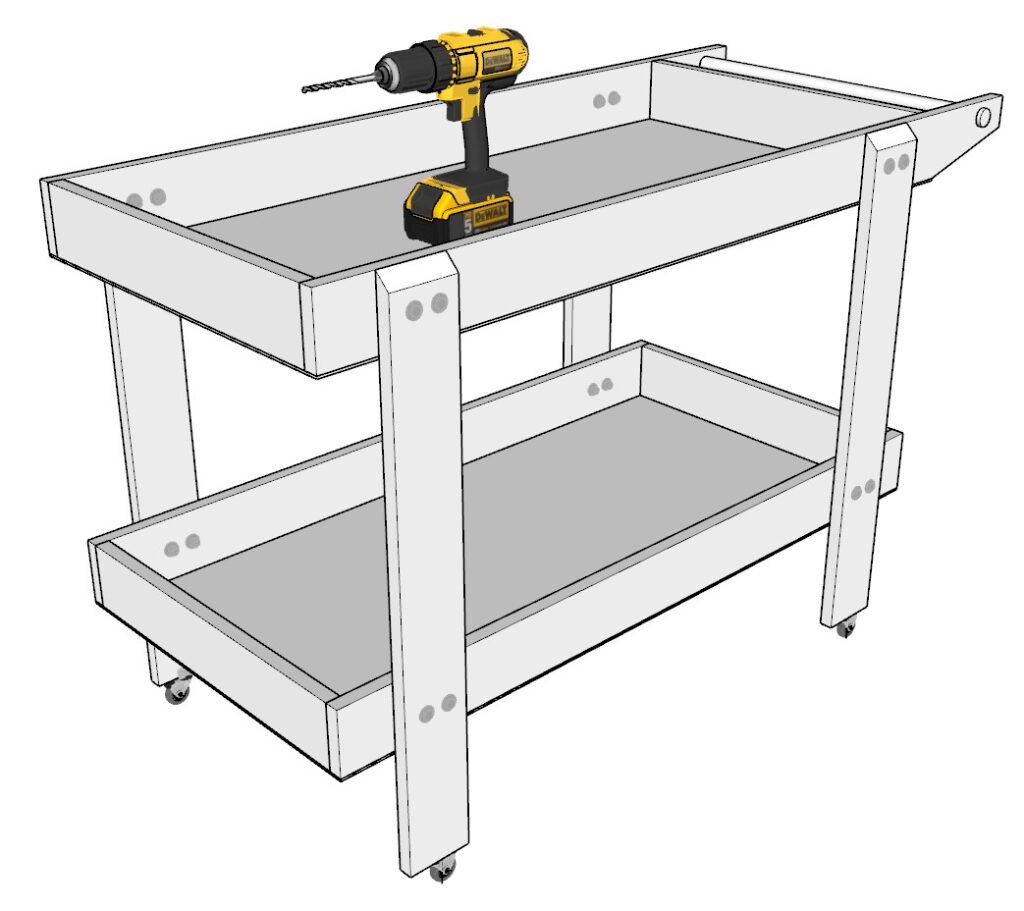
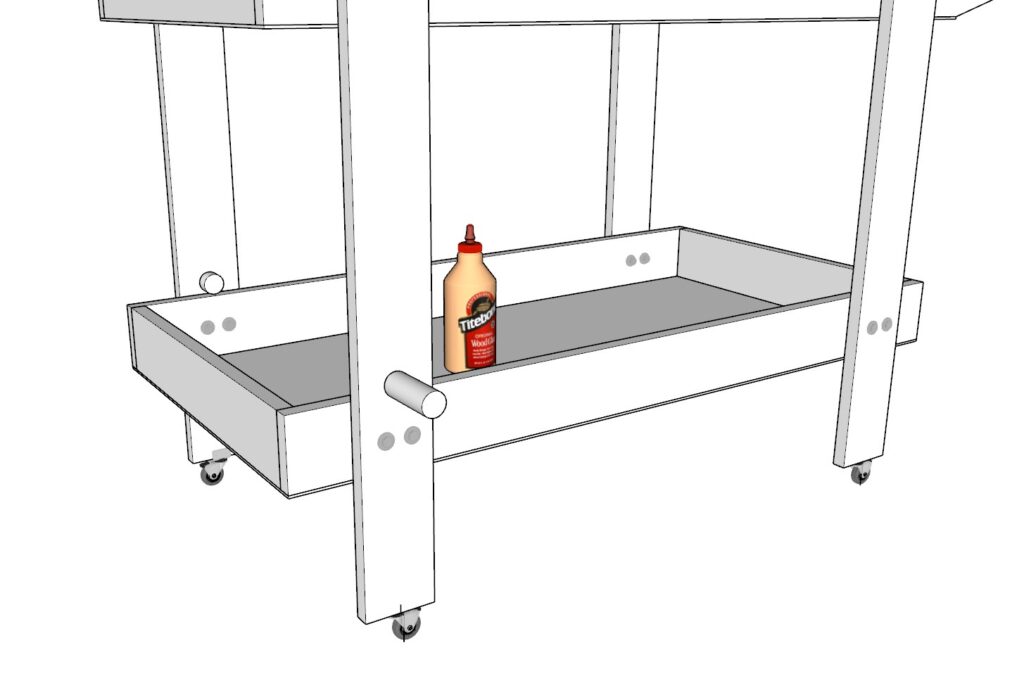
Step 1: Assembling the Shelves and Cart Components
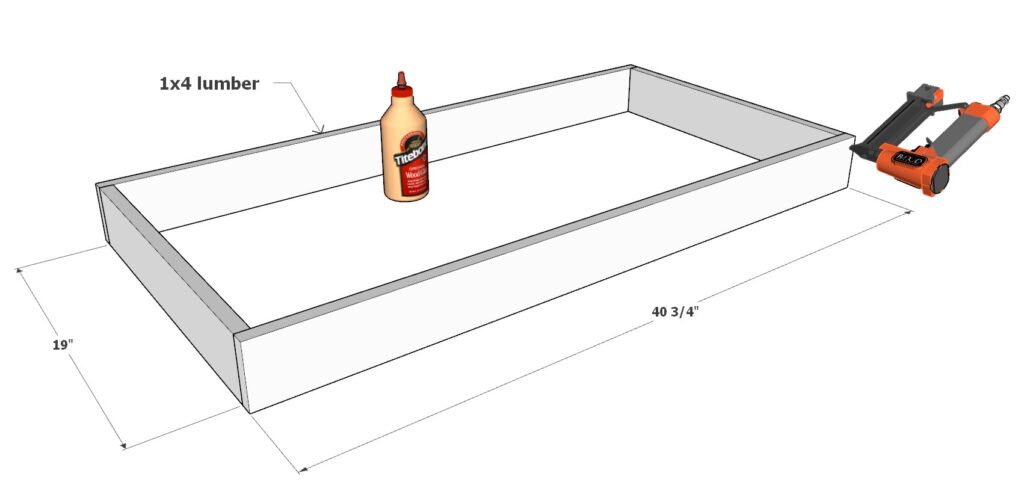
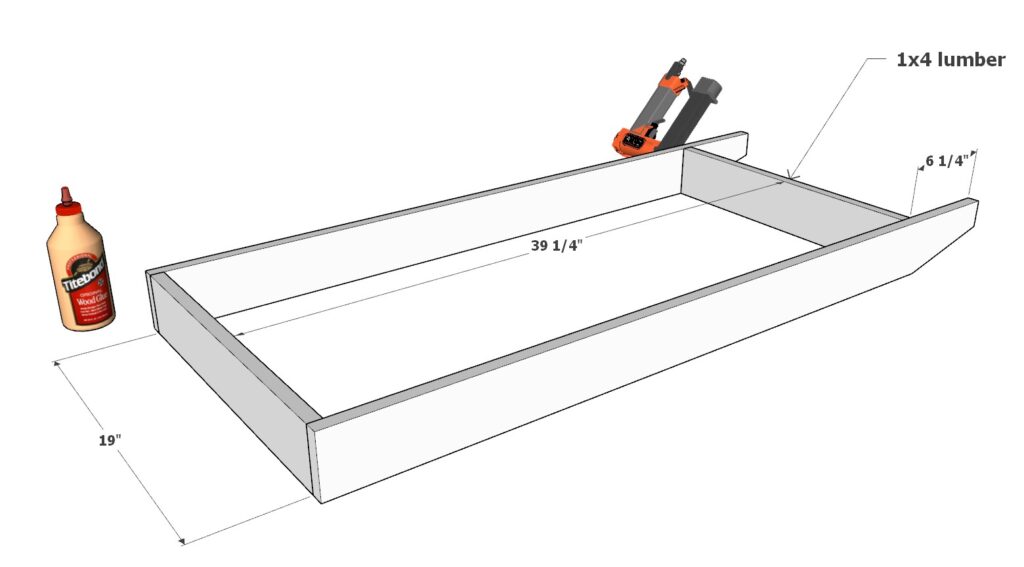
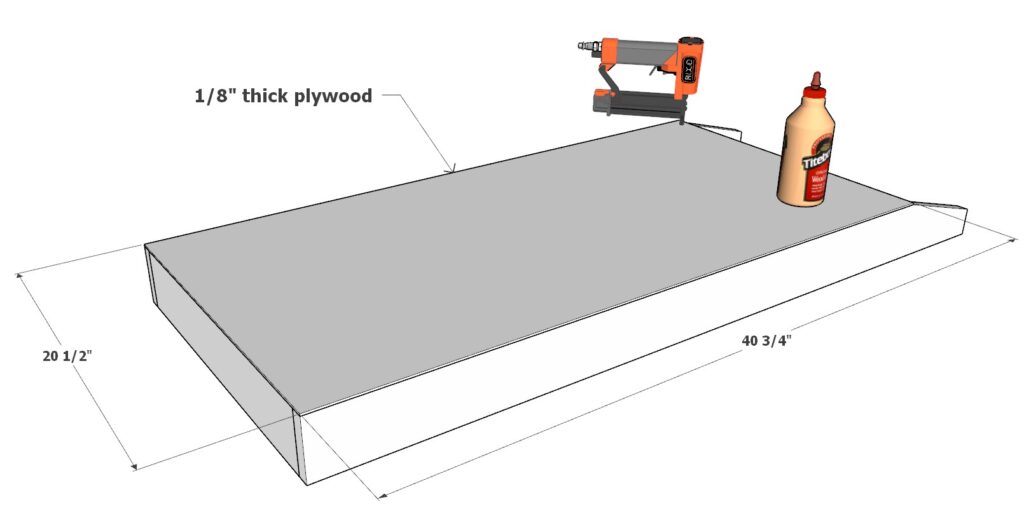
Sub-step 1.1: Constructing the Bottom Shelf
- Gather your materials: two 40-3/4″ 1×4 lumber pieces, two 19″ 1×4 lumber pieces, wood glue, 1.5″ pin nails, and a 20-1/2″ x 40-3/4″ sheet of 1/8″ thick plywood.
- Lay out the two 40-3/4″ pieces parallel to each other.
- Apply wood glue to the ends of the 19″ pieces, and position them between the longer pieces at each end to create a rectangle.
- Secure the structure by driving 1.5″ pin nails at each joint.
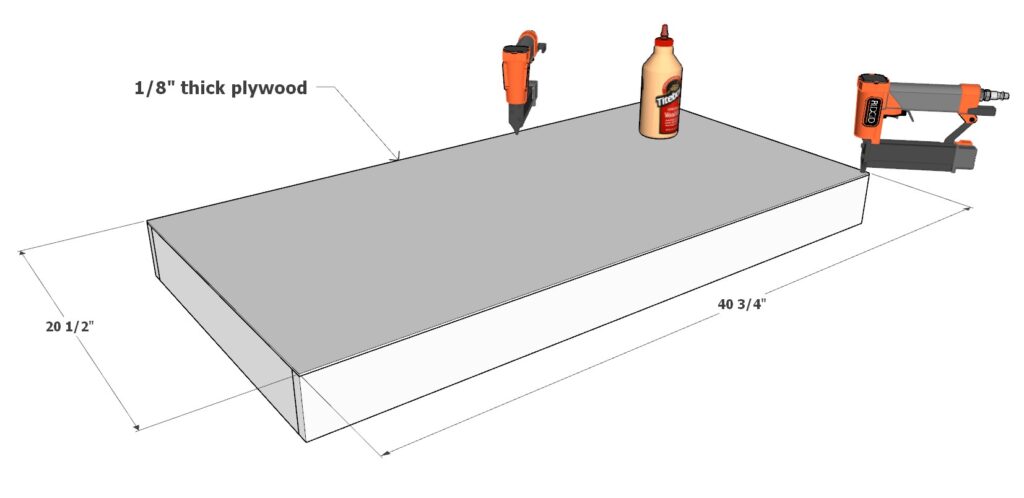
- Place the plywood sheet on top, ensuring it’s flush with the frame, then glue and pin nail it down to complete the bottom shelf.
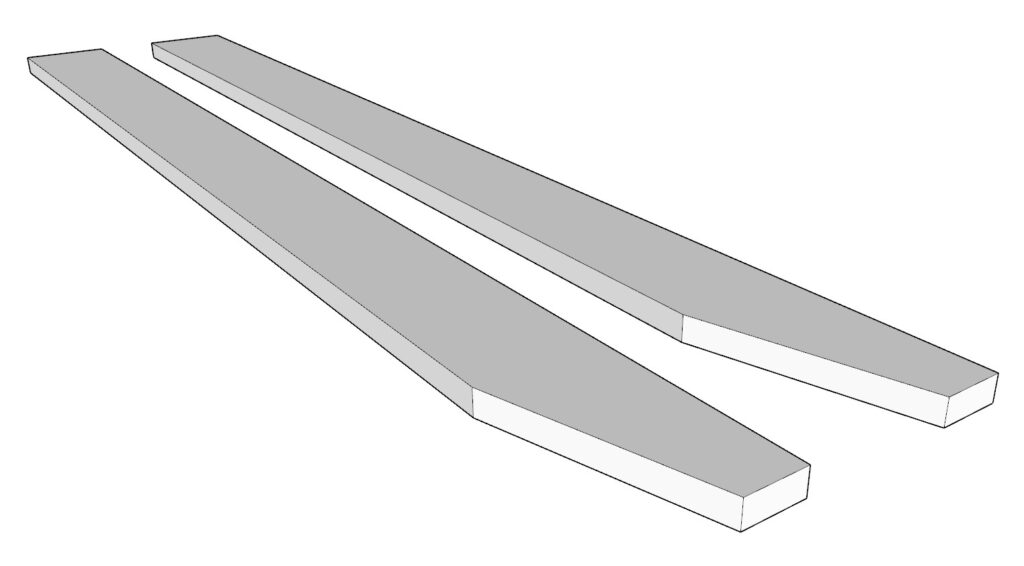
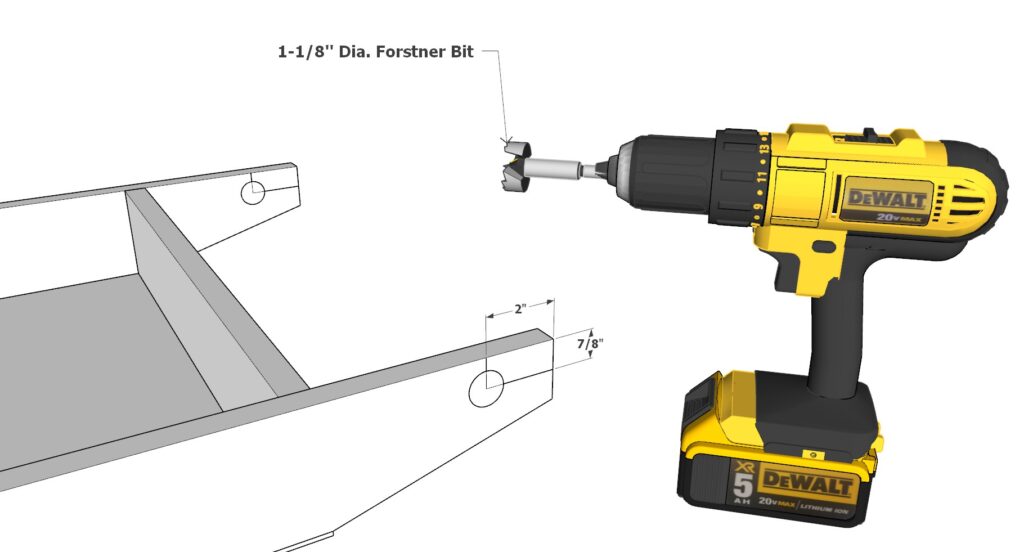
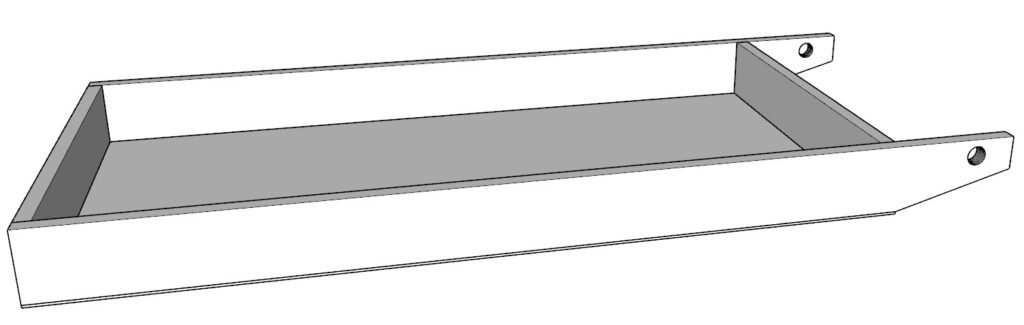
Sub-step 1.2: Crafting the Main Shelf with Handles
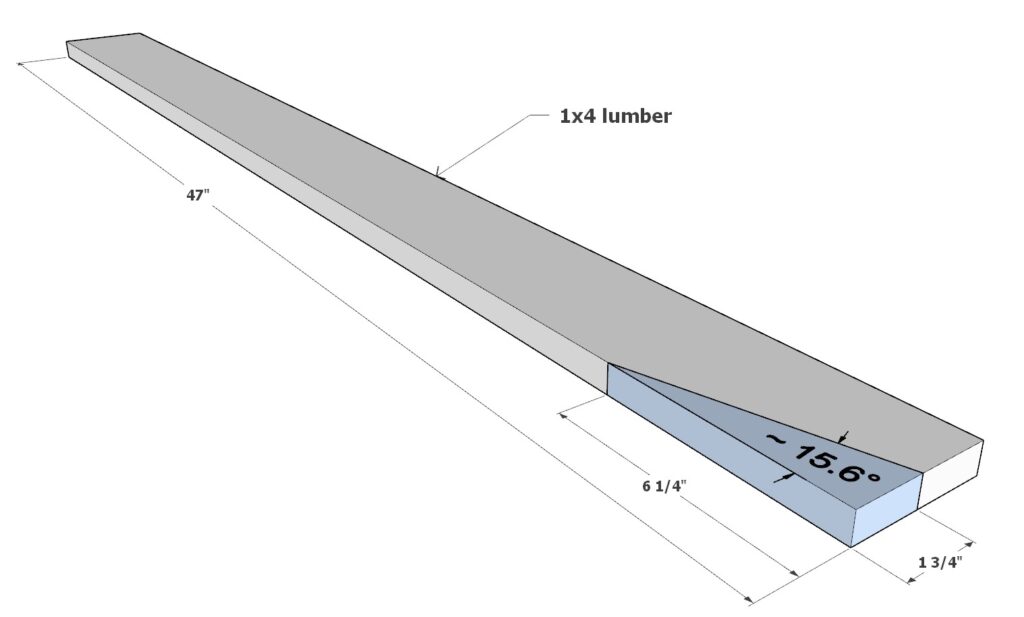
- Take a 47″ 1×4 lumber piece and cut one end at a 15.6-degree angle as shown in the provided diagram.
- Replicate the angled cut for a second 47″ piece to create a pair.
- Align these pieces parallel to each other, and fix two 19″ 1×4 pieces perpendicular to them with the appropriate spacing as indicated in the diagram.
- Secure the structure with wood glue and 1.5″ pin nails.
- Attach a 20-1/2″ x 40-3/4″ plywood sheet on top with glue and pin nails, ensuring it’s flush.
Sub-step 1.3: Installing the Handle
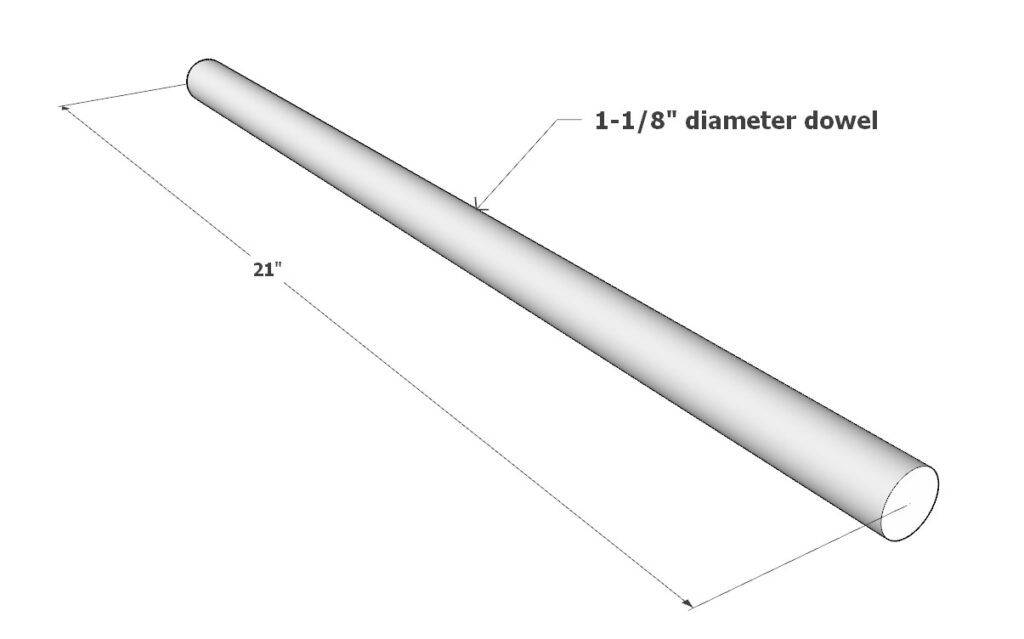
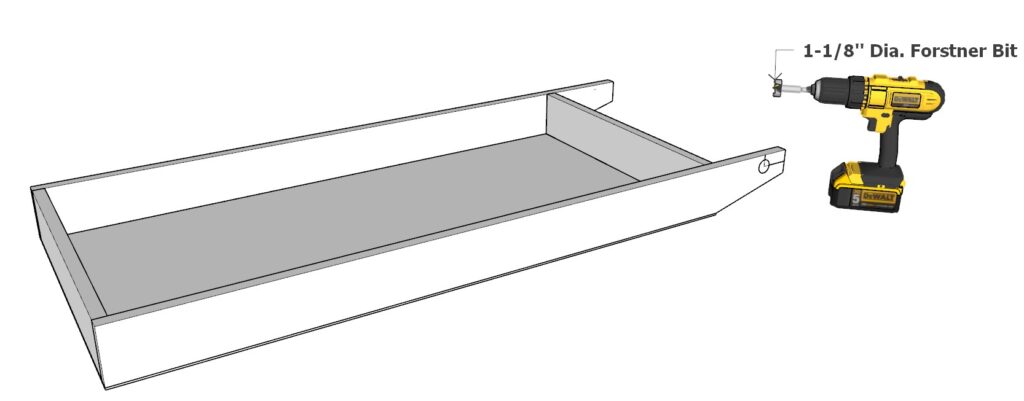
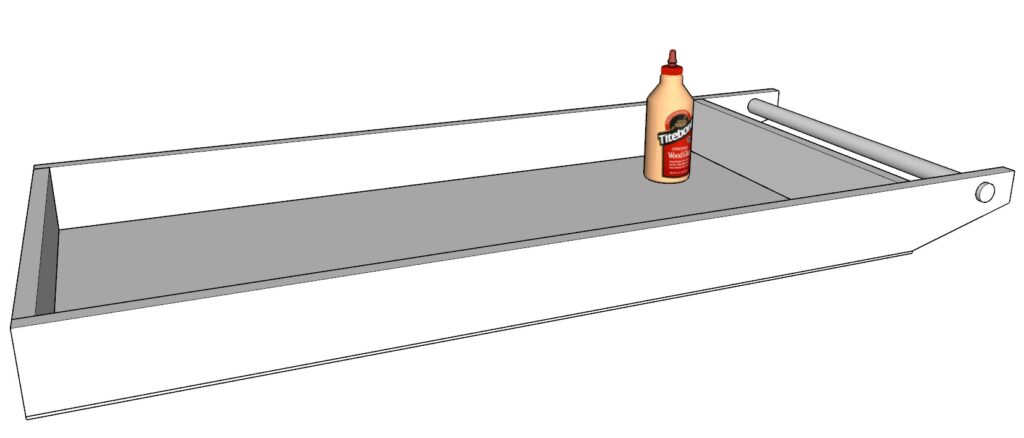
- For the handle, you’ll need a 21″ long, 1-1/8″ diameter dowel.
- Mark the location for the handle on the protruding end of the angled 1×4 pieces as per the diagram.
- Using a forstner bit matching the dowel’s diameter, drill holes at the marked spots.
- Apply glue inside the holes and insert the dowel to serve as the handle, ensuring a secure fit.
Sub-step 1.4: Building the Top Display Tray
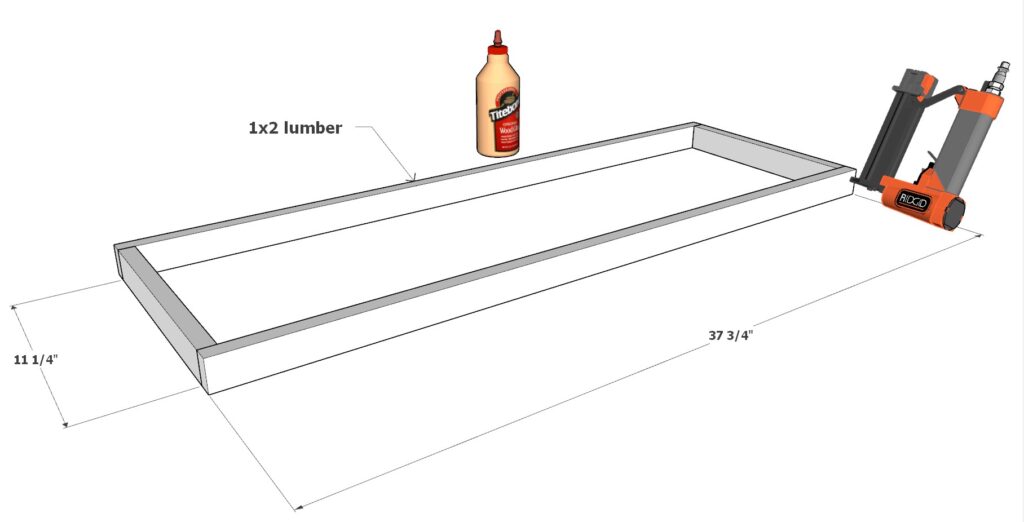
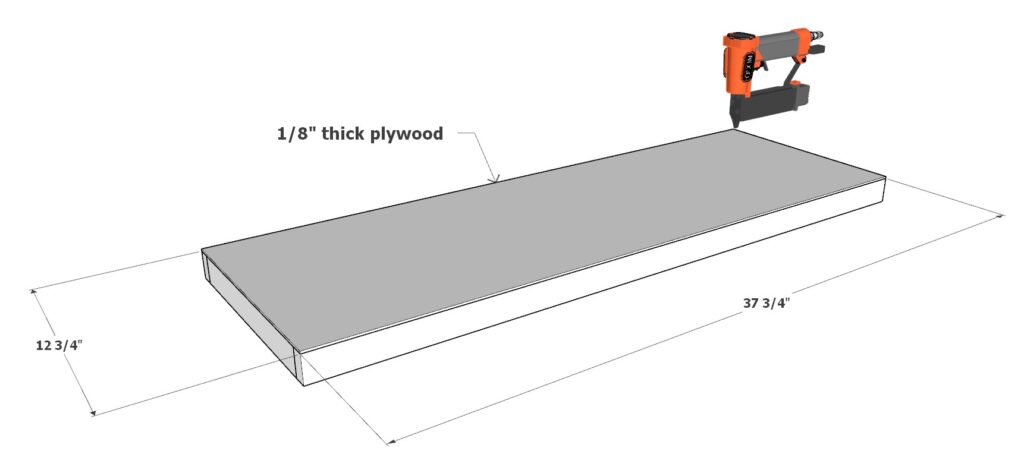
- Prepare two 37-3/4″ long 1×2 lumber pieces and two 11-1/4″ long 1×2 pieces.
- Form a rectangle by attaching the shorter pieces between the longer pieces at each end.
- Fix the frame with wood glue and pin nails.
- Finish by attaching a 12-3/4″ x 37-3/4″ plywood sheet on top with glue and pin nails for the tray surface.
Tips for Success
- Utilize clamps to hold the pieces in place while you work with the pin nailer; it ensures stability and increases safety.
- Sand and plane all wood pieces prior to assembly for a cleaner and more professional appearance. It’s more challenging to sand corners and edges after assembly.
Step 2: Constructing the Cart Roof
Sub-step 2.1: Shaping the Main Roof Supports
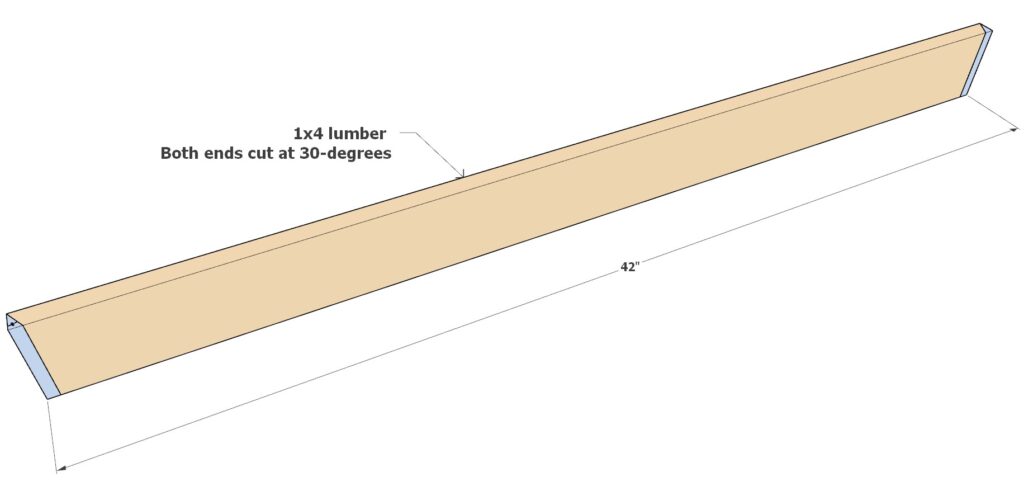
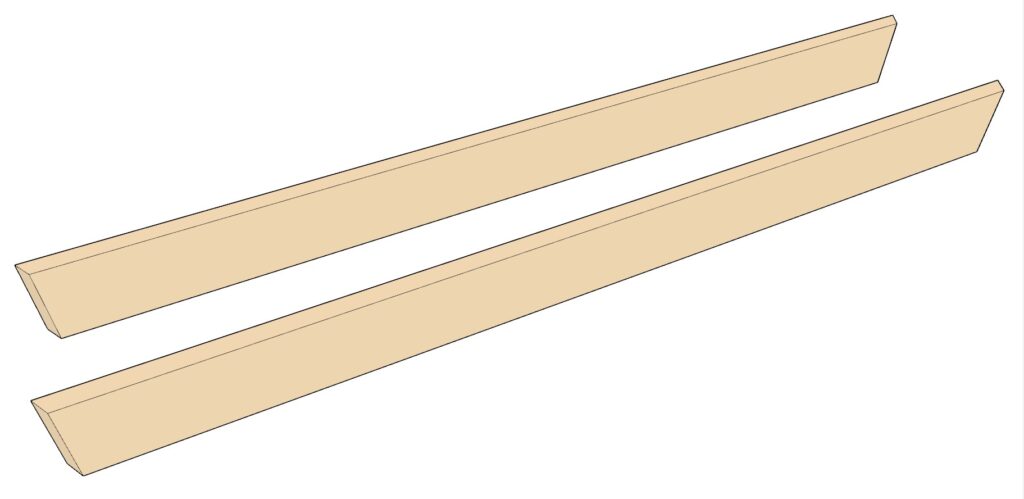
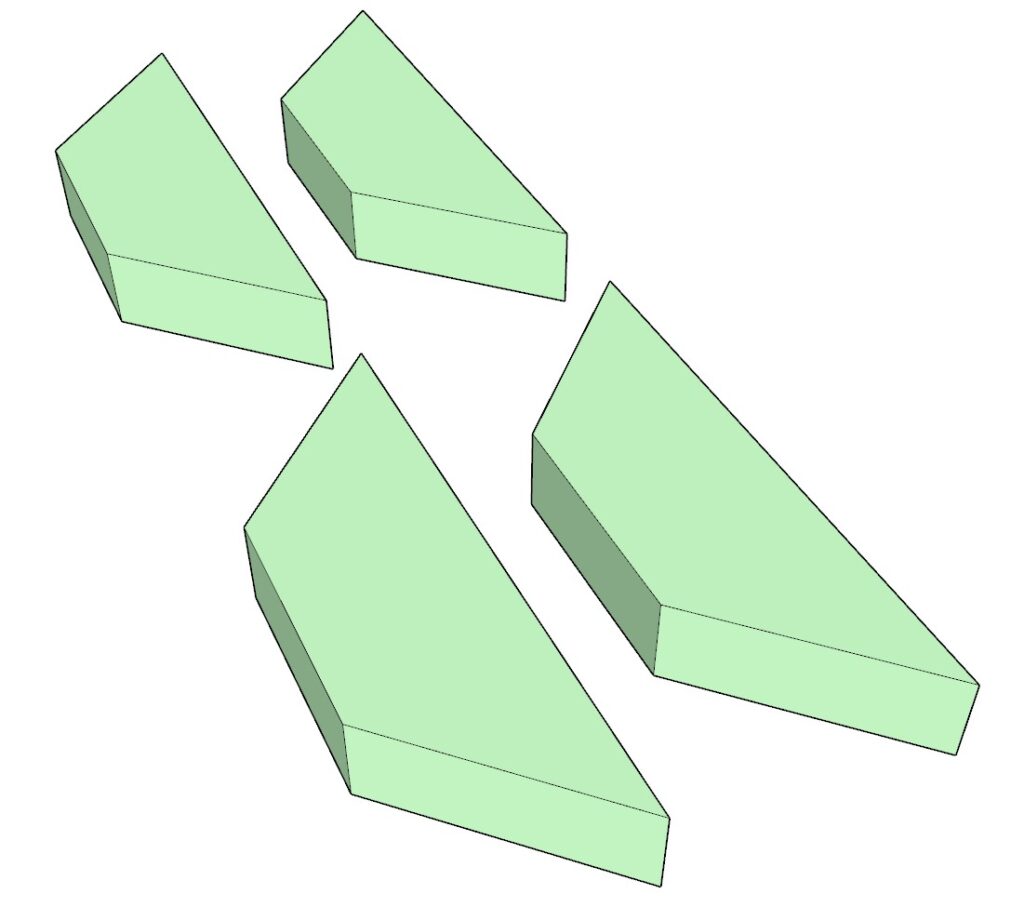
- Start with two 42″ 1×4 lumber pieces.
- Trim both ends of each piece at a 30-degree angle for a decorative touch, as these will be the main supports of the roof, referred to as the ‘peach’ components in the diagrams.
- Ensure you have two identical ‘peach’ components.
Sub-step 2.2: Preparing the Roof Attachments
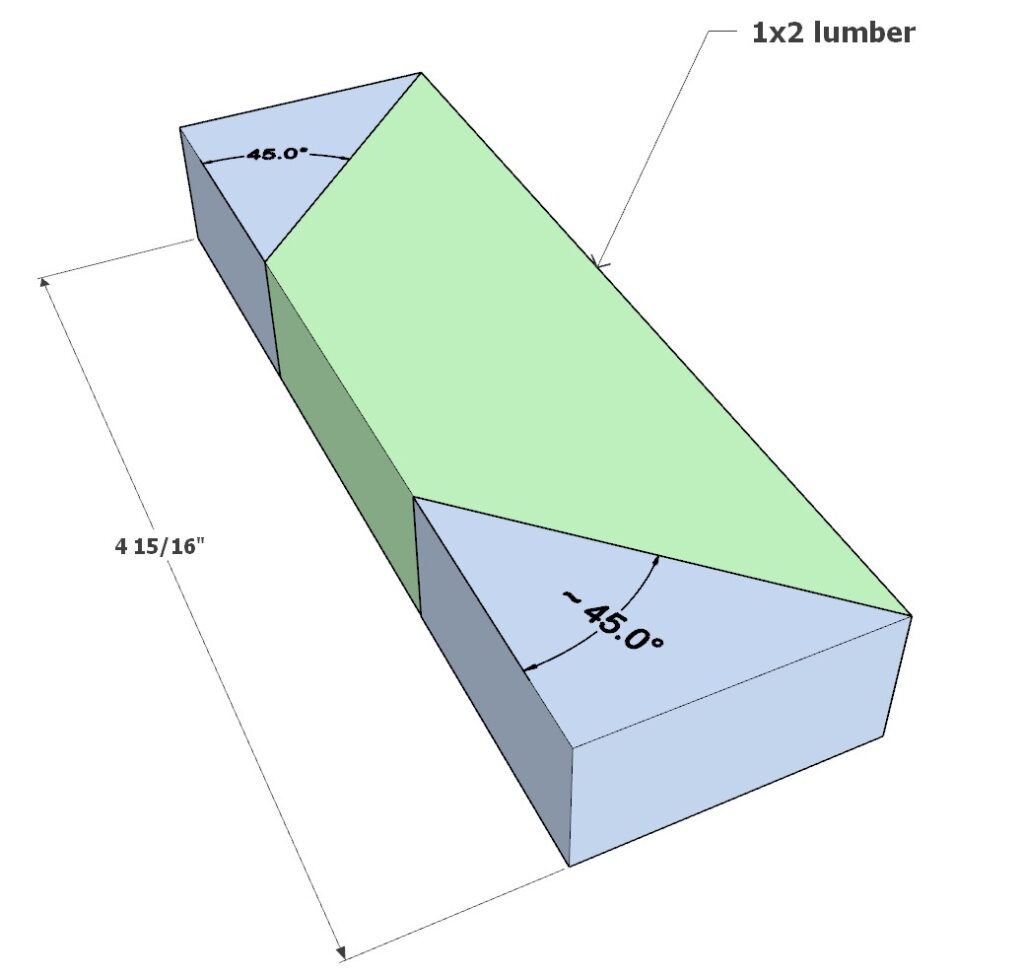
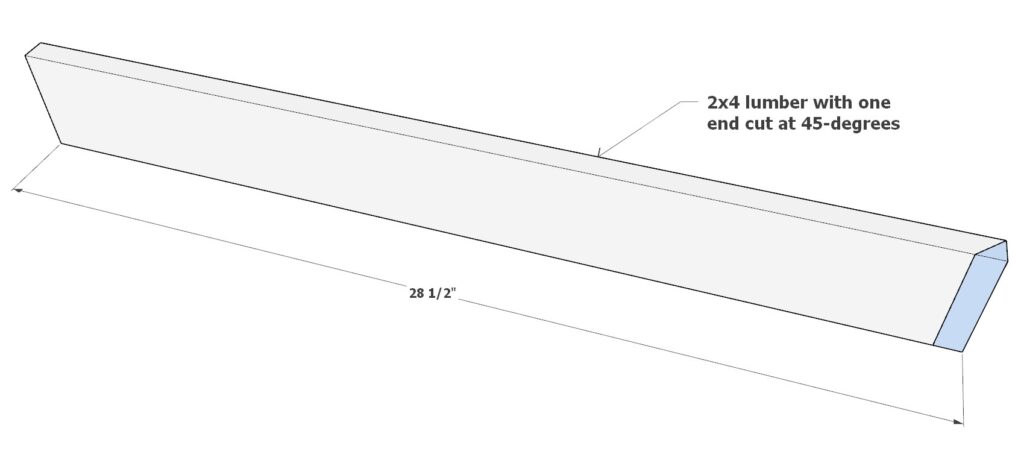
- Cut four pieces of 4-15/16″ long 1×2 lumber.
- Trim both ends of each piece at 45-degrees. These will serve as connectors for the roof and are ‘green’ in the diagrams.
- Confirm you have four precisely cut ‘green’ components.
Sub-step 2.3: Assembling the Roof Framework
- Arrange the ‘peach’ components parallel to each other on a flat surface.
- Place the ‘green’ components between them, spaced as indicated in the diagram.
- Use wood glue and 1.5″ pin nails to secure the ‘green’ components to the ‘peach’ components, forming the roof’s basic structure.
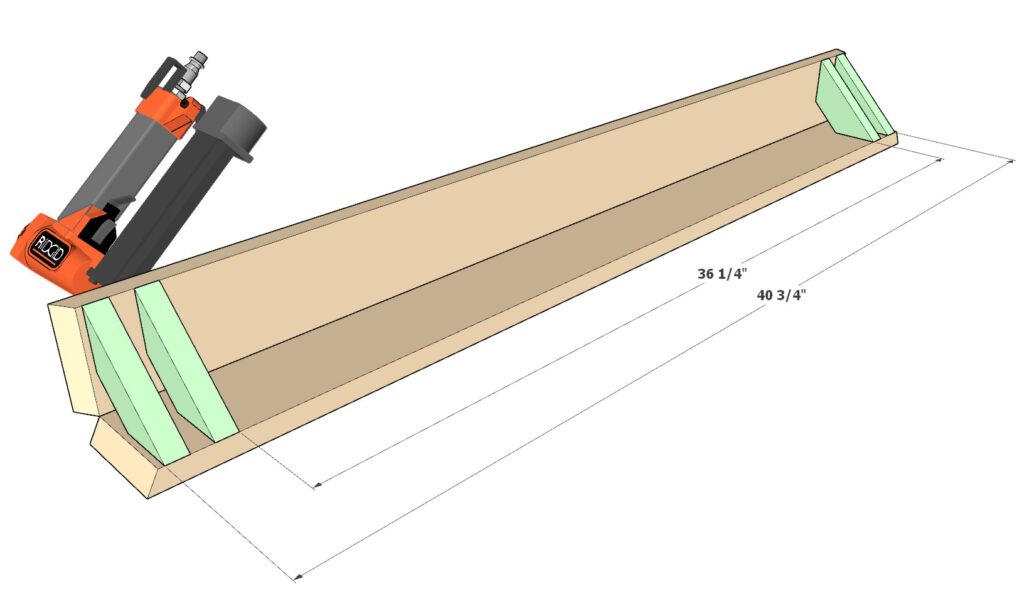

Sub-step 2.4: Reinforcing the Roof
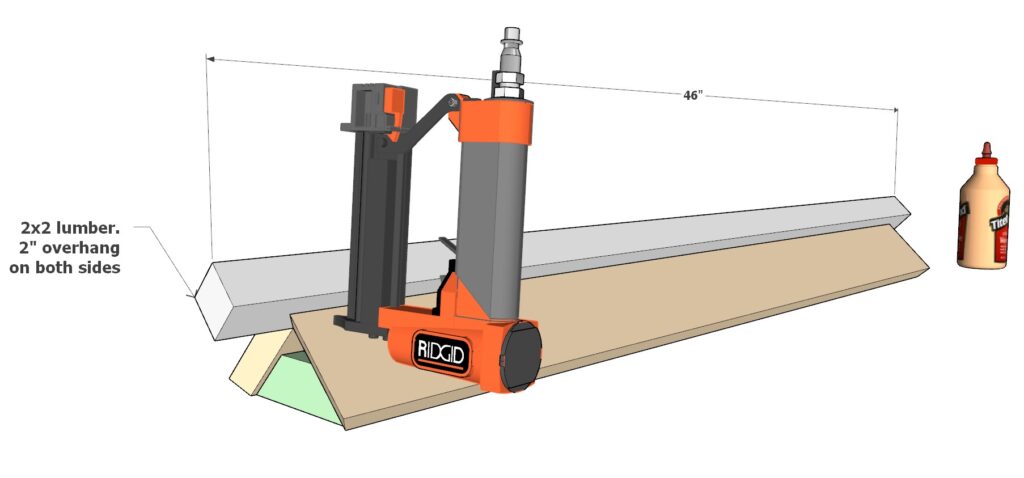
- Take a 46″ long 2×2 lumber piece and place it atop the roof framework to act as the ridge.
- This will provide structural integrity to the roof.
- Attach it using wood glue and 1.5″ pin nails, following the diagram for correct placement.
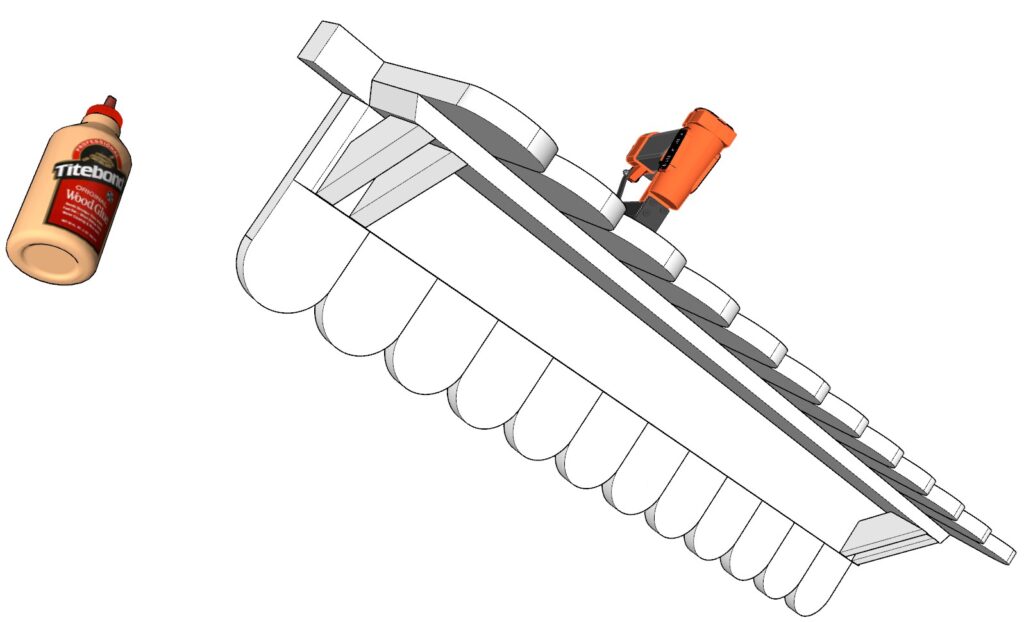
Sub-step 2.5: Adding the Shingles
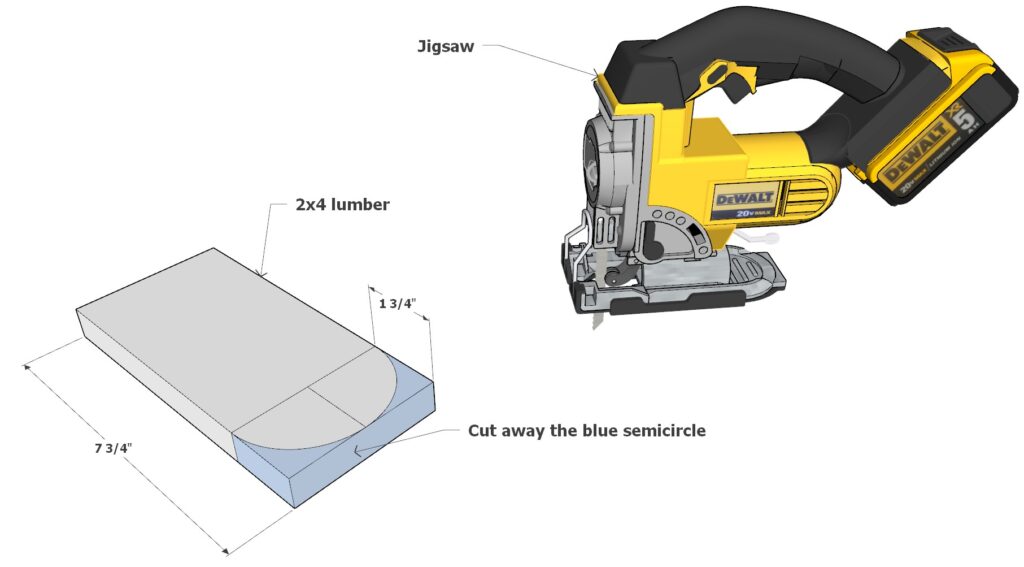
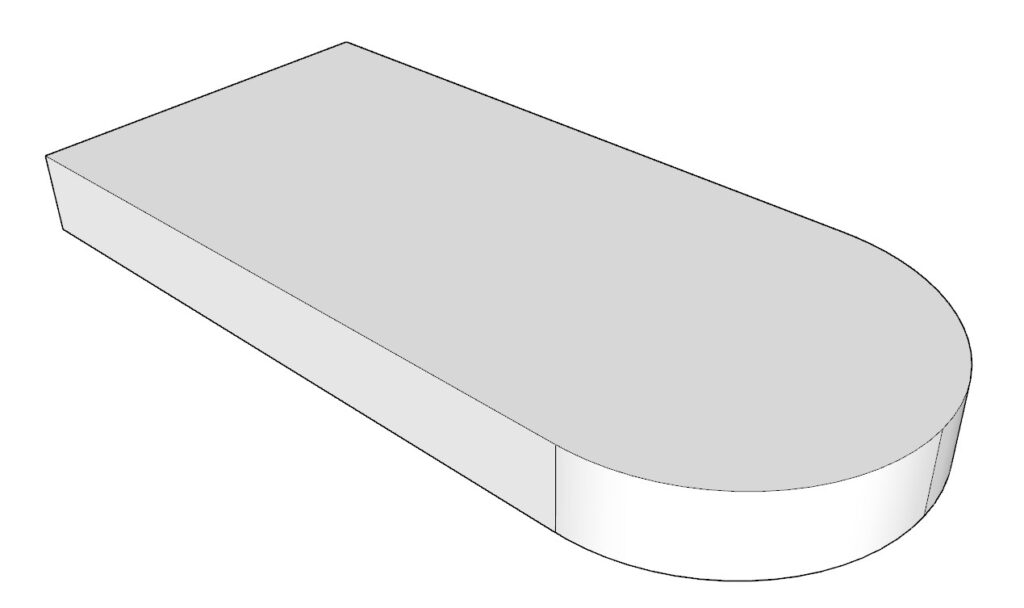
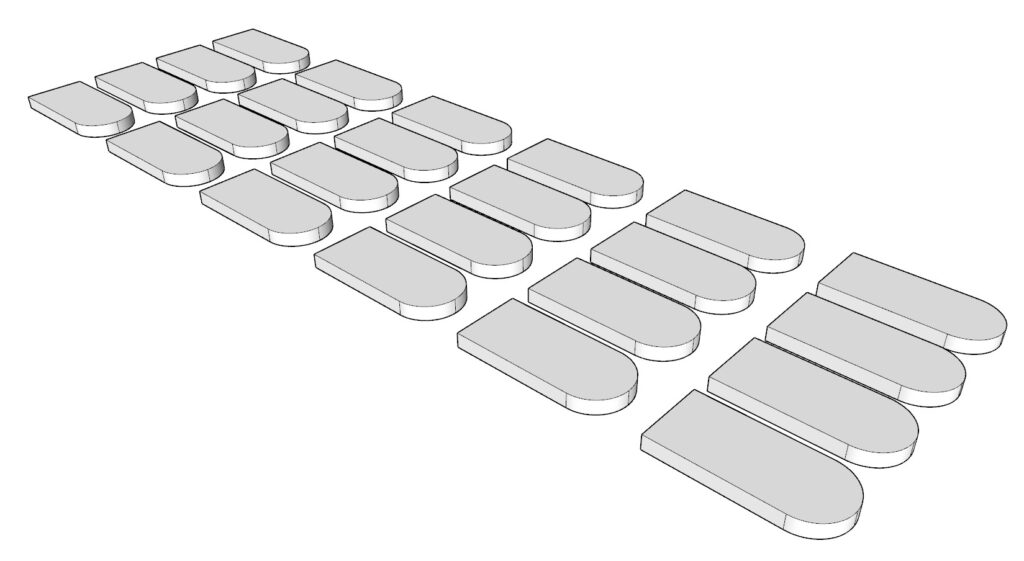
- Prepare 24 pieces of 7-3/4″ long 1×4 lumber for the shingles.
- For added decoration, you have the option to cut a semi-circle on one end using a band saw, jig saw, or scroll saw, or trim the ends at 45-degrees for a sharper look.
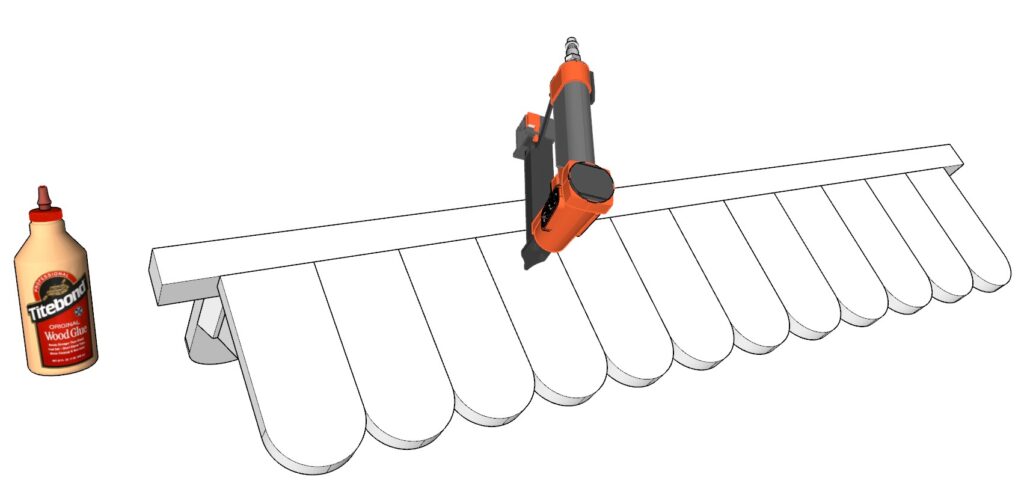
- Attach the shingles to the roof frame with wood glue and pin nails, ensuring even spacing and alignment.
Creative Tips
- Personalize your roof with the optional decorative cuts for the shingles to match the theme of your event or personal style preference.
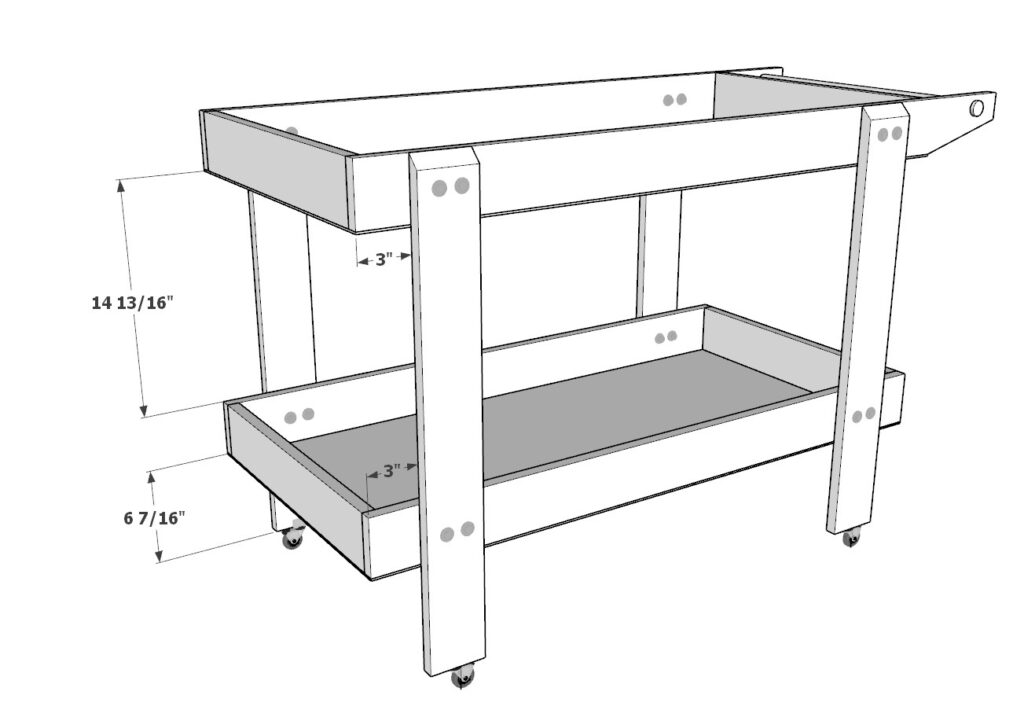
Step 3: Crafting the Cart Legs and Initial Assembly
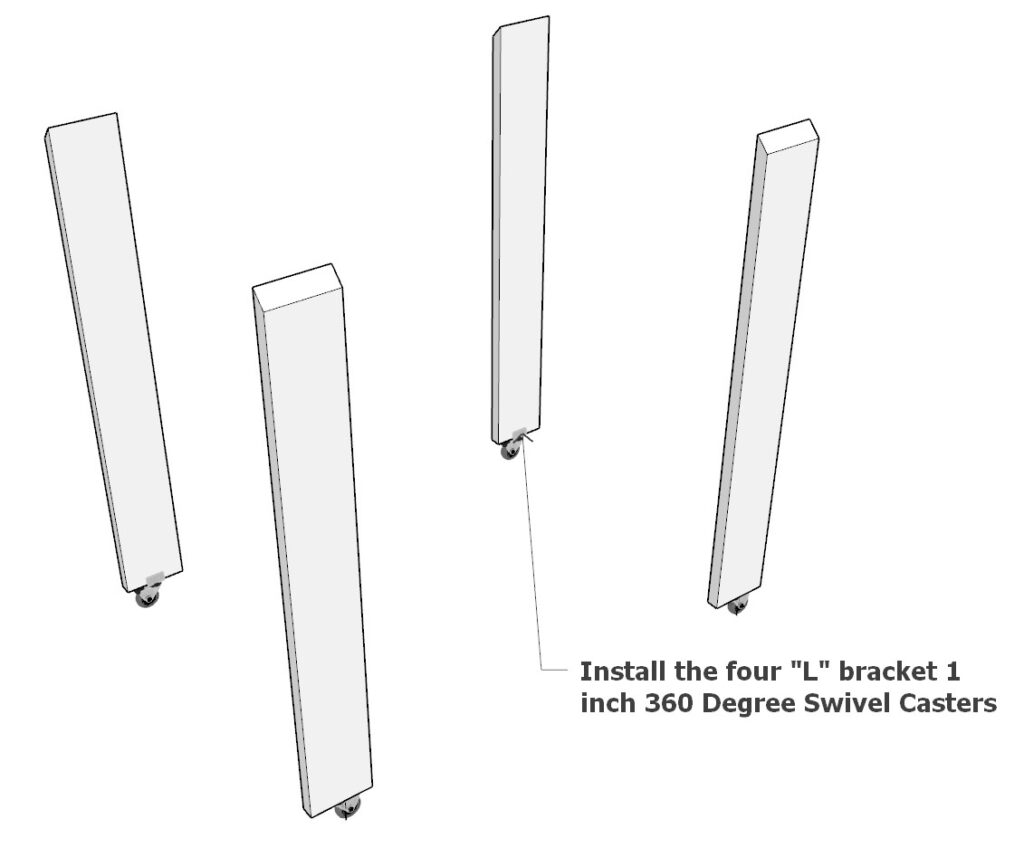
Sub-step 3.1: Cutting the Legs
- Obtain four 28-1/2″ long 1×4 lumber pieces.
- Cut one end of each lumber piece at a 45-degree angle as indicated in the diagram, ensuring all cuts are identical.
- Confirm you have four legs with matching angled cuts.

Sub-step 3.2: Attaching the Wheels
- Acquire four 1-inch 360-degree swivel casters.
- Attach one caster to the base of each leg using the appropriate hardware provided with the casters.
- Ensure that the wheels are securely fastened and can rotate freely.
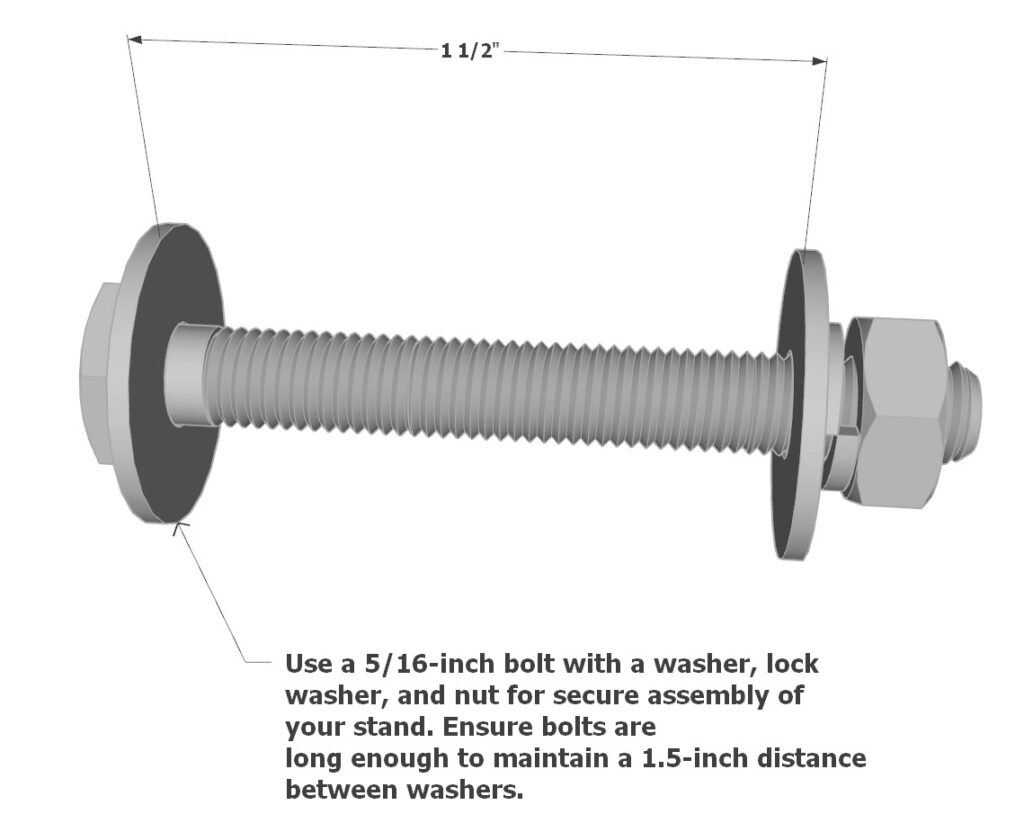
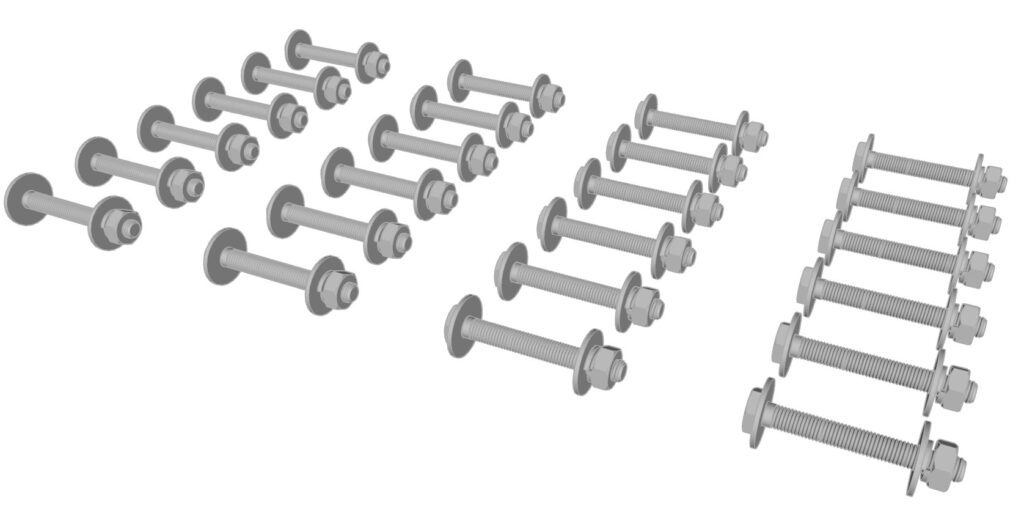
Sub-step 3.3: Preparing for Bolt Assembly
- Gather your bolt assembly materials: 5/16″ bolts, washers, lock washers, and nuts.
- Check that each bolt is long enough to maintain a 1.5″ distance between washers, as demonstrated in the diagram.
- Prepare 24 bolt assemblies for the entire cart.
Sub-step 3.4: Securing the Legs to the Cart
- Using a drill with a bit that matches the diameter of your bolts, create holes at matching locations.
- Once the holes are drilled, insert the bolt assemblies through the legs and the corresponding parts of the cart.
- Tighten the bolts with washers, lock washers, and nuts to ensure a secure fit.
Pro Tips for Assembly
- Consistency is key when drilling holes for the bolt assemblies. Make sure all holes align properly to avoid assembly issues later on.
- Consider labeling each leg and corresponding cart part with a unique, concealed mark or color code to ensure they match up during reassembly after the cart is collapsed.
- When disassembling, keep a diagram or photo handy to remember which part goes where, saving time and hassle.
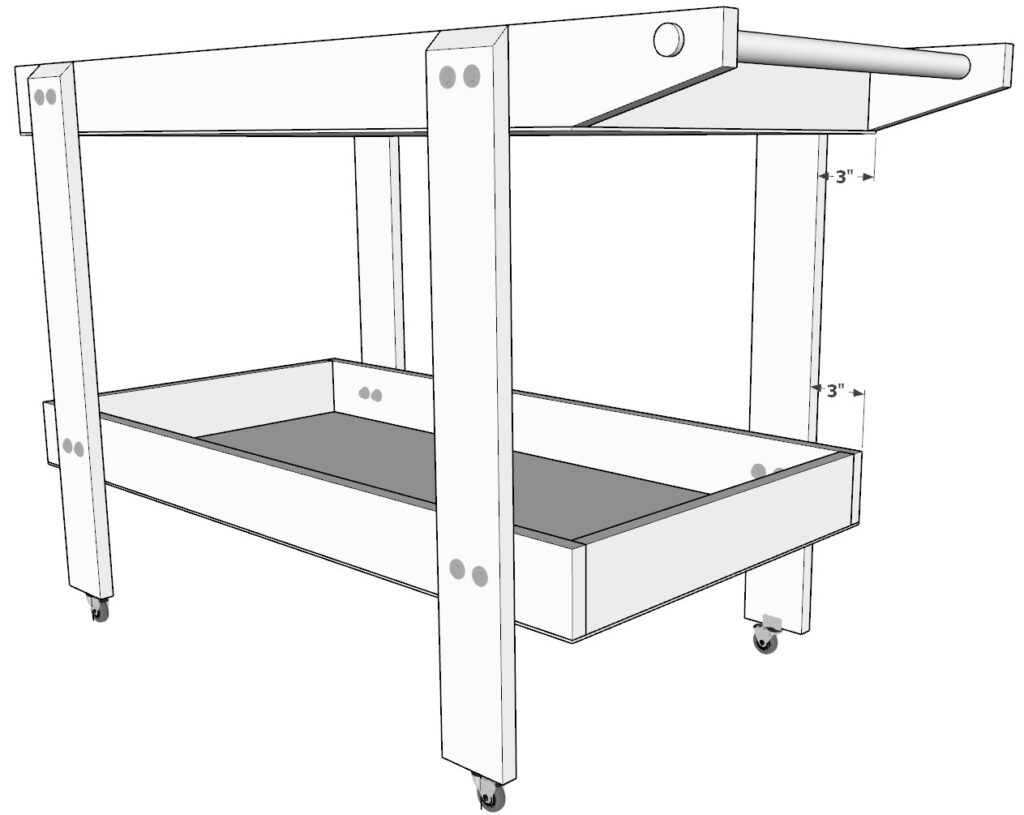
Step 4: Constructing Support Pillars and Adding the Roof
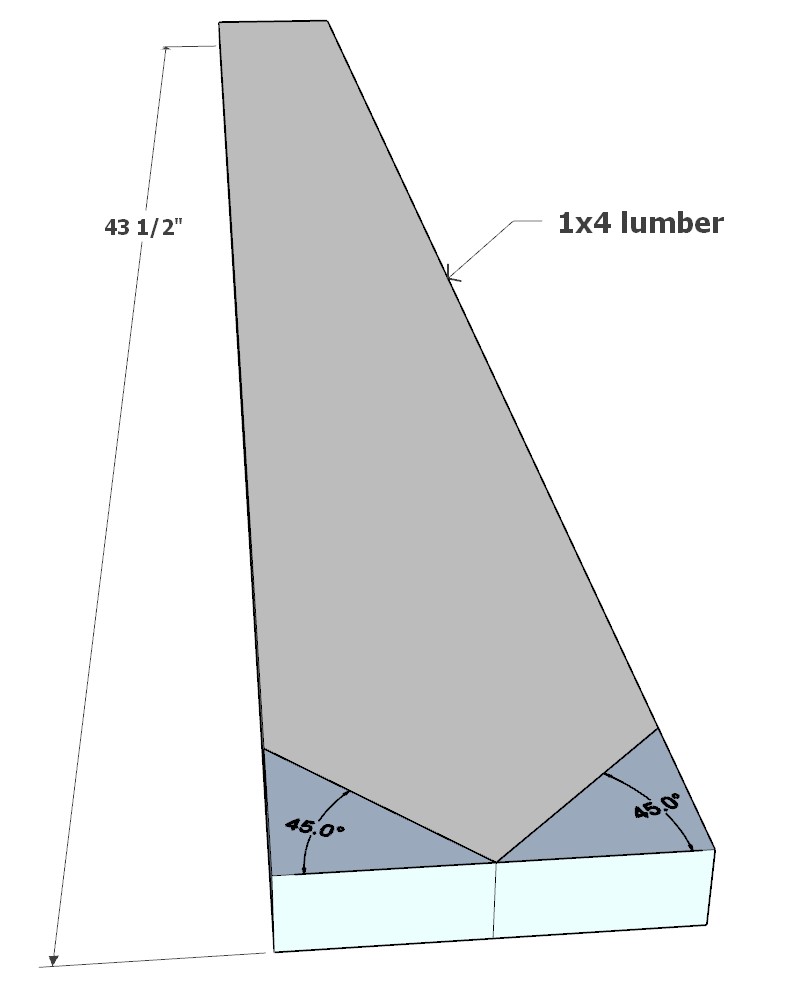
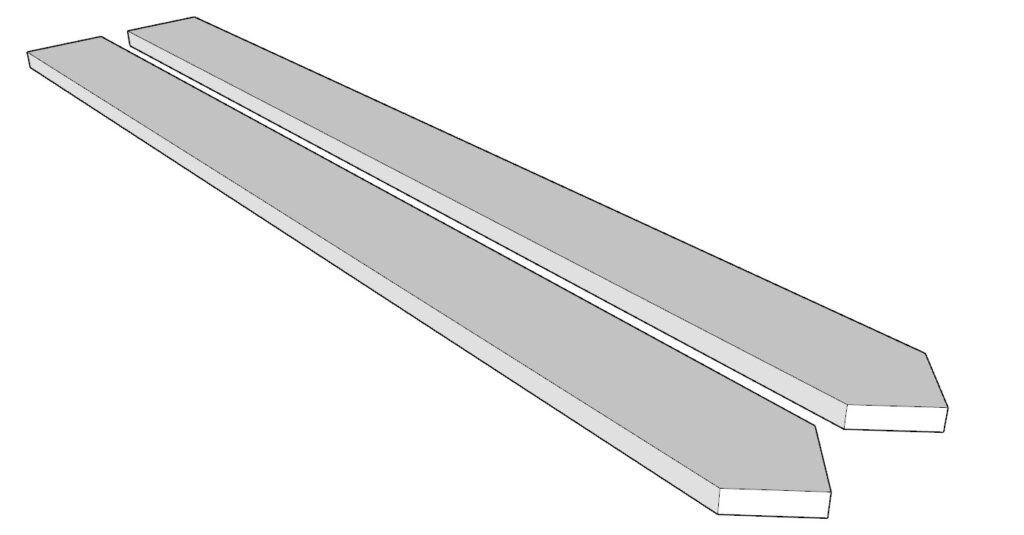
Sub-step 4.1: Shaping the Pillars
- Begin with two pieces of 43-1/2″ long 1×4 lumber.
- Cut one end of each piece at a 45-degree angle, making two cuts to form a pointed end.
- Ensure that both pillars have identical angled cuts.
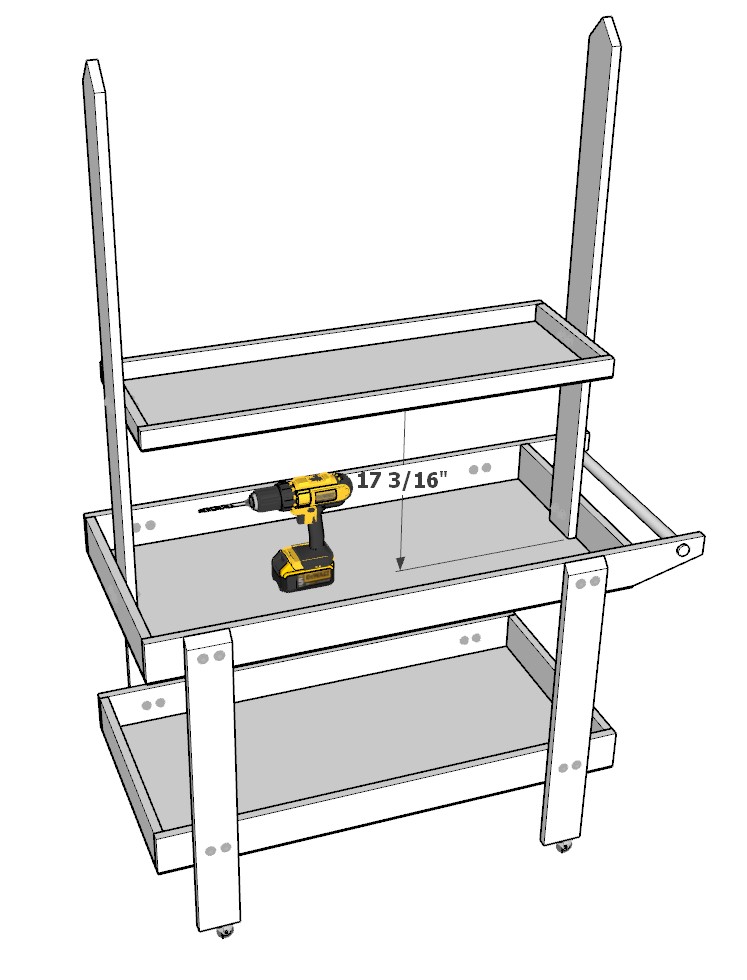
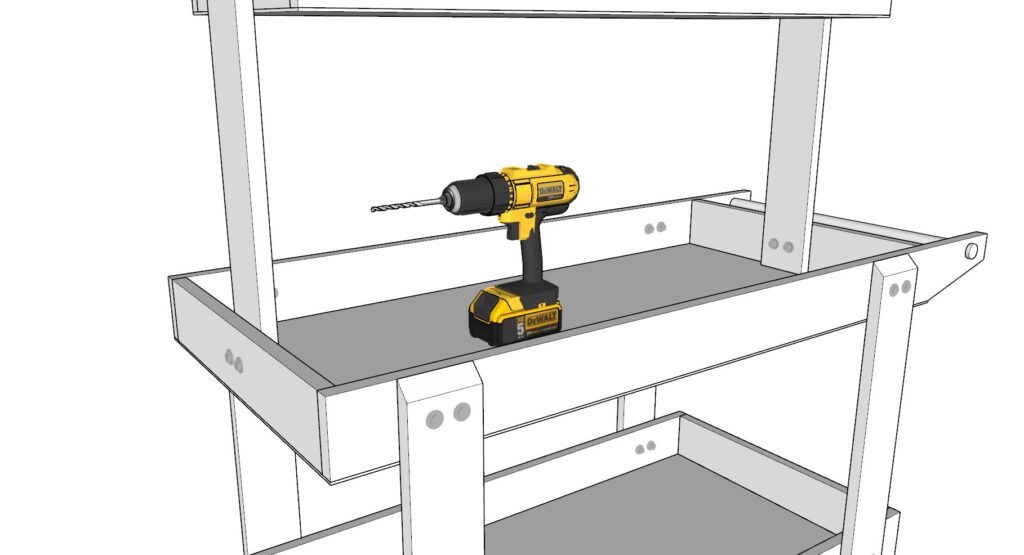
Sub-step 4.2: Attaching Pillars to the Main Shelf
- Position the pillars upright on the sides of the main shelf or serving area.
- Using the bolt assembly method from the previous steps, drill holes at the designated spots for each pillar.
- Secure the pillars to the main shelf with bolt assemblies, ensuring they are tight and upright.
Sub-step 4.3: Installing the Top Tray
- Align the top serving or display tray with the top ends of the pillars.
- Drill holes for the bolt assemblies as per the previous method, ensuring they match the corresponding spots on the pillars.
- Fasten the tray onto the pillars with the bolt assemblies for a secure fit.
Sub-step 4.4: Adding the Roof
- Carefully slide the roof structure onto the top of the pillars.
- There is no need for additional hardware here as the roof is designed to fit snugly onto the pillar points.
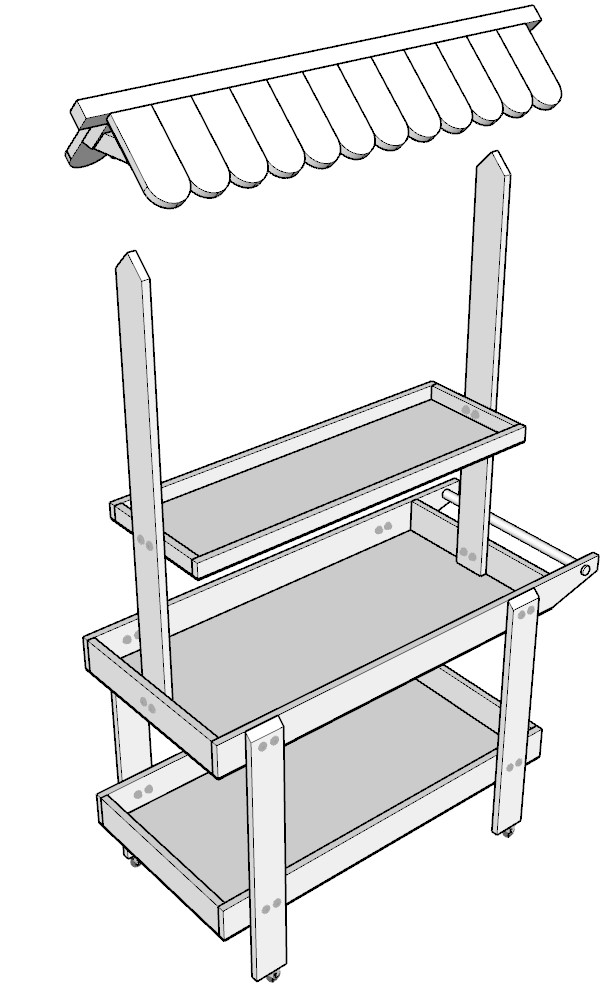
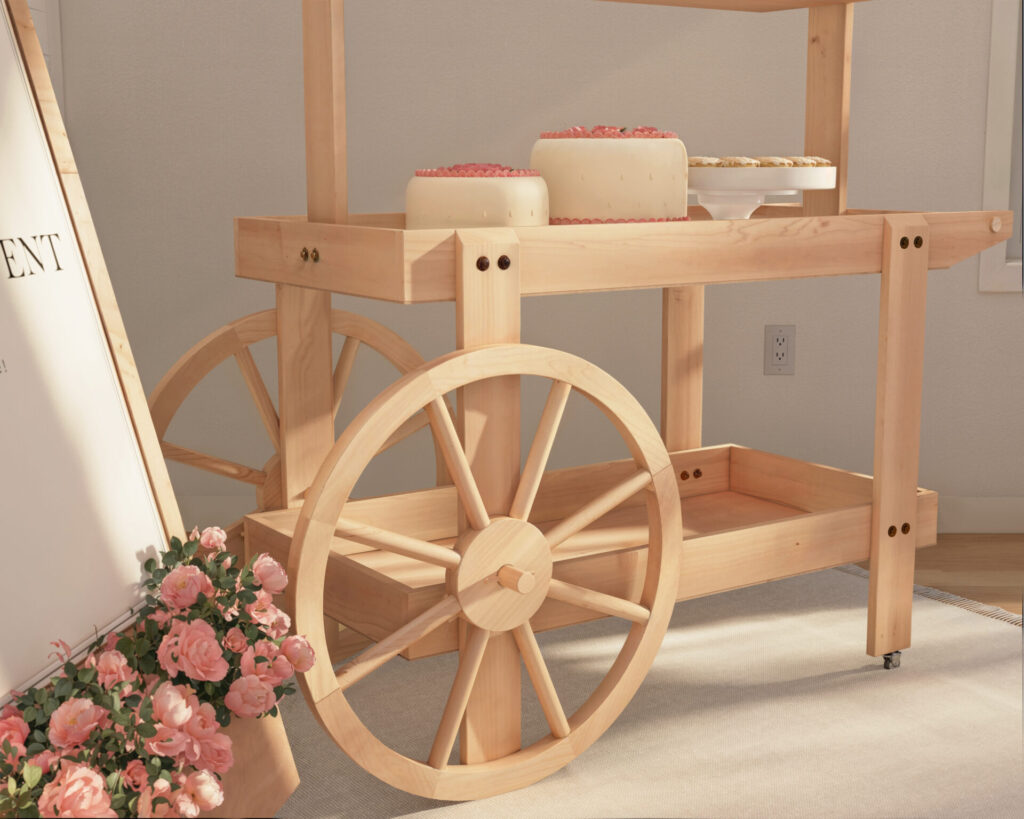
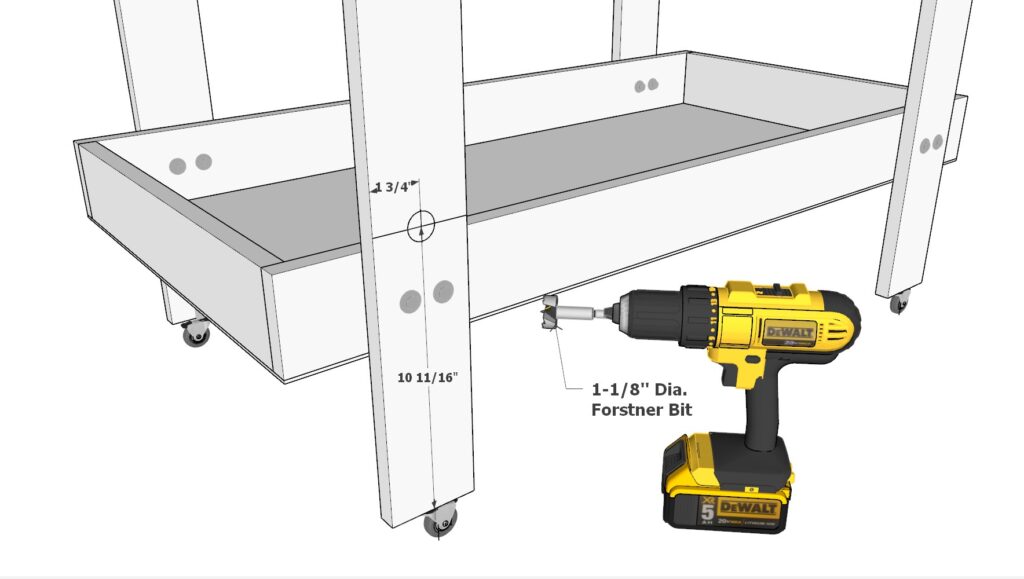
Step 5: Attaching the Decorative Wheels
Sub-step 5.1: Preparing the Axles
- Select the back legs of the cart for axle installation.
- With a 1-1/8″ diameter forstner bit, drill holes at the specified locations on the back legs as shown in the diagram.
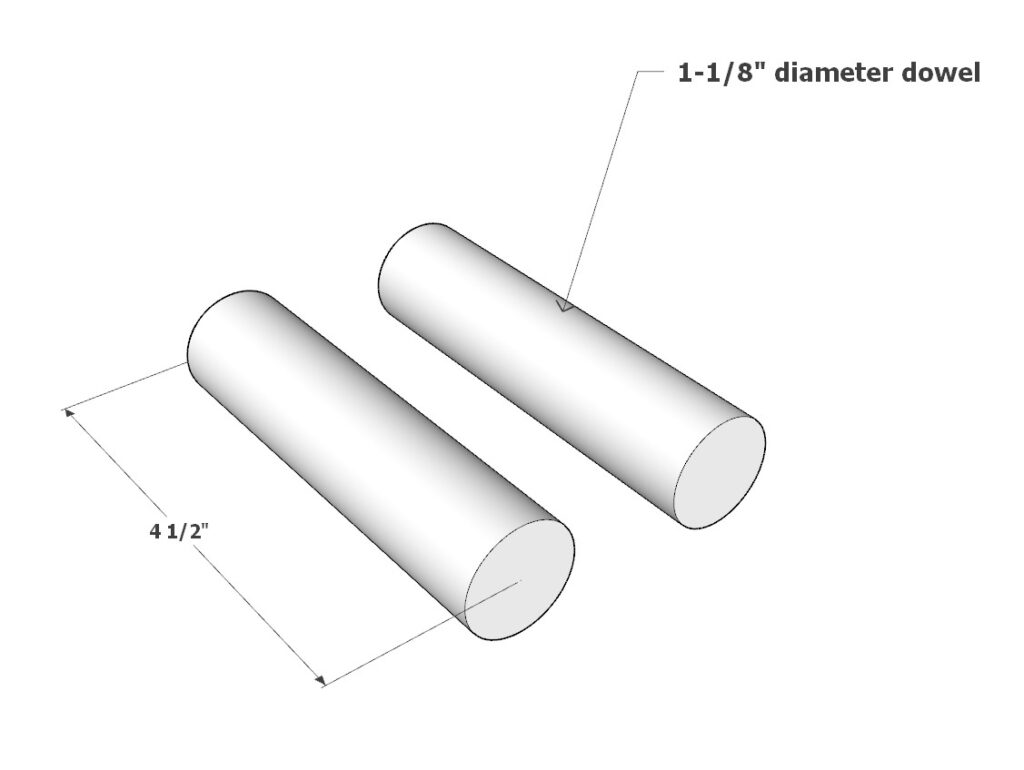
- Insert a 4-1/2″ long 1-1/8″ diameter dowel into each hole, ensuring they are parallel to the ground and even with each other.
- Secure the dowels in place with a generous amount of wood glue for a strong bond.
Sub-step 5.2: Mounting the Wooden Wheels
- Position the wooden wheels onto the dowel axles.
- Drill a small hole through the center of each dowel axle to accommodate a smaller 1/4″ diameter dowel.
- Push the 1/4″ dowel through the larger dowel, ensuring it extends evenly on both sides to hold the wooden wheels in place securely.


Assembly Tips
- If the wheels you’ve chosen differ from the recommended 24-inch size, measure and adjust the axle placement accordingly to suit the wheel dimensions.
- Should the wheels have a pre-drilled hole that is not compatible with a 1-1/8″ dowel, select a dowel that matches the wheel’s hole size for a snug fit.
- Verify the height at which the wheels will be mounted before drilling; the size stated by the manufacturer may vary from the actual size received. Measure the wheels upon arrival to confirm the proper fit and adjust the leg drilling point if necessary.
- Remember, these wheels are primarily for decorative purposes and are not meant to bear the full weight of the cart or to be used for frequent transportation.
Step 6: Finishing Touches and Maintenance
Sub-step 6.1: Preparing the Wood
- Begin by thoroughly sanding each component of the cart to remove any rough edges or surfaces. Start with a coarse grit sandpaper and progress to a finer grit for a smooth finish.
- Wipe down the wood with a damp cloth to remove all dust and debris from sanding. Allow it to dry completely before proceeding to painting or staining.
Sub-step 6.2: Painting the Cart
- If you opt to paint your cart, choose a high-quality outdoor paint that will withstand weather conditions if the cart is used outside.
- Apply a primer coat first to ensure the paint adheres well and to extend the durability of your finish. Let the primer dry according to the manufacturer’s instructions.
- Apply the first coat of paint evenly, using a brush or roller suitable for the type of paint you’re using. Allow it to dry thoroughly.
- Apply a second coat if necessary for full coverage and a vibrant finish. Let it dry completely.
Sub-step 6.3: Staining the Cart
- For a natural look, select a wood stain in your desired shade. Ensure it’s suitable for outdoor use if the cart will be exposed to the elements.
- Apply the stain with a brush, working in the direction of the wood grain. Wipe away any excess stain with a clean cloth.
- Allow the stain to dry as per the product’s instructions. You may need to apply a second coat for a deeper color.
- Once the stain has dried, apply a clear outdoor sealer to protect the wood from moisture and sun damage.
Sub-step 6.4: Maintenance
- Regularly check the cart for any loose bolts or hardware and tighten as needed.
- If painted, inspect for chips or cracks in the paint and touch up to prevent wood rot.
- For stained carts, reapply sealer annually to maintain protection against the weather.
Sub-step 6.5: Earning with Your Event Cart
- Take high-quality photos of your finished cart to use in your promotional materials.
- List your cart for rent on local event planning websites, social media groups, or community boards.
- Price your rental competitively, considering your local market. Starting at $100 per event is a reasonable benchmark.
- Include delivery, setup, and pickup services in your rental package to add value and justify your pricing.
- Gather testimonials from users to build credibility and attract more customers.