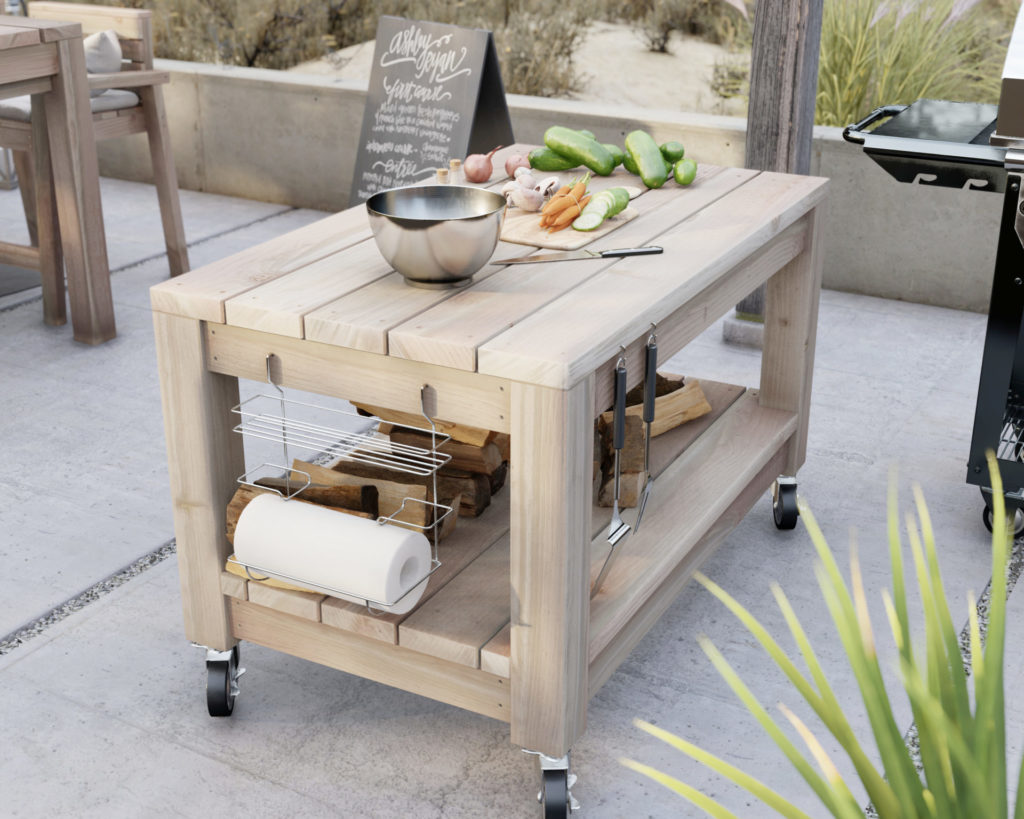
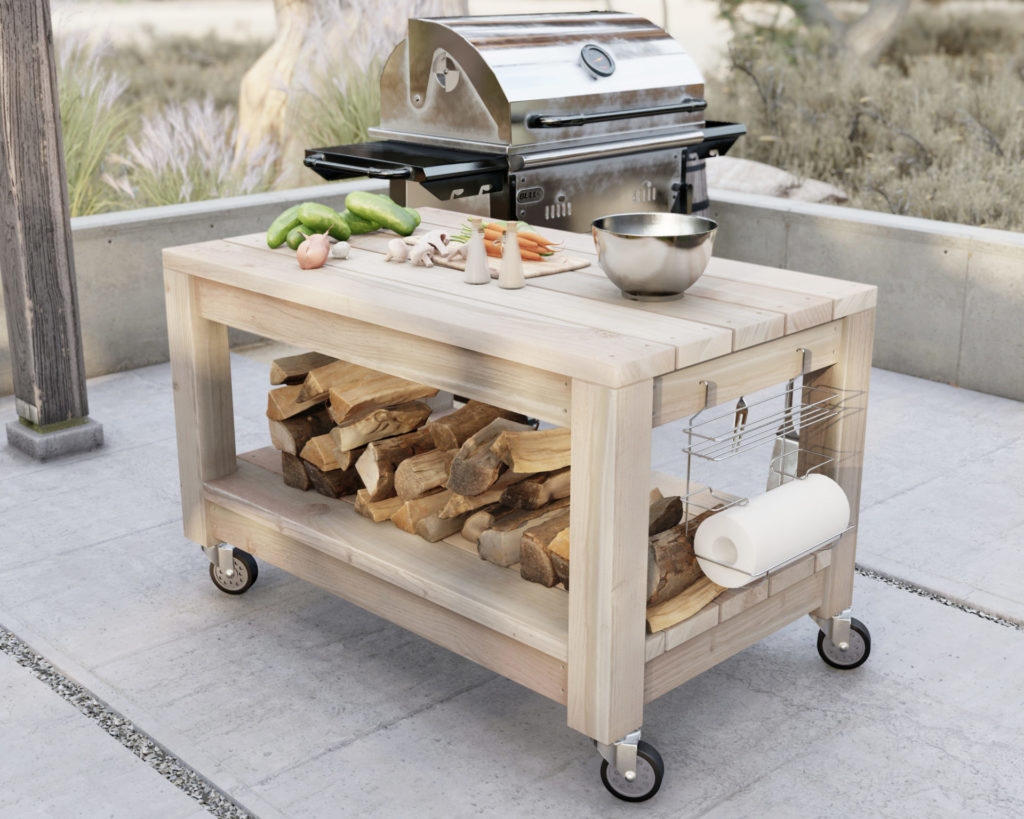
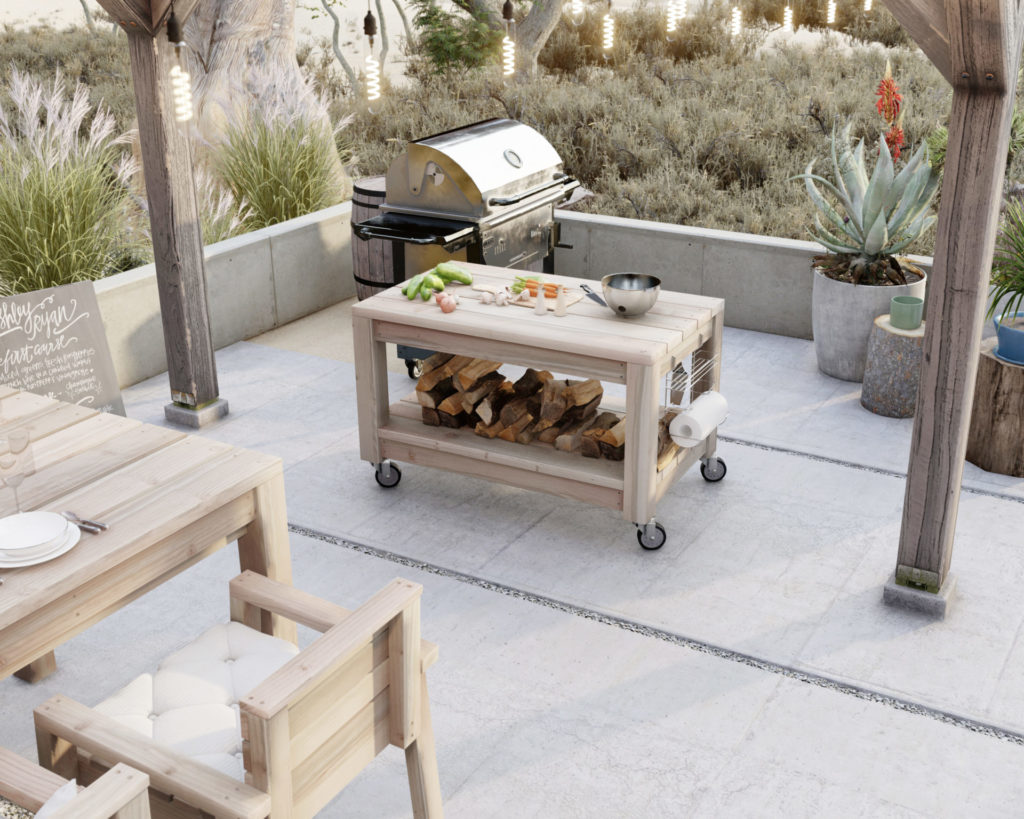
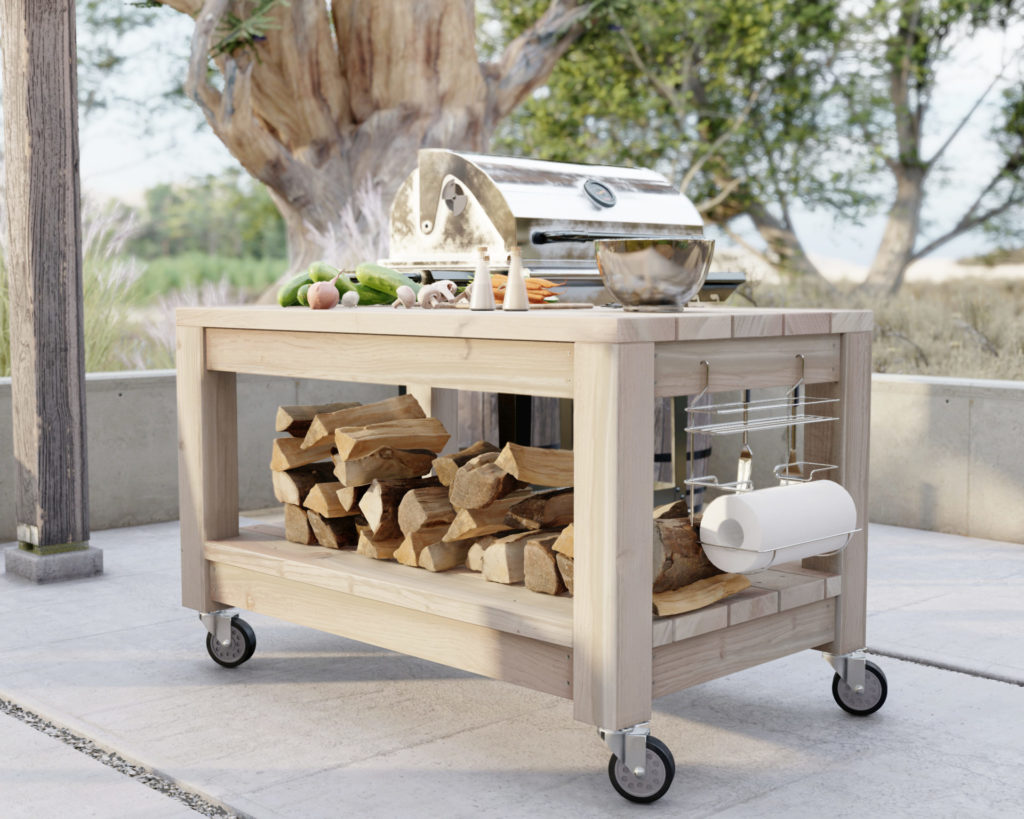
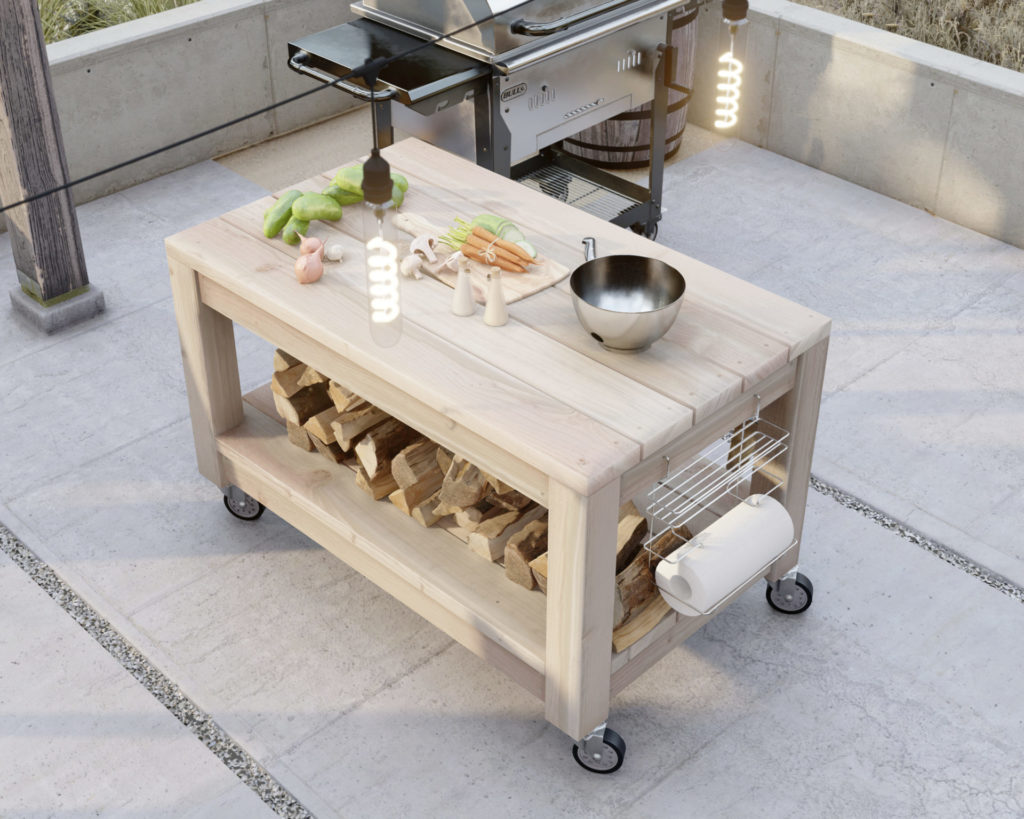
How do you benefit with the DIY kitchen and grill island?
What you get with this outdoor kitchen island and rolling grill table is a versatile and reliable helper. You will love the rolling capability because it gives you more control of your indoor or outdoor kitchen cooking experience. The rolling BBQ table provides an island for meats, vegetables, cleaning supplies, and grilling and cooking utensils. If you’re working outside, you can have everything on hand before you start grilling. The storage self on the bottom of the grill table has plenty of space for rough, bulky, or dirty items such as wood, charcoal, coal, fire starters, etc. You can easily add hooks and trays to hold things like grill scrapers, spatulas, tongs, and paper towels.
What are just some of the uses of this DIY kitchen island?
- The rolling table can be used as a serving table. Simply load up the table with, food, plates, drinks, utensils, etc. and you can service entire tables of guests at the same time. This works great for large events like backyard weddings, quinceaneras, and larger get togethers.
- As a transport cart. The rolling island can be very useful for transporting heavy items during party set up and clean up. This table is very heavy duty and can hold some real weight. Afterwards, the rolling island can be stowed away and out of site if needed.
- As a grill mate. For those who love to grill and barbecue then this is great for keeping everything you need in one place. The grill cart can hold coolers, drinks, and meat. You will lobe having a grill and BBQ table on hand so that you can focus on what matters most to you.
Who can build this DIY Kitchen and grill island?
If you’re looking for outdoor kitchen ideas and designs that are easy and cheap to make, then this plan is for you. The table does not have any fancy joint, difficult cuts, or complicated assembly steps. If your new to woodworking, by following the easy-to-understand step by step instructions provided, you will be able to save yourself time, material, and the frustration on trying to figure out the build on your own.
What about other furniture pieces I see in the photos?
Plans for the full-size counter height outdoor dining table and chair set can be found here.
Plans for the full-size standard height outdoor dining table and chair set can be found here.
The kitchen island cart was designed for you to match in style to the outdoor table and chair set to give an overall uniform and aesthetic look.

Time to build
5 hours (varies with experience)
Total cost of build
About $170 (Costs may vary based on location and supplier.)
Skill level required
Beginner
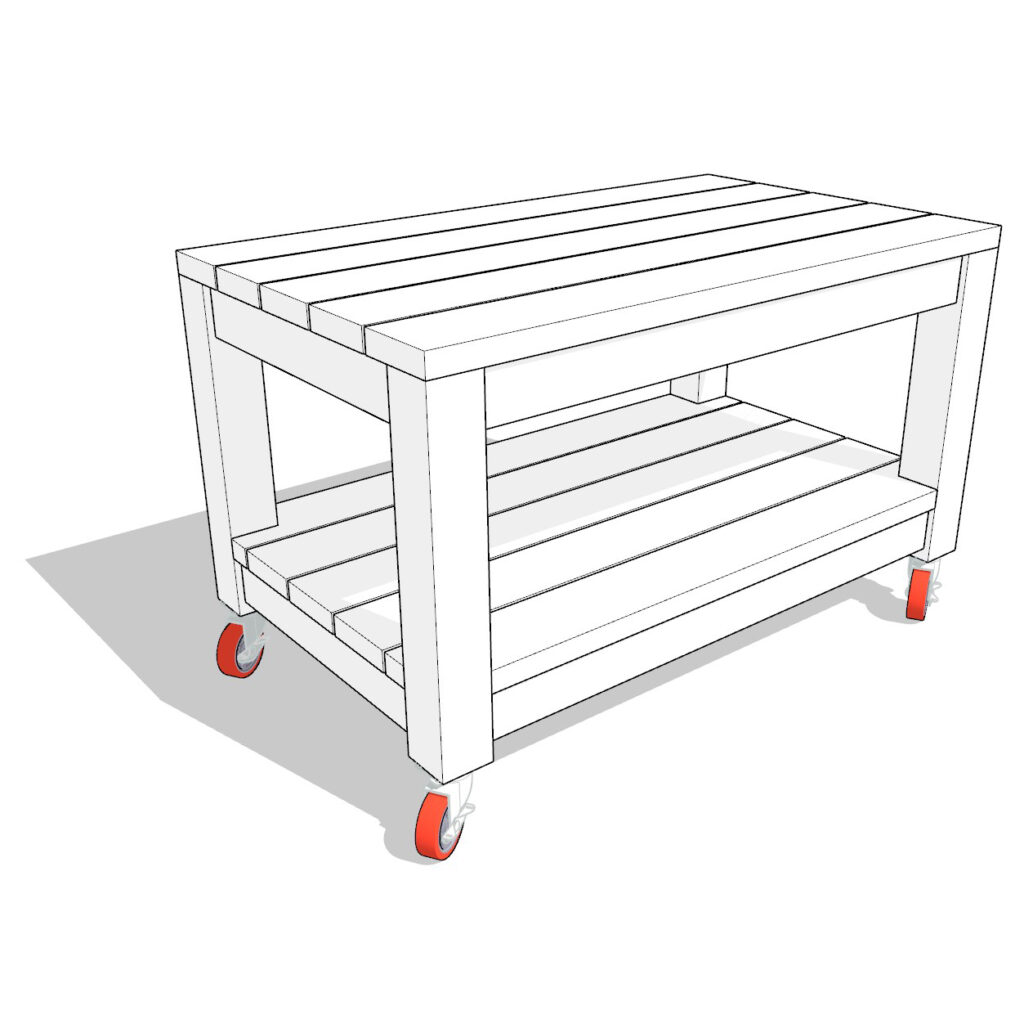
GrillMate Rolling Prep Station DIY Plan
What is included in the PDF download?
- Easy to read step by step instructions
- Material list
- Cut list
- Tools needed
- 3D illustrations
- Helpful links to tools and materials needed for the project
Tools & Materials Needed
Available with the purchase of the DIY plan PDF.
Lumber Shopping & Cut List
Available with the purchase of the DIY plan PDF.
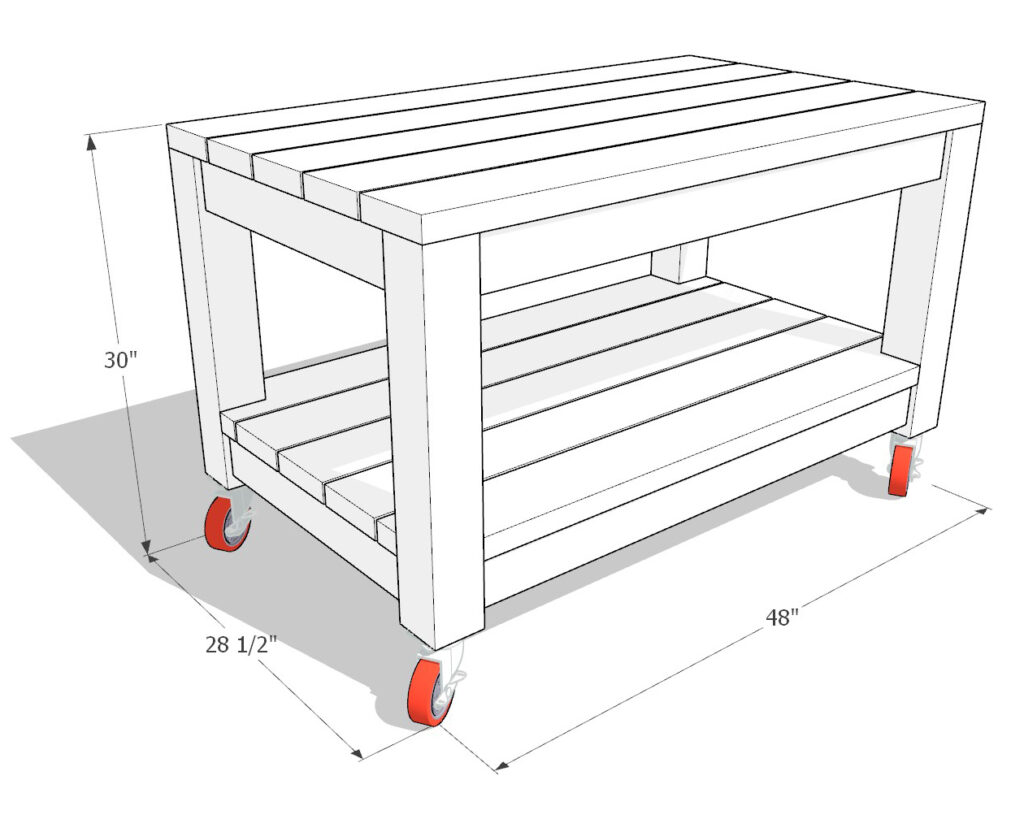
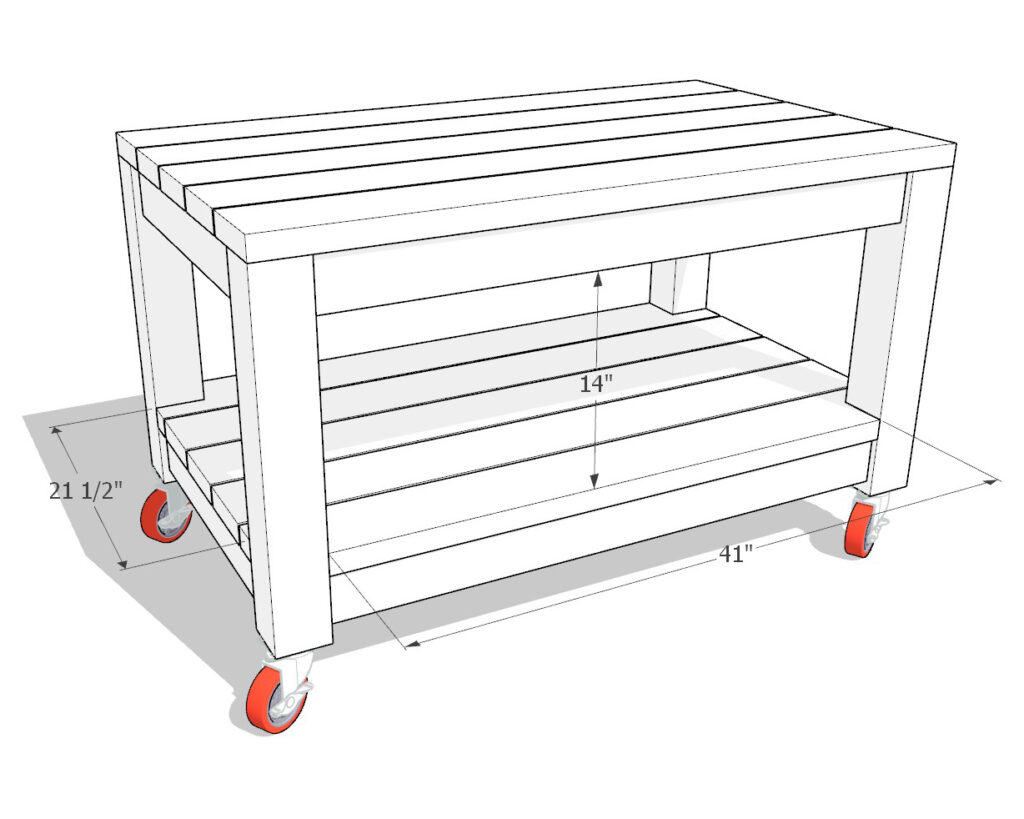
GrillMate Rolling Prep Station Dimensions
Concealing Screw Holes: Why the Plug Cutter is Essential for Your Grill Island Table
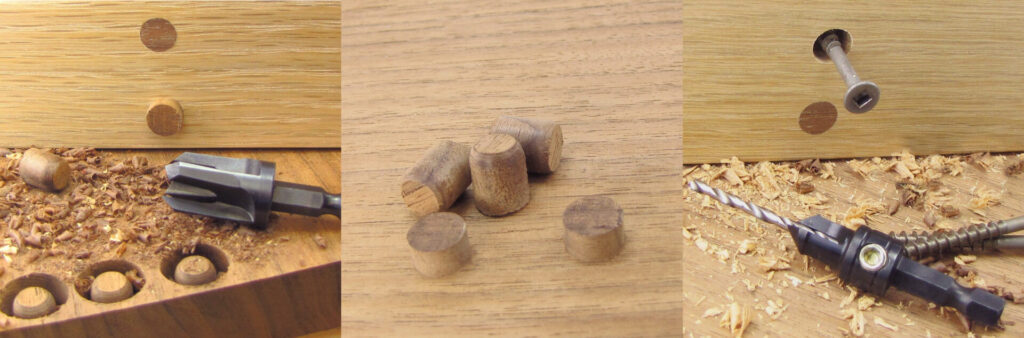
When working on projects like this DIY kitchen and grill island table, you’re going to have a lot of screw holes. If you’re aiming for a clean, polished look, visible screw holes can be a bit of an eyesore. But don’t worry—there’s a great way to handle this: using a plug cutter.
Why Use a Plug Cutter?
Let’s be honest: nobody wants their hard work to be overshadowed by visible screw holes. For this project, where durability and appearance both matter, the plug cutter is your best friend. Here’s why:
Consistency in Staining: If you’re planning to stain your table, wood putty and epoxy won’t stain well—they’ll stick out like a sore thumb. A plug cutter lets you cut plugs from the same wood you’re using for your table, so the plugs take the stain just like the rest of the wood. This keeps everything looking consistent and professional.
Grain Matching: Another big advantage of plugs is that you can match the wood grain. When the grain of the plug lines up with the rest of the board, the hole practically disappears. It’s these little details that can really elevate the look of your project, making it look less like a DIY and more like a pro build.
Versatility and Precision: With the Make it Snappy Tools 3 Piece Tapered Plug Cutter Set, you get three different sizes, so you’re covered no matter the size of your screw holes. Pair this with the Snappy Tools Countersink Drill Bit Set, especially if you have a drill press, and you’ll be able to drill precise, clean holes that fit the plugs perfectly.
How to Use Plug Cutters for Best Results:
Pre-Drill and Countersink: Before you drive your screws, use a countersink drill bit to create a recess that’s deep enough for the plug to sit flush or slightly below the surface. This ensures the plug will fit perfectly over the screw head.
Cut the Plugs: Use the plug cutter on a scrap piece of the same wood you’re using for your table. This will ensure that the plugs match perfectly in color and grain.
Test on Scrap Wood First: It’s a good idea to practice on some scrap wood before working on your final piece. This will help you get the hang of drilling the right depth and fitting the plugs snugly.
Glue and Insert Plugs: Apply a small amount of wood glue to the plug and insert it into the hole. Once the glue dries, trim the plug if necessary and sand it flush with the surface.
Considerations for Finishing:
- Staining: If staining, plugs are the way to go since they’ll absorb the stain just like the rest of your table.
- Painting: If you decide to paint, you have more flexibility. Wood putty or epoxy can work, as the paint will cover them, but plugs still offer a smoother finish.
Tools Mentioned:
These tools not only help conceal screw holes but also ensure that your table looks top-notch—giving you a project you’ll be proud to show off. So if you don’t want those screw holes to ruin the look of your hard work, give plug cutters a try. It’s one of those small steps that makes a big difference!
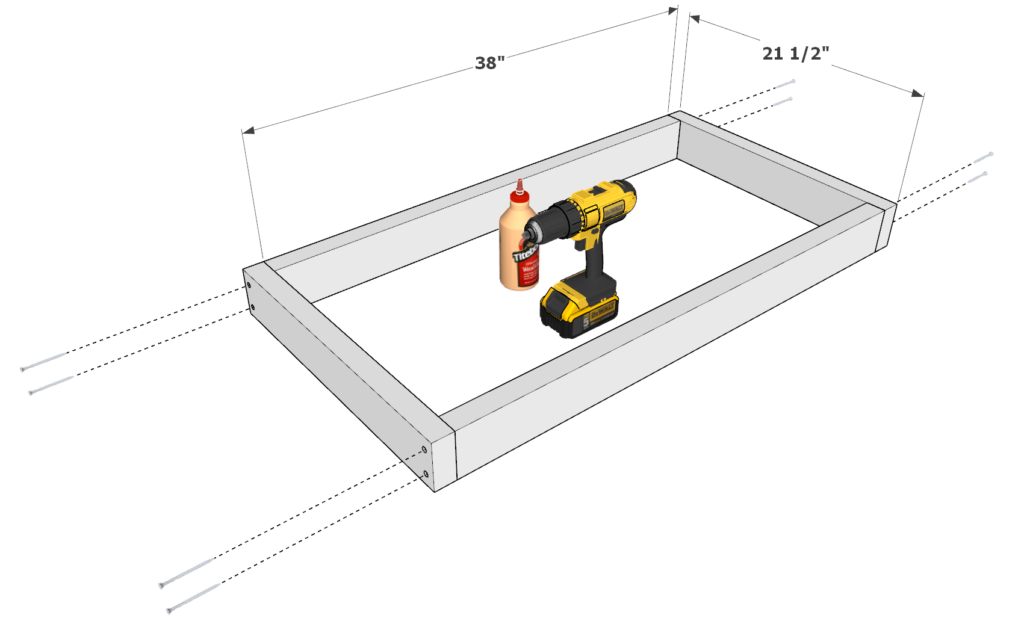
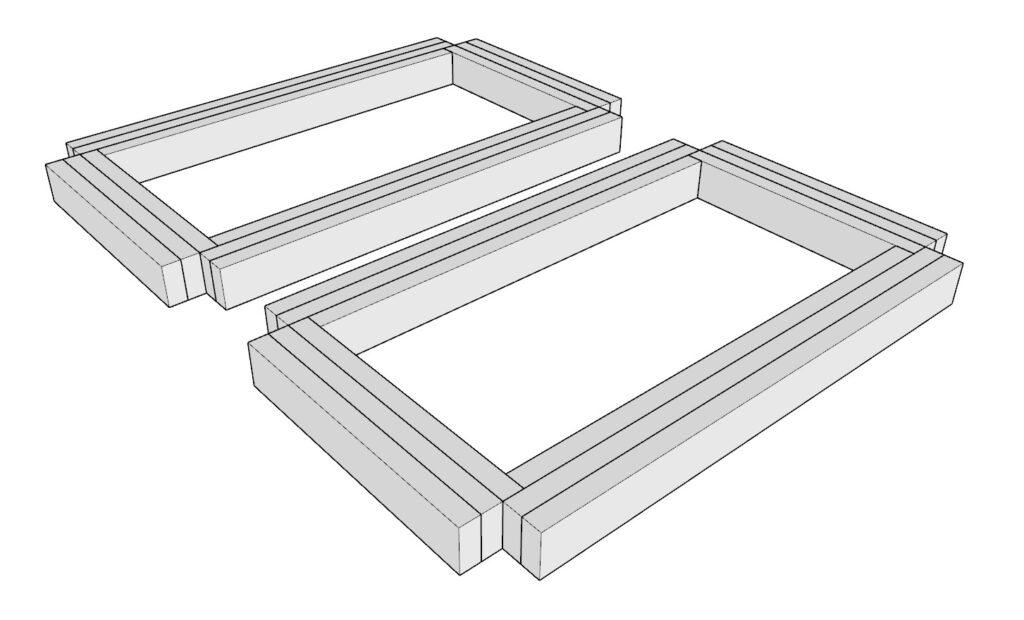
STEP 1: BUILD THE FRAME OF THE GRILL ISLAND TABLE
1.1 Build the First Layer of the Frame
- Gather the following materials:
- 2 pieces of 2×4 lumber, each 21-1/2 inches long
- 2 pieces of 2×4 lumber, each 38 inches long
- Arrange the lumber pieces as shown in the first image.
- To join the pieces:
- Apply wood glue to all areas where the pieces will make contact.
- Predrill the holes to prevent the wood from splitting. Use a countersink drill bit to make space for the screw heads.
- Secure the pieces with 3.5-inch screws.
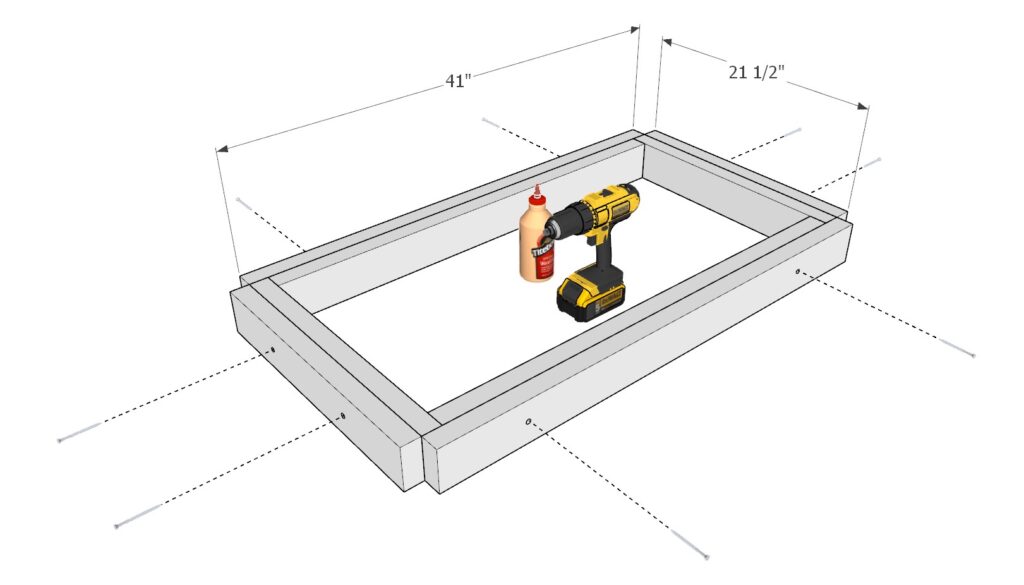
1.2 Build the Second Layer of the Frame
- Gather the following materials:
- 2 pieces of 2×4 lumber, each 21-1/2 inches long
- 2 pieces of 2×4 lumber, each 41 inches long
- Arrange the lumber pieces as shown in the second image.
- To join the pieces:
- Apply wood glue to all contact areas. Make sure to glue the entire sides of the 2×4 faces that are touching.
- Predrill the holes and secure with 2.5-inch screws instead of the 3.5 inch screws to prevent the screws from poking through.
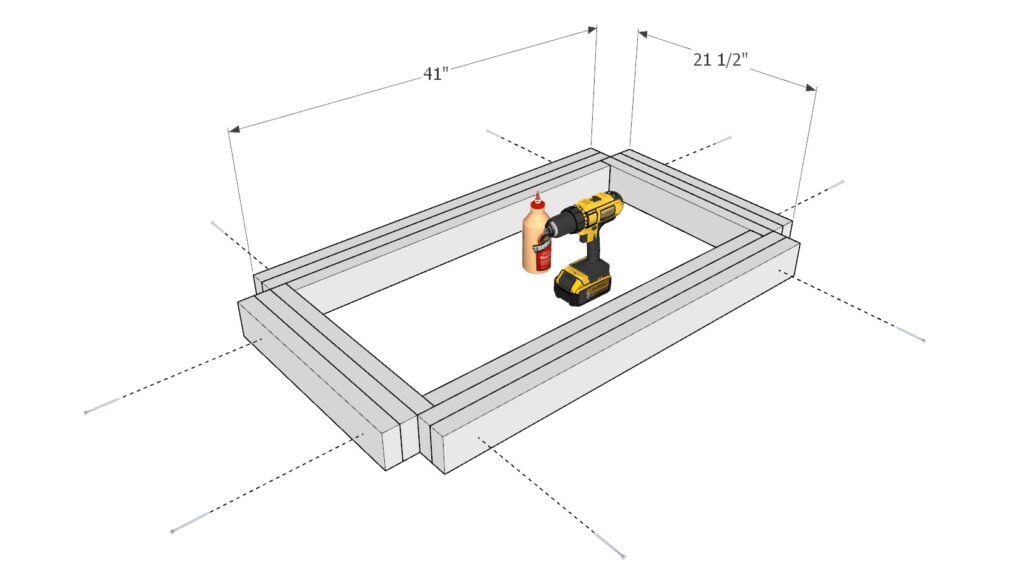
1.3 Build the Final Layer of the Frame
- Repeat the steps in 1.2 using:
- 2 pieces of 2×4 lumber, each 21-1/2 inches long
- 2 pieces of 2×4 lumber, each 41 inches long
- Arrange and join the pieces in the same way as before, ensuring all contact areas are glued and screws are properly driven in.
1.4 Make a Second Identical Frame
- Repeat the steps 1.1 to 1.3 to build a second identical frame. Ensure all pieces are properly aligned and securely fastened.
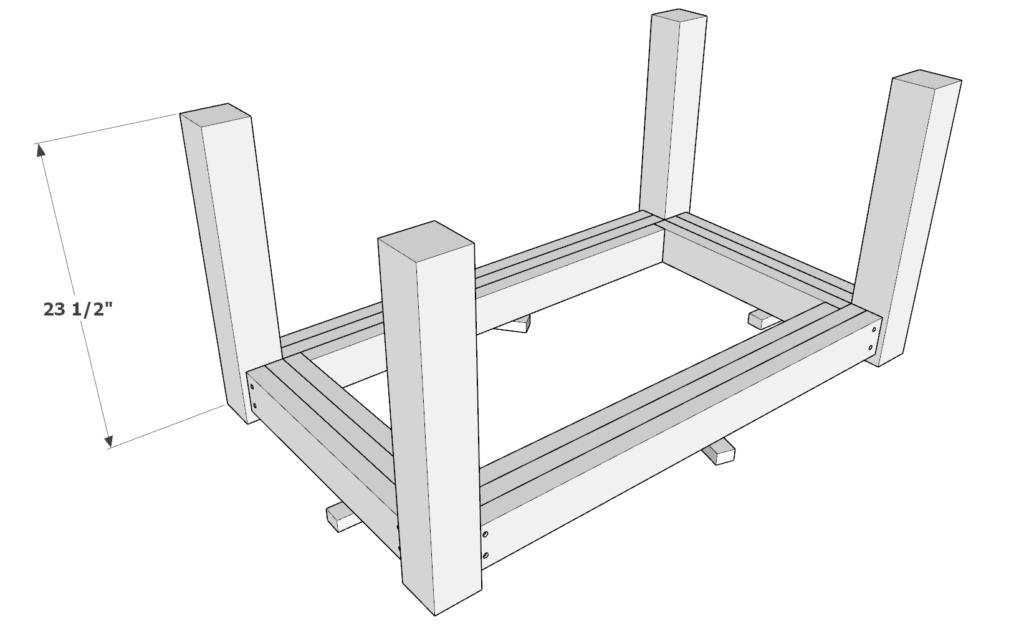
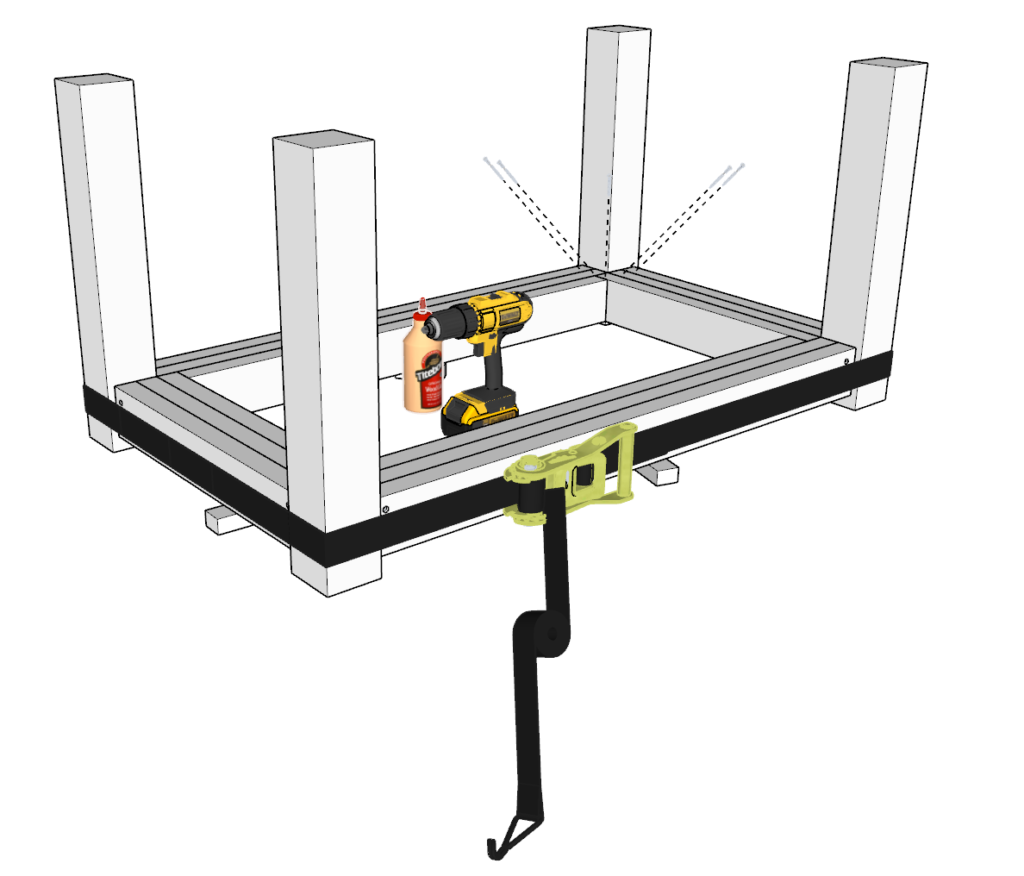
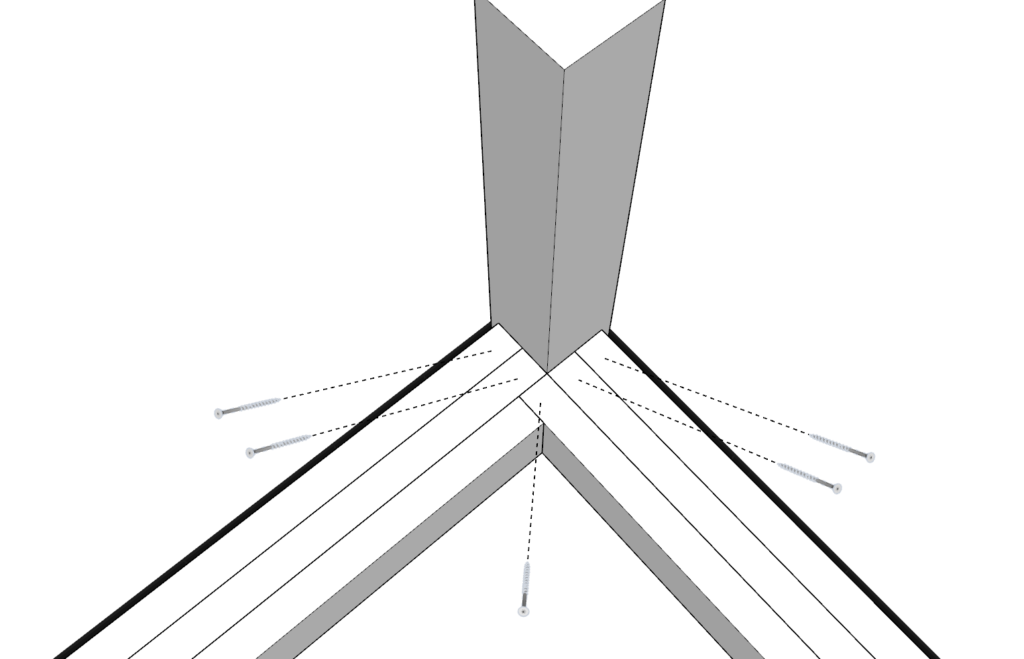
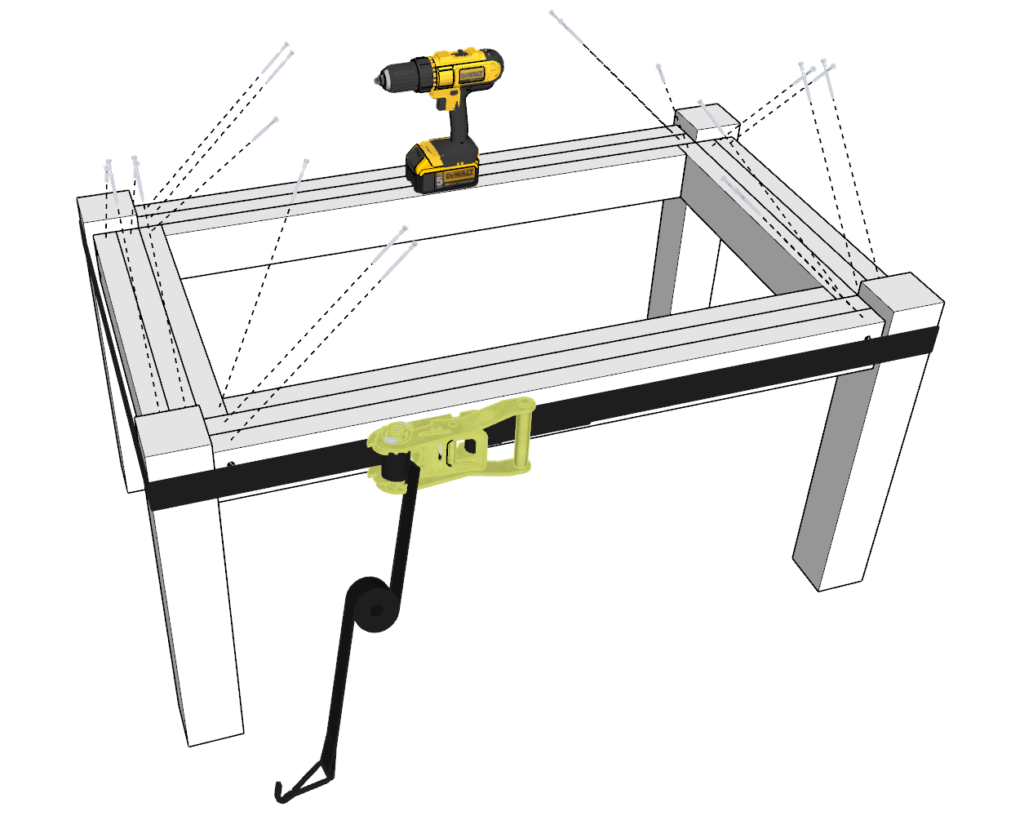
STEP 2: ATTACH THE LEGS TO THE FRAME
In this step, you will attach the legs to one of the frames you built in the previous step. This will form the base of your kitchen and grill island.
2.1 Prepare the Frame
- Place one of the completed frames from Step 1 on top of 1-inch spacers.
- Tip: You can use scrap wood to create these spacers.
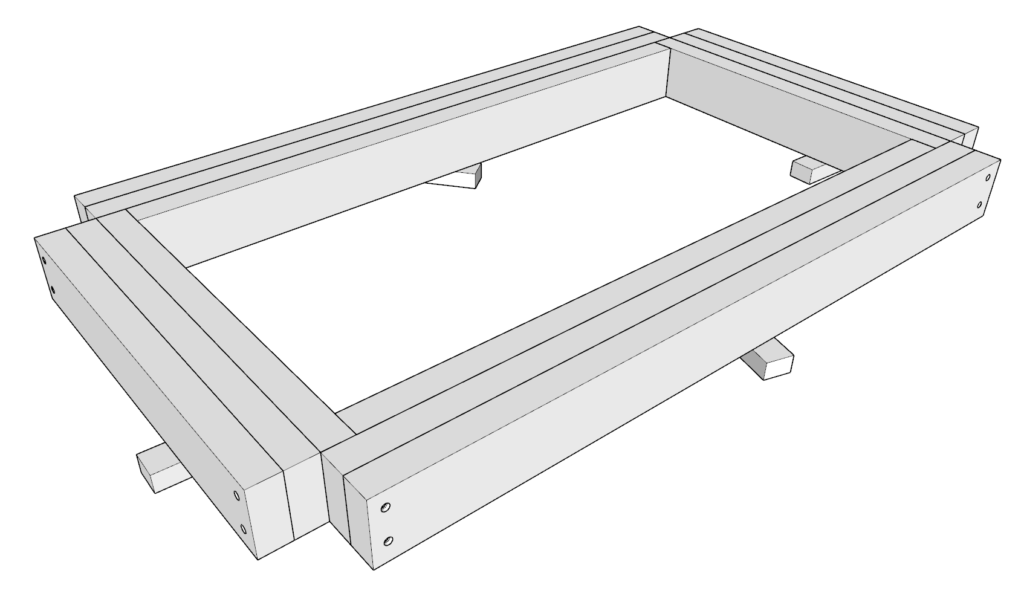
2.2 Position the Legs
- Gather four pieces of 4×4 lumber, each 23-1/2 inches long.
- Position these legs at each corner of the frame.
- Apply generous amounts of wood glue to all contact areas between the frame and the legs.
2.3 Align and Secure the Legs
- Wrap a ratchet strap around the frame and legs to hold them in place.
- Tighten the straps, but not completely—leave some slack.
- Adjust the alignment:
- Use a hammer to tap into place any legs or frame parts that are not perfectly aligned.
- Once the legs and frame are properly aligned, tighten the ratchet strap as tightly as possible to secure everything.
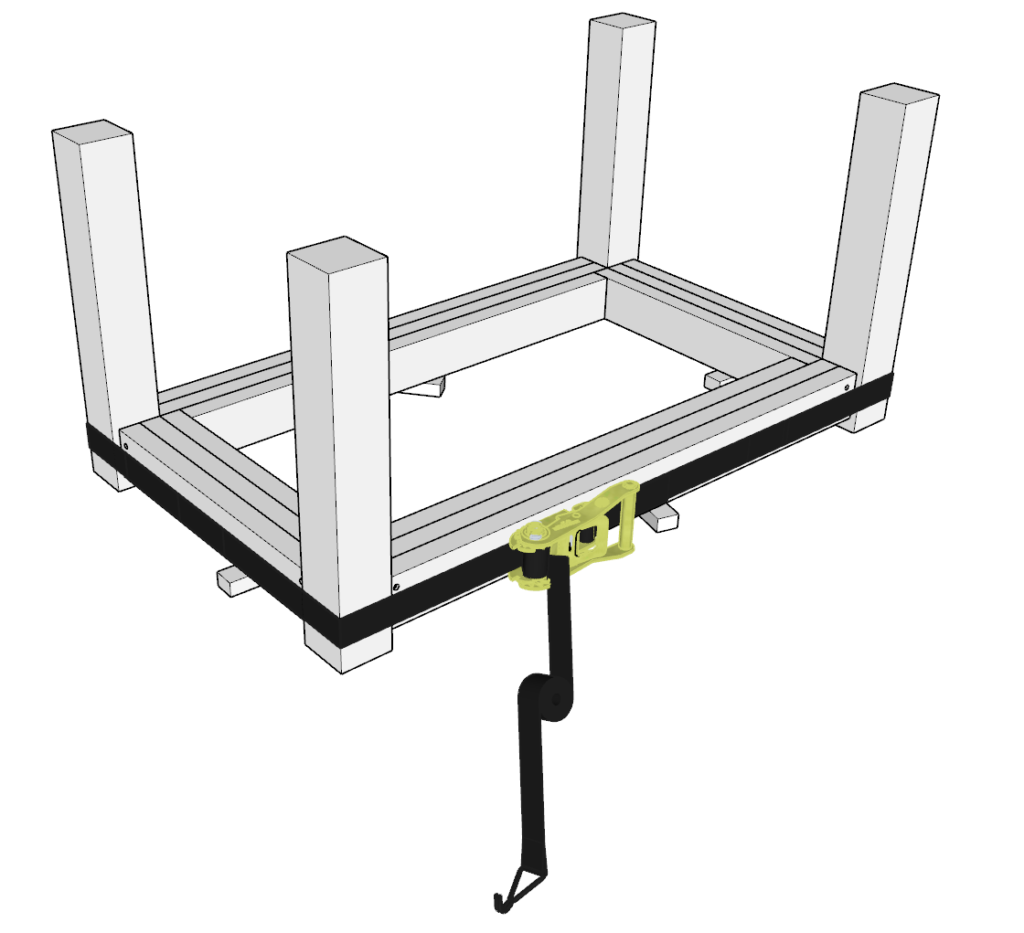
2.4 Fasten the Legs to the Frame
- Predrill holes through the frame into each 4×4 leg.
- Insert 3.5-inch screws deep into the legs to create a strong connection.
- Repeat this process for all four legs, ensuring each is securely fastened.
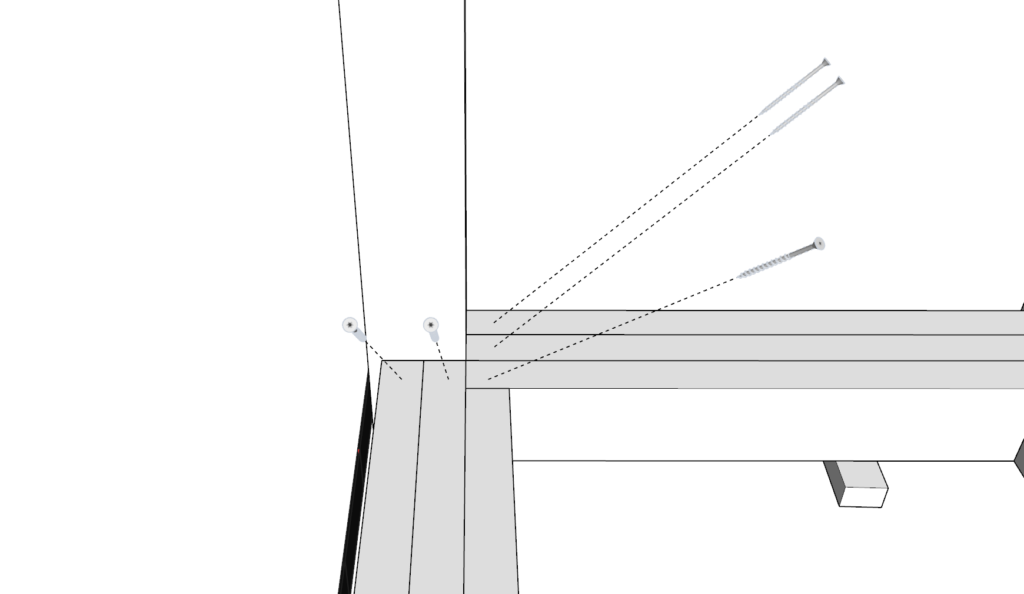
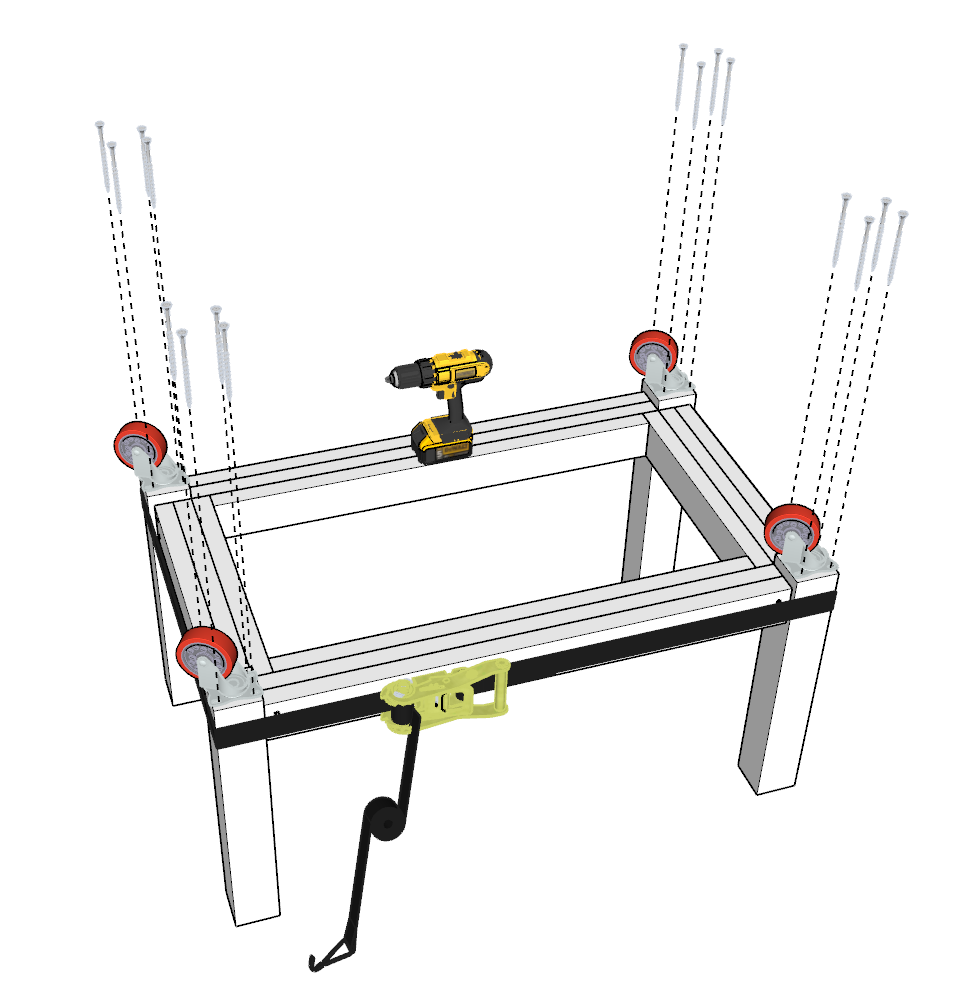
STEP 3: ATTACH SCREWS AND WHEELS TO THE FRAME
This step involves flipping the table and attaching wheels to make your grill island table mobile. Follow these steps carefully to ensure the legs remain strong and stable.
3.1 Flip the Table Safely
- Carefully flip the grill island table over so that the legs are now pointing downward.
- Important: Make sure to have someone help you with flipping the table.
- Do not apply pressure to the legs until they are fully attached. Flip the table in midair to avoid stressing the leg joints, as pressure before proper attachment can weaken them.
3.2 Secure the Frame from the Bottom
- With the table flipped, add 3.5-inch screws into the legs in the same pattern as used in the previous step.
- Predrill holes as needed to ensure the screws go in smoothly and securely.
3.3 Attach the Wheels
- Gather four 4-inch swivel caster wheels with safety total lock, capable of supporting up to 1,200 lbs.
- Note: You can purchase these wheels here (affiliate link).
- Position one wheel at each corner of the table’s base.
- Predrill holes using a wide drill bit to fit the larger 4-5-inch screws needed for the wheels.
- Predrilling is crucial here to prevent the 4×4 legs from splitting due to the larger screws.
- Secure the wheels with the screws, ensuring they are tightly fastened for maximum stability and mobility.
STEP 4: ATTACH THE BOTTOM SHELF DECKING
In this step, you’ll add the decking pieces to create the bottom shelf of your grill island table. This will provide additional storage space for heavy or bulky items.
4.1 Prepare the Decking Pieces
- Gather five pieces of 2×6 lumber, each 48 inches long.
- For two of these 2×6 pieces, you need to cut 3.5-inch by 3.5-inch notches on both ends. This allows the pieces to fit around the legs of the table as shown in the diagram below.
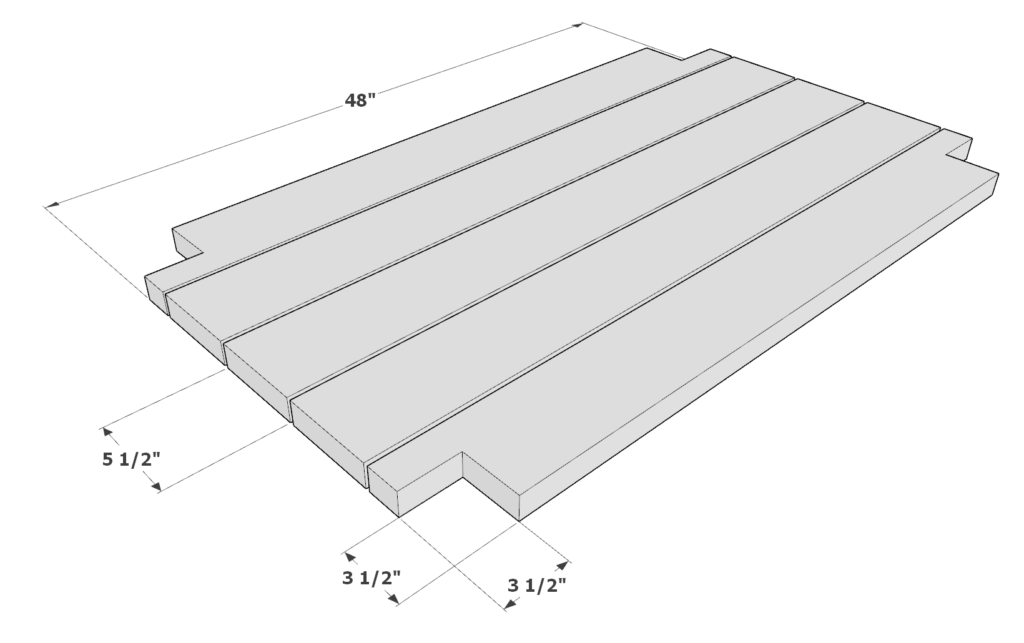
4.2 Position the Decking Pieces
- Insert all five decking pieces onto the bottom frame of the table.
- Make sure to space the boards about 1/4 inch apart for proper spacing.

4.3 Attach the Decking Pieces
- Apply wood glue to all contact areas where the decking pieces meet the frame.
- Predrill holes in each decking piece to prevent splitting.
- Secure each piece with 2.5-inch screws, making sure they are firmly attached to the frame.
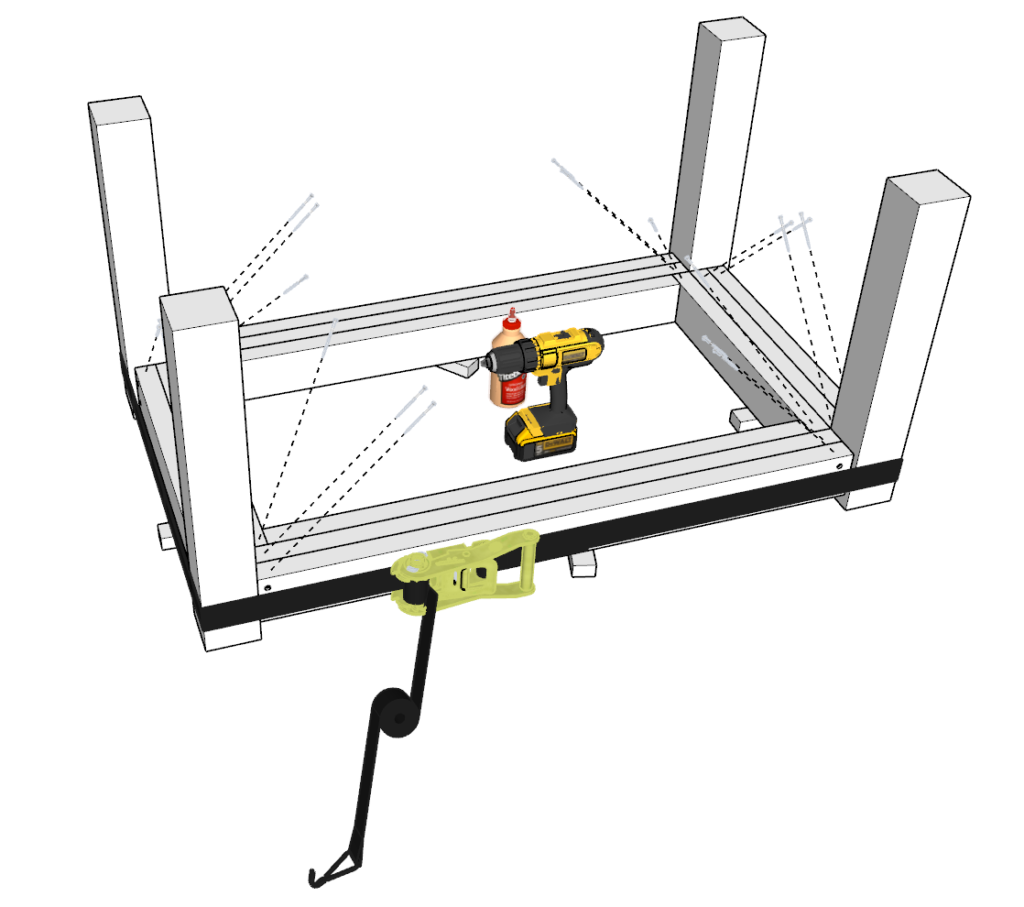
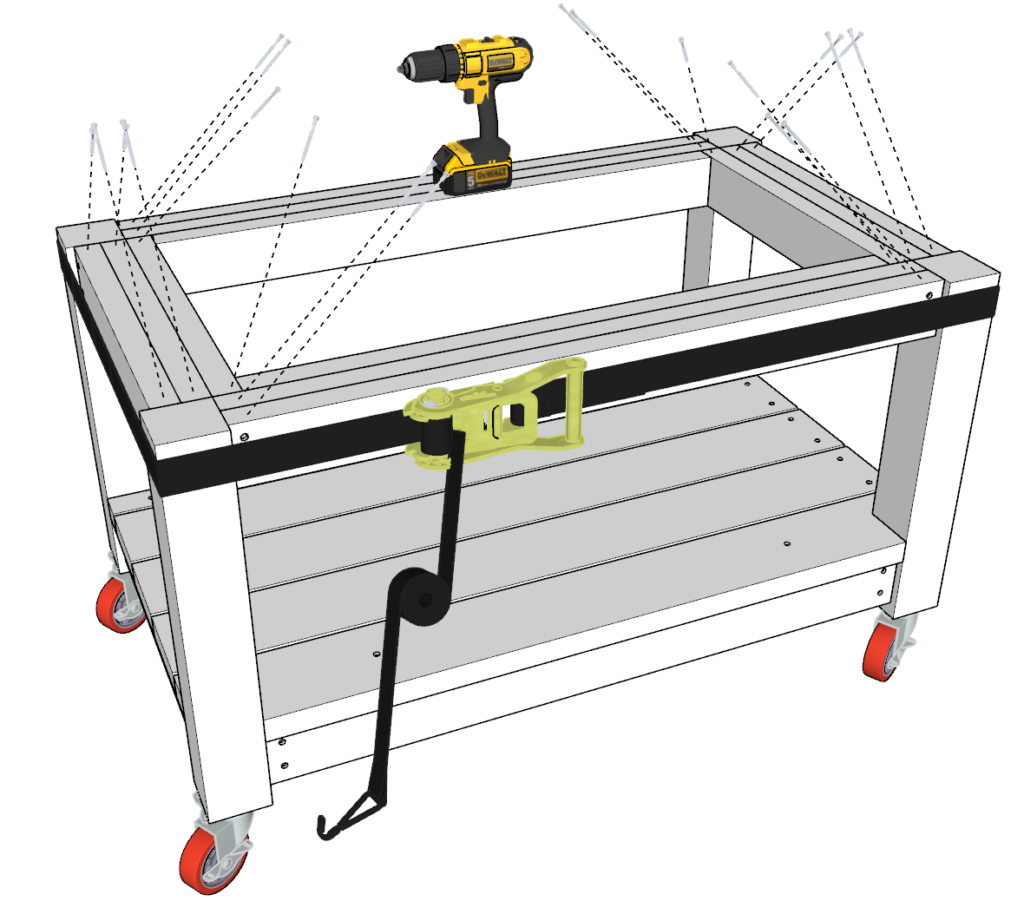
STEP 5: ATTACH THE SECOND FRAME TO THE MAIN FRAME
In this step, you will attach the second frame piece you built in Step 1 to complete the main structure of your grill island table.
5.1 Position the Second Frame
- Take the second frame you built in Step 1 and place it on top of the main frame of the grill island table.
- Ensure the frame is aligned properly with the table’s legs and existing structure.
5.2 Secure the Frame with Glue and Straps
- Apply wood glue generously to all contact areas between the second frame and the main frame.
- Use ratchet straps to hold the frame in place. Wrap the straps around the frame and legs, similar to how you did in Step 2.
- Hammer into place any parts that are not aligning perfectly.
5.3 Tighten and Secure
- Once the frame is properly aligned, tighten the straps fully to secure everything in place.
- Predrill holes and insert 3.5-inch screws into the frame and legs to ensure a strong connection.
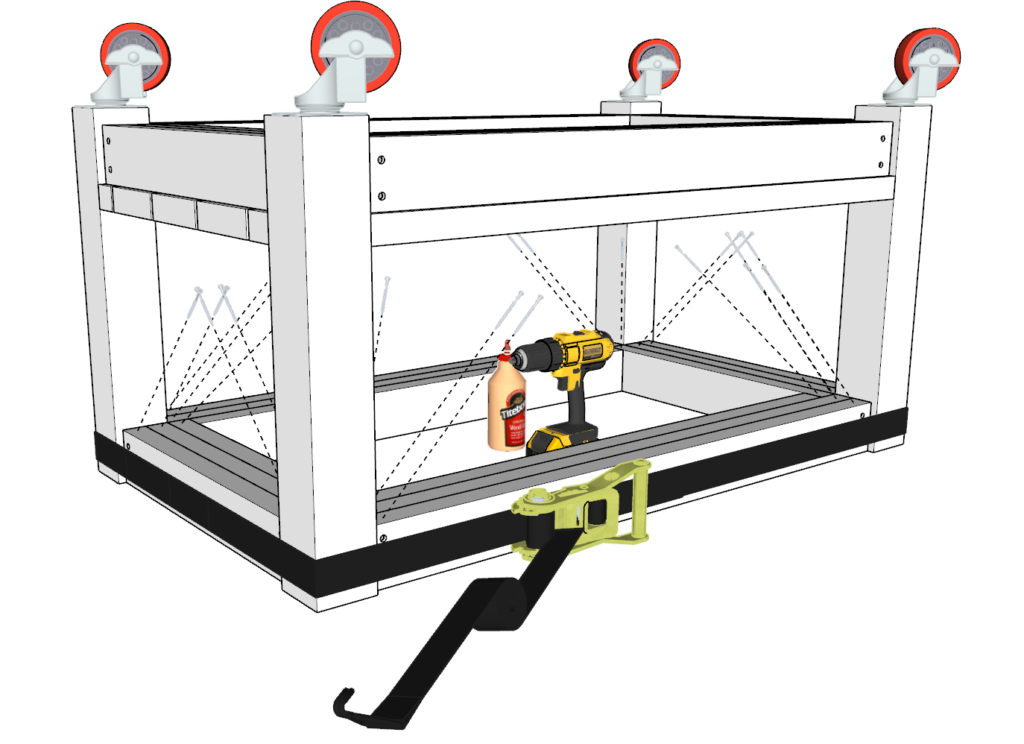
5.4 Flip and Reinforce
- Carefully flip the entire table so that the top of the second frame is accessible.
- Ensure you have help to flip the table without putting pressure on the legs.
- Add additional 3.5-inch screws from the top to further secure the second frame to the main structure.
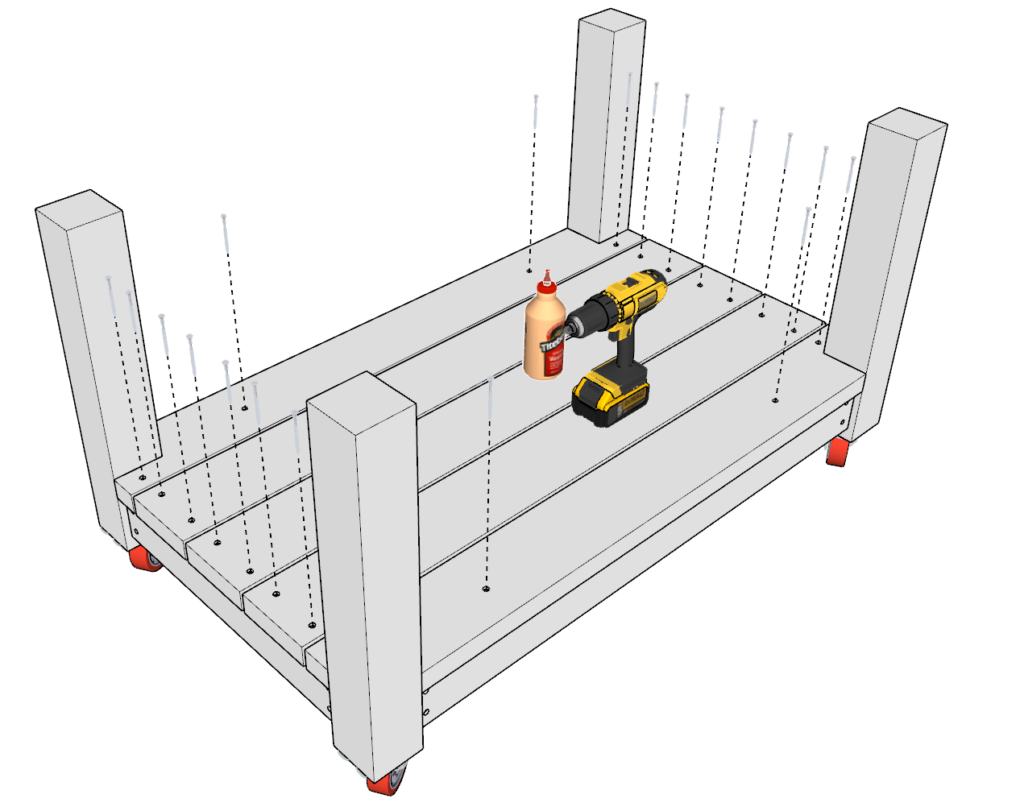
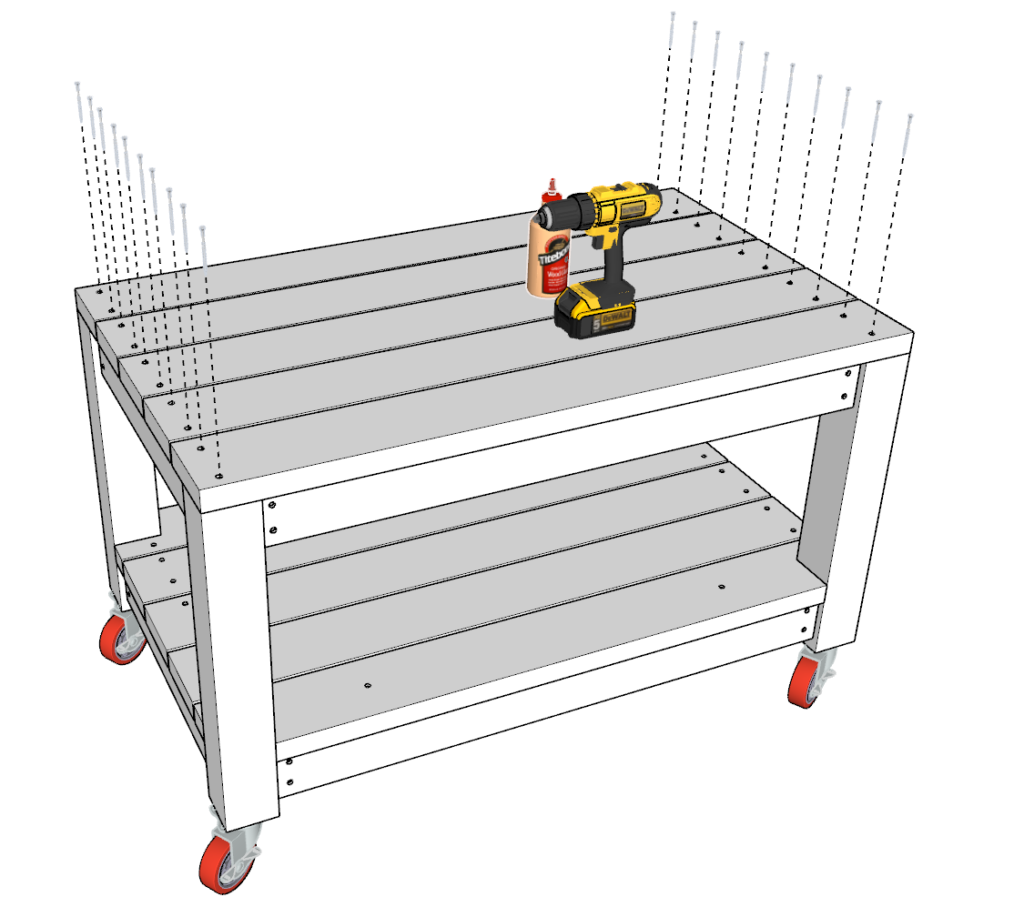
STEP 6: ATTACH THE TABLETOP AND FINISHING TOUCHES
This step covers attaching the tabletop boards and how to properly finish your grill island table for a professional look and long-lasting durability.
6.1 Attach the Tabletop Boards
- Gather five pieces of 2×6 lumber, each 48 inches long.
- Arrange the boards on top of the frame as shown in the diagram below.
- Space the boards about 1/4 inch apart for proper ventilation and a clean look.
- To secure the boards:
- Apply wood glue to the contact areas where the boards meet the frame.
- Predrill holes to prevent splitting.
- Fasten each board with 2.5-inch screws, making sure they are tightly secured.
6.2 Fill Screw Holes and Imperfections
Before sanding and finishing, it’s important to fill any visible screw holes or imperfections to give your table a polished look. Here are your options and what to consider:
Wood Putty: Good for small holes, but it doesn’t stain well and can stand out against stained wood. If you’re planning to stain, this might not be the best choice unless you’re okay with the putty showing. It’s better suited for painted projects.
Epoxy Fillers: These are strong and durable, but keep in mind that epoxy doesn’t accept stain either. It will stay the color of the filler, so this option is best if you’re painting or if the appearance doesn’t bother you.
Wood Plugs: If you’re staining, use wood plugs. They’re made from wood and can be stained to match the rest of your project. To use plugs, predrill and countersink your screws deep enough so the plugs can cover them. Glue the plugs in, sand them smooth, and they’ll blend right in.
6.3 Sanding Best Practices
Proper sanding is key to getting a smooth finish and preparing the wood for staining or painting. Here’s how to do it right:
Start with 80-Grit Sandpaper: Begin with 80-grit to remove major imperfections, rough spots, or any excess filler. Always sand in the direction of the wood grain to avoid scratches.
Finish with 220-Grit Sandpaper: Move up to 220-grit for a finer finish, leaving the surface smooth and ready for finishing.
Use an Orbital Sander: An orbital sander helps speed up the process and provides even pressure, resulting in a consistent surface.
Clean the Surface: After sanding, wipe down the table with a damp cloth or tack cloth to remove all dust before applying any finish.
6.4 Staining the Table
Staining can bring out the beauty of the wood and protect it. Here’s the best way to stain your table:
Apply Pre-Stain Conditioner: This helps the wood absorb stain evenly, especially on softer woods like pine. Brush or wipe it on, following the instructions on the product.
Apply the Stain: Choose your stain and apply it with a brush or cloth, always following the wood grain. Wipe off excess stain with a clean cloth to avoid blotches.
Use Separate Products: For the best results, use separate stain and polyurethane products. All-in-one products can be less durable and offer less control over the final look. Separate stain and polyurethane give you the ability to fine-tune each layer.
6.5 Sealing with Polyurethane
Sealing with polyurethane will protect your table from moisture, scratches, and UV damage, which is great for outdoor use.
Choose the Right Type: For outdoor use, oil-based polyurethane offers great durability, though it takes longer to dry. Water-based poly dries faster and has less odor but might need more coats for the same protection.
Apply Multiple Coats: Apply 2-3 coats of polyurethane. Let each coat dry fully, then lightly sand with fine-grit sandpaper (320 or higher) between coats for a smooth finish.
6.6 Painting the Table
If painting is your choice, follow these steps for a solid, weather-resistant finish:
Priming: Always start with a good primer. It helps the paint adhere better and extends the life of the finish, especially if the table will be outside.
Painting: Use exterior-grade paint and apply it in thin, even coats. Allow each coat to dry before applying the next to avoid drips and uneven coverage.
Topcoat for Protection: For extra durability, add a clear topcoat or sealer over the paint. This step helps protect the paint from weather and wear.
6.7 Weatherproofing the Table
To ensure your table stands up to outdoor conditions:
Seal All Edges and Gaps: Make sure to apply sealant or finish to every exposed edge, including the bottom of the legs, to prevent moisture from seeping in.
Use Weather-Resistant Hardware: Choose stainless steel or galvanized screws and hardware to avoid rusting and deterioration over time.
6.8 Caring for Your Table
Taking care of your table will keep it looking great and extend its life:
Regular Cleaning: Wipe down your table regularly with a damp cloth to keep it clean. Avoid harsh cleaners that could damage the finish.
Reapply Finish as Needed: Depending on exposure to the elements, you may need to reapply stain, paint, or polyurethane every few years to maintain protection.
Protect from Harsh Weather: Cover your table during heavy rain, snow, or intense sun when not in use, or store it in a sheltered area to prolong its lifespan.
