Introduction
What’s up, DIYers and dog lovers? We’re diving into a project that’s all about giving your four-legged friends their own slice of paradise. Our Double Dog House DIY Plan isn’t just about the build – it’s about creating a space where your pups can feel the love in every corner. It’s for the dogs who are more than just pets; they’re your loyal followers on every road trip, your ever-ready fetch partners, and your faithful companions on lazy Sunday afternoons. This plan is your opportunity to craft a retreat that’s as comfy as a hug and as sturdy as your friendship. Let’s gear up and bring this dream dog house to life.

Specifications
Let’s break down what makes this DIY Double Dog House a must-build for your dog pals:
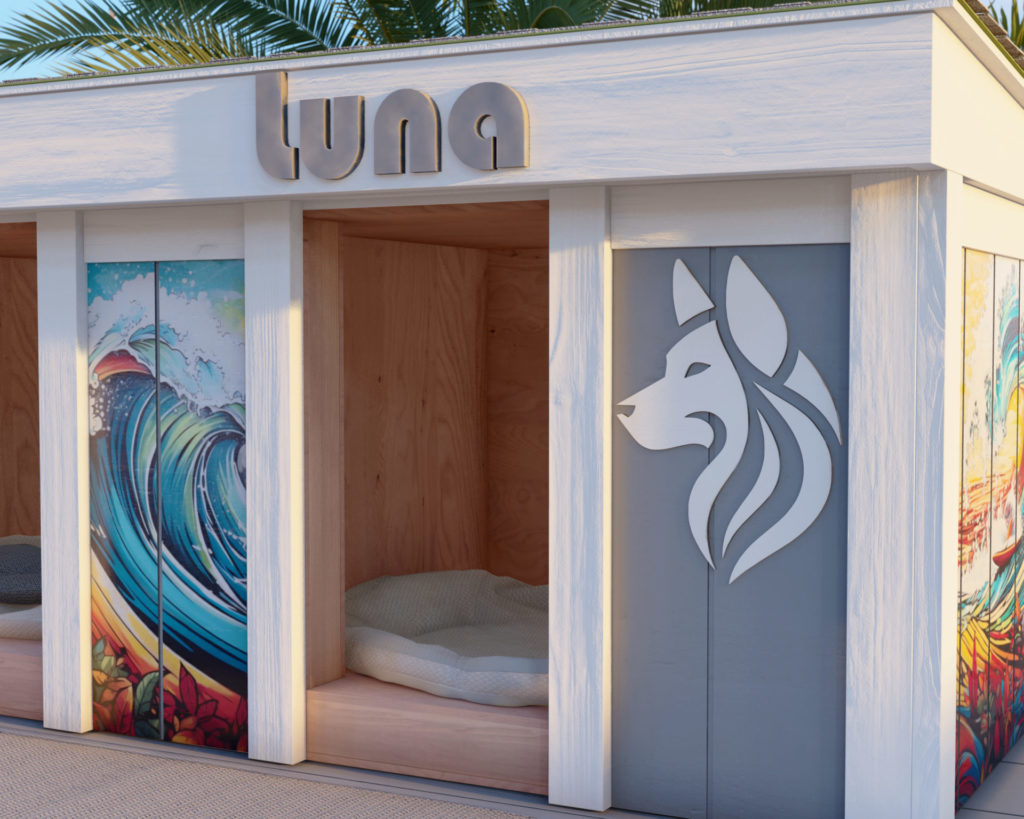
Spacious Design for Two: Ample room for medium to large breeds, ensuring comfort without cramping style.
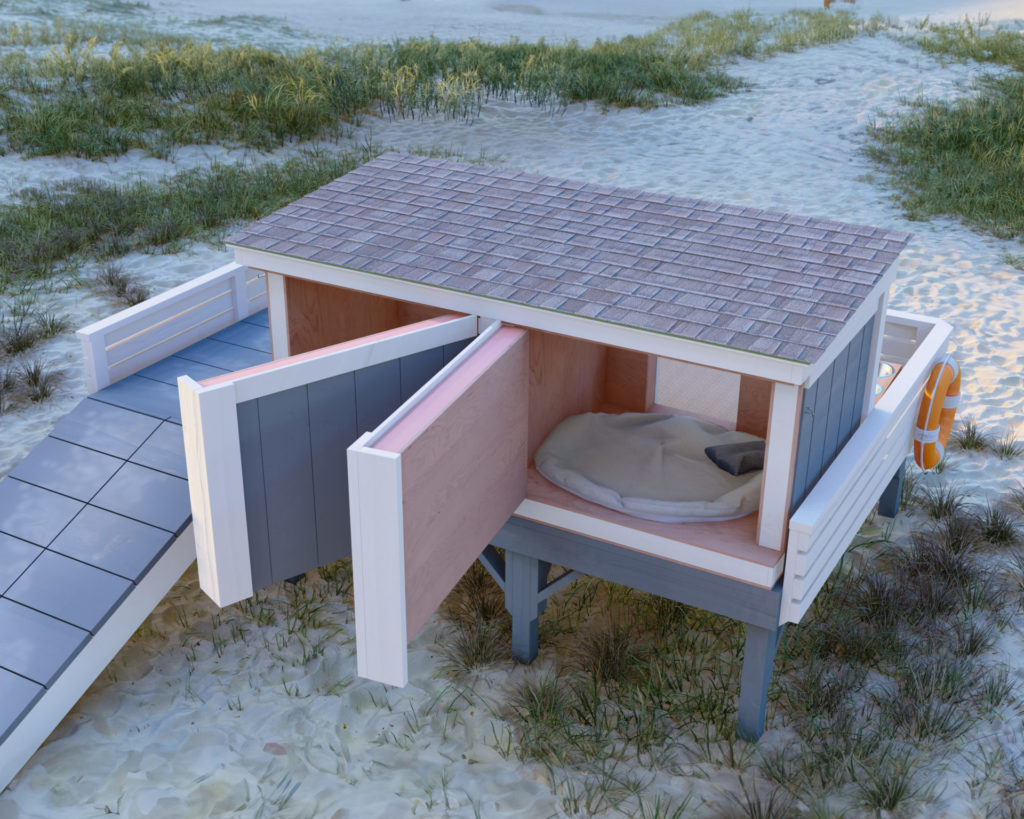
Superior Insulation: Comprehensive insulation for floors, walls, and ceiling to maintain a comfortable temperature year-round.
Elevated Foundation: Off-the-ground construction to keep your pets dry and the dwelling damp-free.
Optimal Ventilation: Engineered for continuous airflow, promoting a healthy and fresh environment.
Convenient Rear Access: Dual doors at the back simplify cleaning and interaction, making maintenance hassle-free.
Sloped Roof: Designed for efficient water runoff to safeguard the structure from rain and weather wear.
Resilient Siding: Built to withstand the elements, ensuring longevity and durability through all seasons.
Protective Paint: The painted exterior provides additional weatherproofing and a polished finish.
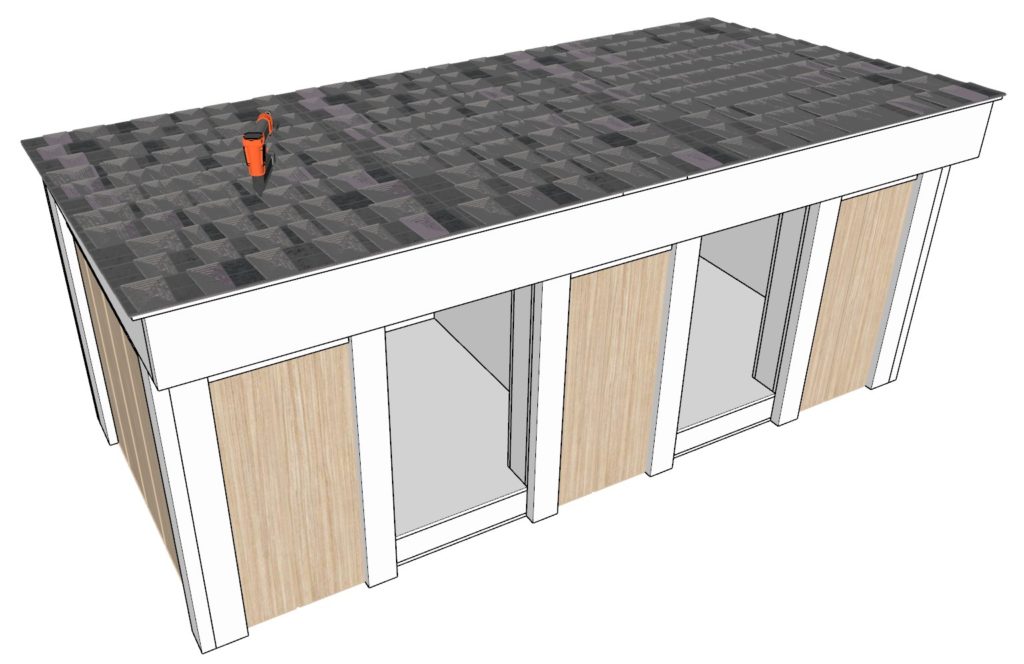
Roofing with Shingles: The shingled roof offers extra protection, ensuring the interior remains dry.
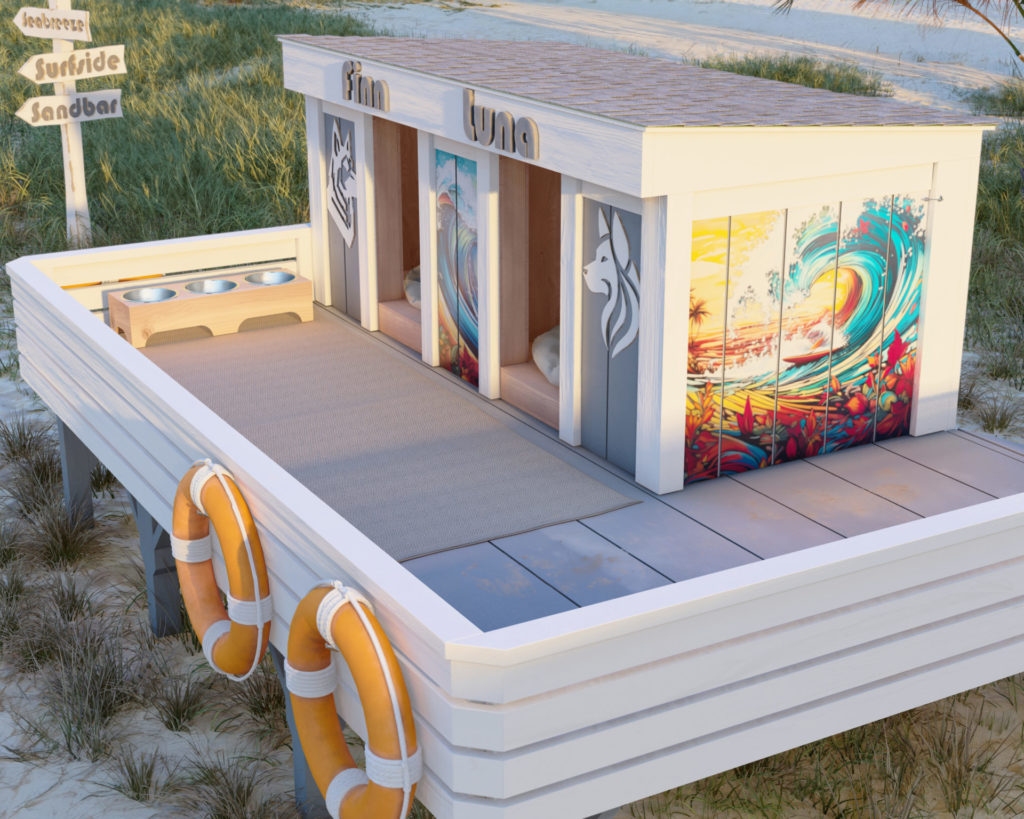
Extended Deck Platform: A slatted deck for optima water draining and serves as an inviting outdoor space for lounging and lookout duties.
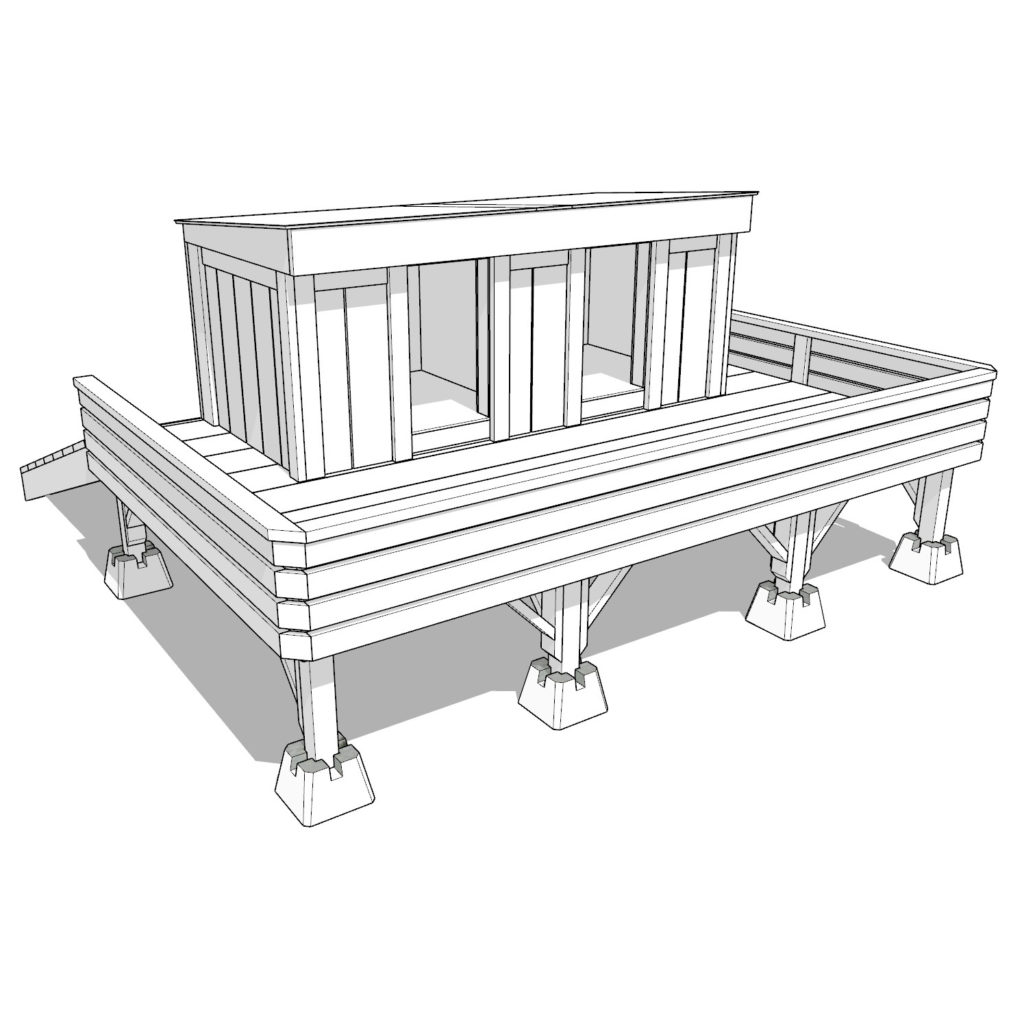
Sturdy Support Posts: 4×4 pillar posts with cross-bracing for a stable and secure base.
Accessible Ramps: Gentle inclines for easy deck access, accommodating dogs of all sizes and ages.
With these professional-grade specifications, our DIY plan is designed to guide you in creating a robust and refined retreat for your beloved dogs.
Why Choose Our DIY Plan?
When it’s time to get down to building, here’s why our Double Dog House stands out:
Beginner-Friendly: No prior woodworking wizardry required. We lay it out clear and simple, step by step.
Comprehensive Guides: From diagrams that actually make sense to a materials list that’s all-inclusive, we’ve got you covered.
Design with Finesse: Our dog house doesn’t just meet the needs; it exceeds them with style and practicality.
Durability Focused: We prioritize your pets’ safety and comfort with a design that’s built to last.
Value for Money: Invest once in our plan, and create a pet home that will stand the test of time.
Conclusion:
In wrapping up, our Double Dog House DIY Plan is more than just blueprints—it’s the beginning of a new chapter for you and your pets. It’s about taking the love you have for your furry family members and turning it into a safe, stylish, and comfortable living space that they can call their own. With our plan in your hands, you’re not just building walls; you’re crafting a haven of happiness for your dogs that will stand as a testament to the care and affection you hold for them. So, grab your tools and let your heart lead the way to a successful build. Your pets’ dream home is just a project away.
Time
(varies with experience)
Cost
$1,500 (Costs may vary based on location and supplier.)
Skill level required
Beginner
DIY Double Doghouse PDF Plan
What is included in the PDF download?
- Easy to read step by step instructions
- Material list
- Tools needed
- Helpful links to materials and tools needed
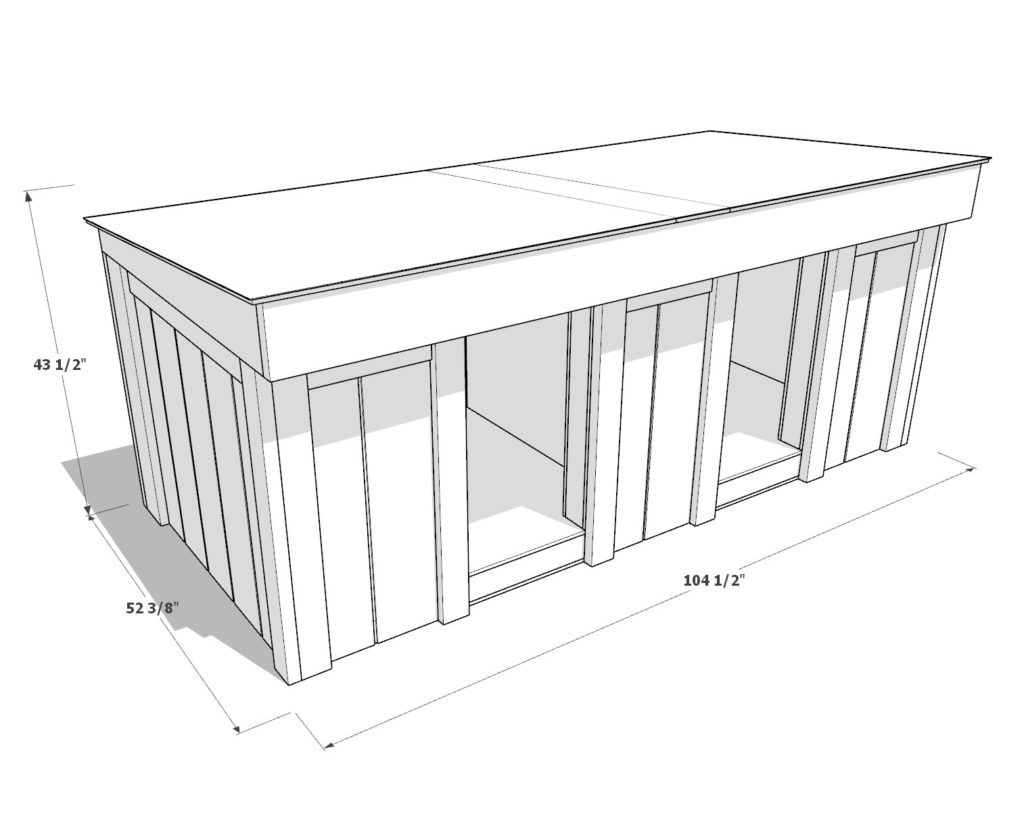
Overall Project Dimensions
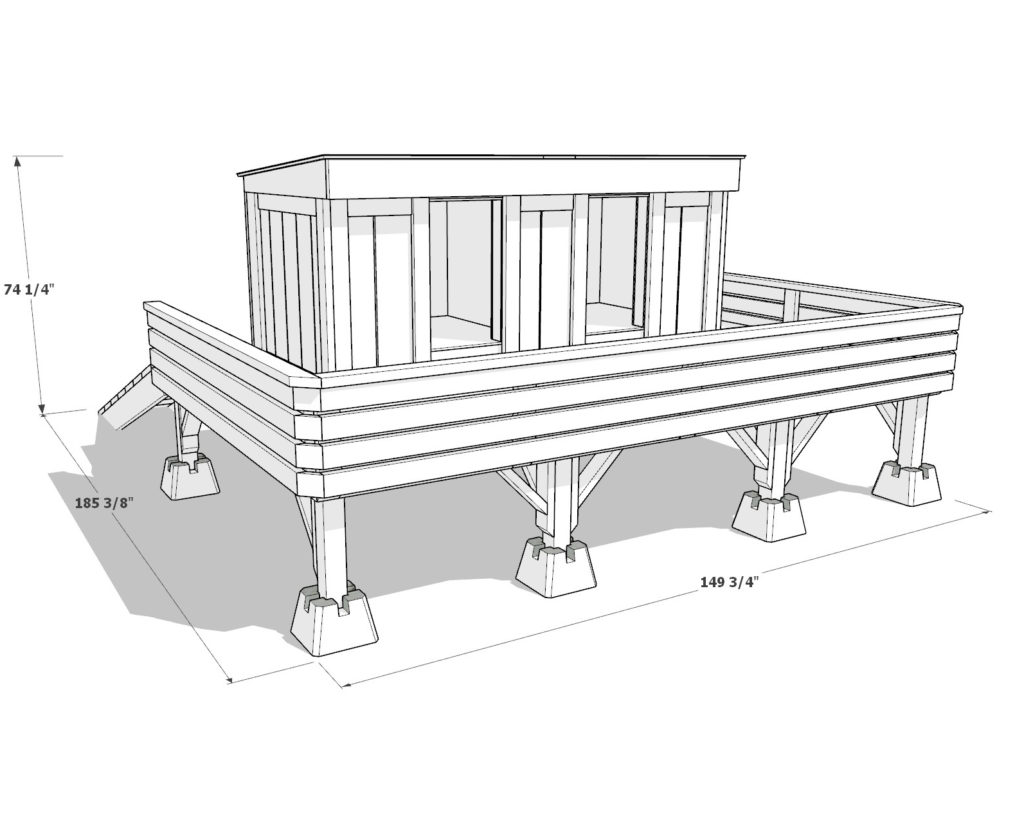
DIY Double Doghouse Dimensions
Step 1: Preparing Ceiling, Floor, and Wall Panels
Color-Coded Components:
- Blue: Floors and Ceilings
- Green: Side Walls
- Brown: Back Doors
- Pink: Front Walls
- Lime Green: Doghouse divider wall
- Teal: Panel Connectors
- Peach: Additional Support
Assembly Instructions:
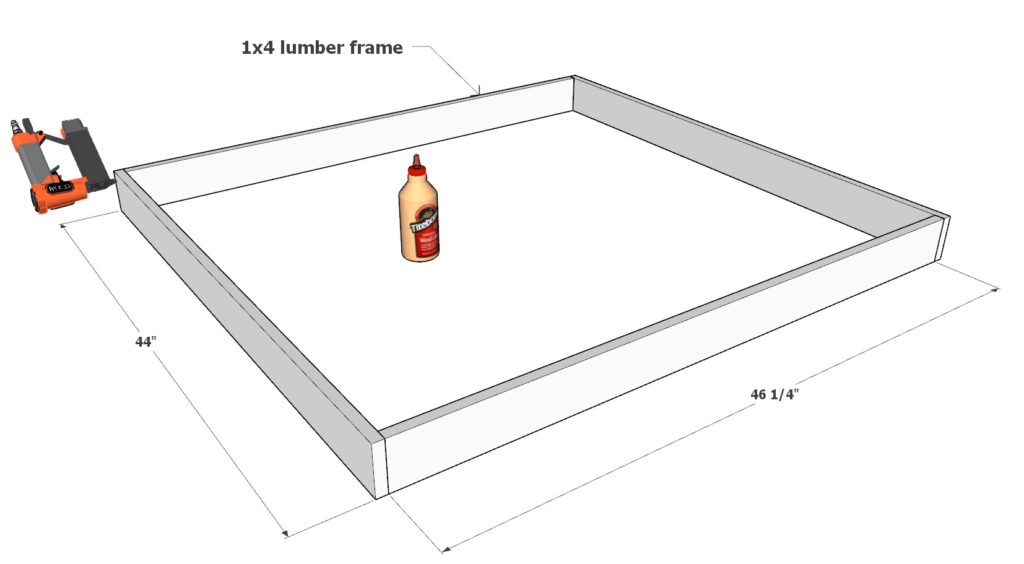
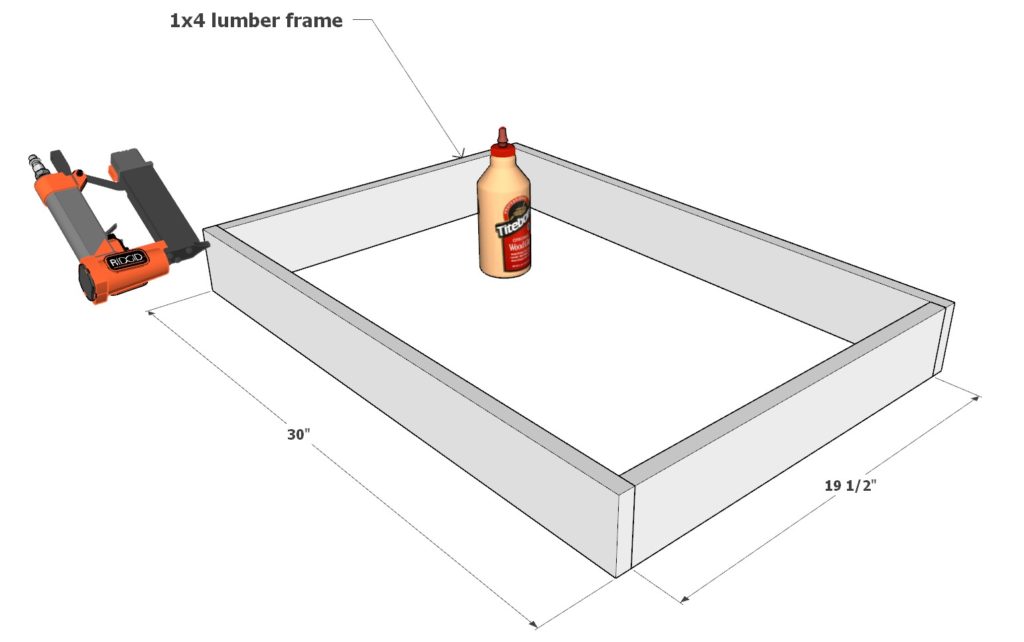
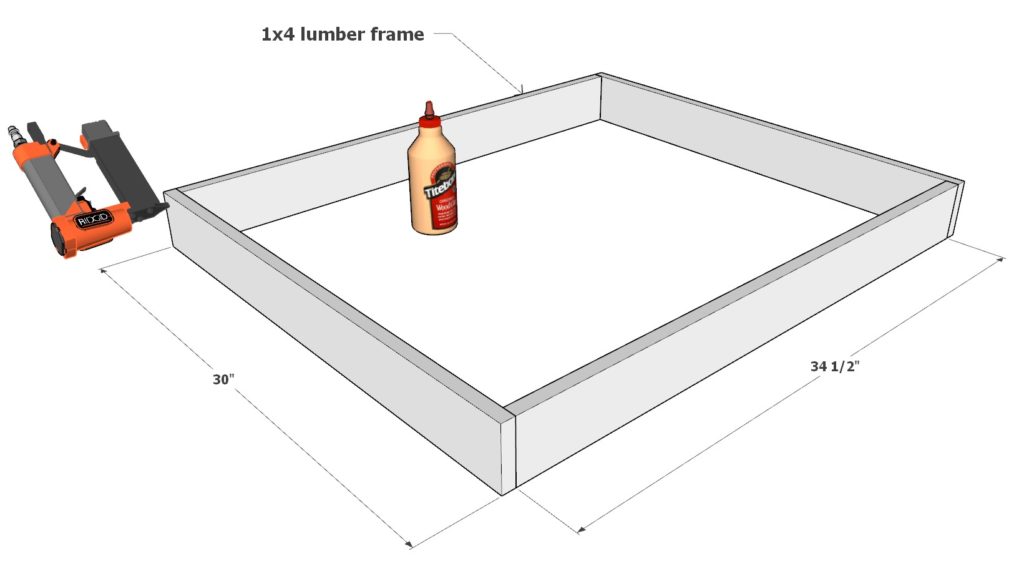
Secure all components together using wood glue and 1.5-inch pin nails, ensuring a strong and lasting assembly.
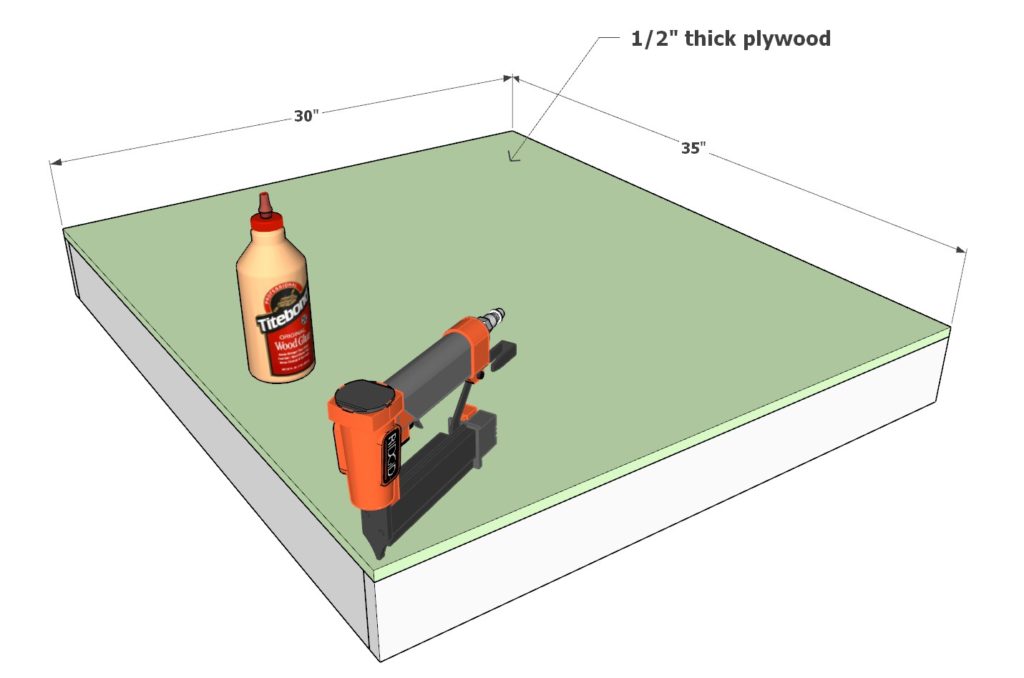
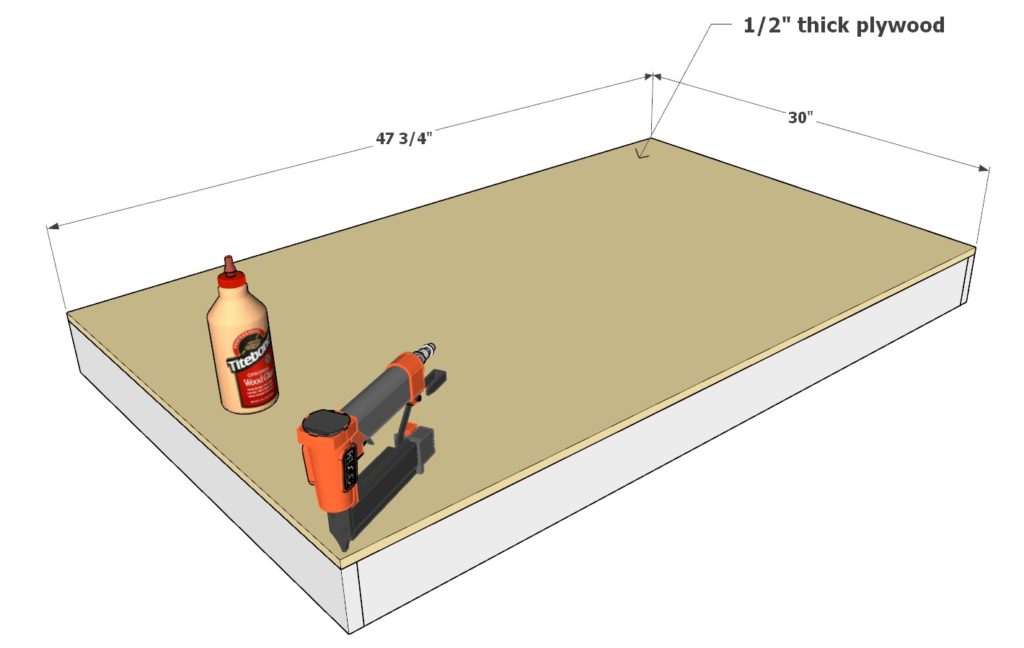
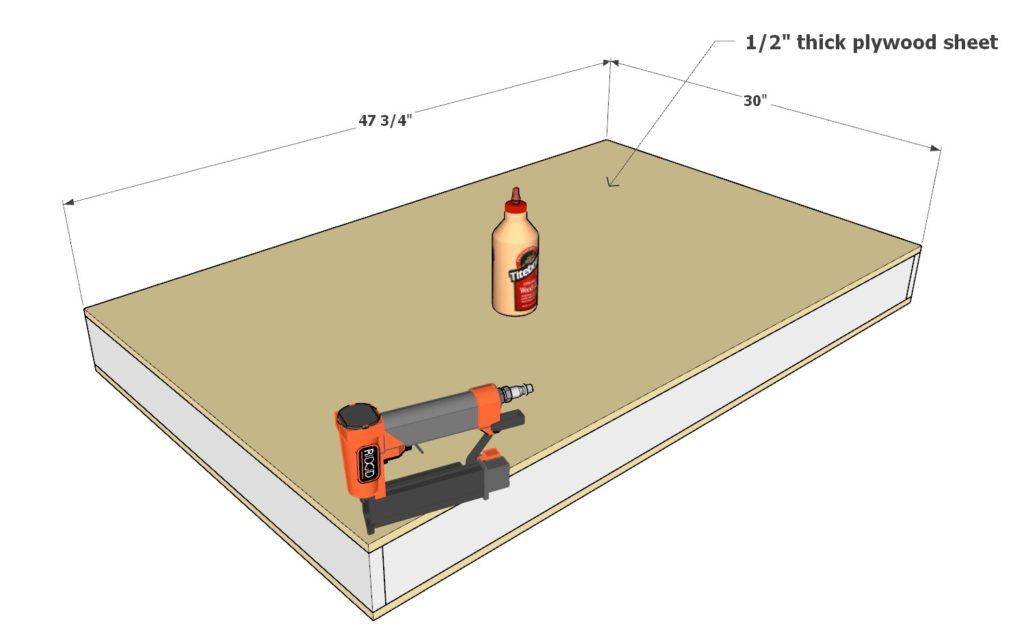
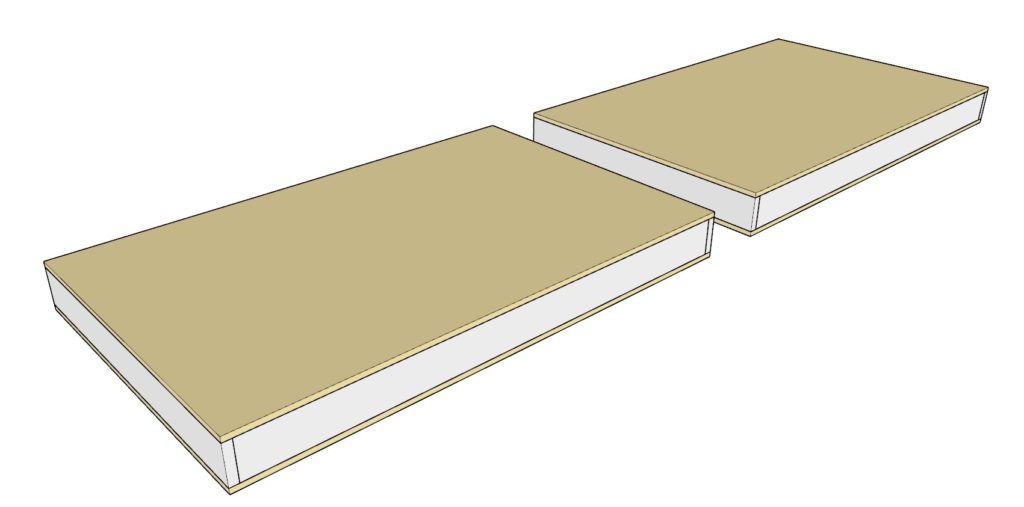
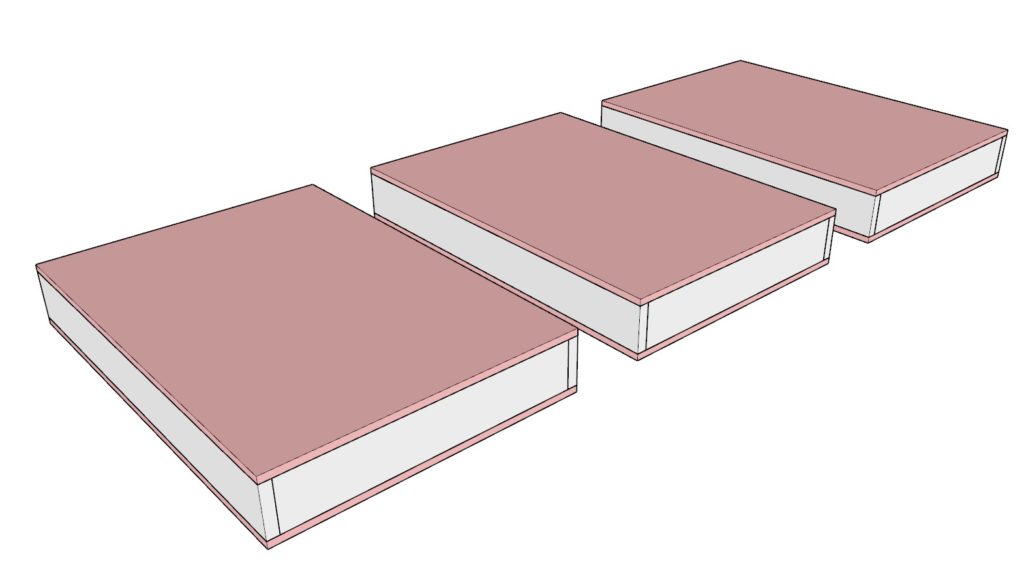
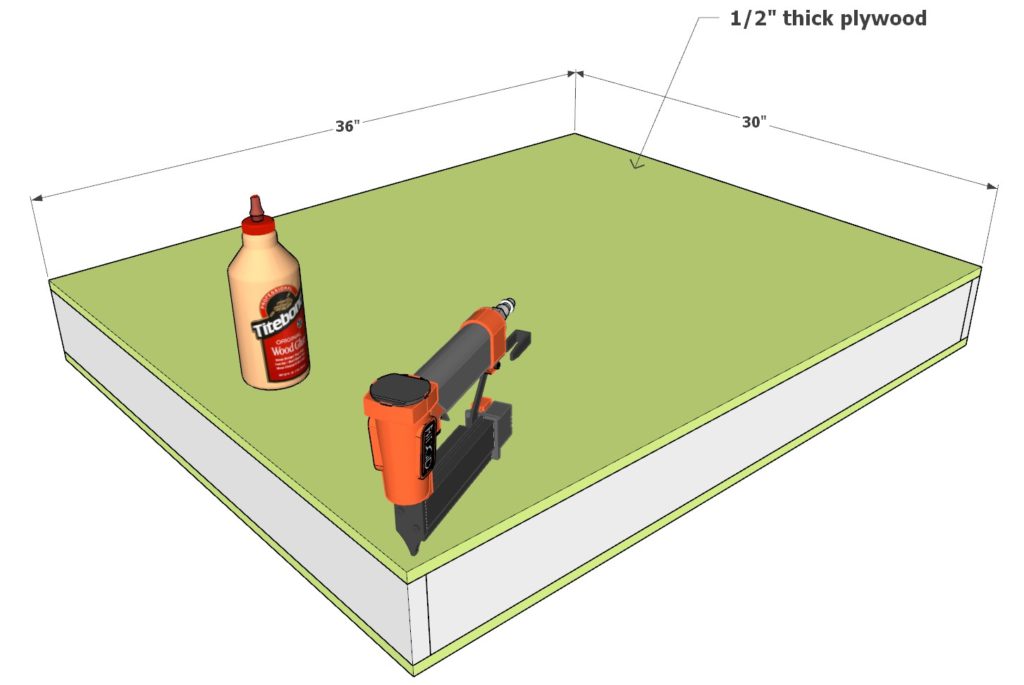
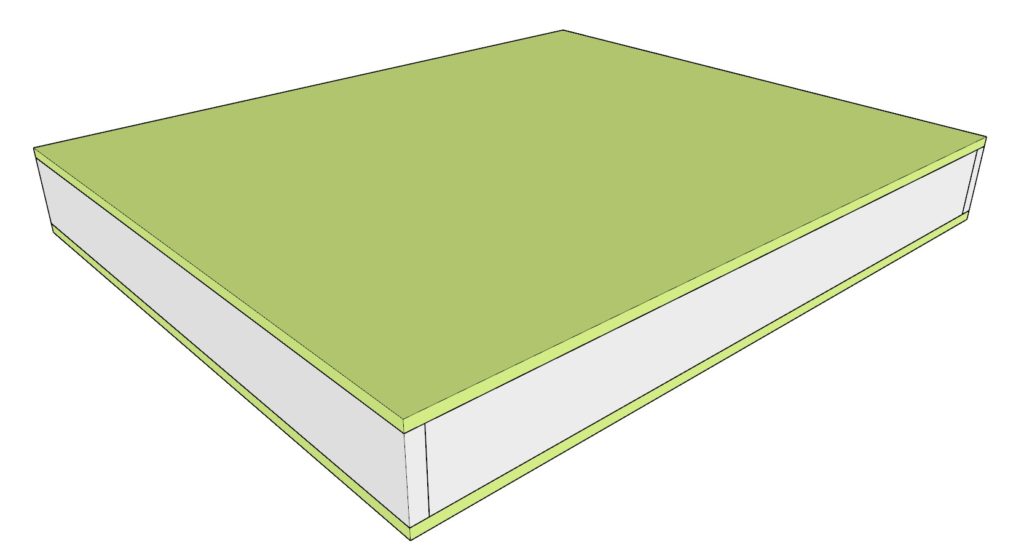
Blue Components:
- Construct using two 44-inch and two 46-inch lumber pieces.
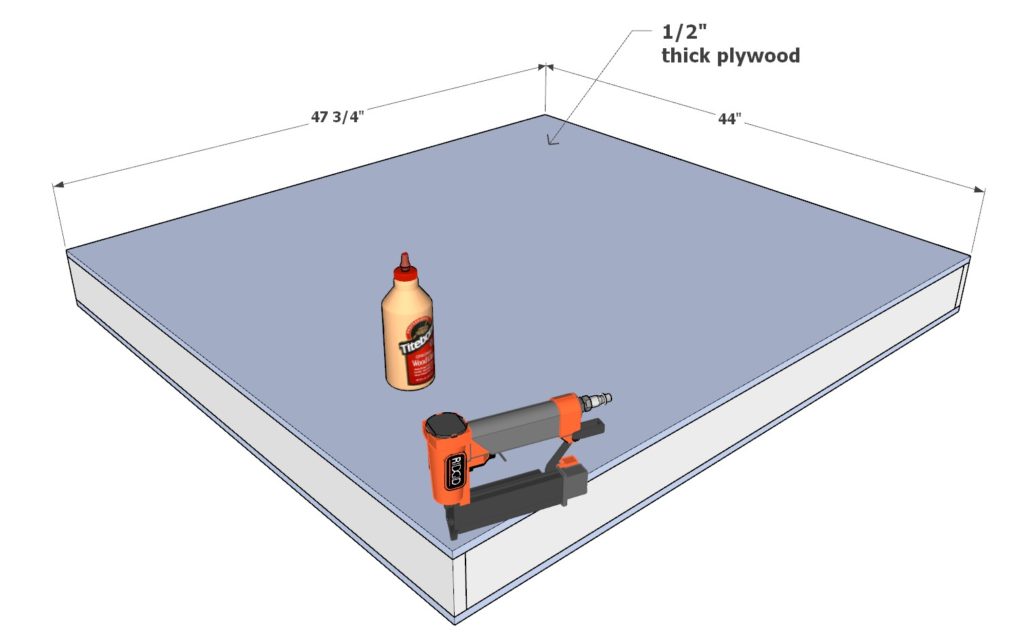
- Attach a 47-3/4 inch x 44 inch plywood sheet on both sides.
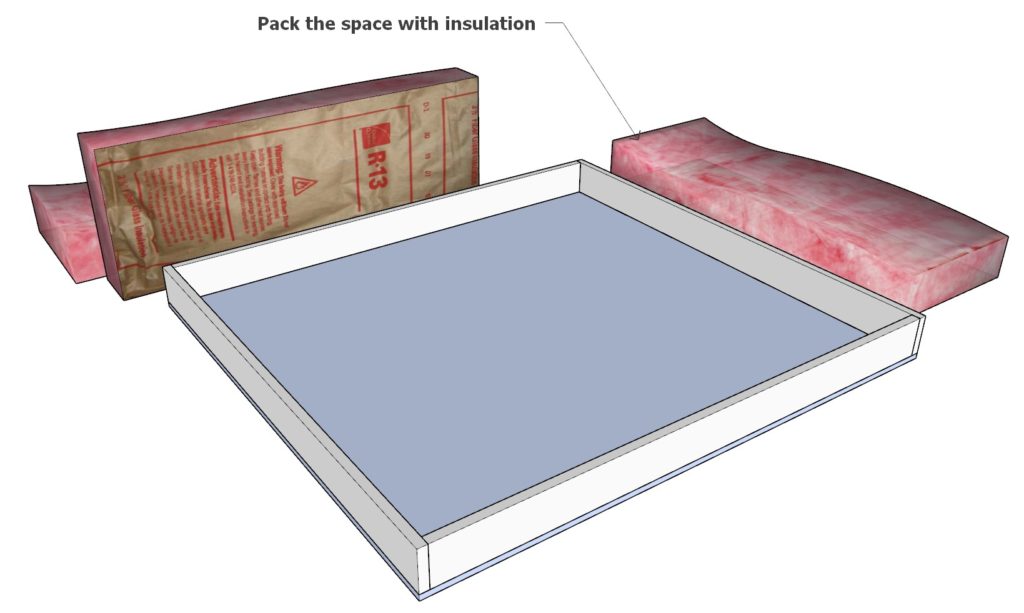
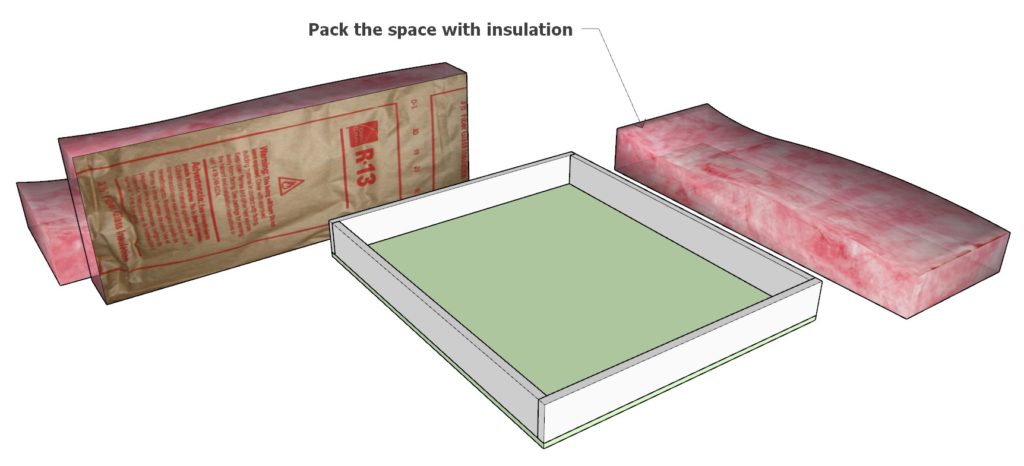
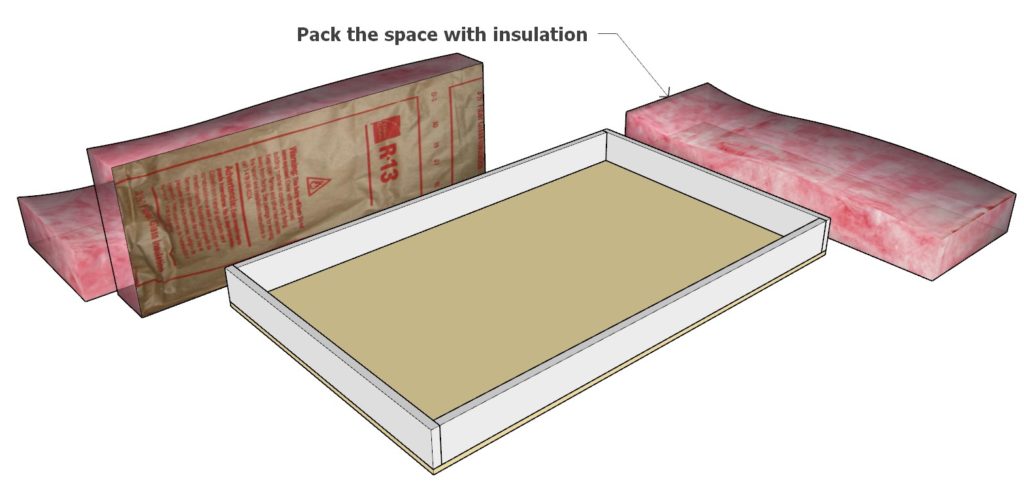
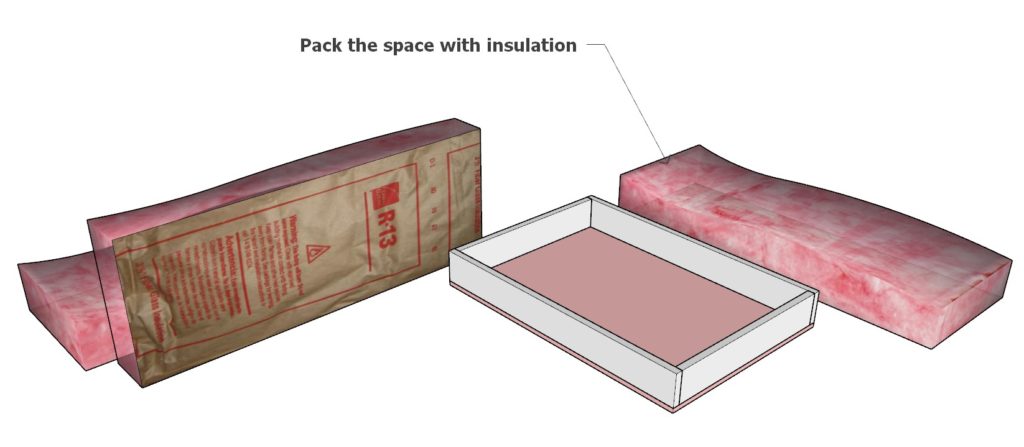
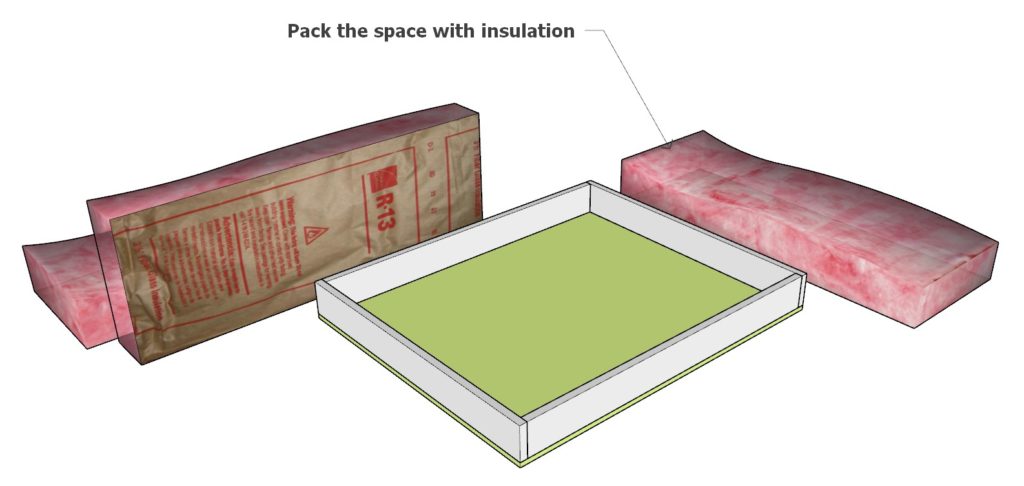
- Sandwich insulation between plywood sheets.
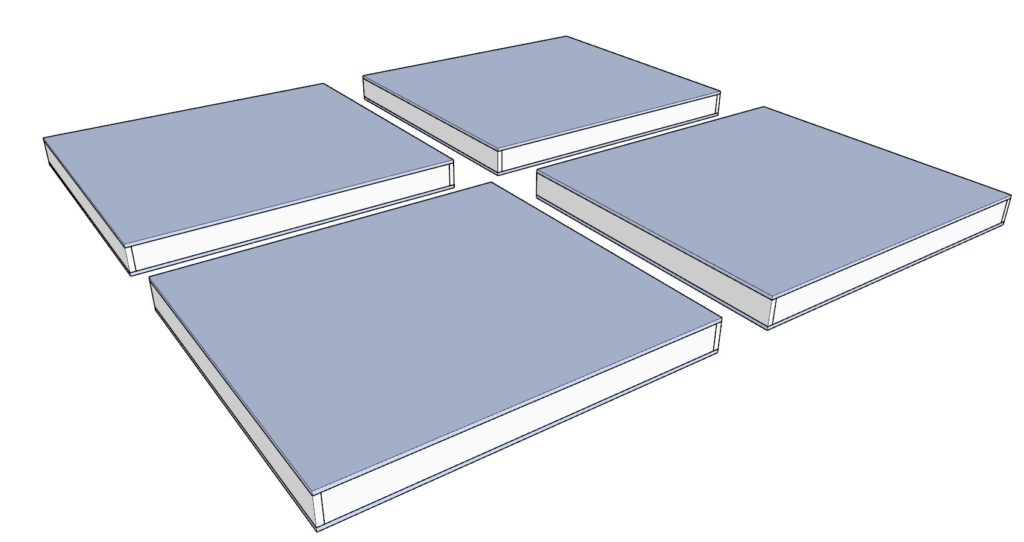
- Repeat to make 4 panels.
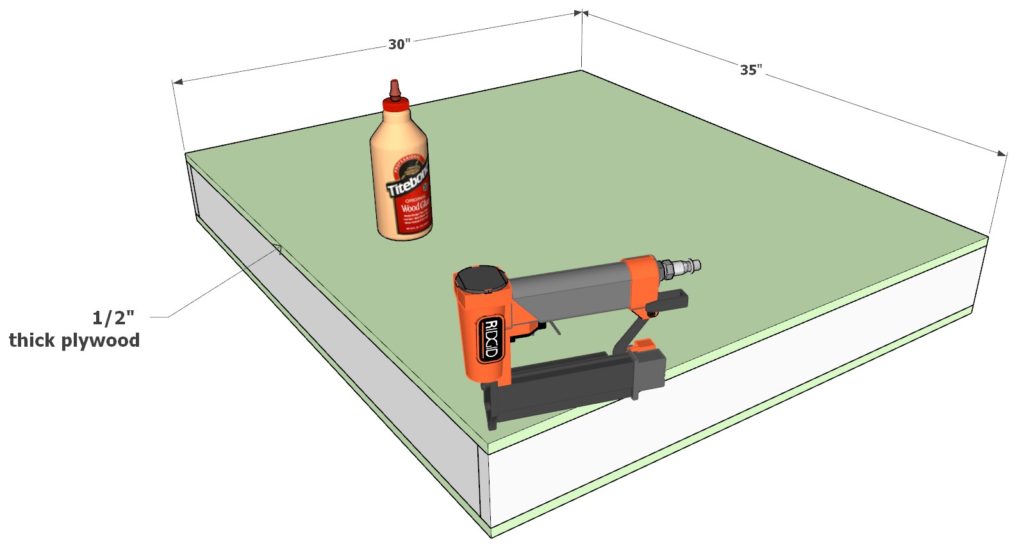
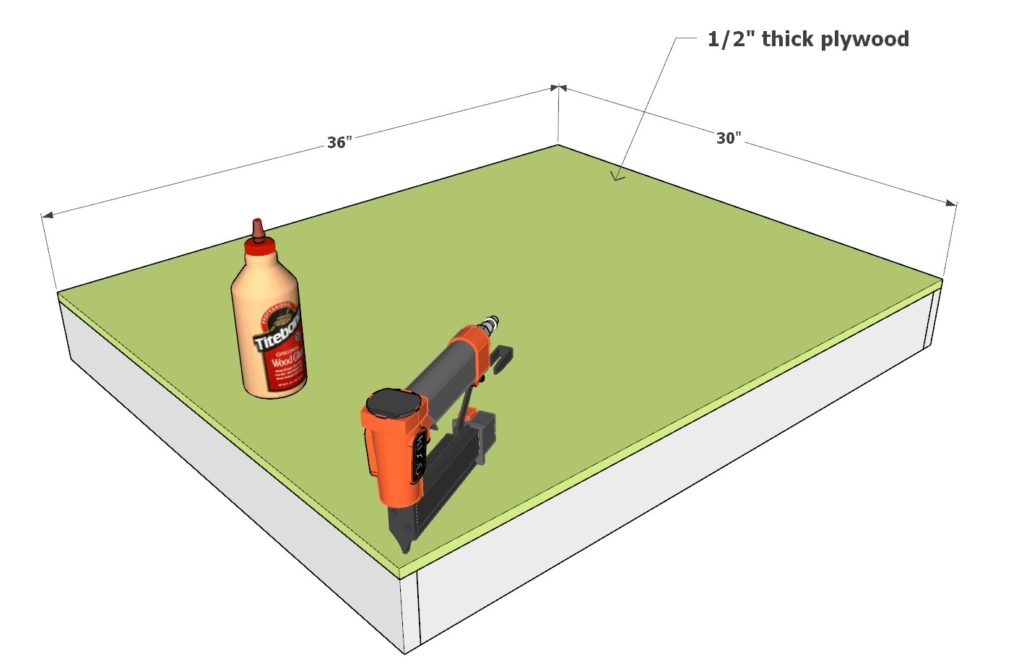
Green Components:
- Use two 30-inch and two 33-1/2 inch lumber pieces.
- Assemble with a 35 inch x 30 inch plywood sheet on each side.
- Insert insulation.
- Create 2 panels.
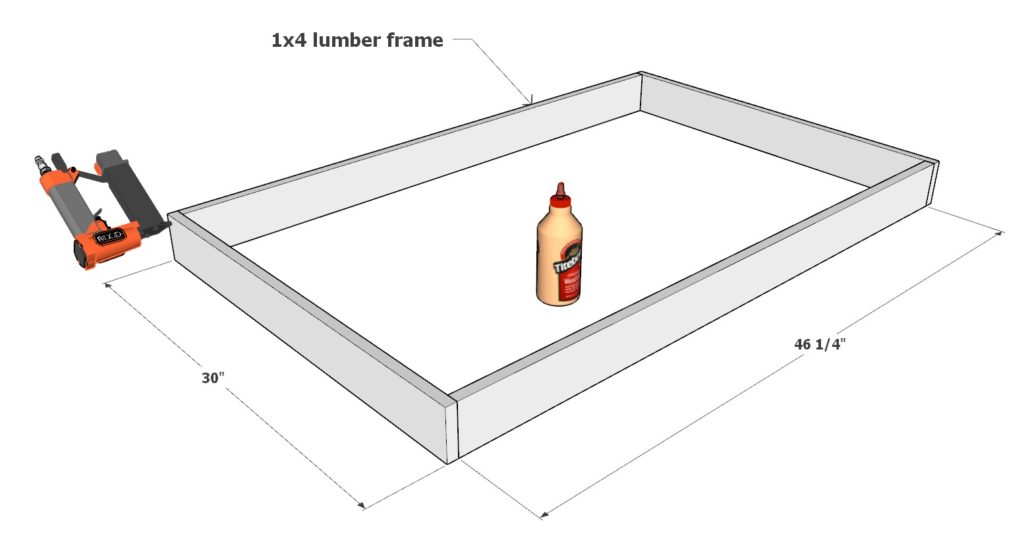
Brown Components:
- Start with two 30-inch and two 46-1/4 inch lumber pieces.
- Use a 30 inch x 47-3/4 inch plywood sheet for each side.
- Add insulation.
- Make 2 panels.
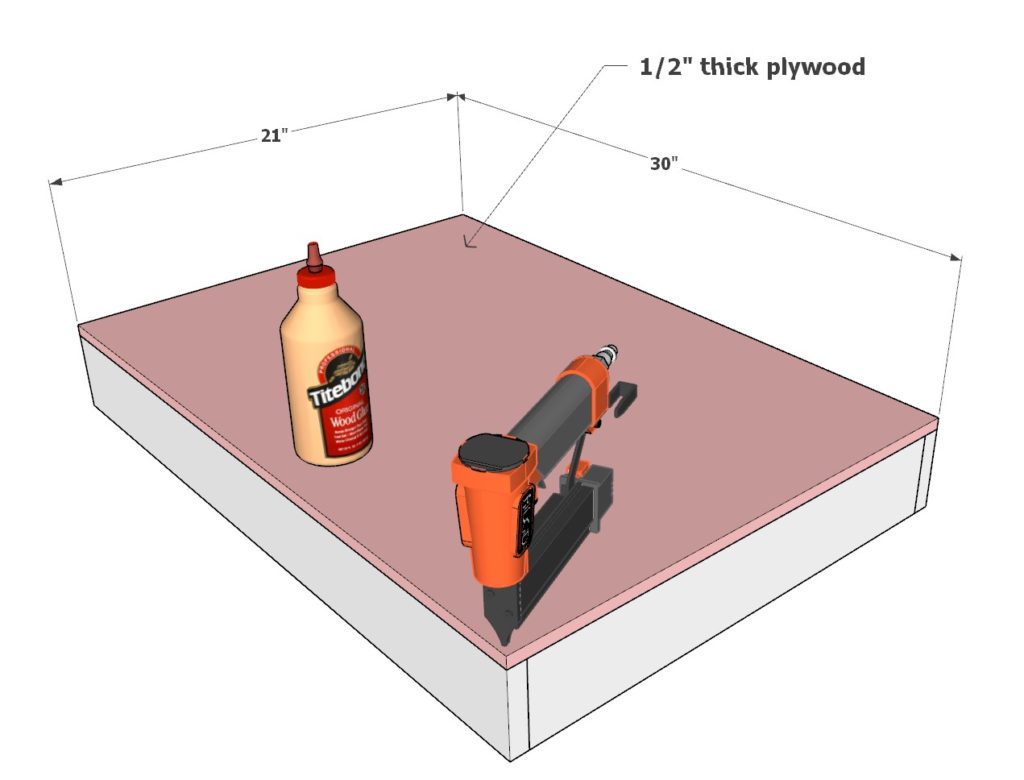
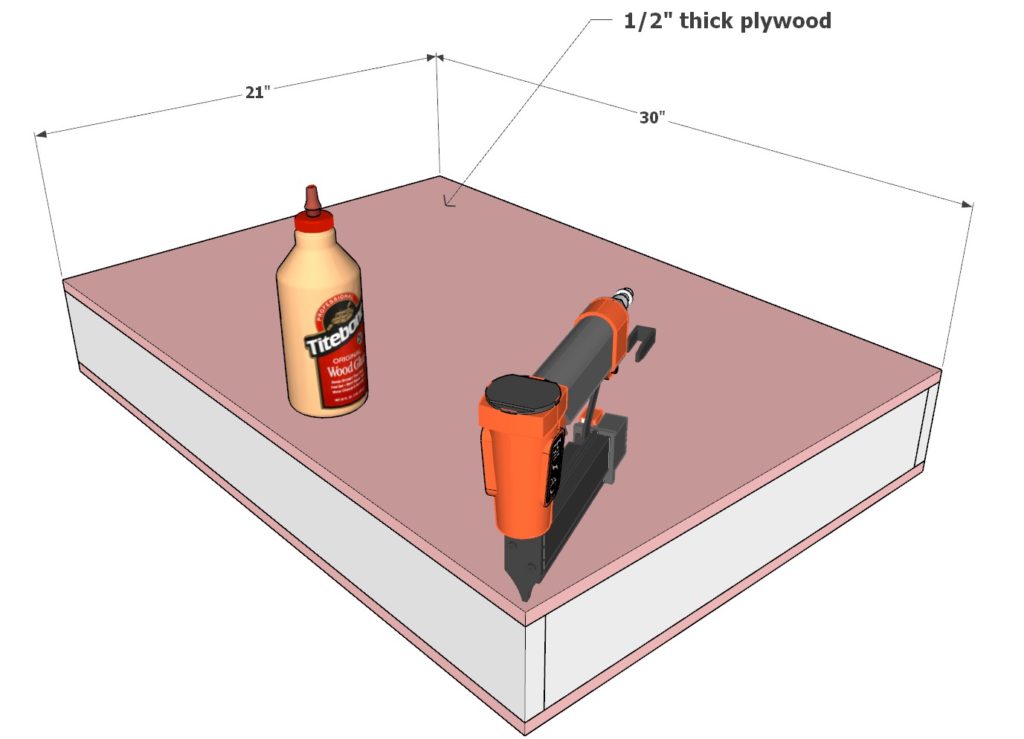
Pink Components:
- Build with two 30-inch and two 19-1/2 inch lumber pieces.
- Cover with a 30 inch x 21 inch plywood sheet on each side.
- Include insulation.
- Produce 3 panels.
Lime Green Component:
- Construct from two 30-inch and two 34-1/2 inch lumber pieces.
- Attach a 30 inch x 36 inch plywood sheet on each side.
- Enclose insulation.
- Create 1 panel.
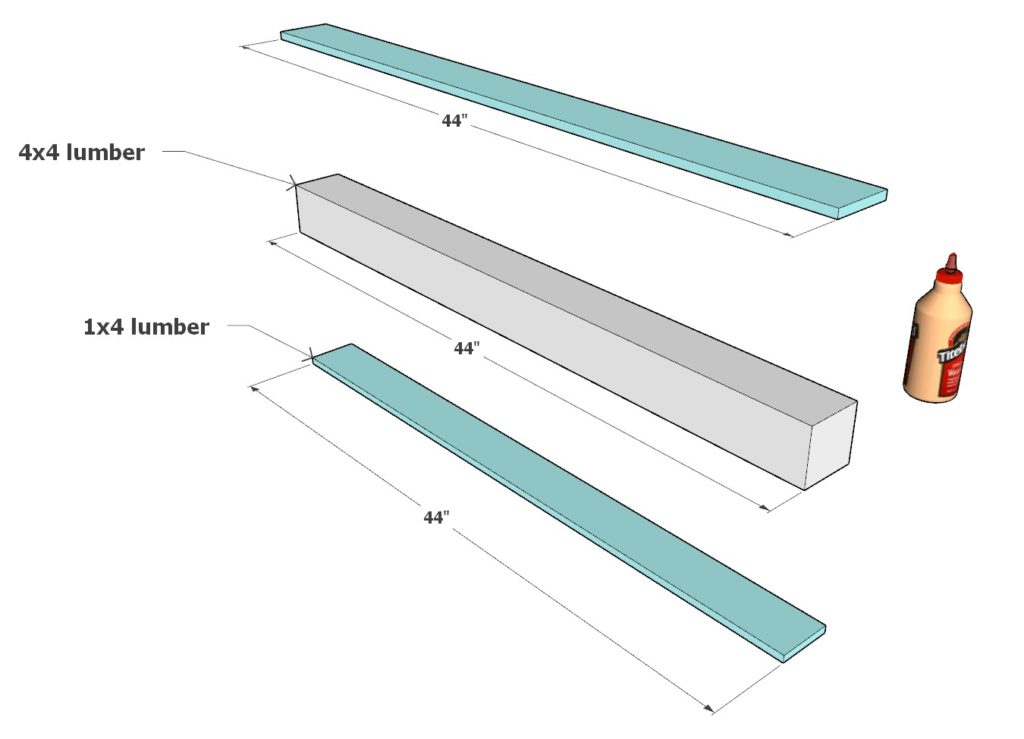
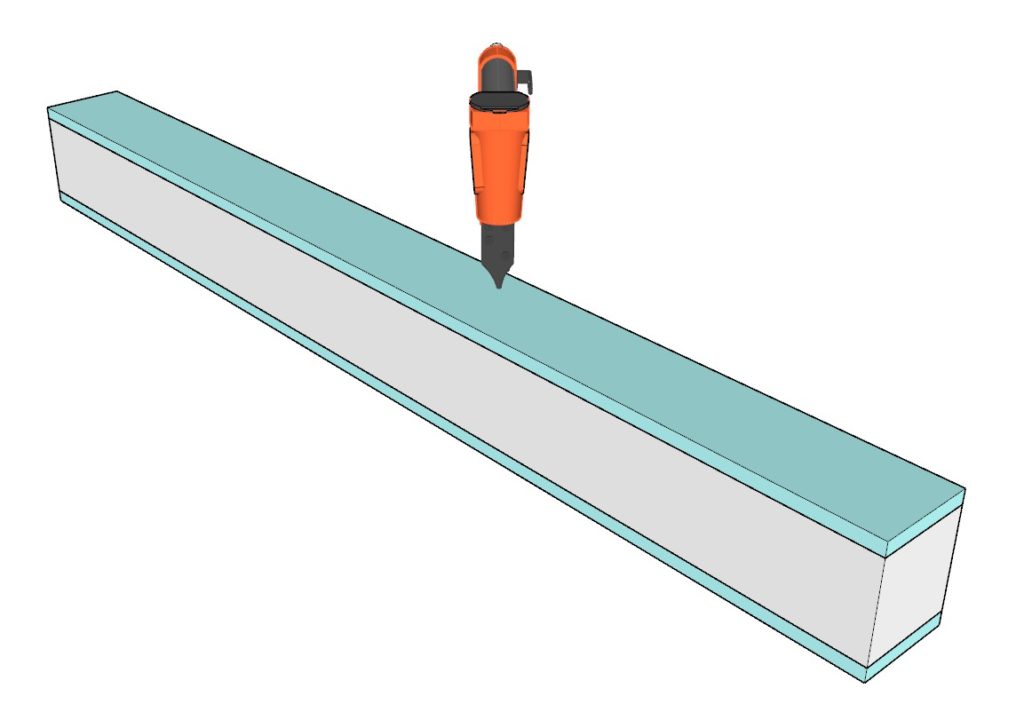
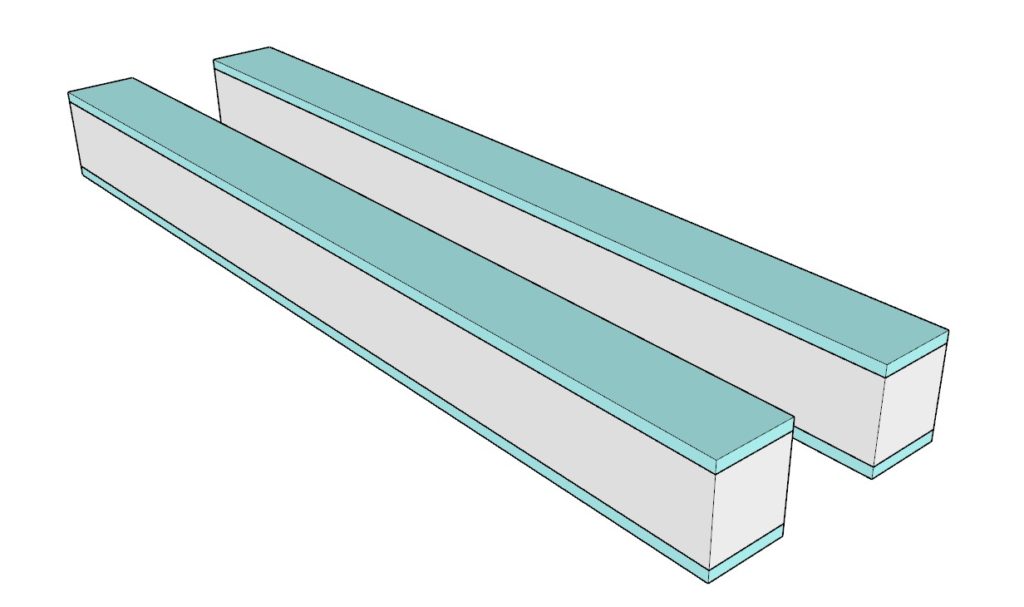
Teal Components (Panel Connectors):
- Use two 44-inch 1×4 lumber pieces and a 44-inch 4×4 lumber piece.
- Secure together.
- Form 2 connectors.
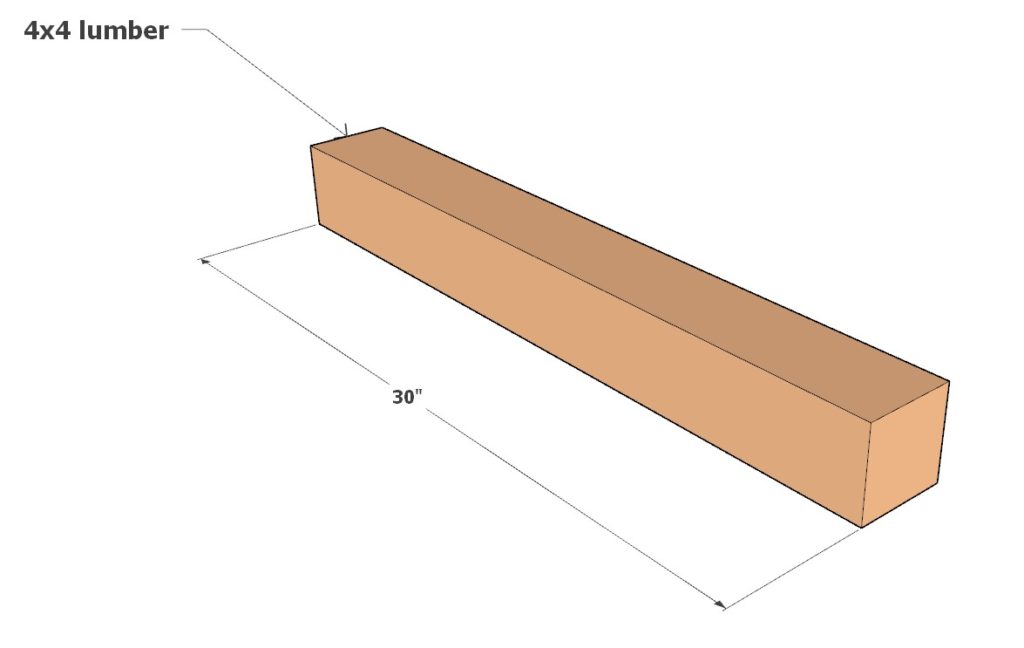
Peach Component (Support):
- Prepare one 30-inch 4×4 lumber piece.
Tip: Refer to the cut optimization guide for efficient material use.


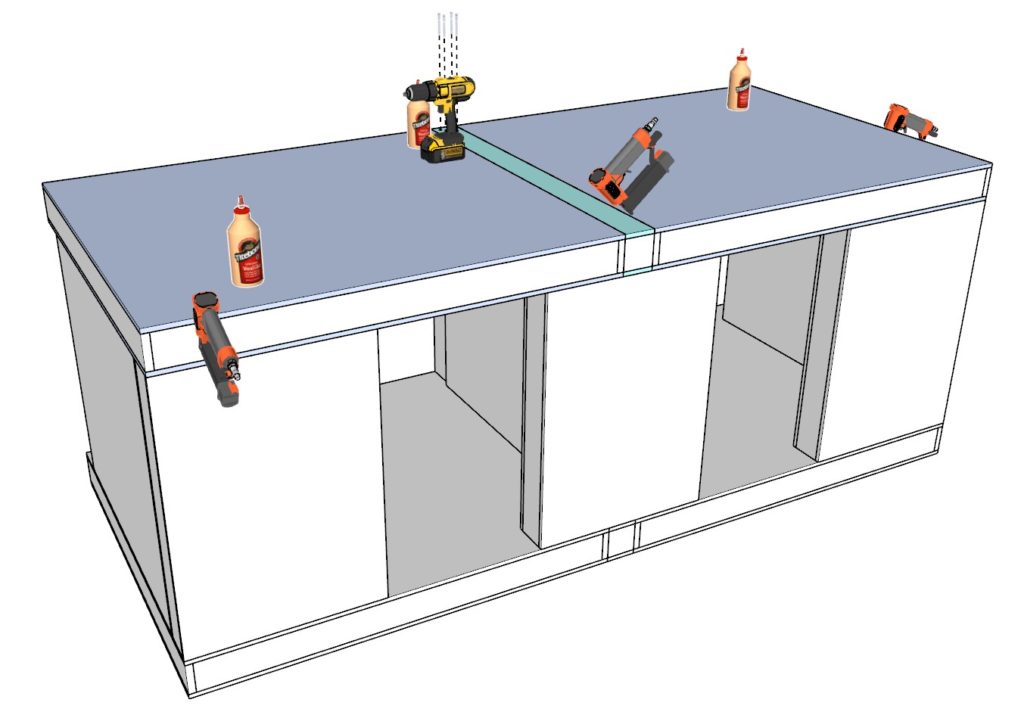
Step 2: Assembling the Doghouse Walls
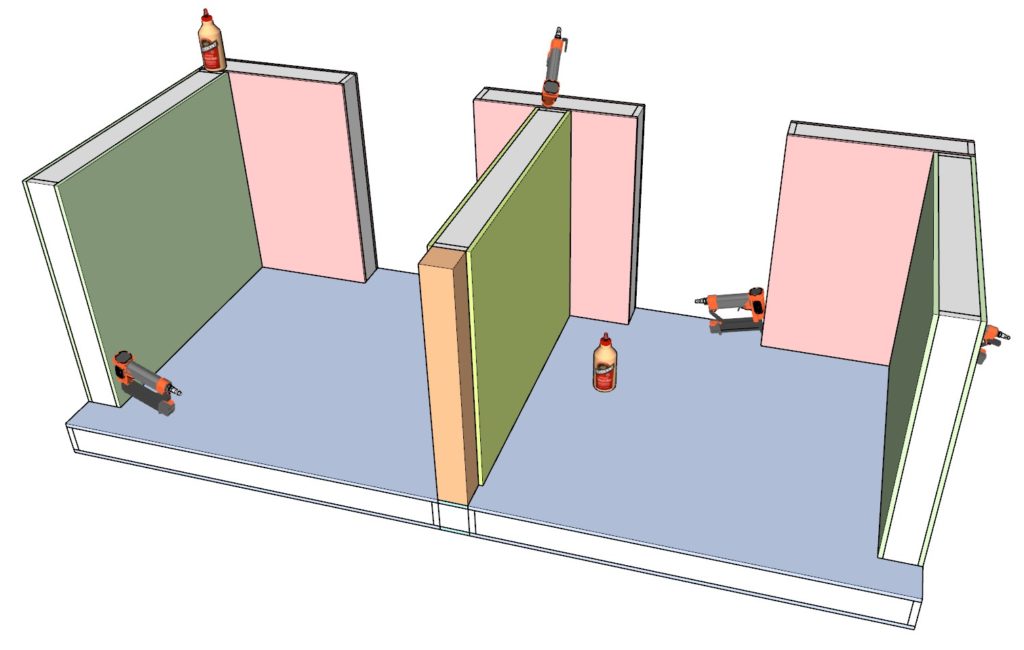
Floor Assembly:
- Begin with two blue components for the floor, separating them with a teal connector. This forms the base of the doghouse.
Wall Construction:
- Place three pink components at the front to create the front walls.
- Use the two green components for the outer side walls.
- Set the lime green component as the dividing wall inside the doghouse.
- Position the peach component at the back as the connecting post.
Securing the Structure:
- Secure all pieces using wood glue and 1.5-inch pin nails. Initially, the structure may seem slightly unstable but will gain stability as more layers are added.
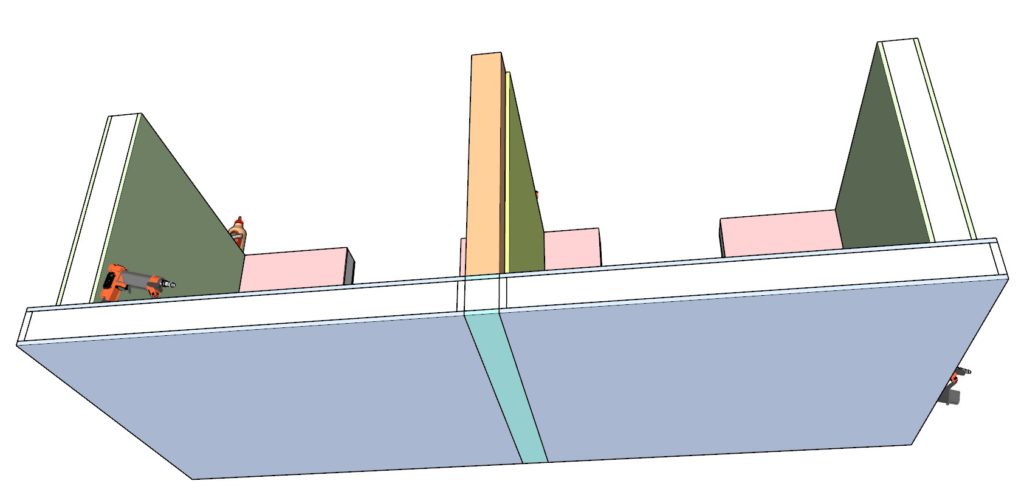
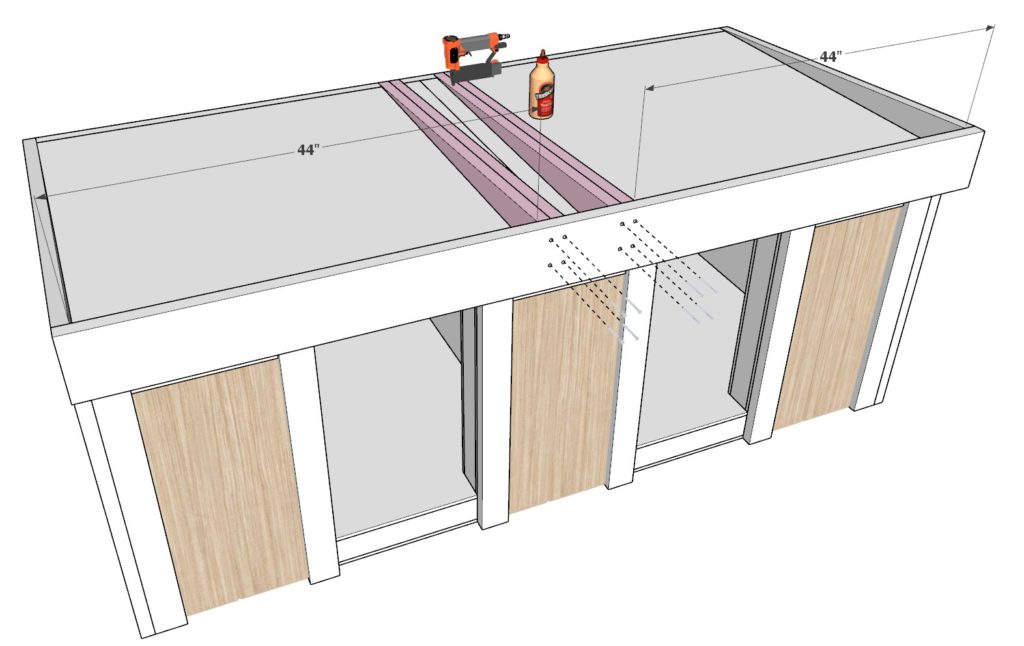
Ceiling Placement:
- Add the remaining two blue components on top as the ceiling, with another teal component between them.
Reinforcing Teal and Peach Components:
- For the teal and peach components, use 6-inch-long screws for extra strength, particularly vital for supporting the doghouse doors.
- Pre-drill holes with a drill to avoid splitting the wood.
- Use a countersink drill bit to ensure screws sit flush with the wood’s surface, preventing any protrusion.


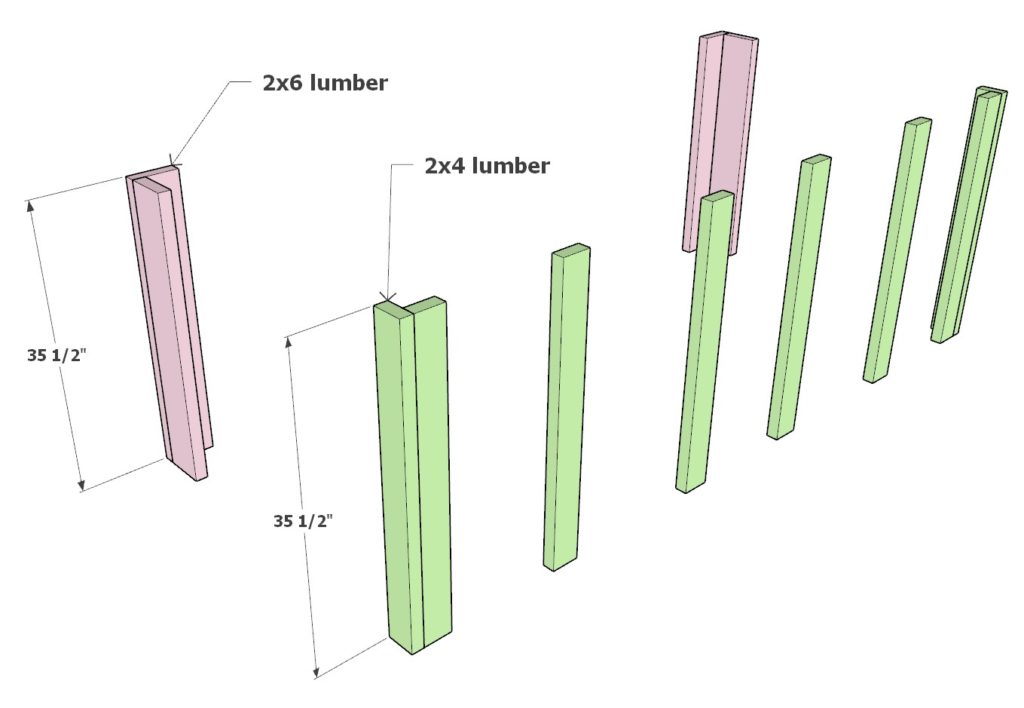
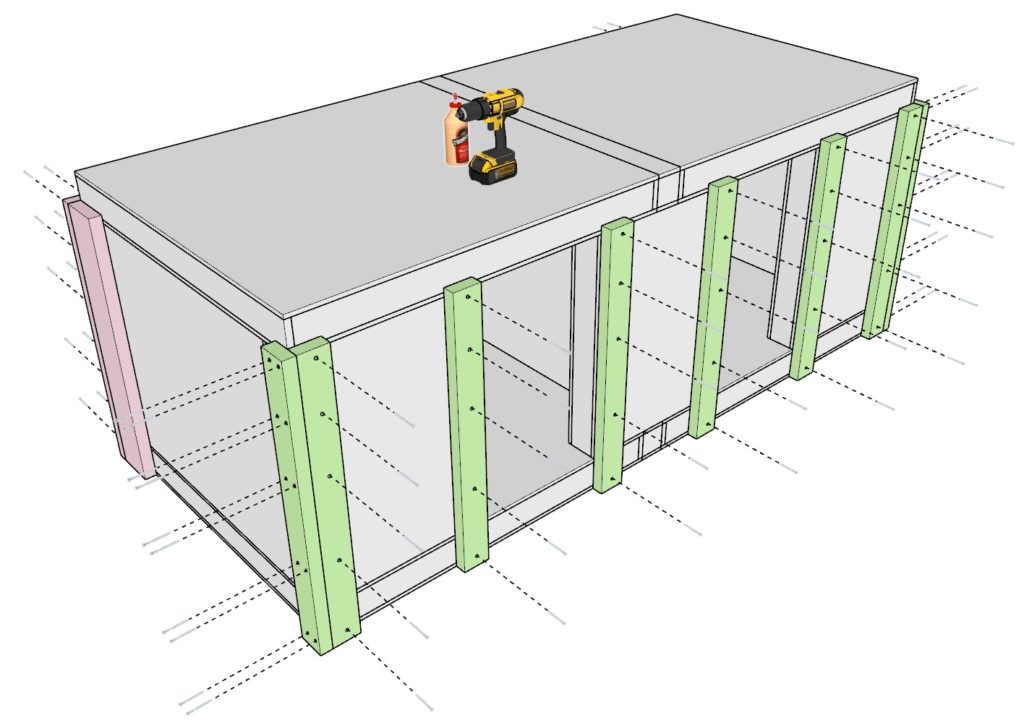
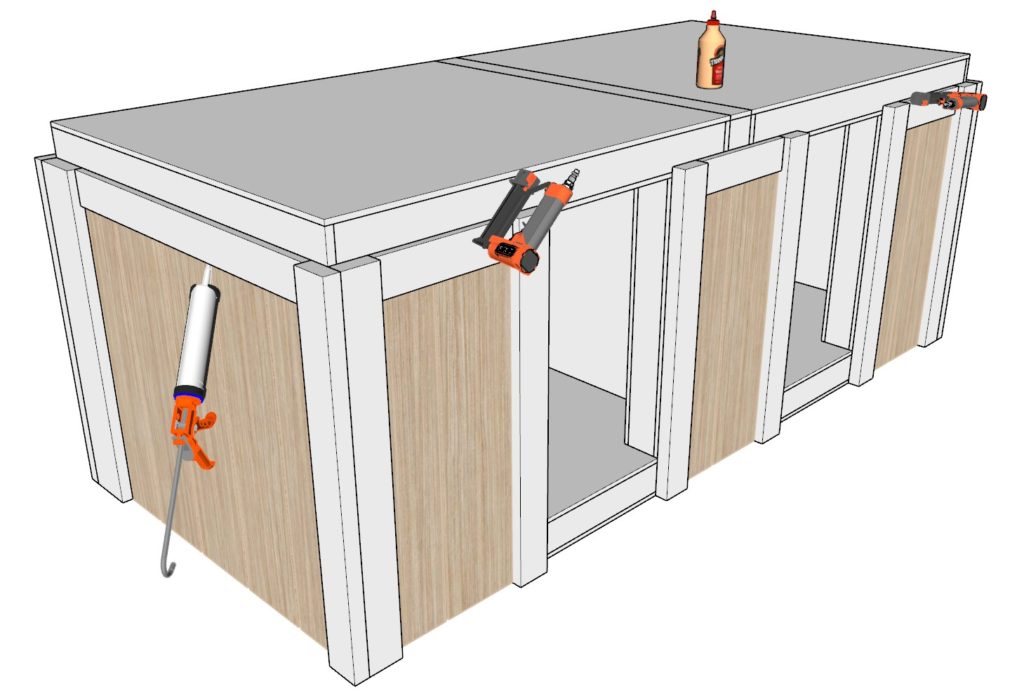
Step 3: Adding Outer Casing and Doors
Preparing Outer Casing:
- Identify the lumber pieces for the outer casing: lime green pieces are 35-1/2 inch long 2x4s, and salmon pink pieces are 35-1/2 inch long 2x6s.
Arrangement:
- Arrange these lumber pieces as shown in the diagram. This step is crucial for proper alignment.
Installing Doors:
- Before securing the outer casing, place the two remaining brown door components (from Step 1) in their designated positions.
Securing Lime Green Components:
- Attach the lime green components directly to the panels created in Step 1. Use 3.5-inch screws and wood glue for a firm attachment.
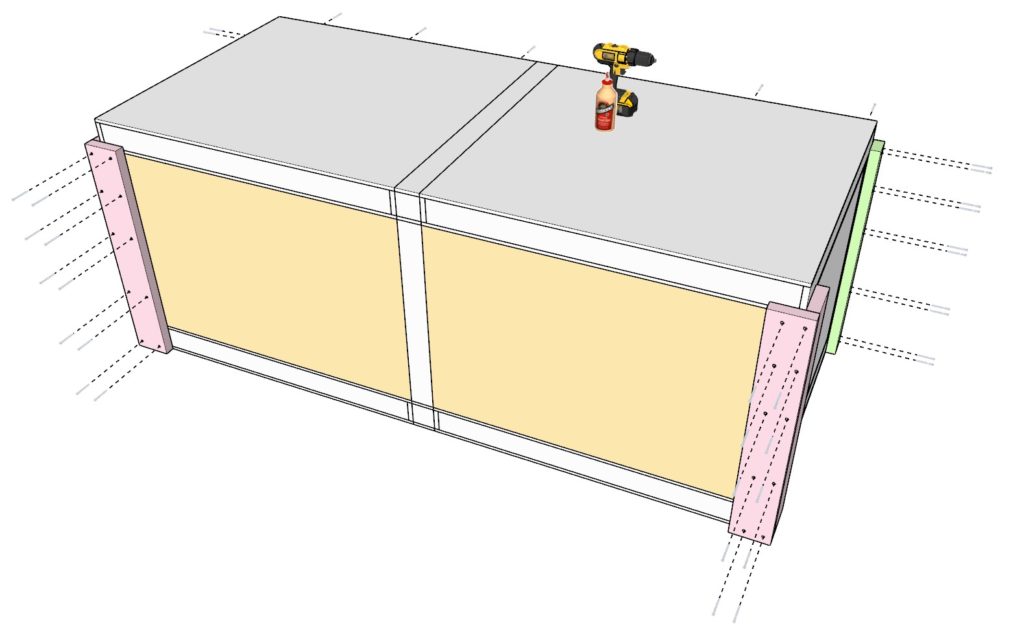
Attaching Pink Components:
- Join the pink components together and to the back of the brown doors. Importantly, do not connect them to the doghouse walls. This ensures that the doors can open and close freely.
- The doors should not be glued or screwed into the main doghouse structure at this stage.
Tips for a Clean Finish:
- Always predrill and countersink the screws to prevent wood splitting.
- Use wood putty to fill any screw holes, smoothing out for a clean, professional finish.
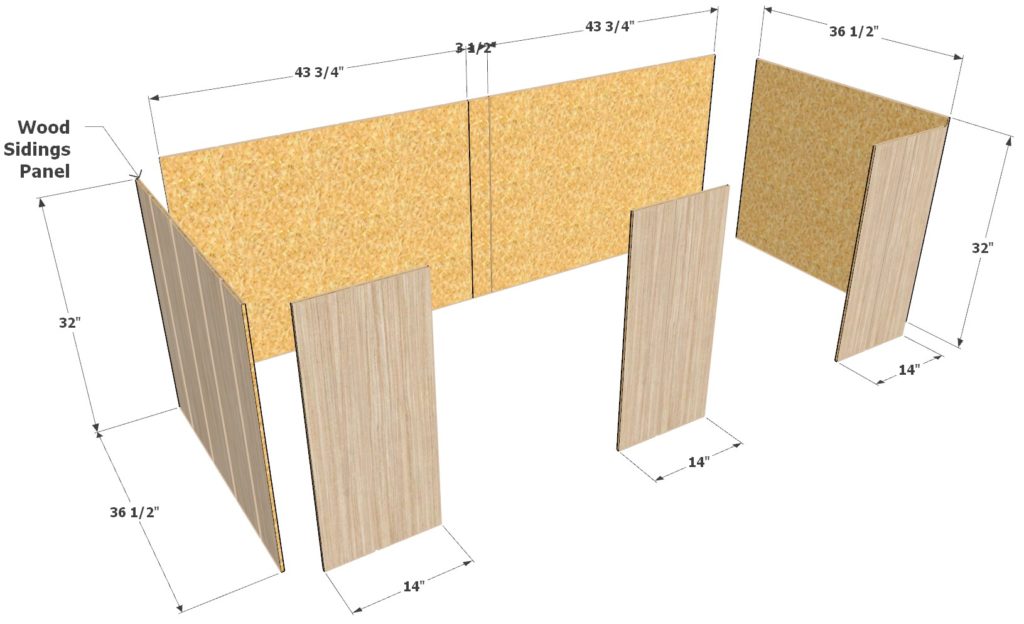
Step 4: Adding Siding to the Doghouse
Choosing Siding Material:
- Opt for Engineered Treated Wood Siding panels. These are durable, easy to paint, and often come pre-primed and pre-painted.
Cutting Siding Panels:
- Prepare the siding panels in the following sizes:
- Two panels measuring 32 inches x 36-1/2 inches
- Three panels measuring 14 inches x 32 inches
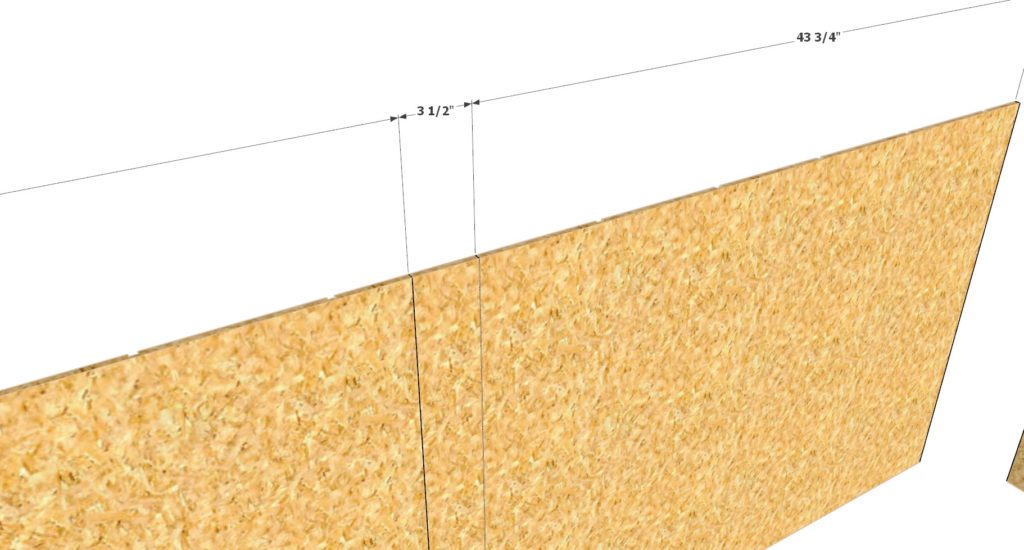
- Two panels measuring 43-3/4 inches x 32 inches
- One panel measuring 3.5 inches x 32 inches
Preparing for Siding Installation:
- Place Underlayment or a Weather Resistive Barrier (WRB) between the siding and the plywood panels. This step is crucial for moisture protection.
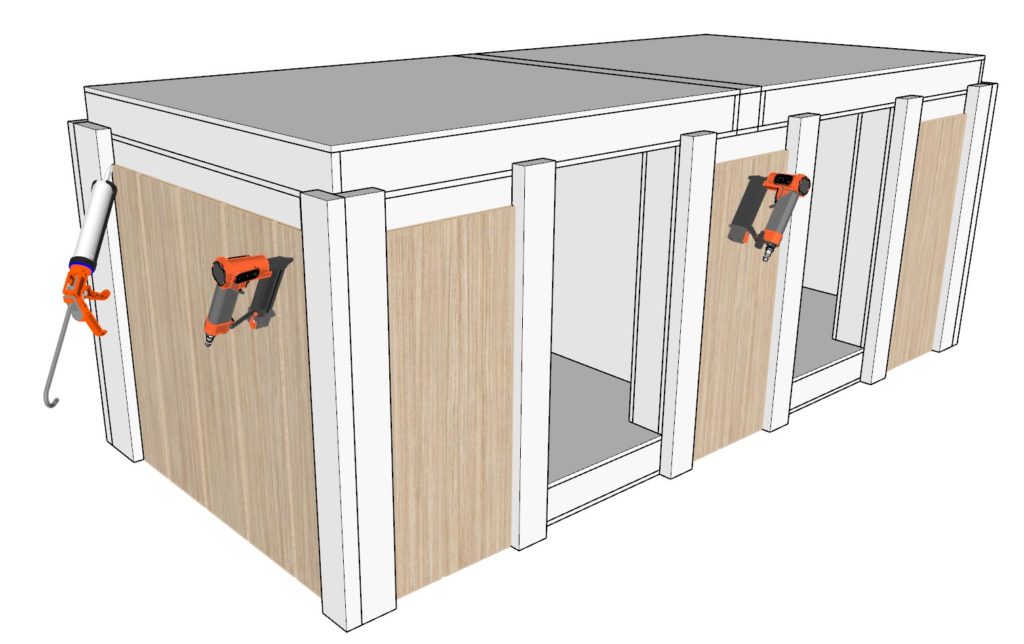
Attaching the Siding:
- Refer to the last diagram in this step for correct placement of each siding panel.
- Secure the siding panels to the doghouse using 1.5-inch pin nails and glue.
- Apply caulking around all joins and edges to ensure there are no gaps for moisture to penetrate.
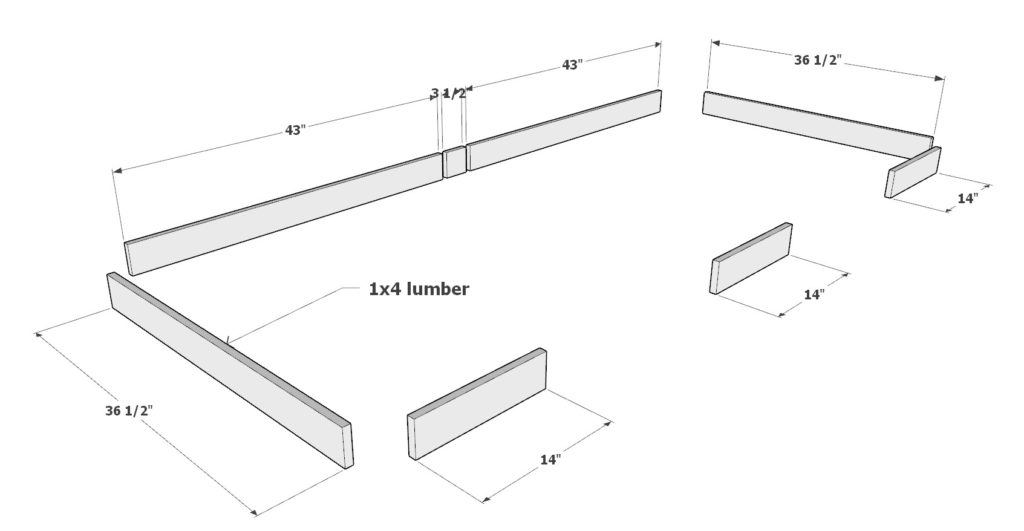
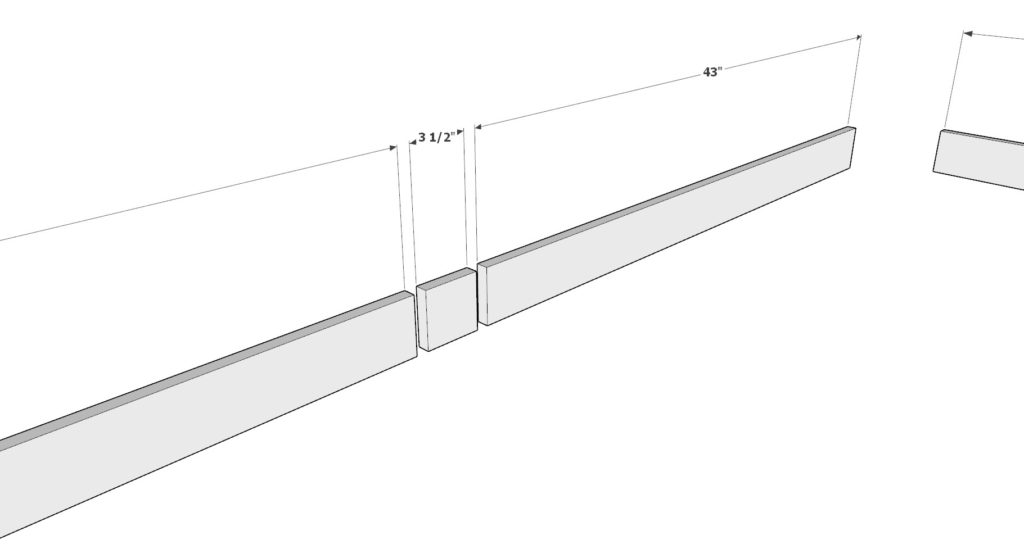
Step 5: Adding Additional Casing Lumber
Preparing Lumber Pieces:
- Gather 1×4 lumber pieces in the following sizes:
- Two pieces measuring 36-1/2 inches
- Three pieces measuring 14 inches
- Two pieces measuring 43 inches
- One piece measuring 3-1/2 inches
Attaching the Lumber:
- Secure each piece of lumber to the doghouse using wood glue and pin nails. Ensure each piece is aligned correctly and fits snugly in place.
Finishing Touches:
- Use caulking to fill any gaps between the lumber pieces. This step is essential to ensure a smooth, gap-free finish and prevent moisture from entering.
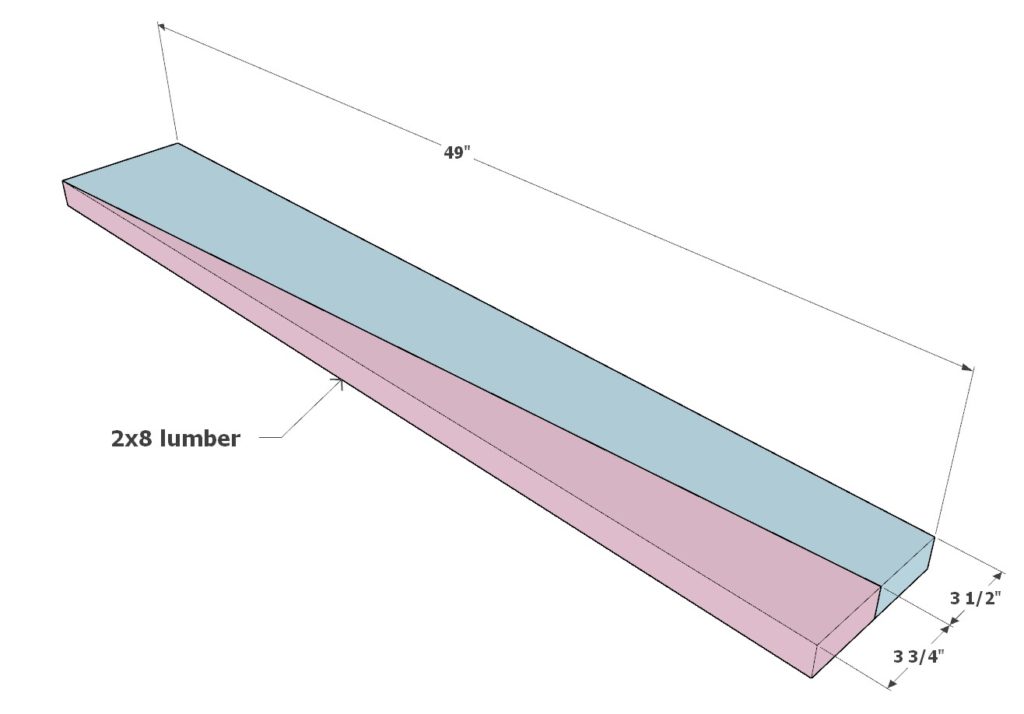
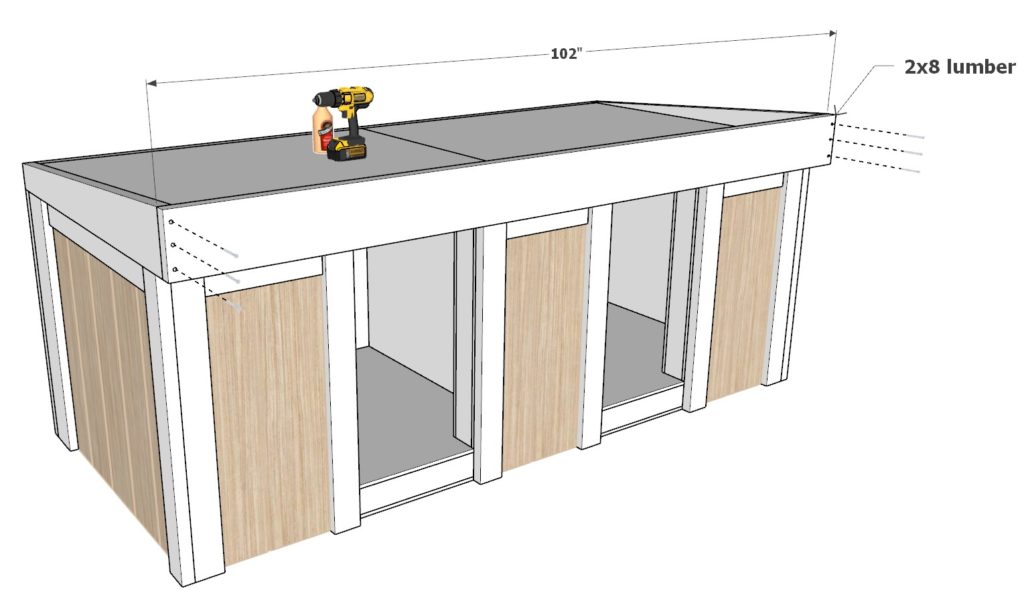
Step 6: Constructing the Roof Frame
Preparing the Main Roof Components:
- Start with a 49-inch 2×8 lumber piece.
- Cut this piece into two parts as indicated in the diagram: one part blue and the other part pink.
- Use a band saw, jigsaw, table saw, hand saw, or reciprocating saw for the cutting.
Cutting Additional Pieces:
- Cut two blue pieces and four pink pieces in total.
- To obtain the extra two pink pieces, you will need an additional 49-inch 2×8 lumber piece.
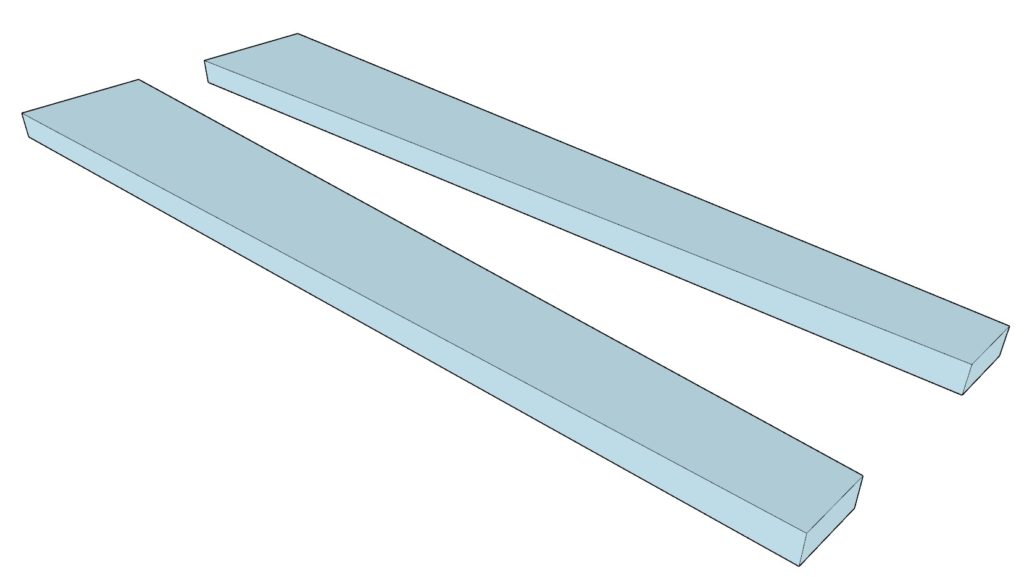
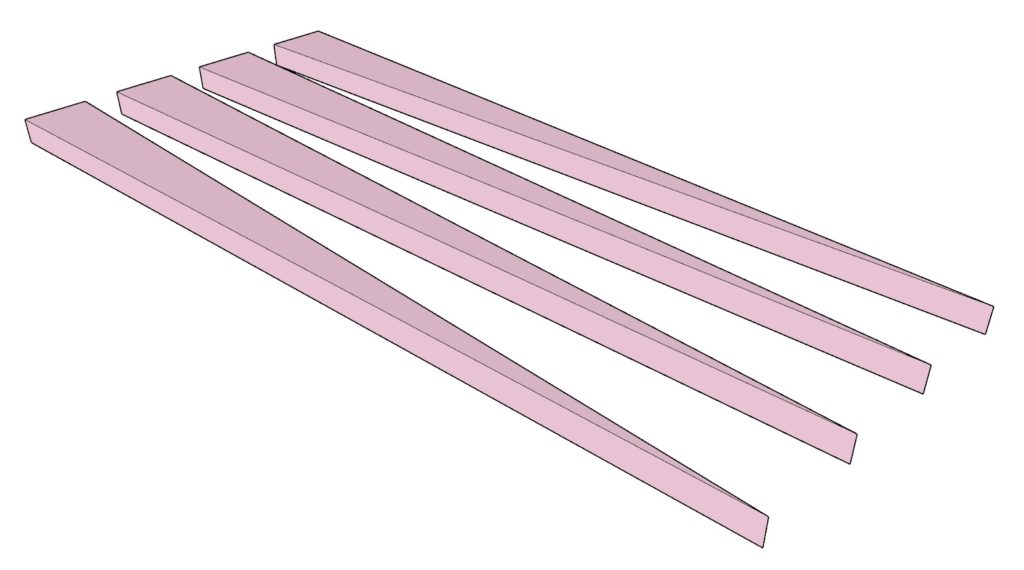
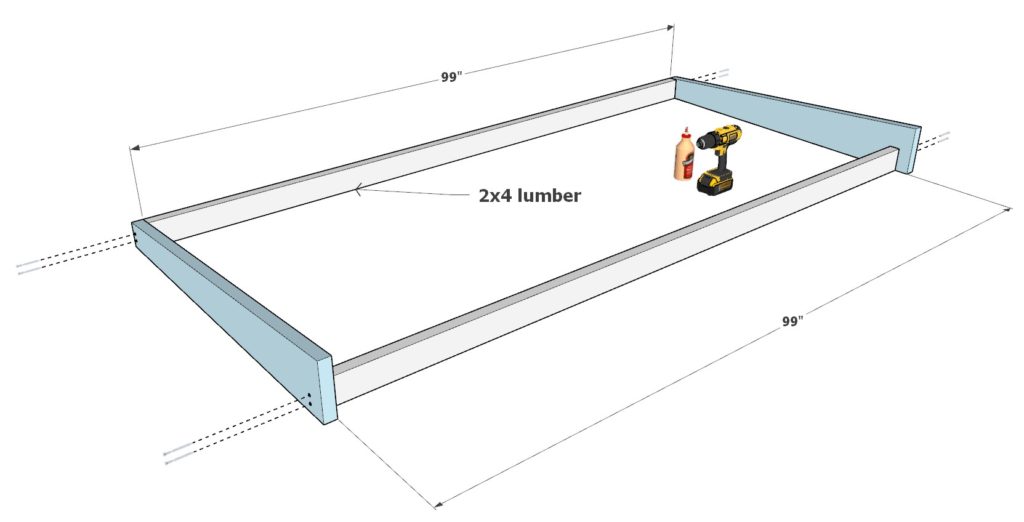
Assembling the Roof Frame:
- Combine the two blue pieces with two 99-inch long 2×4 lumber pieces to create the frame for the doghouse roof.
- Use wood glue and 3.5-inch screws for assembly.
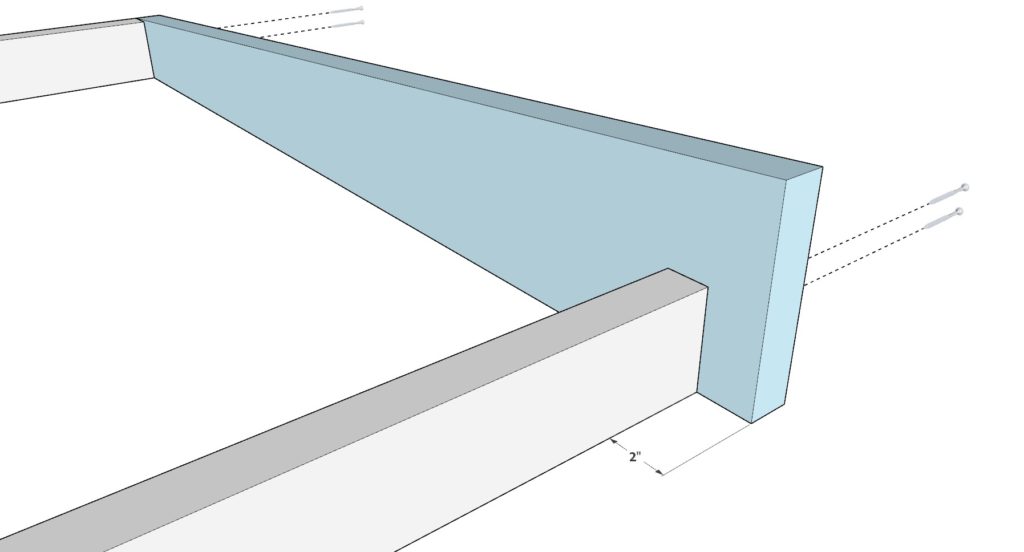
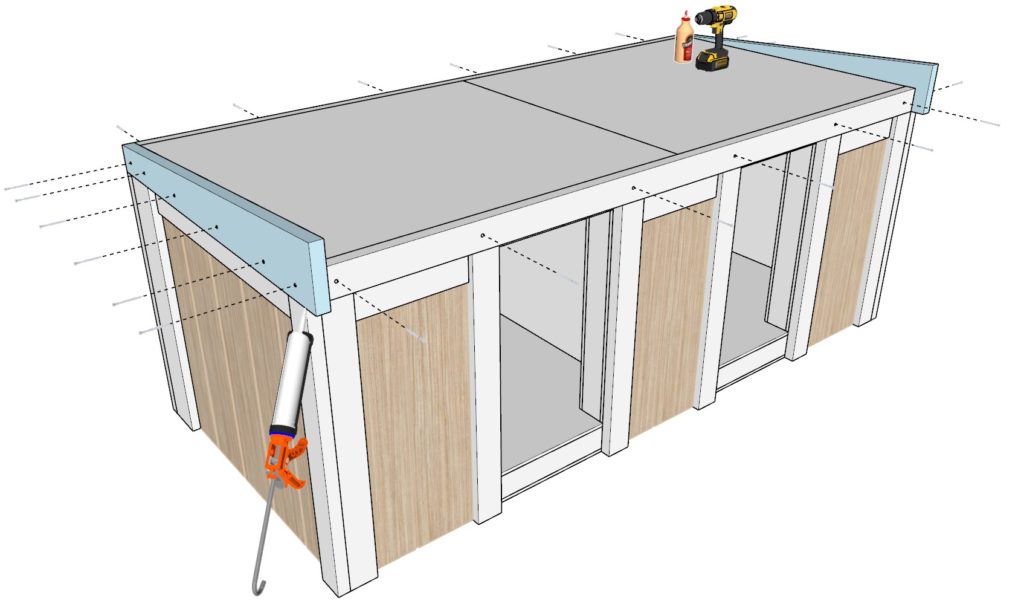
Attaching the Roof Frame to the Doghouse:
- Place the roof frame on the doghouse as illustrated in the diagram.
- Secure it with wood glue and 3.5-inch screws, ensuring it is properly aligned and stable.
Finishing the Roof Frame:
- Use caulking to fill any gaps in the roof frame for a smooth finish.
- Fill screw holes with putty for a neat and clean appearance.
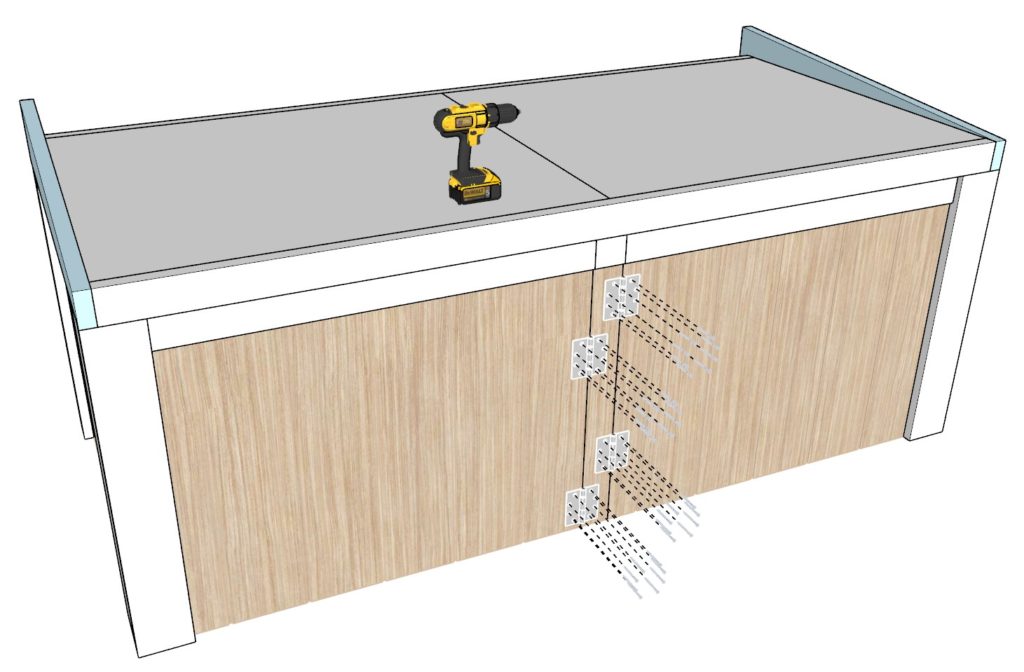
Step 7: Installing Hinges and Latches on Doors
Preparing for Hinge Installation:
- Start by selecting heavy-duty hinges for the doghouse doors. Choose screws long enough to penetrate deep into the 4×4 lumber for a secure fit.
Fitting the Doors:
- Before attaching the hinges, ensure that the door components fit well within the frame and can swing open and close smoothly.
- If necessary, use a sander to gently sand down any rough or misaligned edges. Be careful not to create large gaps, as this could lead to drafts and reduce the doghouse’s insulation efficiency.
Attaching the Hinges:
- Secure the hinges in place, aligning them carefully to ensure the doors can swing freely without any obstruction.
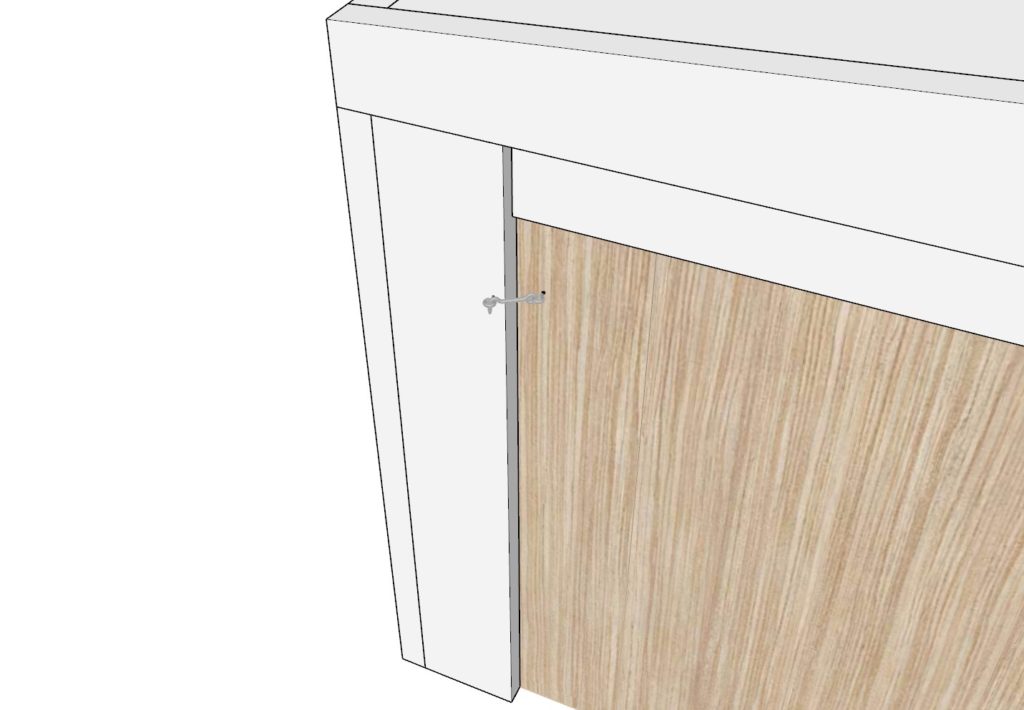
Adding Hook and Eye Latches:
- Install two simple Hook and Eye Latches on the doors. This hardware will allow the doors to be securely locked and easily unlocked when needed.
Testing Door Functionality:
- Once the hinges and latches are in place, test the doors thoroughly. Ensure they swing open and close easily and that the latches engage and disengage smoothly.

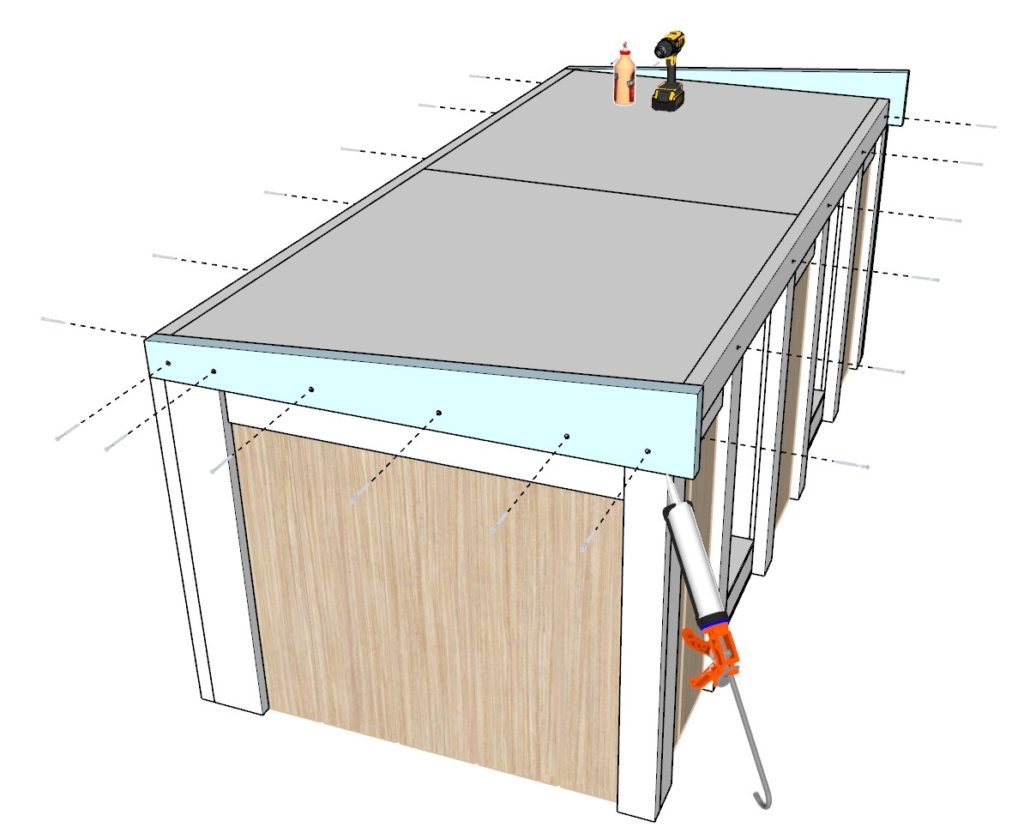
Step 8: Completing the Roof
Front Roof Extension:
- Attach a 102-inch long 2×8 lumber piece to the front edge of the roof.
- Use wood glue and 3.5-inch screws to secure it in place, ensuring it’s aligned evenly along the roof’s front.
Installing Pink Components:
- Add the four pink components from Step 6 to the roof frame.
- Secure each piece with wood glue, pin nails, and 3.5-inch screws for a sturdy construction.
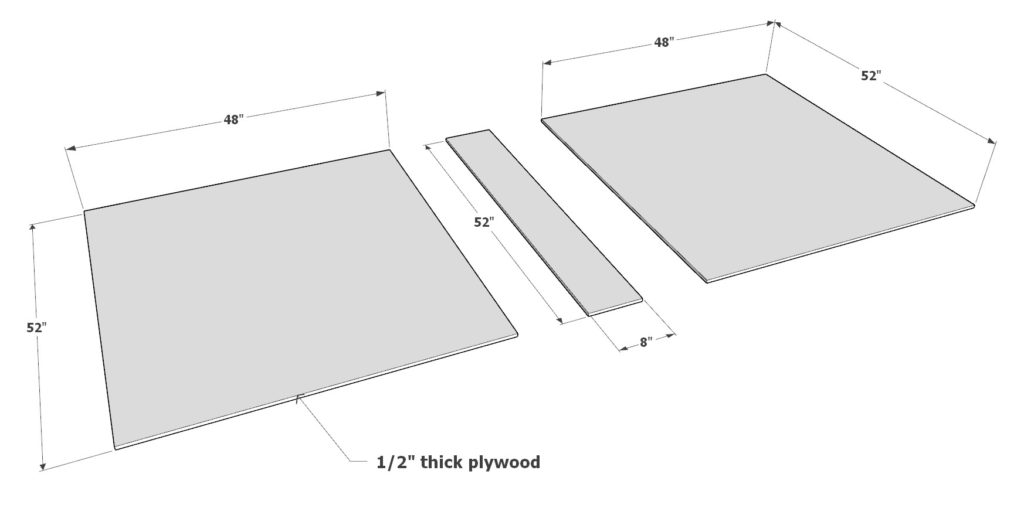
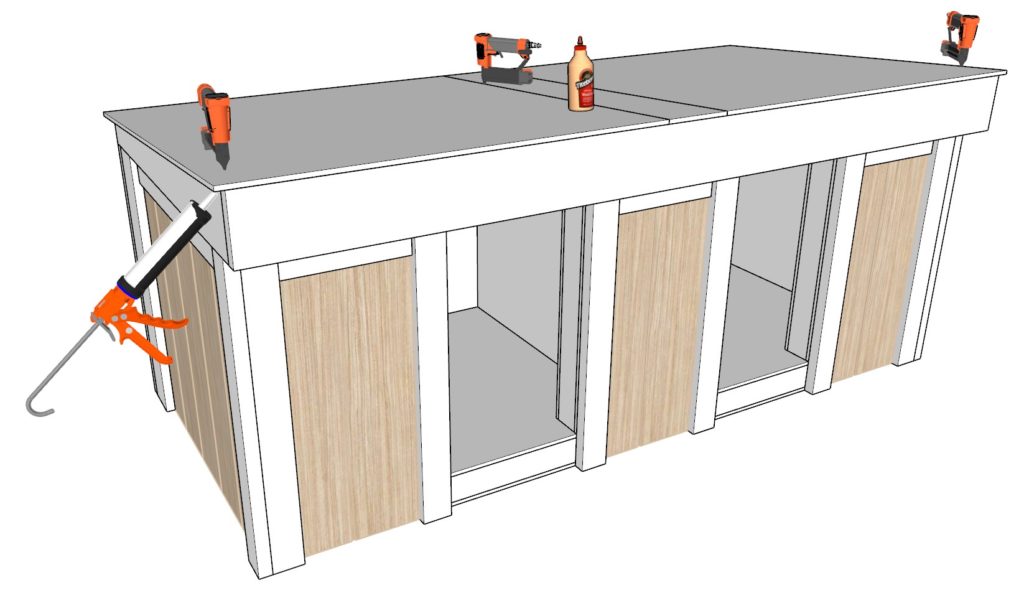
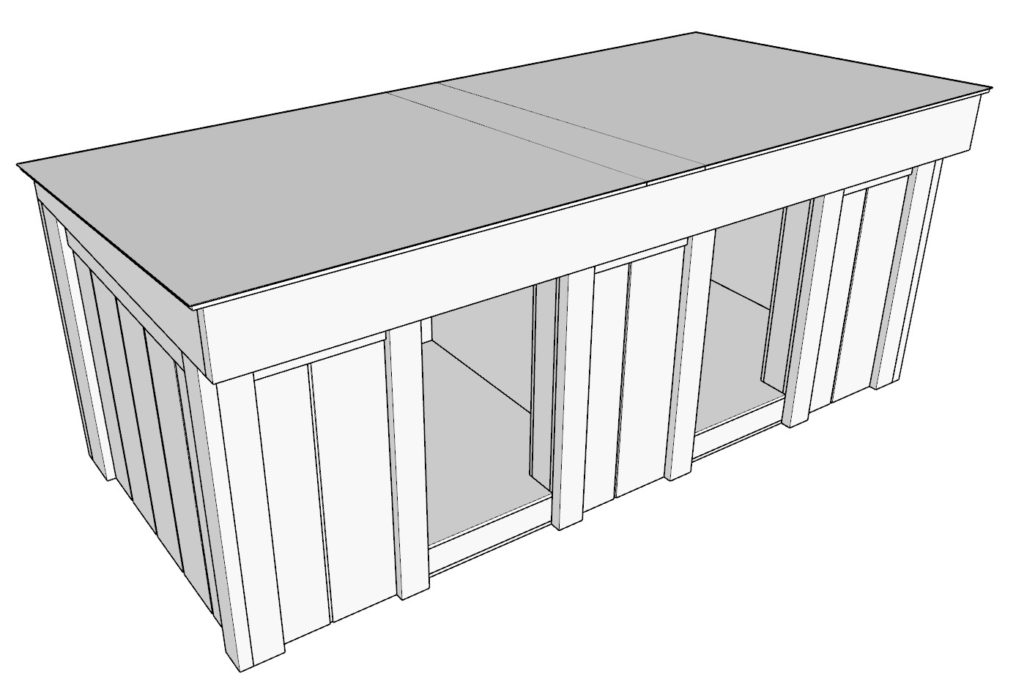
Adding Plywood to the Roof:
- Place two plywood sheets measuring 48 inches x 52 inches, and one 8 inch x 52 inch piece on top of the roof structure.
- Secure them with wood glue and pin nails.
- Use caulking to fill any gaps, ensuring a seamless finish.
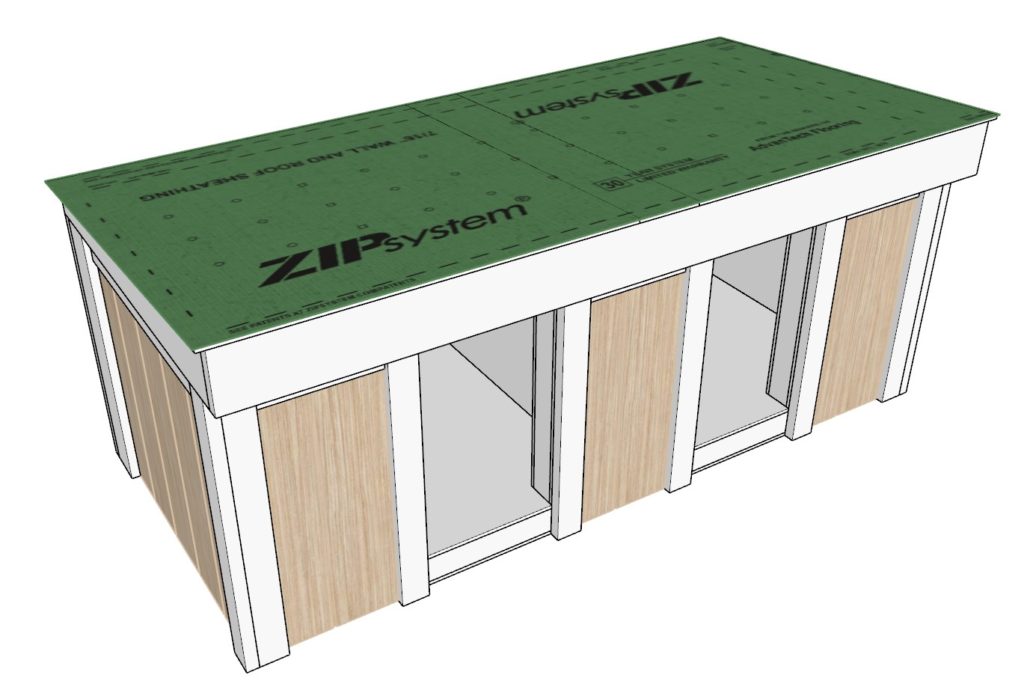
Applying Roofing Underlayment:
- Cover the plywood with Roofing underlayment, a water-resistant or moisture barrier material. This layer is crucial to prevent water damage to the plywood beneath.
Choosing Roofing Material:
- Finalize the roof by adding either shingles or a metal roof, depending on your preference and the desired aesthetic.
- Ensure the chosen material is properly installed and secured, offering complete protection from the elements.
Step 9: Painting and Maintenance of the Doghouse
Painting the Doghouse:
Preparing for Painting – Start by cleaning the doghouse surface thoroughly to remove any dust or debris. Ensure it’s completely dry before painting.
Priming – Apply a high-quality exterior primer to all wood surfaces. This step is crucial for better paint adhesion and additional protection against weather.
Choosing the Right Paint – Opt for a durable, weather-resistant exterior paint specifically formulated for wood.
Painting Process – Evenly apply the first coat of paint with a brush or roller. Allow it to dry fully before applying a second coat for better coverage and protection.
Details and Finish – Carefully cover all crevices and corners. Allow the doghouse to dry completely after painting.
Maintaining the Doghouse:
Regular Inspection – Check the doghouse regularly for signs of damage such as chipping paint, wood rot, or loosening components.
Cleaning Routine – Keep the doghouse clean by removing dirt, debris, and pet hair. Clean the exterior as needed with a gentle soap solution.
Weather Protection – Inspect and maintain the roofing underlayment and shingles or metal roof to ensure they are effectively protecting the doghouse from weather elements.
Repainting – Plan to repaint the doghouse every few years to refresh its protective coating and appearance.
Winter Care – In colder climates, consider adding extra insulation or a safe doghouse heater for additional warmth.
Pest Control – Regularly inspect for pests or insects that could damage the wood or pose risks to your pets.
This approach ensures a comprehensive guide for painting and maintaining the doghouse, focusing on protection and longevity.
Deck Dimensions
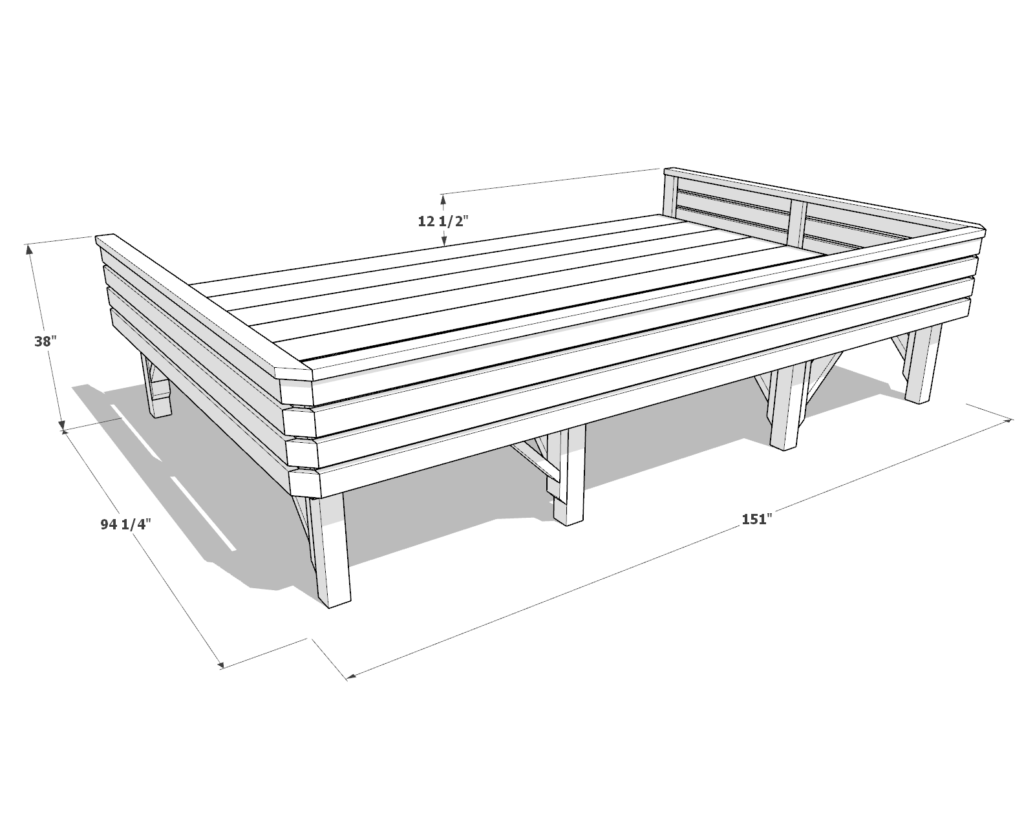
Step 1: Building the Frame of the Doghouse Deck
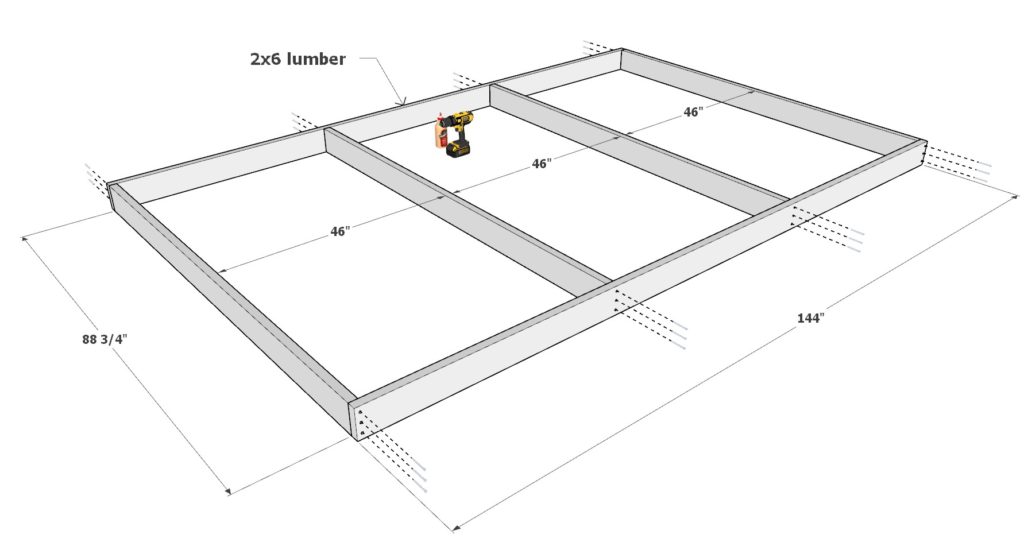
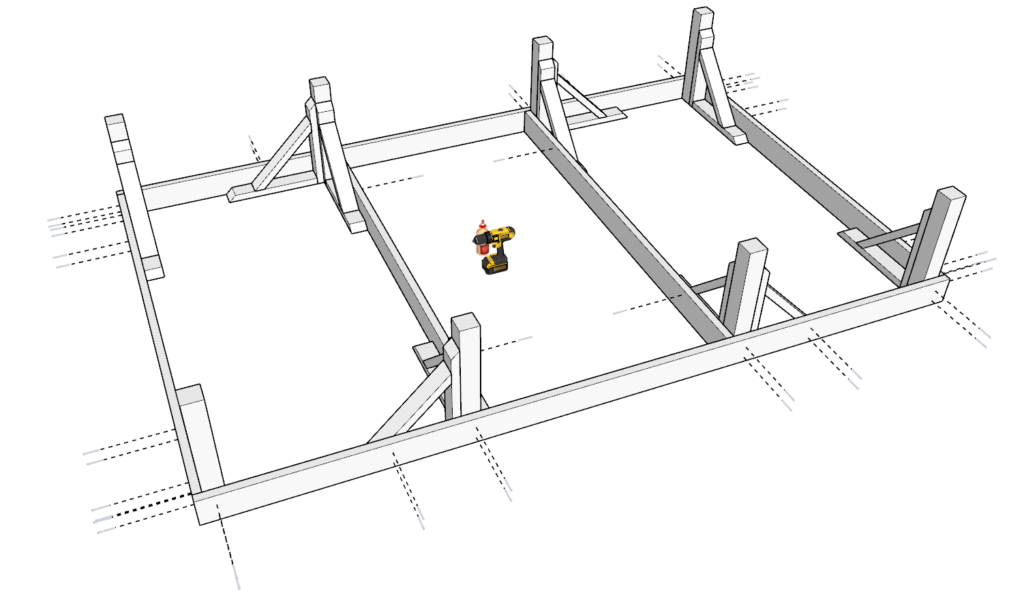
Constructing the Frame:
- Start with two 144-inch long 2×6 lumber pieces and four 88-3/4 inch long 2×6 lumber pieces for the frame.
- Secure the components with wood glue and 3.5-inch screws, ensuring corners are square and edges align neatly.
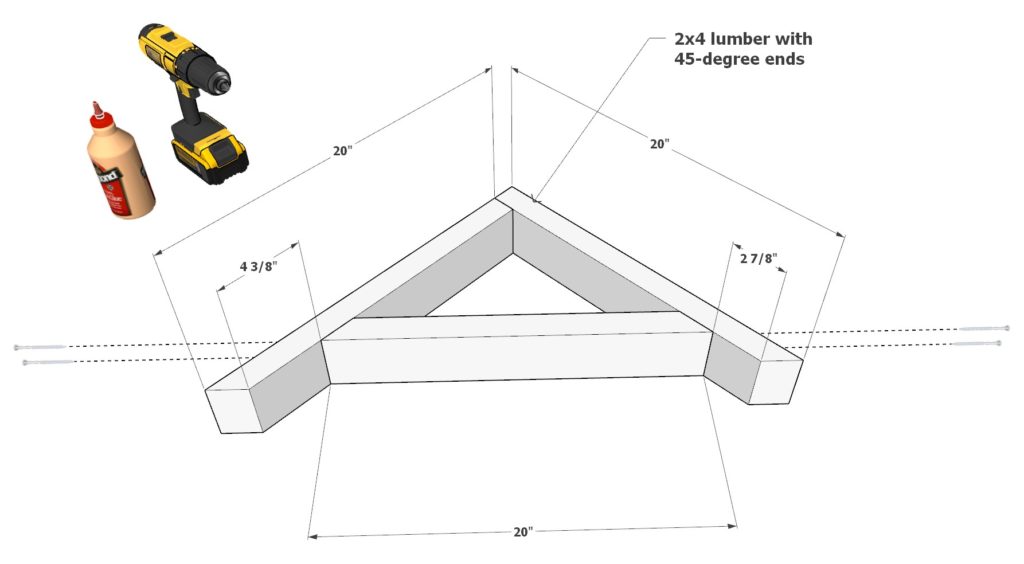
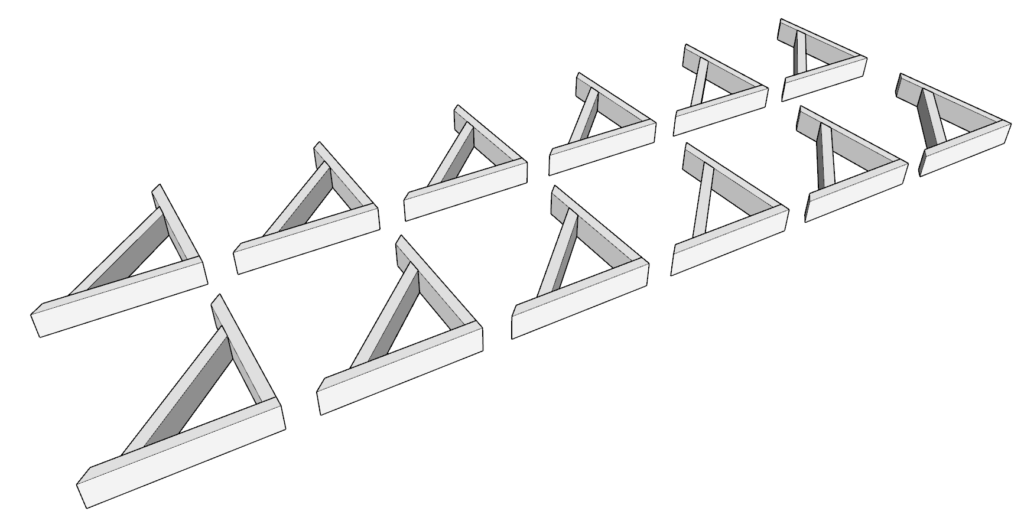
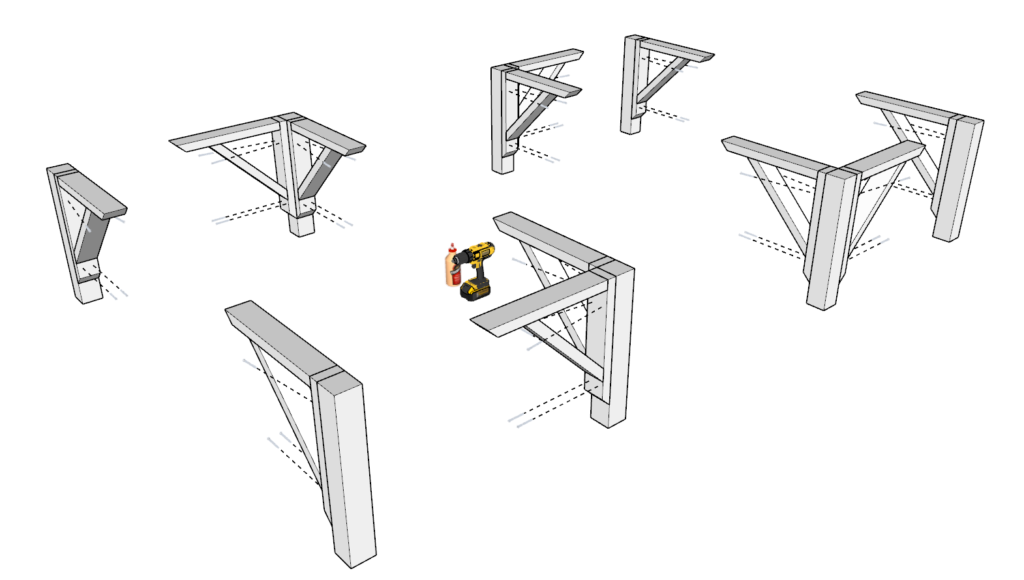
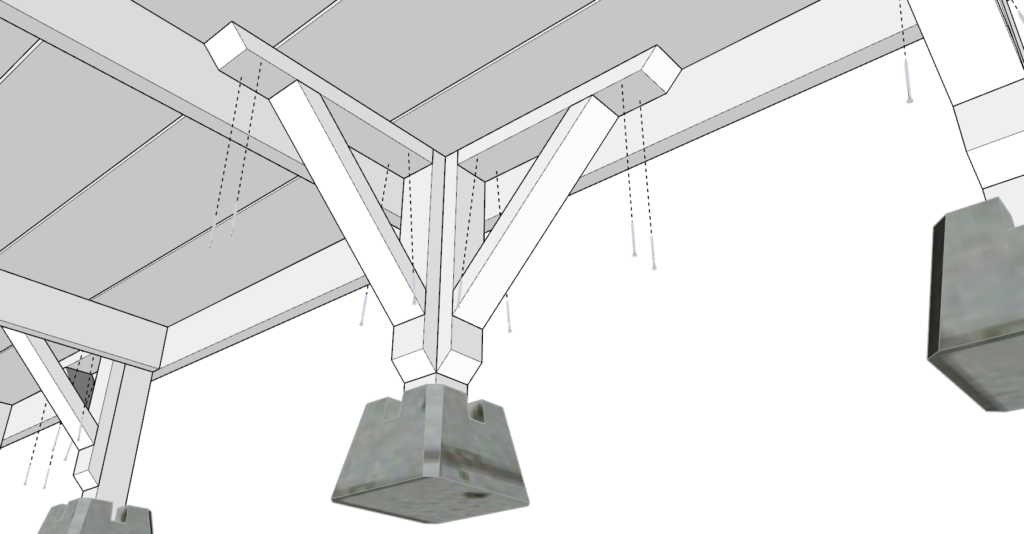
Making Reinforcement Cross Braces:
- Follow the second diagram in this step for cross brace construction.
- Cut two 20-inch 2×4 lumber pieces at one end with a 45-degree angle and one 20-inch piece with both ends cut at 45 degrees.
- Join the three pieces together using wood glue and 3.5-inch screws. Remember to predrill holes to prevent wood splitting and use a countersink drill bit for a flush finish.
- Construct a total of 16 cross braces.
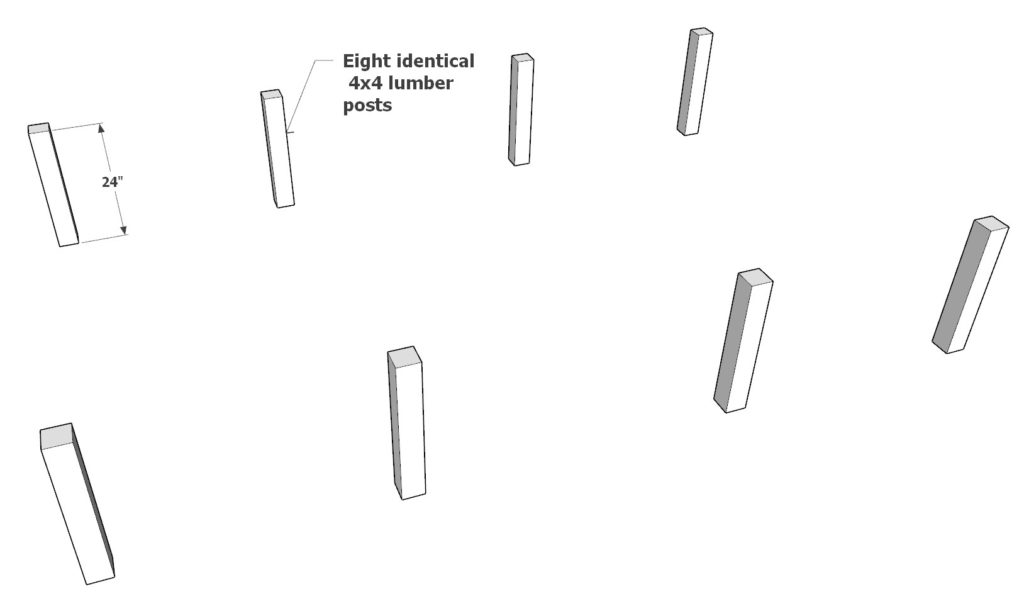
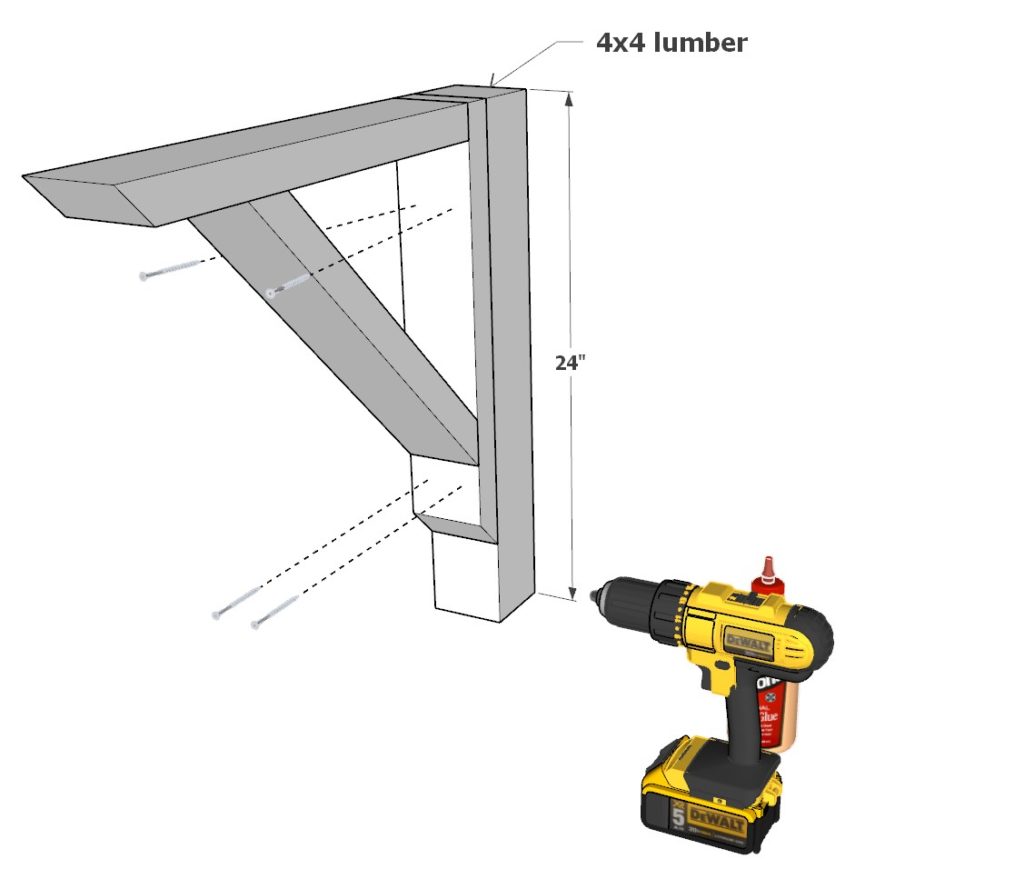
Attaching Cross Braces to Deck Legs:
- Prepare eight 24-inch (or 36-inch for cementing) 4×4 lumber pieces for the deck legs.
- Attach the cross braces to the deck legs using wood glue and 3.5-inch screws.
If Cementing Deck Pillars:
- For cemented deck pillars, use pressure-treated 4x4s.
- Dig a hole at least 12 inches deep for each pillar.
- Place rocks at the bottom for drainage, then pour in cement, setting the 4x4s firmly.
- Ensure the pillars are vertical and leave the cement to set before proceeding.
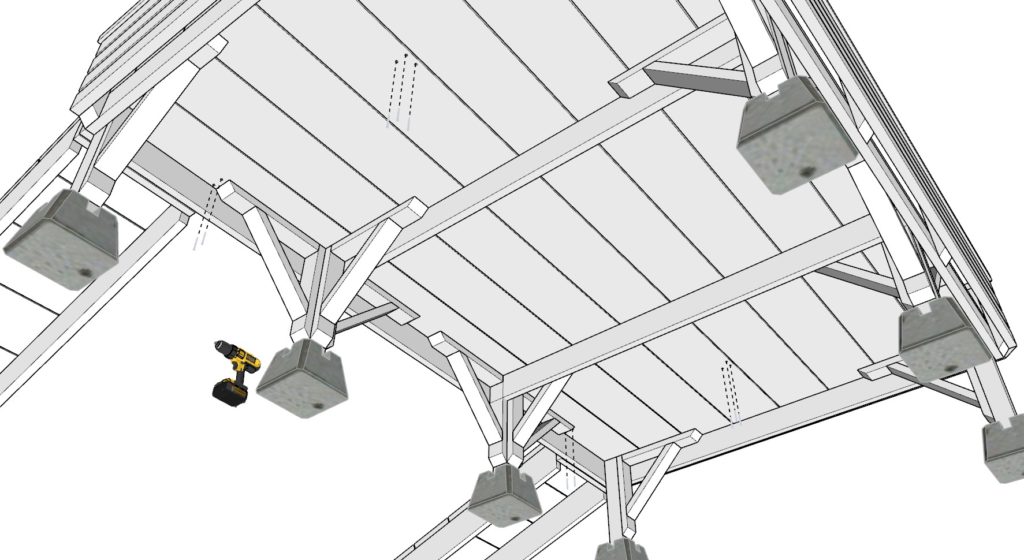
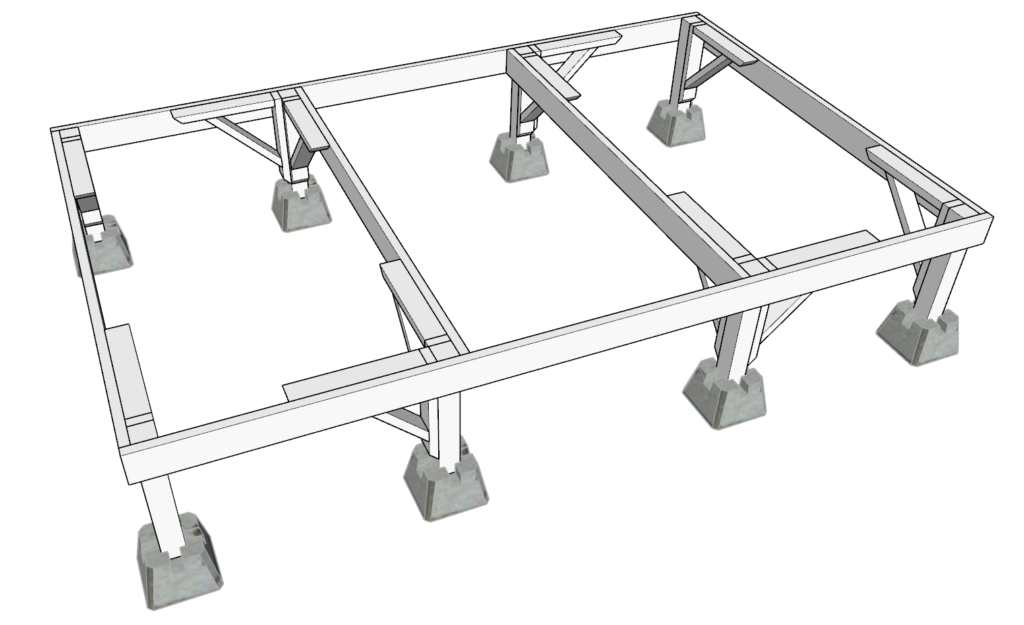
Securing Deck Legs and Cross Braces to Frame:
- Attach the deck legs and cross braces to the frame of the doghouse deck, ensuring stability and even spacing.
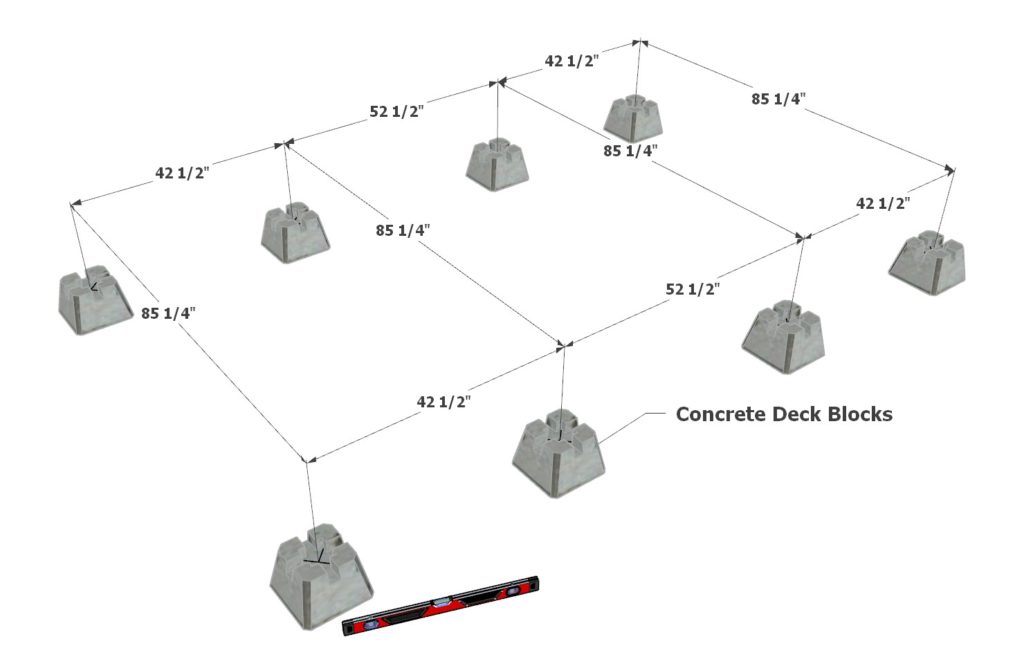
Setting the Deck on Concrete Blocks:
- Place eight concrete deck blocks at the intended site of the doghouse.
- Position the deck frame on these blocks, checking for level and alignment.

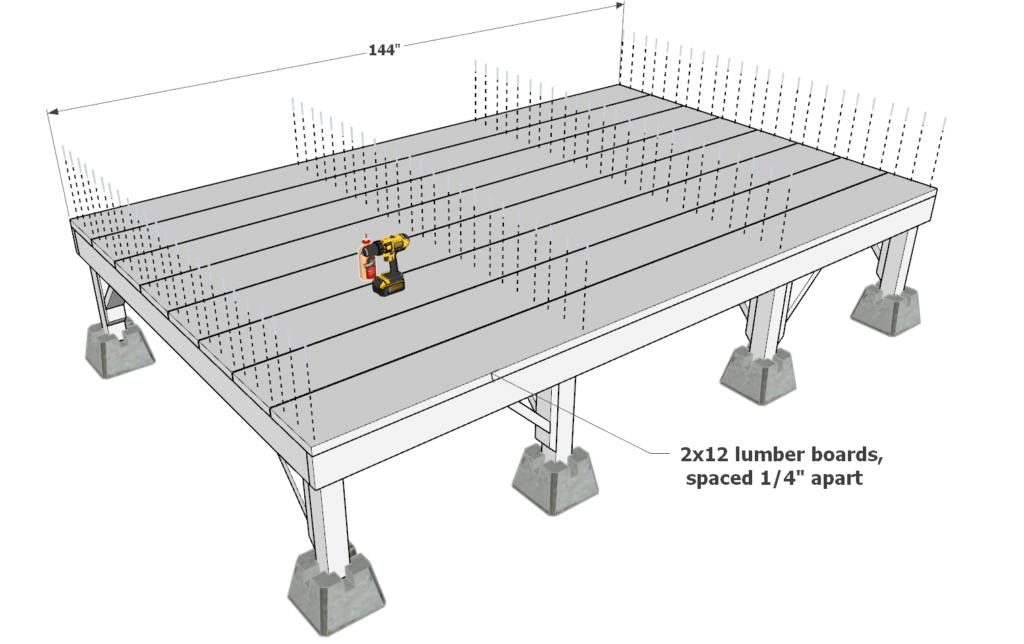
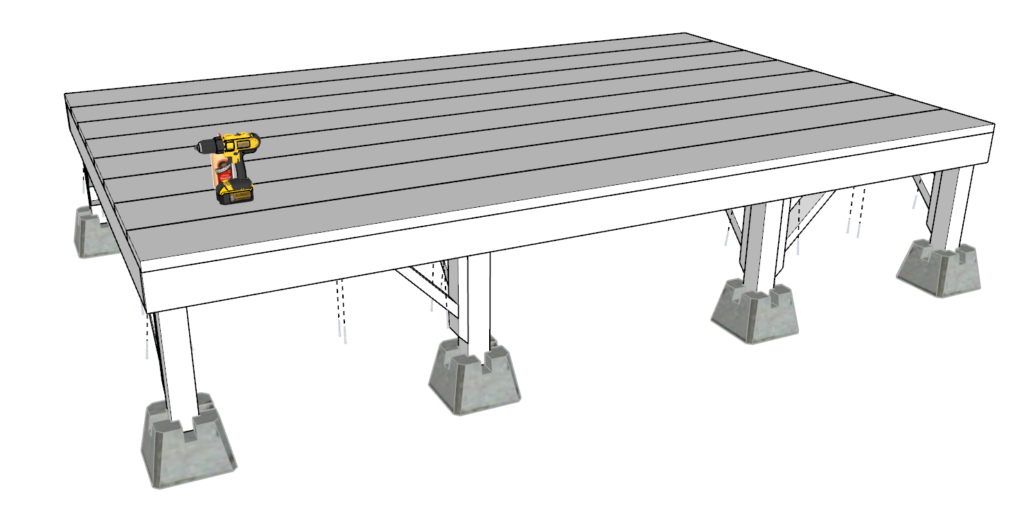
Step 2: Adding Decking Boards and Securing Cross Braces
Installing Decking Boards:
- Prepare eight 144-inch long 2×12 lumber boards for the decking.
- Lay the boards across the frame, spacing them approximately 1/4 inch apart for proper ventilation and drainage.
- Secure each decking board to the frame using 3.5-inch screws, ensuring they are evenly aligned and the spacing is consistent.
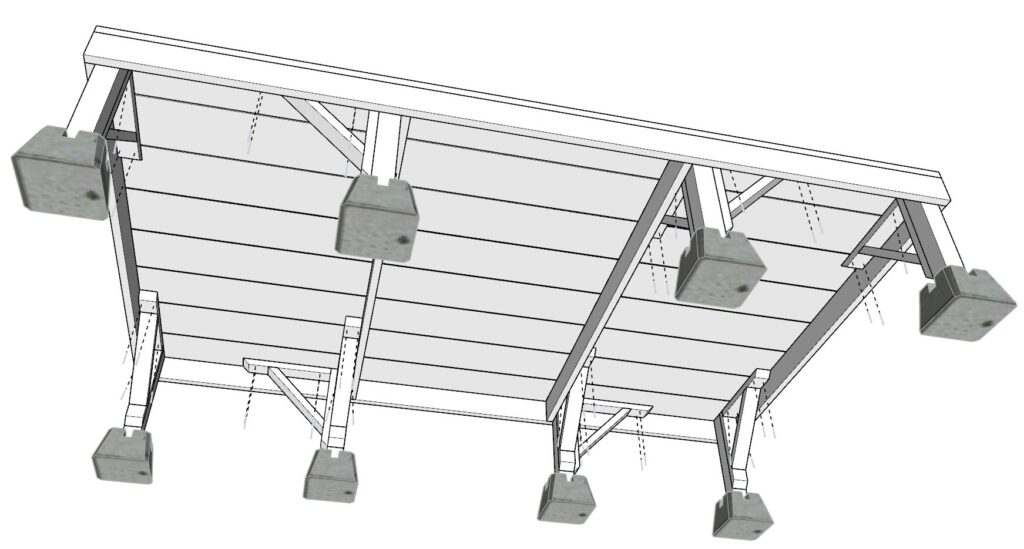
Attaching Cross Braces to Decking:
- Align the cross braces (constructed in Step 1) beneath the decking boards.
- Secure the cross braces to the decking boards from above using 2.5-inch screws.
- Use 2.5-inch screws to prevent them from protruding through the top of the lumber, maintaining a smooth and safe deck surface.
Step 3: Constructing the Railing for the Deck
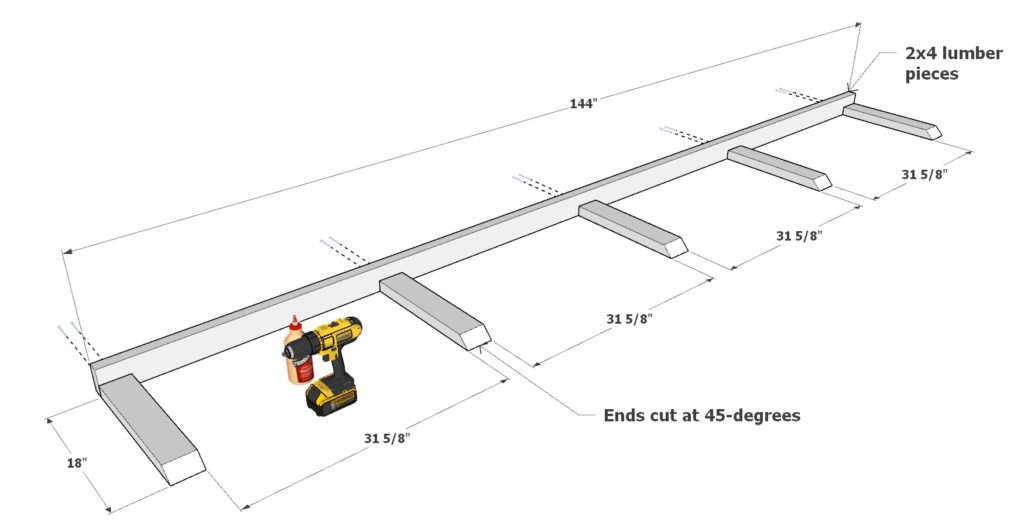
Building the Front Railing:
- Start with one 144-inch 2×4 lumber piece.
- Prepare five 18-inch 2×4 lumber pieces, each with one end cut at a 45-degree angle.
- Arrange these pieces as shown in the first diagram: the 144-inch piece as the base, with the 18-inch pieces spaced evenly along it.
- Secure them together using 2.5-inch screws and wood glue.
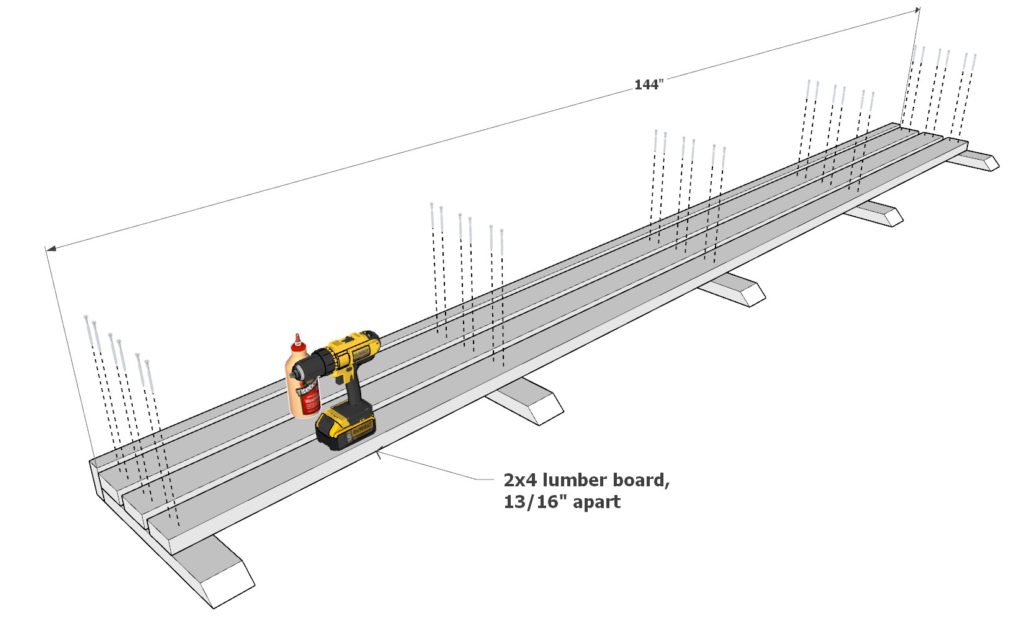
- Add three more 144-inch 2×4 lumber pieces on top of the 18-inch pieces to create slats for the railing.
- Space these 144-inch pieces 13/16 inches apart for consistent slat spacing.
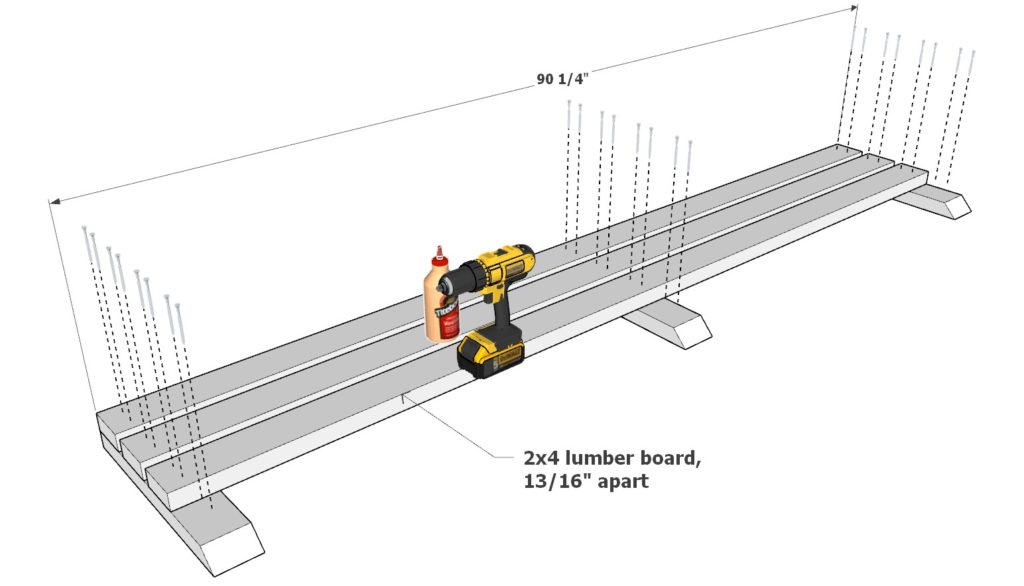
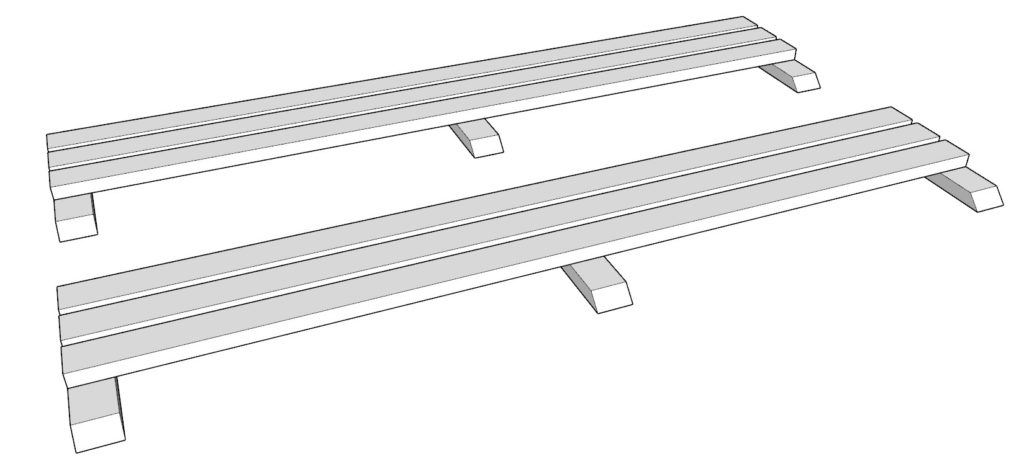
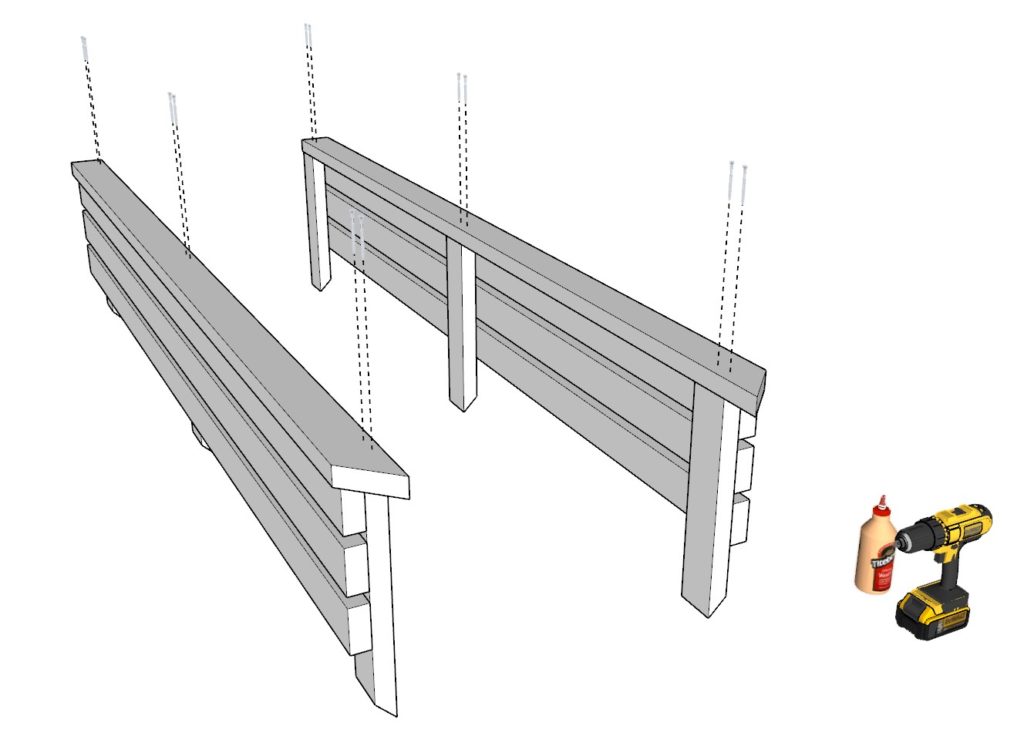
Constructing the Side Railings:
- For each side railing, take three 18-inch 2×4 lumber pieces.
- Add three 90-1/4 inch long 2×4 lumber pieces, spaced 13/16 inches apart, as slats.
- Secure all pieces with wood glue and 2.5-inch screws.
- Ensure that the two side railing components are identical.
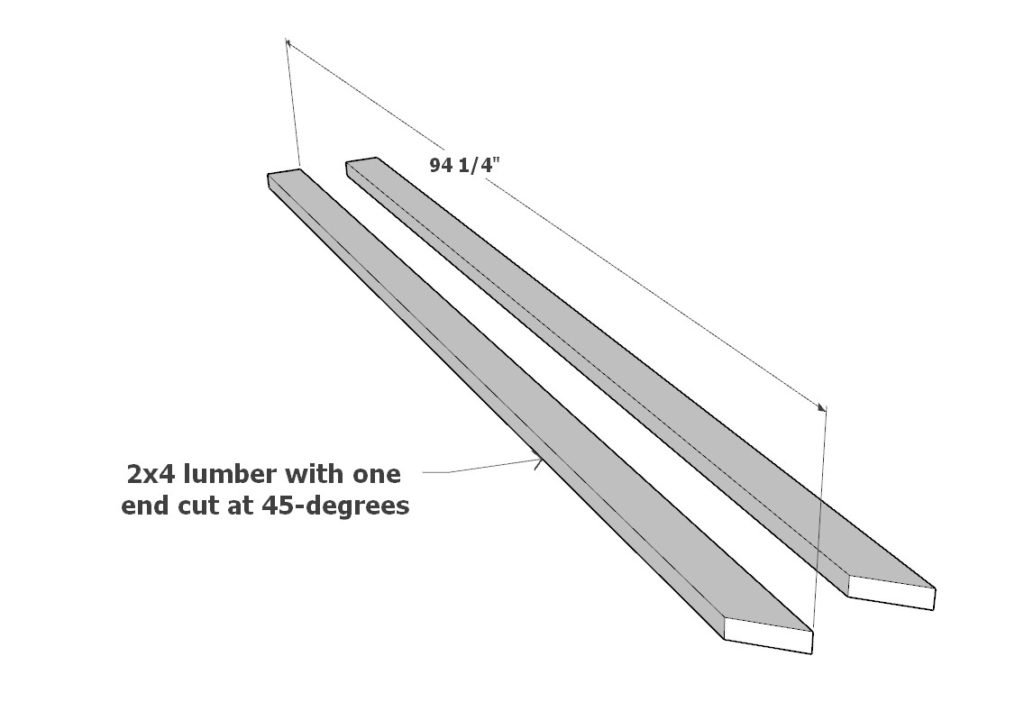
Attaching Angled Supports:
- Cut one end of two 94-1/4 inch 2×4 lumber pieces at a 45-degree angle.
- Attach these pieces to each side railing component, providing additional support and aesthetic appeal.
- Use 3.5-inch screws and wood glue for a strong bond.

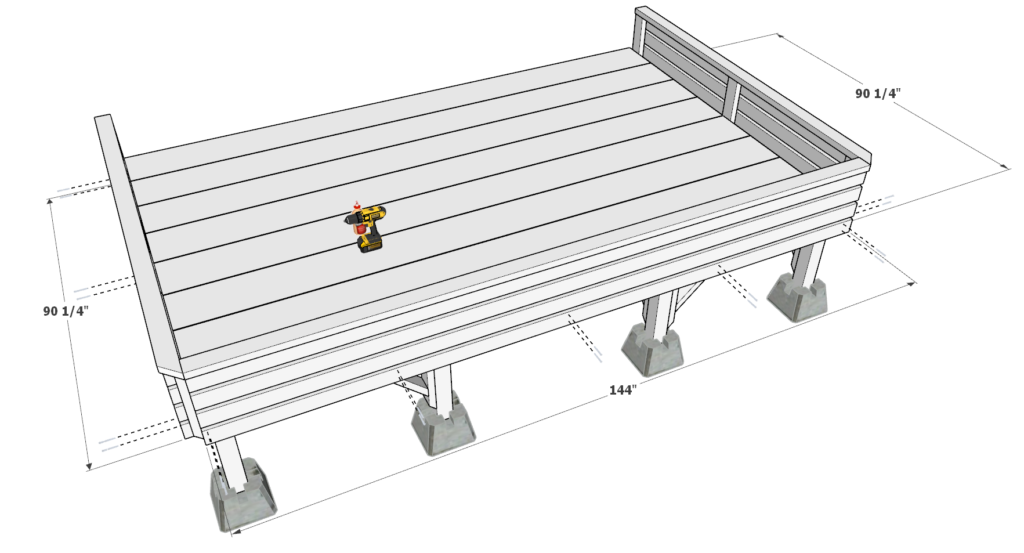
Step 4: Attaching Railing Components to the Deck
Securing Railing to Deck:
- Align the railing components (constructed in Step 3) with the edges of the main deck.
- Attach the railings to the deck using 2.5-inch screws and wood glue for a secure fit.
- Ensure the railings are level and evenly spaced as you secure them.
Attaching Top Railing Lip:
- For the top railing lip, use 3.5-inch screws. This provides a stronger hold and adds to the stability of the railing.
Adding Final Railing Pieces:
- Attach one 90-1/4 inch 2×4 to each side of the side railing components.
- Add one 144-inch 2×4 to the front railing component.
- Secure these pieces with wood glue and 2.5-inch screws, ensuring they are properly aligned with the rest of the railing.
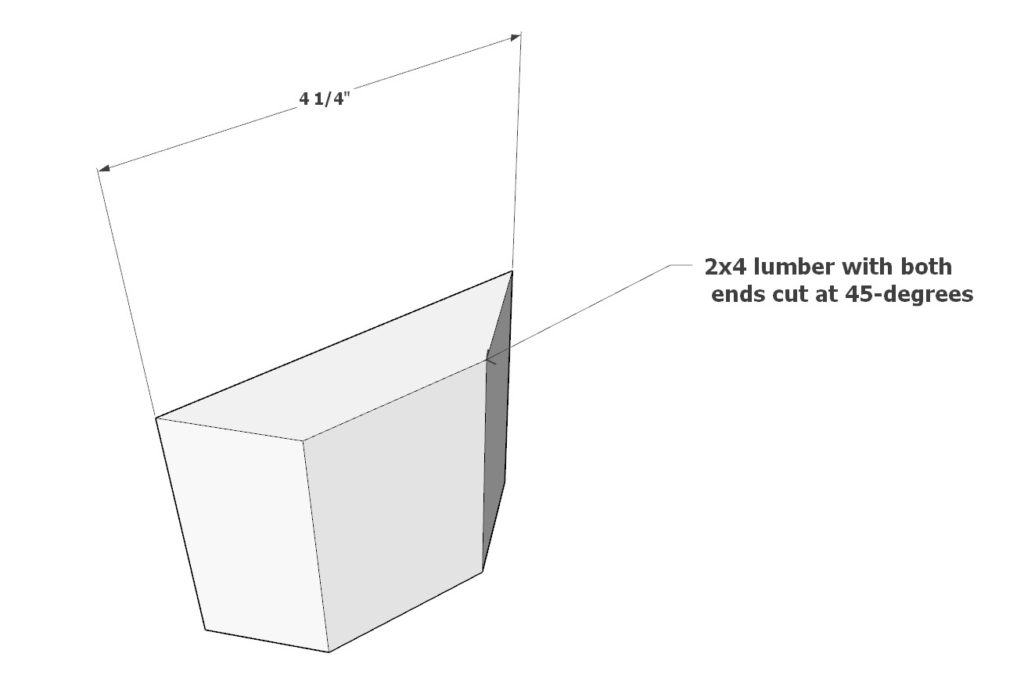
Installing Connector Pieces:
- Cut eight 4-1/4 inch 2×4 lumber pieces (cut at 45-degrees on both ends) to serve as connectors between the front and side railings.
- Position these connectors at the joints where the front and side railings meet.
- Secure the connectors in place using wood glue and pin nails for a neat finish.


Step 5: Painting and Maintaining the Deck
Painting the Deck:
Surface Preparation – Clean the deck thoroughly and let it dry. Fill screw holes with wood putty and sand smoothly.
Primer Application – Apply a high-quality exterior primer evenly for better paint adhesion.
Choosing Paint – Use exterior-grade, weather-resistant paint suitable for wood decks.
Painting Process – Apply the first coat evenly, then a second coat if necessary for better coverage.
Finishing Touches – Touch up any uneven areas and allow ample drying time.
Maintaining the Deck:
Regular Inspections – Periodically check for wear, such as peeling paint or loose boards.
Cleaning Routine – Sweep regularly and clean with a mild cleaner as needed.
Repainting – Plan to repaint or restain every few years to maintain the protective coating.
Monitoring for Damage – Look for wood rot and repair or replace damaged boards promptly.
Winter Care – In snowy areas, remove snow promptly to prevent moisture damage.
Pest Control – Check for termites or other wood-damaging pests and take appropriate action.
Sealing Joints – Seal the deck’s joints and edges every few years to prevent water infiltration.

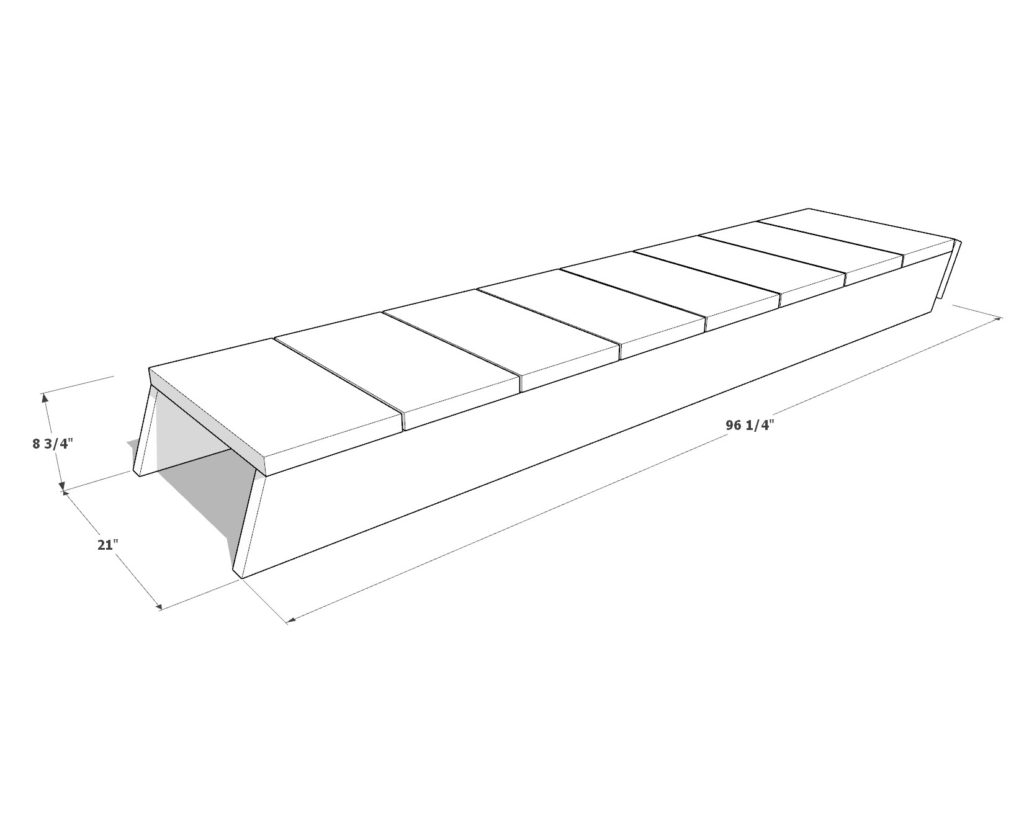
Ramp Dimensions
Step 1: Constructing the Ramp Frame
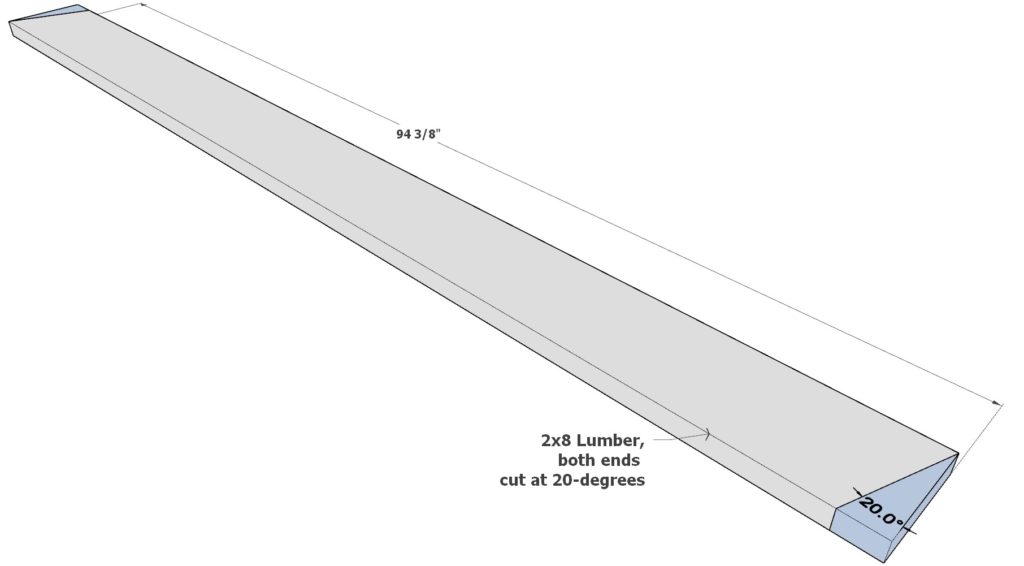
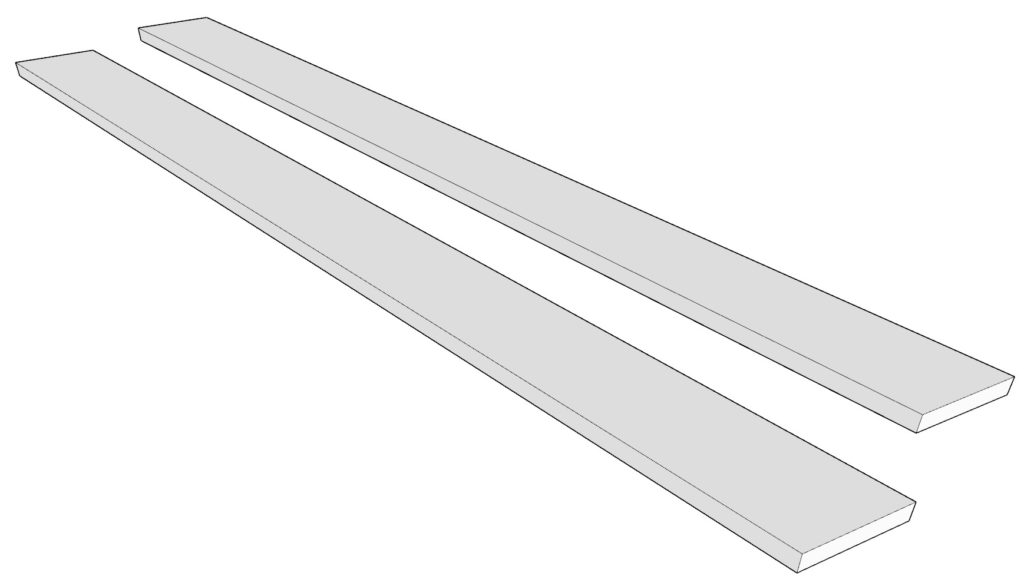
Cutting Ramp Supports:
- Begin by cutting two 94-3/8 inch 2×8 lumber boards. Ensure that both ends of each board are cut at a 20-degree angle for the proper slope.
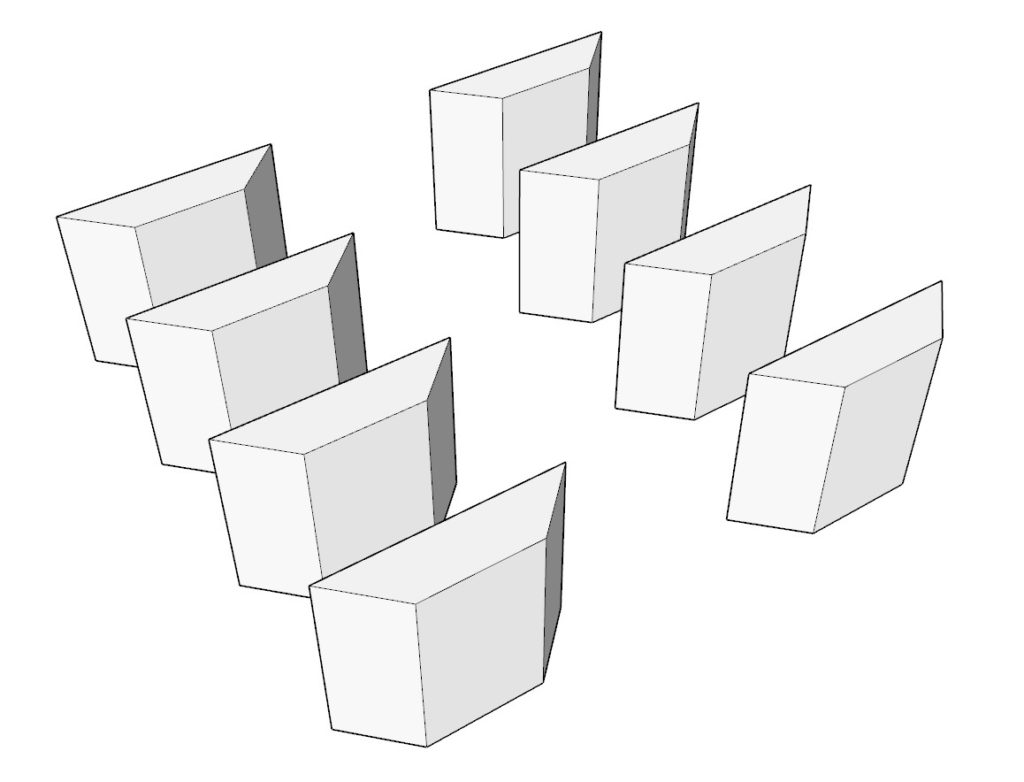
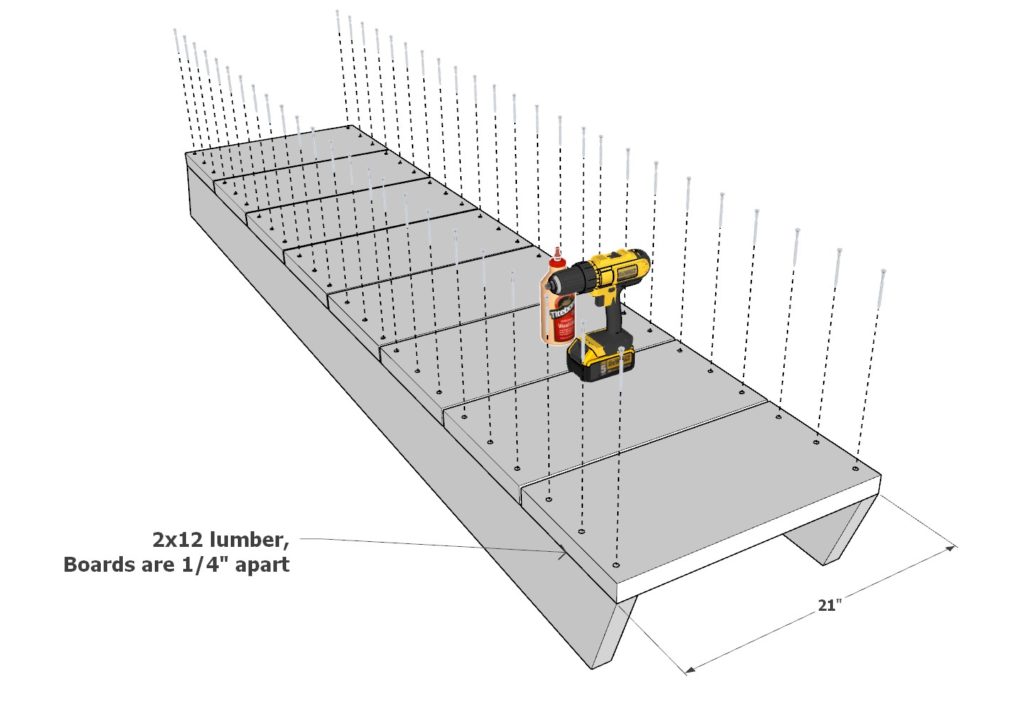
Attaching Ramp Treads:
- Arrange eight 21-inch long 2×12 lumber boards across the ramp frame. These will serve as the ramp treads.
- Space the treads approximately 1/4 inch apart for consistent spacing and better grip.
- Secure each tread to the ramp supports using 3.5-inch screws and wood glue for a strong, stable assembly.
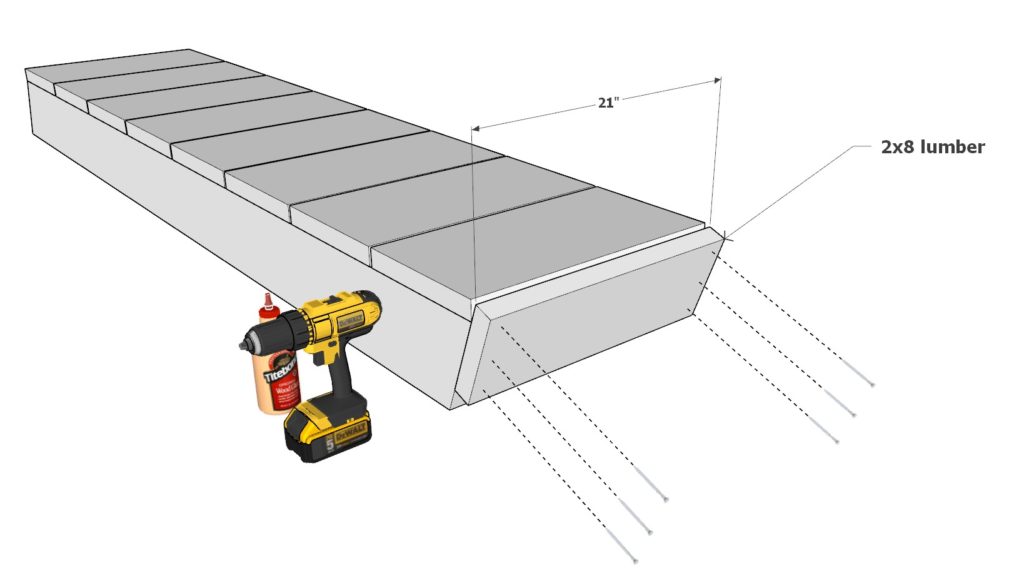
Adding Additional Support:
- Place a 21-inch long 2×8 lumber piece across the ramp for extra support.
- Secure this piece with 3.5-inch screws, ensuring it is properly aligned and firmly attached.
- Make two identical ramp components
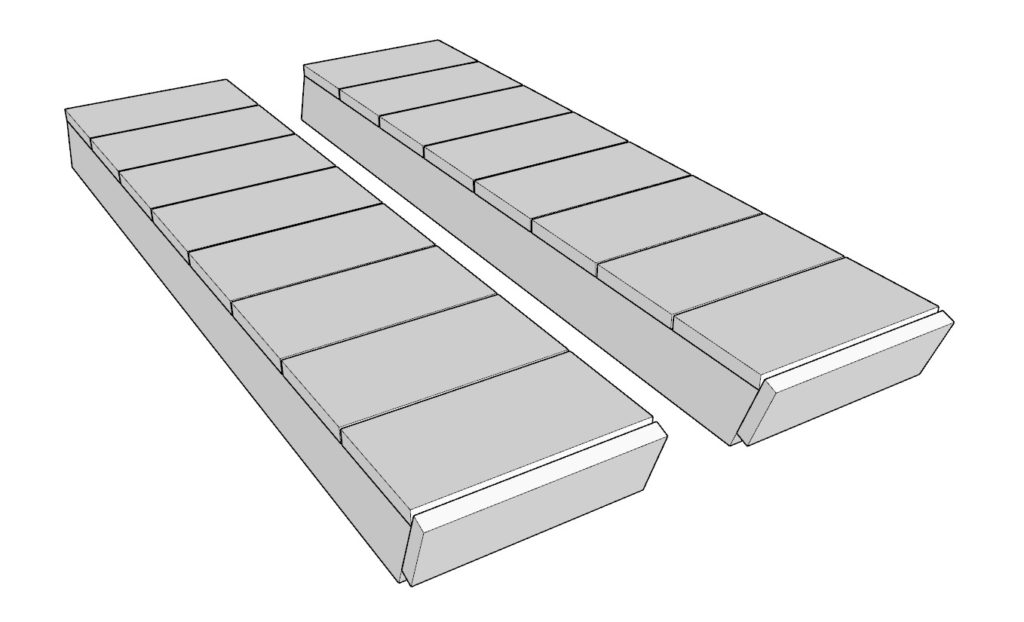
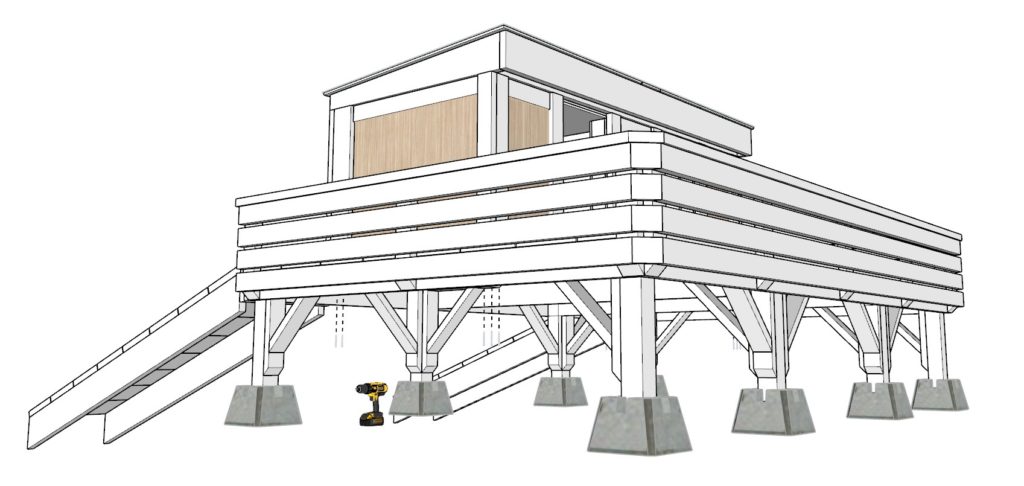
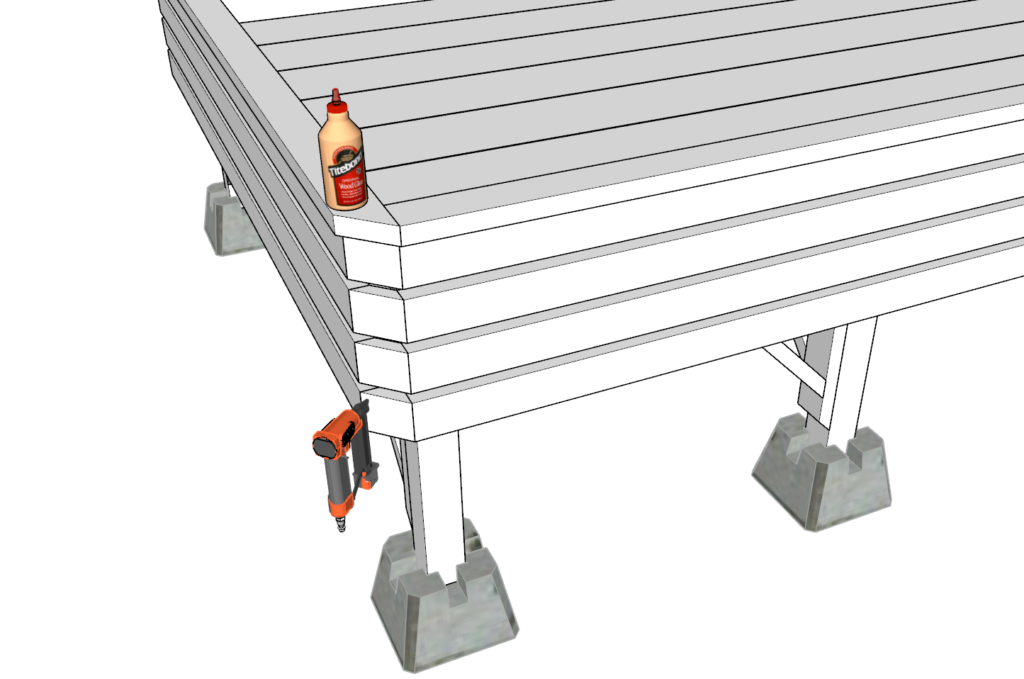
Next Step: Attaching Ramps to Doghouse Deck and Securing Doghouse
Positioning the Ramps:
- Choose the placement for the ramps based on the diagram – either side-by-side or at the deck’s ends.
- Align the ramps with the deck to ensure a smooth transition. Note that the ramps are intentionally longer than needed. This extra length is designed to be buried or cemented into the ground for enhanced stability and durability.
Securing Ramps to Deck:
- Attach each ramp to the deck using wood glue and 2.5-inch screws.
- Use a generous number of screws along the length of the ramp, especially at the point where the ramp meets the deck, to ensure a robust and stable connection.
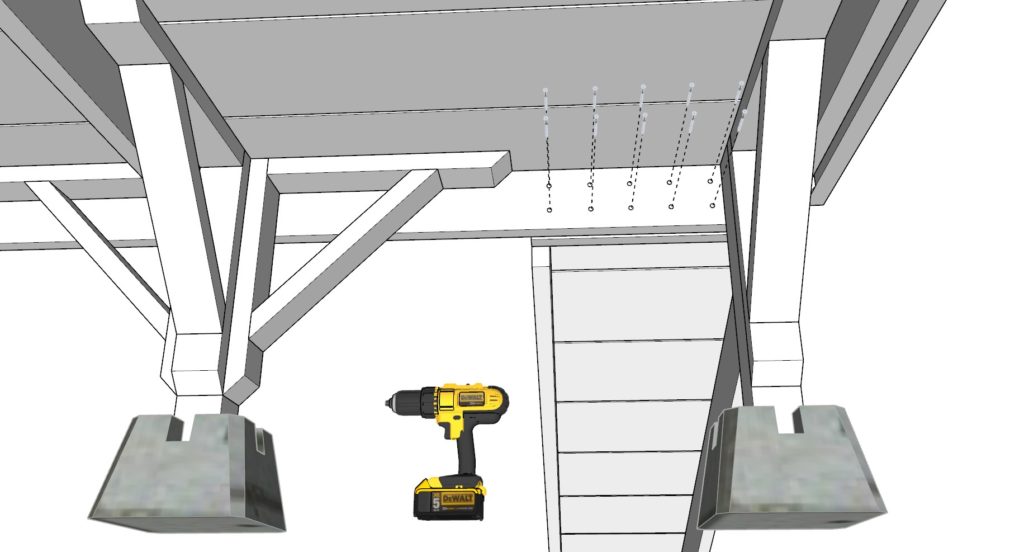
Attaching the Doghouse:
- Position the doghouse on the deck in its designated spot.
- Secure the doghouse from underneath the decking. Drive 2.5-inch screws upward through the bottom of the decking boards into the 2×4 and 2×6 casing components of the doghouse.
- Distribute the screws evenly for consistent support and stability.