DIY fire pit overview:
Propane fire pits are becoming increasingly popular amongst those looking to enjoy a cozy outdoor setting. With a propane fire pit, you can enjoy an outdoor fire without the mess and smoke of a wood–burning pit. These fire pits are also much more convenient and require minimal maintenance.
A gas fire pit is a great way to add warmth and ambiance to your outdoor living space. It’s an attractive and efficient way to enjoy the outdoors without the mess and smoke associated with traditional wood burning fires. Gas fire pits are easy to use and maintain. Some benefits of the gas fire pit and outdoor living are listed below.
The first benefit of a gas fire pit is convenience. With a gas fire pit, you can light it up and enjoy a warm fire in minutes. You don’t have to worry about collecting and storing wood, or dealing with the smoke and soot associated with a traditional wood burning fire. You also don’t have to worry about cleaning up the ashes afterwards. All you have to do is turn on the gas, light it up, and you’re ready to go.
Another benefit of a gas fire pit is the ability to control the heat. Unlike a wood burning fire, you can adjust the flame to create the perfect temperature for your outdoor gathering. This is great for those cooler nights, when you want to enjoy a warm fire without being overwhelmed by the heat. You can also adjust the flame to create a cozy atmosphere for your outdoor seating area.
Gas fire pits also create less pollution than a traditional wood burning fire. The flames are cleaner and produce less smoke, which is better for your health and the environment. They also burn more efficiently, providing more heat with less gas.
DIY fire pit specifications:
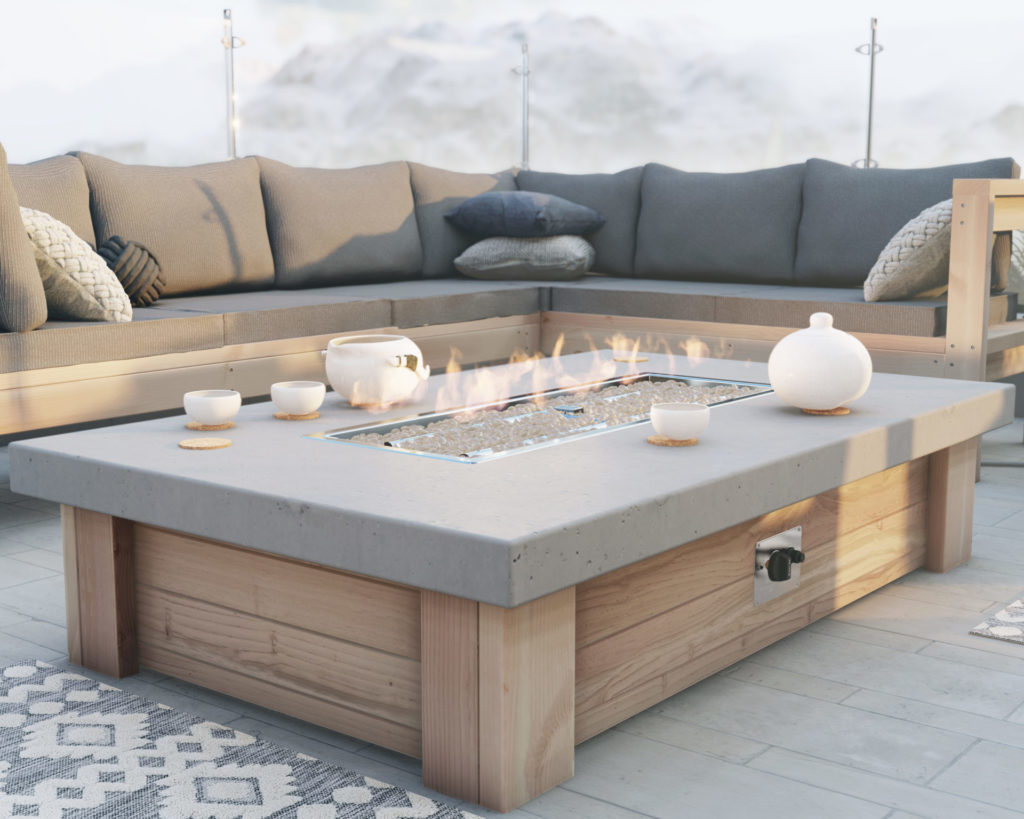
This DIY fire pit features a wide cement slab that is reinforced with wire mesh that directly connects with the fire pit wooden frame.
The cement slab is designed to provide superior strength and durability, making it ideal for long lasting use. The finish on the slab is smooth and helps to provide a beautiful and elegant look as well as protecting the cement from the elements.
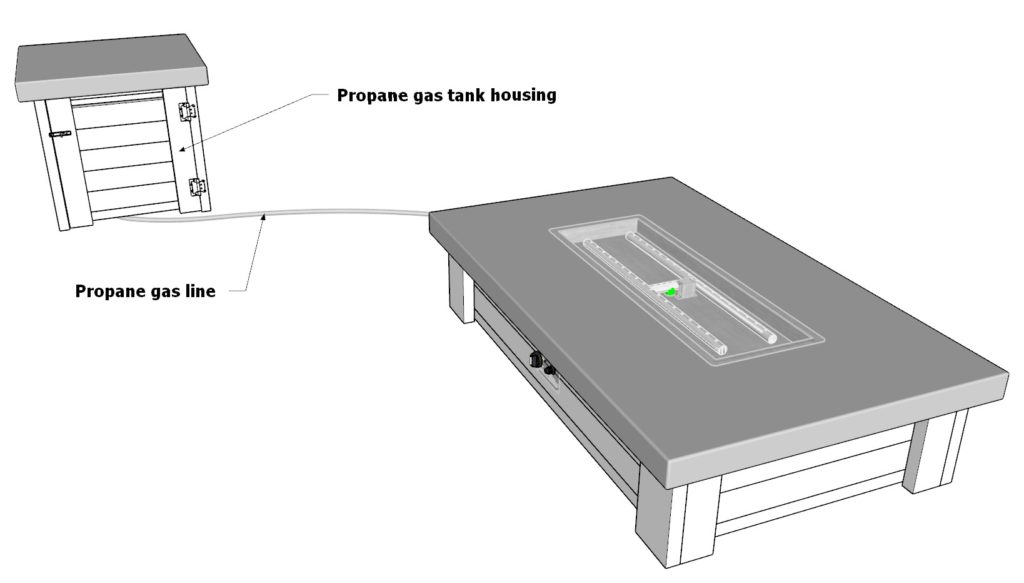
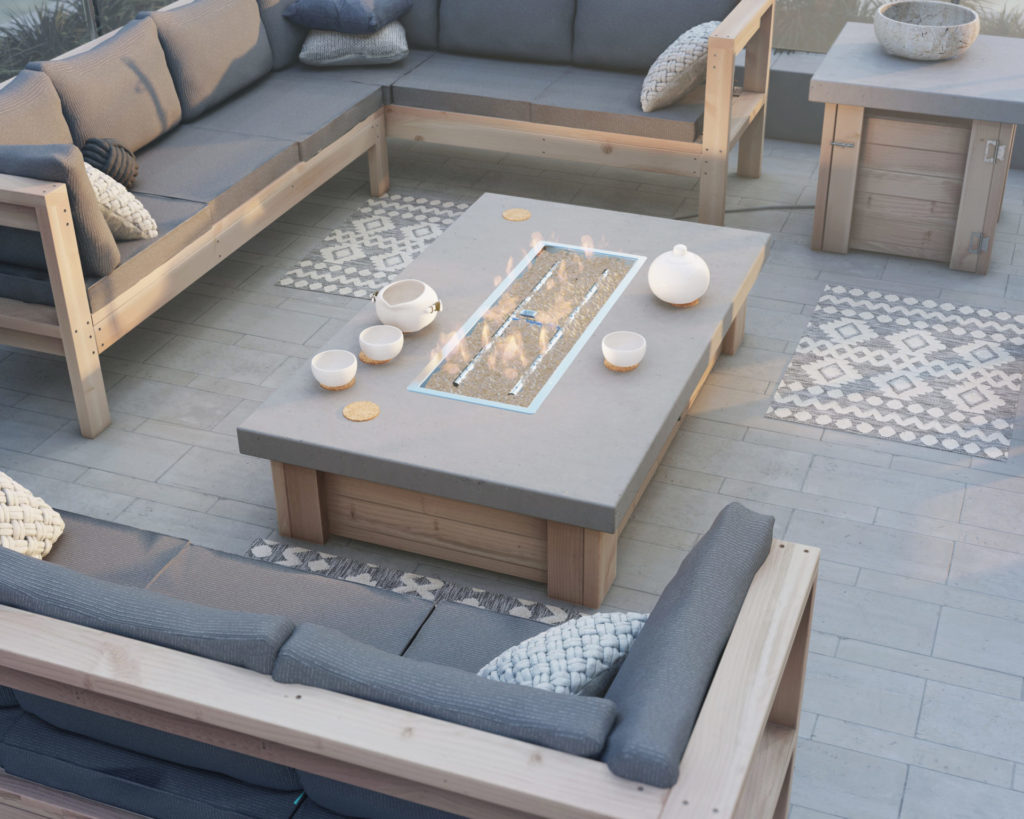
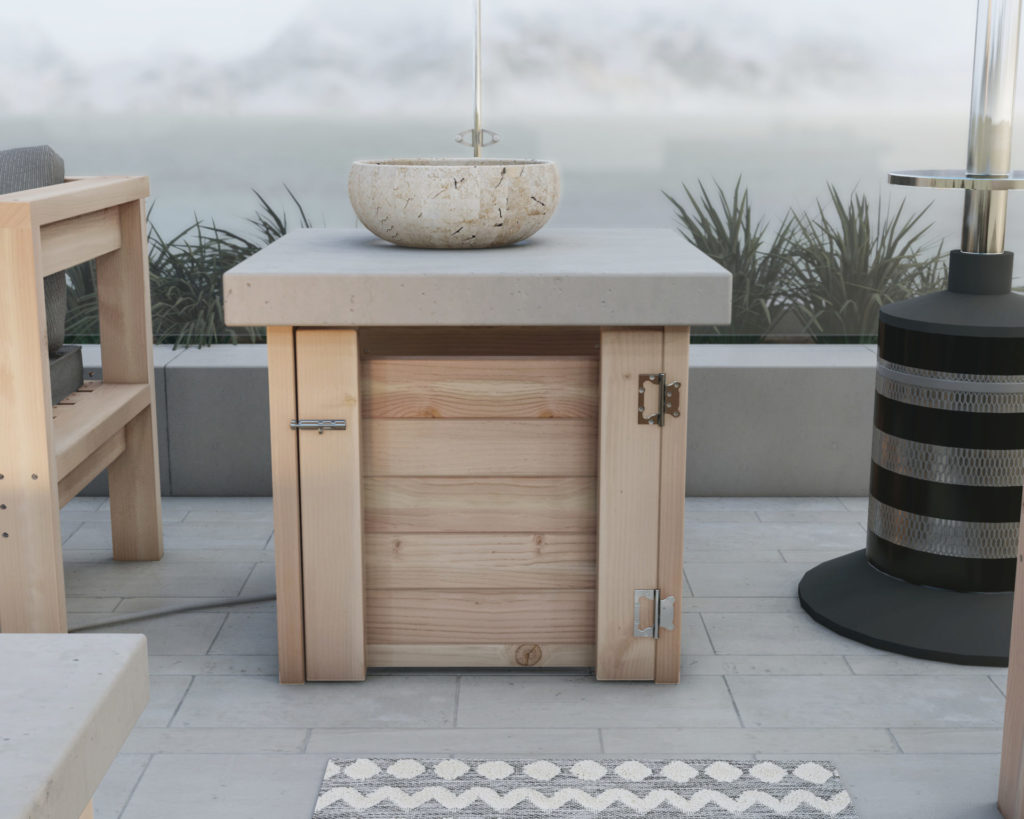
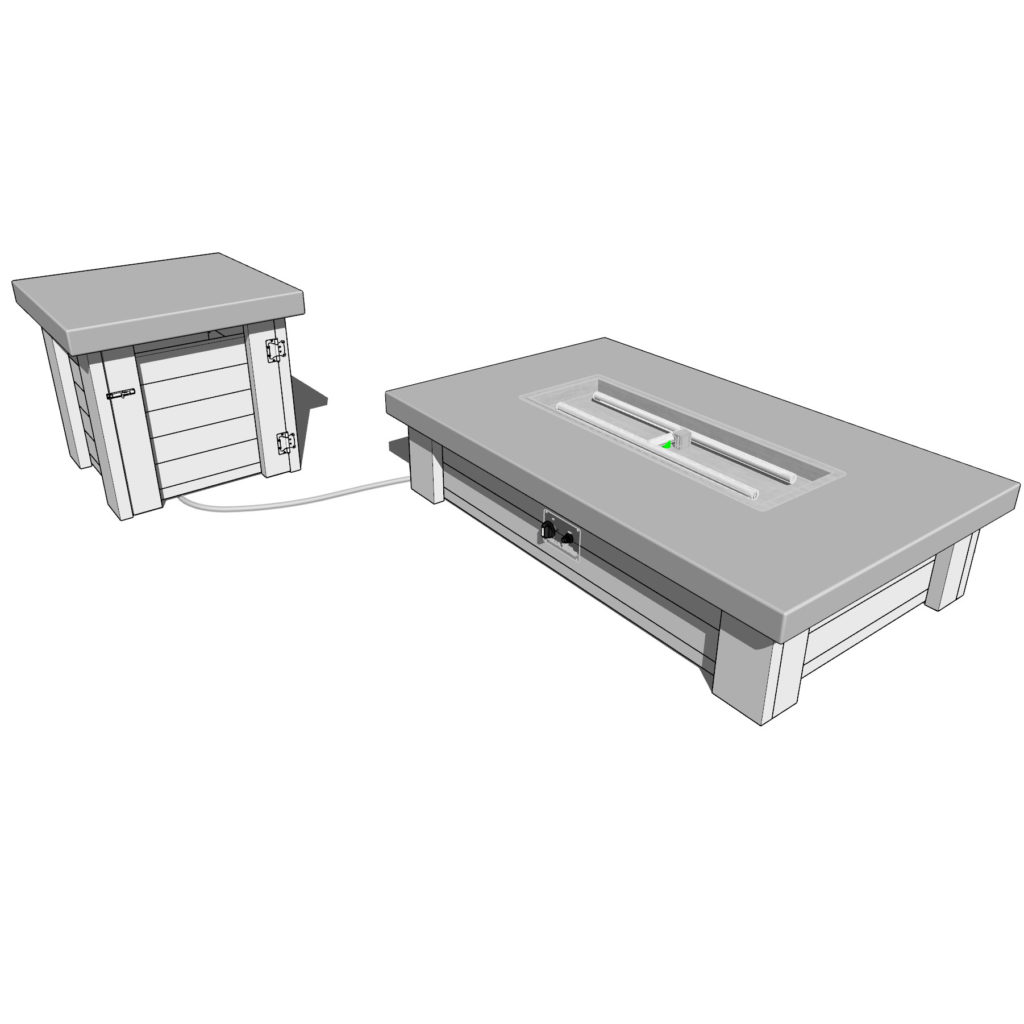
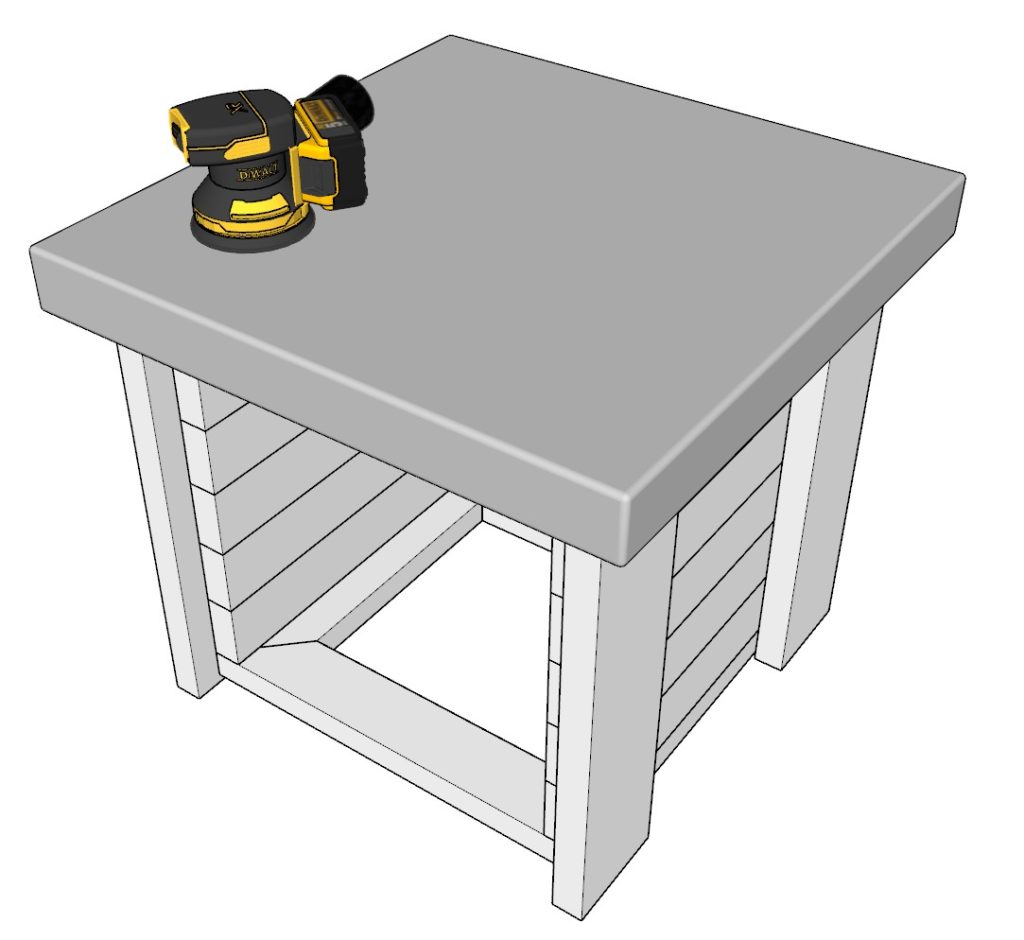
The fire pit can be connected directly to a house gas line or to the propane tank housing side table. This table is designed to hold a standard size propane tank and to conceal it from view. A gas hose runs between the propane tank housing and the fire pit.
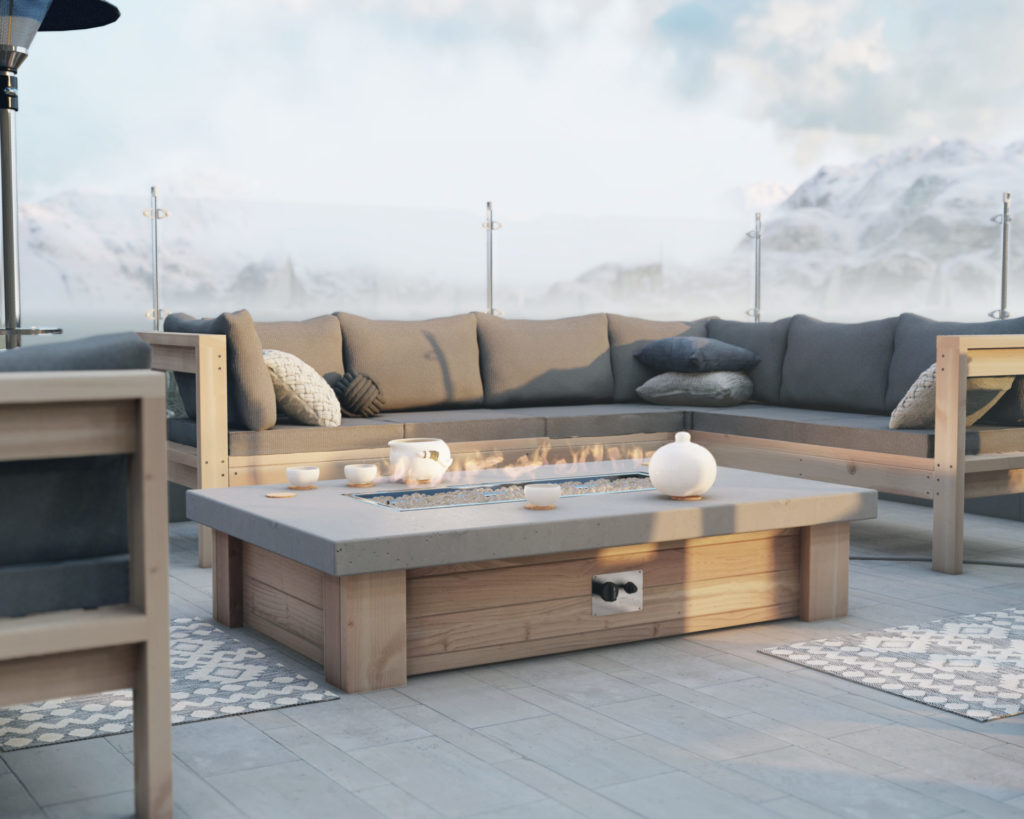
The wide fire pit cement slab is one of my favorite features of this design. It can be used to host outdoor gatherings, while providing a safe and stable space for hot drinks and plates. This wide slab gives you a great area to entertain guests.
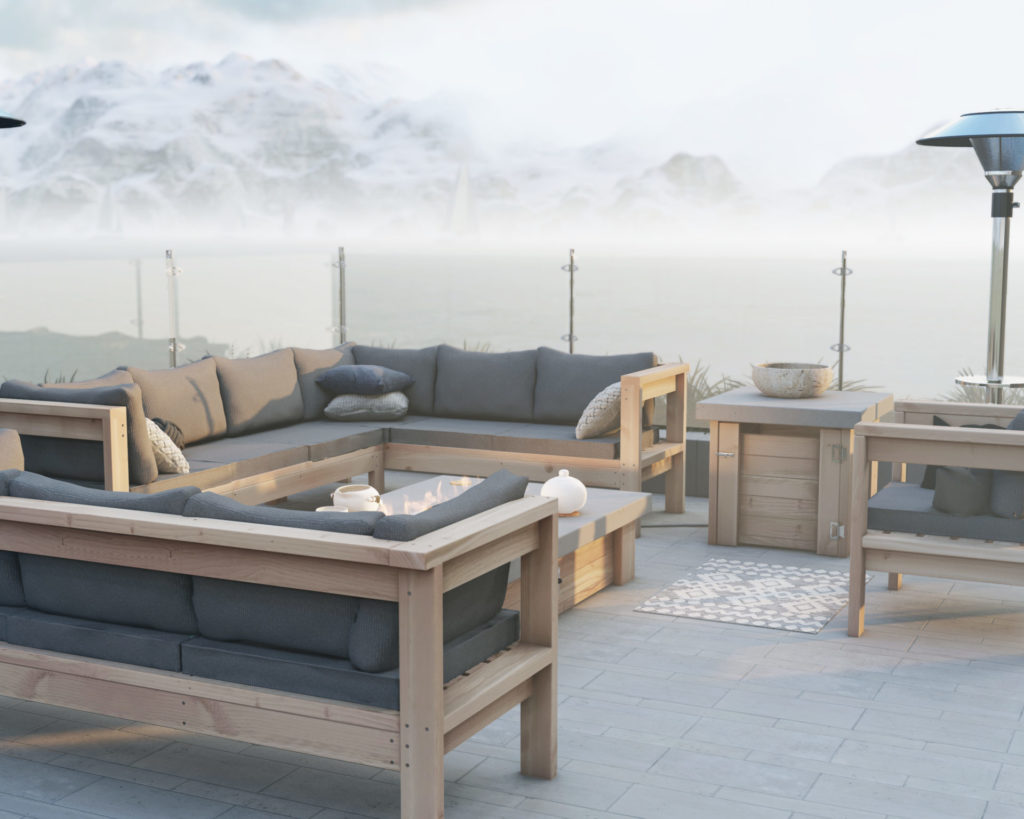
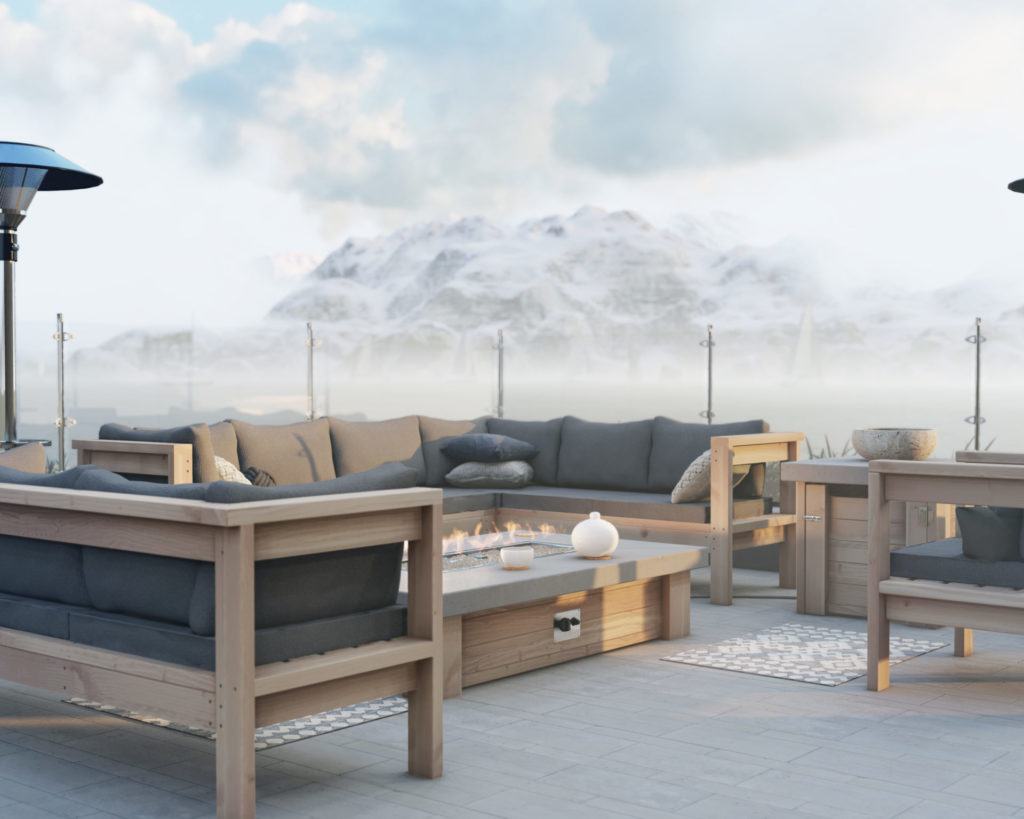
Creating a cozy outdoor gathering space with sectional sofas and chairs around the fire pit
To maximize your fire pit experience and to make events even more enjoyable, you can consider building some sectional sofas and chairs to place around the fire pit. Here are some of the benefits of having sectional sofas and chairs around your outdoor fire pit:
Comfort: Sectional sofas and chairs are designed to be comfortable and cozy, providing a great place to relax and enjoy your outdoor living space.
Versatility: With the various sections, you can arrange and rearrange the furniture to accommodate different groups of people.
Visibility: The open design of the sectional furniture allows for everyone to be able to see each other and the fire pit.
Safety: The higher back and arms of the sectional sofas and chairs provide a barrier between anyone near the fire pit and the heat.
Plans for the DIY sectional can be found here.
Plans for the DIY couch can be found here.
Plans for the DIY chair can be found here.
Who can build this DIY fire pit?
This DIY fire pit is fairly easy to assemble with the step–by–step instructions provided in this post. I believe this would be a great project for beginners to woodworking and anyone with minimal woodworking experience. The DIY plans offered in this post include helpful description, images, diagrams, helpful links, and more to ensure that the DIY build is smooth, efficient, and easy.


Time to build
About 10 hours
Total cost of build
About $800
Skill level required
Beginner
Download the PDF plans
DIY propane fire pit PDF plans
What is included in the PDF download?
Easy to read step by step instructions
Material list
Tools needed
3D illustrations
Recommended tools/materials
Available with purchase of DIY PDF plan. Thank you for your support and making this website possible!
Shopping list and cut list
Available with purchase of DIY PDF plan. Thank you for your support and making this website possible!
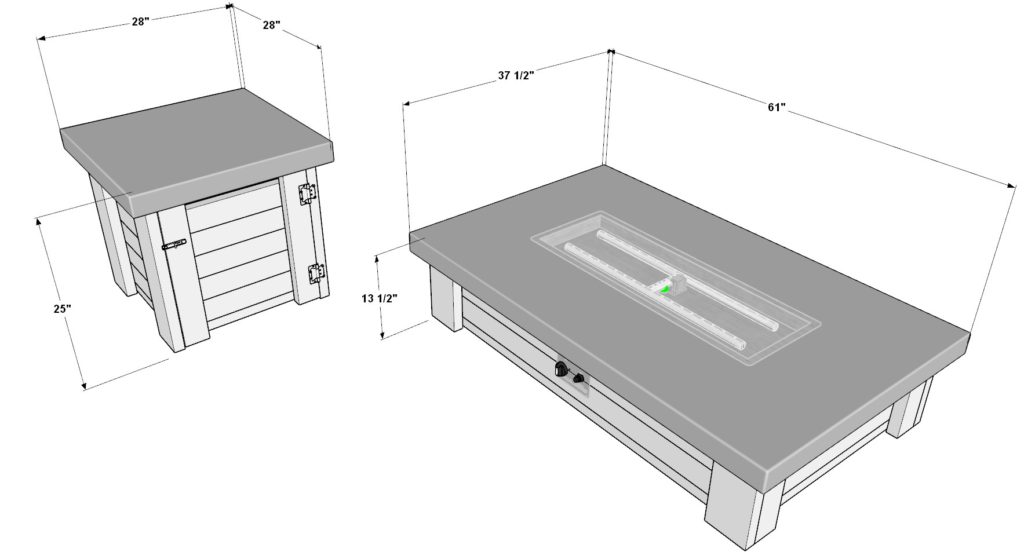
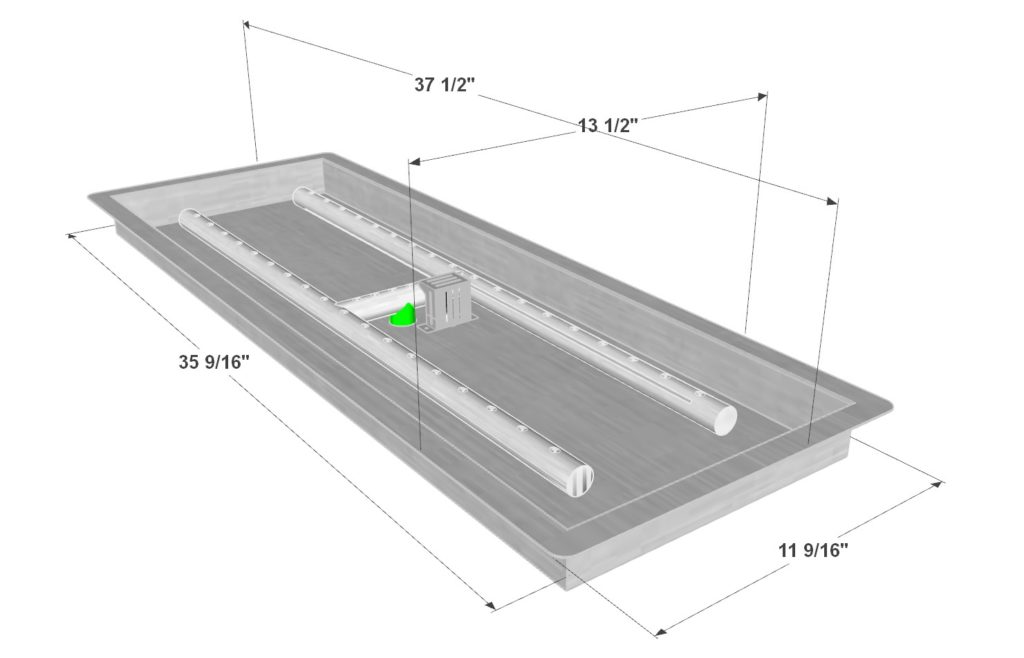
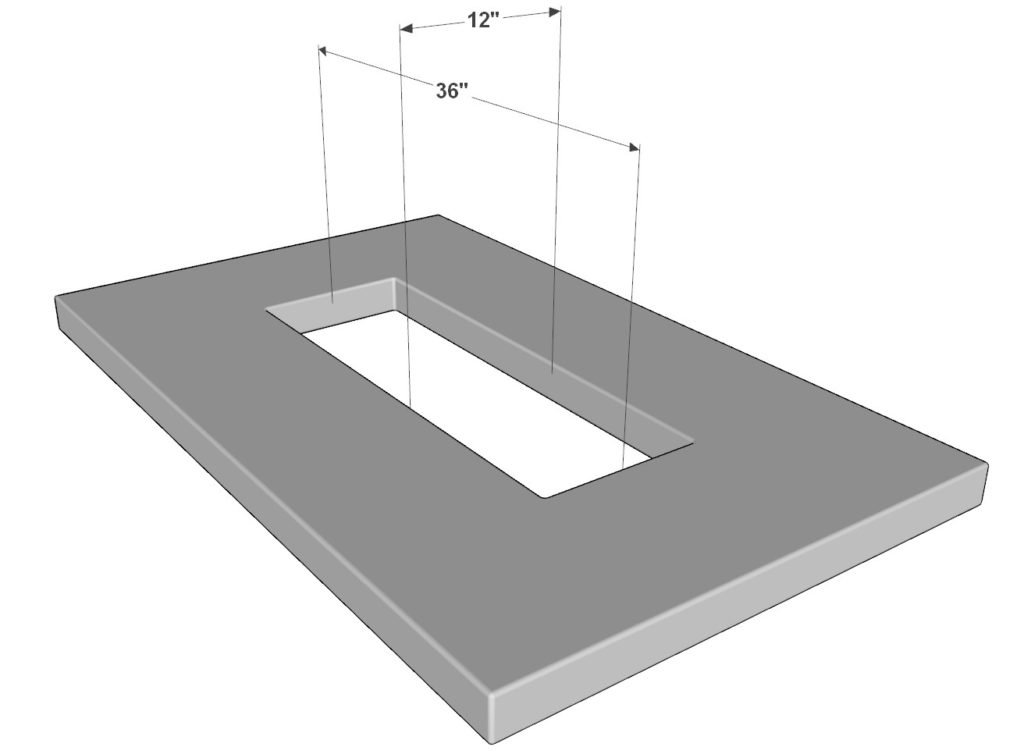
The DIY plans demonstrate the use of a 13-1/2″ x 37-1/2″ H Burner Kit & Pan for Rectangle Fire Pit insert. The DIY plans provide detailed instructions for constructing a fire pit that will fit a rectangular H Burner of this particular size, but other sizes of fire pits can also be constructed using these plans. One would simply need to modify the size of the hole in the fire pit slab.
The fire pit hole in the fire pit slab needs to be larger than the base of the H Burner insert but smaller than the lip of the insert. This ensures that the insert fits nicely into the fire pit slab.
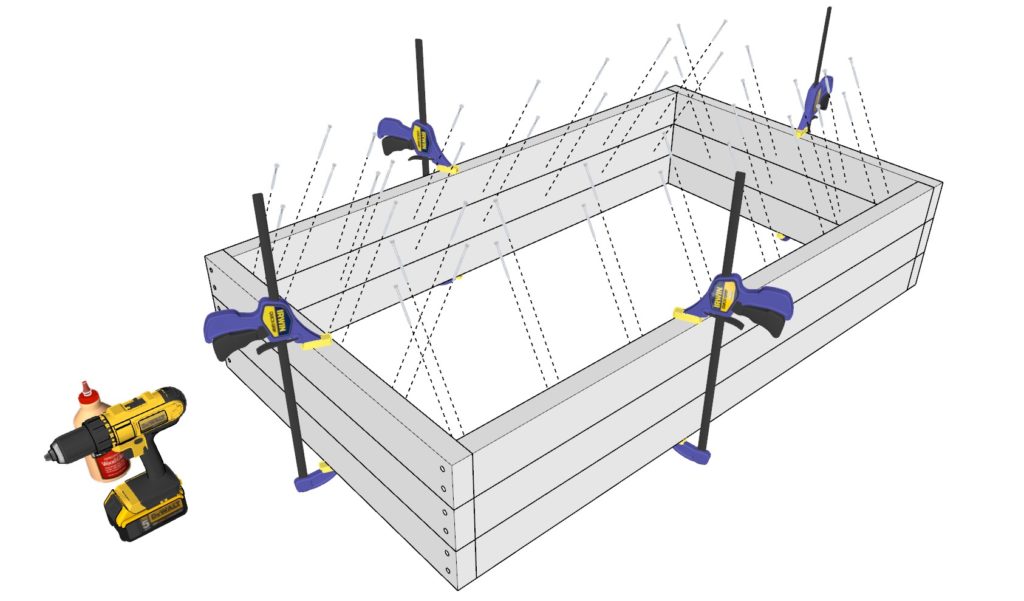
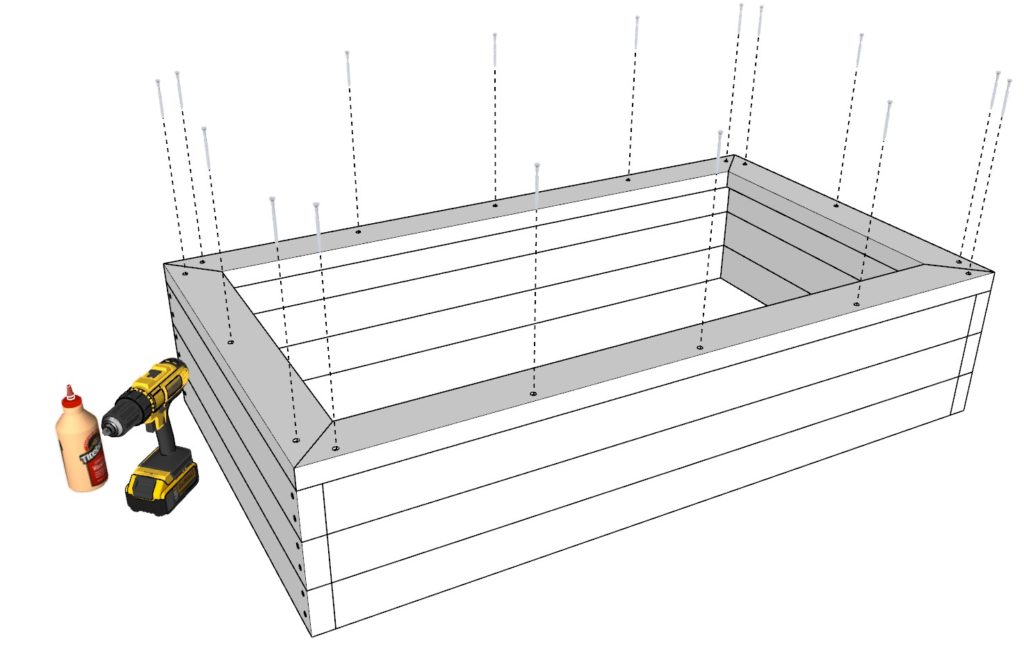
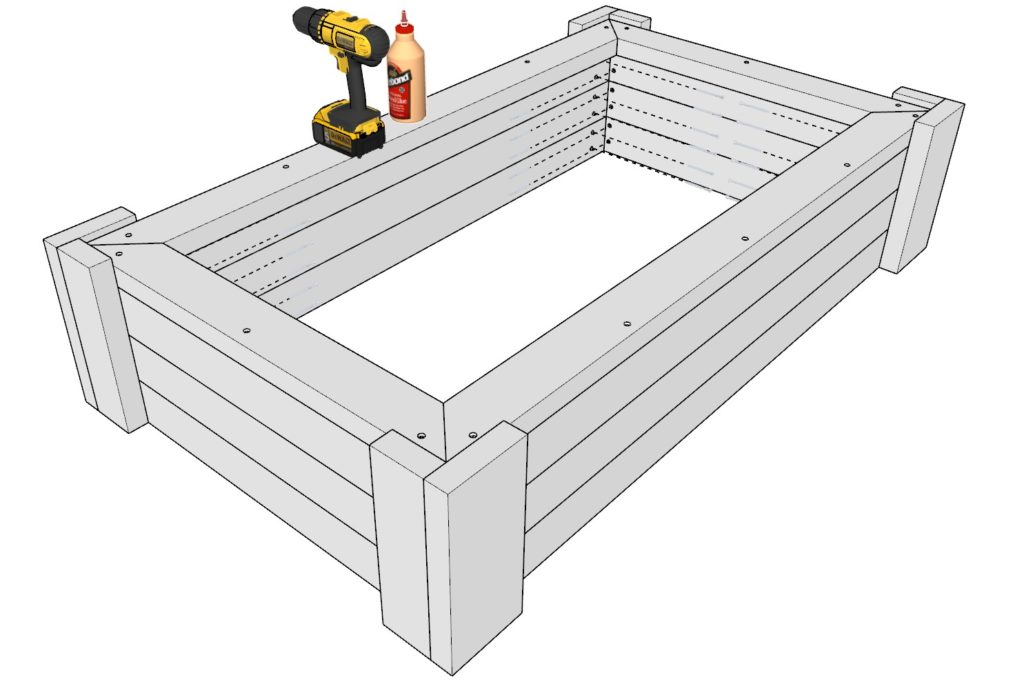
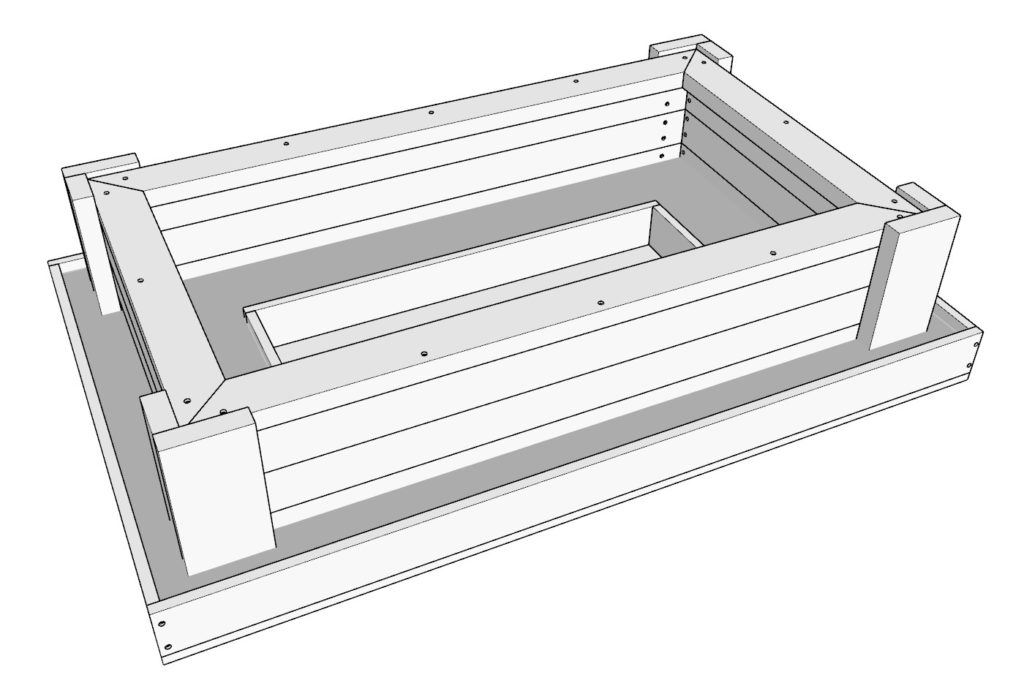
Step 1 (DIY fire pit frame construction)
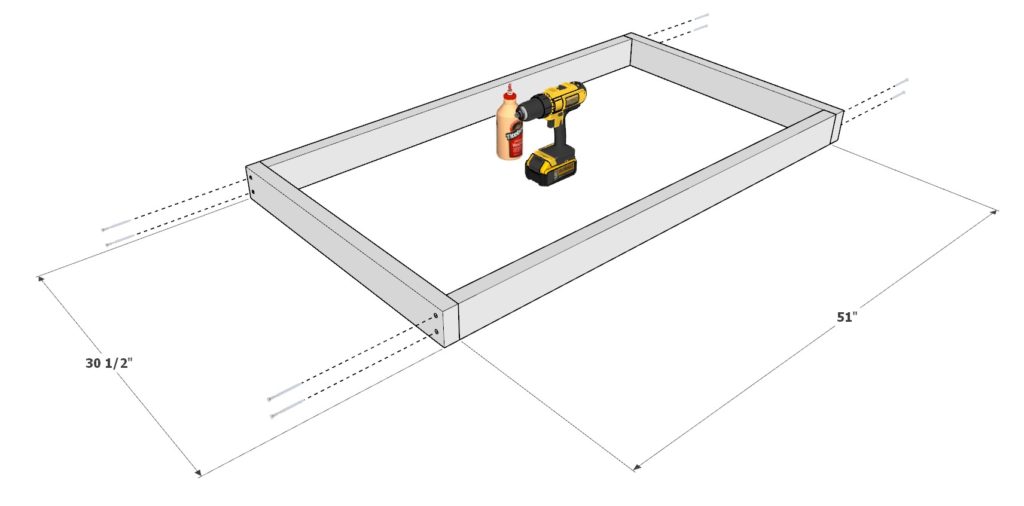
First, assemble to fire pit frame out of 2×4 lumber.
Take two 41 inch 2×4 lumber pieces and two 30-1/2 inch 2×4 lumber pieces and arrange them as shown below. Add glue, predrill holes to prevent the wood from splitting, and add 3.5 inch screws.
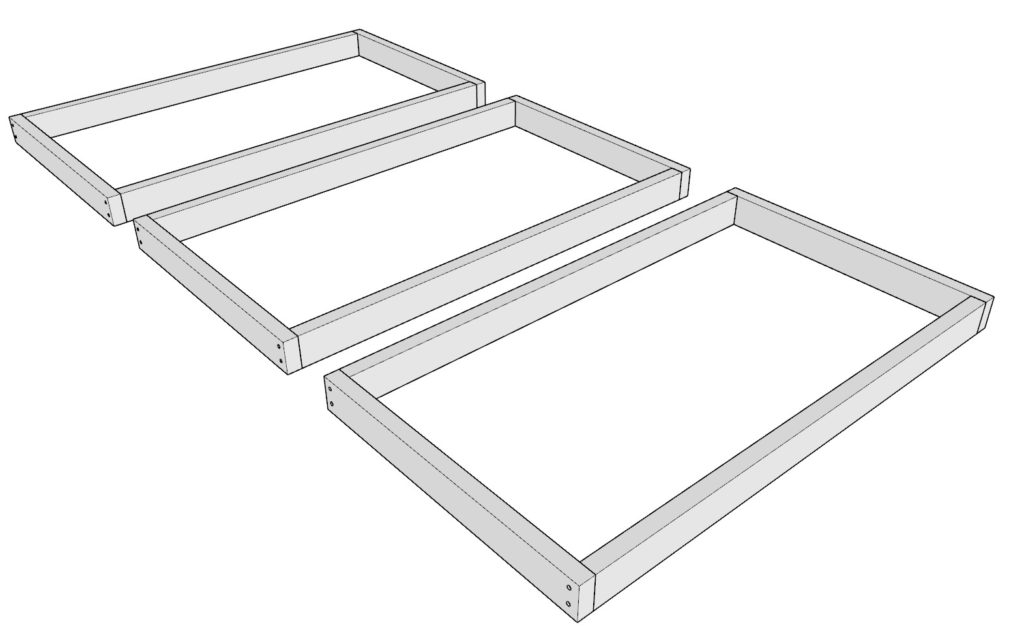
Make three identical frame pieces.
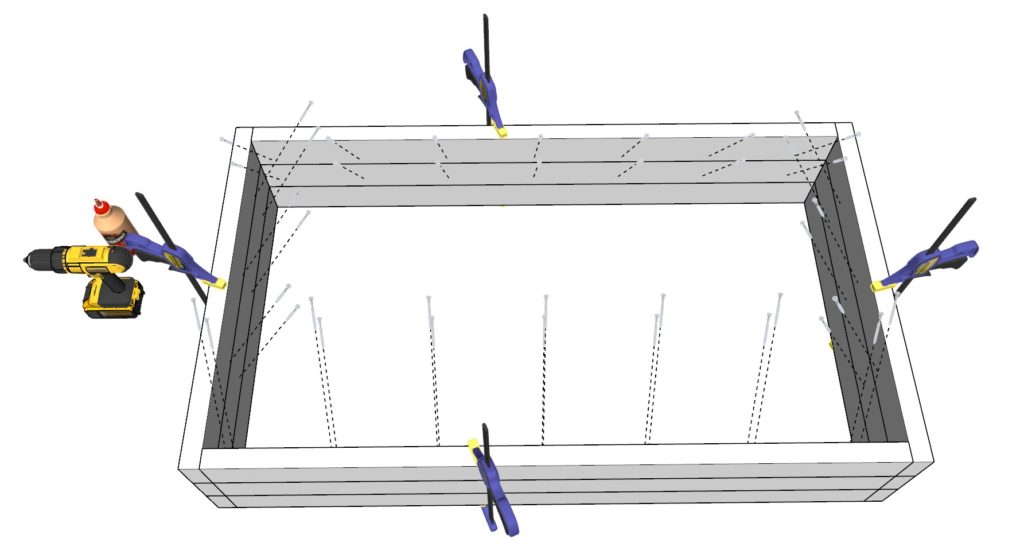
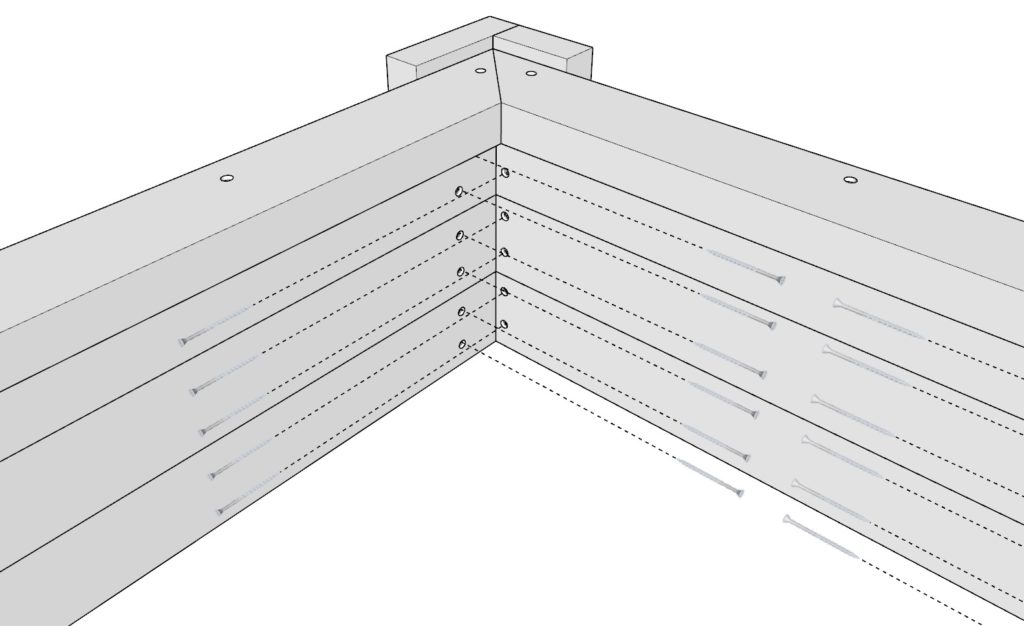
Next, join the three frame pieces adding glue, predrilling, and adding 3.5 inch screws diagonally. Using clamps can make this process easier. Additionally, you can assemble the frame one layer at a time for a more neat fit.
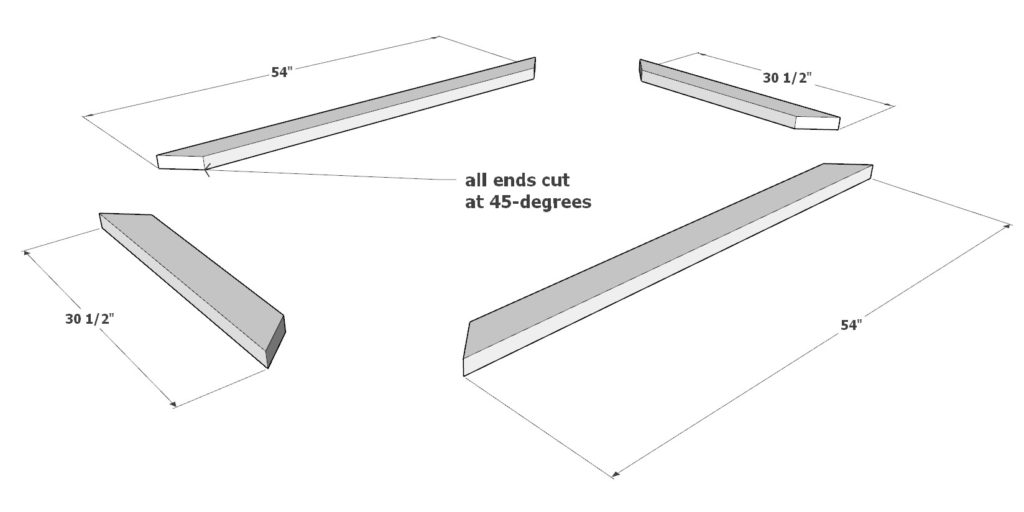
Step 2 (Adding a lip and legs to DIY fire pit)
Next, add a bottom lip to the DIY fire pit base.
Take two 54 inch 2×4 lumber pieces cut at a 45-degree angle on both ends, and two 30-1/2 inch 2×4 lumber pieces cut at a 45-degree angle on both ends and attach them to the base of the fire pit.
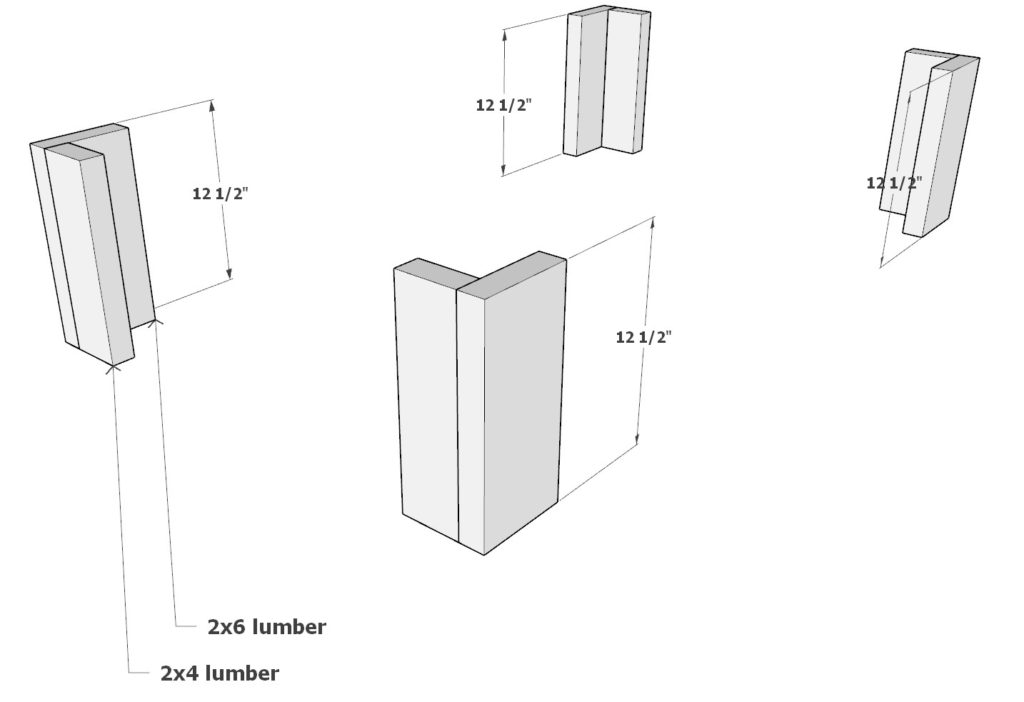
Next, add the legs of the fire pit.
Take four 12-1/2 inch 2×4 lumber pieces and four 12-1/2 inch 2×6 lumber pieces and arrange them as shown below.
Attach these using generous amounts of glue, predrill, and add 2.5 inch screws from the inside of the fire pit frame.
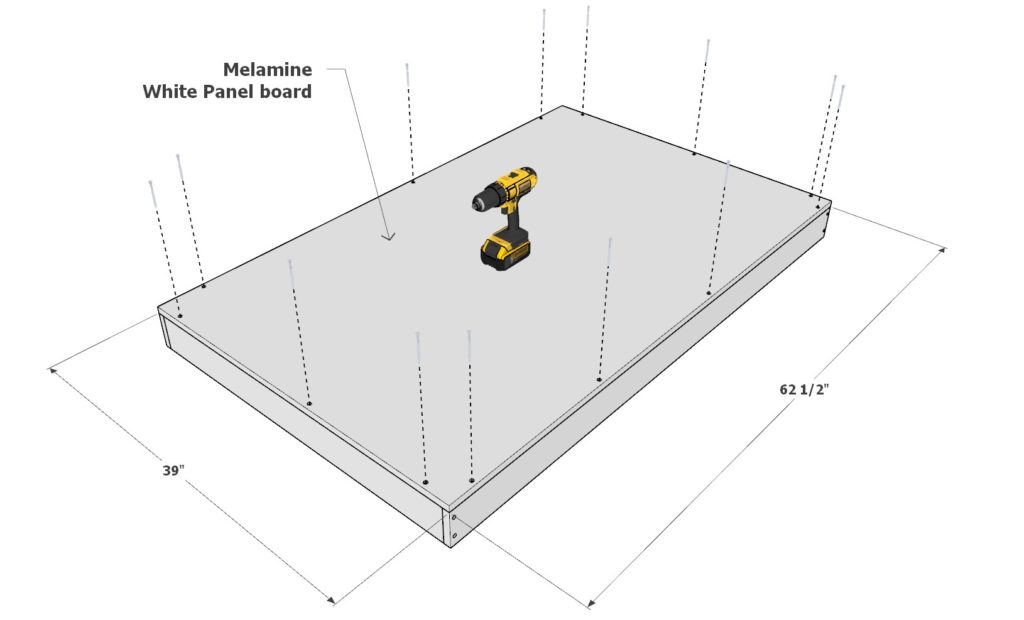
Step 3 (Construction of the melamine frame for cement slab)
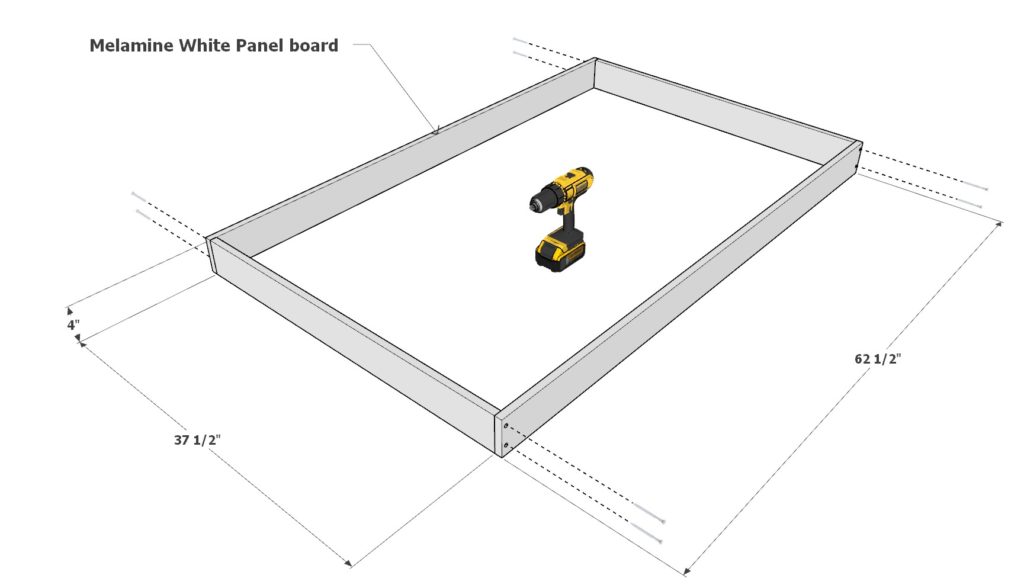
Next, construct the melamine white panel board frame for pouring the cement.
Take two 37-1/2 inch x 4 inch melamine white panel boards and two 62-1/2 inch x 4 inch melamine white panel boards. Attach these together with 2.5 inch screws.
Melamine white panel boards can be brittle so use screws sparingly and space them out.
Next, add a 62-1/2 inch x 39 inch Melamine white panel board to the bottom of the frame and attach with 2.5 inch screws.
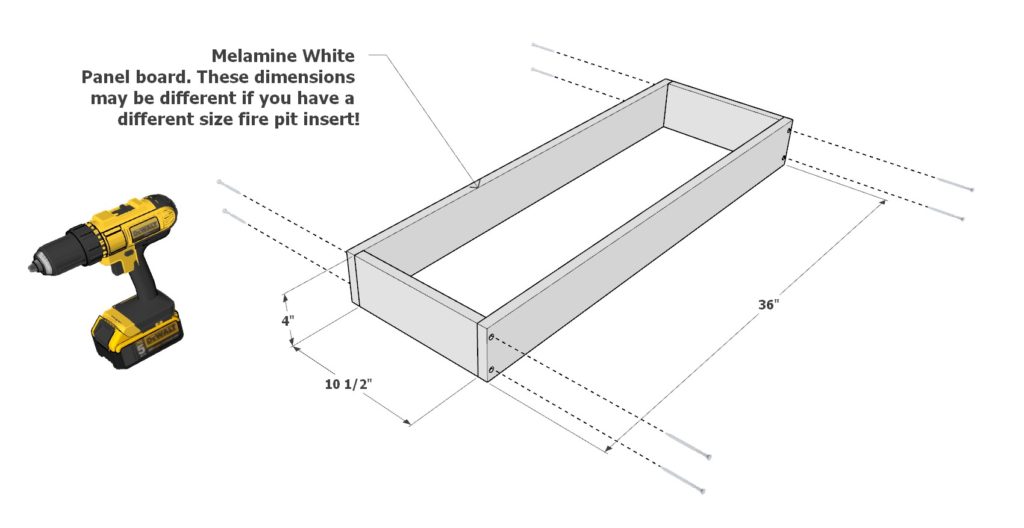
Build an insert that will go in the middle to create the space for the fire pit metal insert.
Take two 36 inch x 4 inch melamine white panel boards and two 10-1/2 inch x 4 inch melamine white panel boards. Attach these together with 2.5 inch screws.
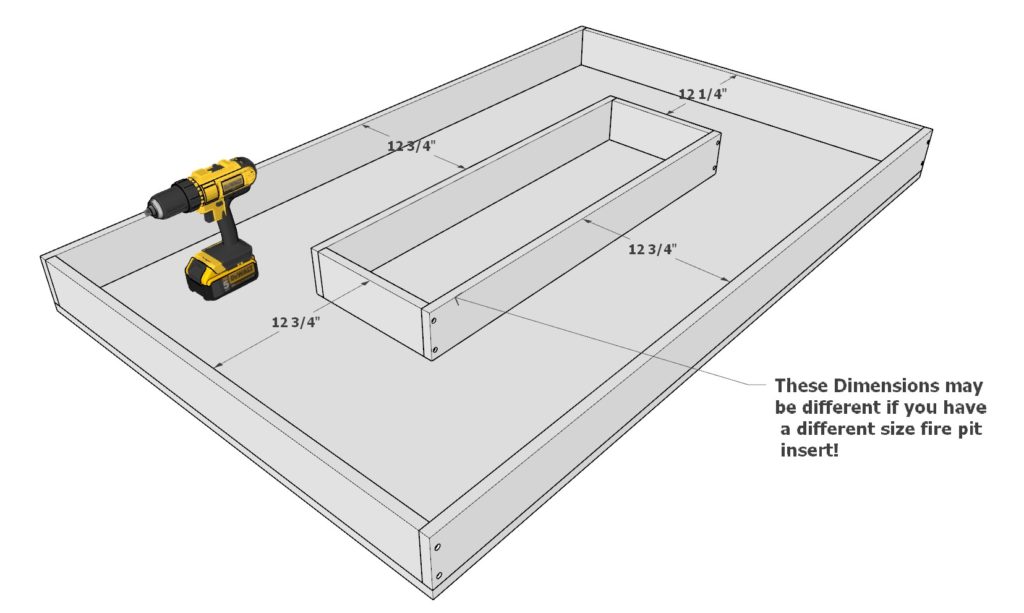
Attach the smaller melamine insert to the center of the larger melamine frame as shown below and secure with 2.5 inch screws.
If your fire pit insert is a little different in size, adjust the smaller melamine insert accordingly.
The fire pit hole in the fire pit slab needs to be larger than the base of the H Burner insert but smaller than the lip of the insert. This ensures that the insert fits nicely into the fire pit slab.
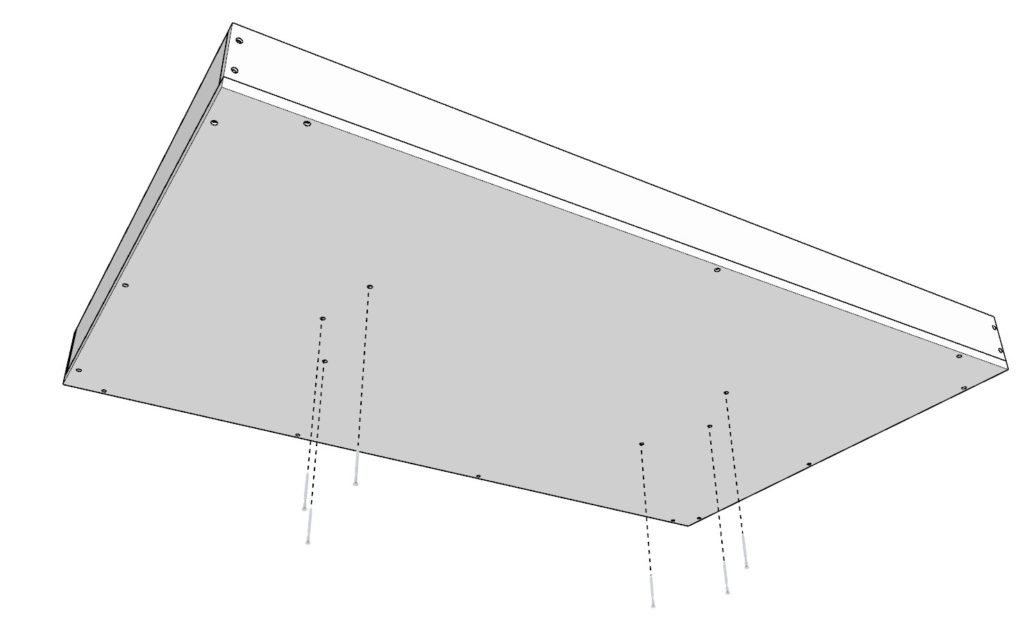
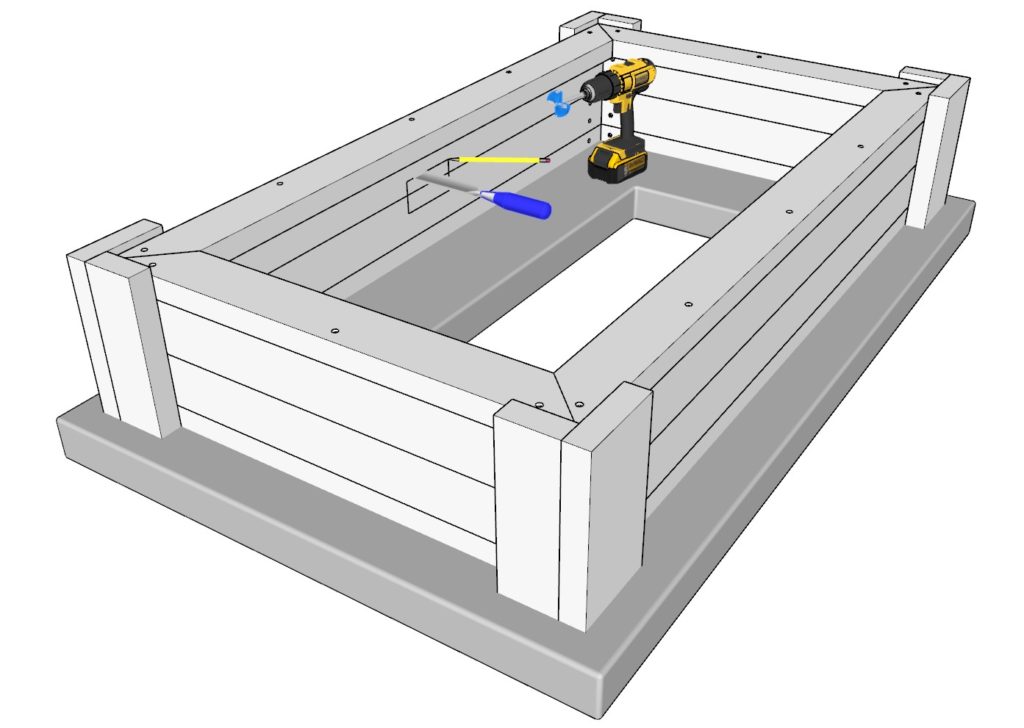
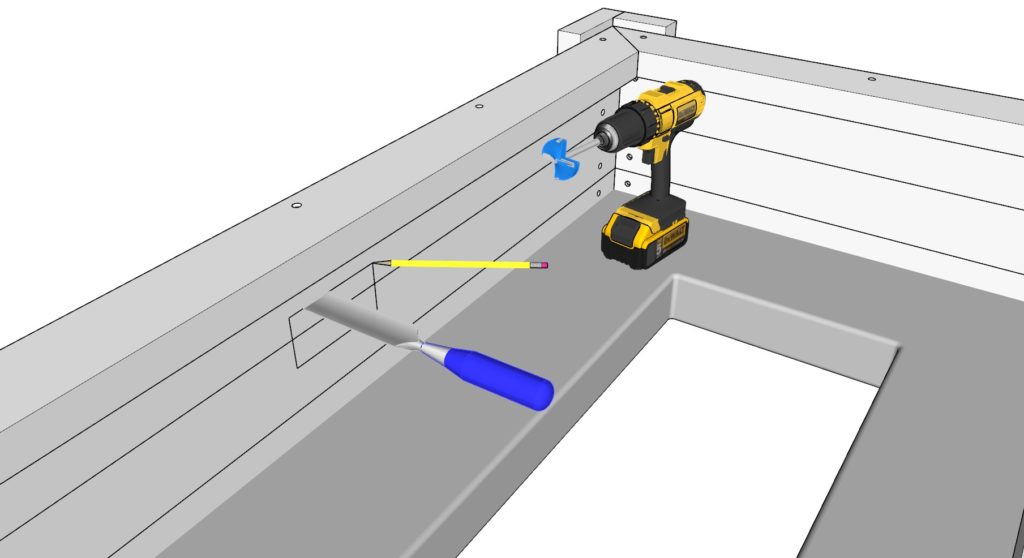
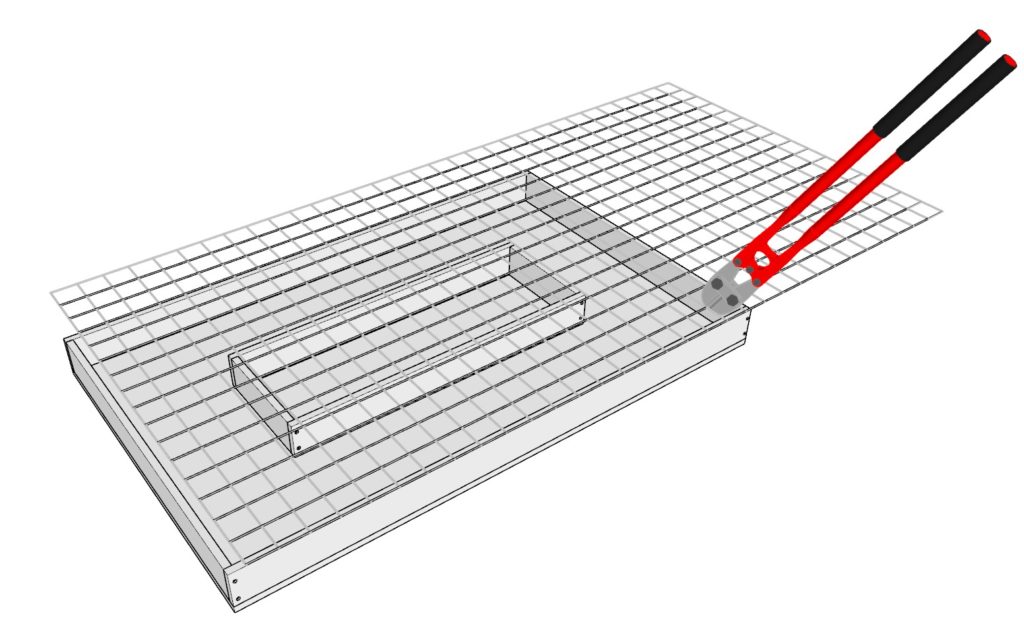
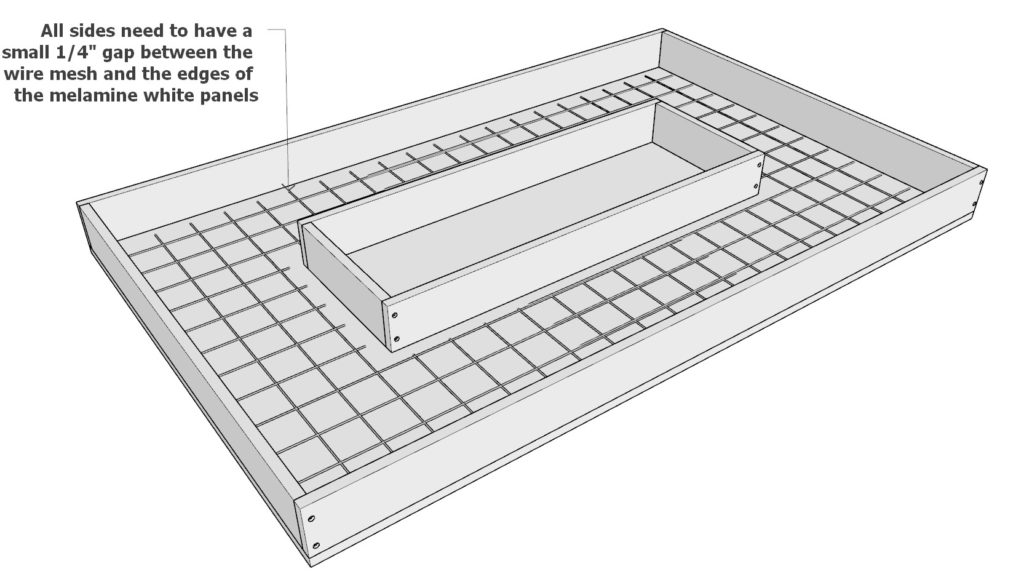
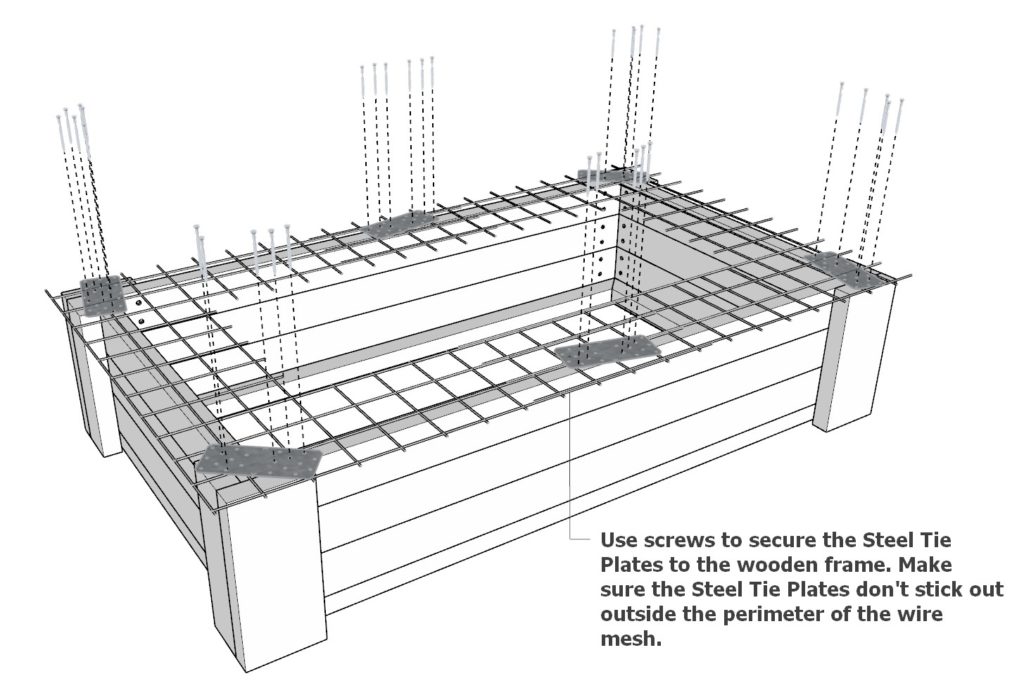
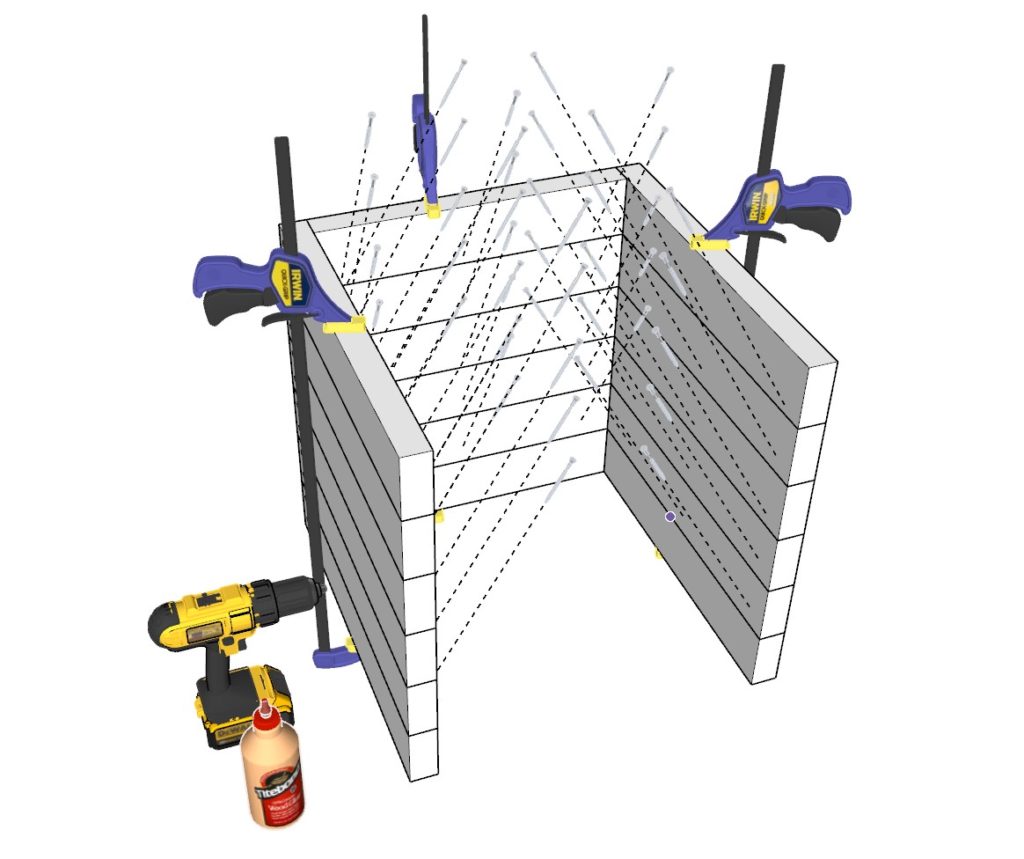
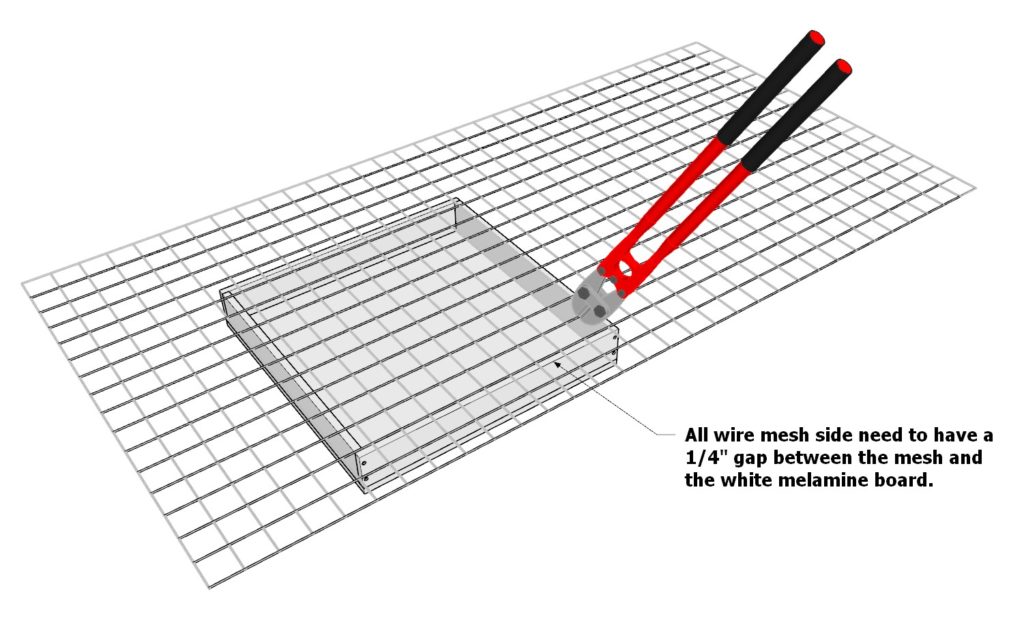
Step 4 (Cutting out and attaching the wire mesh to DIY fire pit frame)
Next, cut out and attach the wire mesh to the DIY fire pit frame.
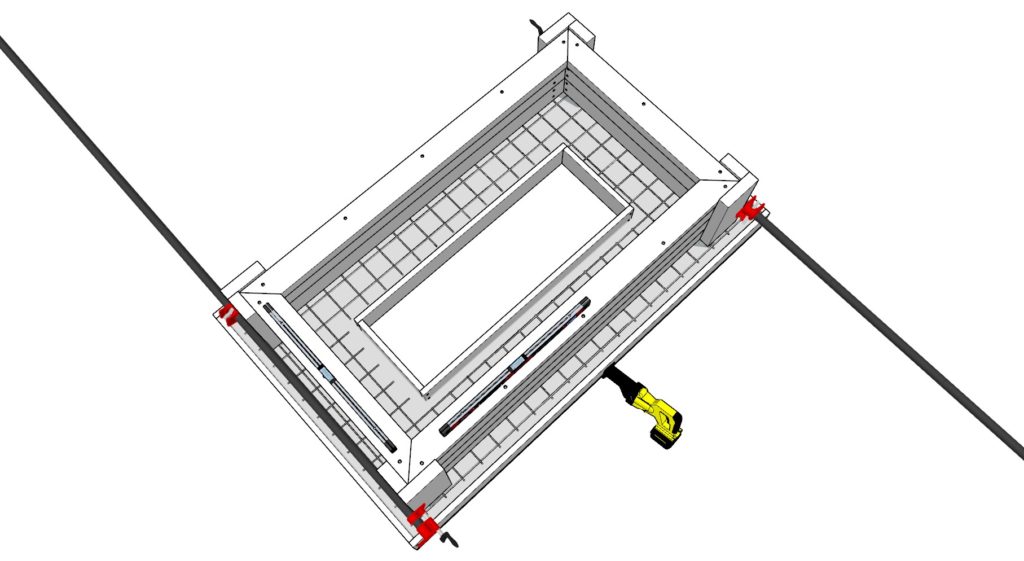
Cut out a a wire mesh insert with similar dimensions to the melamine frame built in the previous step but make sure that the wire mesh has 1/4″ gaps on all sides so that it doesn’t stick out when the final cement slab is completed.
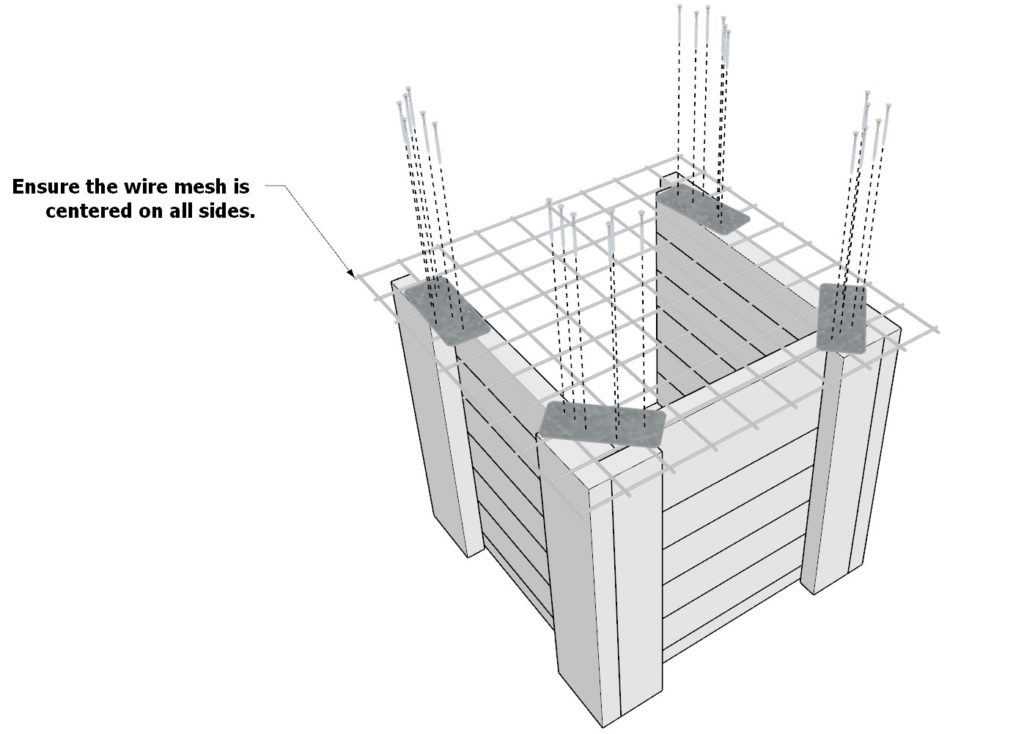
Attach the wire mesh to the fire pit frame. Make sure it is centered. Secure the wire mesh with steel tie plates and screws. Make sure the steel tie plates do not stick out beyond the boundaries of the wire mesh.

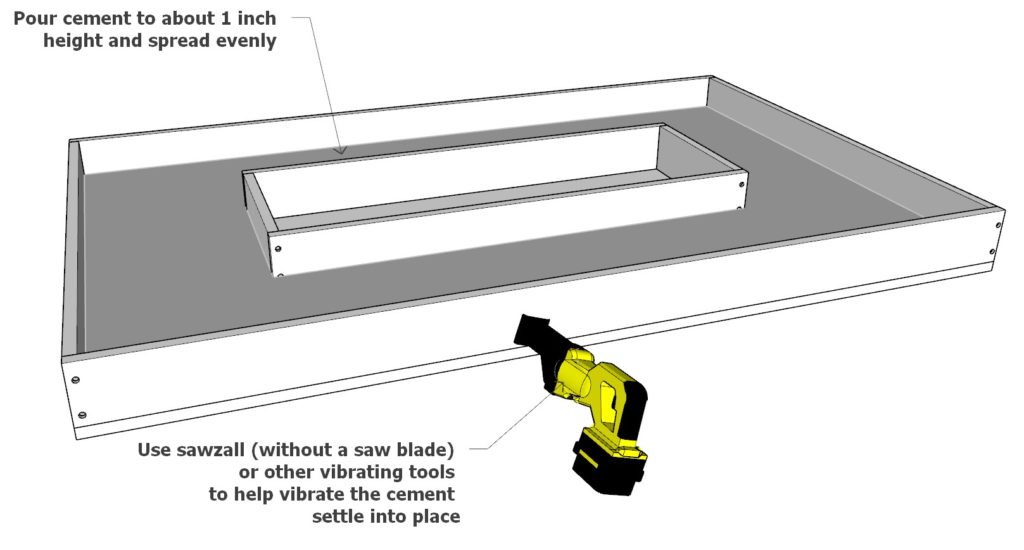
Step 5 (Pouring cement slab)
Next, pour the cement and attach the fire pit frame + mesh to the cement slab.
READ INSTRUCTIONS PRIOR TO POURING THE CEMENT.
For the concrete, I use Quikrete Countertop Concrete Mix 80 lb bags.
Quikrete Countertop Concrete Mix 80 lb is a great choice for making fire pit cement slabs. This product is specifically designed for countertops, so it provides superior strength and durability. It also has a higher compressive strength than other concrete mixes, which makes it more suitable for outdoor applications such as fire pits.
Quikrete Countertop Concrete Mix is composed of a blend of Portland cement, graded sand, and special additives that increase its strength and durability. The Portland cement gives the concrete mix its strength and durability, while the graded sand helps to provide uniformity. The special additives also help to reduce shrinkage and cracking, ensuring a long lasting and durable fire pit cement slab.
The product is also designed to be easy to use. It is pre-blended to the proper consistency and comes in a convenient bag that can easily be mixed with water. This makes it simple to prepare and install, allowing you to quickly create a fire pit cement slab. The product also sets quickly, so you don’t have to wait long before you can start using your fire pit.
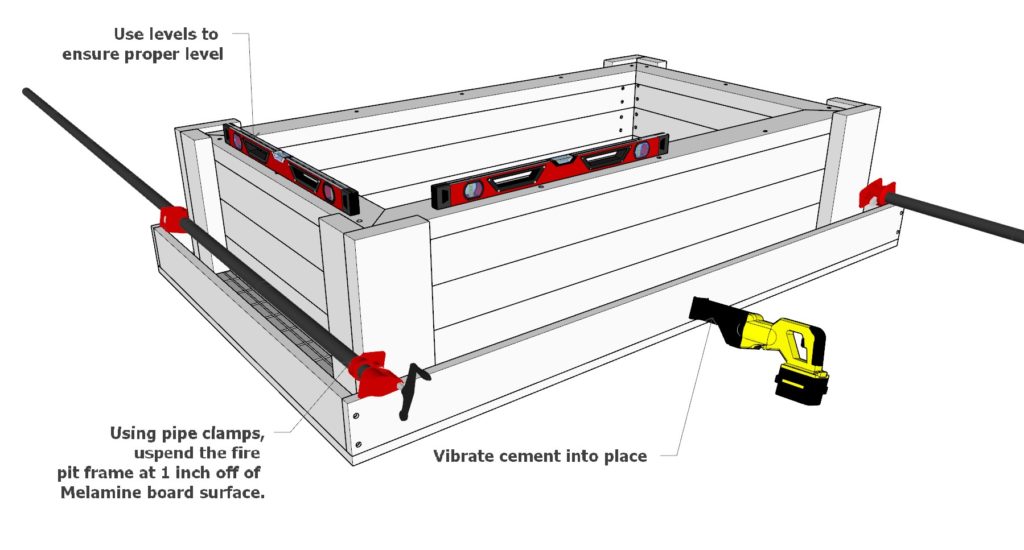
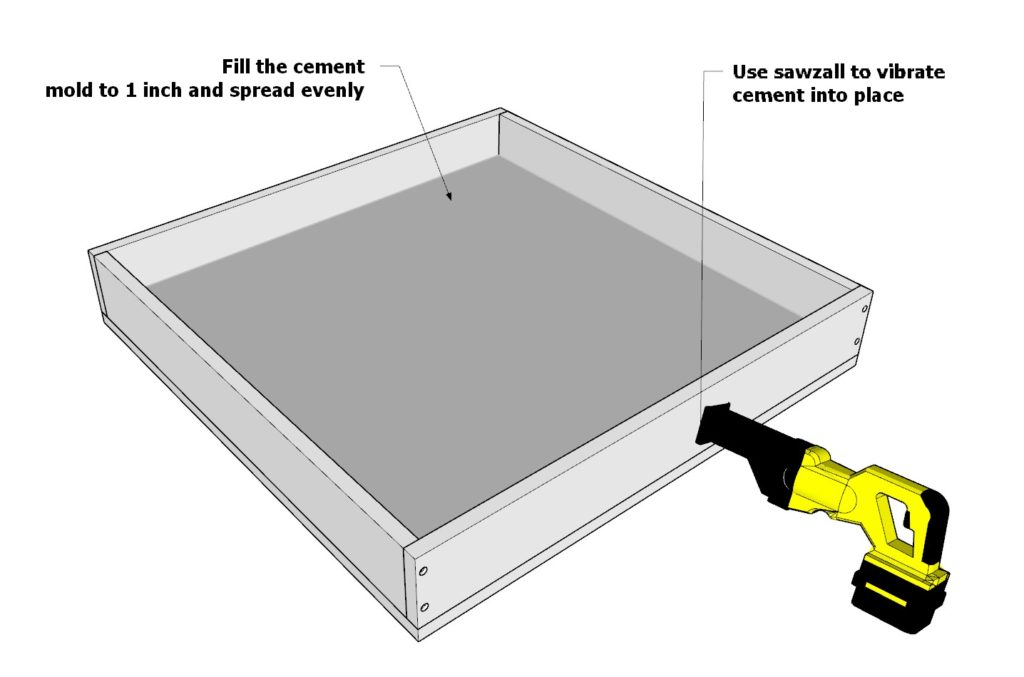
First, take the melamine frame constructed in previous steps and add a 1 inch layer of Quikrete Countertop Concrete Mix. Use a Sawzall (blade removed) to vibrate the cement into place. Make sure the first inch is evenly spread out and is of the same consistency. The rational for pouring a 1 inch layer first is to ensure the surface is one color. I found that the Quikrete Countertop Concrete Mix bags tend to very in color from bag to bag.
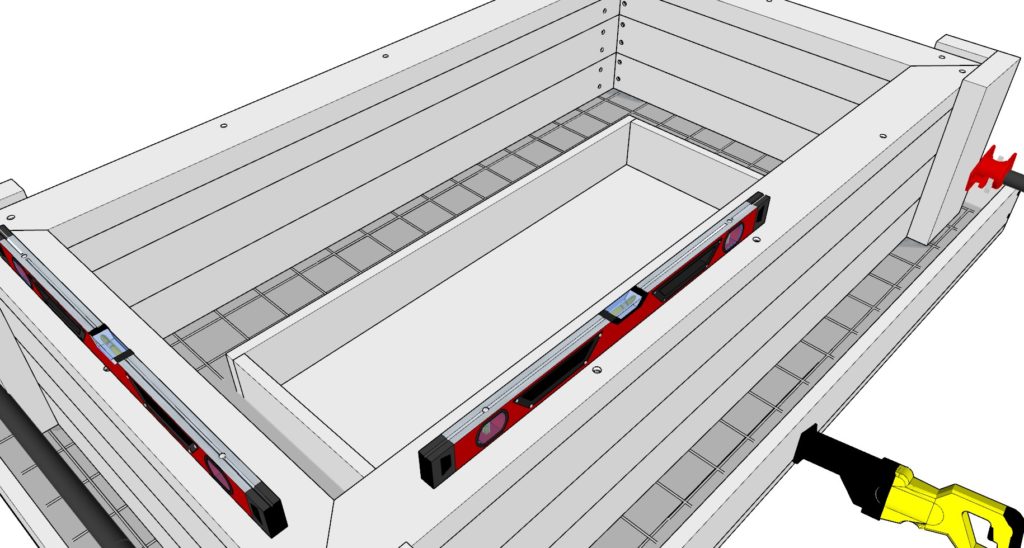
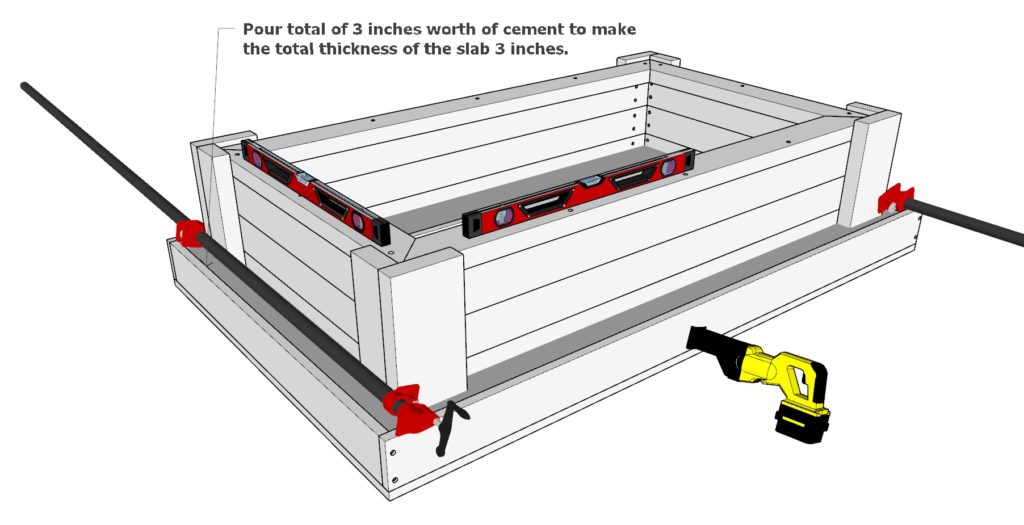
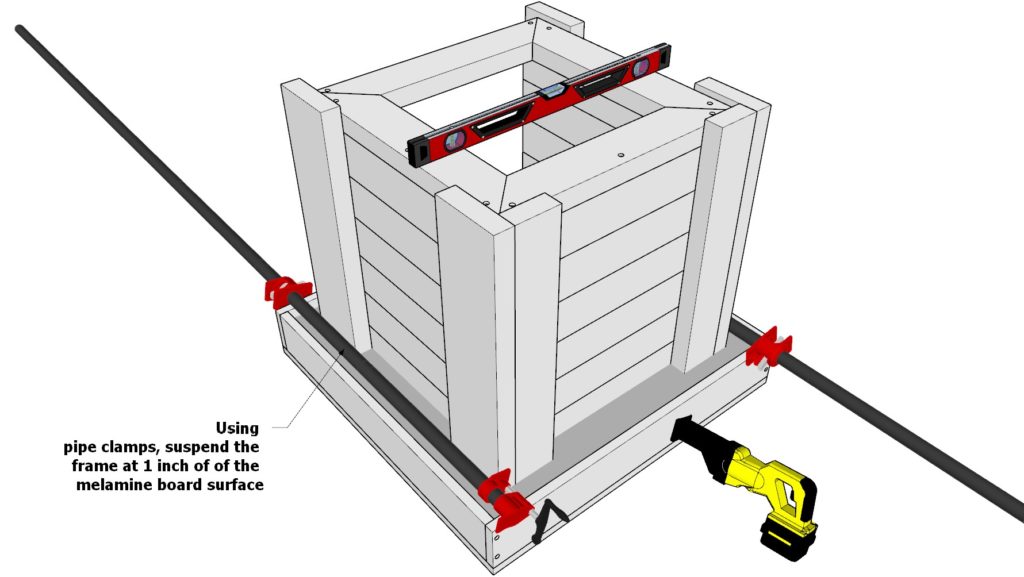
Next, add the fire pit frame with its attached wire mesh to the melamine frame. Use pipe clamps to suspend the fire pit frame with the wire mesh to a height of about 1 inch. Use a level to ensure proper level.
Add the remaining cement and pour to a level of 3 inches.
Tip: It may be a good idea to suspend the fire pit with the mesh at 1 inch with the pipe clamps prior to pouring the cement. Keep the pipe clamps and remove the fire pit frame + wire mesh + pipe clamps to the side. This will make the process less stressful and cleaner.
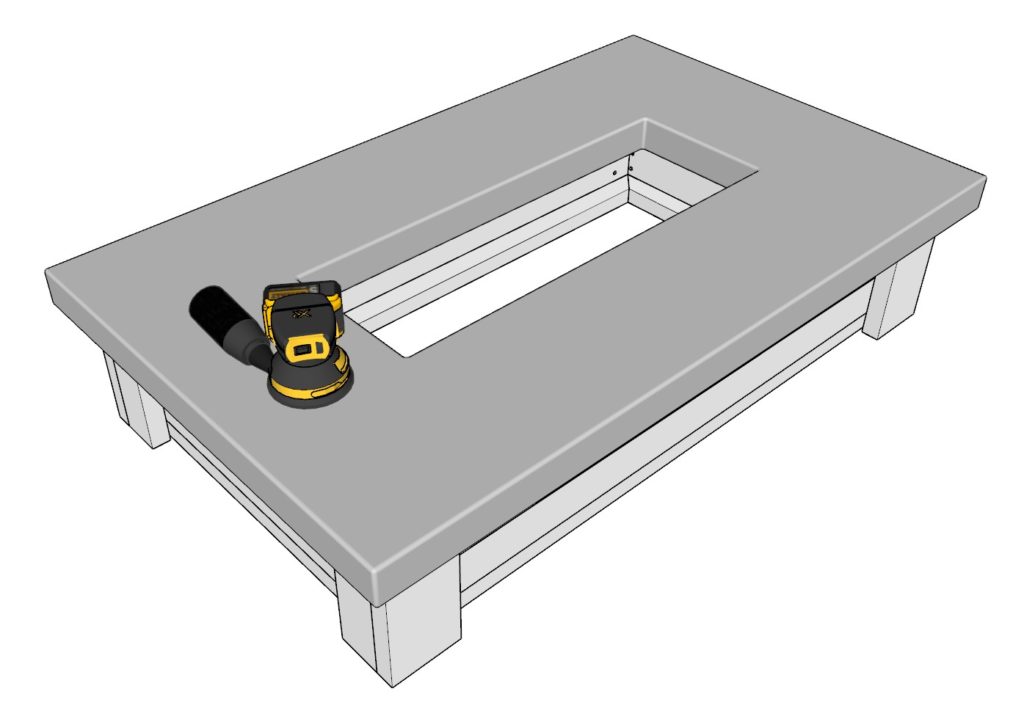
Step 6 (Finishing the cement slab of DIY fire pit)
Next, remove the melamine boards and reveal the fire pit slab to prepare and apply the finish.
The first step to preparing a cement slab for a firepit is to make sure that the surface is clean and free of debris. Use a fine grit sandpaper to remove any imperfections and to round off the edges of the cement slab. It’s important to make sure that the grinder or sander is set to the right speed, so that it doesn’t create too much dust or damage the surface of the slab.
If you have any gaps, holes, or air pockets, you can fill these by mixing up more cement in a small cup and dripping the cement over the imperfections and sanding down the patched surface to match the rest of the slab.
Once the surface of the slab has been cleaned up, it’s time to apply the finish. The type of finish you use will depend on the look you want to achieve, as well as the type of firepit you’re building. A good option for most DIY firepits is a concrete sealer or sealant. This will help protect the surface from weather damage and will also give it a nice, polished look.
To apply the sealer or sealant, it’s best to use a roller or brush. Start by pouring the product onto the slab and then spread it evenly using the roller or brush. Make sure to cover the entire surface of the slab and pay special attention to any corners or edges. Once the entire surface is coated, allow the sealer or sealant to dry completely before lighting the firepit.
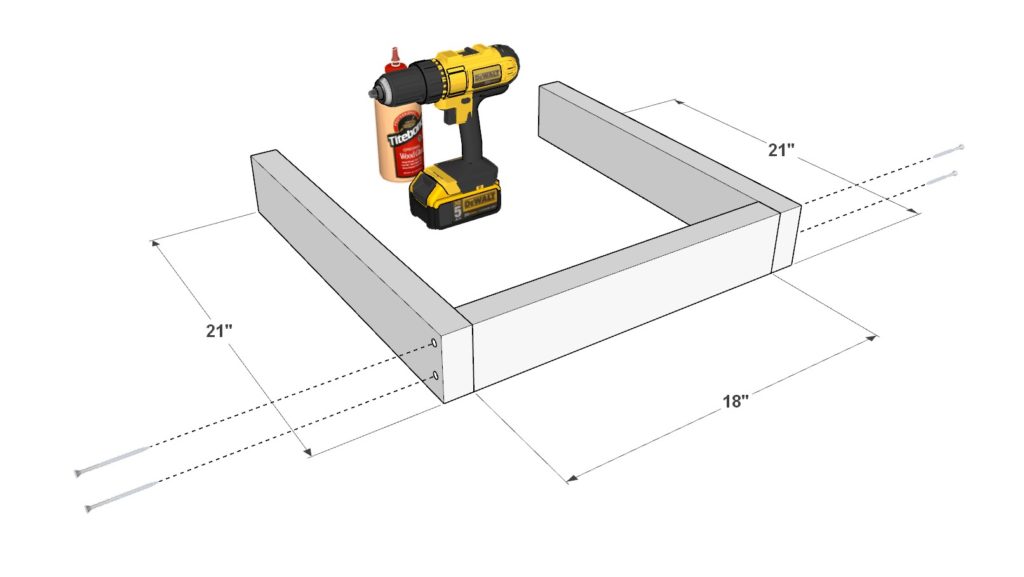
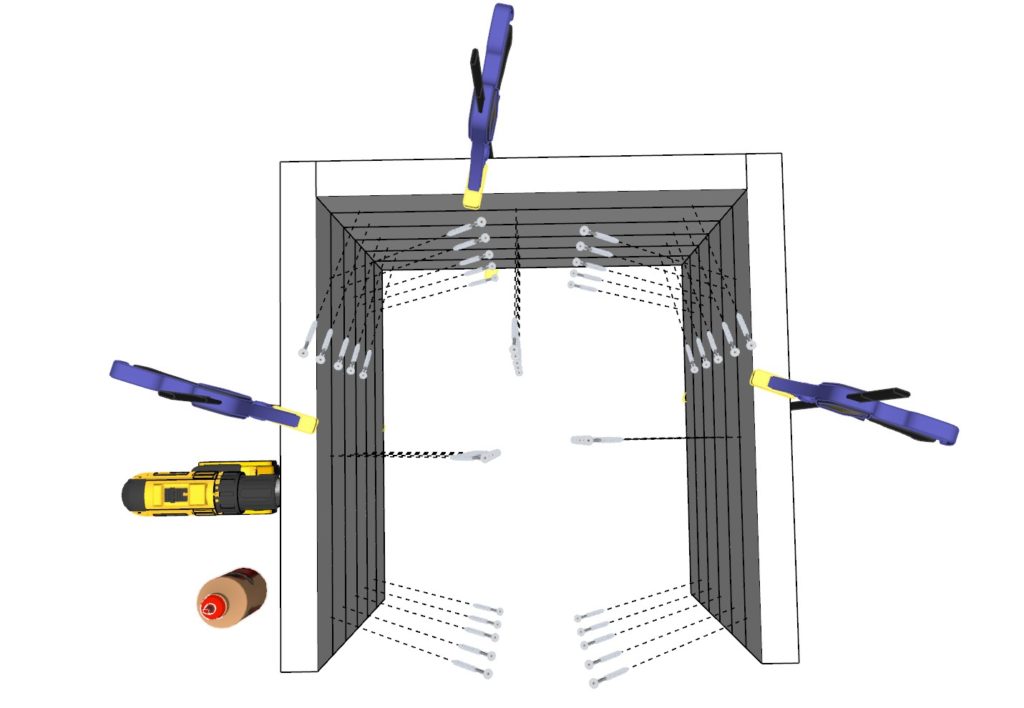
Step 7 (Building the frame of the propane housing side table)
Next, build the frame of the propane gas housing side table.
Take two 21 inch 2×4 lumber pieces and one 18 inch 2×4 lumber piece and attach it with glue, predrilling, and 3.5 inch screws.
Make six identical frame pieces.
Ad before, join these pieces with wood glue, clamping, predrilling, and 3.5 inch screws placed diagonally.
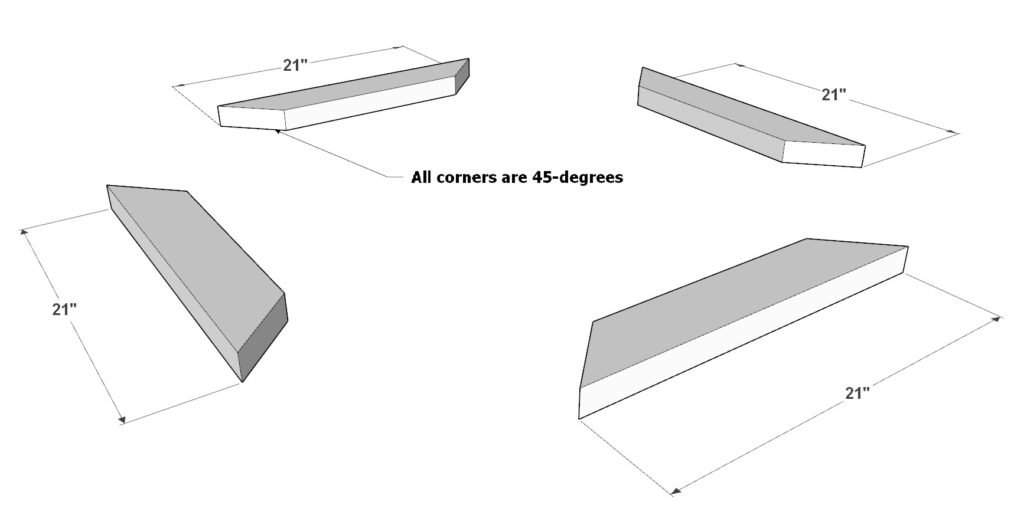
Add a lip at the bae of the side table made from four identical 21 inch 2×4 lumber pieces cut at a 45-degree angle on both ends as shown below.
Secure the lip with glue, predrilling, and 3.5 inch screws.
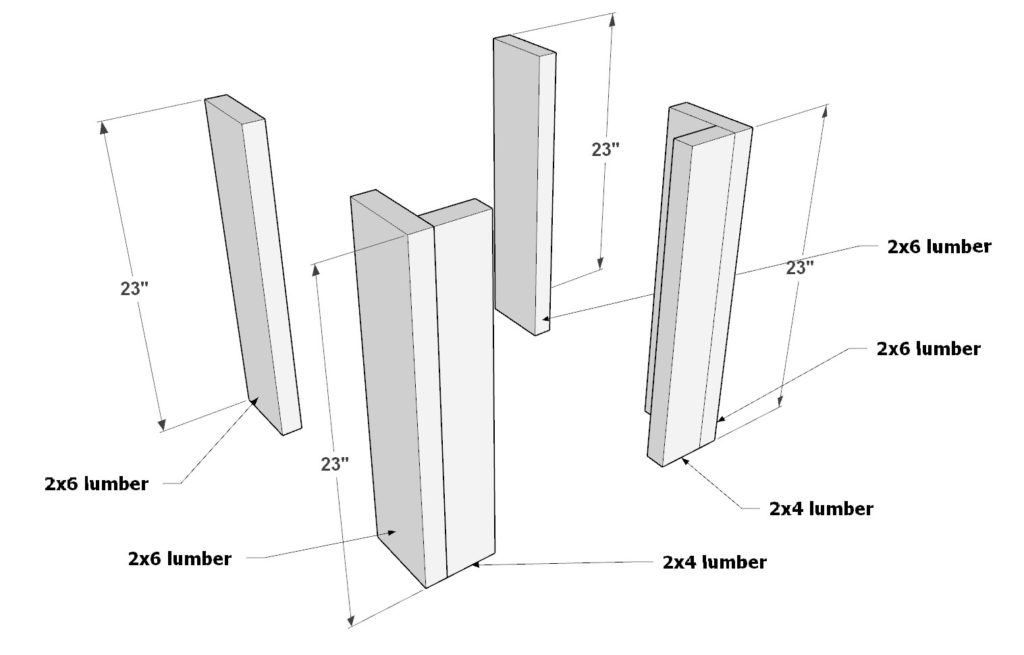
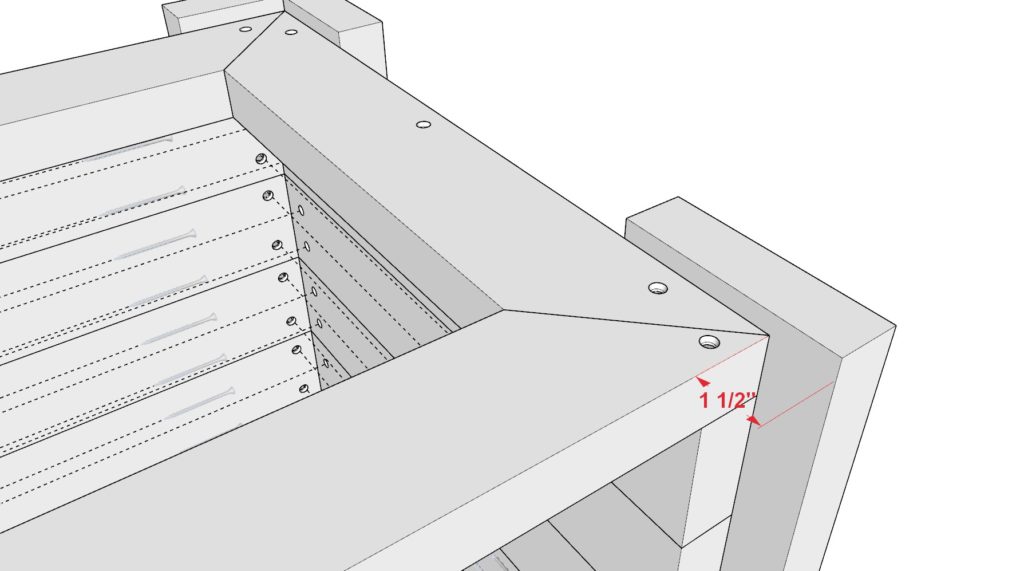
Add the legs to the side table. Take two 23 inch 2×4 lumber pieces and four 23 inch 2×6 lumber pieces. Add these to the side table frame as shown below. Make sure that the stand along 2×6 lumber pieces are sticking out by 1-1/2 inches as shown below in red.

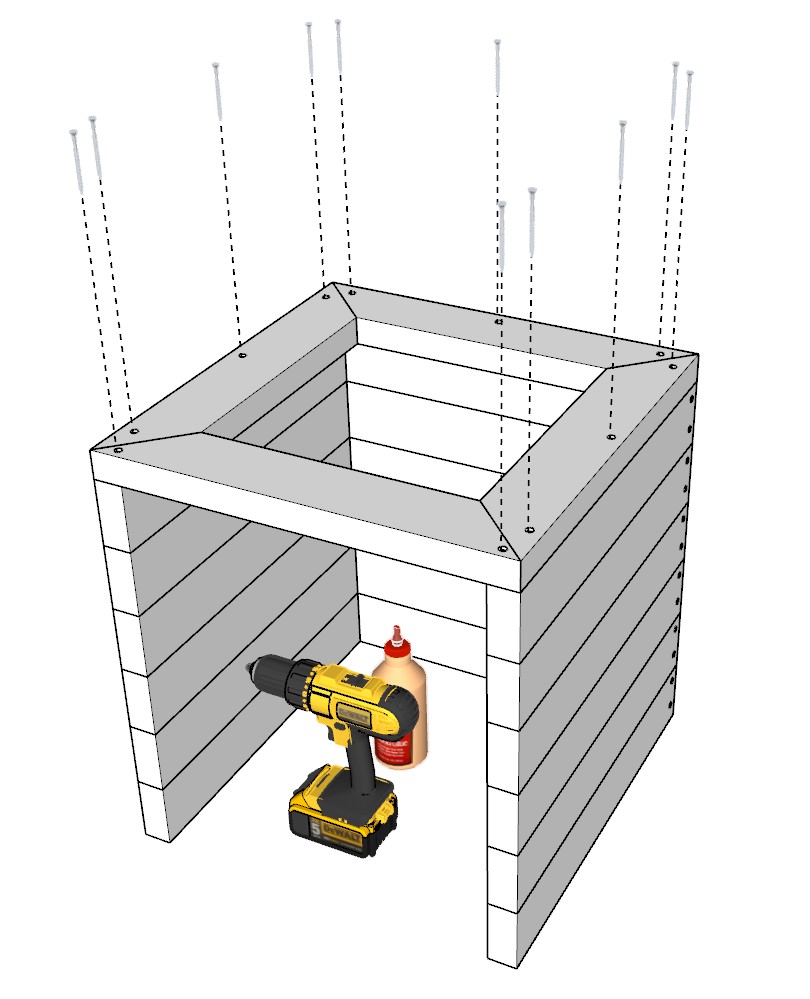
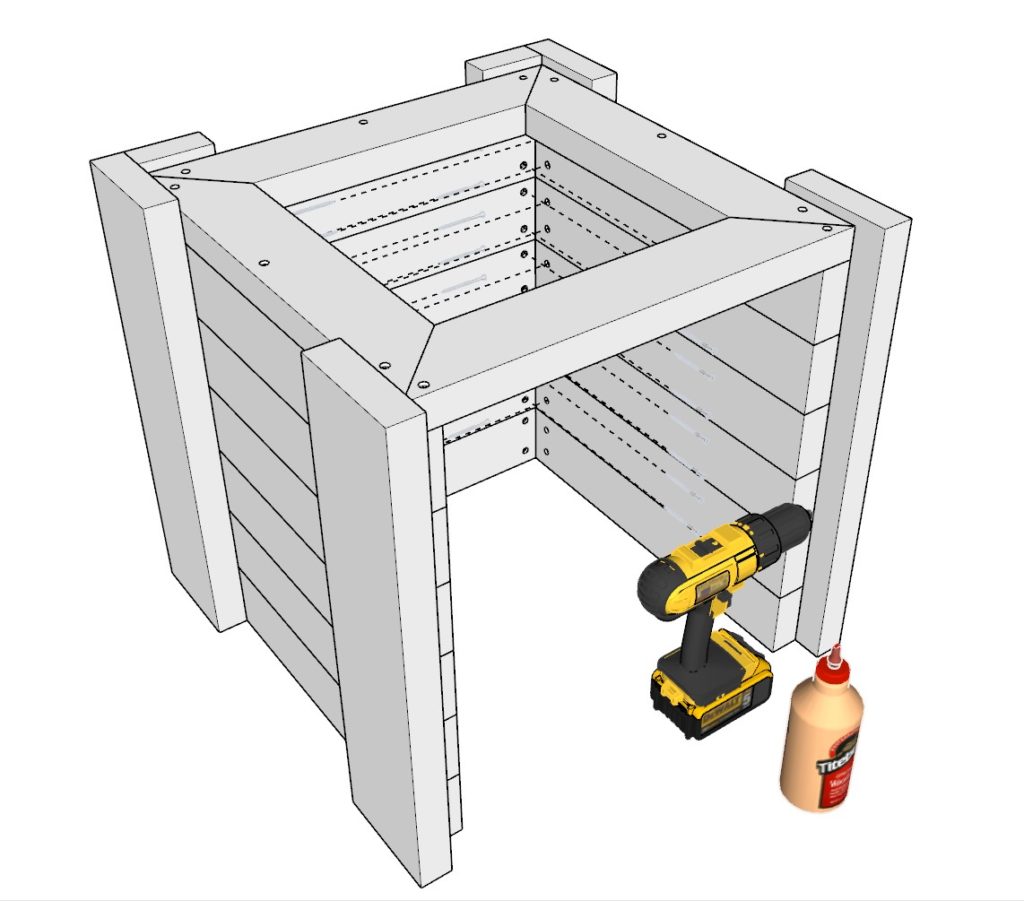
Step 8 (building the melamine frame and attaching wire mesh to side table)
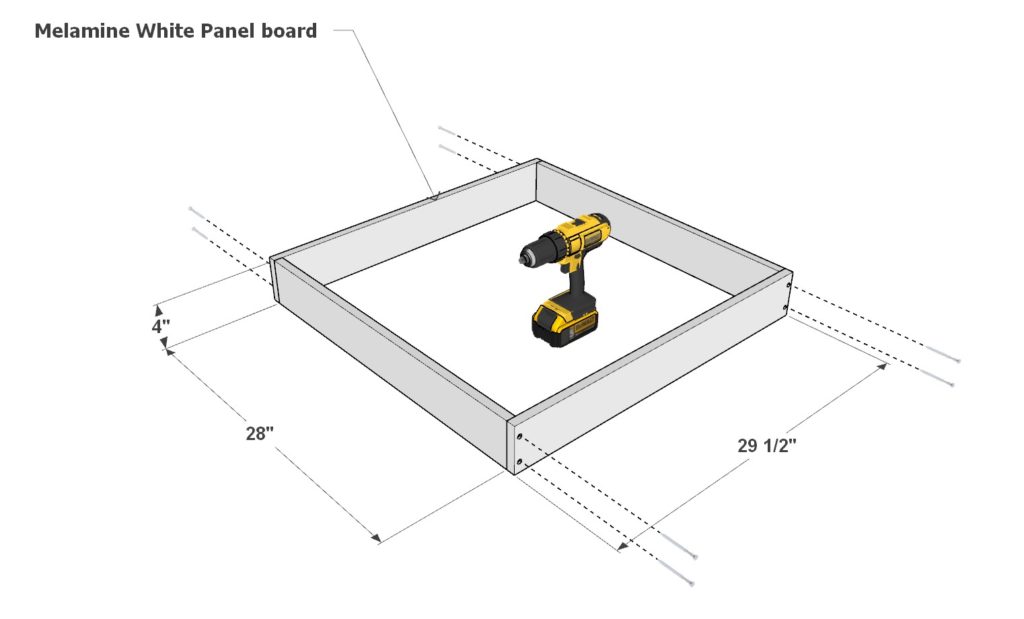
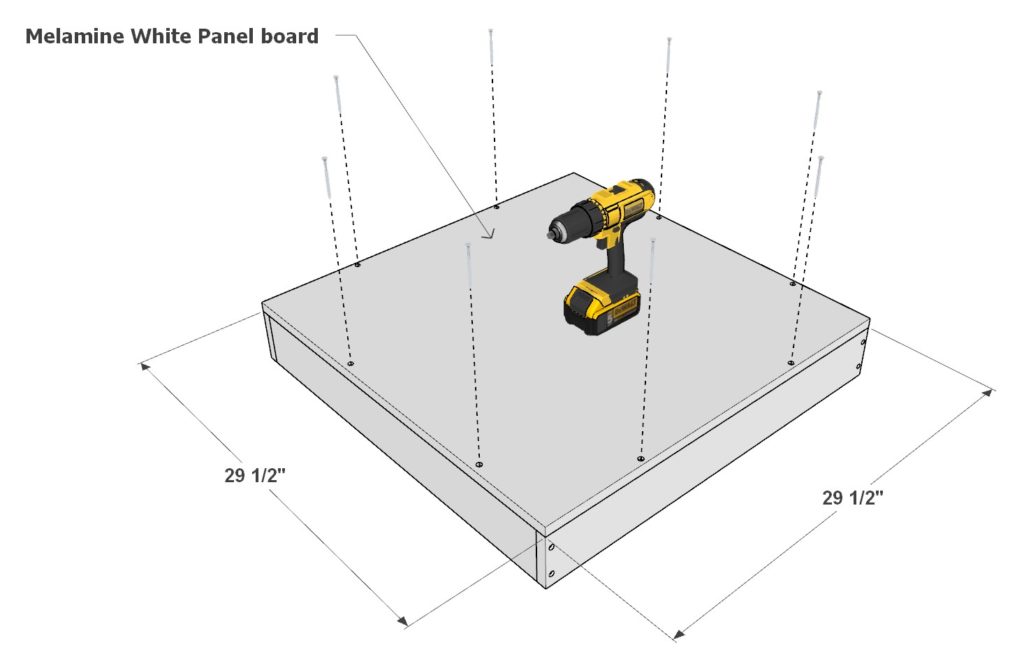
Next, construct the melamine white panel board frame for pouring the cement.
Take two 29-1/2 inch x 4 inch melamine white panel boards and two 28 inch x 4 inch melamine white panel boards. Attach these together with 2.5 inch screws.
Next, add a 29-1/2 inch x 29-1/2 inch Melamine white panel board to the bottom of the frame and attach with 2.5 inch screws.
Next, cut out a a wire mesh insert with similar dimensions to the melamine frame but make sure that the wire mesh has 1/4″ gaps on all sides so that it doesn’t stick out when the final cement slab is completed.
Attach the wire mesh to the fire pit frame. Make sure it is centered. Secure the wire mesh with steel tie plates and screws. Make sure the steel tie plates do not stick out beyond the boundaries of the wire mesh.
Step 9 (Pouring cement for side table propane housing)
Next, pour the cement and attach the side table frame + mesh to the cement slab.
As before, take the melamine frame constructed in previous steps and add a 1 inch layer of Quikrete Countertop Concrete Mix. Use a Sawzall (blade removed) to vibrate the cement into place. Make sure the first inch is evenly spread out and is of the same consistency.
Next, add the side table frame with its attached wire mesh to the melamine frame. Use pipe clamps to suspend the side table frame with the wire mesh to a height of about 1 inch. Use a level to ensure proper level.
Add the remaining cement and pour to a total level of 3 inches.
Use the same finishing techniques on the side table as the fire pit.
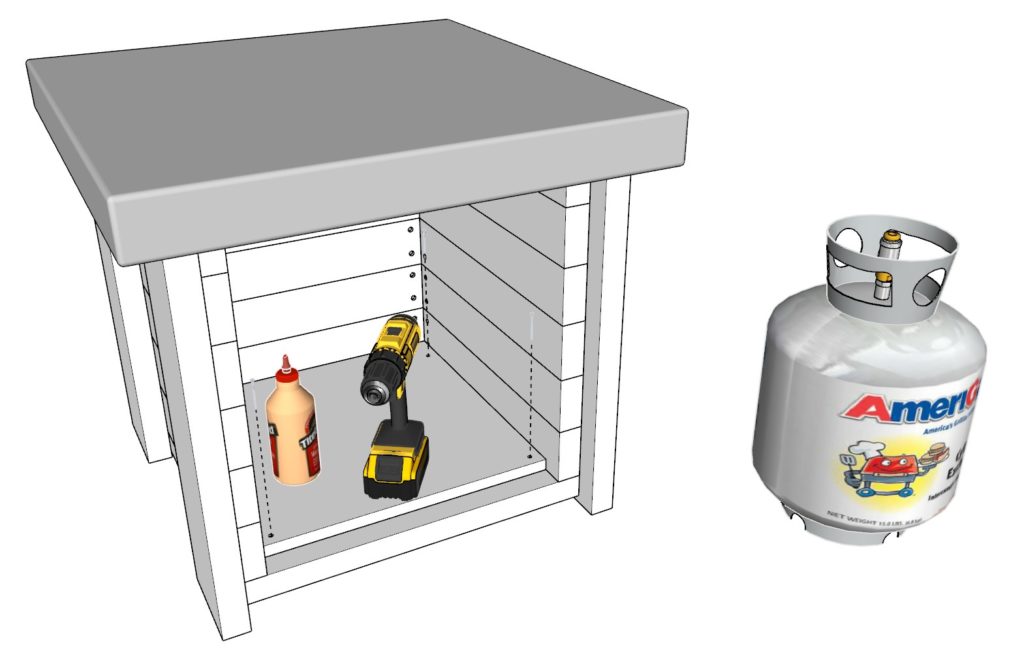
Step 10 (Installing the base and door of the propane housing side table)
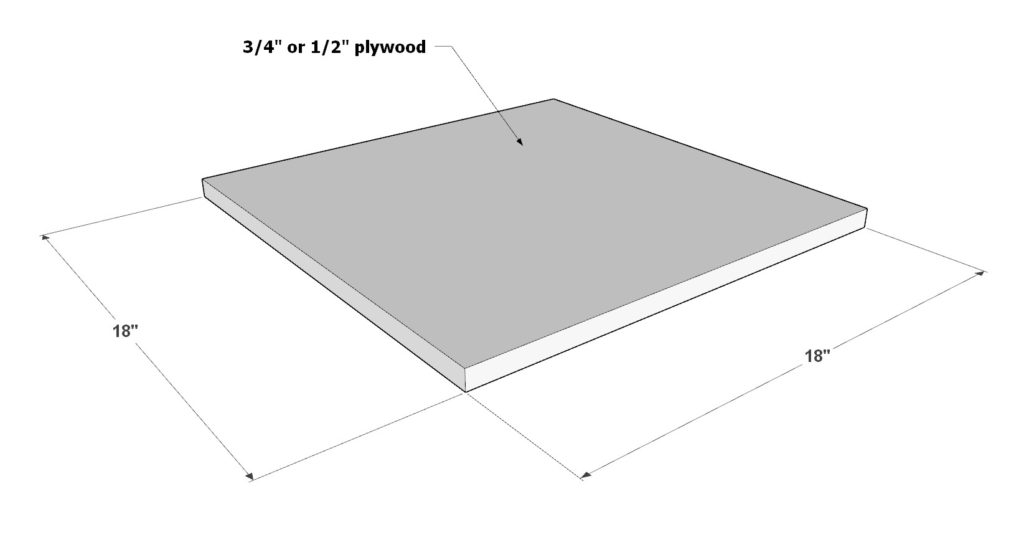
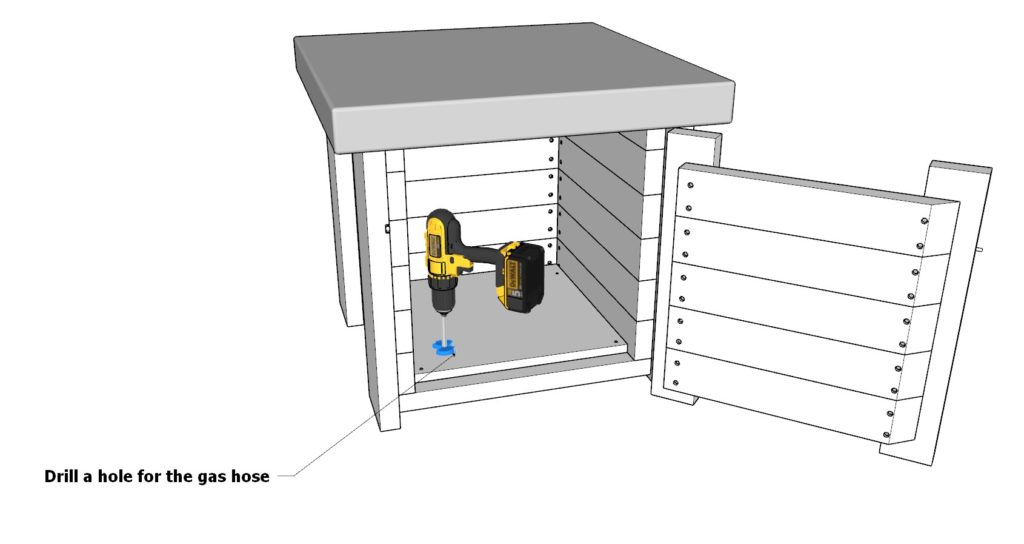
Next, add a bottom to the side table by cutting out a 18 inch x 18 inch plywood sheet.
Attach it to the lip of the side table using glue, predrilling, and 1.5 inch screws.
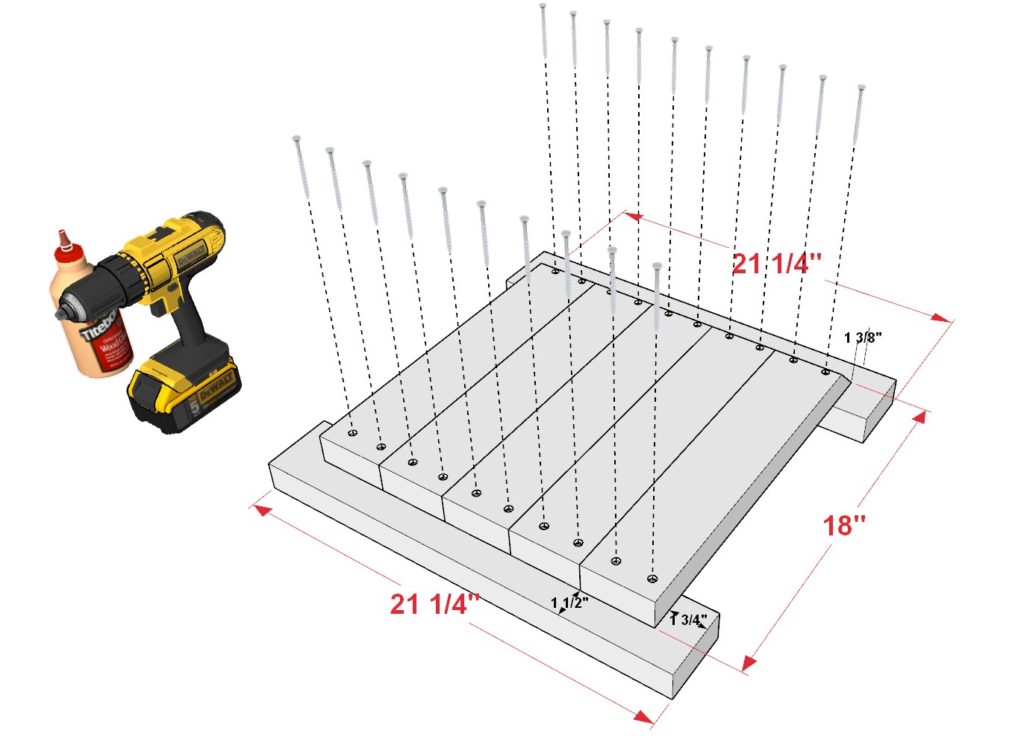
Next build the doors to the side table to be able to easily access the propane tank.
Take five 18 inch 2×4 lumber pieces that are cut at 45-degrees on one end and two 21-1/4 inch 2×4 lumber pieces and arrange them as shown below. Ensure the proper spacing. use glue, predrilling, and 2.5 inch screws to join the piece together.
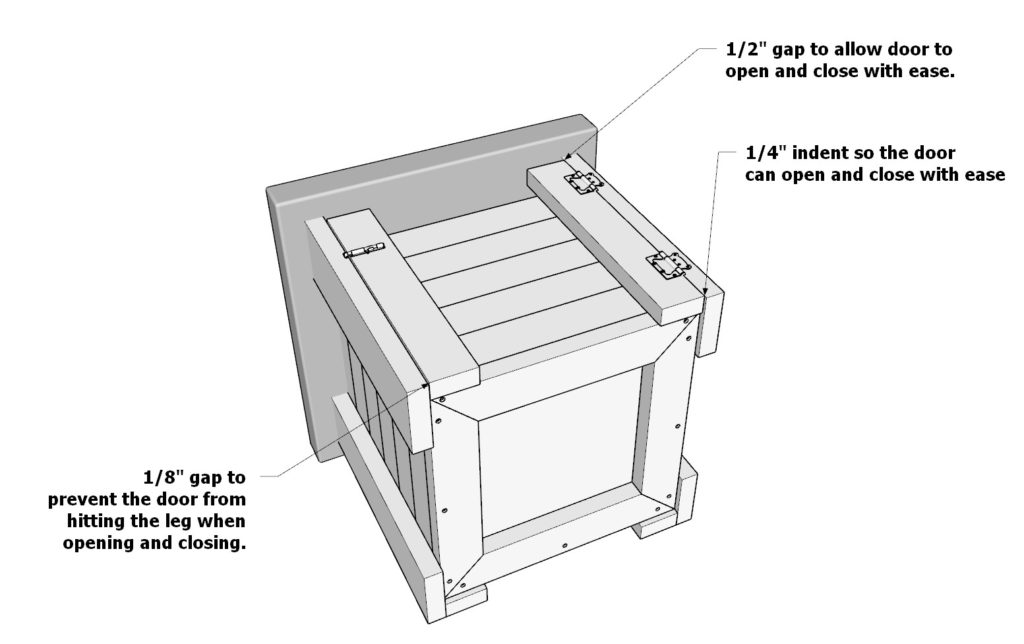
Next, add the door to the side table. Use two hinges and a door latch. Ensure that the spacing of the door is appropriate and that the door can swing open and close with ease.
Lastly, drill a hole for the gas line in the bottom of the plywood sheet as shown in the last diagram.
Step 11 (Assembly of the DIY fire pit kit)
Now, it’s time to connect the components. There are many DIY propane gas fire pit kits out there and each one is slightly different. Follow the instructions of the manufacturer for safe and proper installation.
Start by making sure you have all the components to properly connect the fire pit to the propane or gas source.
The first component is the propane tank fitting. This is the connector that comes off one end of the gas hose that screws into the propane tank.
Next, you should have a gas line regulator. Propane regulators regulate high pressure gas to ensure even flow of gas. Many propane hose kits come with a regulator attached.
You should then have about 10 feet of rubber hose (loner hoses are available to purchase online as well) that would run through the hole drilled in the propane housing side table and out to the fire pit.
Next you should have a straight gas key valve with key, a push button igniter with leads and ground wire.
Lastly you should have a gas hose that runs to the gas burner adapter that then in turn connects to the “H” shaped burner.
Use thread seal tape to ensure all connections are tight without any gas leaks.
Please follow the installation instructions of your chosen manufacturer to ensure safe and proper installation of the fire pit kit.
To secure the ignition connector with the control panel. you may need to use a chisel to chip away a portion of the 2×4 lumber to properly be able to install the control panel. Again each manufacture will have different requirements.
You can now stain the fire pit and propane housing if desired.
Now you can begin adding the lava rocks, fire glass, or other decorative elements. Spread the lava rocks or fire glass evenly inside the burner pan. make sure that the lava rocks or fire glass do not block any of the gas ports or control valves.