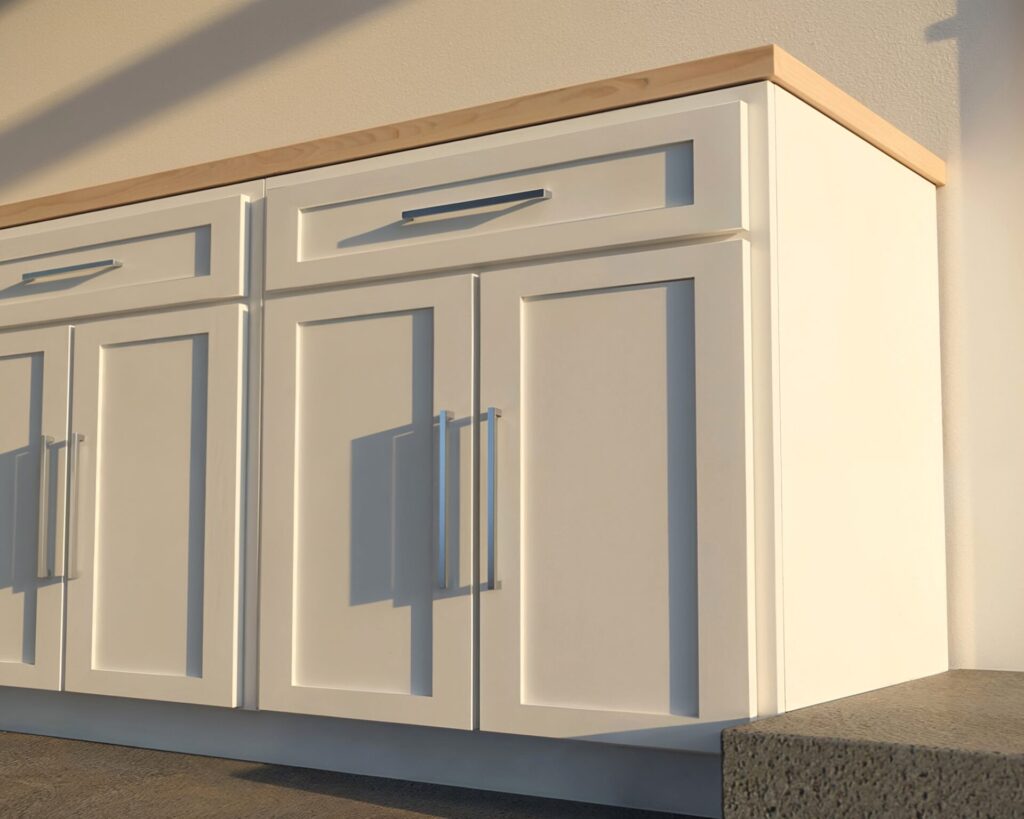
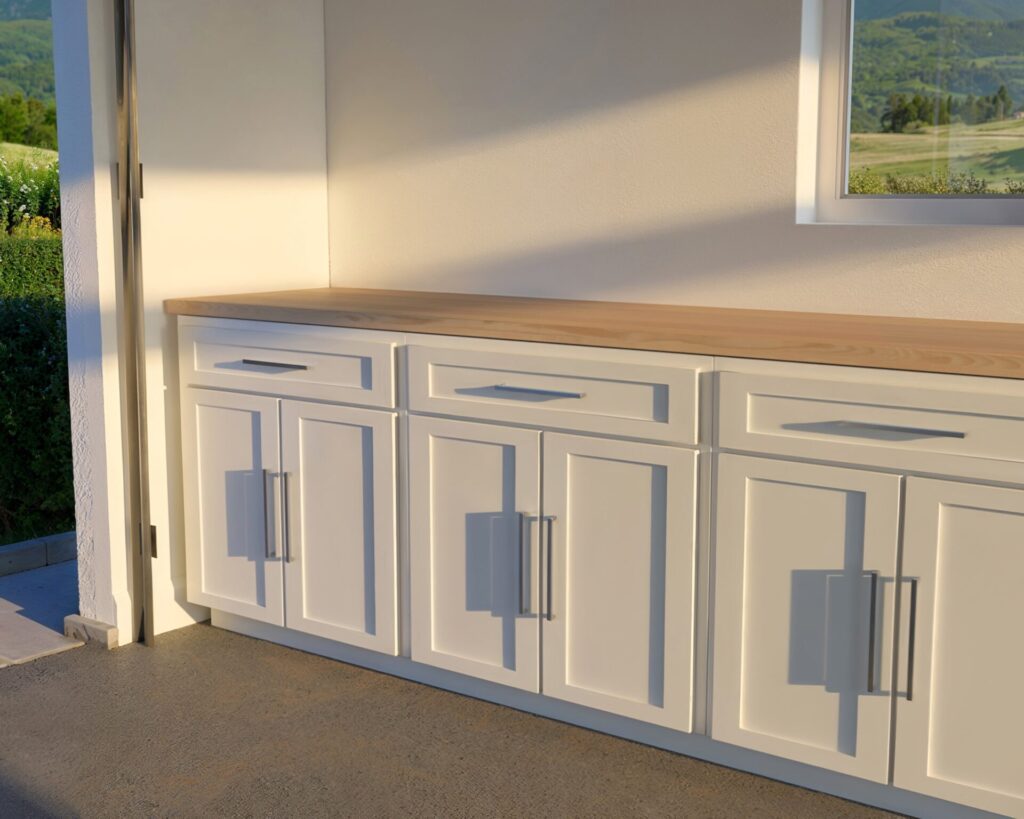
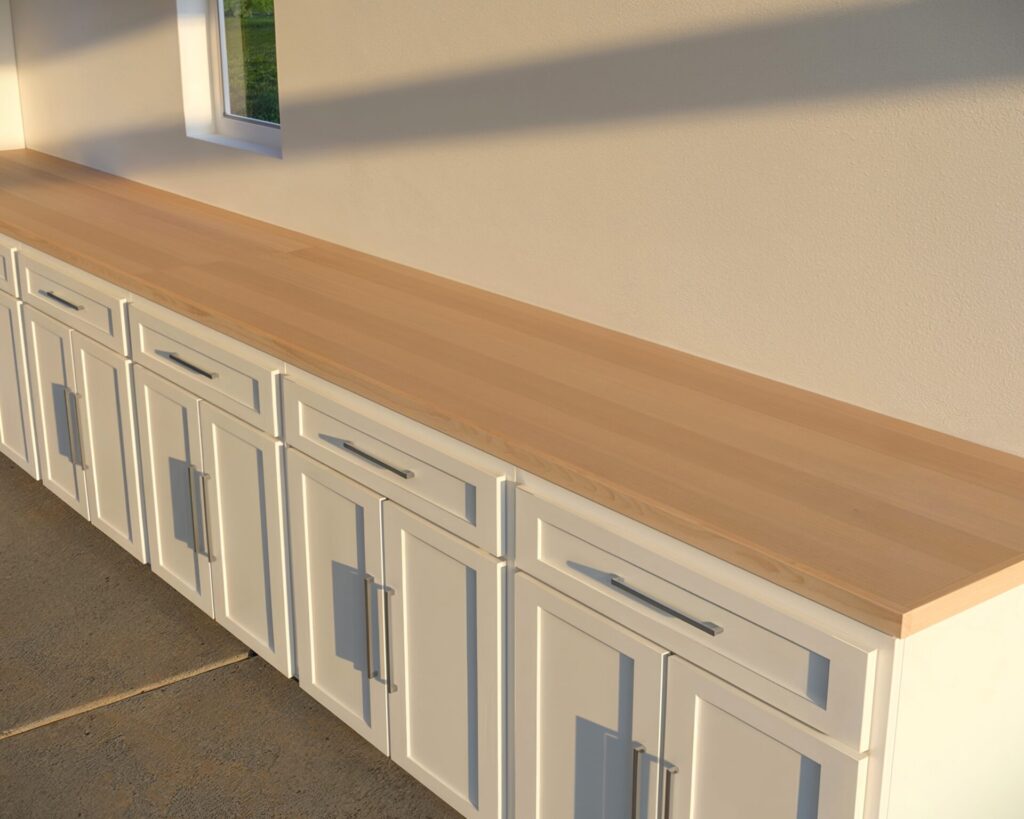
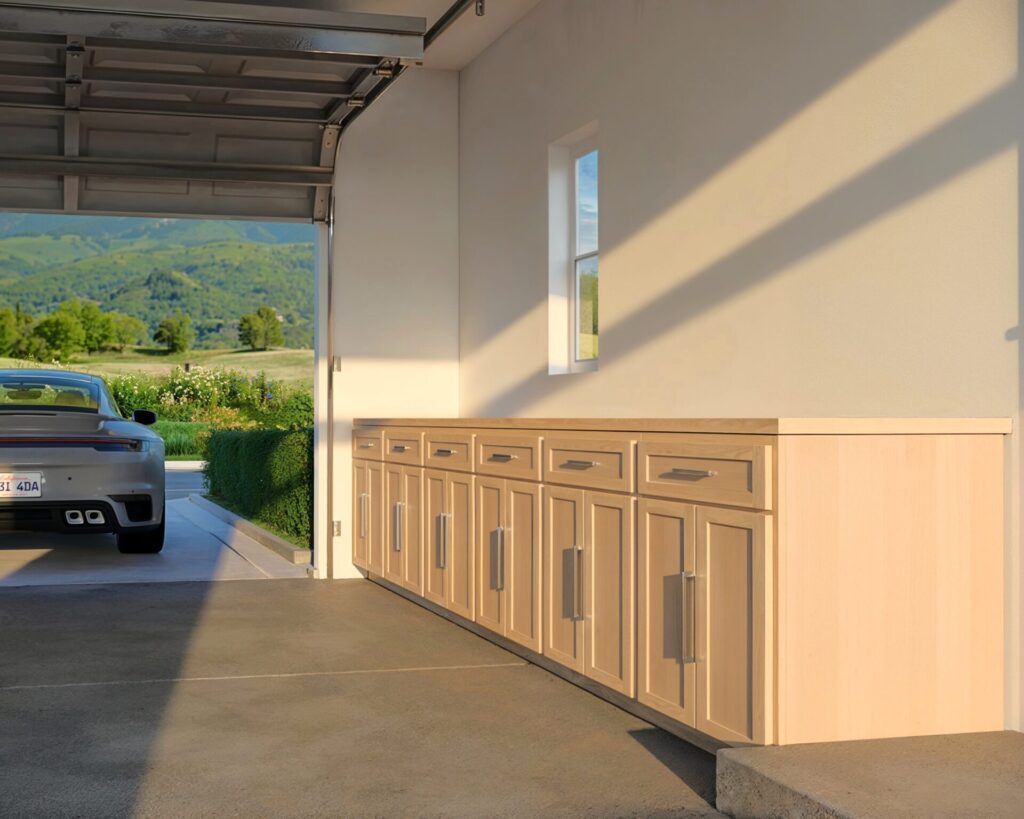
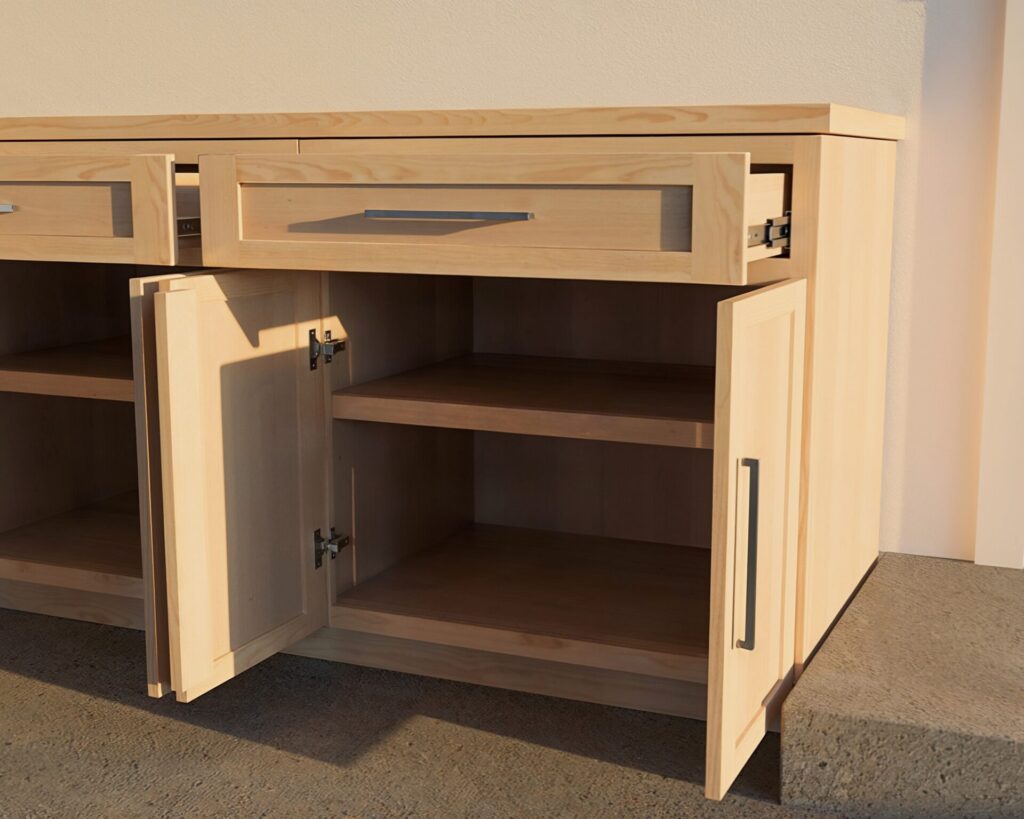
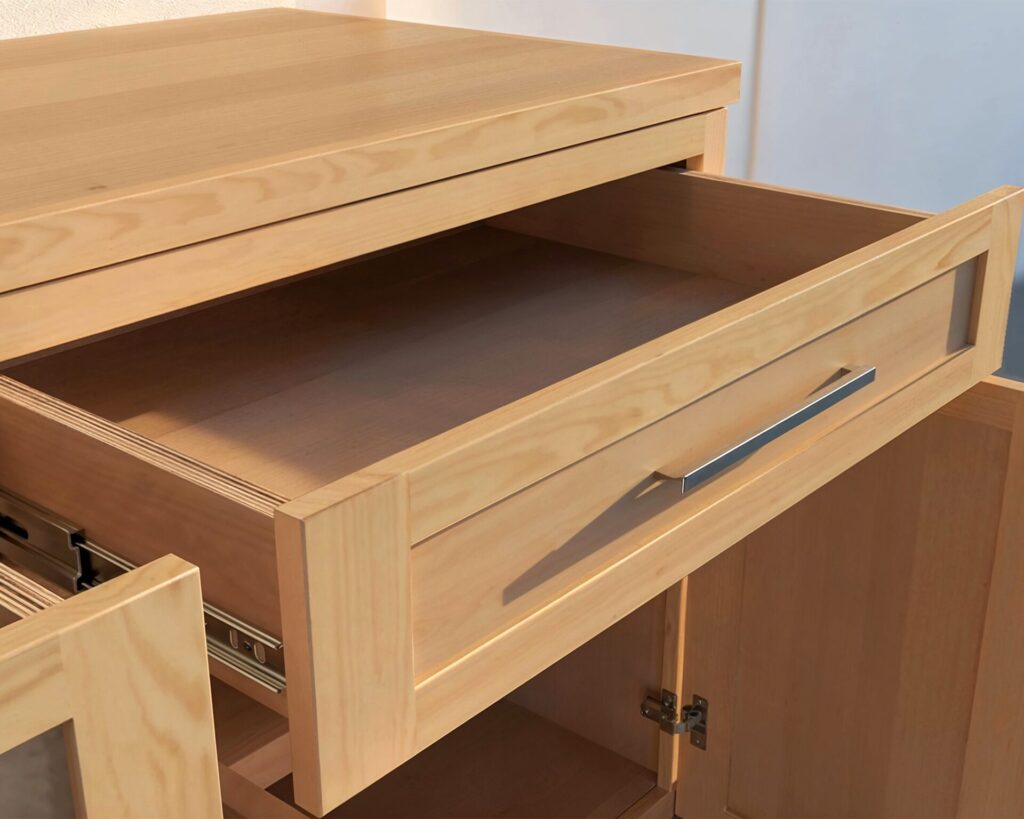
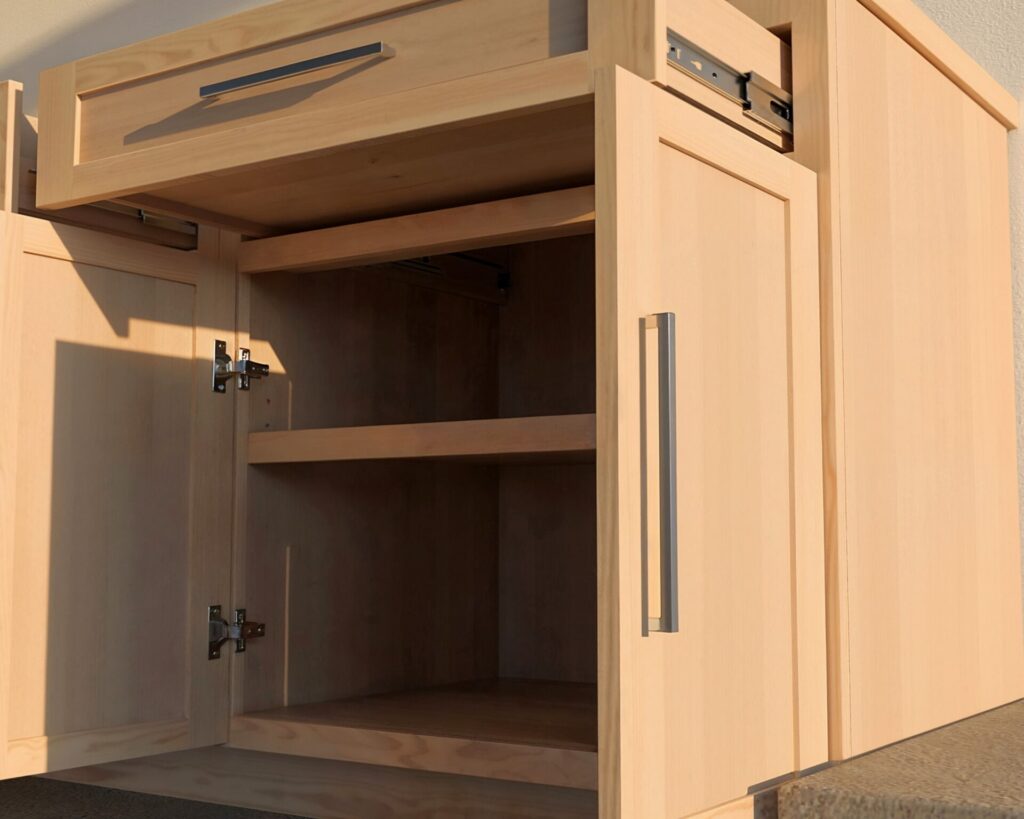
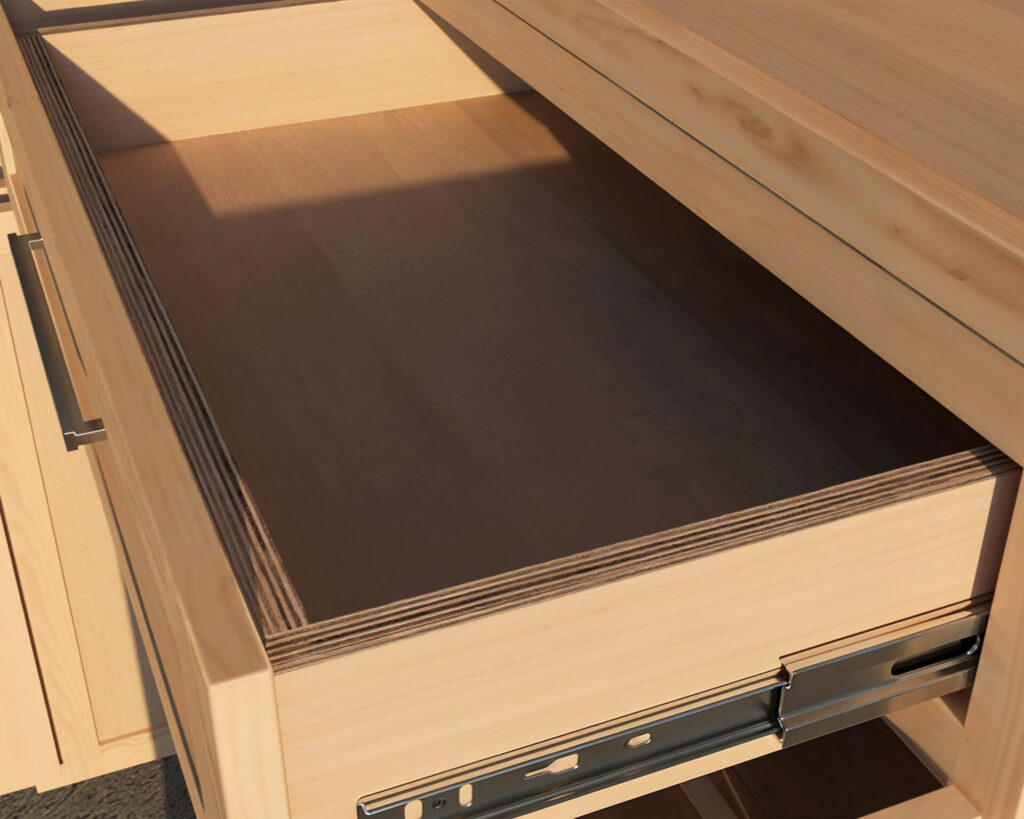
Why Building Your Own Cabinets is the Smarter Choice
In today’s market, buying pre-made cabinets for your kitchen or garage can be an expensive endeavor. The cost of quality kitchen cabinets can easily run into thousands of dollars, often pushing the budget of a full remodel well beyond expectations. Even standard-grade cabinets can cost between $100 to $400 per linear foot, while custom options can be upwards of $500 to $1,200 per linear foot. Similarly, garage cabinets, often marketed as durable and customizable, can also be a significant expense, especially if you’re looking for something beyond the basic particleboard units that don’t hold up over time.
The Problem: High Costs and Limited Customization
The biggest challenges homeowners face when buying cabinets are the steep costs and the lack of true customization. You’re often left choosing between what’s available rather than what best fits your space and needs. This can be particularly frustrating in unique spaces like garages, where storage needs vary greatly and off-the-shelf options often fall short.
The Solution: Invest in DIY
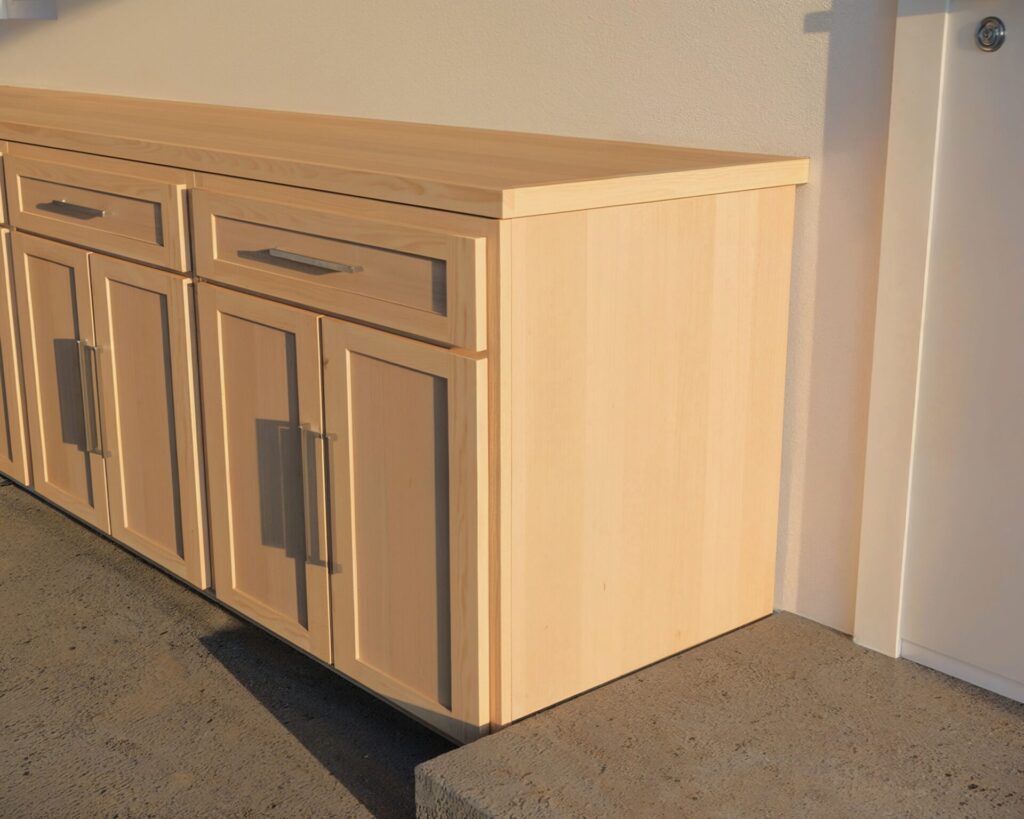
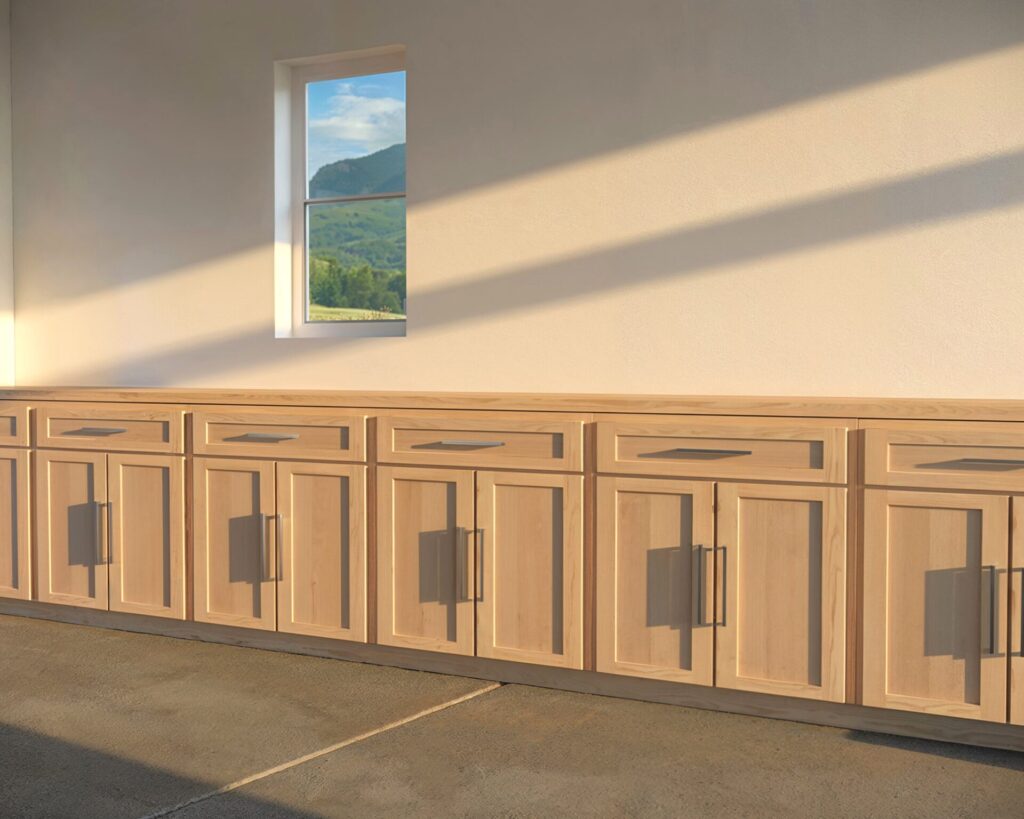
Investing in some basic woodworking tools and building your own cabinets can be a game-changer. Not only does it offer a cost-effective solution, but it also provides the satisfaction of creating something tailor-made for your space. With a DIY plan like the one provided, you have the freedom to customize dimensions, styles, and finishes to perfectly match your home’s needs and aesthetics.
Cost Efficiency:
The initial investment in basic tools—such as a drill, saw, and router—might seem like an extra cost, but when compared to the price of buying cabinets, it’s a small fraction. The cost of materials for building a quality cabinet is significantly lower, allowing you to stretch your budget further. You’re not paying for brand names or the markup that comes with pre-assembled units. Instead, your money goes directly into quality materials and the tools that will serve you for multiple projects.
DIY Cabinet Features That Save You More:
- Durable Construction: By using 3/4″ plywood and 1/4″ backing, your cabinets will be stronger and more durable than many of the mass-produced options available.
- Customization at No Extra Cost: With DIY, you can add features like adjustable shelves, soft-close hinges, and premium finishes without the hefty upgrade costs.
- Satisfaction and Skills: Building your own cabinets not only saves money but also equips you with valuable skills and the satisfaction of crafting something yourself.
Why This DIY Plan Solves the Problem:
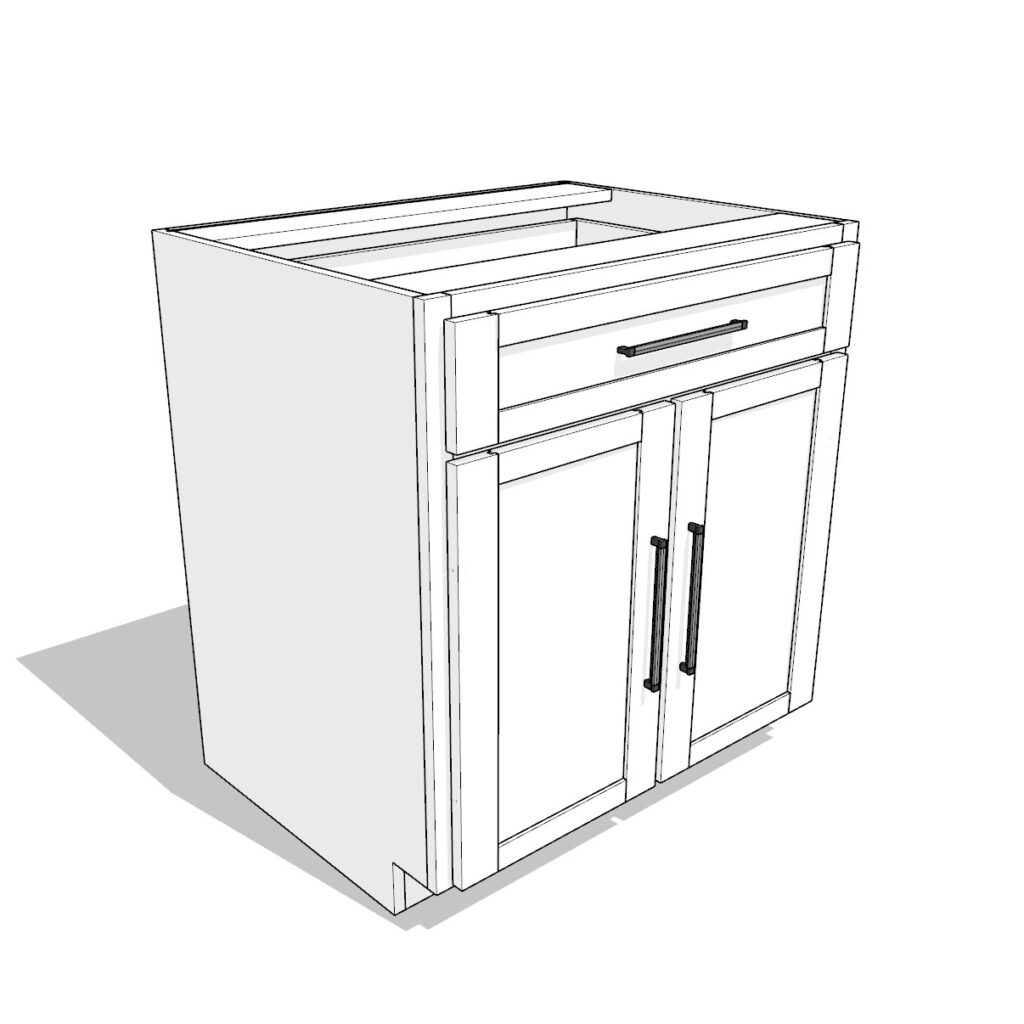
This DIY plan takes the guesswork out of building your own cabinets. It’s designed with clear, step-by-step instructions, detailed diagrams, and a comprehensive materials list, making the process accessible even for beginners. You’ll get a professional finish without needing to be a professional woodworker. The plan includes everything down to the precise placement of screws, ensuring that your build is straightforward and stress-free.
What’s Included in the DIY Plan
When you purchase this DIY plan, you’re not just getting a basic guide—you’re receiving a comprehensive, detailed toolkit designed to make your project as smooth and successful as possible. Here’s what’s included:
Step-by-Step Written Instructions: Every step is clearly outlined in a written format that’s easy to follow, from the initial cuts to the final assembly. Each step is broken down into manageable tasks, ensuring you never feel overwhelmed.
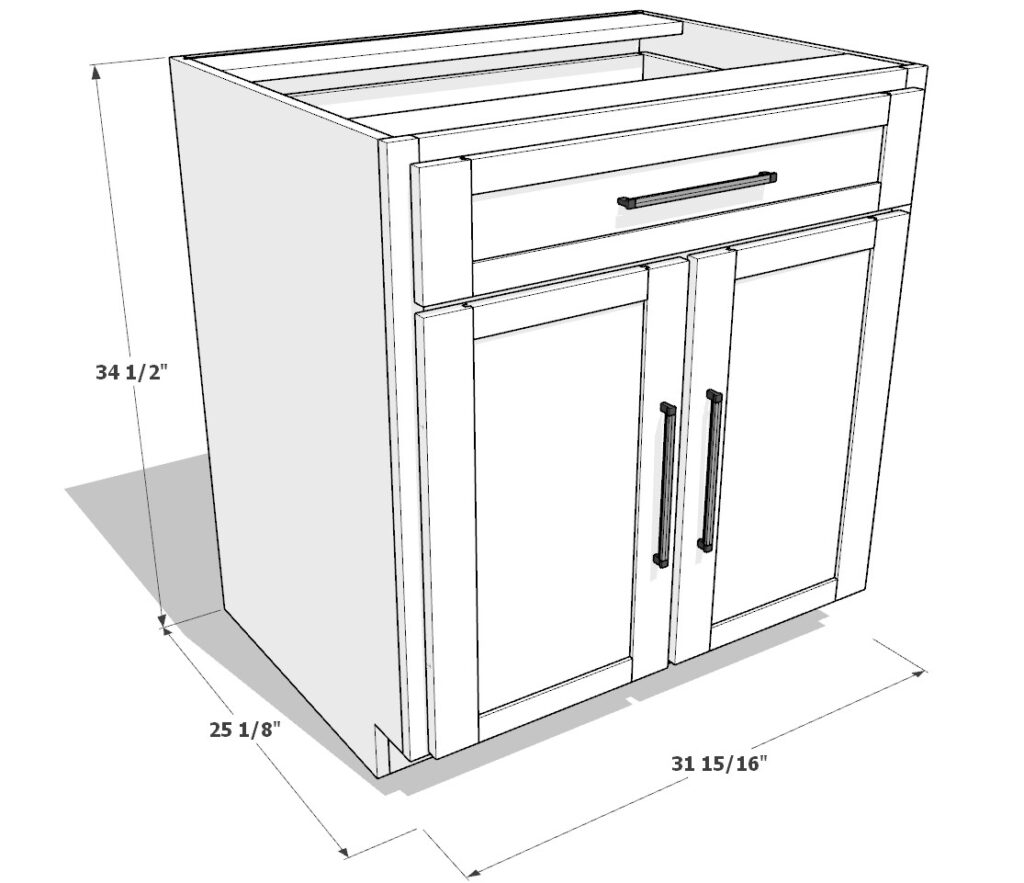
Detailed Visual Diagrams: The plan includes high-quality, color-coded diagrams that visually guide you through each step. These diagrams are designed to be intuitive, showing exactly where each piece goes and how it fits together.
Tools List: A complete list of tools needed for the project, with links to recommended products. This ensures you have everything you need before you start, saving you time and potential frustration.
Materials and Lumber Shopping Lists: Detailed lists of all the materials and lumber required, including precise measurements and quantities. These lists are optimized to minimize waste and cost, so you buy only what you need.
Cut Optimization Guide: Maximize the use of your plywood and lumber with a cut optimization guide that lays out the most efficient way to make all your cuts. This helps you save money and reduce waste.
Cost Estimates: A breakdown of the estimated costs for all materials, so you can budget your project accurately and ensure it fits within your financial goals.
Print-Friendly Format: The entire guide is designed to be print-friendly, allowing you to easily take it into your workshop. Keep the instructions and diagrams on hand as you build, ensuring you’re always on the right track.
Beginner-Friendly Design: This plan is crafted with beginners in mind, making sure that even those new to woodworking can follow along and achieve professional results. Each step, cut, and placement is detailed down to the exact position of screws and fasteners.
With this DIY plan, you have everything you need to confidently tackle your cabinet project, knowing you have professional guidance every step of the way. It’s more than just a plan; it’s a complete package designed to help you succeed.
Ready to Build?
Choosing to build your own cabinets with this plan means you’re not just saving money—you’re investing in your home, your skills, and your satisfaction. Download the plan today and start creating the perfect cabinets for your kitchen or garage, all while keeping your budget firmly under control. Let’s make your space work for you, without the hefty price tag of store-bought options.
Time
(varies with experience)
Cost
$100-$180 per cabinet (Costs may vary based on location and supplier.)
Skill level required
Beginner
DIY Base Cabinet PDF Plan
What is included in the PDF download?
- Easy to read step by step instructions
- Material list
- Tools needed
- Helpful links to materials and tools needed
Tools and Materials Needed for Cabinet Construction
Tools:
- Jigsaw or Circular Saw – For cutting notches in the side panels to create the toe kick (Step 1.1).
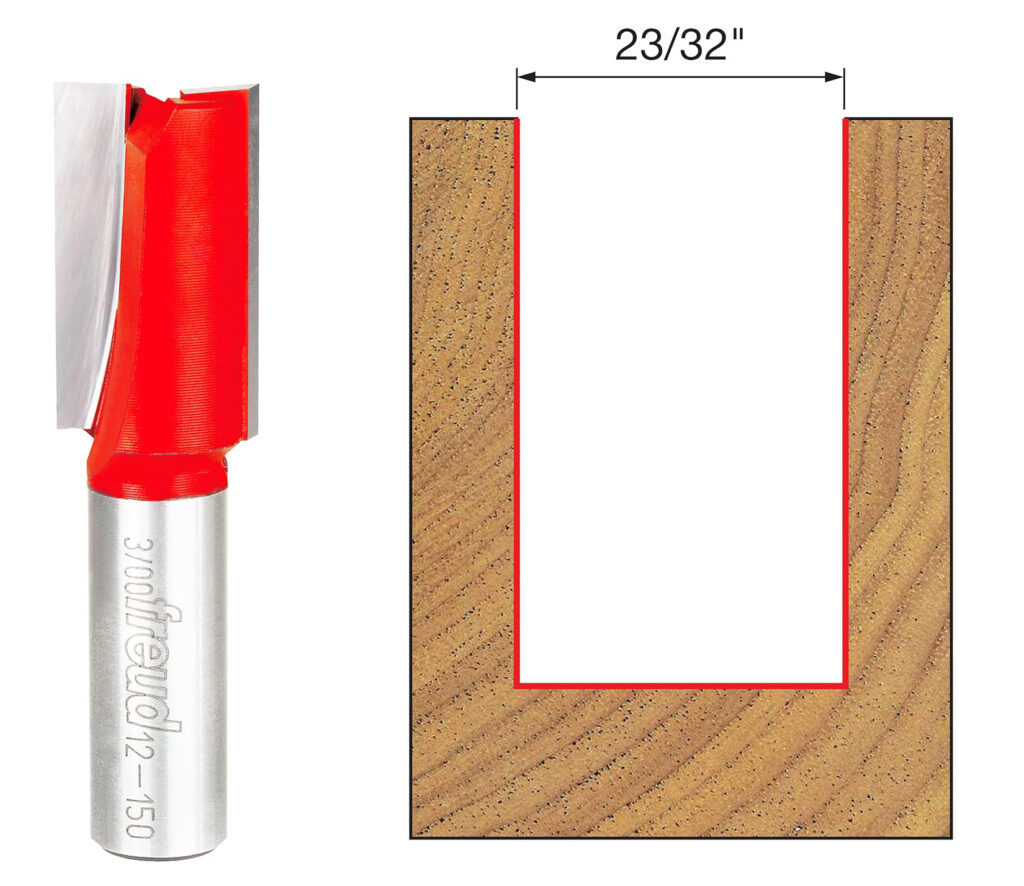
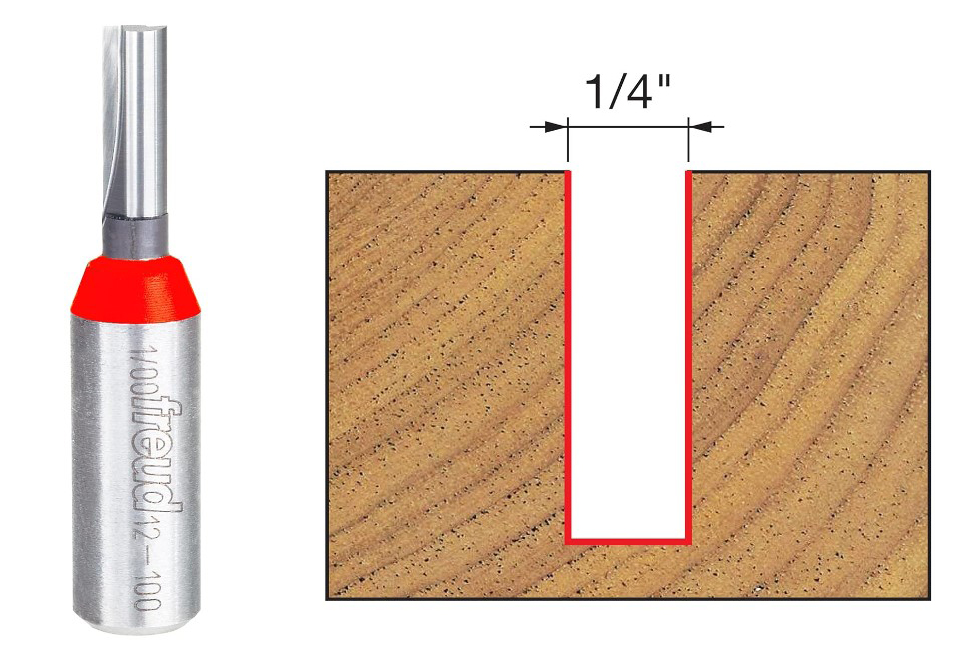
- Router with 1/4″ and 23/32″ Straight Bits – Required for cutting grooves in side panels and floor panel to assemble the cabinet carcass using dado joints (Steps 1.2, 1.3, 2.2).
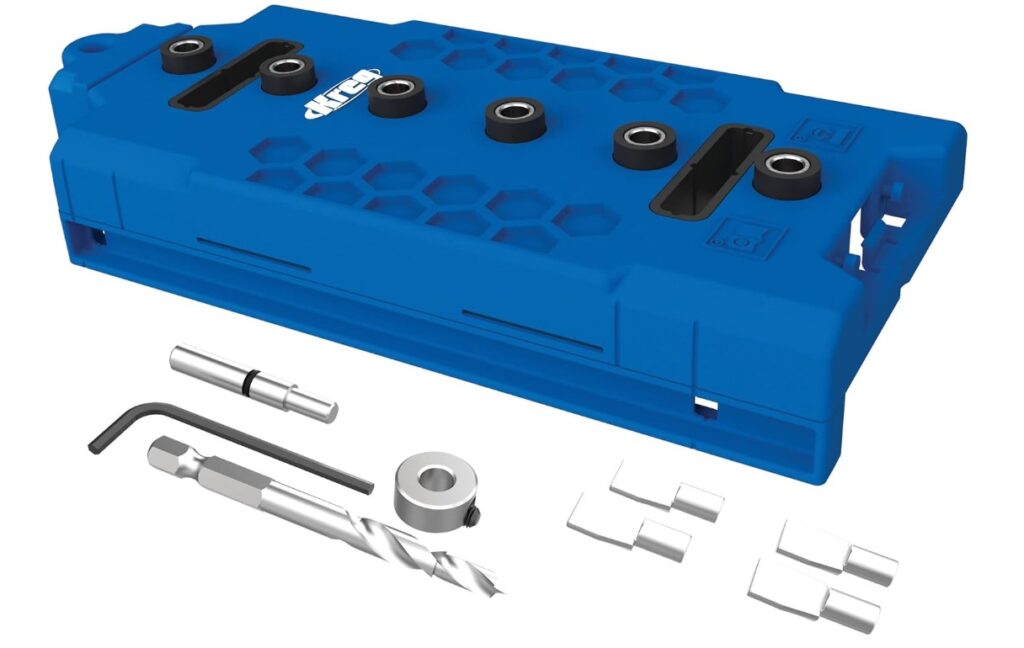
- Shelf Pin Jig – Ensures precise and evenly spaced holes for adjustable shelf pins (Step 1.4).
- Drill with 1/4″ Drill Bit – Used to drill shelf pin holes and other necessary pilot holes (Step 1.4).
- Pocket Hole Jig – For drilling pocket holes in stretchers, drawer components, and face frames, providing strong, hidden joints (Steps 3.1, 8.2).
- Clamps – Essential for holding components in place during assembly and while glue sets, ensuring proper alignment (Various Steps).
- Power Drill or Cordless Drill – For driving screws and securing components during assembly and hinge installation (Various Steps).
- Kreg KHI-HINGE Concealed Hinge Jig – Assists in precise placement and drilling of hinge cup holes for Euro hinges, simplifying hinge installation (Step 11).
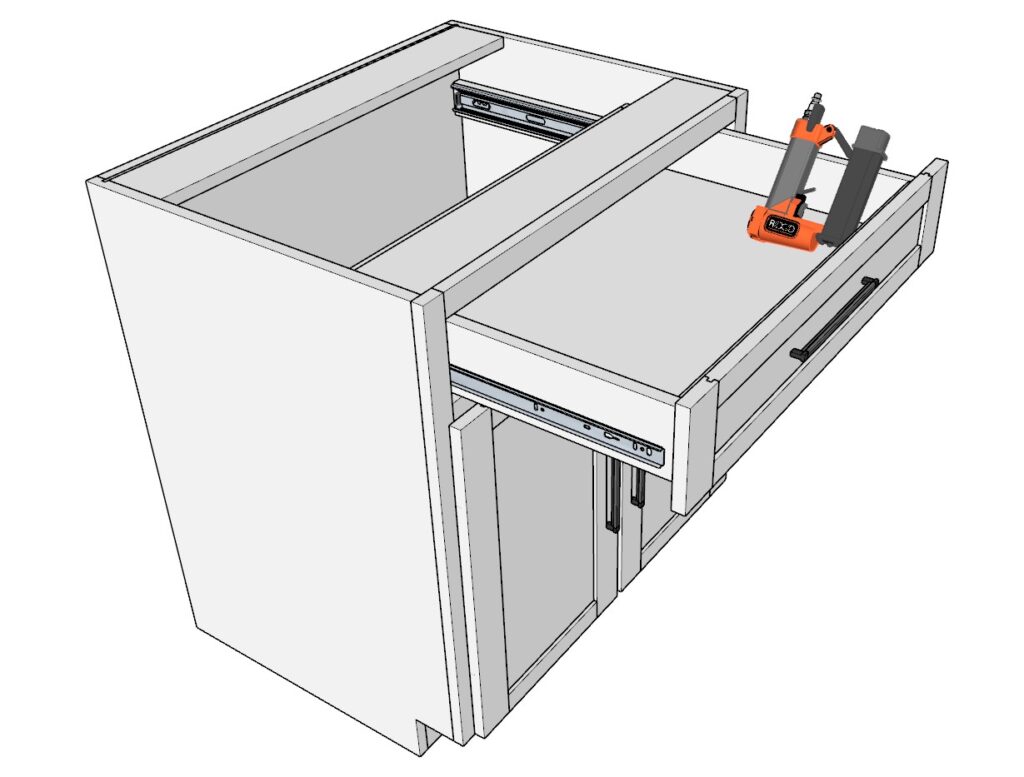
- Pin Nailer or Brad Nailer – Used to secure face frames, back panels, and trim pieces like the toe kick (Steps 3.7, 11.6, 11.7).
- Level – To ensure that the cabinets are level and properly aligned during installation (Step 12).
- Stud Finder – Locates studs in the wall to securely attach cabinets (Step 12.2).
- Miter Saw or Handsaw – For cutting precise lengths of trim pieces, such as toe kicks (Step 12.3).
- Table Saw – Essential for making precise cuts in wood and achieving accurate dimensions for your project.
- Sander + Sanding Disks (Variety) – A sander is necessary for smoothing out surfaces. Use a variety of sanding disks to achieve the desired finish.
- Router Bits Tongue & Groove Set (3/4-Inch, 2 Bit) –
For creating tongue and groove joints, which are essential for cabinet assembly and joinery work.
Materials:
- Euro Hinges (Soft-Close, 1/2″ Partial Overlay) – Allows for smooth, soft-closing of cabinet doors, enhancing usability and appearance (Step 11).
- Wood Glue – Used extensively throughout the project to bond components securely; a critical element in building strong joints (Various Steps).
- Pocket Hole Screws (1-1/4″) – Used with the pocket hole jig to assemble stretchers, face frames, and drawer components, providing hidden yet strong connections (Various Steps).
- Cabinet Screws (2-1/2″) – Utilized for attaching cabinets securely to wall studs, providing stability and safety (Step 12.2).
- Finishing Nails or Brad Nails – Used for attaching trim, such as toe kicks, and other light components securely (Step 12.3).
- Shelf Pins – Provide adjustable support for shelves within the cabinet, allowing for customization of storage space (Step 4.2).
- Drawer Slides (1/2 inch) –
Required for the smooth operation of drawers, providing a sturdy and reliable sliding mechanism.
Affiliate Link Notice:
I only recommend tools and materials that I have personally used or trust. By purchasing through my affiliate links, you support my work at no additional cost to you. Your support helps me continue providing quality DIY guides and projects!
Lumber Shopping & Cut List
Lumber Shopping List:
1×2 Lumber – 3 pieces, 8 ft long per cabinet
1×3 Lumber – 2 pieces, 8 ft long per cabinet
1×4 Lumber – Quantity as needed per cabinet assembly
1/4″ Thick Plywood Sheet (4ft x 8ft) – 1 sheet per cabinet (Refer to the PDF document titled “Base Cabinet 1_4_ Thick Plywood Cut Optimization” for cut optimization.)
3/4″ Thick Plywood Sheet (4ft x 8ft) – 1 sheet per cabinet (Refer to the PDF document titled “Base Cabinet 3_4_ Thick Plywood Cut Optimization” for cut optimization.)
Detailed Cut List: Cabinet Project
Panels
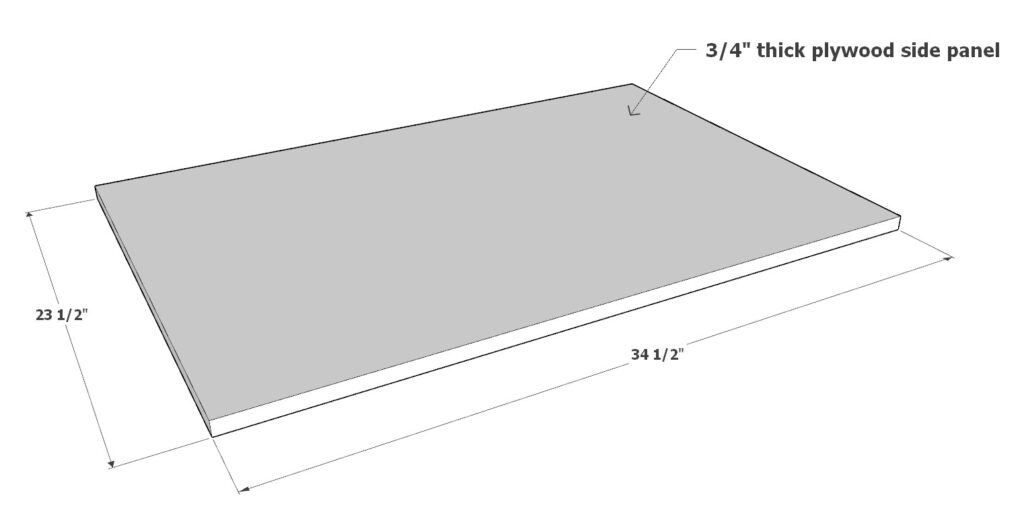
- Side Panels: (2) – 3/4″ plywood, 34-1/2″ x 23-1/2″
- Floor Panel: (1) – 3/4″ plywood, 31″ x 23-1/2″
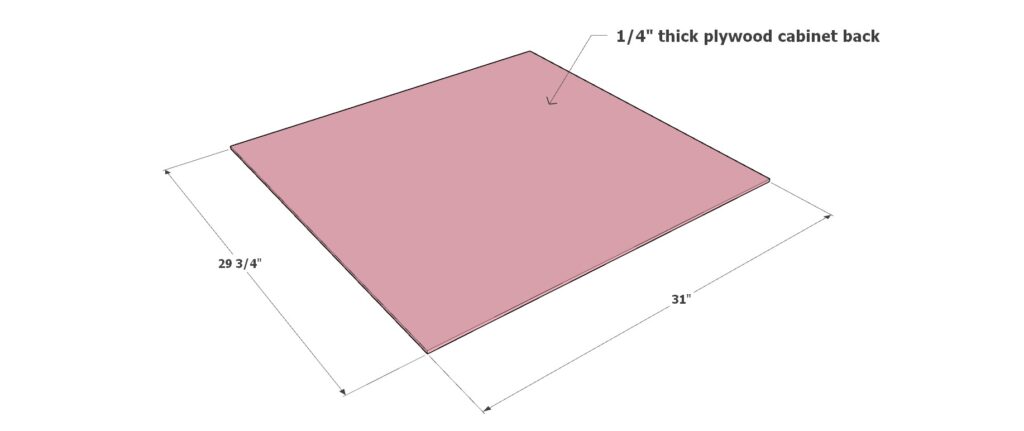
- Back Panel: (1) – 1/4″ plywood, 31″ x 29-3/4″
Stretchers
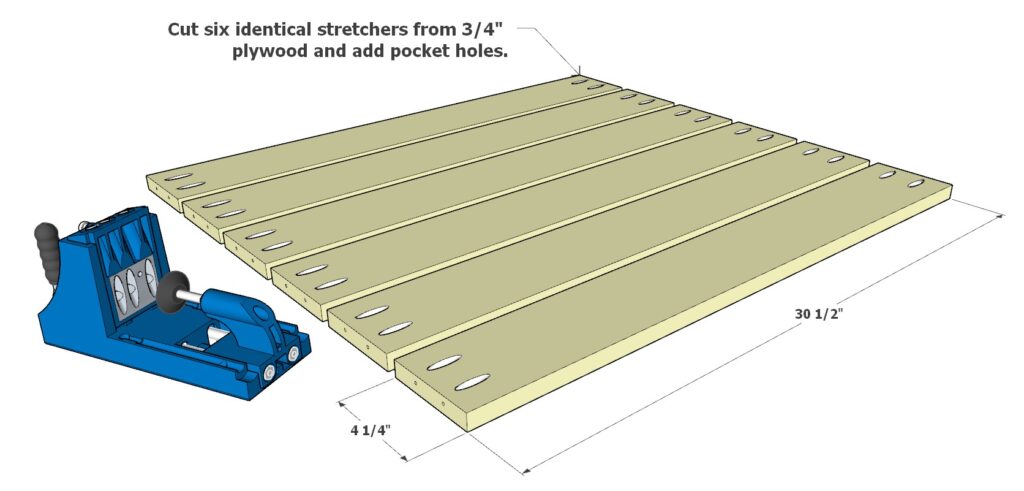
- Stretchers: (6) – 3/4″ plywood, 30-1/2″ x 4-1/4″
Shelves
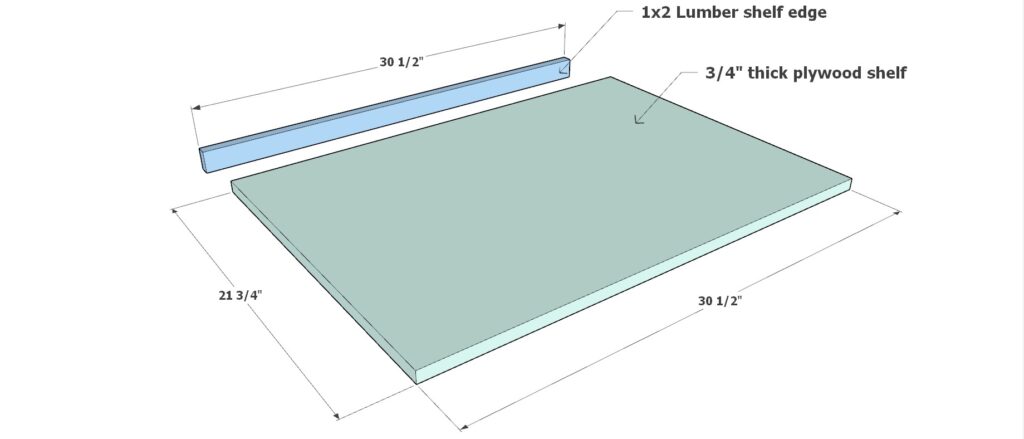
- Adjustable Shelf: (1) – 3/4″ plywood, 30-1/2″ x 21-3/4″
- Shelf Lip: (1) – 1×2 lumber, 30-1/2″
Face Frame
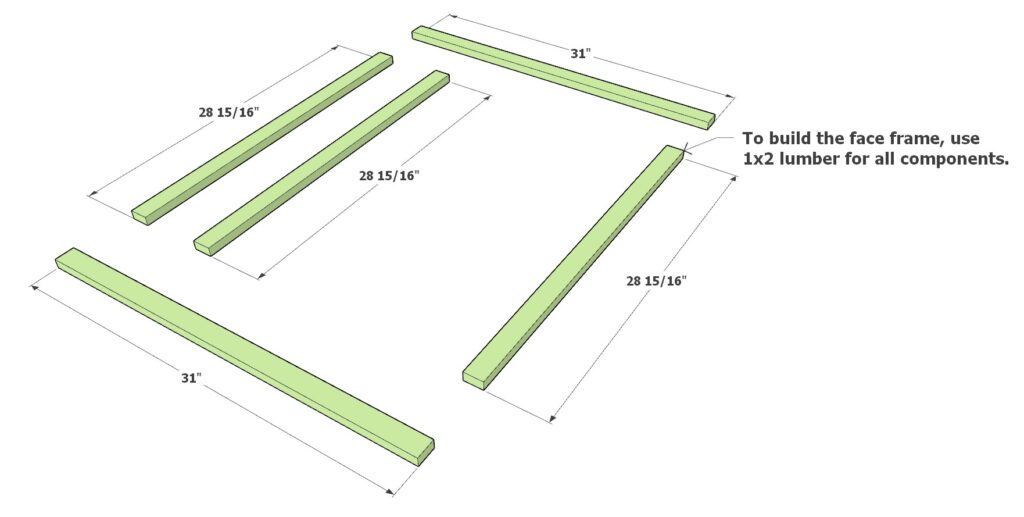
- Rails: (3) – 1×2 lumber, 28-15/16″
- Stiles: (2) – 1×2 lumber, 31″
- Center Stile (Version B): (1) – 1×3 lumber, 21-1/2″
Drawer Components
- Drawer Sides: (2) – 3/4″ plywood, 21″ x 4-1/4″
- Drawer Back: (1) – 3/4″ plywood, 26-9/16″ x 4-1/4″
- Drawer Front: (1) – 3/4″ plywood, 26-9/16″ x 3-1/2″
- Drawer Bottom: (1) – 1/4″ plywood, 27-1/16″ x 20-1/2″
Drawer Slides
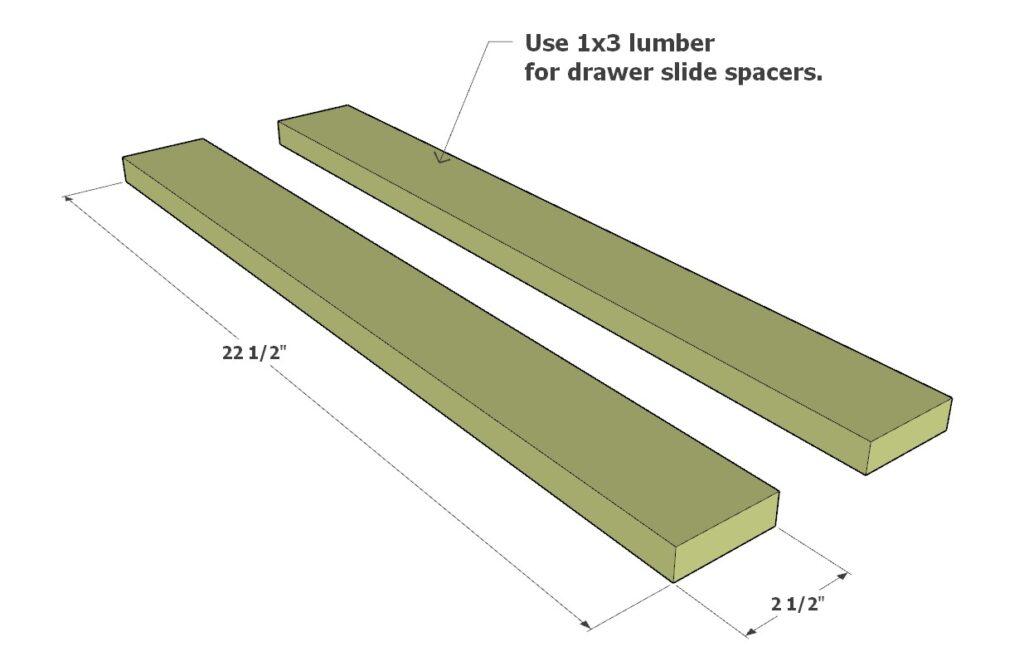
- Drawer Slide Spacers: (2) 1×3 lumber, 22-1/2″ – Used to mount drawer slides inside the cabinet
Doors
- Door Stiles: (4) – 1×3 lumber, 23-1/4″
- Door Rails: (4) – 1×2 lumber, 10-1/4″
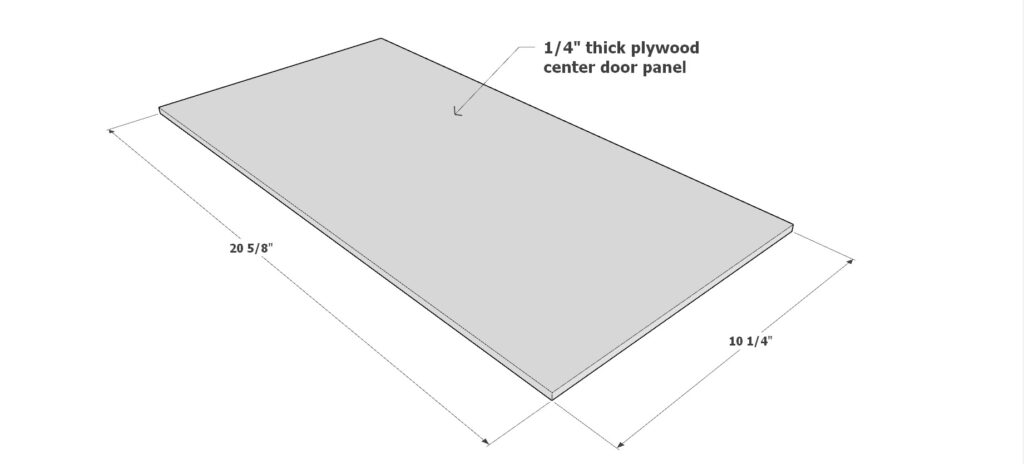
- Door Center Panel: (1) – 1/4″ plywood, 20-5/8″ x 10-1/4″
Drawer Front Assembly
- Stiles: (2) – 1×3 lumber, 6″
- Rails: (2) – 1×2 lumber, 25″
- Center Panel: (1) – 1/4″ plywood, 25-1/2″ x 3-1/2″
Optional Components
- False Center Stile (Version A): (1) – 1×3 lumber, 21-1/2″
Toe Kick
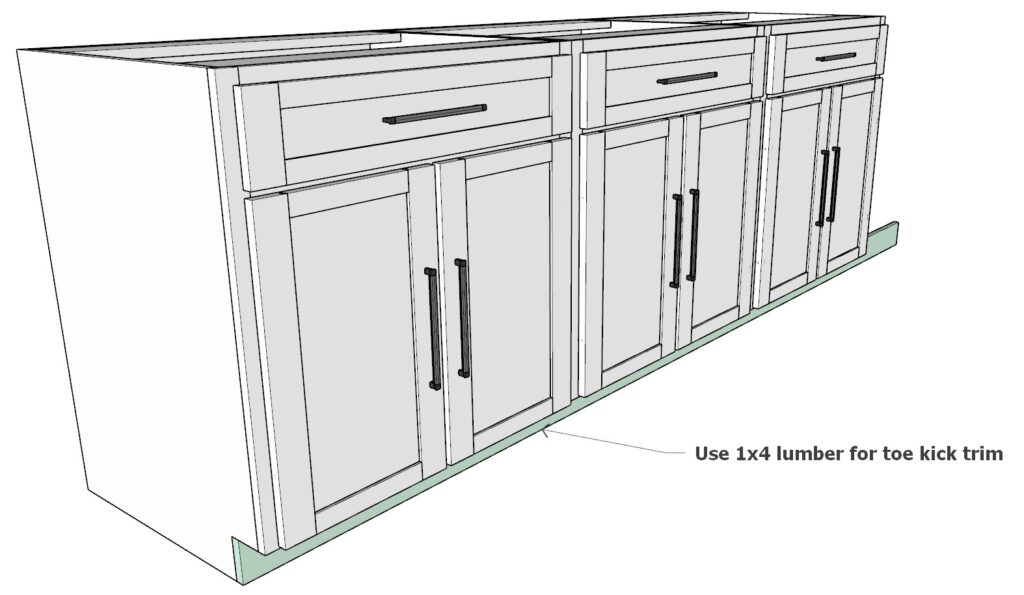
- Toe Kick Trim: (1) – 1×4 lumber, cut to cabinet base length
Common Wood Types for Cabinets
1. Plywood
Overview: Plywood is an engineered wood made from thin layers of wood veneer glued together. It’s a top choice for cabinet construction due to its strength and versatility.
Pros:
- Strength and Stability: Ideal for structural components like sides, backs, and bases.
- Cost-Effective: Provides strong support without the high cost of solid wood.
- Variety of Grades: Available in grades from A to C, with A-grade offering a smooth finish suitable for visible areas.
- Availability: Widely available at Home Depot and Lowe’s in various thicknesses (1/4″, 1/2″, 3/4″) and types, including hardwood veneers like oak, maple, and birch.
Cons:
- Edge Finishing: Requires additional finishing, like edge banding, for exposed edges.
- Moisture Sensitivity: Can warp if not properly sealed against moisture.
Recommendation: Use 3/4″ plywood for cabinet carcasses and shelves as detailed in the DIY plan for durability and strength.
2. MDF (Medium-Density Fiberboard)
Overview: MDF is made from wood fibers bonded with resin under pressure, offering a smooth surface perfect for painting.
Pros:
- Smooth Surface: Great for painted finishes due to its uniform surface.
- Affordable: Less expensive than plywood and solid wood.
- Uniformity: No grain or knots, making it easier to work with for detailed cuts.
Cons:
- Poor Moisture Resistance: Swells and deteriorates when exposed to moisture.
- Heavy: Its density makes it heavier and more challenging to handle.
Recommendation: Use MDF for cabinet doors and decorative panels, but avoid in moisture-prone areas unless sealed.
3. Solid Wood Options
Solid wood adds a classic, high-quality look to cabinets and is typically used for doors, drawer fronts, and face frames.
Maple:
- Pros: Hard and durable, smooth grain for staining or painting.
- Cons: Moderate cost, can be more expensive than birch.
- Best For: High-traffic areas needing durability.
Oak:
- Pros: Strong and wear-resistant with a traditional grain.
- Cons: Heavy grain can be difficult to paint smoothly.
- Best For: Traditional or rustic cabinet styles.
Cherry:
- Pros: Elegant with a rich patina that deepens over time, smooth grain.
- Cons: Higher cost, softer than maple, prone to dents.
- Best For: High-end, refined cabinet designs.
Birch:
- Pros: Economical, easy to work with, takes stain well.
- Cons: Softer than other hardwoods, more susceptible to scratches.
- Best For: Budget-friendly projects that still want a hardwood look.
Availability: Home Depot and Lowe’s often stock these woods in various formats, including solid lumber and veneer plywood.
Woods to Avoid for Cabinets
Pine:
- Cons: Soft and prone to damage, knots can bleed through finishes.
- Best For: Only recommended for rustic or decorative uses.
Particleboard:
- Cons: Weak, prone to sagging and moisture damage, not durable.
- Best For: Avoid for structural components; limited to low-cost interiors.
Industry Standards for Cabinet Wood in the USA
- Plywood: The go-to for structural integrity in cabinet bases, sides, and shelving.
- MDF: Preferred for painted finishes, especially on doors and panels.
- Solid Wood: Typically used for face frames, doors, and drawer fronts where aesthetics and durability are key.
Where to Buy
For DIY builders, the most convenient sources are major retailers like Home Depot and Lowe’s, which carry a variety of plywood, MDF, and solid wood suitable for cabinet projects. Always check availability and compare grades to ensure you’re getting the best material for your specific needs.
Final Tips
- Check Wood Grades: For plywood, choose higher grades for visible areas.
- Plan for Moisture: Use moisture-resistant wood or seal properly in high-humidity areas like kitchens and bathrooms.
- Evaluate Costs: Balance your budget with the quality needed for your project; sometimes spending a bit more on higher-quality wood can save costs in the long run through durability.
Choosing the right wood is a critical step in building cabinets that are both beautiful and functional. This guide ensures you’re equipped with the knowledge to make the best decision for your DIY cabinet project, aligning with the industry standards and what’s readily available at popular home improvement stores.
Step 1: Preparing the Cabinet Side Panels
In this step, you’ll learn how to make and prepare the cabinet side panels, including cutting notches for the toe kick and creating grooves for the cabinet’s assembly. Follow these sub-steps carefully to ensure your panels are accurate and ready for the next stages of construction.
1.1 Cut the Side Panels
- Materials Needed: Two pieces of 3/4″ thick plywood, each measuring 34-1/2″ x 23-1/2″.
- Instructions:
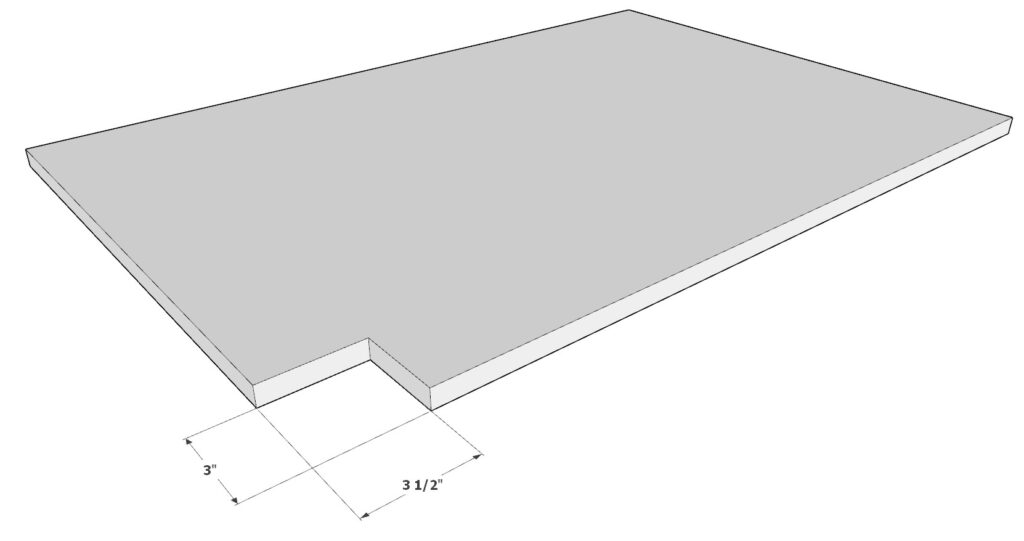
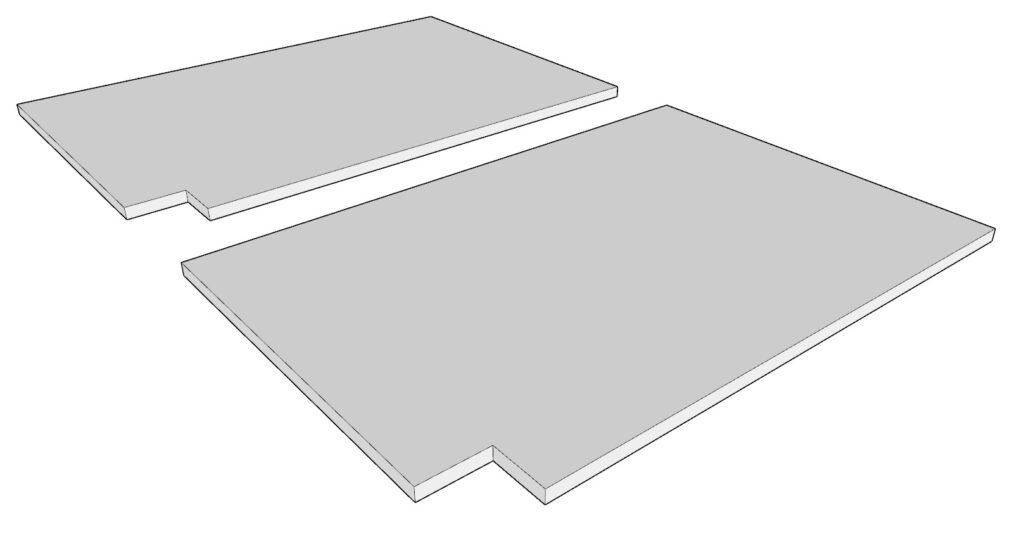
- Mark the Notch for the Toe Kick: On each side panel, mark a 3″ x 3-1/2″ notch at the bottom corner. This notch will accommodate the toe kick, allowing room for your feet when standing close to the cabinet.
- Cut the Notch:
- Use a jigsaw or circular saw to carefully cut out the notches.
- Aim for straight, clean cuts for a professional look. However, remember that any small imperfections will be covered later by the toe kick trim board.
1.2 Cut Grooves for Cabinet Assembly
- Create the Groove for the Floor Panel:
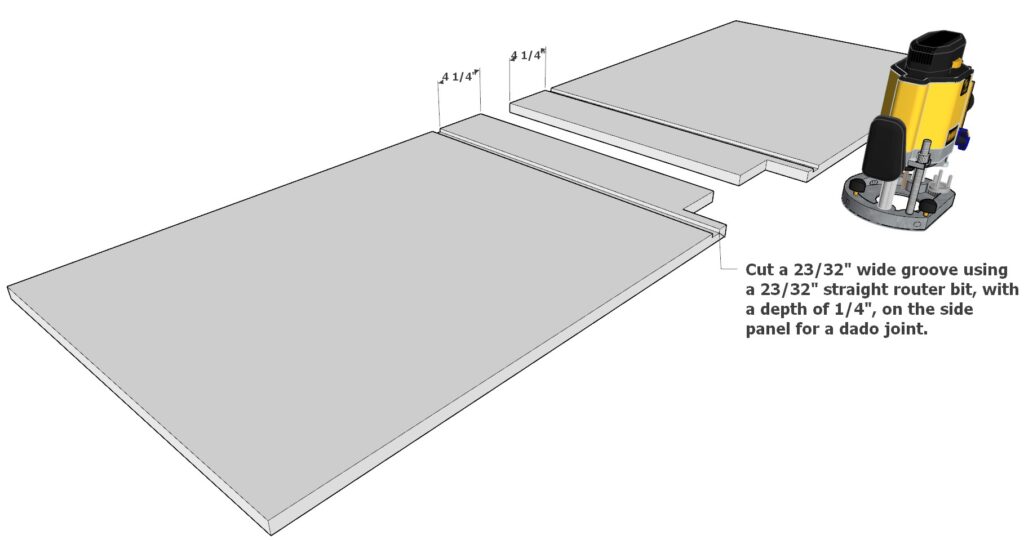
- Set Up Your Router: Use a 23/32″ straight router bit.
- Cut the Groove:
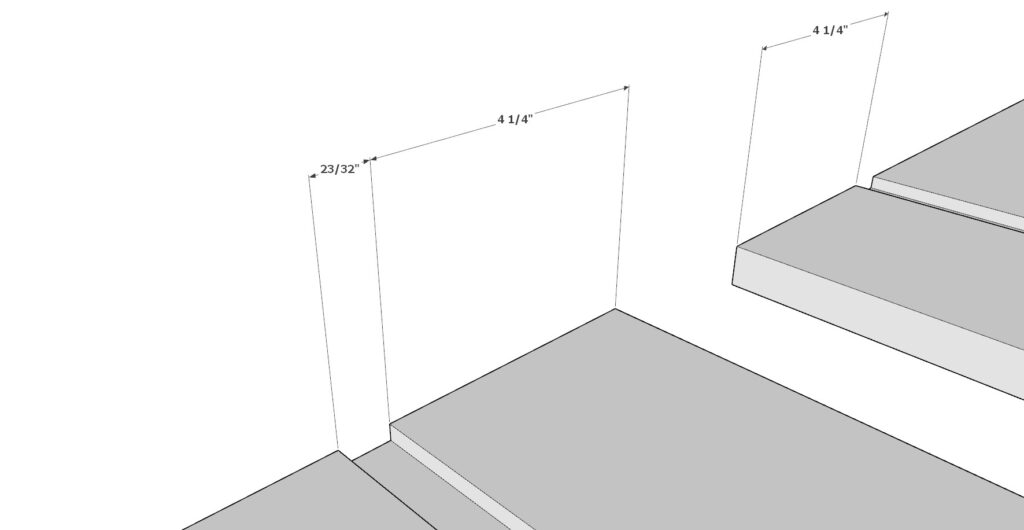
- Position the router and cut a 23/32″ wide groove into the inside of each side panel.
- The groove should be 1/4″ deep and located 4-1/4″ from the bottom edge of the panel. This groove will later hold the floor panel in place with a strong dado joint.
1.3 Add Grooves for the Back Panel
- Create the Groove for the Back Panel:
- Switch to a 1/4″ Straight Router Bit.
- Cut the Groove:
- On the inside edge of each side panel, cut a 1/4″ deep groove with a width of 1/4″.
- This groove will run from top to bottom along the back edge of each panel and will be used to secure the back panel in place.
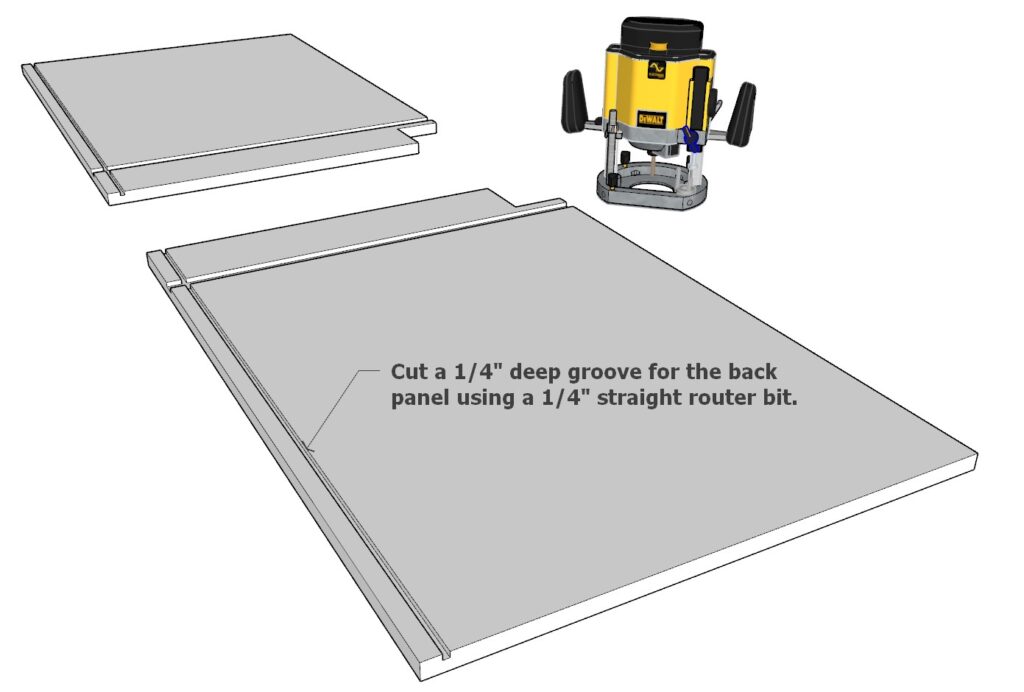
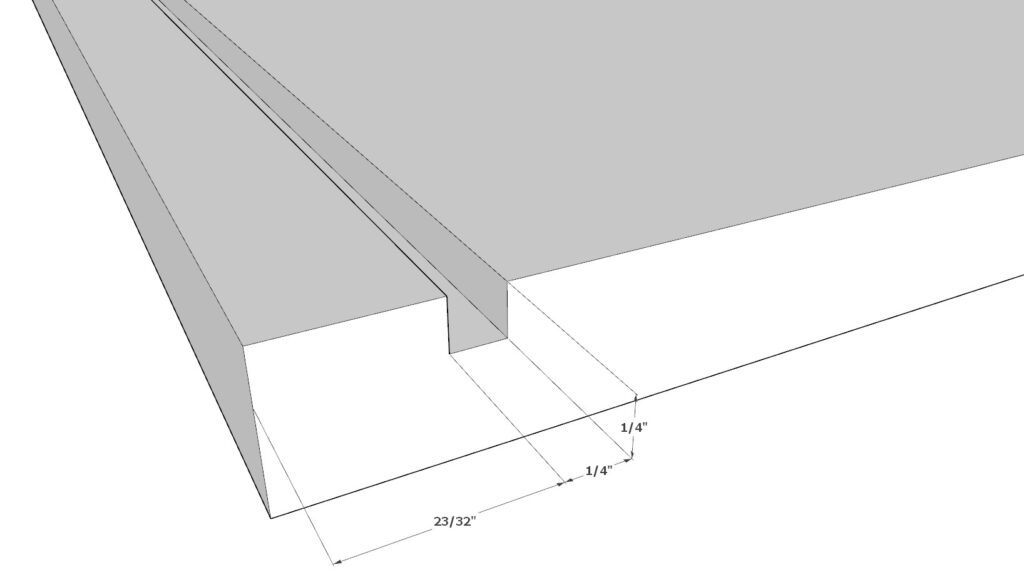
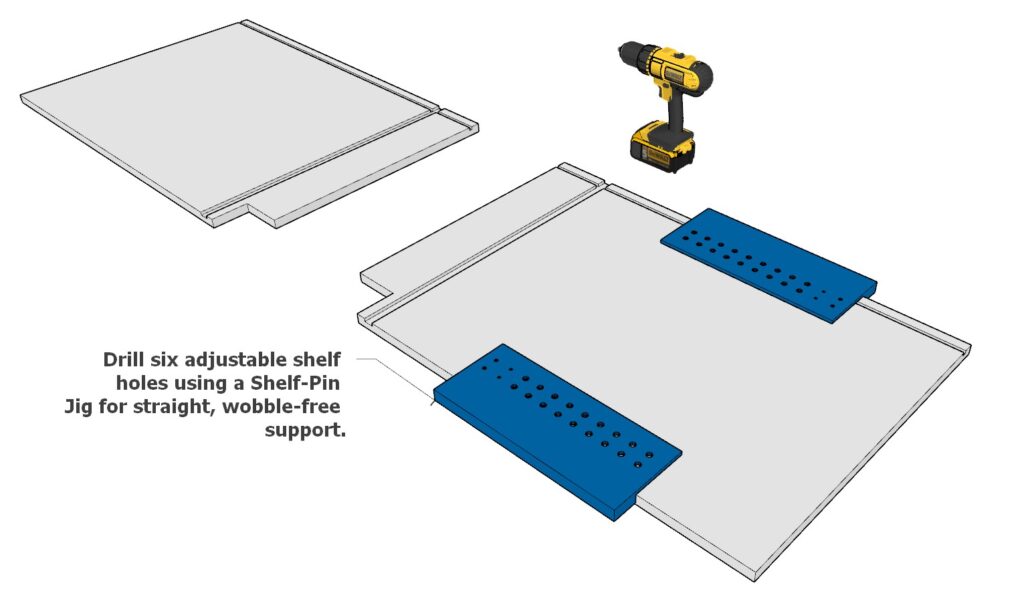
1.4 Drill Adjustable Shelf Holes
- Materials Needed: Shelf pin jig, drill, and 1/4″ drill bit.
- Instructions:
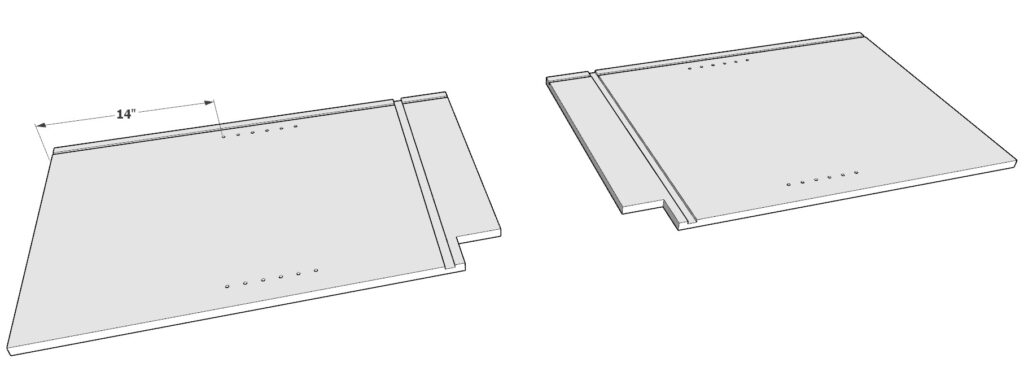
- Mark the Hole Positions: Use a shelf pin jig to mark the positions for six adjustable shelf holes on each side panel.
- Drill the Holes:
- Drill straight and accurate holes using the jig to ensure strong, wobble-free shelf support.
- These holes will allow you to adjust the height of your shelves as needed, providing flexibility in your cabinet design.
By completing these steps, you should have two mirror-image side panels that are fully prepped with notches, grooves, and shelf pin holes. These side panels are essential for the structural integrity and functionality of your cabinet, setting the foundation for the next steps in your DIY project.
Step 2: Preparing the Cabinet Floor Panel
In this step, you’ll prepare the cabinet floor panel, which will be integrated into the cabinet carcass to provide a sturdy base. Follow the instructions below to accurately cut and groove the floor panel.
2.1 Cut the Floor Panel
- Materials Needed: One piece of 3/4″ thick plywood measuring 31″ x 23-1/2″.
- Instructions:
- Measure and Mark: Verify the dimensions of your plywood piece to ensure it measures exactly 31″ x 23-1/2″. This piece will serve as the cabinet floor panel.
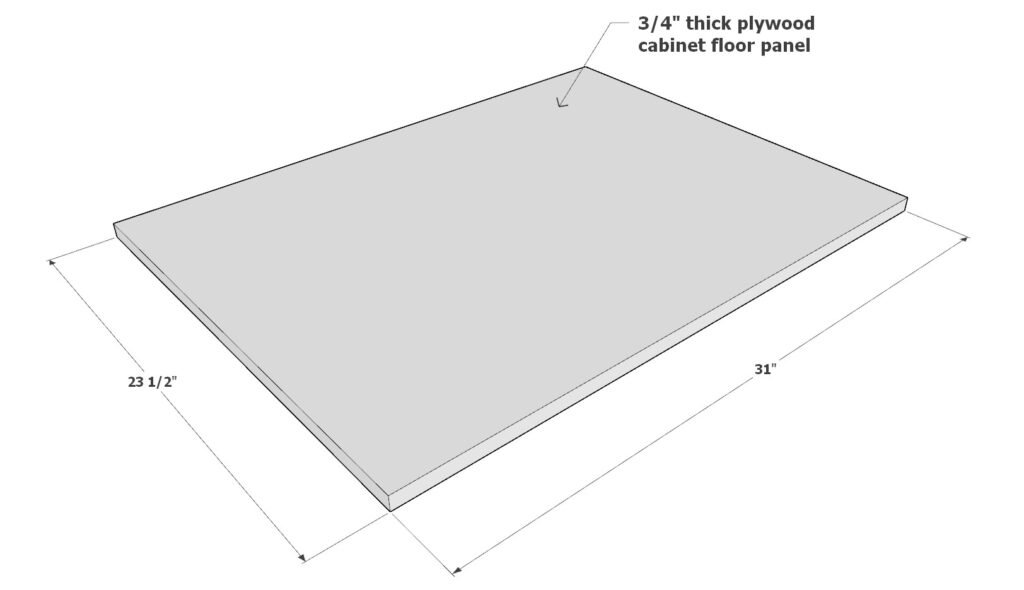
2.2 Cut the Groove for the Back Panel
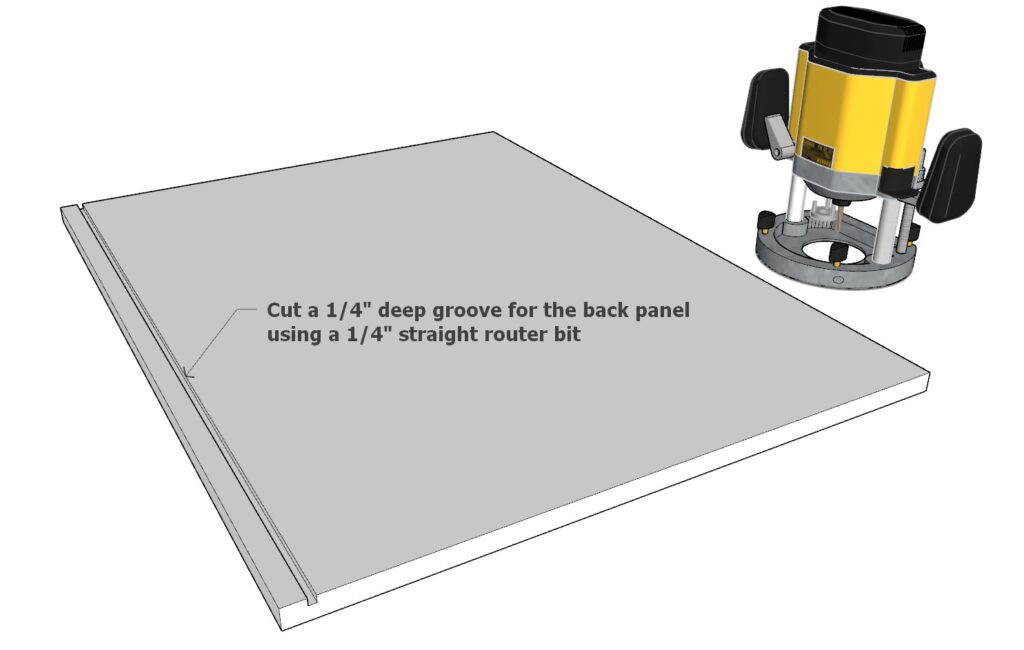
- Create the Groove:
- Set Up Your Router: Use a 1/4″ straight router bit.
- Cut the Groove:
- Position the router and cut a 1/4″ wide and 1/4″ deep groove along the back edge of the floor panel. This groove will align with the back panel groove on the side panels, allowing the cabinet back panel to fit securely into place.
By completing these steps, your cabinet floor panel will be properly grooved and ready for integration into the cabinet carcass.

Step 3: Assembling the Cabinet Carcass
In this step, you’ll assemble the cabinet carcass by integrating the side panels, floor panel, stretchers, and back panel. This will create the basic structure of the cabinet. Follow the detailed instructions below to ensure a sturdy and accurate assembly.
3.1 Prepare the Stretchers
- Materials Needed: Six pieces of 3/4″ thick plywood, each measuring 30-1/2″ x 4-1/4″.
- Instructions:
- Cut the Stretchers: Cut six identical stretchers to the specified dimensions from the 3/4″ plywood.
- Add Pocket Holes: Using a pocket hole jig, drill pocket holes on one side of each stretcher as shown in the diagram (color-coded in yellow). This will allow for a secure connection with the rest of the cabinet components.
3.2 Assemble the Side Panels and Floor Panel
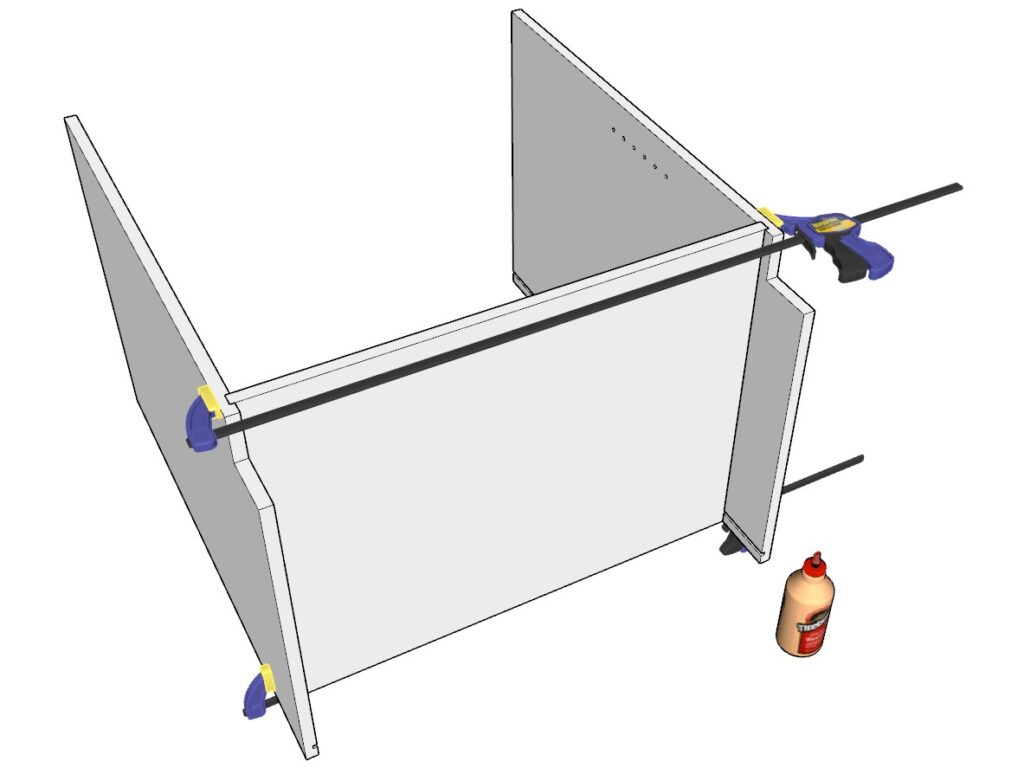
- Materials Needed: Side panels, floor panel, wood glue, clamps.
- Instructions:
- Apply Glue to the Joints: Apply wood glue into the grooves of the floor panel.
- Attach the First Side Panel: Slide the floor panel into the groove of the first side panel. Ensure it fits snugly.
- Attach the Second Side Panel: Repeat the process for the second side panel, making sure all pieces align properly.
- Clamp the Assembly: Use wood clamps to hold the structure together temporarily, ensuring that everything is square and aligned before securing further with stretchers.

3.3 Add the Back Stretchers
- Materials Needed: Two stretchers, pocket hole screws (1-1/4″), wood glue.
- Instructions:
- Position the Back Stretchers: Place two stretchers at the back of the cabinet carcass; these will be used to secure the cabinet to the wall later.
- Secure with Screws and Glue: Apply wood glue to the stretcher ends, align them correctly, and fasten using 1-1/4″ pocket hole screws. This will lock the side panels and floor panel in place.
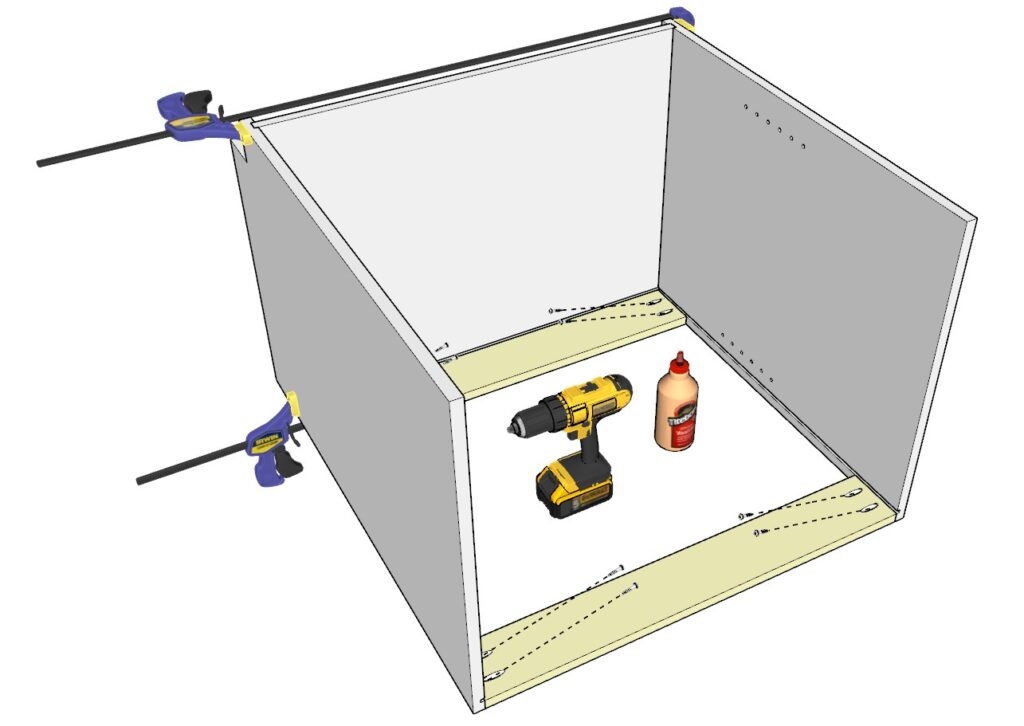
3.4 Add the Top Stretchers with Spacers
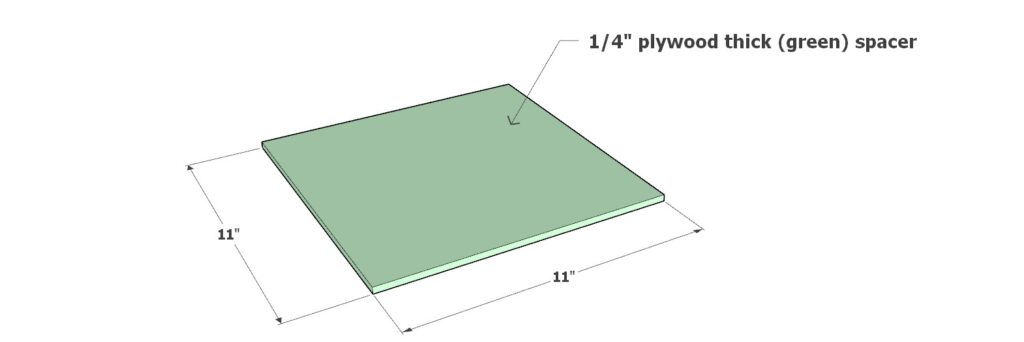
- Materials Needed: Two stretchers, 1/4″ plywood spacer (green), pocket hole screws (1-1/4″), wood glue.
- Instructions:
- Use the Spacer: Place the 1/4″ plywood spacer (color-coded in green) between the back of the cabinet carcass and the stretcher to maintain a 1/4″ gap for the back panel.
- Attach the Stretchers: Secure the two stretchers at the top of the cabinet carcass with 1-1/4″ pocket hole screws and wood glue, using the spacer to ensure correct positioning.
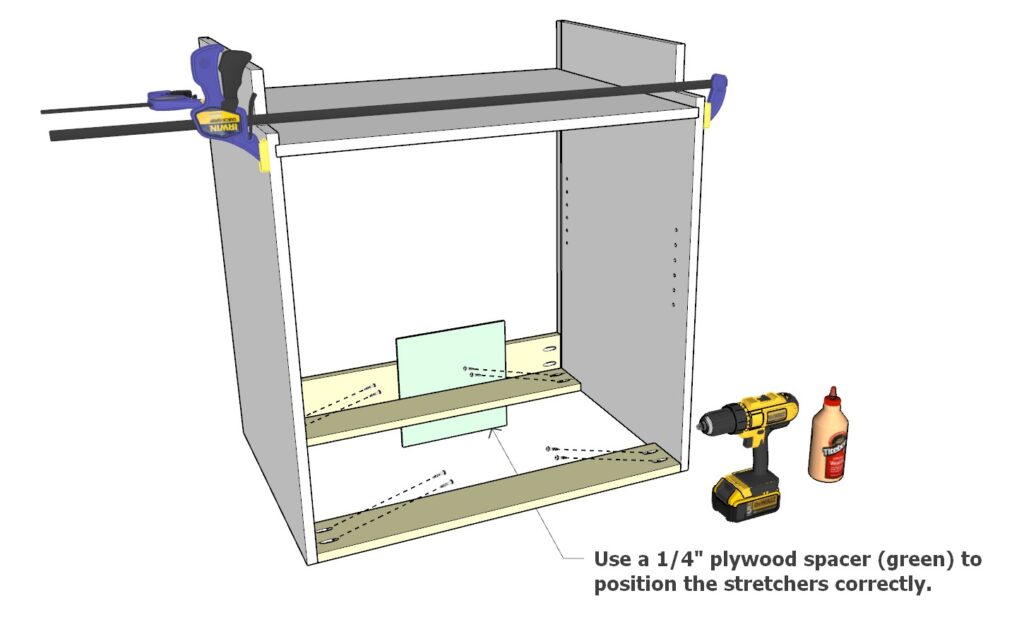
3.5 Position the Drawer Box Stretcher with Spacer
- Materials Needed: One stretcher, 5-3/4″ wide spacer (lavender), pocket hole screws (1-1/4″), wood glue.
- Instructions:
- Use the Lavender Spacer: Place the 5-3/4″ wide spacer (color-coded in lavender) to correctly position the stretcher for the drawer box.
- Attach the Stretcher: Apply glue, position the stretcher, and secure it with 1-1/4″ screws. This stretcher helps guide the placement and support of the drawer box.

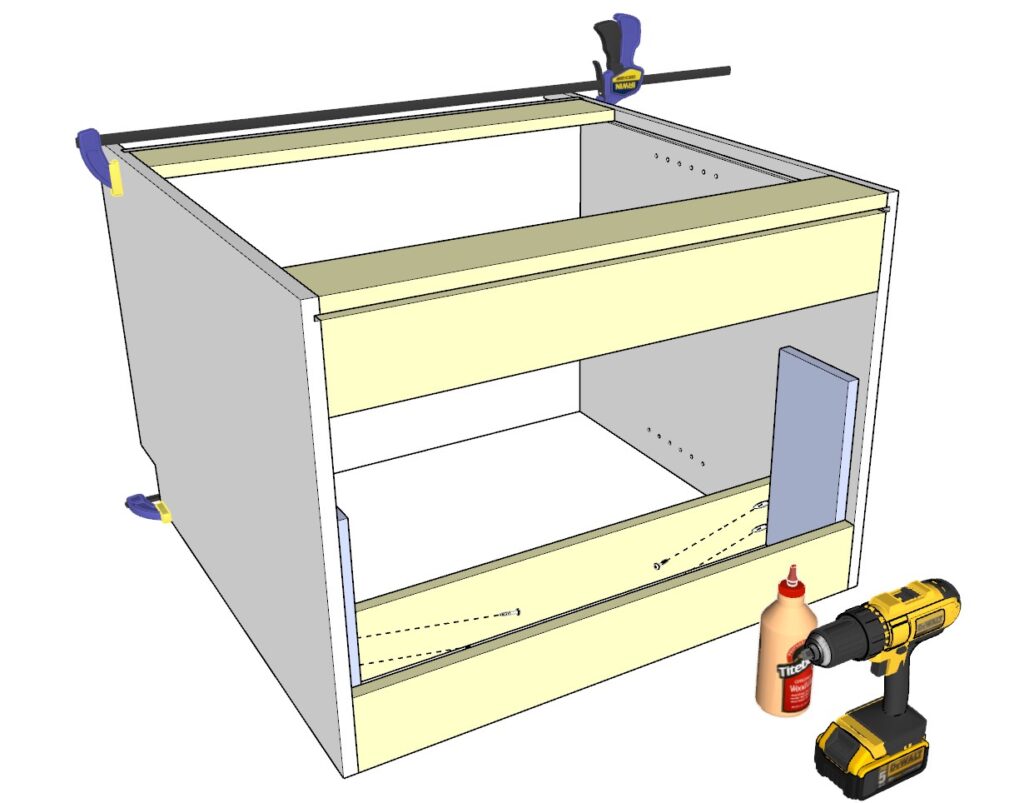
3.6 Install the Bottom Stretcher for the Toe Kick
- Materials Needed: One stretcher, wood glue, pocket hole screws (1-1/4″).
- Instructions:
- Position the Bottom Stretcher: Place the last stretcher at the bottom of the cabinet, aligning it where the toe kick trim board will attach.
- Secure with Screws and Glue: Use wood glue and 1-1/4″ screws to attach the stretcher, ensuring a solid base for the toe kick area.

3.7 Install the Back Panel
- Materials Needed: 1/4″ thick plywood back panel (31″ x 29-3/4″), rubber mallet, pin nailer, brad nails.
- Instructions:
- Insert the Back Panel: Slide the back panel into the grooves on the side and floor panels. Make sure it fits snugly.
- Tap Gently into Place: If needed, use a rubber mallet to gently tap the back panel fully into the grooves.
- Secure with Nails: Once in place, use a pin nailer and brad nails to fasten the back panel securely to the carcass.
By following these steps, you will have assembled the basic shape of the cabinet carcass, with all components securely integrated.


Step 4: Making and Adding the Cabinet Shelf
In this step, you’ll make the adjustable shelf for your cabinet and install it securely using shelf pins. Follow these instructions carefully to ensure your shelf is properly assembled and positioned.
4.1 Prepare the Shelf Components
- Materials Needed:
- One piece of 3/4″ thick plywood measuring 30-1/2″ x 21-3/4″.
- One 1×2 lumber piece, 30-1/2″ long.
- Instructions:
- Cut the Plywood and Lumber: Ensure that the plywood and the 1×2 lumber piece are cut to the correct dimensions. The plywood will serve as the shelf, and the 1×2 will serve as the shelf lip and will also provide additional support and stability.
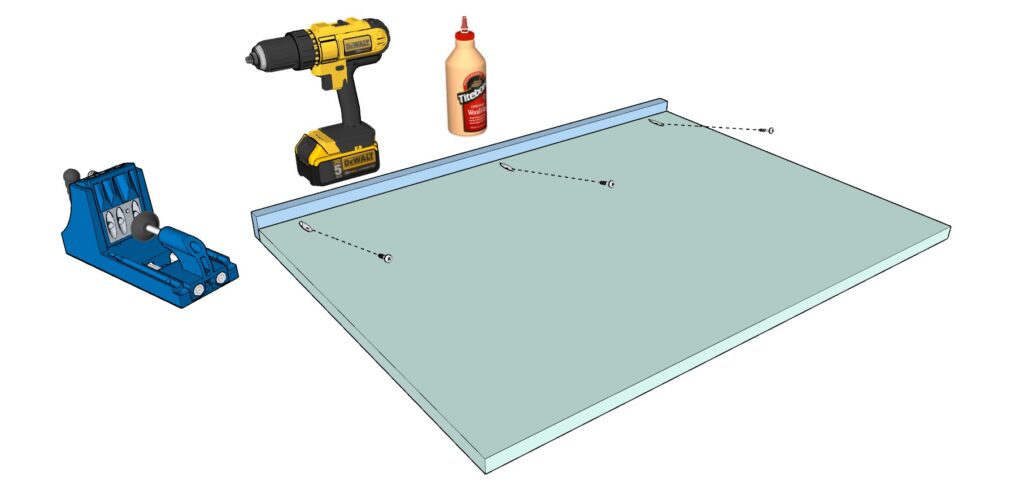
- Drill Pocket Holes: Using a pocket hole jig, drill pocket holes along one long edge of the 3/4″ thick plywood shelf. Refer to the diagram for correct placement of the pocket holes.
- Assemble the Shelf:
- Apply wood glue along the edge where the plywood meets the 1×2 lumber.
- Align the 1×2 lumber piece with the edge of the plywood, ensuring it is flush and even.
- Secure them together using 1-1/4″ pocket hole screws, tightening firmly to create a solid shelf assembly.
4.2 Install the Shelf into the Cabinet Carcass
- Materials Needed:
- Four shelf pins.
- Instructions:
- Insert Shelf Pins: Place four shelf pins into the pre-drilled pin holes on the side panels of the cabinet carcass. Ensure the pins are level and secure to support the shelf properly.
- Position the Shelf: Carefully place the assembled shelf onto the pins inside the cabinet carcass. Make sure it sits evenly on all four pins and check for stability.
By completing these steps, your shelf will be securely integrated into the cabinet, providing adjustable storage space that can be customized to your needs.

Step 5: Making the Cabinet Face Frame (Version A)
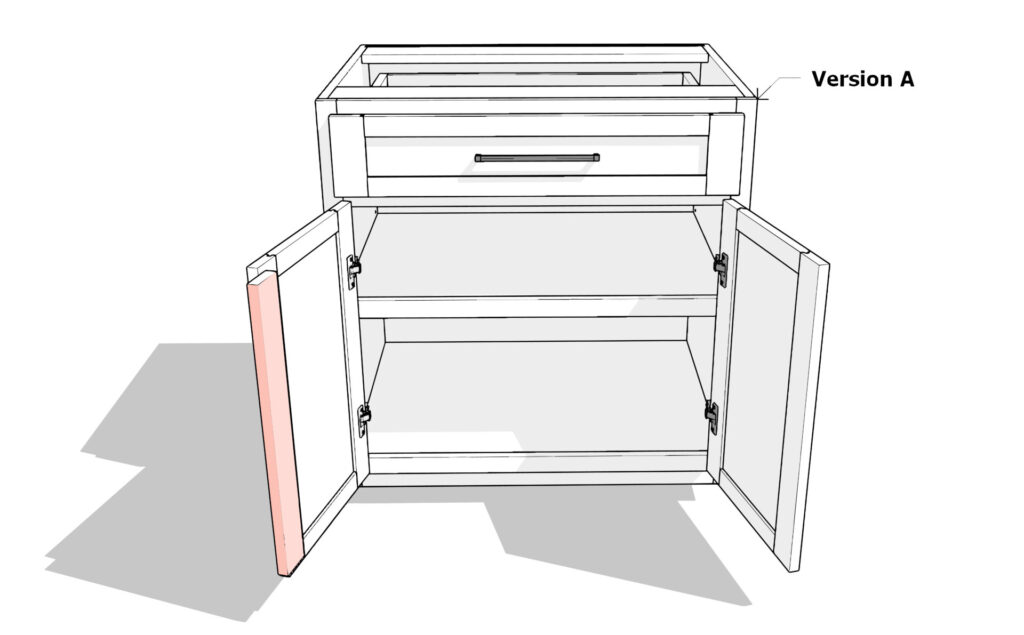
In this step, you will learn how to build Version A of the cabinet face frame. This version features a false center stile that attaches directly to one of the cabinet doors rather than the face frame itself. This design offers certain advantages and disadvantages compared to Version B, which will be discussed in the next step.
Pros and Cons of Version A (False Center Stile Attached to Door)
Pros:
- Unobstructed Access: By attaching the false stile to the door, there is no center divider in the cabinet when the doors are open. This allows for easy access to the entire shelf and the cabinet interior without any obstructions.
- Versatility: You can store longer and larger items more easily, as there are no barriers inside the cabinet.
- Full Shelf Removal: This design allows you to remove the adjustable shelf entirely if needed, making it convenient for cleaning or reconfiguring the space.
Cons:
- Specific Opening Sequence: The cabinet doors must be opened and closed in a specific sequence. This can be slightly inconvenient and might take some getting used to.
Note: This DIY plan showcases Version A, where the false stile is attached to the door. The first image in this step illustrates Version A, while Version B will be detailed in the next step and is shown in the first image of that section. In Version B, the center stile is fixed to the face frame, which means you can’t remove the shelf—though it remains adjustable up and down. This setup eliminates the need to open the doors in a particular order but at the cost of easier access.
Building the Face Frame (Version A)
Materials Needed:
- Three 1×2 lumber pieces, each 28-15/16″ long.
- Two 1×2 lumber pieces, each 31″ long.
- Wood glue, pocket hole jig, 1-1/4″ pocket hole screws.
Instructions:
Cut the Lumber: Ensure all your 1×2 lumber pieces are accurately cut to the specified lengths: three at 28-15/16″ and two at 31″.
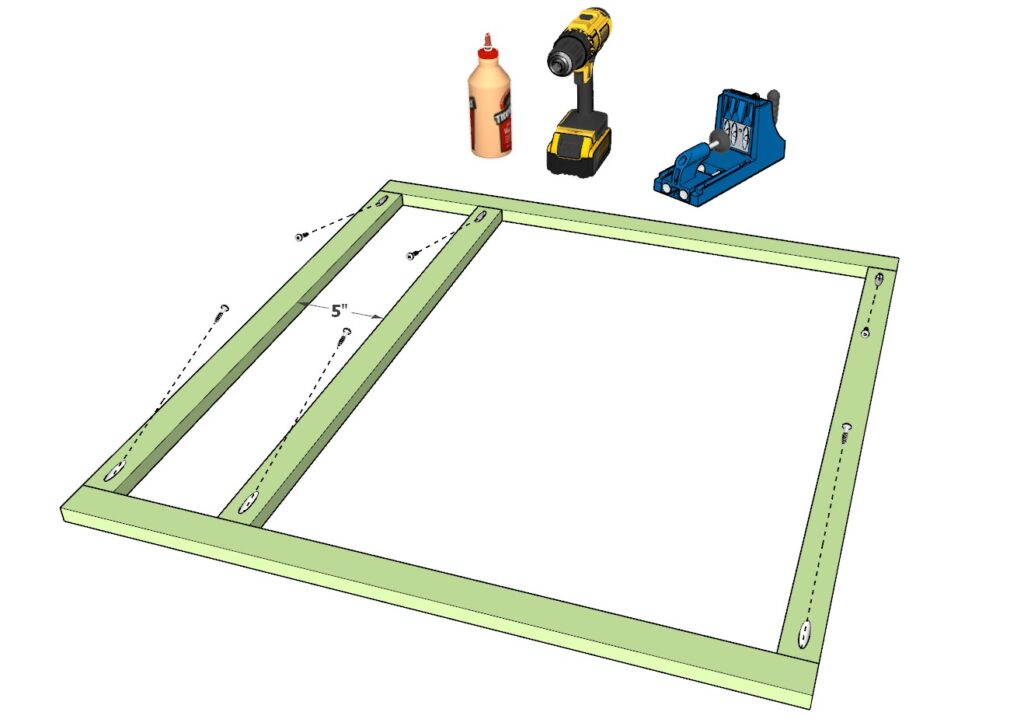
Drill Pocket Holes:
- Use a pocket hole jig to drill pocket holes in the appropriate locations on the lumber pieces. Refer to the diagram for exact placement.
- The pocket holes will help secure the horizontal and vertical pieces together, ensuring a strong frame.
Assemble the Frame:
- Apply wood glue to the ends of the lumber pieces where they will join.
- Use 1-1/4″ pocket hole screws to assemble the frame. Make sure everything is aligned and square before tightening the screws.
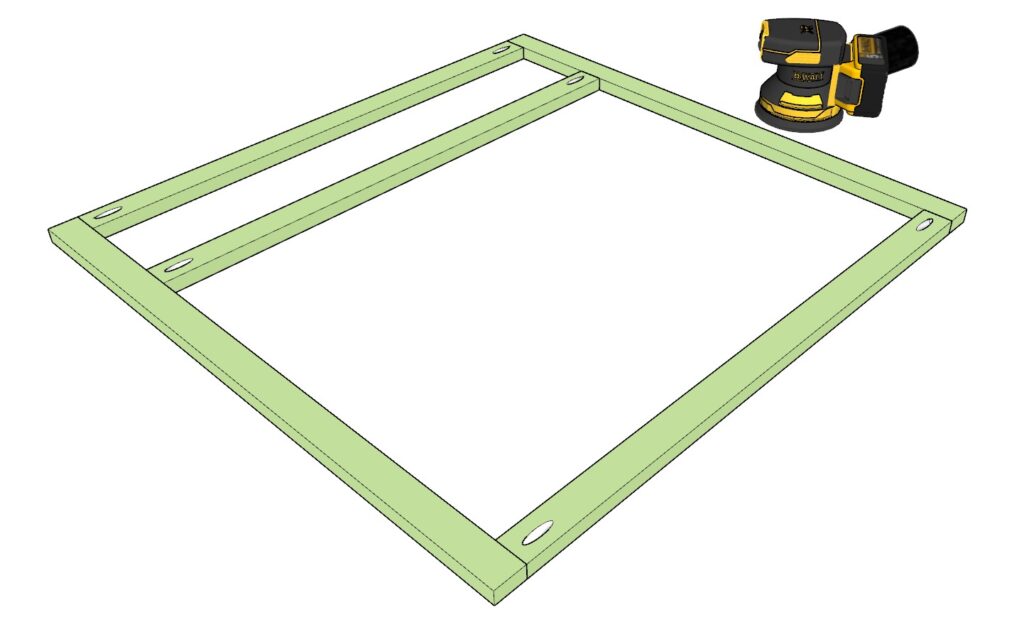
Sand the Frame:
- Sand down the assembled face frame to ensure a smooth surface that’s ready for finishing or attaching to the cabinet carcass.
Check Alignment:
- Double-check that all connections are tight and the frame is flush. Proper alignment is crucial for a professional finish and functionality.
By completing these steps, you will have assembled Version A of the face frame, ready to be attached to your cabinet. This version offers a practical solution for maximizing storage and accessibility, especially in spaces where flexibility and ease of use are top priorities.
Step 6: Making the Cabinet Face Frame (Version B)
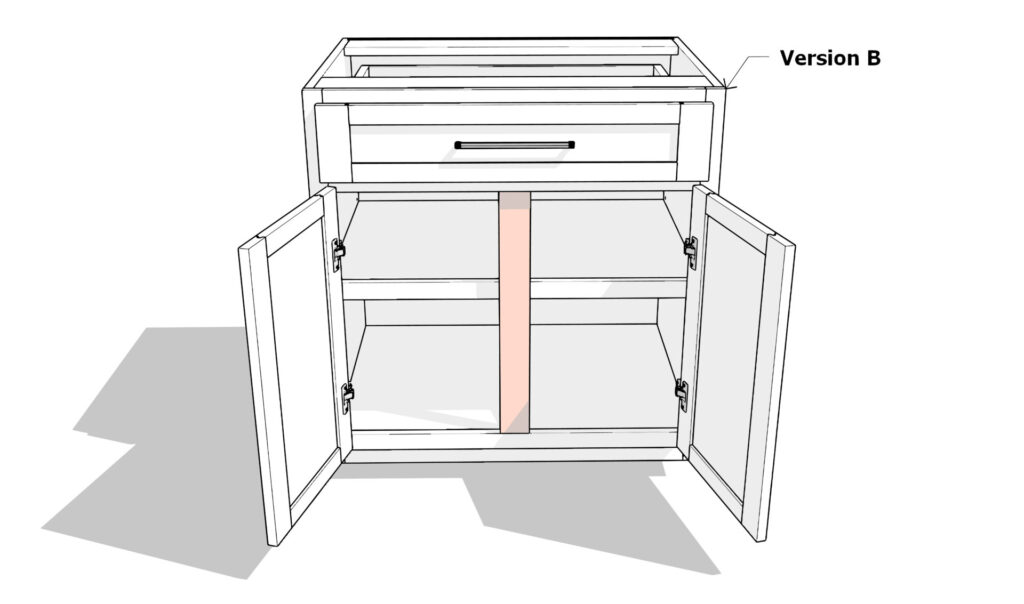
In this step, you’ll build Version B of the cabinet face frame. Unlike Version A, this version includes a fixed center stile attached directly to the face frame, offering a different set of pros and cons compared to the false stile approach.
Pros and Cons of Version B (Fixed Center Stile on Face Frame)
Pros:
- No Specific Opening Sequence: With the fixed center stile, the cabinet doors can be opened and closed in any order, making everyday use straightforward and intuitive.
- Simpler Assembly: Version B has a simpler structure that does not rely on the false stile mechanism, making it easier for those who prefer a more traditional cabinet design.
Cons:
- Limited Access: The fixed center stile can obstruct access to the interior of the cabinet, making it harder to reach larger or longer items.
- Shelf Removal Restriction: While the shelf remains adjustable up and down, it cannot be fully removed from the cabinet due to the center stile.
Note: The first image in this step illustrates Version B with the fixed center stile, while the first image in Step 5 shows Version A. Choose the version that best suits your needs and preferences.
Building the Face Frame (Version B)
Materials Needed:
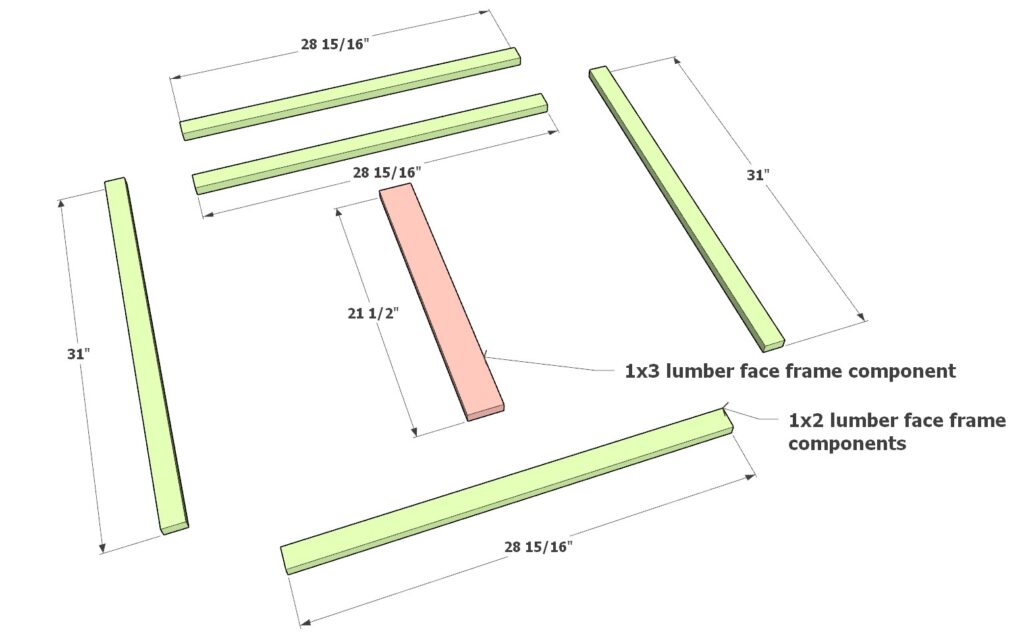
- Three 1×2 lumber pieces, each 28-15/16″ long.
- Two 1×2 lumber pieces, each 31″ long.
- One 1×3 lumber piece, 21-1/2″ long (center stile, color-coded in pink).
- Wood glue, pocket hole jig, 1-1/4″ pocket hole screws.
Instructions:
Cut the Lumber:
- Ensure all 1×2 and 1×3 lumber pieces are cut to the specified lengths: three at 28-15/16″, two at 31″, and one at 21-1/2″ (1×3 for the center stile).
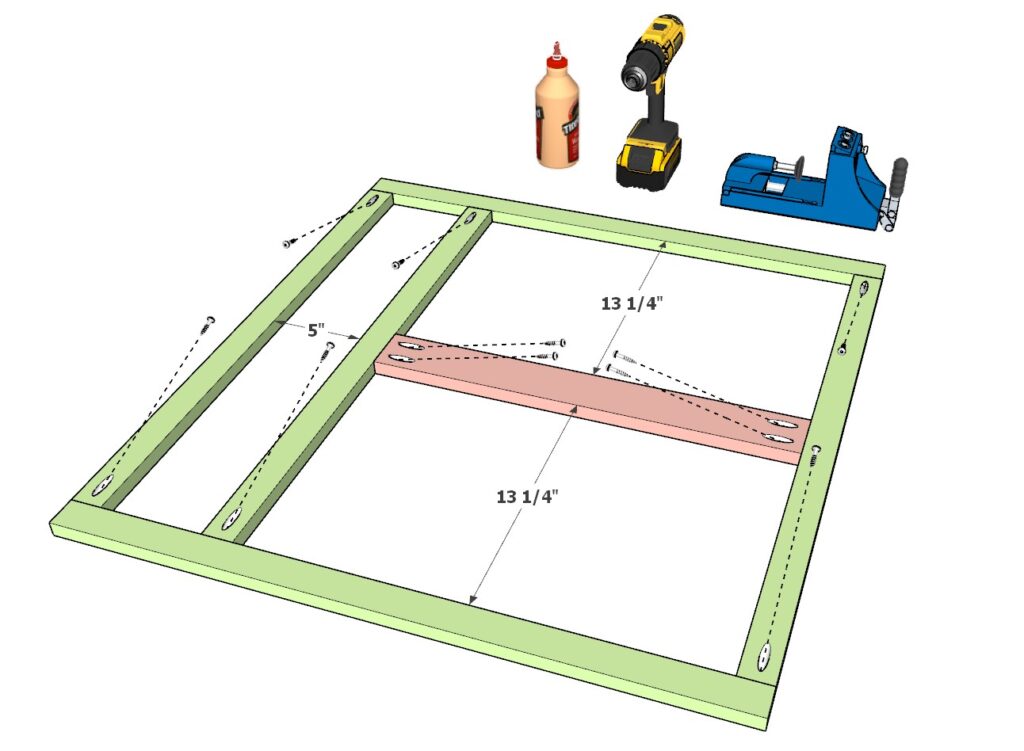
Drill Pocket Holes:
- Use a pocket hole jig to drill pocket holes in the appropriate locations on the lumber pieces, following the diagram for precise placement.
- The pocket holes will secure the horizontal and vertical pieces of the frame, including the center stile.
Assemble the Frame:
- Apply wood glue to the ends of the lumber pieces where they will join.
- Assemble the frame by securing it with 1-1/4″ pocket hole screws, ensuring the center stile (1×3 lumber) is positioned in the middle of the face frame as shown in the diagram.
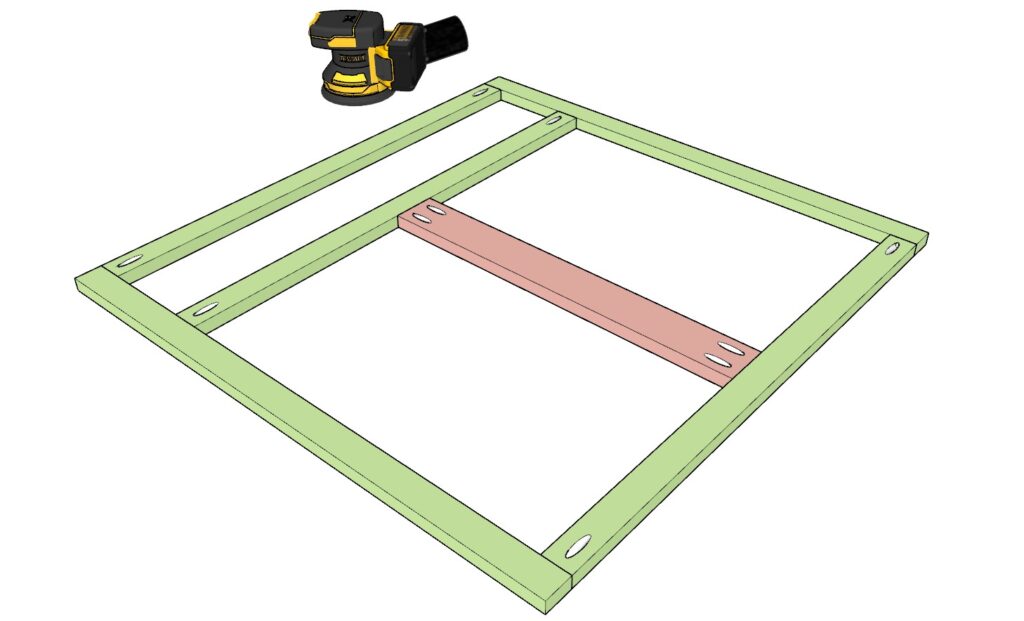
Sand the Frame:
- Sand down the assembled face frame to ensure a smooth, even surface that’s ready for finishing or attachment to the cabinet carcass.
Check Alignment:
- Ensure all connections are tight, the frame is flush, and the center stile is correctly positioned. Proper alignment is essential for the doors and overall cabinet functionality.
By completing these steps, you’ll have assembled Version B of the face frame, which includes a fixed center stile. This version is ideal for those seeking ease of use without the sequence requirements of Version A, though it comes with a trade-off in terms of accessibility to the cabinet interior.
Step 7: Attaching the Cabinet Face Frame
In this step, you will attach the face frame to the cabinet carcass, completing the front structure of your cabinet. The method of attachment will depend on whether you plan to paint or stain the cabinet. Follow the instructions below to ensure a secure and clean attachment of the face frame.
7.1 Attach the Face Frame for Painted Cabinets
- Materials Needed: Wood glue, brad nails, pin nailer, wood filler.
- Instructions:
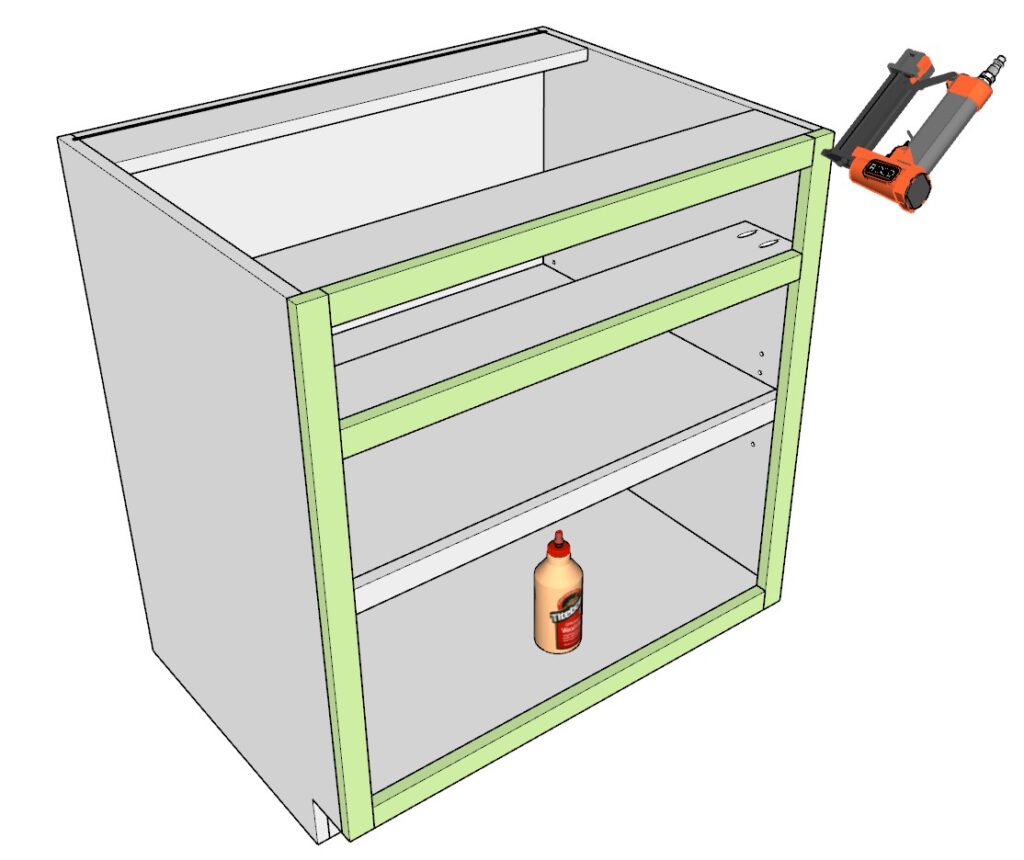
- Apply Wood Glue: Spread an even layer of wood glue along the edges of the cabinet carcass where the face frame will attach.
- Position the Face Frame: Carefully align the face frame with the front of the cabinet carcass, making sure all edges are flush and square.
- Secure with Brad Nails:
- Use a pin nailer with brad nails to attach the face frame securely to the carcass.
- Place the nails at regular intervals along the edges to ensure a tight fit.
- If any gaps appear, clamp the face frame in place until the glue sets.
- Fill Nail Holes:
- Once the face frame is attached, use wood filler to fill the nail holes.
- Sand the filled areas smooth once dry, so they blend seamlessly when painted.
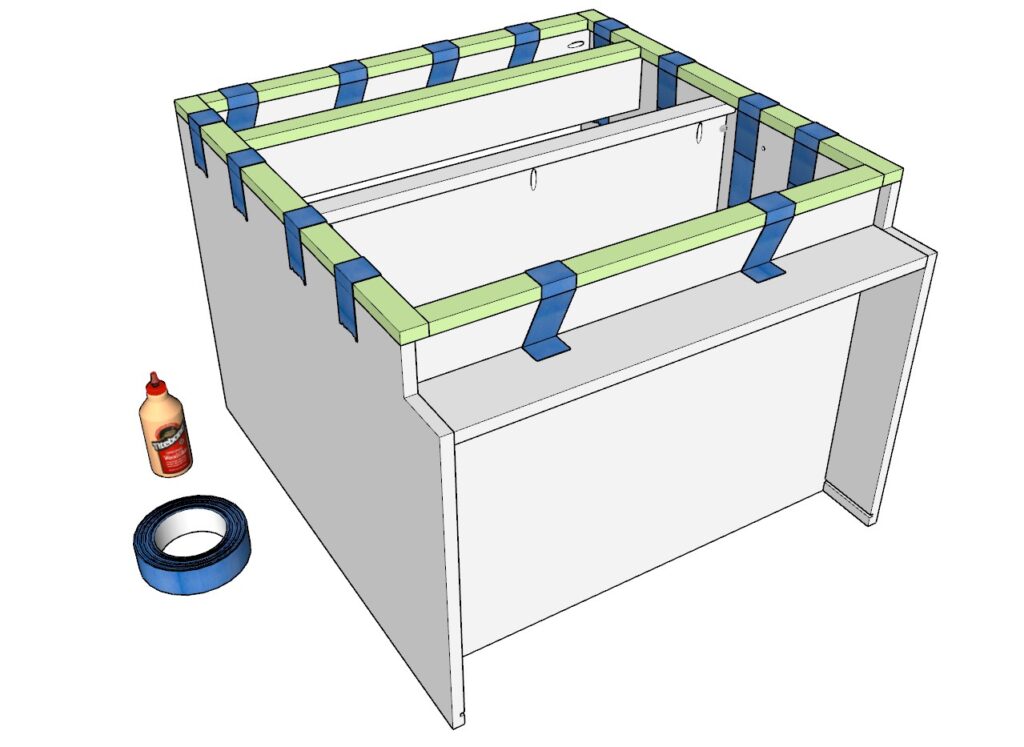
7.2 Attach the Face Frame for Stained Cabinets
- Materials Needed: Wood glue, clamps or painter’s tape.
- Instructions:
- Apply Wood Glue: Apply a thin layer of wood glue along the cabinet carcass edges where the face frame will be attached.
- Position the Face Frame: Align the face frame carefully with the carcass, ensuring all edges are flush and that the face frame sits evenly.
- Secure the Face Frame:
- Use clamps to hold the face frame in place while the glue dries, ensuring a tight bond without visible fasteners.
- If clamps are not available, use painter’s tape to hold the frame firmly against the cabinet carcass until the glue sets.
- Check alignment and adjust as needed before the glue fully dries.
Note: When staining, avoid using nails as the filled nail holes may remain visible and affect the final appearance. Properly securing the face frame with glue alone ensures a clean, professional look.
By following these steps, you will have successfully attached the face frame to your cabinet carcass. This step completes the basic structure and sets the stage for adding doors, drawers, and other finishing touches. Make sure to check for any misalignments and correct them promptly to maintain the professional appearance of your cabinet.
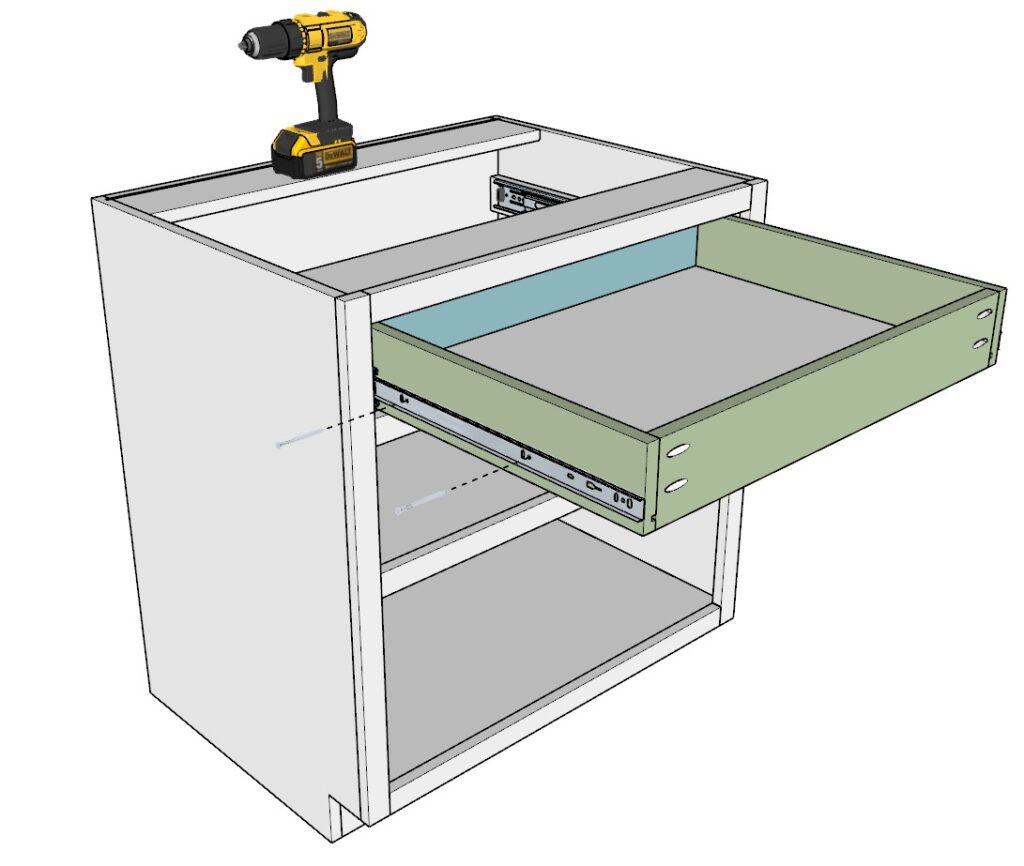
Step 8: Building and Installing the Cabinet Drawer
In this step, you will create the drawer box and install it into the cabinet carcass. The drawer will provide functional storage, and it’s essential to follow these detailed sub-steps to ensure accurate assembly and smooth operation.
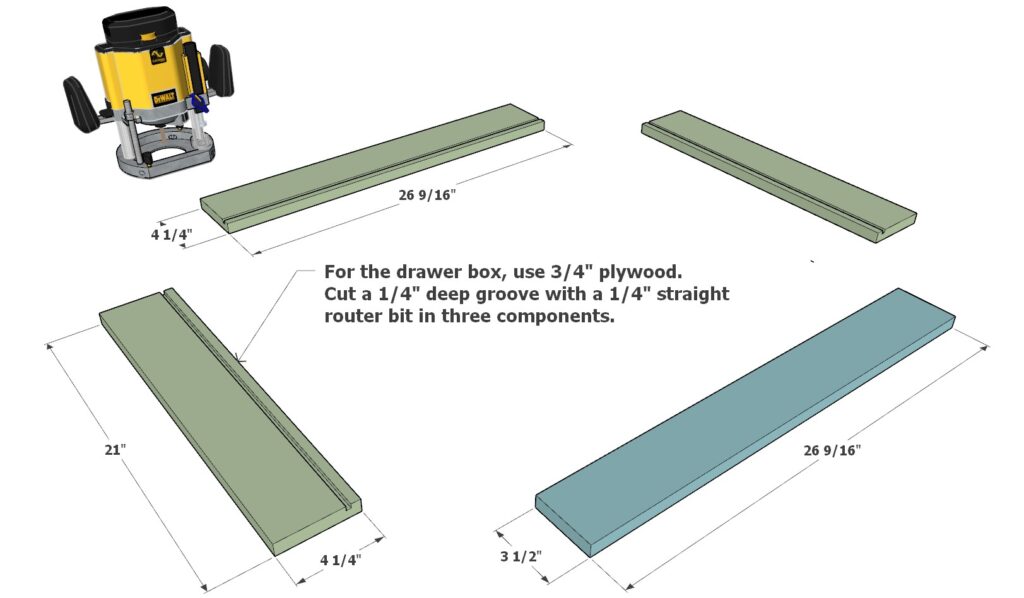
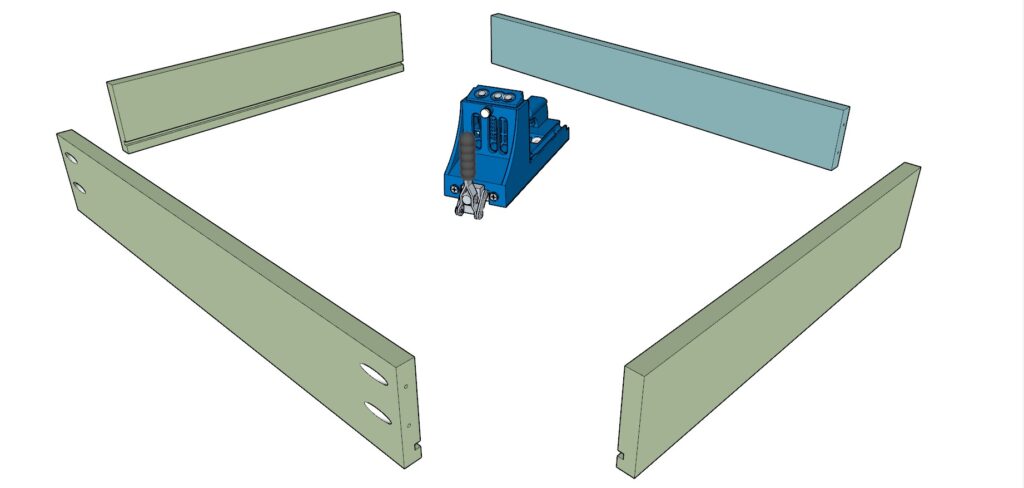
8.1 Cut and Prepare Drawer Components
Materials Needed:
- Two 3/4″ thick plywood pieces, each 21″ long x 4-1/4″ (moss green in the diagram).
- One 3/4″ thick plywood piece, 26-9/16″ long x 4-1/4″ (moss green).
- One 3/4″ thick plywood piece, 26-9/16″ long x 3-1/2″ (dark teal).
Sub-Steps:
- Cut the Plywood:
- Ensure all pieces are accurately cut to the specified dimensions: 21″ x 4-1/4″ (2 pieces),26-9/16″ x 4-1/4″, and 26-9/16″ x 3-1/2″.
- Mark the Groove Placement:
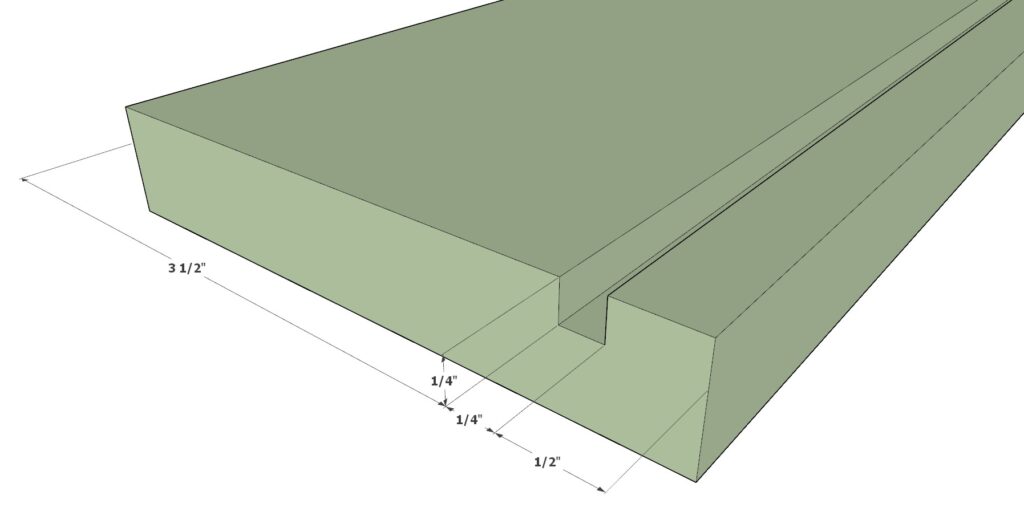
- On the three moss green components, mark where the grooves will be cut for the drawer bottom.
- Cut the Grooves:
- Use a 1/4″ straight router bit to cut a 1/4″ deep groove along the marked lines on the moss green pieces. Ensure the grooves are straight and aligned for a snug fit.
- Cut the Plywood:
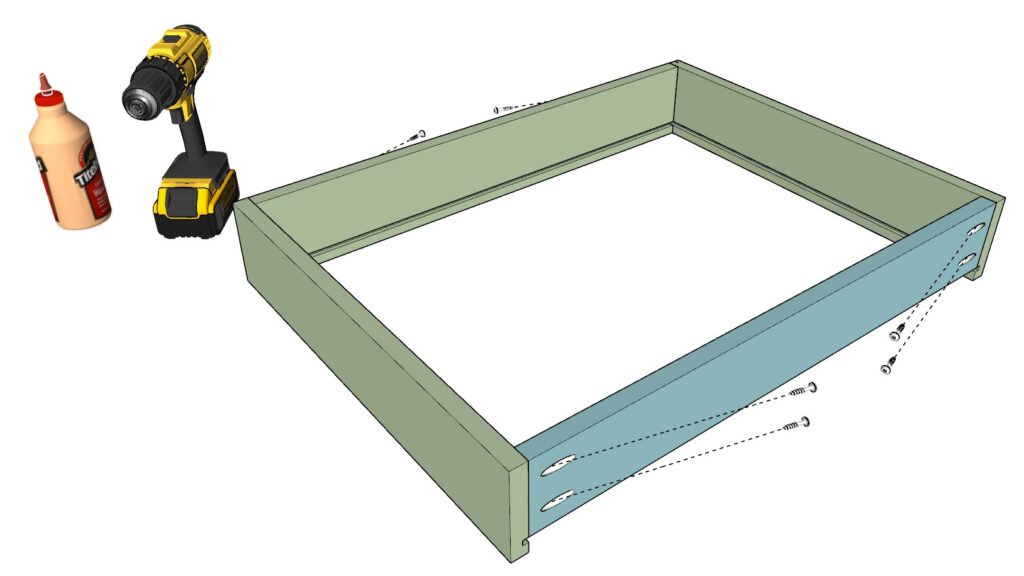
8.2 Assemble the Drawer Box
Materials Needed: Pocket hole jig, 1-1/4″ pocket hole screws, wood glue.
Sub-Steps:
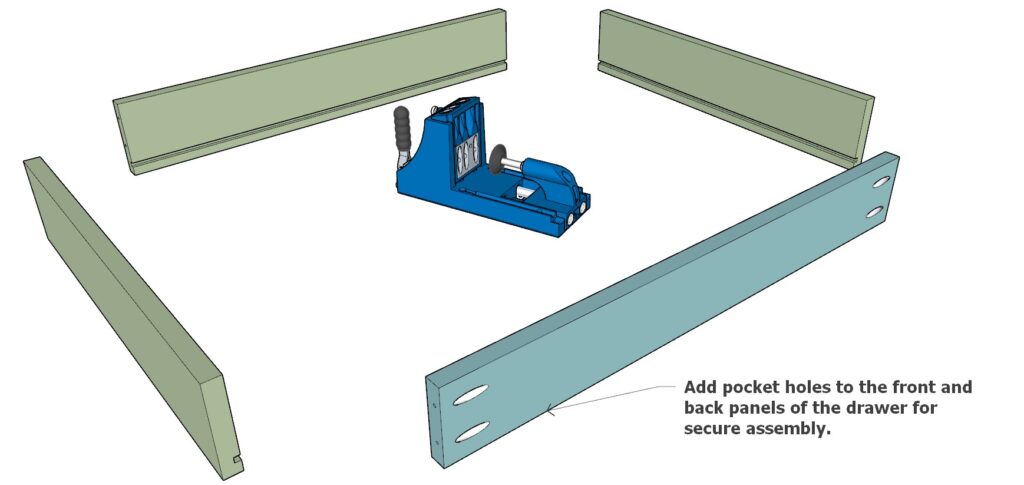
- Drill Pocket Holes:
- Use the pocket hole jig to drill holes into the front (dark teal) and back (26-9/16″ moss green) panels of the drawer box.
- Apply Wood Glue:
- Apply wood glue along the edges where the drawer components will join.
- Assemble the Box:
- Align the front, back, and side panels, making sure the grooves line up correctly.
- Secure the joints with 1-1/4″ pocket hole screws, ensuring all corners are square.
- Drill Pocket Holes:
8.3 Attach the Drawer Bottom
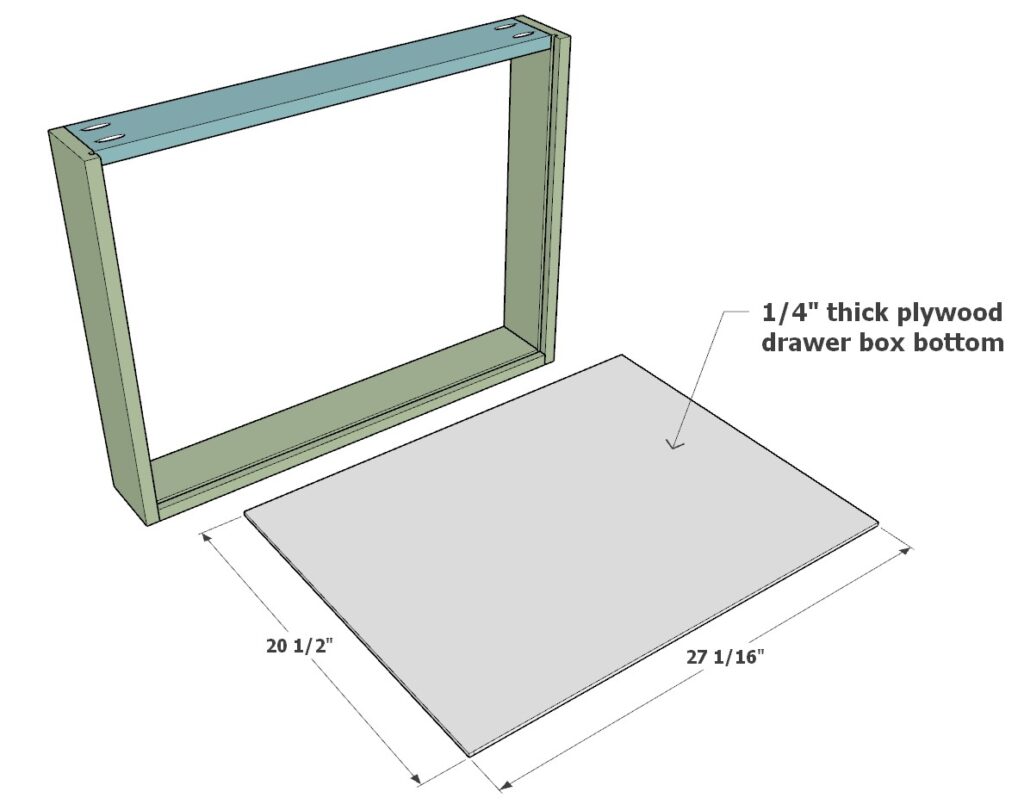
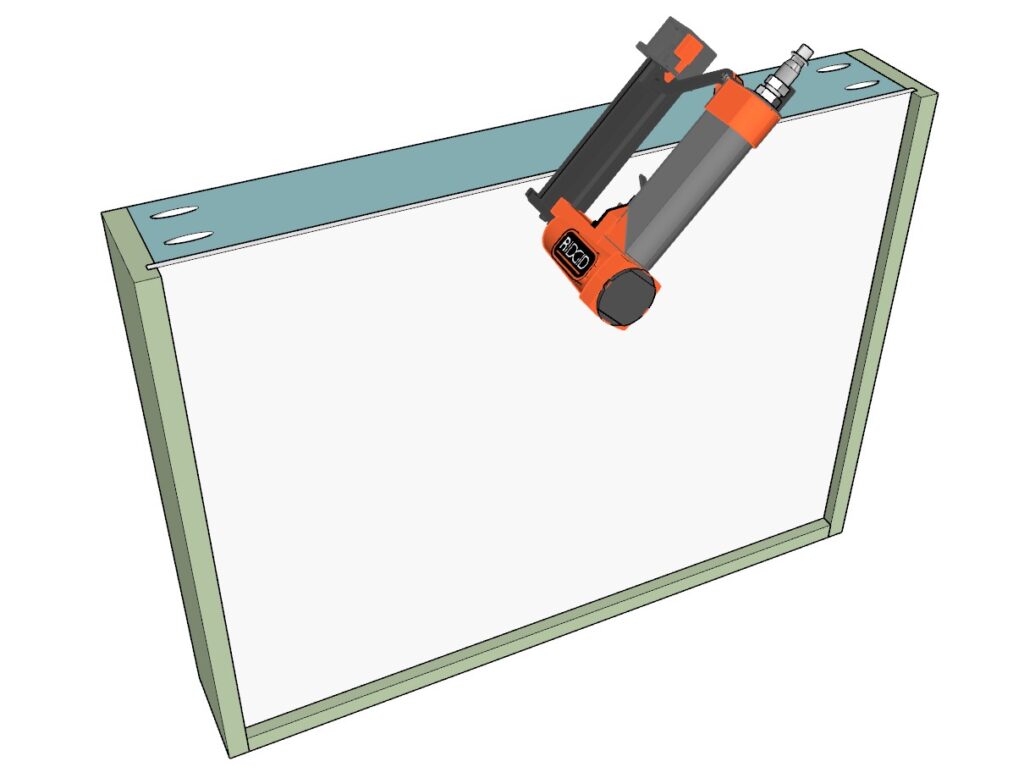
Materials Needed: 1/4″ thick plywood sheet (27-1/16″ x 20-1/2″), pin nailer, brad nails.
Sub-Steps:
- Insert the Drawer Bottom:
- Slide the 1/4″ plywood sheet into the grooves of the assembled drawer box.
- Secure the Bottom:
- Use a pin nailer to attach the drawer bottom to the box, ensuring it doesn’t slide out.
- Insert the Drawer Bottom:

8.4 Install the Drawer into the Cabinet
Materials Needed: Two 1×3 lumber pieces (each 22-1/2″ long), one 1/4″ thick drawer slides spacer.
Sub-Steps:
- Install Drawer Spacers:
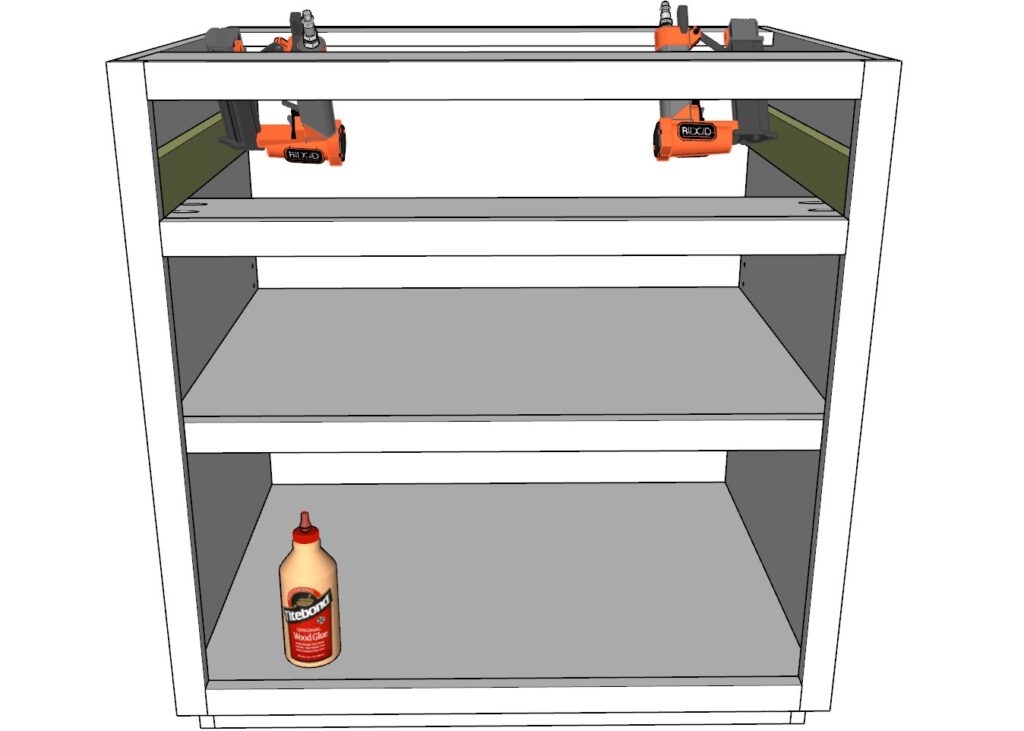
- Attach the 1×3 lumber pieces inside the cabinet where the drawer slides will mount. Use wood glue and pin nails for a secure fit.
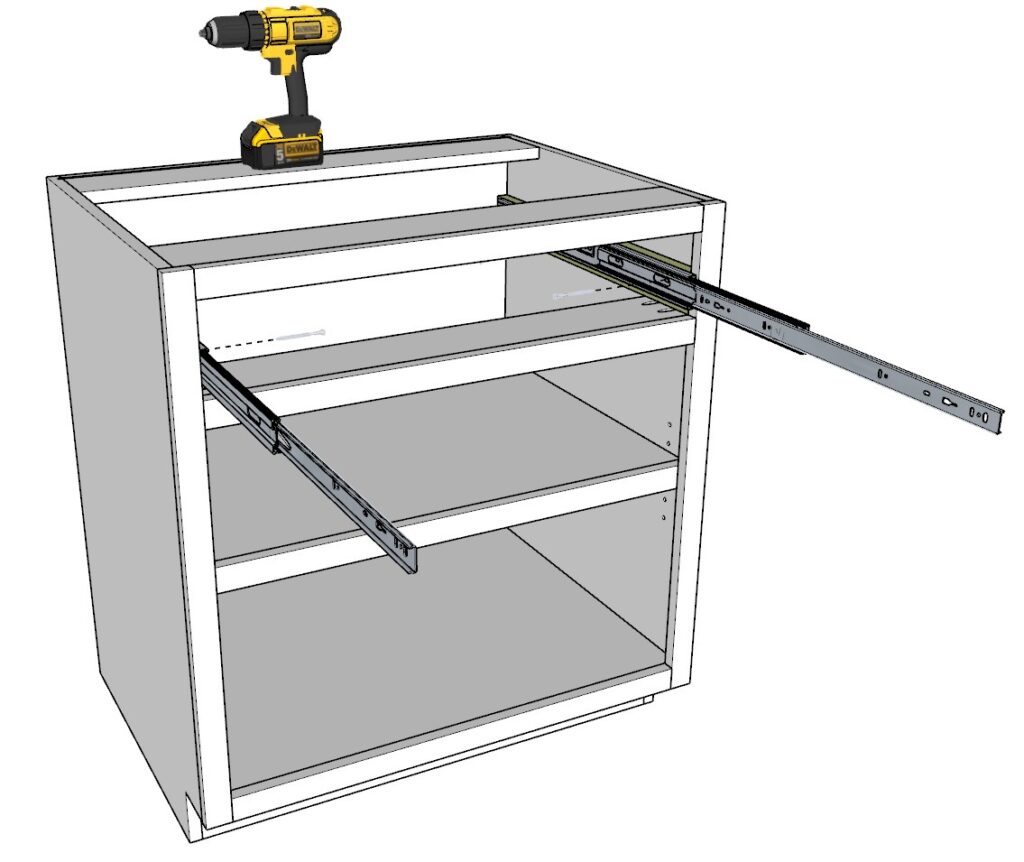
- Attach Drawer Slides to Cabinet:
- Following the manufacturer’s instructions, install the drawer slides inside the cabinet, making sure they are level and aligned correctly.
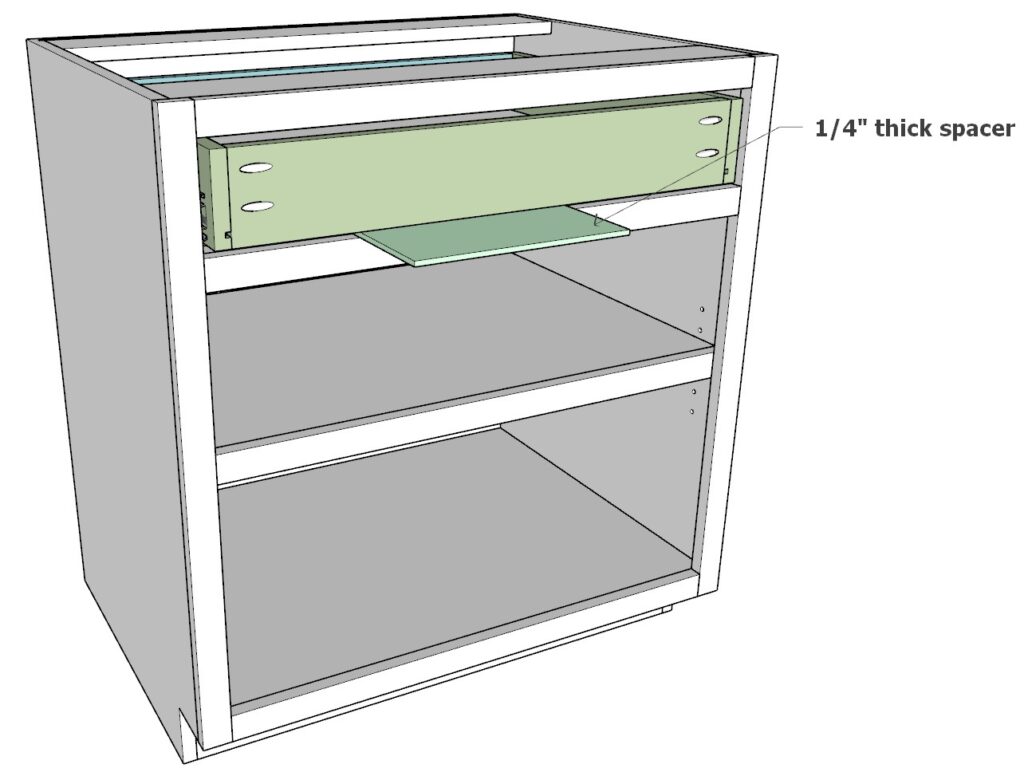
- Attach Slides to Drawer Box:
- Use a 1/4″ thick spacer to position the drawer box correctly, ensuring there is a 1/4″ gap between the box and the face frame to prevent rubbing.
- Secure the drawer box to the slides as per the manufacturer’s instructions.
- Install Drawer Spacers:

8.5 Test the Drawer
- Sub-Steps:
- Check Drawer Movement:
- Open and close the drawer to ensure it moves smoothly without obstruction.
- Adjust if Necessary:
- Ensure the drawer box sits slightly recessed behind the drawer face, providing a snug fit when closed.
- Adjust the slides as needed to achieve the correct alignment.
- Check Drawer Movement:
Step 9: Building the Cabinet Doors
In this step, you will build two cabinet doors using stiles, rails, and a plywood center panel. Follow these detailed sub-steps to ensure your doors are correctly assembled and aligned.
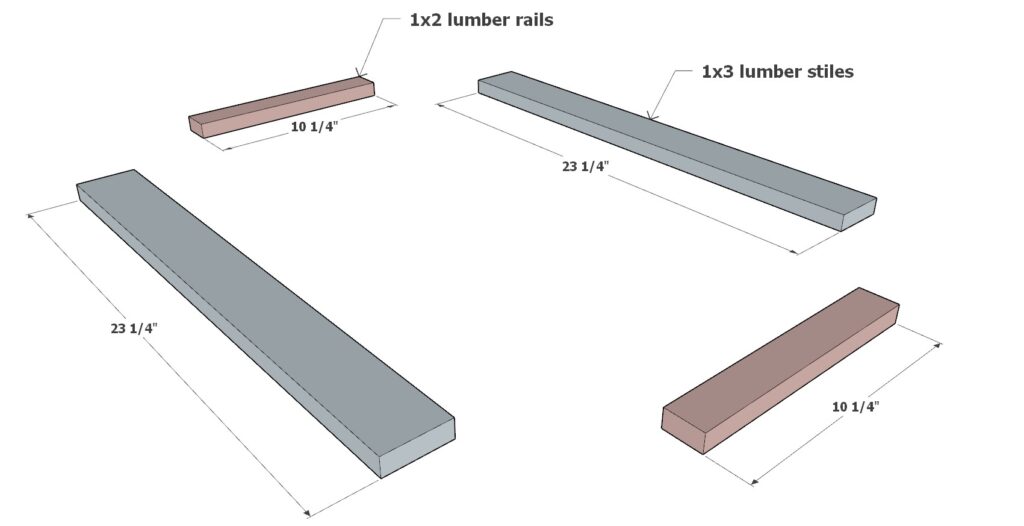
9.1 Cut the Stiles and Rails
Materials Needed:
- Two 1×3 lumber pieces, each 23-1/4″ long (stiles, color-coded in gray).
- Two 1×2 lumber pieces, each 10-1/4″ long (rails, color-coded in brown).
Sub-Steps:
- Cut the Stiles:
- Measure and cut two pieces of 1×3 lumber to 23-1/4″ in length. These will form the vertical sides (stiles) of the door.
- Cut the Rails:
- Measure and cut two pieces of 1×2 lumber to 10-1/4″ in length. These will form the horizontal top and bottom pieces (rails) of the door.
- Cut the Stiles:
9.2 Cut Grooves and Tongues for Door Assembly
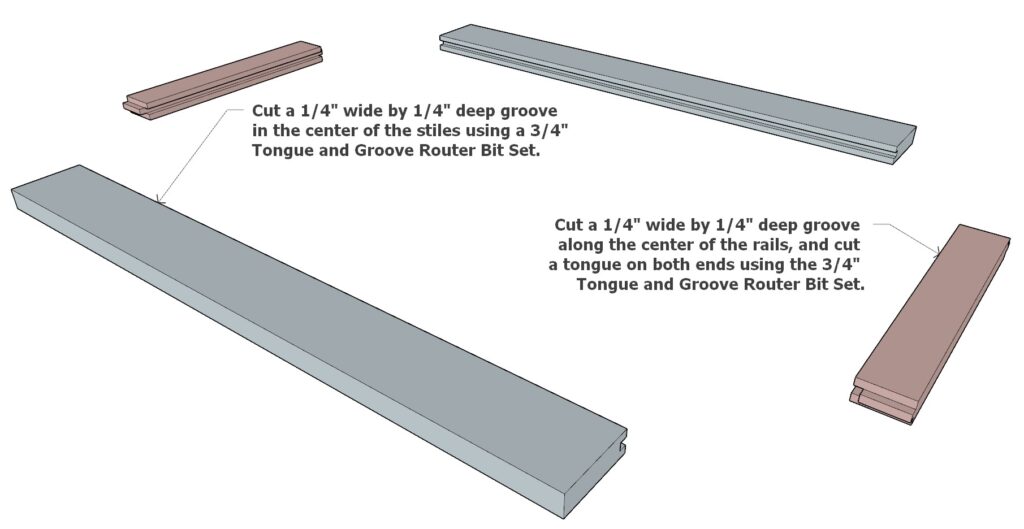
Materials Needed: 3/4″ Tongue and Groove Router Bit Set.
Sub-Steps:
- Groove the Stiles:
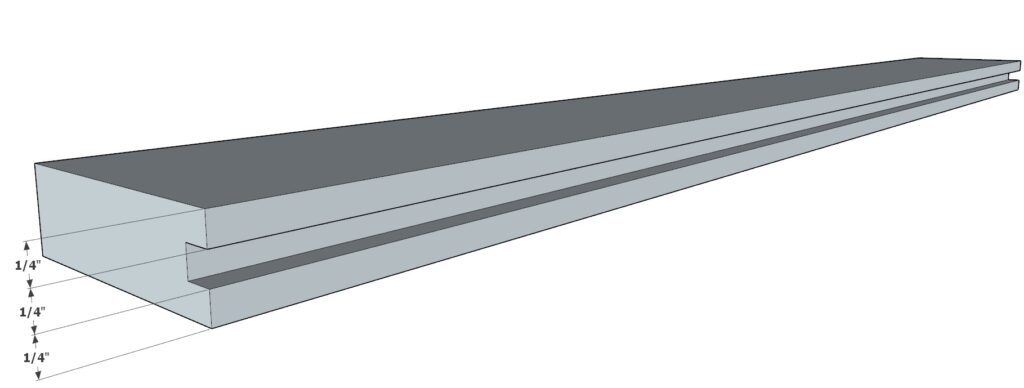
- Using the tongue and groove router bit set, cut a 1/4″ wide x 1/4″ deep groove along the center of each stile (gray components). This will create the channel that holds the center panel.
- Groove and Tongue the Rails:
- Use the same router bit set to cut a 1/4″ wide x 1/4″ deep groove along the center of each rail (brown components).
- Additionally, cut a tongue on both ends of each rail. This tongue will fit into the grooves of the stiles, ensuring a strong joint.
- Groove the Stiles:

9.3 Prepare the Center Door Panel
Materials Needed: 1/4″ thick plywood sheet, cut to 20-5/8″ x 10-1/4″.
Sub-Steps:
- Cut the Plywood Panel:
- Measure and cut the 1/4″ thick plywood to the dimensions of 20-5/8″ x 10-1/4″. This panel will sit in the grooves of the stiles and rails, forming the center of the cabinet door.
- Cut the Plywood Panel:
9.4 Assemble the Cabinet Doors
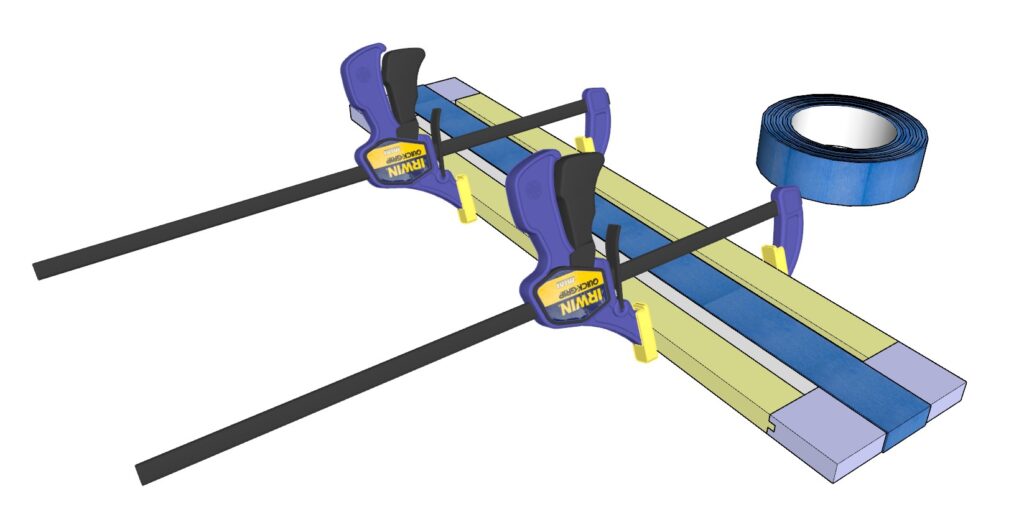
Materials Needed: Wood glue, clamps or tape.
Sub-Steps:
- Apply Wood Glue:
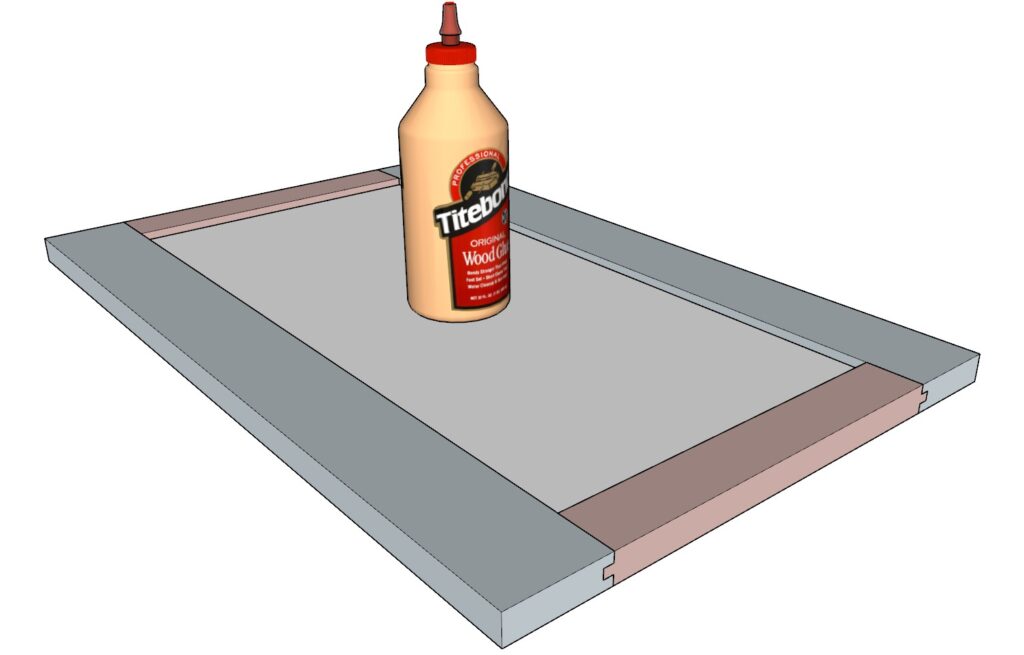
- Apply wood glue along the grooves of the stiles and rails, as well as the tongues of the rails.
- Assemble the Door:
- Fit the 1/4″ plywood panel into the grooves of the stiles and rails.
- Align the tongues of the rails with the grooves in the stiles, ensuring all pieces fit snugly and square.
- Secure the Assembly:
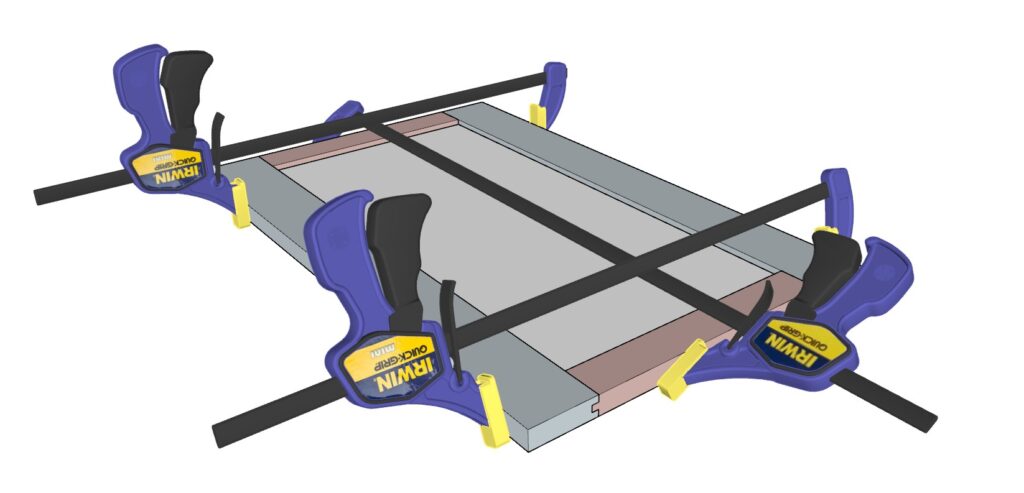
- Use clamps to hold the door assembly tightly together while the glue dries. If clamps are not available, use strong tape to secure the components.
- Check for Alignment:
- Ensure the door is square and all joints are tight. Adjust if necessary before the glue sets.
- Apply Wood Glue:
9.5 Repeat to Make the Second Door
- Sub-Step:
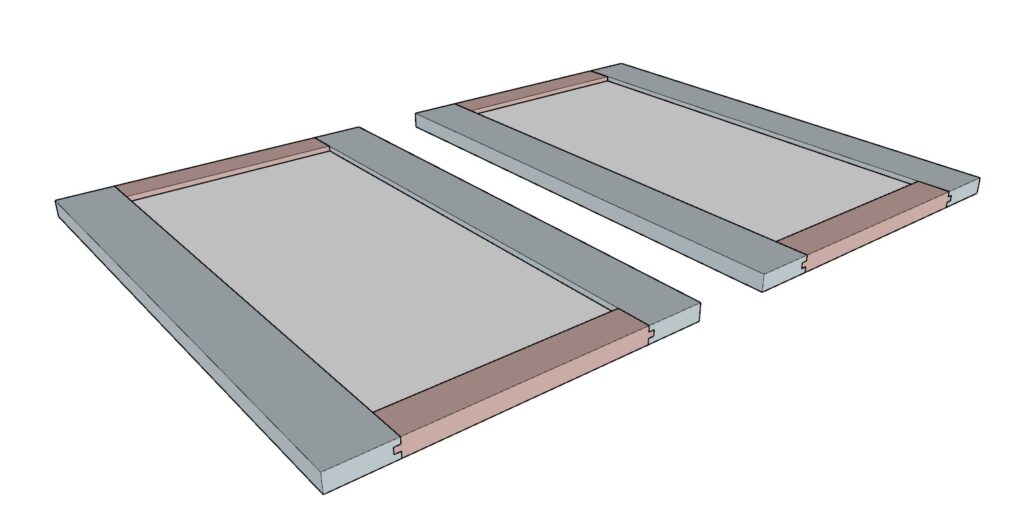
- Build a Second Door:
- Follow the same steps to create a second identical door for your cabinet.
- Build a Second Door:
Step 10: Building the Drawer Front
In this step, you will build the drawer front using stiles, rails, and a center panel. This component will serve as the face of the drawer, matching the style of the cabinet doors. Follow the instructions carefully to ensure a cohesive and functional design.
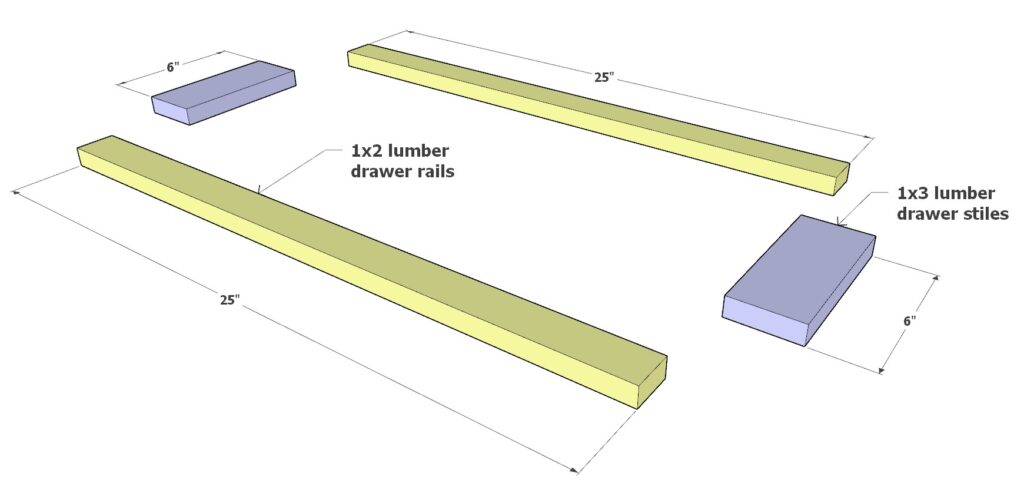
10.1 Cut the Stiles and Rails
Materials Needed:
- Two 1×3 lumber pieces, each 6″ long (stiles, color-coded in purple).
- Two 1×2 lumber pieces, each 25″ long (rails).
Sub-Steps:
- Cut the Stiles:
- Measure and cut two pieces of 1×3 lumber to 6″ in length. These will form the vertical sides (stiles) of the drawer front.
- Cut the Rails:
- Measure and cut two pieces of 1×2 lumber to 25″ in length. These will form the horizontal top and bottom pieces (rails) of the drawer front.
- Cut the Stiles:
10.2 Cut Grooves and Tongues for Assembly
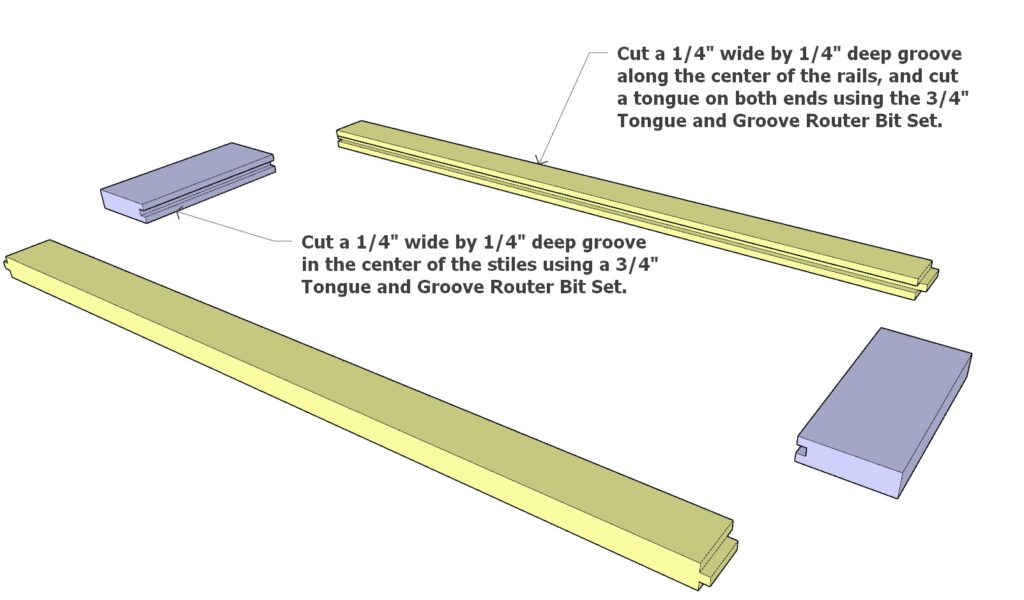
Materials Needed: 3/4″ Tongue and Groove Router Bit Set.
Sub-Steps:
- Groove the Stiles:
- Using the tongue and groove router bit set, cut a 1/4″ wide x 1/4″ deep groove along the center of each stile (purple components). This will create a channel for the center panel.
- Groove and Tongue the Rails:
- Use the same router bit set to cut a 1/4″ wide x 1/4″ deep groove along the center of each rail.
- Cut a tongue on both ends of each rail. These tongues will fit into the grooves of the stiles, forming secure joints.
- Groove the Stiles:
10.3 Prepare the Center Drawer Panel
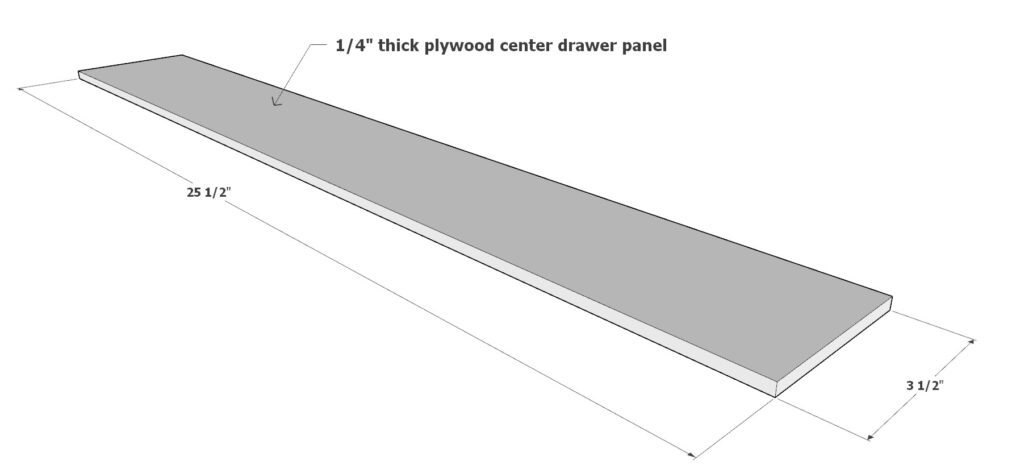
Materials Needed: 1/4″ thick plywood sheet, cut to 25-1/2″ x 3-1/2″.
Sub-Steps:
- Cut the Plywood Panel:
- Measure and cut the 1/4″ thick plywood to 25-1/2″ x 3-1/2″. This will serve as the center panel for the drawer front.
- Cut the Plywood Panel:
10.4 Assemble the Drawer Front
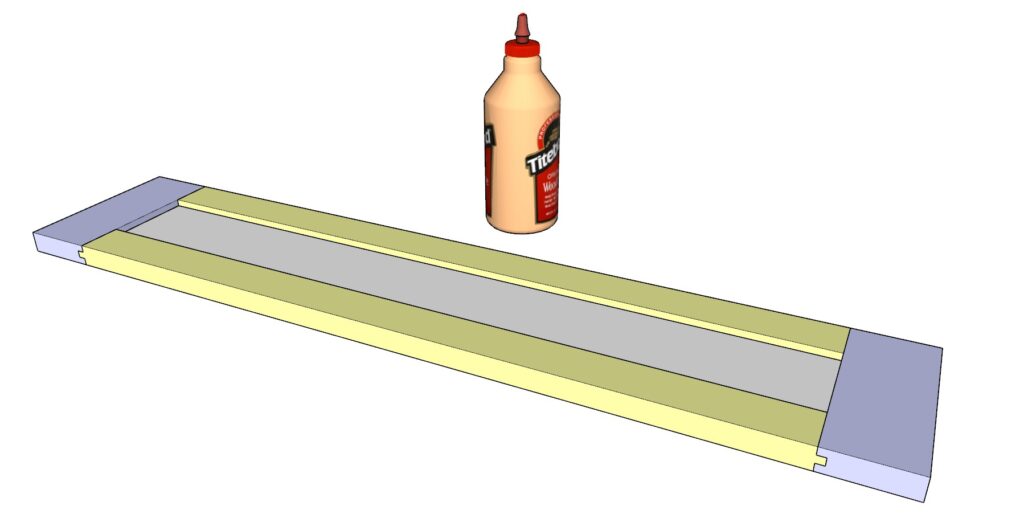
Materials Needed: Wood glue, clamps or tape.
Sub-Steps:
- Apply Wood Glue:
- Apply wood glue along the grooves of the stiles and rails, as well as the tongues on the rails.
- Fit the Center Panel:
- Insert the 1/4″ plywood panel into the grooves of the stiles and rails.
- Assemble the Drawer Front:
- Align the tongues of the rails with the grooves in the stiles, ensuring all parts fit snugly and are square.
- Secure the Assembly:
- Use clamps to hold the assembled drawer front tightly while the glue dries. If clamps are not available, use strong tape to keep everything in place.
- Check for Alignment:
- Ensure the drawer front is square and all joints are tight. Make any necessary adjustments before the glue sets.
- Apply Wood Glue:
By following these steps, you will have built the drawer front, matching the style and quality of the cabinet doors. Ensure all joints are secure and the surfaces are smooth, providing a professional finish.
Step 11: Attaching Euro Hinges, Adding a False Center Stile, and Installing the Drawer Face
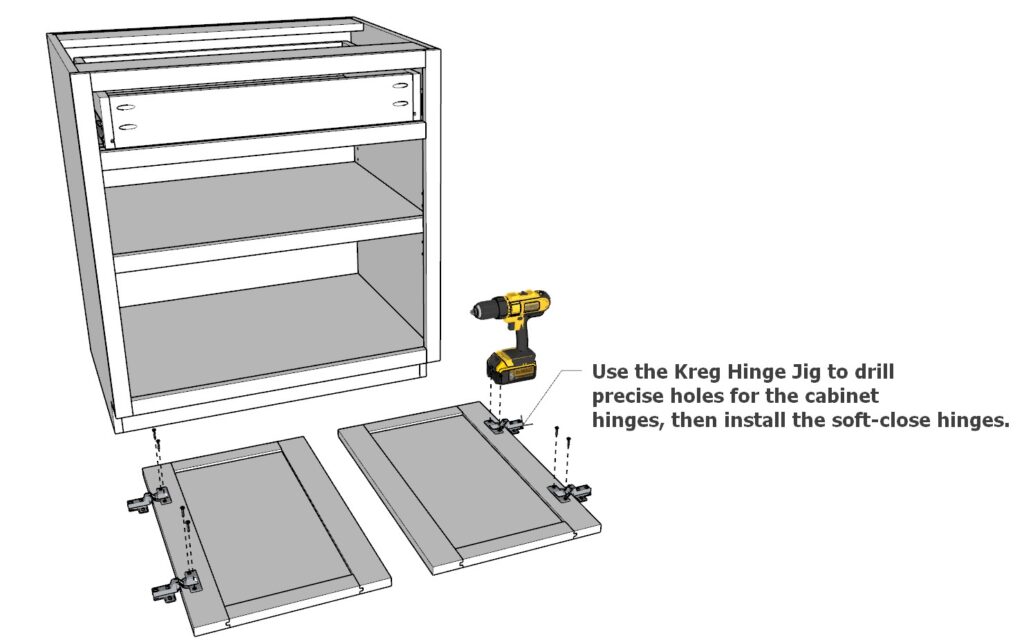
In this step, you’ll install the soft-close cabinet door hinges and the drawer face, and, if you chose Option A for the face frame, you’ll also add the false center stile to the door. We’ll be using the Kreg KHI-HINGE Concealed Hinge Jig to ensure precise and easy hinge installation.
To see a visual example of how to attach hinges, refer to this YouTube video.
Tools and Materials Needed:
- Soft-Close Hinges: 1/2″ partial overlay with a 100-degree opening angle.
- Kreg KHI-HINGE Concealed Hinge Jig: For accurate hinge cup hole placement.
- 35mm Forstner Bit: Included with the Kreg jig.
- Power Drill: For drilling hinge cup holes and pilot holes.
- Clamps: To hold the jig and door securely.
- Pencil and Measuring Tape: For marking hinge positions.
- Screws: Provided with the hinges for securing the hinges and mounting plates.
Step 11.1: Prepare and Mark Hinge Locations
- Mark Hinge Locations on the Door: Measure 4 inches from the top and bottom edges of each cabinet door and mark these spots. This spacing is standard for most cabinet doors, offering balanced support and functionality.
- Position the Kreg Jig: Place the Kreg hinge jig at the marked spots on the door. Ensure the jig is correctly set for the desired cup distance (commonly 3mm from the door edge), aligning the index line on the jig with the marks.
Step 11.2: Drill the Hinge Cup Holes
- Set Up the Kreg Jig: Adjust the jig’s settings for the proper cup distance and depth. Most concealed hinges require a 12-13mm (about 1/2 inch) depth for the hinge cup.
- Drill the Holes: Using the 35mm Forstner bit, drill the cup holes at the marked spots. The Kreg jig’s stop collar will prevent you from drilling too deep, ensuring the hole is at the correct depth for the hinge to sit flush with the door surface.
Step 11.3: Attach Hinges to the Door
- Insert the Hinges: Fit the hinges into the drilled cup holes, ensuring they sit flush and aligned.
- Secure the Hinges: Use the provided screws to attach the hinges securely to the door. Avoid overtightening to prevent damage to the door or stripping the screws.
Step 11.5: Attach the Doors to the Cabinet
- Clip the Hinges onto Mounting Plates: Position the cabinet door so the hinges align with the mounting plates and press until they click securely in place. The clip-on design of the hinges simplifies this process.
- Adjust Door Alignment: Use the hinge adjustment screws to fine-tune the door’s position. Adjust side-to-side, depth, and height settings to achieve even spacing around the door and smooth operation.
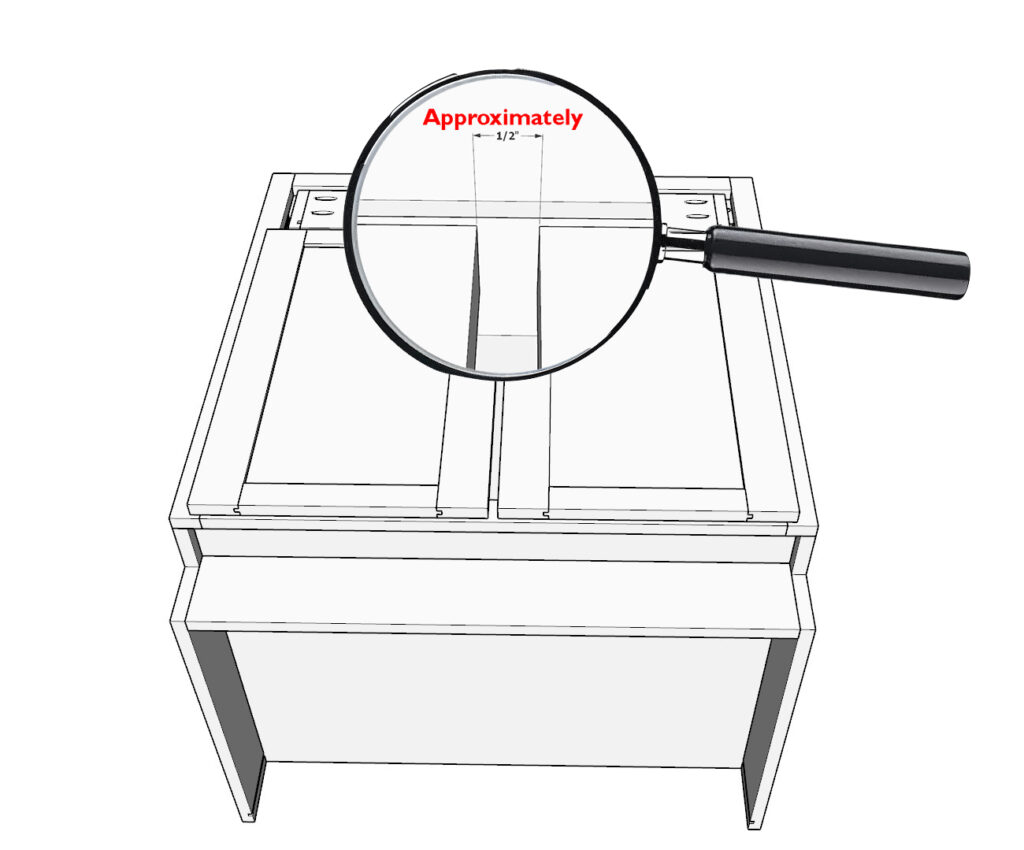
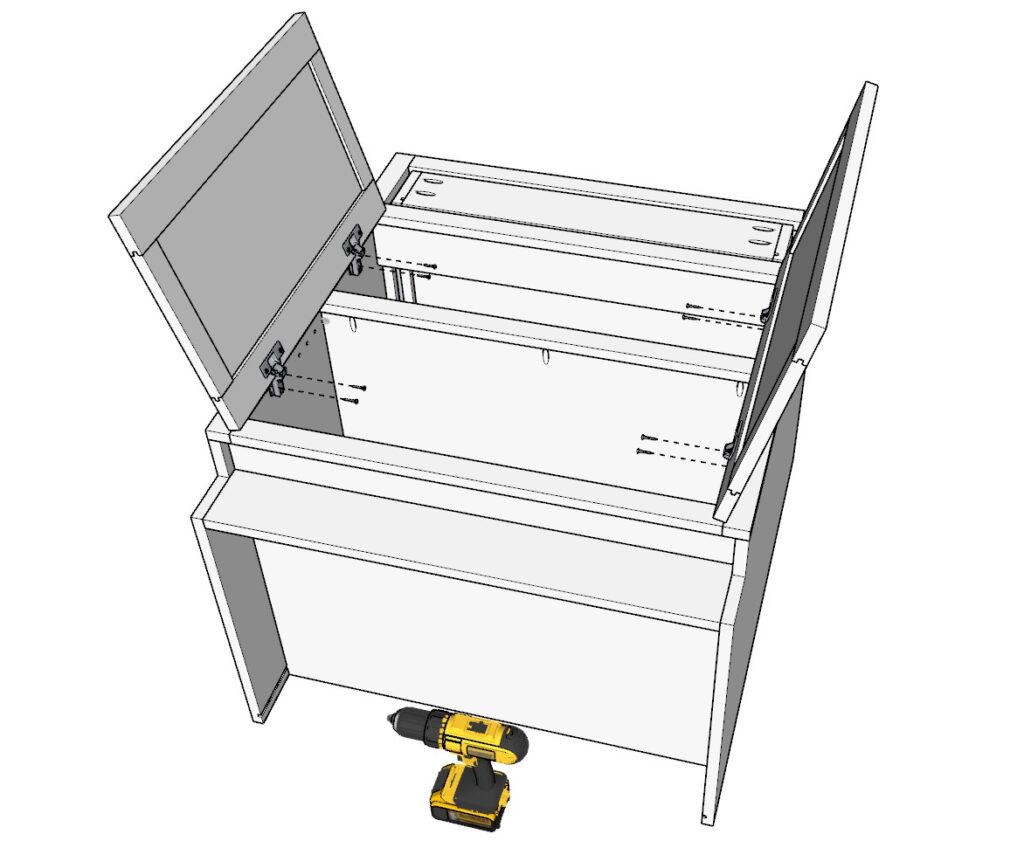
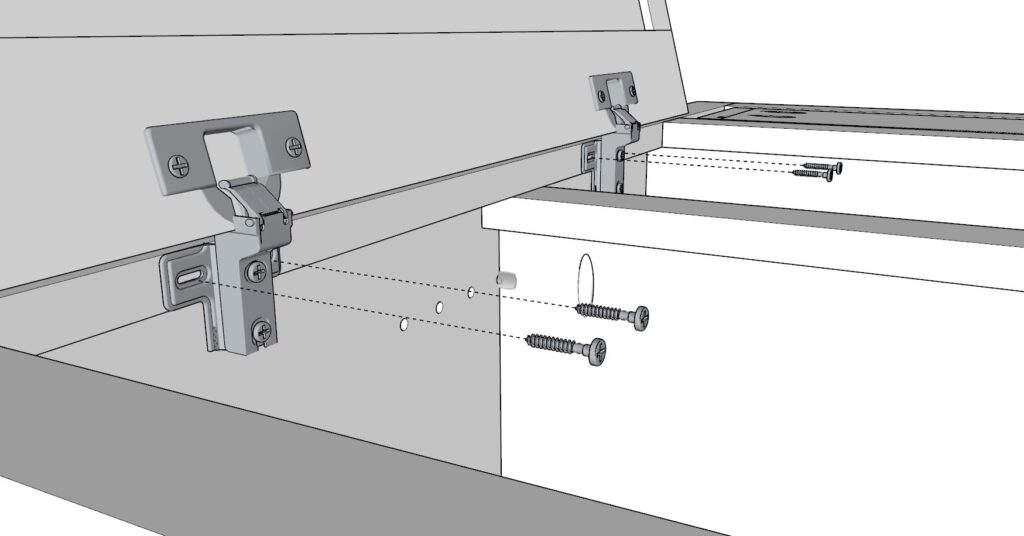
Step 11.6: Install the False Center Stile (Option A)
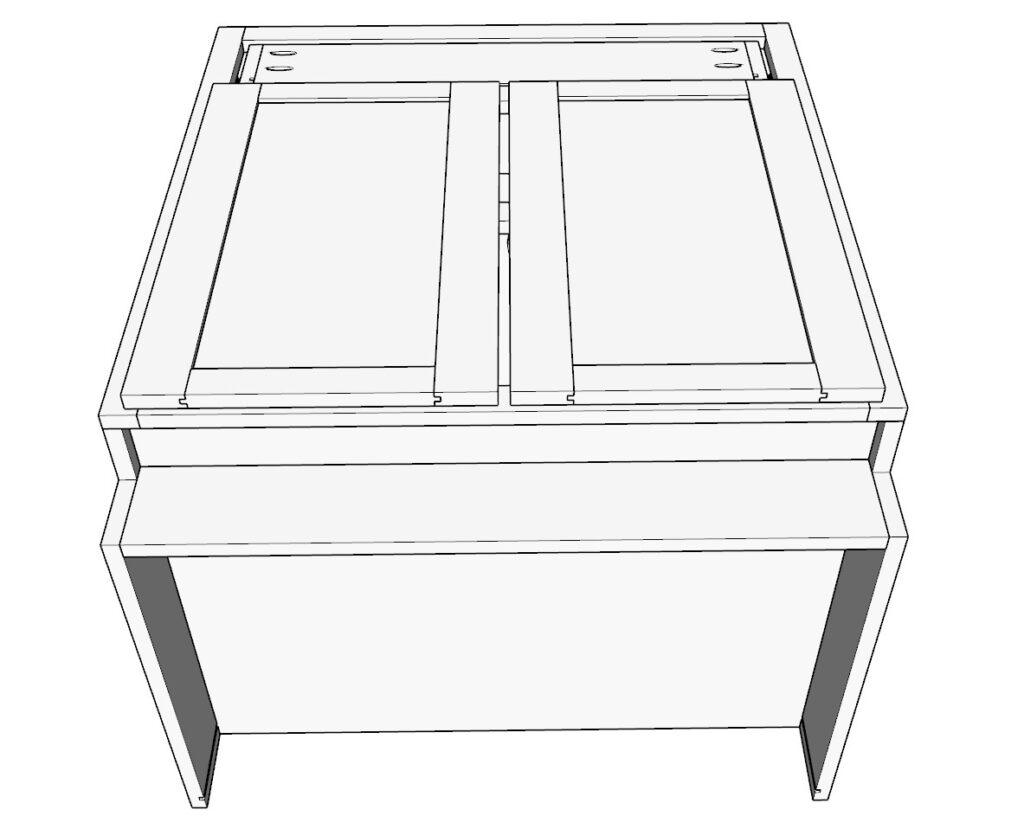
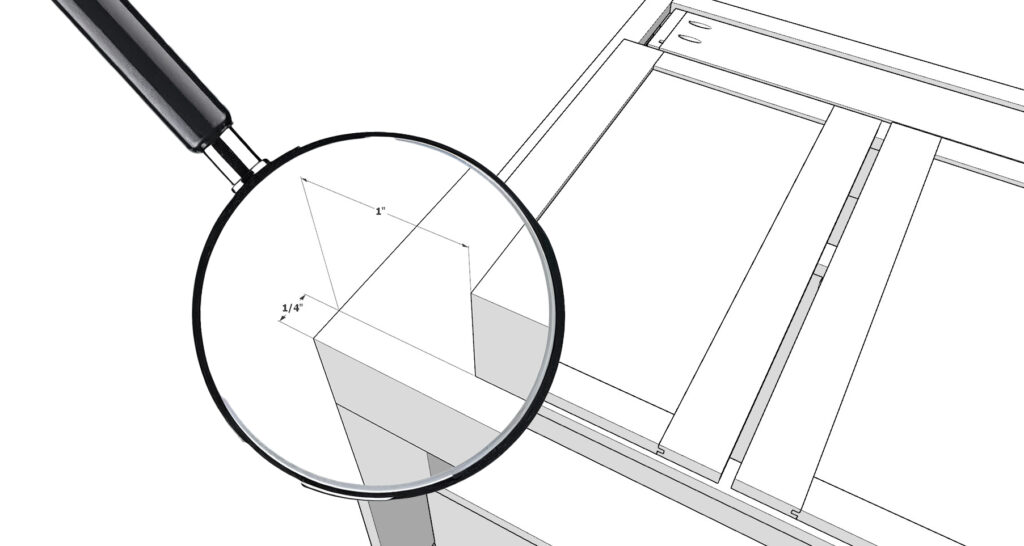
If you are using Option A, where the false stile is attached to the door rather than the cabinet face frame:
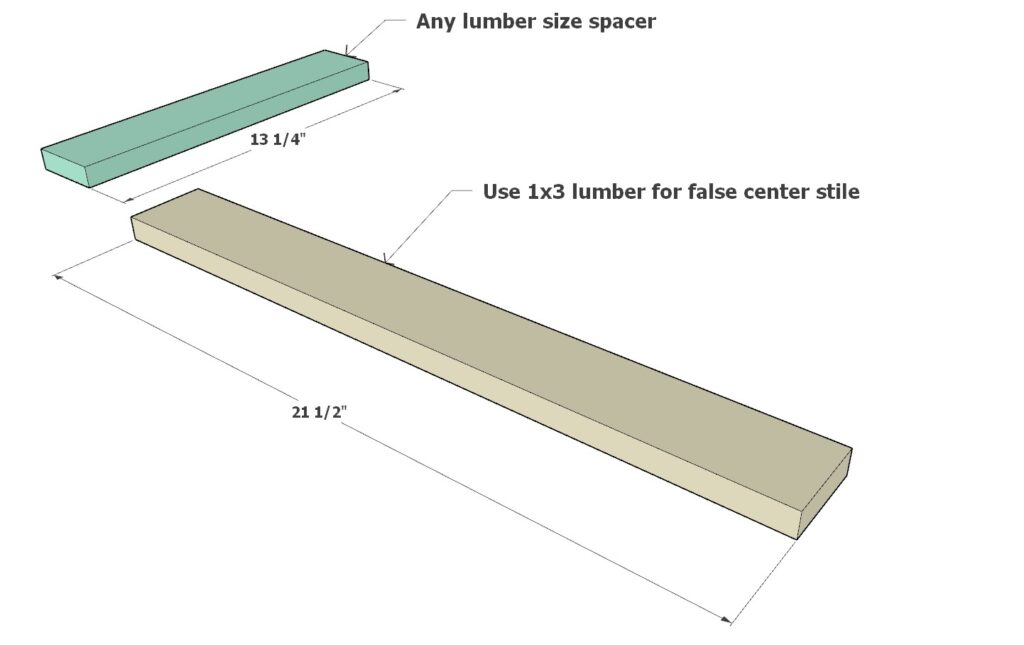
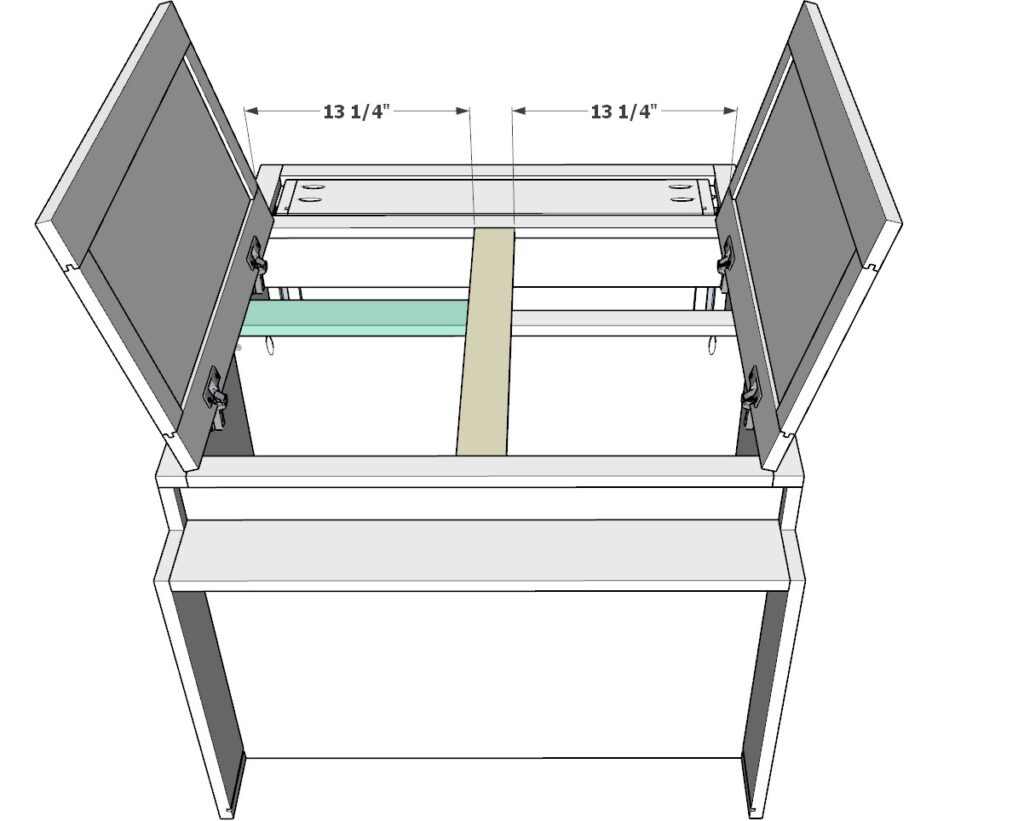
- Prepare the False Stile: Cut a 21-1/2 inch long 1×3 lumber piece for the false stile (color-coded in mustard in the diagrams).
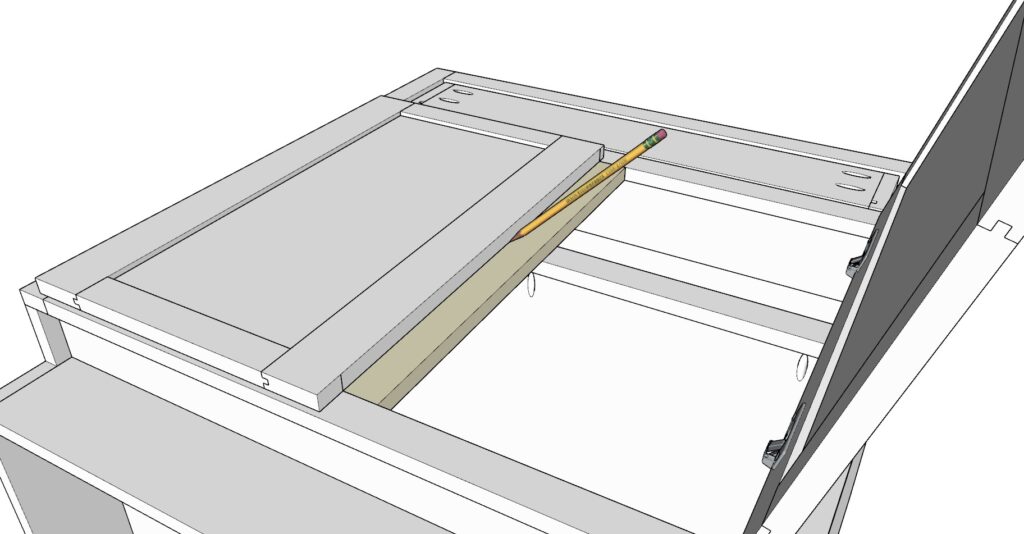
- Position Using a Spacer: Use a 13-1/4 inch long spacer (color-coded in teal in the diagram) to ensure correct placement. This helps you align the stile accurately on the door.
- Attach the False Stile: Mark the placement with a pencil and secure the stile to the door using wood glue and brad nails. This will allow unobstructed access to the cabinet when the doors are open, although the doors must be opened and closed in a specific order.

Step 11.7: Attach the Drawer Face
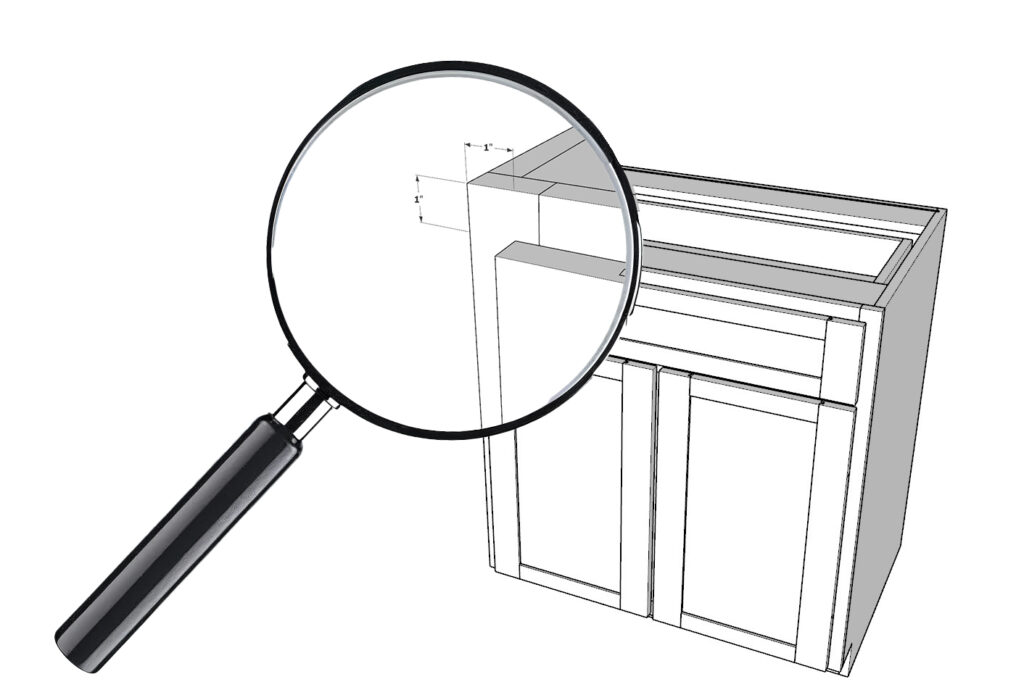
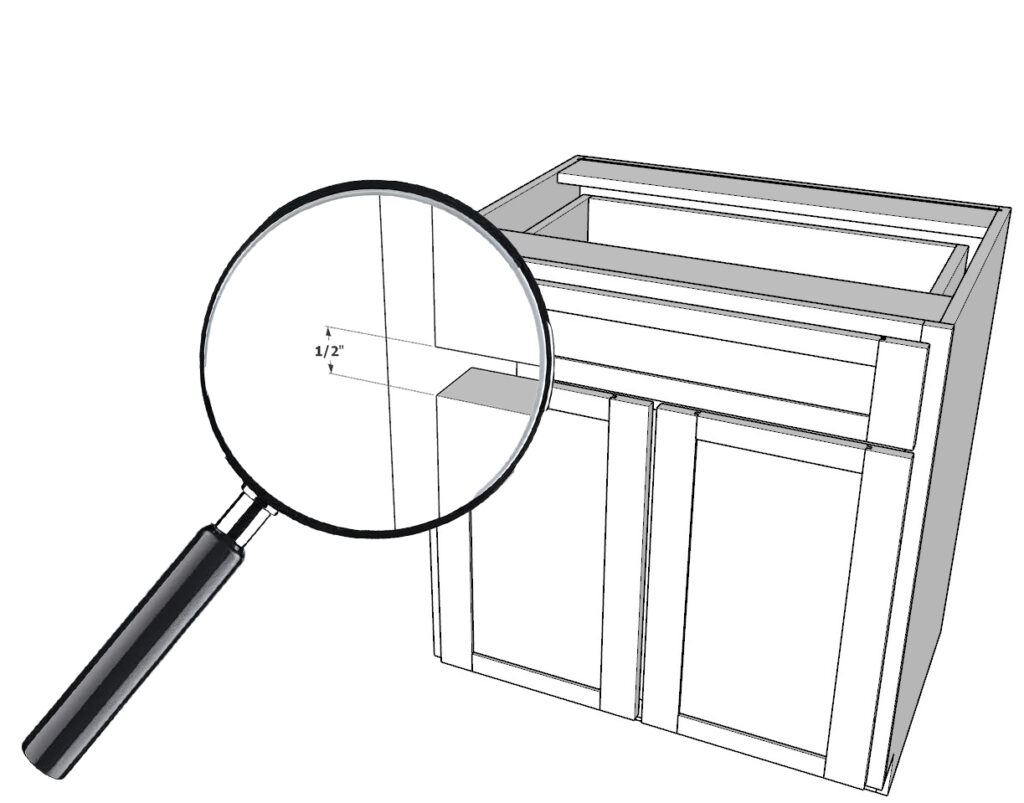
- Align the Drawer Face: Position the drawer face on the drawer box, ensuring it is centered and properly aligned.
- Secure the Drawer Face: Use wood glue and a pin nailer to attach the drawer face to the drawer box. Check for alignment and adjust as necessary.
Step 11.8: Final Adjustments and Handle Installation
- Test Door and Drawer Operation: Open and close the doors and drawer several times to check for smooth operation and proper alignment. Adjust hinges and drawer slides as needed.
- Install Handles: Attach handles to the doors and drawer, ensuring they are straight and securely fastened.
Step 12: Adding the Toe Kick and Securing Cabinets Together and to the Wall
Step 12.1: Securing Cabinets to Each Other
Tools and Materials Needed:
- Clamps
- Level
- 1-1/4 inch wood screws
- Drill with a countersink bit
- Shims (if needed for leveling)
- Pencil
Procedure:
Align the Cabinets:
- Place the cabinets side by side in their final positions.
- Use a level to ensure the cabinets are aligned and level with each other.
- Use shims under the cabinets if necessary to adjust the height and level them perfectly.
Clamp the Cabinets Together:
- Once aligned, use clamps to hold the cabinets tightly together.
- Make sure the faces of the cabinets are flush with each other, with no gaps.
Drill Pilot Holes:
- Drill pilot holes through the side of the cabinets where they meet, near the top and bottom for a strong connection.
- Use a countersink bit to allow the screw heads to sit flush or slightly below the surface.
Secure with Screws:
- Insert 1-1/4 inch wood screws into the pilot holes and drive them in to secure the cabinets together. Since the cabinets are 3/4 inch thick on each side panel or frame, a 1-1/4 inch screw is sufficient and will not protrude through the other side.
- Tighten the screws until the cabinet faces are snug and flush against each other.
Step 12.2: Attaching Cabinets to the Wall
Tools and Materials Needed:
- Stud finder
- Level
- 2-1/2 inch cabinet screws
- Drill with a countersink bit
- Shims
Procedure:
Locate Wall Studs:
- Use a stud finder to locate the wall studs behind the cabinets. Mark the stud locations with a pencil on the wall just above the cabinets.
- Studs are usually spaced 16 inches apart, so plan your screw placements accordingly.
Drill Pilot Holes in the Cabinet Back:
- Drill pilot holes through the back panel of the cabinets into the studs. Position these holes near the top of the cabinet to maximize holding strength.
- Use a countersink bit to create a recess for the screw heads.
Shim and Level Cabinets:
- Before attaching the cabinets, recheck that they are level front to back and side to side. Use shims to adjust as needed.
- If the wall is uneven, place shims behind the cabinet where the screw will be driven to prevent the cabinet from distorting when tightened.
Secure the Cabinets to the Wall:
- Use 2-1/2 inch cabinet screws to attach the cabinets to the wall studs through the pilot holes. These screws are long enough to anchor securely into the studs behind the drywall.
- Tighten the screws until the cabinets are securely fastened to the wall, but avoid overtightening, which can warp the cabinet frames.
Step 12.3: Adding the Toe Kick Trim
Materials Needed:
- 1×4 lumber for the toe kick trim
- Finishing nails or brad nails
- Nail gun or hammer
- Wood glue (optional)
- Caulk and caulk gun (optional for finishing)
Procedure:
Cut the Toe Kick Trim:
- Measure the length of the toe kick area at the base of the cabinets.
- Cut the 1×4 lumber to fit the length of the cabinet run using a miter saw or handsaw. Make sure to miter the ends if joining multiple pieces.
Position the Toe Kick:
- Align the toe kick trim piece with the base of the cabinets, ensuring it sits flush with the floor and lines up with the front edges of the cabinets.
- Use a level to ensure the toe kick is straight and aligned along its entire length.
Attach the Toe Kick Trim:
- Secure the trim piece using finishing nails or brad nails, spaced every 8-12 inches. A nail gun will make this process faster and easier, but a hammer and finishing nails will also work.
- Optionally, apply a small amount of wood glue along the back of the trim for extra hold.
Finish the Toe Kick:
- If there are gaps between the trim and the floor or cabinets, use caulk to fill them for a seamless look.
- Sand any rough edges and touch up with paint or finish as needed to match the cabinets.
Final Step: Preparing and Painting Your Cabinets
Achieving a smooth, professional finish on your cabinets requires careful preparation and precise painting techniques. This step combines the preparation and painting processes into one comprehensive guide.
Step 1: Preparing the Cabinets for Painting
Clean the Cabinets:
- Start by thoroughly cleaning all cabinet surfaces with a degreaser like Trisodium Phosphate (TSP) or a commercial degreasing product. This step is crucial to remove grease, dirt, and other residues that can affect paint adhesion.
Sanding:
- Sand all surfaces with 120- to 150-grit sandpaper to create a rough texture for the primer to adhere to. Use a random orbital sander for flat surfaces and sanding sponges for detailed areas.
- After the initial sanding, progress to finer grits, such as 180-220, to smooth the surfaces while maintaining enough texture for the primer.
Fill Imperfections:
- Fill any gaps, holes, or imperfections with a high-quality wood filler. Sand these areas smooth once the filler is dry.
Remove Dust:
- Use a vacuum with a brush attachment, followed by a tack cloth, to remove all sanding dust from the surfaces. This ensures a clean base for the primer.
Step 2: Priming the Cabinets
- Apply Primer:
- Use a high-quality bonding primer suitable for cabinetry. Apply a thin, even coat using a brush, roller, or spray gun. Make sure to cover all surfaces, including edges and detailed areas.
- Let the primer dry according to the manufacturer’s instructions, then lightly sand with 220-grit sandpaper to remove any rough spots. Wipe down with a tack cloth to remove dust.
Step 3: Painting the Cabinets
Option A: Using a Spray Gun
Set Up the Spray Gun:
- Use an HVLP (High Volume Low Pressure) spray gun or an airless sprayer with a fine finish tip. Adjust the spray gun settings based on the paint’s viscosity and the manufacturer’s recommendations.
Test the Spray Pattern:
- Practice spraying on a piece of cardboard or scrap material to ensure an even spray pattern without runs or spitting.
Spray the Paint:
- Begin by spraying edges and detailed areas first, then move to flat surfaces. Hold the gun perpendicular to the surface and maintain a consistent distance of about 6-8 inches.
- Use a 50% overlap on each pass to ensure uniform coverage. Move the gun at a steady pace to avoid uneven paint application.
Apply Multiple Coats:
- Apply multiple thin coats, allowing each to dry fully and lightly sanding between coats with 320- to 400-grit sandpaper. This helps achieve a smooth, factory-like finish.
Option B: Using a Brush and Roller
Brush Edges and Details:
- Use a high-quality synthetic brush for edges and detailed areas. Apply the paint in long, smooth strokes to minimize brush marks.
Roll Larger Surfaces:
- For larger, flat areas, use a mini foam roller designed for smooth surfaces. Roll in one direction with light pressure to achieve an even coat.
Sand Between Coats:
- Lightly sand between coats with fine-grit sandpaper (320-400 grit) and wipe with a tack cloth. This step is essential to maintain a smooth finish.
Apply Final Coat:
- Apply the final coat slightly wetter to achieve a smooth, glass-like appearance. Allow for extended drying time on the final coat to ensure a durable, long-lasting finish.
Final Touches:
Inspect and Touch Up:
- Check all surfaces under bright light for imperfections. Touch up any areas with a fine brush.
Reassemble the Cabinets:
- Once fully cured, reattach all hardware and rehang doors and drawers. Adjust as needed to ensure everything aligns properly.
Curing Time:
- Allow the paint to cure completely before heavy use. Curing times vary, but a few days to a week is typically recommended for full hardness and durability.

