Introduction
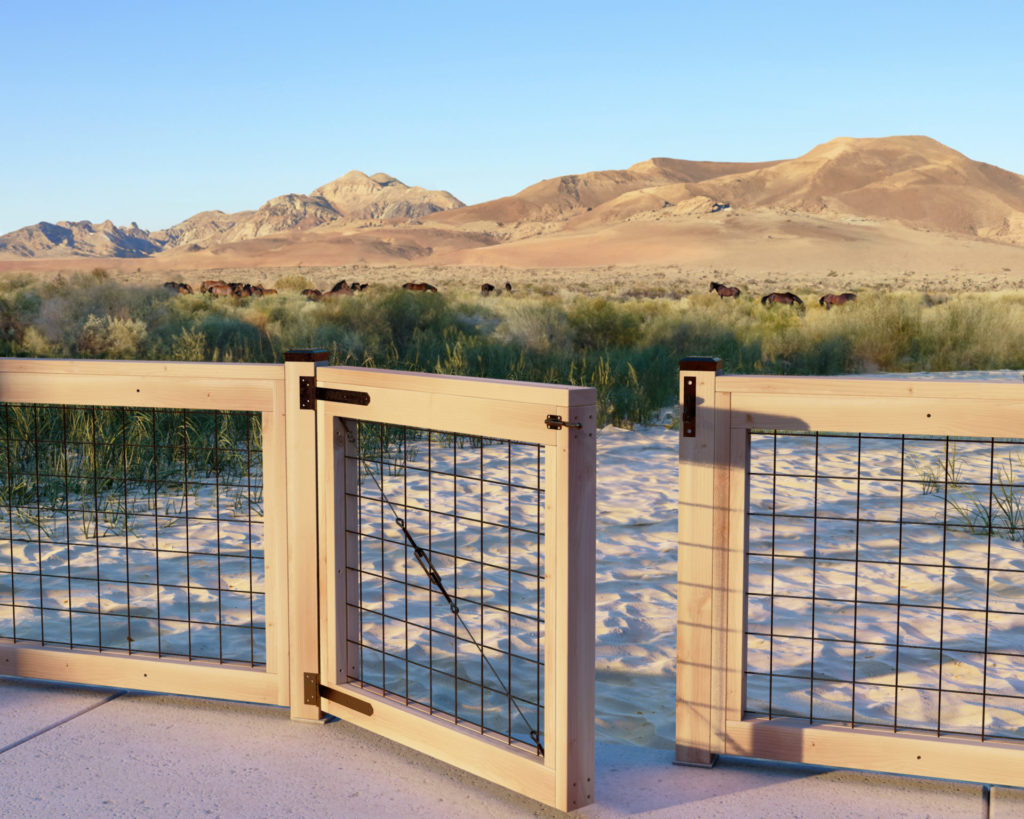
There’s no denying how important a fence and gate can be to a homeowner. Beyond being aesthetically pleasing, well-constructed fences and gates offer privacy, security, and can significantly increase the curb appeal of a property. The right fence can even transform a basic yard into a beautiful and peaceful sanctuary, perfect for spending time with family and friends. In this comprehensive guide, we will discuss the benefits and steps to building an elegant yet durable DIY fence and gate using Wild Hog black metal railing panels.
Discover Wild Hog Black Metal Railing Panels
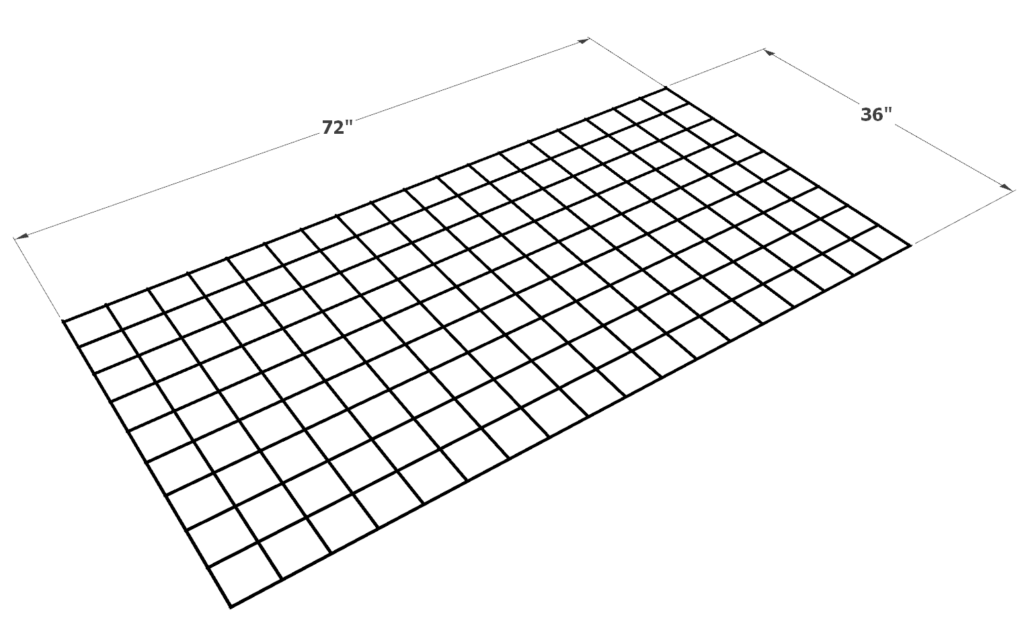
Wild Hog Black Metal Railing Panels provide a touch of elegance and sophistication for your DIY fence and gate project. These 36 in. x 72 in. panels are perfect for any size backyard sanctuary. Designed with the consumer and craftsman in mind, they originated from big and bulky welded hog panels with a smaller size that is ideal for diverse applications.
These panels are not only beautiful, but they are also durable with a 6-gauge welded 4 in. x 4 in. mesh pattern, allowing for great visibility and a distinctive style. They are perfect for a variety of uses, including railings, fences, arbors, trellises, and other garden applications. The three-layered powder coating and customizable design make Wild Hog Panels suitable for both interior and exterior projects, including horizontal, vertical, or stair installations.
The Simplicity of Assembly
Don’t let the idea of a DIY fence and gate project intimidate you. This plan, created with beginners in mind, does not require any fancy joints or cuts. Using regular construction 2×4 and 4×4 lumber pieces, the fence and gate assembly is a breeze. With only a few basic tools, you can follow the step-by-step instructions for a professional-quality, aesthetically pleasing, and functional fence and gate for your home.
The Joy of Creating
We believe that building your own DIY fence and gate should be an enjoyable and rewarding experience. This project is your opportunity to dive into your creative side and customize a fence and gate that suits your personal taste and needs.
While constructing your DIY fence and gate, don’t worry about perfection; instead, focus on the satisfaction and pride derived from building something unique and functional for your home. This project is not only about enhancing the security and look of your property but also about enriching your life and showcasing your creative talents.
Wild Hog Railing Panels: The ultimate choice for durability and style
When it comes to choosing the perfect material for your DIY fence and gate project, Wild Hog Railing Panels stand out in terms of durability, design, and versatility. With their 6-gauge welded 4 in. x 4 in. mesh pattern and three-layered powder coating, these black metal panels are designed to withstand the test of time while maintaining their beauty and functionality.
Create the perfect outdoor space with our DIY fence and gate
Your backyard is an extension of your home, and a well-designed fence and gate can significantly enhance its aesthetics and functionality. By choosing our DIY fence and gate plan, you’ll be able to create a stunning outdoor space that offers security, privacy, and a touch of elegance – all while showcasing your personal style and craftsmanship.
Boost your home's value with a DIY fence and gate project
Investing in a custom-designed DIY fence and gate not only adds beauty and security to your home, but it can also boost its value. By following our comprehensive plan with Wild Hog Black Metal Railing Panels, you’ll be able to create a fence and gate that is both visually appealing and built to last – a feature that is sure to impress potential buyers.
Get Started Today
In conclusion, our DIY fence and gate plan featuring Wild Hog Black Metal Railing Panels provides everything you need to create a stunning, secure, and functional addition to your outdoor space. From beginners to experienced builders, this project will not only improve your home but also provide a sense of accomplishment in completing a beautiful and worthwhile project.
Are you ready to embark on this exciting journey? Purchase our easy-to-follow plan today, and begin creating the stylish and secure sanctuary you’ve always dreamed of for your backyard. Make this the perfect home improvement project that will get you noticed while providing a safe haven for your loved ones and pets.
Remember, the magic is in you. So, keep the passion and determination high, and soon you’ll have a beautiful, safe, and stylish fence and gate to call your own. And who knows – it could be the start of a new DIY adventure!
Check list before you start the DIY fence/gate building.
It is important to consider a few important things before starting a DIY fence.
- You will likely need a permit. You will need to check your local codes and regulations.
- Some areas may have a homeowners association that have rules to govern the style, size, and placement of fences.
- If unclear, you may also need to check property lines and discuss the project with your neighbors before construction.
- Consider the building material. A cedar fence, if built appropriately, can last up to 40 years. Here in California, the lumber of choice for fencing is redwood due to its availability, durability, and cost.
- Determine fence gate location and all access points.
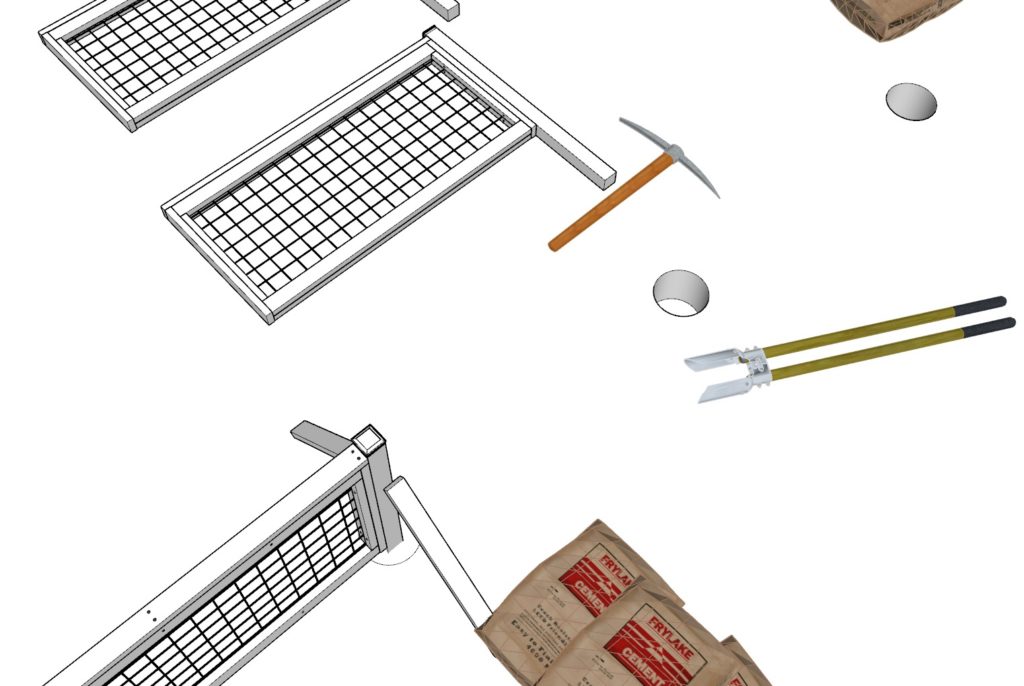
- When building with the fence panels, you will need to calculate the total length of each side of your property and calculate the total panel length needed. You may need to install a partial panel to make everything fit. (Good thing is that these panels are easily customizable, and the metal can be cut with small bolt cutters or a cutting wheel).
- Call the utility company before construction to ensure your fence posts will not hit any utility lines.
- Determine the number of posts needed for the project.
Time to build fence
variable depending on size of project.
Cost of fence build
The estimated cost for this fence is $15 per linear foot, though material prices may vary over time. Please research current costs for accuracy.
Skill level required
Beginner
Download the PDF plans
Fence and Gate PDF plan
What is included in the PDF download?
- Easy to read step by step instructions
- Material list
- Tools needed
- Helpful links to materials and tools needed
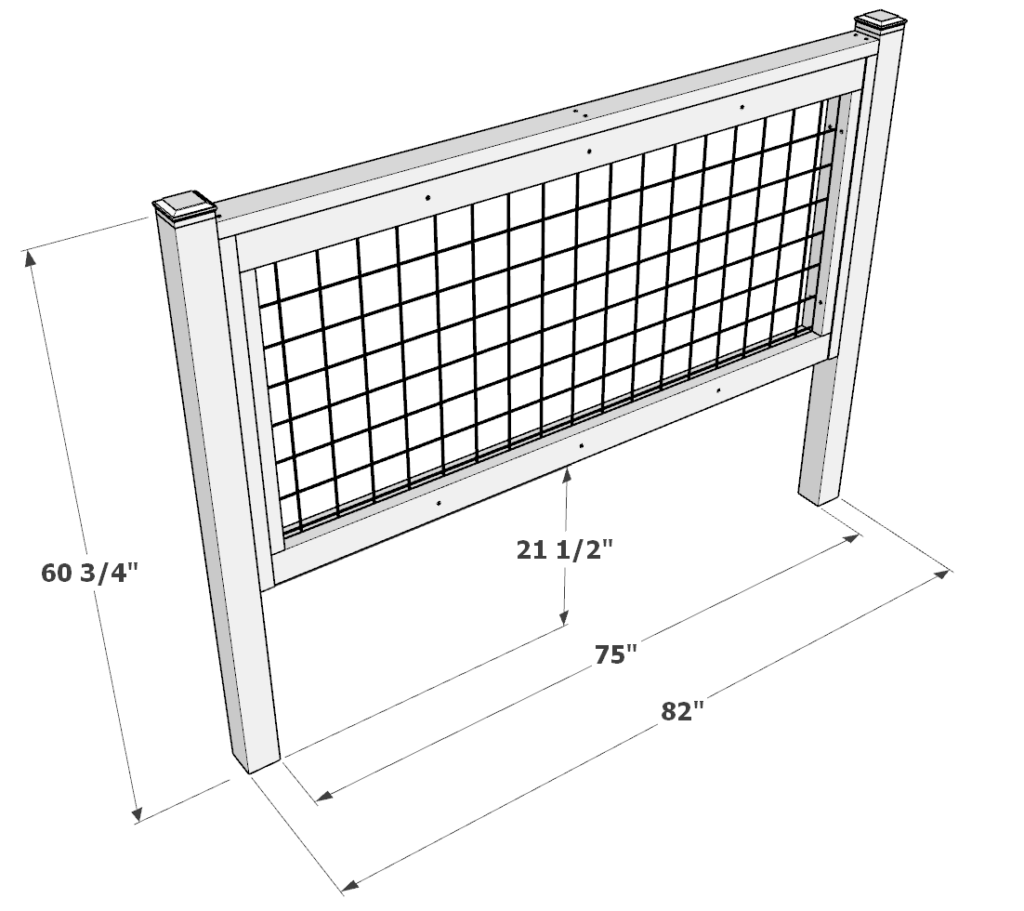
DIY Fence Panel Dimensions
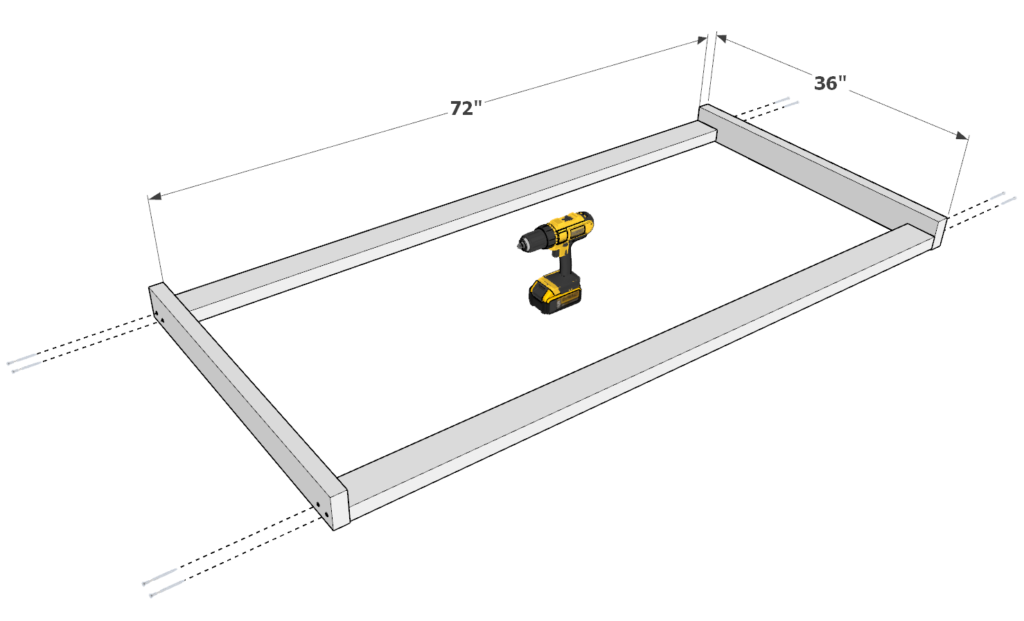
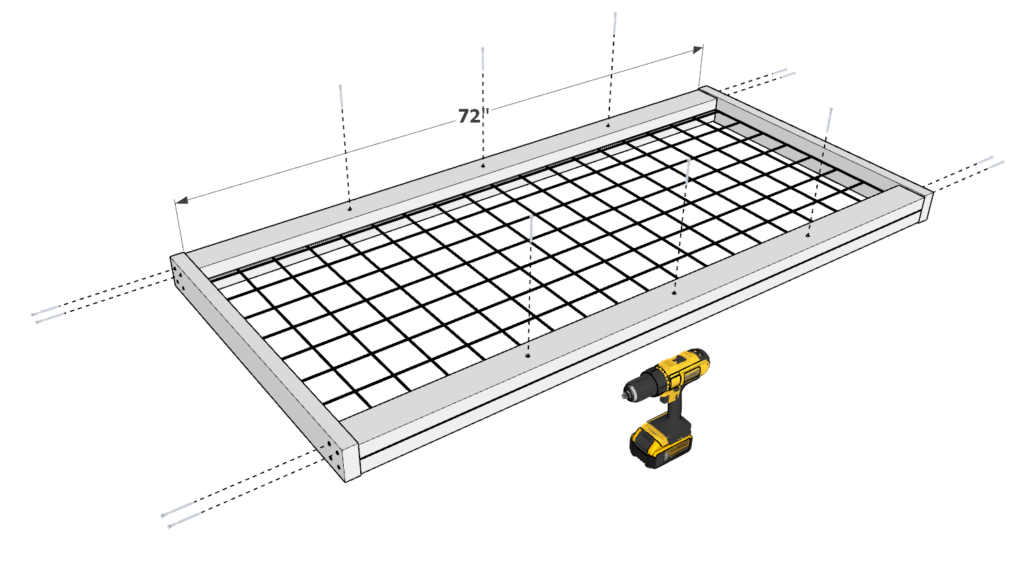
Step 1: Assembling the Frame
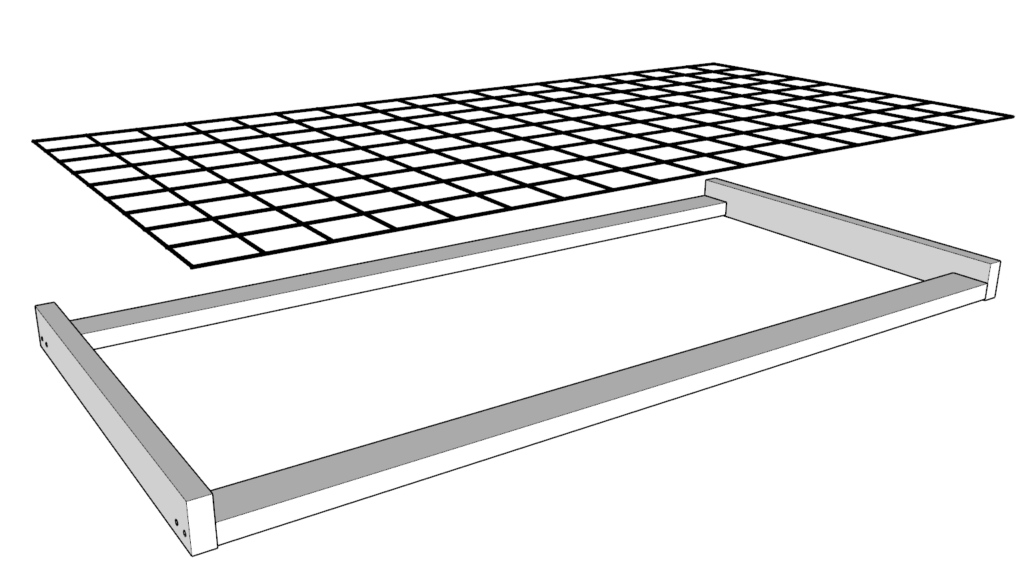
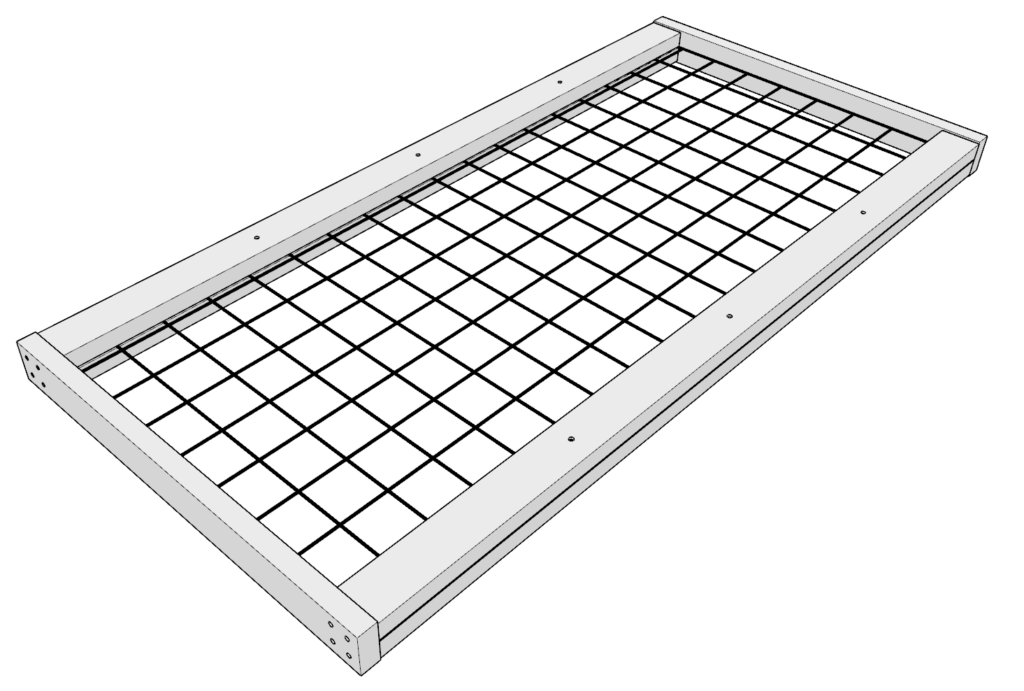
First, gather two 36-inch 2×4 lumber pieces and two 72-inch 2×4 lumber pieces. Arrange them into a rectangular frame as shown in the provided diagram. Before attaching the pieces, predrill holes to prevent the wood from splitting. Secure the frame together using 3-inch screws.
To ensure uniformity across all the panels in your fence, create a small 3/16-inch indent on each side of the 72-inch 2×4 lumber pieces. You can use a 3/16-inch spacer, made from scrap lumber, as a guide to achieve consistent spacing throughout your project. Simply reuse this spacer for each panel you build.
Step 2: Installing the Metal Railing Panel
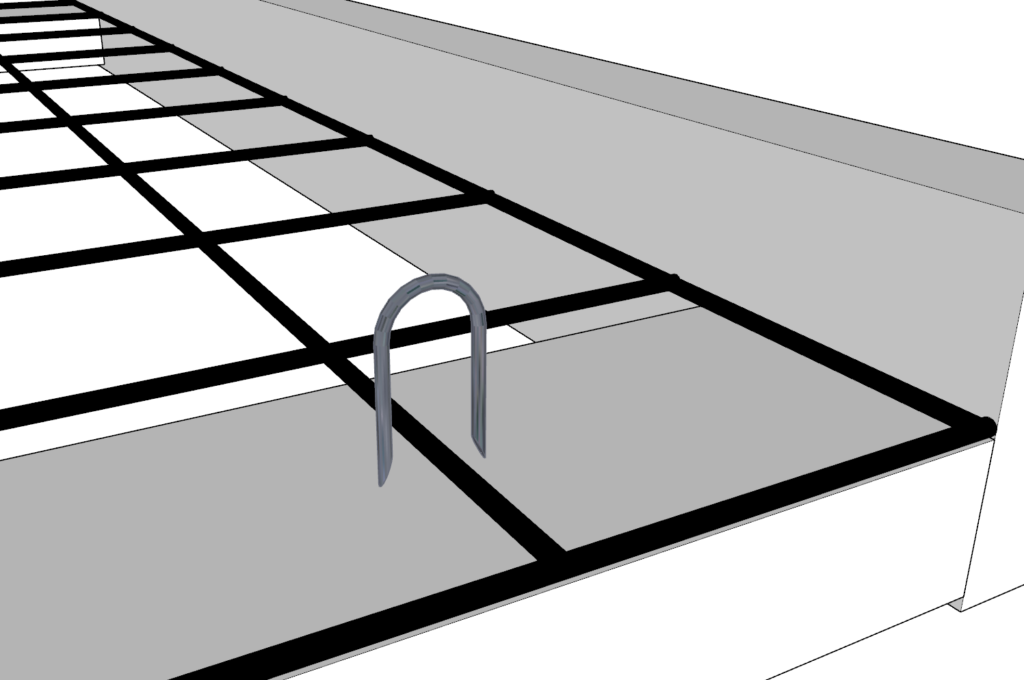
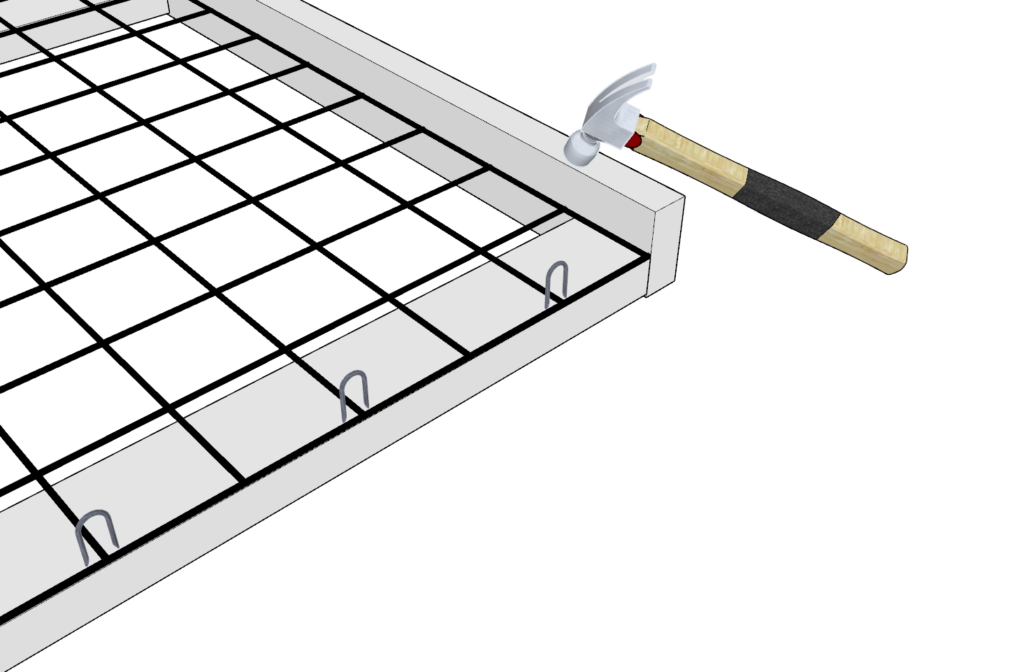
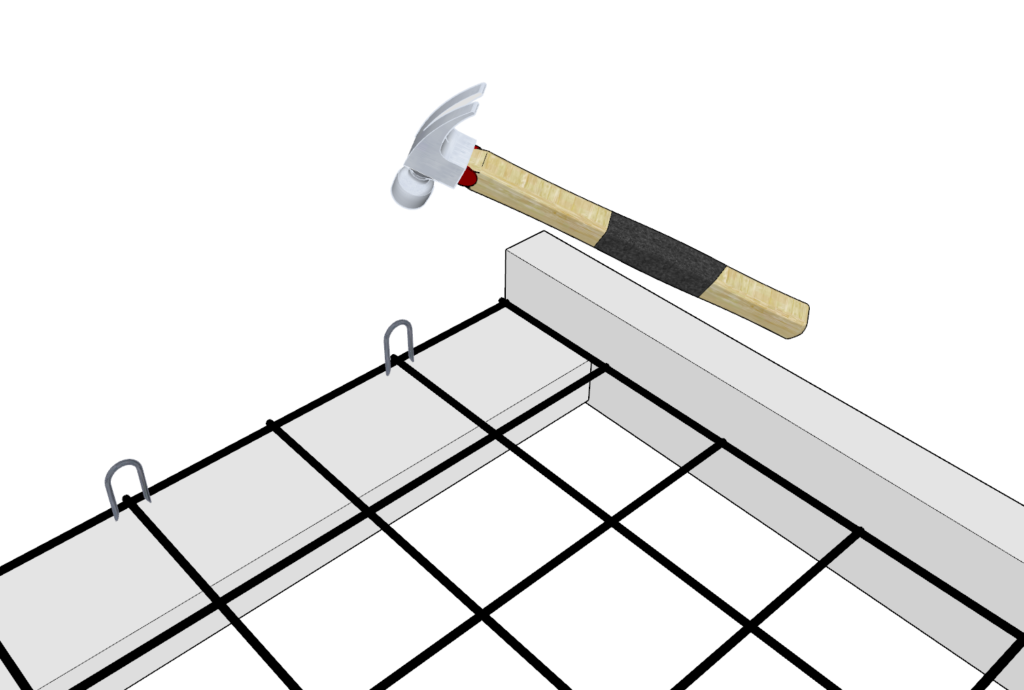
Next, place the 36-inch x 72-inch metal railing panel into the frame you’ve created. Ensure that the panel is properly positioned and secure it using double point staples. Hammer the staples into place until they are flush with the wood and metal.
To prevent the metal railing panel from sliding or shifting within the frame, strategically place the staples to provide adequate support and stabilization. This may require evenly distributing the staples throughout the panel’s edges.
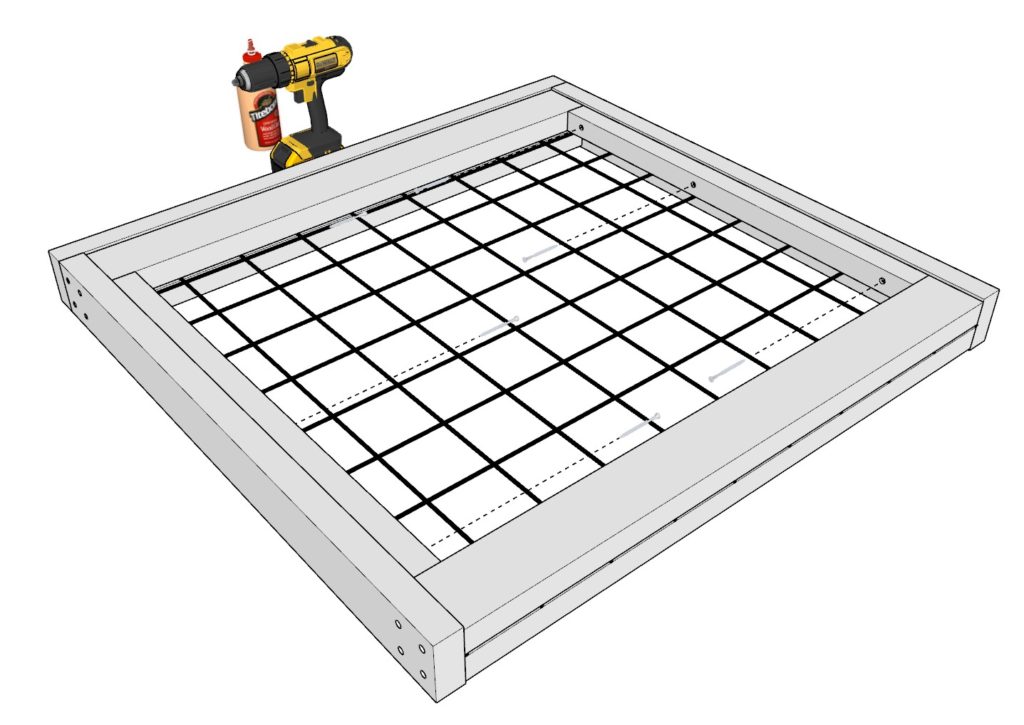
Step 3: Securing the Metal Railing Panel with Additional 2x4 Lumber
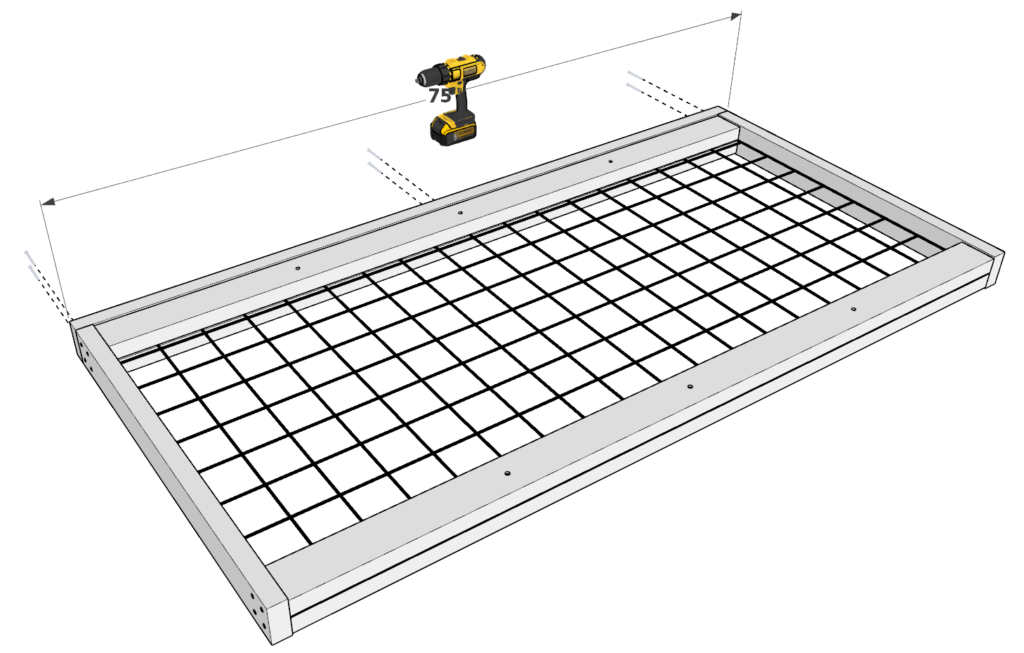
Now, take two additional 72-inch 2×4 lumber pieces and position them directly on top of the metal railing panel, as illustrated in the provided diagram. Before attaching them, predrill holes to prevent the wood from splitting. Then, secure the 2×4 lumber pieces using screws, ensuring that the metal panel is firmly held in place within the frame.
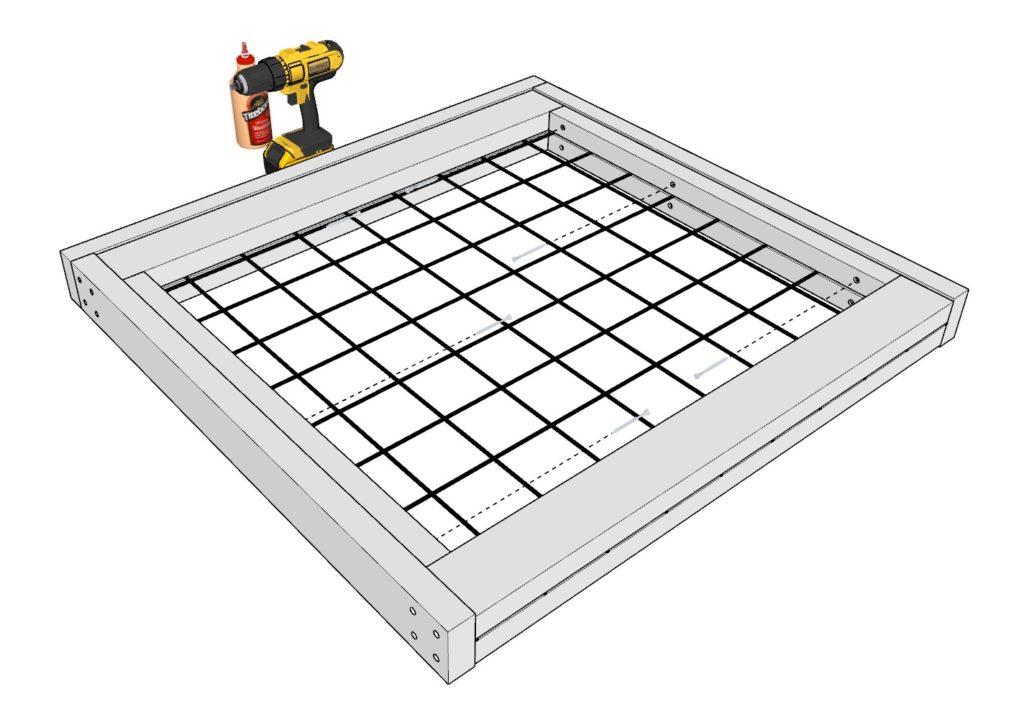
Step 4: Attaching the Top Rail to the Fence Panel
Next, grab your 75-inch 2×4 lumber piece, and position it parallel to the two outer 72-inch pieces to create the top rail of the fence panel. Make sure it’s properly aligned with the edges of the fence panel.
Predrill holes to prevent the wood from splitting, and then secure the top rail with screws, ensuring a strong and stable connection with the rest of the fence panel.
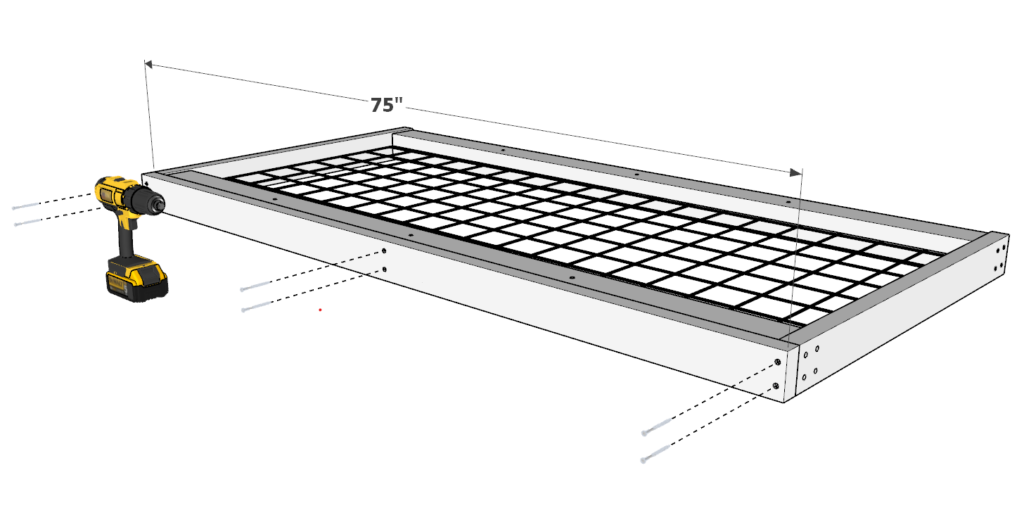
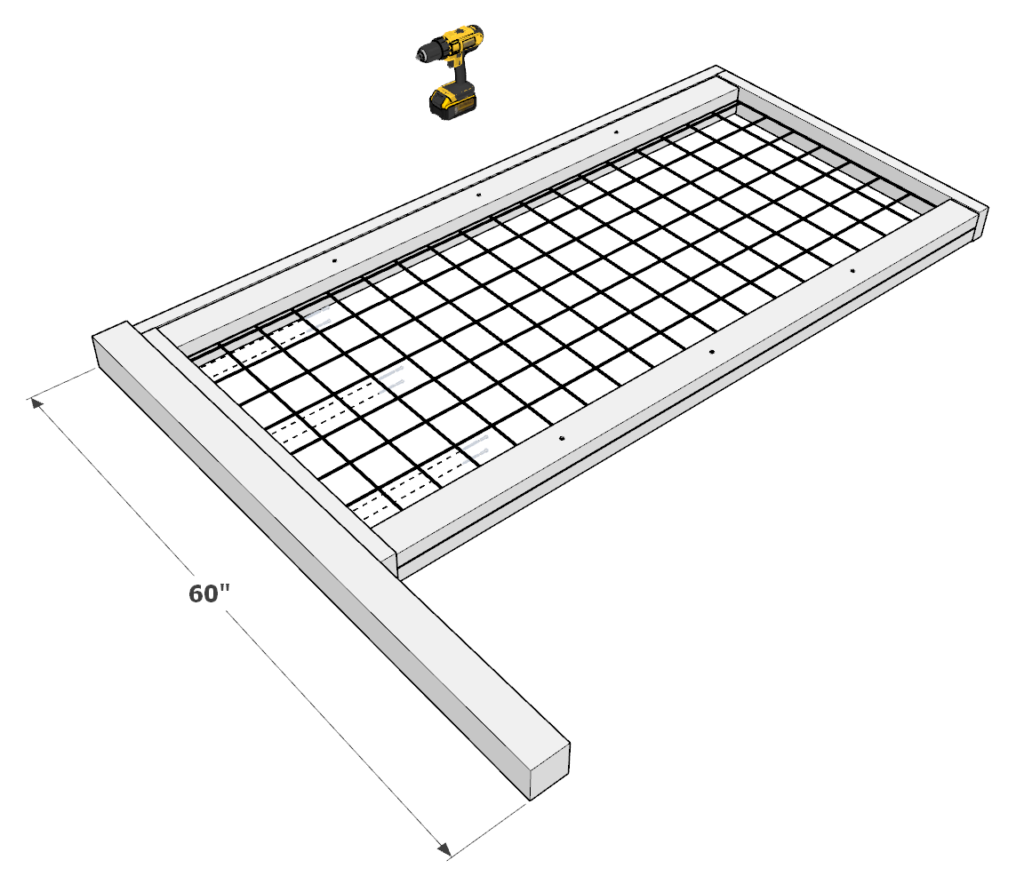
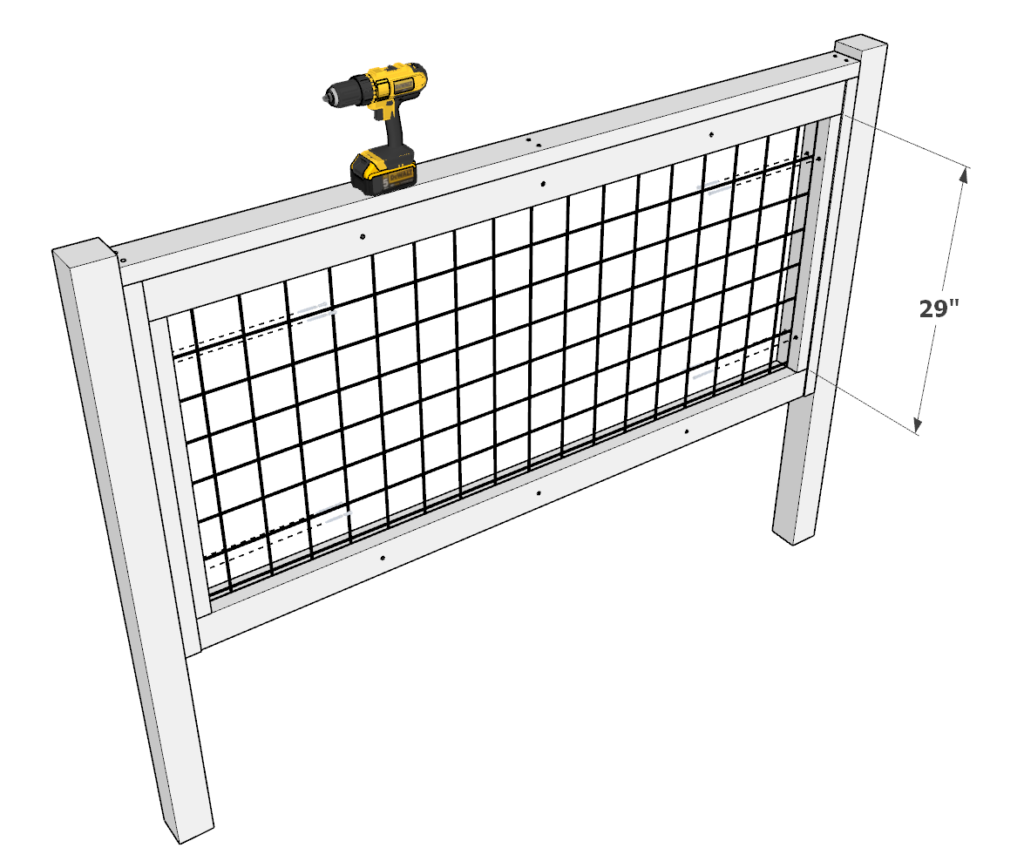
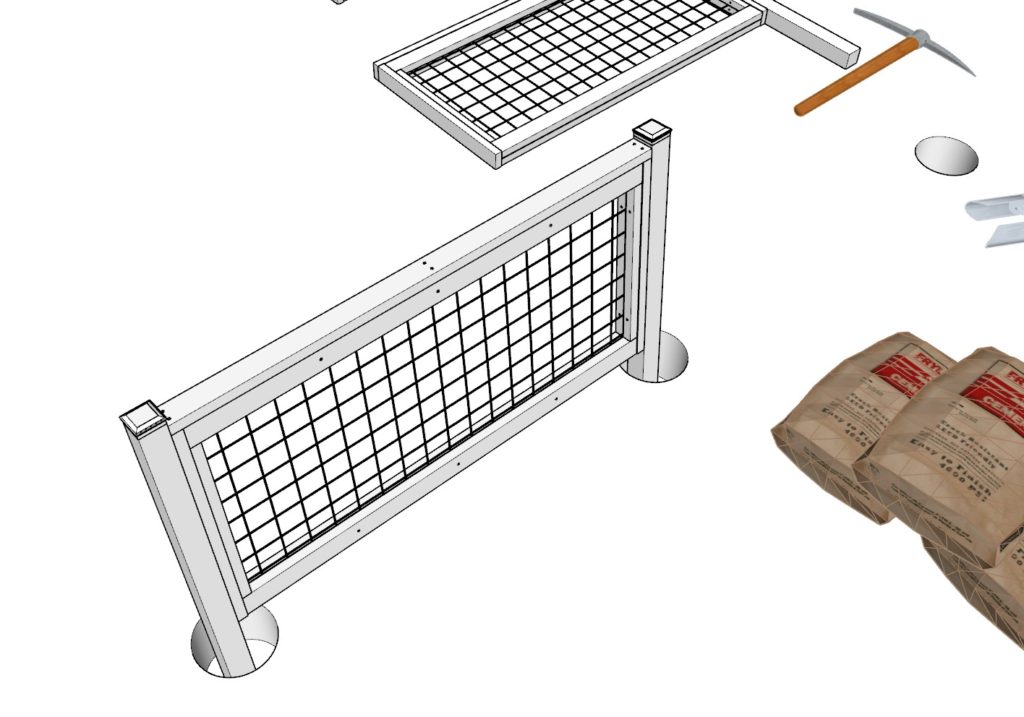
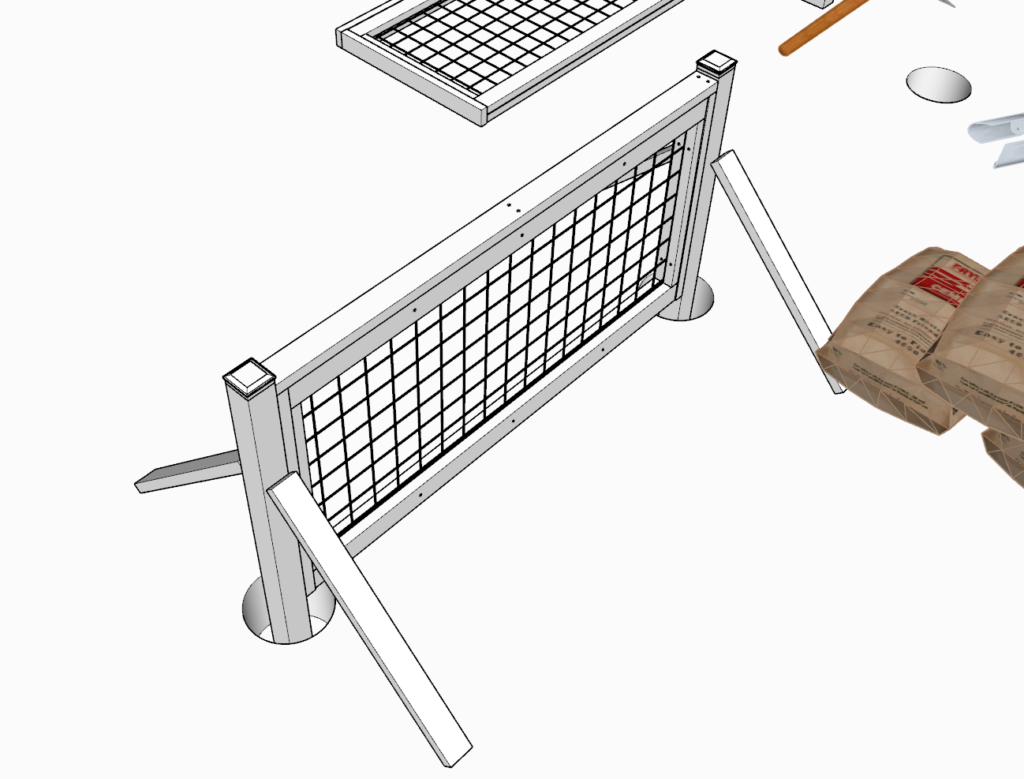
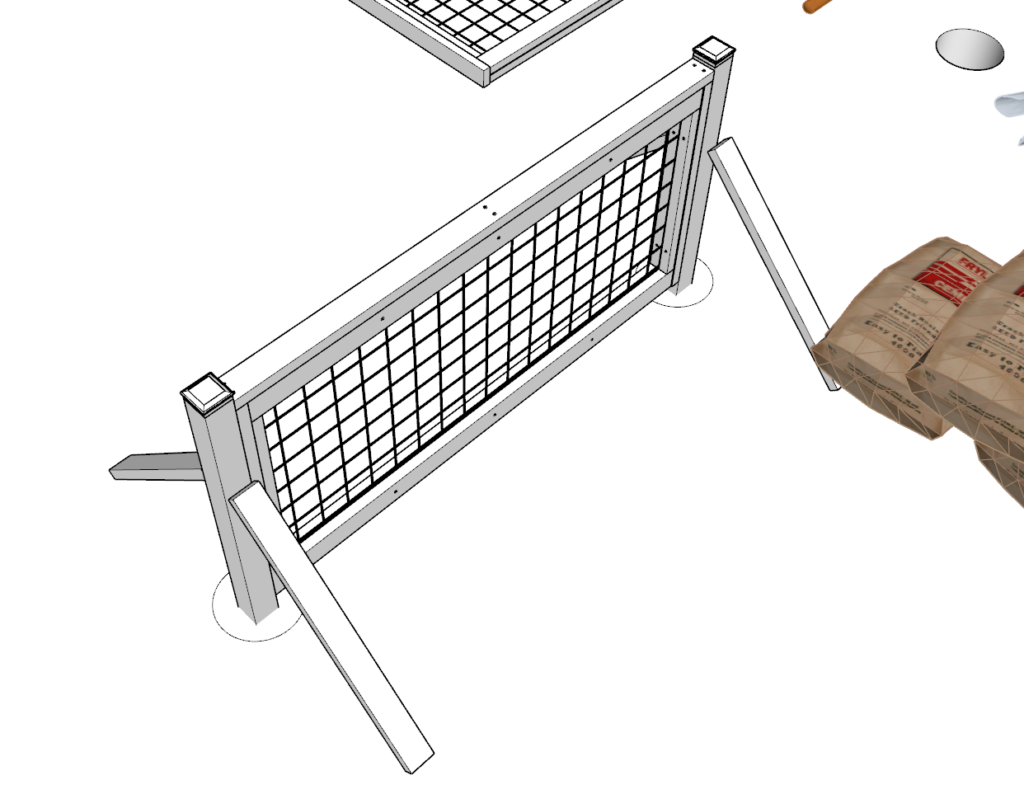
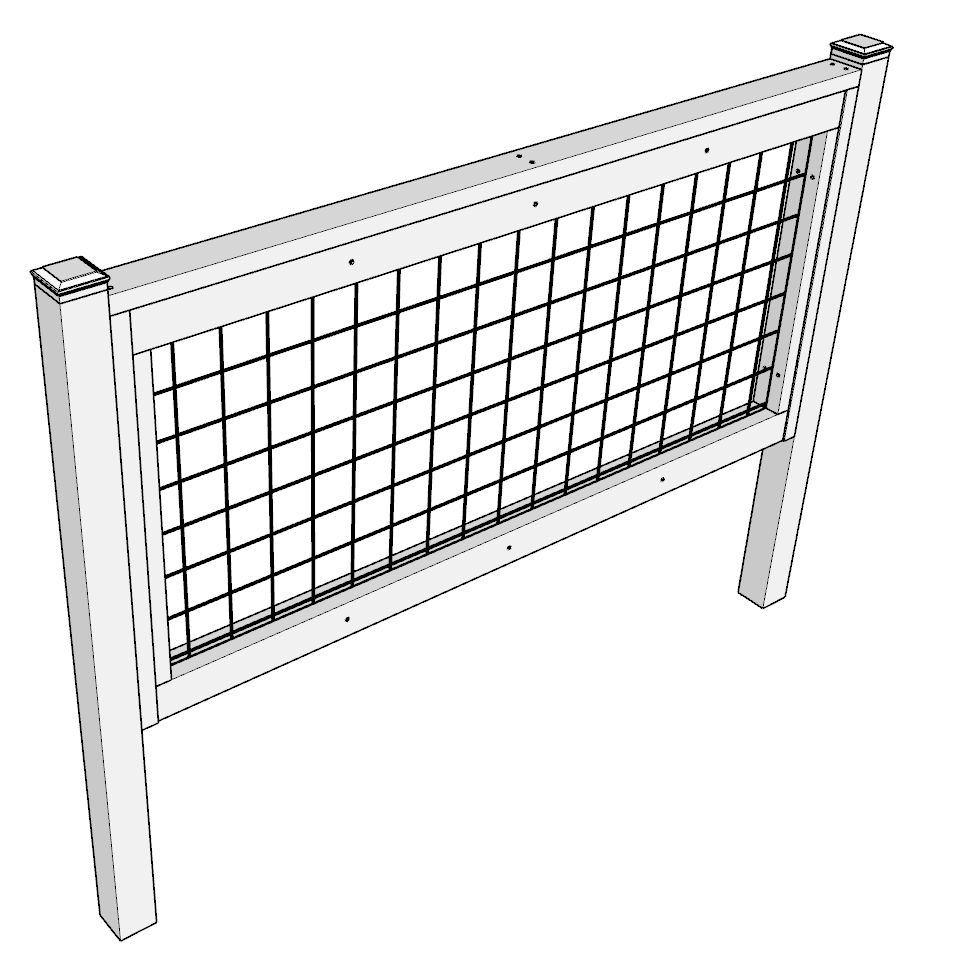
Step 5: Attaching the Fence Panel to 4x4 Posts
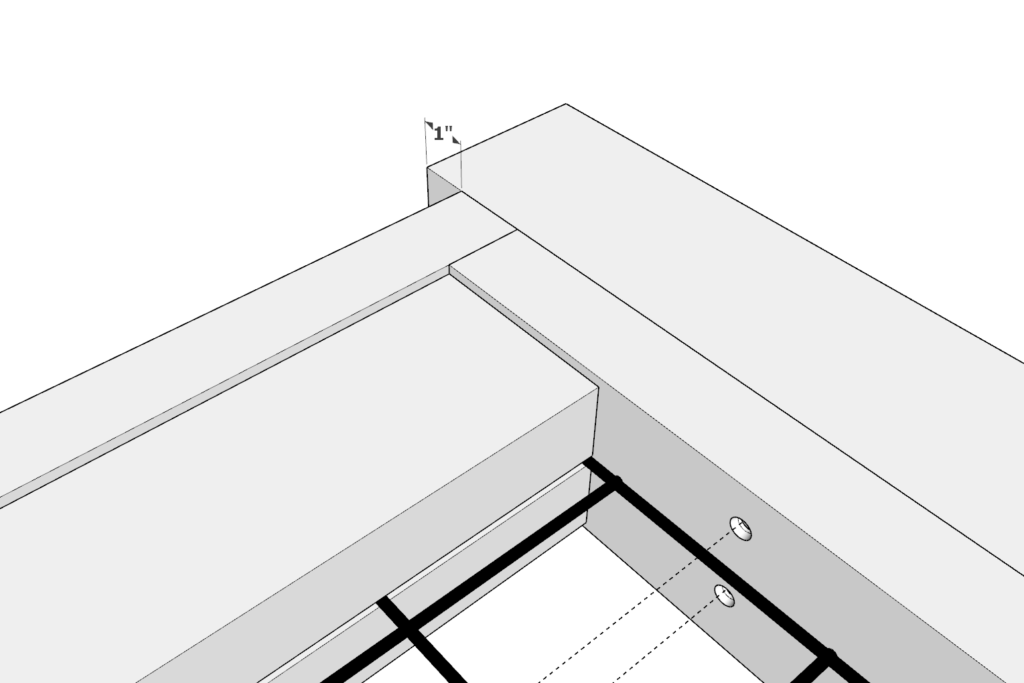
Now, it’s time to attach the fence panel to the 60-inch 4×4 lumber pieces, which will serve as support posts. Depending on your setup, you may need one or two posts for each panel. More information on the arrangement is provided further below in this step.
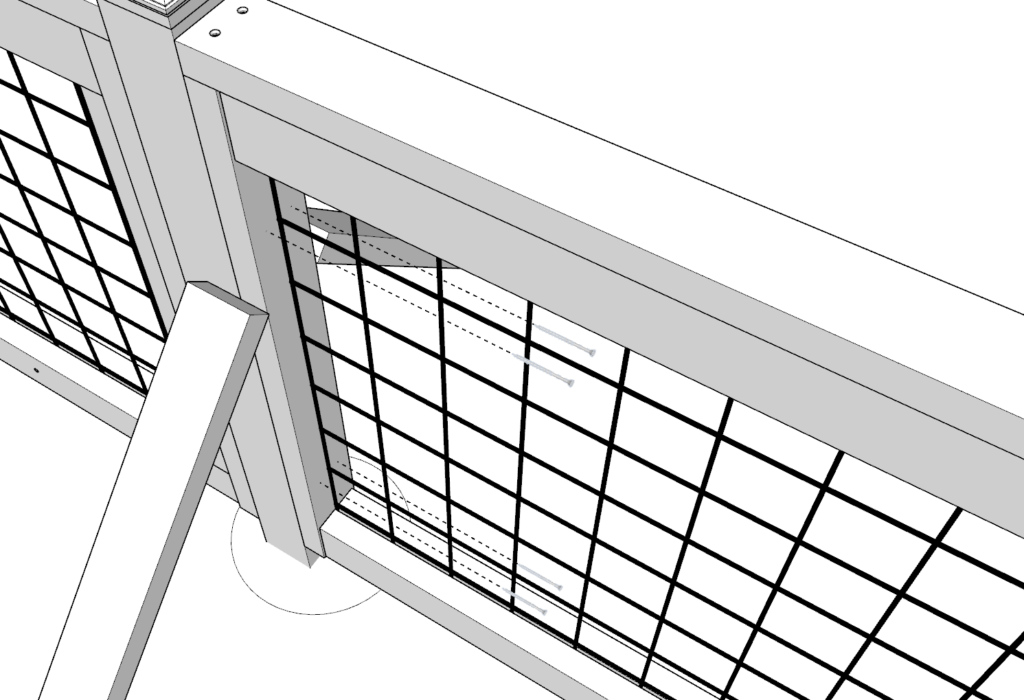
First, indent the fence panel by 1 inch, as shown in the provided diagram. Next, align each 60-inch 4×4 lumber piece with the ends of the 36-inch 2×4 lumber pieces. Make sure they are properly positioned and flush with the outer edges.
Predrill holes to prevent wood from splitting, and then secure the fence panel to the 4×4 posts using screws, creating a strong and stable connection.
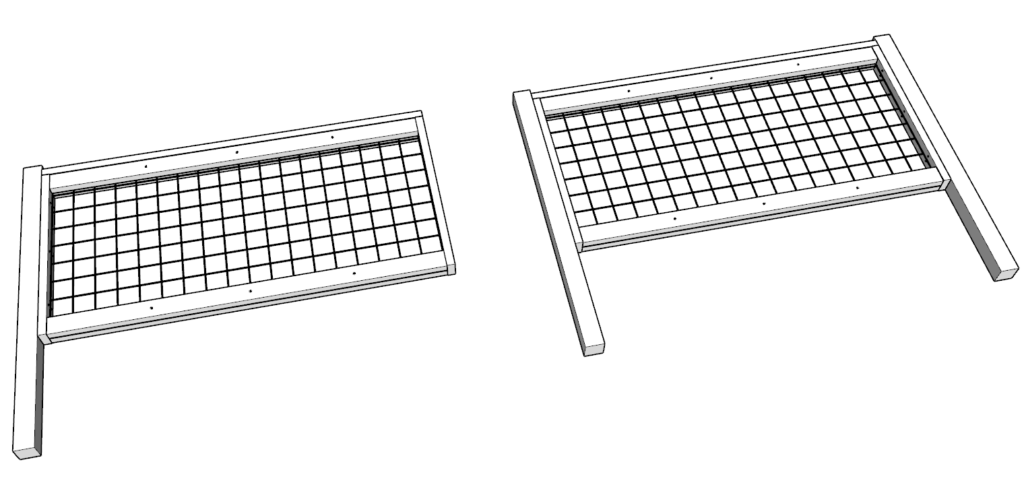
When starting your fence installation, you will need a “starter” panel with two support posts. For the rest of the panels, only one support post is required, as they will share the neighboring posts. Further information on the installation process can be found in the upcoming steps.
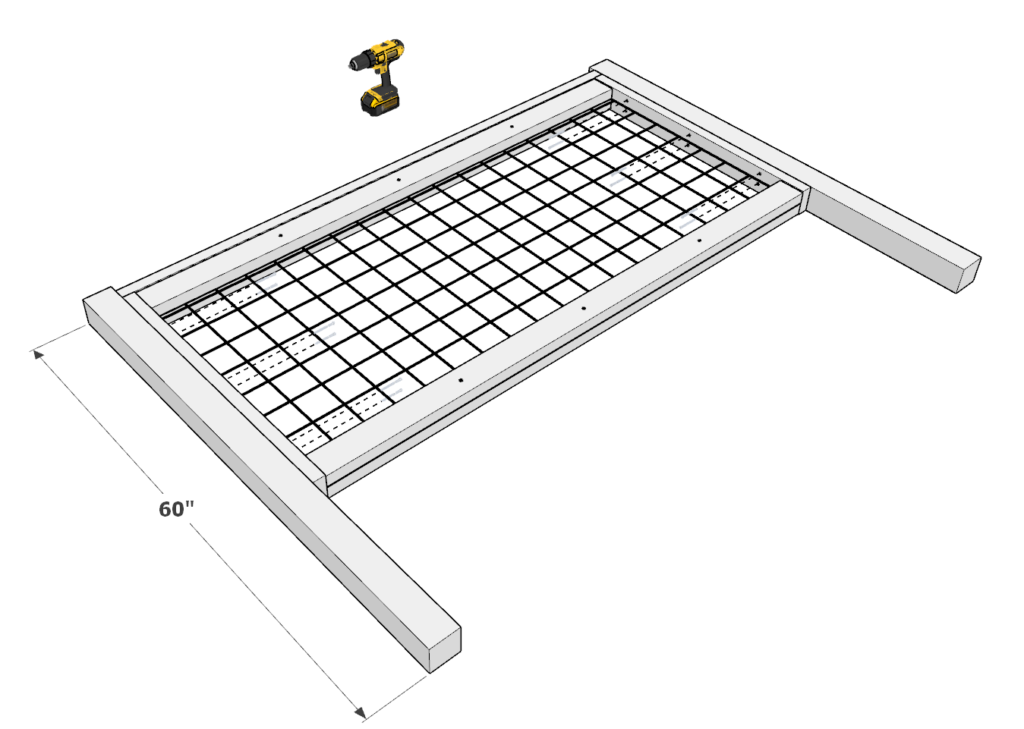
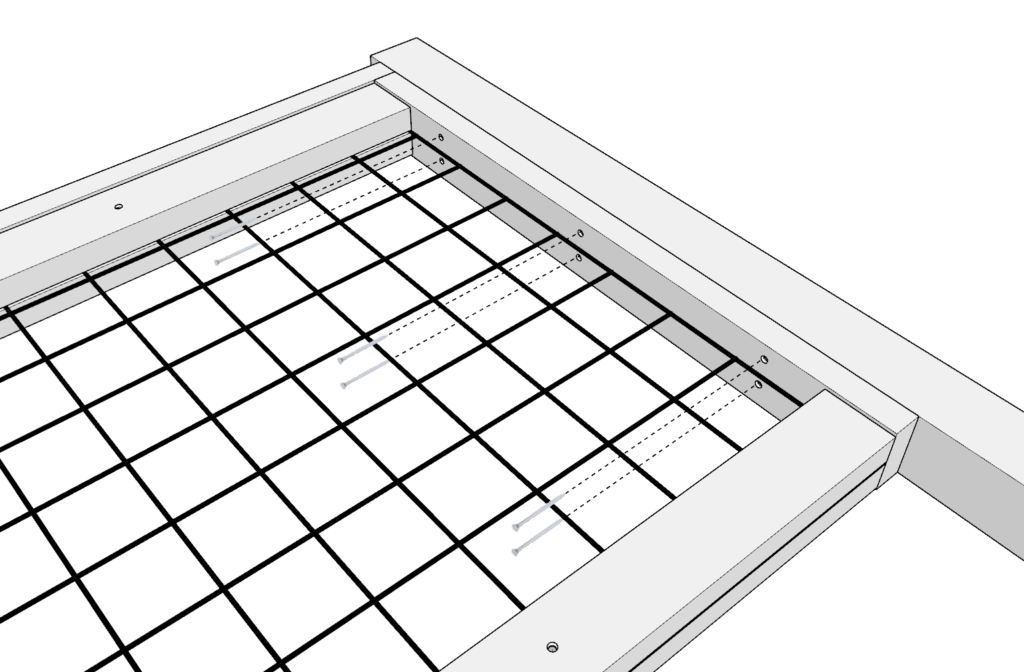
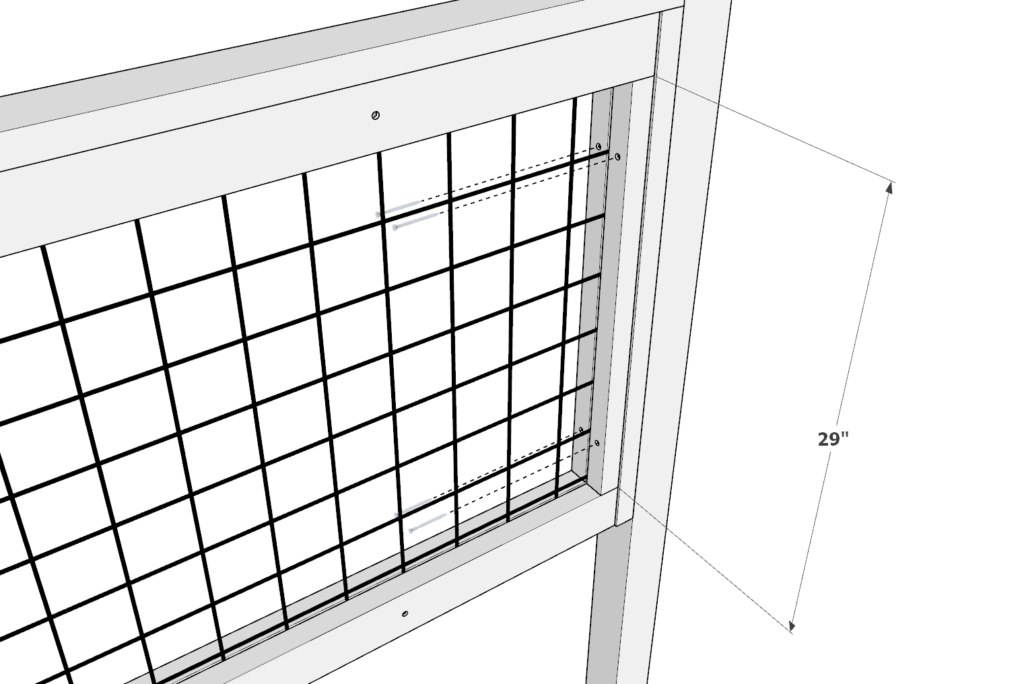
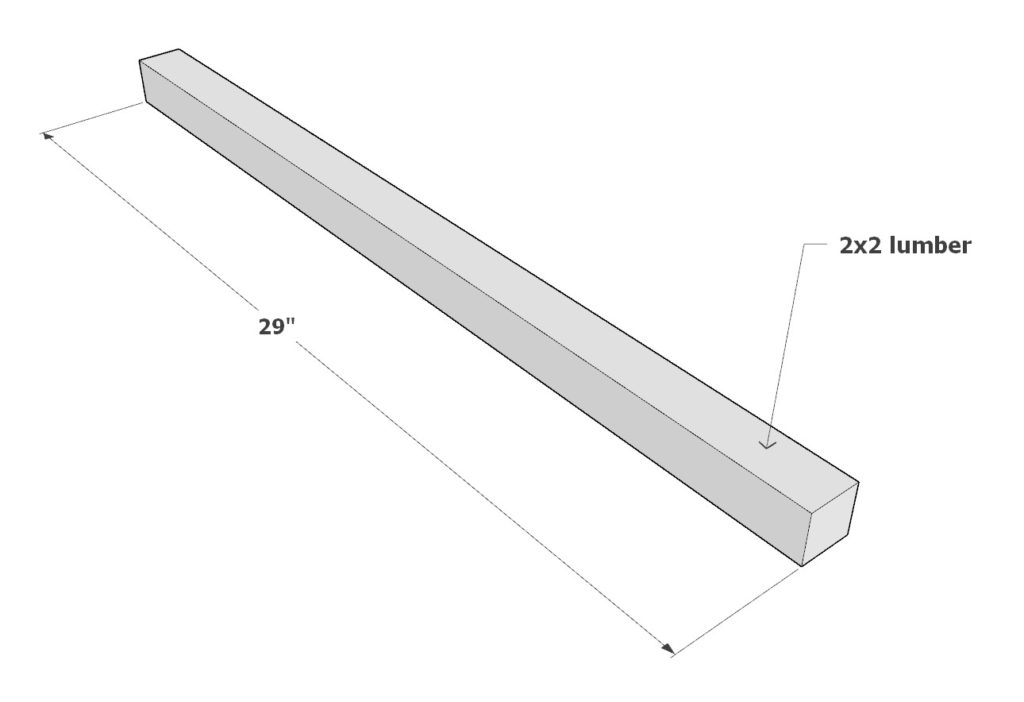
Step 6: Securing the Metal Railing on the "Starter" Panel
On the “starter” panel, add four 29-inch 2×2 lumber pieces in the positions indicated in the provided diagram. These 2×2 lumber pieces will help secure the metal railing within the frame, ensuring the stability and durability of the fence panel.
As before, predrill holes to prevent wood from splitting, and then attach the 2×2 pieces to the fence panel using screws. Make sure they are properly aligned and securely fastened to ensure the best possible protection and support for the metal railing.
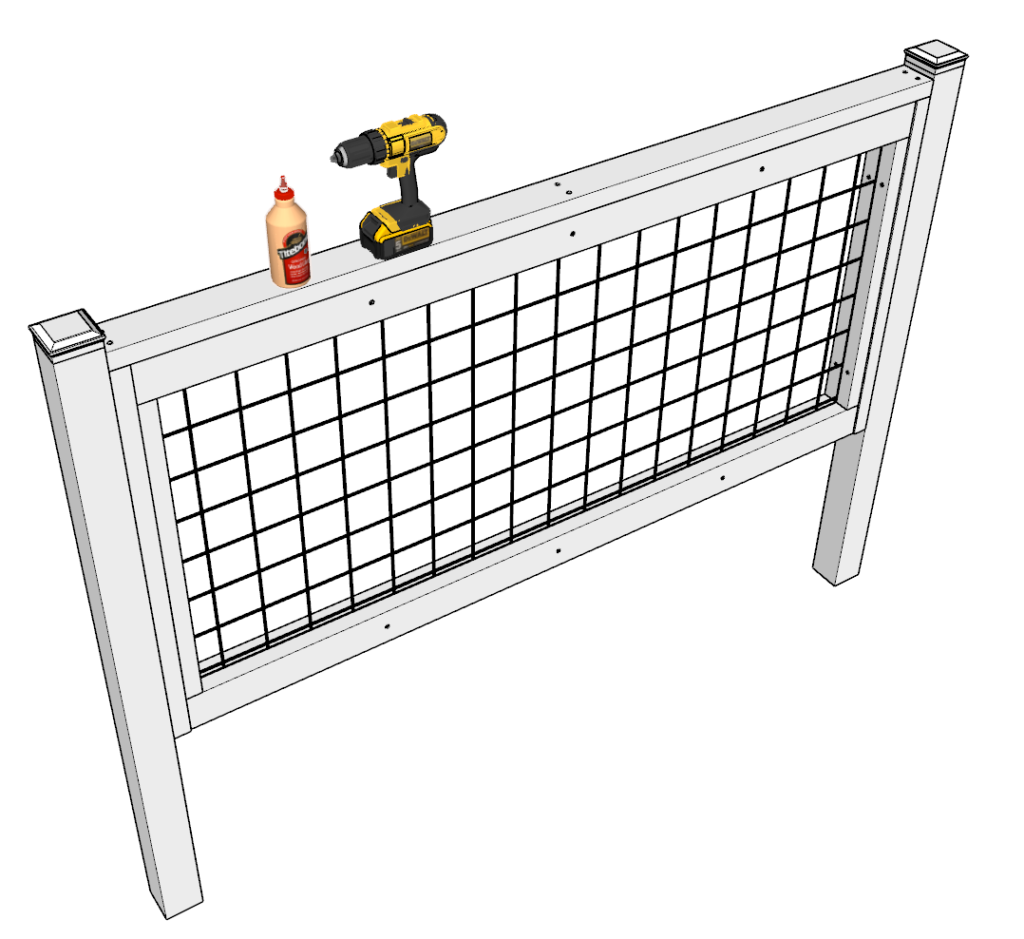
Step 7: Installing Post Caps for a Finished Look
Finally, add post caps to the top of the 4×4 support posts. These decorative elements not only add a polished and complete appearance to your fence but also provide protection to the top of the posts from weather and moisture damage.
Depending on the post cap design and where you purchase them, they may need to be glued or secured with screws. Follow the manufacturer’s recommendations to ensure a secure and proper installation, completing your DIY fence and gate project.
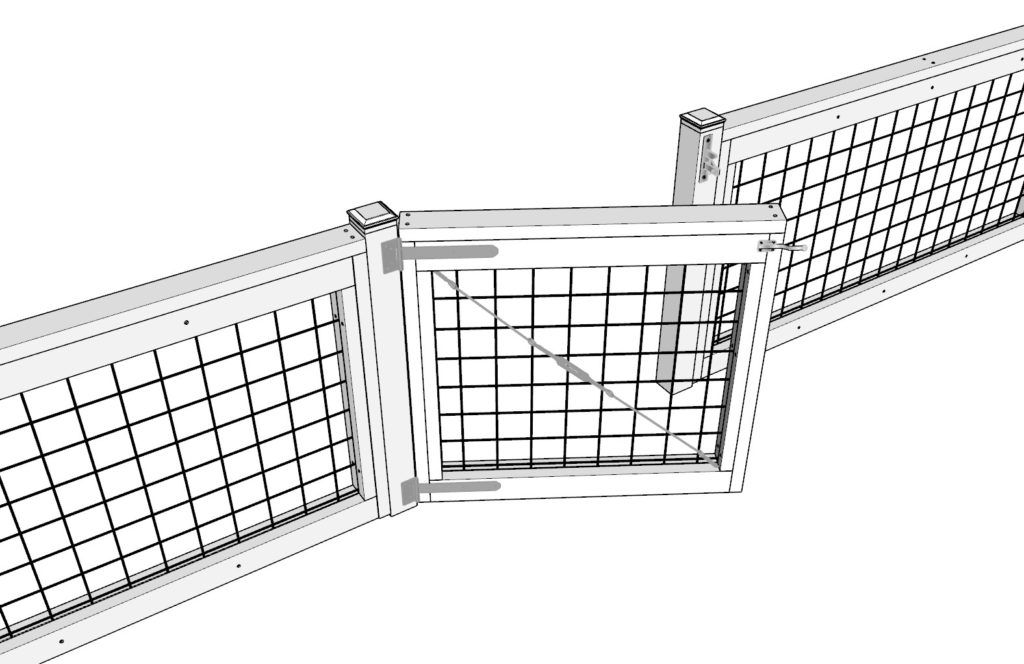
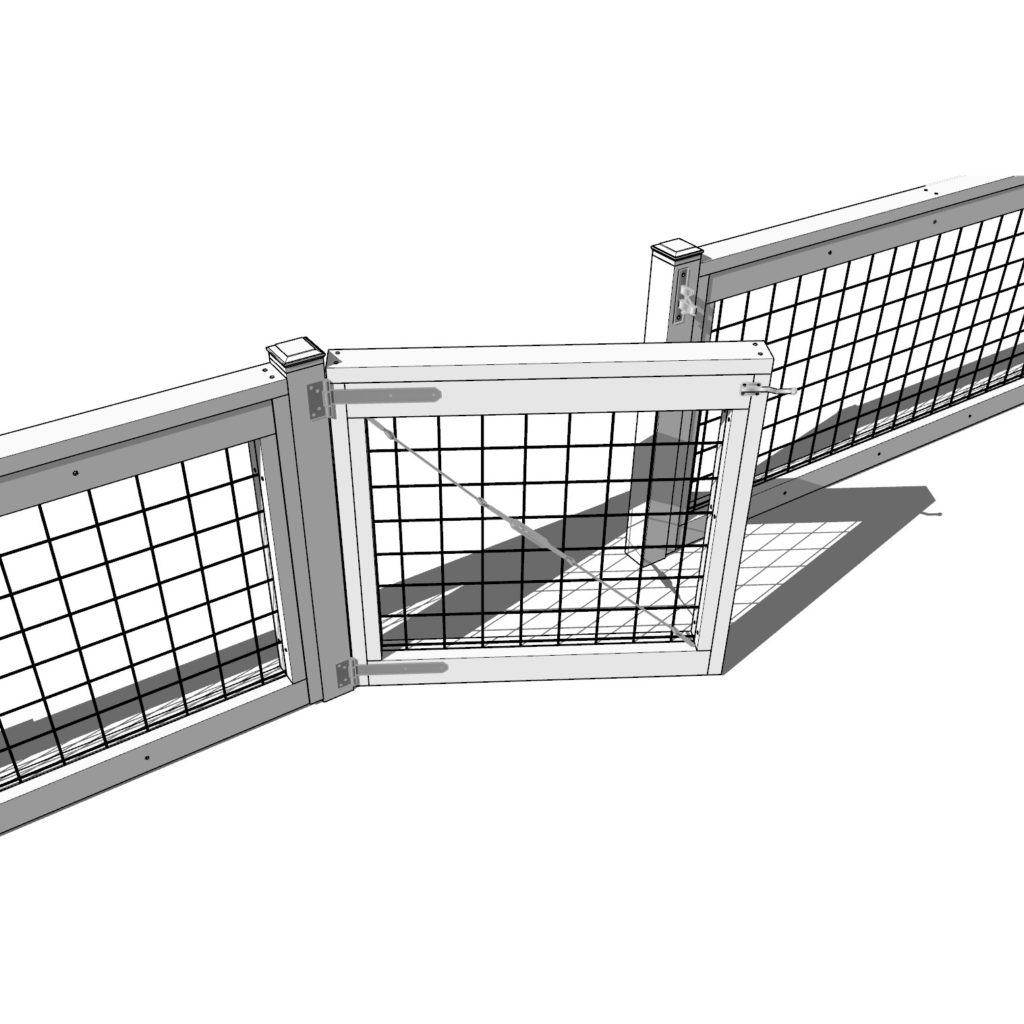
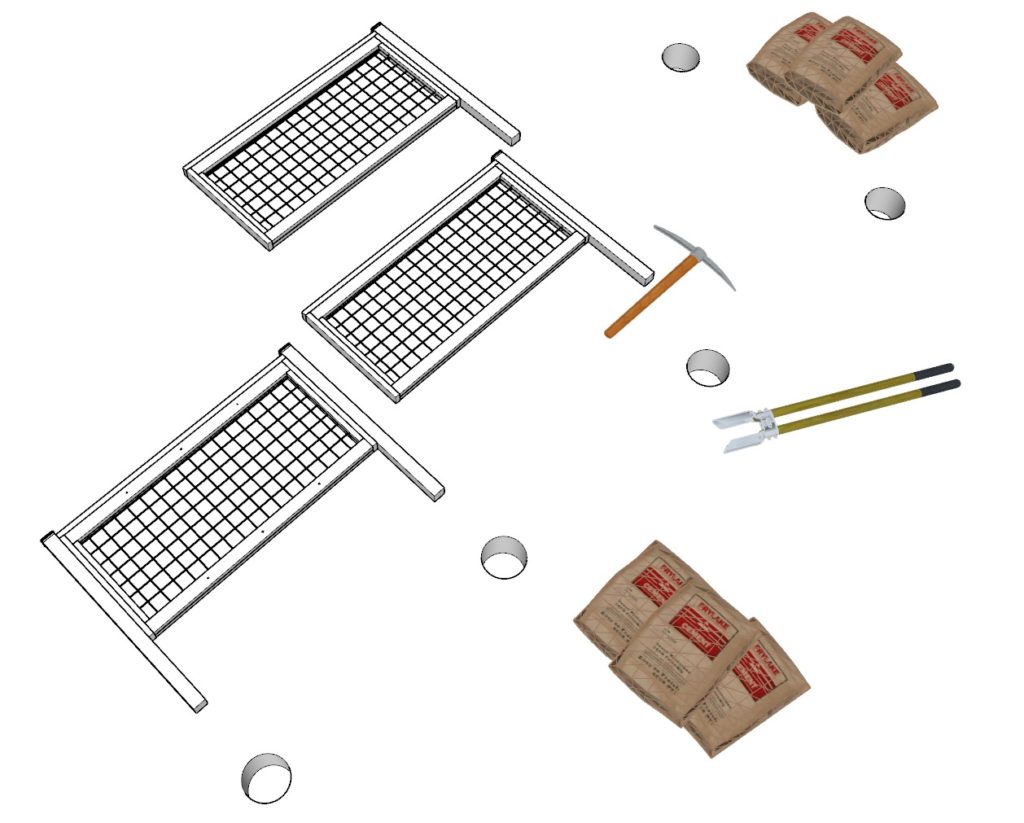
Step 8: Installing DIY Fence Panels on Your Property
Now that your fence panels and support posts are assembled, it’s time to install them on your property. Please note that this guide does not cover the details of digging holes, filling holes with gravel, or handling cement work. The images and descriptions below showcase how the fence panels connect with one another during the installation process.
1. Begin with the “starter” panel, which has two posts attached. Set it in place and secure it according to your preferred method (e.g., cementing the posts into holes). Ensure proper alignment and levelness before moving on to the next panel.
2. Add the subsequent fence panel, which has only one post, connecting it to the previous panel’s shared post. Make sure the panels are securely connected and stable.
3. Continue adding panels in this manner until the entire perimeter is fenced.
4. Once all fence panels are installed, attach the 29-inch 2×2 lumber pieces to every panel (besides the starter panel). These additional lumber pieces will further secure the metal railing in place and complete your DIY fence.
By following these steps, you’ll have successfully installed a stylish, secure, and professionally crafted fence around your home, achieving both elegance and functionality for your outdoor space.

Step 9: Finishing Touches – Staining, Painting, or Treating the Fence
Congratulations, your fence is now assembled and installed! To ensure its longevity and enhance its appearance, consider staining, painting, or treating the wood with a wood preservative.
If you’ve used pressure-treated lumber for your fence, there’s no need to apply additional wood preservatives, as the lumber has already been treated to resist decay and insect damage. However, you can still choose to stain or paint the fence to match your desired aesthetic.
Select a high-quality exterior stain, paint, or wood preservative that’s appropriate for your climate and weather conditions. Carefully follow the manufacturer’s instructions for application and drying times.
By taking this extra step, you’re not only personalizing your fence but also protecting and extending its lifespan, ensuring that it remains a beautiful and secure feature of your home’s outdoor space for years to come.
Step-by-step instruction on building DIY fence gate
Time to build
1-2 hours
Total cost of build
$80
Skill level required
Beginner
DIY Fence Gate Dimensions
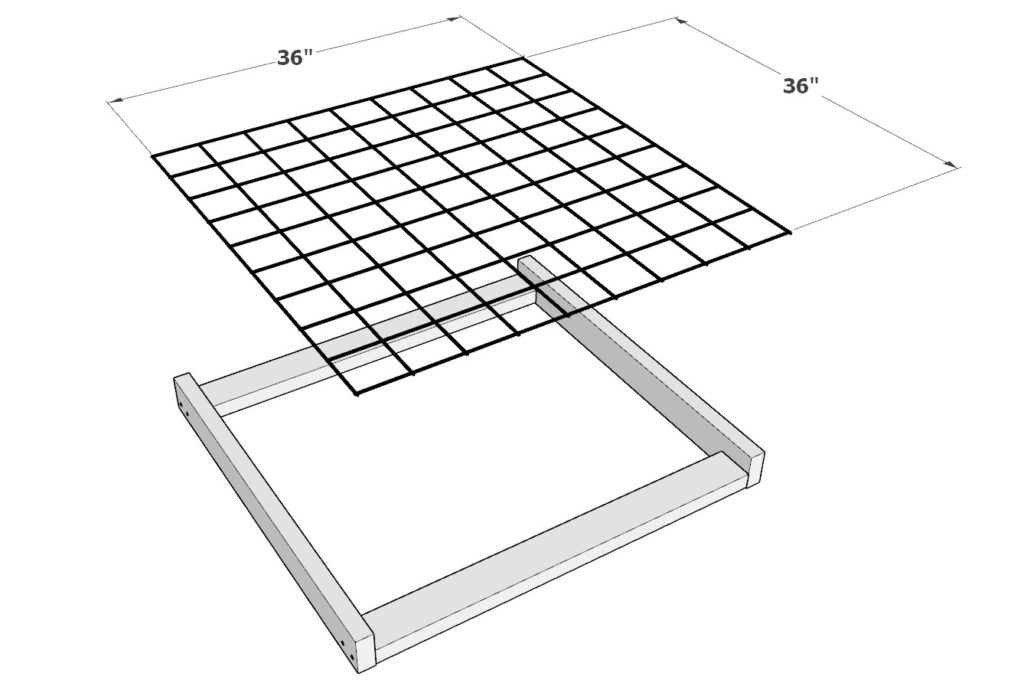
Step 1: Assembling the Gate Frame
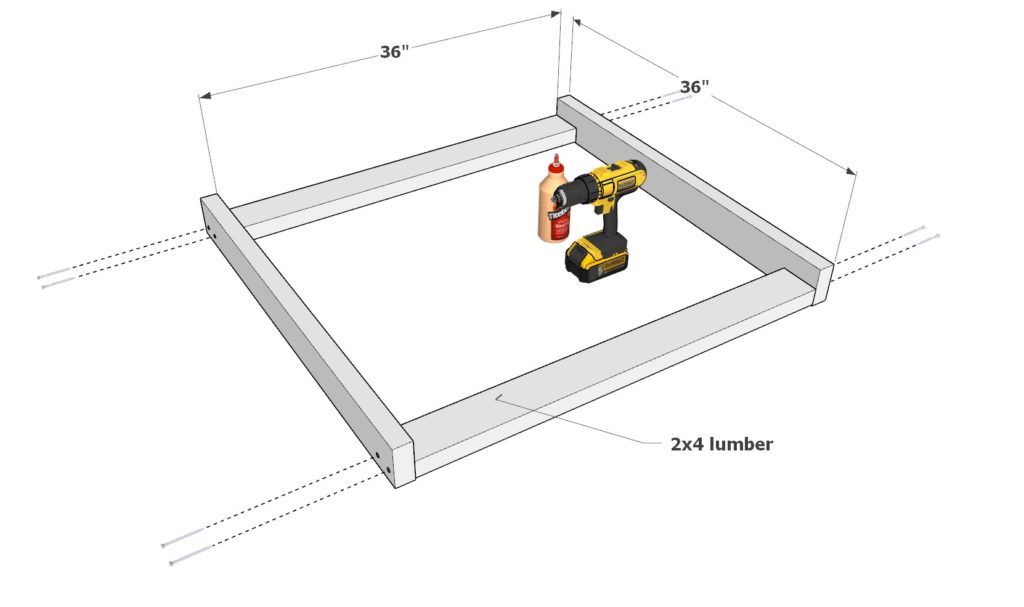
Now that your fence is complete, it’s time to build the gate. Begin by gathering four 36-inch 2×4 lumber pieces and arrange them into a rectangular frame, as shown in the provided diagram.
To prevent the wood from splitting and ensure a strong connection, predrill holes at all the corners where the lumber pieces will be joined together. Apply a layer of wood glue and secure the frame together using 3.5-inch screws, providing optimal stability and durability for your gate.
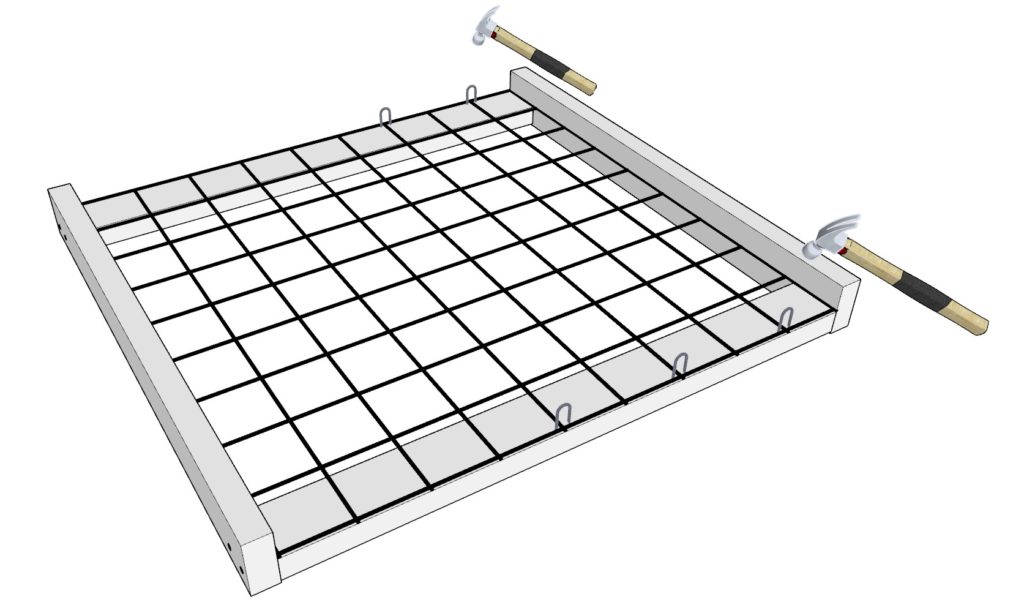
Step 2: Installing the Metal Railing Panel on the Gate Frame
First, prepare the 36-inch x 36-inch metal railing panel for the gate. If needed, cut a stock 72-inch x 36-inch panel down to size using bolt cutters, a grinder, or a metal saw, and then sand down the edges for a smooth finish.
Next, place the 36-inch x 36-inch metal railing panel into the gate frame, ensuring it is properly positioned. Secure the panel with double point staples, hammering them into place until they are flush with the wooden frame and metal.
To prevent the metal railing panel from sliding or shifting within the frame, strategically place the staples to provide adequate support and stabilization. This may require evenly distributing the staples throughout the panel’s edges.

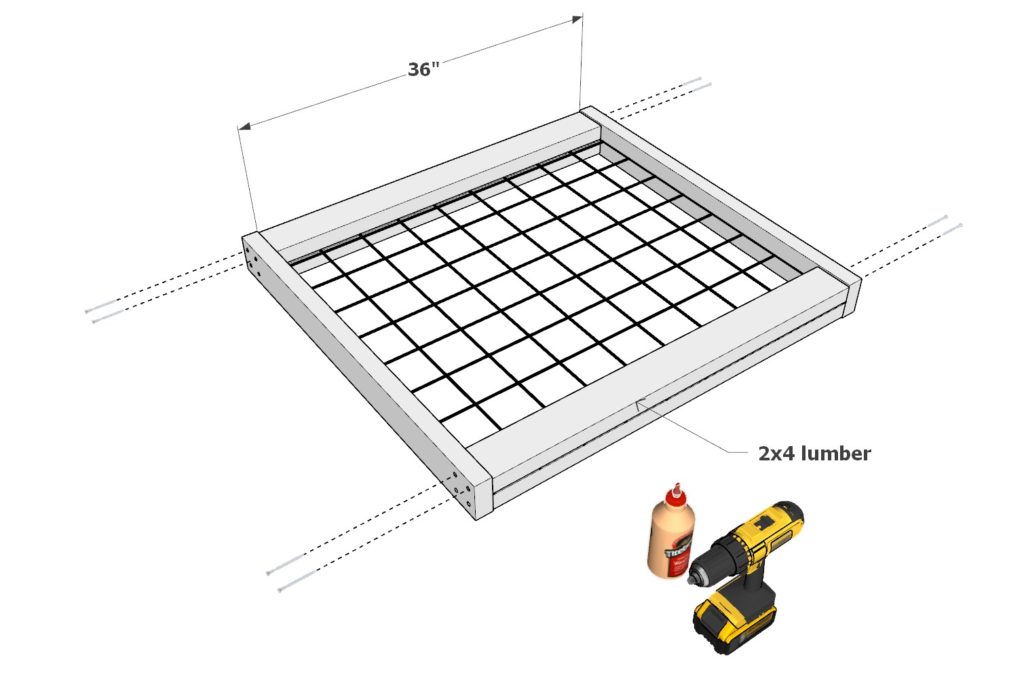
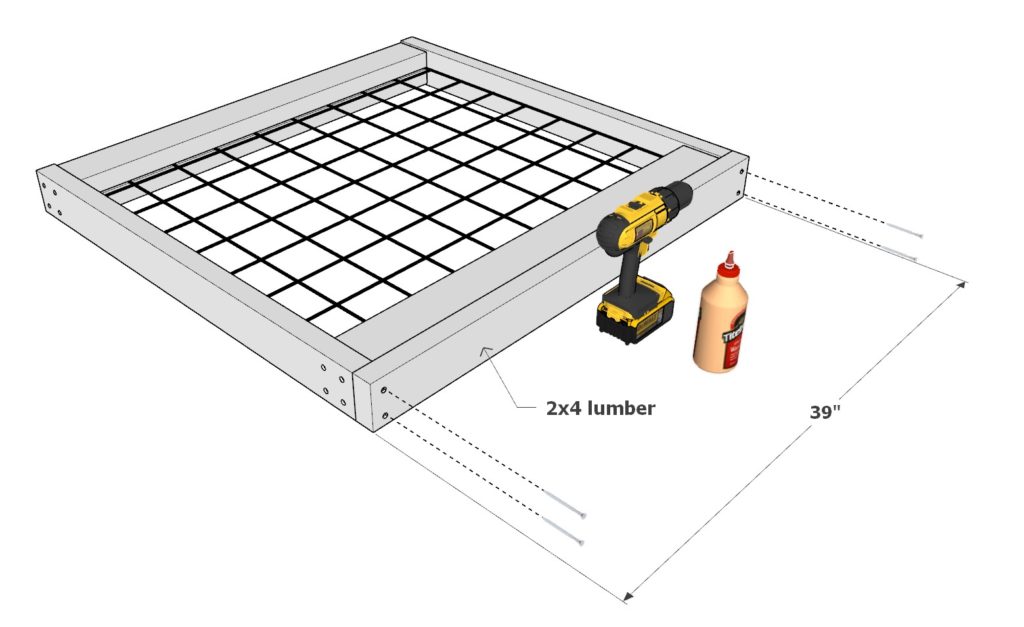
Step 3: Securing the Metal Railing Panel and Completing the Gate Assembly
First, take two 36-inch 2×4 lumber pieces and place them directly on top of the metal railing panel to lock it in, as shown in the provided diagram. Predrill holes to prevent wood from splitting and secure the lumber pieces with screws, ensuring the metal panel is firmly held in place within the frame.
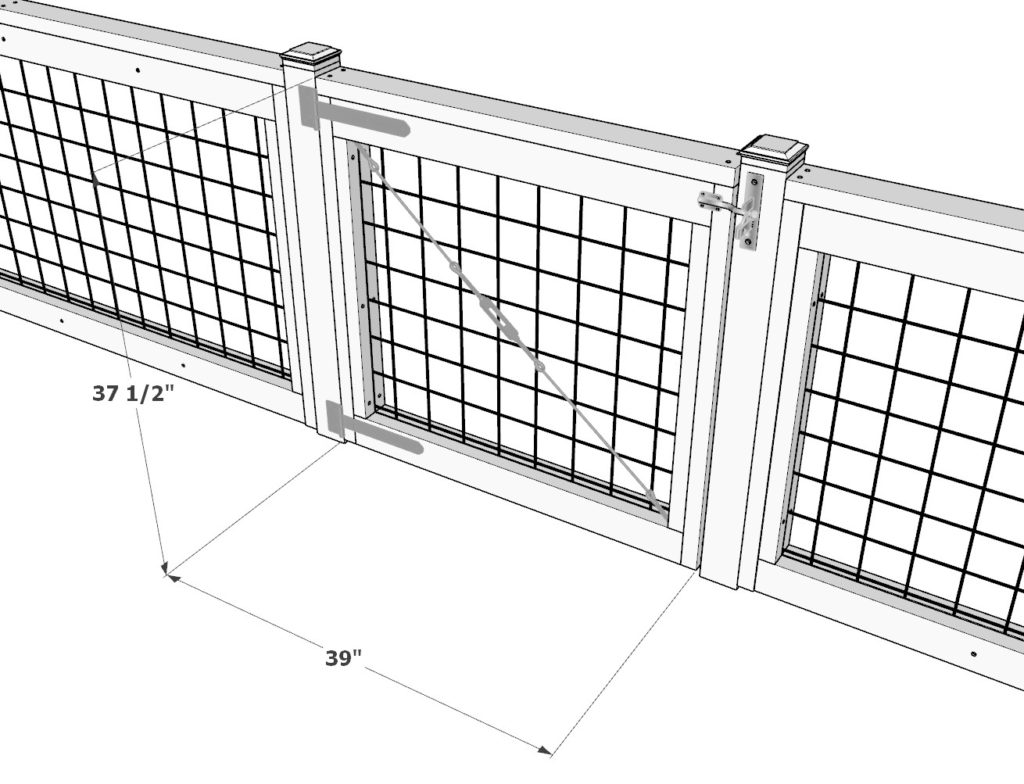
Next, “cap” off the gate by adding a 39-inch 2×4 lumber piece at the top of the gate frame. As before, predrill holes and secure the lumber piece with screws to keep the metal panel in place.
Lastly, add four 29-inch 2×2 lumber pieces to the positions indicated in the provided diagram. Use 2.5-inch screws to secure these in place to prevent them from showing through the other side. Before attaching, predrill holes, apply glue, and then fasten the screws, creating a strong and well-stabilized gate.
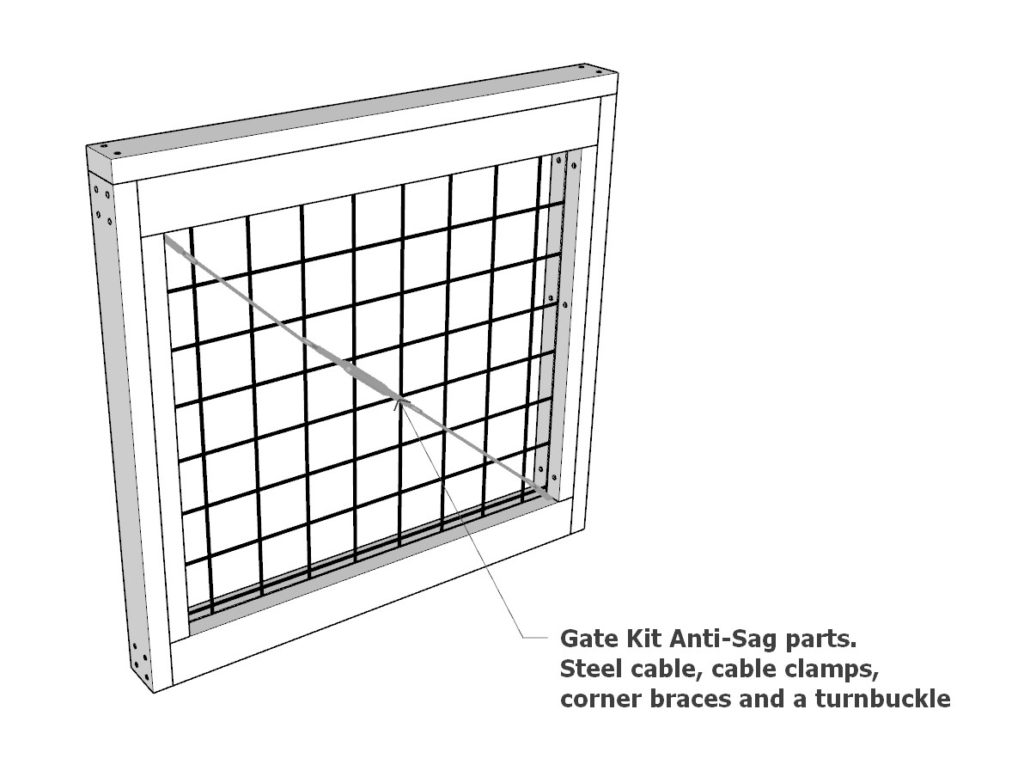
Step 4: Installing an Anti-Sag Gate Kit
To ensure the long-term stability of your gate and prevent sagging over time, we recommend installing an anti-sag gate kit. There are various kits available online, and while the specific installation may vary slightly, the general concept is similar for most kits.
1. Attach a metal bracket to the upper corner of the gate, located on the hinge side. Ensure it’s properly aligned and securely fastened in place.
2. Mount another bracket diagonally at the lower corner of the gate, on the latch side, following the same alignment and attachment process as the first bracket.
3. Attach cables to each corner bracket by threading them through the designated openings. Connect the two ends of the cable to a turnbuckle, which will allow you to adjust the tension as needed.
By properly installing and maintaining the anti-sag gate kit, you’ll help prevent your gate from sagging over time and keep it in optimal condition for years to come.
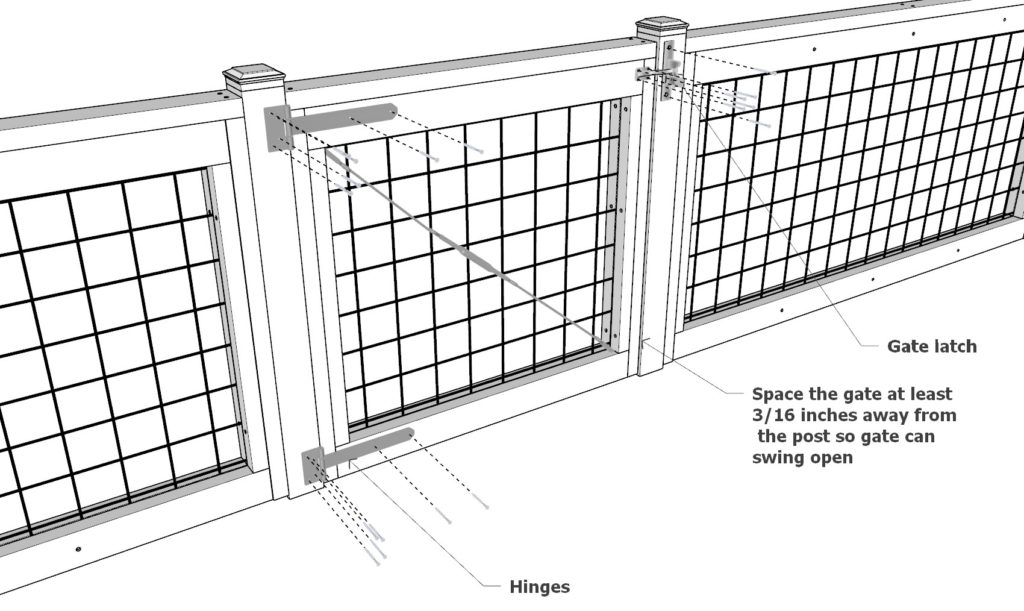
Step 5: Installing Hinges and Gate Lock Hardware
Now, it’s time to add the hinges and gate lock hardware to your gate.
1. Start by attaching the hinges to the “flat” side of the gate, where the 2×4 lumber pieces are flush with one another. Make sure they are positioned correctly for proper alignment and movement.
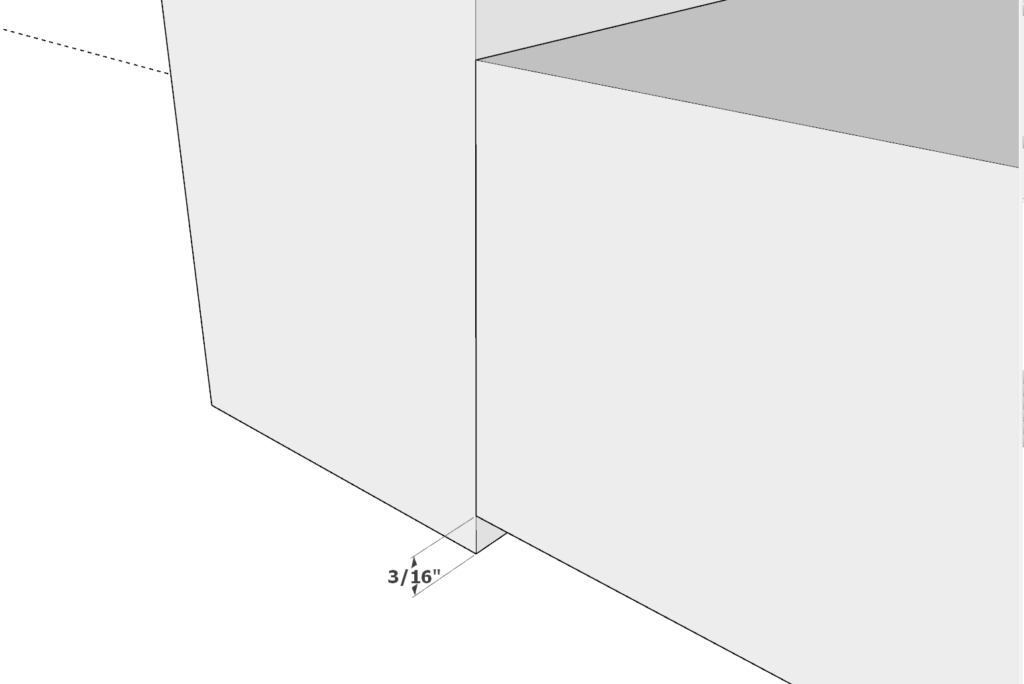
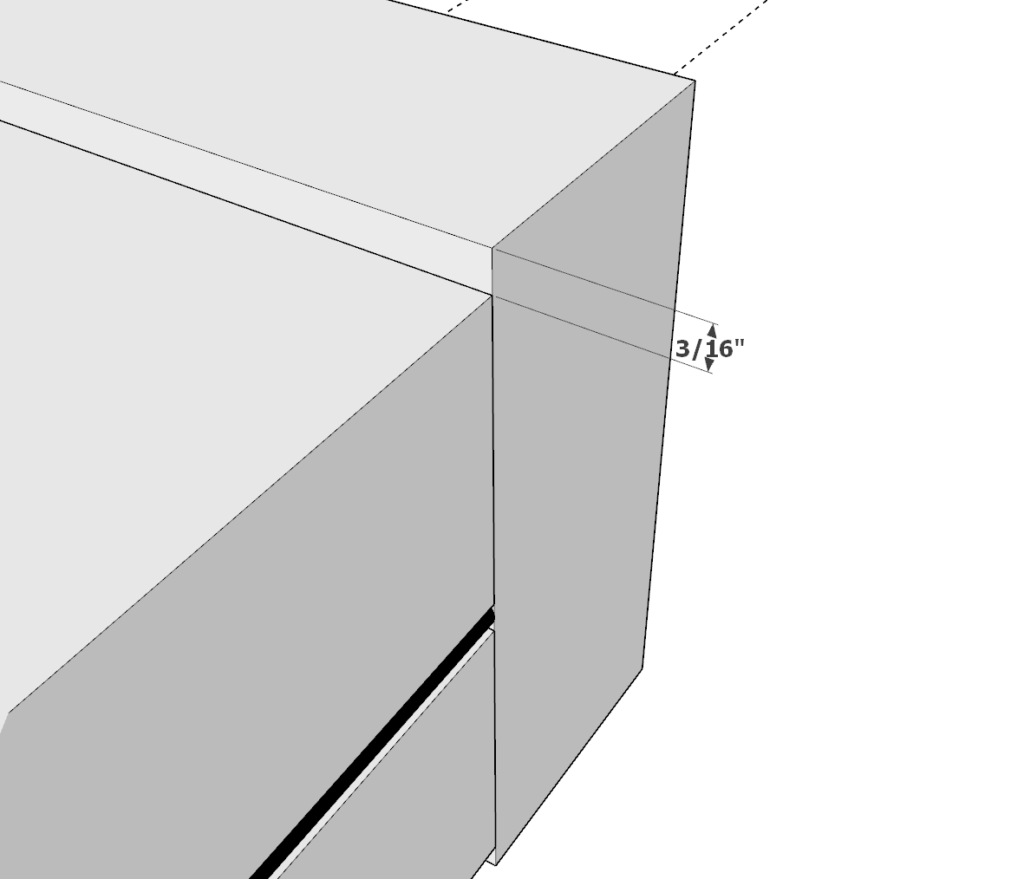
2. Install the gate within the fence, ensuring that there is at least a 3/16-inch gap between the gate and the fence post. This gap is essential to prevent the gate from becoming stuck when opening and closing. If you find that the gap is too narrow, you can shave down the side of the gate that makes contact with the post until it has an appropriate clearance.
3. Once the gate is securely and properly installed, attach the gate lock hardware following the manufacturer’s instructions, ensuring it is securely fastened and functions properly.
With your gate fully assembled and installed, you can now proceed to paint or stain it to match your fence and create a seamless and cohesive appearance. Your gate is now ready to provide added security and functionality to your outdoor space.