Overview of the DIY fence project
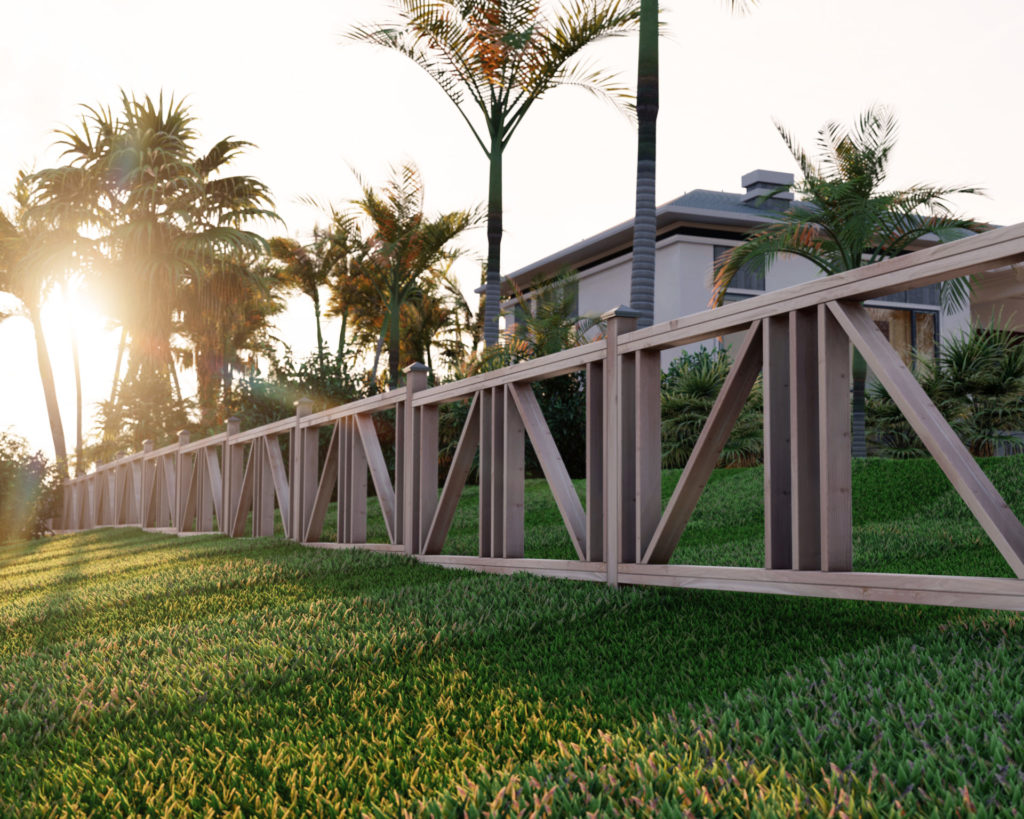
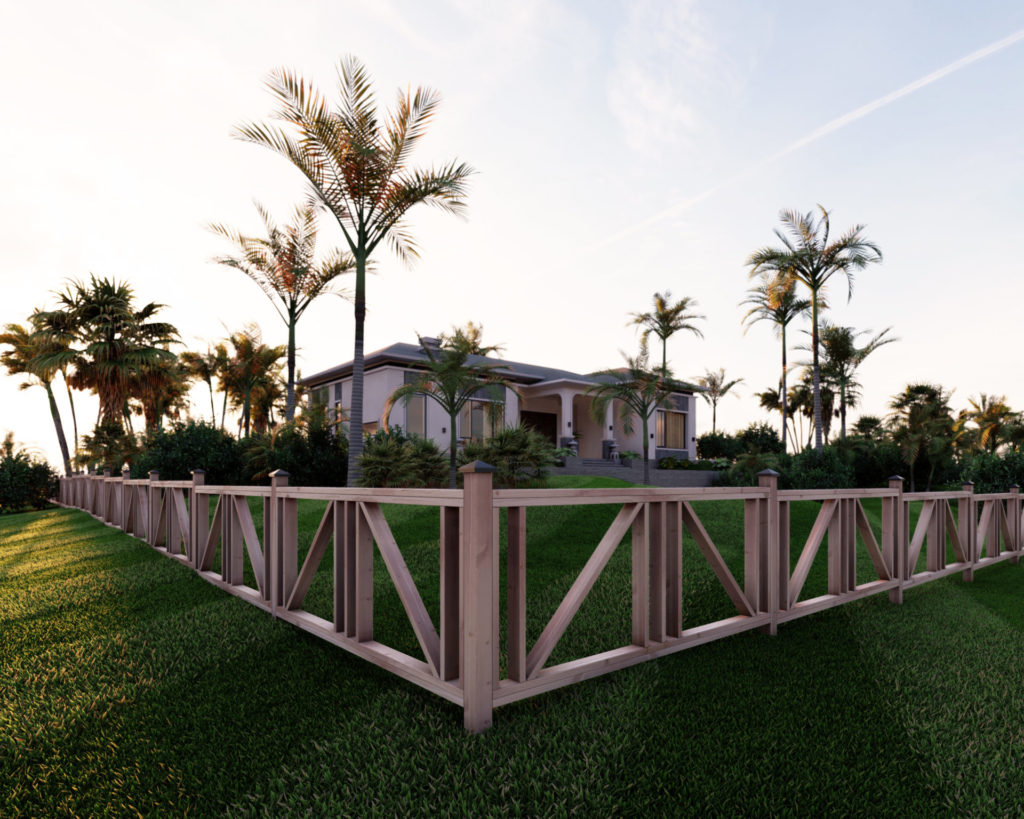
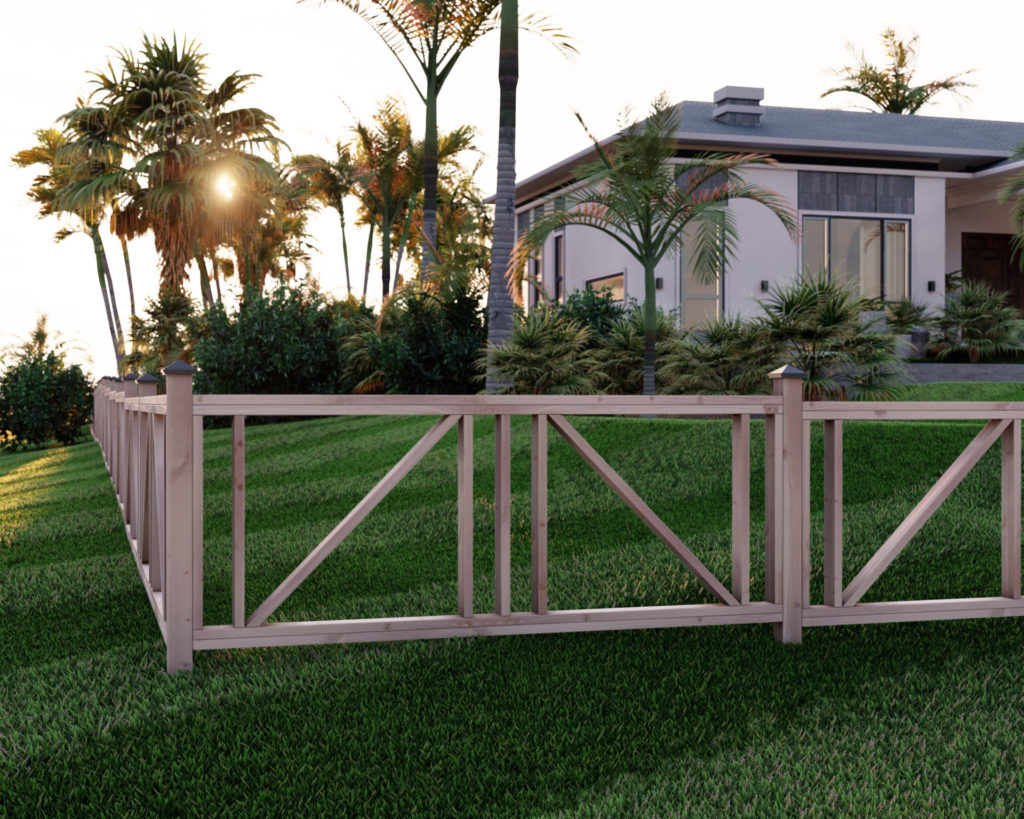
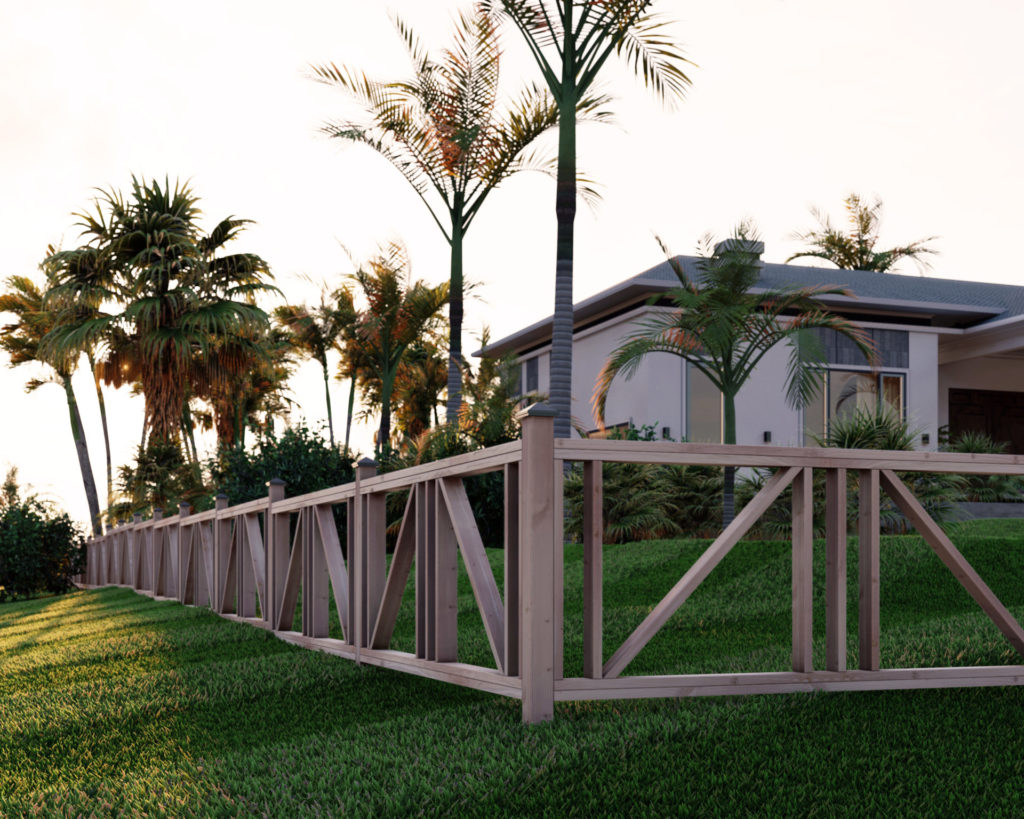
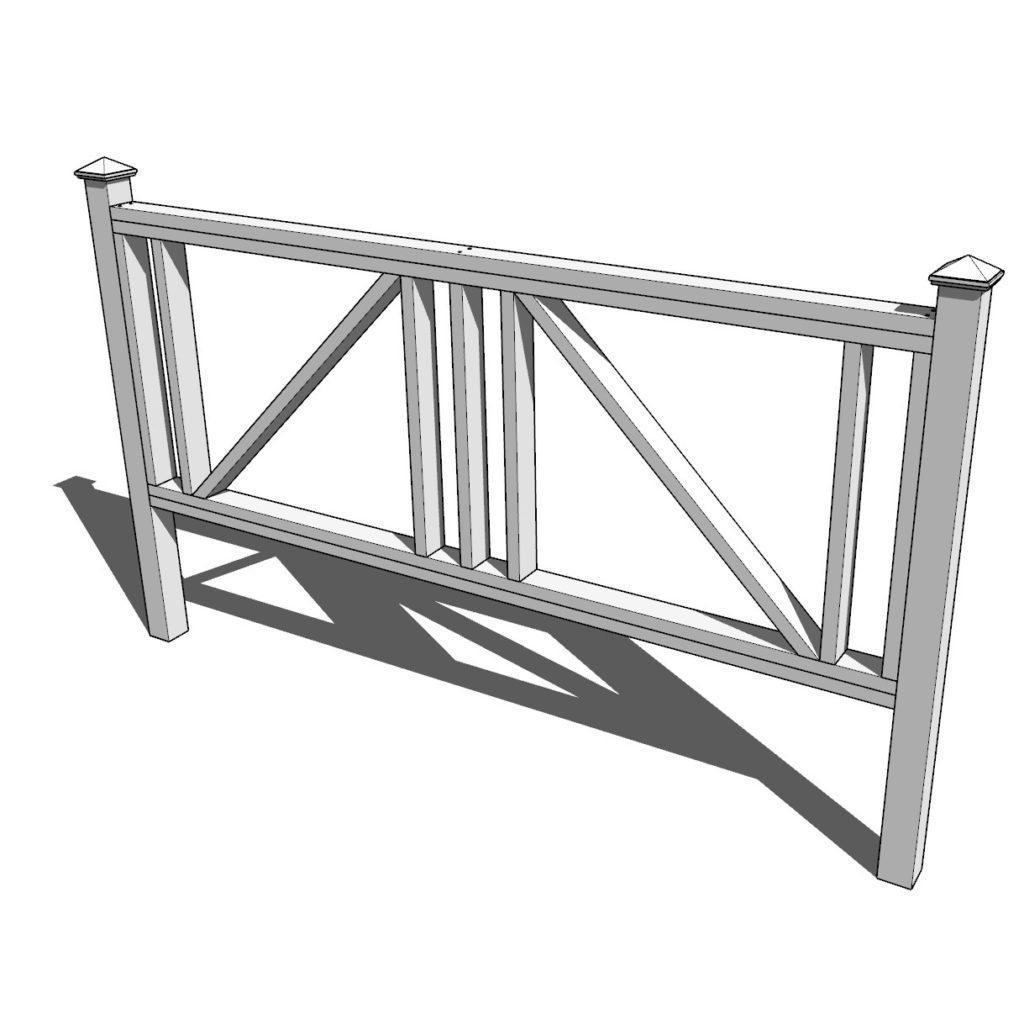
This beautiful traditional farmhouse panel design and wood construction provides security without keeping “the nature“ out. These panels can serve as a “window“ to the outside. These fence panels are perfect for use on balconies, decks, patios, railing, fencing, arbors, trellis, porches, and garden application because the farmhouse pattern allows for great visibility while being extremely durable.
If you want to take your backyard/frontyard privacy to the next level, you can plant fast-growing vines like Pileostegia viburnoides, Jasminum nudiflorum, or vitis vinifera. These vines will quickly cover the fence panels, creating an intimate space that is still full of light. And for an added bonus, many of these vines are also very fragrant, filling your backyard with a lovely scent.
Who can build this DIY fence?
The DIY friendly fence panels are easy to assemble with the step-by-step instructions provided in this post. Once the posts are set, the DIY fence is easy to install and attach.
I believe this fence would be a great project for beginners to woodworking and anyone with minimal woodworking experience.
The DIY plans offered in this post include helpful description, images, diagrams, helpful links, and more to ensure that the DIY fence build is smooth, efficient, and easy.
What does this post cover?
This post will focus on covering the step on how to build the fence panels and attaching them to the fence post. Measuring and laying out of the fence posts, digging holes, pouring concreate, staining or treating the wood ARE NOT COVERED.
Check list before you start the DIY fence building.
It is important to consider a few important things before starting a DIY fence.
- You will likely need a permit. You will need to check your local codes and regulations.
- Some areas may have a homeowners association that have rules to govern the style, size, and placement of fences.
- If unclear, you may also need to check property lines and discuss the project with your neighbors before construction.
- Consider the building material. A cedar fence, if built appropriately, can last up to 40 years. Here in California, the lumber of choice for fencing is redwood due to its availability, durability, and cost.
- Determine fence gate location and all access points.
- When building with the fence panels covered in this DIY post, you will need to calculate the total length of each side of your property and calculate the total panel length needed. You may need to install a partial panel to make everything fit. (Good thing is that these panels are easily customizable, and the metal can be cut with small bolt cutters or a cutting wheel).
- Call the utility company before construction to ensure your fence posts will not hit any utility lines.
- Determine the number of posts needed for the project.
Time to build
Depending on size of the project
Total cost of build
About $35 per panel
Skill level required
Beginner
Download the PDF plans
DIY wooden farmhouse panel fence PDF plans
What is included in the PDF download?
- Easy to read step by step instructions
- Material list
- Tools needed
- Helpful links to materials and tools needed
Step-by-step instruction on building DIY fence panels
Recommend tools and materials
- Saw (miter saw recommended for precision cuts)
- Drill
- Impact driver with bit for screws
- wood countersink drill bit
- measuring tape
- 1 post cap per post (not required)
- 1lbs of 3.5 inch long screws per panel
Lumber list and cut list
Available with the purchase of the DIY PDF plans. Thank you for supporting this website and making these posts possible!
Step 1 (Construction of the DIY farmhouse fence panels.)
First, assemble and construct the fence panels.
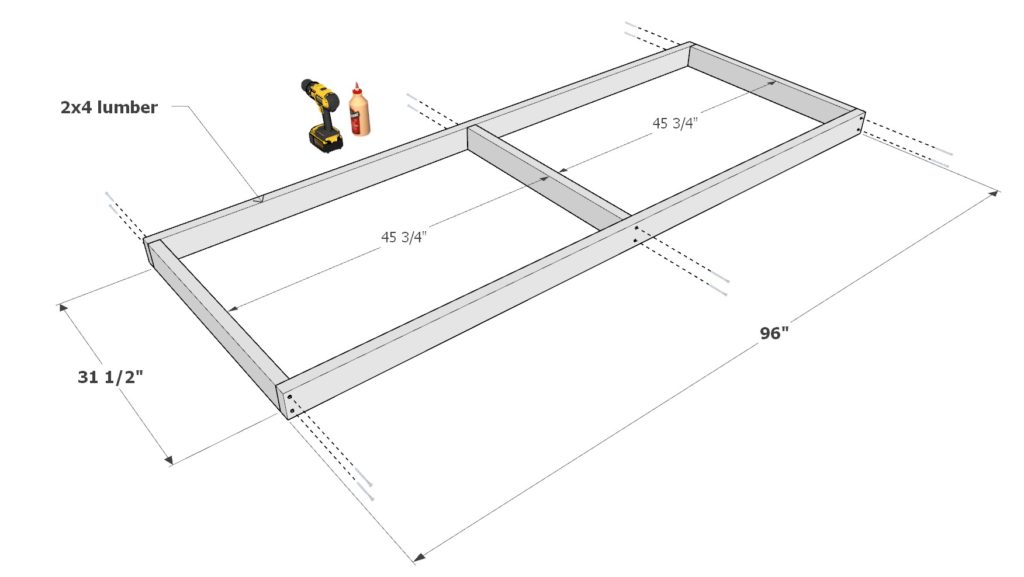
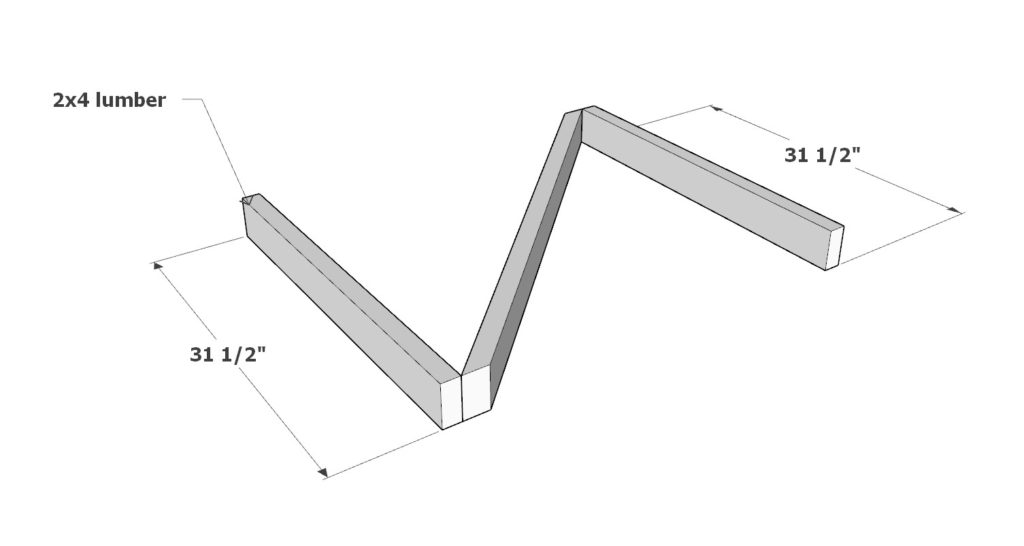
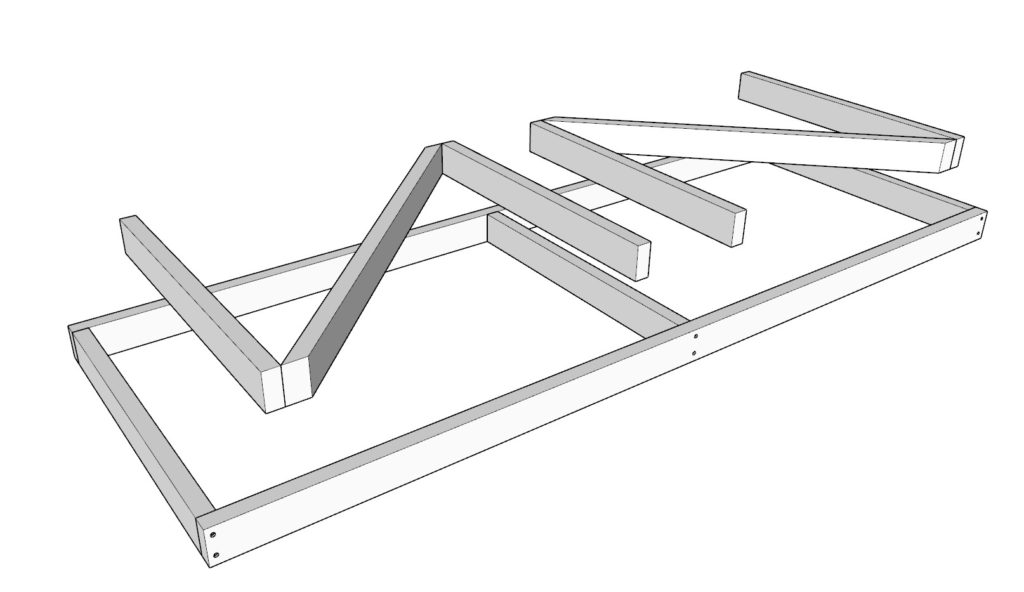
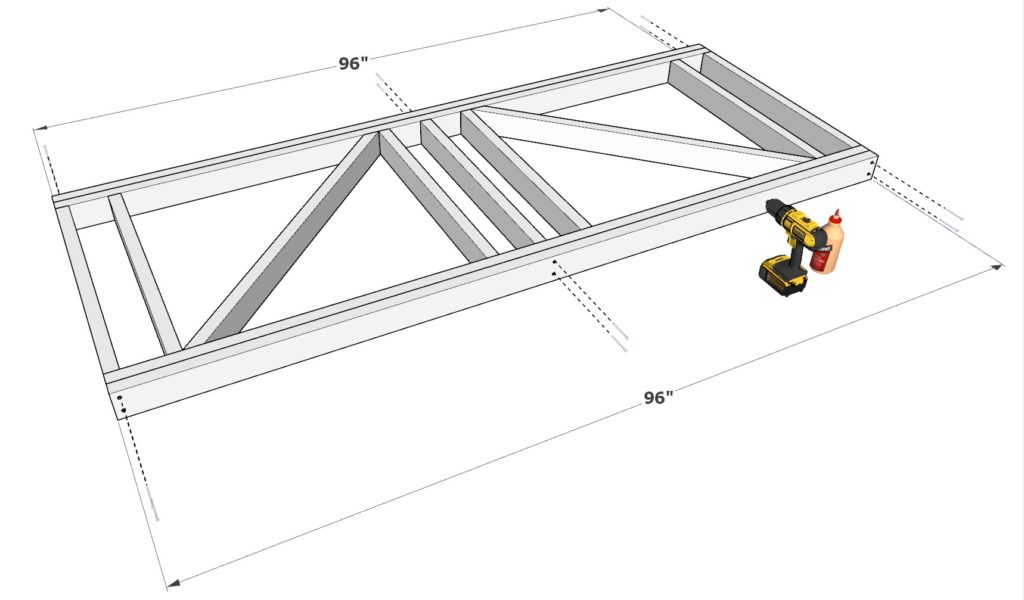
Begin by taking two 31-1/2 inch 2×4 lumber pieces and two 96 inch 2×4 lumber pieces and arranging them as shown below. Join these pieces together by predrilling holes to prevent the wood from splitting, add 3.5 inch screws, and add glue.
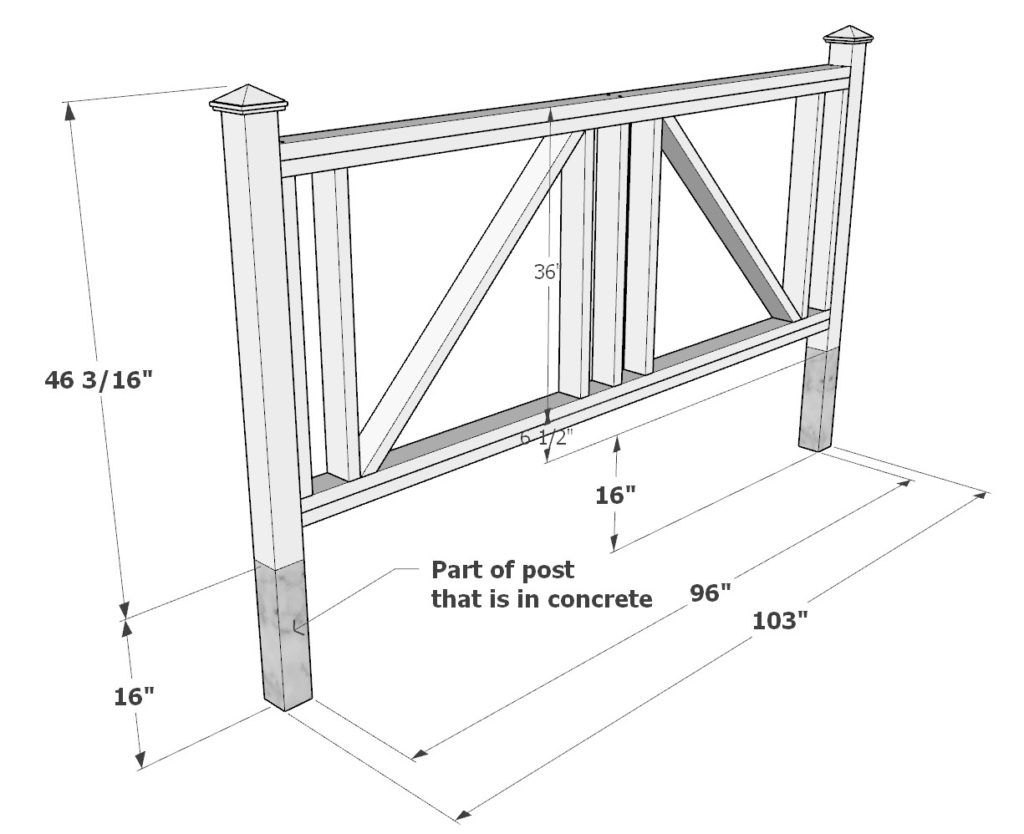
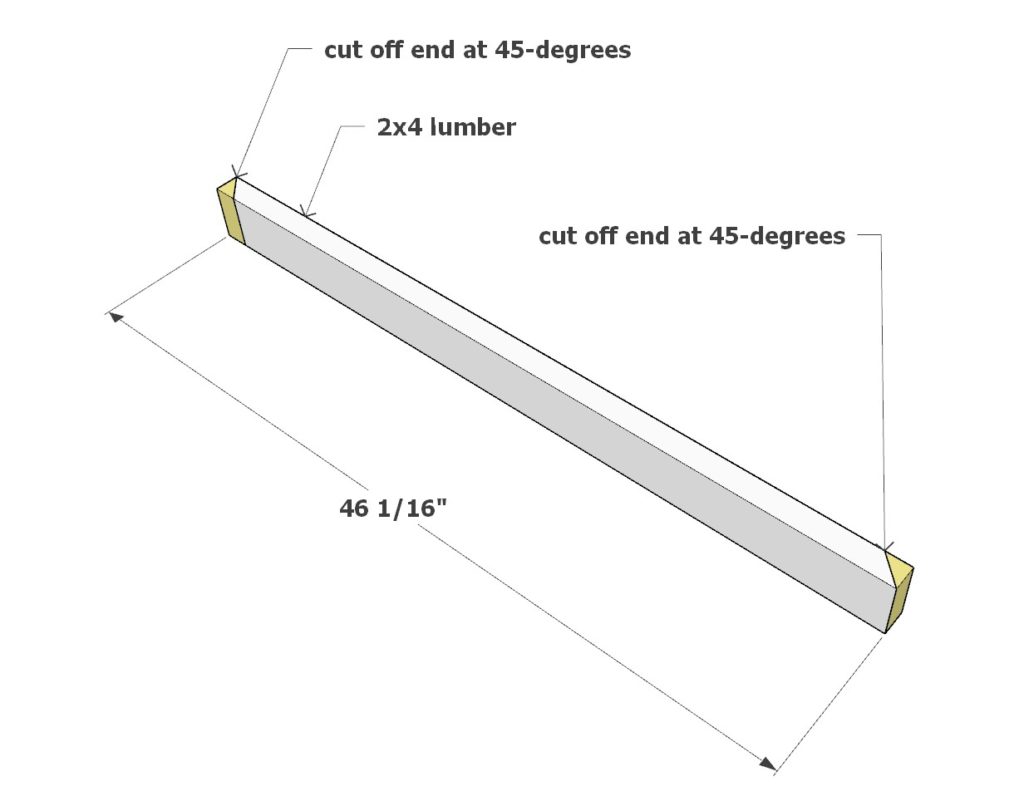
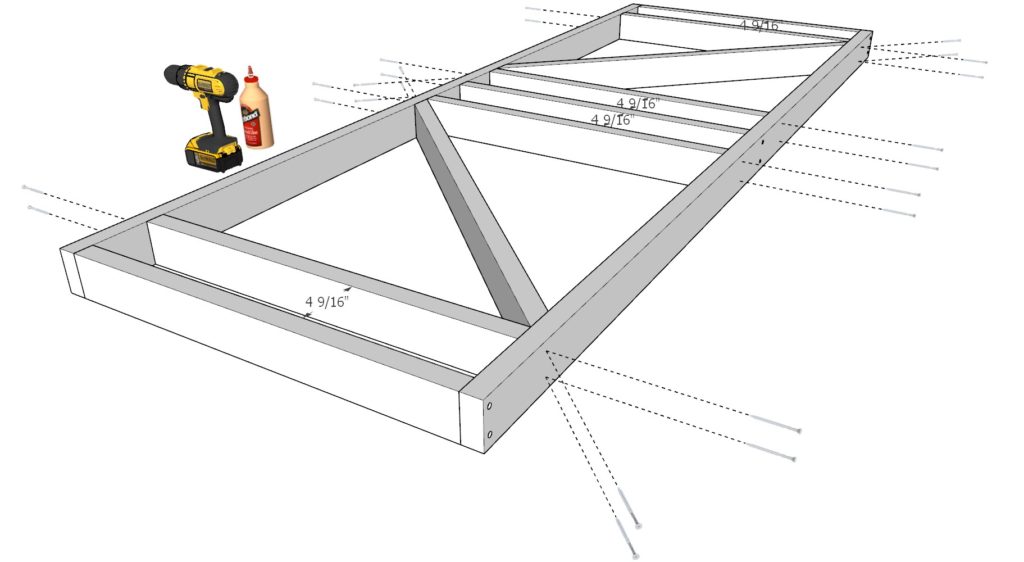
Next, begin to build the interior “N” component of the fence panel. Take two 46-1/16 inch 2×4 lumber pieces that is cut at 45-degrees on both ends and four 31-1/2 inch 2×4 lumber pieces and arrange these into the main frame of the panel as shown below. Ensure proper spacing (4-9/16 inch gaps as shown below). Again predrill, add glue, and add 3.5 inch screws.
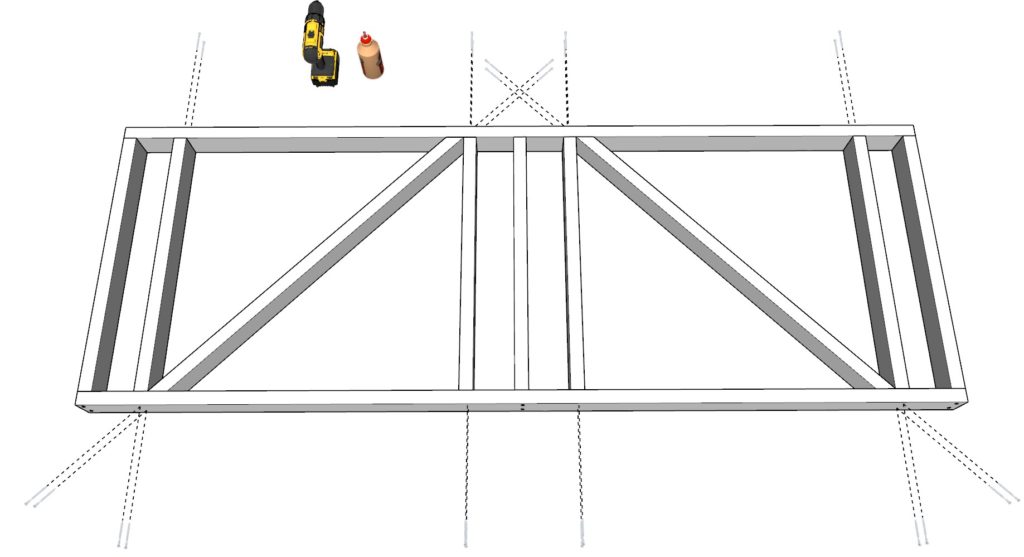
Lastly add two 96 inch 2×4 lumber pieces to the top and bottom of the panel. Use glue, predrill, and add 3.5 inch screws.
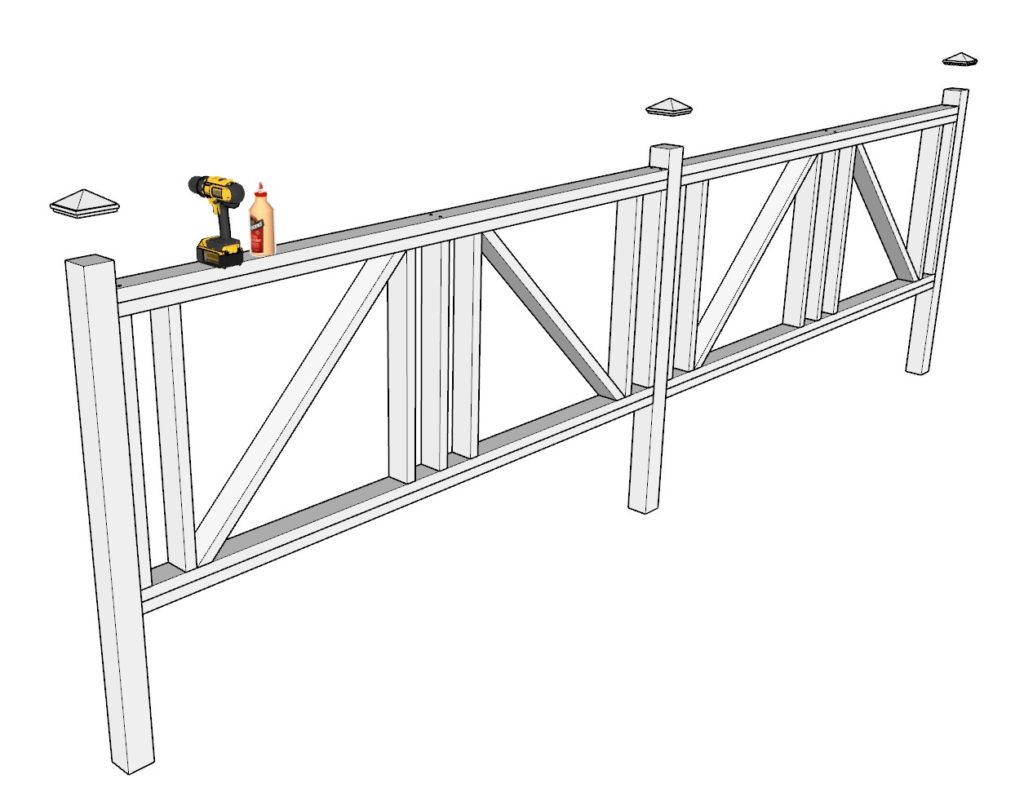
Step 2 (DIY fence panel assembly and post fence installation)
Next, add the fence posts to the panels and install the fence into the ground.
This post does not cover all the details of fence installation.
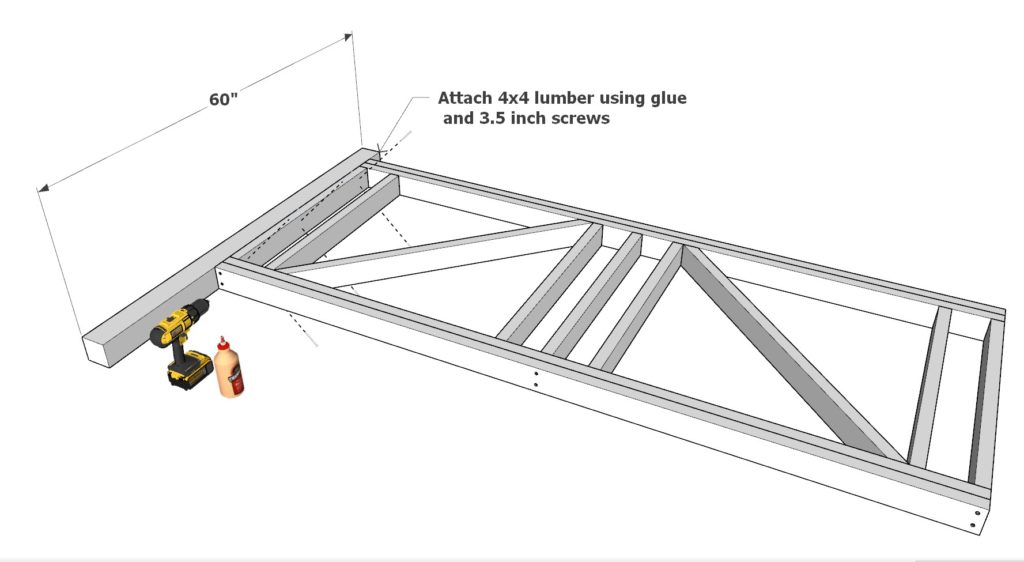
First, add a 60 inch 4×4 post to one side of the fence panel. Use glue, predrill, and add 3.5 inch screws to secure the post to the panel.
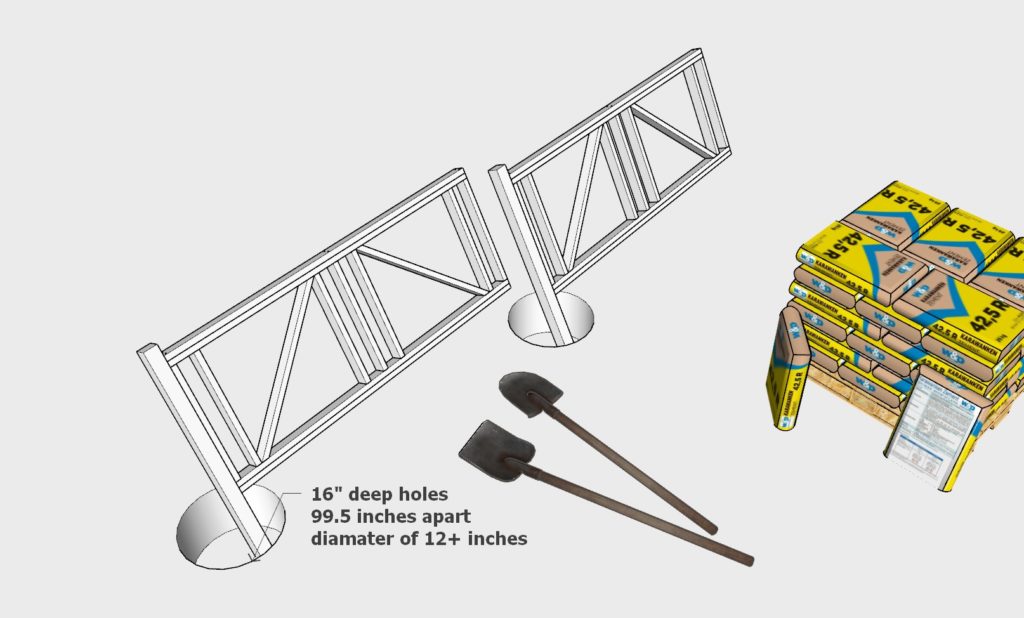
Next, dig holes that are at least 16 inches deep and 99.5 inches apart. The holes should be 12+ inches in diameter.
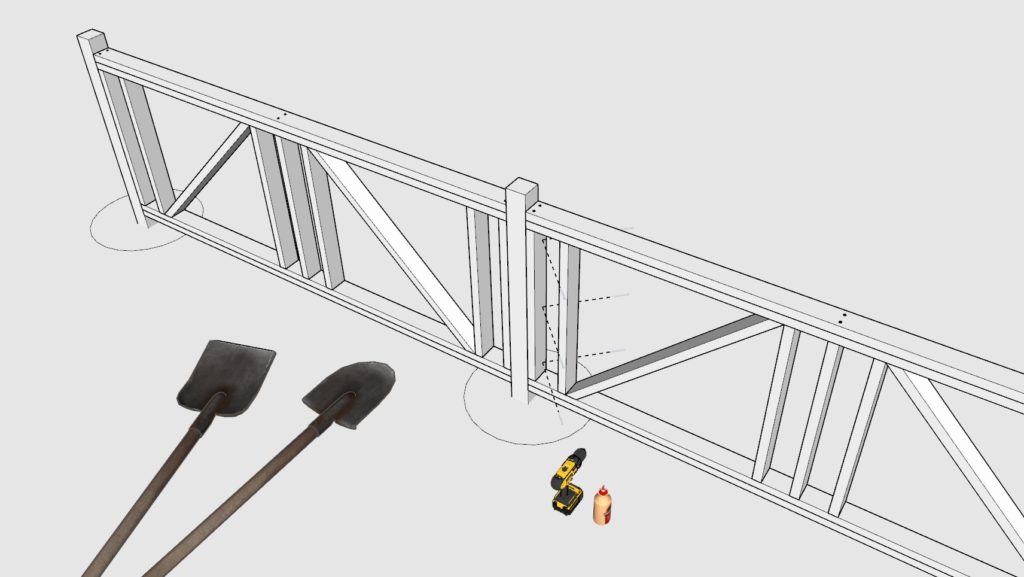
Next, attach the fence panels together in the same manner as before and add concrete to fill the holes. Use supports to keep the fence in place while the concrete sets.
Step 3 (DIY fence 4x4 fence post caps)
The most common type of fence post cap is the pyramid style cap. These caps are generally made of plastic or metal, and they simply fit onto the top of the fence post. To install a pyramid style fence post cap, simply place the cap onto the top of the fence post and tap it into place with a hammer.
Installing a fence cap that is made of metal or wood is a bit more difficult than installing a plastic cap, but it can still be done relatively easily. Follow the instructions of the manufacturer. Generally you would first need to pre-drill a few holes into the fence post. Next, align the fence cap with the holes and screw it into place.
Staining your new DIY fence panels.
It’s important to protect your fence from the elements. A good stain will do that while also adding some color to your fence. Here are the basic steps for staining a fence.
1. Prep the fence. This includes cleaning it with a power washer and/or sanding it down to remove any loose paint or stain.
2. Choose your stain. There are many different types of stains, so do some research to find the right one for your needs.
3. Apply the stain. Follow the instructions on the can or bottle for best results.
4. Let the stain dry. This can take anywhere from a few hours to a few days, depending on the type of stain you used.
5. Enjoy your newly-stained fence!
Painting your new DIY fence panels.
1. Decide what type of paint you will use. There are a few different types of paint that can be used on a fence. Some of the most popular choices include acrylic paint, oil-based paint, and water-based paint. Each type of paint has its own advantages and disadvantages, so be sure to choose the type of paint that will best suit your needs.
2. Choose a color for your fence. Once you have decided on the type of paint you will use, you need to choose a color. When choosing a color, keep in mind that darker colors will absorb more heat than lighter colors. This can be a good thing or a bad thing, depending on your climate. If you live in a hot climate, a darker color will help keep your fence cooler. If you live in a cold climate, a darker color will help keep your fence warmer.
3. Prepare the fence for painting. Before you start painting, you need to make sure the fence is clean and free of any debris. You should also sand down the fence to create a smooth surface for the paint to adhere to.
4. Paint the fence. Once the fence is prepared, you can start painting. When painting, be sure to use a paintbrush or roller that is designed for the type of paint you are using. Also, be sure to follow the manufacturer’s instructions for the paint you are using.
5. Allow the fence to dry. After you have finished painting, you need to allow the fence to dry. Depending on the type of paint you used, this could take anywhere from a few hours to a few days. Once the fence is dry, you can enjoy your new paint job.
What cement or concreate is best for the fence posts?
When it comes to fence posts, concrete is one of the best materials you can use. It is durable, long lasting, and low maintenance. There are different types of concrete.
One type of concrete is regular concrete, which is a mix of water, cement, and aggregate. This type of concrete is strong and can be used for fence posts, but it is not as durable as other types of concrete.
Another type of concrete is fiber-reinforced concrete. This type of concrete is made with steel or synthetic fibers, which makes it stronger and more durable than regular concrete. It is also less likely to crack and is less likely to be damaged by weathering.
A third type of concrete is high-strength concrete. This type of concrete is made with a higher proportion of cement, which makes it stronger than regular concrete. It is also more resistant to weathering and is less likely to crack.
Since this fence is low to the ground any of these options should be fine. Regular concrete is a good choice for fence posts that will not be subject to a lot of wear and tear, but if you need a more durable fence post, choose fiber-reinforced or high-strength concrete.